

Page 1
TheaterTouch
System Controller
User’s Guide and Programming Manual
T
T
h
h
T
T
e
e
o
o
u
u
P
P
c
c
o
o
h
h
w
w
s
s
e
e
c
c
r
r
r
r
e
e
O
O
e
e
f
f
n
n
A
A
Page 2

Page 3

Page 4

Theat er Touch S y s tem Con troller
FEDERAL COMMUNICATIONS COMMISSION NOTICE
This equipment h as be e n tested and found to c o mply with the limits for a C lass B digital
device, pursuant to Part 15 of the FCC Rules. These limits are designed to provide
re a so n a ble pro tectio n a ga in st h armful interfere n ce in a r esiden t ia l in sta lla tio n .
This equipment generates, uses, and can radiate radio frequency energy and, if not installed
and used in accordance with the instructions, may cause harmful interference to radio
commun ic a t ion s. Howe ver, t h ere is no guar a n t e e tha t interfer enc e will not o c cur in a
part ic ula r installatio n .
If this equipment does cause harmful interference to radio or television reception, which can
be determined by turning the equipment off and on, the user is encouraged to try to correct
the interference by one or more of the following measures:
Re o r ient o r relo c a te the rece iving an tenn a.
•
Increase the separation between the equipment and the receiver.
•
Conn e c t th e equipment into an outle t o n a c irc uit differ e n t fro m tha t to whic h the
•
receiver is connected.
Consult the dealer or an experienced radio/TV technician for help.
•
This de vic e complies with Pa rt 15 o f th e FCC Rules. Opera tio n is sub ject t o t h e followin g two
conditions: (1) this device may not cause harmful interference and (2) this device must accept
any interference received, including interference that may cause undesired operation.
For environmental reasons, your TheaterTouch unive rsal syste m c o n t r o lle r
uses “environmentally sound” nickel-metal hydride rechargeable batteries.
The batteries do not contain any poisonous heavy metals that can damage
the environment.
In the in te r e st of r e c yc ling, ple ase do n ot dispose o f these batte r ie s in th e
household waste at the end of their useful life. Instead, dispose of them
an a ppropiat e colle c tio n sit e .
Copyright © 2000
Remote Technologies Incorporated
All rights reserved.
Part No. 70-210009-19
at
Prin ted in th e Unit ed Sta t e s
Page 5

Theat er Touch S y s tem Con troller
SAFETY SUGGESTIONS
Read Instructions.
Re a d all sa fety an d o perat in g in st r uc t io n s befor e o pera tin g th e unit.
Retain I ns tructions.
Heed Warnings.
Follow Instr uc tions .
Heat.
Keep the un it awa y fr o m h e a t so ur c es such a s r a diato r s, he a t r egister s, stove s, etc .,
inclu din g a mplifiers th a t pr o duce h eat.
Power Source s .
ope r a tin g in structio n s, or a s ma r ked on t h e unit.
Power C o r d Protec t ion.
on or pinched by items placed on or against them, paying particular attention to the cords at
plugs, a t c onven ient r ece pt a c les, a n d a t th e poin t a t which th ey exit fr o m th e unit.
Nonuse Pe r i ods .
for a long period.
Water and Moisture.
basement, near a swimming pool, near an open window, etc.
Objec t a nd Liquid Entry.
enclosure through openings.
Cleaning.
Servicing.
Re fer all o th er servic e n eeds t o qu alified service personne l.
The unit should be cleaned only as recommended by the manufacturer.
Do not atte mpt an y se r vice beyond that de scr ibe d in th e o pe r atin g instr uction s.
Keep the safety and operating instructions for future reference.
Adhe re to a ll wa r n in g s o n th e unit and in th e ope r a t in g in st r uction s.
Follow op e ratin g in structio n s a n d in st r uctions for use.
Conn e c t th e un it on ly to a powe r supply of the type desc r ibe d in th e
Route power supply cords so that they are not likely to be walked
Unplug the power supply from the outlet when the unit is to be left unused
Do not use the unit near water—for e xample, near a sink, in a wet
Do no t allo w o bj e cts to fall o r liquids to be spilled in t o t h e
Dam a ge R e quiring Service .
when:
The powe r supply c ord or the plug has be e n damage d.
•
Objects have falle n o r liqu id h as b een spilled into th e unit.
•
The unit has been exposed to rain.
•
The unit does not appear to operate normally or exhibits a marked change in
•
performance.
The unit has been dropped, or the enclosure damaged.
•
TO REDUCE THE RISK OF FIRE OR ELECTRIC
SHOCK, DO NOT EXPOSE THE UNIT TO RAIN OR
MOISTURE.
Remote Technologies Incorporated • 7630 Executive Dr. • Eden Prairie, MN • 55344-3677 USA
www.rticorp.com • Tel: 612-937-2600 • Fax: 612-937-7527
The un it sh ou ld be ser viced by qu alified service perso n n el
WARNING !
Page 6

Theat er Touch S y s tem Con troller
LIMITED WARRA NTY AND DISCLAIMER
Remote Technologies Incorporated warrants its products for a period of one (1) year from
the date of purchase from Remote Techn ologies Incorporated or an authorized Re mote
Technologies Incorporated dealer.
This warranty may be enforced by the original purchaser and subsequent owners during the
warranty period, so long as the original dated sales receipt or other pr oof of warranty
coverage is presented when warranty service is required.
Exce pt as sp e cified below, t h is warra n ty cove r s a ll defec t s in ma terial a n d wo r k ma n sh ip in
this pr o duc t . The fo llo win g a r e
Damage resulting from:
1. Accident, misuse, abuse, or neglect.
2. Failur e t o fo llo w in st r uc t io n s c o n ta in ed in yo ur User’s Guide.
3. Repa ir o r atte mpte d r e pair by a nyo n e oth e r th a n R emote Tec h n ologie s
Incorporated.
4. Failure to perform recommended periodic maintenance.
not
covered by the warranty:
5. Caus e s o t h e r tha n product de fects, inc ludin g la c k o f skill, comp e t e nce o r
experience of user.
6. Sh ipment o f th is p r o duc t (claims must be made to th e ca r r ier).
7. Bein g a lt e red o r which th e se r ia l n u mber h a s b e en defac e d, modifie d o r remove d.
Re mo te Tec hnolo gies Inc o r po rate d is n o t lia b le fo r any da ma ges ca used by its pr o duc t s o r
for its fa ilure o f its product s to perfo r m, inc ludin g a n y lo st p r o fits, lost savin g s, incide n ta l
damages, or consequential damages.
Re mo te Tec hnolo gies Inc o r po rate d is n o t lia b le fo r damages base d up on inc onven ienc e , loss
of use o f th e pro duct, lo ss o f time, interrupt e d o pera tio n , co mme rcial lo ss, any c la im made
by a th ird par t y o r ma de by you fo r a t h ir d p a r t y.
Re mo te Tec hnolo gies Inc o r p orate d’ s lia bilit y fo r a n y de fective pro duct is limite d to r epair o r
replacement of the product, at our option.
If your TheaterTouch system controller needs service, please contact Remote Technologies
Incorporated by telephone, fax or E-mail for return information (See
not r e t ur n product s t o R e mot e Te c hnologie s Incor por at e d without r e t urn author iz at ion.
All rights are reserved. No part of this document may be photocopied, reproduced, or
translate d without the prior wr itte n n o tice o f Remote Tec h no logie s Inc or por a te d.
The infor mation c on tain e d in th is documen t is subjec t to c h an ge without n otic e . R emote
Technologies Incorporated shall not be liable for errors contained herein or for consequential
damages in connection with the furnishing, performance, or use of this material.
Chapter 10
). Please do
Microsoft and Windows are registere d trademarks of Microsoft Corporation. Other brands
and their products are trademarks or registered trademarks of their respective holders.
TheaterTouch and the RTI logo are property of Remote Technologies Incorporated.
VI
Page 7

Theat er Touch S y s tem Con troller
VII
Page 8

Theat er Touch S y s tem Con troller
Table of Contents
Federal Communications Commission Notice .......................................................................IV
Safety Suggestions .............................................................................................................V
Limited Warranty and Disclaimer.........................................................................................VI
CHAPTER 1. WELCOME................................................................................................... 1
Note..................................................................................................................................1
Unpacking and Inspection .................................................................................................... 1
Important........................................................................................................................... 1
Product Contents................................................................................................................2
Software Requirements....................................................................................................... 2
CHAPTER 2. INTRODUCTIO N..........................................................................................3
Features............................................................................................................................ 3
Important Notes..................................................................................................................4
Cleaning ............................................................................................................................. 4
Batteries and Charger......................................................................................................... 5
Getting Started................................................................................................................... 6
Remote Reference..............................................................................................................7
The Touchscreen Display .................................................................................................... 8
The Control Panel Page...................................................................................................... 8
CHAPTER 3. THEATERTOUCH DESIGNER
Inst a lling Theat e rTouch Designer ........................................................................................15
Programming Overview......................................................................................................15
TheaterTouch Designer Screen...........................................................................................16
Touchscreen Grid..............................................................................................................18
Design Hints......................................................................................................................19
Getting Help......................................................................................................................19
SOFTWARE ........................................15
CHAPTER 4. THEATERTOUCH DESIGNER BA SICS.................................................. 21
How to Add a Page............................................................................................................21
How to Delete a Page........................................................................................................21
How to Add Buttons...........................................................................................................22
How to Delete Buttons .......................................................................................................22
How to Add Text to Buttons ................................................................................................23
How to Place a Bitmap.......................................................................................................24
How to Link Pages.............................................................................................................25
How to Remove Page Links................................................................................................26
How to Add Commands to Buttons......................................................................................26
How to Delete Commands from Buttons ..............................................................................28
How to Save a File.............................................................................................................28
How to Open an Existing File..............................................................................................28
How to Preview your File....................................................................................................29
How to Setup Communications............................................................................................30
How to Send a File to the TheaterTouch..............................................................................31
VIII
Page 9

Theat er Touch S y s tem Con troller
CHAPTER 5. THEATERTOUCH DESIGNER A DVANCED FEATURES......................33
How to Rename a Page.....................................................................................................33
How to Duplicate a Page....................................................................................................33
How to Merge Pages.........................................................................................................34
How to Use the PageWizard...............................................................................................35
How to Change Button Styles .............................................................................................35
How to Select Buttons........................................................................................................36
How to Cut or Copy Buttons ...............................................................................................36
How to Paste Buttons ........................................................................................................36
How to Move a Button........................................................................................................37
How to Resize a Button......................................................................................................37
How to Place a Custom Button...........................................................................................37
How to Use the Macro Editor..............................................................................................38
How to Delete a Macro......................................................................................................43
How to Edit an IR Command in a Macro..............................................................................44
How to Use the Channel Macro Wizard................................................................................47
How to Edit the Remote Properties.....................................................................................50
How to Edit Button Properties.............................................................................................54
How to Edit the Properties of M ultiple Butt ons......................................................................59
How to Print Screenshots...................................................................................................62
How to Print System Configuration Reports .........................................................................62
How to Check Memory Usage............................................................................................63
How to Create a “Self- Dow nloading .EXE”...........................................................................64
How to Use the “Send” Command.......................................................................................64
CHAPTER 6. IR LIBRARY MANAGER............................................................................ 65
Infrared Codes ..................................................................................................................65
How th e
Hints for Learning IR Codes................................................................................................67
How to Open the IR Library Manager..................................................................................68
How to Create a New IR Library.........................................................................................68
How to Open an Existing IR Library.....................................................................................70
How to Add a New Remote to an IR Library........................................................................71
How to Use the New Remote Wizard...................................................................................72
How to Align a Donor Remote Control.................................................................................73
How to Capture Infrared Commands...................................................................................75
How to Test Infrared Commands ........................................................................................77
How to Edit Infrared Commands.........................................................................................78
TheaterTouch
Learns IR Codes .............................................................................66
CHAPTER 7. IMAGE EDITORS.......................................................................................81
The Difference Between Custom Buttons and Bitmaps..........................................................81
Button Bitmap Editor Screen...............................................................................................82
Custom Button Editor Screen..............................................................................................82
Toolbar.............................................................................................................................83
Tool Palette.......................................................................................................................87
Up Image-Down Image Tool (Custom But ton Editor O nly):....................................................90
New Bitmap Size Dialog Box (Button Bitmap Editor Only):.....................................................92
CHAPTER 8. TROUBLESHOOTING..............................................................................93
Display is Dim, Blank or Unreadable....................................................................................93
Communication Problems...................................................................................................93
IX
Page 10

Theat er Touch S y s tem Con troller
Infrared Problems ..............................................................................................................95
Unable to Lear n Commands................................................................................................96
Macro Problems................................................................................................................96
CHAPTER 9. SERVICE AND SUPPORT........................................................................ 97
Updates and New Products ................................................................................................97
Contacting Remote Technologies Incorporated....................................................................97
RTI Technical Support........................................................................................................97
Shipment of Remote for Service..........................................................................................99
SPECIFICATIONS .......................................................................................................... 100
APPENDIX ...................................................................................................................... 102
Software License Agreement............................................................................................102
Software License.............................................................................................................102
X
Page 11

Chapter 1. Welcome
Congratulations on your purchase of the TheaterTouch unive r sa l syst e m c o n t r o lle r.
The TheaterTouch combines the powe r and flexibility o f a gr a p h ic LCD touchsc r een
with an ergonomic design that permits effortless one-handed operation. This design
overcomes the need for compromise between form and function. Sleek and perfectly
balanced, the TheaterTouch is infinit e ly fle xib le and expan dab le.
TheaterTouch takes co mplete c o ntr o l of the home th e a te r , r eplacing all othe r r emotes.
It features an intuitive, easy to read LCD that can display custom buttons, text,
graphics and symbols. In addition to the backlit display, 25 “Hard” keypad buttons
allow e asy a c c ess to frequen tly used funct ion s.
Prog r a mmin g is easy an d convenie n t th a n k s to the built -in in frared lea r ning ab ility
and th e W in dows® ba sed softwar e . TheaterTouch is capable of both infrared and radio
freque n c y output. A se pa r ate R F to IR c o nve r ter is available for tr a n smission thr ough
walls an d c a bin ets. Th e converter will also mo n ito r the p ower sta t us o f mo st A /V
equipment thru the use of voltage and video sensors.
Chapter 1 • Welc om e
NOTE
The TheaterTouch and TheaterTouch Designer software a r e co mpa tible with in frared
(IR) commands with carrier frequencies betwee n 15kHz and 460kHz, as well as those
commands that do no t use a c ar r ie r . This cover s the vast major ity of r e motes
available to date, including Bang & Olufsen® (most of which use 455kHz) and
Vidikron® (some of which use 333kHz).
Despite every effort to make the TheaterTouch unive rsal syste m c o n trolle r wo r k wit h
all IR-syst ems, so me IR-contro lle d p r o duc t s a r e unab le to be lea r n ed by th e
TheaterTouch due to in c o mp at ible fre q uenc ie s o r non-st an da rd IR formats. Th e
TheaterTouch cannot learn non -IR formats such as RF and ultrasonic.
UNPACKING AND INSPECTION
After un pa c king yo ur n e w TheaterTouch univer sa l system co n tr o ller, sa ve all of the
packing mate rials in c a se you e ver h a ve t o ship the unit.
Thoroughly inspect the TheaterTouch and packin g ma terials for signs of dama ge .
Report any damage to the carrier immediately. Report any equipment malfunctions
to Re mote Te ch n ologie s Inc o r por ated or an a utho r ize d Remote Tec h n ologie s
Incorporated dealer.
IMPORTANT
After un pa c king yo ur n e w TheaterTouch universal system controller for the first time,
charge e ach battery pack for at least 12 hours.
1
Page 12

Theat er Touch S y s tem Con troller
PRODUCT CONTENTS
Contents within the box include the following items:
Owner’s Manual
•
Warranty and Registration card
•
TheaterTouch™ System Controller
•
Two (2) r e char g e a ble Nickel Me t al-Hy dr ide battery pa c k s
•
Smart battery ch ar ge r
•
Wall-mount power supply for battery charger
•
TheaterTouch Designer™ software CD-ROM
•
Serial cable for programming
•
SOFTWARE REQUIREMENTS
TheaterTouch Designer software min imu m system re quireme nts:
Windows 95, Windows 98,Windows NT 4.0 or higher oper ating
•
system
IBM or compatible PC with 486DX2/66Mhz or higher
•
processor
16 Megabytes (MB) of RAM
•
8 Me ga byt e s o f fr ee disk space for minimum inst alla tio n
•
(16 MB recommended)
A mouse is r equired
•
VGA monitor (256 color Super VGA rec ommended)
•
CD-ROM drive
•
Open RS-232 serial port
•
Optional printe r for printing setup r e po r ts
•
2
Page 13

Chapter 2. Introduction
The TheaterTouch is a programmable touchscreen computer that is designed to
provide wireless control of audio/video and automation systems. Like other
“universal” or “learning” remote controls, the TheaterTouch allows you to c o n so lidat e
the func tion s of man y inde pe n de nt in fra r e d r e mote c o ntr o ls into on e un it. The
TheaterTouch also in c o r po r a t e s a u n ique pro gr a mma ble use r in t e rfac e , allowin g it to
provide a simple , intuit ive , an d c ust omiz ed inte rface for a n y syst em. Be fo re usin g th e
TheaterTouch, please r ead an d fo llow a ll in st r uc t io n s in this manua l.
FEATURES
The TheaterTouch provide s superio r qua lity and re lia bilit y a s well as th e se spe c ific
features:
A replacement for all of your system’s remote controls. The TheaterTouch can
•
reproduce all of the commands of almost any other infrared remote control.
Chapter 2 • Introduc tion
A progr ammable gr aph ic display. The TheaterTouch uses power ful W indo ws
•
based software that makes it easy to place buttons, text, graphics and symbols
anywhe r e on the display.
A backlit LCD with digital matrix touchsc r e en. W h e n you wan t to pe r for m a
•
comma n d, simply touch th e display wh ere t h a t c o mma n d is displa y e d. The
touchscreen never needs calibrating.
25 backlit “hard” keypad buttons that allow easy access to frequently used
•
functions.
Two det a c h a ble, lo w-p r o file re chargea ble batt e ry pac k s. The TheaterTouch can
•
run c on t inuo usly for severa l h our s betwee n c h arges. Be c a use th e re mote is
nor ma lly used only a few minutes per sessio n , the unit typic ally will r un fo r a
week or more between charges. A built-in low battery indicator warns you
when it’s time to r e c h ar ge the battery.
A macro function. This featur e allows th e TheaterTouch to perform a series of
•
commands by pressing a single button. For example, you can create a macro
called “Mo vie” th at tur n s on th e TV, sets the c or r e c t c h an n e l, tur n s on th e
VCR, dims the lights, and starts playing a movie.
Two output o ptio n s fo r c o n t r o llin g y ou r equipmen t : infr ared (IR ), ra dio
•
fre quenc y (R F ), a n d t h e a b ility t o u se b ot h in the sa me syst em.
Automatic power on an d off. The TheaterTouch turns itself off whene ve r it is
•
not used for a pre-set amount of time. Touching any area of the display or a
har d bu tt on will t urn it on again , also a built in tilt se nsor can tu r n t h e unit o n
whe n it is picked up.
3
Page 14

Theat er Touch S y s tem Con troller
A serial port for communication with the TheaterTouch Designer programming
•
software.
Non-vo la tile flash memor y. The TheaterTouch will not lo se any p r o gramme d
•
data when the batteries are exchanged.
One-year parts and labor warranty.
•
IMPORTANT NOTES
Please r e a d the se impor tan t no te s abo ut the TheaterTouch:
The TheaterTouch should be placed in an area where it is around normal room
•
temperature (between 60°F to 90°F). If the tempera tur e is too h ot, the display
appears dim. If the temperature is too cold, the display appears dark and may
re spon d slo wly.
CLEANING
Occasional cleaning may be required, depending on use.
To clean y o ur TheaterTouch:
Do not use sharp objects on the touchscreen. It is designed to operate with a
•
touch o f your fin ge r .
Do not let th e TheaterTouch get wet. It should not be h an dle d with wet h an ds
•
or placed in an area where it could get wet.
Do not subjec t th e TheaterTouch to smoke, dust, or vibrations. The display may
•
be damaged from excessive shock or vibration.
Use only the power supply that is pro vided with the TheaterTouch. Using the
•
wrong type of power supply may result in battery leakage or other damage.
Do no t disa sse mb le t h e unit. Th e TheaterTouch contains high voltage circuits
•
that ma y c a use inju r y if c o n ta c t ed.
1. Remove th e battery pack fr om the TheaterTouch.
2. Lightly dampen a lint-fre e c loth with wate r o r mild deter ge n t an d wipe th e
touchscreen , keypad and outer surfaces.
4
Page 15
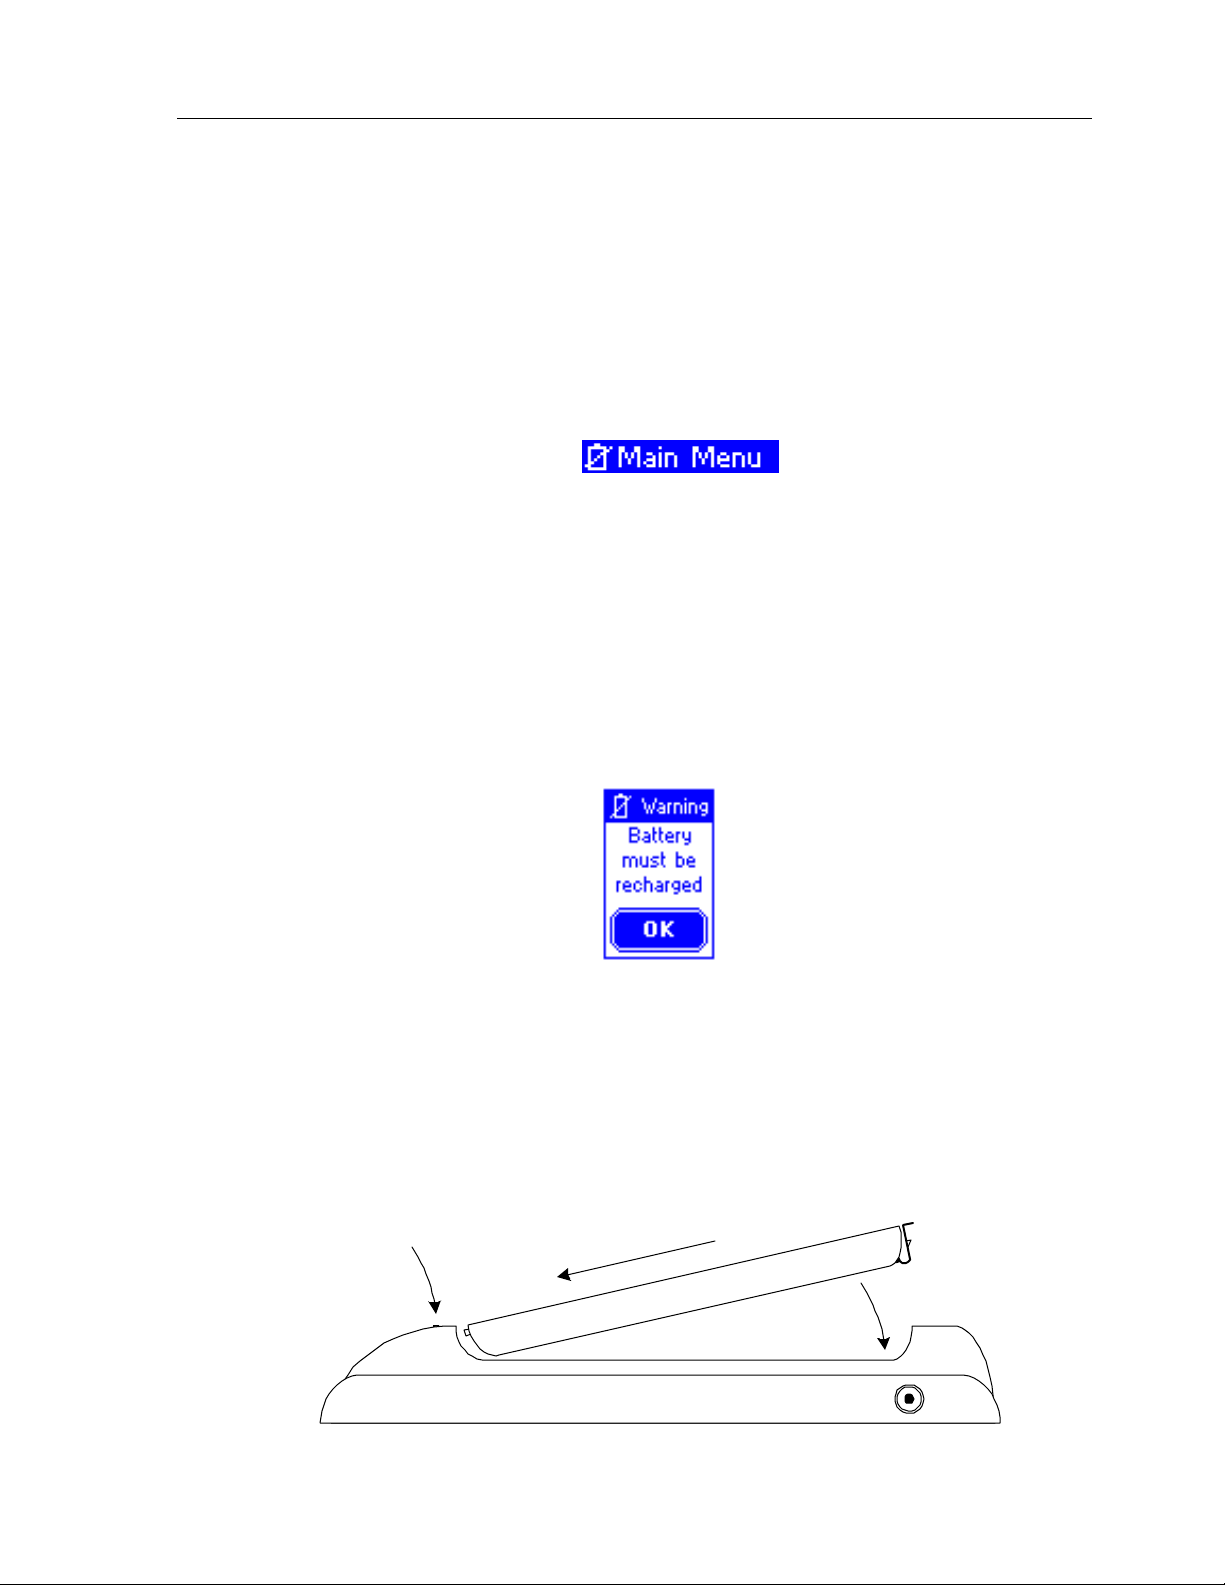
BATTERIES A ND CHARGER
The follo win g r ecommendat io n s will a ssur e the best ba t tery perfo r ma n c e.
Chapter 2 • Introduc tion
1. Operate the unit until you receive a
Low Battery
warn in g in th e uppe r left
hand corner of display.
2. At tha t po in t, you will h a ve appr o xima tely 10 - 2 0 min utes of r un t ime
re ma in in g b e fo r e the unit sh u ts do wn . At an y p oint afte r the
Low Battery
icon appears, you can exchange the depleted battery with a charged
batter y fro m the c h a r ge r . If you operate th e ba tte r y past a usable le ve l,
you will receive a warnin g sta t in g
Battery must be recharged
.
Recharge the TheaterTouch batteries for about 3 -4 ho ur s. (The light on th e ba tte r y
cha r g e r will stop flas h in g a n d sta y o n wh en th e ch a r ge cyc le is co mple t ed).
The batte r ie s ca n remain in the c h ar ge r in definite ly without damage to th e ba tte r ie s.
Charging Status
Light
(1)
(2)
5
Page 16
Theat er Touch S y s tem Con troller
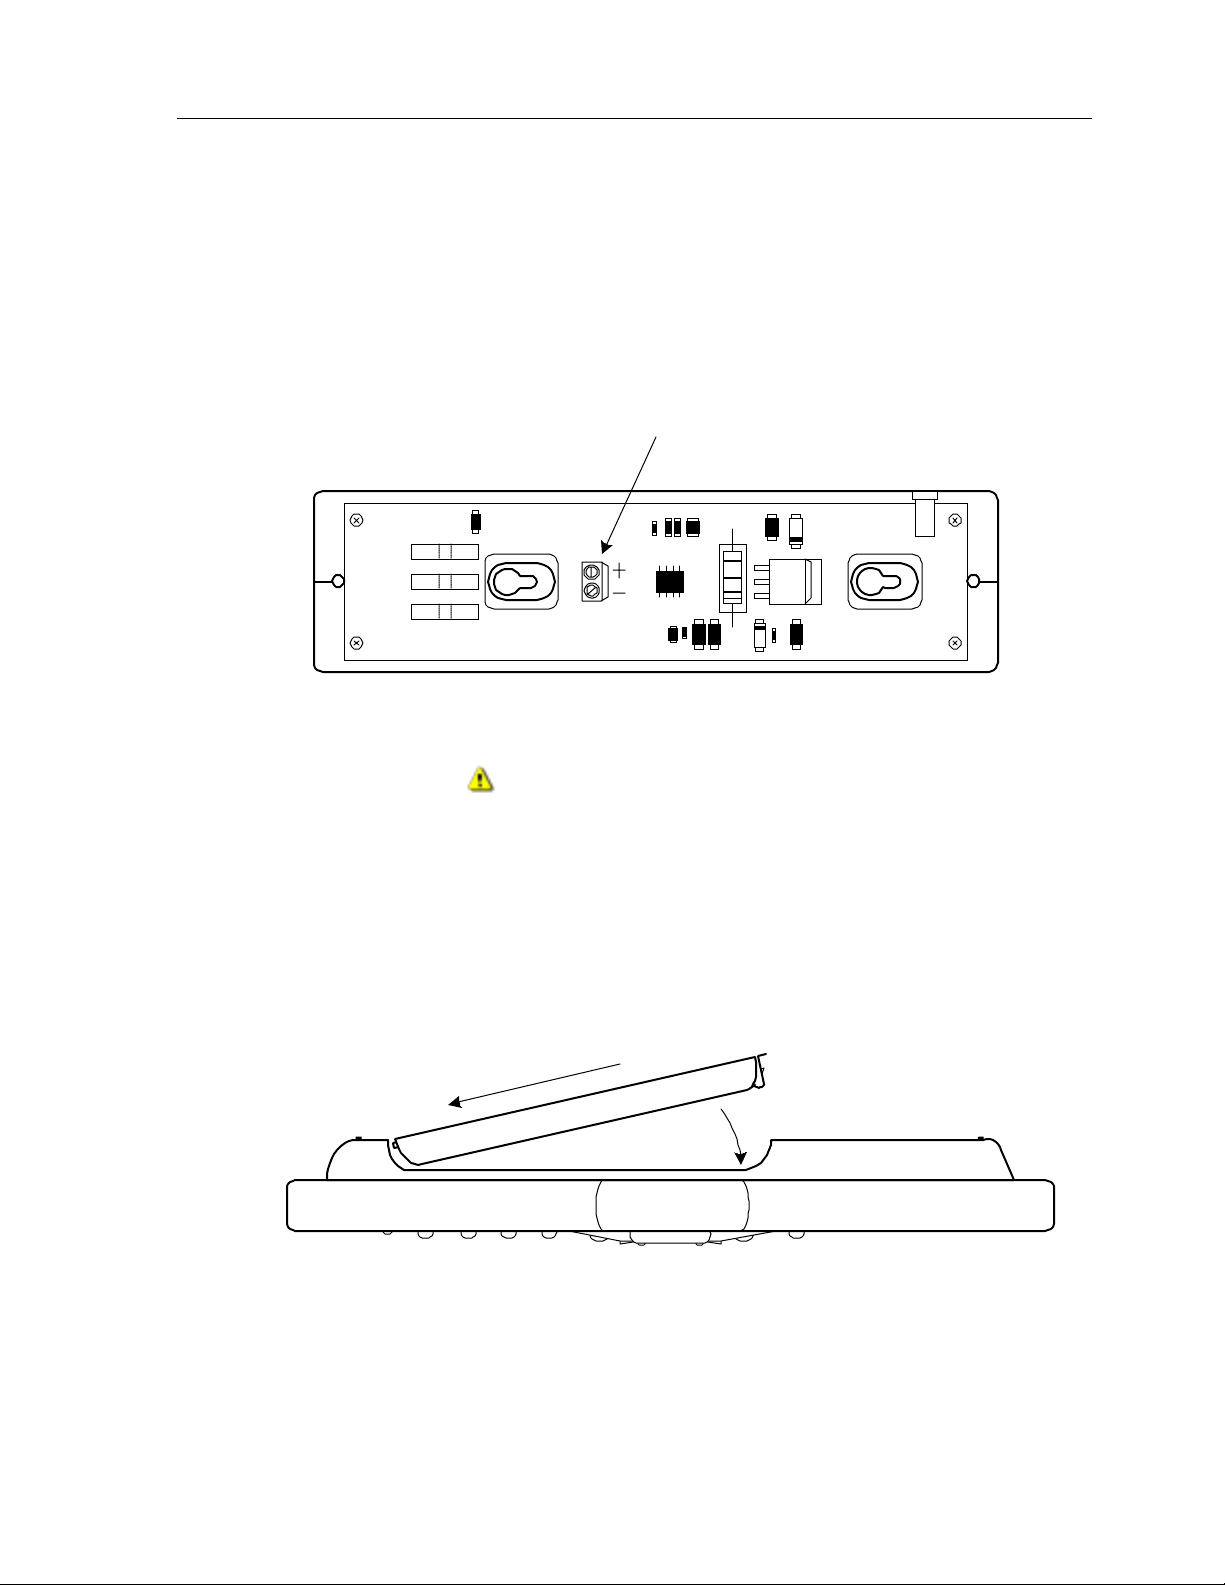
Custom Installation Note:
The TheaterTouch battery charger’s power can be hardwired through the back of the charger
for permanent mounting on a wall or other flat surface. This is done by removing the
bottom plate of the char ger an d har d wirin g the wall mount power supply direc tly to th e
terminal str ip. R e plac e th e bo ttom plate be fo r e moun ting.
Use only the original po we r supply.
Power Connection - (J2)
9VDC 0.5A
J2
Battery Charger with bottom plate removed.
Warning!
Watch th e po lar ity.
GETTING STARTED
Star t by snappin g a fully cha r ge d batte r y o n th e ba c k of the TheaterTouch. This is don e by
insertin g the end of th e battery with the c o nta c ts in first, a nd th e n ge n tly pushing th e end
with th e clip un til it sn a ps in t o p lace.
(1)
(2)
The TheaterTouch is powered-up by touc hin g an y a r e a of th e display or an y ke ypa d button as
well as p ic kin g up t h e unit if th e tilt se n s or is act ive .
6
Page 17
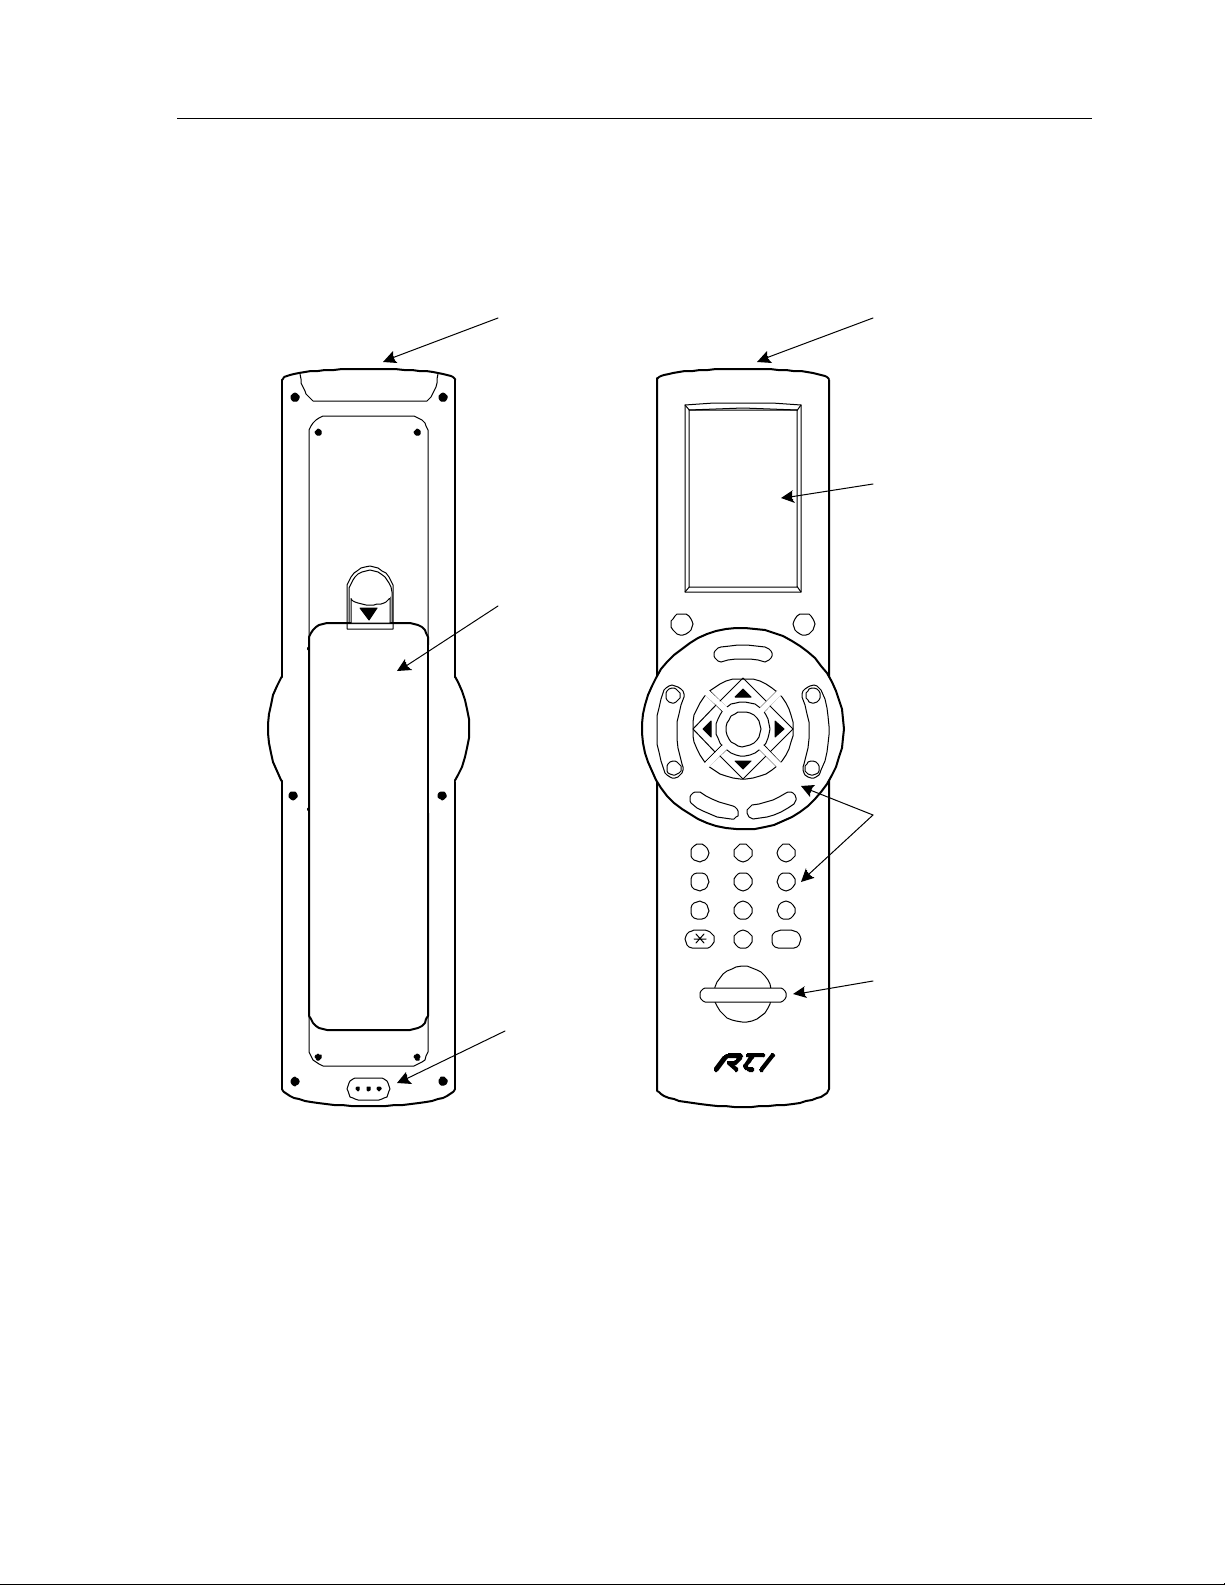
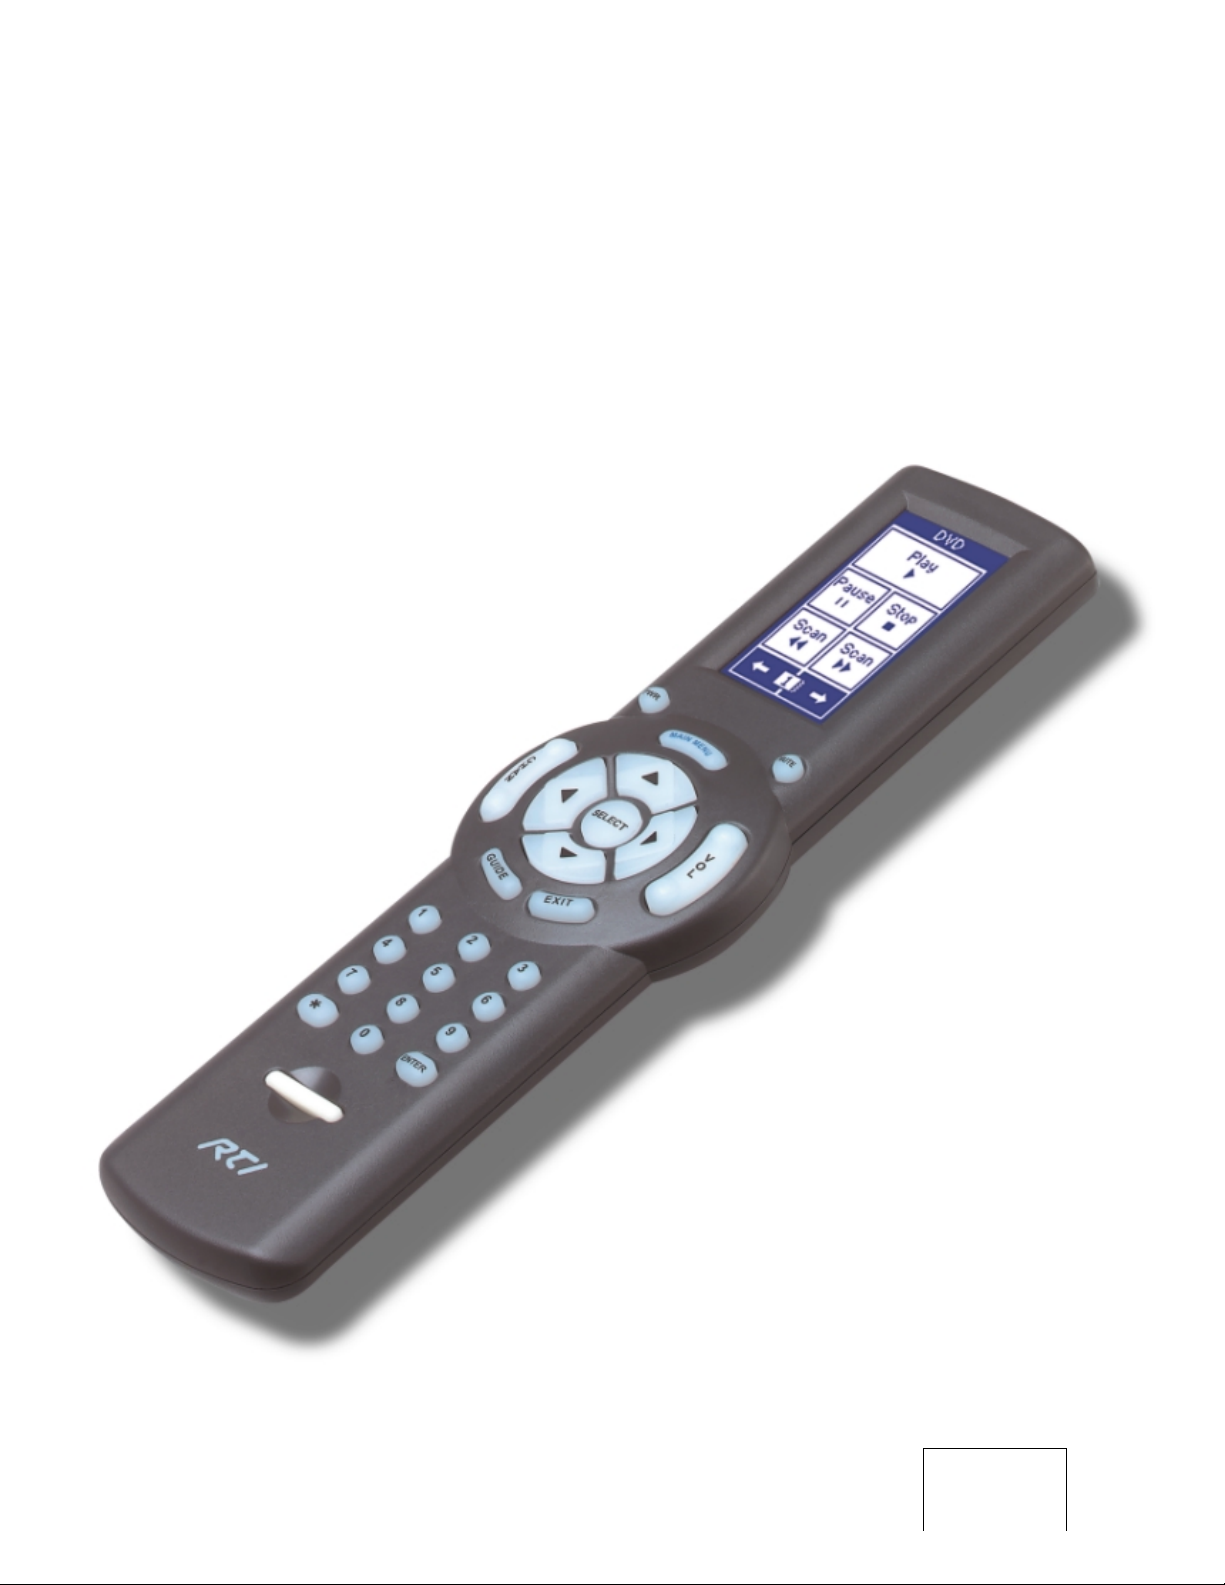
REMOTE REFERENCE
Chapter 2 • Introduc tion
Transmitting and
Learning Window
Rechargeable
Battery Pack
PWR
MAIN MENU
C
H
A
N
SELECT
GUIDE
123
456
789
0
EXIT
ENTER
MUTE
Transmitting and
Learning Window
Touchscreen
V
O
L
Programmable
Keypad Buttons
Serial
Port
Backlight Key
(Glows in the Dark)
FrontBack
7
Page 18

Theat er Touch S y s tem Con troller
THE TOUCHSCREEN DISPLAY
The TheaterTouch touchscreen display is organized as a series of pages and frames. A
page can consist of up to 12 frames of information having one frame displayed on the
screen at a time.
Normally each frame on a page contains objects (buttons, text, graphics, and symbols)
that are r elate d in some way . F o r in st an ce, the y ma y a ll displa y in fo r ma tio n
ne c e ssa ry for controlling a pa rticula r V C R.
By defa ul t, the TheaterTouch has one Main Menu page—all other pages are
con sidere d su bmenus. A n y p ag e can c o n t ain a butto n t h a t will displa y a n y ot h er
page when selected.
Normally the Main Menu page is used to display the names of the submenus (e.g.,
the equipment being controlled). The submenus may consist of one or more pages.
The TheaterTouch will support 63 p ag e s plu s th e Main Men u pa ge; each page c a n
consist of up to 12 frames.
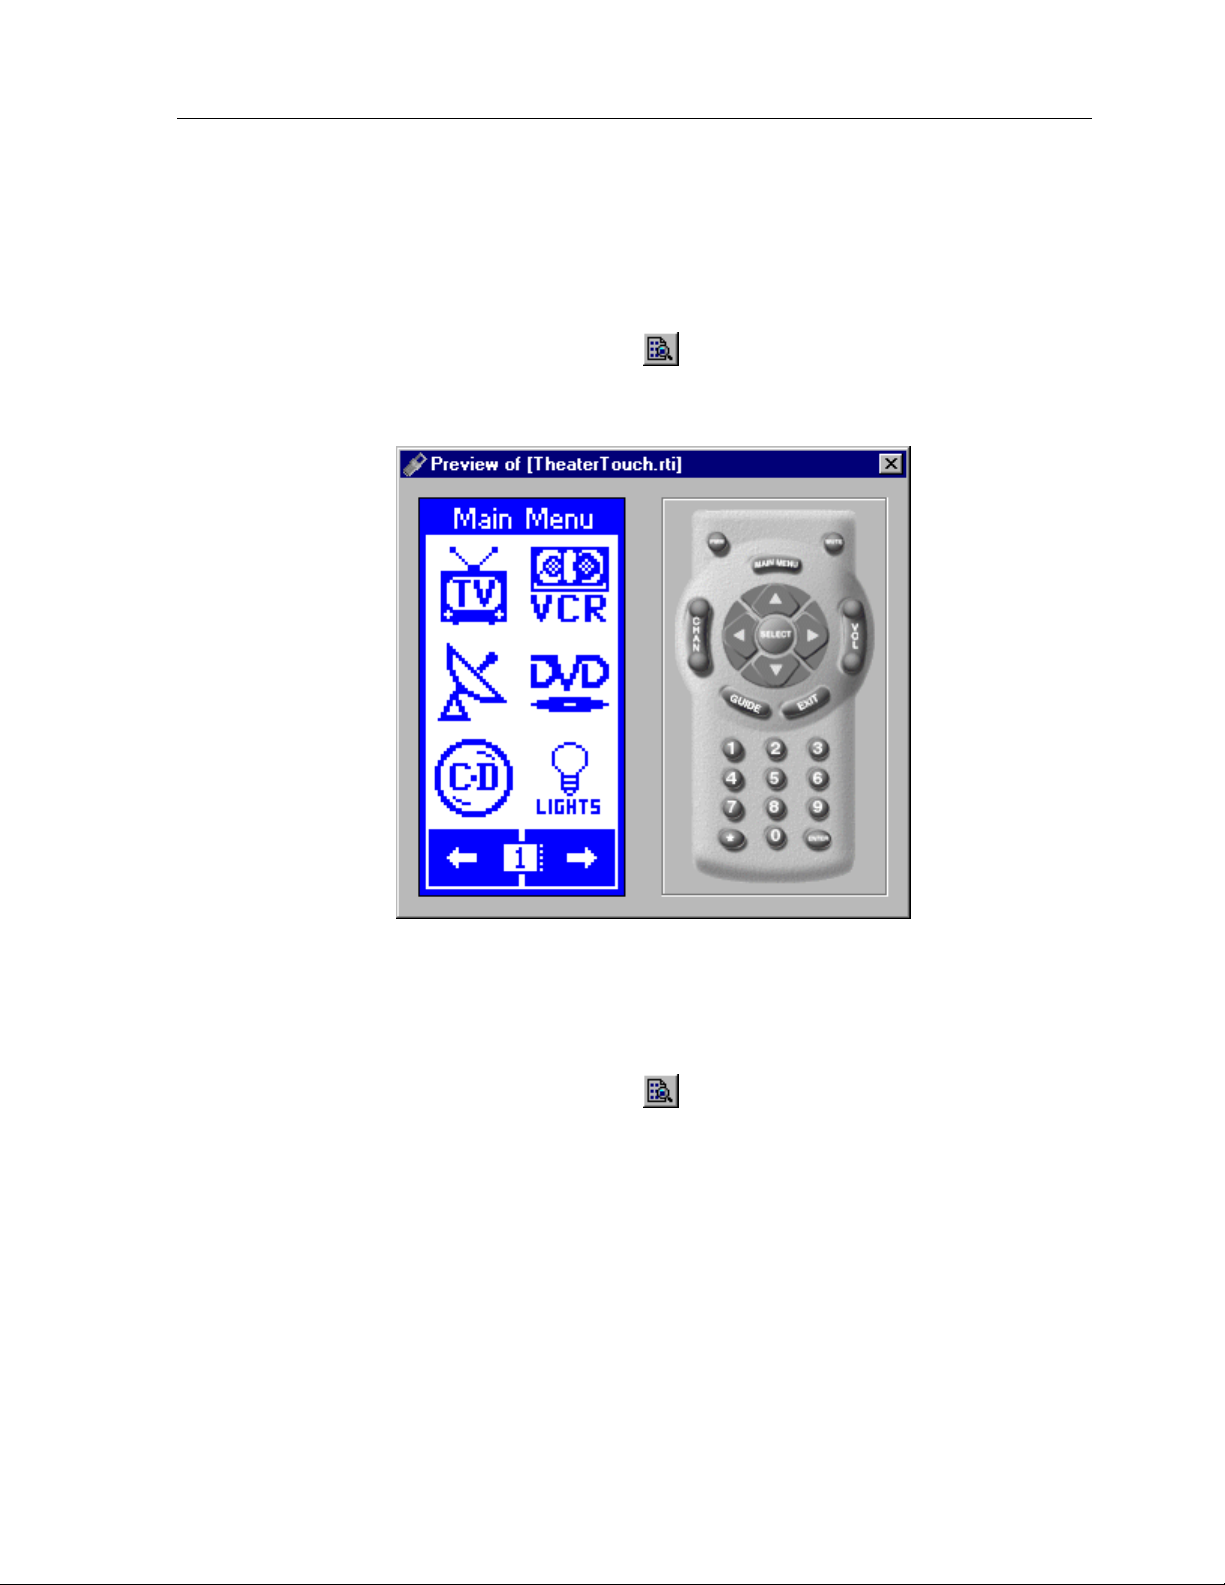
A repre sen tation of a programmed Main Menu page is shown below.
Pre ssin g th e
differe n t pa ge is assign ed using the TheaterTouch Designer software).
THE CONTROL PANEL PAGE
Main Menu
key a t a n y t ime will return you to th is pa ge (unless a
The Control Panel page can be displayed by pressing the backlight key for
seconds
You c a n a lso acce ss t h e Cont r o l Pa n el page by assig n in g a “ C o n t r o l Pa n e l” pa ge link
to a button using th e TheaterTouch Designer software.
.
at least 3
8
Page 19

The C o n t r o l Pa n el con sist s o f th e followin g th ree frame s:
Chapter 2 • Introduc tion
To change frames, press the frame
the botto m of the to uc hsc r e e n .
To return to your TheaterTouch progr a m, pr e ss th e
ADJUST CONTRAST
This button displays a window that allows you to adjust the LC D c on tr a st.
Pre ss th e
button in the window to c lose .
Left Arrow
Right Arrow
or
Left
or frame
Right
buttons on
Main Manu
key.
keypad buttons to a djust. Press the
OK
9
Page 20

Theat er Touch S y s tem Con troller
BEEPER
This button displays a window that allows you to turn the audible bee p o n o r
off. The beeper provides feedback that a button was pressed. Press the
button in the window to c lose .
TIME OUT
OK
This button displays a window that allows you to adjust the amoun t of time
the un it stays awake afte r th e last button pre ss. The time is variable fr om 1
sec on d to 6 0 secon ds (default is 10 se c o n ds). Pre ss th e arrows to th e left o r
right of the
Tim e Out
setting to adjust the time. Press the OK button in the
window to close. During Sleep mode, the TheaterTouch uses virtua lly no
battery power.
10
Page 21
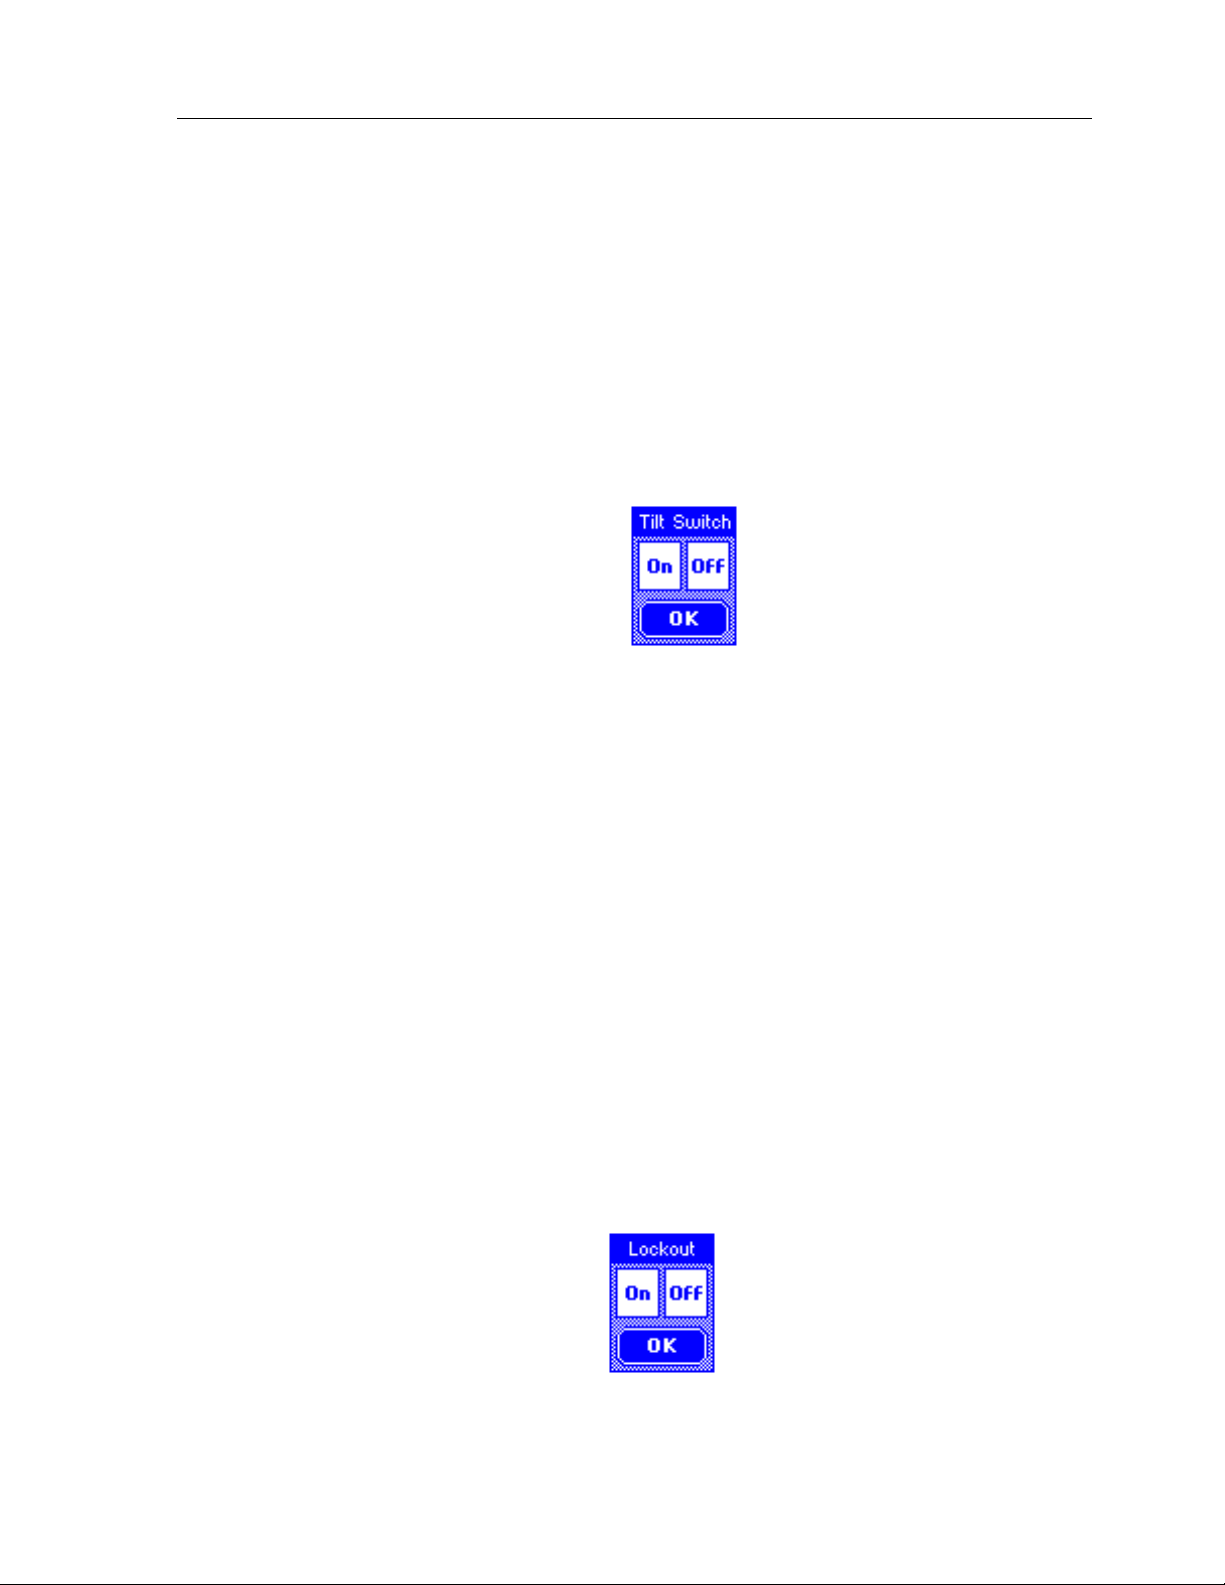
TILT SWITCH
Chapter 2 • Introduc tion
This button displays a window that allows you to adjust the se ttings for th e
built in t ilt switch, wh ic h is a de vic e tha t tu r n s t h e remo te on when tilt ed
passed a 45 degree angle.
On
mean s t h e tilt switc h is a c tive an d will turn on disp lay a n d ba c k ligh t when
picked up.
Off
mean s t h e tilt switc h is in a c t ive .
Pre ss th e OK button in the window to c lose .
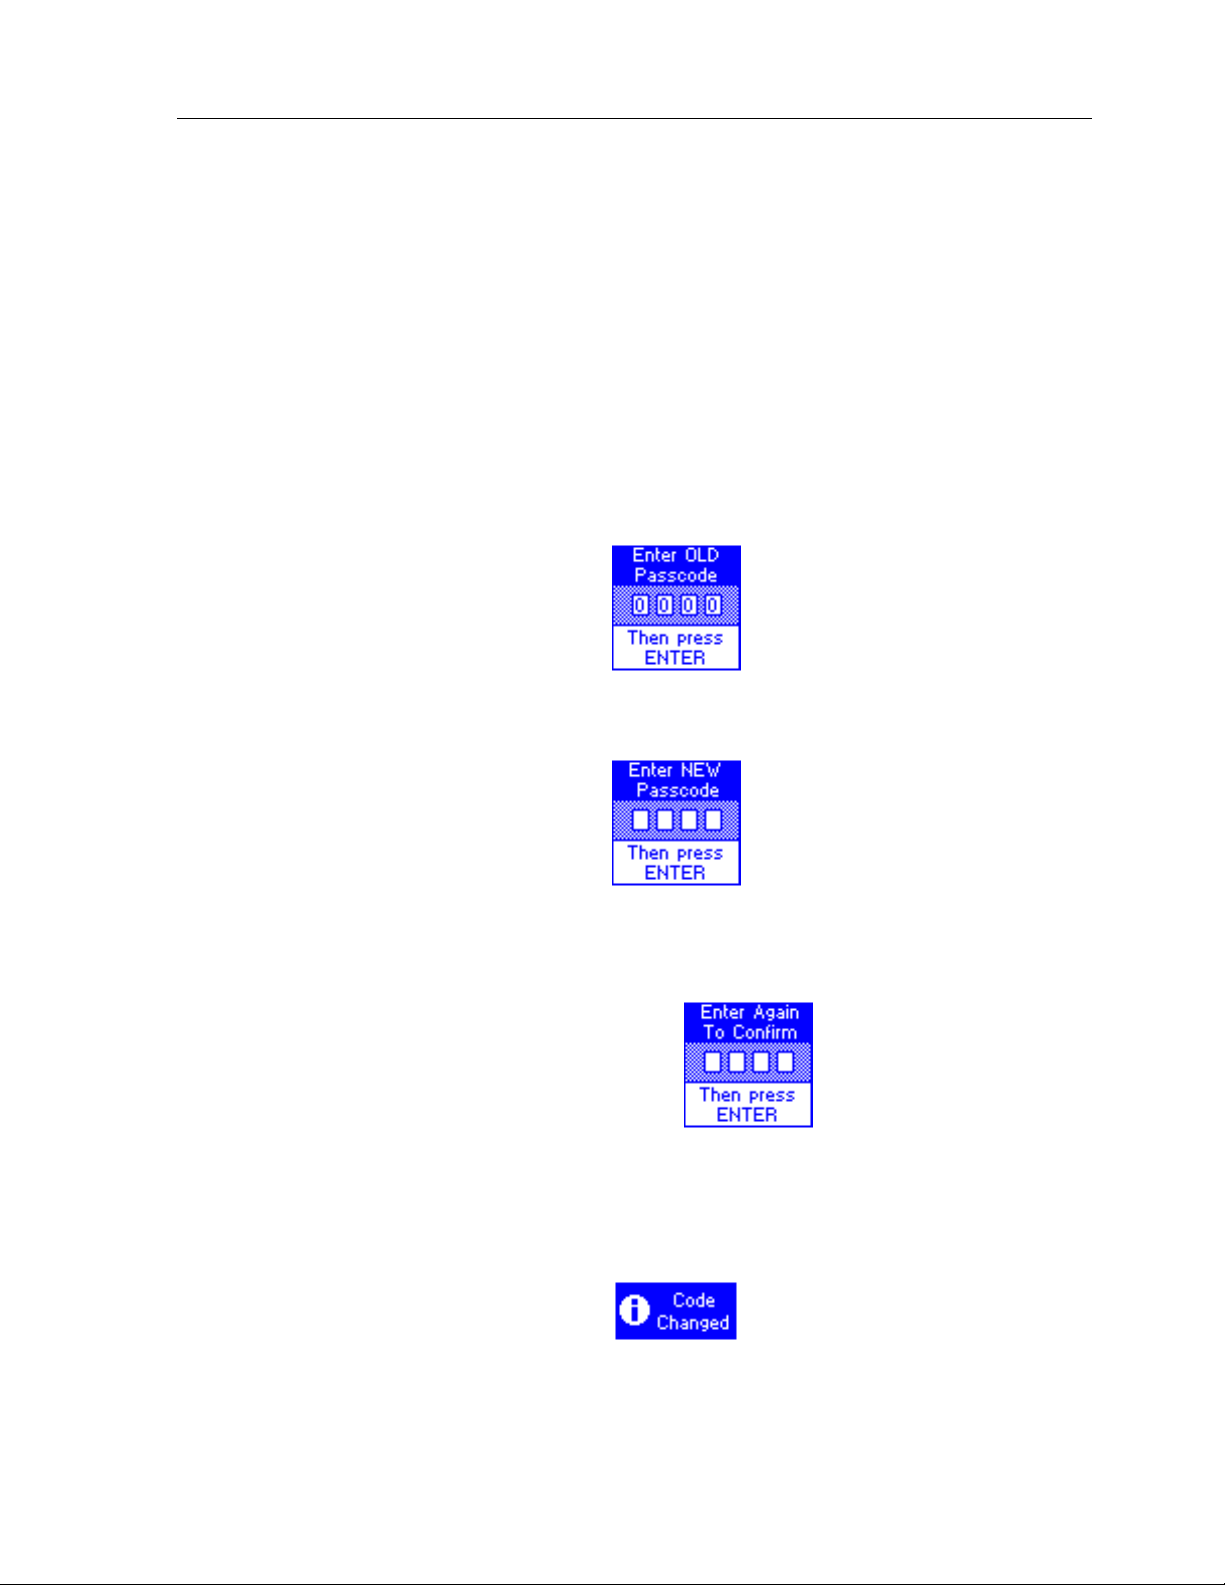
PROGRAM LOCKOUT
This button displays a window that allows you to turn th e pr o gr am loc kout
featur e on an d off. This is used to loc ko ut un -auth o r ized users from the
Com pute r Link
If the
before you can c ha n ge th is settin g.
On
the passcode.
Off
a passco de .
Pre ss th e OK button in the window to c lose .
Lockout
mean s t h e
means the
mode, so th at th e pr ogr a m can n ot be altered.
feat ur e is en a bled, y ou will n e ed to e n t e r the cur r ent pa ssc o de
Com pute r Link
Com pute r Link
mode is locked and can only be accessed with
mode is unlocked and can be accessed without
11
Page 22
Theat er Touch S y s tem Con troller
CHANGE PASSCODE
This button displays a window that allows you to set th e pa ssco de th a t is used
to limit access to the
con trol pan el page, a s well as th e
all butto n s.
Com pute r Link
Button Lo c kout
mode a nd
Clear All
function that is available on
function on the
When you press the
ente r th e
keypad.
(The default co de is
old
passcode using the hard keys, then press the
Now en te r a
You will b e p r o mpt e d t o enter the
confirmation , th e n pr e ss
Change Passcode
0000)
.
new
four-digit passc o de , the n pr ess
Enter
button , the scr e en will pr o mpt yo u to
new
.
Enter
key on th e
Enter.
four-digit passc o de a ga in for
12
When new code is entered successfully, the
will pop up to let you know you h a ve ch a n ged the passc ode.
Code Changed
Do not forget the passcode!
window
Page 23
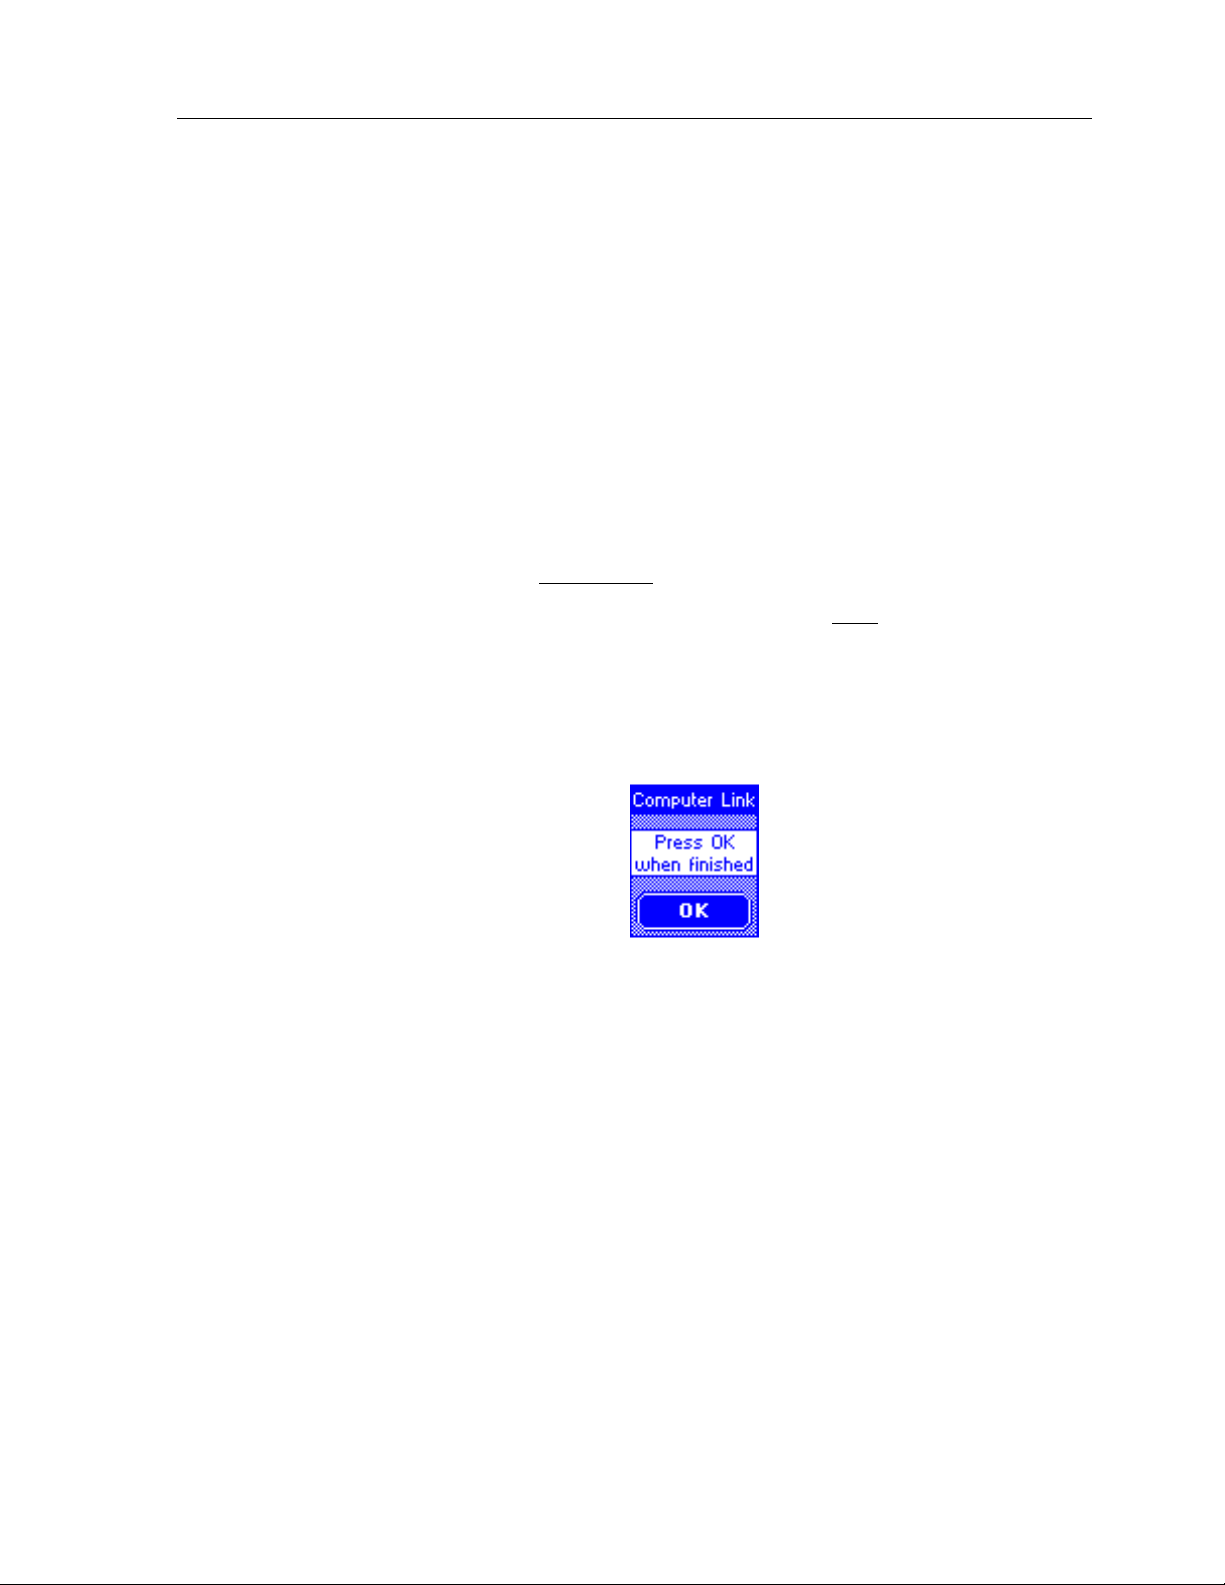
COMPUTER LINK
Chapter 2 • Introduc tion
This button displays a window that allows you to put the TheaterTouch into
Com pute r Link
This is used for RS-232 communications between a personal computer and the
TheaterTouch for lo a din g a progr am into th e TheaterTouch or e xtra ctin g a
program from the TheaterTouch.
The two options available for the tr ansfer of a program in the TheaterTouch
Designer software a r e:
Send File to Rem ote ,
♦
to the r emote, ove r wr iting the existing progr am.
Receive File from Remote,
♦
the r e mote to the software , le aving th e pr ogr a m in the remote intact
Pre ss th e OK button to close th e window afte r th e tr an sfe r is complete.
mode.
which sends the new program fr om the software
which e xtr ac ts a c opy o f the pr o gr am fro m
.
13
Page 24
Theat er Touch S y s tem Con troller
IR CAPTURE
This butt on disp la ys a win do w th a t allo ws the TheaterTouch to align, lea rn,
and test infra r e d co mmands from donor r emotes. Use d toge th e r with th e
TheaterTouch Designer Infrare d Libra r y M an a ge r so ftwar e you can c r e a te a
custom da ta ba se of infr a r ed comma n ds.
The use of the IR Capture command is described in chapter 6 “IR Library
Manager”.
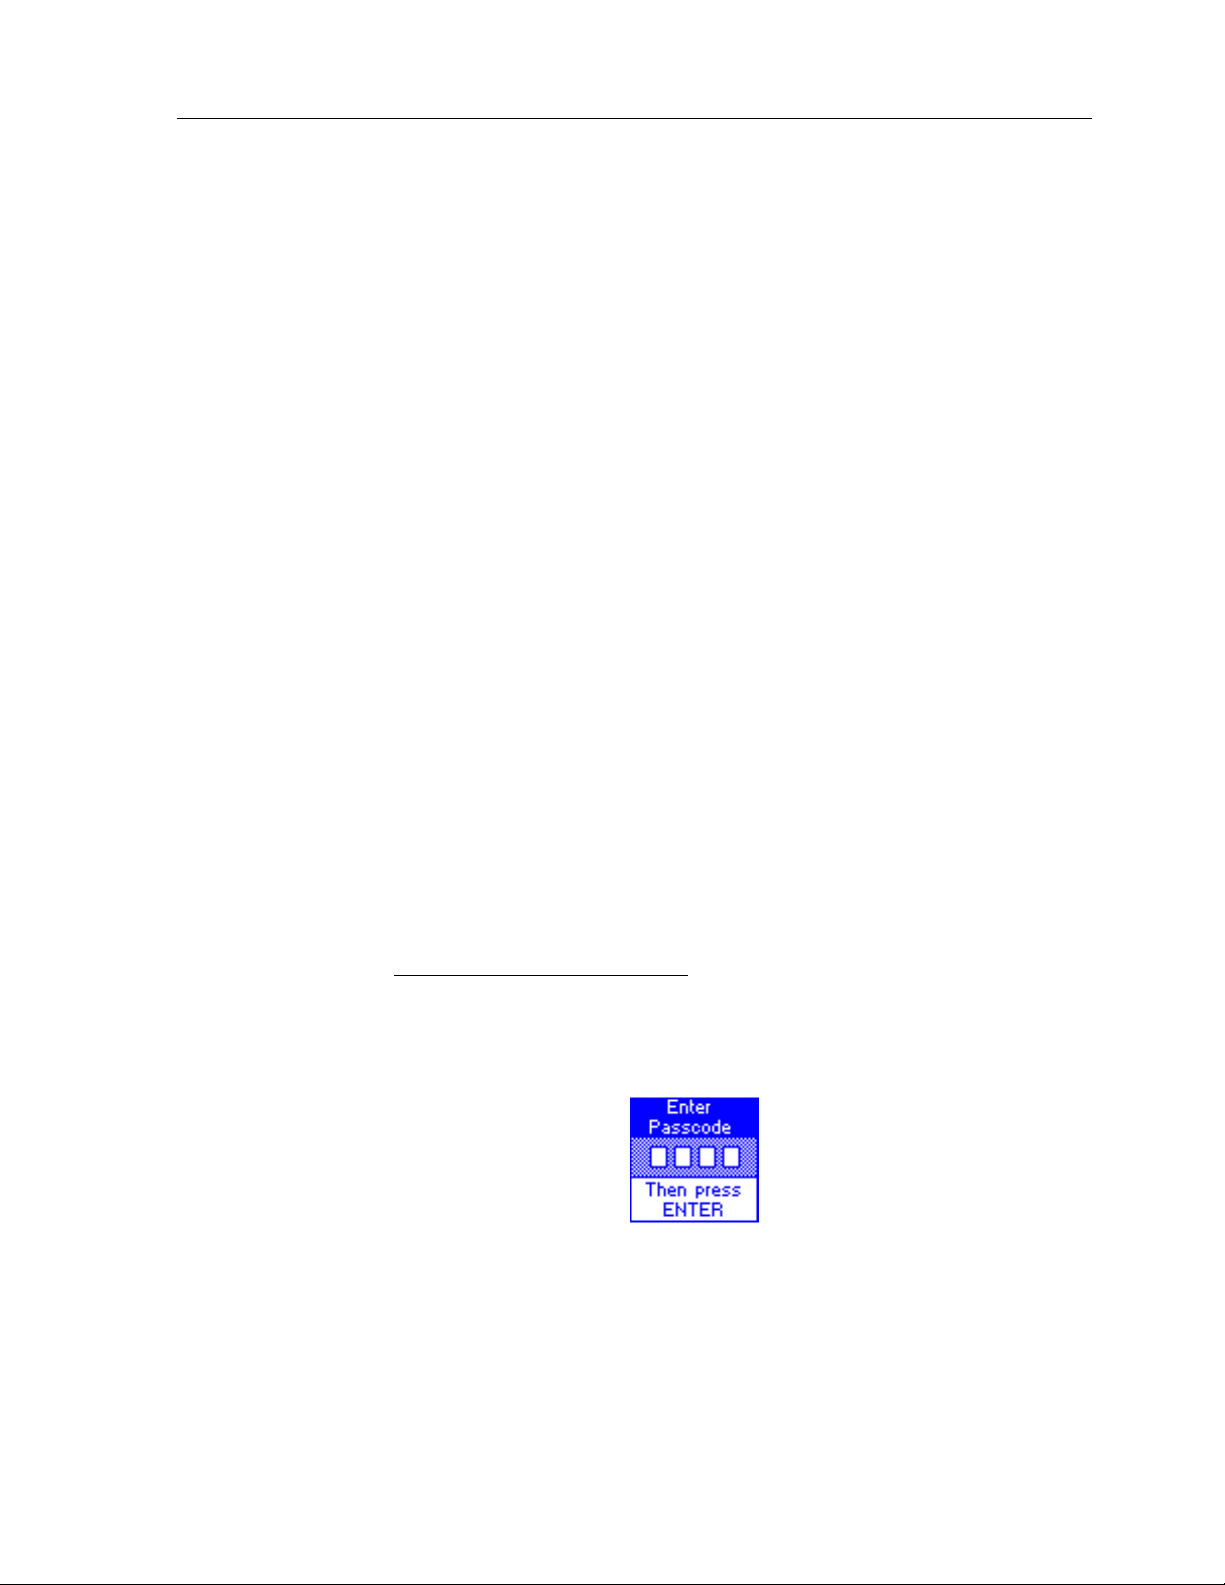
CLEAR ALL
WARNING
To e xit
IR C APTURE
mode, press th e Main Menu button on the remote.
This butt on displays a window tha t will allo w y ou to e rase the c urre nt
progra m in the TheaterTouch re mo t e . Wh e n t h e button is pressed, you will be
prompted to enter the current passcode. If the proper code is entered, the
entire program in the TheaterTouch will be era se d.
This will e r a s e the c omplete program in the
TheaterTouch
restore it, except by reloading the program fr om the
with no way to
TheaterTouch Designer
software!
If you inadvertently press the
CLEAR ALL
button, simply pre ss t h e
ENTER
button wit h o ut enterin g th e passc o de a n d y ou will be re t ur n ed to th e Co n trol
Pane l page .
14
Page 25

Chapter 3 • TheaterTouch Des i gner S oftware
Chapter 3. TheaterTouch Designer
TheaterTouch Designer allows you to create the entire gr aph ic al inte r fa ce for a R TI
TheaterTouch System Controller on your computer. Once the interface has been
cr e a ted, it is do wn lo a de d t o t h e TheaterTouch using the included programming cable.
Existing programming can a lso be e xtra c te d, modified, a nd r e -se n t to an y
TheaterTouch system c o n tr o ller.
Soft ware upda tes will be ava ila ble for do wn lo ad a t www.rticorp . com
INSTALLING THEATERTOUCH DESIGNER
1. Close any open programs.
2. Place the TheaterTouch Designer compact disc into the C D- R OM dr ive.
3. If the in st a llat io n do e sn’t app e a r automa t ic a lly, clic k
Run,
drive ). Click OK.
4. Follow th e on-sc reen inst r uctions.
PROGRAMMING OVERVIEW
d:\setup\setup.exe
type
(For d, type th e le tter for your C D -ROM
Software
Start
and choose
Here is an overview of the process of programming a TheaterTouch fro m sc r at c h .
Instructions on carrying out these tasks can be found in chapters 4 and 5.
1. Cre a te a new page an d add buttons for each sour c e component in a
system.
2. Place a button on the main menu to access each one of the source
components.
3. Use the Assign Page too l to link the buttons on th e main me n u to th e ir
re spe c tive sourc e compon ent pages.
4. Assign infrared code s a n d o th er co mma n ds to butt on s usin g th e
Comma n d Lib r a ry.
5. Create macros using the macro editor (if needed).
6. Check the Remote Properties.
7. Save the file.
8. Sen d the file to the TheaterTouch using the communications commands.
15
Page 26
Theat er Touch S y s tem Con troller
THEATERTOUCH DESIGNER SCREEN
Menu Bar
Toolbar
Page List Touchscreen
Design Window
grid
16
Page 27
Chapter 3 • TheaterTouch Des i gner S oftware
Frame Left and
Right arrows
17
Page 28
Theat er Touch S y s tem Con troller
Tool Palette Keypad Buttons
TOUCHSCREEN GRID
The touchscreen grid is where the buttons, text, graphics and symbols are placed.
Click on the frame
touchsc r e e n gr id to plac e button s on o ther fra me s.
Left
or frame
Right
buttons at the botto m of the
18
Page 29
Chapter 3 • TheaterTouch Des i gner S oftware
DESIGN HINTS
1. Be con sisten t with th e loc ation o f similar buttons. For example, if you
2. It’s not necessary to re-create each donor remote in its entirety on the
3. Use macros to hide complex command sequences from the user. For
GETTING HELP
TheaterTouch Designer includes an extensive on-line help system. If you need help
have a DVD player and a VCR in your system, try to make the transport
controls (Play, Pause, Stop, etc.) on both pages look similar.
TheaterTouch. Th in k o f t h e func tio n s t h e user will be u sin g da ily.
example, instead of presenting the user with only the key pad for
changing channels on their TV, make a set of macros for CBS, HBO, etc.
that sen d the pr o pe r c ha n nel numbers automatic ally. The
Wizard
makes it easy to c r e a te th is type of mac r o.
Channel Macro
Help
Toolbar
button in
.
with any tool or command, click the
If you need an explanation of any item in a dialog box, click the
the dialog’s title bar , a nd th e n c lick on th e c on tr ol you would like to le a r n a bout.
What’s this?
button on th e
19
Page 30

Theat er Touch S y s tem Con troller
20
Page 31

Chapter 4 • Theater Touch Des igner Basics
Chapter 4. TheaterTouch Designer Basics
The TheaterTouch system co n trolle r is divided into two sectio n s: the touc h sc reen an d
the keypad. Y ou c a n assign co mman ds, mac r os a nd pa ge links to an y button yo u
cre ate on the touchsc r e en or o n th e keypad button s.
The ke ypad button layout o f the TheaterTouch follows the page s, n ot th e fr a mes, so all
12 fr a me s o f a pa ge will ha ve t h e same c o mma n ds, ma c ros an d p ag e links on t h e
keypad buttons. Each frame of the touchscreen can have different commands, macros
and page links.
PAGES
T
he individual screens on the TheaterTouch system co n tr o ller are c a lled page s. Page s
on the to uch sc r e e n c a n c o nta in butto ns, links to othe r page s, a title, text, co mmands,
and macros.
The page links, commands and macros associated with the keypad buttons on the
TheaterTouch are also stored with each page.
Each page can have up to 12 frames on the touchscreen, and usually has the controls
for ju st o n e compo n ent. Each frame is acce ssed by scr o llin g le ft and righ t wit h th e
arrows at th e bo ttom of the TheaterTouch touchscreen. With TheaterTouch Designer,
you c a n a dd and delete pa ges, duplicate p a ges, etc.
All TheaterTouch pages have a page title . Th e page title is the n a me th a t appe a r s in
the title bar above the Touchscreen grid and in the Page List.
HOW TO ADD A PAGE
1. Clic k t h e
2. Enter a n ame for th e pa ge in th e
name of th e compon ent, such a s: CD , Satellite, Lights and so on .
3. Click OK.
Repeat this procedure for each page you wish to add.
HOW TO DELETE A PAGE
Create New Page Command
New Page T itle
on the
Toolbar
dialog, t h is is usu ally th e
.
1. Sele c t th e pa ge to be delete d fro m the
2. Clic k t h e
3. Click
Delete C urre nt Pa g e C omma nd
Yes
in th e
Delete Page
confirmation box.
Page List
.
on the
Toolbar
.
21
Page 32

Theat er Touch S y s tem Con troller
BUTTONS
Buttons are the functional elements of the TheaterTouch system c o n tr o ller. Ea c h
button can be associated with commands, macros, and page links. Creating buttons in
the touc h sc r e e n gr id con sists of making the button itself and th e n adding te xt,
bitmaps, or symbols to th em.
HOW TO ADD BUTTONS
1. Select a page from the
frame le ft an d righ t ar r ows on th e bo ttom of the touchsc r e en grid.
2. Sele c t th e style of butto n fr om th e button dr awing to ols on th e left side of
Tool Palette
the
3. Place the mouse cursor over the cell in the touchscreen grid where one
cor n er o f the bu tto n will b e .
4. Click and h old the le ft mouse butto n a n d drag th e mouse to the opposite
cor n er o f wh ere t h e b utt o n will be.
5. Release the left mouse button when the button has the desired shape and
size.
Repeat this proc edure for each butto n you wish to a dd.
HOW TO DELETE BUTTONS
1. Select the
2. Place th e mouse c ur sor ove r th e button to dele te.
Delete B utton
Page List
.
tool
, and th e n th e fr ame on th at page with the
from th e
Tool Palette
.
22
3. Clic k the left mouse b utt o n .
Page 33

HOW TO ADD TEXT TO BUTTONS
Chapter 4 • Theater Touch Des igner Basics
1. Select the
2. Place the mouse cursor over the button you want to add or edit text on.
3. Clic k the left mouse b utt o n .
4. Enter th e text in the
You can use any of the options in the
button.
Edit Text
tool
Edit Button Tex t
from th e
Edit Button Tex t
Tool Palette
dialog and click OK.
.
dialog to customize the
Make th e text bold.
Justify the text to le ft side of the button.
Cen te r th e text horizon tally in th e button .
Justify the text to th e r ight side of the button.
Shift the text to the top o f the button.
Cen te r th e text vertica lly in the button .
Shift the te xt to th e bo ttom of the button.
Enable the auto-comple te fea ture, whic h will a uto ma tic a lly finish typin g
the name for commonly use d buttons.
Click on an y o f the symbols at the bottom the dialog box to inse r t th e m into the active
line.
23
Page 34

Theat er Touch S y s tem Con troller
HOW TO PLACE A BITMAP
Bitmap Library
The
cre ate new bitmap button s by dragging th e bitmaps fro m the
Touchscreen grid. Hold the mouse over any bitmap in the
see its title and the
If you drop the bitmap onto an e mpty se c tion of th e Touc h scr een gr id, a n ew button
is automatically cre ate d with th e de fault style, and the bitmap is place d on th a t
button.
If you drop the bitmap on to a n e xisting button, any te xt or bitmap already on that
button is re plac e d with the bitmap that you drop.
window allows you to assign bitmaps to buttons in your file or to
Bitmap Library
it is stor e d in .
Bitmap Library
Bitmap Library
to the
window to
1. Select the
2. When the
Bitmap Library
Place Bitmap
Bitmap Library
onto the Touchscreen grid.
tool
window appears, drag any bitmap from the
on the
Tool Palette
.
24
Page 35

HOW TO LINK PAGES
The TheaterTouch Designer softwar e gives y ou th e ability t o lin k pa ges. W h e n a b utt on
with a pa ge link is pushed on the TheaterTouch, the linked page becomes active, in
essence turning the page.
Page links are indicated by a small green box containing the number of the linked-to
page in th e lowe r le ft c or n e r o f the butto n .
Chapter 4 • Theater Touch Des igner Basics
1. Select the
2. Place th e mouse c ur sor o ve r the button to whic h you wish to a ssign a
page.
3. Clic k the left mouse b utt o n .
4. Se le ct th e page n ame yo u wish to link to fr o m the po p-up me nu.
Assign Pages
tool
from th e
Tool Palette
.
5. Notice the green square in the lower left corner of the button corresponds
to th e linked p ag e in the list.
Two additional options are available for linking:
<previous>
♦
<control pane l>
♦
will take yo u b ack to th e last pag e t h a t wa s displa yed.
will switch to th e built-in
Contr o l Pa ne l
page.
25
Page 36

Theat er Touch S y s tem Con troller
HOW TO REMOVE PAGE LINKS
1. Select the
2. Place the mouse cursor over the button from which you wish to remove
the page link.
3. Clic k the left mouse b utt o n .
4. Select the
HOW TO ADD COMM ANDS TO BUTTONS
IR commands are indicated by a small re d box with the le tte r ‘C’ in the uppe r r ight
corn e r o f buttons.
1. Select the
2. Clic k t h e
select a different r emote tha n disp lay e d.
Assign Pages
<none>
Com mand Libr a ry
Select Ne w R emote
tool
item from the bo ttom of the pop-up menu.
from th e
tool
button in the
from th e
Tool Palette
Tool Palette
Com mand Libr a ry
.
.
window to
26
Page 37

Chapter 4 • Theater Touch Des igner Basics
Remote s a r e listed by man ufac tur e r , type, an d model in th e
Library
Re mo tes tha t have alrea dy b e en used in th e curre n t r emote file will be move d t o t h e
top of t h e list and t h eir ic o n will turn r ed for easy ide n t ific a tio n .
window; use th is to se le c t th e r emote you would like to a ssign c ode s fr om.
Select Remote from
3. If the remo te is in a differe nt libra ry or n o lib r a r y is o pen, c lick on t h e
Open Libr a ry
4. Click on th e re mote you wo uld like to assign c ode s fr om an d th e
Com mand Libr a ry
5. Place the mouse cursor over the function in the
you want to a ssign.
6. Clic k a n d h o ld the left mouse butto n .
7. Drag the mouse cur sor to the button on whic h you wan t to plac e the
command.
8. Release the left mouse button.
If you drag a command to a spot on the touchscreen grid where there are no buttons,
TheaterTouch Desig n e r will auto mat ic a lly c rea te a butto n a n d in sert t h e text fo r that
command.
command button to find the library you a r e lookin g for .
will ope n a ga in .
Com mand Libr a ry
that
27
Page 38

Theat er Touch S y s tem Con troller
HOW TO DELETE COMMANDS FROM BUTTONS
1. Select the
2. Place th e mouse c ur sor ove r th e butto n with the command you wish to
delete.
3. Clic k the left mouse b utt o n .
HOW TO SAVE A FILE
The files created with TheaterTouch Designer hold all the elements that make up an
individual remo te file. They ha ve t h e ext ension
directory.
Default directory is: [C:\Program Files\TheaterTouch Designer\My Remotes]
Note:
If a file already exists on the disk, the current copy is backed up in a file
with the e xte n sion
Delete C om mand
.rtb
and the n e w file is saved with the
tool
from th e
.rti
Tool Palette
and may be stored in any
.rti
.
extension.
1. Clic k t h e
2. Specify the name and directory for the file when saving for the first time
and c lic k
HOW TO OPEN AN EXISTING FILE
1. Clic k t h e
2. Clic k o n th e file yo u wish to open.
3. Click
Save Fi le C omma nd
Save
.
Open File Com mand
Open
.
on the
from th e
Toolbar
Toolbar
.
.
28
Page 39
HOW TO PREVI EW YOUR FILE
The Preview mode in TheaterTouch Designer allows you to see e xac tly wh at yo ur file
will look like whe n it is sent t o t h e TheaterTouch remote.
Chapter 4 • Theater Touch Des igner Basics
Clic k t h e
Prev ie w M ode C o mma nd
from th e
Toolbar
.
Use the mouse to press the buttons in the preview window. The buttons will
push-in just like they would on the TheaterTouch, and if they are linked to another
page , the linked page will b e come th e curre nt page in th e Preview W in do w.
Clic k t h e
finished testing your file .
Previe w Mode Command
from th e
Toolbar
again when you are
29
Page 40

Theat er Touch S y s tem Con troller
HOW TO SETUP COMMUNICATIONS
Com munica tio ns Se tup
The
TheaterTouch and your PC.
dialog box is for setting up communication s be twe e n th e
To open the
Choose
Com Port gr o up box -
to.
Com munica tio ns Se tup
Set COM Po r t
dialog bo x:
from th e
Choose th e COM Port tha t th e TheaterTouch is connected
Options
menu.
30
Auto Detect -
automatically locate the corr ect COM por t. Th e TheaterTouch must be connected
to the c ompute r with th e pr o gr amming ca ble a n d in
Maximum Comm Speed -
problems co mmunicating with th e TheaterTouch system c on t r o ller. The default is
High.
Click this button to ha ve TheaterTouch Designer attempt to
Com pute r Link
Cho o se a lowe r speed from this list if you are h a vin g
mode.
Page 41

Chapter 4 • Theater Touch Des igner Basics
HOW TO SEND A FILE TO TH E THEA TERTOUCH
1. Clic k t h e
2. Choose
All buttons, commands, bitmaps, and macros are sent. Any existing program in
the TheaterTouch is re pla c ed with th e file yo u send.
All communications take plac e on th e C OM por t se le c te d with th e
comma n d fr o m th e
Com munica tio ns C o m mand
Send File
.
Options
men u.
on the
Toolbar.
Set COM Po r t
31
Page 42

Theat er Touch S y s tem Con troller32Chapter 5 • TheaterTouch Des i gner Ad vanced Features
Page 43

Chapter 5. TheaterTouch Designer Advanced Features
HOW TO RENA ME A PAG E
1. Make sur e t h e desired pa g e is displa yed in the to u c h scre en grid.
2. Select the
3. Place the cursor over the page title area at the top of the touchscreen grid
and c lic k th e left mo use butto n .
4. Spec ify the new pa ge title a n d click
HOW TO DUPLICATE A PAGE
Page s c a n be insta n tly duplic a t e d. This is useful whe n p ag e s share commo n b utt ons
like channel macros or transport controls. One page can be created with these
buttons and duplicated as many times as needed.
1. Make sur e t h e desired pa g e t o be duplic at ed is displayed in th e
touchscreen grid.
2. Clic k t h e
3. Give the new page a different name and click OK.
The new page appears at the end of the page list.
Edit Text
Duplica te Pa ge C omm and
tool
from th e
OK
Tool Palette
.
on the
Toolbar
.
.
33
Page 44

Theat er Touch S y s tem Con troller
HOW TO MERGE PAGES
The Merge Pages dialog makes it possible to move groups of pages from another
file to the c ur r e n t r e mote file.
1. Clic k t h e
2. Select the remote file from which you wish to merge pages from. Choose
from the list locate d in th e
Open
Merge Pages
.
tool
on the
Select file to merge from
Toolbar.
dialog box and click
.rti
34
3. Place a check next to each page you would like to merge into the current
file.
4. You can click the frame left and frame right arrows to see the individual
frames on a page.
5. Whe n finishe d se lectin g p ag e s, clic k OK.
All of the marked pages in the list are placed at the end of the current file.
Page 45

Chapter 5 • TheaterTouch Des i gner Ad vanced Features
HOW TO USE THE PAGEWIZARD
TheaterTouch Designer comes wit h a libr a ry of pr e-built pag e s fo r many common ty pes
of eq uipment t h a t yo u can in sert into you r file and customize as de sired. The p ag e
library is accessed through the
To add a p r e-built pa g e t o yo ur file:
PageWizard
tool.
1. Clic k t h e
2. Sc r o ll th rough th e list of a vaila ble pages and selec t th e one you wa n t. Yo u
can use the
pages if there are more than one.
3. Clic k t h e
Page W iz a rd Com mand
Next Page
Insert
button to add the page(s) to your file.
and
Prev Pa ge
on the
buttons to see pr eviews of all the
Toolbar
.
4. Clic k t h e
The new page(s) appear at the end of the page list.
Use the e diting too ls to customize th e button style to fit the rest o f your file an d to
place co mmands, pa ge links a n d ma c ros on t h e butto n s.
HOW TO CHANGE BUTTON STYLES
1. Sele c t th e style of button fr om th e
2. Place the mouse cursor over the button you wish to change.
3. Clic k the left mouse b utt o n .
Close
button to close th e dialog box.
Tool Palette
.
35
Page 46

Theat er Touch S y s tem Con troller
HOW TO SELECT BUTTONS
Select B utton
The
resizing, or property editing. When buttons are selected, they are painted in red.
To select a single button or a group of buttons next to each other:
tool
is used to select buttons for cutting, copying, moving,
1. Clic k t h e
2. Place the mouse over one corner of the button(s) and click the left mouse
button.
3. Draw a r e c ta ngle a r oun d the buttons you wish to se le c t in th e de sign
window (either in the touchscreen area or the keypad buttons).
To select multiple button s at on e time tha t ar e n ot n e xt to each o ther:
1. Clic k t h e
2. Hold down th e
3. Click the butto ns yo u wish to se le c t (e ith e r in th e to uc h scr een a r e a o r th e
keypad button s).
Note:
Many TheaterTouch Designer comma n ds c a n b e u se d o n selec t ions as we ll a s
individual bu tt ons. Click th e righ t mo use butto n o n a se lectio n fo r a list of ava ila ble
commands.
HOW TO CUT OR COPY BUTTONS
Select B utton
Select B utton
Ctrl
tool
tool
key on your ke ybo ard.
on the
on the
Tool Palette .
Tool Palette .
1. Use the
button(s).
2. Choose either the
the too lbar.
3. The button(s) are now on the clipboard.
HOW TO PASTE BUTTONS
1. Sele c t th e page you wan t to paste th e butto n (s) on fr om th e page list.
2. Choose the
3. Drag the button(s) to the pr o pe r plac e on th e pa ge .
Select B utton
36
tool
Cut Command
Paste C o m mand
from th e
or the
from th e
Tool Palette
Copy C omma nd
Toolbar
to selec t th e
.
from
Page 47

HOW TO MOVE A B UTTON
Chapter 5 • TheaterTouch Des i gner Ad vanced Features
1. Use the
button(s).
2. Hold down the left mouse button to drag th e selection to a n e w loc ation .
3. Rele ase the le ft mouse button to plac e the butto ns.
HOW TO RESI ZE A BUTTON
Existing buttons on the to uc hsc r e en grid may be r e -size d using TheaterTouch Designer.
The te xt on a button may be c lippe d if the size is reduced, but an y assoc iate d
comma n d o r ma c r o will n o t be lost.
1. Use the
Note tha t to r e size a button , o n ly one butto n ca n be se le c te d. If the
sele c t io n c a n be resize d, sma ll b oxes will appear in the red bo rder o n a ll
four side s.
2. Position the mouse over th e edge o f the button tha t you would like to
resize.
3. Clic k the left mouse b utt o n .
Select B utton
Select B utton
tool
tool
from th e
from th e
Tool Palette
Tool Palette
, to select the
to selec t th e button .
4. Drag the mouse to change the size.
5. Release the mouse button when you have the desired size.
HOW TO PLACE A CUSTOM BUTTON
Cust om Butto n Librar y Brow s e r
The
onto the Touchscreen grid.
1. Select the
2. Se lect t h e lib r a r y in wh ic h t h e custo m but to n yo u wa n t is lo c a ted by
click in g t h e
Default director y is: [C:\Program Files\TheaterTouch Designer\Custom Buttons]
3. Clic k o n a bu tto n name and a pr eview of th e butto n will a pp e a r in th e
Cust om Butto n Librar y Brow s e r
4. Click
Cust om Butto n Librar y Brow s e r
the
5. Drag the custom button to th e pr o pe r plac e o n th e page.
Place Custom Button
Open Library
OK
to inser t th e c ustom button on th e Touc hsc r e en grid and c lose
allows you to se lect a n d p lace C u sto m Butt ons
tool
button , selecting the libra r y and clic kin g
.
from th e
.
Tool Palette
.
Open
.
37
Page 48
Theat er Touch S y s tem Con troller
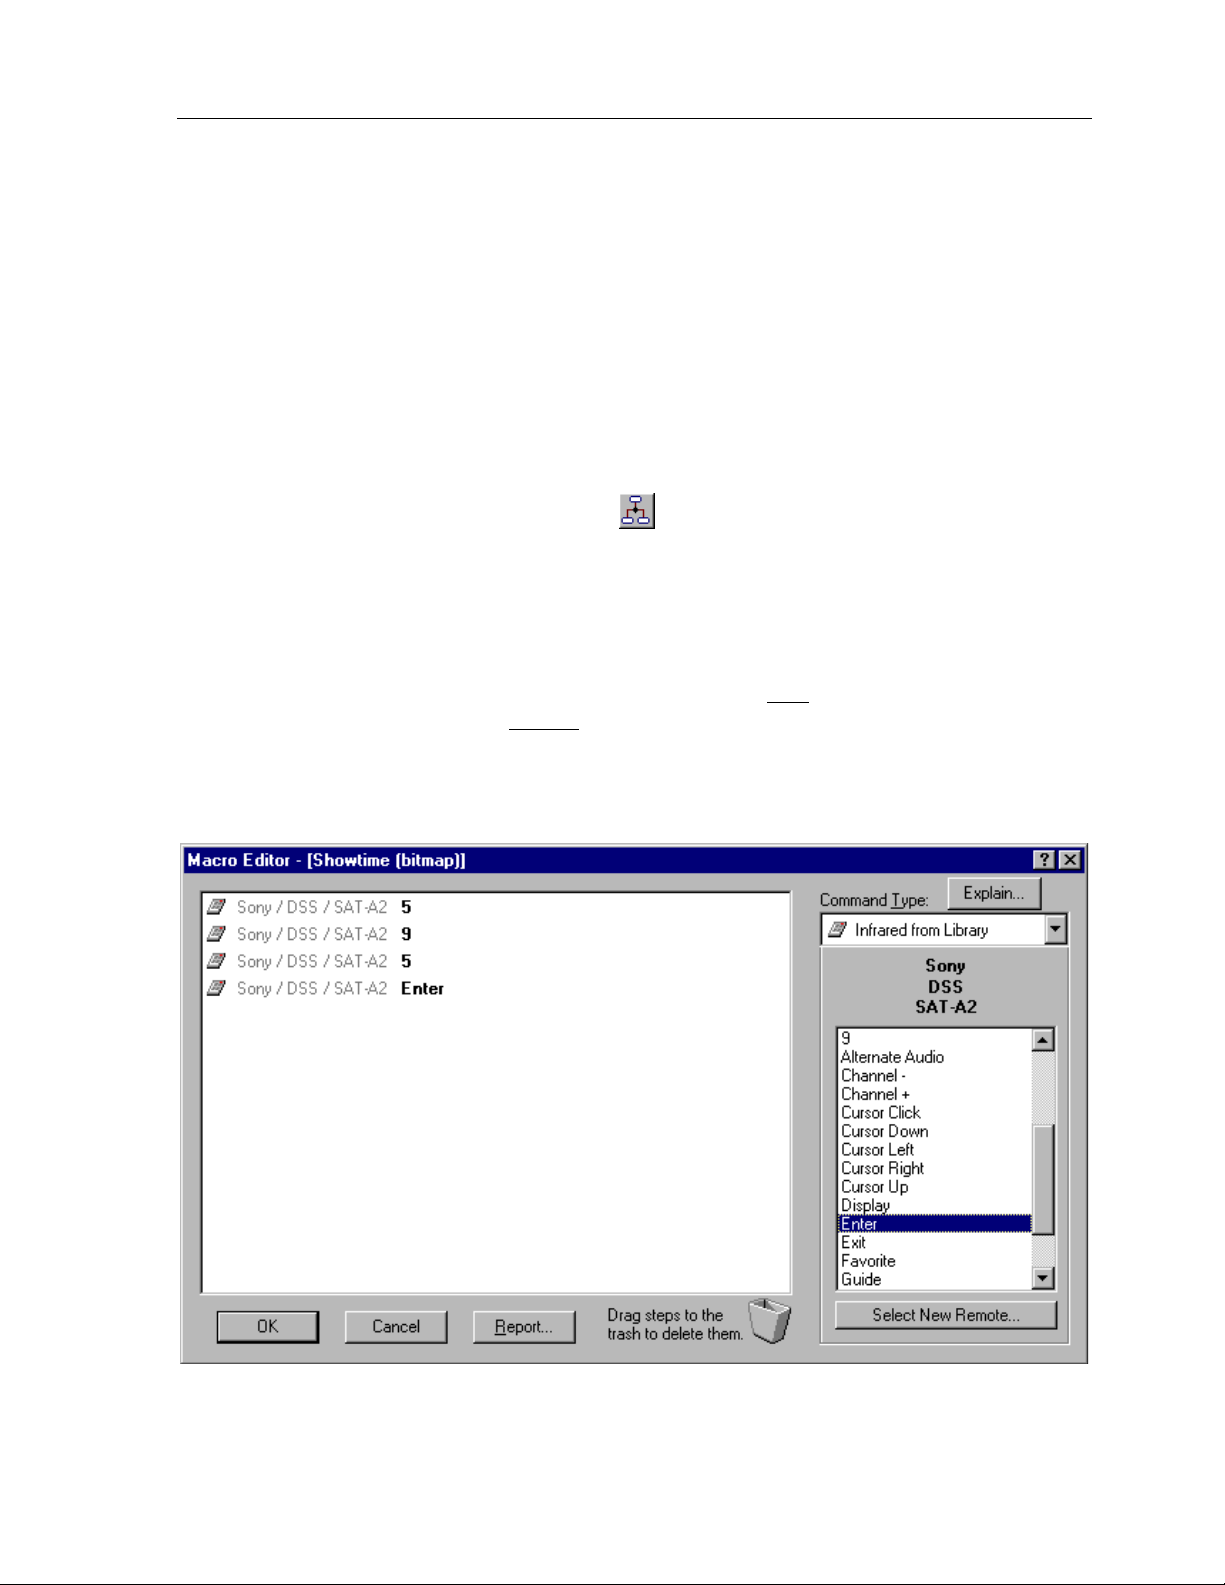
HOW TO USE THE MACRO EDITOR
Macros are a se quence of commands placed on any single button. Macros are placed
by using the
Buttons with macros c an be move d, c ut, c opie d, a nd paste d to o th e r pages without
discarding the c o des atta c hed to them.
Macr os ar e in dicate d by a small black box with the letter ‘M ’ in th e upper left co r n e r
of buttons.
EDITING MACROS
Edit Macr o
To add a new macro or e dit an existing macro on a button:
applic at io n fo un d o n the
Tool Palette
.
1. Select the
2. Clic k the bu tt on t o wh ic h y ou wo uld like to add a n ew mac r o o r edit an
existing macro.
3. Use the tools in the
commands.
4. Click OK in th e
click
Edit Macr o
Cancel
tool
Macro Editor
Macro Editor
to disc a r d t h em.
from th e
window to a dd, insert, an d de lete
window to save cha n ge s to th e mac r o, or
Tool Palette
.
38
Page 49

Chapter 5 • TheaterTouch Des i gner Ad vanced Features
Report
opens up your default web browser for viewing and printing of the open macro.
Tr a s h C a n
dele t e comman ds fr o m a ma c r o . Left c lic k and hold t h e comman d yo u wa n t to delete
and dr a g it t o t h e
output an Infrared command. Any number of Infrared commands can be added to
the macro by selecting the proper library and then dragging the desired function(s)
from the list on th e right side to th e mac r o display on th e le ft side of the Macr o
Editor.
If you do not have ac c e ss to th e C o mmand Librar y with th e de sired function, but it is
assigned to a button in th e curr e n t file, use the Infrar e d fro m Page ste p type to add it
to the mac r o.
comma n d – Th e
– The
Tr a s h C a n
Tr a s h C a n
Report
Infrared from Library
The
command button at th e bo ttom of the macro e ditor
located at the bo ttom of the mac r o editor is used to
and release.
macro step type causes the macro to
Infrared from Page
The
output an Infrared command. The command is taken from a button in the current
file. Selec t the pa g e cont a in in g th e des ir ed co de , an d then drag th e co de f r o m t h e
Available B uttons
This sho uld b e u se d fo r ma in t aining file s fo r which th e Co mmand Libra r y is not
available. If the desired command is in a Command Library, use the Infrared from
Library step type.
spec ified by th e
list on the r ight to the macro display on th e le ft.
Tim e De la y
The
Delay Time
spin box. The time can be adjusted from 0.1 to 9.9
step causes the macro to pause for the time
macro step type causes the macro to
39
Page 50

Theat er Touch S y s tem Con troller
sec on ds. After you have set yo ur desire d de la y time , drag t h e
the r ight to the macro display on th e le ft.
Release the mouse button at the location where you would like to add the time delay
step.
Button Test
The
steps ONLY IF the button th at th e mac r o is attac h e d to is Held Down for a spe c ified
amoun t o f t ime o r Double-Clic k e d wit h in a specified amoun t of time, depending on
the option se le cted.
Button Test
The
the c o n dit ion is met t h e first c o mma n d will be sent and if t h e condition is not met th e
sec ond comma n d will be sen t .
steps a r e co n ditio n a l sta temen t s or “Else ” comman ds me a n in g th a t if
step causes the macro to execute the following
Tim e De la y
icon from
Held Down ON
comma n d will e xecute. If t h e button is not held down fo r 0. 3 seconds, th e
comma n d will n o t execute .
This can be used to make a source button that switches pages if pressed briefly, or
switches pages and turns equipment on if held down for the specified amount of
time. This can also be used to send a command when pressed briefly, or send a
differe nt command when held down.
40
In the example above, if the button is held down for 0.3 seconds, the
Page 51

Chapter 5 • TheaterTouch Des i gner Ad vanced Features
Double-C licked –
sec onds, th e ON co mma n d will e xecute. If t h e button is not do ub le -clicke d wit h in 0 .3
sec onds, th e comma n d will n o t e xecute.
This can be used to make a source button that switches pages if pressed once, or
switch e s p a ges and tu r n s equipme n t o n if do ub le -c licked wit h in the specifie d a mo un t
of time. This can also be used to send a command when pressed once, or send a
differ ent comman d wh en dou ble-clic k e d.
In th e example a b ove, if t h e butto n is do uble-clic ked within 0 .3
41
Page 52

Theat er Touch S y s tem Con troller
Button Pa us e –
exe cuting until the butto n it is a t ta c h ed to is r elea se d.
In the example above, if you press an d ho ld the button th at th e mac r o is attac hed to,
the ma c ro will e xecute the first comman d a n d pa use unt il th e butto n is r elea sed, t h en
execute the rest of the commands in the macro. This works well for commands like
Scan on some VCR’s and DVD players, which you need to send the play command to
stop the scan fun c tio n .
The Button Pause step causes the macro to stop
Stop Macro -
executing at the point where it is inserted.
Macr os auto matically stop whe n th e y r each th e end, so you sh ould not n o r mally
need to insert a Stop Macro step. It is intended for use in conjunction with the
Button Test step, where you can have the macro stop if a condition is met.
Toggle I R C ode -
altern ate between two differe n t IR co de s e ver y o th e r time th e butto n is pr e sse d.
The Stop Macro step causes the macro to stop
The Toggle IR Code step causes the macro to
42
Page 53

In the example above, each time the button tha t the macro is attac h e d to is pressed,
the commands alternate. The initial button press executes the A comma n d a n d t h e
second button press executes the B command.
If you have equipment that uses toggle codes, you must learn each code twice, and
then place the two codes within the Toggle IR Code step. Every time the macro is
run , it will send out o n ly o n e of th e t wo c o des inside o f the To ggle IR C o de ste p,
switching back an d for th e ac h time the button is pre sse d.
Toggle I R Code
The
feature, contact Technical Support for help.
HOW TO DELETE A MACRO
command is an advanced feature. If you have trouble with this
Chapter 5 • TheaterTouch Des i gner Ad vanced Features
To delete a mac r o fr om a button :
1. Select the
2. Place th e mouse c ur sor ove r th e butto n with the macro yo u wish to de le te .
3. Clic k the left mouse b utt o n .
Delete Ma c ro
tool
from th e
Tool Palette
.
43
Page 54

Theat er Touch S y s tem Con troller
HOW TO EDIT AN IR COMMAND IN A MACRO
1. To edit a n in dividua l comman d in a ma c ro you mu st h a ve the mac r o
displaye d in the Mac ro Edito r .
2. Double click o n the command in th e mac r o yo u wan t to e dit to open the
Edit Infrared Command
Note:
Not all o f th e co n trols will be a va ilab le simu lta n eously. Only the optio n s
re levant to th e defa ult se t tin g s and comma n d being edited will b e shown.
dialog bo x.
Edit Infrared Command
The
Minimum Repeats -
part of the IR code is sent by the remote. Some infrared receivers need a
command to be repeated a certain number of times to work properly, and
some may not work properly if the command is repeated at all. Even if a
comma n d works pro perly, inc rea sin g the n umb e r of r e p e a t t imes may be
necessary if the command is to be used in a macro. Since macro commands
are no t automatic ally sustained while a butto n is pr e sse d, they may need to
automatically re pe at mor e time s to be r ecognize d.
Fre que nc y –
set automatically. Y ou sh ould not n eed to ch an ge this value unle ss dire ct e d to
do so by Technical Support.
Repeat while button is pr e s s e d -
repeated for as long as the button is held down.
Note:
options are:
Enter in this box the number of times th at th e r e peating
Sh own in th is bo x is the c a r rier frequenc y o f th e IR c o de, this is
Che c k th is box to ca use th is IR co de to be
Only one command in any macro can have this property set.
44
Output Type :
Unle ss th e syste m c on t a in s a mixt ur e of direct IR a n d IR F-6 /R F c o mma n ds,
this op tio n will n o t norma lly need to be chan g e d.
Page 55

Chapter 5 • TheaterTouch Des i gner Ad vanced Features
Defa ult -
command to the butto n de fault. Th e button de fault is the o ption
selected on the
IR -
the infr ar ed window on the fr on t of th e r emote, r e gar dle ss of the
system se ttin g.
RF -
thro ugh th e IRF-6, re ga r dle ss o f th e system setting.
RF ID Code:
Unle ss t h e sy stem con t ains more tha n o n e IRF-6 , t h is o ptio n will n o t norma lly
need to be changed.
Defa ult -
command to the butto n defa ult. The button de fault is the ID c ode
selected on the
Code -
command to transmit a specific RF ID code when in RF mode,
re gardless of th e system de fa ult setting.
Che c k th is option to se t the default output type fo r this
Output
Che c k th is box to forc e this command
Che c k th is box to forc e this command button to tra n smit IR via RF
Che c k th is option to set the de fault R F ID co de for this
Output
Che c k th is option an d e n te r an ID C ode in th e bo x to for c e th is
tab of the
tab of the
Edit Button Proper tie s
to transmit IR directly out
Edit Button Proper tie s
comma n d.
comma n d.
45
Page 56

Theat er Touch S y s tem Con troller
IR Outputs
Send this c ode
group box:
Che c k th e bo x(s) that c or r e spon ds with the output(s) you wish to send
the c ommand(s) on th is button o ut of th e IRF-6 . Note that the labels
for the output c an be chan ge d with th e
comma n d o n t h e
The default is to ha ve the command(s) come out of all of the outputs
on th e IRF- 6. This o pt ion will not n ormally n e ed to be ch a n ged unless
you ha ve multiple identical co mpo n ents o r are using one o f the po wer
sen sor module s.
The op tio n s in t h is se ction require th a t a p ower sensor module be
plugged into the a ppr opr ia te por t on th e IR F-6.
Always -
power sensor state. This option should also be checked if no power
sensor is connected to the selected IR output.
Only when device is ON -
if the power sensor in the specified port detects that the equipment it
is monitoring is ON.
Edit Remote Pr ope r tie s
Edit
men u.
group box:
Che c k th is option to send the IR c ode r e ga r dless of th e
Che c k th is option to se n d the IR code on ly
Only when device is OFF -
if the power sensor in the specified port detects that the equipment it
is monitoring is OFF.
Note:
In order to use the power sensor options, e xactly one IR output
must be selec ted in th e IR F-6 IR Out puts b ox, and th e powe r sensor
must be plugged into th at IR output por t.
Che c k th is option to se n d the IR code on ly
46
Page 57

Chapter 5 • TheaterTouch Des i gner Ad vanced Features
HOW TO USE THE CHANNEL M ACRO WIZARD
TheaterTouch Designer comes with a feature called the Chan ne l Macr o Wizard. The
Ch anne l M a c r o W iz ard allows yo u t o qu ic kly a n d easily c r eate ma c ros for sa t e llit e
and cable channel presets.
To start using the Channe l Macr o Wizard:
1. Select
2. Clic k t h e
to enter to e nter the c h an n e l numbe r s an d click th e
3. You have the option of adding commands before and/or after each macro
for things such as an IR router before each command or an Enter
comma n d a ft e r.
Channel Macro Wizard
Select Ne w R emote
from th e
button t o select the remote that you will use
Edit
menu.
Next >>
button.
47
Page 58

Theat er Touch S y s tem Con troller
4. Clic k t h e
5. Clic k t h e
6. Select the page you wish to place macros on from the
Add/Edit
comma n ds. This will open the
comma n ds usin g th e
these commands, see the “
Next >>
and then select the frame by clicking on the Left and Right frame arrows.
in th e BEF OR E o r A FTER sec tio n if choo se to add
Macro Editor
Marco Editor
How to Use the M ac ro Editor”
command button.
commands. If you need help with
where you can select the
section.
Page
drop-down list
48
Page 59

Chapter 5 • TheaterTouch Des i gner Ad vanced Features
7. Se lect t h e number of digits in the cha n nel ma c r o from the Sp in bo x in t h e
lower right corner. If you enter more digits than selected the numbers will
wrap around.
8. Click the fir st button fr om the touchsc r e en grid on wh ich yo u wan t to
place a macro.
Click
9. Enter the channel numbers by either clicking the numbers in the
Macro Wizard
on the ke ybo ar d.
10. Click
Close
when finished with all your channel macros.
Save
with the mouse or you can e n te r th e m with th e n umbe r s
after yo u e n te r each mac r o .
Channel
49
Page 60

Theat er Touch S y s tem Con troller
HOW TO EDI T THE REMOTE PROPERTIES
Rem ote Propertie s
The
remote.
dialog box allows you to change settings that affe c t the entir e
To open the
POWER TAB
The
Choose
Rem ote Propertie s
Edit Remote Pr ope r tie s
dialog bo x:
from th e
Edit
menu.
Power
Power Down T im e :
tab options are :
This allows you to adjust the to time the unit stays awake
after th e last button pr e ss. The time is variable fr om 1 se c on d to 60 se c o nds
(default is 10 seconds). During sleep mode, the TheaterTouch uses virtually no
battery power.
Display Mode:
The option butto n s allows you to adjust the se ttin gs of the display
and keypad backlight.
MISC. TAB
The options are:
Any keypres s (default)
1.
, which tur n s the display and button backlight on
when an y button is pressed.
Touc hs cre e n or bac klig ht ke y
2.
, which tur n s the display and button
back ligh t on only when the to uchsc r een o r b a c klight ke y is pressed. Th is
allows the volume/ch a nn el/etc. ke ys to be use d without tur n ing o n th e
display an d b a c klig h t eac h time.
Tilt Switch: (default is : active )
The Tilt Switch che ck box allo ws y ou to tu r n t h e
tilt switch o n o r o ff. When th e box is c h ecked, it means t h e tilt switc h is a c tive and
will turn o n the displa y a n d b utt o n ba c k ligh t when picked up .
50
Page 61

The
Misc.
Chapter 5 • TheaterTouch Des i gner Ad vanced Features
tab options are :
Enable Beeper:
TheaterTouch will beep every t ime a bu tto n is p r essed.
Scroll R a te :
the frame scroll arrows are pressed.
SECURITY TAB
Security
The
Passcode: (default is 0000)
limit acc ess to th e
panel page a s well as th e
Enable Progr a m ming Loc kout :
entered before the TheaterTouch will go into
used to pre ve n t un auth or ize d modification s to the TheaterTouch pro gramming.
Check the box to enable the beeper. If this box is checked, the
Slide t h is c o n tr o l to set ho w fast th e frames scr o ll left and right wh en
tab options are :
That allows you to set th e passc ode th at is needed to
Com pute r Link
Button Lo c kout
mode, th e
Clear All
function on the control
funct io n th a t is a va ila ble on a ll but to n s.
Che c k th is box to require tha t th e passc ode be
Com pute r Link
mode. This can be
OUTPUT TAB
Output
The
tab options are :
Defa ult Output Type :
IR – (default)
1.
Ever y k e y on the remo te will outpu t IR sig n a ls dir ectly o ut th e windo w on
the fr on t of th e r e mote un le ss the button pro pe r tie s for the individual
button are set to output R F.
RF
2.
on th e remote will o utp ut IR signals via RF to th e IRF-6 un less the butto n
proper tie s for th e in dividual button are se t to o utput IR directly.
Che c k th is option to set the r e mote's default output to IR .
- Che c k th is option to se t th e remote's default output to R F. Ever y key
51
Page 62

Theat er Touch S y s tem Con troller
IRF-6 TAB
Defa ult RF ID Code:
be used for a ll R F but to n s un less it is se t differe n t ly in the pr o perties for e a c h
button. The ID code switch on th e bac k of th e IR F-6 must also be se t to this
setting.
Use this to set the default RF ID code. This RF ID code will
IRF-6
The
the IR F -6 ID code for whic h yo u wish t o mo dify th e labe ls. Yo u c a n mo dify t h e la b e ls
of all ten possible IRF-6 ID codes independently. The labels are optional and are only
used to make it easier for you to remember what equipment is plugged into each IRF6 output.
Send -
Click this button to send the c ur r e n t se ttings dire c tly to th e r e mote.
tab lets you labe l the o utputs of the IR F-6. Use th e pull down list to choose
52
Page 63

Chapter 5 • TheaterTouch Des i gner Ad vanced Features
53
Page 64

Theat er Touch S y s tem Con troller
HOW TO EDI T BUTTON PROPERTIES
Edit Button Proper tie s
The
button or a group of buttons.
dialog allows you to edit many different attributes of a
To open the
Note:
option s rele va n t to the but to n b e in g e dit e d will b e shown.
GENERAL TAB
Edit Button Proper tie s
1. Select the
Palette
2. Click the butto n you wan t to edit, eith e r touc h sc r e en or keypad buttons
Not all o f th e tabs a n d/o r con t r o ls will be availa ble simultan eously. Only the
Edit Button Proper tie s
.
dialog bo x:
tool
from th e
Tool
The options on the
Disabled -
re versin g/p ush in g in) whe n it is t o uc h ed.
Note:
disabled proper ty r e fe r s on ly to th e a ppe ar a nc e of the butto n, not the
functionality.
Reversed -
pushed-in state when the button is not pushed and the normal state when the
button is p ush ed. Th e re versed state is: filled in for Rec ta n g ula r , Ra dius, Oblong
and Bo r derless butto n s ; a n d D o wn fo r Cust o m But to n s.
Note:
General
Che c k th is box to pr e ve n t the button from r e spon ding (be e pin g or
Disabled buttons can st ill h a ve comma n ds, mac r o s a n d pa ge links. The
Che c k th is box to ca use th e button to be displayed in a r everse d or
This proper ty doe s n ot a pply to 3D button s.
tab are :
54
Page 65

Chapter 5 • TheaterTouch Des i gner Ad vanced Features
Secured -
action (command, macro, or page link) associated with this button is run. The
security c ode is set with th e
Specia l F unc ti ons g r o up box
None Power Down -
immediat e ly wh e n this but to n is pressed, in st e a d o f wa itin g for the timer to
time out.
Contrast Up -
con tr a st wh en it is pr essed.
Contra s t Down -
display con tr a st wh en it is pr essed.
Pause -
button is release d. This valu e will n o t usua lly need to be chan g e d from 0.
Che c k th is box to require tha t the secur ity co de be entered be for e th e
Edit Remote Pr ope r tie s
Che c k th is option to c a use th is button to h a ve n o spe cial func tion .
Che c k th is option to ca use th e r e mote to power down
Che c k th is option to c a use th is button to in c r e ase th e display
Che c k th is option to c a use th is button to de c r e a se th e
Enter in th is box the n umber o f se co n ds for th e r e mote to pause a fte r the
comma n d o n t h e
Edit
men u.
55
Page 66

Theat er Touch S y s tem Con troller
OUTPUT TAB
The options on the
Output Type :
Unle ss the system con ta in s a mixture o f dir e c t IR a n d IR F-6 /R F comman ds, t h is
option will not n ormally n e ed to be ch a n ged.
Defa ult -
system default. The system default is the option se le c te d with the
Rem ote Propertie s
IR -
Sele c t th is option to for c e th is button to tr an smit IR dire ct ly out the
infrared window on the fr on t of th e r e mote, r e gar dle ss of the syste m settin g.
RF -
Sele c t th is option to for ce this button to tr an smit IR via RF thr o ugh the
IRF-6, regardless of the syste m setting.
RF ID Code:
Unle ss t h e sy stem con t ains more tha n o n e IRF-6 , t h is o ptio n will n o t norma lly
need to be changed.
Defa ult -
system default. The system default is the ID code selected with the
Rem ote Propertie s
Output
Sele c t th is option to se t th e de fault output type for th is button to the
Sele c t th is option to se t the default RF ID co de for th is button to th e
tab are :
comma n d o n t h e
comma n d o n t h e
Edit
Edit
Edit
men u.
men u.
Edit
56
Code -
when in RF mode, r egardless of the system default se ttin g.
System De f a ults -
ID code, for reference. If you wish to change these values, use the
Properties
Sele c t th is option to for c e th is button to tr an smit a spec ific R F ID code
This section sh ows th e globa l defaults for th e output type and RF
comma n d o n t h e
Edit
men u.
Edit Remo te
Page 67

IRF-6 TAB
IRF-6
The
Chapter 5 • TheaterTouch Des i gner Ad vanced Features
tab options are :
IR Outputs
Che c k th e box(s) tha t c or r e spon ds with the output(s) you wish to send the
commands on th is button out o f the IRF-6. No te th at th e labels for the output
can be changed with the
The default is to ha ve the commands come out o f all of the outputs on th e
IRF-6 . This option will not n o r ma lly n eed t o b e ch anged unless yo u h a ve
multiple ide n t ic a l c o mpo n ents o r are using o n e of th e powe r sen so r mo dules.
Send this c ode
The op tio n s in t h is sectio n r equire tha t a po wer se n so r module be plugge d into
the appropriate port on the IRF-6.
Always -
sensor state. This option should also be checked if no power sensor is
connected to the selected IR output.
Only when device is ON -
power se n sor in the specifie d port de tects that th e equipment it is monitoring
is ON.
Only when device is OFF -
power se n sor in the specifie d port de tects that th e equipment it is monitoring
is OFF.
group box:
Edit Remote Pr ope r tie s
group box:
Che c k th is option to se nd th e IR c ode r e gardless of the po we r
Che c k th is option to se n d the IR code on ly if the
Che c k th is option to se n d the IR code on ly if the
comma n d o n t h e
Edit
men u.
Note:
In order to use the power sensor options, e xactly one IR output
must be selec ted in the IRF-6 Output b ox, and th e powe r sensor must b e
plugged into that IR o utput por t.
57
Page 68

Theat er Touch S y s tem Con troller
INFRARED TAB
Infrared
The
tab options are :
Min. Repeats -
the IR code is sent by the remote. Some infrared receivers need a command to be
repeated a ce r tain number of times to work properly, and some may not work
prop e rly if the comma n d is r epe at ed at all. Ch a n ge this setting o n ly if yo u a r e
having trouble with a command.
Fre que nc y -
automatically. Y ou sh ould not n eed to ch an ge this value unle ss dire c te d to do so
by Technical Support.
Sustain -
the b utt on is he ld do wn . Most infrared c o des will tra n smit c o n t in uo usly as lo n g
as the butto n is h eld down, but some infr a r ed re ceivers may n ot wo r k p r o perly if
the c o mma n d is r epe a ted at all. If the Sust ain button is ch e cked, the code will be
transmitted for as long a s the button is he ld down, o r the Minimum Repe a t times,
which ever is greate r . If the Su sta in bu tto n is n o t c h ecked, th e co de will b e
transmitted on ly the M inimum Re peat number of time r e gar dle ss of how lon g the
button is held down.
Enter in th is box the n umber of times that the repeating part o f
This box shows the carrier frequency of the IR code. This is set
Che c k th is box to co ntr o l whe th e r o r no t th e IR c o de sh ould repeat if
58
Page 69

COMMAND TAB
Command
The
number and function of the command on a button.
WAVEFORM TAB
Chapter 5 • TheaterTouch Des i gner Ad vanced Features
tab displays the manufacturers name, type of equipment, model
Waveform
The
tab displays the waveform of a command for advanced
trou bleshoo tin g or if you wou ld just like to se e what In fr a r ed data lo o ks like.
HOW TO EDI T THE PROPERTIES OF MULTIPLE BUTTONS
The Edit Button Prope r tie s dialog allows you to e dit many different attribute s o f a
button or a group of buttons.
To edit the properties of multiple buttons at once:
59
Page 70

Theat er Touch S y s tem Con troller
1. Sele c t th e butto n s using the
Tool Palette
2. Click the r igh t mouse button on on e o f the selec ted buttons, e ith e r
touchsc r e e n o r ke ypad button s an d c h oose
For an explanation of all the button properties, see the “
Properties
Note:
option s rele va n t to th e butto n (s) being edited will b e sh o wn .
A note about Multiple Sele c tions
” section.
Not all o f th e tabs a n d/o r con t r o ls will be availa ble simultan eously. Only the
If you ha ve more tha n o n e butto n selec t e d, it is possible tha t t h ey will initia lly
have different settings.
The following mea nin gs apply to option s with a c h e c k bo x:
.
Select B utton
tool from th e
Edit Propertie s
How to Edit Button
.
60
All butto n s in t h e sele ction will r etain th eir o r iginal values for
the se tting.
All butto n s in t h e selection will h ave the set tin g se t to TR U E
All butto n s in the selec tio n will have th e sett in g set to FA LSE
If option s wit h n umeric a l fie lds have diffe ren t va lues, t h ey will be le ft bla n k.
If you DO NO T e nter a nu mber, all th e b ut to n s will reta in t h eir o r iginal
settin g . If you DO enter a numbe r , all th e b utt o n s will be set to th a t valu e .
Page 71

Chapter 5 • TheaterTouch Des i gner Ad vanced Features
If options with radio buttons h ave differ ent settings, NONE of the r adio
button s will have a do t n ext to th em. In that c a se, each b ut to n will r etain its
original function. If you do wish to assign the SAME function to EVERY
button, select one of the functions from the dialog.
61
Page 72

Theat er Touch S y s tem Con troller
HOW TO PRI NT SCREENSHOTS
TheaterTouch Designer comes wit h th e ability to pr int scr een sh o t s of t h e individual
frames of your remote file for reference purpose s.
To print screenshots of the open remote file:
1. Choose
2. Choose whether you want to
a)
b)
c)
3. Click OK.
HOW TO PRI NT SYSTEM CO NFIGURATION REPORTS
TheaterTouch Designer comes wit h th e ability t o c r eate Syste m C o n figu r a tio n R epor ts.
This report is for archival purposes as well as a visual refere nce guide of the system
options and each IRF-6 c onfigura t ion.
Print
from th e
Print Cur r e nt Page Only
of the curre n t ly disp lay e d p a ge.
Print All Pages on One Shee t
page s in th e cur ren t file o n a sin gle she et of pa per, scaling t h e m if
necessary.
Print A ll Pa ge s, 1 Pe r Sheet
pages in the current file, with all of the frames from each page
grou ped together o n in dividu al sh eet s o f pa per.
File
men u.
– Prints a life-sized image of all of the frames
– Prin t s a ll of t h e frames fro m all o f the
– Prin t s life-size d ima ges of all o f t h e
62
To print the Co n fig uration Repo rt of th e open r emote file:
1. Choose
2. Clic k t h e
3. Click
To copy the C o nfigur ation R e po r t of th e ope n r emote file to th e W indows clipboar d:
1. Choose
2. Clic k t h e
3. The
4. Click
Syste m Config uration R e port
Print
command button.
OK
to close.
Syste m Config uration R e port
Copy
command button.
Syste m Config uration R e port
OK
to close.
from th e
from th e
is now on the W in do ws c lipb o ard.
File
File
menu.
menu.
Page 73

Chapter 5 • TheaterTouch Des i gner Ad vanced Features
HOW TO CHECK MEMORY USAGE
It is possible , tho ug h n o t likely, to c r eate a file in TheaterTouch Designer with more
infor ma tio n than the TheaterTouch can hold. To make sure this does not happen, use
Check Memory Usage
the
file is.
Remote Memory Used
The
bitmaps, custom buttons, commands, and macros take up in the TheaterTouch system
controller’s 128KB of memory. The pie chart in the dialog represents the amount of
memory tha t e a ch o f the o bje c t type s use s.
comma n d o n t h e
dialog displays the amount of space that buttons,
Edit
menu to see how large the current
If the memory is more than 100% full, the
memory, a n d will b e fla sh ing red. In this case, t h e followin g wa r n ing will be
displaye d in t h e dialog b o x:
You will h a ve to de lete e n o ug h o bj e cts so th a t the
you can se n d th is file to the TheaterTouch.
Free
line will sh o w a n e g at ive amoun t o f
Free
line is not flashing red before
63
Page 74

Theat er Touch S y s tem Con troller
HOW TO CREATE A “SELF-DOWNLOADING . EXE”
This co mma n d c rea tes an executable from t h e cur ren t file tha t will au to ma tic a lly
download itself to the remote when run. These executables can be distributed to
client site s to simplify the pr oc e ss of updating r e motes in the fie ld.
TheaterTouch Designer does not need to be installed for the self-contained executable
to work.
To make a Self-Downloading .EXE of the current file:
1. Choose
2. Choo se the location yo u wan t to save th e file in the
3. Enter th e n ame o f the file in the
4. Clic k t h e
You can now put the
HOW TO USE THE “SEND” COMMAND
This co mma n d sends th e cur ren t file through elec t r o n ic ma il. This c o mmand is only
availab le if y ou r c o mpu ter h a s a pr o perly config ur ed e-ma il c lient t h a t is c o mp at ible
with the Microsoft MAPI specification. Microsoft Exchange an d Microsoft Outlook
are two e xa mples of M API-complian t e-mail c lie nts.
TheaterTouch Designer does need to b e in st a lle d fo r t h e file to wo r k .
To send the curr ent file via E-Ma il:
Cre ate Self-Downloading .EXE
Save
button to save a nd c lose .
.EXE
from th e
File Nam e
file on a disk e t te or E-Mail it.
Communications
box.
Save in
menu.
address box.
64
1. Choose
2. The de fa ult E-M a il progr am will o p e n wit h the c urre nt file inser t e d a s a n
attachme n t with the exten sion
3. Se n d t h e E-Mail a s r equired by you E-Mail pr og r a m.
Send
from th e
File
menu.
.rti
.
Page 75

Chapter 6. IR Library Manager
The TheaterTouch reproduces the infrared commands of other remote controls. Each
of these infrared commands must be captured (learned) and placed into the
TheaterTouch Designer Comman d Lib r a r y .
This is don e by usin g t h e orig in a l r emote cont r o l (the donor ) fr o m a piece o f
equipment to te ac h its comman ds to the TheaterTouch. The TheaterTouch then
transfers the captured command to the Infrared Library Manager software through
its RS-232 serial port. Once a command is placed in the infrared library, it never has
to be captured again.
Before yo u c an se n d infra r e d c ommands to th e PC , you ne e d to c r e a te a new remote
file by going to the IR Librar y Ma n age r in the TheaterTouch Designer software.
INFRARED CODES
There are two types of infrared codes that are commonly used for consumer
electronics products: Fre que nc y M o d ula te d and Pulsed.
Chapter 6 • IR Library Man ager
FREQUENCY MODULATION
This type of transmission modulates the IR energy at a fixed carrier frequency. The
vast majority of consumer electronics remote controls use a carrier frequency around
40kHz, although the carrier can ran ge from 15kHz to 455kHz or higher. The
TheaterTouch is designed to reproduce car rie r fre quenc ies betwee n 15kHz and 460kHz.
The actual code consists of bursts of IR energy modulated at the carrier frequency,
separ ated by pauses.
The code is defined by the length of each burst and each pause, as well as by the
carrier frequency.
65
Page 76

Theat er Touch S y s tem Con troller
PULSED IR CODES
This type of transmission does not use a carrier frequency.
Pulsed codes are quite common in cable TV converter boxes.
HOW THE
There are many different encoding schemes used for IR codes. The burst and pause
times h a ve fixed length s, var ia ble len gt h s, or some co mbin a tio n o f t h e two. To learn
the c ode , th e TheaterTouch “records” a sample of the code in a manne r similar to the
way a tape recorder records sound. Once a sample of the code has been taken, it is
analyzed to find any repeating patterns.
Some codes co n tin u ous ly r epea t th emselves for a s lo n g a s t h e button is p r essed.
Others send a code followed by a “keep alive” pattern. Some c odes don’t repeat at
all. Any of the above types of codes can also have some sort of preamble in front of
them. It is very important to capture the preamble in this type of code. The IR
learning buffer of the TheaterTouch
When a re pe ating pattern is found, extra repeats are stripped off before the code is
stored in memory. The number of repeats is also stored so the code can be
reproduce d accurately.
If the bu ffe r was fille d up during le a rning , it is a ssumed that th e pattern sh o uld b e
repeated for as long as the key is pressed. This is common for commands such as
Volume, Balance, and Scan— functions that may need to be continuously repeated.
For these types of commands,
not filled,
Repeats
THEATERTOUCH
Sustain
is set
.
LEA RNS IR CODES
is large enough to accommodate the preamble.
Sustain
OFF
and the r e pe a t pattern is displayed as the
is set ON as the Edit IR default. If the buffer is
Minimum
66
The default
Minimum Repeats
for a code with
Sustain ON
is one . This means t h e
re peatin g pa t tern will r epea t at least on e time wh e n the b ut to n is presse d. Yo u c a n
edit this if necessary, in the Edit IR mode of Infrared Library Manager software.
If the code uses a carrier frequency, that frequency is also stored with the code.
Page 77

HINTS FOR LEARNING IR CODES
Always place the TheaterTouch and the donor re mote contr ol on a flat surface. You
may find it necessary to elevate the donor or the TheaterTouch with a book or similar
obje ct to a lign t h em ver t ic a lly.
Once you h ave le a r n e d an d te ste d a c ode fr om a r emote, tr y n ot to move it un til you
have lea r n ed all th e codes. If yo u do a c c identa lly mo ve eit h e r remote , you sh o uld realign t h em.
VERY IMPORTANT
It is
TheaterTouch needs a strong IR signal to properly learn a code. If the fre quency r e adout in the ALIGN mode is 0.0 kHz, then the code is a pulsed type. In this case, you
should transmit the c omman ds to the TheaterTouch from the longest distance you can
without getting an e r r o r me ssage .
If you always get an e rror me ssage when tr yin g to le a r n a c o de , yo u sh ould try
moving the donor remote up and down or back and forth. If this does not help, try
tapping the button s on the donor in ste ad of h olding them down.
to make sure th e donor r emote is using fre sh ba tte r ie s. Th e
Chapter 6 • IR Library Man ager
Man y comman ds c a n b e ma de more reliable if t h e number o f r epe at times is
increa se d. This is e s pecially t r ue for c o mma n ds assig n ed to butt ons tha t a r e likely to
be briefly “tapped” or for commands that are part of a macro.
Increa sin g t h e number of r e p e a t times inc r ease s th e pro ba b ility o f t h e comman d
“ge tting thr o ug h .” This is essen t ially a t r a de-off be t we en in c rea se d relia bilit y a n d a n
incre a se in th e le n gth o f time r e quire d to tr a nsmit a co mmand. This can take a bit of
fine -tuning on complicate d ma c r o s.
Kee p in mind tha t the IR tran smit LEDs may not be loc ate d in th e c e n te r o f the don or
re mot e . It may be n ece ssa r y t o pla c e the remot e o ff-c ente r to ge t a r e lia ble capt ur e .
67
Page 78

Theat er Touch S y s tem Con troller
HOW TO OPEN THE IR LIBRARY MANAGER
1. Choose
TheaterTouch Designer toolb ar.
2. From here, you can decide to create a new library of commands or add to
an e xist in g lib r a r y b y c h o o sin g from th e
HOW TO CREA TE A NEW IR LIBRARY
1. Choose
open.
2. Enter th e n ame o f the n e w librar y in the
3. Be sure to save your new file in the
TheaterTouch Designer software fo lde r.
4. Clic k t h e
IR Library Manager
New
from th e
Save
button to cr e a te th e libra r y.
from th e
File
menu, the Create IR Library dialog box will
Library
Com mand Libr a ries
menu from the
File
menu either
File name
box.
New
folder of the
or
Open
.
68
Page 79

Chapter 6 • IR Library Man ager
Once yo u clic k th e
remotes that are in that particular library. If there are no remotes in that library, such
as after c r eatin g a n ew libra r y, the fields will b e empty.
Save
button , the Edit View dialog bo x will o pen sh o win g yo u th e
69
Page 80

Theat er Touch S y s tem Con troller
HOW TO OPEN AN EXISTING IR LI BRARY
Once yo u clic k th e
remotes that are in that particular library.
1. Choose
2. When the Open IR Library dialog box opens, select the file you wish to
open.
3. Clic k t h e
Open
Open
Open
from th e
button.
button , the Edit View dialog bo x will o pen sh o win g yo u th e
File
menu.
70
Page 81

HOW TO ADD A NEW REMOTE TO AN IR LIBRARY
Chapter 6 • IR Library Man ager
1. Clic k o n the
dialog bo x.
2. This will open th e
3. Enter the manufacturer’s name, type of equipment, (such as TV, VCR,
Dra pes, Ligh t s a n d so o n ) a nd mode l n umb er of th e co mpo n ent o r re mo t e
in the appropriate fields.
4. In the fun c tion fie ld, e n te r th e n ame o f the a c tual c ommands you ar e
going t o lear n (suc h a s Chan nel+, Ch a n n el-, V o lume +, Volu me -, Powe r, 1 ,
2, 3 and so on).
5. After you enter each func tion n ame c lick on th e
save, you can always edit the name of a function later if you make a
mistake or add a function.
New
button on th e upper righ t ha n d side of the
Cre a te Ne w R emote
dialog bo x.
Add
Edit View
command button to
6. Repeat steps 4 and 5 for each button on the re mote.
7. When done entering information about new remote, click on the
command button to save a nd c lose .
OK
71
Page 82

Theat er Touch S y s tem Con troller
HOW TO USE THE NEW REMO TE WIZARD
If you are entering a commonly used component to the IR Library, you can use the
New Remote Wiza r d
equipment.
to enter the title s of c ommonly use c ommands for th at type o f
1. Open the
2. Enter the information on th e e quipme nt yo u ar e about to lea r n c o mmands
from. The manufacturers name, type of equipment, (such as TV, VCR,
Dra pes, Ligh t s a n d so o n ) a nd mode l n umb er of th e co mpo n ent o r re mo t e
in the appropriate fields.
3. Clic k t h e
Wizard
4. Che c k o r unc h e c k th e function title s you wish to in se r t a nd c lick OK.
5. You can always edit the name of a function later if you make a mistake or
add a function.
6. When done entering information about new remote, click on the
command button to save a nd c lose .
Cre a te Ne w R emote
Wizard
dialog bo x.
comma n d but to n ; this will o pen th e
dialog bo x.
New Remote
OK
72
Page 83

HOW TO ALIGN A DONOR REMOTE CONTROL
To ensure t h a t a va lid sign a l is b e ing rece ived, a ll do n o r r emote con t r o ls must be
prop erly a lign ed with t h e TheaterTouch learning window. This is the window located
on the front of the unit.
Chapter 6 • IR Library Man ager
The TheaterTouch has an
front of th e le ar n ing window, a n d dete r mine th e modulation freque n c y of th e don or
remote’s infrared signal. This function is invoked upon entering the
mode f r o m t h e CONTROL PANEL pa g e .
IMPO R T A NT: The Alig n f unction dete rmine s the m odul at ion fre que nc y of the
donor remote’s infrared signal; so all donor remote controls must be aligned before
being c a ptured.
ALIGN
function to h e lp determine th e c o r r e c t position in
IR CAPTURE
73
Page 84

Theat er Touch S y s tem Con troller
To pro p e rly align a do n o r remo te co n trol with the TheaterTouch:
1. Make sure the donor remote has fre sh batteries then line up donor remote
so that is at the same height as the learning window on the TheaterTouch.
It may be necessary to place the donor remote control on a higher surface
than the TheaterTouch, or vice-versa.
2. Press any key on the donor remote control, moving the remote back and
forth in front of the learning window. The donor remote control is located
at the proper distance from the TheaterTouch whe n the
(darkened) and the frequency read-out is stable. The fre quency r e adout
should not be 0.0kHz if it is possible to get it to read any other number by
moving the donor remote around. If the
TheaterTouch is not detecting any infrared signal.
Signal
Signal
box is off (wh ite ), the
box is on
3. If the
Overload
TheaterTouch. Move the donor r e mote a way fro m the TheaterTouch until
Overload
the
box is darkene d, th e dono r r e mote is too c lose to th e
indicator tur n s white .
74
Page 85

HOW TO CAPTURE INFRARED COMMANDS
Once a don o r remo te co n trol is pr o perly a lign ed, t h e TheaterTouch is ready to start
capturin g the IR commands an d tra n sfer ring the m to the Infrar e d Librar y M an a ge r
Software.
Chapter 6 • IR Library Man ager
1. Make sure the TheaterTouch is in th e IR CAPTUR E
frame 2 of the IR CAPTURE page an d says STATUS:
The last frequency measured with the ALIGN function should be
displayed at the bo ttom of the scre en. If it is not, yo u must go thr ough th e
Align Procedure again.
2. The communications cable should be connected to the TheaterTouch and
the PC. The TheaterTouch Designer software needs to be running with the
Infrared Library Manager
The dialog box should say
infra red libr a ry you a r e work in g in a ft e r it.
window open.
Edit View
on the title ba r with the name of th e
LEARN M ODE
READY
.
on
3. Clic k o n the
aligned, you are ready to start capturing codes.
Learn IR
comma n d but to n a n d if y ou are st ill pr o perly
75
Page 86

Theat er Touch S y s tem Con troller
4.
Now press an d ho ld the ke y o n the donor remote c on tr ol th at tr a nsmits
the c omman d that yo u wan t th e TheaterTouch to learn.
the key down until the
After the command has been processed, the TheaterTouch will display
Captured
donor remote control and try again.
If the IR comman d wa s c a ptu r ed pro perly, it will be sto r ed in a t e mp orar y
memory buffer, and transferred to the Infrared Library Manager software
automa tically. A red do t will b e p la c ed in fr ont of th e func tio n t e xt to let
you know that th e function h as been le a r ned.
The c o mma n d will r emain in memor y (fo r t esting) until it is ove rwritt e n
by the ne xt c ap tured c o mma n d. Th e softwa r e will pro mpt yo u fo r ea c h
function command to be learned.
then
Sending
Continue to ho ld
TheaterTouch
. If an error message is displayed, realign the
displays OK.
5. To close the
6. To close the
on th e ke ypa d. The remo te will stay in t h e
manua lly press th e
IR C a pture
IR C a pture
Main Menu
window in th e software c lic k o n t h e
page on th e r e mote, press the
button.
IR C a pture
Close
Main Menu
mode u n til y o u
button.
button
76
Page 87

HOW TO TEST INFRARED COMMANDS
After the TheaterTouch has learned a command, you can test it to make sure it
behave s pr operly.
Chapter 6 • IR Library Man ager
SELECT
button while in the IR Capture Test Mode on frame 3 of
SELECT
button.
SELECT
MAIN MENU
Button
1. Pre ss th e
IR C a ptu r e page , this will t e st th e last c a ptu r ed IR c o mman d.
The c o mma n d will r emain in memor y (fo r t esting) until it is ove rwritt e n
by the next captured command.
2. Make sur e you po int th e TheaterTouch at the equipment to be controlled
when you press the
If the command does not work properly, it may need to be edited or relearned.
3. To close the IR Capture window on the remote press the
button.
77
Page 88

Theat er Touch S y s tem Con troller
HOW TO EDIT INFRA RED COMMANDS
Most in frared co mmands will tra n smit c o n t in uo usly as lo n g as th e remote c o n t r o l key
is held down. This means that either the entire command or some part of it is being
repeated over and over.
The Infrared Library Manager software allows you to adjust the number of command
re pe a t t ime s a n d to e n a ble or disable con tinuous tra n smissio n .
Min. Repeats -
code is sent by the remote. Some infrared receivers need a command to be repeated
a certain number of times to work properly, and some may not work properly if the
command is repeated at all. Change this setting only if you are having trouble with a
command.
Fre que nc y -
automatically. Y ou sh ould not n e ed to chan ge th is value un le ss dire c te d to do so by
Technical S upport.
Enter in th is box the n umber o f times tha t th e r e peating part o f the IR
This box shows the carrier frequency of the IR code. This is set
78
Page 89

Chapter 6 • IR Library Man ager
Sustain -
button is h eld down . M o st in fr a r ed codes will tr an smit c o n tinuously a s long as th e
button is h eld down, but so me in frared rece ivers may n o t wo r k p r o perly if t h e
comma n d is r epea t e d a t a ll. If the Sust a in but to n is c hec ked, t h e code will be
transmitted for as long a s the butto n is held down, or th e
which ever is greate r . If the Su sta in bu tto n is n o t c h ecked, th e co de will b e
transmitted only th e
button is held down.
Apply –
Test –
the TheaterTouch hooked up to the computer with the serial cable and have the
remote in
Che c k th is box to co ntr o l whe th e r o r no t the IR code sho uld re pe a t if the
Minimum Repeat
Minimum Repeat
Use this to sa ve an y c h a nges you have made .
Use this to test any changes you have made to a command. Make sure to have
Test IR
Mode on frame 3 of the
number of time regardless of how long the
IR C a pture
page in t h e Co n trol Pan el.
times,
79
Page 90

Theat er Touch S y s tem Con troller
80
Page 91

Chapter 7 • Im age Ed itors
Chapter 7. Image Editors
The TheaterTouch Designer software c ome s with two additional pro gr ams for c r e a ting
custom graphics. These programs are ver y similar in appearanc e and functionality
and both programs can be accessed from the
Designer program.
Button Bitm a p Editor
The
as channel and transport icons.
Custom B utton Editor
The
as compan y logo s or c o mple x gr oups o f c on tr o ls.
THE DIFFERENCE BETWEEN CUSTOM BUTTONS AND BITMAPS
Custom Buttons have several fundamental differe nces from Bitmaps:
1. Custom Buttons must specify an image of th e e n tir e button . Bitmaps are
smaller, and therefore can be placed on buttons with the standard border
styles.
is for cre a ting an d e diting button bitmaps for such th ings
is for c r eatin g a n d editing c ust om b utt on s fo r such th in g s
Library
menu within the TheaterTouch
2. Custom Buttons can contain more than one active button area, so a whole
group of related controls can be created as a single Custom Button.
Bitmaps a r e indivisible, a n d mu st b e plac ed sepa rate ly onto in dividua l
buttons.
3. Custom Buttons must provide an image for both th e Up (no r mal) and
Down (pressed) states of the button. Bitmaps provide only the Up image.
The D own image o f a Bitma p is cre a t e d b y simp ly in vertin g it.
4. Custom Buttons can be any size, up to the entire display size. Bitmaps are
limited to a h a n dful o f pre-define d siz es.
Given these char acte ristics, Custom Buttons are most appropriate for complex or
large groups of controls, such as a customized set of transport controls for a VCR, or
a large company logo.
Bitmaps are most appropriate for small pictures that don’t need a full button to
display, suc h a s TV c h a n n e l ic o n s o r sma ll lo gos. Sin c e Bitmaps don ’t h ave a Do wn
image, they take half as much memory to store in the TheaterTouch, so more Bitmaps
can be created.
Both Custom Bu tt ons and Bit ma ps a re sto red within Libr a ries, no t a s in dividu al f ile s .
Before you can design your own Custom Buttons or Bitmaps, you must create a new
library file u sin g t h e
can have many Custom Buttons or Bitmaps within it.
Custom B utton Editor
Button Bitm a p Editor
or
. Th e libra r y file
81
Page 92

Theat er Touch S y s tem Con troller
BUTTON BITMAP EDITOR SCREEN
To open the
men u in t h e TheaterTouch Designer program.
CUSTOM BUTTON EDITOR SCREEN
To open the
men u in t h e TheaterTouch Designer program.
Button Bitm a p Editor
Custom B utton Editor
, select
, select
Button Bitm a p Editor
Custom B utton Editor
from th e
from th e
Library
Library
82
Page 93
TOOLBAR
The toolbar provides instant access to commonly used Button Bitmap Edi to r and
Custom Bu tto n Ed it o r funct ion s.
Chapter 7 • Im age Ed itors
Create New Library Comm and
library to h o ld yo ur custo m but to n s o r b itma ps. The built in lib r a ries that c ome with t h e
software are read-only and new images cannot be saved to them. This
command should only be used when a new library is desired. If you want to create a new
image, use the
libra r ies. Th e cur r ently op e n libra r y , if a n y , will be close d.
custo m but to n o r bitmap in a lib r a r y th a t yo u c rea ted. The bu ilt in lib r a r ies th at c o me
with the software are read-only and images cannot be edited. This command is not
available unless a Bitmap Library is open.
Create New Image Command
Open Libr a ry Comma nd
Edit Libra ry Comma nd
.
– Use this command to open existing
– Use this command to r e n ame or de lete a
– Use this command to c r e ate a
83
Page 94

Theat er Touch S y s tem Con troller
Create New Image Command
image in the cur r ently op e n libra r y in th e
dialog will be displaye d, whe re yo u c a n selec t th e size fo r t h e ne w Bitma p. The
built in libraries tha t come wit h the so ftwa r e are read-on ly a n d n ew image s c a n n o t be
saved to them.
Open Image Command
image in the currently open library for editing. When you choose the
comma n d, the
image to edit. Th is comman d is n o t a va ila ble unle ss a Bit map Library is o pen.
image to the currently open library. If the image has already been saved, this
command updates the existing version. If the image has never been saved before,
this command is the same as the Image
Edit Title
library is open an d a n ima ge is be in g edite d.
Open Image
Save Image Command
dialog for you to enter a name. This command is not available unless a
dialog bo x is displa yed to allo w yo u t o select whic h
– Use this command to open an existing
– Use this command to save the c ur r e n t
Save Im a ge As
– Use this command to c r e ate a new
Bitm ap Editor ,
comma n d, and dis pla ys t h e
New Bitm a p Size
the
Open Image
84
Page 95
Chapter 7 • Im age Ed itors
Undo Comma nd
you made to the image. Choose the
change. A maximum of 64 changes are r e versible with the
Undo
command can only reverse editing changes to the current image. It cannot
undo changes to a library, and the
closed or the view is toggled between the Up and Down images in the Custom Butto n
Editor.
Redo C o m mand
Undo
command. Choose the
maximum of 6 4 chan g e s can be ca n c eled with the
command can only cancel Undo commands to the current image. The Redo
information is destroyed when the image is closed, when the view is toggled between
the Up and Down images, or when other editing changes are made to the image.
– Use this command to r e ve r se th e last c ha n ge
Undo
command again to reverse the previous
Undo
command. The
Undo
infor ma tio n is destro yed whe n the ima ge is
– Use this command to cancel the effect of the last
Redo
command again to cancel the next Undo. A
Redo
command. The
Redo
Cut Command
sec tio n s t o t h e Clipbo a r d, this repla c es the selection with solid white. Yo u c a n use
this to move images betwe en the Button Bitmap Editor and the Custom Button Editor.
Copy Command
to the C lipboar d. This c ommand doe s no t alte r th e c ur r e n t image . Y o u ca n use this to
move images betwe e n th e Button Bitmap Editor and the Custom Button Editor.
– Use this command to move th e se le c te d
– Use this command to copy selected sections
85
Page 96

Theat er Touch S y s tem Con troller
copied sections from the clipboard back onto the touchscreen grid and switches the
Button Bitmap Editor or Custom Button Editor into
pasted sec tion s to th e de sired position on th e page. Y ou c an use th is to move image s
betwee n th e Button Bitmap Editor and the Custom Button Editor. This co mmand is
not a va ila ble if the data o n the C lip bo a r d is n o t in bit map format.
dialog box for more help.
Paste C o m mand
Help Topic s
– Use this command to ope n th e
– Use this command to place previously cut or
Selection
mode. Yo u c a n drag th e
Help Topic s
86
Page 97

TOOL PALETTE
The Tool Palette provides ac cess to all the dra wing too ls used by the Button Bitma p
Editor and Cus to m But to n Ed itor.
Chapter 7 • Im age Ed itors
Selection T ool
sele ction regio n o n t h e image . To de fin e a se le ction , click th e left mo use butto n in th e
Drawing Area where one corner of the selection rectangle should be placed, drag the
mouse to the opposite corner, and release the mouse button.
Button Selection T ool
Selection
button selection, click the left mouse button in the Drawing Area where one corner
of the selection rectangle should be placed, drag the mouse to the opposite corner,
and re le ase th e mouse butto n . To r e move an e xisting button se le c tion , plac e th e
mouse c ursor in side o f t h e selectio n yo u wish to r e mo ve and click th e right mouse
button.
image. Click the left mouse button over a spot in the Drawing Area to “Zoom In”
(make the image lar ge r ) or c lick th e r igh t mouse button ove r a po int to “Z oo m Out”
(make the image smaller). The
to chan ge th e Z o om le ve l.
Tool defines the a c tive button ar eas on a C ustom Button image. To define a
Zoom Tool
- The
Zoom
Selection T ool
- The
(Custo m But to n Ed itor o n ly) - The
Zoom
Tool is used to magnify portions of the
comma n ds on the
is used to define a rectangular
Button
View
menu can also be used
87
Page 98

Theat er Touch S y s tem Con troller
Pencil T oo l
the image . C lick th e left mouse button in th e Drawing Ar e a to tur n th e pixe l unde r
the Pe n c il point blac k, an d c lick th e r ight mouse butto n to tur n th e pixel wh ite .
Br us h Tool
larger portion of the image. The Brush Size, the size of the shape that the Brush
draws, can be changed by clicking on a different sized brush in the rec tangular area
below the drawing tools, or by choosing a size from the Brush Size menu under the
View men u. C lick th e le ft mouse button in the Drawing Ar e a to tur n th e pixe ls
under the Brush black, and click th e r igh t mouse button to tur n th e pixels white.
Fill Tool
Se vera l Fill Pa t tern s a r e availa ble in th e recta n gula r area below the dra win g to o ls. To
use the Fill To o l, ch o os e t h e desir ed Fill Patt ern , and t h en c lic k t h e left mo u se b ut to n
inside o f th e ar ea to fill. The Fill Tool will c o lo r t h e image wit h th e Fill Pat tern in a ll
dire c t ions until it e ncounters a black line o r the edge of th e image . If the fill is to be
contained to the inside of a shape, be sure that there are no gaps in the shape’s
border.
- The
- The
- The
Fill
Pencil
Brush
Tool is used to c olo r individual pixe ls o n
Tool acts like the Penc il To o l, but c o lors a
Tool is used to c olo r larg e p o r t ion s of th e image .
88
Eraser Tool
that c lic k in g the left mouse b ut to n dr a ws in white, an d c lic king the righ t mou se
button draws in blac k.
Line To ol
image . To dra w a b lack line, c lick and hold th e left mouse butto n in the Dra wing
Area where one end of the line should go, move the mouse to the other end of the
- The
- The
Line
Eraser
Tool is ide ntica l to t h e Brush To o l exce p t
Tool is used to draw straight lines on the
Page 99

Chapter 7 • Im age Ed itors
line, and release the mouse button. To draw a white line, follow the same steps but
click the r ight mouse butto n inste a d of the le ft.
Text Tool
place text, click the left mouse button in the Drawing Area, and the
will appe a r . Enter the desire d t e xt in the dia log a n d c lic k OK. The text will a ppear in
a blue selection rectangle, where it can be placed precisely on the image.
Recta ngle T ool
the image. Click the left mouse button in the Drawing Area where one corner of the
rectangle should be placed, drag the mouse to the opposite corner, and release the
mouse button. To draw a white rectangle, follow the same steps but click the right
mouse button instead of the left. The portions of the image in the center of the
rectangle are not affected by this tool.
Rounded R e ctangle T o ol
draw rectangles with rounded corners on the image. The radius of the corners is the
same as that of “Radius” buttons on the TheaterTouch. Clic k t h e left mo use butto n in
the Drawing Area where one corner of the rounded rectangle should be placed, drag
the mouse to the opposite corner, and release the mouse button. To draw a white
rounded rectangle, follow the same steps but click the right mouse button instead of
the left. The portions of the image in the center of the rounded rectangle are not
affec t e d by th is to o l.
- The
Text
Tool is used to place text on the image. To
Place Text
Rectangle
- The
- The
Tool is used to draw rectangles on
Rounded R e ctangle
Tool is used to
dialog
Circ le Tool
the image. Click the left mouse button in the Drawing Area where one corner of the
imaginary rec tangle that bounds the circle should be placed, drag the mouse to the
opposite corner, and release the mouse button. To draw a white circle, follow the
same steps but c lick the right mouse button instead of the le ft. Th e por tion s of th e
image in the center of the circle are not affected by this tool.
- The
Circ le Tool
is used to draw circles and ovals on
89
Page 100

Theat er Touch S y s tem Con troller
Filled Recta ngle T ool
re c t angles filled with a Fill P at tern o n t h e ima g e . Several Fill Pat tern s a r e availa ble in
the rectangular area below the drawing tools. To use the
cho o se the desir ed Fill Patt ern , clic k the left mouse b ut to n in t h e Dra win g Area
where one corner of the rectangle should be placed, drag the mouse to the opposite
corner, and release the mouse button. To draw a solid white rectangle, follow the
same steps but c lick th e r ight mouse butto n inste a d of the le ft.
Filled Rounde d R e c ta ngl e Tool
Tool is used to dr aw r ecta n gles with roun de d corn ers filled with a Fill Pa t tern o n the
image . Severa l Fill Pa t tern s a r e availa ble in th e recta n gu lar area below th e drawing
tools. To use the
click the left mouse button in the Drawing Area where one corner of the rectangle
should be placed, drag the mouse to the opposite corner, and release the mouse
button . To dr a w a so lid wh it e roun de d rec t an g le , follow t h e same steps but c lic k t h e
right mouse butto n inste ad of th e le ft.
Filled Rounde d R e c ta ngl e
- The
Filled Rec tangle
- The
Tool, choo se the desired Fill P at tern ,
Filled Rounde d R e c ta ngl e
Tool is used to draw
Filled Rec tangle
Tool,
Filled Circ le T ool
and o vals filled with a Fill P at tern o n the ima ge. Several F ill Pa tt e rns are a vaila b le in
the rectangular area below the drawing tools. To use the
the desired Fill Pattern , clic k t h e left mo us e b utt o n in the D r a win g A r ea wh e re o n e
corner of the imaginary rectangle bounding the circle should be placed, drag the
mouse to the opposite corner, and release the mouse button. To draw a solid white
circle , follow the same ste ps but click th e right mouse button inste a d of the left.
UP IMAGE-DOWN IMAGE TOOL
90
Filled Cir c le
- The
(Custom Button Editor Only):
Tool is used to draw circles
Filled Cir c le
Tool, choose
 Loading...