

Page 1

Form Number A6192
Part Number D301229X012
July 2007
ROC Polling Services User Manual
Remote Automation Solutions
Page 2

ROC Polling Services User Manual
Revision Tracking Sheet
July 2007
This manual may be revised periodically to incorporate new or updated information. The
revision date of each page appears at the bottom of the page opposite the page number. A change
in revision date to any page also changes the date of the manual that appears on the front cover.
Listed below is the revision date of each page (if applicable):
Page Revision
All pages July-07
Initial issue Oct-05
NOTICE
Remote Automation Solutions (“RAS”), division of Emerson Process Management shall not be liable for technical or editorial errors
in this manual or omissions from this manual. RAS MAKES NO WARRANTIES, EXPRESSED OR IMPLIED, INCLUDING THE
IMPLIED WARRANTIES OF MERCHANTABILITY AND FITNESS FOR A PARTICULAR PURPOSE WITH RESPECT TO THIS
MANUAL AND, IN NO EVENT SHALL RAS BE LIABLE FOR ANY INCIDENTAL, PUNITIVE, SPECIAL OR CONSEQUENTIAL
DAMAGES INCLUDING, BUT NOT LIMITED TO, LOSS OF PRODUCTION, LOSS OF PROFITS, LOSS OF REVENUE OR USE
AND COSTS INCURRED INCLUDING WITHOUT LIMITATION FOR CAPITAL, FUEL AND POWER, AND CLAIMS OF THIRD
PARTIES.
Bristol, Inc., Bristol Babcock Ltd, Bristol Canada, BBI SA de CV and the Flow Computer Division are wholly owned subsidiaries of
Emerson Electric Co. doing business as Remote Automation Solutions (“RAS”), a division of Emerson Process Management.
FloBoss, ROCLINK, Bristol, Bristol Babcock, ControlWave, TeleFlow and Helicoid are trademarks of RAS. AMS, PlantWeb and the
PlantWeb logo are marks of Emerson Electric Co. The Emerson logo is a trademark and service mark of the Emerson Electric Co.
All other trademarks are property of their respective owners.
The contents of this publication are presented for informational purposes only. While every effort has been made to ensure
informational accuracy, they are not to be construed as warranties or guarantees, express or implied, regarding the products or
services described herein or their use or applicability. RAS reserves the right to modify or improve the designs or specifications of
such products at any time without notice. All sales are governed by RAS’ terms and conditions which are available upon request.
RAS does not assume responsibility for the selection, use or maintenance of any product. Responsibility for proper selection, use
and maintenance of any RAS product remains solely with the purchaser and end-user.
ii Revised July-07
Page 3

ROC Polling Services User Manual
Contents
Chapter 1 – Introduction 1
1.1 Overview ............................................................................................................... 1
1.2 Organization.......................................................................................................... 1
1.3 Product Description............................................................................................... 2
1.3.1 A Hierarchy of ROCs, ROC Field Servers, Groups, and Services ...........2
1.3.2 The Graphical Interface............................................................................4
Chapter 2 – Installing the Software 7
2.1 System Requirements........................................................................................... 7
2.2 Installing the Software........................................................................................... 7
2.3 Verifying the Installation...................................................................................... 14
Chapter 3 – Configuring the System 17
3.1 Organize the Hierarchical Structure ....................................................................17
3.1.1 ROC Field Servers ................................................................................. 17
3.2 Configure a Group............................................................................................... 17
3.2.1 Adding a Group ......................................................................................17
3.3 Configure a ROC................................................................................................. 18
3.3.1 Adding a ROC ........................................................................................18
3.3.2 Modifying a ROC's Communication Configuration .................................21
3.4 Configure a ROC Field Server ............................................................................ 24
3.4.1 Adding a Field Server.............................................................................24
3.4.2 Modifying a ROC Field Server Configuration ......................................... 26
3.4.3 Deleting a Field Server...........................................................................27
Chapter 4 – Managing the Connections 31
4.1 Start or Stop the Service .....................................................................................31
4.2 Disconnect or Connect a ROC............................................................................ 33
4.3 Define the Polling Interval ...................................................................................35
4.4 Refresh a ROC.................................................................................................... 36
4.5 Connection Backup............................................................................................. 37
4.5.1 Export Connection..................................................................................37
4.5.2 Import Connection.................................................................................. 37
Chapter 5 – ROC Diagnostics 41
5.1 Collected Data..................................................................................................... 41
5.2 Ping Utility ...........................................................................................................44
5.3 Communication Viewer ....................................................................................... 45
5.4 Event Log ............................................................................................................ 46
Revised July-07 iii
Page 4

ROC Polling Services User Manual
Appendix A – ROC Field Server Installation Guide 49
A.1 Installing the License Key.................................................................................... 49
A.1.1 Verifying the License Key Installation..................................................... 48
A.2 Downloading the Program................................................................................... 50
A.3 Configuring the Program...................................................................................... 55
iv Revised July-07
Page 5

Chapter 1 – Introduction
This chapter presents the structure of this manual and provides an
overview of the Remote Operations Controller (ROC) Polling
Services software.
1.1 Overview
This manual describes how to use the ROC Polling Services
software to configure and monitor a network of ROC devices.
The software runs on a personal computer (PC) that uses the
Windows® operating system and presumes that you are familiar
with how to use Windows and a personal computer. Refer to
Section 2.1, System Requirements for specific software and
hardware requirements.
Note: In this manual, the term “ROC Polling Service” or “the
software” refers to the ROC Polling Services software.
ROC Polling Services User Manual
1.2 Organization
The organization of this manual reflects how you use the software
and complements the on-line help system provided with the ROC
Polling Services software. The manual includes:
Chapter 1
Introduction
Chapter 2
Installing the
Software
Chapter 3
Configuring the
System
Chapter 4
Managing the
Connections
Chapter 5
ROC Diagnostics
Appendix A
ROC Field Server
Installation Guide
Describes the structure of this guide and the
general purpose of the ROC Polling Services
software.
Describes the process and requirements for
installing the ROC Polling Services software.
Describes the system’s hierarchical structure
and how to configure and maintain the major
system components (groups, ROCs, and ROC
Field Servers).
Describes how to manage the connections
between the ROC field units, the ROC Field
Servers (if present), and the ROC Polling
Service Manager.
Describes the tools included in ROC Polling
Services software that provide connection
information and log events.
Describes how to create a ROC Field Server.
Revised July-07 1
Page 6

ROC Polling Services User Manual
1.3 Product Description
Emerson's Flow Computer Division ROC Polling Services
software helps you configure and manage the structure as well as
monitor the status of your ROCs as part of the PlantWeb™ Smart
Remote Automation system architecture. Based on your unique
field configurations, you use the software to define a high-level
server (the “ROC Polling Server”) and organizational groups. To
this structure (or “AMS Suite: Intelligent Device Manager
hierarchy”) you add ROCs (individual devices) or ROC Field
Servers (that act as data communication devices).
Once fully configured to your environment, the ROC Polling
Service packages AMS messages for transmission through the
communications network to a ROC800-Series Remote Operations
Controller, where the package is disassembled for communication
to a Highway Addressable Remote Transducer (HART®) or Smart
Wireless instrument connected to the ROC in the field.
The ROC Polling Service Manager (which you configure and
maintain using the software) combines two system components:
A physical hierarchy of ROCs grouped together geographically
or operationally.
A software-based graphical user interface (GUI) to help you
visualize, configure, monitor, and manage the physical
hierarchy.
1.3.1 A Hierarchy of ROCs, ROC Field Servers, Groups, and Services
Organizationally, a ROC (what the software generically calls a
“device”) is the physical heart of the system. Based on your
communications network, you add and configure ROCs that are
connected by Ethernet in your organization. Additionally, through
the use of ROC Field Servers, you can add and configure ROCs
that are connected through standard serial communications
methods (such as satellite or radio). You can organize one or more
ROCs into logical groups, based either on geography (such as all
ROCs in the western portion of the state) or function. The structure
of your ROCs and ROC Field Servers communications network is
your hierarchy. At the top of the hierarchy is the ROC Polling
Service, which coordinates the information and provides a data
conduit to the AMS Device Manager software.
2 Revised July-07
Page 7

Groups
ROC Polling
Server
ROCs
ROC Polling Services User Manual
A hierarchy of groups, ROCs,
and ROC Field Servers
ROC Field Servers
Figure 1-1, A Hierarchy of Groups, ROCs, and ROC Field Servers
The maximum number of physical ROCs within your system
hierarchy is based on a license. We currently offer the ROC
Polling Service in two licensed configurations, limited (which can
manage up to 25 ROCS, not including ROC Field Servers) and
unlimited (which has no limit on the number of ROCs). Consult
with your sales representative to see which license configuration is
most applicable to your environment.
Note: Changing the computer name, on which the ROC Polling
Services software is installed, reverts the software to the Limited
license. If the Unlimited license was purchased, you can resolve
the issue one of two ways:
Change the computer name back to what it was when the
software was originally installed.
Reinstall the ROC Polling Services software.
Revised July-07 3
Page 8

ROC Polling Services User Manual
1.3.2 The Graphical Interface
The graphical user interface (GUI) enables you to quickly visualize
the hierarchical structure of all components your ROC Polling
Service Manager controls.
Communications frame
Configuration tree
Figure 1-2. ROC Polling Service Manager (expanded)
Note: You can customize which fields display and in what order
they appear in the communications frame by selecting Options
from the Tools menu.
While incorporating many Windows-standard usage conventions,
the GUI adds features to help you effectively manage remote
operations controllers. The left-hand side of the screen (the
configuration tree) presents the relational structure or hierarchy of
your groups, Field Servers, and ROCs. The right-hand side of the
screen (the communications frame) uses a color flag to indicate
each ROC’s operational status and provides other ROC-specific
information. You can view the entire hierarchy or you can collapse
the hierarchy and focus on specific sub-groups.
4 Revised July-07
Page 9

ROC Polling Services User Manual
Figure 1-3. ROC Polling Service Manager (collapsed)
Refer to Chapter 3, Configuring the System for detailed
information on using the features of this screen to effectively
manage your groups, ROCs, ROC Field Servers, and the ROC
Polling Service Manager.
Revised July-07 5
Page 10

ROC Polling Services User Manual
6 Revised July-07
Page 11

Chapter 2 – Installing the Software
This section describes the process for installing the ROC Polling
Services software on your personal computer (PC).
2.1 System Requirements
The ROC Polling Services software runs on an IBM-compatible
PC. The PC can be either a desktop or a portable computer, but
must meet the following minimum requirements:
Pentium-class processor (500 MHz or greater recommended).
CD-ROM drive.
Windows 2000 (with Service Pack 2), or XP.
SVGA color monitor, 800 by 600 pixels.
Ethernet.
100 MB of available hard disk space.
ROC Polling Services User Manual
Note: If you are installing the AMS Device Manager on this PC,
you also need to upgrade the ROC Network (HSI) for the AMS
Device Manager. The upgrade is required to support the new
features in this version of the ROC Polling Services software and
requires separate installation.
2.2 Installing the Software
The ROC Polling Services software is delivered on CD. An
installation wizard guides you through the install process.
To install the software on your PC:
1. Place the installation CD in your PC’s CD tray. The installation
program should start automatically, and display the first
InstallShield Wizard screen (Figure 2-1).
Note: If the software does not automatically start, use Explorer
to locate and then click the SETUP.EXE file on the CD’s root
folder.
Revised July-07 7
Page 12

ROC Polling Services User Manual
Figure 2-1. Microsoft SQL Server 2005 Express
Note: Microsoft SQL Server and Microsoft .NET Framework
2.0 are required components for this application. The install
program analyzes your system to determine what is currently
installed. If either component is missing, the program prompts
you to install the appropriate component.
The following screen sequence assumes both Microsoft SQL
Server and Microsoft .NET Framework 2.0 have not been
installed. Once you click Yes to the prompt, the installation
proceeds. If you already have NET 2.0, proceed to step 6.
2. A message displays asking if you would like to install
Microsoft (R) .NET 2.0 Framework. Click Yes to continue.
Figure 2-2. .NET 2.0 InstallShield message
3.
The .NET Framework 2.0 Setup screen displays. Click Next.
8 Revised July-07
Page 13

ROC Polling Services User Manual
Figure 2-3. Microsoft .NET Framework 2.0 Setup
4.
The End-User License Agreement screen displays. If you
agree, place a check mark next to I accept the terms… and
click Install.
Note: If you do not accept the license agreement terms, the
installation ends.
Figure 2-4. End-User License Agreement
Revised July-07 9
Page 14

ROC Polling Services User Manual
5. A status monitoring screen displays as the software
components install, followed by the Setup Complete screen.
Click Finish to complete the installation of .NET Framework
2.0.
Figure 2-5. Setup Complete
6.
The Microsoft SQL InstallShield Wizard displays (see Figure
2-1). Click OK. The wizard installs and configures the
Microsoft SQL Desktop Engine. When completed, it displays
the InstallShield Wizard screen for the ROC Polling Services.
Figure 2-6. ROC Polling Service InstallShield
10 Revised July-07
Page 15

ROC Polling Services User Manual
7. Click Next. The License Agreement screen displays.
Figure 2-7. Software License
8.
Review the license agreement (use the scroll bar at the right
edge of the screen to scroll through the text). If you agree,
select the I accept the terms… radio button and click Next.
The Customer Information screen displays.
Note: If you do not accept the license agreement terms, the
installation ends.
Revised July-07 11
Page 16

ROC Polling Services User Manual
Figure 2-8. Customer Information
9.
Complete the User Name and Organization fields and radio
button as appropriate for your organization and click Next. The
ready to Install the Program screen displays.
Figure 2-9. Ready to Install
12 Revised July-07
Page 17

ROC Polling Services User Manual
10. Click Install to begin the installation process. A status
monitoring screen displays as the software components install,
followed by the InstallShield Wizard Completed screen.
Figure 2-10. Installation Status Monitoring
11.
Once the installation process finishes, the InstallShield Wizard
Completed screen displays.
Revised July-07 13
Page 18

ROC Polling Services User Manual
Figure 2-11. InstallShield Wizard Completed
12.
Click Finish to complete the installation of the ROC Polling
Service software. An icon for the ROC Polling Manager is
placed on your desktop.
2.3 Verifying the Installation
Before you begin the process of configuring the ROC Polling
Service software (discussed in Chapter 3), make sure the software
starts correctly.
1. Double-click the ROC Polling Manager icon on your desktop
or click Start > Programs > Emerson Process Management
> Flow Computer Division > ROC Polling Services > ROC
Polling Manager. The ROC Polling Service Manager screen
displays.
14 Revised July-07
Page 19

ROC Polling Services User Manual
PC on which the ROC
Polling Services software
runs
Figure 2-12. ROC Polling Service Manager
2.
This is the “baseline” ROC Polling Service Manager structure
that is delivered with your software. It identifies the computer
or physical machine (in this case, USMTNEO-SJMCCA) on
which the ROC Polling Service software runs.
3. Your next step is to begin defining the hierarchical structure of
ROCs and groups. Go to Chapter 3, Configuring the System.
Revised July-07 15
Page 20

ROC Polling Services User Manual
16 Revised July-07
Page 21

ROC Polling Services User Manual
Chapter 3 – Configuring the System
This section describes how you use the ROC Polling Services
software to define your ROC Polling Service Manager and each
portion of your ROC hierarchy. Before you begin defining your
hierarchy you may want to review Section 1.3, Product
Description.
3.1 Organize the Hierarchical Structure
Although you can reconfigure your hierarchy at any time, you
should start the configuration process with an idea of your
hierarchy’s initial structure or organization.
Determine the number of ROC field units involved and what
groups (geographic or functional) you might need. Decide whether
and how many ROC Field Servers you want to implement (see
Section 3.1.1, ROC Field Servers). This is also an excellent time to
identify critical technical resources and collect configurationrelated information (such as ROC names, IP addresses, and ROC
address/group information) for your ROC field units. A few hours
spent planning your implementation on paper pays off with a
smoother setup and better functioning system in the field.
3.1.1 ROC Field Servers
A ROC Field Server enables you to communicate with those ROCs
in your hierarchy that are not connected via Ethernet. For example,
you may have some ROC field units that communicate using serial
connections. To include those ROCs in the ROC Polling Service
Manager, you first create a ROC Field Server. You then place the
ROCs using serial communications within that ROC Field Server’s
hierarchy. The Ethernet-connected ROC Field Server acts as an
intermediary communications device, linking the serial-based ROC
field units into the total hierarchy.
You can add as many ROC Field Servers into your hierarchy as
necessary. Due to their functionality, ROC Field Servers do not
count as ROCs if you have a limited ROC Polling Service license.
3.2 Configure a Group
Groups are collections of ROC field units and—if applicable—
ROC Field Servers. Your software license dictates the number of
ROCs in your hierarchy. You can define as many groups as you
want in a ROC Polling Service Manager hierarchy, but the number
and structure of groups should always correspond to a logical
Revised July-07 17
Page 22

ROC Polling Services User Manual
organizational or geographic structure. For this reason, a group
should always contain at least one ROC field unit.
3.2.1 Adding a Group
You can add a group to a server, a ROC Field Server, or another
group. You cannot add a group to a ROC field unit.
To add a group:
1. Right-click on a server, a group, or a ROC Field Server and
select Add Group. The new group (with the name “New
Group”) immediately appears on the hierarchy.
2. Highlight the group you just created by clicking on the icon.
Click the (Edit Selected Item) icon.
3.3 Configure a ROC
Edit Selected Item icon
Figure 3-1. Polling Services Manager
3.
Type in the name of the new group and press Enter. The
process completes.
Adding a ROC into the hierarchy involves physically adding the
device and then configuring any communications parameters. The
software provides a configuration wizard to help you when you
initially add a ROC. Once the ROC is present on the hierarchy, you
can click on its icon in the graphical hierarchy to change its
18 Revised July-07
Page 23

configurations. If necessary, you can also delete ROCs from the
hierarchy.
3.3.1 Adding a ROC
To add a ROC to the hierarchy:
1. Right-click on the hierarchy where you want to add a ROC.
Select Add Device > ROC TCP/IP to start the configuration
wizard. The General screen displays.
ROC Polling Services User Manual
Figure 3-2. General
Enter a name for the new ROC in the Description field. Review
2.
(and change, if necessary) the values displayed in each field in
the Connection Parameters frame.
Field Description
Description
IP Address
Port
Login
Password
Uniquely identifies the new ROC Field Server.
Note: This does not have to be the station name
originally given the ROC. Each device should
have a unique name. AMS Device Manager will
use this name to identify the ROC.
Enter the ROC’s specific IP address. The default
is 10.0.0.2.
Enter the ROC’s specific port. The default is 4000.
Enter the login ID originally defined for this ROC
when it was configured using the ROCLINK 800
configuration software.
Enter the password originally defined for this ROC
when it was configured using the ROCLINK 800
configuration software.
Revised July-07 19
Page 24

ROC Polling Services User Manual
3. Click Advanced to display the Connection Advanced screen.
4.
Use this screen to define the retry and time out parameters for
this ROC.
Figure 3-3. Connection Advanced
Field Description
Number of
Retries
Indicates the number of times the ROC Polling
Service Manager tries to request data from this
ROC (after the initial attempt) before reporting a
timeout error. Valid values are 0 to 25. The default
is 3.
Time Out
Indicates, in seconds, the time the ROC Polling
Service Manager waits to receive a valid message
from this ROC after sending it a message. The
default is 5.
Note: Do not enter 0 in this field. Entering 0 does
not enable the ROC Polling Service Manager to
wait between retries and immediately creates a
timeout error.
5. Click OK (or Apply, then OK if you make any changes to this
screen) and the General screen displays.
6. Click Next to display the Interface Modules screen.
20 Revised July-07
Page 25
ROC Polling Services User Manual
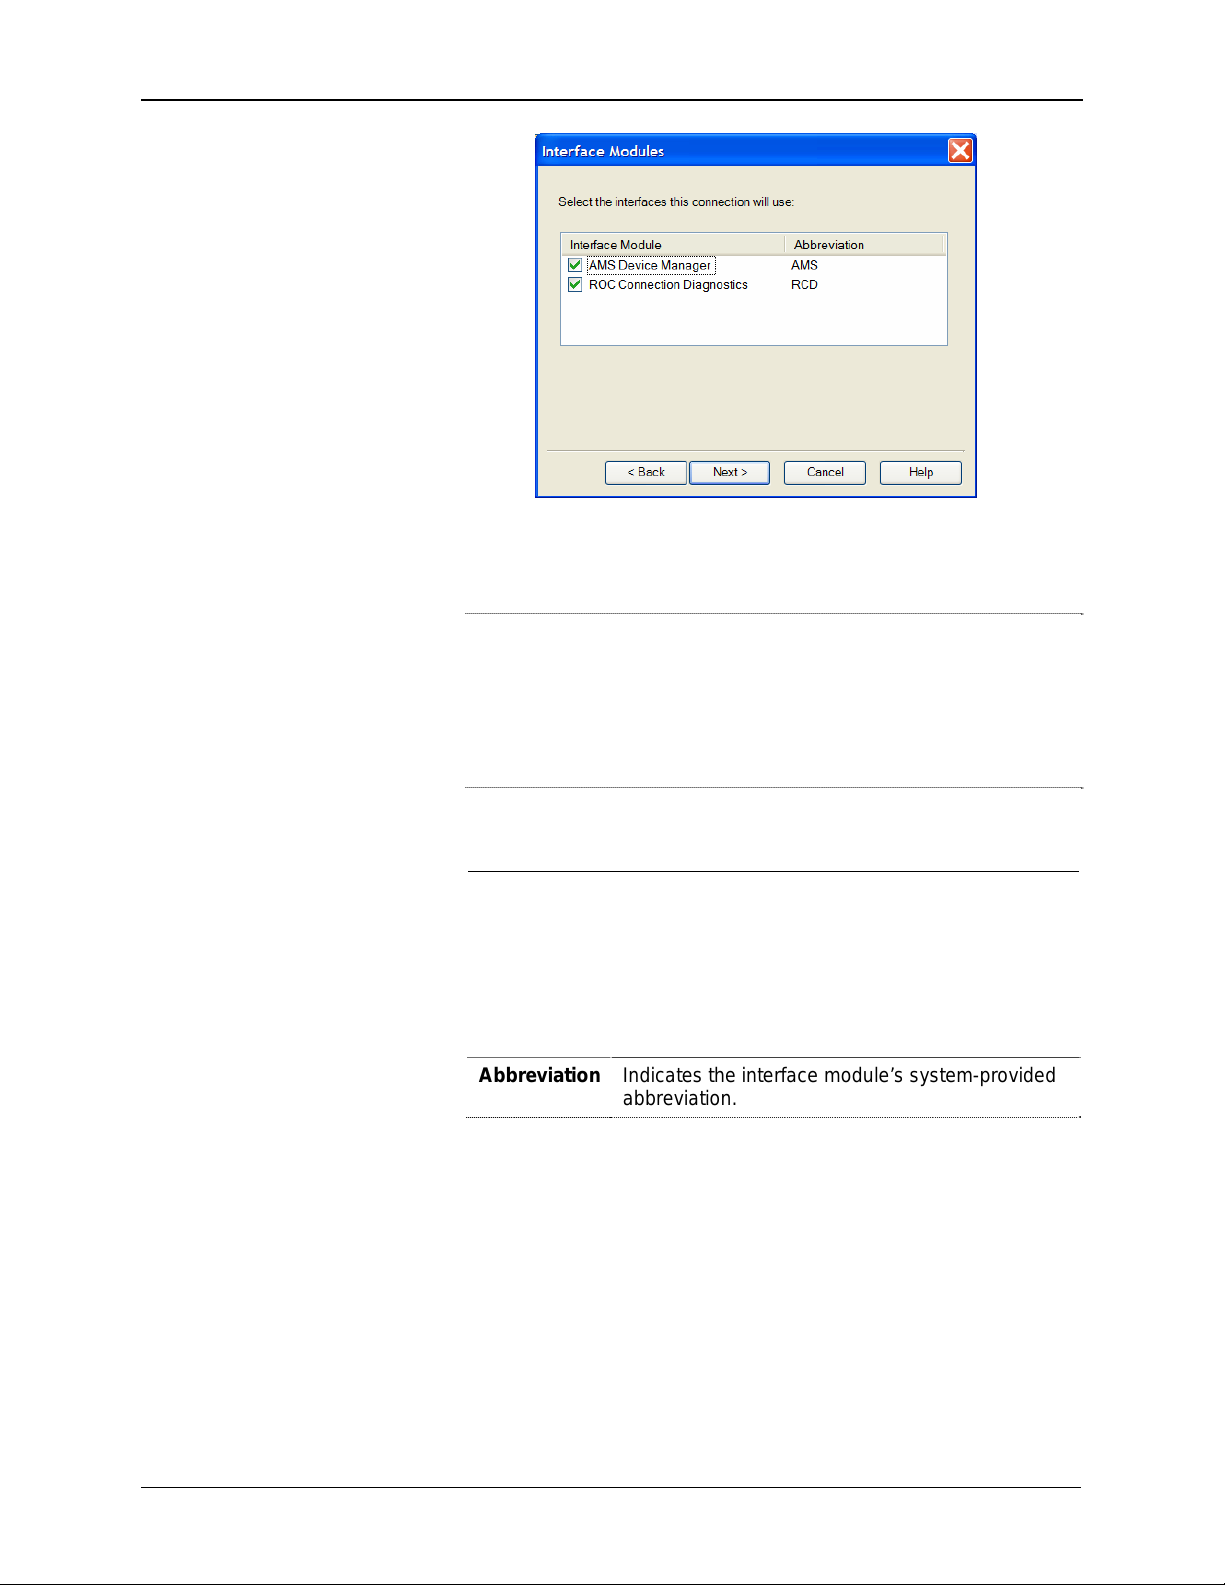
Figure 3-4. Interface Modules
Note: Two modules are present on the Interface Modules
screen: AMS Device Manager and ROC Connection
Diagnostics. AMS Device Manager must be enabled (check
marked) to communicate with AMS devices. ROC Connection
Diagnostics must be enabled (check marked) to use the
diagnostic tools in the ROC Polling Service Manager.
7. Use this screen to associate the ROC with an interface module.
Field Description
Interface
Module
Abbreviation
Identifies which interface module the ROC uses to
communicate with the ROC Polling Service
Manager.
Note: Use the check box in this field to enable or
disable connections to the selected interface. You
also use the check box to enable or disable
diagnostics. Enabled (checked) is the default.
Indicates the interface module’s system-provided
abbreviation.
8. Click Next to display the Address screen.
Revised July-07 21
Page 26

ROC Polling Services User Manual
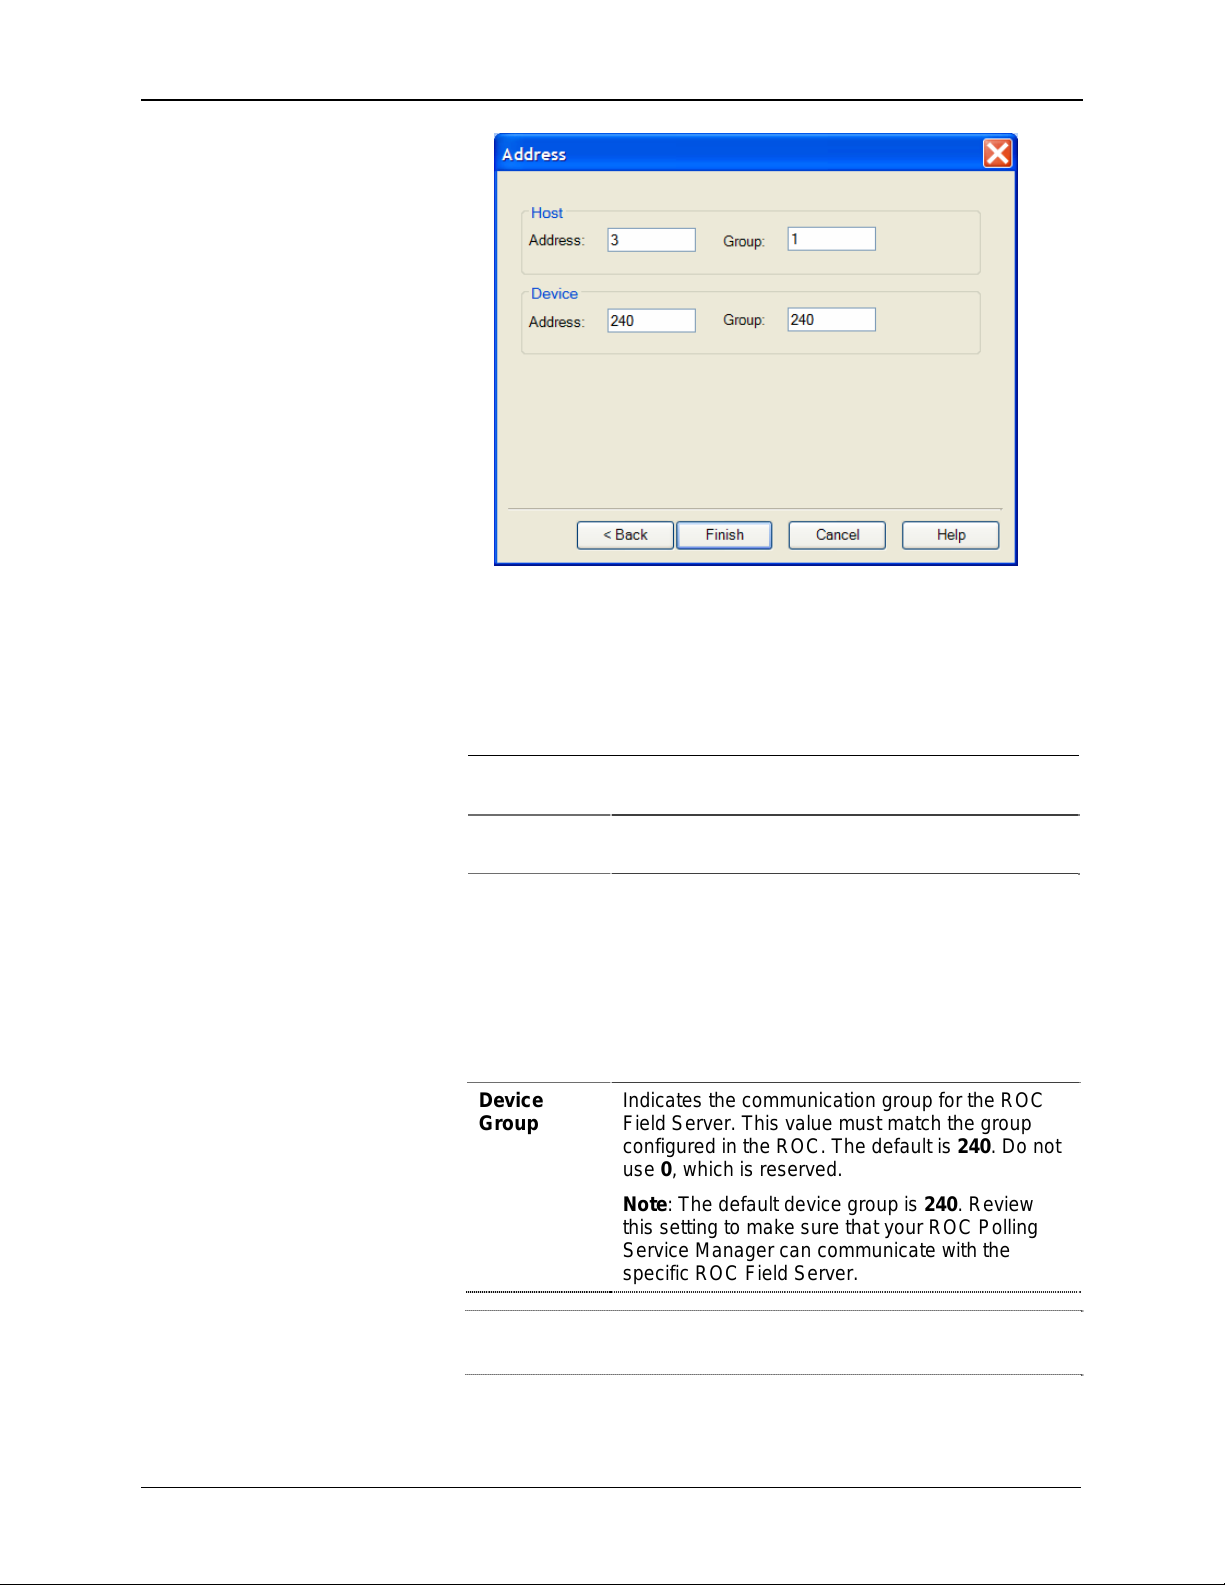
Figure 3-5. Address
9.
Use this screen to define the communications relationship
between the ROC (the “device”) and the “host” (in this case,
the ROC Field Server).
Field Description
Host
Address
Host Group
Device
Address
Device
Group
Indicates the communication address for the ROC
Polling Service Manager or (if present) the ROC
Field Server. The default is 3.
Indicates the communication group for the ROC
Polling Service or ROC Field Server. The default
is 1.
Indicates the communication address for the
specific ROC. The default is 240. Do not use 0,
which is reserved.
Note: This value must match the address
configured in the ROC.
Indicates the communication group for the specific
ROC. The default is 240. Do not use 0, which is
reserved.
Note: This value must match the group configured
in the ROC.
Note: Leaving the default value (240) in the Device Address
and Group may create issues if you need to communicate with
a specific ROC. Entering different values in these fields (which
must correspond to the values used when the ROC was initially
configured using the ROCLINK 800 software) provides direct
communications to specific ROCs.
22 Revised July-07
Page 27

ROC Polling Services User Manual
10. Click Finish to complete the process of adding the new ROC.
The ROC Polling Service Manager screen redisplays. Note the
new ROC in the hierarchy.
3.3.2 Modifying a ROC’s Communication Configuration
Once you have defined a ROC, you can change its communication
configurations at any time.
To modify a ROC’s communication configuration:
1. Right-click the ROC’s icon in the hierarchy. Select Properties.
The Connection Properties screen displays.
2.
Select the tab for the configuration component you want to
modify. Click OK (or Apply, then OK if you have changed
any values).
Note: If you need to set parameters for timeout and number of
retries the ROC should use when connecting with the ROC
Polling Service, click Advanced to display the Connection
Advanced screen.
3.3.3 Deleting a ROC
To delete a ROC from the hierarchy:
1. Click the icon for the ROC you want to delete. The system
highlights it.
Figure 3-6. Connection Properties
Revised July-07 23
Page 28
ROC Polling Services User Manual
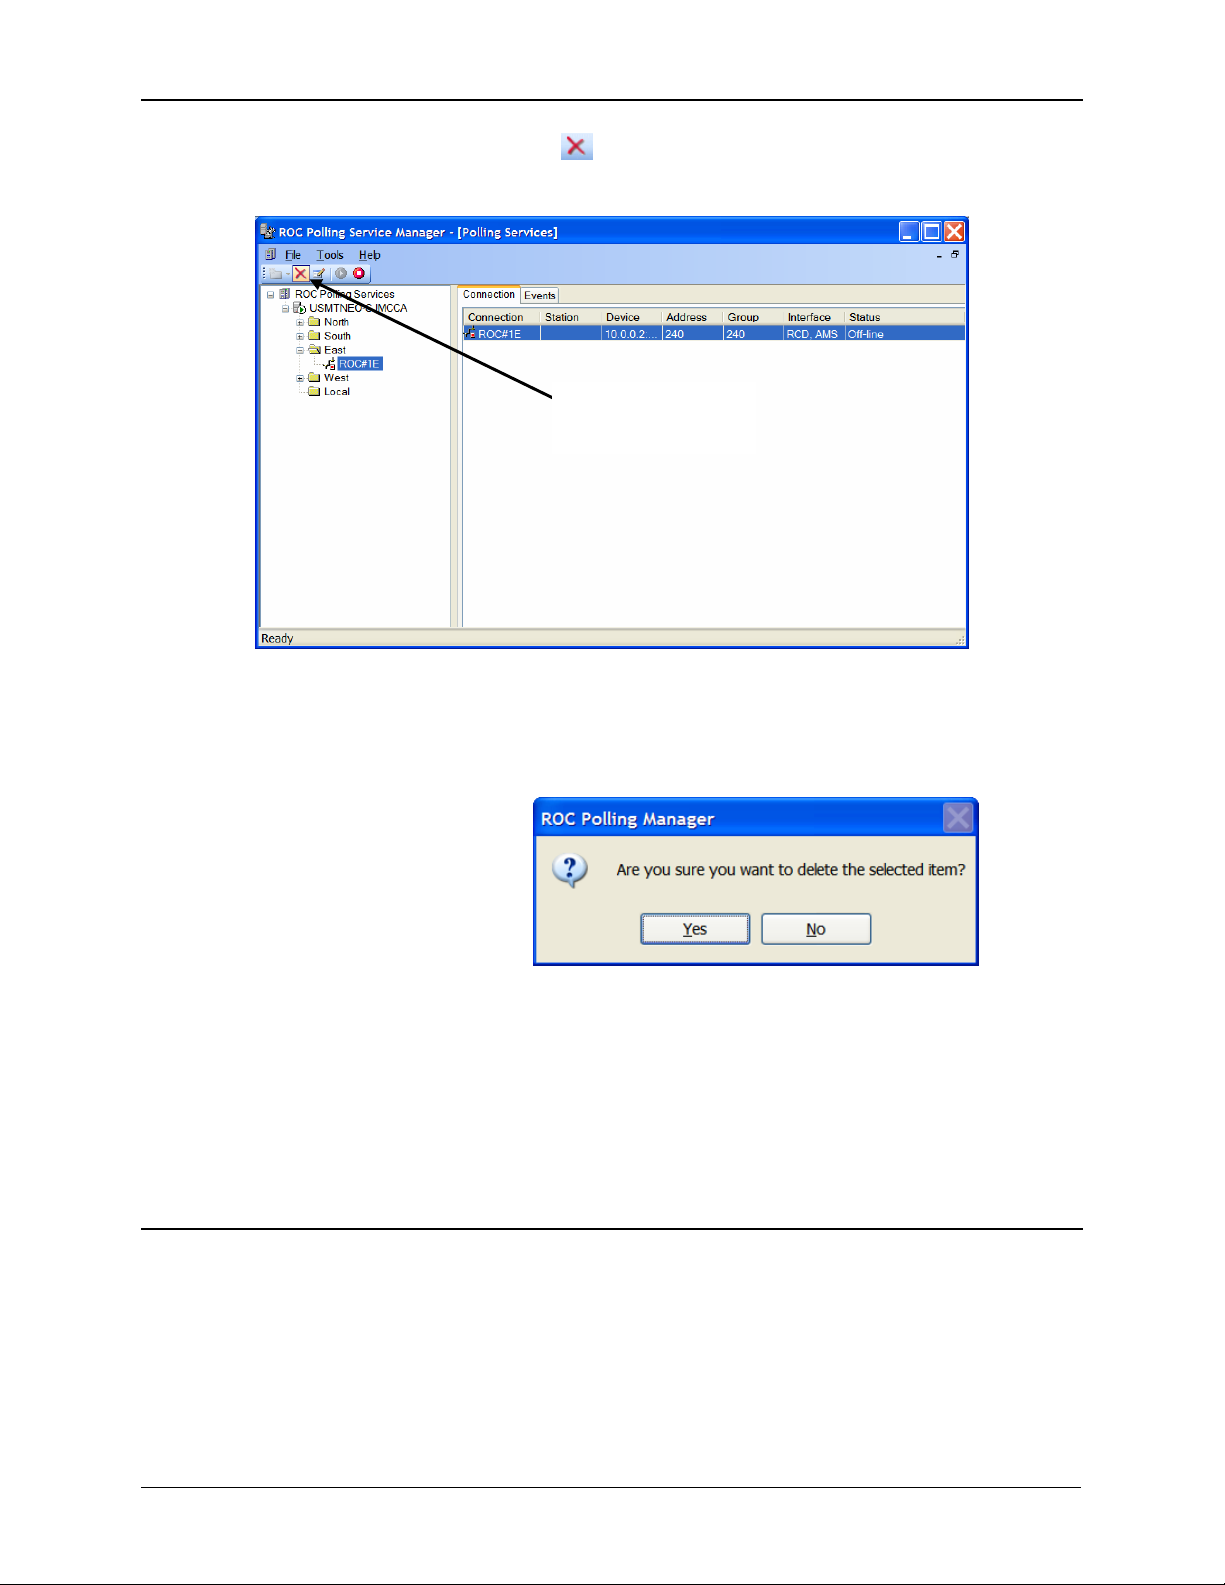
2. Click the (Delete) icon on the tool bar or press the Delete
key on the keyboard (note that ROC#1E is highlighted).
Icon for deleting a
device or group
Figure 3-7. Deleting a ROC
The software displays a warning message.
3.
4.
Click Yes. The software redisplays the ROC Polling Service
Manager screen. Note that the ROC you selected has been
removed from the hierarchy.
3.4 Configure a ROC Field Server
A ROC Field Server interfaces a low-bandwidth field
communications network to a high-speed Ethernet control network.
The ROC Field Server provides communications pass-through
functionality from up to five TCP/IP ports to up to five serial
communications ports on the ROC Field Server.
Figure 3-8. Deletion message
The current implementation of the ROC Field Server is based on
the ROC800-Series platform. The Field Server functionality is
enabled through a user program located on the ROC and
24 Revised July-07
Page 29

configured to route communications from specific TCP/IP ports to
the ROC communications cards. The ROC Field Server installs on
top of the high-bandwidth section of the communications network.
Note: Refer to Appendix A, ROC Field Server Installation Guide
for the process of installing and configuring a ROC Field Server.
Refer to the ROCLINK 800 Configuration Software User Manual
(Form A6121) for information on configuring a ROC.
Configuring a new or existing ROC Field Server requires you to
define its connection properties. These include the IP address, port,
host and device addresses, and connection timeout and retry
parameters.
3.4.1 Adding a Field Server
Note: You can only add a ROC Field Server to an existing group.
To add a Field Server:
ROC Polling Services User Manual
1. Right-click an existing group and select Add Device > ROC
Field Server. The first screen in the configuration wizard
displays.
Figure 3-9. General
2.
Enter the name of the new ROC Field Server in the Description
field. Review (and change, if necessary) the values displayed in
each field in the Connection Parameters frame.
Field Description
Description
IP Address
Port
Revised July-07 25
Uniquely identifies the new ROC Field Server.
Enter the ROC’s IP address. The default is
10.0.0.2.
Enter the ROC’s port. The default is 4000.
Page 30

ROC Polling Services User Manual
Field Description
Login
Enter the login ID originally defined for this ROC
when it was configured using the ROCLINK 800
configuration software.
Password
Enter the password originally defined for this ROC
when it was configured using the ROCLINK 800
configuration software.
Note: If you need to set timeout and number of retries
parameters this ROC Field Server should use when connecting
with the ROC Polling Service, click Advanced to display the
Connection Advanced screen.
3. Click Advanced to display the Connection Advanced screen.
Figure 3-10. Connection Advanced
Use this screen to define the retries and time out parameters for
4.
this ROC Field Server.
Field Description
Number of
Retries
Time Out
Indicates the number of times the ROC Polling
Service Manager tries to request data from this
ROC Field Server (after the initial attempt) before
reporting a timeout error.
Indicates, in seconds, the time the ROC Polling
Service Manager waits to receive a valid message
from this ROC Field Server after sending it a
message.
Note: Do not enter 0 in this field. Entering 0 does
not enable the ROC Polling Service Manager to
wait between retries and immediately creates a
timeout error.
5. Click OK (or Apply, then OK if you have changed any values)
and the General screen displays.
6. Click Next to display the Address screen.
26 Revised July-07
Page 31
ROC Polling Services User Manual
Figure 3-11. Address
Review (changing if necessary) the values in the Host and
7.
Device frames on this screen.
Field Description
Host
Address
Host Group
Device
Address
Device
Group
Indicates the communication address for the ROC
Polling Service. The default is 3.
Indicates the communication group for the ROC
Polling Service. The default is 1.
Indicates the communication address for the ROC
Field Server. This value must match the address
configured in the ROC. The default is 240. Do not
use 0, which is reserved.
Note: The default device address is 240. Review
this setting to make sure that your ROC Polling
Service Manager can communicate with the
specific ROC Field Server.
Indicates the communication group for the ROC
Field Server. This value must match the group
configured in the ROC. The default is 240. Do not
use 0, which is reserved.
Note: The default device group is 240. Review
this setting to make sure that your ROC Polling
Service Manager can communicate with the
specific ROC Field Server.
Note: A ROC Field Server does not require you to define any
Interface Modules.
Revised July-07 27
Page 32

ROC Polling Services User Manual
8. Click Finish to complete the process of adding the new ROC
Field Server. The ROC Polling Service Manager screen
redisplays. Note the new ROC Field Server in the hierarchy.
New ROC Field
Server
Figure 3-12. ROC Polling Service Manager (with new ROC Field Server)
3.4.2 Modifying a ROC Field Server Configuration
Use this procedure if you need to change a ROC Field Server’s
connection properties.
To modify a ROC Field Server’s configurations:
1. Right-click the Field Server’s icon and select Properties. The
Connection Properties screen displays.
28 Revised July-07
Page 33

ROC Polling Services User Manual
Figure 3-13. Connection Properties
Note: A ROC Field Server does not require you to define any
Interface Modules, and therefore does not have an Interface
Module tab.
2. Select the appropriate tab – General or Address – for the
information you want to modify. Click OK (or Apply, then
OK if you have changed any values).
3.4.3 Deleting a Field Server
To delete a Field Server:
1. Click the ROC Field Server icon you want to delete. The
system highlights it.
2. Click the (Delete) icon on the tool bar or press the Delete
key on the keyboard.
Revised July-07 29
Page 34

ROC Polling Services User Manual
Figure 3-14. Deleting a ROC Field Server
Icon for deleting a
device or group
ROC field server to
be deleted
3.
The software displays a warning message.
Figure 3-15. Deletion message
4.
Click Yes. The software removes the ROC Field Server from
the ROC Polling Service Manager hierarchy.
Note: You can only delete one device at a time. Any ROCs
associated with the ROC Field Server must be deleted before
you are able to delete the Field Server.
30 Revised July-07
Page 35

ROC Polling Services User Manual
Chapter 4 – Managing the Connections
This section describes how you manage communications between
the ROC Polling Service Manager and the ROCs (and ROC Field
Servers, if present) within the hierarchy. Once configured, the
ROC Polling Service Manager can periodically check—or poll—
all ROCs within the hierarchy. At your discretion, you have the
ability to start or stop that polling, or to perform on-demand checks
of the status of individual ROCs.
Note: As a default, the ROC Polling Service does not
automatically refresh the communication status of the ROCs within
the hierarchy. You must define a polling interval, as described in
Section 4.3, Define the Polling Interval.
4.1 Start or Stop the Service
At any point you can turn the entire ROC Polling Service Manager
on or off. You control this option using either of two buttons on the
toolbar of the ROC Polling Service Manager screen.
Service Start
(grayed out) and
Stop buttons.
Figure 4-1. Service Start and Stop buttons
Revised July-07 31
Page 36

ROC Polling Services User Manual
Note: Typically the service is running, so after you click on the
specific server (in this example, USMTNEO-SJMCCA) the Start
button (the green button on the left with the right-pointing triangle
at its center) is grayed out to indicate the current state of the
service. Once you stop the service, the software grays out the Stop
button.
To stop the Polling Service:
1. Highlight the Polling Server and click the (Stop) button.
The system stops the Polling Service and collapses the
hierarchy.
Service Start and
Stop (grayed out)
Stopped ROC
Polling Service
Manager with
attached Stop
icon
buttons.
Figure 4-2. Stopped Polling Service
Note: The red Stop button is now grayed out, and the green Start
button is now available. Note that the server has a “Stop” icon
attached to it.
To restart the Polling Service:
1. Highlight the Polling Server and click the (Start) button.
The system starts the Polling Service, redisplays the hierarchy,
and attempts to reconnect with each ROC and ROC Field
Server.
32 Revised July-07
Page 37

Service Start
(grayed out) and
Stop buttons.
Re-started ROC
Polling Service
Manager (with
attached Start icon)
ROC Polling Services User Manual
Figure 4-3. Started Polling Service
Note: The green Start button is now grayed out, and the red
Stop button is now available. Note that the server has a “Start”
icon attached to it.
4.2 Disconnect or Connect a ROC
You can disconnect or re-connect an individual ROC from the
ROC Polling Service Manager. Use the graphical hierarchy for this
option.
To disconnect a ROC:
1. Right-click the icon for the ROC you want to disconnect.
2. Select Disconnect from the context menu. The ROC Polling
Service Manager communicates the request to the ROC and
changes the ROC’s display in the Status field.
Note: The next time the Polling Services is started it attempts
to connect with all devices. This occurs even if the service was
previously disconnected from the devices.
Revised July-07 33
Page 38

ROC Polling Services User Manual
Figure 4-4. Started Polling Service
Stopped ROC (with
attached Stop icon
and Off-line status)
Note: The ROC icon now has a red “Stop” icon attached to it.
To connect a ROC:
1. Right-click the icon for the ROC you want to connect.
2. Select Connect from the context menu. The ROC Polling
Service Manager communicates the request to the ROC and
changes the ROC’s display in the Status field.
Started ROC (with
attached Start icon
and On-line status)
Figure 4-5. Started Polling Service
34 Revised July-07
Page 39

ROC Polling Services User Manual
Note: The ROC icon now has a green “Start” icon attached to
it. If the status on the ROC says No-Response, something is
preventing the device from properly connecting. Check all
connecting cables to ensure a proper connection and refresh the
device in the Polling Services Manager.
Figure 4-6. No-Response Polling Service
4.3 Define the Polling Interval
By default, the ROC Polling Service Manager does not routinely
refresh each ROC in its hierarchy after it establishes the first
connection. If you want ROC hierarchy and information to
routinely refresh (both in the ROC Polling Service Manager and in
the AMS Device Manager), you must change that polling interval
to a value suitable to your organization.
To define the polling interval:
1. Right-click the ROC Polling Server icon to highlight it.
2. Select Properties, and select the Interface Modules tab on the
Properties screen.
3. Select the device manager name to highlight it.
4. Click on the Polling Interval of the selected line. After one or
two seconds, the Days, Hours, and Minutes fields display.
Revised July-07 35
Page 40

ROC Polling Services User Manual
5.
Adjust the values in the Days, Hours, and Minutes fields as
necessary.
Figure 4-7. Polling Interval
4.4 Refresh a ROC
Field Description
Days
Hours
Minutes
6. Click OK (or Apply, then OK if you have changed any
Indicates, in days, the current polling interval.
Valid values are 0 through 7. The default 0.
Indicates, in hours, the current polling interval.
Valid values are 0 through 23. The default is 0.
Indicates, in minutes, the current polling interval.
Valid values are 0 through 59. The default is 0.
values).
“Refresh” is another term for requesting the ROC Polling Service
Manager to perform an on-demand poll of a specific ROC. Use the
graphical hierarchy for this option.
Note: The ROC must already be connected before you can refresh
the connection.
To refresh a ROC:
1. Right-click the icon for the ROC you want to refresh.
2. Select Refresh from the context menu. The ROC Polling
Service sends a communication request to that ROC.
36 Revised July-07
Page 41

4.5 Connection Backup
You can easily import and export your connection settings from
the ROC Polling Service Manager. This is ideal for saving a
backup of your system configuration or transferring the connection
configuration to a new ROC Polling Manager.
4.5.1 Export Connections
You can easily back up your connection settings or transfer them
to another ROC Polling Manager by using the export feature of the
ROC Polling Service Manager.
Note: The system save the configuration to a file with an extension
of .RPC.
To export your connection settings:
1. Right-click on the ROC Polling Server in the configuration
ROC Polling Services User Manual
tree.
2. Select Export from the context menu. The Export Connections
screen displays.
Figure 4-8. Export Connections
3.
Select the device connections you wish to export. Devices with
a check mark next to them are exported. All devices are
selected by default. When you have chosen which devices to
export, click Export.
4. The system prompts you to specify a name and location to save
your configuration. After you have entered the required
information, click Save to export your configuration.
Revised July-07 37
Page 42

ROC Polling Services User Manual
5. A message displays stating the connections have been
successfully exported.
6.
Click OK to finish exporting your connections
4.5.2 Import Connections
You can easily import connection settings that have previously
been exported by the ROC Polling Manager.
To import connection settings:
Figure 4-9. Export Successful
1. From the Polling Services screen, right-click on the ROC
Polling Server in the configuration tree.
2. Select Import from the context menu.
3. Locate the file containing the connection settings and select
Open. (Only files with the extension .RPC display.)
4. The Import Connections dialog box appears. Verify you have
the correct file selected at the top of the screen. If not, you can
select Browse to locate the correct file on your computer.
5. You can select which connections you want to import by
placing a check mark next to the device. Only devices with a
check mark next to them are imported. All devices are selected
by default. Select Import to continue.
38 Revised July-07
Page 43

ROC Polling Services User Manual
Figure 4-10. Import Connections
Note: If you already have devices configured and attempt to
Import the same connections, you will end up with duplicate
devices. Delete the duplicate devices from the hierarchy to fix
this issue.
Revised July-07 39
Page 44

ROC Polling Services User Manual
40 Revised July-07
Page 45

Chapter 5 – ROC Diagnostics
This section describes the diagnostic tools available in the ROC
Polling Services Manger. You have the ability to view various
pieces of diagnostic information concerning device connection,
data transmission, and stored events.
Notes:
ROC Diagnostics are enabled by default. If you wish to turn off
this functionality, disable ROC Communication Diagnostics on
the Interface Module tab of the Connection Properties screen.
For more information, please refer to Chapter 3.3, Configure a
ROC.
ROC Diagnostics are only accessible for individual ROC units.
There are no diagnostics in this program for ROC Field
Servers.
To access the Diagnostics tool in the Polling Services:
ROC Polling Services User Manual
1. Using the configuration tree or the communications frame,
right-click the device you wish to receive information about.
2. Select Diagnostics from the context menu.
Figure 4-5. Diagnostics
Revised July-07 41
Page 46

ROC Polling Services User Manual
Notes:
The Diagnostics screen is comprised of three tabs. These
The Reset button is available on all tabs at the bottom of
5.1 Collected Data
The Collected Data tab, which displays when you access the
Diagnostics screen, allows you to view information concerning the
total number of good and bad messages received, the total number
of good and bad bytes received, and information about the
connection to the device.
tabs are discussed in further detail in Chapter 5.1,
Collected Data; Chapter 5.2, Ping Utility; and Chapter 5.3,
Communication Viewer.
the screen. Select the Reset will clear any collected data on
the Collected Data and Ping Utility tab, as well as stop the
Ping Utility if it is running.
To access the Collected Data screen:
1. Using the configuration tree or the communications frame,
right-click the device you wish to receive information on and
select Diagnostics. The Diagnostics screen displays showing
the Collected Data tab.
Figure 5-2. Collected Data
2.
Review the following information collected for the device.
42 Revised July-07
Page 47

Field Description
Messages
This section displays information about the
number of messages sent to and received from
the device. It also displays the number of errors
occurring during transmissions.
ROC Polling Services User Manual
Good
Bad
No Response
Retries
CRC Errors
Last ROC
Bytes
Total
Error
This section displays information about the
amount of information (bytes) transmitted to and
from the device.
Displays the total number of
messages transmitted to the end
device.
Displays the number of good
messages received from the end
device.
Displays the number of
messages that have failed
coming from the end device. No
response and invalid CRC are
bad messages.
Displays the number of times
the device failed to respond to a
transmission.
Displays the number of times a
message has tried to be re-sent.
Displays the number of
messages that did not pass the
CRC check.
Displays a description of the last
ROC error received.
Total
Good
Bad
Bandwidth
Connection
Last Good
Last Bad
Revised July-07 43
This section displays information about the
connection to and from the device.
Time Stamp
Time Stamp
Displays the total number of
bytes transmitted to the end
device.
Displays the total number of
good bytes received from the
end device.
Displays the total number of bad
bytes received from the end
device.
Displays the transfer rate of the
last request/response sequence.
Displays the time the last good
message was received.
Displays the time the last bad
message was received.
Page 48

ROC Polling Services User Manual
Field Description
Turn Around
(ms)
Displays, in milliseconds, the
time taken for the last
request/response sequence to
be completed.
5.2 Ping Utility
Min (ms)
Max (min)
Average (ms)
Displays, in milliseconds, the
quickest turnaround time
achieved through the current
connection.
Displays, in milliseconds, the
longest turnaround time
achieved through the current
connection.
Displays, in milliseconds, the
average turnaround time
achieved through the current
connection.
The Ping Utility is provided as an easy way to test connection
speed and stability between the ROC and other devices. You
control the utility through the Start/Stop button. If you press
Start, the utility continually pings the device until you tell it to
stop. You are immediately able to view the results of each ping on
this screen.
To access the Ping Utility screen:
1. Select the Ping Utility tab. The Ping Utility screen displays.
Figure 5-3. Ping Utility
44 Revised July-07
Page 49

ROC Polling Services User Manual
2. Select the Ping Utility tab to review the following information
collected for the device.
Field Description
Counters
Displays general information about the
number of pings.
Success
Fail
Statistics
Turn Around
Min (ms)
Average
Attempts
Displays timing statistics about the pings
attempted.
(ms)
Max (ms)
(ms)
Displays the total number of
pings attempted.
Displays the number of pings
that returned successfully.
Displays the number of pings
that have not returned
successfully.
Displays, in milliseconds, the
time taken for the last
request/response sequence
to complete.
Displays, in milliseconds, the
quickest turnaround time
achieved while running the
current ping session.
Displays, in milliseconds, the
longest turnaround time
achieved while running the
current ping session.
Displays, in milliseconds, the
average turnaround time
achieved while running the
current ping session.
Configuration
Start/Stop
History
Allows you to set, in seconds, the time
between each ping request.
Starts and stops the Ping Utility. Once you
press Start, pings are sent to the device at
predefined intervals until you press the Stop
button.
Provides the Attempt number, Turn around,
Minimum, Maximum, and Average times
achieved for each ping sequence of the
current session.
5.3 Communication Viewer
The Communication Viewer monitors and reports all
communications occurring while the Diagnostics window is open.
To access the Communication Viewer screen:
Revised July-07 45
Page 50

ROC Polling Services User Manual
1. Select the Communication Viewer tab. The Communication
Viewer screen displays.
Figure 5-4. Communication Viewer
5.4 Event Log
Note: The text field of the Communication Viewer is color
coded. Outgoing data is blue, Incoming is Green, and Yellow
indicates an Error in the communication.
2. Review the following information collected for the device.
Field Description
Format
Show
OpCodes
Clear
Displays each communication packet in one of
three formats: Binary, Decimal, and Hex.
Decimal is the default.
Turns ON and OFF a description of each data
packet. This message displays at the beginning of
each data stream in the text box.
Clears the text box of any previous data.
The Event Log records a history of issues and events that have
occurred during connections. The log supports filtering which
allows you to narrow your search and provides you with more
relevant information. The information can be exported to provide
additional support should the need arise.
To access the Event Log:
1. Highlight the device you wish to view in the configuration
screen. You also have the ability to view all the events for your
devices by selecting the ROC Polling Server, multiple devices
by selecting groups, and individual devices.
46 Revised July-07
Page 51

ROC Polling Services User Manual
2. Select the Events tab in the communications frame.
Figure 5-5. Event Log
3.
Review the following information available on this screen.
Field Description
Event Filter
End Date
Event Type
Contains the
The Event Filter provides you with a means to
narrow events displayed in the log. By limiting the
number of results you can focus on events with
more relevance.
Start Date
text
Limits the log to only show
events occurring on or after this
date.
Limits the log to only show
events occurring on or before
this date.
Limits results to only show a
particular event type. Valid
values are All, Ping, AMS,
diagnostics, General, CRC
Error, No Response, and
Retry. The default is All.
Limits the log to only show
events with the selected text
appearing in the Description.
Details
Export
Revised July-07 47
This button displays all of the currently selected
event’s information. All details in the database for
this entry are shown.
Allows you to export events to an XML-based file.
This file has the extension .RPE. A viewer for this
Page 52

ROC Polling Services User Manual
Field Description
file is not currently available.
Delete
Refresh
Records
Event Type
Timestamp
Connection
Description
Allows you to delete events from the Event Log.
Allows you to refresh the event log and retrieve
the most recent information available.
Provides you with the number of events in the
selected log. 20 events are displayed per page. If
there are more than 20 events, you can navigate
to additional pages by using the arrows located on
either side of this text.
Displays a generalized category label for the
event.
Provides the time the event occurred.
Displays the ID of the connected device
responsible for the event.
Displays a message containing a description of
the event.
48 Revised July-07
Page 53

ROC Polling Services User Manual
Appendix A – ROC Field Server Installation Guide
This section describes how to install and configure the ROC Field
Server user program, FieldServer.TAR, in the ROC Field Server
product. Your ROC Field Server should also have a license key
installed in the CPU card (as described in Section A.1.1, Verifying
the License Key Installation). If the license key is installed, begin
at Section A.2. If the license key is not installed, begin at Section
A.1.
A.1 Installing the License Key
If you order the Field Server User Program for a new ROC Field
Server, your ROC Field Server is delivered with the license key
installed. Go to Section A.2, Downloading the Program.
If your ROC Field Server does not have the license key installed in
the CPU, you must install the license key yourself.
Caution
Failure to exercise proper electrostatic discharge precautions—
such as wearing a grounded wrist strap—may reset the processor
or damage electronic components, resulting in interrupted
operations.
To install a license key:
1. Remove power from the ROC Field Server.
2. Unscrew the screws from the Central Processing Unit (CPU)
faceplate.
3. Remove the CPU faceplate.
4. Place the license key in the appropriate terminal slot (P4 or P6)
of the CPU.
Incorrect
Figure A-1. License Key Installation
Correct
DOC0423A
Note: When using a single license key, install it in slot P4.
5. Press the license key into the terminal until it is firmly seated.
6. Replace the CPU faceplate.
Revised July-07 49
Page 54

ROC Polling Services User Manual
7. Replace the screws on the CPU faceplate.
8. Restore power to the ROC Field Server.
A.1.1 Verifying the License Key Installation
After you install the license key, you can verify whether the key is
recognized. From the ROCLINK 800 screen, select Utilities >
License Key Administrator. The License Key Administrator
screen displays.
Figure A-2. License Key Administrator
The FieldServer User Program appears in the Application Name
column. (For further information on the License Key
Administrator screen, refer to the ROCLINK 800 Configuration
Software User Manual, Form A6121.)
After you verify that the license key is correctly installed and
recognized, proceed to Section A.2, Downloading the Program.
Note: The Field Server screen also indicates whether the license
key is installed. See Section A.3.
A.2 Downloading the Program
This section provides instructions for installing the user program
into the Flash and ROM memory on the ROC Field Server using
ROCLINK 800 software.
To download the user program:
50 Revised July-07
Page 55

ROC Polling Services User Manual
1. Connect the ROC Field Server to your computer using the
Local Operation Interface (LOI) port.
2. Start and logon to ROCLINK 800.
3. Select Utilities > User Program Administrator from the
ROCLINK menu bar. The User Program Administrator screen
displays.
Figure A-3. User Program Administrator
4.
Click Browse and select the path and user program file to
download from the CD-ROM. (Program files are typically
located in the Program Files folder on the CD-ROM.) As
Figure A-4 shows, the screen lists all valid user program files
with the .TAR extension.
Revised July-07 51
Page 56

ROC Polling Services User Manual
Figure A-4. Select User Program File
5.
Click Open to select the program file. The User Program
Administrator screen displays. As shown in Figure A-5, note
that the Download User Program File frame identifies the
selected program and that the Download & Start button is
active.
Figure A-5. User Program Administrator
52 Revised July-07
Page 57

ROC Polling Services User Manual
6. Click Download & Start to begin loading the selected
program.
Figure A-6. Confirm Download
7.
Click Yes to begin the download. During the download, the
program performs a Warm Start, creates an event in the Event
Log, and—when the download completes—displays a
confirmation message.
Figure A-7. ROCLINK 800 Download Confirmation
Click OK. The User Program Administrator screen displays.
8.
Note that:
The Device User Program Environment frame reflects the
additional use of ROC Field Server memory.
The User Programs Installed in Device frame identifies the
program.
Revised July-07 53
Page 58

ROC Polling Services User Manual
Figure A-8. User Program Administrator Screen
9.
Click Close. The ROCLINK 800 screen displays and the
download is complete.
Figure A-9. ROCLINK 800 Screen
54 Revised July-07
Page 59

A.3 Configuring the Program
After you have loaded and enabled the user program, you
configure the Field Server User Program using the ROCLINK 800
software.
To configure the program:
1. Using the ROCLINK 800 screen’s directory tree, navigate to
the User Program > Program #1, FieldServer > Display#21,
Field Server.
ROC Polling Services User Manual
Figure A-10. Directory Tree
2.
Double-click #1. The Field Server screen displays.
Revised July-07 55
Page 60

ROC Polling Services User Manual
Figure A-11. Field Server
3.
Use this screen to configure the ROC Field Server.
Field Description
Point
Number
Tag
Program
Status
License Key
Provides a numeric identifier for the configuration.
Valid values are 1 through 5. You can define up to
five ROC Field Server configurations to allow one
TCP/IP port for each Comm port.
Attaches a user-defined name to this particular
Field Server configuration. Enter as many
alphanumeric characters as necessary.
This read-only field shows whether the Field
Server program is running. Valid values are
Running or Loaded.
Note: If the program is loaded but not running,
access the User Program Administrator screen
(see Figure A-8) and click Start to initiate the
program.
This read-only field shows whether the license
key (required for this program) is correctly
installed. Valid values are Installed or Not
Installed.
56 Revised July-07
Page 61

Field Description
Comm Ports
This frame indicates the configuration for each
comm port associated with this program.
Note: The values you can check reflect the
settings on the Comm Port screen’s General tab
(accessed by ROC > Comm Port). Use the Port
Owner frame on that screen to link a specific User
Program with a specific comm port and that comm
port’s connection rate. The User Program number
must match the User Program number to which
you installed the Field Server software.
ROC Polling Services User Manual
TCP
Status
Port
Rx Byte
Tx Byte
This frame defines transmission control protocol
(TCP) components for this Field Server.
This read-only field shows this
Field Server’s status. Valid values
are Enabled (Field Server is
receiving TCP transmissions),
Disabled (Field Server is not
receiving TCP transmissions), or
Connected (Field Server is
connected to ROC Polling Service
Manager).
Identifies the specific four-digit
port for this Field Server. Values
1131, 1113, and 1024 and lower
are reserved.
This read-only field shows the
Count
Count
total bytes this Field Server has
received from the Polling Service
Manager. The system increments
this value as the ROC Field
Server receives packets from the
ROC Polling Service Manager.
This read-only field shows the
total bytes this Field Server has
transmitted to the Polling Service
Manager. The system increments
this value as the ROC Field
Server sends packets to the ROC
Polling Service Manager.
Connections
Revised July-07 57
Indicates the total number of
active TCP connections for this
ROC Field Server. Three is the
maximum number of connections
allowed per ROC Field Server.
A connection is “active” if, during
the past 30 minutes, it has
received a transmission. If a
connection has not received a
transmission in the past 30
minutes, the system closes the
connection.
Page 62

ROC Polling Services User Manual
Field Description
TCP
(continued)
Inactivity
Defines, in minutes, the amount of
time a connection can remain
inactive before the ROC Field
Server closes it.
Close
Connections
Protocols
Timeouts
Initial (ms)
Interpacket
The fields in this frame are reserved for future
development.
Defines the timeout periods for data packets.
(ms)
Click this button to manually close
all TCP connections between the
ROC Field Server and the ROC
Polling Service Manager.
Indicates, in milliseconds, the
amount of time the ROC Field
Server waits for an initial
response from the first data
packet from the ROC field unit. If a
transmission exceeds this value,
the ROC Field Server ignores the
entire response.
Indicates, in milliseconds, the
maximum allowable amount of
time between partial data packets
sent from the ROC field unit. If a
transmission exceeds this value,
the ROC Field Server ignores the
entire response.
4. Click Apply to save the configurations for this Field Server.
This completes the process of configuring a ROC Field Server.
For further information on user programs, refer to the ROCLINK
800 Configuration Software User Manual (Form A6121).
If you have comments or questions regarding this manual, please direct them to your local sales
representative or contact:
Emerson Process Management
Remote Automation Solutions
Marshalltown, Iowa 50158 USA
Houston, TX 77065 USA
Pickering, North Yorkshire UK Y018 7JA
Website: www.EmersonProcess.com/Remote
58 Revised July-07
 Loading...