

Remote Automation Solutions Level Sensor Application Module (for FB107) User Manual Manuals & Guides
Page 1

Form A6271
Part Number D301596X012
June 2009
Level Sensor Application Module
™
(for FloBoss
107 Flow Managers)
User Manual
Remote Automation Solutions
Page 2

Level Sensor Application Module User Manual
Revision Tracking Sheet
June 2009
This manual may be revised periodically to incorporate new or updated information. The revision date of each
page appears at the bottom of the page opposite the page number. A change in revision date to any page also
changes the date of the manual that appears on the front cover. Listed below is the revision date of each page
(if applicable):
Page Revision
Initial release Jun-09
NOTICE
Remote Automation Solutions (“RAS”), division of Emerson Process Management shall not be liable for technical or editorial errors in this
manual or omissions from this manual. RAS MAKES NO WARRANTIES, EXPRESSED OR IMPLIED, INCLUDING THE IMPLIED
WARRANTIES OF MERCHANTABILITY AND FITNESS FOR A PARTICULAR PURPOSE WITH RESPECT TO THIS MANUAL AND, IN
NO EVENT SHALL RAS BE LIABLE FOR ANY INCIDENTAL, PUNITIVE, SPECIAL OR CONSEQUENTIAL DAMAGES INCLUDING, BUT
NOT LIMITED TO, LOSS OF PRODUCTION, LOSS OF PROFITS, LOSS OF REVENUE OR USE AND COSTS INCURRED INCLUDING
WITHOUT LIMITATION FOR CAPITAL, FUEL AND POWER, AND CLAIMS OF THIRD PARTIES.
Bristol, Inc., Bristol Canada, BBI SA de CV and Emerson Process Management Ltd, Remote Automation Solutions division (UK), are wholly
owned subsidiaries of Emerson Electric Co. doing business as Remote Automation Solutions (“RAS”), a division of Emerson Process
Management. FloBoss, ROCLINK, Bristol, Bristol Babcock, ControlWave, TeleFlow and Helicoid are trademarks of RAS. AMS, PlantWeb
and the PlantWeb logo are marks of Emerson Electric Co. The Emerson logo is a trademark and service mark of the Emerson Electric Co.
All other trademarks are property of their respective owners.
The contents of this publication are presented for informational purposes only. While every effort has been made to ensure informational
accuracy, they are not to be construed as warranties or guarantees, express or implied, regarding the products or services described
herein or their use or applicability. RAS reserves the right to modify or improve the designs or specifications of such products at any time
without notice. All sales are governed by RAS’ terms and conditions which are available upon request.
RAS does not assume responsibility for the selection, use or maintenance of any product. Responsibility for proper selection, use and
maintenance of any RAS product remains solely with the purchaser and end-user.
©2009 Remote Automation Solutions, division of Emerson Process Management. All rights reserved
.
ii Issued Jun-09
Page 3

Level Sensor Application Module User Manual
Contents
Page
Chapter 1 – Introduction....................................................................................................................1-1
1.1 Scope and Organization...............................................................................................1-1
1.2 Product Overview .........................................................................................................1-1
1.2.1 Wave Smoothing............................................................................................1-2
1.2.2 Module Wiring................................................................................................1-4
1.3 Program Requirements.................................................................................................1-5
Chapter 2 – Installation......................................................................................................................2-1
2.1 Installing the Application Module..................................................................................2-1
Chapter 3 – Configuration.................................................................................................................3-1
3.1 Level Sensor Configuration Screen..............................................................................3-2
3.2 Level Sensor Data Screen............................................................................................3-4
3.3 Saving the Configuration ..............................................................................................3-8
Chapter 4 – Reference Materials.......................................................................................................4-1
4.1 Point Type 63: Level Sensor Configuration and Status................................................4-3
4.2 Point Type 64: Level Sensor Data................................................................................4-6
Issued Jun-09 Contents iii
Page 4

Level Sensor Application Module User Manual
[This page is intentionally left blank.]
iv Contents Issued Jun-09
Page 5

Chapter 1 – Introduction
This chapter describes the structure of this manual and presents an
overview of the Level Sensor (LS) Application Module for the
FloBoss™ 107 (“FB107”). The LS Application Module provides all the
functions necessary to communicate with a level sensor (such as an
Advanced Telemetrics 1100LD digital tank gauge or any other level
sensor using that protocol), including an onboard communications port
that enables module-to-LS communications without using one of the
communications ports on the FB107.
The standard APP 485 application module (which includes the LS
Application Module) streamlines the installation process by
automatically installing all point types and screens that are part of the
application. APP 485 modules can house a variety of applications; for
further information about additional APP 485 modules, contact your
sales representative.
Level Sensor Application Module User Manual
1.1 Scope and Organization
This document serves as the user manual for the Level Sensor
Application module, which is intended for use in a FloBoss 107
(FB107). This manual describes how to install and configure the Level
Sensor Application module (referred to as the “LS Application module”
or “the module” throughout the rest of this manual). You access and
configure this module using ROCLINK™ 800 Configuration Software
loaded on a personal computer running Windows® 2000 (with Service
Pack 2), Windows XP, or Windows Vista.
The sections in this manual provide information in a sequence
appropriate for first-time users. Once you become familiar with the
procedures and the software, the manual becomes a reference tool.
This manual has the following major sections:
Chapter 1 – Introduction
Chapter 2 – Installation
Chapter 3 – Configuration
Chapter 4 – Reference
This manual assumes that you are familiar with the FB107 and its
configuration. For more information, refer to the FloBoss 107 Flow
Manager Instruction Manual (Form A6206) or the ROCLINK 800
Configuration Software User Manual (for FloBoss 107) (Form A6217).
1.2 Product Overview
The Level Sensor Application module enables the FB107 to
communicate directly with up to ten level sensors (reporting on oil or
Issued Jun-09 Introduction 1-1
Page 6

Level Sensor Application Module User Manual
water or both) on the same EIA-485 (RS-485) communications port.
(The module provides its own communication for this purpose.) The
module serves as an interface between the sensors and the FB107,
supporting the Advanced Telemetrics 1100LD or 1100C digital tank
gauges or any other level sensor using that protocol. The module polls
data from the level sensor, validates that data, and updates the
appropriate production totals using that data.
At a scan interval you specify, the module polls each sensor, requesting
current tank levels and fluid temperatures. As each sensor responds, the
module compares the current tank level value against that sensor’s last
good level value response.
If the sensor reports a difference (representing a drop in level), the
module multiplies that difference by a conversion factor (“strapping
value”) you define, reflects that change in the accumulated runs, and
calculates and updates the closing stock value. For this module, the drop
in level value represents a load. The module also determines production
values, which represent increases in the level values, using the
calculation:
(Closing stock value) + (Accumulated runs) – (Opening stock value)
At the contract hour (which you can either specifically define for the
module or default to the contract hour defined on the FB107), the
module:
Copies the total production values for all tanks to yesterday’s total
production and initializes total production, and
Copies the closing stock values to the opening stock values and
initializes the accumulated runs and production.
1.2.1 Wave Smoothing
The module uses an algorithm to limit the detection of “waves,” or false
changes in fluid level. You use the Level Sensor Data screen (see
Section 3.2) to configure the wave smoothing parameters, which
include:
Maximum wave limit (distance in inches above or below the last
valid reading).
Scan periods (the number of times the module reads the level to
validate the wave height).
Wave timeout (the number of scans to determine if level variations
are due to liquid movement or “sloshing”). This parameter enables
you to validate and count level changes that are smaller than the
maximum wave limit.
To assist in the calculations, the module also tracks the following values
and displays them on the Level Sensor Data screen:
Current level (the actual measured level).
Production accumulation (positive changes in level).
Load accumulation (negative changes in level).
1-2 Introduction Issued Jun-09
Page 7

Level Sensor Application Module User Manual
Change (sensor level minus production or load level).
Once each scan period, the module reads the sensors and performs wave
smoothing calculations. You can configure maximum wave limits
(typically 1 inch) and specify the number of scan periods (typically one
per second) until the module considers a wave a valid reading (where
the wave timeout value = 5) for oil or water.
When the module first reads the sensor, the module stores that value as
the production or load level. When the next sensor reading occurs, the
module compares the stored production level value to the actual reading
and, depending on the amount of change, performs one of three actions:
No change
If the difference between one reading and the next is less than or
equal to the maximum wave limit value, the module retains the
current value for the specified number of scan periods until wave
timeout value expires. At that time the level becomes the production
or load level and the module adjusts the accumulators accordingly.
Positive change
If the difference between one reading and the next is positive and
greater than the maximum wave limit value, the module adds the
change to the production accumulator and the new level becomes
the production or load level. The module continues to add positive
changes to the production accumulator until there are no more
changes outside of the maximum wave limit and the wave timeout
value expires. At that time the level becomes the production or load
level.
Negative change
If the difference between one reading and the next is negative and
greater than the maximum wave limit value, the module adds the
change to the load accumulator and continues adding subsequent
values to the load accumulator as long as the level continues to drop
and the wave timeout value has not expired.
Figure 1 presents a flow chart illustrating this process:
Issued Jun-09 Introduction 1-3
Page 8

Level Sensor Application Module User Manual
Figure 1. Wave Smoothing
1.2.2 Module Wiring
Connect the sensor(s) to the communications port on the module using
between 16 and 24 AWG wiring. Figure 2 shows example wiring
between the module and several sensors.
Note: Level sensors can be either externally powered or obtain power
through the sensor wiring itself.
1-4 Introduction Issued Jun-09
Page 9

Level Sensor Application Module User Manual
120 OHM
TERMINATION RESISTOR
USER SUPPLIED
A
B
FIELD
DEVICE
+
-
A
FIELD
DEVICE
B
++
--
A
FIELD
DEVICE
B
EXTERNAL
Figure 2. Module Wiring
DO Points
To save power, you can specify a DO point the module controls,
which enables you to turn on a level sensor before it is polled and then
turn it off after polling. This is typically a DO status point (2,x,3). To
accomplish this, you need to connect to a DOR module on the FB107
or supply your own relay.
1.3 Program Requirements
The Level Sensor Application module is compatible with version 1.20
(or greater) of the FB107 firmware and with version 1.82 (or greater) of
the ROCLINK 800 software.
EXTERNAL
POWERPOWER
EXTERNAL
POWER
Issued Jun-09 Introduction 1-5
Page 10

Level Sensor Application Module User Manual
[This page is intentionally left blank.]
1-6 Introduction Issued Jun-09
Page 11

Chapter 2 – Installation
This chapter provides instructions for installing the LS Application
module. Read Section 1.3 of this manual for program requirements.
2.1 Installing the Application Module
The application module occupies the standard footprint of a FB107 I/O
or communications module. To install the module, place it in an empty
slot (1 through 7) on the FB107. To ensure that the FB107 recognizes
the module, you must perform a warm start (ROC > Flags > Warm
Start).
Note: Although the label on the physical module is APP 485, the
Description field on the General tab verifies that this module
contains the Level Sensor Application. See Figure 3.
Level Sensor Application Module User Manual
Figure 3. LS Application Module
Once you have verified that the FB107 has recognized the LS
Application module, proceed to Chapter 3 to begin configuring the
module.
Issued Jun-09 Installation 2-1
Page 12

Level Sensor Application Module User Manual
[This page is intentionally left blank.]
2-2 Installation Issued Jun-09
Page 13

Chapter 3 – Configuration
After you have successfully installed the LS Application module in the
FB107, you configure the module using two module-specific screens
(Level Sensor Program Configuration and Level Sensor Data):
Use the Level Sensor Program Configuration screen to define the
number of sensors; assign a DO point to the module, and set scan,
polling, and communication parameters.
Use the Level Sensor Data screen to set sensor-specific parameters
such as labels, alarms, and wave smoothing values. This screen also
displays production information and polling status.
You must configure the module before you can establish
communications with the level sensors. To configure the module (after
logging onto ROCLINK 800 and successfully installing the module),
proceed through the screens as shown in this chapter.
Level Sensor Application Module User Manual
You can access all the module-specific screens from the main
ROCLINK 800 screen:
Figure 4. ROCLINK 800
Issued Jun-09 Configuration 3-1
Page 14
Level Sensor Application Module User Manual
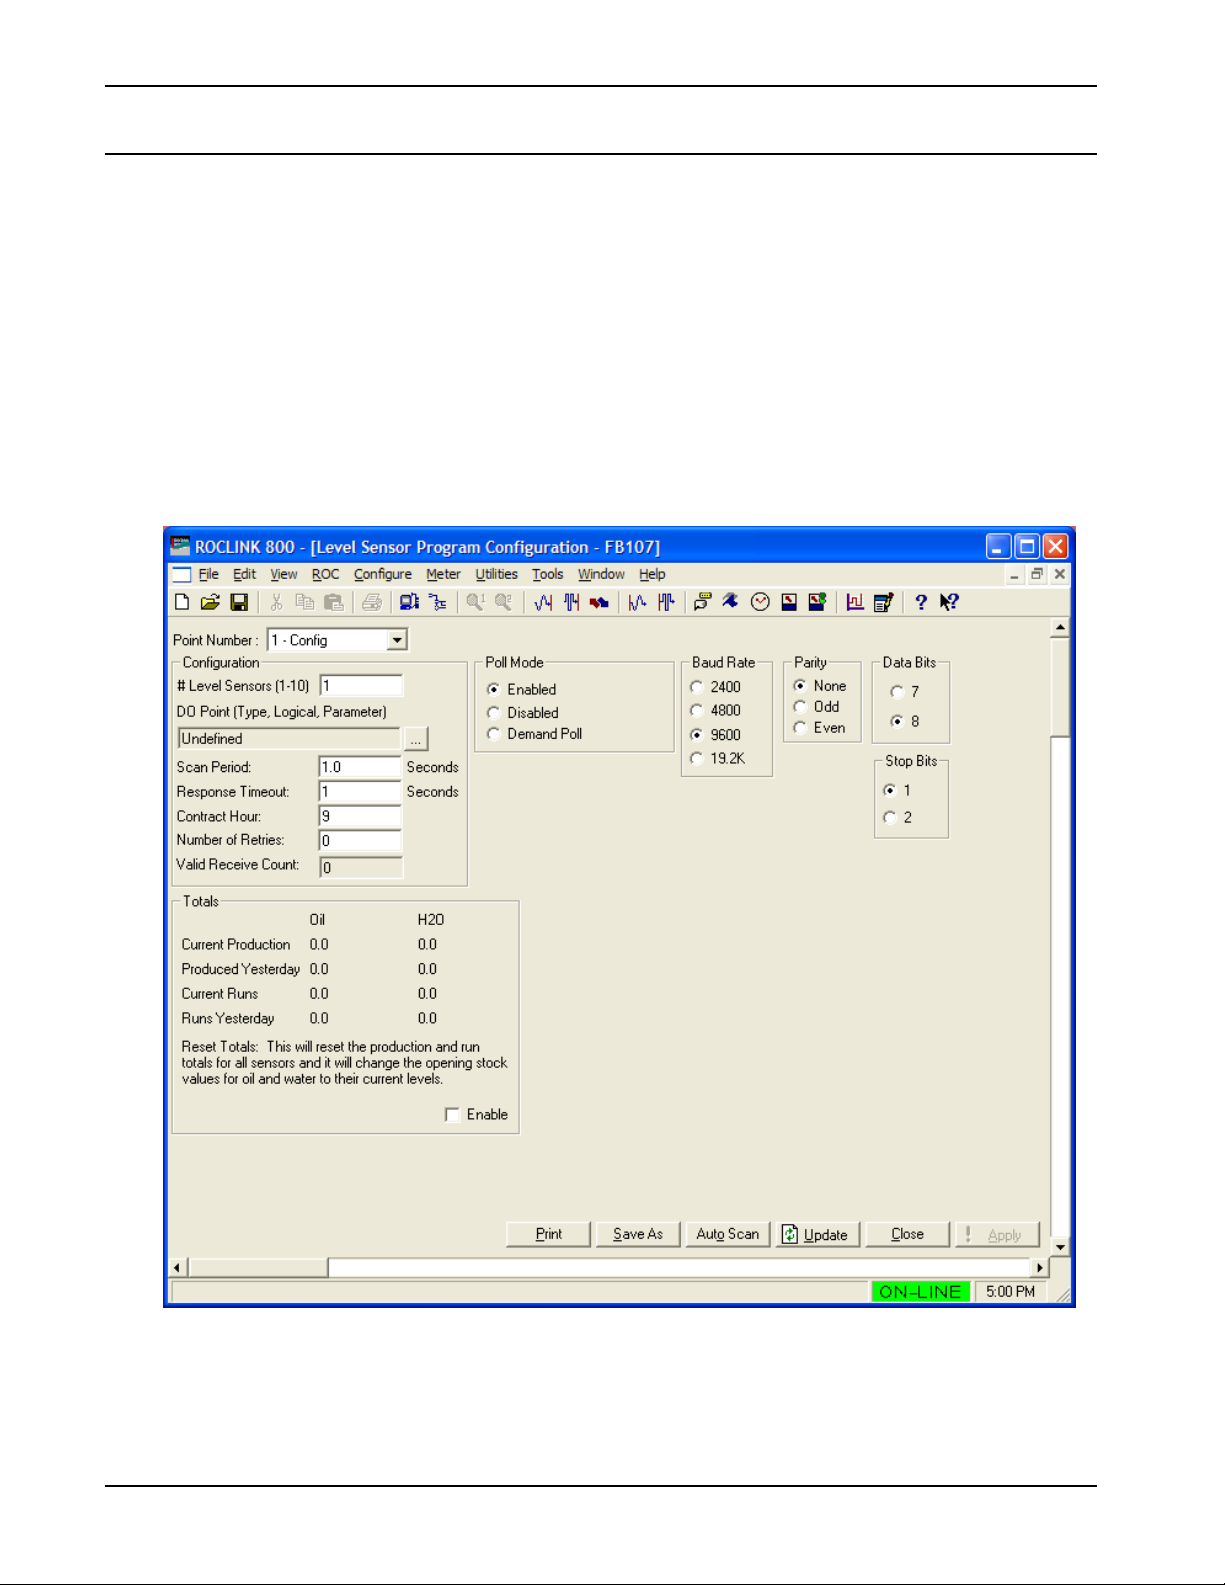
3.1 Level Sensor Configuration Screen
Use this screen to configure communications with one or more level
sensors, associate a digital output point with the module, and enable and
set polling, scan, and communications parameters. To access this
screen:
1. From the Directory Tree, double-click SLOT X - Level Sensor App
Mod (where X is the slot number where the module is installed).
2. Double-click Level Sensor App Mod.
3. Double-click Display #64, Level Sensor Program Configuration.
4. Double-click #1, Config. The Level Sensor Configuration screen
displays:
Figure 5. Level Sensor Configuration
3-2 Configuration Issued Jun-09
Page 15

Level Sensor Application Module User Manual
5. Review the values in the following fields:
Field Description
Point Number
Identifies the point number associated with this
module. 1 – Config is the only valid option.
# Level Sensors
DO Point (Type,
Logical, Parameter)
Scan Period
Response Timeout
Contract Hour
Sets the maximum number of level sensors. Valid
values are 1 to 10. The default is 1.
Sets the digital output TLP associated with the
module for power control. Enter either a specific
TLP or click
and use it to define the TLP.
To save power, you can use this field to specify a
DO point the module controls, turning sensors on
before they are polled and turning them off after
the polling completes.
Sets, in seconds, how often the module scans
the sensors for level information. Valid values are
1 to 9999999. The default is 1.0 second.
Sets, in seconds, how long the module waits for a
response from a level sensor before timing out
the connection. Valid values are 0 to 65535. The
default is 1 second.
Sets the hour (in a 24-hour clock format) at which
the module moves production and load totals
from current to yesterday’s totals. Valid values
are 0 (midnight) to 23 (11PM).
Note: At startup, this value defaults to the
contract hour defined in the FB107. You
can reset this value specifically for this
module.
to display the Select TLP screen
Number of Retries
Valid Receive Count
Totals
Reset Totals
Poll Mode
Issued Jun-09 Configuration 3-3
Sets how many times the module attempts to poll
a level sensor after the initial attempt before
timing out. Valid values are 0 to 255. The default
is 0.
This read-only field shows the number of
validated responses the module has received
from level sensors. This value rolls over after a
maximum of 65535 responses.
These read-only fields show, for oil and water,
production and run totals for yesterday and
today.
Enables you to reset the production and run
totals.
Note: Selecting this option resets the opening
stock values for oil and water to their
current levels.
Controls when the module polls the sensors.
Valid values are Enabled (poll sensors according
to the value in the Scan Period field) or Disabled
(do not poll sensors).
Page 16

Level Sensor Application Module User Manual
Field Description
Initiate Demand Poll
Starts a poll of all sensors, regardless of the
value in the Scan Period field. The module clears
this checkbox after it completes polling and
calculates levels and includes those values in the
current levels.
Note: The module ignores the Wave Limit and
Wave Limit Counts when you issue an ondemand poll.
Baud Rate
Parity
Data Bits
Stop Bits
6. Click Apply to save any changes you have made to this screen.
7. Click Close to return to the ROCLINK 800 screen. Proceed to
Section 3.2 to define sensor data for each sensor.
3.2 Level Sensor Data Screen
Use this screen to review level data the FB107 receives from the
sensors. The module provides one iteration of this screen for up to 10
defined sensors. You can move between sensor data displays using
either the Point Number drop-down box on this screen or from the list
on the Directory Tree.
Sets, in bits per second, the communication baud
rate. 9600 is the default.
Sets the communication parity. None is the
default.
Sets the communication data bits. 8 is the
default.
Sets the communication stop bits. 1 is the
default.
To access this screen:
1. From the Directory Tree, double-click SLOT X - Level Sensor App
Mod (where X is the slot number where the module is installed).
2. Double-click Level Sensor App Mod.
3. Double-click Display #65, Level Sensor Data.
4. Double-click #1, Sensor 1. The Level Sensor Data screen displays:
3-4 Configuration Issued Jun-09
Page 17

Level Sensor Application Module User Manual
Figure 6. Level Sensor Data
5. Review—and change as necessary—the values in the following
fields:
Field Description
Point Number
General
Configuration
Tag Name
Unit Number
Num Levels
Fluid Temperature
Identifies the sensor number (up to 10) for this
screen. Click d to display all defined sensors.
Sets general information for the selected sensor.
Sets a 10-character label for the selected sensor.
The default is Sensor X (where X is a number
between 1 and 10).
Identifies the unit number of the tank associated
with this sensor.
This read-only field shows the number of levels
the sensor reports. Typically, this is two: oil and
water.
This read-only field shows, in degrees
Fahrenheit, the current temperature of the fluid in
the tank.
Strapping Value
Wave Smoothing
Configuration
Issued Jun-09 Configuration 3-5
Sets the conversion factor the module uses to
convert linear measurement to volume. The
module multiplies the level value by this strapping
value to determine the volume of the fluid.
Sets parameters that average (or smooth) wave
variations in fluid (both oil and water) levels.
Page 18

Level Sensor Application Module User Manual
Field Description
Maximum Wave
Sets, in inches, a maximum wave height for
smoothing. The module ignores level changes
less than or equal to this value, attributing them
to sloshing in the tank and ignoring them when
determining production or accumulated values.
Changes in height in excess of this value trigger
an alarm.
Wave Timeout
Wave Timeout Value
Diagnostics –
Communication
Status
Enables the module, if selected, to process the
current oil or water levels after completing the
number of polls specified in the Wave Timeout
Value field, even if the level change has not
exceeded the wave limit for either oil or water.
Sets the number of polls the module must
complete before calculating oil or water levels.
These read-only fields show the status of
communications with the sensors. The module
displays a variety of messages related to the
sensors, which can include:
Polling Disabled
Valid Response Received
Retrying
Invalid Message Format
Response Timeout
Invalid CRC
Invalid Unit Number
No Level Data
No Temperature Data
No Error Data
and No Warning Data.
Messages are color-coded to indicate severity.
Red indicates an alarm condition.
Sensor Error Value
Sensor Warning
Value
Totals
High Level Alarm
Clear
High Level Alarm Set
High Level Alarm EU
3-6 Configuration Issued Jun-09
This read-only field shows the number of errors
read from the sensor.
This read-only field shows the number of
warnings read from the sensor.
These fields, if selected, enable the module to
calculate the total production and run values for
oil and/or water and display those values on the
Level Sensor Configuration screen.
This read-only field indicates that the high level
alarm is currently inactive.
Note: Alarms occur only on oil levels.
This read-only field indicates that the high level
alarm is currently active.
Note: Alarms occur only on oil levels.
Sets the tank level, in engineering units (EUs),
above which the high level alarm occurs. 900 is
the default.
Page 19

Level Sensor Application Module User Manual
Field Description
Alarming Mode
Sets how the program logs alarms with
Spontaneous Report by Exception (SRBX)
notification. Click d to select a mode (described
below).
Note: The system generates one alarm,
regardless of the number of different
errors that may occur in the time before
the alarm clears. SRBX notification occurs
based on the Alarm Logging Mode. For
the system to generate an alarm (such as
for a Poll Sequence Failure error), you
must first enable the Alarm Logging Mode
parameter on the current logical stream.
Production
Information
No Alarm
Logging
Enable
Alarm
Log,
no SRBX
Enable
Log,
SBRX on
Set
Enable
Log,
SRBX on
Clear
Enable
Log,
SRBX on
Both
These read-only fields show the current
production totals for both oil and water.
6. Click Apply to save your changes.
No logging occurs.
Logging occurs, but without
generating SRBX notifications.
Logging occurs, and SRBX
notifications occur on alarm set.
Logging occurs, and SRBX
notifications occur on alarm clear.
Logging occurs, and SRBX
notifications occur on both alarm set
and alarm clear.
7. Click Close to return to the ROCLINK 800 screen. Proceed to
Section 3.3 to save your configuration.
Issued Jun-09 Configuration 3-7
Page 20

Level Sensor Application Module User Manual
3.3 Saving the Configuration
Whenever you modify or change the configuration, it is a good practice
to save the final configuration to memory. To save the configuration:
1. Select ROC > Flags. The Flags screen displays:
Figure 7. Flags screen
2. Click Save Configuration. A verification message displays:
Figure 8. Perform screen
3-8 Configuration Issued Jun-09
Page 21

Level Sensor Application Module User Manual
3. Click Yes to begin the save process. The Status field on the Flags
screen displays In Progress. When the process completes, the
following message displays:
Figure 9. Save Confirmation
4. Click OK. The Status field on the Flags screen displays Completed.
5. Click Update on the Flags screen. This completes the process of
saving your new configuration.
Note: For archive purposes, you should also save this configuration to
your PC’s hard drive or a removable media (such as a diskette or
a flash drive) using the File > Save Configuration option on the
ROCLINK 800 menu bar.
Issued Jun-09 Configuration 3-9
Page 22

Level Sensor Application Module User Manual
[This page is intentionally left blank.]
3-10 Configuration Issued Jun-09
Page 23

Level Sensor Application Module User Manual
Chapter 4 – Reference Materials
This section provides tables of information on the point types the Level
Sensor Application module uses.
Point Type 63 (Level Sensor Configuration and Status)
Point Type 64 (Level Sensor Data)
Issued Jun-09 Reference 4-1
Page 24

Level Sensor Application Module User Manual
[This page is intentionally left blank.]
4-2 Configuration Issued Jun-09
Page 25

Level Sensor Application Module User Manual
4.1 Point Type 63: Level Sensor Configuration and Status
Point type 63 contains the parameters for configuring the Level Sensor Application module and houses the status information from the sensors.
The module maintains one logical point of this point type.
Point Type 63: Level Sensor Application Configuration
Parm
#
0 Point Tag ID R/W User AC 10
1 Not Used
2 Not Used
3 R/W Both UINT8 1
4 Not Used
5 DO Point Type R/W User UINT8 1 DO = 2;
6 DO Logical R/W User UINT8 1 DO = 0-37;
7 DO Parameter R/W User FL 4 DO = 3;
8 Poll Mode R/W User UINT8 1
9 Scan Period R/W User FL 4 Any Positive
10 Response Timeout R/W User UINT16 2
11 Valid Receive Counter R/O System UINT16 1
12 Current Oil Production R/O System FL 4 Any Positive
Name Access
System
or User
Update
Data
Type
Length Range Default Version
0x20 → 0x7E for
each ASCII
character
0 → 10
Softpoint = 17
Disabled = 255
Softpoint = 0 - 31
Disabled = 255
Softpoint = 1 - 21
Disabled = 255
0 → 2
Floating Point
Number
0 → 65535
0 → 65535
Floating Point
Number
“Config“ 1.00 Point Type Description
1 1.00 Number of level sensors polled
255 1.00 Point type for selected DO
255 1.00 Logical for selected DO
255 1.00 Parameter for selected DO
0 1.00 Poll Mode:
1.0 1.00 Scan Period
1 1.00 Response Timeout
0 1.00 Valid Receive Counter
0.0 1.00 Current Oil Production
Description of functionality
0 = Polling Disabled
1 = Normal Poll
2 = Demand Poll
and meaning of values
4-3 Reference Issued Jun-09
Page 26
Level Sensor Application Module User Manual
Point Type 63: Level Sensor Application Configuration
Parm
#
13 Current H2O Production R/O System FL 4 Any Positive
14 Yesterday’s Oil Production R/O System FL 4 Any Positive
15 Yesterday’s H2O Production R/O System FL 4 Any Positive
16 Current Oil Runs R/O System FL 4 Any Positive
17 Current H2O Runs R/O System FL 4 Any Positive
18 Yesterday’s Oil Run R/O System FL 4 Any Positive
19 Yesterday’s H2O Run R/O System FL 4 Any Positive
20 Contract Hour R/W User UINT8 1
21 Cold Start R/W User UINT8 1
22 Baud Rate R/W User UINT8 1
23 Stop Bits R/W User UINT8 1
24 Data Bits R/W User UINT8 1
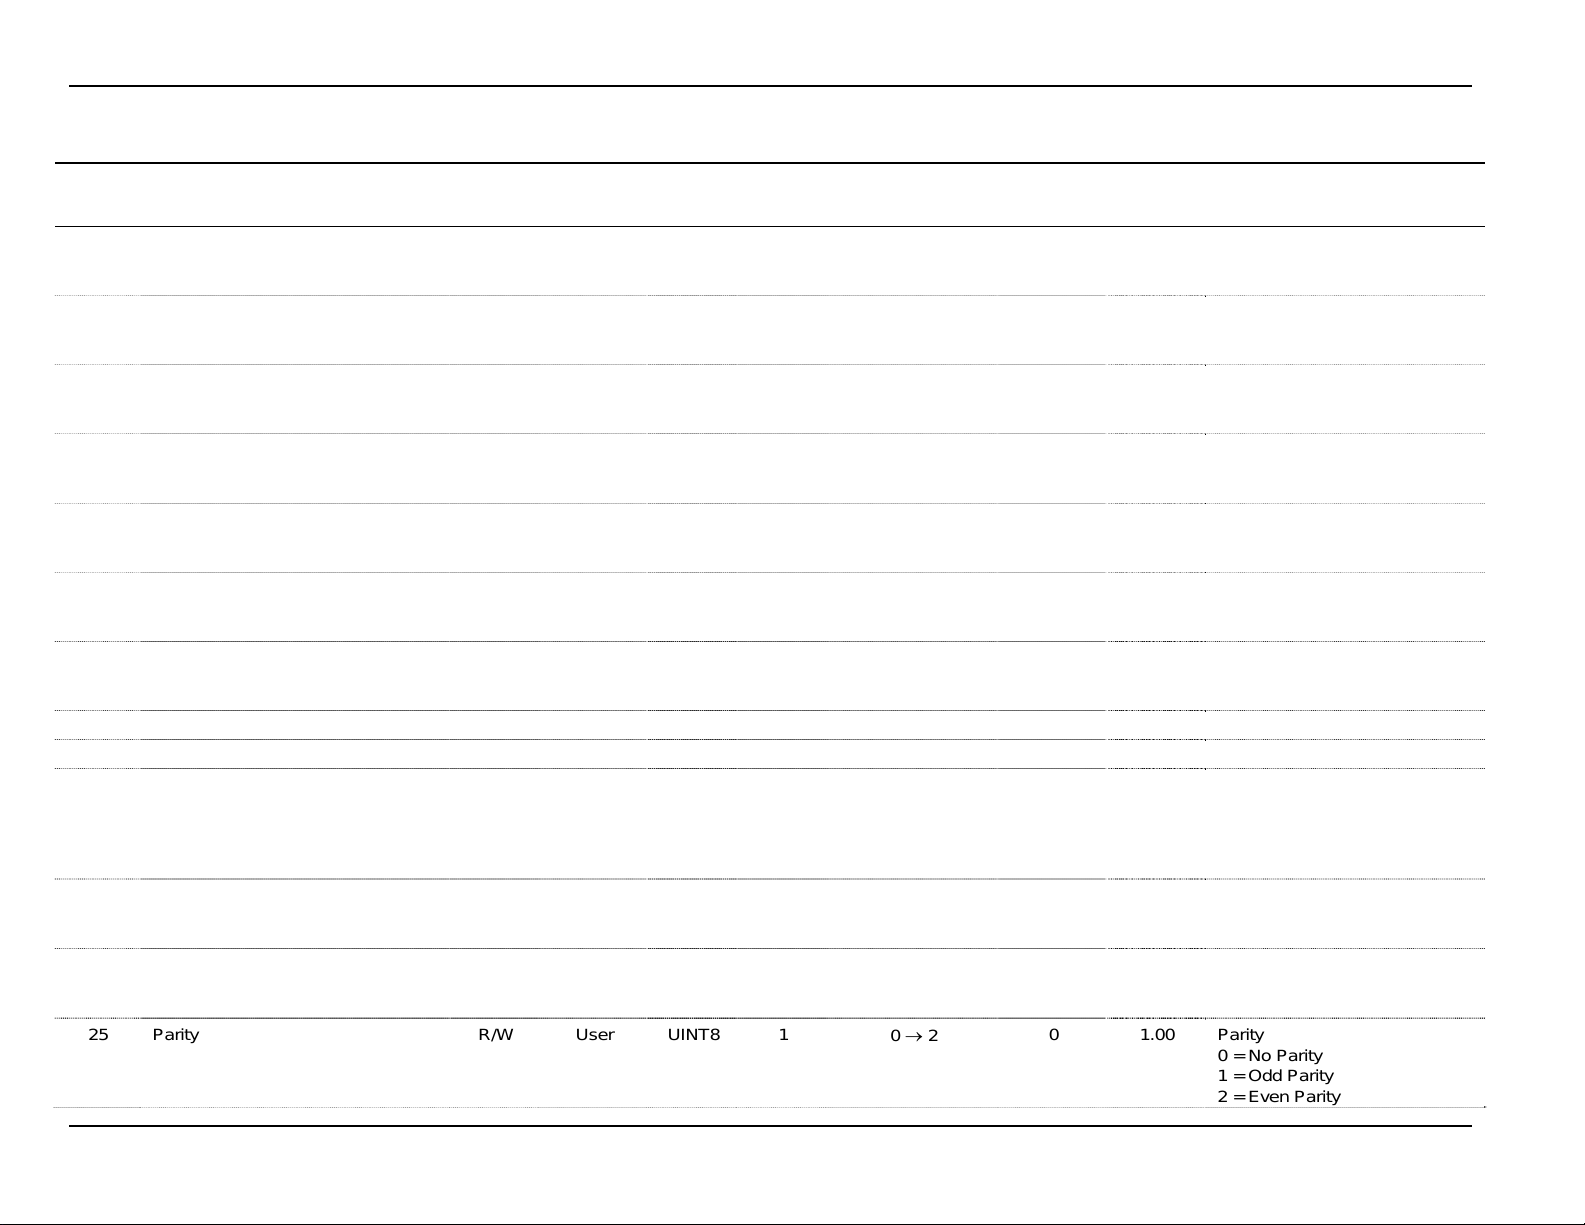
25 Parity R/W User UINT8 1
Name Access
System
or User
Update
Data
Type
Length Range Default Version
Floating Point
Number
Floating Point
Number
Floating Point
Number
Floating Point
Number
Floating Point
Number
Floating Point
Number
Floating Point
Number
0 → 23
0 → 1
0 → 3
1 → 2
7 → 8
0 → 2
Description of functionality
and meaning of values
0.0 1.00 Current H2O production
0.0 1.00 Yesterday’s Oil Production
0.0 1.00 Yesterday’s H2O Production
0.0 1.00 Current Oil Runs
0.0 1.00 Current H2O Runs
0.0 1.00 Yesterday’s Oil Run
0.0 1.00 Yesterday’s H2O Run
0 1.00 Contract Hour
0 1.00 Cold Start
2 1.00 Baud Rate:
0 = 2400 Baud
1 = 4800 Baud
2 = 9600 Baud
3 = 19200 Baud
1 1.00 Stop Bits:
1 = 1 Stop Bit
2 = 2 Stop Bits
8 1.00 Data Bits
7 = 7 Data Bits
8 = 8 Data Bits
0 1.00 Parity
0 = No Parity
1 = Odd Parity
2 = Even Parity
4-4 Reference Issued Jun-09
Page 27

Point Type 63: Level Sensor Application Configuration
Parm
#
26 Number of Retries R/W User UINT8 1
Name Access
System
or User
Update
Data
Type
Level Sensor Application Module User Manual
Length Range Default Version
1 → 255
0 1.00 Number of Retries
Description of functionality
and meaning of values
Issued Jun-09 Reference 4-5
Page 28

Level Sensor Application Module User Manual
4.2 Point Type 64: Level Sensor Data
Point type 64 contains the parameters for level sensor data. The module maintains 10 logical points of this point type (where logical 0 is sensor 1,
logical 1 is sensor 2, and so on).
Point Type 64: Level Sensor Data
Parm
#
0 Tag R/W User AC 10
1 Not Used
2 Level Sensor Address R/W User UINT8 1
3 Strap Value R/W User FL 4 Any Positive
4 Fluid Temperature R/O System FL 4 Valid Floating
5 System Message R/O System UINT8 1
6 Num Levels R/O System UINT8 1
7 Oil Wave Limit R/W User FL 4 Any Positive
Name Access
System
or User
Update
Data
Type
Length Range Default Version
0x20 → 0x7E for
each ASCII
character
1 → 99
Floating Point
Number
Point Number
0 → 10
0 → 2
Floating Point
Number
Logical 0
= “Sensor
1” to
Logical 9
= “Sensor
10”
0 1.00 Level Sensor Address
1 1.00 Strap Value
0.0 1.00 Dry Heating Value
0 1.00 Error:
0 1.00 Num Levels
0.25 1.00 Oil Wave Limit
1.00 Tag
Description of functionality
0 = Polling Disabled
1 = Valid Response
Received:
2 = Retrying
3 = Invalid Message
Format:
4 = Response Timeout
5 = Invalid CRC
6 = Invalid Unit Number
7 = No Level Data
8 = No Temperature Data
9 = No Error Data
10 = No Warning Data
and meaning of values
4-6 Reference Issued Jun-09
Page 29

Point Type 64: Level Sensor Data
Parm
#
8 H2O Wave Limit R/W User FL 4 Any Positive
9 Oil Wave Limit Count R/W User UINT8 1
10 H2O Wave Limit Count R/W User UINT8 1
11 Current Oil Level R/O System FL 4 Valid Floating
12 Current H2O Level R/O System FL 4 Valid Floating
13 Oil Closing Stock R/O System FL 4 Valid Floating
14 H2O Closing Stock R/O System FL 4 Valid Floating
15 Oil Runs R/O System FL 4 Any Positive
16 H2O Runs R/O System FL 4 Any Positive
17 Opening Stock Oil R/O System FL 4 Valid Floating
18 Opening Stock H2O R/O System FL 4 Valid Floating
19 Oil Production R/O System FL 4 Any Positive
20 H2O Production R/O System FL 4 Any Positive
21 New Oil Level R/O System FL 4 Valid Floating
22 New H2O Level R/O System FL 4 Valid Floating
23 Oil Wave Counter R/O System UINT8 1
24 H2O Wave Counter R/O System UINT8 1
Name Access
System
or User
Update
Data
Type
Length Range Default Version
Floating Point
Number
0 → 255
0 → 255
Point Number
Point Number
Point Number
Point Number
Floating Point
Number
Floating Point
Number
Point Number
Point Number
Floating Point
Number
Floating Point
Number
Point Number
Point Number
0 → 255
0 → 255
Level Sensor Application Module User Manual
Description of functionality
and meaning of values
0.25 1.00 H2O Wave Limit
5 1.00 Oil Wave Limit Count
5 1.00 H2O Wave Limit Count
0.0 1.00 Current Oil Level
0.0 1.00 Current H2O Level
0.0 1.00 Oil Closing Stock
0.0 1.00 H2O Closing Stock
0.0 1.00 Oil Runs
0.0 1.00 H2O Runs
0.0 1.00 Opening Stock Oil
0.0 1.00 Opening Stock H2O
0.0 1.00 Oil Production
0.0 1.00 H2O Production
0.0 1.00 New Oil Level
0.0 1.00 New H2O Level
0 1.00 Tracks scan periods since the
start of the wave.
0 1.00 Tracks scan periods since the
start of the wave.
Issued Jun-09 Reference 4-7
Page 30

Level Sensor Application Module User Manual
Point Type 64: Level Sensor Data
Parm
#
25 Enable Oil Totals R/W User UINT8 1
26 Enable H2O Totals R/W User UINT8 1
27 Cold Start R/W System UINT8 1
28 Yesterday’s Oil Production R/O System FL 1 Any Positive
29 Yesterday’s H2O Production R/O System FL 1 Any Positive
30 Oil Wave Smoothing R/W User UINT8 1
31 H2O Wave Smoothing R/W User UINT8 1
32 Yesterday’s Oil Runs R/O System FL 4 Any Positive
33 Yesterday’s H2O Runs R/O System FL 4 Any Positive
34 Current Oil Volume R/O System FL 4 Valid Floating
35 Current H2O Volume R/W System FL 4 Valid Floating
36 High Level Alarm EU R/W System FL 4 Valid Floating
Name Access
System
or User
Update
Data
Type
Length Range Default Version
0 → 1
0 → 1
0 → 1
Floating Point
Number
Floating Point
Number
0 → 1
0 → 1
Floating Point
Number
Floating Point
Number
Point Number
Point Number
Point Number
Description of functionality
and meaning of values
1 1.00 Enable Oil Totals:
0 = Disable
1 = Enable
1 1.00 Enable H2O Totals:
0 = Disable
1 = Enable
1 1.00 Cold Start:
0 = Disable
1 = Enable
0.0 1.00 Yesterday’s Oil Production
0.0 1.00 Yesterday’s H2O Production
1 1.00 Oil Wave Smoothing:
0 = Disable
1 = Enable
1 1.00 H2O Wave Smoothing:
0 = Disable
1 = Enable
0.0 1.00 Yesterday’s Oil Runs
0.0 1.00 Yesterday’s H2O Runs
0.0 1.00 Current Oil Volume
0.0 1.00 Current H2O Volume
900 1.00 High Level Alarm EU
4-8 Reference Issued Jun-09
Page 31

Point Type 64: Level Sensor Data
Parm
#
37 High Level Alarm Enable R/W User UINT8 1
38 High Level Alarm Indicator R/O System UINT8 1
39 Sensor Error R/O System UINT8 2
40 Sensor Warning R/O System UINT8 2
Name Access
System
or User
Update
Data
Type
Length Range Default Version
0 → 4
0 → 1
0 → 65535
0 → 65535
Level Sensor Application Module User Manual
Description of functionality
and meaning of values
0 1.00 High Level Alarm Enable:b
0 = Disable Logging
1 = Enable Logging, No SRBX
2 = Enable Logging, SRBX on
Set
3 = Enable Logging, SRBX on
Clear
4 = Enable Logging, SRBX on
both Set and Clear
0 1.00 High Level Alarm Indicator:
0 = Disable
1 = Enable
0 1.00 Sensor Error
0 1.00 Sensor Warning
Issued Jun-09 Reference 4-9
Page 32

Level Sensor Application Module User Manual
If you have comments or questions regarding this manual, please direct them to your local sales representative
or contact:
Emerson Process Management
Remote Automation Solutions
Marshalltown, Iowa 50158 USA
Houston, TX 77065 USA
Pickering, North Yorkshire UK Y018 7JA
Website: www.EmersonProcess.com/Remote
4-10 Reference Issued Jun-09
 Loading...