

Page 1

s
User Manual
Document: D5131
Part: D301430X012
November 2016
TechView User’s Guide
OpenBSI Version 5.9
Remote Automa ti on Solution
www.EmersonProcess.com/Remote
Page 2

Application Safety Considerations
Protecting Operating Processes
A failure of this application – for whatever reason -- may leave an operating process without
appropriate protection and could result in possible damage to property or injury to persons. To protect
against this, you should review the need for additional backup equipment or provide alternate means
of protection (such as alarm devices, output limiting, fail-safe valves, relief valves, emergency shutoffs,
emergency switches, etc.)
CAUTION
When implementing control using this product, observe best industry practices as suggested by applicable
and appropriate environmental, health, and safety organizations. While this product can be used as a safety
component in a system, it is NOT intended or designed to be the ONLY safety mechanism in that system.
Page 3

Contents
TechView User’s Guide
Chapter 1 – Introduction - What is TechView? 1-1
Chapter 2 – TechView Installation 2-1
Chapter 3 – Starting TechView and Establishing Communications 3-1
3.1 Starting Your Session: .............................................................................................................. 3-1
3.2 Establishing Communications ................................................................................................... 3-2
3.2.1 Communication Setup page - BSAP ............................................................................. 3-2
3.2.2 Communication Setup page - IP ................................................................................... 3-3
3.2.3 Advanced Communication Parameters – BSAP ........................................................... 3-4
3.2.4 Advanced Communication Parameters – IP ................................................................. 3-7
3.2.5 Node Setup ................................................................................................................... 3-8
3.2.6 Calibration Setup ......................................................................................................... 3-10
3.2.7 Transmitter Setup (Only Visible if using Remote Access) .......................................... 3-13
3.3 Signing On to the RTU ............................................................................................................ 3-15
Chapter 4 – Overview of TechView Functions 4-1
4.1 Changing the Session Parameters You Entered ...................................................................... 4-2
4.2 Restarting the Session .............................................................................................................. 4-3
4.3 Saving Your Session File .......................................................................................................... 4-3
Copying Your Session to Another Session File Name ............................................................. 4-3
4.4 Application Settings ................................................................................................................... 4-3
4.4.1 Startup tab ..................................................................................................................... 4-4
4.4.2 Security tab ................................................................................................................... 4-7
4.4.3 General tab ................................................................................................................... 4-7
4.5 Calibration and Verification Signals .......................................................................................... 4-8
4.5.1 Extended Verification .................................................................................................... 4-9
4.5.2 Changing the Name of a Transmitter .......................................................................... 4-11
4.6 Changing the Local Address / Group Number ........................................................................ 4-11
4.6.1 Starting the Flash Configuration Utility ........................................................................ 4-12
4.6.2 Show Firmware Version in Node ................................................................................ 4-12
4.6.3 Writing an Audit Note .................................................................................................. 4-12
4.6.4 Viewing OpenBSI Workstation Communication Statistics .......................................... 4-13
4.6.5 Deleting Historical Files from the RTU (Clear History) ............................................... 4-13
Chapter 5 – Calibration Overview 5-1
5.1 Why is Calibration Necessary? ................................................................................................. 5-1
5.2 Calibration Concepts ................................................................................................................. 5-1
5.3 Before You Begin ...................................................................................................................... 5-3
5.4 Equipment Required for Calibration .......................................................................................... 5-5
5.4.1 Equipment Required For Pressure Calibration ............................................................. 5-5
5.4.2 Equipment Required For Temperature Calibration ....................................................... 5-7
5.4.3 Equipment Required for Analog Output Calibration (3808 only) ................................... 5-7
5.4.4 Entering Calibration Mode / Leaving Calibration Mode ................................................ 5-7
Chapter 6 – Calibrating the 3508 series TeleTrans Transmitter 6-1
6.1 Calibration of Differential/Gage Pressure ................................................................................. 6-1
Issued Nov-2016 Contents iii
Page 4

TechView User’s Guide
6.2 Calibration of Static Pressure ................................................................................................... 6-3
6.3 Calibration of RTD Temperature ............................................................................................... 6-5
Chapter 7 – Calibrating the 3808 Transmitter 7-1
7.1 Calibration of Gage or Differential Pressure (3808-10A/3808-30A only) .................................. 7-1
7.2 Calibration of Static Pressure (3808-30A ONLY) ..................................................................... 7-2
7.3 Calibration of RTD Temperature ............................................................................................... 7-3
7.4 Calibrating the Analog Output (Analog Pressure Transducer models ONLY) ......................... 7-5
Chapter 8 – Calibrating the 3530 TeleFlow-series Flow Computers 8-1
8.1 Calibration of Differential/Gage Pressure ................................................................................. 8-1
8.2 Verification of Differential Pressure ........................................................................................... 8-2
8.3 Calibration of Static Pressure ................................................................................................... 8-2
8.4 Verification of Static Pressure ................................................................................................... 8-3
8.5 Calibration of RTD Temperature ............................................................................................... 8-4
8.5.1 Verification of RTD Temperature .................................................................................. 8-6
8.6 Damping .................................................................................................................................... 8-6
8.6.1 Configuring the Damping Time ..................................................................................... 8-7
8.7 Calibrating TeleRecorder Inputs (3530-45B/55B ONLY) .......................................................... 8-7
8.7.1 Calibrating the Input ...................................................................................................... 8-8
Chapter 9 – Calibrating the ControlWave EFM / GFC-CL /GFC/ XFC 9-1
9.1 Calibration of Differential/Gage Pressure ................................................................................. 9-1
9.2 Verification of Differential/Gage Pressure ................................................................................. 9-2
9.3 Calibration of Static Pressure ................................................................................................... 9-4
9.4 Verification of Static Pressure ................................................................................................... 9-5
9.5 Calibration of RTD Temperature ............................................................................................... 9-6
9.6 Verification of Temperature ....................................................................................................... 9-9
9.7 Damping .................................................................................................................................. 9-11
9.7.1 Configuring the Damping Time ................................................................................... 9-11
9.8 Orifice ...................................................................................................................................... 9-12
9.8.1 Specifying the Orifice Plate Size ................................................................................. 9-12
Chapter 10 – Configuring and Calibrating the 4088B 10-1
10.1 Configuring the 4088B ............................................................................................................ 10-1
10.1.1 DP/GP Pressure .......................................................................................................... 10-2
10.1.2 Static Pressure ............................................................................................................ 10-2
10.1.3 Temperature ................................................................................................................ 10-3
10.1.4 Serial Port Setup ......................................................................................................... 10-4
10.1.5 Transmitter Data ......................................................................................................... 10-5
10.1.6 RTD Coefficients ......................................................................................................... 10-6
10.2 Calibrating the 4088B .............................................................................................................. 10-6
10.2.1 Calibration of Gage or Differential Pressure ............................................................... 10-7
10.2.2 Calibration of Static Pressure ..................................................................................... 10-7
10.2.3 Calibration of RTD Temperature ................................................................................. 10-8
Chapter 11 – Online Editing (ControlWave only) 11-1
11.1 On-line Editing of Signal Lists ................................................................................................. 11-1
11.2 On-line Editing of Archive Files ............................................................................................... 11-4
11.2.1 Archive Fields .............................................................................................................. 11-6
11.2.2 Batch Editing of Archive Files ..................................................................................... 11-7
Chapter 12 – Device and Measurement Groups 12-1
iv Contents Issued Nov-2016
Page 5

TechView User’s Guide
Appendix A -Initialization Files A-1
Creating an Advanced Interface Setup File for Storage at the RTU ................................................. A-2
To create an Advanced Interface Setup Zip File for a custom application: ...................................... A-2
AISF.TVS File Format ....................................................................................................................... A-3
Configuration Initialization (*.INI) Files (Platform-dependent) ........................................................... A-5
LISTS.INI ......................................................................................................................................... A-15
TRANSLATION.INI Initialization File ..................................................................................... A-16
Notes about IP Address Formats in TVS Files ...................................................................... A-19
Index IND-1
Issued Nov-2016 Contents v
Page 6

This page is intentionally left blank
Page 7

TechView User’s Guide (D5131)
Chapter 1 – Introduction - What is TechView?
TechView is a standalone software package that allows a technician to:
Calibrate transmitter(s) either locally (bench configuration) or via
communication with the transmitter’s master controller (RTU).
Perform certain basic configuration operations on a controller, flow
computer, or transmitter, such as changing the local address or
EBSAP group number.
Collect real-time or historical data from the controller, flow
computer, or transmitter.
Start other OpenBSI programs or utilities to perform other activities,
such as the Flash Configuration utility.
Perform on-line edits to signal lists, and to the structure of archive
files in ControlWave-series controllers. (Requires 4.60 or newer
ControlWave firmware.)
Typically, you install TechView software on a portable laptop computer
to allow the technician to bring it to the site of the RTU/transmitter. You
could also install it on a desktop computer in a lab for bench
configuration of a transmitter.
You can use TechView to calibrate the RTD temperature circuitry and
/or the MVT/GPT pressure transducer for the following products:
3508 TeleTrans Transmitter
3808 MVT Transmitter (Firmware Version 1.5 or newer)
3530-10B TeleFlow Electronic Gas Measurement Computer
3530-20B TeleFlow Plus
3530-45B TeleRecorder
3530-50B TeleFlow Corrector
3530-55B TeleRecorder
Rosemount 4088B Transmitter
ControlWave EFM
ControlWave GFC
ControlWave XFC
Issued Nov-2016 Introduction 1-1
Page 8

Page 9

Chapter 2 – TechView Installation
Note: For minimum system requirements and more detailed installation
instructions, refer to Chapter 2 of the OpenBSI Utilities Manual
(D5081).
1. Log into the workstation with administrative privileges.
2. Insert the OpenBSI CD-ROM in your CD-ROM drive.
3. If your CD-ROM drive has autorun enabled, skip to the next step.
Otherwise, open a DOS prompt with administrative privileges, then
set the folder to the CD root directory, and run the same “open”
command that is in the autorun.inf file on the CD, for example
“demo32.exe openbsi.dbd”. When the CD browser screen appears,
choose the Install OpenBSI option.
A screen reminds you to close all other programs, and warns you
that older OpenBSI versions will be removed. Click Next.
TechView User’s Guide (D5131)
4. A license agreement screen opens. Review the agreement, using the
scroll bar to bring it into view. Click I accept the terms of the
license agreement to proceed. Then click Next.
5. On the next screen, you can specify the user files folder. The system
stores user files such as ControlWave projects, ACCOL files,
recipes, and network files in sub-folders of this folder. Note: If User
Account Control (UAC) is enabled in Windows, you must have
write access to this folder. The default is
C:\ProgramData\Bristol\Openbsi. Use the default or use Browse
to specify a different user files folder. When finished click Next.
6. On the next screen, use the check-boxes to select either Network
Edition (if you purchased the full Network Edition) or BSI_Config
if you are using the free BSI_Config package. These are the
packages which include TechView.
7. Once you make your choices, click Next.
8. This is your last opportunity to make any changes prior to starting
the installation. If you want to make changes, you can click Back to
go back to earlier pages. If you want to read the printed release notes
for this version of OpenBSI, check the View the Release Notes box.
9. If you are ready to perform the installation, click Install, and the
installation process starts. Be patient, as it may take several minutes
to install all of the different utilities, depending upon which you
choose.
10. When the installation completes, re-boot your computer when
prompted. This must be done in order for OpenBSI to function
properly. If you choose not to re-boot now, you must do so before
Issued Nov-2016 Installation 2-1
Page 10

TechView User’s Guide (D5131)
After re-boot, an “OpenBSI Tools” menu selection is added to your
Windows Start Programs menu through which you can access the
various OpenBSI utilities. If you prefer, you can create Windows™
shortcuts to the tools to provide access through icons on the desktop.
See your Windows™ documentation for information on how to do this.
running OpenBSI. Click Finish, and the installation will be
complete, and re-boot will proceed, if you chose to do it now.
2-2 Installation Issued Nov-2016
Page 11

TechView User’s Guide (D5131)
Chapter 3 – Starting TechView and Establishing
Communications
Note: Neither LocalView nor NetView can be running on your
computer at the same time you are running TechView. If either
of those programs are running, you must shut them down, first.
Click Start > Programs > OpenBSI Tools > TechView
In This Chapter
3.1 Starting Your Session: ..................................................................... 3-1
3.2 Establishing Communications .......................................................... 3-2
3.2.1 Communication Setup page - BSAP. ................................... 3-2
3.2.2 Communication Setup page - IP .......................................... 3-3
3.2.3 Advanced Communication Parameters – BSAP .................. 3-4
3.2.4 Advanced Communication Parameters – IP ........................ 3-7
3.2.5 Node Setup ........................................................................... 3-8
3.2.6 Calibration Setup ................................................................ 3-10
3.2.7 Transmitter Setup (Only Visible if using Remote Access) . 3-13
3.3 Signing On to the RTU ................................................................... 3-15
3.1 Starting Your Session:
The configuration information you specify to allow TechView to
communicate with controllers, flow computers and transmitters is stored
in a session file. Session files have a file extension of *.TVS. .
Once you have a session file saved, you can start TechView by standard
Windows™ methods such as typing ‘TechView’ on the command line,
followed by the path and name of the session file (excluding the TVS
extension), or you can drag a TVS file icon onto a shortcut icon for the
TechView application.
Note: If you use the command line option, put quotation marks around
the path or filename if it includes spaces.
Issued Nov-2016 Starting TechView /Establishing Communications 3-1
Page 12

TechView User’s Guide (D5131)
When first starting TechView, by default, the software prompts you to
open an existing session file.
Figure 3-1. Opening a Session File
Note: You can change the initial prompt for the user from the
Application Settings dialog box.
Select the session file name you want to open, then click Open.
3.2 Establishing Communications
You can establish communication with all RTUs/transmitters using the
BSAP protocol. For some RTUs you may also use Internet (IP)
protocol.
On the Communication Setup page, choose either BSAP or IP in the
Select Communication Protocol field.
3.2.1 Communication Setup page - BSAP
For BSAP communication, specify the BSAP local address of the RTU
or transmitter:
If you know the BSAP local address, select the Specify Local Address
button, and choose the address using the list box, or enter it directly.
If you want the user to specify the local address at startup, select Ask
for Local Address at startup; the user will be prompted to enter the
address.
If you want TechView at startup to attempt to find the local address by
sequentially polling each possible local address (1-127) at the current
baud rate, select Auto Detection.
3-2 Starting TechView / Establishing Communications Issued Nov-2016
Page 13

TechView User’s Guide (D5131)
Most users
don’t need to
adjust these
advanced
parameters.
Choose “BSAP” protocol.
Specify the local
address of the
RTU / transmitter.
Select the PC
communication port.
Select the
baud rate.
Click on [Next>].
Figure 3-2.Communication Setup dialog box (BSAP)
Specify the PC communication port, e.g. COM1, COM2, etc. in the
What port would you like to use field.
Specify the baud rate used by the port in the What baud rate would
you like to use field. If you are making an FSK connection to a 4088B,
this must be 1200.
Most users don’t need to adjust the advanced parameters, but if you
need to, click on Advanced Communication Parameters. (Information
on this dialog box is included later in this section.)
Click on Next to proceed to the next page.
3.2.2 Communication Setup page - IP
For IP communication, you must specify the IP address of the RTU.
If you want the user to specify the IP address at startup, select Ask for
IP Address at startup; the user will be prompted to enter the address.
Most users don’t need to adjust the advanced parameters, but if you
need to, click Advanced Communication Parameters. (Information on
this dialog box is included later in this section.)
Click Next to proceed to the next page.
Issued Nov-2016 Starting TechView /Establishing Communications 3-3
Page 14

TechView User’s Guide (D5131)
Specify the IP
address of the RTU.
Choose
Internet
Protocol
(IP).
Most users
don’t need to
adjust these
advanced
parameters.
Figure 3-3. Communication Setup dialog box (IP)
3.2.3 Advanced Communication Parameters – BSAP
Most users should not edit these parameters. If however, you are having
certain communication problems, you may edit these parameters to
better tune your system.
Click on
[Next>].
Figure 3-4. Advanced Communication Parameters dialog box (BSAP)
3-4 Starting TechView / Establishing Communications Issued Nov-2016
Page 15

TechView User’s Guide (D5131)
Field Description
Poll Period
Variable
Front Pad, Back Pad
This is the rate (in seconds) in which TechView polls the
directly connected RTU.
This is the amount of time, in seconds, that TechView waits
for a response from an RTU or transmitter before assuming
that the unit is dead and will not respond.
These fields specify the number of null characters to insert at
the beginning (front) or ending (back) of a message. Null
characters may be useful in situations where there may be a
momentary delay which could cause the start of a message to
be missed, for example, while a radio link is being activated.
Null characters are also necessary if you are communicating
using a 2-wire RS-485 link, to ensure that DTR is not dropped
prematurely. To determine the delay caused by null packing,
perform the following calculation:
seconds of delay = (number of null characters x 10) / baud
rate
Use RTS/CTS Signals
Disable the sending of the
Time Synch
Dialup Line / Dial
Parameters
On an FSK connection, use “3” back pad for model 4088B.
Use “2” or “3” Back Pad for models 3508 and 3808.
If your communication line uses Ready to Send (RTS) / Clear
to Send (CTS) signals (not to be confused with ACCOL
signals), check this box.
Check this box to prevent TechView from sending a BSAP
time synch message. (Requires OpenBSI 5.8 Service Pack 1
or newer.) The default setting for this is set in the Advanced
Configuration utility. See Appendix E of the OpenBSI Utilities
Manual (D5081) for details on the Advanced Configuration
utility.
If using a dial line to communicate with the controller, check
this box, then click the Dial Parameters button, and specify
the dialing parameters.
Issued Nov-2016 Starting TechView /Establishing Communications 3-5
Page 16

TechView User’s Guide (D5131)
Figure 3-5. Dial Parameters
Field
Dial-up Parameters:
Enter modem commands
and phone number to be
dialed
Retries
Timeout
Command Delay
Init String
Hang-up parameters:
Description
Enter any modem commands, as well as the dial string
here.
This is the number of attempts TechView makes to dial a
controller (RTU), before declaring that it is off-line. This
must be an integer from 0 to 10.
This is the period of time (in seconds) TechView waits
before declaring a dialing attempt to be a failure.
This is the period of time (in seconds) TechView waits
between sending commands.
This is an initialization string for the modem. TechView
immediately precedes the initialization string with the “AT”
modem command. TechView sends the initialization string
ahead of the dial-up string.
String1
3-6 Starting TechView / Establishing Communications Issued Nov-2016
This is the first string TechView sends to the modem when
an attempt is made to hang up.
Page 17

TechView User’s Guide (D5131)
String2
Retries
Timeout
No Data Timeout
DTR Support"
This is the second string TechView sends to the modem
when an attempt is made to hang up.
This is the number of attempts which will be made to hang
up the modem before declaring a hang-up failure. This
value must range from 0 to 10.
This is the amount of time TechView waits before
declaring an attempt to hang up to be a failure.
This value specifies the amount of time (in seconds) after
which the modem should be hung up if there has been no
communication (other than poll messages) between
TechView and the controller.
If you check this box, TechView will drop DTR in order to
hang up, before sending the hang-up strings, and
TechView will raise DTR before dialing.
Click OK to save the dial-up and hang-up parameters.
3.2.4 Advanced Communication Parameters – IP
Most users should not edit these parameters. If however, you are having
certain communication problems, you can edit these parameters to better
tune your system.
Figure 3-6. Advanced Communication Parameters dialog box (IP)
Issued Nov-2016 Starting TechView /Establishing Communications 3-7
Page 18

TechView User’s Guide (D5131)
Field
UDP Port for the IP Driver
UDP Port for Time Synchs
Description
The UDP Port Number for IP Driver (sometimes known
as the socket number) is used for communication with
RTUs. It is used to split message traffic along different
'streams'. All PCs or RTUs which are to communicate with
each other must have the same UDP Port Number for IP
Driver. In a sense, this value is like a common password
which must be known by each node in the network. If no
value is entered, TechView assigns a default value for use
throughout the network when the system is first created.
(Note: Although the term “UDP port” is used, it has no
actual relationship with the physical communication ports.)
Note: The UDP Port Number for IP Driver should never
be 0.
The UDP Port Number for Time Synch is used for time
synchronization of the RTUs. All PCs or RTUs must have
this value defined, or else they will be unable to receive
time synchronization messages. In a sense, this value is
like a common password which must be known by each
node in the network. If no value is entered, TechView
assigns a default value for use throughout the network
when the system is first created. (Note: Although the term
“UDP port” is used, it has no actual relationship with the
physical communication ports.) Note: The UDP Port
Number for Time Synch should never be 0.
Frequency of Time Sy nchs
Disable the sending of the
Time Synch
3.2.5 Node Setup
Next, you must identify certain characteristics of the unit to which you
are trying to communicate. The appearance of the Node Setup page
varies somewhat, depending upon what type of RTU you are
configuring:
This value specifies (in seconds) how often time
synchronization messages should be sent to IP RTUs.
Check this if you want to disable the transmission of time
synch messages.
3-8 Starting TechView / Establishing Communications Issued Nov-2016
Page 19

TechView User’s Guide (D5131)
Figure 3-7. Node Setup dialog box (appearance varies based on node type)
Field
Node Type
Description
The type of controller, RTU, flow computer, or transmitter. Valid
choices include:
3305 RTU 3305 controller
3310 RTU 3310 controller
3330 DPC 3330 controller
3335 DPC 3335 controller
3508 Model 3508 TeleTrans transmitter
3530 3530-series TeleFlow / TeleRTU
TeleCorrector/TeleRecorder
3808 Model 3808 transmitter
4088B Rosemount 4088B transmitter
ControlWave ControlWave Process Automation
Controller
CW_10 ControlWave_10 controller
CW_30 ControlWave_30 controller
CW_35 ControlWave_35 roller
CWave_EFM ControlWave Electronic Flow Meter
Cwave-Exp ControlWave Express Gas Flow Computer
Cwave_GFC ControlWave Gas Flow Computer
ControlWave_LP ControlWave Low Power Controller
CWave_Micro ControlWave Micro Controller
CWave_XFC ControlWave Explosion-Proof Flow
PT Transmitter
Issued Nov-2016 Starting TechView /Establishing Communications 3-9
When checked indicates that communication will be with a gage
pressure transmitter. There will be no static pressure. When not
checked, indicates that the transmitter has both differential and static
Computer (3820)
Page 20

TechView User’s Guide (D5131)
pressures. This applies only to 3508/3808 units.
Wet Ends
Perform Horn in
operation
Control Strategy
Resource
Load Type
Control Strategy
file name
Certain RTUs (EFM, GFC, XFC) may include a built-in internal
transmitter with sensor (wet end). Some versions of the XFC can
include 2 wet ends. Specify the number of wet ends for this RTU.
If checked, the transmitter’s communication with the BBTI board will
be temporarily suspended, so that a different program can
communicate with the transmitter.
If this ControlWave project has multiple resources, select the
resource which is currently running in the unit.
(Not shown) If communication is with a 3530 TeleFlow-series unit,
specify which of the standard application ACCOL loads (or C load) is
running in the unit. If needed, you can then use the Calibration
Signal Configuration button to specify different signal names for
the configuration signals associated with the load. Note: If the load
type you specify here does not match the load type running in the
controller, TechView prompts you to change the load type so that it
does match the one running in the controller.
You can specify a control strategy to be used in conjunction with the
RTU used in this application. For the 33XX line of RTUs, this is the
name of the ACCOL load running in the RTU. For the ControlWave
line of RTUs, this is the name of the .MWT project running in the
RTU. Click Browse to locate the file. Note: 3508 and 3808
Transmitters don’t have a control strategy file.
Web Access
Startup Page
Advanced
Interface Setup
You can optionally specify a default web page for this RTU, which
you may start while you are in TechView. Click Browse if necessary,
to locate it.
Most users use the standard configuration INI files that come with
TechView. Some advanced users, however, may want to customize
the organization of pages within TechView. This button calls up a
dialog box allowing you to identify special configuration files for
TechView. For details on this subject, please see Appendix A of this
manual.
3.2.6 Calibration Setup
This page specifies certain parameters that tell TechView how it will
access the transmitters for calibration.
3-10 Starting TechView / Establishing Communications Issued Nov-2016
Page 21

TechView User’s Guide (D5131)
Figure 3-8. Calibration Setup dialog box
Field
Target Node
Select
Transmitter
Access Local /
Remote
How many
transmitters does
the application
load support (Wet
ends and
externals)?
Description
Displays the type of node chosen in the Node Setup
dialog box.
This field only applies for BSAP communication
connections.
For 3508 and 3808 series transmitters, checking
“Local” means that TechView will communicate locally
with a transmitter directly connected to the PC, on Level
1 of the temporary BSAP network. For Network 3000
(except for the 3530-series) checking the “Remote” box
means that TechView will communicate with an RTU
directly connected to the PC, on level 1 of the BSAP
network. This RTU has one or more transmitters
connected to it that will be on Level 2 of the temporary
BSAP network. Note: The 3530-series does not support
Remote access.
Note: In Remote Access, if your Network 3000 RTU is
not currently part of a network, i.e. you are working in
the lab, or performing bench testing, you should connect
through the Slave Port. Conversely, if you are working in
the field, with an RTU that is already part of a network,
you should connect through the Pseudo Slave Port.
Note: If you select Remote the Transmitter Setup page
will be added to your Session configuration.
If using the ControlWave Express/EFM/GFC/XFC
series, with multiple transmitters, the application running
in the ControlWave EFM/GFC/XFC must support
multiple meter runs and TechView configures the
transmitter(s) by setting parameters within the RTU’s
multi-run application; and calibration success/failure will
be noted as an audit record in the multi-run application.
You must specify the total number of transmitters (both
internal wet ends, and external transmitters) here.
Issued Nov-2016 Starting TechView /Establishing Communications 3-11
Page 22

TechView User’s Guide (D5131)
Disable Damping
Do not ask user’s
permission when
freezing/unfreezin
g live values.
Enable “As
Found/As Left”
Verification
Functionality
Calibration Signal
Configuration
Extended
Verification
Signal
Configuration
As Found / As
Left Verification
Signal
Configuration
Note: If you want to use TechView to communicate with
an RTU that doesn’t require any calibration, you can
hide calibration options by setting this to 0. (OpenBSI
5.8 Service Pack 1 and newer.)
If your ControlWave RTU has an internal transmitter that
doesn’t require damping, you can disable damping
functions by selecting this box. (OpenBSI 5.8 Service
Pack 1 and newer.)
When the user enters calibration mode, live values for
differential pressure, static pressure, gage pressure, and
temperature are frozen (i.e. the RTU will collect no new
values from the transmitter, during calibration mode.) A
prompt appears warning the user of this, and giving
them the option of not entering calibration mode.
Similarly, when the user tries to exit calibration mode,
the user will be prompted to confirm that they want to
exit, thereby unfreezing live values. If you check this
box, however, these warning boxes will not appear, and
the user will automatically enter/exit calibration mode. If
you don’t check it, the warning prompts will appear,
giving the user the option of aborting the starting or
exiting of calibration mode.
Check this button to activate the “As Found/As Left”
feature for calibration logs. (OpenBSI 5.8 and newer.)
Note: You cannot use this feature if you are also using
the extended verification feature; they are mutually
exclusive.
If you have modified a standard application with different
calibration signal or variable names, the [Calibration
Signal Configuration] button allows you to specify the
new signal/variable names.
If you have modified an application that uses the
extended verification feature for Modbus messages, and
specified different variable names for the extended
verification signal configuration feature, click the
Extended Verification Signal Configuration button to
specify the new variable names. (OpenBSI 5.8 Service
Pack 2 and newer.) Note: Extended verification only
applies to external transmitters. In addition, the
Extended Verification and As Found/As Left functions
are mutually exclusive.
If you have modified a standard application with different
verification signal or variable names, the As Found / As
Left Verification Signal Configuration button allows
you to specify the new signal/variable names. (OpenBSI
5.8 and newer.) Note: The As Found/As Left and
Extended Verification features are mutually exclusive.
If you chose Local for Select Transmitter Access, click Finish; if you
chose Remote click Next.
3-12 Starting TechView / Establishing Communications Issued Nov-2016
Page 23

TechView User’s Guide (D5131)
3.2.7 Transmitter Setup (Only Visible if using Remote Access)
First, specify the number of transmitters connected below this RTU.
Specify the number of transmitters below this RTU
Figure 3-9. Transmitter Setup dialog box – Initial View
Issued Nov-2016 Starting TechView /Establishing Communications 3-13
Page 24

TechView User’s Guide (D5131)
If desired, you can change the Local Address and the Type of the
transmitter from the Transmitter Identification dialog box.
To modify the address or type of a transmitter in the list, either
double-click on the transmitter’s name, or click on the name, and then
click on Modify and make the changes in the Transmitter
Identification dialog box.
Figure 3-10. Transmitter Identification
To add another transmitter to the list, click Add and fill in the fields in
the Transmitter Identification dialog box.
To remove a transmitter from the list, click on the transmitter’s name,
then click Remove.
To remove all of the transmitters from the list, click on Remove All.
Click OK when finished.
When you have finished configuration for the transmitters, click Finish.
3-14 Starting TechView / Establishing Communications Issued Nov-2016
Page 25

3.3 Signing On to the RTU
Once you click Finish and communications have been successfully
established with the RTU, TechView prompts you for a Username and
Password.
TechView User’s Guide (D5131)
Figure 3-11. SignOn to RTU
Enter the username/password combination, and click Signon. The RTU
must recognize this username/password combination as valid in order
for you to gain access.
Notes:
Some customers may choose to set up a default username/password,
to avoid having to enter it repeatedly. See Application Settings later
in this manual, for details.
If you use TechView to call up web pages, for example, in the
Measurement group, do not sign off from the Sign-On/Off web
page control unless you intend to also exit TechView, since the web
pages, and TechView share the same connection to the RTU. If you
only want to exit web pages, but continue with TechView, just close
the web pages, from the standard windows control, don’t sign off.
If you are unable to sign on to the RTU, because it needs to be
downloaded first, you can do this without logging on. In TechView,
click on Operations > Download First Level Node to call up the
Downloader and download a control strategy file to the RTU. You
can then proceed to download.
Issued Nov-2016 Starting TechView /Establishing Communications 3-15
Page 26

Page 27

TechView User’s Guide (D5131)
Chapter 4 – Overview of TechView Functions
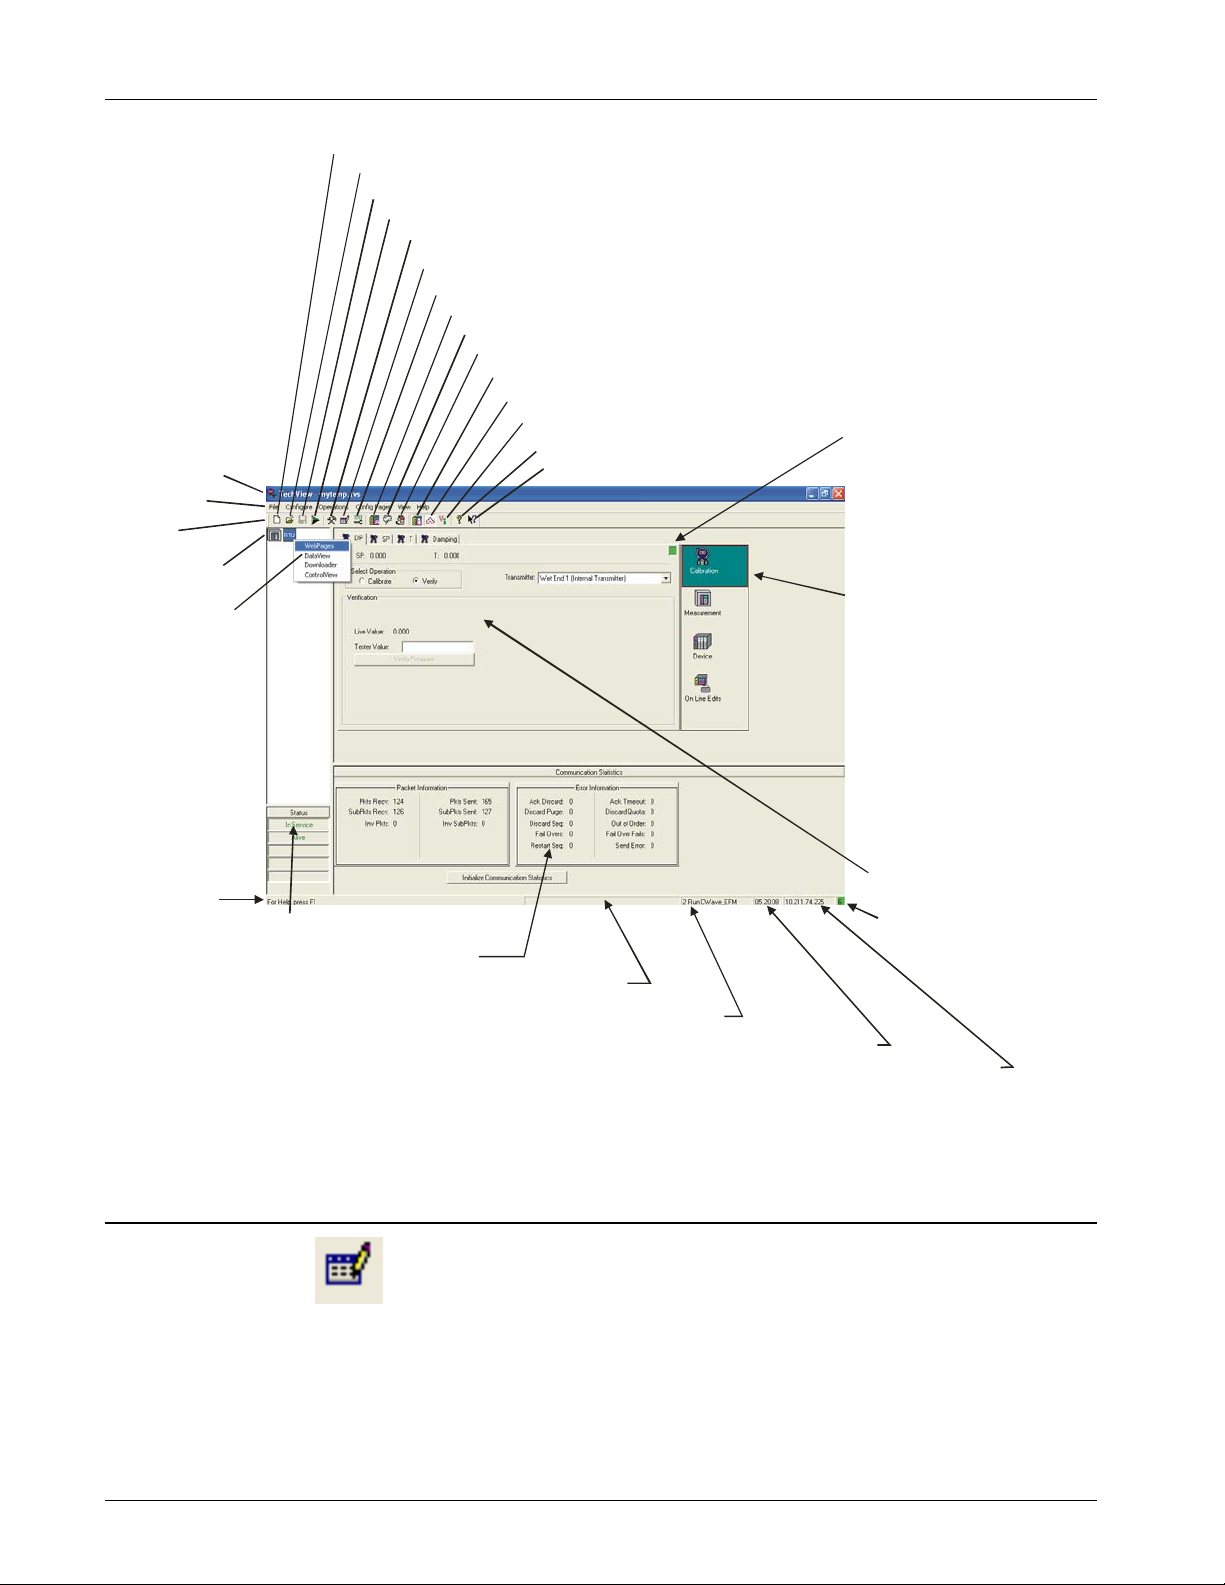
The basic functions of TechView are available through the menu bar,
and tool bar items (see Figure 4-1).
In This Chapter
4.1 Changing the Session Parameters You Entered ............................. 4-2
4.2 Restarting the Session ..................................................................... 4-3
4.3 Saving Your Session File ................................................................. 4-3
Copying Your Session to Another Session File Name .................... 4-3
4.4 Application Settings ......................................................................... 4-3
4.4.1 Startup tab ............................................................................ 4-4
4.4.2 Security tab ........................................................................... 4-7
4.4.3 General tab ........................................................................... 4-7
4.5 Calibration and Verification Signals ................................................. 4-8
4.5.1 Extended Verification ........................................................... 4-9
4.5.2 Changing the Name of a Transmitter ................................. 4-11
4.6 Changing the Local Addres s / Group Number ............................... 4-11
4.6.1 Starting the Flash Configuration Utility ............................... 4-12
4.6.2 Show Firmware Version in Node ........................................ 4-12
4.6.3 Writing an Audit Note ......................................................... 4-12
4.6.4 Viewing OpenBSI Workstation Communication Statistics . 4-13
4.6.5 Deleting Historical Files from the RTU (Clear History) ....... 4-13
Standard sets of configuration/calibration pages specific to each type of
transmitter, or RTU containing a transmitter, are included when you
install TechView.
Based on your choice of node type, these pages load in a series of one or
more groups, accessible via icons on the right hand side of the page.
When you choose a particular group, the associated pages appear on the
screen, or menu items which call them appear, depending upon the
number of pages. Once the group is activated, you can proceed to
perform the calibration, configuration, or online editing for your
RTU/transmitter.
The Calibration group is always required. Additional groups may exist
for other functions. Advanced users can also change the organization of
the pages in groups, by editing TechView initialization files. For more
information on changing these initialization files, see Appendix A –
Initialization Files.
Issued Nov-2016 Overview of TechView Functions 4-1
Page 28
TechView User’s Guide (D5131)
Open new session file
Open existing session file
Save session file
Restart session with new parameters
View/Modify application parameters
Title bar
Menu bar
Tool bar
Network tree
Pop-up menu
to call up other
programs for
use with this
RTU.
Modify session parameters
View/modify calibration signal names
Change local address and group number
Start Flash Configuration Utility
Write audit note
Show/hide Node status box
Show/hide Communication Statistics Window
Show firmware version in node
Show TechView version info
Access help file
Blinks on data refresh
Sele ct the gr oup
of pages you want
to use right now.
Status bar
Node status box
Communication Statistics window
Most recent status message
Type of RTU/application
Firmware revision in RTU or Transmitter
Node address (IP or BSAP local)
Figure 4-1. TechView Overview
4.1 Changing the Session Parameters You Entered
If you want to change the entries you made in the Communication
Setup, Node Setup, or Calibration Setup dialog boxes for this session,
click on the icon shown at left, or click on Configure > Session
Parameters. Enter the new parameters, as desired. After exiting the
wizard, the session restarts automatically with the new parameters.
Typical calibration page
Current security level
of logged on user.
4-2 Overview of TechView Functions Issued Nov-2016
Page 29

4.2 Restarting the Session
If you change the local address or group number of the RTU, and want
to restart the session, click on the icon shown at left. If communication
is lost during calibration, you can also use this button to restart
communications.
4.3 Saving Your Session File
To save your session file, click on File > Save Session, or click on the
Copying Your
Session to
Another Session
File Name
icon shown at left.
Click on File>Save Session As. The Save Copy As dialog box opens.
Enter a name for the second copy of the session file in the File name
field, and click Save. The original session file remains active; the newly
named session file will be a copy of the active session file, but will not
be running.
TechView User’s Guide (D5131)
Enter a name for the
session, then click on
[Save].
Figure 4-2. Copying a Session
4.4 Application Settings
Note: Unlike session parameters, which are stored in TVS files, and
can thereby vary depending upon which session file you have
running, application parameters apply to the TechView
application itself. Therefore, there is only one set of application
parameters that apply no matter what session file you are using
Issued Nov-2016 Overview of TechView Functions 4-3
Page 30
TechView User’s Guide (D5131)
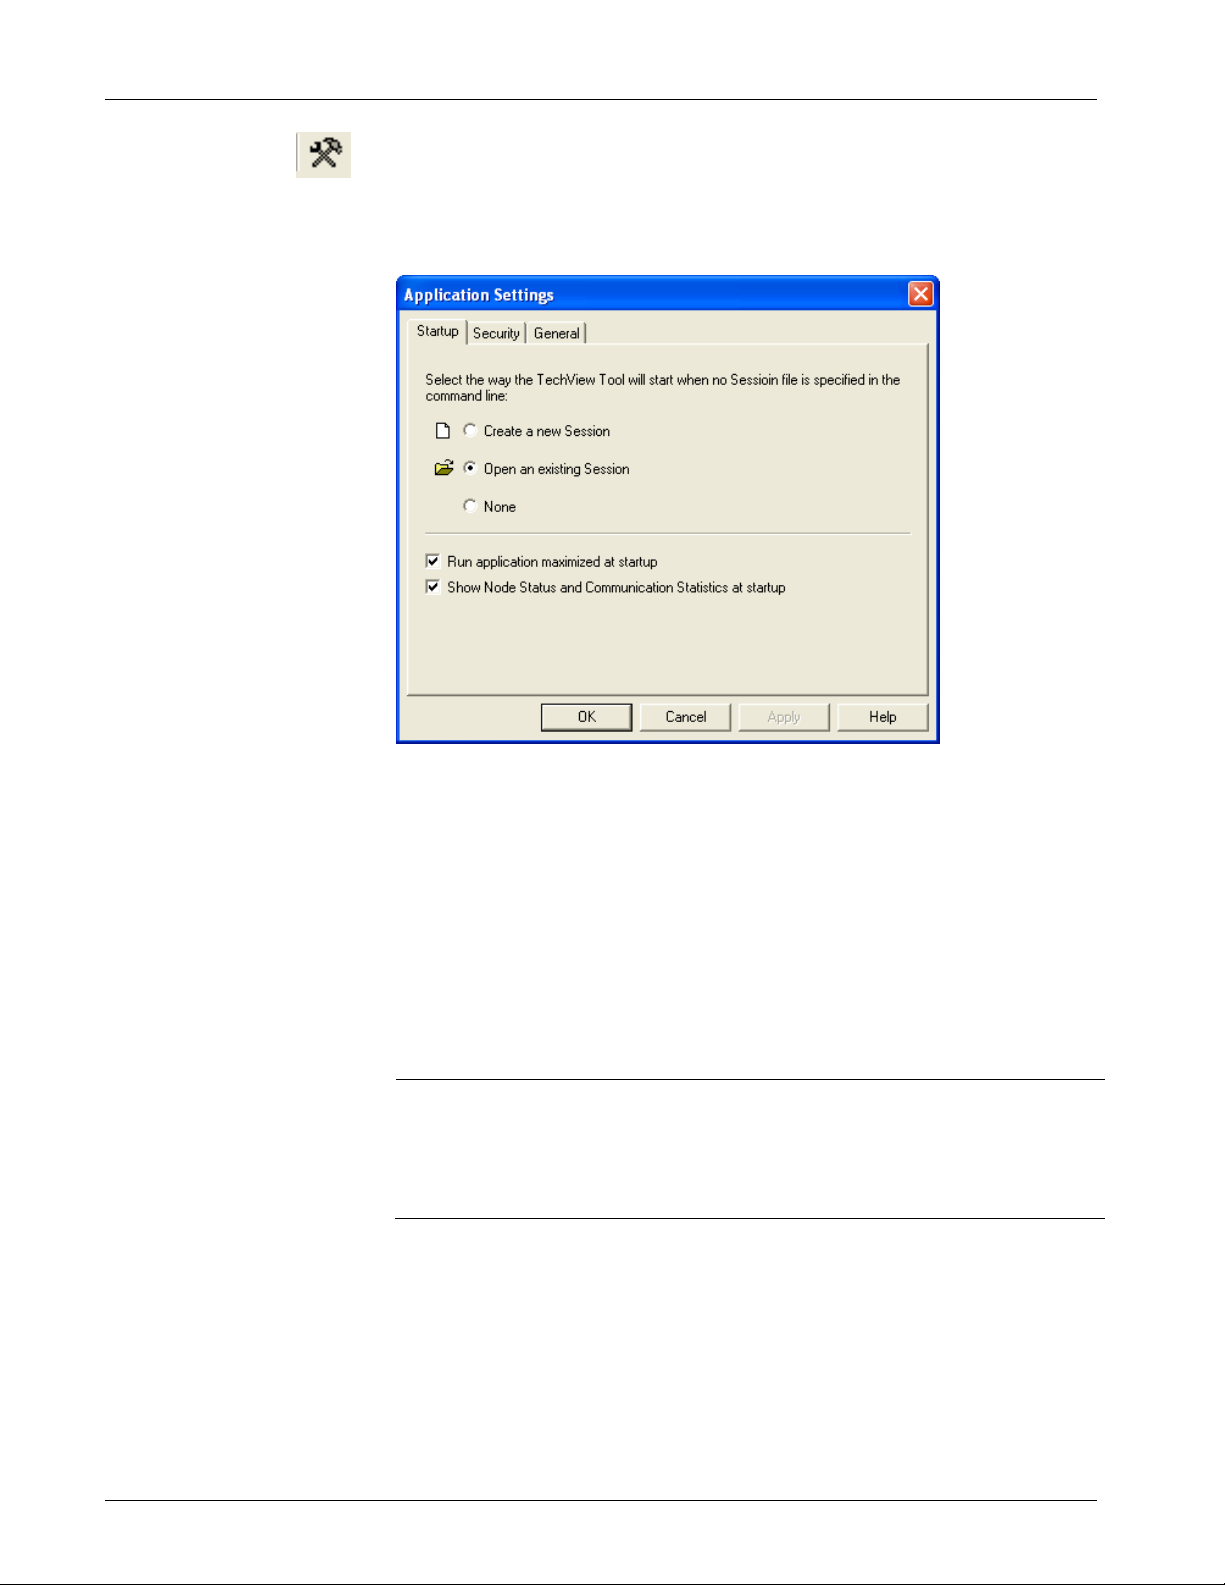
Application Settings determine the choices the user needs to make when
TechView first starts. To call up the Application Settings dialog box,
click Configure > Application Settings, or simply click on the icon,
shown at left.
Figure 4-3. Application Settings dialog box – Startup tab
4.4.1 Startup tab
The Startup tab specifies the initial prompt a user sees, if a session file
is not specified via the command line. As discussed, earlier, a *.TVS
session file holds certain configuration parameters for how TechView
communicates with a controller or transmitter
Field
Create a new
Session
Description
If selected, when TechView starts, it prompts the user
to provide a name for a new session (or to use the
default name of temp.tvs.). This session file holds the
communication/ configuration settings you
subsequently define.
4-4 Overview of TechView Functions Issued Nov-2016
Page 31

TechView User’s Guide (D5131)
Figure 4-4. Create Session File
Open an existing
Session
If selected, when TechView starts, it prompts the user
to choose a previously defined session file, which
TechView then starts. (Default choice). Note:: Only
one session can be active at any one time; if you
already have a session running, when you try to open
a new session file, TechView prompts you to confirm
that the current session will be closed.
Figure 4-5. Open Session File
None
Issued Nov-2016 Overview of TechView Functions 4-5
If selected, no prompt appears initially. The user has
two choices:
The user can choose to manually start a new session
by clicking on File> New Session, or by clicking on
the icon shown at left
The user can choose to open a previously defined
session by clicking on File > Open Session, or by
clicking on the icon shown at left, and then selecting
the appropriate *.TVS file
Page 32

TechView User’s Guide (D5131)
Run application
maximized at
startup
Show Node Status
and
Communication
Statistics at startup
If checked, when the TechView application starts, it
fills the available screen space on your PC monitor
If checked, displays the Node Status box, and the
Communication Statistics window.
Note: These items can be shown/hidden after startup
“In Service” = Unit is currently on-line.
“Out of Service”= Unit is currently off-line.
“Alive = TechView can communicate with the
unit.
“Dead = TechView cannot communicate with the
unit.
“Downloading”= Download in progress
“Needs NRT” = IP node needs new Node Routing
“Needs Poll” = BSAP node needs to be polled.
“Time Sync” = Unit needs a time-synchronization
is completed
Table.
Figure 4-6. Node Status Box
To show/hide the Node Status box, click View >
Node Status or click on the icon shown at left.
Figure 4-7. Communication Statistics window
To show/hide the Communication Statistics
window, click on View > Comm Statistics or
click on the icon shown at left.
4-6 Overview of TechView Functions Issued Nov-2016
Page 33
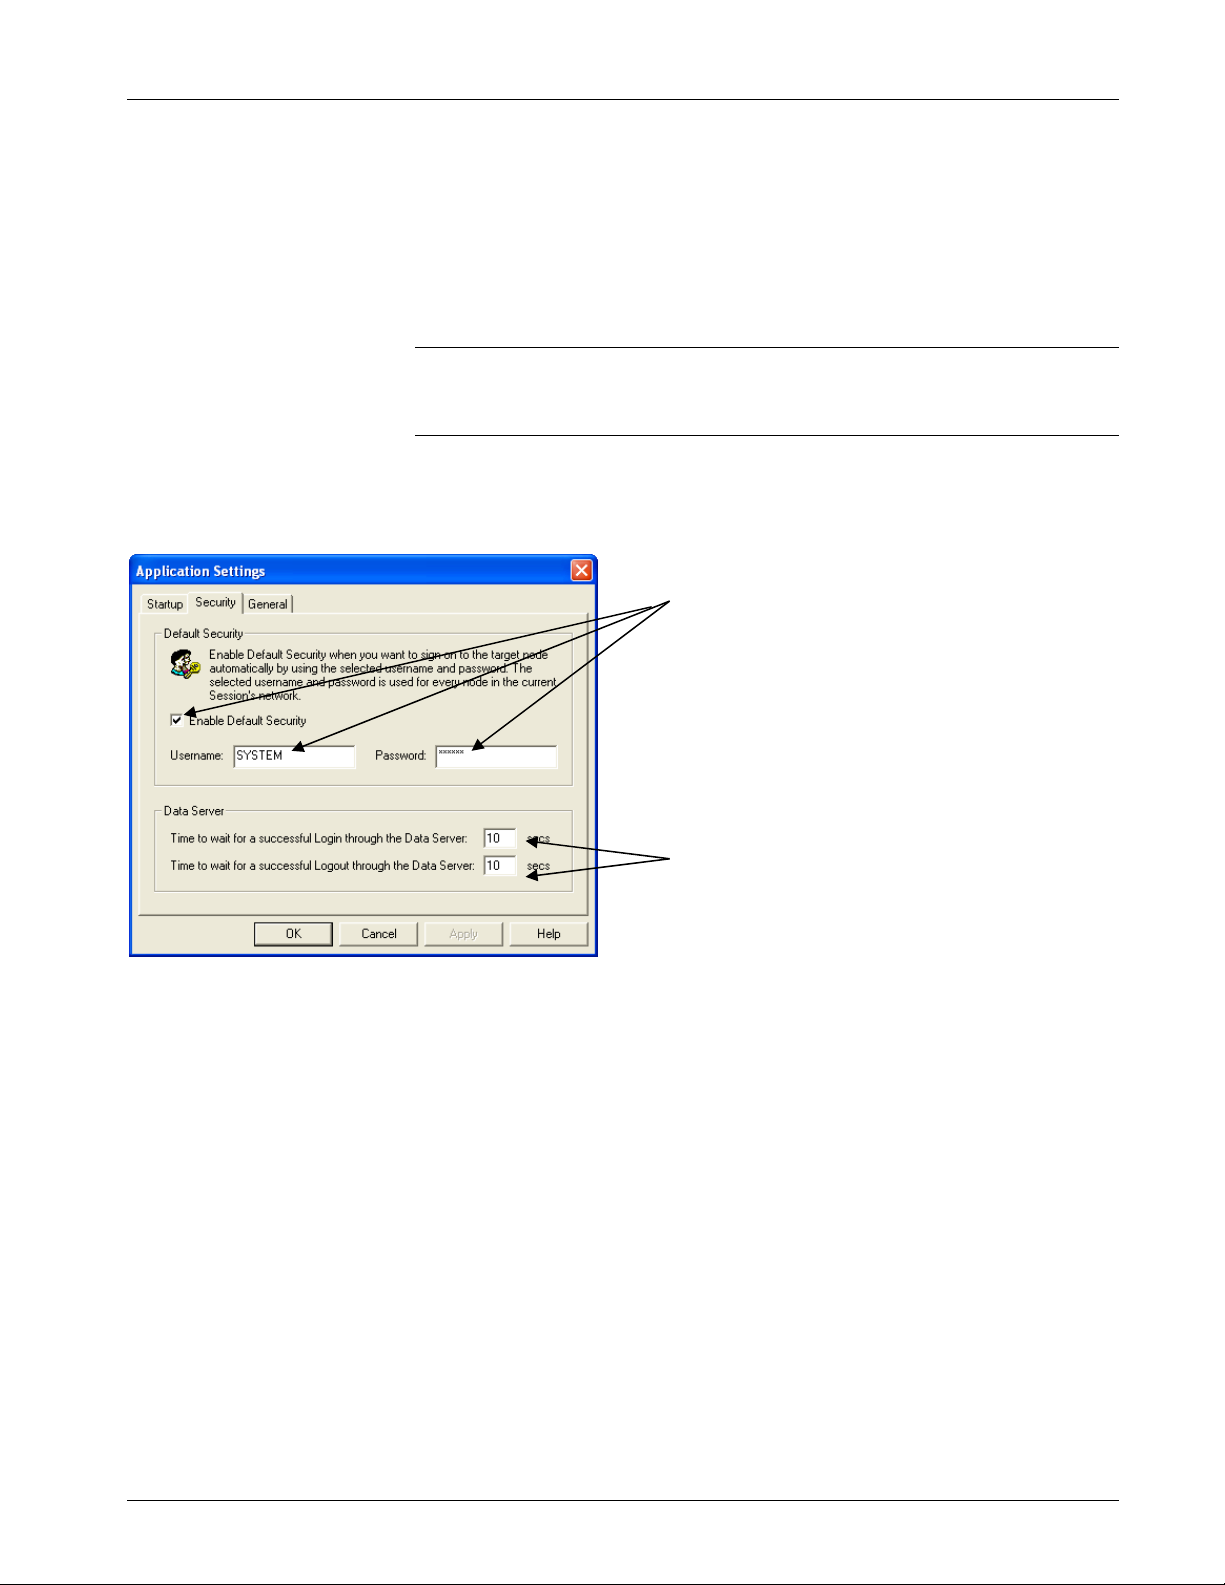
4.4.2 Security tab
The Security tab allows you to optionally set up a default
username/password combination that TechView uses to log onto any
RTU in your network. For this to work, each RTU you want to
communicate with must have this same username/password
combination defined locally.
Note: Beginning with OpenBSI 5.8 Service Pack 1, passwords can
The Security tab also allows you to set a timeout (in seconds) for
successfully logging in or out of web pages.
TechView User’s Guide (D5131)
include up to 16 characters; previous versions were limited to six
characters.
If you don’t want to enter a username
and password every time you log onto
an RTU, you can enable the default
security feature, and then set a default
username and password. You must
have configured the same username /
password combination for each RTU
you try to access during this session.
These settings allow you to change
the timeouts for logging into/out of
web pages, handled via the Data
Server.
Figure 4-8. Application Settings dialog box – Security tab
4.4.3 General tab
On the General tab you can specify whether or not you want the
Advanced Interface Setup File detection dialog box to prompt you when
AISF files already exist on the PC, and would be overwritten by files
from the RTU. To disable this prompt, un-check the Show Advanced
Interface Setup File Detection Dialog option.
Issued Nov-2016 Overview of TechView Functions 4-7
Page 34

TechView User’s Guide (D5131)
Figure 4-9. Application Settings dialog box – General tab
You can also use the Change Font button to change the font used in
properties pages from the default of MS-San Serif – 8 point.
The change of font takes effect once the application or session is restarted. You can change the point size of text immediately by clicking
View > Small Fonts, View> Medium Fonts or View > Large Fonts.
Note: Bolding or larger point sizes may result in text that cannot fit on
pages and so cannot be read. Verify your changes to ensure
readability.
4.5 Calibration and Verification Signals
If you modify a standard application (pre-made ACCOL load or
ControlWave project that shipped from the factory with your unit), and
as part of that modification, change the signal names used for
calibration, verification, live values, etc., you must identify the new
signal names, within TechView, otherwise calibration and verification
operations will not function properly. To do this, you must call up the
associated Calibration, or Verification signals dialog box.
To call up configuration signals, click Configure > Calibration Signals
or click the Calibration Signal Configuration button located in the
Calibration Setup page of the Session Parameters wizard. You can also
click the icon shown above.
To call up verification signals, click Configure > As Found / As Left
Verification Signals or click on the As Found / As Left Signal
Configuration button located in the Calibration Setup page of the
Session Parameters wizard.
4-8 Overview of TechView Functions Issued Nov-2016
Page 35

TechView User’s Guide (D5131)
Figure 4-10. Modifying Calibration Signal Names
Note: The dialog box appears different depending upon which RTU
platform and application you are modifying.
Be sure, when specifying calibration signals, that you first select the
correct transmitter, meter run and/or application.
4.5.1 Extended Verification
If you are using the extended verification feature (OpenBSI 5.8 Service
Pack 2 and newer) which allow audit logging of Modbus messages for
verification of zero and span, and you change the names of verification
variables used in the application, you must specify the new names as
well.
To call up the Extended Verification Signals dialog box, click
Configure > Extended Verification Signals or click on the Extended
Verification Signal Configuration button located in the Calibration
Setup page of the Session Parameters wizard.
Issued Nov-2016 Overview of TechView Functions 4-9
Page 36

TechView User’s Guide (D5131)
The table, below, describes the functions of each of the variables.
Change the names as required, and click OK.
Figure 4-11. Extended Verification Signals dialog box
If, at any time you need to restore the default variable names, call up the
dialog box and click the Restore Factory Default Signal Names
button, then click OK.
Table 4-1. Default Variable Names for Extended Verification
Default Variable Name Data Type Description
@GV.MVT_Events_MB BOOL Set to TRUE to enable the extended verification
feature. TechView only enables extended verification
when this variable is defined; if the default variable
name or a substitute name you specify does not exist
in the application, the extended verification feature is
disabled.
@GV.VF_Applied_x REAL TechView stores the verification (tester) value the user
enters here. The x refers to the external transmitter
number.
@GV.CV_Applied_x REAL TechView stores the actual live value read from the
process variable in the transmitter here. The x refers
to the external transmitter number.
@GV.Verif_Exec_x INTEGER This field shows an execution code when the applied
variables are updated. These codes are:
1 = Verify DP Zero
2 = Verify DP Span
3 = Verify SP Zero
4 = Verify SP Span
5 = Verify T Zero
6 = Verify T Span
Note: The application programmer is responsible for
resetting this value to 0 after the code is read.
4-10 Overview of TechView Functions Issued Nov-2016
Page 37

4.5.2 Changing the Name of a Transmitter
To change the name displayed for a particular transmitter, click the
Change Transmitter Name button and type in a new name for the
transmitter. If you decide you don’t want to change the name, prior to
pressing Enter press Esc.
Figure 4-12. Changing the Name of a Transmitter
If you make a mistake, and want to change signal names back to the
original names from the standard application, click Restore Factory
Default Signal Names.
This feature requires OpenBSI 5.8 (or newer).
4.6 Changing the Local Address / Group Number
For those RTUs in which the local address is stored in FLASH
(ControlWave-series, TeleFlow-series) TechView can change the local
address of the unit, and simultaneously change the local address for this
session so communications will continue. The session is temporarily
suspended while this change is occurring.
TechView User’s Guide (D5131)
By default, the Group Number is always set to 0, however, if you are
using Expanded Node Addressing (EBSAP) you may assign different
group numbers. Note, however, that once you have changed the group
number, you must drag the icon for the node in the NetView tree so that
it is underneath the correct virtual node.
Figure 4-13. Changing the Local Address / Group Number
Issued Nov-2016 Overview of TechView Functions 4-11
Page 38
TechView User’s Guide (D5131)
p
p
To change the local address or group number, use the list boxes
provided, then click on the associated Change button.
Note: The change local address and change group number functions for
4.6.1 Starting the Flash Configuration Utility
The Flash Configuration utility allows configuration of soft switches,
orts, IP parameters, and for ControlWave-series units, additional
arameters, as well. To start the Flash Configuration utility, click
Operations > Access Flash Parameters, or click on the icon, shown at
left. For information on the Flash Configuration utility, see the Chapter
5 of the OpenBSI Utilities Manual (document# D5081).
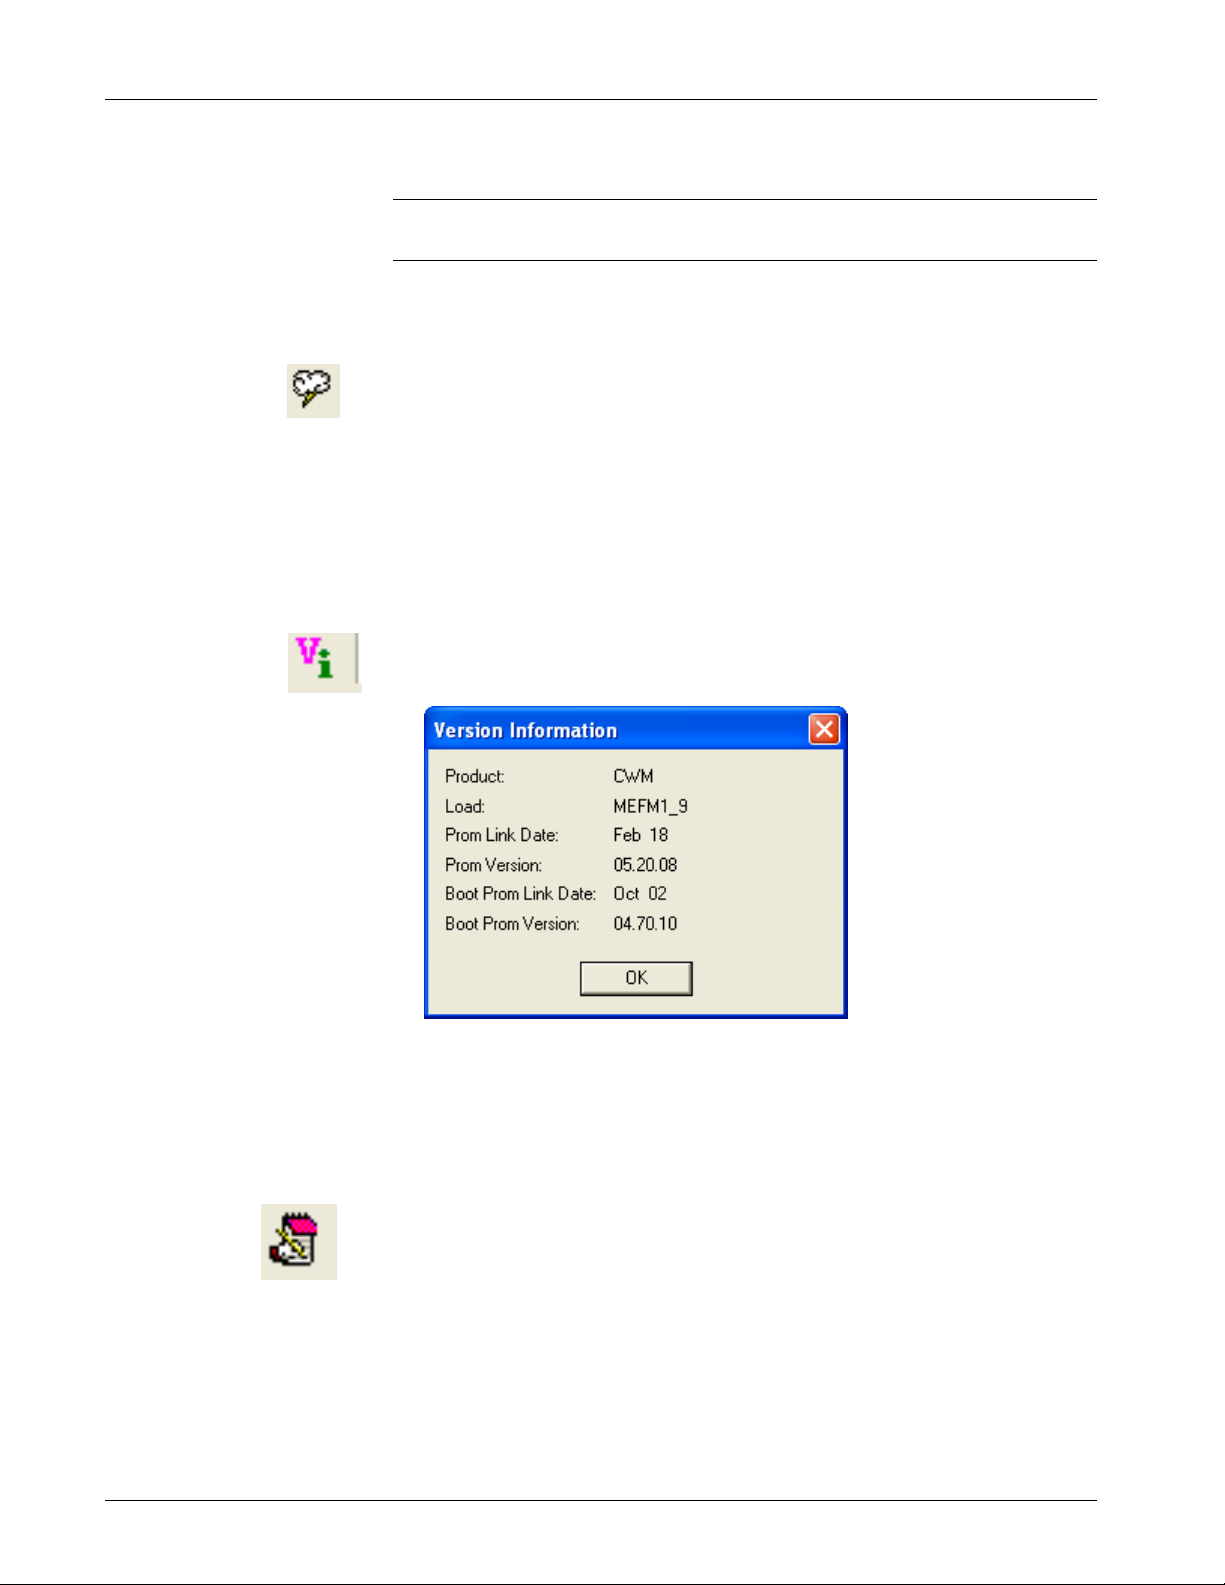
4.6.2 Show Firmware Version in Node
To find out the version of system firmware within the RTU, click on
View > Version Information, or click on the icon shown at left
ControlWave require 04.60 or newer system firmware
Figure 4-14. Version Information dialog box
4.6.3 Writing an Audit Note
The Audit system configured in a ControlWave RTU’s AUDIT function
block maintains a history of certain system events and alarms. In
addition, beginning with TechView, it is possible to have an operator or
technician send their own audit note to be stored in the RTU.
To send an audit note to the RTU, type the text in the box (up to 37
characters), then click on the Send button. TechView adds the note to
the audit file, with a timestamp.
4-12 Overview of TechView Functions Issued Nov-2016
Page 39

TechView User’s Guide (D5131)
Figure 4-15. Notes dialog box
To close the Notes dialog box, click Exit.
4.6.4 Viewing OpenBSI Workstation Communication Statistics
In addition to RTU communication statistics which may be displayed at
the bottom of TechView screens, you can optionally view OpenBSI
workstation communication statistics. To see these, click View >
OpenBSI Processes from the menu bar.
For information on what the various statistics mean, see Chapter 6 of
the OpenBSI Utilities Manual (D5081).
Figure 4-16. OpenBSI System Processes
4.6.5 Deleting Historical Files from the RTU (Clear History)
A ControlWave-series controller stores archive files of historical data,
and audit records of significant system events. Normally, the Harvester,
or some other program periodically collects this data for export to
Issued Nov-2016 Overview of TechView Functions 4-13
Page 40

TechView User’s Guide (D5131)
OpenEnterprise or a third-party package, and eventually new data
overwrites the existing data.
If, however, you want to permanently delete audit or archive data
residing in the ControlWave, you can use the Clear History function.
Note: The ControlWave-series controller must have 04.80 or newer
If there should be a power failure to the ControlWave during the “Clear
Caution
History” operation, files will not delete properly.
If you want to save any Audit or Archive data, you must do this before
Caution
you use the Clear History function.
We also recommend you save your current historical configuration to
an FCP file prior to deleting audit or archive files, so that you can
restore the structure (though not the data), if a failure occurs.
1. To delete historical data, click Operations > Clear History.
firmware to use this function. This operation requires OpenBSI
5.7 or newer.
2. The Clear RTU History dialog box opens.
Choose the type of historical data you want
to delete, then click “Start.”
Figure 4-17. Deleting Historical Data
3. You have four possible choices on what to delete. See explanations
for the fields, below.
4-14 Overview of TechView Functions Issued Nov-2016
Page 41

TechView User’s Guide (D5131)
Field Description
Clear Audit Records
Clear All Archive Files
Clear Single Archive File
Clear All History (Audit
and All Archives)
This choice deletes all Audit records residing in the
ControlWave.
This choice deletes all Archive Files residing in the
ControlWave.
This choice deletes a single Archive File. When
choosing this, use the list box to specify which Archive
File you want to delete.
This choice deletes all Audit Records and all Archive
Files.
4. After you make your choice, click OK to proceed with the deletions,
or Cancel to abort the operation. After you click OK TechView
gives you a warning prompt and asks you to confirm that you want
to perform the deletions.
Once you click OK to the deletion confirmation prompt, there is no way
Caution
to reverse the deletion operation; the delete command removes the
chosen files from the unit and the unit re-boots twice to accomplish the
deletion operation.
Note: If you see the status message Not enough memory to complete
parameter setting, it means the flash memory area is full and the
deletion could not be completed because files are shifted during
the deletion. If this occurs during the Clear All History operation,
try clearing audit files first, then clear archives; if this doesn’t
resolve the issue, use the Flash File Access tool to delete
individual files and free up space. See the ControlWave Designer
Programmer’s Handbook (D5125) for information on the Flash
File Access tool.
Issued Nov-2016 Overview of TechView Functions 4-15
Page 42

Page 43

Chapter 5 – Calibration Overview
This chapter provides general information on calibration and then
provides procedures for calibrating different devices.
In This Chapter
5.1 Why is Calibration Necessary? ........................................................ 5-1
5.2 Calibration Concepts ....................................................................... 5-1
5.3 Before You Begin ............................................................................. 5-3
5.4 Equipment Required for Calibration................................................. 5-5
5.4.1 Equipment Required For Pressure Calibration .................... 5-5
5.4.2 Equipment Required For Temperature Calibration .............. 5-7
5.4.3 Equipment Required for Analog Output Calibration (3808 only)
............................................................................................ 5-7
5.4.4 Entering Calibration Mode / Leaving Calibration Mode ........ 5-7
5.1 Why is Calibration Necessary?
TechView User’s Guide (D5131)
When a transmitter ships from the factory, it is already factor ycompensated for a specific pressure range. When you install the
transmitter on site, however, the accuracy of the transmitter may have
been affected by environmental conditions (temperatures, atmospheric
pressures, etc.) at that particular site. For this reason you must calibrate
the transmitter. In addition, you must periodically re-calibrate the
transmitter to ensure that it maintains its accuracy.
5.2 Calibration Concepts
You must understand certain concepts and terminology before
performing the calibration procedures:
Measured Variable
Applied Value
The measured variable is the actual “live” process variable reading,
coming from the transmitter. This could be a differential/gage
pressure reading, a static pressure reading, or a resistance
temperature detector (RTD) temperature reading.
Applied values are used during calibration. They represent known
values, which are used as a standard or benchmark from which
other values can be calculated by the transmitter.
For pressure, the applied value is a known pressure, applied from
an external pressure source, to the transmitter.
For temperature, the applied value is a known resistance applied by
the user, by connecting a resistor, in place of the RTD.
Upper Range Limit
(URL) and Lower
Range Limit (LRL)
Issued Nov-2016 Calibration Overview 5-1
Transmitters are ordered with specific pressure ranges. An upper
range limit (URL) and a lower range limit (LRL) are preset at the
factory to define the range of pressures that the transmitter can
Page 44

TechView User’s Guide (D5131)
Upper Range Value
(URV) and Lower
Range Value (LRV)
(applies to analog
models only)
read. The URL is the maximum value for the pressure, which can
be read by the transmitter. The LRL is the minimum value for the
pressure, which can be read by the transmitter. Any pressure value
which is higher than 105% of the value of the URL or lower than
the value of (LRL -(5% of the URL)) is considered out-of-range
and cannot be considered accurate.
In contrast to the URL and LRL which define the fixed, predefined factory range for the transmitter, the Upper Range Value
(URV) and Lower Range Value (LRV) may be used to establish
the range being measured for the actual process. For example,
suppose the transmitter has an LRL of 0 psi, which corresponds to
4 mA and a URL of 1000 psi, which corresponds to 20 mA, but the
range of values you want to measure is 0 to 500 psi, then the LRV
would be 0 (4 mA) and the URV would be 500 (20 mA).In this
example, the LRV and URV settings represent a 2 to 1 turndown.
There are certain rules to be observed when setting LRV and URV.
The LRV cannot be set below the LRL.
The URV cannot be set above the URL.
URV minus LRV must be greater than 1/20 of the URL.
For more information on LRV/URV, please consult the hardware
documentation for the transmitter.
SPAN
ZERO
MVT
RTD
GPT
The SPAN value is a positive value which (when added to the
ZERO value) defines the highest expected operational value for a
particular measured variable. This could be the same as the URL,
but in some cases, the SPAN value might not equal the URL. For
example, a transmitter having a 2000 psi URL might only be used
over a 0 to 1000 psi range, and so a span calibration at the 1000 psi
point is performed. The minimum value for the span is URL
divided by 20. If, when calibrating the SPAN value for a pressure
transducer, you apply a pressure value significantly less than the
URL, accuracy may be reduced for readings outside of the span.
The ZERO value is the measured variable value that corresponds to
0% of the transmitter’s SPAN, i.e. 4 mA for a 4 to 20 mA range, or
1V for a 1 to 5V range.
Multi-variable transducer.
Resistance Temperature Detector
Gage Pressure Transducer
Verification
This is a periodic check in which you compare the live reading of a
transmitter against a known measurement standard in order to
5-2 Calibration Overview Issued Nov-2016
Page 45

TechView User’s Guide (D5131)
p
determine if the transmitter measures accurately and remains
properly calibrated. You apply an external source, such as a deadweight tester, to the transmitter and check points along the
measurement curve.
Damping
Damping Time
As Found / As Left
(OpenBSI 5.8 and
newer)
The output damping feature is applicable to ControlWave
EFM/GFC/XFC flow/gas computers, 3508-series Transmitters and
3808-series Transmitters and controls the rate at which the output
responds to a given change of input. It is used to slow down the
output response to a rapid or oscillatory change of the measured
variable.
The period of time during which the indicated value changes only
63% of the difference between the “present measured variable” and
the “present indicated pressure” in one damping time period. It
would take 5 times the DP Floating Point Damping Time for the
“present indicated pressure” to equal the “present measured
pressure” (if a change in the “present measured pressure” didn’t
occur). An increase in the DP Floating Point Damping Time results
in an increased smoothing of the indicated value. Note: In the case
of a model 3530-series unit, if the External Transmitter is a model
3808, Damping Mode is always enabled and can’t be changed;
Damping Time can’t be changed either.
“As Found/As Left” verification is a systematic method to capture
the state of a transmitter, both before and after linearization or
calibration of the transmitter.
At the start of the process, you perform the “As Found”
verification. This determines the current state of the transmitter.
You evaluate the results against a set of limits to determine
whether you need to:
a) leave the transmitter as is
b) perform a physical calibration of the transmitter or
c) take the transmitter out of service and replace it.
You can compare the results to values from the previous “As Left”
verification.
Note: As Found/As Left operations are logged in the audit buffer
at the RTU.
5.3 Before You Begin
Before you start the calibration procedure, there are several things you
need to be aware of.
Calibration in the lab
vs. calibration on site
Issued Nov-2016 Calibration Overview 5-3
Although it is more convenient and recommended to perform this
rocedure using a laboratory setup, calibration can also be performed
Page 46
TechView User’s Guide (D5131)
on site providing that the connecting line or flange is equipped with a
calibration tap and appropriate shutoff and bypass valves. This added
equipment allows you to feed in an external test pressure source or use
the process pressure as a reference signal. In the latter setup, the
valves are closed to seal a fixed pressure in the connecting line.
Note: Before starting any calibration procedures, make sure that the
unit in question is firmly anchored in its intended operating
position. A different mounting position can affect zero
calibration for some ranges and necessitate re-calibration.
WARNING
Communication
Port
Considerations
Only perform calibration activities if the area is non-hazardous.
Before attempting on-site calibration, carefully check the application. If
the unit in question is operated in a closed control loop configuration,
either the MVT/GPT Pressure Transducer must be isolated from the
process, or the process must be turned off. If this is not done, a critical
process could accidentally be driven into a dangerous region causing
damage to equipment and property, and injury to persons
Note: If you modified your application to use different calibration /
verification signal names, you must identify these within
TechView. See Section 4.5.
Notes:
When performing calibration in the field for a Network 3000
device, use the Pseudo-Slave Port of the RTU, not the Slave Port.
Connecting through the Slave port would force you to break
communications with upper levels of the network. In addition, if
you use the Slave Port, it would receive a node routing table
(NRT) from TechView which would only encompass the locally
connected node, and its transmitters. When the connection is
subsequently restored with the network, this would be an incorrect
node routing table, and communications would still not be possible
with higher level nodes. To avoid these problems, perform
calibration through a Pseudo-Slave Port.
When performing calibration through a ControlWave unit’s port,
you must set its _Px_NRT_DIS system variable to TRUE to avoid
the same problem described above.
When performing calibration through a ControlWave unit’s port,
you must set its _Px_NRT_DIS system variable to TRUE to avoid
the same problem described above.
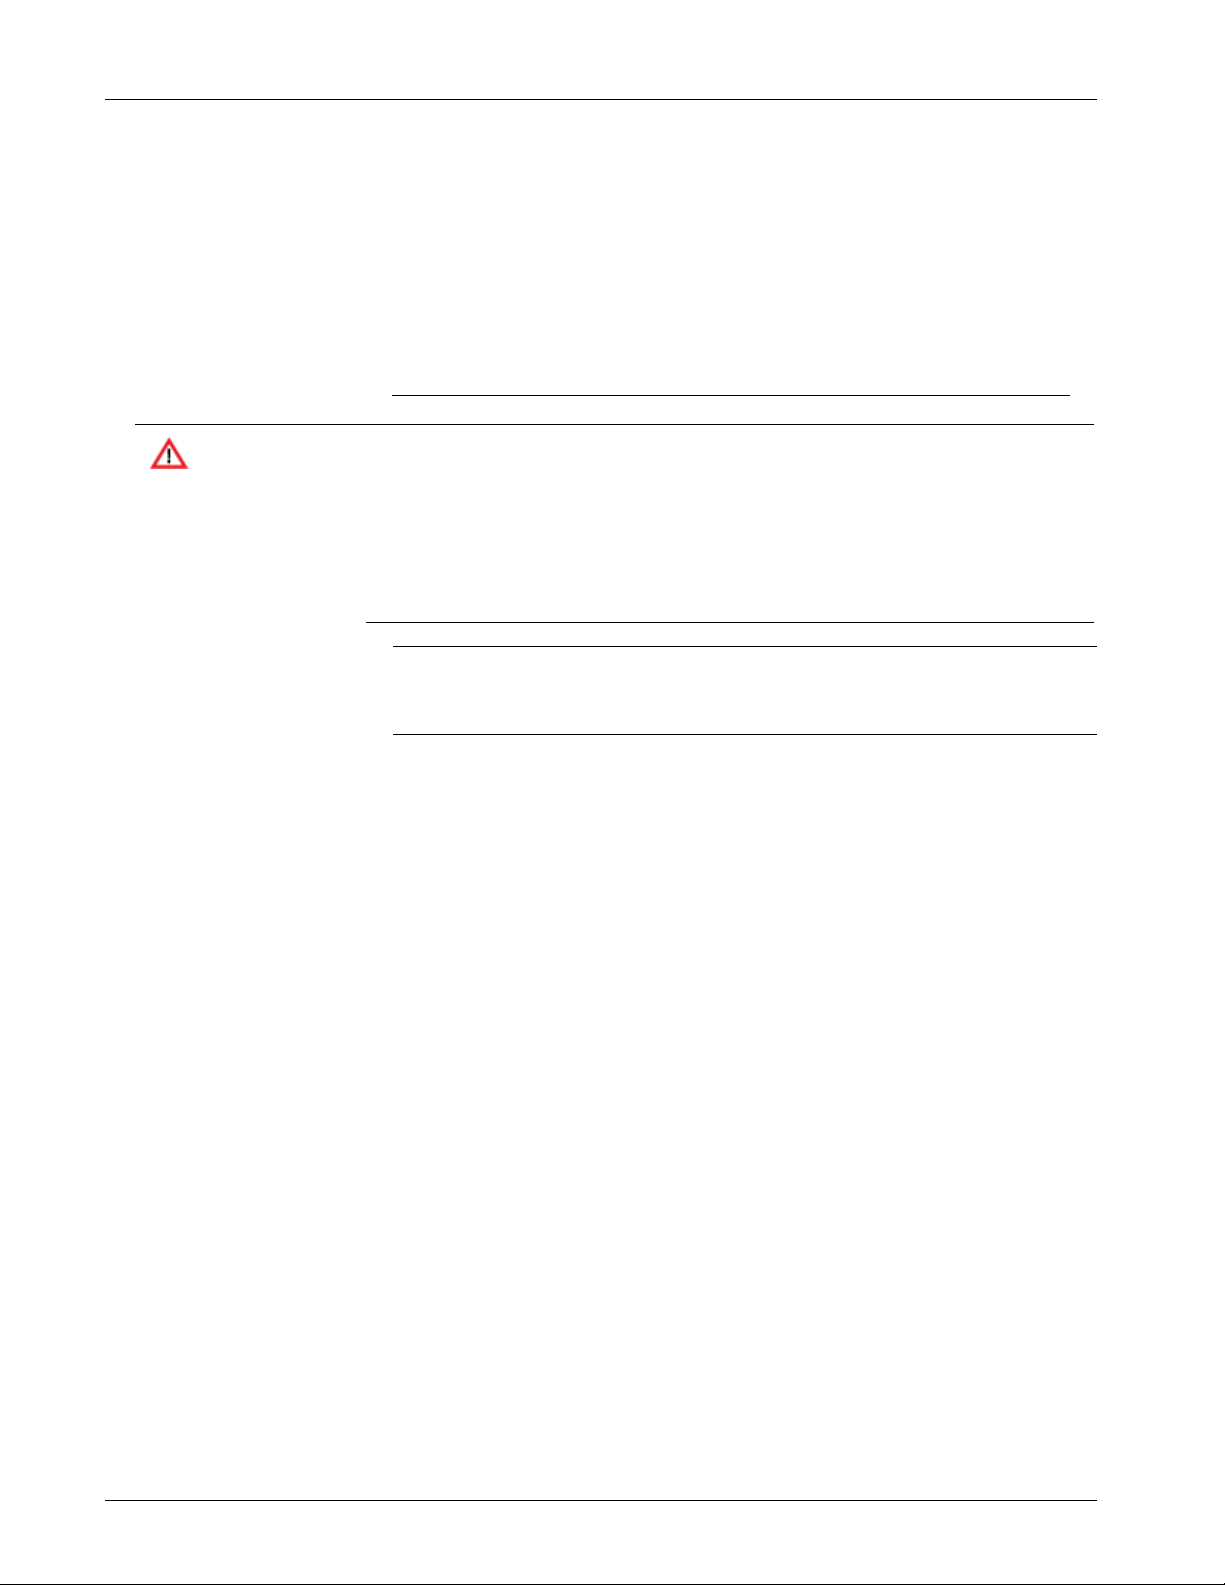
If you are using Expanded Node Addressing (EBSAP) with
ControlWave, and the ControlWave unit is in a group other than
Group 0, the Local Port MUST be marked as LOCAL via the
System Variable Wizard in ControlWave Designer. Otherwise,
communications will not be possible.
5-4 Calibration Overview Issued Nov-2016
Page 47
TechView User’s Guide (D5131)
The _Px_LOCAL_PORT must be set to TRUE
Figure 5-1. Identifying the Local Port
5.4 Equipment Required for Calibration
The equipment required depends on what type of calibration you need to
perform.
5.4.1 Equipment Required For Pressure Calibration
Pressure calibration (static, differential or gage) requires the following
items:
Instrument Mounting Fixture: This fixture must secure the
instrument such that the MVT is positioned identically to its
installation site. GPT equipped units must be positioned vertically.
A Pressure Gauge (must cover the range of the MVT/GPT
Transducer .025% accuracy)
An adequate Pressure Regulator
A Pressure Source (and Interconnect Lines) capable of generating
fixed pressure values equivalent to 0%, and 100% values of
transmitter’s range (URL).
The pressure calibration procedures in this manual require that a text
fixture incorporating these items be used.
Issued Nov-2016 Calibration Overview 5-5
Page 48

TechView User’s Guide (D5131)
A typical MVT pressure calibration interconnection diagram is shown,
below:
: For static pressure calibration setup, connect an identical supply
Note
pressure to the low side port of the MVT.
Figure 5-2. Typical Setup for MVT Calibration
A typical gage pressure calibration interconnection diagram is shown,
below:
Figure 5-3. Typical Calibration Setup of GPT Using Test Pressure
5-6 Calibration Overview Issued Nov-2016
Page 49

TechView User’s Guide (D5131)
5.4.2 Equipment Required For Temperature Calibration
In order to calibrate the RTD Temperature properly, you must have a
Caution
resistor with accuracy of 0.01% accuracy or better. Other wise: you could
actually make the RTD calibration less accurate than it was prior to your
calibration/verification. For example, with a 0.1% resistor, a temperature
reading could be off 0.25 degrees C at 100 ohms, and 0.9 degrees C at 300
ohms. Factory calibration accuracy is 0.05°C at 100°C (212°F) and 0.30°C
at 300°C (572°F).
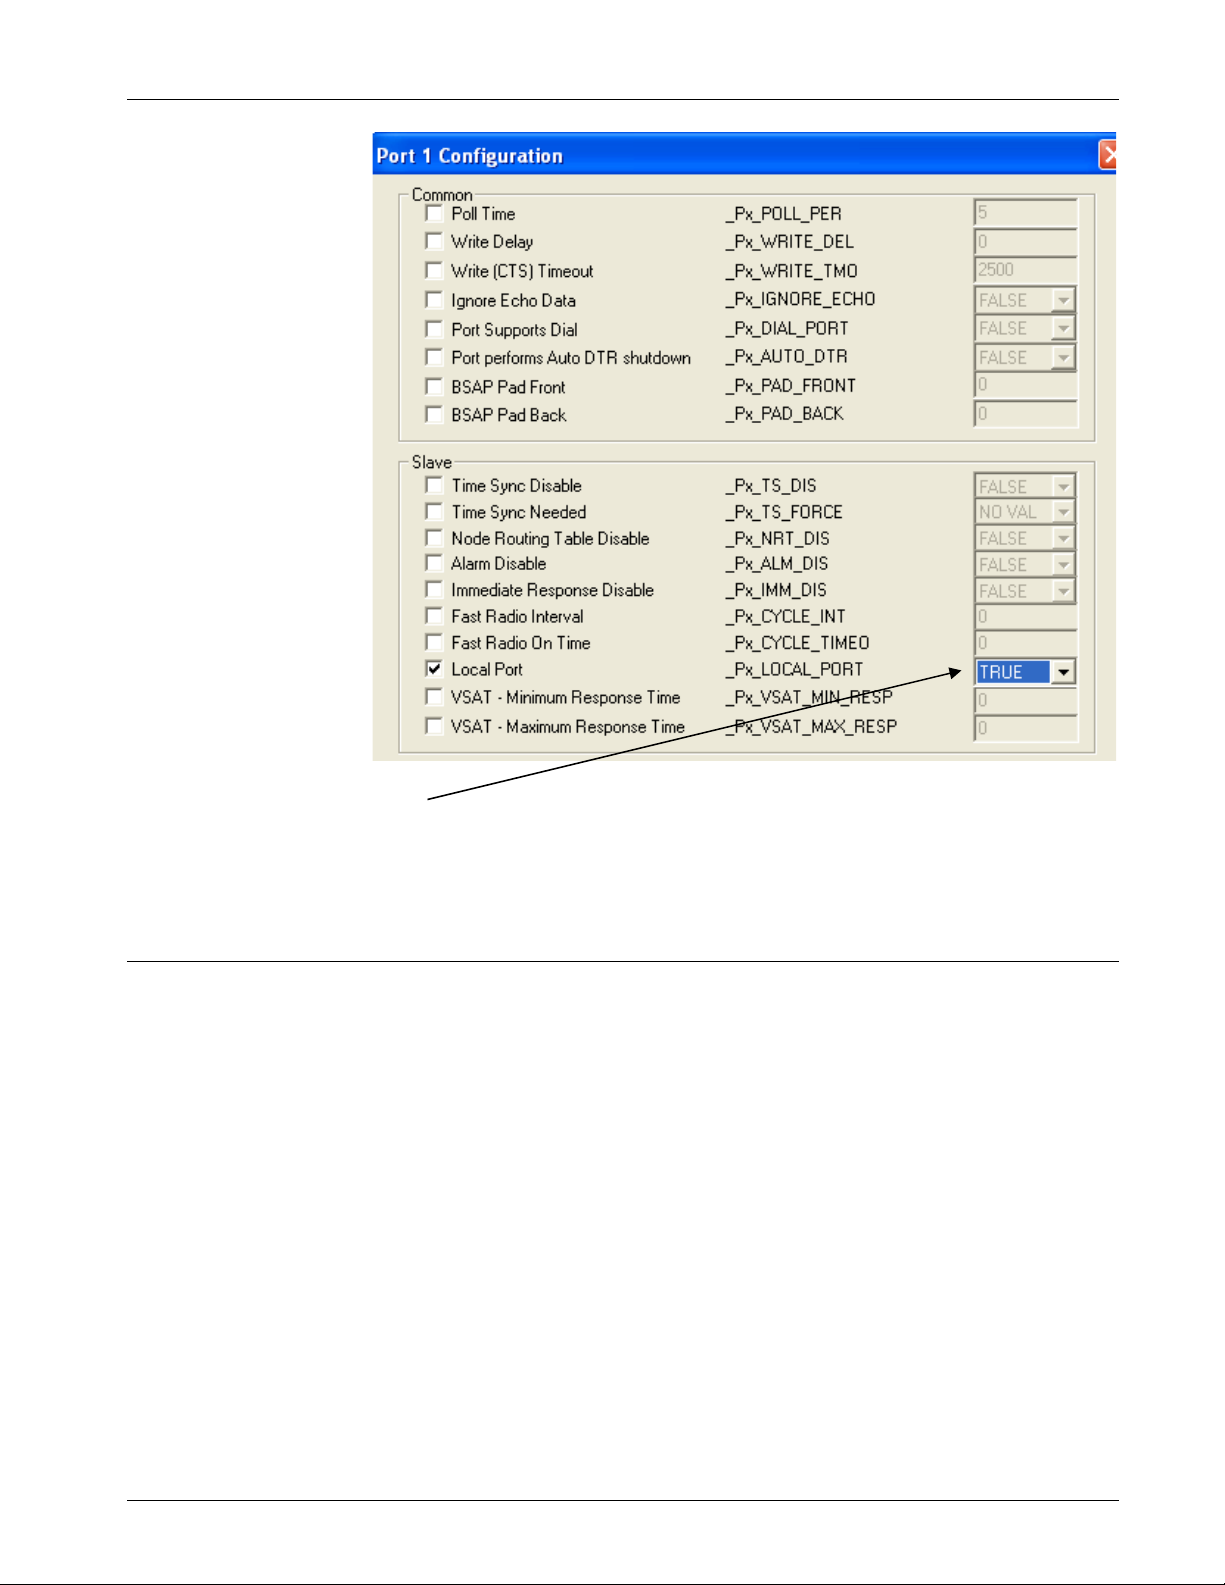
RTD Calibration Resistors
R
zero
R
20%Scale
R
40%Scale
R
50%Scale
R
60%Scale
R
80%Scale
R
span
= 100.00, ±0.01%, 1/4W (0°C = +32°F)
= 140.23, ±0.01%, 1/4W (104.55°C = +220°F)
= 180.57, ±0.01%, 1/4W (212.85°C = +415°F)
= 200.01, ±0.01%, 1/4W (266.38°C = +511°F)
= 220.12, ±0.01%, 1/4W (322.74°C = +613°F)
= 260.22, ±0.01%, 1/4W (438.34°C = +821°F)
= 300.00, ±0.01%, 1/4W (+557.69°C = +1035.84°F)
5.4.3 Equipment Required for Analog Output Calibration (3808 only)
Analog output calibration requires:
electrical supply source: +5Vdc (Min.), +42Vdc (Max.) – powers
the transmitter
digital multimeter (DMM) or ammeter with a 5-1/2 digit scale
(.005% accuracy)
Transmitter Interface Unit (Part No. 389959-01-4)
250-ohm resistor (.01%, 1/4 watt)
5.4.4 Entering Calibration Mode / Leaving Calibration Mode
You enter calibration mode by clicking on the
Calibration icon on the right hand side of the screen.
.
Issued Nov-2016 Calibration Overview 5-7
Page 50

TechView User’s Guide (D5131)
When you enter calibration mode, live values for differential pressure,
static pressure, gage pressure, and temperature are frozen (i.e. the RTU
will collect no new values from the transmitter, during calibration
mode.) By default, you’ll see a prompt warning you of this and giving
you the option of not entering calibration mode. Click Yes to enter
calibration mode.
Figure 5-4. Entering Calibration Mode
Figure 5-5. Exiting Calibration Mode
Similarly, by default, when you click on a different group icon to exit
calibration mode, you’ll see a prompt asking you to confirm that you
want to exit calibration mode, thereby unfreezing live values. Click Yes
to exit calibration mode.
Note: You can disable these confirmation prompts in the Calibration
Setup session parameters dialog box.
5-8 Calibration Overview Issued Nov-2016
Page 51

TechView User’s Guide (D5131)
p
Chapter 6 – Calibrating the 3508 series TeleTrans
Transmitter
This chapter covers calibration activities for the Bristol 3508-series
TeleTrans transmitter.
For a general overview of calibration concepts, see Chapter 5.
For instructions on starting calibration mode, see Section 5.4.4.
In This Chapter
6.1 Calibration of Differential/Gage Pressure ........................................ 6-1
6.2 Calibration of Static Pressure .......................................................... 6-3
6.3 Calibration of RTD Temper ature ...................................................... 6-5
6.1 Calibration of Differential/Gage Pressure
Figure 6-1. DP Tab – Calibrating Differential/Gage Pressure
Calibrating Zero and
Span
1. To calibrate the zero, vent the transmitter to atmosphere, so no
differential pressure is applied. Click Calibrate Zero and the Live
Value will be trimmed to be as close to the zero as possible.
2. To calibrate the span, enter the desired span in the Operating Span
field, then apply a pressure equivalent to the desired span. This
value must be less than or equal to the Data Plate DP URL value.
Then click Calibrate Operating Span. The Live Value will be
trimmed to be as close to the desired span, as possible.
Shifting the DP/GP
Floating Point Number
If needed, the span and zero of the DP/GP floating point number may be
shifted a minor amount (+3% of URL) so that it correlates with the
ressure standard. A correction is achieved by calculating a shift
Issued Nov-2016 3508 Calibration 6-1
Page 52

TechView User’s Guide (D5131)
correction factor and applying it to the floating point number by direct
entry.
1. Compare the floating point values in the Live Value field with the
2. Calculate the amount of ZERO shift necessary to correlate the
Example: Assume that a DP Transmitter with a 300 inH2O URL
3. Click Shift Floating Point Zero. The adjusted value will appear in
pressure standard. Choose values at, or close to, zero and the URV.
If the zero pressure reading is offset from zero, proceed to step 2.
However, if the zero readings agree but an offset occurs at the upper
end of the range, proceed to step 4.
floating point number with the external reading as described in the
following example, and enter it in the Zero Shift field.
has been properly calibrated for a 0 to 100 inH2O range. If the
external device reads 1.400, the difference is: 0 - 1.400 = -1.400 = -
1.400. A Zero Shift entry of -1.4 would provide correlation between
the floating point number and the external device. Note: Always set
the zero before attempting span calibration. Any zero errors result in
an equivalent span offset that complicates calibration.
the Live Value field. If an error occurs, proceed to step 6.
4. Calculate the amount of SPAN shift necessary to correlate the
floating point number with the external reading at the upper end of
the range (this assumes that zero was previously calibrated as noted
above). Use the following example as a guide then enter the value in
the Span Shift field.
Example: Assume that the URL of the transmitter is 300 inH2O and
that the calibrated range is 0 to 100 inH2O. If the external device
reads 0.000 and 99.125 inH2O for equivalent DP/GP floating point
readings of 0.000 and 100.000 inH2O, the difference would be
100.000 - 99.125 = 0.875. The required span shift entry would be
calculated as follows:
Span Shift = (+inH2O error) URL/URV = (+0.875) 300/100 =
+2.625 inH2O
5. Click Shift Floating Point Span. The adjusted value will appear in
the Live Value field. If an error occurs, proceed to step 6.
6. If the error message "Correction not allowed, change exceeds +3%
of URL" appears, the problem may be caused by: a) the pressure
source is not accurate; b) an incorrect value was entered; or c) the
zero pressure point was not set accurately. Check out each item and
make corrections as required.
Changing the Pressure
Units
Select the pressure units for the transmitter, from the Select Pressure
Units list box, then click the Change Pressure Units button.
Note: To force a refresh after changing pressure units, click the Restart
button.
6-2 3508 Calibration Issued Nov-2016
Page 53

6.2 Calibration of Static Pressure
p
For static pressure, the same pressure must be applied to both the HI and
LO inputs of the transmitter, thus producing a zero differential across
the HI and LO ports, and a SP value at the HI port.
TechView User’s Guide (D5131)
Figure 6-2. SP Tab – Calibrating Static Pressure
Calibrating Zero and
Span
Shifting the SP Floating
Point Number
1. To calibrate the zero, vent the transmitter to atmosphere, so only
atmospheric pressure is applied. Click Calibrate Zero, and the Live
Value will be trimmed to be as close to the zero as possible.
2. To Calibrate the span, enter the desired span in the Operating Span
field, then apply a pressure equivalent to the desired span. This
value must be less than or equal to the Data Plate SP URL value.
Then click Calibrate Operating Span. The Live Value will be
trimmed to be as close to the desired span, as possible.
If needed, the span and zero of the SP floating point number may be
shifted a minor amount (+3% of URL) so that it correlates with the
ressure standard used by the external process measuring device. A
correction is achieved by calculating a shift correction factor and
applying it to the floating point number by direct entry.
If it is determined that the difference at zero and upper end of the SP
range is the same, then only a zero shift will be required.
Example: Assume that the URL of the transmitter is 2000 psi
and that it has been calibrated for a 0 to 500 psi range. If the 0
check point was read as 1.200, the difference would be: 0 - 1.200
= -1.200. A zero entry of -1.2 psi would provide the correlation
between the floating point number and the standard of the
Issued Nov-2016 3508 Calibration 6-3
Page 54

TechView User’s Guide (D5131)
To implement a zero correction, enter the correction value in the Zero
Shift field, and click the Shift Floating Point Zero button. After a
moment the reading in the Live Value field will reflect the change.
The attempted entry of values that exceed +3% will result in an error
message.
Should a correlation difference exist at the upper end of the range but
none occurs at the zero end, only a span shift will be required.
Example: Assume that the URL of the static pressure sensor is
external device.
Note: Always set the zero point before attempting span
calibration. Any zero errors will result in an equivalent
span offset that complicates calibration.
2000 psi and that the calibrated range is 0 to 500 psi. If the Live
Value field reads 0.000 and 500 psi and the external device
reads 0.000 and 497.445 psi for these same points, the difference
is 0 psi at the low end and 2.555 psi at the upper end. The span
shift is calculated as follows: Span Shift = (+ psi error)
URL/Operating Point = (+2.555) 2000/500 = +10.22 psi
Changing the Pressure
Units
To implement a span correction, enter the correction value in the Span
Shift field, and click the Shift Floating Point Span button. After a
moment the reading in the Live Value field will reflect the change.
Values that exceed +3% will elicit an error message and the previous
values will be retained.
Select the pressure units for the transmitter, from the Select Pressure
Units list box, then click the Change Pressure Units button.
Note: To force a refresh after changing pressure units, click Restart.
6-4 3508 Calibration Issued Nov-2016
Page 55

6.3 Calibration of RTD Temperature
Note:: The maximum rated RTD cable length for the TeleTrans
Transmitter (Model 3508) is 100 feet. This limitation is imposed
to reduce noise pickup at electrically noisy sites and also to limit
error due to line resistance. Users may employ longer cables
provided they verify proper operation in their specific
application.
TechView User’s Guide (D5131)
Changing the
Temperature Units
Calibrating the Zero
and Span
Figure 6-3. T tab – Calibrating RTD Temperature
The factory calibrates the internal temperature sensor to provide
optimum transmitter accuracy and performance over a wide range of
temperature conditions and cannot be changed in the field. However, the
temperature output reading can be calibrated for the user's application.
Readings can be displayed in either degrees Celsius or degrees
Fahrenheit. To toggle the units from one to the other, click on the
Change Units button. Output values will be scaled to the selected units.
Note: To force a refresh after changing units, click Restart.
1. Disconnect the regular RTD and connect a 100 Ohm (±0.01%)
precision resistor across the RTD terminals (this is equivalent to
32°F).
2. Observe the Live Reading and wait for it to stabilize.
3. Click on the Calibrate Zero (at 100 OHMs) button to calibrate the
RTD zero.
Issued Nov-2016 3508 Calibration 6-5
Page 56
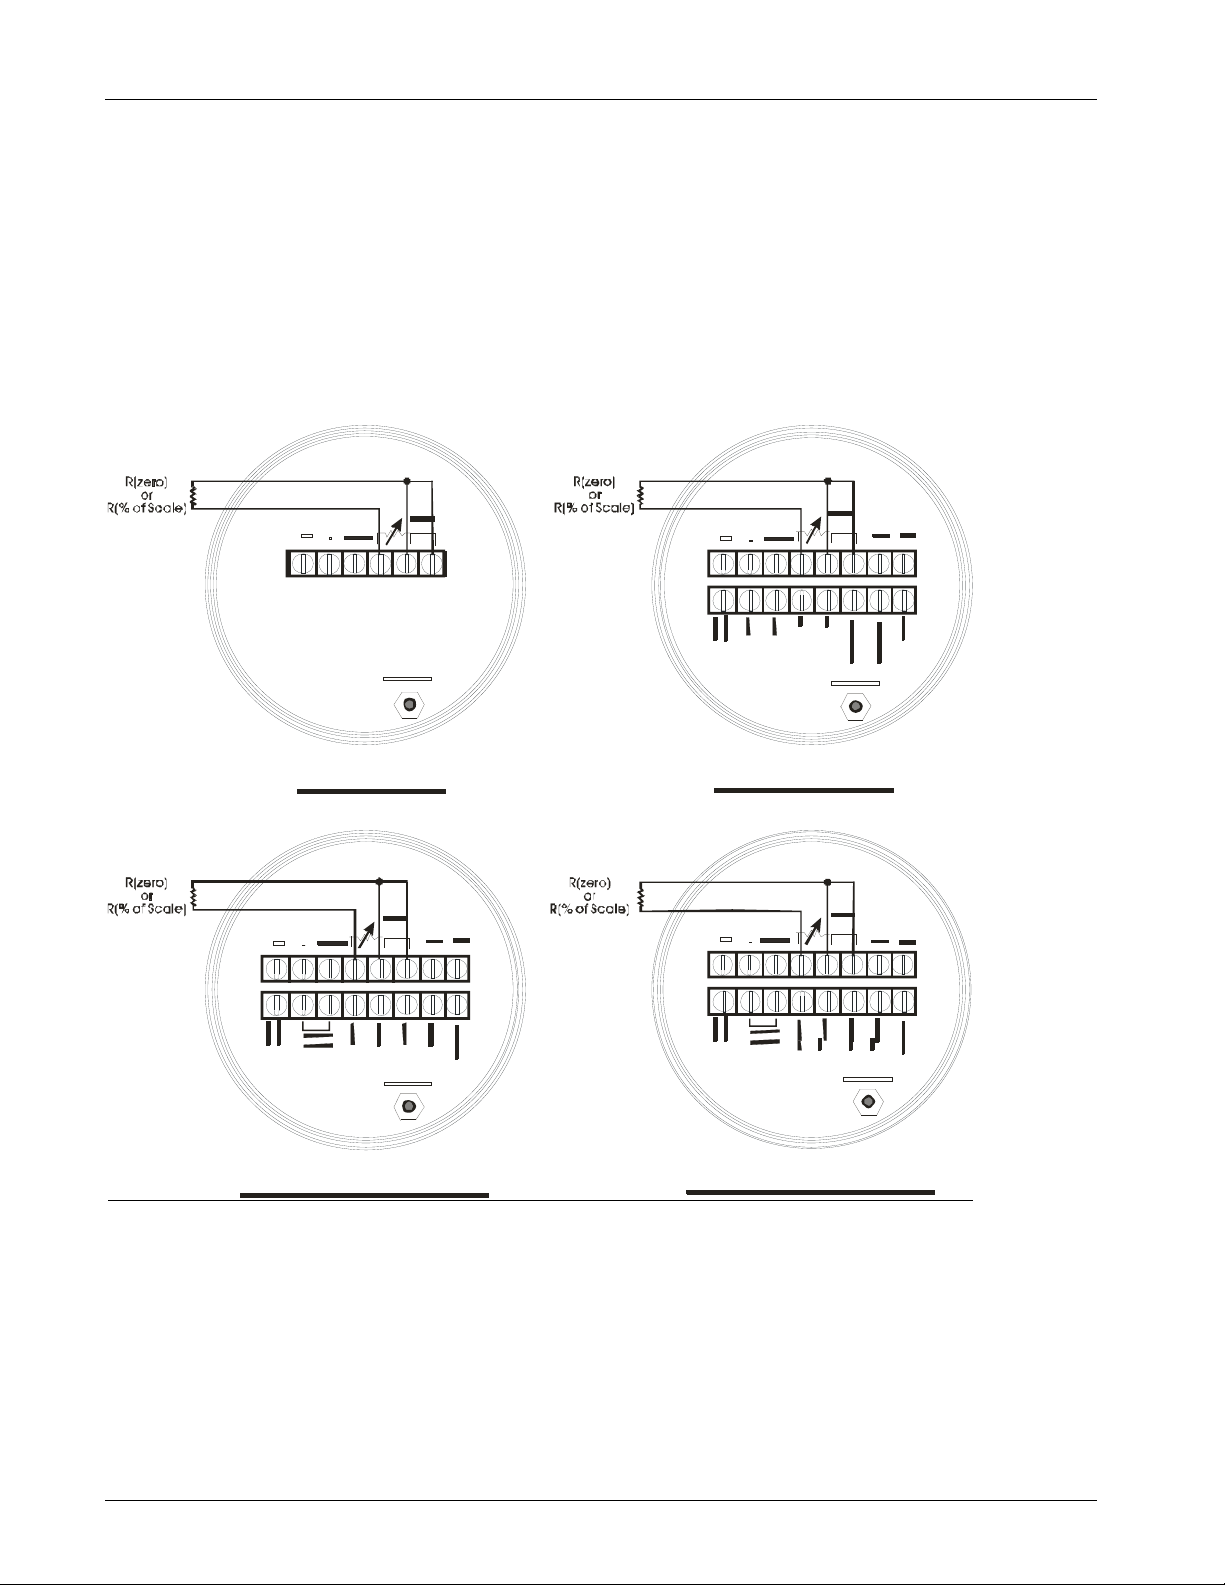
TechView User’s Guide (D5131)
p
4. Disconnect the resistor of step 1 and connect a 140.23 Ohm (±0.01%)
5. Observe the Live Reading and wait for it to stabilize.
6. Enter the desired operating span in the Operating Span field.
7. Click on the Calibrate Operating Span button.
8. Disconnect the resistor, and reconnect the RTD.
precision resistor across the RTD terminals (this is equivalent to
220°F).
Figure 6-4. Model 3508 TeleTrans - Connections for RTD Calibration (See page 5-7 for resistor
values)
Adjusting the Live
Reading
If after re-connecting the unit to the process it is determined th at the
number in the Live Reading field does not correlate with that measured
by an external process monitoring device, offset compensation may be
erformed. To do this, enter the desired reading in the Live Reading
field, then click the Adjust Live Reading button.
6-6 3508 Calibration Issued Nov-2016
Page 57

TechView User’s Guide (D5131)
Chapter 7 – Calibrating the 3808 Transmitter
This chapter covers calibration activities for the Bristol 3808-series
transmitter.
For a general overview of calibration concepts, see Chapter 5.
For instructions on starting calibration mode, see Section 5.4.4.
In This Chapter
7.1 Calibration of Gage or Differential Pressure (3808-10A /3808-30A only)
......................................................................................................... 7-1
7.2 Calibration of Static Pressure (3808-30A ONLY) ............................ 7-2
7.3 Calibration of RTD Temper ature ...................................................... 7-3
7.4 Calibrating the Analog Output (Analog Pressure Transducer models
ONLY) .............................................................................................. 7-5
7.1 Calibration of Gage or Differential Pressure (3808-10A/3808-30A only)
The Sensor LRL and Sensor URL display the lower-range limit and
upper range limit, respectively, of the gage pressure / differential
pressure sensor.
Figure 7-1. DP tab – Calibrating Gage or Differential Pressure
1. In the “Select Operation for DP Sensor” box, select Zero
Calibration.
Issued Nov-2016 3808 Calibration 7-1
Page 58

TechView User’s Guide (D5131)
2. To perform the zero calibration, vent the transmitter to atmosphere,
3. To calibrate the span, select Span Calibration in the “Select
Note: If, for some reason, you want to return to the calibration that was
so no pressure is applied. Click on the Calibrate Zero button, and
the Measured Value will be trimmed to be as close to the zero as
possible.
Operation for DP Sensor” box, then apply a pressure equivalent to
the desired span. Now enter the pressure you applied in the New
Applied Value field. If the transmitter accepts the New Applied
Value, the value you entered will be displayed in the Target Trim
Value field. This value must be less than or equal to the Sensor
URL value. Click on Calibrate Span. The Measured Value will be
trimmed to be as close to the desired span, as possible. Note: Span
calibration may only be performed successfully if the applied
pressure and span are within +3% of one another.
performed by the factory, click on Restore Factory Defaults.
7.2 Calibration of Static Pressure (3808-30A ONLY)
Note: For static pressure calibration setup, connect identical supply
pressures to both the low and high side ports of the MVT.
Figure 7-2. SP tab - Calibration of Station Pressure
The Sensor LRL and Sensor URL display the lower-range limit and
upper range limit, respectively, of the static pressure sensor.
1. In the “Select Operation for SP Sensor” box, select Zero
Calibration.
7-2 3808 Calibration Issued Nov-2016
Page 59

TechView User’s Guide (D5131)
2. To perform the zero calibration, vent the transmitter to atmosphere,
so only atmospheric pressure is applied. Click on the Calibrate
Zero button, and the Measured Value will be trimmed to be as
close to the zero as possible.
3. To calibrate the span, select Span Calibration in the “Select
Operation for SP Sensor” box, then apply a pressure equivalent to
the desired span. Now enter the pressure you applied in the New
Applied Value field. If the transmitter accepts the New Applied
Value, the value you entered will be displayed in the Target Trim
Value field. This value must be less than or equal to the “Sensor
URL” value. Click on Calibrate Span. The Measured Value will
be trimmed to be as close to the desired span, as possible. Note:
Span calibration may only be performed successfully if the applied
pressure and span are within +3% of one another.
Note: If, for some reason, you want to return to the calibration that was
performed by the factory, click on Restore Factory Defaults.
7.3 Calibration of RTD Temperature
Figure 7-3. T tab – Calibration of RTD Temperature
Issued Nov-2016 3808 Calibration 7-3
Page 60

TechView User’s Guide (D5131)
Lower TB
Not Shown
+
3808 RTD Co nnect ion s
Figure 7-4. Model 3808 Transmitter RTD Calibration Connection Diagram (See Section 5.4.2 for
resistor values)
1. Disconnect the regular RTD and connect a 100 Ohm (0.01%)
precision resistor across the RTD terminals (this is equivalent to
32°F).
2. Observe the Measured Value and wait for it to stabilize.
3. Click the Calibrate Zero button to calibrate the RTD zero.
4. Disconnect the resistor of step 1 and connect a precision resistor
across the RTD terminals to represent your desired span.
To calibrate to the default temperature span value of 558 °C (1036
°F) requires a resistance value of 300 ohms +/- 0.01%.
To calibrate the temperature span to any other desired value, you
must know the proper resistance value for that span. You must
calculate this yourself or refer to a 100 ohm platinum RTD chart.
For example, to calibrate the span to the upper range limit (URL) of
the transmitter (660 °C, 1220 °F) requires a 332 ohm resistance +/-
0.01%. After you connect the required resistance, enter the desired
temperature span value in the Custom Span field.
5. Observe the Live Value and wait for it to stabilize.
6. If you used a 300-ohm resistance in step 4, click the Calibrate Span
(at 300 ohm) button; if you connected any other resistance value
click the Calibrate Custom Span button.
7. Disconnect the resistor, and reconnect the RTD.
7-4 3808 Calibration Issued Nov-2016
Page 61

TechView User’s Guide (D5131)
Notes:
If, for some reason, you want to return to the calibration that was
performed by the factory, click on Restore Factory Defaults.
To change the reading from the RTD for the 3808, enter the desired
reading (which should be similar to the actual reading, but
presumably off slightly), and click on Adjust Live Reading.
7.4 Calibrating the Analog Output (Analog Pressure Transducer models ONLY)
3808 analog output calibration requires the following items:
electrical supply source: +6Vdc (Min.), +42Vdc (Max.) – powers
the transmitter
digital multimeter (DMM) or ammeter with a 5-1/2 digit scale
(0.005% accuracy)
Transmitter Interface Unit (Part No. 389959-01-4)
250-ohm resistor (0.01%, ¼ watt)
Lower TB
Not Shown
Figure 7-5. 3808 Analog Output Calibration - Voltage Measurement Diagram
Issued Nov-2016 3808 Calibration 7-5
Page 62
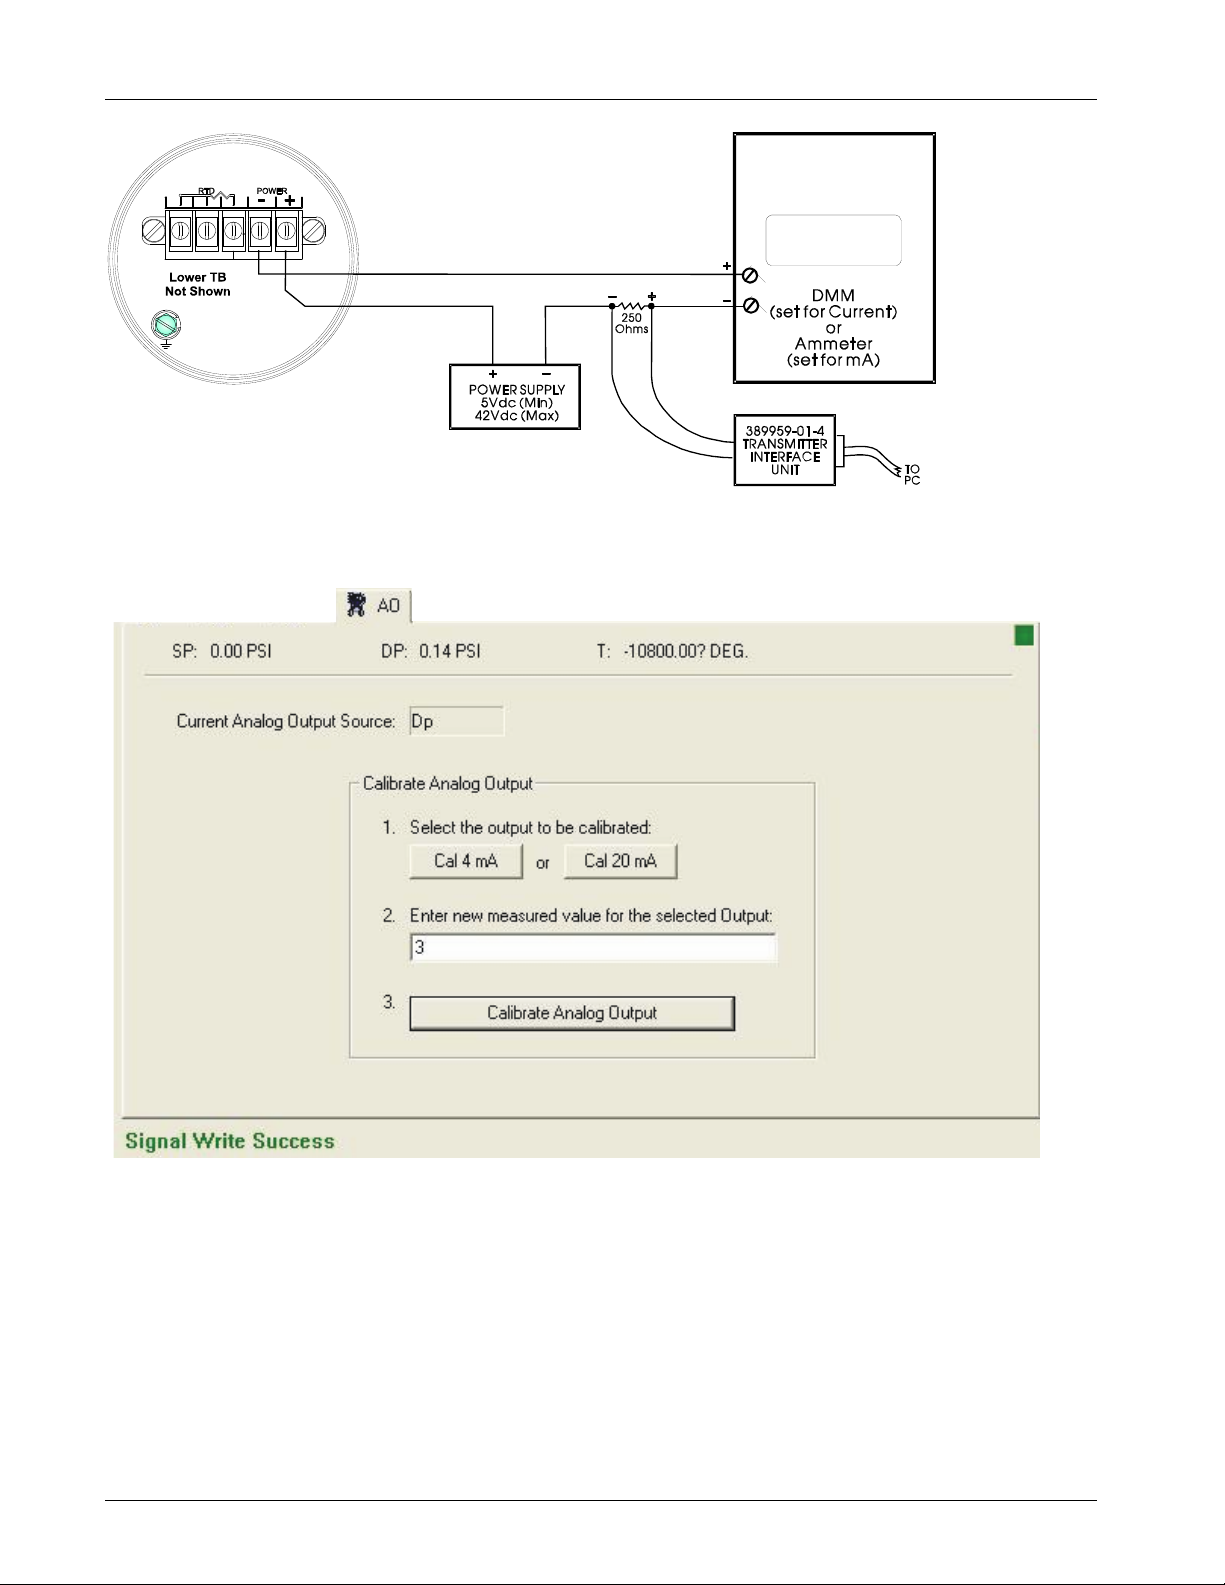
TechView User’s Guide (D5131)
Figure 7-6. 3808 Analog Output Calibration - Current Measurement Diagram
Figure 7-7. AO tab – Calibrating the Analog Output
Any of the three process variables (differential/gauge pressure, static
pressure, or RTD temperature) can control the analog output of the
transmitter. The analog output ranges from 4 mA to 20 mA, but the 4
mA and 20 mA points may change over time and require calibration.
The measured variable in this case is the value read by an accurate milliammeter or voltmeter connected to the analog output.
To calibrate the analog output:
7-6 3808 Calibration Issued Nov-2016
Page 63

TechView User’s Guide (D5131)
1. For Select the output to be calibrated choose “Cal 4 mA”.
Measure the current or voltage externally, and enter the measured
value in the Enter new measured value for the selected Output
field, in milliamperes.
2. To calibrate, select the Calibrate Analog Output button. The 3808
will adjust and save the new settings.
3. Repeat steps 1 and 2, but this time select “Cal 20 mA” for the Select
the output to be calibrated choice.
Note: When calibrating the 4mA point, only measured value entries
between 3mA and 5mA are accepted. When calibrating the
20mA point, only measured value entries between 19mA and
21mA are accepted.
Issued Nov-2016 3808 Calibration 7-7
Page 64

Page 65

TechView User’s Guide (D5131)
Chapter 8 – Calibrating the 3530 TeleFlow-series Flow
Computers
This chapter covers calibration activities for the Bristol 3530-series flow
computers (TeleFlow, TeleRecorder, TeleCorrector).
For a general overview of calibration concepts, see Chapter 5.
For instructions on starting calibration mode, see Section 5.4.4.
In This Chapter
8.1 Calibration of Differential/Gage Pressure ........................................ 8-1
8.2 Verification of Differential Pressure ................................................. 8-2
8.3 Calibration of Static Pressure .......................................................... 8-2
8.4 Verification of Static Pressure .......................................................... 8-3
8.5 Calibration of RTD Temper ature ...................................................... 8-4
8.5.1 Verification of RTD Temperature.......................................... 8-6
8.6 Damping ........................................................................................... 8-6
8.6.1 Configuring the Damping Time ............................................. 8-7
8.7 Calibrating TeleRecorder Inputs (3530-45B/55B ONLY) ................ 8-7
8.7.1 Calibrating the Input ............................................................. 8-8
Important
Whenever performing calibration operations on a 3530-series unit, you
must be connected to the local port of the 3530. You cannot perform
calibration via the network port of the 3530
8.1 Calibration of Differential/Gage Pressure
Figure 8-1. DP tab – Calibration of Differential / Gage Pressure
Issued Nov-2016 3530 TeleFlow Calibration 8-1
Page 66

TechView User’s Guide (D5131)
1. If this flow computer is handling more than one meter run, first
select the run you want to configure from the Run list box.
2. In the “Select Operation” box, select Calibrate.
3. To calibrate the zero, vent the transmitter to atmosphere, so
atmospheric pressure is applied. Click on the Calibrate Zero
button, and the Live Value will be trimmed to be as close to the zero
as possible.
4. To calibrate the span, enter the desired span in the Operating Span
field, then apply a pressure equivalent to the desired span. This
value must be less than or equal to the Data Plate URL value. Then
click on Calibrate Operating Span. The Live Value will be
trimmed to be as close to the desired span, as possible.
8.2 Verification of Differential Pressure
Note: This must be performed using an external tes t fixture that can
apply various pressures.
1. If this flow computer is handling more than one meter run, first
select the run you want to configure from the Run list box.
2. In the “Select Operation” box, select Verify.
3. Using an external test fixture, apply a known pressure. When the
Reported Value is steady, enter the pressure you applied in the
Applied Value field, then click on Verify Differential Pressure
Calibration. Repeat this process using the external test fixture to
apply known pressures of 0, 50, 100, 80, 20, and 0 percent of span.
Note: If, during the verification procedure, the transmitter is found to
be out of calibration, perform the calibration procedure to correct
the discrepancy.
8.3 Calibration of Static Pressure
For static pressure, the same pressure must be applied to both the HI and
LO inputs of the transmitter, thus producing a zero differential across
the HI and LO ports, and a SP value at the HI port.
8-2 3530 TeleFlow Calibration Issued Nov-2016
Page 67

TechView User’s Guide (D5131)
Figure 8-2. SP tab – Calibration of Static Pressure
1. If this flow computer is handling more than one meter run, first
select the run you want to configure from the Run list box.
2. In the “Select Operation” box, select Calibrate.
3. To calibrate the zero, vent the transmitter to atmosphere, so no
pressure is applied. Click on the Calibrate Zero button, and the
Live Value will be trimmed to be as close to the zero as possible.
4. To calibrate the span, enter the desired span in the Operating Span
field, then apply a pressure equivalent to the desired span. This
value must be less than or equal to the Data Plate URL value. Then
click on Calibrate Operating Span. The Live Value will be
trimmed to be as close to the desired span, as possible.
8.4 Verification of Static Pressure
Note: This must be performed using an external test fixture that can
apply various pressures.
1. If this flow computer is handling more than one meter run, first
select the run you want to configure from the Run list box.
2. In the “Select Operation” box, select Verify.
3. Using an external test fixture, apply a known pressure. When the
Reported Value is steady, enter the pressure you applied in the
Applied Value field, then click on Verify Static Pressure
Calibration. Repeat this process using the external test fixture to
apply known pressures of 0, 50, 100, 80, 20, and 0 percent of span.
Issued Nov-2016 3530 TeleFlow Calibration 8-3
Page 68

TechView User’s Guide (D5131)
Note: If, during the verification procedure, the transmitter is found to
be out of calibration, perform the calibration procedure to correct
the discrepancy.
8.5 Calibration of RTD Temperature
Figure 8-3. T tab – Calibration of RTD Temperature
1. If this flow computer is handling more than one meter run, first
select the run you want to configure from the Run list box.
2. In the Select Operation box, select Calibrate.
3. You have the option of displaying the temperature in either
Fahrenheit or Celsius; to switch the units displayed, click on the
Change Units button.
4. Disconnect the regular RTD and connect a 100 Ohm (0.01%)
precision resistor across the RTD terminals (this is equivalent to
32°F).
5. Observe the Live Reading and wait for it to stabilize.
6. Click on the Calibrate Zero (at 100 OHMs) button to calibrate the
RTD zero.
8-4 3530 TeleFlow Calibration Issued Nov-2016
Page 69

TechView User’s Guide (D5131)
7. Disconnect the resistor of step 4 and connect a 140.23 Ohm
(0.01%) precision resistor across the RTD terminals (this is
equivalent to 220°F).
8. Observe the Live Reading and wait for it to stabilize.
9. Enter the desired operating span in the Operating Span field.
10. Click on the Calibrate Operating Span button.
11. Disconnect the resistor, and reconnect the RTD.
12. If after re-connecting the unit to the process it is determined that the
number in the Live Reading field does not correlate with that
measured by an external process-monitoring device, offset
compensation may be performed. To do this, enter the desired
reading, and click on the Adjust Live Reading button.
Figure 8-4. TeleFlow CPU Board RTD Calibration Connection Diagram (See page 5-7 for resistor
values)
Issued Nov-2016 3530 TeleFlow Calibration 8-5
Page 70

TechView User’s Guide (D5131)
8.5.1 Verification of RTD Temperature
1. If this flow computer is handling more than one meter run, first
2. In the “Select Operation” box, select Verify.
3. Disconnect the regular RTD and connect a 100 Ohm (0.01%)
4. The regular RTD must be disconnected, and replaced with a resistor
5. When the Reported Value is steady, enter the value you applied in
6. Repeat this process with other test values (typically 0, 50, 100, 80,
select the run you want to configure from the Run list box.
precision resistor across the RTD terminals (this is equivalent to
32°F).
which simulates the desired temperature.
the Applied Value field, then click on the Verify Temperature
Calibration button.
20, 0 percent of scale values would be applied.)
8.6 Damping
The output damping feature controls the rate at which the output
responds to a given change of input. It is used to slow down the output
response to a rapid or oscillatory change of the measured variable.
Figure 8-5. Damping tab
The Damping Time is a period of time during which the indicated
value changes only 63% of the difference between the “present
measured variable” and the “present indicated pressure” in one damping
time period. It would take 5 times the DP floating point damping time
8-6 3530 TeleFlow Calibration Issued Nov-2016
Page 71

for the “present indicated pressure” to equal the “present measured
pressure” (if a change in the “present measured pressure” didn’t occur).
An increase in the DP floating point damping time results in an
increased smoothing of the indicated value.
Note: In the case of a model 3530-series unit, if the external transmitter
is a model 3808, damping mode is always enabled and can’t be
changed; damping time can’t be changed either.
8.6.1 Configuring the Damping Time
1. If this flow computer is handling more than one meter run, first select
the run you want to configure from the Run list box.
2. Enable the damping feature (if it isn’t already active) by clicking on
the Change DP Floating Point Damping Mode button. (The
currently active mode is displayed in the Damping Mode field).
3. To change the Damping Time enter a new damping time (in
seconds) in the Damping Time field, then click on the Change DP
Floating Point Damping Time button.
TechView User’s Guide (D5131)
Note: If you later decide to disable the damping feature, click again on
Change DP Floating Point Damping Mode.
8.7 Calibrating TeleRecorder Inputs (3530-45B/55B ONLY)
Important
The “Inputs” page provides for gage pressure calibration of inputs to
remove the effect of sensor zero offset and slope variation. You must
calibrate the zero first.
Gage pressure calibration requires the following items:
Instrument mounting fixture: This fixture must secure the instrument
such that the presure transducer is mounted vertically.
a pressure gauge (must cover the range of the pressure transducer)
an adequate pressure regulator
a pressure source and interconnect lines
A test fixture that incorporates the items listed above may be used. A
typical 3530-series pressure transducer calibration interconnection
diagram is provided, below:
Issued Nov-2016 3530 TeleFlow Calibration 8-7
Page 72

TechView User’s Guide (D5131)
Figure 8-6. 3530-45B/-55B TeleRecorder Pressure Transducer Connections
Figure 8-7. Main tab
8.7.1 Calibrating the Input
Note: Calibration mode only remains active for the length of time
indicated in the Calibrate Time field. Otherwise, Zero Offset
and Span Factor will be set to 0.000 and 1.000, respectively.
1. First, calibrate the ZERO. You should apply atmospheric pressure
when calibrating the ZERO. Click on Calibrate Zero. The load
calculates a Zero Offset that will be added to the sensor reading to
8-8 3530 TeleFlow Calibration Issued Nov-2016
Page 73

TechView User’s Guide (D5131)
remove any existing offset at zero pressure. For example, a 1000
psig sensor may be reading 1002 psig with no pressure applied.
After calibration a -2.0 zero offset will be used on the Input Value
to remove the +2 psig offset.
2. To calibrate the span, apply 25% to 100% of sensor URL pressure,
and enter the applied value in the Applied Pressure field, then click
the Calibrate Span button to do a span factor calculation. The load
calculates a Span Factor that will be applied to the Input Value
reading to compensate for slope variation. For example, with zero
offset already calculated and 50 psig applied a 100 psig sensor may
be reading 49 psig because the sensor slope is slightly off. The load
will calculate and apply a span correction factor of 50/49 = 1.0205
to the Input Value to compensate for the slope variation. THIS
CALIBRATION DOES NOT LINEARIZE THE SENSOR INPUT
READING - IT ONLY COMPENSATES FOR ZERO OFFSET
AND SLOPE VARIATION. The result of applying zero offset and
span factor to the Input Value is the Value in Use. The ACCOL
load executes every 15 seconds; so allow time for results to appear.
Note: If desired, you can clear the Zero Offset and Span Factor values
by clicking on Restore Defaults; the offset and span factors are
set to 0.0 and 1.0 respectively.
Issued Nov-2016 3530 TeleFlow Calibration 8-9
Page 74

Page 75

TechView User’s Guide (D5131)
Chapter 9 – Calibrating the ControlWave EFM / GFC-CL
/GFC/ XFC
This chapter covers calibration activities for the ControlWave EFM,
GFC, XFC, and GFC-CL.
For a general overview of calibration concepts, see Chapter 5.
For instructions on starting calibration mode, see Section 5.4.4.
In This Chapter
9.1 Calibration of Differential/Gage Pressure ........................................ 9-1
9.2 Verification of Differential/Gage Pressure ....................................... 9-2
9.3 Calibration of Static Pressure .......................................................... 9-4
9.4 Verification of Static Pressure .......................................................... 9-5
9.5 Calibration of RTD Temper ature ...................................................... 9-6
9.6 Verification of Temperature ............................................................. 9-9
9.7 Damping ......................................................................................... 9-11
9.7.1 Configuring the Damping Time ........................................... 9-11
9.8 Orifice ............................................................................................. 9-12
9.8.1 Specifying the Orifice Plate Size ........................................ 9-12
9.1 Calibration of Differential/Gage Pressure
Figure 9-1. DP tab – Calibration of Differential / Gage Pressure
Issued Nov-2016 ControlWave EFM/GFC/XFC Calibration 9-1
Page 76

TechView User’s Guide (D5131)
1. Select the transmitter you want to calibrate using the Transmitter
2. In the “Select Operation” box, select Calibrate.
3. To perform the zero calibration, vent the transmitter to atmosphere,
4. Wait for the Live Value to become steady, and enter a Tester Value
5. Click on Calibrate Zero and the Live Value will be trimmed to be
6. To calibrate the span, apply a pressure equivalent to the desired
list box. “Wet ends” refer to internal transmitters; all other
transmitters are external.
so no pressure is applied.
equivalent to the zero value.
as close to the zero as possible. If you are calibrating the internal
transmitter, the Calibration Status will be set to SUCCESS or
FAIL based on whether the trim operation was successful.
Calibration status is not available for external transmitters. The page
displays the Live Value and Tester Value in the Actual and Tester
value fields, respectively, for the Zero test point.
span, and wait for the Live Value to settle.
7. Now enter the pressure you applied in the Tester Value field and
click on Calibrate Span. The Live Value will be trimmed to be as
close to the desired span, as possible. If you are calibrating the
internal transmitter, the Calibration Status will be set to SUCCESS
or FAIL based on whether the trim operation was successful.
Calibration status is not available for external transmitters. The page
displays the Live Value and Tester Value in the Actual and Tester
value fields, respectively, for the span test point.
Note: If, for some reason, you want to return to the calibration that was
performed by the factory, click on Restore Factory Defaults.
9.2 Verification of Differential/Gage Pressure
You perform verification as a check to see whether calibration is
required, or after calibration is completed to verify proper calibration.
You choose As Found to record that verification readings are before
calibration, or As Left to record that verification readings are after
calibration.
For a DP, you must perform verification at a minimum of two points,
typically at zero (the high and low side of the transmitter equalized) and
with a differential pressure applied across the high and low sides of the
transmitter (typically, the upper range limit). Typically you would use
three, five, or seven verification points to verify differential pressure.
9-2 ControlWave EFM/GFC/XFC Calibration Issued Nov-2016
Page 77

TechView User’s Guide (D5131)
Figure 9-2. DP tab – Verification of Differential / Gage Pressure
1. Select the transmitter you want to verify using the Transmitter list
box. “Wet ends” refer to internal transmitters; all other transmitters
are external.
2. In the “Select Operation” box, select Verify.
3. If you are performing the verification prior to calibration, choose As
Found. If you are performing the verification after calibration,
choose As Left. This choice determines where readings are stored
for the calibration report.
4. Depending upon your application, you may have multiple test points
to check in sequence. For the first test point, apply a known pressure
using a deadweight tester, or similar device and let the reading
stabilize. Enter the Tester Value which represents the known
pressure value you applied, then click on the button labeled with that
test point. The grid in the right side of the screen displays the Actual
Value read from the transmitter, the Tester Value you entered, and
then calculates the difference between these values and displays it in
the Deviation field. The cursor advances to the next test point.
5. Repeat step 4 for each additional test point. If you make a mistake
and want to re-run the verification for a particular test point, click
the Back button. If you want to skip over a test point, click the Skip
Test Point button.
Issued Nov-2016 ControlWave EFM/GFC/XFC Calibration 9-3
Page 78

TechView User’s Guide (D5131)
9.3 Calibration of Static Pressure
Note: For static pressure calibration setup, connect identical supply
pressures to both the low and high side ports of the MVT.
Figure 9-3. SP tab – Calibration of Static Pressure
1. Select the transmitter you want to calibrate using the Transmitter
list box. “Wet ends” refer to internal transmitters; all other
transmitters are external.
2. To perform the zero calibration, vent the transmitter to atmosphere,
so atmospheric pressure is applied. Wait for the Live Value to
become steady, and enter a Tester Value equivalent to the zero
value.
3. Click on Calibrate Zero and the Live Value will be trimmed to be
as close to the zero as possible. If you are calibrating the internal
transmitter, the Calibration Status will be set to SUCCESS or
FAIL based on whether the trim operation was successful.
Calibration status is not available for external transmitters. The page
displays the Live Value and Tester Value in the Actual and Tester
value fields, respectively, for the Zero test point.
4. To calibrate the span, apply a pressure equivalent to the desired
span, and wait for the Live Value to settle. Now enter the pressure
you applied in the Tester Value field and click on Calibrate Span.
The Live Value will be trimmed to be as close to the desired span,
as possible. If you are calibrating the internal transmitter, the
Calibration Status will be set to SUCCESS or FAIL based on
whether the trim operation was successful. Calibration status is not
available for external transmitters. The page displays the Live Value
and Tester Value in the Actual and Tester value fields,
respectively, for the Span test point.
9-4 ControlWave EFM/GFC/XFC Calibration Issued Nov-2016
Page 79

Note: If, for some reason, you want to return to the calibration that was
performed by the factory, click on Restore Factory Defaults.
9.4 Verification of Static Pressure
You perform verification as a check to see whether calibration is
required, or after calibration is completed to verify proper calibration.
You choose As Found to record that verification readings are before
calibration, or As Left to record that verification readings are after
calibration.
For static pressure transmitters, you must perform verification at a
minimum of two points, typically at zero (the transmitter vented to
atmosphere) and under pressure (often, the upper range limit, or if that
is not practical, near the typical operating range of the transmitter).
TechView User’s Guide (D5131)
Figure 9-4. SP tab – Verification of Static Pressure
1. Select the transmitter you want to verify using the Transmitter list
box. “Wet ends” refer to internal transmitters; all other transmitters
are external.
2. In the “Select Operation” box, select Verify.
3. If you are performing the verification prior to calibration, choose As
Found. If you are performing the verification after calibration,
choose As Left. This choice determines where reading are stored for
the calibration report.
Issued Nov-2016 ControlWave EFM/GFC/XFC Calibration 9-5
Page 80

TechView User’s Guide (D5131)
4. Depending upon your application, you may have multiple test points
to check in sequence. For the first test point, apply a known pressure
using a deadweight tester, or similar device and let the reading
stabilize. Enter the Tester Value which represents the known
pressure value you applied, then click on the button labeled with that
test point. The grid in the right side of the screen displays the Actual
Value read from the transmitter, the Tester Value you entered, and
then calculates the difference between these values and displays it in
the Deviation field. The cursor advances to the next test point.
5. Repeat step 4 for each additional test point. If you make a mistake
and want to re-run the verification for a particular test point, click
the Back button. If you want to skip over a test point, click the Skip
Test Point button.
9.5 Calibration of RTD Temperature
Figure 9-5. T tab - Calibration of RTD Temperature
1. Select the transmitter you want to calibrate using the Transmitter
list box. “Wet ends” refer to internal transmitters; all other
transmitters are external.
2. Disconnect the regular RTD and connect a 100 Ohm (0.01%)
precision resistor across the RTD terminals (which is equivalent to
32°F)
3. Observe the Live Value and wait for it to stabilize.
4. Click on the Calibrate Zero (at 100 ohm) button to calibrate the
RTD zero. If you are calibrating the internal transmitter, the
9-6 ControlWave EFM/GFC/XFC Calibration Issued Nov-2016
Page 81

TechView User’s Guide (D5131)
Calibration Status will be set to SUCCESS or FAIL based on
whether the trim operation was successful. Calibration status is not
available for external transmitters.
5. Disconnect the resistor of step 2 and connect a precision resistor
across the RTD terminals to represent your desired span.
To calibrate to the default temperature span value of 558 °C (1036
°F) requires a resistance value of 300 ohms +/- 0.01%.
To calibrate the temperature span to any other desired value, you
must know the proper resistance value for that span. You must
calculate this yourself or refer to a 100 ohm platinum RTD chart.
For example, to calibrate the span to the upper range limit (URL) of
the transmitter (660 °C, 1220 °F) requires a 332 ohm resistance +/-
0.01%. After you connect the required resistance, enter the desired
temperature span value in the Custom Span field.
6. Observe the Live Value and wait for it to stabilize.
7. If you used a 300-ohm resistance in step 5, click the Calibrate Span
(at 300 ohm) button; if you connected any other resistance value
click the Calibrate Custom Span button. In either case, if you are
calibrating the internal transmitter, the Calibration Status will be
set to SUCCESS or FAIL based on whether the trim operation was
successful. Calibration status is not available for external
transmitters. Disconnect the resistor, and reconnect the RTD.
8. To change the reading from the RTD, enter the desired reading in
the Live Reading field (which should be similar to the actual
reading, but presumably off slightly), and click on Adjust Live
Reading. The page displays the actual reading, and the live reading
you entered in the Actual and Tester fields, respectively.
Note: If, for some reason, you want to return to the calibration that was
performed by the factory, click on Restore Factory Defaults.
Issued Nov-2016 ControlWave EFM/GFC/XFC Calibration 9-7
Page 82

TechView User’s Guide (D5131)
.
TB6
RTD
}
Input
TB2
RTD
Input
Control
GFC-CL
Battery Charger
& I/O Bd.
Wave
TB10
RTD
Input
}
Control
Wave
GFC
CPU/System
Controller Bd
Figure 9-6. Connections for RTD Temperature Calibration – ControlWave EFM, ControlWave GFC-
CL, ControlWave GFC (See page 5-7 for resistor values)
9-8 ControlWave EFM/GFC/XFC Calibration Issued Nov-2016
Page 83

RTD+ ( E xci tati on)
RTD+ ( S ens e)
_
RTD (Return)
TechView User’s Guide (D5131)
Figure 9-7. Connections for RTD Temperature Calibration – ControlWave XFC (see page 5-7 for
resistor values)
9.6 Verification of Temperature
You perform verification as a check to see whether calibration is
required, or after calibration is completed to verify proper calibration.
You choose As Found to record that verification readings are before
calibration, or As Left to record that verification readings are after
calibration.
For temperature transmitters, you can perform verification at two points,
but more often, you would use single point verification. You perform
the single point verification by measuring the process temperature with
a calibrated thermometer, and comparing the results to the temperature
indicated by the temperature transmitter.
Issued Nov-2016 ControlWave EFM/GFC/XFC Calibration 9-9
Page 84

TechView User’s Guide (D5131)
Figure 9-8. T tab – Verification of Temperature
1. Select the transmitter you want to verify using the Transmitter list
box. “Wet ends” refer to internal transmitters; all other transmitters
are external.
2. In the “Select Operation” box, select Verify.
3. If you are performing the verification prior to calibration, choose As
Found. If you are performing the verification after calibration,
choose As Left. This choice determines where reading are stored for
the calibration report.
4. Depending upon your application, you may have multiple test points
to check in sequence. For the first test point, apply a known pressure
using a deadweight tester, or similar device and let the reading
stabilize. Enter the Tester Value which represents the known
pressure value you applied, then click on the button labeled with that
test point. The grid in the right side of the screen displays the Actual
Value read from the transmitter, the Tester Value you entered, and
then calculates the difference between these values and displays it in
the Deviation field. The cursor advances to the next test point.
5. Repeat step 4 for each additional test point. If you make a mistake
and want to re-run the verification for a particular test point, click
the Back button. If you want to skip over a test point, click the Skip
Test Point button.
9-10 ControlWave EFM/GFC/XFC Calibration Issued Nov-2016
Page 85

9.7 Damping
TechView User’s Guide (D5131)
The output damping feature controls the rate at which the output
responds to a given change of input. It is used to slow down the output
response to a rapid or oscillatory change of the measured variable.
Figure 9-9. Damping tab
The Damping Time is a period of time during which the indicated
value changes only 63% of the difference between the “present
measured variable” and the “present indicated pressure” in one damping
time period. It would take 5 times the DP Floating Point Damping Time
for the “present indicated pressure” to equal the “present measured
pressure” (if a change in the “present measured pressure” didn’t occur).
An increase in the DP Floating Point Damping Time results in an
increased smoothing of the indicated value.
Note: If the External Transmitter is a model 3808, damping mode is
always enabled and can’t be changed; damping time can’t be
changed either.
9.7.1 Configuring the Damping Time
1. Select the transmitter you want to change the damping time for
using the Transmitter list box. “Wet ends” refer to internal
transmitters; all other transmitters are external.
2. To change the Damping Time enter a new damping time (in
seconds) in the Damping Time field, then click on the Change DP
Floating Point Damping Time button. This writes the new
damping time to your application in the ControlWave.
Issued Nov-2016 ControlWave EFM/GFC/XFC Calibration 9-11
Page 86

TechView User’s Guide (D5131)
9.8 Orifice
If you change the orifice plate on your pipe, you can use the Orifice tab
to update your application with the new orifice plate diameter..
Figure 9-10. Orifice tab
9.8.1 Specifying the Orifice Plate Size
1. Select the transmitter using the Transmitter list box. “Wet ends”
refer to internal transmitters.
2. Enter the New Plate Diameter and click the Apply new Orifice
Plate Diameter button. This writes the new orifice diameter to your
application in the ControlWave. The Current Plate Diameter field
updates with the new value.
9-12 ControlWave EFM/GFC/XFC Calibration Issued Nov-2016
Page 87

TechView User’s Guide (D5131)
Chapter 10 – Configuring and Calibrating the 4088B
This chapter covers configuration and calibration activities for the
Rosemount 4088B transmitter.
For a general overview of calibration concepts, see Chapter 5.
For instructions on starting calibration mode, see Section 5.4.4.
In This Chapter
10.1 Configuring the 4088B ................................................................... 10-1
10.1.1 DP/GP Pressure ................................................................. 10-2
10.1.2 Static Pressure ................................................................... 10-2
10.1.3 Temperature ....................................................................... 10-3
10.1.4 Serial Port Setup ................................................................ 10-4
10.1.5 Transmitter Data ................................................................. 10-5
10.1.6 RTD Coefficients ................................................................ 10-6
10.2 Calibrating the 4088B .................................................................... 10-6
10.2.1 Calibration of Gage or Differential Pressure ...................... 10-7
10.2.2 Calibration of Static Pressure ............................................. 10-7
10.2.3 Calibration of RTD Temperature ........................................ 10-9
10.1 Configuring the 4088B
Click the Configuration icon to bring up the Config tab.
The Config tab includes buttons for calling up menus to configure the
sensor.
Figure 10-1. Config tab
Note: The menus may be re-sized so they may appear different from the
illustrations shown here.
Issued Nov-2016 4088B Configuration and Calibration 10-1
Page 88

TechView User’s Guide (D5131)
10.1.1 DP/GP Pressure
Configuration options for the differential pressure variable consist of
setting the damping, selecting the engineering units, and setting lower
and upper range values.
Figure 10-2. Configuring the Differential/Gage (DP/GP) Pressure Variable
1. Click DP/GP Pressure to open the DP/GP Pressure menu.
2. Specify a Damping value from 0.0 (none) to 30.0 seconds. For a
step change in input it takes five times the damping value for the
reading to reach the new input. For example, an input change from
60 inH2O to 70 inH2O will take five seconds when damping is set
to 1. Similarly, an input change from 60 inH2O to 70 inH2O will
take 20 seconds when damping is set to 4.
3. Select the engineering Units for the differential pressure variable.
4. Specify the Lower Range Value (LRV). The LRV should be the
lowest value for the DP/GP variable you want to measure for your
process. This cannot be less than the Lower Range Limit (LRL)
which represents the factory set lowest value for the range of values
the sensor can read.
5. Specify the Upper Range Value (URV). The URV should be the
highest value for the DP/GP variable you want to measure for your
process. This cannot be more than the Upper Range Limit (URL)
which represents the factory set highest value for the range of values
the sensor can read.
10.1.2 Static Pressure
Configuration options for the static pressure variable consist of setting
the damping, selecting the engineering units, and setting lower and
upper range values.
10-2 4088B Configuration and Calibration Issued Nov-2016
Page 89

TechView User’s Guide (D5131)
Figure 10-3. Configuring the Static (SP) Pressure Variable
1. Click Static (SP) Pressure to open the Static (SP) Pressure menu.
2. Click Set On to enable SP conversion; click Set Off to disable SP
conversion.
3. Specify a Damping value from 0.0 (none) to 30.0 seconds. For a
step change in input it takes five times the damping value for the
reading to reach the new input. For example, an input change from
60 psi to 70 psi will take five seconds when damping is set to 1.
Similarly, an input change from 60 psi to 70 psi will take 20 seconds
when damping is set to 4.
4. Select the engineering Units for the static pressure variable.
5. Specify the Lower Range Value (LRV). The LRV should be the
lowest value for the SP variable you want to measure for your
process. This cannot be less than the Lower Range Limit (LRL)
which represents the factory set lowest value for the range of values
the sensor can read.
6. Specify the Upper Range Value (URV). The URV should be the
highest value for the SP variable you want to measure for your
process. This cannot be more than the Upper Range Limit (URL)
which represents the factory set highest value for the range of values
the sensor can read.
10.1.3 Temperature
Configuration options for the temperature variable consist of setting the
damping, selecting the engineering units, and setting lower and upper
range values.
Issued Nov-2016 4088B Configuration and Calibration 10-3
Page 90

TechView User’s Guide (D5131)
1. Click Temperature to open the Temperature menu.
2. Click Set On to enable RTD conversion; click Set Off to disable
Figure 10-4. Configuring the Temperature Variable
RTD conversion.
3. Choose either 3-Wire or 4-Wire based on the type of RTD you are
using.
4. Specify a Damping value from 0.0 (none) to 30.0 seconds. For a
step change in input it takes five times the damping value for the
reading to reach the new input. For example, an input change from
60 degrees to 70 degrees will take five seconds when damping is set
to 1. Similarly, an input change from 60 degrees to 70 degrees will
take 20 seconds when damping is set to 4.
5. Select the engineering Units for the temperature variable.
6. Specify the Lower Range Value (LRV). The LRV should be the
lowest value for the temperature variable you want to measure for
your process. This cannot be less than the Lower Range Limit
(LRL) which represents the factory set lowest value for the range of
values the sensor can read.
7. Specify the Upper Range Value (URV). The URV should be the
highest value for the temperature variable you want to measure for
your process. This cannot be more than the Upper Range Limit
(URL) which represents the factory set highest value for the range of
values the sensor can read.
8. If you want the sensor to report a preset temperature value if the
RTD connection fails due an open or short, set the Fail-To option to
ON, and enter the preset temperature value you want to use during a
failure in the Fail-To value field.
10.1.4 Serial Port Setup
The Serial Port Setup menu lets you configure the RS-485 serial port for
BSAP communication.
10-4 4088B Configuration and Calibration Issued Nov-2016
Page 91

TechView User’s Guide (D5131)
Figure 10-5. Configuring the Serial Port
1. Specify the BSAP local address for the sensor in the Node Address
field.
2. If your network uses expanded BSAP addressing (EBSAP), enter
the EBSAP group number in the Group Number field; otherwise
set to 0.
3. Choose the Local Port Address Mode.
4. Specify the Baud Rate the serial port uses to communicate.
5. Specify the Transmit Delay in milliseconds. This is the amount of
time the sensor will wait before it responds to a request.
6. Ignore the MODBUS Address; this is not useful for the 4088B.
10.1.5 Transmitter Data
The Transmitter Data menu shows certain identifying information about
the sensor.
Figure 10-6. Viewing Transmitter Identification Information
Field Description
Transmitter
Tagname
Issued Nov-2016 4088B Configuration and Calibration 10-5
Shows the user-configurable tag name for the transmitter.
Page 92

TechView User’s Guide (D5131)
Transmitter
Serial Number
Sensor Block
Number
Firmware
Revision
10.1.6 RTD Coefficients
The sensor computes RTD resistance using the R0 value and the A and
B coefficients in the modified DIN equation RT = R0 *
(1+A*T+B*T^2). The sensor then calculates RTD temperature from the
resistance.
Shows the transmitter serial number.
Shows the transmitter block number.
Shows the revision of firmware running in the transmitter.
Field Description
RTD Temperature
A Coefficient
B Coefficient
R0 Value
Restore Factory
Defaults
10.2 Calibrating the 4088B
Figure 10-7. Configuring the RTD
The RTD temperature computed from the RTD
resistance.
Shows the A coefficient currently in use. If needed, you
can specify a different A coefficient to use in the (A*T)
term.
Shows the B coefficient currently in use. If needed, you
can specify a different B coefficient to use in the
(B*T^2) term.
Shows the R0 value currently in use. If needed, you
can specify a different R0 value to use in the equation.
Click here to restore the factory default values for the
A, B, and R0 coefficients. These are the coefficients for
a platinum RTD with an “alpha” of 0.00385.
Click the Calibration icon to bring up the Calibration tabs.
10-6 4088B Configuration and Calibration Issued Nov-2016
Page 93
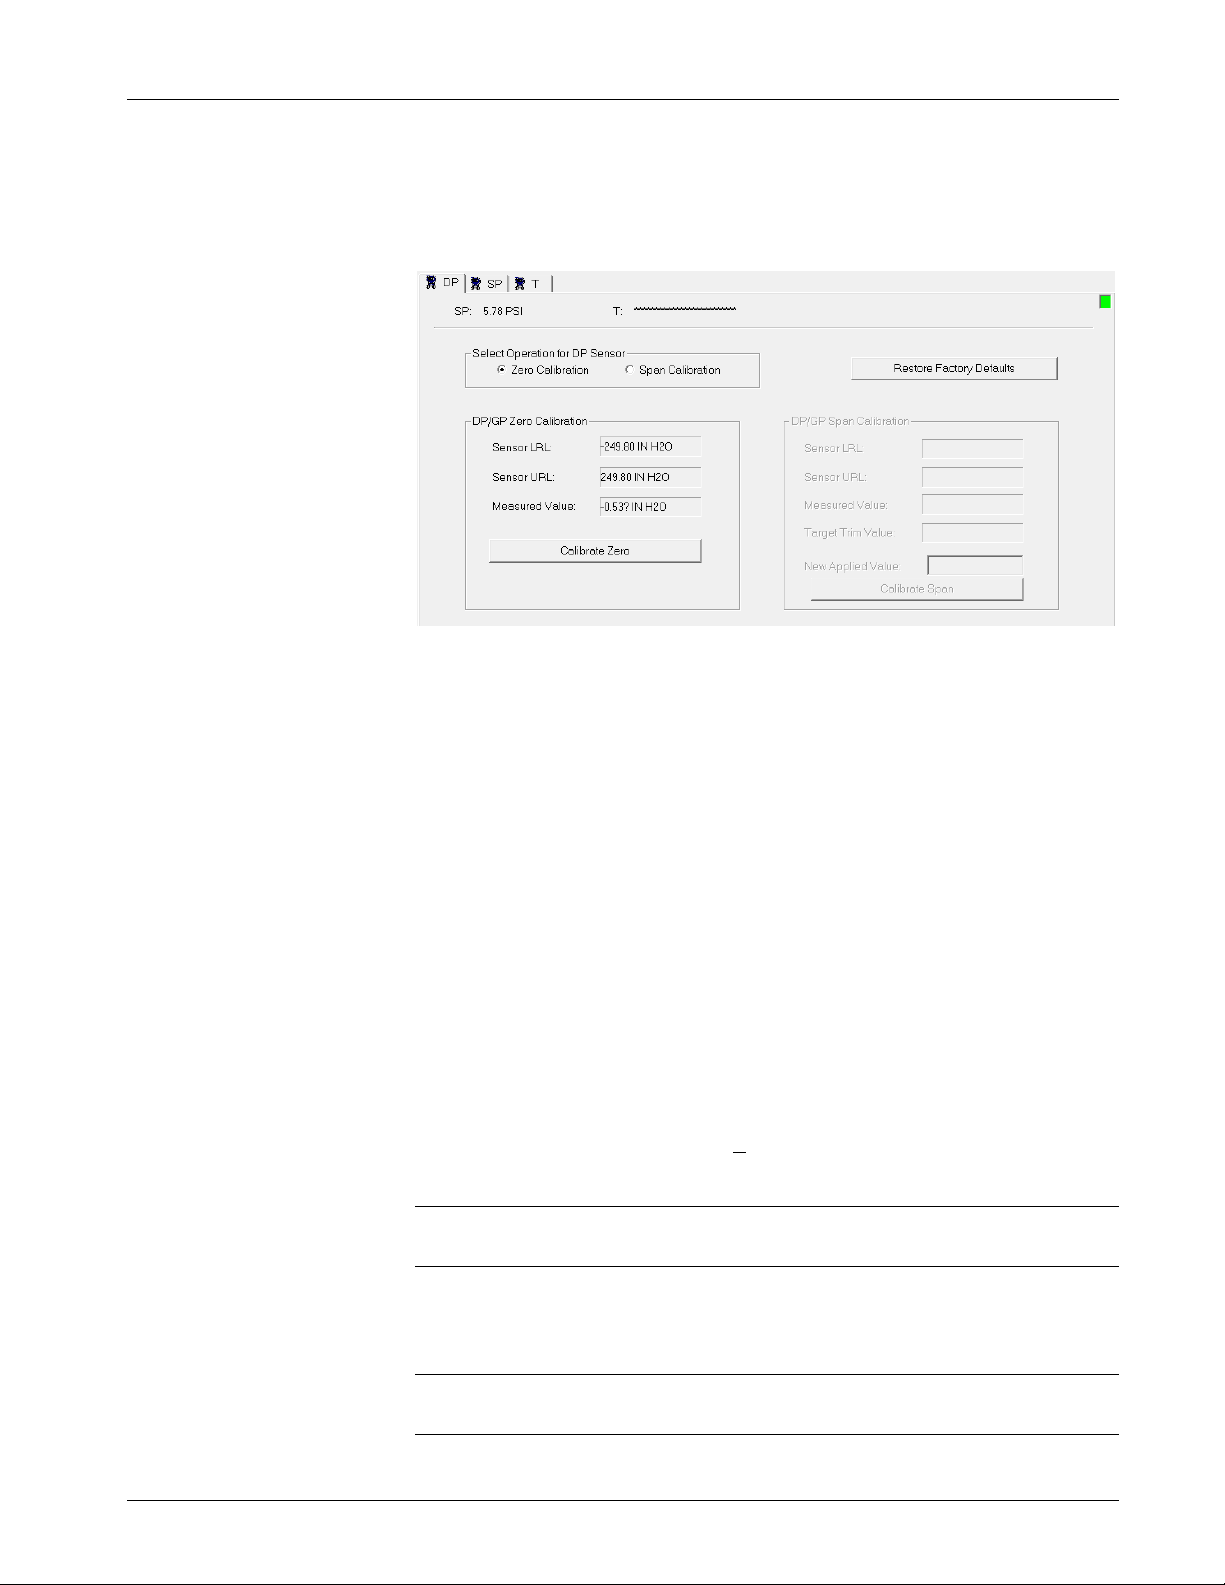
TechView User’s Guide (D5131)
10.2.1 Calibration of Gage or Differential Pressure
The Sensor LRL and Sensor URL display the lower-range limit and
upper range limit, respectively, of the gage pressure / differential
pressure sensor.
Figure 10-8. Calibrating Gage or Differential Pressure
1. In the “Select Operation for DP Sensor” box, select Zero
Calibration.
2. To perform the zero calibration, vent the transmitter to atmosphere,
so no pressure is applied. Click on the Calibrate Zero button, and
the Measured Value will be trimmed to be as close to the zero as
possible.
3. To calibrate the span, select Span Calibration in the “Select
Operation for DP Sensor” box, then apply a pressure equivalent to
the desired span. Now enter the pressure you applied in the New
Applied Value field. If the transmitter accepts the New Applied
Value, the value you entered will be displayed in the Target Trim
Value field. This value must be less than or equal to the Sensor
URL value. Click on Calibrate Span. The Measured Value will be
trimmed to be as close to the desired span, as possible. Note: Span
calibration may only be performed successfully if the applied
pressure and span are within +3% of one another.
Note: If, for some reason, you want to return to the calibration that was
performed by the factory, click on Restore Factory Defaults.
10.2.2 Calibration of Static Pressure
Note: For static pressure calibration setup, connect identical supply
pressures to both the low and high side ports of the MVT.
Issued Nov-2016 4088B Configuration and Calibration 10-7
Page 94
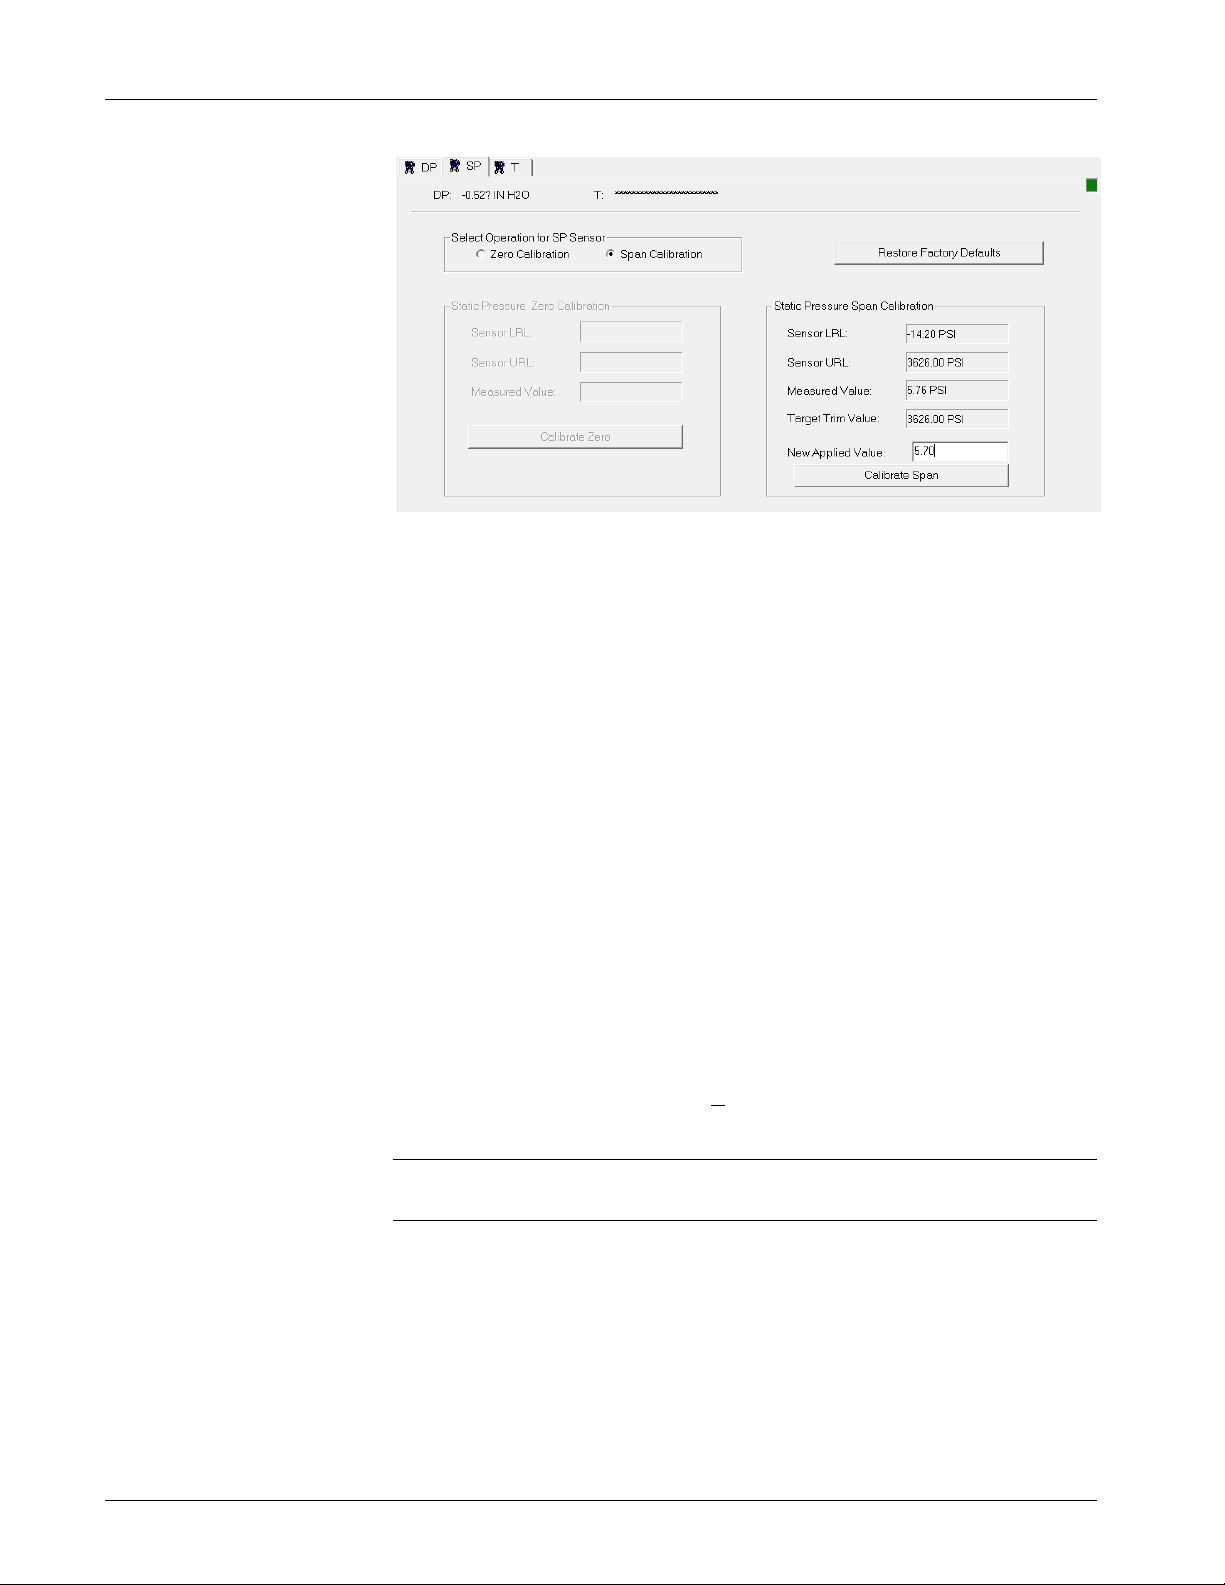
TechView User’s Guide (D5131)
The Sensor LRL and Sensor URL display the lower-range limit and
upper range limit, respectively, of the static pressure sensor.
1. In the “Select Operation for SP Sensor” box, select Zero
Figure 10-9. SP tab - Calibration of Station Pressure
Calibration.
2. To perform the zero calibration, vent the transmitter to atmosphere,
so only atmospheric pressure is applied. Click on the Calibrate
Zero button, and the Measured Value will be trimmed to be as
close to the zero as possible.
3. To calibrate the span, select Span Calibration in the “Select
Operation for SP Sensor” box, then apply a pressure equivalent to
the desired span. Now enter the pressure you applied in the New
Applied Value field. If the transmitter accepts the New Applied
Value, the value you entered will be displayed in the Target Trim
Value field. This value must be less than or equal to the “Sensor
URL” value. Click on Calibrate Span. The Measured Value will
be trimmed to be as close to the desired span, as possible. Note:
Span calibration may only be performed successfully if the applied
pressure and span are within +3% of one another.
Note: If, for some reason, you want to return to the calibration that was
performed by the factory, click on Restore Factory Defaults.
10-8 4088B Configuration and Calibration Issued Nov-2016
Page 95

10.2.3 Calibration of RTD Temperature
Figure 10-10. T tab – Calibration of RTD Temperature
1. Disconnect the regular RTD and connect a 100 Ohm (0.01%)
precision resistor across the RTD terminals (this is equivalent to
32°F).
TechView User’s Guide (D5131)
2. Observe the Measured Value and wait for it to stabilize.
3. Click the Calibrate Zero button to calibrate the RTD zero.
4. Disconnect the resistor of step 1 and connect a precision resistor
across the RTD terminals to represent your desired span.
To calibrate to the default temperature span value of 558 °C (1036
°F) requires a resistance value of 300 ohms +/- 0.01%.
To calibrate the temperature span to any other desired value, you
must know the proper resistance value for that span. You must
calculate this yourself or refer to a 100 ohm platinum RTD chart.
For example, to calibrate the span to the upper range limit (URL) of
the transmitter (660 °C, 1220 °F) requires a 332 ohm resistance +/-
0.01%. After you connect the required resistance, enter the desired
temperature span value in the Custom Span field.
5. Observe the Live Value and wait for it to stabilize.
6. If you connected a 300-ohm resistance in step 4, click the Calibrate
Span (at 300 ohm) button; if you connected any other resistance
value click the Calibrate Custom Span button.
7. Disconnect the resistor, and reconnect the RTD.
Notes:
If, for some reason, you want to return to the calibration that was
performed by the factory, click on Restore Factory Defaults.
To change the reading from the RTD for the 4088B, enter the
desired reading (which should be similar to the actual reading, but
presumably off slightly), and click on Adjust Live Reading.
Issued Nov-2016 4088B Configuration and Calibration 10-9
Page 96

Page 97

TechView User’s Guide (D5131)
Chapter 11 – Online Editing (ControlWave only)
TechView supports online editing of signal lists, and archive file
structures in ControlWave-series controllers with version 04.60 (or
In This Chapter
11.1 On-line Editing of Signal Lists
newer) firmware.
10.1 On-line Editing of Signal Lists ........................................................ 11-1
10.2 On-line Editing of Archive Files ...................................................... 11-4
10.2.1 Archive Fields ..................................................................... 11-6
10.2.2 Batch Editing of Archive Files ............................................. 11-7
Signal lists are a convenient way to organize and view signals used in
your control strategy. For example, you might have a list of
configuration parameters that apply to a particular portion of the control
strategy; or you might have a list containing the current values of
various process variables.
Note: Beginning with OpenBSI 5.8 Service Pack 1, lists can contain
up to 10,000 signals; earlier versions limited this to 5000 signals.
If your controller is running a standard application, created by Emerson,
certain signals will already be stored in signal lists for you to look at.
You may decide, however, that there are other signals in the application
that you want to add to an existing list, or maybe there are signals you
want to remove from a list, because you don’t use them much. These
changes can be made via on-line signal list editing.
Issued Nov-2016 Online Editing 11-1
Page 98

TechView User’s Guide (D5131)
By default, online signal list editing is accessed by clicking on the On
Line Edits group icon.
These are all
the signals in
the currently
selected list.
Signals
appear in the
order they
are defined in
the list; you
cannot sort
them.
This is a list
of other
signals in the
application
that are
available for
you to add to
the currently
selected list.
First, select the list you want to modify here. If “Description”
You can search for particular signals based on their signal name
or signal descriptor. Choose either “Search for Signal” or “Search
for Descriptor” and type a partial signal name or descriptor;
TechView automatically scrolls the list to a matching signal or
descriptor and displays a “hand icon”
signal.
is blank, no
description
Use the scroll
bars to bring
additional
signals into
view.
You can sort
the available
signals
alphabetically
by signal name
or descriptor
by clicking on
next to a matching
the label.
= Sort
alphabetically
from top
= Sort
alphabetically
from bottom
Figure 11-1. Lists tab – Online Editing of Signal Lists
Field Description
Select a list to
modify
Search for Signal
/ Search for
Descriptor
List number n
Available Signals
Delete
This box displays all the lists marked for on-line modification in the RTU.
Lists are shown either by their list number, or a textual description. Choose
the list you want to modify. This will be referred to as the “currently selected
list”.
To locate a particular signal (variable), you can search based on the signal
name or the signal descriptor. Choose either Search for Signal or Search
for Descriptor then enter partial search text in the sea rch fiel d to the right.
TechView searches through the list and scrol ls the window to the first mat ch.
It displays a hand
descriptor. (OpenBSI 5.8 and newer.)
This list shows all the signals included in the currently selected list you chose
previously under Select a list to modify. Signals are displayed in the order
they appear in the list, along with their associated signal descriptor, if
configured. (If no signal descriptor was configured, the descriptor field is left
blank.) If necessary, use the scroll bar to bring more signals from the list into
view.
This is a list of all signals in the RTU that have been marked as “PDD”, along
with their associated signal description. (If no signal descriptor was
configured, the descriptor field is left blank.) Any of these available signals
may be added to the currently selected list, or may be used to replace a
particular signal already in the list. You may sort the signals in this list either
by signal name, or signal description by clicking on the “Signal” or
“Description” titles at the top of the list box.
To remove one or more signals from the currently selected list, click on
icon next to the matching signal name or signal
11-2 Online Editing Issu ed Nov-2016
Page 99

TechView User’s Guide (D5131)
the signals to be removed, so they are highlighted, and then click on the
Delete button. As in standard Windows, you can hold down the Ctrl key
to select multiple signals, individually, or select the first signal in a range,
and then select the final signal in the range while clicking on Shift. Once
you click on Delete the highlighted signals will be removed from the
currently selected list. Note: The signal is still in the control st rategy file,
but once you send the modified list to the RTU, it will no longer be part of
this list.
Move Up
Move Down
Insert
Replace
This button allows you to change the position of the currently selected
signal so that is moved one position closer to the top of the list. Click on
the signal you want to move, then click on Move Up and the signal will be
moved one position up in the list.
This button allows you to change the position of the currently selected
signal so that is moved one position closer to the end of the list. Click on
the signal you want to move, then click on Move Down and the signal will
be moved one position down in the list.
This button allows you to add any signals selected from the Available
Signals into the currently selected list. To do this, click on signals in the
Available Signals box, so they are highlighted, then click on the Insert
button. As in standard Windows, you can hold down the Ctrl key to select
multiple signals, individually, or select the first signal in a range, and then
select the final signal in the range while clicking on Shift. Once you click
on Insert the signals will be added to the currently selected list. If a signal
is already highlighted the list, TechView inserts the signals immediately
below it. If no signal is highlighted in the list, or multiple signals are
already highlighted in the list, TechView inserts the signals at the top of
the list. If desired, you can move them, one at a time, to a different
position in the list by clicking on the signal, then using the Move Up or
Move Down buttons.
This button allows you to replace any signal in the currently selected list,
with a signal from the Available Signals box. To do this, click on the
signal you want to be replaced, in the currently selected list, so it is
highlighted, then click on the signal you want to replace it with in the
Available Signals box, then finally click on the Replace button. The
highlighted signal in the currently selected list will be replaced with the
highlighted signal from the Available Signals box.
Send list to RTU
When you have finished modifying the signal list, click on Send list to
RTU and the modified list will be sent to the controller, thereby completing
you online edits.
What if I’m not seeing any lists or signals at all?
You can only perform online editing for lists created with initialization files; lists generated with the LIST
function block in ControlWave Designer cannot be edited online through TechView.
If, when you bring up the “Lists” on-line editing page, there are no signal lists in the Select a list to modify
selection box, and consequently, no signals in the Available Signals list box, it’s probably because your
translation initialization file has not been properly specified for TechView.
To specify the translation initialization file, click on the Session Parameters icon, and click on Next in the
Communications Setup dialog box. In the Node Setup dialog box, click on the Advanced Interface Setup
button and specify the translation initialization file.
For details on the format of INI files, please see Appendix A.
Issued Nov-2016 Online Editing 11-3
.
Page 100
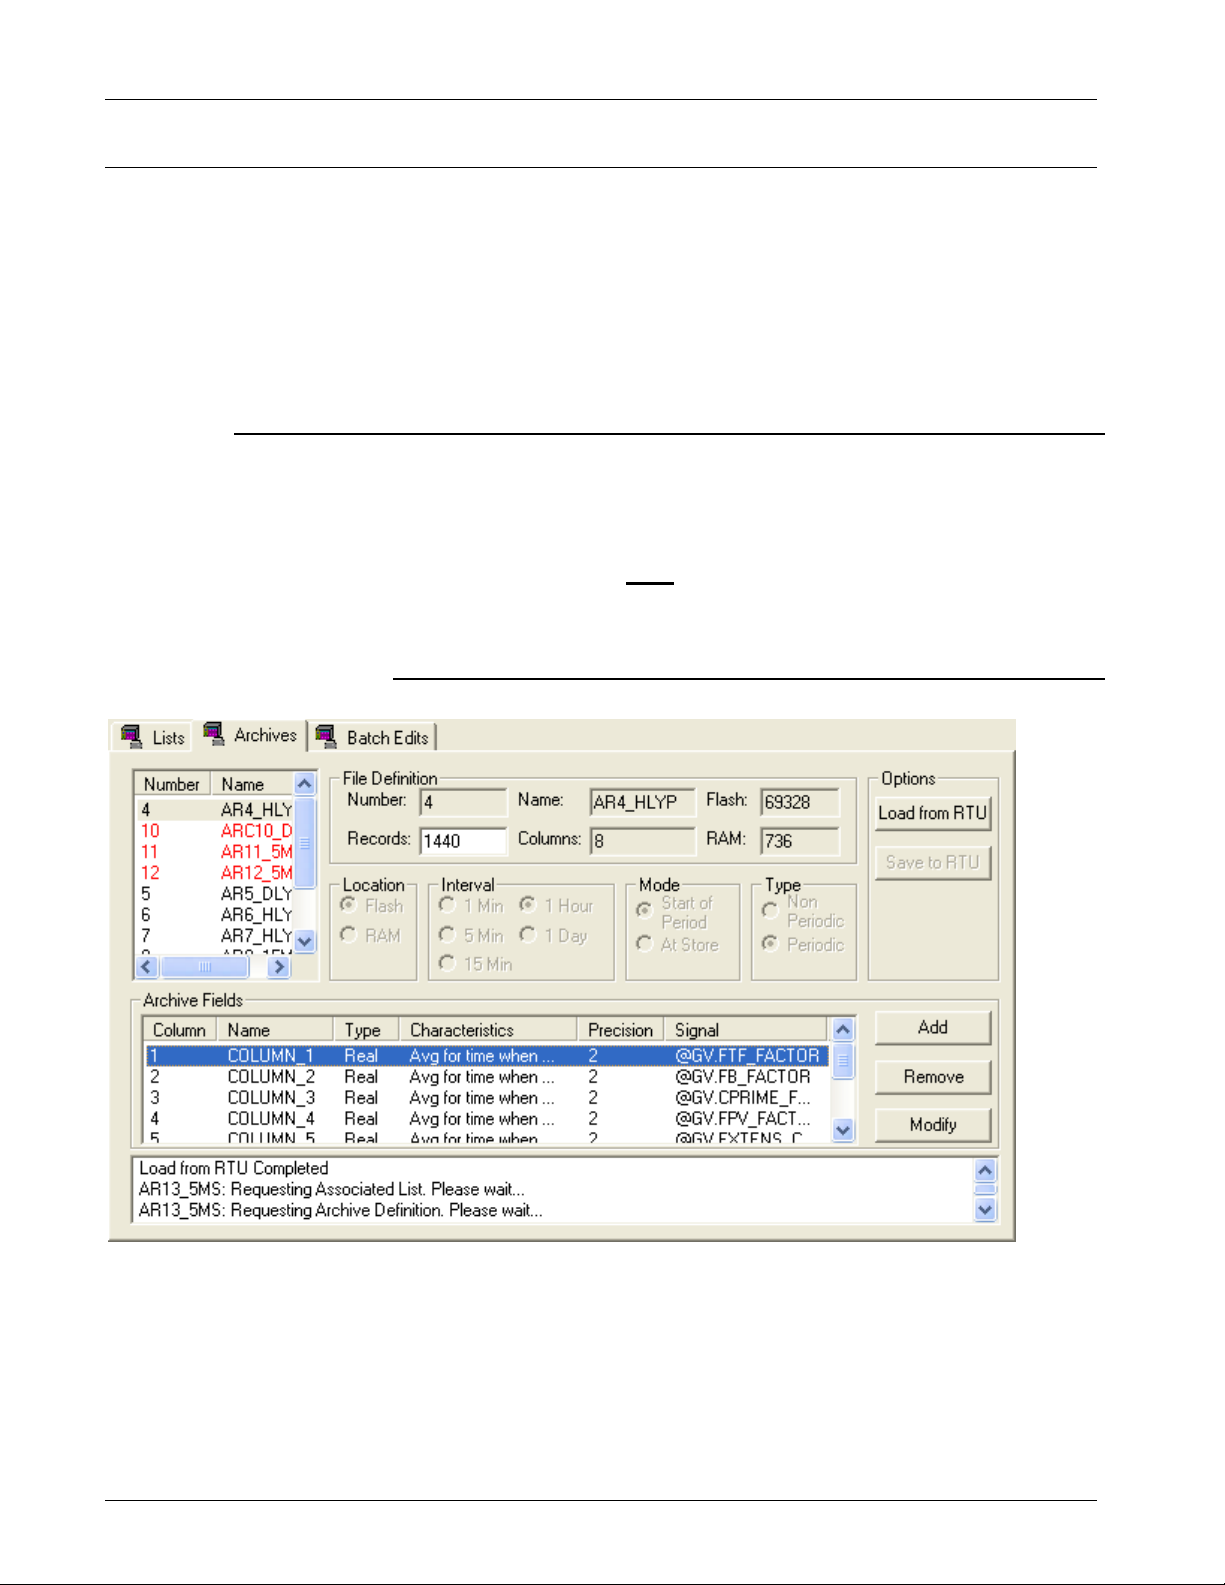
TechView User’s Guide (D5131)
11.2 On-line Editing of Archive Files
Through on-line editing of archive files, you can:
Change the number of records (rows) that will be saved in an
existing archive file.
Add, delete, or modify the column definitions for an existing archive
file.
You cannot, however, create new archive files, nor can you edit saved
archive file data.
Important
Archive files larger than 1 sector cannot be edited online. To determine
whether or not your archive file exceeds 1 sector, please review the
Historical System overview section of the ACCOL3 online help in
ControlWave Designer.
The lists identified by the iiOutList and iiArchiveList parameters of the
Archive function block must be modifiable, in order for your archive
structure to be modified.
ASCII archive files (introduced in ControlWave firmware version 05.10)
cannot be edited online.
Figure 11-2. Archives tab – Online editing of Archives
When you call up the Archives tab, information on archive files is
loaded.
Note: If you see archive information colored red, there is a
configuration error.
11-4 Online Editing Issu ed Nov-2016
 Loading...