

Remote Automation Solutions Guide: OpenEnterprise Web View Reference Guide Manuals & Guides
Page 1

Reference Guide
D301545X412
April 2012
OpenEnterprise Web View Reference
Guide (V2.83)
Remote Automation Solutions
Website: www.EmersonProcess.com/Remote
Page 2

Reference Guide
w
D301545X412
APRIL 2012
Web Vie
Contents
1 Web View Overview.................................................................................................................1
1.1 Web View Functionality.......................................................................................................1
1.2 Web View Environment.......................................................................................................2
1.2.1 The OEDesktop............................................................................................................2
1.2.1.1 New File in OEDesktop..........................................................................................2
1.2.1.1.1 Default Files......................................................................................................3
1.2.1.2 Saved File in OEDesktop.......................................................................................3
1.2.1.2.1 Saving Web View Files.....................................................................................3
1.2.1.2.2 Loading Web View Files...................................................................................3
1.2.2 The Web View Container..............................................................................................5
1.3 Web View Modes ................................................................................................................5
1.3.1 Web View Runtime Mode.............................................................................................5
1.3.1.1 The Homepage ......................................................................................................6
1.3.1.1.1 Opening New Windows....................................................................................6
1.3.1.1.2 The Home Page and Context Menus...............................................................6
1.3.1.2 The Context Menu..................................................................................................7
1.3.1.2.1 Go Home..........................................................................................................7
1.3.1.2.2 Forward.............................................................................................................7
1.3.1.2.3 Back..................................................................................................................7
1.3.1.2.4 Refresh.............................................................................................................7
1.3.1.2.5 Set as Home Page............................................................................................7
1.3.1.2.6 Properties.........................................................................................................7
1.3.1.3 Web View Status....................................................................................................8
1.3.2 Web View Configuration Mode.....................................................................................8
1.3.2.1 Web View General Page........................................................................................8
1.3.2.1.1 Home Page.......................................................................................................8
1.3.2.1.2 File Browse Button............................................................................................9
1.3.2.1.3 Allow Runtime Configuration............................................................................9
1.3.2.1.4 Force Save As..................................................................................................9
1.3.2.2 Web View Aliases Page.........................................................................................9
1.3.2.2.1 Permanently Resolve Aliases...........................................................................9
1.3.2.2.2 Configured Aliases............................................................................................9
1.4 Web View and OEMenus....................................................................................................9
1.4.1 Web View and Aliases................................................................................................10
1.5 Web View and Security.....................................................................................................10
1.5.1 Web View and Custom Tokens..................................................................................10
1.5.2 Web View Application Tokens....................................................................................12
1.5.3 Web View File Tokens................................................................................................12
1.6 Examples ..........................................................................................................................12
1.6.1 Create a Home Page Using an Alias..........................................................................13
1.6.1.1 Open a new Web View File in the OEDesktop ....................................................13
1.6.1.2 Put the file into configuration mode......................................................................14
1.6.1.3 Select the Properties context menu.....................................................................15
1.6.1.4 Set the URL to be an Alias...................................................................................15
1.6.1.5 Define the Alias....................................................................................................16
1.6.1.6 Save the Web View file........................................................................................16
1.6.1.7 Load the new file into the OEDesktop..................................................................17
- i -
Page 3

Reference Guide
w
D301545X412
APRIL 2012
Setting the Home Page as the Default File................................................................19
1.6.2
1.6.3 Using Aliases with Custom Menus.............................................................................21
1.6.3.1 Creating the Streetmap Home Page....................................................................21
1.6.3.1.1 Create a new OEDesktop menu.....................................................................21
1.6.3.1.2 Configure the Street Map Home Page Menu.................................................24
1.6.3.1.3 Using the Street Map Home Page Menu........................................................25
1.6.3.2 Creating a Menu for a Specific Map.....................................................................26
1.6.3.2.1 Do the Street Map Navigation........................................................................26
1.6.3.2.2 Copy the URL from the map page..................................................................27
1.6.3.2.3 Add a New Item to the Street Map Menu.......................................................28
1.6.3.2.4 Configure the New Menu................................................................................30
1.6.3.2.5 Using the Specific Map Menu.........................................................................32
2 Glossary .................................................................................................................................33
3 Index .......................................................................................................................................34
Web Vie
- ii -
Page 4

Reference Guide
w
D301545X412
APRIL 2012
Web Vie
1 Web View Overview
The Web View is an OpenEnterprise ActiveX control that allows web pages (.HTM/HTML files) to be
viewed within the OpenEnterprise Desktop environment. Other files viewable through Internet
Explorer, known as Active Documents, such as Acrobat Portable Document files (.PDF), Microsoft
Excel workbooks (.XLS), Word documents (.DOC), Extensible Markup Language files (.XML) and text
files (.TXT) can also be viewed in the Web Viewer.
The Web Viewer provides the same basic functionality as the other OpenEnterprise Views (e.g. Trend
Client, Notes Client Alarm Client etc) in that it can be launched by OEMenus and supports OESecurity
and Aliases.
1.1 Web View Functionality
The Web View component behaves in much the same way as all the other OpenEnterprise Views in
that it:-
1. Loads into the OEDesktop or its own container.
2. Has Runtime and Configuration modes.
3. Can be a target for OEMenus
- 1 -
Page 5

Reference Guide
w
D301545X412
APRIL 2012
4. Is subject to OpenEnterprise Security
Web Vie
1.2 Web View Environment
The Web View component, like all OpenEnterprise Views can be opened in two environments:-
1. Within the OpenEnterprise Desktop.
2. Within its own container.
1.2.1 The OEDesktop
The Web View component can be opened within the OEDesktop as a new file or as a previously
configured and saved file.
1. Loading as a new file.
2. Loading as a configured file.
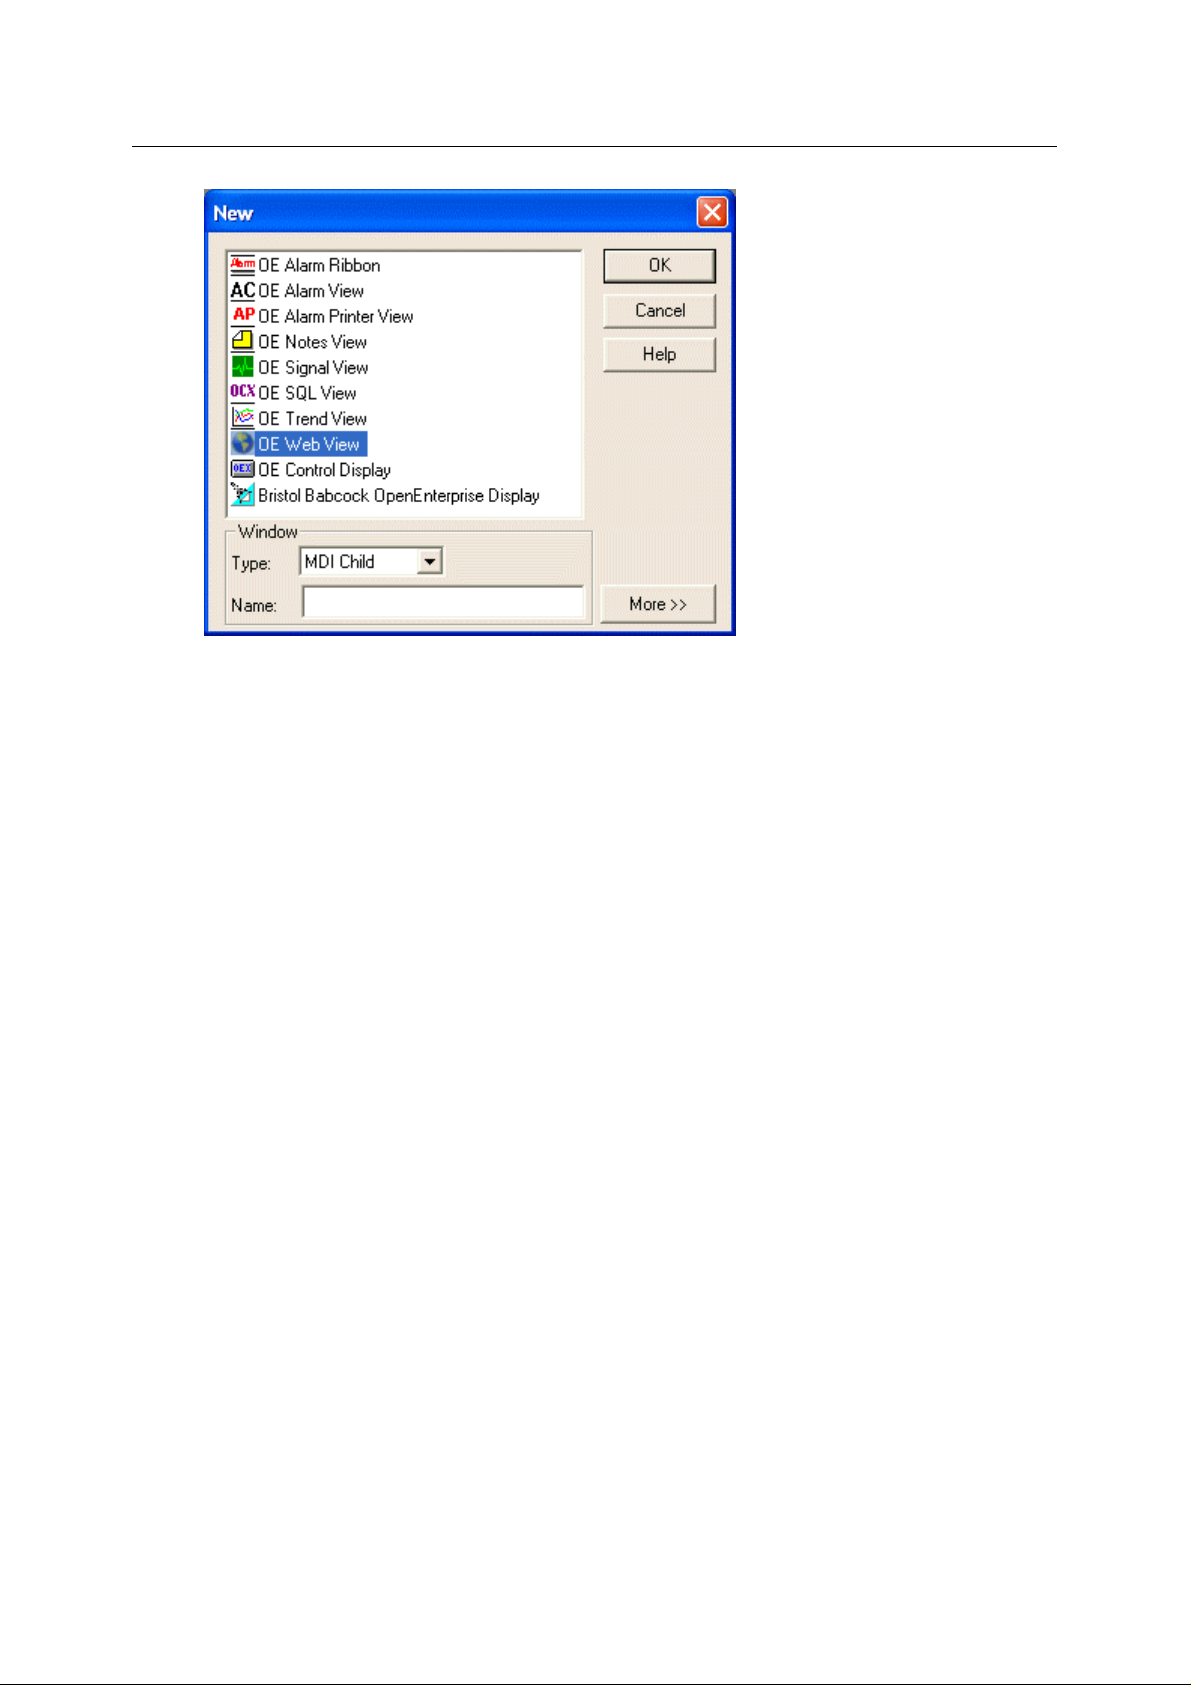
1.2.1.1 New File in OEDesktop
To open a
n New Web file within the OEDesktop do the following:-
1. Select OEDesktop>New from the menu bar at the top of the OEDesktop.
You can also open a new file within the OEDesktop by selecting File>New if the File menu has
been enabled, or by clicking on the New Window Icon on the OEDesktop toolbar, shown
here:-
2. Select OE Web View from the list of file types and click the OK button.
- 2 -
Page 6
Reference Guide
w
D301545X412
APRIL 2012
1.2.1.1.1 Default Files
Web Vie
OEDe
sktop supports the notion of ‘Default Files’. These are files that are loaded when the user
selects OEDesktop>New, thus allowing project specific configuration to be loaded by default. It is
possible to specify a .wbv file that OEDesktop will load when the user creates a new Web View
window in OEDesktop. As this file can be set to point a URL, it is possible to load a specific file or web
page into the Web View when creating new Web View instances in OEDesktop.
1.2.1.2 Saved File in OEDesktop
A saved Web
View files within the OEDesktop environment.
1.2.1.2.1 Saving Web View Files
To save a
component selected.
1. After making changes to the file in Configure mode, select File>Save or File>Save As... from
2. Accept the name provided or change it, then click the OK button.
Web View files can be configured so that when changes are made to configuration, the user is always
presented with a Save As dialog.
1.2.1.2.2 Loading Web View Files
To load a saved We
View file is given a .wbv extension. The following sections explain how to handle Web
Web File from the OEDesktop do the following with the window containing the Web View
the OEDesktop menu bar.
b File into the OEDesktop do the following:-
1. Select OEDesktop>Open from the menu bar at the top of the OEDesktop.
2. Select the OE Web Views file type from the drop-down list on the Open dialog as shown
here:-
- 3 -
Page 7

Reference Guide
w
D301545X412
APRIL 2012
2. Click the Browse ([...]) button to the right of the File Name field, highlighted in this example:-
Web Vie
3. Browse to the file you want to load and click the Open button, as shown in the example
below.
4. Now click the OK button on the original Open dialog to load the file into the OEDesktop. You
can optionally specify a window name as shown in this example:-
- 4 -
Page 8

Reference Guide
w
D301545X412
APRIL 2012
Web Vie
1.2.2 The Web View Container
A new or a saved Web View file can be run within its own container rather than opened straight into
the OEDesktop. The Web View container is opened by selecting Start>Program
Files>OpenEnterprise>Views>Web.
1.3 Web View Modes
Like all the other OpenEnterprise Views, the Web View runs in one of two 'modes':-
1. Runtime mode
2. Configuration mode
1.3.1 Web View Runtime Mode
When the Web View is initially loaded into the OEDesktop or its own container, it appears in Runtime
mode. A new file will be blank, because it has no Home Page configured, unless a Default File has
been specified. When configured, it can display a web page or any file that can be displayed by a web
browser. This file is known as the Home Page. If the Home Page is a web page, when the user right
clicks on the page, a context menu is displayed.
- 5 -
Page 9

Reference Guide
w
D301545X412
APRIL 2012
Web Vie
1.3.1.1 The Homepage
The Ho
Since the Web View has no Address Bar, once the Home Page is loaded the user will only be able to
navigate to different pages via hyperlinks, or by using the Go Home, Forward and Back options on
the Web View's context menu. However, if the user switches to configure mode and back to runtime
after this navigation, or if the Home Page is altered in runtime, they will be taken back to the Home
Page.
1.3.1.1.1 Opening New Windows
Note that links that open th
window. New windows cannot be opened in the OEDesktop from hyperlinks in the Web View window.
The new web page will appear in the same Web View window. Within the OEDesktop environment
new windows can only be opened by OEDesktop itself, from the OEDesktop/File>New and
OEDesktop/File>Open menus or from configured Custom OEDesktop menus.
1.3.1.1.2 The Home Page and Context Menus
If the Home Page is a
Web View Context Menu will be displayed. However, if the URL is an Active Document page the
display of context menus will be handled by the Active Document process (i.e. Acrobat, Word, Excel
etc) and not by Web View. Therefore Web View will have no control over these menus and they
cannot be altered.
me Page can be any valid URL supported by Internet Explorer (i.e http, file, ftp etc.).
e browser in a new page will not do so when selected from a Web View
web page, when the user clicks the right mouse button, the OpenEnterprise
- 6 -
Page 10

Reference Guide
w
D301545X412
APRIL 2012
This means that when Web View is displaying an Active Document it will not be possible to do any of
the activities available on the OpenEnterprise Runtime Context Menu (bring up the properties page,
go back etc).
1.3.1.2 The Context Menu
Web Vie
The Web Vie
Active Document, it is not available.
w context menu is available if the Home Page is a web page. If the Home Page is an
1.3.1.2.1 Go Home
Relo
ads the Home Page. The URL history remains available so that the user can go back to the page
that was displayed before the Go Home menu option was selected.
1.3.1.2.2 Forward
Navigate
1.3.1.2.3 Back
Navigate
1.3.1.2.4 Refresh
Relo
1.3.1.2.5 Set as Home Page
Sets the cu
this is done (subject to security permissions). Once it is done the Home Page value will be altered and
will be saved to the file the next time a file save is performed.
1.3.1.2.6 Properties
Laun
s to the next page in the page history list.
s to the previous page in the page history list.
ads the current page.
rrent page as the current home page. A prompt will ask the user for confirmation before
ches the properties page if configured to allow runtime configuration.
- 7 -
Page 11
Reference Guide
w
D301545X412
APRIL 2012
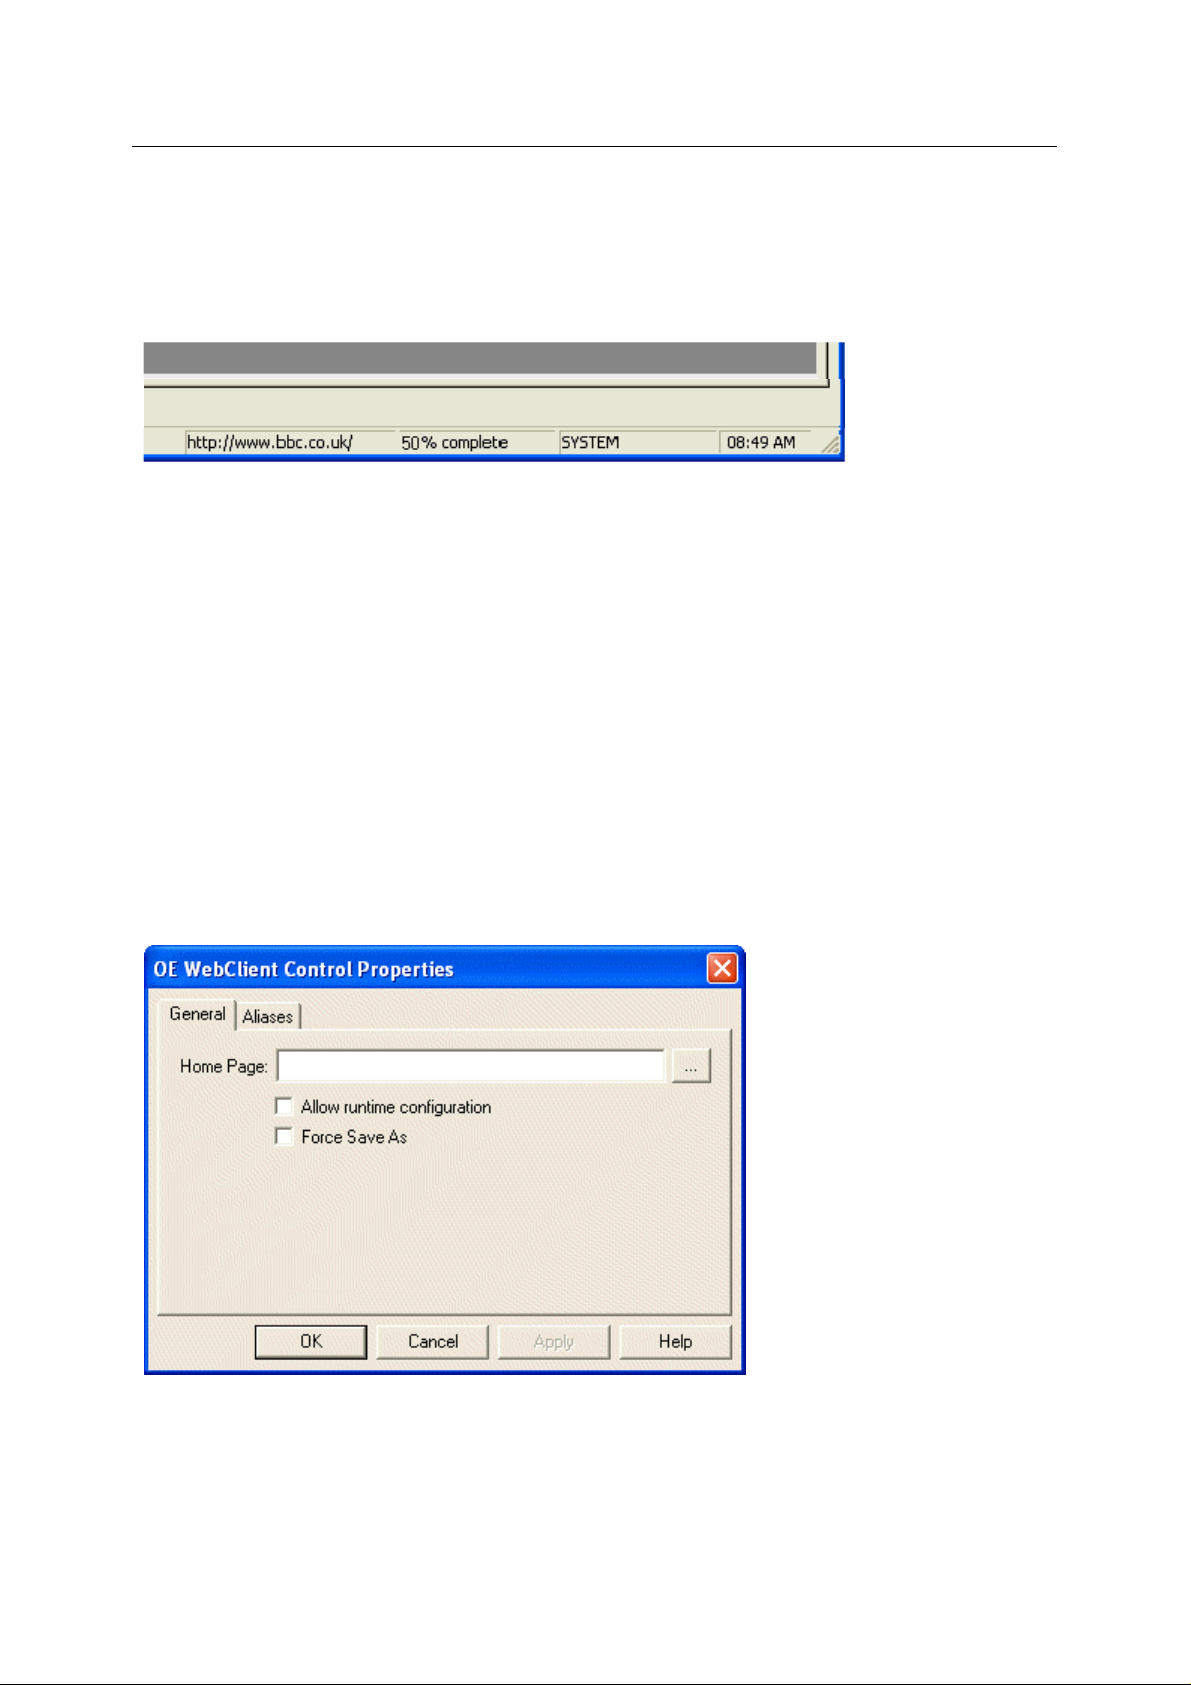
1.3.1.3 Web View Status
n the Web View window is the active window, the OpenEnterprise Desktop Status Bar will display
Whe
the current browser location, followed by the download progress, the logged in user and the current
time. The download progress will be displayed as a textual percentage when the page is loading e.g.
‘50% complete’. When the Web page has fully loaded, the progress pane will say 'Done'.
The browser location indicator will continue to be displayed while the Web View window has the
focus.
Web Vie
1.3.2 Web View Configuration Mode
The Web View can be placed into Configuration mode when it is the active window by selecting
File>Mode>Configure from the OEDesktop menu bar, or pressing Ctrl and M together on the
keyboard. The page will then be blank and the words Web Client - Configure Mode will appear in the
centre of the window.
Right click in the window and select theProperties context menu to display the Web View Property
pages . There are two pages available when in Configure mode:-
1. General Page
2. Aliases Page
1.3.2.1 Web View General Page
The main p
urpose of this page is to allow configuration of the Home Page via a text box.
1.3.2.1.1 Home Page
URLs
can be typed into this box. When the Web View file loads, it will first check the logged in user's
security setting, and then if those security settings allow it, will navigate to the URL specified here.
- 8 -
Page 12

Reference Guide
w
D301545X412
APRIL 2012
The URL may contain aliases. If the URL contains aliases, it is recommended to give the aliases a
default value. When loading the page from a Custom OEMenu, the aliases will be resolved as the
page is loaded.
1.3.2.1.2 File Browse Button
Web Vie
Selecting thi
Page. The path of any file chosen will be set as the home page and have the file:// prefix added.
1.3.2.1.3 Allow Runtime Configuration
Specifies whether the properties dialog can be
1.3.2.1.4 Force Save As
Sets wheth
checked and saved the file will be made read-only and the user will be presented with a Save As...
dialog box when they try to save.
1.3.2.2 Web View Aliases Page
The Aliases p
s button will open a file browse window that allows you to select a file as your Home
shown in runtime. By default this will be unchecked.
er the Force Save As functionality is enabled. By default this will be unchecked. When it is
age is similar to the Aliases pages in the other OpenEnterprise View components.
1.3.2.2.1 Permanently Resolve Aliases
A checkb
1.3.2.2.2 Configured Aliases
Grid
page. Provides the ability to assign initial values to these by typing the value into the Default Value
field. Default alias values will be overridden by parameters passed from Custom OEMenus.
ox allowing aliases to be permanently resolved when the file is saved.
showing all of the Aliases that are currently defined in the Home Page string on the General
1.4 Web View and OEMenus
Web View, like other OpenEnterprise View controls can be a target of OEMenus. This means that a
Web View file (extension .WBV) can be loaded into a window within the OEDesktop from an
OpenEnterprise Custom Menu.
- 9 -
Page 13

Reference Guide
w
D301545X412
APRIL 2012
OpenEnterprise Custom Menus can be configured either as part of a context menu on another View
component, or as a Custom menu added to the OEDesktop menu bar.
As with other OpenEnterprise Views, Web View files can be loaded from an OpenEnterprise Custom
Menu, and can also receive Alias values passed from the source View.
For further information on how to add a Custom Menu to View files that are able to be an OEMenus
Source, or to the OEDesktop menu bar, please refer to the OEMenus
and OEDesktop documentation.
Web Vie
1.4.1 Web View and Aliases
Web View supports the ability to resolve aliases in the Home Page URL. The aliases can be a part or
parts of the URL or the entire URL. This gives it the ability to be set up for a generic URL and then to
have this URL resolved when the aliases are resolved. Thus a single configuration file can be used to
browse to different websites, or to different pages on a single website.
For example the Home Page could be set up to the following URL:-
http://www.streetmap.co.uk/streetmap.dll?grid2map?X=<<XREF>>&Y=<<YREF>>&arrow=y&zo
om=4
The <<XREF>> and <<YREF>> aliases in this URL could then be resolved at Runtime to specific X
and Y OS Grid Ref numbers recognised by the StreetMap website. This would result in a map being
displayed for those co-ordinates. In this way a single Web View configuration file can be used to
display different maps at Runtime.
Web View and OEMenus
1.5 Web View and Security
It is possible to permit and deny navigation to certain URLs via the use of OpenEnterprise Custom
Tokens. When the Web View is about to navigate it checks whether the requested URL is allowed
under the current user’s Custom Token configuration.
Wildcards are allowed in any part of a custom token. Like Application, OPC and File tokens, Custom
tokens can be included or excluded for a user or a group. Including a token pro v ides access and
excluding a token revokes access. This combined with the wildcards provides a very flexible system
for controlling what websites users have access to.
If the requested URL is not permitted then a page will be displayed indicating a security violation
(instead of the requested page). For further information regarding OpenEnterprise Security Tokens
please refer to the Security Configuration Tool documentation.
1.5.1 Web View and Custom Tokens
The following example shows how including and excluding Custom Tokens can control web site
access:
User ‘A’ has the following custom tokens INCLUDED:
http://www.bristol-babcock.com*
http://www.somesite.com/subfolderA*
User ‘A’ has the following custom token EXCLUDED:
http://www.bristol-babcock.com/securefolder*
With these tokens included and excluded the following table shows how certain URLs would be
evaluated:
- 10 -
Page 14

Reference Guide
w
D301545X412
APRIL 2012
Web Vie
URL
http://www.bristol-babcock.com YES
http://www.bristol-babcock.com/openenterprise/default.htm YES
http://www.somesite.com/subfolderA/index.htm YES
http://www.bristol-babcock.com/securefolder YES
Allowed
- 11 -
Page 15

Reference Guide
w
D301545X412
APRIL 2012
http://www.bristol-babcock.com/securefolder/index.htm NO
http://www.bbc.co.uk NO
http://www.somesite.com/subfolderB/index.htm NO
As can be seen whole websites can be enabled and then certain areas revoked. Alternatively only
specific URLs from a web site can be enabled. If required, everything could be enabled.
Web Vie
1.5.2 Web View Application Tokens
A new set of application tokens will be defined that will permit/restrict access to various aspects of the
control’s functionality.
The tokens will be added as part of the default load and will be new Application Tokens. The following
table defines the tokens:-
Name
Web Client - Properties OE Web Client Access to the property pages.
Modify Home Page OE Web Client
Go Home OE Web Client
Go Forward OE Web Client
Go Back OE Web Client
Refresh Current Page OE Web Client
Set as Home Page OE Web Client
Create OE Web Client OE Desktop
Open OE Web Client OE Desktop Ability to open an OEWebClient instance.
Save OE Web Client OE Desktop Ability to save an OEWebClient instance.
There will also be a new TokenGroup defined called ‘OE Web Client’. This will include all the Web
View tokens.
The Security Configuration Tool will be modified to display the new OEWebClient Application tokens.
This will include displaying the OEWebClient icon next to each one.
Type Description
Ability to manually change the home
page. This will enable/disable the Home
Page edit box.
This will enable/disable the
‘Go Home’ context menu.
This will enable/disable the
‘Forward’ context menu.
This will enable/disable the
‘Back’ context menu.
This will enable/disable the
‘Back’ context menu.
This will enable/disable the
‘Set as Home Page’ context menu.
Ability to create an OEWebClient
instance.
1.5.3 Web View File Tokens
It is possible to prevent access to individual Web View configuration files through the use of file
tokens. When a file cannot be accessed a page will be displayed indicating a security violation
(instead of the requested page).
1.6 Examples
Here are a few concrete examples of how to set up the Web Viewer within the OEDesktop
environment.
1. Creating a Home Page using an Alias
2. Setting the Home Page as the Default File
- 12 -
Page 16

Reference Guide
w
D301545X412
APRIL 2012
3. Using Aliases with Custom Menus
Web Vie
1.6.1 Create a Home Page Using an Alias
This is how to create a Web View with a Home Page. The whole URL of the home page is an Alias
which has been given an initial definition. This means that whenever the file is opened, it will
automatically display the Web page defined by the Alias within the saved Web View file, but the URL
can be overridden by parameters sent from an OpenEnterprise Custom menu. Here are the steps for
doing this:-
1. Open a new Web View File in the OEDesktop
2. Put the file into configuration mode
3. Select the Properties context menu
4. Set the URL to be an Alias
5. Define the Alias
6. Save the Web View file
7. Load the new file into the OEDesktop
1.6.1.1 Open a new Web View File in the OEDesktop
This is h
ow to open a new Web View file within the OEDesktop:-
1. Select the Desktop>New menu option from the OEDesktop
2. Select the Web View File type, then select the OK button. Note that we have set the new
window name to Web View.
- 13 -
Page 17

Reference Guide
w
D301545X412
APRIL 2012
3. The Web View file is loaded into a window within the OEDesktop. It is blank at this stage
because no Home Page has been set.
Web Vie
1.6.1.2 Put the file into configuration mode
We cann
ot configure the new file whilst it is in Runtime mode. So we must put it into Configure mode.
1. The fastest way to put any window in OEDesktop into Configuration mode is to first make
sure it is the active window by clicking on it, then press Ctrl and M at the same time on the
computer keyboard.
2. You can tell that the new window is in configure mode when you see Web Client - Configure
Mode in the centre of the window as shown in the example below.
- 14 -
Page 18

Reference Guide
w
D301545X412
APRIL 2012
Web Vie
1.6.1.3 Select the Properties context menu
No
w right click on the window and select the Properties context menu:-
1.6.1.4 Set the URL to be an Alias
Type the Alias <<
use with OEMenus.
URL>> into the Home Page field. The << and >> symbols mark this as an Alias for
- 15 -
Page 19

Reference Guide
w
D301545X412
APRIL 2012
1.6.1.5 Define the Alias
Web Vie
Select the Ali
page) into the Default Value field. Now, whenever this Web View file is opened in the OEDesktop,
unless it is supplied with a Parameter from OEMenus as it loads, it will display this default home page.
1.6.1.6 Save the Web View file
ases tab, then type the intended default home page (here it is set to the Google home
To s
ave the Web View file, select File>Save As... from the OEDesktop menu bar and save the file to
the directory of your choice.
- 16 -
Page 20

Reference Guide
w
D301545X412
APRIL 2012
1.6.1.7 Load the new file into the OEDesktop
Web Vie
1. Select OEDe
2. Select the Web View file type from the File Type drop-down list.
3. Now click the browse button ([...]) which is highlighted in the image below.
sktop>Open from the OEDesktop menu bar.
4. Navigate to and select the file just saved in the OEDesktop. Then select the Open button.
- 17 -
Page 21

Reference Guide
w
D301545X412
APRIL 2012
5. The file name will be entered into the File Name field. In the example below we have named
the window Google for easier recognition within the OEDesktop.
Web Vie
6. The Web View file is loaded with Google as the home page.
- 18 -
Page 22

Reference Guide
w
D301545X412
APRIL 2012
Web Vie
1.6.2 Setting the Home Page as the Default File
Setting a Default File for a particular OpenEnterprise file type means that when you next load a new
file of that type into the OEDesktop, OpenEnterprise will use the Default File rather than a completely
new un-configured file. This is how to set a Default File for the Web View component.
1. Select OEDesktop>Default Files from the OEDesktop menu bar.
- 19 -
Page 23

Reference Guide
w
D301545X412
APRIL 2012
2. On the Default Files dialog select the OEWeb View type from the list, then click the browse
(...) button to the right of the Default File field at the bottom of the dialog (shown highlighted
in the image below)..
Web Vie
3. Using the directory browser, find the file that you want to use as the default file and then click
the Open button.
4. The file name will be placed in the Default File field on the original dialog. Click OK to close
the dialog and set this as the default Web View file. Next time you open a new Web View file
within the OEDesktop, this is the file that will be loaded.
- 20 -
Page 24

Reference Guide
w
D301545X412
APRIL 2012
Web Vie
1.6.3 Using Aliases with Custom Menus
The Alias that was created on the Create a Home Page Using an Alias page can now be used with
OEMenus to create provide quick access to useful street maps. The Street Maps web site is very
handy if you need a map of a place. Normally, when you want to view a street map of a place, you
have to navigate to the Street Map site, type in the name of the city or the post code then click the
search button. Then after a while, the map is shown.
You can use the Web View component with OEMenus to provide instant links to street maps of
different cities or locations, using the Street Maps web site. New links can be added to as you have
need. To start the Street Map custom menu follow the steps below.
1. Creating the Streetmap Home Page
2. Creating a Menu for a Specific Map
1.6.3.1 Creating the Streetmap Home Page
The Cu
The custom menu hierarchy will include first the Streep Map home page, then a street map of the
Bristol Babcock office location in the UK. The menu could then include other maps as and when they
are required.
stom Menus we will create in this example will be based on providing Streetmaps to users.
1. Create a new OEDesktop menu
2. Configure the Street Map Home Page menu item
3. Using the Street Map Home Page Menu
1.6.3.1.1 Create a new OEDesktop menu
From the OEDesktop menu bar, select OEDesktop>Customize. This opens the OEDe sktop
1.
Properties with the Menu page open.
- 21 -
Page 25

Reference Guide
w
D301545X412
APRIL 2012
Web Vie
2. On the Desktop Properties dialog, and the Menu tab, select the New... button.
2. On the New Menu Item dialog, type the new OEDesktop menu name (Street Maps) into the
name field and click the Configure... button.
- 22 -
Page 26

Reference Guide
w
D301545X412
APRIL 2012
2. Add a new Menu Command.
Web Vie
2. Name the new menu command Streetmap Home Page. Set the Target to OE Web View
and the Action to Load File with Parameters. Make sure the Direct Invoke check box is
unchecked. Then click the Configure... button.
- 23 -
Page 27

Reference Guide
w
D301545X412
APRIL 2012
Web Vie
1.6.3.1.2 Configure the Street Map Home Page Menu
Whe
n you click the Configure... button on the Menu Editor dialog with an Action of Load File with
Parameters, the Load file with parameters dialog is displayed.
1. Firstly, click the browse button next the the File name field at the top of the dialog. This has
been highlighted in the image below. Then select the Default Web View file, as shown in the
example.
2. Now type URL into the Target column or alias to resolve field. Then type the Street Map
home page URL into the Parameter Value field. Finally, click the Add button, shown
highlighted in red in the image below. This will add the Target Alias name and definition to the
Parameters list. You can then click the OK button.
- 24 -
Page 28

Reference Guide
w
D301545X412
APRIL 2012
Web Vie
1.6.3.1.3 Using the Street Map Home Page Menu
1.
Now when you are in the OEDesktop, you can access the Street Map Home Page menu, as
shown below.
2. The Web View will then be opened at the Street Map Home Page, even though our Default
Web View file is set to open at the Google Home Page.
- 25 -
Page 29

Reference Guide
w
D301545X412
APRIL 2012
Web Vie
1.6.3.2 Creating a Menu for a Specific Map
There is no
First, we need to use the Street Map site to search for the specific map. Then we have to copy the
URL and paste it into the Parameter Value for each new custom menu we create. We always only
need to use the URL alias as the Target Alias within our Default Web View file. The Parameter Value
that we send from each new custom menu item will override the value we gave it in the actual Default
Web View file. Here are the steps required in more detail:
1. Do the Street Map Navigation
2. Copy the URL from the map page
3. Add a New Item to the Street Map Menu
4. Configure the New Menu
5. Using the Specific Map Menu
1.6.3.2.1 Do the Street Map Navigation
This is
code. This particular example provides a close-up view, but once you have found the map you can
select other scales also.
w a little configuration needed for each specific map that we wish to provide to our users.
an example of how to provide a link to a street map of a place for which you have the post
In Internet Explorer, navigate to the Street Map web site, and put in the Post Code for the required
place. Here we have entered the post code for Bristol Babcock's UK offices. Then click t he Search
button. After a while the map will be displayed within the browser.
- 26 -
Page 30

Reference Guide
w
D301545X412
APRIL 2012
Web Vie
1.6.3.2.2 Copy the URL from the map page
Whe
n the map appears in the browser window, select the whole string in the Address bar, right click
on Internet Explorer, then select Copy. This will place the URL string into the computer's clipboard.
We are now going to use this as the Parameter Value with our new custom menu item.
- 27 -
Page 31

Reference Guide
w
D301545X412
APRIL 2012
Web Vie
1.6.3.2.3 Add a New Item to the Street Map Menu
1.
From the OEDesktop menu bar, select OEDesktop>Customize... again, as shown below.
- 28 -
Page 32

Reference Guide
w
D301545X412
APRIL 2012
Web Vie
2. Select the Street Maps menu which we configured before from the Menu list, and then select
the Edit button, shown highlighted in red in the image below.
3. Add a new command after the Street Map Home Page command called Bristol Babcock
Map. Then click the Configure... button.
- 29 -
Page 33

Reference Guide
w
D301545X412
APRIL 2012
Web Vie
1.6.3.2.4 Configure the New Menu
After clicking
opens.
1. Firstly, click the browse button, highlighted in the image below, and select the Default Web
2. Now type URL into the Target column or alias to resolve field, and paste the Bristol
the Configure... button on the Menu Editor, the Load file with parameters dialog
View file, as shown in the example.
Babcock URL, previously copied from the browser address bar into the Parameter Value
field.
- 30 -
Page 34

Reference Guide
w
D301545X412
APRIL 2012
Web Vie
3. Now click the Add button (highlighted in red in the image below) to add the Target Alias name
and definition to the Parameters list. Then close the Load file with parameters dialog and
the Menu Editor, and save the OEDesktop.
- 31 -
Page 35

Reference Guide
w
D301545X412
APRIL 2012
Web Vie
1.6.3.2.5 Using the Specific Map Menu
1.
Now from the OEDesktop, select the Bristol Babcock Map custom menu item, as shown
below.
2. The Bristol Babcock Map page is opened in a Web View window.
- 32 -
Page 36

Reference Guide
w
D301545X412
APRIL 2012
Web Vie
2 Glossary
Application Tokens: Pre-defined strings that can be used to enable/disable aspects of an
application for security purposes.
Configure Mode: Within the OEDesktop environment all OpenEnterprise View files have
Runtime and Configuration modes. Before a View can display data it must be configured by
accessing its Propery pages in Configure mode. A View can be placed into either mode by
selecting the File>Mode menu from the OEDesktop menu bar or can be toggled into either
mode by pressing the Ctrl and M keys together on the computer keyboard.
Custom Tokens: Custom Tokens are strings which can be used to control a logged in user's
access to functionality within the OEDesktop environment. The string could represent a
Custom Menu or in the case of the Web View component, the whole or part of a URL.
HTTP: HTTP (Hypertext Transfer Protocol) is the set of rules for transferring files (text, graphic
images, sound, video, and other multimedia files) on the World Wide Web. As soon as a Web
user opens their Web browser, the user is indirectly making use of HTTP. HTTP is an
application protocol that runs on top of the TCP/IP suite of protocols (the foundation protocols
for the Internet).
IE: Microsoft's Web browser, Internet Explorer. V6.0 or greater is assumed.
OE Activex Controls: Set of ActiveX controls that provide the OpenEnterprise functionality on
the workstation (outside of GraphworX). Examples of these are the Trend Client, the Alarm
Client and the Notes Client.
OpenEnterprise ActiveX control: Set of ActiveX controls that provide the OpenEnterprise
functionality on the workstation (outside of GraphworX). Examples of these are the Trend
Client, the Alarm Client and the Notes Client.
- 33 -
Page 37

Reference Guide
w
D301545X412
APRIL 2012
Runtime mode: Within the OEDesktop environment all OpenEnterprise View files have a
Runtime mode and a Configuration mode. In Runtime mode, the Views display actual data
from the OpenEnterprise database. A View can be placed into either mode by selecting the
File>Mode menu from the OEDesktop menu bar or can be toggled into either mode by
pressing the Ctrl and M keys together on the computer keyboard.
URL: Uniform Resource Locator. A string of characters conforming to a standardized format,
which refers to a resource which can be displayed by a WebBrowser control.
Web Page: A document on the World Wide Web. Every Web page is identified by a unique URL
(Uniform Resource Locator).
WebBrowser Control: ActiveX control that provides Internet Explorer web browsing functionality,
i.e. displaying web pages from the World Wide Web, or local files that can be displayed in a
Web browser.
Web Vie
3 Index
1
A
Add................................................................... 28
New Item ...................................................... 28
Alias................................................ 14, 16, 17, 21
Define........................................................... 17
Home Page Using ........................................ 14
Using............................................................. 21
Aliases..............................................................11
Allow Runtime Configuration............................ 10
B
Back ................................................................... 9
C
Configure.................................................... 25, 30
New Menu .................................................... 30
Street Map.................................................... 25
Configured Aliases........................................... 11
Context Menu..................................................... 9
Copy................................................................. 27
URL............................................................... 27
Create......................................................... 14, 22
new OEDesktop menu.................................. 22
Creating...................................................... 22, 26
Menu............................................................. 26
Streetmap..................................................... 22
Custom Menus................................................. 21
D
Default File....................................................... 20
Define............................................................... 17
Alias.............................................................. 17
E
Examples.......................................................... 13
F
File into configuration mode..............................15
Put.................................................................15
Force Save As ..................................................11
Forward...............................................................9
H
Home ......................................8, 9, 10, 14, 22, 25
Home Page...................... 8, 9, 10, 14, 20, 22, 25
Home Page Menu.............................................25
Home Page Using.............................................14
Alias...............................................................14
L
Load..................................................................18
new file into ...................................................18
M
Map page..........................................................27
Menu
Creating.........................................................26
N
New File........................................................4, 18
New file into ......................................................18
Load ..............................................................18
New Item...........................................................28
Add................................................................28
New Menu.........................................................30
Configure.......................................................30
New OEDesktop menu .....................................22
Create............................................................22
New Web View File...........................................14
Open..............................................................14
O
OEDesktop..........................................4, 5, 14, 18
- 34 -
Page 38

Reference Guide
w
D301545X412
APRIL 2012
Web Vie
OEDesktop Environment.................................... 4
OEMenus ......................................................... 11
Open................................................................. 14
new Web View File....................................... 14
P
Permanently Resolve Aliases.......................... 11
Properties..................................................... 9, 16
Properties context menu.................................. 16
Select............................................................ 16
Put.................................................................... 15
file into configuration mode .......................... 15
R
Refresh............................................................... 9
S
Save............................................................. 5, 17
Web View file................................................17
Saved File .......................................................... 5
Security ............................................................ 12
Select ............................................................... 16
Properties context menu .............................. 16
Set................................................................ 9, 16
Setting.................................................... 9, 16, 20
URL............................................................... 16
Specific Map............................................... 26, 31
Specific Map Menu........................................... 31
Street Map.................................................. 25, 28
Configure...................................................... 25
Street Map Menu ..............................................28
Street Map Navigation ......................................26
Streetmap .........................................................22
Creating.........................................................22
U
URL.............................................................16, 27
Copy..............................................................27
Set.................................................................16
Using...............................................14, 21, 25, 31
Alias...............................................................21
W
Web View......................... 7, 9, 10, 11, 12, 13, 17
Web View Aliases Page....................................11
Web View Application Tokens..........................13
Web View Configuration Mode.........................10
Web View Container...........................................7
Web View Custom Token Example..................12
Web View Environment ......................................4
Web View file..............................................13, 17
Save..............................................................17
Web View File Tokens......................................13
Web View Functionality ......................................3
Web View General Page ..................................10
Web View Modes................................................7
Web View Overview............................................3
Web View Runtime Mode...................................7
Web View Status.................................................9
- 35 -
Page 39

Page 40

Reference Guide
D301545X412
APRIL 2012
DISCLAIMER
Bristol, Inc., Bristol Babcock Ltd, Bristol Canada, BBI SA de CV and the Flow Computer Division , are wholly owned subsidiaries of Emerson Electric Co. doing business
as Remote Automation Solutions (“RAS”), a division of Emerson Process Management. ROC, FloBoss, ROCLINK, Bristol, Bristol Babcock, ControlWave, TeleFlow and
Helicoid are trademarks of RAS. AMS, PlantWeb and the PlantWeb logo are marks of Emerson Electric Co. The Emerson logo is a trademark and service mark of the
Emerson Electric Co. All other marks are property of their respective owners.
The contents of this publication are presented for informational purposes only. While every effort has been made to ensure informational accuracy, they are not to be
construed as warranties or guarantees, express or implied, regarding the products or services described herein or their use or applicability. RAS reserves the right to
modify or improve the designs or specifications of such products at any time without notice. All sales are governed by RAS’ terms and conditions which are available upon
request. RAS does not assume responsibility for the selection, use or maintenance of any product. Responsibility for proper selection, use and mai nt en ance of any RAS
product remains solely with the purchaser and end-user.
Engineered and supported by:
Remote Automation Solutions,
Blackpole Road, Worcester, WR3 8YB, UK
Registered office: Meridian East, Leicester, LE19 1UX
Registered in England and Wales, Registration No. 00671801
VAT Reg No. GB 705 353 652
Emerson Process Management
Remote Automation Solutions
1100 Buckingham St
Watertown, CT 06795
T 1 (860) 945 2200
F 1 (860) 945 2278
www.EmersonProcess.com/Remote
binfo@EmersonProcess.com
© 2001-2012 Remote Automation Solutions, division of Emerson Process Management. All rights
reserved.
Emerson Process Management
Remote Automation Solutions
Blackpole Road
Worcester, WR3 8YB
T 44 (0) 1905 856848
F 44 (0) 1905 856930
www.EmersonProcess.com/Remote
oedsupport@EmersonProcess.com
 Loading...