

Remote Automation Solutions Guide: OpenEnterprise Suppression Group Configuration Reference Guide Manuals & Guides
Page 1

Reference Guide
D301538X412
April 2012
OpenEnterprise Suppression Group
Configuration Reference Guide (V2.83)
Remote Automation Solutions
Website: www.EmersonProcess.com/Remote
Page 2

Reference Guide
D301538X412
APRIL 2012
Suppression Group Configuration
Contents
1 Suppression Groups...............................................................................................................1
2 Main Dialog...............................................................................................................................1
2.1 File Menu ............................................................................................................................2
2.2 Help Menu...........................................................................................................................2
2.3 Suppression Group List.......................................................................................................2
2.4 Add Button ..........................................................................................................................2
2.5 Delete Button ......................................................................................................................3
2.6 Modify Button ......................................................................................................................3
2.7 Close Button........................................................................................................................3
3 New Suppression Group Dialog.............................................................................................3
3.1 Group Number ....................................................................................................................3
3.2 Description .................................................................................................................... ......4
3.3 Access Area........................................................................................................................4
3.4 Auto Acknowledge Group Members...................................................................................4
3.5 Signal Master ......................................................................................................................4
3.6 Object Master...................................................................................................................... 4
3.7 Master .................................................................................................................................4
3.8 Browse Button.....................................................................................................................4
3.9 Return To Normal Delay Period..........................................................................................4
3.10 Suppression Delay Period...............................................................................................5
3.11 Configure Associated Alarm Conditions..........................................................................5
3.12 OK Button ........................................................................................................................5
3.13 Cancel Button..................................................................................................................5
3.14 Help..................................................................................................................................5
4 Modify Suppression Group Dialog ........................................................................................ 5
4.1 Group Number ....................................................................................................................6
4.2 Description .................................................................................................................... ......6
4.3 Access Area........................................................................................................................6
4.4 Auto Acknowledge Group Members...................................................................................6
4.5 Signal Master ......................................................................................................................6
4.6 Object Master...................................................................................................................... 7
4.7 Master .................................................................................................................................7
4.8 Browse Button.....................................................................................................................7
4.9 Return To Normal Delay Period..........................................................................................7
4.10 Suppression Delay Period...............................................................................................7
4.11 Configure Associated Alarm Conditions..........................................................................7
4.12 OK Button ........................................................................................................................7
4.13 Cancel Button..................................................................................................................7
4.14 Help..................................................................................................................................8
5 Suppression Group Association Dialog................................................................................8
5.1 Alarm Condition View List...................................................................................................8
5.2 Remove Button ...................................................................................................................9
5.3 Signals Button.....................................................................................................................9
- i -
Page 3

Reference Guide
D301538X412
APRIL 2012
Objects Button.....................................................................................................................9
5.4
5.5 OK Button............................................................................................................................9
5.6 Cancel Button......................................................................................................................9
5.7 Associated Alarm Conditions List .......................................................................................9
5.7.1 Associated Alarm View Settings...................................................................................9
5.7.1.1 The View Settings Keys.......................................................................................10
5.7.1.2 The View Values.................................................................................................10
6 Alarm Conditions Dialog.......................................................................................................10
6.1 Alarm Conditions Dialog Settings .....................................................................................11
6.1.1 AlarmConditionWhereClause.....................................................................................11
6.1.2 AlarmConditionCaption...............................................................................................12
6.2 Alarm Conditions Caption .................................................................................................12
6.3 Associated Alarm Conditions List .....................................................................................13
6.4 OK Button..........................................................................................................................13
6.4.1 Yes - back to Browse dialog.......................................................................................13
6.4.2 No - back to Suppression Group Association dialog..................................................13
Suppression Group Configuration
7 Browser Dialog ......................................................................................................................14
7.1 Browser Behavior and Settings.........................................................................................14
7.1.1 Contextual Behavioral Differences.............................................................................14
7.1.2 Settings File Changes ................................................................................................14
7.1.3 Contextual Behavior...................................................................................................15
7.1.3.1 Browsing for a Suppression Group Master..........................................................15
7.1.3.2 Browsing for Associated Suppression Group Alarm Conditions..........................15
7.1.4 Settings File Changes ................................................................................................15
7.1.4.1 Browser Keys.......................................................................................................15
7.1.4.2 Browser Values....................................................................................................16
7.1.4.2.1 SearchTable...................................................................................................16
7.1.4.2.2 FilterAttributes.................................................................................................16
7.1.4.2.3 ResultColumns...............................................................................................17
7.1.5 Settings File Changes ................................................................................................17
7.1.5.1 Browser Keys.......................................................................................................17
7.1.5.2 Browser Values....................................................................................................17
7.1.5.2.1 SearchTable...................................................................................................17
7.1.5.2.2 FilterAttributes.................................................................................................18
7.1.5.2.3 ResultColumns...............................................................................................18
7.2 Title Bar.............................................................................................................................18
7.3 Filter ..................................................................................................................................19
7.4 Refresh..............................................................................................................................19
7.5 Options..............................................................................................................................19
7.6 Results List........................................................................................................................20
7.7 Next...................................................................................................................................20
7.8 OK Button..........................................................................................................................20
7.8.1 Associated Alarm Condition Configuration.................................................................20
8 Index .......................................................................................................................................22
- ii -
Page 4

Reference Guide
D301538X412
APRIL 2012
Suppression Group Configuration
1 Suppression Groups
Group Suppression provides the capability to associate related alarm conditions with a maste r alarm
signal, (or object), such that if the master signal, (or object) goes into alarm, then all associated
alarms, (the suppression group members) are automatically suppressed. This allows the operator to
concentrate on the actual fault without being swamped with nuisance alarms that only occurre d due to
the original fault condition.
OpenEnterprise currently supports the concept of both Signal and Object Suppression Groups. Signal
Suppression Groups have a signal as their group master, and Object Suppression Groups have an
item from the Objects table as their Group Master.
Note:
• The group master must have at least one alarm condition of its own, in order for it to create an
alarm which will trigger the group into suppression.
• All alarm conditions configured for the group master will affect the group.
• There is no restriction on the type of Alarm Condition that can be added to (associated with) a
Suppression Group. It is perfectly feasible to add Signal related Alarm Conditions to an Object
Suppression Group, and Object related Alarm Conditions to a Signal Suppression Group.
2 Main Dialog
The Main Dialog enables users to create, modify or delete Suppression Groups.
- 1 -
Page 5

Reference Guide
D301538X412
APRIL 2012
Suppression Group Configuration
2.1 File Menu
The File menu provides an option to Exit the application.
2.2 Help Menu
Displays information regarding the version and build of OpenEnterprise, plus support contact
information.
2.3 Suppression Group List
All configured Suppression Groups are listed here. The list displays the following information about
each suppression group: -
1. Number - the unique number of the suppression group
2. Master - the Master signal or object of the suppression group
3. Description - a description of the suppression group if available (a description can be added
from the 'Modify Suppression Group' dialog, accessed by selecting the [Modify] button on the
main dialog)
4. Group State - the current state of the suppression group, which will be one of the following: -
a. Suppressed - meaning the Master signal/object is in alarm and the group is currently
suppressed
b. Not Suppressed - meaning the Master signal/object is not in alarm and the group is
not currently in a suppressed state
c. Suppressed by timer - meaning that a return to normal delay period has been
placed on the group, and although the alarm on the Master has returned to normal
the group will remain in a suppressed state until the period of the delay is exhausted
2.4 Add Button
This button displays the New Suppression Group dialog, which enables the u se r to add a new
Suppression Group.
- 2 -
Page 6

Reference Guide
D301538X412
APRIL 2012
Suppression Group Configuration
2.5 Delete Button
The Delete button will be enabled if one or more list items are selected: an appropriate warning box
will be displayed seeking further confirmation before selected suppression groups are deleted.
2.6 Modify Button
This button displays the Modify Suppression Group dialog, which enables the user to change settings
on existing Suppression Groups. It is only available for selection if a single group is selected in the
list.
2.7 Close Button
Closes the Suppression Group Configuration tool.
3 New Suppression Group Dialog
This dialog enables the user to create a new Suppression Group.
3.1 Group Number
When adding a group, the Group Number will be automatically filled in with the next consecutive
available number. The user may override this, but if they attempt to overwrite an existing group
number then a warning will be given and database updates prevented.
- 3 -
Page 7

Reference Guide
D301538X412
APRIL 2012
When modifying an existing group, the Group Number field will be disabled so that it may not be
edited.
Suppression Group Configuration
3.2 Description
This is a text field, which should be used to give an informative description to the Suppression Group
which is being added or modified.
3.3 Access Area
This is a drop-down list from which an Access Area for the Suppression Group can be selected.
3.4 Auto Acknowledge Group Members
If this box is checked, when the alarm generated by the Master signal or object of the group is
acknowledged, all alarm conditions associated with the group will also be acknowledged .
3.5 Signal Master
When this radio button is selected, the Browse Dialog will display signals for selection of a Group
Master signal.
3.6 Object Master
When this radio button is selected, the Browse Dialog will display objects from the Objects table to
enable the user to select a Group Master object.
3.7 Master
The Master of the Suppression Group can be selected from a list of signals or objects by clicking on
the [Browse] button. When the Master has been selected, it will be displayed here. If you know the
exact name of the Suppression Group Master , you can type it directly into this field without having to
use the [Browse] button.
By default, the name of the signal or object is displayed, but another attribute can be displayed here
(for example the description) instead of the name.
The alternate attribute can be displayed by creating a 'GroupMasterNameColumn' value on the
'OpenEnterprise\Tasks\OEToolBox\Editors\Suppression Groups' Settings Key. Type
the alternate attribute name into the data field for the value.
3.8 Browse Button
Selection of this button will display the Signal or Object browser dialog, depending on whether the
Signal or Object radio button has been selected.
You can then select the Master of the Suppression Group from this list.
3.9 Return To Normal Delay Period
When checked, the suppressed status of the associated alarm conditions for this Group will remain
true for a delay period, defined by the Hours, Minutes and Seconds spin controls in this section of the
dialog. The delay period will cause the associated alarm conditions to remain suppressed for the
specified period after the Suppression Group's Master signal or object has cleared its alarm.
- 4 -
Page 8

Reference Guide
D301538X412
APRIL 2012
The Return To Normal Delay Period box is unchecked by default. The default setting means that as
soon as the Master alarm has cleared, it and all of its associated alarm condition's become
unsuppressed immediately.
Suppression Group Configuration
3.10 Suppres sion Del ay Period
The delay period after a Suppression Group's Master alarm clears, during which the associated alarm
conditions remain in a suppressed state.
3.11 Configure Associated Alarm Conditions
Selection of this button displays the Suppression Group Association dialog, which enables the user to
view and select alarm conditions which will belong to the Suppression Group being configured.
3.12 OK Button
When selected, the dialog will close and any changes made will be applied to the database.
3.13 Cancel Button
When selected, the dialog will close without applying the changes to the database.
3.14 Help
Selection of this button will open the Help file for the Suppression Group tool at the correct topic for
the current dialog.
4 Modify Suppression Group Dialog
This dialog enables the user to modify a Suppression Group. It is exactly the same as the New
Suppression Group dialog, except that the ID number of the Suppression Group is greyed out, so
cannot be changed.
- 5 -
Page 9

Reference Guide
D301538X412
APRIL 2012
Suppression Group Configuration
4.1 Group Number
When adding a group, the Group Number will be automatically filled in with the next consecutive
available number. The user may override this, but if they attempt to overwrite an existing group
number then a warning will be given and database updates prevented.
When modifying an existing group, the Group Number field will be disabled so that it may not be
edited.
4.2 Description
This is a text field, which should be used to give an informative description to the Suppression Group
which is being added or modified.
4.3 Access Area
This is a drop-down list from which an Access Area for the Suppression Group can be selected.
4.4 Auto Acknowledge Group Members
If this box is checked, when the alarm generated by the Master signal or object of the group is
acknowledged, all alarm conditions associated with the group will also be acknowledged .
4.5 Signal Master
When this radio button is selected, the Browse Dialog will display signals for selection of a Group
Master signal.
- 6 -
Page 10

Reference Guide
D301538X412
APRIL 2012
Suppression Group Configuration
4.6 Object Master
When this radio button is selected, the Browse Dialog will display objects from the Objects table to
enable the user to select a Group Master object.
4.7 Master
The Master of the Suppression Group can be selected from a list of signals or objects by clicking on
the [Browse] button. When the Master has been selected, it will be displayed here. If you know the
exact name of the Suppression Group Master , you can type it directly into this field without having to
use the [Browse] button.
By default, the name of the signal or object is displayed, but another attribute can be displayed here
(for example the description) instead of the name.
The alternate attribute can be displayed by creating a 'GroupMasterNameColumn' value on the
'OpenEnterprise\Tasks\OEToolBox\Editors\Suppression Groups' Settings Key. Type
the alternate attribute name into the data field for the value.
4.8 Browse Button
Selection of this button will display the Signal or Object browser dialog, depending on whether the
Signal or Object radio button has been selected.
You can then select the Master of the Suppression Group from this list.
4.9 Return To Normal Delay Period
When checked, the suppressed status of the associated alarm conditions for this Group will remain
true for a delay period, defined by the Hours, Minutes and Seconds spin controls in this section of the
dialog. The delay period will cause the associated alarm conditions to remain suppressed for the
specified period after the Suppression Group's Master signal or object has cleared its alarm.
The Return To Normal Delay Period box is unchecked by default. The default setting means that as
soon as the Master alarm has cleared, it and all of its associated alarm condition's become
unsuppressed immediately.
4.10 Suppres sion Del ay Period
The delay period after a Suppression Group's Master alarm clears, during which the associated alarm
conditions remain in a suppressed state.
4.11 Configure Associated Alarm Conditions
Selection of this button displays the Suppression Group Association dialog, which enables the user to
view and select alarm conditions which will belong to the Suppression Group being configured.
4.12 OK Button
When selected, the dialog will close and any changes made will be applied to the database.
4.13 Cancel Button
When selected, the dialog will close without applying the changes to the database.
- 7 -
Page 11

Reference Guide
D301538X412
APRIL 2012
Suppression Group Configuration
4.14 Help
Selection of this button will open the Help file for the Suppression Group tool at the correct topic for
the current dialog.
5 Suppression Group Association Dialog
The Suppression Group Association dialog enables the user to browse and select alarm conditions to
include within the configured Suppression Group.
5.1 Alarm Condition View List
This drop-down list shows three ‘views’ of the Alarm Conditions associated with a given Suppression
Group. There are three options available: -
1. Signal - all Signal Alarm Conditions associated with the Suppression Group are displayed in
the 'Associated Alarm Conditions List'
2. Object - all Object Alarm Conditions associated with the Suppression group (e.g. redundancy
alarm conditions) are displayed in the list
3. All - Signal, Object and other alarm conditions (e.g. journal alarm conditions) that are
associated with the Suppression Group are displayed in the list
- 8 -
Page 12

Reference Guide
D301538X412
APRIL 2012
Suppression Group Configuration
5.2 Remove Button
Single or multiple alarm conditions selected from the Associated Alarm Conditions list are removed
from the list when this button is selected. A warning dialog will give the user the opportunity to cancel
the operation before removal takes place.
5.3 Signals Button
Selecting this button will open the Browser dialog with signals displayed.
5.4 Objects Button
Selecting this button will open the Browser dialog with objects displayed.
5.5 OK Button
When selected, the dialog will close and the user returned to the New or Modify Suppression Group
dialog. Any changes made on this dialog will not be applied to the database until the [OK] button on
the New or Modify Suppression Group dialog (whichever the user is returned to) is sel ecte d.
5.6 Cancel Button
When selected, the dialog will close. Any changes made will be lost.
5.7 Associated Alarm Conditions List
The alarm conditions associated with the selected Suppression Group are listed here. The type of
alarms shown will depend on the selection from the 'Alarm Condition View List' at the top of the
dialog.
The columns displayed may be changed by modifying the Settings file. For more information, see the
'Associated Alarm View Settings' topic.
5.7.1 Associated Alarm View Settings
The ‘All’ view takes all of its attributes from the AlarmCondition table. The ‘Signal’ and ‘Object’ views
can include data from the AlarmCondition table but may also include data from another source table
in their queries. The associated alarm views can be modified using the settings keys and values
defined below.
- 9 -
Page 13

Reference Guide
D301538X412
APRIL 2012
5.7.1.1 The View Settings Keys
Suppression Group Configuration
The key
Use the Settings Editor to create these view keys if required.
5.7.1.2 The View Values
The followi
These other values may be additionally added to the Signal and Object Keys, but not the All key: -
s for changing the view settings are:-
1. OpenEnterprise\Tasks\OEToolbox\Editors\Suppression
Groups\AlarmConditionViews\All
2. OpenEnterprise\Tasks\OEToolbox\Editors\Suppression
Groups\AlarmConditionViews\Object
3. OpenEnterprise\Tasks\OEToolbox\Editors\Suppression
Groups\AlarmConditionViews\Signal
ng value may be applied to the All, Signal and Object keys: -
• Columns – CSV list of the attributes from the alarmcondition view to display in the list view.
In addition, the list may include attributes from the Alarm Condition’s source table. Source
columns must be specified as ‘source.column’ e.g. source.description. An optional display
name may be supplied for each attribute. Formatted as ‘attributename[=displayname],…’. E.g.
objectname=Object Name.
• SourceTable – The table where the Alarm Condition's source objects can be found for this
type of alarm. E.g. ‘signal’.
Note: This value does not apply to the All view. It is only required when one or more source
columns are defined in the data of the Columns value.
• SourcePK – The primary key column in SourceTable. E.g. ‘name’.
Note: This value does not apply to the All view. It is only required when one or more source
columns are defined in the data of the Columns value.
6 Alarm Conditions Dialog
This dialog displays all alarm conditions that are associated with the selected signal or obj ect. The
condition, type, alarmcondition id and object name are displayed.
Like the Browser dialog, configuration of the Alarm Conditions dialog can be performed through
modifications to the Settings File. See the 'Alarm Conditions Dialog Settings' topic for more
information on this.
- 10 -
Page 14

Reference Guide
D301538X412
APRIL 2012
Suppression Group Configuration
6.1 Alarm Conditions Dialog Settings
All configurable settings related to the Alarm Conditions dialog will be located under the following
Settings Keys:
• OpenEnterprise\Tasks\SignalBrowse
• OpenEnterprise\Tasks\ObjectBrowse
Both the SignalBrowse and ObjectBrowse Keys can have the following Values for configuring Alarm
Conditions:
• AlarmConditionWhereClause - The SQL ‘where’ clause used to select which Alarm
Conditions show in the Alarm Conditions browse dialog.
• AlarmConditionCaption – The text to be shown in the dialog caption bar.
6.1.1 AlarmConditionWhereClause
This value affects the way that the Suppression Group tool searches for alarm conditions that are
related to a parent signal or object that has been selected from the Browser dialog. It can be used to
modify the SQL ‘where’ clause which is used by the Suppression Group tool to match alarm
conditions to a parent Signal or Object.
The data displayed in the 'Alarm Conditions Dialog' is queried from the alarmcondition view. By
default the query will be as follows:
select alarmconditionlookup.text, alarmcondition.alarmconditiontype,
alarmcondition.id, alarmcondition.objectname from alarmcondition,
alarmconditionlookup where alarmcondition.condition =
alarmconditionlookup.condition and alarmcondition.id in (select id from
alarmcondition where [where clause]);
The [where clause] section of the string is a configurable 'where' clause designed to select the
appropriate alarm conditions that match the context object.
- 11 -
Page 15

Reference Guide
D301538X412
APRIL 2012
The clause may contain Column Name Parameters that refer to attributes in the parent Signal or
Object. This allows values that can only be known at runtime to be inserted into the 'where' clause. In
order to be consistent with the convention used for column name parameters in OEMenus, the
parameters are delimited by a double pipe character (‘||’) and take the form:
||column name parameter||
For example, '||name||' or '||description||'. Note, the parameter should be enclosed
in single quotes(').
The rest of the AlarmConditionWhereClause value will be taken as is. For example, the
AlarmConditionWhereClause value might be set to:
objectname like ‘||mminame||.%’
In this example, the mminame attribute of the parent signal or object will be substituted for the text
“||mminame||” to create the where clause. This example also shows that the like keyword and the %
wildcard may be used.
Note: The SQL keyword where is not needed.
By default, the AlarmConditionWhereClause for both Signals and Objects will be:
Suppression Group Configuration
objectname = ‘||name||’
With this value, the name attribute of the parent signal or object will be substituted for the text
“||name||” to create the where clause.
6.1.2 AlarmConditionCaption
It is possible to define the text shown in the Alarm Conditions dialog caption bar using this Settings
value.
By default the caption for the Alarm Conditions dialog shows the name of the selected signal, followed
by a space, followed by the text 'Alarm Conditions'. This is the same as setting the
AlarmConditionCaption value to:
||name|| Alarm Conditions
The caption text may be changed by using a different signal attribute. For example, for readability, the
parent signal's description attribute may be used in the Alarm Conditions Dialog caption instead of its
name by using the following text in the AlarmConditionCaption value:
||description|| Alarm Conditions
6.2 Alarm Conditions Caption
The caption displays the name of the signal or object that was selected from the Browser display. This
indicates that the alarm conditions displayed are associated only with that signal or object.
The caption can be modified using the AlarmConditionsCaption Settings Value. See the 'Alarm
Conditions Dialog Settings' topic for more information.
- 12 -
Page 16

Reference Guide
D301538X412
APRIL 2012
Suppression Group Configuration
6.3 Associated Alarm Conditions List
This list displays all alarm conditions that are associated with the selected Signal or Object. The
alarm condition description is displayed (i.e. High, High High, Low, Change to True), as well as the
specific alarm condition table to which it belongs.
The list allows multiple selection of alarm conditions. Behavior is consistent with Windows™ multiple
object selection. Hold the [Shift] or [Ctrl] key on your keyboard whilst selecting alarm conditions from
the list with your left mouse button. Use the [Shift] key to select all conditions between the first and left
click, or the [Ctrl] key to select multiple conditions that are not next to each other.
6.4 OK Button
When you click this button, you will be asked if you want to browse for another signal or object.
6.4.1 Yes - back to Browse dialog
If you want to select another signal to add associated alarm conditions for that signal to the
Suppression Group, click the [Yes] button. You will then be returned to the Browse dialog, so that you
can select another signal or object. You will have to re-enter a filter.
6.4.2 No - back to Suppression Group Association dialog
If you select the [No] button you will be returned to the 'Suppression Group Association' dialog. The
alarm conditions that you have just selected, together with any alarm conditions selected prior to
selecting the [No] button will be entered into the list on the Suppression Group Association' dialog.
- 13 -
Page 17

Reference Guide
D301538X412
APRIL 2012
Suppression Group Configuration
7 Browser Dialog
The Browser dialog is used to display signals or objects for selection. Its behavior and the data
displayed differs depending on the context. See the 'Browser Behavior and Settings' topic for more
information.
7.1 Browser Behavior and Settings
The Browser dialog is a generic search and select tool for OpenEnterprise configuration components,
and its behavior can change depending on the context in which it is used. Its appearance and
operation can also be changed using special keys and values, which can be created in the
OpenEnterprise Settings file.
7.1.1 Contextual Behavioral Differences
1. The Browser dialog can be set to search for signals or objects depending on which button is
selected when it is called.
2. The behavior of the [OK] button on the Browser dialog can change depending on context.
7.1.2 Settings File Changes
1. The default signal or object search tables can be changed.
2. The Filter attributes at the top of the dialog can be re-ordered and redefined.
3. The columns shown in the Results List can be changed.
4. The display names of both Filter attributes and Results List columns can be changed.
- 14 -
Page 18

Reference Guide
D301538X412
APRIL 2012
5. The way that the Suppression Group tool searches for alarm conditions that are associated
with a selected signal or object can be modified to cope with project specific signal or object
schemas.
Suppression Group Configuration
7.1.3 Contextual Behavior
The behavior of the Browse dialog changes depending on the context.
7.1.3.1 Browsing for a Suppression Group Master
n browsing for a Master signal or object from the 'Suppression Group Dialog', selecting the
Whe
'Signal' or 'Object' radio button changes the table that is queried by the Browser:-
When the Browser is called from the 'Suppression Group' dialog, once a signal or object has been
selected, on clicking the [OK] button, the selection is returned from the Browser dialog to the Master
field on the 'Suppression Group' dialog.
7.1.3.2 Browsing for Associated Suppression Group Alarm Conditions
Selecting the
the data that is displayed by the Browser:-
When the Browser is called from the 'Suppression Group Association' dialog, once a signal or object
has been selected, on clicking the [OK] button, the 'Alarm Conditions' dialog displays all alarm
conditions associated with the selected signal or object. Once the alarm conditions which will be
associated with the Suppression Group have been selected fro m the 'Alarm Conditions' dialog, this
dialog will appear: -
Two options are possible: -
1. If you select the [Yes] button you will be returned to the Browser dialog to select another
2. If you select the [No] button you will be returned to the 'Suppression Group Association'
[Signal] or [Object] buttons on the 'Suppression Group Association' dialog also changes
signal or object, so that you can add more associated alarm conditions to the Suppression
Group
dialog, adding the associated alarm conditions which you have already selected.
7.1.4 Settings File Changes
Configuration of the Browse dialog will be performed via changes to the OpenEnterprise Settings file.
7.1.4.1 Browser Keys
All settings re
• OpenEnterprise\Tasks\SignalBrowse
lated to the browse dialog will be located under the following SettingsKeys:
- 15 -
Page 19

Reference Guide
D301538X412
APRIL 2012
• OpenEnterprise\Tasks\ObjectBrowse
7.1.4.2 Browser Values
Suppression Group Configuration
Both the SignalBro
browsing:
7.1.4.2.1 SearchTable
The table for browsing signals or objects can be redefined through t his value. The default table for
signals is the 'signal' table, and for objects it is the 'objects' table. However, the default search tables
may be changed using the 'SearchTable' Value. For example, if a new signal table is created for a
project called 'mysignals', setting the Signal search table to ‘mysignals’ will ensure that the 'mysignals'
table is used by the Browser dialog when browsing for signals.
7.1.4.2.2 FilterAttributes
The data for this value is a CSV list of attributes from the search table to show in the filter section. An
optional display name may be supplied for each attribute. Formatted as
‘attributename[=displayname]’.
wse and ObjectBrowse Keys may contain the following Values for configuring
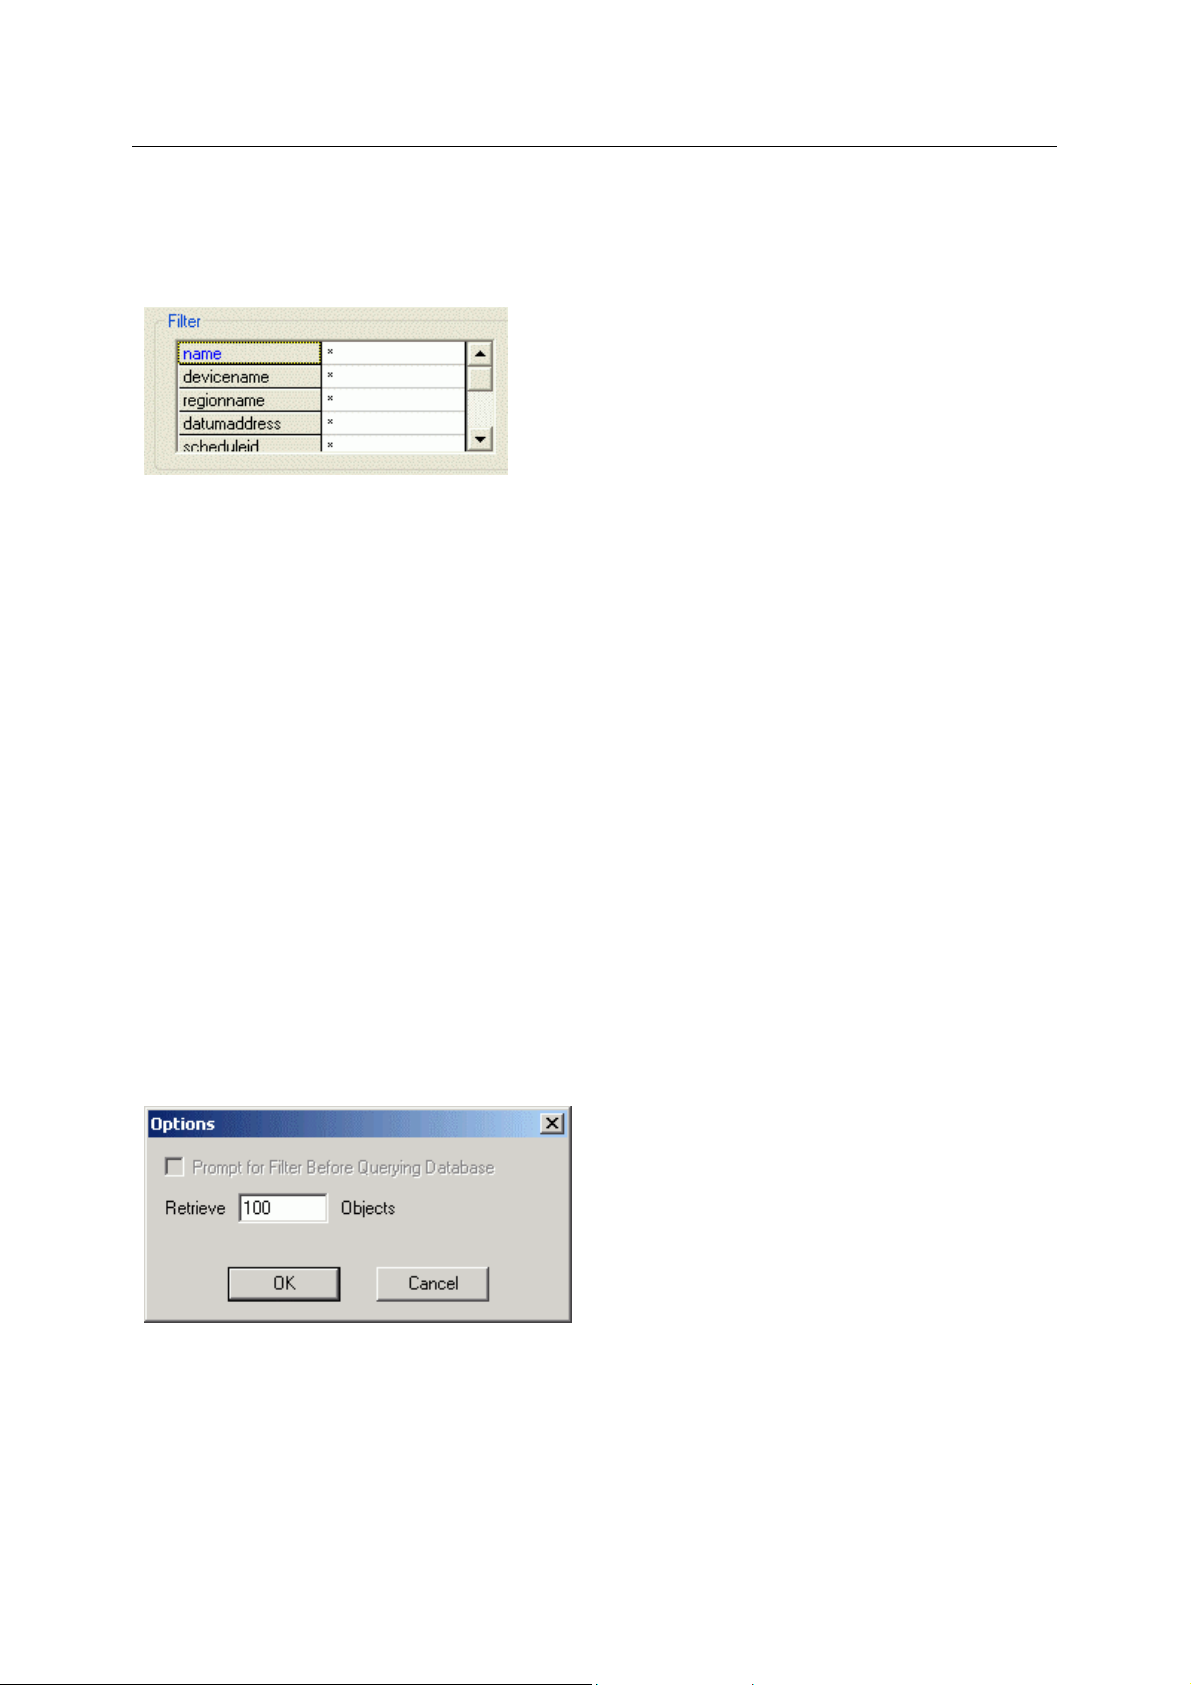
For example, the FilterAttributes value could be set to have a data value of ‘name=Name,
description=Information, devicename=Device Name’. This would have the affect of restricting and
renaming the filters in the filter list to 'Name', 'Information' and 'Device Name' as shown below. The
filter attributes are shown in the order specified in the FilterAttributes value.
By default, the filter attributes value will be set to ‘*’ to indicate that all attributes will be shown. The
filter attributes by default display all of the attributes in the search table.
- 16 -
Page 20

Reference Guide
D301538X412
APRIL 2012
7.1.4.2.3 ResultColumns
The data for this value is a CSV list of attributes from the search table to show in the results section.
An optional display name may be supplied for each attribute. Formatted as
‘attributename[=displayname]’.
Suppression Group Configuration
7.1.5 Settings File Changes
Configuration of the Browse dialog will be performed via changes to the OpenEnterprise Settings file.
7.1.5.1 Browser Keys
All settings re
• OpenEnterprise\Tasks\SignalBrowse
• OpenEnterprise\Tasks\ObjectBrowse
7.1.5.2 Browser Values
Both the SignalBro
browsing:
7.1.5.2.1 SearchTable
The table for browsing signals or objects can be redefined through t his value. The default table for
signals is the 'signal' table, and for objects it is the 'objects' table. However, the default search tables
may be changed using the 'SearchTable' Value. For example, if a new signal table is created for a
project called 'mysignals', setting the Signal search table to ‘mysignals’ will ensure that the 'mysignals'
table is used by the Browser dialog when browsing for signals.
lated to the browse dialog will be located under the following SettingsKeys:
wse and ObjectBrowse Keys may contain the following Values for configuring
- 17 -
Page 21

Reference Guide
D301538X412
APRIL 2012
7.1.5.2.2 FilterAttributes
The data for this value is a CSV list of attributes from the search table to show in the filter section. An
optional display name may be supplied for each attribute. Formatted as
‘attributename[=displayname]’.
For example, the FilterAttributes value could be set to have a data value of ‘name=Name,
description=Information, devicename=Device Name’. This would have the affect of restricting and
renaming the filters in the filter list to 'Name', 'Information' and 'Device Name' as shown below. The
filter attributes are shown in the order specified in the FilterAttributes value.
Suppression Group Configuration
By default, the filter attributes value will be set to ‘*’ to indicate that all attributes will be shown. The
filter attributes by default display all of the attributes in the search table.
7.1.5.2.3 ResultColumns
The data for this value is a CSV list of attributes from the search table to show in the results section.
An optional display name may be supplied for each attribute. Formatted as
‘attributename[=displayname]’.
7.2 Title Bar
- 18 -
Page 22
Reference Guide
D301538X412
APRIL 2012
This will either say 'Signals' or 'Objects', depending on the selection from the dialog that called the
Browser.
Suppression Group Configuration
7.3 Filter
The signal list may be filtered by entering filter criteria into any of the attributes in the 'Filter' section.
Filter expressions are not enforced until the [Refresh] button is clicked.
An asterisk in any field (*) will force the Signal Browser to ignore any unspecified characters to the
right or left of the asterisk. For example *LEVEL* will find IP1:TANK3.LEVEL., IP1:TANK3.LEVEL. or
CW1:@GV.TANK1_LEVEL etc..
A question mark (?) may be used to indicate a wildcard which will accept any single character found
where the wildcard placeholder occurs in the filter expression. For instance, IP1.TANK?.LEVEL. will
find IP1:TANK3.LEVEL., IP1:TANK4.LEVEL., IP1:TANK5.LEVEL. and IP1:TANK6.LEVEL..
The attributes in the filter box can be re-ordered and changed by the use of application settings. See
the 'Settings File Changes' topic for more information.
7.4 Refresh
When the [Refresh] button is selected, the Signal List is updated. The first 100 Signals which match
the filter in the filter grid are shown.
The number of signals displayed can be changed by using the [Options] button.
7.5 Options
The number of objects that the Browse dialog will return can be changed here. By default, the Browse
dialog will return 100 objects each time the [Refresh] button is selected. To change this, type a new
number and click the [OK] button.
- 19 -
Page 23

Reference Guide
D301538X412
APRIL 2012
Suppression Group Configuration
7.6 Results List
This pane displays the signals returned by the query based on the filter supplied in the Filter Grid. The
number of signals displayed per query is determined by the number of objects to retrieve value, which
is set on the Options dialog.
By default, the Signal List only shows the Name attribute. This is configurable via OpenEnterprise
settings to allow any number of different columns to be shown. Please refer to the Settings File
Changestopic for more information on how to configure the attributes in this list.
7.7 Next
Places the next block of Signals or objects into the Signal list. The default number of Signals returned
is 100, but this can be changed by clicking the [Options] button and using the Options dialog.
7.8 OK Button
If the Browser dialog was called from the 'Suppression Group' dialog, when the [OK] button is
selected, the signal or object chosen will be placed in the Master signal-object field in the
'Suppression Group' dialog.
However, changes will only be made to the database when the [OK] button on the 'Suppression
Group' dialog is selected.
7.8.1 Associated Alarm Condition Configuration
If the Browser dialog was called from the 'Suppression Group Association' dialog, the behavior will be
slightly different. When you have selected a signal or object from the list, you will be presented with
the 'Alarm Conditions' dialog. This will display all alarm conditions that are associated with the parent
signal or object that was selected from the Browser dialog.
- 20 -
Page 24

Reference Guide
D301538X412
APRIL 2012
Suppression Group Configuration
Choose the alarm conditions that will be associated with the Suppression Group.
- 21 -
Page 25

Reference Guide
D301538X412
APRIL 2012
Suppression Group Configuration
8 Index
1
A
Access Area................................................... 7, 9
Add Button ......................................................... 5
Associated AC Cancel Button.......................... 12
Associated AC OK Button................................ 12
Associated Alarm Conditions Dialog................ 10
Associated Alarm Conditions List .................... 12
Auto Acknowledge Group Members.............. 7, 9
B
Browse Button................................................ 7, 9
C
Close Button....................................................... 6
Configure Associated Alarm Conditions ...... 8, 10
H
Help Menu...........................................................5
M
Main Dialog.........................................................4
Modify Button......................................................6
Modify Suppression Group Dialog......................8
N
New Suppression Group Dialog .........................6
O
Object Master..................................................7, 9
R
Remove Button.................................................11
D
Delete Button ..................................................... 5
Description ..................................................... 6, 9
G
Group Number ............................................... 6, 9
S
Signal Browser Dialog ......................................16
Signal Master..................................................7, 9
Suppression Group List......................................5
Suppression Groups Overview...........................4
- 22 -
Page 26

Page 27

Reference Guide
D301538X412
APRIL 2012
DISCLAIMER
Bristol, Inc., Bristol Babcock Ltd, Bristol Canada, BBI SA de CV and the Flow Computer Division , are wholly owned subsidiaries of Emerson Electric Co. doing business
as Remote Automation Solutions (“RAS”), a division of Emerson Process Management. ROC, FloBoss, ROCLINK, Bristol, Bristol Babcock, ControlWave, TeleFlow and
Helicoid are trademarks of RAS. AMS, PlantWeb and the PlantWeb logo are marks of Emerson Electric Co. The Emerson logo is a trademark and service mark of the
Emerson Electric Co. All other marks are property of their respective owners.
The contents of this publication are presented for informational purposes only. While every effort has been made to ensure informational accuracy, they are not to be
construed as warranties or guarantees, express or implied, regarding the products or services described herein or their use or applicability. RAS reserves the right to
modify or improve the designs or specifications of such products at any time without notice. All sales are governed by RAS’ terms and conditions which are available upon
request. RAS does not assume responsibility for the selection, use or ma intenance of any product. Responsibility for proper selection, use and maintenance of any RAS
product remains solely with the purchaser and end-user.
Engineered and supported by:
Remote Automation Solutions,
Blackpole Road, Worcester, WR3 8YB, UK
Registered office: Meridian East, Leicester, LE19 1UX
Registered in England and Wales, Registration No. 00671801
VAT Reg No. GB 705 353 652
Emerson Process Management
Remote Automation Solutions
1100 Buckingham St
Watertown, CT 06795
T 1 (860) 945 2200
F 1 (860) 945 2278
www.EmersonProcess.com/Remote
binfo@EmersonProcess.com
© 2001-2012 Remote Automation Solutions, division of Emerson Process Management. All rights
reserved.
Emerson Process Management
Remote Automation Solutions
Blackpole Road
Worcester, WR3 8YB
T 44 (0) 1905 856848
F 44 (0) 1905 856930
www.EmersonProcess.com/Remote
oedsupport@EmersonProcess.com
 Loading...