

Remote Automation Solutions Guide: OpenEnterprise Scheduler Reference Guide Manuals & Guides
Page 1

Reference Guide
D301529X412
April 2012
OpenEnterprise Scheduler Reference
Guide (V2.83)
Remote Automation Solutions
Website: www.EmersonProcess.com/Remote
Page 2

Reference Guide
r
D301529X412
APRIL 2012
Schedule
Contents
1 The Scheduler..........................................................................................................................1
1.1 The Schedule Configuration ...............................................................................................1
1.2 The Scheduled Object.........................................................................................................1
1.3 The OpenEnterprise Scheduler ..........................................................................................1
1.4 Command Line Parameters................................................................................................1
1.4.1 Parameters...................................................................................................................2
1.4.1.1 dataservice.............................................................................................................2
1.4.1.2 -i .............................................................................................................................2
1.4.1.3 -t.............................................................................................................................2
1.5 Journal Task Events............................................................................................................2
1.6 Scheduler Configuration......................................................................................................2
1.6.1 Diaries...........................................................................................................................3
1.6.2 Patterns ........................................................................................................................3
1.6.2.1 Trigger Patterns .....................................................................................................3
1.6.3 On-Off Patterns ............................................................................................................3
1.6.4 Control Curve Patterns.................................................................................................4
1.6.5 Calendars .....................................................................................................................4
1.6.6 Scheduled Objects .......................................................................................................4
1.6.6.1 A Schedule Diary ...................................................................................................5
1.6.6.2 A Target Object......................................................................................................5
1.6.6.2.1.1 Single Object..............................................................................................5
1.6.6.2.1.2 Multiple Objects..........................................................................................5
1.6.6.3 A Scheduled Action................................................................................................6
1.6.6.3.1.1 Trigger Pattern...........................................................................................6
1.6.6.3.1.2 On-Off Pattern............................................................................................6
1.6.6.3.1.3 A Control Curve Pattern.............................................................................6
1.6.7 Scheduling Tables - Relationships...............................................................................7
1.7 Scheduler User Interface ....................................................................................................7
1.7.1 Menu Bar......................................................................................................................8
1.7.1.1 Menu Bar................................................................................................................8
1.7.1.2 File Menu ...............................................................................................................8
1.7.1.3 View Menu .............................................................................................................8
1.7.1.3.1 Toolbar..............................................................................................................8
1.7.1.3.2 Status Bar.........................................................................................................8
1.7.1.3.3 Options…..........................................................................................................8
1.7.1.4 Options Dialog........................................................................................................8
1.7.1.4.1 Time Zone.........................................................................................................9
1.7.1.4.2 Log File.............................................................................................................9
1.7.1.4.3 Keep For...........................................................................................................9
1.7.1.4.4 OK Button.........................................................................................................9
1.7.1.4.5 Cancel Button...................................................................................................9
1.7.1.5 Help Menu..............................................................................................................9
1.7.1.6 Status Bar ............................................................................................................10
1.8 Scheduling Examples........................................................................................................10
1.8.1 Using a Trigger Pattern ..............................................................................................10
1.8.1.1 Step 1 - Create and Configure the Trigger Pattern..............................................10
1.8.1.1.1.1 Create the Pattern....................................................................................10
- i -
Page 3

Reference Guide
r
D301529X412
APRIL 2012
Schedule
1.8.1.1.1.2
1.8.1.1.1.3 Final Configuration...................................................................................11
1.8.1.2 Step 2 - Create and Configure the Diary (Trigger)...............................................12
1.8.1.2.1 Create the Diary..............................................................................................12
1.8.1.2.2 Configure the Diary.........................................................................................13
1.8.1.2.3 Diary Name.....................................................................................................14
1.8.1.2.4 Event Type......................................................................................................14
1.8.1.2.5 Pattern Type...................................................................................................14
1.8.1.2.6 Pattern............................................................................................................14
1.8.1.2.7 Name..............................................................................................................14
1.8.1.2.8 Repeat Interval - 1 Hour.................................................................................14
1.8.1.2.9 Unlimited Repeat............................................................................................14
1.8.1.3 Step 3 - Create the Scheduled Object (Trigger) ..................................................14
1.8.1.3.1.1 Open the SQL Client................................................................................14
1.8.1.3.1.2 Type in the SQL Statement......................................................................14
1.8.1.4 SQL Analysis - Trigger Pattern ............................................................................15
1.8.1.4.1.1 Schedule Diary.........................................................................................15
1.8.1.4.1.2 Target Object............................................................................................15
1.8.1.4.1.3 Schedule Action.......................................................................................15
1.8.2 Using an On-Off Pattern.............................................................................................15
1.8.2.1 Step 1 Create and Configure the On-Off Pattern.................................................16
1.8.2.1.1.1 Create the Pattern....................................................................................16
1.8.2.1.1.2 Initial Configuration...................................................................................16
1.8.2.1.1.3 Final Configuration...................................................................................17
1.8.2.2 Step 2 - Create and Configure the Diary (OnOff) ................................................ 17
1.8.2.2.1 Step 2 - Create and Configure the Diary (OnOff)...........................................17
1.8.2.2.2 Diary Name.....................................................................................................19
1.8.2.2.3 Event Type......................................................................................................19
1.8.2.2.4 Pattern Type...................................................................................................19
1.8.2.2.5 Pattern............................................................................................................19
1.8.2.2.6 Name..............................................................................................................19
1.8.2.2.7 Repeat Interval - 5 Minutes ............................................................................19
1.8.2.2.8 Unlimited Repeat............................................................................................19
1.8.2.3 Step 3 - Create the Scheduled Object (On-Off)...................................................19
1.8.2.3.1.1 Open the SQL Client................................................................................19
1.8.2.3.1.2 Type in the SQL Statement......................................................................19
1.8.2.4 SQL Analysis - On-Off Pattern.............................................................................20
1.8.2.4.1.1 Schedule Diary.........................................................................................20
1.8.2.4.1.2 Target Object............................................................................................20
1.8.2.4.1.3 Schedule Action.......................................................................................20
1.8.3 Using a Control Curve Pattern....................................................................................20
1.8.3.1 Step 1 - Create and Configure the Control Curve Pattern...................................21
1.8.3.1.1.1 Create the Pattern....................................................................................21
1.8.3.1.1.2 Initial Configuration...................................................................................21
1.8.3.1.1.3 Final Configuration...................................................................................22
1.8.3.2 Step 2 - Create and Configure the Diary (Control Curve)....................................22
1.8.3.2.1 Create the Diary..............................................................................................22
1.8.3.2.2 Configure the Diary.........................................................................................23
1.8.3.2.3 Diary Name.....................................................................................................24
1.8.3.2.4 Event Type......................................................................................................24
Initial Configuration...................................................................................11
- ii -
Page 4

Reference Guide
r
D301529X412
APRIL 2012
Schedule
1.8.3.2.5
1.8.3.2.6 Pattern............................................................................................................24
1.8.3.2.7 Name..............................................................................................................24
1.8.3.2.8 Repeat Interval - 1 Hour.................................................................................24
1.8.3.2.9 Unlimited Repeat............................................................................................24
1.8.3.3 Step 3 - Create the Scheduled Object (Control Curve) .......................................24
1.8.3.4 SQL Analysis - Control Curve..............................................................................25
2 Index .......................................................................................................................................26
Pattern Type...................................................................................................24
1.8.3.3.1.1 Open the SQL Client................................................................................24
1.8.3.3.1.2 Type in the SQL Statement......................................................................24
1.8.3.4.1.1 Schedule Diary.........................................................................................25
1.8.3.4.1.2 Target Object............................................................................................25
1.8.3.4.1.3 Schedule Action.......................................................................................25
- iii -
Page 5
Reference Guide
r
D301529X412
APRIL 2012
Schedule
1 The Scheduler
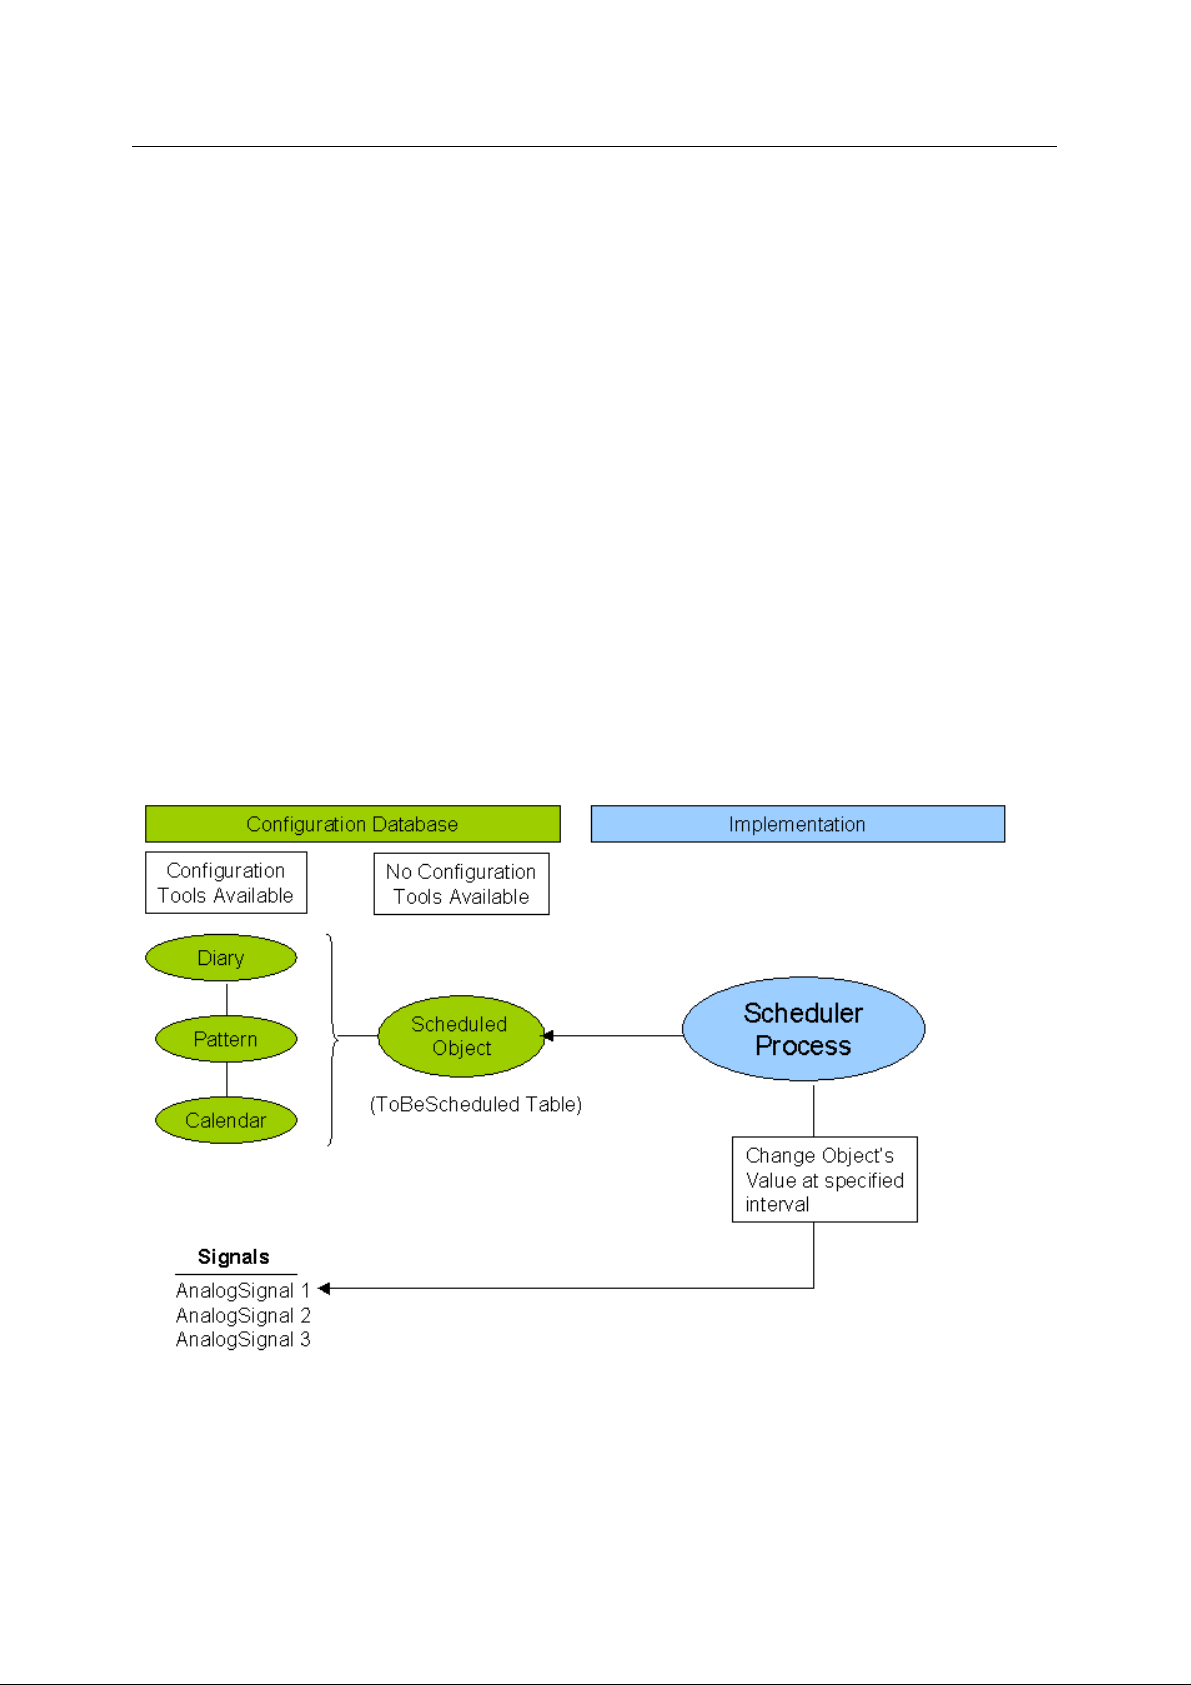
The OpenEnterprise Scheduler enables the scheduled modification of any attribute of any object
within the OpenEnterprise database. The OpenEnterprise Scheduling system is dependent on the
following: -
1.1 The Schedule Configuration
An association of Diaries, Patterns and Calendars - these elements provide the schedule times and
values required for a Scheduled object.
1.2 The Scheduled Object
This provides the Scheduler with the actual Scheduled object, and links it with the Schedule
Configuration by referencing the Diary to use.
1.3 The OpenEnterprise Scheduler
This processes the schedules.
The diagram below illustrates the relationship between these three elements..
1.4 Command Line Parameters
It is recommended that the Scheduler is started automatically as part of an OpenEnterprise Session.
See the Session Manager Help File for more information.
The following command line is used to start the Scheduler:
- 1 -
Page 6

Reference Guide
r
D301529X412
APRIL 2012
OEScheduler [<dataservice>] [-i] [-t]
Schedule
1.4.1 Parameters
1.4.1.1 dataservice
Optional parameter which specifies the data service of the database that the Scheduler is to be run
on. If not specified the default will be rtrdb1.
1.4.1.2 -i
n this switch is specified the Scheduler will skip any missed diaries and only schedule current
Whe
and future events. If this switch is not specified the Scheduler will on start up process missed diaries,
triggering events for these diaries as required.
1.4.1.3 -t
Indicate
allows the OpenEnterprise Session Manager to restart the Scheduler. Without this switch the
Scheduler will display a Dr Watson error message and wait until a user dismisses the program.
s that if a software exception occurs while the Scheduler is running it should terminate. This
1.5 Journal Task Events
The Scheduler logs errors to the database journaltask table and from there into the alarmsummary,
eventlog and eventhistory. The following table details the errors that are logged.
Event Id Description
0 Scheduler Config message – raised when Alarm and Expiry Note diaries are
deleted.
1 Missed diary. This event is raised when diary expiration cannot be processed at
the allotted time for the named diary. At present this will only be raised as the
scheduler is run up or if a diary is inserted into the database with a diarytime
before the current time.
1.6 Scheduler Configuration
In order to be able to change a Target Object’s value at a specific time, the Scheduler needs to
know:-
• The Target Object
• The time to change the value
• The new value
In order to implement this information with the highest degree of flexibility, OpenEnterprise uses the
concept of Diaries, Patterns, Calendars and Scheduled Objects.
1. Diaries
2. Patterns
3. Calendars
4. Scheduled Objects
- 2 -
Page 7

Reference Guide
r
D301529X412
APRIL 2012
Schedule
1.6.1 Diaries
A Diary can run on its own or can be a container for a Pattern. Ideally, the Diary and the Pattern
should be of the same duration, but this is not essential. If they are not of the same duration, then the
Pattern is truncated at the expiry time of the Diary.
The Scheduler is informed by the Diary Start time to begin processing the information that is found in
the Pattern. The Diaries and Calendars Configuration tool is found in the Toolbox. It allows Diaries to
be created.
Scheduler Configuration
1.6.2 Patterns
A Pattern may have many scheduled events configured. For details on how scheduled events are
configured for a Pattern please refer to the Patterns Help File. Each event within a Pattern has a time
and a value property. The Patterns configuration tool in the Toolbox enables Patterns to be created.
There are three types of Pattern: Triggers, On/Off and Control Curves. Each Pattern type is able to
change a specific type of value: -
1.6.2.1 Trigger Patterns
Each event in
object. The changing of the attribute’s value triggers some kind of action. Usually, a Trigger Pattern
is used to change a boolean value from False to True or vice versa.
A Trigger Pattern is therefore appropriate for scheduling an object that has a Boolean attribute that is
used to trigger some kind of action. An example of this would be the NW3000 device’s
collecttemplates field. This defaults to a value of False, but when set to True, the RDI 3000 sends a
command to collect the templates for the RTU. Afterwards, the collecttemplates field is returned to its
default value of False.
a Trigger Pattern is associated only with a single value of an attribute of the Target
1.6.3 On-Off Patterns
Each event in an On/Off Pattern may be associated with one of two values. Events are displayed as
blocks of time, the rising edge of the block represents an ON value, whilst the falling edge represents
an OFF value. This type of Pattern is therefore ideal for controlling digital output signals.
- 3 -
Page 8

Reference Guide
r
D301529X412
APRIL 2012
Schedule
1.6.4 Control Curve Patterns
In a Control Curve Pattern, each event has a time and a value expressed as a real number. Control
Curves are ideal for controlling analogue output signals.
Scheduler Configuration
1.6.5 Calendars
Calendars deal with the problem of needing a different Pattern to schedule the same Scheduled
Object on different days of the year, for instance during different seasons of the year. Imagine a gas
or water supply valve, which needs to be open for longer or shorter periods during certain seasons.
The standard On/Off Pattern used with this supply valve is no good for these special demands.
Therefore a new Pattern needs to be created which will cope with this. Once the Pattern is
configured, the Diary used by the Scheduled Object can be configured to run the seasonal Pattern on
the days when demand fluctuates from the norm
In order to do this, the user must create a special seasonal Calendar. The days affected by the
seasonal demands are marked on this Calendar, and on those days the Diary can be configured to
use the seasonal Pattern rather than the regular Pattern. Diaries and Calendars Configuration tool
enables Calendars to be created and configured in this way.
Scheduler Configuration
1.6.6 Scheduled Objects
Although Diaries, Patterns and Calendars are used for configuring scheduling within OpenEnterprise,
unless these objects are linked with a Target Object and an Action, no scheduling takes place. This
association is set when an entry is made in the ‘To Be Scheduled’ table. An entry within this table
may be referred to as a Scheduled Object. There is currently no tool available in the Toolbox to
perform this action, so Scheduled Objects have to be created using the SQL Client. Scheduled
Objects are what the Scheduler works with when it performs the task of scheduling.
Scheduled Objects contain three references, which enable the Scheduler to process the Scheduled
Object:
• A Schedule Diary
• A Target Object
• A Scheduled Action
- 4 -
Page 9

Reference Guide
r
D301529X412
APRIL 2012
Scheduler Configuration
Schedule
1.6.6.1 A Schedule Diary
Every Sched
attribute of the Scheduled Object in the ToBeScheduled table. The Diary start time alerts the
Scheduler to perform the Scheduled Action(s) on the Target Object.
A Diary is a simple alerting mechanism for the Scheduler. It can only run at regular intervals, and it
does not carry any information regarding the Scheduled Action (i.e. change of value) to be performed
on the Target Object. Using a Pattern with a Diary enables varied scheduling intervals, and also
provides the actual change of value at each interval. A Diary may on creation reference only one
Pattern, but through the use of Calendars, other Patterns may be associated with the same Diary on
different days of the year.
Scheduled Objects
1.6.6.2 A Target Object
The Ta
1.6.6.2.1.1 Single Object
This is
should be identified, and the value of that attribute. An example is given below of a local real analog
signal that has been configured as a Scheduled Object in the ToBeScheduled table. The Attribute
column indicates attributes within the ToBeScheduled table.
Attribute Explanation Value
uled Object must contain a reference to a Diary. This is contained in the UsesThisInfo
rget Object is the object that is changed by the Scheduled Action.
usually a single object. It is identified by the Table to which it belongs, the attribute by which it
Tablename
Tableentry
Tableentryvalue
1.6.6.2.1.2 Multiple Objects
The table to which the Target object
belongs.
The attribute which will be used to
define the Target object
The value within this attribute which
defines the Target object
LocalRealAnalog
Name (the Primary Key)
LOCAL:RAMPANALOG.001
- 5 -
Page 10

Reference Guide
r
D301529X412
APRIL 2012
Although the Target Object is usually a single object, it need not necessarily be so, since the field
used to identify the Target Object does not need to be its primary key and does not need to have a
unique value.
For instance, the Target object could be all of the analog signals associated with a particula r NW3000
RTU. If the name of the RTU were ‘IP1’ all of its signals would have a DeviceName attribute of ‘IP1’.
For this configuration the Scheduled Object in the ToBeScheduled table would have the following
set-up: -
Attribute Explanation Value
Schedule
Tablename
Tableentry
Tableentryvalue
Scheduled Objects
1.6.6.3 A Scheduled Action
These are the values that
triggers it into action. These are defined by four attributes in the ToBeScheduled table: -
• An ON value attribute name for the Target Object (TriggerOnName)
• An ON value for the Target Object (TriggerOnValue)
• An OFF value attribute name for the Target Object (TriggerOffName)
• An OFF value for the Target Object (TriggerOffValue)
These attributes are only used by Trigger Patterns and On-Off Patterns
1.6.6.3.1.1 Trigger Pattern
If a Trigger P
field that flags a device to perform an action when True, after which the field’s value is set back to
False by OpenEnterprise. An example of such a field would be the CollectTemplates field in the
NW3000 Device table. The OFF value attribute is ignored for Trigger Patterns..
attern is being used, then the Target Object’s ON value attribute is likely to be a Boolean
The table to which the Target object
belongs.
The attribute which will be used to define
the Target object
The value within this attribute which defines
the Target object
must be changed by the Scheduler when the Scheduled Object’s Diary
NW3000realanalog
DeviceName
IP1
1.6.6.3.1.2 On-Off Pattern
If an On-Off Pattern is bei
usually a boolean, but could be an Integer field. If the attribute is an Integer, the On and Off values
can contain two different values. If the On and Off values are boolean, they can be specified as TrueFalse, On-Off or 1-0 depending on how the Target Object’s value field has been configured. The
Scheduler will use the Pattern to define the times of the Actions, and whether they are On or Off
actions, but will use the values in the Scheduled Object to update the Target.
1.6.6.3.1.3 A Control Curve Pattern
Since a Control Curve Patt
Scheduler uses the Control Curve Pattern to set the Scheduled Object's value. The Scheduler does
not use the TriggerOn and TriggerOff values in the Scheduled Object to determine Scheduled Action
values, so they should be left empty, but it will use the TriggerOn and TriggerOff name attribute
specified there.
Scheduled Objects
ng used with a Scheduled Object, the Target Object’s value attribute is
ern explicitly defines both the time and value of a Scheduled Action, the
- 6 -
Page 11

Reference Guide
r
D301529X412
APRIL 2012
Schedule
1.6.7 Scheduling Tables - Relationships
Each object in the CalendarEventsForDiary table draws the Diary, Pattern and Calendar objects
together into a fully fledged and unique scheduling configuration.
Scheduler Configuration
1.7 Scheduler User Interface
The Scheduler has a simple window interface that provides connectivity feedback and allows some
interface modification. It also enables the Scheduler's transaction output file format to be modified.
Click the hotspots* on the image below for more information.
- 7 -
Page 12

Reference Guide
r
D301529X412
APRIL 2012
Schedule
1.7.1 Menu Bar
1.7.1.1 Menu Bar
The Menu Bar contains three options.
1.7.1.2 File Menu
There is only
1.7.1.3 View Menu
There are th
1.7.1.3.1 Toolbar
This optio
1.7.1.3.2 Status Bar
This option toggles the Status bar on and off.
the Exit option on this item. This closes the Scheduler.
ree options on the View menu:-
n toggles the toolbar on and off.
1.7.1.3.3 Options…
Selection di
Menu Bar
1.7.1.4 Options Dialog
The Option
splays the Options dialog.
s dialog enables the user to change some settings for the Scheduler.
- 8 -
Page 13

Reference Guide
r
D301529X412
APRIL 2012
1.7.1.4.1 Time Zone
Schedule
The Sch
works internally in local time, so a diary that should trigger at 2 PM every day will always trigger at 2
PM local time irrespective of the time zone and daylight saving scheme in use.
1.7.1.4.2 Log File
The Sch
corresponding actions performed. The file is saved into the Scheduler’s current working di rectory.
The user may select one of three options from the Log File list: -
No Log File
This option will stop the OE Scheduler from writing its Log File to disk.
Single Log File
This option will cause the OE Scheduler to write a single Log File to disk. The file will be called
OEScheduler.txt. It will keep on getting larger until there is no more space on the hard disk, so the
user will need to manage it.
New Log File Each Day
This is the recommended mode for log files, as it allows a record of actions to be kept, but the files
are managed by the system, and so will not grow continually. The name of each Log File is of the
format OEScheduler YYYY-MM-DD.txt, and saved away each day.
Options Dialog
eduler allows the user to define which time zone it is operating in. The Scheduler always
eduler keeps an audit trail of configuration changes and all events together with the
1.7.1.4.3 Keep For
This field allo
deleting them.
1.7.1.4.4 OK Button
n selected, the dialog closes, saving any modified options on the dialog.
Whe
1.7.1.4.5 Cancel Button
n selected, the dialog closes without saving any modifications made.
Whe
1.7.1.5 Help Menu
ending on the option selected, displays this Help File or the 'About' box, which provides
Dep
information on the OpenEnterprise version and contact details.
ws the user to specify how long the Scheduler should keep its daily Log files before
- 9 -
Page 14

Reference Guide
r
D301529X412
APRIL 2012
1.7.1.6 Status Bar
Schedule
The indi
connection exists to that data service, a red background indicates no connection and a green
background indicates a working connection.
If at any point connection to the data service is lost the indicator’s background will revert to red. The
Scheduler will then attempt to reconnect to the data service at regular intervals. Once a connection is
established the background of the indicator will change back to green.
cator on the right hand side of the status bar shows the current data service and whether a
1.8 Scheduling Examples
The following examples describe the process of creating three Scheduled Objects, each using a
different type of Pattern.
1. A Schedule using a Trigger Pattern
2. A Schedule using On-Off Pattern
3. A Schedule using a Control Curve Pattern
Scheduler Overview
1.8.1 Using a Trigger Pattern
Polled data collection from Bristol RTUs can be forced by setting the CollectTemplates attribute of the
RTU to TRUE. This forces what is known as a "one shot" collection of data. This process can be
automated by creating a Schedule. In order to create the Scheduled Object, one needs: -
• A Diary with an associated Pattern of the correct type (Trigger);
• A Trigger Pattern for use with the Diary;
• A Target Object (in this case a Bristol RTU);
• A Scheduled Action (in this case the CollectTemplates attribute is set to True).
Step 1 - Create and Configure the Trigger Pattern
1.8.1.1 Step 1 - Create and Configure the Trigger Pattern
This mu
the Diary when that is created.
st be done before creating the Diary, so that it will be available as a Pattern to associate with
1.8.1.1.1.1 Create the Pattern
Select the [Add] button fro
m the Triggers tab of the Pattern Editor tool.
- 10 -
Page 15

Reference Guide
r
D301529X412
APRIL 2012
Schedule
1.8.1.1.1.2 Initial Configuration
The Ne
overall period for it.
1.8.1.1.1.3 Final Configuration
Please
final configuration for the Pattern shows that four triggers have been configured at 15 minute intervals.
w Trigger dialog enables the user to create a unique name for the Pattern and select an
refer to the Patterns Reference Guide for details on how to configure Trigger Patterns. The
- 11 -
Page 16

Reference Guide
r
D301529X412
APRIL 2012
Schedule
Step 2 - Create and Configure the Diary (Trigger)
1.8.1.2 Step 2 - Create and Configure the Diary (Trigger)
A Diary must
used. Then this Diary will be associated with the Pattern created in the previous step.
1.8.1.2.1 Create the Diary
Select the [Add] button o
now be created, since a Scheduled Object must have a Diary. An hourly Diary will be
n the Diary Tab of the Diary and Calendar configuration tool.
- 12 -
Page 17

Reference Guide
r
D301529X412
APRIL 2012
Schedule
1.8.1.2.2 Configure the Diary
This is th
configuration.
e Add Diary dialog. Click the hotspots* on the image below for more information on the
- 13 -
Page 18

Reference Guide
r
D301529X412
APRIL 2012
Steps 1 and 2 have completed the preliminary configuration. Now the Scheduled Object must be
created. However, since there is currently no tool in the OpenEnterprise Toolbox to do this, we will
have to use the SQL Client.
Step 3 - Create the Scheduled Object (Trigger)
1.8.1.2.3 Diary Name
Schedule
The ne
1.8.1.2.4 Event Type
For all Pattern types
1.8.1.2.5 Pattern Type
The app
1.8.1.2.6 Pattern
1.8.1.2.7 Name
The Pattern
1.8.1.2.8 Repeat Interval - 1 Hour
This ha
the options available.
1.8.1.2.9 Unlimited Repeat
The Dia
1.8.1.3 Step 3 - Create the Scheduled Object (Trigger)
w Diary has been given a unique name that will explain what it does.
, it is recommended that the event type is set to Perform On Action.
ropriate Pattern type must be selected from the list.
created in the previous step is selected from the list.
s been set to one hour. Please refer to the Patterns Reference Guide for further information on
ry will continually activate the Scheduled Object according to the Repeat Interval..
1.8.1.3.1.1 Open the SQL Client
t Start>Programs>OpenEnterprise>SQL Client
Selec
The SQL Client will be displayed.
1.8.1.3.1.2 Type in the SQL Statement
Type in the following SQ
L statement and press the Enter key.
- 14 -
Page 19

Reference Guide
r
D301529X412
APRIL 2012
insert into tobescheduled (accessarea,id, description,tablename,
tableentry,tableentryvalue,triggeronname,triggeronvalue,triggeroffname,trig
geroffvalue,usesthisinfo ) values ('ALL',
0,'IP1_15_MINUTE_COLLECT_TEMPLATES','nw3000device_table', 'devicename',
'IP1','collecttemplates','TRUE','','','IP1COLLECTION_15Mins');
commit;
SQL Analysis - Trigger Pattern
1.8.1.4 SQL Analysis - Trigger Pattern
Schedule
This topi
following elements:-
1.8.1.4.1.1 Schedule Diary
The followi
usesthisinfo – value(‘IP1COLLECTION_15Mins’)
1.8.1.4.1.2 Target Object
The followi
tablename – value(‘nw3000device_table’) – what table it is in
tableentry – value(‘devicename’) – the name of the attribute which defines it
tableentryvalue – value(‘IP1’) – the actual Target Object
1.8.1.4.1.3 Schedule Action
The followi
changed when the Schedule is triggered, and the value to which it should be ch anged.
triggeronname – value(‘collecttemplates’) – the name of the attribute which will be changed
triggeronvalue – value(‘TRUE’) – the value to apply to the attribute which will be modified
triggeroffname – value(‘’) – the name of the OFF value attribute – ignored because it is a Trigger
Pattern.
c explains the SQL statement in Step 3 in terms of the Scheduled Object, identifying the
ng attribute and value determines the Diary which will be used for the Schedule.
ng attributes and values determine the Target Object of the Schedule.
ng attributes and values determine the attribute of the Target Object which is to be
triggeroffvalue – value(‘’) – ignored because it is a Trigger Pattern
Worked Examples
1.8.2 Using an On-Off Pattern
This sort of Scheduled Object is used to update a digital signal. It requires: -
• A Diary with an associated Pattern of the correct type (On/Off Schedule);
• An On/Off Pattern for use with the Diary;
• A Target Object (in this case a Local Digital Signal);
• A Scheduled Action (in this case the ON Action is True, and the OFF Action is False).
Step 1 Create and Configure the On-Off Pattern
This sort of Scheduled Object is used to update a digital signal. It requires: -
- 15 -
Page 20

Reference Guide
r
D301529X412
APRIL 2012
• A Diary with an associated Pattern of the correct type (On/Off Schedule);
• An On/Off Pattern for use with the Diary;
• A Target Object (in this case a Local Digital Signal);
• A Scheduled Action (in this case the ON Action is True, and the OFF Action is False).
Step 1 Create and Configure the On-Off Pattern
1.8.2.1 Step 1 Create and Configure the On-Off Pattern
Schedule
This mu
the Diary when it is created.
1.8.2.1.1.1 Create the Pattern
Select the [Add] button fro
st be done before creating the Diary, so that it will be available as a Pattern to associate with
m the On/Off Schedules tab of the Pattern Editor tool.
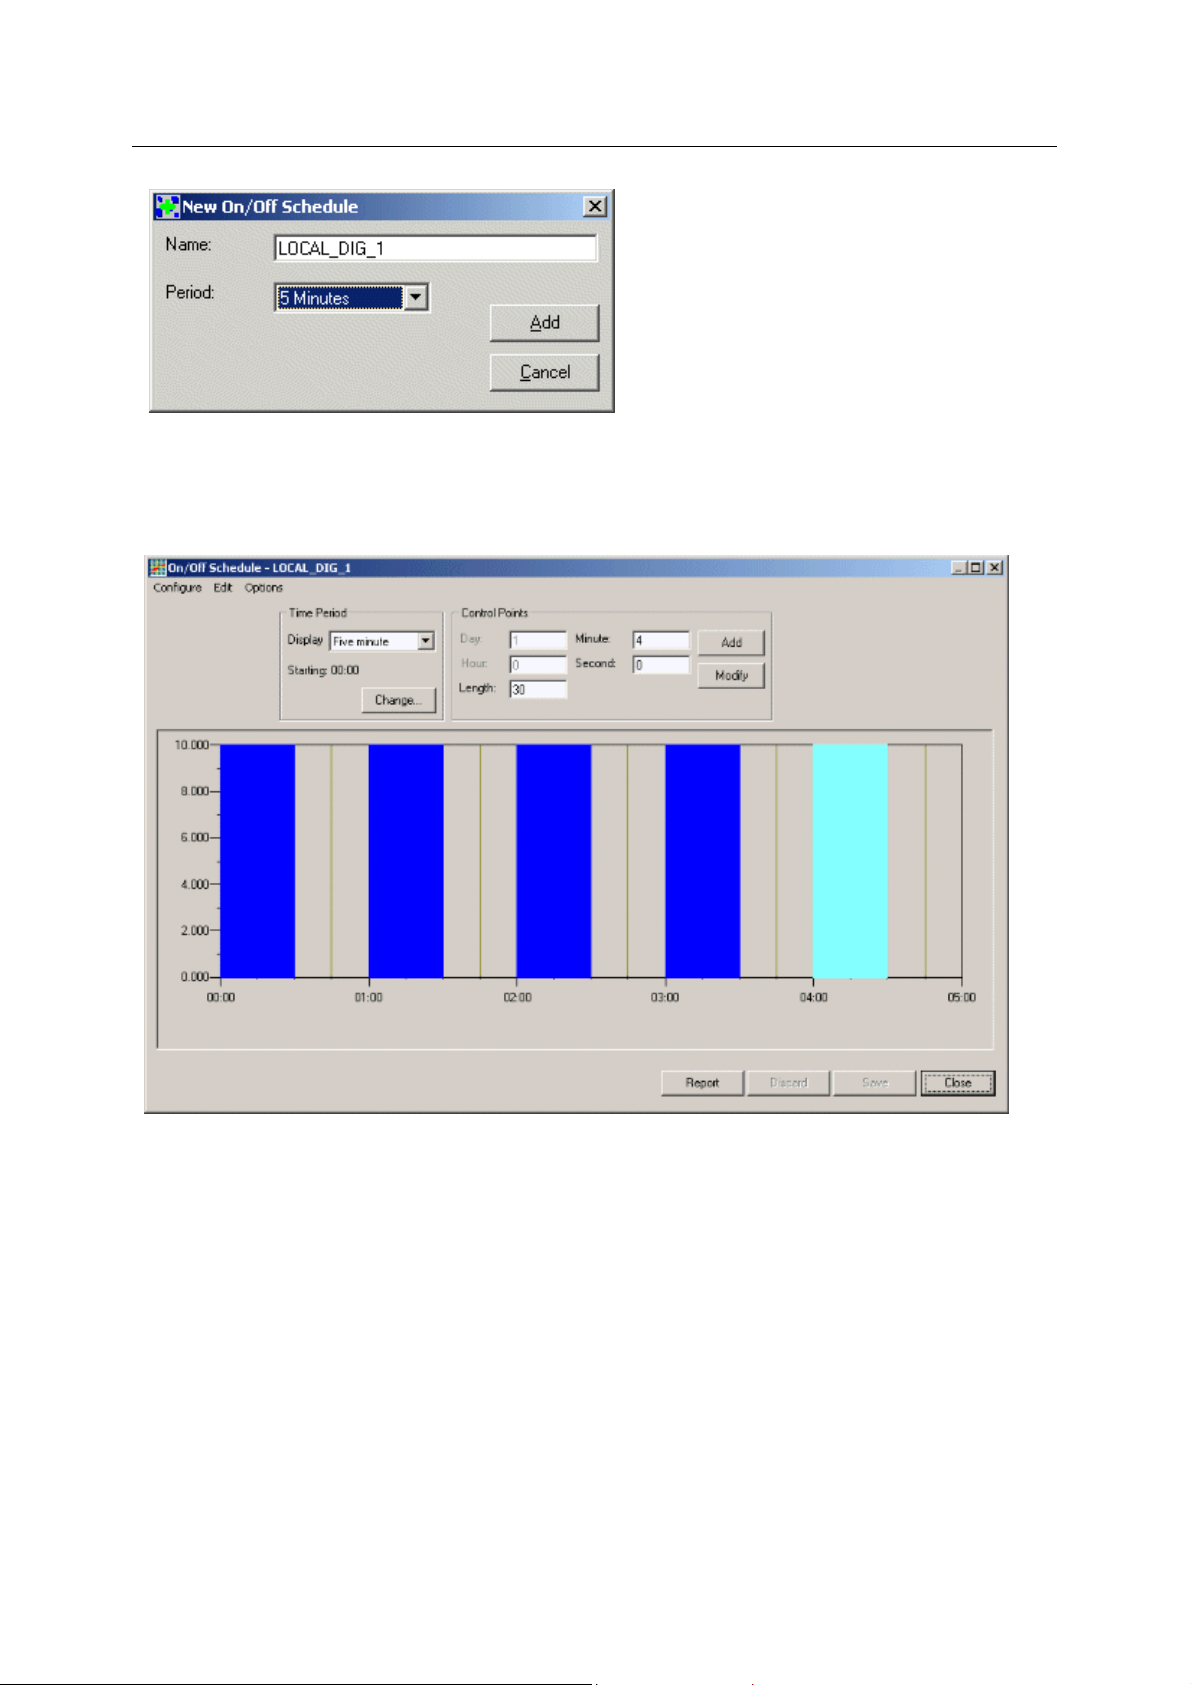
1.8.2.1.1.2 Initial Configuration
The Ne
an overall period for it. Here we have selected a five minute period for the Pattern.
w On/Off Schedule dialog enables the user to create a unique name for the Pattern and select
- 16 -
Page 21
Reference Guide
r
D301529X412
APRIL 2012
Schedule
1.8.2.1.1.3 Final Configuration
For detail
The final configuration for the Pattern used here shows that five thirty second On/Off blocks have
been configured at one minute intervals.
s on how On/Off Patterns are configured, please refer to the OE Patterns Reference Guide .
Step 2 - Create and Configure the Diary (OnOff)
1.8.2.2 Step 2 - Create and Configure the Diary (OnOff)
1.8.2.2.1 Step 2 - Create and Configure the Diary (OnOff)
A Diary must
is set to run over a five minute period. A five-minute Diary will be used together with a Pattern that
sets the Target Object On and Off in 30 second intervals.
Create the Diary
Select the [Add] button on the Diary Tab of the Diary and Calendar configuration tool.
now be created, since a Scheduled Object must have a Diary. In this case the Pattern
- 17 -
Page 22

Reference Guide
r
D301529X412
APRIL 2012
Schedule
Configure the Diary
This is the Add Diary dialog. Click the hotspots* on the image below for more information on the
configuration.
- 18 -
Page 23

Reference Guide
r
D301529X412
APRIL 2012
Steps 1 and 2 have completed the preliminary configuration. Now the Scheduled Object must be
configured using the SQL Client.
Step 3 - Create the Scheduled Object (On-Off)
1.8.2.2.2 Diary Name
Schedule
The ne
1.8.2.2.3 Event Type
For all Pattern types
1.8.2.2.4 Pattern Type
The app
1.8.2.2.5 Pattern
1.8.2.2.6 Name
The Pattern
1.8.2.2.7 Repeat Interval - 5 Minutes
This
1.8.2.2.8 Unlimited Repeat
The Dia
1.8.2.3 Step 3 - Create the Scheduled Object (On-Off)
1.8.2.3.1.1 Open the SQL Client
Selec
w Diary has been given a unique name that will explain what it does.
, it is recommended that the event type is set to Perform On Action.
ropriate Pattern type must be selected from the list.
created in the previous step is selected from the list.
has been set to five minutes to match the Pattern created in the previous step.
ry will continually activate the Scheduled Object according to the Repeat Interval..
t Start>Programs>OpenEnterprise>SQL Client
The SQL Client will be displayed.
1.8.2.3.1.2 Type in the SQL Statement
Type in the following SQ
L statement and press the Enter key.
- 19 -
Page 24

Reference Guide
r
D301529X412
APRIL 2012
insert into tobescheduled (accessarea,id, description,tablename,
tableentry,tableentryvalue,triggeronname,triggeronvalue,triggeroffname,trig
geroffvalue,usesthisinfo ) values ('ALL',
0,'LOCAL_DIG_1_ON_OFF’,'localdigital_table', 'name',
'LOCAL:CALC.BOOL.001','value','TRUE','value','FALSE','LOCAL_DIG_1');
commit;
SQL Analysis - On-Off Pattern
1.8.2.4 SQL Analysis - On-Off Pattern
Schedule
This topi
following elements:-
1.8.2.4.1.1 Schedule Diary
The followi
usesthisinfo – value(‘LOCAL_DIG_1’)
1.8.2.4.1.2 Target Object
The followi
tablename – value(‘localdigital_table’) – what table it is in
tableentry – value(‘name’) – the name of the attribute in tablename table which defines the Target
Object
tableentryvalue – value(‘LOCAL:CALC.BOOL.001’) – the actual Target Object
1.8.2.4.1.3 Schedule Action
The followi
changed when the Schedule is triggered, and the value to which it should be ch anged.
triggeronname – value(‘value’) – the name of the ON value attribute which will be changed
triggeronvalue – value(‘TRUE’) – the value to apply to the ON value attribute
c explains the SQL statement in Step 3 in terms of the Scheduled Object, identifying the
ng attribute and value determines the Diary which will be used for the Schedule.
ng attributes and values determine the Target Object of the Schedule.
ng attributes and values determine the attribute of the Target Object which is to be
triggeroffname – value(‘value’) – the name of the OFF value attribute
triggeroffvalue – value(‘FALSE’) – the value to apply to the OFF value attribute
Worked Examples
1.8.3 Using a Control Curve Pattern
This sort of Scheduled Object is used to update an analog signal. It requires: -
• A Diary with an associated Pattern of the correct type (Control Curve);
• An On/Off Pattern for use with the Diary;
• A Target Object (in this case a Local Analog Signal);
• A Scheduled Action (only the value attribute is needed).
Step 1 - Create and Configure the Control Curve Pattern
This sort of Scheduled Object is used to update an analog signal. It requires: -
- 20 -
Page 25

Reference Guide
r
D301529X412
APRIL 2012
• A Diary with an associated Pattern of the correct type (Control Curve);
• An On/Off Pattern for use with the Diary;
• A Target Object (in this case a Local Analog Signal);
• A Scheduled Action (only the value attribute is needed).
Step 1 - Create and Configure the Control Curve Pattern
1.8.3.1 Step 1 - Create and Configure the Control Curve Pattern
Schedule
This mu
the Diary when it is created.
1.8.3.1.1.1 Create the Pattern
Select the [Add] button fro
st be done before creating the Diary, so that it will be available as a Pattern to associate with
m the Control Curve tab of the Pattern Editor tool.
1.8.3.1.1.2 Initial Configuration
The Ne
and select an overall period for it. A Control Curve also has to specify a Low and High range before
being added.
w Control Curve Schedule dialog enables the user to create a unique name for the Pattern
- 21 -
Page 26

Reference Guide
r
D301529X412
APRIL 2012
Schedule
1.8.3.1.1.3 Final Configuration
Please
Patterns. The final configuration for the Pattern used here shows a number of points have been
added to control the value of the signal over the hour.
refer to the OE Patterns Reference Guide for details on how to configure Control Curve
Step 2 - Create and Configure the Diary (Control Curve)
1.8.3.2 Step 2 - Create and Configure the Diary (Control Curve)
A Diary must
is set to run over a one hour period. An hourly Diary will be used together with the Control Curve
Pattern created in the previous step.
1.8.3.2.1 Create the Diary
Select the [Add] button o
now be created, since a Scheduled Object must have a Diary. In this case the Pattern
n the Diary Tab of the Diary and Calendar configuration tool.
- 22 -
Page 27

Reference Guide
r
D301529X412
APRIL 2012
Schedule
1.8.3.2.2 Configure the Diary
This is th
e Add Diary dialog with some explanation of the configuration below: -
- 23 -
Page 28

Reference Guide
r
D301529X412
APRIL 2012
Steps 1 and 2 complete the preliminary configuration. Now the Scheduled Object must be configured
using the SQL Client.
Step 3 - Create the Scheduled Object (Control Curve)
1.8.3.2.3 Diary Name
Schedule
The ne
1.8.3.2.4 Event Type
For all Pattern types
1.8.3.2.5 Pattern Type
The app
1.8.3.2.6 Pattern
1.8.3.2.7 Name
The Pattern
1.8.3.2.8 Repeat Interval - 1 Hour
This ha
the options available.
1.8.3.2.9 Unlimited Repeat
The Dia
1.8.3.3 Step 3 - Create the Scheduled Object (Control Curve)
w Diary has been given a unique name that will explain what it does.
, it is recommended that the event type is set to Perform On Action.
ropriate Pattern type must be selected from the list.
created in the previous step is selected from the list.
s been set to one hour. Please refer to the Patterns Reference Guide for further information on
ry will continually activate the Scheduled Object according to the Repeat Interval..
1.8.3.3.1.1 Open the SQL Client
t Start>Programs>OpenEnterprise>SQL Client
Selec
The SQL Client will be displayed.
1.8.3.3.1.2 Type in the SQL Statement
Type in the following SQ
L statement and press the Enter key.
- 24 -
Page 29

Reference Guide
r
D301529X412
APRIL 2012
insert into tobescheduled (accessarea,id,
description,tablename,tableentry,tableentryvalue,triggeronname,
triggeronvalue,triggeroffname,triggeroffvalue,usesthisinfo ) values
('ALL',0,'LOCAL_ANALOG_CONTROL_CURVE','localrealanalog_table','name',
'LOCAL:CALC.REAL.001','value','','value','','LOCAL_ANALOG_1');commit;
SQL Analysis - Control Curve
1.8.3.4 SQL Analysis - Control Curve
1.8.3.4.1.1 Schedule Diary
The followi
usesthisinfo – value(‘LOCAL_ANALOG_1’)
1.8.3.4.1.2 Target Object
The followi
tablename – value(‘localrealanalog_table’) – what table it is in
ng attribute and value determines the Diary which will be used for the Schedule.
ng attributes and values determine the Target Object of the Schedule.
Schedule
tableentry – value(‘name’) – the name of the attribute which defines it
tableentryvalue – value(‘LOCAL:CALC.REAL.001’) – the actual Target Object
1.8.3.4.1.3 Schedule Action
The followi
changed when the Schedule is triggered, and the value to which it should be ch anged.
ttriggeronname – value(‘value’) – the name of the ON value attribute which will be changed
triggeronvalue – value(‘’) ignored because its value is controlled by a Control Curve
triggeroffname – value(‘value’) – the name of the OFF value attribute
triggeroffvalue – value(‘’) – ignored because its value is controlled by a Control Curve
Worked Examples
ng attributes and values determine the attribute of the Target Object which is to be
- 25 -
Page 30

Reference Guide
r
D301529X412
APRIL 2012
2 Index
Schedule
1
C
Calendars........................................................... 6
Cancel Button................................................... 11
Command Line Parameters............................... 3
Configure............................ 12, 14, 18, 19, 23, 24
Control Curve Pattern................................... 23
Diary ................................................. 14, 19, 24
On-Off Pattern.............................................. 18
Trigger Pattern.............................................. 12
Control Curve....................................... 24, 26, 27
Control Curve Pattern ...................................... 23
Configure...................................................... 23
Control Curve Schedule Introduction............... 22
Create...............12, 14, 16, 18, 19, 21, 23, 24, 26
Scheduled Object.............................16, 21, 26
D
Diaries................................................................ 4
Diary..................................................... 14, 19, 24
Configure.......................................... 14, 19, 24
Diary Name .......................................... 16, 21, 26
E
Event Type........................................... 16, 21, 26
H
Help Menu........................................................ 11
Hour............................................................ 16, 26
J
Journal Task Events........................................... 4
K
Keep For........................................................... 11
L
Log File............................................................. 10
M
Minutes............................................................. 21
O
OK Button......................................................... 11
OnOff................................................................ 19
On-Off............................................................... 21
On-Off Pattern............................................ 18, 22
Configure.......................................................18
On-Off Schedule Introduction...........................17
Options Dialog ..................................................10
P
Pattern Name........................................16, 21, 26
Pattern Type .........................................16, 21, 26
Patterns...............................................................5
R
Relationships ......................................................8
Repeat Interval......................................16, 21, 26
S
Schedule Diary....................................................7
Scheduled Action................................................8
Scheduled Object..................................16, 21, 26
Create................................................16, 21, 26
Scheduled Objects..............................................6
Scheduler Configuration.....................................4
Scheduler Main Window.....................................9
Scheduler Overview............................................3
Scheduling Tables ..............................................8
SQL Analysis ........................................17, 22, 27
Status Bar.........................................................11
Step.................. 12, 14, 16, 18, 19, 21, 23, 24, 26
T
Target Object......................................................7
Time Zone.........................................................10
Trigger.........................................................14, 16
Trigger Pattern............................................12, 17
Configure.......................................................12
Trigger Schedule Introduction...........................12
U
Unlimited Repeat ..................................16, 21, 26
V
View Menu........................................................10
W
Worked Examples.............................................11
- 26 -
Page 31

Reference Guide
D301529X412
APRIL 2012
DISCLAIMER
Bristol, Inc., Bristol Babcock Ltd, Bristol Canada, BBI SA de CV and the Flow Computer Division , are wholly owned subsidiaries of Emerson Electric Co. doing business
as Remote Automation Solutions (“RAS”), a division of Emerson Process Management. ROC, FloBoss, ROCLINK, Bristol, Bristol Babcock, ControlWave, TeleFlow and
Helicoid are trademarks of RAS. AMS, PlantWeb and the PlantWeb logo are marks of Emerson Electric Co. The Emerson logo is a trademark and service mark of the
Emerson Electric Co. All other marks are property of their respective owners.
The contents of this publication are presented for informational purposes only. While every effort has been made to ensure informational accuracy, they are not to be
construed as warranties or guarantees, express or implied, regarding the products or services described herein or their use or applicability. RAS reserves the right to
modify or improve the designs or specifications of such products at any time without notice. All sales are governed by RAS’ terms and conditions which are available upon
request. RAS does not assume responsibility for the selection, use or maintenance of any product. Responsibility for proper selection, use and mai nt en ance of any RAS
product remains solely with the purchaser and end-user.
Engineered and supported by:
Remote Automation Solutions,
Blackpole Road, Worcester, WR3 8YB, UK
Registered office: Meridian East, Leicester, LE19 1UX
Registered in England and Wales, Registration No. 00671801
VAT Reg No. GB 705 353 652
Emerson Process Management
Remote Automation Solutions
1100 Buckingham St
Watertown, CT 06795
T 1 (860) 945 2200
F 1 (860) 945 2278
www.EmersonProcess.com/Remote
binfo@EmersonProcess.com
© 2001-2012 Remote Automation Solutions, division of Emerson Process Management. All rights
reserved.
Emerson Process Management
Remote Automation Solutions
Blackpole Road
Worcester, WR3 8YB
T 44 (0) 1905 856848
F 44 (0) 1905 856930
www.EmersonProcess.com/Remote
oedsupport@EmersonProcess.com
 Loading...