

Remote Automation Solutions Guide: OpenEnterprise ROC Configuration Tool Reference Guide Manuals & Guides
Page 1

Reference Guide
D301654X412
April 2012
OpenEnterprise ROC Configuration
Tool Reference Guide (V2.83)
Remote Automation Solutions
Website: www.EmersonProcess.com/Remote
Page 2

Reference Guide
D301654X412
APRIL 2012
ROC Configuration Tool
Contents
1 ROC Configuration Overview.................................................................................................1
2 User Interface........................................................................................................................... 1
2.1 Starting the ROC Configuration Tool..................................................................................2
2.2 The Welcome Page.............................................................................................................3
2.2.1 Show this Form on startup............................................................................................3
3 Menu Bar ..................................................................................................................................4
3.1 File Menu ............................................................................................................................4
3.1.1 Export ...........................................................................................................................4
3.1.1.1 The Export File Dialog............................................................................................4
3.1.1.2 Restoring ROC Configuration................................................................................5
3.1.2 Exit................................................................................................................................5
3.2 Tools Menu .........................................................................................................................5
3.2.1 New Device Menu ........................................................................................................6
3.2.1.1 From .800 File........................................................................................................6
3.2.1.2 From Device...........................................................................................................6
3.2.2 New Parameter Pattern Template................................................................................6
3.2.3 New Schedule ..............................................................................................................6
3.2.4 New ROC Driver...........................................................................................................7
3.2.5 New Port Parameters Template...................................................................................7
3.2.6 System Parameters Configuration ...............................................................................7
3.3 Options Menu......................................................................................................................7
3.3.1 Time Stamp Display .....................................................................................................7
3.3.1.1 UTC........................................................................................................................7
3.3.1.2 Local Time..............................................................................................................7
3.3.1.3 Device Time ...........................................................................................................7
3.3.2 List View Column Widths..............................................................................................8
3.3.2.1 List View Column Widths .......................................................................................8
3.3.2.2 From Header..........................................................................................................8
3.3.2.3 From Data ..............................................................................................................8
3.3.2.4 From Header and Data ..........................................................................................8
3.3.2.5 Equal Widths..........................................................................................................8
3.4 Help Menu...........................................................................................................................8
3.4.1 ROC Configuration Tool Help.......................................................................................8
3.4.2 About ROC Configuration Tool.....................................................................................8
4 Tree V iew Pane.........................................................................................................................9
4.1 Devices ...............................................................................................................................9
4.1.1 Devices Context Menu .................................................................................................9
4.1.1.1 ReDraw node and Refresh All Data.......................................................................9
4.1.1.2 From .800 File........................................................................................................9
4.1.1.3 From Device.........................................................................................................10
4.1.1.4 Paste....................................................................................................................10
4.1.2 Devices Sub Nodes....................................................................................................11
4.1.2.1 Devices Sub Nodes Context Menu......................................................................11
4.1.2.1.1 From .800 File.................................................................................................12
- i -
Page 3

Reference Guide
D301654X412
APRIL 2012
ROC Configuration Tool
4.1.2.1.2
4.1.2.1.3 Paste...............................................................................................................12
4.1.2.2 All Devices ...........................................................................................................13
4.1.2.3 Devices by Type...................................................................................................13
4.1.2.4 Devices by ROC Group .......................................................................................14
4.1.2.5 Devices by Plant Area..........................................................................................14
4.1.2.6 Device Node.........................................................................................................15
4.1.2.6.1 Device Context Menu.....................................................................................15
4.1.2.6.2 Requests by Schedule....................................................................................20
4.1.2.6.3 Requests by Type...........................................................................................25
4.1.2.6.4 Database ROC Points....................................................................................29
4.1.2.6.5 Signals for Point Parameter Values..............................................................102
4.1.2.6.6 Database ROC History Points......................................................................105
4.1.2.6.7 Diagnostics...................................................................................................110
4.2 Data Collection................................................................................................................110
4.2.1 Data Collection Context Menu..................................................................................110
4.2.2 Schedules for ROC Device Requests ......................................................................111
4.2.2.1 Schedules Context Menu...................................................................................111
4.2.2.1.1 New Schedule...............................................................................................111
4.2.2.1.2 Paste.............................................................................................................111
4.2.2.2 Schedule Context Menu.....................................................................................111
From Device...................................................................................................12
4.1.2.6.1.1 Update Device Configuration...................................................................16
4.1.2.6.1.2 Refresh Parameter Values.......................................................................16
4.1.2.6.1.3 Refresh History Configuration..................................................................17
4.1.2.6.1.4 Copy.........................................................................................................19
4.1.2.6.1.5 Rename....................................................................................................19
4.1.2.6.1.6 Delete.......................................................................................................19
4.1.2.6.1.7 Disable.....................................................................................................19
4.1.2.6.1.8 Properties.................................................................................................19
4.1.2.6.2.1 Requests by Schedule Context Menu......................................................20
4.1.2.6.2.2 Scheduled Requests................................................................................20
4.1.2.6.2.3 No Schedule.............................................................................................23
4.1.2.6.3.1 User Created Requests............................................................................26
4.1.2.6.3.2 General Requests....................................................................................26
4.1.2.6.3.3 Read History Requests............................................................................26
4.1.2.6.3.4 Request by Type Sub node Context Menus............................................26
4.1.2.6.3.5 Requests By Type Context Menu............................................................27
4.1.2.6.3.6 Individual Request Context Menu............................................................28
4.1.2.6.4.1 Database ROC Points Node Context Menu.............................................30
4.1.2.6.4.2 I/O Node...................................................................................................30
4.1.2.6.4.3 Control Node............................................................................................58
4.1.2.6.4.4 Meter Node...............................................................................................75
4.1.2.6.4.5 System Info Node.....................................................................................81
4.1.2.6.4.6 Modbus Node...........................................................................................87
4.1.2.6.4.7 User Defined Node...................................................................................92
4.1.2.6.4.8 User/Security Node..................................................................................97
4.1.2.6.5.1 Signals for Point Parameter Values Context Menu................................102
4.1.2.6.5.2 Signal Context Menu..............................................................................103
4.1.2.6.6.1 Database ROC History Points Context Menu........................................106
4.1.2.6.6.2 HSO Point Context Menu.......................................................................106
- ii -
Page 4

Reference Guide
D301654X412
APRIL 2012
ROC Configuration Tool
4.2.2.2.1
4.2.2.2.2 Rename........................................................................................................112
4.2.2.2.3 Delete ...........................................................................................................112
4.2.2.2.4 Disable..........................................................................................................112
4.2.2.2.5 Properties.....................................................................................................112
4.2.3 Parameter Pattern Templates ..................................................................................112
4.2.3.1 Parameter Pattern Tempates Context Menu.....................................................112
4.2.3.1.1 New Parameter Pattern Template................................................................113
4.2.3.1.2 Paste.............................................................................................................113
4.2.3.2 Parameter Pattern Template Context Menu......................................................113
4.2.3.2.1 Copy .............................................................................................................113
4.2.3.2.2 Rename........................................................................................................113
4.2.3.2.3 Delete Parameter Pattern.............................................................................113
4.2.3.2.4 Properties.....................................................................................................113
4.3 Communication to ROC Devices ....................................................................................113
4.3.1 Communication to ROC Devices Context Menu......................................................114
4.3.2 Communication Port Parameters Templates ...........................................................114
4.3.2.1 Port Parameters Templates Context Menu .......................................................114
4.3.2.1.1 New Port Parameters Template...................................................................114
4.3.2.1.2 Paste.............................................................................................................114
4.3.2.2 ROC Dialup/Serial node Context.......................................................................114
4.3.2.2.1 Copy .............................................................................................................115
4.3.2.2.2 Delete ...........................................................................................................115
4.3.2.2.3 Properties.....................................................................................................115
4.3.3 ROC Drivers .............................................................................................................115
4.3.3.1 ROC Drivers Context Menu ...............................................................................115
4.3.3.2 New ROC Driver... .............................................................................................115
4.3.3.3 ROC Driver.........................................................................................................115
4.3.3.3.1 ROC Driver Context Menu............................................................................116
4.3.3.3.2 Delete ...........................................................................................................116
4.3.3.3.3 Disable..........................................................................................................116
4.3.3.3.4 Request Diagnostic Dump............................................................................116
4.3.3.3.5 Properties.....................................................................................................117
4.3.3.3.6 Direct Serial Channels..................................................................................117
4.3.3.3.7 DialUp Serial Channels ................................................................................117
4.3.3.3.8 Modem Pools................................................................................................118
4.4 ROC Point Types ............................................................................................................119
4.4.1 ROC Point Types Context Menu..............................................................................119
4.4.1.1 Update Database from new Roc.mdb................................................................119
4.4.1.1.1 Updating the database from auto-created SQL files....................................120
Copy .............................................................................................................112
4.3.3.3.6.1 Direct Serial Channels Context Menu....................................................117
4.3.3.3.6.2 New Direct Serial Channel.....................................................................117
4.3.3.3.6.3 Paste......................................................................................................117
4.3.3.3.7.1 Direct Serial Channels Context Menu....................................................118
4.3.3.3.7.2 New DialUp Serial Channel....................................................................118
4.3.3.3.7.3 Paste......................................................................................................118
4.3.3.3.8.1 Modem Pools Context Menu..................................................................118
4.3.3.3.8.2 New Modem Pool...................................................................................119
4.4.1.1.1.1 The created SQL files ............................................................................120
4.4.1.1.1.2 How to use the files................................................................................120
- iii -
Page 5

Reference Guide
D301654X412
APRIL 2012
Custom User Defined Types ....................................................................................121
4.4.2
4.4.2.1 Custom User Defined Types Context Menu ......................................................121
4.4.2.2 Plus Protocol......................................................................................................121
4.4.2.3 Standard Protocol ..............................................................................................121
4.4.3 Imported from ROC.mdb..........................................................................................121
4.4.3.1 Imported from ROC.mdb Context Menu............................................................121
4.4.3.2 Plus Protocol......................................................................................................122
4.4.3.3 Standard Protocol ..............................................................................................122
4.4.4 File Name .................................................................................................................123
4.4.5 Browse Button ..........................................................................................................123
5 List View Pane......................................................................................................................124
5.1 Standard Context Menu..................................................................................................124
5.2 Logged Values Context Menu.........................................................................................124
5.2.1 Adjust Timestamp Where Clause.............................................................................124
6 Wizards.................................................................................................................................125
6.1 Device Configuration Wizard ..........................................................................................125
6.1.1 General Page ...........................................................................................................128
6.1.1.1 Title Bar..............................................................................................................129
6.1.1.2 Name..................................................................................................................129
6.1.1.3 Plant Area ..........................................................................................................129
6.1.1.4 Access Area.......................................................................................................129
6.1.1.5 Display ...............................................................................................................129
6.1.1.6 Description .........................................................................................................129
6.1.1.7 Device Information.............................................................................................130
6.1.1.7.1 Station Name................................................................................................130
6.1.1.7.2 Device Type..................................................................................................130
6.1.1.7.3 Device Version..............................................................................................130
6.1.1.7.4 Version String Info........................................................................................130
6.1.1.7.5 Logical Compatibility Status .........................................................................130
6.1.1.7.6 File Uploaded Date/Time..............................................................................130
6.1.1.8 Address..............................................................................................................130
6.1.1.9 Group .................................................................................................................130
6.1.1.10 Disable..............................................................................................................130
6.1.1.11 Driver................................................................................................................130
6.1.1.12 Link to Database Device Template...................................................................130
6.1.1.12.1 If Selected Device is a Template................................................................130
6.1.1.13 Selected Template............................................................................................131
6.1.1.14 Advanced..........................................................................................................131
6.1.1.15 Store and Forward Addresses..........................................................................131
6.1.1.15.1 Store and Forward Addresses....................................................................131
6.1.1.15.2 Address.......................................................................................................131
6.1.1.15.3 Group First Device......................................................................................131
6.1.1.15.4 Address Second Device.............................................................................131
6.1.1.15.5 Group Second Device ................................................................................131
6.1.1.15.6 Address Third Device.................................................................................131
6.1.1.15.7 Group Third Device ....................................................................................131
6.1.1.16 Use Intermediate Communication Device........................................................132
ROC Configuration Tool
- iv -
Page 6

Reference Guide
D301654X412
APRIL 2012
ROC Configuration Tool
6.1.1.16.1
6.1.1.16.2 Intermediate Communication Device..........................................................132
6.1.2 Communications Route Page...................................................................................133
6.1.2.1 Title Bar..............................................................................................................134
6.1.2.2 Retry on Other Healthy Comms Routes ............................................................134
6.1.2.3 Try Request even if all Routes Failed................................................................134
6.1.2.4 Alternate Primary and Secondary IP..................................................................134
6.1.2.5 Primary IP Communication ................................................................................134
6.1.2.5.1 IP Address....................................................................................................134
6.1.2.5.2 Port Number.................................................................................................134
6.1.2.5.3 Close Delay..................................................................................................135
6.1.2.5.4 Close When Not In Use................................................................................135
6.1.2.5.5 Cost ..............................................................................................................135
6.1.2.5.6 Advanced......................................................................................................135
6.1.2.6 Secondary IP Communication ...........................................................................135
6.1.2.6.1 IP Address....................................................................................................135
6.1.2.6.2 Port Number.................................................................................................135
6.1.2.6.3 Close Delay..................................................................................................135
6.1.2.6.4 Close When Not In Use................................................................................135
6.1.2.6.5 Cost ..............................................................................................................135
6.1.2.7 Direct Serial Communication .............................................................................135
6.1.2.7.1 Port Name.....................................................................................................135
6.1.2.7.2 Cost ..............................................................................................................135
6.1.2.7.3 Advanced......................................................................................................135
6.1.2.8 Dial Up Communication .....................................................................................136
6.1.2.8.1 Modem Pool..................................................................................................136
6.1.2.8.2 Phone Number..............................................................................................136
6.1.2.8.3 Cost ..............................................................................................................136
6.1.2.8.4 Advanced......................................................................................................136
6.1.2.9 Communication Route Configuration.................................................................136
6.1.2.9.1 Title Bar ........................................................................................................137
6.1.2.9.2 Method..........................................................................................................137
6.1.2.9.3 Schedule.......................................................................................................137
6.1.2.9.4 Method..........................................................................................................137
6.1.2.9.5 Schedule.......................................................................................................137
6.1.2.9.6 Connect Timeout..........................................................................................137
6.1.2.9.7 Message Response Timeout........................................................................137
6.1.2.9.8 Num Retries..................................................................................................137
6.1.2.9.9 Delay Between Retries.................................................................................137
6.1.3 Override Driver Defaults Page..................................................................................137
6.1.3.1 Title Bar..............................................................................................................138
6.1.3.2 Override Host Address Defaults ........................................................................138
6.1.3.2.1 Host Address................................................................................................138
6.1.3.2.2 Host Group...................................................................................................138
6.1.3.3 Override Logon Parameter Defaults..................................................................138
6.1.3.3.1 Operator Id....................................................................................................138
6.1.3.3.2 Password......................................................................................................139
6.1.3.3.3 Access Level.................................................................................................139
6.1.3.4 Override TimeZone Default................................................................................139
6.1.3.4.1 TimeZone......................................................................................................139
Use Intermediate Communication Device..................................................132
- v -
Page 7

Reference Guide
D301654X412
APRIL 2012
ROC Configuration Tool
6.1.3.5
6.1.3.6 Send Access Level on Logon ............................................................................139
6.1.4 Points Selection Page ..............................................................................................139
6.1.4.1 Point Selection Page..........................................................................................140
Device Flags ......................................................................................................139
6.1.3.5.1 Adjust Times from ROC Device for DST......................................................139
6.1.3.5.2 Auto-ack on Receipt of ROC Device SRBX.................................................139
6.1.3.5.3 Update Database Point with ROC Alarm Log Values..................................139
6.1.3.5.4 Update Database Signal with ROC Alarm Log Values.................................139
6.1.3.5.5 Update Database History Point with ROC Alarm Log Values......................139
6.1.3.5.6 Update Database History Point with ROC Current Values ..........................139
6.1.4.1.1 Title...............................................................................................................141
6.1.4.1.2 Point Types...................................................................................................141
6.1.4.1.3 Point Types Selection List............................................................................141
6.1.4.1.3.1 Selected Point Types.............................................................................142
6.1.4.1.3.2 Abbrev....................................................................................................142
6.1.4.1.3.3 Description.............................................................................................143
6.1.4.1.3.4 oe pts......................................................................................................143
6.1.4.1.3.5 sel pts.....................................................................................................143
6.1.4.1.3.6 oe sigs....................................................................................................143
6.1.4.1.3.7 sel sigs ...................................................................................................144
6.1.4.1.4 Select All Point Types...................................................................................144
6.1.4.1.5 Clear All Point Types....................................................................................144
6.1.4.1.6 Apply Default................................................................................................144
6.1.4.1.7 Import All History Points that are Used.........................................................144
6.1.4.1.8 Points Summary...........................................................................................144
6.1.4.1.8.1 Available.................................................................................................144
6.1.4.1.8.2 In DB ......................................................................................................144
6.1.4.1.8.3 Selected.................................................................................................145
6.1.4.1.8.4 To Add....................................................................................................145
6.1.4.1.8.5 To Delete................................................................................................145
6.1.4.1.9 Signals Summary..........................................................................................145
6.1.4.1.9.1 In DB ......................................................................................................145
6.1.4.1.9.2 Selected.................................................................................................145
6.1.4.1.9.3 To Add....................................................................................................145
6.1.4.1.9.4 To Delete................................................................................................145
6.1.4.1.10 Clear All Signals.........................................................................................145
6.1.4.1.11 Apply Default Signals .................................................................................145
6.1.4.1.12 Advanced Selection....................................................................................145
6.1.4.1.13 Point Selection Configuration.....................................................................145
6.1.4.1.13.1 Point Types..........................................................................................146
6.1.4.1.13.2 Point Types List....................................................................................146
6.1.4.1.13.3 Points for selected Type.......................................................................148
6.1.4.1.13.4 Signals for Selected Point....................................................................149
6.1.4.1.13.5 Select All Point Types..........................................................................149
6.1.4.1.13.6 Clear All Point Types............................................................................150
6.1.4.1.13.7 Select All Points...................................................................................150
6.1.4.1.13.8 Clear All Points.....................................................................................150
6.1.4.1.13.9 Apply To All..........................................................................................150
6.1.4.1.13.10 Clear All Selected Params.................................................................150
6.1.4.1.14 Finish..........................................................................................................150
- vi -
Page 8

Reference Guide
D301654X412
APRIL 2012
ROC Configuration Tool
6.1.4.2
6.2 ROC Device Update Wizard ...........................................................................................152
6.2.1 Roc Device Update Page.........................................................................................153
6.2.1.1 Title bar ..............................................................................................................153
6.2.1.2 Station Name .....................................................................................................154
6.2.1.3 Device Type .......................................................................................................154
6.2.1.4 Device Version...................................................................................................154
6.2.1.5 Logical Compatibility State.................................................................................154
6.2.1.6 Station Name (Database) ..................................................................................154
6.2.1.7 Device Type (Database) ....................................................................................154
6.2.1.8 Device Version (Database)................................................................................154
6.2.1.9 Logical Compatibility State (Database)..............................................................154
6.2.1.10 Additional Points in Device...............................................................................154
6.2.1.11 Fewer Points in Device.....................................................................................154
6.2.1.12 Points in Database that are no longer available...............................................155
6.2.2 Point Selection Page................................................................................................155
6.2.2.1 Title ....................................................................................................................156
6.2.2.2 Point Types ........................................................................................................156
6.2.2.3 Point Types Selection List..................................................................................156
6.2.2.4 Select All Point Types........................................................................................159
6.2.2.5 Clear All Point Types..........................................................................................159
6.2.2.6 Apply Default......................................................................................................160
6.2.2.7 Import All History Points that are Used..............................................................160
6.2.2.8 Points Summary.................................................................................................160
6.2.2.9 Signals Summary...............................................................................................160
6.2.2.10 Clear All Signals ...............................................................................................161
6.2.2.11 Apply Default Signals........................................................................................161
Add Points from Device Page............................................................................150
6.1.4.2.1 Title...............................................................................................................151
6.1.4.2.2 Add No ROC Points......................................................................................151
6.1.4.2.3 Add All ROC Points for Default Selection.....................................................151
6.1.4.2.4 Add All ROC Points in Device......................................................................151
6.1.4.2.5 Add Default Selection of Signals for any Added Points................................151
6.1.4.2.6 Import All History Points that are Used.........................................................151
6.1.4.2.7 Finish............................................................................................................152
6.2.2.3.1 Selected Point Types....................................................................................157
6.2.2.3.2 Abbrev ..........................................................................................................157
6.2.2.3.3 Description....................................................................................................158
6.2.2.3.4 oe pts............................................................................................................158
6.2.2.3.5 sel pts ...........................................................................................................158
6.2.2.3.6 oe sigs ..........................................................................................................159
6.2.2.3.7 sel sigs..........................................................................................................159
6.2.2.8.1 Available.......................................................................................................160
6.2.2.8.2 In DB.............................................................................................................160
6.2.2.8.3 Selected........................................................................................................160
6.2.2.8.4 To Add..........................................................................................................160
6.2.2.8.5 To Delete......................................................................................................160
6.2.2.9.1 In DB.............................................................................................................160
6.2.2.9.2 Selected........................................................................................................160
6.2.2.9.3 To Add..........................................................................................................160
6.2.2.9.4 To Delete......................................................................................................161
- vii -
Page 9

Reference Guide
D301654X412
APRIL 2012
ROC Configuration Tool
6.2.2.12
6.2.2.13 Point Selection Configuration...........................................................................161
6.2.2.14 Finish................................................................................................................166
6.3 ROC Driver Wizard .........................................................................................................166
6.3.1 Driver Configuration General Page ..........................................................................167
6.3.1.1 Name..................................................................................................................167
6.3.1.2 Address..............................................................................................................168
6.3.1.3 Disable ...............................................................................................................168
6.3.1.4 Plant Area ..........................................................................................................168
6.3.1.5 Access Area.......................................................................................................168
6.3.1.6 Display ...............................................................................................................168
6.3.1.7 Description .........................................................................................................168
6.3.2 Driver Configuration Device Defaults Page..............................................................168
6.3.2.1 Host Address......................................................................................................169
6.3.2.2 Host Group.........................................................................................................169
6.3.2.3 Operator ID ........................................................................................................169
6.3.2.4 Password ...........................................................................................................169
6.3.2.5 Access Level......................................................................................................169
6.3.2.6 Time Zone..........................................................................................................169
6.3.2.7 Adjust Times from ROC Device for DST............................................................169
6.3.2.8 Auto-ack on Receipt of ROC Device SRBX.......................................................169
6.3.2.9 Update Database Point with ROC Alarm Log Values........................................169
6.3.2.10 Update Database Signal with ROC Alarm Log Values.....................................169
6.3.2.11 Update Database History Point with ROC Alarm Log Values..........................169
6.3.2.12 Update Database History Point with ROC Current Values...............................169
6.4 Port Parameters Template Wizard..................................................................................169
6.4.1 Name........................................................................................................................170
Advanced Selection..........................................................................................161
6.2.2.13.1 Point Types.................................................................................................161
6.2.2.13.2 Point Types List..........................................................................................162
6.2.2.13.2.1 Point Types List....................................................................................162
6.2.2.13.2.2 Selected Point Types...........................................................................162
6.2.2.13.2.3 Abbrev..................................................................................................163
6.2.2.13.2.4 Description...........................................................................................163
6.2.2.13.2.5 db pts....................................................................................................163
6.2.2.13.2.6 db sigs..................................................................................................163
6.2.2.13.3 Points for selected Type.............................................................................163
6.2.2.13.3.1 Points for selected Type.......................................................................163
6.2.2.13.3.2 Selected Points....................................................................................164
6.2.2.13.3.3 db sigs..................................................................................................164
6.2.2.13.4 Signals for Selected Point..........................................................................164
6.2.2.13.4.1 Signals for Selected Point....................................................................164
6.2.2.13.4.2 Param...................................................................................................165
6.2.2.13.4.3 Abbrev..................................................................................................165
6.2.2.13.4.4 Name....................................................................................................165
6.2.2.13.5 Select All Point Types.................................................................................165
6.2.2.13.6 Clear All Point Types..................................................................................165
6.2.2.13.7 Select All Points..........................................................................................165
6.2.2.13.8 Clear All Points...........................................................................................165
6.2.2.13.9 Apply To All.................................................................................................166
6.2.2.13.10 Clear All Selected Params........................................................................166
- viii -
Page 10

Reference Guide
D301654X412
APRIL 2012
Description................................................................................................................170
6.4.2
6.4.3 Baud Rate.................................................................................................................170
6.4.4 Parity.........................................................................................................................170
6.4.5 Stop Bits ...................................................................................................................170
6.4.6 Data Bits...................................................................................................................170
6.4.7 Num FF.....................................................................................................................170
6.4.8 Num End FF .............................................................................................................171
6.4.9 Delay After Connect .................................................................................................171
6.4.10 Rts DeAssert Delay...............................................................................................171
6.4.11 Specify Value ........................................................................................................171
6.4.12 Auto-enables.........................................................................................................171
6.4.13 DSR for half duplex...............................................................................................171
6.4.14 Initialisation String1...............................................................................................171
6.4.15 Initialisation String2...............................................................................................171
6.4.16 Dial String..............................................................................................................171
6.4.17 Auto-Answer String...............................................................................................171
6.5 Parameter Pattern Template Wizard ..............................................................................171
6.5.1 Name........................................................................................................................172
6.5.2 Point Types...............................................................................................................172
6.5.2.1 Point Type..........................................................................................................173
6.5.2.2 Abbrev................................................................................................................173
6.5.2.3 Description .........................................................................................................173
6.5.2.4 Params...............................................................................................................173
6.5.3 Parameters for Selected Point Type ........................................................................173
6.5.3.1 Param.................................................................................................................174
6.5.3.2 Abbrev................................................................................................................175
6.5.3.3 Name..................................................................................................................175
6.5.4 Finish Button.............................................................................................................175
6.6 Schedule Configuration Wizard ......................................................................................175
6.6.1 Name........................................................................................................................176
6.6.2 Disable......................................................................................................................176
6.6.3 Interval......................................................................................................................177
6.6.4 Minimum Interval ......................................................................................................177
6.6.5 Offset........................................................................................................................177
6.7 System Parameters Wizard ............................................................................................177
6.7.1 General Page ...........................................................................................................179
6.7.1.1 Plant Area ..........................................................................................................180
6.7.1.2 Access Area.......................................................................................................180
6.7.1.3 ROC .800 File Directory.....................................................................................180
6.7.1.4 Display File Directory.........................................................................................180
6.7.1.5 Device Alarm History..........................................................................................180
6.7.1.6 Device Event History..........................................................................................180
6.7.1.7 Device Historical Data........................................................................................180
6.7.1.8 Real Analog History ...........................................................................................181
6.7.1.9 Digital History Stream ........................................................................................181
6.7.1.10 Auto Add Associated Alarm Conditions............................................................181
6.7.1.11 Default Alarm Priority for System Alarms.........................................................181
6.7.1.12 Default Alarm Priority for Device Alarms..........................................................181
6.7.1.13 Default Alarm Priority for Points........................................................................181
6.7.2 Defaults for New Channel Page...............................................................................181
- ix -
ROC Configuration Tool
Page 11

Reference Guide
D301654X412
APRIL 2012
ROC Configuration Tool
6.7.2.1
6.7.2.2 Close Delay (Serial)...........................................................................................182
6.7.2.3 Close When Not In Use .....................................................................................182
6.7.2.4 Num Failures Before Alarm (Serial)...................................................................182
6.7.2.5 Delay After Poll (Serial)......................................................................................182
6.7.2.6 Dial Up Port Parameters (Dial Up).....................................................................182
6.7.2.7 Close Delay (Dial Up).........................................................................................182
6.7.2.8 Close When Not In Use .....................................................................................182
6.7.2.9 Num Failures Before Alarm (Dial Up) ................................................................182
6.7.2.10 Delay After Poll (Dial Up)..................................................................................182
6.7.2.11 Hayes Modem Alive String...............................................................................182
6.7.2.12 Modem Alive Check Period..............................................................................182
6.7.3 Defaults for New Device...........................................................................................183
6.7.3.1 Driver..................................................................................................................183
6.7.3.2 Retry on Other Healthy Communication Routes................................................183
6.7.3.3 Try Request even if all routes Failed .................................................................183
6.7.3.4 IP Port Number ..................................................................................................183
6.7.3.5 IP Close Delay ...................................................................................................183
6.7.3.6 IP Close When Not in Use .................................................................................183
6.7.3.7 IP Communications............................................................................................183
6.7.3.8 Direct Serial Communications............................................................................184
6.7.3.9 Dial Up Communications... ................................................................................184
6.7.3.10 Communication Route Configuration................................................................184
6.7.3.11 Auto Update Clock following Read Clock.........................................................185
6.7.3.12 Time Difference.................................................................................................185
6.7.3.13 Minimum Interval ..............................................................................................185
6.7.4 Defaults for Auto Requests.......................................................................................185
6.7.4.1 CheckConfiguration............................................................................................186
6.7.4.2 ReadAlarmData..................................................................................................186
6.7.4.3 ReadClock..........................................................................................................186
6.7.4.4 ReadEventData..................................................................................................186
6.7.4.5 ReadHistoryPointsConfig...................................................................................186
6.7.4.6 RocLogon...........................................................................................................186
6.7.4.7 WriteClock..........................................................................................................186
6.7.4.8 ReadHistoryData.Minute....................................................................................187
6.7.4.9 ReadHistoryData.Periodic..................................................................................187
6.7.4.10 ReadHistoryData.Daily.....................................................................................187
6.7.4.11 ReadPointParameters.All.................................................................................187
6.7.4.12 ReadPointParameters.Values..........................................................................187
6.7.4.13 Re-establish comms.........................................................................................187
6.7.4.14 Ip connect (close unused).................................................................................187
Port Parameters (Serial) ....................................................................................182
6.7.3.10.1 Title Bar......................................................................................................184
6.7.3.10.2 Method........................................................................................................184
6.7.3.10.3 Schedule.....................................................................................................185
6.7.3.10.4 Method........................................................................................................185
6.7.3.10.5 Schedule.....................................................................................................185
6.7.3.10.6 Connect Timeout........................................................................................185
6.7.3.10.7 Message Response Timeout......................................................................185
6.7.3.10.8 Num Retries................................................................................................185
6.7.3.10.9 Delay Between Retries...............................................................................185
- x -
Page 12

Reference Guide
D301654X412
APRIL 2012
ROC Configuration Tool
6.7.4.15
6.7.4.16 Dialout...............................................................................................................187
6.7.4.17 Srbx...................................................................................................................187
6.7.5 Default Schedules for Requests...............................................................................187
6.7.5.1 CheckConfiguration............................................................................................188
6.7.5.2 ReadAlarmData..................................................................................................188
6.7.5.3 ReadClock..........................................................................................................188
6.7.5.4 ReadEventData..................................................................................................188
6.7.5.5 ReadHistoryPointsConfig...................................................................................188
6.7.5.6 RocLogon...........................................................................................................188
6.7.5.7 WriteClock..........................................................................................................188
6.7.5.8 ReadHistoryData.Minute....................................................................................189
6.7.5.9 ReadHistoryData.Periodic..................................................................................189
6.7.5.10 ReadHistoryData.Daily.....................................................................................189
6.7.5.11 ReadPointParameters.All.................................................................................189
6.7.5.12 ReadPointParameters.Values..........................................................................189
6.7.5.13 Request Default Schedule................................................................................189
6.8 Request Wizard...............................................................................................................189
6.8.1 Request General Page.............................................................................................189
6.8.1.1 Description .........................................................................................................190
6.8.1.2 Disable Request.................................................................................................190
6.8.1.3 Schedule ............................................................................................................190
6.8.1.4 On re-establishment of Communications...........................................................191
6.8.1.5 After IP Connect (Close Unused).......................................................................191
6.8.1.6 After IP Connect (not Close Unused).................................................................191
6.8.1.7 After Dialout .......................................................................................................191
6.8.1.8 After Srbx ...........................................................................................................191
6.8.2 Request Parameters Page.......................................................................................191
6.8.2.1 Request Parameters Page (General) ................................................................192
6.8.2.2 Request Parameters Page (Specified TLPs).....................................................201
Ip connect (not close unused)...........................................................................187
6.8.2.1.1 Single Type...................................................................................................193
6.8.2.1.2 Multiple Types...............................................................................................194
6.8.2.1.3 Pattern Select...............................................................................................195
6.8.2.1.4 Point Types List............................................................................................195
6.8.2.1.4.1 Single Point Type List ............................................................................195
6.8.2.1.4.2 Multiple Point Type List..........................................................................196
6.8.2.1.5 Points For Selected Type.............................................................................197
6.8.2.1.5.1 Multiple Point Type Selected..................................................................197
6.8.2.1.5.2 Single Point Type Selected....................................................................198
6.8.2.1.6 Parameter List..............................................................................................198
6.8.2.1.6.1 Pattern Selected.....................................................................................198
6.8.2.1.6.2 No Pattern Selected and Single Point Type Selected............................199
6.8.2.1.6.3 No Pattern Selected and Multiple Point Types Selected.......................200
6.8.2.2.1 Request Parameters Page (Specified TLPs) ...............................................201
6.8.2.2.2 Specified TLP List.........................................................................................202
6.8.2.2.3 Select New TLP............................................................................................202
6.8.2.2.4 TLP Selection...............................................................................................203
6.8.2.2.4.1 TLP Selection.........................................................................................203
6.8.2.2.4.2 List Point Types......................................................................................203
6.8.2.2.4.3 Point Types List......................................................................................203
- xi -
Page 13

Reference Guide
D301654X412
APRIL 2012
ROC Configuration Tool
6.8.2.2.4.4
6.8.2.2.4.5 Parameters List......................................................................................204
6.8.2.3 Request Parameters Page (Configurable Opcode)...........................................205
6.8.2.3.1 Request Parameters Page (Configurable Opcode)......................................205
6.8.2.3.2 Opcode Points List........................................................................................206
6.8.2.3.3 Read All Configured Locations.....................................................................206
6.8.2.3.4 Point Number................................................................................................206
6.8.2.3.5 Start Location................................................................................................206
6.8.2.3.6 Number of Locations.....................................................................................206
6.9 Channel Configuration Wizards ......................................................................................206
6.9.1 Channel Configuration Wizards................................................................................206
6.9.2 Direct Serial Channel Configuration Wizard.............................................................207
6.9.2.1 Direct Serial Channel Configuration Wizard......................................................207
6.9.2.2 Channel Configuration General Page................................................................207
6.9.2.2.1 Port Name.....................................................................................................207
6.9.2.2.2 Plant Area.....................................................................................................207
6.9.2.2.3 Access Area..................................................................................................208
6.9.2.2.4 Display..........................................................................................................208
6.9.2.2.5 Description....................................................................................................208
6.9.2.2.6 Disable Use..................................................................................................208
6.9.2.3 Channel Configuration Parameters Page..........................................................208
6.9.2.3.1 Port Parameters............................................................................................208
6.9.2.3.2 Close Delay..................................................................................................209
6.9.2.3.3 Num Failures Before Alarm..........................................................................209
6.9.2.3.4 Delay After Poll.............................................................................................209
6.9.2.3.5 Close When Not In Use................................................................................209
6.9.3 DialUP Serial Channel Configuration Wizard...........................................................209
6.9.3.1 DialUP Serial Channel Configuration Wizard ....................................................209
6.9.3.2 Channel Configuration General Page................................................................209
6.9.3.2.1 Port Name.....................................................................................................210
6.9.3.2.2 Plant Area.....................................................................................................210
6.9.3.2.3 Access Area..................................................................................................210
6.9.3.2.4 Display..........................................................................................................210
6.9.3.2.5 Description....................................................................................................210
6.9.3.2.6 Disable Use..................................................................................................210
6.9.3.3 Channel Configuration Parameters Page..........................................................211
6.9.3.3.1 Port Parameters............................................................................................211
6.9.3.3.2 Close Delay..................................................................................................211
6.9.3.3.3 Num Failures Before Alarm..........................................................................211
6.9.3.3.4 Delay After Poll.............................................................................................211
6.9.3.3.5 Close When Not In Use................................................................................211
6.9.4 Modem Pool Configuration Wizard...........................................................................212
6.9.4.1 Modem Pool Configuration Wizard....................................................................212
6.9.4.2 Modem Pool Configuration General Page......................................................... 212
6.9.4.2.1 Name............................................................................................................212
6.9.4.2.2 Plant Area.....................................................................................................212
6.9.4.2.3 Access Area..................................................................................................212
6.9.4.2.4 Display..........................................................................................................213
6.9.4.2.5 Description....................................................................................................213
6.9.4.3 Modem Pool Configuration Channels Page.......................................................213
Points List...............................................................................................204
- xii -
Page 14

Reference Guide
D301654X412
APRIL 2012
Dialogs........................................................................................................................ ..........213
7
7.1 Point Rename Dialog ......................................................................................................214
7.1.1 Old Name..................................................................................................................214
7.1.2 New Name................................................................................................................214
7.1.3 Base of Name...........................................................................................................214
7.1.4 Extension of Name...................................................................................................214
7.2 Point Properties Dialog ...................................................................................................215
7.2.1 Parameter Pattern....................................................................................................215
7.3 Update From Device Template.......................................................................................215
7.3.1 Last Update Message...............................................................................................216
7.3.2 Update Points/Signals from Template......................................................................217
7.3.3 Update Requests from Template..............................................................................217
7.3.4 Add New Objects......................................................................................................217
7.3.4.1 Adding New Points and Signals from the Template ..........................................217
7.3.4.2 Adding New Requests from the Template.........................................................217
7.3.4.3 Adding New Signal Alarm Conditions from the Template..................................217
7.3.5 Update Existing Objects...........................................................................................218
7.3.5.1 Updating Points and Signals from the Template ...............................................218
7.3.5.2 Updating Requests from the Template..............................................................218
7.3.5.3 Updating Signal Alarm Conditions from the Template.......................................218
7.3.6 Delete Objects..........................................................................................................218
7.3.6.1 Deleting Points and Signals not in the Template...............................................219
7.3.6.2 Deleting Requests not in the Template..............................................................219
7.3.6.3 Deleting Signal Alarm Conditions not in the Template ......................................219
7.3.7 Last Update ..............................................................................................................219
7.3.8 Update History Configuration from Template...........................................................219
7.3.9 Update History Points Configuration ........................................................................219
7.3.10 Update Number of Points Allowable .....................................................................219
7.3.11 Link to Database Device Template.......................................................................220
7.3.12 Selected Template................................................................................................220
7.3.13 OK button..............................................................................................................220
7.4 Database Device Template Selection.............................................................................220
7.4.1 Possible Device Templates List................................................................................221
7.5 Device Template Options................................................................................................221
7.5.1 Last Update Message...............................................................................................222
7.5.2 Update Points/Signals from Template......................................................................223
7.5.3 Update Requests from Template..............................................................................223
7.5.4 Add New Objects......................................................................................................223
7.5.4.1 Adding New Points and Signals from the Template ..........................................223
7.5.4.2 Adding New Requests from the Template.........................................................223
7.5.4.3 Adding New Signal Alarm Conditions from the Template..................................223
7.5.5 Update Existing Objects...........................................................................................224
7.5.5.1 Updating Points and Signals from the Template ...............................................224
7.5.5.2 Updating Requests from the Template..............................................................224
7.5.5.3 Updating Signal Alarm Conditions from the Template.......................................224
7.5.6 Delete Objects..........................................................................................................224
7.5.6.1 Deleting Points and Signals not in the Template...............................................225
7.5.6.2 Deleting Requests not in the Template..............................................................225
7.5.6.3 Deleting Signal Alarm Conditions not in the Template ......................................225
7.5.7 Last Update ..............................................................................................................225
- xiii -
ROC Configuration Tool
Page 15

Reference Guide
D301654X412
APRIL 2012
Update History Configuration from Template...........................................................225
7.5.8
7.5.9 Update History Points Configuration ........................................................................225
7.5.10 Update Number of Points Allowable .....................................................................225
7.6 ROC 800 File Selection...................................................................................................226
7.6.1 ROC 800 File Selection............................................................................................226
7.6.2 File Name .................................................................................................................226
7.6.3 Browse......................................................................................................................226
7.6.4 OK.............................................................................................................................227
8 Tasks.....................................................................................................................................227
8.1 Create a ROC Device from a .800 file ............................................................................227
8.2 Create a ROC Device when connected via Internet.......................................................228
8.3 Create ROC Device when connected via Serial Port .....................................................228
8.4 Create a ROC Device that is connected via a dial-up link..............................................229
8.5 Configure Data Collection for a ROC Device..................................................................230
8.5.1 To configure collection of analog and digital value data every 10 seconds.............230
8.5.2 To configure collection of alarms every 10 seconds ................................................230
8.5.3 To configure collection of events every 1 minute.....................................................230
8.5.4 To configure collection of history every 1 minute.....................................................231
8.5.5 To configure setting of device clock every 10 minutes.............................................231
8.6 Testing the Collected Data..............................................................................................231
8.6.1 To view all signals ....................................................................................................231
8.6.2 To view analog signal data for a single device in database.....................................231
8.6.3 To view alarms in database......................................................................................231
8.6.4 To view event data in database................................................................................231
8.6.5 To view history data in database..............................................................................231
ROC Configuration Tool
9 Understanding .....................................................................................................................232
9.1 ROC Point Types ............................................................................................................232
9.2 ROC Points .....................................................................................................................233
9.3 ROC Parameters.............................................................................................................233
9.4 ROC Point-Parameter Referencing ................................................................................234
9.4.1 TLP...........................................................................................................................234
9.4.2 Point Type and Parameter Abbreviations.................................................................234
9.5 ROC Signals ...................................................................................................................234
9.6 Breakdown of ROC RDI Requests..................................................................................235
9.6.1 CheckConfiguration request.....................................................................................235
9.6.2 Update Device Configuration (from device context menu).......................................235
9.6.3 Refresh Parameter Values (from device context menu) .........................................236
9.6.4 Refresh History Configuration (from device context menu) ....................................236
9.6.5 ReadPointers request...............................................................................................236
9.6.6 ReadSystemInformation request..............................................................................236
10 Index .....................................................................................................................................237
- xiv -
Page 16
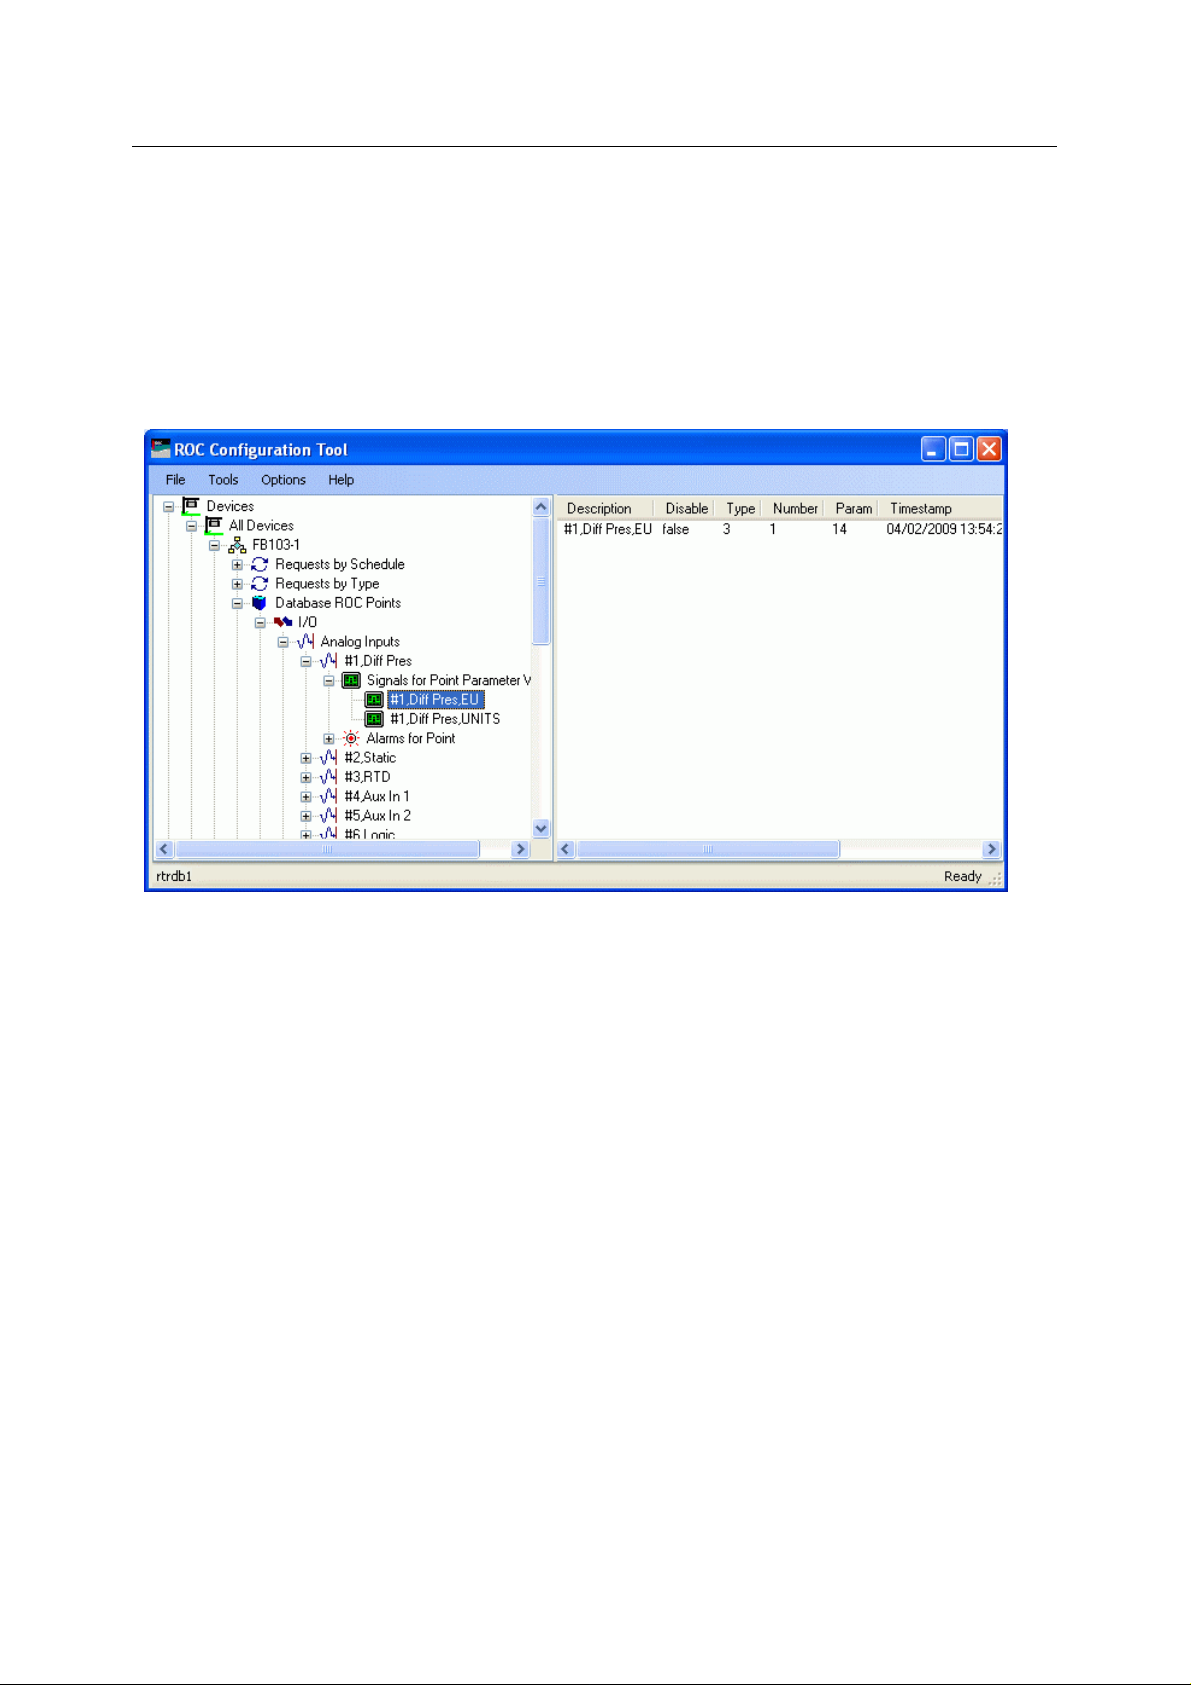
Reference Guide
D301654X412
APRIL 2012
ROC Configuration Tool
1 ROC Configuration Overview
The ROC Configuration Tool allows users to add ROC Devices, Points and Signals to the
OpenEnterprise database. The data can then be collected by timed schedule or initiated manually on
a 'one shot' basis from within the Configuration Tool.
Whilst configuration is accomplished using the ROC Configuration Tool, communication with Devices,
insertion of Devices, Points, Signals into the database, and data collection is achieved through the
OpenEnterprise ROC RDI (Remote Device Interface).
The ROC RDI runs as a task on the OpenEnterprise Server and uses the configuration details
provided in the Configuration Tool to communicate with ROC Devices through Internet, Serial or DialUp connections.
This document is divided into three main sections:
1. User Interface – gives a detailed description of the User Interface.
2. Tasks – a list of important tasks, showing how to configure ROC devices and set up data
collection in the OpenEnterprise database, and also how to view t he data using the ROC
Configuration Tool.
3. Understanding – provides extra information that may be of help in understanding how
OpenEnterprise works with ROC data.
2 User Interface
The user interface of the ROC Configuration Tool consists of two panes - The Tree View pane and
the Details pane. The Tree View pane lists ROC Devices, Data Collection, Communication and Point
Types objects under four parent nodes in a tree view format. The Details pane displays details of
objects that are select in the Tree View pane.
- 1 -
Page 17

Reference Guide
D301654X412
APRIL 2012
ROC Configuration Tool
2.1 Starting the ROC Configuration Tool
The ROC Configuration Tool is found in the OpenEnterprise Toolbox. The Toolbox is opened by
selecting:-
Start | All Programs | OpenEnterprise | Toolbox
Then double click on the 'ROC Tools' icon:-
Here It is shown inside the Toolbox window:-
- 2 -
Page 18
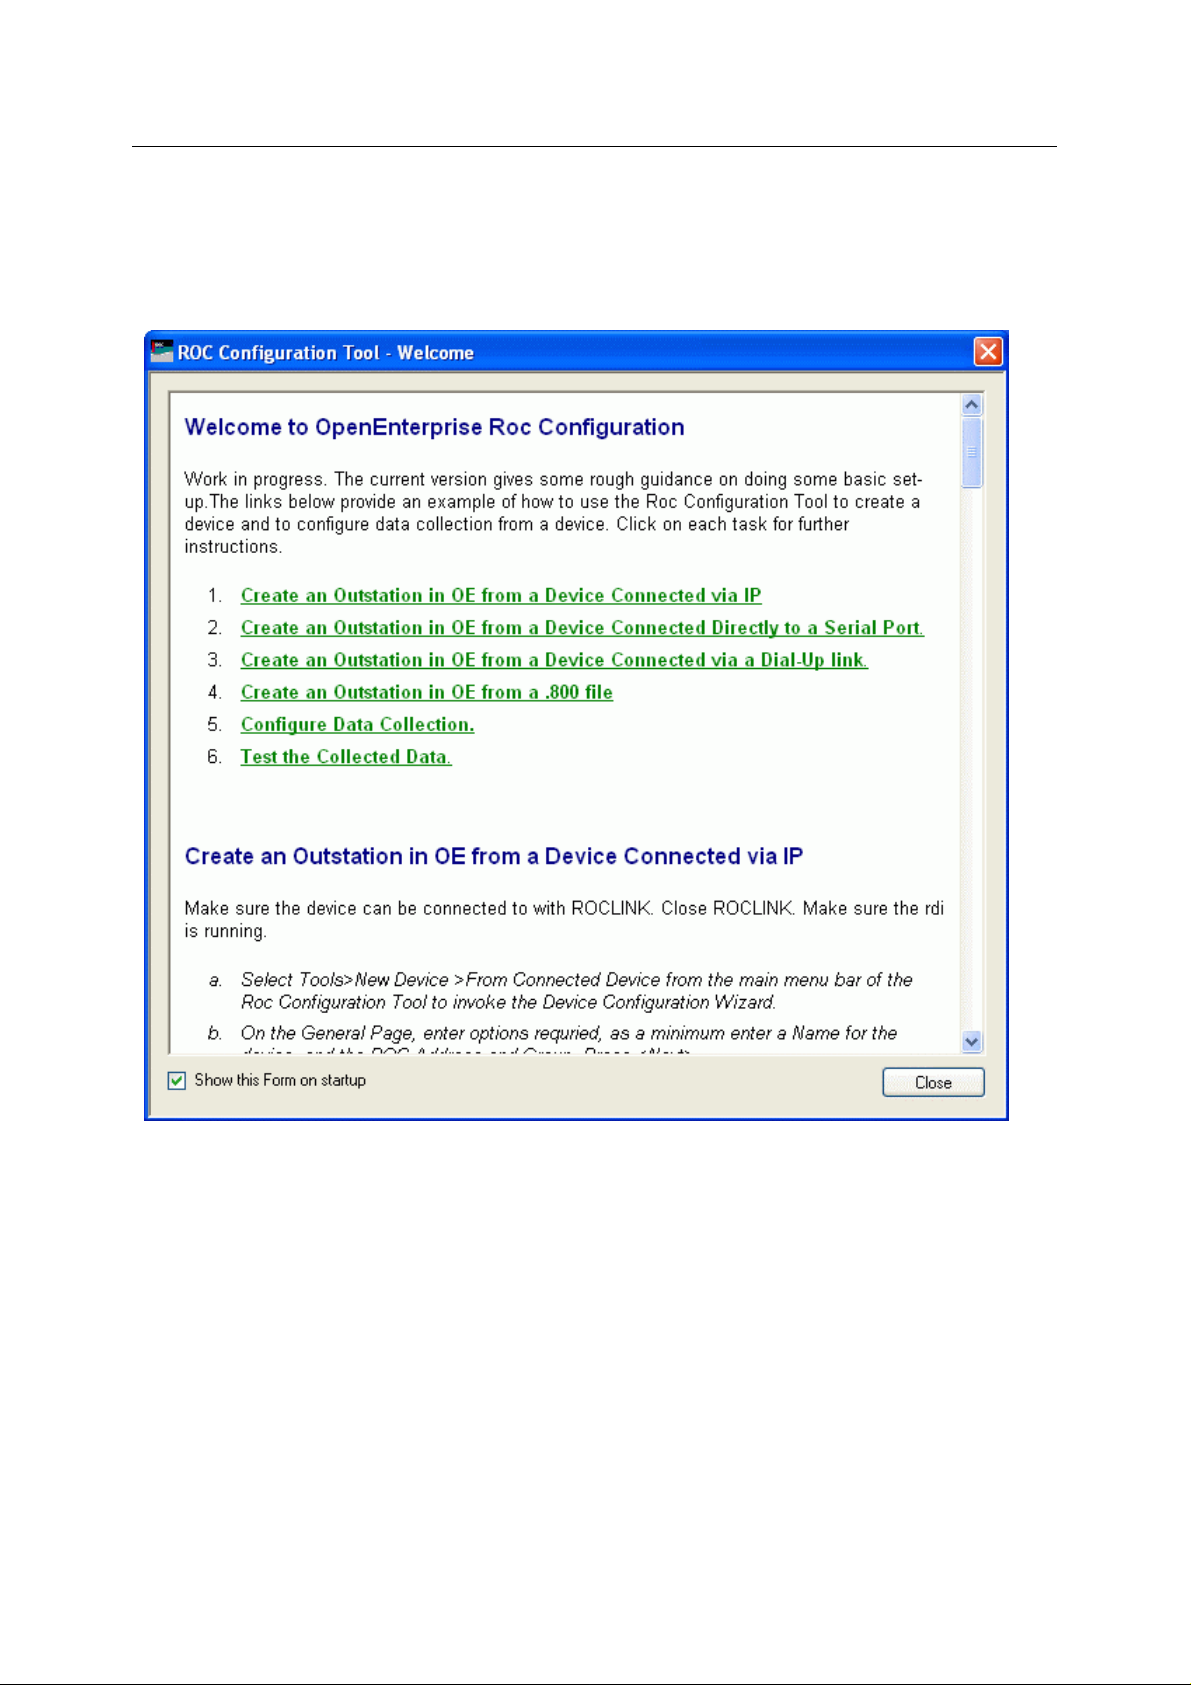
Reference Guide
D301654X412
APRIL 2012
ROC Configuration Tool
2.2 The Welcome Page
When the ROC Configuration Tool is first opened this Welcome page will appear. It provides
instructions on how to perform basic tasks with the ROC Configuration Tool. Click the links on the
image below for further help.
2.2.1 Show this Form on startup
You can prevent the Welcome Page from appearing when the ROC Configuration Tool is started by
removing the check from this box.
The Welcome page can be enabled again by using the Settings Editor to change the 'Show Welcome
Page' data value to 1 on the following key:-
OpenEnterprise\Tasks\OEToolbox\Editors\ROCConfiguration
To open the Settings Editor select:-
Start>Run
Then type 'SettingsEditor' into the text box:-
- 3 -
Page 19
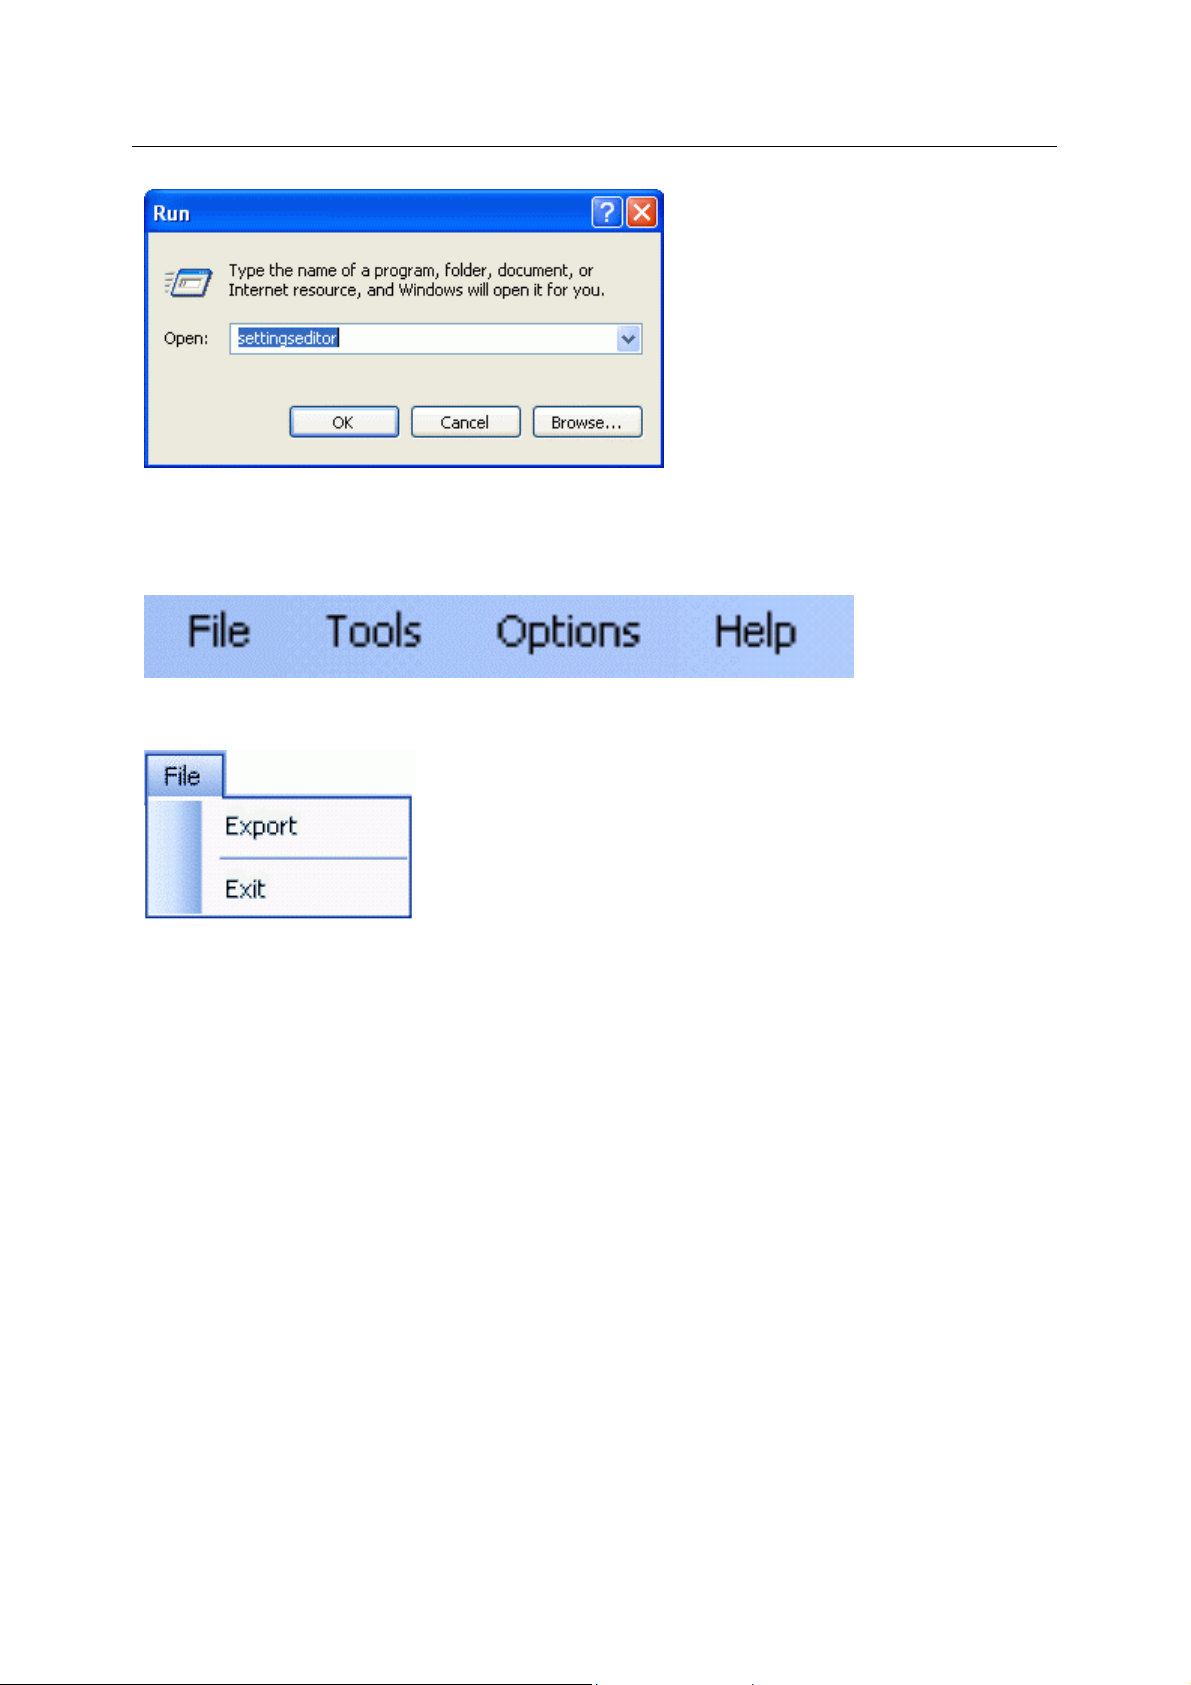
Reference Guide
D301654X412
APRIL 2012
ROC Configuration Tool
3 Menu Bar
The menu bar provides access to the functionality of the ROC Configuration Tool.
3.1 File Menu
The file menu provides two options:-
• Export
• Exit
3.1.1 Export
This option allows you to save all ROC configuration currently in the OpenEnterprise database to an
SQL script file. This can be used at any time to restore the current ROC configuration to the
OpenEnterprise database.
3.1.1.1 The Export File Dialog
The dialo
default OpenEnterprise SQL History directory. This default directory can be changed using the
View>Options menu from the Toolbox. The suggested name of the file will be 'custom_oeroc.sql'.
The name of the file can be changed. If you do this, you should leave the '.sql' extension, which marks
it as an SQL script file. The directory can also be changed by using the [Browse...] button to search
for a new directory.
g opens with a fully qualified path-filename already in the 'File Name' field. It points to the
- 4 -
Page 20
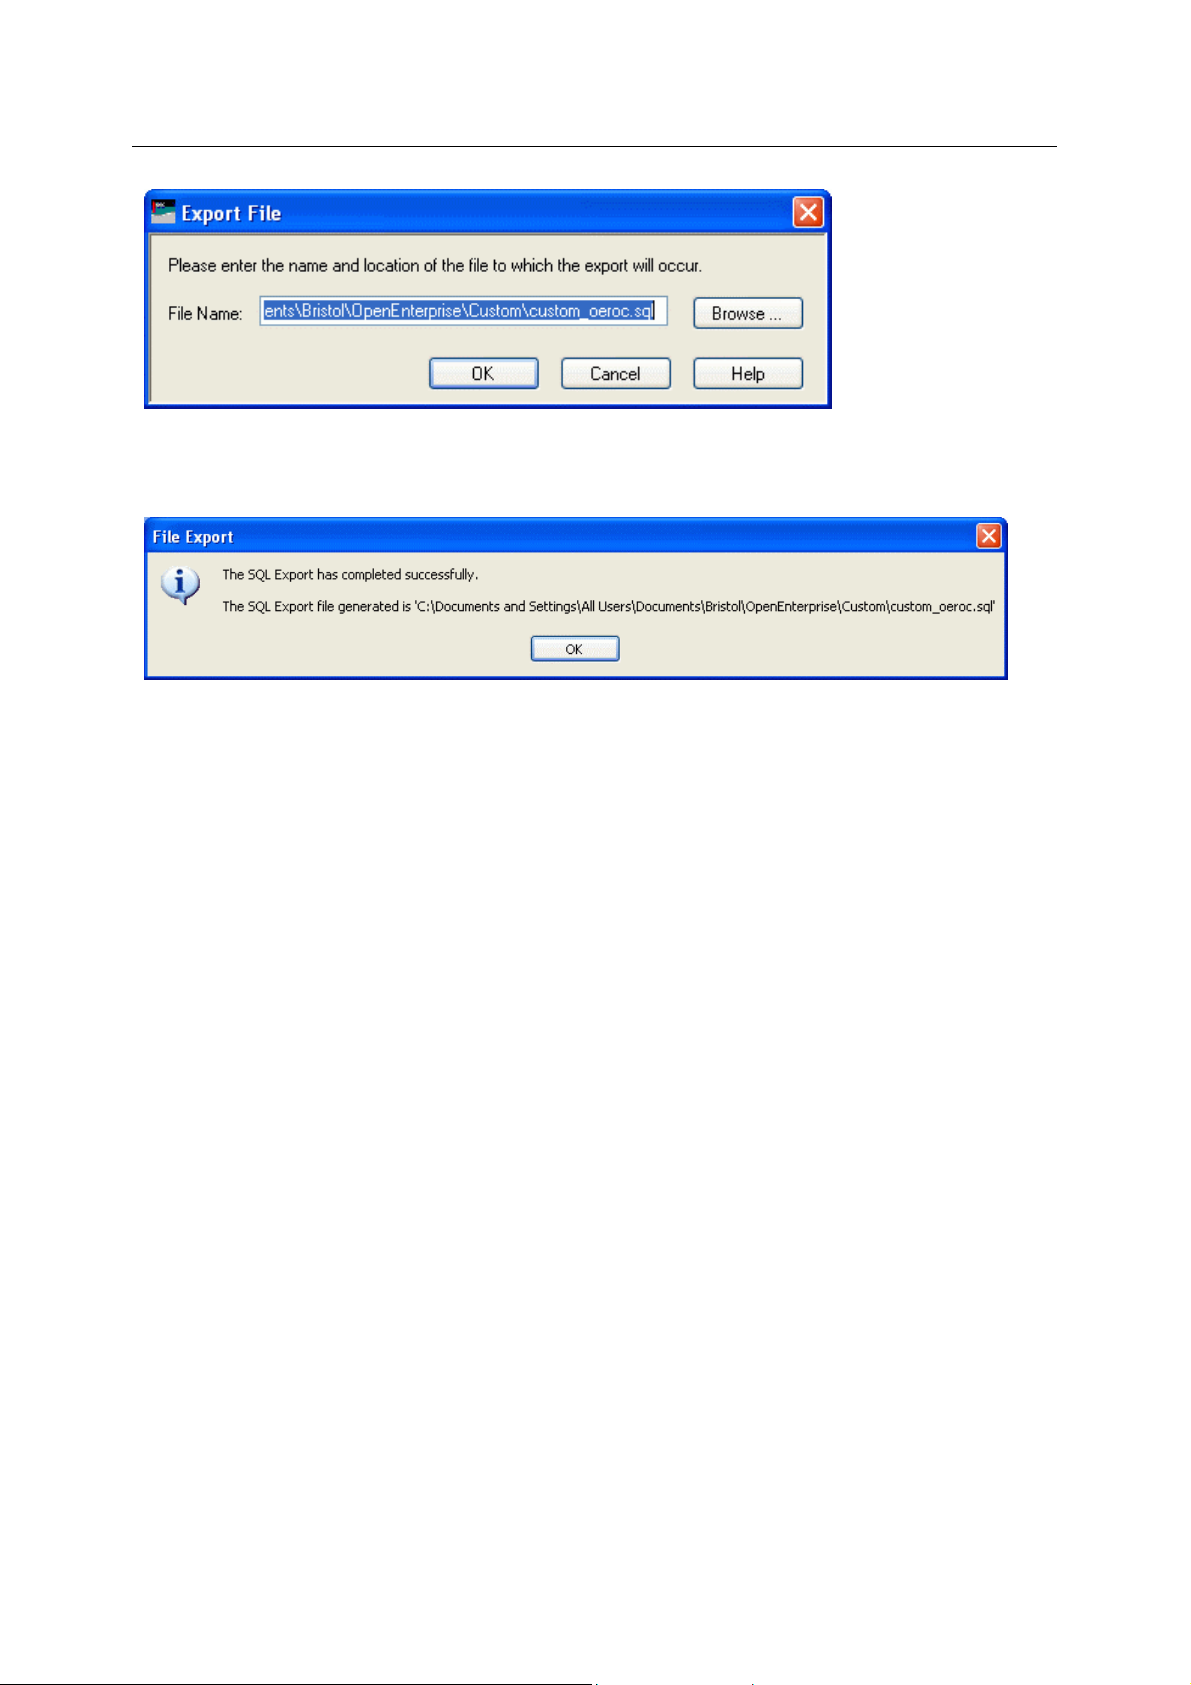
Reference Guide
D301654X412
APRIL 2012
When [OK] is selected, OpenEnterprise will write the current ROC configuration from the
OpenEnterprise database to the file. A message will inform you that the file has been exported
successfully.
ROC Configuration Tool
3.1.1.2 Restoring ROC Configuration
You can u
following:
se the export file created with this operation to restore ROC configuration by doing the
1. Open the SQL Client (Start>Programs>OpenEnterprise>SQL Client)
2. Type into the SQL Client the following SQL command on one line:
include 'C:\Documents and Settings\All
Users\Documents\Bristol\OpenEnterprise\Custom\custom_oeroc.sql';
- where the path and file name refer to the original .SQL file created by the Export operation.
3.1.2 Exit
Exits the ROC Configuration Tool and returns you to the Toolbox.
3.2 Tools Menu
The Tools menu allows you to create new Devices. Parameter Pattern Templates, Schedule s, ROC
Drivers, Port Parameter Templates. It also has an option which allows you to configure global defaults
for these objects.
- 5 -
Page 21
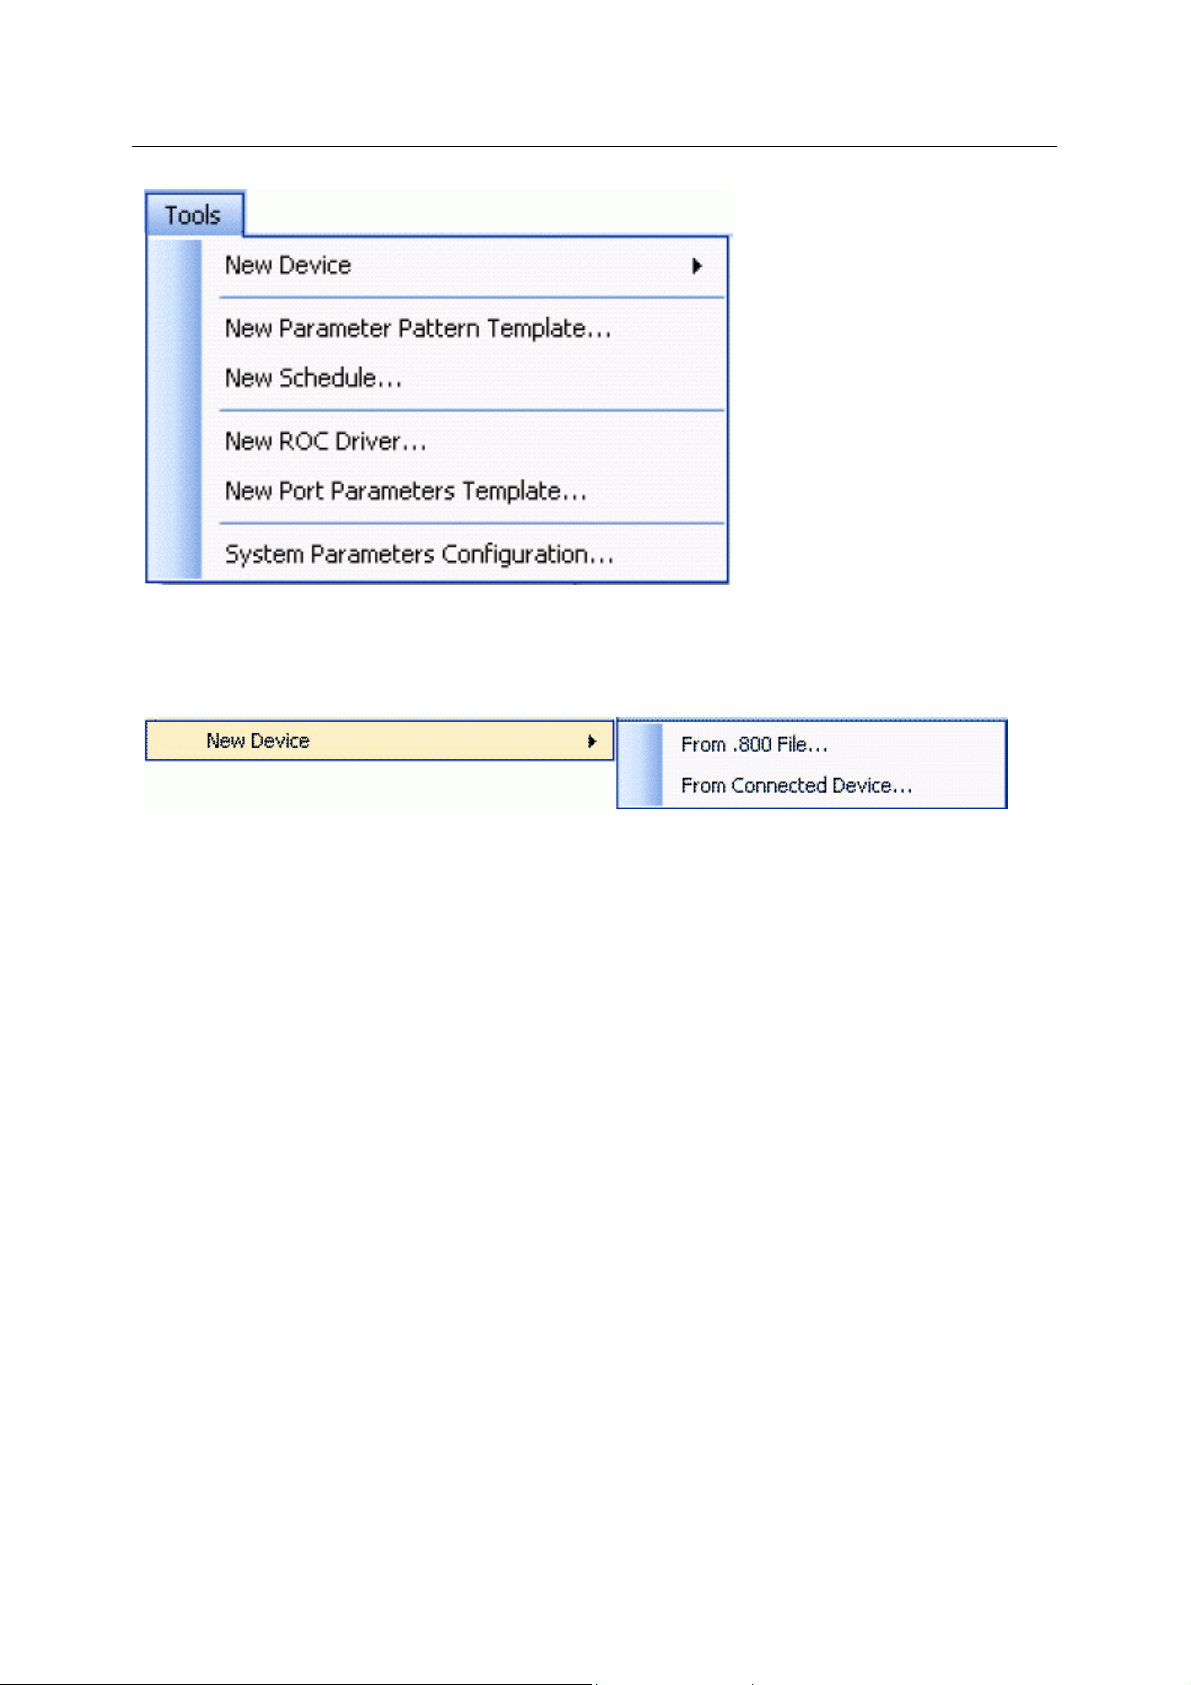
Reference Guide
D301654X412
APRIL 2012
ROC Configuration Tool
3.2.1 New Device Menu
New devices can be added to the OpenEnterprise database by either adding them from a relevant
ROC.800 file, or from a device that is connected.
The 'New Device' menu item leads to two hanging menu items:-
• From .800 File...
• From Connected Device
3.2.1.1 From .800 File
This optio
add from the appropriate ROC.800 configuration file.
ROC devices use database files to store their default configuration. These database files have an
extension of .800. For instance, 'ROC364 Default.800' is the name of the database file that stores the
default configuration for the ROC 364 device. The first part of the file name indicates the actual ROC
device.
3.2.1.2 From Device
This optio
already physically connected to the host computer by supplying the connection details. The ROC RDI
is then able to discover the connection and retrieves the device configuration from the device.
n opens the 'ROC 800 File Selection' dialog, which enables you to select a new device to
n opens the 'Device Configuration Wizard', which enables you to add a ROC device which is
3.2.2 New Parameter Pattern Template
This option opens the 'Parameter Pattern Template' page, which enables you to configure a new
Parameter Pattern Template.
3.2.3 New Schedule
This option opens the 'Schedule Configuration' dialog, which enables new schedules to be created.
- 6 -
Page 22
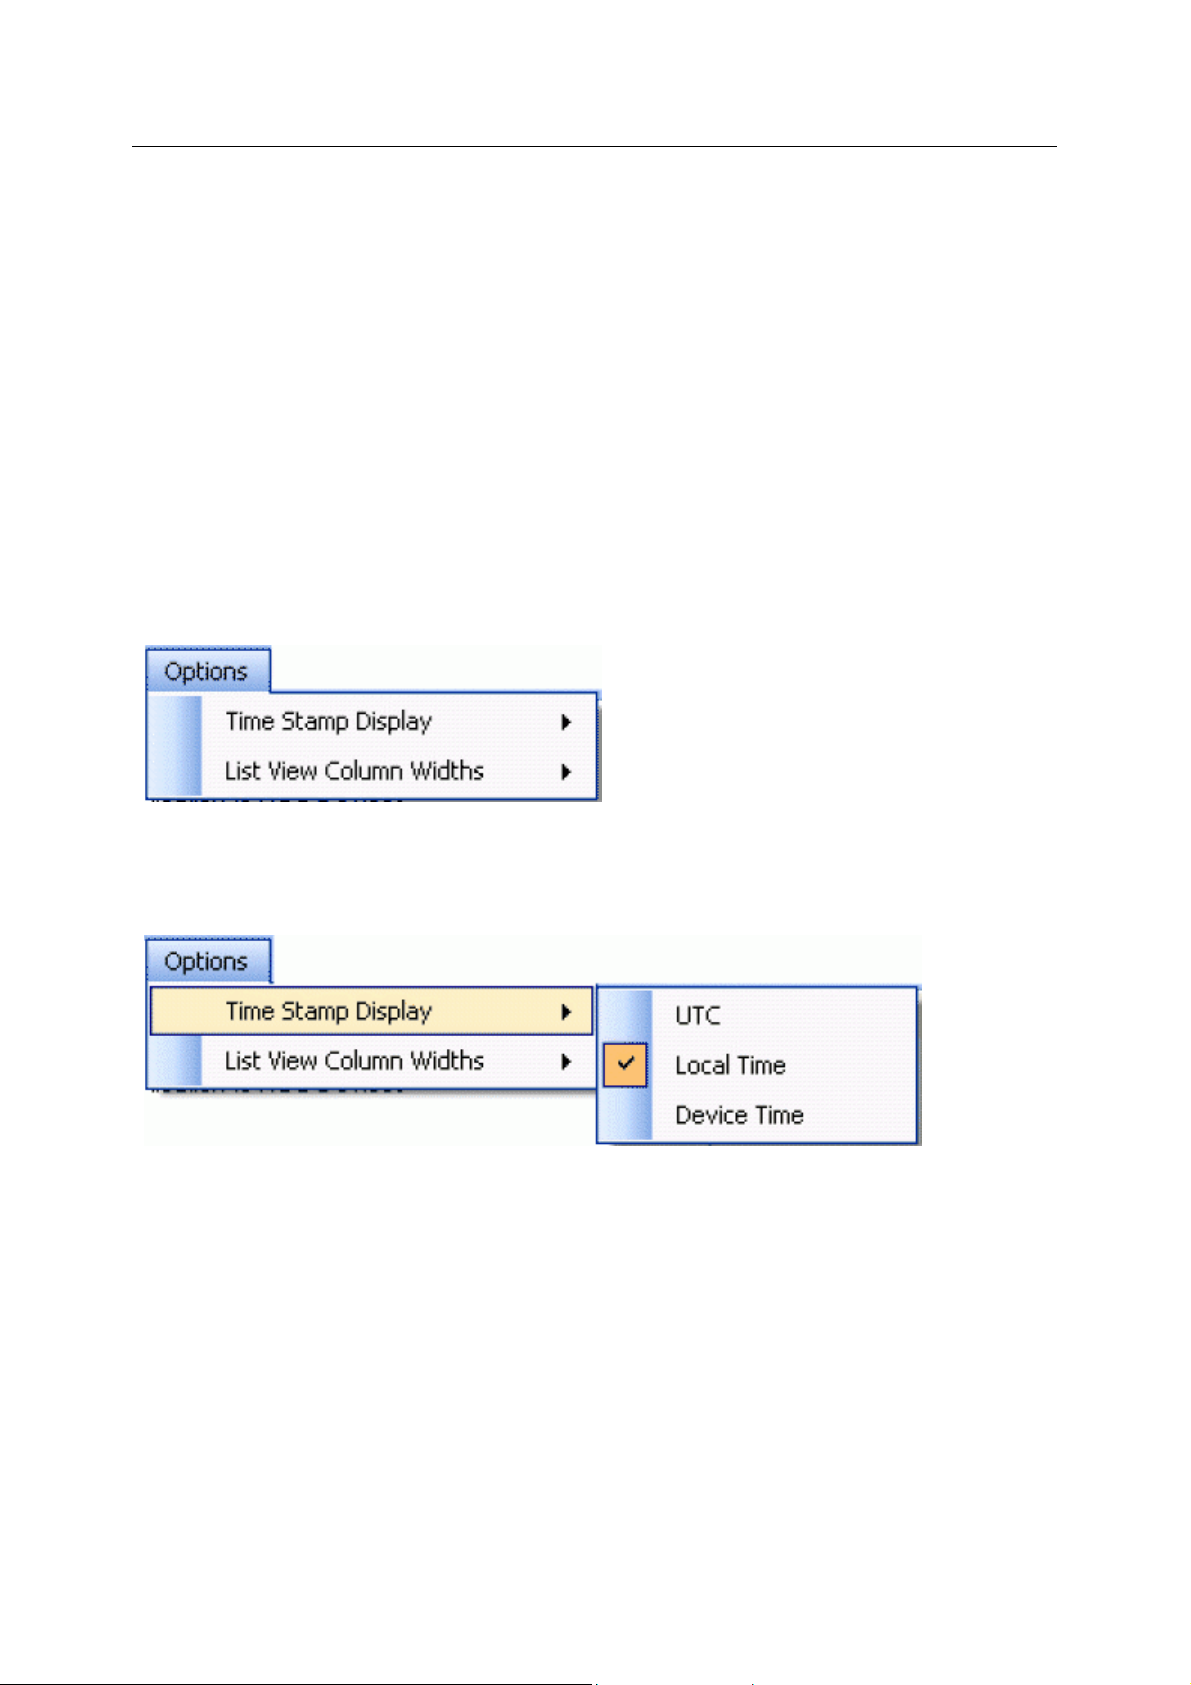
Reference Guide
D301654X412
APRIL 2012
ROC Configuration Tool
3.2.4 New ROC Driver
This option opens the 'Driver Configuration' dialog. Some large systems may benefit from runni ng
more than one ROC RDI.
3.2.5 New Port Parameters Template
This menu item enables Port Parameter Templates for 'Serial' and 'Dial-up' ports to be configured.
3.2.6 System Parameters Configuration
This menu item opens the 'System Parameters Configuration ' Pages, which enable you to configure
global options for use when adding new devices .
System Parameters Configuration
3.3 Options Menu
Enables you to set defaults for timestamps and column widths in the List View Pane.
3.3.1 Time Stamp Display
Options under the 'Time Stamp Display' menu enable you to select the time that will be used for
timestamps that appear in the List View Pane.
3.3.1.1 UTC
If checked, timestam
Time).
3.3.1.2 Local Time
If checked, timestam
3.3.1.3 Device Time
p values in the List View Pane will be shown in UTC (Co-ordinated Universal
p values in the List View Pane will be shown in Local Time.
If checked, timestam
p values in the List View Pane will be shown in the time set at the Device.
- 7 -
Page 23
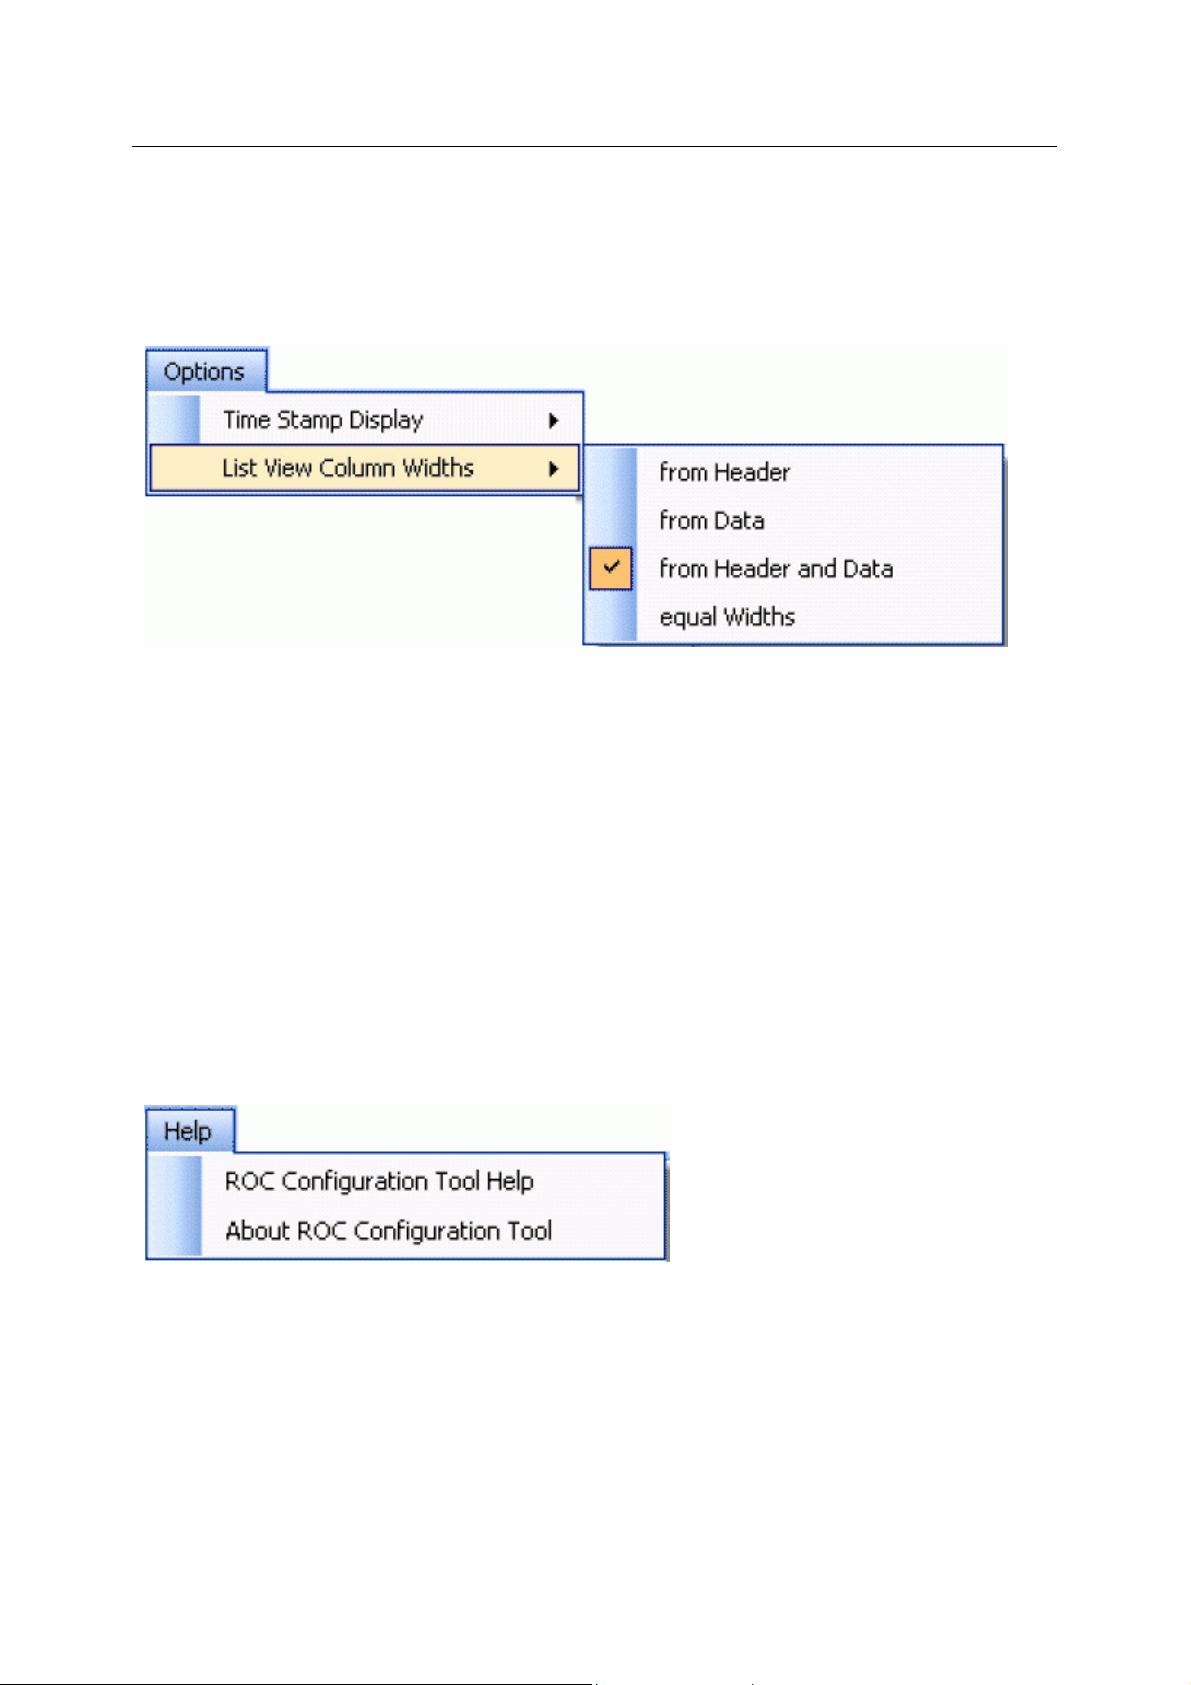
Reference Guide
D301654X412
APRIL 2012
ROC Configuration Tool
3.3.2 List View Column Widths
3.3.2.1 List View Column Widths
Options under the 'List View' menu enable you to select the time that will be used for timestamps that
appear in the List View Pane.
3.3.2.2 From Header
If checked, column wi
3.3.2.3 From Data
If checked, column wi
3.3.2.4 From Header and Data
If checked, column wi
3.3.2.5 Equal Widths
If checked, column wi
dths in the List View will be set according to header widths.
dths in the List View will be set according to the data width.
dths in the List View will be set according to header and data widths.
dths in the List View will be set to equal widths.
3.4 Help Menu
The Help Menu has two options.
3.4.1 ROC Configuration Tool Help
Displays the help file for the ROC Configuration Tool at the opening page.
3.4.2 About ROC Configuration Tool
Displays a box that shows the current version and build of the software, and also provides contact
details.
- 8 -
Page 24
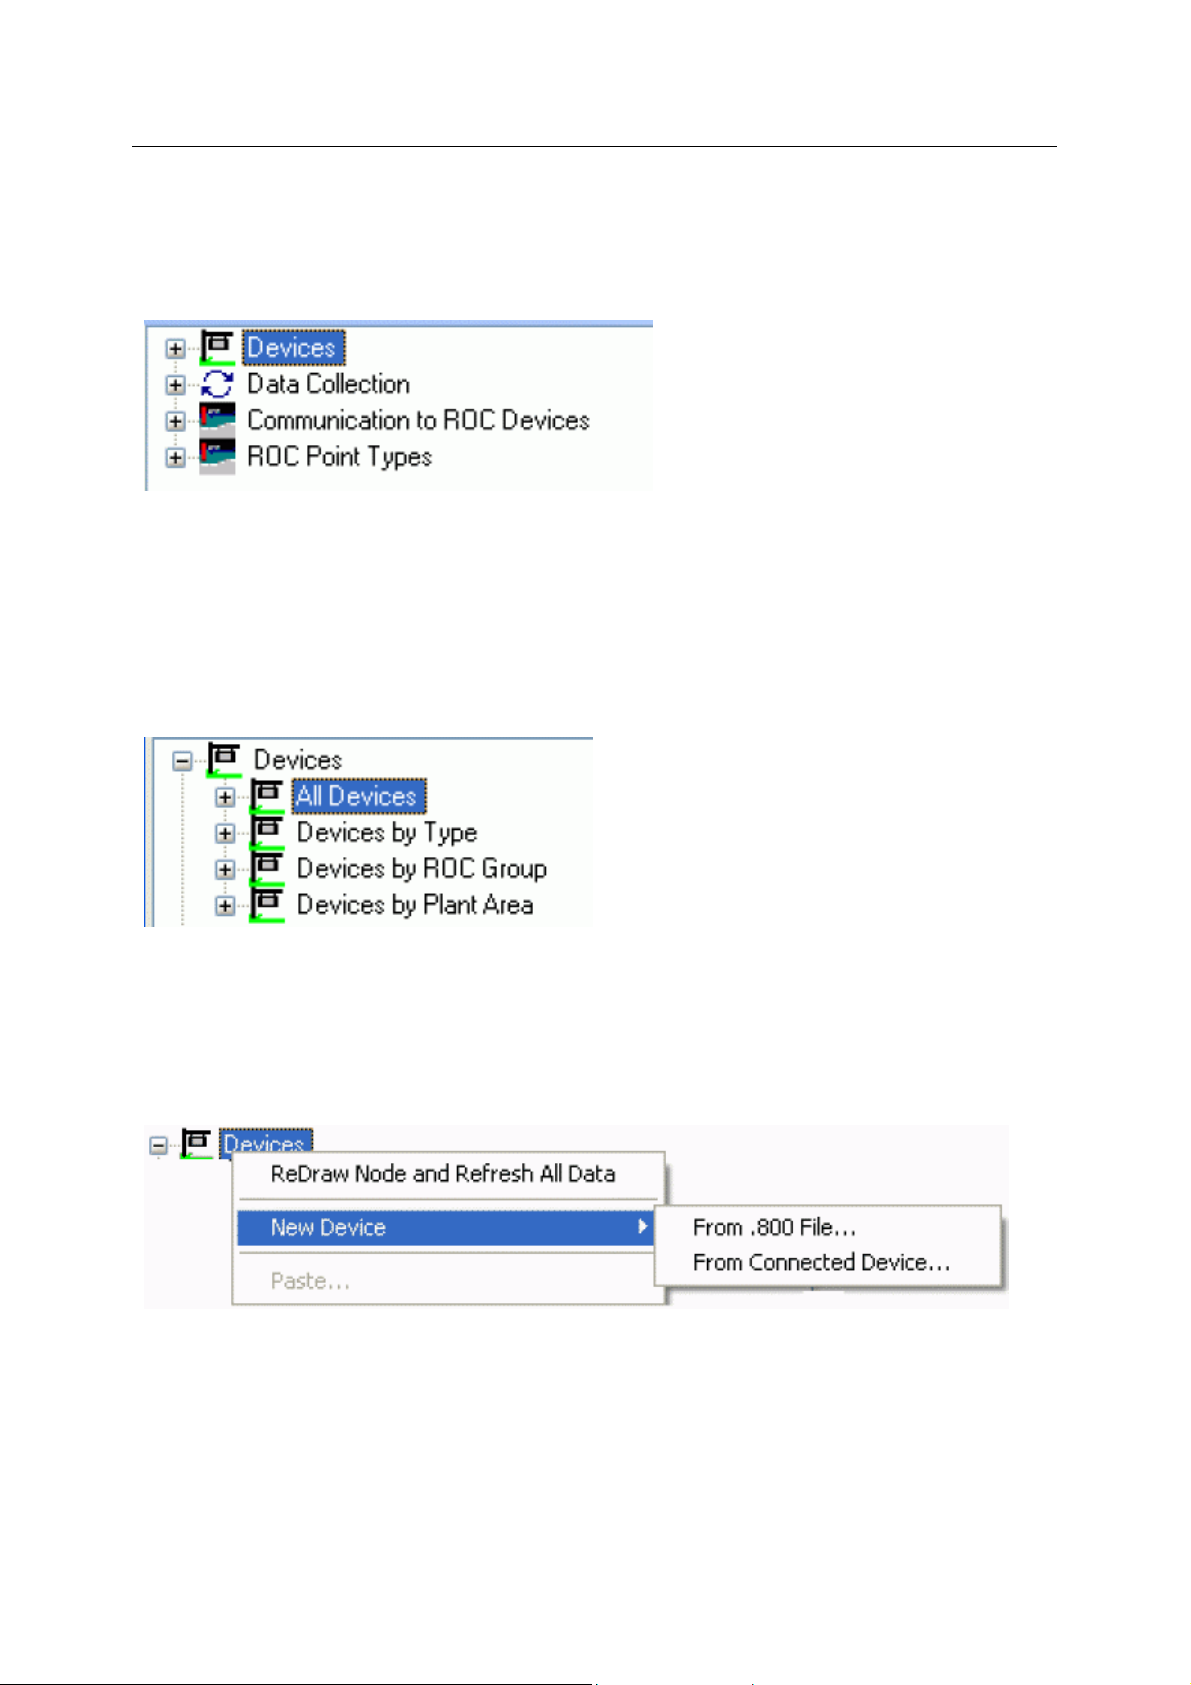
Reference Guide
D301654X412
APRIL 2012
ROC Configuration Tool
4 Tree View Pane
The Tree View Pane displays ROC Configuration as nodes in a tree like hierarchy. The four main
parent nodes are: Devices, Data Collection, Communication to ROC Devices and ROC Point Types.
4.1 Devices
The Devices node is the parent of all Device nodes and the associated Requests, Points and Signals
that have been entered into the database.
It opens out to reveal four child nodes that display the Devices that are added in different
arrangements - alphabetically, by type, by ROC Group and by Plant Area.
The Devices node has its own context menu.
4.1.1 Devices Context Menu
The 'Devices' node context menu enables users to:-
• Redraw the node and refresh all device data under it
• Create a new Device
4.1.1.1 ReDraw node and Refresh All Data
Refre
shes all data for all devices under the Devices node and redraws the Tree View..
4.1.1.2 From .800 File
This optio
add from the appropriate ROC.800 configuration file.
n opens the 'ROC 800 File Selection' dialog, which enables you to select a new device to
- 9 -
Page 25
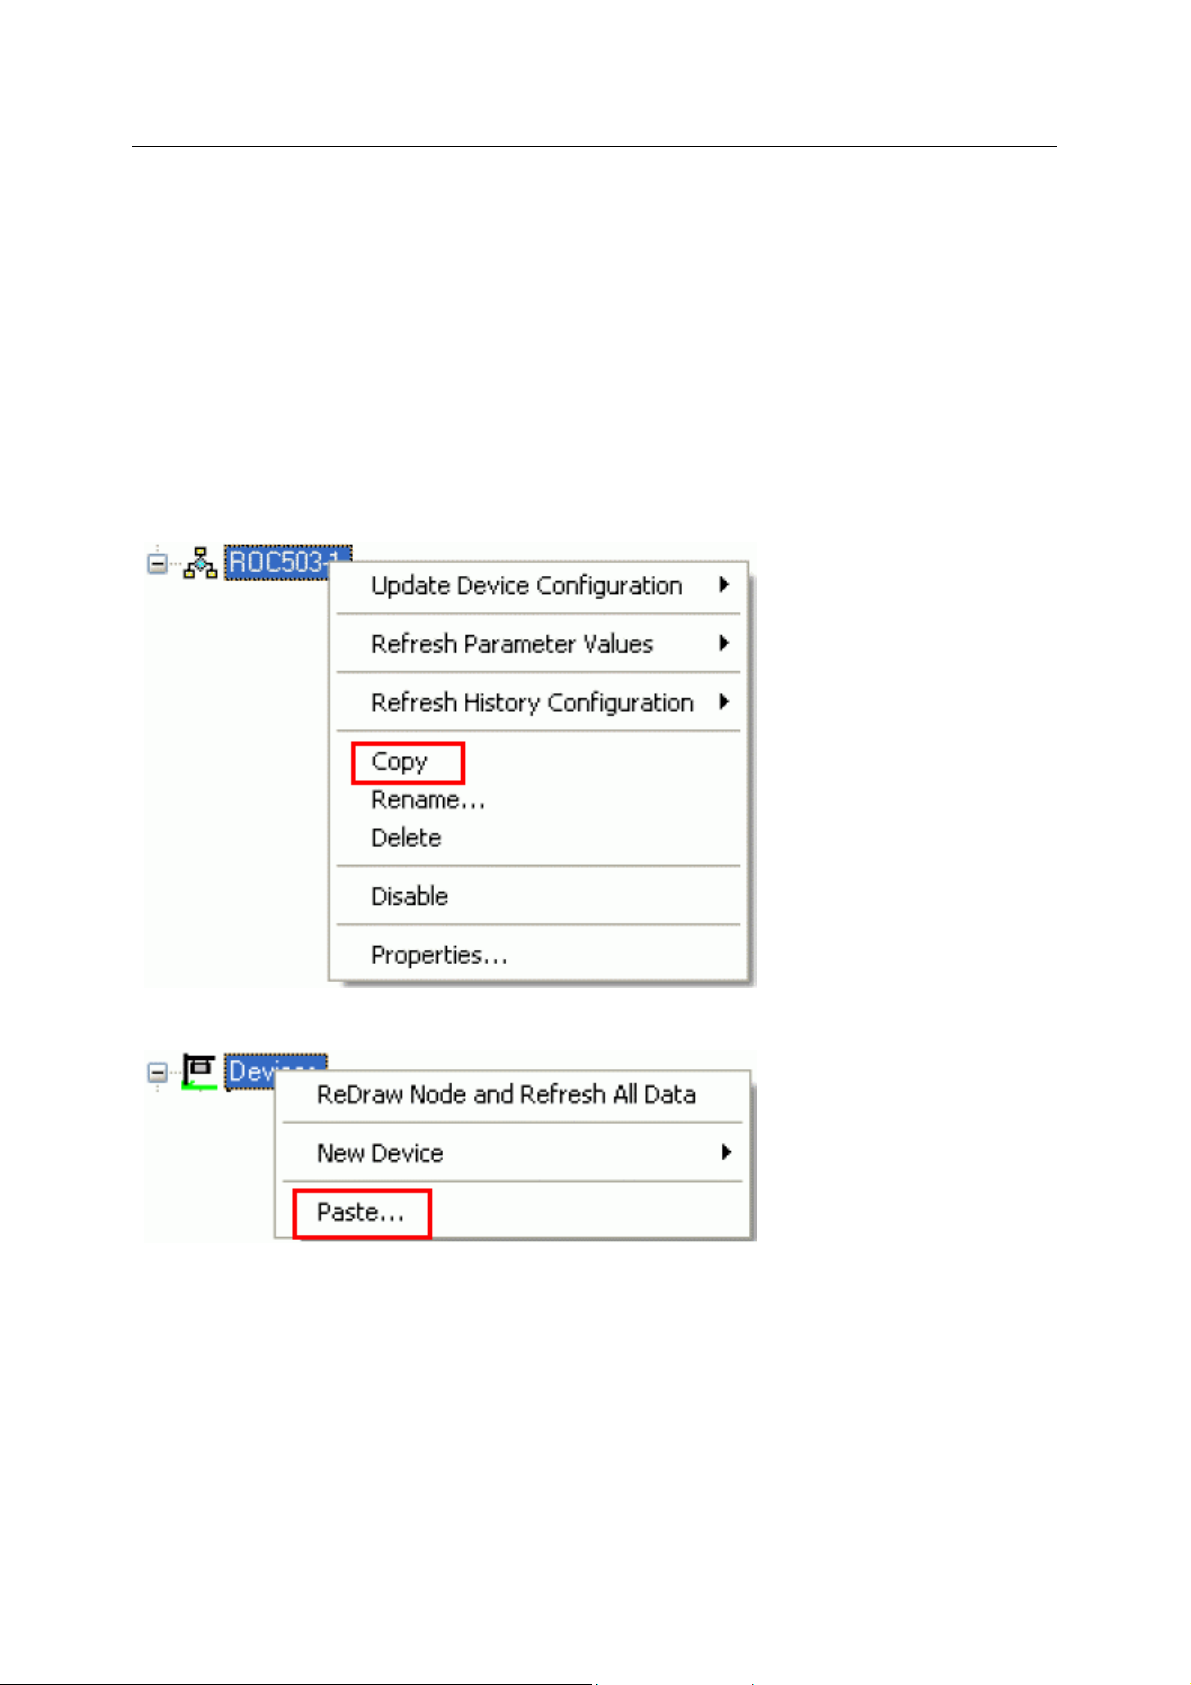
Reference Guide
D301654X412
APRIL 2012
ROC devices use database files to store their default configuration. These database files have an
extension of .800. For instance, 'ROC364 Default.800' is the name of the database file that stores the
default configuration for the ROC 364 device. The first part of the file name indicates the actual ROC
device.
4.1.1.3 From Device
ROC Configuration Tool
This optio
already physically connected to the host computer by supplying the connection details. The ROC RDI
is then able to discover the connection and retrieves the device configuration from the device.
4.1.1.4 Paste
This optio
menu obtained when a Device has been selected:-
n opens the 'Device Configuration Wizard', which enables you to add a ROC device which is
n is only enabled if a Device has first been copied using the 'Copy' item from the context
The 'Paste' option will then be enabled on this context menu for selection:-
When selected, the 'Copy Device from...' dialog will prompt you to enter a name for the new Device.
The Device that is being copied is named in the title bar:-
- 10 -
Page 26

Reference Guide
D301654X412
APRIL 2012
The user must type in a unique name for the new Device before the copy can take place. Once the
new Device has been copied, it will take its place under the 'All Devices', 'Devices by Type', 'Devices
by ROC Group' and 'Devices by Plant Area' nodes.
ROC Configuration Tool
The source Device can then be marked as a Device Template by linking with it from this new Device's
'General' property page. This means that the new Device can then be updated automatically when
any changes occur to the Template that it is linked to.
4.1.2 Devices Sub Nodes
The Devices Sub nodes are used to group installed devices in different ways. They are shown here
hanging under the Devices node:-
All Devices Sub nodes have the same context menu.
4.1.2.1 Devices Sub Nodes Context Menu
The Devi
hanging under the Devices node:-
ces Sub nodes are used to group installed devices in different ways. They are shown here
They all have this context menu, which enables users to add new devices from any of those nodes:-
- 11 -
Page 27

Reference Guide
D301654X412
APRIL 2012
4.1.2.1.1 From .800 File
ROC Configuration Tool
This optio
add from the appropriate ROC.800 configuration file.
ROC devices use database files to store their default configuration. These database files have an
extension of .800. For instance, 'ROC364 Default.800' is the name of the database file that stores the
default configuration for the ROC 364 device. The first part of the file name indicates the actual ROC
device.
4.1.2.1.2 From Device
This optio
already physically connected to the host computer by supplying the connection details. The ROC RDI
is then able to discover the connection and retrieves the device configuration from the device.
4.1.2.1.3 Paste
This optio
menu obtained when a Device has been selected:-
n opens the 'ROC 800 File Selection' dialog, which enables you to select a new device to
n opens the 'Device Configuration Wizard', which enables you to add a ROC device which is
n is only enabled if a Device has first been copied using the 'Copy' item from the context
The 'Paste' option will then be enabled on this context menu for selection:-
When selected, the 'Copy Device from...' dialog will prompt you to enter a name for the new Device.
The Device that is being copied is named in the title bar:-
- 12 -
Page 28

Reference Guide
D301654X412
APRIL 2012
The user must type in a unique name for the new Device before the copy can take place. Once the
new Device has been copied, it will take its place under the 'All Devices', 'Devices by Type', 'Devices
by ROC Group' and 'Devices by Plant Area' nodes.
ROC Configuration Tool
The source Device can then be marked as a Device Template by linking with it from this new Device's
'General' property page. This means that the new Device can then be updated automatically when
any changes occur to the Template that it is linked to.
4.1.2.2 All Devices
The 'All Devices' no
The 'All Devices' node has a context menu that is also shared by the following nodes:-
• All Devices
• Devices by Type
• Devices by ROC Group
• Devices by Plant Area
4.1.2.3 Devices by Type
The 'Device
belong to:-
s by Type' node lists Devices in alphabetical order according to Device Type that they
de lists added Devices in alphabetical order.
There is no context menu available on the 'ROC Device Type' nodes themselves.
The 'ROC Device Types' nodes are the direct parent of any Devices that are added.
- 13 -
Page 29

Reference Guide
D301654X412
APRIL 2012
The 'Devices by Type' node has a context menu that is also shared by the following nodes:-
• All Devices
• Devices by Type
• Devices by ROC Group
• Devices by Plant Area
4.1.2.4 Devices by ROC Group
ROC Configuration Tool
The 'Device
that they belong to:-
There is no context menu available on the 'ROC Group' nodes themselves.
The 'ROC Group' nodes are the direct parent of any Devices that are added.
The 'Devices by ROC Group' node has a context menu that is also shared by the following nodes:-
• All Devices
• Devices by Type
• Devices by ROC Group
• Devices by Plant Area
s by ROC Group' node lists Devices in alphabetical order according to the ROC Group
4.1.2.5 Devices by Plant Area
The 'Device
they belong to:-
There is no context menu available on the 'ROC Plant Area' nodes themselves.
The 'ROC Plant Area' nodes are the direct parent of any Devices that are added.
s by Plant Area' node lists Devices in alphabetical order according to the Plant Area that
- 14 -
Page 30

Reference Guide
D301654X412
APRIL 2012
The 'Devices by Plant Area' node has a context menu that is also shared by the following nodes:-
• All Devices
• Devices by Type
• Devices by ROC Group
• Devices by Plant Area
4.1.2.6 Device Node
ROC Configuration Tool
This is th
These nodes represent Requests, ROC Points and OpenEnterprise signals that are exclusively
associated with the particular device.
4.1.2.6.1 Device Context Menu
The Devi
e parent node for all device explicit configuration.
ce context menu enables you to perform various operations on the selected device. .
- 15 -
Page 31

Reference Guide
D301654X412
APRIL 2012
4.1.2.6.1.1 Update Device Configuration
Enable
from a connected device or from a Device Template.
From 800 File
If this option is selected, the "ROC 800 File Selection" dialog will enable you to select the ROC 800
file that you want to use to update the device configuration.
From Connected Device
If this option is chosen, the ROC RDI will attempt to update the selected device from a currently
connected device using the same communications channel.
From Device Template
s you to update the configuration for the selected device, either from a ROC 800 database file,
ROC Configuration Tool
If this option is selected a then the selected Device can be updated from another Device which will be
used as a Device Template.
The user will be presented with the 'Update from a Database Device Template' dialog so they can
choose a Device Template, and specify what will be updated.
4.1.2.6.1.2 Refresh Parameter Values
This me
There are two options which enable the Parameter values to be refreshed from a ROC .800 file, or
directly from the Connected Device.
From .800 File
If the 'From .800 File' option is selected, the 'ROC 800 File Selection' dialog will appear, prompting
you to indicate the .800 file that is to be used. For more help on this dialog, click on the image below.
nu item enables you to refresh all Parameter values associated with the selected Device.
Once the file has been chosen, this message will appear, requiring the user to select the [Yes] or [No]
button before proceeding.
- 16 -
Page 32
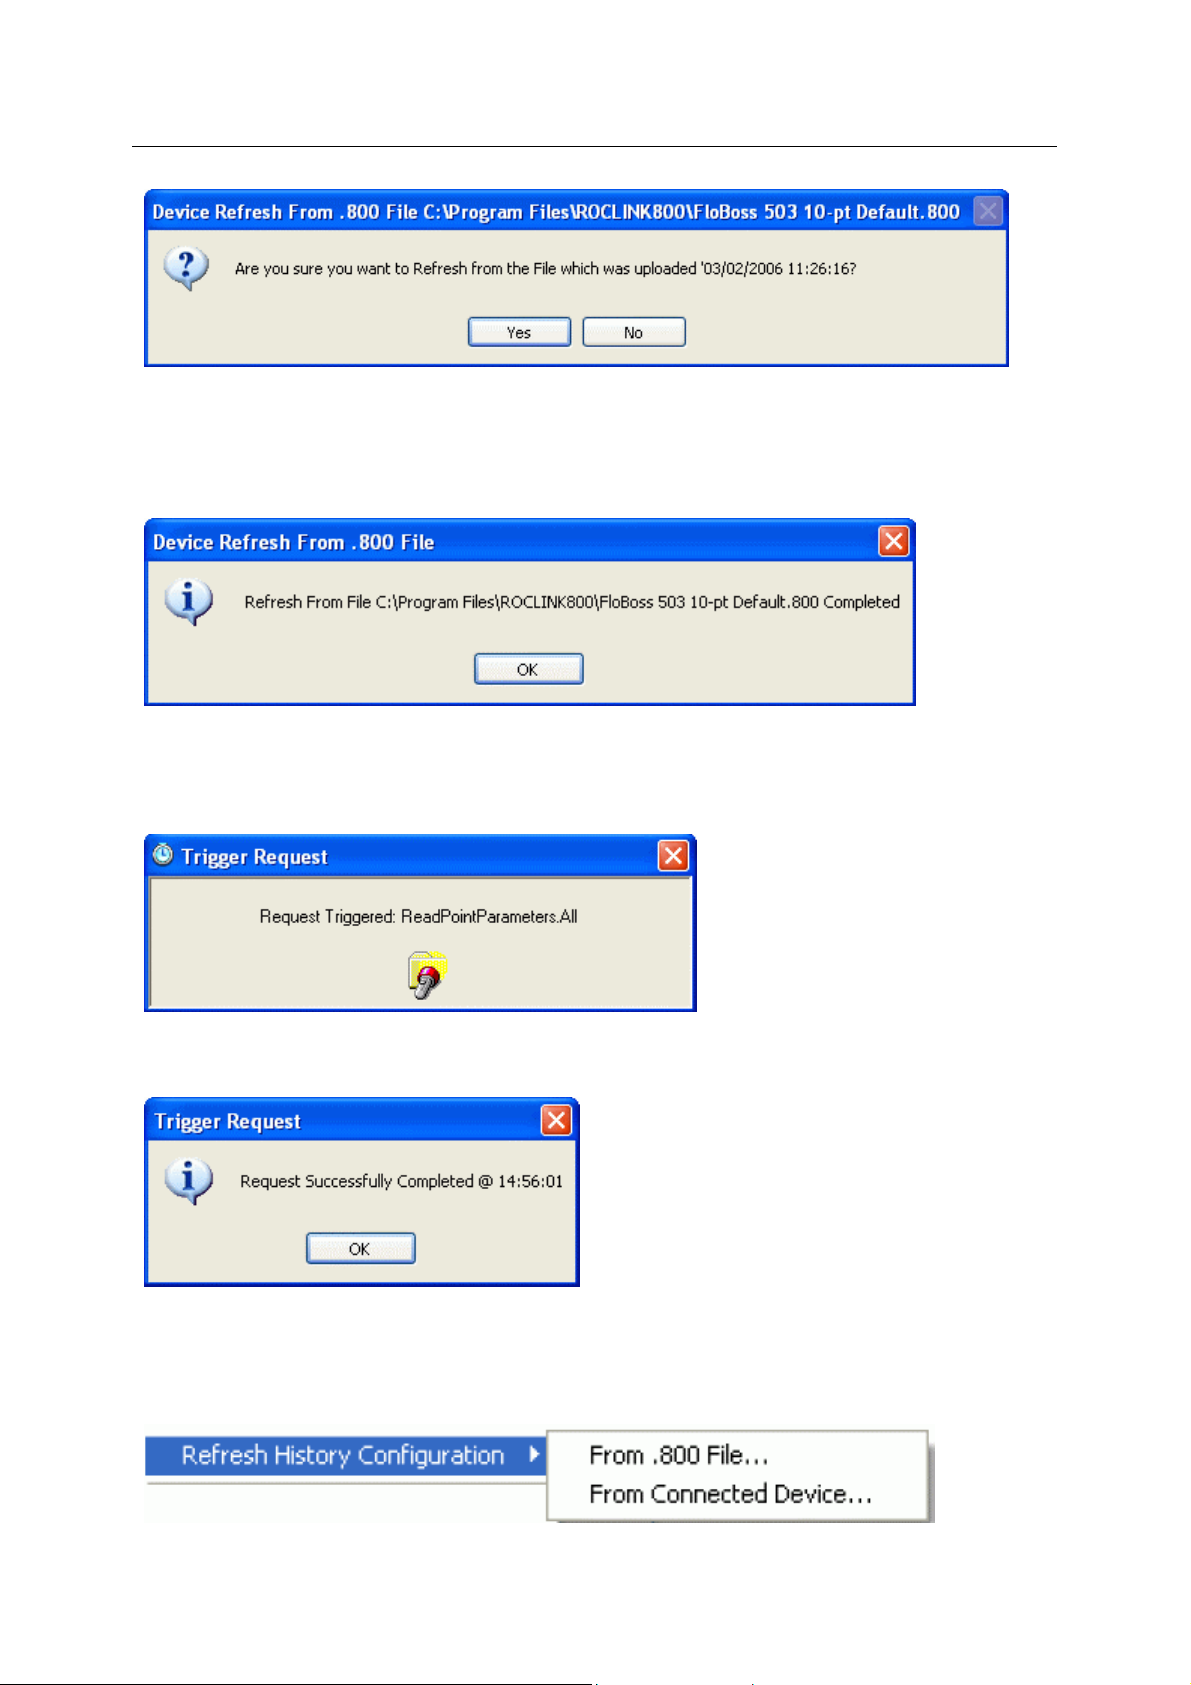
Reference Guide
D301654X412
APRIL 2012
The date and time of the file are given to help with this decision. If the current values are likely to be
more recent than those in the file, then you may abort the operation by selecting the [No] button. If
you selects the [Yes] button, then the values will be updated from the selected file.
Something like the following message will inform you when the operation is completed.
ROC Configuration Tool
From Connected Device
If the 'From Connected Device' option is selected, this message will inform you that the a
'ReadPointParameters.All' Request has been triggered.
Another message will then inform you when the Request has completed, and whether it was
successful or not.
4.1.2.6.1.3 Refresh History Configuration
This me
There are two options which enable the History Configuration to be refreshed from a ROC .800 file, or
directly from the Connected Device.
nu item enables you to refresh the History Configuration associated with the selected Device.
- 17 -
Page 33
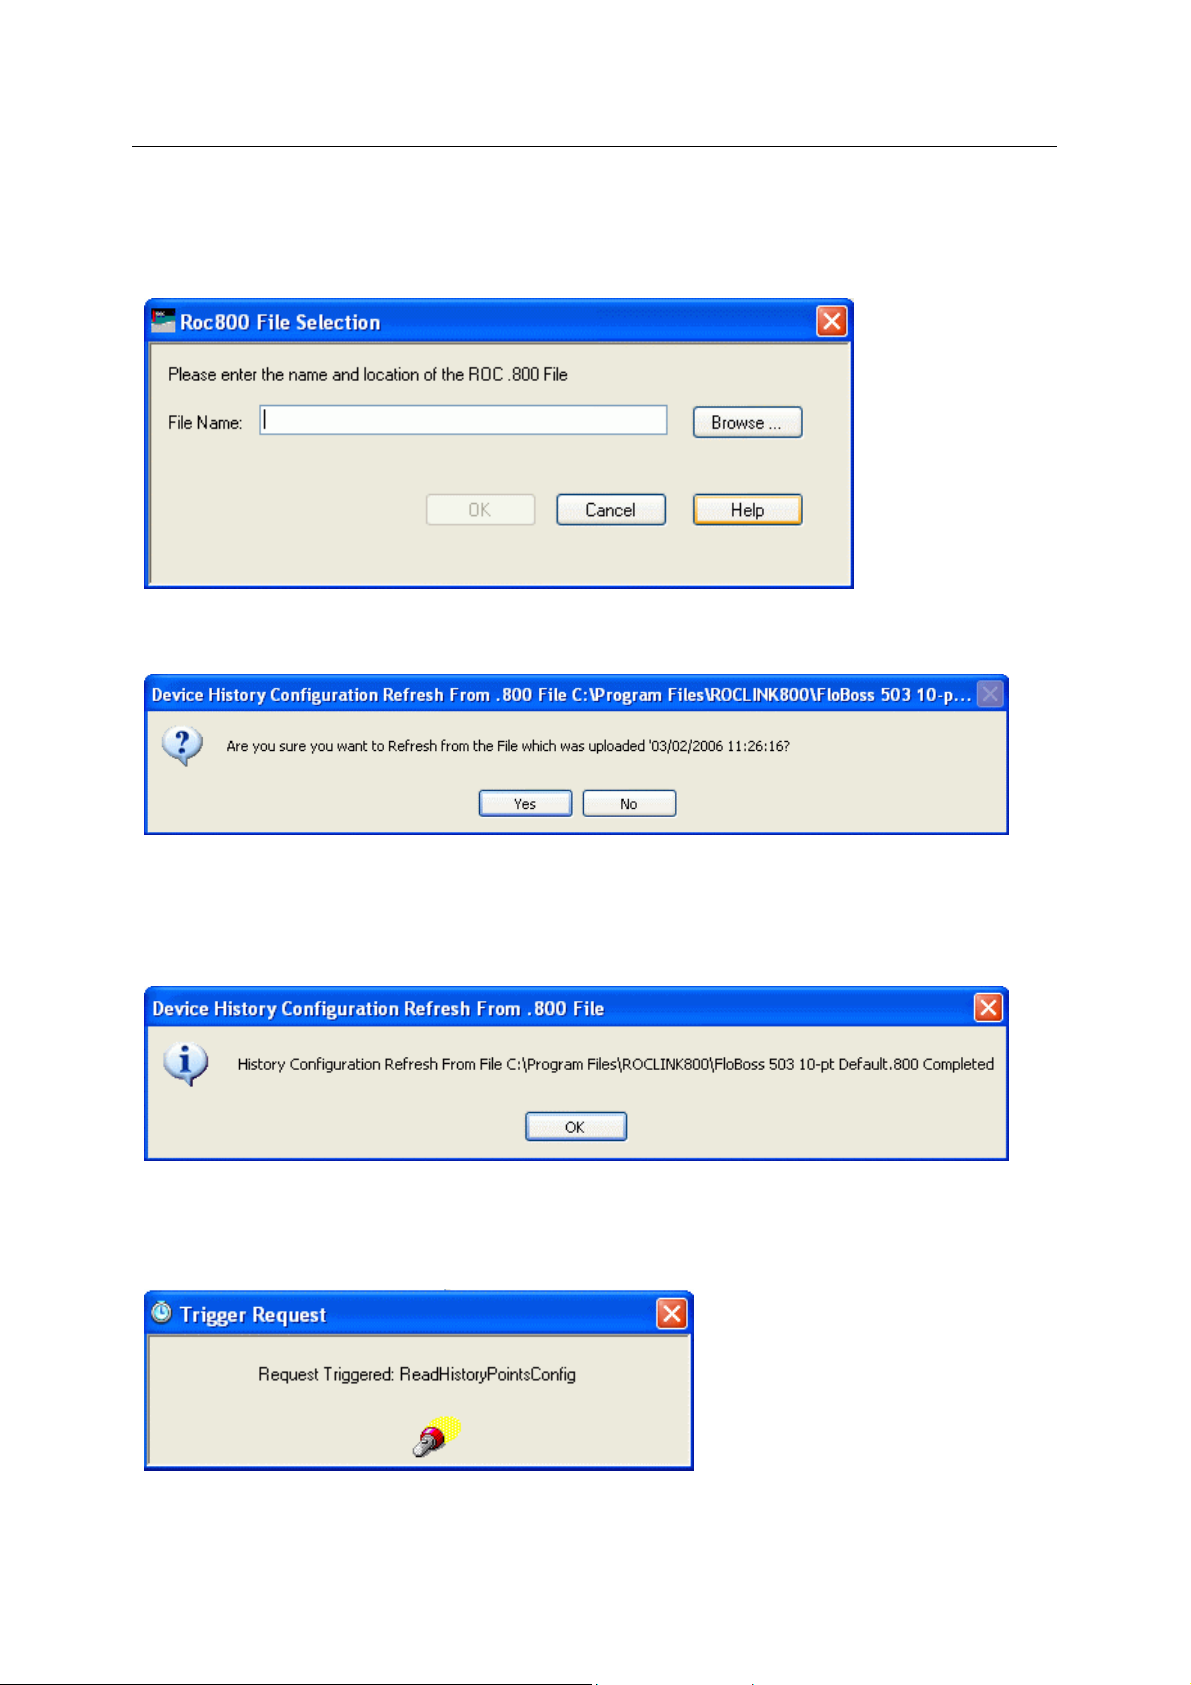
Reference Guide
D301654X412
APRIL 2012
From .800 File
If the 'From .800 File' option is selected, the 'ROC 800 File Selection' dialog will appear, prompting
you to indicate the .800 file that is to be used. For more help on this dialog, click on the image below.
Once the file has been chosen, this message will appear, requiring the user to select the [Yes] or [No]
button before proceeding.
ROC Configuration Tool
The date and time of the file are given to help with this decision. If the current History configuration is
likely to be more recent than those in the file, then you may abort the operation by selecting the [No]
button. If you selects the [Yes] button, then the values will be updated from the selected file.
Something like the following message will inform you when the operation is completed.
From Connected Device
If the 'From Connected Device' option is selected, this message will inform you that the a
'ReadHistoryPointsConfig' Request has been triggered.
Another message will then inform you when the Request has completed, and whether it was
successful or not.
- 18 -
Page 34
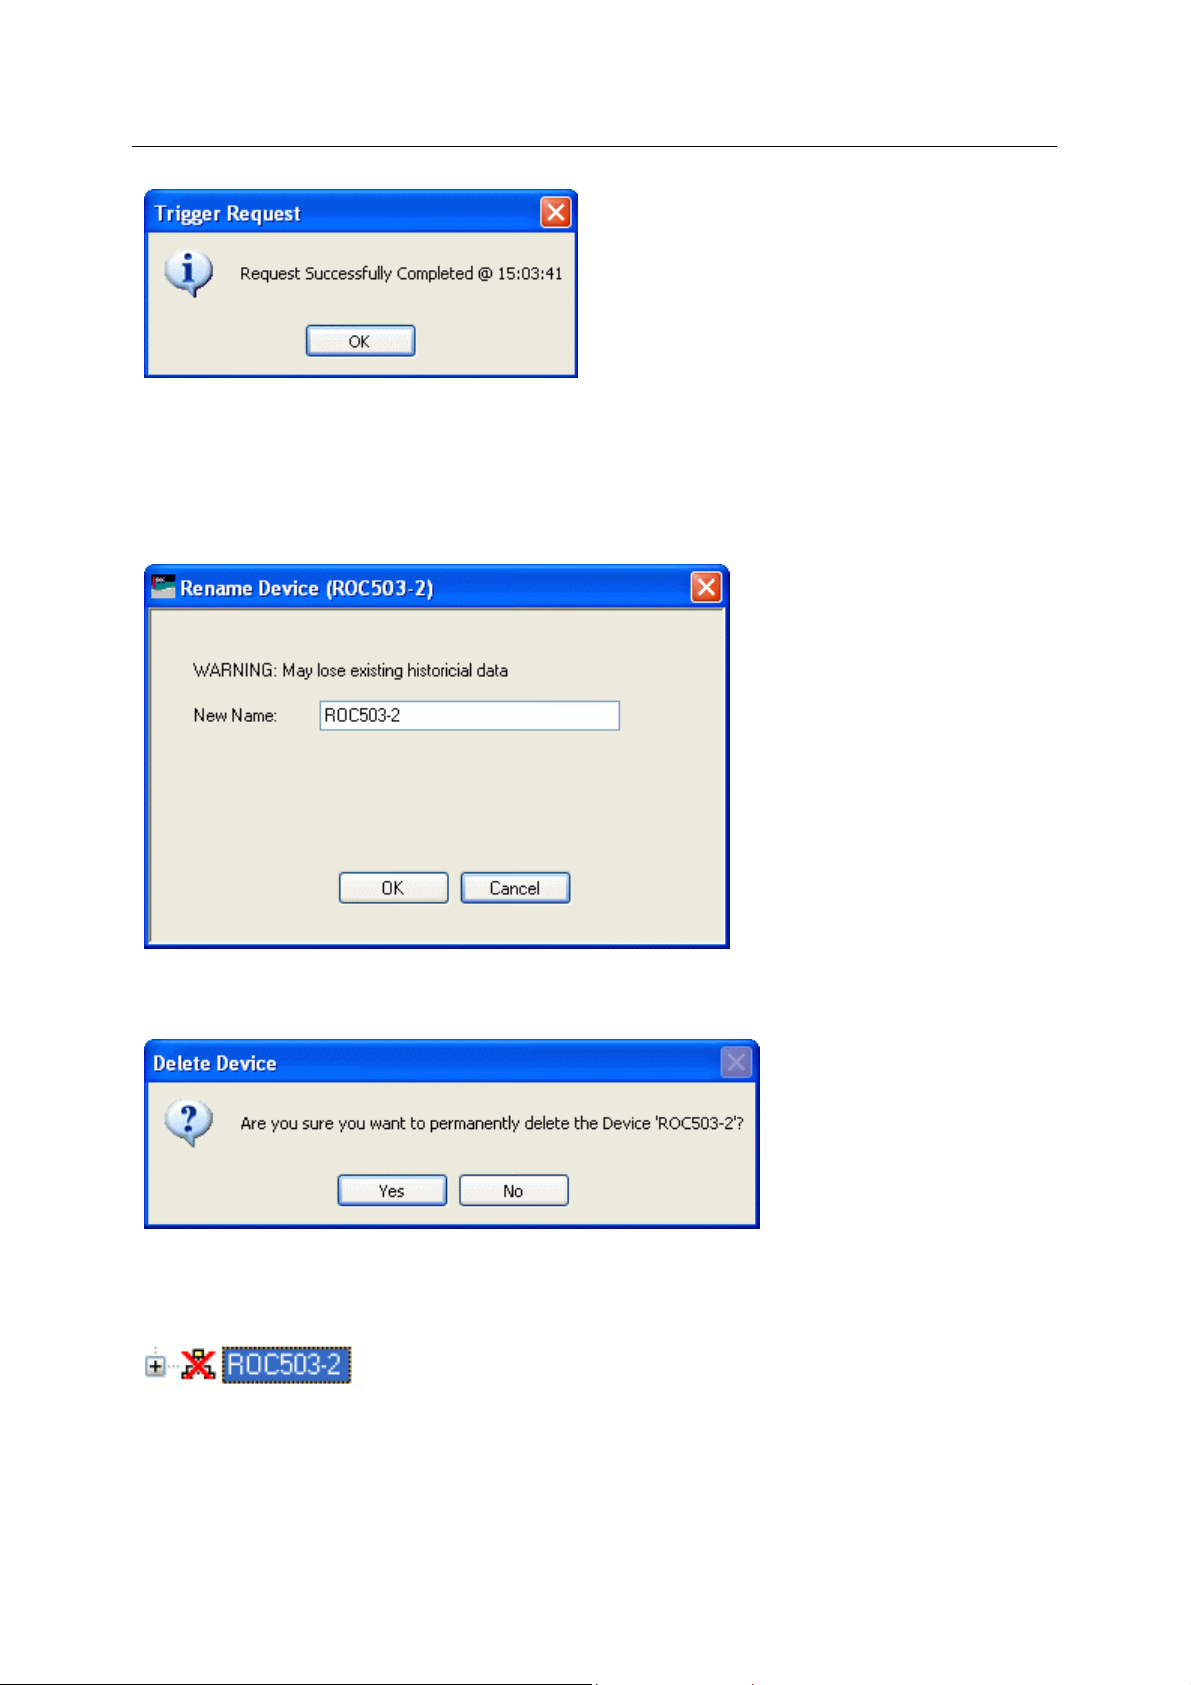
Reference Guide
D301654X412
APRIL 2012
4.1.2.6.1.4 Copy
Copi
es the selected Device configuration to memory. The Device can then be pasted from any of the
Devices Sub nodes.
4.1.2.6.1.5 Rename
Enable
s you to enter a new name for the selected Device.
ROC Configuration Tool
4.1.2.6.1.6 Delete
Deletes the selected Devi
4.1.2.6.1.7 Disable
If this box is checke
View.
4.1.2.6.1.8 Properties
This optio
n opens the Device Configuration Wizard at the General Page.
d, the Device is disabled. It will then appear with a red cross through it in the Tree
ce. The user will be asked for confirmation before the Device is deleted.
- 19 -
Page 35
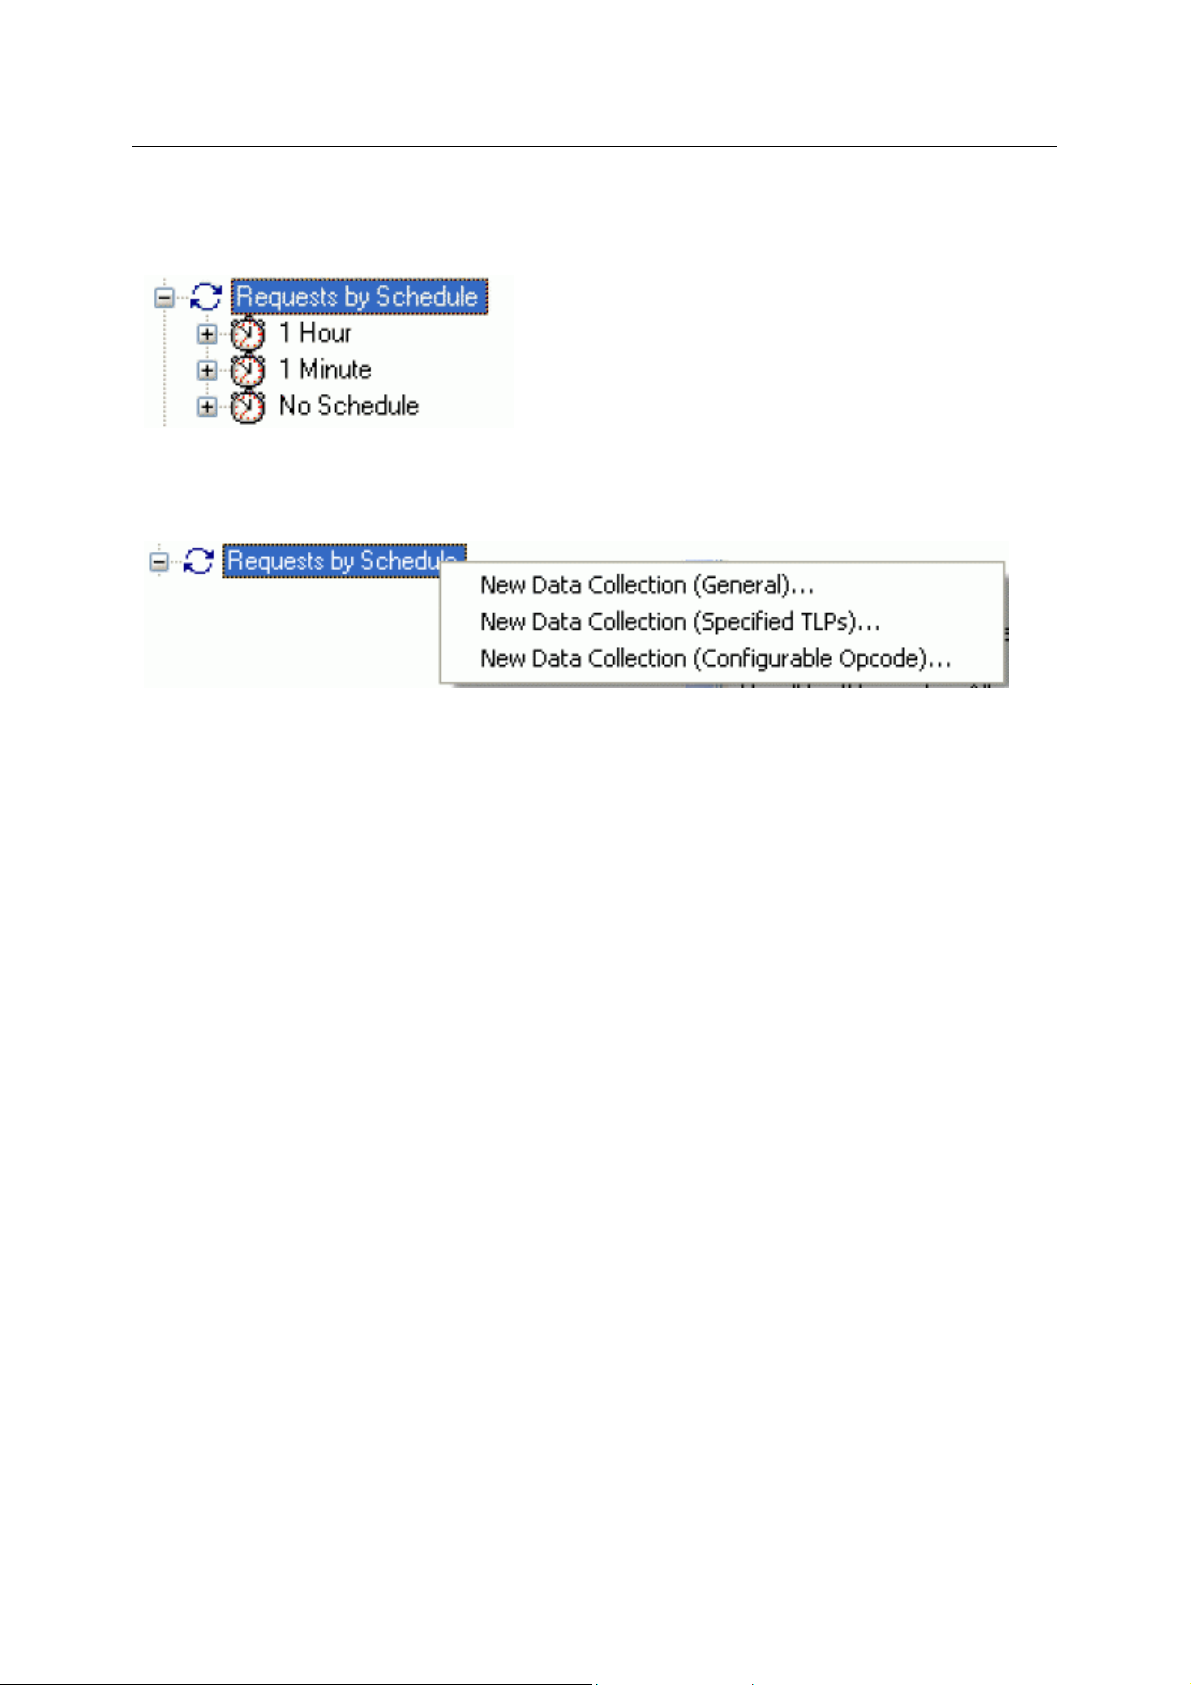
Reference Guide
D301654X412
APRIL 2012
4.1.2.6.2 Requests by Schedule
ROC Configuration Tool
This no
4.1.2.6.2.1 Requests by Schedule Context Menu
Whe
to create new Requests with an associated Schedule.
New Data Collection (General)
Opens the ROC Request Wizard so that you can configure a new ROC Request.
The ROC Request Wizard consists of two pages. This option opens the Request Wizard in a mode
that will open the 'General' Request Parameters Page.
de lists Requests according to whether or not they are associated with a Schedule.
n you right clicks on the 'Requests by Schedule' node, this context menu appears. It enables you
• General Page
• General Data Collection Request
New Data Collection (Specified TLPs)
Opens the ROC Request Wizard so that you can configure a new ROC Request.
The ROC Request Wizard consists of two pages. This option opens the Request Wizard in a mode
that will open the 'Specified TLPs' Request Parameters Page.
• General Page
• TLP Data Collection Request
New Data Collection (Configurable Opcode)
Opens the ROC Request Wizard so that you can configure a new ROC Request.
The ROC Request Wizard consists of two pages. This option opens the Request Wizard in a mode
that will open the 'Configurable Opcode' Request Parameters Page.
• General Page
• Configurable Opcode Request
4.1.2.6.2.2 Scheduled Requests
n a user created Request is associated with a Schedule it is placed under a new Schedule node
Whe
which has the name of the Schedule.
- 20 -
Page 36
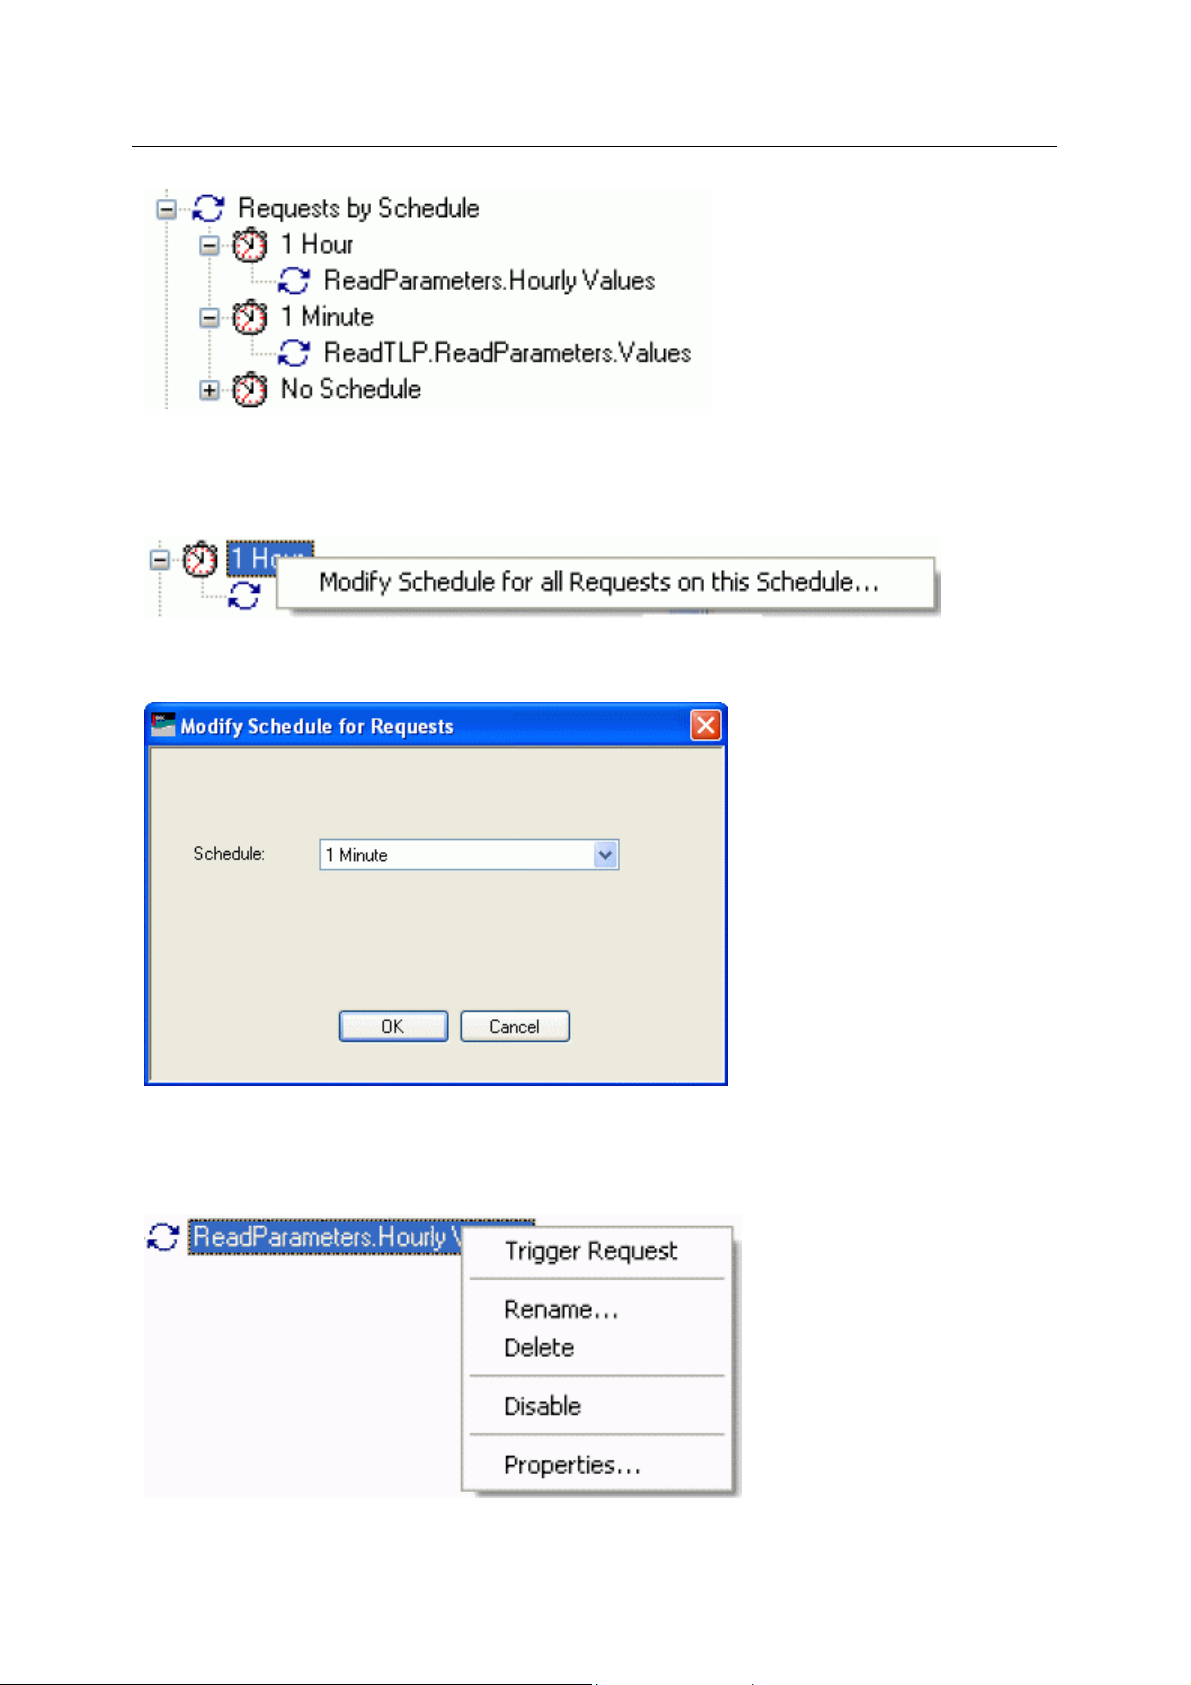
Reference Guide
D301654X412
APRIL 2012
Scheduled Requests Context Menu
The context menu that appears on all Scheduled Request nodes enables you to cha nge the Schedule
for the Request.
A new Schedule can be selected from the drop-down list on the 'Modify Schedule for Requests'
dialog:
ROC Configuration Tool
Individual Request Context Menu
This context menu appears on any individual Request. It enables the user to trigger the Request
manually, rename, delete or disable it and also to view its Property pages.
- 21 -
Page 37
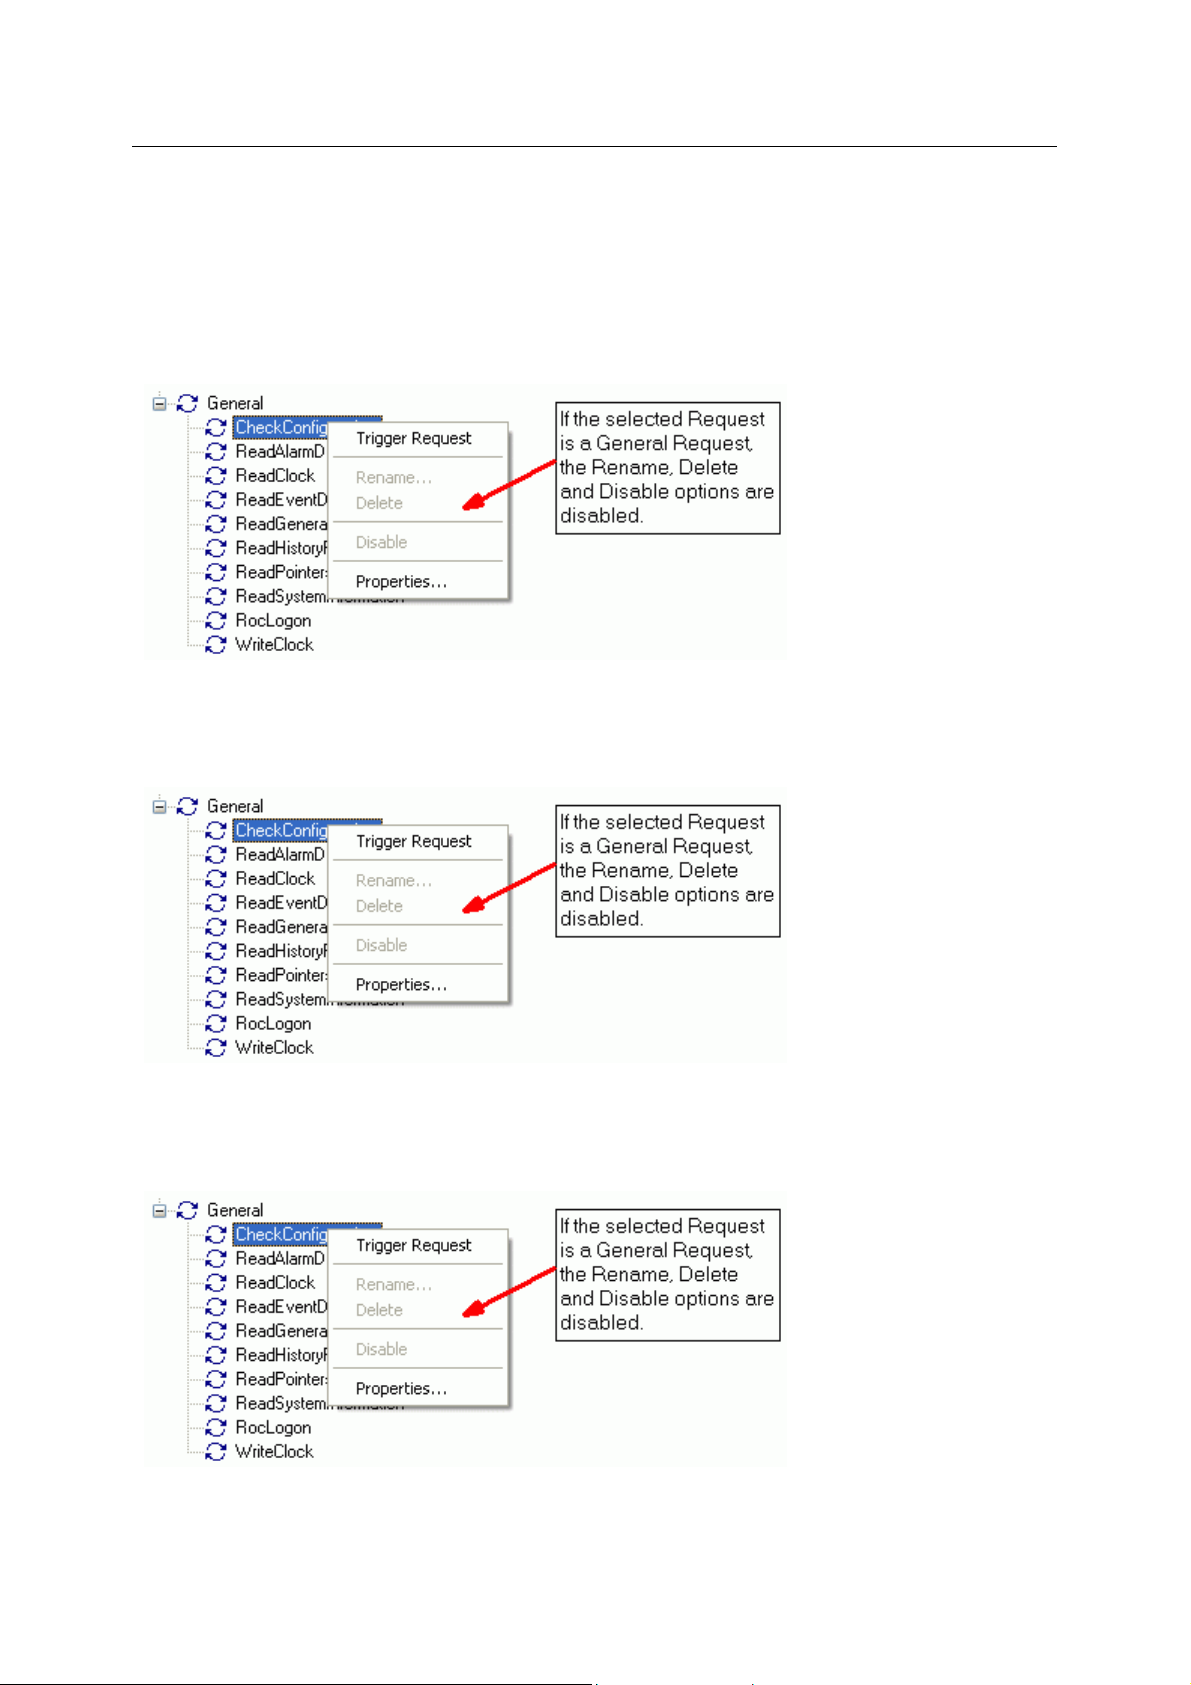
Reference Guide
D301654X412
APRIL 2012
Trigger Request
The ROC RDI is activated to send this Request to the device immediately.
Rename
Selection of this option allows you to change the name of a user created Request. If the Request is a
general one, this option is not enabled.
ROC Configuration Tool
Delete
Selection of this option allows you to delete a user created Request. If the Request is a general one,
this option is not enabled.
Disable Request
Selection of this option allows you to disable a user created Request. If the Request is a general one,
this option is not enabled.
Properties
- 22 -
Page 38
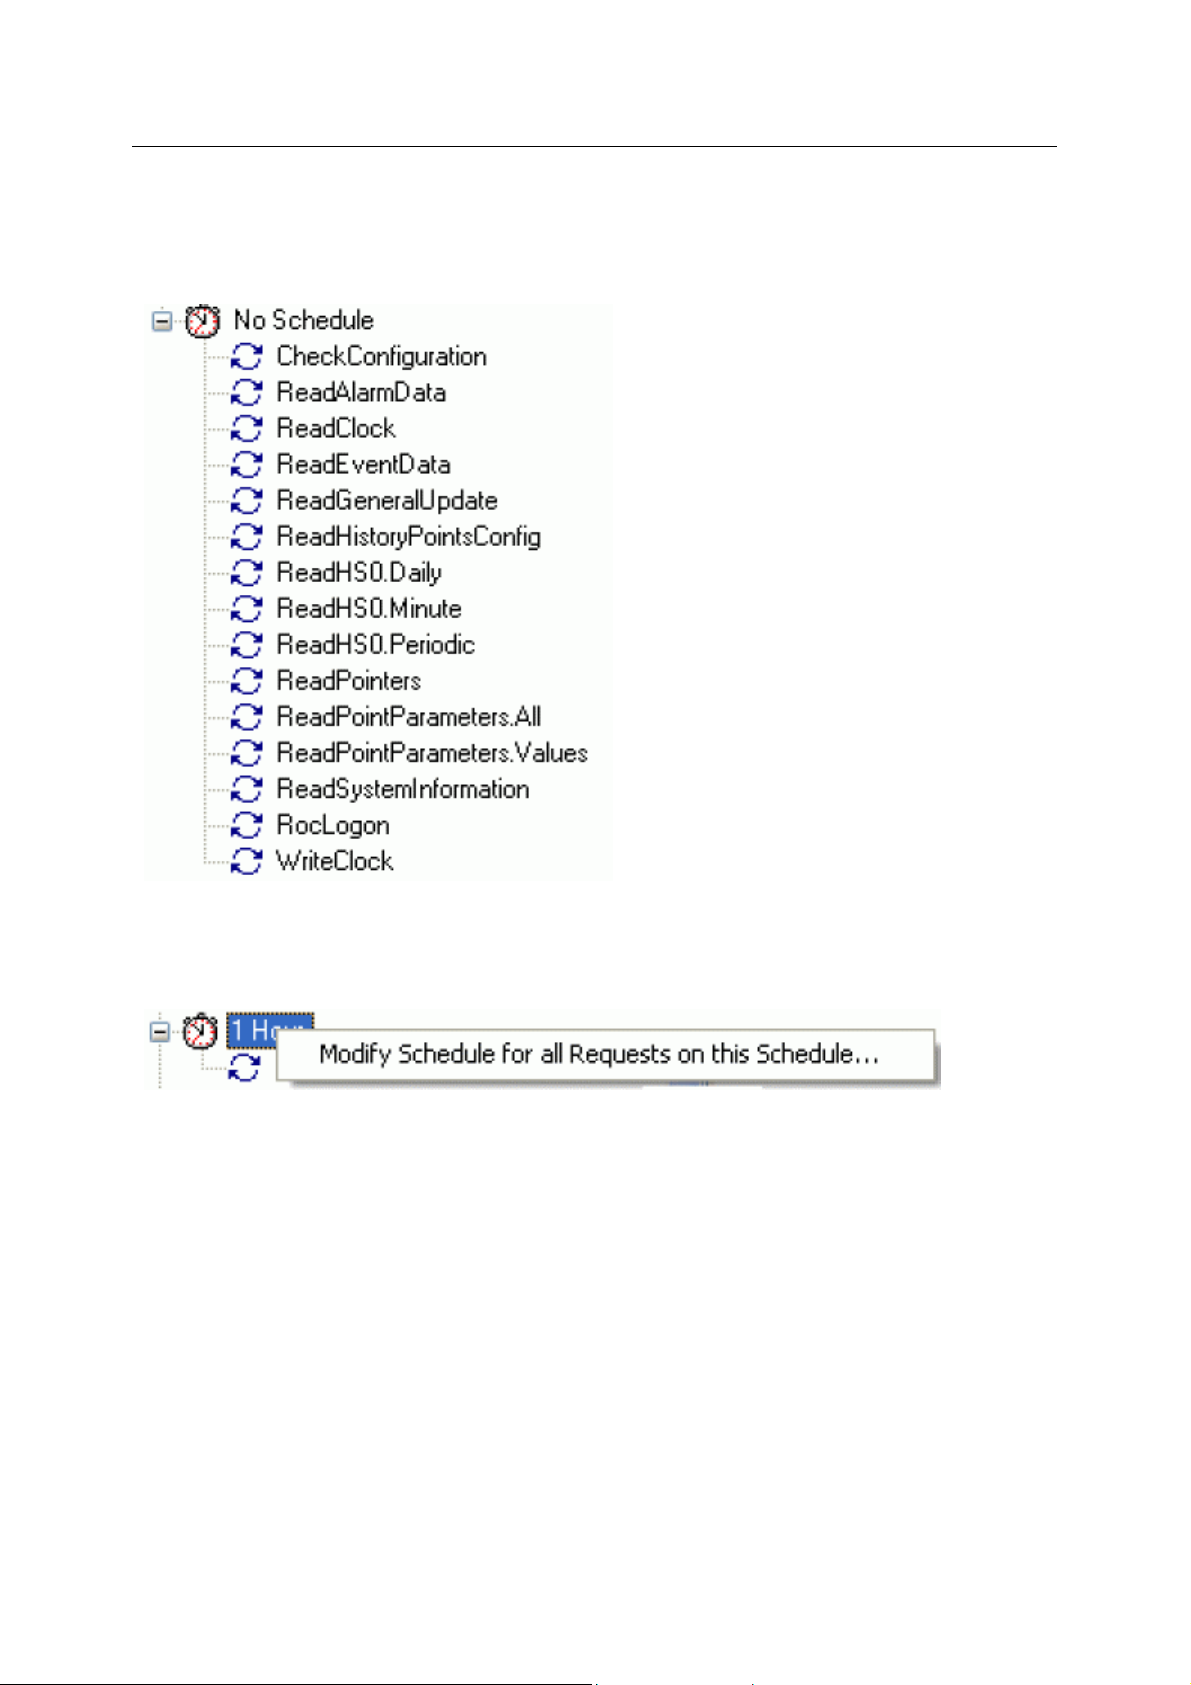
Reference Guide
D301654X412
APRIL 2012
Displays the Request Wizard Pages for this Request. Changes can then be made to this Request.
4.1.2.6.2.3 No Schedule
uests under the 'No Schedule' node have not yet been associated with a Schedule.
Req
ROC Configuration Tool
Scheduled Requests Context Menu
The context menu that appears on all Scheduled Request nodes enables you to cha nge the Schedule
for the Request.
A new Schedule can be selected from the drop-down list on the 'Modify Schedule for Requests'
dialog:
- 23 -
Page 39
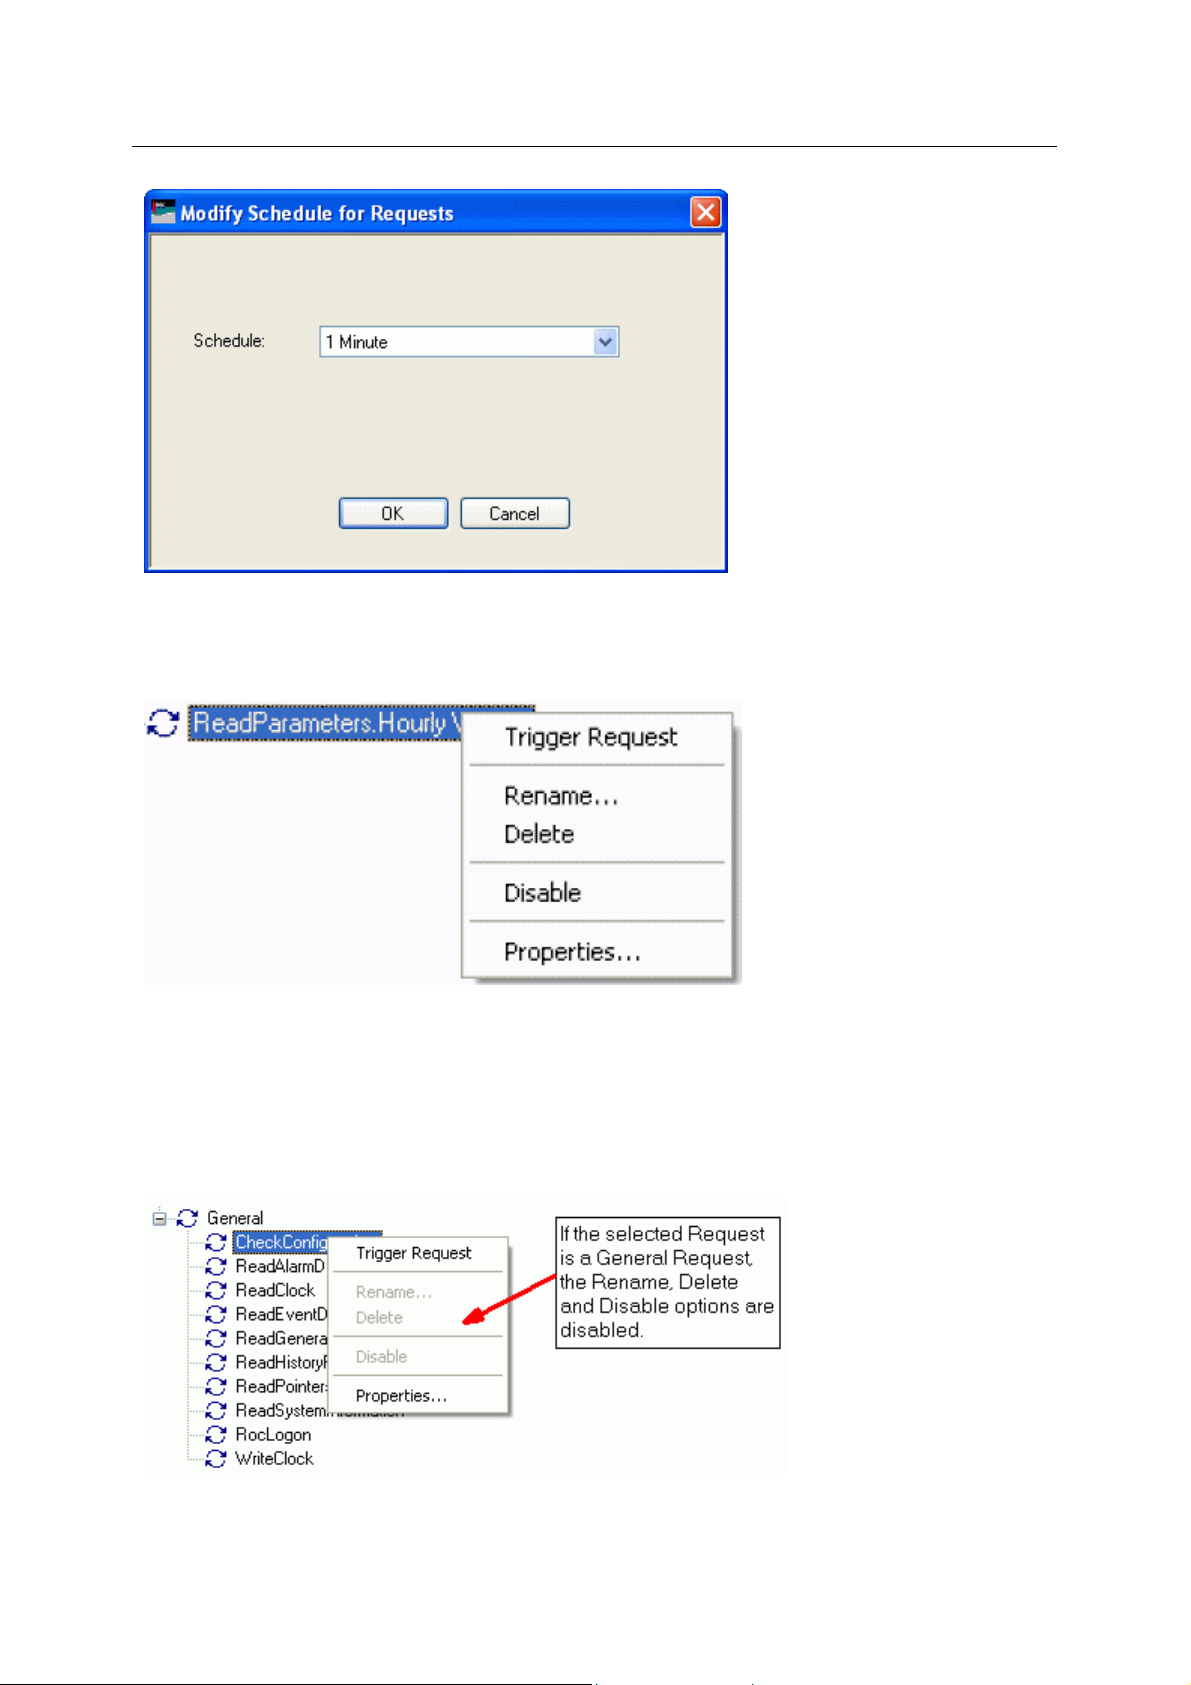
Reference Guide
D301654X412
APRIL 2012
Individual Request Context Menu
This context menu appears on any individual Request. It enables the user to trigger the Request
manually, rename, delete or disable it and also to view its Property pages.
ROC Configuration Tool
Trigger Request
The ROC RDI is activated to send this Request to the device immediately.
Rename
Selection of this option allows you to change the name of a user created Request. If the Request is a
general one, this option is not enabled.
Delete
- 24 -
Page 40
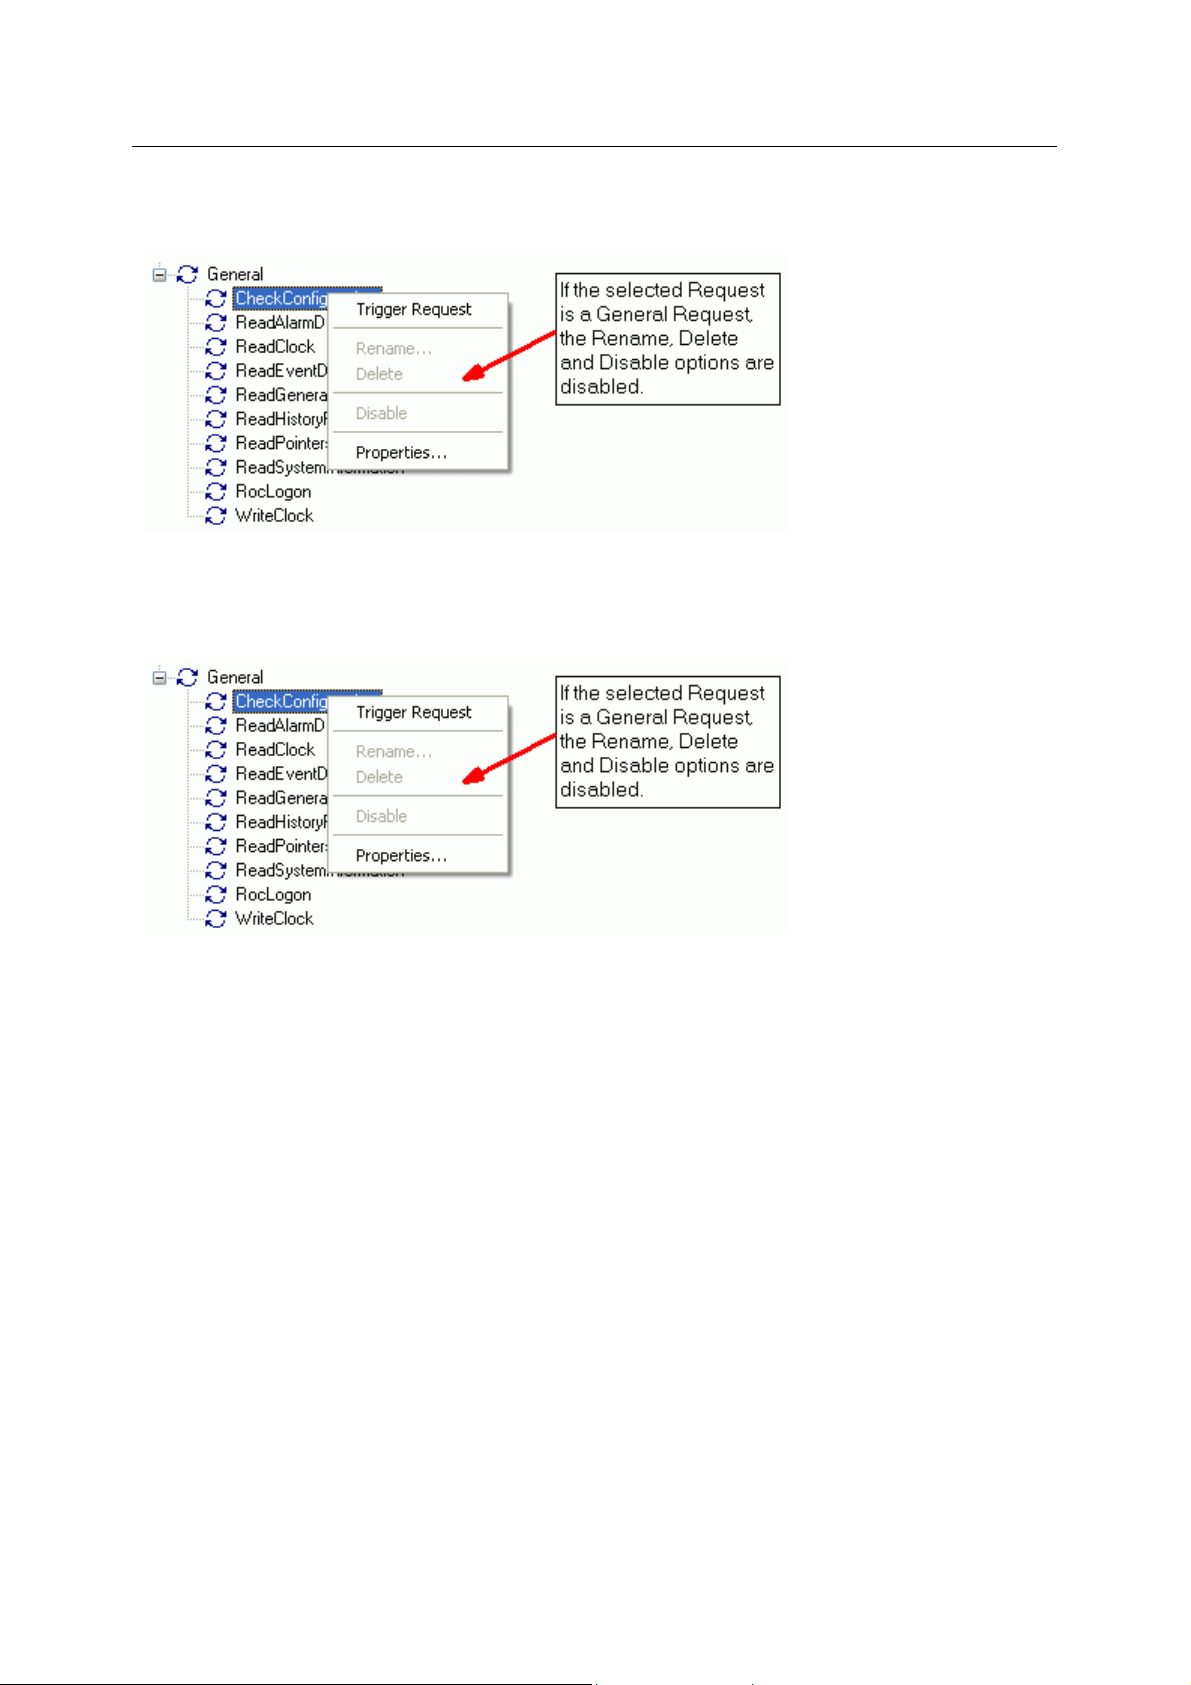
Reference Guide
D301654X412
APRIL 2012
Selection of this option allows you to delete a user created Request. If the Request is a general one,
this option is not enabled.
Disable Request
Selection of this option allows you to disable a user created Request. If the Request is a general one,
this option is not enabled.
ROC Configuration Tool
Properties
Displays the Request Wizard Pages for this Request. Changes can then be made to this Request.
4.1.2.6.3 Requests by Type
The Re
sorted by Request Types.
quests by Type node displays all available Requests (whether General o r use r created)
- 25 -
Page 41
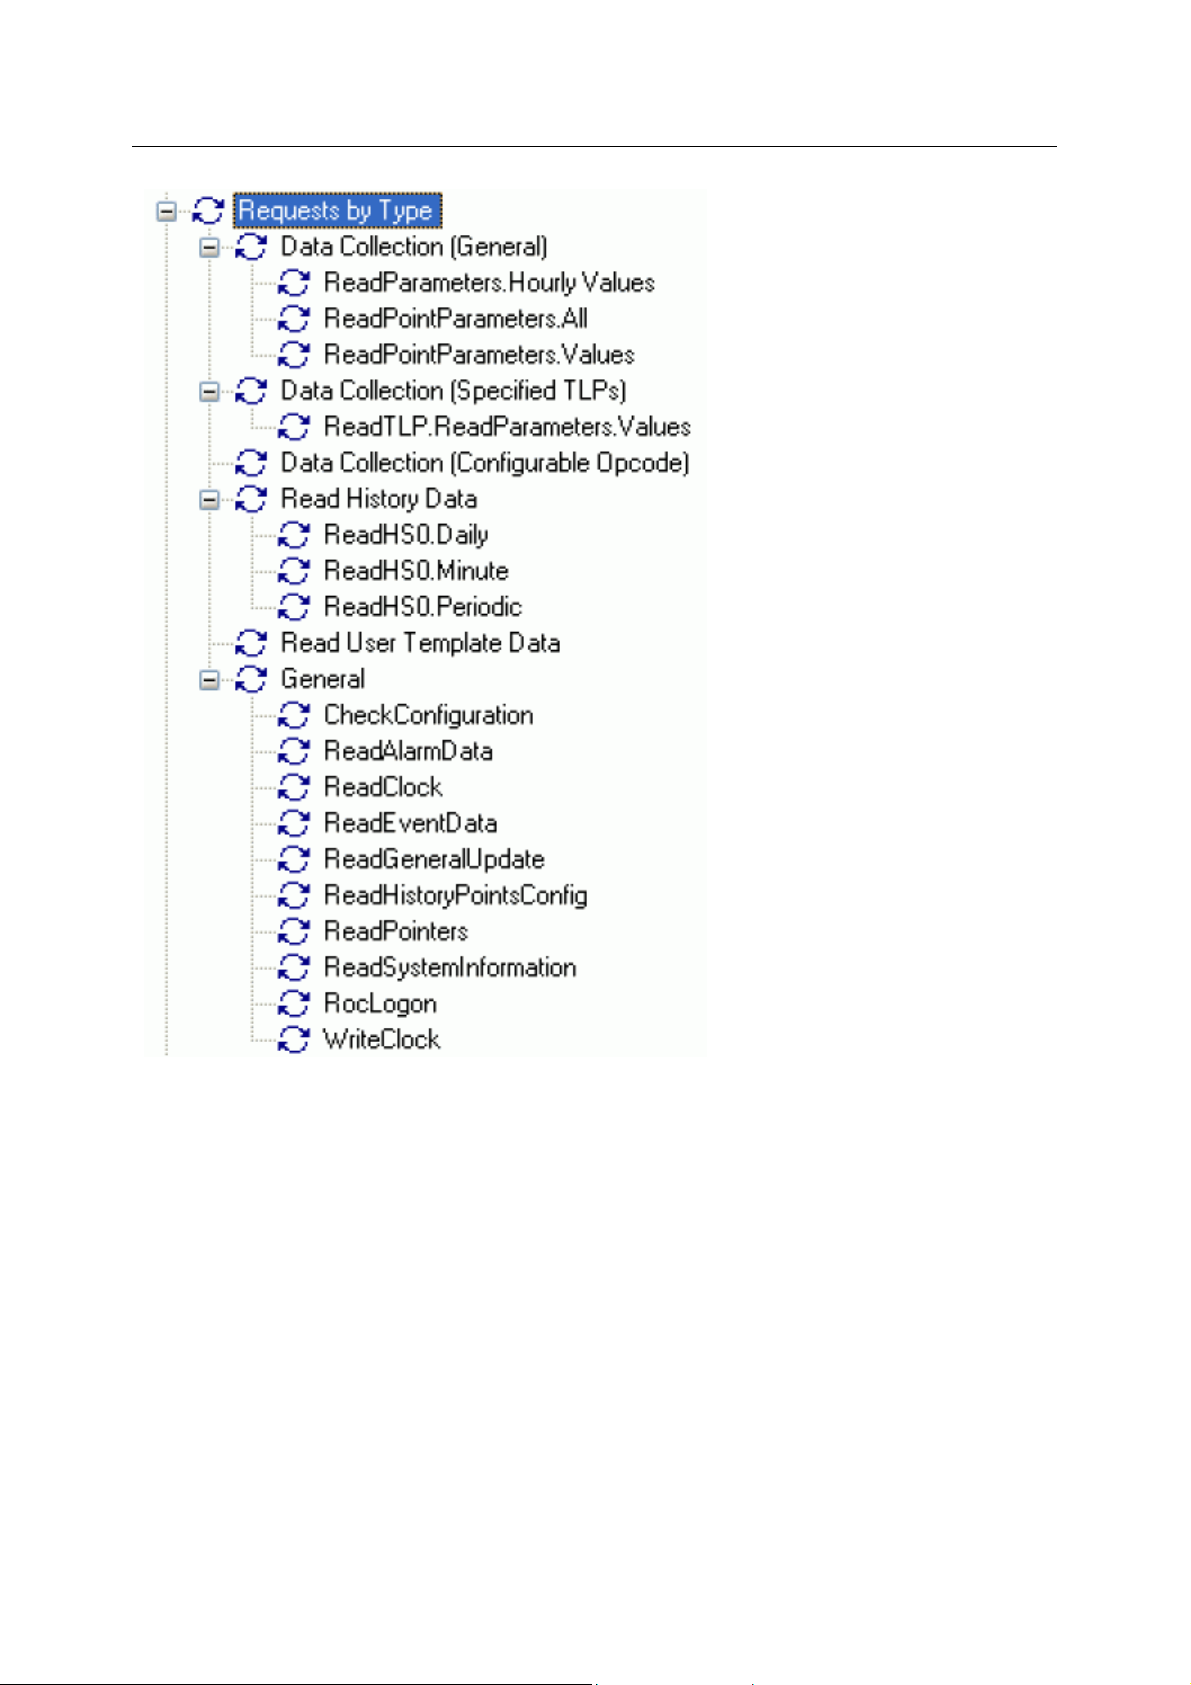
Reference Guide
D301654X412
APRIL 2012
ROC Configuration Tool
4.1.2.6.3.1 User Created Requests
User Cre
the Request manually and view its configuration pages.
4.1.2.6.3.2 General Requests
Gene
Request manually and view its configuration pages.
4.1.2.6.3.3 Read History Requests
Rea
the Request manually and view its configuration pages.
4.1.2.6.3.4 Request by Type Sub node Context Menus
As well a
context menu that enables you to create new Requests:-
ated Request nodes have an individual Request Context menu that enables users to trigger
ral Request nodes have an individual Request Context menu that enables users to trigger the
d History Request nodes have an individual Request Context menu that enables users to trigger
s the 'Request By Type' node, all its immediate Request Type sub nodes have the same
• Data Collection (General)
- 26 -
Page 42

Reference Guide
D301654X412
APRIL 2012
• Data Collection (Specified TLPs)
• Data Colection (Configurable Opcode)
• Read History Data
ROC Configuration Tool
• Read User Template Data
• General
4.1.2.6.3.5 Requests By Type Context Menu
The Re
create their own Requests.
quests by Type node and its immediate sub nodes have this context menu that enables you to
New Data Collection (General)
Opens the ROC Request Wizard so that you can configure a new ROC Request.
The ROC Request Wizard consists of two pages. This option opens the Request Wizard in a mode
that will open the 'General' Request Parameters Page.
- 27 -
Page 43

Reference Guide
D301654X412
APRIL 2012
• General Page
• General Data Collection Request
New Data Collection (Specified TLPs)
Opens the ROC Request Wizard so that you can configure a new ROC Request.
The ROC Request Wizard consists of two pages. This option opens the Request Wizard in a mode
that will open the 'Specified TLPs' Request Parameters Page.
• General Page
• TLP Data Collection Request
New Data Collection (Configurable Opcode)
Opens the ROC Request Wizard so that you can configure a new ROC Request.
The ROC Request Wizard consists of two pages. This option opens the Request Wizard in a mode
that will open the 'Configurable Opcode' Request Parameters Page.
ROC Configuration Tool
• General Page
• Configurable Opcode Request
4.1.2.6.3.6 Individual Request Context Menu
context menu appears on any individual Request. It enables the user to trigger the Request
This
manually, rename, delete or disable it and also to view its Property pages.
Trigger Request
The ROC RDI is activated to send this Request to the device immediately.
Rename
Selection of this option allows you to change the name of a user created Request. If the Request is a
general one, this option is not enabled.
- 28 -
Page 44

Reference Guide
D301654X412
APRIL 2012
Delete
Selection of this option allows you to delete a user created Request. If the Request is a general one,
this option is not enabled.
ROC Configuration Tool
Disable Request
Selection of this option allows you to disable a user created Request. If the Request is a general one,
this option is not enabled.
Properties
Displays the Request Wizard Pages for this Request. Changes can then be made to this Request.
4.1.2.6.4 Database ROC Points
This is th
OpenEnterprise database object in its specific ROC Point table.
e parent node for all ROC Points within the device. Each actual ROC Point is mapped to an
- 29 -
Page 45

Reference Guide
D301654X412
APRIL 2012
In addition, selected Point Parameters may have also been mapped to the conventional
OpenEnterprise signal tables. These are listed under each specific Point that they refer to, and also
under the main 'Signals for Point Parameters' node.
OpenEnterprise ROC Signals are also listed separately under the 'Signals for Point Parameter Values'
node which follows the 'Database ROC Points' node in the Tree View pane of the ROC Configuration
Tool.
ROC Configuration Tool
4.1.2.6.4.1 Database ROC Points Node Context Menu
The co
ntext menu that appears when you clicks the right mouse button whilst this node is selected. It
enables you to map extra ROC Point Parameters to the OpenEnterprise ROC Signal tables in the
database.
Add/Delete Database Points/Signals
This option enables you to add or delete ROC Points or Signals from the OpenEnterprise database. It
opens the 'Points Selection' page of the 'ROC Device Wizard' so that you can select the Points and
Parameters required.
4.1.2.6.4.2 I/O Node
The ROC I/O node
sensors that control or measure plant processes. These are 'Analog Inputs', 'Analog Outputs',
'Discrete Inputs', 'Discrete Outputs' and 'Pulse Inputs'.
contains the parent nodes for all ROC Points that are used for Input and Output to
I/O Node Context Menu
The context menu that appears when you clicks the right mouse button whilst this node is selected. It
enables you to map more ROC Points to the OpenEnterprise database.
- 30 -
Page 46

Reference Guide
D301654X412
APRIL 2012
Add/Delete Database Points/Signals
This option enables you to add or delete ROC Points or Signals from the OpenEnterprise database. It
opens the 'Points Selection' page of the 'ROC Device Wizard' so that you can select the Points and
Parameters required.
Analog Inputs
The Analog Inputs node is the parent of all ROC Analog Input Points found within the selected device.
When the plus sign to the left of the Analog Inputs node is selected, it expands to reveal the available
Points.
ROC Configuration Tool
Analog Inputs Context Menu
The context menu that appears when you clicks the right mouse button whilst this node is selected. It
enables you to map more ROC Points to the OpenEnterprise database.
Add/Delete Database Points/Signals
This option enables you to add or delete ROC Points or Signals from the OpenEnterprise database. It
opens the 'Points Selection' page of the 'ROC Device Wizard' so that you can select the Points and
Parameters required.
- 31 -
Page 47

Reference Guide
D301654X412
APRIL 2012
Analog Input Point
If the Analog Input Point has any specific Parameters mapped to the appropriate OpenEnterprise
ROC signal table, it will have a plus sign to the left of it, which when selected will reveal the signals
that have been mapped to Parameters for the selected ROC Point.
Any alarms for the Point will also be shown.
Analog Input Point Context Menu
This context menu belongs to individual ROC Analog Input Points.
ROC Configuration Tool
Add/Delete Database Points/Signals
This option enables you to add or delete ROC Points or Signals from the OpenEnterprise database. It
opens the 'Points Selection' page of the 'ROC Device Wizard' so that you can select the Points and
Parameters required.
Rename
Opens the 'Point Rename Dialog', which enables you to rename this Point.
Delete Point
The selected Point will be deleted.
Disable Point
The selected Point will be disabled.
Properties
Opens the 'Point Properties Dialog', which enables you to associate a 'Parameter Pattern Te mplate'
with the Point.
Signals for Point Parameter Values
The 'Signals for Point Parameter Values' node is the parent for any ROC Signals that have been
created from the Point. The parent node and each Point node have context menus.
- 32 -
Page 48
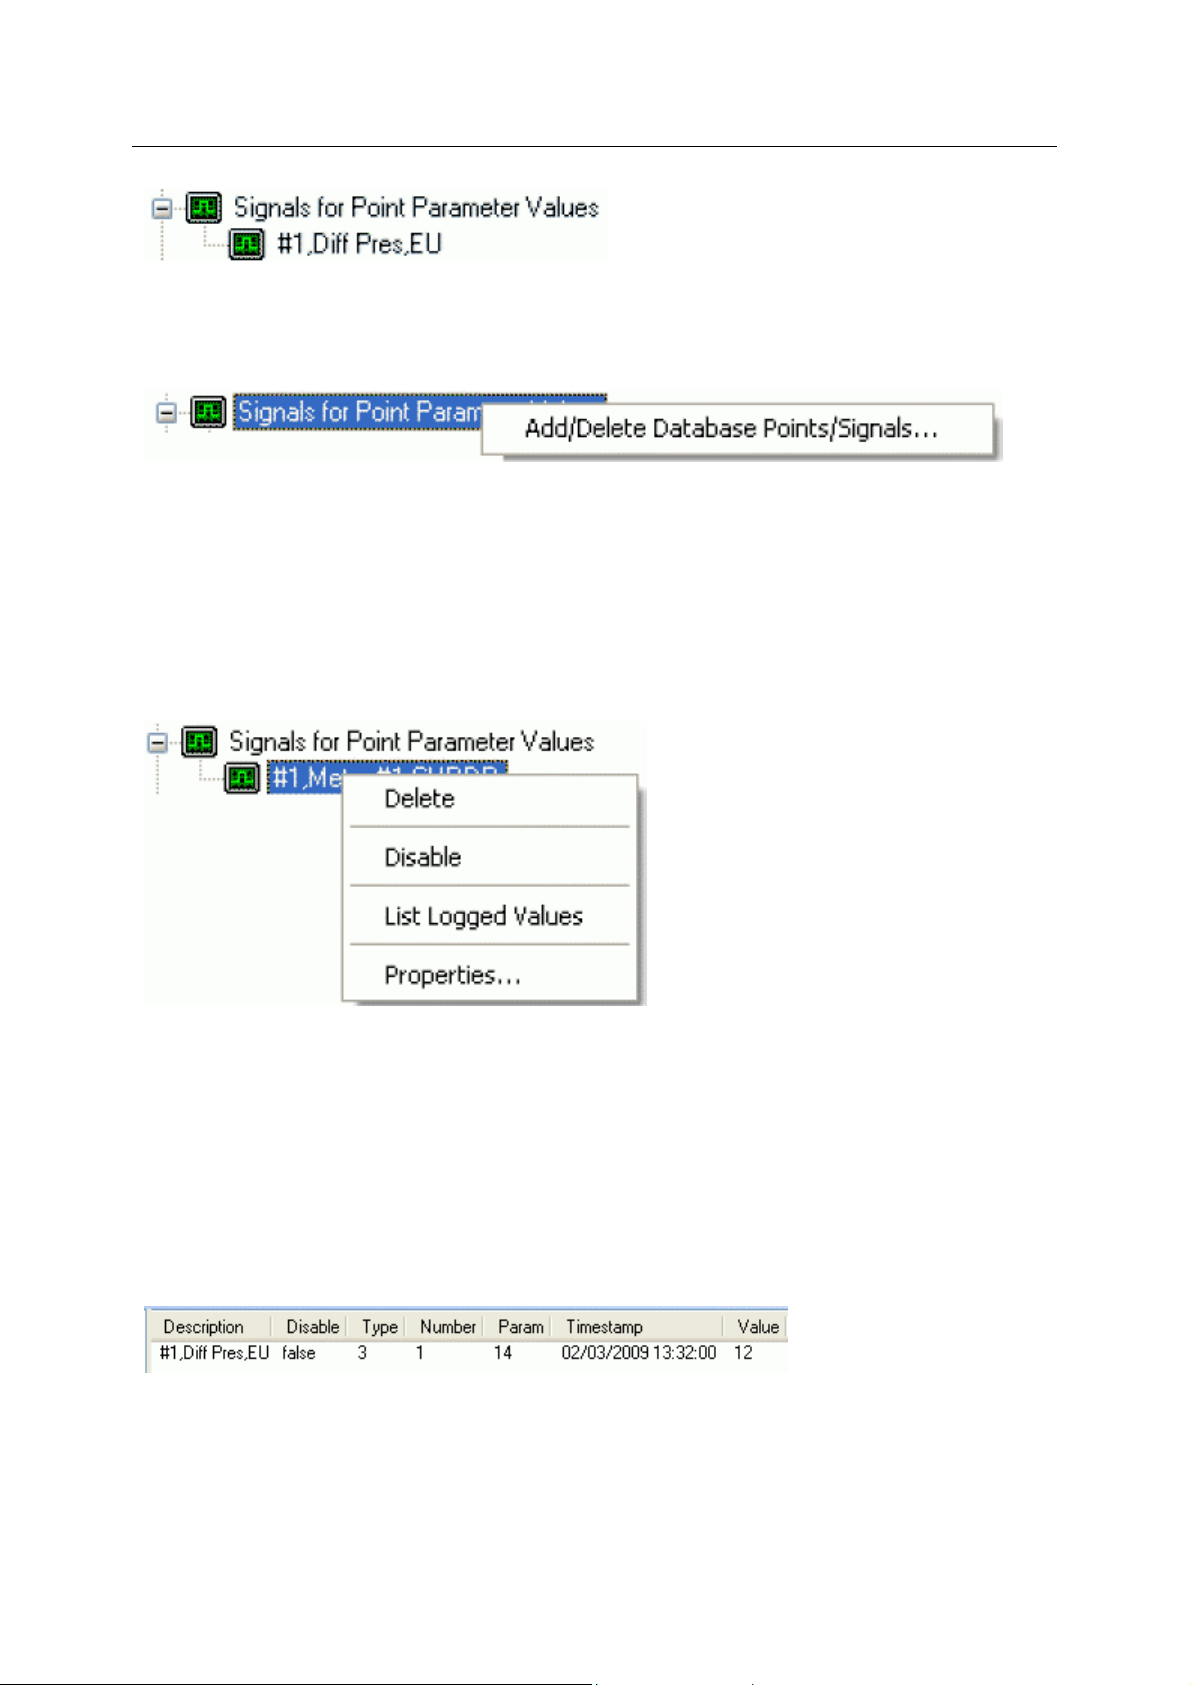
Reference Guide
D301654X412
APRIL 2012
Signals for Point Parameter Values Context Menu
The 'Signals for Point Parameter Values' parent node has this single context menu. Click on it below
for more help.
Add/Delete Database Points/Signals
This option enables you to add or delete ROC Points or Signals from the OpenEnterprise database. It
opens the 'Points Selection' page of the 'ROC Device Wizard' so that you can select the Points and
Parameters required.
Signal Context Menu
ROC Configuration Tool
This context menu is available from any Signal node that appears under the 'Signals for Point
Parameter Values' node that comes under any Point node.
Delete
The selected ROC Signal will be deleted from the OpenEnterprise database.
Disable
The selected ROC Signal will be disabled.
List Logged Values
Overwrites the List View Pane which prior to using this menu item contains the single selected Signal
object.
When the 'List Logged Values' menu item is selected from the object on the Tree View context menu
the last hours worth of sampled data for the selected Signal appears in the List View Pane.
The Logged Values list has a context menu which appears when you selects an y value and right
clicks the mouse.
- 33 -
Page 49
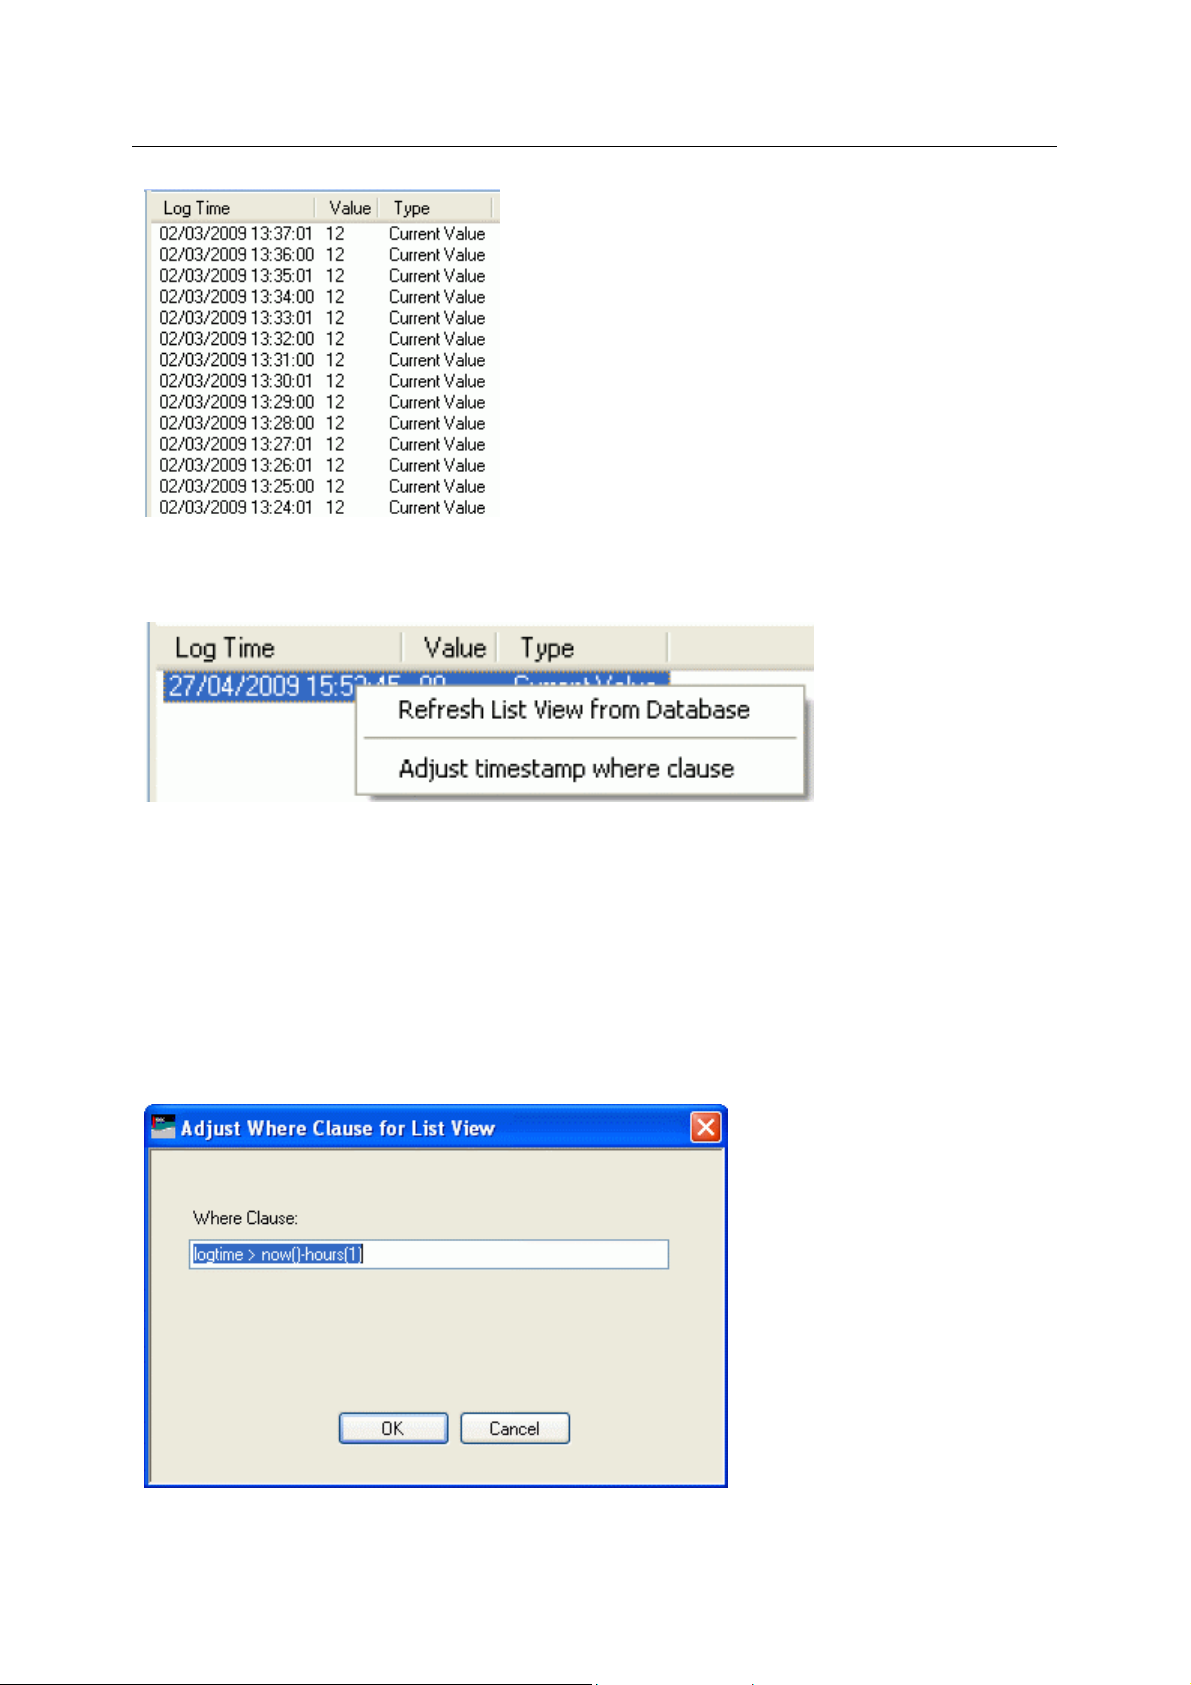
Reference Guide
D301654X412
APRIL 2012
Logged Values List Context Menu
The Logged Values list context menu has two options.
ROC Configuration Tool
Refresh List View from Database
Refreshes the list with the most recent values found in the database.
Adjust timestamp where clause
Enables you to retrieve more historical data for a selected signal by changing the amount of time
requested by the query. The default query retrieves the last hours worth of data.
The simplest way to do this is to type a new value into the brackets after the named time (could be
'hours' or 'days') - e.g. 'logtime > now()-hours(5)'. This would retrieve the last five hours worth of data
for the selected signal from the OpenEnterprise database.
Signal Properties
- 34 -
Page 50
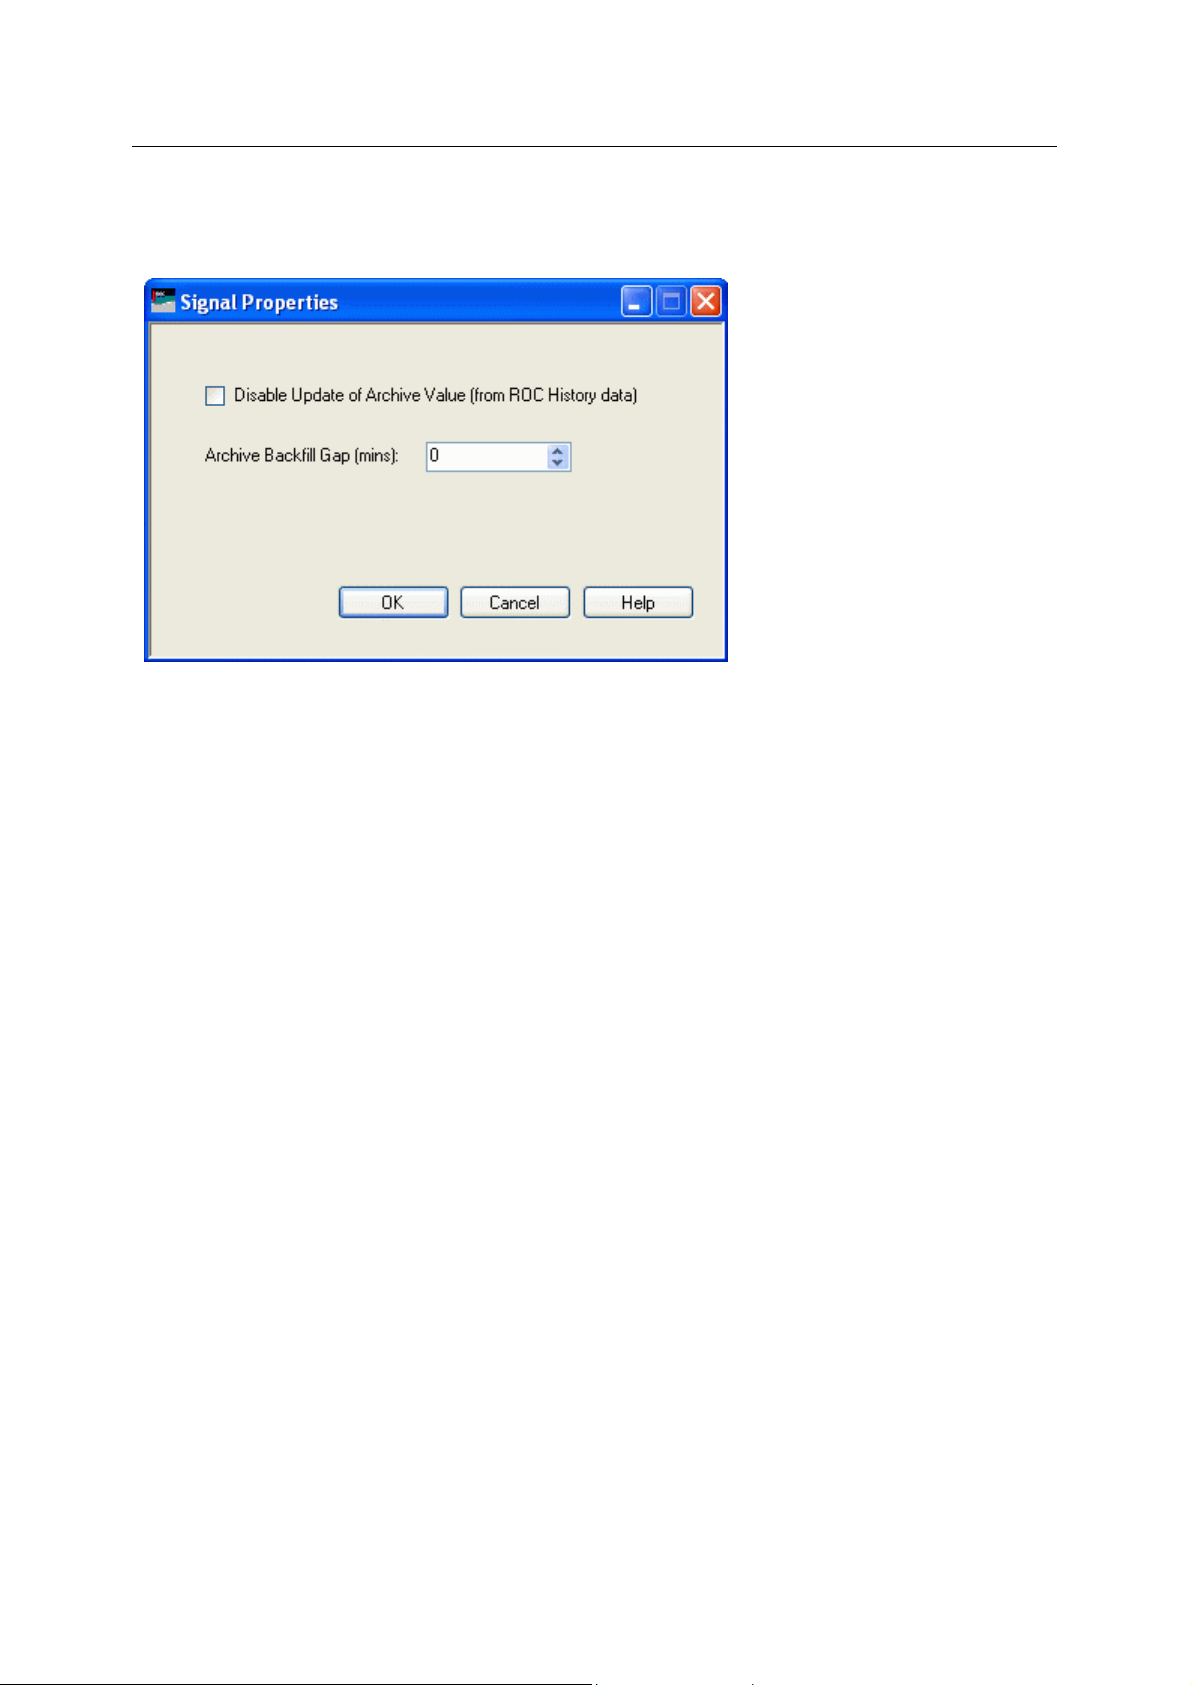
Reference Guide
D301654X412
APRIL 2012
The 'Signal Properties' dialog enables you to configure how the ROC RDI updates the ArchiveValue
and ArchiveTimestamp fields of the selected ROC Signal on receipt of history values from the ROC
Device.
ROC Configuration Tool
Disable Update of Archive Value
If this box is checked then history values retrieved from the Device will not be written to the
ArchiveValue and the ArchiveTimestamp fields of the ROC Realanalog or ROC Digital tables.
If it remains unchecked (the default) then the ArchiveValue and ArchiveTimestamp field for the
selected Signal will be updated from the ROC Device.
Archive Backfill Gap
If the value in this field is 0 (zero), then history values retrieved from the Device will always be written
to the selected Signal's ArchiveValue and ArchiveTimestamp fields (unless the 'Disable Update of
Archive Value' field is checked.
If this value is greater than zero, then the RDI will attempt to only update history values if there is a
‘gap’ in the receipt of the Current Values.
No special RDI processing will trigger a read of history on detecting a ‘gap’ - gaps will only be filled if
the request to read the history values is configured and scheduled (or manually triggered).
Alarms for Point
If there are alarms associated with the selected Point and the 'On add a ROC Point to the database
automatically add associated alarm conditions' option is checked on the 'System Parameters Wizard
General Page', then they will be listed immediately under the Point in the Tree View window.
There is a context menu available on each Alarm Condition.
- 35 -
Page 51
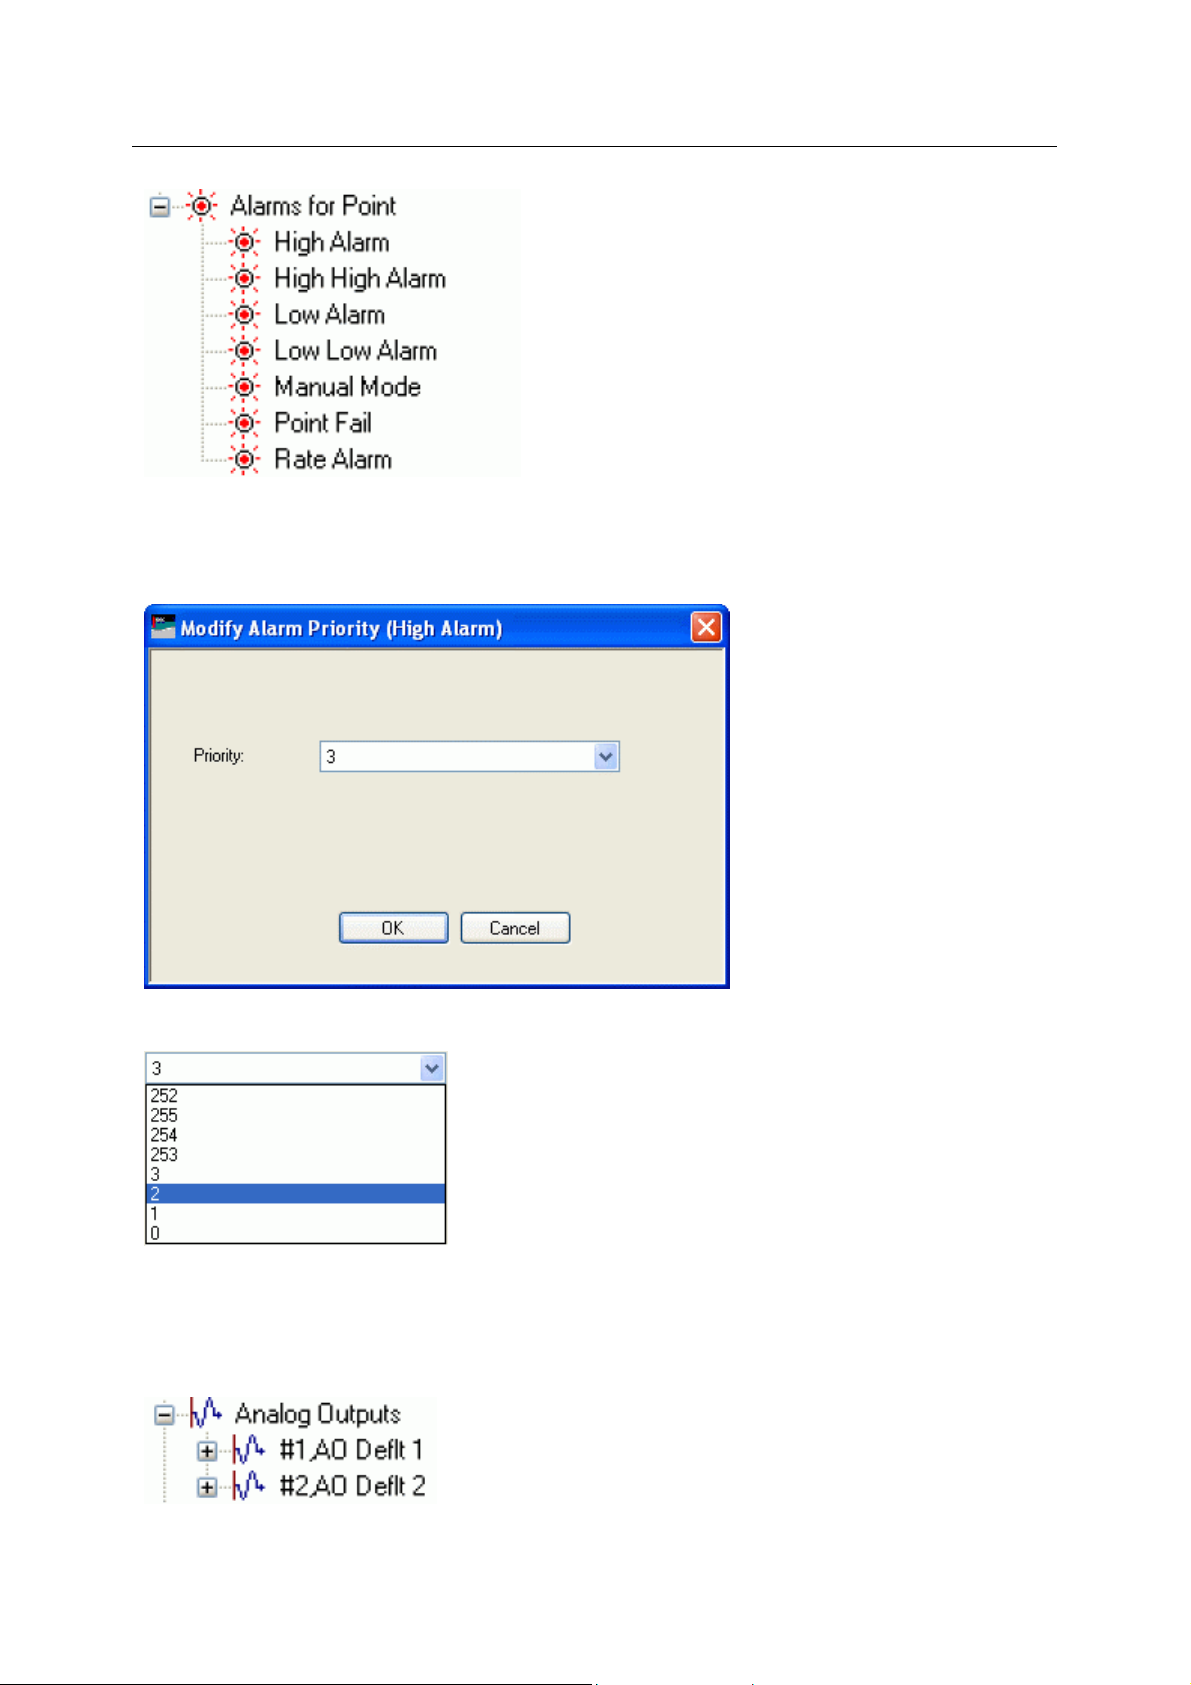
Reference Guide
D301654X412
APRIL 2012
Modify Alarm Priority
If the 'Modify Alarm Priority' option on any Alarm Condition is selected, the priority of the Alarm
Condition can be changed using this dialog.
ROC Configuration Tool
The new priority is chosen from the drop-down list:
Analog Outputs
The Analog Outputs node is the parent of all ROC Analog Output Points found within the selected
device. When the plus sign to the left of the Analog Outputs node is selected, it expands to reveal the
available Points of that type in the Device.
- 36 -
Page 52
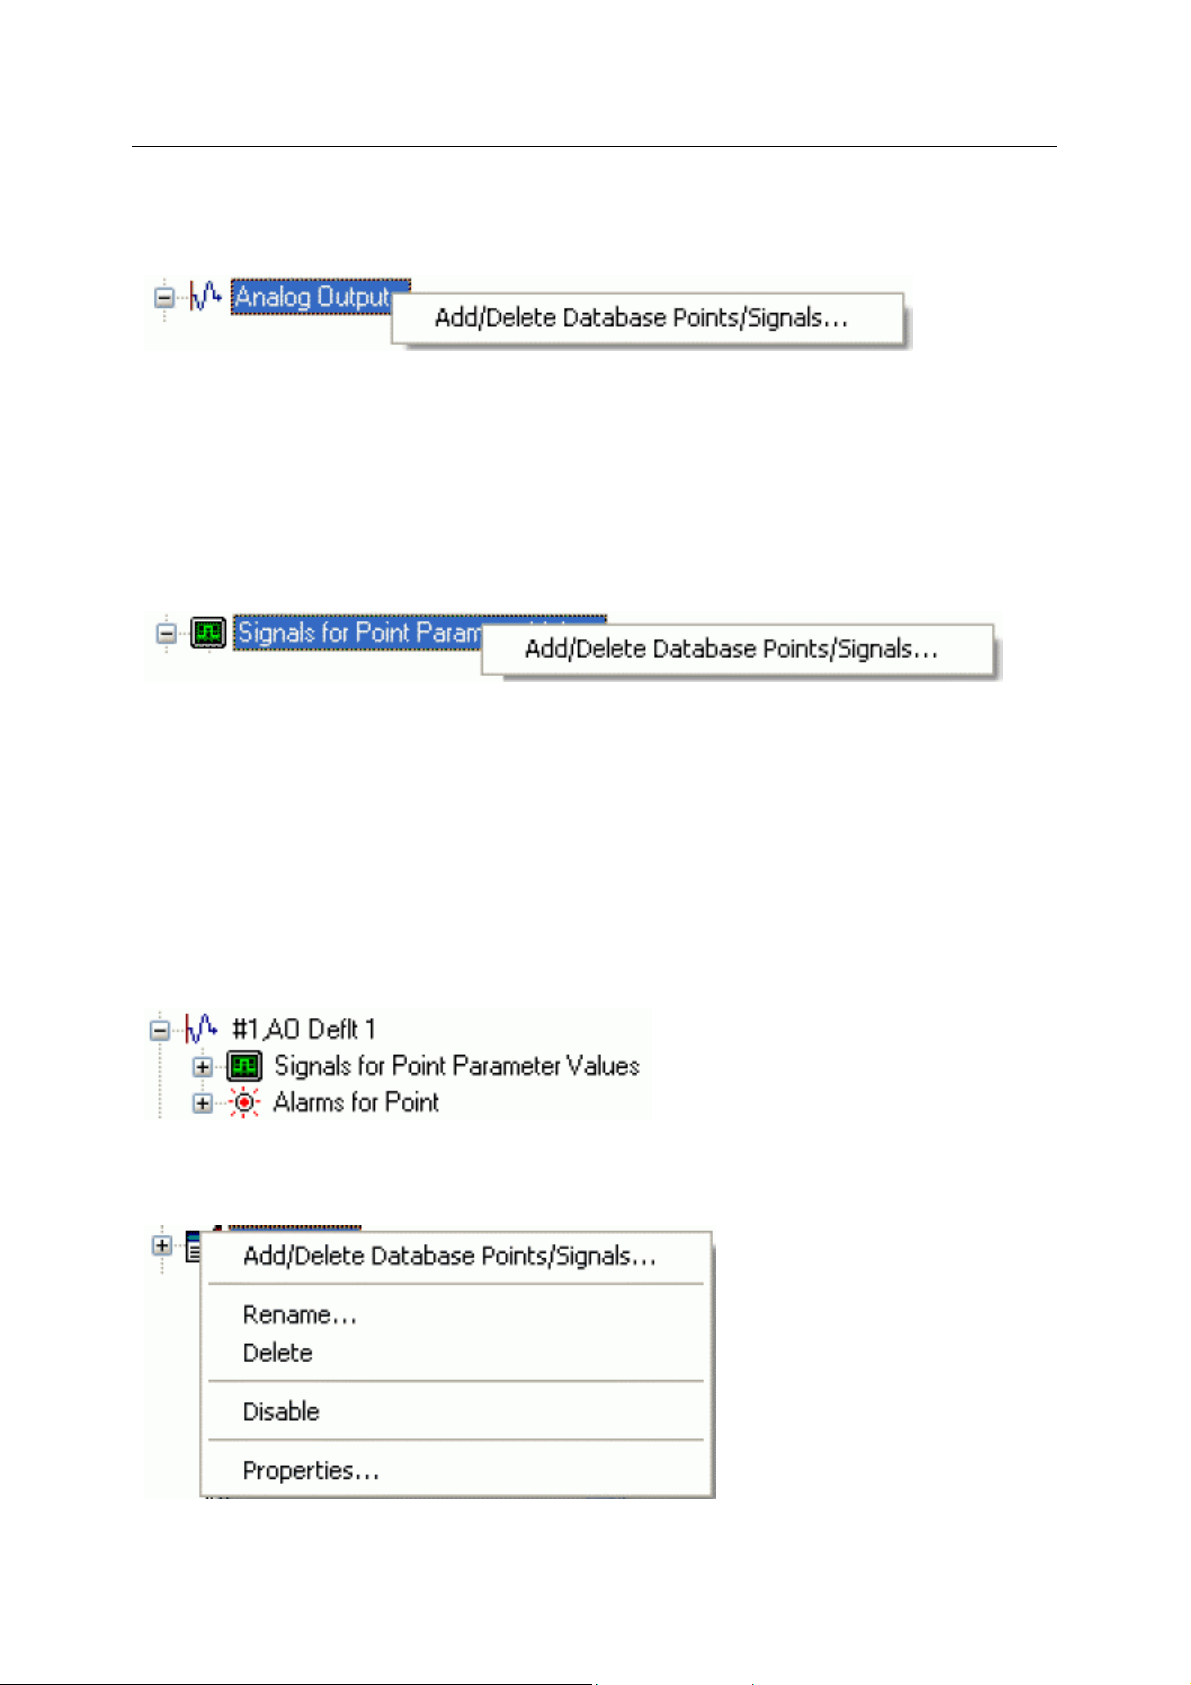
Reference Guide
D301654X412
APRIL 2012
Analog Outputs Context Menu
The context menu on the 'Analog Outputs' node allows you to add or delete ROC Points and Signals.
Add/Delete Database Points/Signals
This option enables you to add or delete ROC Points or Signals from the OpenEnterprise database. It
opens the 'Points Selection' page of the 'ROC Device Wizard' so that you can select the Points and
Parameters required.
Signals for Point Parameter Values Context Menu
The 'Signals for Point Parameter Values' parent node has this single context menu. Click on it below
for more help.
ROC Configuration Tool
Add/Delete Database Points/Signals
This option enables you to add or delete ROC Points or Signals from the OpenEnterprise database. It
opens the 'Points Selection' page of the 'ROC Device Wizard' so that you can select the Points and
Parameters required.
Analog Output Point
If the Analog Output Point has any specific Parameters mapped to the appropriate OpenEnterprise
ROC signal table, it will have a plus sign to the left of it, which when selected will reveal the signals
that have been mapped to Parameters for the selected ROC Point.
Any alarms for the Point will also be shown.
Analog Output Point Context Menu
This context menu appears on individual ROC Analog Output Points.
- 37 -
Page 53
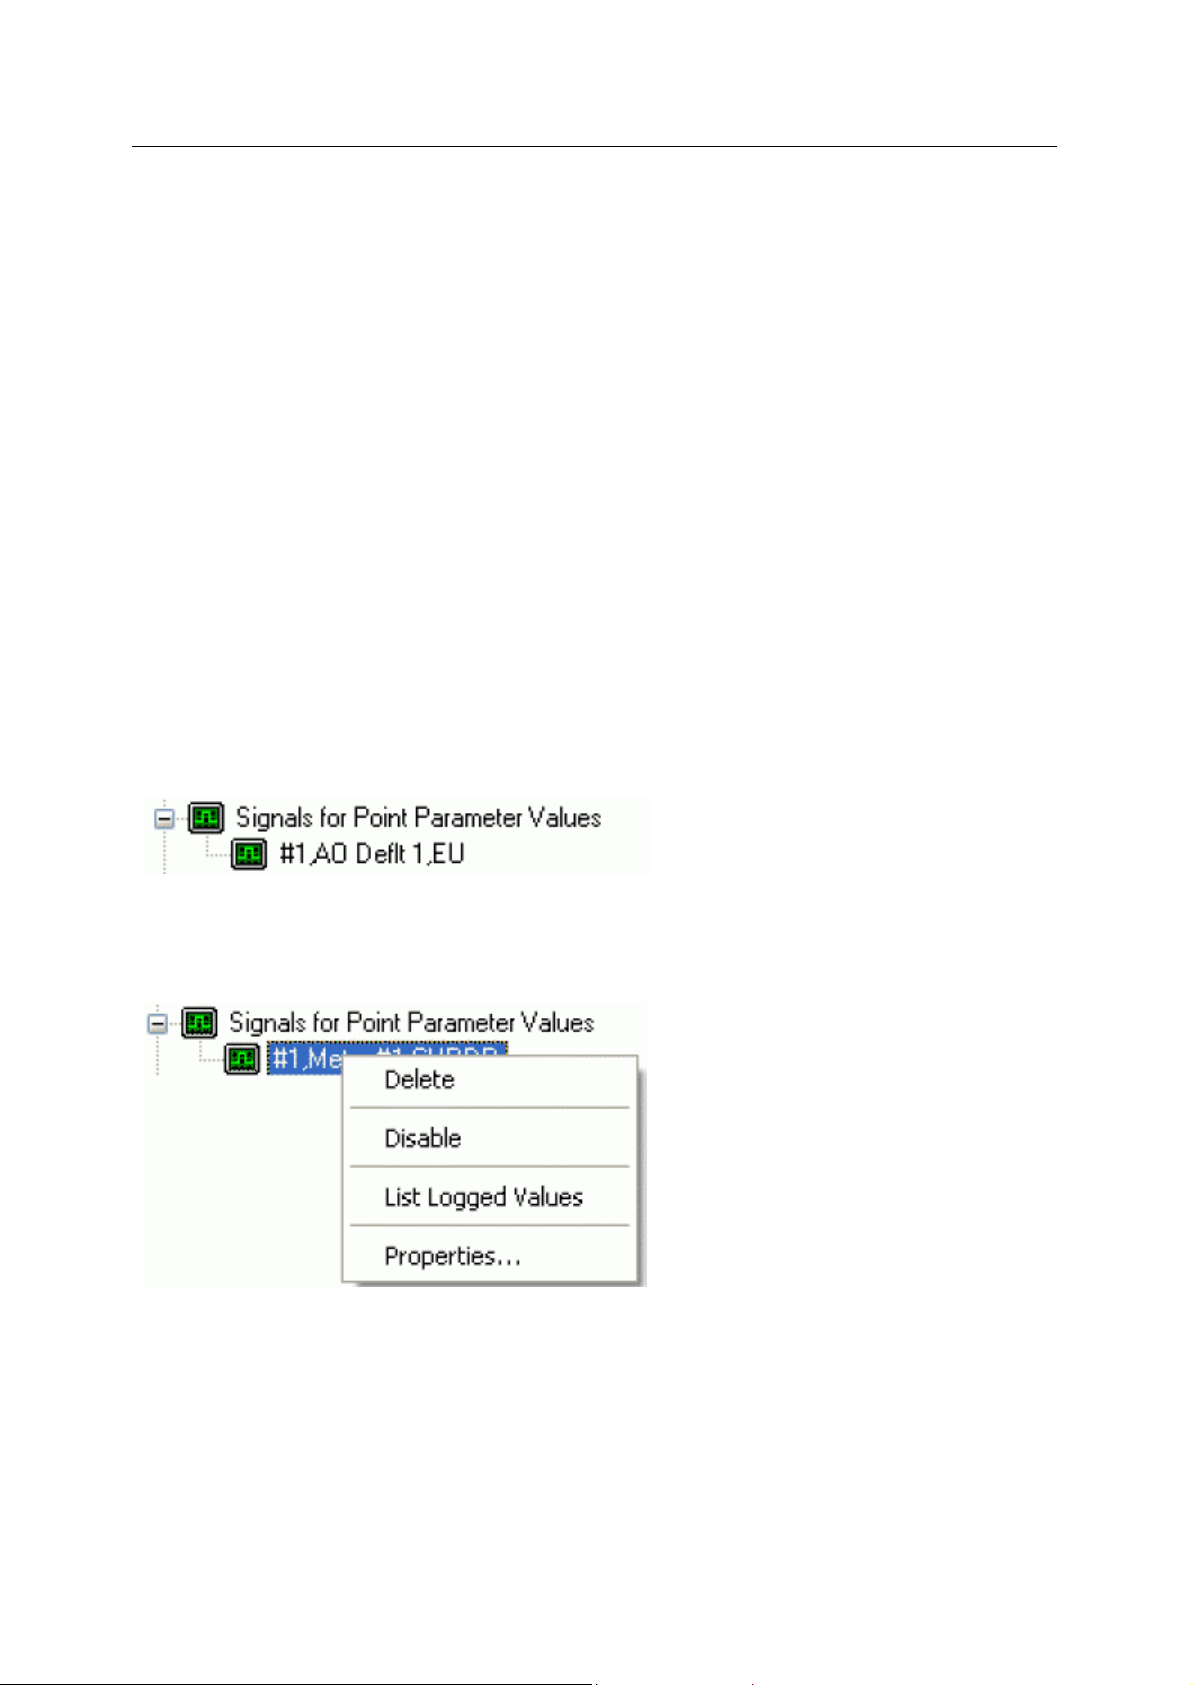
Reference Guide
D301654X412
APRIL 2012
Add/Delete Database Points/Signals
This option enables you to add or delete ROC Points or Signals from the OpenEnterprise database. It
opens the 'Points Selection' page of the 'ROC Device Wizard' so that you can select the Points and
Parameters required.
Rename
Opens the 'Point Rename Dialog', which enables you to rename this Point.
Delete Point
The selected Point will be deleted.
Disable Point
The selected Point will be disabled.
Properties
Opens the 'Point Properties Dialog', which enables you to associate a 'Parameter Pattern Te mplate'
with the Point.
ROC Configuration Tool
Signals For Point Parameter Values
The 'Signals for Point Parameter Values' node is the parent for any ROC Signals that have been
created from the Point. The parent node and each Point node have context menus.
Signal Context Menu
This context menu is available from any Signal node that appears under the 'Signals for Point
Parameter Values' node that comes under any Point node.
Delete
The selected ROC Signal will be deleted from the OpenEnterprise database.
Disable
The selected ROC Signal will be disabled.
List Logged Values
- 38 -
Page 54
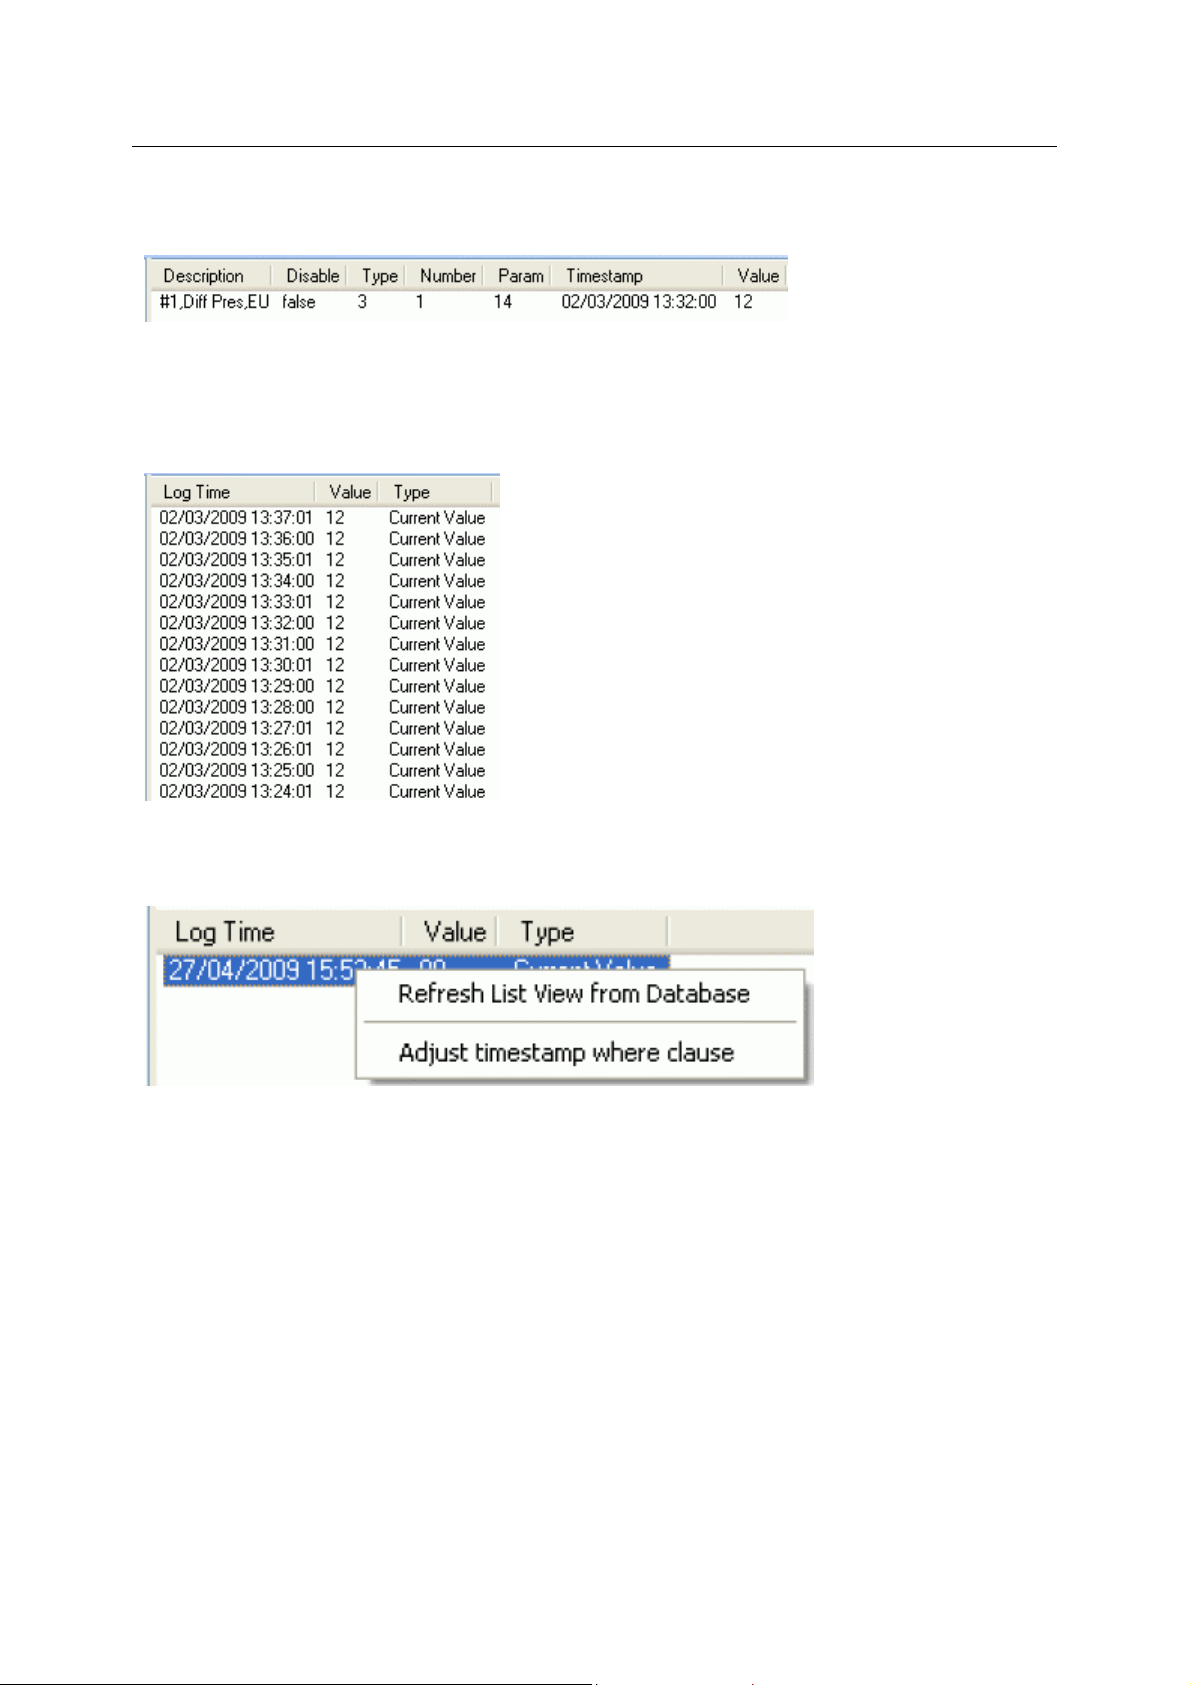
Reference Guide
D301654X412
APRIL 2012
Overwrites the List View Pane which prior to using this menu item contains the single selected Signal
object.
When the 'List Logged Values' menu item is selected from the object on the Tree View context menu
the last hours worth of sampled data for the selected Signal appears in the List View Pane.
The Logged Values list has a context menu which appears when you selects an y value and right
clicks the mouse.
ROC Configuration Tool
Logged Values List Context Menu
The Logged Values list context menu has two options.
Refresh List View from Database
Refreshes the list with the most recent values found in the database.
Adjust timestamp where clause
Enables you to retrieve more historical data for a selected signal by changing the amount of time
requested by the query. The default query retrieves the last hours worth of data.
The simplest way to do this is to type a new value into the brackets after the named time (could be
'hours' or 'days') - e.g. 'logtime > now()-hours(5)'. This would retrieve the last five hours worth of data
for the selected signal from the OpenEnterprise database.
- 39 -
Page 55

Reference Guide
D301654X412
APRIL 2012
Signal Properties
The 'Signal Properties' dialog enables you to configure how the ROC RDI updates the ArchiveValue
and ArchiveTimestamp fields of the selected ROC Signal on receipt of history values from the ROC
Device.
ROC Configuration Tool
Disable Update of Archive Value
If this box is checked then history values retrieved from the Device will not be written to the
ArchiveValue and the ArchiveTimestamp fields of the ROC Realanalog or ROC Digital tables.
If it remains unchecked (the default) then the ArchiveValue and ArchiveTimestamp field for the
selected Signal will be updated from the ROC Device.
Archive Backfill Gap
If the value in this field is 0 (zero), then history values retrieved from the Device will always be written
to the selected Signal's ArchiveValue and ArchiveTimestamp fields (unless the 'Disable Update of
Archive Value' field is checked.
If this value is greater than zero, then the RDI will attempt to only update history values if there is a
‘gap’ in the receipt of the Current Values.
- 40 -
Page 56
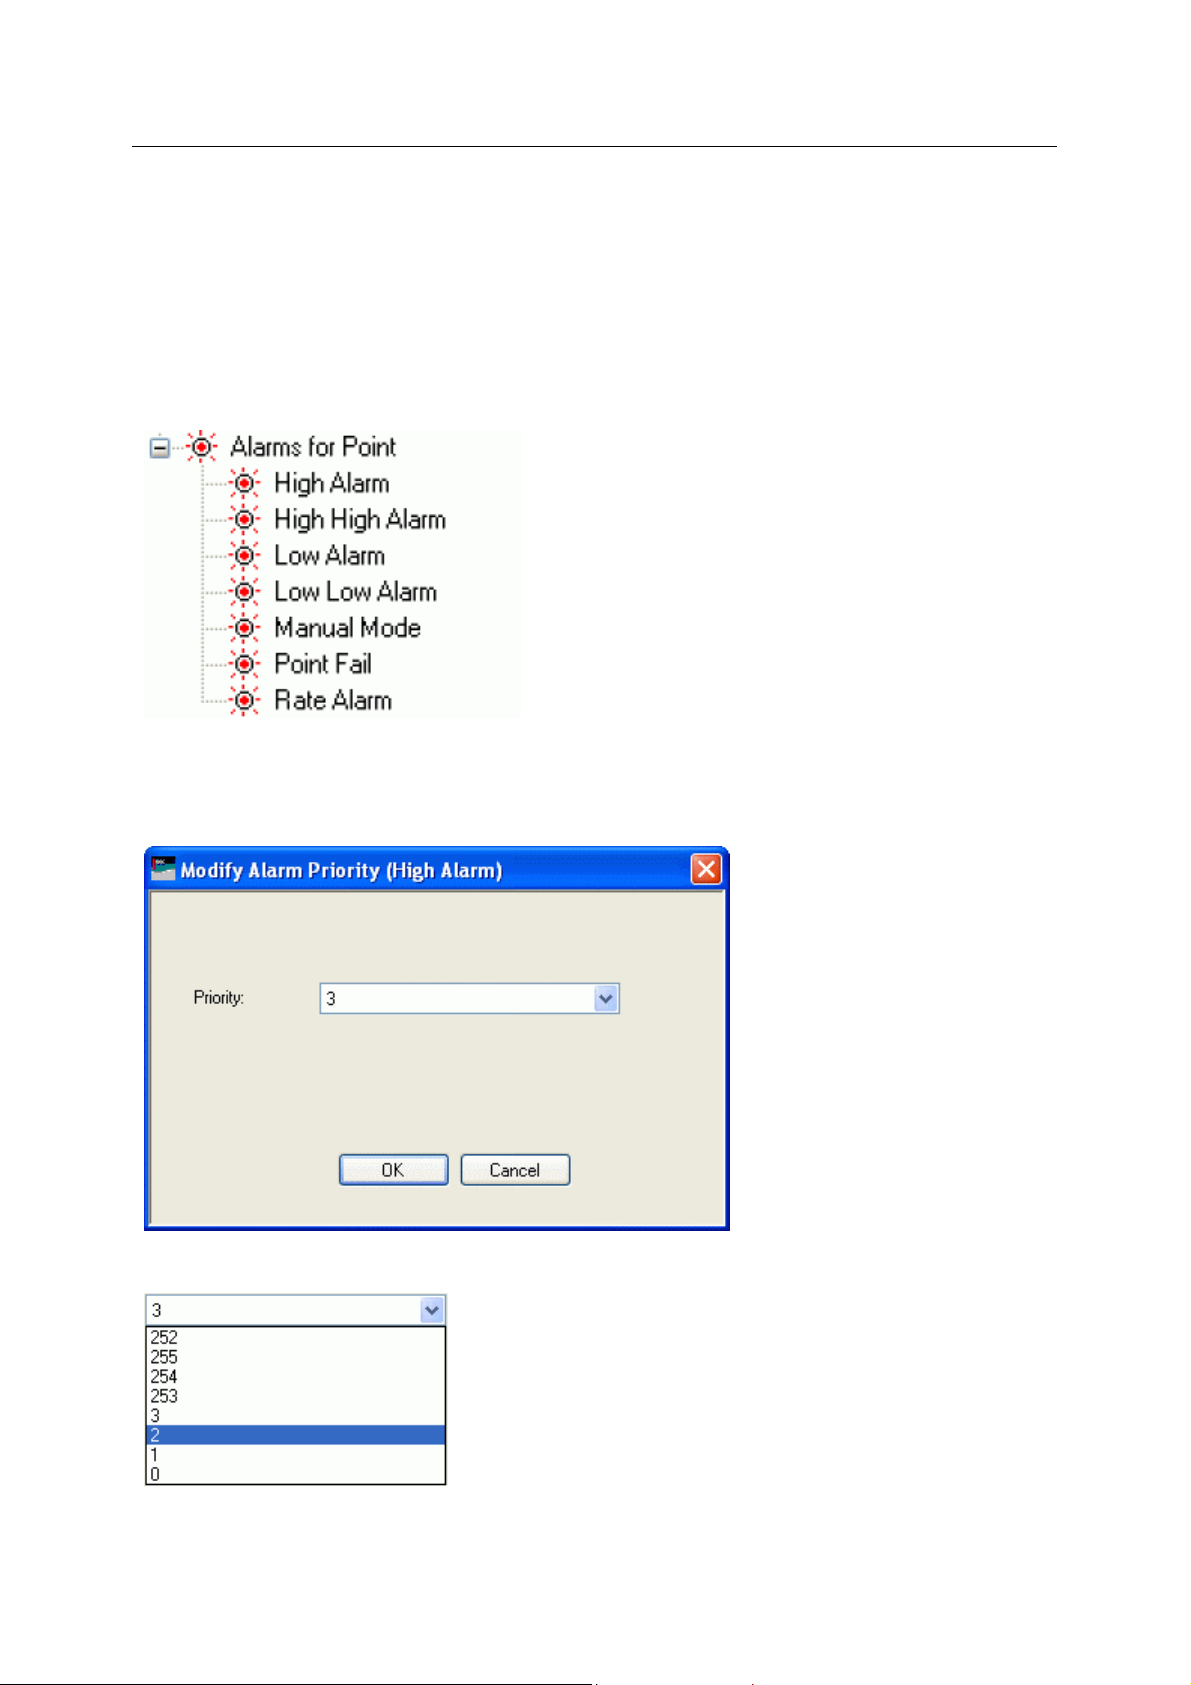
Reference Guide
D301654X412
APRIL 2012
No special RDI processing will trigger a read of history on detecting a ‘gap’ - gaps will only be filled if
the request to read the history values is configured and scheduled (or manually triggered).
Alarms for Point
If there are alarms associated with the selected Point and the 'On add a ROC Point to the database
automatically add associated alarm conditions' option is checked on the 'System Parameters Wizard
General Page', then they will be listed immediately under the Point in the Tree View window.
There is a context menu available on each Alarm Condition.
ROC Configuration Tool
Modify Alarm Priority
If the 'Modify Alarm Priority' option on any Alarm Condition is selected, the priority of the Alarm
Condition can be changed using this dialog.
The new priority is chosen from the drop-down list:
Discrete Inputs
- 41 -
Page 57
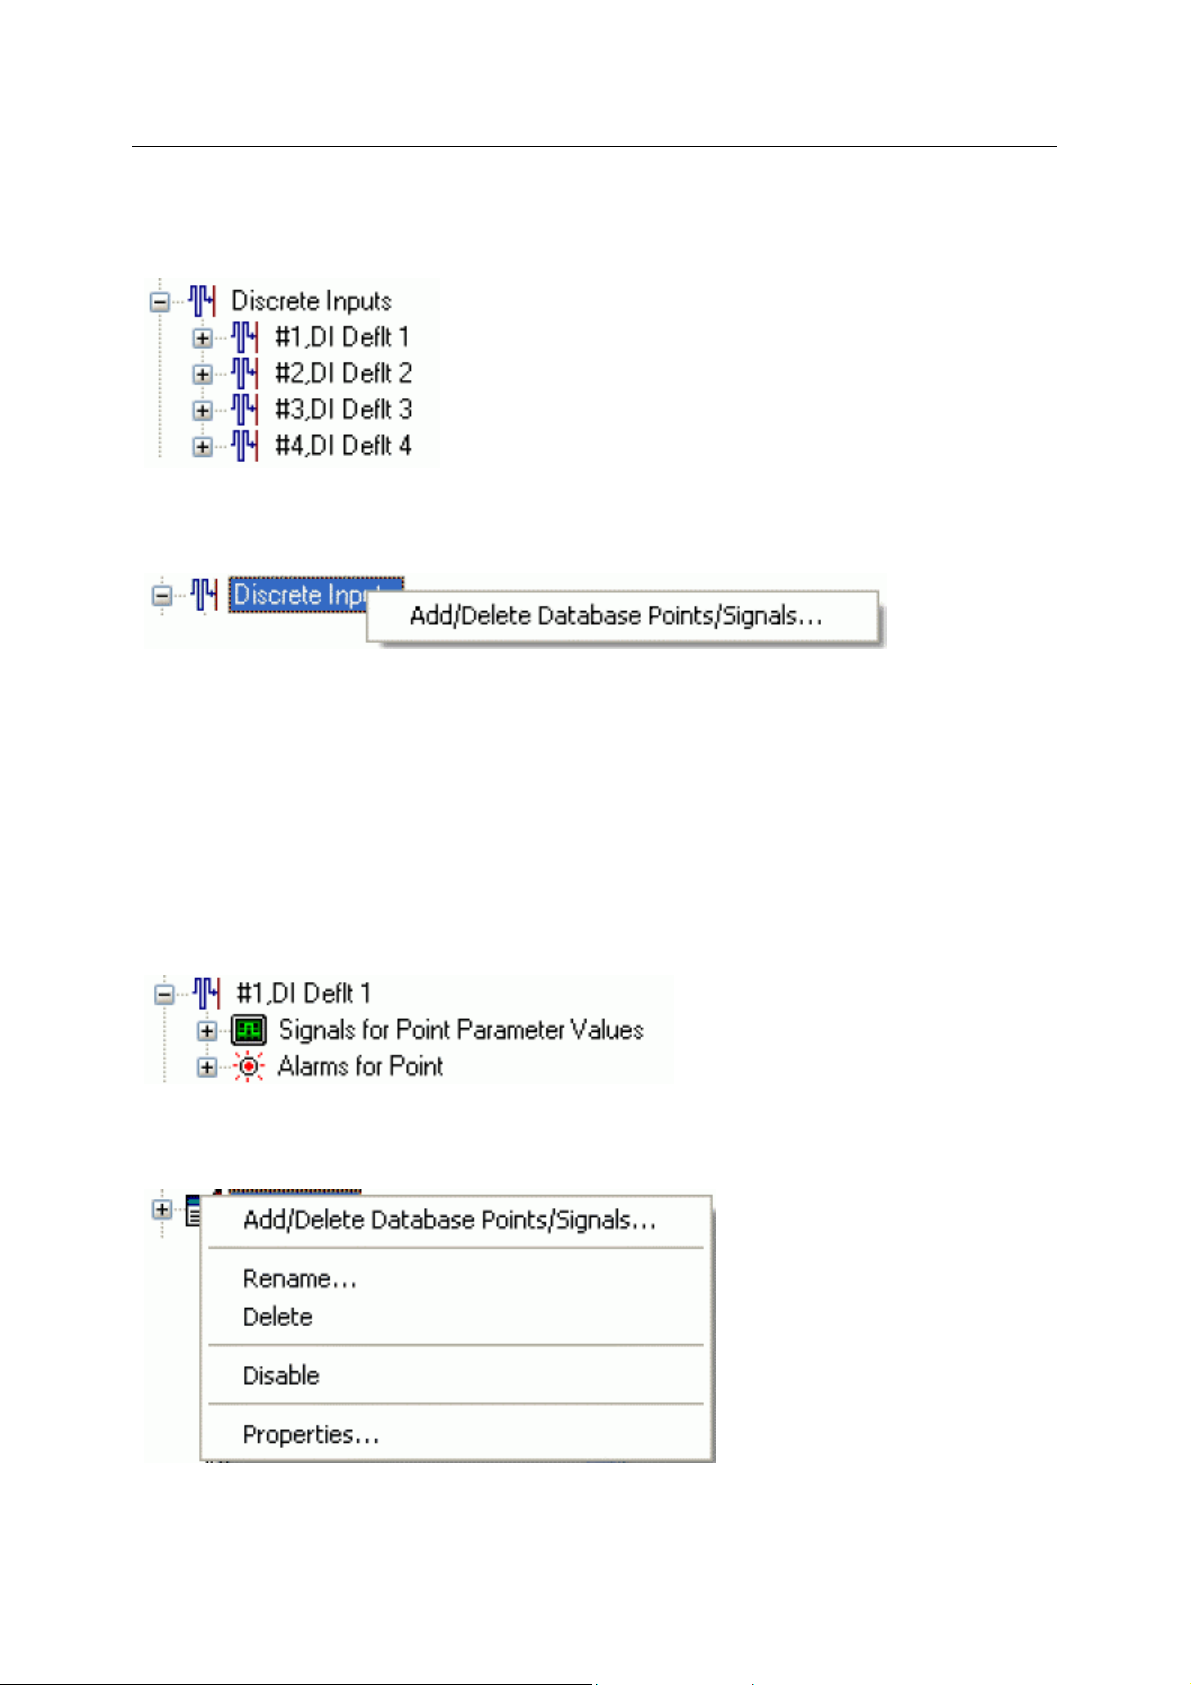
Reference Guide
D301654X412
APRIL 2012
The Discrete Inputs node is the parent of all ROC Discrete Input Points found within the selected
device. When the plus sign to the left of the Discrete Inputs node is selected, it expands to reveal the
available Points of that type in the Device.
Discrete Inputs Context Menu
The context menu on the 'Discrete Inputs' node allows you to add or delete ROC Points and Signals.
ROC Configuration Tool
Add/Delete Database Points/Signals
This option enables you to add or delete ROC Points or Signals from the OpenEnterprise database. It
opens the 'Points Selection' page of the 'ROC Device Wizard' so that you can select the Points and
Parameters required.
Discrete Input Point
If the Discrete Input Point has any specific Parameters mapped to the appropriate OpenEnterprise
ROC signal table, it will have a plus sign to the left of it, which when selected will reveal the signals
that have been mapped to Parameters for the selected ROC Point.
Any alarms for the Point will also be shown.
Discrete Input Point Context Menu
This context menu appears on individual ROC Discrete Input Points.
Add/Delete Database Points/Signals
- 42 -
Page 58

Reference Guide
D301654X412
APRIL 2012
This option enables you to add or delete ROC Points or Signals from the OpenEnterprise database. It
opens the 'Points Selection' page of the 'ROC Device Wizard' so that you can select the Points and
Parameters required.
Rename
Opens the 'Point Rename Dialog', which enables you to rename this Point.
Delete Point
The selected Point will be deleted.
Disable Point
The selected Point will be disabled.
Properties
Opens the 'Point Properties Dialog', which enables you to associate a 'Parameter Pattern Te mplate'
with the Point.
Signals For Point Parameter Values
ROC Configuration Tool
The 'Signals for Point Parameter Values' node is the parent for any ROC Signals that have been
created from the Point. The parent node and each Point node have context menus.
Signals for Point Parameter Values Context Menu
The 'Signals for Point Parameter Values' parent node has this single context menu. Click on it below
for more help.
Add/Delete Database Points/Signals
This option enables you to add or delete ROC Points or Signals from the OpenEnterprise database. It
opens the 'Points Selection' page of the 'ROC Device Wizard' so that you can select the Points and
Parameters required.
Signal Context Menu
This context menu is available from any Signal node that appears under the 'Signals for Point
Parameter Values' node that comes under any Point node.
- 43 -
Page 59

Reference Guide
D301654X412
APRIL 2012
Delete
The selected ROC Signal will be deleted from the OpenEnterprise database.
Disable
The selected ROC Signal will be disabled.
ROC Configuration Tool
List Logged Values
Overwrites the List View Pane which prior to using this menu item contains the single selected Signal
object.
When the 'List Logged Values' menu item is selected from the object on the Tree View context menu
the last hours worth of sampled data for the selected Signal appears in the List View Pane.
The Logged Values list has a context menu which appears when you selects an y value and right
clicks the mouse.
Logged Values List Context Menu
The Logged Values list context menu has two options.
- 44 -
Page 60

Reference Guide
D301654X412
APRIL 2012
Refresh List View from Database
Refreshes the list with the most recent values found in the database.
Adjust timestamp where clause
Enables you to retrieve more historical data for a selected signal by changing the amount of time
requested by the query. The default query retrieves the last hours worth of data.
The simplest way to do this is to type a new value into the brackets after the named time (could be
'hours' or 'days') - e.g. 'logtime > now()-hours(5)'. This would retrieve the last five hours worth of data
for the selected signal from the OpenEnterprise database.
ROC Configuration Tool
Signal Properties
The 'Signal Properties' dialog enables you to configure how the ROC RDI updates the ArchiveValue
and ArchiveTimestamp fields of the selected ROC Signal on receipt of history values from the ROC
Device.
- 45 -
Page 61

Reference Guide
D301654X412
APRIL 2012
Disable Update of Archive Value
If this box is checked then history values retrieved from the Device will not be written to the
ArchiveValue and the ArchiveTimestamp fields of the ROC Realanalog or ROC Digital tables.
ROC Configuration Tool
If it remains unchecked (the default) then the ArchiveValue and ArchiveTimestamp field for the
selected Signal will be updated from the ROC Device.
Archive Backfill Gap
If the value in this field is 0 (zero), then history values retrieved from the Device will always be written
to the selected Signal's ArchiveValue and ArchiveTimestamp fields (unless the 'Disable Update of
Archive Value' field is checked.
If this value is greater than zero, then the RDI will attempt to only update history values if there is a
‘gap’ in the receipt of the Current Values.
No special RDI processing will trigger a read of history on detecting a ‘gap’ - gaps will only be filled if
the request to read the history values is configured and scheduled (or manually triggered).
Alarms for Point
If there are alarms associated with the selected Point and the 'On add a ROC Point to the database
automatically add associated alarm conditions' option is checked on the 'System Parameters Wizard
General Page', then they will be listed immediately under the Point in the Tree View window.
There is a context menu available on each Alarm Condition.
Modify Alarm Priority
- 46 -
Page 62

Reference Guide
D301654X412
APRIL 2012
If the 'Modify Alarm Priority' option on any Alarm Condition is selected, the priority of the Alarm
Condition can be changed using this dialog.
ROC Configuration Tool
The new priority is chosen from the drop-down list:
Discrete Outputs
The Discrete Outputs node is the parent of all ROC Discrete Output Points found within the selected
device. When the plus sign to the left of the Discrete Outputs node is selected, it expands to reveal
the available Points of that type in the Device.
Discrete Outputs Context Menu
The context menu on the 'Discrete Outputs' node allows you to add or delete ROC Points and
Signals.
- 47 -
Page 63

Reference Guide
D301654X412
APRIL 2012
Add/Delete Database Points/Signals
This option enables you to add or delete ROC Points or Signals from the OpenEnterprise database. It
opens the 'Points Selection' page of the 'ROC Device Wizard' so that you can select the Points and
Parameters required.
Discrete Output Point
If the Discrete Output Point has any specific Parameters mapped to the appropriate OpenEnterprise
ROC Signal table, it will have a plus sign to the left of it, which when selected will reveal the signals
that have been mapped to Parameters for the selected ROC Point.
Any alarms for the Point will also be shown.
ROC Configuration Tool
Discrete Output Point Context Menu
This context menu appears on individual ROC Discrete Output Points.
Add/Delete Database Points/Signals
This option enables you to add or delete ROC Points or Signals from the OpenEnterprise database. It
opens the 'Points Selection' page of the 'ROC Device Wizard' so that you can select the Points and
Parameters required.
Rename
Opens the 'Point Rename Dialog', which enables you to rename this Point.
Delete Point
The selected Point will be deleted.
Disable Point
The selected Point will be disabled.
Properties
- 48 -
Page 64
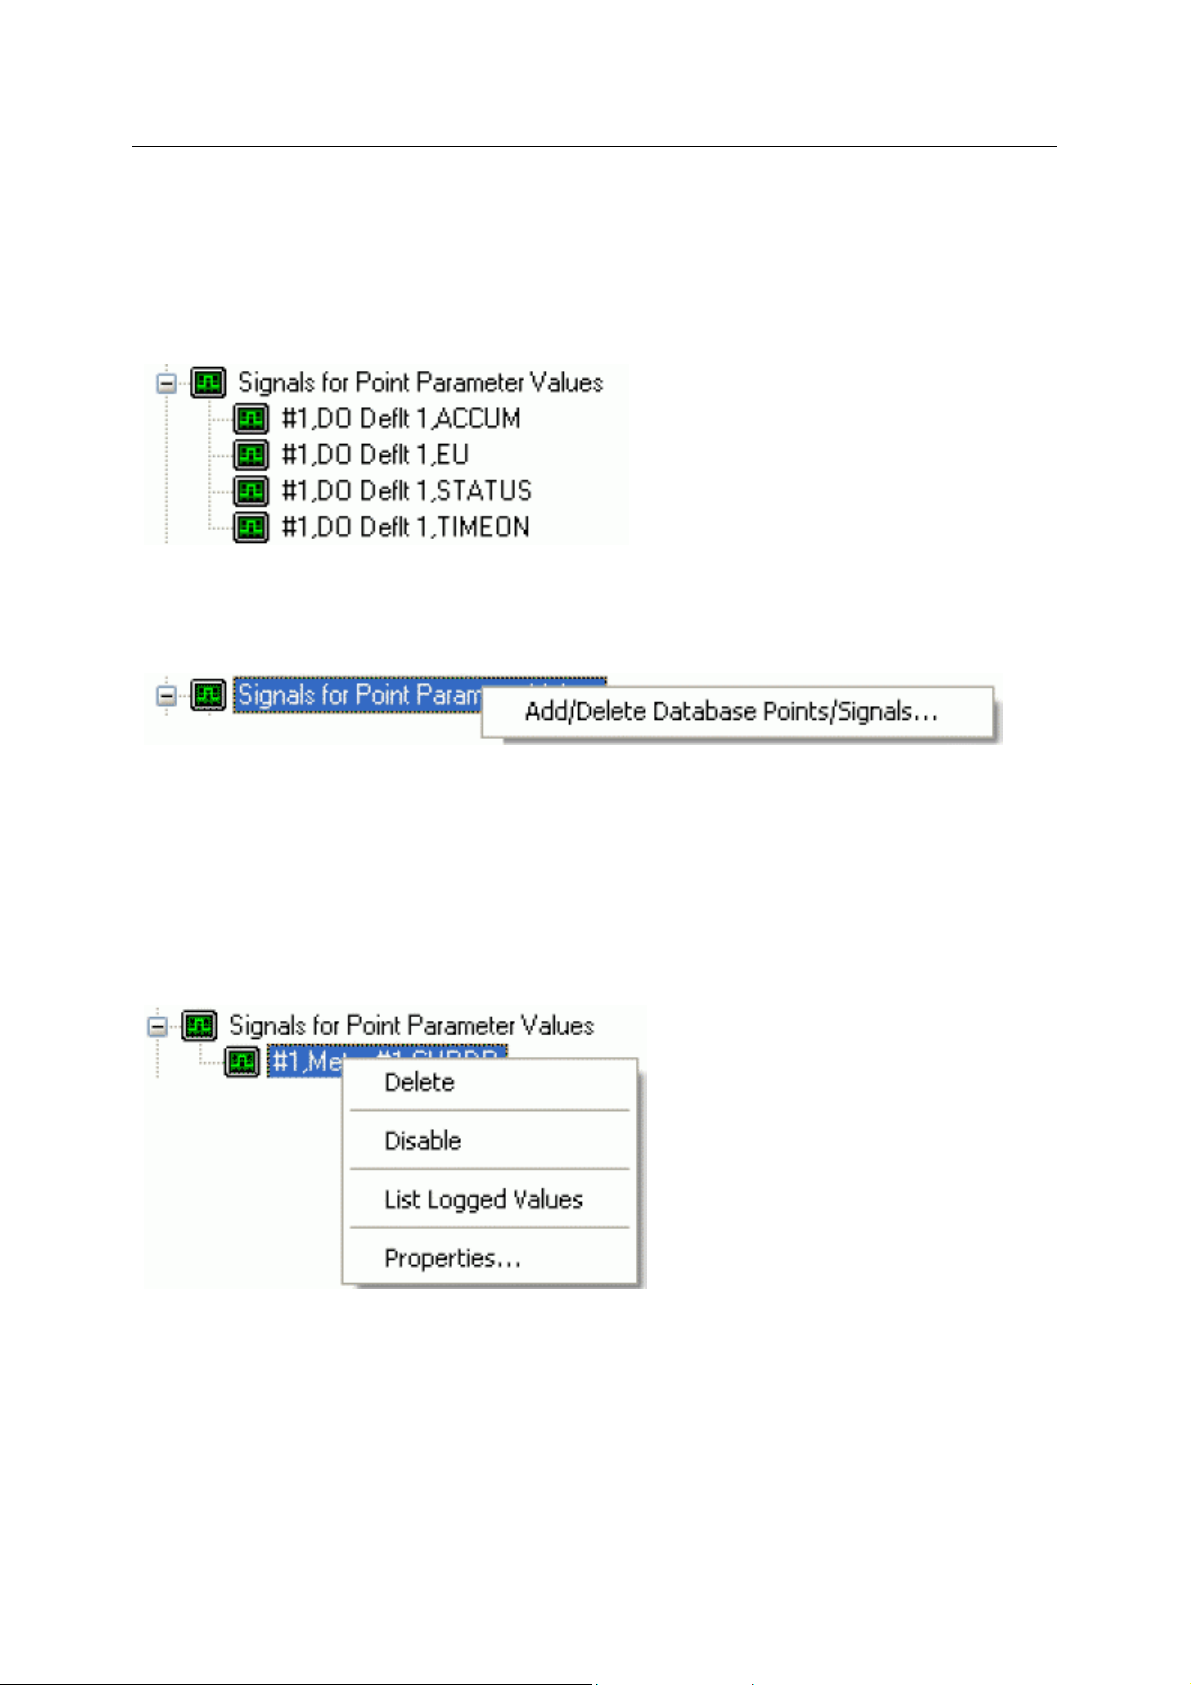
Reference Guide
D301654X412
APRIL 2012
Opens the 'Point Properties Dialog', which enables you to associate a 'Parameter Pattern Te mplate'
with the Point.
Signals For Point Parameter Values
The 'Signals for Point Parameter Values' node is the parent for any ROC Signals that have been
created from the Point. The parent node and each Point node have context menus.
Signals for Point Parameter Values Context Menu
The 'Signals for Point Parameter Values' parent node has this single context menu. Click on it below
for more help.
ROC Configuration Tool
Add/Delete Database Points/Signals
This option enables you to add or delete ROC Points or Signals from the OpenEnterprise database. It
opens the 'Points Selection' page of the 'ROC Device Wizard' so that you can select the Points and
Parameters required.
Signal Context Menu
This context menu is available from any Signal node that appears under the 'Signals for Point
Parameter Values' node that comes under any Point node.
Delete
The selected ROC Signal will be deleted from the OpenEnterprise database.
Disable
The selected ROC Signal will be disabled.
List Logged Values
- 49 -
Page 65

Reference Guide
D301654X412
APRIL 2012
Overwrites the List View Pane which prior to using this menu item contains the single selected Signal
object.
When the 'List Logged Values' menu item is selected from the object on the Tree View context menu
the last hours worth of sampled data for the selected Signal appears in the List View Pane.
The Logged Values list has a context menu which appears when you selects an y value and right
clicks the mouse.
ROC Configuration Tool
Logged Values List Context Menu
The Logged Values list context menu has two options.
Refresh List View from Database
Refreshes the list with the most recent values found in the database.
Adjust timestamp where clause
Enables you to retrieve more historical data for a selected signal by changing the amount of time
requested by the query. The default query retrieves the last hours worth of data.
The simplest way to do this is to type a new value into the brackets after the named time (could be
'hours' or 'days') - e.g. 'logtime > now()-hours(5)'. This would retrieve the last five hours worth of data
for the selected signal from the OpenEnterprise database.
- 50 -
Page 66
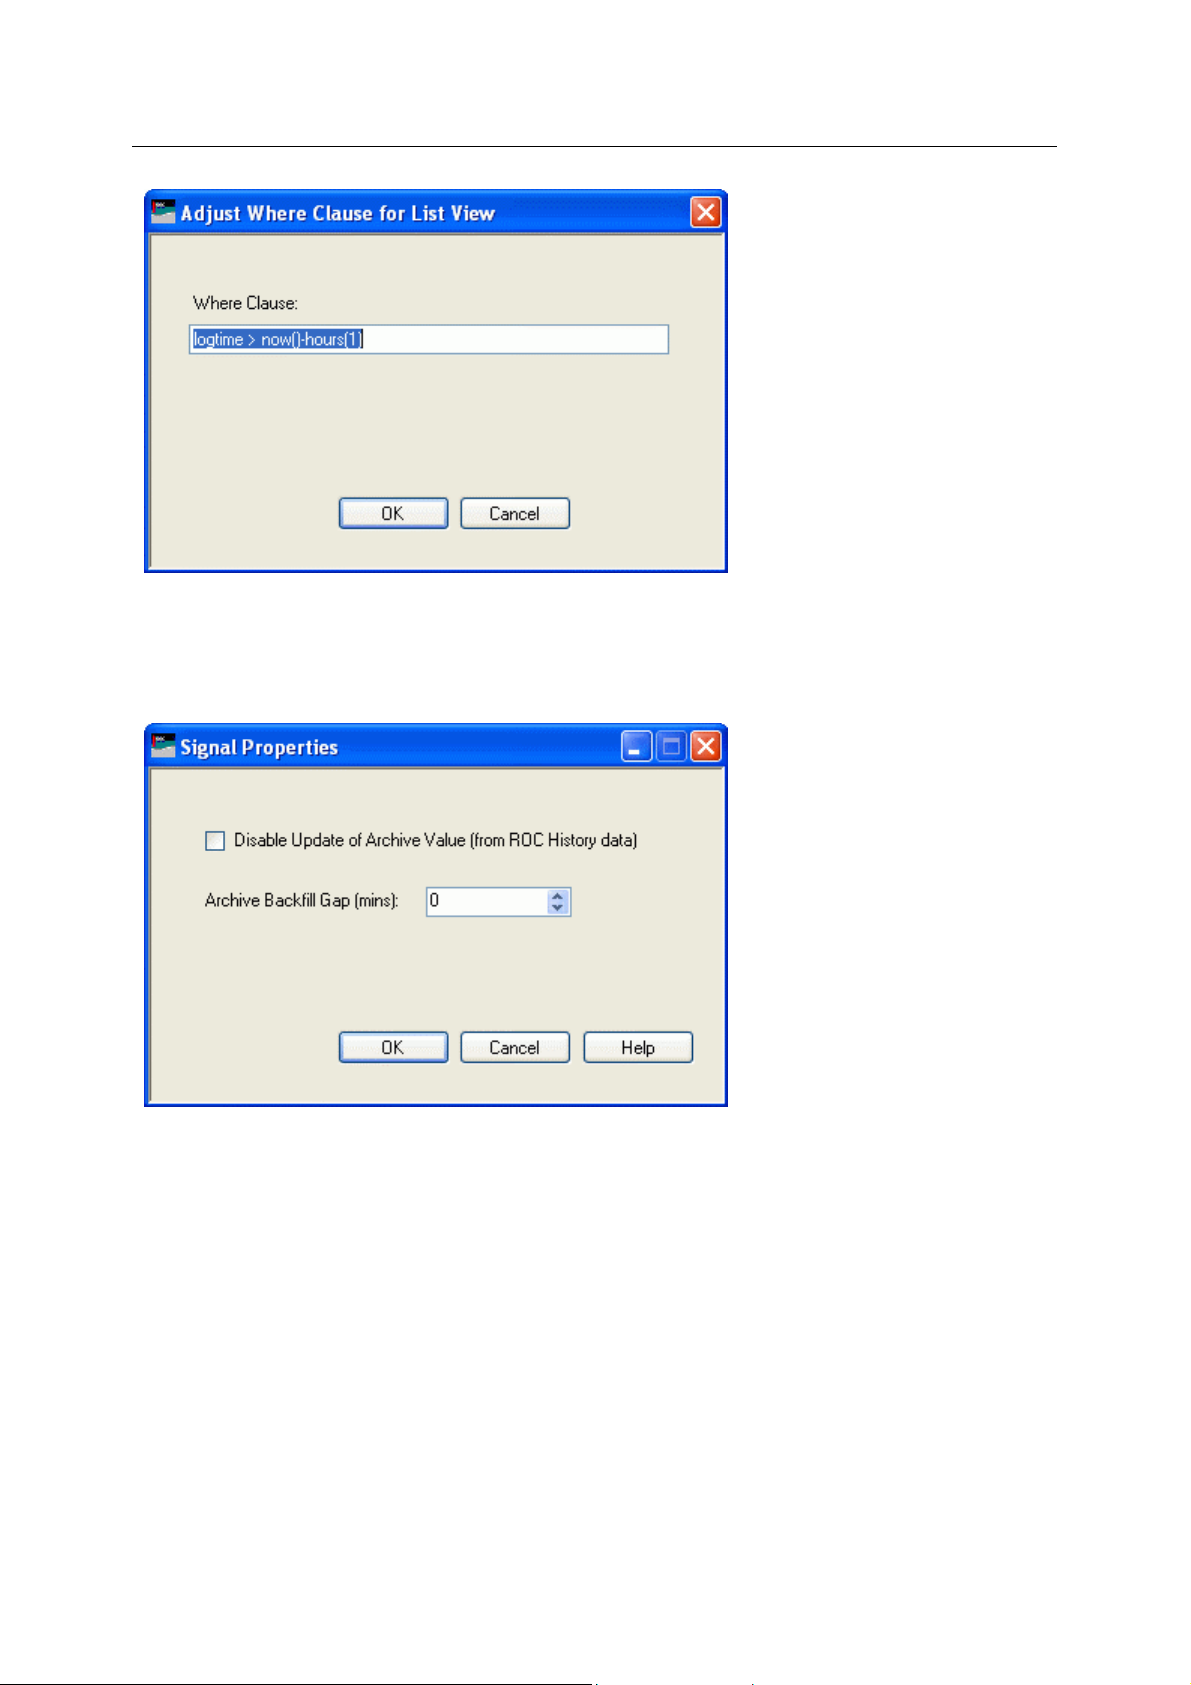
Reference Guide
D301654X412
APRIL 2012
Signal Properties
The 'Signal Properties' dialog enables you to configure how the ROC RDI updates the ArchiveValue
and ArchiveTimestamp fields of the selected ROC Signal on receipt of history values from the ROC
Device.
ROC Configuration Tool
Disable Update of Archive Value
If this box is checked then history values retrieved from the Device will not be written to the
ArchiveValue and the ArchiveTimestamp fields of the ROC Realanalog or ROC Digital tables.
If it remains unchecked (the default) then the ArchiveValue and ArchiveTimestamp field for the
selected Signal will be updated from the ROC Device.
Archive Backfill Gap
If the value in this field is 0 (zero), then history values retrieved from the Device will always be written
to the selected Signal's ArchiveValue and ArchiveTimestamp fields (unless the 'Disable Update of
Archive Value' field is checked.
If this value is greater than zero, then the RDI will attempt to only update history values if there is a
‘gap’ in the receipt of the Current Values.
- 51 -
Page 67

Reference Guide
D301654X412
APRIL 2012
No special RDI processing will trigger a read of history on detecting a ‘gap’ - gaps will only be filled if
the request to read the history values is configured and scheduled (or manually triggered).
Alarms for Point
If there are alarms associated with the selected Point and the 'On add a ROC Point to the database
automatically add associated alarm conditions' option is checked on the 'System Parameters Wizard
General Page', then they will be listed immediately under the Point in the Tree View window.
There is a context menu available on each Alarm Condition.
ROC Configuration Tool
Modify Alarm Priority
If the 'Modify Alarm Priority' option on any Alarm Condition is selected, the priority of the Alarm
Condition can be changed using this dialog.
The new priority is chosen from the drop-down list:
Pulse Inputs
- 52 -
Page 68
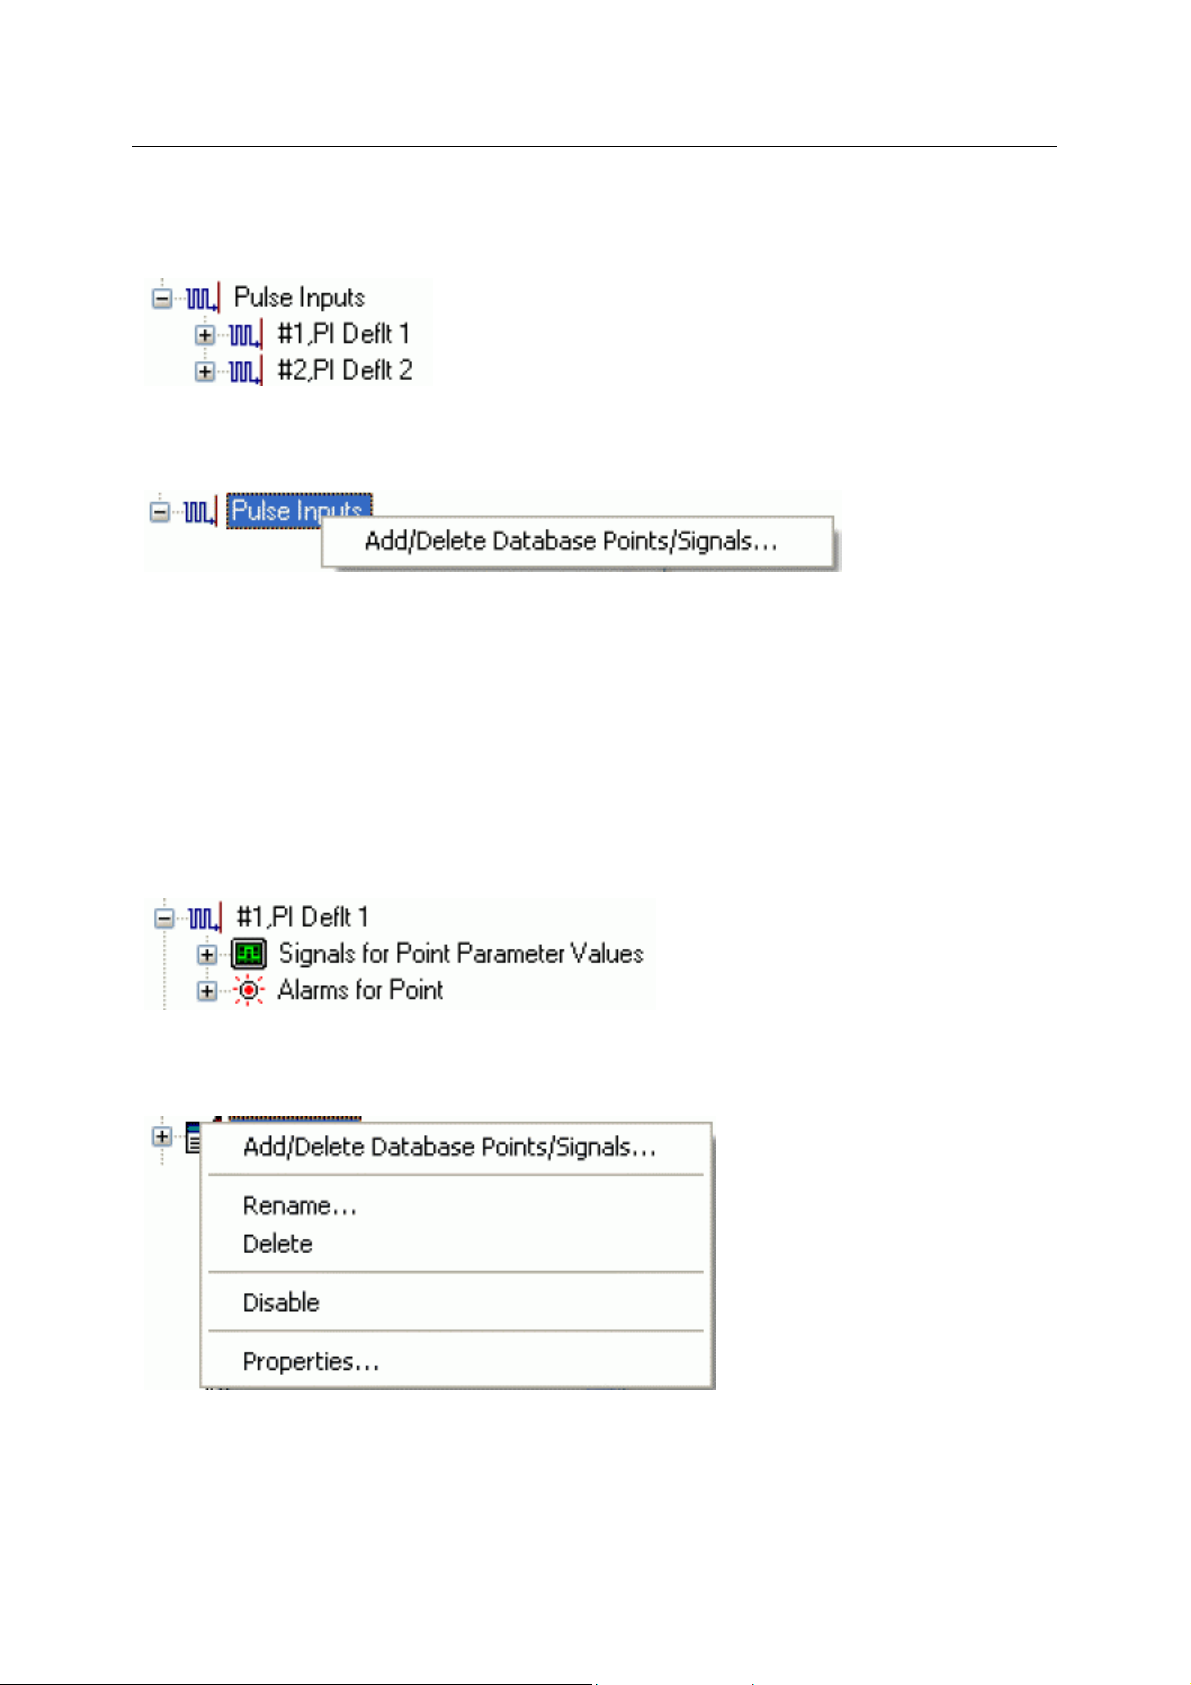
Reference Guide
D301654X412
APRIL 2012
The Pulse Inputs node is the parent of all ROC Pulse Input Points found within the selected device.
When the plus sign to the left of the Pulse Inputs node is selected, it expands to reveal the available
Points of that type in the Device.
Pulse Inputs Context Menu
The context menu on the 'Pulse Inputs' node allows you to add or delete ROC Points and Signals.
Add/Delete Database Points/Signals
This option enables you to add or delete ROC Points or Signals from the OpenEnterprise database. It
opens the 'Points Selection' page of the 'ROC Device Wizard' so that you can select the Points and
Parameters required.
ROC Configuration Tool
Pulse Input Point
If the Pulse Input Point has any specific Parameters mapped to the appropriate OpenEnterprise ROC
signal table, it will have a plus sign to the left of it, which when selected will reveal the signals that
have been mapped to Parameters for the selected ROC Point.
Any alarms for the Point will also be shown.
Pulse Input Point Context Menu
This context menu appears on individual ROC Pulse Input Points.
Add/Delete Database Points/Signals
This option enables you to add or delete ROC Points or Signals from the OpenEnterprise database. It
opens the 'Points Selection' page of the 'ROC Device Wizard' so that you can select the Points and
Parameters required.
- 53 -
Page 69
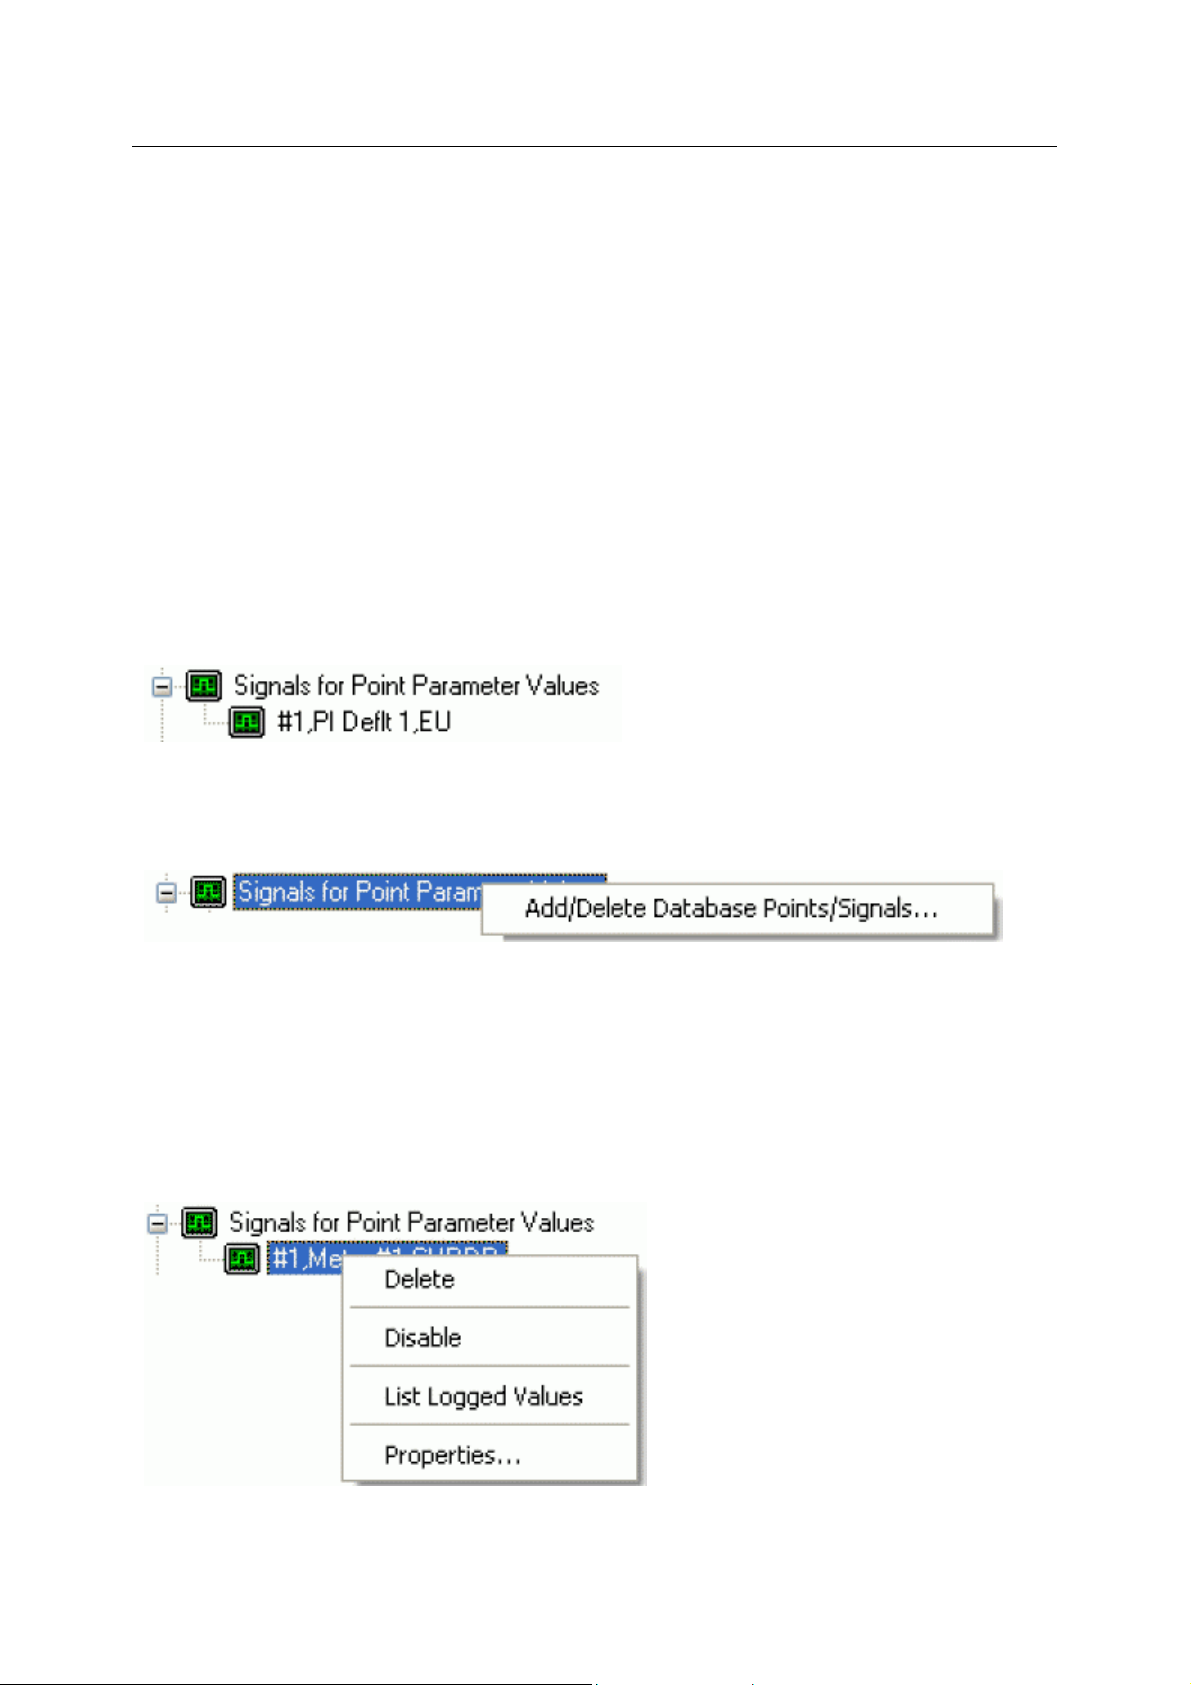
Reference Guide
D301654X412
APRIL 2012
Rename
Opens the 'Point Rename Dialog', which enables you to rename this Point.
Delete Point
The selected Point will be deleted.
Disable Point
The selected Point will be disabled.
Properties
Opens the 'Point Properties Dialog', which enables you to associate a 'Parameter Pattern Te mplate'
with the Point.
Signals for Point Parameter Values
The 'Signals for Point Parameter Values' node is the parent for any ROC Signals that have been
created from the Point. The parent node and each Point node have context menus.
ROC Configuration Tool
Signals for Point Parameter Values Context Menu
The 'Signals for Point Parameter Values' parent node has this single context menu. Click on it below
for more help.
Add/Delete Database Points/Signals
This option enables you to add or delete ROC Points or Signals from the OpenEnterprise database. It
opens the 'Points Selection' page of the 'ROC Device Wizard' so that you can select the Points and
Parameters required.
Signal Context Menu
This context menu is available from any Signal node that appears under the 'Signals for Point
Parameter Values' node that comes under any Point node.
Delete
- 54 -
Page 70
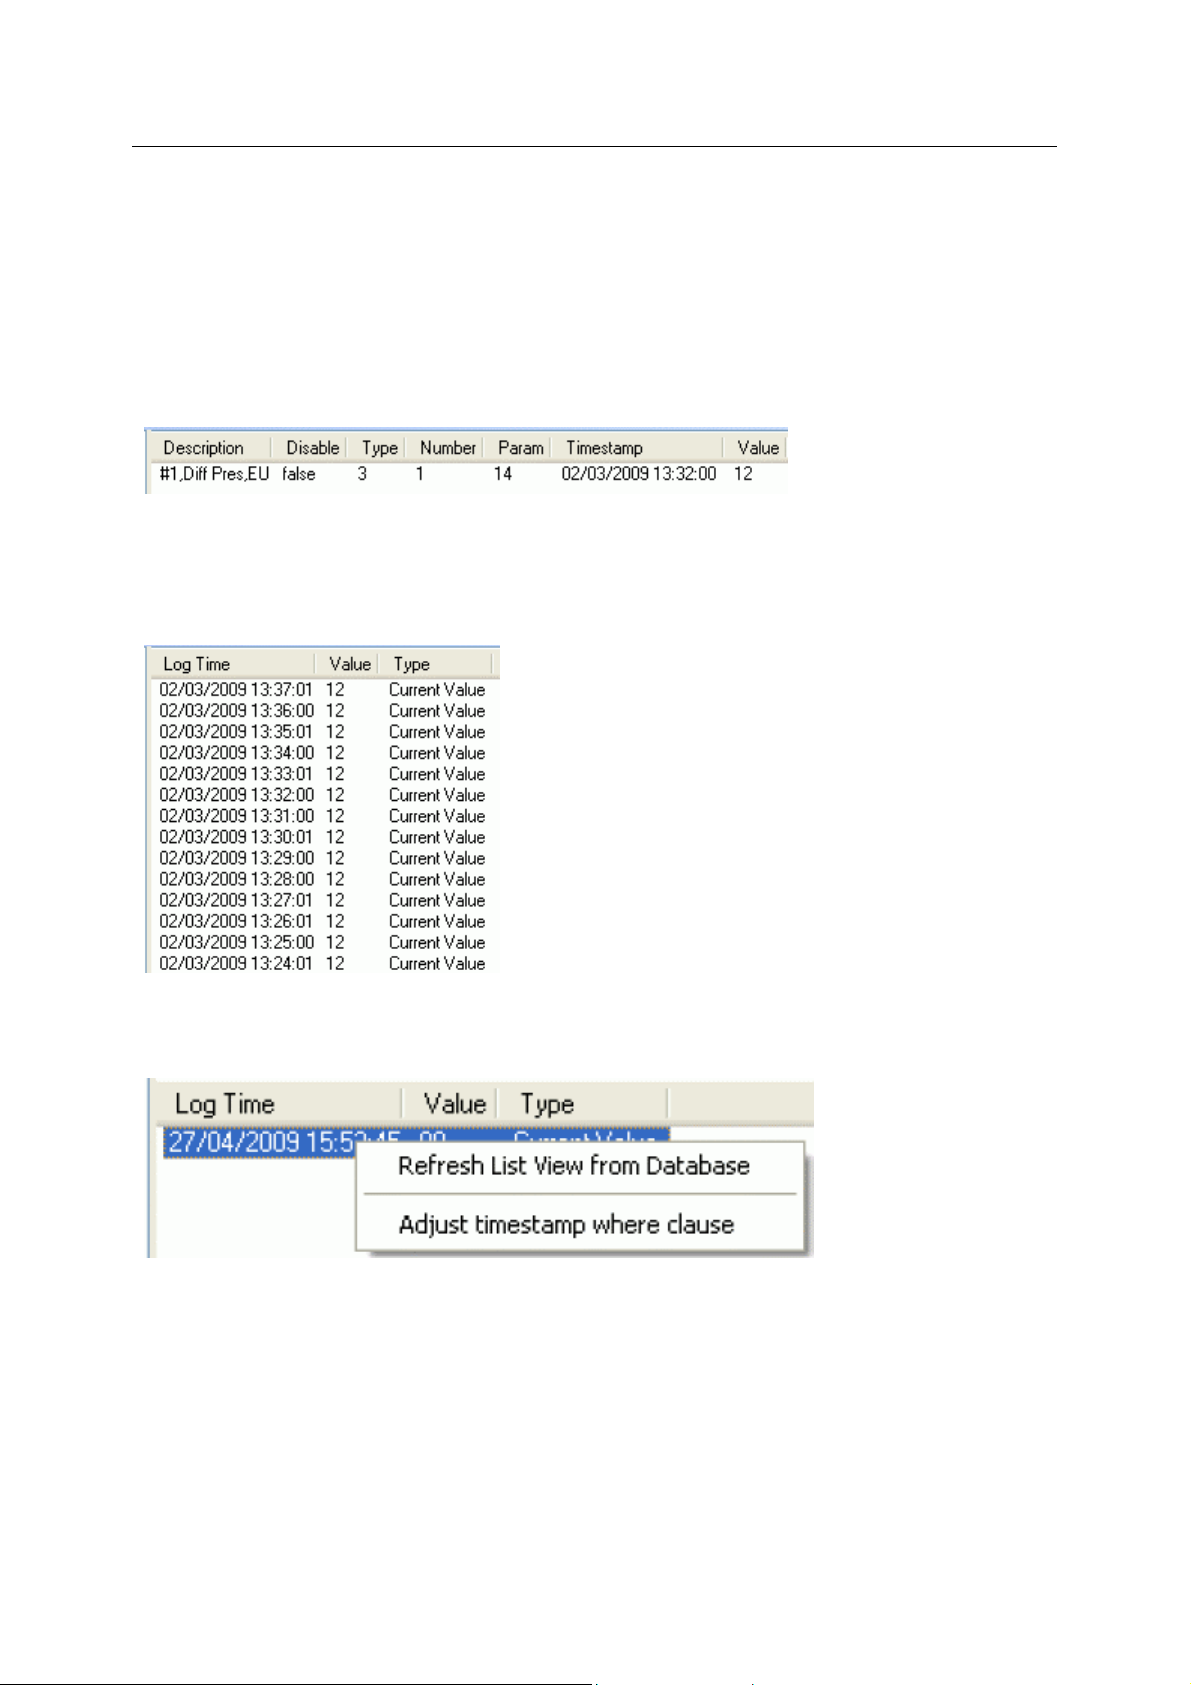
Reference Guide
D301654X412
APRIL 2012
The selected ROC Signal will be deleted from the OpenEnterprise database.
Disable
The selected ROC Signal will be disabled.
List Logged Values
Overwrites the List View Pane which prior to using this menu item contains the single selected Signal
object.
When the 'List Logged Values' menu item is selected from the object on the Tree View context menu
the last hours worth of sampled data for the selected Signal appears in the List View Pane.
The Logged Values list has a context menu which appears when you selects an y value and right
clicks the mouse.
ROC Configuration Tool
Logged Values List Context Menu
The Logged Values list context menu has two options.
Refresh List View from Database
Refreshes the list with the most recent values found in the database.
Adjust timestamp where clause
Enables you to retrieve more historical data for a selected signal by changing the amount of time
requested by the query. The default query retrieves the last hours worth of data.
- 55 -
Page 71
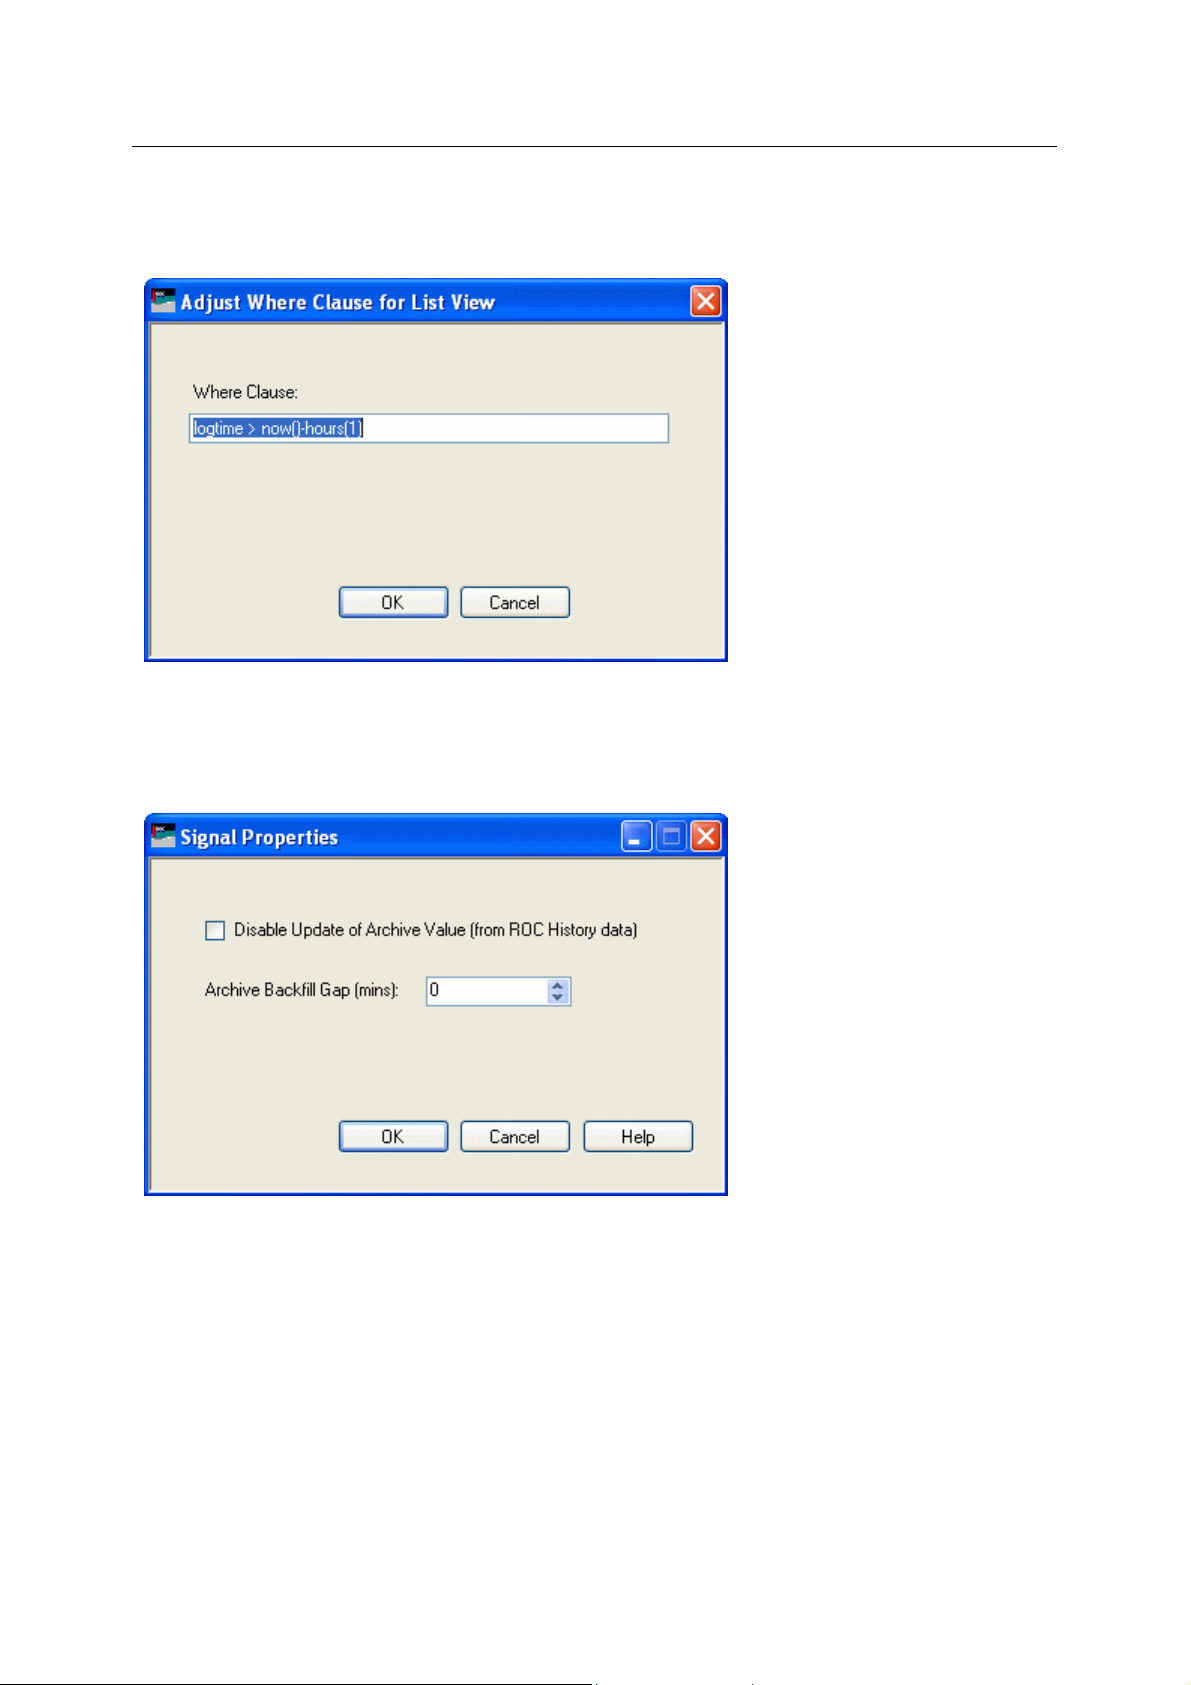
Reference Guide
D301654X412
APRIL 2012
The simplest way to do this is to type a new value into the brackets after the named time (could be
'hours' or 'days') - e.g. 'logtime > now()-hours(5)'. This would retrieve the last five hours worth of data
for the selected signal from the OpenEnterprise database.
ROC Configuration Tool
Signal Properties
The 'Signal Properties' dialog enables you to configure how the ROC RDI updates the ArchiveValue
and ArchiveTimestamp fields of the selected ROC Signal on receipt of history values from the ROC
Device.
Disable Update of Archive Value
If this box is checked then history values retrieved from the Device will not be written to the
ArchiveValue and the ArchiveTimestamp fields of the ROC Realanalog or ROC Digital tables.
If it remains unchecked (the default) then the ArchiveValue and ArchiveTimestamp field for the
selected Signal will be updated from the ROC Device.
Archive Backfill Gap
If the value in this field is 0 (zero), then history values retrieved from the Device will always be written
to the selected Signal's ArchiveValue and ArchiveTimestamp fields (unless the 'Disable Update of
Archive Value' field is checked.
- 56 -
Page 72
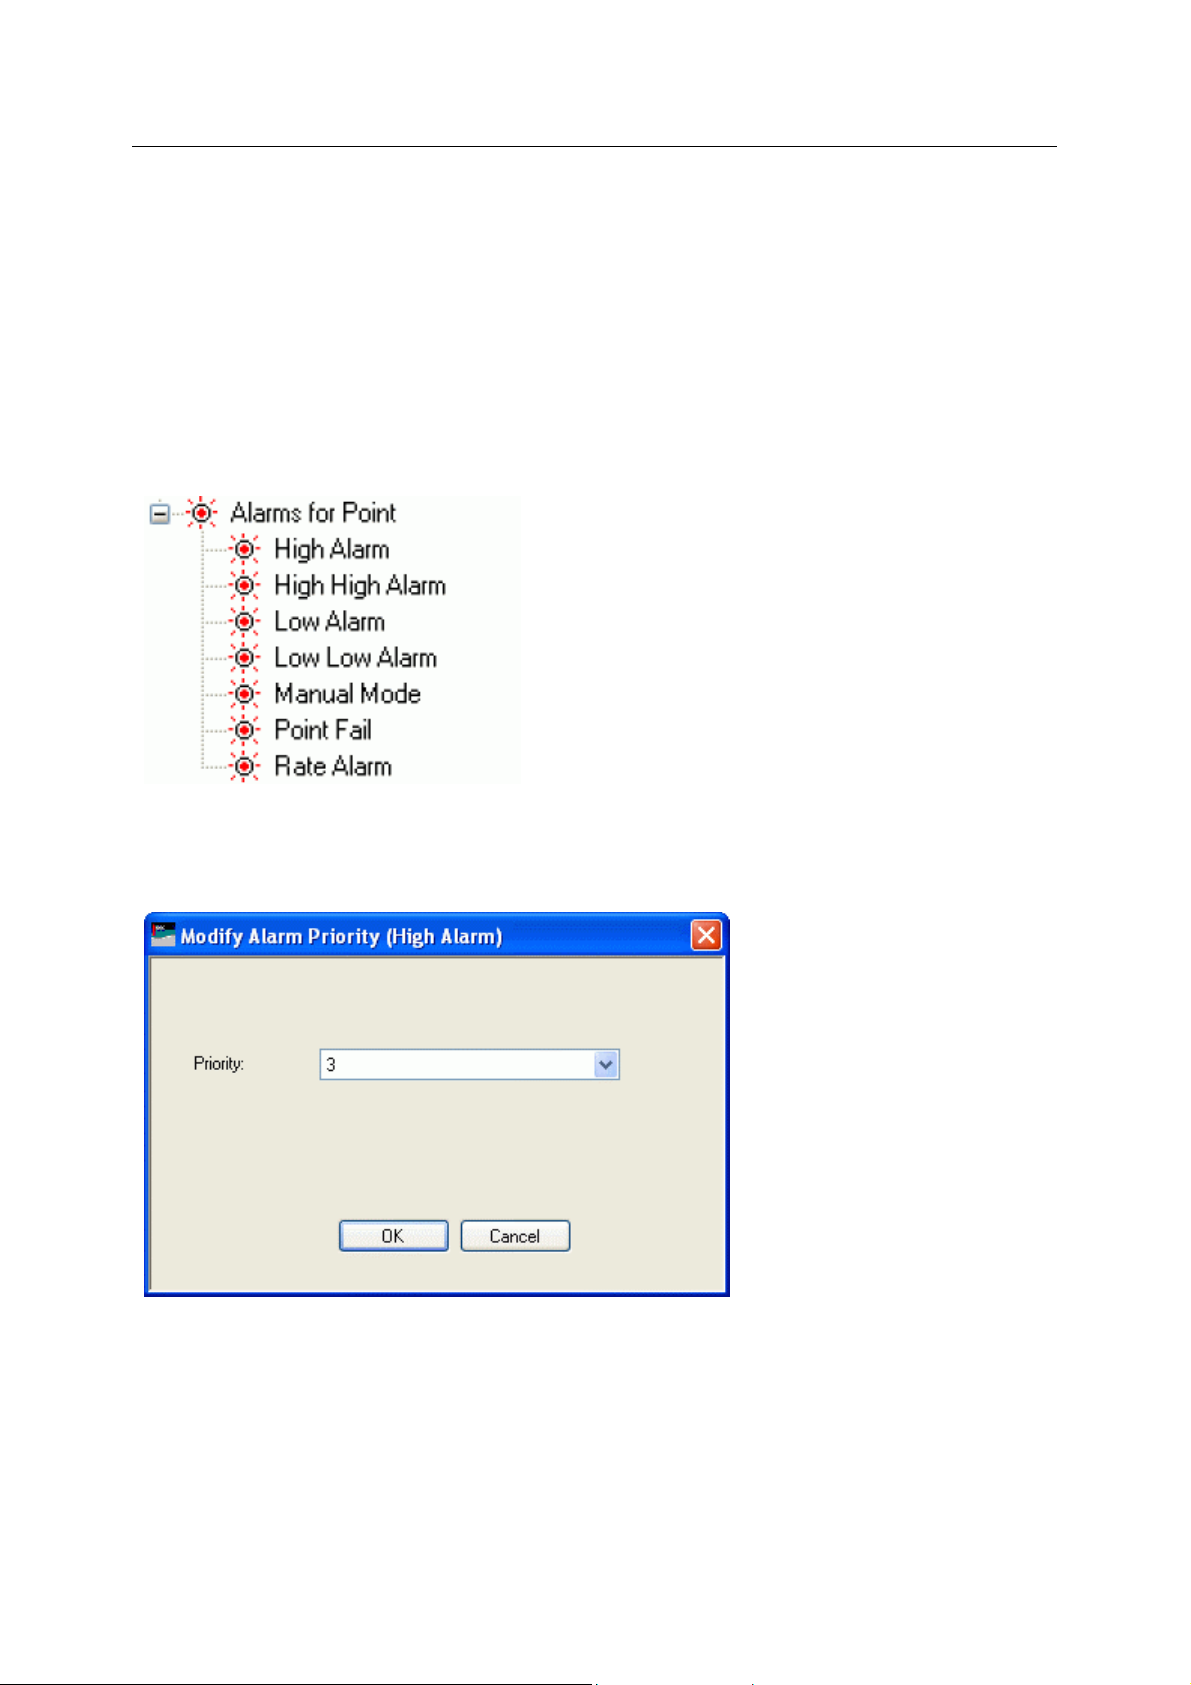
Reference Guide
D301654X412
APRIL 2012
If this value is greater than zero, then the RDI will attempt to only update history values if there is a
‘gap’ in the receipt of the Current Values.
No special RDI processing will trigger a read of history on detecting a ‘gap’ - gaps will only be filled if
the request to read the history values is configured and scheduled (or manually triggered).
Alarms for Point
If there are alarms associated with the selected Point and the 'On add a ROC Point to the database
automatically add associated alarm conditions' option is checked on the 'System Parameters Wizard
General Page', then they will be listed immediately under the Point in the Tree View window.
There is a context menu available on each Alarm Condition.
ROC Configuration Tool
Modify Alarm Priority
If the 'Modify Alarm Priority' option on any Alarm Condition is selected, the priority of the Alarm
Condition can be changed using this dialog.
The new priority is chosen from the drop-down list:
- 57 -
Page 73
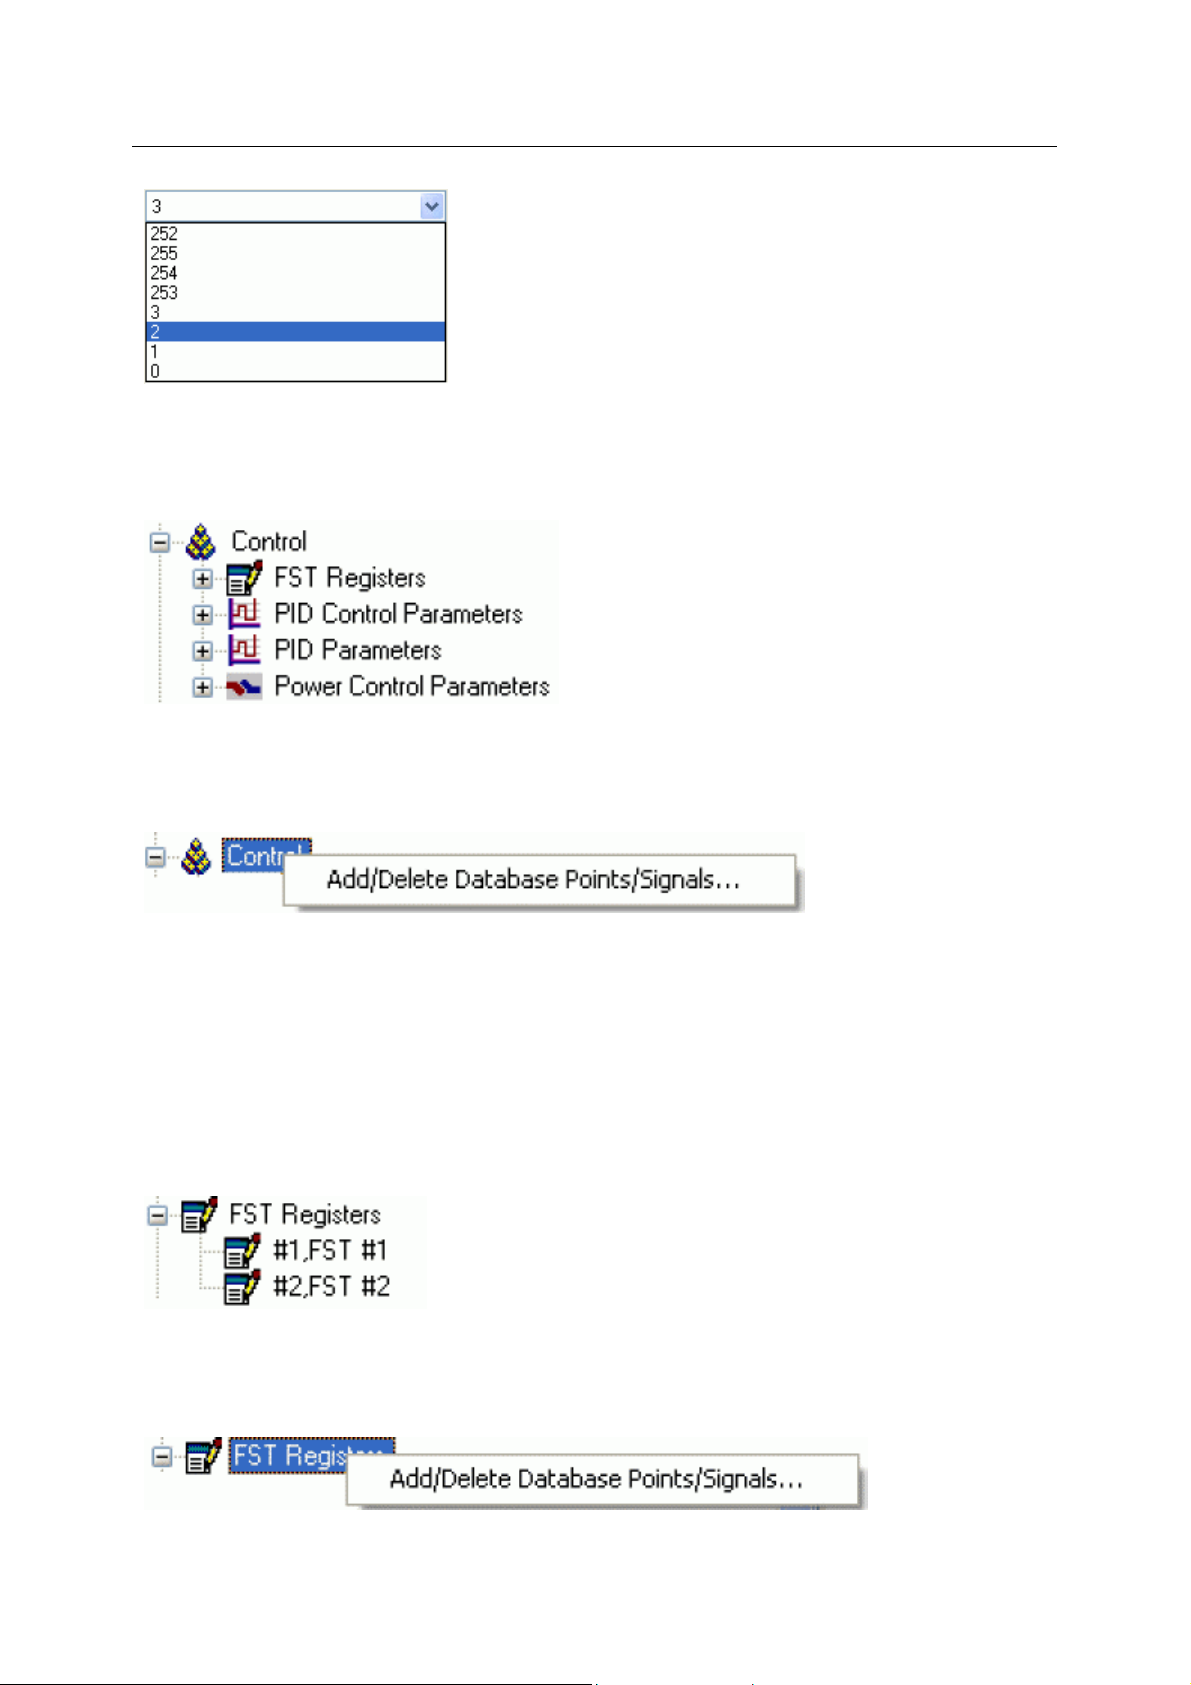
Reference Guide
D301654X412
APRIL 2012
4.1.2.6.4.3 Control Node
The Co
ROC Device. These are 'FST Registers', 'PID Control Parameters', 'PID Parameters' and 'Power
Control Parameters'.
ntrol node contains the parent nodes for all ROC Points that are used for control within the
ROC Configuration Tool
Control Node Context Menu
The context menu that appears when you clicks the right mouse button whilst this node is selected. It
enables you to map more ROC Points to the OpenEnterprise database.
Add/Delete Database Points/Signals
This option enables you to add or delete ROC Points or Signals from the OpenEnterprise database. It
opens the 'Points Selection' page of the 'ROC Device Wizard' so that you can select the Points and
Parameters required.
FST Registers
The FST Registers node is the parent of all FST Registers Points found within the selected device.
When the plus sign to the left of the FST Registers node is selected, it expands to reveal the available
Points.
FST Registers Context Menu
The context menu that appears when you clicks the right mouse button whilst this node is selected. It
enables you to map more ROC Points to the OpenEnterprise database.
- 58 -
Page 74

Reference Guide
D301654X412
APRIL 2012
Add/Delete Database Points/Signals
This option enables you to add or delete ROC Points or Signals from the OpenEnterprise database. It
opens the 'Points Selection' page of the 'ROC Device Wizard' so that you can select the Points and
Parameters required.
FST Registers Point
If the FST Registers Point has any specific Parameters mapped to the appropriate OpenEnterprise
ROC signal table, it will have a plus sign to the left of it, which when selected will reveal the signals
that have been mapped to Parameters for the selected ROC Point..
FST Registers Point Context Menu
This context menu belongs to all individual ROC Points.
ROC Configuration Tool
Add/Delete Database Points/Signals
This option enables you to add or delete ROC Points or Signals from the OpenEnterprise database. It
opens the 'Points Selection' page of the 'ROC Device Wizard' so that you can select the Points and
Parameters required.
Rename
Opens the 'Point Rename Dialog', which enables you to rename this Point.
Delete Point
The selected Point will be deleted.
Disable Point
The selected Point will be disabled.
Properties
Opens the 'Point Properties Dialog', which enables you to associate a 'Parameter Pattern Te mplate'
with the Point.
Signals for Point Parameter Values
- 59 -
Page 75

Reference Guide
D301654X412
APRIL 2012
The 'Signals for Point Parameter Values' node is the parent for any ROC Signals that have been
created from the Point. The parent node and each Point node have context menus.
Signals for Point Parameter Values Context Menu
The 'Signals for Point Parameter Values' parent node has this single context menu. Click on it below
for more help.
Add/Delete Database Points/Signals
This option enables you to add or delete ROC Points or Signals from the OpenEnterprise database. It
opens the 'Points Selection' page of the 'ROC Device Wizard' so that you can select the Points and
Parameters required.
ROC Configuration Tool
Signal Context Menu
This context menu is available from any Signal node that appears under the 'Signals for Point
Parameter Values' node that comes under any Point node.
Delete
The selected ROC Signal will be deleted from the OpenEnterprise database.
Disable
The selected ROC Signal will be disabled.
List Logged Values
Overwrites the List View Pane which prior to using this menu item contains the single selected Signal
object.
When the 'List Logged Values' menu item is selected from the object on the Tree View context menu
the last hours worth of sampled data for the selected Signal appears in the List View Pane.
- 60 -
Page 76

Reference Guide
D301654X412
APRIL 2012
The Logged Values list has a context menu which appears when you selects an y value and right
clicks the mouse.
Logged Values List Context Menu
The Logged Values list context menu has two options.
ROC Configuration Tool
Refresh List View from Database
Refreshes the list with the most recent values found in the database.
Adjust timestamp where clause
Enables you to retrieve more historical data for a selected signal by changing the amount of time
requested by the query. The default query retrieves the last hours worth of data.
The simplest way to do this is to type a new value into the brackets after the named time (could be
'hours' or 'days') - e.g. 'logtime > now()-hours(5)'. This would retrieve the last five hours worth of data
for the selected signal from the OpenEnterprise database.
- 61 -
Page 77

Reference Guide
D301654X412
APRIL 2012
Signal Properties
The 'Signal Properties' dialog enables you to configure how the ROC RDI updates the ArchiveValue
and ArchiveTimestamp fields of the selected ROC Signal on receipt of history values from the ROC
Device.
ROC Configuration Tool
Disable Update of Archive Value
If this box is checked then history values retrieved from the Device will not be written to the
ArchiveValue and the ArchiveTimestamp fields of the ROC Realanalog or ROC Digital tables.
If it remains unchecked (the default) then the ArchiveValue and ArchiveTimestamp field for the
selected Signal will be updated from the ROC Device.
Archive Backfill Gap
If the value in this field is 0 (zero), then history values retrieved from the Device will always be written
to the selected Signal's ArchiveValue and ArchiveTimestamp fields (unless the 'Disable Update of
Archive Value' field is checked.
If this value is greater than zero, then the RDI will attempt to only update history values if there is a
‘gap’ in the receipt of the Current Values.
- 62 -
Page 78

Reference Guide
D301654X412
APRIL 2012
No special RDI processing will trigger a read of history on detecting a ‘gap’ - gaps will only be filled if
the request to read the history values is configured and scheduled (or manually triggered).
PID Control Parameters
The PID Control Parameters node is the parent of all PID Control Parameters Points found within the
selected device. When the plus sign to the left of the PID Control Parameters node is selected, it
expands to reveal the available Points.
PID Control Parameters Node Context Menu
The context menu that appears when you clicks the right mouse button whilst this node is selected. It
enables you to map more ROC Points to the OpenEnterprise database.
ROC Configuration Tool
Add/Delete Database Points/Signals
This option enables you to add or delete ROC Points or Signals from the OpenEnterprise database. It
opens the 'Points Selection' page of the 'ROC Device Wizard' so that you can select the Points and
Parameters required.
PID Control Parameters Point
If the PID Control Parameters Point has any specific Parameters mapped to the appropriate
OpenEnterprise ROC signal table, it will have a plus sign to the left of it, which when selected will
reveal the signals that have been mapped to Parameters for the selected ROC Point.. Insert the
image to be used here....
PID Control Parameters Point Context Menu
This context menu belongs to all individual ROC Points.
- 63 -
Page 79

Reference Guide
D301654X412
APRIL 2012
Add/Delete Database Points/Signals
This option enables you to add or delete ROC Points or Signals from the OpenEnterprise database. It
opens the 'Points Selection' page of the 'ROC Device Wizard' so that you can select the Points and
Parameters required.
Rename
Opens the 'Point Rename Dialog', which enables you to rename this Point.
Delete Point
The selected Point will be deleted.
Disable Point
The selected Point will be disabled.
Properties
Opens the 'Point Properties Dialog', which enables you to associate a 'Parameter Pattern Te mplate'
with the Point.
ROC Configuration Tool
Signals for Point Parameter Values
The 'Signals for Point Parameter Values' node is the parent for any ROC Signals that have been
created from the Point. The parent node and each Point node have context menus.
Signals for Point Parameter Values Context Menu
The 'Signals for Point Parameter Values' parent node has this single context menu. Click on it below
for more help.
Add/Delete Database Points/Signals
This option enables you to add or delete ROC Points or Signals from the OpenEnterprise database. It
opens the 'Points Selection' page of the 'ROC Device Wizard' so that you can select the Points and
Parameters required.
Signal Context Menu
This context menu is available from any Signal node that appears under the 'Signals for Point
Parameter Values' node that comes under any Point node.
- 64 -
Page 80
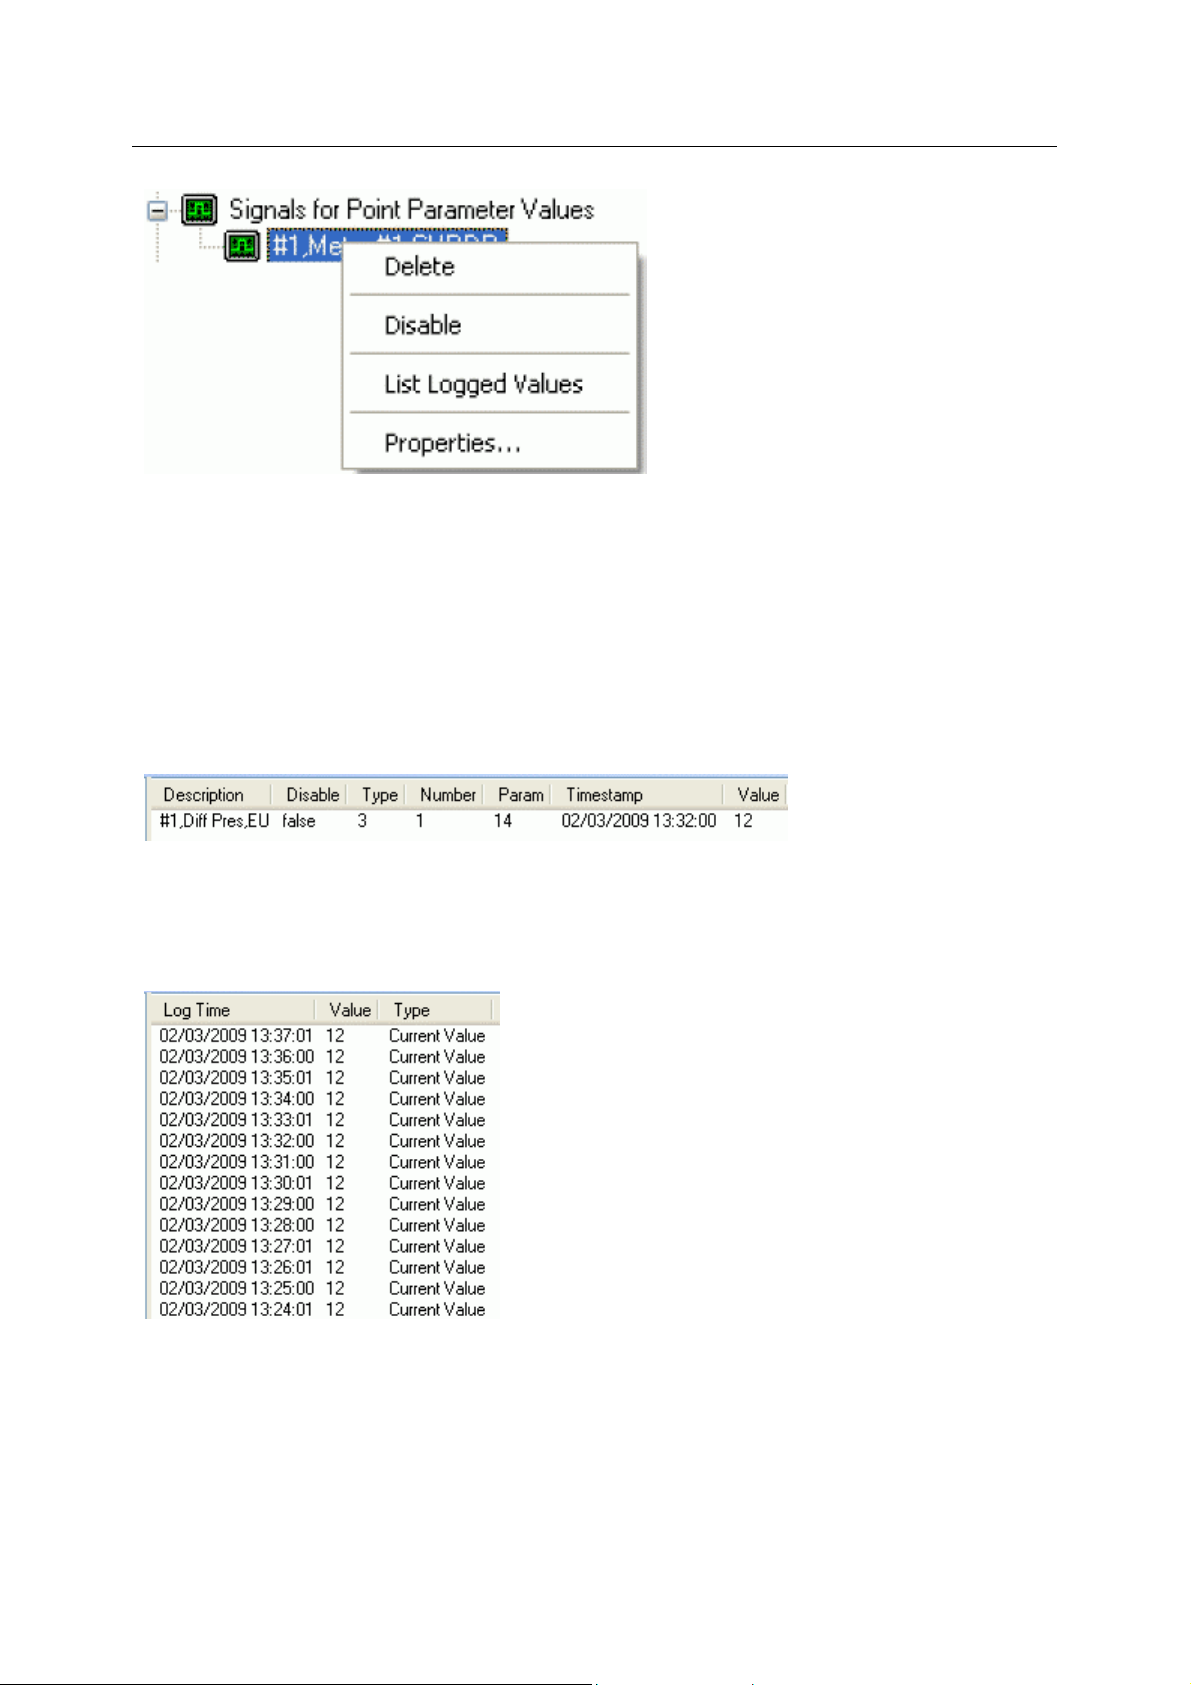
Reference Guide
D301654X412
APRIL 2012
Delete
The selected ROC Signal will be deleted from the OpenEnterprise database.
Disable
The selected ROC Signal will be disabled.
ROC Configuration Tool
List Logged Values
Overwrites the List View Pane which prior to using this menu item contains the single selected Signal
object.
When the 'List Logged Values' menu item is selected from the object on the Tree View context menu
the last hours worth of sampled data for the selected Signal appears in the List View Pane.
The Logged Values list has a context menu which appears when you selects an y value and right
clicks the mouse.
Logged Values List Context Menu
The Logged Values list context menu has two options.
- 65 -
Page 81

Reference Guide
D301654X412
APRIL 2012
Refresh List View from Database
Refreshes the list with the most recent values found in the database.
Adjust timestamp where clause
Enables you to retrieve more historical data for a selected signal by changing the amount of time
requested by the query. The default query retrieves the last hours worth of data.
The simplest way to do this is to type a new value into the brackets after the named time (could be
'hours' or 'days') - e.g. 'logtime > now()-hours(5)'. This would retrieve the last five hours worth of data
for the selected signal from the OpenEnterprise database.
ROC Configuration Tool
Signal Properties
The 'Signal Properties' dialog enables you to configure how the ROC RDI updates the ArchiveValue
and ArchiveTimestamp fields of the selected ROC Signal on receipt of history values from the ROC
Device.
- 66 -
Page 82
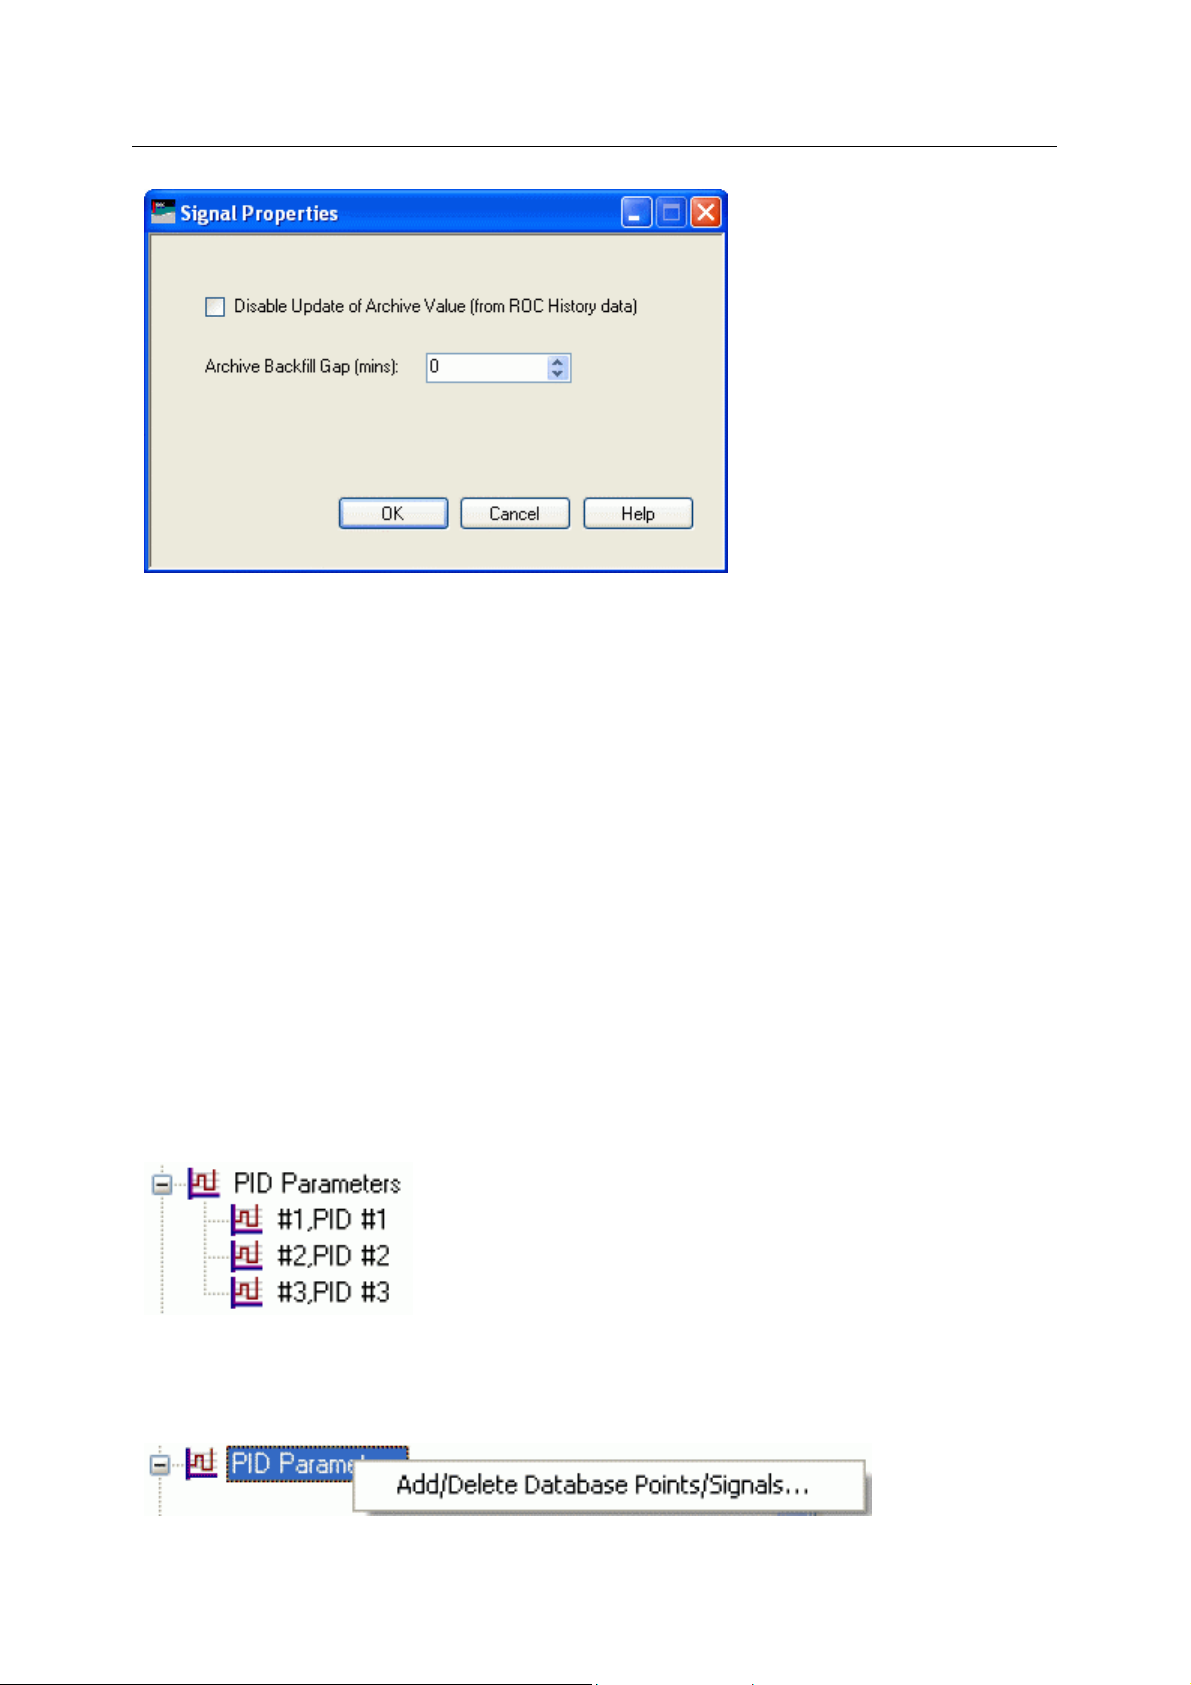
Reference Guide
D301654X412
APRIL 2012
Disable Update of Archive Value
If this box is checked then history values retrieved from the Device will not be written to the
ArchiveValue and the ArchiveTimestamp fields of the ROC Realanalog or ROC Digital tables.
ROC Configuration Tool
If it remains unchecked (the default) then the ArchiveValue and ArchiveTimestamp field for the
selected Signal will be updated from the ROC Device.
Archive Backfill Gap
If the value in this field is 0 (zero), then history values retrieved from the Device will always be written
to the selected Signal's ArchiveValue and ArchiveTimestamp fields (unless the 'Disable Update of
Archive Value' field is checked.
If this value is greater than zero, then the RDI will attempt to only update history values if there is a
‘gap’ in the receipt of the Current Values.
No special RDI processing will trigger a read of history on detecting a ‘gap’ - gaps will only be filled if
the request to read the history values is configured and scheduled (or manually triggered).
PID Parameters
The PID Parameters node is the parent of all PID Parameters Points found within the selected device.
When the plus sign to the left of the PID Parameters node is selected, it expands to reveal the
available Points.
PID Parameters Context Menu
The context menu that appears when you clicks the right mouse button whilst this node is selected. It
enables you to map more ROC Points to the OpenEnterprise database.
- 67 -
Page 83
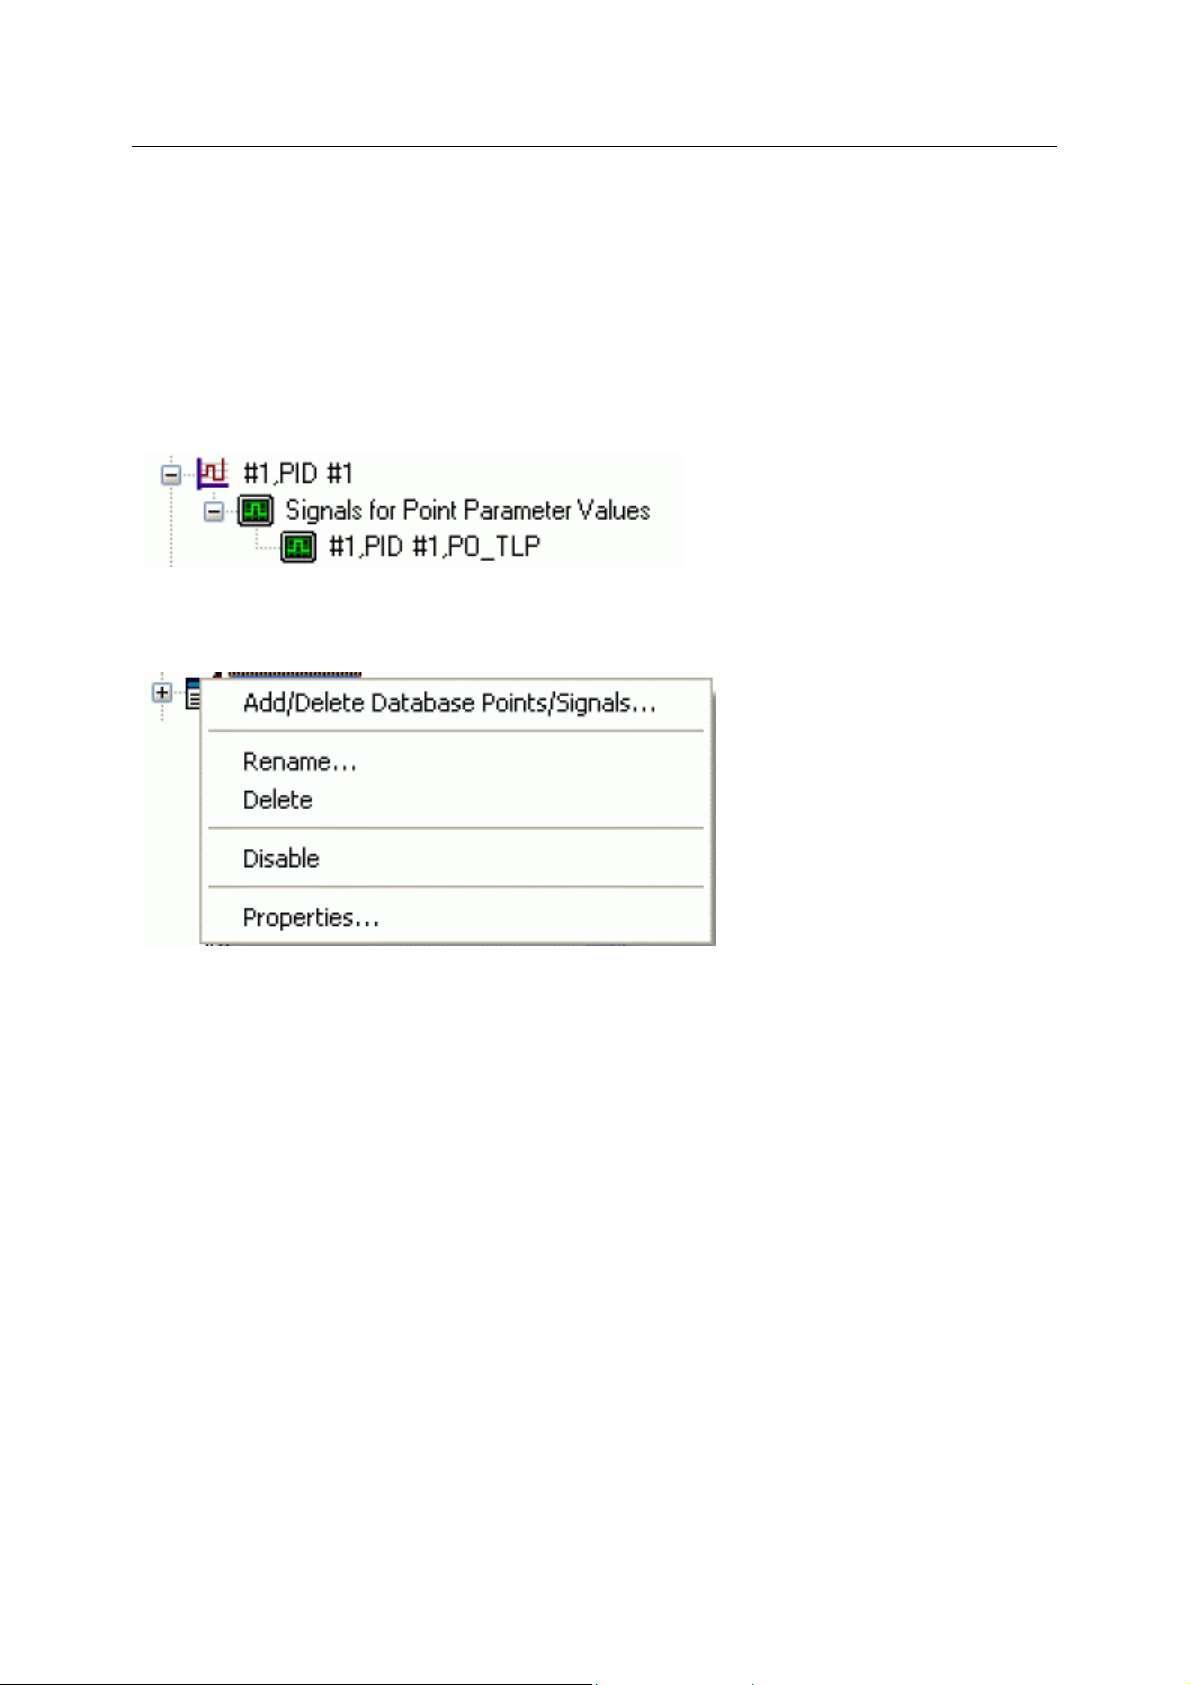
Reference Guide
D301654X412
APRIL 2012
Add/Delete Database Points/Signals
This option enables you to add or delete ROC Points or Signals from the OpenEnterprise database. It
opens the 'Points Selection' page of the 'ROC Device Wizard' so that you can select the Points and
Parameters required.
PID Parameters Point
If the PID Parameters Point has any specific PID Parameters mapped to the appropriate
OpenEnterprise ROC signal table, it will have a plus sign to the left of it, which when selected will
reveal the signals that have been mapped to Parameters for the selected ROC Point..
PID Parameters Point Context Menu
This context menu belongs to all individual ROC Points.
ROC Configuration Tool
Add/Delete Database Points/Signals
This option enables you to add or delete ROC Points or Signals from the OpenEnterprise database. It
opens the 'Points Selection' page of the 'ROC Device Wizard' so that you can select the Points and
Parameters required.
Rename
Opens the 'Point Rename Dialog', which enables you to rename this Point.
Delete Point
The selected Point will be deleted.
Disable Point
The selected Point will be disabled.
Properties
Opens the 'Point Properties Dialog', which enables you to associate a 'Parameter Pattern Te mplate'
with the Point.
Signals for Point Parameter Values
- 68 -
Page 84
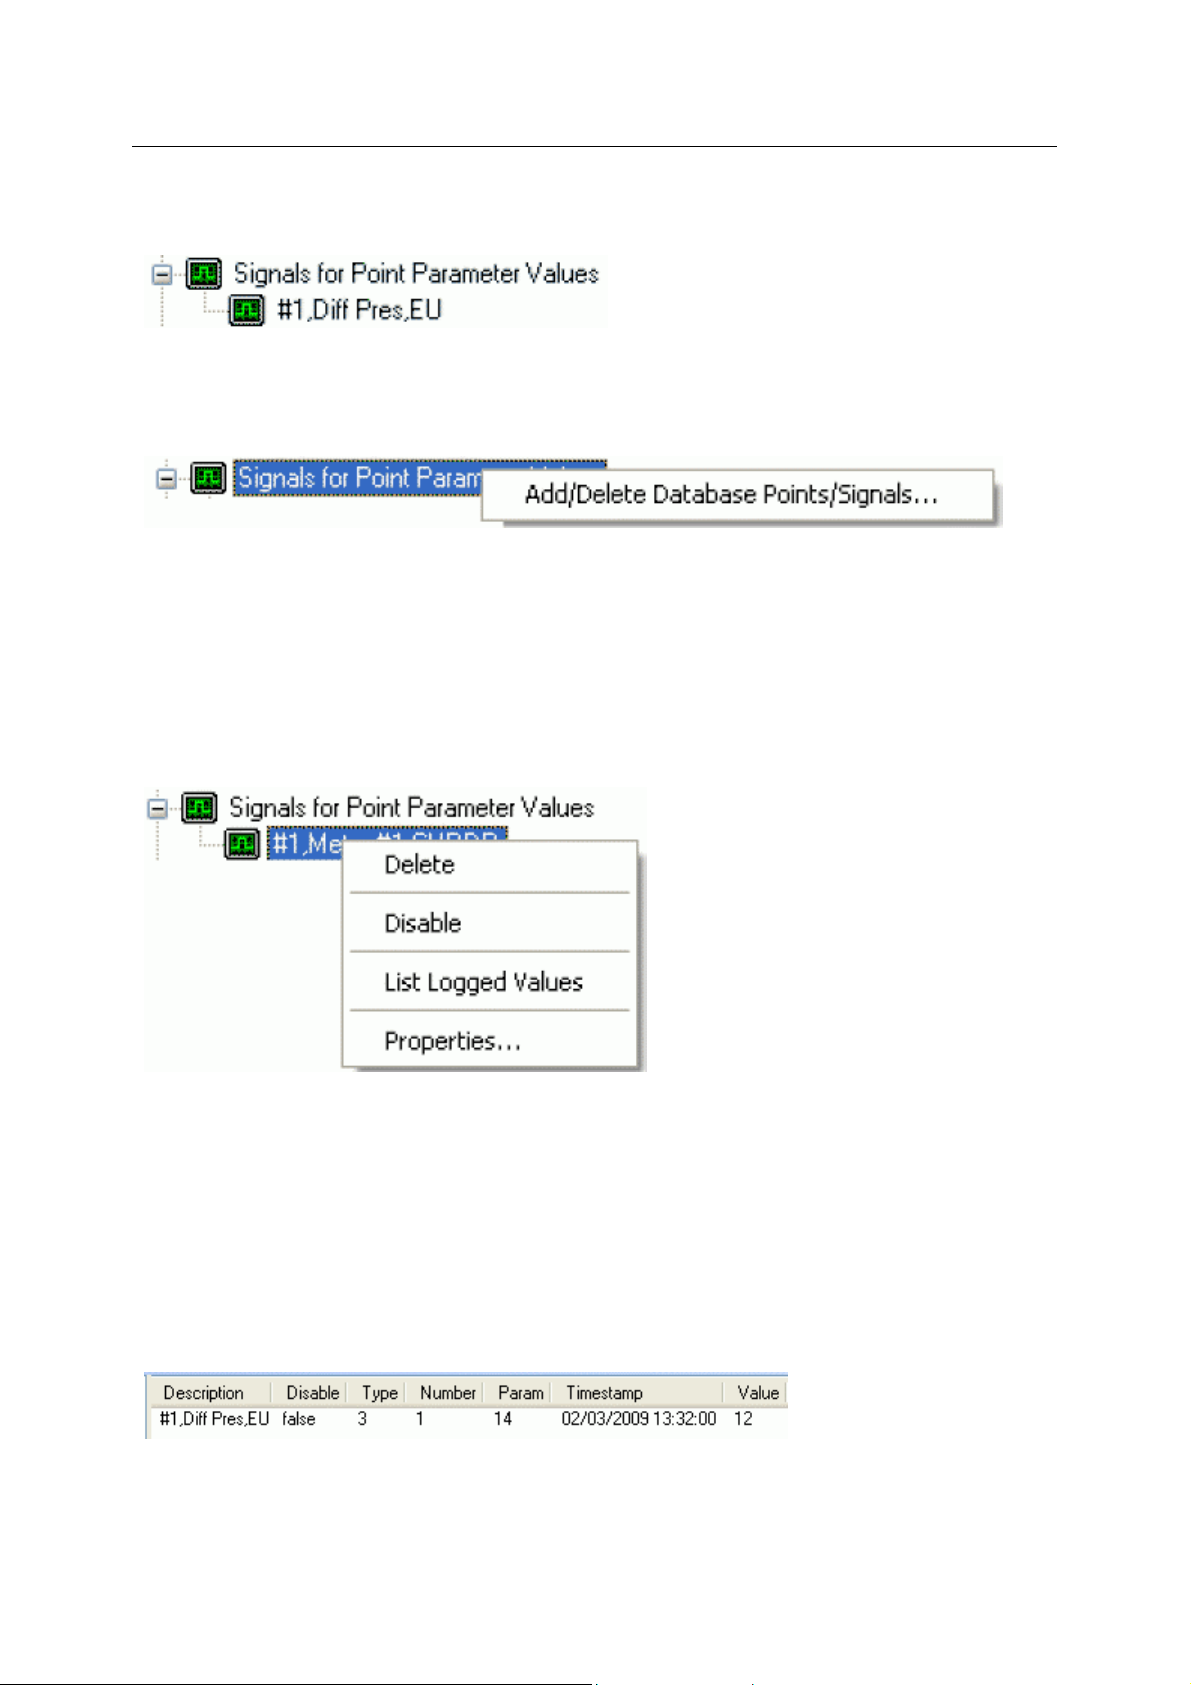
Reference Guide
D301654X412
APRIL 2012
The 'Signals for Point Parameter Values' node is the parent for any ROC Signals that have been
created from the Point. The parent node and each Point node have context menus.
Signals for Point Parameter Values Context Menu
The 'Signals for Point Parameter Values' parent node has this single context menu. Click on it below
for more help.
Add/Delete Database Points/Signals
This option enables you to add or delete ROC Points or Signals from the OpenEnterprise database. It
opens the 'Points Selection' page of the 'ROC Device Wizard' so that you can select the Points and
Parameters required.
ROC Configuration Tool
Signal Context Menu
This context menu is available from any Signal node that appears under the 'Signals for Point
Parameter Values' node that comes under any Point node.
Delete
The selected ROC Signal will be deleted from the OpenEnterprise database.
Disable
The selected ROC Signal will be disabled.
List Logged Values
Overwrites the List View Pane which prior to using this menu item contains the single selected Signal
object.
When the 'List Logged Values' menu item is selected from the object on the Tree View context menu
the last hours worth of sampled data for the selected Signal appears in the List View Pane.
- 69 -
Page 85
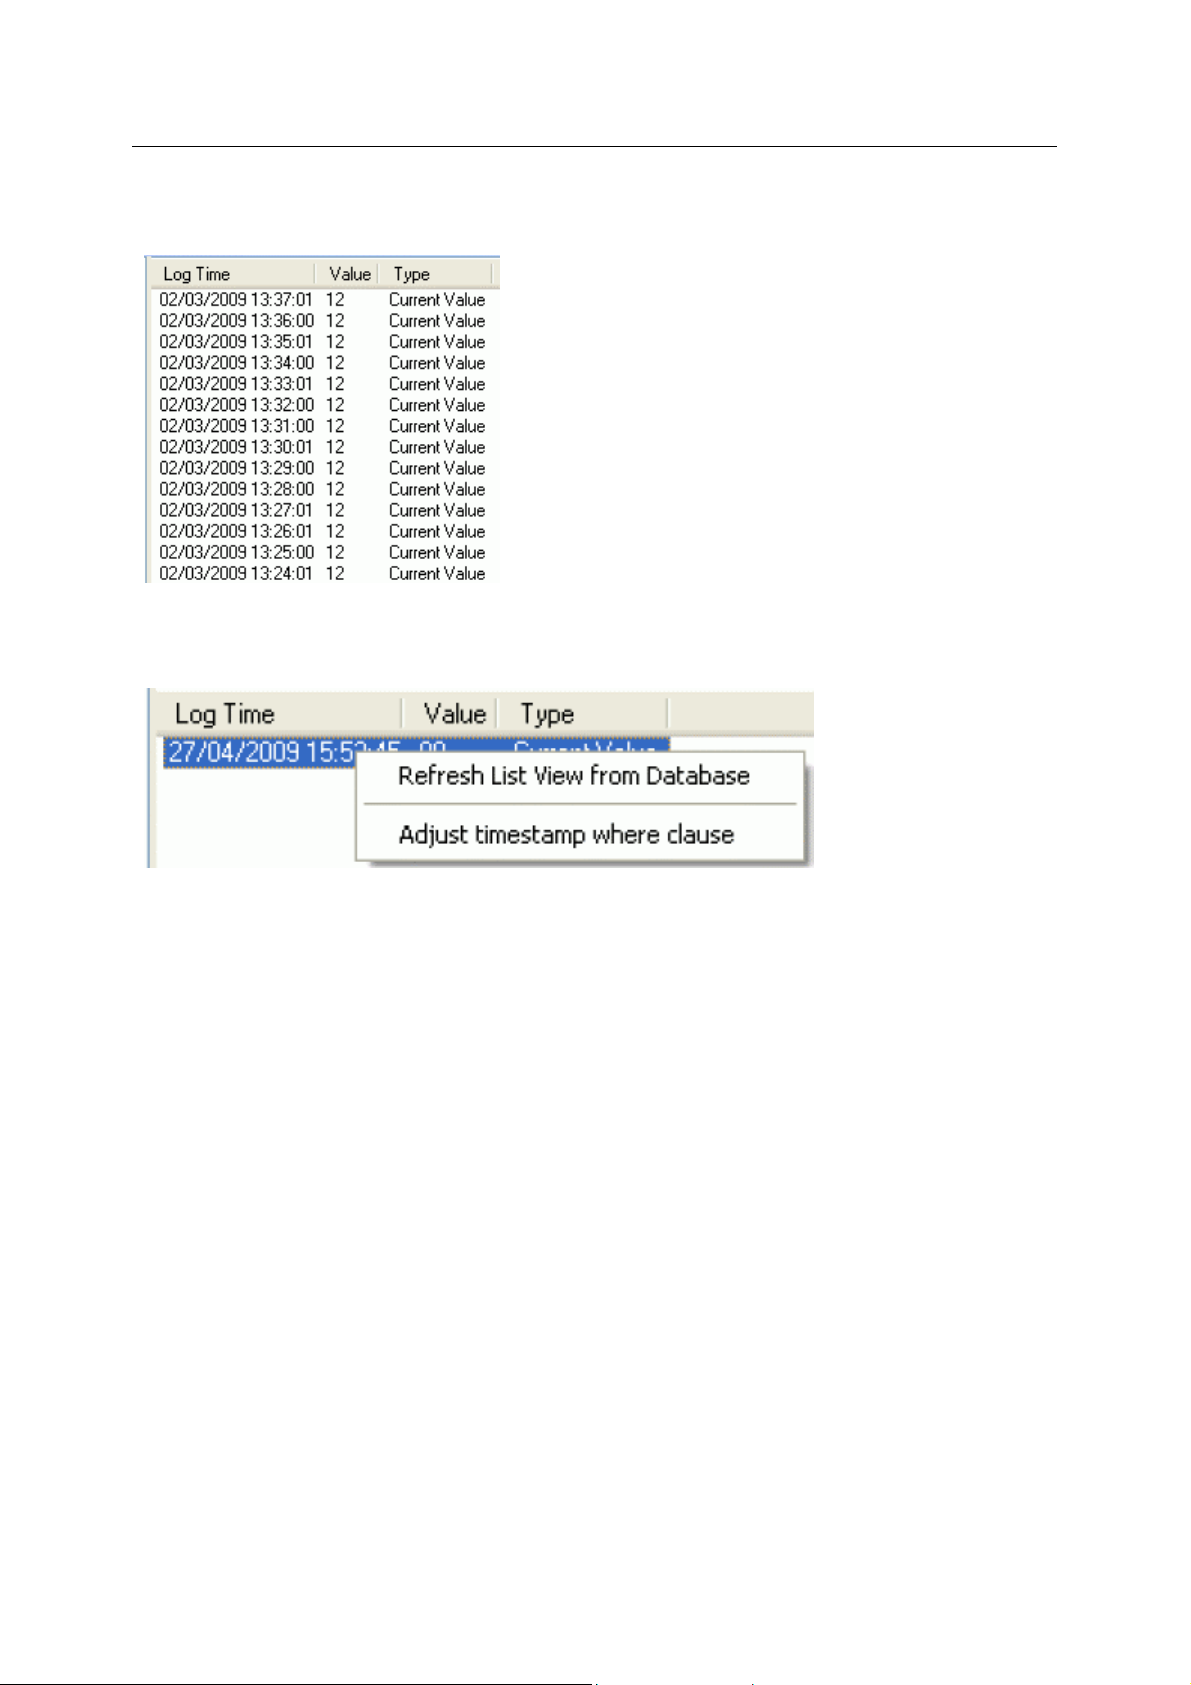
Reference Guide
D301654X412
APRIL 2012
The Logged Values list has a context menu which appears when you selects an y value and right
clicks the mouse.
Logged Values List Context Menu
The Logged Values list context menu has two options.
ROC Configuration Tool
Refresh List View from Database
Refreshes the list with the most recent values found in the database.
Adjust timestamp where clause
Enables you to retrieve more historical data for a selected signal by changing the amount of time
requested by the query. The default query retrieves the last hours worth of data.
The simplest way to do this is to type a new value into the brackets after the named time (could be
'hours' or 'days') - e.g. 'logtime > now()-hours(5)'. This would retrieve the last five hours worth of data
for the selected signal from the OpenEnterprise database.
- 70 -
Page 86

Reference Guide
D301654X412
APRIL 2012
Signal Properties
The 'Signal Properties' dialog enables you to configure how the ROC RDI updates the ArchiveValue
and ArchiveTimestamp fields of the selected ROC Signal on receipt of history values from the ROC
Device.
ROC Configuration Tool
Disable Update of Archive Value
If this box is checked then history values retrieved from the Device will not be written to the
ArchiveValue and the ArchiveTimestamp fields of the ROC Realanalog or ROC Digital tables.
If it remains unchecked (the default) then the ArchiveValue and ArchiveTimestamp field for the
selected Signal will be updated from the ROC Device.
Archive Backfill Gap
If the value in this field is 0 (zero), then history values retrieved from the Device will always be written
to the selected Signal's ArchiveValue and ArchiveTimestamp fields (unless the 'Disable Update of
Archive Value' field is checked.
If this value is greater than zero, then the RDI will attempt to only update history values if there is a
‘gap’ in the receipt of the Current Values.
- 71 -
Page 87
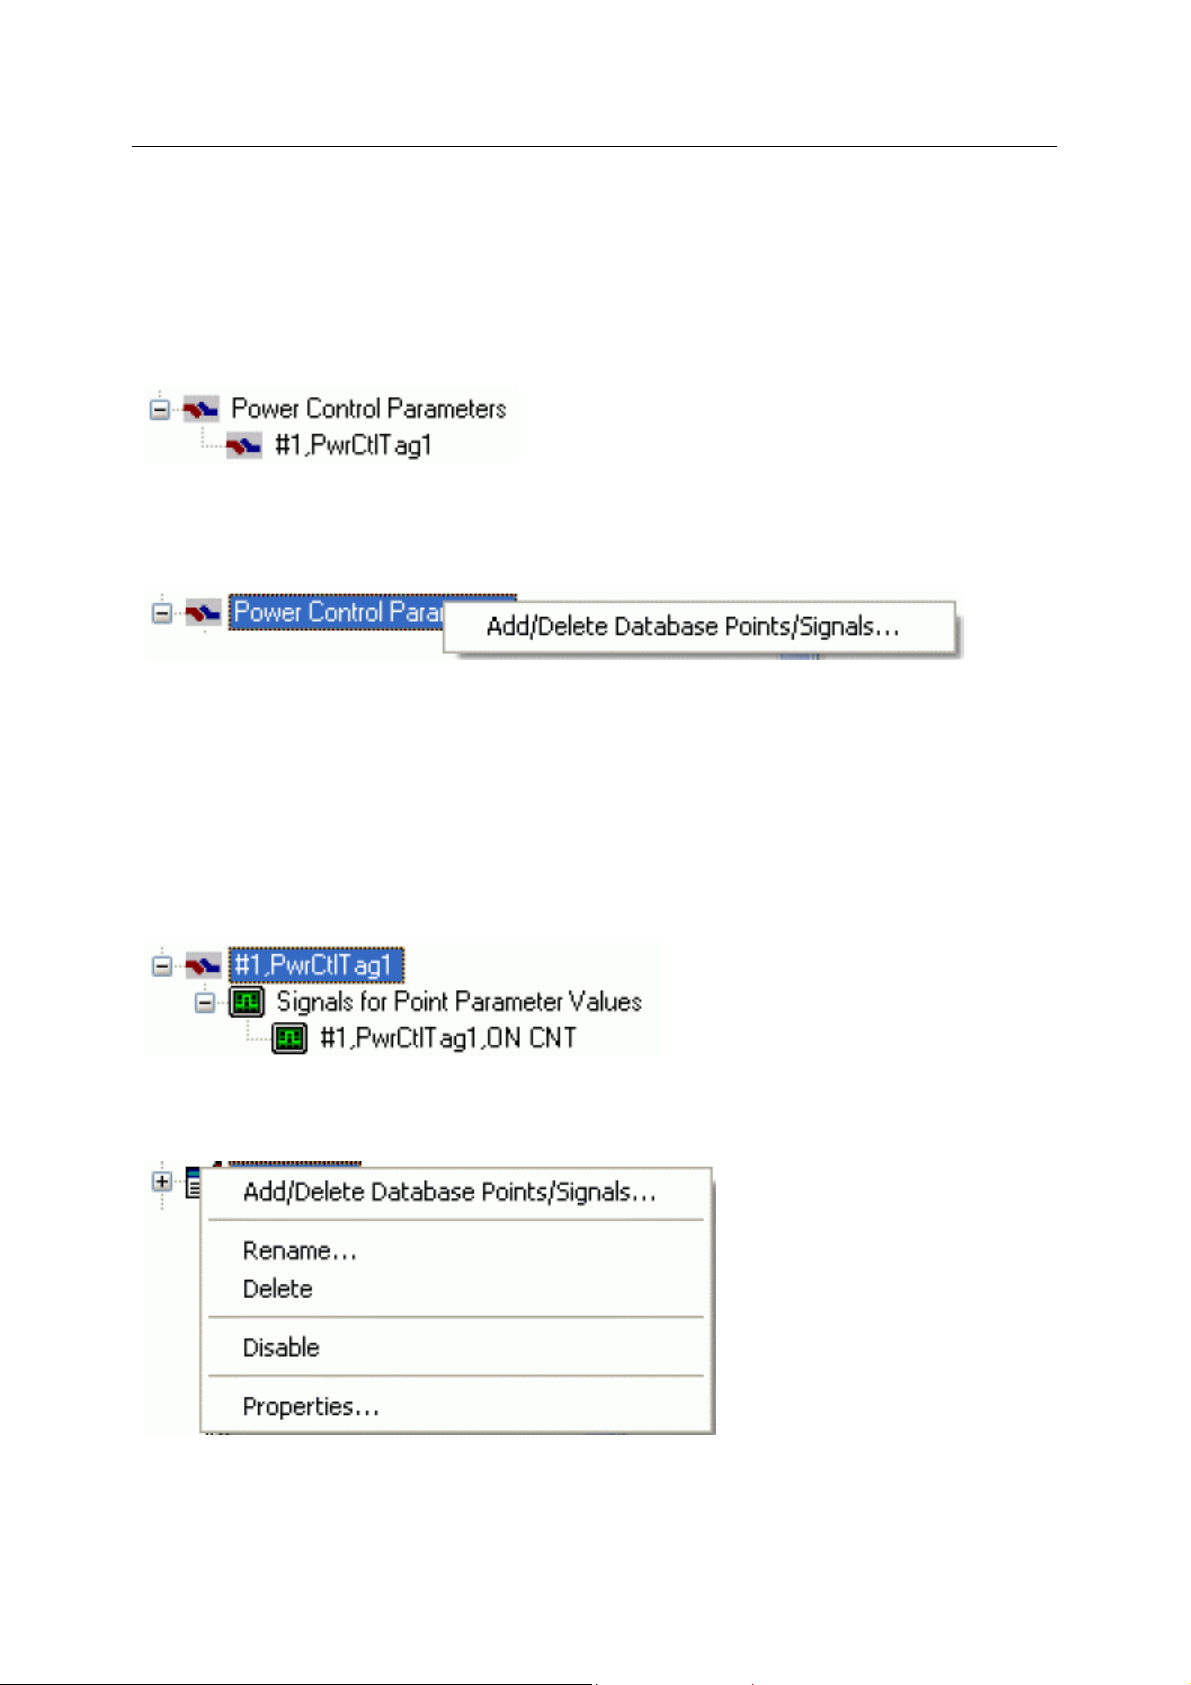
Reference Guide
D301654X412
APRIL 2012
No special RDI processing will trigger a read of history on detecting a ‘gap’ - gaps will only be filled if
the request to read the history values is configured and scheduled (or manually triggered).
Power Control Parameters
The Power Control Parameters node is the parent of all Power Control Parameters Points found
within the selected device. When the plus sign to the left of the Power Control Parameters node is
selected, it expands to reveal the available Points.
Power Control Parameters Context Menu
The context menu that appears when you clicks the right mouse button whilst this node is selected. It
enables you to map more ROC Points to the OpenEnterprise database.
ROC Configuration Tool
Add/Delete Database Points/Signals
This option enables you to add or delete ROC Points or Signals from the OpenEnterprise database. It
opens the 'Points Selection' page of the 'ROC Device Wizard' so that you can select the Points and
Parameters required.
Power Control Parameters Point
If the Power Control Parameters Point has any specific Parameters mapped to the appropriate
OpenEnterprise ROC signal table, it will have a plus sign to the left of it, which when selected will
reveal the signals that have been mapped to Parameters for the selected ROC Point..
Power Control Parameters Point Context Menu
This context menu belongs to all individual ROC Points.
Add/Delete Database Points/Signals
- 72 -
Page 88
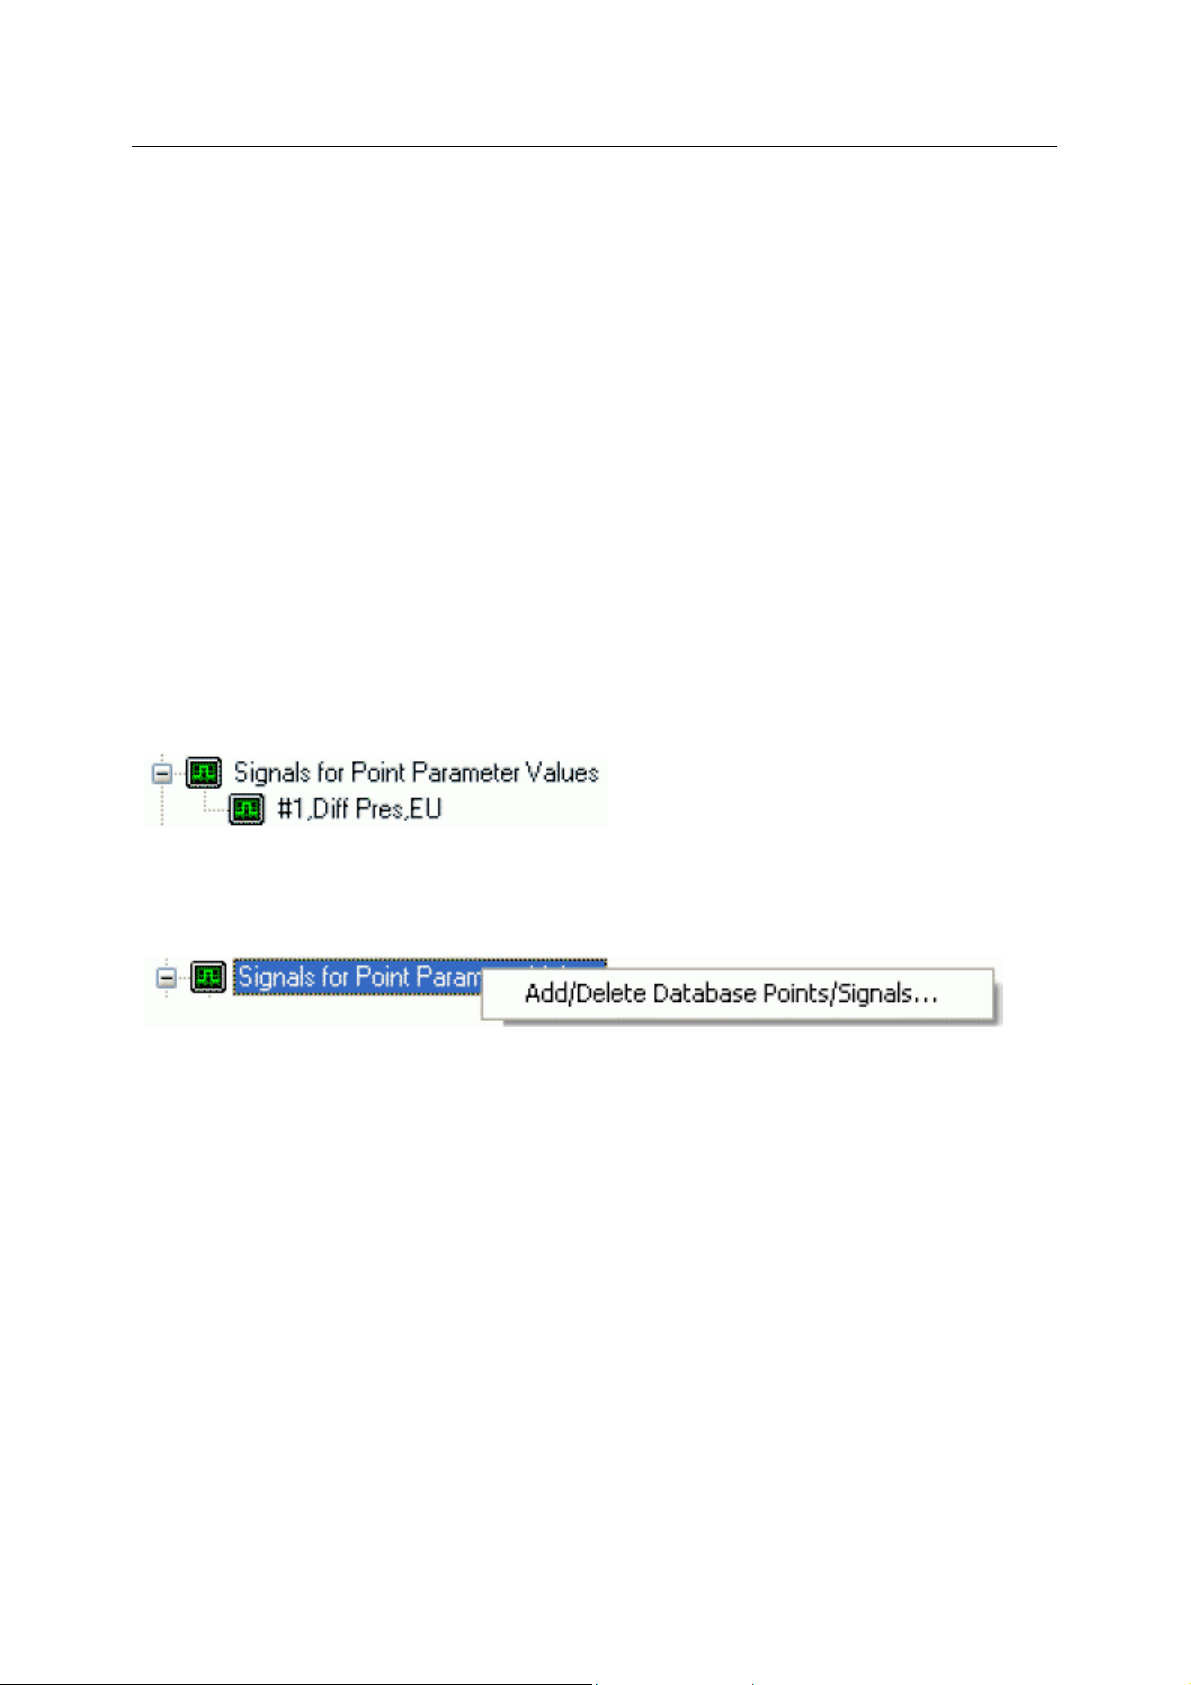
Reference Guide
D301654X412
APRIL 2012
This option enables you to add or delete ROC Points or Signals from the OpenEnterprise database. It
opens the 'Points Selection' page of the 'ROC Device Wizard' so that you can select the Points and
Parameters required.
Rename
Opens the 'Point Rename Dialog', which enables you to rename this Point.
Delete Point
The selected Point will be deleted.
Disable Point
The selected Point will be disabled.
Properties
Opens the 'Point Properties Dialog', which enables you to associate a 'Parameter Pattern Te mplate'
with the Point.
Signals for Point Parameter Values
ROC Configuration Tool
The 'Signals for Point Parameter Values' node is the parent for any ROC Signals that have been
created from the Point. The parent node and each Point node have context menus.
Signals for Point Parameter Values Context Menu
The 'Signals for Point Parameter Values' parent node has this single context menu. Click on it below
for more help.
Add/Delete Database Points/Signals
This option enables you to add or delete ROC Points or Signals from the OpenEnterprise database. It
opens the 'Points Selection' page of the 'ROC Device Wizard' so that you can select the Points and
Parameters required.
Signal Context Menu
This context menu is available from any Signal node that appears under the 'Signals for Point
Parameter Values' node that comes under any Point node.
- 73 -
Page 89

Reference Guide
D301654X412
APRIL 2012
Delete
The selected ROC Signal will be deleted from the OpenEnterprise database.
Disable
The selected ROC Signal will be disabled.
ROC Configuration Tool
Overwrites the List View Pane which prior to using this menu item contains the single selected Signal
object.
When the 'List Logged Values' menu item is selected from the object on the Tree View context menu
the last hours worth of sampled data for the selected Signal appears in the List View Pane.
The Logged Values list has a context menu which appears when you selects an y value and right
clicks the mouse.
Signal Properties
The 'Signal Properties' dialog enables you to configure how the ROC RDI updates the ArchiveValue
and ArchiveTimestamp fields of the selected ROC Signal on receipt of history values from the ROC
Device.
- 74 -
Page 90

Reference Guide
D301654X412
APRIL 2012
Disable Update of Archive Value
If this box is checked then history values retrieved from the Device will not be written to the
ArchiveValue and the ArchiveTimestamp fields of the ROC Realanalog or ROC Digital tables.
ROC Configuration Tool
If it remains unchecked (the default) then the ArchiveValue and ArchiveTimestamp field for the
selected Signal will be updated from the ROC Device.
Archive Backfill Gap
If the value in this field is 0 (zero), then history values retrieved from the Device will always be written
to the selected Signal's ArchiveValue and ArchiveTimestamp fields (unless the 'Disable Update of
Archive Value' field is checked.
If this value is greater than zero, then the RDI will attempt to only update history values if there is a
‘gap’ in the receipt of the Current Values.
No special RDI processing will trigger a read of history on detecting a ‘gap’ - gaps will only be filled if
the request to read the history values is configured and scheduled (or manually triggered).
4.1.2.6.4.4 Meter Node
The Mete
configuration, control and flow measurement within the ROC Device.
r node contains the parent nodes for all ROC Points that are used for Meter calibration,
Meter Context Menu
The context menu that appears when you clicks the right mouse button whilst this node is selected. It
enables you to map more ROC Points to the OpenEnterprise database.
- 75 -
Page 91
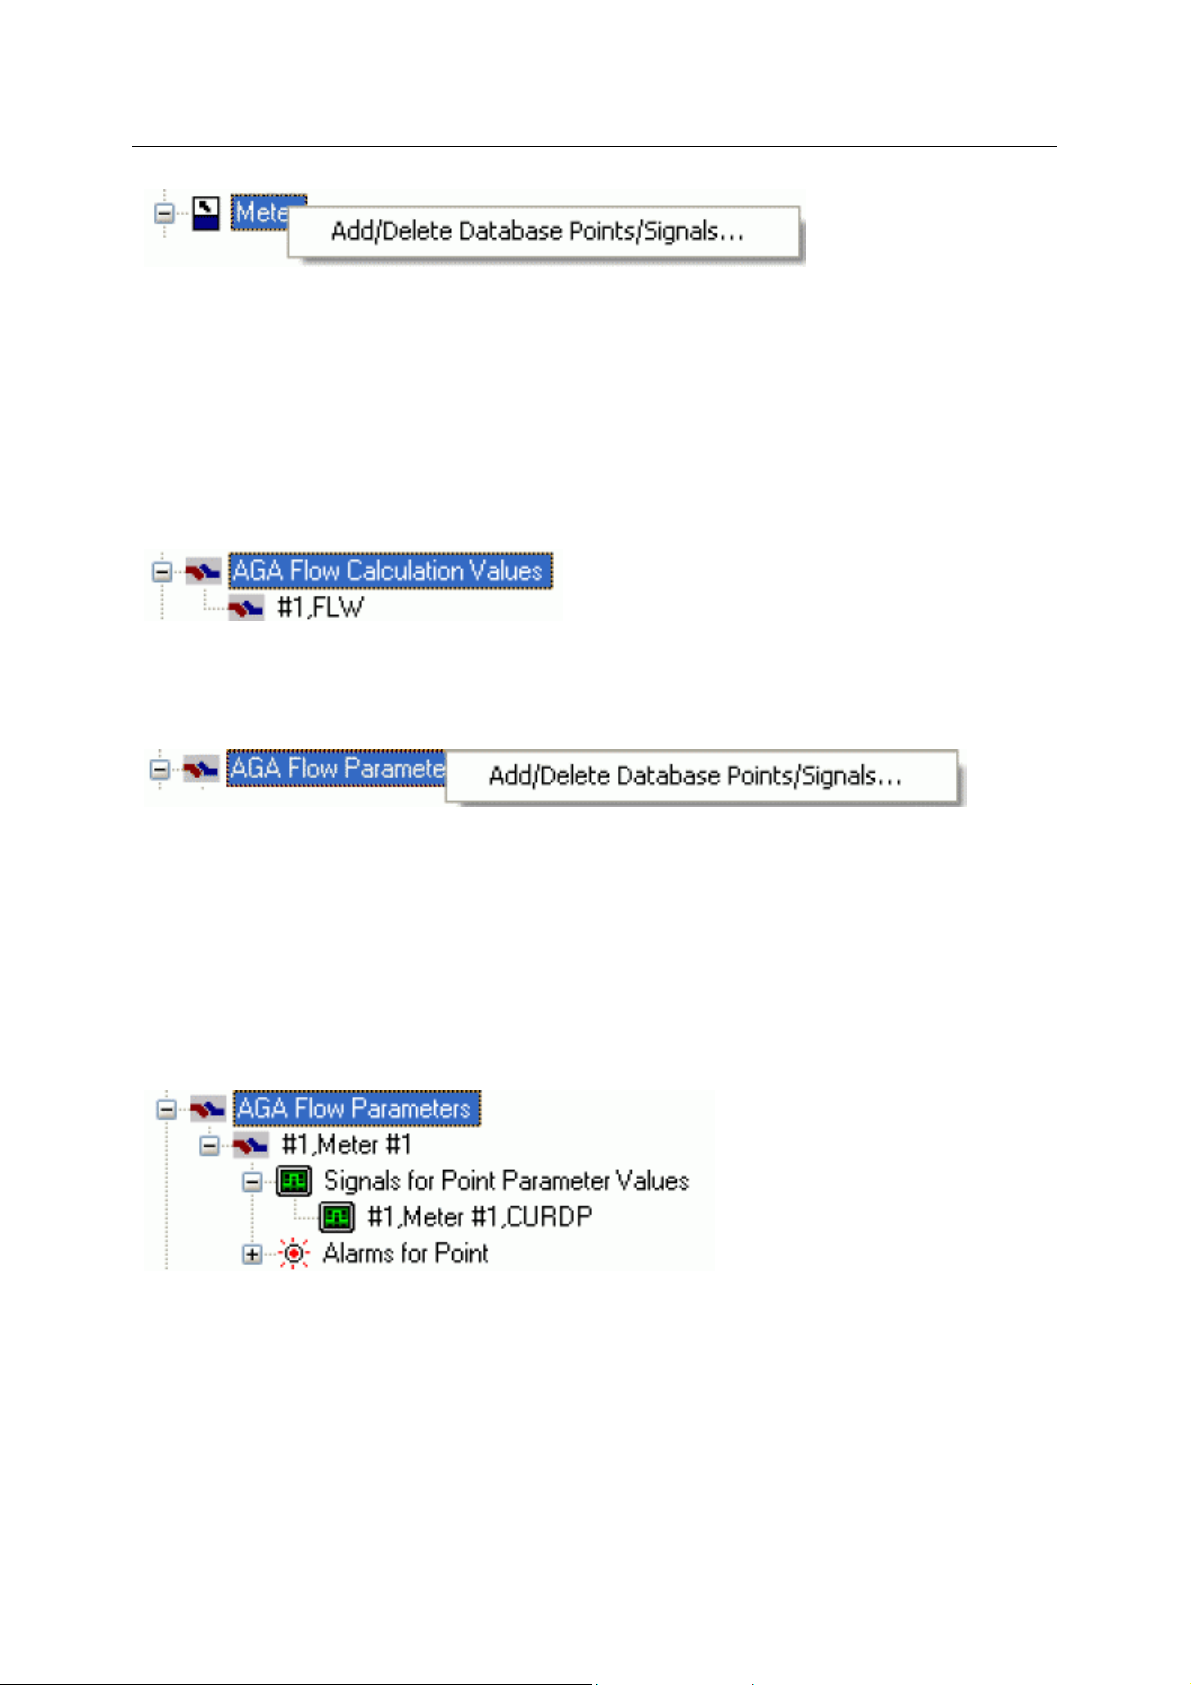
Reference Guide
D301654X412
APRIL 2012
Add/Delete Database Points/Signals
This option enables you to add or delete ROC Points or Signals from the OpenEnterprise database. It
opens the 'Points Selection' page of the 'ROC Device Wizard' so that you can select the Points and
Parameters required.
Meter Point Types
The Meter Point Type nodes are the parent nodes for all Points to do with Meters found within the
selected Device. When the plus sign to the left of the Meter Sub node is selected, it expands to reveal
any available Points.
Meter Point Type Context Menu
ROC Configuration Tool
This is the context menu that is available on any of the Meter Point Type nodes. It enables you to add
or delete Points and Signals of this type to the OpenEnterprise database.
Add/Delete Database Points/Signals
This option enables you to add or delete ROC Points or Signals from the OpenEnterprise database. It
opens the 'Points Selection' page of the 'ROC Device Wizard' so that you can select the Points and
Parameters required.
Meter Point
If the Meter Point has any specific Meter Parameters mapped to the appropriate OpenEnterprise ROC
signal table, it will have a plus sign to the left of it, which when selected will reveal the signals that
have been mapped to Parameters for the selected ROC Point. ype topic text here.
Meter Point Context Menu
This context menu belongs to all individual ROC Points.
- 76 -
Page 92

Reference Guide
D301654X412
APRIL 2012
Add/Delete Database Points/Signals
This option enables you to add or delete ROC Points or Signals from the OpenEnterprise database. It
opens the 'Points Selection' page of the 'ROC Device Wizard' so that you can select the Points and
Parameters required.
Rename
ROC Configuration Tool
Opens the 'Point Rename Dialog', which enables you to rename this Point.
Delete Point
The selected Point will be deleted.
Disable Point
The selected Point will be disabled.
Properties
Opens the 'Point Properties Dialog', which enables you to associate a 'Parameter Pattern Te mplate'
with the Point.
Signals for Point Parameter Values
The 'Signals for Point Parameter Values' node is the parent for any ROC Signals that have been
created from the Point. The parent node and each Point node have context menus.
Signals for Point Parameter Values Context Menu
The 'Signals for Point Parameter Values' parent node has this single context menu. Click on it below
for more help.
Add/Delete Database Points/Signals
This option enables you to add or delete ROC Points or Signals from the OpenEnterprise database. It
opens the 'Points Selection' page of the 'ROC Device Wizard' so that you can select the Points and
Parameters required.
Signal Context Menu
- 77 -
Page 93

Reference Guide
D301654X412
APRIL 2012
This context menu is available from any Signal node that appears under the 'Signals for Point
Parameter Values' node that comes under any Point node.
Delete
The selected ROC Signal will be deleted from the OpenEnterprise database.
Disable
ROC Configuration Tool
The selected ROC Signal will be disabled.
List Logged Values
Overwrites the List View Pane which prior to using this menu item contains the single selected Signal
object.
When the 'List Logged Values' menu item is selected from the object on the Tree View context menu
the last hours worth of sampled data for the selected Signal appears in the List View Pane.
The Logged Values list has a context menu which appears when you selects an y value and right
clicks the mouse.
Logged Values List Context Menu
The Logged Values list context menu has two options.
- 78 -
Page 94

Reference Guide
D301654X412
APRIL 2012
Refresh List View from Database
Refreshes the list with the most recent values found in the database.
Adjust timestamp where clause
Enables you to retrieve more historical data for a selected signal by changing the amount of time
requested by the query. The default query retrieves the last hours worth of data.
The simplest way to do this is to type a new value into the brackets after the named time (could be
'hours' or 'days') - e.g. 'logtime > now()-hours(5)'. This would retrieve the last five hours worth of data
for the selected signal from the OpenEnterprise database.
ROC Configuration Tool
Signal Properties
The 'Signal Properties' dialog enables you to configure how the ROC RDI updates the ArchiveValue
and ArchiveTimestamp fields of the selected ROC Signal on receipt of history values from the ROC
Device.
- 79 -
Page 95

Reference Guide
D301654X412
APRIL 2012
Disable Update of Archive Value
If this box is checked then history values retrieved from the Device will not be written to the
ArchiveValue and the ArchiveTimestamp fields of the ROC Realanalog or ROC Digital tables.
ROC Configuration Tool
If it remains unchecked (the default) then the ArchiveValue and ArchiveTimestamp field for the
selected Signal will be updated from the ROC Device.
Archive Backfill Gap
If the value in this field is 0 (zero), then history values retrieved from the Device will always be written
to the selected Signal's ArchiveValue and ArchiveTimestamp fields (unless the 'Disable Update of
Archive Value' field is checked.
If this value is greater than zero, then the RDI will attempt to only update history values if there is a
‘gap’ in the receipt of the Current Values.
No special RDI processing will trigger a read of history on detecting a ‘gap’ - gaps will only be filled if
the request to read the history values is configured and scheduled (or manually triggered).
Alarms for Point
If there are alarms associated with the selected Point and the 'On add a ROC Point to the database
automatically add associated alarm conditions' option is checked on the 'System Parameters Wizard
General Page', then they will be listed immediately under the Point in the Tree View window.
There is a context menu available on each Alarm Condition.
Modify Alarm Priority
- 80 -
Page 96
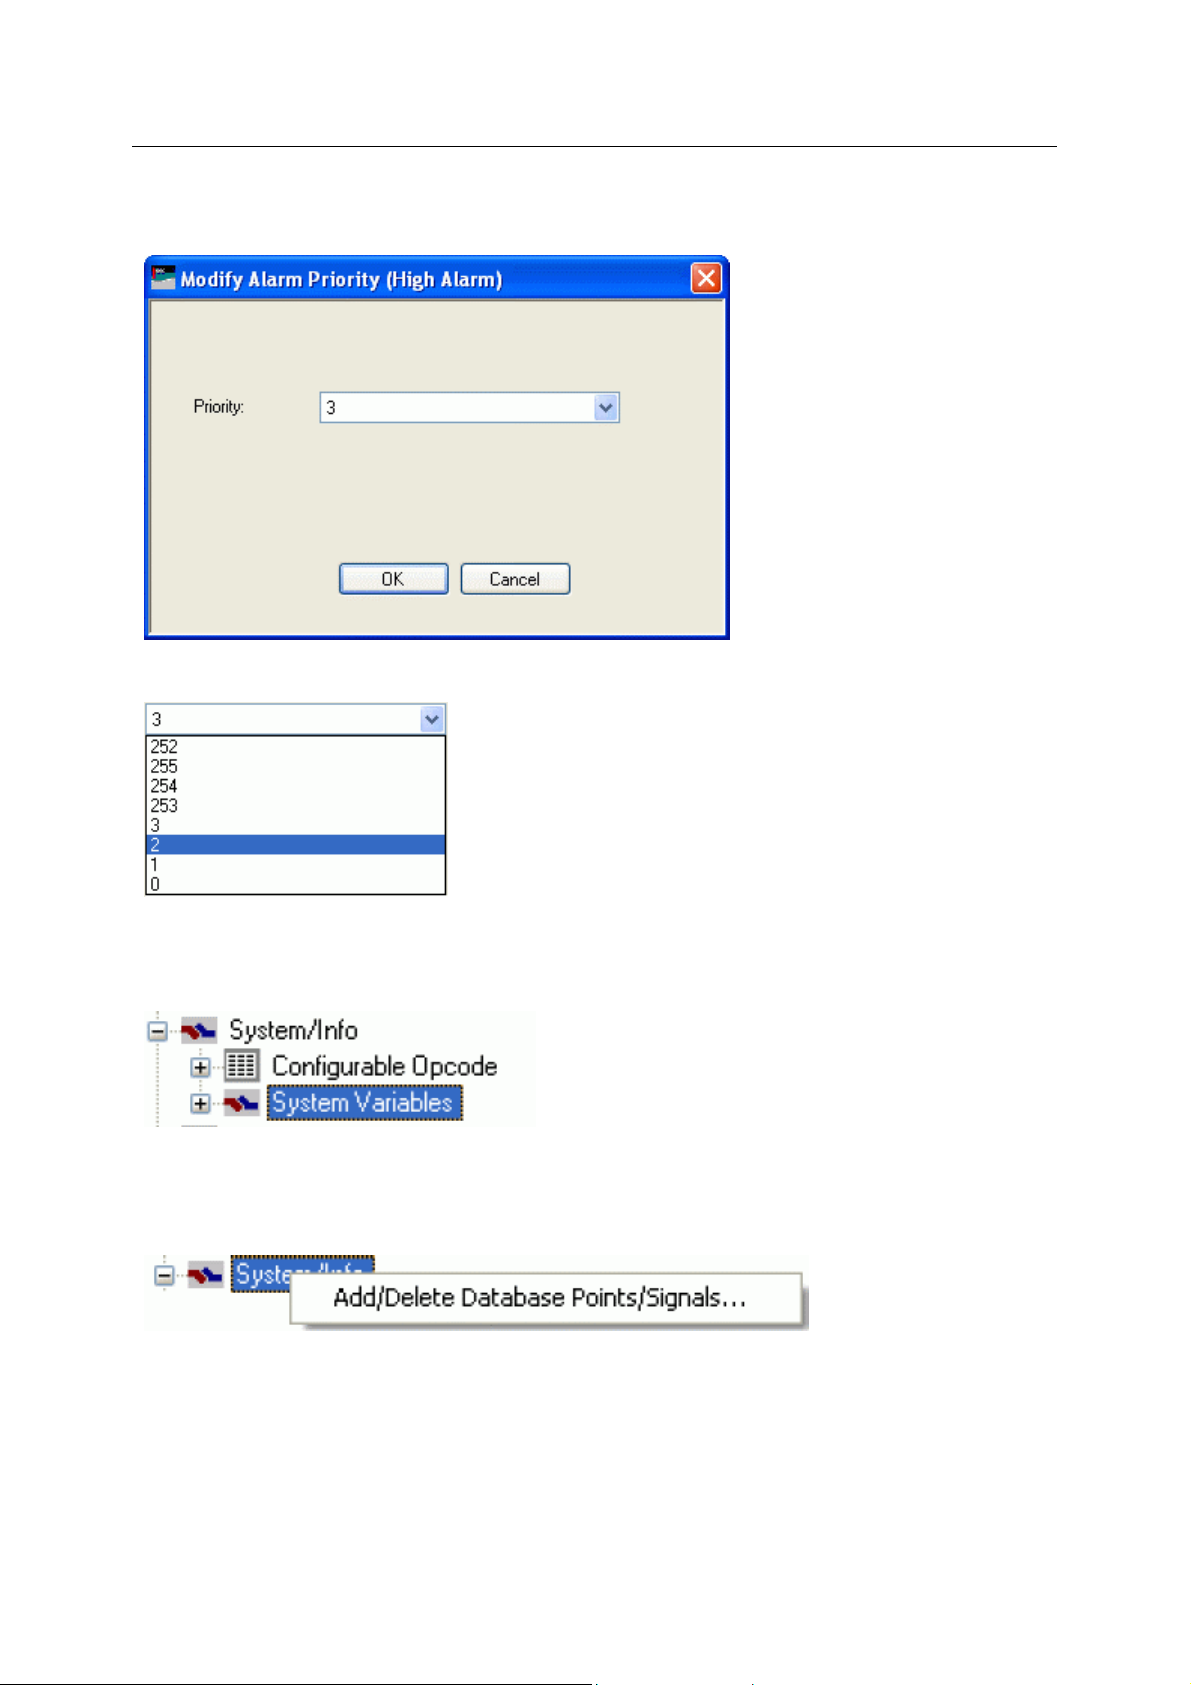
Reference Guide
D301654X412
APRIL 2012
If the 'Modify Alarm Priority' option on any Alarm Condition is selected, the priority of the Alarm
Condition can be changed using this dialog.
ROC Configuration Tool
The new priority is chosen from the drop-down list:
4.1.2.6.4.5 System Info Node
The System/Info node
the ROC Device.
System Info Context Menu
The context menu that appears when you clicks the right mouse button whilst this node is selected. It
enables you to map more ROC Points to the OpenEnterprise database.
contains the parent nodes for all System/Info Type Points that are used within
Add/Delete Database Points/Signals
This option enables you to add or delete ROC Points or Signals from the OpenEnterprise database. It
opens the 'Points Selection' page of the 'ROC Device Wizard' so that you can select the Points and
Parameters required.
System Info Point Types
- 81 -
Page 97
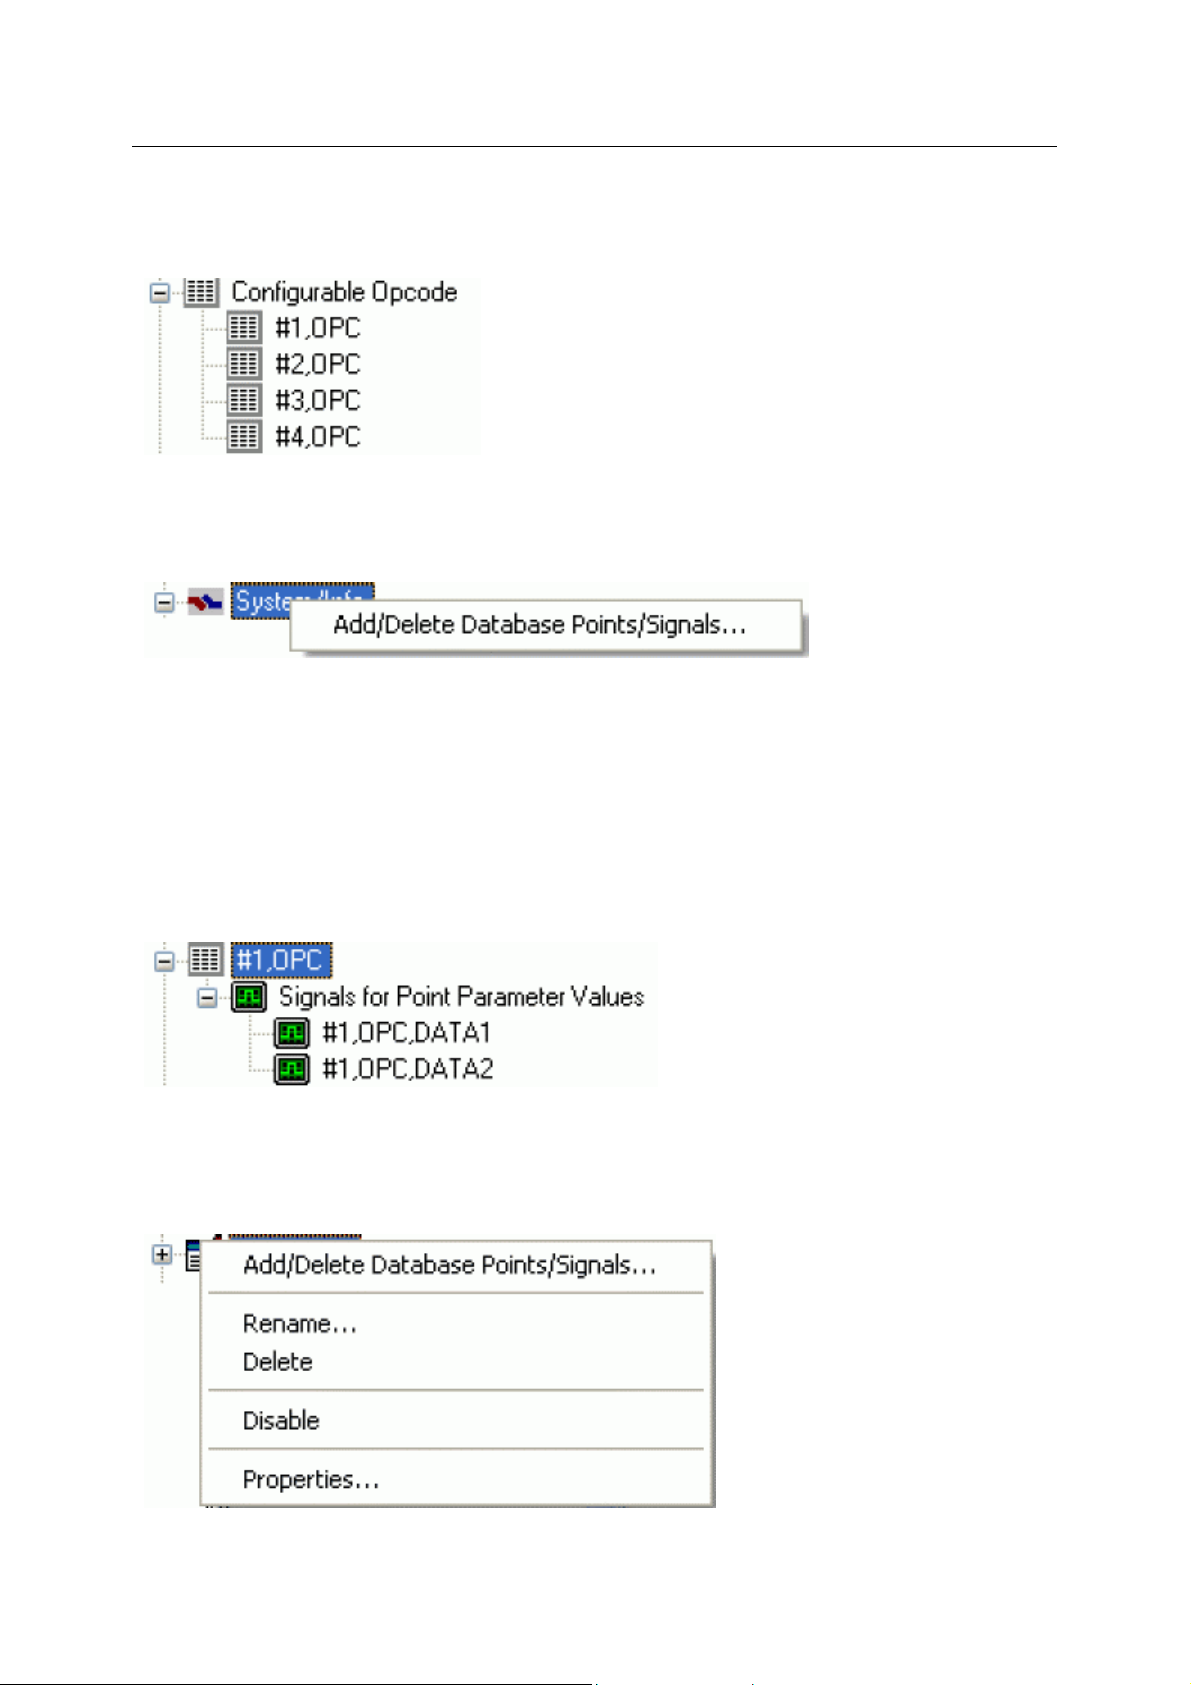
Reference Guide
D301654X412
APRIL 2012
The System Info Point Type nodes are the parent nodes for all System Info Type Points within the
selected Device. This includes 'Configurable Opcode' Type Points also. When the plus sign to the left
of the System Info Point Type node is selected, it expands to reveal any available Points.
System Info Point Type Context Menu
This is the context menu that is available on any of the System Info Point Type nodes. It enables you
to add or delete Points and Signals of this type to the OpenEnterprise database.
ROC Configuration Tool
Add/Delete Database Points/Signals
This option enables you to add or delete ROC Points or Signals from the OpenEnterprise database. It
opens the 'Points Selection' page of the 'ROC Device Wizard' so that you can select the Points and
Parameters required.
System Info Point
If the System Info Point has any specific Parameters mapped to the appropriate OpenEnterprise ROC
signal table, it will have a plus sign to the left of it, which when selected will reveal the signals that
have been mapped to Parameters for the selected ROC Point.
System Info Point Types
System Info Point Context Menu
This context menu belongs to all individual ROC Points.
- 82 -
Page 98
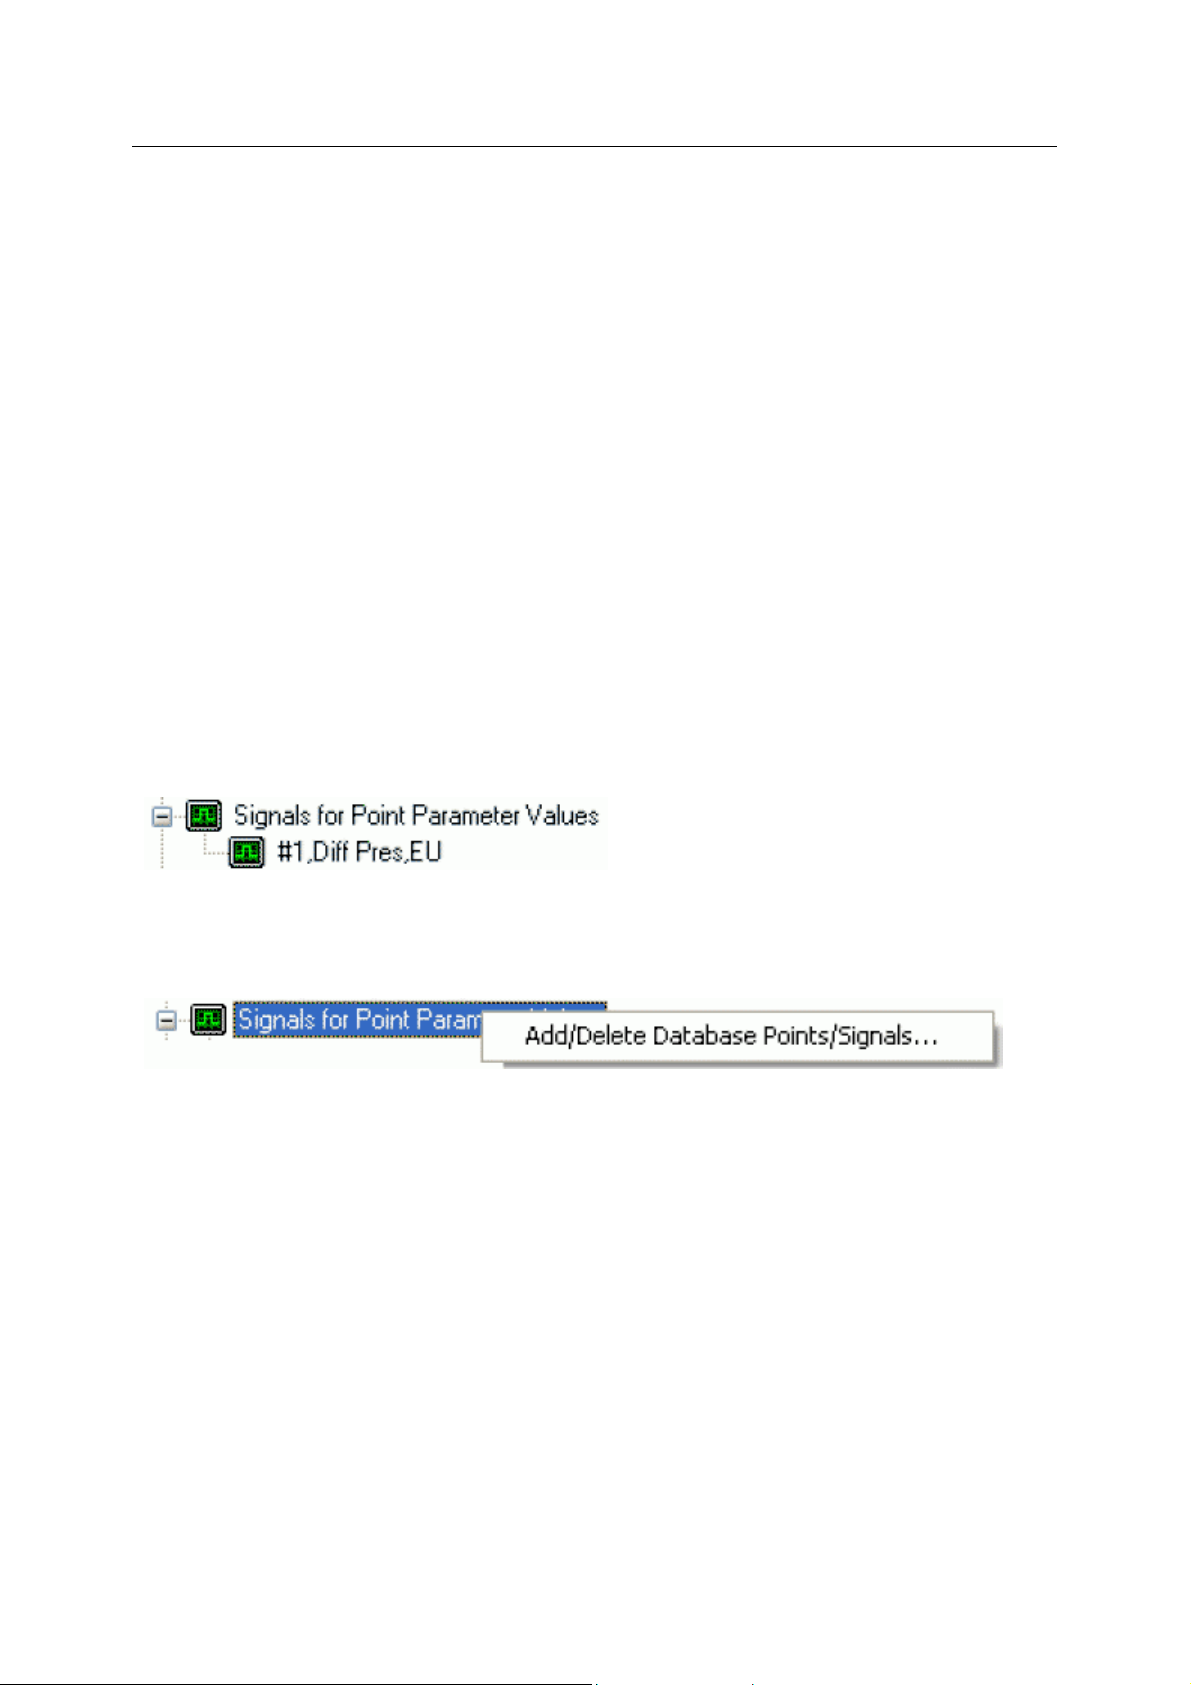
Reference Guide
D301654X412
APRIL 2012
Add/Delete Database Points/Signals
This option enables you to add or delete ROC Points or Signals from the OpenEnterprise database. It
opens the 'Points Selection' page of the 'ROC Device Wizard' so that you can select the Points and
Parameters required.
Rename
Opens the 'Point Rename Dialog', which enables you to rename this Point.
Delete Point
The selected Point will be deleted.
Disable Point
The selected Point will be disabled.
Properties
Opens the 'Point Properties Dialog', which enables you to associate a 'Parameter Pattern Te mplate'
with the Point.
ROC Configuration Tool
Signals for Point Parameter Values
The 'Signals for Point Parameter Values' node is the parent for any ROC Signals that have been
created from the Point. The parent node and each Point node have context menus.
Signals for Point Parameter Values Context Menu
The 'Signals for Point Parameter Values' parent node has this single context menu. Click on it below
for more help.
Add/Delete Database Points/Signals
This option enables you to add or delete ROC Points or Signals from the OpenEnterprise database. It
opens the 'Points Selection' page of the 'ROC Device Wizard' so that you can select the Points and
Parameters required.
Signal Context Menu
This context menu is available from any Signal node that appears under the 'Signals for Point
Parameter Values' node that comes under any Point node.
- 83 -
Page 99

Reference Guide
D301654X412
APRIL 2012
Delete
The selected ROC Signal will be deleted from the OpenEnterprise database.
Disable
The selected ROC Signal will be disabled.
ROC Configuration Tool
List Logged Values
Overwrites the List View Pane which prior to using this menu item contains the single selected Signal
object.
When the 'List Logged Values' menu item is selected from the object on the Tree View context menu
the last hours worth of sampled data for the selected Signal appears in the List View Pane.
The Logged Values list has a context menu which appears when you selects an y value and right
clicks the mouse.
Logged Values List Context Menu
The Logged Values list context menu has two options.
- 84 -
Page 100
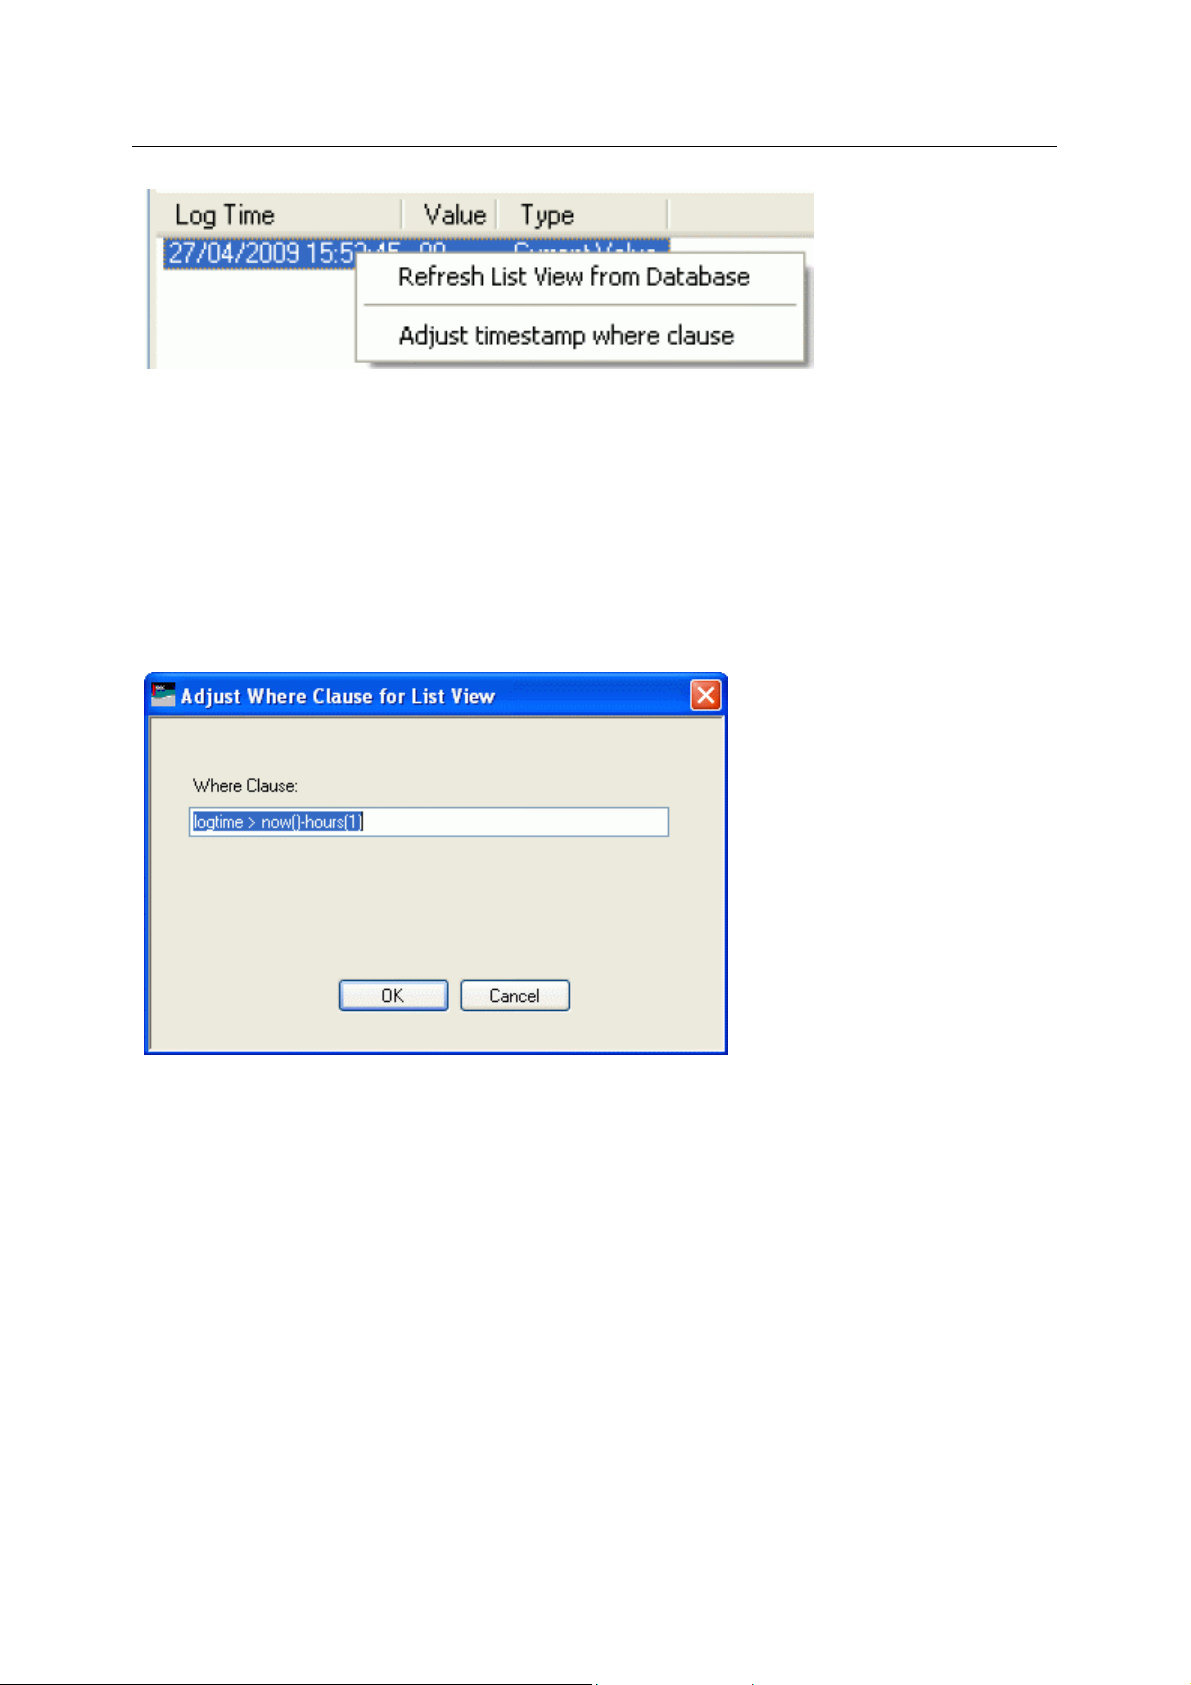
Reference Guide
D301654X412
APRIL 2012
Refresh List View from Database
Refreshes the list with the most recent values found in the database.
Adjust timestamp where clause
Enables you to retrieve more historical data for a selected signal by changing the amount of time
requested by the query. The default query retrieves the last hours worth of data.
The simplest way to do this is to type a new value into the brackets after the named time (could be
'hours' or 'days') - e.g. 'logtime > now()-hours(5)'. This would retrieve the last five hours worth of data
for the selected signal from the OpenEnterprise database.
ROC Configuration Tool
Signal Properties
The 'Signal Properties' dialog enables you to configure how the ROC RDI updates the ArchiveValue
and ArchiveTimestamp fields of the selected ROC Signal on receipt of history values from the ROC
Device.
- 85 -
 Loading...