

Remote Automation Solutions Guide: OpenEnterprise Report Selector Reference Guide Manuals & Guides
Page 1

Reference Guide
D301528X412
April 2012
OpenEnterprise Report Selector
Reference Guide (V2.83)
Remote Automation Solutions
Website: www.EmersonProcess.com/Remote
Page 2

Reference Guide
r
D301528X412
APRIL 2012
Report Selecto
Contents
1 Report Selector........................................................................................................................1
1.1 Report Selector in OEDesktop............................................................................................1
1.1.1 Opening New file..........................................................................................................1
1.1.2 Opening a Saved File...................................................................................................2
1.2 Report Selector in its own container ...................................................................................3
2 Report Selector Runtime Interface ........................................................................................3
2.1 Report Selector Menu Bar ..................................................................................................4
2.1.1 File menu......................................................................................................................4
2.1.1.1 New File .................................................................................................................5
2.1.1.2 Open File................................................................................................................5
2.1.1.3 Save File ................................................................................................................5
2.1.1.4 Save As..................................................................................................................5
2.1.1.5 Print Setup .............................................................................................................5
2.1.1.6 Print........................................................................................................................5
2.1.1.7 Recent Files ...........................................................................................................5
2.1.2 View menu....................................................................................................................5
2.1.3 Configure menu............................................................................................................6
2.1.4 Help menu ....................................................................................................................6
2.2 Container Toolbar ...............................................................................................................6
2.2.1 New File........................................................................................................................6
2.2.2 Open File......................................................................................................................6
2.2.3 Save File.......................................................................................................................6
2.2.4 Print ..............................................................................................................................6
2.3 Report Toolbar ....................................................................................................................6
2.3.1 Print ..............................................................................................................................6
2.3.2 Save Report..................................................................................................................7
2.3.3 Email Report.................................................................................................................7
2.3.4 View in native viewer....................................................................................................7
2.3.5 Configure......................................................................................................................7
2.3.6 Next [>>] and Previous [<<] report buttons ..................................................................7
2.4 Report Filter Options...........................................................................................................7
2.4.1 Report Name ................................................................................................................7
2.4.2 Report Format...............................................................................................................8
2.4.3 Report Alias..................................................................................................................8
2.4.3.1 Primary Alias Value................................................................................................8
2.4.3.2 Set Alias Value Button ...........................................................................................9
2.4.4 Report Alias Editor Page..............................................................................................9
2.4.4.1 Report Aliases........................................................................................................9
2.4.4.2 Alias Value Change..............................................................................................10
2.4.5 Report Date ................................................................................................................10
2.4.5.1 Report Date Calendar..........................................................................................10
2.4.5.1.1 Report(s) Identified Date ................................................................................10
2.4.5.1.1.1 Multiple report color..................................................................................10
2.4.5.1.1.2 Viewing multiple published reports...........................................................11
2.4.5.1.2 Run Report Context Menu..............................................................................11
2.4.5.1.2.1 Run Report...............................................................................................12
- i -
Page 3

Reference Guide
r
D301528X412
APRIL 2012
Report Selecto
2.4.5.1.2.2
2.4.5.1.2.3 Available published reports......................................................................12
2.4.5.1.2.4 Run Report Progress ...............................................................................13
2.4.5.1.2.5 File Download Dialog............................................................................... 13
2.5 Report viewing area..........................................................................................................13
3 Report Selector Configuration............................................................................................. 14
3.1 Property pages in the Container .......................................................................................14
3.2 Property Pages in the OEDesktop....................................................................................15
3.3 General Page....................................................................................................................16
3.3.1 Page Menu .................................................................................................................17
3.3.2 Default Dataservice....................................................................................................18
3.3.3 User specified Dataservice.........................................................................................18
3.3.4 Test Connection .........................................................................................................18
3.3.5 Allow Runtime Configuration......................................................................................18
3.3.6 Show Toolbar..............................................................................................................18
3.3.7 Show next and previous buttons ................................................................................19
3.3.8 Browse mode..............................................................................................................19
3.3.9 View mode..................................................................................................................19
3.3.10 Run mode................................................................................................................19
3.4 Report Selection Page......................................................................................................19
3.4.1 Page Menu .................................................................................................................20
3.4.2 Show all reports..........................................................................................................21
3.4.3 Available reports.........................................................................................................21
3.4.4 Show disabled reports................................................................................................21
3.4.5 Default Report Selection.............................................................................................21
3.4.6 Show configured formats............................................................................................21
3.4.7 Show all supported formats........................................................................................21
3.4.8 Show selected formats...............................................................................................21
3.4.9 Formats list.................................................................................................................22
3.4.10 Show disabled formats............................................................................................22
3.4.11 Default Format Selection.........................................................................................22
3.5 Aliases Page .....................................................................................................................22
3.5.1 Alias List .....................................................................................................................23
3.5.1.1 Alias Name...........................................................................................................23
3.5.1.2 Report ..................................................................................................................24
3.5.1.3 Alias Value ...........................................................................................................24
3.5.1.4 Primary Alias........................................................................................................24
3.5.1.5 Display Name.......................................................................................................24
3.6 Report Date Page .............................................................................................................25
3.6.1 Show the current date ................................................................................................25
3.6.2 Show the date prior to the current date......................................................................25
3.6.3 Show the following date..............................................................................................26
3.6.4 Override report time....................................................................................................26
3.7 Calendar Page ..................................................................................................................26
3.7.1 Show Run...................................................................................................................27
3.7.2 Show Run and Publish...............................................................................................27
3.7.3 Show list of available reports......................................................................................28
3.7.4 Start Time...................................................................................................................28
3.7.5 End Time ....................................................................................................................29
Run and Publish Report...........................................................................12
- ii -
Page 4

Reference Guide
r
D301528X412
APRIL 2012
Range.........................................................................................................................29
3.7.6
3.7.7 Report available color.................................................................................................29
3.7.7.1 Changing the default color...................................................................................30
3.7.8 Different color for multiple reports ..............................................................................30
3.7.9 Show Time of day.......................................................................................................31
3.7.10 List of All reports .....................................................................................................31
3.7.11 The Oldest report....................................................................................................32
3.7.12 The Newest report...................................................................................................32
3.8 Filter Options Page ...........................................................................................................32
3.8.1 Show all Filters ...........................................................................................................33
3.8.2 Allow report name to be selected...............................................................................33
3.8.3 Allow report format to be selected..............................................................................34
3.8.4 Allow the report date to be selected...........................................................................34
3.8.5 Allow Primary Alias value to be edited.......................................................................34
3.8.6 Allow other report alias values to be edited................................................................35
4 Index .......................................................................................................................................36
Report Selecto
- iii -
Page 5
Reference Guide
r
D301528X412
APRIL 2012
Report Selecto
1 Report Selector
The Report Selector enables users to view, run and publish reports from any OpenEnterpris e
Workstation. It is an OpenEnterprise View component, and is designed for use within the OEDesktop
environment. It can also be used on an OpenEnterprise Workstation outside the OEDesktop in its own
container.
With the Report Selector a user can:-
1. Copy a previously published report from the OpenEnterprise server to the local machine for
printing or viewing
2. Fill in reporting gaps by running, viewing and publishing unavailable published reports
3. Run a configured report and view or save it in different formats
1.1 Report Selector in OEDesktop
The Report Selector is an OpenEnterprise View component, and therefore can be loaded into a
window in the OEDesktop.
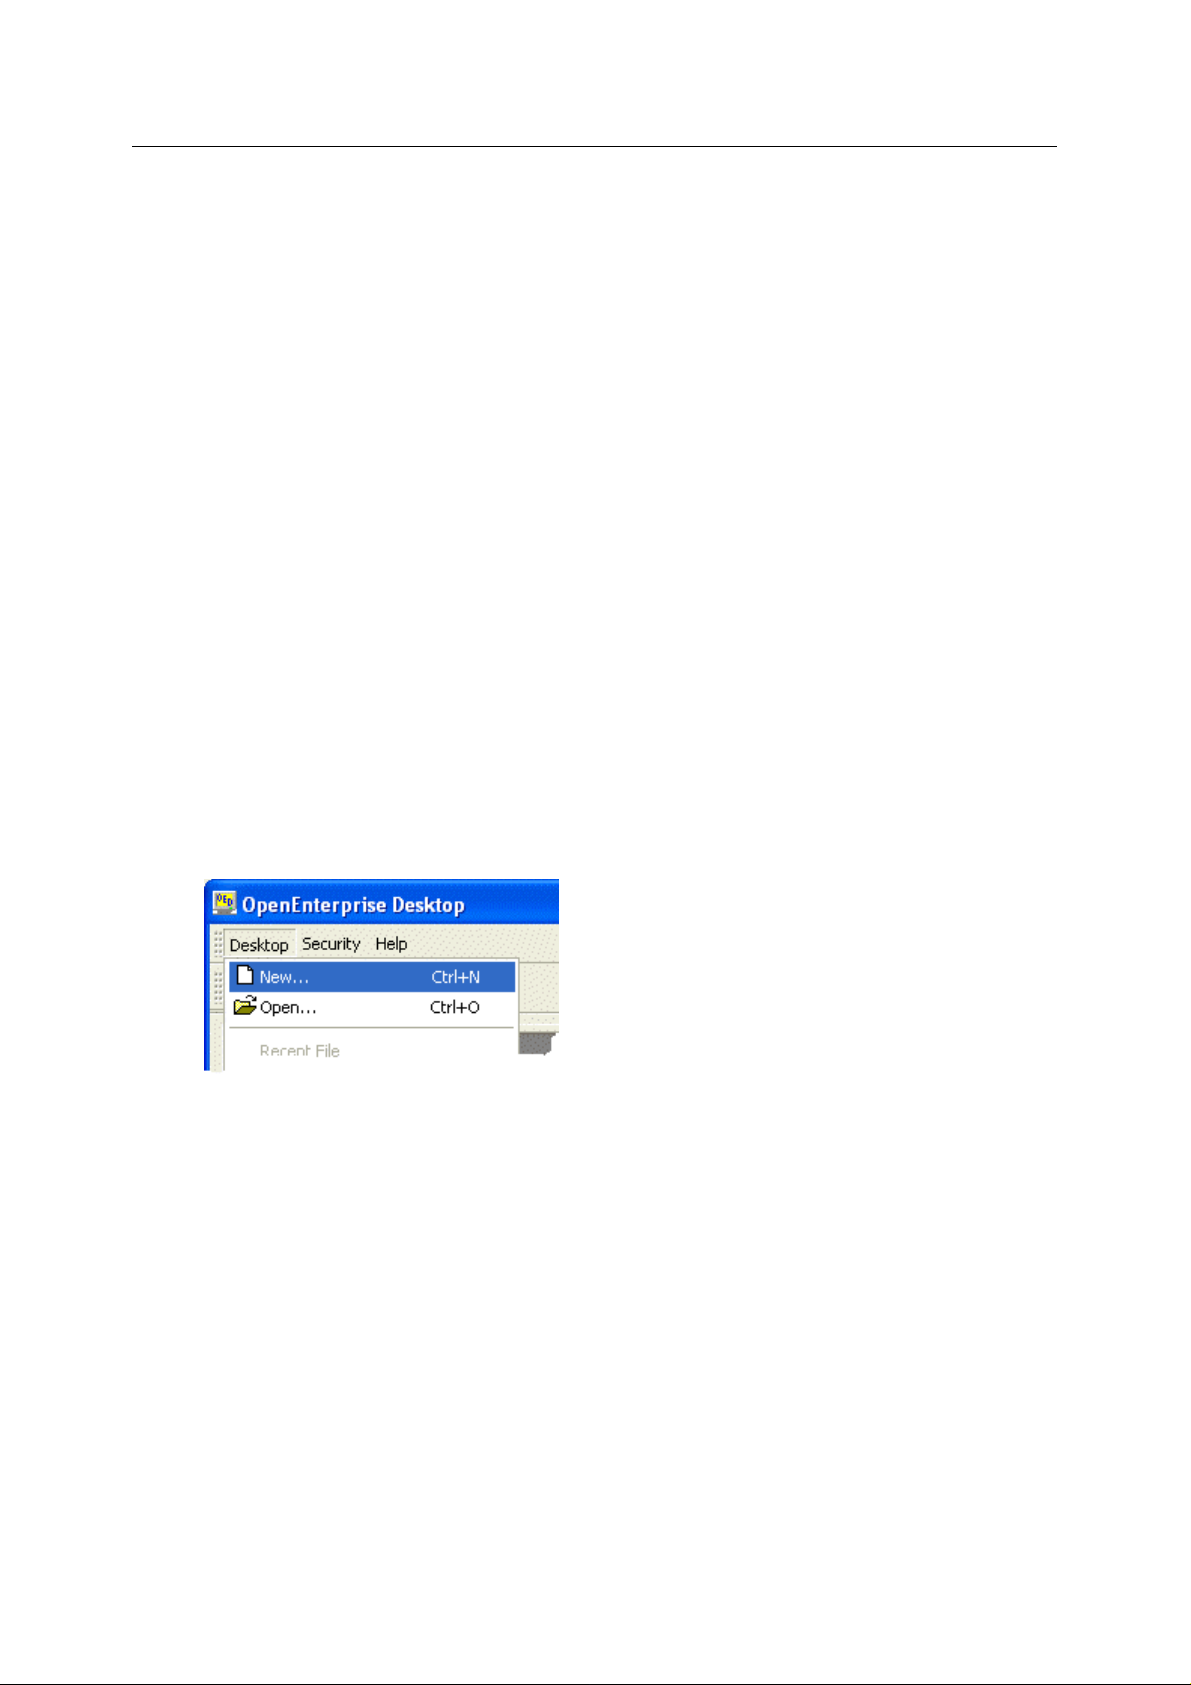
1.1.1 Opening New file
1. A new Report Selector window can be loaded into the OEDesktop by selecting the
OEDesktop>New menu item from the OEDesktop:-
2. Then select the 'OE Report Selector' file type from the list as shown here.
- 1 -
Page 6

Reference Guide
r
D301528X412
APRIL 2012
Report Selecto
1.1.2 Opening a Saved File
1. A saved Report Selector file can be loaded into the OEDesktop by selecting the
OEDesktop>Open menu item:-
2. Then select the 'OE Report Selector' file type from the 'Open' dialog.
3. Then browse for and select the actual file using the browse button, highlighted in the image
below.
- 2 -
Page 7

Reference Guide
r
D301528X412
APRIL 2012
Report Selecto
1.2 Report Selector in its own container
As an OpenEnterprise View component, the Report Selector has its own container, into whic h a
Report Selector file can be loaded.
To do this select Start>All Programs>OpenEnterprise>Views>Report Selector. This will open the
Report Selector View in its own container with the default Report Selector file (name =
<dataservice>.rpv). The default Report Selector filename is set when OpenEnterprise is installed. The
path and filename can be found in the Settings Editor component under the
'OpenEnterprise\Tasks\Window Manager\Child Applications\Report Selector Control' key. On
installation this file will have default options. You can make changes in the Report Selector container
and save them.
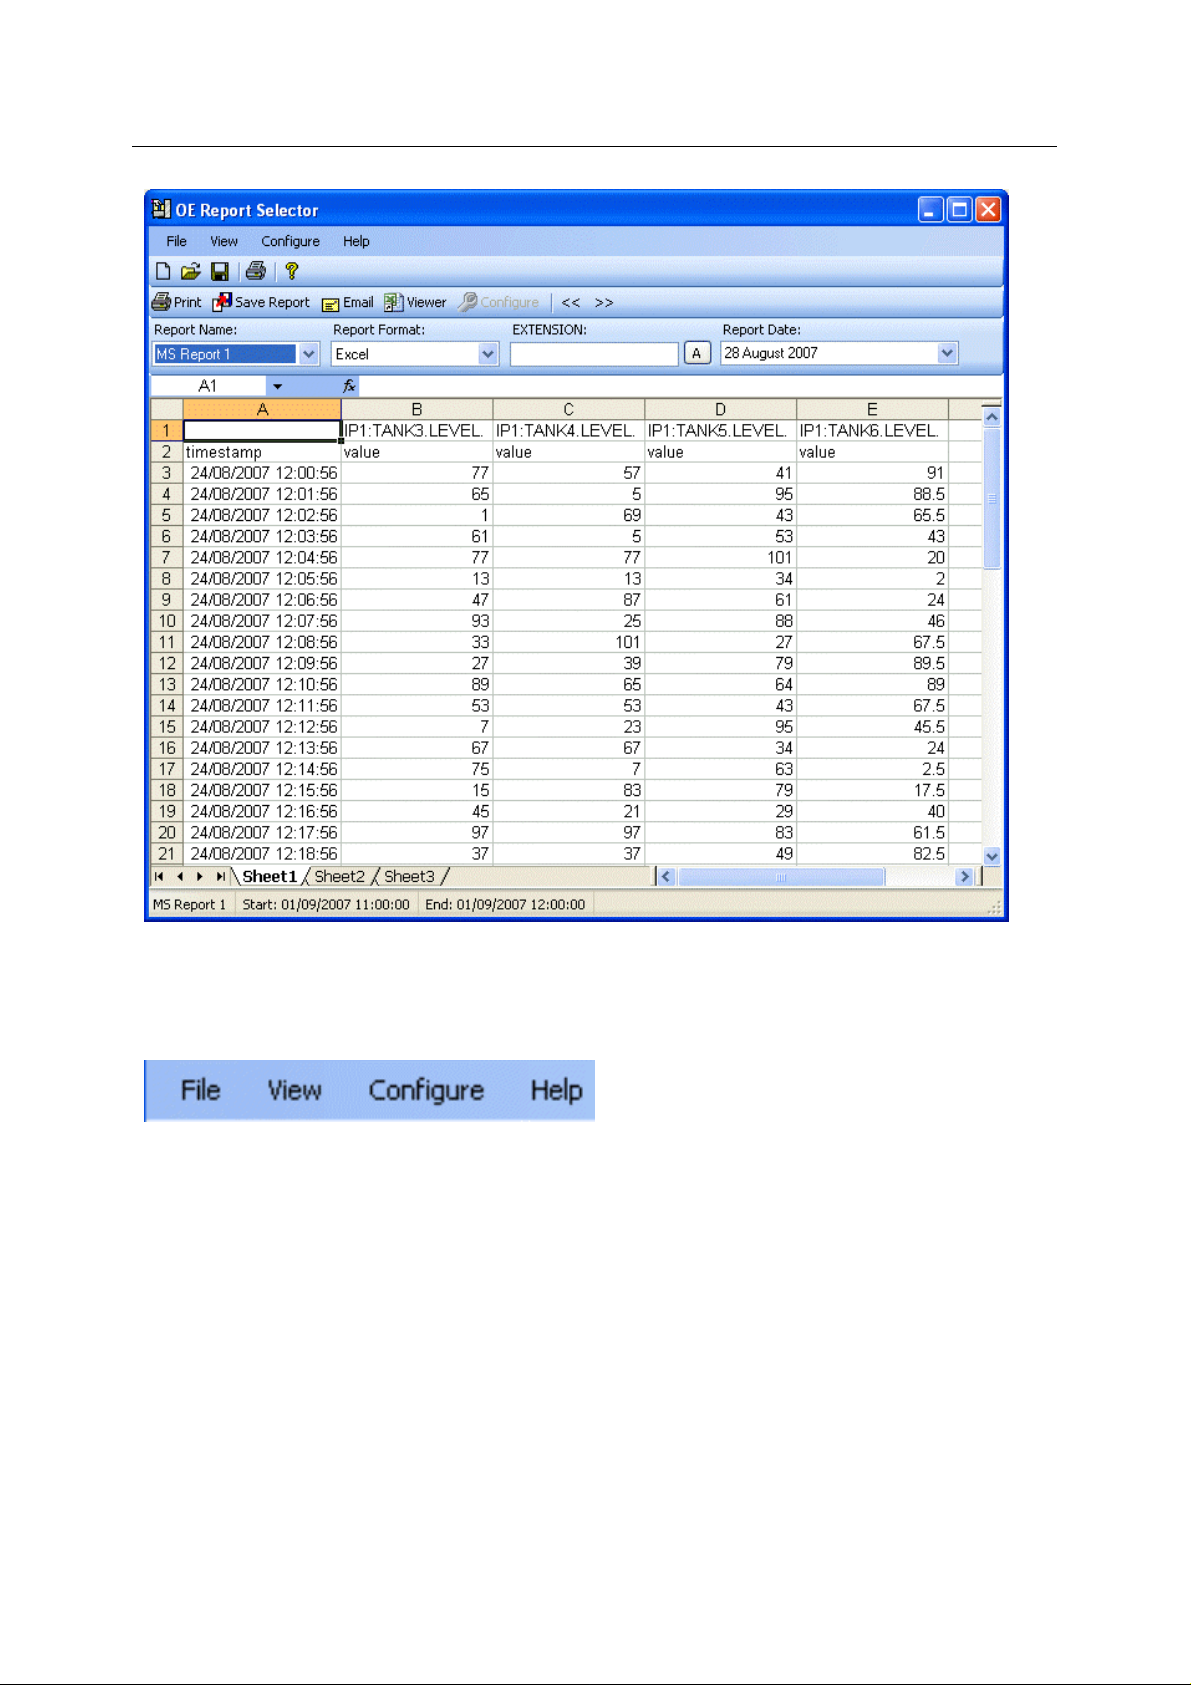
2 Report Selector Runtime Interface
This is the Report Selector in its own container in runtime mode. It can also be loaded into a window
within the OEDesktop. Use the Report Selector to view or print previously published reports, or create
new published reports. Details of the various features of the user interface are listed under the image
below.
- 3 -
Page 8
Reference Guide
r
D301528X412
APRIL 2012
Report Selecto
2.1 Report Selector Menu Bar
These are the menu items that are available to any OpenEnterprise View that is opened in its own
container.
2.1.1 File menu
These are menu options on the Report Selector File menu.
- 4 -
Page 9

Reference Guide
r
D301528X412
APRIL 2012
2.1.1.1 New File
Open
s a new default Report Selector file. The default Report Selector filename is set when
OpenEnterprise is installed. The path and filename can be found in the Settings Editor component
under the 'OpenEnterprise\Tasks\Window Manager\Child Applications\Report Selector Control' key.
Report Selecto
2.1.1.2 Open File
s a previously saved Report Selector file.
Open
2.1.1.3 Save File
If change
be overwritten.
2.1.1.4 Save As
Cha
saved. You can save the new settings under a new file name using this option.
2.1.1.5 Print Setup
Open
2.1.1.6 Print
Prints the report that is in the viewing area. If no report is being viewed, no print will take pl
2.1.1.7 Recent Files
A list of files that have most recently bee
s are made, they can be saved using this option. If you choose this option the loaded file will
nges can be made to the default file in the Report Selector's container, and these changes can be
s the configured printer's set up pages.
ace.
n loaded into the Report Selector container.
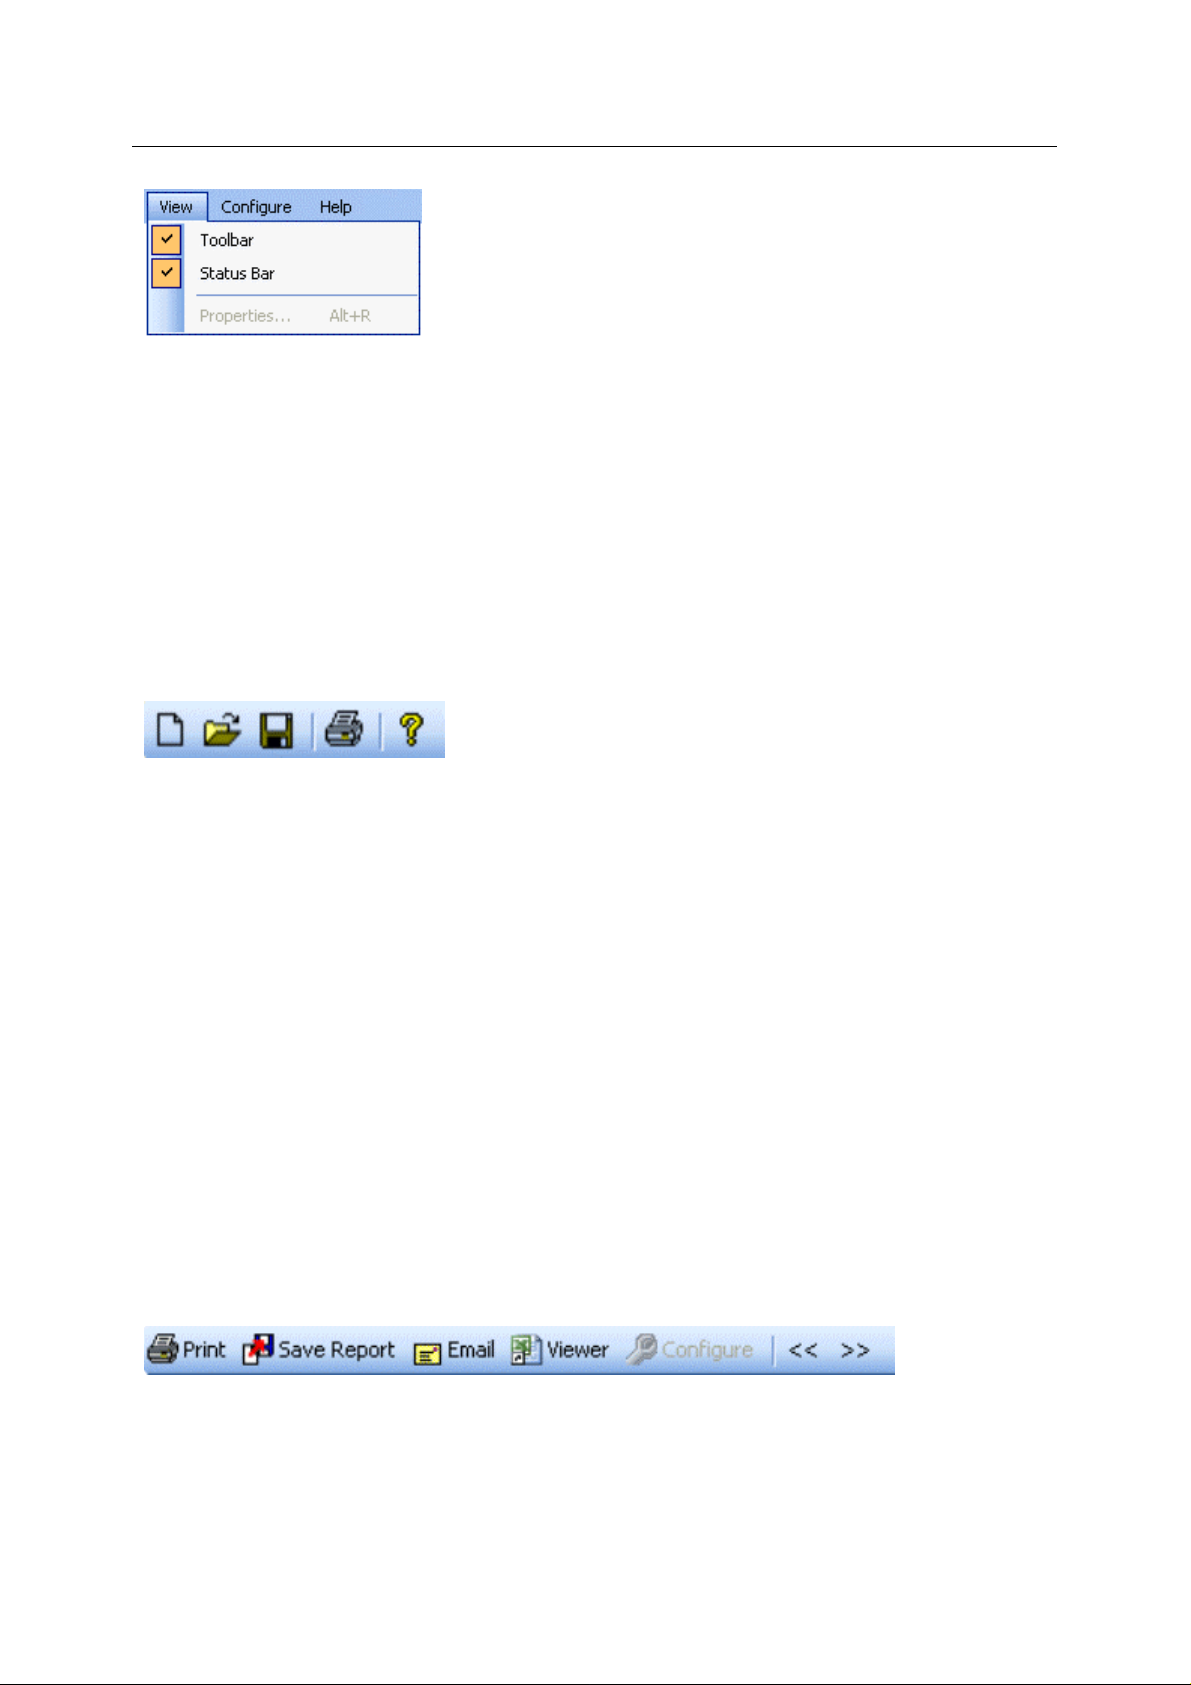
2.1.2 View menu
The View menu shows two options. The Toolbar and Status bar options hide and show the Toolbar
and Status bar of the Report Selector container. A tick indicates the object is shown, no tick indicates
that it is hidden.
The Properties... option is disabled, because the Report Selector container, is here in Runtime mode.
The Properties.. option is only available when the container is placed in Configure mode by selecting
the Configure menu item to the right of the View item.
- 5 -
Page 10
Reference Guide
r
D301528X412
APRIL 2012
Report Selecto
2.1.3 Configure menu
Places the Report Selector container into Configure mode, enabling access to the Property pages.
When the container is in Configure mode, this menu item changes to Runtime.
2.1.4 Help menu
Provides options to view the Help file and the About box, which displays OpenEnterprise version,
build and contact details.
2.2 Container Toolbar
The container toolbar is the same for all OpenEnterprise View components. It provides quick options
to some of the main menu functions.
2.2.1 New File
Opens a new default Report Selector file. The default Report Selector filename is set when
OpenEnterprise is installed. The path and filename can be found in the Settings Editor component
under the 'OpenEnterprise\Tasks\Window Manager\Child Applications\Report Selector Control' key.
2.2.2 Open File
Opens a previously saved Report Selector file.
2.2.3 Save File
If changes are made, they can be saved using this option. If you choose this option the loaded file will
be overwritten.
2.2.4 Print
Prints the report that is in the viewing area. If no report is being viewed, no print will take place.
2.3 Report Toolbar
The Report Toolbar provides quick access to various functions that act on the report in the viewing
area.
2.3.1 Print
Prints the report that is currently in the viewing area.
- 6 -
Page 11
Reference Guide
r
D301528X412
APRIL 2012
Report Selecto
2.3.2 Save Report
Saves the report that is currently in the viewing area.
2.3.3 Email Report
Enables the user to Email the report that is currently in the viewing area. The default email client will
open with the report file attached, and the name of the report in the message section. Select a user
and send the email.
2.3.4 View in native viewer
Opens the report in the viewing area in its native viewer. For instance, if it is an Excel file, providing
that Excel is installed on the host computer, it will be opened in Excel.
2.3.5 Configure
This option is disabled by default when the Report Selector is opened in its own container. If the
button is enabled, the user can click it to put the Report Selector into runtime mode. The button can
be enabled from the General Page of the Report Selector property pages.
2.3.6 Next [>>] and Previous [<<] report buttons
These buttons enable you to quickly navigate to the next and previous published reports that are
available on the server.
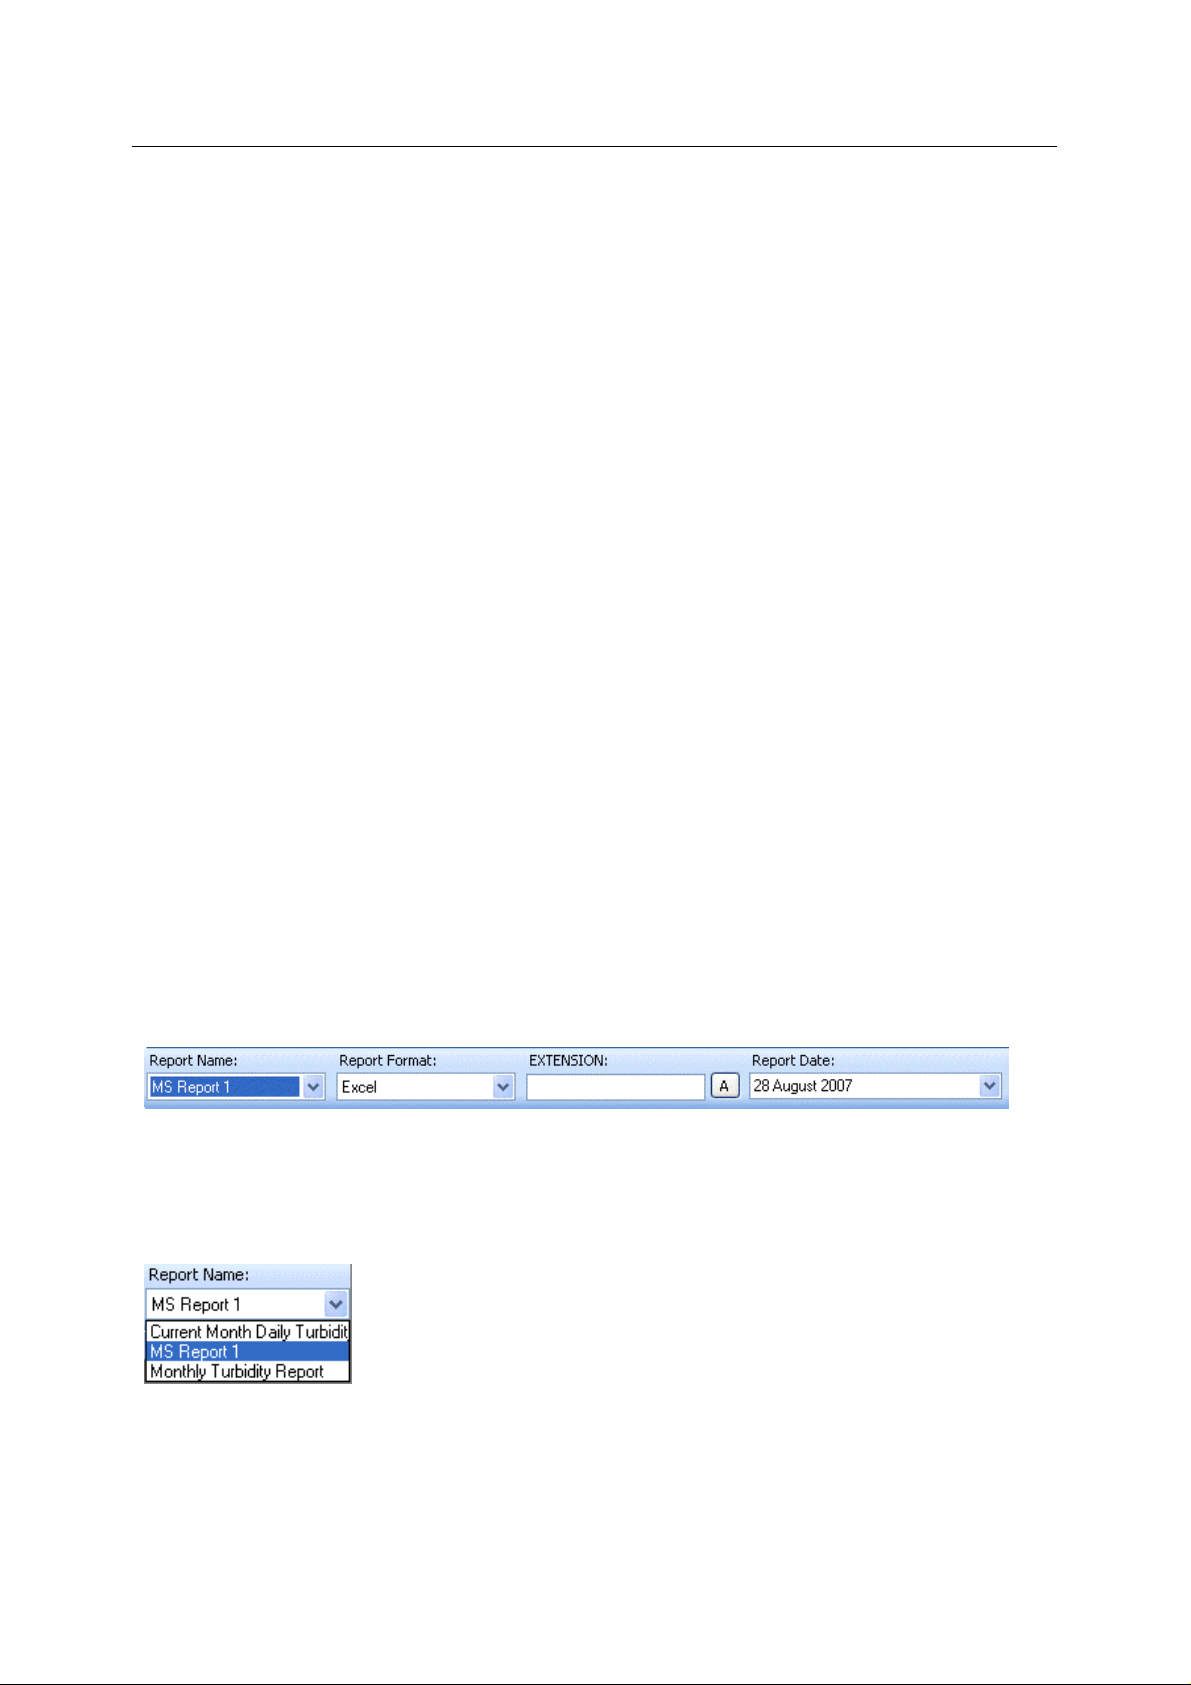
2.4 Report Filter Options
These options enable you to:-
1. Select a configured report for viewing
2. Select the format you want to view the report in
3. Define values for any aliases
4. Select a date/time for running/publishing the report
2.4.1 Report Name
Select the configured report that you want to view from the list. You may not be seeing all of the
configured reports in this list. To ensure that you can see all reports, review the Report Selection
Page of the Report Selector Configuration pages.
- 7 -
Page 12

Reference Guide
r
D301528X412
APRIL 2012
Report Selecto
2.4.2 Report Format
Select the Report Format that you would like to view the report in from the list available. The format
you want to view in is not limited to the formats that have been configured for the report. You may not,
however, see all of these options, depending on how the Report Selector file is configured. To enable
more formats, see the Report Selection Page of the Report Selector Configuration pages.
2.4.3 Report Alias
This section may or may not be enabled. The Report Selector sets the BASEDATE and BASETIME
aliases depending on the date and time selected for running the report, but the DATASERVICE alias
on reports can be made available here for modification by the user. See the Aliases Page on the
Report Selector configuration pages for more information.
If the DATASERVICE alias is not enabled for modification, the Report Selector checks the report to
see if any CSV or SQL alias is defined. If there is, then this alias name appears above the Primary
Alias Value field, and the CSV list or the results of the query are shown in the value field as a dropdown list.
The user can then select one of the available values. Otherwise, the text above the Primary Alias
Value field will display the first alias name found other than the DATASERVICE alias. This will be
deemed the primary alias, and any value assigned in the report to this alias will appear in the Primary
Alias Value field. This value, and the value of any other single value alias can be modified by clicking
the [A] button.
If no alias other than DATASERVICE is configured on the report, and the DATASERVICE alias is not
made available for modification, this section will be disabled.
2.4.3.1 Primary Alias Value
The Re
alias name appears above this field, and the CSV list or the results of the query are shown in this field
as a drop-down list.
port Selector checks the report to see if any CSV or SQL alias is defined. If there is, then this
- 8 -
Page 13

Reference Guide
r
D301528X412
APRIL 2012
The user then selects one of the values available. Otherwise, the text above the drop-down will
display the first alias name found other than the DATASERVICE alias. This will be deemed the
primary alias, and any value assigned in the report will appear in the value field below the alias name.
Any single value alias in the report can be modified by clicking the [A] button.
2.4.3.2 Set Alias Value Button
s the Report Alias Editor.
Open
Report Selecto
2.4.4 Report Alias Editor Page
The Report Alias Editor is opened when the user clicks on the [A] button on the Report Selector View
runtime interface.
The Report Alias Editor enables the user to define alias values when a report is run. Note, only
aliases that are enabled using the Aliases Page of the configuration pages will be available in this list.
2.4.4.1 Report Aliases
A lis
t of the single value aliases on the selected report. If the DATASERVICE alias is not shown, it is
because it has not been selected from the global list of report aliases on the Aliases Page of the
Report Selector configuration pages.
- 9 -
Page 14

Reference Guide
r
D301528X412
APRIL 2012
2.4.4.2 Alias Value Change
Click on any of the 'Value' fields from the list of report aliases, and type in the required value.
Report Selecto
2.4.5 Report Date
The Report Date control allows you to select a date and time for running the report. The date that is
initially shown in the field by default is the current date, but this can be changed on the Report Date
Page of the Property pages. Click the arrow to the right of the Report Date field to view a calendar,
from which you can choose a date and time.
2.4.5.1 Report Date Calendar
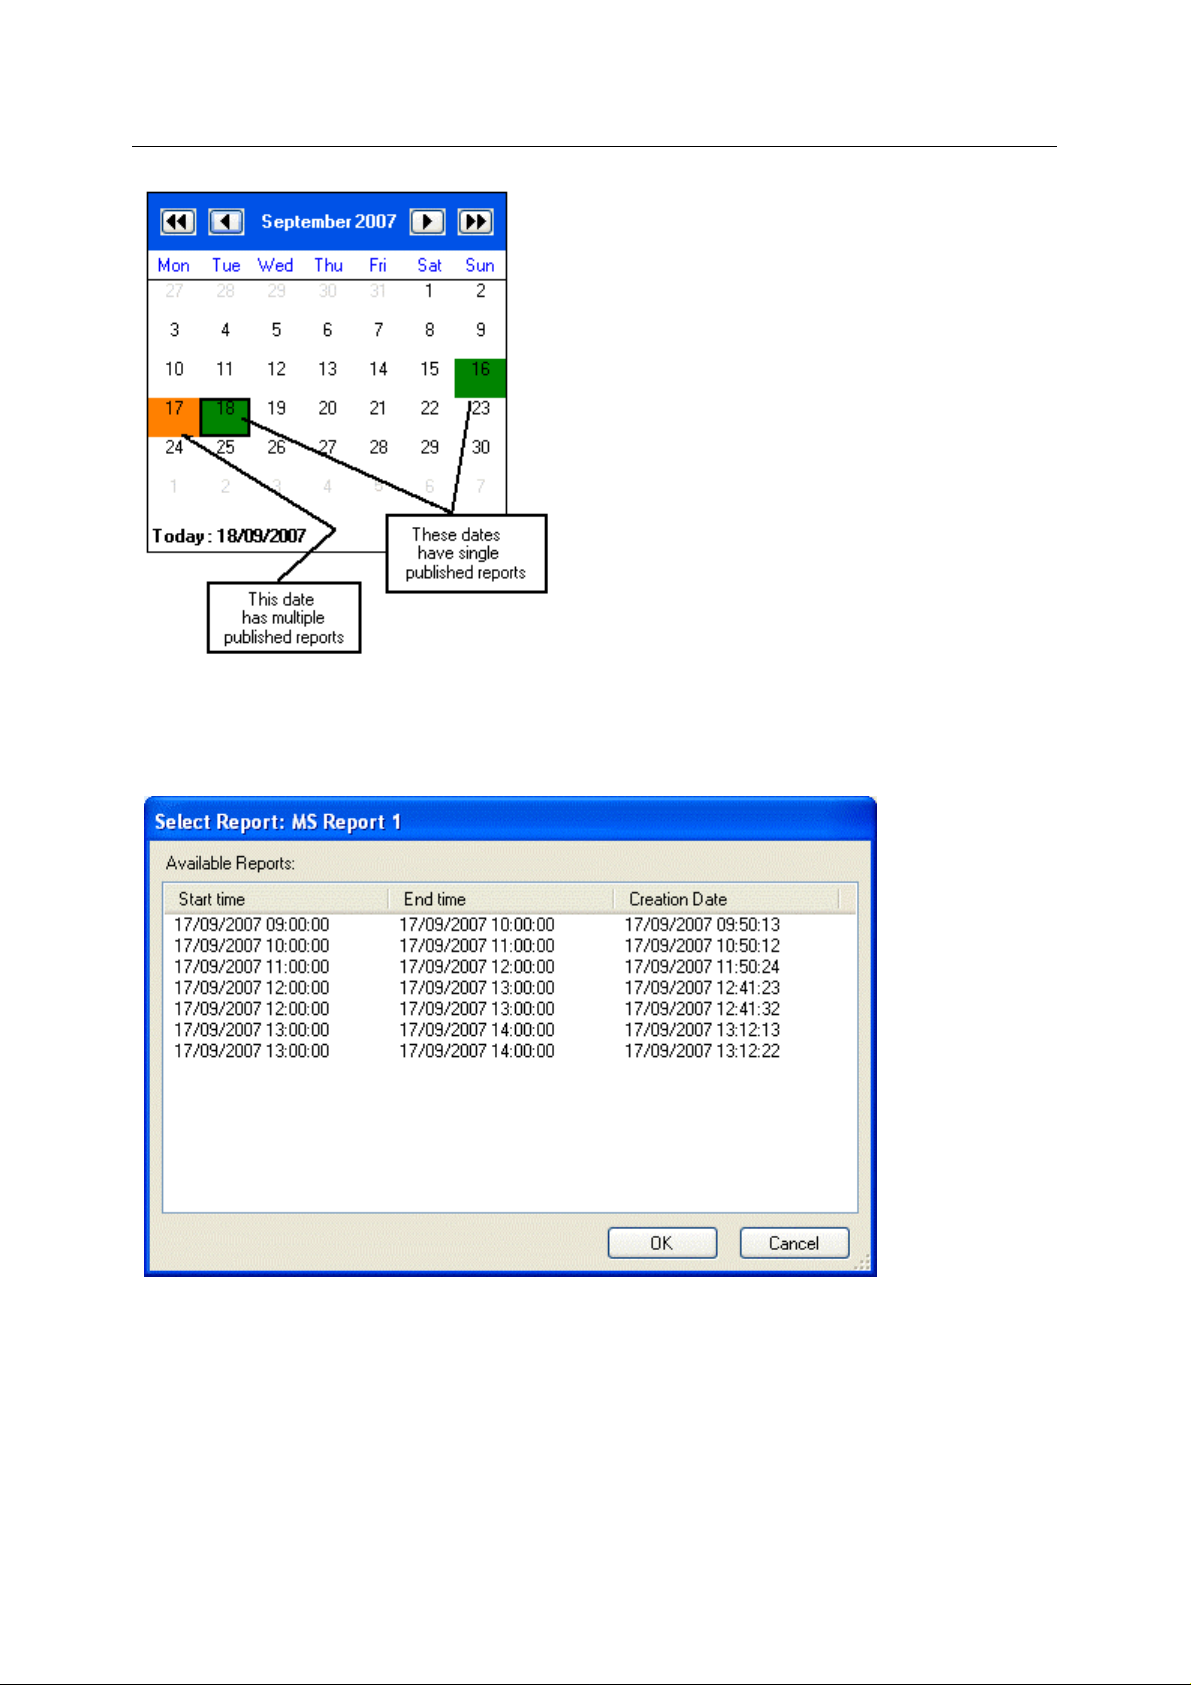
The Re
day can also be shown on the Calendar, but this has to be enabled on the Calendar Page of the
Report Selector Properties. The colored dates represent dates for which there are already publi she d
reports.
2.4.5.1.1 Report(s) Identified Date
port Date Calendar enables you to select the date for which the report will be run. The time of
The col
2.4.5.1.1.1 Multiple report color
It is possi
configured appear with a different colored background. This can be configured on the Calendar Page
of the Report Selector Property pages.
ored dates indicate dates for which published reports have been found.
ble to configure the Report Selector View so that dates/times which have multiple reports
- 10 -
Page 15
Reference Guide
r
D301528X412
APRIL 2012
Report Selecto
2.4.5.1.1.2 Viewing multiple published reports
Whe
n there is a date which contains multiple published reports, you can view a list of these published
reports and make a selection by double clicking on that date. The 'Select Report' dialog appears,
listing the available published reports for that day. Select a report and click the [OK] button.
2.4.5.1.2 Run Report Context Menu
This
context menu appears when you right click on any date in the report date calendar. Any of the
options shown in the image below can be disabled from the Calendar Page of the Report Selector's
property pages.
- 11 -
Page 16

Reference Guide
r
D301528X412
APRIL 2012
2.4.5.1.2.1 Run Report
This will
the Report Selector. There are three options:-
run the report for the selected day. The time of the report will depend on the configuration of
1. If you checked the 'Override report time' box on the Report Date Page of the Report Selector
configuration pages, the Report Selector will use the time defined there.
Report Selecto
2. If you have checked the 'Show time of day' box on the Calendar Page of the configuration
pages, the report time can be changed from the time control that appears at the bottom of the
report date calendar.
3. If neither of the above options has been enabled, the Report Selector will run the report for
midnight (00:00:00 hours) on the selected day.
2.4.5.1.2.2 Run and Publish Report
This will
configuration of the Report Selector. There are three options:-
run and publish the report for the selected day. The time of the report will depend on the
1. If you checked the 'Override report time' box on the Report Date Page of the Report Selector
configuration pages, the Report Selector will use the time defined there.
2. If you have checked the 'Show time of day' box on the Calendar Page of the configuration
pages, the report time can be changed from the time control that appears at the bottom of the
report date calendar.
3. If neither of the above options has been enabled, the Report Selector will run the report for
midnight (00:00:00 hours) on the selected day.
Since the report will be published, it will show in the list of published reports the next time you select
this date for the same report.
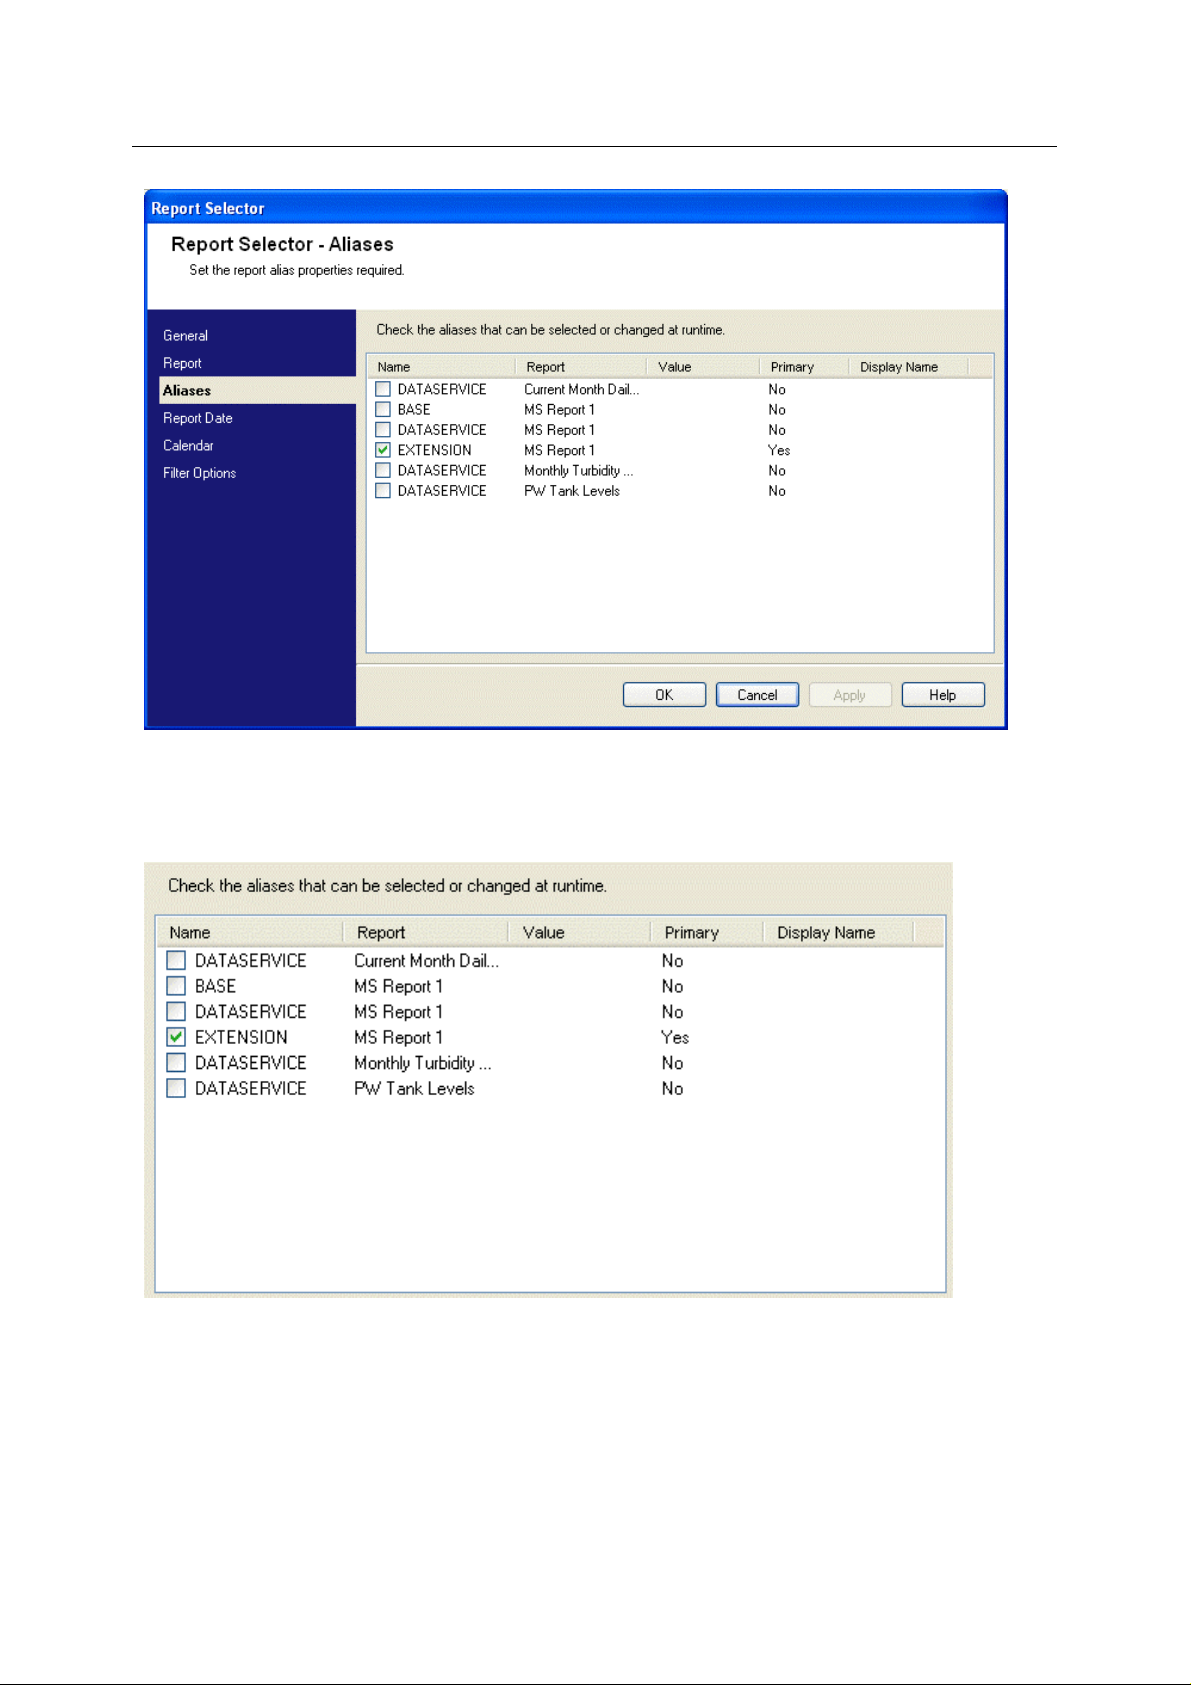
2.4.5.1.2.3 Available published reports
- 12 -
Page 17

Reference Guide
r
D301528X412
APRIL 2012
This is a list of the available published reports. An asterisk after any report time indicates that there
are duplicate reports available for that time. Select one of the reports listed to view it in the viewing
area.
2.4.5.1.2.4 Run Report Progress
n you select an option from the report calendar context menu, you will see the 'Run Report
Whe
Progress' dialog.
Report Selecto
This will update you on the progress of the requested report. When the report has been run, a file
download will be initiated, and you will be presented with the 'File Download' dialog.
2.4.5.1.2.5 File Download Dialog
This dial
area.
og is presented before the Report Selector displays the selected report in the report viewing
Select the [Open] button to open the file in the Report Selector's viewing area. Choose the [Save]
button to save it, and choose the [Cancel] button to cancel the file download.
2.5 Report viewing area
This area will change according to whether a report has been run, and the format of the report that
was run. This report is in Excel format, so it looks like and has the same controls as an Excel
worksheet. The Status bar at the bottom of the viewing area shows from left to right the name of the
report, the start time and the end time.
- 13 -
Page 18

Reference Guide
r
D301528X412
APRIL 2012
Report Selecto
When a report and a report date has been selected for viewing, the Report Selector will initiate a file
download. First, you will see the 'Run Report Progress' dialog, then you will be presented with the
'File Download' dialog.
3 Report Selector Configuration
To configure the behaviour of the Report Selector View, you need to access its Property pages.
Accessing the Report Selector configuration pages is slightly different depending on whether the
Report Selector is opened within its own container or within the OEDesktop.
3.1 Property pages in the Container
To access the property pages in the container, you have to select the Configure menu item from the
container's Menu Bar. The Report Selector is then in Configure Mode, as can be seen from the
message in the centre of the Report Selector window. You can then right click and sel ect the
Properties menu to access the Property Pages.
- 14 -
Page 19

Reference Guide
r
D301528X412
APRIL 2012
Report Selecto
3.2 Property Pages in the OEDesktop
In the OEDesktop, the Report Selector Property pages are presented in two ways:-
1. When the Report Selector is first loaded into the OEDesktop, the Property pages are
presented as a wizard.
You can change the default options as you move through the wizard, or you can just accept all
the defaults by clicking the [Cancel] button, and change them later by putting the Report
Selector into configure mode.
2. When accessing the Property pages in configure mode within the OEDesktop, they are
presented not as a wizard, but as a dialog with a side menu that allows you to select any
page for modification.
- 15 -
Page 20

Reference Guide
r
D301528X412
APRIL 2012
Report Selecto
There are two ways to put the Report Selector View into configure mode:-
a. Toggle runtime and configure mode by pressing the CTRL and M keys
simultaneously on your keyboard.
b. Select File>Mode>Configure from the OEDesktop menu, then File>Mode>Runtime
to place it back into runtime mode.
3.3 General Page
The General Page allows you to configure the dataservice, properties and mode of the current
instance of the Report Selector.
- 16 -
Page 21

Reference Guide
r
D301528X412
APRIL 2012
Report Selecto
3.3.1 Page Menu
When the Report Selector is placed into configure mode, the Page menu allows you to select any
page for editing. However, when the Report Selector is first loaded into the OEDesktop as a new file,
the Property pages are presented as a wizard, and you cannot choose which page you want to
modify. You just have to click the [Next] buttons until you get to the page you want to change.
- 17 -
Page 22

Reference Guide
r
D301528X412
APRIL 2012
Report Selecto
3.3.2 Default Dataservice
The default dataservice defined by the OpenEnterprise installation. It is defined in the 'Database'
value on the parent OpenEnterprise key in the Settings Editor file.
3.3.3 User specified Dataservice
The user can specify a different dataservice other than the default dataservice for the Report Selector
tool to use when it runs reports.
3.3.4 Test Connection
Tests the connection to either the default dataservice or a user specified dataservice, if one is
supplied. A message is displayed informing you of success or failure.
3.3.5 Allow Runtime Configuration
When checked, the [Configure] button on the Report Toolbar is enabled.
When this button is clicked, the Report Selector configuration pages appear, but the Report Selector
remains in runtime mode.
3.3.6 Show Toolbar
Shows or hides the Report Toolbar.
- 18 -
Page 23

Reference Guide
r
D301528X412
APRIL 2012
Report Selecto
3.3.7 Show next and previous buttons
Shows or hides the next and previous report buttons on the Report Toolbar.
3.3.8 Browse mode
In this mode the Report Selector will open without showing any report in the report viewing area.
You will be able to select any report for viewing or saving. You will also be able to browse the
available reports using the [>>] and [<<] buttons.
3.3.9 View mode
The Report Selector will open and will initiate a download of the most recently published report that
you selected on the Report Selection Page of the Report Selector property pages.
You will see the 'Run Report Progress' dialog. Then you will be presented with the 'File Download'
dialog, and the file will be placed in the report viewing area, or saved, depending on your choice.
If you have not selected a single report for viewing, the Report Selector will take the first report in the
list of available reports on the Report Selection Page of the Report Selector property pages, and
attempt to download the latest published report to the viewer.
3.3.10 Run mode
The Report Selector will open and will run the report that you selected on the Report Selection Page
of the Report Selector property pages.
You will see the 'Run Report Progress' dialog. Then you will be presented with the 'File Download'
dialog, and the file will be placed in the report viewing area, or saved, depending on your choice..
If you have not selected a single report for viewing, it will take the first report in the list of available
reports and run it based on the current time and date.
3.4 Report Selection Page
You can use this page to decide what reports and report formats will be available when the Report
Selector is loaded.
- 19 -
Page 24

Reference Guide
r
D301528X412
APRIL 2012
Report Selecto
3.4.1 Page Menu
When the Report Selector is placed into configure mode, the Page menu allows you to select any
page for editing. However, when the Report Selector is first loaded into the OEDesktop as a new file,
the Property pages are presented as a wizard, and you cannot choose which page you want to
modify. You just have to click the [Next] buttons until you get to the page you want to change.
- 20 -
Page 25

Reference Guide
r
D301528X412
APRIL 2012
Report Selecto
3.4.2 Show all reports
When checked all enabled reports will be available for selection from the Report Selecto r wh en it is
loaded.
3.4.3 Available reports
This is a list of the reports that will be available for selection when the Report Selector is loaded.
3.4.4 Show disabled reports
If checked, then disabled reports will also be available for selection when the Report Selector is
loaded.
3.4.5 Default Report Selection
A default report can be defined for the Report Selector when it is loaded. Select one of the reports
from this drop-down list.
If the Report Selector is configured to run in 'View' or 'Run' mode on the General Page, this is the
report that will be displayed each time it is loaded.
3.4.6 Show configured formats
When checked, only the formats that have been configured for the selected report will be available
from the 'Report Format' drop-down list.
3.4.7 Show all supported formats
When checked, all possible formats will be available from the 'Report Format' drop-down list.
3.4.8 Show selected formats
When checked, all possible formats are made available in the formats list for selection.
- 21 -
Page 26

Reference Guide
r
D301528X412
APRIL 2012
Only the formats that are checked will be available from the 'Report Format' drop-down list.
Report Selecto
3.4.9 Formats list
These are the formats that will be available depending on the selection of the options in the 'Formats'
section of the 'Report Selection' page.
3.4.10 Show disabled formats
If checked, disabled formats associated with the available reports will be shown also.
3.4.11 Default Format Selection
A default format can be defined for the Report Selector when it is loaded. Select one of the formats
from this drop-down list.
If the Report Selector is configured to run in 'View' or 'Run' mode on the General Page, this is the
format that will be used each time it is loaded.
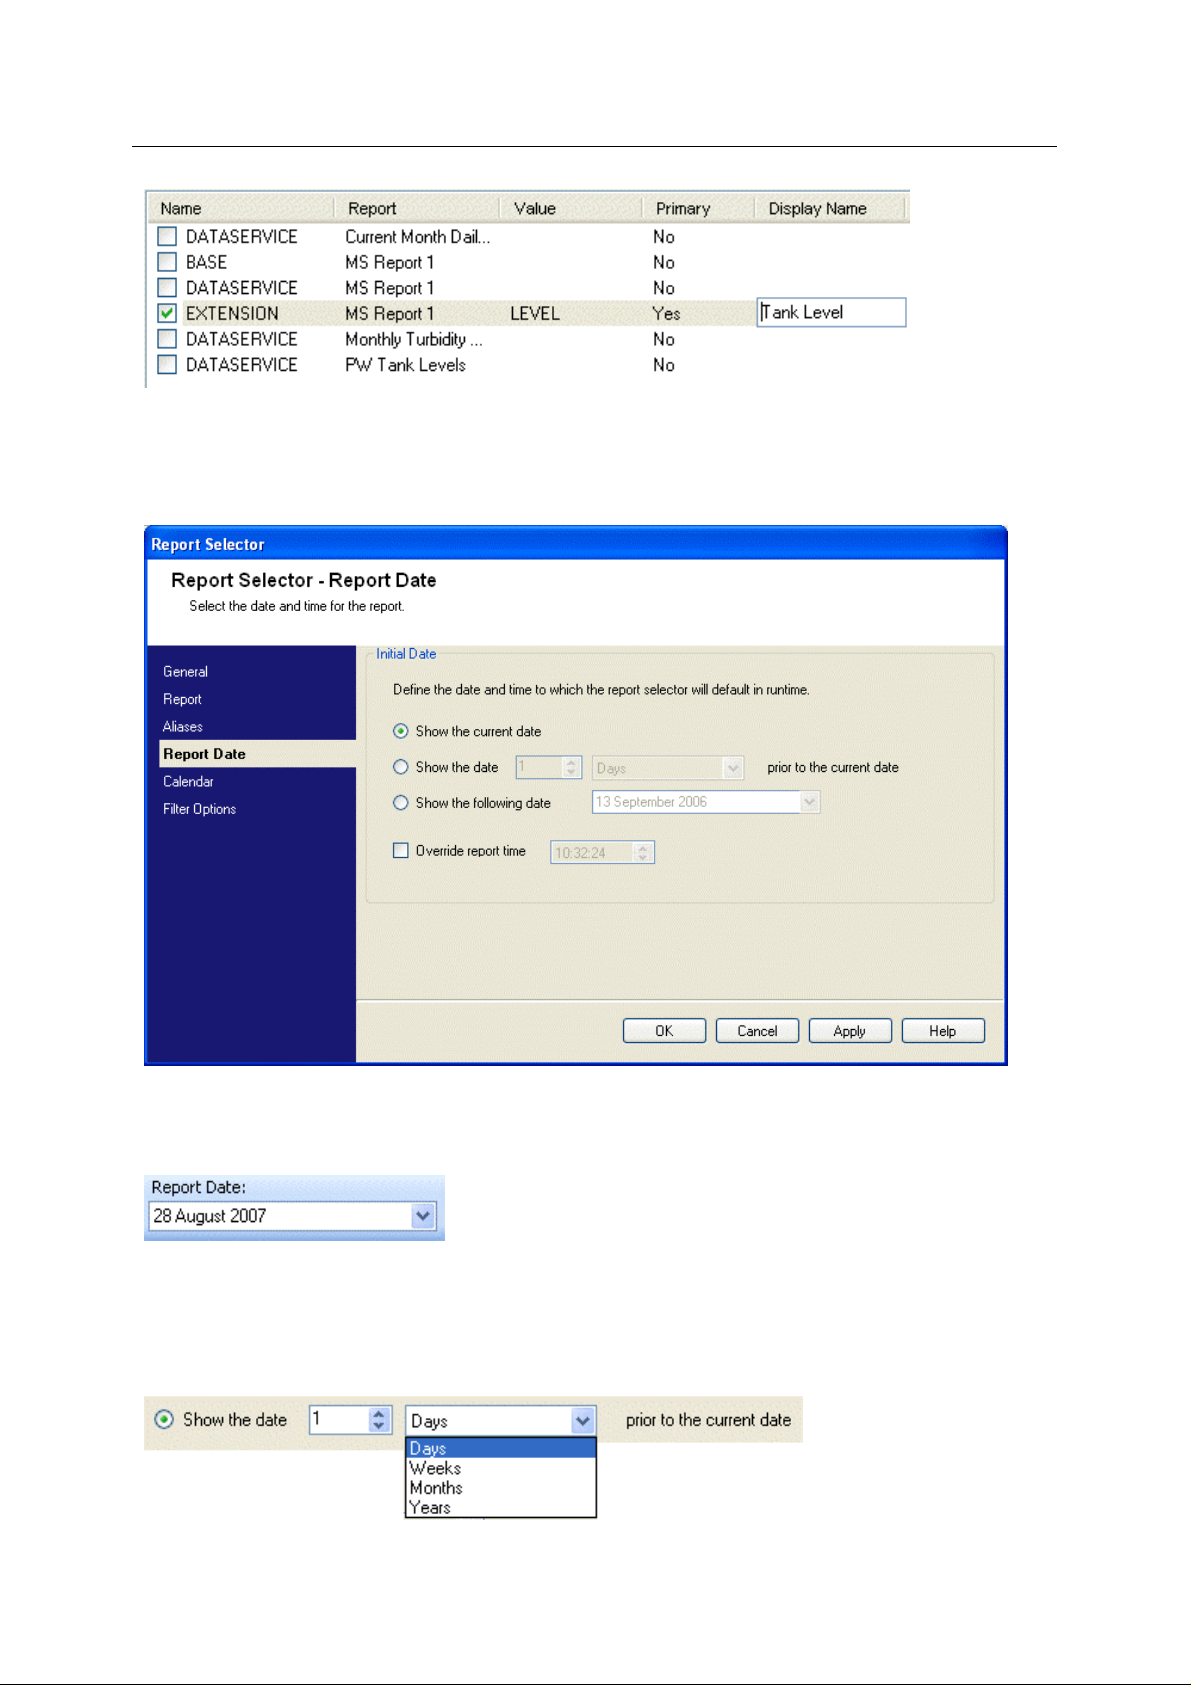
3.5 Aliases Page
The Aliases page enables you to configure which aliases the user will be able to define values for
from the 'Report Alias Editor' page when viewing reports in runtime mode.
- 22 -
Page 27
Reference Guide
r
D301528X412
APRIL 2012
Report Selecto
3.5.1 Alias List
This is the list of aliases that are used on the available reports. Check the ones that you would like to
be able to give a value to when viewing reports.
3.5.1.1 Alias Name
This
column shows the actual alias name as it is set up on the report. Check the box to ensure that
the alias is available in runtime mode for assigning a value.
- 23 -
Page 28

Reference Guide
r
D301528X412
APRIL 2012
3.5.1.2 Report
Report Selecto
The nam
3.5.1.3 Alias Value
Click on thi
the alias on the report.
3.5.1.4 Primary Alias
Only one alia
If there is a CSV list or SQL query alias on the report, that will automatically become the primary alias.
If the only aliases found for a report are single value aliases, the first alias found will be designated
the primary alias.
e of the report which uses the listed alias.
s field to type in a value for the alias. When the report is run, this value will be defined for
s per report will be defined by the Report Selector as the primary alias.
If required, the user can override a designated primary alias by clicking on the 'Pri mary' field of the
alias that is going to become the primary alias and selecting the 'Yes' option.
The previous primary alias will automatically be changed so that 'No' appears in its 'Primary' field.
3.5.1.5 Display Name
Click on a
the actual alias name in runtime mode. This may make it clearer for the user to understand what the
alias refers to when viewing reports.
ny 'Display Name' field to give the selected Alias another name that will be used instead of
- 24 -
Page 29
Reference Guide
r
D301528X412
APRIL 2012
Report Selecto
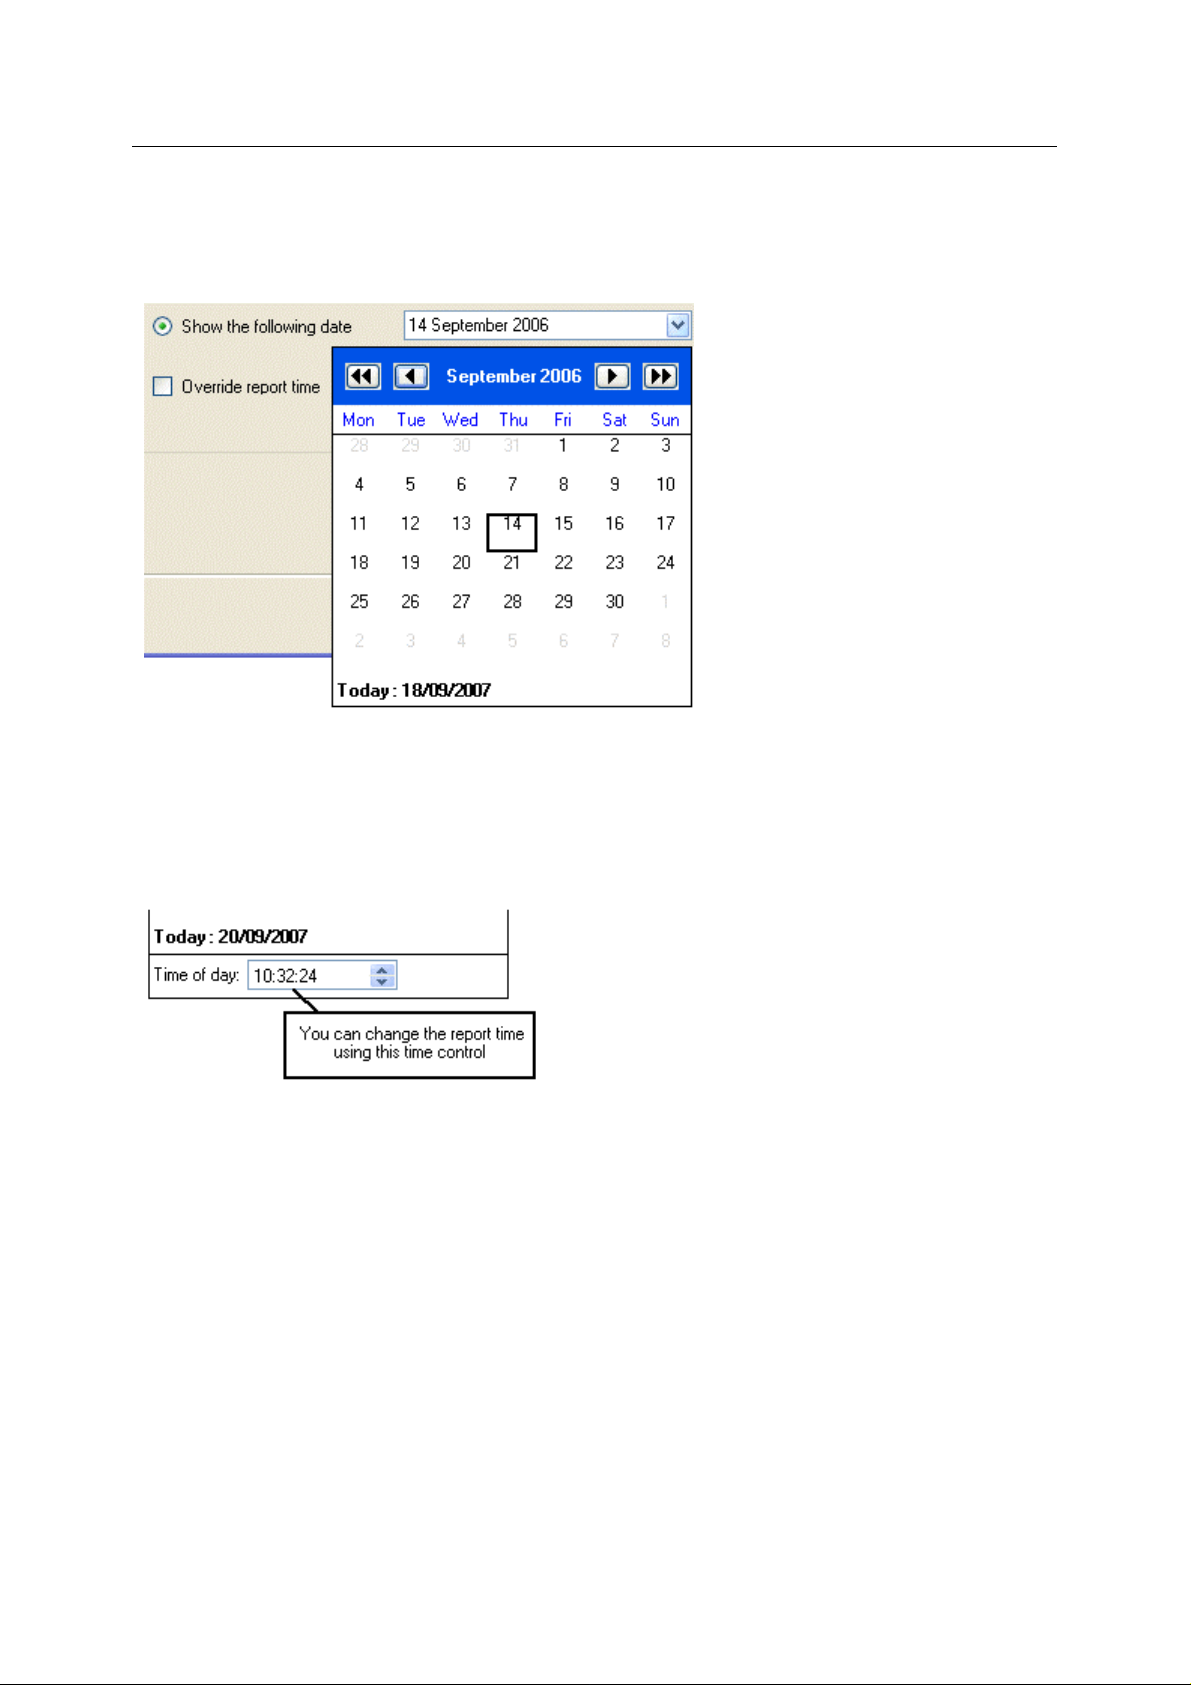
3.6 Report Date Page
The Report Date Page enables you to define the date or date and time for running reports in the
Report Selector View.
3.6.1 Show the current date
This is the default option. The Report Selector will display the current date in the report date field.
3.6.2 Show the date prior to the current date
When selected, the controls become enabled. Select a number and then select the date period that
applies (Days, Weeks, Months or Years). For instance, in the example below, the date shown in the
Report Date field will always be one day prior to the current date.
- 25 -
Page 30
Reference Guide
r
D301528X412
APRIL 2012
Report Selecto
3.6.3 Show the following date
This option enables you to specify a specific date that will be displayed in the Report Date field
whenever the Report Selector View is opened.
3.6.4 Override report time
When checked, this option enables you to override the Report Selector's time setting before a report
is run.
Then, an editable time control will be added to the bottom of the Report Date Calendar, as shown in
the image below.
Note, if the time editor is not displayed as shown above, the time specified on the Report Date page
will be used.
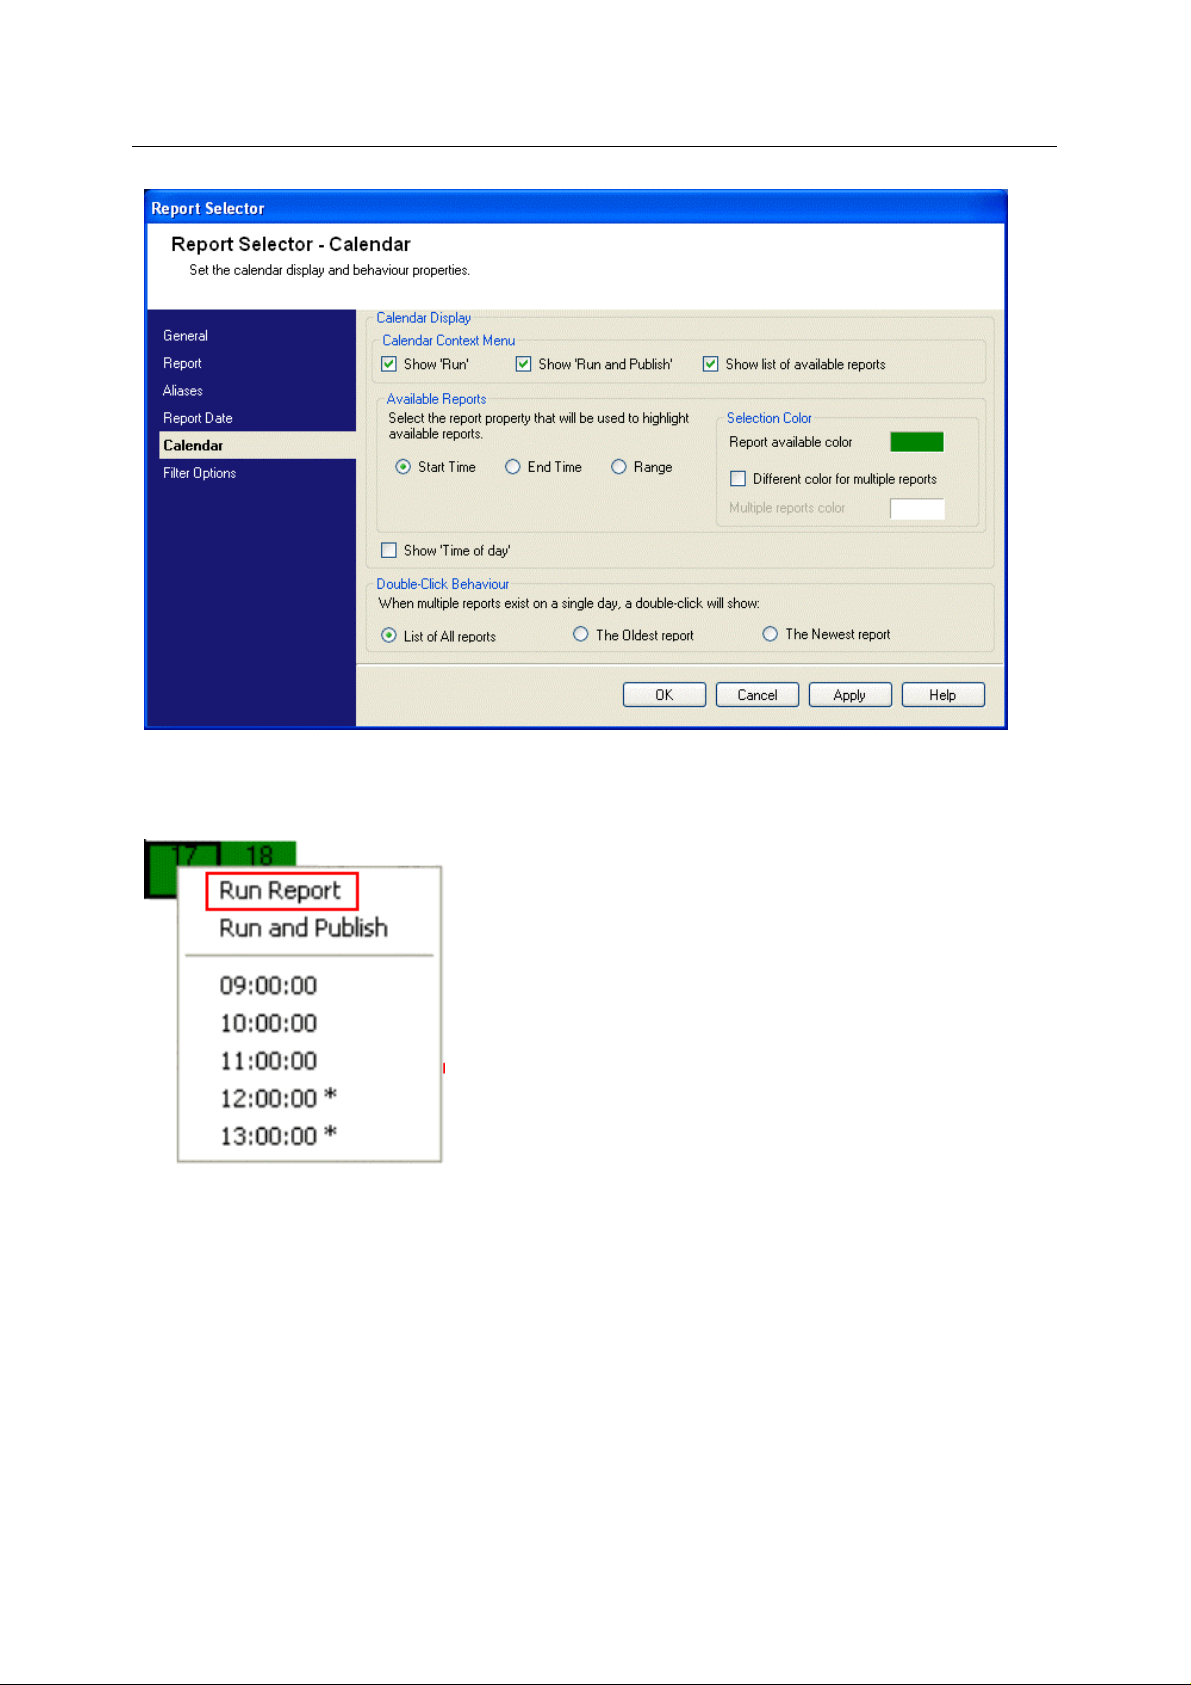
3.7 Calendar Page
The Calendar Page enables you to change the behaviour of the Report Date Calendar in runtime
mode.
- 26 -
Page 31
Reference Guide
r
D301528X412
APRIL 2012
Report Selecto
3.7.1 Show Run
When checked, this option enables the 'Run Report' item on the Report Date Calendar context menu.
3.7.2 Show Run and Publish
When checked, this option enables the 'Run and Publish' item on the Report Date Calenda r context
menu.
- 27 -
Page 32

Reference Guide
r
D301528X412
APRIL 2012
Report Selecto
3.7.3 Show list of available reports
When checked, this option enables a list of available reports to be added to the Report Date Calendar
context menu.
3.7.4 Start Time
If 'Start Time' is selected as the basis for displaying reports, any dates which coincide with the start
time of a published report will be colored green (by default). When the user right clicks on a colored
date on the Report Date Calendar, providing the you have enabled the 'Show list of available reports'
option on the 'Calendar Page', the start time of any published reports found for that date will be
displayed at the bottom of the context menu.
- 28 -
Page 33

Reference Guide
r
D301528X412
APRIL 2012
Report Selecto
3.7.5 End Time
If 'End Time' is selected as the basis for displaying reports, any dates which coincide with the end
time of a published report will be colored green (by default). When the user right clicks on a colored
date on the Report Date Calendar, providing the you have enabled the 'Show list of available reports'
option on the 'Calendar Page', the end time of any published reports found for that date will be
displayed at the bottom of the context menu.
3.7.6 Range
If 'Range' is selected as the basis for displaying reports, any dates which fall between the start and
end times of a published report will be colored (green by default). When the user right clicks on a
colored date within this range on the Report Date Calendar, providing the you have enabled the
'Show list of available reports' option on the 'Calendar Page', the date range of the published report
will be displayed at the bottom of the context menu. The example below shows how the Report Date
Calendar and its context menu would look for a published report that displays a month's worth of data.
3.7.7 Report available color
Displays the background color for any date on the Report Date Calendar that is associated wi th a
published report . The default color is green.
- 29 -
Page 34

Reference Guide
r
D301528X412
APRIL 2012
3.7.7.1 Changing the default color
nge the default 'Report available color', double click on the color square itself and select a new
To cha
color from the palette that appears.
Report Selecto
3.7.8 Different color for multiple reports
When checked the 'Multiple reports color' box is enabled. You can configure a different color for dates
which are associated with multiple published reports.
To change the default 'Multiple reports color', double click on the color square itself and select a new
color from the palette that appears.
- 30 -
Page 35

Reference Guide
r
D301528X412
APRIL 2012
Report Selecto
3.7.9 Show Time of day
Check this if you want to have the current time of day displayed at the bottom of the Report Date
Calendar.
3.7.10 List of All reports
When this option is selected, a list of the published reports available for the selected date will be
shown in the 'Select Report' form, shown below. A single report must be selected for viewing.
- 31 -
Page 36

Reference Guide
r
D301528X412
APRIL 2012
Report Selecto
3.7.11 The Oldest report
When this option is selected, if a date which contains multiple published reports is double cli cked, the
Report Selector will download the oldest of those reports to the workstation for viewing or saving.
3.7.12 The Newest report
When this option is selected, if a date which contains multiple published reports is double cli cked, the
Report Selector will download the newest of those reports to the workstation for viewing or saving.
3.8 Filter Options Page
You can define which of the report filter options will be enabled during runtime operation of the Report
Selector.
- 32 -
Page 37

Reference Guide
r
D301528X412
APRIL 2012
Report Selecto
3.8.1 Show all Filters
When checked, all the filters will be enabled during runtime operation. The user will be able to select
any filter.
When unchecked, no filters will be enabled during runtime operation. The user who does not have the
necessary token to place the Report Selector into configure mode will not be able to open the saved
Report Selector file and select a specific report to view.
Even so, the Report Selector can still become a target for OEMenus in this state, and can be made to
show a specific report by passing alias values to the Report Selector file from the source view as it is
opened. For more information, see the OEMenus documentation.
3.8.2 Allow report name to be selected
When checked, the report name filter will be enabled during runtime operation. The user will be able
to select a report from those enabled on the Report Selection Page.
When unchecked, the report name filter will be disabled during runtime. The user will not be able to
select a report name from this list.
- 33 -
Page 38

Reference Guide
r
D301528X412
APRIL 2012
Report Selecto
3.8.3 Allow report format to be selected
When checked, the report format filter will be enabled during runtime operation. The user will be able
to select a report format from those that are allowed on the Report Selection Page.
3.8.4 Allow the report date to be selected
When checked, the report date filter will be enabled during runtime operation. The user will be able to
select a report date from the report date calendar.
3.8.5 Allow Primary Alias value to be edited
When checked, the alias filter will be enabled during runtime operation. The user will be able to
change the value of the primary alias, in runtime mode. In the example shown here, the 'Allow
Primary Alias value to be edited has been checked, but the 'Allow other report alias values to be
edited' box is unchecked.
- 34 -
Page 39

Reference Guide
r
D301528X412
APRIL 2012
As you can see, the [A] button is disabled, because the user is not allowed to change any alias other
than the primary alias. The user can change it by typing the value directly into the value field below
the primary alias name.
Each report only has one primary alias. If the report has a CSV list or SQL type alias, then this is
automatically designated as the primary alias. If the report has a number of single value aliases, the
first alias defined in the report is designated the primary alias.
Report Selecto
3.8.6 Allow other report alias values to be edited
When checked, the alias filter will be enabled during runtime operation. The user will be able to
change the value of other aliases apart from the primary alias in runtime mode. In the image below,
both the 'Allow Primary Alias to be edited' and 'Allow other report aliases to be edited' boxes have
been checked. In runtime mode, the primary alias name has been identified and the [A] button is
enabled, indicating that there are other aliases that may have their value defined.
If the user selects the [A] button, the 'Report Alias Editor' shows all the aliases that can be edited,
including the primary and non-primary aliases. Any alias value can now be defined by the user. The
'Primary' field indicates whether the alias is primary or not.
- 35 -
Page 40

Reference Guide
r
D301528X412
APRIL 2012
4 Index
1
A
Alias List........................................................... 23
Alias Name....................................................... 24
Alias Value ....................................................... 24
Alias Value Change.......................................... 11
Aliases Page.................................................... 23
All reports......................................................... 31
Allow other report alias values......................... 35
Allow Primary Alias value.................................34
Allow report format........................................... 34
Allow report name............................................ 33
Allow Runtime Configuration............................ 19
Available published reports.............................. 14
Available reports ........................................ 21, 28
B
Browse mode ................................................... 20
C
Calendar Page................................................. 27
Configure............................................................ 9
Configure menu.................................................. 8
Current date ..................................................... 26
D
Date..................................................................26
Date prior.......................................................... 26
Day................................................................... 31
Default dataservice .......................................... 19
Default Format Selection.................................. 23
Default selection............................................... 21
Different color................................................... 30
Display Name................................................... 25
Download Dialog.............................................. 14
E
Edited.........................................................34, 35
Email Report ...................................................... 9
End Time.......................................................... 29
F
Filter Options Page .......................................... 32
Formats list....................................................... 22
G
Report Selecto
General Page....................................................18
H
Help menu...........................................................8
I
Identified Date...................................................12
Its own container.................................................5
M
Multiple reports .................................................30
N
Native viewer ......................................................9
New File..........................................................7, 8
Newest report....................................................32
Next.....................................................................9
O
OEDesktop..........................................................4
Oldest report.....................................................31
Open File ........................................................7, 8
Override report time..........................................26
P
Page Menu..................................................18, 21
Previous buttons...............................................19
Previous report buttons.......................................9
Primary Alias.....................................................24
Primary Alias Value...........................................10
Print.................................................................7, 8
Print Setup..........................................................7
Publish..............................................................27
Publish report....................................................14
R
Range ...............................................................29
Recent Files........................................................7
Report.........................................................12, 24
Report Alias ......................................................10
Report Alias Editor Page ..................................11
Report Aliases...................................................11
Report available color.......................................29
Report Date.................................................11, 34
Report Date Calendar.......................................12
Report Date Page.............................................25
- 36 -
Page 41

Reference Guide
r
D301528X412
APRIL 2012
Report Selecto
Report Filter Options.......................................... 9
Report Format.................................................... 9
Report Name...................................................... 9
Report Selection Page..................................... 20
Report Selector.............................................. 4, 5
Report Selector Configuration.......................... 16
Report Selector Container Toolbar.................... 8
Report Selector Menu Bar.................................. 6
Report Selector Overview.................................. 4
Report Selector Runtime Interface..................... 6
Report Toolbar................................................... 8
Report viewing area......................................... 15
Run...................................................................14
Run mode......................................................... 20
Run Report....................................................... 13
Run Report Context Menu ............................... 13
Run Report Progress ....................................... 14
S
Save File ........................................................ 7, 8
Save File As....................................................... 7
Save Report ....................................................... 9
Selected ..................................................... 33, 34
Set Alias Value Button ..................................... 11
Show.................................................................26
Show all Filters..................................................33
Show all reports................................................21
Show all supported formats..............................22
Show configured formats..................................21
Show disabled formats .....................................22
Show disabled reports ......................................21
Show list............................................................28
Show next.........................................................19
Show Run .........................................................27
Show selected formats .....................................22
Show Time........................................................31
Show Toolbar....................................................19
Start time...........................................................28
T
Test Connection................................................19
U
User specified dataservice................................19
V
View ....................................................................9
View menu..........................................................7
View mode........................................................20
- 37 -
Page 42

Reference Guide
D301528X412
APRIL 2012
DISCLAIMER
Bristol, Inc., Bristol Babcock Ltd, Bristol Canada, BBI SA de CV and the Flow Computer Division , are wholly owned subsidiaries of Emerson Electric Co. doing business
as Remote Automation Solutions (“RAS”), a division of Emerson Process Management. ROC, FloBoss, ROCLINK, Bristol, Bristol Babcock, ControlWave, TeleFlow and
Helicoid are trademarks of RAS. AMS, PlantWeb and the PlantWeb logo are marks of Emerson Electric Co. The Emerson logo is a trademark and service mark of the
Emerson Electric Co. All other marks are property of their respective owners.
The contents of this publication are presented for informational purposes only. While every effort has been made to ensure informational accuracy, they are not to be
construed as warranties or guarantees, express or implied, regarding the products or services described herein or their use or applicability. RAS reserves the right to
modify or improve the designs or specifications of such products at any time without notice. All sales are governed by RAS’ terms and conditions which are available upon
request. RAS does not assume responsibility for the selection, use or maintenance of any product. Responsibility for proper selection, us e and maintenance of any RAS
product remains solely with the purchaser and end-user.
Engineered and supported by:
Remote Automation Solutions,
Blackpole Road, Worcester, WR3 8YB, UK
Registered office: Meridian East, Leicester, LE19 1UX
Registered in England and Wales, Registration No. 00671801
VAT Reg No. GB 705 353 652
Emerson Process Management
Remote Automation Solutions
1100 Buckingham St
Watertown, CT 06795
T 1 (860) 945 2200
F 1 (860) 945 2278
www.EmersonProcess.com/Remote
binfo@EmersonProcess.com
© 2001-2012 Remote Automation Solutions, division of Emerson Process Management. All rights
reserved.
Emerson Process Management
Remote Automation Solutions
Blackpole Road
Worcester, WR3 8YB
T 44 (0) 1905 856848
F 44 (0) 1905 856930
www.EmersonProcess.com/Remote
oedsupport@EmersonProcess.com
 Loading...