

Remote Automation Solutions Guide: OpenEnterprise Pattern Configuration Reference Guide Manuals & Guides
Page 1

Reference Guide
D301522X412
APRIL 2012
OpenEnterprise Pattern Configuration
Reference Guide (V2.83)
Remote Automation Solutions
Website: www.EmersonProcess.com/Remote
Page 2

Reference Guide
D301522X412
APRIL 2012
Pattern Configuration
Contents
1 Pattern Configuration..............................................................................................................1
1.1 Trigger Patterns ..................................................................................................................1
1.2 Control Curve Patterns........................................................................................................1
1.3 On-Off Patterns...................................................................................................................1
1.4 OpenEnterprise Scheduling................................................................................................1
1.4.1 A Diary..........................................................................................................................1
1.4.2 A Pattern.......................................................................................................................1
1.4.3 Calendars .....................................................................................................................1
1.4.4 Scheduled Events.........................................................................................................2
1.5 Main Dialog - Triggers Tab .................................................................................................2
1.5.1 File Menu......................................................................................................................3
1.5.1.1 Exit .........................................................................................................................3
1.5.2 Help Menu ....................................................................................................................3
1.5.2.1 Help........................................................................................................................3
1.5.2.2 About......................................................................................................................3
1.5.3 Control Curve................................................................................................................3
1.5.4 On-Off Schedules.........................................................................................................3
1.5.5 Pattern List....................................................................................................................3
1.5.6 Add Pattern Button.......................................................................................................3
1.5.7 View-Modify Pattern Button..........................................................................................3
1.5.8 Delete Button................................................................................................................3
1.5.9 Used By........................................................................................................................3
1.5.10 Close Button..............................................................................................................4
1.5.11 Adding a Trigger........................................................................................................4
1.5.11.1 Pattern Name........................................................................................................4
1.5.11.2 Period....................................................................................................................4
1.5.11.3 Add Button............................................................................................................4
1.5.11.4 Cancel Button.......................................................................................................4
1.5.12 Configuring a Trigger ................................................................................................4
1.5.12.1 Configure Menu....................................................................................................5
1.5.12.1.1 Save................................................................................................................5
1.5.12.1.2 Discard............................................................................................................5
1.5.12.1.3 Close...............................................................................................................5
1.5.12.2 Edit Menu..............................................................................................................5
1.5.12.2.1 Auto Event Add...............................................................................................5
1.5.12.3 Options Menu........................................................................................................5
1.5.12.3.1 Horizontal Grid................................................................................................5
1.5.12.3.2 Vertical Grid....................................................................................................6
1.5.12.3.3 Draw Rectangular...........................................................................................6
1.5.12.4 Adding Events by Clicking....................................................................................6
1.5.12.5 Trigger Events.......................................................................................................6
1.5.12.6 Adding Events by typing the time.........................................................................6
1.5.12.7 Add Event Button..................................................................................................6
1.5.12.8 Modify Event Button..............................................................................................6
1.5.12.9 Display Zoom........................................................................................................6
1.5.12.10 Change Start Button...........................................................................................7
1.5.12.11 Report Button......................................................................................................7
- i -
Page 3

Reference Guide
D301522X412
APRIL 2012
Pattern Configuration
1.5.12.12
1.5.12.13 Save Button........................................................................................................8
1.5.12.14 Close Configure Dialog.......................................................................................8
1.6 Main Dialog - Control Curves Tab.......................................................................................8
1.6.1 File Menu......................................................................................................................9
1.6.1.1 Exit .........................................................................................................................9
1.6.2 Help Menu ....................................................................................................................9
1.6.2.1 Help........................................................................................................................9
1.6.2.2 About......................................................................................................................9
1.6.3 On-Off Schedules.........................................................................................................9
1.6.4 Triggers.......................................................................................................................10
1.6.5 Pattern List..................................................................................................................10
1.6.6 Add Pattern Button.....................................................................................................10
1.6.7 View-Modify Pattern Button........................................................................................10
1.6.8 Delete Button..............................................................................................................10
1.6.9 Used By......................................................................................................................10
1.6.10 Close Button............................................................................................................10
1.6.11 Adding a Control Curve...........................................................................................10
1.6.11.1 Pattern Name......................................................................................................10
1.6.11.2 Period..................................................................................................................11
1.6.11.3 Low Range..........................................................................................................11
1.6.11.4 High Range.........................................................................................................11
1.6.11.5 Add Button..........................................................................................................11
1.6.11.6 Cancel Button.....................................................................................................11
1.6.12 Configuring a Control Curve....................................................................................11
1.6.12.1 Configure Menu..................................................................................................12
1.6.12.1.1 Save..............................................................................................................12
1.6.12.1.2 Discard..........................................................................................................12
1.6.12.1.3 Close.............................................................................................................12
1.6.12.2 Edit Menu............................................................................................................12
1.6.12.2.1 Auto Event Add.............................................................................................12
1.6.12.3 Options Menu......................................................................................................12
1.6.12.3.1 Horizontal Grid..............................................................................................12
1.6.12.3.2 Vertical Grid..................................................................................................13
1.6.12.3.3 Draw Rectangular.........................................................................................13
1.6.12.4 Adding Events by Clicking..................................................................................13
1.6.12.5 Control Curve Events..........................................................................................13
1.6.12.6 Adding Events by typing the time.......................................................................13
1.6.12.7 Add Event Button................................................................................................13
1.6.12.8 Modify Event Button............................................................................................13
1.6.12.9 Display Range.....................................................................................................13
1.6.12.10 Display Zoom....................................................................................................13
1.6.12.11 Change Start Button.........................................................................................14
1.6.12.12 Report Button....................................................................................................14
1.6.12.13 Discard Button..................................................................................................15
1.6.12.14 Save Button......................................................................................................15
1.6.12.15 Close Configure Dialog.....................................................................................15
1.7 Main Dialog - On/Off Schedules .......................................................................................15
1.7.1 File Menu....................................................................................................................16
1.7.1.1 Exit .......................................................................................................................16
Discard Button....................................................................................................8
- ii -
Page 4

Reference Guide
D301522X412
APRIL 2012
Help Menu ..................................................................................................................16
1.7.2
1.7.2.1 Help......................................................................................................................16
1.7.2.2 About....................................................................................................................16
1.7.3 Triggers.......................................................................................................................16
1.7.4 Control Curve..............................................................................................................17
1.7.5 Pattern List..................................................................................................................17
1.7.6 Add Pattern Button.....................................................................................................17
1.7.7 View-Modify Pattern Button........................................................................................17
1.7.8 Delete Button..............................................................................................................17
1.7.9 Used By......................................................................................................................17
1.7.10 Close Button............................................................................................................17
1.7.11 Adding an On-Off Schedule....................................................................................17
1.7.11.1 Pattern Name......................................................................................................17
1.7.11.2 Period..................................................................................................................18
1.7.11.3 Add Button..........................................................................................................18
1.7.11.4 Cancel Button.....................................................................................................18
1.7.12 Configuring an On-Off Schedule.............................................................................18
1.7.12.1 Configure Menu..................................................................................................19
1.7.12.1.1 Save..............................................................................................................19
1.7.12.1.2 Discard..........................................................................................................19
1.7.12.1.3 Close.............................................................................................................19
1.7.12.2 Edit Menu............................................................................................................19
1.7.12.2.1 Auto Event Add.............................................................................................19
1.7.12.3 Options Menu......................................................................................................19
1.7.12.3.1 Horizontal Grid..............................................................................................19
1.7.12.3.2 Vertical Grid..................................................................................................19
1.7.12.3.3 Draw Rectangular.........................................................................................19
1.7.12.4 Adding Events by Clicking..................................................................................19
1.7.12.5 On-Off Schedule Events.....................................................................................19
1.7.12.6 Adding Events by typing the time.......................................................................20
1.7.12.7 Add Event Button................................................................................................20
1.7.12.8 Modify Event Button............................................................................................20
1.7.12.9 Display Zoom......................................................................................................20
1.7.12.10 Change Start Button.........................................................................................20
1.7.12.11 Report Button....................................................................................................21
1.7.12.12 Discard Button..................................................................................................22
1.7.12.13 Save Button......................................................................................................22
1.7.12.14 Close Configure Dialog.....................................................................................22
1.8 Auto Event Add Dialog......................................................................................................22
1.8.1 Frequency of Events Value ........................................................................................23
1.8.2 Frequency of Events Units .........................................................................................23
1.8.3 Make Pattern Cyclic....................................................................................................23
1.8.3.1 Pattern Before Auto Adding Events .....................................................................23
1.8.3.2 Pattern After Adding Events - Cyclic....................................................................24
1.8.3.3 Pattern After Adding Events - Non-Cyclic............................................................24
1.8.4 OK Button...................................................................................................................25
1.8.5 Cancel Button.............................................................................................................25
1.8.6 Help Button.................................................................................................................25
1.9 Delete Pattern Dialog........................................................................................................25
1.9.1 Diaries Using Pattern List...........................................................................................26
- iii -
Pattern Configuration
Page 5

Reference Guide
D301522X412
APRIL 2012
Confirm Button............................................................................................................26
1.9.2
1.9.3 Cancel Button.............................................................................................................26
1.9.4 Help Button.................................................................................................................26
2 Index .......................................................................................................................................28
Pattern Configuration
- iv -
Page 6

Reference Guide
D301522X412
APRIL 2012
Pattern Configuration
1 Pattern Configuration
The Pattern Configuration tool enables a user to add, modify and delete scheduling patterns.
Scheduling patterns are templates that enable OpenEnterprise to change the value of an analog or
digital value over a period of time. There are three types of patterns available.
1.1 Trigger Patterns
Trigger Patterns are used to set boolean values to True at user defined intervals. For instance, the
Calculate attribute of a calculation in the calculation table can be set to True, which causes
OpenEnterprise to run the calculation at the times specified by the trigger events within the pattern.
1.2 Control Curve Patterns
Control Curve Patterns are used to set analog values over a period of time. For instance, the events
of a control curve can be associated with an analog signal to change its value over the time period of
the pattern.
1.3 On-Off Patterns
On/Off Patterns are used to set boolean values on and off over a period of time. For instance, a
digital signal (e.g. representing a valve) can be controlled by associating it with the events of an OnOff pattern to set it On or Off at the times specified in the pattern.
1.4 OpenEnterprise Scheduling
To understand how Patterns are used for OpenEnterprise scheduling, it is helpful to understand the
relationship between Diaries, Patterns, Calendars and Scheduled Events.
1.4.1 A Diary
A Diary is a time frame that may act as a ‘container’ for a Pattern. It has a beginning and an end time
assigned to it. The scheduling action (or ‘trigger’) applies to its start time. It may be configured to
repeat continuously, for a specified number of times, or run just once.
1.4.2 A Pattern
A Pattern is a user-defined series of time intervals that trigger events within an associated Diary.
Those events, unlike a Diary’s trigger may happen at irregular intervals along the span of the Diary,
and the events can be associated with an analog or a digital value. A Pattern has to be coupled with
a Diary in order to run.
1.4.3 Calendars
Calendars enable a user to assign a different Pattern to a Diary on a specific day. For instance, a
schedule which turns a valve on and off may require a different pattern of behaviour over the
Weekend period compared with the Weekday pattern. The user would then specify that the Diary
which turns the valve on and off is to use a different Pattern every weekend, as determined by the
Weekend Calendar (i.e): -
Calendar to Use Day Diary Pattern to Run
Standard Calendar Mon ValveDiary Pattern1
- 1 -
Page 7

Reference Guide
D301522X412
APRIL 2012
Standard Calendar Tue ValveDiary Pattern1
Standard Calendar Wed ValveDiary Pattern1
Standard Calendar Thur ValveDiary Pattern1
Standard Calendar Fri ValveDiary Pattern1
Weekend Calendar Sat ValveDiary Pattern2
Weekend Calendar Sun ValveDiary Pattern2
Pattern Configuration
1.4.4 Scheduled Events
It is important to understand that unless a Diary is associated with a Scheduled event (which is an
object in the ToBeScheduled table), nothing will happen, even though the Scheduler will continue to
'start' the Diary at it's appointed time. There is currently no OpenEnterprise tool to add Scheduled
events, and so these must be added using SQL via the SQL Client. See the Scheduler help file for
more information.
1.5 Main Dialog - Triggers Tab
Trigger Pattern tab is displayed by default. A Trigger Pattern enables the user to define specific times
when an action should be performed on a targeted value. This is typically used to set a Boolean
attribute to True, in order to perform an action. For example, if the 'Calculate' attribute of a calculation
is set to True, the calculation is run. Using OpenEnterprise scheduling, the calculation can be set to
run at the at times specified in a Trigger pattern.
- 2 -
Page 8

Reference Guide
D301522X412
APRIL 2012
Pattern Configuration
1.5.1 File Menu
1.5.1.1 Exit
The File menu has only an Exit option. Selecting this will exit Pattern Configuration tool. This menu
option may also be invoked by holding down the [Alt] key on the keyboard, followed by pressing the
‘F’ key and then the ‘X’ key.
1.5.2 Help Menu
1.5.2.1 Help
Selection will display this help file.
1.5.2.2 About
Selection
build and contact details. The option may also be invoked by holding down the [Alt] key on the
keyboard followed by the ‘H’ key and then the ‘A’ key.
will display the ‘About’ dialog. This provides details of the current OpenEnterprise version,
1.5.3 Control Curve
Selecting this tab will display the 'Control Curves Tab'. This enables the user to add, modify or delete
Control Curve patterns.
1.5.4 On-Off Schedules
Selecting this tab will display the 'On/Off Schedules Tab'. This enables the user to add, modify or
delete On/Off Schedule patterns.
1.5.5 Pattern List
This list displays configured patterns. When a single pattern is selected, the [View/Modify] and
[Delete] buttons become enabled. If more than one pattern is selected (by holding down the [Shift]
or [Ctrl] whilst selecting multiple patterns) then the [View/Modify] button becomes disabled, but the
[Delete] button remains enabled, allowing the user to delete more than one pattern at a time.
1.5.6 Add Pattern Button
Selection opens the appropriate Add Pattern dialog, which enables the user to add a pattern to the
Database.
1.5.7 View-Modify Pattern Button
This button becomes enabled when a single pattern is selected from the list. Selecting it will open up
the appropriate Pattern editing dialog. When a pattern is first created it is empty. The pattern has to
be modified to create events in it.
1.5.8 Delete Button
Selection enables the user to delete objects selected from the list of patterns. The Delete Pattern
Dialog is displayed before the deletion, giving the user an opportunity to cancel it.
1.5.9 Used By
Displays the Scheduled Actions dialog. This details all scheduled actions (entries from the
ToBeScheduled table) which are using the selected Pattern.
- 3 -
Page 9

Reference Guide
D301522X412
APRIL 2012
Pattern Configuration
1.5.10 Close Button
The dialog is closed. Changes will have already been saved by the Add or Modify dialogs.
1.5.11 Adding a Trigger
The ‘New Trigger’ dialog enables the user to create a new Trigger pattern.
1.5.11.1 Pattern Name
Type a unique name for the new pattern into this field. Non-unique names or an empty field will not
be acce
1.5.11.2 Period
This di
1.5.11.3 Add Button
Whe
new pattern will then be shown in the pattern list.
1.5.11.4 Cancel Button
pted when the user selects the [Add] button to add the pattern.
splays the available duration times for patterns. They are:
• Minute
• 5 Minute
• Hour
• Day
• Week
• Month
• Year
n this button is selected the new pattern is added to the Database. The dialog will close and the
If this button is sel
any database transactions.
ected the current dialog will close. The Pattern Configuration tool will not perform
1.5.12 Configuring a Trigger
The Trigger Configuration dialog enables you to add, modify or delete trigger events on the pattern.
- 4 -
Page 10

Reference Guide
D301522X412
APRIL 2012
Pattern Configuration
1.5.12.1 Configure Menu
This me
1.5.12.1.1 Save
This optio
1.5.12.1.2 Discard
Selecting thi
1.5.12.1.3 Close
This optio
1.5.12.2 Edit Menu
The Edit men
1.5.12.2.1 Auto Event Add
Events may be adde
This option will be disabled when configuring On/Off schedules. Selection will open the Auto Event
Add dialog.
nu has three options:-
n saves the currently configured pattern to the database.
s option discards any changes made in the pattern since the last Save.
n closes the Pattern Configuration tool without saving any changes made.
u has one option:-
d automatically across the pattern at predefined intervals by selecting this option.
1.5.12.3 Options Menu
There are th
1.5.12.3.1 Horizontal Grid
This option, if available and unchecked,
Control Curve patterns.
ree options on this menu:-
will turn off the horizontal grid lines. It is only available for
- 5 -
Page 11

Reference Guide
D301522X412
APRIL 2012
1.5.12.3.2 Vertical Grid
Pattern Configuration
When unchecked, the verti
1.5.12.3.3 Draw Rectangular
n available, if checked, the plot line between points is drawn as a step graph, rather than directly
Whe
from one point to another. This option is only available for Control Curve patterns.
1.5.12.4 Adding Events by Clicking
g the right mouse button on the Graph Area will automatically add a pattern event at that point.
Clickin
A newly added event will appear as light blue, since it is the automatically selected event.
If another event is added or selected, then the recently added event becomes dark blue to indicate
that it is no longer the selected event.
1.5.12.5 Trigger Events
A Trigge
moved anywhere along the X-axis.
1.5.12.6 Adding Events by typing the time
Pattern event
Control Points group of controls and then selecting the [Add] button. Availability of Time and
Duration fields depends on the type of pattern being created or modified, and the time period of the
pattern. Values outside the range of the pattern will not be accepted.
r event will appear as a thin vertical line. The events, once created, can be selected and
s may also be added by entering a valid value into the Time and Duration fields in the
cal grid lines will be turned off.
Events may be modified by selecting the event and then entering new values into the time fields
within the ‘Control Points’ group on the dialog.
1.5.12.7 Add Event Button
When a new time is
selected, a new event will be drawn at the time indicated by the time fields. If an event already exists
at the time indicated, a message will inform the user that the event cannot be added.
1.5.12.8 Modify Event Button
An event may be modified
‘Control Points’ group on the dialog. When this button is then selected, the event will be moved to the
time indicated in the Control Points fields, unless it clashes with an existing event.
1.5.12.9 Display Zoom
It is possi
Patterns that stretch over a longer period of time.
Select the ‘Display’ drop-down list from within the ‘Time Period’ group of controls. There will be a
number of options available depending on the length of the Pattern:-
ble to zoom in and out on the Graph Area. This may be very helpful, especially with
entered into the time fields in the Control Points section, and this button is
by selecting it and then entering new values into the time fields within the
- 6 -
Page 12

Reference Guide
D301522X412
APRIL 2012
Once a Display Period option has been selected, the display in the Graph Area adjusts to the
selection. Scroll bars will appear if the selected Display time is smaller than the length of the Pattern.
1.5.12.10 Change Start Button
Pattern Configuration
Selecting thi
Pattern should display as its start time.
The Pattern will then display as if its start time was at the specified offset time: -
s button will open the 'Start Offset' dialog (shown below). Fill in an offset time which the
Note: - The Offset time is not saved as part of the Pattern, so the Pattern will always run with no
offset.
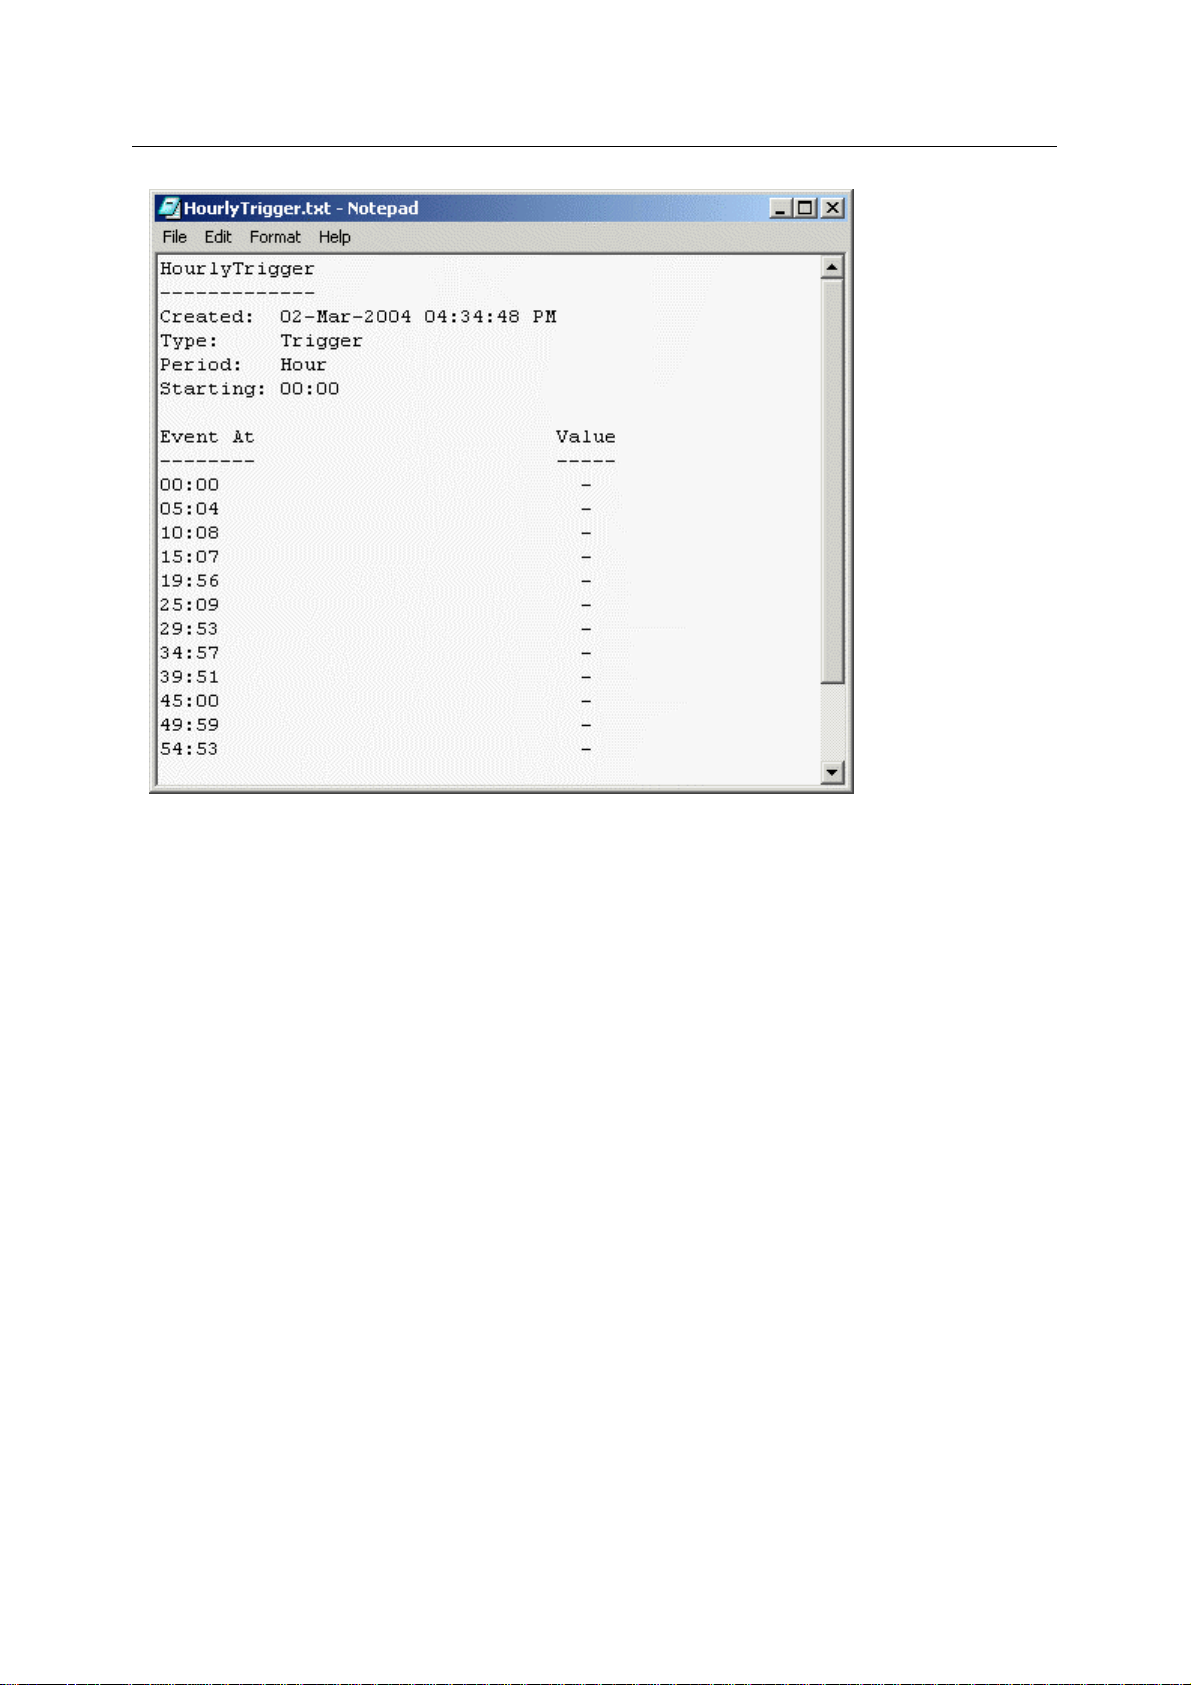
1.5.12.11 Report Button
Select this button to create
appear.
Select a directory and accept or change the default name of the file if desired. The file name will
default to the name of the pattern, followed by the .txt extension to mark it as a text file. Save the file.
Another message box will appear confirming that the file was saved and asking if the user wants to
view the file. If [Yes] is selected, the Report is opened up in Notepad: -
a text file that summarizes the pattern. A ‘Save As’ file dialog box will
- 7 -
Page 13
Reference Guide
D301522X412
APRIL 2012
Pattern Configuration
It displays the name of the Pattern, its Creation date, its Creation time, its Type and Period. A list of
Events, giving the time and any value which may have been set. Note that as the example shown
above is a Trigger pattern, it does not have values associated with it. Control Curve and On-Off
patterns display a value associated with each event.
1.5.12.12 Discard Button
n any changes are made to the pattern, the Discard and Save buttons become available.
Whe
Selecting this button will discard any changes made since the last save. A message will appear
asking you to confirm that you want to discard the changes.
1.5.12.13 Save Button
n any changes are made to the pattern, the Discard and Save buttons become available.
Whe
Selecting this button will immediately save any changes made since the last save to the database.
1.5.12.14 Close Configure Dialog
A message
will ask if you want to save any changes made before closing the dialog down.
1.6 Main Dialog - Control Curves Tab
The Control Curves tab enables the user to configure Control Curve patterns. A Control Curve
pattern enables a user to specify not only the times of events within the time scale of the pattern, but
to also ascribe a value to each event. This kind of pattern is typically applied to analog Output or local
analog signals.
- 8 -
Page 14

Reference Guide
D301522X412
APRIL 2012
Pattern Configuration
1.6.1 File Menu
1.6.1.1 Exit
The File menu has only an Exit option. Selecting this will exit Pattern Configuration tool. This menu
option may also be invoked by holding down the [Alt] key on the keyboard, followed by pressing the
‘F’ key and then the ‘X’ key.
1.6.2 Help Menu
1.6.2.1 Help
Selection will display this help file.
1.6.2.2 About
Selection
build and contact details. The option may also be invoked by holding down the [Alt] key on the
keyboard followed by the ‘H’ key and then the ‘A’ key.
will display the ‘About’ dialog. This provides details of the current OpenEnterprise version,
1.6.3 On-Off Schedules
Selecting this tab will display the 'On/Off Schedules Tab'. This enables the user to add, modify or
delete On/Off Schedule patterns.
- 9 -
Page 15

Reference Guide
D301522X412
APRIL 2012
Pattern Configuration
1.6.4 Triggers
Selecting this tab will display the 'Triggers Tab'. This enables the user to add, modify or delete
Control Curve patterns.
1.6.5 Pattern List
This list displays configured patterns. When a single pattern is selected, the [View/Modify] and
[Delete] buttons become enabled. If more than one pattern is selected (by holding down the [Shift]
or [Ctrl] whilst selecting multiple patterns) then the [View/Modify] button becomes disabled, but the
[Delete] button remains enabled, allowing the user to delete more than one pattern at a time.
1.6.6 Add Pattern Button
Selection opens the appropriate Add Pattern dialog, which enables the user to add a pattern to the
Database.
1.6.7 View-Modify Pattern Button
This button becomes enabled when a single pattern is selected from the list. Selecting it will open up
the appropriate Pattern editing dialog. When a pattern is first created it is empty. The pattern has to
be modified to create events in it.
1.6.8 Delete Button
Selection enables the user to delete objects selected from the list of patterns. The Delete Pattern
Dialog is displayed before the deletion, giving the user an opportunity to cancel it.
1.6.9 Used By
Displays the Scheduled Actions dialog. This details all scheduled actions (entries from the
ToBeScheduled table) which are using the selected Pattern.
1.6.10 Close Button
The dialog is closed. Changes will have already been saved by the Add or Modify dialogs.
1.6.11 Adding a Control Curve
The ‘New Control Curve’ dialog enables the user to create a new Control Curve pattern.
1.6.11.1 Pattern Name
Type a unique name for the new pattern into this field. Non-unique names or an empty field will not
be acce
pted when the user selects the [Add] button to add the pattern.
- 10 -
Page 16

Reference Guide
D301522X412
APRIL 2012
1.6.11.2 Period
splays the available duration times for patterns. They are:
This di
• Minute
• 5 Minute
• Hour
• Day
• Week
• Month
• Year
1.6.11.3 Low Range
Pattern Configuration
Type the lowest value re
1.6.11.4 High Range
Type the high
1.6.11.5 Add Button
n this button is selected the new pattern is added to the Database. The dialog will close and the
Whe
new pattern will then be shown in the pattern list.
1.6.11.6 Cancel Button
If this button is sel
any database transactions.
est value required for the Y-axis on the pattern you are adding.
quired for the Y-axis on the pattern you are adding.
ected the current dialog will close. The Pattern Configuration tool will not perform
1.6.12 Configuring a Control Curve
The Control Curve Configuration dialog enables you to add, modify or delete control curve events on
the pattern.
- 11 -
Page 17

Reference Guide
D301522X412
APRIL 2012
Pattern Configuration
1.6.12.1 Configure Menu
This me
1.6.12.1.1 Save
This optio
1.6.12.1.2 Discard
Selecting thi
1.6.12.1.3 Close
This optio
1.6.12.2 Edit Menu
The Edit men
1.6.12.2.1 Auto Event Add
Events may be adde
This option will be disabled when configuring On/Off schedules. Selection will open the Auto Event
Add dialog.
nu has three options:-
n saves the currently configured pattern to the database.
s option discards any changes made in the pattern since the last Save.
n closes the Pattern Configuration tool without saving any changes made.
u has one option:-
d automatically across the pattern at predefined intervals by selecting this option.
1.6.12.3 Options Menu
There are th
1.6.12.3.1 Horizontal Grid
This option, if available and unchecked,
Control Curve patterns.
ree options on this menu:-
will turn off the horizontal grid lines. It is only available for
- 12 -
Page 18

Reference Guide
D301522X412
APRIL 2012
1.6.12.3.2 Vertical Grid
Pattern Configuration
When unchecked, the verti
1.6.12.3.3 Draw Rectangular
n available, if checked, the plot line between points is drawn as a step graph, rather than directly
Whe
from one point to another. This option is only available for Control Curve patterns.
1.6.12.4 Adding Events by Clicking
g the right mouse button on the Graph Area will automatically add a pattern event at that point.
Clickin
A newly added event will appear as light blue, since it is the automatically selected event.
If another event is added or selected, then the recently added event becomes dark blue to indicate
that it is no longer the selected event.
1.6.12.5 Control Curve Events
A Control
Control Curve, a joining line is automatically drawn between the points, from left to right. The points,
once created, can be selected and moved anywhere within the graph area.
1.6.12.6 Adding Events by typing the time
Pattern event
Control Points group of controls and then selecting the [Add] button. Availability of Time and
Duration fields depends on the type of pattern being created or modified, and the time period of the
pattern. Values outside the range of the pattern will not be accepted.
Curve event will be seen as a point on the graph area. As new points are added to a
s may also be added by entering a valid value into the Time and Duration fields in the
cal grid lines will be turned off.
Events may be modified by selecting the event and then entering new values into the time fields
within the ‘Control Points’ group on the dialog.
1.6.12.7 Add Event Button
When a new time is
selected, a new event will be drawn at the time indicated by the time fields. If an event already exists
at the time indicated, a message will inform the user that the event cannot be added.
1.6.12.8 Modify Event Button
An event may be modified
‘Control Points’ group on the dialog. When this button is then selected, the event will be moved to the
time indicated in the Control Points fields, unless it clashes with an existing event.
1.6.12.9 Display Range
The user may
into the ‘Hi’ and ‘Low’ fields within the ‘Range’ group and selecting the ‘Set’ button:
Such changes are not saved and consequently the initial range for the pattern will be restored when it
is re-opened.
1.6.12.10 Display Zoom
It is possi
Patterns that stretch over a longer period of time.
ble to zoom in and out on the Graph Area. This may be very helpful, especially with
entered into the time fields in the Control Points section, and this button is
by selecting it and then entering new values into the time fields within the
, for viewing purposes shorten or extend the range of the Y-axis by entering new values
Select the ‘Display’ drop-down list from within the ‘Time Period’ group of controls. There will be a
number of options available depending on the length of the Pattern:-
- 13 -
Page 19

Reference Guide
D301522X412
APRIL 2012
Once a Display Period option has been selected, the display in the Graph Area adjusts to the
selection. Scroll bars will appear if the selected Display time is smaller than the length of the Pattern.
1.6.12.11 Change Start Button
Pattern Configuration
Selecting thi
Pattern should display as its start time.
The Pattern will then display as if its start time was at the specified offset time: -
s button will open the 'Start Offset' dialog (shown below). Fill in an offset time which the
Note: - The Offset time is not saved as part of the Pattern, so the Pattern will always run with no
offset.
1.6.12.12 Report Button
Select this button to create
appear.
a text file that summarizes the pattern. A ‘Save As’ file dialog box will
- 14 -
Page 20

Reference Guide
D301522X412
APRIL 2012
Select a directory and accept or change the default name of the file if desired. The file name will
default to the name of the pattern, followed by the .txt extension to mark it as a text file. Save the file.
Another message box will appear confirming that the file was saved and asking if the user wants to
view the file. If [Yes] is selected, the Report is opened up in Notepad: -
Pattern Configuration
It displays the name of the Pattern, its Creation date, its Creation time, its Type and Period. A list of
Events, giving the time and any value which may have been set. Note that as the example shown
above is a Trigger pattern, it does not have values associated with it. Control Curve and On-Off
patterns display a value associated with each event.
1.6.12.13 Discard Button
n any changes are made to the pattern, the Discard and Save buttons become available.
Whe
Selecting this button will discard any changes made since the last save. A message will appear
asking you to confirm that you want to discard the changes.
1.6.12.14 Save Button
n any changes are made to the pattern, the Discard and Save buttons become available.
Whe
Selecting this button will immediately save any changes made since the last save to the database.
1.6.12.15 Close Configure Dialog
A message
will ask if you want to save any changes made before closing the dialog down.
1.7 Main Dialog - On/Off Schedules
An On/Off Schedule enables the user to specify a number of On/Off event blocks over a specified
period of time which have a start time and a finish time. The start times of each event block are used
to switch a discrete value On, and the end time of each block switches the value Off. This is typically
applied to a digital Output signal that controls a switch, such as a Pump’s on/off switch.
- 15 -
Page 21

Reference Guide
D301522X412
APRIL 2012
Pattern Configuration
1.7.1 File Menu
1.7.1.1 Exit
The File menu has only an Exit option. Selecting this will exit Pattern Configuration tool. This menu
option may also be invoked by holding down the [Alt] key on the keyboard, followed by pressing the
‘F’ key and then the ‘X’ key.
1.7.2 Help Menu
1.7.2.1 Help
Selection will display this help file.
1.7.2.2 About
Selection
build and contact details. The option may also be invoked by holding down the [Alt] key on the
keyboard followed by the ‘H’ key and then the ‘A’ key.
will display the ‘About’ dialog. This provides details of the current OpenEnterprise version,
1.7.3 Triggers
Selecting this tab will display the 'Triggers Tab'. This enables the user to add, modify or delete
Control Curve patterns.
- 16 -
Page 22

Reference Guide
D301522X412
APRIL 2012
Pattern Configuration
1.7.4 Control Curve
Selecting this tab will display the 'Control Curves Tab'. This enables the user to add, modify or delete
Control Curve patterns.
1.7.5 Pattern List
This list displays configured patterns. When a single pattern is selected, the [View/Modify] and
[Delete] buttons become enabled. If more than one pattern is selected (by holding down the [Shift]
or [Ctrl] whilst selecting multiple patterns) then the [View/Modify] button becomes disabled, but the
[Delete] button remains enabled, allowing the user to delete more than one pattern at a time.
1.7.6 Add Pattern Button
Selection opens the appropriate Add Pattern dialog, which enables the user to add a pattern to the
Database.
1.7.7 View-Modify Pattern Button
This button becomes enabled when a single pattern is selected from the list. Selecting it will open up
the appropriate Pattern editing dialog. When a pattern is first created it is empty. The pattern has to
be modified to create events in it.
1.7.8 Delete Button
Selection enables the user to delete objects selected from the list of patterns. The Delete Pattern
Dialog is displayed before the deletion, giving the user an opportunity to cancel it.
1.7.9 Used By
Displays the Scheduled Actions dialog. This details all scheduled actions (entries from the
ToBeScheduled table) which are using the selected Pattern.
1.7.10 Close Button
The dialog is closed. Changes will have already been saved by the Add or Modify dialogs.
1.7.11 Adding an On-Off Schedule
The ‘New On/Off Schedule’ dialog enables the user to create a new On/Off pattern.
1.7.11.1 Pattern Name
Type a unique name for the new pattern into this field. Non-unique names or an empty field will not
be acce
pted when the user selects the [Add] button to add the pattern.
- 17 -
Page 23

Reference Guide
D301522X412
APRIL 2012
1.7.11.2 Period
splays the available duration times for patterns. They are:
This di
• Minute
• 5 Minute
• Hour
• Day
• Week
• Month
• Year
1.7.11.3 Add Button
n this button is selected the new pattern is added to the Database. The dialog will close and the
Whe
new pattern will then be shown in the pattern list.
Pattern Configuration
1.7.11.4 Cancel Button
If this button is sel
any database transactions.
ected the current dialog will close. The Pattern Configuration tool will not perform
1.7.12 Configuring an On-Off Schedule
The On-Off Schedule Configuration dialog enables you to add, modify or delete On-Off schedule
events on the pattern.
- 18 -
Page 24

Reference Guide
D301522X412
APRIL 2012
1.7.12.1 Configure Menu
Pattern Configuration
This me
1.7.12.1.1 Save
This optio
1.7.12.1.2 Discard
Selecting thi
1.7.12.1.3 Close
This optio
1.7.12.2 Edit Menu
The Edit men
1.7.12.2.1 Auto Event Add
Events may be adde
This option will be disabled when configuring On/Off schedules. Selection will open the Auto Event
Add dialog.
1.7.12.3 Options Menu
There are th
nu has three options:-
n saves the currently configured pattern to the database.
s option discards any changes made in the pattern since the last Save.
n closes the Pattern Configuration tool without saving any changes made.
u has one option:-
d automatically across the pattern at predefined intervals by selecting this option.
ree options on this menu:-
1.7.12.3.1 Horizontal Grid
This option, if available and unchecked,
Control Curve patterns.
1.7.12.3.2 Vertical Grid
When unchecked, the verti
1.7.12.3.3 Draw Rectangular
n available, if checked, the plot line between points is drawn as a step graph, rather than directly
Whe
from one point to another. This option is only available for Control Curve patterns.
1.7.12.4 Adding Events by Clicking
g the right mouse button on the Graph Area will automatically add a pattern event at that point.
Clickin
A newly added event will appear as light blue, since it is the automatically selected event.
If another event is added or selected, then the recently added event becomes dark blue to indicate
that it is no longer the selected event.
1.7.12.5 On-Off Schedule Events
An On-Off event will be seen as a thi
dragged from right to left to widen it. The left edge of the event signifies the scheduled object's value
is switched ON, the right edge of the event signifies the value is switched OFF. Events can be
selected and moved along the X-axis.
cal grid lines will be turned off.
will turn off the horizontal grid lines. It is only available for
ck vertical line. The right edge of an On-Off event can be
Adding Points by Clicking
- 19 -
Page 25

Reference Guide
D301522X412
APRIL 2012
1.7.12.6 Adding Events by typing the time
Pattern Configuration
Pattern event
Control Points group of controls and then selecting the [Add] button. Availability of Time and
Duration fields depends on the type of pattern being created or modified, and the time period of the
pattern. Values outside the range of the pattern will not be accepted.
Events may be modified by selecting the event and then entering new values into the time fields
within the ‘Control Points’ group on the dialog.
1.7.12.7 Add Event Button
When a new time is
selected, a new event will be drawn at the time indicated by the time fields. If an event already exists
at the time indicated, a message will inform the user that the event cannot be added.
1.7.12.8 Modify Event Button
An event may be modified
‘Control Points’ group on the dialog. When this button is then selected, the event will be moved to the
time indicated in the Control Points fields, unless it clashes with an existing event.
1.7.12.9 Display Zoom
It is possi
Patterns that stretch over a longer period of time.
Select the ‘Display’ drop-down list from within the ‘Time Period’ group of controls. There will be a
number of options available depending on the length of the Pattern:-
s may also be added by entering a valid value into the Time and Duration fields in the
entered into the time fields in the Control Points section, and this button is
by selecting it and then entering new values into the time fields within the
ble to zoom in and out on the Graph Area. This may be very helpful, especially with
Once a Display Period option has been selected, the display in the Graph Area adjusts to the
selection. Scroll bars will appear if the selected Display time is smaller than the length of the Pattern.
1.7.12.10 Change Start Button
Selecting thi
Pattern should display as its start time.
The Pattern will then display as if its start time was at the specified offset time: -
s button will open the 'Start Offset' dialog (shown below). Fill in an offset time which the
- 20 -
Page 26

Reference Guide
D301522X412
APRIL 2012
Pattern Configuration
Note: - The Offset time is not saved as part of the Pattern, so the Pattern will always run with no
offset.
1.7.12.11 Report Button
Select this button to create
appear.
Select a directory and accept or change the default name of the file if desired. The file name will
default to the name of the pattern, followed by the .txt extension to mark it as a text file. Save the file.
Another message box will appear confirming that the file was saved and asking if the user wants to
view the file. If [Yes] is selected, the Report is opened up in Notepad: -
a text file that summarizes the pattern. A ‘Save As’ file dialog box will
- 21 -
Page 27

Reference Guide
D301522X412
APRIL 2012
Pattern Configuration
It displays the name of the Pattern, its Creation date, its Creation time, its Type and Period. A list of
Events, giving the time and any value which may have been set. Note that as the example shown
above is a Trigger pattern, it does not have values associated with it. Control Curve and On-Off
patterns display a value associated with each event.
1.7.12.12 Discard Button
n any changes are made to the pattern, the Discard and Save buttons become available.
Whe
Selecting this button will discard any changes made since the last save. A message will appear
asking you to confirm that you want to discard the changes.
1.7.12.13 Save Button
n any changes are made to the pattern, the Discard and Save buttons become available.
Whe
Selecting this button will immediately save any changes made since the last save to the database.
1.7.12.14 Close Configure Dialog
A message
will ask if you want to save any changes made before closing the dialog down.
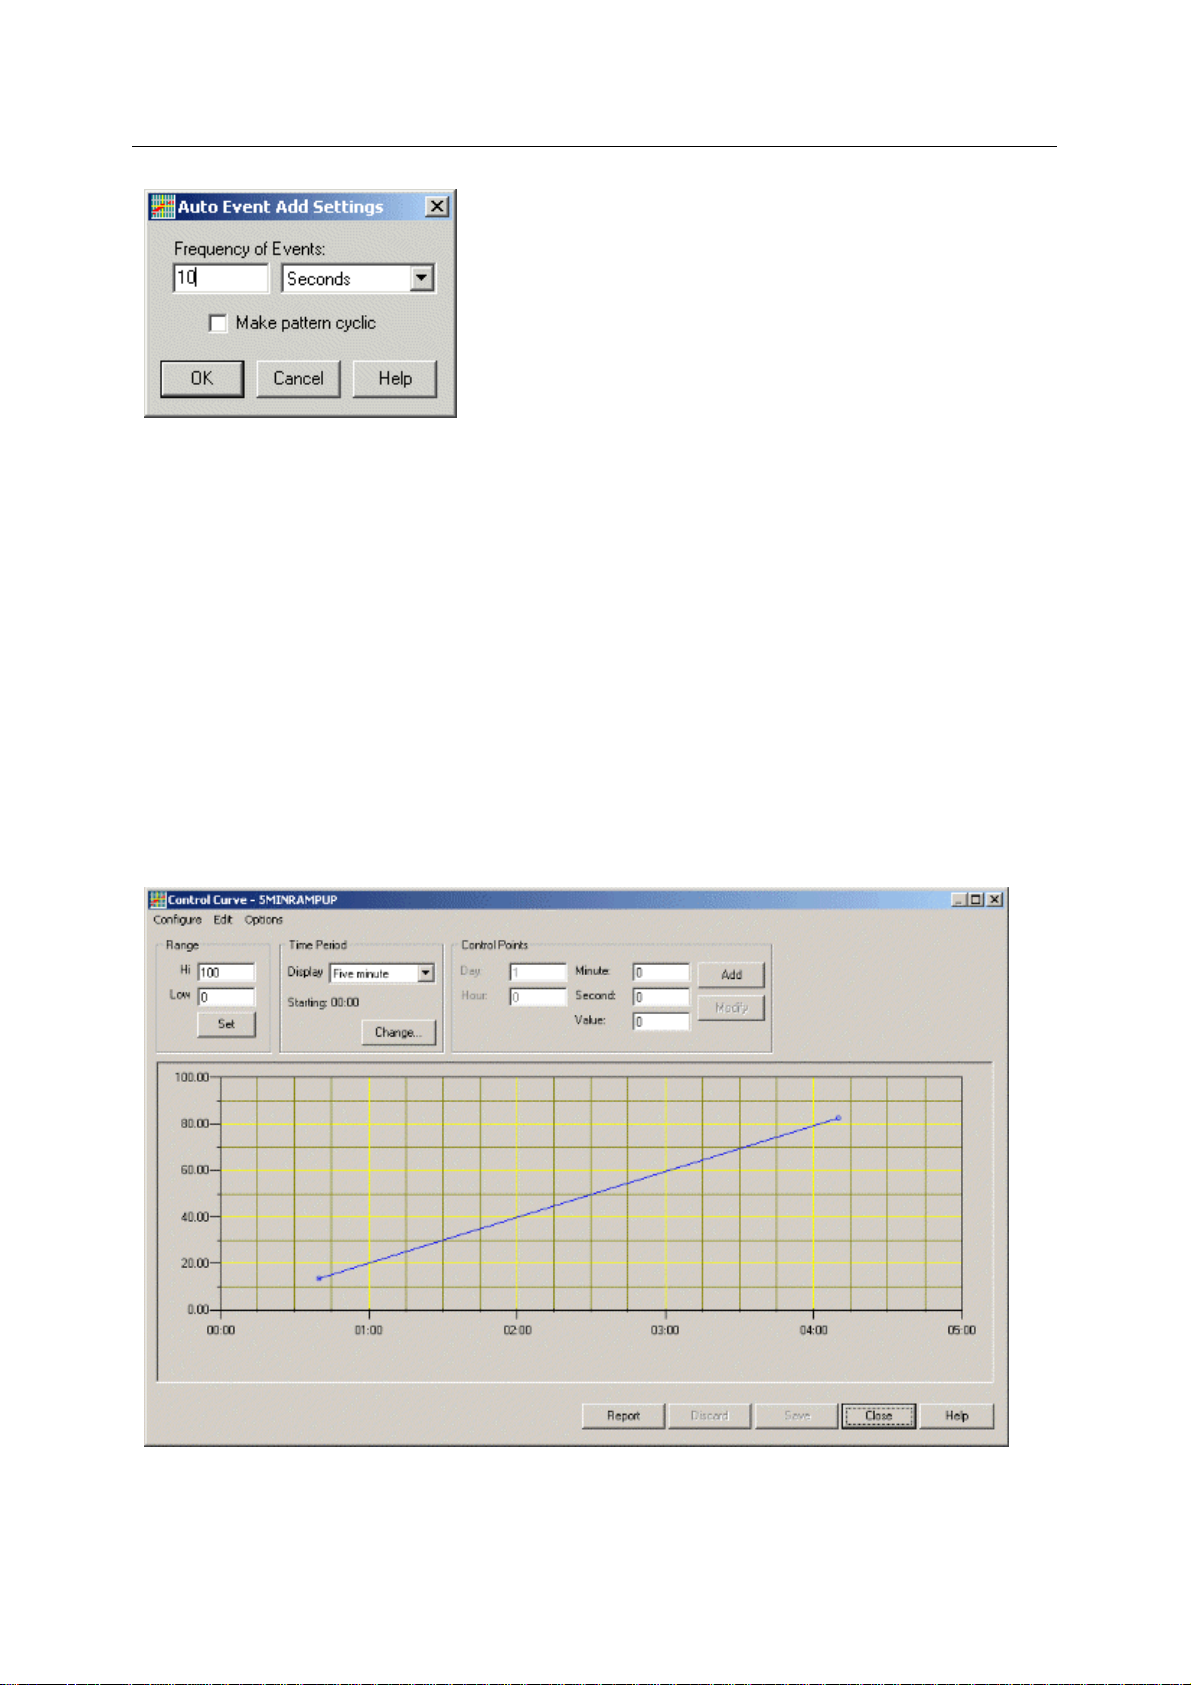
1.8 Auto Event Add Dialog
This dialog enables the user to configure the frequency at which the Pattern Configuration tool should
enter events within the current pattern.
- 22 -
Page 28
Reference Guide
D301522X412
APRIL 2012
Pattern Configuration
1.8.1 Frequency of Events Value
Type the frequency interval between the automatically added events.
1.8.2 Frequency of Events Units
Select the event units which are available from this drop down list.
1.8.3 Make Pattern Cyclic
This check box enables the user to choose whether the pattern will be cyclic or non-cyclic. The
difference between these options is demonstrated below.
1.8.3.1 Pattern Before Auto Adding Events
In orde
cyclic pattern, we will start from a common pattern and then add events to form a cyclic and a then a
non-cyclic pattern. The image below shows the starting point for each pattern before the events are
auto added.
r to see the difference between how the Auto Add Event feature draws a cyclic and a non-
- 23 -
Page 29

Reference Guide
D301522X412
APRIL 2012
1.8.3.2 Pattern After Adding Events - Cyclic
Pattern Configuration
This is
checked.
how the pattern would look after adding auto events with the 'Make Pattern Cyclic' box
1.8.3.3 Pattern After Adding Events - Non-Cyclic
This is
unchecked.
how the pattern would look if the events were added and the 'Make Pattern Cyclic' box is left
- 24 -
Page 30

Reference Guide
D301522X412
APRIL 2012
Pattern Configuration
1.8.4 OK Button
If selected, the dialog will close, and the Pattern Configuration tool will draw in the events at the
interval entered by the user. If the interval was too small, which would cause too many events to be
generated, the user will be returned to the Auto Event Add Settings dialog, and will be asked to enter
a larger interval period.
1.8.5 Cancel Button
If this button is selected the current dialog will close. The Pattern Configuration tool will not perform
any database transactions.
1.8.6 Help Button
If selected, this help file will be displayed with the correct topic displayed.
1.9 Delete Pattern Dialog
This dialog enables the user to confirm the deletion of the Pattern before it occurs.
- 25 -
Page 31

Reference Guide
D301522X412
APRIL 2012
1.9.1 Diaries Using Pattern List
Pattern Configuration
This is a list of Diaries which are using the selected Pattern.
1.9.2 Confirm Button
When selected, the Pattern Configuration tool will delete the selected Pattern.
1.9.3 Cancel Button
If this button is selected the current dialog will close. The Pattern Configuration tool will not perform
any database transactions.
1.9.4 Help Button
If selected, this help file will be displayed with the correct topic displayed.
This dialog shows all Scheduled Actions (entries in the ToBeScheduled table) which are using the
selected Pattern. If a Pattern is not being used by a Scheduled Action, it will not do anything. To be
effective, a Pattern must be associated with a Diary, and the Diary must be named in the 'usesthisinfo'
attribute of an entry in the ToBeScheduled table. See the Scheduler help file for more information on
how to create Scheduled Actions.
- 26 -
Page 32

Reference Guide
D301522X412
APRIL 2012
Pattern Configuration
- 27 -
Page 33

Reference Guide
D301522X412
APRIL 2012
2 Index
1
A
Add Button ............................................. 7, 14, 20
Add Pattern Button................................. 6, 13, 19
Add Point Button.................................... 9, 16, 22
Adding.................................................... 9, 15, 22
Points.................................................. 9, 15, 22
Auto Event Add Settings Dialog....................... 24
Auto Event Dialog OK Button........................... 27
C
Cancel Button................................... 7, 14, 20, 27
Change Start Button............................. 10, 16, 23
Clicking................................................... 9, 15, 22
Close Button........................................... 6, 13, 19
Close Configure Dialog........................11, 18, 24
Configure Menu...................................... 8, 14, 21
Confirm Button................................................. 27
Control Curve............................................... 6, 19
Control Curve Configuration Dialog................. 14
Control Curve Events.......................................15
Control Curves Tab..........................................11
D
Delete Button .........................................6, 13, 19
Delete Pattern Dialog....................................... 27
Diaries Using Pattern List................................. 27
Discard Button...................................... 11, 18, 24
Display Range.................................................. 16
Display Zoom......................................... 9, 16, 22
E
Edit Menu...............................................8, 15, 21
Events Units..................................................... 25
Frequency..................................................... 25
Events Value.................................................... 25
Frequency..................................................... 25
F
Frequency ........................................................ 25
Events Units ................................................. 25
Events Value ................................................ 25
H
Help Button ...................................................... 27
Help Menu.............................................. 6, 12, 19
High Range ...................................................... 14
Pattern Configuration
L
Low Range........................................................14
M
Make Pattern Cyclic..........................................25
Modify Point Button.................................9, 16, 22
N
New Control Curve Dialog................................13
New On-Off Schedule Dialog............................20
New Trigger Dialog.............................................6
O
On-Off Schedule Configuration Dialog .............20
On-Off Schedule Events...................................22
On-Off Schedules .........................................6, 12
On-Off Schedules Tab......................................18
OpenEnterprise Scheduling................................4
Options Menu..........................................8, 15, 21
P
Pattern Configuration Overview..........................4
Pattern List..............................................6, 13, 19
Pattern Name..........................................7, 13, 20
Period......................................................7, 13, 20
Points......................................................9, 15, 22
Adding.................................................9, 15, 22
R
Report Button........................................10, 17, 23
S
Save Button ..........................................11, 18, 24
Scheduled Actions Dialog.................................28
T
Time........................................................9, 15, 22
typing...................................................9, 15, 22
Trigger.........................................................12, 19
Trigger Configuration Dialog...............................7
Trigger Events.....................................................9
Triggers Tab........................................................5
Typing.....................................................9, 15, 22
time......................................................9, 15, 22
U
Used By ..................................................6, 13, 19
- 28 -
Page 34

Reference Guide
D301522X412
APRIL 2012
Pattern Configuration
V
View-Modify Pattern Button ....................6, 13, 19
- 29 -
Page 35

Page 36

Reference Guide
D301522X412
APRIL 2012
DISCLAIMER
Bristol, Inc., Bristol Babcock Ltd, Bristol Canada, BBI SA de CV and the Flow Computer Division , are wholly owned subsidiaries of Emerson Electric Co. doing business
as Remote Automation Solutions (“RAS”), a division of Emerson Process Management. ROC, FloBoss, ROCLINK, Bristol, Bristol Babcock, ControlWave, TeleFlow and
Helicoid are trademarks of RAS. AMS, PlantWeb and the PlantWeb logo are marks of Emerson Electric Co. The Emerson logo is a trademark and service mark of the
Emerson Electric Co. All other marks are property of their respective owners.
The contents of this publication are presented for informational purposes only. While every effort has been made to ensure informational accuracy, they are not to be
construed as warranties or guarantees, express or implied, regarding the products or services described herein or their use or applicability. RAS reserves the right to
modify or improve the designs or specifications of such products at any time without notice. All sales are governed by RAS’ terms and conditions which are available upon
request. RAS does not assume responsibility for the selection, use or maintenance of any product. Responsibility for proper selection, use and maint en ance of any RAS
product remains solely with the purchaser and end-user.
Engineered and supported by:
Remote Automation Solutions,
Blackpole Road, Worcester, WR3 8YB, UK
Registered office: Meridian East, Leicester, LE19 1UX
Registered in England and Wales, Registration No. 00671801
VAT Reg No. GB 705 353 652
Emerson Process Management
Remote Automation Solutions
1100 Buckingham St
Watertown, CT 06795
T 1 (860) 945 2200
F 1 (860) 945 2278
www.EmersonProcess.com/Remote
binfo@EmersonProcess.com
© 2001-2012 Remote Automation Solutions, division of Emerson Process Management. All rights
reserved.
Emerson Process Management
Remote Automation Solutions
Blackpole Road
Worcester, WR3 8YB
T 44 (0) 1905 856848
F 44 (0) 1905 856930
www.EmersonProcess.com/Remote
oedsupport@EmersonProcess.com
 Loading...