

Remote Automation Solutions Guide: OpenEnterprise Notes View Reference Guide Manuals & Guides
Page 1

Reference Guide
D301502X412
April 2012
OpenEnterprise Notes View Reference
Guide (V2.83)
Remote Automation Solutions
Website: www.EmersonProcess.com/Remote
Page 2

Reference Guide
w
D301502X412
April 2012
Notes Vie
Contents
1 Notes View................................................................................................................................1
2 Configuration...........................................................................................................................2
2.1 General Page......................................................................................................................2
2.1.1 Current User.................................................................................................................3
2.1.2 Silence..........................................................................................................................3
2.1.3 Allow Runtime Configuration........................................................................................3
2.1.4 No Warning on Removal of Notes................................................................................3
2.1.5 Create New Note on Startup ........................................................................................3
2.1.6 Configure Default Recipient Dialog ..............................................................................3
2.1.6.1 To Field ..................................................................................................................4
2.1.6.2 Recipient Text Field ...............................................................................................4
2.1.7 Create Menu.................................................................................................................4
2.1.8 Use Sub Menu..............................................................................................................4
2.2 Display Page.......................................................................................................................4
2.2.1 Current User Only.........................................................................................................5
2.2.2 Current User and Objects.............................................................................................5
2.2.3 Custom .........................................................................................................................5
2.2.4 Background Colour.......................................................................................................5
2.3 Database Page ...................................................................................................................5
2.3.1 Notes Database............................................................................................................6
2.3.2 Connection Status........................................................................................................6
2.3.3 Display Connection Status ...........................................................................................6
2.4 Attributes Page....................................................................................................................7
2.4.1 Available Attributes.......................................................................................................7
2.4.2 Selected Attributes .......................................................................................................7
2.4.3 Add Attribute Button .....................................................................................................7
2.4.4 Add All Button...............................................................................................................7
2.4.5 Remove Attribute Button ..............................................................................................7
2.4.6 Remove All Button........................................................................................................7
2.5 Notification Page.................................................................................................................7
2.5.1 Play Sound ...................................................................................................................8
2.5.2 Sound File.....................................................................................................................8
2.5.3 Output Message Box....................................................................................................8
2.5.4 Message.......................................................................................................................8
2.6 TimeZone Page...................................................................................................................8
2.6.1 Adjust Time Zone .........................................................................................................9
2.6.2 Time Zone.....................................................................................................................9
2.7 Aliases Page .......................................................................................................................9
2.7.1 Permanently Resolve Aliases.....................................................................................10
2.7.2 Alias............................................................................................................................10
2.7.3 Resolved To................................................................................................................10
2.7.4 Default Value..............................................................................................................10
2.8 Priorities Page...................................................................................................................10
2.8.1 Use Priority Descriptions............................................................................................10
2.8.2 Priority.........................................................................................................................11
2.8.3 Enable.........................................................................................................................11
- i -
Page 3

Reference Guide
w
D301502X412
April 2012
Description..................................................................................................................11
2.8.4
3 Runtime ..................................................................................................................................12
3.1 Modify Note Dialog............................................................................................................12
3.2 Forward Note ....................................................................................................................13
3.3 View Note Dialog...............................................................................................................13
3.4 Delete Note .......................................................................................................................14
3.5 Create Note - Details Page...............................................................................................14
3.5.1 From ...........................................................................................................................15
3.5.2 To................................................................................................................................15
3.5.3 Recipient Field............................................................................................................15
3.5.4 Select Recipient Dialog ..............................................................................................16
3.5.5 Subject........................................................................................................................16
3.5.6 Text.............................................................................................................................16
3.6 Create Note - Type Page..................................................................................................16
3.6.1 Standard Note ............................................................................................................17
3.6.2 Expiring Note..............................................................................................................17
3.6.2.1 Date Time Configuration Dialog...........................................................................17
3.6.2.1.1 Actual Time.....................................................................................................18
3.6.2.1.2 Time................................................................................................................18
3.6.2.1.3 Date................................................................................................................18
3.6.2.1.4 Relative Time..................................................................................................18
3.6.2.1.5 Set Relative Time Fields.................................................................................18
3.6.3 Alarmed Note..............................................................................................................19
3.6.3.1 Alarm Time Field..................................................................................................19
3.6.3.2 Date Time Configuration Dialog...........................................................................19
3.6.3.2.1 Actual Time.....................................................................................................19
3.6.3.2.2 Time................................................................................................................20
3.6.3.2.3 Date................................................................................................................20
3.6.3.2.4 Relative Time..................................................................................................20
3.6.3.2.5 Set Relative Time Fields.................................................................................20
3.6.3.3 Additional Text Fields...........................................................................................20
3.6.3.4 Alarm Priority Field...............................................................................................20
3.6.3.5 Priority Selection Dialog.......................................................................................20
3.6.3.5.1.1 Priority Numbers Displayed......................................................................21
3.6.3.5.1.2 Priority Descriptions Displayed................................................................21
3.7 Print All Notes ...................................................................................................................21
3.8 Print Selected Notes .........................................................................................................21
Notes Vie
4 Index .......................................................................................................................................22
- ii -
Page 4

Reference Guide
w
D301502X412
April 2012
Notes Vie
1 Notes View
The OpenEnterprise Notes View component enables an OpenEnterprise user to send and view
SCADA specific messages. There are three types of Note: Standard, Expiry and Alarmed. Notes may
be sent to users, signals or other objects (such as RTUs).
Notes can be used to disseminate useful information. For instance, Notes sent directly to
OpenEnterprise users can inform them of important events as they happen.
An example of the Note View component is shown below, containing an instance of each type of note.
Each note in the example displays the sender, the intended recipient(s), the Subject, Message, Note
type and Expiry time. Other Note attributes are also available for display.
Notes attached to objects (such as an RTU) can be accessed by users from automated displays
which contain the object , updating them concerning the reasons for unusual operational beh aviour
(see the example below).
- 1 -
Page 5

Reference Guide
w
D301502X412
April 2012
Notes Vie
2 Configuration
To configure any View, the component must be placed into configure mode. This can be done in three
ways from within the Desktop.
1. Select the Desktop>>Mode>>Configure option from the Desktop's menu bar. This places
every window in the Desktop into configure mode.
2. With the View window in focus, select the File>>Mode>>Configure option from the
OpenEnterprise Desktop's menu bar. This places the selected component only into configure
mode.
3. With the View window in focus, press the [Ctrl] and [M] keys on the computer keyboard
simultaneously. This will place the selected View into configure mode. Doing the same again
will toggle it back into runtime mode.
Once the View component is in configure mode, the Property Pages (which is where configuration
takes place) can be accessed by right clicking on the View and selecting the 'Propertie s' o ption, as
shown in the example below:-
2.1 General Page
The General Page is the default Property Page. Navigate to the other property pages by clicking on
it's tab.
- 2 -
Page 6

Reference Guide
w
D301502X412
April 2012
Notes Vie
2.1.1 Current User
This is a non-editable text field that shows the currently logged on user
2.1.2 Silence
If this check box is checked, then the Notes View will not play a sound, beep or output any message
boxes when a new note arrives.
2.1.3 Allow Runtime Configuration
If this option is checked, then the 'Properties' option will be appended to the Notes Context menu
(accessed by right clicking on the Note View).
This will give the user the ability to access the property pages while the Notes View is in Runtime.
2.1.4 No Warning on Removal of Notes
This options dictates whether the Notes View will display a cautionary message before the deletion of
notes.
2.1.5 Create New Note on Startup
If this option is checked, then the Notes View will launch a Create Note dialog whenever it loads in
this file. This option primarily works in conjunction with Alias support in the Notes View.
This feature enables a system to be configured where a user can se lect an object (from a list of
SCADA Users in the SQL Viewer, for example) and use the Message Bus (an OpenEnterprise Menus
feature) to invoke the Notes View.
The Notes View instance will then open a new note dialog and resolve the name of the recipient that
was passed across as an alias.
2.1.6 Configure Default Recipient Dialog
Select this button, and the Configure Default Recipient Dialog will open up: -
- 3 -
Page 7

Reference Guide
w
D301502X412
April 2012
2.1.6.1 To Field
This
consists of a drop-down list and an editable text field. The drop-down list gives three options: -
• User
• Signal
• Object
In the example, User was selected.
Notes Vie
2.1.6.2 Recipient Text Field
In the editabl
end of the word).
This means the Notes View will replace the <<USER>> alias with a parameter passed to it via the
OpenEnterprise Message bus.
The name of an actual user can also be entered, in which case this configured Notes View would
automatically try to create notes only for that SCADA user each time it was opened.
e text field, an alias is typed (distinguished by the double chevrons at the beginning and
2.1.7 Create Menu
This feature invokes the Menu Editor and allows the configuration of custom menu items. See Menu
Editor Help for further information.
2.1.8 Use Sub Menu
If checked then the custom Menus items will appear under a sub-menu within the Notes context
menu, called 'Custom'.
If unchecked the OpenEnterprise Menus commands will appear as part of the main context menu.
2.2 Display Page
The Display Page enables the user to configure the type of notes that will be displayed in the saved
Notes file (with an extension of .NCD). Navigate to the other property pages by clicking on it's tab.
- 4 -
Page 8

Reference Guide
w
D301502X412
April 2012
Notes Vie
2.2.1 Current User Only
Selection of this option will display only sent or received Notes for the currently logged in user of the
Workstation. No signal or object notes will be displayed.
2.2.2 Current User and Objects
If this option is selected, the user will be able to see their own sent and received Notes plus any
object Notes having an access area within the user's operational domain.
2.2.3 Custom
Selection will open a further field into which the user should type the name of any single object within
the scope of their defined access areas.
The Notes View will only display notes for the specified signal/object. Wildcards cannot be used.
2.2.4 Background Colour
Selection of the browse button to the right of the Colour Square will open a colour selection dialog.
The user may then select an alternate colour for the background of the Notes View.
2.3 Database Page
The Database Page enables the user to specify the name of the Database that the Notes View should
connect to. Navigate to the other property pages by clicking on it's tab.
- 5 -
Page 9

Reference Guide
w
D301502X412
April 2012
Notes Vie
2.3.1 Notes Database
The user should type the name of the Database from which the Notes View instance will search for
Notes to display.
The usual Database naming conventions apply: Local Server - Workstation Installation
In this case, the Database and the Notes View will be running on the same machine, and therefore no
IP address is needed. The Database is addressed by its TCP service name or the defined TCP port
number. By default this is rtrdb1 or 11001. These values are set in the services file found in the
C:\%WinDir%\System32\Drivers\Etc directory.
Remote Standalone Installation
The Database is referred to by the remote Server's DNS name, or IP address, followed by a colon,
followed by the service name or number of the OpenEnterprise Database running on the Serv er - i.e.
oeserv1:rtrdb1. The Server's DNS name may be given an alias by using the Hosts file found in the
C:\%WinDir%\System32\Drivers\Etc directory.
Remote Redundant Servers
A Notes View connecting to redundant Servers must have the IP address of both Servers, as well as
the service name of the Database. Each Server/service combination is separated by a comma - i.e.
oeserv1:rtrdb1,oeserv2:rtrdb1.
Database Page
2.3.2 Connection Status
This non-editable field displays the connection status of the Notes View and the specified Database. If
a database is not connected, the user cannot add new notes.
2.3.3 Display Connection Status
If checked Notes View will place its database name and connection status on the OpenEnterprise
Desktop status bar when it has the focus.
- 6 -
Page 10
Reference Guide
w
D301502X412
April 2012
Notes Vie
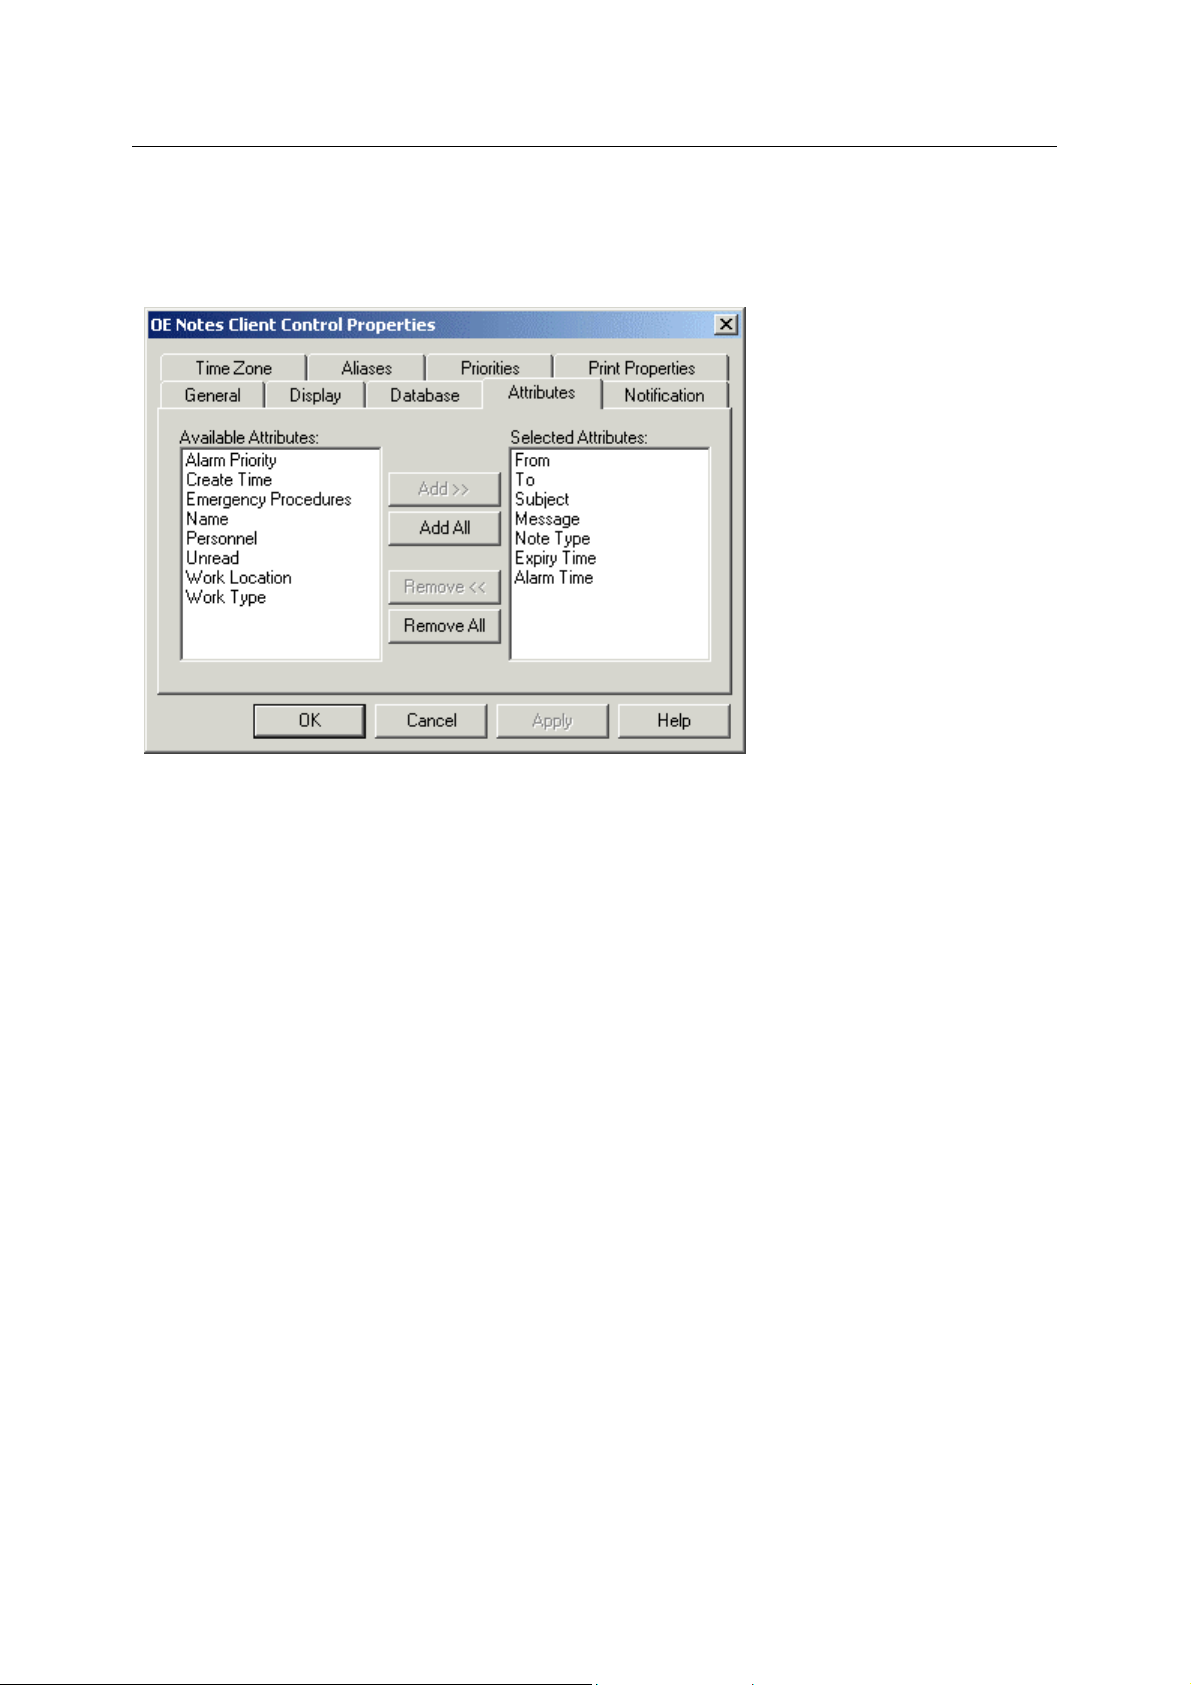
2.4 Attributes Page
The Attributes Page enables the user to configure the attributes that will appear in the Notes View
window. Navigate to the other property pages by clicking on it's tab.
2.4.1 Available Attributes
This is a list of all the available attributes for inclusion within the Notes View window.
2.4.2 Selected Attributes
This is the list of attributes that have been selected for inclusion in the Notes View window.
2.4.3 Add Attribute Button
Selection of this button will place any selected attributes into the Selected Attributes list. The button is
only enabled once a selection has been made from the Available Attributes list.
2.4.4 Add All Button
This button will move every attribute from the Available Attributes list to the Selected Attributes list.
2.4.5 Remove Attribute Button
When selected, any attributes highlighted within the Selected Attributes list will be removed and
replaced back in the Available Attributes list.
2.4.6 Remove All Button
Selection of this button will remove all attributes from the Selected Attributes list and replace them
back in the Available Attributes list.
2.5 Notification Page
The Notification Page enables the user to configure notification of messages. When the user receives
a new note a message box and/or a sound can be played. Navigate to the other property pages by
clicking on it's tab.
- 7 -
Page 11

Reference Guide
w
D301502X412
April 2012
Notes Vie
2.5.1 Play Sound
If this box is checked, then the Sound File field and browse button will become enabled.
2.5.2 Sound File
The user should either type in the full pathname of the sound file to be used (it must be a *.wav file),
or use the browse button to select a .wav file on the local computer.
If the Notes View cannot find the file, or there is no sound card installed in the Workstation computer it
will provide a system beep when a new note arrives addressed to the currently logged in user.
2.5.3 Output Message Box
When this box is checked the Message field becomes enabled.
2.5.4 Message
The user can type in a message that will pop up on the computer screen when an Notes message is
received for the logged in user.
Note: The notification is only handled when the Note received is to the currently logged on user.
There will not be notification when an object/signal Note arrives.
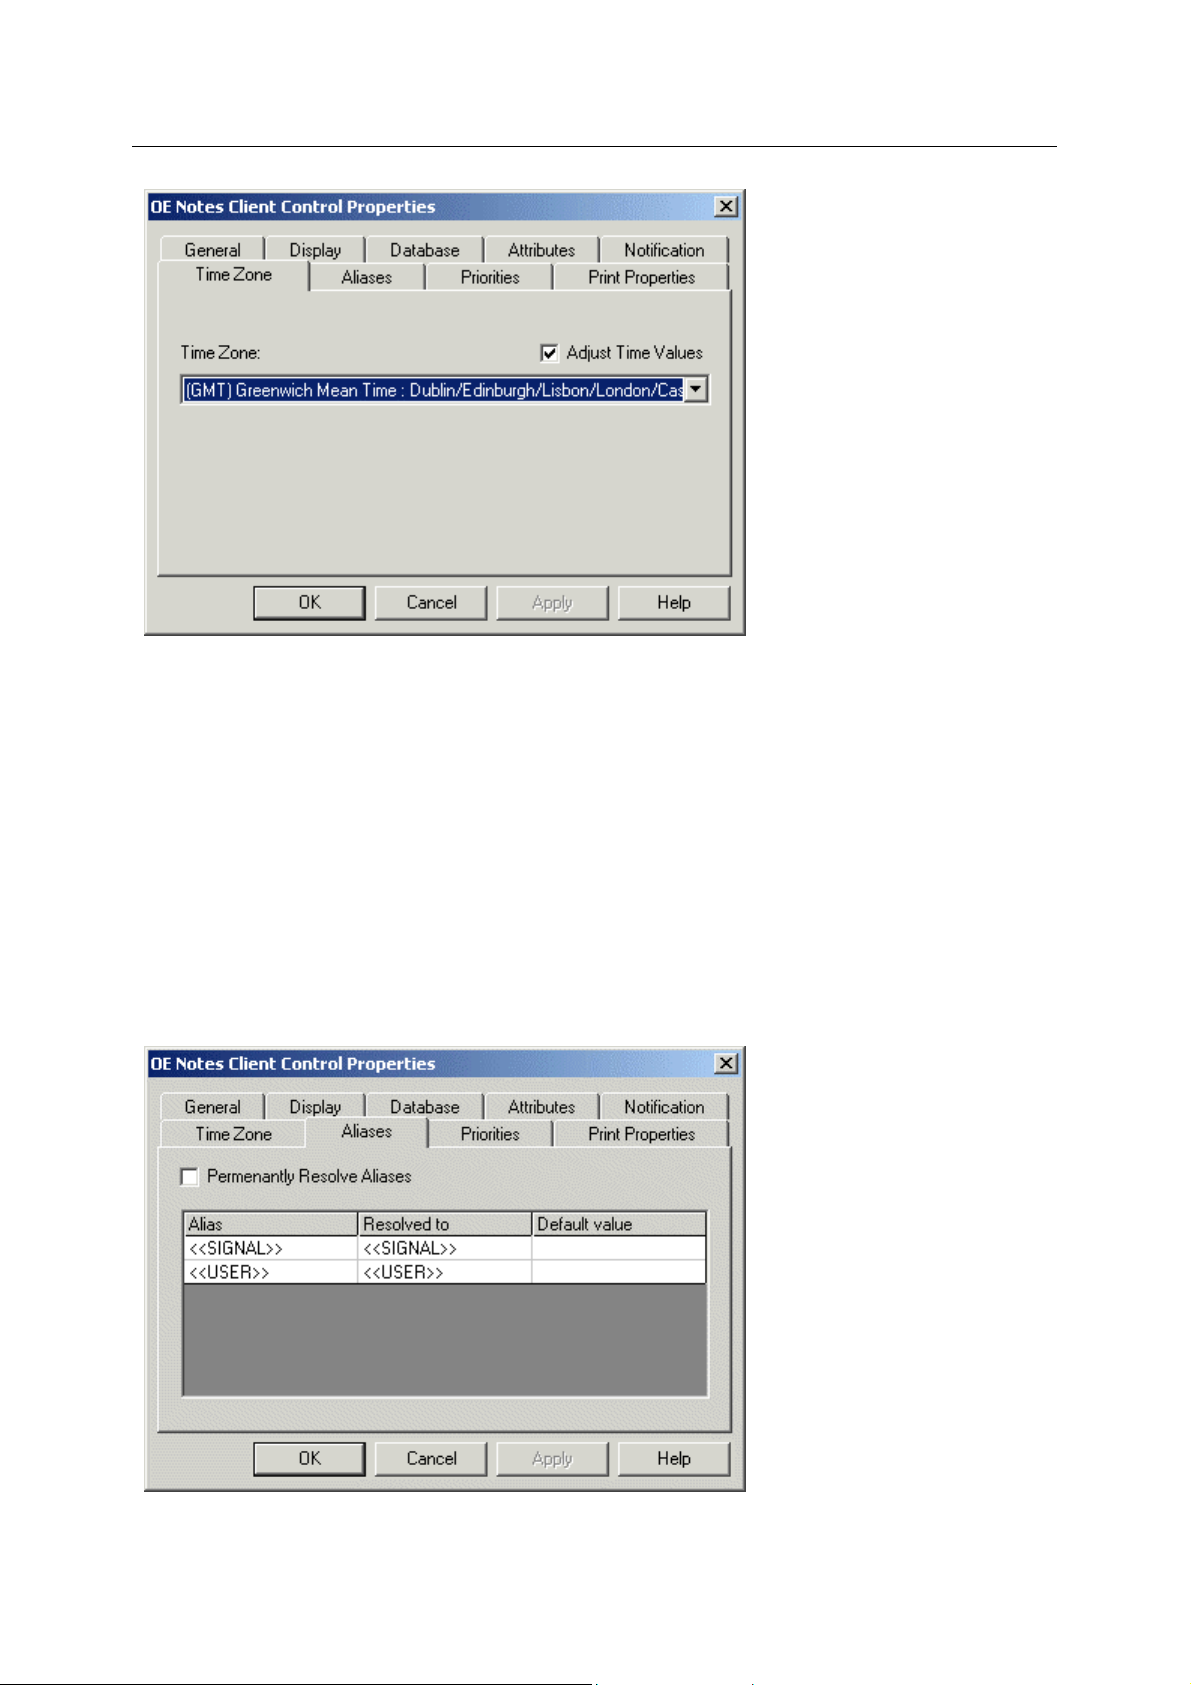
2.6 TimeZone Page
The TimeZone Page enables the user to change the time zone of the saved Notes View file. All times
will be shown in the time of the selected Time Zone. Navigate to the other property pages by clicking
on it's tab.
- 8 -
Page 12
Reference Guide
w
D301502X412
April 2012
Notes Vie
2.6.1 Adjust Time Zone
When this is checked the 'Time Zone' drop down list becomes enabled, and the user can select a new
time zone for the Notes View.
2.6.2 Time Zone
This is a drop down list of all time zones. The default time zone for all Views is the physical time zone
for which the Workstation is configured.
2.7 Aliases Page
The Aliases Page summarizes all of the aliases that are currently being used in the Notes View, and
what they are currently resolved to. It allows the user to set a default value for each alias. Any edit
box on the Property Pages of the Notes View supports Aliases (text strings enclosed in '<<' and '>>').
Navigate to the other property pages by clicking on it's tab.
- 9 -
Page 13
Reference Guide
w
D301502X412
April 2012
Notes Vie
2.7.1 Permanently Resolve Aliases
If checked, this will cause all the configuration options that contain aliases and are currently resolved
to a value to be saved in a resolved state when the file is next saved.
2.7.2 Alias
This is the alias as it is specified on any of the edit fields within the Notes Property Pages.
2.7.3 Resolved To
This is the current value that the alias is resolved to, if any.
2.7.4 Default Value
A default value can be specified here. The default value will be overriden by any parameters matching
the alias names sent in via the OpenEnterpise Message Bus (i.e from an Menu command on another
View).
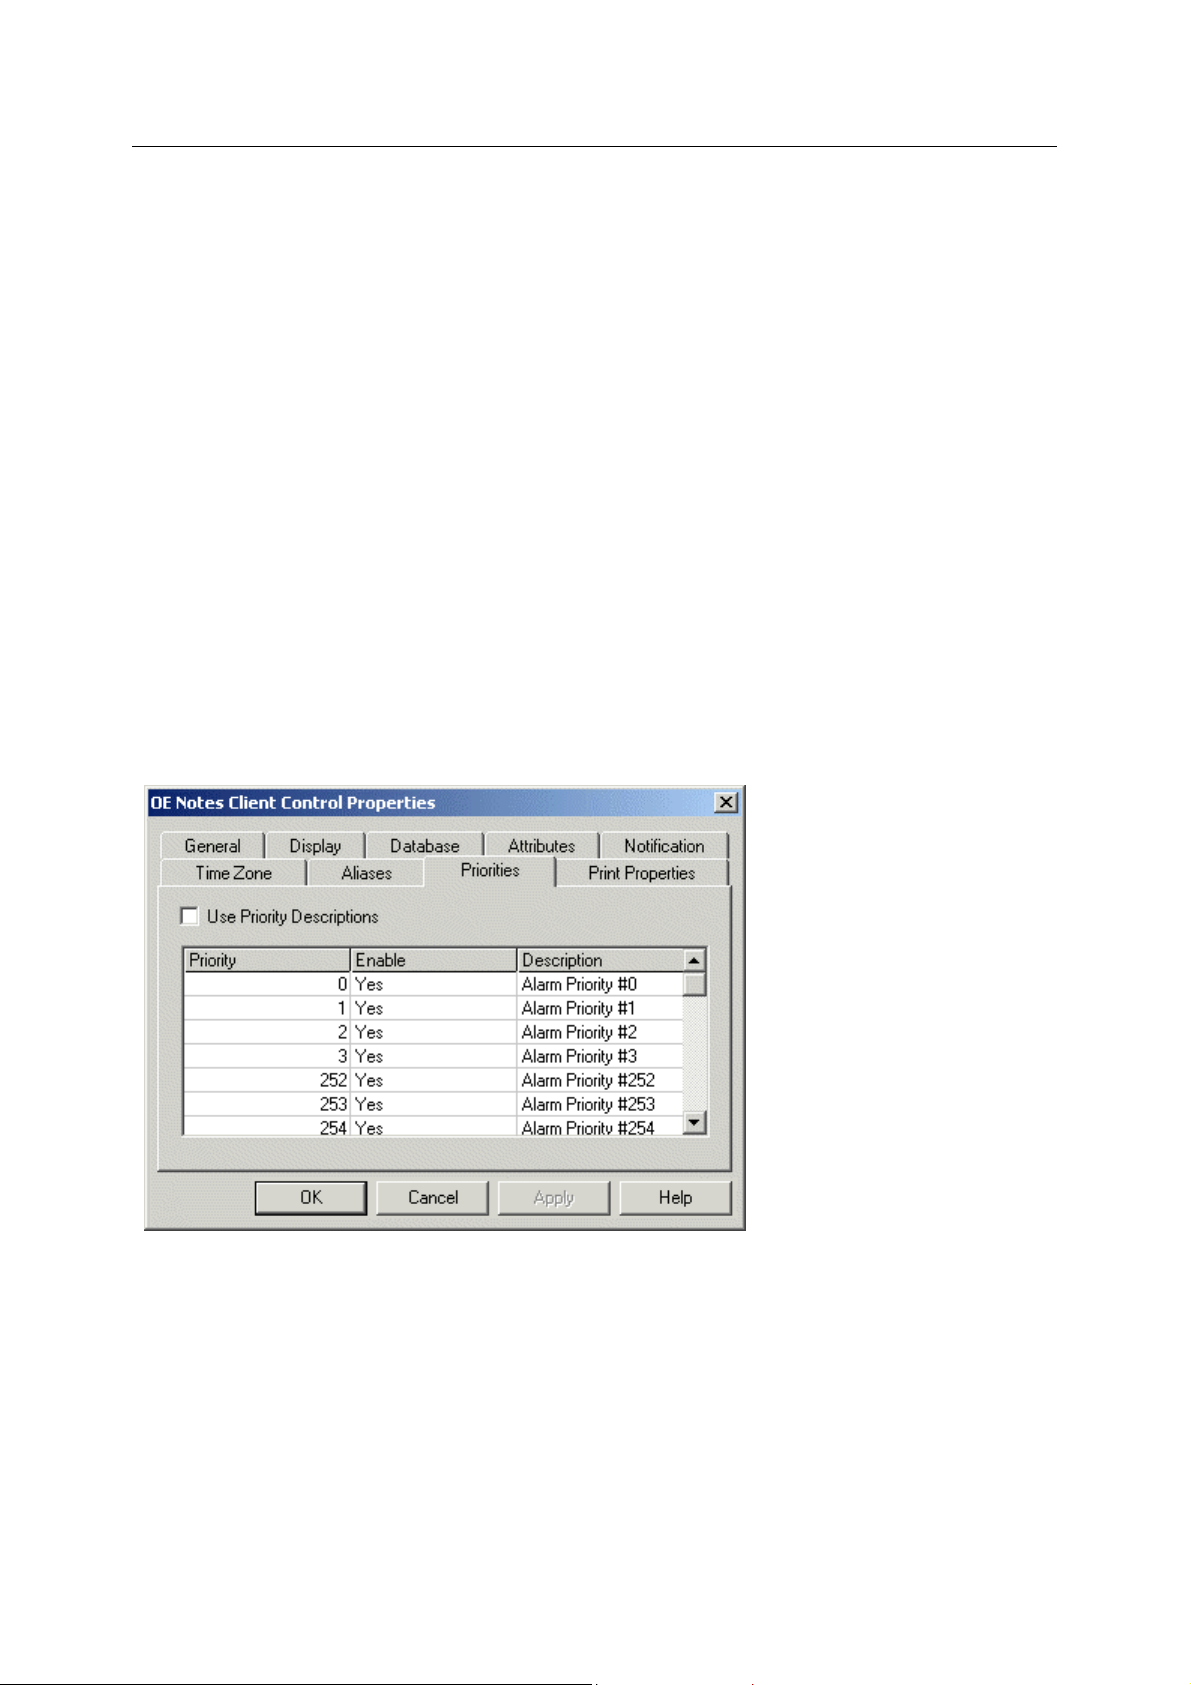
2.8 Priorities Page
The Priorities Page allows the user to disable any priorities that they do not wish to be present in the
Priority Selection dialog window when adding a new Alarmed Note. It also allows the user to change
any alarm priority description as it is shown in the Priority Selection window from the Notes View.
Navigate to the other property pages by clicking on it's tab.
2.8.1 Use Priority Descriptions
By default, the Notes View will detail a list of the priority numbers when selecting a priority for an
Alarmed Note as shown below.
- 10 -
Page 14

Reference Guide
w
D301502X412
April 2012
To configure the Notes View to show the user instead a list of the priority descriptions, check the 'Use
Priority Descriptions' Check Box. This will cause the alarm priority descriptions to be displayed in the
Priority Selection box.
Notes Vie
If the description attribute of an alarm priority is blank, the priority number will be used.
2.8.2 Priority
This is the alarm priority.
2.8.3 Enable
If a priority is disabled, it will not appear as a priority when configuring an Alarmed Note. To disable a
priority, click on the 'Enabled' column on the relevant row and select 'No' from the combo box.
2.8.4 Description
This field allows the user to change the priority description that is used by the 'Priority Selection'
dialog when configuring an Alarmed Note. By selecting the description cell on the grid, user defined
priority descriptions can be configured.
The descriptions created on this page do not update the descriptions in the Database. However, they
are stored in the .ncd file when the Notes View is saved. They then act as a local override of the
priority description text found in the database.
If the user has overridden a priority description but wishes to revert back to the database value for the
description, then the description text needs to be set blank and the [OK] button selected. On return to
the property page, the description will have reverted back to the database value.
- 11 -
Page 15

Reference Guide
w
D301502X412
April 2012
Notes Vie
3 Runtime
When a saved Notes View file is loaded into a window within the Desktop in runtime mode, it has a
context menu which enables the user to create, modify, view, forward, delete and print the displayed
notes.
3.1 Modify Note Dialog
The Note Details dialog is presented with the Subject and Text fields editable for modification. See
the Create Note Dialog Details Page and the Type Page topics for information on the fields on the
Details and Type tabs.
- 12 -
Page 16

Reference Guide
w
D301502X412
April 2012
Notes Vie
3.2 Forward Note
A note can also be forwarded to one or more other recipients. The Note Details dialog is displayed,
enabling the user to change text and select a forwarding recipient.
3.3 View Note Dialog
The Note Detail dialog is presented for viewing. The fields are disabled, so no editing can take place.
- 13 -
Page 17

Reference Guide
w
D301502X412
April 2012
Notes Vie
3.4 Delete Note
Select one or more notes from the notes list and remove them by selecting this option from the
context menu.
3.5 Create Note - Details Page
When the 'New Note' option is selected, the Note Detail page appears. This allows the user to create
a new note.
- 14 -
Page 18

Reference Guide
w
D301502X412
April 2012
Notes Vie
3.5.1 From
This non-editable field displays the currently logged in user.
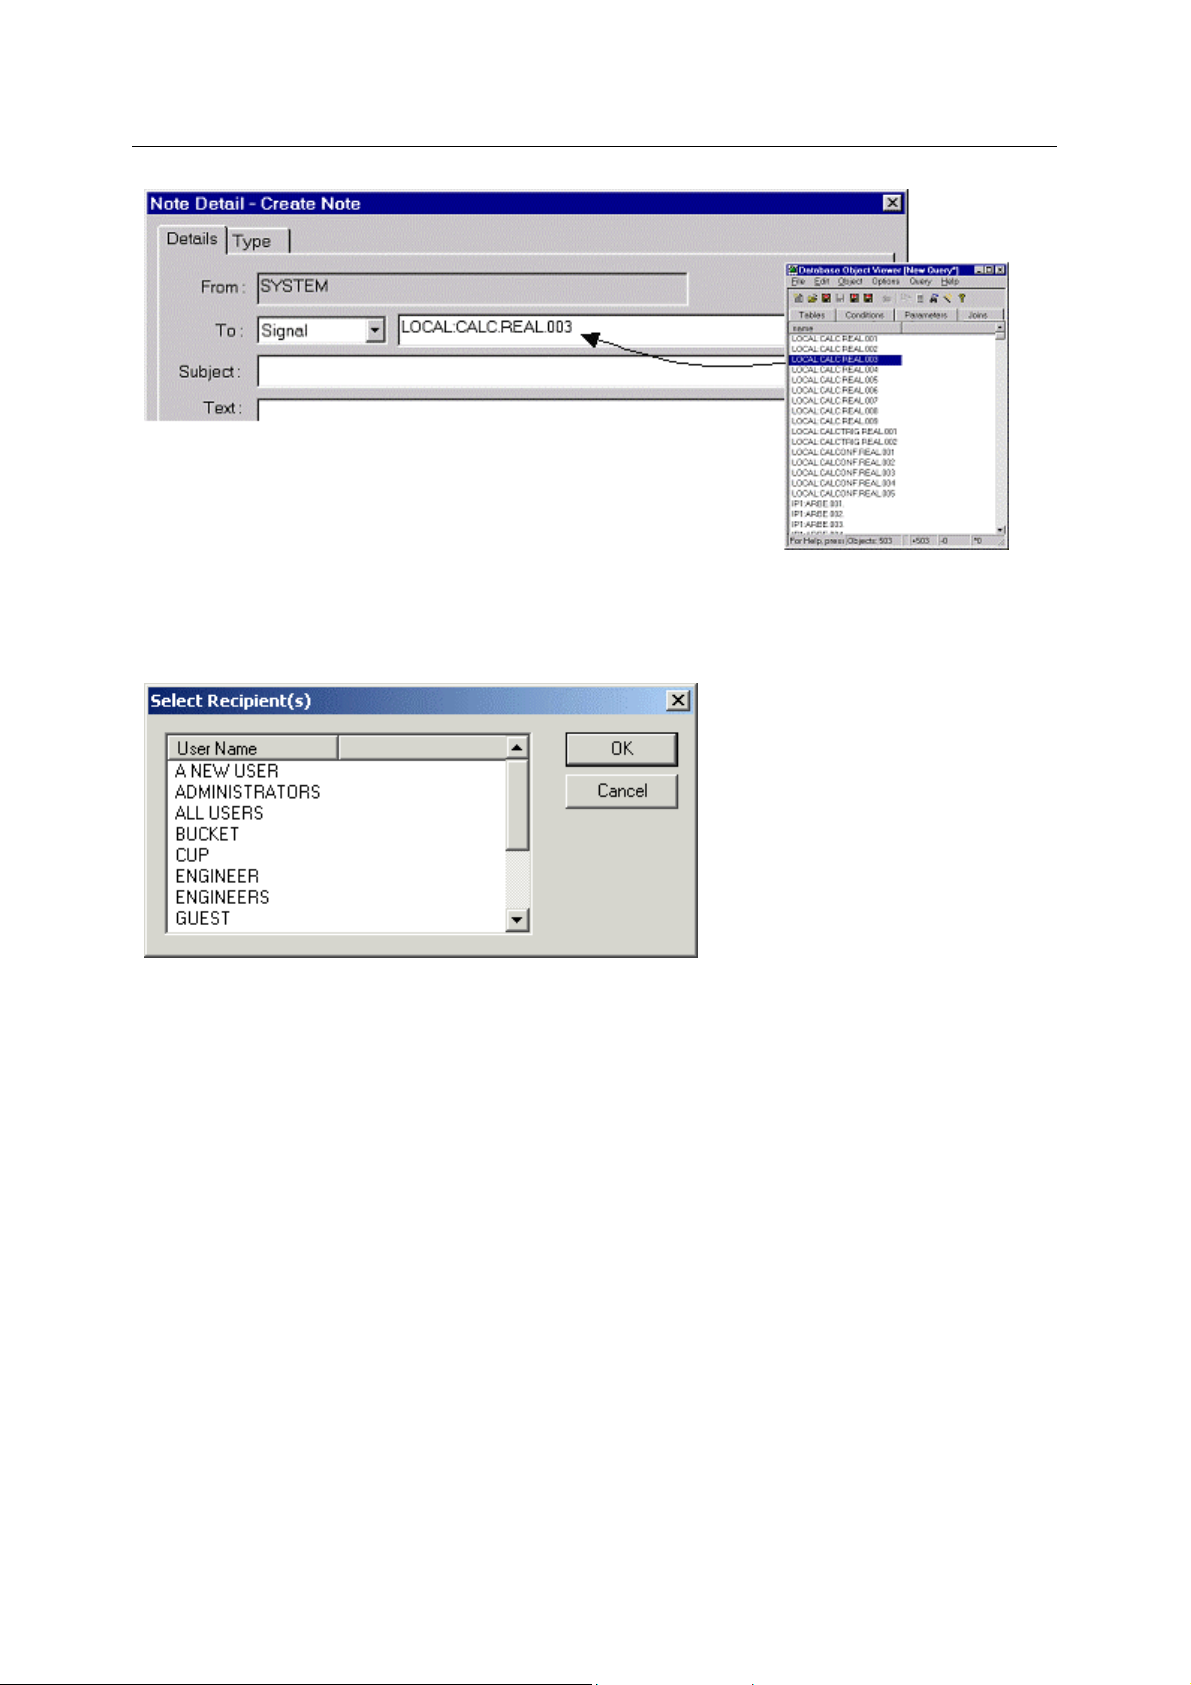
3.5.2 To
To set the recipient of a note, the user must first select the type of recipient from the list, shown
below.
3.5.3 Recipient Field
The Recipient field is non-editable if User has been chosen as the recipient, since the Select
Recipients dialog is presented for the user to select a recipient.
If, however, Signal or Object has been chosen as the recipient of the note, the field becomes editable.
In this case, a signal or object can be dragged and dropped from the Database Object View into this
field, as shown below. Wildcards cannot be used.
- 15 -
Page 19
Reference Guide
w
D301502X412
April 2012
Notes Vie
3.5.4 Select Recipient Dialog
This dialog enables the user to select a single or multiple users from the list as recipients of the new
note.
3.5.5 Subject
The user must enter a subject before the note can be sent.
3.5.6 Text
The message text should be typed in here.
3.6 Create Note - Type Page
The Type page allows the user to select and configure a note type other than the default 'Standard
Note'. Navigate to the 'Type' dialog by clicking on it's tab.
- 16 -
Page 20

Reference Guide
w
D301502X412
April 2012
Notes Vie
3.6.1 Standard Note
This is the default selection. A Standard Note requires no further configuration than to have a
recipient and a subject or message.
3.6.2 Expiring Note
An Expiring Note is a Note that is automatically deleted at a time configured by its creator.
Selection of the browse button to the right of the Expiry: field will display the Date/Time Configuration
dialog, which enables the time of the Note's deletion to be configured.
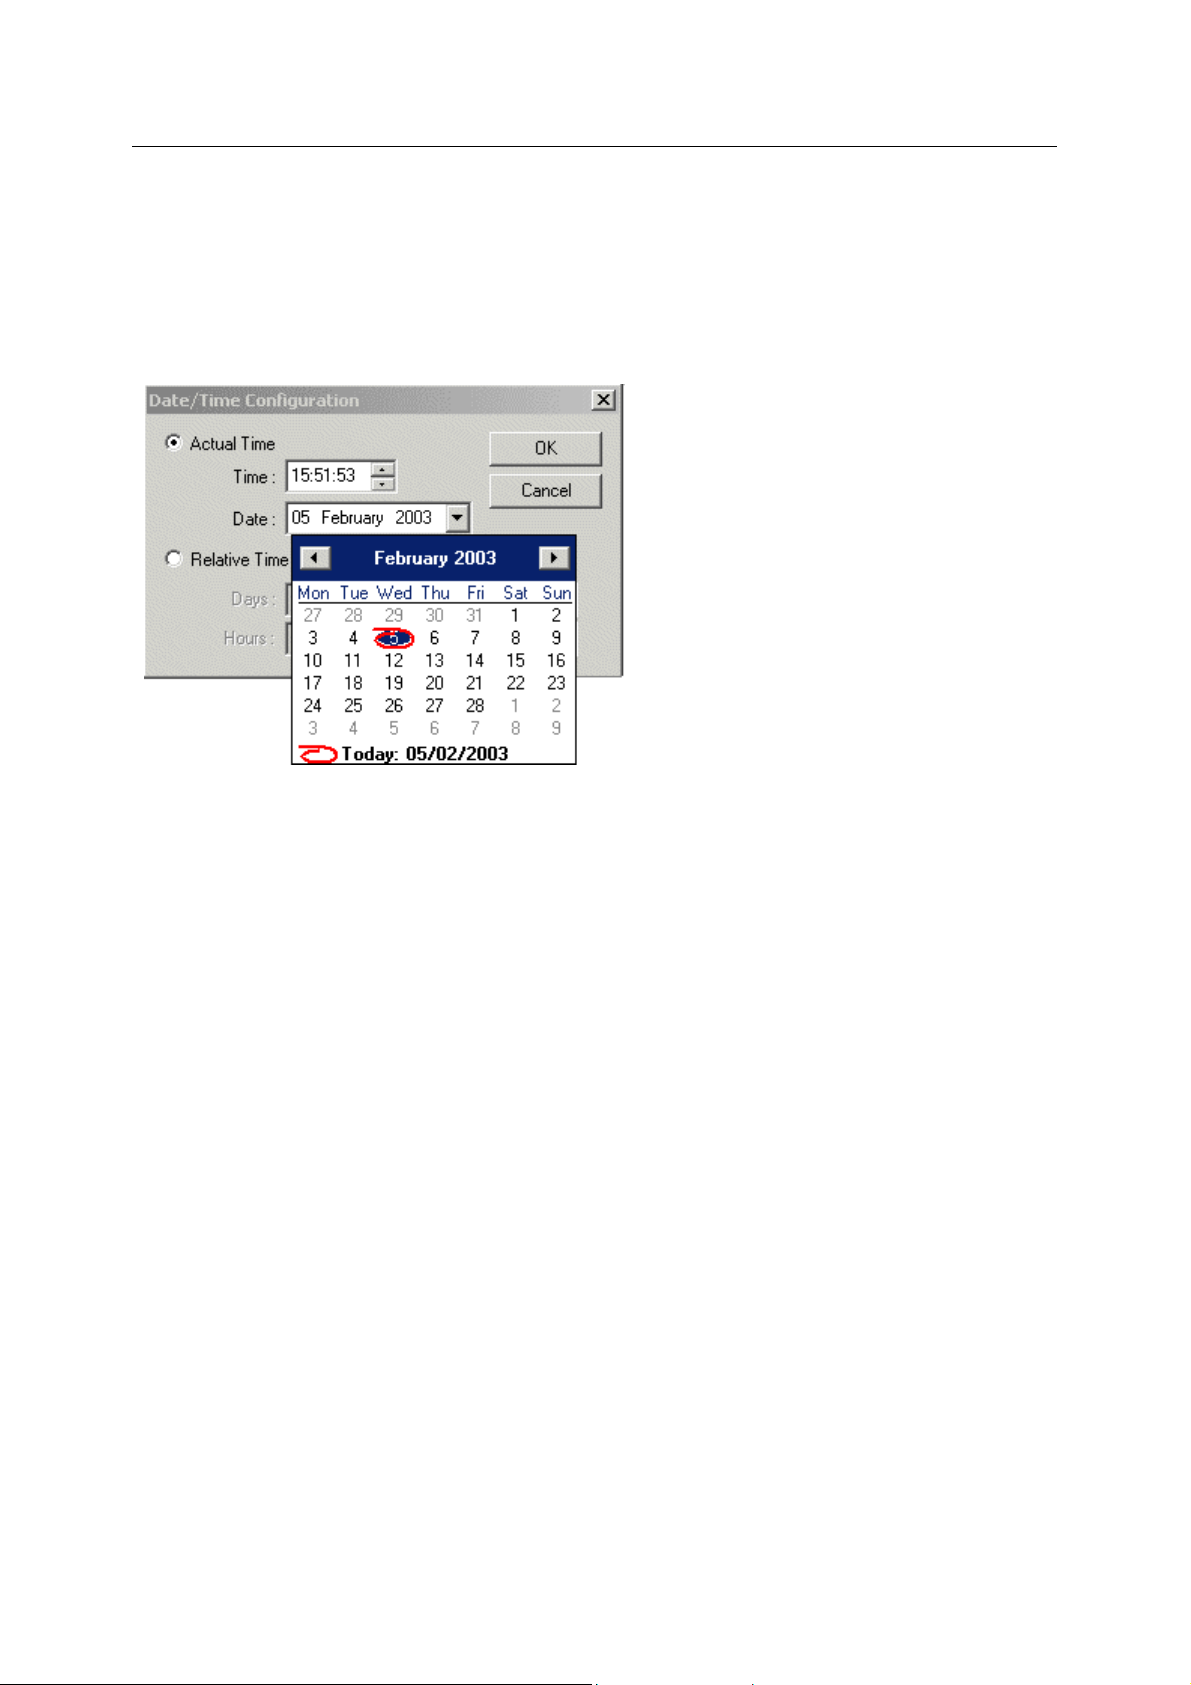
3.6.2.1 Date Time Configuration Dialog
This dial
time when a Notes alarm will be generated for an Alarmed Note.
og enables the user to configure the time at which an Expiring Note will be deleted, or the
- 17 -
Page 21

Reference Guide
w
D301502X412
April 2012
3.6.2.1.1 Actual Time
Notes Vie
If checked, th
for either the deletion of an Expiry Note, or the generation of a Note alarm for an Alarmed Note.
3.6.2.1.2 Time
With the mou
value.
3.6.2.1.3 Date
n this field is selected a calendar is displayed for selection of a new date.
Whe
e Time and Date fields are enabled ready for the user to select an exact time and date
se highlight the hours, minutes or seconds and use the spin controls to change the
3.6.2.1.4 Relative Time
Whe
n this button is selected, the Day, Hours, Minutes and Seconds fields become enabled. Expiry
Notes will expire at the configured time relative to the creation of the Note, and Note alarms will be
generated at a time relative to the creation of an Alarmed Note.
3.6.2.1.5 Set Relative Time Fields
These button
note will become expired (deleted), or when a Note alarm will be generated (in the case of an
Alarmed Note).
s enable the user to configure a time relative to the creation of the note when either the
- 18 -
Page 22

Reference Guide
w
D301502X412
April 2012
Notes Vie
3.6.3 Alarmed Note
An Alarmed Note is a note that triggers an alarm at a time and with a priority configured by its creator.
The alarm time and alarm prioriy configuration are done with the aid of the Date Time Configuration
Dialog and Priority Selection Dialog, which are accessed by clicking on the browse buttons to the right
of the Alarm Time and Alarm Priority fields.
When this option is selected the Alarm Time, Alarm Priority, Work Location, Work Type, Personnel
and Emergency Procedures fields become enabled. Click the hotspots on the image for help on the
features of the dialog.
3.6.3.1 Alarm Time Field
The Alarm Ti
to the right, which invokes the Date Time Configuration Dialog.
The time displayed when the Type Page is first selected is the time when the dialog was opened.
3.6.3.2 Date Time Configuration Dialog
This dial
time when a Notes alarm will be generated for an Alarmed Note.
me Field is not directly editable. It has to be configured by clicking on the browse button
og enables the user to configure the time at which an Expiring Note will be deleted, or the
3.6.3.2.1 Actual Time
If checked, th
for either the deletion of an Expiry Note, or the generation of a Note alarm for an Alarmed Note.
e Time and Date fields are enabled ready for the user to select an exact time and date
- 19 -
Page 23
Reference Guide
w
D301502X412
April 2012
3.6.3.2.2 Time
Notes Vie
With the mou
value.
3.6.3.2.3 Date
n this field is selected a calendar is displayed for selection of a new date.
Whe
3.6.3.2.4 Relative Time
se highlight the hours, minutes or seconds and use the spin controls to change the
Whe
n this button is selected, the Day, Hours, Minutes and Seconds fields become enabled. Expiry
Notes will expire at the configured time relative to the creation of the Note, and Note alarms will be
generated at a time relative to the creation of an Alarmed Note.
3.6.3.2.5 Set Relative Time Fields
These button
note will become expired (deleted), or when a Note alarm will be generated (in the case of an
Alarmed Note).
3.6.3.3 Additional Text Fields
These fields
extra information along with the Note.
3.6.3.4 Alarm Priority Field
The Alarm Pri
priority for the Alarmed Note has been configured. An Alarmed Note must have a priority configured.
This is done through the Priority Selection Dialog, which is invoked by clicking on the browse button
to the right of this field.
If the [OK] or [Apply] button is selected before a priority has been configured a message will appear
informing the user to configured an alarm priority. The dialog will remain in focus.
3.6.3.5 Priority Selection Dialog
s enable the user to configure a time relative to the creation of the note when either the
become enabled for an Alarmed Note. They are free text fields that can be used to store
ority field is not directly editable. A value of minus one (-1) indicates that no alarm
rowse button opens the Priority Selection Dialog. The user must select an alarm priority value,
This b
or the Alarmed Note will not be added to the Database.
- 20 -
Page 24

Reference Guide
w
D301502X412
April 2012
Notes View has two ways of handling alarm priorities. Depending on how the Notes View is
configured on the Priorities Page the priority field will either be a number or a text description of the
priority.
3.6.3.5.1.1 Priority Numbers Displayed
3.6.3.5.1.2 Priority Descriptions Displayed
Notes Vie
3.7 Print All Notes
If this option is chosen, all notes will be printed in Memo style, each note on a different page.
3.8 Print Selected Notes
If this option is chosen, only the selected notes will be printed. OpenEnterprise will use the printer
settings from the Print Properties Page, using foreground and background colors, headers and
footers.
- 21 -
Page 25

Reference Guide
w
D301502X412
April 2012
4 Index
1
A
Actual Time ................................................ 20, 21
Add All Button .................................................. 10
Add Attribute Button........................................... 9
Alarmed Note................................................... 20
Alias.................................................................. 12
Attributes Page................................................... 9
C
Create Menu ...................................................... 7
Create Note Dialog Details Page..................... 16
Custom............................................................... 7
D
Database Page .................................................. 8
Default Value.................................................... 12
Delete Note...................................................... 16
F
Field.................................................................... 6
M
Modify Note Dialog........................................... 14
N
Notes.................................................................. 6
Notes Overview.................................................. 4
O
Output Message Box........................................ 10
Notes Vie
P
Print All Notes...................................................23
Print Selected Notes.........................................23
Priorities Page...................................................12
Priority...............................................................13
R
Recipient Text Field............................................6
Remove All Button............................................10
Runtime Context Menu.....................................14
S
Set Relative Time Fields.............................20, 22
Silence................................................................6
Sound File.........................................................10
Subject..............................................................18
T
Time............................................................20, 21
Time Zone.........................................................11
TimeZone Page ................................................11
U
Use Priority Descriptions ..................................13
V
View Note Dialog ..............................................15
W
Warning on Removal ..........................................6
- 22 -
Page 26

Page 27

Reference Guide
D301502X412
April 2012
DISCLAIMER
Bristol, Inc., Bristol Babcock Ltd, Bristol Canada, BBI SA de CV and the Flow Computer Division , are wholly owned subsidiaries of Emerson Electric Co. doing business
as Remote Automation Solutions (“RAS”), a division of Emerson Process Management. ROC, FloBoss, ROCLINK, Bristol, Bristol Babcock, ControlWave, TeleFlow and
Helicoid are trademarks of RAS. AMS, PlantWeb and the PlantWeb logo are marks of Emerson Electric Co. The Emerson logo is a trademark and service mark of the
Emerson Electric Co. All other marks are property of their respective owners.
The contents of this publication are presented for informational purposes only. While every effort has been made to ensure informational accuracy, they are not to be
construed as warranties or guarantees, express or implied, regarding the products or services described herein or their use or applicability. RAS reserves the right to
modify or improve the designs or specifications of such products at any time without notice. All sales are governed by RAS’ terms and conditions which are available upon
request. RAS does not assume responsibility for the selection, use or maintenance of any product. Responsibility for proper selection, us e and maintenance of any RAS
product remains solely with the purchaser and end-user.
Engineered and supported by:
Remote Automation Solutions,
Blackpole Road, Worcester, WR3 8YB, UK
Registered office: Meridian East, Leicester, LE19 1UX
Registered in England and Wales, Registration No. 00671801
VAT Reg No. GB 705 353 652
Emerson Process Management
Remote Automation Solutions
1100 Buckingham St
Watertown, CT 06795
T 1 (860) 945 2200
F 1 (860) 945 2278
www.EmersonProcess.com/Remote
binfo@EmersonProcess.com
© 2001-2012 Remote Automation Solutions, division of Emerson Process Management. All rights
reserved.
Emerson Process Management
Remote Automation Solutions
Blackpole Road
Worcester, WR3 8YB
T 44 (0) 1905 856848
F 44 (0) 1905 856930
www.EmersonProcess.com/Remote
oedsupport@EmersonProcess.com
 Loading...