

Remote Automation Solutions Guide: OpenEnterprise Messaging Config Tool Reference Guide Manuals & Guides
Page 1

Reference Guide
D301499X412
April 2012
OpenEnterprise Messaging Config Tool
Reference Guide (V2.83)
Remote Automation Solutions
Website: www.EmersonProcess.com/Remote
Page 2

Reference Guide
D301499X412
April 2012
Messaging Config Tool
Contents
1 Messaging Configuration .......................................................................................................1
1.1 Adding, Deleting and Modifying Objects.............................................................................1
1.1.1 Context Menus .............................................................................................................1
1.1.1.1 Create a new object...............................................................................................1
1.1.1.2 Delete the selected object......................................................................................1
1.1.2 Properties Pane............................................................................................................1
2 Recipient View .........................................................................................................................1
2.1 Recipient Tree View Pane ..................................................................................................2
2.1.1 Recipient Groups..........................................................................................................2
2.1.2 Email Recipients...........................................................................................................2
2.1.3 Pager Recipient............................................................................................................2
2.1.4 Message Formats.........................................................................................................3
2.1.5 Page Formats...............................................................................................................3
2.1.6 Telephony Details.........................................................................................................3
2.2 Recipient Properties Pane ..................................................................................................3
2.2.1 Recipient Group Properties..........................................................................................3
2.2.1.1 Recipient Group Name ..........................................................................................4
2.2.1.2 Recipient Group Description..................................................................................4
2.2.2 Mail Recipient Properties..............................................................................................4
2.2.2.1 Mail Recipient Name..............................................................................................4
2.2.2.2 E-mail Address.......................................................................................................5
2.2.2.3 Mail Recipient Description ..................................................................................... 5
2.2.2.4 Ack Key..................................................................................................................5
2.2.2.4.1 Acknowledging Alarm s using the Ack Key.......................................................5
2.2.2.5 Ack Mode ...............................................................................................................6
2.2.2.6 Override .................................................................................................................6
2.2.2.7 User........................................................................................................................6
2.2.2.8 Pattern Group.........................................................................................................6
2.2.2.9 Time Zone..............................................................................................................6
2.2.2.10 Disable..................................................................................................................7
2.2.3 Message Format Properties.........................................................................................7
2.2.3.1 Mail Format Name..................................................................................................7
2.2.3.2 Subject ...................................................................................................................7
2.2.3.3 Body.......................................................................................................................7
2.2.4 Page Recipient Properties............................................................................................7
2.2.4.1 Page Recipient Name............................................................................................8
2.2.5 Page Format Properties ...............................................................................................8
2.2.5.1 Page Format Name................................................................................................8
2.2.5.2 Paging Message ....................................................................................................8
2.2.5.3 Pre-Send Delay......................................................................................................8
2.2.5.4 Post-Send Delay....................................................................................................8
2.2.6 Telephony Details Properties .......................................................................................9
2.2.6.1 Telephony Format Name .......................................................................................9
2.2.6.2 Telephony Format Description...............................................................................9
2.2.6.3 Pre-Dial Delay........................................................................................................9
2.2.6.4 Outside Line Access Number ................................................................................9
- i -
Page 3

Reference Guide
D301499X412
April 2012
Messaging Config Tool
2.2.6.5
2.2.6.6 Main Number........................................................................................................10
2.2.6.7 Post-Connect Delay.............................................................................................10
2.2.6.8 Pre-Disconnect Delay ..........................................................................................10
2.2.6.9 Connection Loss Redial Attempts........................................................................10
2.2.6.10 Connection Loss Redial Delay............................................................................10
3 Routines View........................................................................................................................10
3.1 Routines Tree View Pane .................................................................................................11
3.1.1 Messaging Routine.....................................................................................................11
3.1.2 Pattern Groups ...........................................................................................................11
3.1.3 Alarm Patterns............................................................................................................11
3.1.4 Action Group...............................................................................................................11
3.1.5 Action and Next Action...............................................................................................11
3.1.6 Delay...........................................................................................................................12
3.1.7 Repeat........................................................................................................................12
3.1.8 Recipient Groups........................................................................................................12
3.1.9 Email Recipients.........................................................................................................12
3.1.10 Pager Recipient.......................................................................................................12
3.2 Routine Properties Pane...................................................................................................12
3.2.1 Messaging Routine Properties ...................................................................................12
3.2.1.1 Messaging Routine Name....................................................................................13
3.2.1.2 Messaging Routine Description ...........................................................................13
3.2.1.3 Disable All New Actions.......................................................................................13
3.2.1.4 Disable All Actions ...............................................................................................13
3.2.2 Pattern Group Properties............................................................................................13
3.2.2.1 Pattern Group Name............................................................................................14
3.2.2.2 Pattern Group Description ...................................................................................14
3.2.3 Alarm Pattern Properties............................................................................................14
3.2.3.1 Alarm Pattern Name.............................................................................................15
3.2.3.2 Alarm Pattern Description....................................................................................15
3.2.3.3 Device Name........................................................................................................15
3.2.3.4 Object Name ........................................................................................................15
3.2.3.5 Base.....................................................................................................................15
3.2.3.6 Extension .............................................................................................................16
3.2.3.7 Attribute................................................................................................................16
3.2.3.8 Priority..................................................................................................................16
3.2.3.9 Condition..............................................................................................................16
3.2.3.10 Access Area........................................................................................................16
3.2.3.11 Plant Area...........................................................................................................16
3.2.3.12 Trigger Action When Alarm Clears.....................................................................16
3.2.4 Delay Properties.........................................................................................................16
3.2.4.1 Days.....................................................................................................................17
3.2.4.2 Hours....................................................................................................................17
3.2.4.3 Minutes.................................................................................................................17
3.2.5 Repeat Properties.......................................................................................................17
3.2.5.1 Forever.................................................................................................................17
3.2.5.2 Do Not Repeat .....................................................................................................17
3.2.5.3 Repeat Times.......................................................................................................17
Main Pre-Dial Delay...............................................................................................9
- ii -
Page 4

Reference Guide
D301499X412
April 2012
Menus .....................................................................................................................................17
4
4.1 File Menu ..........................................................................................................................18
4.1.1 New Connection.........................................................................................................18
4.1.2 Close Connection.......................................................................................................18
4.1.3 Export to File...............................................................................................................19
4.1.4 Send Configuration to Database ................................................................................ 19
4.1.5 Exit..............................................................................................................................19
4.1.5.1 Save Changes Before Exit...................................................................................19
4.1.5.2 Exit Without Saving Changes ..............................................................................19
4.2 View Menu ........................................................................................................................19
4.2.1 Toggle Toolbar ...........................................................................................................20
4.2.2 Toggle Status Bar.......................................................................................................20
4.2.3 Split Window Modification...........................................................................................20
4.2.4 Options .......................................................................................................................20
4.2.5 Options Dialog Connection Tab..................................................................................20
4.2.5.1 Initial Database Enable........................................................................................21
4.2.5.2 Initial Database Connection.................................................................................21
4.2.5.3 Output File Tab ....................................................................................................21
4.2.5.3.1 Output File Name............................................................................................21
4.2.5.3.2 Browse Button................................................................................................22
4.2.5.4 Colors Tab............................................................................................................22
4.2.5.4.1 Enable Tree view Background Color..............................................................22
4.2.5.4.2 Color Palette...................................................................................................22
4.2.5.5 Validation Tab ......................................................................................................22
4.2.5.5.1 Blank Email Addresses...................................................................................23
4.2.5.5.2 Duplicate Email Addresses.............................................................................23
4.2.5.5.3 Missing Mail Format References....................................................................23
4.2.5.6 Signal Tag Tab.....................................................................................................23
4.2.5.6.1 Signal Tag File Location.................................................................................24
4.2.5.6.2 Signal Tag File Browse Button.......................................................................24
4.2.6 View By Messaging Routine.......................................................................................24
4.2.7 View By Recipient Groups..........................................................................................24
4.2.8 Expand Tree (1 Level)................................................................................................24
4.2.9 Collapse Tree (1 Level)..............................................................................................24
4.3 Window Menu ...................................................................................................................25
4.3.1 Cascade......................................................................................................................25
4.3.2 Tile..............................................................................................................................25
4.3.3 Arrange Icons .............................................................................................................26
4.3.4 Currently Open Windows............................................................................................26
4.4 Help Menu.........................................................................................................................26
4.4.1 About box....................................................................................................................26
4.4.2 Messaging Config Help File........................................................................................26
Messaging Config Tool
5 Toolbar....................................................................................................................................26
5.1 New Connection................................................................................................................27
5.2 Add Recipient Group.........................................................................................................27
5.3 Create New Messaging Routine .......................................................................................27
5.4 Send Configuration to Database.......................................................................................27
5.5 Export to File.....................................................................................................................28
- iii -
Page 5

Reference Guide
D301499X412
April 2012
View By Recipient Groups ................................................................................................28
5.6
5.7 View By Messaging Routine .............................................................................................28
5.8 Collapse Tree (1 Level).....................................................................................................28
5.9 Expand Tree (1 Level).......................................................................................................28
5.10 About box.......................................................................................................................28
6 Context Menus.......................................................................................................................28
6.1 Recipient View Context Menu...........................................................................................29
6.1.1 Add Recipient Group..................................................................................................29
6.2 Recipient Group Context Menu.........................................................................................29
6.2.1 Add Recipient Sub-menu............................................................................................29
6.2.1.1 Add E-mail Recipient............................................................................................30
6.2.1.2 Add Pager Recipient............................................................................................30
6.2.2 Permanently Delete Group.........................................................................................30
6.2.3 SQL Sub Menu...........................................................................................................30
6.2.3.1 SQL Copy to Clipboard........................................................................................30
6.2.3.2 Show SQL Dialog.................................................................................................30
6.2.4 Context Menu Help.....................................................................................................30
6.2.5 Recipient Group Property Dialog................................................................................ 30
6.2.5.1 Recipient Group Name ........................................................................................31
6.2.5.2 Recipient Group Description................................................................................31
6.3 Mail Recipient Context Menu............................................................................................31
6.3.1 Remove Recipient from Group...................................................................................31
6.3.2 Permantently Delete Recipient...................................................................................31
6.3.3 Add Mail Format.........................................................................................................31
6.3.4 Disable Page Delivery................................................................................................32
6.3.5 Disable All Page Deliveries ........................................................................................32
6.3.6 SQL Sub Menu...........................................................................................................32
6.3.6.1 SQL Copy to Clipboard........................................................................................32
6.3.6.2 Show SQL Dialog.................................................................................................32
6.3.7 Context Menu Help.....................................................................................................32
6.3.8 Mail Recipient Properties............................................................................................32
6.3.8.1 Mail Recipient Name............................................................................................33
6.3.8.2 E-mail Address.....................................................................................................33
6.3.8.3 Mail Recipient Description ...................................................................................33
6.3.8.4 Ack Key................................................................................................................33
6.3.8.4.1 Acknowledging Alarm s using the Ack Key.....................................................33
6.3.8.5 Ack Mode .............................................................................................................34
6.3.8.6 Override ...............................................................................................................35
6.3.8.7 User......................................................................................................................35
6.3.8.8 Pattern Group.......................................................................................................35
6.3.8.9 Time Zone............................................................................................................35
6.3.8.10 Disable................................................................................................................35
6.4 Message Format Context Menu........................................................................................35
6.4.1 Remove Message Format Reference ........................................................................35
6.4.2 Permanently Delete Message Format........................................................................35
6.4.3 SQL Sub Menu...........................................................................................................35
6.4.3.1 SQL Copy to Clipboard........................................................................................36
6.4.3.2 Show SQL Dialog.................................................................................................36
6.4.4 Context Menu Help.....................................................................................................36
- iv -
Messaging Config Tool
Page 6

Reference Guide
D301499X412
April 2012
Message Format Properties.......................................................................................36
6.4.5
6.4.5.1 Mail Format Name................................................................................................36
6.4.5.2 Subject .................................................................................................................36
6.4.5.3 Body.....................................................................................................................37
6.5 Pager Recipient Context Menu.........................................................................................37
6.5.1 Remove Recipient from Group...................................................................................37
6.5.2 Permantently Delete Recipient...................................................................................37
6.5.3 Add Page Format .......................................................................................................37
6.5.4 Add Pager Number.....................................................................................................37
6.5.5 Disable Page Delivery................................................................................................37
6.5.6 Disable All Page Deliveries ........................................................................................37
6.5.7 SQL Sub Menu...........................................................................................................38
6.5.7.1 SQL Copy to Clipboard........................................................................................38
6.5.7.2 Show SQL Dialog.................................................................................................38
6.5.8 Context Menu Help.....................................................................................................38
6.5.9 Page Recipient Properties..........................................................................................38
6.5.9.1 Page Recipient Name..........................................................................................38
6.6 Page Format Context Menu..............................................................................................39
6.6.1 Add Next Page Format...............................................................................................39
6.6.2 Remove Reference.....................................................................................................39
6.6.3 Permanently Delete....................................................................................................39
6.6.4 SQL Sub Menu...........................................................................................................39
6.6.4.1 SQL Copy to Clipboard........................................................................................39
6.6.4.2 Show SQL Dialog.................................................................................................39
6.6.5 Context Menu Help.....................................................................................................40
6.6.6 Page Format Properties .............................................................................................40
6.6.6.1 Page Format Name..............................................................................................40
6.6.6.2 Paging Message ..................................................................................................40
6.6.6.3 Pre-Send Delay....................................................................................................40
6.6.6.4 Post-Send Delay..................................................................................................40
6.7 Telephony Details Context Menu......................................................................................40
6.7.1 Remove Telephone Details........................................................................................41
6.7.2 Remove Telephone Reference...................................................................................41
6.7.3 SQL Sub Menu...........................................................................................................41
6.7.3.1 SQL Copy to Clipboard........................................................................................41
6.7.3.2 Show SQL Dialog.................................................................................................41
6.7.4 Context Menu Help.....................................................................................................41
6.7.5 Telephony Details Properties .....................................................................................41
6.7.5.1 Telephony Format Name .....................................................................................42
6.7.5.2 Telephony Format Description.............................................................................42
6.7.5.3 Pre-Dial Delay......................................................................................................42
6.7.5.4 Outside Line Access Number ..............................................................................42
6.7.5.5 Pre-Dial Delay......................................................................................................42
6.7.5.6 Main Number........................................................................................................42
6.7.5.7 Post-Connect Delay.............................................................................................43
6.7.5.8 Pre-Disconnect Delay ..........................................................................................43
6.7.5.9 Connection Loss Redial Attempts........................................................................43
6.7.5.10 Connection Loss Redial Delay............................................................................43
6.8 Routine View Context Menu .............................................................................................43
6.8.1 Create New Messaging Routine.................................................................................43
- v -
Messaging Config Tool
Page 7

Reference Guide
D301499X412
April 2012
Message Routine Context Menu.......................................................................................43
6.9
6.9.1 Delete Paging Routine................................................................................................44
6.9.2 Add Pattern Group......................................................................................................44
6.9.3 Add Action Group .......................................................................................................44
6.9.4 SQL Sub Menu...........................................................................................................44
6.9.4.1 SQL Copy to Clipboard........................................................................................44
6.9.4.2 Show SQL Dialog.................................................................................................44
6.9.5 Message Routine Properties......................................................................................45
6.9.5.1 Messaging Routine Name....................................................................................45
6.9.5.2 Messaging Routine Description ...........................................................................45
6.9.5.3 Disable All New Actions.......................................................................................45
6.9.5.4 Disable All Actions ...............................................................................................45
6.10 Pattern Group Context Menu.........................................................................................45
6.10.1 Add Pattern .............................................................................................................46
6.10.2 Delete Group...........................................................................................................46
6.10.3 SQL Sub Menu........................................................................................................46
6.10.3.1 SQL Copy to Clipboard.......................................................................................46
6.10.3.2 Show SQL Dialog ...............................................................................................46
6.10.4 Pattern Group Properties........................................................................................46
6.10.4.1 Pattern Group Name...........................................................................................47
6.10.4.2 Pattern Group Description..................................................................................47
6.11 Alarm Pattern Context Menu .........................................................................................47
6.11.1 Delete Pattern .........................................................................................................47
6.11.2 Disable Pattern........................................................................................................47
6.11.3 SQL Sub Menu........................................................................................................47
6.11.3.1 SQL Copy to Clipboard.......................................................................................48
6.11.3.2 Show SQL Dialog ...............................................................................................48
6.11.4 Context Menu Help .................................................................................................48
6.11.5 Alarm Pattern Properties.........................................................................................48
6.11.5.1 Alarm Pattern Name...........................................................................................49
6.11.5.2 Alarm Pattern Description...................................................................................49
6.11.5.3 Device Name......................................................................................................49
6.11.5.4 Object Name.......................................................................................................49
6.11.5.5 Base....................................................................................................................49
6.11.5.6 Extension............................................................................................................50
6.11.5.7 Attribute...............................................................................................................50
6.11.5.8 Priority.................................................................................................................50
6.11.5.9 Condition.............................................................................................................50
6.11.5.10 Access Area......................................................................................................50
6.11.5.11 Plant Area.........................................................................................................50
6.11.5.12 Trigger Action When Alarm Clears...................................................................50
6.12 Action Group Context Menu..........................................................................................50
6.12.1 Delete Action Group................................................................................................50
6.12.2 Add Action...............................................................................................................50
6.12.3 SQL Sub Menu........................................................................................................50
6.12.3.1 SQL Copy to Clipboard.......................................................................................51
6.12.3.2 Show SQL Dialog ...............................................................................................51
6.12.4 Context Menu Help .................................................................................................51
6.12.5 Properties................................................................................................................51
6.13 Action Context Menu .....................................................................................................51
- vi -
Messaging Config Tool
Page 8

Reference Guide
D301499X412
April 2012
Delete Action...........................................................................................................51
6.13.1
6.13.2 Add Recipient Group...............................................................................................51
6.13.3 Add Next Action ......................................................................................................52
6.13.4 SQL Sub Menu........................................................................................................52
6.13.4.1 SQL Copy to Clipboard.......................................................................................52
6.13.4.2 Show SQL Dialog ...............................................................................................52
6.13.5 Context Menu Help .................................................................................................52
6.13.6 Properties................................................................................................................52
7 Create New Object Dialog.....................................................................................................52
7.1 Create New Object Dialog.................................................................................................52
7.2 Create/Select New Object Dialog .....................................................................................53
7.3 New Object Name.............................................................................................................53
7.4 Configured Object List.......................................................................................................53
7.5 OK Button..........................................................................................................................53
7.6 Cancel Button....................................................................................................................53
7.7 Help Button .......................................................................................................................54
Messaging Config Tool
8 Glossary .................................................................................................................................54
9 Index .......................................................................................................................................55
- vii -
Page 9

Reference Guide
D301499X412
April 2012
Messaging Config Tool
1 Messaging Configuration
The Messaging Configuration tool enables the user to configure OpenEnterprise Messaging.
OpenEnterprise Messaging enables automated messages to be sent to email or paging recipients
when specified alarm criteria appears within the 'Alarm Summary' table. Email recipients are able to
acknowledge alarms by email.
The Messaging Configuration tool provides two main views: -
1. Recipient View - Enables the creation of new User Groups and Users
2. Messaging Routine View - Enables the creation of new Messaging Routines.
1.1 Adding, Deleting and Modifying Objects
The Messaging Configuration tool uses a highly intuitive, point and click interface to create and
configure the objects needed for OpenEnterprise Messaging.
1.1.1 Context Menus
Whichever object is selected from the Tree view, if you right click, a context sensitive menu will allow
you to either: -
1.1.1.1 Create a new object
The new object will be of a type that exists below the selected object in the Tree hierarchy - e.g. if a
cipient Group is selected, the context menu allows you to create a new Email or Paging recipient.
Re
1.1.1.2 Delete the selected object
For exampl
whole Recipient Group.
e, if a Recipient Group object is selected, the context menu will allow you to delete the
1.1.2 Properties Pane
Whenever an object is selected, its Properties appear in the right pane of the interface, allowing you
to modify it.
2 Recipient View
This is the default view of the Messaging Configuration tool's user interface. The left pane displays
Recipient Groups, Recipients and each Recipient's Messag e or Page Format in a hierarchical tree
format. The right pane displays the Properties of the item selected from the tree in the left pane.
- 1 -
Page 10

Reference Guide
D301499X412
April 2012
2.1 Recipient Tree View Pane
Messaging Config Tool
The left pane of the Messaging Configuration tool interface contains a Tree view, which displays the
Messaging objects as a hierarchical tree. The objects that appear in the Recipient Tree View Pane
are:-
2.1.1 Recipient Groups
Recipient Groups are groups of Recipients (either email or pager), who will be interested in being
informed of certain alarm criteria. When a Recipient Group is selected from the Tree view pane, and
the right mouse button is clicked, a context menu will appear, which enables you to perform useful
tasks with the selected object.
2.1.2 Email Recipients
Email Recipients are users who are interested in being informed of certain alarm criteria via email.
When an email recipient object is selected, and the right mouse button is clicked, a context menu
appears, which enables you to perform useful tasks with the selected object.
2.1.3 Pager Recipient
- 2 -
Page 11

Reference Guide
D301499X412
April 2012
Pager Recipients are users who are interested in being informed of certain alarm criteria via numeric
pagers. When a pager recipient object is selected, and the right mouse button is clicked, a context
menu appears, which enables you to perform useful tasks with the selected object.
Messaging Config Tool
2.1.4 Message Formats
Message Formats define the Subject and Message parts of the email message that will be sent to
Email recipients in the event of a configured Alarm Pattern matching an alarm.
2.1.5 Page Formats
Page Formats define the message text, and pre and post send delays for pager messages.
2.1.6 Telephony Details
The Telephony Details consist of the Pager telephone number, as well as connection delay and redial settings.
2.2 Recipient Properties Pane
The right pane displays the Properties for each object that is selected from the left Tree view pane.
Recipient object properties are listed below.
2.2.1 Recipient Group Properties
When a Recipient Group object is selected from the Tree view in the left pane, the right pane displays
its Properties. Any enabled fields (usually having a white background) can be modified.
- 3 -
Page 12

Reference Guide
D301499X412
April 2012
2.2.1.1 Recipient Group Name
Messaging Config Tool
The non
2.2.1.2 Recipient Group Description
You can type
-editable name of the Recipient Group is displayed here.
a relevant description for the Recipient Group in here.
2.2.2 Mail Recipient Properties
When a Mail Recipient object is selected from the Tree view in the left pane, the right pane displays
its Properties. Any enabled fields (usually having a white background) can be modified.
2.2.2.1 Mail Recipient Name
The non
-editable name of the Mail Recipient is displayed here.
- 4 -
Page 13

Reference Guide
D301499X412
April 2012
2.2.2.2 E-mail Address
Messaging Config Tool
This edita
2.2.2.3 Mail Recipient Description
You may place any descri
Recipient.
2.2.2.4 Ack Key
The text in this field is a st
string that the recipient JSmith would use to acknowledge an alarm in the example on the Mail
Recipient Properties topic is "JSmithAck".
2.2.2.4.1 Acknowledging Alarms using the Ack Key
The followi
example a user called "Test 1" has defined his Ack Key string as "oedtest2". The OEMessaging
Server detects that an alarm pattern associated with this user has been matched in the alarm
summary table. After waiting for the prescribed delay time, it sends an e-mail to "Test 1".
The body of the e-mail contains any text that was entered into the Mail Format assigned to this Mail
Recipient, and at the end of this text the following tags are added by the Messaging server:-
<ACK?=><__ID=<AlarmIDNumber>#<TimeCode>
The "Test 1" user clicks Reply to the e-mail sent by the Messaging server, and prior to acknowledging
the alarm this is the actual e-mail message that he sees:-
ble field contains the email address of the Mail Recipient.
ptive text here that will enable you to more clearly identify the Mail
ring that the Mail Recipient will use to acknowledge alarms by email. The
ng example shows how to use the Ack Key to acknowledge alarms via e-mail. In this
To acknowledge this alarm, before actually sending the reply, he places the text "oedtest2"
immediately after the equals sign (=) in the tag that begins "ACK?". An example is shown below with
the Ack Key in place:-
- 5 -
Page 14

Reference Guide
D301499X412
April 2012
Messaging Config Tool
There is no need to enter any other text into the main body of the reply. The reply is sent, and when it
is received by the OEMessaging Server, the alarm is acknowledged.
2.2.2.5 Ack Mode
The ackn
the Override check box and then selecting Optimistic from this list.
In Optimistic mode, only the alarm Id is sent in the Message Id. When a valid reply is received, the
alarm is acknowledged regardless of the Occurrence Time. In Pessimistic mode, the Occurrence
Time of the alarm will be included in the Message Id. When the reply is received, this must match the
current Occurrence Time.
The need for this functionality comes from the fact that NW3000 alarms are generated at the RTU.
This means that two instances of an alarm can have the same alarm Id but different occurrence times.
Pessimistic mode ensures that the acknowledgement sent will only acknowledge the intende d alarm.
2.2.2.6 Override
Che
mode from the list.
2.2.2.7 User
This is
Mail Recipient will inherit all of the security settings for this user.
owledgement mode defaults to Pessimistic mode. The mode can be changed by selecting
ck this box to enable the Ack Mode list. Then you can choose either Optimistic or Pessimistic
a list of configured OpenEnterprise users with whom the Mail Recipient will be identified. The
2.2.2.8 Pattern Group
A Pattern Group with which the Mail Reci
2.2.2.9 Time Zone
The time zo
recipient must be selected.
ne for the Mail Recipient. This is a mandatory field, so the correct time zone for the
pient will be associated.
- 6 -
Page 15

Reference Guide
D301499X412
April 2012
2.2.2.10 Disable
Messaging Config Tool
Check thi
mail, even though they may belong to an enabled Messaging Routine.
s box to disable this Mail Recipient. When disabled, the Recipient will not receive alarm
2.2.3 Message Format Properties
When a Message Format object is selected from the Tree view in the left pane, the right pane
displays its Properties. Any enabled fields (usually having a white background) can be modified.
2.2.3.1 Mail Format Name
The non
2.2.3.2 Subject
This editable
that is sent to the associated Mail Recipient. The text in chevrons indicates aliases, that pick up actual
values from the Alarm Pattern that matches the alarm being reported.
2.2.3.3 Body
This editable
that is sent to the associated Mail Recipient. The text in chevrons indicates aliases, that pick up actual
values from the Alarm Pattern that matches the alarm being reported.
-editable name of the selected Mail Format is displayed here.
field displays the text that will be placed into the Subject field of each email message
field displays the text that will be placed into the Message field of each email message
2.2.4 Page Recipient Properties
When a Page Recipient object is selected from the Tree view in the left pane, the right pane displays
its Properties. Any enabled fields (usually having a white background) can be modified.
- 7 -
Page 16

Reference Guide
D301499X412
April 2012
2.2.4.1 Page Recipient Name
Messaging Config Tool
The non
-editable name of the Page Recipient is displayed here.
2.2.5 Page Format Properties
When a Page Format object is selected from the Tree view in the left pane, the right pane displays its
Properties. Any enabled fields (usually having a white background) can be modified.
2.2.5.1 Page Format Name
The non
2.2.5.2 Paging Message
This edita
Format.
2.2.5.3 Pre-Send Delay
A value in milliseconds
criteria for a Routine before initiating the sending of the message.
2.2.5.4 Post-Send Delay
A value in millise
closing the message sending process.
-editable name of the selected Page Format is displayed here.
ble field contains the actual text that will be sent to the Page Recipient using this Page
which the Messaging Server will wait after detecting associated Alarm Pattern
conds which the Messaging Server will wait after sending the message before
- 8 -
Page 17

Reference Guide
D301499X412
April 2012
Messaging Config Tool
2.2.6 Telephony Details Properties
When a Telephony Details object is selected from the Tree view in the left pane, the right pane
displays its Properties. Any enabled fields (usually having a white background) can be modified.
2.2.6.1 Telephony Format Name
The non
2.2.6.2 Telephony Format Description
A full descript
2.2.6.3 Pre-Dial Delay
A delay, in seconds
2.2.6.4 Outside Line Access Number
Any number t
2.2.6.5 Main Pre-Dial Delay
A delay, in secon
-editable name of the selected Telephony Format is displayed here.
ion of the Telephony Format being used can be entered here.
which the Messaging Server will observe before entering the outside line number.
hat is required to gain access to an outside line must be entered here.
ds, which the Messaging Server will observe before dialling the Pager Number.
- 9 -
Page 18

Reference Guide
D301499X412
April 2012
2.2.6.6 Main Number
Messaging Config Tool
This is th
second delays into the dialling process. This can be used to navigate through the automated
telephone menus (e.g. 012345678,,,2,1,444).
2.2.6.7 Post-Connect Delay
A delay, in seconds
Pager and sending the message.
2.2.6.8 Pre-Disconnect Delay
A delay in se
before disconnection with the Pager.
2.2.6.9 Connection Loss Redial Attempts
This is th
lost, before aborting.
2.2.6.10 Connection Loss Redial Delay
The delay, in seconds, whi
of connection with the Pager.
e actual number of the Pager used by the Page Recipient. Commas may be inserted to add
which will be observed by the Messaging Server after making a connection to the
conds, which will be observed by the Messaging Server after sending the message and
e number of redial attempts which the Messaging Server will try, should the connection be
ch will be used by the Messaging Server before redialling following a loss
3 Routines View
The Messaging Routines View displays the whole hierarchy of configured OpenEnterprise Messaging
objects. At the top of the hierarchy is the Messaging Routine. To be effective, each Messaging
Routine must contain at least one Pattern Group, Alarm Pattern, Action Group, Action, Recipient
Group, a Recipient having a Message or Page Format and optionally one or more Next Actions.
This View can be disabled by using the Security Configuration Tool to place the "MessagingRoutines"
Custom Token in the 'Exclude' box for any user or User Group.
- 10 -
Page 19
Reference Guide
D301499X412
April 2012
Messaging Config Tool
3.1 Routines Tree View Pane
The left pane of the Messaging Configuration tool interface contains a Tree view, which displays the
Messaging objects as a hierarchical tree. The objects that appear in the Routine Tree View Pane are:-
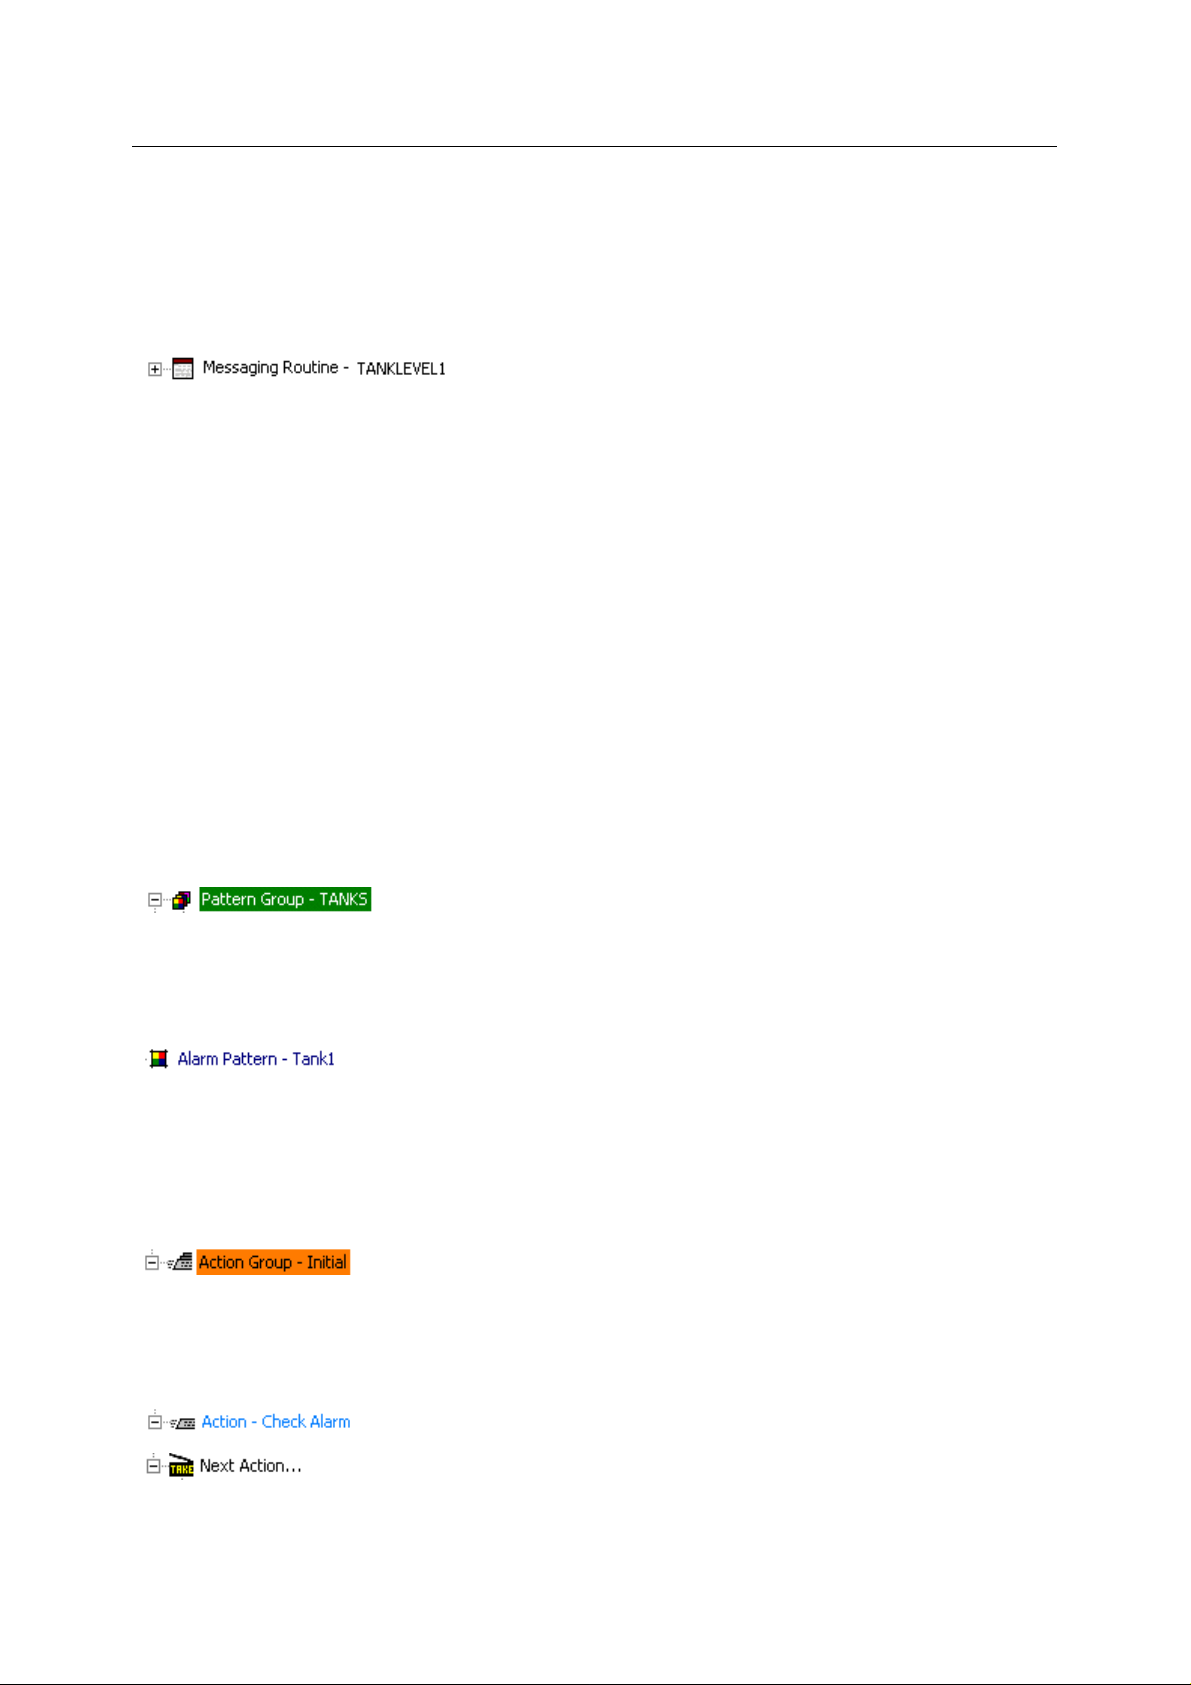
3.1.1 Messaging Routine
A Messaging Routine contains all the information necessary to implement OpenEnterprise
Messaging. This includes: -
1. One or more Alarm Patterns, which define the alarm criteria that will initiate the sending of
messages to recipients.
2. One or more associated Actions, which determine whether the message should be re-sent,
any delay period, and the number of times the message should be re-sent, if there is no
response from the Recipients.
3. Optional further Actions, intended to escalate the Messaging process in the event that an
alarm still exists and is unacknowledged after a defined number of repeats of a previously
defined Action.
4. One or more Recipients. Recipients can be email or pager recipients.
5. An email address or pager number for each recipient.
6. A defined message format for each recipient.
3.1.2 Pattern Groups
A Pattern Group consists of one or more Alarm Patterns, which define the alarm criteria that will
initiate the sending of messages to recipients.
3.1.3 Alarm Patterns
Alarm Patterns define alarm criteria which must exist in the database to initiate the sending of
messages to recipients. Alarm Patterns contain a reference to a signal and a n associated alarm
condition. When this signal and alarm condition appear in the 'Alarm Summary' table, messaging
commences.
3.1.4 Action Group
An Action Group contains one or more Actions, which define message re-send delays and how many
times messages should be sent before either being stopped or escalated to a Next Action.
3.1.5 Action and Next Action
- 11 -
Page 20

Reference Guide
D301499X412
April 2012
Actions contain a 'Delay' and a 'Repeat', which define a waiting period before commencing th e Action,
and how many times to repeat the Action (the Repeat can be set to not repeat, to repeat a number of
times or to repeat forever).
Messaging Config Tool
3.1.6 Delay
A Delay belongs to an Action. It defines the amount of time to wait before sending messages to
recipients once an Alarm Pattern is recognized.
3.1.7 Repeat
A 'Repeat' belongs to an Action, and defines the number of times a message should be sent to
recipients, should the alarm continue in an unacknowledged state.
3.1.8 Recipient Groups
Recipient Groups are groups of Recipients (either email or pager), who will be interested in being
informed of certain alarm criteria. When a Recipient Group is selected from the Tree view pane, and
the right mouse button is clicked, a context menu will appear, which enables you to perform useful
tasks with the selected object.
3.1.9 Email Recipients
Email Recipients are users who are interested in being informed of certain alarm criteria via email.
When an email recipient object is selected, and the right mouse button is clicked, a context menu
appears, which enables you to perform useful tasks with the selected object.
3.1.10 Pager Recipient
Pager Recipients are users who are interested in being informed of certain alarm criteria via numeric
pagers. When a pager recipient object is selected, and the right mouse button is clicked, a context
menu appears, which enables you to perform useful tasks with the selected object.
3.2 Routine Properties Pane
The right pane displays the Properties for each object that is selected from the left Tree view pane.
3.2.1 Messaging Routine Properties
When a Message Routine object is selected from the Tree view in the left pane, the right pane
displays its Properties. Any enabled fields (usually having a white background) can be modified.
- 12 -
Page 21

Reference Guide
D301499X412
April 2012
Messaging Config Tool
3.2.1.1 Messaging Routine Name
The non
3.2.1.2 Messaging Routine Description
A full descript
3.2.1.3 Disable All New Actions
Placing a
operation) to be disabled.
3.2.1.4 Disable All Actions
Placing a
-editable name of the selected Messaging Routine is displayed here.
ion for the Messaging Routine can be entered here.
check in this box causes all newly configured Actions (since the last Export to Database
check in this box causes all Actions to be disabled.
3.2.2 Pattern Group Properties
When a Pattern Group object is selected from the Tree view in the left pane, the right pane displays
its Properties. Any enabled fields (usually having a white background) can be modified.
- 13 -
Page 22

Reference Guide
D301499X412
April 2012
Messaging Config Tool
3.2.2.1 Pattern Group Name
The non
3.2.2.2 Pattern Group Description
A full descript
-editable name of the selected Pattern Group is displayed here.
ion of the Pattern Group can be entered here.
3.2.3 Alarm Pattern Properties
When an Alarm Pattern object is selected from the Tree view in the left pane, the right pane displays
its Properties. Any enabled fields (usually having a white background) can be modified.
- 14 -
Page 23

Reference Guide
D301499X412
April 2012
Messaging Config Tool
3.2.3.1 Alarm Pattern Name
The non
3.2.3.2 Alarm Pattern Description
A full descript
3.2.3.3 Device Name
The name of
regarding the signal of interest.
3.2.3.4 Object Name
The signal that will cause
property page be found in the 'Alarm Summary' table.
3.2.3.5 Base
The first pa
<Base>.<Extension>.<Attribute>).
-editable name of the selected Alarm Pattern is displayed here.
ion of the Alarm Pattern can be entered here.
the logging device, controller or RTU from which OpenEnterprise is receiving alarm data
a Messaging Routine to begin should the alarm condition specified on this
rt of the signal name. Used with the ACCOL system of naming signals (i.e.
- 15 -
Page 24

Reference Guide
D301499X412
April 2012
3.2.3.6 Extension
Messaging Config Tool
The se
<Base>.<Extension>.<Attribute>).
3.2.3.7 Attribute
The third p
<Base>.<Extension>.<Attribute>).
3.2.3.8 Priority
The pri
3.2.3.9 Condition
The alarm condition for the selected signal that will initiate a Messaging Routine.
from the drop-down list.
3.2.3.10 Access Area
The Acce
3.2.3.11 Plant Area
The Plant Are
3.2.3.12 Trigger Action When Alarm Clears
cond part of the signal name. Used with the ACCOL system of naming signals (i.e.
art of the signal name. Used with the ACCOL system of naming signals (i.e.
ority of the alarm condition selected from the Condition list.
ss Area of the signal. The value defaults to the Default Access Area if not specified here.
a of the signal. Defaults to 'ALL' if not specified here.
Select the condition
If this box is checke
matched in the Alarm Summary table, and also when it is cleared.
d, the Messaging Routine will run when the alarm defined in the Alarm Pattern is
3.2.4 Delay Properties
When a Delay object is selected from the Tree view in the left pane, the right pane displays its
Properties. Any enabled fields (usually having a white background) can be modified.
- 16 -
Page 25

Reference Guide
D301499X412
April 2012
3.2.4.1 Days
Messaging Config Tool
The num
specified in an Alarm Pattern. Type directly in, or use the spin controls.
3.2.4.2 Hours
The num
specified in an Alarm Pattern. Type directly in or use the spin controls.
3.2.4.3 Minutes
The num
specified in an Alarm Pattern. Type directly in, or use the spin controls.
ber of days to wait before initiating the Messaging Routine after detection of alarm criteria
ber of days to wait before initiating the Messaging Routine after detection of alarm criteria
ber of minutes to wait before initiating the Messaging Routine after detection of alarm criteria
3.2.5 Repeat Properties
When a Repeat element is selected from the Tree view in the left pane, the right pane displays its
Properties. Any enabled fields (usually having a white background) can be modified.
3.2.5.1 Forever
If this button is sel
the alarm is cleared or acknowledged.
3.2.5.2 Do Not Repeat
If this button is sel
one time, even though the alarm is not cleared.
3.2.5.3 Repeat Times
If this button is sel
the alarm is cleared or acknowledged, or for the number of repeats specified in the box to the right of
the button. The box will be enabled for input when the button is checked.
ected, the Messaging Server will continue repeating the Messaging Routine until
ected, the Messaging Server will not repeat the Messaging Routine once it has run
ected, the Messaging Server will continue repeating the Messaging Routine until
4 Menus
The menu bar provides access to a number of menu items.
- 17 -
Page 26

Reference Guide
D301499X412
April 2012
Messaging Config Tool
4.1 File Menu
The File Menu provides access to a number of high level Messaging functions.
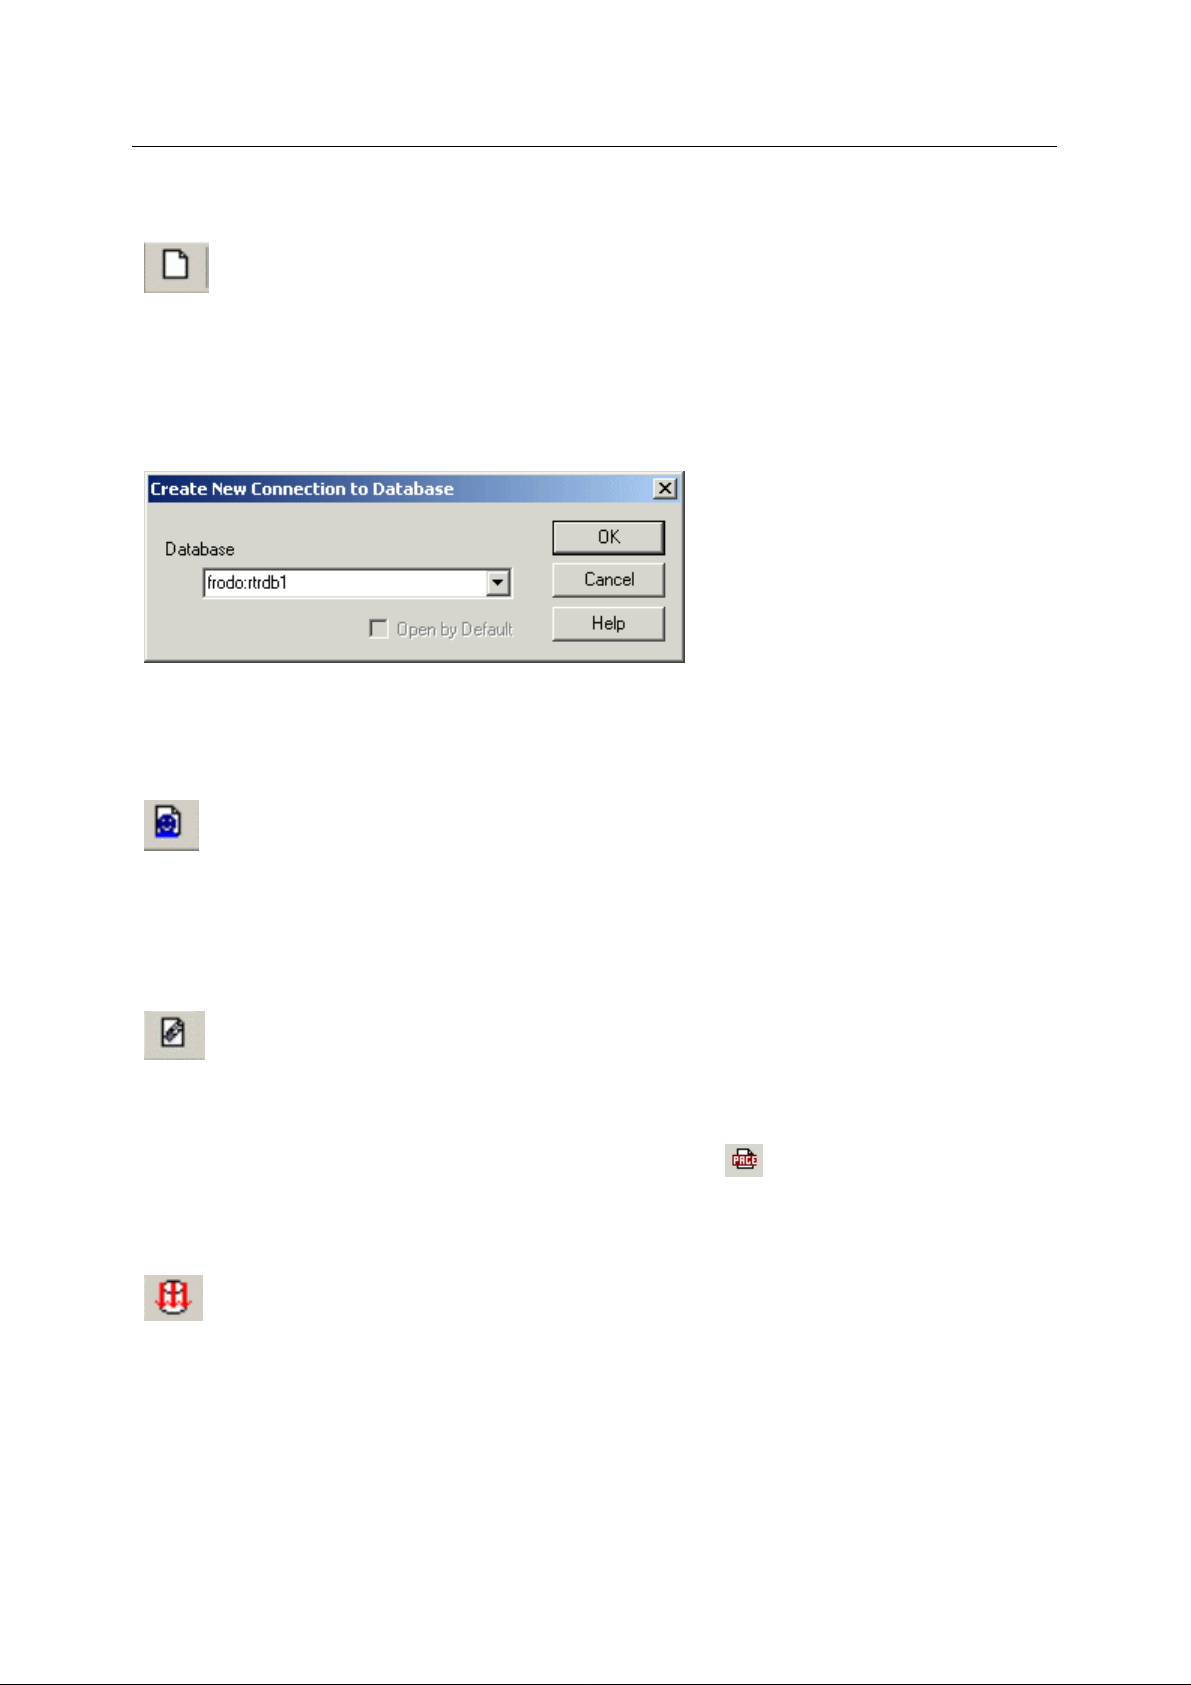
4.1.1 New Connection
(Toolbar button)
Opens up a new window within the user interface, having a new connection to the same o r a different
OpenEnterprise database. The Create New Connection to Database dialog will be displayed,
prompting you to enter an OpenEnteprise database connection string into the text field.
OpenEnterprise remote database connection strings are defined by <Computer Name>:<TCP service
name>, as shown in the example below.
A brief progress dialog will appear informing you that the Messaging Configuration tool is querying the
database.
4.1.2 Close Connection
Selecting this option will close the currently selected window, which represents the Messaging
configuration for a specific OpenEnterprise database. A brief progress dialog will appear with a
message that the Messaging Configuration tool is closing all of its queries with the database.
- 18 -
Page 27

Reference Guide
D301499X412
April 2012
Messaging Config Tool
4.1.3 Export to File
(Toolbar button)
Exports the current Messaging configuration to an SQL script file with the extension sql, which can be
run from the SQL Client to restore the current configuration at any time. If a file name has already
been configured using the Options dialog (obtained from the View menu), the file will be automatically
saved to that, and a message will inform you of the success of this operation. Otherwise you will be
prompted for a file name.
4.1.4 Send Configuration to Database
(Toolbar button)
Will export the current Messaging settings to the OpenEnterprise database. Any changes you have
made since opening the Messaging Configuration tool will be saved to the database.
4.1.5 Exit
This option closes the Messaging Configuration tool. If you have made changes that you have not yet
exported to the database, you will be prompted to do so with this message: -
4.1.5.1 Save Changes Before Exit
If you want to save your
close and you will be returned to the Messaging Configuration tool's interface. From there select the
'Send Configuration to Database' option from the file menu. You will then be able to exit the
application.
4.1.5.2 Exit Without Saving Changes
you select the [Yes] button, the Messaging Configuration tool will close without saving the new
If
changes you have made, they will be lost, and you will have to enter them again.
changes before closing down, select the [No] button. The message box will
4.2 View Menu
The View menu provides access to features which affect the display settings of the Messaging tool's
user interface.
- 19 -
Page 28

Reference Guide
D301499X412
April 2012
Messaging Config Tool
4.2.1 Toggle Toolbar
Selecting this option toggles visibility of the Toolbar in the Messaging Configuration tool's user
interface. A tick resides next to the option, if it has been selected until it is de-selected.
4.2.2 Toggle Status Bar
Selecting this option toggles visibility of the Status Bar in the Messaging Configuration tool's user
interface. A tick resides next to the option, if it has been selected until it is de-selected.
4.2.3 Split Window Modification
When this option is chosen, the cursor is placed automatically over the split line between the left (Tree
view) and right (Properties) pane of the user interface, enabling you to move it to the right or the left.
4.2.4 Options
This menu item makes the Options Dialog available, which enables you to configure adva nced
features of the Messaging Configuration Tool.
ptions Dialog Connection Tab
4.2.5 Options Dialog Connection Tab
The Options dialog enables further configuration of the Messaging Configuration tool. The
Connections tab is shown on top. It enables you to define the database that the Messaging
Configuration tool will connect with when it starts.
- 20 -
Page 29

Reference Guide
D301499X412
April 2012
4.2.5.1 Initial Database Enable
Che
cking this box will enable the setting of an initial database that the Messaging Configuration tool
will automatically connect to each time it is started.
Messaging Config Tool
4.2.5.2 Initial Database Connection
The Op
Messaging Configuration tool will try first to connect to the default
OpenEnterprise database (rtrdb1).
TCP services are defined by default in the C:\Winnt\System32\Drivers\etc\Services file.
OpenEnterprise remote database connection strings are defined by <Computer Name>:<TCP service
name>.
4.2.5.3 Output File Tab
This tab en
enEnterprise database connection string should go here. If one is not provided here, the
TCP service offered by a local
ables an SQL script export filename to be pre-configured.
4.2.5.3.1 Output File Name
You can type
button. You must provide the full path name unless you wish the file to be saved to the root directory.
the name of the file in here, or browse for a directory and file using the browse [...]
- 21 -
Page 30
Reference Guide
D301499X412
April 2012
4.2.5.3.2 Browse Button
Messaging Config Tool
Select this bu
output file. The filename will be placed in the Output File Name text box.
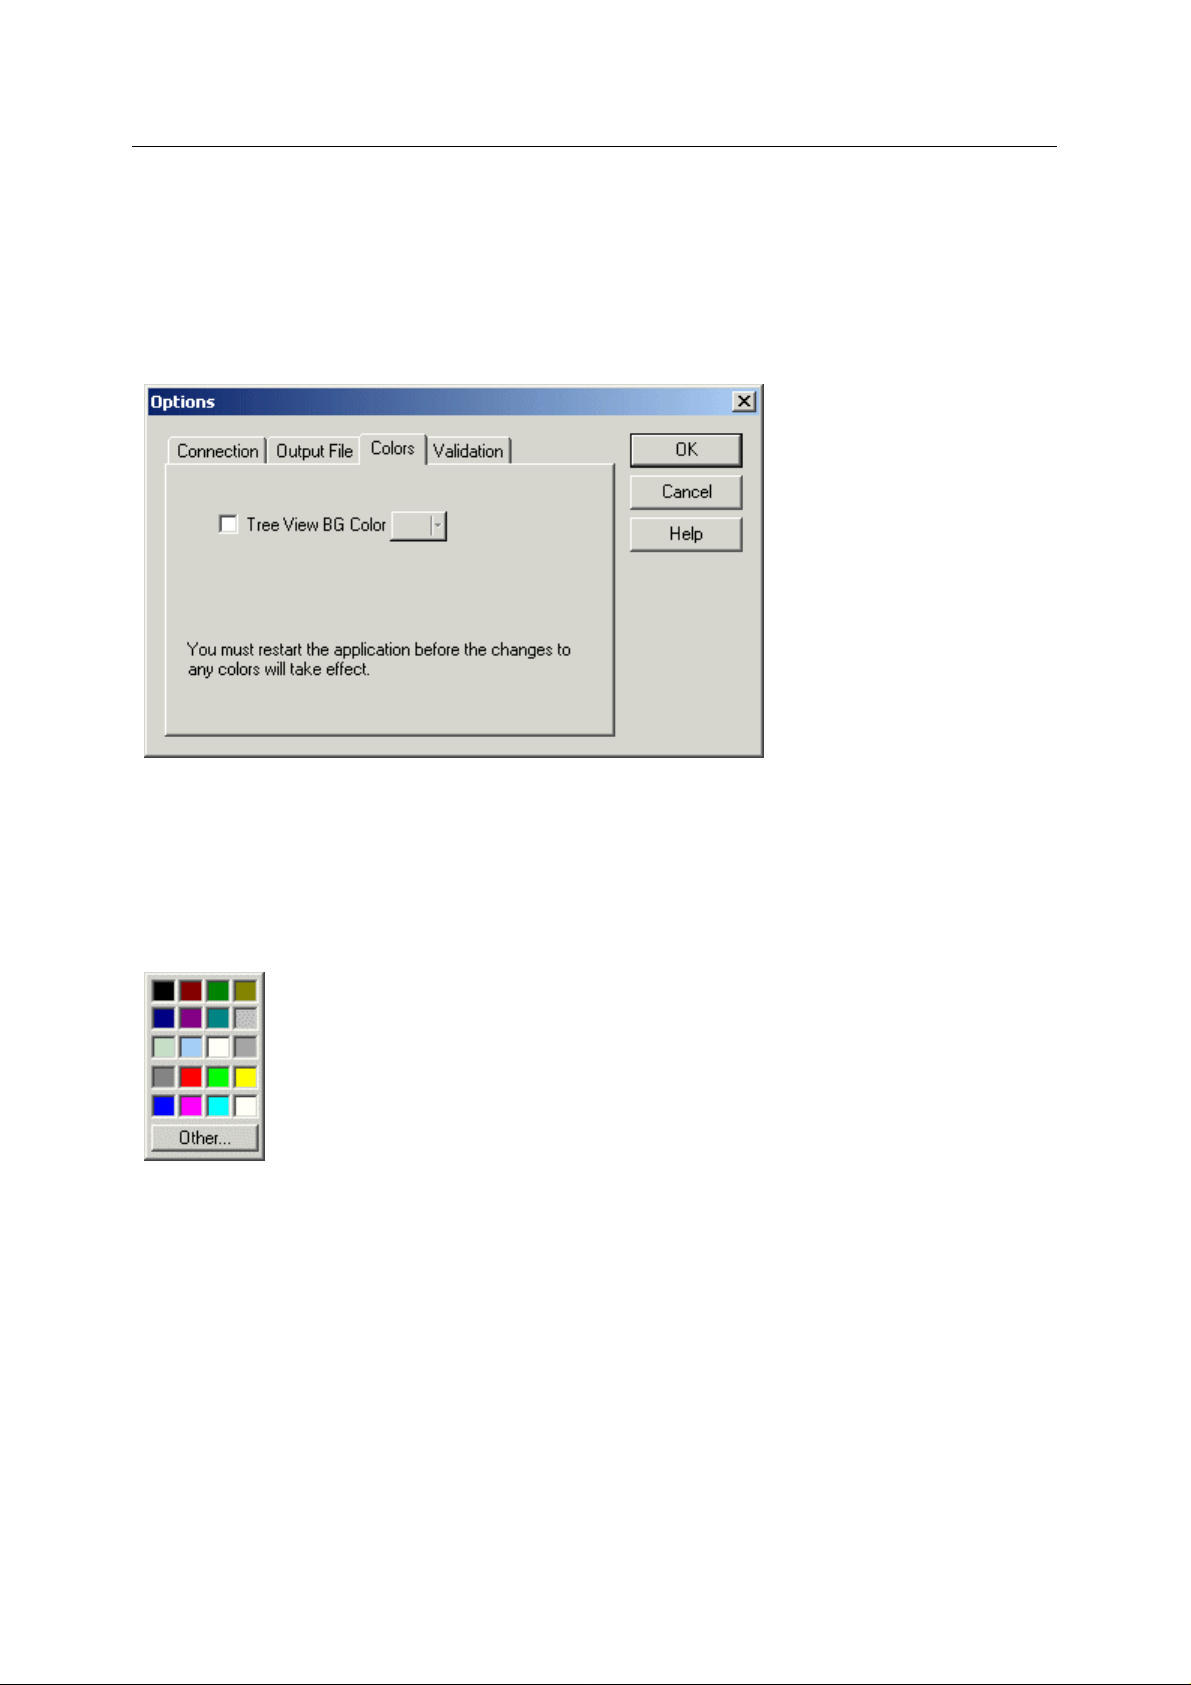
4.2.5.4 Colors Tab
This tab en
4.2.5.4.1 Enable Tree view Background Color
tton to open a Windows file dialog from which you can navigate to a directory for the
ables the background color of the Tree view to be changed.
Whe
n this box is checked, the drop down Color Palette box to the right becomes enabled. A new
color from the palette can be chosen to replace the background color of the Tree view.
4.2.5.4.2 Color Palette
n the box to the left of the palette is checked, this Color Palette becomes available.
Whe
The color you select from this palette will become the new background color of the Tree view.
4.2.5.5 Validation Tab
This dial
og enables you to set some validation tests when creating new Alarm Recipients.
- 22 -
Page 31

Reference Guide
D301499X412
April 2012
4.2.5.5.1 Blank Email Addresses
Messaging Config Tool
If this box is checke
configuration to the database that the Alarm Recipient does not have a blank email address. A
message box will inform you if this is the case, and the configuration will not be saved to the
database. You will have to provide an email address for the new Alarm Recipient, and attempt the
'Export to Database' operation again.
4.2.5.5.2 Duplicate Email Addresses
If this box is checke
configuration to the database that the Alarm Recipient is not providing a duplicate email address. A
message box will inform you if this is the case, and the configuration will not be saved to the
database. You will have to provide a unique email address for the new Alarm Recipient, and attempt
the 'Export to Database' operation again.
4.2.5.5.3 Missing Mail Format References
If this box is checke
configuration to the database that the Alarm Recipient does not have a missing Mail Format
Reference. A message box will inform you if this is the case, and the configuration will not be saved to
the database. You will have to provide a Mail Format reference for the new Alarm Recipient, and
attempt the 'Export to Database' operation again.
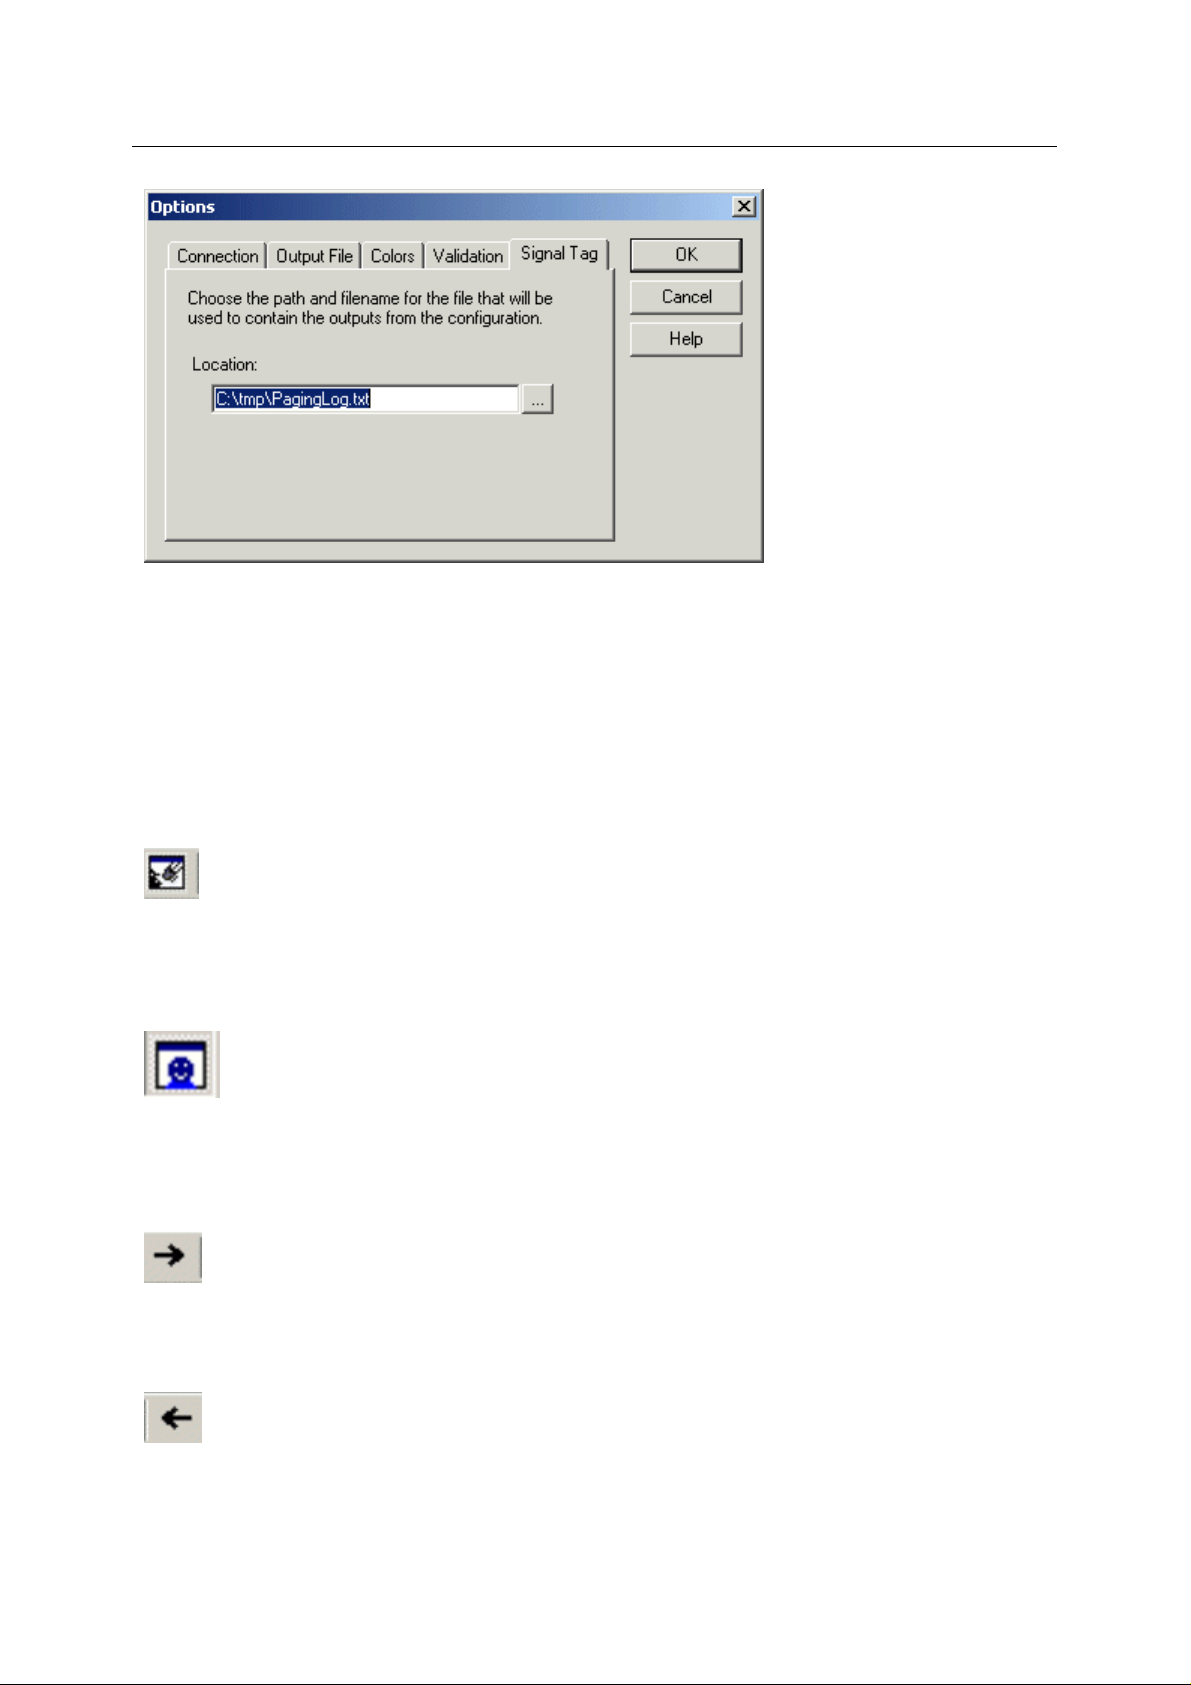
4.2.5.6 Signal Tag Tab
This tab i
s only available if the database has been built so that Signal Tag Descriptions are enabled.
d, then validation will be performed before sending new Alarm Recipient
d, then validation will be performed before sending new Alarm Recipient
d, then validation will be performed before sending new Alarm Recipient
- 23 -
Page 32
Reference Guide
D301499X412
April 2012
4.2.5.6.1 Signal Tag File Location
Messaging Config Tool
The nam
Messaging Configuration tool to access it.
4.2.5.6.2 Signal Tag File Browse Button
Select this bu
Signal Tag file. The filename will be placed in the Location text box.
e and location to save the Signal Tag file. The directory must be shared in order for the
tton to open a Windows file dialog from which you can navigate to a directory for the
4.2.6 View By Messaging Routine
Sets the Tree view to the Routine View, so that Messaging Routine objects are at the highest (left
most) position in the hierarchy.
4.2.7 View By Recipient Groups
Sets the Tree view to the Recipient View, so that Recipient Group objects are at the highest (left
most) position in the hierarchy.
4.2.8 Expand Tree (1 Level)
Expands all elements of the Tree view by one element.
4.2.9 Collapse Tree (1 Level)
Collapses all elements of the Tree view by one element.
- 24 -
Page 33

Reference Guide
D301499X412
April 2012
Messaging Config Tool
4.3 Window Menu
The Window menu provides access to features which affect the Window settings of the Messaging
tool's user interface.
4.3.1 Cascade
If there are multiple connection windows open, they will be cascaded one behind the other.
4.3.2 Tile
If there are multiple database connection windows open, they will be tiled within the user interface.
- 25 -
Page 34

Reference Guide
D301499X412
April 2012
Messaging Config Tool
4.3.3 Arrange Icons
If there are multiple minimized database connection windows inside the Messaging Configuration
tool's user interface, they will be placed in a row from the bottom left corner of the interface window.
4.3.4 Currently Open Windows
Displays a list of currently open windows. Each window represents a new connection with an
OpenEnterprise database.
4.4 Help Menu
This menu provides access to the 'About' box, and also to this help file.
4.4.1 About box
The About box provides version and contact details for this OpenEnterprise component.
4.4.2 Messaging Config Help File
This item provides access to the Messaging Configuration tool's help file.
5 Toolbar
The Toolbar provides quick access to commonly used Message Configuration tool functions.
- 26 -
Page 35
Reference Guide
D301499X412
April 2012
Messaging Config Tool
5.1 New Connection
(Toolbar button)
Opens up a new window within the user interface, having a new connection to the same o r a different
OpenEnterprise database. The Create New Connection to Database dialog will be displayed,
prompting you to enter an OpenEnteprise database connection string into the text field.
OpenEnterprise remote database connection strings are defined by <Computer Name>:<TCP service
name>, as shown in the example below.
A brief progress dialog will appear informing you that the Messaging Configuration tool is querying the
database.
5.2 Add Recipient Group
When selected, the standard New Object dialog is displayed, ready for you to create a new Recipient
Group, or select a previously configured one from a list. The Recipient Group will then 'belong' to this
Messaging Routine.
5.3 Create New Messaging Routine
When selected, the standard New <Item> dialog is displayed, ready for you to type in a new name for
the Messaging Routine you are about to add.
When this function is selected from the Toolbar icon displayed as
Tree view is currently in Routine View.
, it will only be available if the
5.4 Send Configuration to Database
(Toolbar button)
Will export the current Messaging settings to the OpenEnterprise database. Any changes you have
made since opening the Messaging Configuration tool will be saved to the database.
- 27 -
Page 36

Reference Guide
D301499X412
April 2012
Messaging Config Tool
5.5 Export to File
(Toolbar button)
Exports the current Messaging configuration to an SQL script file with the extension sql, which can be
run from the SQL Client to restore the current configuration at any time. If a file name has already
been configured using the Options dialog (obtained from the View menu), the file will be automatically
saved to that, and a message will inform you of the success of this operation. Otherwise you will be
prompted for a file name.
5.6 View By Recipient Groups
Sets the Tree view to the Recipient View, so that Recipient Group objects are at the highest (left
most) position in the hierarchy.
5.7 View By Messaging Routine
Sets the Tree view to the Routine View, so that Messaging Routine objects are at the highest (left
most) position in the hierarchy.
5.8 Collapse Tree (1 Level)
Collapses all elements of the Tree view by one element.
5.9 Expand Tree (1 Level)
Expands all elements of the Tree view by one element.
5.10 About box
The About box provides version and contact details for this OpenEnterprise component.
6 Context Menus
Whenever you right click on an object or any area of the Tree View Pane, whether you are in
Recipient View or Routines View, a context menu will be displayed:-
These are the context menus that are available:-
- 28 -
Page 37

Reference Guide
D301499X412
April 2012
Messaging Config Tool
6.1 Recipient View Context Menu
To create a new Recipient Group, select an empty area of the left pane while in 'Recipient View' mode
and right click. A Create New Recipient Group context menu item will become available.
6.1.1 Add Recipient Group
When selected, the standard New Object dialog is displayed, ready for you to create a new Recipient
Group, or select a previously configured one from a list. The Recipient Group will then 'belong' to this
Messaging Routine.
6.2 Recipient Group Context Menu
To add Recipients to a Recipient Group, select the Recipient Group and right click to show the
context menu. The context menu has other options also.
6.2.1 Add Recipient Sub-menu
The Add Recipient sub-menu provides access to two further menu items, which e nable you to add
either an E-Mail or Pager Recipient. The appropriate dialog will appear to help you in this process.
- 29 -
Page 38

Reference Guide
D301499X412
April 2012
6.2.1.1 Add E-mail Recipient
Messaging Config Tool
The Ne
Recipient Group, or to select a previously configured one.
6.2.1.2 Add Pager Recipient
The Ne
Recipient Group, or to select a previously configured one.
w Object dialog will appear, enabling you to add a new E-Mail Recipient to the selected
w Object dialog will appear, enabling you to add a new Pager Recipient to the selected
6.2.2 Permanently Delete Group
Selection of this item will permanently delete it from the database when the Export to Database option
is chosen later from the Menu bar or Toolbar. At that time, you will be shown a message, allowing you
to abort the database export and exit the Messaging Configuration tool without saving any changes to
the database.
6.2.3 SQL Sub Menu
The SQL sub menu is available on the context menu for any object selected from the Tree view.
6.2.3.1 SQL Copy to Clipboard
Cau
ses the SQL statement that would be necessary to insert this item into the database to be copied
to the Windows clipboard.
6.2.3.2 Show SQL Dialog
ses the SQL statement that would be necessary to insert the selected item into the database to
Cau
be displayed as shown in the example below. The actual SQL statement will vary depending on the
object selected from the Tree view.
6.2.4 Context Menu Help
Selection of this option will display context sensitive help from this help file.
6.2.5 Recipient Group Property Dialog
The Recipient Group property dialog enables you to change certain aspects of the Recipient Group
object selected from the Tree view. It is exactly the same as the Properties which are displayed in the
right pane when the object is selected.
- 30 -
Page 39
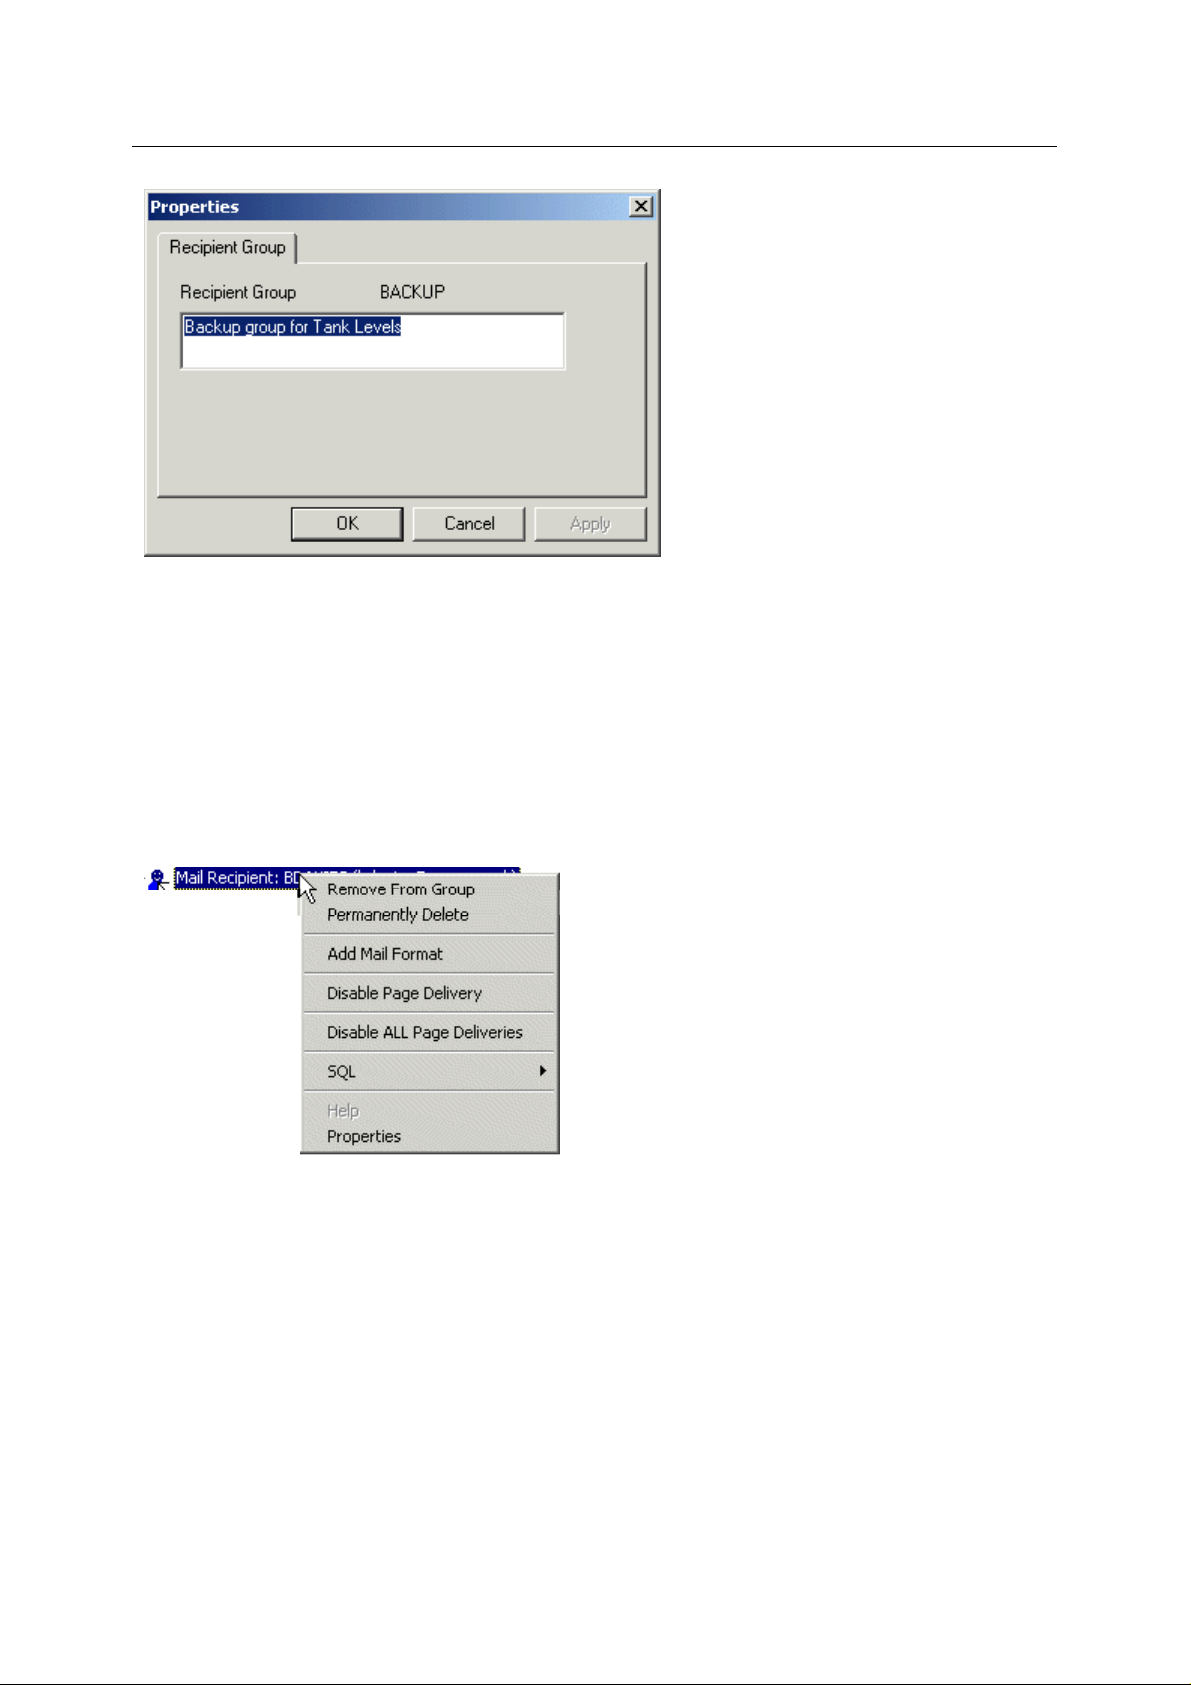
Reference Guide
D301499X412
April 2012
6.2.5.1 Recipient Group Name
Messaging Config Tool
The non
6.2.5.2 Recipient Group Description
You can type
-editable name of the Recipient Group is displayed here.
a relevant description for the Recipient Group in here.
6.3 Mail Recipient Context Menu
The appearance of this context menu will vary, depending on whether the selected Mail Recipient has
already been assigned a Mail Format.
6.3.1 Remove Recipient from Group
The Recipient will be removed from the Recipient Group, but will not be removed from the database
when the 'Export to Database' operation is performed.
6.3.2 Permantently Delete Recipient
The Recipient will be permanently deleted from the database when the next 'Export to Database'
operation is performed.
6.3.3 Add Mail Format
The New Object dialog will appear, enabling you to add a new Mail Format for the selected Mail
Recipient, or to select a previously configured one.
- 31 -
Page 40

Reference Guide
D301499X412
April 2012
Messaging Config Tool
6.3.4 Disable Page Delivery
Disables Messaging delivery for the selected Mail Recipient in this Recipient Group only. If the
Recipient is in other Recipient Groups, messaging will not be disabled for the Recipient in those other
groups.
6.3.5 Disable All Page Deliveries
Disables Messaging deliveries for this Mail Recipient in all Recipient Groups to which he belon gs.
Message deliveries will not be disabled for other Recipients in this group or any other group that the
currently selected Recipient belongs to.
6.3.6 SQL Sub Menu
The SQL sub menu is available on the context menu for any object selected from the Tree view.
6.3.6.1 SQL Copy to Clipboard
Cau
ses the SQL statement that would be necessary to insert this item into the database to be copied
to the Windows clipboard.
6.3.6.2 Show SQL Dialog
ses the SQL statement that would be necessary to insert the selected item into the database to
Cau
be displayed as shown in the example below. The actual SQL statement will vary depending on the
object selected from the Tree view.
6.3.7 Context Menu Help
Selection of this option will display context sensitive help from this help file.
6.3.8 Mail Recipient Properties
The Mail Recipient property box enables you to change certain aspects of the Mail Recipient object
selected. It is exactly the same as the Properties which are displayed in the right pane when the
object is selected.
- 32 -
Page 41

Reference Guide
D301499X412
April 2012
Messaging Config Tool
6.3.8.1 Mail Recipient Name
The non
6.3.8.2 E-mail Address
This edita
6.3.8.3 Mail Recipient Description
You may place any descri
Recipient.
6.3.8.4 Ack Key
The text in this field is a st
string that the recipient JSmith would use to acknowledge an alarm in the example on the Mail
Recipient Properties topic is "JSmithAck".
6.3.8.4.1 Acknowledging Alarms using the Ack Key
The followi
example a user called "Test 1" has defined his Ack Key string as "oedtest2". The OEMessaging
Server detects that an alarm pattern associated with this user has been matched in the alarm
summary table. After waiting for the prescribed delay time, it sends an e-mail to "Test 1".
-editable name of the Mail Recipient is displayed here.
ble field contains the email address of the Mail Recipient.
ptive text here that will enable you to more clearly identify the Mail
ring that the Mail Recipient will use to acknowledge alarms by email. The
ng example shows how to use the Ack Key to acknowledge alarms via e-mail. In this
The body of the e-mail contains any text that was entered into the Mail Format assigned to this Mail
Recipient, and at the end of this text the following tags are added by the Messaging server:-
- 33 -
Page 42

Reference Guide
D301499X412
April 2012
<ACK?=><__ID=<AlarmIDNumber>#<TimeCode>
The "Test 1" user clicks Reply to the e-mail sent by the Messaging server, and prior to acknowledging
the alarm this is the actual e-mail message that he sees:-
To acknowledge this alarm, before actually sending the reply, he places the text "oedtest2"
immediately after the equals sign (=) in the tag that begins "ACK?". An example is shown below with
the Ack Key in place:-
Messaging Config Tool
There is no need to enter any other text into the main body of the reply. The reply is sent, and when it
is received by the OEMessaging Server, the alarm is acknowledged.
6.3.8.5 Ack Mode
The ackn
the Override check box and then selecting Optimistic from this list.
In Optimistic mode, only the alarm Id is sent in the Message Id. When a valid reply is received, the
alarm is acknowledged regardless of the Occurrence Time. In Pessimistic mode, the Occurrence
Time of the alarm will be included in the Message Id. When the reply is received, this must match the
current Occurrence Time.
The need for this functionality comes from the fact that NW3000 alarms are generated at the RTU.
This means that two instances of an alarm can have the same alarm Id but different occurrence times.
Pessimistic mode ensures that the acknowledgement sent will only acknowledge the intende d alarm.
owledgement mode defaults to Pessimistic mode. The mode can be changed by selecting
- 34 -
Page 43

Reference Guide
D301499X412
April 2012
6.3.8.6 Override
ck this box to enable the Ack Mode list. Then you can choose either Optimistic or Pessimistic
Che
mode from the list.
6.3.8.7 User
Messaging Config Tool
This is
Mail Recipient will inherit all of the security settings for this user.
6.3.8.8 Pattern Group
A Pattern Group with which the Mail Reci
6.3.8.9 Time Zone
The time zo
recipient must be selected.
6.3.8.10 Disable
Check thi
mail, even though they may belong to an enabled Messaging Routine.
a list of configured OpenEnterprise users with whom the Mail Recipient will be identified. The
pient will be associated.
ne for the Mail Recipient. This is a mandatory field, so the correct time zone for the
s box to disable this Mail Recipient. When disabled, the Recipient will not receive alarm
6.4 Message Format Context Menu
This context menu appears when a Message Format object is selected from the Tree view and the
right mouse button is clicked.
6.4.1 Remove Message Format Reference
Removes the reference to the Message Format for the selected Mail Recipient, but leaves the
Message Format in the database for further use.
6.4.2 Permanently Delete Message Format
Permanently deletes the Message Format from the database so that it will no longer be available to
any user.
6.4.3 SQL Sub Menu
The SQL sub menu is available on the context menu for any object selected from the Tree view.
- 35 -
Page 44

Reference Guide
D301499X412
April 2012
6.4.3.1 SQL Copy to Clipboard
ses the SQL statement that would be necessary to insert this item into the database to be copied
Cau
to the Windows clipboard.
6.4.3.2 Show SQL Dialog
ses the SQL statement that would be necessary to insert the selected item into the database to
Cau
be displayed as shown in the example below. The actual SQL statement will vary depending on the
object selected from the Tree view.
Messaging Config Tool
6.4.4 Context Menu Help
Selection of this option will display context sensitive help from this help file.
6.4.5 Message Format Properties
The Message Format property box enables you to change certain aspects of the Message Format
object selected. It is exactly the same as the Properties which are displayed in the right pane when
the object is selected.
6.4.5.1 Mail Format Name
The non
6.4.5.2 Subject
This editable
that is sent to the associated Mail Recipient. The text in chevrons indicates aliases, that pick up actual
values from the Alarm Pattern that matches the alarm being reported.
-editable name of the selected Mail Format is displayed here.
field displays the text that will be placed into the Subject field of each email message
- 36 -
Page 45

Reference Guide
D301499X412
April 2012
6.4.5.3 Body
Messaging Config Tool
This editable
that is sent to the associated Mail Recipient. The text in chevrons indicates aliases, that pick up actual
values from the Alarm Pattern that matches the alarm being reported.
field displays the text that will be placed into the Message field of each email message
6.5 Pager Recipient Context Menu
The appearance of this context menu will vary, depending on whether the selected Page Recipient
has already been assigned a Page Format or Pager Number.
6.5.1 Remove Recipient from Group
The Recipient will be removed from the Recipient Group, but will not be removed from the database
when the 'Export to Database' operation is performed.
6.5.2 Permantently Delete Recipient
The Recipient will be permanently deleted from the database when the next 'Export to Database'
operation is performed.
6.5.3 Add Page Format
The New Object dialog will be shown. This will enable you to add a new Page Format for the selected
Page Recipient, or to assign a previously configured one.
6.5.4 Add Pager Number
The New Object dialog will be shown, to enable you to add a new Telephony Details object for the
selected Page Recipient, or to assign a previously configured one.
6.5.5 Disable Page Delivery
Disables Messaging delivery for the selected Mail Recipient in this Recipient Group only. If the
Recipient is in other Recipient Groups, messaging will not be disabled for the Recipient in those other
groups.
6.5.6 Disable All Page Deliveries
Disables Messaging deliveries for this Mail Recipient in all Recipient Groups to which he belon gs.
Message deliveries will not be disabled for other Recipients in this group or any other group that the
currently selected Recipient belongs to.
- 37 -
Page 46

Reference Guide
D301499X412
April 2012
Messaging Config Tool
6.5.7 SQL Sub Menu
The SQL sub menu is available on the context menu for any object selected from the Tree view.
6.5.7.1 SQL Copy to Clipboard
Cau
ses the SQL statement that would be necessary to insert this item into the database to be copied
to the Windows clipboard.
6.5.7.2 Show SQL Dialog
ses the SQL statement that would be necessary to insert the selected item into the database to
Cau
be displayed as shown in the example below. The actual SQL statement will vary depending on the
object selected from the Tree view.
6.5.8 Context Menu Help
Selection of this option will display context sensitive help from this help file.
6.5.9 Page Recipient Properties
The Pager Recipient property dialog enables you to change certain aspects of the Pager Recipient
object selected. It is exactly the same as the Properties which are displayed in the right pane when
the object is selected.
6.5.9.1 Page Recipient Name
The non
-editable name of the Page Recipient is displayed here.
- 38 -
Page 47

Reference Guide
D301499X412
April 2012
Messaging Config Tool
6.6 Page Format Context Menu
This context menu appears when a Page Format object is selected from the Tree view and the right
mouse button is clicked.
6.6.1 Add Next Page Format
Adds a new Page Format for this Page Recipient. The new Page format is sent if the there has to be
a repeat sending of the message.
6.6.2 Remove Reference
Removes the reference to this Page Format under the Page Recipient in the Tree view, but does not
remove it from the database when the next 'Export to Database' operation is performed.
6.6.3 Permanently Delete
Removes the Page Format from the database when the next 'Export to Database' operation is
performed.
6.6.4 SQL Sub Menu
The SQL sub menu is available on the context menu for any object selected from the Tree view.
6.6.4.1 SQL Copy to Clipboard
Cau
ses the SQL statement that would be necessary to insert this item into the database to be copied
to the Windows clipboard.
6.6.4.2 Show SQL Dialog
ses the SQL statement that would be necessary to insert the selected item into the database to
Cau
be displayed as shown in the example below. The actual SQL statement will vary depending on the
object selected from the Tree view.
- 39 -
Page 48

Reference Guide
D301499X412
April 2012
Messaging Config Tool
6.6.5 Context Menu Help
Selection of this option will display context sensitive help from this help file.
6.6.6 Page Format Properties
The Page Format property box enables you to change certain aspects of the Page Format object
selected. It is exactly the same as the Properties which are displayed in the right pane when the
object is selected.
6.6.6.1 Page Format Name
The non
6.6.6.2 Paging Message
This edita
Format.
6.6.6.3 Pre-Send Delay
A value in milliseconds
criteria for a Routine before initiating the sending of the message.
6.6.6.4 Post-Send Delay
A value in millise
closing the message sending process.
-editable name of the selected Page Format is displayed here.
ble field contains the actual text that will be sent to the Page Recipient using this Page
which the Messaging Server will wait after detecting associated Alarm Pattern
conds which the Messaging Server will wait after sending the message before
6.7 Telephony Details Context Menu
This context menu appears when a Telephony Details object is selected from the Tree view and the
right mouse button is clicked.
- 40 -
Page 49

Reference Guide
D301499X412
April 2012
Messaging Config Tool
6.7.1 Remove Telephone Details
Removes the Telephone Details object from the database when the next 'Export to Database'
operation is performed.
6.7.2 Remove Telephone Reference
Removes the reference to this Telephone Details object under the Page Recipient in the Tree view,
but does not remove it from the database when the next 'Export to Database' operation is performed.
6.7.3 SQL Sub Menu
The SQL sub menu is available on the context menu for any object selected from the Tree view.
6.7.3.1 SQL Copy to Clipboard
Cau
ses the SQL statement that would be necessary to insert this item into the database to be copied
to the Windows clipboard.
6.7.3.2 Show SQL Dialog
ses the SQL statement that would be necessary to insert the selected item into the database to
Cau
be displayed as shown in the example below. The actual SQL statement will vary depending on the
object selected from the Tree view.
6.7.4 Context Menu Help
Selection of this option will display context sensitive help from this help file.
6.7.5 Telephony Details Properties
The Telephony Details property dialog enables you to change certain aspects of the Telephony
Details object selected. It is exactly the same as the Properties which are displayed in the right pane
when the object is selected.
- 41 -
Page 50

Reference Guide
D301499X412
April 2012
Messaging Config Tool
6.7.5.1 Telephony Format Name
The non
6.7.5.2 Telephony Format Description
A full descript
6.7.5.3 Pre-Dial Delay
A delay, in seconds
6.7.5.4 Outside Line Access Number
Any number t
6.7.5.5 Pre-Dial Delay
A delay, in seconds
6.7.5.6 Main Number
This is th
second delays into the dialling process. This can be used to navigate through the automated
telephone menus (e.g. 012345678,,,2,1,444).
-editable name of the selected Telephony Format is displayed here.
ion of the Telephony Format being used can be entered here.
which the Messaging Server will observe before entering the outside line number.
hat is required to gain access to an outside line must be entered here.
which the Messaging Server will observe before entering the outside line number.
e actual number of the Pager used by the Page Recipient. Commas may be inserted to add
- 42 -
Page 51
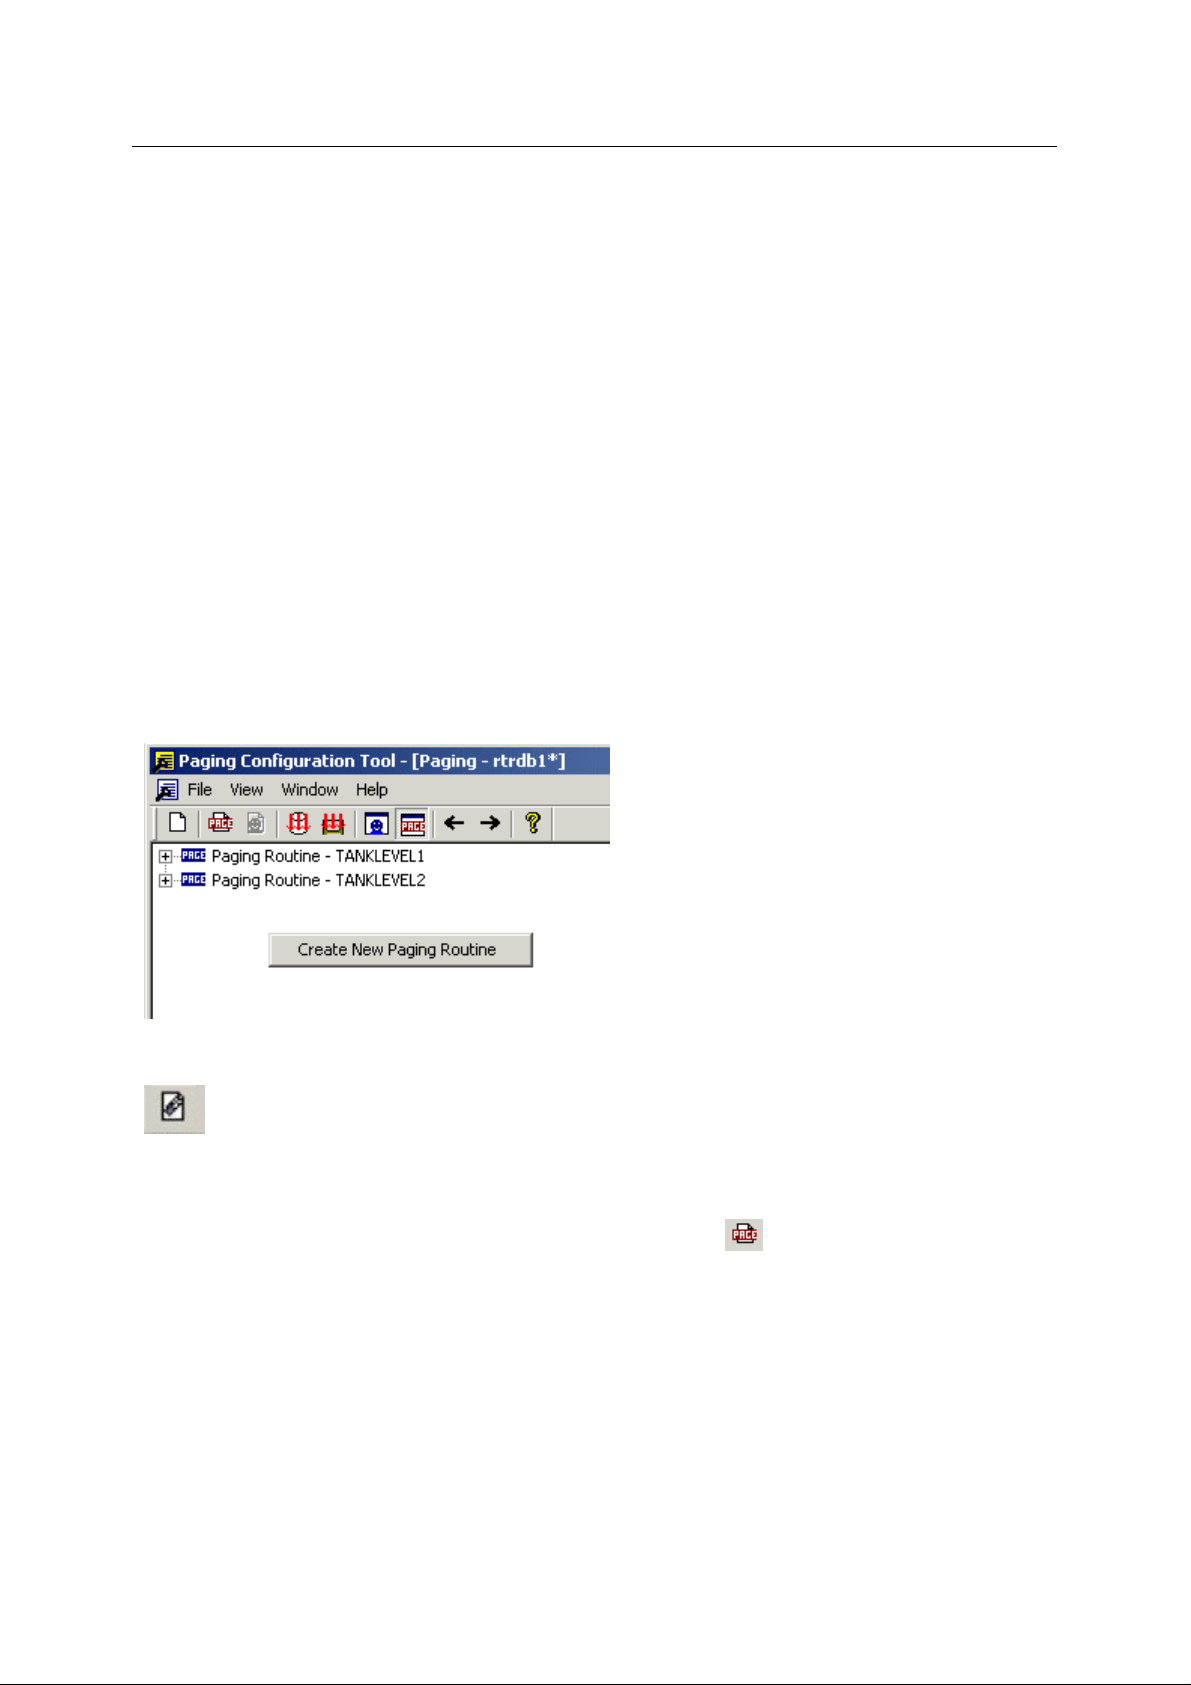
Reference Guide
D301499X412
April 2012
6.7.5.7 Post-Connect Delay
Messaging Config Tool
A delay, in seconds
Pager and sending the message.
6.7.5.8 Pre-Disconnect Delay
A delay in se
before disconnection with the Pager.
6.7.5.9 Connection Loss Redial Attempts
This is th
lost, before aborting.
6.7.5.10 Connection Loss Redial Delay
The delay, in seconds, whi
of connection with the Pager.
conds, which will be observed by the Messaging Server after sending the message and
e number of redial attempts which the Messaging Server will try, should the connection be
which will be observed by the Messaging Server after making a connection to the
ch will be used by the Messaging Server before redialling following a loss
6.8 Routine View Context Menu
To create a new Messaging Routine, select an empty area of the left pane while in 'Message Routine View' and right click. A Create New Messaging Routine context menu item will become available.
6.8.1 Create New Messaging Routine
When selected, the standard New <Item> dialog is displayed, ready for you to type in a new name for
the Messaging Routine you are about to add.
When this function is selected from the Toolbar icon displayed as
Tree view is currently in Routine View.
, it will only be available if the
6.9 Message Routine Context Menu
This context menu appears when a Messaging Routine object is selected from the Tree view and the
right mouse button is clicked.
- 43 -
Page 52

Reference Guide
D301499X412
April 2012
Messaging Config Tool
6.9.1 Delete Paging Routine
Selecting this option will delete the Messaging Routine from the database when the next 'Export to
Database' operation is performed.
6.9.2 Add Pattern Group
This option enables you to add a new Pattern Group to this Routine. Note that if there is already a
Pattern Group assigned to this Routine, that this option will be shown as Delete Pattern Group.
6.9.3 Add Action Group
This option enables you to add a new Action Group to this Routine. Note that if there is already an
Action Group assigned to this Routine, that this option will be shown as Delete Action Group.
6.9.4 SQL Sub Menu
The SQL sub menu is available on the context menu for any object selected from the Tree view.
6.9.4.1 SQL Copy to Clipboard
Cau
ses the SQL statement that would be necessary to insert this item into the database to be copied
to the Windows clipboard.
6.9.4.2 Show SQL Dialog
ses the SQL statement that would be necessary to insert the selected item into the database to
Cau
be displayed as shown in the example below. The actual SQL statement will vary depending on the
object selected from the Tree view.
This menu provides access to the 'About' box, and also to this help file.
- 44 -
Page 53

Reference Guide
D301499X412
April 2012
Messaging Config Tool
6.9.5 Message Routine Properties
The Routine property dialog enables you to change certain aspects of the Routine object selected. It
is exactly the same as the Properties which are displayed in the right pane when the object is
selected. Click on the hotspots* in the image below for further help on the features of the dialog.
6.9.5.1 Messaging Routine Name
The non
6.9.5.2 Messaging Routine Description
A full descript
6.9.5.3 Disable All New Actions
Placing a
operation) to be disabled.
6.9.5.4 Disable All Actions
Placing a
-editable name of the selected Messaging Routine is displayed here.
ion for the Messaging Routine can be entered here.
check in this box causes all newly configured Actions (since the last Export to Database
check in this box causes all Actions to be disabled.
6.10 Pattern Group Context Menu
This context menu appears when a Pattern Group object is selected from the Tree view and the right
mouse button is clicked.
- 45 -
Page 54

Reference Guide
D301499X412
April 2012
Messaging Config Tool
6.10.1 Add Pattern
Enables you to create a new Pattern to add to the selected Pattern Group.
6.10.2 Delete Group
Enables you to delete the selected Pattern Group.
6.10.3 SQL Sub Menu
The SQL sub menu is available on the context menu for any object selected from the Tree view.
6.10.3.1 SQL Copy to Clipboard
Cau
ses the SQL statement that would be necessary to insert this item into the database to be copied
to the Windows clipboard.
6.10.3.2 Show SQL Dialog
ses the SQL statement that would be necessary to insert the selected item into the database to
Cau
be displayed as shown in the example below. The actual SQL statement will vary depending on the
object selected from the Tree view.
This menu provides access to the 'About' box, and also to this help file.
6.10.4 Pattern Group Properties
The Pattern Group property dialog enables you to change certain aspects of the Pattern Group object
selected. It is exactly the same as the Properties which are displayed in the right pane when the
object is selected.
- 46 -
Page 55

Reference Guide
D301499X412
April 2012
6.10.4.1 Pattern Group Name
Messaging Config Tool
The non
6.10.4.2 Pattern Group Description
A full descript
-editable name of the selected Pattern Group is displayed here.
ion of the Pattern Group can be entered here.
6.11 Alarm Pattern Context Menu
This context menu appears when an Alarm Pattern object is selected from the Tree view and the right
mouse button is clicked.
6.11.1 Delete Pattern
This option deletes the selected Pattern. Note that the deletion is only made if you Export to
Database before closing the Messaging Configuration tool.
6.11.2 Disable Pattern
This option disables the selected Pattern. Note that the change will only be saved to the database if
an Export to Database is performed before closing the Messaging Configuration tool.
6.11.3 SQL Sub Menu
The SQL sub menu is available on the context menu for any object selected from the Tree view.
- 47 -
Page 56

Reference Guide
D301499X412
April 2012
6.11.3.1 SQL Copy to Clipboard
ses the SQL statement that would be necessary to insert this item into the database to be copied
Cau
to the Windows clipboard.
6.11.3.2 Show SQL Dialog
ses the SQL statement that would be necessary to insert the selected item into the database to
Cau
be displayed as shown in the example below. The actual SQL statement will vary depending on the
object selected from the Tree view.
Messaging Config Tool
6.11.4 Context Menu Help
Selection of this option will display context sensitive help from this help file.
6.11.5 Alarm Pattern Properties
The Alarm Pattern property dialog enables you to change certain aspects of the Pattern Group object
selected. It is exactly the same as the Properties which are displayed in the right pane when the
object is selected. Click on the hotspots* in the image below for further help on the feature s of the
dialog.
- 48 -
Page 57

Reference Guide
D301499X412
April 2012
Messaging Config Tool
6.11.5.1 Alarm Pattern Name
The non
6.11.5.2 Alarm Pattern Description
A full descript
6.11.5.3 Device Name
The name of
regarding the signal of interest.
6.11.5.4 Object Name
The signal that will cause
property page be found in the 'Alarm Summary' table.
6.11.5.5 Base
The first pa
<Base>.<Extension>.<Attribute>).
-editable name of the selected Alarm Pattern is displayed here.
ion of the Alarm Pattern can be entered here.
the logging device, controller or RTU from which OpenEnterprise is receiving alarm data
a Messaging Routine to begin should the alarm condition specified on this
rt of the signal name. Used with the ACCOL system of naming signals (i.e.
- 49 -
Page 58
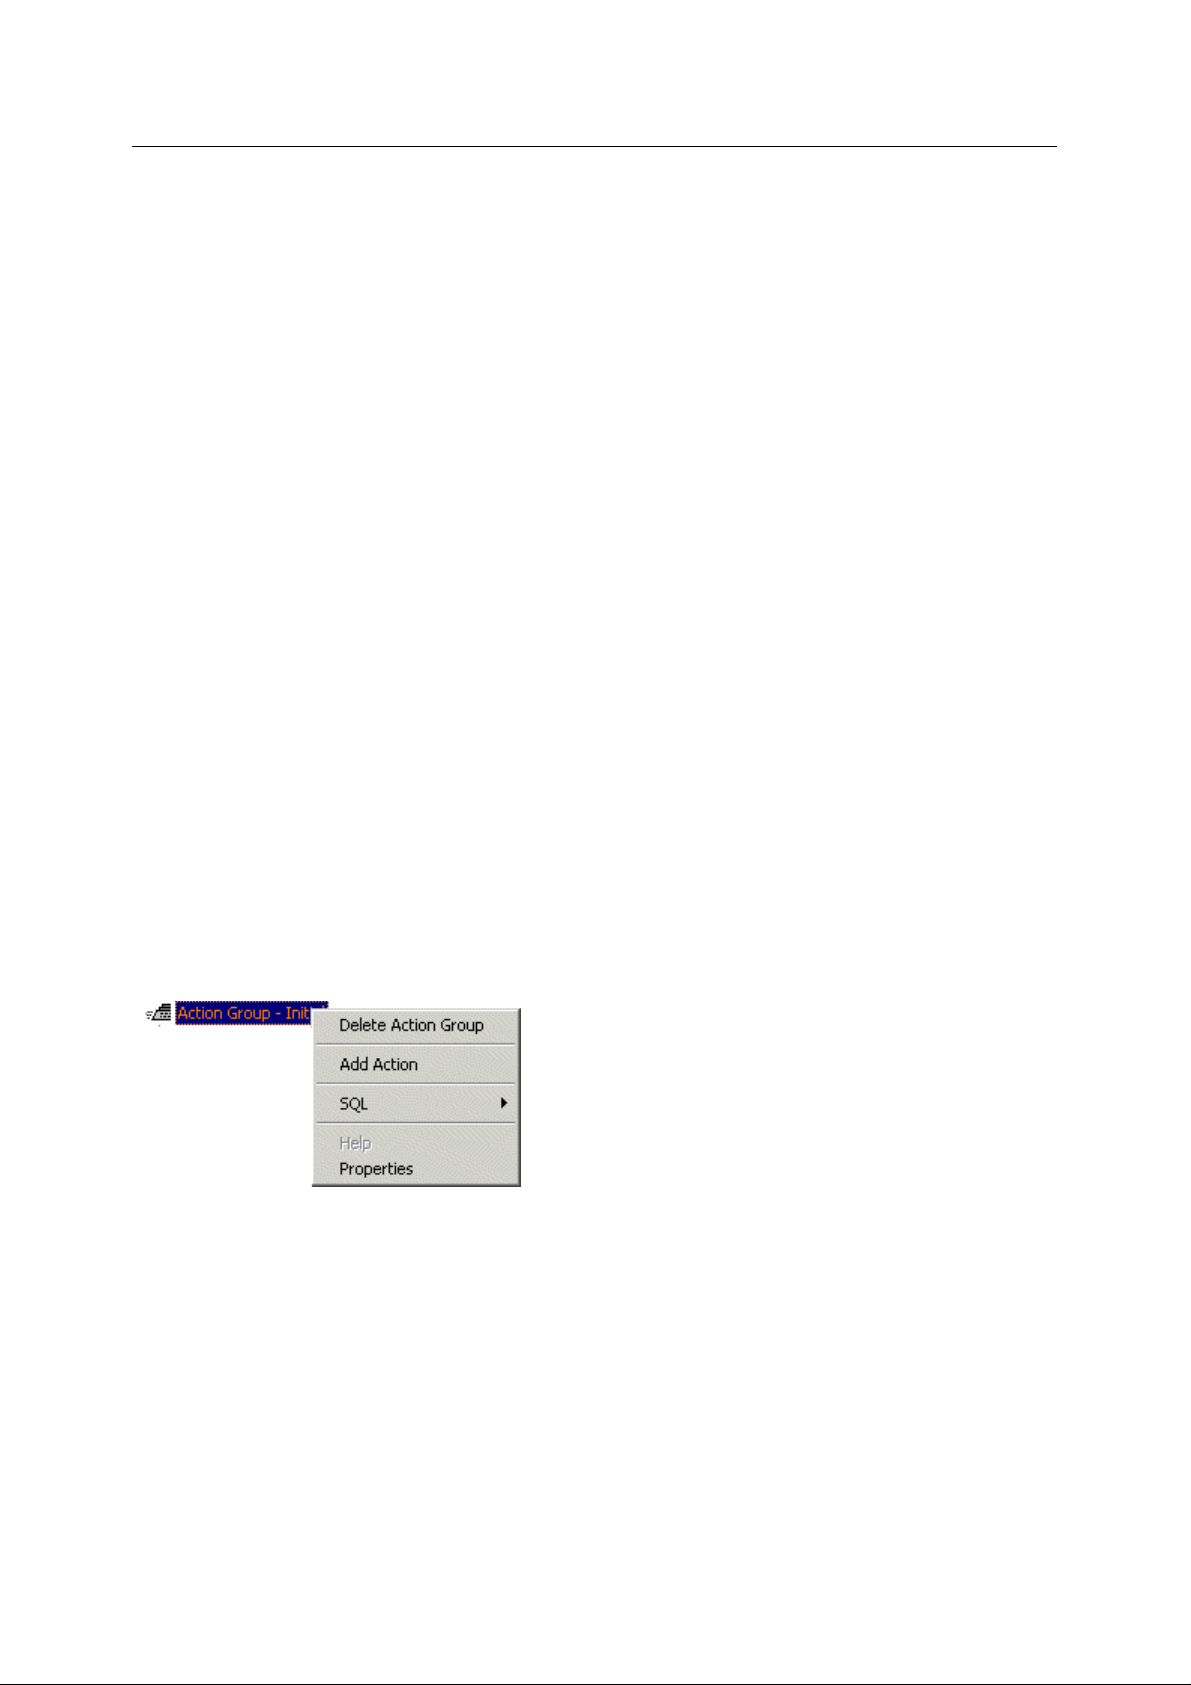
Reference Guide
D301499X412
April 2012
6.11.5.6 Extension
Messaging Config Tool
The se
<Base>.<Extension>.<Attribute>).
6.11.5.7 Attribute
The third p
<Base>.<Extension>.<Attribute>).
6.11.5.8 Priority
The pri
6.11.5.9 Condition
The alarm condition for the selected signal that will initiate a Messaging Routine.
from the drop-down list.
6.11.5.10 Access Area
The Acce
6.11.5.11 Plant Area
The Plant Are
6.11.5.12 Trigger Action When Alarm Clears
cond part of the signal name. Used with the ACCOL system of naming signals (i.e.
art of the signal name. Used with the ACCOL system of naming signals (i.e.
ority of the alarm condition selected from the Condition list.
ss Area of the signal. The value defaults to the Default Access Area if not specified here.
a of the signal. Defaults to 'ALL' if not specified here.
Select the condition
If this box is checke
matched in the Alarm Summary table, and also when it is cleared.
d, the Messaging Routine will run when the alarm defined in the Alarm Pattern is
6.12 Action Group Context Menu
This context menu appears when an Action Group object is selected from the Tree view and the right
mouse button is clicked.
6.12.1 Delete Action Group
The Action Group will be deleted the next time you perform an 'Export to Database' operation.
6.12.2 Add Action
Adds an Action to the currently selected Action Group.
6.12.3 SQL Sub Menu
The SQL sub menu is available on the context menu for any object selected from the Tree view.
- 50 -
Page 59

Reference Guide
D301499X412
April 2012
6.12.3.1 SQL Copy to Clipboard
Cau
ses the SQL statement that would be necessary to insert this item into the database to be copied
to the Windows clipboard.
6.12.3.2 Show SQL Dialog
ses the SQL statement that would be necessary to insert the selected item into the database to
Cau
be displayed as shown in the example below. The actual SQL statement will vary depending on the
object selected from the Tree view.
Messaging Config Tool
6.12.4 Context Menu Help
Selection of this option will display context sensitive help from this help file.
6.12.5 Properties
This object currently has no properties of its own to be configured.
6.13 Action Context Menu
This context menu appears when an Action or 'Next Action' object is selected from the Tree view and
the right mouse button is clicked.
6.13.1 Delete Action
The currently selected Action will be deleted when the 'Export to Database' operation is next
performed.
6.13.2 Add Recipient Group
- 51 -
Page 60

Reference Guide
D301499X412
April 2012
When selected, the standard New Object dialog is displayed, ready for you to create a new Recipient
Group, or select a previously configured one from a list. The Recipient Group will then 'belong' to this
Messaging Routine.
Messaging Config Tool
6.13.3 Add Next Action
When selected, the standard Create/Select <Item> dialog is displayed, ready for you to type in a new
name for the Next Action you are about to add.
6.13.4 SQL Sub Menu
The SQL sub menu is available on the context menu for any object selected from the Tree view.
6.13.4.1 SQL Copy to Clipboard
Cau
ses the SQL statement that would be necessary to insert this item into the database to be copied
to the Windows clipboard.
6.13.4.2 Show SQL Dialog
ses the SQL statement that would be necessary to insert the selected item into the database to
Cau
be displayed as shown in the example below. The actual SQL statement will vary depending on the
object selected from the Tree view.
6.13.5 Context Menu Help
Selection of this option will display context sensitive help from this help file.
6.13.6 Properties
This object currently has no properties of its own to be configured.
7 Create New Object Dialog
When creating new objects or associating previously configured Recipients with Recipient Groups or
Recipient Groups with Messaging Routines, you will see a different dialog, depending on the object
that has been selected from the Tree view.
7.1 Create New Object Dialog
For instance, if an Action Group object is selected from the Tree view, and the 'Add Action' option is
chosen from the context menu, this is the dialog you will see. You have to create a new Action object
every time.
- 52 -
Page 61

Reference Guide
D301499X412
April 2012
Messaging Config Tool
7.2 Create/Select New Object Dialog
However, if you have selected a Recipient Group, and have already created one or more Recipients,
the dialog will give you the opportunity to select one of those Recipients to associate with the Group.
For instance, in the example below, two Recipients called 'BDAVIES' and 'TEST1' have already been
created. A Recipient Group object is then selected, and the 'Add Recipient' option is selected. The
'Create/Select Recipient' dialog is displayed, enabling you to select one of these previously created
Recipients to be associated with the Recipient Group.
7.3 New Object Name
If you are going to create a completely new object, the name must be typed in here. It must be unique
to objects of this type.
7.4 Configured Object List
If you are going to select an object that has previously been added to the database, select an object
from this list. It will be automatically entered into the Name field. Then select the OK button.
7.5 OK Button
If adding a new object, the new object will be added to the List or Tree view, depending on the dialog.
The object will not be added to the database until you perform a new 'Export to Database' operation.
If setting an interface option, the option will be saved, and will become effective the next time
Messaging Configuration tool is started.
7.6 Cancel Button
The dialog will be closed, but any new object will not be added to the List or Tree view (depending on
the dialog).
- 53 -
Page 62

Reference Guide
D301499X412
April 2012
Messaging Config Tool
7.7 Help Button
This context sensitive help topic will be displayed from the Messaging Configuration tool help file.
8 Glossary
DPC: Digital Process Control device.
HMI: Human Machine Interface. Basically, the data that is presented to the Control room operator
from the processing plant. This consists typically of graphical displays that mimic the
processing plant. It will also usually include trend displays that show a signal's value over a
period of time and an Alarm View display that enables the operator to see and acknowledge
alarms. The OpenEnteprise HMI utilizes these and many other ways of presenting data to the
user.
OPC: Object linking and embedding for Process Control applications. A set of seven open
standards for connectivity and interoperability of industrial automation and the enterprise
systems.
RDI: Remote Device Interface. The OpenEnterprise driver and the related tables that provide an
interface to a remote device for data collection.
RTU: Remote Telemetry Unit. A device which interfaces objects in the physical world to a SCADA
system by transmitting telemetry data to the system and/or altering the state of connected
objects based on control messages received from the system.
SCADA: Supervisory Control and Data Acquisition system. Standard systems include a
processing plant connected to data collection devices, communication systems to transmit the
data back to a Control room Server database, and Workstations which di splay the data.
TCP: Transmission Control Protocol. Together with Internet Protocol (IP), TCP is one of the core
protocols underlying the Internet. The two protocols are usually referred to as a group, by the
term "TCP/IP." TCP enables two computers to establish a connection and exchange
information. TCP guarantees delivery of data and also guarantees that information packets
will be delivered in the same order in which they were sent.
- 54 -
Page 63

Reference Guide
D301499X412
April 2012
9 Index
1
A
About box................................................... 29, 31
Access Area............................................... 20, 52
Action ...........................15, 18, 20, 48, 52, 53, 54
Action Context Menu........................................ 53
Action Group.................................................... 15
Action Group Context Menu............................. 52
Add........................................... 30, 32, 40, 47, 54
Add Action........................................................ 53
Add Action Group............................................. 47
Add Email Recipient......................................... 32
Add Mail Format............................................... 34
Add Next Action ............................................... 54
Add Next Page Format..................................... 42
Add Pager Number .......................................... 40
Add Pager Recipient........................................ 33
Add Pattern ...................................................... 48
Add Recipient Sub Menu ................................. 32
Alarm Pattern Context Menu............................ 50
Alarm Pattern Description.......................... 19, 52
Alarm Pattern Properties.................................. 18
Alarm Pattern Property Box ............................. 51
Alarm Patterns ............................... 15, 18, 19, 52
Arrange Icons................................................... 29
Attribute...................................................... 20, 52
B
Base........................................................... 19, 52
Blank Email Addresses.................................... 26
Body........................................................... 11, 39
box.................................................................... 49
Browse Button.................................................. 25
C
Cancel Button................................................... 56
Cascade........................................................... 28
Clipboard33, 35, 38, 41, 42, 44, 47, 49, 50, 53, 54
Close Connection............................................. 22
Collapse Tree............................................. 27, 31
Color Palette Dropdown................................... 25
Condition.................................................... 20, 52
Configured Object List...................................... 56
Connection Loss Redial Attempts.............. 14, 46
Messaging Config Tool
Connection Loss Redial Delay....................14, 46
Context Menu Help33, 35, 39, 41, 42, 44, 51, 53, 54
Create New.................................................30, 46
D
Database.....................................................23, 30
Send Configuration .................................23, 30
Days..................................................................20
Delay Properties ...............................................20
Delete............................................................6, 47
Delete Action.....................................................54
Delete Action Group..........................................53
Delete Group.....................................................49
Delete Pattern...................................................50
Device Name ..............................................19, 52
Disable All Actions......................................18, 48
Disable All New Actions..............................18, 48
Disable All Page Deliveries.........................35, 40
Disable Page Delivery.................................35, 40
Disable Pattern .................................................50
Duplicate Email Addresses...............................26
E
Email Address...............................................9, 36
Email Recipients...........................................7, 16
Enable Treeview Background Color.................25
Exit....................................................................23
Expand Tree ...............................................27, 31
Export..........................................................22, 30
Extension....................................................20, 52
F
Forever..............................................................21
Forever Object..................................................16
G
Group..........................................................34, 40
H
Help.......................................................29, 47, 49
Help Button.......................................................56
Hours ................................................................21
I
Initial Database Connection..............................24
Initial Database Enable.....................................24
- 55 -
Page 64

Reference Guide
D301499X412
April 2012
Messaging Config Tool
Interface Paging Routines View....................... 14
Interface Recipient View .................................... 6
L
Level........................................................... 27, 31
M
Mail Format Name...................................... 11, 39
Mail Format References................................... 26
Mail Recipient Context Menu........................... 34
Mail Recipient Name.................................... 9, 36
Mail Recipient Properties................................... 9
Mail Recipient Properties Dialog...................... 35
Main Number.............................................. 14, 45
Main Pre-Dial Delay......................................... 14
Message............. 6, 12, 17, 29, 30, 43, 46, 47, 48
Message Format Properties............................. 11
Message Formats .............................................. 8
Messaging Config Help File............................. 29
Messaging Configuration Overview................... 6
Minutes............................................................. 21
Missing............................................................. 26
Modifying Objects............................................... 6
N
Name11, 12, 17, 18, 19, 39, 41, 43, 48, 50, 52, 55
New.................................................................. 55
New Connection......................................... 22, 30
New Object Dialog ........................................... 55
Not Repeat....................................................... 21
O
Object................................... 6, 16, 19, 52, 55, 56
OK Button......................................................... 56
Options............................................................. 24
Options Dialog Colors Tab............................... 25
Options Dialog Connection Tab....................... 24
Options Dialog Output File Tab........................ 25
Options Dialog Signal Tag ............................... 26
Options Dialog Validation Tab.......................... 26
Output File Name............................................. 25
Outside Line Access Number..................... 13, 45
P
Page Format Context Menu............................. 41
Page Format Properties................................... 12
Page Format Property Box............................... 42
Page Formats ...................................8, 12, 40, 43
Page Recipient Name.................................12, 41
Page Recipient Properties................................12
Page Recipient Property Box............................41
Pager Recipient ............................................7, 16
Pager Recipient Context Menu.........................40
Paging...................................................12, 29, 43
Paging Routine ...........................................27, 31
Pattern Group Context Menu............................48
Pattern Group Description..........................18, 50
Pattern Group Properties..................................18
Pattern Group Property Box .............................49
Pattern Groups..........................15, 18, 47, 49, 50
Permanently Delete........................33, 34, 40, 42
Permanently Delete Group...............................33
Permanently Delete Recipient....................34, 40
Plant Area...................................................20, 52
Post-Connect Delay....................................14, 46
Post-Send Delay.........................................13, 43
Pre-Dial Delay.............................................13, 45
Pre-Disconnect Delay.................................14, 46
Pre-Send Delay...........................................12, 43
Priority.........................................................20, 52
Properties....................................................53, 55
Properties Pane..................................................8
R
Recipient Group Context Menu ........................32
Recipient Group Description.........................9, 34
Recipient Group Name .................................8, 34
Recipient Group Properties ................................8
Recipient Group Properties Box.......................33
Recipient Groups....... 7, 8, 16, 27, 30, 31, 32, 54
Recipient View Context Menu...........................31
Remove Recipient.......................................34, 40
Remove Reference...........................................42
Remove Telephone Details ..............................43
Remove Telephone Reference.........................43
Repeat Properties.............................................21
Repeat Times....................................................21
Routine Context Menu......................................46
Routine Description.....................................17, 48
Routine Properties............................................17
Routine Property Box........................................48
- 56 -
Page 65

Reference Guide
D301499X412
April 2012
Messaging Config Tool
Routine View Context Menu............................. 46
Routines...........14, 15, 17, 27, 30, 31, 46, 47, 48
S
Send Configuration .................................... 23, 30
Database................................................ 23, 30
Show SQL33, 35, 39, 41, 42, 44, 47, 49, 51, 53, 54
Signal Tag File Browse Button......................... 27
Signal Tag File Location................................... 27
Split Window Modification................................ 24
SQL Copy33, 35, 38, 41, 42, 44, 47, 49, 50, 53, 54
Clipboard33, 35, 38, 41, 42, 44, 47, 49, 50, 53, 54
SQL Sub Menu33, 35, 38, 40, 42, 43, 47, 49, 50, 53, 54
Subject .......................................................11, 39
T
Telephony Details...............................................8
Telephony Details Context Menu......................43
Telephony Details Properties............................13
Telephony Details Property Box.......................44
Telephony Format Description....................13, 45
Telephony Format Name............................13, 45
Tile ....................................................................28
Toggle Status Bar.............................................24
Toggle Toolbar..................................................24
Tree View Pane ..................................................7
V
View Menu........................................................23
W
Windows Open..................................................29
- 57 -
Page 66

Reference Guide
D301499X412
April 2012
DISCLAIMER
Bristol, Inc., Bristol Babcock Ltd, Bristol Canada, BBI SA de CV and the Flow Computer Division , are wholly owned subsidiaries of Emerson Electric Co. doing business
as Remote Automation Solutions (“RAS”), a division of Emerson Process Management. ROC, FloBoss, ROCLINK, Bristol, Bristol Babcock, ControlWave, TeleFlow and
Helicoid are trademarks of RAS. AMS, PlantWeb and the PlantWeb logo are marks of Emerson Electric Co. The Emerson logo is a trademark and service mark of the
Emerson Electric Co. All other marks are property of their respective owners.
The contents of this publication are presented for informational purposes only. While every effort has been made to ensure informational accuracy, they are not to be
construed as warranties or guarantees, express or implied, regarding the products or services described herein or their use or applicability. RAS reserves the right to
modify or improve the designs or specifications of such products at any time without notice. All sales are governed by RAS’ terms and conditions which are available upon
request. RAS does not assume responsibility for the selection, use or ma intenance of any product. Responsibility for proper selection, use and maintenance of any RAS
product remains solely with the purchaser and end-user.
Engineered and supported by:
Remote Automation Solutions,
Blackpole Road, Worcester, WR3 8YB, UK
Registered office: Meridian East, Leicester, LE19 1UX
Registered in England and Wales, Registration No. 00671801
VAT Reg No. GB 705 353 652
Emerson Process Management
Remote Automation Solutions
1100 Buckingham St
Watertown, CT 06795
T 1 (860) 945 2200
F 1 (860) 945 2278
www.EmersonProcess.com/Remote
binfo@EmersonProcess.com
© 2001-2012 Remote Automation Solutions, division of Emerson Process Management. All rights
reserved.
Emerson Process Management
Remote Automation Solutions
Blackpole Road
Worcester, WR3 8YB
T 44 (0) 1905 856848
F 44 (0) 1905 856930
www.EmersonProcess.com/Remote
oedsupport@EmersonProcess.com
 Loading...