

Page 1

Reference Guide
D301513X412
April 2012
OpenEnterprise Menus Reference Guide
(V2.83)
Remote Automation Solutions
Website: www.EmersonProcess.com/Remote
Page 2

Reference Guide
D301513X412
April 2012
OEMenus
Contents
1 OEMenus..................................................................................................................................1
1.1 Custom Menus....................................................................................................................1
1.1.1 Example View Custom Menu .......................................................................................1
1.1.2 Example OEDesktop Custom Menu.............................................................................1
1.2 Sources, Targets and Actions.............................................................................................2
1.2.1 Source and Target........................................................................................................2
1.2.2 Actions..........................................................................................................................2
1.2.2.1 Load File ................................................................................................................2
1.2.2.2 Load File with Parameters .....................................................................................2
1.2.2.3 Load File from OPC Tags ......................................................................................2
1.2.2.4 Database Update...................................................................................................2
1.3 Views and Data Sources.....................................................................................................3
1.3.1.1 The Data Source - Tables or Tags?.......................................................................3
1.4 Views and their Data Display..............................................................................................3
1.4.1 Views Displaying Data from Table Columns................................................................3
1.4.2 Views Displaying Data from OPC Tags........................................................................4
1.4.3 Views Displaying other types of Data...........................................................................4
1.5 Parameters and Aliases......................................................................................................4
1.5.1 Parameter - definition...................................................................................................4
1.5.2 Alias - definition............................................................................................................4
1.5.3 Aliases and Parameters - what's the difference?.........................................................5
1.5.4 User defined string Aliases...........................................................................................5
1.5.5 Aliases that are class attributes....................................................................................5
1.5.6 Aliases reduce display creation....................................................................................5
2 The Two Types of Alias ........................................................................................................... 7
2.1 String Aliases ......................................................................................................................7
2.1.1 Graphics View...............................................................................................................8
2.1.2 Trend View....................................................................................................................8
2.1.3 SQL View (.DBX File)...................................................................................................8
2.1.4 Notes View....................................................................................................................8
2.1.5 Web View......................................................................................................................9
2.2 Class Aliases.......................................................................................................................9
2.2.1 Alarm View Aliases.......................................................................................................9
2.2.2 Signal View Aliases....................................................................................................10
2.2.3 Report Selector Aliases..............................................................................................11
3 Three Types of Parameter.....................................................................................................13
3.1 Resolved String Alias Parameters ....................................................................................13
3.1.1 Graphics View.............................................................................................................13
3.1.2 Trend View..................................................................................................................13
3.2 Resolved Column Alias Parameters .................................................................................13
3.2.1 Alarm View..................................................................................................................13
- i -
Page 3

Reference Guide
D301513X412
April 2012
Alarm Ribbon (Banner) View......................................................................................13
3.2.2
3.2.3 SQL View....................................................................................................................14
3.2.4 Notes View..................................................................................................................14
3.3 Constant Values................................................................................................................14
4 OEMenus View by View.........................................................................................................14
5 Accessing OEMenu Editor....................................................................................................15
5.1 View Components.............................................................................................................15
5.1.1 Alarm Banner View.....................................................................................................15
5.1.2 Alarm View..................................................................................................................15
5.1.3 OE Notes View ...........................................................................................................15
5.1.4 OE Trend View...........................................................................................................15
5.1.5 OE SQL View..............................................................................................................16
5.1.6 OE Graphics View ......................................................................................................16
5.2 OEDesktop........................................................................................................................16
6 Menu Editor Dialog................................................................................................................17
6.1 Reordering Menu Items.....................................................................................................17
OEMenus
7 Menu Commands...................................................................................................................17
7.1 Creating Menus.................................................................................................................18
7.2 Renaming Menus..............................................................................................................18
7.3 Copying Menus .................................................................................................................19
7.4 Pasting Menus ..................................................................................................................20
7.5 Deleting Menus .................................................................................................................20
8 Menu Separators....................................................................................................................20
9 Menu Groups..........................................................................................................................21
9.1 Creating Menu Groups......................................................................................................21
9.2 Create Menu Groups.........................................................................................................21
9.3 Copy Menu Groups...........................................................................................................22
9.4 Paste Menu Groups ..........................................................................................................23
9.5 Invoke All Menu Group Option..........................................................................................23
9.5.1 Group Color Change ..................................................................................................23
9.5.1.1 Runtime................................................................................................................23
9.5.2 Invoke All Submenu Items..........................................................................................24
10 Direct Invoke..........................................................................................................................24
11 Insert Custom Group Menu Before Parent Menu...............................................................25
11.1 Removing the Custom Group Menu..............................................................................26
- ii -
Page 4

Reference Guide
D301513X412
April 2012
Target......................................................................................................................................27
12
12.1 Target - Views................................................................................................................27
12.2 Target - OE Control Display ..........................................................................................28
12.3 Target - Data Server......................................................................................................29
12.4 Target - Windows Applications......................................................................................29
13 Action......................................................................................................................................29
13.1.1 Standard Actions Available.....................................................................................30
13.1.2 Extra Actions Available ...........................................................................................30
13.1.3 Single Action Only Available...................................................................................30
14 [Enable/Disable] Button........................................................................................................30
14.1 Tabular Data Type Views ..............................................................................................30
14.1.1 Data Source ............................................................................................................31
14.1.2 Enable Menu When Condition Occurs....................................................................32
14.1.3 Enable Menu When Condition Generates an Error................................................32
14.1.4 Conditions ...............................................................................................................32
14.1.5 Equals .....................................................................................................................32
14.1.6 Greater Than...........................................................................................................32
14.1.7 Less Than................................................................................................................32
14.1.8 Range......................................................................................................................32
14.1.9 Value 1....................................................................................................................32
14.1.10 Value 2.................................................................................................................33
14.1.11 Available Columns ...............................................................................................33
14.1.12 Currently Available List ........................................................................................33
14.1.13 Auto Insert Alias...................................................................................................33
14.1.14 Add Column Button..............................................................................................33
14.1.15 Remove Button ....................................................................................................33
14.1.16 Use This Configuration ........................................................................................33
14.2 Tag Data Type - Graphics View ....................................................................................34
14.2.1 Data Source ............................................................................................................34
14.2.2 Enable Menu When Condition Occurs....................................................................34
14.2.3 Enable Menu When Condition Generates an Error................................................35
14.2.4 Conditions ...............................................................................................................35
14.2.5 Greater Than...........................................................................................................35
14.2.6 Less Than................................................................................................................35
14.2.7 Range......................................................................................................................35
14.2.8 Value 1....................................................................................................................35
14.2.9 Value 2....................................................................................................................35
14.2.10 Currently Available List ........................................................................................36
14.2.11 Auto Insert Alias...................................................................................................36
14.2.12 Add Alias Button...................................................................................................36
14.2.12.1 New Alias Dialog (Trend View source)............................................................36
14.2.12.2 Alias Definition Dialog (Graphics View source)................................................36
14.2.12.3 Alias Name........................................................................................................37
14.2.12.4 Alias Object.......................................................................................................37
- iii -
OEMenus
Page 5

Reference Guide
D301513X412
April 2012
OEMenus
14.2.13
14.2.14 Use This Configuration ........................................................................................37
14.3 Tag Data Type - Trend View .........................................................................................37
14.3.1 Enable Menu When Condition Occurs....................................................................39
14.3.2 Enable Menu When Condition Generates an Error................................................39
14.3.3 Conditions ...............................................................................................................39
14.3.4 Equals .....................................................................................................................39
14.3.5 Greater Than...........................................................................................................39
14.3.6 Less Than................................................................................................................39
14.3.7 Range......................................................................................................................39
14.3.8 Value 1....................................................................................................................39
14.3.9 Value 2....................................................................................................................40
14.3.10 Auto Insert Alias...................................................................................................40
14.3.11 Add Alias Button...................................................................................................40
14.3.12 Currently Available List ........................................................................................41
14.3.13 Remove Button ....................................................................................................41
14.3.14 Use This Configuration ........................................................................................41
Remove Button ....................................................................................................37
14.3.11.1 New Alias Dialog (Trend View source)............................................................40
14.3.11.2 Alias Definition Dialog (Graphics View source)................................................40
14.3.11.3 Alias Name........................................................................................................41
14.3.11.4 Alias Object.......................................................................................................41
15 [Configure] Button.................................................................................................................41
15.1 Configuration Dialogs ....................................................................................................42
15.2 Configuring Different Actions.........................................................................................42
15.2.1 Load File Only.........................................................................................................42
15.2.1.1 Load File - Tabular View Source........................................................................42
15.2.1.1.1 File Name Field / List General......................................................................43
15.2.1.1.2 File Browse Button .......................................................................................43
15.2.1.1.3 File Path Field...............................................................................................44
15.2.1.1.4 Always Reload This File...............................................................................44
15.2.1.2 Load File - Tag Data Source...............................................................................44
15.2.1.2.1 File Name OEGraphics.................................................................................45
15.2.1.2.2 File Path Field...............................................................................................45
15.2.1.2.3 Object Field...................................................................................................45
15.2.1.2.4 File Browse Button .......................................................................................45
15.2.1.2.5 Always Reload This File...............................................................................46
15.2.2 Load File with Parameters ......................................................................................46
15.2.2.1 Load File with Alias Type Parameters................................................................46
15.2.2.1.1 Graphics View Source with Parameters.......................................................47
15.2.2.1.1.1 File Name Configuration........................................................................47
15.2.2.1.1.2 Parameters List......................................................................................47
15.2.2.1.1.3 Parameter Name....................................................................................48
15.2.2.1.1.4 Parameter Definition ..............................................................................48
15.2.2.1.1.5 Object Name..........................................................................................48
15.2.2.1.1.6 Target Column or Alias to Resolve........................................................48
- iv -
Page 6

Reference Guide
D301513X412
April 2012
OEMenus
15.2.2.1.1.7
15.2.2.1.1.8 Constant Parameter Definition Type......................................................48
15.2.2.1.1.9 Alias Name.............................................................................................48
15.2.2.1.1.10 Object Name Field ...............................................................................48
15.2.2.1.1.11 Configuration Add Button.....................................................................48
15.2.2.1.1.12 Configuration Update Button................................................................48
15.2.2.1.1.13 Configuration Remove Alias Button.....................................................49
15.2.2.1.2 Graphics View Source from Data Access Tags ...........................................49
15.2.2.1.2.1 Multiple Process Points Grouped into a Symbol....................................49
15.2.2.1.2.2 File Name Field OEGraphics as Source................................................50
15.2.2.1.2.3 File Browse.............................................................................................50
15.2.2.1.2.4 Display Tag List......................................................................................51
15.2.2.1.2.5 Show Warning if No Tags Found...........................................................52
15.2.2.2 Trend View Source with Parameters..................................................................52
15.2.2.2.1 File Name List - Trend View......................................................................... 52
15.2.2.2.2 Alias Parameter Type - Trend Source..........................................................53
15.2.2.2.3 Constant Parameter Type - OETrend Source..............................................53
15.2.2.3 Load File with Column Type Parmeters.............................................................53
15.2.2.3.1 File Name Field / List General......................................................................54
15.2.2.3.2 File Path Field...............................................................................................54
15.2.2.3.3 Always Reload This File...............................................................................54
15.2.2.3.4 Parameter Name..........................................................................................54
15.2.2.3.5 Parameter Definition.....................................................................................54
15.2.2.3.6 Parameters List.............................................................................................54
15.2.2.3.7 Target Column or Alias to Resolve...............................................................55
15.2.2.3.8 Parameter Value...........................................................................................55
15.2.2.3.9 Column Name...............................................................................................55
15.2.2.3.10 Insert Alias Button ......................................................................................55
15.2.2.3.11 Configuration Add Button...........................................................................55
15.2.2.3.12 Configuration Update Button......................................................................55
15.2.2.3.13 Configuration Remove Alias Button............................................................55
15.2.3 Database Update....................................................................................................55
15.2.3.1 Column Type Source..........................................................................................56
15.2.3.1.1 Data source General OEView......................................................................56
15.2.3.1.2 Drag Drop Data Source Tag.........................................................................57
15.2.3.1.3 Drag Drop Column Alias...............................................................................57
15.2.3.1.4 Description....................................................................................................57
15.2.3.1.5 Display Value................................................................................................57
15.2.3.1.6 Read Only.....................................................................................................57
15.2.3.1.7 Use Runtime Dialog......................................................................................57
15.2.3.1.8 Default Value................................................................................................58
15.2.3.1.8.1 Graphics View Source............................................................................58
15.2.3.1.8.2 How to use the RunSqlScript table........................................................58
15.2.3.1.9 Available Columns........................................................................................58
15.2.3.1.10 Currently Available List...............................................................................58
15.2.3.1.11 Remove......................................................................................................58
Alias Parameter Definition Type.............................................................48
- v -
Page 7

Reference Guide
D301513X412
April 2012
OEMenus
15.2.3.2
15.2.3.3 Trend View Source.............................................................................................62
15.2.4 Launch Windows Application..................................................................................66
15.2.4.1 Column Parameters............................................................................................66
15.2.4.2 Alias Parameters ................................................................................................67
15.2.4.3 Executable File Field..........................................................................................68
15.2.4.4 Browse Button.....................................................................................................68
15.2.4.5 Start In Field........................................................................................................68
15.2.4.6 Arguments Field..................................................................................................68
15.2.4.7 Run Field.............................................................................................................68
15.2.4.8 Available Columns..............................................................................................69
15.2.4.9 Auto Insert...........................................................................................................69
15.2.4.10 Add Column or Alias Button..............................................................................69
15.2.4.11 Add Alias Dialog ...............................................................................................69
15.2.4.12 Currently Available............................................................................................70
15.2.4.13 Parameters List.................................................................................................70
Graphics View Source........................................................................................59
15.2.3.2.1 Data Source OEGraphics View....................................................................59
15.2.3.2.2 Description....................................................................................................60
15.2.3.2.3 Display Value................................................................................................60
15.2.3.2.4 Use Runtime Dialog......................................................................................60
15.2.3.2.5 Default Value................................................................................................60
15.2.3.2.5.1 Graphics View Source............................................................................60
15.2.3.2.5.2 How to use the RunSqlScript table........................................................60
15.2.3.2.6 Read Only.....................................................................................................61
15.2.3.2.7 Currently Available List.................................................................................61
15.2.3.2.8 Auto Insert Alias............................................................................................61
15.2.3.2.9 Add Alias Button...........................................................................................61
15.2.3.2.9.1 New Alias Dialog (Trend View source) .................................................61
15.2.3.2.9.2 Alias Definition Dialog (Graphics View source)......................................61
15.2.3.2.10 Update Alias Button....................................................................................62
15.2.3.2.11 Remove......................................................................................................62
15.2.3.3.1 Description....................................................................................................64
15.2.3.3.2 Display Value................................................................................................64
15.2.3.3.3 Use Runtime Dialog......................................................................................64
15.2.3.3.4 Default Value................................................................................................64
15.2.3.3.4.1 Graphics View Source............................................................................64
15.2.3.3.4.2 How to use the RunSqlScript table........................................................64
15.2.3.3.5 Read Only.....................................................................................................65
15.2.3.3.6 Auto Insert Alias............................................................................................65
15.2.3.3.7 Add Alias Button...........................................................................................65
15.2.3.3.7.1 New Alias Dialog (Trend View source) .................................................65
15.2.3.3.7.2 Alias Definition Dialog (Graphics View source)......................................65
15.2.3.3.8 Currently Available List.................................................................................66
15.2.3.3.9 Remove Button.............................................................................................66
15.2.4.11.1 Alias Name.................................................................................................70
15.2.4.11.2 Object Name...............................................................................................70
- vi -
Page 8

Reference Guide
D301513X412
April 2012
OEMenus
15.2.4.14
15.2.4.15 Remove Button.................................................................................................70
16 Window Name........................................................................................................................70
16.1 Window Name Aliases...................................................................................................71
16.2 Window Name Aliases Example....................................................................................71
16.2.1 Source Display Configuration..................................................................................72
16.2.1.1 Process Point and Pick Object...........................................................................72
16.2.1.2 Menu Editor Configuration..................................................................................74
16.2.1.3 Load File with Parameters Configuration...........................................................75
16.2.1.4 Setting the Alias Values......................................................................................76
16.2.2 Target Display Configuration...................................................................................78
17 Window Behaviour ................................................................................................................79
17.1.1 No Parent................................................................................................................79
17.1.2 Hide Parent .............................................................................................................79
17.1.3 Close Parent............................................................................................................80
17.1.4 With Parent..............................................................................................................80
18 Window Ty pe..........................................................................................................................80
18.1.1 MDI Child.................................................................................................................80
18.1.2 Floating Window......................................................................................................80
18.1.3 Docked....................................................................................................................80
Update Button...................................................................................................70
19 [Advanced] Button ................................................................................................................ 80
19.1 Window Name Advanced ..............................................................................................80
19.1.1 Window Name Advanced with Alias Parameters....................................................81
19.1.1.1 Window Name.....................................................................................................81
19.1.1.2 Use Window Name.............................................................................................81
19.1.1.3 Caption Text - With 'In Tag' Type Parameters....................................................81
19.1.1.3.1 Enabling the Caption Text Field...................................................................82
19.1.1.3.2 The differences between a Window Name and Caption Text......................82
19.1.1.4 Currently Available List.......................................................................................82
19.1.1.5 Auto Insert Alias..................................................................................................82
19.1.1.6 Add Alias Button.................................................................................................83
19.1.1.6.1 New Alias Dialog (Trend View source)........................................................83
19.1.1.6.2 Alias Definition Dialog (Graphics View source)............................................83
19.1.1.7 Update Alias Button............................................................................................83
19.1.1.8 Remove Button...................................................................................................84
19.1.2 Window Name Advanced with Column Parameters...............................................84
19.1.2.1 Window Name.....................................................................................................84
19.1.2.2 Use Window Name.............................................................................................85
19.1.2.3 Caption Text - With Column Type Parameters...................................................85
19.1.2.3.1 Enabling the Caption Text Field...................................................................85
19.1.2.3.2 The differences between a Window Name and Caption Text......................85
19.1.2.4 Available Columns..............................................................................................85
- vii -
Page 9

Reference Guide
D301513X412
April 2012
OEMenus
19.1.2.5
19.1.2.6 Add Column Button.............................................................................................86
19.1.2.7 Currently Available List.......................................................................................86
19.1.2.8 Remove Button...................................................................................................86
20 More Dialog............................................................................................................................86
20.1 Show Status Bar............................................................................................................87
20.2 Dock with Title Bar.........................................................................................................87
20.3 Dock with Gripper..........................................................................................................88
20.4 Docked To... ..................................................................................................................88
20.5 Resizeable.....................................................................................................................88
20.6 Restyleable....................................................................................................................88
20.7 Minimizable....................................................................................................................88
20.8 Maximizable...................................................................................................................88
20.9 Window Zoom State ......................................................................................................88
20.10 Height .........................................................................................................................89
20.11 Width...........................................................................................................................89
20.12 From Left ....................................................................................................................89
20.13 From Top....................................................................................................................89
20.14 Relative To..................................................................................................................89
20.15 Centre On...................................................................................................................89
20.16 Positional Object List..................................................................................................89
20.16.1 OE Desktop..........................................................................................................89
20.16.2 Windows Desktop ................................................................................................89
20.16.3 Mouse Position.....................................................................................................90
Auto Insert Alias..................................................................................................86
21 Worked Example....................................................................................................................90
21.1 STEP 1 - Create the Target View..................................................................................90
21.2 STEP 2 - Source View - Add Visible Object..................................................................91
21.3 STEP 3 - Source View - Adding Dynamic Object..........................................................91
21.4 STEP 4 - Source View - Add OPC Tag.........................................................................92
21.5 STEP 5 - Source View - Create Alias............................................................................93
21.5.1.1 1. Select the part of the tag to be substituted with an alias................................93
21.5.1.2 2. Type in the alias..............................................................................................93
21.6 STEP 6 - Source View - Define Alias Value..................................................................94
21.7 STEP 7 - Source View - Create Custom Menu .............................................................95
21.8 Example in Action..........................................................................................................97
22 Index .......................................................................................................................................99
- viii -
Page 10
Reference Guide
D301513X412
April 2012
OEMenus
1 OEMenus
The OpenEnterprise Menu Editor is a core component within the OpenEnterprise product suite that
enables inter-operability between View components within the OEDesktop environment. Menus created
with the OEMenu Editor are called Custom menus.
1.1 Custom Menus
OpenEnterprise Views are Workstation components which enable the viewing of OpenEnterprise data
within the OEDesktop environment. The View components are - Alarm View, Alarm Banner View, Alarm
Printer View, Graphics View, Trend View, Signal View, SQL View, Notes View, Web View and Report
Selector View.
Custom context menus can be created for most Views. This means that when the View is running within
the OEDesktop, for all views except the Graphics View, right clicking on the View window will display the
Custom menu (see the example below). For the Graphics View, left clicking displays the context menu.
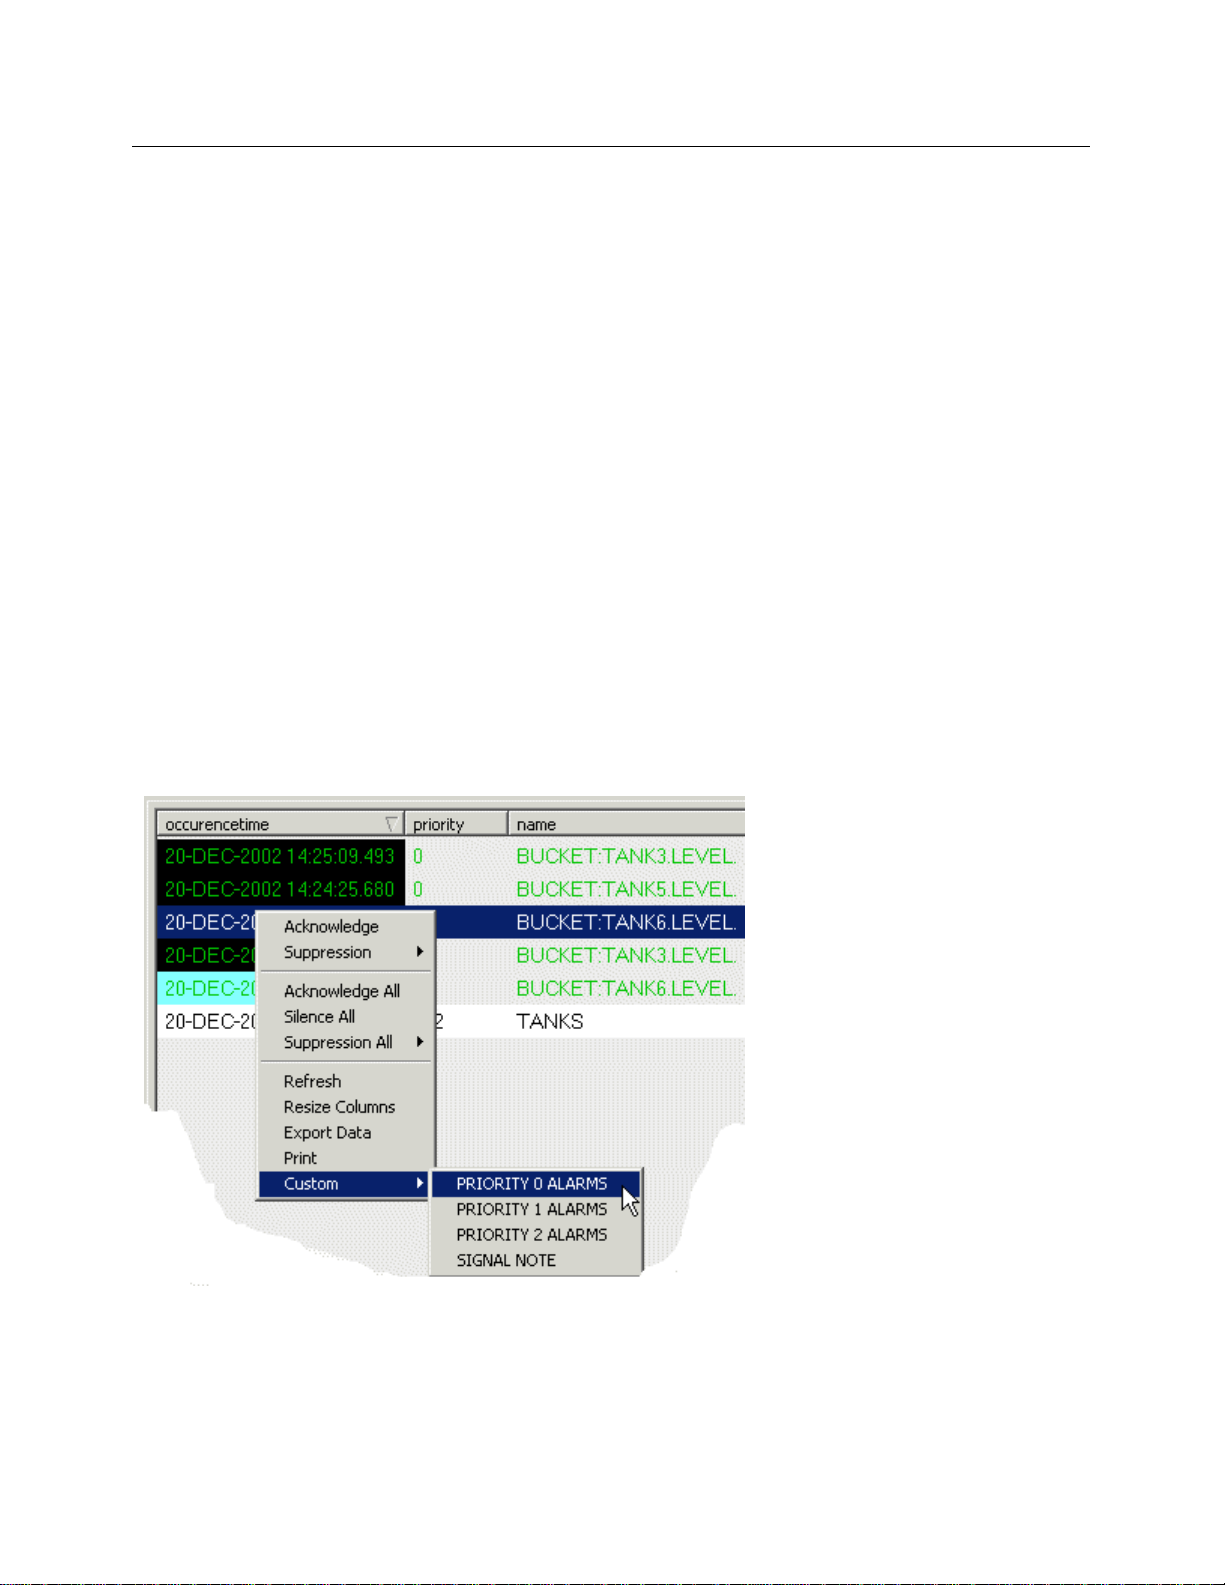
1.1.1 Example View Custom Menu
The example below shows a Custom context menu within an Alarm View window. The selected menu
item will filter the Alarm View by Priority.
1.1.2 Example OEDesktop Custom Menu
Using OEMenus we can also extend the OEDesktop menu bar. The example below shows a number of
Custom menu items added to the OEDesktop menu bar. These have been added using the OEMenu
Editor. The selected menu item also filters the Alarm View by Alarm Priority.
- 1 -
Page 11

Reference Guide
D301513X412
April 2012
OEMenus
1.2 Sources, Targets and Actions
When a Custom menu is used in OpenEnterprise, it involves a Source View, a Target (which is usually
also a View) and a menu Action.
1.2.1 Source and Target
When configuring OEMenus, it is helpful to keep in mind the concept of the Source and Target View.
One View will be the Source (i.e. the View which displays the menu item), and the other View will be the
Target (this is the View which will be loaded into the OEDesktop from the menu item). There is one
Target that is not a View at all - the OPC Server, which performs database updates from OEMenus.
1.2.2 Actions
Another concept to be clear about when using OpenEnterprise Custom Menus is that of Menu Action.
There are four options available, depending on the Source and Target components: -
1.2.2.1 Load File
ction is available for all Target Views. It enables the Custom Menu on the Source View to open
This a
another View file into the OEDesktop, or to open a Windows application (such as Notepad).
1.2.2.2 Load File with Parameters
ction enables the Source application to not only open another View file within the OEDesktop (the
This a
Target), but to also pass Parameters from the Source to the Target View.
1.2.2.3 Load File from OPC Tags
ction is only available when the Source is a Graphics View and the Target is a Trend View. It
This a
enables the user to configure a Custom menu on an object in a Graphics display that will open a Trend
View. As the Trend View opens the user is shown a dialog that lists all Tags obtained from the object on
which the Custom menu was configured on the Source View. The user can then select one or more of
these Tags to apply to the Target Trend View.
1.2.2.4 Database Update
This is th
e only option available if the Data Server has been chosen as the Target for the Custom menu.
- 2 -
Page 12
Reference Guide
D301513X412
April 2012
OEMenus
1.3 Views and Data Sources
When configuring Custom menus, it is not only helpful to think in terms of which View is the Source and
which is the Target, but also to bear in mind where each View gets its data from. Where the View gets its
data from largely determines the kind of data that each View can pass or receive via a Custom menu.
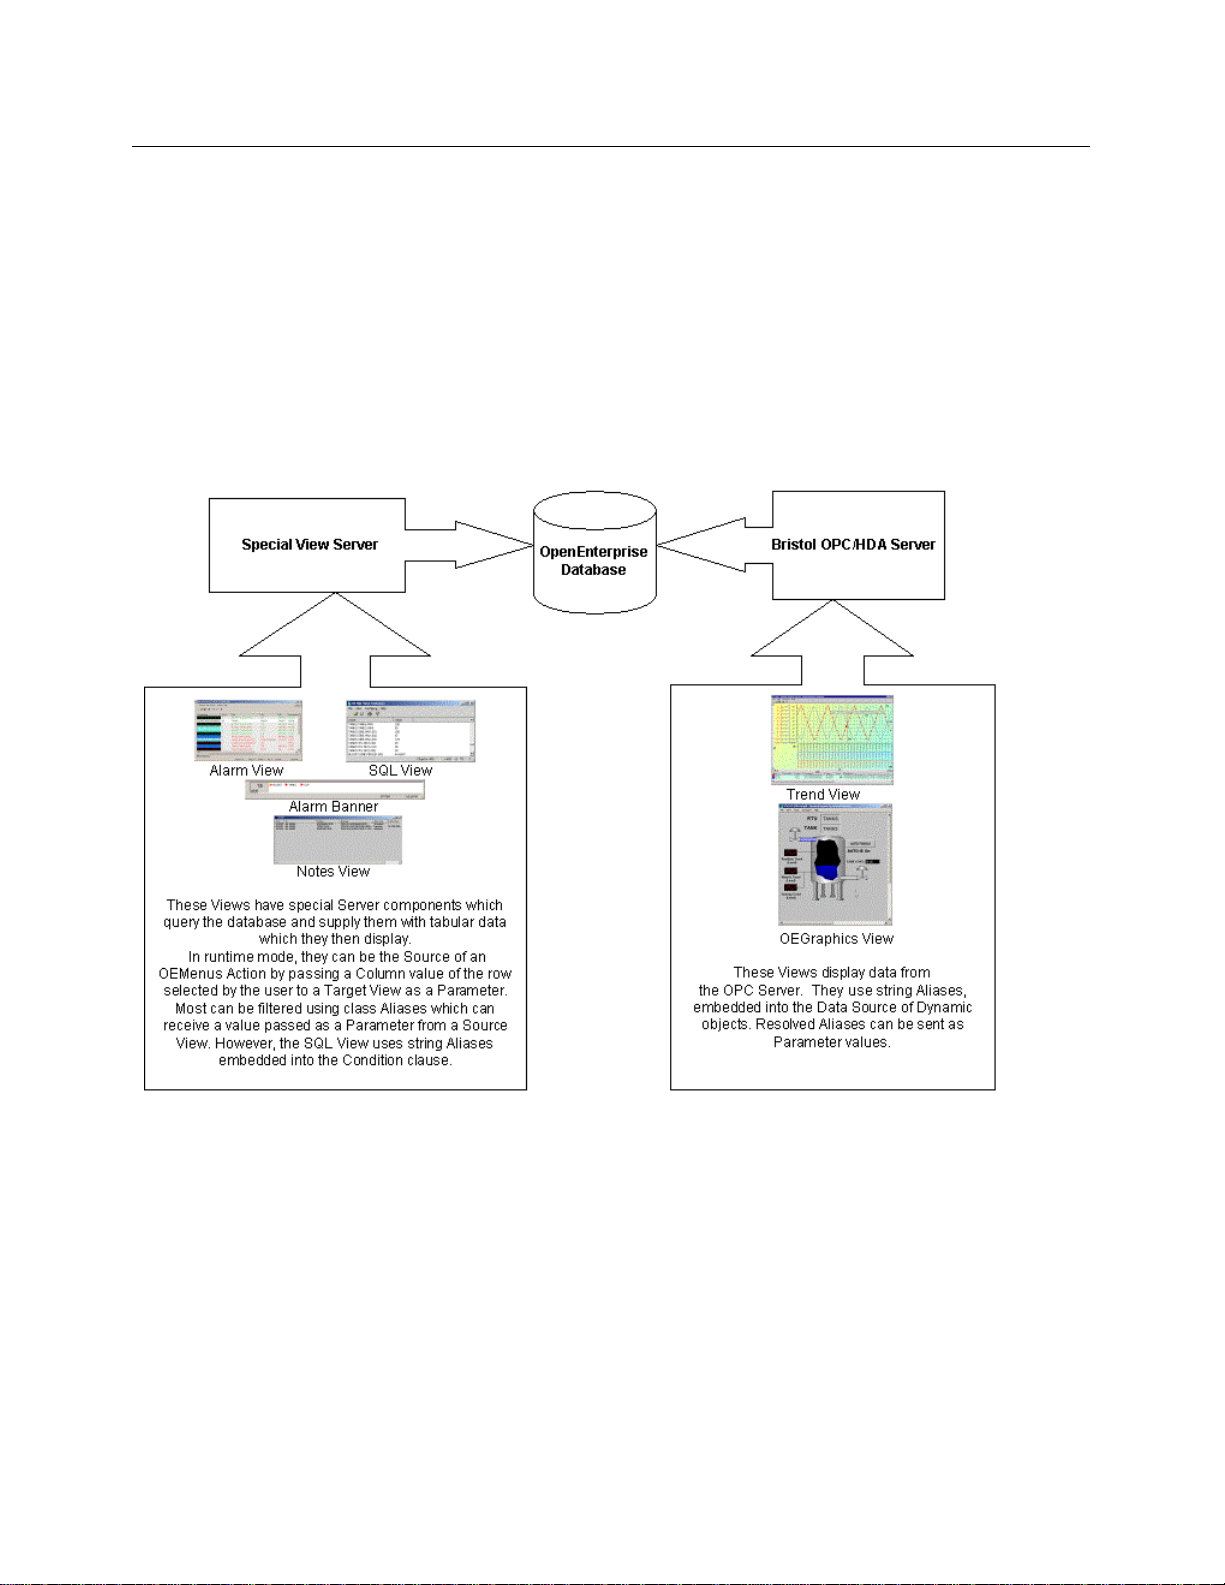
1.3.1.1 The Data Source - Tables or Tags?
Whateve
form of rows and columns, or the Bristol OPC/HDA Server in the form of OPC tags. Below is a diagram
which seeks to illustrate this.
r the type of View, it will source its data directly from either the OpenEnterprise Database in the
1.4 Views and their Data Display
OpenEnterprise Views that display data from the OpenEnterprise database generally obtain that data
from one of two sources. They either get the data directly from a specialist Server component that
requests the data from the OpenEnterprise Database in the form of rows and columns (i.e. the Alarm
Server serves the Alarm View with data), or they get the data from the Bristol OPC/HDA Server in the
form of OPC/HDA tags.
1.4.1 Views Displaying Data from Table Columns
This is a list of OpenEnterprise Views which display data received in tabular format: -
• Alarm View / Event View
- 3 -
Page 13

Reference Guide
D301513X412
April 2012
• Alarm Printer View
• Alarm Banner View
• Database Object Viewer (SQL View)
• Notes View
• Signal View (Bristol RTUs only)
1.4.2 Views Displaying Data from OPC Tags
These are the OpenEnterprise Views which display data received as OPC Tags:-
• Graphics View
• Trend View
1.4.3 Views Displaying other types of Data
These views do not display data directly from the OpenEnterprise database.
OEMenus
• Web View - displays data from the Web
• Report Selector - displays and generates reports found in the database
1.5 Parameters and Aliases
Parameters and Aliases are what make OEMenus such an important and useful feature of
OpenEnterprise. In general, Parameters and Aliases enable key information to be passed around
between the same or different types of Views in OpenEnterprise.
To avoid confusion, it may be helpful to first define the terms Parameters and Aliases as they will be used
within this document.
1.5.1 Parameter - definition
A Parameter is a value that is sent from the Source View via OEMenus. The Parameter is associated with
a particular Alias on the Target View, giving it a value.
1.5.2 Alias - definition
An Alias acts as a placeholder or a variable on a Target View. An Alias can be a specially formatted
string, a database attribute or a class attribute on the Target View. The Alias is given a value, or 'resolved'
by the Parameter that has been passed to it from OEMenus. Sometimes a default value can be assigned
to an Alias in configuration mode. The default Alias value is overridden by a value passed via OEMenus
during runtime operation. In runtime mode, a resolved Alias can be used as a Parameter.
- 4 -
Page 14

Reference Guide
D301513X412
April 2012
OEMenus
1.5.3 Aliases and Parameters - w hat's the difference?
Since Aliases can be sent as Parameters when they have a value, it is tempting to think of Parameters
and Aliases as the same thing. However, functionally they are not the same. A Parameter is a value. An
Alias is a variable that must be given a value. Unless the Alias exists in a View that allows the assignment
of default values to Aliases, it has no value until it is resolved when loaded by a Custom OEMenu. When
you use a resolved Alias as a Parameter, you are not sending the Alias to the Target View, you are
sending its current value.
1.5.4 User defined string Aliases
An Alias is a variable name, so it is a string of some sort. With Views that insert Aliases into a string (i.e.
as part of an OPC tag, or an SQL statement), the string can be anything as long as it is surrounded by
"<<" and ">>" characters (i.e. <<DEVICENAME>>). We recommend using uppercase characters for this
type of Alias to distinguish it from column type Aliases, which are usually in lower or mixed case.
1.5.5 Aliases that are class attributes
Other views do not use user defined strings as aliases, but use internal class attributes within the View
itself as Aliases.
The Report Selector is such a View. You can use an OEMenu to configure a Report Selector file so that it
opens showing disabled reports by defining the Target Alias as 'ShowDisabledReports', and the value as
True.
The Alarm View has internal alias names that correspond to the attributes found in the alarmsummary
table. These attribute names can be used with OEMenus to filter the Alarm View. To filter an Alarm View
on the device name, define the Target Alias as 'devicename' (without the quotes), and the value as an
actual devicename (i.e. NORTH).
Although the concept of Parameters and Aliases may seem a little daunting at first, they are definitely
worth learning about, because ....
1.5.6 Aliases reduce display creation
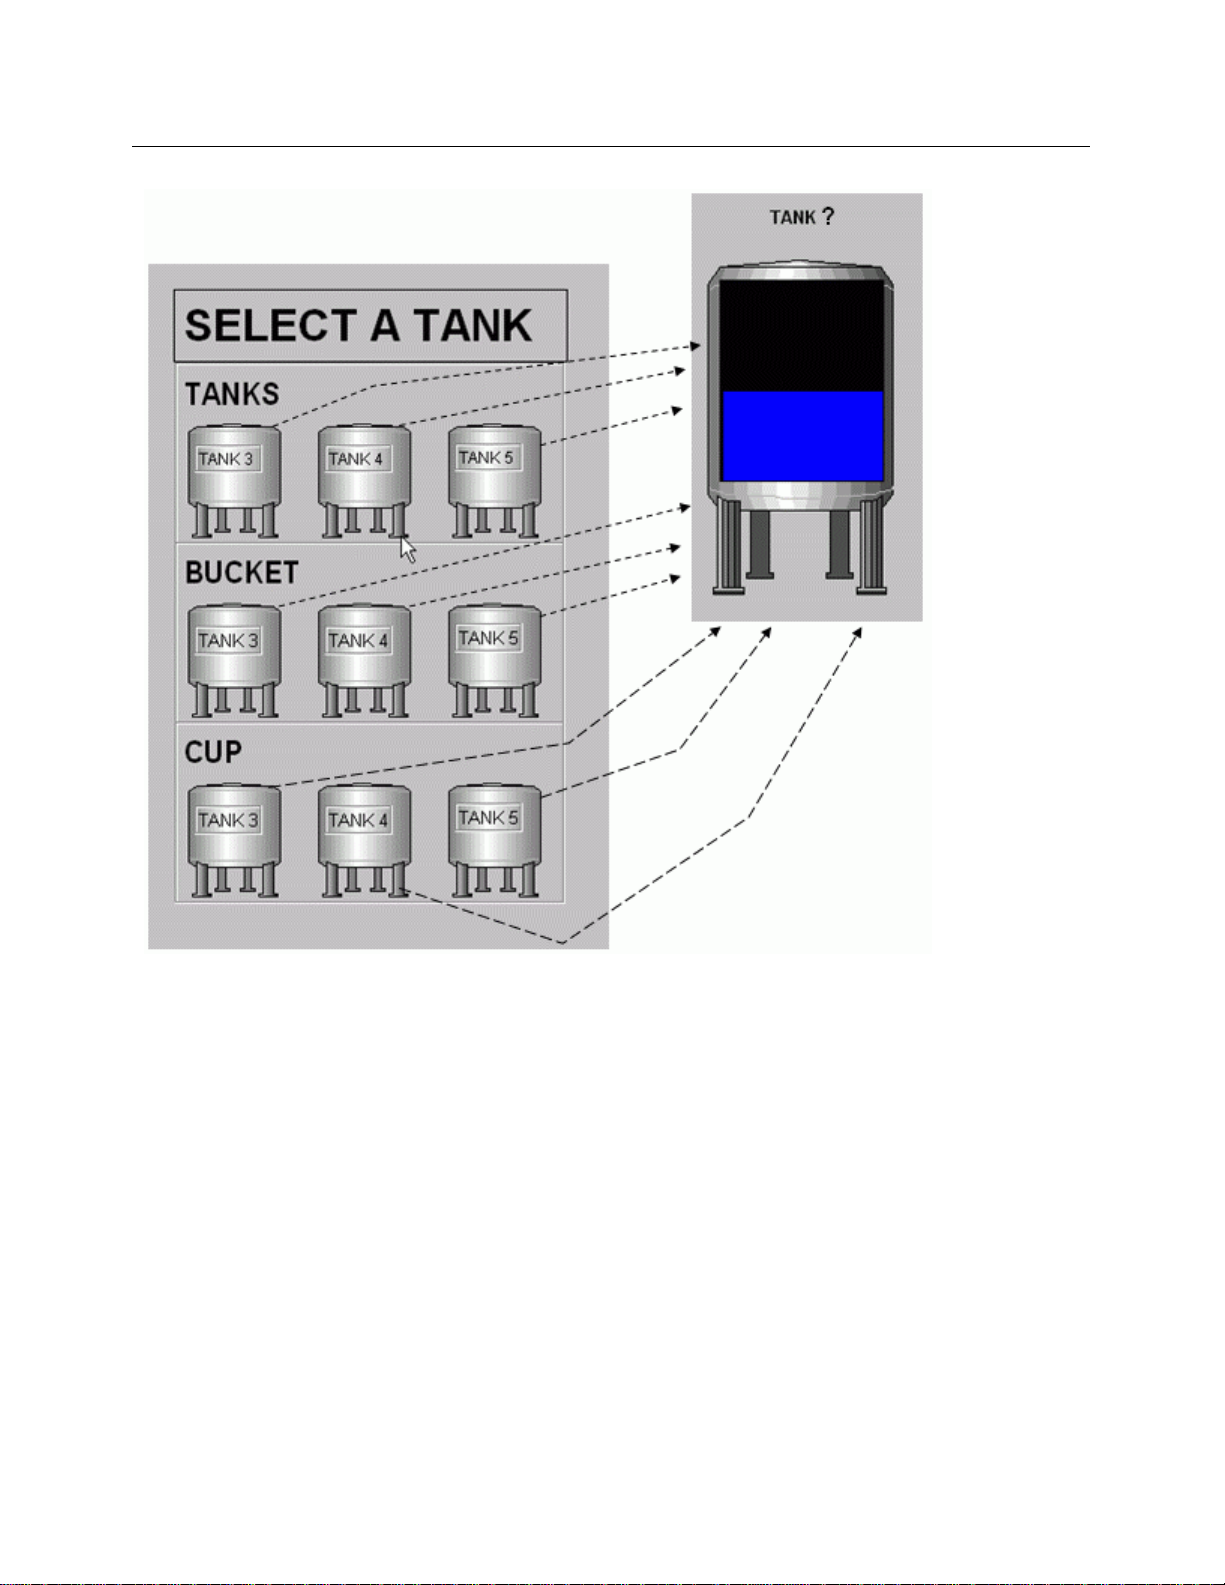
Here is a very simple example to show how Aliases reduce the number of displays you need to create.
Imagine there are a number of Tanks (say nine Tanks - but it could be ninety) that need to be
monitored.
Normally, you would have to create a main display from which you select the desired Tank, and then you
would need to create a separate display for each individual Tank because each Tank would require a
unique OPC tag. However, using Aliases, instead of having to create separate displays for each Ta nk,
you only need to create one display, which uses one OPC tag containing one or more aliases. Then that
one display can be used to display the details for all the other Tanks.
In the example below, the main display invites users to select one of the Tanks. There are three RTUs,
each monitoring three Tanks. That would normally mean nine separate displays.
- 5 -
Page 15

Reference Guide
D301513X412
April 2012
OEMenus
Because we are using Parameters and Aliases, however, we only need one display which will suffice for
all nine Tanks.
- 6 -
Page 16
Reference Guide
D301513X412
April 2012
OEMenus
Each Tank has a Custom Menu on it, which runs when the user clicks on it. We can send the RTU and
Base part of the signal name as parameters each time we open the Selected Tank display and the
aliases resolve to display the tank that was selected.
2 The Two Types of Alias
There are two types of Alias. String Aliases are user defined, but Class Aliases are defined by the View
itself, so you need to know what they are so you can use them.
2.1 String Aliases
As a general rule, string Aliases are recognized by OEMenus as a string inside double chevrons (e.g.
<<ALIAS>>). String Aliases have to be inserted into a string in the Target View. The way that this takes
place varies according to the properties of the View. There are currently five Views that use string
Aliases:-
- 7 -
Page 17

Reference Guide
D301513X412
April 2012
OEMenus
2.1.1 Graphics View
Aliases can be inserted into the Data Source window of a dynamic object on a Graphic View. The alias
can be entered on its own or as part of an OPC tag.
When entered by itself, the Alias is typed into the Data Source window of the dynamic object with $" "$
delimiters (e.g. $"<<DEVICENAME>>"$), which causes the defined Alias to be displayed on its own as a
string.
If the Alias is inserted as part of an OPC Tag into the Data Source window, the part of the OPC Tag
which will be replaced by the Alias is removed and the Alias is put in its place. For example, to send the
Base part of the signal to a Target View as a Parameter, if the original OPC Tag is:-
BristolBabcock.BristolOPCServer\"rtrdb1"."realanalog"."name:char:"IP1:TANK3.L
EVEL."."value:float".
Then we have to edit the OPC string to be:-
BristolBabcock.BristolOPCServer\"rtrdb1"."realanalog"."name:char:"IP1:<<BASE>
>.LEVEL."."value:float".
If this display is going to contain Custom menus of its own (i.e. it is going to become a Source View), you
will need to give the Dynamic object on which the Alias has been placed a name, so that OEMenus can
refer to the resolved Alias when the time comes to send that value to the Target View.
2.1.2 Trend View
With Trend Views, the Alias is embedded as part of the OPC Tag for a Pen. Aliases configured in this
way are displayed on the 'Parameters' Tab of the Trend Properties dialog. This enables the user to
configure an initial value for the Aliases, so that if the saved Trend is opened directly into the OEDesktop,
rather than via OEMenus, it will still show data.
2.1.3 SQL View (.DBX File)
A string Alias can be embedded into an SQL Query created with Database Object Viewer (DOV) as part
of the condition on the 'Conditions' Tab of the DOV. For example, take a query in which the name and
value of all analog signals are selected, but there is a condition on the Condition Tab which limits the
signals to those that have 'LEVEL' in their name. The condition would read name like '%LEVEL%'.
The string of the actual condition can be replaced by an Alias. For example, I could create an alias in the
condition clause by typing - name like '%<<NAME>>%'. The << and >> characters now mark this out
as a string Alias.
Now, we could create a Custom Menu on the Source View to open this SQL View file, sending a
Parameter with a name of 'NAME', defined as a constant string value, depending on what signals we
wanted to display .
The value of the Alias can also be temporarily defined on the 'Parameters' tab of the DOV, so that the
View file can be opened outside of the OEMenus system and still display a result.
2.1.4 Notes View
String Aliases within Notes View can be embedded on the Display tab in the Custom/Name field and al so
on the 'Configure Default Recipient' dialog. The Aliases on the Display tab Custom/Name field will be
matched to Parameters from the Source View to filter the display of Notes in the Notes View.
- 8 -
Page 18

Reference Guide
g
D301513X412
April 2012
An Alias (e.g. <<USERNAME>>) configured on the 'Default Recipient' dialog enables a Source View, or a
Custom OEDesktop menu to open the Notes View file, passing the name of a Default User to it. This will
mean that when the current user sends a note using this Notes View file, it will be automatically
addressed to the user defined as the Default Recipient from the Source Custom menu.
OEMenus
2.1.5 Web View
Within Web View, string Aliases can be inserted into the 'Homepage' URL field on the General
configuration page of the Web View in configure mode. They are inserted in the usual format (e.g.
<<HOMEPAGE>>), and can be part of the URL or can represent the whole URL.
2.2 Class Aliases
Class Aliases are not created by the user. They are internal class names that are used in the View itself
to configure the View.
You need to know the names of these Aliases before you can use them with OEMenus. Three Views use
Class Aliases to filter their contents:-
2.2.1 Alarm View Aliases
The Alarm View displays either current alarms or past events and alarms, depending on ho w it is
configured. Alarm View Column Aliases have exactly the same names as the actual attributes in the
AlarmSummary table. They can be viewed from the 'Parameters' tab of the Modify Filter Alarm View
Property dialog.
Alarm View column Aliases can be used when the Alarm View is a Target to filter the Alarm View. For
instance, to filter an Alarm View on the device name, define the Target Alias as 'devicename' (without the
quotes), and the value as an actual device name. The value can be a constant value, or based on an
object selected by the user in the Source View.
Target Alias name in
Alarm View
accessarea
aknowleged
attribute
base
calloutarea
cleared
clienttype
condition
description
devicename
Filters the Alarm View according to the supplied accessarea of
Filters the Alarm View according to the supplied
Filters the Alarm View according to the supplied attribute
Filters the Alarm View according to the supplied base value of
Filters the Alarm View according to the supplied calloutarea of
Filters the Alarm View according to the supplied cleared state
Filters the Alarm View according to the supplied clienttype of
Filters the Alarm View according to the supplied condition of
Filters the Alarm View according to the supplied description of
Filters the Alarm View accordin
Values and Comments
the alarm
acknowledged state of the alarm
value of the alarm
the alarm
the alarm
of the alarm
the alarm
the alarm
the alarm
to the supplied devicename
- 9 -
Page 19

Reference Guide
D301513X412
April 2012
eventtype
extension
name
operator
plantarea
priority
suppressed
Class Aliases
Filters the Alarm View according to the supplied eventtype of
Filters the Alarm View according to the supplied extension of
Filters the Alarm View according to the supplied name of the
Filters the Alarm View according to the supplied plantarea of
Filters the Alarm View according to the supplied priority of the
2.2.2 Signal View Aliases
OEMenus
of the alarm
the alarm
the alarm
alarm
Filters the Alarm View according to the supplied operator of
the alarm
the alarm
alarm
Filters the Alarm View according to the supplied suppressed
state of the alarm
The Signal View displays signals from Bristol RTUs. The signals displayed can be filtered by sending
Parameters to the Signal View from any Source View via a Custom menu. The Alias names of the Signal
View are shown in the list below. Note that they are case sensitive.
Target Alias name in
Signal View
rtu
instance
searchstring
signal
base
extension
attribute
logical
highhigh
Filters the Signal View according to RTU name. The value will
Filters the Signal View according to the instance part of a
ControlWave signal name. The Instance part of a
ControlWave signal name is defined as being all characters
Used to filter the Signal View for ControlWave signals. If the
Instance part of the signal name has been defined,
searchstring is assumed to be equivalent only to the Variable
part of the signal name. If the Instance has not been defined,
then searchstring is assumed to be a full string search,
including the Instance and Variable parts of the ControlWave
Filters the Signal View by specific Signal name. The value will
Filters the Signal View by the base part of the Signal name.
Filters the Signal View by the extension part of the Signal
name. The value will be a valid extension name.
Filters the Signal View by the attribute part of the Signal
name. The value will be a valid attribute name.
Filters the Signal View according to Logical Signals that are in
alarm. Value must be set to true (Lower Case).
Filters the Signal View according to Analog signals that are in
HighHigh alarm. Value must be set to true (Lower Case).
Values and Comments
be the name of an RTU.
prior to the last full-stop, (period).
signal name.
be the name of a signal.
The value will be a valid base name.
- 10 -
Page 20

Reference Guide
A
D301513X412
April 2012
OEMenus
high
low
lowlow
alarm
control
manual
questionable
Class Aliases
Filters the Signal View according to Analog signals that are in
High alarm. Value must be set to true (Lower Case).
Filters the Signal View according to Analog signals that are in
Low alarm. Value must be set to true (Lower Case).
Filters the Signal View according to Analog signals that are in
LowLow alarm. Value must be set to true (Lower Case).
Filters the Signal View according to the Alarm bit setting on
Alarm signals. Values can be none, enable or inhibit.
Filters the Signal View according to the Control Bit setting for
signals. Values can be none, enable or inhibit.
Filters the Signal View according to the Manual Bit setting for
signals. Values can be none, enable or inhibit.
Filters the Signal View according to the Questionable Bit
setting for signals. Values can be none or set.
2.2.3 Report Selector Aliases
The Report Selector displays published reports from the database. Every part of its configuration can
become an alias for use with OEMenus. Below are the names of the Class Aliases available for use with
the Report Selector as a Target for OEMenus.
Target Alias name in Report
Selector View
Values and Comments Default
Dataservice
AllowRuntimeConfiguration
ShowToolbar
ShowNextPrevious
DoubleClickShowMode
CalendarContextRun
CalendarContextRunPublish
CalendarContextReportList
ShowAllReports
ShowDisabledReports
The name of the data service to use. rtrdb1
Allow configuration settings to be
changed while in run mode.
Flag to indicate if the toolbar should be
shown.
Flag to indicate if the next and previous
buttons should be shown.
Value representing the double click
view mode.
0 - All
1 - Oldest
2 - Newest
Flag to indicate if the run menu item
should be displayed on the calendar
date context menu.
Flag to indicate if the run and publish
menu item should be displayed on the
calendar date context menu.
Flag to indicate if a list of available
reports should be displayed on the
calendar date context menu.
flag to indicate if all reports should be
displayed in the reports drop down list
and not just selected reports.
A flag to indicate if disabled reports
should be displayed in the reports drop
down list.
- 11 -
False
False
True
0
True
True
True
False
False
Page 21

Reference Guide
D301513X412
April 2012
OEMenus
FormatShowMode
ShowDisabledFormats
ShowAllFilters
AllowReportNameSelect
AllowReportFormatSelect
AllowPrimaryAliasValueEdit
AllowOtherAliasValuesEdit
AllowDateSelection
ShowDateMode
PriorDateOffset
PriorDateOffsetType
SpecifiedDate
OverrideOffsetTime
ReportTime
ShowTime
CalendarDateMode
AvailableReportColor
MultipleReportsColor
ReportSelectorMode
DifferentColorForMultipleReports
Determines what formats are displayed
in the format drop down list.
0 – Show all formats
1 – Show configured formats
2 – Show selected formats
A flag to indicate if disabled formats
should be displayed in the reports drop
down list.
Allow all the filters? True
Allow the report name to be selected? True
Allow the report format to be selected? True
Allow primary alias value to be edited? True
Allow other alias values to be edited? True
Allow report date to be selected? True
The show date mode
0 – Current Date
1 – Prior to current date
2 – Specified date
The current date offset value when
ShowDateMode = 1
The type of offset when
ShowDateMode = 1
0 – Days
1 – Weeks
2 – Months
3 – Years
The specified date when
ShowDateMode = 2
Do we want to override the offset time? False
The report time when
OverrideOffsetTime = true
Flag to indicate if the time selector
should be displayed in the drop down
calendar.
Value to indicate which date is used to
show what reports are available.
0 – Starttime
1 – Endtime
2 – Range
Color used on the calendar to indicate
that a report is available
Color used on the calendar to indicate
that multiple reports are available
The mode for the report selector.
0 – Browse
1 – View
2 – Run
Do we want to use a different color
for multiple reports?
0
False
0
0
0
Current
Date
00:00:00
False
0
Green
White
0
False
Class Aliases
- 12 -
Page 22

Reference Guide
D301513X412
April 2012
OEMenus
3 Three Types of Parameter
OEMenus has three ways of acquiring Parameter values . All View types that can be a Source for
OEMenus can send constant value Parameters. Also, resolved string Aliases can be sent as Parameters
by Views that use embedded string Aliases, and resolved column Aliases can b e sent a s Parameters by
Views that display columnar data.
• Resolved String Alias values
• Resolved Column values
• Constant values
3.1 Resolved String Alias Parameters
Graphics and Trend View components that have embedded string Aliases can use the resolved values of
these Aliases to send on as Parameters to a Target View.
3.1.1 Graphics View
When a Graphics View that is a Target of another View is opened, any Aliases are resolved and have a
value. This value can then be passed to another View as a Parameter.
OEMenus needs to know the Target Alias that is going to be resolved by the value, the name of the
source Alias, and the name of the dynamic object on which the source Alias exists.
3.1.2 Trend View
The Trend View also can be used as a Source for OEMenus once its own string Aliases have been
resolved. OEMenus only needs to know the name of the Target Alias and the name of the Source Alias.
3.2 Resolved Column Alias Parameters
Views that return tabular data from the database can use that data to send as Parameters to a Target
View in OEMenus.
3.2.1 Alarm View
Alarm View column values can be used as Parameter values, because when an Alarm View is opened,
the column values are resolved immediately. You can use the values of the column Aliases to send as
Parameters to other Target Views. For instance, use the name value of a selected alarm to define a
<<NAME>> alias in the condition of an SQL View.
3.2.2 Alarm Ribbon (Banner) View
The Alarm Ribbon or Banner lists the sites that currently have alarms. It can be a Source for OEMenus.
OEMenus requires the name of the Target Alias and also requires you to select a column fro m those
available. The value of that column for the Site selected on the Alarm Ribbon in runtime mode will be
passed as a Parameter to the Target View. The columns available are from the plantarea table.
- 13 -
Page 23

Reference Guide
g
D301513X412
April 2012
OEMenus
3.2.3 SQL View
When an SQL View is run the query returns values. The column values can then be sent as Parameters
to a Target View. When a user selects a single object from those on display in the SQL View in runtime,
the value of any of the columns of this selected object can be sent as a Parameter to the Target View.
3.2.4 Notes View
A Note selected from the Notes View window has resolved database column values from the notes table
that identify the selected Note. These values can be used as Parameters to send to a Target View.
3.3 Constant Values
All Views that can be a Source for an OEMenu allow the user to send constant values as Parameters to a
Target View. OEMenus requires the name of the Target Alias and the value to send. The user types the
Parameter value directly into a text field.
4 OEMenus View by View
This section details how each OEView component can be used with OEMenus. The table below gives the
component name, whether or not it can be a Source for OEMenus, whether it can be a Target for
OEMenus, its available Parameter types, and its native Alias type.
Component Source? Target? Available
Parameter Type
OEDesktop
Alarm View
Alarm Banner
Alarm Printer
SQL View
Signal View
Graphics View
Yes No Constant value
supplied in
configure mode
Yes Yes Column value of
object selected
in runtime mode,
or
Constant value
supplied in
configure mode
Yes No Attribute values
of Site selected
in runtime mode,
or
Constant value
supplied in
configure mode
No No None None
Yes Yes Column value of
object selected
in runtime mode,
or
Constant value
supplied in
configure mode
No Yes None Class Aliases
Yes Yes Resolved Strin
Native Alias Type
None
Class Aliases, which
equate to AlarmSummary
fields. Filtering must be
enabled.
None
String Alias - defined in
query Condition
Aliases embedded
- 14 -
Page 24

Reference Guide
D301513X412
April 2012
OEMenus
Trend View
OPC Server
Web View
Report Selector
Aliases on
Dynamic objects,
or
Constant value
supplied in
configure mode
Yes Yes Resolved Alias
embedded into
OPC tags on
Pens, or
Constant value
supplied in
configure mode
No Yes OPC Tag
containing
resolved string
or column
Aliases,
depending on
the type of View.
Tag defines
which database
object to update
No Yes None String Aliases
No Yes None Class Aliases
in dynamic object Data
Source
String Aliases embedded
into OPC tags on Pens.
None
5 Accessing OEMenu Editor
Not all Views provide access to the OEMenu Editor, because not all Views can be a Source for
OEMenus. Below is a list of the Views that can be a Source for OEMenus, and a description of how the
Menu Editor can be accessed from that component.
5.1 View Components
5.1.1 Alarm Banner View
Place the Alarm Banner into Configuration mode and then select the OE Menus: [Create..]
button on the General Property Configuration page.
5.1.2 Alarm View
Place the Alarm View into Configuration mode and then select the OE Menus: [Create..]
button on the General Property Configuration page.
5.1.3 OE Notes View
Place the Notes View into Configuration mode and then select the OE Menus: [Create..]
button on the General Property Configuration page.
5.1.4 OE Trend View
Place the Trend View into Configuration mode and then select the OE Menus: [Create..]
button on the General Property Configuration page.
- 15 -
Page 25

Reference Guide
D301513X412
April 2012
Other View Components access the OEMenu Editor differently: -
5.1.5 OE SQL View
Files used by the SQL View, which access the OEMenu Editor, are configured within the
Database Object Viewer. To access the Menu Editor from within the Database Object
Viewer, the user may either select the Options/Custom Data String menu or the Menu Editor
icon from the toolbar.
5.1.6 OE Graphics View
Place the OE Graphics window into Configure mode. To access the OEMenu Editor: -
1. Select a 'Pick' action property page;
2. Select the Custom Command option from the Action List;
3. Select the [Custom ...] button at the bottom of the 'Pick' action property page.
5.2 OEDesktop
OEMenus
Select the Desktop/Customize... menu option. The Menu tab of the OEDesktop Property Pages
opens by default. Selecting 'New' opens the OEMenu Editor dialog.
- 16 -
Page 26

Reference Guide
D301513X412
April 2012
OEMenus
6 Menu Editor Dialog
The Menu Editor dialog enables you to configure Custom menus for OpenEnterprise Views. The
OEDesktop also supports OEMenus on its menu bar.
This pane displays the configured Custom menu hierarchy (as icons) within a tree structure,
representing:-
1.
2.
3.
Command items (actionable menu items)
Group items (sub menu labels)
Separators (a line between sections of a menu)
6.1 Reordering Menu Items
Menu items may be reordered by selecting them with the left mouse button, moving them to the required
position in the hierarchy, and releasing the button.
7 Menu Commands
These are the basic operations for working with Menu Commands.
- 17 -
Page 27
Reference Guide
D301513X412
April 2012
1. Creating Menus
2. Renaming Menus
3. Copying Menus
4. Pasting Menus
5. Deleting Menus
OEMenus
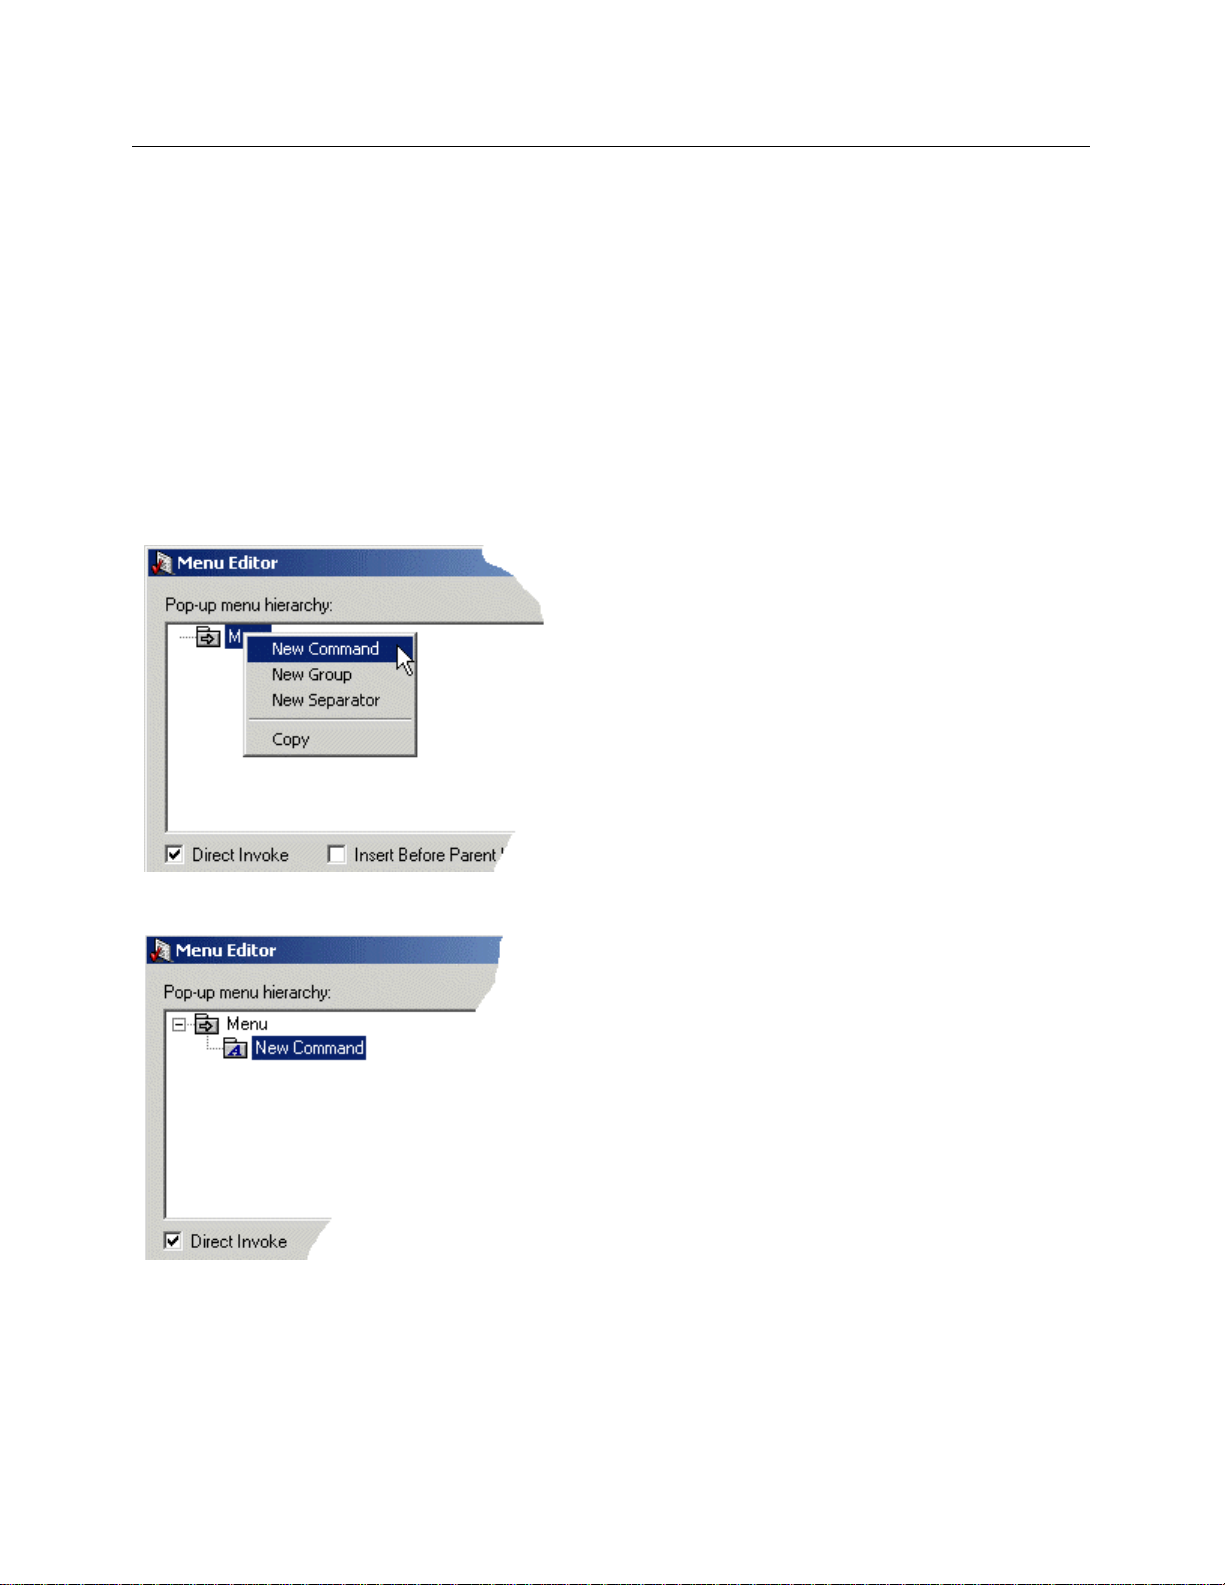
7.1 Creating Menus
When the OEMenu Editor is first invoked, it has no menu items configured. To begin configuring menu
items the user must first right click on the Menu icon at the top of the Pop-up Menu hierarchy list and
select the 'New Command' option, as shown: -
The new Menu Command added.
7.2 Renaming Menus
To rename a Menu Command right click on it and select 'Rename' from the context menu, as shown
below:-
- 18 -
Page 28

Reference Guide
D301513X412
April 2012
The cursor will be placed inside the new Menu Command ready to be renamed.
OEMenus
7.3 Copying Menus
A Menu Command can be copied and pasted elsewhere in the Pop-up menu hierarchy list. This is often
desirable, as copied Menu Commands retain their configuration details. Select the Menu Co mmand to be
copied, right click and then select the 'Copy' option as shown below:-
- 19 -
Page 29
Reference Guide
D301513X412
April 2012
OEMenus
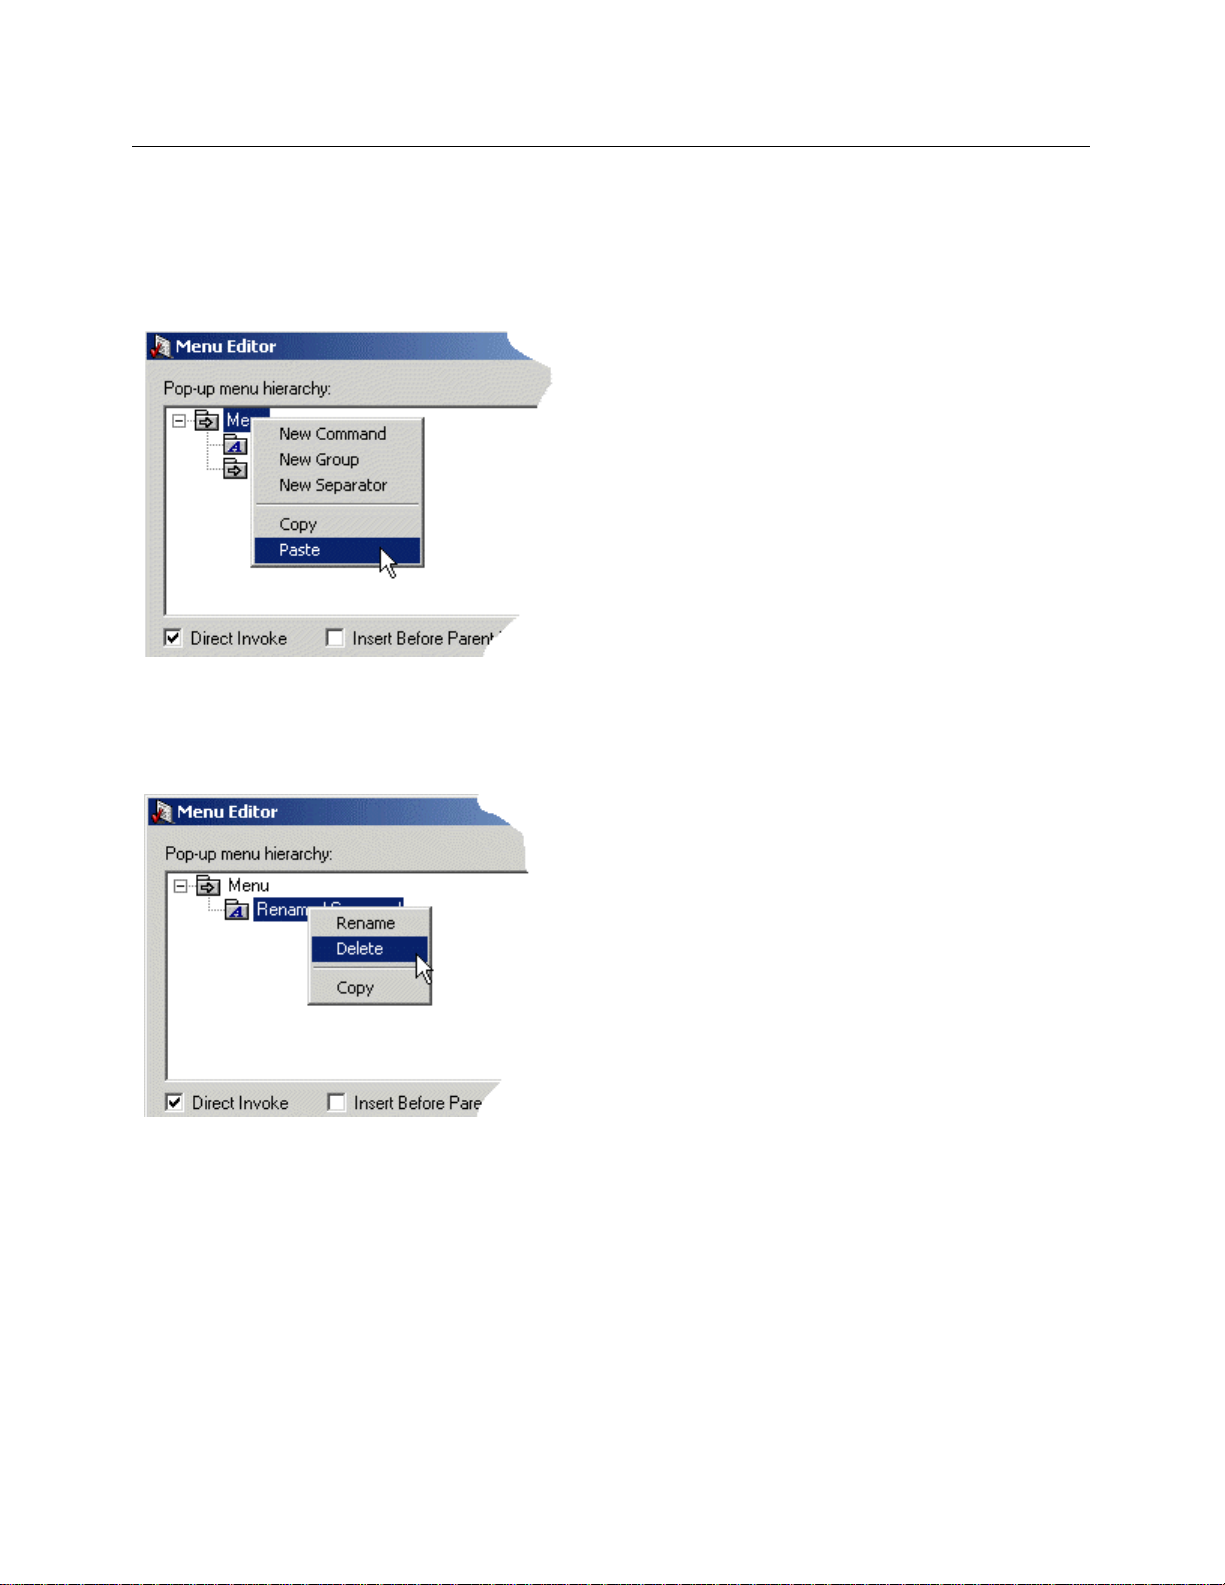
7.4 Pasting Menus
To paste a copied Menu Command into the Menu Hierarchy List select the Menu Group where the Menu
Command is to be pasted, right click and select the 'Paste' option as shown below. The copied Menu
Command will be pasted in at the bottom of the selected group.
7.5 Deleting Menus
To delete a Menu Command select it, right click and select the 'Delete' option from the context menu as
shown below:-
8 Menu Separators
Separators provide a separator bar between menu items. To create a Separator bar, select a Group, right
click and then select the 'Separator' item from the context menu as shown below:-
- 20 -
Page 30

Reference Guide
D301513X412
April 2012
Separator bars Example
OEMenus
9 Menu Groups
Menu Groups are sub-menus which descend from the parent menu, having their own group of Menu
Commands. They provide a mechanism for organizing Menu Commands into groups.
9.1 Creating Menu Groups
1. Copying Menu Groups
2. Pasting Menu Groups
3. Invoke All Menu Group Option
9.2 Create Menu Groups
Select an existing Group (including the top 'Menu' group), then right click and select 'New Group' from the
context menu. the Menu Editor places a New Group heading within the menu item list.
- 21 -
Page 31

Reference Guide
D301513X412
April 2012
Example of a new Group
OEMenus
9.3 Copy Menu Groups
A Menu Group with all it's Menu Commands and their configuration details may be copied for pasting
elsewhere in the Menu Hierarchy. Select the Group, right click and select the 'Copy' option as shown
below:-
- 22 -
Page 32

Reference Guide
D301513X412
April 2012
OEMenus
9.4 Paste Menu Groups
To paste a copied Menu Group elsewhere within the Menu Hierarchy list, select the Group under which
the new Group should be pasted, right click and then select the 'Paste' option. The new Group will be
pasted under the selected Group as shown below:-
9.5 Invoke All Menu Group Option
When a Group object is selected from the Menu Hierarchy Pane, the 'Command' section of the dialog
changes to the 'Group' section, providing the option to make the Group into an 'Invoke All Submenu
Items' Group.
9.5.1 Group Color Change
When the 'Invoke All Submenu Items' option is checked, the Group's color chan ges whilst in configure
mode to white.
9.5.1.1 Runtime
n the OEMenu is viewed in Runtime mode, instead of appearing as a Group: -
Whe
- 23 -
Page 33
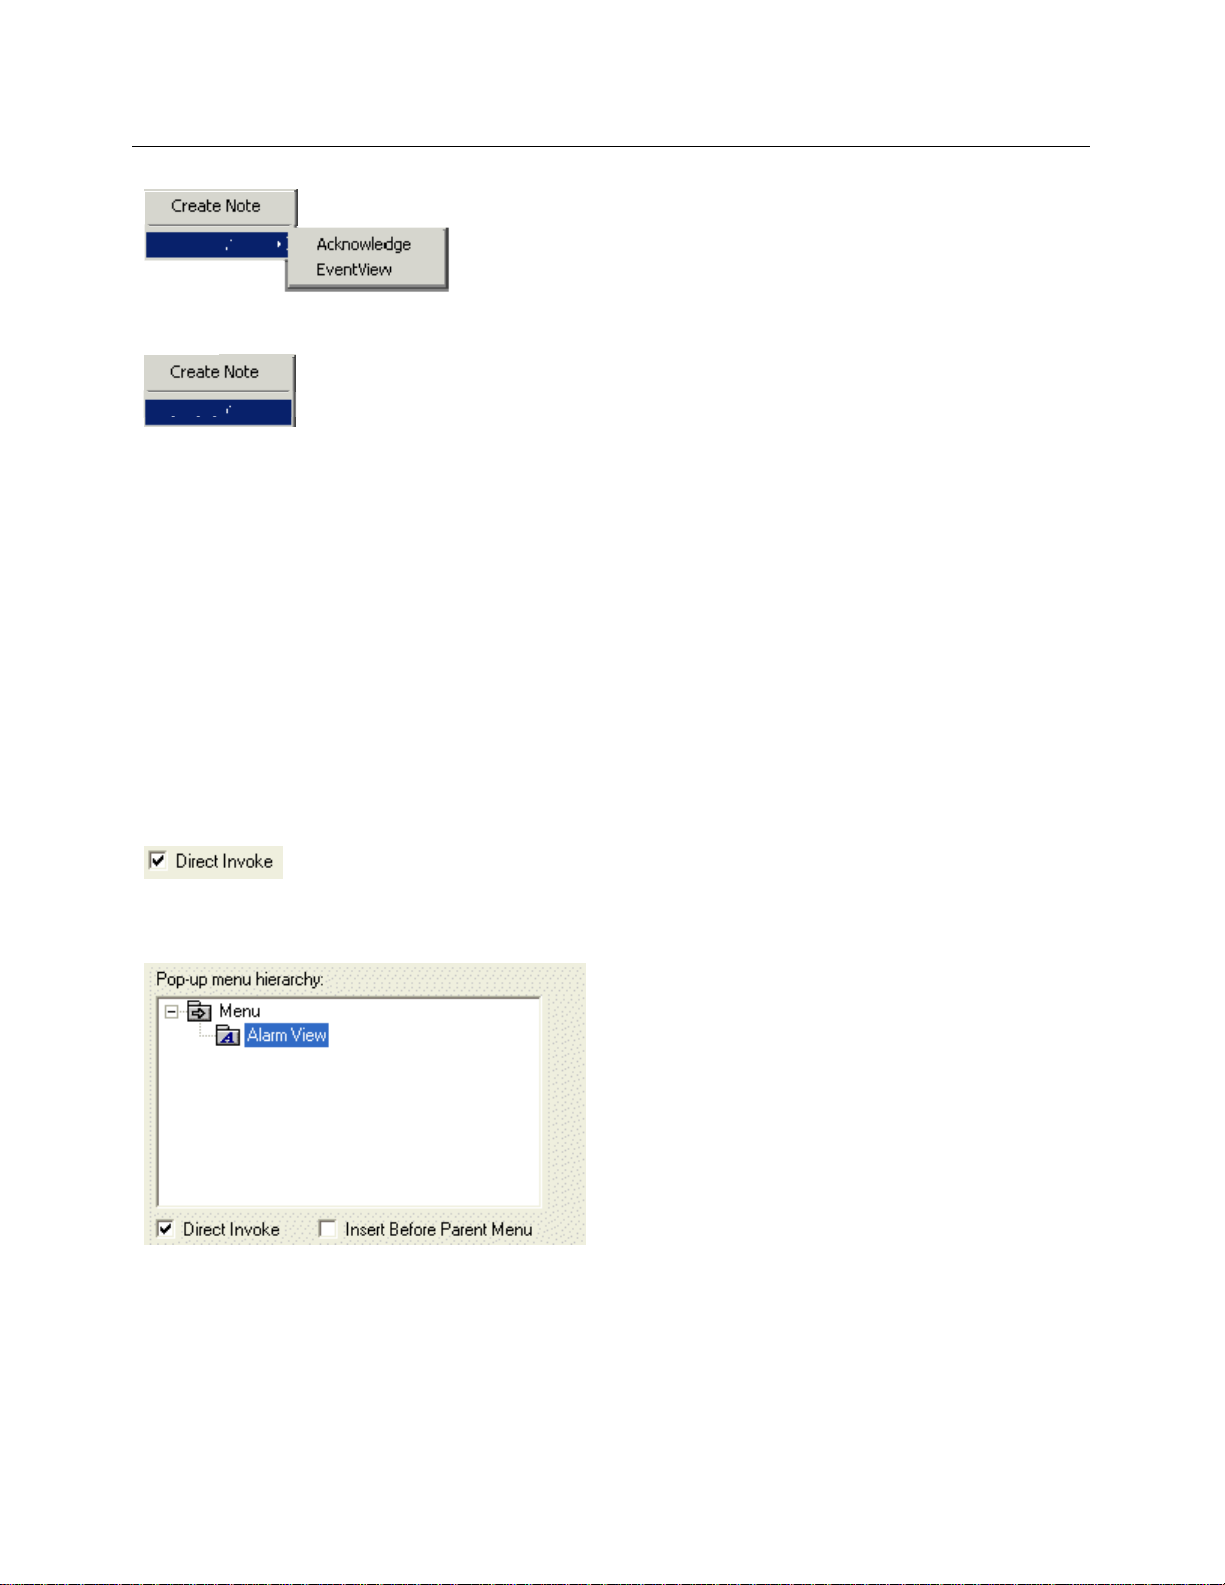
Reference Guide
D301513X412
April 2012
it will appear as if it were a normal menu command:-
OEMenus
9.5.2 Invoke All Submenu Items
All actions, (i.e. submenu items), defined below that Group will be invoked through a single user action.
By selecting this Group menu item, all submenu items will automatically be invoked.
If an OEMenus Group is configured in this way, then the submenu items below the Group will never be
displayed in runtime. However, they will still be available in configuration mode, thus allowing changes in
the configuration of those submenu items to be applied.
It will be possible to cascade Groups to use this functionality, such that sub Groups of a Group for which
Invoke All Submenu Items is configured, can themselves be configured to Invoke All Submenu Items.
The failure of any submenu action will not prevent other submenu items defined within the Group from
being invoked.
10 Direct Invoke
This option applies when a single OEMenus Custom Context menu Command is configured on a Pick
object within an OpenEnterprise Graphics View display:-
When the option is checked, as shown in the image above, the actual menu command will not be seen in
runtime, but the menu will be immediately invoked when the user clicks on the object that contains the
Pick object. This gives the impression that the user has clicked on a command button.
- 24 -
Page 34

Reference Guide
D301513X412
April 2012
However, if there is more than one menu command configured, the Direct Invoke option, though selected,
is overridden...
OEMenus
...and the menu commands will become available in runtime when the user selects the Pick object with
the Custom menu on it:-
11 Insert Custom Group Menu Before Parent Menu
Commands configured on a Custom menu appear under a Custom Group menu on the Views parent
context menu. If this box is checked, the Custom Group menu will appear above the commands of the
parent context menu in Run-Time mode. Unchecked means the Custom Group menu will a ppear after all
the commands of the parent context menu. An example of a Custom Menu inserted before the parent
menu is shown below.
- 25 -
Page 35

Reference Guide
D301513X412
April 2012
11.1 Removing the Custom Group Menu
OEMenus
The Custom sub-menu can be overridden, causing the Custom menu items to appear as part of the
normal OEView component's context menu, and not under the Custom sub-group. This is achieved by
un-checking the 'Use Sub Menu' box found on the General property page of the OEView, as shown in the
image below.
If the 'Insert Before Parent Menu' is left checked on the Custom menu configuration, like so...
...this will be the result:-
- 26 -
Page 36

Reference Guide
D301513X412
April 2012
OEMenus
12 Target
The "Target" list allows the user to select the target file type on which the OEMenus action will be
performed.
There are four categories of Target applications: -
1. View components.
2. OE Control Display
3. Data Server.
4. Windows applications.
12.1 Target - Views
View components are designed to be opened within the OEDesktop container window on Workstations as
part of a configured SCADA application. The list below uses the names displayed within the Target list
and explains briefly what each component does.
- 27 -
Page 37

Reference Guide
D301513X412
April 2012
Target Name Explanation
Bristol OpenEnterprise Display Loads a Graphics application instance into the
designated window within the OEDesktop.
OE Alarm Printer View Loads an Alarm Printer ActiveX Control into the
designated window within the OEDesktop.
OE Alarm Ribbon Loads an Alarm Ribbon ActiveX Control into
the designated window within the OEDesktop.
OE Alarm View Loads an Alarm Client ActiveX control into the
designated window within the OEDesktop.
OE Desktop Loads a different configured OEDesktop. This
takes the place of the currently loaded
OEDesktop. The only Action available will be
Load file. This Target option is not available if
OEGraphics is the source application.
OE Notes View Loads a Notes Client ActiveX control into the
designated window within the OEDesktop.
OE Signal View Loads a Signal View ActiveX Control into the
designated window within the OEDesktop.
OE SQL View Loads an SQL Viewer ActiveX control into the
designated window within the OEDesktop.
OE Trend View Loads a Trend Client ActiveX control into the
designated window within the OEDesktop.
OE Web View Loads a Web Client ActiveX control into the
designated window within the OEDesktop.
OE Report Selector Loads a Report Selector .NET control into the
designated window within the OEDesktop.
OEMenus
12.2 Target - OE Control Display
The OE Control Display is a container that is able to hold any ActiveX control. It must be used when using
Multiple OEDesktops to load OEGraphics views. It also enables the user to load any registered ActiveX™
control (i.e. the Calendar control) into a window within the OEDesktop.
- 28 -
Page 38

Reference Guide
D301513X412
April 2012
The OE Control Display must be launched within an OEDesktop instance, and saved as a file with an
OEX extension before it can be used as a Target for an OEMenu. Providing the OE Control Display
contains an OpenEnterprise View, the OE Control Display can be used as a Target file which accepts
parameters from an OEMenu action.
OEMenus
12.3 Target - Data Server
The Data Server option launches the Bristol OPC Client, which provides synchronous read and write
access to database attribute values. It must be configured using the Database Update configuration
dialog, opened by using the [Configure] button on the Menu Editor Dialog.
12.4 Target - Windows Applications
The 'Windows application' option within the Target list provides the ability to launch any executable (.BAT,
.COM or .EXE) Windows file. When this option is chosen as a Target file type, the only action available is
Load File. The resulting application is not under the direct control of OEDesktop, and opens in a window
that is not confined to the OEDesktop.
13 Action
The "Action" box on the OEMenu Editor Dialog allows the user to define the specific action to be
performed on the component selected from the target box. The entries available within this combo box
are dependent upon the Source component, which is hosting the OEMenu, and the current selection from
the "Target" combo box.
- 29 -
Page 39

Reference Guide
D301513X412
April 2012
OEMenus
13.1.1 Standard Actions Available
All standard View components support 'Load File' and 'Load File with parameters' actions.
13.1.2 Extra Actions Available
In addition, OEMenus created within the OEGraphics application, which use the Trend Component as a
Target application, support a 'Load File with Tag List' action.
13.1.3 Single Action Only Available
The Data Server and Windows Application Targets have single dedicated actions of 'Database Update'
and 'Launch Application' respectively.
14 [Enable/Disable] Button
This functionality provides the ability to enable or disable Custom Menus based on the value of predefined condition. For instance, if an alarm is already acknowledged then an OEMenu item to
acknowledge an alarm could be disabled.
Use of the Enable/Disable dialog box is slightly different if the source application has parameters as
aliases, rather than columns. The dialog is again different for the two components that use parameters for
aliases (OEGraphic View and Trend View).
Important Note: It is essential that the Bristol OPC Server be running and connected to any databases
from which attribute information is to be obtained before attempting to evaluate any conditions. If this is
not the case then any reads on that database will fail, resulting in the error Condition State being
employed for the menu item(s) in question.
14.1 Tabular Data Type Views
This dialog enables you to configure conditions for which the custom menu item will be disabled when the
source component is a View which receives data directly from specific tables in the database. These
Views are - Alarm View, Alarm Banner, Alarm Printer, Notes View and SQL View
- 30 -
Page 40

Reference Guide
D301513X412
April 2012
OEMenus
14.1.1 Data Source
The "Data Source" edit field is used to define the database tag against which the condition will be
evaluated.
This must be a full data access OPC tag definition, but can contain one or more column or alias
definitions (depending on the Source View type), which will be resolved from the Source View when the
action is invoked.
- 31 -
Page 41

Reference Guide
D301513X412
April 2012
This field is a drag & drop target and hence tags can be dragged directly from the Database Explorer if
required.
OEMenus
14.1.2 Enable Menu When Condition Occurs
When checked, the OEMenu item is enabled when the condition defined in the Condition section is True.
14.1.3 Enable Menu When Condition Generates an Error
When checked, the OEMenu item is enabled if the condition is False or if any error occurs when
evaluating the condition. The types of failure that may occur include unresolved aliases, invalid tags, and
incompatible data types to perform the comparison. (NOTE: No indication of the error condition is
available to the user.)
14.1.4 Conditions
This section allows the user to define conditions that will enable or disable the OEMenu item. The
conditions are selected by means of radio buttons, which makes them mutually exclusive.
The condition radio buttons define the type of condition to be evaluated. The radio buttons themselves
can be greyed out depending on the data type of the OPC data access tag defined as the "Data Source".
14.1.5 Equals
This condition may be applied to any data access tag. The condition is True if the value of the OPC tag in
the Data Source field is equal to the value entered into the Value 1 field.
14.1.6 Greater Than
This condition may be applied to float or integer type data access tags. If selected, the condition is True if
the Data Source value is greater than the value in the Value 1 field. The Value 2 field will be disabled.
14.1.7 Less Than
This condition may be applied to float or integer type data access tags. The condition is True if the Data
Source value is less than the value specified in the Value 1 field. The Value 2 field is disabled.
14.1.8 Range
This condition may be applied to float or integer type data access tags. If selected, the Value 2 field
becomes enabled. The condition is True if the value of the Data Source falls between the values set in
the Value 1 and Value 2 fields.
14.1.9 Value 1
The "Value 1" edit field contains the value against which the data source tag will be evaluated, for
"Equals", "Greater Than", and "Less Than" conditions. It is also used as either the upper or lower range
value for the "Range" condition.
This may be a constant value, or a full OPC Data Access tag, (with or without aliases).
This field is greyed out if no Data Source value is defined.
The field is a drag & drop target and hence tags can be dragged directly from the Database Explorer if
required.
- 32 -
Page 42

Reference Guide
D301513X412
April 2012
OEMenus
14.1.10 Value 2
The "Value 2" field is only available when a "Range" condition is defined, and is used to define the upper
or lower range value for the condition.
This may be a constant value, or a full OPC Data Access tag, (with or without aliases).
This field is a drag & drop target and hence tags can be dragged directly from the Database Explorer if
required.
The range condition has been implemented so that the "Value 1" and "Value 2" values are compared prior
to the condition being evaluated. This ensures that the larger of the two values is always treated as the
upper range, and the lesser the lower range.
14.1.11 Available Columns
This is the list of columns that are available for use as aliases from the Source OEView. They can be
inserted into the Data Source tag at the appropriate place by using the Auto Insert option and the [Add
Column] button or by dragging and dropping an added alias from the Currently Available List onto the
Data Source field.
14.1.12 Currently Available List
When a new alias or column is added, it appears within this list. It can then be dragged and dropped from
here into any field containing a full data access OPC tag definition.
14.1.13 Auto Insert Alias
Auto inserting of aliases is used on enable/disable menu dialogs, advanced window naming dialogs and
on database update dialogs. For enable/disable and database update dialogs, aliases are inserted into
the Data Source string. For the advanced window naming dialogs, the aliases a re inserte d into a text
field.
If checked, every alias that is added through the [Add Alias] button or [Add Column] button will be
automatically added to the string in the Data Source or text field at the cursor position.
If unchecked, aliases will be added to the Currently Available list of aliases, but not to the text or Data
Source field. From there the user can drag and drop any alias into the Data Source field in any order
desired.
14.1.14 Add Column Button
When this button is selected the currently selected column within the 'Available Columns' list will be
copied to the 'Currently Available' list. Once in the 'Currently Available' list, the aliases can be dragged
and dropped to any point within the Data Source or Caption Text field, depending on the type of dialog.
14.1.15 Remove Button
An alias selected from the Currently Available list of aliases may be removed by selecting the [Remove]
button.
14.1.16 Use This Configuration
If checked, then the OEMenu uses the configuration defined on this dialog. If not checked, the
configuration on this dialog is not implemented.
- 33 -
Page 43

Reference Guide
D301513X412
April 2012
OEMenus
14.2 Tag Data Type - Graphics View
This dialog enables you to configure conditions for which the custom menu item will be disabled when the
source component is OEGraphics.
14.2.1 Data Source
The "Data Source" edit field is used to define the database tag against which the condition will be
evaluated.
This must be a full data access OPC tag definition, but can contain one or more column or alias
definitions (depending on the Source View type), which will be resolved from the Source View when the
action is invoked.
This field is a drag & drop target and hence tags can be dragged directly from the Database Explorer if
required.
14.2.2 Enable Menu When Condition Occurs
When checked, the OEMenu item is enabled when the condition defined in the Condition section is True.
- 34 -
Page 44

Reference Guide
D301513X412
April 2012
OEMenus
14.2.3 Enable Menu When Condition Generates an Error
When checked, the OEMenu item is enabled if the condition is False or if any error occurs when
evaluating the condition. The types of failure that may occur include unresolved aliases, invalid tags, and
incompatible data types to perform the comparison. (NOTE: No indication of the error condition is
available to the user.)
14.2.4 Conditions
This section allows the user to define conditions that will enable or disable the OEMenu item. The
conditions are selected by means of radio buttons, which makes them mutually exclusive.
The condition radio buttons define the type of condition to be evaluated. The radio buttons themselves
can be greyed out depending on the data type of the OPC data access tag defined as the "Data Source".
14.2.5 Greater Than
This condition may be applied to float or integer type data access tags. If selected, the condition is True if
the Data Source value is greater than the value in the Value 1 field. The Value 2 field will be disabled.
14.2.6 Less Than
This condition may be applied to float or integer type data access tags. The condition is True if the Data
Source value is less than the value specified in the Value 1 field. The Value 2 field is disabled.
14.2.7 Range
This condition may be applied to float or integer type data access tags. If selected, the Value 2 field
becomes enabled. The condition is True if the value of the Data Source falls between the values set in
the Value 1 and Value 2 fields.
14.2.8 Value 1
The "Value 1" edit field contains the value against which the data source tag will be evaluated, for
"Equals", "Greater Than", and "Less Than" conditions. It is also used as either the upper or lower range
value for the "Range" condition.
This may be a constant value, or a full OPC Data Access tag, (with or without aliases).
This field is greyed out if no Data Source value is defined.
The field is a drag & drop target and hence tags can be dragged directly from the Database Explorer if
required.
14.2.9 Value 2
The "Value 2" field is only available when a "Range" condition is defined, and is used to define the upper
or lower range value for the condition.
This may be a constant value, or a full OPC Data Access tag, (with or without aliases).
This field is a drag & drop target and hence tags can be dragged directly from the Database Explorer if
required.
- 35 -
Page 45

Reference Guide
D301513X412
April 2012
The range condition has been implemented so that the "Value 1" and "Value 2" values are compared prior
to the condition being evaluated. This ensures that the larger of the two values is always treated as the
upper range, and the lesser the lower range.
OEMenus
14.2.10 Currently Available List
When a new alias or column is added, it appears within this list. It can then be dragged and dropped from
here into any field containing a full data access OPC tag definition.
14.2.11 Auto Insert Alias
Auto inserting of aliases is used on enable/disable menu dialogs, advanced window naming dialogs and
on database update dialogs. For enable/disable and database update dialogs, aliases are inserted into
the Data Source string. For the advanced window naming dialogs, the aliases a re inserte d into a text
field.
If checked, every alias that is added through the [Add Alias] button or [Add Column] button will be
automatically added to the string in the Data Source or text field at the cursor position.
If unchecked, aliases will be added to the Currently Available list of aliases, but not to the text or Data
Source field. From there the user can drag and drop any alias into the Data Source field in any order
desired.
14.2.12 Add Alias Button
When the [Add Alias] button is selected the 'New Alias' or 'Define Alias' dialog is displayed, depending on
whether the source view is a Trend or Graphics view.
14.2.12.1 New Alias Dialog (Trend View source)
There is only
14.2.12.2 Alias Definition Dialog (Graphics View source)
The Graphi
one field on this dialog, which is the name of the alias.
cs View dialog also has the Object field.
- 36 -
Page 46
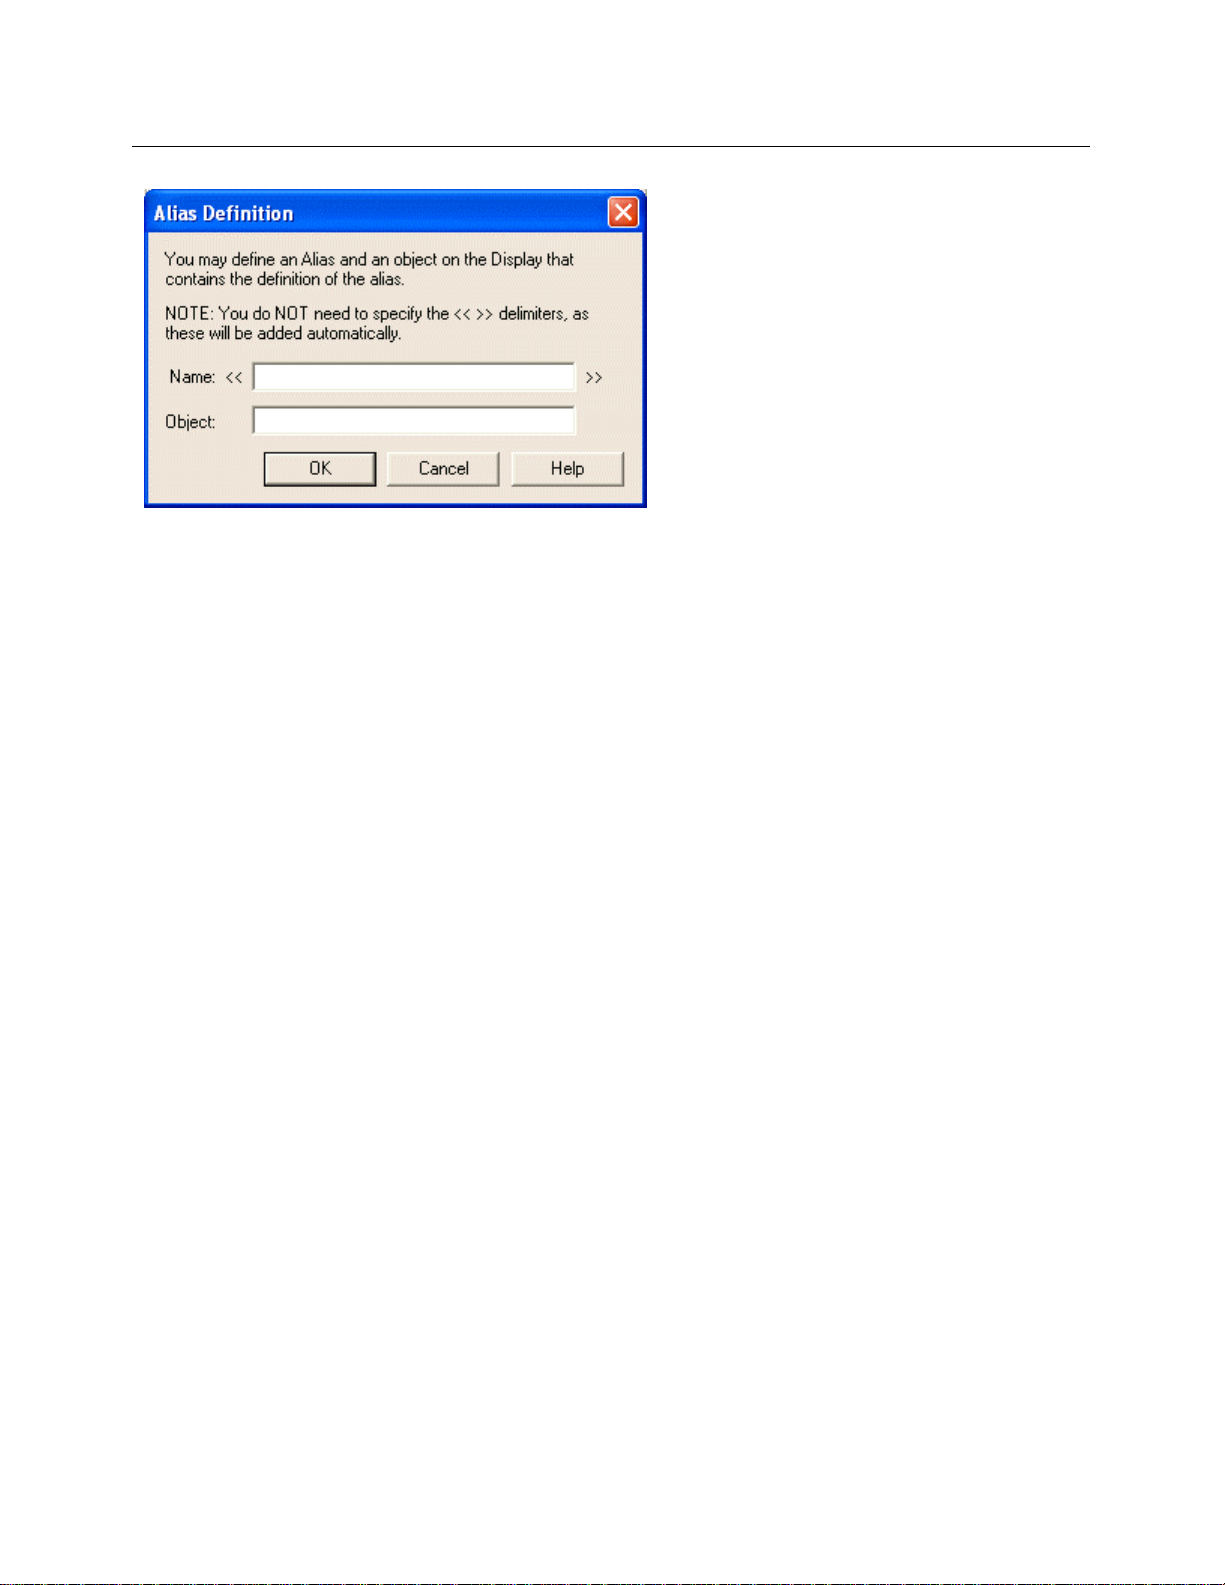
Reference Guide
D301513X412
April 2012
14.2.12.3 Alias Name
OEMenus
The ne
since these are added automatically, as indicated by the double chevrons on the dialog. When the OK
button is selected the alias is added to the Currently Available list of aliases.
14.2.12.4 Alias Object
Whe
alias appears needs to be given a name so that OEMenus can find and pass the correct alias value to the
target View.
The same alias name can be repeated, but can be given different values depending on the object that it
appears on.
w alias is typed into the Name field. There is no need to add the double chevrons ('<<' and '>>'),
n using OEMenus to pass alias values as parameters in a Graphics display, the object on which the
14.2.13 Remove Button
An alias selected from the Currently Available list of aliases may be removed by selecting the [Remove]
button.
14.2.14 Use This Configuration
If checked, then the OEMenu uses the configuration defined on this dialog. If not checked, the
configuration on this dialog is not implemented.
14.3 Tag Data Type - Trend View
This dialog enables you to configure conditions for which the custom menu item will be disabled when the
source component is Trend View.
- 37 -
Page 47
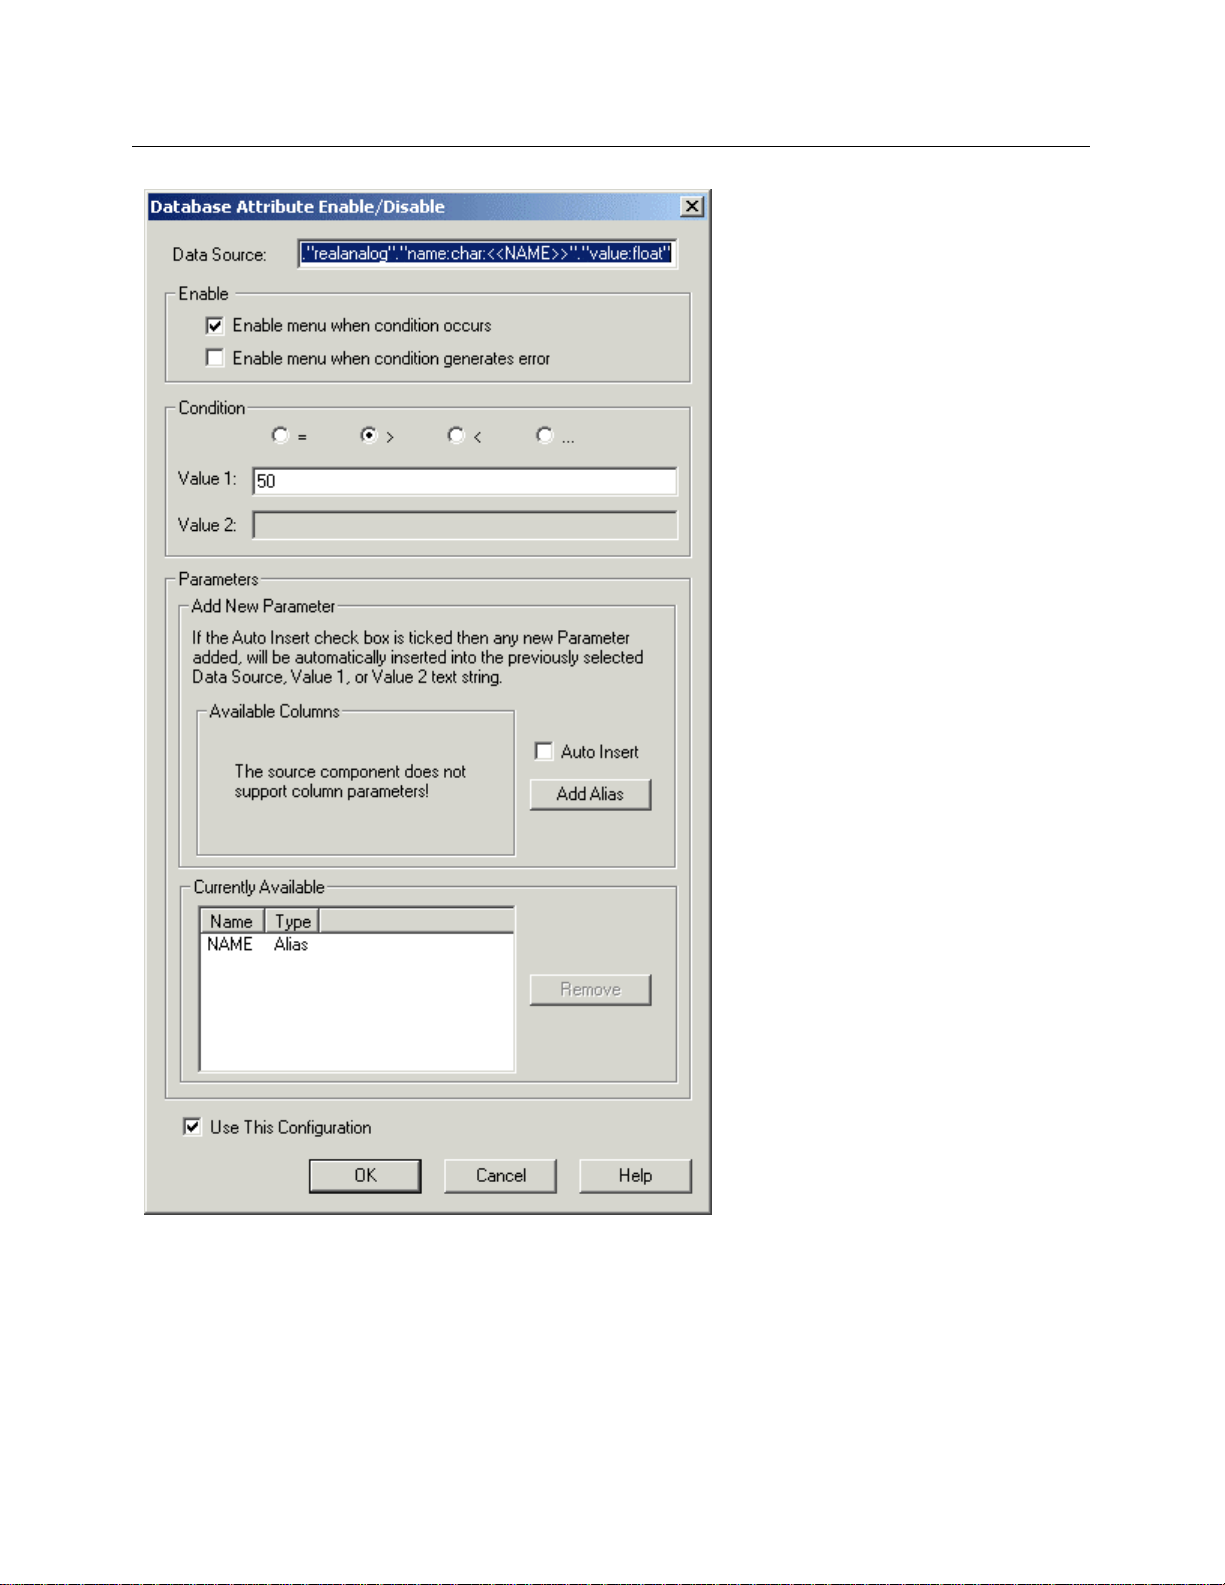
Reference Guide
D301513X412
April 2012
OEMenus
This text field needs to contain a valid OPC data access tag. The easiest way to do this initially is to dragdrop a tag from the Database Object Viewer.
• Drag-dropping an OPC tag
Aliases or column definitions can be included in the data access tag string. There are two wa ys to place
column aliases into the OPC tag in Data Source field:-
1. Auto Insert method
- 38 -
Page 48

Reference Guide
D301513X412
April 2012
2. Drag-drop method
OEMenus
14.3.1 Enable Menu When Condition Occurs
When checked, the OEMenu item is enabled when the condition defined in the Condition section is True.
14.3.2 Enable Menu When Condition Generates an Error
When checked, the OEMenu item is enabled if the condition is False or if any error occurs when
evaluating the condition. The types of failure that may occur include unresolved aliases, invalid tags, and
incompatible data types to perform the comparison. (NOTE: No indication of the error condition is
available to the user.)
14.3.3 Conditions
This section allows the user to define conditions that will enable or disable the OEMenu item. The
conditions are selected by means of radio buttons, which makes them mutually exclusive.
The condition radio buttons define the type of condition to be evaluated. The radio buttons themselves
can be greyed out depending on the data type of the OPC data access tag defined as the "Data Source".
14.3.4 Equals
This condition may be applied to any data access tag. The condition is True if the value of the OPC tag in
the Data Source field is equal to the value entered into the Value 1 field.
14.3.5 Greater Than
This condition may be applied to float or integer type data access tags. If selected, the condition is True if
the Data Source value is greater than the value in the Value 1 field. The Value 2 field will be disabled.
14.3.6 Less Than
This condition may be applied to float or integer type data access tags. The condition is True if the Data
Source value is less than the value specified in the Value 1 field. The Value 2 field is disabled.
14.3.7 Range
This condition may be applied to float or integer type data access tags. If selected, the Value 2 field
becomes enabled. The condition is True if the value of the Data Source falls between the values set in
the Value 1 and Value 2 fields.
14.3.8 Value 1
The "Value 1" edit field contains the value against which the data source tag will be evaluated, for
"Equals", "Greater Than", and "Less Than" conditions. It is also used as either the upper or lower range
value for the "Range" condition.
This may be a constant value, or a full OPC Data Access tag, (with or without aliases).
This field is greyed out if no Data Source value is defined.
The field is a drag & drop target and hence tags can be dragged directly from the Database Explorer if
required.
- 39 -
Page 49
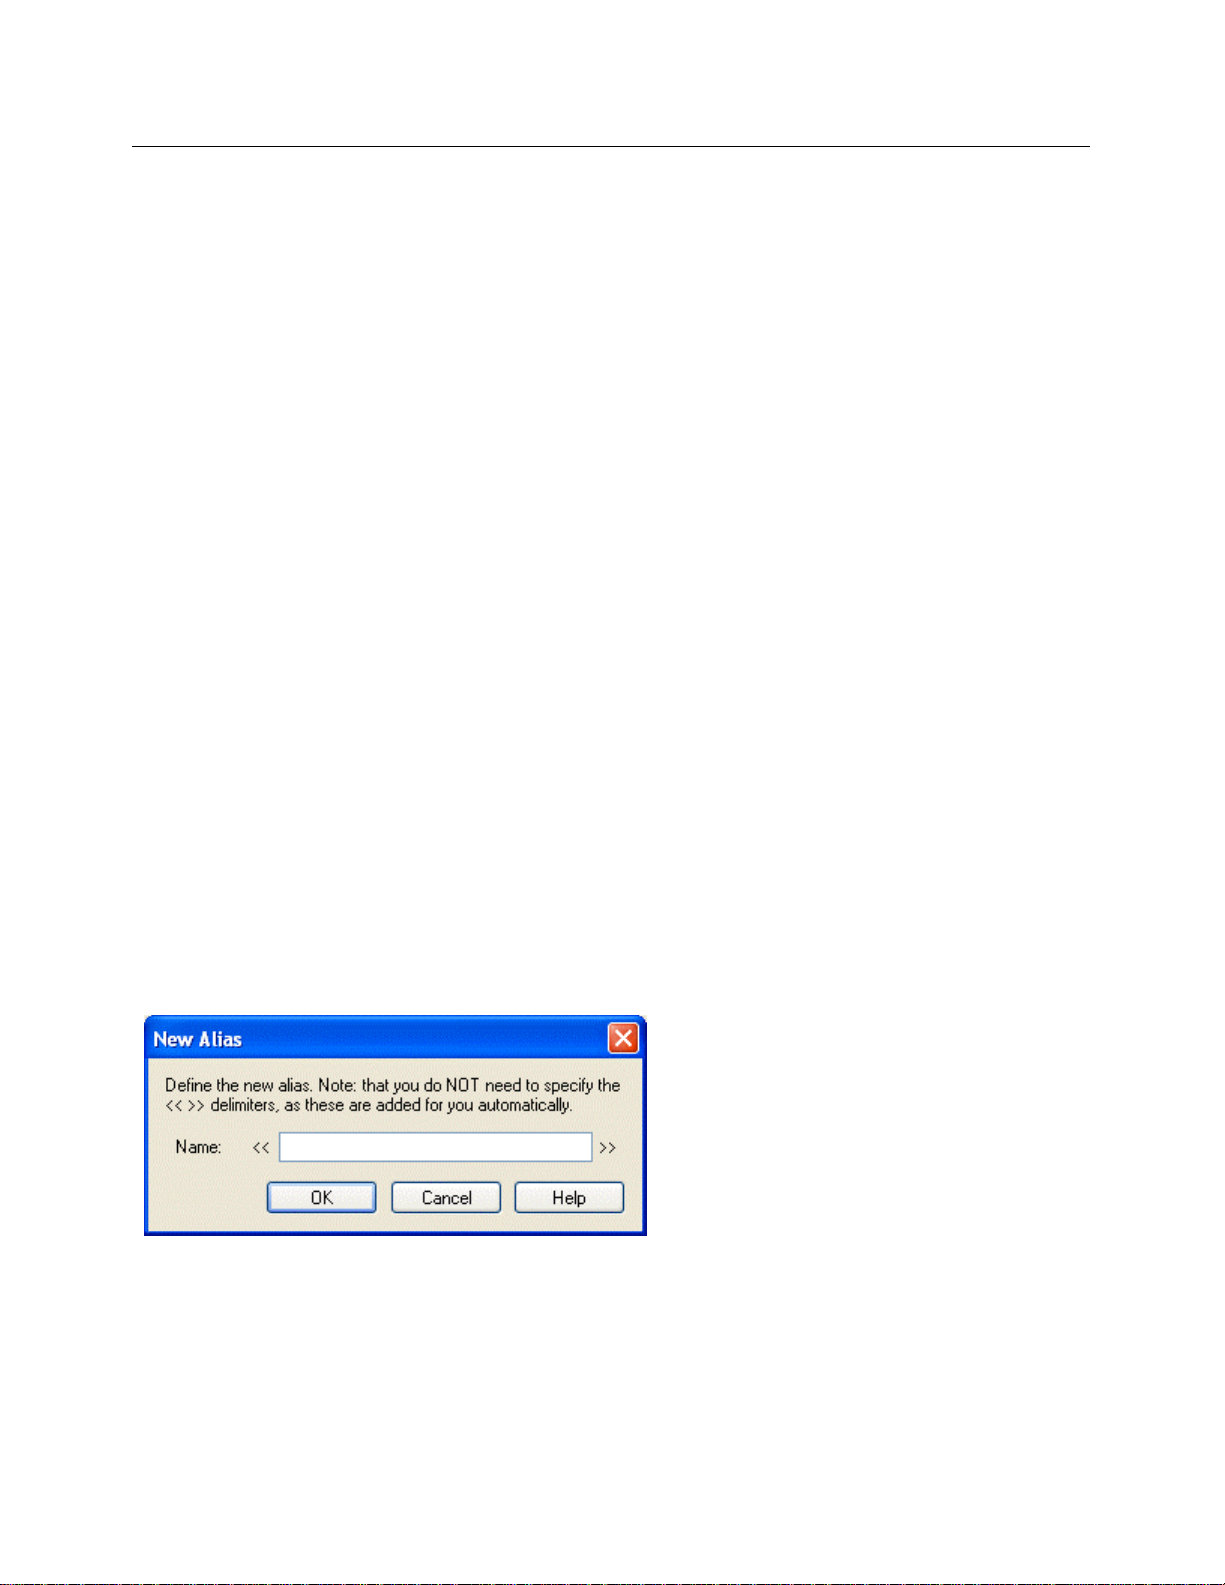
Reference Guide
D301513X412
April 2012
OEMenus
14.3.9 Value 2
The "Value 2" field is only available when a "Range" condition is defined, and is used to define the upper
or lower range value for the condition.
This may be a constant value, or a full OPC Data Access tag, (with or without aliases).
This field is a drag & drop target and hence tags can be dragged directly from the Database Explorer if
required.
The range condition has been implemented so that the "Value 1" and "Value 2" values are compared prior
to the condition being evaluated. This ensures that the larger of the two values is always treated as the
upper range, and the lesser the lower range.
14.3.10 Auto Insert Alias
Auto inserting of aliases is used on enable/disable menu dialogs, advanced window naming dialogs and
on database update dialogs. For enable/disable and database update dialogs, aliases are inserted into
the Data Source string. For the advanced window naming dialogs, the aliases a re inserte d into a text
field.
If checked, every alias that is added through the [Add Alias] button or [Add Column] button will be
automatically added to the string in the Data Source or text field at the cursor position.
If unchecked, aliases will be added to the Currently Available list of aliases, but not to the text or Data
Source field. From there the user can drag and drop any alias into the Data Source field in any order
desired.
14.3.11 Add Alias Button
When the [Add Alias] button is selected the 'New Alias' or 'Define Alias' dialog is displayed, depending on
whether the source view is a Trend or Graphics view.
14.3.11.1 New Alias Dialog (Trend View source)
There is only
one field on this dialog, which is the name of the alias.
14.3.11.2 Alias Definition Dialog (Graphics View source)
The Graphi
cs View dialog also has the Object field.
- 40 -
Page 50

Reference Guide
D301513X412
April 2012
14.3.11.3 Alias Name
OEMenus
The ne
since these are added automatically, as indicated by the double chevrons on the dialog. When the OK
button is selected the alias is added to the Currently Available list of aliases.
14.3.11.4 Alias Object
Whe
alias appears needs to be given a name so that OEMenus can find and pass the correct alias value to the
target View.
The same alias name can be repeated, but can be given different values depending on the object that it
appears on.
w alias is typed into the Name field. There is no need to add the double chevrons ('<<' and '>>'),
n using OEMenus to pass alias values as parameters in a Graphics display, the object on which the
14.3.12 Currently Available List
When a new alias or column is added, it appears within this list. It can then be dragged and dropped from
here into any field containing a full data access OPC tag definition.
14.3.13 Remove Button
An alias selected from the Currently Available list of aliases may be removed by selecting the [Remove]
button.
14.3.14 Use This Configuration
If checked, then the OEMenu uses the configuration defined on this dialog. If not checked, the
configuration on this dialog is not implemented.
15 [Configure] Button
- 41 -
Page 51

Reference Guide
D301513X412
April 2012
The [Configure] button opens the Parameter Configuration Dialog. This Dialog varies according to what
kind of data (tabular or point based data) the Source and Target Views display . The Source and Target
Views do not have to display the same kind of data in order to use OEMenus functionality. The Parameter
Configuration Dialog enables you to configure Parameters which are resolved on the Source View, or to
define a string as a Parameter, which you are going to send to the Target View, and to match these
Parameters with Columns or Aliases on the Target View. Each resolved Parameter on the Source View
must match up with and resolve the value of a specific Column or Alias on the Target View. It is best to
think of Parameters as being strings passed from the Source View, and Aliases or Columns as being
place holders for these strings on the Target View.
OEMenus
15.1 Configuration Dialogs
The exact dialog called by this button depends on the Source View type, and the Action selected from the
Action List.
15.2 Configuring Different Actions
The Actions that can be selected for a Menu Command differ according to the Source and Target View
types. When the [Configure] button is selected from the main Menu Editor Dialog, the options on the
Menu Configuration dialog will be different according to the Source View type and the Target and Action
selections of the created Menu Command. These options are listed below:-
1. Load a File
2. Load a File Passing a Parameter
3. Database Update
4. Launch a Windows Application
15.2.1 Load File Only
If the Target View was one of the OpenEnterprise Views, there are two versions of the Configuration
dialog for this type of Action, depending on whether the Source View displays Tabular or Tag type data.
1. Load File - Tabular Data View
2. Load File - Tag Data View
To see what type of data each of the Views displays, see the Views and their Data Types page.
15.2.1.1 Load File - Tabular View Source
If the Action chosen is 'L
Graphics View file.
oad File', this is the dialog that is displayed when the source View is not a
- 42 -
Page 52

Reference Guide
D301513X412
April 2012
15.2.1.1.1 File Name Field / List General
OEMenus
For all View
provides a drop-down list of columns from the source table, one of which may be used to indicate which
file to load. Another method of specifying the file to load is to use the file browse button [...].
Using the Drop-down Column List
The columns supported by OEViews which obtain their values from a table within the OEDatabase a re
available from the File list box.
When the OEMenu item is invoked, (during Run -Time operation), the OE Message Bus queries the
source application for the value of the specified attribute for the currently selected row. This will define the
display to be launched.
NOTE: The ability to source a file name from an attribute is not available from the Trend or OEGraphics
components. This is because they do not source their data directly from the Database, but from the
Bristol OPC Server, and so the concept of a row does not exist.
15.2.1.1.2 File Browse Button
components except OEGraphics and OETrend Views, the Load File configuration dialog box
Selecting the
select the file to load.
browse button [...] causes the File Open dialog to be opened, from which the user can
- 43 -
Page 53

Reference Guide
D301513X412
April 2012
Once a file is chosen, the file name and it's path are entered automatically into the correct fields.
OEMenus
15.2.1.1.3 File Path Field
n the browse button is used to locate a file to be loaded by the OEMenu Command, it's path is
Whe
automatically placed in this field. If known to the user, the file name and path fields can be typed in
manually.
15.2.1.1.4 Always Reload This File
If this box is checke
afresh with the file specified in the File edit field when this OEMenu option is selected. If not checked,
then the window will not be reloaded with the specified file. However, any new alias values will be passed
into the window when the OEMenu is selected.
15.2.1.2 Load File - Tag Data Source
If the Action chosen is 'L
component.
d then the window containing the target OEView component will always be reloaded
oad File', this is the dialog that is displayed when Graphics View is the source
- 44 -
Page 54

Reference Guide
D301513X412
April 2012
15.2.1.2.1 File Name OEGraphics
OEMenus
The Graphi
on the Source component.
Using an Alias
In this case the display name will be obtained at Run-Time, from the Graphics View display from which
the 'Load File' action was launched.
In the example below, the alias <<SIGNAL1>> should be resolved from an OE Graphics dynamic object
named 'signalPPT1' on the source component. This resolved alias should be the name of a Graphics
View file to be found within the directory named in the 'Path' field.
cs View component allows files to be specified with the file browse button [...], or by an alias
If the Object field is left blank, then the alias will be resolved from the visible object on which the action is
defined.
15.2.1.2.2 File Path Field
n the browse button is used to locate a file to be loaded by the OEMenu Command, it's path is
Whe
automatically placed in this field. If known to the user, the file name and path fields can be typed in
manually.
15.2.1.2.3 Object Field
This field be
OE Graphic object from the source OE Graphic View.
15.2.1.2.4 File Browse Button
Selecting the
select the file to load.
comes enabled if there is an alias name in the File edit field. It should contain the name of the
browse button [...] causes the File Open dialog to be opened, from which the user can
- 45 -
Page 55

Reference Guide
D301513X412
April 2012
Once a file is chosen, the file name and it's path are entered automatically into the correct fields.
OEMenus
15.2.1.2.5 Always Reload This File
If this box is checke
afresh with the file specified in the File edit field when this OEMenu option is selected. If not checked,
then the window will not be reloaded with the specified file. However, any new alias values will be passed
into the window when the OEMenu is selected.
d then the window containing the target OEView component will always be reloaded
15.2.2 Load File with Parameters
This option loads an OpenEnterprise View into the OEDesktop and passes Parameters from the Source
View to the Target View file, which define the data that is displayed by the loaded View. The
configuration options for this action differ depending on the type of data that can be passed by
the Source View:-
1. Alias Type Parameters
2. Column Type Parameters
To see what type of data each of the Views displays, see the Views and their Data Types page.
15.2.2.1 Load File with Alias Type Parameters
never you are creating a Custom menu on a Graphics or Trend View, you can send constant values
Whe
or resolved aliases as string Parameters when you load a file. These are the three options available when
configuring OEMenus on these Views.
1. Graphics View Source with Parameters
2. Graphics View Source with Data Access Tags
3. Trend View Source with Parameters
- 46 -
Page 56

Reference Guide
D301513X412
April 2012
15.2.2.1.1 Graphics View Source with Parameters
OEMenus
With Graphi
which are contained within objects on the Graphics View display. Therefore, Aliases must be identified
not only by the Alias name, but also by the object name from which they come.
cs View as the source component for an OEMenu, parameters are in the form of aliases,
15.2.2.1.1.1 File Name Configuration
This
section from the 'Load File with Parameters' dialog enables the user to configure the file to load
when the OEMenu Command is selected. It is identical to the 'File Load' dialog, depending on the source
OEView component. Select the correct link to this dialog from the 'Related Topics' links below.
15.2.2.1.1.2 Parameters List
- 47 -
Page 57

Reference Guide
D301513X412
April 2012
This list displays the list of parameters that have been configured for passing to the target file. The
parameter attributes within the list are different depending on what the source View component is.
15.2.2.1.1.3 Parameter Name
column shows the name of the alias or column within the Target file which will be resolved to the
This
value of the alias, column or constant being sent from this file (the Source).
15.2.2.1.1.4 Parameter Definition
column displays the name of the alias, database attribute or constant string value which is being sent
This
to the Target file to resolve the alias or column which is defined in the 'Parameter Name' column.
15.2.2.1.1.5 Object Name
This is th
15.2.2.1.1.6 Target Column or Alias to Resolve
This text field defines the a
15.2.2.1.1.7 Alias Parameter Definition Type
Usi
defined as either an alias or as a constant value. Since OEGraphics View accesses the OEDatabase
through the Bristol OPC Server, a parameter definition cannot be defined as a column within the
database.
e name of the dynamic object on the Source display which contains the Named Alias.
lias or column name to be resolved within the target OE Component.
ng an OEGraphics View as the Source for an OEMenu command means that a parameter can be
OEMenus
When 'Alias' is checked, the Alias Name field appears. Underneath it the Object Name field becomes
enabled. The double chevrons are added automatically when the aliases are added to the Parameters
list. It is assumed that if an alias is defined within this dialog box, then a matching alias is also available
from the source OE Graphics display.
15.2.2.1.1.8 Constant Parameter Definition Type
n this button is checked the Constant Value field is enabled, and the Object Name field becomes
Whe
disabled. The user types the constant value into the field. This value is passed directly to the named alias
on the Target component.
15.2.2.1.1.9 Alias Name
This is th
There is no need to add the double chevrons.
15.2.2.1.1.10 Object Name Field
This is
the dynamic object on the OEGraphics display which contains the alias. If the Object Name is undefined,
then the visible object on which the action is defined is queried for the alias.
15.2.2.1.1.11 Configuration Add Button
Whe
fields will be added to the Parameters List.
15.2.2.1.1.12 Configuration Update Button
Whe
Name / Constant value) or the Object Name (if OEGraphics is the source) may be changed and Updated
using this button. If the Definition or Object Name is changed without selecting this button, then the
change will not be saved.
e name of the alias that is being sent from the Source component to the Target component.
only relevant if the Parameter type is an alias. If 'Alias' is specified then the Object Name defines
n this button is selected, any new set of parameters which has been defined within the relevant text
n an existing Parameter from the Parameters List is selected, the Parameter Definition (i.e. the Alias
Note:- The target alias cannot be updated.
- 48 -
Page 58

Reference Guide
D301513X412
April 2012
15.2.2.1.1.13 Configuration Remove Alias Button
Selection of this button
15.2.2.1.2 Graphics View Source from Data Access Tags
ction is only available when configuring a Custom Menu from a dynamic object on a Graphics View
This a
that has multiple process points grouped together as a symbol, and where the Target is a Trend View.
This is the configuration dialog as it appears when the [Configure] button is selected from the Menu
Editor.
will delete the selected Parameter from the Parameter List.
OEMenus
15.2.2.1.2.1 Multiple Process Points Grouped into a Symbol
In orde
you will need to group several Dynamic objects with OPC Tags together into a Symbol object. Ensure that
the 'Default Pick' object is deleted from the individual dynamic objects that make up the symbol. Then
create a dynamic 'Pick' object on the Symbol object. From the 'Action' drop-down menu on the dynamic
'Pick' object select the 'Custom Command' Action. Then click the [Custom] button on the Pick object to
configure the Custom menu. Create a New Command in the Menu Editor, select 'OE Trend View' as the
Target, then the Action list on the Menu Editor interface will contain the 'Load from Data Access Tags'
option.
The 'Load File from Data Access Tags" dialog enables OEMenus to present the user with a list of unique
OPC Tags that are within the symbol object on which the Custom menu is configured.
r to create a dynamic object on which you can configure a Custom OEMenu that uses this Action,
- 49 -
Page 59

Reference Guide
D301513X412
April 2012
When the desired Tag or Tags are selected by the user in runtime, the Trend opens with the Tags passed
to it. For each Tag selected from the list, a new Pen is created with the passed Tags defining the Data
Source for each Pen.
OEMenus
15.2.2.1.2.2 File Name Field OEGraphics as Source
The OEG
the Source component.
Using an Alias
In this case the display name will be obtained at Run-Time, from the OE Graphics display from which the
'Load File from Data Access Tags' action was launched.
In the example below, the alias <<DISPLAY1>> would be resolved from an OE Graphics dynamic object
named 'DisplaysObject' on the source component. This resolved alias sho uld be the name of an
OEGraphics View file to be found within the directory named in the 'Path' field.
raphics View component allows files to be specified with the file browse button or by an alias on
If the Object field is left blank, then the alias will be resolved from the visible object on which the action is
defined.
15.2.2.1.2.3 File Browse
- 50 -
Page 60
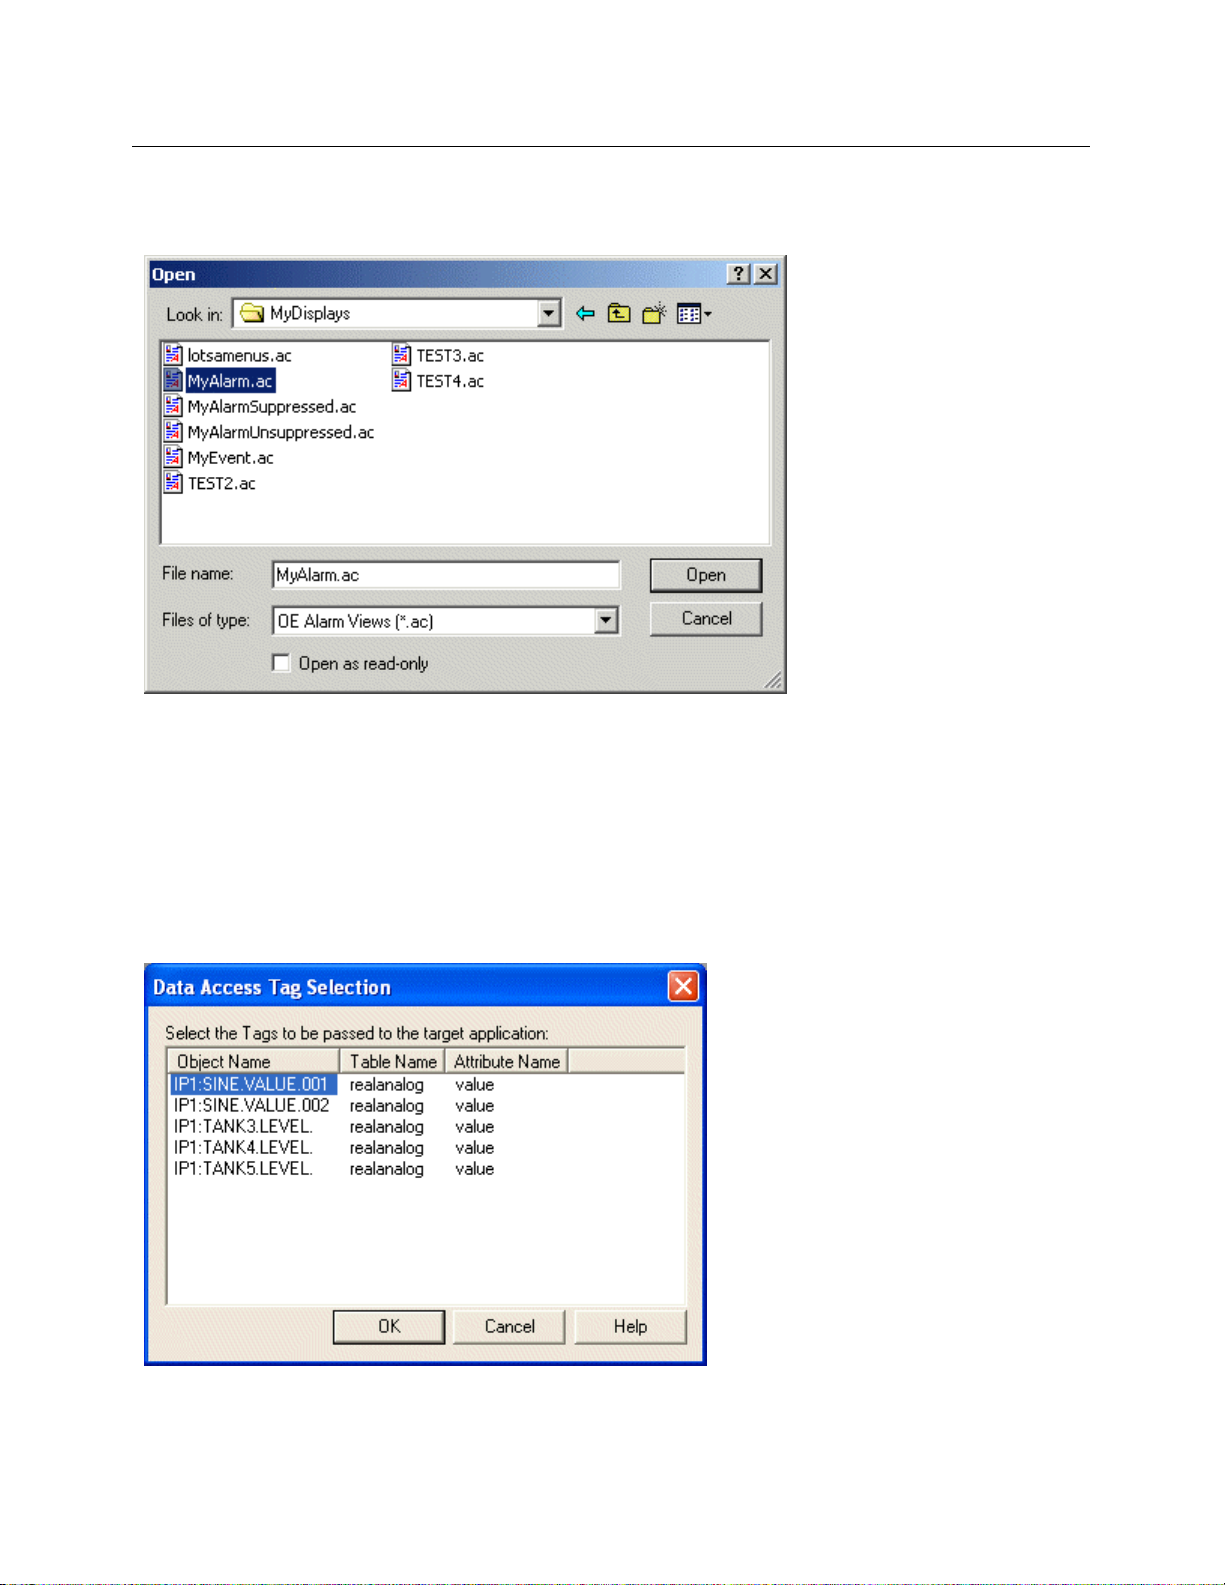
Reference Guide
D301513X412
April 2012
Selecting the browse button causes the File Open dialog to be opened, from which the user can select
the file to load.
OEMenus
Once a file is chosen, the file name and it's path are entered automatically into the correct fields.
15.2.2.1.2.4 Display Tag List
n checked, a list box containing all tags associated with the OEGraphics visible object or symbol on
Whe
which the OEMenu is configured will be displayed to the user. From this list box, the user can then sele ct
those tags to be trended.
In Runtime, when the user selects the OEMenu, the tag list below is presented before opening the Target
Trend View. It displays the unique tags found on the source object or symbol . The user may select one
or any combination of tags, which are then passed to the Target Trend.
If this option is not selected, then all tags are automatically passed onto the target Trend Component
- 51 -
Page 61

Reference Guide
D301513X412
April 2012
15.2.2.1.2.5 Show Warning if No Tags Found
If this box is checke
from which the OEMenu was selected.
15.2.2.2 Trend View Source with Parameters
d, then a warning will be displayed if no tags are found on the OEGraphics object
OEMenus
Below is the
Configuration dialog when the Trend View is the source for the OEMenu.
15.2.2.2.1 File Name List - Trend View
Although the '
arrow is selected. The ability to source a file name from an attribute is not available from the Trend
component because Trend View pens do not source their data directly from the database, but from the
Bristol OPC Server or the Historical Data Access Server.
File' text field has an arrow to the right of it, no database columns will be displayed when the
- 52 -
Page 62

Reference Guide
D301513X412
April 2012
15.2.2.2.2 Alias Parameter Type - Trend Source
ng a Trend View as the Source for an OEMenu command means that a parameter can be defined as
Usi
either an alias or as a constant value. Since Trend View accesses the database through the Bristol OPC
Server, a parameter definition cannot be defined as a column within the database.
When 'Alias' is checked, the Alias Name field appears. The double chevrons are added automatically
when the aliases are added to the Parameters list. If an alias is defined within this dialog box, then a
matching alias must have been defined on one of the pens from the source Trend View.
15.2.2.2.3 Constant Parameter Type - OETrend Source
n this button is checked the Constant Value field is enabled. The user types the constant value into
Whe
the field. This value is passed directly to the named alias or column on the Target component.
15.2.2.3 Load File with Column Type Parmeters
OEMenus
Below is the
Configuration Dialog for Views which retrieve data in tabular, rather than point based format.
- 53 -
Page 63

Reference Guide
D301513X412
April 2012
15.2.2.3.1 File Name Field / List General
OEMenus
For all View
provides a drop-down list of columns from the source table, one of which may be used to indicate which
file to load. Another method of specifying the file to load is to use the file browse button [...].
Using the Drop-down Column List
The columns supported by OEViews which obtain their values from a table within the OEDatabase a re
available from the File list box.
When the OEMenu item is invoked, (during Run -Time operation), the OE Message Bus queries the
source application for the value of the specified attribute for the currently selected row. This will define the
display to be launched.
NOTE: The ability to source a file name from an attribute is not available from the Trend or OEGraphics
components. This is because they do not source their data directly from the Database, but from the
Bristol OPC Server, and so the concept of a row does not exist.
15.2.2.3.2 File Path Field
components except OEGraphics and OETrend Views, the Load File configuration dialog box
n the browse button is used to locate a file to be loaded by the OEMenu Command, it's path is
Whe
automatically placed in this field. If known to the user, the file name and path fields can be typed in
manually.
15.2.2.3.3 Always Reload This File
If this box is checke
afresh with the file specified in the File edit field when this OEMenu option is selected. If not checked,
then the window will not be reloaded with the specified file. However, any new alias values will be passed
into the window when the OEMenu is selected.
15.2.2.3.4 Parameter Name
column shows the name of the alias or column within the Target file which will be resolved to the
This
value of the alias, column or constant being sent from this file (the Source).
15.2.2.3.5 Parameter Definition
column displays the name of the alias, database attribute or constant string value which is being sent
This
to the Target file to resolve the alias or column which is defined in the 'Parameter Name' column.
15.2.2.3.6 Parameters List
This list di
parameter attributes within the list are different depending on what the source View component is.
splays the list of parameters that have been configured for passing to the target file. The
d then the window containing the target OEView component will always be reloaded
- 54 -
Page 64

Reference Guide
D301513X412
April 2012
15.2.2.3.7 Target Column or Alias to Resolve
OEMenus
This text field defines the a
15.2.2.3.8 Parameter Value
The Para
to the named alias or column on the Target component.
15.2.2.3.9 Column Name
This list
be selected to send as a parameter definition to the Target View.
15.2.2.3.10 Insert Alias Button
Whe
'Parameter Value' field by selecting this button. The Parameter is entered with ("||") markers at the
beginning and end of the Column name. This marks it as a Column Parameter rather than a constant
value. It will only be added to the actual Parameter List that will be sent to the Target View when the
[Add] button is selected whilst the Parameter is in the 'Parameter Value' field, and the Target Alias is in
the Target Alias text field.
15.2.2.3.11 Configuration Add Button
Whe
fields will be added to the Parameters List.
15.2.2.3.12 Configuration Update Button
meter value field. This can be a constant value or a Column Alias. The value is passed directly
will be populated with the columns which are available to the OEView. Any available column may
n one of the Columns listed in the 'Column Name' list is selected, it can be inserted into the
n this button is selected, any new set of parameters which has been defined within the relevant text
lias or column name to be resolved within the target OE Component.
n an existing Parameter from the Parameters List is selected, the Parameter Definition (i.e. the Alias
Whe
Name / Constant value) or the Object Name (if OEGraphics is the source) may be changed and Updated
using this button. If the Definition or Object Name is changed without selecting this button, then the
change will not be saved.
Note:- The target alias cannot be updated.
15.2.2.3.13 Configuration Remove Alias Button
Selection of this button
will delete the selected Parameter from the Parameter List.
15.2.3 Database Update
The Database Update Action uses the Bristol OPC Server to update values in the database. Therefore it
is essential that the OPC Server is started before any Views request data from it. The Configuration
dialog is different, depending on the Source View :-
1. Column View Type Source
2. Graphics View Source
3. Trend View Source
To see what type of data each of the Views displays, see the Views and their Data Types page.
- 55 -
Page 65

Reference Guide
D301513X412
April 2012
15.2.3.1 Column Type Source
OEMenus
This dial
than as OPC tags, and the Target View is 'Data Server' .
og is used when the Source component is a View which retrieves data in tabular form, rather
15.2.3.1.1 Data source General OEView
This text field need
drop a tag from the Database Object Viewer.
• Drag-dropping an OPC tag
s to contain a valid OPC data access tag. The easiest way to do this initially is to drag-
- 56 -
Page 66

Reference Guide
D301513X412
April 2012
Aliases or column definitions can be included in the data access tag string. There are two ways to place
column aliases into the OPC tag in Data Source field:-
1. Auto Insert method
2. Drag-drop method
15.2.3.1.2 Drag Drop Data Source Tag
OEMenus
You can d
Viewer.
15.2.3.1.3 Drag Drop C olumn Alias
A column ali
dialog.
15.2.3.1.4 Description
This text field allows the user to define a
(Column or user created types with "<<" ">>" delimiters) can also be used in this field. This is then
displayed in the Run-Time dialog box, to provide the user with a more meaningful representation for the
update to be performed.
15.2.3.1.5 Display Value
If this box is checked, the value of the OPC tag in the Data Source field will be di
OEMenu item as shown in the example below.
rag-drop an OPC tag into the 'Data source' field on this dialog from the Database Object
as can be dragged and dropped from the Alias list into the Data Source field at the top of the
textual description of the attribute to be updated. Aliases
splayed next to the
15.2.3.1.6 Read Only
Whe
n checked, this restricts the user to viewing the value only.
15.2.3.1.7 Use Run time Dialog
If checked, th
This allows the user to specify the value to be written to the database attribute. The dialog box is of the
following form:
en a dialog box is displayed when the menu item containing the attribute value is selected.
- 57 -
Page 67
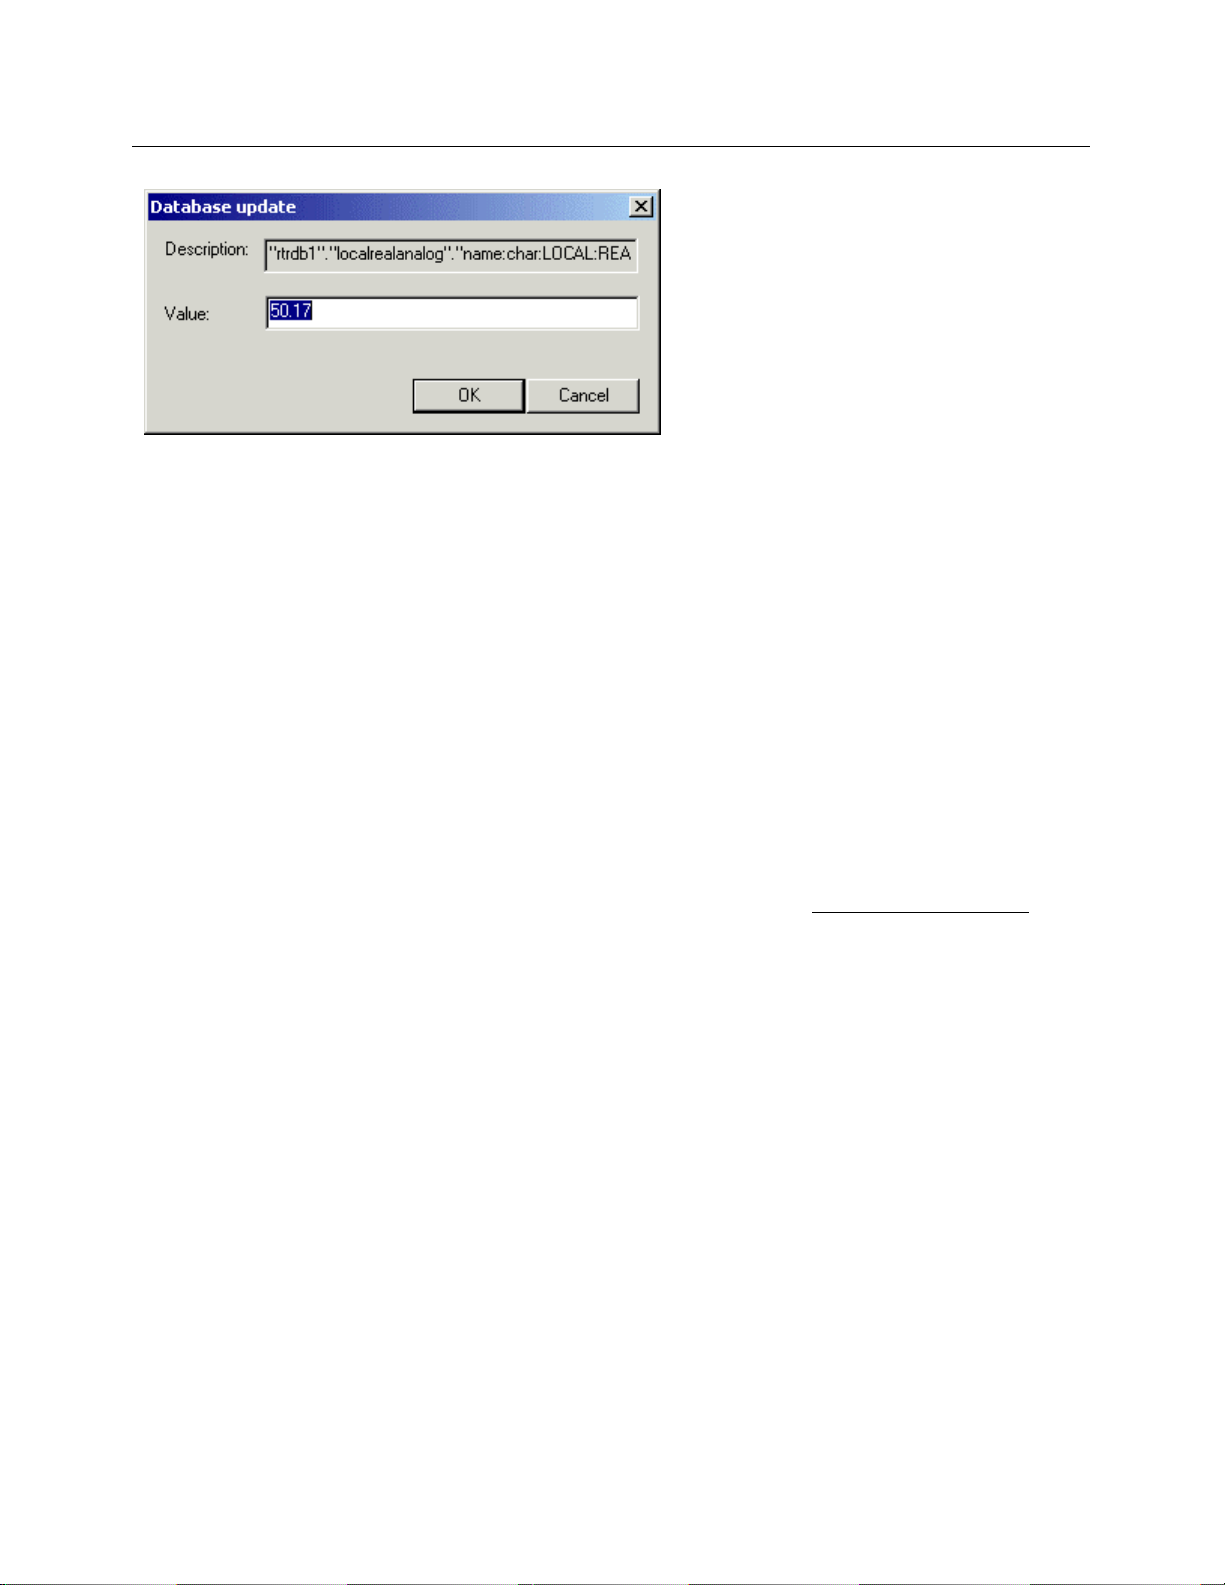
Reference Guide
D301513X412
April 2012
If a description has been defined, then this will be displayed in the description text box. Otherwise, the
full, (resolved) OPC data access tag will be displayed.
15.2.3.1.8 Default Value
OEMenus
If the "Use ru
control will be enabled automatically to allow this). This will define the value to be written to the database.
15.2.3.1.8.1 Graphics View Source
As well a
RunSQLScript table to run an SQL Script, when a Custom Pick Action is configured on an OEGraphics
display.
15.2.3.1.8.2 How to use the RunSqlScript table
On the OEGraphi
default value via the OPC Data Access Server. The DataSource of the Database Update must be an
OPC Tag that updates the SQLScript attribute of the RunSQLScript table. Deselect the Read Only and
Use Runtime Dialog boxes on the Database Update dialog. The Default Value will be the SQL statement
you want to run. Do not enclose the whole statement in quotes, but the name of the object that is being
updated must be enclosed within two SINGLE quotes - e.g., where name = 'TANKS:TANK3.LEVEL.'
order to make the button press behave like a normal button press, don't configure the action to generate a
menu, instead check the 'direct invoke' check box, and this will be the default (and only) action on the
menu, so it will occur whenever the button is released and pressed - it will appear to the operator exactly
as if it were a 'download value' pick action. Another advantage of this approach is that the security system
can be used to control this particular pick action using the custom tokens, so you can limit which users
can do it, without requiring database security.
15.2.3.1.9 Available Columns
This list box d
placed into the Data Source field.
ntime dialog" option is not checked, then the user must provide a default value, (the edit
s updating database values directly, the Data Server can work in conjunction with the
cs display, use the 'Custom' Pick Action, and create an OEMenu item that downloads a
. In
etails the columns available to the OEView for using as aliases in the OPC tag which is
15.2.3.1.10 Currently Available List
n a new alias or column is added, it appears within this list. It can then be dragged and dropped from
Whe
here into any field containing a full data access OPC tag definition.
15.2.3.1.11 Remove
Selecting thi
s button will remove the currently selected alias definition from the Currently Available list.
- 58 -
Page 68

Reference Guide
D301513X412
April 2012
15.2.3.2 Graphics View Source
OEMenus
This dial
from the dynamic object in which they are found.
og is used when the source View is a Graphics View display. It enables aliases to be resolved
15.2.3.2.1 Data Source OEGraphics View
This text field need
easiest way to do this initially is to drag-drop a tag from the Database Object Viewer.
• Drag-dropping an OPC tag
Aliases can be included in the data access tag string. There are two ways to place aliases into the OPC
tag in Data Source field:-
1. Auto Insert method
2. Drag-drop method
s to contain a valid OPC data access tag. This is the value that will be updated. The
- 59 -
Page 69

Reference Guide
D301513X412
April 2012
15.2.3.2.2 Description
OEMenus
This text field allows the user to define a
(Column or user created types with "<<" ">>" delimiters) can also be used in this field. This is then
displayed in the Run-Time dialog box, to provide the user with a more meaningful representation for the
update to be performed.
15.2.3.2.3 Display Value
If this box is checked, the value of the OPC tag in the Data Source field will be di
OEMenu item as shown in the example below.
15.2.3.2.4 Use Run time Dialog
If checked, th
This allows the user to specify the value to be written to the database attribute. The dialog box is of the
following form:
en a dialog box is displayed when the menu item containing the attribute value is selected.
textual description of the attribute to be updated. Aliases
splayed next to the
If a description has been defined, then this will be displayed in the description text box. Otherwise, the
full, (resolved) OPC data access tag will be displayed.
15.2.3.2.5 Default Value
If the "Use ru
control will be enabled automatically to allow this). This will define the value to be written to the database.
15.2.3.2.5.1 Graphics View Source
As well a
RunSQLScript table to run an SQL Script, when a Custom Pick Action is configured on an OEGraphics
display.
15.2.3.2.5.2 How to use the RunSqlScript table
ntime dialog" option is not checked, then the user must provide a default value, (the edit
s updating database values directly, the Data Server can work in conjunction with the
- 60 -
Page 70

Reference Guide
D301513X412
April 2012
On the OEGraphics display, use the 'Custom' Pick Action, and create an OEMenu item that downloads a
default value via the OPC Data Access Server. The DataSource of the Database Update must be an
OPC Tag that updates the SQLScript attribute of the RunSQLScript table. Deselect the Read Only and
Use Runtime Dialog boxes on the Database Update dialog. The Default Value will be the SQL statement
you want to run. Do not enclose the whole statement in quotes, but the name of the object that is being
updated must be enclosed within two SINGLE quotes - e.g., where name = 'TANKS:TANK3.LEVEL.'
order to make the button press behave like a normal button press, don't configure the action to generate a
menu, instead check the 'direct invoke' check box, and this will be the default (and only) action on the
menu, so it will occur whenever the button is released and pressed - it will appear to the operator exactly
as if it were a 'download value' pick action. Another advantage of this approach is that the security system
can be used to control this particular pick action using the custom tokens, so you can limit which users
can do it, without requiring database security.
15.2.3.2.6 Read Only
n checked, this restricts the user to viewing the value only.
Whe
15.2.3.2.7 Currently Available List
n a new alias or column is added, it appears within this list. It can then be dragged and dropped from
Whe
here into any field containing a full data access OPC tag definition.
OEMenus
. In
15.2.3.2.8 Auto Insert Alias
Auto inse
on database update dialogs. For enable/disable and database update dialogs, aliases are inserted into
the Data Source string. For the advanced window naming dialogs, the aliases a re inserte d into a text
field.
If checked, every alias that is added through the [Add Alias] button or [Add Column] button will be
automatically added to the string in the Data Source or text field at the cursor position.
If unchecked, aliases will be added to the Currently Available list of aliases, but not to the text or Data
Source field. From there the user can drag and drop any alias into the Data Source field in any order
desired.
15.2.3.2.9 Add Alias Button
Whe
whether the source view is a Trend or Graphics view.
15.2.3.2.9.1 New Alias Dialog (Trend View source)
There is only
rting of aliases is used on enable/disable menu dialogs, advanced wi ndow naming dialogs and
n the [Add Alias] button is selected the 'New Alias' or 'Define Alias' dialog is displayed, depending on
one field on this dialog, which is the name of the alias.
15.2.3.2.9.2 Alias Definition Dialog (Graphics View source)
- 61 -
Page 71

Reference Guide
D301513X412
April 2012
The Graphics View dialog also has the Object field.
15.2.3.2.10 Update Alias Button
Whe
n an available alias from the Currently Available Alias list is selected, this button becomes enabl ed.
Selecting it will display the Define Alias dialog, shown below. The Object name can then be edited.
OEMenus
15.2.3.2.11 Remove
Selecting thi
15.2.3.3 Trend View Source
This dial
configuration pages to be defined.
s button will remove the currently selected alias definition from the Currently Available list.
og is used when the source View is a Trend View. It enables aliases found in the Trend's
- 62 -
Page 72
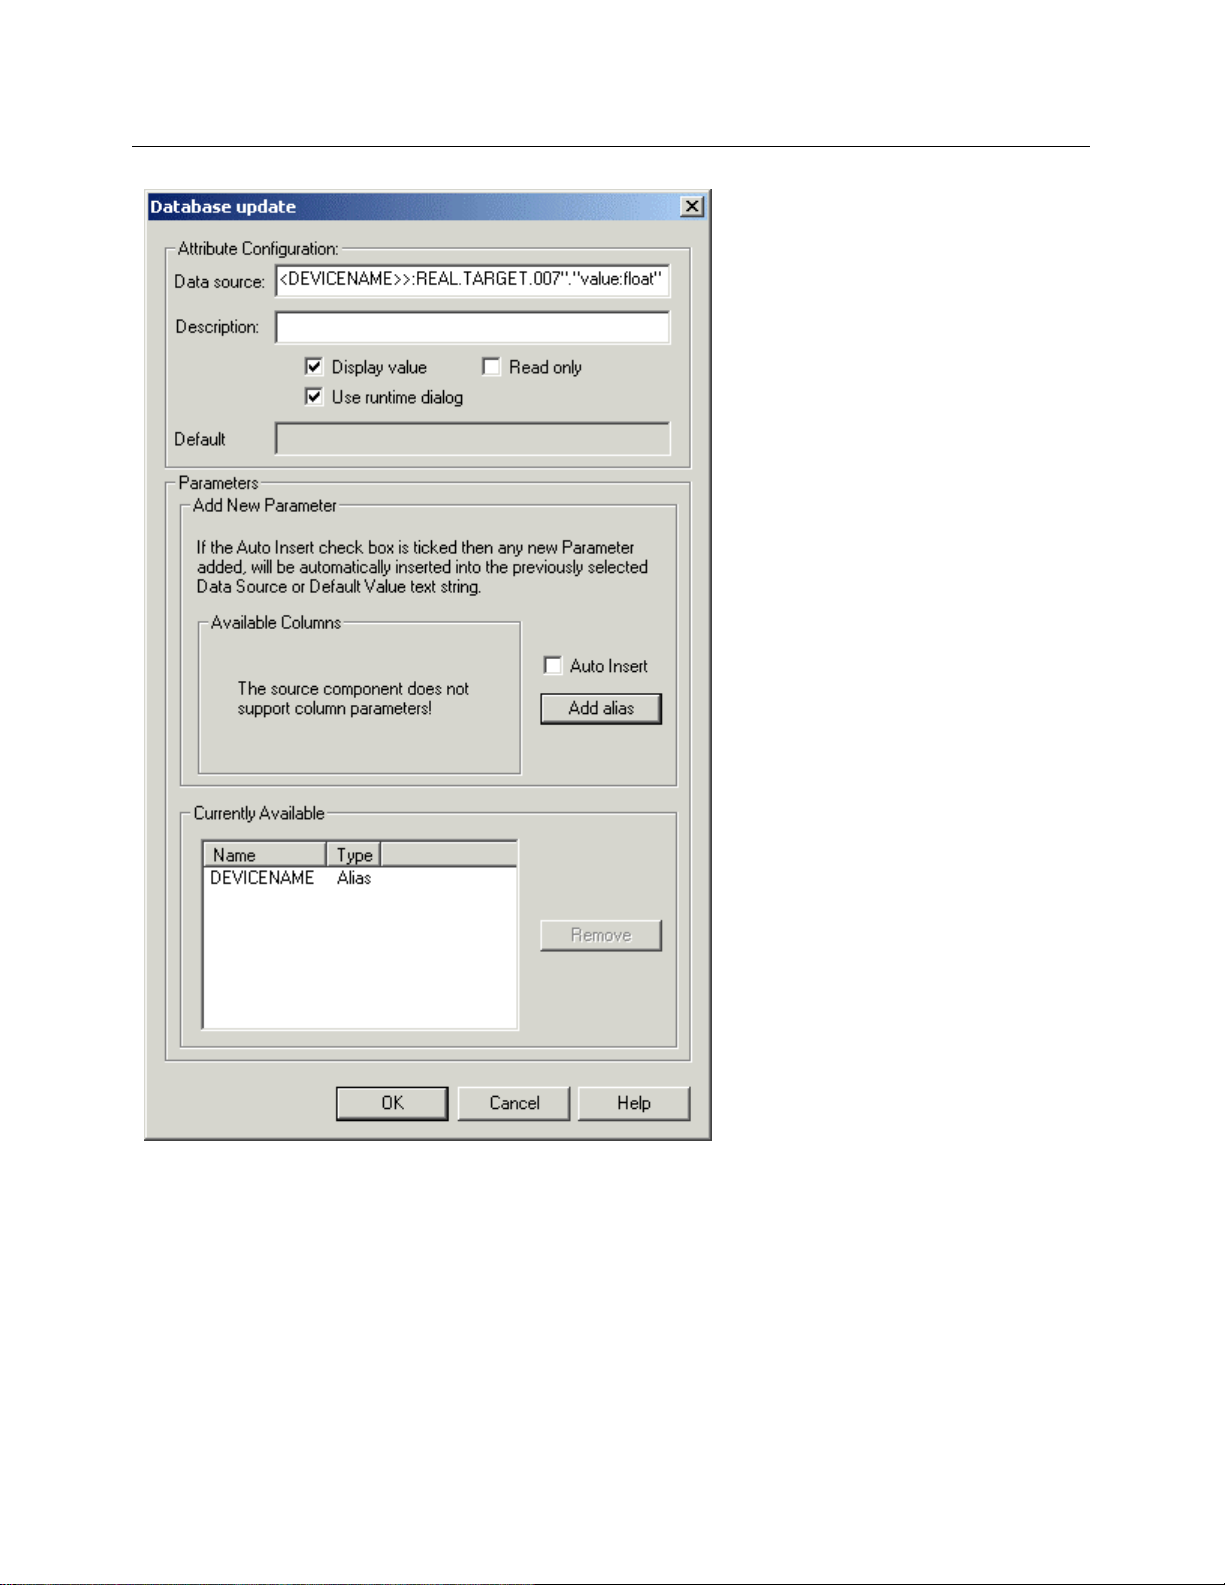
Reference Guide
D301513X412
April 2012
OEMenus
This text field needs to contain a valid OPC data access tag. The easiest way to do this initially is to dragdrop a tag from the Database Object Viewer.
• Drag-dropping an OPC tag
Aliases or column definitions can be included in the data access tag string. There are two ways to place
column aliases into the OPC tag in Data Source field:-
1. Auto Insert method
2. Drag-drop method
- 63 -
Page 73

Reference Guide
D301513X412
April 2012
15.2.3.3.1 Description
OEMenus
This text field allows the user to define a
(Column or user created types with "<<" ">>" delimiters) can also be used in this field. This is then
displayed in the Run-Time dialog box, to provide the user with a more meaningful representation for the
update to be performed.
15.2.3.3.2 Display Value
If this box is checked, the value of the OPC tag in the Data Source field will be di
OEMenu item as shown in the example below.
15.2.3.3.3 Use Run time Dialog
If checked, th
This allows the user to specify the value to be written to the database attribute. The dialog box is of the
following form:
en a dialog box is displayed when the menu item containing the attribute value is selected.
textual description of the attribute to be updated. Aliases
splayed next to the
If a description has been defined, then this will be displayed in the description text box. Otherwise, the
full, (resolved) OPC data access tag will be displayed.
15.2.3.3.4 Default Value
If the "Use ru
control will be enabled automatically to allow this). This will define the value to be written to the database.
15.2.3.3.4.1 Graphics View Source
As well a
RunSQLScript table to run an SQL Script, when a Custom Pick Action is configured on an OEGraphics
display.
15.2.3.3.4.2 How to use the RunSqlScript table
ntime dialog" option is not checked, then the user must provide a default value, (the edit
s updating database values directly, the Data Server can work in conjunction with the
- 64 -
Page 74

Reference Guide
D301513X412
April 2012
On the OEGraphics display, use the 'Custom' Pick Action, and create an OEMenu item that downloads a
default value via the OPC Data Access Server. The DataSource of the Database Update must be an
OPC Tag that updates the SQLScript attribute of the RunSQLScript table. Deselect the Read Only and
Use Runtime Dialog boxes on the Database Update dialog. The Default Value will be the SQL statement
you want to run. Do not enclose the whole statement in quotes, but the name of the object that is being
updated must be enclosed within two SINGLE quotes - e.g., where name = 'TANKS:TANK3.LEVEL.'
order to make the button press behave like a normal button press, don't configure the action to generate a
menu, instead check the 'direct invoke' check box, and this will be the default (and only) action on the
menu, so it will occur whenever the button is released and pressed - it will appear to the operator exactly
as if it were a 'download value' pick action. Another advantage of this approach is that the security system
can be used to control this particular pick action using the custom tokens, so you can limit which users
can do it, without requiring database security.
15.2.3.3.5 Read Only
n checked, this restricts the user to viewing the value only.
Whe
15.2.3.3.6 Auto Insert Alias
OEMenus
. In
Auto inse
on database update dialogs. For enable/disable and database update dialogs, aliases are inserted into
the Data Source string. For the advanced window naming dialogs, the aliases a re inserte d into a text
field.
If checked, every alias that is added through the [Add Alias] button or [Add Column] button will be
automatically added to the string in the Data Source or text field at the cursor position.
If unchecked, aliases will be added to the Currently Available list of aliases, but not to the text or Data
Source field. From there the user can drag and drop any alias into the Data Source field in any order
desired.
15.2.3.3.7 Add Alias Button
Whe
whether the source view is a Trend or Graphics view.
15.2.3.3.7.1 New Alias Dialog (Trend View source)
There is only
rting of aliases is used on enable/disable menu dialogs, advanced wi ndow naming dialogs and
n the [Add Alias] button is selected the 'New Alias' or 'Define Alias' dialog is displayed, depending on
one field on this dialog, which is the name of the alias.
15.2.3.3.7.2 Alias Definition Dialog (Graphics View source)
The Graphi
cs View dialog also has the Object field.
- 65 -
Page 75

Reference Guide
D301513X412
April 2012
15.2.3.3.8 Currently Available List
Whe
n a new alias or column is added, it appears within this list. It can then be dragged and dropped from
here into any field containing a full data access OPC tag definition.
15.2.3.3.9 Remove Button
OEMenus
An alias sele
button.
cted from the Currently Available list of aliases may be removed by selecting the [Remove]
15.2.4 Launch Windows Application
This dialog enables the user to configure OEMenus to launch a Windows application. As well as valid
strings, it also allows Column or Alias type Parameters to be used to specify the executable file, its start in
folder or the filename argument. The appearance of the dialog varies according to what type of Aliases
the Source View is able to send as Parameters.
15.2.4.1 Column Parameters
To illustrate the use of Col
corresponding application, start in folders and file names. Each column of the table is used as a
Parameter to call a Windows application and load the selected file. The Custom menu is configured on an
SQL View file (DBX), which displays the contents of the table. If the user selects a row from the list and
uses the Custom menu, the selected file is loaded into its correct application within the Windows
environment.
umn Parameters, in the example below, a new table has been created, listing
- 66 -
Page 76
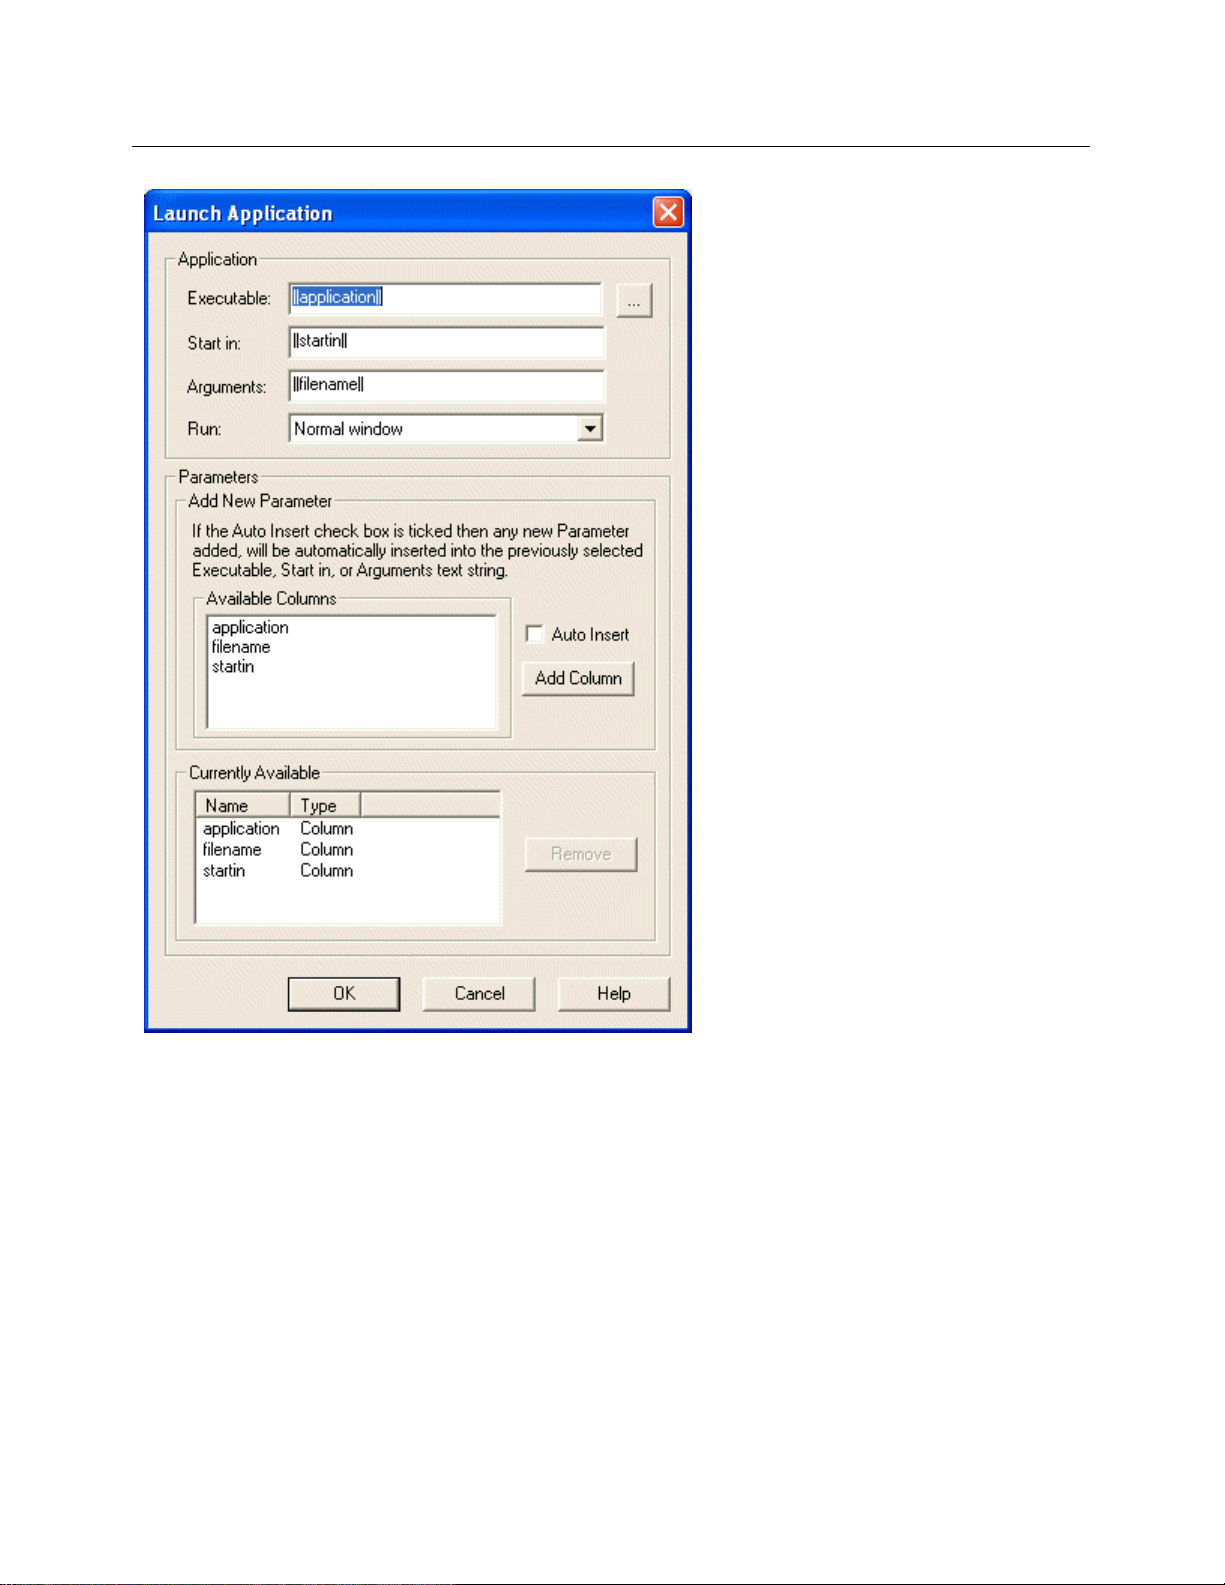
Reference Guide
D301513X412
April 2012
OEMenus
15.2.4.2 Alias Parameters
If the Source
with the list is unpopulated, and you have to add the Parameters to the list. To do this click the [Add Alias]
button. .
View sends non-column Aliases as Parameters, there is only one list - Parameters. To start
- 67 -
Page 77

Reference Guide
D301513X412
April 2012
OEMenus
15.2.4.3 Executable File Field
This edita
launched, or an Alias that contains the full path name of the application. The user may also type this in or
use the [Browse] button.
15.2.4.4 Browse Button
Selecting the [
user to browse for the application to be launched.
15.2.4.5 Start In Field
This field defi
15.2.4.6 Arguments Field
This field spe
executable.
15.2.4.7 Run Field
The user
ble field must contain the whole path name and file name of the executable file that is to be
Browse] button will invoke the standard Windows™ File Open dialog box, which allows the
nes the directory in which the executable will run.
cifies command line parameters. This will usually be a file that is to be opened by the
can chose to launch the application in a maximized, minimized or normal window.
- 68 -
Page 78

Reference Guide
D301513X412
April 2012
15.2.4.8 Available Columns
n you open the Launch Application dialog, if the Source View sends Column Parameters, this list will
Whe
be automatically populated with any columns that are available to the Source View. These can be used
as Parameters for opening the application and loading in a file. To use them as Parameters, select one of
the listed Columns then the [Add] button. The selected column will be added to the Currently Available
list, with a Type of Column. It can now be used as a Parameter by dragging it from the Currently Available
list to one of the Parameter fields (Executable, Start in or Arguments).
15.2.4.9 Auto Insert
OEMenus
If this button is ch
dialog before the Add Column or Alias button is used. Then the new Parameter will be added at the
cursor position in the selected field automatically, with the correct delimiters.
15.2.4.10 Add Column or Alias Button
The nam
hosts the Custom menu. Columns or Aliases can be made available to send as Parameters using this
button. If you are configuring a Source View that sends Column values as Aliases, select an Alias from
the Available Columns list first, then select this button. The selected Column will then appear in the
Currently Available list, and can then be dragged to the appropriate field in the Application section of the
dialog.
If you are configuring from a Source View that sends user defined Aliases, the Available Columns list is
replaced by a Parameters list, and you need to create a list of your configured Aliases first. When you
click this button, you will see the Add Alias Dialog
15.2.4.11 Add Alias Dialog
This dial
you should firstly give the Dynamic object on which it resides a name, and secondly make sure that it is
resolved to a value by the time it is sent to the called application.
e of this button will change according to the Type of Parameters sent by the Source View which
og enables OEMenus to locate an Alias on the current View. If the Alias is on a Graphics View,
ecked, then place the cursor inside the appropriate Application field at the top of the
If the Alias is on a Trend View, there is no need to define an object, so the above dialog appears with only
the Name field.
- 69 -
Page 79

Reference Guide
D301513X412
April 2012
15.2.4.11.1 Alias Name
OEMenus
This is th
There is no need to add the double chevrons.
15.2.4.11.2 Object Name
This is th
15.2.4.12 Currently Available
Whe
Alarm View or SQL View), if you select a Column Alias from the Available Columns list, then click the
[Add Column] button, it is added to this list. It can then be dragged to the appropriate field in the
Application section of the dialog, where it will be dropped with the correct delimiters automatically added.
15.2.4.13 Parameters List
This list i
[Add Alias] button, which opens the Add Alias dialog.
15.2.4.14 Update Button
This button i
change the Object name of an Alias that has already been added to the Parameters list. Select the Alias,
and then the [Update] button. This opens the Add Alias dialog with the Object field in edit mode. Change
the Object name and click the [OK] button to update the Object name for the Alias.
15.2.4.15 Remove Button
e name of the alias that is being sent from the Source component to the Target component.
e name of the dynamic object on the Source display which contains the Named Alias.
n you are configuring the Custom menu on a View that sends Column Aliases as Parameters (e.g.
s empty when the Launch Application dialog is first opened. You have to populate it using the
s only available when the Source of the Custom menu is Graphics View. It enables you to
An alias sele
button.
cted from the Currently Available list of aliases may be removed by selecting the [Remove]
16 Window Name
The Window "Name" field allows the user to define the name of the window into which the target View is
launched.
- 70 -
Page 80

Reference Guide
D301513X412
April 2012
Naming windows allows for component re-use within OEDesktop. When an OEMenu action i s invoked,
OEDesktop will look for a window with the Window Name specified by the action. If it exists, OEDesktop
will reuse that window rather than creating a new window.
NOTE: For this to work, the window name must already contain an OpenEnterprise View of the same
type as that specified as the target, (i.e. One can only load an Alarm Client into a window already
containing an Alarm Client.)
The window will be auto named by OEDesktop if: -
• No Window Name is specified
• No dynamic Caption is configured
• The specified window contains a View of a different type
OEMenus
16.1 Window Name Aliases
Text and aliases can be used in the Window Name field. This feature can be used to provide unique
window names for the target view when using OEMenus. For more information on how this works, see the
example on the Window Name Aliases Example topic.
16.2 Window Name Aliases Example
The example OEDesktop below shows how a Graphics display has been configured so that OEMenus
opens a single Trend file in the OEDesktop with a unique window n ame depending on which signal was
selected. Each window name contains the signal name that was selected. If a user selects the same
signal twice, the previous window is overwritten.
The target Trend file has the default pen configured with a <<SIGNAL>> alias in the place of the name
part of the OPC tag.
The same alias on the source Graphics file that is controlling the window name s is also used to resolve
the alias in the Trend tag.
- 71 -
Page 81

Reference Guide
D301513X412
April 2012
OEMenus
16.2.1 Source Display Configuration
This section describes the configuration required on the source view, which is a Graphics View display.
These are the items to configure on the Source display.
1. Process Points and Pick objects
2. Menu Editor configuration
3. Parameter configuration
4. Setting the alias values
16.2.1.1 Process Point and Pick Object
The first thing that we need to do is to drop a Process Point onto the Graphics View display area.
1.
2. Then in the Process Point Datasource, we put an alias named <<SIGNAL>>. Note we enclose
this alias inside $" and "$ markers, ensuring that when the alias is given a value, that value will
appear as text on the display.
- 72 -
Page 82

Reference Guide
D301513X412
April 2012
3. We give the PPT/DE object a name of 'SIG1'. This is so that we can refer to the specific object on
which the alias appears when passing the value of the alias as a parameter to our target View.
This means that we can use the same alias name on all of our Process Point objects, but assign
a different value to the alias on each object.
OEMenus
4. Next, we need to create the OEMenu on the Process Point. This is done by adding a Custom
menu on the Default Pick object that is automatically added to the Process Point. Firstly, check
that the 'Custom Command' Action is already selected for the Pick object.
5. Then click the [Custom] button at the bottom of the dialog.
- 73 -
Page 83

Reference Guide
D301513X412
April 2012
16.2.1.2 Menu Editor Configuration
1.
Create a menu command with the name 'TREND'. Note, we leave ''Direct Invoke' checked. This is
because we want the menu action to take place when the object is clicked, rather than having to
select the menu option after the object is clicked.
OEMenus
2. We set the Target to 'OE Trend View', and the Action to 'Load File with Parameters'. Then click
the [Configure] button.
3. Then type the name of the window into the 'Name' field in the 'Window' section, followed by a
hyphen and the <<SIGNAL>> alias. The <<SIGNAL>> part of the name will be substituted with
the value that we will later give to the alias of that name that is on this object.
4. Now we have to configure the 'Load File with Parameters' Action, so click the [Configure] button
on the 'Command' section.
- 74 -
Page 84

Reference Guide
D301513X412
April 2012
16.2.1.3 Load File with Parameters Configuration
1.
Configure the file to load. The Trend file that we will load should have already been configured
with a <<SIGNAL>> alias in the name part of a tag that we have configured on the Default Pen.
See the Target Display Configuration topic for this.
OEMenus
2. Then type the target alias name into the 'Target column or alias to resolve' field.
3. Next, set the parameter value as detailed in the numbered steps in the image below.
4. Finally, add the Parameter to the Parameters list by clicking the [Add] button.
- 75 -
Page 85

Reference Guide
D301513X412
April 2012
5. The Parameter is added to the Parameters list.
OEMenus
16.2.1.4 Setting the Alias Values
No
w we need to set the alias names on each object to have the value we want it to have.
1. Right click on the Process Point that you have just configured and select 'Edit Local Aliases'.
- 76 -
Page 86

Reference Guide
D301513X412
April 2012
OEMenus
2. Type the Alias Definition into the editable field for the Alias that is on the object. Then click the OK
button.
- 77 -
Page 87

Reference Guide
D301513X412
April 2012
OEMenus
16.2.2 Target Display Configuration
The Target display in our example is a Trend View. This is how we configured it.
1. Open a new Trend View in the OEDesktop and place it into configure mode, then right click on it
and select 'Properties'
2. Select the Pens tab, click on the Default Pen, then select the [Modify] button.
3. Now, create a query in a Database Object viewer that finds some signal values, and drag-drop
the value into the Data Source field for the Default pen.
- 78 -
Page 88

Reference Guide
D301513X412
April 2012
4. Now highlight the name in the OPC Tag, delete it, and type in the <<SIGNAL>> target alias.
OEMenus
a.
b.
5. Finally, check the 'Convert Realtime Data Sources to Historical' box under the Data Source field.
Then save the Trend View.
17 Window Behaviour
The Window Behaviour list enables the user to configure what the source component window will do once
the OEMenu Action has completed. Click on the following options for more information: -
17.1.1 No Parent
If selected, and when the Menu Action is completed, the source OE component window will remain open
and visible, since it is not considered to have any parent /child relationship with the new window.
17.1.2 Hide Parent
If selected, the source component window is hidden when the Menu Action is completed. It will not be
visible but the window will still be available for use by other OEMenus actions.
- 79 -
Page 89

Reference Guide
D301513X412
April 2012
OEMenus
17.1.3 Close Parent
Selection of this option will cause the source component window to be closed once the Menu Action has
taken place.
17.1.4 With Parent
Selection of this option causes the target window to be associated with its parent source such that if the
parent window (the source) is subsequently closed, then the child window (the target) will also be closed.
18 Window Type
The Window Type Combo Box allows the user to define one of three styles for the target component
window: -
18.1.1 MDI Child
A standard Multiple Document Interface window. This type of window can only be moved about within the
OEDesktop window, but not outside it.
18.1.2 Floating Window
This type of window is one that is not bound to the draw area of the OEDesktop (i.e. it can be moved
outside the OEDesktop).
18.1.3 Docked
This is a window which is attached to the top, bottom, left or right side of the OEDesktop window.
19 [Advanced] Button
The [Advanced] button enables more advanced configuration for the caption that appears on the window
title bar of the OEMenus target. The dialog differs depending on which OpenEnterprise View is acting as
the Source for the OEMenu. Click on the Related Topics links below to go to the relevant Advanced
Window Name Dialog.
19.1 Window Name Advanced
When a Custom Menu is selected by a user in Runtime, it will open a new window in the OEDesktop
environment containing the Target View. This dialog enables you to control the caption of the new
window. The configuration dialog is different depending on whether the Source View supports Alias or
Column type Parameters.
1. Alias Type Parameters
2. Column Type Parameters
To see what type of data each of the Views displays, see the Views and Data Sources page.
- 80 -
Page 90
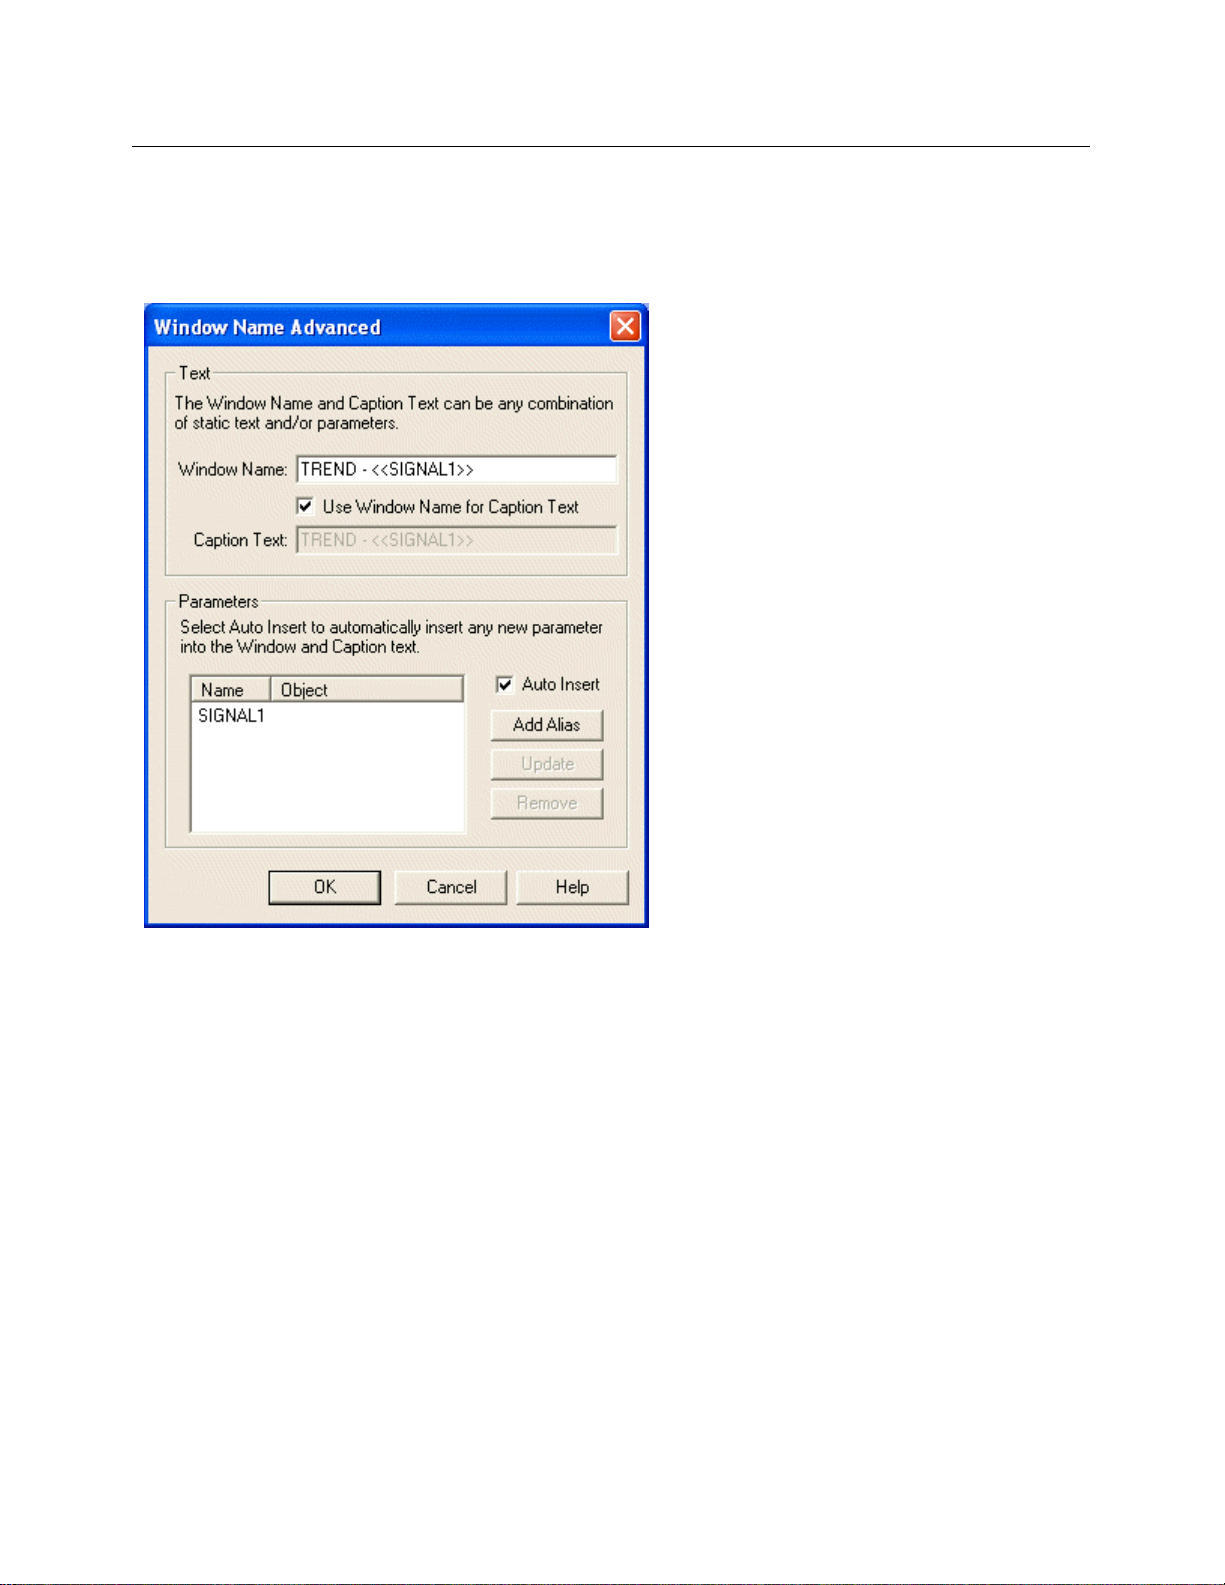
Reference Guide
D301513X412
April 2012
OEMenus
19.1.1 Window Name Advanced with Alias Parameters
This is how the Window Caption dialog appears for Source components which display non tabular data
(i.e. OEGraphics and Trend Views).
19.1.1.1 Window Name
The targ
target window name can be configured from here, if no name was specified on the main dialog.
19.1.1.2 Use Window Name
The Use wi
use whatever is in the Name field on the previous dialog as the window name for the target component.
Every field is disabled until the 'Use Window Name' box is unchecked. Certain fields will then become
enabled, depending on the source component being used.
19.1.1.3 Caption Text - With 'In Tag' Type Parameters
OpenEnte
given a name, but not a caption, the name is by default used as the caption, or title at the top of the
window. However, if the window is given a caption, the caption will override the window name as the title
of the window. OpenEnterprise allows you to specify a caption or a name for the window that will open in
the OEDesktop as the result of a custom menu action.
et window name is copied here from the main Menu Editor dialog. This field is editable, so the
ndow name box is checked by default. This indicates that the OEMenu command will currently
rprise enables windows to have both a window name and a windo w caption. If a window is
- 81 -
Page 91

Reference Guide
D301513X412
April 2012
19.1.1.3.1 Enabling the Caption Text Field
If the 'Use Window Name' box remains checked, this field is not editable, as demonstrated in the example
above. To make it editable, un-check the 'Use Window Name for Caption Text' box, as shown in the
example below.
Then the Caption Text box becomes editable. You can enter any combination of free text and aliases as
the window caption, as shown in the image below.
OEMenus
19.1.1.3.2 The differences between a Window Name and Caption Text
Use the Ca
same name. Use the Window Name when you want only one window with the same name open in the
OEDesktop.
19.1.1.4 Currently Available List
Whe
here into any field containing a full data access OPC tag definition.
19.1.1.5 Auto Insert Alias
Auto inse
on database update dialogs. For enable/disable and database update dialogs, aliases are inserted into
the Data Source string. For the advanced window naming dialogs, the aliases a re inserte d into a text
field.
If checked, every alias that is added through the [Add Alias] button or [Add Column] button will be
automatically added to the string in the Data Source or text field at the cursor position.
If unchecked, aliases will be added to the Currently Available list of aliases, but not to the text or Data
Source field. From there the user can drag and drop any alias into the Data Source field in any order
desired.
ption Text when you do not mind having multiple windows open in the OEDesktop with the
n a new alias or column is added, it appears within this list. It can then be dragged and dropped from
rting of aliases is used on enable/disable menu dialogs, advanced wi ndow naming dialogs and
- 82 -
Page 92
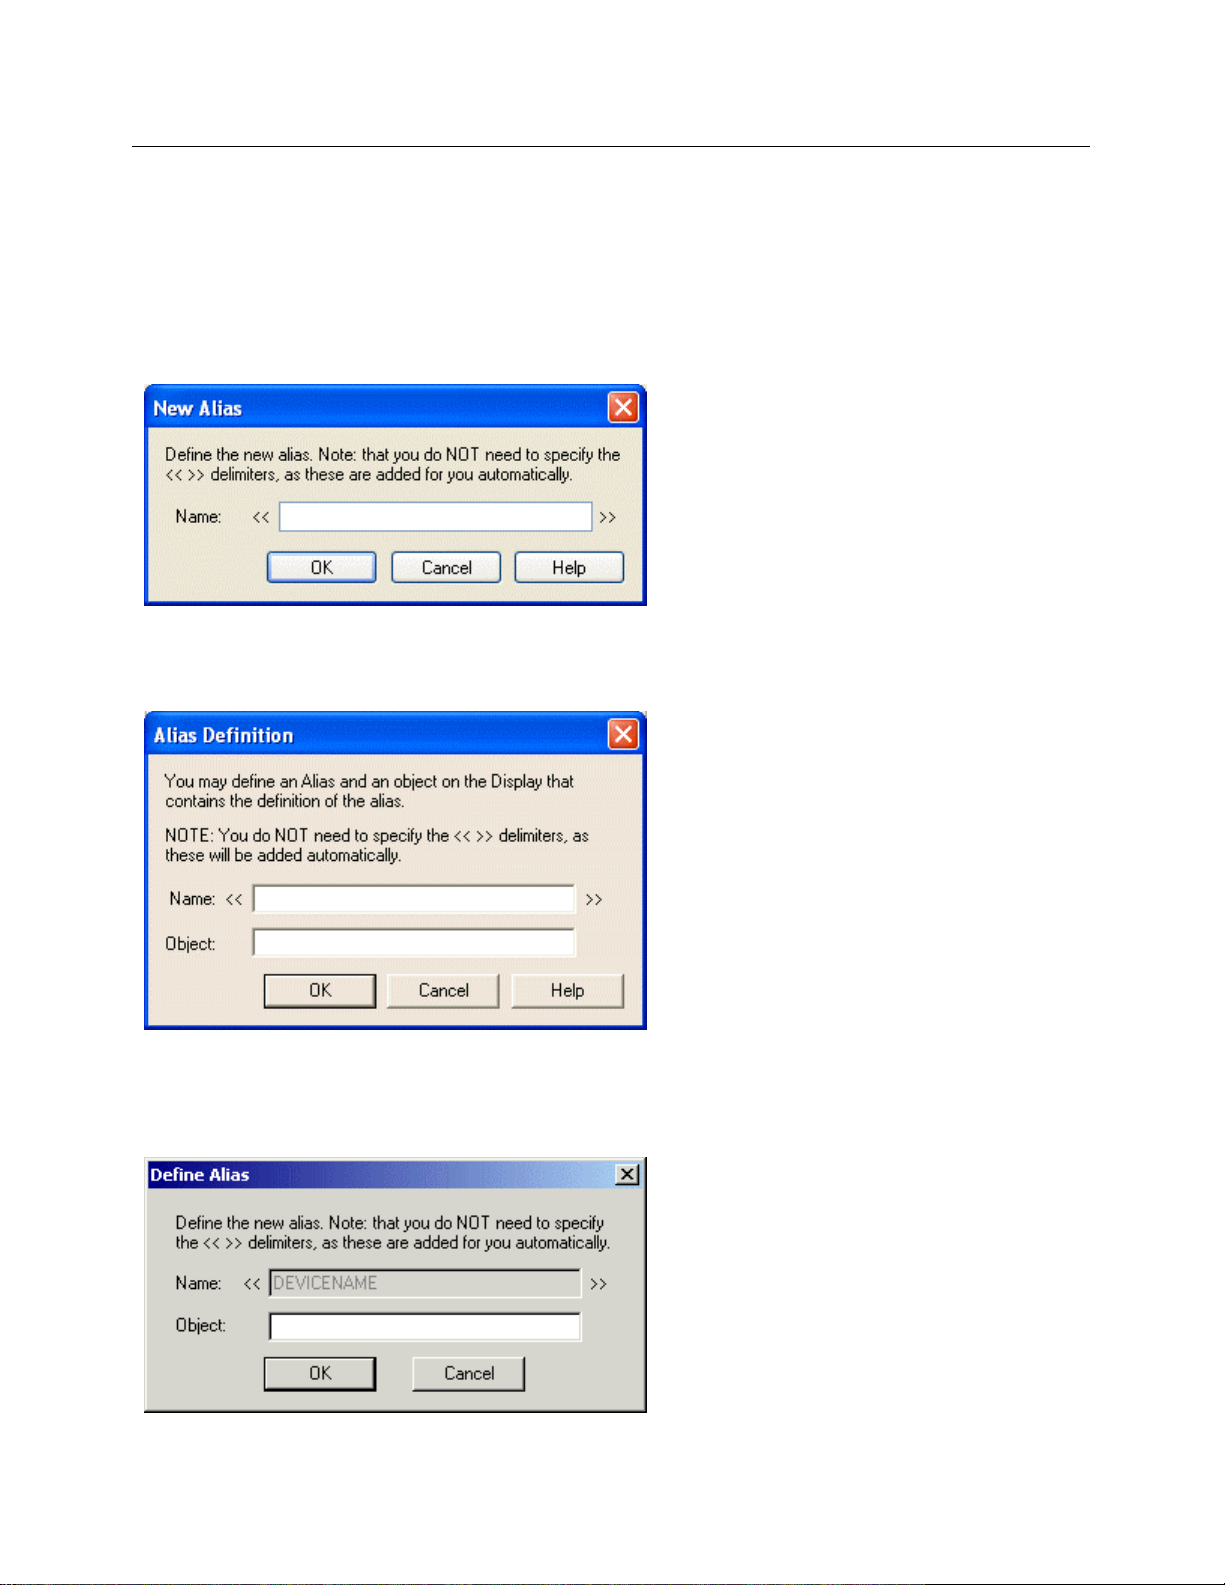
Reference Guide
D301513X412
April 2012
19.1.1.6 Add Alias Button
n the [Add Alias] button is selected the 'New Alias' or 'Define Alias' dialog is displayed, depending on
Whe
whether the source view is a Trend or Graphics view.
19.1.1.6.1 New Alias Dialog (Trend View source)
OEMenus
There is only
19.1.1.6.2 Alias Definition Dialog (Graphics View source)
The Graphi
one field on this dialog, which is the name of the alias.
cs View dialog also has the Object field.
19.1.1.7 Update Alias Button
Whe
n an available alias from the Currently Available Alias list is selected, this button becomes enabl ed.
Selecting it will display the Define Alias dialog, shown below. The Object name can then be edited.
- 83 -
Page 93
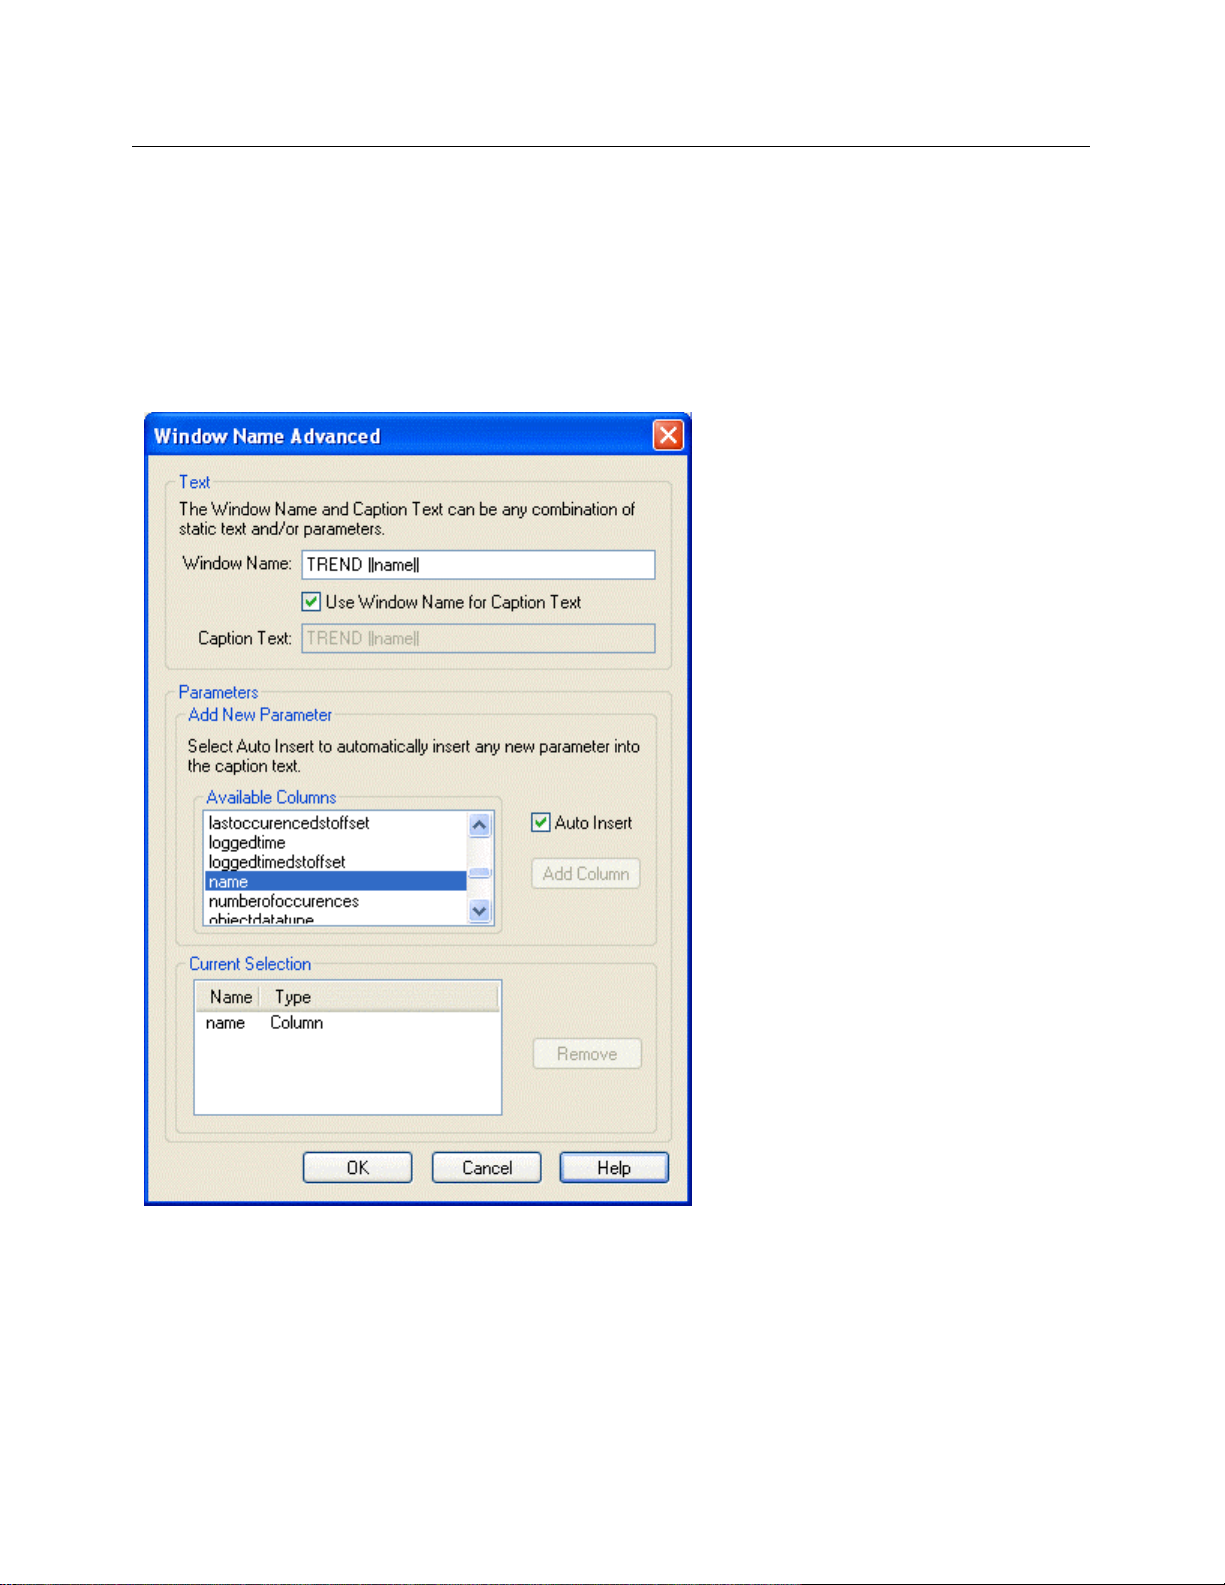
Reference Guide
D301513X412
April 2012
19.1.1.8 Remove Button
OEMenus
An alias sele
button.
cted from the Currently Available list of aliases may be removed by selecting the [Remove]
19.1.2 Window Name Advanced with Column Parameters
This is the Window Caption dialog for Source components that retrieve data in tabular format, and
therefore use columns as parameters (i.e. Alarm View, SQL View, Notes View and Alarm Banner View).
19.1.2.1 Window Name
The targ
target window name can be configured from here, if no name was specified on the main dialog.
et window name is copied here from the main Menu Editor dialog. This field is editable, so the
- 84 -
Page 94

Reference Guide
D301513X412
April 2012
19.1.2.2 Use Window Name
OEMenus
The Use wi
use whatever is in the Name field on the previous dialog as the window name for the target component.
Every field is disabled until the 'Use Window Name' box is unchecked. Certain fields will then become
enabled, depending on the source component being used.
19.1.2.3 Caption Text - With Column Type Parameters
OpenEnte
given a name, but not a caption, the name is by default used as the caption, or title at the top of the
window. However, if the window is given a caption, the caption will override the window name as the title
of the window. OpenEnterprise allows you to specify a caption or a name for the window that will open in
the OEDesktop as the result of a custom menu action.
19.1.2.3.1 Enabling the Caption Text Field
If the 'Use Window Name' box remains checked, this field is not editable, as demonstrated in the example
above. To make it editable, un-check the 'Use Window Name for Caption Text' box, as shown in the
example below.
Then the Caption Text box becomes editable. You can enter any combination of free text and aliases as
the window caption, as shown in the image below.
ndow name box is checked by default. This indicates that the OEMenu command will currently
rprise enables windows to have both a window name and a windo w caption. If a window is
19.1.2.3.2 The differences between a Window Name and Caption Text
Use the Ca
same name. Use the Window Name when you want only one window with the same name open in the
OEDesktop.
19.1.2.4 Available Columns
The othe
from the Available Columns list.
ption Text when you do not mind having multiple windows open in the OEDesktop with the
r controls behave in the same way as for Parameter aliases, but the aliases are selected directly
- 85 -
Page 95

Reference Guide
D301513X412
April 2012
19.1.2.5 Auto Insert Alias
OEMenus
Auto inse
on database update dialogs. For enable/disable and database update dialogs, aliases are inserted into
the Data Source string. For the advanced window naming dialogs, the aliases a re inserte d into a text
field.
If checked, every alias that is added through the [Add Alias] button or [Add Column] button will be
automatically added to the string in the Data Source or text field at the cursor position.
If unchecked, aliases will be added to the Currently Available list of aliases, but not to the text or Data
Source field. From there the user can drag and drop any alias into the Data Source field in any order
desired.
19.1.2.6 Add Column Button
Whe
copied to the 'Currently Available' list. Once in the 'Currently Available' list, the aliases can be dragged
and dropped to any point within the Data Source or Caption Text field, depending on the type of dialog.
19.1.2.7 Currently Available List
Whe
here into any field containing a full data access OPC tag definition.
19.1.2.8 Remove Button
An alias sele
button.
rting of aliases is used on enable/disable menu dialogs, advanced wi ndow naming dialogs and
n this button is selected the currently selected column within the 'Available Columns' list will be
n a new alias or column is added, it appears within this list. It can then be dragged and dropped from
cted from the Currently Available list of aliases may be removed by selecting the [Remove]
20 More Dialog
The Main Menu Editor dialog has a button labelled [More>>]. When selected, an extra part of the dialog
is revealed, providing options which control the look, style and size of the Target View window.
- 86 -
Page 96

Reference Guide
D301513X412
April 2012
OEMenus
20.1 Show Status Bar
Indicates whether the status bar will be displayed at the bottom of the Child windows.
20.2 Dock with Title Bar
For a docked window the user can choose whether to display a Title bar. This option is disabled if the
Window Type selection was not Docked.
- 87 -
Page 97

Reference Guide
D301513X412
April 2012
OEMenus
20.3 Dock with Gripper
For a docked window the user can choose whether it has a gripper bar. This option is di sabled if the
Window Type selection was not Docked.
20.4 Docked To...
The Docked To menu option enables the user to specifiy which side of the main OEDesktop window the
docked window will be attached to. Options are: -
• Top
• Left
• Bottom
• Right
At creation a docked window can be docked along the entire length of one of the four main window's
sides. Docked windows having a title bar or gripper bar can moved once loaded into the OEDesktop by
dragging them by the gripper or title bar to another side. Docked windows with no gripper or title bar
cannot be moved once loaded into the OEDesktop. Two or more docked windows may share the same
side.
20.5 Resizeable
If selected, the window will be resizable.
20.6 Restyleable
Toggles the pop-up context menu that allows the user to change the window type.
20.7 Minimizable
The window may be minimized. This feature applies only to MDI child windows.
20.8 Maximizable
The window may be maximized. This feature applies only to MDI child windows.
20.9 Window Zoom State
There are 4 options: -
• Normal
• Minimized
• Maximized
• Maximum State - creates a window with normal zoom, but sized as large as possible. This option
is only relevant with MDI child windows.
- 88 -
Page 98

Reference Guide
D301513X412
April 2012
OEMenus
20.10 Height
Height in Pixels. Only one dimension for docked windows can be set; which one depends on which side it
is docked to.
20.11 Width
Width in Pixels. Whereas MDI child and floating windows can have height and width set, only one
dimension for docked windows can be set; which one depends on which side it is do cked to.
20.12 From Left
The number of pixels that the new window will be offset horizontally from the origin of the selected
Relative To object.
20.13 From Top
The number of pixels that the new window will be offset vertically from the origin of the selected Relative
To object.
20.14 Relative To
If selected, the top left corner of the new window will be positioned at an offset relative to the positional object selected. The offset is designated by the values in the From Left and From Top fields. The point from which the offset is calculated will either be the top left corner of the OEDesktop, the Windows Desktop or the current mouse position.
20.15 Centre On
If selected, the centre of the new window will be positioned exactly in the centre of the positional object selected, whether that be the OEDesktop or the Windows Desktop. The mouse is not available in the Positional Object List if the Centre On option is selected.
20.16 Positional Object List
Defines the object that will be used as a marker to position the new window. The new window's position will be determined by the selection made from this list and which of the positioning options was selected (i.e. Relative To or Centre On). The possible positional objects are as follows:-
20.16.1 OE Desktop
If the Relative To option is selected, the new window will be placed at the designated offset from the top
left corner of the window display area of the OEDesktop window. If the Centre On option is chosen, the
new window will be positioned exactly in the centre of the OEDesktop display area.
20.16.2 Windows Desktop
This is the default point of origin for Floating windows. If the Relative To option is selected, the top left
corner of the new window will appear at the designated offset from the Top Left corner of the Windows
Desktop. If the Centre On option was selected, the new window will appear in the exact centre of the
Windows Desktop. This option is not available for MDI Child type windows.
- 89 -
Page 99

Reference Guide
D301513X412
April 2012
OEMenus
20.16.3 Mouse Position
This option is available as a point of origin for both MDI Child and Floating type windows. If the Relative
To option is chosen, the top left corner of the new window will appear at the designated offset from the
current position of the mouse. If the Centre On option is chosen, the Mouse Position option is not
available.
More Dialog
21 Worked Example
For this example, the Source of the OEMenus action will be a Graphics display, the Target will be an
Alarm View.
The Graphics display that is the Source of this OEMenus action was the Target of a previous OEMenus
action. The Tank that is displayed on the Source of this OEMenus action was passed as a parameter
from a previous display.
The Alarm View itself is configured to receive filters from OEMenus, but has no filters configured directly
on it's Filter Page. It is filtered by the name parameter passed when opened via OEMenus from the
Source Graphics display.
21.1 STEP 1 - Create the Target View
As with all OEMenus configurations it is better to start with the target component. Open a new Alarm View
and configure the Database and Attributes pages. Then ensure that the Use Filter flag is set on the Filter
Page as shown below.
There is no need to use the [Modify] button to define a filter here, since the filter will be passed as a
parameter from the Source component via OEMenus. The Alarm View should now be saved.
- 90 -
Page 100

Reference Guide
D301513X412
April 2012
OEMenus
21.2 STEP 2 - Source View - Add Visible Object
Add a tank from one of the library of ready made objects within OEGraphics. Then add a rectangle on top
of the tank, as shown below.
21.3 STEP 3 - Source View - Adding Dynamic Object
With the visible object selected, click on the Size icon from the Dynamics toolbar, circled in red on the
image below.
This opens the Size object Property Inspector, shown below.
- 91 -
 Loading...