

Remote Automation Solutions Guide: Alarm Printer View Reference Guide-OpenEnterprise v2.83 Manuals & Guides
Page 1

Reference Guide
D301471X412
April 2012
OpenEnterprise Alarm Printer View
Reference Guide (V2.83)
Remote Automation Solutions
Website: www.EmersonProcess.com/Remote
Page 2

Reference Guide
A
w
D301471X412
April 2012
larm Printer Vie
Contents
1 Alarm Printer View...................................................................................................................1
1.1 Alarm Printer Overview.......................................................................................................1
1.2 Configuration.......................................................................................................................1
1.2.1 Accessing the Property Pages .....................................................................................1
1.2.1.1.1 The context menu.............................................................................................1
1.2.1.1.2 The Desktop Mode menu.................................................................................1
1.2.1.1.3 [Ctrl] + [M].........................................................................................................2
1.2.2 Accessing the Property Pages .....................................................................................2
1.2.2.1.1 The context menu.............................................................................................2
1.2.2.1.2 The Desktop Mode menu.................................................................................2
1.2.2.1.3 [Ctrl] + [M].........................................................................................................3
1.2.3 Using the Alarm Printer View as an Event Log ............................................................3
1.2.4 Enabling Printer Filtering..............................................................................................3
1.2.4.1 Associating Signals with a Printer..........................................................................3
1.2.4.2 Configuring the Active Alarm Printer......................................................................4
1.2.4.3 Enabling Printer Filtering........................................................................................4
1.2.5 Setting up Printer Hardware.........................................................................................4
1.2.6 Configuring Printed Colors ...........................................................................................6
1.2.7 Color Support................................................................................................................6
1.3 Property Pages ...................................................................................................................6
1.3.1 General Page ...............................................................................................................7
1.3.1.1 Features.................................................................................................................7
1.3.1.1.1 Background Color.............................................................................................7
1.3.1.1.2 Dont Cache All Alarms......................................................................................8
1.3.1.1.3 Number of Alarms to Cache.............................................................................8
1.3.1.1.4 Log to File.........................................................................................................8
1.3.1.1.5 Disable Properties at Runtime..........................................................................8
1.3.1.1.6 Auto Print..........................................................................................................9
1.3.2 Databases Page...........................................................................................................9
1.3.2.1 Features.................................................................................................................9
1.3.2.1.1 Selected Databases List...................................................................................9
1.3.2.1.2 Add Database Dialog........................................................................................9
1.3.2.1.3 Remove Button...............................................................................................10
1.3.3 Printers Page..............................................................................................................10
1.3.3.1 Features...............................................................................................................10
1.3.3.1.1 Selected Printers List......................................................................................10
1.3.3.1.2 Add Printers Dialog.........................................................................................10
1.3.3.1.3 Remove Printer Button...................................................................................11
1.3.3.1.4 Active Printer..................................................................................................11
1.3.3.1.5 Fit to Page......................................................................................................11
1.3.3.1.6 Monochrome Box............................................................................................11
1.3.4 Attributes Page...........................................................................................................11
1.3.4.1 Features...............................................................................................................12
1.3.4.1.1 Available Attributes List..................................................................................12
1.3.4.1.2 Add Button......................................................................................................12
1.3.4.1.3 Add All Button.................................................................................................12
1.3.4.1.4 Remove Attributes Button...............................................................................12
- i -
Page 3

Reference Guide
A
w
D301471X412
April 2012
larm Printer Vie
1.3.4.1.5
1.3.4.1.6 Selected Attributes List...................................................................................12
1.3.5 Filter Page ..................................................................................................................12
1.3.5.1 Use Filter Check Box ...........................................................................................12
1.3.5.2 General Sub Page................................................................................................13
1.3.5.2.1 Features..........................................................................................................13
1.3.5.3 Priority Sub Page.................................................................................................14
1.3.5.3.1 Features..........................................................................................................14
1.3.5.4 Conditions Sub Page ...........................................................................................15
1.3.5.4.1 Filter Conditions List.......................................................................................15
1.3.5.5 State Sub Page....................................................................................................15
1.3.5.5.1 Features..........................................................................................................16
1.3.5.6 Site Sub Page ......................................................................................................17
1.3.5.6.1 Features..........................................................................................................17
1.3.5.7 Other Sub Page ...................................................................................................17
1.3.5.7.1 Features..........................................................................................................18
1.3.6 Time Zone Page.........................................................................................................19
1.3.6.1 Features...............................................................................................................19
1.3.6.1.1 Adjust Time Zone............................................................................................19
1.3.6.1.2 Time Zone List................................................................................................19
1.4 Runtime Mode...................................................................................................................19
1.4.1 Features......................................................................................................................20
1.4.1.1 Alarm Display.......................................................................................................20
1.4.1.2 Start Printing ........................................................................................................20
1.4.1.3 Stop Printing.........................................................................................................20
1.4.1.4 Properties.............................................................................................................20
1.4.1.5 Sorting Alarms......................................................................................................20
Remove All Button..........................................................................................12
1.3.5.2.1.1 Name........................................................................................................13
1.3.5.2.1.2 Description...............................................................................................13
1.3.5.2.1.3 Event Type...............................................................................................13
1.3.5.2.1.4 Device Name............................................................................................14
1.3.5.2.1.5 Using Wildcards.......................................................................................14
1.3.5.3.1.1 All Priorities..............................................................................................14
1.3.5.3.1.2 Selection...................................................................................................14
1.3.5.3.1.3 Select Priorities Dialog.............................................................................15
1.3.5.3.1.4 Range of Priorities....................................................................................15
1.3.5.5.1.1 Acknowledged Filter.................................................................................16
1.3.5.5.1.2 Cleared Filter............................................................................................16
1.3.5.5.1.3 Suppressed Filter.....................................................................................16
1.3.5.5.1.4 Unacknowledged Filter.............................................................................16
1.3.5.5.1.5 Uncleared Filter........................................................................................16
1.3.5.5.1.6 Unsuppressed Filter.................................................................................17
1.3.5.6.1.1 Access Area.............................................................................................17
1.3.5.6.1.2 Plant Area.................................................................................................17
1.3.5.6.1.3 Callout Area..............................................................................................17
1.3.5.7.1.1 Current Workstation Only.........................................................................18
1.3.5.7.1.2 Workstation..............................................................................................18
1.3.5.7.1.3 Alarm Text................................................................................................18
1.3.5.7.1.4 Using Wildcards.......................................................................................18
- ii -
Page 4

Reference Guide
A
w
D301471X412
April 2012
Index .......................................................................................................................................21
2
larm Printer Vie
- iii -
Page 5

Reference Guide
A
w
D301471X412
April 2012
larm Printer Vie
1 Alarm Printer View
1.1 Alarm Printer Overview
The Alarm Printer View is one of the few View components that are available to configure and run on
both OpenEnterprise Servers and Workstations. The Alarm Printer View enables the user to:
• Print alarms and events to a printer as they occur ;
• Display alarms and events on screen as they occur ;
• Start and Stop printing of alarms;
1.2 Configuration
1.2.1 Accessing the Property Pages
There are three ways of accessing the Property Pages for the Alarm Printer View component: -
1.2.1.1.1 The context menu
Right cli
here:-
1.2.1.1.2 The Desktop Mode menu
If the 'Propert
Printer window in focus, select File>Mode>Configure from the OEDesktop Menu bar as shown
here:-
ck on the Alarm Printer View window and select the 'Properties' option, as shown
ies' option is not available on the context menu shown above, with the Alarm
- 1 -
Page 6

Reference Guide
A
w
D301471X412
April 2012
Then right click on the Alarm Printer window and select the 'Properties' option:-
larm Printer Vie
1.2.1.1.3 [Ctrl] + [M]
With the Alarm Printer View window in foc
keyboard simultaneously.
us press the [Ctrl] and [M] keys on the computer
1.2.2 Accessing the Property Pages
There are three ways of accessing the Property Pages for the Alarm Printer View component: -
1.2.2.1.1 The context menu
Right cli
here:-
1.2.2.1.2 The Desktop Mode menu
If the 'Propert
Printer window in focus, select File>Mode>Configure from the OEDesktop Menu bar as shown
here:-
ck on the Alarm Printer View window and select the 'Properties' option, as shown
ies' option is not available on the context menu shown above, with the Alarm
- 2 -
Page 7

Reference Guide
A
w
D301471X412
April 2012
Then right click on the Alarm Printer window and select the 'Properties' option:-
larm Printer Vie
1.2.2.1.3 [Ctrl] + [M]
With the Alarm Printer View window in foc
keyboard simultaneously.
us press the [Ctrl] and [M] keys on the computer
1.2.3 Using the Alarm Printer View as an Event Log
Although the Alarm Printer View's purpose is to print alarms, it actually prints the contents of the event
log table from the OpenEnterprise database.
In order to view all events, the Alarm Priority Filter of the Alarm Printer Viewer should be set to display
all priorities. Then it will display both alarms and events from the event log.
1.2.4 Enabling Printer Filtering
It is possible to filter alarms which appear within each instance of the Alarm Printer View according to
its designated Active Printer and alarms which have been associated with this printer in the database.
There are 3 steps required in order to enable printer filtering of alarms: -
1. Associate signals with a printer
2. Make this printer the Alarm Printer View's Active Printer
3. Enable Printer Filtering in the registry
1.2.4.1 Associating Signals with a Printer
Every signal
particular printer, which is done by setting the signal's printer attribute to be the name of a printer that
will be used as the Active Printer within a particular instance of the Alarm Printer View.
has a printer attribute. Printer Filtering requires that signals should be associated with a
- 3 -
Page 8

Reference Guide
A
w
D301471X412
April 2012
1.2.4.2 Configuring the Active Alarm Printer
larm Printer Vie
In orde
Alarm Printer Properties pages, and select the Printers tab. See the Printers Page topic for further
information on setting the Active Printer from here. The name that is in the signal's printer attribute
must exactly match the name of the Active Printer .
1.2.4.3 Enabling Printer Filtering
Printer Filteri
alarms/events for signals associated with a particular alarm printer are displayed and printed by the
Alarm Printer Viewer.
To enable this feature open the Settings Editor and find the following key:Key: OpenEnterprise\Tasks\AlarmPrinter
Then look for the following value on this key and set its data to 1:Value: Print Filter
If the value does not exist, create it. Setting the data of the 'Print Filter' value to 1 will perform two
tasks. The first is that it will disable the filter property pages in the Alarm Printer View and the second
is the Alarm Printer Viewer will only show alarms/events that match the Active Printer selected in the
Alarm Printer Viewer. An example is shown below.
r to configure the Active Alarm Printer for an Alarm Printer View instance, you need to open the
ng must now be enabled in the OpenEnterprise settings file to make sure that only
1.2.5 Setting up Printer Hardware
Colours for printing alarms are configured in OpenEnterprise by using the Alarm Priority Editor (see
the 'Configuring Printout Colours' topic). However, the hardware device (printer) used for printing by
the Alarm Printer View will need to be configured properly also. If the printer has colour capability,
configuring it properly will produce alarms in the nearest colour chosen for that priority. The method of
configuration varies depending upon the type of printer you have. Printer configuration is typically
performed using one of the following three methods.
1) Setting dip switches as stated in the printer's manual.
2) Selecting appropriate buttons or menus on the front display panel of the printer.
3) Using software (printer driver).
- 4 -
Page 9

Reference Guide
A
w
D301471X412
April 2012
You must configure your printer to emulate an EPSON printer. This will enable the Alarm Printer View
to send colour codes to the printer correctly, thus enabling the printer to interpret the codes and print
the alarm(s) in colour.
Refer to the printer's technical manual for information on setting up the Epson emulation
Page/Line printers
The Alarm Printer View has the ability to print to a page or a line printer. When printing to a page
printer (eg a laser printer), all alarms are put into a buffer until one page is complete; then the entire
page of alarms is printed. When printing to a line printer (eg a dot matrix printer), alarms are printed
as they occur.
The "Fit to Page" option in the Printers Property page must be checked or unchecked accordingly.
When printing to a Page Printer the "Fit to Page" option should be checked and when printing to a line
printer this option should be unchecked.
Printer Spooling
For the Alarm Printer View to be able to work efficiently, printing should be done in the background,
by setting up the Print Spooling option. This option exists in the standard Windows Printer Propertie s
for the active printer.
larm Printer Vie
Windows NT Spooling
If the "Fit to Page" flag is set then the Windows Printer Properties page must be set up as shown
below.
- 5 -
Page 10

Reference Guide
A
w
D301471X412
April 2012
The option "Spool print documents so program finishes printing faster" will need to be selected , this
will spool the document onto the hard disk. Once this is done SPOOLS.EXE will send the document
to the printer in the background.
larm Printer Vie
1.2.6 Configuring Printed Colors
Configuration of printed colours for each of the priorities is done through the Alarm Priority
configuration tool.
The Alarm Priority Tool is invoked from the Toolbox. An Alarm Priority from the list on the left is
selected and then the "Display/Print" tab is selected. From this tab the user can invoke a colour
selection dialog by double clicking on the small square to the right of the 'Print Color' label. The
selected colour will become the new printed colour for that alarm priority.
Once print colours have been set for the priorities, select [Apply] or [Close] to save the data into the
database.
The Alarm Printer View will retrieve the data from the database and use this data to set the colour of
the alarm before it is printed.
1.2.7 Color Support
Line Printers
The Alarm Printer View will support seven colours on a line printer (eg a dot matrix printer). If a colour
that is defined but is not supported is selected, the Alarm Printer View will choose the nearest colour.
The seven colours that are supported are black, red, blue, violet, yellow, orange and green.
Page Printers
When a colour page printer (eg a laser printer) is selected, approximately 60,000 colours are
supported (this depends on the technology of the colour page printer).
If the "Fit to Page" option is checked from the Alarm Printer View's property page and a colour line
printer is the active printer, the print speed will be considerably slower. This is due to the fact that the
line printer is having to print in true colour.
When printing to a black on white line printer and colours have been chosen for the priorities, the
printer will ignore the codes sent by the Alarm Printer View.
1.3 Property Pages
The General Page enables the user to configure general options for the Alarm Printer View.
- 6 -
Page 11

Reference Guide
A
w
D301471X412
April 2012
1.3.1 General Page
larm Printer Vie
The General Page enables the user to configure general options for the Alarm Printer View.
1.3.1.1 Features
1.3.1.1.1 Background Color
Selecting the
colour selection dialog box.
browse button to the right of the white Background colour indication square displays a
Click here to view this.
- 7 -
Page 12

Reference Guide
A
w
D301471X412
April 2012
By default the Background colour square displays the current display scheme.
larm Printer Vie
A new background colour can be selected by clicking on the desired colour square. When the [OK]
button on the colour dialog box is selected the selected colour is set to replace th e Alarm Printer's
current background colour. The new colour is reflected in the Background colour square.
1.3.1.1.2 Dont Cache All Alarms
If checked, li
memory limitations of the Server or Workstation running the Alarm Printer View.
1.3.1.1.3 Number of Alarms to Cache
The Alarm Pri
If the [Don't cache all alarms] button is checked, and no number is specified in the 'Number of
alarms to cache' field, the Alarm Printer Server by default will cache 100 records.
If it is possible that the printers on which the alarms are being printed may be offline at any time then
it is important to cache the alarms so that they will stay in the computers memory until they can be
printed. If insufficient alarms are cached during periods of increased alarm activity, the alarms may be
lost.
1.3.1.1.4 Log to File
n 'Log to File' is checked all alarms will be saved into a log file specified in the "File Name" box.
Whe
The Alarm Printer View will save the file by default with either a .LOG or a .TXT extension, depending
on user selection. The file will be viewable as text in Notepad, or any other text editor.
Even if alarms are not being printed to a printer they will still be logged to file if this option is selected.
This means that the Alarm Printer View can also be used to provide a filtered list of alarms/events in
situations where printed output is not required.
mits the number of alarms to be cached. Otherwise all alarms will be cached up to the
nter View connects to a single printer and obtains records from the Alarm Printer Server.
1.3.1.1.5 Disable Properties at Runtime
n checked, the user will not be able to access these property pages whilst in Runtime mode.
Whe
Default allows access to the Property pages in Runtime mode.
- 8 -
Page 13
Reference Guide
A
w
D301471X412
April 2012
1.3.1.1.6 Auto Print
larm Printer Vie
When s
Alarm Printer View goes into 'Runtime' mode. The "Auto Print" switch overrides the "Start Printing"
and "Stop Printing" items on the context menu. If the Auto Print switch is set, and the user
subsequently double clicks on an .APC file through Windows Explorer, the Alarm Printer View will
start printing the alarms to the Active printer. The advantage of using the Auto Print is that all the
printing is activated automatically and does not rely on the user to start printing.
elected, forces the Alarm Printer View to start printing to the active printer as soon as the
1.3.2 Databases Page
The Databases Page enables the user to configure one or more databases for which the Alarm
Printer View will display alarms and events.
1.3.2.1 Features
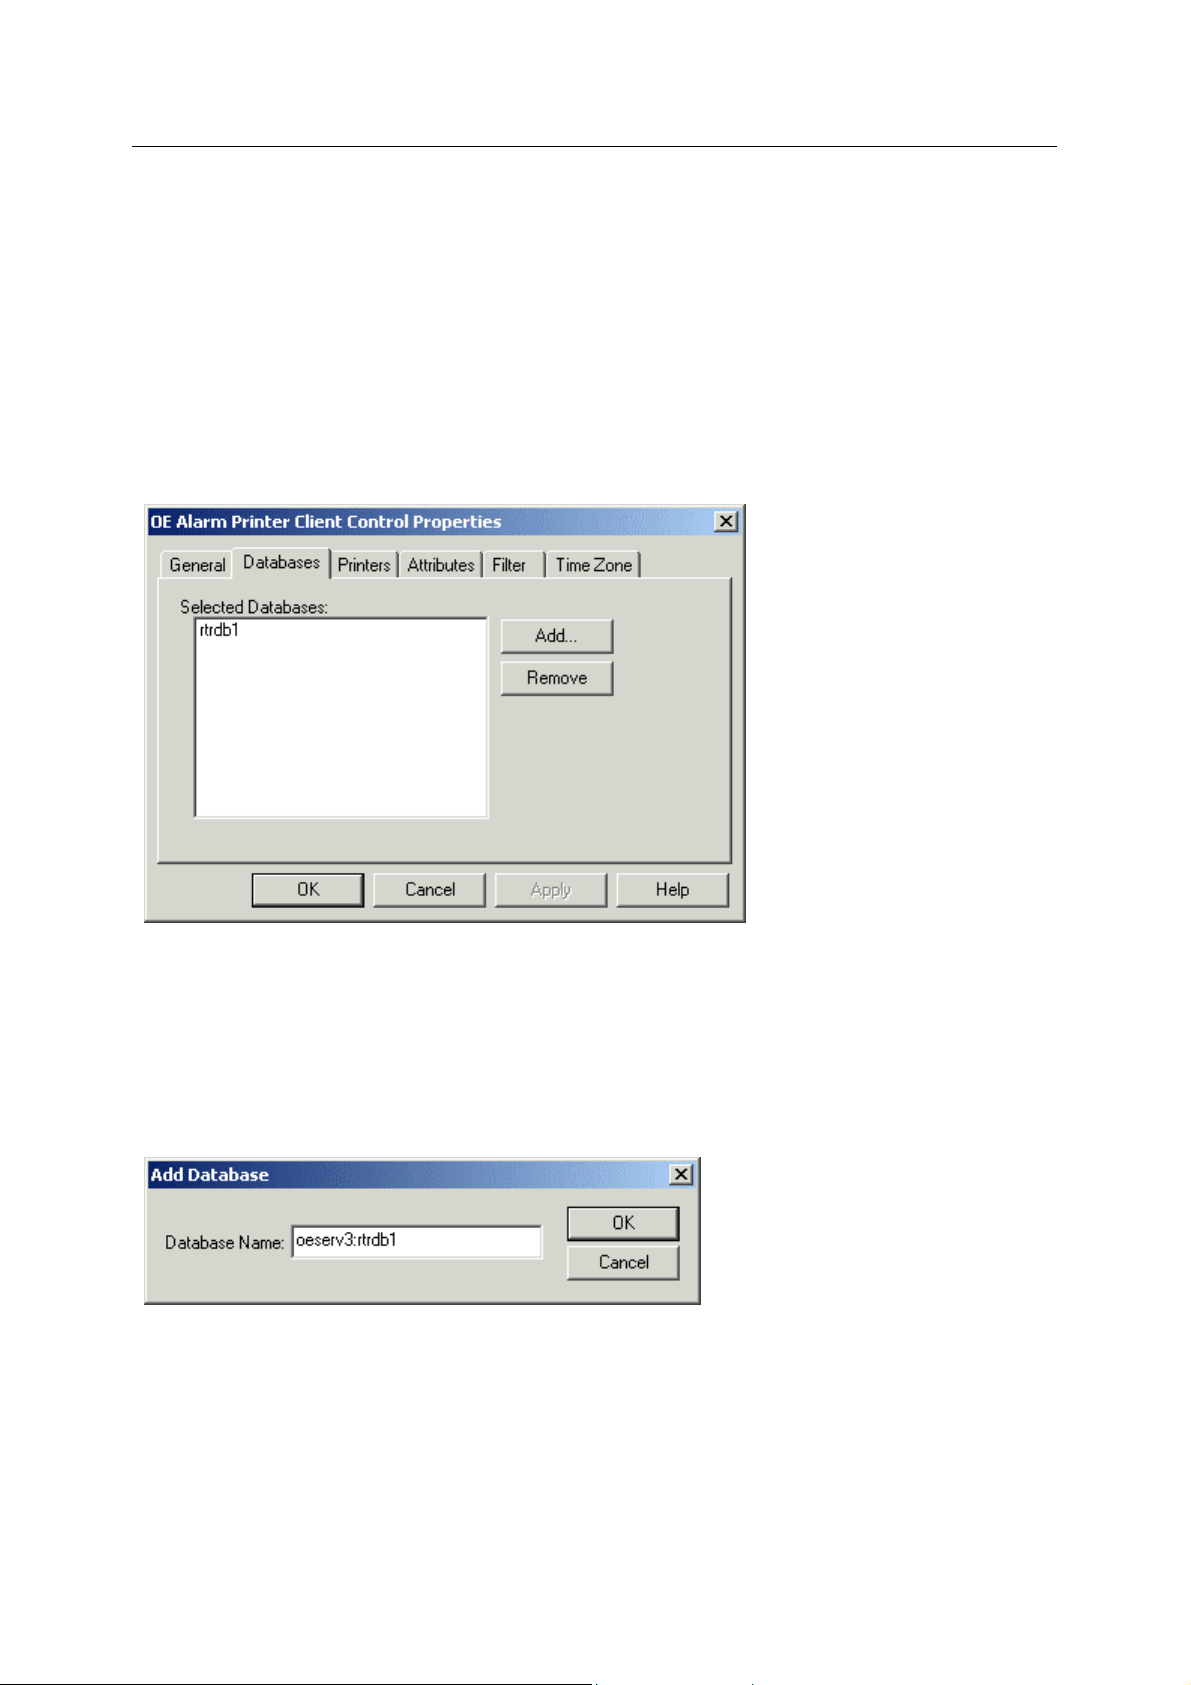
1.3.2.1.1 Selected Databases List
Displays the
1.3.2.1.2 Add Database Dialog
Enable
A remote database is defined by the Server's DNS name(s) followed by a colon, followed by 'rtrdb1'
(eg OEServer:rtrdb1). There is a comma in between each server if the Database is run ning in
Redundant mode- (eg Master1:rtrdb,Master2:rtrdb1). OpenEnterprise Databases may also be defined
by IP addresses (eg 102.10.0.90:rtrdb1,102:10.0.91:rtrdb1). The Server DNS names may be aliase d
using the Hosts file found in the 'C:\Winnt\System32\Drivers\etc' directory. This allows
Databases to be named independently of specific IP addresses or DNS names. A sample Hosts entry
is shown below: -
databases from which the Alarm Printer will source alarms.
s the user to add an OpenEnterprise Database to the 'Selected Databases' List.
101.100.0.183 oeserv1 oedwat1 #pserv1
- 9 -
Page 14

Reference Guide
A
w
D301471X412
April 2012
101.100.0.184 oeserv2 oedwat2 #pserv1
The IP addresses of the Servers are given on the left, then after a space or tab each alias name is
specified. In the example above there are two alias names defined for each Server. The hash
indicates that what follows is a comment. After the hash above the real DNS names of the Servers is
given as a reminder. With the above Hosts file, 'pinging' oeserv1 would result in a reply from the
machine with the IP address 101.100.0.183, even though its real DNS name is pserv1.
The 'rtrdb1' part of the database name is an alias for a sevice defined in the Services file, found in the
same directory as the Hosts file. In applications where there are more than one database defined,
these aliases may be given more descriptive names such as 'nw3000', 'dynamiclogic' or 'corporate'.
Each alias must have a unique service number, and the numbers must be applied consistently acro ss
the application.
Databases Page
1.3.2.1.3 Remove Button
s the database selected from the 'Selected Databases' list box.
Delete
larm Printer Vie
1.3.3 Printers Page
The Printers Page enables the user to configure one or more printers to which the Alarm Printer View
will print alarms and events.
1.3.3.1 Features
1.3.3.1.1 Selected Printers List
This is th
the Printers must be marked as the Active Printer by selecting it and clicking the [Active Printer]
button. Each instance of the Alarm Printer View can be configured to only print alarms that are
associated with its Active Printer. This is known as Printer Filtering. To find out how Printer Filtering is
configured for an Alarm Printer View, see the Enabling Printer Filtering page.
1.3.3.1.2 Add Printers Dialog
This dial
select a local or network printer to be the designated Alarm Printer.
e list of printers that have been configured to print alarms by the Alarm Printer View. One of
og appears, showing a list of printers available to the Workstation or Server. The user can
- 10 -
Page 15

Reference Guide
A
w
D301471X412
April 2012
1.3.3.1.3 Remove Printer Button
larm Printer Vie
Deletes
1.3.3.1.4 Active Printer
Sets the Active printe
is in this list, the active one is used to print alarms.
1.3.3.1.5 Fit to Page
Whe
Setup of Printer Hardware topic).
1.3.3.1.6 Monochrome Box
Whe
in the Alarm Priorities Editor. See Configure Printout Colours topic.
the printer selected from the list box.
r from a printer selected from the 'Selected Printers' List. If more than one printer
n checked, a page full of alarms is printed; normally used when printing to page printers (see
n checked, alarms are printed in black text, no matter what colour settings have been configured
1.3.4 Attributes Page
The Attributes Page enables the user to select the attributes that will be displayed and/or printed by
the Alarm Printer View.
- 11 -
Page 16

Reference Guide
A
w
D301471X412
April 2012
1.3.4.1 Features
1.3.4.1.1 Available Attributes List
larm Printer Vie
The attribute
table of the database.
1.3.4.1.2 Add Button
Adds the
1.3.4.1.3 Add All Button
Adds all of the attributes in
1.3.4.1.4 Remove Attributes Button
Remove
1.3.4.1.5 Remove All Button
Remove
1.3.4.1.6 Selected Attributes List
The list of attributes
Alarm Printer View.
s available for inclusion in the Alarm Printer View window. Sourced from the Event Log
selected attribute(s) to the 'Selected Attributes' list box.
the 'Available Attributes' list to the 'Selected Attributes' list box.
s the selected attribute(s) from the 'Selected Attributes' list box.
s all the attributes from the 'Selected Attributes' list box.
selected from the 'Available Attributes' list to be displayed and printed by the
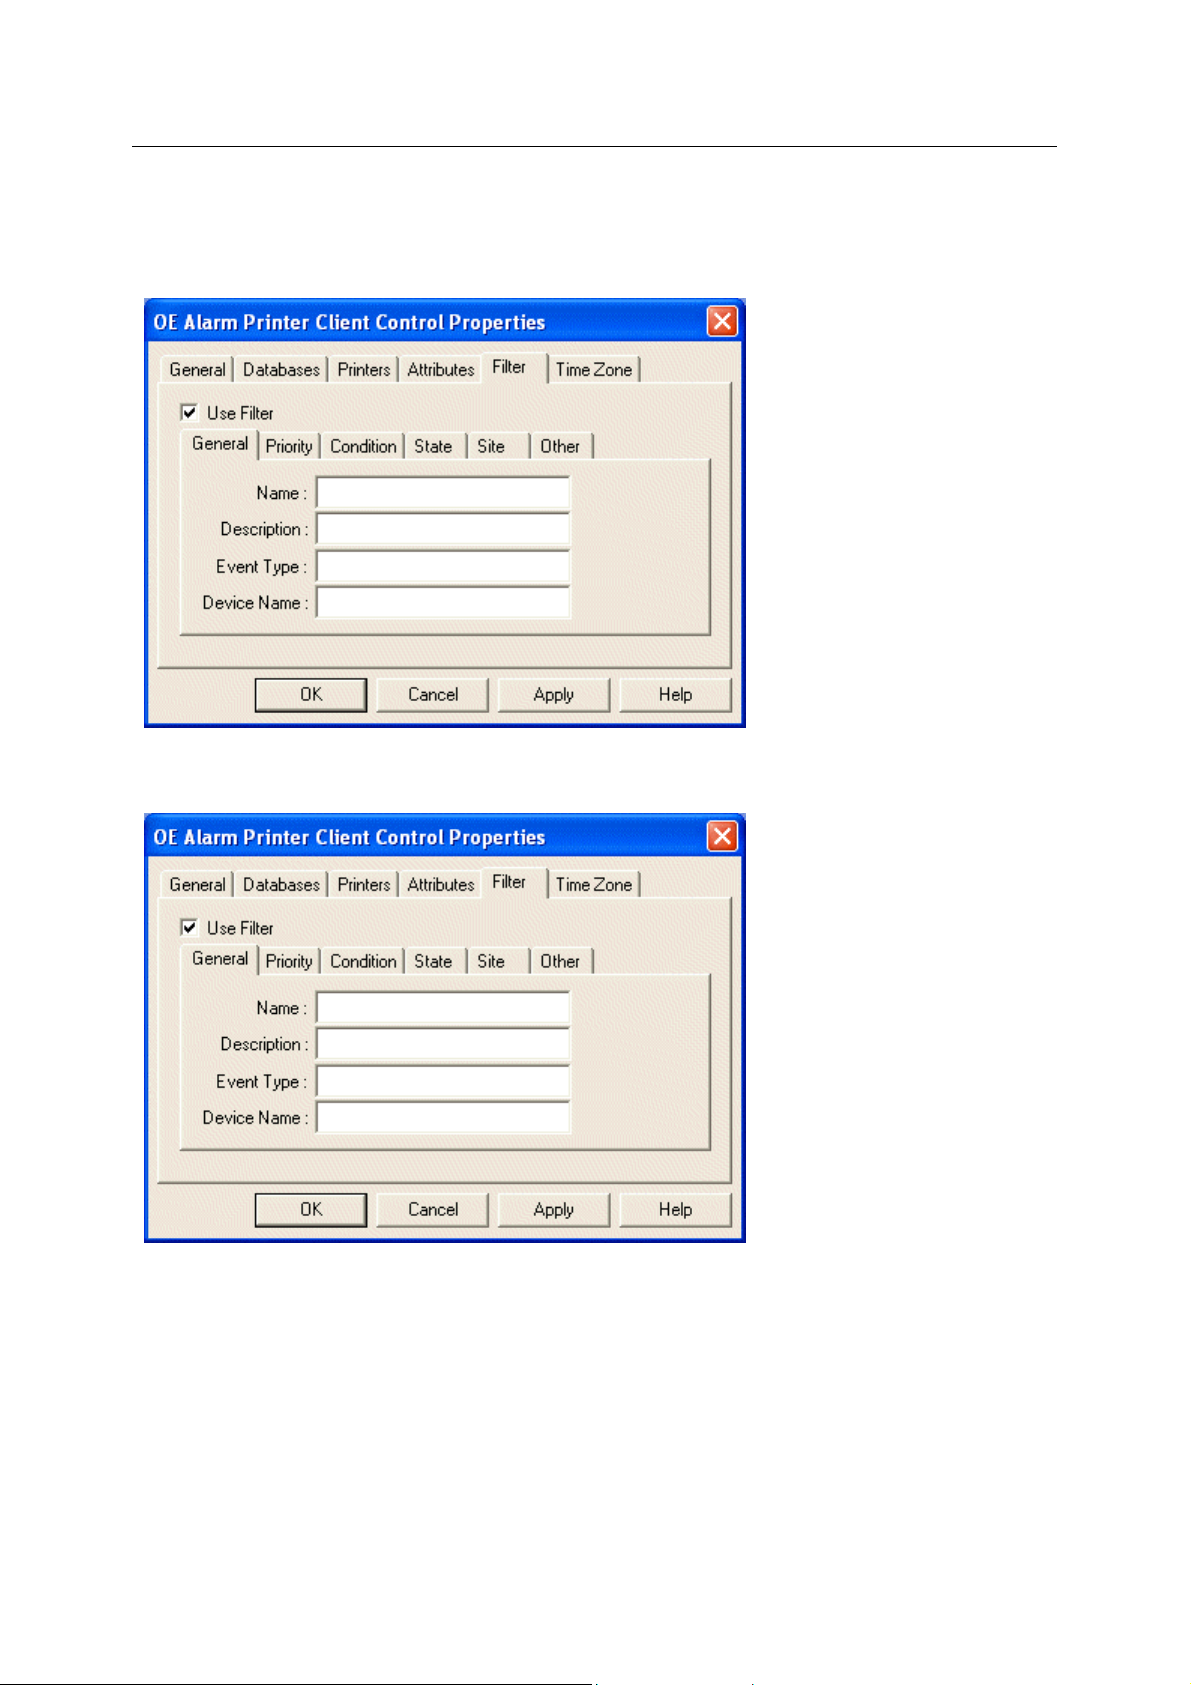
1.3.5 Filter Page
The Filter Page contains one check box that enables the filtering of alarms and events. When
checked, filtering is enabled, and the actual filter pages are displayed on the same dialog.
1.3.5.1 Use Filter Check Box
Whe
n checked, the Filter Sub Pages are made visible. If Printer Filtering is enabled, this box will be
disabled.
- 12 -
Page 17
Reference Guide
A
w
D301471X412
April 2012
1.3.5.2 General Sub Page
larm Printer Vie
The Filter G
description, event type or device name of the alarm object.
The Filter General Sub Page enables the user to create alarm and event filters based on the name,
description, event type or device name of the alarm object.
eneral Sub Page enables the user to create alarm and event filters based on the name,
1.3.5.2.1 Features
1.3.5.2.1.1 Name
The nam
Wildcards topic.
1.3.5.2.1.2 Description
This is th
Using Wildcards topic.
1.3.5.2.1.3 Event Type
e attribute of the signal or object in alarm. Wildcard rules can be viewed from the Using
e description attribute of the signal or object in alarm. Wildcard rules can be viewed from the
- 13 -
Page 18

Reference Guide
A
w
D301471X412
April 2012
This is the EventType attribute of the signal or object in alarm. Event types may be any text string
which has been used to define event types. The actual text used will vary according to the application.
Wildcard rules can be viewed from the Using Wildcards topic.
1.3.5.2.1.4 Device Name
This is th
accepted in any field. Wildcard rules can be viewed from the Using Wildcards topic.
1.3.5.2.1.5 Using Wildcards
Whe
The wildcard characters are the * (asterisk) and ? (question mark) chara cters.
The '*' signifies a match with zero or more characters. Note: any characters specified after an asteri sk
are ignored.
The '?' signifies a match with exactly one character.
A few examples:
Wilcard Use Explanation
e Device Name associated with the signal or object in alarm. Wildcard characters are
n using the Filter Property pages several filter settings allow wildcard characters to be specified.
larm Printer Vie
Digital* Matches with Digital Alarm, Digital Alarm9, Digital, etc.
Real? Matches with Real1, RealX, but does not match Real.
Analog*15 Matches with Analog Alarm386, Analog15 etc. (remember that the 15 after the
asterisk will be ignored).
1.3.5.3 Priority Sub Page
The Filter Pri
ority Sub Page enables the user to filter alarms and events according to their priority.
1.3.5.3.1 Features
1.3.5.3.1.1 All Priorities
No filter will b
1.3.5.3.1.2 Selection
e applied to alarm priorities.
- 14 -
Page 19

Reference Guide
A
w
D301471X412
April 2012
The user can select any combination of Alarm Priorities as a filter. The browse button to the right
becomes enabled. Selection of the browse button presents the user with the Select Priorities Dialog.
1.3.5.3.1.3 Select Priorities Dialog
Any prioritie
highlighted priorities will be used as a filter when the [OK] button is selected.
Filter Priority Sub Page
s selected from the list become highlighted until they are clicked a second time. All
larm Printer Vie
1.3.5.3.1.4 Range of Priorities
The user i
range numbers may be changed by using the spin arrows or by typing the number directly into the
range field.
1.3.5.4 Conditions Sub Page
The Filter
s able to define a range of Alarm Priorities as a filter for the Alarm Banner. The 'from and to'
Conditions Sub Page enables the user to filter alarms according to alarm condition.
1.3.5.4.1 Filter Conditions List
The co
mplete list of alarm conditions available is displayed here. A single or multiple selection can be
made. Holding down the [Shift] or [Ctrl] keys while selecting conditions enables multiple condition
selections.
1.3.5.5 State Sub Page
The Filter Sta
te Sub Page enables the user to filter alarms according to their state.
- 15 -
Page 20

Reference Guide
A
w
D301471X412
April 2012
The Filter State Sub Page enables the user to filter alarms according to their state.
larm Printer Vie
1.3.5.5.1 Features
1.3.5.5.1.1 Acknowledged Filter
Displays a
1.3.5.5.1.2 Cleared Filter
Displays a
1.3.5.5.1.3 Suppressed Filter
Displays a
1.3.5.5.1.4 Unacknowledged Filter
Displays a
1.3.5.5.1.5 Uncleared Filter
Displays a
nd prints all acknowledged alarms.
nd prints all cleared alarms.
nd prints all suppressed alarms..
nd prints all unacknowledged alarms.
nd prints all uncleared alarms..
- 16 -
Page 21

Reference Guide
A
w
D301471X412
April 2012
1.3.5.5.1.6 Unsuppressed Filter
Displays a
1.3.5.6 Site Sub Page
nd prints all unsuppressed alarms..
larm Printer Vie
The Filter Site Sub Page e
1.3.5.6.1 Features
1.3.5.6.1.1 Access Area
This attrib
unique Access Area. Wildcard rules can be viewed from the Using Wildcards topic.
ute is used to provide security for signals, objects and users. Every Plant Area is given a
nables the user to filter alarms and events according to site information.
1.3.5.6.1.2 Plant Area
This is th
location which has plant machinery configured for processing. Wild card rules can be viewed from the
Using Wildcards topic.
1.3.5.6.1.3 Callout Area
This attrib
assigned to Callout areas for efficiency of maintenance. Wildcard rules can be viewed from the Using
Wildcards topic.
1.3.5.7 Other Sub Page
The Filter Oth
were initiated from the current Workstation, a remote Workstation, or on any element of the Alarm
Text created by the alarm or event.
e Plant Area name. The term Plant Area is interchangeable with 'Site'. It signifies any specific
ute is used where Sites are spread across large physical areas, and Si tes need to be
er Sub Page enables the user to filter alarms and events on the basis of whether they
- 17 -
Page 22

Reference Guide
A
w
D301471X412
April 2012
1.3.5.7.1 Features
larm Printer Vie
1.3.5.7.1.1 Current Workstation Only
If checked, al
1.3.5.7.1.2 Workstation
If a remote Workstation i
from that remote Workstation. This field can accept wild-cards, and therefore if Workstations have
been named generically (ie OpRoom1, OpRoom2 etc.), the filter could apply to more than one remote
Workstation.
1.3.5.7.1.3 Alarm Text
Any text
used with wild-cards.
1.3.5.7.1.4 Using Wildcards
n using the Filter Property pages several filter settings allow wildcard characters to be specified.
Whe
The wildcard characters are the * (asterisk) and ? (question mark) chara cters.
The '*' signifies a match with zero or more characters. Note: any characters specified after an asteri sk
are ignored.
The '?' signifies a match with exactly one character.
A few examples:
Wilcard Use Explanation
arms and events will be filtered on whether they originated from the current Workstation.
s named here, alarms and events will be filtered on whether they originated
type here will be used as a filter on the Alarm Text of any alarm or event. The field can be
Digital* Matches with Digital Alarm, Digital Alarm9, Digital, etc.
Real? Matches with Real1, RealX, but does not match Real.
Analog*15 Matches with Analog Alarm386, Analog15 etc. (remember that the 15 after the
asterisk will be ignored).
- 18 -
Page 23

Reference Guide
A
w
D301471X412
April 2012
larm Printer Vie
1.3.6 Time Zone Page
This page allows the user to configure Time zone settings for the Alarm View.
1.3.6.1 Features
1.3.6.1.1 Adjust Time Zone
nge the Time Zone for the Alarm Printer View the [Adjust Time Zone] box must be checked.
To cha
When this box is checked, the Time Zone drop-down list is enabled, and a new Time Zone may be
selected. The default setting is the physical time zone of the Server or Workstation.
1.3.6.1.2 Time Zone List
This list i
zone other than the default for the Printer View. This will cause all alarm times to be shown according
to the time zone selected from this list.
s enabled once the 'Adjust Time Zone' box is checked. It enables the user to select a time
1.4 Runtime Mode
Below is an example of the Alarm Printer View running in a window within OEDesktop.
- 19 -
Page 24

Reference Guide
A
w
D301471X412
April 2012
larm Printer Vie
1.4.1 Features
1.4.1.1 Alarm Display
The alarms are displayed in this area according to the configuration set up on the Property pages.
1.4.1.2 Start Printing
Right cli
begin to be printed when it is selected, and the 'Stop Printing' option becomes available. If the Alarm
Printer View window has just opened and this option is available, then printing of alarms has not yet
started, probably because the 'Auto Print' alarms option was not selected on the General property
page.
1.4.1.3 Stop Printing
Right cli
selected, then printing of alarms will stop. When the 'Auto Print' option is selected from the General
Property page, both the Start Printing and Stop Printing options are disabled.
1.4.1.4 Properties
Right cli
Property pages for configuration of the Alarm Printer View.
1.4.1.5 Sorting Alarms
The default sort ord
second click on the same column heading will reverse the sort order.
Note: alarms are automatically sorted into descending time-stamp (attribute name: occurencetime)
order by default. It should be noted that when alarms are printed this is always in the order in which
they are received irrespective of the sort order on the screen.
cking on the Alarm Display brings up this context menu. If this option is available, alarms will
cking on the Alarm Display brings up this context menu. If this option is available and is
cking on the Alarm Display brings up this context menu. Selection of this option will open the
ering of alarms can be changed by clicking on the relevant column he ading. A
- 20 -
Page 25

Reference Guide
A
w
D301471X412
April 2012
2 Index
1
A
Access Area..................................................... 19
Accessing....................................................... 3, 4
Property Pages...........................................3, 4
Acknowledged Filter......................................... 18
Active Printer.................................................... 12
Add All Button .................................................. 13
Add Button ....................................................... 13
Add Database Dialog....................................... 10
Add Printers Dialog.......................................... 12
Adjust Time Zone............................................. 21
Alarm Display................................................... 21
Alarm Printer Overview...................................... 3
Alarm Printer View ............................................. 5
Using............................................................... 5
Alarms.......................................................... 9, 21
Number........................................................... 9
Sorting .......................................................... 21
All Priorities ...................................................... 16
Attributes Page................................................. 12
Auto Print.......................................................... 10
Available Attributes List....................................13
B
Background Color .............................................. 9
C
Cache................................................................. 9
Callout Area ..................................................... 19
Cleared Filter.................................................... 18
Color Support..................................................... 8
Conditions List.................................................. 17
Configuring......................................................... 7
Printed Colors................................................. 7
D
Databases Page............................................... 10
Description....................................................... 15
Device Name.................................................... 15
Disable Properties............................................10
Dont Cache All Alarms....................................... 9
E
Enabling ............................................................. 5
Printer Filtering............................................... 5
larm Printer Vie
Event Log............................................................5
Event Type........................................................15
F
File
Log ................................................................10
Filter Conditions Sub Page...............................16
Filter General Sub Page...................................14
Filter Page.........................................................13
Filter Priority Sub Page.....................................16
Filter Site Sub Page..........................................18
Filter State Sub Page........................................17
Fit......................................................................12
Page..............................................................12
G
General Page......................................................8
L
Log....................................................................10
File.................................................................10
M
Monochrome Box..............................................12
N
Name ................................................................15
Number...............................................................9
Alarms.............................................................9
P
Page..................................................................12
Fit ..................................................................12
Plant Area.........................................................19
Printed Colors.....................................................7
Configuring......................................................7
Printer Filtering....................................................5
Enabling ..........................................................5
Printer Hardware.................................................6
Printers Page....................................................11
Priorities............................................................16
Range............................................................16
Properties..........................................................21
Property Pages...............................................3, 4
Accessing....................................................3, 4
R
Range ...............................................................16
Priorities ........................................................16
- 21 -
Page 26

Reference Guide
A
w
D301471X412
April 2012
larm Printer Vie
Remove All Button ........................................... 13
Remove Attributes Button................................ 13
Remove Button ................................................ 11
Remove Printer Button.....................................12
Runtime............................................................ 10
Runtime Mode.................................................. 21
S
Select Priorities Dialog..................................... 16
Selected Attributes List .................................... 13
Selected Databases List .................................. 10
Selected Printers List....................................... 12
Selection........................................................... 16
Sorting.............................................................. 21
Alarms .......................................................... 21
Start Printing.....................................................21
Stop Printing .....................................................21
Suppressed Filter..............................................18
T
Time Zone List..................................................21
Time Zone Page ...............................................20
U
Unacknowledged Filter.....................................18
Uncleared Filter.................................................18
Unsuppressed Filter..........................................18
Use Filter Check Box........................................14
Using...................................................................5
Alarm Printer View ..........................................5
Using Wildcards..........................................15, 20
- 22 -
Page 27

Reference Guide
D301471X412
April 2012
DISCLAIMER
Bristol, Inc., Bristol Babcock Ltd, Bristol Canada, BBI SA de CV and the Flow Computer Division , are wholly owned subsidiaries of Emerson Electric Co. doing business
as Remote Automation Solutions (“RAS”), a division of Emerson Process Management. ROC, FloBoss, ROCLINK, Bristol, Bristol Babcock, ControlWave, TeleFlow and
Helicoid are trademarks of RAS. AMS, PlantWeb and the PlantWeb logo are marks of Emerson Electric Co. The Emerson logo is a trademark and service mark of the
Emerson Electric Co. All other marks are property of their respective owners.
The contents of this publication are presented for informational purposes only. While every effort has been made to ensure informational accuracy, they are not to be
construed as warranties or guarantees, express or implied, regarding the products or services described herein or their use or applicability. RAS reserves the right to
modify or improve the designs or specifications of such products at any time without notice. All sales are governed by RAS’ terms and conditions which are available upon
request. RAS does not assume responsibility for the selection, use or maintenance of any product. Responsibility for proper selection, us e and maintenance of any RAS
product remains solely with the purchaser and end-user.
Engineered and supported by:
Remote Automation Solutions,
Blackpole Road, Worcester, WR3 8YB, UK
Registered office: Meridian East, Leicester, LE19 1UX
Registered in England and Wales, Registration No. 00671801
VAT Reg No. GB 705 353 652
Emerson Process Management
Remote Automation Solutions
1100 Buckingham St
Watertown, CT 06795
T 1 (860) 945 2200
F 1 (860) 945 2278
www.EmersonProcess.com/Remote
binfo@EmersonProcess.com
© 2001-2012 Remote Automation Solutions, division of Emerson Process Management. All rights
reserved.
Emerson Process Management
Remote Automation Solutions
Blackpole Road
Worcester, WR3 8YB
T 44 (0) 1905 856848
F 44 (0) 1905 856930
www.EmersonProcess.com/Remote
oedsupport@EmersonProcess.com
 Loading...