

Page 1

Training Manual
s
D5091
June, 2007
ristol OpenEnterprise
OpenEnterprise for Beginners
Remote Automa tion Solution
www.EmersonProcess.com/Remote
Page 2

Welcome to OpenEnterprise for Beginners
This manual is the first real exposure most readers will have to the OpenEnterprise product, and
we recognize that first impressions count. We have tried hard to provide a basic introduction,
suitable for anyone with basic knowledge of SCADA or process control. However,
OpenEnterprise is a powerful, flexible product, and as a result there’s a lot to learn – and this
manual is just the beginning.
As OpenEnterprise has expanded into newer and wider markets more of our customers have
become interested in a ‘do it yourself’ approach to setting up their systems. Because of this, the
need arose for a more user-friendly manual that explains how to set up the basic features of
OpenEnterprise, with special emphasis on examples. The result is this manual - OpenEnterprise
for Beginners. We recommend you work though the manual, and set up each of the examples.
On the OpenEnterprise CD we have included some example loads (programs) for Bristol RTUs.
If you don’t have your own RTU loads, you can use these.
Initially, most of the SCADA systems we sold were configured primarily by our own in-house
system engineers, as well as experienced third-party system integrators with a high level of
technical expertise. For these customers we developed a very detailed set of reference manuals,
which can be found on the OpenEnterprise CD. After you have completed the examples in this
manual, we recommend you use these reference guides as you design and implement your
system. You will also find that the product itself includes a comprehensive online help system –
we recommend you use it regularly.
Thank you for buying OpenEnterprise. All of us at Emerson who have worked on this product
are proud of it, and would like to hear any feedback you may have, good or bad. We try hard to
incorporate improvements into each new release, and many of those improvements and new
features arise out of suggestions from our existing customers. Please email or call me with any
suggestions or comments you may have, either on this manual, or on the product.
Steve Hill
SCADA Program Manager
Emerson Process Management
Tel: +1 (860) 945-2501
Email: stephen.hill@emersonprocess.com
Contacting the OpenEnterprise Support Team
Telephone support for OpenEnterprise users is available Monday through Friday from 8AM to
4:30PM (Eastern U.S.) excluding holidays and scheduled factory shutdowns at the following
number: 1-860-945-3865
You can e-mail the OpenEnterprise Support Team at: openenterprise@emersonprocess.com
Page 3

D5091 - OpenEnterprise (OE) for Beginners
Table of Contents
Why OE for Beginners?...................................................................................................................i
Contacting the OpenEnterprise Support Group...............................................................................i
Chapter 1 - Introduction - What is OpenEnterprise (OE)?...................................................1-1
How does the Database work?...............................................................................................1-3
Learning the Real Database ‘Lingo’ (Attributes, Records, and Objects)........................1-3
What sorts of things are saved in the OE database? ........................................................1-5
How does data get from the Controller Network into the OE database?...............................1-6
Alarm Data Collection.....................................................................................................1-7
Poll List Collection..........................................................................................................1-7
Report by Exception (RBE).............................................................................................1-8
Array and Archive Collection via Open BSI Converter..................................................1-8
How do we view the contents of the OE Database?..............................................................1-9
Where can I get more information?.......................................................................................1-9
Chapter 2- Configuring Controllers to Work with OE..........................................................2-1
Preparing Your Control Strategy Files to work with OE.......................................................2-1
Identifying Which Signals in the Control Strategy File Should be Collected by OE......2-2
Preparing an ACCOL Load to work with OE........................................................................2-4
Specifying an Alarm Signal in ACCOL Workbench.......................................................2-4
Specifying a Global Signal in ACCOL Workbench........................................................2-5
Specifying an RBE Signal in an ACCOL Load...............................................................2-6
Saving, Compiling and Downloading the ACCOL Load................................................2-6
Preparing a ControlWave Project to work with OE...............................................................2-7
Specifying an Alarm Variable in a ControlWave Project................................................2-7
Specifying a Global Variable in a ControlWave Project.................................................2-8
Making Sure You Have the Correct Resource Settings in ControlWave Designer.........2-9
Compiling and Downloading the ControlWave Project..................................................2-9
Chapter 3- Building the OpenEnterprise Database................................................................3-1
Things you have to do before you start building the OE Database… ...................................3-1
Your hardware must have been set up.............................................................................3-1
Backup Your OpenEnterprise Server (UPGRADES / RE-BUILDS ONLY)..................3-1
Install Open BSI and configure the Open BSI Network..................................................3-2
Verify that communications are possible to RTUs via DataView...................................3-2
Install OpenEnterprise Server software on the Server Computer..........................................3-2
How is the database built? .....................................................................................................3-3
Starting the Database Project Builder..............................................................................3-3
Using Database Project Builder.......................................................................................3-4
Specifying File Locations................................................................................................3-4
i
Page 4

Allowing ‘Open’ Access to Database Tables During System Configuration..................3-5
Including the Default Security Groups............................................................................3-6
During Configuration, You are the SYSTEM User.........................................................3-7
Verifying that the Time Zone is Correct..........................................................................3-8
Choosing How You Will Communicate with the Controllers.........................................3-9
Confirming Your Choices and Building the Database Tables.......................................3-10
Adding Signal/Variable/Tag Names to the Database Tables.........................................3-11
Creating Poll Lists for Data Collection..........................................................................3-12
Estimating the Maximum Database Size.......................................................................3-12
Configuring Historical Data Collection.........................................................................3-13
Configuring an OpenEnterprise Session........................................................................3-16
Completing the Database Project Building Process.......................................................3-17
Chapter 4 – Using Database Explorer to Find Data...............................................................4-1
What is the Database Explorer?.............................................................................................4-1
Before You Begin ..................................................................................................................4-2
Starting Database Explorer....................................................................................................4-2
Identifying the Name and Location of Your Database..........................................................4-2
Using the Add Database to Hierarchy Dialog Box................................................................4-3
Establishing a Connection with the Database........................................................................4-4
Viewing the Overall Structure of the Database .....................................................................4-5
Viewing Databases, Tables, Views, and Attributes...............................................................4-6
Database Tree Control Window.............................................................................................4-7
Database Detail Window / Table Detail Window................................................................4-8
Attribute Detail Window........................................................................................................4-9
Searching the Database for A Particular Table....................................................................4-11
Searching the Database for A Particular Attribute (Column Name)...................................4-11
Searching the Database for A Primary Key Attribute .........................................................4-12
Searching the Database for ‘Owned’ Tables .......................................................................4-12
Viewing the Contents of the Database Using the Database Object Viewer........................4-13
Starting the Database Object Viewer.............................................................................4-13
Viewing Data By Constructing Simple Queries............................................................4-13
Identifying the Table You Want to Query...............................................................4-14
Specifying the Attributes You Want to Examine ...................................................4-15
Specifying Conditions to Limit the Amount of Data Returned By Your Query .....4-16
Run the Query and View the Results.......................................................................4-19
Applying Filtering Criteria to Your Query..............................................................4-21
Saving the Criteria Used For Your Query in A DBX File.......................................4-23
Opening An Existing DBX File...........................................................................................4-23
Adding ‘Live’ Data to Third-Party Applications by Dragging DDE Tags....................4-24
Example - Adding An Analog Value To A Spreadsheet Using DDE ...........................4-25
Chapter 5 – Building Displays to ‘Mimic’ Your Process .......................................................5-1
What is the OpenEnterprise Graphics Software?...................................................................5-1
Before You Begin ..................................................................................................................5-3
Starting the OE Graphics package.........................................................................................5-4
Opening a Display..................................................................................................................5-4
A Quick Look at the Drawing Tools......................................................................................5-6
Choosing Colors...............................................................................................................5-6
Drawing A Straight Line..................................................................................................5-7
ii
Page 5

Selecting Objects on Displays .........................................................................................5-7
Drawing A Box................................................................................................................5-8
Drawing An Ellipse or A Circle.......................................................................................5-9
Saving A Display...................................................................................................................5-9
Switching Between Configure Mode and Runtime Mode...................................................5-10
Examples of Creating Various Display Objects ..................................................................5-11
Example #1 - Creating A Text Label on A Display.......................................................5-12
Example #2 - Displaying A Numerical Value From the Database (Process Point).......5-14
Example #3 - Displaying the changing level of liquid in a tank....................................5-18
Example #4 - Creating A Sliding Setpoint Control With Which the Operator Can Update
a Value in the Database & RTU ..............................................................................5-25
Example #5 – Displaying A Message Based on A Logical Value in the Database.......5-31
Example #6 – Changing the Color of A Pump Based on a Logical Value....................5-34
Example #7 - Creating a System Overview Display .....................................................5-38
What Now? ..........................................................................................................................5-41
Saving Your Own Symbols in the Symbol Library, and Updating Objects through Share
Keywords.......................................................................................................................5-42
Using Aliasing to allow you to re-use the Same Objects With Different Data From the ....
Database.........................................................................................................................5-45
Tips For Planning Your Human-Machine Interface (HMI) System..............................5-52
Chapter 6 – Working with Historical Data.............................................................................6-1
What is Historical Data?........................................................................................................6-1
What is Historical Data Used For? ........................................................................................6-1
How Does the Historian Work?.............................................................................................6-2
Historical Data is Stored Temporarily in Log Files.........................................................6-2
Historical Data is Stored Permanently in Archive Files..................................................6-3
How is the Historian Configured? .........................................................................................6-4
Defining a Logging Group...............................................................................................6-4
Choosing the Source Table:.............................................................................................6-5
Figuring out how often you want to log the data.............................................................6-5
Assigning individual records to the logging group (optional).........................................6-6
Choosing Columns to be logged and calculations to be performed (if any)....................6-6
Choosing Columns For Logging................................................................................6-6
Decide what calculations (if any) you want to perform on the logged data..............6-7
Specifying characteristics of the log file and archive files..............................................6-9
Specifying the Source of Data for a Log File................................................................6-10
Determining the Buffer Size and Number of Buffers to be stored in the Log File........6-10
Deciding When to Generate An Archive File................................................................6-11
Example #1 – Logging 1-minute data for a few signals......................................................6-12
Example #2 – Logging Status Values by Exception............................................................6-32
Example #3 - Logging Hourly and Daily Flow Calculations, and using Timed Archives..6-39
Example #4 – Using the Archive File Tool.........................................................................6-51
iii
Page 6

Chapter 7 – Trending Your Data.............................................................................................7-1
What are Trends?...................................................................................................................7-1
Example 1 – Trending a Real-time data value.......................................................................7-4
Example 2 – Making Some Basic Modifications to the Trend You Just Made...................7-11
Example 3 – Trending a Historical Data Value...................................................................7-22
Example 4 – Having a Trace Change Color when data is questionable..............................7-30
Example 5 - Working with Multiple Pens in the Same Trend.............................................7-34
Example 6 – Optimizing your Trend for data or speed .......................................................7-38
Chapter 8 – Using Alarm Viewer to Manage Alarms ............................................................8-1
What are the different types of alarms?.................................................................................8-1
Analog Alarms................................................................................................................. 8-1
Logical Alarms..................................................................................................................8-3
Change of State Alarms................................................................................................... 8-4
Example 1 - Starting the Alarm Viewer and Viewing All Incoming Alarms.........................8-5
Example 2 - Acknowledging Alarms..................................................................................... 8-8
Example 3- Changing the Attributes Displayed in the Alarm Viewer ................................. 8-10
Example 4 - Viewing the Alarm/Event History.....................................................................8-12
Chapter 9 - Using OE Desktop .................................................................................................9-1
What is OE Desktop?.............................................................................................................9-1
Example 1 - Specifying a Display that appears when you start the Desktop ........................9-2
Example 2 - Adding an Alarm View to the Desktop.............................................................9-6
Example 3 - Creating an OE Desktop that Includes Menu Items for Displays ...................9-10
Chapter 10 - Configuring Security for your System.............................................................10-1
Why Establish a Security Policy?........................................................................................10-1
What are Users and Groups?................................................................................................10-1
Creating Users and Groups..................................................................................................10-5
Starting the Security Configuration Tool.............................................................................10-5
Creating Groups.............................................................................................................10-6
Choosing Application Tokens for a User or Group.....................................................10-12
Choosing Token Groups..............................................................................................10-14
Choosing File Tokens, OPC Tokens, and Custom Tokens..........................................10-15
Modifying a Group ............................................................................................................10-15
Creating Users ....................................................................................................................10-16
Modifying a User...............................................................................................................10-17
Creating a user outside of a group .....................................................................................10-18
Assigning a User to an existing Group..............................................................................10-18
Dividing the Database up Into Access areas (OPTIONAL)..............................................10-20
Assigning Objects (Data) To Particular Access areas .......................................................10-22
Allow Users Access to Particular Access areas:................................................................10-23
Configuring Security for Tables and Views ......................................................................10-24
Common Security Tasks for Users....................................................................................10-26
Logging Onto the System ............................................................................................10-26
Logging Off the System...............................................................................................10-26
Changing Your Password ............................................................................................10-26
Common Security Tasks for Administrators ...............................................................10-27
Adding a New User to an existing Group..............................................................10-27
Removing a User....................................................................................................10-28
iv
Page 7

Disabling a User's Account....................................................................................10-29
Removing the Lock-out of a user...........................................................................10-29
Resetting a User's Password if they forget the one they chose..............................10-30
Other Security Issues ...................................................................................................10-31
Security in ControlWave Controllers.....................................................................10-31
Security in Network 3000-series Controllers.........................................................10-31
Open BSI Security .................................................................................................10-32
Network Infrastructure (UDP and TCP Sockets)...................................................10-32
Windows™ Security..............................................................................................10-32
Virus Protection for Your Workstations................................................................10-32
Firewall Software For Your Networks ..................................................................10-33
Physical Security....................................................................................................10-33
Networked Surveillance of Remote Sites using ControlWave..............................10-33
Maintain Current Backups.....................................................................................10-33
Human Factors.......................................................................................................10-33
Chapter 11 – Creating Reports...............................................................................................11-1
What are Reports?..........................................................................................................11-1
Before You Begin ..........................................................................................................11-1
Step 1. - Create a Report Template................................................................................11-3
Step 2. - Create a Report from the Template in the Previous Step..............................11-14
Step 3. – Test the Report..............................................................................................11-19
Step 4 - Create a Timed Schedule for the Report ......................................................11-20
Step 5. – Choose Who Will Receive the Report (Recipients).....................................11-24
Step 6. – Specify the Format of the Report..................................................................11-28
Appendix A – Learning SQL A-1
v
Page 8

BLANK PAGE
Page 9

Chapter 1 - Introduction - What is OpenEnterprise?
Chapter 1 - Introduction - What is OpenEnterprise (OE)?
OpenEnterprise, often abbreviated as OE, is
Bristol’s primary Supervisory Control and Data
Acquisition (SCADA) software package. It is used
primarily in the water, waste water and natural gas
industries. It also includes an integrated human
machine interface HMI to provide data to plant
operators, via graphical displays (mimics), trends,
alarm summaries, and web pages.
The name OpenEnterprise is derived from
two of the principal philosophies behind the
product.
It is ‘open’ in that its individual components
utilize industry-standard architectures,
languages, and protocols (SQL, ODBC, OPC,
TCP/IP, DDE, etc.), making it extremely
flexible, particularly with respect to
communicating with third-party hardware and
software products.
The ‘enterprise’ part of the name applies
because it is designed to provide data to other
parts of your business enterprise.
Client workstations, called OpenEnterprise
Workstations are personal computers (PCs)
that communicate with the OpenEnterprise
Server.
Too many buzzwords!
What is it really?
OpenEnterprise provides a powerful database
that has been optimized for process control,
plus a rich collection of different software
programs that allow you to view, manage,
manipulate, and export the data residing in the
database.
The OpenEnterprise Database resides on a
computer called the OpenEnterprise Server.
The OE Database is the central storage location
for all real-time data collected from your
process control network, and all historical data
you are currently using for trends, reports, etc.,
plus all of the configuration data for the system
itself. The OE Server uses Open BSI software,
(another Bristol product) which allows
communication with a network of Bristol
remote process controllers. An OPC Server is
also provided for communications with thirdparty devices.
OE
OpenEnterprise for Beginners
1-1
Page 10

Chapter 1 - Introduction - What is OpenEnterprise?
(
)
s
OPENENTERPRISE WORKST ATIONS
For operator interaction with system (HMI).
Users can view graphical displays, trends,
print reports, etc.
OPENENTERPRISE SERVERS
(OE Database resides here, Open BSI software
and RDI 3000 for communication with controller
network.) OPC Server included for export of data
to third-party applications and devices.
ControlWave-series
control ler(s) running
ControlWave projects
Inputs from field instrumentation
contact closures, flow meters, pressure transmitters, etc.
These workstations run software that allows plant
operators, and other users, to view detailed graphical
displays that depict current conditions of your plant or
process. These displays typically use graphical symbols
of things like pumps, valves, tanks, etc. that can change
color, move, etc. based on the status of your plant. The
workstations can also be configured to display and
manage alarm messages, show graphical trends of realtime and historical data, and to print reports. Various
levels of security can be configured to limit access to
different portions of the database, particular displays,
etc. Many other features are available in
OpenEnterprise, but these are the most common ones
used on nearly all systems.
The OpenEnterprise Server responds to requests for
data from the client OpenEnterprise Workstations.
When the OE Workstation requests the data, the OE
Server looks for the requested data in the OE Database,
and then responds by sending back the requested data.
Network 3000 serie
controller(s) running
ACCOL loads
What do we mean by
Client and Server?
The client / server definitions in
software mirror those in your daily
life. If, for example, you go into a
restaurant and sit down to eat, you
are the client. You request certain
types of food from the waiter /
waitress (your server) who then
returns with the food you requested.
Similarly, an OpenEnterprise
Workstation includes client
software, which requests data from
the OE Server, which responds to the
requests, and serves up the data, at
the OE Workstation.
In summary, the client asks for
something, and the server
serves it up to the client.
OpenEnterprise for Beginners
1-2
Page 11

Chapter 1 - Introduction - What is OpenEnterprise?
m
How does the Database work?
A cell of the table. This particular table has 36 cells.
We’ve been using the term ‘Database’
a lot, but we never really said what a
database is.
Column 1 Column 2 Column 3 Column 4 Column 5 Column 6 Column 8Column 7 Colu
A database, in its simplest form, is
Row1
really just a bunch of tables that have
some pre-defined interrelationship.
Row 2
When we say tables we’re referring to
Row 3
a grid of rows and columns, like in a
spreadsheet program.
Row 4
The intersection of a row and column
is called a cell, and contained within
the cell is a single piece of data called
a value. It could be a numerical value,
a string of text, a Boolean ON/OFF
value, etc.
When we talk about the interrelationships between tables, we mean that certain information in
one table, references other data in yet another table. These complex interactions between tables
are part of the database design, also known as the schema.
OpenEnterprise contains a schema specially designed to handle the information gathered from
complex industrial processes.
Learning the Real Database ‘Lingo’ (Attributes, Records, and Objects)
Each box in the table, can hold one OBJECT. This particular table can hold 36 objects.
The people who write database
programs use a whole different
set of terminology when they
Attribute 1 Attribute 2 Attribute 3 Attribute 4 Attribute 5 Attribute 6 Attribute 7 Attribute 8 Attribute 9
Record 1
refer to the structure of tables in
a database.
Record 2
Instead of referring to the name
of a particular column, or a
heading, they call the column
name an attribute. Attributes
Record 3
Record 4
are characteristics, or qualities
associated with something.
OpenEnterprise for Beginners
1-3
Page 12

Chapter 1 - Introduction - What is OpenEnterprise?
Instead of calling the row of a table a row, they call it a record. That makes sense, because a
record implies something that is recorded or kept for a certain period of time. Another word used
to refer to a record is object.
A simple table from the OE Database, called dvi_schedule is shown, below. (NOTE: The first
row shown, isn’t actually part of the table, it’s the names of the attributes in the table.) The
attributes are called ‘scheduleid’, ‘maxinterval’, ‘mininterval’, ‘offset’, and ‘disable’. Currently,
the table has three records, each of which has those five attributes.
+------------+------------------------+-------------+--------+---------+
| scheduleid | maxinterval | mininterval | offset | disable |
+------------+------------------------+-------------+--------+---------+
| 1 | '01-JAN-0001 00:00:05' | NULL | NULL | NULL |
| 254 | '01-JAN-0001 00:00:05' | NULL | NULL | NULL |
| 2 | '01-JAN-0001 01:00:00' | NULL | NULL | NULL |
+------------+------------------------+-------------+--------+---------+
Whenever a particular attribute of a record is not defined, or has no value, it is labeled NULL.
For example, if we had a record describing a person, and that person had no middle name then
the middlename attribute would be set to NULL.
Please Remember…
A DATABASE is just a big collection of tables.
An ATTRIBUTE is just the name (heading) of a column in one of the
tables.
A RECORD is just a row of a table. Another word for this is OBJECT.
A single piece of data in the database is a VALUE for a particular
attribute of a particular record. If no value has been assigned, the
value is “NULL”.
OpenEnterprise for Beginners
1-4
Page 13

Chapter 1 - Introduction - What is OpenEnterprise?
What sorts of things are saved in the OE database?
All the configuration data for the OE Server, as well as all of the real-time and historical data
collected from the network of process controllers, is kept in the OE Database.
What do we mean by “Real Time Data” and
“Historical Data”?
Real time data describes conditions occurring right now, i.e. the current state of your process
or plant. Granted, there is a slight delay (usually measured in a few seconds or less) between
the time when the data is sent by process instruments (flow meters, level switches, etc.) and
when it is actually inserted in the OE Database, but this is usually inconsequential. The data
reflects current operating conditions, and you can act on it, to change those conditions.
Conversely, historical data refers to things that happened some time in the past. It is data that
was collected at some previous time, such as last week, last month, etc. Generally, historical
data is used to help identify trends in system operation, and also to generate reports required by
regulatory agencies, such as the Environmental Protection Agency (EPA) etc.
In summary, ‘real time data’ means data from right now, and ‘historical data’
means data from some time in the past….
The data in the OE Database is stored in hundreds of different tables, most of which we’re never
going to look at, because they perform various internal housekeeping tasks. We are, however,
going to list some of the tables that you’re likely to make use of, as you configure your OE
system. You don’t have to memorize these now, we’re just listing them so that you get a feel for
the sorts of things that get stored in the OE Database, and so you might recognize the names
later, when you have to use them.
The Most Frequently Used Tables in OpenEnterprise
Table Name(s) What is this used for?
Realanalog This table includes all the analog signal data collected from your process
controllers. It includes the signal’s name, the signal value, etc. Examples of
the data stored in the Realanalog table would include pressure readings,
temperature readings, flow readings, etc.
Digital This table includes all the logical signal data collected from your process
controllers. It includes the signal’s name, the signal value, etc. Examples of
the data stored in the Digital table would be valve OPENED/CLOSED
positions, switch ON/OFF statuses, pump RUN/STOPPED statuses, etc.
Nw3000device This table contains information about the individual controllers in the
OpenEnterprise for Beginners
1-5
Page 14

Chapter 1 - Introduction - What is OpenEnterprise?
6
network.
Nw3000polllist This table defines lists of signals to be collected from controllers.
Dvi_schedule This table defines the scan time classes used in poll list collection. We’ll
discuss that subject later in this document.
Users This table lists all of the persons designated as valid users of the system,
and records information about them, and what they are allowed to do in the
system.
Oelogdata,
Oelogcolumn,
Oelogcontrol,
Loghistory
These tables are used in the definition of the OE Historian. The OE
Historian allows data collected into the OE Database to be saved and
reused later in trends and reports.
How does data get from the Controller Network into
the OE database?
Data from your network of remote process controllers is collected and stored in the OE Database.
The actual communication between the Bristol controllers and the OE Database is handled by
Open BSI and a communications driver program called RDI3000. (RDI3000 stands for Remote
Device Interface 3000 -- 3000 refers to Bristol Network 3000-series controllers. Our
ControlWave-series of controllers can also communicate via this method.)
There are five (5) methods by which data goes from the Bristol controllers into the OE Database.
They are:
• Alarm Data Collection
• Poll List Collection
• RBE Collection
• Array Collection via Open BSI Converter
• Archive Collection via Open BSI Converter
In addition, RTUs and PLCs manufactured by other vendors can communicate with the OE
Database using vendor-supplied OPC server software and custom communication drivers.
(We’re not going to cover this subject in this book.)
OpenEnterprise for Beginners
1-
Page 15

Chapter 1 - Introduction - What is OpenEnterprise?
7
Alarm Data Collection
Alarms are generated in a controller when a particular
signal goes outside a pre-defined range, or changes
state into an alarm state. Some typical alarm
conditions might be that a liquid level is too high, or a
temperature is too low, or that a pump has failed to
start.
We’ll talk, in detail, about alarm concepts in another
chapter. At this point, all you really need to know is
that an alarm is a message that is telling the operator
that something happened, which could potentially be
serious.
OpenEnterprise displays these alarms on the OE Workstations. In addition, OE can be
configured to send alarms via e-mail, and to cell phones and pagers.
An alarm means something
just happened and needs
attention. For example, the
controller detected that a
pump failed, or a pressure
signal is too high….
Poll List Collection
Most people are familiar with the term polling in
connection with elections. Every two years, for
example, your town might have an election for mayor,
and people go to the polls to vote. That’s similar to the
type of polling we’re discussing here. In the Poll List
data collection mechanism, OpenEnterprise sends out
requests for data from the controllers according to a
pre-defined schedule. For example, collect a certain
type of data every two hours. All signals collected as
part of the same scheduled collection are said to be in
the same scan time class. For example, if hourly flow
totals must be collected, an hourly scan time class can
be defined, and all hourly flow totals collected as part
of that scan time class. The signals included in a
particular scan time class are automatically placed into
structures called poll lists, by the OE Poll List Builder.
If you had other signals that you wanted collected
every minute, you would create a 1-minute scan time
class, etc.
Poll List Collection
operates on a schedule.
For example, collect all the
flow total signals every
hour, collect all the logical
signals every minute, etc. It
doesn’t matter if there
hasn’t been any change,
Poll List Collection will just
collect the values anyway.
OpenEnterprise for Beginners
1-
Page 16

Chapter 1 - Introduction - What is OpenEnterprise?
Report by Exception (RBE)
Report by exception (abbreviated RBE) causes a
signal to be collected only on exception, in other
words, you only collect the signal when it changes.
RBE is different from poll list collection because in
poll list collection, signals are collected whether or
not they have changed. In RBE, if a signal doesn’t
change, it isn’t collected.
For logical signals that would mean that a signal is
only collected when it changes state from ON to
OFF (or OFF to ON). For analog signals, that
would mean that a signal would only be collected if
its value changes significantly from its previous
value. The determination of whether or not a
change is significant is determined by a value
called the deadband. The deadband is a range
above and below the signal’s value, and must be
configured for every signal.
If it hasn’t changed more than the value defined by that range, since the last time it was
collected, any change is considered insignificant, and the signal isn’t collected. RBE is a useful
method of data collection because it reduces the amount of data that has to be collected, while
also allowing data to be displayed more rapidly than would be possible via Polled List collection.
RBE says, “Check to see if the
data is different from the last
time we collected it. If it hasn’t
changed, don’t bother collecting
it”
Value: Collect it?:
SAME
CHANGED ;
SAME
SAME
SAME
CHANGED ;
SAME
Array and Archive Collection via Open BSI Converter
The Open BSI Harvester utility, can collect array data, and archive data, directly from the
controllers, and store it in files on the OE Server computer. A related utility, called the Open BSI
Converter can insert the data from these files directly into tables of the OE Database.
OpenEnterprise for Beginners
1-8
Page 17

Chapter 1 - Introduction - What is OpenEnterprise?
How do we view the contents of the OE Database?
The main method for viewing the contents of
the OE Database is the Database Explorer.
Database Explorer is a program that runs on
the OE Server or OE Workstation. Database
Explorer lets you examine the structure of the
database. It also includes a feature called the
Database Object Viewer that lets you search
through the contents of the OE Database, view
portions of particular tables, etc. For
information on how Database Explorer works,
please refer to Chapter 4. Understanding how
to use the Database Explorer is one of the best
ways to get the most out of your OE system.
Database Explorer
Where can I get more information?
Now that you’ve finished this chapter, you should have a pretty good idea about what
OpenEnterprise (OE) is, and what sort of information is stored in the OE Database. You should
also be at least somewhat familiar with the terminology we use when talking about the database.
We also hope you understand the concept of client and server.
• For information on actually installing OpenEnterprise software, please see the
OpenEnterprise Installation Guide portion of the OpenEnterprise Reference Guide
(document# D5092).
• For information on particular features of OpenEnterprise, see the online help files.
• For information on configuring your controllers so data will be collected by OE, see Chapter
3.
• For information on the Database Explorer program, see Chapter 4.
• For information on alarm concepts in Network 3000 controllers, see An Introduction to
ACCOL (document# D4056).
• For information on alarm concepts in ControlWave controllers, see the Alarm Configuration
section of the ControlWave Designer Programmer’s Handbook (document# D5125).
• For information on how Report By Exception (RBE) works, see the RBE section of the
ACCOL II Reference Manual (document# D4044) and the online help file in ControlWave
Designer. For advanced software developers requiring detailed technical information on RBE
, see Appendix D of the Network 3000 Communications Application Programmer’s
Reference (document# D4052).
OpenEnterprise for Beginners
1-9
Page 18

Page 19

Chapter 2 – Configuring Controllers to Work with OE
s
Chapter 2- Configuring Controllers to Work with OE
Preparing Your Control Strategy Files to work with OE
For this chapter, we will assume that data
collected about your plant or process comes
from the network of Bristol remote process
controllers or RTUs. If you are using another
brand of controller, you will need to consult
other documentation beyond this manual.
Bristol controllers are either from the Network
3000-series (that includes the DPC 3330, DPC
3335, RTU 3305, or RTU 3310), or the
ControlWave series that includes the
ControlWave, ControlWave MICRO, and
ControlWave LP, among others.
The controllers execute a pre-defined program
called a control strategy which is responsible
for reading data in from process instrumentation
(flow meters, pressure transmitters, etc.),
performing calculations based on the data
collected, and sending out commands to
instrumentation (switches, valves, etc.)
For Network 3000-series
controllers, the control strategy
is written in a language called
ACCOL II, using a program
called ACCOL Workbench.
Network 3000
eries Controller
The resulting file, which is downloaded into the controller, is referred to as the ACCOL load.
The primary structure for storing an individual data value (pump status, flow reading, etc.) in the
ACCOL load is called an ACCOL signal.
What’s the difference
between the term ‘RTU’
and Remote Process
Controller?
If you study the theory of control systems
there are slight differences between these
terms, but for our purposes, they all mean
the same thing. RTU is just an abbreviation
for the term Remote Terminal Unit, which
is basically the same thing as a Remote
Process Controller. Sometimes people will
just use the term Remote. You might also
hear people say DPC (Distributed Process
Controller.) You may even hear someone
say Node, which is a reference to the fact
that a controller can serve as part of a
network.
All of these terms refer to a smallcomputerized device located at a
remote site that collects data from
instrumentation, and performs
control operations based on the
data it collects.
OpenEnterprise for Beginners
2-1
Page 20

Chapter 2 – Configuring Controllers to Work with OE
r
g
For ControlWave-series controllers, the control strategy is
written in any one of five (5) IEC 61131-3 languages, using
a program called ControlWave Designer (IEC 61131-3 is
an international standard for process control programming
languages).
The resulting file, called a ControlWave project, is
downloaded into the ControlWave controller. The
primary structure for storing a data value (temperature
reading, valve position, etc.) in the ControlWave
project is called a variable, and is equivalent to a
‘signal’ in a 33xx controller. NOTE: When you are
actually working with OE, no distinction is made
between the name signal and the name variable; they
are all referred to as signals. Some other
manufacturers use the word ‘tag’ to refer to the same
thing. These three words; tag, signal and variable are
often used interchangeably
What’s downloading mean?
Downloading means transferring
programs and / or data from one
device to another. In the case, we’re
downloading a file from the
computer to the controller.
ControlWave series
Controlle
TIP - Adopt a Consistent Naming Convention
When you’re coming up with names for ACCOL signals or ControlWave variables, it
will make life a lot easier if you use a consistent naming convention that describes the
data held in the signals. The reason is that if you use consistent names, it will help you
if you ever need to use SQL commands. (SQL commands aren’t required when you’re
first setting up OpenEnterprise, but many advanced users like to use them). It is also
useful if you are establishing rules for historical templates in the Database Project
Builder. A consistent naming convention will also help you with a subject called
aliasing which we won’t talk about until Chapter 5. Furthermore, it also helps you
remember what the si
nals do!
OpenEnterprise for Beginners
2-2
Page 21

Chapter 2 – Configuring Controllers to Work with OE
Identifying Which Signals in the Control Strategy File Should be Collected by OE
For a signal in an ACCOL load or a variable in a ControlWave project to be collected and stored
in the OE Database, it must fall into one of three categories:
! Alarms - any signal or variable configured as an alarm is automatically collected when it
enters an alarm state, or returns to a normal state. Normally these signals are those for which
it is important that the operators are alerted when pre-determined conditions (like a
maximum tank level) are exceeded.
• Globals - a global signal or global variable can be collected at a predefined rate via Polled
List collection. The OE server will simply collect these signals at a fixed rate (e.g., once per
minute). The server must ask for these signals.
• RBE - a report by exception (RBE) signal will be sent from the controller to the server
whenever it changes by more than a pre-configured amount, called the ‘deadband’.
We talked a little bit about the different methods of data collection back in Chapter 1. In the first
part of this chapter, we’re going to highlight the steps within ACCOL Workbench or
ControlWave Designer that need to be performed to identify data to be collected by
OpenEnterprise.
IMPORTANT
This section is NOT going to tell you everything you need to know when using
ACCOL Workbench or ControlWave Designer; it just highlights the parts which
are related to whether or not a signal or variable will get collected into the OE
Database. It doesn’t give detailed instructions. If you need help using ACCOL
Workbench, see the ACCOL Workbench User Manual (document# D4051). If
you need help using ControlWave Designer, see the Getting Started with
ControlWave Designer Manual (document# D5085).
OpenEnterprise for Beginners
2-3
Page 22

Chapter 2 – Configuring Controllers to Work with OE
Preparing an ACCOL Load to work with OE
As mentioned, earlier, for any ACCOL signal to be collected into the OE Database, it must be
designated as one of the following:
1) A alarm signal -or-
2) A global signal -or-
3) An RBE signal
Specifying an Alarm Signal in ACCOL Workbench
• On the ‘General’ page of the Signal
Properties dialog box for the signal, you
must choose either ‘Logical Alarm’ or
‘Analog Alarm’ as the signal’s “Type”.
The you select must be
“Type”
either ‘Analog Alarm’
or ‘Logical Alarm’
OpenEnterprise for Beginners
2-4
Page 23

Chapter 2 – Configuring Controllers to Work with OE
C
”
T
• On the ‘Settings’ page of the Signal
Properties dialog box for the signal, you
must choose “Alarm Enable”.
• For analog alarm signals, you must also
specify at least one alarm limit. You should
also specify an alarm deadband. Click on
the [Alarm Limits] button to begin this
configuration.
hoose
For analog alarm signals, you
must specify one or more alarm
limits here.
“Alarm Enable
Specifying a Global Signal in ACCOL Workbench
• On the ‘Settings’ page of the Signal
Properties dialog box for the signal, you
must select the “Mark as Global” box.
o make this a global signal, the
“Mark as Global”
box must be selected.
OpenEnterprise for Beginners
2-5
Page 24

Chapter 2 – Configuring Controllers to Work with OE
Specifying an RBE Signal in an ACCOL Load
• On the ‘Settings’ page of the Signal
Properties dialog box for the signal, you
must select the “Report By Exception”
box.
• If this is an analog signal, you must enter a
deadband. Do not leave the deadband field
blank, or you could overload your
communications network!
• You must configure the RBE Module. This
is discussed in the RBE section of the
ACCOL II Reference Manual (document#
D4044).
Select “Report By Exception” to
identify this as an RBE signal.
If this is an analog signal, you MUST
specify an RBE deadband here.
Saving, Compiling and Downloading the ACCOL Load
• When you have finished editing in ACCOL Workbench, you must save the ACCOL
source file, by clicking on File Æ Save, or by clicking on the ‘Save’ icon.
• You must then build the ACCOL load (*.ACL) file from the ACCOL source file
using the ‘Build’ command in ACCOL Workbench. Click on Actions Æ Build or
click on the ‘Build’ icon.
• When the ACCOL load has been built successfully, without errors, you must
download it into the Network 3000 controller, using the Open BSI Downloader. The
Downloader is accessible from within ACCOL Workbench, by clicking on Actions Æ
Download or by clicking on the ‘Download’ icon. For full instructions on
downloading, see Chapter 7 of the Open BSI Utilities Manual (document# D5081).
You should always test your control strategy (ACCOL load or ControlWave project) before using
it in a ‘live’ running plant or process. This is especially true when you’re first learning things. We
strongly recommend you do this using a controller that is currently disconnected from the process,
or for which manual overrides are ready and staffed should something go wrong. This is really
important, because if you download an untested control strategy, you could potentially lose control
of your plant or process, due to a programming logic error, and you could damage your equipment,
or even worse, hurt somebody! So if you want to avoid flooding something, blowing something up,
or dealing with personal injury lawyers, ALWAYS test before you download to a ‘live’ RTU
connected to a plant!
WARNING! Test Before Downloading
OpenEnterprise for Beginners
2-6
Page 25

Chapter 2 – Configuring Controllers to Work with OE
r
Preparing a ControlWave Project to work with OE
As mentioned, earlier, for any variable in a ControlWave project to be collected into the OE
Database, it must be designated as one of the following:
1) An alarm variable
2) A global variable
3) An RBE variable (Requires ControlWave firmware 04.40 or newer.)
Specifying an Alarm Variable in a ControlWave Project
• In your ControlWave Designer project, each
variable which you want to serve as an alarm
must have its own alarm function block
configured. The alarm function blocks
available are:
ALARM_ANALOG, ALARM_STATE,
ALARM_LOGICAL_ON and
ALARM_LOGICAL_OFF.
• Descriptions on how to configure these
function blocks are included in the
ControlWave Designer online help, and in
the ControlWave Designer Programmer’s
Handbook (document# D5125).
• An alarm condition can only be detected at
the time its Alarm function block is
executed.
• The alarm variable must be marked for
“OPC” collection, as well within the
worksheet. This is discussed in the section
Specifying a Global Variable in a
ControlWave Project.
Check the ‘OPC’ box fo
each variable you want to
be collected by OpenEnterprise.
OpenEnterprise for Beginners
2-7
Page 26

Chapter 2 – Configuring Controllers to Work with OE
Specifying a Global Variable in a ControlWave Project
Global variables in ControlWave Designer are variables that may be accessed by all the program
organization units (POUs) in the project. (If you don’t know what a POU is, you probably need
to review the documentation accompanying ControlWave Designer.)
In your ControlWave Designer project, we recommend that the only variables you designate as
global should be I/O variables. Configure your I/O variables in the ControlWave Designer’s I/O
Configurator first.
• Variables in ControlWave Designer
are designated as global if they are
defined within a global worksheet,
with the VAR_GLOBAL “Usage”.
• The variables must be marked for
“OPC” collection, as well.
A global variable is identified by ‘VAR_GLOBAL’ in its
“Usage”
field.
Any variable which is to appear in the OE Database
must also have selected.
“OPC”
Specifying an RBE variable in a ControlWave Project
To designate a variable for RBE collection in a ControlWave project, you must run the Variable
Extension Wizard, in ControlWave Designer, and check the “RBE” check box for each variable
you want collected via RBE. For non-BOOL variables (REAL, INT, etc.), you would also
specify a deadband. The resulting _RBE.INI file will be downloaded to the ControlWave with
the bootproject.
You must also configure the RBE function block, and configure appropriate RBE system
variables depending upon whether RBE is running on a serial or IP port. For details on all these
subjects, please see the online help in ControlWave Designer.
OpenEnterprise for Beginners
2-8
Page 27

Chapter 2 – Configuring Controllers to Work with OE
Making Sure You Have the Correct Resource Settings in ControlWave Designer
Any variable in your ControlWave project which you want to be included in the OE
Database, must have its OPC parameter check box set, as described in the Specifying a
Global Variable in a ControlWave Project section.
In addition, you must specify, in the Resource Settings dialog box, which OPC variables will be
collected.
• Generally, you should choose “Marked
variables” so that only those variables
which you have explicitly marked for OPC
collection, will be included in the OE
Database.
• If you want all global variables to be part
of the OE Database, choose “All global
variables” which automatically marks all
global variables for OPC collection.
Select the option
Compiling and Downloading the ControlWave Project
• You must then compile the ControlWave project. Click on Build Æ Make or click on
the ‘Make’ icon.
• When the ControlWave project has been compiled successfully, you must download it
into the ControlWave controller. (Please heed the warning about downloading on page
2-6.) For details on performing a download into the ControlWave, see the
Downloading section of the ControlWave Designer Programmer’s Handbook
(document# D5125).
OpenEnterprise for Beginners
2-9
“Marked variables”
Page 28

BLANK PAGE
Page 29

Chapter 3 - Building the OpenEnterprise Database
Chapter 3- Building the OpenEnterprise Database
Things you have to do before you start building the
OE Database…
Okay, we know that you’re just itching to get started, but first, there are some things that MUST
be done, before you start:
Your hardware must have been set up
We’re going to assume, at this point, that you’ve set up all your hardware. By that, we mean that:
• The OE Server computer has been set up, powered on, and is ready to go. See the
documentation accompanying the server hardware for help on doing this.
• All the necessary communication cables linking the OE Server, and controllers, must have
been connected.
• The controller network has been set up, powered on. See the Bristol controller hardware
manuals, and the Open BSI software manuals (see below) for information on this. As
mentioned elsewhere, we recommend you use test hardware (not live hardware) for initial
development.
• Optionally, OE Workstations can also be set up at this time. Otherwise, they can be added
later (We recommend building the system with a single workstation, and adding others later.)
• Each controller must be running a control strategy file which has been prepared for use with
OE. This was discussed in Chapter 2.
NOTE: Hardware setup is beyond the scope of this manual.
Backup Your OpenEnterprise Server (UPGRADES / RE-BUILDS ONLY)
Your OpenEnterprise Server should be backed up. That means all files should be copied to
backup media (CD, tape, disk) or to another computer. This ensures that you can restore the
system in the event of a failure during the database creation process.
OpenEnterprise for Beginners
3-1
Page 30

Chapter 3 - Building the OpenEnterprise Database
Install Open BSI and configure the Open BSI Network
Bristol’s Open Bristol System Interface, called Open BSI, is the communications software
which runs on the OE Server, and allows communications between the OE Server, and the
network of Bristol remote process controllers.
If this is an all-new system, or you are upgrading to a new version of Open BSI as part of your
OpenEnterprise upgrade, you need to install Open BSI on the OE Server computer, and define
the network of controllers within the Open BSI software. This is outside the scope of this
document, but you can find instructions on how to do this in the Open BSI Utilities Manual
(document# D5081).
Verify that communications are possible to RTUs via DataView
Use the Open BSI DataView program to verify that data can be collected from RTUs in the
network. See Chapter 8 of the Open BSI Utilities Manual (D5081) for help on doing this.
Install OpenEnterprise Server software on the Server Computer
Follow the instructions in the OpenEnterprise Installation Guide portion of the OpenEnterprise
Reference Guide for information on how to install OpenEnterprise Server software. At the end of
the installation process, you are given the option of starting the Database Project Builder.
Instructions on using the Database Project Builder follow.
OpenEnterprise for Beginners
3-2
Page 31

Chapter 3 - Building the OpenEnterprise Database
How is the database built?
It may seem kind of funny to talk about building the OE Database, because it makes it sound like
a physical thing like a house. Although you can’t physically touch the OE Database, it does in
fact have a defined structure. The way in which the OE Database is put together is also similar to
building a house, in that, you have to follow a particular order of construction. Any house that
has an underground basement, for example, must have a foundation built, first, before other
floors are constructed. In the same way, the tables of a database must be created before you
attempt to put data values in them. Just like a house must be built properly and periodic
maintenance must be performed, to keep it safe for occupancy, the database must be built and
maintained properly.
Back in Chapter 1, we explained that the OE Database consists of a large collection of tables
which have various inter-relationships defined. We also said that the running OE Database
contains real-time data, historical data, and all the OE Server configuration data.
In this chapter, we’re going to use a tool called the Database Project Builder to create these
tables and set it up to hold all this data. The Database Project Builder allows us to:
• Create all the tables that make up the OE Database
• Configure real-time data collection from controllers/RTUs
• Configure basic historical data collection and perform initial configuration of historical data
• Configure the default security accounts
• Configure which programs run when the OE Server is started
Starting the Database Project Builder
If not started already, Open BSI must be running. If it isn’t, click on Start Æ Programs Æ
OpenBSI Tools Æ NetView. Confirm that communications are functioning.
By default, the Database Project Builder starts automatically following OpenEnterprise
installation (see the OpenEnterprise Installation Guide for more information.)
It may also be started by clicking as follows:
Start ÆPrograms ÆOpenEnterprise Æ Administrative Tools Æ Database Project Builder
OpenEnterprise for Beginners
3-3
Page 32

Chapter 3 - Building the OpenEnterprise Database
]
s
[
]
Using Database Project Builder
When the Database Project Builder starts, click on [Next>] to proceed beyond the Welcome
screen. This will take you to the File Locations screen.
This is a list of
steps to be
performed by
the Database
Project Builde r.
When a step is
completed, it
appears in
.italics
Click on [Next>
Specifying File Locations
The File Locations page specifies where OpenEnterprise will store various types of files on the
OE Server. Generally, we recommend you accept the default file locations presented. If you want
to change them, however, click on the […] button to browse to a new location. When you’ve
finished on this page, click on [Next>].
This is where the “live”
running OE Database
will reside.
You can browse to
select a dif feren t
folder by clicking on
these buttons.
Historical files (log file
and archiv e files) are
stored in these folders.
When finished on
this page, click on
Next>
OpenEnterprise for Beginners
.
3-4
Page 33

Chapter 3 - Building the OpenEnterprise Database
.
NOTE: If one or more of the folders
specified on this page doesn’t exist, you
will be prompted to confirm whether you
want to have Database Project Builder
create it. Click on [Yes] to do so.
Allowing ‘Open’ Access to Database Tables During System Configuration
Normally, users only need access to certain OpenEnterprise Database tables, and are prevented
from accessing other tables. This would be referred to as “Secure” database privileges.
While you’re in the process of building your OE system, we recommend you choose “Open” for
the Database Privileges. This will simplify your configuration activities.
Click on [Next>] to go to the next screen.
We recommend you choose the default
of while you’re building your system.“Open”
Click on to proceed
[Next>]
to the next screen
OpenEnterprise for Beginners
3-5
Page 34

Chapter 3 - Building the OpenEnterprise Database
6
.
Including the Default Security Groups
Security Groups are discussed in detail in Chapter 10. We recommend you leave the “Include
the standard Security Groups” box checked, and click on the [Next>] button.
A prompt will appear,
notifying you that a default
user called SYSTEM has been
created. That user has a default
password of SYSTEM. Click
on [OK].
A user is someone who has
access to OpenEnterprise
Server software.
We recommend you include the
standard security groups.
Click on to proceed
[Next>]
to the next screen
OpenEnterprise for Beginners
3-
Page 35

Chapter 3 - Building the OpenEnterprise Database
7
page.
During Configuration, You are the SYSTEM User
In the “Added Users” box on the Users page, you will see the name SYSTEM. This is the
SYSTEM user that was just added automatically. (The SYSTEM user has full privileges; while
you’re configuring your system, you will be the SYSTEM user.)
Click on to
proceed to the next
[Next>]
Although you can optionally add additional users here, we recommend you click on [Next>] and
add users later, as described in Chapter 10.
The SYSTEM user is added automatically.
OpenEnterprise for Beginners
3-
Page 36

Chapter 3 - Building the OpenEnterprise Database
]
Verifying that the Time Zone is Correct
You should always make sure your OpenEnterprise Server computer is configured with the
correct time zone for your geographical area. Having the correct time zone is particularly
important for historical data management. By default, the time zone is set to match the
Windows™ time zone for your computer.
If the correct time zone is selected, click on [Next>].
Why does OpenEnterprise use Greenwich Mean Time (GMT)?
Greenwich Mean Time (GMT), also known as Coordinated Universal Time (UTC), or military
Zulu (Z) time, is an internationally recognized time standard. Because GMT or UTC is used
worldwide, you can have OpenEnterprise collecting data from different parts of the world (for
example, via satellite links) and the data will always be stored in the OE Database at the
correct time from wherever it originated. This is made possible because the entire planet shares
the same GMT time. Similarly, users from around the globe can view the same data, and have
timestamps (for trends or alarms, for example) corrected to their own local time.
Make sure this represents
the correct time zone for
your geographical area.
Click on [Next>
OpenEnterprise for Beginners
3-8
Page 37

Chapter 3 - Building the OpenEnterprise Database
Choosing How You Will Communicate with the Controllers
Now, you must select the proper device driver. If you are using Bristol controllers, choose
‘Network 3000 and ControlWave Driver’. Now, click on [Next>].
If you are using Bristol controllers, the
Network 3000 and ControlWave driver
must be selected.
Click on [Next>]
What is a Device Driver?
A device driver is simply a program which helps something communicate. In the
case of the Network 3000 and ControlWave driver, it’s a program that allows
communication between OE and Bristol controllers.
OpenEnterprise for Beginners
3-9
Page 38

Chapter 3 - Building the OpenEnterprise Database
.
Confirming Your Choices and Building the Database Tables
This page shows a list of the defaults and selections you have made so far. You can use the scroll
bar to bring additional entries into view. If there are any entries you’d like to modify, click on the
[<Back] key until you reach the desired page; otherwise click on [Next>].
An initial version of the OE Database, containing the configuration information chosen so far is
now created. When all of the listed actions are marked as ‘Done’, and the ‘Build Completed
Successfully’ message is displayed, click on [Next>].
This is a summary of the choices made so far.
Click on
to create an initial
database
Click on when the Status for all actions shows
as ‘Done’.
[Next>]
[Next>]
OpenEnterprise for Beginners
3-10
Page 39

Chapter 3 - Building the OpenEnterprise Database
Adding Signal/Variable/Tag Names to the Database Tables
Although we’ve created an initial version of the OE Database, many of its tables are empty. We
need to include information about the signals/variables from your controllers/RTUs. If your
network of controllers is configured and communicating, you can now import this information.
To do this, click on the “Import Signal Data” box, and then click on the [Import…] button.
Depending upon whether Open BSI is
running, you may be prompted to select, for
OpenEnterprise, the NETDEF file used for
your network of controllers.
The Database Project Builder will start a
separate program called the Database Builder
program (DBB). DBB collects all signals that
are alarms, RBE signals, or have been marked
as global signals, and includes their names in
the OE Database.
This process may take several minutes
depending upon how many signals need to be
collected, and the speed of your network.
Click on
then click on the button.
“Import Signal Data”
[Import...]
OpenEnterprise for Beginners
3-11
Page 40

Chapter 3 - Building the OpenEnterprise Database
.
[
]
Creating Poll Lists for Data Collection
Templates (also known as poll lists) allow groups of
signals to be collected at certain specified rates.
After DBB finishes, you will be prompted whether or not
you want to build templates for data collection. Click on
[Yes].
The Poll List Builder runs automatically.
Click on
Yes
Estimating the Maximum Database Size
Based on the number of signals inserted by the
Database Builder (DBB), OpenEnterprise will
attempt to estimate the size of various database
tables. If you know the maximum number of
signals will be larger than the estimate, enter
revised numbers in the fields provided.
Click on [Next>].
OpenEnterprise for Beginners
Click on .[Next>]
3-12
Page 41

Chapter 3 - Building the OpenEnterprise Database
Configuring Historical Data Collection
IMPORTANT: For a full discussion of the concepts of historical data collection, please refer to
Chapter 6.
On the Historical Data page, you have the option of configuring historical data collection for
selected signals you’ve added to your OE Database.
A series of templates are provided to support some of the most common collection schemes.
If you want to configure historical collection using these templates now, click on the [Add]
button. If none of the templates meet your needs, you could create your own templates, however,
that is beyond the scope of this manual.
To configure historical data, click on [Add]
OpenEnterprise for Beginners
3-13
Page 42

Chapter 3 - Building the OpenEnterprise Database
]
Another alternative is that you can pause the configuration and set up the historical system on
your own using the Historical Configuration Tool, by choosing the [Advanced] button. See
Chapter 6 for details on using this tool.
You also have the option of not configuring the
Historian now, because you can configure it later using
the Historical Configuration Tool. If you want to do
that, click on [Next>].
If you did choose [Add], the Historical Template dialog
box will appear.
You can now select from one of several pre-defined
historical collection templates which determine how
frequently the historical data is collected, and what
calculations are performed on the data.
When you choose a particular template, a description of
the operations it performs appears in the “Template
Details” box.
Once you’ve chosen a template, you must establish
some filtering criteria for which signals you want
If none of the templates meet your needs,
you can optionally start the Historical
Configuration Tool, and define the historical
parameters manually.
Click on [Next>
Choose the desired historical
collection template.
OpenEnterprise for Beginners
3-14
Page 43

Chapter 3 - Building the OpenEnterprise Database
]
collected and stored; otherwise, NO signals will be collected and stored by the Historian.
To add a rule, specify the portion of the “Base”, “Extension”, and/or “Attribute” that
represents the signals you want to collect. For example, if you only want this historical template
applied to signals that have a base name beginning with PUMP, enter PUMP* in the “Base”
field. Then, optionally assign a name for the rule, and click on [Add].
You can repeat this entire process to configure additional templates and rules for them.
For the concept of rules to work effectively, you must have established a consistent signal
naming convention.
When you’ve finished configuring the historical system, click on [Next>].
Click on [Next>
OpenEnterprise for Beginners
3-15
Page 44

Chapter 3 - Building the OpenEnterprise Database
6
n
]
Configuring an OpenEnterprise Session
The Session page lets you configure an OpenEnterprise session. When you’ve made your
selections, click on [Next>].
What is an OpenEnterprise ‘Session’?
The ‘heart’ of OpenEnterprise software is the OE Database running on the
OpenEnterprise Server computer. In order for the OE Database to function properly,
however, there are other programs that need to be running as well. For example, the
communication driver you selected, earlier, must be running. You might have other
programs you want to run too, such as the Reporting package. Any software you want
to run together with the OE Database can be grouped together in an OE Session. A
session is a collection of programs that run concurrently; when you start the session,
all the programs grouped together in that session are started automatically.
You can choose a different name
from the default, if desired.
Click on [Next>
If you choose this, you must
start the session manually.
This option causes the sessio
to be started automatically
whenever Windows is started.
This creates a shortcut
in the Windows startup
folder.
This creates a shortcut
on the Windows desktop.
When checked, will
cause the session to
start immediately after
you exit the Database
Project Wizard.
OpenEnterprise for Beginners
3-1
Page 45

Chapter 3 - Building the OpenEnterprise Database
7
.
[
]
e
The Session Tasks page allows you to choose which software programs (tasks) will be started as
part of the OE session. The “Selected Tasks” box lists all tasks currently included in the session.
The “Available Tasks” box lists tasks which could be added to the session. Use the [>] button to
add programs to the session, or the [<] button to remove programs from the session. Click on
[Next>] when finished.
Copies all to th
“Selected Tasks”
Copies a single highlighted task
from the
box to the box.
Copies a single highlighted task
from the
box to the box.
Copies all to the
“Available Tasks”
Click on .[Next>]
“Available Tasks”
box.
“Availa ble Tasks”
“Selected Tasks”
“Selected Tasks”
“Available Tasks”
“Selected Tasks”
box.
Completing the Database Project Building Process
At this point, the OE Database has been created in a temporary area. When you click on [Next>],
the database will be copied to the \DATA area, which is the final location for the working OE
Database.
Click on
Next>
OpenEnterprise for Beginners
3-1
Page 46

Chapter 3 - Building the OpenEnterprise Database
The OE Database is now complete. Click on [Finish] to exit the Database Project Builder.
If you accepted the default settings when creating the OE session, the OE session will be
started automatically. Look for a blue icon with a green checkmark through it in the
taskbar, and double-click on it to view the status of the session.
Congratulations! You’ve now got an OE Database and an OE Session up and running! To verify
that communications are operating properly, you can now connect to the OE Database using the
Database Explorer. We’ll cover all of that in Chapter 4.
Click on .[Finish]
OpenEnterprise for Beginners
3-18
Page 47

Chapter 4 - Using Database Explorer to Find data
Chapter 4 – Using Database Explorer to Find Data
What is the Database Explorer?
Well, we’ve talked about building the database; now let’s talk about how to find out what’s in
the database. Database Explorer is a tool that runs on the OE Workstation and OE Server.
Typically, you would use the Database Explorer during system configuration and debugging
activities. It allows you to:
• Examine the hierarchical structure of the OE Database; including tables, attributes and
something we haven’t talked about much yet, called views.
• View the contents of the OE Database using the integrated Database Object Viewer. The
contents include all of the actual data objects in the database, e.g. signals, configuration data,
etc.
• Establish “live data points” by dragging OPC Tags from the database onto a graphical mimic
display (created with the OE Graphics package). This allows real-time process data (or any
other information contained in the database) to be included on displays for viewing by
operators at the OE Workstation. This is an essential part of the display-building process, and
is discussed in Chapter 5.
• Establish links to external spreadsheet programs such as Microsoft® Excel using drag and
drop DDE links.
To perform these functions, you must first start the Database Explorer, then add the database to
the hierarchy (if it isn’t already visible), and then establish a connection with the database. Then
you will be able to examine various parts of the database, and call up actual data using the
Database Object Viewer.
OpenEnterprise for Beginners
4-1
Page 48

Chapter 4 - Using Database Explorer to find data
Before You Begin
Before you attempt to start Database Explorer, the following must be done:
• Your OE Database must have been created, and must be running. See Chapter 3 for
information on this.
• You must know the service name of the OE Database (or the IP address and name, if it
resides on another computer). Consult your site-specific documentation for details. If you
don’t know what a service is, don’t worry, we’re going to explain that.
• You must have successfully logged on to your OE Workstation, with sufficient security
privileges to access the OE Database. Consult your site-specific documentation for details.
NOTE: Security will be discussed in detail in Chapter 10.
Starting Database Explorer
To start Database Explorer, click on:
Start Æ Programs Æ OpenEnterprise Æ Database Explorer
If this is the first time you are using the Database Explorer with this particular OE Database, you
must explicitly identify for Database Explorer the name and (if located on a computer other than
the current one) the location of the Database. See Identifying the Name and Location of Your
Database.
A connection must then be requested with the OE
Database. See Establishing a Connection with the
Database.
T ree Hierarch y
Identifying the Name and Location of Your Database
If this is the first time you are using Database Explorer with a particular OE Database, you must
add the database to the tree hierarchy of databases accessible to Database Explorer.
To do so, click on the ‘Add Database’ icon, shown above, or click on File Æ Add Database.
The Add Database to Hierarchy dialog box will appear.
OpenEnterprise for Beginners
4-2
Page 49

Chapter 4 - Using Database Explorer to Find data
Using the Add Database to Hierarchy Dialog Box
The Add Database to Hierarchy dialog box allows you to specify, for Database Explorer, the
name of your OE Database. In addition, if the OE Database resides on a PC other than the
current one, you must also specify its location. The combination of the database name and
location is called the service.
In the Add Database to Hierarchy dialog box, enter
the OE database name, for example ‘rtrdb1’. If the
database resides on a different computer than the one
you are currently using, the name of the database
must be preceded by the IP address of the other
server, for example: ‘120.0.210.10:mydatabase’.
You may also use an alias for the IP address, for
example if the text ‘MYSERVER’ has been defined
in your HOSTS file as being equivalent to an IP
address of ’125.45.2.8’, you could enter either
‘MYSERVER:rtrdb1’ -or- you could enter
‘125.45.2.8:rtrdb1’.
To connect with this database, choose the “Connect
Database” option.
Click on [OK] to exit the dialog box.
The database will be added to the tree hierarchy.
Enter the name of the
Database, or its address
and name if it resides on
a computer other than the
current one.
What is a ‘Service’?
A service is a unique address used to
identify a particular program running
on a particular computer in a TCP/IP
network. The default service for the
OE Database is:
‘servername:rtrdb1’
where:
servername: is replaced with the name
of the computer on which the OE
Database resides, or the IP address of
that computer, or a name defined in
your Windows™ Hosts file which
resolves to that IP address.
(servername: can be omitted if you are
running this copy of Database
Explorer on the computer that contains
the OE Database.)
rtrdb1 is the default name for the OE
Database, which must resolve to an IP
socket number. (By default, OE uses
IP socket 11101 in your Windows™
Services file. You can change this, if
necessary.)
If this all confuses you, think of the
Internet as a neighborhood full of
apartment buildings, and programs as
people living in the buildings. The
server name is the equivalent to the
address for their apartment building
and the IP socket is equivalent to their
apartment number.
OpenEnterprise for Beginners
4-3
Page 50

Chapter 4 - Using Database Explorer to find data
The database icon will be surrounded by a RED box with
a diagonal line through it, until an actual connection is
established.
T ree Hierarch y
Establishing a
Once a database has been identified for Database Explorer by adding it to the tree hierarchy, a
connection with the Database must be established so that the Database structure can be accessed.
Before attempting to establish a connection with a Database, the Database must be
running. If it is NOT running, you must explicitly start it. In addition, you must
have logged in with security access for this particular Database, or data you wish to
view must be accessible to the ‘PUBLIC’ user.
To establish a connection, click on the icon for the database in the tree hierarchy, then press the
right mouse button, and choose “Connect” from the pop-up menu. Initially, the database will be
shown surrounded by an orange box, indicating that a connection has not yet been made. The
amount of time required to make the connection varies depending upon the size of the database,
and the bandwidth of your connection.
When the icon for the database is
surrounded by a GREEN box, the
connection has been successfully
established.
Connection with the Database
NOTE
OpenEnterprise for Beginners
4-4
Page 51

Chapter 4 - Using Database Explorer to Find data
IMPORTANT
Once a connection has been successfully established, Database Explorer will issue a
query to the database to obtain details on its internal structure. This structural
information is retained until the database is disconnected. Whenever a re-connection is
made, the query will be issued again to update the structural detail information.
If, while connected, the database structure is altered by some external tool (such as the
SQL Client) queries to the database may NOT be successful, depending upon how the
database was changed. Should this occur, you should disconnect, and then re-connect
so a new query can be initiated.
What if I wasn’t able to connect?
Any of the following items could prevent a successful connection:
• The OE Database isn’t running. (You can’t connect to it if it isn’t running.)
• Communications are faulty, or you didn’t specify the correct service. (You
should verify that you can actually communicate with the OE Server computer.
Try pinging it using the DOS ping command.
• Firewall software (a type of security software) is running, that has prevented the
connection with the IP socket. (The IP socket for the OE Database must be
accessible. By default, this socket is 11101. Check your Windows™ Services file
to verify the correct socket, and notify your System Administrator that the OE
socket must be accessible through the firewall.)
Viewing the Overall Structure of the Database
Once Database Explorer has successfully established a connection with the database, the internal
structure of the database can be examined.
OpenEnterprise for Beginners
4-5
Page 52

Chapter 4 - Using Database Explorer to find data
6
-
Viewing Databases, Tables, Views, and Attributes
Each database consists of a series of named tables. Associated with each table are a collection
of attributes (remember, attributes are just the column names of the table). By default, the
standard tables in OpenEnterprise have a suffix of ‘_table’ at the end of their names, for
example, the ‘alarmsummary_table’.
Database Explorer also allows you to look at views. Views are essentially a restricted look into
some portion of a table or set of tables. Views do not have the suffix ‘_table’. Views are
sometimes used for security purposes because they restrict which parts of a table (or tables) a
user can access or change, and for convenience reasons, because they prevent you being
overloaded with more information than you really need to see.
Database Explorer’s main screen is divided into 3 separate windows, each of which displays
different information about the connected database.
If the icon for the database is a red box with a
diagonal line through it, there has never been
a connection to this database. If the icon for the
database is a red box with no diagonal line, the
connection has been lost, possibly due to the
database being shut down.
Database Detail Window -or
the Table Detail Windo w
Click on ‘+’ to
see tables in
this database
If the icon for the
database is a green
box, a connection is
active.
Database T ree Control Window
OpenEnterprise for Beginners
4-
Attribute Deta il Window
Page 53

Chapter 4 - Using Database Explorer to Find data
7
Database Tree Control Window
This window occupies the left-hand side of the screen. It displays all of the databases in the
hierarchy.
If the database is currently connected, it will be displayed with a small GREEN box around it.
If the database is NOT currently connected, it will be displayed with a small RED box around it,
with a diagonal line through the center.
If the database is connected, and Database Explorer is currently performing a query to obtain
detailed information about the database, a small AMBER (dark orange-yellow) box will appear.
If you click on the ‘+’ icon associated with the database, a list of the tables and views which
make up that particular database will be displayed.
Tables which
make up this
database
Use scroll bar to bring
additional table names
into view
OpenEnterprise for Beginners
4-
Page 54

Chapter 4 - Using Database Explorer to find data
Database Detail Window / Table Detail Window
The Database Detail Window and Table Detail Window alternately occupy the upper-right hand
corner of the Database Explorer’s main screen. Which of the two windows is visible depends
upon selections made in the Database Tree Control Window:
The Database Detail Window displays the names of all databases whenever ‘All Databases’ has
been selected in the Database Tree Control Window. The format of the window can vary; see
Changing the Appearance of Detail Windows.
When ‘All Databases ’ is selec ted in the T ree
Control Window, all of the databases will appear
in the Database Detail Window
The Table Detail Window displays the names of the tables associated with whatever database has
been selected in the Database Tree Control Window. The format of the window can vary; see
Changing the Appearance of Detail Windows.
When database named ‘scada-web:rtrdb1’ is selected
in the Database Tree Control Window, the tables associated with ‘scada-web:rtrdb1’ are shown in the
Table Detail Window .
Use scroll bar to bring
more table names into
view
OpenEnterprise for Beginners
4-8
Page 55

Chapter 4 - Using Database Explorer to Find data
e
Attribute Detail Window
The Attribute Detail Window occupies the lower right hand corner of the Database Explorer
main screen. It displays the attributes (i.e. column names) of the tables that have been selected in
the Database Tree Control Window. The format of the window can vary; see Changing the
Appearance of Detail Windows.
Clicking on a table in the Database Tree Control Window
causes a list of all the attributes (columns) belonging to
that table to be displayed in the Attribute Detail Window.
Use the scroll bars to bring more
attributes, or more details about th
attributes into view
Double-clicking on tables or views will launch
the Database Object Viewer, which will query the
database to retrieve data from that table or view.
certain
Clicking once on a table name will display a list of attributes for the particular table. Doubleclicking on certain tables will launch the Database Object Viewer, along with a pre-defined DBX
file to query the database for data from that particular table.
OpenEnterprise for Beginners
4-9
Page 56

Chapter 4 - Using Database Explorer to find data
Changing the Appearance of Detail Windows
The Database Detail, Table Detail, and Attribute Detail windows can be modified to appear in
one of four presentation modes: Large icons, small icons, lists, or detail.
To change the mode, click within the window you want to change, then click on “View” in the
menu bar, and choose “Large Icons”, “Small Icons”, “List” or “Detail” from the pop-up
menu. Alternatively, you can choose the mode from the icons in the menu bar.
Large Icons
In this mode, only a few large icons are visible at any
one time.
Small Icons
In this mode, many more icons are visible. They are
shown, in left-to-right (across) order.
List
This mode is similar to small icons, except the icons
appear in lists from top-to-bottom.
Detail
In this mode, more detailed information is presented
for each item, including information on its location
and function in the database.
OpenEnterprise for Beginners
4-10
Page 57

Chapter 4 - Using Database Explorer to Find data
Searching the Database for A Particular Table
A particular OE database can be made up of hundreds of different tables. Sometimes, you may
not remember where a particular table is located in the hierarchy of the database, or even its
exact name - - to solve this problem, you can use the Search For Table dialog box.
To search through the tree hierarchy for a particular table,
click on the database’s icon in the hierarchy presented in the
Database Tree Control Window, then press the right mouse
button. Choose “Search For Table” from the pop-up menu,
and the Search for Table dialog box will appear. Enter the
table name you are looking for (or enter the first few
characters of its name followed by a wildcard ‘*’ character)
then click on the [OK] push button.
Tables and views with the specified name (or matching the partial name and wildcard) will be
listed in the Table Detail Window. If you double-click on a listed table, its location in the
hierarchy will be displayed in the Database Tree Control Window, and the attributes (columns)
associated with the table will be displayed in the Attribute Detail Window.
Searching the Database for A Particular Attribute (Column Name)
A database can include hundreds of different tables, and a particular table can include hundreds
of different attributes (which we’ve said before, are column names). Sometimes, you may not
remember which table holds a particular attribute, and you might not remember the exact name
of the attribute - - to solve this problem, you can use the Search for Attribute dialog box.
To search through the tree hierarchy for a particular attribute, click on the database’s icon in the
hierarchy presented in the Database Tree Control Window, then press the right mouse button.
Choose “Search For Attribute” from the pop-up menu, and the Search for Attribute dialog box
will appear. Enter the attribute name you are looking for (or enter the first few characters of its
name followed by a wildcard ‘*’ character) then click on the [OK] push button.
OpenEnterprise for Beginners
4-11
Page 58

Chapter 4 - Using Database Explorer to find data
Tables with the specified attribute (or matching the partial name and wildcard) will be listed in
the Table Detail Window. If you double-click on a listed table, its location in the hierarchy will
be displayed in the Database Tree Control Window, and the attributes associated with the table
will be displayed in the Attribute Detail Window.
Searching the Database for A Primary Key Attribute
A primary key attribute is simply an attribute that is used as an index (or part of an index) for
manipulating information in a table, because it is unique for each record (row). A primary key
might include multiple attributes. For example, a timestamp attribute and a name attribute might
be combined to form the primary key.
To search through the tree hierarchy for a particular
primary key attribute, click on the database’s icon in
the hierarchy presented in the Database Tree Control
Window, then press the right mouse button. Choose
“Search For Primary Key Attribute” from the popup menu, and the Search for Primary Key Attribute
dialog box will appear.
Enter the attribute name you are looking for (or enter the first few characters of its name
followed by a wildcard ‘*’ character) then click on the [OK] push button.
Tables with the specified primary key attribute (or matching the partial name and wildcard) will
be listed in the Table Detail Window. If you double-click on a listed table, its location in the
hierarchy will be displayed in the Database Tree Control Window, and the attributes associated
with the table will be displayed in the Attribute Detail Window.
Searching the Database for ‘Owned’ Tables
An ‘owned’ table is a table in which the ‘Owner’ attribute has been set to the name of a
particular user. When you choose “Search for Owned Tables” all tables for which the ‘Owner’
attribute matches the name of the currently logged on user will be listed.
OpenEnterprise for Beginners
4-12
Page 59

Chapter 4 - Using Database Explorer to Find data
Viewing the Contents of the Database Using the
Database Object Viewer
You can use the Database Object Viewer to:
• Examine the data residing in the database tables by requesting data that meets certain user-
specified criteria. (This is called querying the database for information.)
• Configure real-time process points in graphical displays using OPC Tags.
• Configure real-time data links to third-party packages such as Microsoft® Excel using DDE
Links.
Starting the Database Object Viewer
Once the Database Explorer has been started, and a successful connection has been made to your
running database, you can start the Database Object Viewer by clicking on the icon shown
above, -or- by double-clicking on certain Table names in the Database Explorer tree control
window, or- by clicking on: View Æ Database Object Viewer
The Database Object Viewer will appear, with the ‘Tables’ page displayed first. You can now
proceed to query the database for data.
Viewing Data By Constructing Simple Queries
The Database Object Viewer provides various options for querying the database. In this section,
we will cover the simplest approach that will yield useful information for most users. Examples
of queries using more detailed criteria will be covered in the next section:
OpenEnterprise for Beginners
4-13
Page 60

Chapter 4 - Using Database Explorer to find data
xxxxxxxxxxxxxxxxxxxxxxxxxxxxxxxxxxxxxxxxxxxxxxxxxxxxxxxxxxxxxxxxxxxxxx
The simple approach to querying the database involves:
• Identifying the table you want to request data from using the ‘Tables’ page.
• Identifying the attributes you want to request data from using the ‘Attributes’ page.
• Specifying any limiting conditions using the ‘Conditions’ page.
• Running the query and looking for our results on the ‘Objects’ page.
If you have trouble remembering this sequence, just remember T-A-C-O which is the first letter
of each of the Database Object Viewer pages you need to use.
Identifying the Table You Want to Query
The ‘Tables’ page of the Database Object Viewer allows you to select which table (or tables) you
want to examine.
OpenEnterprise for Beginners
4-14
Page 61
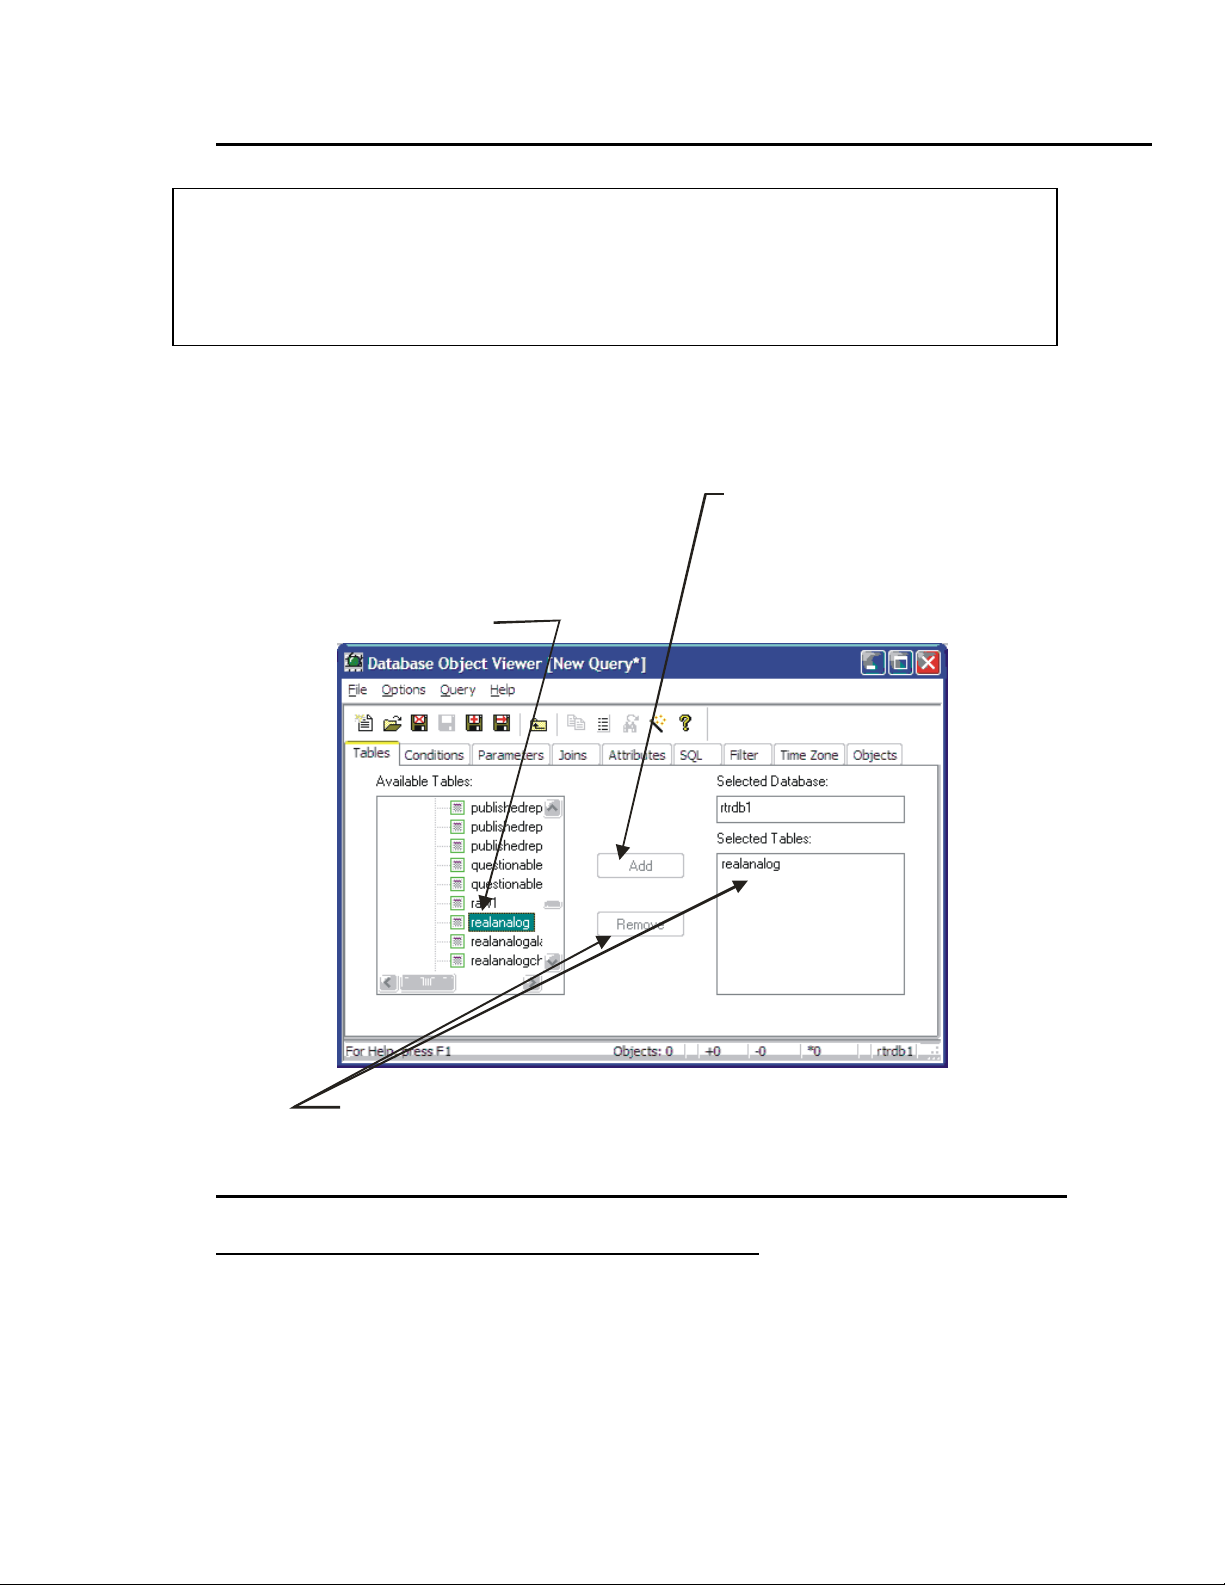
Chapter 4 - Using Database Explorer to Find data
m
[
.
NOTE
Even though the Database Object Viewer allows you to select multiple tables, we
recommend that when you are first learning how to use the Database Object Viewer, you
choose only one table to be searched at any one time. Choosing multiple tables introduces
certain complexities into the query that may result in problems for the novice user.
Click on the name of the table or view you want to request data from in the “Available Tables”
list box, then click on the [Add] push button. The table name will be added to the “Selected
Tables” list box. You can now click on the ‘Attributes’ page to continue defining your query.
Click on the name of
the table (or view) you
want to retrieve data
from, in the Available
Tables list box.
Then click on the [Add]
push button, and the
name of the table will
appear in the Selected
Tables list box.
If you change your mind and want to remove a table fro
the Selected Tables list box, click on its name, then click
Specifying the Attributes You Want to Examine
The ‘Attributes’ page of the Database Object Viewer allows you to specify which attributes
(columns) from the previously selected table, you want to examine.
OpenEnterprise for Beginners
on the
Remove] push button
4-15
Page 62

Chapter 4 - Using Database Explorer to find data
6
e
[
.
Click on the name of the attributes you want to examine in the “Available Attributes” list box,
then click on the [Add] push button. The attribute name will be added to the “Selected
Attributes” list box.
Click on the name of
the attribute you want
to examine, in the
Available Attributes
list box.
Then click on the [Add]
push button, and the
name of the Attribute will
appear in the Selected
Attributes list box.
If you change your mind and want to remove an attribut
from the Selected Attributes list box, click on its name,
then click on the [Remove] push button. To remove all
You can now click on the ‘Conditions’ page to continue defining your query.
Specifying Conditions to Limit the Amount of Data Returned By Your Query
The ‘Conditions’ page of the Database Object Viewer allows you to make your query more
specific, and thereby limit the amount of data returned.
For example, if you specified in the ‘Attributes’ page that you wanted to see the names and
values of entries in the realanalog table, you could receive thousands of responses depending
upon the number of objects (such as ACCOL signals) in your database. This may be much more
data than you want, and it also could put an unnecessary burden on communications as the server
attempts to fulfill the request for massive amounts of data. The ‘Conditions’ page, however, lets
you tailor the request by entering more specific criteria, thereby making the resulting data more
usable for you, and more manageable for the communications system.
attributes , use the
Remove All] push button
OpenEnterprise for Beginners
4-1
Page 63

Chapter 4 - Using Database Explorer to Find data
7
.
e
Click on the attribute
you want to specify
a condition for, then
Then specify a condition for
that attribute, and click on th
[Update] push button.
click on the [Add]
Click on the name of the attribute you want to specify a condition for in the “Available
Attributes” list box, then click on the [Add] push button. The attribute name will be added to
the “Condition” line below the push buttons; enter an equation specifying the condition you
want to apply.
Here are some examples of conditions. NOTE: You must leave a single space on each side of an
arithmetic operator ( = , <, >):
push button
value < 500
manualinhibit = TRUE
units = ‘MGD’
extension = ‘INPUT’
name LIKE ‘%PUMP%’
OpenEnterprise for Beginners
4-1
Page 64

Chapter 4 - Using Database Explorer to find data
.
When finished entering the condition, click on the [Update] push button. The specified condition
will be displayed in the “Conditions” list box, and the “Condition” line will be cleared so that
you can specify any additional conditions. NOTE: When you enter multiple conditions, all
conditions must be satisfied.1
To edit a co ndition, click on it,
then click on the [Edit] push
button, then make any changes
If you want to change any of the conditions you have entered, click on the condition in the
“Conditions” list box, then click on the [Edit] push button, and edit the condition line as
desired, then click on the [Update] push button. When you have finished specifying any
conditions you would like to apply, you can run your query.
1
Essentially, when expressed as boolean logic, the conditions are all ANDed together.
in the Condition box
OpenEnterprise for Beginners
4-18
Page 65

Chapter 4 - Using Database Explorer to Find data
.
Run the Query and View the Results
If you want the results of this query to be regularly refreshed as data changes in the
If you did NOT specify any conditions
on the ‘Conditions’ page, by default,
you will receive a warning message
(the warning is intended to remind you
that your query could potentially result
in a very large amount of data being
collected, what we call the KILLER
QUERY…). You can ignore the
message and click on [Yes] if you are
unconcerned about the size of the
query, or click on [No] to revise the
query, before running it.
NOTE: These warning messages may
be suppressed by checking the “Auto
run without conditions” item on the
‘Conditions’ page.
database, click on the ‘Active Query’ icon, shown at left, or click on Options Æ
Active Query. NOTE: If you do not do this, data in the query will not be updated as it
changes.
To run the query, click on the ‘Run Query’ icon or click on Query Æ Apply.
This message will only appear if you didn’t specify
any conditions; it is meant to warn you that the
results of the query may be a large amount of data
OpenEnterprise for Beginners
4-19
Page 66

Chapter 4 - Using Database Explorer to find data
q
The results of the query can be viewed on the ‘Objects’ page; normally, running the query will
switch to the ‘Objects’ page automatically. If this is an active query, they will be updated
periodically as new data comes in.
Total Number
of objects
Number of objects
added since
uery issued
Number of objects
remo ved s in ce
query issued
Database
name
Number of objects
changed since
query issued
OpenEnterprise for Beginners
4-20
Page 67

Chapter 4 - Using Database Explorer to Find data
Applying Filtering Criteria to Your Query
The ‘Filters’ page allows you filter the list of available attributes shown on the ‘Attributes’ page.
A description of the various filtering criteria is included below.
Items that are checked are included in the list of ‘Available Attributes’.
String Attributes in the table that store string data, such as signal names, operator names,
descriptors, etc.
Bool Attributes in the table that store TRUE/FALSE data such as logical signal values,
the values of manual, control and alarm inhibit/enable flags, etc.
Integer Attributes in the table that store integer data such as counts, ID numbers, etc.
Real Attributes in the table that store floating-point data such as analog signal values.
Time/Date Attributes in the table that store date and time information such as timestamps.
Primary Key Attributes in the table that are part of the primary key for the table and uniquely
identify the objects within the table.
Foreign Key Attributes in the table that are used as part of another table’s primary key, and are
used to reference those objects from this table.
OpenEnterprise for Beginners
4-21
Page 68

Chapter 4 - Using Database Explorer to find data
Not Key Attributes in the table that are NOT part of any key.
Nullable Attributes in the table that can hold a NULL value.
Not Nullable Attributes in the table that can NEVER hold a NULL value.
Persistent Attributes in the table that are saved to disk when the server is shut down.
Not
Persistent Attributes that are never saved to disk.
Hidden Attributes in the table that, by default, are not visible to the user. NOTE: This is
not a security feature, just a convenience. These attributes are typically of little
interest to most users.
Not Hidden Attributes in the table that, by default, are available to the user.
To choose all criteria (i.e. no attributes excluded) click on the [Set All] push button.
To exclude all criteria (typically done to de-select everything, and then select only a few criteria)
click on the [Clear All] push button.
OpenEnterprise for Beginners
4-22
Page 69

Chapter 4 - Using Database Explorer to Find data
Saving the Criteria Used For Your Query in A DBX File
Once you have finished creating your query, you can save
the query criteria, so that you can run it again in the future.
To do this, click on the ‘Save As’ icon, or click on File Æ
Save As. Standard Windows™ Save dialog boxes will
appear in which you can specify a path and filename for
your database query. The file extension for database
queries is (.DBX).
Subsequent changes can be saved by clicking on the ‘Save’ icon, or by clicking on File Æ Save.
NOTE: If you save your DBX file in the default directory, with the same name as the table or
view from which you queried data, the query can later be recalled by double-clicking on the table
name in the Database Tree Control Window.
DBX files can be recalled into the Database Object Viewer to re-initiate a query, and may also be
used by other OE components.
DBX files are a way to save
your queries, and re-use
them later…
Opening An Existing DBX File
If you have previously saved the criteria for a query in a DBX file, you can open it by clicking
on the ‘Open Query’ icon, or by clicking on File Æ Open, and selecting the DBX file from the
dialog box.
If you saved your DBX file in the default directory, with the same name as the table or view for
which you issued your query, you can recall the DBX file by double-clicking on the table name
in the Database Tree Control window.
OpenEnterprise for Beginners
4-23
Page 70

Chapter 4 - Using Database Explorer to find data
Adding ‘Live’ Data to Third-Party Applications by
Dragging DDE Tags
Another use of the Database Object Viewer is to establish ‘live’ dynamic data exchange (DDE)
links between OpenEnterprise and a third-party DDE compliant package, such as Microsoft®
Excel. This allows the creation of spreadsheets containing ‘live’ data, which will update as it
changes in the database.
Before You Begin
Before you can add live data to a spreadsheet, you must have already:
• started the third-party application, e.g. Microsoft® Excel, and created a spreadsheet.
• installed and started up the Polyhedra DDE Server. (See the OpenEnterprise Reference
Guide (document# D5092) for instructions on how to do this.)
• started the OE Database
• started the Database Explorer and established a connection with your running database. (See
pages 4-2 through 4-4.)
• read through and become familiar with how to create and run a query of your database. (See
pages 4-13 through 4-19 for details.)
An example illustrating this process is included, below:
OpenEnterprise for Beginners
4-24
Page 71

Chapter 4 - Using Database Explorer to Find data
Example - Adding An Analog Value To A Spreadsheet Using DDE
The Brighton Hills tank farm has a series of tanks that hold liquids. They use Network 3000series controllers to monitor the tank levels, and they want to display the tank levels (in FEET) in
a spreadsheet for the operator.
Step 1. - Start creating your query by selecting the Table containing the data:
On the ‘Tables’ page of the Database
Object Viewer, there are numerous tables
listed. In this case, we want to select the
table containing analog data values; called
‘realanalog’. Click on the [Add] push
button.
Step 2. - Choose the Attributes included in your query:
On the ‘Attributes’ page of the Database
Object Viewer, click on the ‘Name’
attribute in the “Available Attributes” list
box, then click on the [Add] push button.
Repeat this process for the ‘Value’ and
‘Units’ attributes.
OpenEnterprise for Beginners
4-25
Page 72
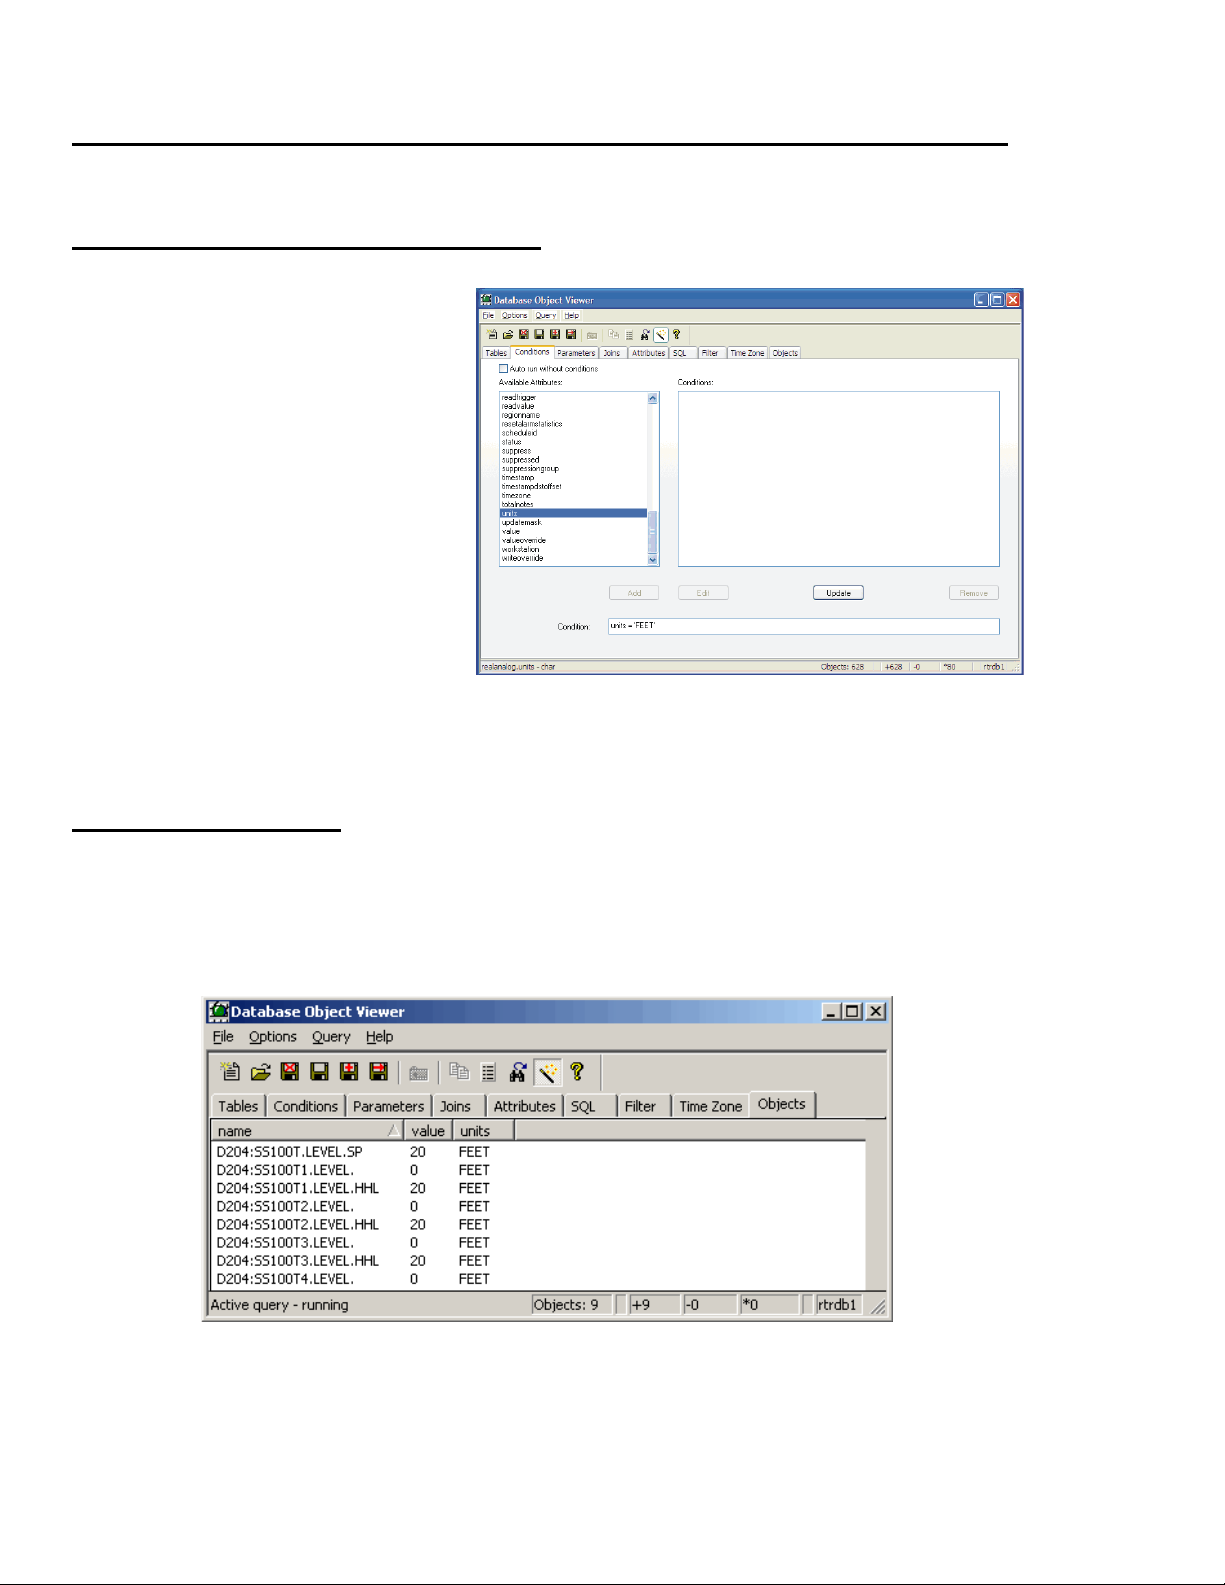
Chapter 4 - Using Database Explorer to find data
6
Step 3. - Specify Conditions of the query:
On the ‘Conditions’ page of the
Database Object Viewer, we only want
tank levels, which we know are in units
of FEET, so we will put a condition on
our query that units must equal ‘FEET’.
To do this, click on ‘units’ in the
“Available Attributes” list box, then
click on the [Add] push button. The
word ‘units’ will appear in the
“Condition” line, add the following
text to the line:
= ‘FEET’
Now, click on the [Update] push button, and the condition you made will appear in the
“Conditions” box above.
Step 4. - Run the query:
Click on the ‘Active Query’ icon, and then run the query by clicking on Query Æ Apply, or just
click on the ‘Run Query’ icon. The results of the query (analog signal values which have units of
‘FEET’) will appear on the ‘Objects’ page of the Database Object Viewer.
OpenEnterprise for Beginners
4-2
Page 73

Chapter 4 - Using Database Explorer to Find data
7
Step 5. - Leave the ‘Objects’ page of the Database Object Viewer on the screen,
and open up your spreadsheet (if not already open)
Keep the ‘Objects’ page of the Database Object Viewer (which contains your analog values)
visible on the screen. Now call up the spreadsheet you want to add ‘live’ data to in Excel.
Step 6. - Change the Default Tag Format in the Database Object Viewer to DDE
The Database Object Viewer is most frequently used to export OPC tags, therefore, that is the
default export tag format it uses. To export DDE links, you must change the export format to
DDE. Click on: Options Æ Tag Format Æ DDE.
Step 7. - Drag the data from the Database Object Viewer to the Appropriate Cell in
the Spreadsheet
Drag the value from the Database Object Viewer window to the cell in the spreadsheet where
you would like the data to be displayed. This establishes the DDE link. Repeat, as necessary, to
bring additional data into the spreadsheet.
Drag the value from the Database
Object Viewer to the appropriate
cell in the spreadsheet
OpenEnterprise for Beginners
4-2
Page 74

Chapter 4 - Using Database Explorer to find data
NOTE: If a message similar to the one shown below is displayed, it means that the Polyhedra
DDE Server did not start.
If the Polyhedra DDE Server has been installed, you can start it by clicking on Start Æ
Programs Æ Polyhedra Æ DDE. If the Polyhedra DDE Server was never installed, you must
install it according to instructions in the OpenEnterprise Reference Guide (document# D5092).
Some advanced topics which we won’t cover here
• The Database Object Viewer includes a ‘Joins’ page which allows you to query multiple
tables to find data intersections. Don’t try it! It’s not for beginners, and could crash your
system.
• The Database Object Viewer includes an ‘SQL’ page which lets you edit SQL queries on the
database. If you’re interested in this, review the appendix on SQL at the end of this manual.
• The OE Menus feature allows you to take DBX files you create in Database Object Viewer,
and tie them into menus, that allow you to pass parameters between OE components, and edit
the database. This is a very powerful feature for customizing your system, but is beyond the
scope of this manual. Please see the OE Menus section of the OE Reference Guide
(document# D5092) if you need information on this.
OpenEnterprise for Beginners
4-28
Page 75

Chapter 5 - Building Displays to ‘Mimic’ Your Process
Chapter 5 – Building Displays to ‘Mimic’ Your Process
What is the OpenEnterprise Graphics Software?
The OpenEnterprise Graphics software (also called OEGraphics or GraphicsView) is a
specially licensed version of the Iconics GraphWorX32 software, which has been specifically
modified to support additional functionality. It is used to build and view graphical displays,
sometimes known as mimic displays, which allow operators to monitor their plant or process
from the OE Workstation. The entire collection of displays used by the operator is referred to as
the human-machine interface (HMI) or graphical user interface (GUI).
Data is collected from the plant or process via instrumentation devices (e.g. flow meters,
electrical contacts, pressure transmitters) and transmitted to RTUs. Data from the RTUs is then
sent to the OE Database, where it can be extracted for use on displays.
OpenEnterprise for Beginners
5-1
Page 76

Chapter 5 - Building Displays to ‘Mimic’ Your Process
g
Displays consist of a mixture of
static and dynamic objects. These
objects are drawn to resemble
specific parts of the plant or process
such as pumps, valves, compressors,
tanks, etc. Static objects do not
change, and are not connected to the
OE Database. Dynamic objects,
however, are linked to ‘live’ realtime process data in the OE
Database through the use of OPC
Tags.
The dynamic objects can be configured to change color, size, or flash based on how the real-time
data changes. For example, an analog value might flash when it has entered an alarm state, or a
pump might turn green when it is running and yellow when it is undergoing maintenance.
Besides allowing an operator to monitor the plant or
process, displays can be configured to help the
operator control the process by allowing data entry
of setpoints, by allowing the operator to start and
stop devices depicted on the display such as pumps,
motorized valves, etc. In each case, these actions are
possible by sending commands from the display
down to the OE Database, and then on to the
controller network.
Objects which are to be used on multiple displays
can be saved as symbols in the symbol library.
They can then be easily imported into any new
display which is created. Symbols and displays can
also use a technique called aliasing which allows
symbols and even entire displays to be re-used with
different entries from the database, depending upon
which alias (name) is currently selected.
This chapter presents an overview of the display building process, including:
• instructions for starting the OE Graphics software, opening a display, changing from
‘configure’ to ‘runtime’ mode, saving the display, etc.
• step-by-step examples for creating various display objects. Various features of OE Graphics
are highlighted as part of the examples.
Th is is a n OP C Ta
What is an OPC Tag?
OPC stands for Object-linking and
embedding for Process Control, an
industry standard that was developed
by the OPC Foundation, to allow a
standard method of communication
between different process control
devices and software. An OPC tag
identifies a piece of information
(normally a signal value or attribute)
using the conventions of the OPC
standard. Within OpenEnterprise this
allows data from the OE Database to
be accessed by displays or trends, or
software by other vendors.
OpenEnterprise for Beginners
5-2
Page 77

Chapter 5 - Building Displays to ‘Mimic’ Your Process
• instructions for working with symbols, setting up aliasing of individual symbols, saving them
in the symbol library, and re-using them on other displays.
• suggestions for designing your entire human-machine interface (HMI) system.
IMPORTANT
This chapter is NOT intended to be a comprehensive reference to all features and functions of the
OE Graphics package. If you need information on a particular feature not covered here, please refer
to the GraphWorX32 User Manual.
Before You Begin
Before you attempt to build displays, the following must have been done:
• You must have installed the OE Graphics package on your workstation. This process is
briefly covered in the OpenEnterprise Installation Guide portion of the OpenEnterprise
Reference Guide (document# D5092).
• Your OE Database must have been created and must be running.
• You must be able to connect to the OE Database using Database Explorer, and issue a query
of the OE Database (This was discussed in Chapter 4.)
• You must have successfully logged on to your OpenEnterprise Workstation, with sufficient
security privileges to access the OE Database. Consult your site-specific documentation for
details.
• You must be familiar with the details of the underlying plant or process which will be
depicted on the displays, and also must know which tables and attributes of the OE Database
contain the data you want to include on the display.
OpenEnterprise for Beginners
5-3
Page 78

Chapter 5 - Building Displays to ‘Mimic’ Your Process
Starting the OE Graphics package
By default, the startup sequence for the OE Graphics package is to click on Start Æ Programs
Æ OpenEnterprise Æ Workstation. This sequence may have been modified, however, when
OE Graphics was initially installed.
If you cannot find OpenEnterprise Graphics, look for GraphWorX32, and start it, instead. After
the splash screen has appeared, the screen should appear as shown, below, with an all-new empty
display open.
Opening a Display
Once OE Graphics is running, you can choose to create an all-new display, or you can open an
existing display.
OpenEnterprise for Beginners
5-4
Page 79

Chapter 5 - Building Displays to ‘Mimic’ Your Process
Opening An All-New Display
When you first start OE Graphics, an all-new empty display is opened automatically, and the
screen will appear as shown on the previous page.
If you already have other displays open, however, and want to create an all-new display, you can
do so by clicking on the icon shown above, or by clicking on File Æ New.
An empty display will now be opened, and you can begin to add graphic elements to it.
Opening An Existing Display
To open a display which has already been created,
click on the Open icon, shown above, or click on File
Æ Open.
The standard Windows™ Open dialog box will
appear.
Use the controls to locate the directory containing your displays. The recommended directory for
storing OpenEnterprise displays is
\OEStore\ Displays
so you might want to look there first.
When you find the display you want to open, double-click on the name of the display file (must
end in ‘.GDF’), -or- click once on its name, then click on the [Open] button, and the display will
appear on the screen.
Using the Example Displays
If you can’t locate any displays, the OpenEnterprise Software CD comes with a selection of
example displays, which you may use as a starting point for creating your own displays.
The example displays are located in the \Examples\Workstation sub-directories on your
OpenEnterprise Software CD.
OpenEnterprise for Beginners
5-5
Page 80

Chapter 5 - Building Displays to ‘Mimic’ Your Process
6
A Quick Look at the Drawing Tools
This section will briefly discuss the most commonly used drawing tools. For more detailed
information, please see the GraphWorX32 User Manual.
Choosing Colors
One of the first things you will want to do when you open up a display is to set the background
color of the display. To do this, click on Format Æ Background Color.
The Color Palette will appear. Click on the color of your choice for the background, then click
on the [OK] push button.
Click on the color you want to
select, then click on the [OK]
push button.
The “Format” pull down menu also has selections
for setting the line color, line style, display
properties, etc. For more details, see the
GraphWorX32 User Manual.
OpenEnterprise for Beginners
5-
Page 81

Chapter 5 - Building Displays to ‘Mimic’ Your Process
e
Drawing A Straight Line
To draw a straight line,
click on the ‘Straight Line’
icon, then click in the
display where you want the
line to begin, and drag the
mouse until you reach the
desired endpoint, then
release the mouse.
To change the line color,
you must use FormatÆ
Line Color, and select the
color from the color
palette.
To move the line after it is
finished, select it and drag
it to the desired location.
To draw a
straight line,
first click on
the ‘Straight
line’ icon
Then click where you want
to start the line, and drag
the mouse to where you want
to finish the line.
Selecting Objects on Displays
To select an object on a display just click on it. A group of eight edit handles
will appear around the object. (The picture at right shows a pump symbol
surrounded by edit handles.) You can click and drag on these handles to resize the object in various directions. To move the object, just click on the
object (not the handles) and hold down the left mouse key while you move
the object to the desired new position.
Drag bounding box
to select multiple
objects
To select more than one object, drag the mouse to form a
bounding box around the objects you want to select, then
release the mouse button and all the complete objects in the
box will be selected.
If a display contains many objects close together, and you are
unable to select the right one, you can select any object on the
display, and repeatedly press the [Tab] key. As you keep
pressing the [Tab] key, a bounding box will move through
each of the objects on the display, allowing you to eventually
select the desired object.
Edit handl
OpenEnterprise for Beginners
5-7
Page 82

Chapter 5 - Building Displays to ‘Mimic’ Your Process
Drawing A Box
To draw a box, click on the ‘Rectangle/Square’ icon, then click in the location in the display
where you want to draw the box, and drag the mouse until the box is the desired size, then
release the mouse.
To draw a square, follow the same procedure, except hold down the [Shift] key while you are
dragging the mouse.
If you want to re-size the box, you can drag on the handles which appear around its edge when it
is selected.
To move the box after it is finished, select it, and drag it to the desired location.
If you want to change the fill color of the box, select the box, then click on the desired color in
the color palette. If you want to turn on/off the fill color, you can click on Format Æ Toggle Fill
(or just click on the ‘Fill/Unfill’ icon).
To draw a box, first click
on the ‘Rectangle/Squ are’
icon.
Next, click where you want to draw
the box, and drag the mouse until
the box is at the desired size.
OpenEnterprise for Beginners
5-8
Page 83

Chapter 5 - Building Displays to ‘Mimic’ Your Process
l
Drawing An Ellipse or A Circle
To draw an ellipse or circle, click on the ‘Ellipse/Circle’ icon, then click in the location in the
display where you want to draw the ellipse, and drag the mouse until the box is the desired size,
then release the mouse.
To draw a circle, follow the same procedure, except hold down the [Shift] key while you are
dragging the mouse.
If you want to re-size the ellipse/circle, you can drag on the handles which appear when it is
selected.
To move the ellipse/circle after it is finished, select it, and drag it to the desired location.
If you want to change the fill color of the ellipse/circle, select it, then click on the desired color
in the color palette. If you want to turn on/off the fill color, you can click on Format Æ Toggle
Fill (or just click on the ‘Fill/Unfill’ icon).
To draw an ellipse
or circle, first click
on the ‘Ellipse/
Circle’ icon.
Next, click where you
want to draw the ellipse,
and drag the mouse unti
it is at the desired size.
For information on the other drawing tools, see the GraphWorX32 User Manual.
Saving A Display
To save a display, click on the ‘Save’ icon, shown above, or click on File Æ Save. The Save or
Save As dialog box will appear. It is recommended that you save your displays in the directory:
\OE Store\ Displays
OpenEnterprise for Beginners
5-9
Page 84

Chapter 5 - Building Displays to ‘Mimic’ Your Process
Switching Between Configure Mode and Runtime Mode
Configure Mode is used to build your displays, add dynamic data, etc. Live data is NOT visible
in Configure Mode.
NOTE: In order to make changes to your display, or to
add ‘live’ data to your display, the OE Graphics
package must be in ‘Configure’ mode - - if you are in
‘Runtime’ mode, click on the ‘Configure’ menu bar
item to return to ‘Configure’. If there is no ‘Configure’
item but you see a ‘Runtime’ item, you are already in
‘Configure’ mode.
If you see ‘Runtime’ here, you are in currently in
Configure Mode. Clicking on ‘Runtime’ will switch
you into Runtime Mode.
If you see ‘Configure’ here you are currently in
Runtime Mode. Clicking on ‘Configure’ will switch
you into Configure Mode.
Configure Mode is for building
the display. You can’t see any live
data in Configure Mode.
Runtime Mode is for running /
viewing the display with live data.
OpenEnterprise for Beginners
5-10
Page 85

Chapter 5 - Building Displays to ‘Mimic’ Your Process
Examples of Creating Various Display Objects
The examples which follow should generally be performed in consecutive order, since most
examples build on the information presented in the previous examples.
Each of the examples assume you have successfully connected to your running Database via
Database Explorer, and that you understand how to query the database for information using the
Database Object Viewer. If you are unsure about how to do these things, please review Chapter
4.
The examples also assume you have already started the OE Graphics package, that you have
opened up a display, that you know how to save it, and how to switch back and forth between
‘Configure’ mode and ‘Runtime’ mode. These subjects are discussed earlier in this chapter.
OpenEnterprise for Beginners
5-11
Page 86

Chapter 5 - Building Displays to ‘Mimic’ Your Process
Example #1 - Creating A Text Label on A Display
Font type
Font size
Bold
Underline
Italicize
While selected, you can
3
change the appearance of
Click on the ‘Text’ icon
1
2
Click where you want
the text with these controls.
to place the text, and
start typing
Step 1. Either click the ‘Text’ icon (shown at right), -or- click on Draw Æ Text.
Step 2. Click on the location in the display where you want to add the text label, and start typing.
Step 3. To change the font, size, or style of the label, select it, and use the controls at the top of
the screen.
OpenEnterprise for Beginners
5-12
Page 87

Chapter 5 - Building Displays to ‘Mimic’ Your Process
Making Changes To An Existing Text Label
If you want to change the text label you’ve
just created, you must right click on it, and
choose “Property Inspector” from the popup menu.
(You could also have chosen Edit Æ Text
to edit the text directly on the screen, but
the Property Inspector provides more
options.)
You should experiment with the Property
Inspector dialog box to see the various
options for representing text.
If desired, you can edit the
text directly in this field
Use this list box to
change the edge
around the text.
You can have a
raised edge, a
sunken edge, etc.
Click here to call up
the Font dialog box
to change the font
styles of the text
Call up a pallette to
select a dif feren t
background color
for the data
OpenEnterprise for Beginners
5-13
Page 88

Chapter 5 - Building Displays to ‘Mimic’ Your Process
e
gging
.
g
Example #2 - Displaying A Numerical Value From the
Database (Process Point)
2
1
Construct a query using the
Database Object Vie wer.
Open a display in the
OpenEnterprise Graphics
package
7
Switch to mode“Runtime”
4
Click on the approximate
location where you would
like the data to appear. Th
Property Inspector dialog
box will pop-up.
6
Click on the
push button.
[OK]
5
Click and drag the value from the
Database Object Viewer into the
“Data Source”
Inspector dialog box. This is calle d
dra
field in the Property
an
OPC Ta
3
Click on the Process Point icon.
Step 1. Using the Database Object Viewer, construct an active query of the database which calls
up the signal data you are interested in from the ‘realanalog’ table. Leave the window
open. (If you’re not sure how to do this, please read Chapter 4).
Step 2. Open a display in the OE Graphics package, and move it side-by-side with the Database
Object Viewer window, so that both windows are in view.
Step 3. Either click on the process point icon, -or-
click on Dynamics Æ Intrinsics Æ Process Point.
OpenEnterprise for Beginners
5-14
Page 89

Chapter 5 - Building Displays to ‘Mimic’ Your Process
g
Step 4. Click on the approximate location in the display where you want the data to appear (you
can adjust the location later, if necessary.) The Property Inspector dialog box will pop-up.
Step 5. Drag whichever value you want to display from the Database Object Viewer window into
the “Data Source” field in the Property Inspector dialog box. This is called dragging an
OPC Tag.
Step 6. Click on the [OK] push button to save the process point. The process point will appear as
a series of question marks ‘?????’ surrounded by drag handles.
OPC Ta
The drag handles can be used to manually re-size the text. The color red indicates that
this object in the display contains ‘live’ data.
NOTE: The OPC tag is now visible within the display if you move the cursor over the
process point.
OpenEnterprise for Beginners
5-15
Page 90

Chapter 5 - Building Displays to ‘Mimic’ Your Process
6
Step 7. Switch to ‘Runtime’ mode to view the active data on the display, by clicking on
“Runtime” in the menu bar. The live data value should appear on the display, and should
match that in the active query of the Database Object Viewer.
In ‘Runtime’ mode, the data value in the active
query of the Database Object Viewer, and the
value of the process point should be the same.
Variations on Example #2
• Making changes to an existing Process Point: If you want to change
the process point, you just created, you can recall the Property
Inspector dialog box to the screen and make changes. To do this, right
click on the process point in ‘Configure’ mode, and select “Property
Inspector” from the pop-up menu.
• Displaying non-numerical data in the Process Point:
There is no restriction on the type of attribute you drag into the
Property Inspector dialog box. While the example described using a
numerical value using the ‘Value’ attribute, you could have dragged
the ‘Units’ or ‘Name’ attribute into the “Data Source” field.
• Making the Process Point changeable by the
Operator: If you want the process point to be
changeable by the operator, for example, to enter
setpoint levels, simply select “Data Entry” as part of
the “Point Type” in the PPT/DE page of the Property
Inspector dialog box. In ‘Runtime’ mode, the operator
can enter new values into this process point which are
copied to the database, and down into the RTU.
Select this to
make operator
entry possible
OpenEnterprise for Beginners
5-1
Page 91

Chapter 5 - Building Displays to ‘Mimic’ Your Process
• Changing Background & Foreground Colors of the Process Point, Changing the Font:
The ‘Text’ page of the Property Inspector dialog box includes various fields for changing the
style of how the text appears. You should experiment with this to see a style you prefer.
Use this list box to
change the edge
around the text.
You can have a
raised edge, a
sunken edge, etc.
Click here to call up
the Font dialog box
to change the font
styles of the text
Call up a pallette to
select a diff eren t
background color
for the data
Common Mistakes Which Occur When Creating Process Points
• Dragging data without first clicking the ‘Process Point’ icon, and clicking in the display
If you do this, you will be dragging just the text for the OPC tag onto your display, which is
useless by itself. Click on the tag in the display, and press the [Delete] key, then start again.
• Dragging the wrong OPC tag
This is the most common error when creating a process point. Depending upon which
attribute (column) you drag from, you might see data in the wrong format (e.g. text instead of
numerical data) or you might be dragging from a row above or below the one you want. If
the displayed value does NOT match the value displayed in the active query, you can just
delete the current tag in the "Data Source" field, and drag in the correct one. Alternatively,
just click on the value in the display, press the [Delete] key, and start again.
• Forgetting to use an active query
If you forgot to click on the ‘Active Query’ icon (shown at right) before running your
query, the query will only be updated if you manually run the query again, and
consequently, the data on your display WILL NOT change when you go into
‘Runtime’ mode. Click on the ‘Active Query’ icon and re-run the query. If this does
NOT fix the problem, verify that your connection to the database is functioning.
OpenEnterprise for Beginners
5-17
Page 92

Chapter 5 - Building Displays to ‘Mimic’ Your Process
Example #3 - Displaying the changing level of liquid in
a tank
NOTE: The tank we are drawing in this example is a simple box; you can be much more
elaborate in your tank design if you desire. In addition, you may wish to check the symbol library
to see if there is a tank symbol already made that you want to use.
2
Open a display in the
OpenEnterprise Graphics
package
1
Construct a query using the
Database Object Vie we r.
3
Click on the box icon,
and create a box.
10
Switch to mode“Runtime”
Click on:
6
Dynamics->Actions->Size
8
Choose the
direction in
which the
inner box will
change size.
9
Specify the range
and click on [OK]
7
Drag the appropriate tank level value
from the Database Object Viewer into
the field in the Property
“Data Source”
Inspector
4
Change the background
color from the palette
5
Create a second box
inside the first box. The
second box represents
the liquid in the tank.
Step 1. Using the Database Object Viewer, construct an active query of the database which calls
up the tank level signal data you are interested in from the ‘realanalog’ table. Leave the
window open. (If you’re not sure how to do this, please read Chapter 4).
Step 2. Open a display in the OE Graphics package, and move it side-by-side with the Database
Object Viewer window, so that both windows are in view.
Step 3. Click on the box icon, then move the cursor to the location where you want to add the
tank. Click and drag until you have created a box which represents the tank.
OpenEnterprise for Beginners
5-18
Page 93
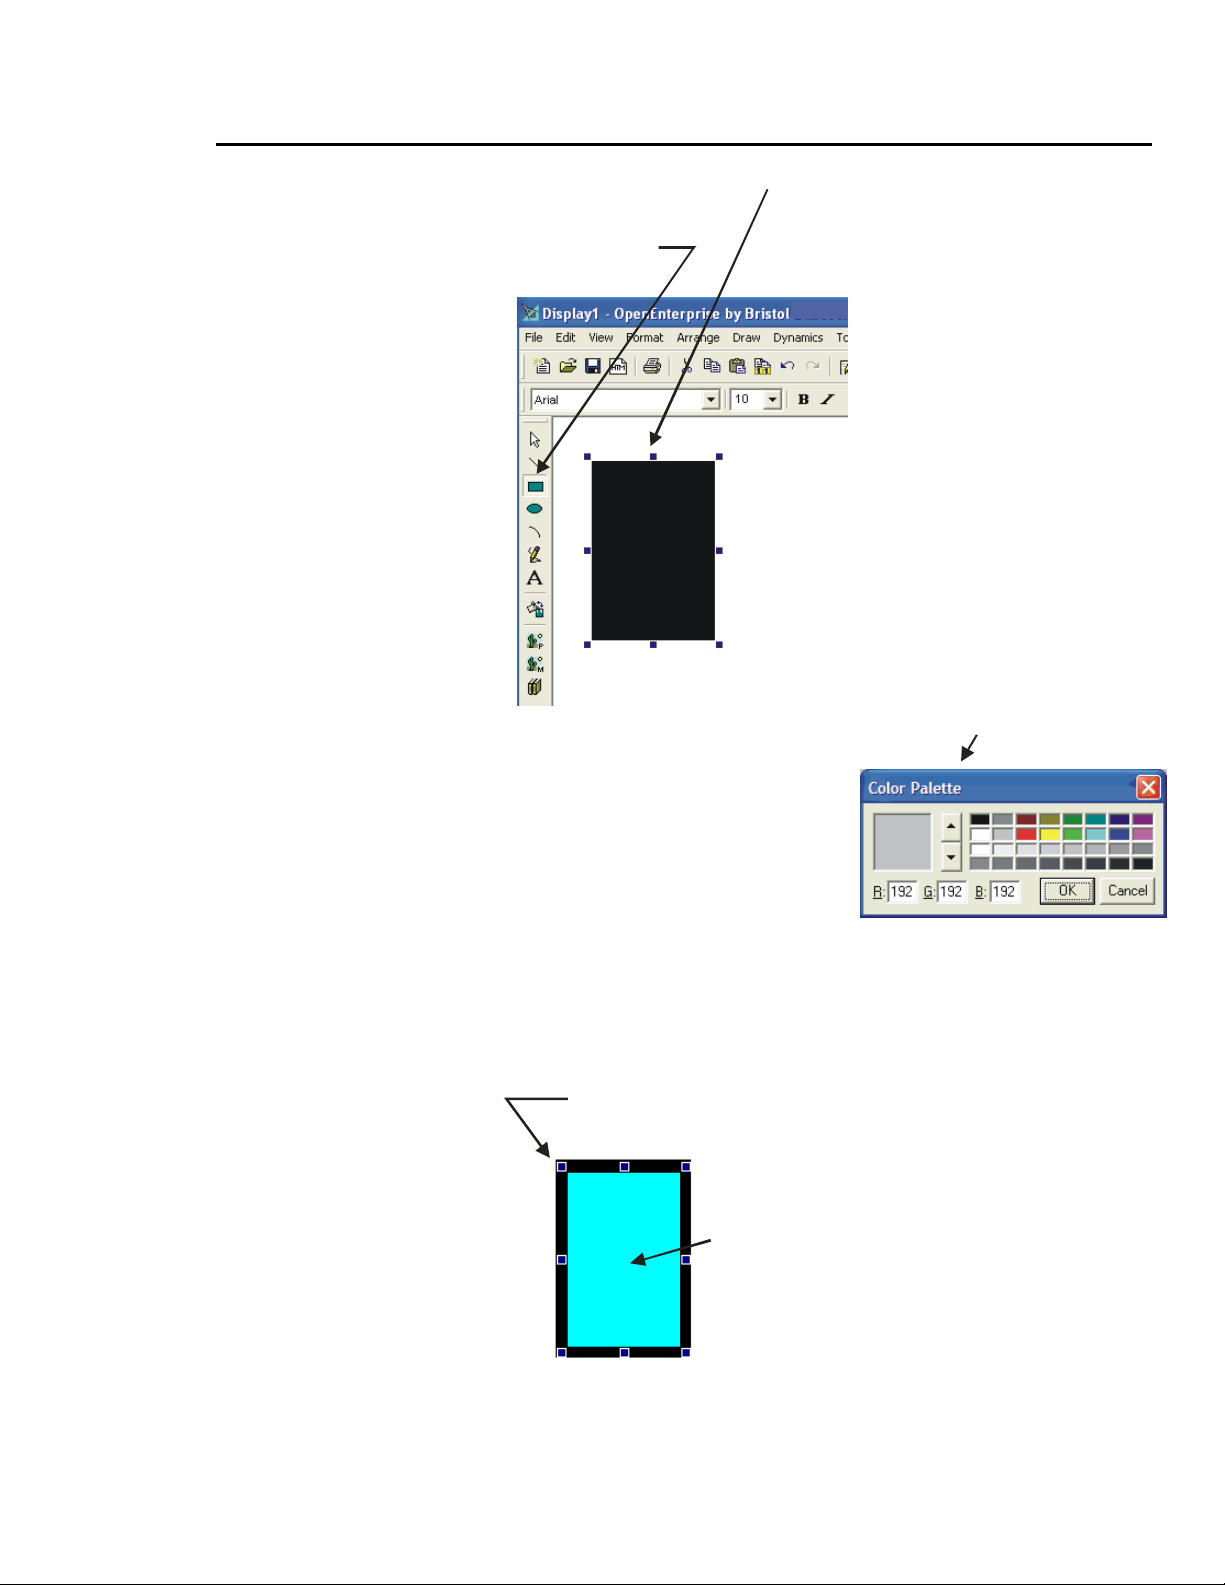
Chapter 5 - Building Displays to ‘Mimic’ Your Process
s
Next, click and
First, click on
the box icon
drag the cursor
until a box is
created
Step 4. Change the background color of the tank to black by
clicking on black in the color palette while the tank is
selected. Alternatively, you can right click on the tank
and change both the "Fill Color" and the "Line Color"
to black, separately.
Step 5. Using the same method described in steps 3 and 4, create another slightly smaller box
with a blue color which will represent the liquid in the tank, and drag it just inside the
first box, so all of its edges appear inside the first box.
Outer box represents
the tank itself
Inner box represent
the liquid in t he tank
Color palette
OpenEnterprise for Beginners
5-19
Page 94

Chapter 5 - Building Displays to ‘Mimic’ Your Process
Step 6. With the smaller blue box selected, click on Dynamics Æ Actions Æ Size and the
Property Inspector dialog box will appear.
Step 7. Drag the appropriate tank level value from the Database Object Viewer into the “Data
Source” field of the Property Inspector dialog box.
Step 8. Choose the direction in which the
inner box changes size to depict the
liquid level.
Step 9. Click on the “Range Override”
check box, and enter values for
“Low” and “High” which
correspond to the minimum and
maximum tank levels to be displayed.
Then click on the [OK] push button.
Step 10.Switch to ‘Runtime’ mode to view the active data on the
display, by clicking on “Runtime” in the menu bar. The
inner box representing the liquid should change size as
the value changes in the active query of the Database
Object Viewer.
OPC tag dragged
in from Database
Object Viewer
Choose the
direction in
which the
size changes
Define range
for tank level
OpenEnterprise for Beginners
5-20
Page 95

Chapter 5 - Building Displays to ‘Mimic’ Your Process
r
Variations on Example #3
Making more realistic looking objects using the drawing tools:
The tank we just drew consisted of two boxes -
- one for the tank, and one for the liquid in the
tank If you want to make a more realistic
looking tank for this example, you can use the
drawing tools provided in the toolbar. In fact, it
is a good idea to experiment with the drawing
tools to see what sorts of objects you can
create.
The straight line and curve tools operate similarly to the box tool; just click on their icons in the
toolbar, then click within the display and drag the cursor until the tool draws the line or curve as
you want it. The ellipse tool also operates similarly, however, if you want to create a circle, hold
down the [Shift] key while using the ellipse tool.
One thing to remember when using the multi-line segmented tool is that to exit that tool, you
must double-click the mouse on the endpoint where you want to stop drawing lines; otherwise it
will continue to try to draw more line segments.
For more information on using these tools, see the GraphWorX32 User Manual.
Making changes and corrections to objects:
To make changes to the non-dynamic parts of the object, just click on them in ‘Configure’ mode,
and make changes using the drawing tools, etc. To make changes in the dynamic properties (i.e.
sizing based on an analog value) right-click on the object in ‘Configure’ mode, and make any
necessary changes in the Property Inspector. If the dynamic properties are too difficult to change
in this way, you can select the object by clicking on it until you see red handles, then, from the
menu bar, click on EditÆDelete Selected Dynamics. You can also do this by right-clicking on
the object, and choosing “Delete Dynamics” from the pop-up menu. Now re-create the
dynamics as you want them.
Select an existing object on the screen
Draw a straight line
Draw a box
Draw an ellipse (hold down [Shift] to make a circle)
Draw a curve
Draw a multi-line segmented object
Ty pe te xt la bel s
Fill an enclosed object with the currently selected colo
OpenEnterprise for Beginners
5-21
Page 96

Chapter 5 - Building Displays to ‘Mimic’ Your Process
Using Irregularly Shaped Borders:
You can use the drawing tools to create an irregularly shaped object for your tank (for example, a
cut-away view) which will be re-sized based on a real-time value in the database.
To do this, create the irregular (but enclosed) object with the segmented line tool, then duplicate
it by depressing the [Ctrl]+[D] keys. Now you have two objects; change one object’s fill color to
be lightly colored (to show the liquid level) and the other object’s fill color to be darker colored
(to represent the background). Align the objects by dragging the cursor around them both to
select them, then click on ArrangeÆAlignÆBoth Centers. If necessary, use the “Bring to
Front” and “Send to Back” options to make sure the lighter colored object is on top.
Make two identical objects. The
lighter colored one will change size
based on the analog value; the
darker colored one does not change.
Use the cursor to select both objects,
then align them using the
feature so that they appear as one
single object; with the lighter colored
object on top.
“Align”
OpenEnterprise for Beginners
5-22
Page 97

Chapter 5 - Building Displays to ‘Mimic’ Your Process
y
Now, click on DynamicsÆActionsÆSize and the Property Inspector dialog box will appear.
Use the exact same methods you used before when you were making the tank using boxes. The
only difference is, this time, make sure you select the “Clip” option as shown in the figure,
below:
If you forget to use clipping, the entire dynamic object will be scaled, and the result will look
wrong for this type of object. The figure on the left, below, shows the results of scaling an
irregular dynamic object (wrong method), and the figure on the right shows the results of
clipping the irregular dynamic object (correct method).
When creating irregularl
shaped dynamic objects,
be sure to select the
option.“Clip”
Dynamic object
is scaled instead
of clipped
(WRONG)
OpenEnterprise for Beginners
Dynamic
object is
correctly
clipped
5-23
Page 98

Chapter 5 - Building Displays to ‘Mimic’ Your Process
t
Using A Pre-Drawn Object From the Symbol Library
If you are having trouble drawing a satisfactory tank, you can always look in the symbol library
to see if there is one you would prefer to use.
Click on the ‘Symbol Library’ icon, shown at left, and the Symbol Library will be
opened.
Click on the category of symbols you want to look at, and the available symbols in that category
will appear. When you see a symbol you want to use, drag it from the symbol library into your
display.
Click on the category
you want to choose
from, and its associated
symbols will be displayed
Next, drag the
symbol you wan
into your display
OpenEnterprise for Beginners
5-24
Page 99

Chapter 5 - Building Displays to ‘Mimic’ Your Process
.
Example #4 - Creating A Sliding Setpoint Control With
Which the Operator Can Update a Value in
the Database & RTU
NOTE: Beginning with this example, we assume that you are familiar enough with the general
display building process to know that you must run a query with the Database Object Viewer,
leave it active while you call up your display, drag it into the data source field of the Property
Inspector, etc. These items will no longer be listed as steps in the example, because their
inclusion is implied. In addition, by this example, we assume that you are familiar with use of the
drawing tools, and how to make use of the topics in the previous examples such as creating a
process point, making an object change size based on an analog value, etc.
Suppose your controller includes logic which allows an operator to adjust a setpoint for a tank
level; the operator alters the setpoint causing other logic controlling input and output valves to
the tank to open or close in order for the tank level to reach the setpoint. There are many ways to
incorporate this operator setpoint within a display.
You could, for example, create a data entry process point (see Making the Process Point
changeable by the Operator on page 5-21) in which the operator manually enters a new
setpoint.
Another approach, which is the subject of this
example, is to create a sliding setpoint control, which
the operator drags on the screen to dynamically change
the setpoint; as the value changes, it is updated in the
database, and copied down to the RTU.
Step 1. Start out by creating a tank liquid level graphic
which re-sizes based on the tank level value. In
this case, just show the level as a dark colored
bar, on top of an identically sized lighter
colored object. (The light colored bar
underneath does not change - - only make the
dark colored object dynamic.) It would also be
a good idea to display the tank level as a
process point just below the graphical
representation on the display.
This bar will be
used to represent
the tank level. The
level will also be
displayed below
as a process point
OpenEnterprise for Beginners
5-25
Page 100

Chapter 5 - Building Displays to ‘Mimic’ Your Process
6
.
If you’re unsure how to create this graphic, please review Example #3 beginning on page
5-18. If you’re unsure how to create a process point, please review Example #2 beginning
on page 5-14.
Step 2. Using the segmented line tool,
draw a triangular pointer, which
will be used as the setpoint slider.
(You can draw the pointer on
another part of the display, and
drag it over later; it doesn’t have to
be right next to the bar
representing the tank level yet;
eventually however, the tip of the
pointer should be next to the bar
representing the tank level.)
Double-click when you have
finished enclosing the pointer (to
exit the segmented line tool) then,
with the pointer still selected,
choose a color for the pointer from
the color palette, and click on the
fill tool to set the new fill color.
Step 3. Create a process point next to the triangular pointer (created in Step 2). This
process point should use the value of whichever signal is your setpoint signal. Do
NOT make it a data entry point; just make it a normal process point which
displays the value of the setpoint signal.
Segmented
line tool
Fill tool
Color palette
Use the segmented line tool
to create a triangular pointer.
Then choose a color for it from
the color palette, and click on
the fill icon to set the new color
OpenEnterprise for Beginners
5-2
 Loading...