

Remock Lockey Next Generation Wireless Door Lock with Remote Control User Instruction Manual
NextGenerationWirelessDoorLockwithRemoteControl
User Instruction Manual
Please read carefully the following instruction
for your safety before using the product.
Itisimportanttounderstandhowthislockworksto
useitcorrectly

Warning Elements
Whenthe LED light isflickering and beepsignalssounddifferent fromusual, pleasechange batteries
immediately.(referto page6)
Please makesure that youdon'tdrop itorgetit wetbecauseit'sa highly sophisticateproduct madefrom
semiconductors.
Whenthe doorlock iscontactedwithwater,you can havetherisk ofelectric shock, fire and malfunction ofthelock.
Donotinstallthisdoor lockin the place ofheavyhumidity, dustoroilysmoketo prevent any fireandelectric shock.
Youmust not install thisdoorlockin the place where inflammable materials exist
Please donotleavetheremotecontrolorthe lockwithin the reach ofinfants.
Pleasechangeusingbatteriesofthelockbodyatthesametimetoall newbatteriesAAALKALINE.
(Amixofnewand usedbatteries ortwodifferent kindsof batteriesmaycausethemalfunctionof thelock.)
Pleaseensureyou correctlyplacetwobatteries accordingtothesignsof+ and-.
Andyouarerecommendednottoreplacebatteriesinpresenceof children .
Pleasetake outbatteriesfromthelockbodywhenthelockisnot used foralongtimetopreventany
possibility offire andmalfunctionoftheproduct
※ Registered remote control's code is not erased even after batteries are changed.
Pleasemake sureabouttheproceduresonregistryanddeletionofremotecontrol'scodeas providedon
page8. Anyerrorsmayleadto themalfunctionofthelock.
Youarealsorequiredtoconfirm whetherthe remotecontrol worksaccordingtoeitherregistryordeletionofthe code.
Pleasekeepinmindthattheremotecontrolcan bestolen,so takespecialcare nottoloseit.
※ You may keep one of remote controls at a secrete place for emergency.
Never trytodisassemblethebody.
Thisdoorlockwasdevelopedasanassistant locksystemforusewitha mainlockequipment.
Pleasekeepinmindthattwopersonsusetwo remotecontrolstoactivatethedooratthesametime.
Sucha duplicateuse maystopfunctioning.
NextGenerationWirelessDoorLockwithRemoteControl
User Instruction Manual
Please read carefully the following instruction
for your safety before using the product.
Itisimportanttounderstandhowthislockworksto
useitcorrectly
User instruction
Open the battery cover by pushing it to the direction (▼)and then insert two
AAalkalinebatteries(refertopage6)
Close thebattery cover.
Oncethelockisinstalled,please ensurethatthe remotecontrol
works properlybytestingitoutside the door. Youhavesomeone
who canmonitorthefunctioninsideduringthetest.
(Afterthat, you twoswitch thepositionandtestit again)
TransmissionDistanceoftheremotecontrol
Bestplace for transmission and receptionof radiowave.
AntennaAngle(90¡withlock bodyisthebest, but maybedifferentaccording to
circumstance.)
Alarm tone willringfromthelockwhenthedooris "lockedoropen."
Locking andopeningsignals
▶ Push lock button→ "Pi~ik" (two-syllable rhythms) →the door is locked.
▶ Press open button →"Pik, pik, pik" (repeated single-syllable rhythm) →the
doorisopen.
▶ If the remote control does not work, please press the button again.
▶ Although it is possible to acknowledge the locking and opening of the door
bysignals,youare recommended toconfirm ityourself.
▶
▶
▶
▶
Function of informing the timing to change batteries.
▶ When LED light flickers every 4 seconds and signals sound like cricket, the
batteriesmust bechangedimmediately.
▶ If you fail to change batteries in time, the lock would stop functioning
(In thiscase,ourcompanydoesnottakeany responsibility for thedamage
causedbythe discontinued functionof the door lock.)
Hand lever.
The hand lever is designed to open easy in emergency such as fire.
Please remember!
4pieces ofremote control
arebasicallyregistered
Pleaseregisterthecodes
ofthese remote controls
again toensure safety.
Pleasemake surethatyou
have toregisterthecode
in thelockwhenyou
purchaseanadditional
remotecontrol.
(refertopage8).

Composition and name of parts
Photosofthefollowing componentsarepresented
toincreaseyour understanding andmay bedifferent
fromactualproducts.
Body
BaseSteel Plate
Latch &Assistant Busing
AA Alkaline Battery RemoteControl
Components
NAME OF EACH PART.
handlever
latch with
assistant busing
assembled
remote controller
front plate
rubber packing
LEDwindow:
signaling the
time ofbatter
change
Battery:
(+,-) Insert after confirmation
batterycover
Antenna:
Variableefficiency
according toth
angle
Openbasesteel plate:
deliveryafter assemble
Battery:
deliveryinserted.
fixpoint for
keychain
rearplate
<Lock Body > < Remote Control>
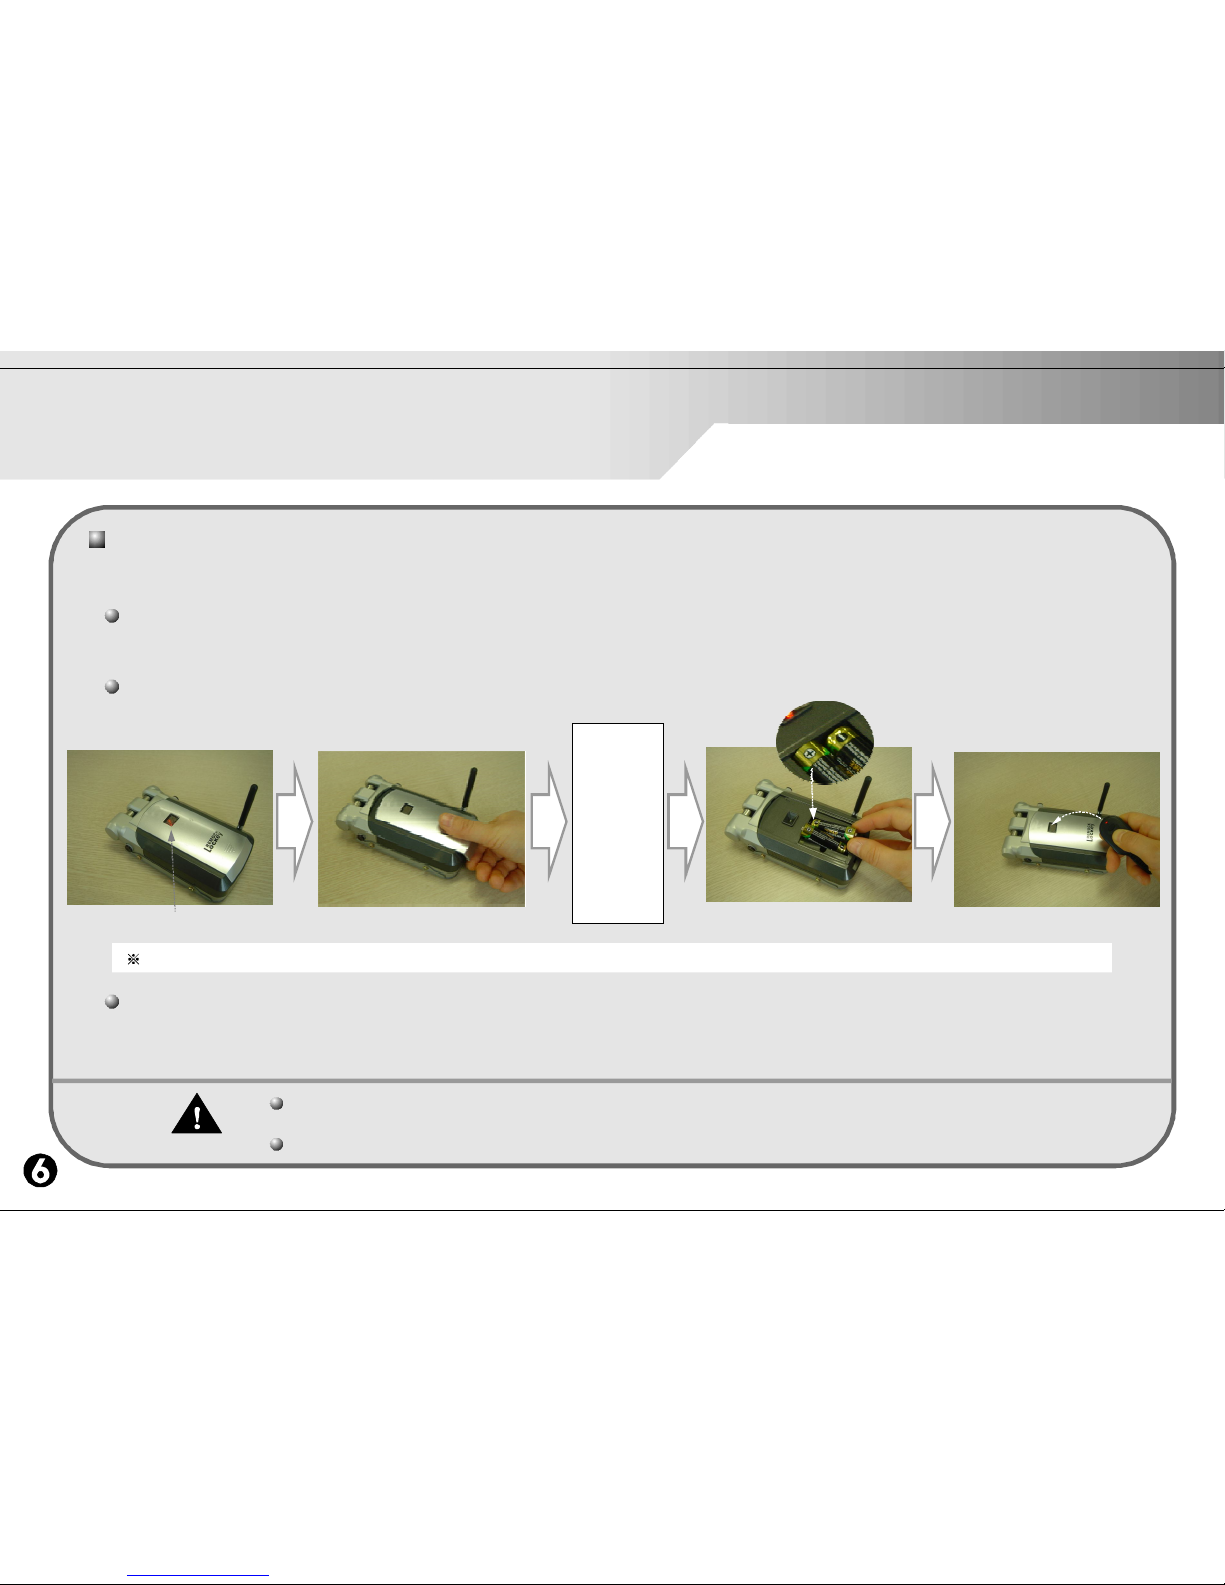
Change of batteries for the lock body
Lock Body
The LED light flickers every 4 seconds to signal the need for battery replacement.
In addition, when signals sound different from usual, you are also required to change batteries as follows:
Locking and opening signals
* Push lock button→ "Pi~ik" (two-syllable rhythms) →the door is loc ked.
* Push open button →"Pik, pik, pik" (repeated single-syllable rhythm) →the door is open.
Steps for re placing batteries [※ When the LED starts flickering please change the batteries immedia tely]
Please
insert new
batteries
at the
interval of
10seconds
(for protectionof electronic
circuit.)
LED flickering Push cover in the direction▼ Insert batteries [+,-] confirm operation
Pleaseuse onlyAA alkaline batteries.The useof magneticbatteriesor recharged batteries mayinduce malfunction of the lock.
Checking procedures after battery replacement
* Please check whether the lock works by using remote controls.
* The LED light and the signals regain their normal mode by recognizing normal battery voltage.
Please check the expiration date of battery(written in the bottom)
Please note that the discharging speed of battery is different according to the storage condition.
Causion
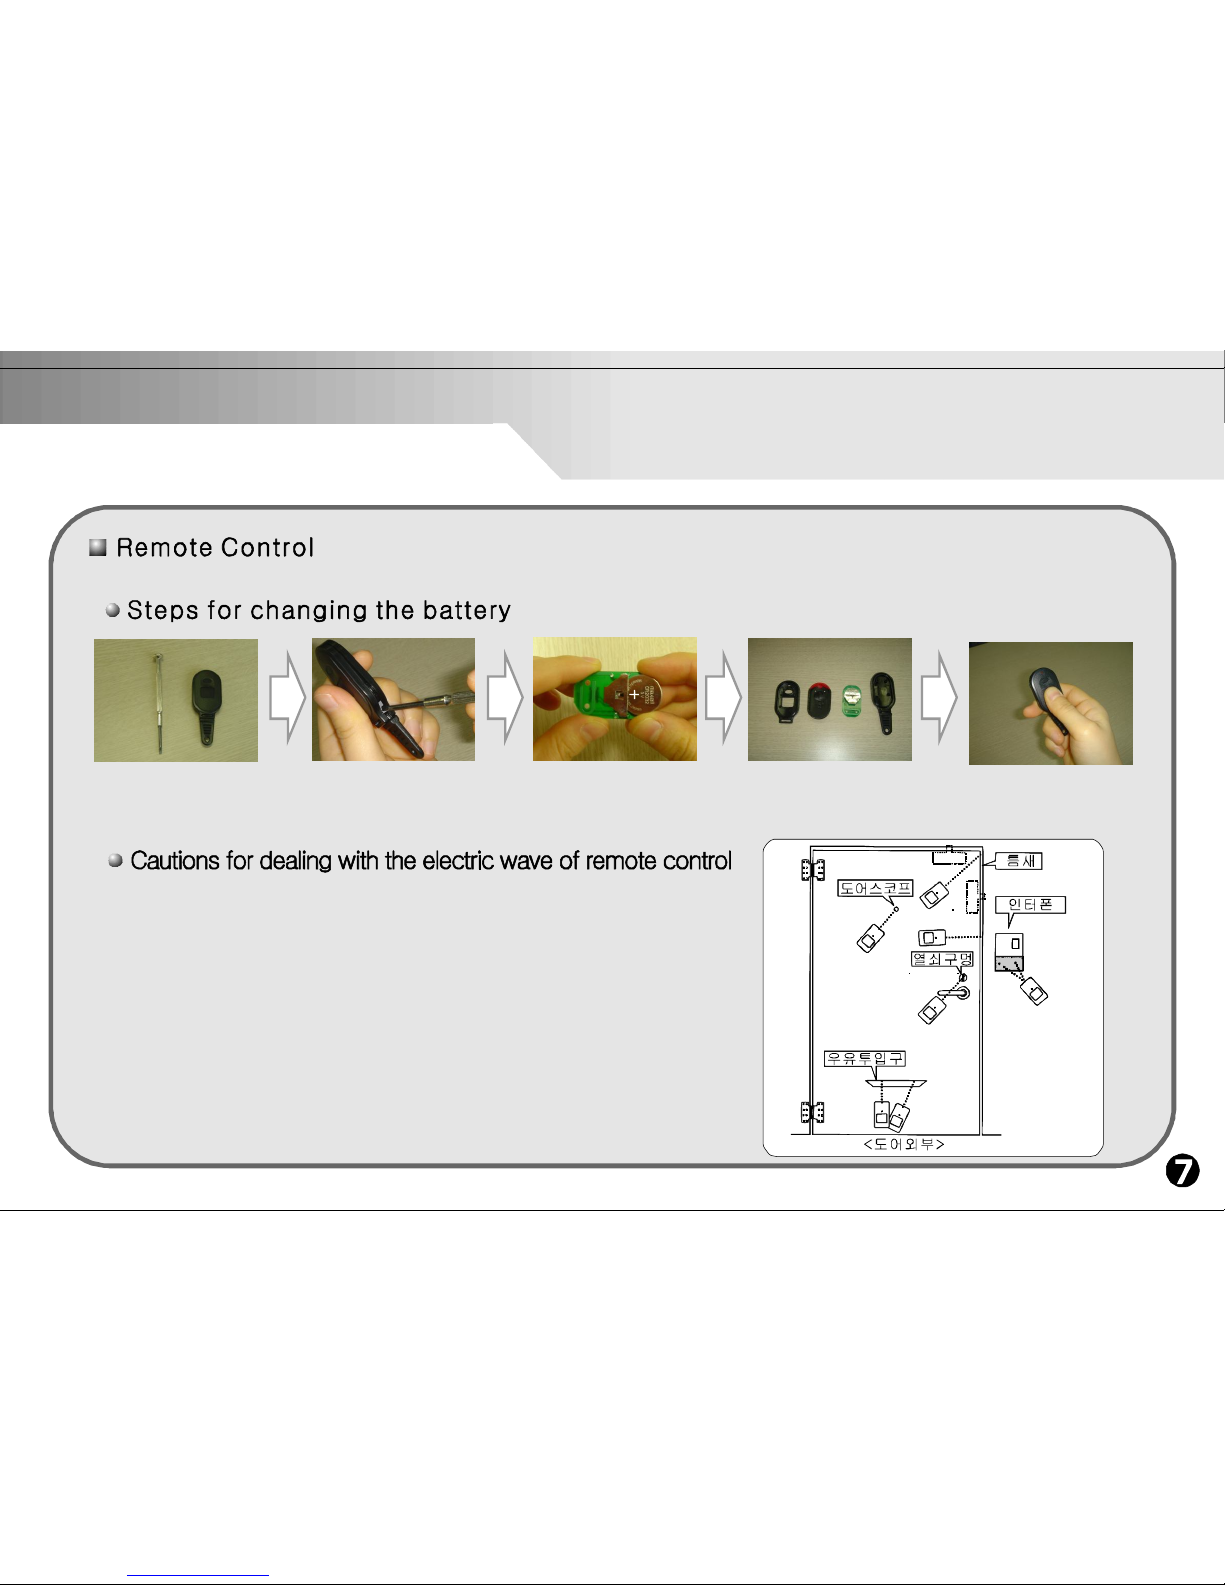
Replacement of Remote Control Battery
Please replace the battery of remote control when the LED light becomes dimmer and the operation speed slows down.
▶ LOCKEY is designed to generate weak electric waves, which
are transmitted through narrow crevices around the door
▶ The standard transmission distance of the remote control is
up to 1.5 meter straightly from the door.
▶ The transmission distance of the remote control from the outdoor
varies with environmental conditions and electric wave background.
(Same conditions from the inside also)
▶ Wireless transmission is very sensitive to other frequency. So the
best location can be changed.
Use a (-)
shaped small
driver
Insert the tip of
driverinto a
channelon lateral
sideand slightly
twistthe driverto
openthecase
Replace battery
(CR 2032)
Make sure the
poles, + or -
Assemble sequence:
front case→rubber
ele'c ciruit board→
backcase
Test
main body and
remote control

You are recommended not to press registration button unless you
want to re-register the codes after losing one of remote controls or to register the newly purchased one.
Pressing the registration button will delete all stored codes.
Caution
How to register or delete the code of
between remote controls and lock body
Registration button
Registration ofR/C
1 Openthe batterycover.
2 Thereisregistrationbutton in themiddleoftheleftsideofbatteryholder.
3 Pressregistrationbuttonwitha stick-liketoolforabout2 seconds.
4 TheLED lightflickerswith a sound of"Pi-ri-lik"
5 Presseachremote controls foraboutone seconduntilitmakes "pi-ik-" sound.
☞ When you stop taking further steps for more than 15 seconds,
the remote controlturnsto the normal mode automatically.
6 Pressregistrationbuttonforabout onesecondtoresumetheregistration
7 Registrationhas beencompleted. Testthe lock usingthe registered remotecontrols
8 Whenone ofthe remote controlsdonot work, pleaseregister again
followingthe same steps as abovementioned
1 Incaseyouloseoneofthe remote controls, please collect theremainingthreeforre-registration
2 Pleasetake thesame stepsas describedaboveforre-registration
3 This meansthat the lostremotecontrolisdeletedregistration.
Check ifLED light flickers

Please test the four remote controls from out side with leaving the key body inside before installation.
Check the door condition (material, shape and surface)
If the door has an unsmooth surface or its paint peels and if it is a wood door, we cannot guarantee your
security after installation. (In that case, please consult with the dealer)
■ Measurement for installation location.
Check if the lock can fit into the door and its frame.
■ Cleaning the installation place.
Wipe off the dust or moisture on the installationplace with alcohol.
(Impurities will undermine adhesion)
■ Inserting busing in the hole of latch.
Install the lock after inserting assistant busing in the hole of latch and combining the body with the completed latch.
■ Notice for the attachment/detachment of the body.
Be careful not let the lock body fall from the installation place to prevent human injury and damage of the lock.
■ Automatic opening
There is function that in case of incomplete installation or operation failure, the lock will be opened
automatically, with warning sound.
Tapecan not be re-used.
Thistapecan not be used onceit is attached.So, attach it after reading theinstallation method enough.
Caution
Establishment common sense

How to install and disassemble
1.Take off the adhesive tapefrom latch.
2.Push and attach latch todoor pillar. Atthis stagethere isno needto
detach adhesive tape from the body.
3.Nowplease detach adhesive tapefrom the body.
4.Fixthe body on thepositionwhere you want to installit
5.Remove assistant bushing after dismantling combination.
6.Presstheadhesivetapeto remove the air,so thatthe adhesive
strengthbetweenthe bodyandlatch will be increased.
* Test the lock using the remote controls
Please try to operate remote controls and check if the
installation was made properly.
* Please do not touch the
installed lock for 24 hours for
better adhesion.
* You can detachiteasily fromthedoor and carryitwhen youmove to new place.
* Please purchase newlatch and baseplate withattachedadhesive tapeat our
distributor shop.
1. Pleasedetachbolts on both sidesof baseplate fromthebodybyusing a cross driver(+).
2. Pleasecut thebaseplate attached to door whileputting pianostringor guitarstring
between baseplate and doorsurface and then pulling the stringslowly.
Please note thatif youstop it will not move again.(same method forlatch)
3. It iseasierto detach adhesive tapewhich isattached to thedoor afterwarming itby hairdryer.

▶ ASK SINGLE CONVERSION
▶ 315MHz (±500KHz)
▶ Alkaline AAM size 2 pcs
▶ 6 months based on 20 times per day
▶ -20℃ ~ 60℃ (in no freezing and dew condition)
▶ 5%~80%(in no dew condition)
▶ Number of registered remote controller: 16 different codes can be registered respectively.
▶ ASK SINGLE CONVERSION
▶ 315MHz (±500KHz)
▶ lithium battery CR2032
▶ 12 months based on 20 times per day
▶ -20℃ ~ 60℃ (in no freezing and dew condition)
▶ 5%~80%(in no dew condition)
▶ about 260,000,000
Specification

Warranty
1. We offer after-service for free when the product is broken during the warranty period after it was
installed in compliance with the user instruction manual. You can bring the product to the dealer or us.
2. However we charge fee for the following services even during the warranty period:
Even in the guarantee period, charged repair will be made in the following cases:
a) When there is no evidence on the date of purchase
b) When failure or damage was caused by natural disaster such as fire, earth quake, water
flood. lightening and others.
c) When failure or damage was caused by improper use, attachment, dismantlement, or modification.
d) When failure or damage was caused by careless handling or accidental dropping after purchase.
e) Change of consumables (battery, attached base plate, latch).
f) When failure or damage was due to environmental conditions
g) The product's register number was removed
3. This warranty is intended for the key body and remote controllers.
This warranty does not comment on the matters regarding sales loss caused by the failure or damage
of the product
4. Warranty period
a) The warranty is effective for a period of one (1) year from the date of purchase
b) The date of shipment is considered as the date of purchase in case there is no evidence on the
date of purchase
 Loading...