

Page 1
REMKO EST
Electric infrared radiator
Operation
Technology
Spare Parts
Edition GB – M10
REMKO - powerful like a bear.
Page 2

Page 3
Operating instructions
Make sure to read these instructions carefully before starting/using the unit!
Our guarantee will become void when the unit supplied by us is used and
installed for inadequate purposes, or maintained incorrectly, etc.,
or if it is changed without our prior consent.
Subject to alterations!
Electric infrared radiator
Contents Page
Safety Instructions 4
Description of the Unit 4
Unit Assembly 4
Starting 5
Unit shut down 5
Minimum distances 5
Maintenance 5
Always keep these operating instructions near or on the unit!
G
Contents Page
Exploded view 6
Spare part list 6
Technical data 7
Wiring diagram 7
Troubleshooting 7
Service and guarantee 7
G
3
Page 4
Safety Instructions
Extensive tests have been conducted on the material,
functionality and quality of the REMKO infrared radiator
to ensure that it is a high-performance unit with a long
service life.
Hazards may nevertheless arise if the unit is used by
persons not familiar with its operation or if the unit is not
used for its intended purpose.
◊ Make sure that the operating personnel of the radia-
tor check the unit for visible defects on the operating
and safety mechanisms and ensure that no protective devices are missing.
The supervisor is to be informed if problems are
found.
◊ In case of faults which endanger the safe operation
of the unit, it must be stopped.
◊ The unit may only be operated when assembled and
for its intended purpose.
◊ Safety components (e.g. protective grilles) may not
be disassembled or taken out of operation.
◊ Make sure to observe relevant local regulations and
take appropriate safety measures when the unit is in
operation.
◊ The unit may not be operated in rooms susceptible
to explosions.
◊ Make sure that the unit is kept at a safe distance
from flammable materials.
◊ The protective grille and parts of the surface become
hot during unit operation.
◊ Only change the direction of the radiant heat when
the unit is cool.
◊ Never insert foreign objects into the unit.
◊ If the unit is not monitored and is in continuous op-
eration in closed rooms, suitable room thermostats
must be used.
◊ The unit may never be left unattended while in op-
eration if it is possible that unauthorised persons
have access to it.
◊ Do not cover the unit during operation.
◊ The unit may not be operated directly beneath a wall
socket.
◊ The unit may not be operated near bathtubs, show-
ers, swimming pools, etc.
◊ Do not expose the unit to a direct stream of water.
◊ Make sure that water does not get inside the unit.
◊ Protect all electric cables outside the units from
damage (e.g. caused by animals).
Description of the Unit
The unit is operated with electric power and has been
designed for universal, fully-automatic, smooth operation.
The unit is equipped with capsuled, electrical heating
elements, a sturdy pedestal, a mounting bracket and
connecting cable with plug.
This unit meets the basic safety and consumer health
requirements outlined in the relevant EU regulations.
The unit is safe and easy to operate.
Areas of Application
◊ Point heating of workplaces in non fire-hazard fabri-
cation rooms and halls;
◊ Permanent or temporary heating of rooms.
◊ Maintaining the temperature of components suscep-
tible to frost.
◊ Defrosting of machines vehicles and fire-proof stor-
ing goods with keeping the prescribed distance of
safety.
Unit Assembly
The unit has been supplied preassembled and can either be operated as a standing unit or be mounted on
the wall.
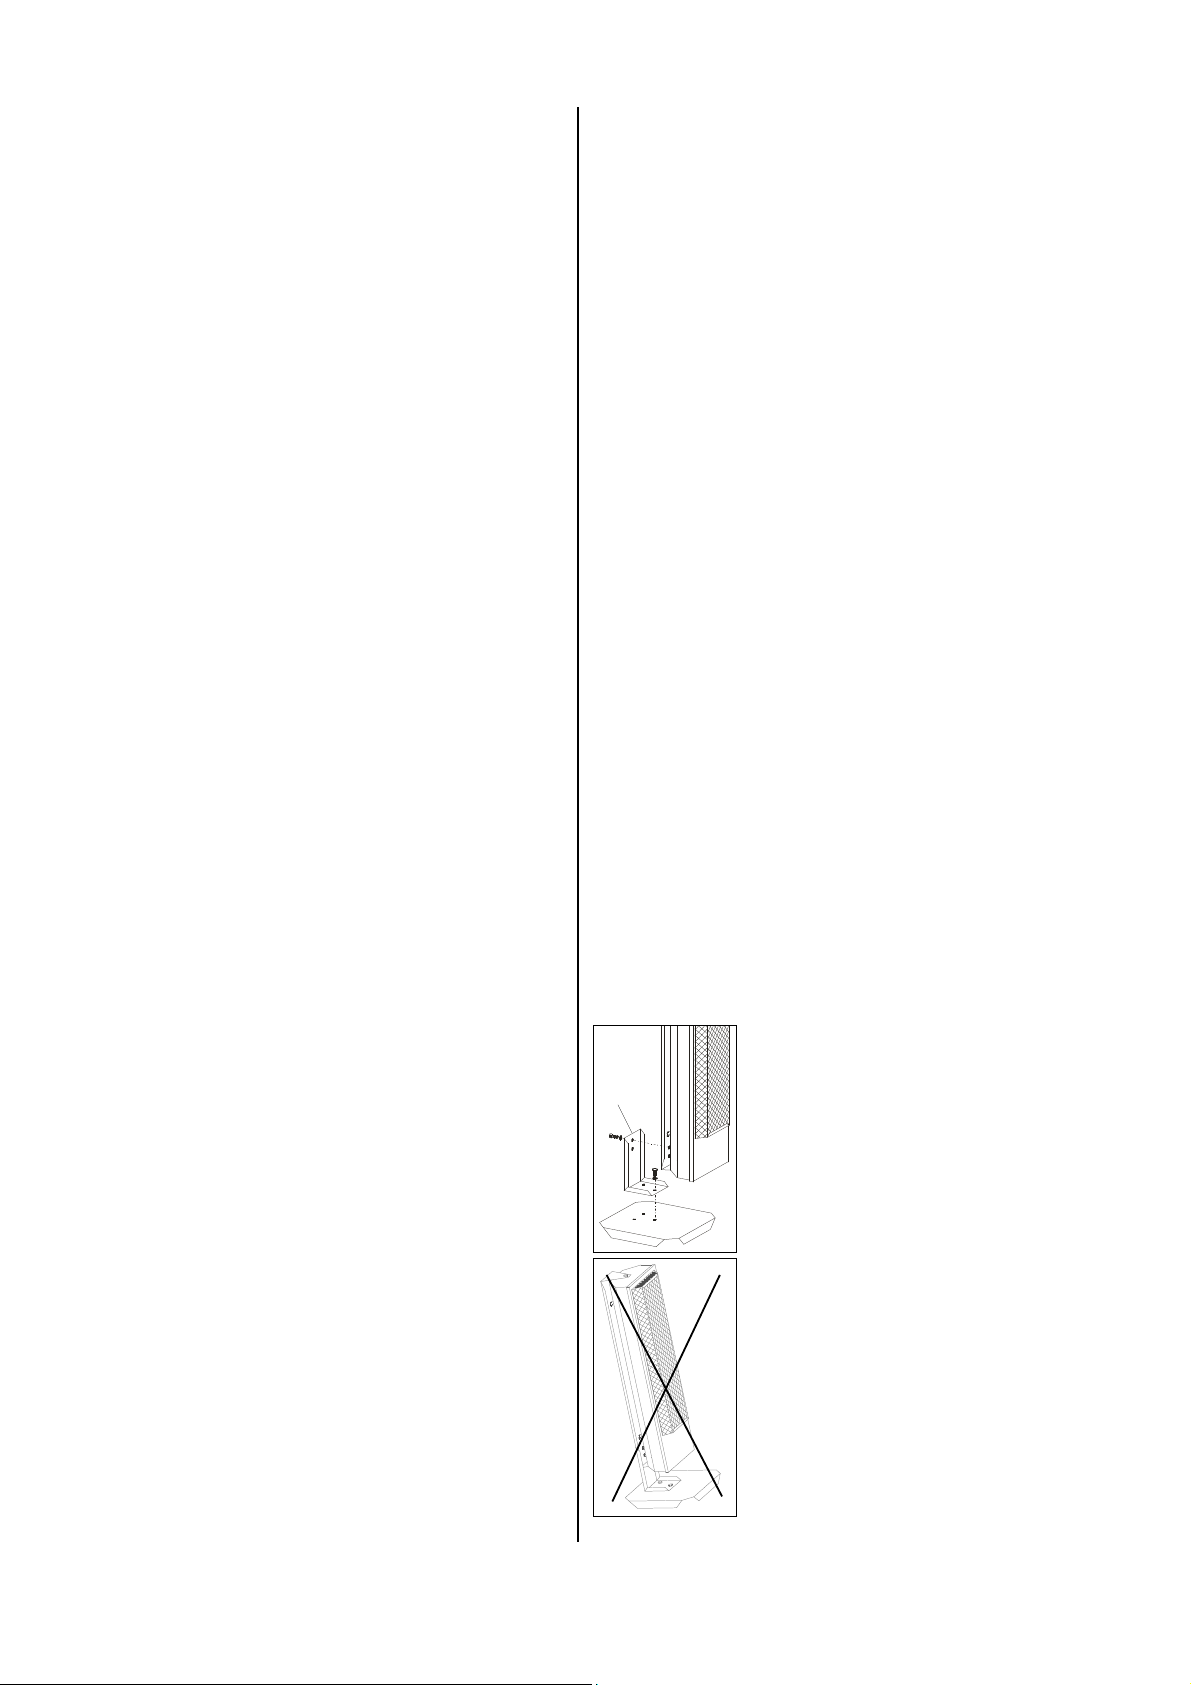
Assembly as standing unit
1. Attach the mounting angle A to
the pedestal with the 3 M8
A
screws placing the washer underneath.
2. Attach the unit’s mounting
bracket to the mounting angle
with the 2 M8 screws placing the
washer underneath.
3. Place the unit securely on a
level and non-combustible surface.
Extension cable may only be laid by authorised
electricians based on the capacity of a unit, the
length of the cable and in accordance with local re-
G
quirements.
4
Make sure that a safe distance is maintained!
G
Page 5
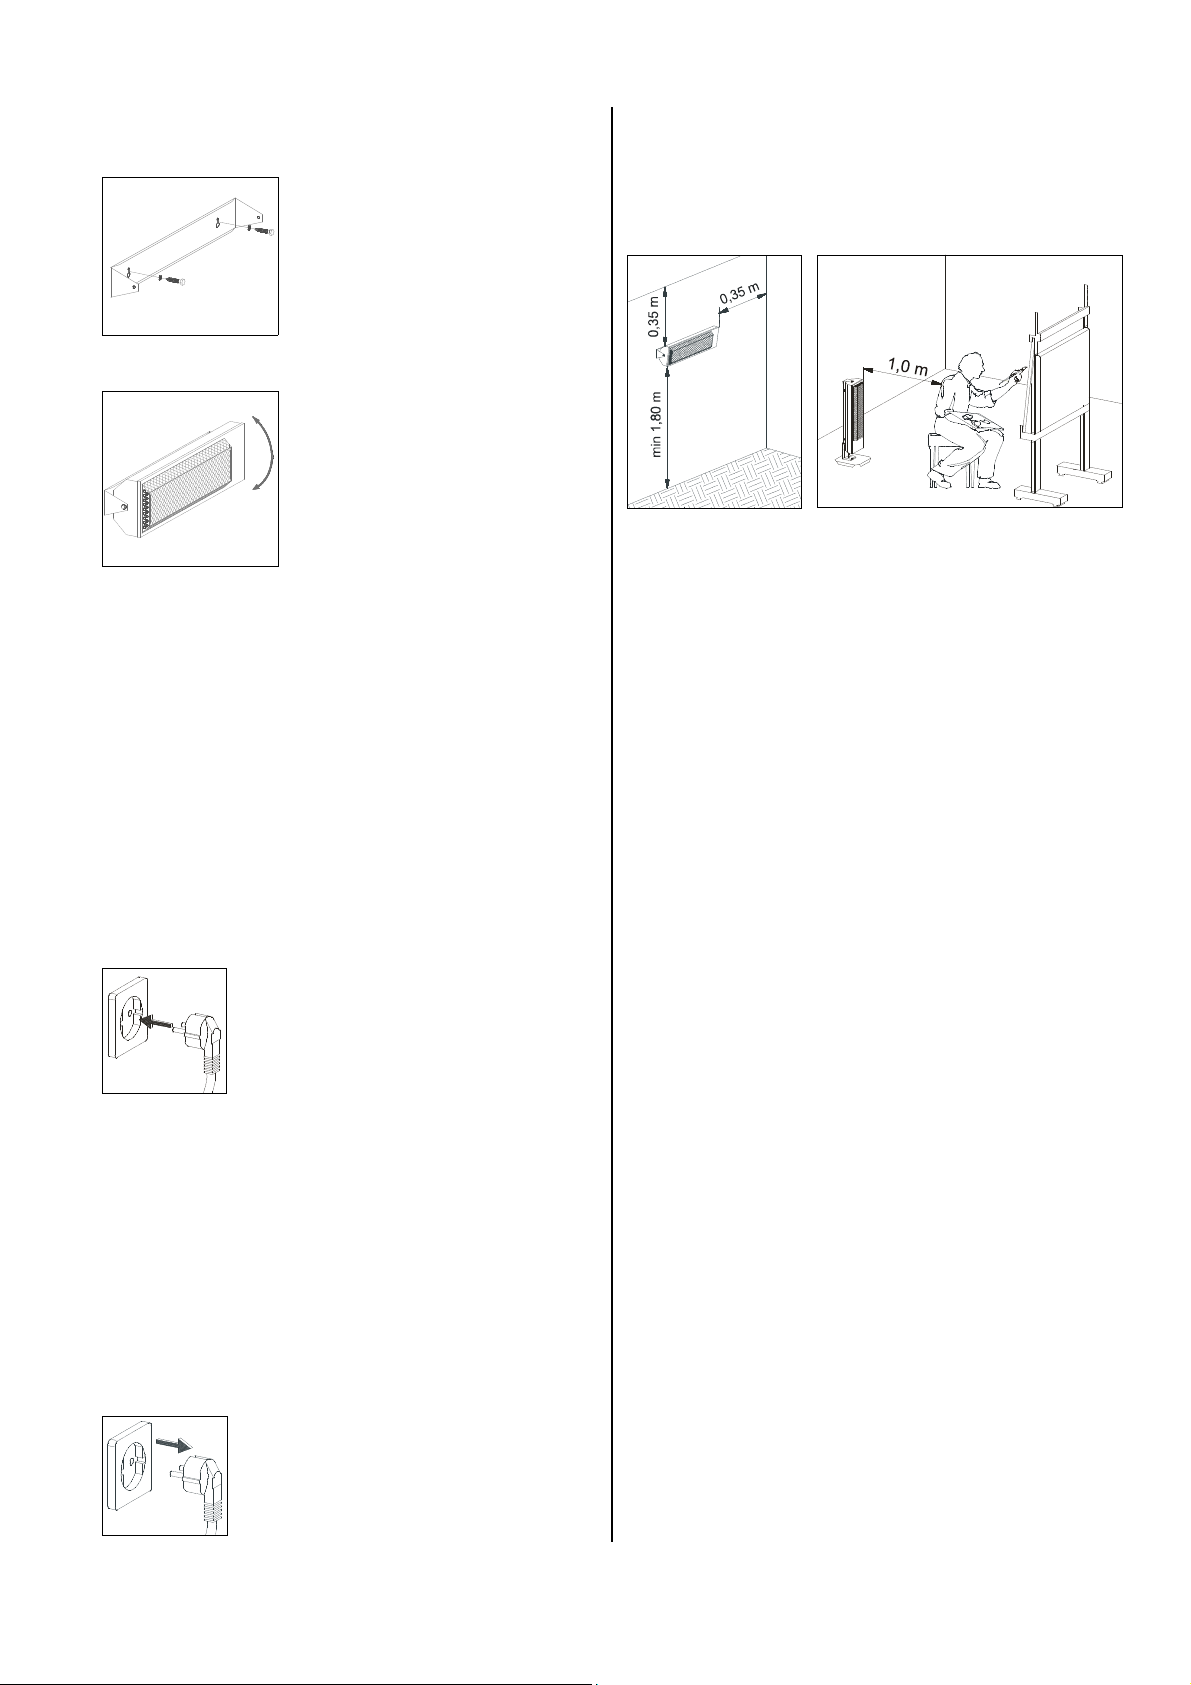
Wall assembly
1. Remove the mounting bracket
from the unit housing.
2. Attach the mounting bracket
firmly in a horizontal position
on a secure wall not made of
combustible material making
sure to maintain the required
safety distances.
3. Reattach the unit housing to
the mounting bracket.
The connecting cable should
hang down.
4. Adjust the direction of the radiant heat as required and
tighten the tightening screws
on the side.
Starting
Only those persons who have been trained to operate of
the unit may be responsible for operating and monitoring it.
Prior to initial operation, check the unit for any visual defects on the control and safety mechanisms.
Put the unit into operation as follows.
1. Make sure that the unit is placed firmly on the ground
or that it is securely attached to the wall.
2. Check the power supply.
230V/1~ 50 Hz.
3. Insert the power plug into a correctly
fused plug socket.
Fuse protection 16 A (inert).
The unit is to be connected to the power supply via
a special supply point with fault current safety
G
switch.
Extension cables may only be used once they are
unrolled.
G
Unit Shut Down
1. Unplug unit from the power source.
2. Allow the unit to cool down.
Minimum distances
The minimum safety distances below must be
maintained at all times.
Maintenance
Regular maintenance and observance of some basic
principles are required to ensure a long service life and
to keep the unit functioning properly.
According to the terms of use the units are to be
checked as to their perfect operation by an expert when
necessary, but at least once a year.
Prior to starting any work make sure to pull the
mains plug out of the mains socket!
G
Maintenance work may only be performed by
authorised personnel.
G
Please pay attention to the following points:
◊ The unit is to be maintained and cleaned in regular
intervals.
◊ The unit is to be kept free from dust and other de-
posits and is to be cleaned only with a dry or humid
cloth.
Do not place the unit in a direct stream of water.
◊ Do not use any aggressive cleaning agents or those
which are harmful or environmentally unfriendly.
◊ Do not use cleaning agents which contain solvents.
◊ Use only suitable cleaning agents to remove exces-
sive dirt.
◊ Check safety devices regularly.
◊ Check protective suction and grids regularly and
clean when necessary
Please conduct an electrical safety test after servicing the unit.
G
5
Page 6
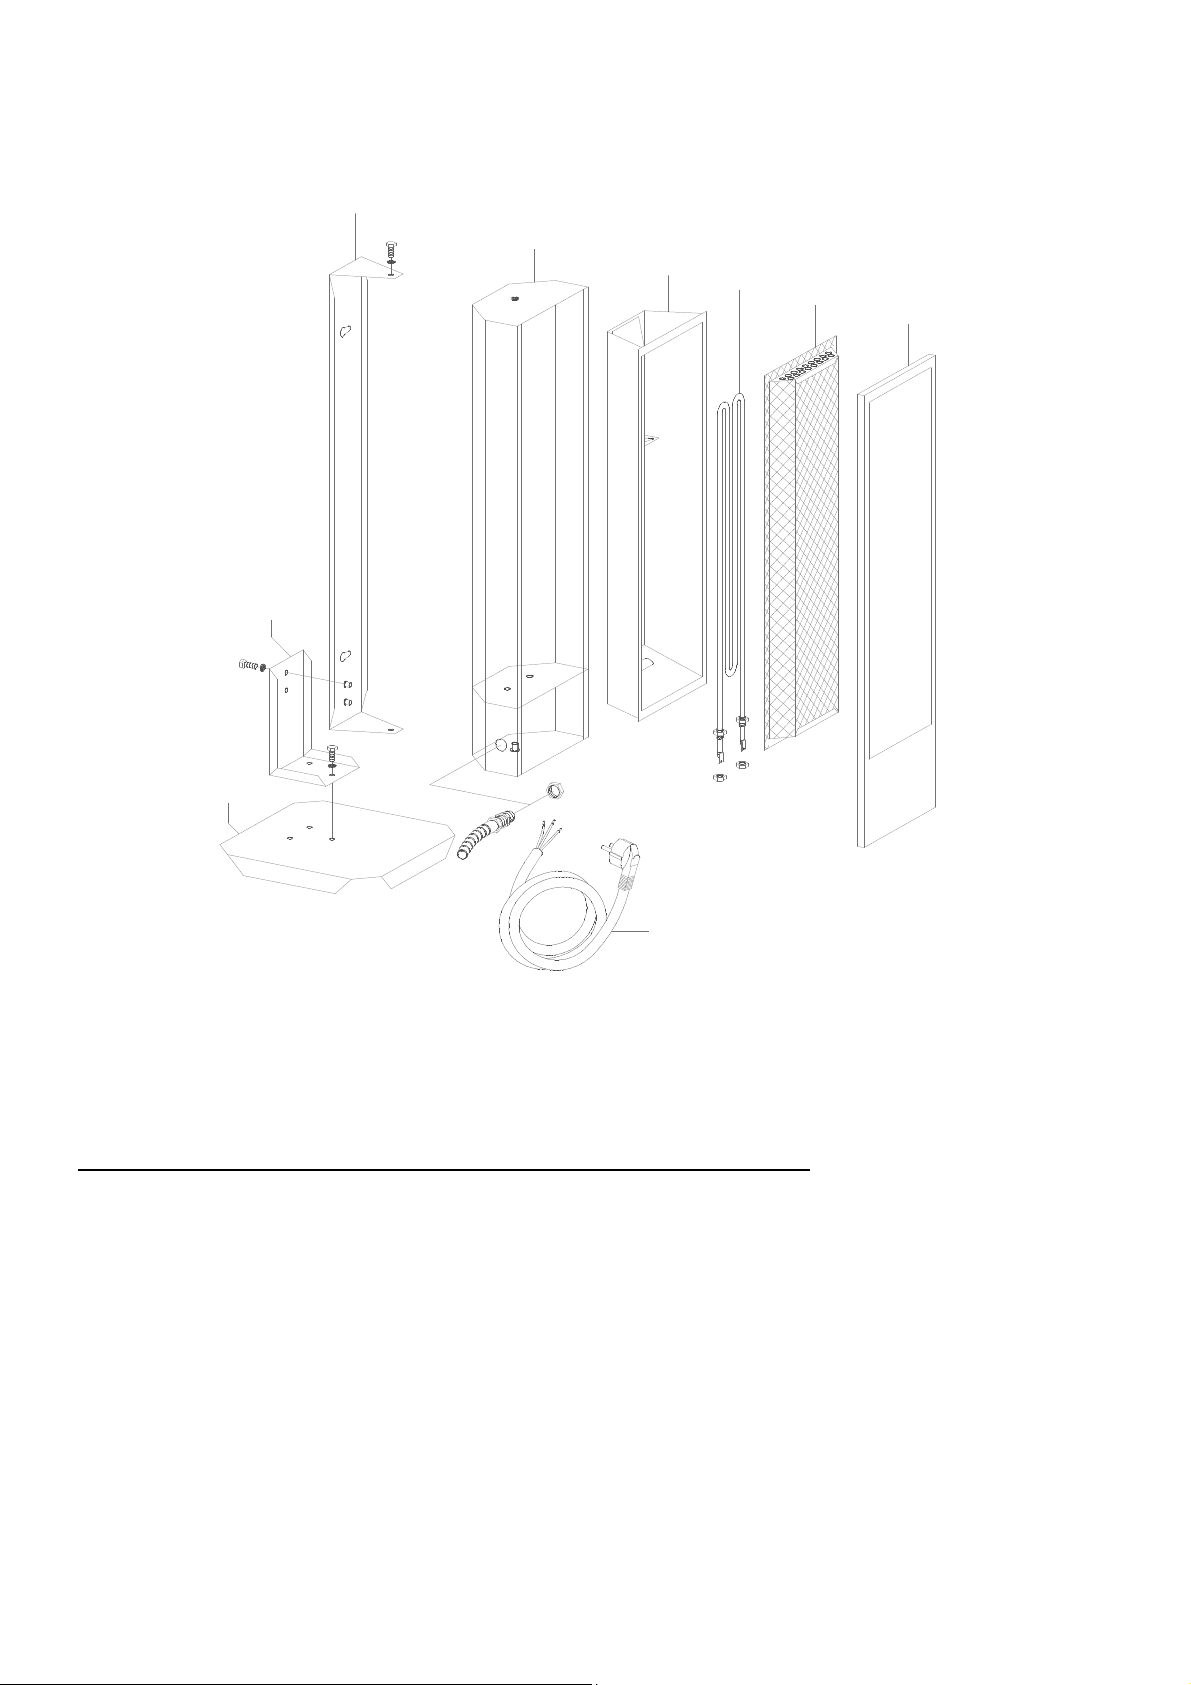
Exploded View
1
9
2
3
4
5
6
8
7
Spare Part List
No. Description Ref.-No.
1 mounting bracket 1101206
2 outside casing 1101205
3 reflector 1101204
4 heating element 1101201
5 protection grille 1101202
6 housing frame 1101203
7 connecting cable with plug 1103035
8 pedestal 1101207
9 mounting angle 1101208
6
We reserve the right to make modifications in dimensions and construction in the interests of technical progress.
Page 7
Technical Data
Troubleshooting
Model EST
Nominal heat output kW 2
Electrical connection V 230/1~
Frequency Hz 50
Rated current A 9,1
Protection class I
Power consumption kW 2
Fuse protection A (inert) 16
Dimensions- Wall unit
Length mm 195
Width mm 770
Height mm 225
Weight kg 7,7
Dimensions- Standing unit
Length mm 305
Width mm 305
Height mm 905
Weight kg 10,0
Prior to starting any work make sure to pull the
mains plug out of the mains socket!
G
Maintenance work may only be performed by
authorised personnel.
G
If your unit is not heating, follow these steps to find the
problem.
1. Check main fuse.
2. Check main plug.
3. Check connecting cable.
4. Make sure the heating resistor is working.
The heating resistor may only be replaced by an
authorised service centre.
Should the unit still not work after performing these
checks, please contact an authorised service centre.
Please conduct an electrical safety test after servicing the unit.
G
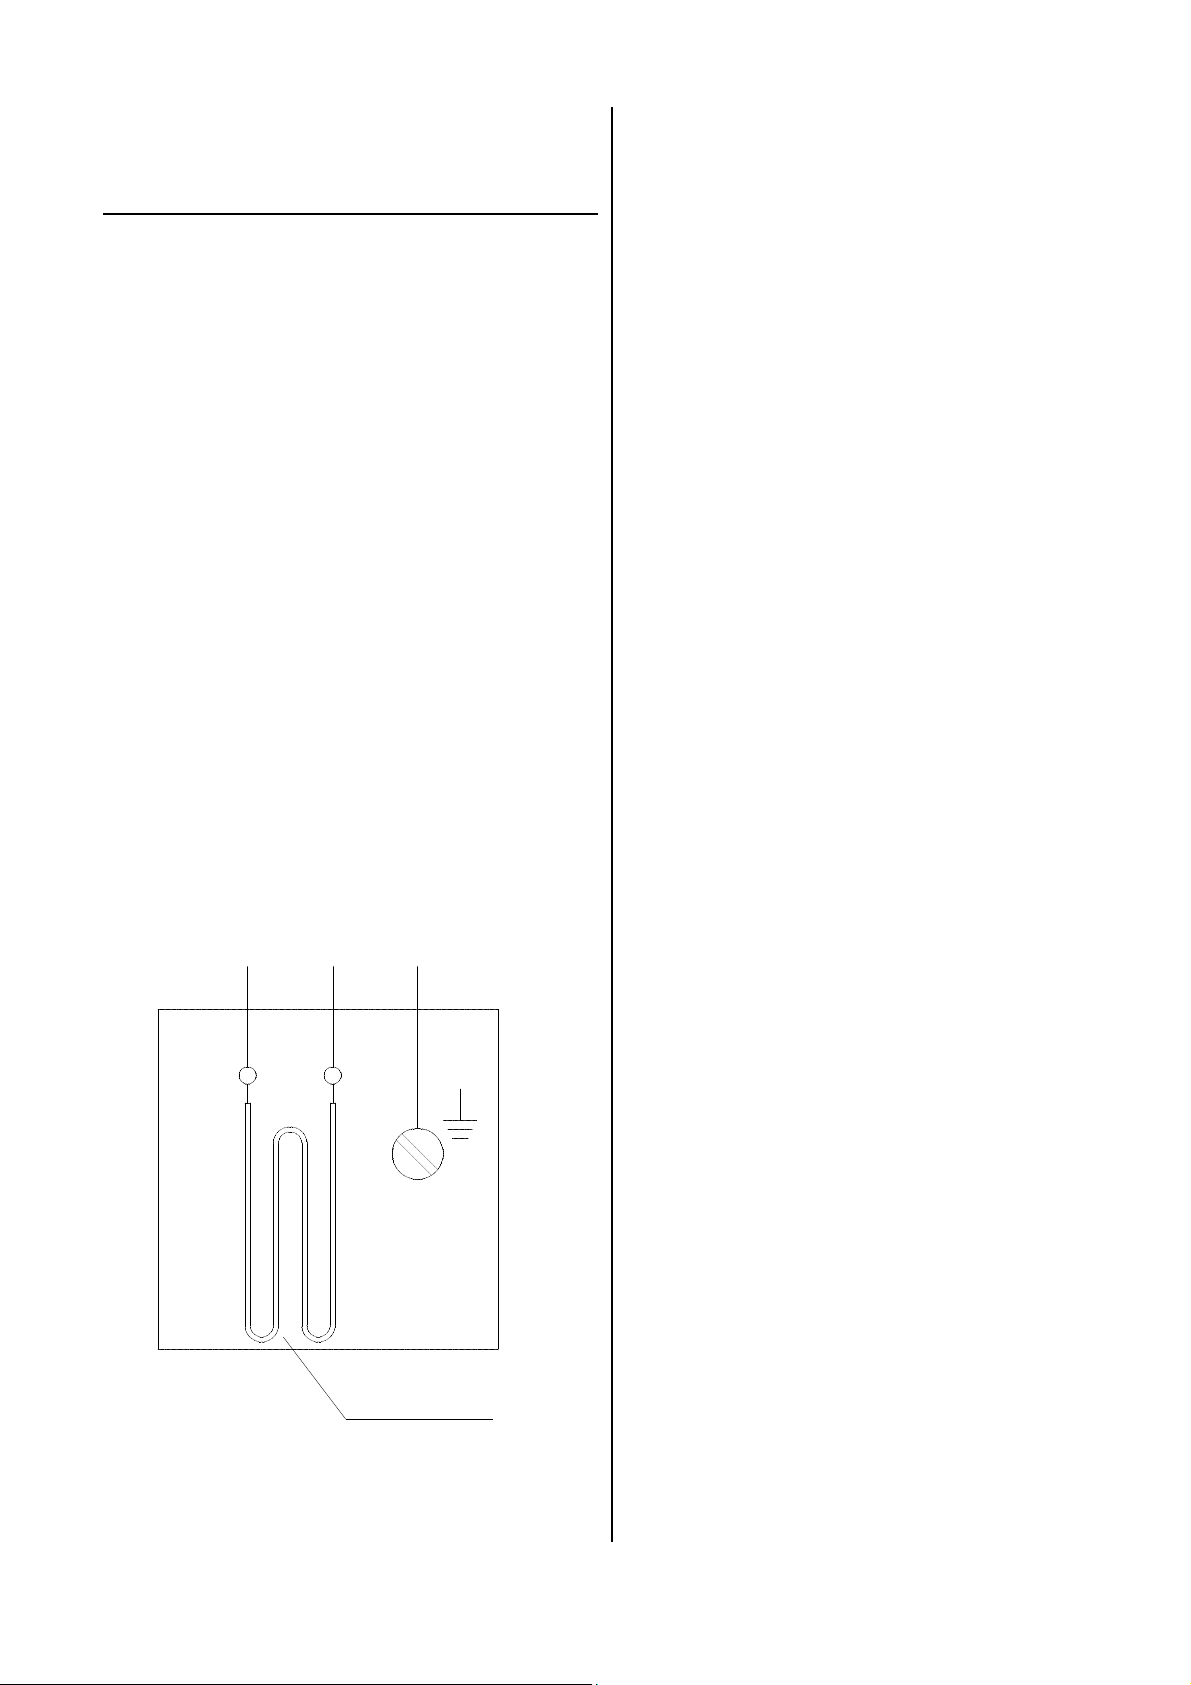
Wiring Diagram
230V/1~ 50 Hz
L1 N PE
Heating element
Service and Guarantee
Any claims under guarantee regarding materials can be
accepted only when the orderer or his customer has
filled in completely the “guarantee certificate” which is
enclosed with every REMKO-heater and has returned it
to REMKO GmbH & Co. KG in due time after the unit’s
sale and commissioning.
The units are factory tested on faultless function. If any
failure occurs though which cannot be eliminated by the
operating person, please contact your dealer or contact
person.
An operation/use other than that indicated in these
instructions is prohibited!
In the case of non-observation we will not be held
G
responsible and our guarantee will become void.
Correct usage
The units are to be used only for heating and ventilation
purpose in industrial or commercial application because
of their construction and equipment.
If specification of the manufacturer or legal regulations,
are not followed or if unauthorised changes are made
on the unit, the manufacturer is not liable for resulting
damages.
7
Page 8

REMKO GmbH & Co. KG
Klima- und Wärmetechnik
D-32791 Lage • Im Seelenkamp 12
D-32777 Lage • PO Box 1827
Phone +49 (5232) 606 - 0
Fax +49 (5232) 606260
 Loading...