

Remington SMOOTH AND SILKY WDF-4840 Use And Care Manual
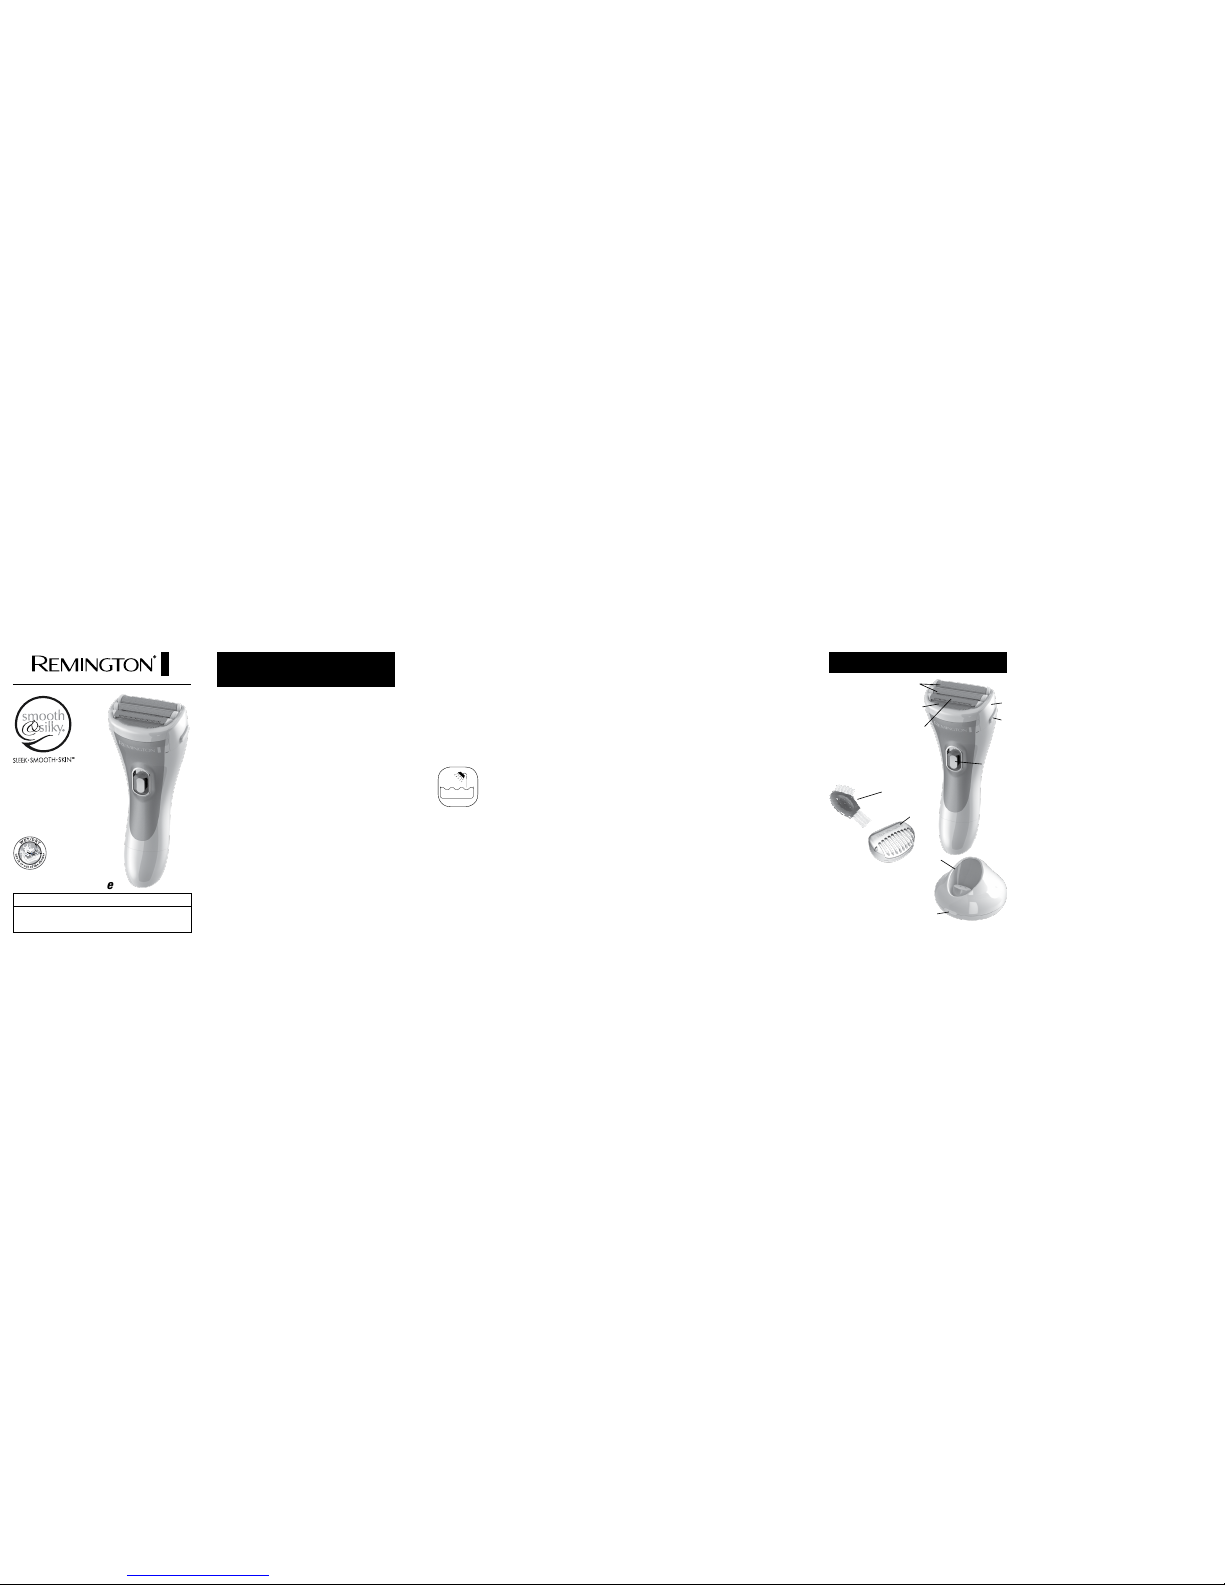
DESCRIPTION
(A) Shaving head
(B) Head release button
(C) Flexible outer foils
(D) Aloe Vera moisturizing strip
(E) Intercept trimmer with comfort tips
(F) On/Off switch
(G) Charge stand
(H) Charging indicator light
(I) Bikini trimmer headguard
(J) Cleaning brush
WDF-4840
Use and Care Guide
IMPORTANT SAFETY
INSTRUCTIONS
READ ALL
INSTRUCTIONS
BEFORE USING.
When using electrical appliances, basic precautions should always be observed,
including the following. Read all instructions before using this appliance.
WARNING
To reduce the risk of burns, fire,
electric shock or injury to persons:
n This appliance is for household use
only.
n Close supervision is necessary
when this appliance is used by, on,
or near children or persons with
certain disabilities.
n Use this appliance only for its
intended use as described in this
manual. Do not use attachments
not recommended by manufacturer.
n Keep the cord away from heated
surfaces.
n Never operate this appliance if
it has a damaged cord or plug, if
it is not working properly, if it has
been dropped or damaged, or if it
has been dropped into water.
n Do not use outdoors or operate
where aerosol (spray) products are
being used or where oxygen
is being administered.
n Plug charger directly into receptacle
– do not use an extension cord.
n Unplug charger before plugging or
unplugging appliance.
n Do not store it in temperatures
exceeding 140°F (60°C).
n Do not plug or unplug this
appliance when your hands are
wet.
n Do not wrap the cord around the
appliance.
n Always attach the plug to the
appliance, then to the outlet. To
disconnect, turn all controls to
OFF, then remove plug from outlet.
Detach removable power cords
from appliances for storage.
n Never drop or insert any object
into any of the appliance’s openings.
n The power unit is intended to be
correctly oriented in a vertical or
floor mount position.
n Do not use this appliance with
a damaged or broken heads or
cutters, as injury may occur.
DANGER
To reduce the risk of electric shock:
n Do not place or store this appliance
where it can fall or be pulled into a
tub or sink.
n Except when charging, always
unplug this appliance from the
electrical outlet immediately after
using.
n Unplug this appliance before
cleaning it.
n Do not use an extension cord
or a voltage converter with this
appliance.
n Do not use while bathing or in the
shower if it is plugged in.
SAvE ThESE INSTRUCTIONS
GETTING READY
Please be patient when first using
your shaver, as with any new product,
it may take a little while to familiarize
yourself with the device. If you take
the time to acquaint yourself with
your shaver, we are confident you will
receive years of enjoyable use and
complete satisfaction.
INSTRUCTIONS FOR CHARGING
Always ensure that your hands, trimmer and charge stand are dry before
charging.
Before using your REMINGTON®
shaver for the first time, charge
for 24 hours. For subsequent uses,
charge 24 hours before use. The
charging indicator light on your
charge stand will light up to indicate
that your shaver is charging. One full
charge allows 30 mins. of cordless
usage time.
Use product until the battery is
low. This is indicated by the shaver
running distinctly slower.
Your shaver cannot be overcharged,
however, if the product is not going to
be used for an extended time period
(2-3 months), unplug it from the
outlet and store. Fully recharge your
shaver when you would like to use
it again.
To preserve the life of your batteries,
let them run out every six months
then recharge for 20 hours.
CHARGING CAUTIONS
n Do not attach the power adaptor to
the outlet with wet hands.
n Always charge the shaver in a cool,
dry place.
n Do not charge the shaver in close
proximity to water.
n The shaver can be attached
to an electrical outlet voltage
of 120V only.
Product Features
Register Your New Product Today!
By registering your new Remington® product you will receive these important benefits:
Proof of ownership • Product protection • Product registration • Special offers
Register online at: www.RemingtonProducts.com
The shaver is a wet shaver which
may be used in a bath or shower.
Thank you for choosing REMINGTON® products. Our products are designed to
meet the highest standard of quality, functionality and design. The model you
have chosen can be used in or out of the shower and is designed to provide a
gentle, close shave. Please read the instructions for use carefully and keep in a
safe place for future reference.
CAUTION
Use this appliance only for its intended use as described in this manual.
Do not use this product if it is not working correctly, if it has been dropped or
damaged, or submerged in water.
(H)
(G)
(J)
(A)
(C)
(B)
(E)
(D)
(F)
(I)

6. No responsibility will be accepted for late, lost, stolen, misdirected or damaged
product.
7. Please allow 4-6 weeks to receive your refund by check.
*Applies to US and Canadian customers’ returns only.
120 VAC, 60 Hz
© 2014 SBI
® Registered Trademark and TM Trademark of Spectrum Brands, Inc. (SBI)
6/14 10620-00
Questions or comments:
Call 800-736-4648 in U.S. or 800-268-0425 in Canada,
or visit RemingtonProducts.com
Dist. by:
Spectrum Brands, Inc.,
Middleton, WI 53562
Dist. by:
Spectrum Brands Canada, Inc.
131 Saramia Crescent
Vaughan, ON L4K 4P7
Designed in USA
Made in China
T22-0001765
Contains a listed adaptor.
This warranty gives you specific legal rights and you may also have other rights
which vary from state to state or province to province. Some states do not allow
the exclusion or limitation of incidental, special or consequential damages.
Performance Guarantee
Spectrum Brands, Inc. Money-back Offer
If within 30 days after you have purchased your Remington
®
branded product,
you are not satisfied and would like a refund, return it with the sales slip indicating purchase price and date of purchase to the retailer from whom it was purchased. Spectrum Brands, Inc. will reimburse all retailers who accept the product
within 30 days from the date of purchase. If you have any questions concerning
the money-back guarantee, please call 800-736-4648 in the US or 800-2680425 in Canada.
Remington Guarantees Satisfaction After 30 Days!
Remington 60-Day Money Back Guarantee*
If within 60 days after purchasing any Remington
® product, you are not
completely satisfied and would like a refund, return it with the original dated
sales receipt directly to Remington and receive a full refund.** For questions
concerning the money-back guarantee, please call 800-736-4648 in the US or
800-268-0425 in Canada.
**Terms and conditions apply.
1. Refund will be in the form of a check issued in US Dollars and will be provided
only if all Terms and Conditions are met.
2. The following items must be returned to Remington and postmarked no later
than 60 days after purchase of the Remington product:
a. The Remington product;
b. The original sales receipt indicating price and date purchased; and
c. The completed 60-day money back guarantee form located at
RemingtonProducts.com/60day.
3. In addition, Remington, in its discretion, must determine that the returned
product was used in accordance with the instruction booklet (included with the
product at the time of purchase).
4. Returns should be mailed prepaid (no collect returns accepted) to:
Remington 60-Day MBG
507 Stokely Drive, Box 1
DeForest, WI 53532
5. Refund does not include postage costs for the return of the product, but will
include applicable taxes paid by customer, if any.
Limited Two-Year Warranty
Spectrum Brands, Inc. warrants this
product against any defects that are due to faulty material or workmanship for a
two-year period from the original date of consumer purchase. This warranty does
not include
damage to the product resulting
from accident or misuse.
If the product should become defective within the warranty period, we will
replace it free of charge. Return your product and sales receipt with your name,
address and day time phone number to: Remington Returns Center, 507 Stokely
Dr., P.O. Box 1, Deforest, WI 53532. For more information call 800-736-4648 in
the US or 800-268-0425 in Canada.
Warranty excludes:
n Foils and cutters
KEEP ORIGINAL SALES RECEIPT
AS PROOF OF PURCHASE FOR
WARRANTY PURPOSES.
This warranty does not cover
products damaged by the following:
n Accident, misuse, abuse or alteration of the product
n Servicing by unauthorized persons
n Use with unauthorized accessories
n Connecting it to incorrect current
and voltage
n Wrapping cord around appliance
causing premature wear & breakage
n Any other conditions beyond our
control
SPECTRUM BRANDS, INC. SHALL NOT BE RESPONSIBLE FOR ANY INCIDENTAL,
SPECIAL OR CONSEQUENTIAL DAMAGES RESULTING FROM THE USE OF THIS
PRODUCT. ALL IMPLIED WARRANTIES, INCLUDING BUT NOT LIMITED TO
IM PLIED WARRANTIES OF FITNESS AND MERCHANTABILITY, ARE LIMITED IN
DURATION TO TWO YEARS FROM DATE OF ORIGINAL PURCHASE.
Warranty
Cleaning & Maintenance
How To Use
CARE FOR YOUR SHAVER
To ensure long lasting performance of
your shaver, clean the head assembly
regularly. The easiest and the most
hygienic way to clean the shaver is by
rinsing the shaving head after use with
warm water. Always keep the protective headguard on the shaving head
when the shaver is not in use.
AFTER EACH USE
1. Ensure the shaver is turned off.
2. Press the release buttons to open
the shaver head.
3. Blow on the foils to remove any
loose debris.
4. Brush or rinse the accumulated
hair from the main body of the shaver, shaving head and cutter assembly.
5. Leave the head assembly open to
let the shaver dry completely.
6. Return the shaving head to its
original position and snap in place.
NOTE:
n Ensure that the shaver is turned off
when cleaning.
n Do not clean the shaving foils with
the brush.
n At regular intervals, put a drop of
sewing machine oil onto the foils
and cutters head.
REPLACING THE FOILS & CUTTERS
Signs that your foils and cutters need
replacing:
n Irritation: As foils get worn, you may
experience skin irritation.
n Pulling: As the cutters wear, your
shave may not feel as close and you
may feel your cutter pulling on your
hair.
n Wear: You may notice that the
cutters have worn through the foils.
To ensure the continued highest quality
performance from your shaver, we
recommend that foils and cutters are
replaced every 6 months.
NOTE: The replacement part for your
shaver model is SPW-440.
Two easy ways to order!
1. Call!
U.S. Residents call
800-392-6544
Canadian Residents call
800-268-0425
2. Order Online at
RemingtonProducts.com
Your shaver is suitable for legs, underarms and the bikini area.
NOTE: For best results, make sure that
the area is clean, dry and free from
creams or oil.
FOR EVERYDAY SHAVING
1. Remove protective cap.
2. Turn the shaver on.
3. Hold the shaver at a right angle to
your skin and move the shaver against
the direction of the hair growth.
FOR SHAVING LONGER HAIR
Use the interecept trimmer to cut hair
short, and then use the flexible foils for
a closer shave.
1. Turn shaver on.
2. Hold the shaver with the trimmer
slightly tilted (approximately at a 45º
angle).
3. Move the trimmer slowly against the
direction of the hair growth.
4. After trimming, move the foils over
the same area for a smooth, closer
shave.
TRIMMING AND SHAPING
1. Attach the bikini trimmer headguard.
2. Turn the shaver on.
3. Hold the shaver at a right angle
to your skin and press down gently.
4. Edge and shape the area as desired.
5. After shaving, turn off shaver.
FOR BEST SHAVING PERFORMANCE
We recommend that you use your new
shaver daily for two or three weeks to
allow time to find the optimum shaving
methods for your particular type of hair
growth patterns.
CAUTION
If your skin is easily irritated by shaving, or you suffer from skin allergies,
you should test a section of your arm
or leg before using the shaver.
NOTE:
n The shaver IS suitable for use in the
bath or shower.
n Do not rinse with water hotter than
160ºF.
n Do not completely submerge the
shaver in water.
HOW TO INSTALL REPLACEMENT
CUTTING HEAD FOILS
1. Turn off the shaver.
2. Press the head release buttons at the side of the
shaving head and remove the shaving head.
3. Place the shaving head on a hard surface with the outer
foils facing up.
4. Using your thumbs, press down on the plastic ends of
the foils (C). The foil assembly will release and slide
down and out of the shaving head.
5. Position the new replacement foils into the shaving
head (L) and press from the inside of the head to snap
them in place. WARNING: The metal foils flex and
damage easily, so be aware to only press on the plastic
ends of the foils.
TO REPLACE THE INTERNAL CUTTERS
1. Turn off the shaver.
2. Press the head release buttons at the side of the
shaving head and remove the shaving head.
3. Grasp the internal cutters under the plastic holders and
pull up firmly to detach the old cutters.
4. Install the new cutters by putting the small pin at the
bottom of the new cutter into the center of the small
spring at the center of the holder, then pressing the
cutter down to snap it onto the stem.
Visit www.RemingtonProducts.com
for FAQ, tips & more
Battery Removal
When your rechargeable shaver reaches the end of
its useful life, the batteries must be removed from the
shaver and recycled or disposed of properly in accordance with your state and local requirements. NOTE:
The rechargeable batteries are not replaceable.
How to Remove the Batteries
from the WDF-4840
(See diagrams to right)
1. Remove screw from bottom of shaver (M).
2. Separate top and bottom housings.
3. Unscrew and remove inner frame (N).
4. Open the inner housing and remove the batteries (O).
5. Insulate battery ends by (1) placing each battery
individually into separate plastic bags or (2) covering
the terminals of each battery completely with plastic or
non-conductive electrical tape.
screw
M
screws
N
O
new foil
L
 Loading...