

Page 1

Strona główna » reloop » reloop RP-7000 MK2 Upper Torque Turntable
Instrukcja obsługi
RP-7000 MK2
Profesjonalny system gramofonowy Upper Torque
EDYCJA CZARNO-SREBRNA
Instrukcje+
⚙
Page 2
Instrukcja obsługi ACHTUNG!
Lesen Sie sich vor der ersten Inbetriebnahme zur eigenen Sicherheit diese Bedienungsanleitung
soorgfältig durch! Alle Personen, die mit der Aufstellung, Inbetriebnahme, Bedienung, Wartung
und Instandhaltung dieses Gerätes zu tun haben, müssen entsprechend qualifiziert sein und diese
Betriebsanleitung genau beachten. Dieses Produkt erfüllt die Anforderungen der geltenden
europäischen und Nationalen Richtlinien, die Konformität wurde nachgewiesen, die
entsprechenden Erklärungen und Unterlagen sind beim Hersteller backlegt.
Instrukcja obsługi UWAGA!
Dla własnego bezpieczeństwa przeczytaj uważnie tę instrukcję obsługi przed pierwszym
uruchomieniem! Wszystkie osoby zaangażowane w instalację, konfigurację, obsługę, konserwację i
serwis tego urządzenia muszą być odpowiednio wykwalifikowane i szczegółowo przestrzegać tej
instrukcji obsługi. Ten produkt jest zgodny z wymogami obowiązujących przepisów europejskich i
⚙
Page 3

krajowych. Zgodność została udowodniona. Odpowiednie oświadczenia i dokumenty są złożone u
producenta.
OSTRZEŻENIE!
Aby zapobiec pożarowi lub uniknąć porażenia prądem, nie wystawiaj urządzenia na działanie
wody lub płynów! Nigdy nie otwieraj obudowy!
Reloop Trademark
Global Distribution GmbH Schuckertstr. 28 48153 Muenster / Niemcy © 2012
UWAGA! Dla własnego bezpieczeństwa przeczytaj uważnie tę instrukcję obsługi przed pierwszym
uruchomieniem! Wszystkie osoby zaangażowane w instalację, konfigurację, obsługę, konserwację i
serwis tego urządzenia muszą być odpowiednio wykwalifikowane i szczegółowo przestrzegać
niniejszej instrukcji obsługi.
Ten produkt jest zgodny z wymogami obowiązujących przepisów europejskich i krajowych.
Zgodność została udowodniona. Odpowiednie oświadczenia i dokumenty są złożone u producenta.
Gratulujemy zakupu gramofonu Reloop RP-7000MK2. Dziękujemy za zaufanie naszej technologii
disc jockey. Przed uruchomieniem tego sprzętu prosimy o dokładne zapoznanie się i
przestrzeganie wszystkich instrukcji.
Wyjmij Reloop RP-7000MK2 z opakowania. Przed pierwszym uruchomieniem sprawdź, czy
urządzenie nie zostało widocznie uszkodzone podczas transportu. Jeśli zauważysz jakiekolwiek
uszkodzenie kabla zasilającego lub obudowy, nie używaj urządzenia. Skontaktuj się ze swoim
wyspecjalizowanym sprzedawcą.
zawartość
1 INSTRUKCJE BEZPIECZEŃSTWA
2 WNIOSEK ZGODNY Z PRZEPISAMI
3 KONSERWACJA
4 OZNACZENIE
5 MONTAŻ I PODŁĄCZANIE
6 TECHNICAL SPECIFICATIONS
7 Documents / Resources
7.1 References
8 Related Posts
SAFETY INSTRUCTIONS
CAUTION! Please exercise particular caution when handling the AC 115/230V, 60/50Hz or
AC100V, 50/60Hz (for JP) power voltage. This voltage rating may lead to a critical electrical
shock! Any damage caused by the non-observance of this operation manual excludes any warranty
⚙
Page 4

claims. The manufacturer is not liable for any damage to property or for personal injury caused by
improper handling or non-observance of the safety instructions.
This device left the works in perfect condition. To maintain this condition and to ensure a risk-
free operation the user must observe the safety instructions and warnings contained in this
operation manual.
For reasons of safety and certification (CE) the unauthorized conversion and/or modification of
the device is prohibited. Please note that in the event of damage caused by manual modification
to this device, any warranty claims are excluded.
The inside of the device does not contain any parts which require maintenance, with the
exception of wear parts that can be exchanged from the outside. Qualified staff must carry out
maintenance, otherwise, the warranty does not apply!
Ensure that the power will only be supplied after the device has been fully set up. Always plug-
in the mains plug last. Ensure that the main switch is in the „OFF“ position when connecting
the device to power.
Only use cables that comply with regulations. Observe that all jacks and bushes are tightened
and correctly hooked up. Refer to your dealer, if you have any questions.
Ensure that when setting up the product, the main cable is not squashed or damaged by sharp
edges.
Prevent the mains cable from coming into contact with other cables! Exercise great care when
handling mains cables and connections. Never touch these parts with wet hands!
Connect the power cable exclusively to appropriate shock-proof outlets. The only supply point
to be used is a supply outlet in accordance with the specifications of the public supply network.
Disconnect the device from the supply outlet when not in use and before cleaning! Be sure to
hold the mains plug by the body. Never pull the main cord! When not using the turntable for
longer periods of time, close the dust guard.
Position the device on a horizontal and stable low-flame base.
Avoid any concussions or violent impacts when installing or operating the device.
When selecting the location of installation, make sure that the device is not exposed to
excessive heat, humidity, and dust. Be sure that no cables lie around openly. You will endanger
your own safety and that of others!
Do not rest any containers filled with liquid that could easily spill onto the device or in its
immediate vicinity. If, however, fluids should access the inside of the device, immediately
disconnect the mains plug. Has the device been checked by a qualified service technician before
re-use? Damage caused by fluids inside the device is excluded from the warranty.
⚙
Page 5

Do not operate the device under extremely hot (in excess of 35° C) or extremely cold (below 5°
C) conditions. Keep the device away from direct exposure to the sun and heat sources such as
radiators, ovens, etc. (even during transport in a closed vehicle). Always ensure sufficient
ventilation.
The device must not be operated after being taken from a cold environment into a warm
environment. The condensation caused hereby may destroy your device. Do not switch on or
operate the device until it has reached ambient temperature!
Controls and switches should never be treated with spray-on cleaning agents and lubricants.
This device should only be cleaned with a damp cloth. Never use solvents or cleaning fluids
with a petroleum base for cleaning.
When relocating, the device should be transported in its original packaging.
When starting operation, the crossfaders and volume controls of your amplifier must be set to a
minimum level. Bring the loudspeaker switches into the „OFF“ position. Wait between 8 to 10
seconds before increasing the volume to avoid damage to loudspeakers and the diplexer.
Devices supplied by voltage should not be left in the hands of children. Please exercise
particular care when in the presence of children.
At commercial facilities, the regulations for the prevention of accidents as stipulated by the
association of professional associations must be observed.
At schools, training facilities, hobbies, and self-help workshops the operation of the device
must be monitored with responsibility by trained staff.
Keep this operation manual in a safe place for later reference in the event of questions or
problems.
APPLICATION IN ACCORDANCE WITH REGULATIONS
This equipment is a professional turntable that plays conventional 12” and 7” records. The
equipment is connected to a mixing console.
This product is authorized for connection to AC 115/230V, 60/50Hz or AC100V, 50/60Hz (for
JP) and is designed exclusively for indoor application.
If the device is used for any other purposes than those described in the operation manual,
damage can be caused to the product, leading to the exclusion of warranty rights. Moreover,
any other application that does not comply with the specified purpose harbors risks such as
short circuit, fire, electric shock, etc.
The serial number determined by the manufacturer must never be removed to uphold the
warranty rights.
⚙
Page 6

MAINTENANCE
Check the technical safety of the device regularly for damage to the mains line or casing, as well
as for wear of wear parts such as rotary, sliding switches, and the pick-up.
If it is to be assumed that a safe operation is no longer feasible, then the device must be
disconnected and secured against accidental use. Always disconnect the mains plug from the
outlet!
It must be assumed that a safe operation is no longer feasible, if the device bears visible defects,
the device no longer functions, following longer storage under unfavorable conditions or after
major transport stress.
DESIGNATION
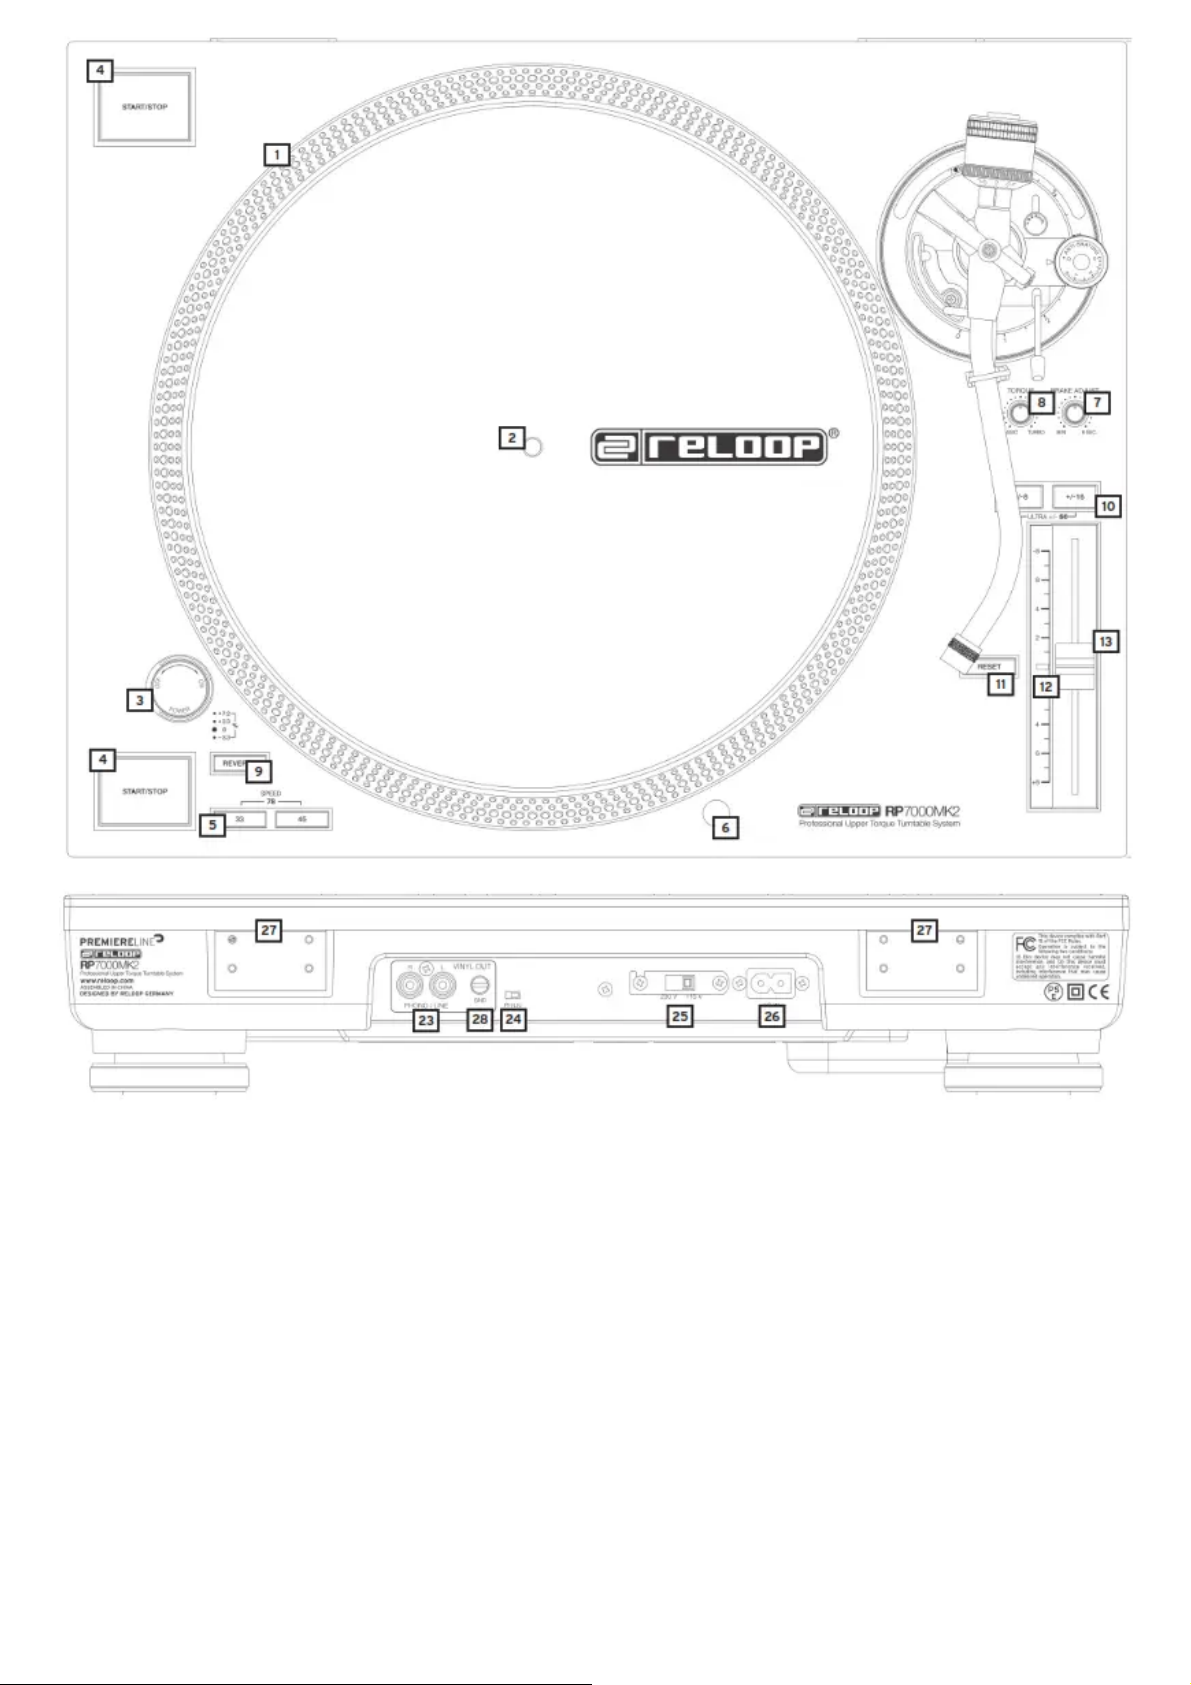
1. Turntable
2. Hub
3. ON/OFF Button on Turntable Illumination
4. START/STOP Button
5. 33/45/78 Switch
6. Stylus Illumination and Socket for Stylus Illumination
7. Dial for Brake Speed
8. Dial for Torque
9. Reverse Switch
10. Pitch Range Select Switch
11. Reset Lock Switch
12. Reset Lock LED
13. Pitch Fader
14. Headshell (not included)
15. Tone Arm
16. Tone Arm Ring
17. Tone Arm Rest
18. Tone Arm Lift
19. Anti-Skating Wheel
20. Tone Arm Ring Locking Mechanism
21. Counterweight Scale
22. Counterweight
⚙
Page 7
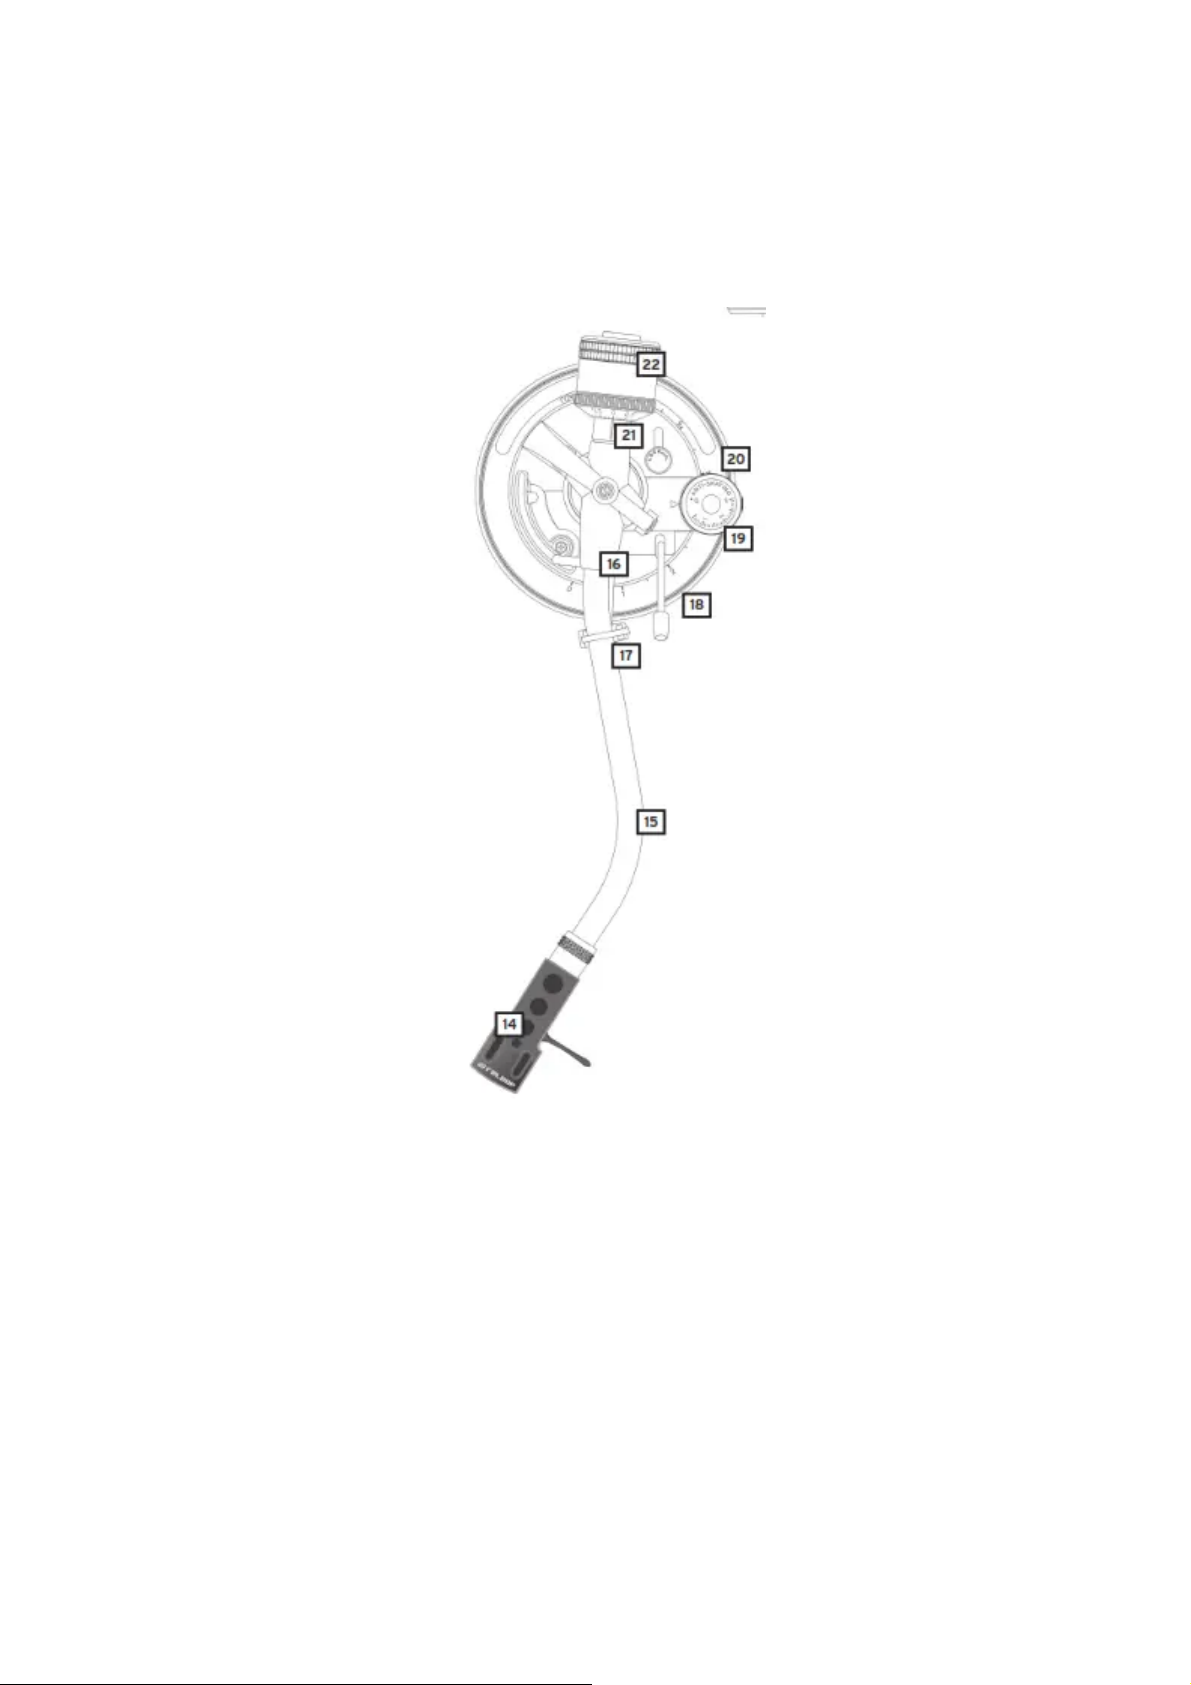
23. Audio Output (Cinch)
24. Phono/Line Switch
25. Voltage Selector Switch (EU/US models only)
26. Mains Cable Connection
27. Turntable Cover Mount
28. GND Connector
ASSEMBLY & CONNECTIONS
1. Connect the Turntable -1- to the motor. To do so, put the turntable above the Hub -2-.
2. Put the included slipmat above the Hub -2- on the turntable.
3. Connect the Counterweight -22- to the Tone Arm -15-.
NOTE! The counterweight Scale -21- must face the DJ.
4. Screw the Headshell -14- into the Tone Arm -15- after mounting your cartridge to the headshell
as described in the following:
a) Connect the headshells connecting wires to the cartridge‘s connection and observe the
correct wire assignment.
⚙
Page 8
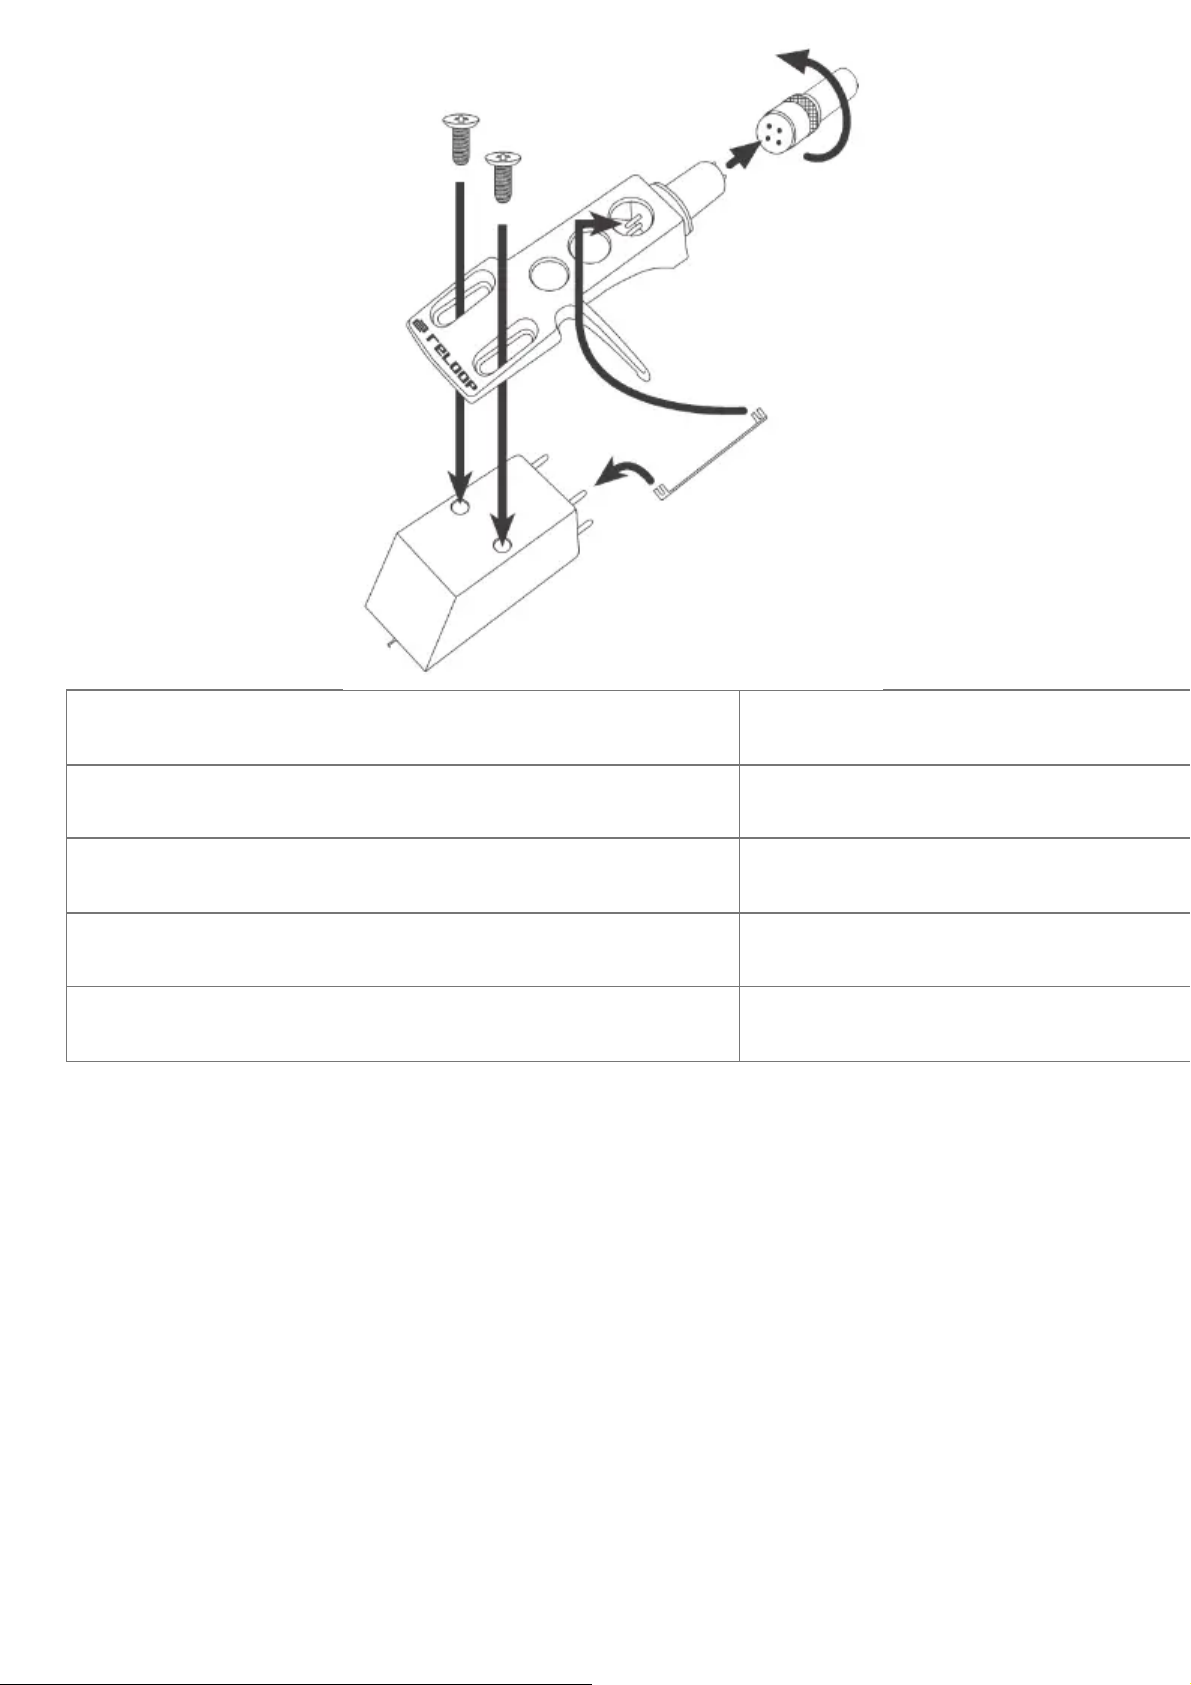
Colour Channel and Polarity
I. White (L+) Left, Positive Pole
II. Blue (L-) Left, Negative Pole
III. Red (R+) Right, Positive Pole
IV. Green (R-) Right, Negative Pole
b) Fix the cartridge via the included mounting screws.
NOTE! If you use a ready-to-mount SME system instead of a headshell system, screw it
directly into the Tone Arm -15-. In this case, you do not need the headshell.
5. Insert the stylus illumination in the intended socket -6-.
6. Connect the Audio Output Cable -23- to the audio inputs of your mixer. Usually, it is not
necessary to ground your turntable as this already happens via the housing. however, should
you notice a humming sound, please connect the grounding wire to the GND screw of your DJ
mixer or phono pre-amp? If these devices are not sufficiently grounded, a humming sound
might still occur.
7. Connect the mains cable to the corresponding connection -26- and a power outlet.
⚙
Page 9

OPERATION
1. Counterweight
Lower the Tone Arm Lift -18- to “down“ position. Guide the Tone Arm -15- almost in front of
the Turntable -1-. Adjust the Counterweight -22- by turning it clockwise as such that the Tone
Arm does not lean up nor down, i.e. it should be balanced parallel to the record. Then return
the Tone Arm to its support -17-. Set the Counterweight Scale -21- of the Counterweight as
such that the „0“ position is above the marked line. Continue turning the Counterweight
clockwise until the scale indicates the value which corresponds to the recommended stylus
force of the pick-up system.
2. Anti-Skating Wheel
This applies inward force to the tonearm so it doesn‘t skip outward across the record due to the
centrifugal force of the record spinning. Cartridge manufacturers usually specify the proper
setting of this.
3. Tone Arm Height
You can adjust the tone arm‘s height if the cartridge you use necessitates this: First release the
Tone Arm Ring Locking Mechanism -20- from the “LOCK“ position. Now you can raise the
tonearm via the Tone Arm Ring -16- in the scale‘s range by up to 6 millimeters (0 millimeters =
default setting). Move the Tone Arm Ring Locking Mechanism back to the “LOCK” position
after the tonearm has been set to the desired height.
ATTENTION! The tonearm must not exceed the maximum height of 6 millimeters as
otherwise damage to the tonearm socket cannot be excluded. Observe the tonearm ring‘s
marking by all means!
4. Power On
After carrying out all connections turn on the device via the ON/OFF Button -3-. The
integrated turntable illumination and stylus illumination -6- will be activated.
5. Playback
Put a record on the slipmat on the turntable -1-. Select the right speed via the 33/45/78 Switch
-5-. The LED of the corresponding switch will go on.
NOTE! In order to select 78 RPM, press both 33 and 45 switches -5- simultaneously. Both
LEDs will go on.
Press one of the two Start/Stop Buttons -4-. Remove the needle protection from the cartridge.
Bring the Tone Arm Lift -18- to the “Up” position and move the Tone Arm -15- above the point,
you wish to play. Put the Tone Arm Lift down so that it lowers itself onto the record‘s groove.
NOTE! It is possible to leave the Tone Arm Lift permanently in the “Down” position and to
⚙
Page 10

lower the Tone Arm manually onto the desired position.
When doing so, be sure not to damage the stylus of the Pick-Up System.
By pressing the Reverse Switch -9- the turntable will move counterclockwise; the LED will be
lit. All functions of the RP-7000MK2 remain available.
By pressing the button again, the turntable will move clockwise again; the LED will go out.
6. Stylus Illumination
The Stylus Illumination -6- will be activated automatically when turning on the power. You can
freely move the lamp by 360°.
NOTE! If you do not wish to use the stylus illumination, just pull out the stylus illumination
from the socket.
7. Pitch Fine Adjustment
Via the Pitch Fader -13- you can steplessly adjust the record‘s pitch. Via the Pitch Range
Buttton -10- you can choose between a pitch range of +/8% and +/-16%.
The respective LED will be lit.
NOTE! In order to select a pitch range of 50%, press both pitch range select switches
simultaneously; both LEDs will be lit.
If you want to play a record at its original pitch, bring the pitch fader to the “+/-0%” position.
By using the Reset Lock Switch -11- you can deactivate the pitch fine adjustment, the LED will
go on. By pressing again the fine adjustment will be re-activated: the turntable returns to the
speed set via the pitch fader and the LED will go out. The Quartz Lock LED -12- will be lit when
in the original pitch and when pitch fine adjustment is deactivated; when the pitch differs, it
will go out.
8. Brake Speed adjustment
a dial -7- you can steplessly adjust the motor‘s brake time in a range of min. (dial to the left) – 6
seconds (dial to the right).
9. Torque Adjustment
Via dial -8- you can steplessly adjust the motor‘s torque in a range of 2.8 kg/cm (dial to the left)
– 4.5 kg/cm (dial to the right).
TECHNICAL SPECIFICATIONS
Type: ……………………………………………………………………………………….manual quartz driven
turntable
Drive: ………………………………………………………………………………………quartz driven upper torque
direct drive
⚙
Page 11

Motor: ……………………………………………………………………………………..brushless DC motor
Turntable RPM: ……………………………………………………………………….33 1/3, 45 and 78 RPM
Turntable: ……………………………………………………………………………….aluminum die casting
Pitch: ………………………………………………………………………………………variably adjustable +/-8%,
+/-16%, +/-50%
Torque: ……………………………………………………………………………………adjustable from min. 2800 –
4500 gf/cm
Start-up time: …………………………………………………………………………min~6 sec. (adjustable)
Brake system: …………………………………………………………………………electronic brake
Effective Arm Length: ……………………………………………………………..230 mm
Overhang: ………………………………………………………………………………..15 mm
Tracking Error Angle: ………………………………………………………………<3°
Wow and flutter: ……………………………………………………………………..0.01% WRMS*
S/N ratio: ………………………………………………………………………………..more than -55 dB
Admissible cartridge weight range: ……………………………………….3.5 – 8.5 g (incl. headshell 13 – 18
g)
Anti-skating range: …………………………………………………………………0 – 3 g
Power input: ……………………………………………………………………………13 W
Power supply: …………………………………………………………………………AC 115/230 V, 60/50 Hz
(EU/US), AC 100 V, 50/60 Hz (JP)
Dimensions: …………………………………………………………………………….458 x 144.6 x 354 mm (w/h/d)
Weight: ……………………………………………………………………………………11,7 kg
*Impact of stylus, record, and tonearm not taken into account.
Note: Subject to alterations. The specified data is of approximate value.
www.reloop.com
Reloop Distribution
Global Distribution GmbH, Schuckertstrasse 28, 48153 Muenster / Germany
Fax: +49.251.6099368
Subject to alterations.
Illustrations are similar to the original product.
Misprints excepted.
⚙
Page 12

Documents / Resources
reloop RP-7000 MK2 Upper Torque Turntable [pdf] Instruction Manual
RP-7000 MK2 Upper Torque Turntable, RP-7000 MK2, Upper Torque Turntable
References
User Manual
Ta strona internetowa jest niezależną publikacją i nie jest ani powiązana, ani popierana przez żadnego z właścicieli znaków towarowych. Znak słowny „Bluetooth®” i logo są
zarejestrowanymi znakami towarowymi należącymi do Bluetooth SIG, Inc. Znak słowny „Wi-Fi®” i logo są zarejestrowanymi znakami towarowymi należącymi do Wi-Fi
Alliance. Jakiekolwiek użycie tych znaków na tej stronie internetowej nie oznacza żadnego powiązania ani poparcia.
⚙
 Loading...