

Page 1
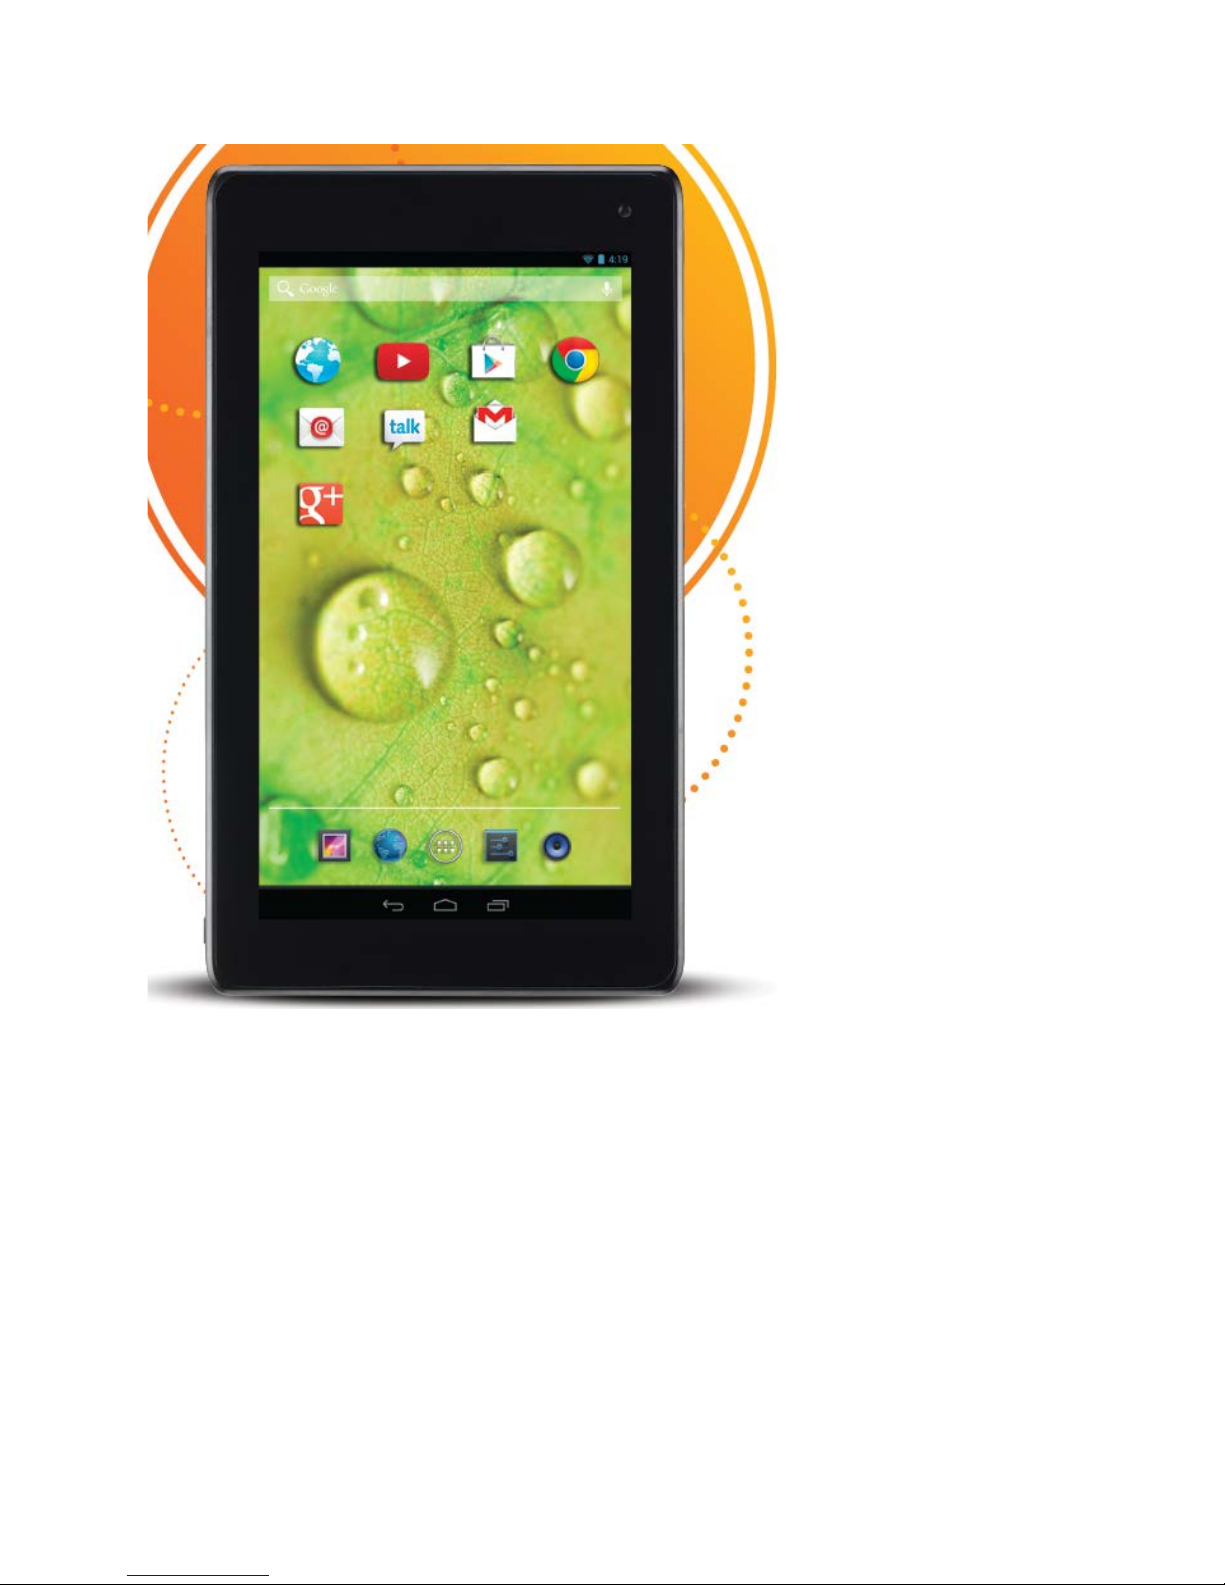
Orbic User Manual
Page 2

2
Contents
1. Using This Manual ……..……………………………………………….……….. 4
2. Safety Instructions ……………………………………………………………….. 5
3. Boxed Contents …………………………………………………………………….. 7
4. Hardware Specification …………………………………………….…….….… 7
5. Product Overview ………………………………………………………….….….. 8
6. Connectivity …….…………………………………………………………….…….. 9
6.1 Connecting to a PC ……………………………….……….……….…….... 9
6.2 Connecting an external USB device ……………...……..……….... 9
6.3 Connecting a micro SD Card ………………………….…….………..… 9
7. Getting Started ………………………………………………….……….………… 10
7.1 Charging the battery …………………………….……….……….…….... 10
7.2 Startup ………………………………………………………….…….……….... 11
7.3 Shutdown …………………………………………………….……….………… 11
7.4 Desktop ……………………….………………………………….…….………… 12
7.5 Sleep Mode …………………………………………….…………….………… 14
7.6 Configuring the Wallpaper ………………………………….…….……. 14
7.7 Applications ………………………………………………………….………… 15
7.8 Using the Touch Screen …………………………………….….……….… 16
7.9 Using Google Search ………………………………………….……………. 16
8. System Settings ………………………………………………………..………….. 18
8.1 Wireless & Networks …………………………………………..……….… 18
8.2 Bluetooth …………………………………………………………….….……... 21
8.3 Sound …………………………………………………………………….…….... 22
8.4 Display ………………………………………………………..…………….….... 23
8.5 Storage …………………………………………………………….……….….... 24
8.6 Battery …………………………………………………………..……….…….... 25
8.7 Apps …………………………………………………………………….…………. 25
8.8 Location Services ……………………………………………….…………… 26
8.9 Security ……………………………………………….…………………..……… 27
8.10 Language & Input ……………………………….…………………………… 28
Page 3

3
8.11 Backup & Reset ………………………………….…………………………… 28
8.12 Accounts ………………………………………………….….………………….. 29
8.13 Date & Time …………………………………………….….………………….. 31
8.14 Accessibility ………………………………………………………..…………… 32
8.15 Developer Options …………………………………………………….….… 33
8.16 About Tablet …………………………………………….…………………….. 34
9. Common Applications ………………………………………………….………
34
9.1
Browser Internet Access …………………………………………………. 34
9.2
Calculator ………………………………………………………….………….… 35
9.3
Calendar ……………………………………………………….……….….……. 35
9.4
Clock …………………………………………………………….……….....……. 36
9.5
Downloads ………………………………………………….………………….. 36
9.6
Email …………………………………………………………….…………..……. 37
9.7
Gmail / Google Play ……………………………………….……………….. 39
9.8
1Mobile Market ………………………………………….………………….. 42
9.9
Explorer ……………………………………………………….…………………. 43
9.10 Music ………………………………………………………….……………..…… 44
9.11 Sound Recorder …………………………………………….………………… 44
9.12 Gallery (V ideo Player) ……..………………………….…………………… 45
9.13 Camera …………………………………………………………………….……… 46
9.14 Widgets Page …………………………………………….……………………. 46
Page 4

4
1. Using This Manual
Congratulations on your purchase of this Tablet. This powerful and versatile
tablet brings the best of the web and mobile computing to your fingertips in a
lightweight, highly versatile platform that fits an active lifestyle. Built around the
Google Android Jelly Bean operating system, the tablet gives you access to
thousands of useful and entertaining applications to enhance your mobile experience.
With integrated wireless access and a highly responsive touchscreen, you can read
books and newspapers on the go; stay up-to-date on the latest news, sports, and
weather; manage your multimedia and business files; browse the web, and lots more.
Note: This Tablet does not have built in 3G and can only access the Internet when
connected to a wireless (Wi-Fi) network. If you would like to access the Internet while
on the move there are a number of 3G Mobile Hotspots / MiFi devices available from
all the major mobile operators. These will allow the Tablet to connect wirelessly with
the Hotspot, bringing the Internet to you when on the move.
Read Me First
•
Please keep this manual for future reference.
•
Please read this manual and all safety instructions carefully before using your
Tablet to ensure safe and proper use.
•
The descriptions in this manual are based on the default settings of your device.
•
Images and screenshots used in this user manual may differ in appearance from
the actual product.
•
Formatting and delivery of this user manual is based on the Google Android Jelly
Bean operating system and may vary depending on the device.
•
Content in this user manual may differ from the product, and is subject to
change without prior notice.
•
Available features and additional services may vary by device, software, or
service provider.
•
Applications and their functions may vary by country, region, or hardware
specification. are not liable for performance issues caused by third-party
applications.
•
Tablet is not liable for performance issues or incompatibilities caused by user
editing of system settings.
•
Software, wallpapers, images, sound sources, and other contents provided in
this device are licenced for limited use between and their respective owners.
Extracting and using these materials for commercial or other purposes is an
infringement of copyright laws. cannot be held liable for such copyright
infringement by the user.
Page 5

5
Trademarks
Tablet and the logo are registered trademarks.
The Android logo, Google Search™, Google Maps™, Google Mail™, YouTube™, Android
Market™, and GoogleTalk™ are trademarks of Google, Inc.
Bluetooth® is a registered trademark of the Bluetooth SIG, Inc. worldwide.
HDMI® is a registered trademark of HDMI Licensing, LLC.
2. Safety Instructions
This user manual contains important safety instructions and information for proper
use of the device. Please follow the instructions in this manual carefully.
•
This is a high-density electronic product; please do not dismantle it by yourself.
•
Avoid shocks and do not let the device fall, as otherwise it may cause damage to
the device.
•
Do not use damaged power cords or plugs, or loose electrical sockets.
•
Do not touch the power cord with wet hands, or disconnect the charger by
pulling the cord.
•
Do not bend or damage the power cord.
•
Avoid using this product in the following environments: high and low
temperatures, humid environments, dusty environments, areas with strong
magnetic fields and prevent long-term exposure to the sun. In particular please
avoid leaving the device in the car during summer if the doors are closed.
•
To clean the product, gently wipe the product using a moist cotton cloth; the use
of other chemical cleaning is prohibited unless they are specifically designed for
this purpose. This product should be kept away from water droplets splashes, so
cups filled with liquids should not be placed near the product. Do not use
alcohol, thinners or petrol to clean the display.
•
If using the headset for a long time, high volume may cause permanent damage
to hearing.
•
Do not use headphones when going across a road, driving a motorcycle or
bicycle, in order to avoid traffic accidents.
•
Please use only the supplied battery, charger and accessories, the use of any
other type of product would be a breach of warranty regulations, and may be
dangerous.
•
Do not short-circuit the charger or the battery.
Page 6

6
•
Do not drop or cause an impact to the charger or the battery.
•
Please deal with waste machinery and accessories according to local
environmental regulations.
•
If you have any questions about the use of this product, please contact your
local dealer or the Tablet customer service center.
•
The Standby T ime of the batteries may vary due to different environmental
influences.
•
Any loss of data caused by product damage, repair or through any other issues
relating to the device are not covered under warranty. Please ensure you make
timely backups of all your data.
•
Do not handle a damaged or leaking Lithium Ion (Li-Ion) battery. For safe
disposal of your Li-Ion batteries, contact your nearest authorised recycling
centre.
•
Handle and dispose of batteries and chargers with care. Never dispose of
batteries or devices in a fire. Follow all local regulations when disposing of used
batteries or devices.
•
Never place batteries or devices on or in heating devices, such as microwave
ovens, cookers, or radiators. Batteries may explode when overheated.
•
Never crush or puncture the battery. Avoid exposing the battery to high
external pressure, which can lead to an internal short circuit and overheating.
Touchscreen Precautions
For optimal use of the touch screen, remove the screen protection film before using
your device.
To avoid scratching the touch screen, do not use sharp tools.
Do not allow the touch screen to come into contact with other electrical devices.
Electrostatic discharges can cause the touch screen to malfunction.
Do not allow the touch screen to come into contact with water. The touch screen may
malfunction in humid conditions or when exposed to water.
Your touch screen has a layer that detects small electrical charges emitted by the
human body. For best performance, tap the touch screen with your fingertip. The
touch screen will not react to touches of sharp tools, such as a stylus or pen which
could damage and mark the screen.
Page 7

7
3. Boxed
Contents
1. Tablet Device
2. Power Adapter
3. Quick Start Guide
4. Safety and Warranty guide
5. USB Cable (for connecting to a PC)
4. Hardware Specification
Processor
1.2GHz Cortex Dual Core Processor
PowerVR SGX540 Graphics Processor
Memory 1GB DDR3 high-speed memory
Storage 8GB built-in with support for external micro SD card up to 32GB
W
ireless
IEEE802.11b/g/n
Wireless internet
USB USB2.0 OTG high speed interface
Video Output HDMI 1.4 high definition video output interface
Audio 3.5mm earphone interface, Built-in microphone
Screen
Size 7 inch capacitive multi touch
Resolution 1024 x 600
Operation
Capacitive
5 point multi touch screen
System Android Jelly Bean
Others
Size (Length × Width × Thickness) 193.5 × 112.4 × 9.5mm
Weight 290g approx.
Battery Built-in polymer lithium battery 3000mAh
Page 8
8
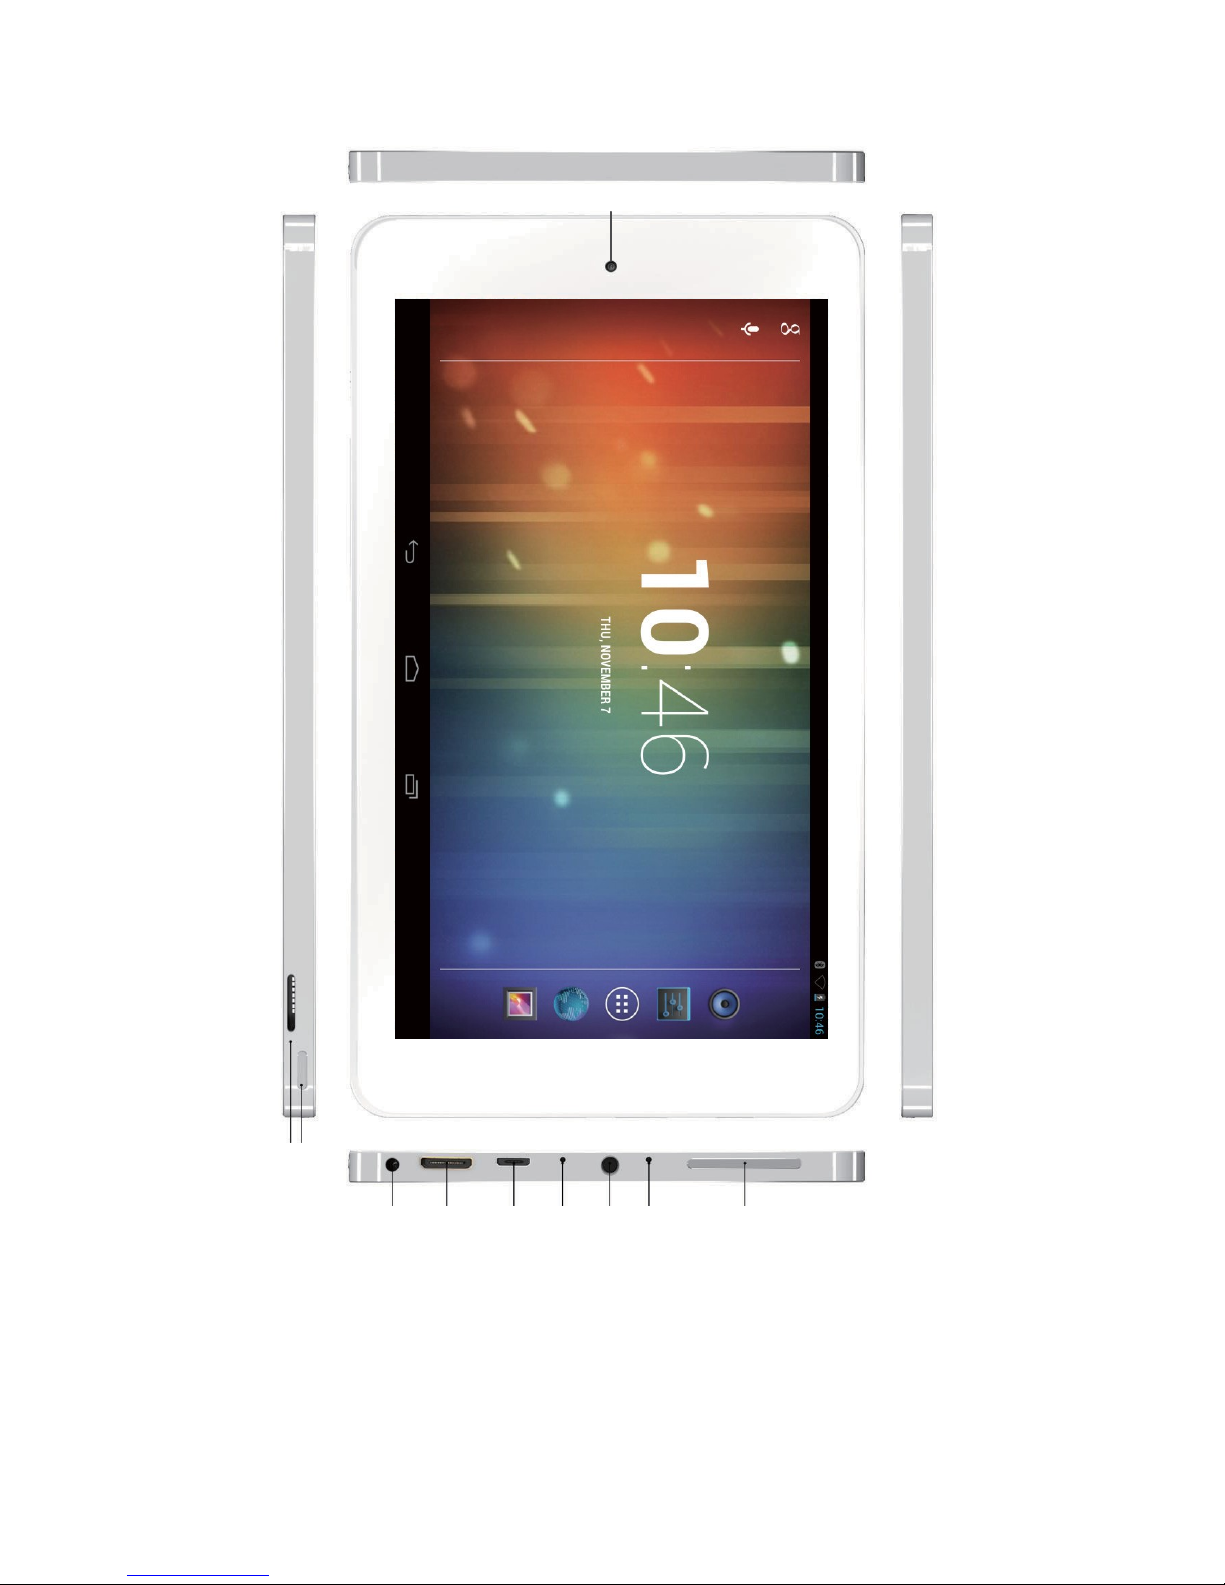
5. Product Overview
10
1 2
3 4 5 6 7 8 9
1. Micro SD Slot 2. Power Button
3. Power-in Socket 4.
Mini HDMI Connector
5. Micro USB Connector 6. Reset Button
7. 3.5mm Headphone Jack 8. Microphone
9. Volume Control Buttons 10. Front Camera
Page 9

9
6. Connectivity
6.1 Connecting to a PC
You can connect the Tablet directly to a PC or Laptop using the supplied USB cable.
Once connected to a PC, the Tablet will appear as a mass storage device allowing
you to access it in the same way you would a removable hard drive, with access via
explorer or my computer.
1. Using the USB cable, connect the micro USB connector to your Tablet.
2. Connect the USB connector to a PC or Laptop.
3. Open folders to view files.
4. Copy files from the PC or Laptop to your Tablet.
To disconnect the Tablet from a PC, click the USB device icon on the Windows task
bar and click the option to safely remove the mass storage device. Then remove the
USB cable from the PC. Failure to follow these instructions may result in loss of data
on your Tablet or damage to your device.
6.2 Connecting an external USB device
You can use a USB storage device to store additional files.
Note: Your device may not support some USB storage devices.
1. Using the USB Adapter Cable, connect the micro USB connector to your
Tablet.
2. Connect a USB device to the USB connector on the Adapter Cable.
3. Open Explorer.
4. Touch the USB symbol
to view files on the USB device.
6.3 Connecting a micro SD Card
You can insert a micro SD Card into your Tablet to store additional files. Capacities up
to 32GB are supported.
1. Insert a micro SD Card into the micro SD Card slot.
2. Open Explorer.
3. Touch the SD Card symbol
to view files on the micro SD Card.
See chapter 9.9 for more information on using Explorer.
Page 10

10
7. Getting Started
7.1 Charging the battery
The Tablet has a built-in battery. Before using the device for the first time, you must
fully charge the battery. Use only the 5V power adapter provided with the device, or
alternatively the Tablet can be charged via a USB cable to a PC or other
USB charging source. Unauthorized chargers can cause batteries to explode or damage
your device.
When your battery charge is low, the device will emit a warning tone and display a low
battery message. The battery icon will also be empty. If the battery charge becomes
too low, the Tablet will automatically power off.
If the battery is completely discharged, the Tablet will not turn on. Allow a
depleted battery to charge for a few minutes before you try to turn on the device.
Charging via the power adapter
1. Connect the power adapter to the Power-in socket.
2. Plug the power adapter into a power outlet.
Charging via USB
1. Connect the USB cable to the micro USB socket.
2. Plug the USB cable into a USB power source (power adapter, PC, Laptop etc.).
When it is charging, the battery symbol in the bottom right hand corner of the desktop
will show a charging (lightning) symbol
.
When the battery is fully charged (no lightning symbol in the battery icon), unplug the
power adapter or USB cable from the Tablet and then from the power socket. To save
energy, unplug or turn off the power adapter at the socket, when not in use.
Note: You can use the Tablet while it is charging, but it may take longer to charge.
While the Tablet is charging, the touch screen may not function correctly. If this
happens, unplug the power adapter from the device in order to use it.
While charging, the Tablet may get warm. This is normal and should not affect your
device’s lifespan or performance.
If your Tablet is not charging properly, please contact support (see chapter 11).
Connecting the power adapter or USB cable improperly may cause serious damage to
the Tablet, the power adapter or the USB power source. Any
damage caused by misuse is not covered by the warranty.
Page 11
11
7.2 Startup
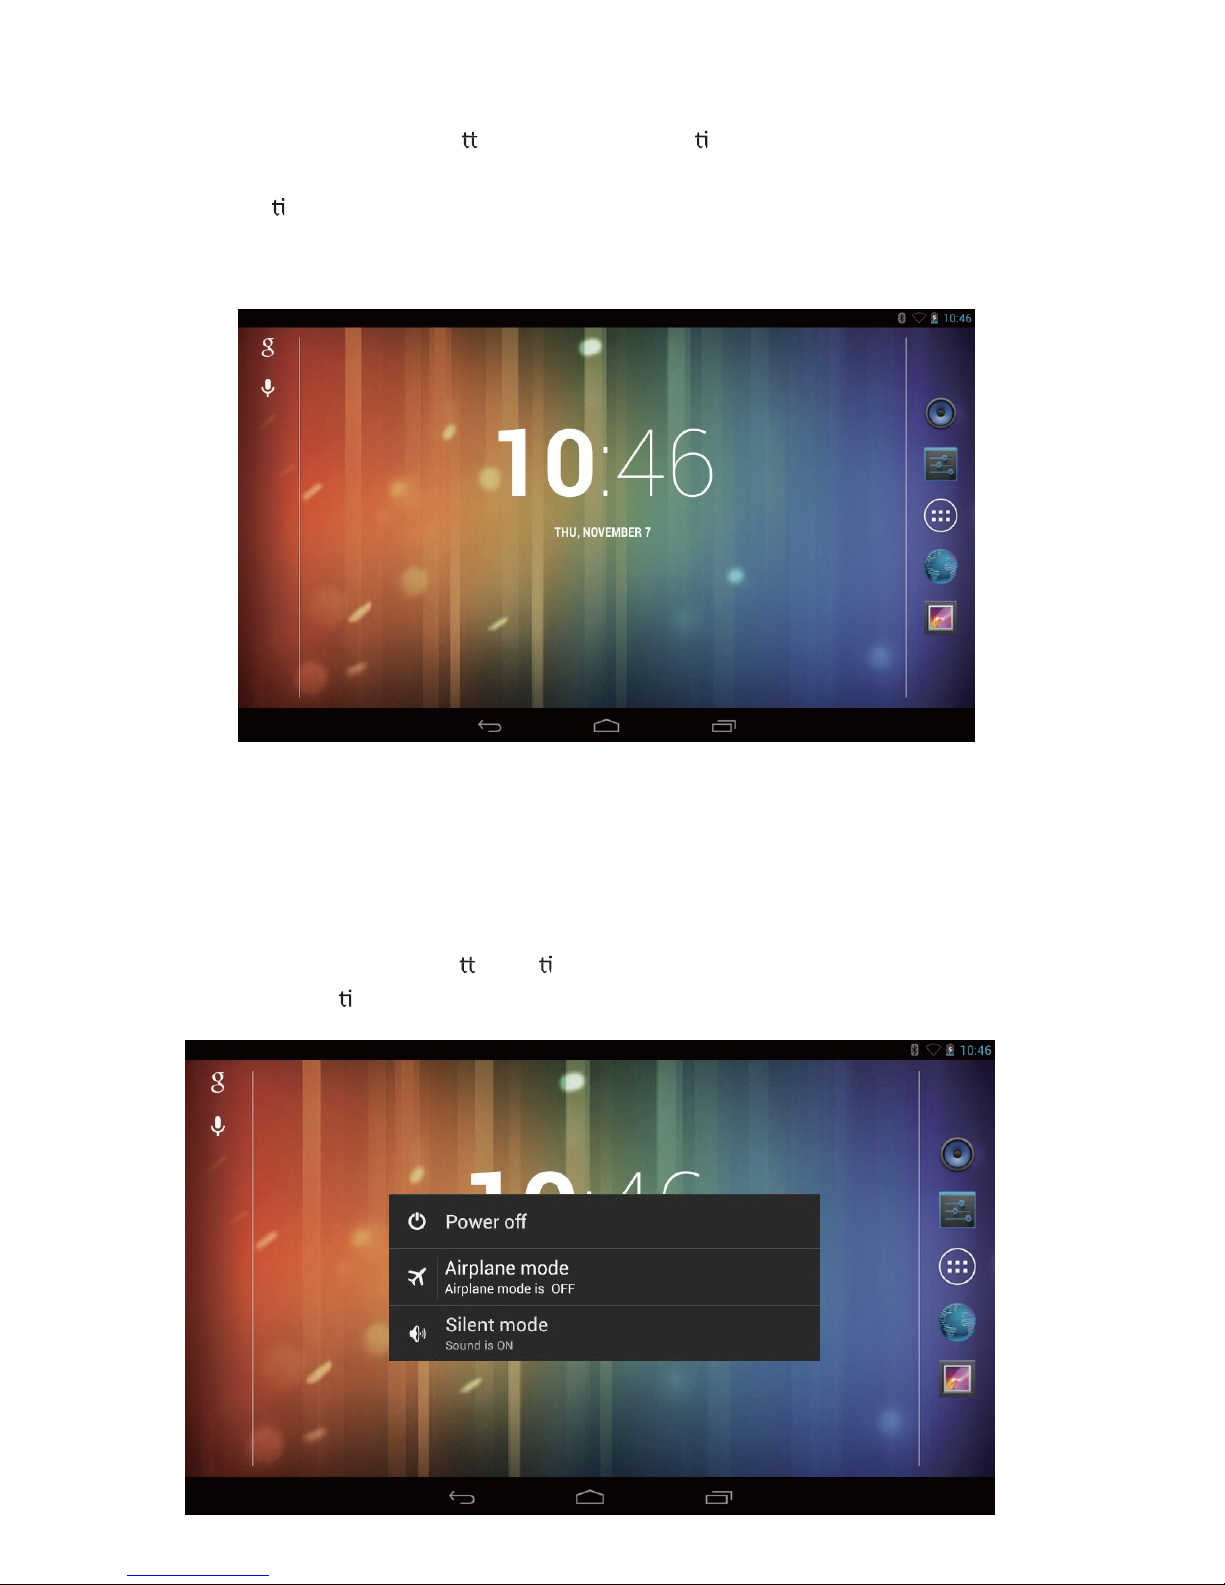
Press and hold the power bu on for 3 seconds un l the Tablet starts to boot. Once it
has finished, the lock screen will be shown. To unlock, drag the “locked” symbol to
the right un l it becomes an “unlocked” symbol.
Note: This screen may have different wallpaper; this can be customized by the user.
You will now be at the default desktop page.
7.3 Shutdown
Press and hold the power bu on un l the Power off pop-up appears on the desktop.
Choose the OK op on to power off the Tablet (as shown below).
Page 12
12
7.4 Desktop
The Tablet runs the latest version of the Android Operating System. Android Jelly Bean
has a similar user interface to previous versions, but has been updated
specifically for use with tablet devices.
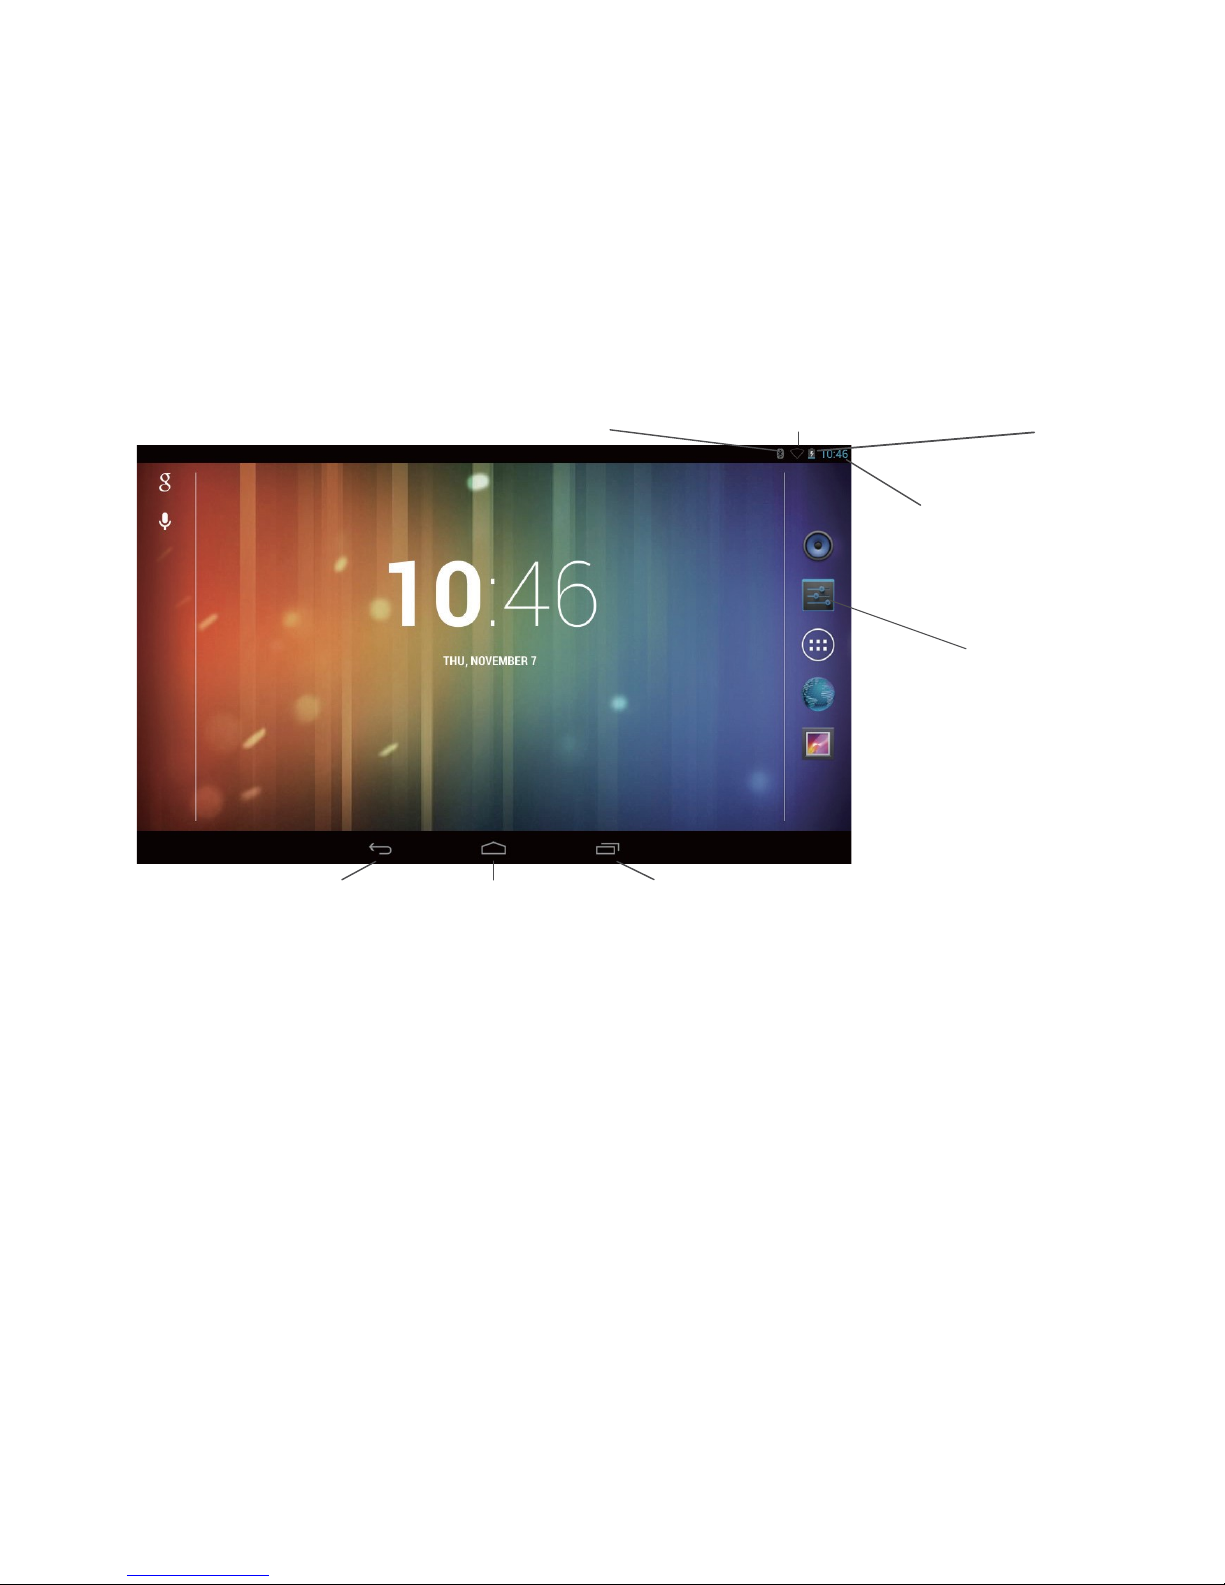
The image below shows the layout of the desktop and where information can be found
and accessed.
Notification
Bar (slide down to see notifications) Wi-Fi status and signal strength
Battery Status
Quick Settings
Shortcut
(slide down to
access)
All Applications
Quick
Links
Bar
(slide to move
through
apps)
Back
Home Recent Apps
The All Applications Quick Links Bar can be scrolled up and down in order to access any
of the applications installed on the tablet.
In the top left hand corner is the Notifications Bar, which informs you of any activities
that the tablet is currently carrying out, or which have recently been completed. This
can be accessed by holding your finger on the bar and sliding your finger downwards.
Information shown in this bar will include downloads, application installations and
recently received messages etc.
In the top right hand corner is the Quick Settings Shortcut, which allows access to
shortcuts for brightness, settings, Wi-Fi, screen rotation, battery power, airplane mode
and bluetooth switching etc. This can be accessed by holding your finger on the Wi-Fi,
battery or clock icons and sliding your finger downwards.
At the bottom of the screen are the Back, Home and Recent App links. For more
information on these links see the following page.
To change the default image and to add and remove applications from the All
Applications Quick Links Bar, hold your finger down anywhere on the desktop for two
seconds. Untick any applications you don’t want to appear and select the back button.
Page 13
13
When you next press on the Home icon , a Complete action using window will
popup. Tap on Launcher and then the Always link. Once done, the Android Home
Screen will appear and will become the default desktop.
The main interface controls on the desktop are shown below:
Icon Name Description
Opens the previous screen you were working in, even if it
Back
Home
was in a different app. Once you are back at the Home
Screen, you can't go any further back through your history.
Opens Home. If you’re viewing a left or right Home Screen,
opens the central Home Screen.
Recent Apps
Menu Button
Applications
Launcher
Battery Status
Opens a list of
thumbnail
images of Apps you have worked
with recently. To open an App, touch it. To remove a
thumbnail from the list, swipe it upwards or doqnwards.
Allows easy access to the menu options for the current
application.
(Android Home Screen only)
Allows access to all your apps and widgets.
Shows the current battery capacity or if the Tablet is
currently charging.
Status Icons
Status icons to the left of the clock tell you which apps have
sent you
notifications.
Icons to the left of the clock, display
the current wireless network connection strength, battery
charge level etc.
Page 14
14
7.5 Sleep Mode
During normal operation of the Tablet, press the power button once, to set the device
into sleep mode. The screen will turn off, but the device will be in a state of
readiness to be used at any time. To wake the device up again, press the power button
to resume normal operation. When the Tablet is not in use, you can use this
function in order to conserve the battery.
7.6 Configuring the Wallpaper (Android desktop only)
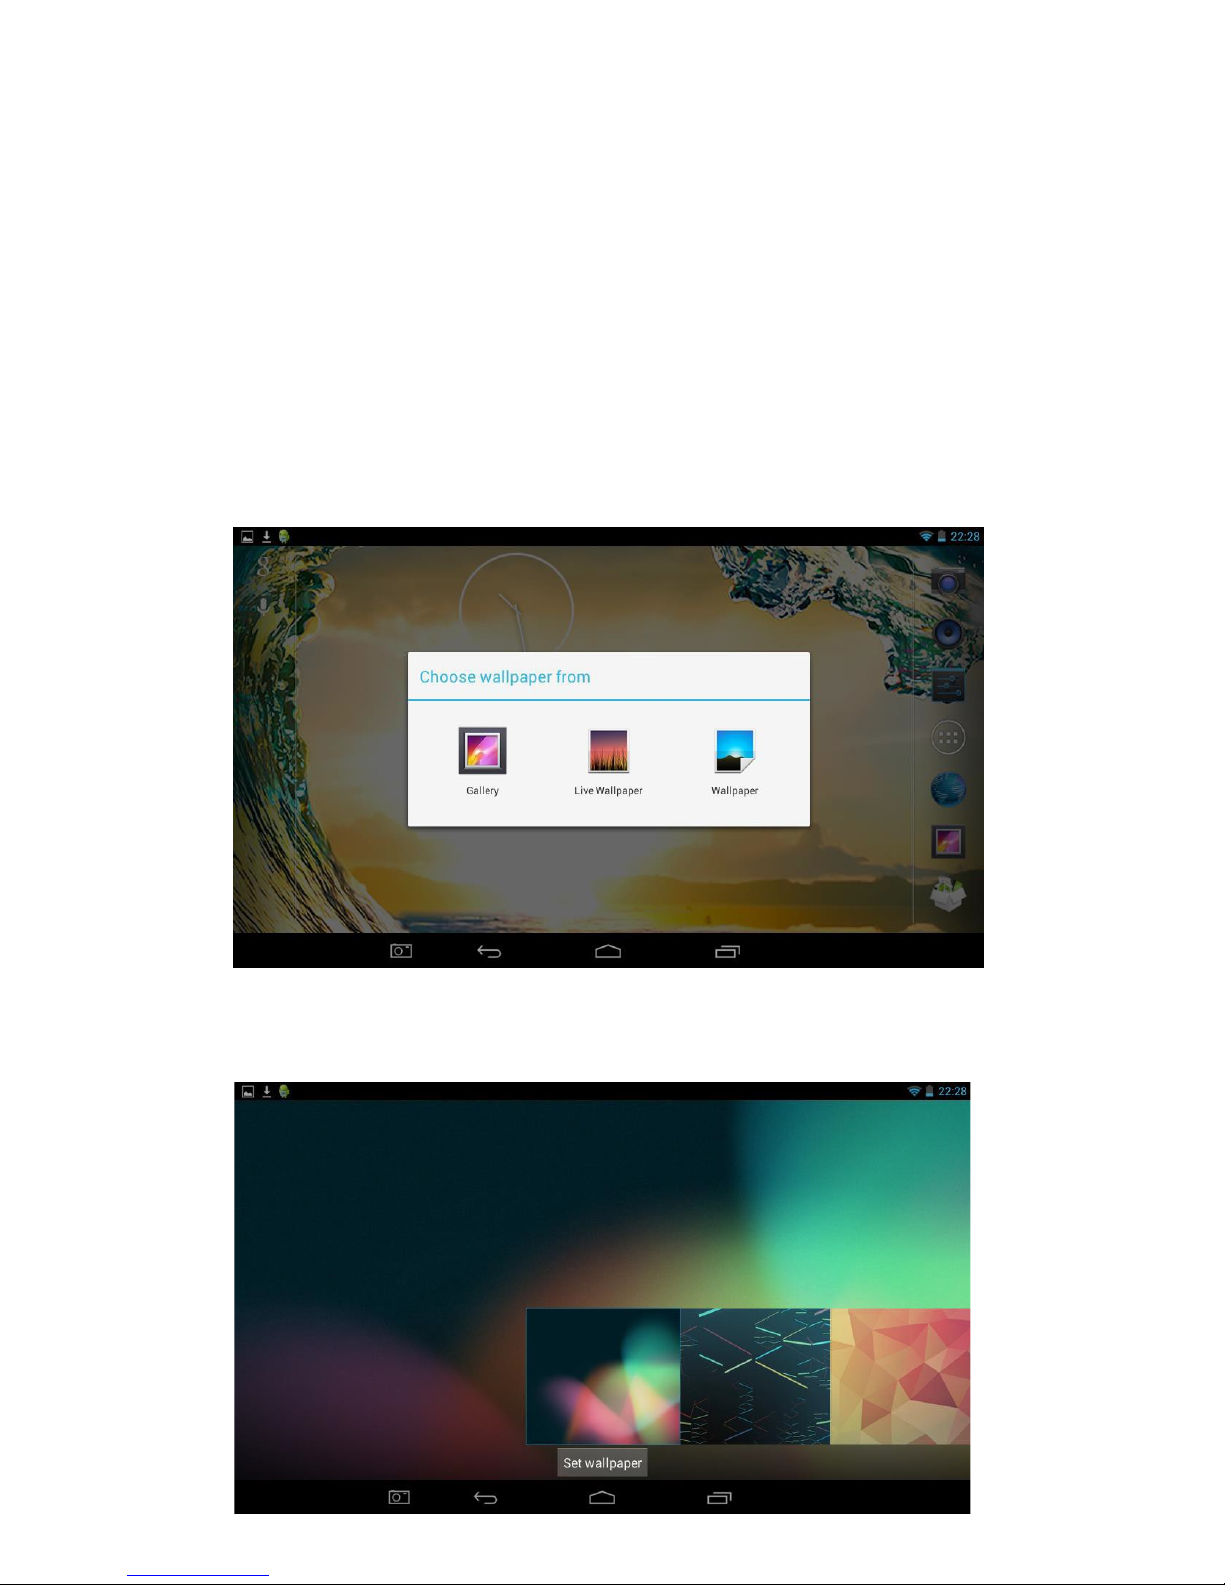
To change the Wallpaper on the Tablet, press one finger on any empty area of the
desktop and after a few seconds the Choose wallpaper from pop-up will appear.
Selecting Gallery, Live Wallpapers or Wallpapers will allow you to select from a
number of different options available as shown below.
Once you have chosen the wallpaper you would like, press the Set wallpaper button as
shown below.
Page 15
15
7.7 Applica ons
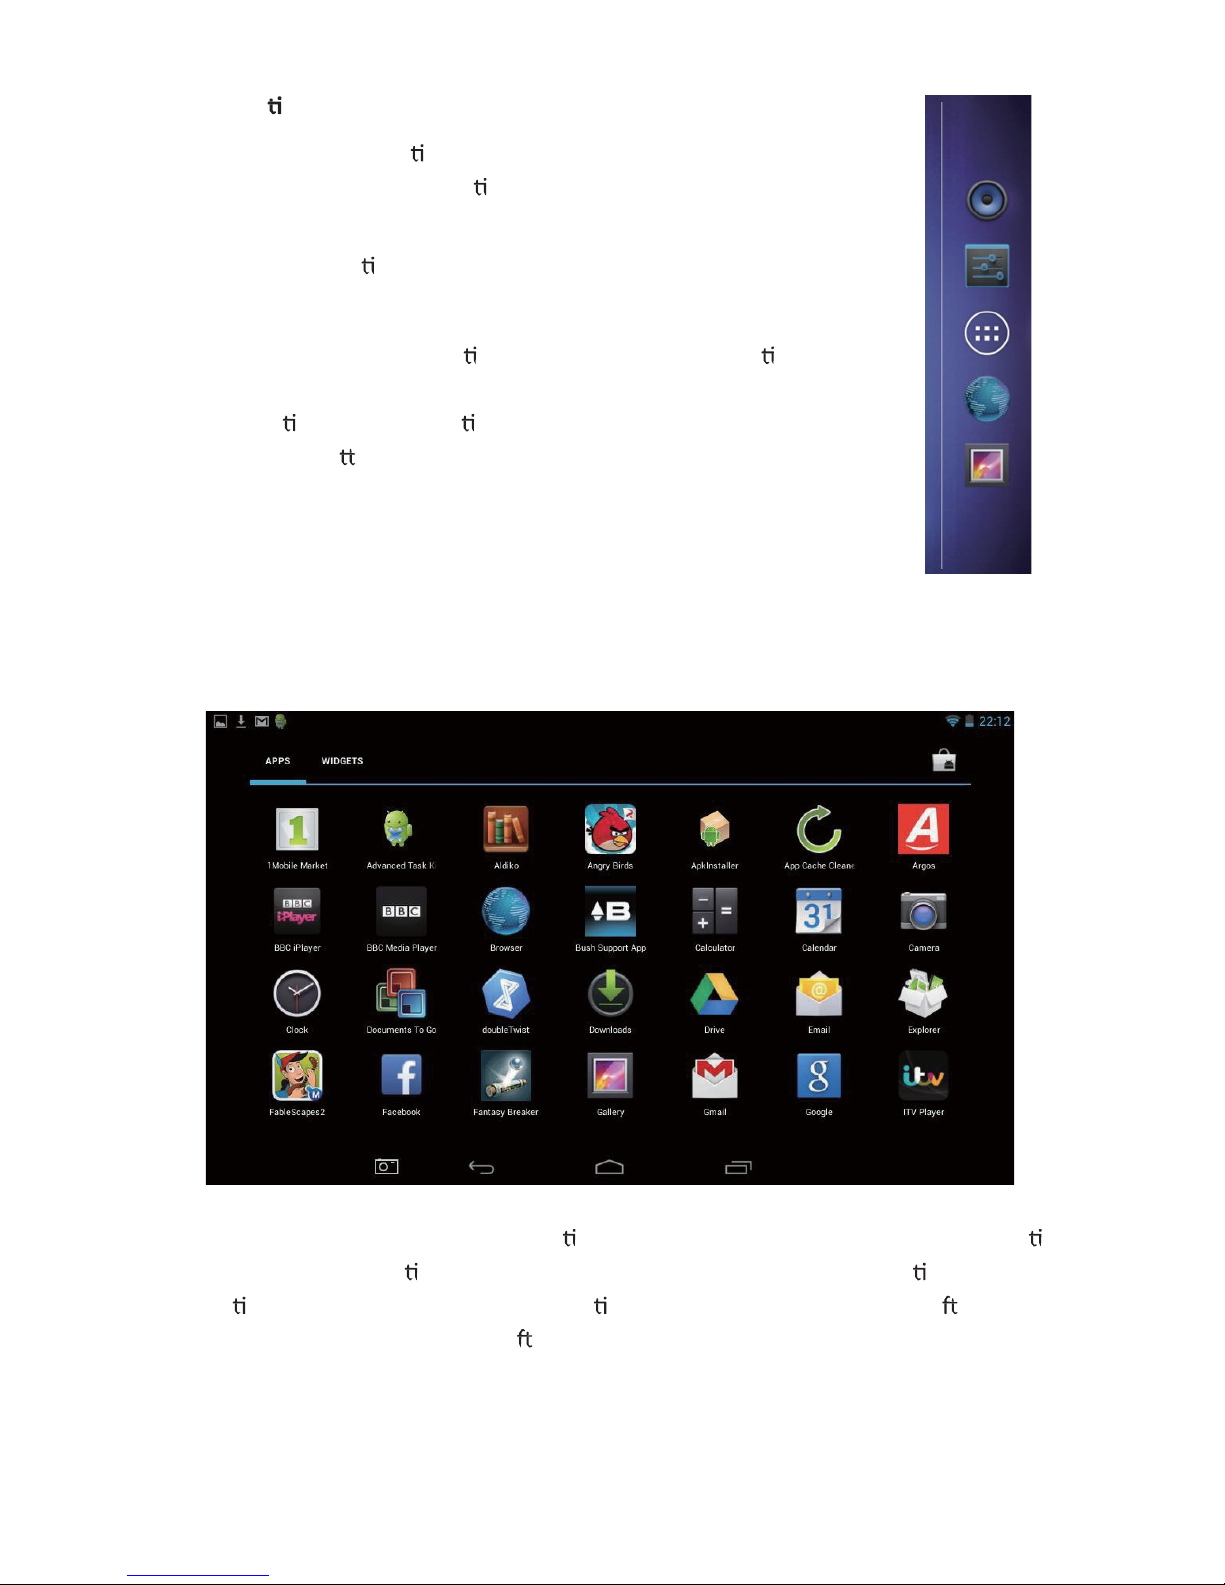
To access all the applica ons available on the Tablet from the
Desktop, slide the All Applica ons Quick Links Bar up or down by
holding it with your finger and moving your finger up or down.
To select an applica on you wish to run, tap on the icon of the app
you wish to run to select and run it.
To add and remove applica ons from the All Applica ons Quick
Links Bar, hold your finger down anywhere on the desktop for two
seconds. Un ck any applica ons you don’t want to appear and
select the back bu on.
From this page you can run any applica on by touching the symbol for that applica on.
Each page of the applica ons list will show a number of installed applica ons, in
alphabe cal order. To access more applica ons, scroll the window to the le by
swiping your finger from right to le .
Page 16

16
7.8 Using the Touch Screen
Use your fingers to manipulate icons, buttons, menus, the onscreen keyboard, and
other items on the touchscreen. You can also change the screen's orientation.
To select or activate something, touch it.
To type something, such as a name, password, or search term, just touch where you
want to type. A keyboard will popup and allow you to type into the field.
Other common gestures include:
Touch & hold
Touch & hold an item on the screen by touching it and not lifting your
finger until an action occurs.
Drag
Touch & hold an item for a moment and then, without lifting your
finger, move your finger on the screen until you reach the target
position. For example, you can drag to reposition shortcuts on the
Home Screen.
Swipe or slide
Quickly move your finger across the surface of the screen, without
pausing when you first touch (so you don't drag something instead). For
example, you can slide a Home Screen left or right to view the other
Home Screens.
Double-tap Quickly tap twice on a webpage, map, or other screen to zoom. For
example, double tap a webpage in Browser to zoom in, and double-tap
again to zoom out.
Pinch In some apps (such as Maps, Browser, and Gallery), you can zoom in
and out by placing two fingers on the screen at once and pinching them
together (to zoom out) or spreading them apart (to zoom in).
7.9 Using Google Search
Google Search can help you find anything you need on your tablet or the web and is
available from the top of any Home Screen on the Tablet. There are two options
available:
•
Speak search terms: Touch the Microphone icon .
After you say what you're looking for, the Browser will open with a list of search
results.
•
Type search terms: Touch Google.
As you type, suggestions appear below the Search box.
The first few suggestions attempt to complete what you are typing:
Page 17

17
•
To search for a suggestion immediately, touch it.
•
To add a suggestion to the search field, touch the arrow to its right. You can then
keep on typing or choose further suggestions.
•
To search for the contents of the search field, touch the Return key on the right
side of the keyboard.
The Browser will open with a list of search results, and below the search term will be
suggestions for all items found on your Tablet including the following:
•
A Maps marker indicates a business listing. Touch to view the listing, see its
location on a map, get directions or take other actions.
•
A Favorites icon identifies one of your bookmarks. Touch to open the
bookmarked page.
•
An App icon indicates one of your Apps. Touch to open the App.
•
A Book cover icon indicates one of your books. Touch to open that book.
•
A Music album icon indicates a song or other music you have downloaded to
your tablet. Touch to play that music.
•
A Video icon indicates one of your videos. Touch to play that video.
Set searchable items
To adjust where Google Search looks on your tablet:
1. On a Home Screen, touch Google.
2. Touch the Menu icon
and select Settings and make sure that Searchable
items is selected.
3. Check the items on your tablet that you want to include in searches.
Manage Google Search privacy settings
1. On a Home Screen, touch Google.
2. Touch the Menu icon
and select Settings and make sure that Google
Search is selected.
3. Adjust any of these settings:
Use Web History - Check to include suggestions based on previous searches
from your computer or other devices.
Manage Web History - Opens Browser to the web search history settings
associated with your Google Account.
Use My Location - Check to take account of your location in search results and
other Google services.
Page 18
18
8. System Settings
To access all the available System Settings for the Tablet, you will need to access the
settings menu. Slide the All Applications Quick Links Bar up or down to select the
settings link
and tap on it., Tap on the Settings icon from Application Launcher.
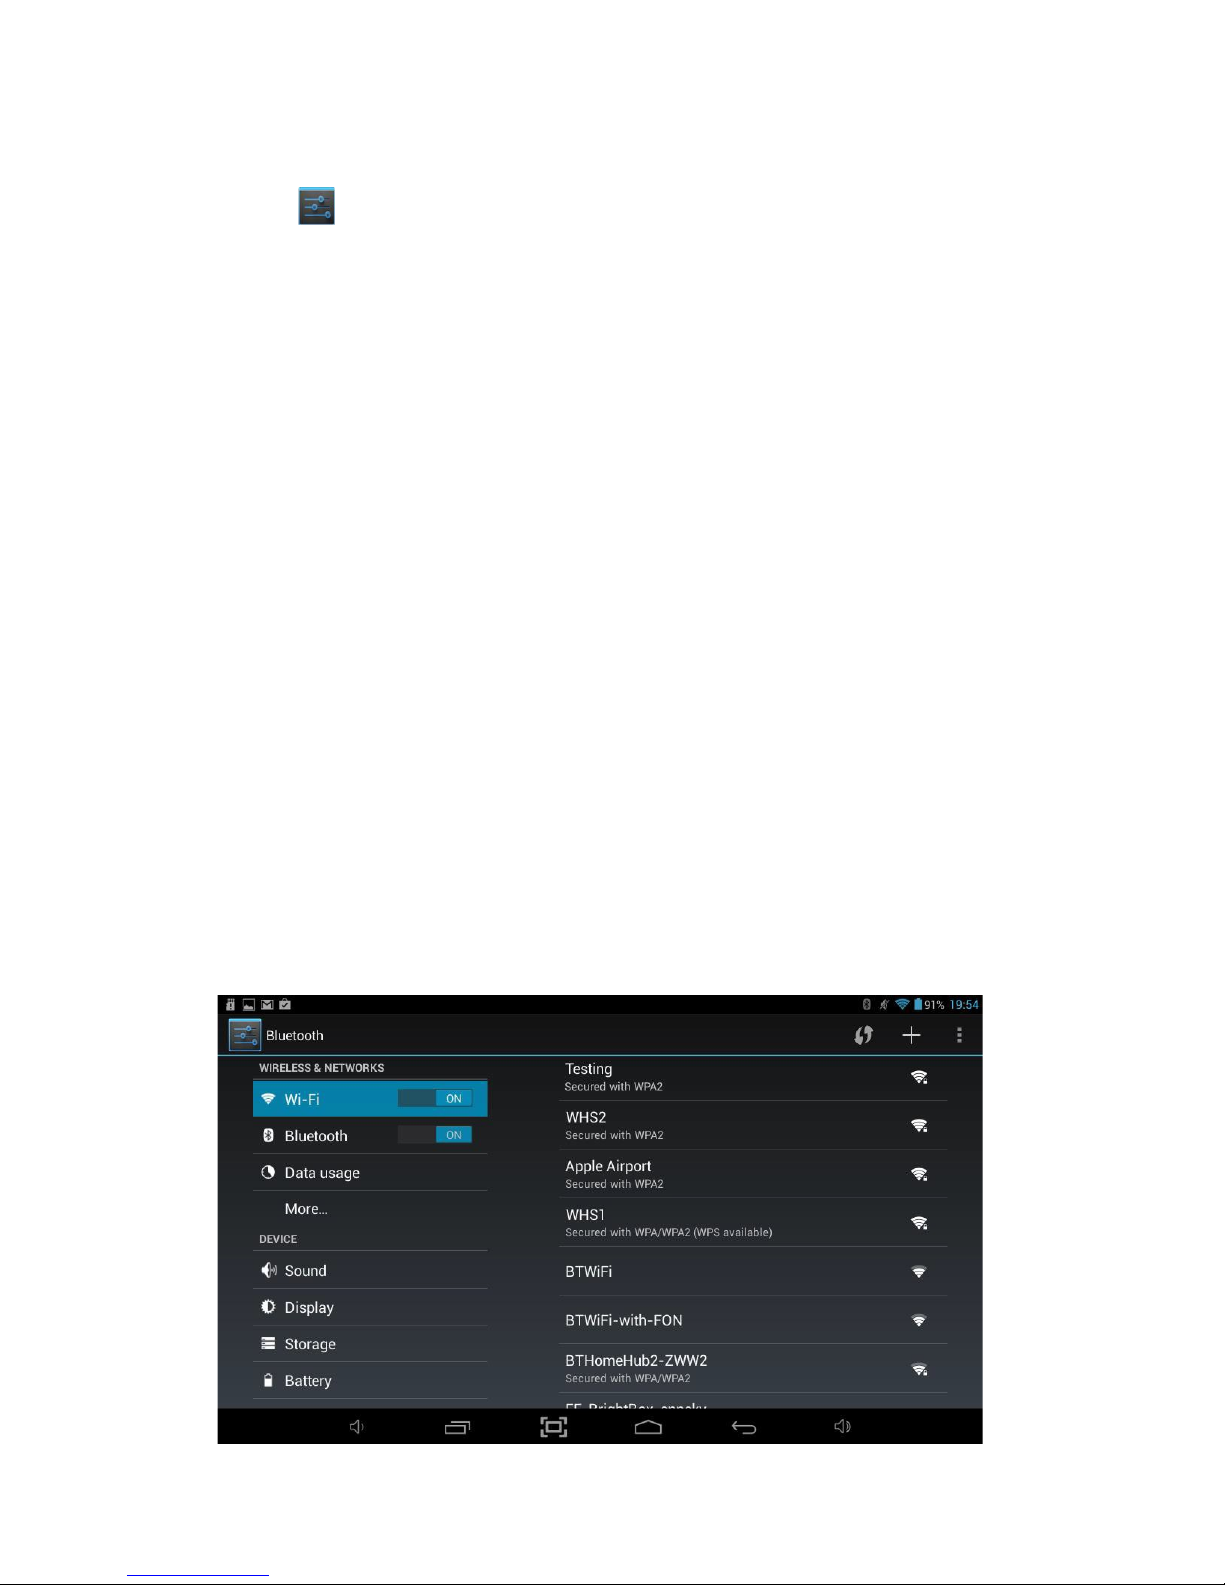
This will open the system settings interface. On the left hand side of the screen are all
the available settings options. Touching one of these groups allows access to all the
settings available within that group on the right hand side of the screen.
8.1 Wireless & Networks
Wi-Fi is a wireless networking technology that can provide Internet access at distances
of up to 100 meters, depending on the Wi-Fi router and your surroundings. To use
Wi-Fi, you need to connect to a wireless access point, or "hotspot." Some hotspots are
open and you can simply connect to them. Others implement security features that
require a password to be entered in order to ensure that only authorized users can
connect.
Note: To extend the life of your battery between charges, turn off Wi-Fi when you are
not using it. You can also set your Tablet to disconnect automatically from Wi-Fi
networks when it is sleeping.
To enable Wi-Fi:
1. Slide the Wi-Fi switch to the right of Wi-Fi to the On position.
2. Once Wi-Fi has been turned on, the Tablet will automatically scan for available WiFi networks and display the names of those it finds. Secured networks are indicated
with a Lock icon. If the Tablet finds a network that you connected to previously, it
will automatically connect to it.
Page 19
19
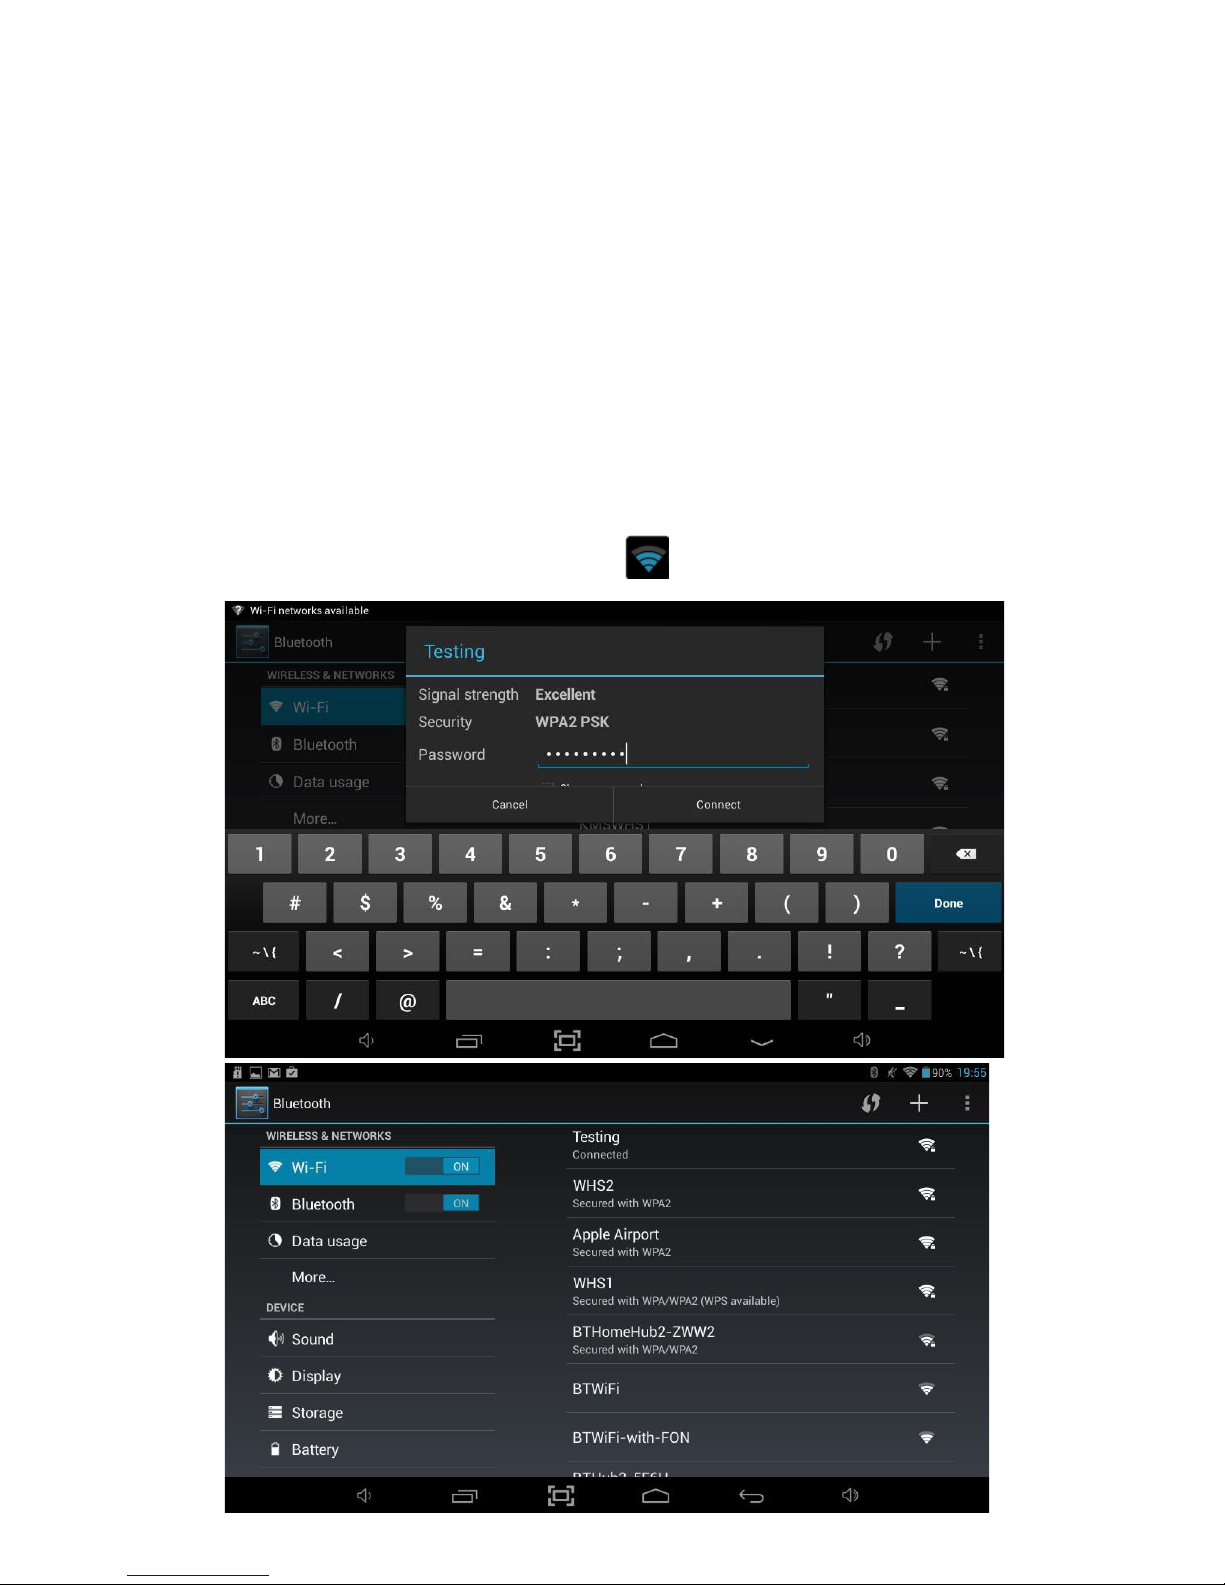
3. Find the right network and select it by touching the entry. If the network is secured,
you are prompted to enter a password. Make sure you enter the correct password,
otherwise the Tablet will not be able to connect to the network.
Where can the correct password be found?
If you are connecting to a Wireless Network which is provided by a router which
has been supplied by BT, Sky etc. then the password will be printed on a sticker on
the unit. Please ensure that you enter any letters using the correct case. Uppercase
letters must be entered in uppercase and lowercase letters must be lowercase.
If the router doesn’t have a sticker showing the password, you will have to ask
whoever setup the wireless network to provide you with the correct password to
connect to the network.
Once finished, the Tablet will now be connected to the network. Once
connected, you will see the wireless icon in the status bar.
Page 20

20
Add a Wi-Fi network
If your wireless network does not broadcast its name (SSID), or you are outside the
range of a Wi-Fi network, you can still add a Wi-Fi network so your Tablet will
remember it, along with any security credentials, and connect to it automatically
when it's in range.
1. Turn on Wi-Fi, if it's not already on.
2. Touch Add Network at the top of the screen.
3. Enter the SSID (name) of the network. If necessary, enter security or other
network configuration details.
4. Touch Save.
The information about the network is saved. Your Tablet will connect to this
network automatically the next time you come within range.
Forget a Wi-Fi network
You can make the Tablet forget about the details of a Wi-Fi network that you
added, if you no longer use it.
1. Turn on Wi-Fi, if it's not already on.
2. In the Wi-Fi settings screen, touch the name of the network.
3. Touch Forget in the dialog that opens.
Note: You should use Forget if you have entered the wrong password and need to
setup the connection again.
Configure proxy settings for a Wi-Fi network
Some networks require you to connect to internal or external network resources via a
proxy server. By default, the Wi-Fi networks you add are not configured to connect via
a proxy, but you can change that for each Wi-Fi network you've added.
1. In the Wi-Fi settings screen, touch and hold the name of the network.
2. Touch Modify network in the dialog that opens.
3. Select Show advanced options.
4. If the network has no proxy settings, touch None under Proxy Settings. If it does,
touch Manual in the menu that opens.
5. Enter the proxy settings supplied by your network administrator.
6. Touch Save.
The proxy settings apply only to the Wi-Fi network you modified. To change the proxy
settings for other Wi-Fi networks, modify them individually.
Page 21
21
8.2 Bluetooth
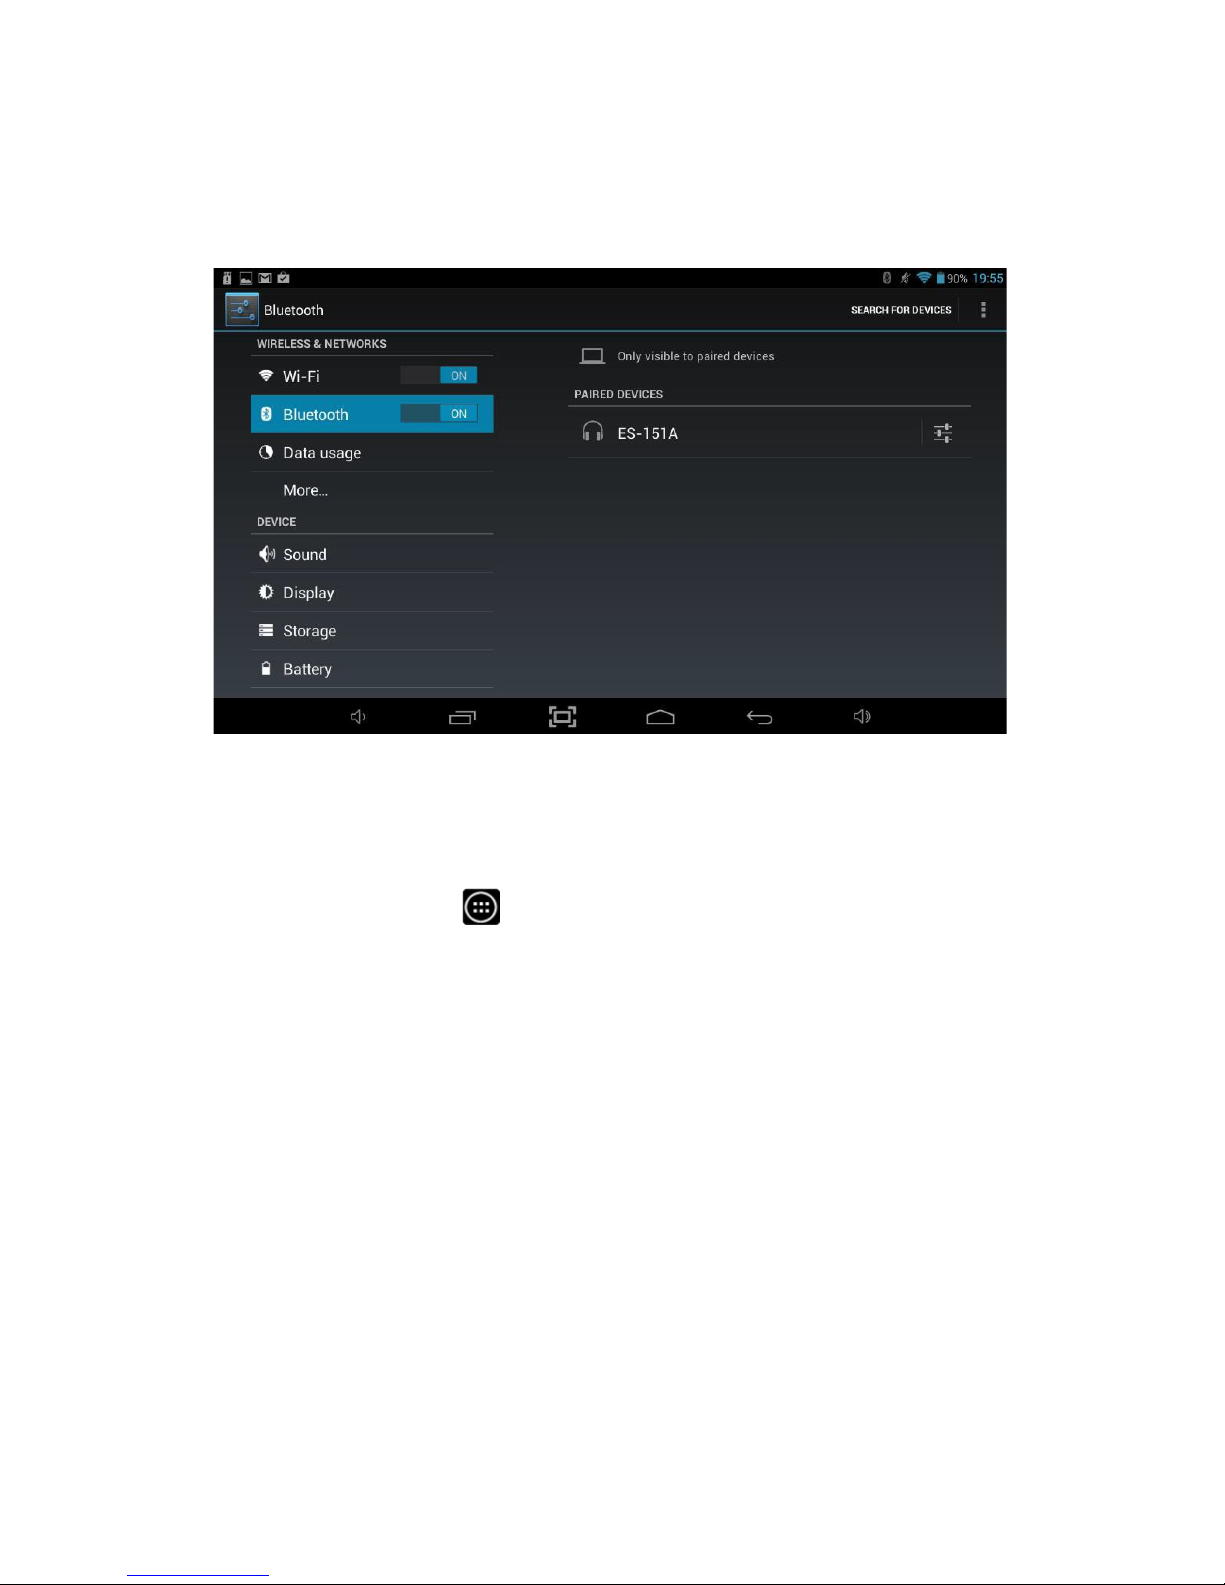
Bluetooth is a wireless technology that allows accessories like Headsets, Keyboards
etc. to be connected to the Tablet without using cables. To connect to a Bluetooth
device, the Tablet will need to be paired with it, which sets up a connection that will
be remembered by both devices.
Note: To extend the life of your battery between charges, turn off Bluetooth when
you are not using it.
To access Bluetooth settings, you will need to access the settings menu. Tap the
Applications Launcher icon
at the bottom of the Home Screen. Tap on the
Settings icon from the Application Launcher page.
Tap on the Bluetooth menu option on the left hand side menu.
To enable Bluetooth:
1. Slide the switch to the right, into the On position.
2. Once Bluetooth has been turned on, the Tablet will automatically scan for
available Bluetooth devices and display the names of those it finds.
3. Find the device you want to connect to and select it by touching the entry. Some
Bluetooth devices require a four digit pairing code to be entered to allow the
connection to complete. If this is the case, then a window will popup allowing the
code to be entered. You should refer to the instructions that came with the device
for this pairing code, but the most common codes are 0000 or 1234.
The device should now be paired and will start to work with the Tablet.
Page 22
22
8.3 Sound
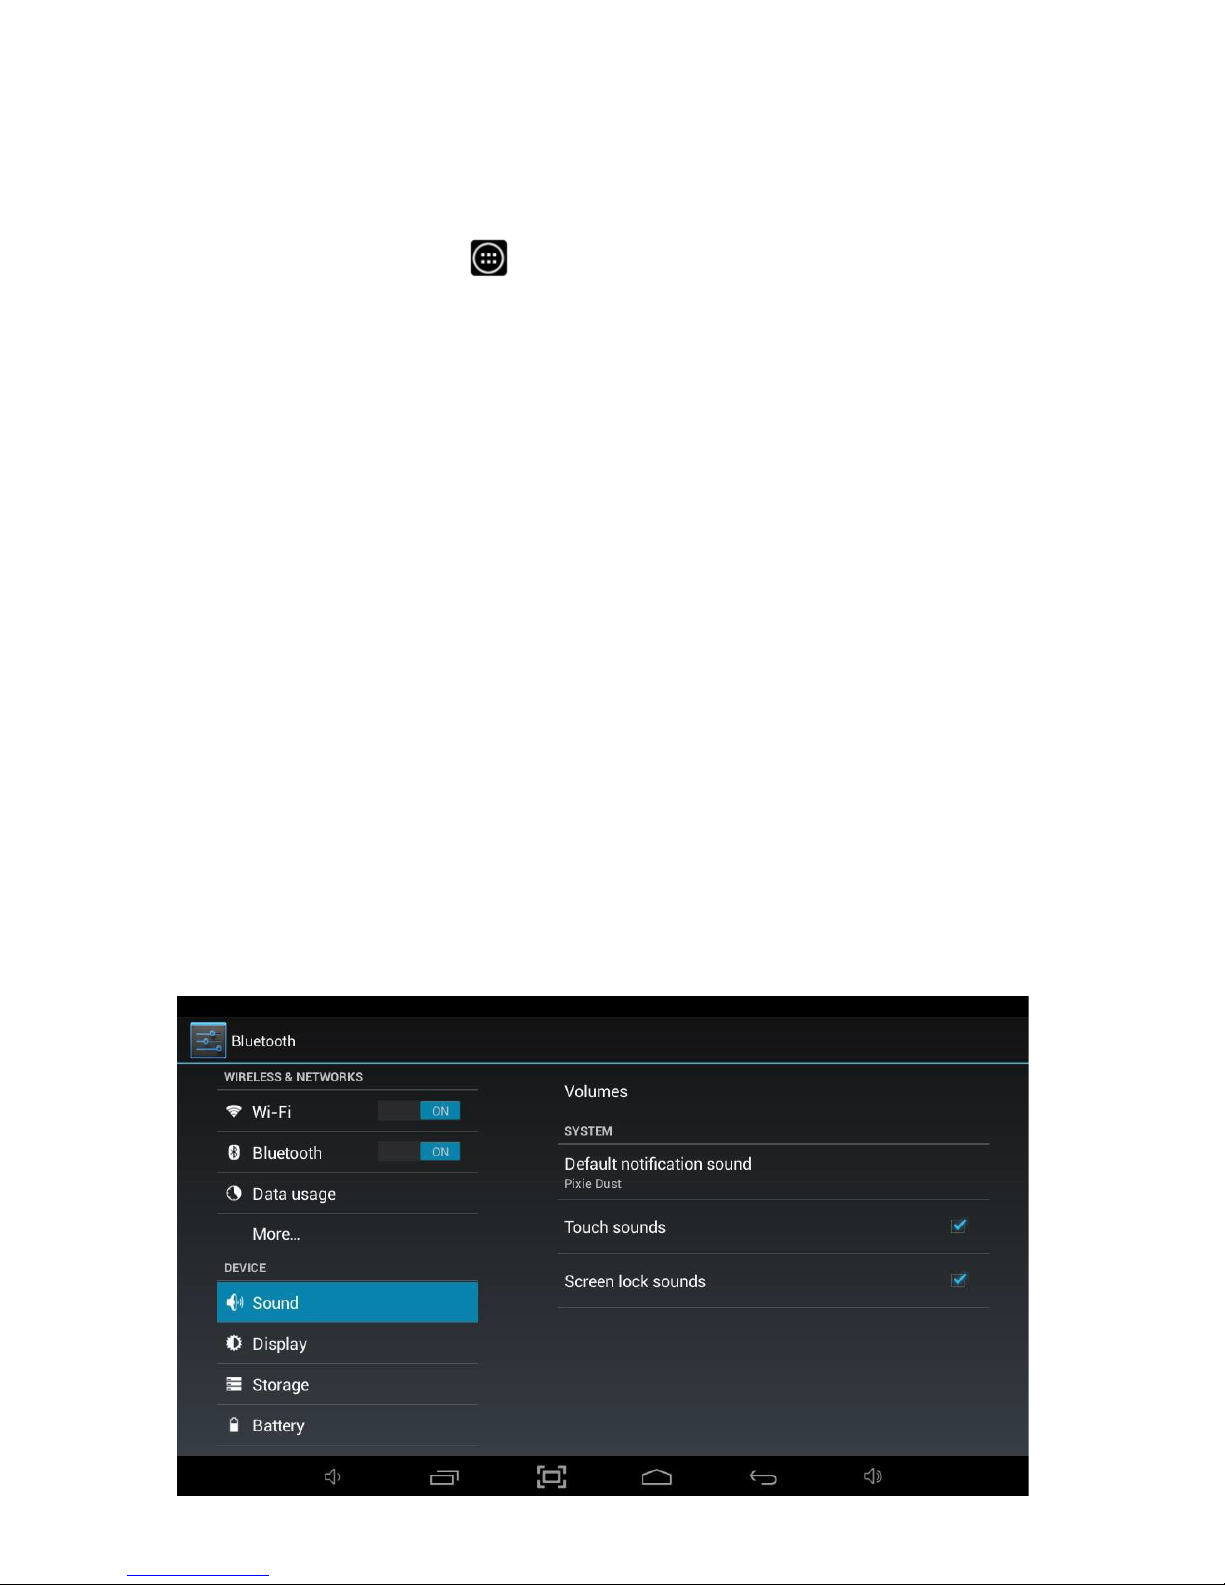
The Sound option allows access to all the sound settings available within the
Tablet.
To access Sound settings, you will need to access the settings menu. Tap the
Applications Launcher icon
at the bottom of the Home Screen. Tap on the
Settings icon from the Application Launcher page.
Tap on the Sound menu option on the left hand side menu.
Within this option, you can make the following changes:
Volumes
This option allows you to configure the default volume settings for
Music, video, games & other media, Ringtone & notifications and
Alarms.
Silent Mode This option allows you to Mute the Tablet or turn Silent Mode
Off.
Default notification Allows a different sound for
notifications
to be selected.
Touch sounds
This option allows you to turn the sound caused by touching the
screen off.
Screen lock sounds
This option allows you to turn the sound caused by unlocking the
screen off.
Vibrate on touch
Allows the tablet to be set to Vibrate whenever the screen is
touched (if supported).
Page 23
23
8.4 Display
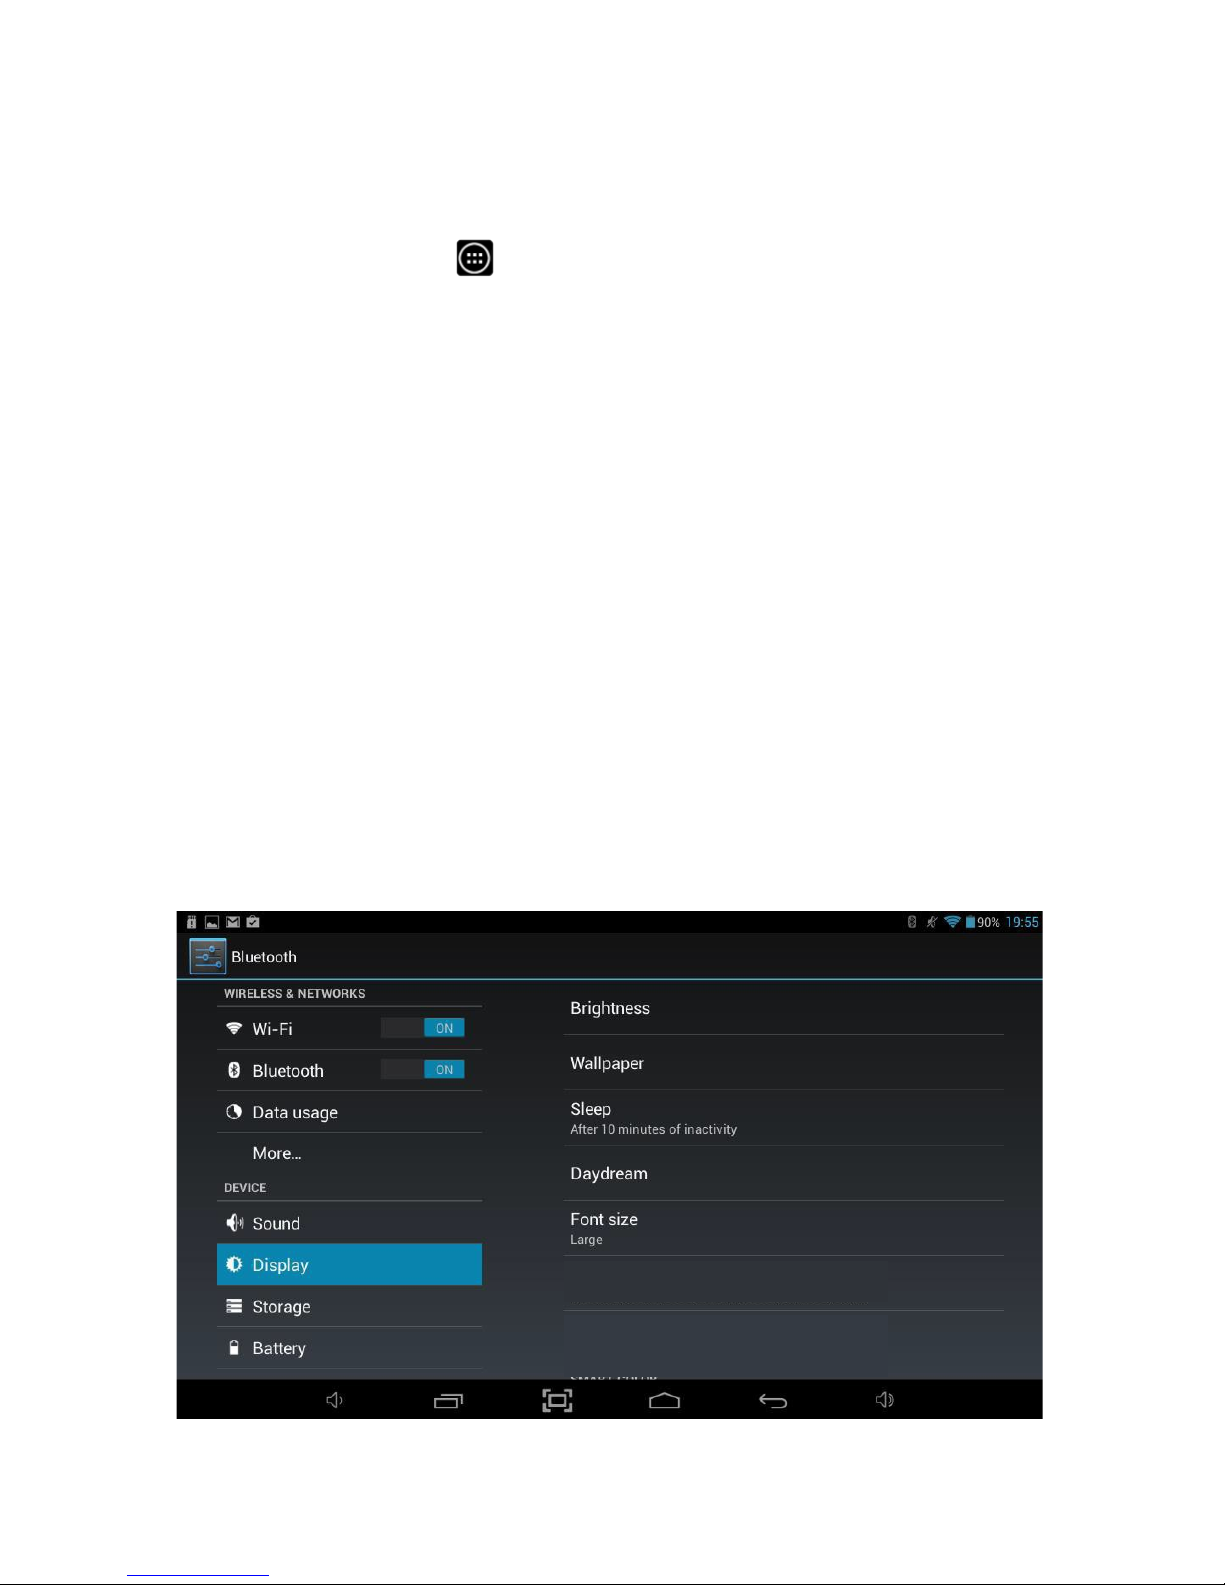
The Display option allows access to all the display settings available within the
Tablet.
To access Display settings, you will need to access the settings menu. Tap the
Applications Launcher icon
at the bottom of the Home Screen. Tap on the
Settings icon from the Application Launcher page.
On the left hand side menu options scroll down by sliding your finger upwards until
you can see the Display option, and then tap on this.
Brightness This option allows you to configure the default brightness of the
screen.
Wallpaper Select different desktop wallpaper from Gallery, Live Wallpapers or
Wallpaper.
Auto-rotate
screen Enable or disable automatic screen rotation when the tablet is
rotated.
Sleep Set the time period before the tablet enters sleep mode from never
to 30 minutes.
Font Size Allows the default font size to be changed in order to allow easier
reading of text.
screen adaption
Used to adjust size of some games display
screen.
Page 24
24
8.5 Storage
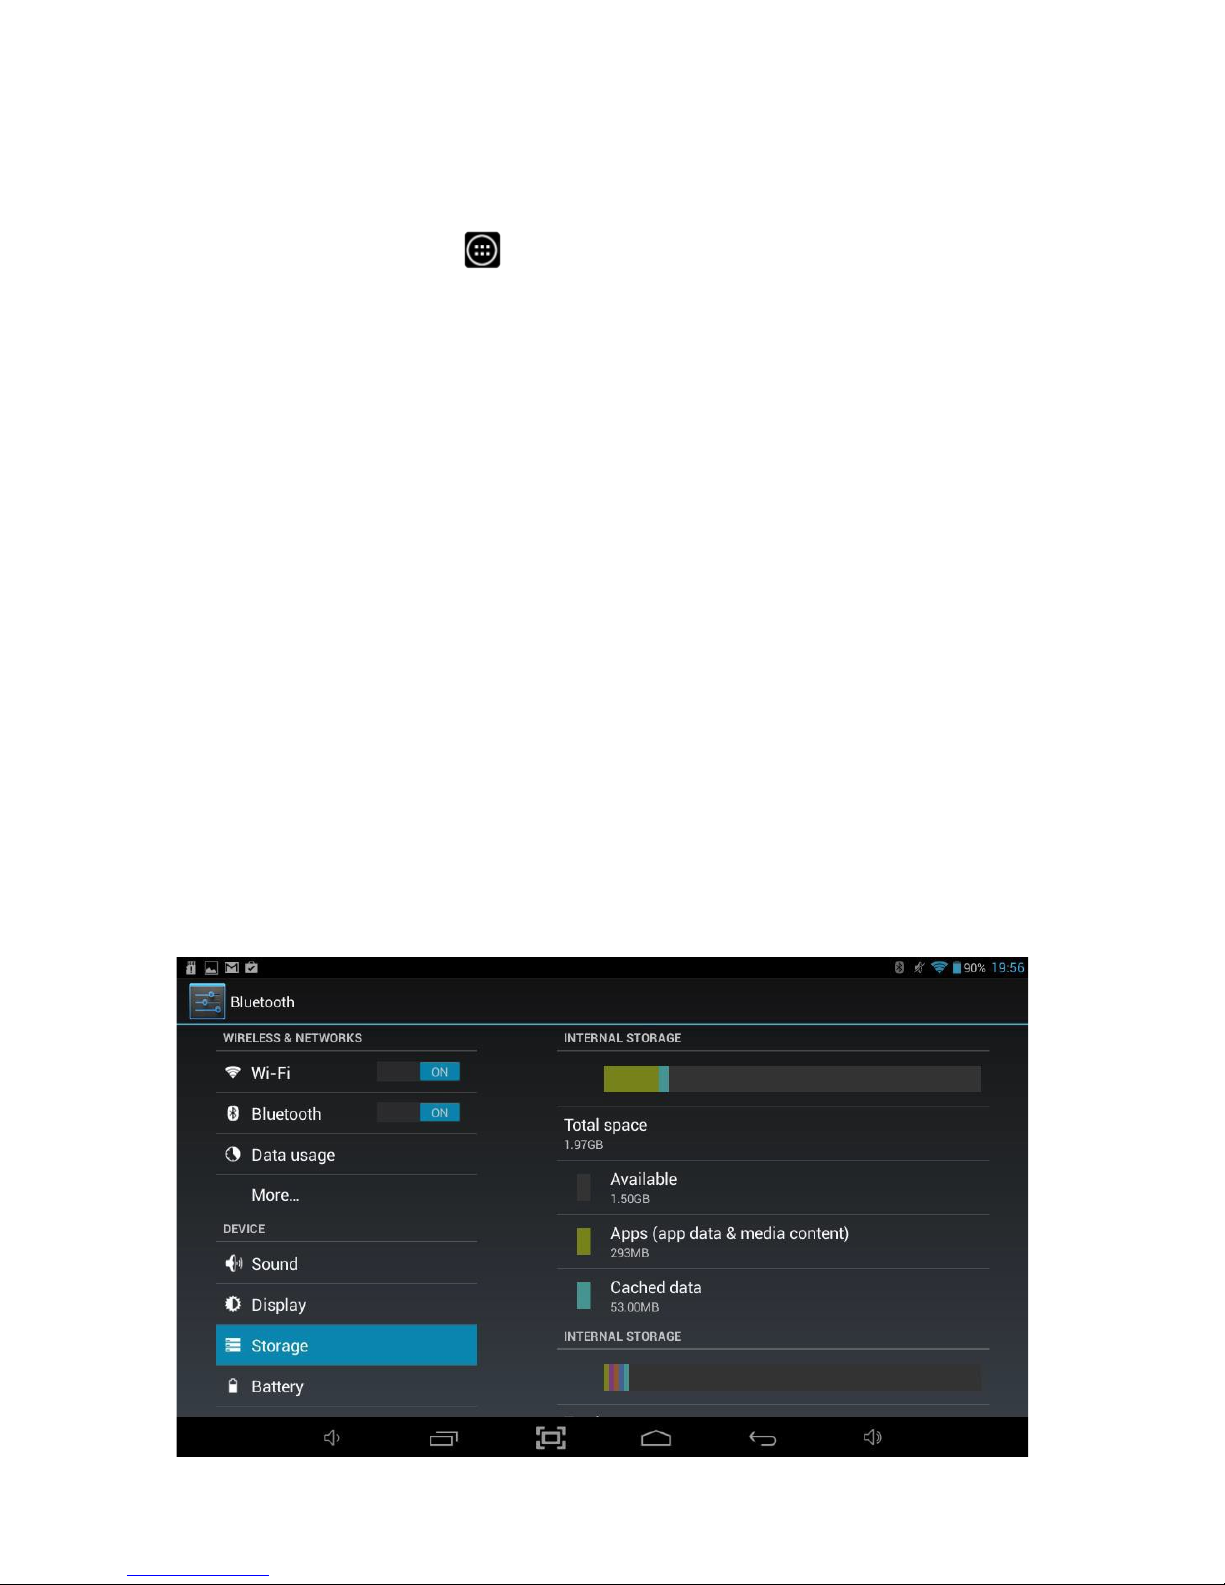
The Storage option gives a complete breakdown of how internal storage and any
external micro SD cards are being used and how much space is available on them.
To access Display settings, you will need to access the settings menu. Tap the
Applications Launcher icon
at the bottom of the Home Screen. Tap on the
Settings icon from the Application Launcher page.
On the left hand side menu options scroll down by sliding your finger upwards until
you can see the Storage option, and then tap on this.
The first entry for Internal Storage is the system storage and is not accessible by users,
but the second entry for Internal Storage shows how much storage is being taken up
by Apps, Pictures, Videos, Misc. and how much is Available.
The following functions can also be accessed from the storage option and are available
for NAND Flash and any SD Card or USB Memory Stick which is inserted into the system:
Erase Storage
This option allows the chosen storage to be formatted. Note: This
will remove all data on the storage and should only be done if there
is no important data on the storage. Any Apps which have been
installed in that location will stop working.
Unmount Storage
Allows the storage to be removed without the potential for data
loss.
Note: Erasing or Unmounting should not be performed on the NAND flash because this
could cause system issues.
Page 25
25
8.6 Battery
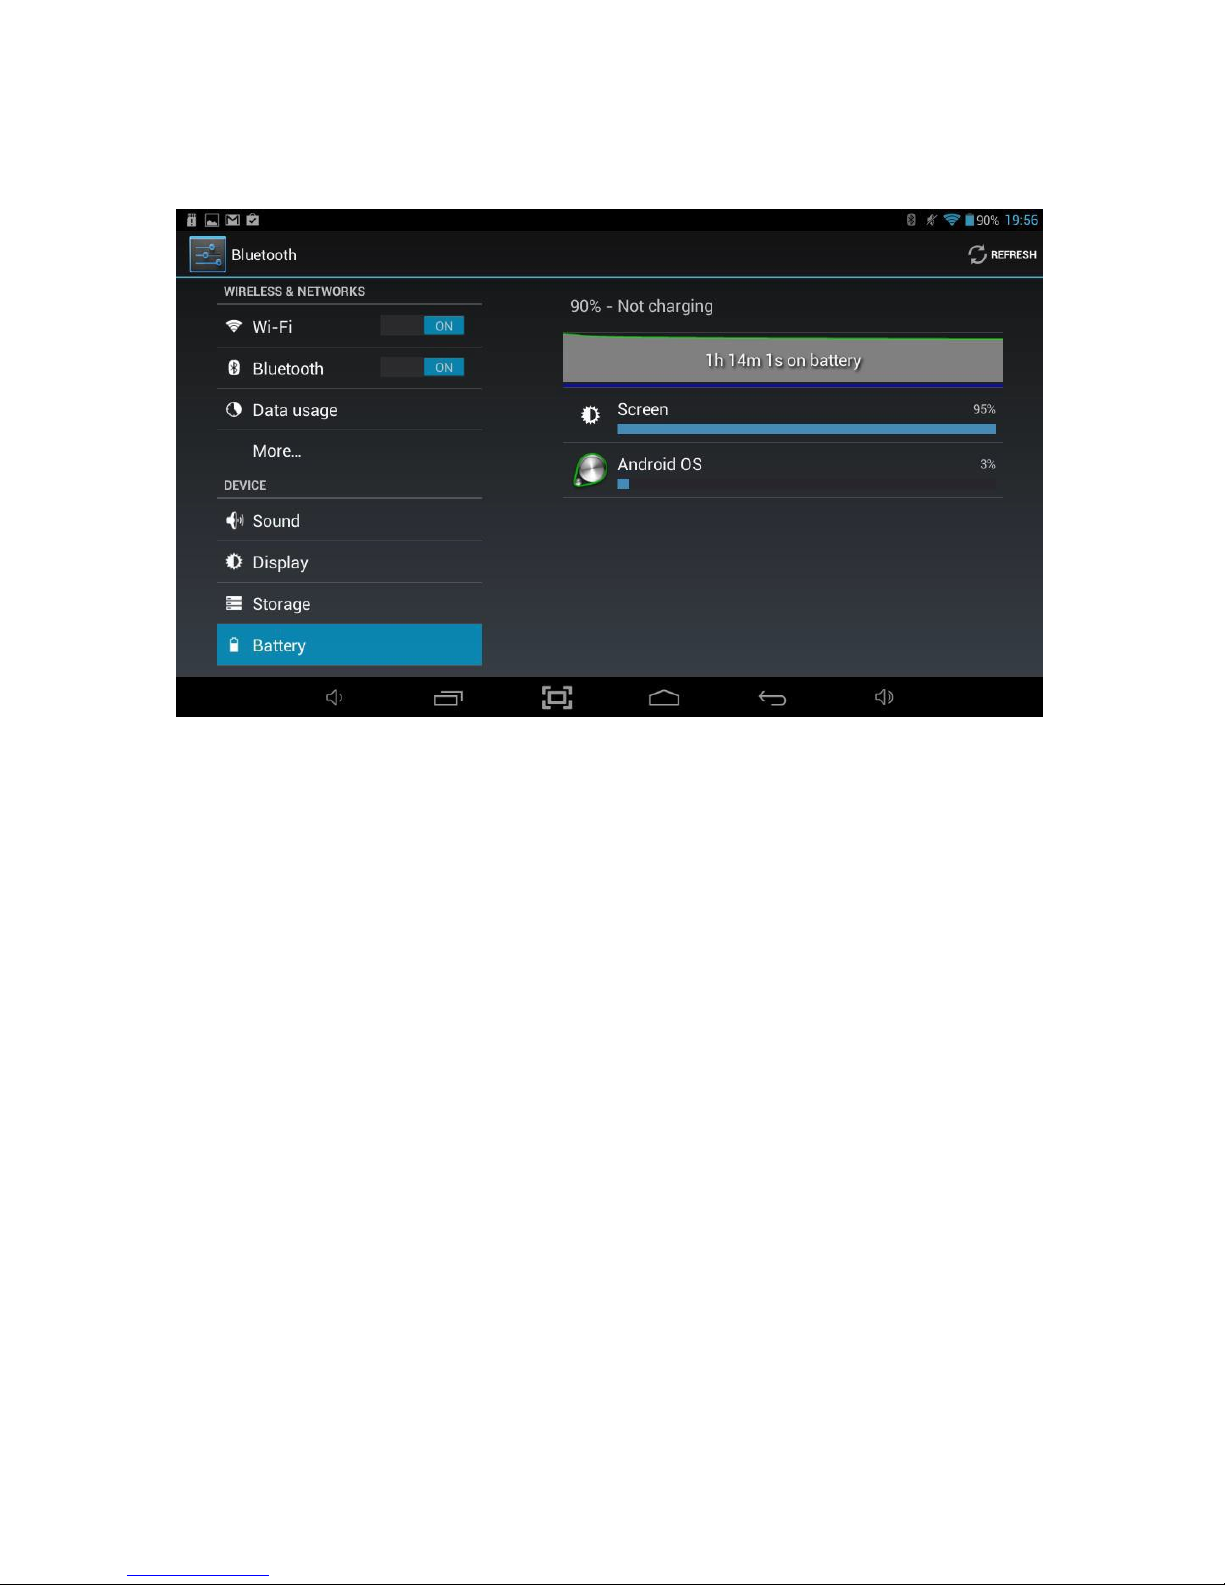
The Battery option shows the current charge of the battery, how the battery has been
used over the period of time shown and whether the Tablet is currently charging.
8.7 Apps
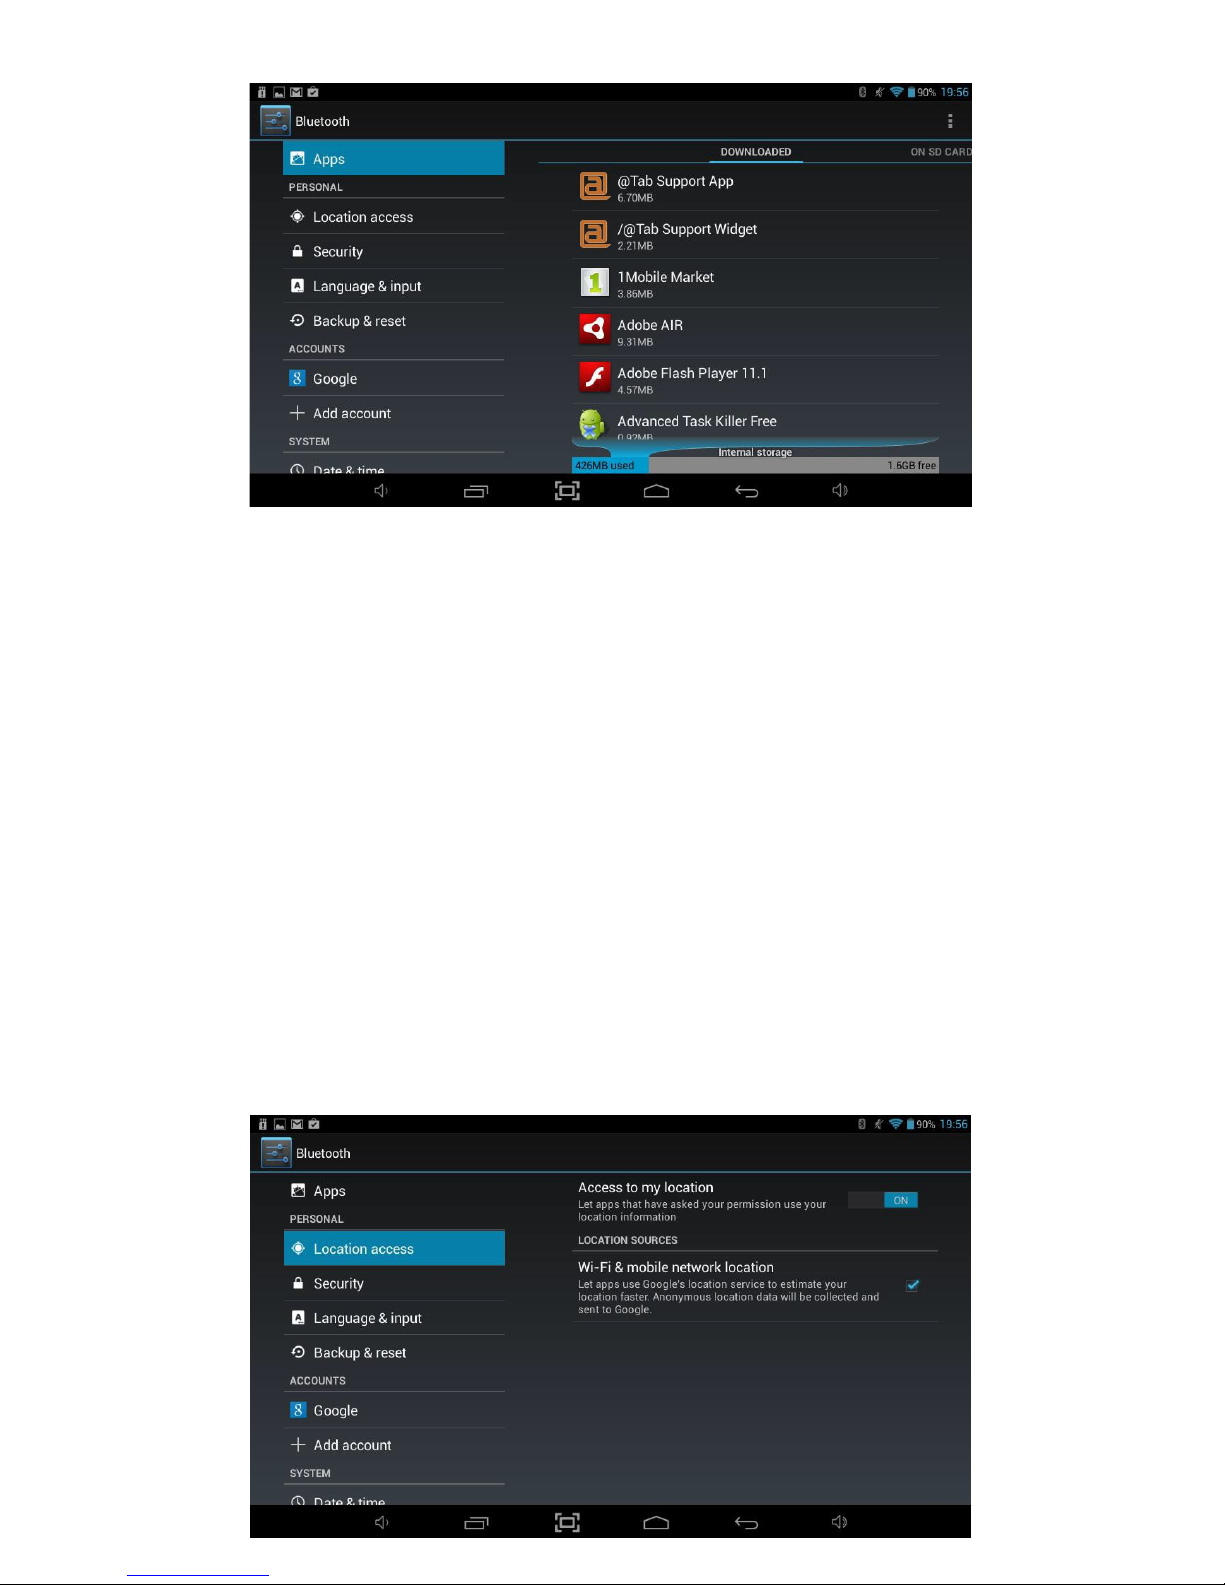
The Apps option allows you to see information about the applications that are
installed on the Tablet. There are four menu options:
Downloaded
Shows all Apps which have been downloaded and installed.
ON SD CARD Shows all Apps which have been installed on any mounted micro SD
card.
RUNNING Shows all Apps which are currently running.
ALL
Shows all Apps including system Apps which are part of the Operating
System.
To uninstall an App, select the application from the list by touching it, and then select
Uninstall.
Note: You can only uninstall Apps which have been installed on the Tablet during use.
Any Apps that were pre-installed on the system from manufacture are not able to be
uninstalled (but any updates applied to these apps can).
Moving Apps to free up Storage Space
Your Tablet’s storage is split into two parts, the Internal Storage where Android and any
Apps you download are installed and the NAND Flash where pictures, music and movies
are stored.
Page 26
26
If you download a lot of Apps, you may get to a point where you see a Storage space
running out message. This means that the Internal Storage is almost full and this may
cause issues with downloading new Apps or updates to existing Apps.
To resolve this situation you can move Apps from the Internal Storage to either the
NAND Flash or to an external microSD Card which has been inserted into the tablet.
To do this, select an App from the list and tap on the Move to SD card option.
The app will take a short period of time to move over and you will be informed once
the operation has been completed. The total size of the app on the Internal storage
will have reduced greatly and storage space will have been freed up.
8.8 Location Services
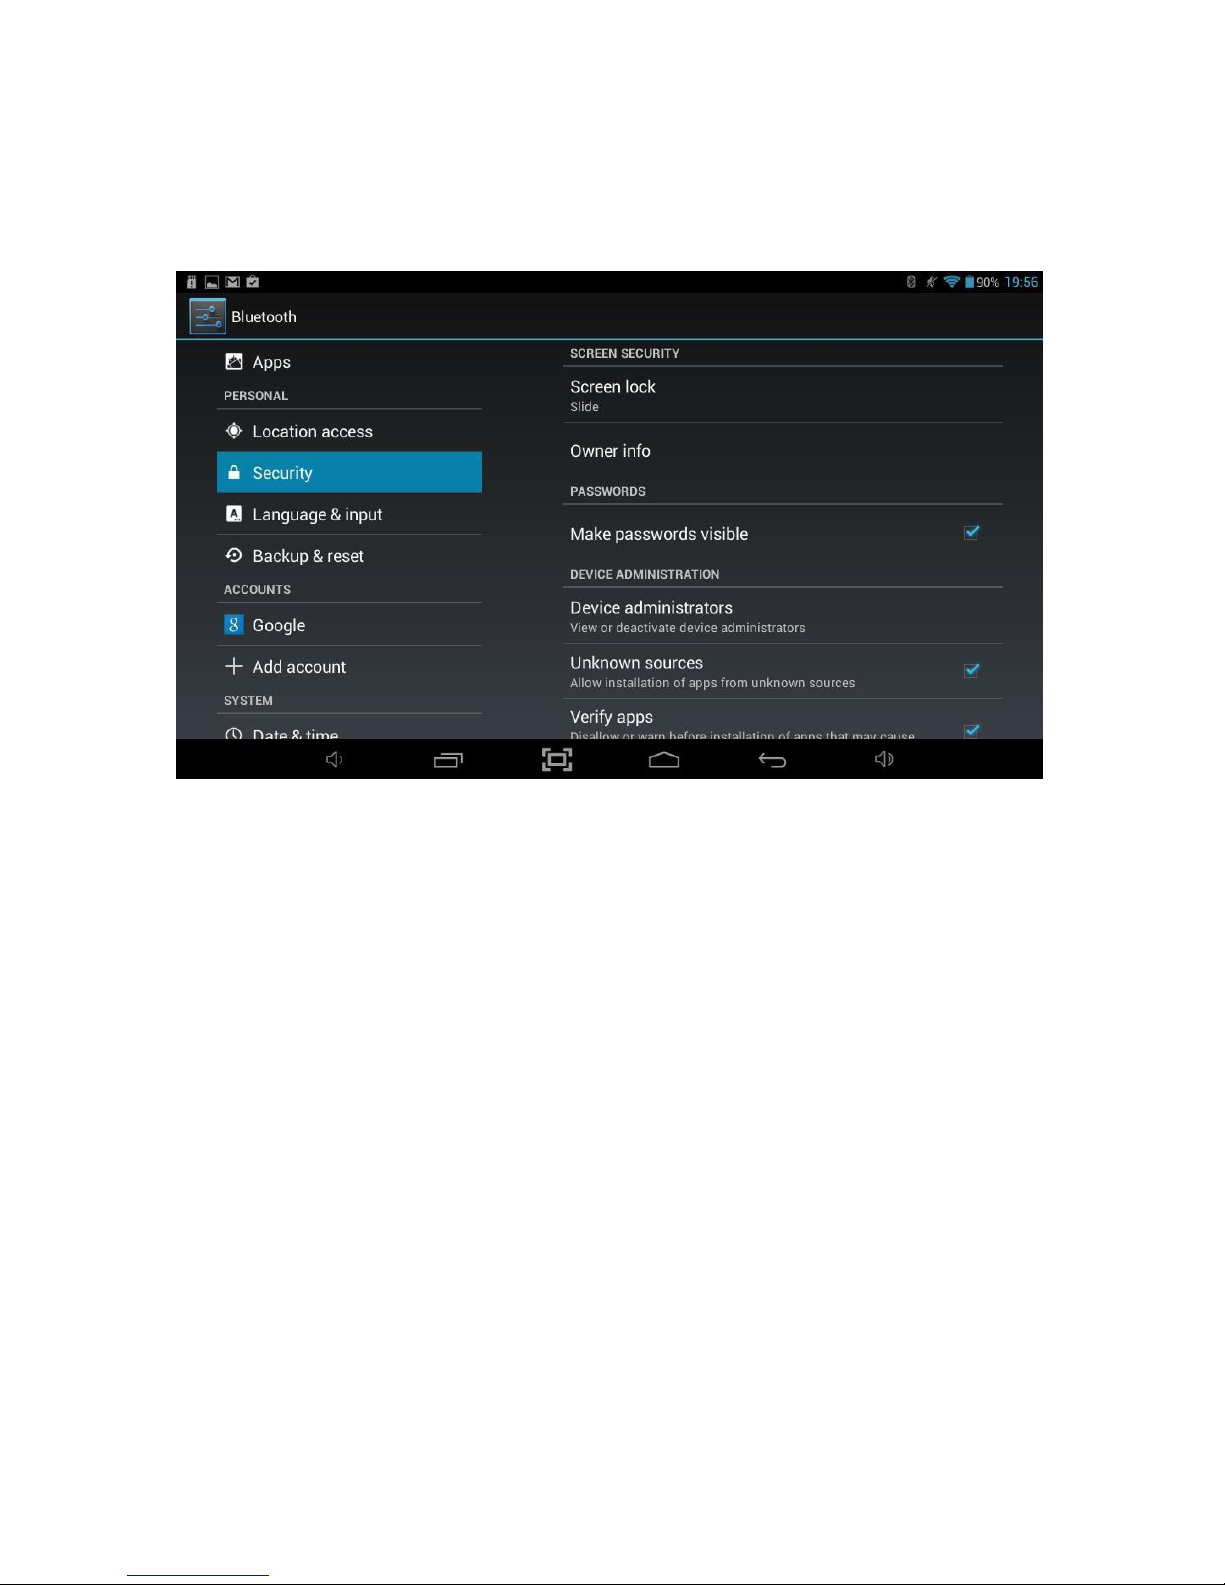
The Location services option allows you to define whether Apps which have
functionality which can be triggered by your location are able to access this data.
Enabling Google’s location services will allow Apps to access this information.
Enabling Location & Google search will allow Google search within the web browser to
determine the location of the tablet in order to help with search results.
Page 27
27
8.9 Security
The Security option allows you to setup how secure you want your Tablet to be.
You may want to set some form of automatic screen lock to prevent unauthorized
access. If a screen lock has been set, the screen locks when your tablet's display goes
to sleep.
Screen Lock
To adjust your tablet's lock settings:
1. Touch Screen lock.
2. Touch the type of lock you want and follow the onscreen instructions.
If you have previously set a lock, you must enter the pattern, PIN, or password to
unlock the lock settings before you can make any changes.
You can choose among these lock options, listed in approximate order of strength:
Slide Provides no
protection,
but lets you get to the Home Screen quickly,
or open Camera and start taking pictures immediately.
Pattern Let’s you draw a simple
pattern
with your finger to unlock the tablet.
PIN Requires four or more numbers. Longer PINs tend to be more secure.
Password Requires four or more letters or numbers. This is the most secure
option, as long as you create a strong password.
.
Page 28
28
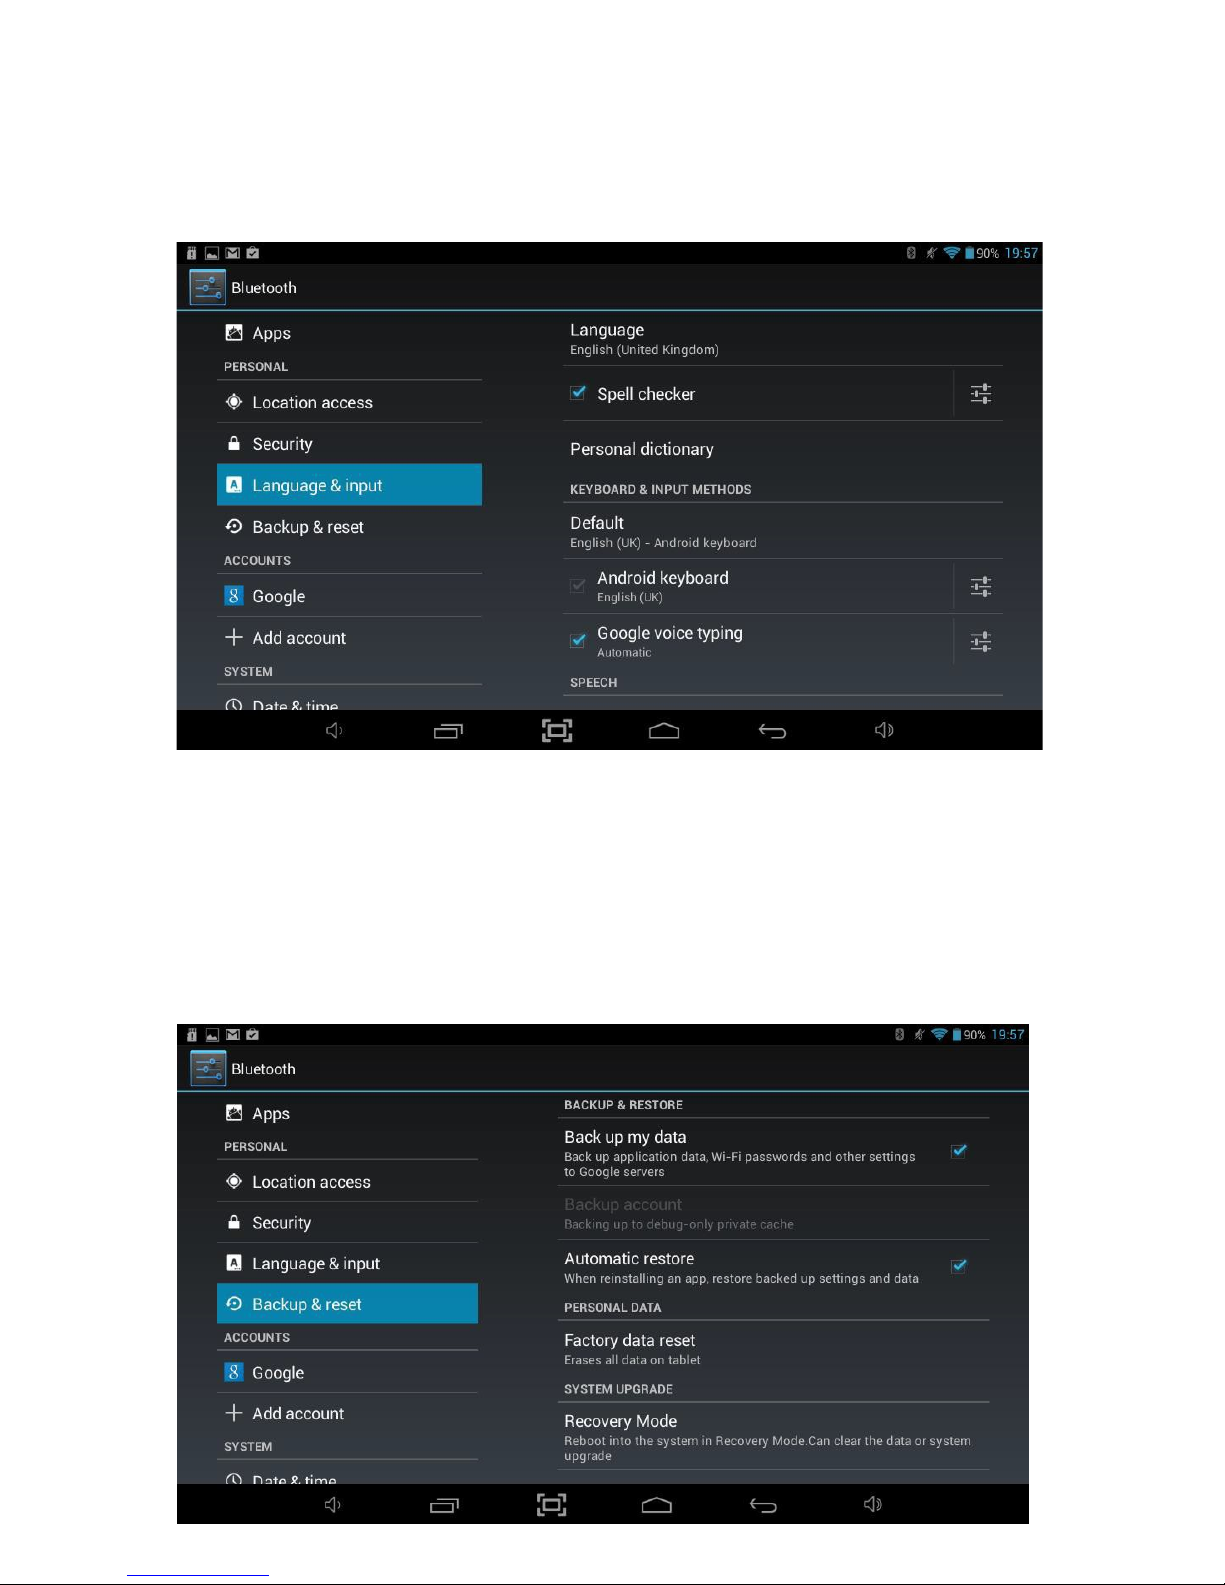
8.10 Language & Input
The Language & input option allows you to select between different languages, also
you can change the keyboard to different language and configure Voice Search and
Text-to-speech output.
8.11 Backup & Reset
The Backup & reset option allows you to backup settings and other data associated
with one or more of your Google Accounts. So that if you need to replace or factory
reset your device, you can restore your data for any accounts that were previously
backed up. It also allows you to enable a factory reset which will completely wipe all
data stored on the Tablet and set it back to the state it was when it left the factory.
Page 29

29
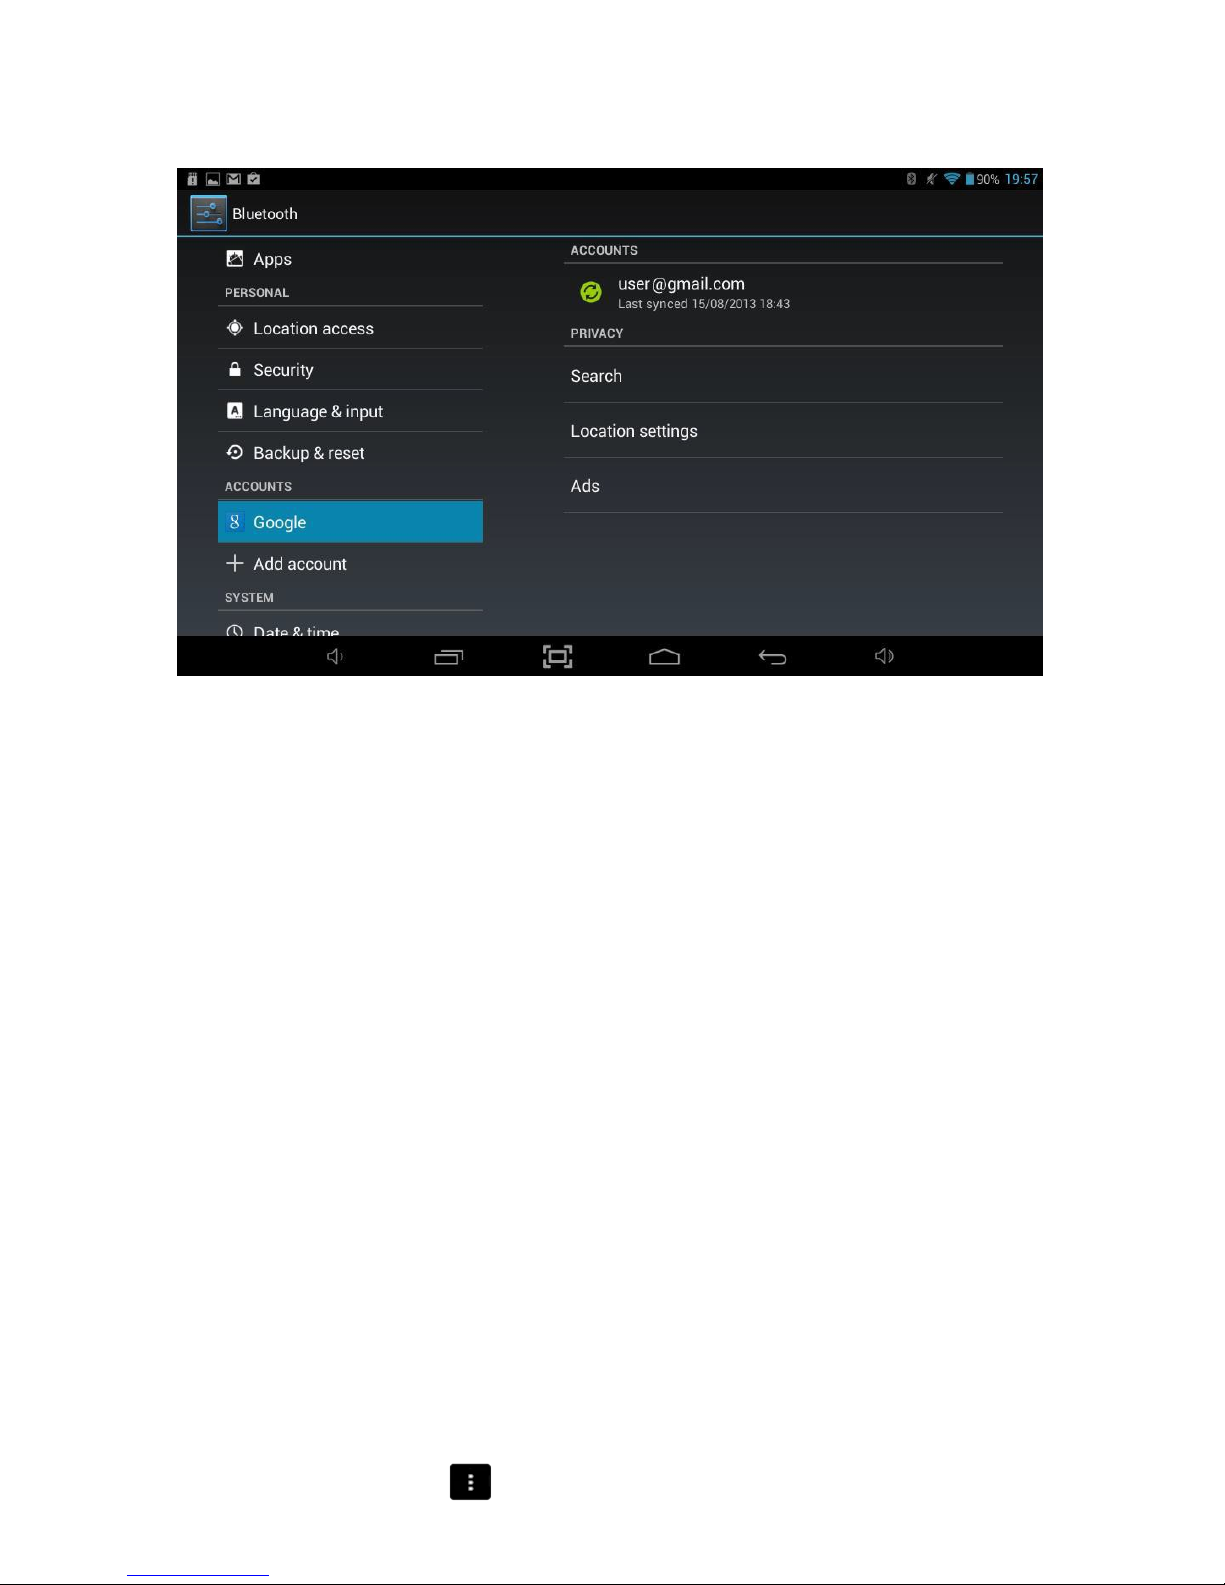
There are four menu options:
Back up my data
If ou check this option, a wide variety of your personal data is
backed up automatically, including your Wi-Fi passwords, Browser
bookmarks, a list of the apps you’ve installed on Google Play, the
words you’ve added to the dictionary used by the onscreen
keyboard, and most of your customized settings.
If you uncheck this option, your data stops getting backed up, and
any existing backups are deleted from Google servers.
Backup account
Displays the Google Accounts whose
information
gets backed up. You
must sign in with one or more of these accounts on a new or reset
device to retrieve the associated
information.
To add a new account,
touch Add account.
Automatic restore
Check this option to restore settings and other data when you
reinstall an app. This feature requires that you are backing up your
data with your Google Account and that the app is using the backup
service.
Factory data reset
Touch this option, then select Reset tablet to erase all your personal
data from internal storage, including information about your Google
Account, any other accounts, your system and app settings, any
downloaded applications, and your music, photos, videos, and other
files.
After resetting your tablet, you will need to re-enter the same information requested
when you first set up your tablet. If you've been backing up your data to a Google
account, an option during the setup process allows you to restore it.
Some third-party apps also make use of the backup service, so if you re-install one, its
settings and data are restored.
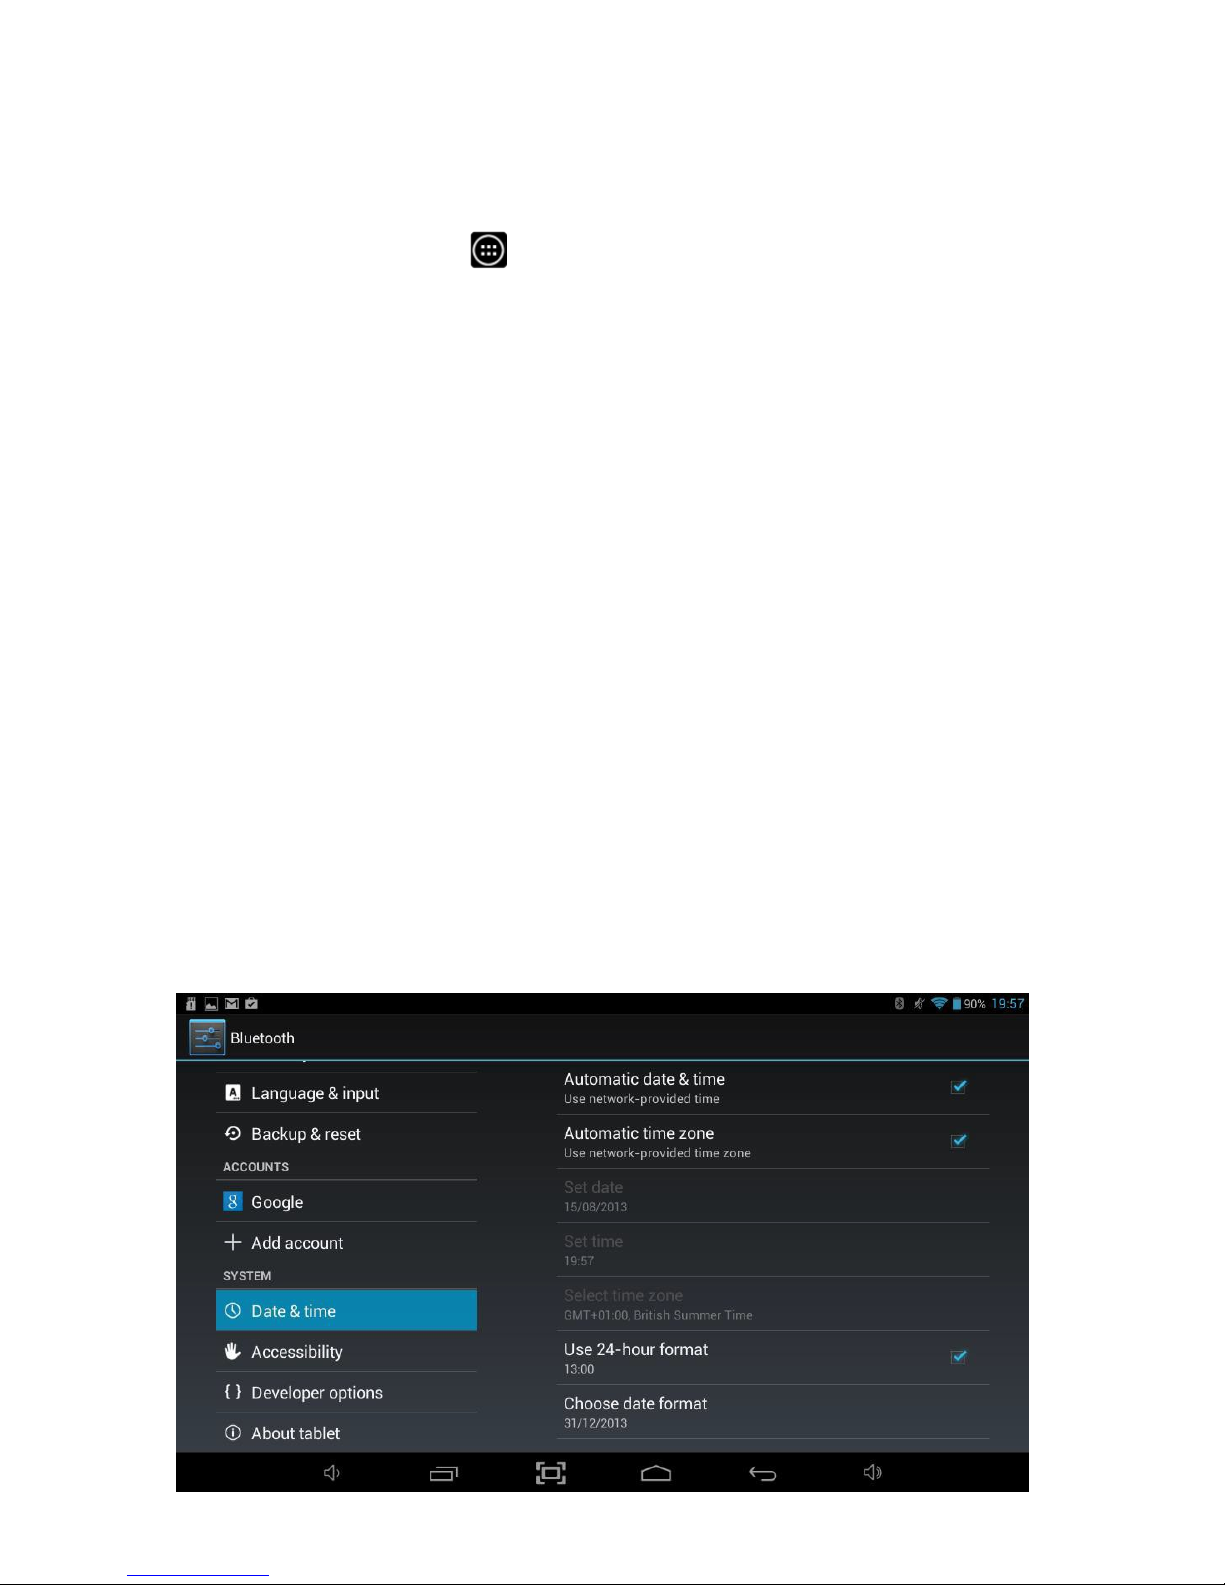
8.12 Accounts
The Accounts option allows you to setup and use multiple Google Accounts and
Microsoft Exchange ActiveSync accounts on your device.
To access Account settings, you will need to access the settings menu. Tap the
Applications Launcher icon
at the bottom of the Home Screen. Tap on the
Settings icon from the Application Launcher page.
On the left hand side menu options scroll down by sliding your finger upwards until
you can see the Accounts option, and then tap on this.
Note: Some accounts can be added in the Accounts screen, as described here. Others
Page 30
30
need to be added using an app that works with those kinds of accounts. For example,
you can only add IMAP and POP3 email accounts with the Email app.
Adding an account
To add an account, you may need to obtain details from system administrator about
the service to which the account connects. For example, you may need to know the
account’s domain or server address.
1. Touch Add account.
2. Touch the kind of account you wish to add.
3. Follow the onscreen steps to enter information about the account.
Most accounts require a username and password, but the details depend on the kind
of account you are adding and the configuration of the service you are connecting to.
Depending on the kind of account, you may be asked to configure what kinds of data
you want to sync, name the account, and other details.
When you have finished, the account is added to the list in Accounts & sync.
Depending on how you configured the account, email, contacts, and other information
will start syncing to your device.
Remove an account
You can remove an account, which will delete it and all information associated with it
from your Tablet, including email, contacts, settings, and so on.
1. Go to Settings > Personal > Accounts & sync.
2. Touch the account to delete.
3. Touch the Menu icon
and select Remove account.
Page 31
31
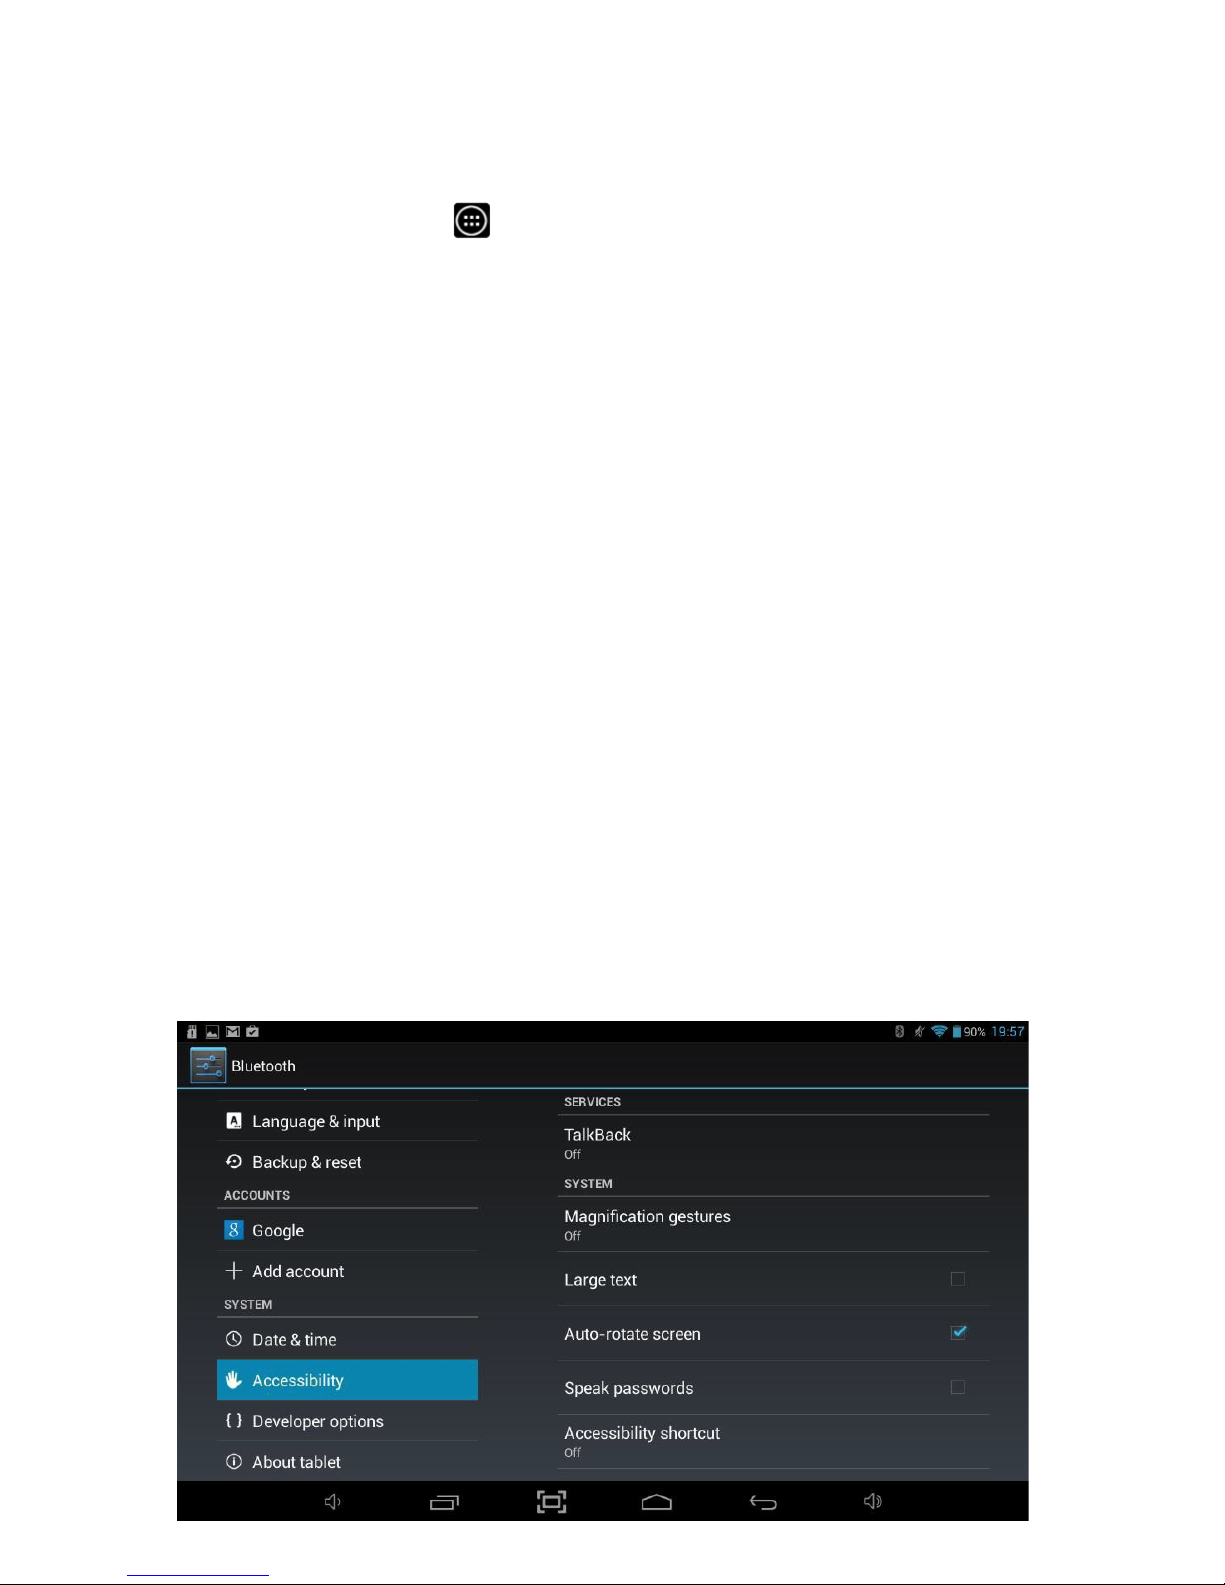
8.13 Date & T ime
The Date & time option allows you to configure the date and time settings for your
Tablet.
To access Date & time settings, you will need to access the settings menu. Tap the
Applications Launcher icon
at the bottom of the Home Screen. Tap on the
Settings icon from the Application Launcher page.
On the left hand side menu options scroll down by sliding your finger upwards until
you can see the Date & time option, and then tap on this.
The following options are available:
Automatic
date &
time
If enabled, the Tablet will
automatically
update the date and
time if connected to the Internet.
Set date
Allows the date to be set manually. This option is only available if
Automatic date & time is disabled.
Set time
Allows the time to be set manually. This option is only available if
Automatic date & time is disabled.
Select time zone
Allows your current time zone to be selected from the available
options.
Use 24-hour format
Allows time format to be switched between 12 and 24 hour
formats.
Choose date format Allows the format of the date to be changed.
Page 32
32
8.14 Accessibility
The Accessibility option allows the Tablet to be configured for use by anyone.
To access Accessibility settings, you will need to access the settings menu. Tap the
Applications Launcher icon
at bottom of the Home Screen. Tap on the Settings
icon from the Application Launcher page.
On the left hand side menu options scroll down by sliding your finger upwards until
you can see the Accessibility option, and then tap on this.
The following options are available:
TalkBack
The TalkBack option provides spoken feedback to help blind and
low-vision users by guiding their finger around the screen using
audio prompting. It describes what is being touched, selected and
activated.
Large text If enabled, will increase the text size used for all functions of the
Tablet.
Auto-rotate
screen
Enable or disable automatic screen rotation when the Tablet is
rotated.
Speak passwords Allows passwords to be entered using speech instead of the
keyboard.
Text-to speech
output
Allows configuration of the text to speech engine which is used by
default by the Tablet.
Touch & hold delay Allows the delay settings for gestures on the screen to be changed.
Install web scripts
Allows Apps to install scripts from Google that make their web
content more accessible.
Page 33
33
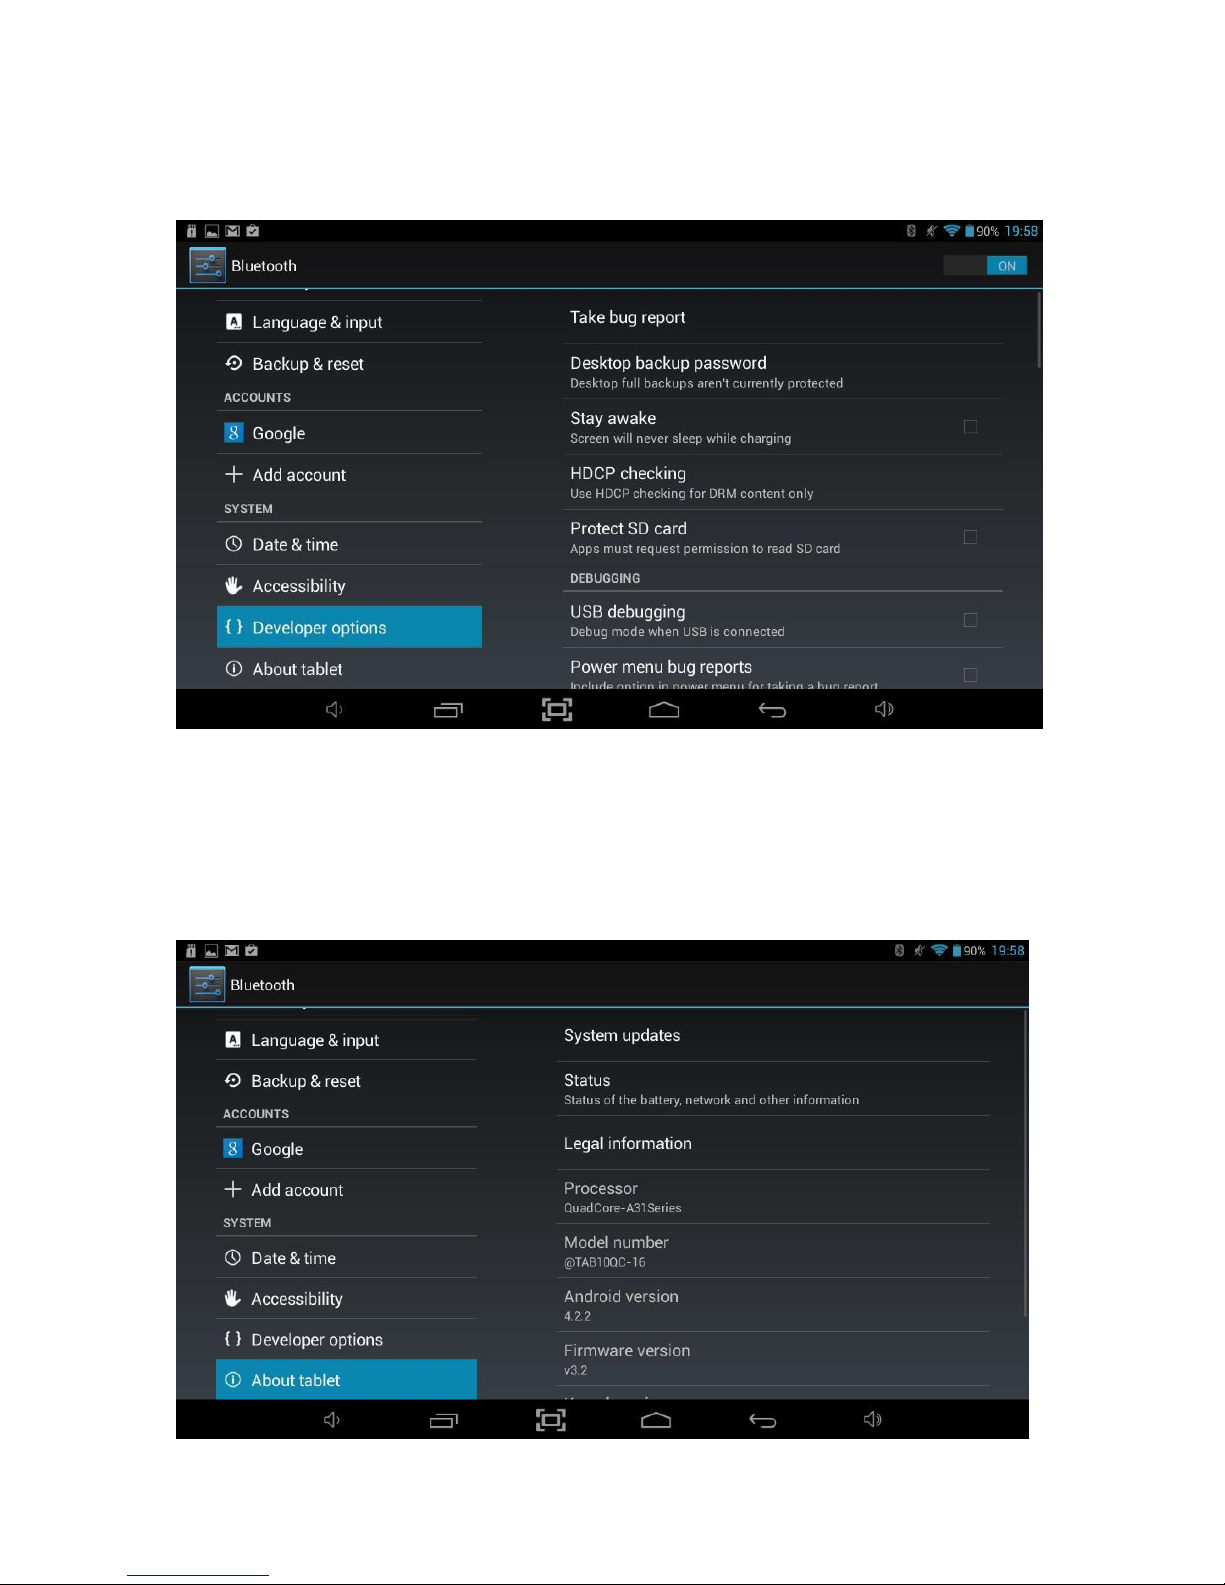
8.15 Developer Options
The Developer options settings are for system development only and shouldn’t be
changed unless you are advised to do so by a support engineer.
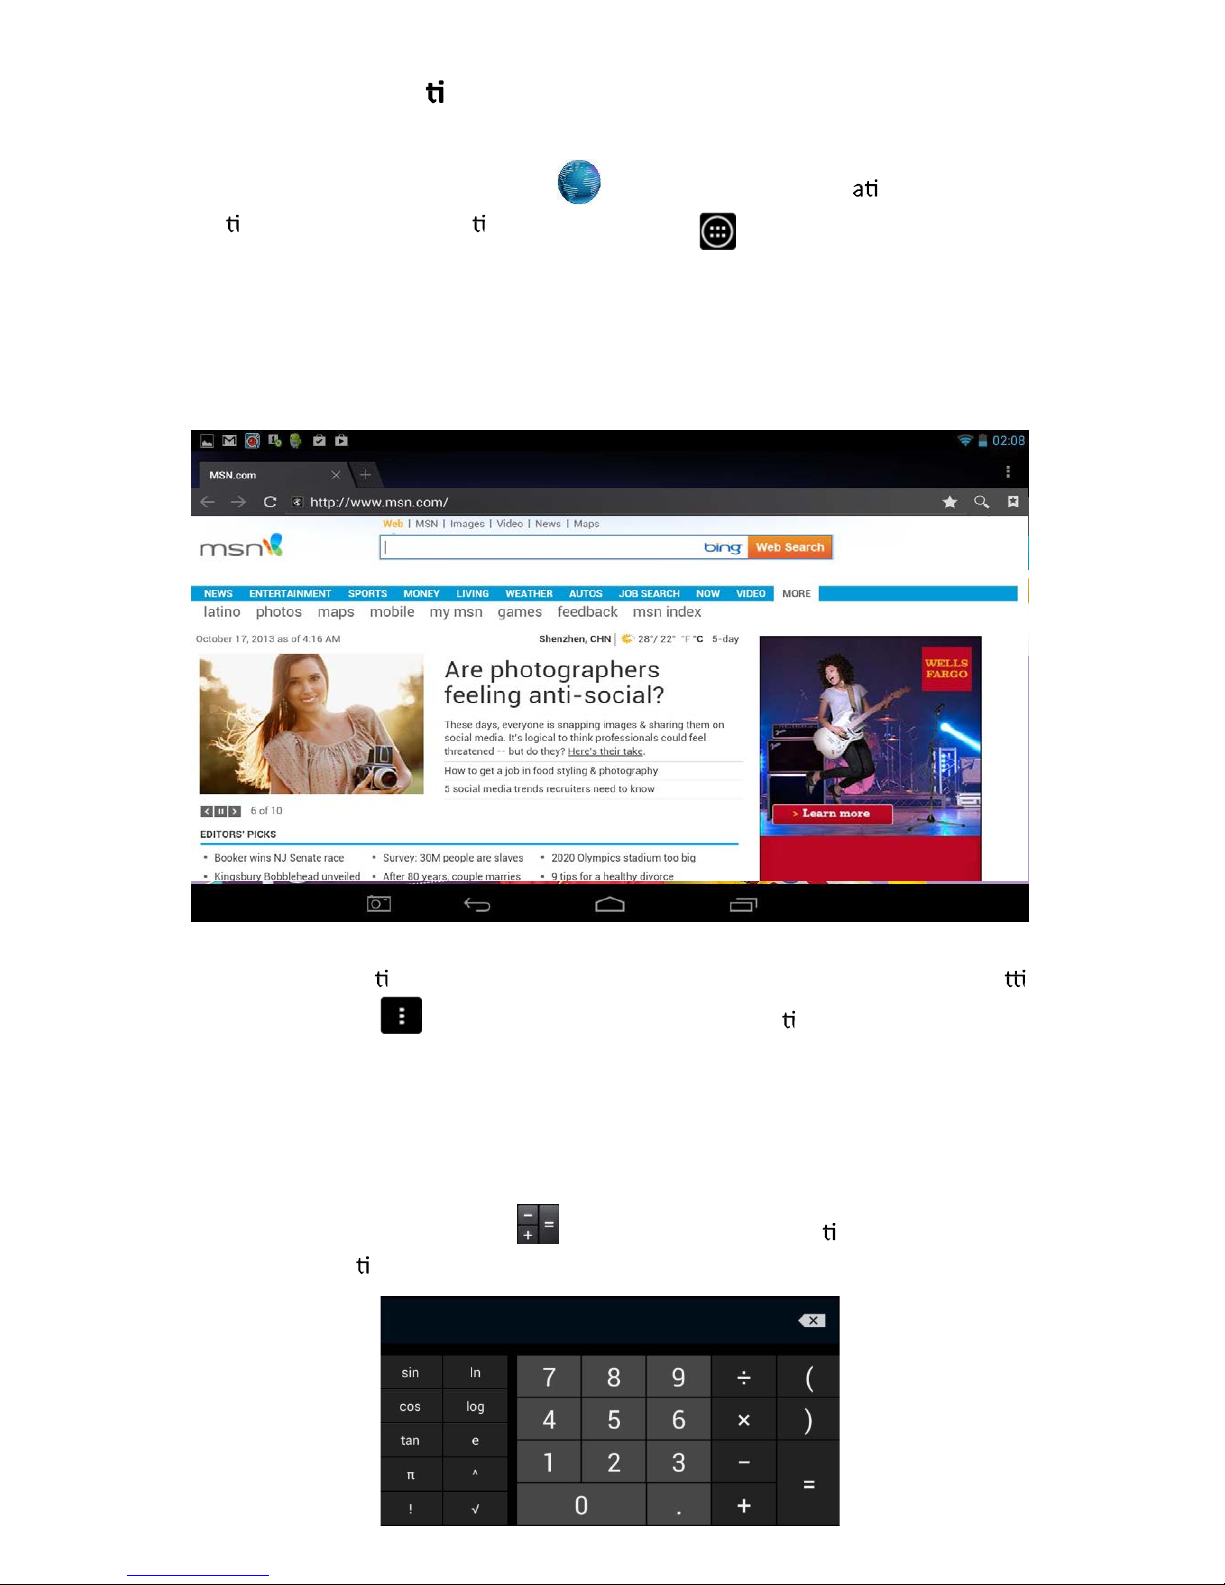
8.16 About Tablet
The About tablet option allows you to see some basic information about your
Tablet.
Page 34
34
9. Common Applica ons
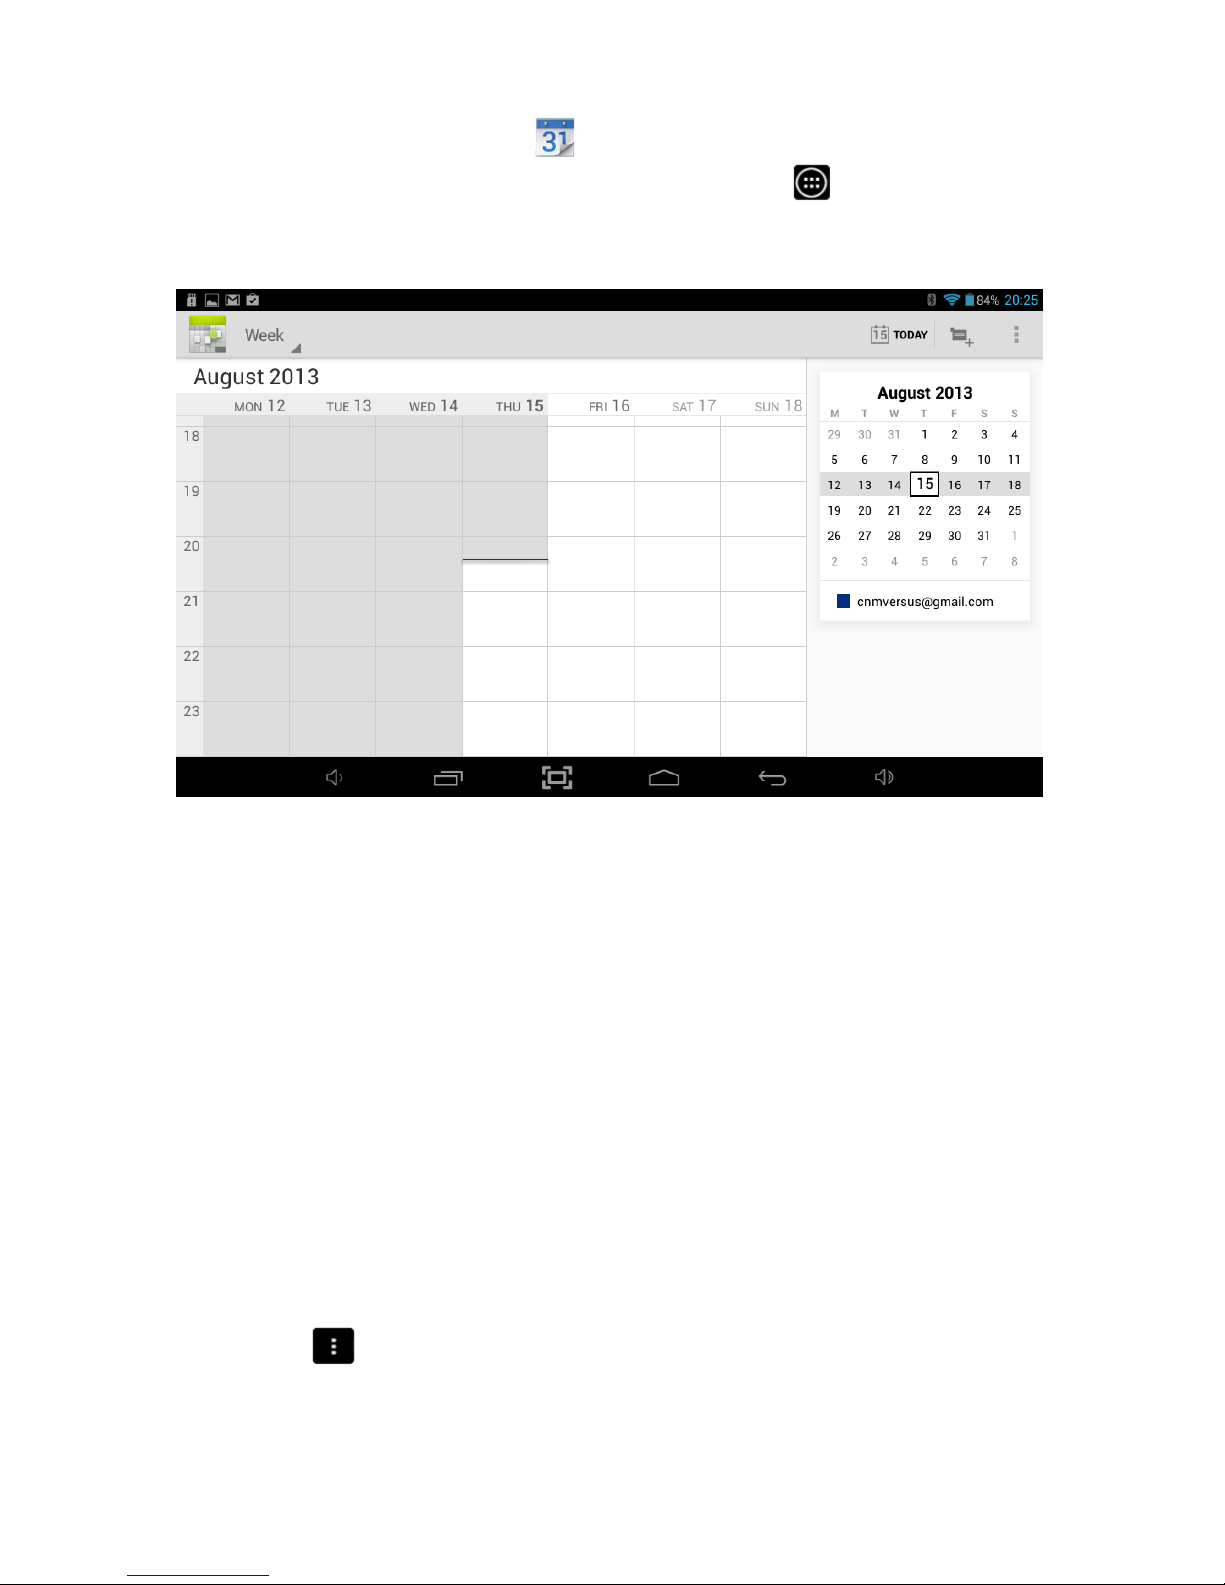
9.1 Browser Internet Access
To open the Web Browser, touch the
icon on the All Applic ons Quick Links Bar.
Alterna vely, tap the Applica ons Launcher icon
at the bottom of the Home Screen.
To navigate to a website, touch the address bar and type in the website address for the
website you would like to view.
Use the popup keyboard to enter the address and then click Go.
To access other func onality within the Browser including Bookmarks and Se ngs,
touch the Menu icon
and select from the available op ons.
Note: The web browser on the Tablet has full support for websites which use Flash for
videos and games.
9.2 Calculator
To open the Calculator, touch the
icon on the All Applica ons Quick Links Bar or
from within Applica ons Launcher.
Page 35
35
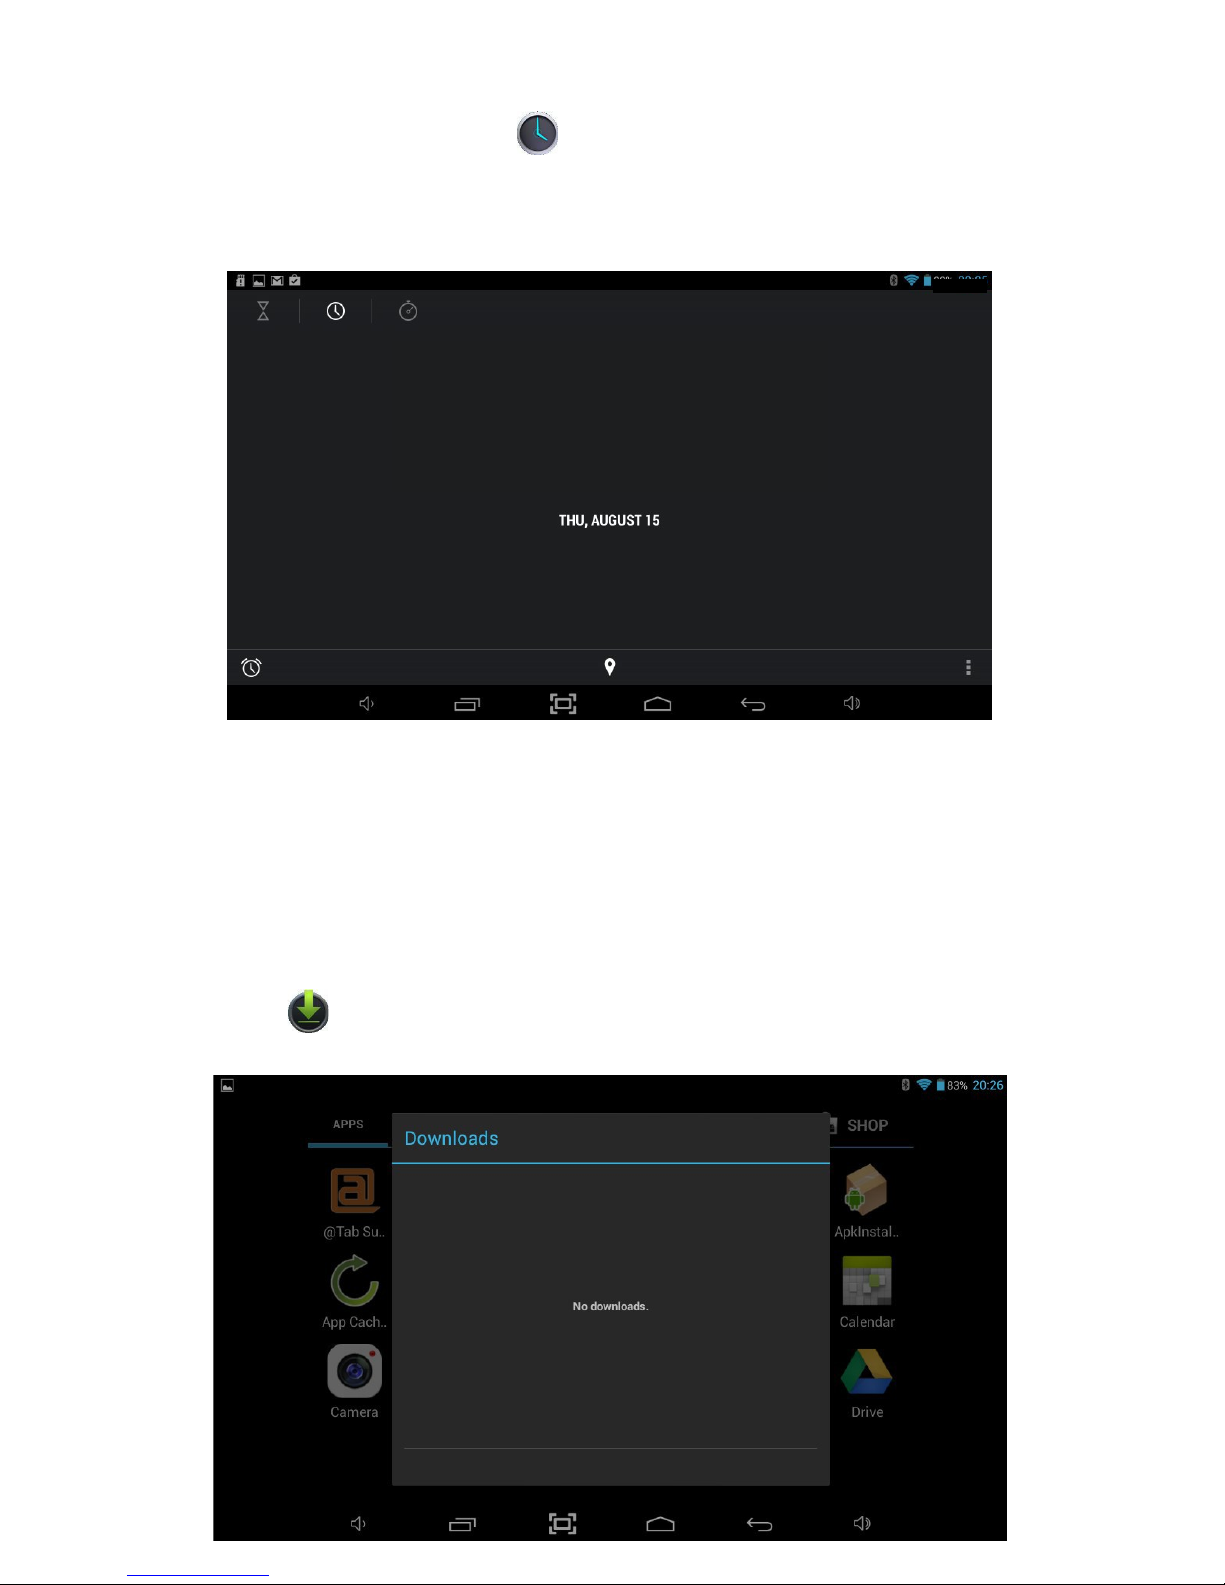
9.3 Calendar
To open the Calendar, touch the
icon on the All Applications Quick Links Bar.
Alternatively, you can tap the Applications Launcher
icon
at the bottom of the
Home Screen.
To add an entry into the Calendar find a cell that corresponds to the time and date you
want to add the entry for and touch the cell until a New event option appears.
Select New event, enter all the relevant details and select Done once you are finished.
Once an event has been saved, you can Touch it to view its details.
To change the Calendar view, choose Day, Week, Month, or Agenda using the tabs at
the top of the screen.
Swipe to scroll vertically or horizontally. In the Day or Week views, spread your fingers
apart or pinch them together to zoom in or out.
To access other functionality within the Calendar including Search and Settings, touch
the menu icon and select from the available options.
Page 36
9.4 Clock
To access the Clock, touch the
icon on the All Applications Quick Links Bar or
from within Applications Launcher. The Tablet will show a large clock on screen and
access to other functionality will be disabled until you exit the clock function by
pressing the Back or Home menu options.
08:25
08:25AM
Pressing the screen will dim everything on screen including the clock, holding your
figure down on the screen will dim everything on screen except the clock.
You can set an alarm by touching the Set alarm option and selecting Add alarm. Setup
the alarm and select OK when finished.
9.5 Downloads
You can see the all applications and files you have downloaded by touching the
Downloads icon on the All Applications Quick Links Bar or from within
Applications Launcher.
36
Page 37
37
9.6 Email
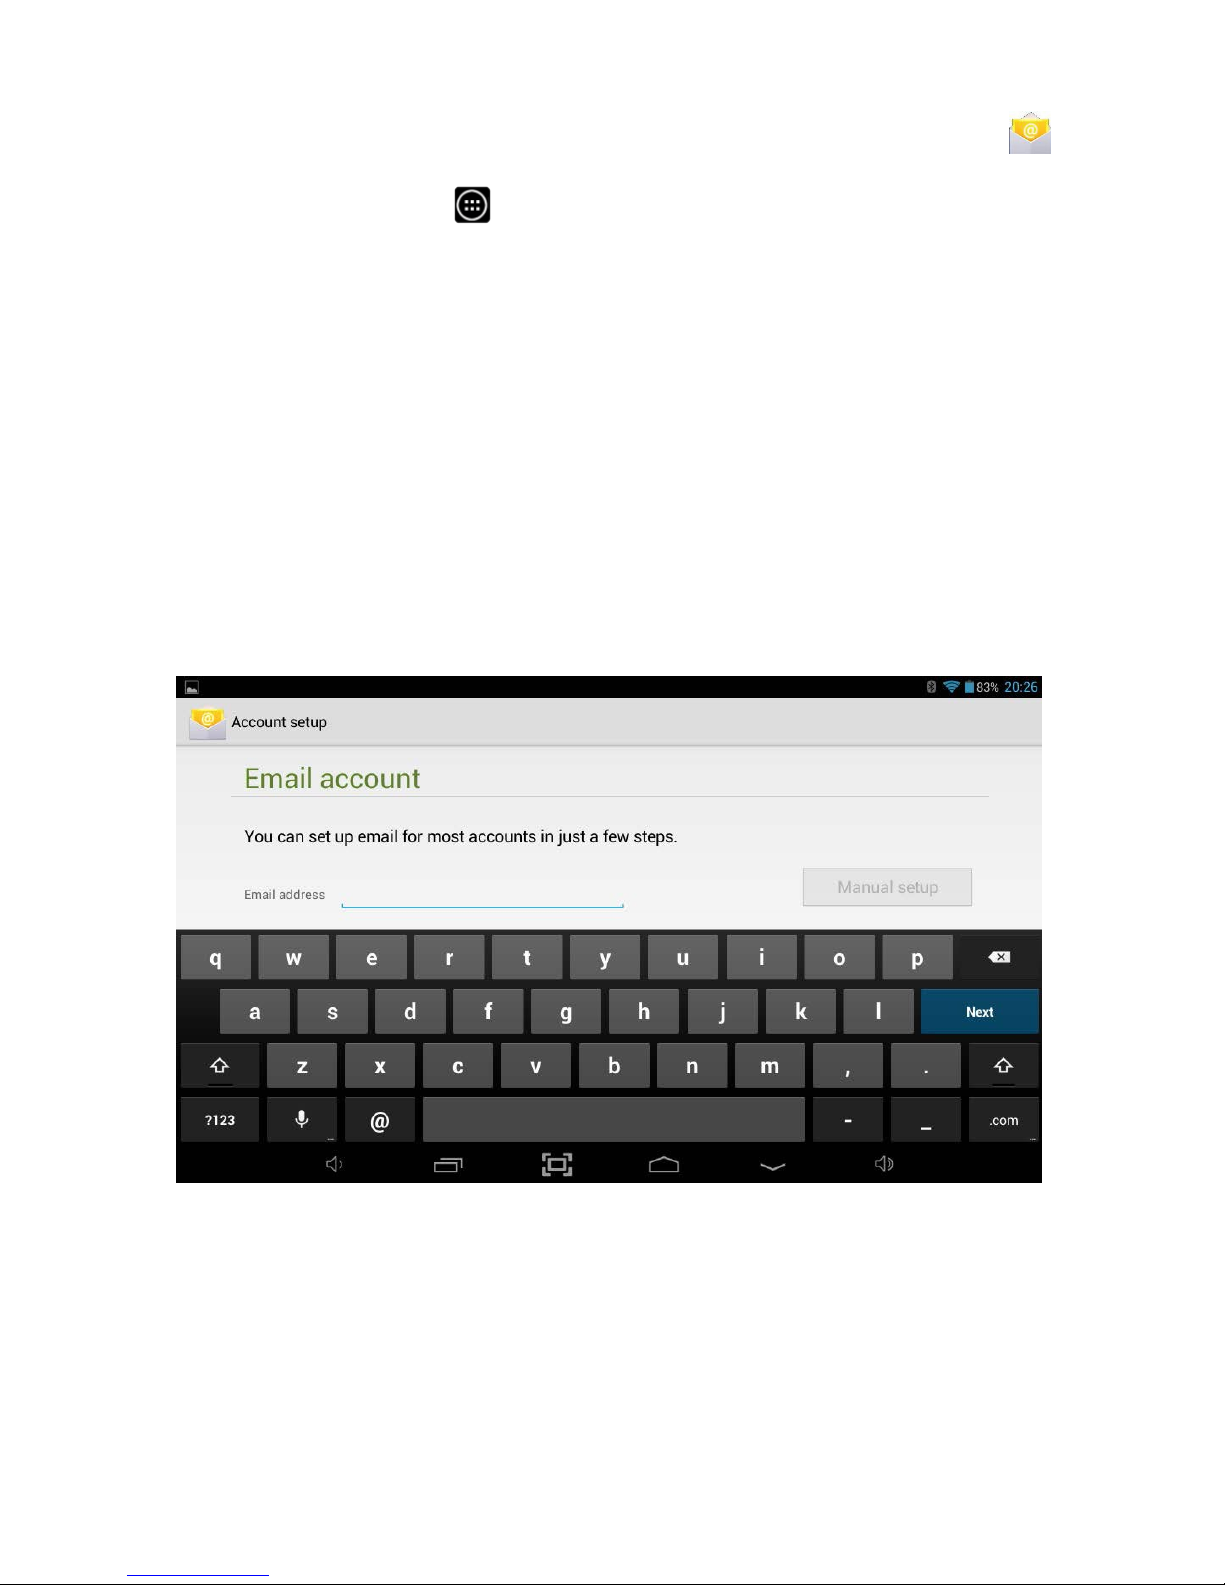
To enable access to your email account i.e. Hotmail, open Email by touching the
icon on the All Applications Quick Links Bar. Alternatively, you can tap the
Applications Launcher icon at the bottom of the Home Screen.
Note: The Email application cannot be used to connect to Google Mail, please use the
Gmail application to access email from a Gmail Account.
Before you can access your email for the first time, you will need to enter the relevant
account information for the email account you want to connect to.
1. Enter the Email address into the box using the popup keyboard and click Done
when finished.
2. Enter the Password into the box using the popup keyboard and click Done when
finished.
3. Finally touch Next and the application will try to finish the setup.
If the setup doesn’t automatically finish, you will have to manually enter the account
information by selecting Manual setup.
If the setup wizard hasn’t been able to connect automatically use the following
procedure:
1. Tap the Manual setup button, select the mailbox type to be used (POP3 or IMAP)
and manually enter all the account details.
Page 38

38
Example for a Windows Live Hotmail Account
Note: For other email providers, please refer to the correct settings required to setup
access to your account. You may need to speak to your email providers support center
to obtain these settings.
2. Select POP3 account
Username: [email protected]
Password: ********
POP3 server: pop3.live.com
Port: 995
Security type: SSL (always)
Delete email from server: Never
3. Tap Next
SMTP server: smtp.live.com
Port: 25
Security type: None
Require sign-in: Make sure this is not Checked.
4. Tap Next
5. Decide on the Email checking frequency, whether to set this as the default email
account and whether to be notified when emails arrive. Tap Next.
6. Enter an account name and display name for outgoing messages, then tap Done.
Viewing E-mail
1. Open the email application and select the email account you wish to view
emails for by tapping the account name.
2. Tap the Inbox icon and then select the email you wish to view by tapping on it.
Sending an E-mail
1. Open the email application and select the email account you wish to send an
email from by tapping the account name.
2. Tap the Menu icon and select Compose from the menu which appears at the
bottom of the screen.
3. Enter the To, Subject and Compose Mail information to create the email. To add
an attachment tap the Menu icon and select Add attachment, you can then
browse for the file to attach.
4. When finished tap the Send button.
Page 39

39
9.7 Gmail / Google Play
In order to use Gmail to access your Google Mail account or Google Play to download
more Apps or Games for your Tablet, you will either have to setup a Google
Account or enter the details for an existing Google Account the first time you want to
use one of these applications.
Note: The Gmail application cannot be used to connect to any email service other than
Google Mail.
A Google Account has many benefits because it lets you organise and access your
personal information from any computer or mobile device:
•
Never lose your contacts again. When you sign in to your Tablet with a Google
account, all the contacts you associate with that account in the People app are
automatically backed up. As a result, they're always accessible through your
Gmail account from any computer.
•
Synchronize and back up everything. Whether you draft an email, add an event
to your calendar, or take a photo, your work gets backed up continuously by
Google and synchronized with any computer where you use the same Google
Account.
•
Access from anywhere. Check your latest calendar, email, text messages, or
social stream, wherever you are, no matter what computer or mobile device
you are using.
•
Keep your data secure and available. Google works around the clock to protect
your personal data from unauthorized access and to ensure that you get it when
you need it, wherever you need it.
•
Use other Google services. Your Google Account also lets you take full
advantage of any other Google apps and services that you may want to use,
such as Gmail, YouTube, Google Play, YouTube, Google Talk, Messaging, and
many more.
To enter details for an existing account touch the Existing option, or to create a new
Google Account touch the New option and follow the straightforward setup process:
1. You will be asked to enter your First and Last names. Then touch Done on the
keyboard or the right arrow to continue
2. Choose a username (email address) for your account. This must be unique and
unfortunately there are already more than 400 million pre-existing accounts, so
you might see “The username isn’t available” the first few times you enter a
username. Please persevere until you have your account setup. You can also
select Touch for suggestions to get a small list of available names to choose from.
3. Touch Done on the keyboard or the right arrow to continue.
Page 40
40
Gmail
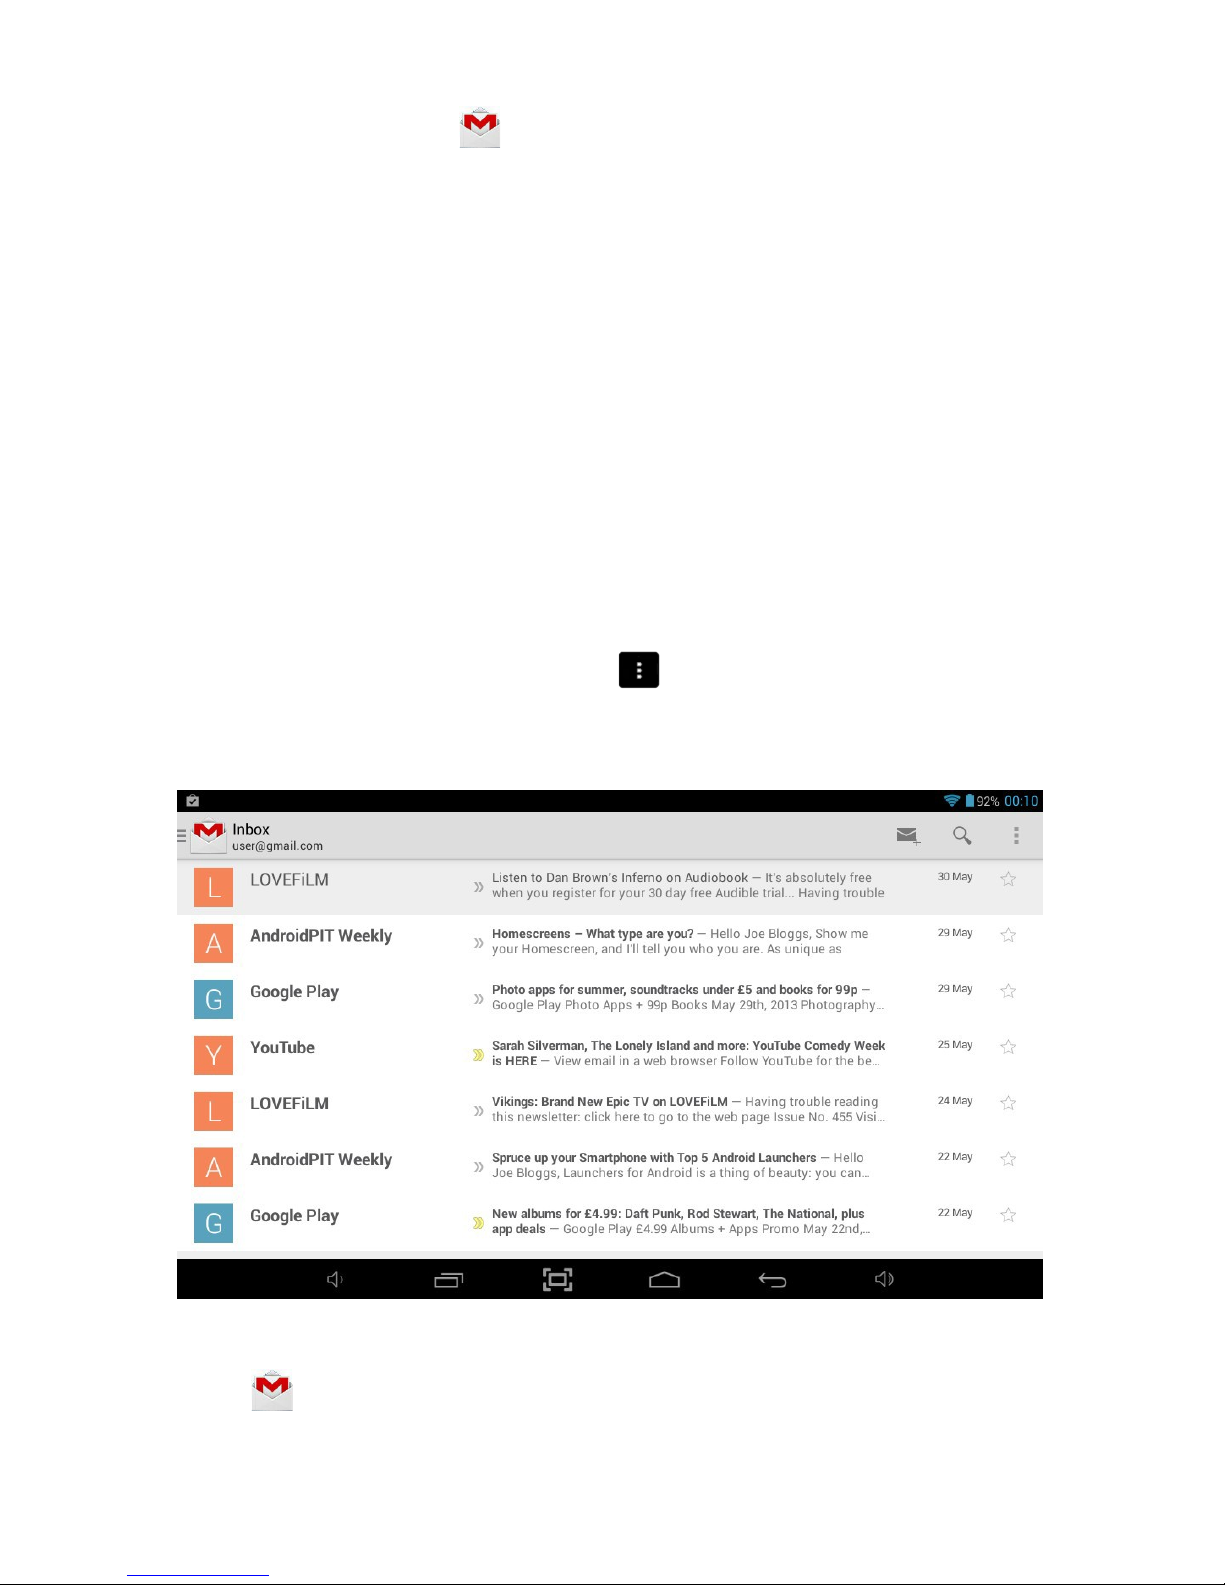
To launch Gmail, touch the icon on the All Applications Quick Links Bar or from
within Applications Launcher and Gmail will open in the Inbox.
From here, you can:
Read email
Touch a message to read it. Unread messages are bold.
While you are reading a message:
Touch the icons and menu along the bottom of the screen to
archive, throw away, label, or perform other actions on that
message.
Swipe left or right to read the previous or next conversation.
Organize email Check the box beside a message to select it. Then use the icons
and menu along the bottom of the screen to manage the
selected messages.
Change your
settings
Touch the Menu icon
to change your preferences, add an
account, or get Help.
No matter where you are within Gmail, you can always get back to the Inbox by
touching
in the top left corner of the screen.
Page 41
41
Google Play
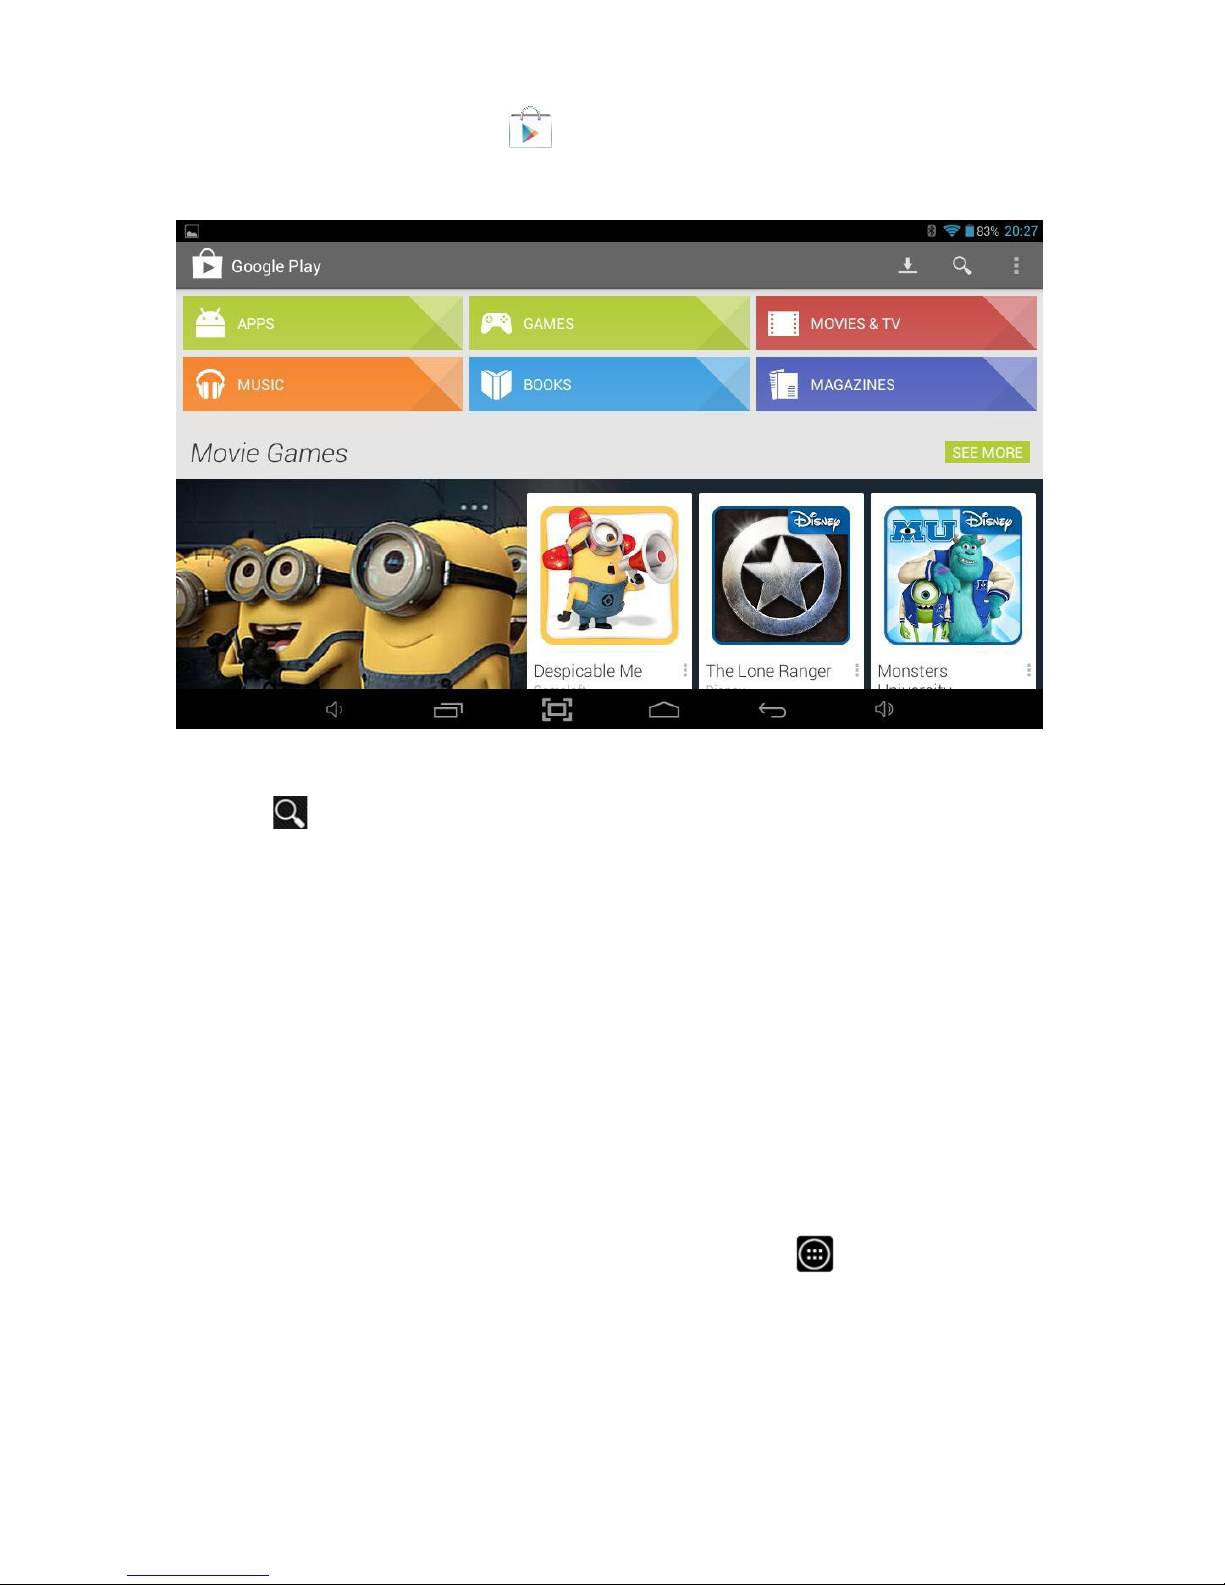
To launch Google Play, touch the
icon on the All Applications Quick Links Bar or
from within Applications Launcher and Google Play will open.
You can search for Apps, Books and Movies you would like to download by touching
the search
icon. Enter the name of something you would like to search for using
the popup keyboard and then touch the search icon to search for it.
Once you have found something you would like to download / install, select it by
touching its entry on screen and then select Install.
From the popup permissions window, touch the option to Accept & download the
App.
Once the installation has finished you can select Done to continue or Open to run the
App for the first time.
Installed Apps will appear in Application Launcher, click to view all installed
applications and look for the newly installed App.
Note: Apps are displayed alphabetically.
Page 42
42
9.9 Explorer
To navigate to all files on your Tablet, or any other storage device you attach to it, open
Explorer, by touching the
icon on the All Applications Quick Links Bar or from
within Applications Launcher.
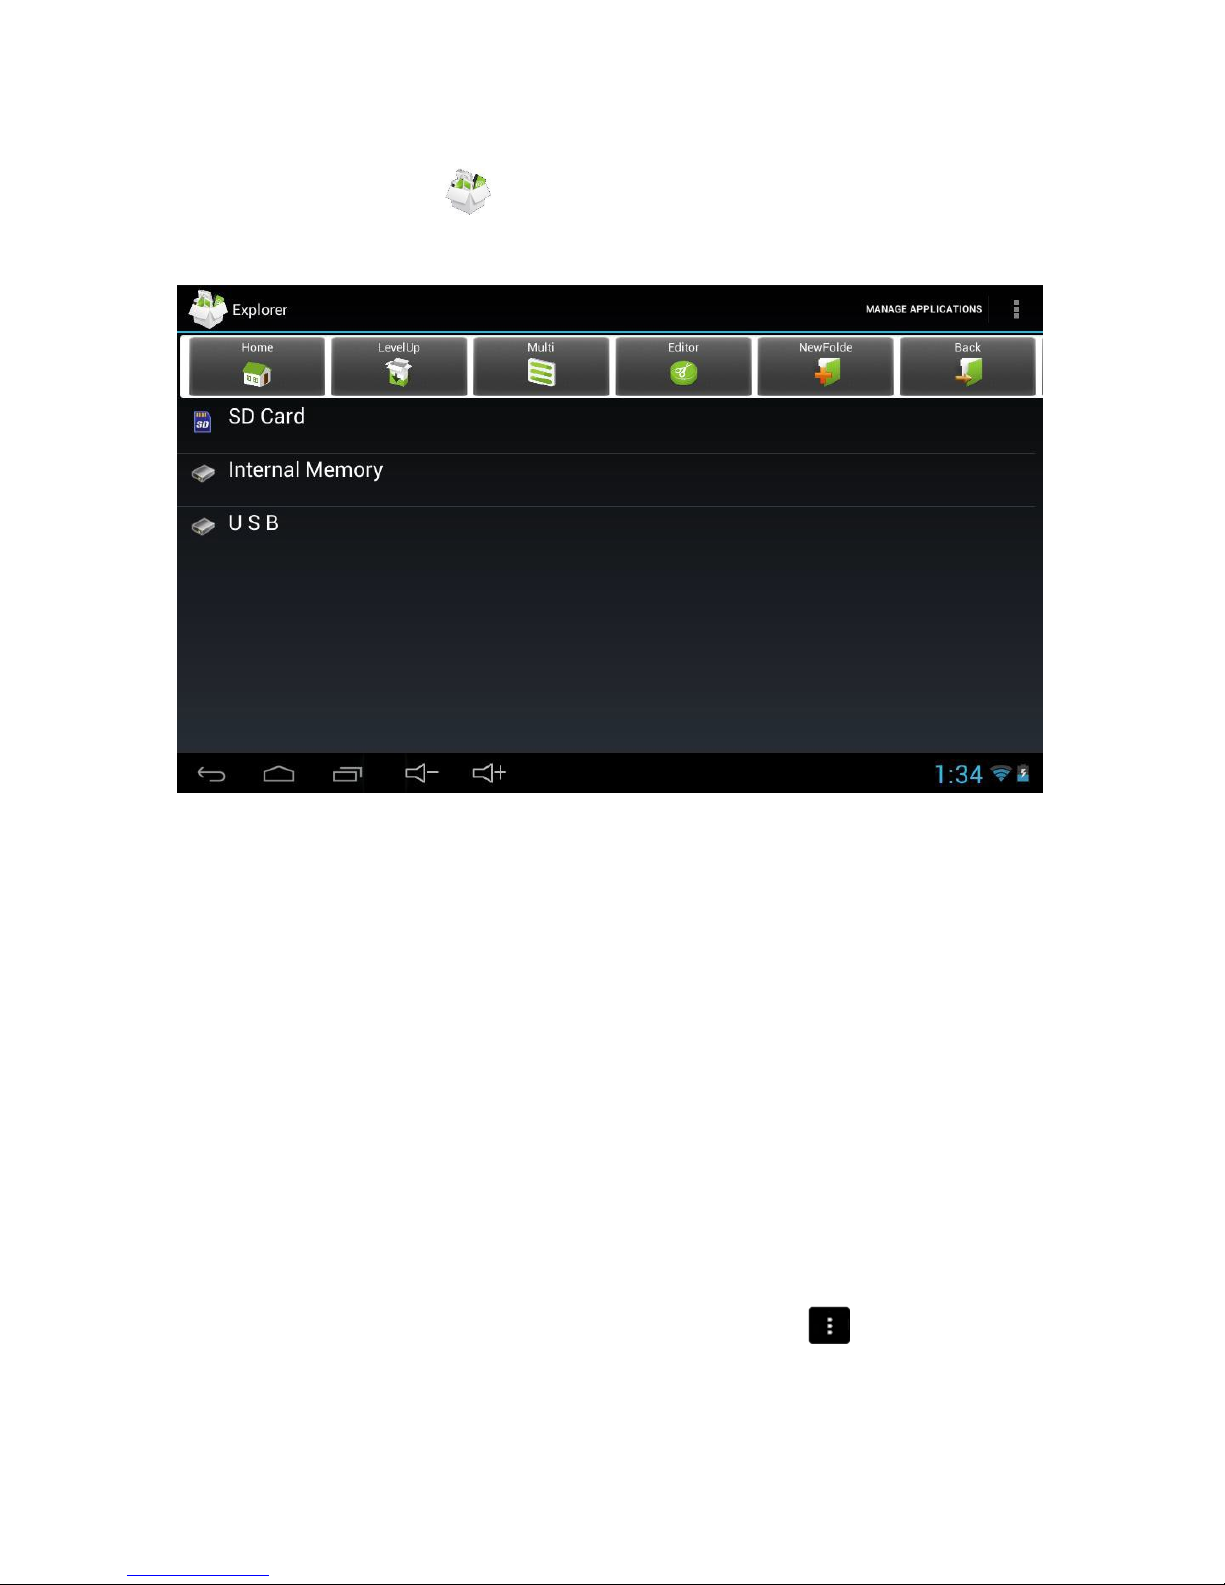
When Explorer opens, it will show all the main storage locations including SD Card,
Internal Memory and USB. The SD Card and USB storage locations will only be
accessible if these types of storage are inserted or connected to the Tablet.
Touch the Internal Memory storage location to show all the folders and files at the
highest level of your Tablet’s internal storage. You can navigate through folders just by
touching them and then select files by also touching them.
To copy and paste files from one folder to another, tap and hold the original file until a
menu appears with options to Delete, Rename, Copy, Move(Cut) or Email the file. Tap
Copy File to create a duplicate of the file or Move(Cut) to move the original file to a
new location. You can then navigate to the destination folder where you want to copy
the file. Tap and hold the folder you want to Copy / Move the file to and from the
menu which appears, select
Paste into Folder (you may have to scroll down to find this
option) and the file Copy / Move will complete.
To create a new folder for your own files, tap the menu icon and select the New
Directory option and use the virtual keyboard to type the folder name.
To access Pictures and Movies taken with the built-in camera, touch the DCIM folder
and then the Camera folder.
There are Music and Movies folders already created to store your media files in.
Page 43
43
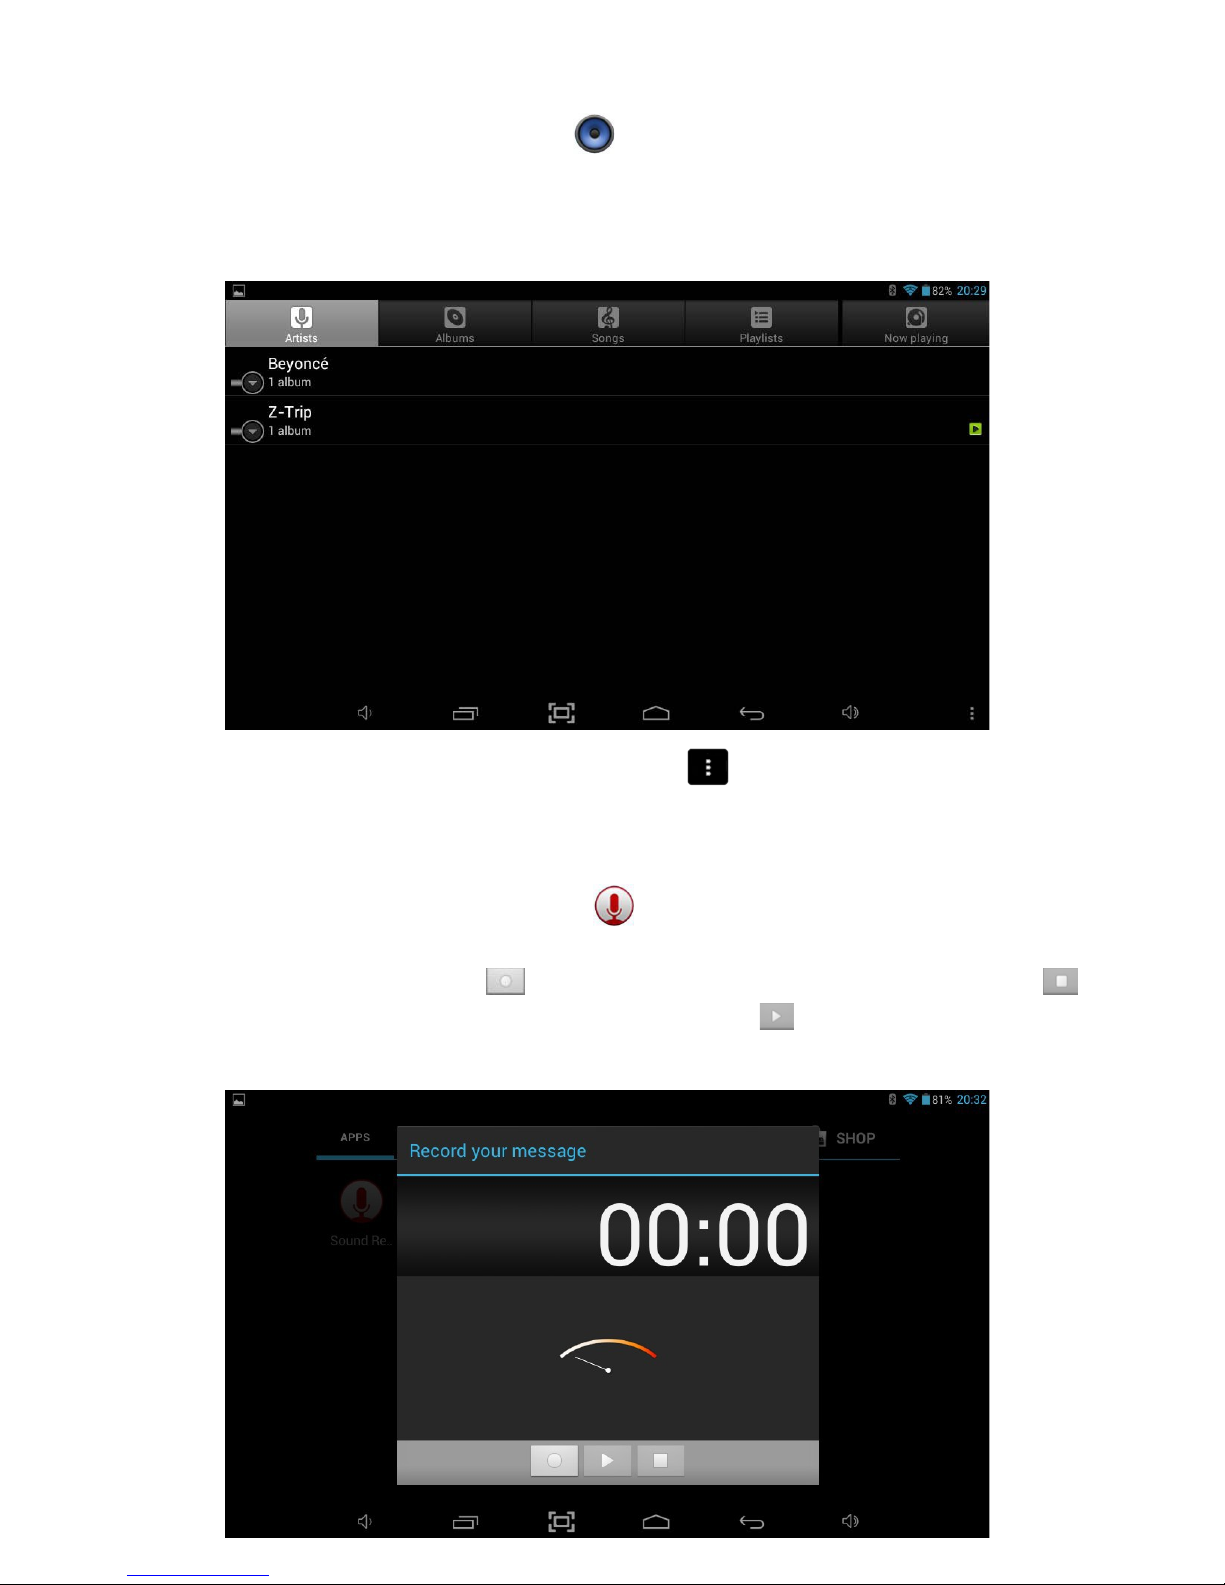
9.10 Music
To access the Music player, touch the
icon on the All Applications Quick Links Bar,
or from within Applications Launcher. By default the Music player will access tracks
stored in the Music folder of the Tablet’s internal storage. Alternatively you can
navigate to a music track and open it in the player from Explorer.
To enable shuffle options touch the menu icon and select from the available
options.
9.11 Sound Recorder
To access the Sound Recorder, touch the
icon on the All Applications Quick Links
Bar, or from within Applications Launcher. Once Sound Recorder has started, you can
start recording by pressing the
button and finish the recording by touching the
button. You can playback the recording by pressing the
button and then choose to
Discard the recording or save it by pressing Done.
Page 44
44
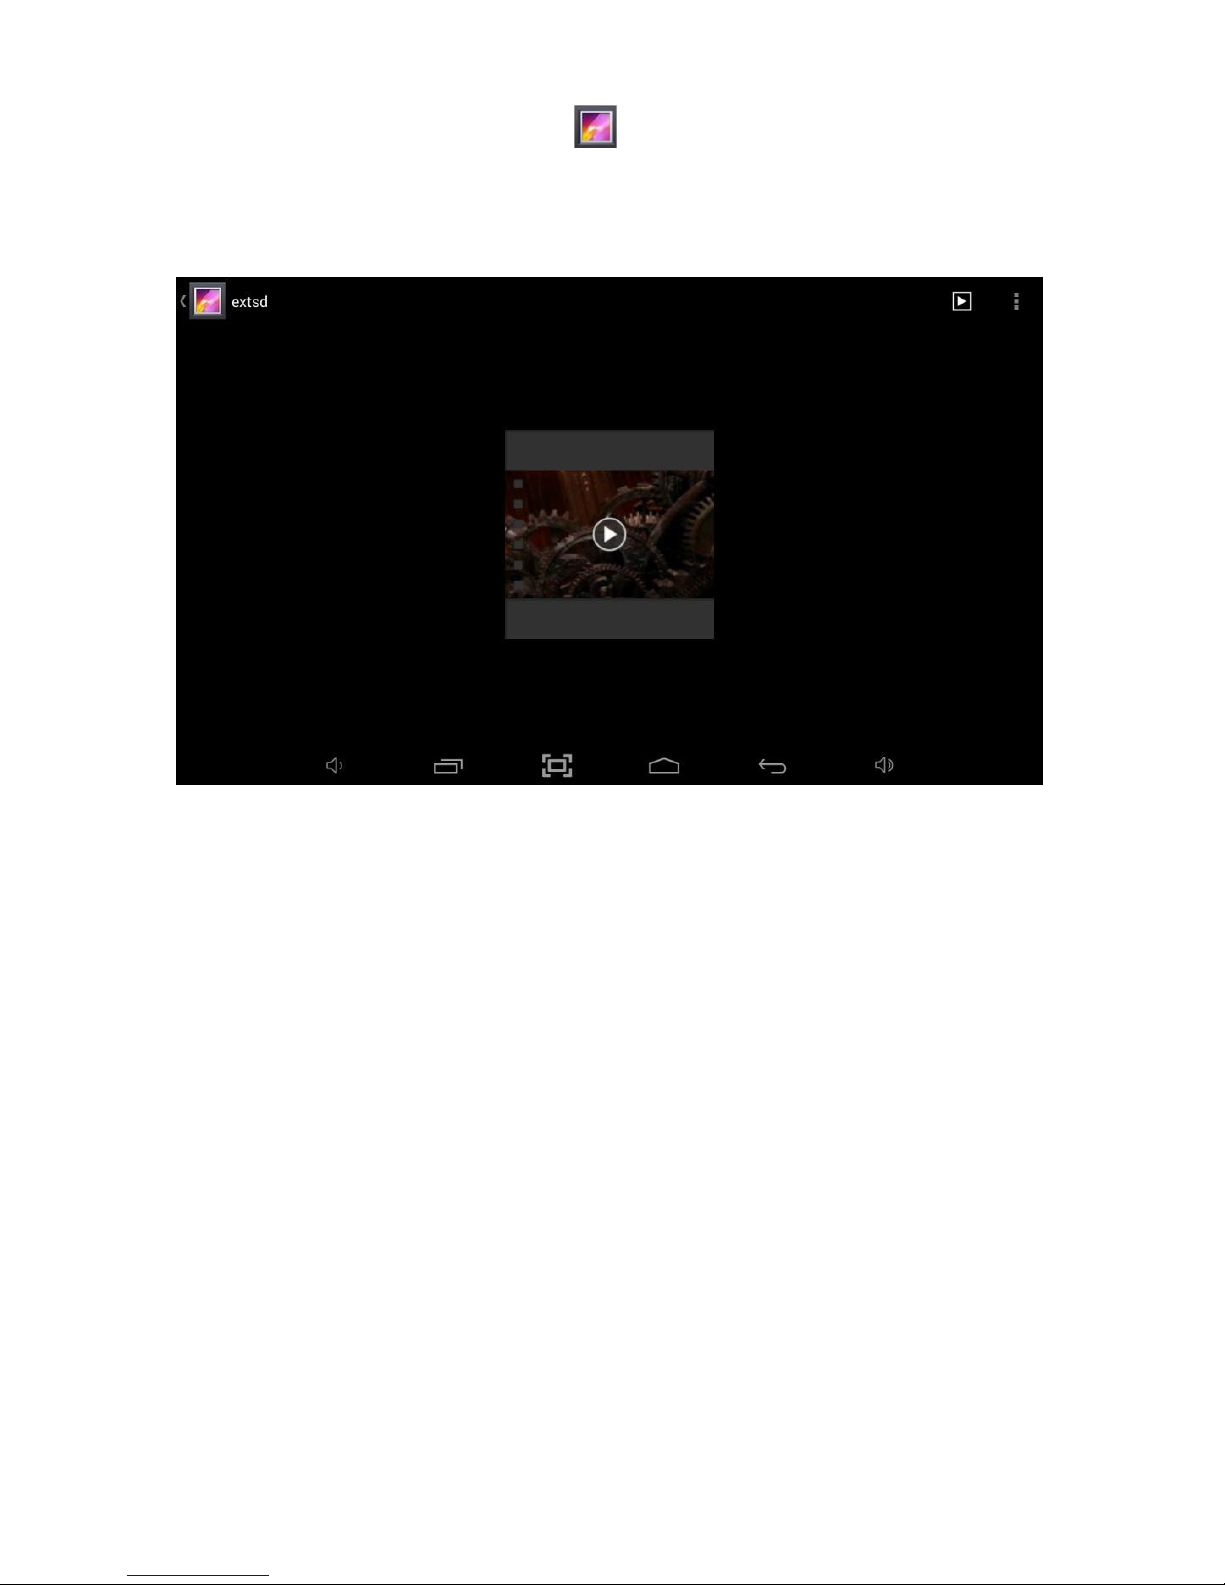
9.12 Gallery (Video Player)
To access the V ideo Player, touch the
icon on the All Applications Quick Links
Bar, from within Applications Launcher or you can navigate to a movie and open it in
the player from Explorer. If no movie is specified, the player will access videos stored in
the Movies folder of the Tablet’s internal storage.
Select a video by touching it and it will start playing. Standard controls are available to
control playback at the bottom of the screen. They will disappear after a few seconds,
but can be brought back by touching the screen.
Play / Pause
Your video will begin playing automatically, to pause the video, simply touch the
screen anywhere on the video player to bring up the control bar and then touch the
pause icon. To resume playing, touch the play icon.
Exiting Playback
In order to exit from a video which is currently being played, tap at the bottom of the
screen and tap the back or home icons.
Mini HDMI Port
The Tablet supports HDMI output by mini HDMI cable. Connect the Tablet to a TV
which supports HDMI using a mini HDMI cable (not supplied), and around 5 seconds
after being connected, the screen will transfer to HDMI output, and will
automatically output sound and image to the TV.
Page 45
45
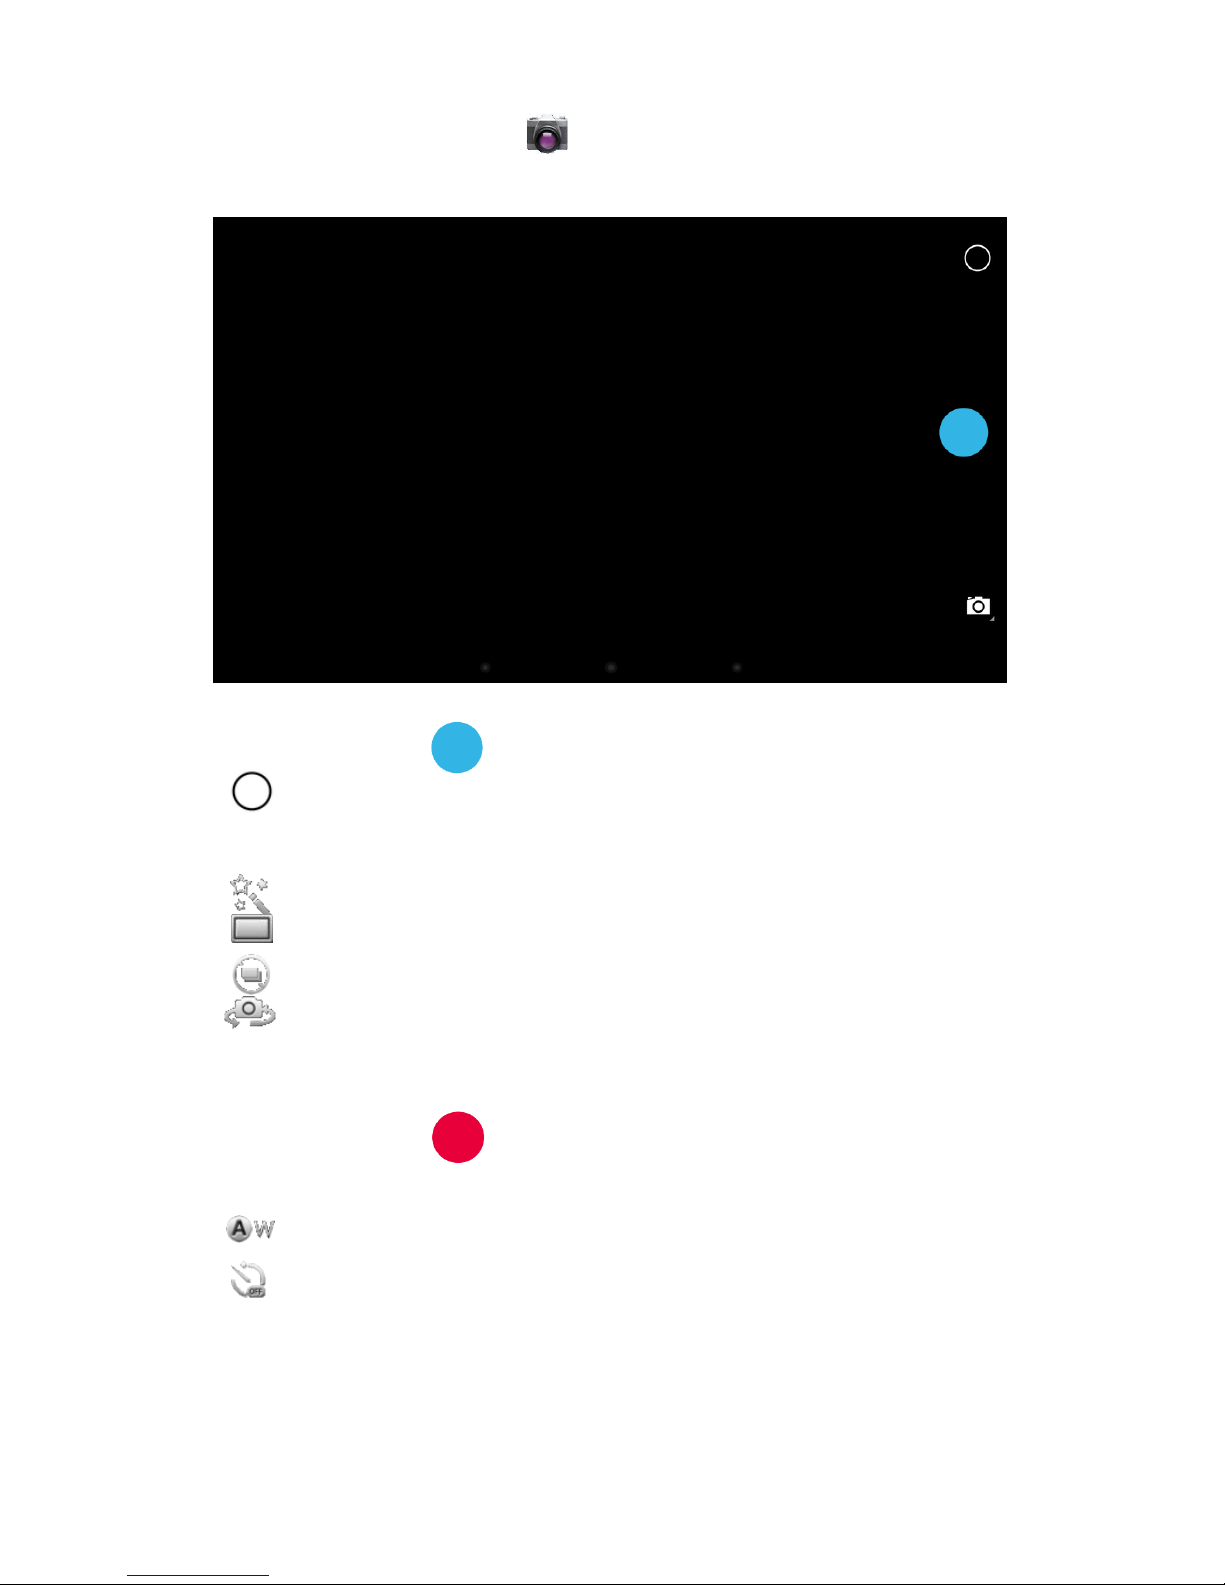
9.13 Camera
To access both Cameras, touch the
icon on the All Applications Quick Links Bar or
from within Applications Launcher.
Camera Mode
Touch the capture button
to take a picture.
Touch
to enter Camera settings, allowing Exposure, White balance, Picture
Quality, Face detection and other settings to be changed.
Touch to add colour effects to the picture.
Touch to change the Snap mode between Normal and Panorama.
Touch
to enable Continuous snap mode.
Touch
to switch between the front or rear cameras.
Video Mode
Touch the capture button
to start recording, touching the capture button a
second time will stop the recording and save the footage.
Touch to adjust the white balance of the image.
Touch
to set the time lapse interval.
Pictures and Movies taken with the camera are stored in the Camera folder which can
be found by opening Explorer and tapping on the DCIM folder, and then the Camera
folder.
Pictures and Movies taken via the camera are also available to play directly from the
V ideo Player. Just open the player and select the picture or movie you want to view.
Page 46
46
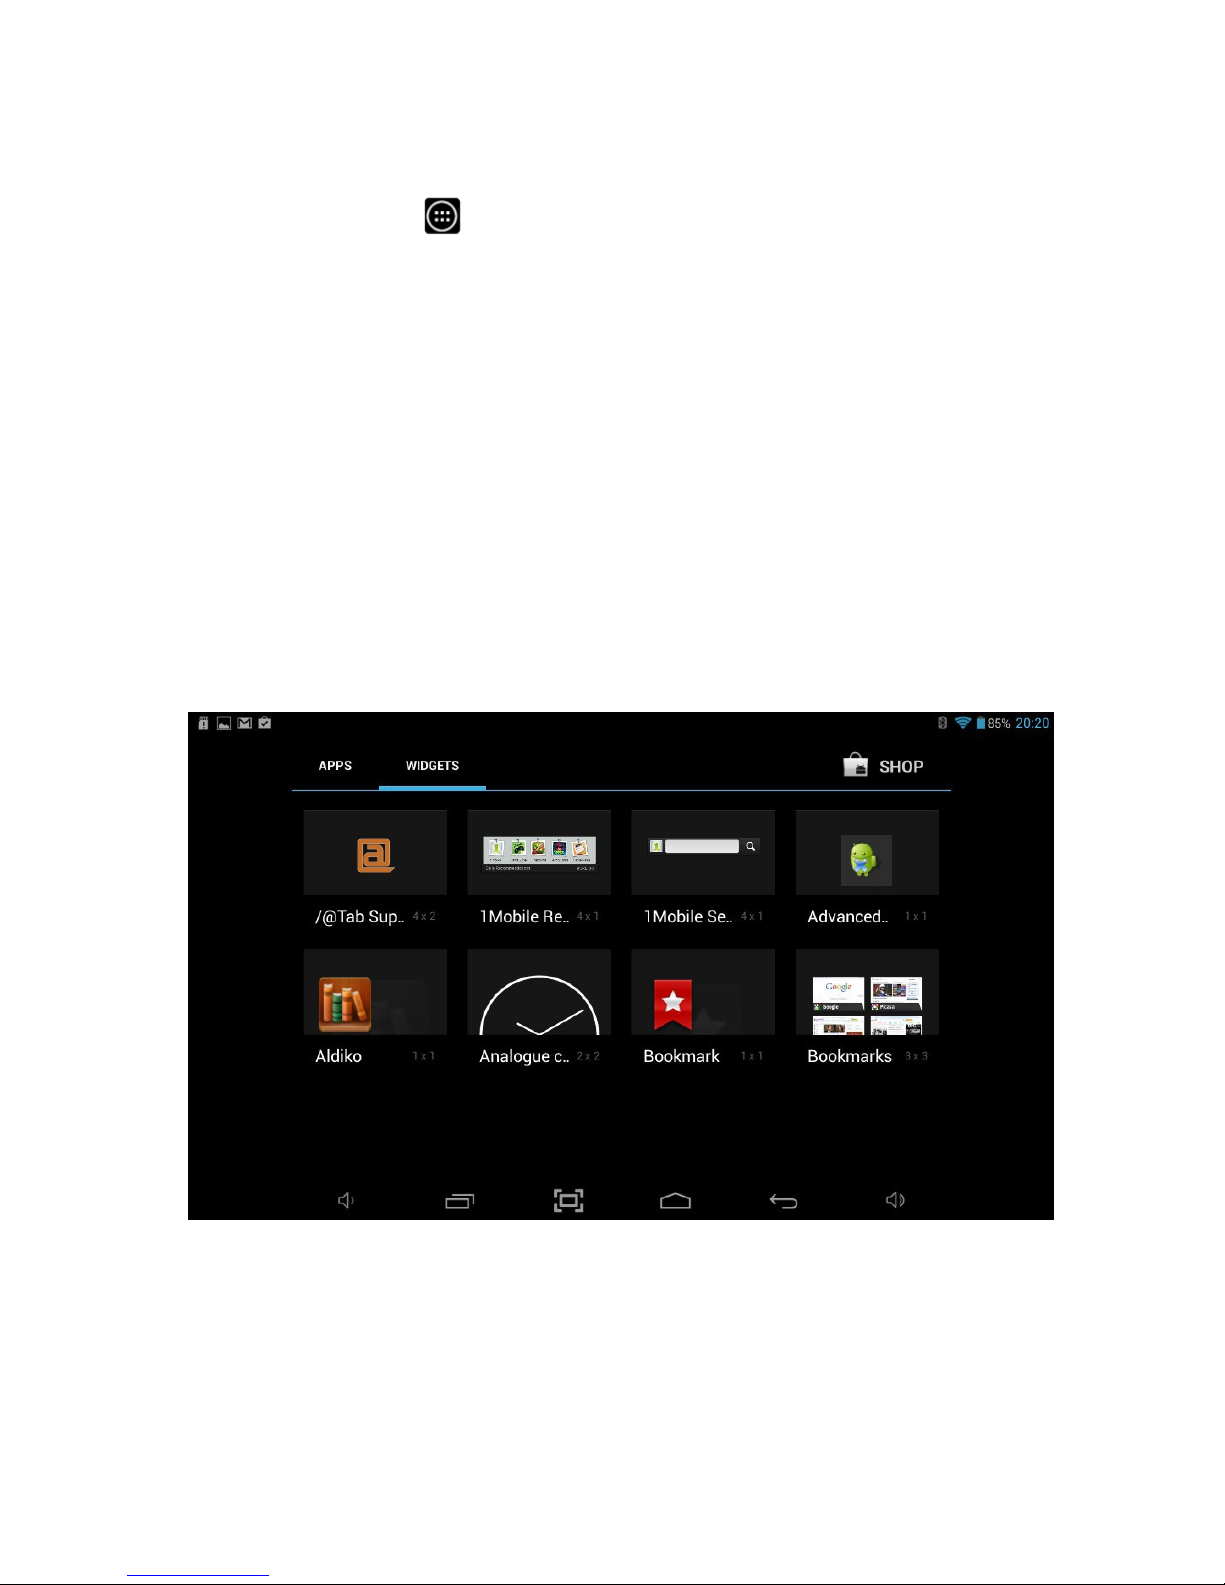
9.14 Widgets Page
To see your available widgets:
Touch the All Apps icon on your Home Screen.
1. Touch Widgets at the top of the screen.
From the main Widgets screen, you can:
•
Move between screens: Swipe left or right.
•
Drag a widget to a Home Screen: Touch and hold the widget's icon, slide your
finger where you want to place it, and lift your finger.
You may be asked to make further choices before the widget activates.
If there is not room on the screen where you release the widget, it will not be added
to the Home Screen. You should try again, but make sure that there are no icons
already on screen in the location you are trying to place the Widget.
Many apps that you download from Play Store or 1Mobile will have associated widgets
which are installed with the app. You should take some time to find out if the widget
would be a good addition to your Home Screen because it will offer continuous
information and access to some of the apps most important functionality.
Page 47

RELIANCE COMMUNICATIONS LLC LIMITED W ARRANTY
WHO THIS WARRANTY COVERS
This 12 month limited war ranty extends only to the original purc haser of this product within the United
States. This warranty is not transferable.
WHAT THIS WARRANTY COVERS
Reliance Com munications, LLC (Re liance) offers you a lim ited warranty that extends for the f irst twelve
(12) month period from the date of original purchase with proof of purchase. Without valid proof of
purchase, Reliance offers a limited warranty extending fifteen (15) months from date of manufacture,
which is coded on the product label (“Warranty Period”).
Should this product, inbox accessories or any part during normal consumer usage and conditions be
proven defective in m ateria l or workm anship that results in product f ailure , such defect(s) will be repaire d
or replaced (with new or rebuilt parts) at Relianc e’s discretion, without charge for parts or labor directly
related to the defect.
WHAT THIS WARRANTY DOES NOT COVE R
1. Warranty claims outside of the product Warranty Period.
2. Damage or defects caused by using the product other than in the normal course.
3. Defects or damages resulting from abnormal use, abnormal conditions, improper storage,
unauthorized modif ications, unau thorized rep air, im proper inst allation, or other ac ts which ar e not the
fault of Reliance.
4. Product with altered or removed serial number.
5. Damage resulting from use of accessories not approved by Reliance.
6. Damage from exposure to moisture, humidity, excessive temperature or extreme environment.
7. Liquid damage due to not properl y sealed/locked accessories, ports and or battery latches of water
resistance devices.
8. All surfaces and externally exposed parts that are scratched or damaged due to normal customer
use.
9. All software, including operating system software, third-party software, applications, and all other
software of any kind.
10. Wear and tear by normal daily use of the product.
11. Customer abuse or other physical abuse or mistreatment of a product as evidenced by:
a. Missing required faceplate;
b. Damaged LCD or Touch Lens (e.g., the product is either broken, cracked, smashed,
bleeding, etc.;
c. IMEI is unreadable electronically or due to missing or altered serial number, IMEI and/or
Reliance date label so as to affect readability;
d. Missing keys on keypad beyond normal wear and tear;
e. Unapproved product modification;
f. Visible product surface physical damage resulting in product being smashed, chewed,
gouged, burned or melted;
Page 48

g. Liquid damage as evidenc ed by submission in liqu id or any other evidence of liquid ingress,
including corrosion of any of the connections and noticeable excessive residue.
Page 49

OTHER LIMITATIONS
Reliance will not back up any data or re-inst all app licati ons or s oftware th at has be en added to t he dev ice.
It is recommended that you backup any such information or data before sending in the product for
warranty repair to avoid permanent loss of data stored.
No other warrant y is applicable to this product. The extent of Relia nce’s liability under this warra nty is
limited to the repair or repl acement provided abo ve and, in no event, shall Re liance’s liabil ity exceed the
purchase price paid by purchaser for this product.
To the extent permitted by applicable law and as otherwise set forth herein, Reliance makes no other
implied warranties, includin g any implied warranty of merchantab ility or fitness for a particular purpose.
Any action for breach of any war ranty mus t be brought within a perio d of 18 months f rom date of original
purchase. In no case shall; Reliance be liable for any special consequential or incidenta l damages for
breach of this or any other warranty, express or im plied, whatsoever. Relianc e shall not be liable for the
delay in rendering service under this war rant y or loss of use during th e time the pr oduct is bein g repaired
or replaced.
HOW TO GET WARRANTY SERVICE
To obtain warrant y service, please ca ll the following telephone num ber from an ywhere in the cont inental
United States: 1-888-838-8555
Page 50
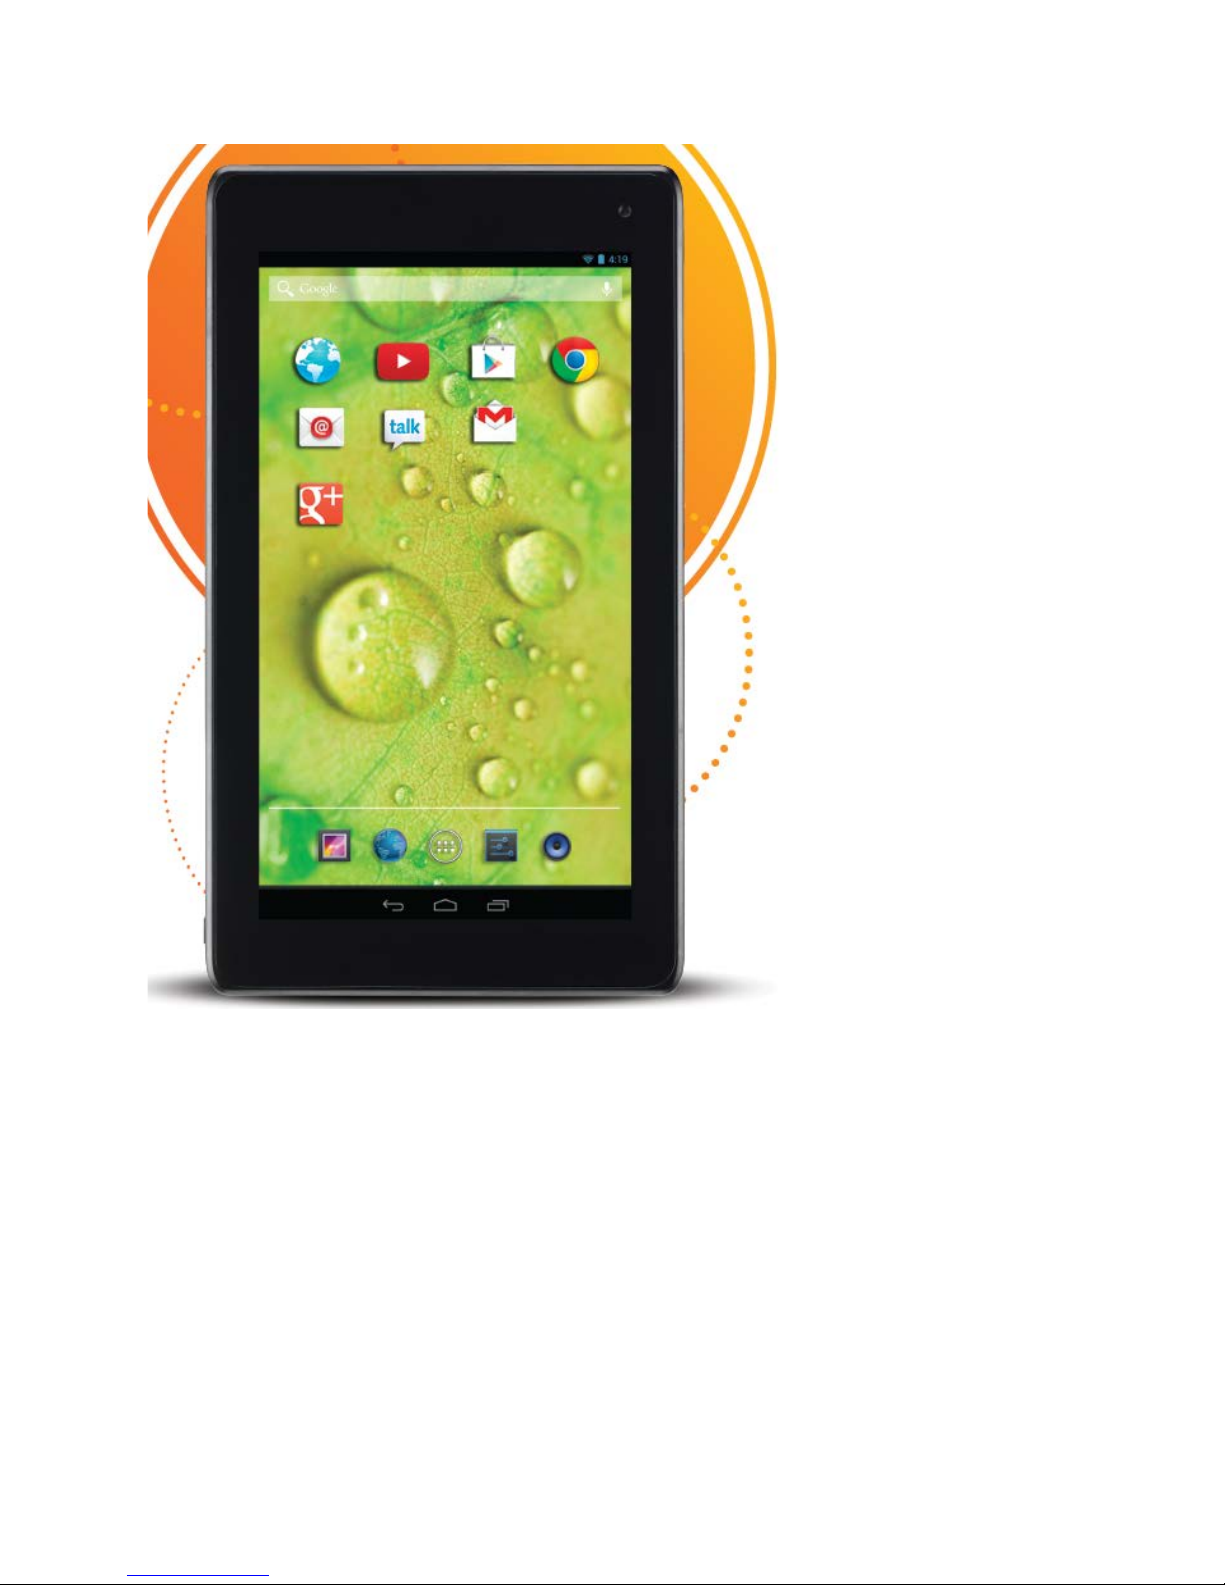
Orbic
Manual De Usuari o
Page 51

Contenidos
1. Usar este manual
…………………………………………………………………………..
4
2. Instrucciones de seguridad
…………………………………………………………………………..
5
3. Contenidos de la caja
…………………………………………………………………………..
7
4. Especificación de hardware
…………………………………………………………………………..
7
5. Descripción general del producto
…………………………………………………………………………..
8
6. Conectividad
…………………………………………………………………………..
9
6.1 Conexión a la PC
…………………………………………………………………………..
…………………………………………………………………………..
…………………………………………………………………………..
7. Comenzar
…………………………………………………………………………..
10
…………………………………………………………………………..
…………………………………………………………………………..
…………………………………………………………………………..
…………………………………………………………………………..
…………………………………………………………………………..
…………………………………………………………………………..
…………………………………………………………………………..
…………………………………………………………………………..
…………………………………………………………………………..
8. Configuraciones del sistema
…………………………………………………………………………..
18
…………………………………………………………………………..
…………………………………………………………………………..
…………………………………………………………………………..
…………………………………………………………………………..
…………………………………………………………………………..
…………………………………………………………………………..
…………………………………………………………………………..
…………………………………………………………………………..
…………………………………………………………………………..
…………………………………………………………………………..
…………………………………………………………………………..
…………………………………………………………………………..
…………………………………………………………………………..
…………………………………………………………………………..
…………………………………………………………………………..
…………………………………………………………………………..
9. Aplicaciones comunes
…………………………………………………………………………..
…………………………………………………………………………..
…………………………………………………………………………..
6.2 Conexión a un dispositivo USB externo
6.3 Conexión a una tarjeta micro SD
9
9
9
7.1 Cargar la batería
7.2 Arranque
7.3 Apagado
7.4 Escritorio
7.5 Modo suspendido
7.6 Configurar el fondo de pantalla
7.7 Aplicacione
7.8 Usar la pantalla táctil
7.9 Usar búsqueda de Google
8.1 Inalámbrico y redes
8.2 Bluetooth
8.3 Sonido
8.4 Pantalla
8.5 Almacenamiento
8.6 Batería
8.7 Aplicaciones
8.8 Servicios de ubicación
8.9 Seguridad
8.10 Idioma e introducción de datos
8.11 Copia de seguridad y reinicio
8.12 Cuentas
8.13 Fecha y hora
8.14 Accesibilidad
8.15 Opciones del desarrollador
8.16 Acerca de la Tablet
9.1
Acceso a Internet del navegador
9.2
Calculadora
10
11
11
12
14
14
15
16
16
18
21
22
23
24
25
25
26
27
28
28
29
31
32
33
34
34
34
35
Page 52

9.3 Calendar ido
…………………………………………………………………………..
…………………………………………………………………………..
…………………………………………………………………………..
…………………………………………………………………………..
…………………………………………………………………………..
…………………………………………………………………………..
…………………………………………………………………………..
…………………………………………………………………………..
…………………………………………………………………………..
…………………………………………………………………………..
…………………………………………………………………………..
…………………………………………………………………………..
10.
Derechos de autor
………………………………………………………………
48
11.
Información acerca de la garantía
………………………………………………………………
49
12.
Eliminación correcta de este producto
………………………………………………………………
52
13.
Eliminación correcta de las baterías
………………………………………………………………
52
14.
Descargo de responsabilidad
………………………………………………………………
53
9.4
Reloj
Descargas
9.5
9.6
Correo electrónico
9.7
Gmail / Google Play
9.8
Mobile Market
9.9
Explorador
9.10
Música
9.11
Grabador de sonido
9.12
Galería (Reproductor de video)
9.13
Cámara
9.14
Página de Widgets
35
36
36
37
39
42
43
44
44
45
46
46
Page 53

4
1. Usar este manual
Felicitaciones por adquirir esta Tablet. Es ta poderosa y versátil Tablet le ofrece lo m ejor de la web y de la
computación móvil al alcanc e de su mano en una plataforma liviana, mu y versátil que se ajusta a un
estilo de vida activo. Creada en torno al sistema operati vo Jell y Bean de Go ogle Andr oid, la T ablet le da acc eso a
miles de aplicaciones útiles y entretenidas para mejorar su experiencia móvil.
Con acceso inalámbrico integrado y una pantalla táctil muy ágil, puede leer libros y periódicos en movimiento, estar actualizado
sobre las últimas noticias, deportes, y el clima, administrar sus archivos multimedia y de negocios, navegar en la web y muchas
cosas más.
Nota: Esta Tablet no posee el servicio 3G y solo puede tener acceso a Internet cuando se conecta a una red inalámbrica (WiFi). Si quiere acceder a Internet mientras está en movimiento, existen varios Hotspots móviles 3G / dispo sitivos WiFi
disponible s desde todos los opera dores móviles princi pales. Éstos le permitirán a la Tablet conectarse en forma
inalámbrica con el Hotspot, llevándole Internet mientras está en movimiento.
Lea este manual antes de la instalación
• Conserve este manual como referencia futura.
• Lea este manual y todas las instrucciones de seguridad cuidado samente antes de usar su Tablet para ga rantizar un
uso seguro y adecuado.
• Las descripciones de este manual se basan en las configuraciones predeterminadas de su dispositivo.
• Las imágenes y capturas de pantalla usadas en este manual de usuario pueden diferir en apariencia
del producto real.
• El formato y entrega de este manual de usuario se basa en el sistema operativo Jelly Bean de Google Android y puede
variar dependiendo del dispositivo.
• El contenido de este manual de usuario puede diferir del producto, y está sujeto a cambios sin previo aviso.
• Las características disponibles y los servicios adicionales pueden variar por dispositivo, software
o proveedor de servicios.
• Las aplicaciones y sus funciones pueden variar por país, región o especificación de hardware, y no son
responsables por problemas de rendimiento provocados por aplicaciones de terceros.
• La Tablet no es responsable de problemas de rendimiento o in compatibilidade s provocadas po r la edición del usuario
de configuraciones del sistema.
• Los software, protectores de pantalla, imágenes, fuentes de sonido y otros contenidos proporcionados en este
dispositivo tienen licencia para uso limitado entre (…) y sus correspondientes propietarios. Extraer y usar estos
materiales para fines comerciales o de otra índole es una violación de las leyes de derechos de autor. La empresa no
será responsable de di cha violación d e derechos de a utor por pa rte del usuari o.
Page 54

5
Marcas registradas
Tablet y el logotipo son marcas registradas.
El logotipo de Android, Google Search™, Google Maps™, Google Mail™ , YouTube™, Android Market™ y GoogleTalk™ son
marcas registradas de Google, Inc.
Bluetooth® es marca registrada de Bluetooth SIG, Inc. en todo el mundo.
HDMI® es marca registrada de HDMI Licensing, LLC.
2. Instrucc iones de se guridad
Este manual de usuario contiene instrucciones importantes de seguridad e información para el uso adecuado de este
dispositivo. Siga las instrucciones de este manual cuidadosamente.
• Éste es un producto electrónico de alta densidad; no lo desarme usted mismo.
• Evite golpes de corriente y no lo deje caer, y a que de otra forma podría daña r el dispo sitivo.
• No use cables o enchufes dañados, o conectores eléctricos sueltos.
• No toque el cable con las manos mojadas, o desconecte el cargador tirando del cable.
• No doble o dañe el cable.
• Evite usar este producto en los siguientes entornos: Altas y bajas temperaturas, entornos húmedos,
entornos polvorientos, áreas con fuertes campos magnéticos y evitar una larga exposición al sol. En particular,
evite dejar el dispositivo en el auto durante el verano si las puertas están cerradas.
• Para lim piar el producto, l impie suavem ente usando un pa ño de algodón húmedo; el uso de la limpieza química
está prohibido, a menos que esté diseñado específicamente para este fin. Este producto debe mantenerse lejos de
las salpicaduras de gotas de agua, entonces no deben colocarse vasos c on líquido cerca del producto. No use
alcohol, solvente o petróleo para limpiar la pantalla.
• Si usa audífonos durante mucho tiempo, el volumen alto puede provocar daño permanente a su
audición.
• No use auriculares al conducir en ruta, manejar motocicleta o bicicleta, para evitar accidentes de
tránsito.
• Use sol o la baterí a, el carg ador y los accesorios proporc ionados; s i usa cual quier otro tipo de pr oducto ser ía un
incumplimiento de las normativas de la garantía, y puede ser peligroso.
• No ponga en cortocircuito el cargador o la batería.
Page 55

6
• No tire o provoque un impacto en el cargador o la batería.
• Use la maquinaria y accesorios de descarte según las normativas ambientales locales.
• Si tiene preguntas acerca del uso de este producto, contáctese con su distribuidor local o el centro de
servicios al cliente de la Tablet.
• El tiempo de espera de las baterías pueden variar debido a diversas influencias ambientales.
• T oda pér d ida de dat os por daños al producto, re par ac ión o por c u al qu ier otro problema relaciona do con
el dispositivo no está cubierta en l a garantía. Asegúrese de tener c opias de seguridad eventuales de
todos sus datos.
• No manipule baterías de ion de litio (Li -Ion) dañadas o con pérdidas. Para una eliminación s egura de sus
baterías de Li-Ion, pónga se en contacto con su centro de reciclado autorizado más cercano.
• Manipule y elimine las baterías y los cargadores con cuidado. Nunca arroje las baterías o los dispositivos al
fuego. Siga todas las normativas al eliminar baterías o dispositivos usados.
• Nunca coloque baterías o dispositivos sobre o en dispositivos de calentamiento, como hornos
microondas, hornillos o radiadores. Las baterías pueden explotar cuando se sob recalientan.
• Nunca aplaste o perfore la batería. Evite exponer la batería a gran presión externa, que puede derivar en
un cortocircuito interno y a sobrecalentamiento.
Precauciones para la pantalla táctil
Para un uso óptimo de la pantalla táctil, quite el film de protección de la pantalla antes de usar su dispositivo.
Para evitar rayar la p antalla tá ctil, no use he rramientas afiladas.
No permita que la pantalla táctil entre en contacto con otros dispositivos eléctricos. Las descargas electrostáticas
pueden provocar que la pantalla táctil no funcione correctamente.
No permita que la pantalla táctil entre en contacto con agua. La pantalla táctil puede funcionar incorrectamente en
condiciones húmedas o al exponerla al agu a.
Su pantalla táctil tiene una capa que detec ta pequeña s cargas eléctricas emitidas por el cuerpo humano.
Para obtener el mejor rendimiento, Toque suavemente la pantalla táctil con la punta de su dedo. La pantalla táctil
no reaccionará al contacto con herramientas afiladas, como estiletes o bolígrafos que podrían dañar y
marcar la pantalla.
Page 56
7
3. C ontenidos de la c aja
1. Dispositivo Tablet
2. Adoptador de energía
3. Manual del usuario
4. Tarjeta de garantía
5. Cable USB (para conectarse a una PC)
4. Especificació n de hardware
Procesador
Procesador Dual Core Cortex de 1.2GHz
Procesador de gráficos PowerVR SGX 540
Memoria
Memoria de gran velocidad DDR3 de 1GB
Almacenamiento
8GB incorporados con soporte para tarjeta micro SD externa hasta 32 GB
Inalámbrico
Internet inalámbrico IEEE802.11b/g/n
USB
Interfaz de gran velocidad OTG USB2.0
Salida de video
Interfaz de salida de video de alta definición 1.4 HDMI
Audio
Interfaz de auricular de 3.5mm, micrófono incorporado
Pantalla
Tamaño
Capacitiva táctil múltiple de 7 pulgadas
Resolución
1024 x 600
Funcionamiento Pantalla táctil múltiple de 5 puntos capacitiva
Sistema
Jelly Bean Android
Otros
Tamaño
(Largo × Ancho × Grosor) 193.5 × 112.4 × 9.5mm
Peso
290g aprox.
Batería
Batería de litio polímero incorporada de 3000mAh
Page 57
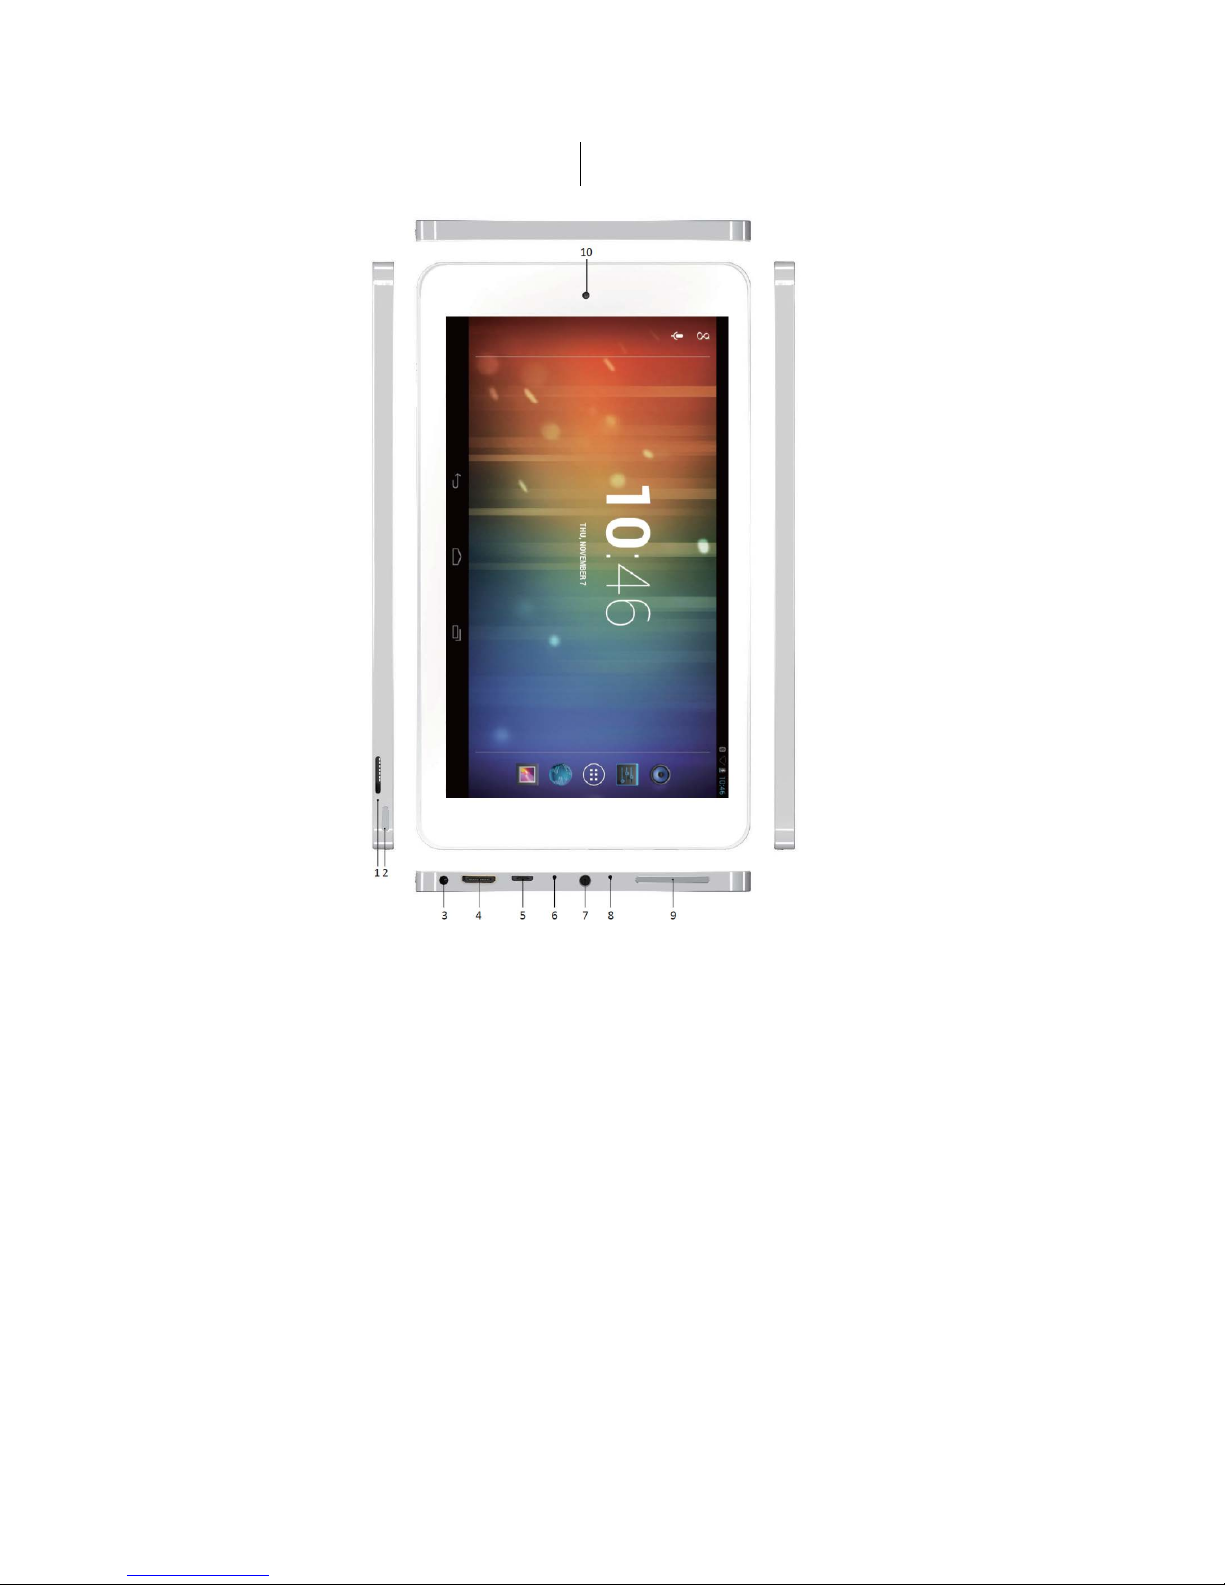
8
5. Descripción general del produc to
1. Ranura de micro SD
2. Botón de encendido
3. Tomacorriente
4. Conector mini HDMI
5. Conector micro USB
6. Botón de reinicio
7. Conector de auriculares de 3.5 mm
8. Micrófono
9. Botones de control de volumen
10. Cámara frontal
Page 58

9
6. Conectividad
6.1 Conexión a la PC
Puede conectar la Tablet directamente a una PC o Laptop usando el cable USB proporcionado.
Una vez que se conecta a un a P C, la Tabl et ap are cerá como un di spo sitiv o de al mace nami ent o que l e per mit e
acceder en la misma forma que un disco duro removible, con acceso a través de explorador o mi computadora.
1. Usando el cable USB, conecte el conector de micro USB a su Tablet.
2. Conecte el conector USB a una PC o Laptop.
3. Abra las carpetas para ver los archivos.
4. Copie los archivos desde la PC o Laptop a su Tablet.
Para desconectar la Tabl et de un a P C, h aga cli c en el í cono d el dispositivo USB en l a ba rra de tareas de
Windows y haga clic en la opción de eli mina r en fo rma segu ra el di spo sit ivo de al mace na mi ento mas ivo . Luego
quite el cable USB de la PC. Si no sigue estas instrucciones, esto podría derivar en pérdida de datos en su
Tablet o en daños a su dispositivo.
6.2 Conexión a un dispositivo USB externo
Puede usar un dispositivo de almacenamiento USB para almacenar archivos
adicionales.
Nota: Es posible que su dispositivo no soporte algunos de los dispositivos de
almacenamiento USB.
1. Usando el cable adaptador USB, conecte el conector de micro USB a su Tablet.
2. Conecte un dispositivo USB al conector USB en el cable adaptador.
3. Abra Explorer.
4. Toque el símbolo USB para ver archivos en el dispositivo USB.
6.3 Conexión a una tarjeta micro SD
Puede insertar una tarjeta micro SD en su Tablet para almacenar archivos adicionales. Se soportan
capacidades hasta 32GB.
1. Inserte una tarjeta micro SD en la ranura de la tarjeta SD.
2. Abra Explorer.
3. Toque el símbolo de la tarjeta SD para ver archivos en la tarjeta
micro SD.
Consulte el capítulo 9.9 para obtener más información ace rca de cómo usar Explorer.
Page 59

10
7. Comenzar
7.1 Cargar la batería
La Tablet tiene una batería incorporada. Antes de usar el dispositivo por primera vez, debe cargar totalmente la
batería. Use solo el adaptador de energía de 5V proporcionado con el dispositivo, o alternativamente, la Tablet
puede cargarse a través del cable USB a una PC u otra fuente de carga USB. Los cargadores no autorizados
pueden provocar que las baterías exploten o dañen su dispositivo.
Cuando su carga de batería es baja, el dispositivo emitirá un tono de advertencia y mostrará un mensaje de
batería baja. El ícono de batería también estará vacío. Si la carga de la batería es demasiado baja, la Tablet
automáticamente se apagará.
Si la batería se descarga completamente, la Tablet no se encenderá. Deje que la batería agotada se
cargue durante algunos minutos antes de intentar encender el dispositivo.
Cargar a través del adaptador de energía
1. Conecte el adaptador de energía al enchufe de energía.
2. Enchufe el adaptador de energía en la salida de energía.
Cargar a través de USB
1. Conecte el cable USB al enchufe de micro USB.
2. Enchufe el cable USB en una fuente de energía USB (adaptador de energía, PC, Laptop, etc).
Cuando se está cargando, el símbolo de la batería en la esquina inferior derecha del escritorio mostrará un
símbolo de carga (iluminado).
Cuando la batería está tot alm ente cargada ( no hay sím bolo iluminad o en el íc ono de la batería), des enchufe e l
adaptador de energía o cable USB de la Tablet y luego del enchufe de energía. Para ahorrar energía,
desenchufe o apague el adaptador de energía en el enchufe, cuando no lo use.
Nota: Puede usar la Tablet mientras se está cargando, pero le llevará más tiempo cargarse.
Mientras se carga la Tablet, es posible que la pantalla táctil no funcione correctamente. Si esto sucede,
desenchufe el adaptador de energía del dispositivo para usarlo.
Mientras se carga, la Tablet puede calentarse. Esto es normal y no debe afectar la vida útil o el rendimiento de su
dispositivo.
Si su Tablet no se carga adecuadamente, contáctese con el soporte (consulte el capítulo 11).
Conectar el adapt ado r de e nergía o el cable USB ina decu adamente pue de provo car daño s severo s a la Tablet , el
adaptador de energía o la fuente de energía USB. Todo
daño provocado por el mal uso no está cubierto por la garantía.
Page 60
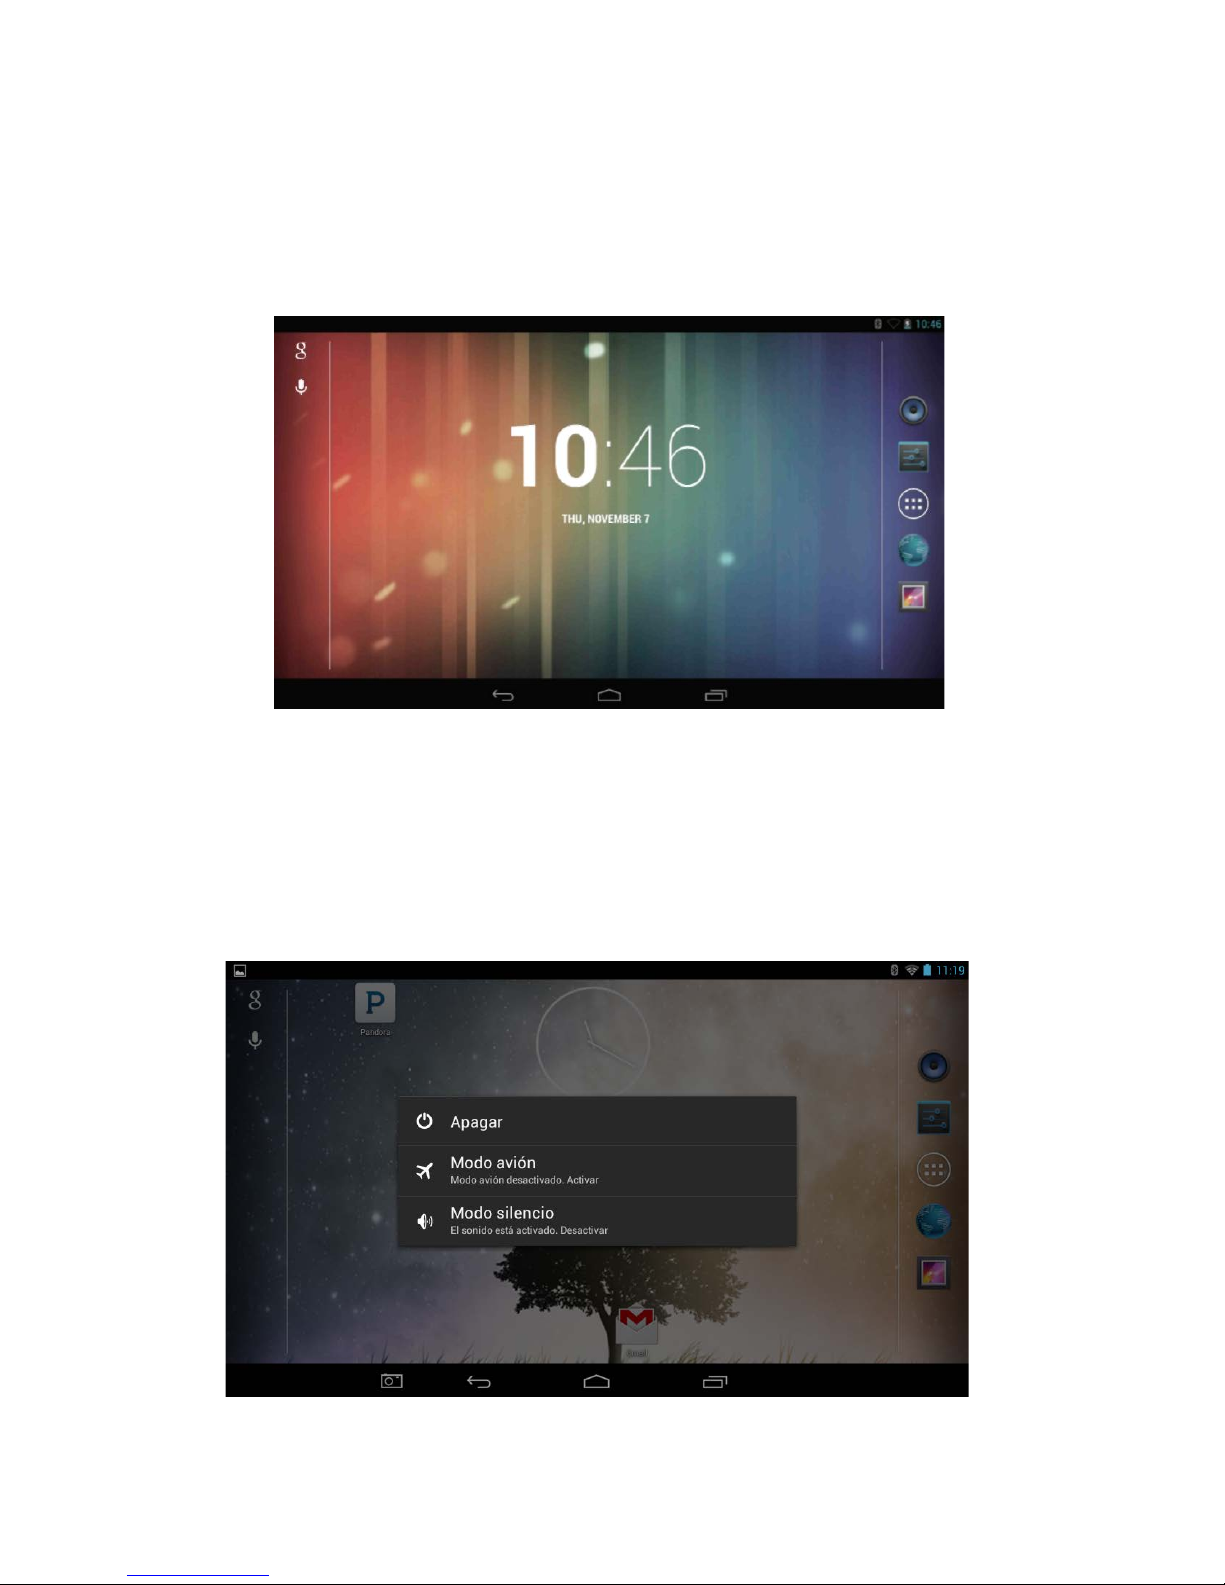
11
7.2 Arranque
Presione y mantenga presionado el botón de encendido durante 3 segundos hasta que la Tablet comience a
reiniciarse. Una vez que haya terminado, aparecer á la pantalla de bloqueo. Para desbloquear, arrastre el símbolo
“bloqueado” a la derecha hasta que se convierta en un símbolo “desbloqueado”.
Nota: Esta pantalla podrá tener diferentes fondos de pantalla, que pueden ser personalizados por el usuario.
Ahora estará en la página del escritorio predeterminado.
7.3 Apagado
Presione y sostenga el botón de energía hasta que la ventana desplegable Apagado aparezca en el escritorio. Elija la
opción OK para apagar la Tablet (como aparece a continuación).
Page 61
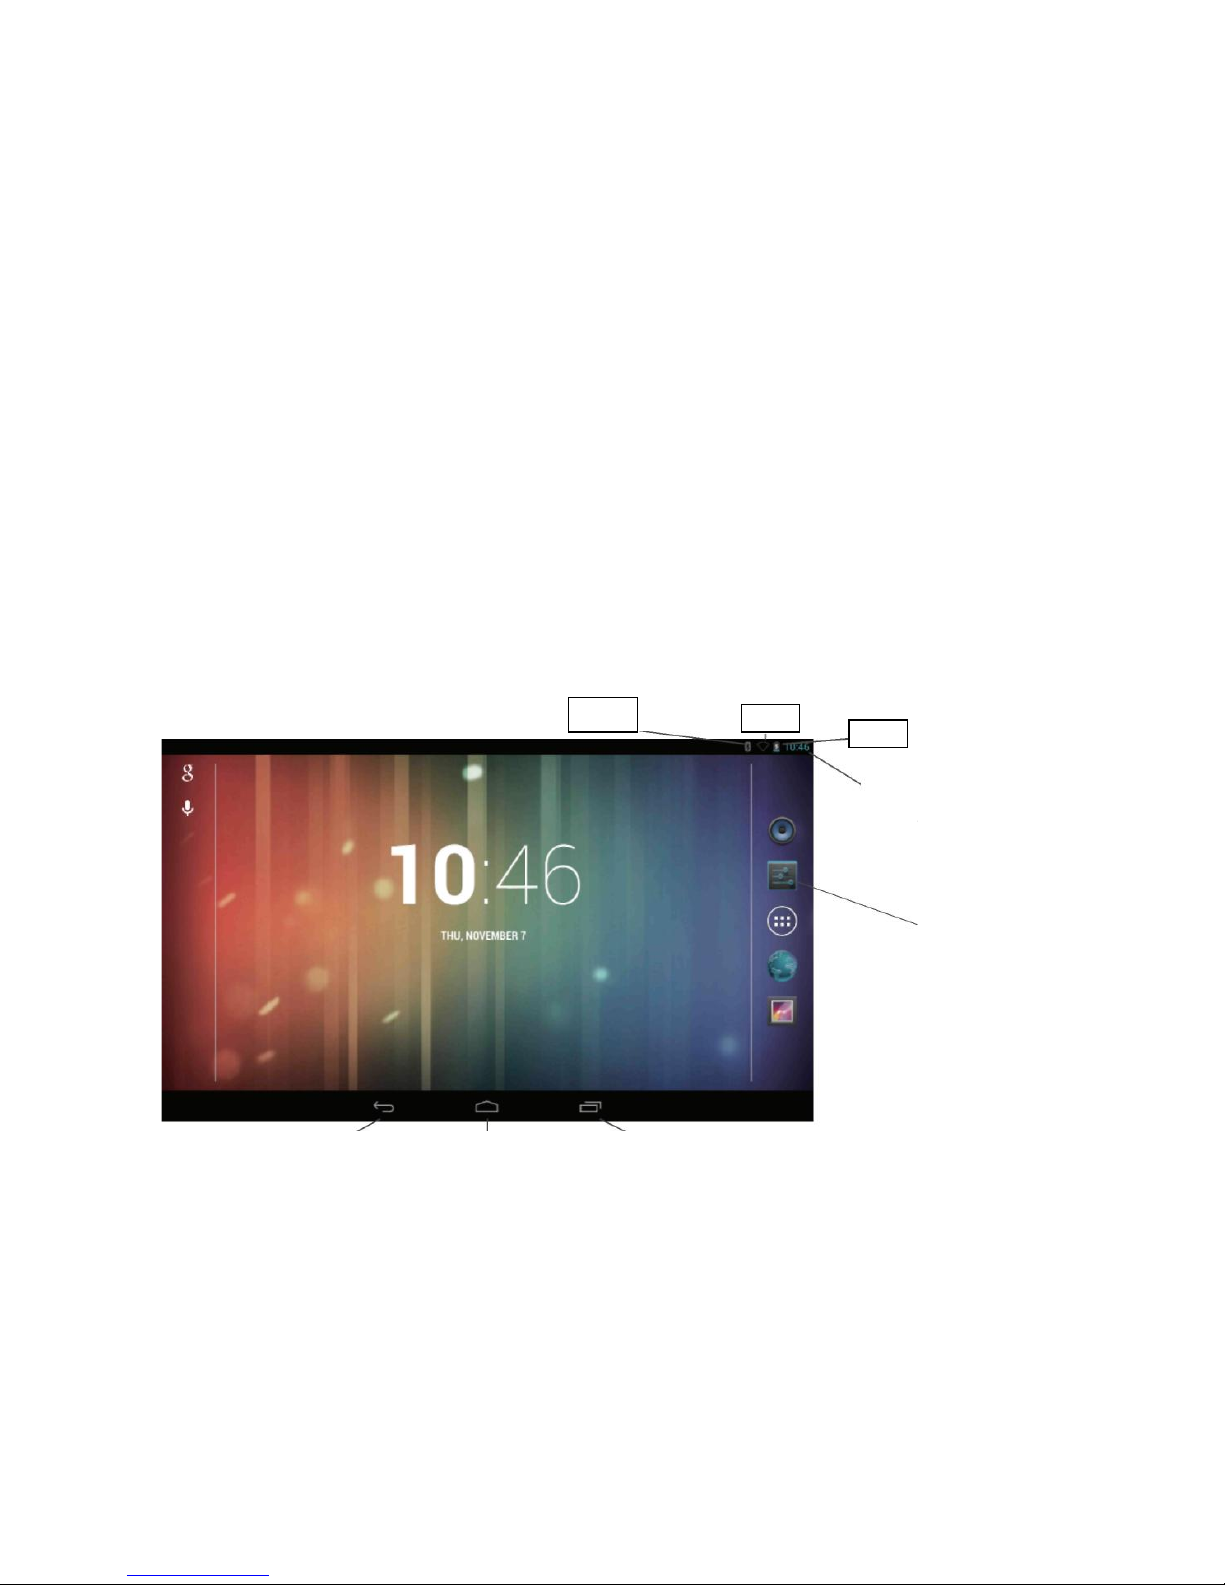
12
Referencias:
Power off: Apagado
Aeroplane mode: modo avión
Aeroplane mode is OFF: El modo avión está apagado
Silent mode: modo silencioso
Sound is ON: El sonido está ENCENDIDO
7.4 Escritorio
La Tablet ejecuta la última versió n del Sistema Operat ivo Android. Jell y Bean de Android tiene una interf az de
usuario similar a las versio nes anteriores, p ero ha sido ac tualizado espec íficam ente para usar con dispos itivos
Tablet.
La imagen que aparece a continuación muestra el esquema del escritorio y dónde puede encontrarse y
accederse a la información.
Ref. 1: Barra de notificación (deslizar hacia abajo para ver notificaciones)
Ref. 2: Estado de Wi-Fi y fuerza de la señal
Ref. 3: Estado de la batería
Atrás
Inicio
Aplicaciones
recientes
Atajo rápido de
configuraciones (deslice
hacia abajo para acceder)
Barra rápida de enlaces
de todas las aplicaciones
(deslizar para moverse a
través de las
Aplicaciones)
Ref. 1
Ref. 3
Ref. 2
Page 62

La Barra de enlaces rápid os de todas las aplicaciones puede desl izarse hacia arriba y hacia abajo
para acceder a alguna de las aplicaciones instaladas en la tablet.
En la esquina superior izquier da está la Barra de notificaciones, que le inf orma acerca de algunas
actividades que está llevando a cabo actualmente la tablet, o que ha completado recientemente.
Puede tenerse acces o sosteniendo su dedo en la barra y deslizándol o hacia abajo. La inf ormación
que aparece en la barra incluirá descargas, instalaciones de aplicación y mensajes recibidos
recientemente, etc.
En la esquina superior derecha, se encuentra el Atajo rápido de configuraciones, que permite el
acceso a atajos para br illo, c onfiguraciones , W i-Fi, rotación de pantal la, energía de la bater ía, m odo
avión e interruptor de bluet ooth, etc. Pue de tenerse ac ceso sos teniendo su dedo en Wi-F i, batería o
íconos de reloj y deslizando su dedo hacia abajo.
En la parte inferior de la pantalla se encuentra n los enlaces Atrás , Inicio o Aplicaciones Recientes.
Para obtener más información sobre estos enlaces, consulte la página siguiente.
Para cambiar la im agen predeterm inada y agregar y quitar aplicaciones d esde la Barra de enlaces
rápidos de todas las ap licaciones, sostenga su dedo en cualquier lug ar hacia abajo en el es critorio
durante dos segundos. Desmarque todas las aplicaciones que no quiere que aparezcan y
seleccione el botón Atrás
13
Page 63
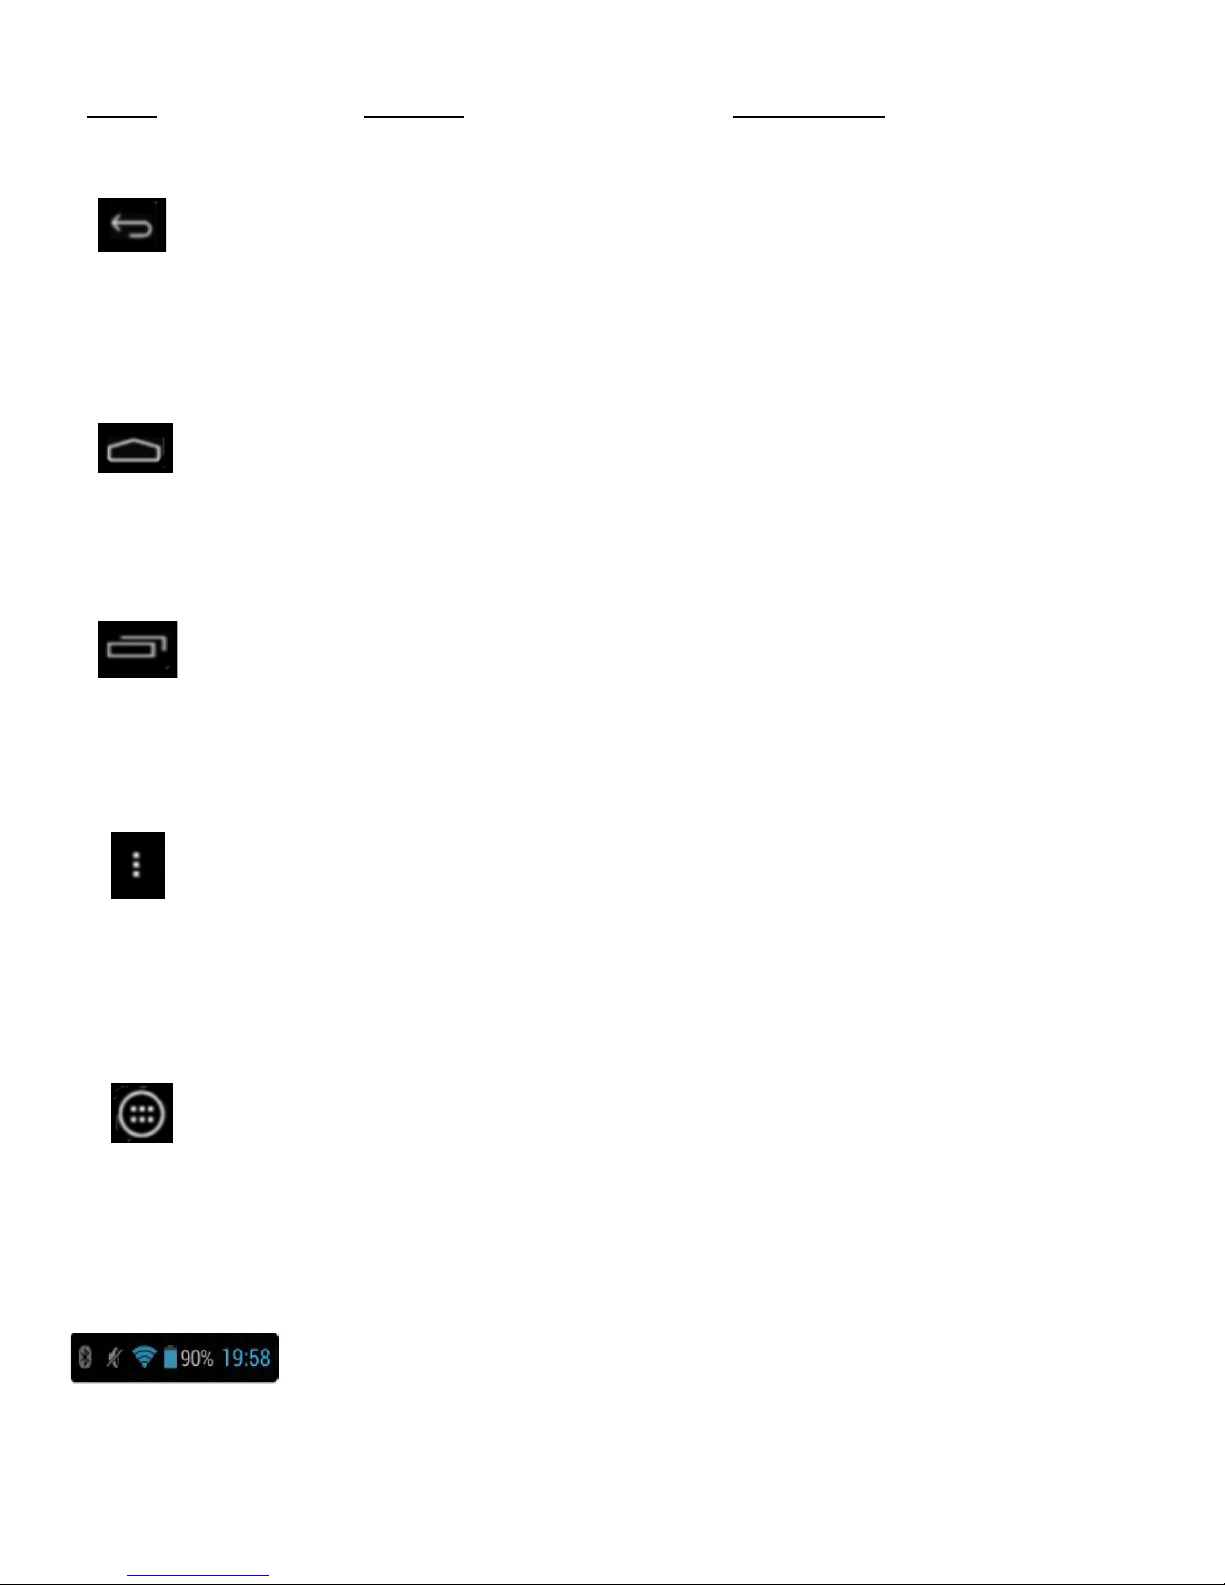
Atrás
Abre la pantalla previa en la que estaba
trabajando incluso si estaba en una
aplicación diferente. Una vez que
vuelva a la Pantalla inicio, no puede
avanzar más en su historia.
Inicio
Abra Inicio. Si está viendo la Pantalla
Inicio a la izquierda o derecha, abre la
Pantalla Inicio central.
Aplicaciones recientes
Abre una lista de imágenes pequeñas de
Aplicaciones en las que ha trabajado
recientemente. Para abrir una Aplicación,
tóquela. Para eliminar un Ícono pequeño
de la lista, deslice hacia arriba o hacia
abajo.
Botón menú
Permite un acceso rápido a las opciones
del menú para la aplicación actual.
Arranque de aplicaciones
(solo Pantalla inicio de Android)
Permite el acceso a todas sus aplicaciones
y widgets
Ícono Descripción Nombre
Íconos de estado
Los íconos de estado a la izquierda
del reloj le dicen qué aplicaciones le
han enviado notificaciones. Los
íconos a la izquierda del reloj
muestran la fuerza de conexión de
red inalámbrica actual, nivel de carga
de batería, etc.
14
Page 64
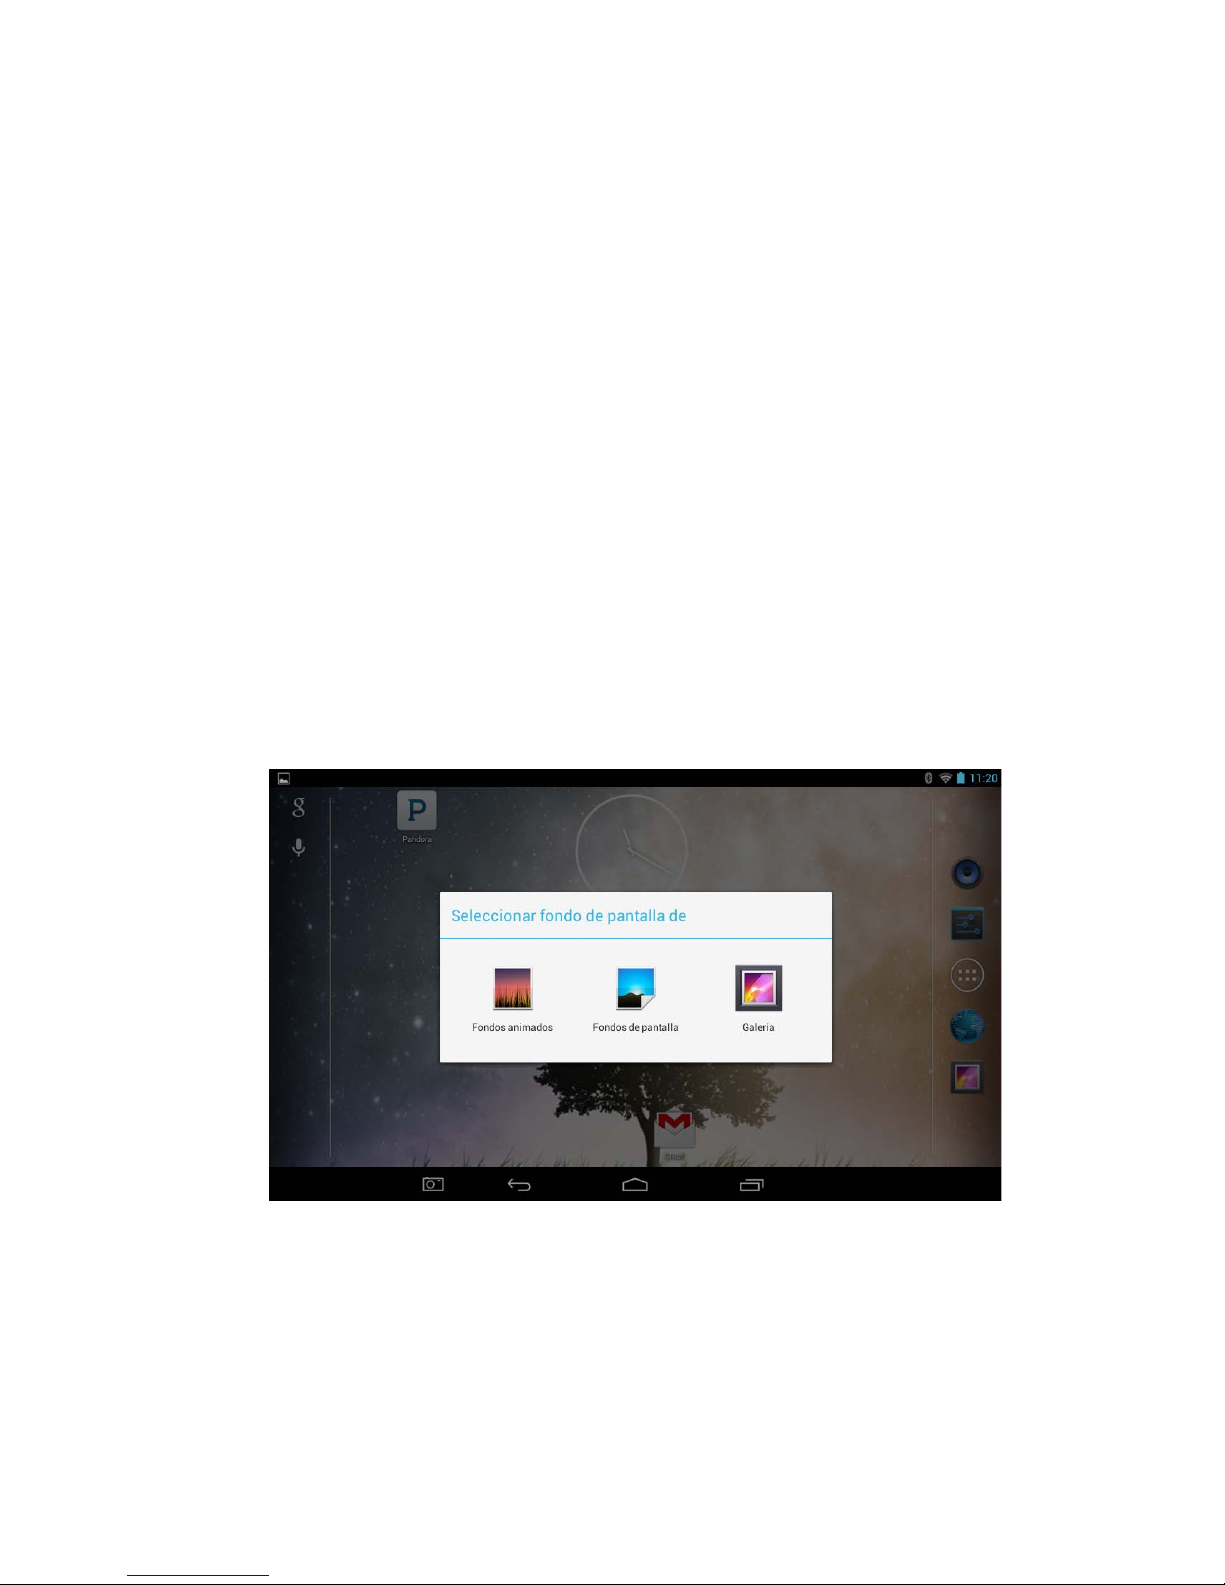
15
7.5. Modo suspendido
Durante el funcionamiento normal de la Tablet, presione el botón de energía una vez, para configurar el
dispositivo en modo suspendi do. La pantalla se apagará, pero e l dispositivo estará preparado p ara ser usado
en cualquier momento. Para activar nue vam ente el d ispos itivo, pr esione e l botón de ence ndido p ara rei nicia r el
funcionamiento normal. Cuando no utilice la Tablet, puede usar esta función para preservar la batería.
7.6. Configurar el protec tor de pantalla (sol o escritorio Andr oid)
Para cambiar el protector de pantalla en la T ablet, presione con un dedo en un área vac ía del escritorio y luego de
algunos segundos, aparecerá la opción desplegable Elija el protector de pantalla de. Seleccionar Galería, Protectores
de pantalla en vivo o Protectores de pantalla le per m itirá sel ecc ionar d e una c ant idad d e opci ones dispo nibl es como
aparece a continuación.
Page 65
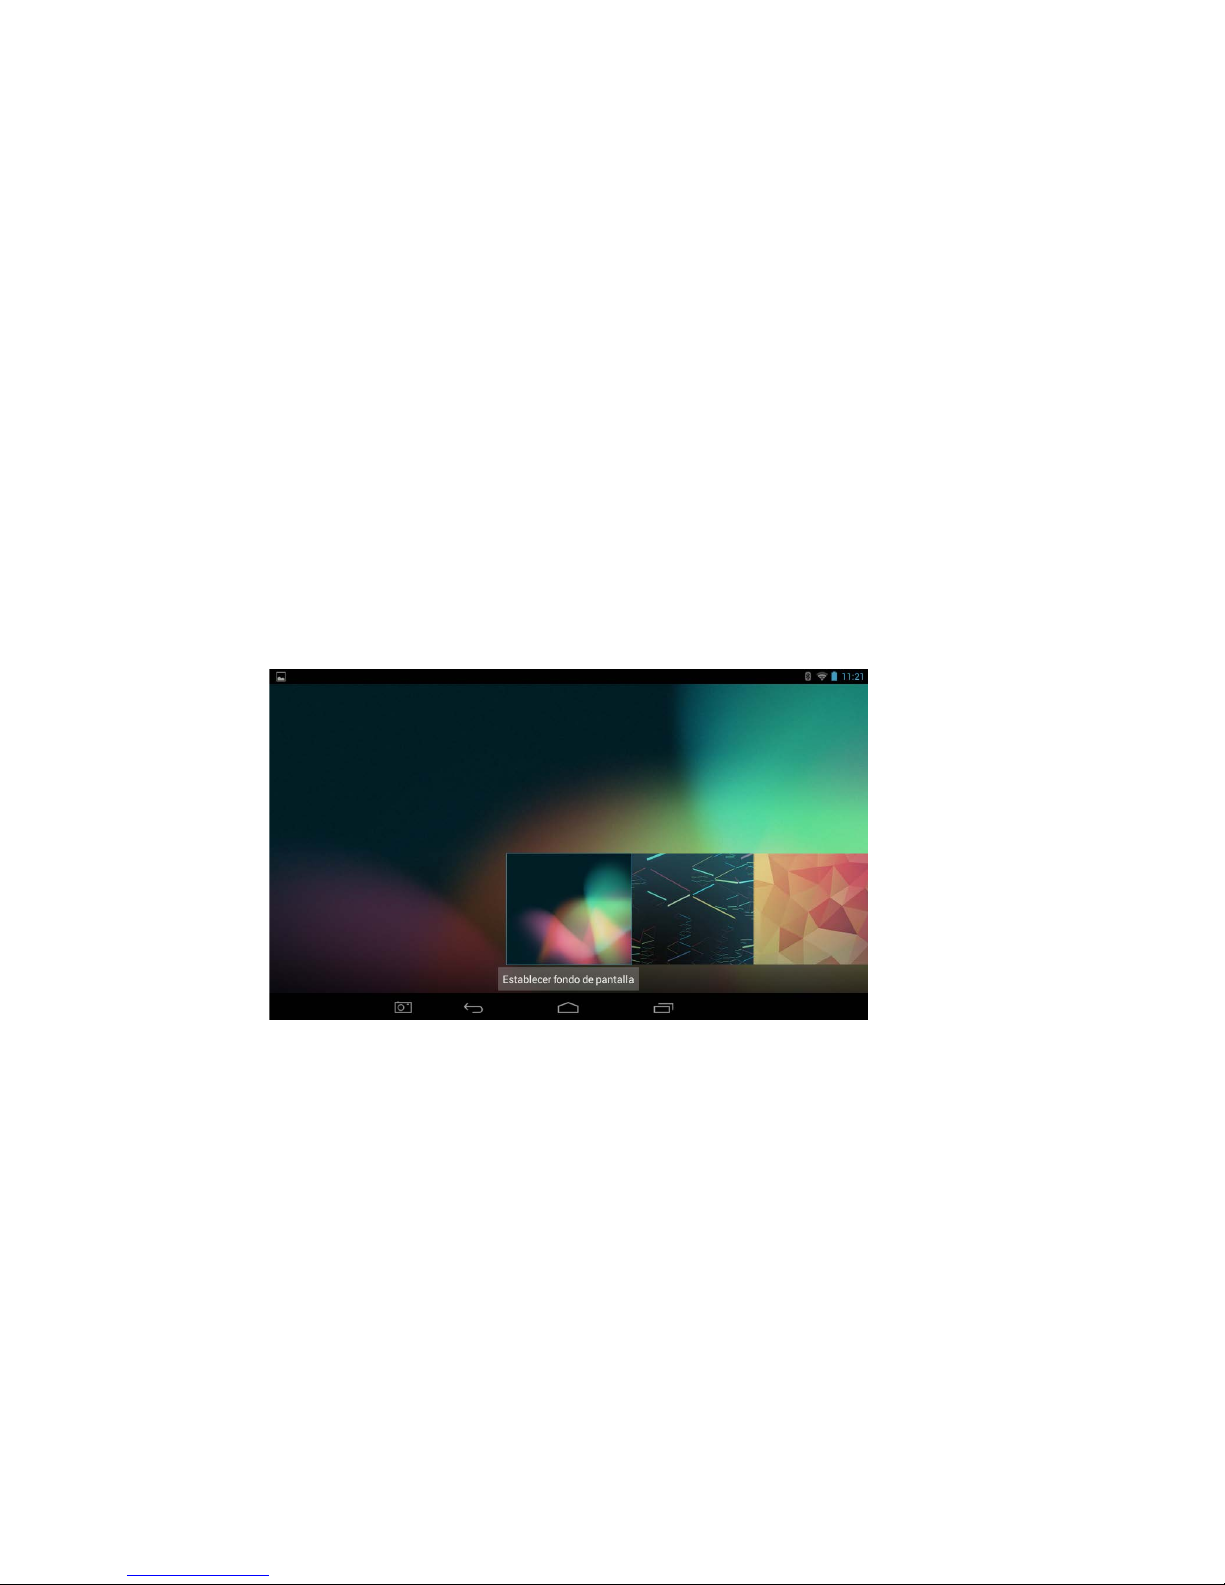
16
Referencias:
Choose wallpaper from: Elegir protector de pantalla de
Gallery: galería
Live wallpaper: protector de pantalla en movimiento
Wallpaper: protector de pantalla
Una vez que haya elegido el protector de pantalla que le gusta, presione el botón Configurar el protector de pantalla según
aparece a continuación.
Referencias:
Set wallpaper: Configurar protector de pantalla
Page 66
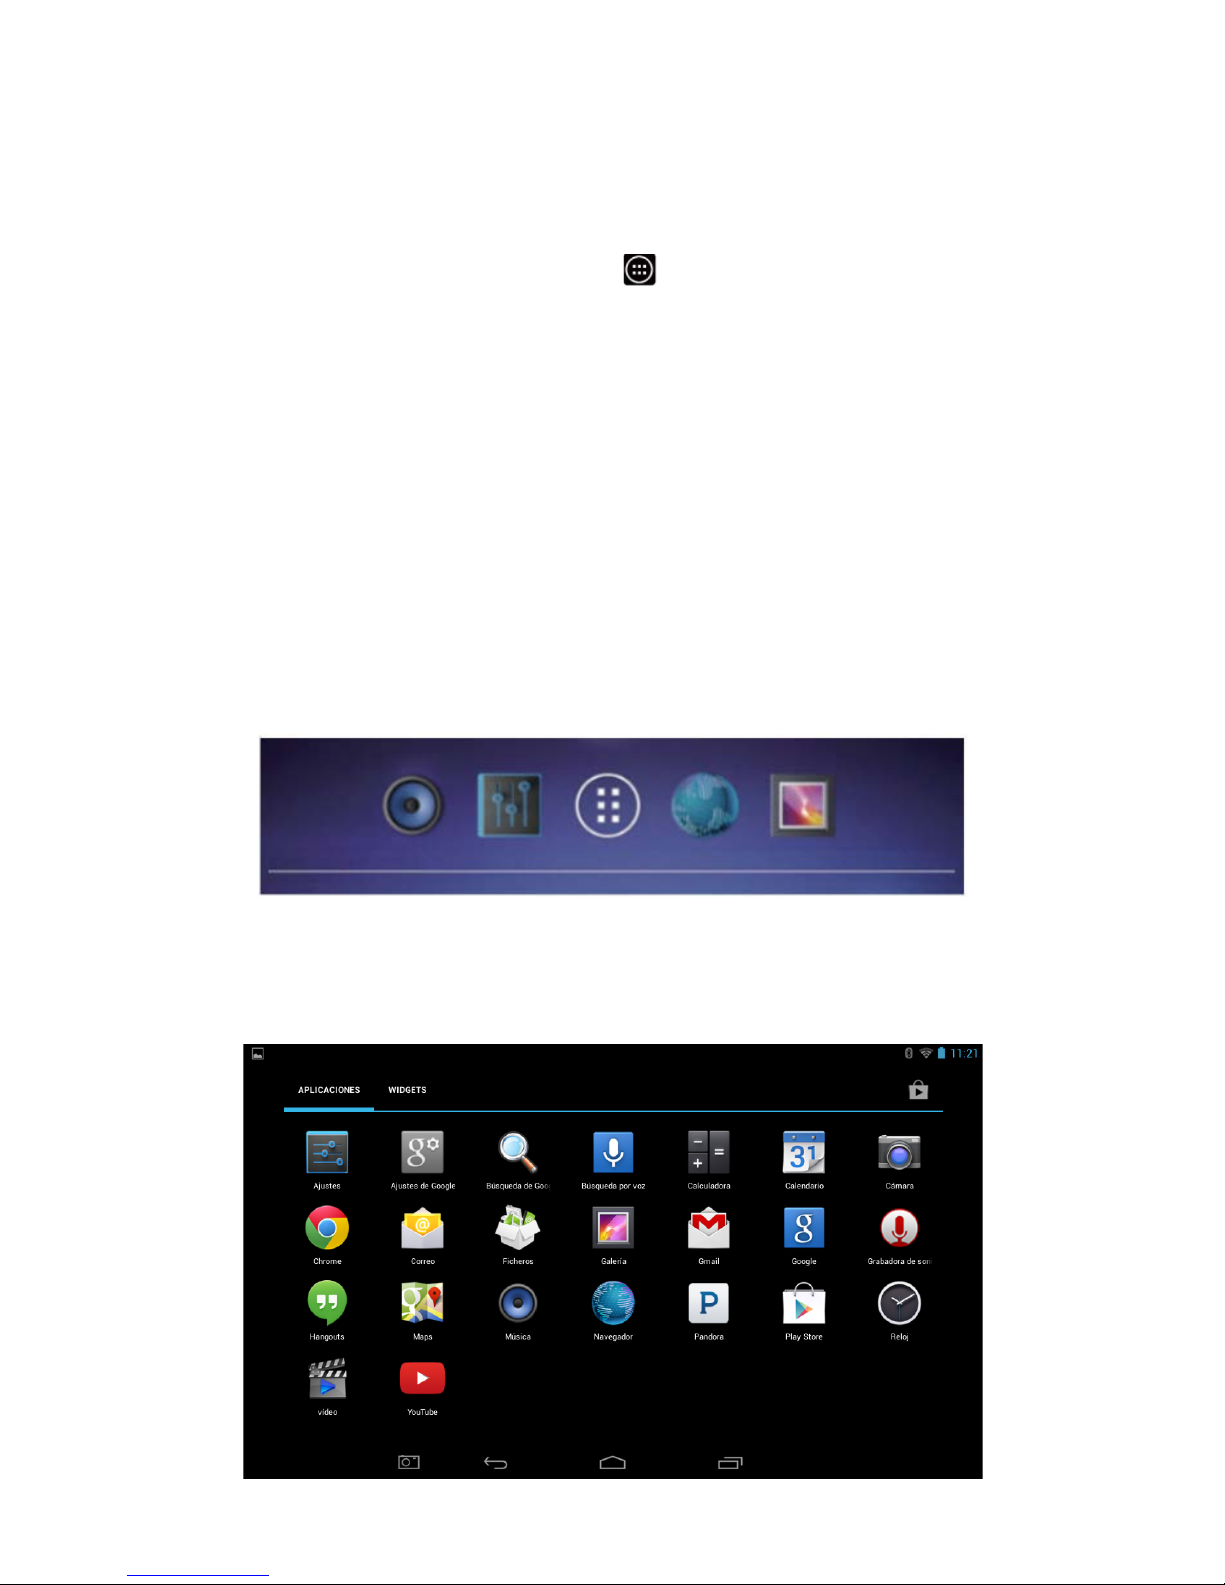
17
7.7. Aplicaciones
Para acceder a todas las aplicaciones disponibles en la Tablet desde el Escritorio,
simplemente presione en el medio.
Para seleccionar una aplicación que desea ejecutar, Toque suavemente el
ícono de la aplicación que desea ejecutar para seleccionarla y ejecutarla.
Para agregar y quitar aplicaciones desde la Barra de enlaces rápidos de todas las
aplicaciones, sostenga su dedo en cualquier lugar hacia abajo en el esc ritorio durante
dos segundos. Desmarque todas las aplicaciones que no quiere que aparezcan y
seleccione el botón atrás.
Desde esta página, puede ejecutar cualquier aplicación tocando el símbolo para esa aplicación. Cada página de
la lista de aplicaciones mostrará una cantidad de aplicaciones instaladas, en orden alfabético. Para acceder a
más aplicaciones, deslice la ventana a la izquierda barriendo el dedo de derecha a izquierda.
Page 67

18
7.8. Usar la pantalla táctil
Use sus dedos para manipular íconos, botones, menús, el teclado desplegado en la pantalla y otros ítems en la pantalla táctil.
También puede cambiar la orientación de la pantalla .
Para seleccionar o activar algo, tóquelo.
Para tipear algo, como el nombre, contraseña, o término de búsqueda, solo toque donde quiere tipear.
Aparecerá un teclado y le permitirá tipear en el campo.
Otros gestos comunes incluyen:
Tocar y sostener
Arrastrar
Barrer o deslizar
Golpear
suavemente dos
veces
Apretar
Tocar y sostener un ítem en la pantalla to cándola y no levantando su ded o hasta que ocurra
una acción.
Tocar y mantener un ítem durante un momento y luego, sin levantar su dedo, mover su
dedo en la pantalla hasta que alcance la posición de destino. Por ejemplo, puede arrastrar
a los atajos de reposición en la Pantalla Inicio.
Mueva rápidamente su dedo en la superf icie de la pantalla, sin deteners e cuando toca por
primera vez (para que no arr astre algo). Por ejem plo, puede desli zar una Pantall a inicio a la
izquierda o a la derecha para ver las otras Pantallas de Inicio.
Toque suave y rápidamente dos veces en un a página web, mapa u otr a pantalla para h acer
zoom. Por ejemplo, Toqu e suavemente dos veces una página web en el Nave gador para ha cer
zoom, y Toque suavemente dos veces para reducirlo.
En algunas aplicaciones (como Mapas, navegador y galería), puede hacer zoom y
reducirlo colocando los dos dedos en la pantalla de una vez, y apretándolos juntos
(para reducir el zoom) o separándolos (para hacer zoom).
7.9 Usar Google Search
Google Search pued e ayudarlo a encontr ar todo lo que quiera en s u t ab le t o l a web y está disponible desde la
parte superior de la Pantalla Inicio en la Tablet. Hay dos opciones disponibles:
• Diga los términos de búsqueda: Toque el ícono Micrófono
Luego de que diga lo que busca, el Navegador abrirá una lista de resultados de búsqueda.
• Tipee los términos de búsqueda: Toque Google.
Mientras tipea, aparecerán sugerencias debajo del casillero de Búsqueda.
Las primeras sugerencias intentan completar lo que está tipeando:
Page 68

19
• Para buscar una sugerencia inmediatamente, tóquela.
• Para agregar sugerencias al campo de búsqueda, toque la flecha a su derecha. Luego puede seguir
tipeando o elegir más sugerencias.
• Para buscar contenidos del campo de búsqueda, toque la tecla Volver en el lado derecho del teclado.
El Navegador se abrirá con una lista de resultados de búsqueda, y debajo del término de búsqueda habrá
sugerencias para todos los ítems encontrados en su Tablet, incluyendo lo siguiente:
• Un marcador Mapas indica una lista comercial. Toque para ver la lista, ver su ubicación en
un mapa, obtener direcciones o realizar otras acciones.
• Un ícono Favoritos identifica uno de sus bookmarks. Toque para abrir la página con
bookmark.
• Un ícono Aplicaciones i n di ca una d e sus A pl i cacio ne s. Toque pa ra ab rir la Apl i ca ción.
• Un ícono de tapa de libro indica uno de sus libros. Toque para abrir ese libro.
• Un ícono de álbum de música indica una canción u otro tipo de música que ha descargado a su tablet.
Toque para reproducir esa música.
• Un ícono de video indica uno de sus videos. Toque para reproducir ese video.
Configurar ítems a busc ar
Para ajustar dónde busca Google Search en su tablet:
1. En una pantalla Inicio, toque Google.
2. Toque el ícono Menú y seleccione Configuraciones y asegúrese de que se seleccionen los Ítems
a buscar.
3. Verifique los ítems en su tablet que quiere incluir en las búsquedas.
Administrar las configuraciones de privacidad de Google Search
1. En una pantalla Inicio, toque Google.
2. Toque el ícono Menú y seleccione Configuraciones y asegúrese de que se seleccione
Búsqueda deGoogle.
3. Ajuste alguna de estas configuraciones:
Usar el historial web – Verifique para incluir sugerencias en base a búsquedas previas de su computadora u
otros dispositivos.
Administrar el historial web – Abra el navegador en la configu ración de hi storial de búsqueda w eb
asociada con su Cuenta Google.
Use My Location – Márquela para conocer su ubicación en resultados de búsqueda y otros servicios
Google.
Page 69

8. Configuraciones del sistema
Para acceder a todas las Configuraciones de sistema disponibles para la Tablet, deberá acceder al menú
configuraciones. Toque suavemente el ícono de Arranque de aplicaciones en la parte infer ior de la
Pantalla Inicio, y luego Toque suavemente en el ícono Configuraciones desde el Arranq ue de
aplicaciones.
Esto abrirá la interfaz de configuraciones del sistema.
En el lado izquierdo de la pant alla, se encuentran las opciones disponibles de c onfiguración. Tocar un o
de estos grupos perm ite el acceso a todas las configurac iones disponibles dentro de ese gr upo en el
lado derecho de la pantalla.
8.1 Inalámbrico y redes
Wi-Fi es una tecnolo gía de r edes inalám bricas que p uede brindar acceso a Internet a distancias de hasta
100 metros, dependiendo del router Wi-Fi y sus alrededores. Para usar Wi-Fi, debe conectarse a un
punto de acceso inalámbrico, o "hotspot." Algunos hotspots están abiertos y simplemente puede
conectarse a ellos. Otros implementan características de seguridad que requieren contraseña para
ingresar, para garantizar que solo puedan conectarse usuarios autorizados.
Nota: Par a extender la vida út il de su batería entre c argas, apague el W i-Fi cuando no lo est é usando.
También puede configurar su Tablet para desconectarse automáticam ente de las redes Wi-Fi cuando
esté suspendida.
20
Page 70
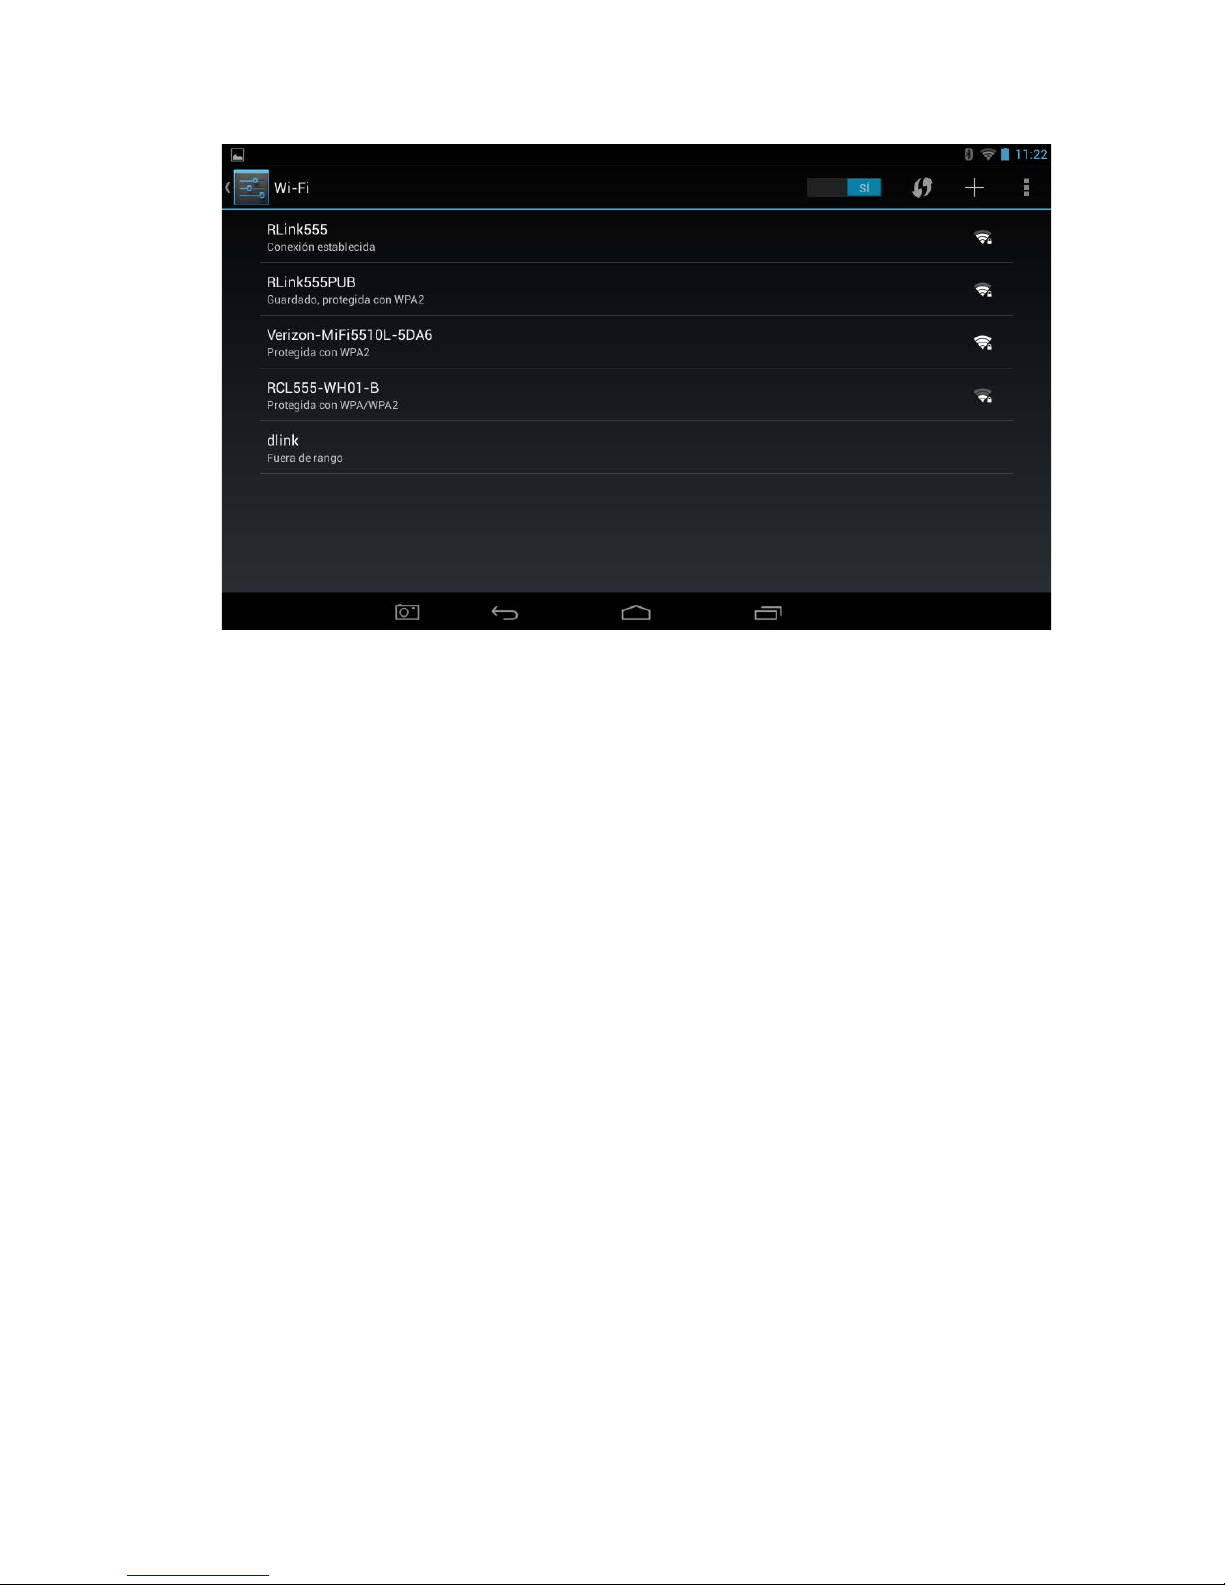
Para habilitar Wi-Fi:
1. Deslice el interruptor de Wi-Fi a la derecha de Wi-Fi a la posición Encendido.
2. Una vez que se haya encendido el Wi-Fi, la Tablet escaneará automáticamente en busca de redes Wi-Fi
disponibles y mostrará los nombres de las que encuentre. Las redes seguras se indican con el ícono
Bloqueado. Si la Tablet encuentra una red a la que se conectó previamente, se conectará
automáticamente a esa red.
21
Page 71
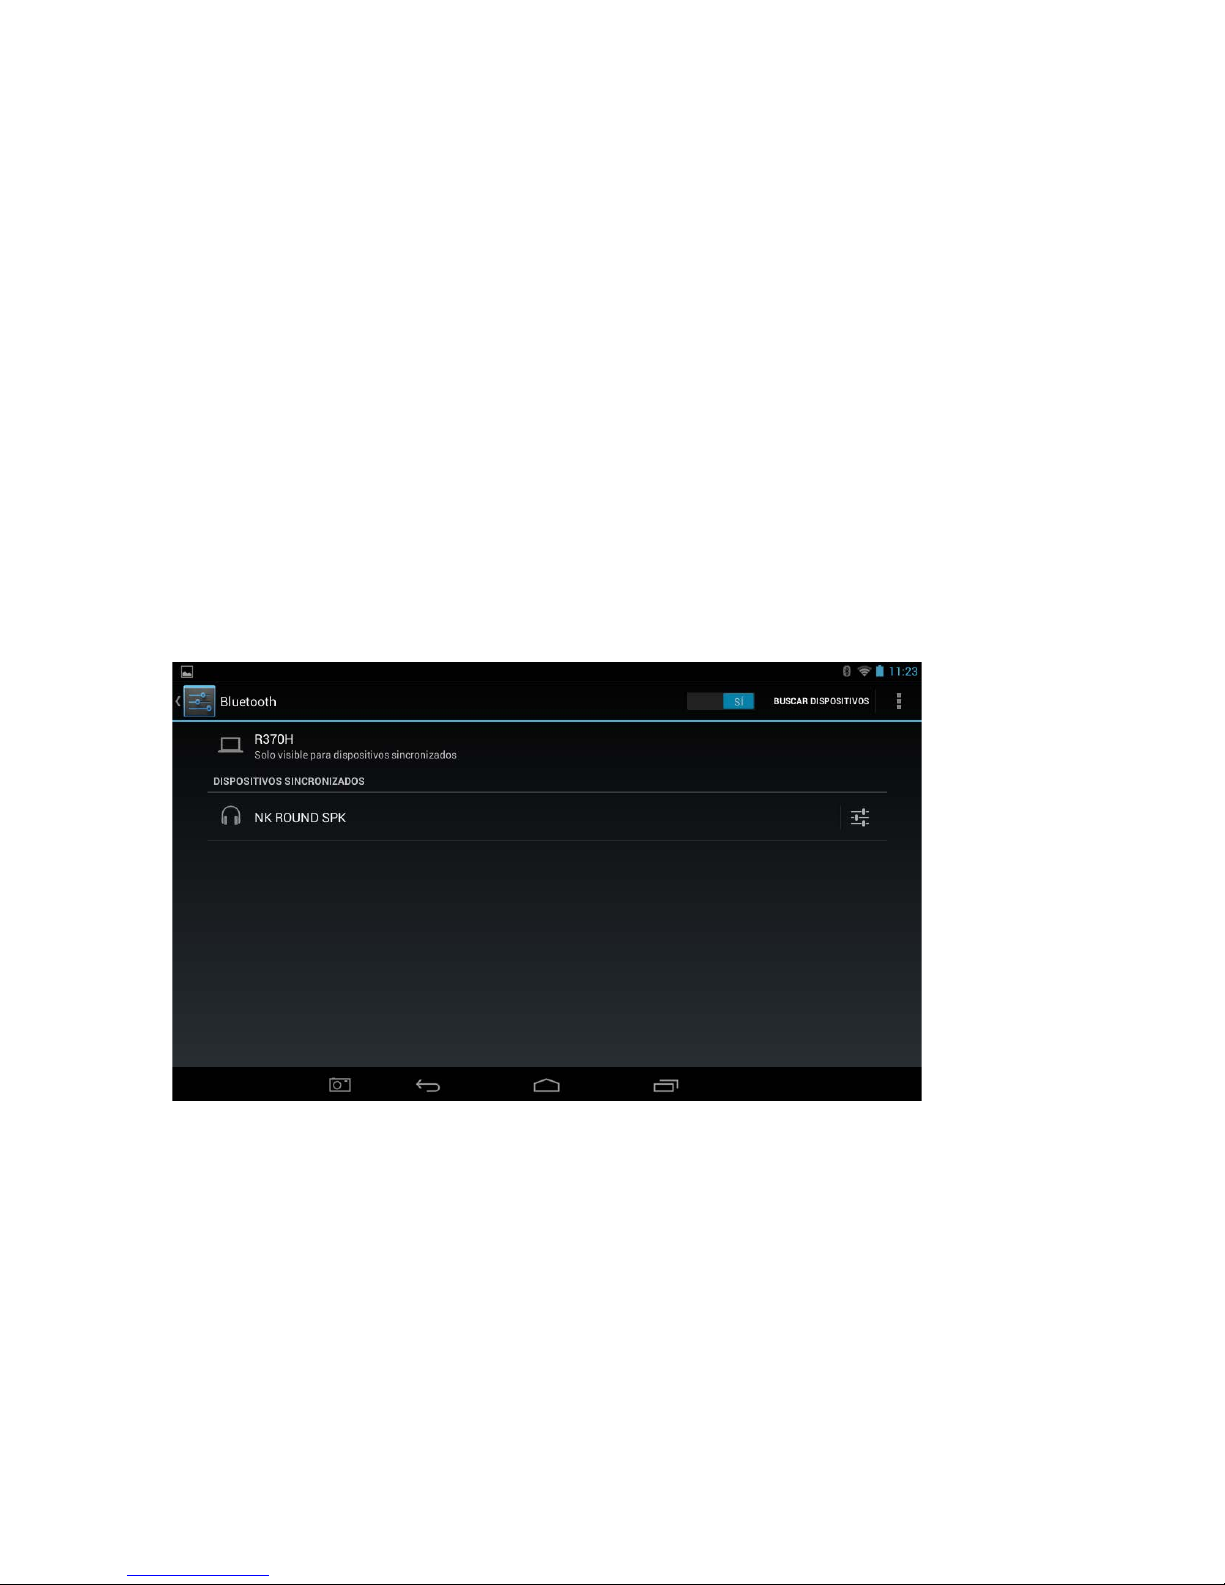
22
3. Encuentre la red c orrecta y selecciónela tocando la entrada. Si la red es segura, se le pide que ingrese una
contraseña. Asegúrese de ingresar la c o ntras eña c orr e c ta; de otro modo, la Tablet no podrá c onec tars e a la
red.
¿Dónde puedo encon trar la contraseña correcta?
Si se conecta a una Red inalám brica que es s um inistrada por un r outer , que h a sido pr oporc ionado por BT ,
Sky, etc., entonces la contraseña es tará impresa en un adhesivo que aparece en la unidad. Asegúrese de
ingresar las letras usando el tamaño de letra correcto. Las letras en mayúscula deben ingresarse en mayúscula y las
letras en minúscula deben ingresarse en minúscula.
Si el router no tiene adhesivo que indique la contraseña, tendrá que pedírsela a quien configuró la red
inalámbrica, para proporcionarle la c ontra seña corre cta que lo cone ctará a la red.
Una vez que haya terminado, la Tablet ya estará conectada a la red, y una vez que esté conectada verá el
ícono inalámbrico al que se conectó en la barra de estado.
Page 72
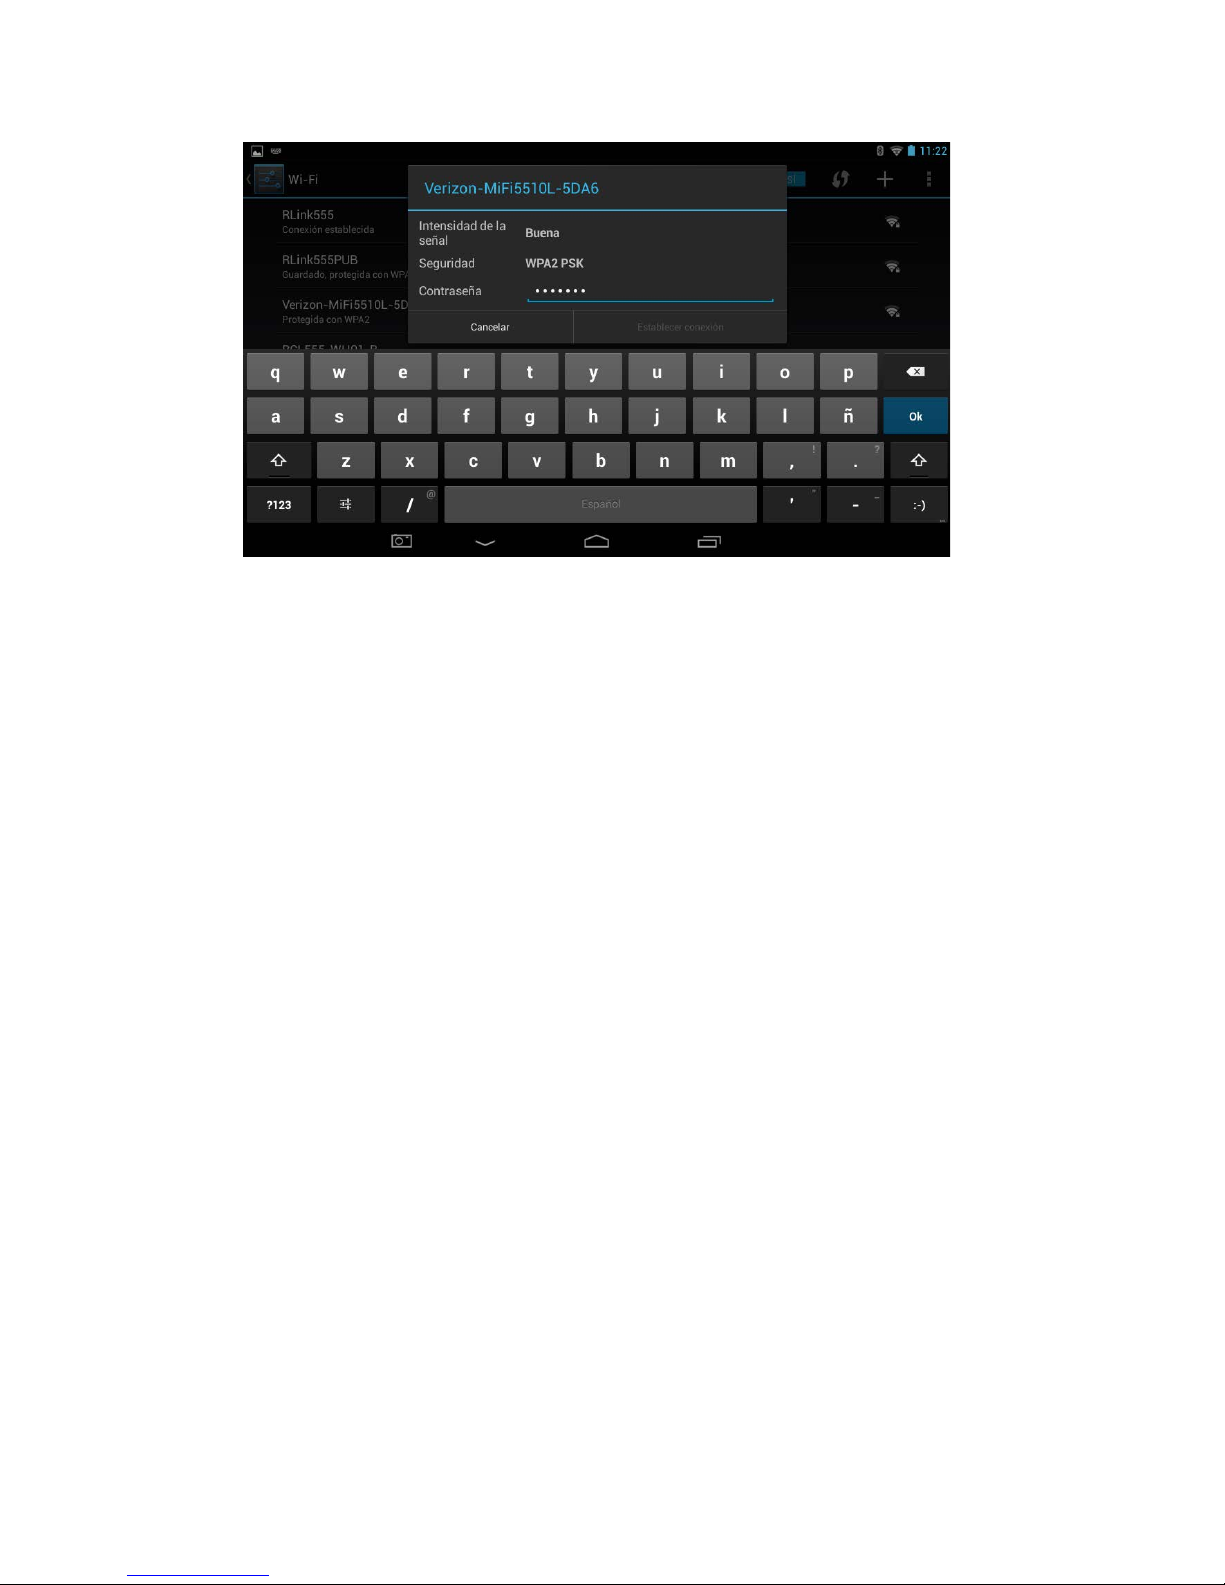
23
RE Referencias:
WIRELESS AND NETWORKS: INALÁMBRICO Y REDES
ON: encendido
Data usage: uso de datos
More...: más...
DEVICE: DISPOSITIVO
Sound: sonido
Display: pantalla
Storage: almacenamiento
Battery: batería
Testing: prueba
Secured with WPA2: asegurado con WPA2
WHS2 Secured with WPA2: WHS2 asegurado con WPA2
Apple airport: aeropuerto Apple
WHS1 secured with WPA/WPA2 (WPS available): WHS1 asegurado con WPA/WPA2 (WPS disponible)
Page 73

24
Referencias:
Testing: prueba
Signal strenght excellent: fuerza de la señal excelente
Security WPA2 PSK: seguridad WPA2 PSK
Password: contraseña
Cancel: cancelar
Connect: conectar
Done: hecho
Wi-Fi ON: Wi-Fi ENCENDIDO
Bluetooth ON: Bluetooth ENCENDIDO
Agregar una red Wi-Fi
Si su red inalámbrica no publica su nombre (SSID), o está fuera del rango de una red Wi-Fi, aún así puede
agregar una red Wi-Fi para que su Tablet la recuerde, junto con las credenciales de seguridad, y conectarse a
ella automáticamente cuando esté dentro del rango.
1. Encienda el Wi-Fi, si ya no está encendido.
2. Toque Agregar red en la pa rte superior de la pantalla.
3. Ingrese el SSID (nombre) de la red. Si fuera necesario, ingrese seguridad u otros detalles de
configuración de red.
4. Toque Guardar.
De esta forma, se guarda la información acerca de la red. Su Tablet se conectará a esta red
automáticamente la próxima vez que entre en el rango.
Olvidar una red Wi-Fi
Puede hacer que la Tablet olvide los detalles de una red Wi-Fi que agregó, si ya no la usa.
1. Encienda el Wi-Fi, si ya no está encendido.
2. En la pantalla de configu raciones Wi-Fi, toque el nombre de la red.
3. Toque Olvidar en el diálogo que se abre.
Nota: Debe usar Olvidar si ha ingresado la contraseña incorrecta y debe configurar nuevamente la
conexión.
Configurar ajustes de proxy para una red Wi-Fi
Algunas redes necesit an que esté conectado a recursos de red internos o externos a través de un servidor
Proxy. En forma predeterm inada, las redes W i-Fi que agrega no están c onfiguradas para c onectarse vía prox y,
pero puede cambiar esto para cada red Wi-Fi que haya agregado.
1. En la pantalla de configuracion es Wi-Fi, toque y mantenga apretado el nombre de la red.
2. Toque Modificar red en el diálogo que se abre.
3. Seleccione Mostrar opciones avanzadas.
4. Si la red no tiene configuraciones de proxy, toque Ninguno bajo Configuraciones Proxy. Si es así, toque Manual en
el menú que se abra.
5. Ingrese las configuraciones Proxy suministradas por su administrador de red.
6. Toque Guardar.
Las configuraciones proxy se aplic an solo a la red Wi-Fi que modificó. Para cambiar las configuraciones Proxy para otras
Page 74
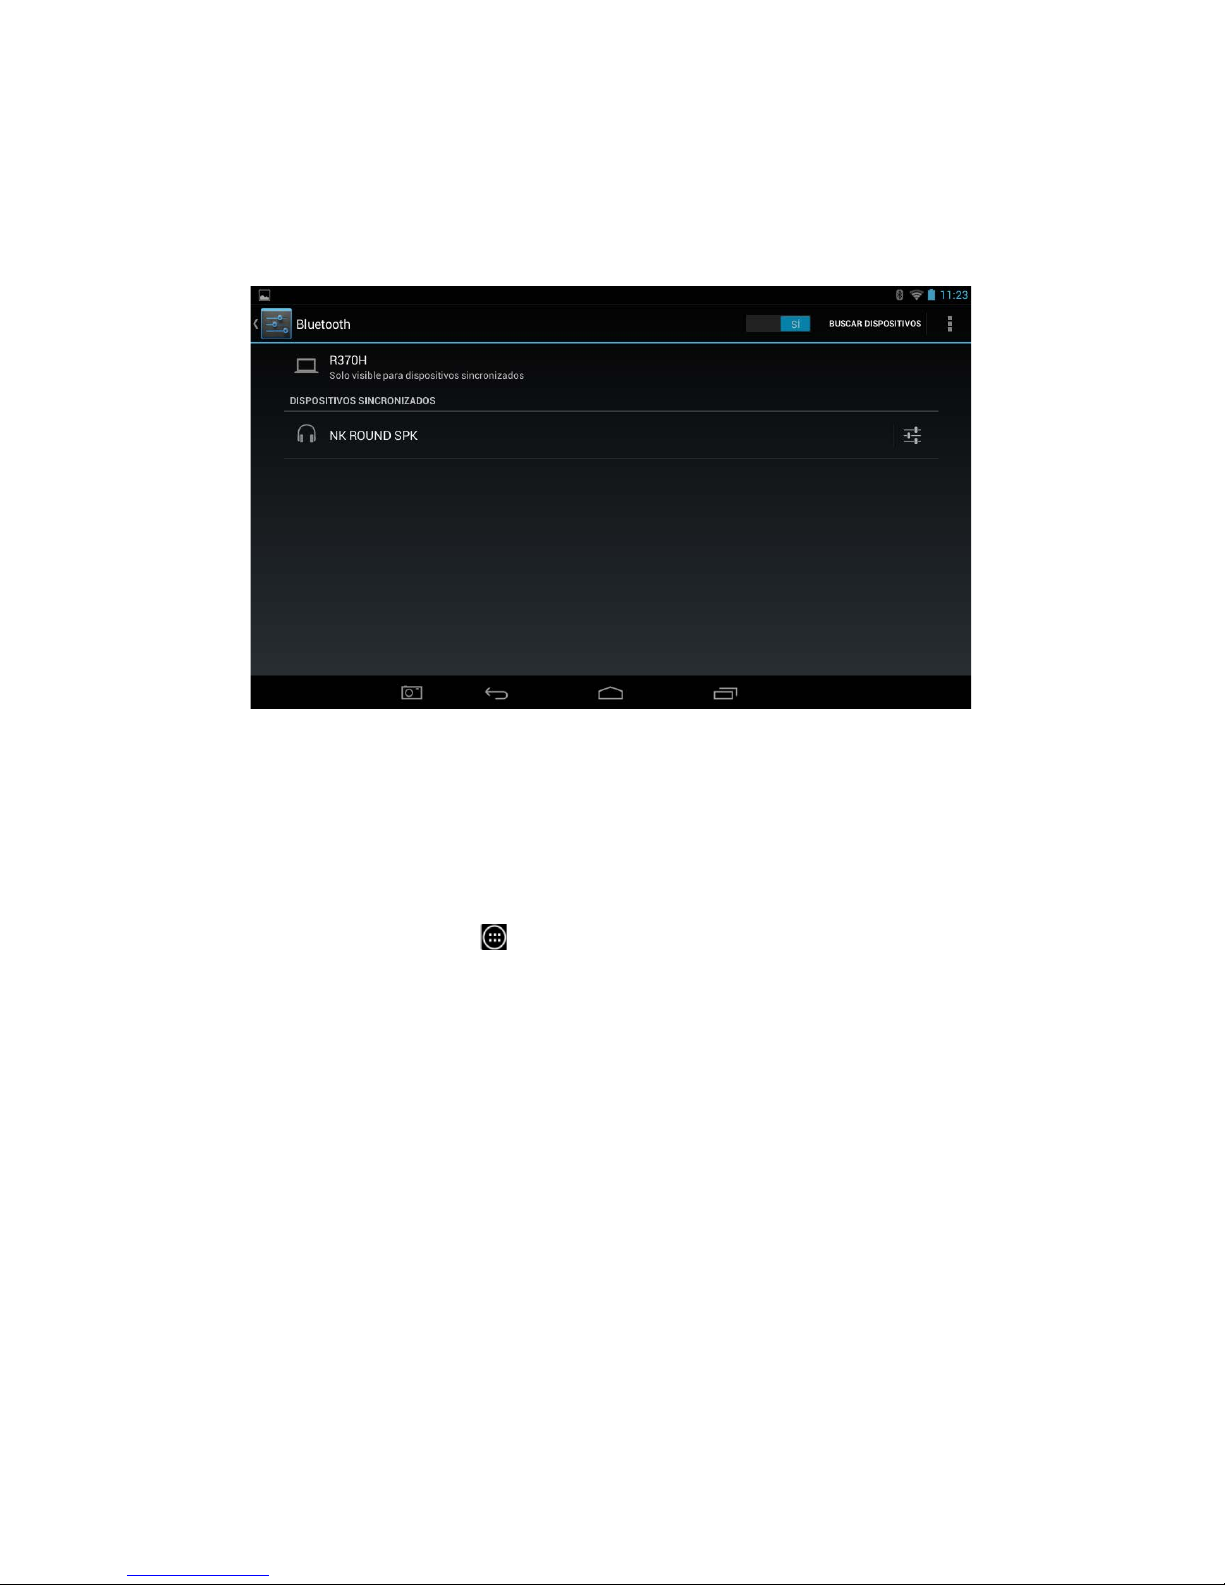
25
redes Wi-Fi, modifíquelas individualmente.
8.2 Bluetooth
Bluetooth es una tecnología inalámbrica que permite que los accesorios como Audífonos, Teclados, etc. se conecten a la
Tablet sin usar cables. Para conectarse a un disposit ivo Bluetooth, la Tablet de berá emparejarse con el dispositivo,
que configura una conexión, que será recordada por ambos dispositivos.
Referencias:
Bluetooth ON: bluetooth ENCENDIDO
Nota: Para extender la vida útil de su batería entre cargas, apague Bluetooth cuando no lo esté usando.
Para acceder a las configuraciones de Bluetooth, deberá acceder al menú configuraciones. Toque suavemente
el ícono del Arranque de aplicaciones en la parte inferior de la Pantalla Inicio. Toque suavemente e l ícono
Configuraciones de la página del Arranque de aplicaciones.
Toque suavemente en la opción de menú Bluetooth en el menú del lado izquierdo.
Para habilitar Bluetooth:
1. Deslice el interruptor a la derecha, en posición Encendido.
2. Una vez que esté encendido el Bluetooth, la Tablet escaneará automáticamente los dispositivos
Bluetooth disponibles y mostrará los nombres de los que encuentre.
3. Encuentre el dispositivo al que quiere conectarse y selecciónelo tocando la entrada. Algunos dispositivos
Bluetooth necesitan un código de emparejamiento de cuatro dígitos que deberá ingresar para permitir que
se complete la conexión. Si éste es el caso, aparecerá luego una ventana que le permite ingresar el código.
Debe consultar las instrucciones que venían con el dispositivo para este código de apareamiento, pero los
códigos más comunes son 0000 o 1234.
El dispositivo ya debe estar apareado y comenzará a funcionar con la Tablet.
Page 75

26
8.3 Sonido
La opción Sonido permite el acceso a todas las configuraciones de sonido disponibles en la Tablet.
Para acceder a las configu raciones de Soni do, deberá acc eder al menú c onfiguraciones . Toque suavemente el
ícono del Arranque de aplicaciones en la parte inferior de la Pantalla Inicio. Toque suavemente el ícono
Configuraciones de la página del Arranque de aplicaciones.
Toque suavemente en la opción de menú Sonido en el menú del lado izquierdo.
Dentro de esta opción, puede realizar los siguientes cambios:
Volúmenes
Modo silencioso
Notificación
predeterminada
Sonidos táctiles
Sonidos de bloqueo de
pantalla
Vibrar al tacto
Esta opción le perm ite configurar las configurac iones de volum en predeterminadas
para Música, video, juegos y otros medios, Ringtones y notificaciones y Alarmas.
Esta opción le permite poner en mudo la Tablet o apagar el modo silencioso.
Permite un sonido diferente para las notificaciones a seleccionar.
Esta opción le permite apagar el sonido provocado al tocar la pantalla.
Esta opción le permite apagar el sonido provocado al desbloquear la pantalla.
Permite que la tablet se configure en Vibración siempre que toque la pantalla (si
está soportado).
Page 76
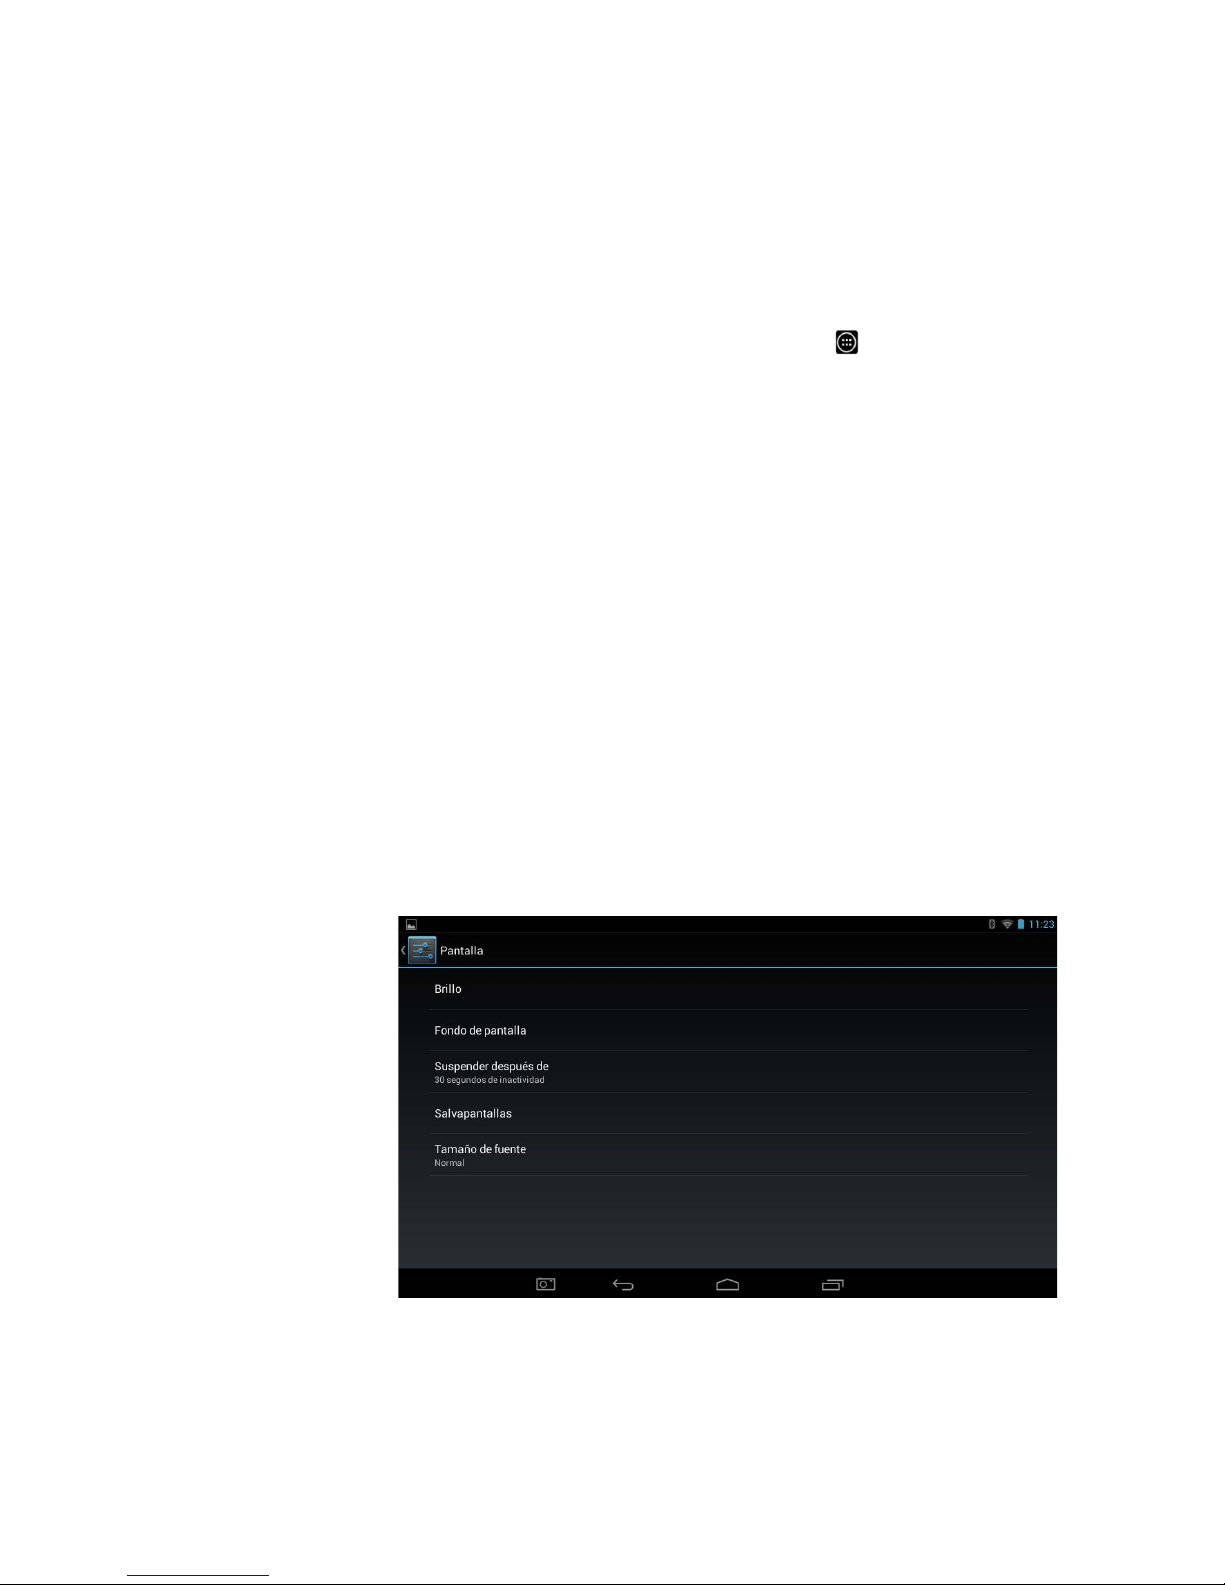
27
Referencias:
Sound: sonido
8.4 Pantalla
La opción Pantalla permite el acceso a todas las configuraciones de pantalla disponibles en la Tablet.
Para acceder a las configuraciones de Pantalla, deberá acceder al m enú c onf igur ac ion es. Toque suavemente el
ícono del Arranque de aplicaciones en la parte inferior de la Pantalla Inicio. Toque suavemente el ícono
Configuraciones de la página del Arranque de aplicaciones.
En las opciones del menú de la i zquierda, despláces e hacia abajo en la pantalla deslizando su dedo hacia
arriba hasta que pueda ver la opción Pantalla, y luego T oque suav emente sobre esta opción.
Brillo
Protector de pantalla
Pantalla de auto rotaci ón
Suspensión
Tamaño de fue nte
Esta opción le permite configurar el brillo predeterminado de la pantalla.
Seleccione un protector de pantalla diferente para el escritorio desde Galería, Protectores
de pantalla en vivo o Protector de pantalla.
Habilitar o deshabilitar la rotación de pantalla automática cuando se rota la
tablet.
Configure el periodo de tiempo antes de que la tablet entre a modo suspendido
desde nunca a 30 minutos.
Permite que el tamaño de fuente predeterminado cambie para permitir una
lectura más fácil del texto.
Page 77
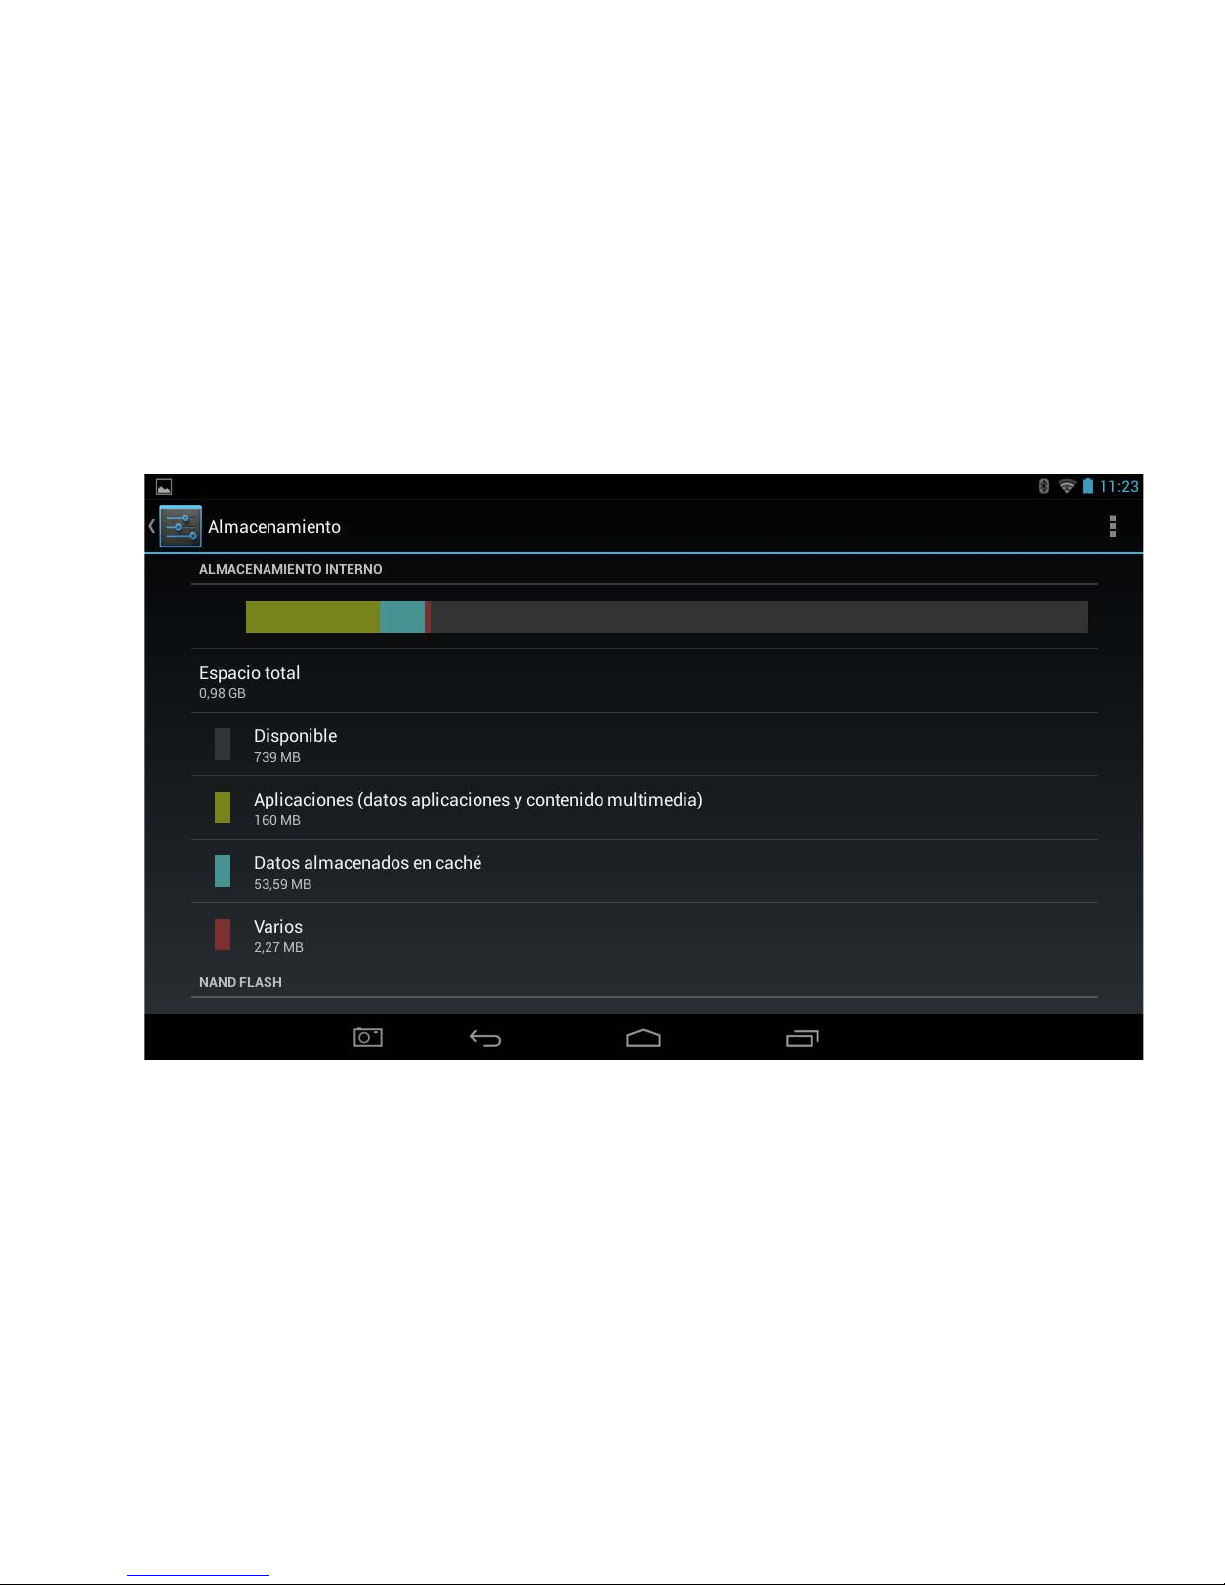
8.5 Almacenamiento
La opción Almacenam iento le da una div isión c om pleta de cóm o se us a el almac enam iento interno y las
tarjetas micro SD externas y cuánto espacio se encuentra disponible en ellos.
Para acceder a las configuraciones de Pantalla, deberá acceder al menú configuraciones. Toque
suavemente el ícono del Arranque de aplicaciones en la parte inferior de la Pantalla Inicio. T oque
suavemente el ícono Configuraciones de la página del Arranque de aplicaciones.
En las opciones del menú de la izquierda, desplácese hacia abajo en la pantalla deslizando su dedo
hacia arriba hasta que pueda ver la opción Almacenamiento, y luego Toque suavemente sobre esta
opción
28
Page 78
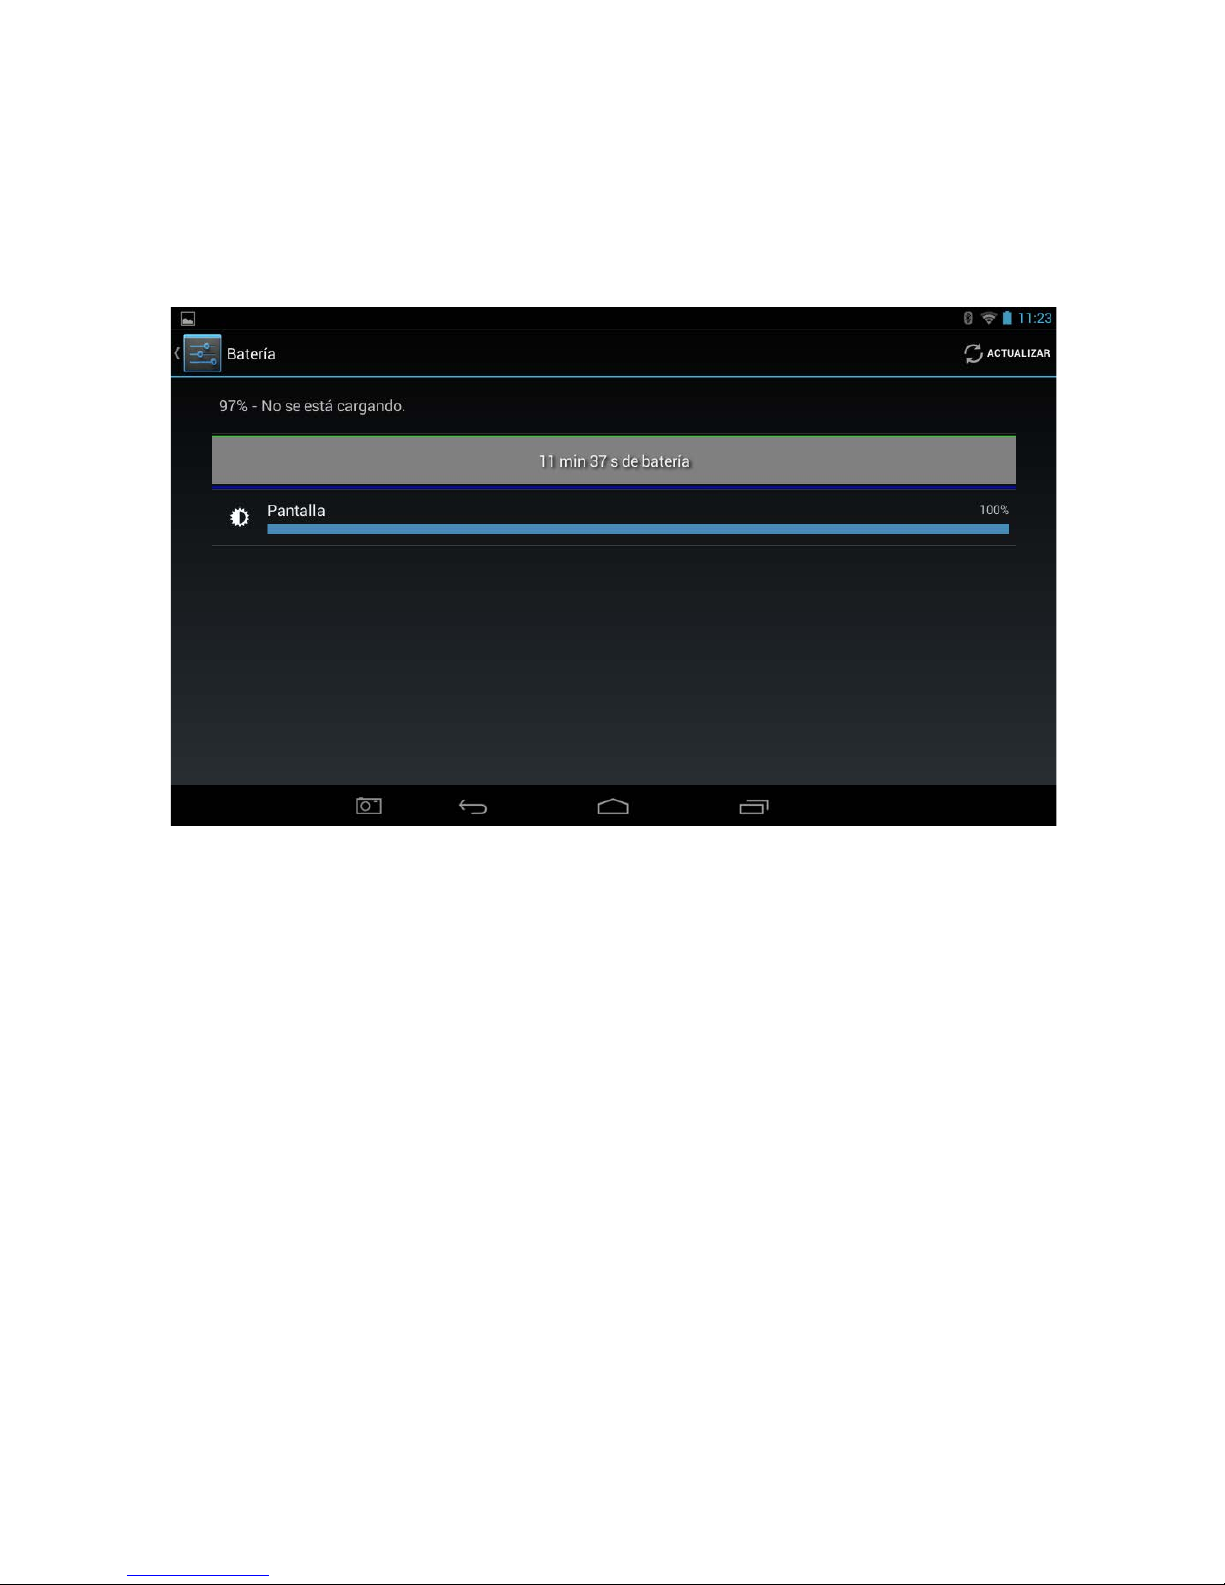
31
8.6 Batería
La opción Batería muestra la carga actual de la batería, cómo se ha usado la batería durante el periodo de tiempo que aparece y
si la Tablet se está cargando actualmen
Referencias
Battery: baterí a
90% - not charging:
90% sin carga
1h 14m 1s on battery:
1h 14m 1s de batería
Android OS: SO A ndroid
Page 79
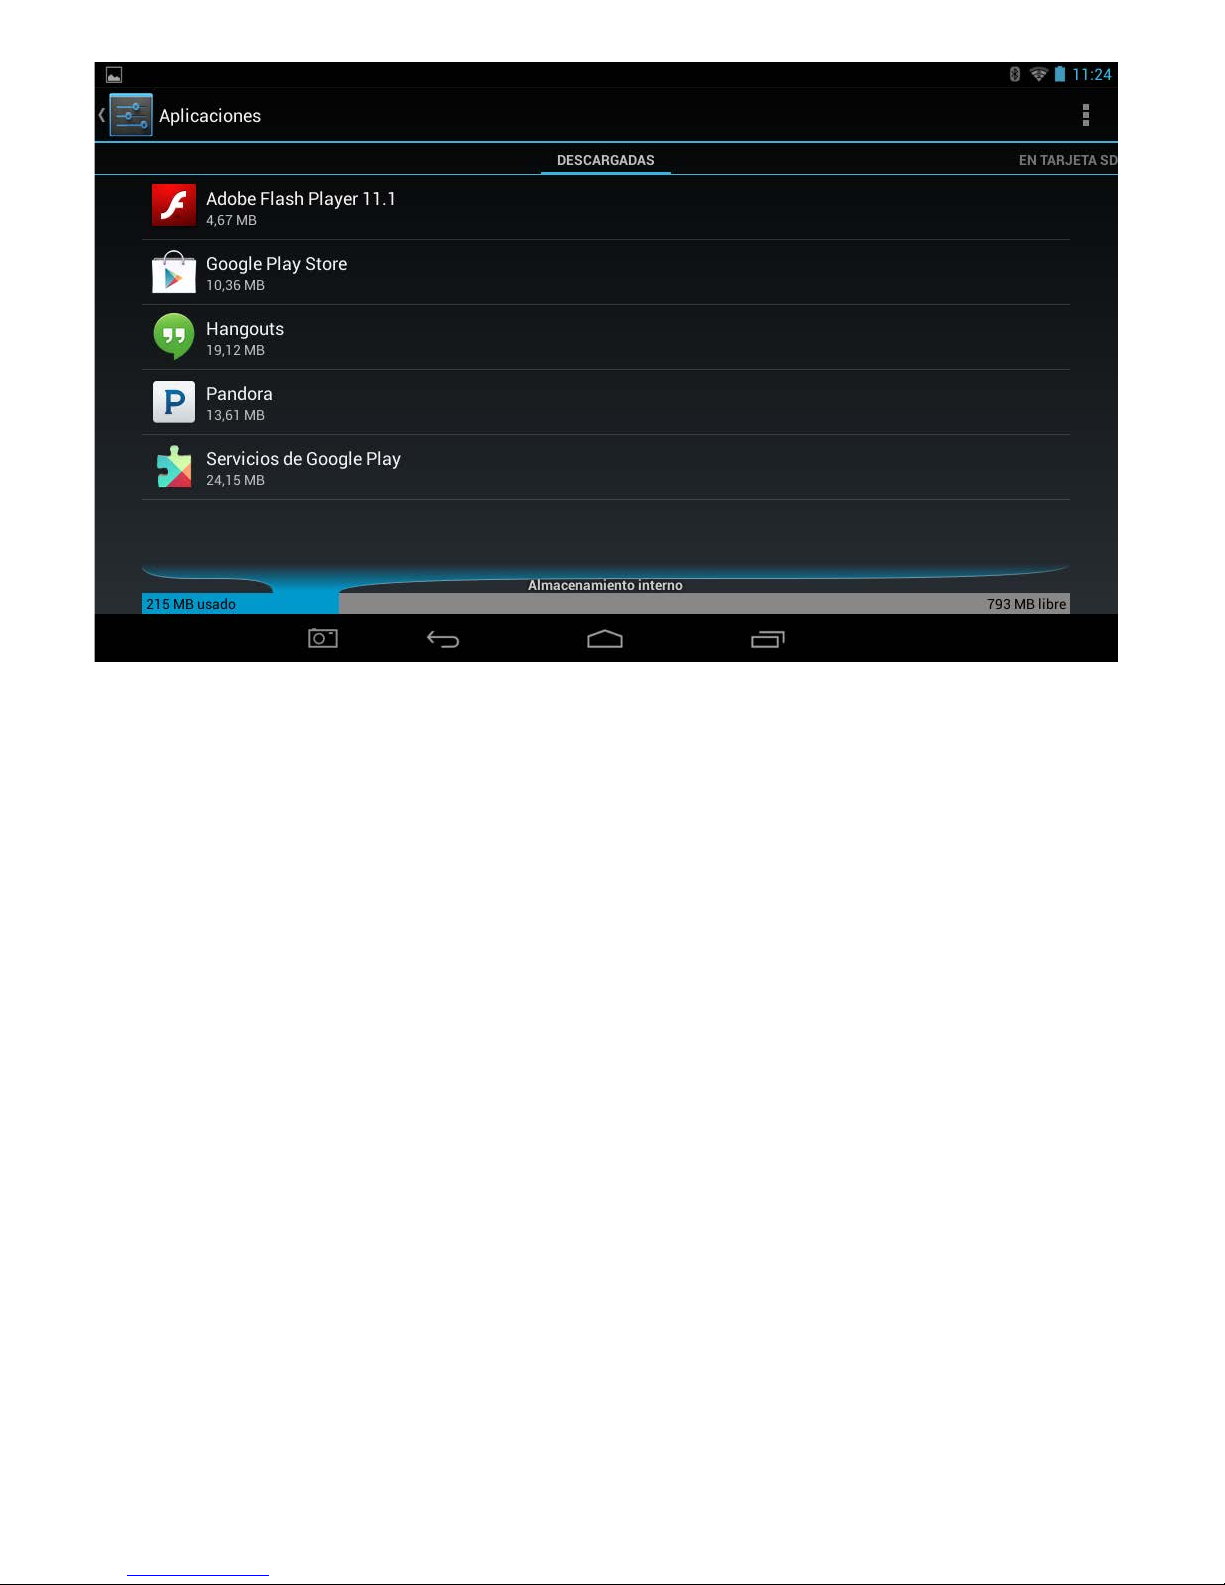
8.7 Aplicaciones
La opción Aplicaciones le permite ver información acerca de las aplicaciones que se instalen en la
Tablet. Hay cuatro opciones de menú:
Descargado Muestra todas las Aplicaciones que se han descargado e instalado.
EN TARJETA SD Muestra todas las Aplicaciones que se han instalado en cualquier tarjeta micro SD
montada.
EJECUTANDO Muestra todas las Aplicaciones que actualmente se ejecutan.
TODOS Muestra todas las Aplicaciones incluidas las Aplicaciones del
sistema que son parte del Sistema Operativo.
Para desinstalar una Aplicación, seleccione la aplicación de la lista tocándola, y luego seleccione
Desinstalar.
Nota: Solo puede desinstalar Aplicaciones que se han instalado en la Tablet durante su uso. Todas las Aplicaciones
que fueron preinstaladas en el si stema de fábri ca no pueden ser desinstala das (pero sí podrá n ser desinstal adas
todas las actualizaciones a plicada s a estas apl icacione s).
Mover Aplicaciones para liberar Espacio de almacenamiento
El almacenamiento de su Tablet se divide en dos partes, el Almacenamiento interno donde se instala Android y
cualquier Aplicación que descargu e, y NAND Fla sh donde se almac enan imágenes, música y pelícu las.
32
Page 80
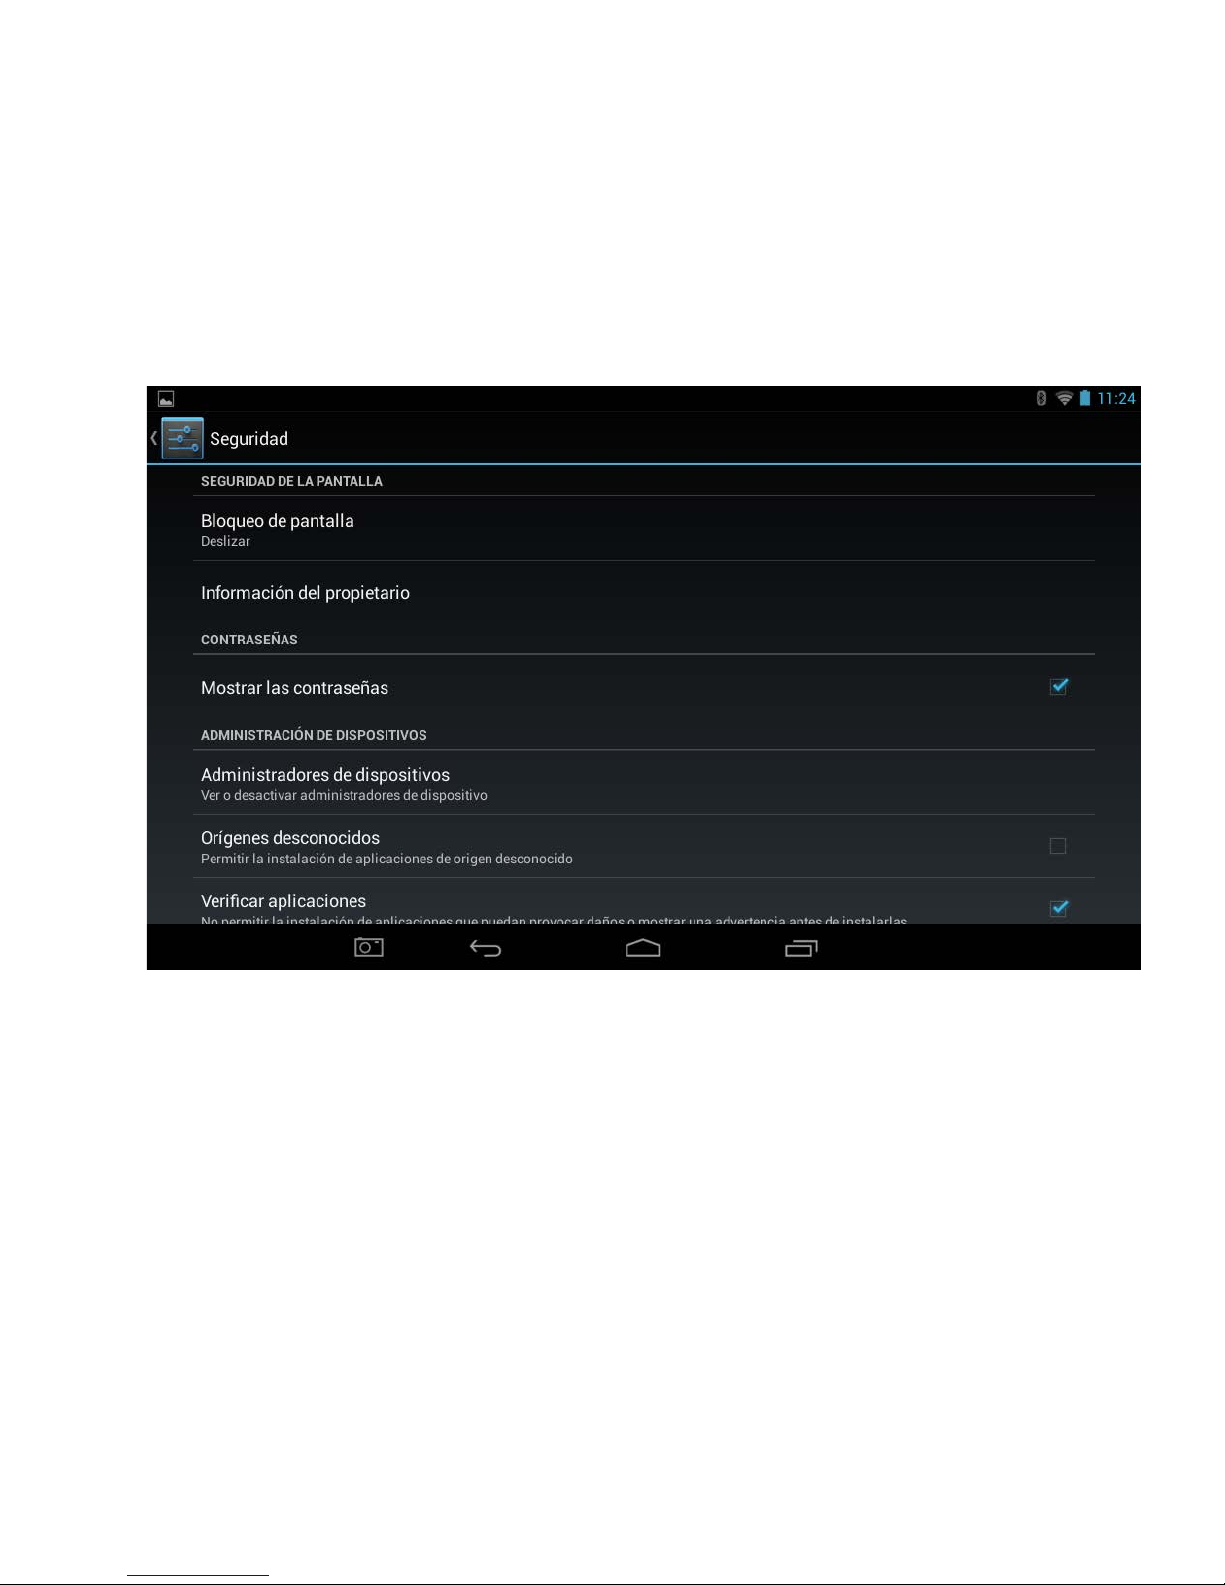
8.9 Segur idad
La opción de Seguridad le permite configurar qué nivel de seguridad quiere para su Tablet. Es posible que
quiera configurar a lguna f orm a de bloq ueo de panta lla autom átic a para evitar el a cces o no autor izado. Si
se ha configurado un bloqueo de pantalla, la pantalla se bloquea cuando la pantalla de la Tablet se
suspende.
Referencias:
Security: seguridad
Screen security: seguridad de pantalla
Screen block: bloque o de pantalla
Slide: deslizar
Owner info: información de usuario
PASSWORDS: CONTRASEÑAS
Make passwords visible: dejar visibles las contraseñas
33
Page 81

DEVICE ADMINISTRATION: ADMINISTRACIÓN DEL DISPOSITIVO
Unknown sources: fuentes desconocidas
Allow installation of apps from unknown sources:
permitir instalación de aplicaciones de Fuentes desconocidas
Bloqueo de pantalla
Para ajustar las configuraciones de bloqueo de su Tablet:
1. Toque el Bloqueo de pantalla.
2. Toque el tipo de bloqueo que quiera y siga las instrucciones en la pantalla.
Si previamente ha configurado un bloqueo, debe ingresar el patrón, PIN o contraseña para
desbloquear las configuraciones de bloqueo antes de que pueda hacer cambios.
Puede elegir entre estas opciones de bloqueo, enumeradas en el orden aproximado de fuerza:
Deslizar No ofrece protección, pero lo deja llegar rápidamente a la Pantalla de inicio, o abrir la Cámara
y comenzar a tomar fotos inmediatamente.
Patrón Dibuje un patrón simple con su dedo para desbloquear la Tablet.
PIN Requiere cuatro o más números. Los PIN más largos tienden a ser más seguros.
Contraseña Requiere cuatro o más letras o números. Es la opción más segura, siempre que
Nota Si olvida su patrón / PIN / contras eña, la única forma de obtener acceso al dispositivo es a trav és del
reinicio de fábrica. Siga el procedimiento detallado en la Guía de solución de problemas, que fue
proporcionado con esta Tablet.
34
Page 82
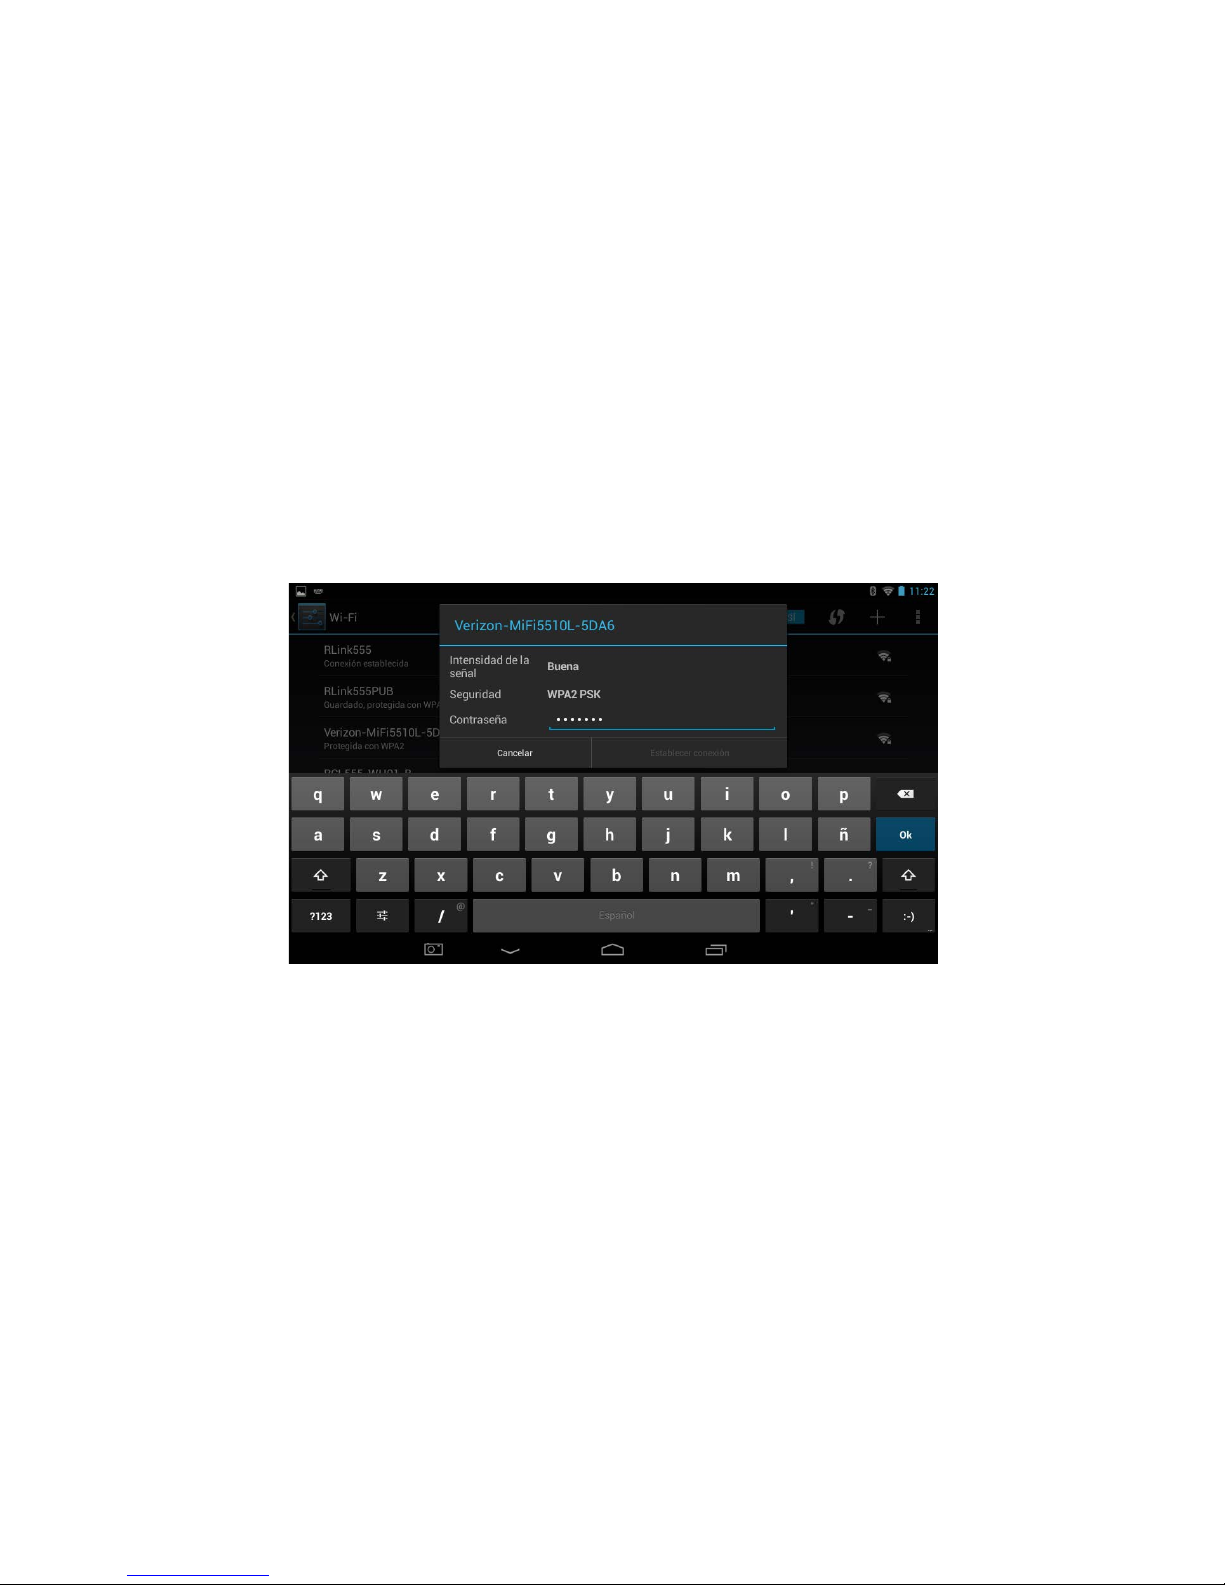
35
Referencias:
WIRELESS AND NETWORKS: INALÁMBRICO Y REDES
ON: encendido
Data usage: uso de datos
More...: más...
DEVICE: DISPOSITIVO
Sound: sonido
Display: pantalla
Storage: almacenamiento
Battery: batería
Testing: prueba
Secured with WPA2: asegurado con WPA2
WHS2 Secured with WPA2: WHS2 asegurado con WPA2
Apple airport: aeropuerto Apple
WHS1 secured with WPA/WPA2 (WPS available): WHS1 asegurado con WPA/WPA2 (WPS disponible)
3. Encuentre la red c orrecta y selecciónela tocando la entrada. Si la red es segura, se le pide que ingrese una
contraseña. Asegúrese de ingresar la c o ntras eña c orr e c ta; de otro modo, la Tablet no podrá c onec tars e a la
red.
¿Dónde puedo encontrar la contraseña correcta?
Si se conecta a una Red inalám brica que es s um inistrada por u n rout er, que h a sido propor cionado por BT,
Sky, etc., entonces la contraseña es tará impresa en un adhesivo que aparece en la unidad. Asegúrese de
ingresar las letras usando el tamaño de letra correcto. Las letras en mayúscula deben ingresarse en mayúscula y las
letras en minúscula deben ingresarse en minúscula.
Si el router no tiene adhesivo que indique la contraseña, tendrá que pedírsela a quien configuró la red
inalámbrica, para proporcionarle la contraseña correcta que lo conectará a la red.
Page 83
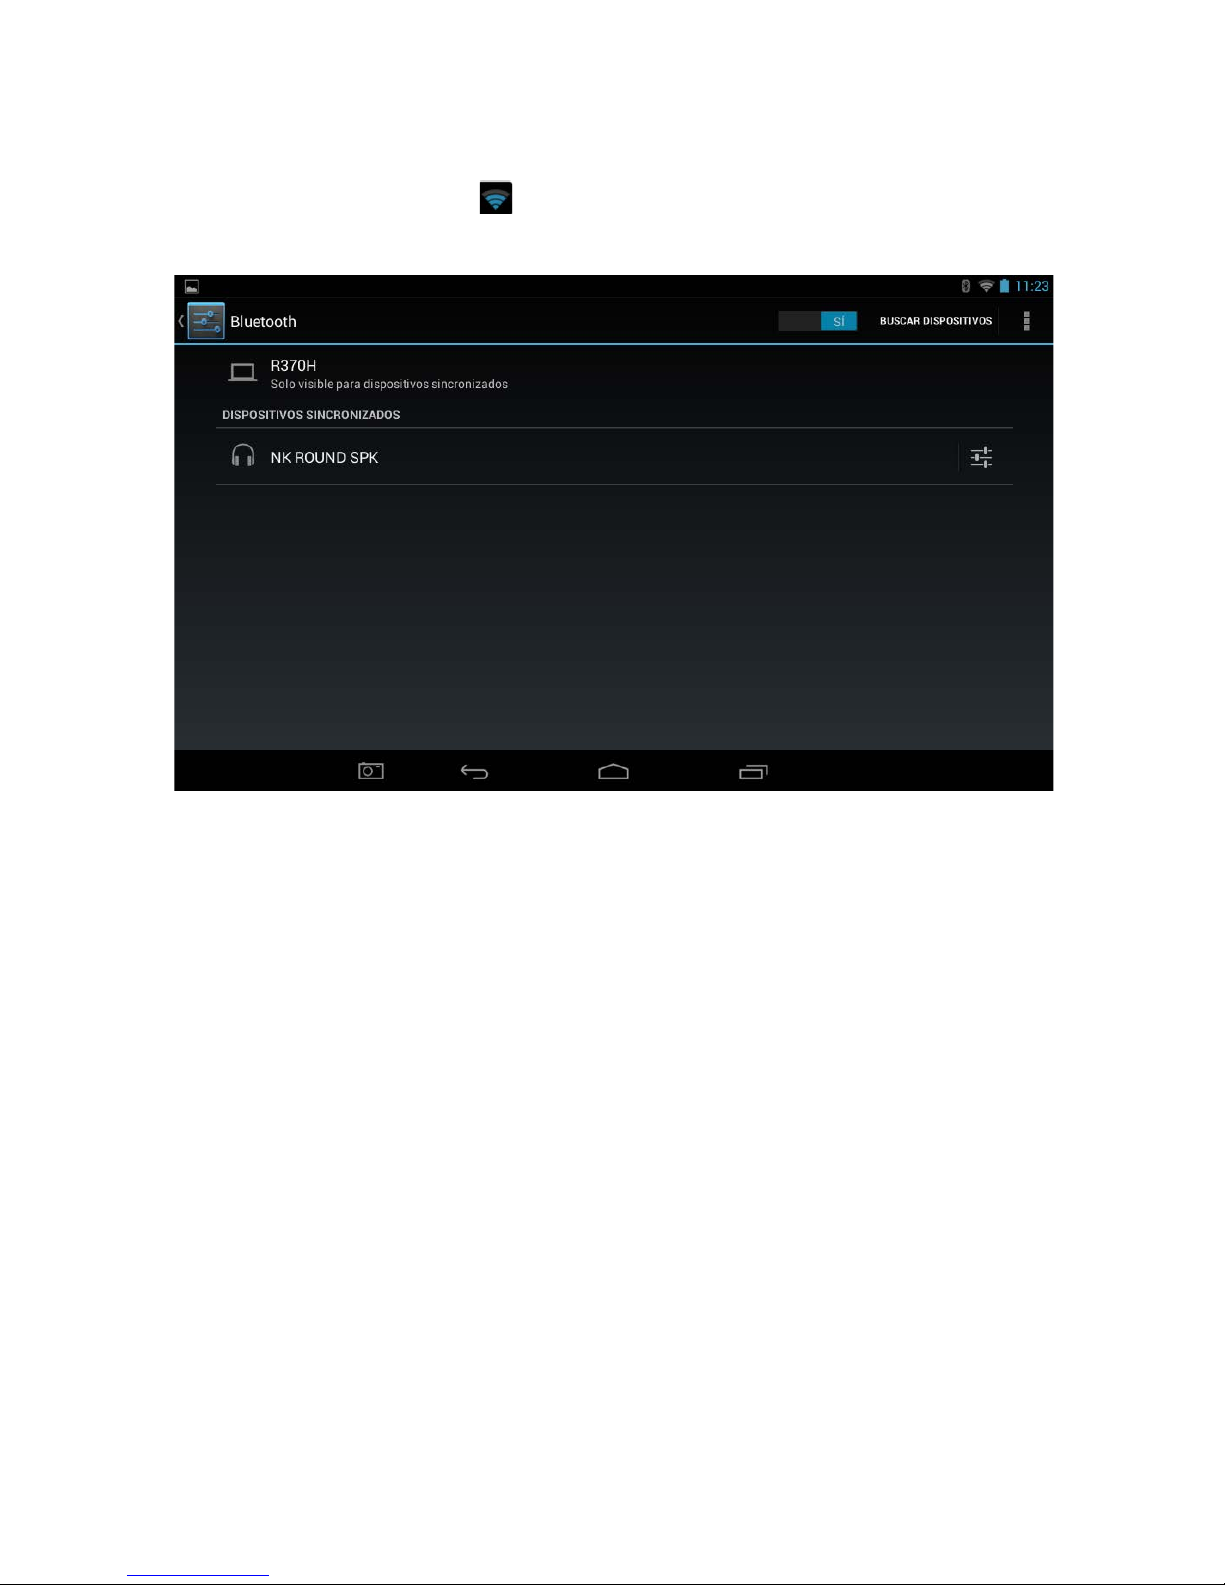
Una vez que haya terminado, la Tablet ya estará conectada a la red, y una vez que esté conectada verá
el ícono inalámbrico al que se conectó en la barra de estado.
Referencias:
Testing: prueba
Signal strenght excellent: fuerza de la señal excelente
Security WPA2 PSK: seguridad WPA2 PSK
Password: contraseña
Cancel: cancelar
Connect: conectar
Done: hecho
Wi-Fi ON: Wi-Fi ENCENDIDO
Bluetooth ON: Bluetooth ENCENDIDO
Agregar una red Wi-Fi
Si su red inalámbrica no publica su nombre (SSID), o está fuera del rango de una red Wi-Fi, aún así
puede agregar una red Wi-Fi para que su Tablet la recuerde, junto con las credenciales de seguridad, y
conectarse a ella automáticamente cuando esté dentro del rango.
1. Encienda el Wi-Fi, si ya no está encendido.
2. Toque Agregar red en la parte superior de la pan talla.
3. Ingrese el SSID (nombre) de la red. Si fuera necesario, ingrese seguridad u otros detalles de
configuración de red.
36
Page 84

4. Toque Guardar.
De esta forma, se guarda la información acerca de la red. Su Tablet se conectará a esta red
automáticamente la próxima vez que entre en el rango.
Olvidar una red Wi-Fi
Puede hacer que la Tablet olvide los detalles de una red Wi-Fi que agregó, si ya no la usa.
1. Encienda el Wi-Fi, si ya no está encendido.
2. En la pantalla de configuracion es Wi-Fi, toque el nombre de la red.
3. Toque Olvidar en el diálogo que se abre.
Nota: Debe usar Olvidar si ha ingresado la contraseña incorrecta y debe configurar nuevamente la
conexión.
Configurar ajustes de proxy para una red Wi-Fi
Algunas redes necesitan que esté conectado a recursos de red internos o externos a través de un
servidor Proxy. En forma predeterminada, las redes Wi-Fi que agrega no están configuradas para
conectarse vía proxy, pero puede cambiar esto para cada red Wi-Fi que haya agregado.
1. En la pantalla de c onfiguraci ones Wi-Fi, toque y mantenga apretado el nombre de la red.
2. Toque Modificar red en el diálogo que se abre.
3. Seleccione M ostrar opciones avanzadas.
4. Si la red no tiene configuraciones de proxy, toque Ninguno bajo Configuraciones Proxy. Si es así, toque
Manual en el menú que se abra.
5. Ingrese las configuraciones Proxy suministradas por su administrador de red.
6. Toque Guardar.
Las configuraciones proxy se aplican solo a la red Wi-Fi que modificó. Para cambiar las configuraciones Proxy
para otras redes Wi-Fi, modifíquelas individualmente.
37
Page 85
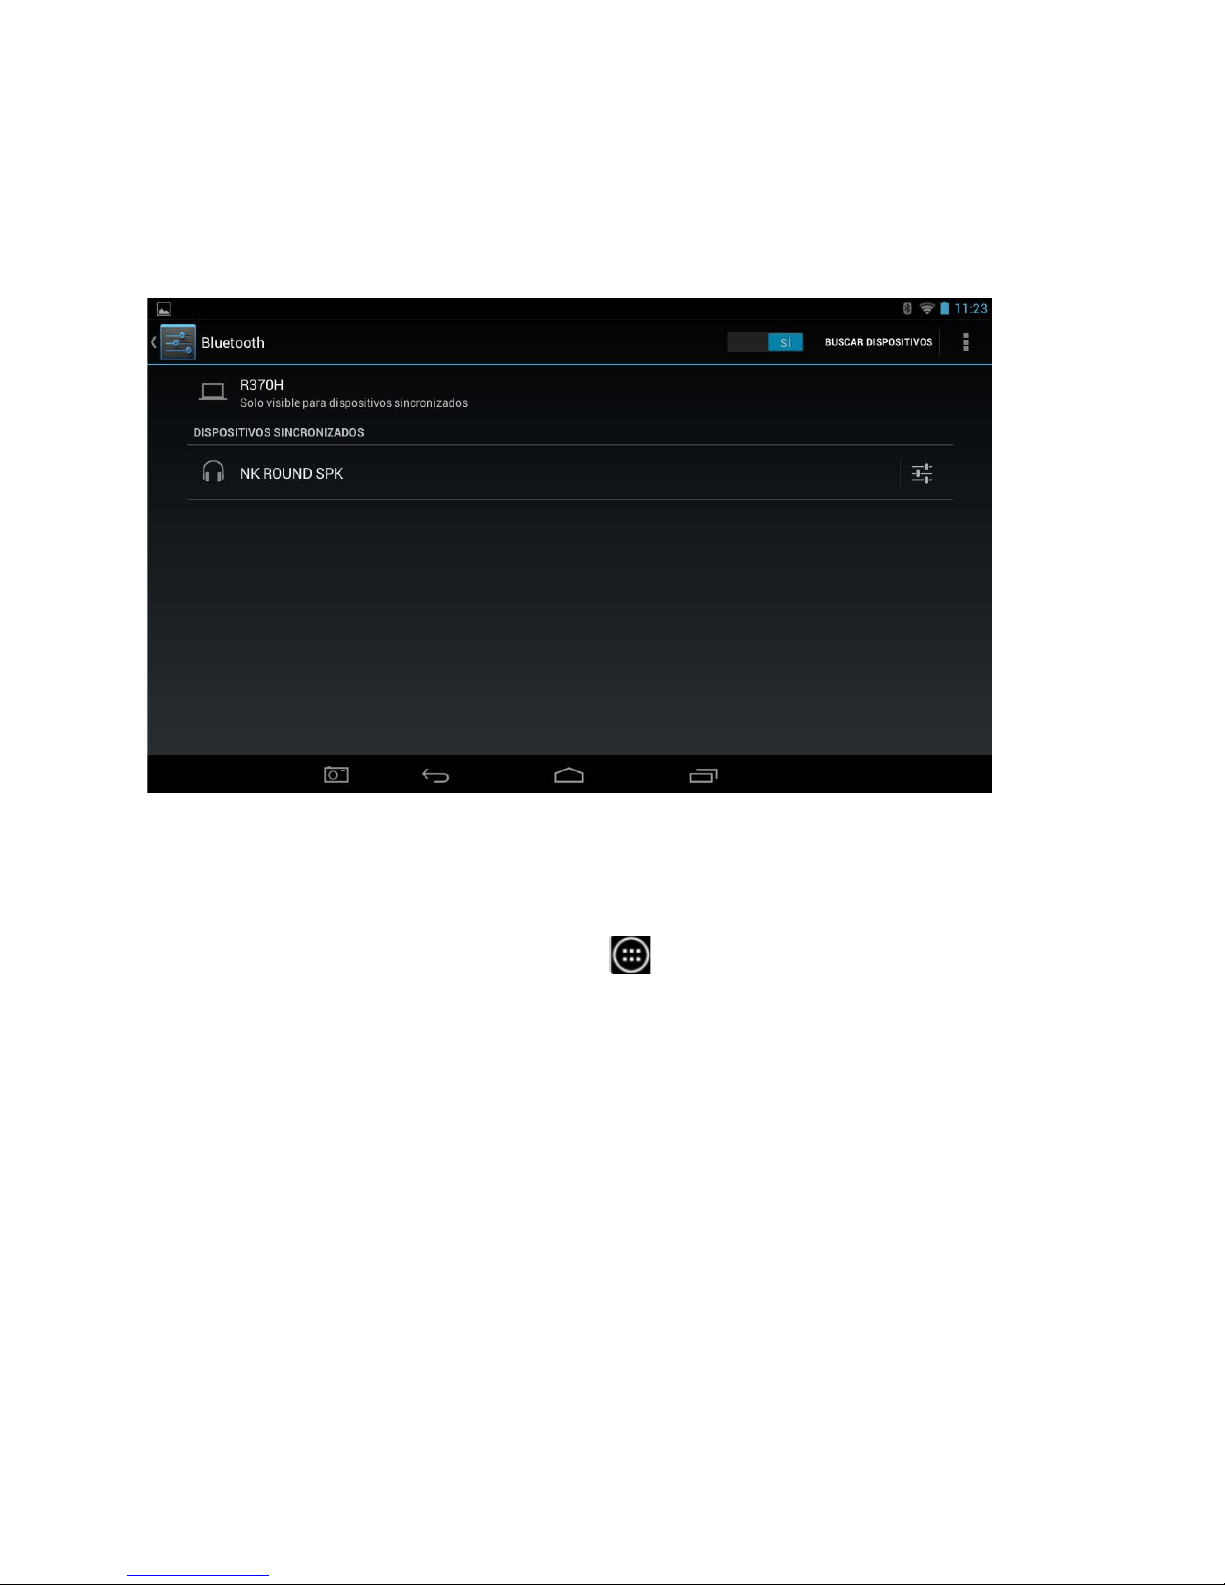
8.2 Bluetooth
Bluetooth es una tecnología inalámbrica que permite que los accesorios como Audífonos, Teclados, etc. se
conecten a la Tablet sin usar cables. Para conectarse a un dispositivo Bluetooth, la Tablet deberá emparejarse
con el dispositivo, que configura una conexión, que será recordada por ambos dispositivos.
Referencias:
Bluetooth ON: bluetooth ENCENDIDO
Nota: Para extender la vida útil de su batería entre cargas, apague Bluetooth cuando no lo esté usando.
Para acceder a las configuraciones de Bluetooth, deberá acceder al menú configuraciones. Toque
suavemente el ícono del Arranque de aplicaciones en la parte inferior de la Pantalla Inicio. Toque
suavemente el ícono Configuraciones de la página del Arranque de aplicaciones.
Toque suavemente en la opción de menú Bluetooth en el menú del lado izquierdo.
Para habilitar Bluetooth:
1. Deslice el interruptor a la derecha, en posición Encendido.
2. Una vez que esté encendido el Bluetooth, la Tablet escaneará automáticamente los
dispositivos Bluetooth disponibles y mostrará los nombres de los que encuentre.
3. Encuentre el dispositivo al que quiere conectarse y selecciónelo tocando la entrada. Algunos
dispositivos Bluetooth necesitan un código de emparejamiento de cuatro dígitos que deberá ingresar
para permitir que se complete la conexión. Si éste es el caso, aparecerá luego una ventana que le
permite ingresar el código. Debe consultar las instrucciones que venían con el dispositivo para este
código de apareamiento, pero los códigos más comunes son 0000 o 1234.
4. El dispositivo ya debe estar apareado y comenzará a funcionar con la Tablet.
38
Page 86

8.3 Sonido
La opción Sonido permite el acceso a todas las configuraciones de sonido disponibles en la Tablet.
Para acceder a las configuraciones de Sonido, deberá acceder al menú configuraciones. Toque
suavemente el ícono del Arranque de aplicaciones en la parte inferior de la Pantalla Inicio. Toque
suavemente el ícono Configuraciones de la página del Arranque de aplicaciones.
Toque suavemente en la opción de menú Sonido en el menú del lado izquierdo.
Dentro de esta opción, puede realizar los siguientes cambios:
Volúmenes
Esta opción le permite configurar las configuraciones de
volumen predeterminadas para Música, video, juegos y
otros medios, Ringtones y notificaciones y Alarmas.
Modo silencioso Esta opción le permite poner en mudo la Tablet o apagar
el modo silencioso
Notificación predeterminada
Permite un sonido diferente para las notificaciones a
seleccionar.
Sonidos táctiles Esta opción le permite apagar el sonido provocado al
tocar la pantalla.
Sonidos de bloqueo de pantalla Esta opción le permite apagar el sonido provocado al
desbloquear la pantalla.
Vibrar al tacto
Permite que la tablet se configure en Vibración siempre
que toque la pantalla (si está soportado).
39
Page 87
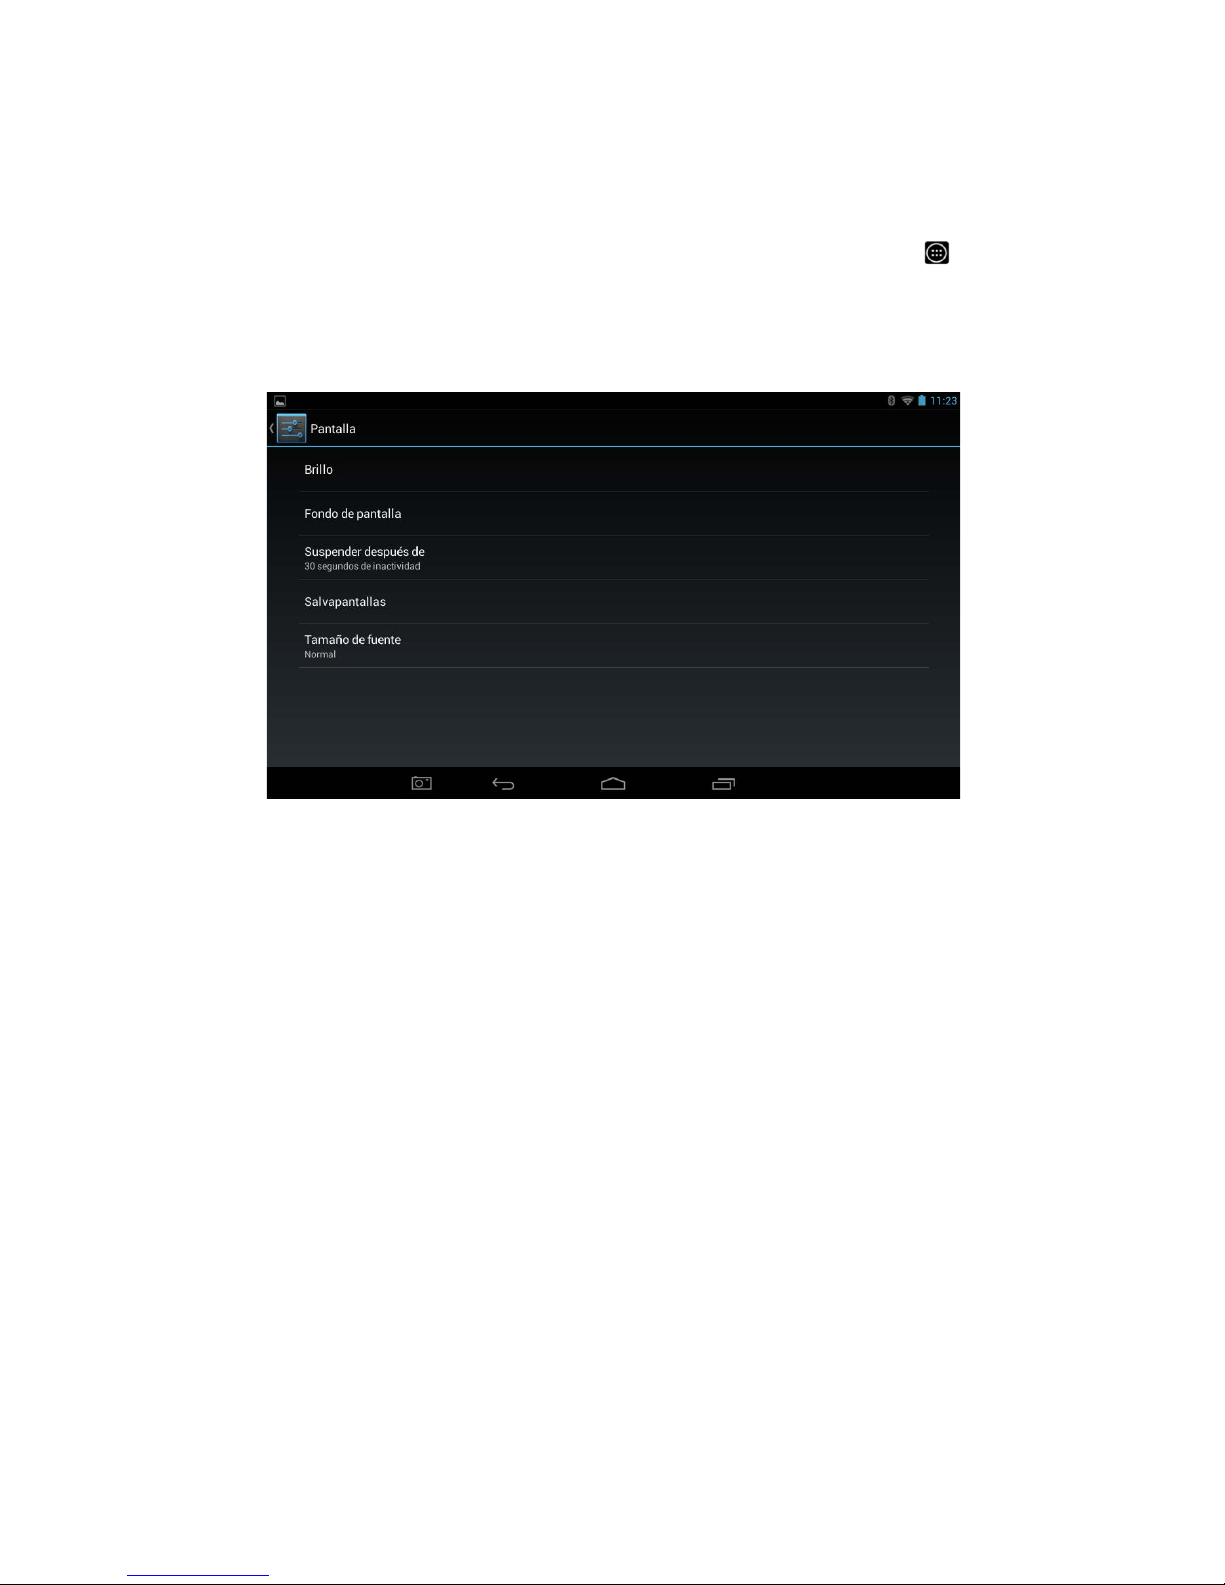
39
8.4 Pantalla
La opción Pantalla permite el acceso a todas las configuraciones de pantalla disponibles en la Tablet.
Para acceder a las configuraciones de Pantalla, deberá acceder al menú configuraciones. Toque
suavemente el ícono del Arranque de aplicaciones en la parte inferior de la Pantalla Inicio. Toque
suavemente el ícono Configuraciones de la página del Arranque de aplicaciones.
En las opciones del menú de la izquierda, desplácese hacia abajo en la pantalla deslizando su dedo hacia
arriba hasta que pueda ver la opción Pantalla, y luego Toque suavemente sobre esta opción.
Brillo Esta opción le permite configurar el brillo predeterminado de la pantalla
Protector de pantalla Seleccione un protector de pantalla diferente para el escritorio desde Galería, Protectores de
pantalla en vivo o Protector de pantalla
Pantalla de auto rotación Habilitar o deshabilitar la rotación de pantalla automática cuando se rota la tablet.
Suspensión Configure el periodo de tiempo antes de que la tablet entre a modo suspendido
desde nunca a 30 minutos.
Tamaño de fu ente Permite que el tamaño de fuente predeterminado cambie para permitir una
lectura más fácil del texto
Page 88
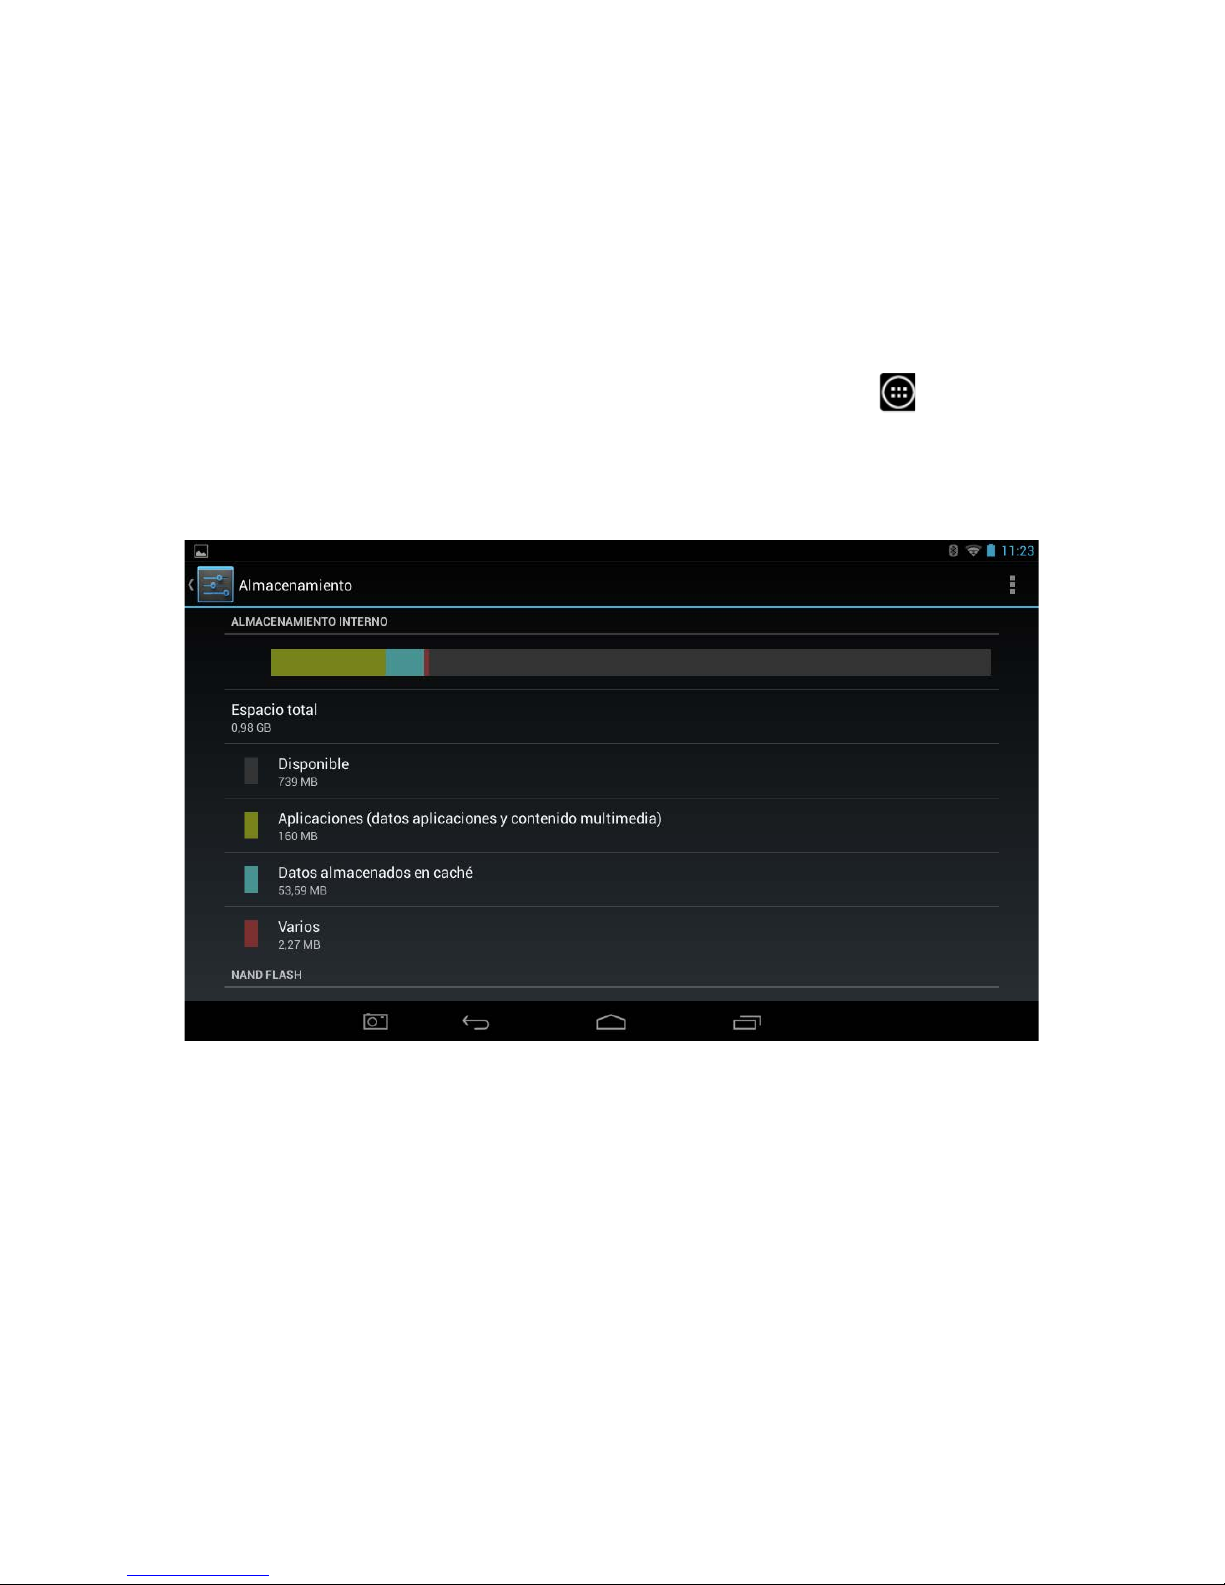
40
8.5 Almacenamiento
La opción Almacenamiento le da una división completa de cómo se usa el almacenamiento interno y las
tarjetas micro SD externas y cuánto espacio se encuentra disponible en ellos.
Para acceder a las configuraciones de Pantalla, deberá acceder al menú configuraciones. Toque suavemente el
ícono del Arranque de aplicaciones en la parte inferior de la Pantalla Inicio. Toque suavemente el ícono
Configuraciones de la página del Arranque de aplicaciones.
En las opciones del menú de la izquierda, desplácese hacia abajo en la pantalla deslizando su dedo hacia arriba
hasta que pueda ver la opción Almacenamiento, y luego Toque suavemente sobre esta opción.
La primera entrada para Almacenamiento interno es el almacenamiento del sistema y no es accesible para los
usuarios, pero la segunda entrada para Almacenamiento interno muestra cuánto almacenamiento es ocupado por
Aplicaciones, Imágenes, Videos, Otros y cuánto espacio se encuentra Disponible.
También puede acceder a las siguientes funciones desde la opción almacenamiento y están disponibles para
NAND Flash y cualquier Tarjeta SD o tarjeta de memoria USB que se inserte en el sistema:
Borrar almacenamiento
Esta opción permite formatear el almacenamiento que elija. Nota: Esto eliminará
todos los datos en el almacenamiento y solo deberá realizarse si no hay datos
importantes en el almacenamiento. Todas las Aplicaciones que se han instalado en
esaubicación
Nota: Las funciones Eliminar o Desmontar no deben llevarse a cabo en NAND
flash porque podría provocar problemas en el sistema.
Page 89

41
Page 90
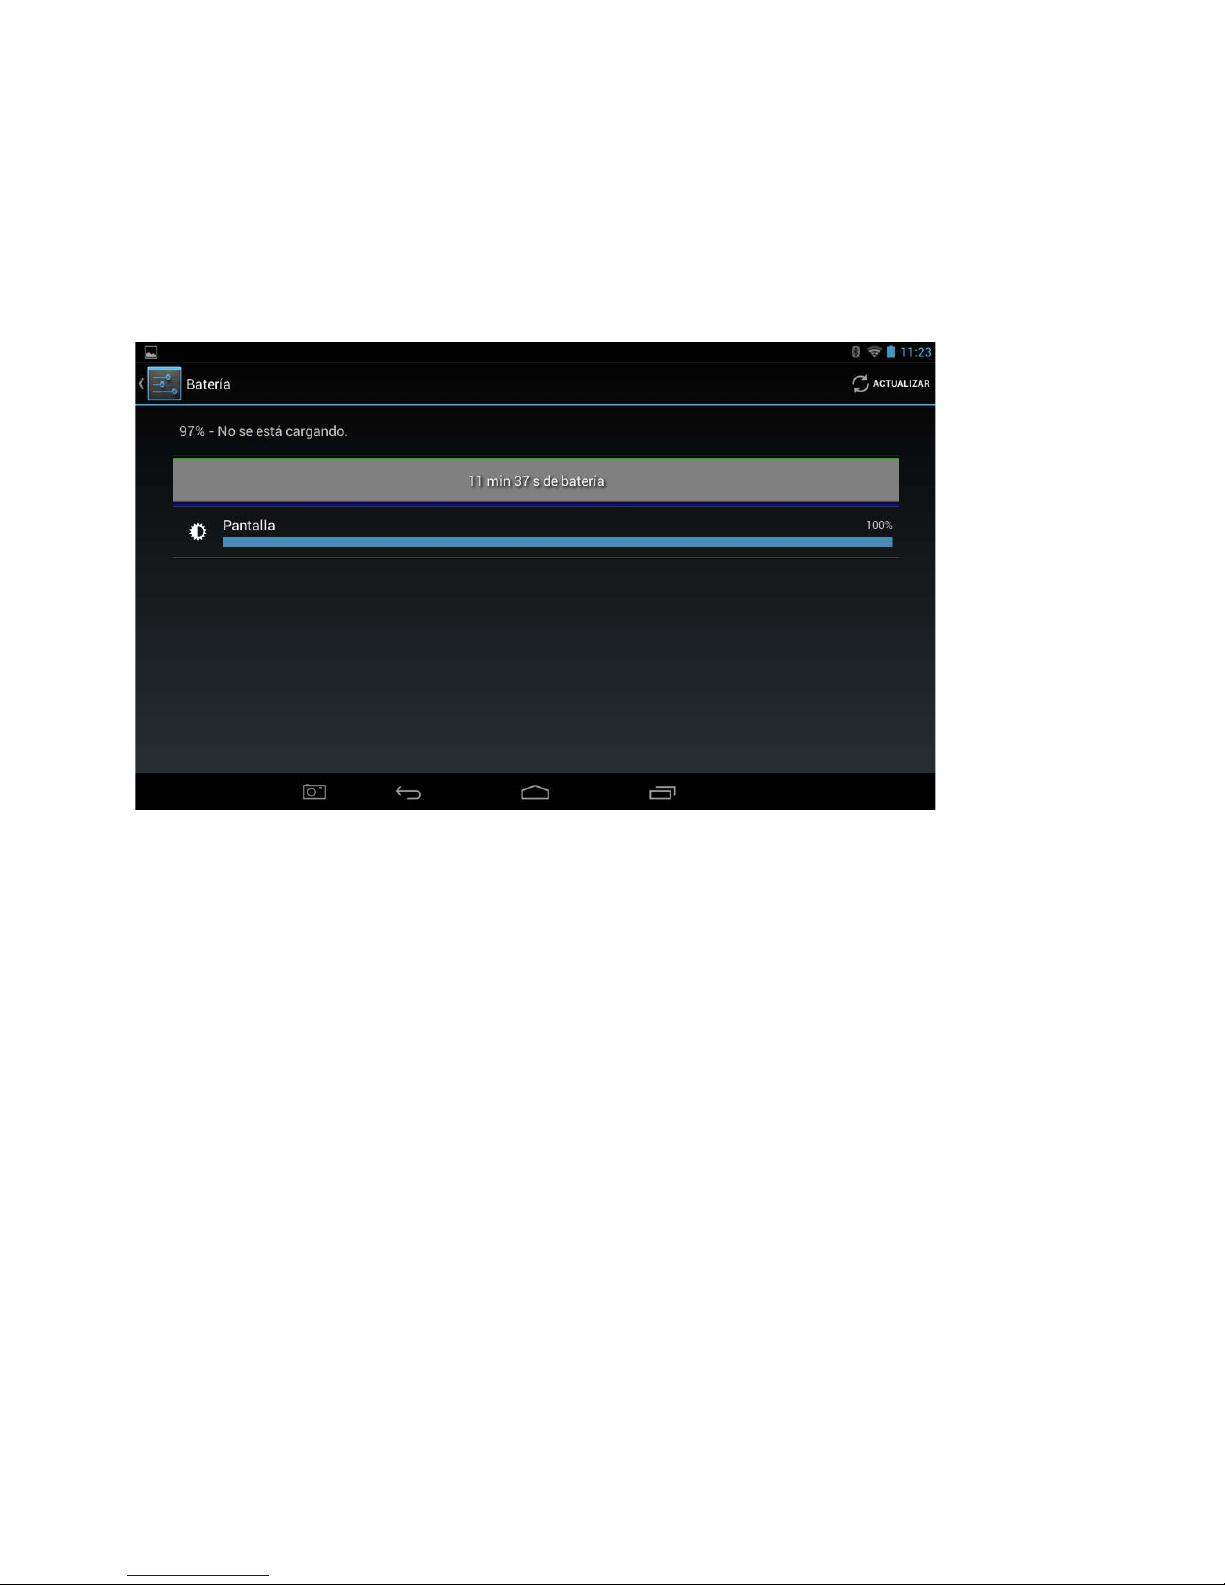
42
8.6 Batería
La opción Batería muestra la carga actual de la batería, cómo se ha usado la batería durante el periodo de tiempo que
aparece y si la Tablet se está cargando actualmente.
Battery : batería
90% - not charging: 90% sin carga
1h 14m 1s on battery: 1h 14m 1s de batería
Android OS: SO Androi
Page 91

Referencias
Battery: batería
90% - not charging: 90% sin carga
1h 14m 1s on battery: 1h 14m 1s de batería
Android OS: SO Android
8.7 Aplicaciones
La opción Aplicaciones le permite ver información acerca de las aplicaciones que se instalen en la Tablet.
Hay cuatro opciones de menú:
Descargado Muestra todas las Aplicaciones que se han descargado e instalado.
En Tarjeta SD Muestra todas las Aplicaciones que se han instalado en cualquier tarjeta micro SD montada.
Ejectando Muestra todas las Aplicaciones que actualmente se ejecutan.
Todos Muestra todas las Aplicaciones incluidas las Aplicaciones del sistema que son parte del
Sistema.
Para desinstalar una Aplicación, seleccione la aplicación de la lista tocándola, y luego seleccione
Desinstalar.
Nota: Solo puede desinstalar Aplicaciones que se han instalado en la Tablet durante su uso. Todas las Aplicaciones
que fueron preinstaladas en el sistema de fábrica no pueden ser desinstaladas (pero sí podrán ser desinstaladas
todas las actualizaciones aplicadas a estas aplicaciones).
43
Page 92
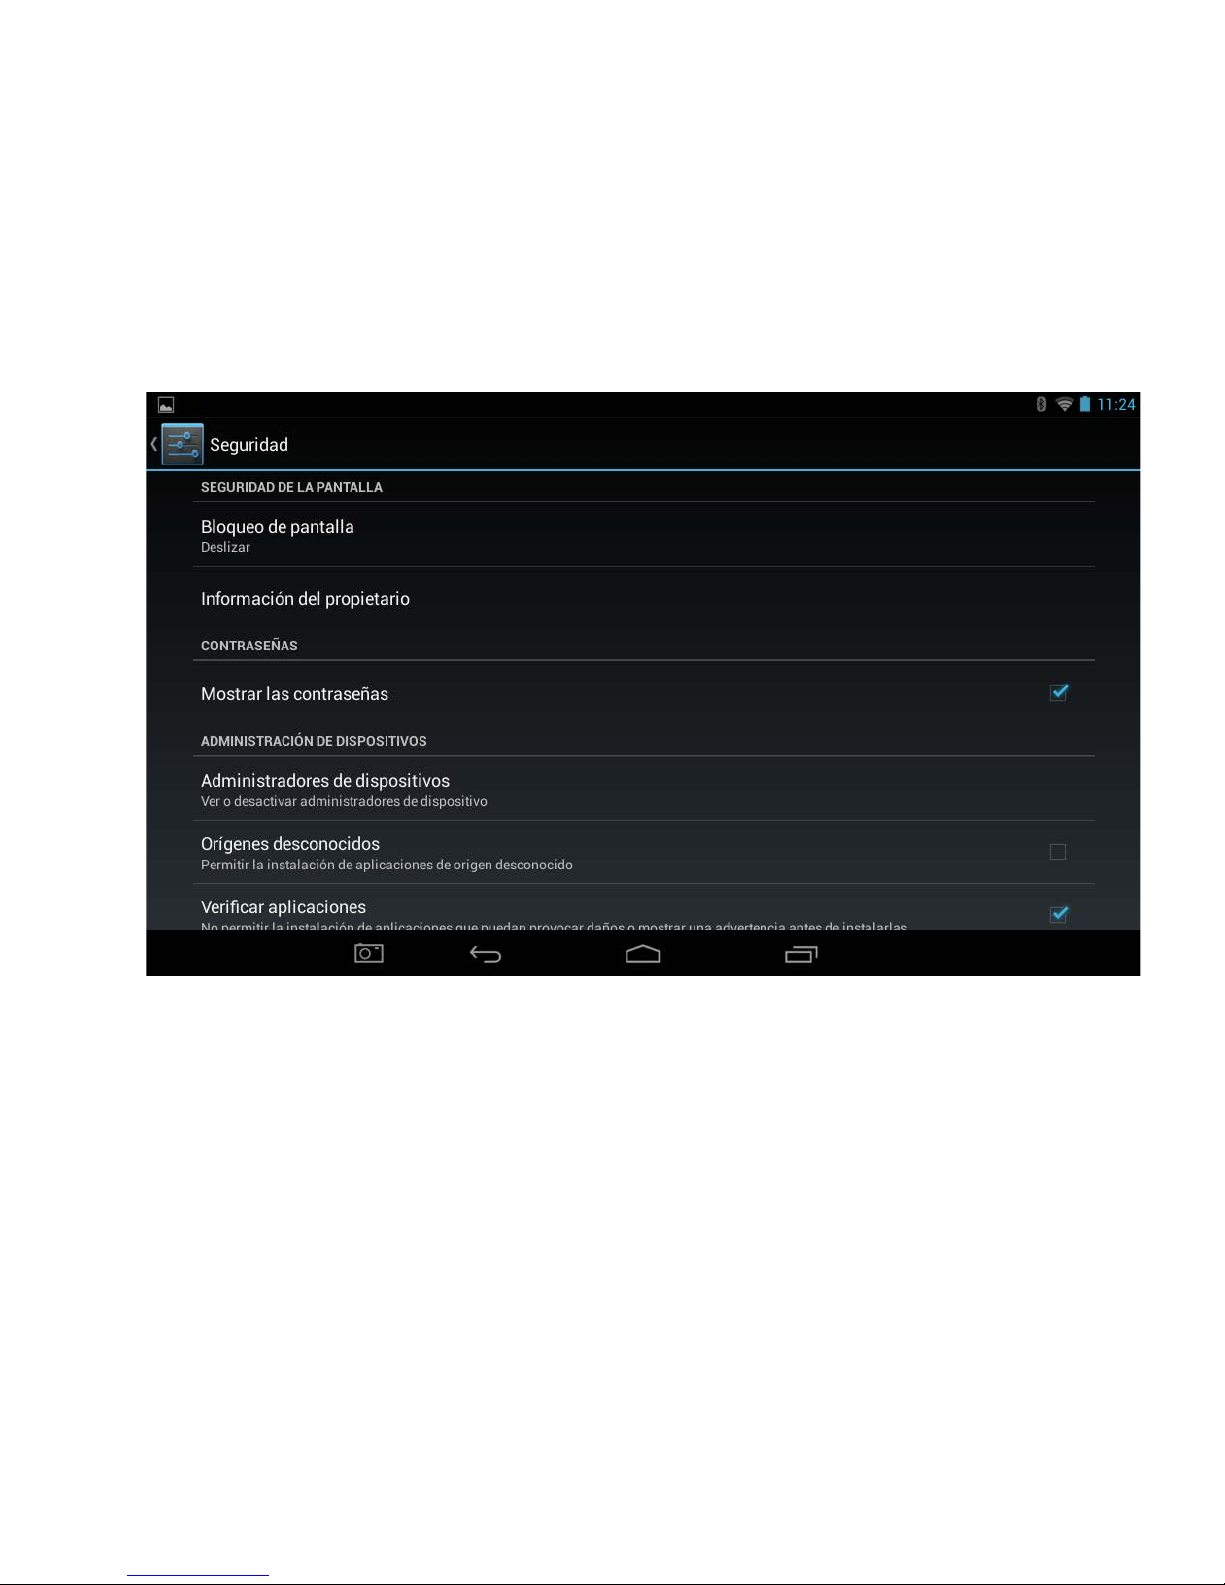
8.9 Segur idad
La opción de Seguridad le permite configurar qué nivel de seguridad quiere para su Tablet. Es posible que
quiera configurar a lguna f orm a de bloq ueo de panta lla autom átic a para evitar el a cces o no autor izado. Si
se ha configurado un bloqueo de pantalla, la pantalla se bloquea cuando la pantalla de la Tablet se
suspende.
Para ajustar las configuraciones de bloqueo de su Tablet:
1. Toque el Bloqueo de pantalla.
2. Toque el tipo de bloqueo que quiera y siga las instrucciones en la pa ntalla.
Si previamente ha configurado un bloqueo, debe ingresar el patrón, PIN o contraseña para
desbloquear las configuraciones de bloqueo antes de que pueda hacer cambios.
Puede elegir entre estas opciones de bloqueo, enumeradas en el orden aproximado de fuerza:
44
Page 93
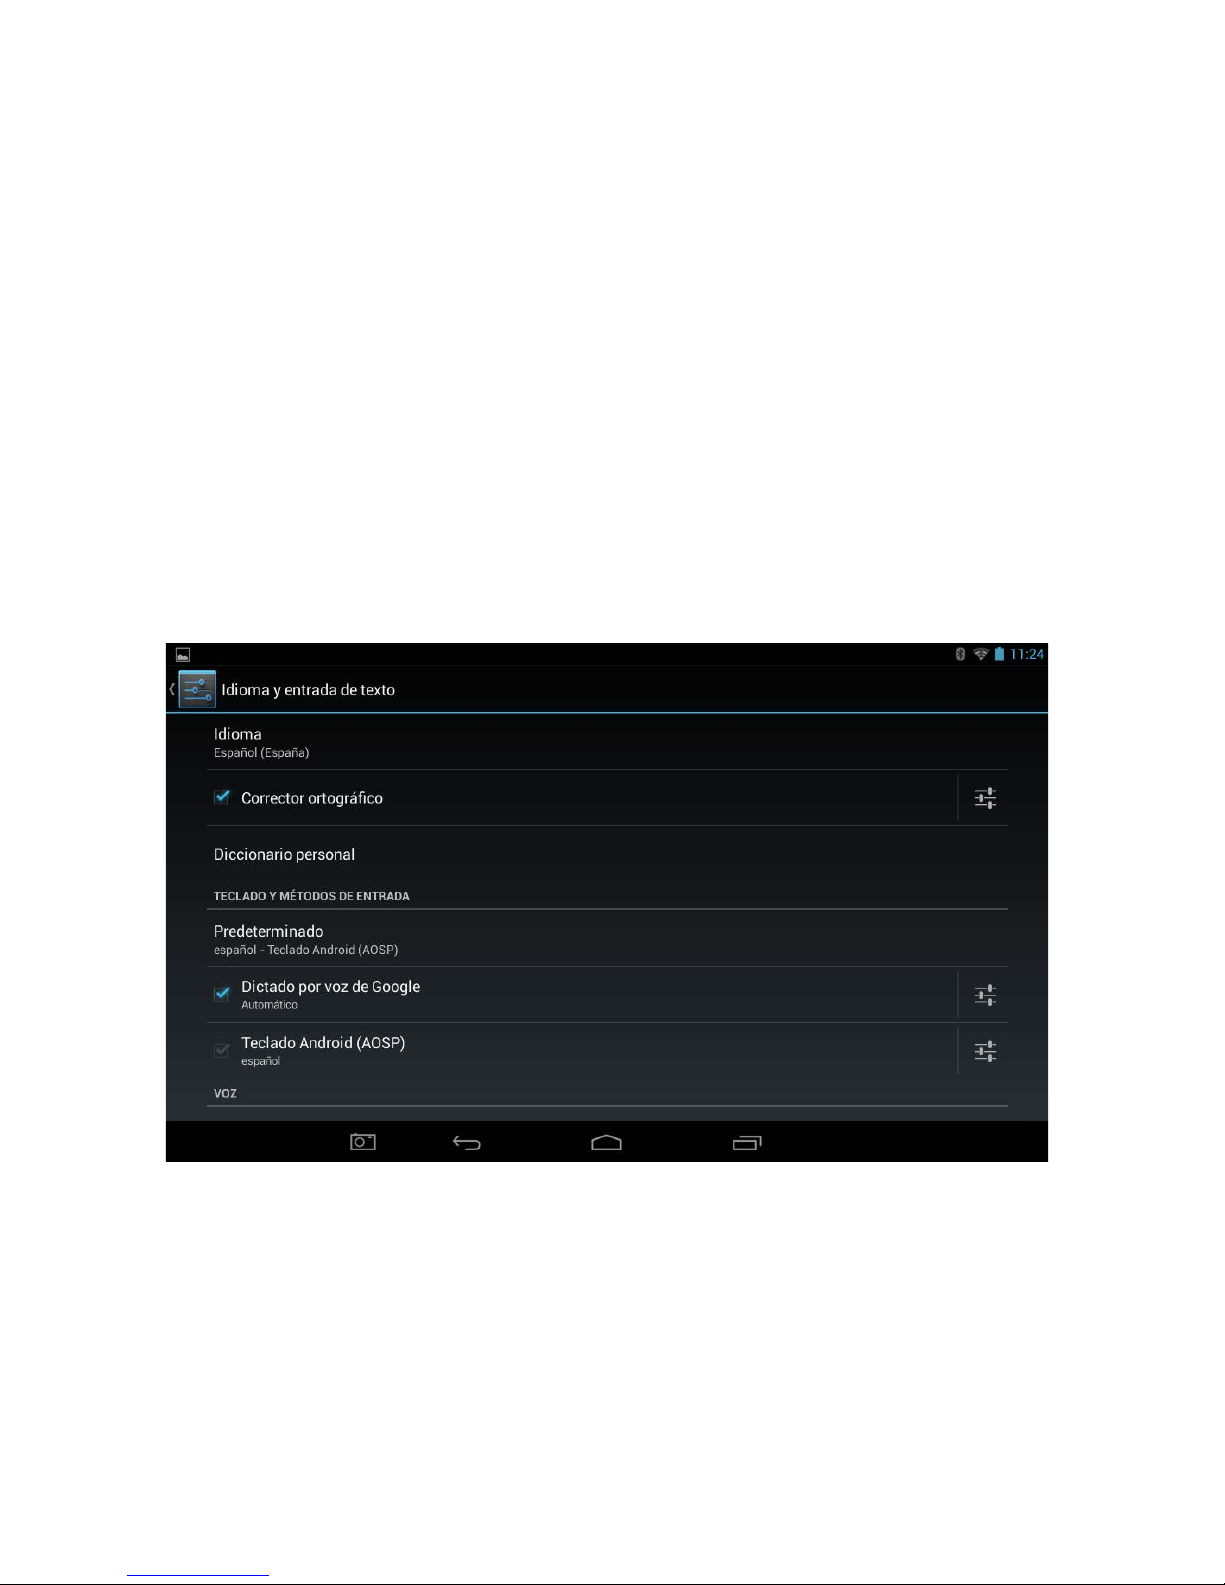
Deslizar No ofrece protección, pero lo deja llegar rápidamente a la Pantalla deinicio, abrir la Cámara y
comenzar a tomar fotos inmediatamente.
Patrón Dibuje un patrón simple con su dedo para desbloquear la Tablet.
PIN Requiere cuatro o más números. Los PIN más largos tienden a ser más seguros.
Contraseña Requiere cuatro o más letras o números. Es la opción más segura, siempre que cree una.
Nota Si olvida su patrón / PIN / contraseña, la única forma de obtener acceso al dispositivo es a través del
reinicio de fábrica. Siga el procedimiento detallado en la Guía de solución de problemas, que fue
proporcionado con esta Tablet.
8.10. Idioma e introducción de datos
La opción Idiom a e intr oducción de datos le p ermite s elecc ionar entr e difere ntes i diomas, y adem ás puede
cambiar el teclado a diferentes idiomas y configurar la salida de Búsqueda por voz y de Texto a habla.
45
Page 94
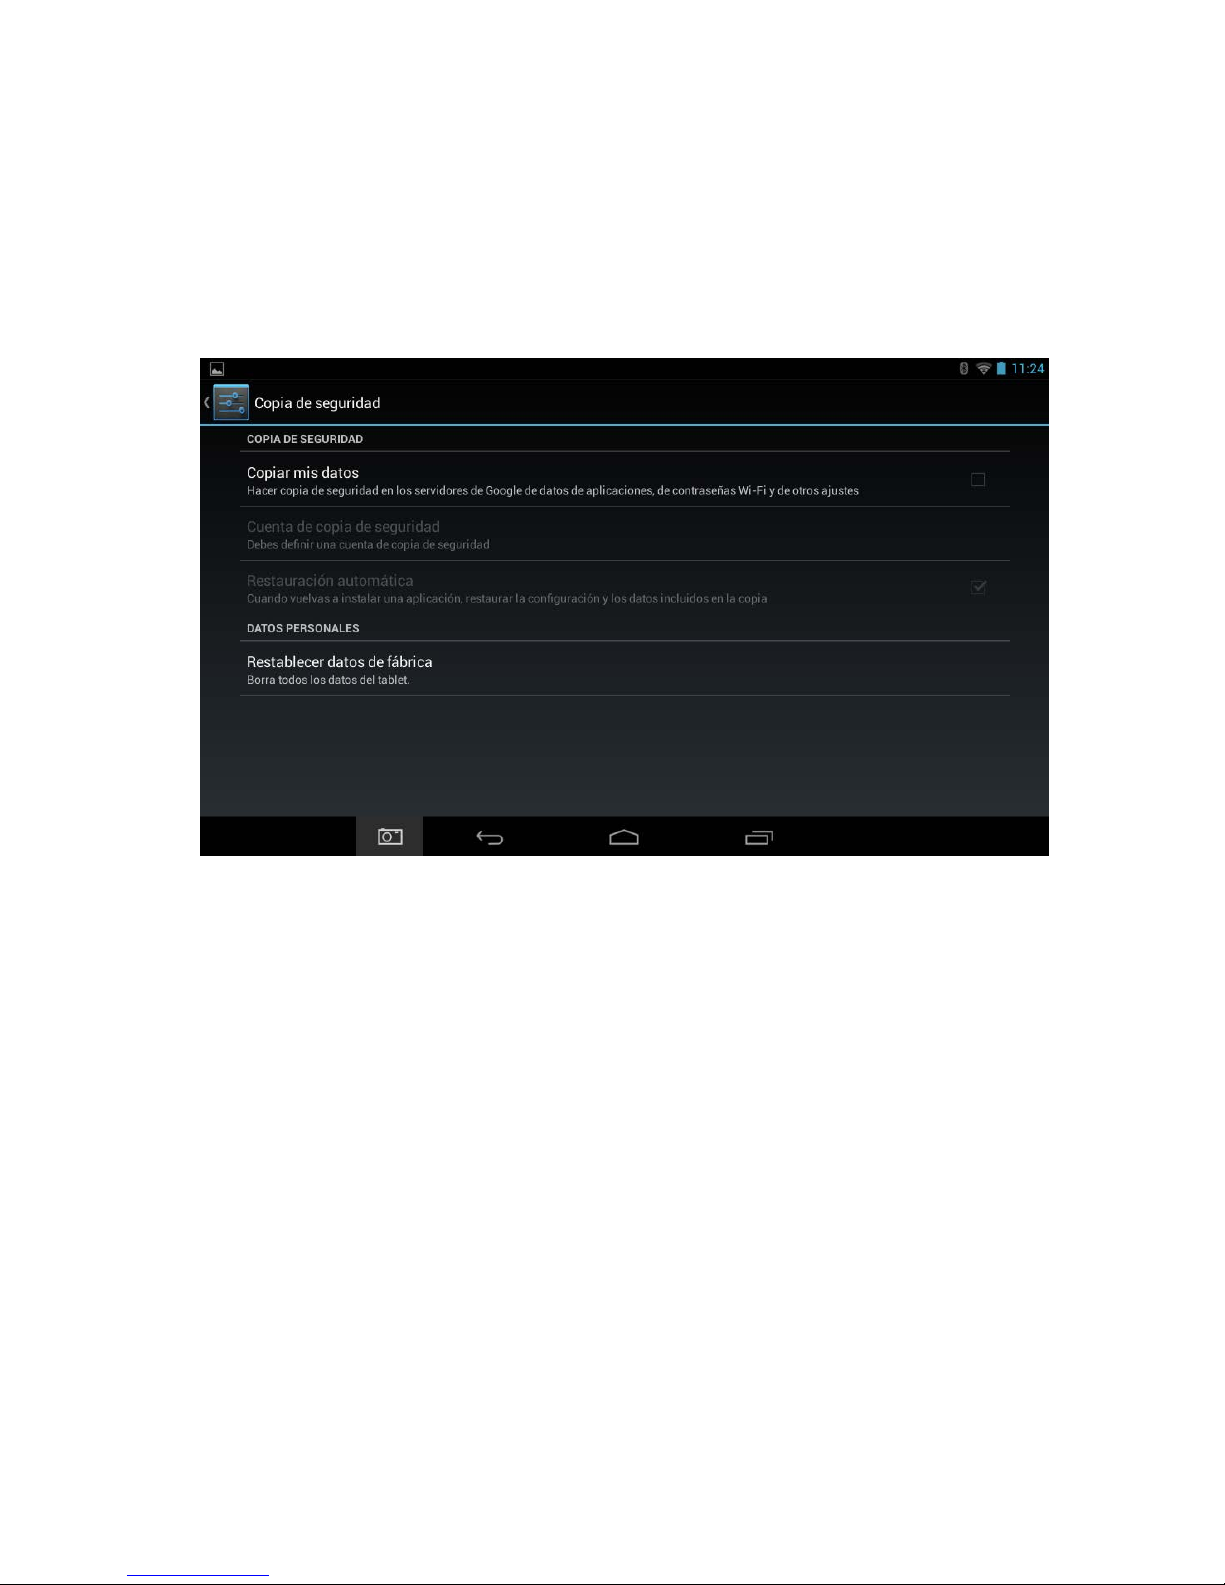
46
8.11 Copia de seguridad y reinicio
La opción de Copia de seguridad y reinicio le permite realizar copias de seguridad de las configuraciones y
cuentas de Google. Entonces, si necesita cambiar o reiniciar al modo de fábrica su dispositivo, puede
recuperar sus datos par a todas las cuentas a las que reali zó copias de seguridad previamente. También
permite habilitar un reinicio de fábric a que borrará c om pletam ente todos los dat os alm ac enados en la Tabl et
y volver al estado cuando dejó la fábrica.
Referencias:
Backup and reset: copia de seguridad y reinicio
BACKUP AND RESTORE: copia de seguridad y restauración
Backup my data: hacer copia de seguridad de mis datos
Backup application data, wi fi passwords and other s ettings to Google server s: realizar copia de segur idad
de los datos de las aplicaciones, contraseñas de wi fi y otras configuraciones para servidores de Google
Automatic restore: restauración automática
When reinstalling an app, restore backed up settings and data: al reinstalar una aplicación, restaurar
configuraciones y datos copiados.
PERSONAL DATA: datos personales
Factory data reset: reinicio de datos de fábrica
Erases all data on Tablet: borra todos los datos en la Tablet
Page 95

Hay cuatro opciones de menú:
Realizar copias de seguridad de mis datos Si marca esta opción, a gran variedad de sus datos
personales se les realiza una copia de seguridad automáticamente, incluyendo sus contraseñas de WiFi, bookmarks del Navegador, una lista de las aplicaciones que ha instalado en Google Play, las palabras
que ha agregado al diccionario, usadas por el teclado en pantalla, y la mayoría de las configuraciones
personalizadas.
Si desmarca esta opción, ya no se seguirá realizando la copia de seguridad de sus datos, y todas las
copias de seguridad existentes se eliminan de los servidores de Google.
Realizar copias de seguridad de la cuenta Muestra las Cuentas de Google cuya información se encuentra
en copias de seguridad. Debe iniciar sesión con una o más de estas cuentas en un dispositivo nuevo o
reiniciado para recuperar la información asociada. Para agregar una nueva cuenta, toque Agregar
cuenta.
Recuperación automática Marque esta opción para recuperar configuraciones y otros datos cuando
reinstale una aplicación. Esta característica requiere que haga copia de seguridad de sus datos con su
Cuenta Google y que la aplicación usa el servicio de copia de seguridad.
Reinicio de datos de fábrica Toque esta opción, y seleccione Reiniciar Tablet para eliminar todos sus
datos personales de almacenamiento interno, incluyendo información acerca de su Cuenta Google,
todas las otras cuentas, su sistema y configuraciones de aplicación, todas las aplicaciones
descargadas, y su música, fotos, videos y otros archivos.
Luego de resetear su Tablet, deberá reingresar la misma información solicitada cuando configuró por
primera vez su Tablet. Si ha hecho copia de seguridad de sus datos a una cuenta Google, una opción
durante el proceso de configuración le permite recuperarlos.
Algunas aplicaciones de terceros también hacen uso del servicio de copia de seguridad, entonces si
reinstala una, se restaurarán sus configuraciones y datos.
8.12 Cuentas
La opción Cuentas le permite configurar y usar múltiples Cuentas de Google y Microsoft Exchange
ActiveSync en su dispositivo.
Para acceder a las configuraciones de Cuenta, deberá acceder al menú configuraciones. Toque
suavemente el ícono del Arranque de aplicaciones en la parte inferior de la Pantalla Inicio. Toque
suavemente el ícono Configuraciones de la página del Arranque de aplicaciones.
En las opciones del menú de la izquierda, desplácese hacia abajo en la pantalla deslizando su dedo
hacia arriba hasta que pueda ver la opción Cuentas, y luego Toque suavemente sobre esta opción.
Nota: Algunas cuentas pueden agregarse en la pantalla Cuentas, según se describe aquí. Otras
necesitan agregarse usando una aplicación que funciona con esos tipos de cuentas. Por ejemplo, solo puede
agregar cuentas de correo electrónico IMAP y POP3 con la aplicación de correo electrónico.
47
Page 96
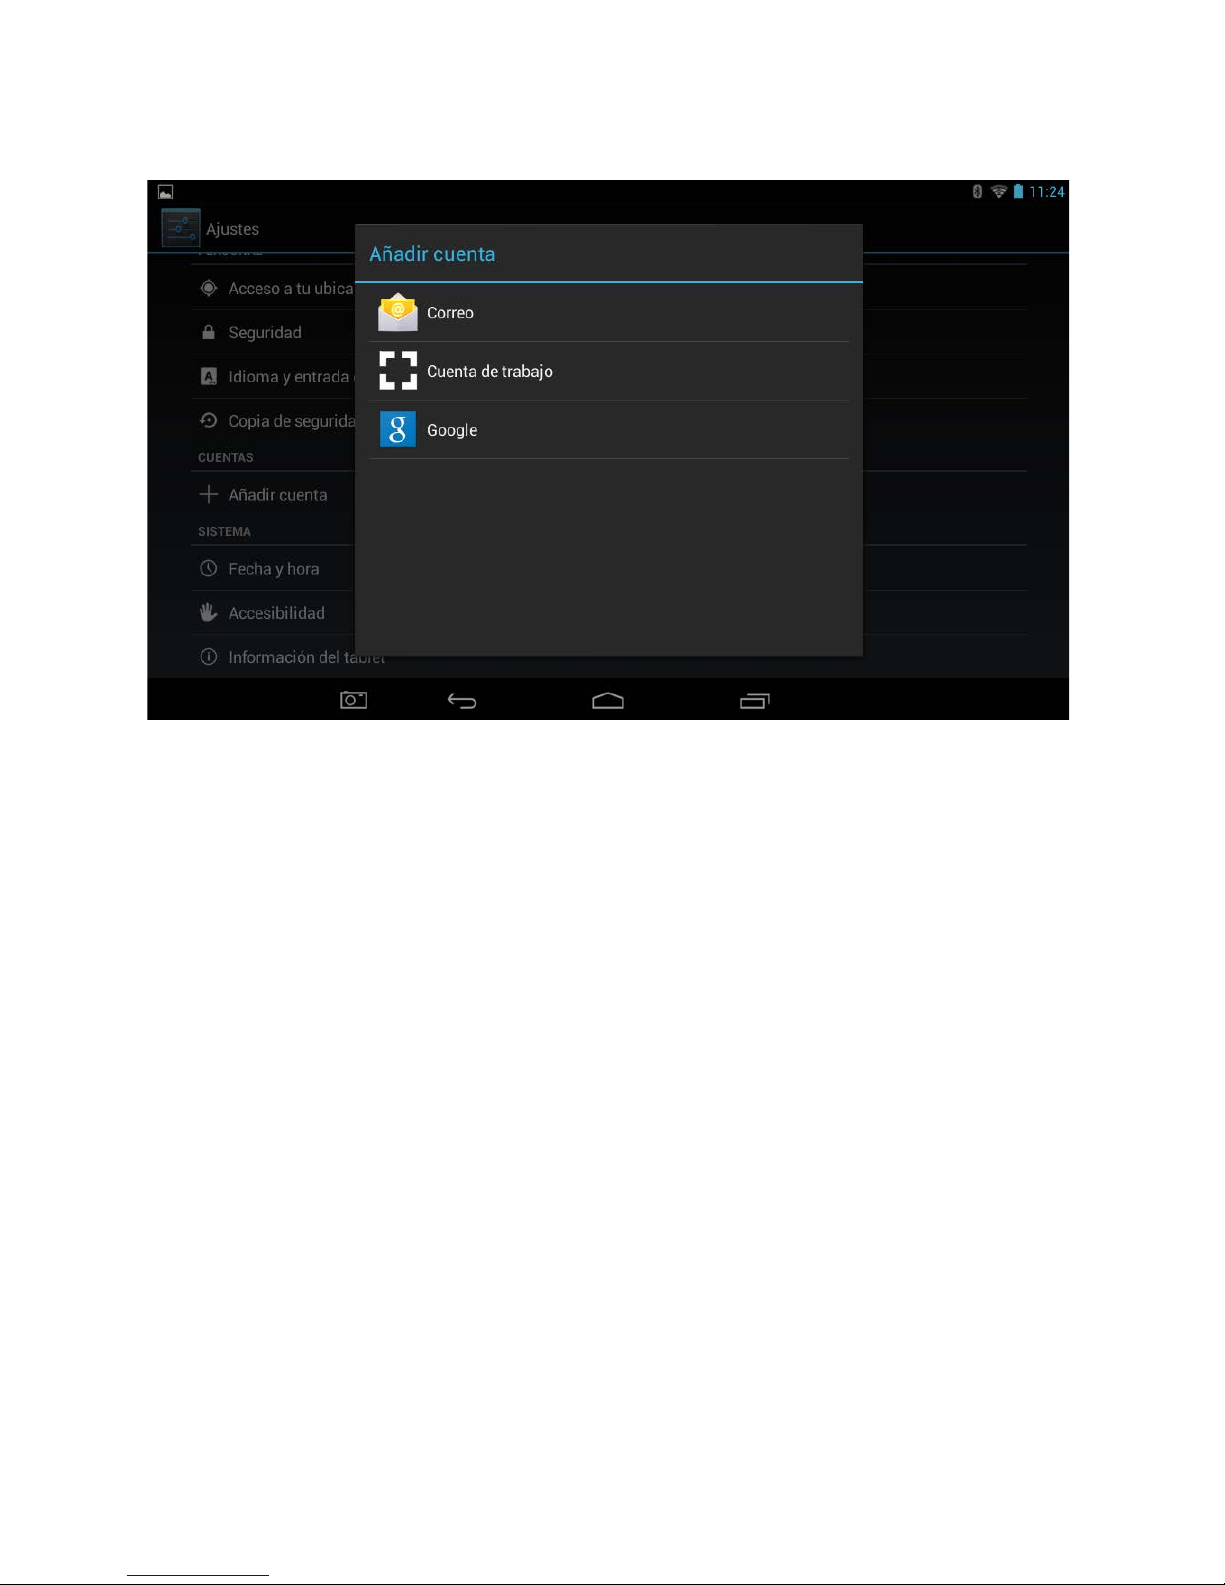
Agregar una cuenta
Para agregar una cuenta, es posible obtener detalles del administrador del sistema acerca del servicio
al que se conecta la cuenta. Por ejemplo, es posible que deba conocer el dominio de la cuenta o la
dirección del servidor.
1. Toque A gregar cue nta.
2. Toque el tipo de cuenta que desea agregar.
3. Siga los pasos en pantalla para ingresar la información acerca de la cuenta.
48
Page 97

La mayoría de las cuentas requieren un nombre de usuario y contraseña, pero los detalles dependen del
tipo de cuenta que está agregando y la configuración del servicio al que se conecte. Dependiendo del
tipo de cuenta, es posi ble que le pida que c onfigure qué ti pos de datos quiere s incr onizar, d arle nom br e
a la cuenta y otros detalles.
Cuando haya terminado, la cuenta se agrega a la lista en las Cuentas y sincronización. Dependiendo de
cómo configuró la cuenta, correo electrónico, contactos y otra información comenzará a sincronizar a su
dispositivo.
Eliminar una cuenta
Puede eliminar una cuenta, que s erá eliminada c on toda la inform ación asociada con esa cuenta de s u
Tablet, incluyendo correo electrónico, contactos, configuraciones, y así sucesivamente.
1. Vaya a Configuraciones > Personal > Cuentas y sinc.
2. Toque la cuenta a eliminar.
3. Toque el ícono Men ú y seleccione Elimine una cuenta.
49
Page 98
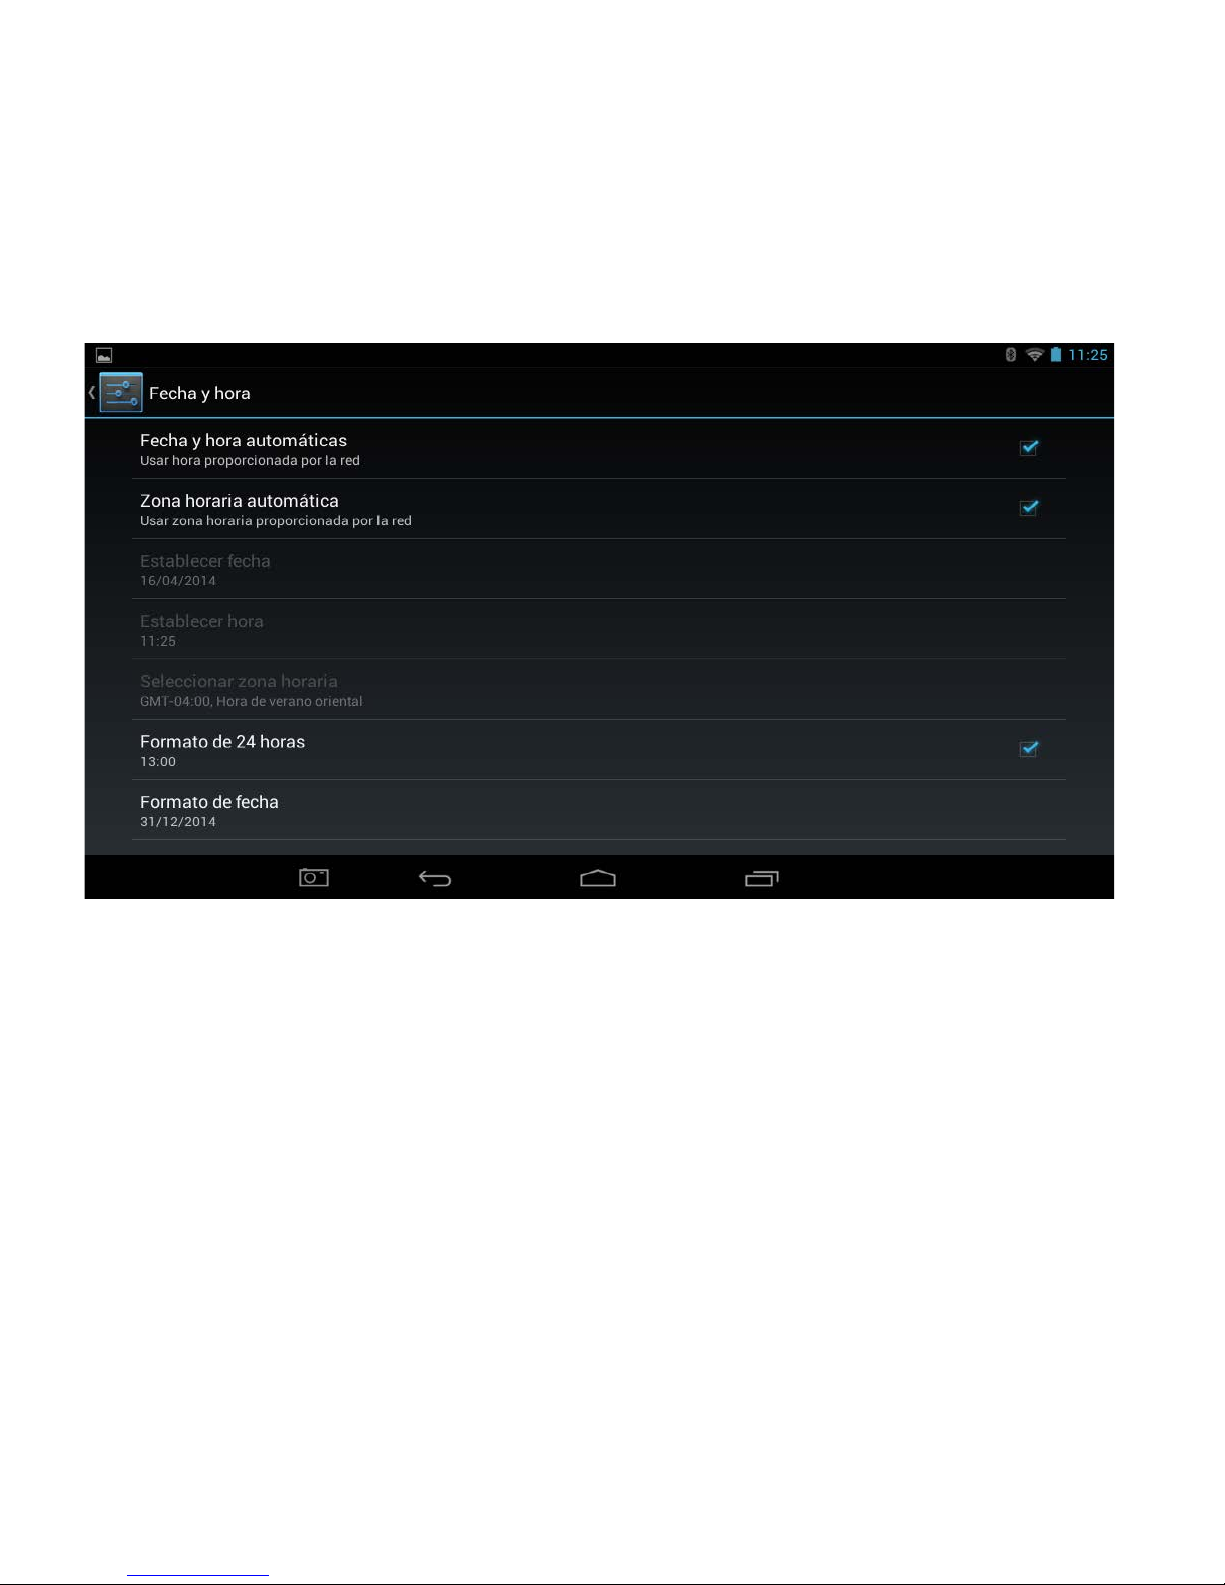
8.13 Fecha y hora
La opción Fecha y hora le permite configurar las configuraciones de fecha y hora para su Tablet.
Para acceder a las configuraciones de Fecha y hora, deberá acceder al menú configuraciones. Toque
suavemente el ícono del Arranque de aplicaciones en la parte inferior de la Pantalla Inicio. Toque
suavemente el ícono Configuraciones de la página del Arranque de aplicaciones.
En las opciones del menú de la izquierda, desplácese hacia abajo en la pantalla deslizando su dedo
hacia arriba hasta que pueda ver la opción Fecha y hora, y luego Toque suavemente sobre esta
opción.Se encuentran disponibles las siguientes opciones:
Fecha y hora automática
Si lo habilita, la Tablet automáticamente actualiza la
fecha y hora si se conecta a Internet.
Configurar fecha
Permite que la fecha se configure manualmente. Esta
opción solamente está disponible si se deshabilita la
fecha y hora automática.
Configurar hora
Permite que la hora se configure manualmente. Esta
opción solamente está disponible si se deshabilita la
fecha y hora automática.
Seleccione zona horaria
Permite que se seleccione la zona horaria actual de las
opciones disponibles.
Use el formato de 24 horas
Permite que el formato horario cambie
entre formatos de 12 y 24 horas
Elija formato de fecha
Permite que cambie el formato de la fecha.
51
Page 99
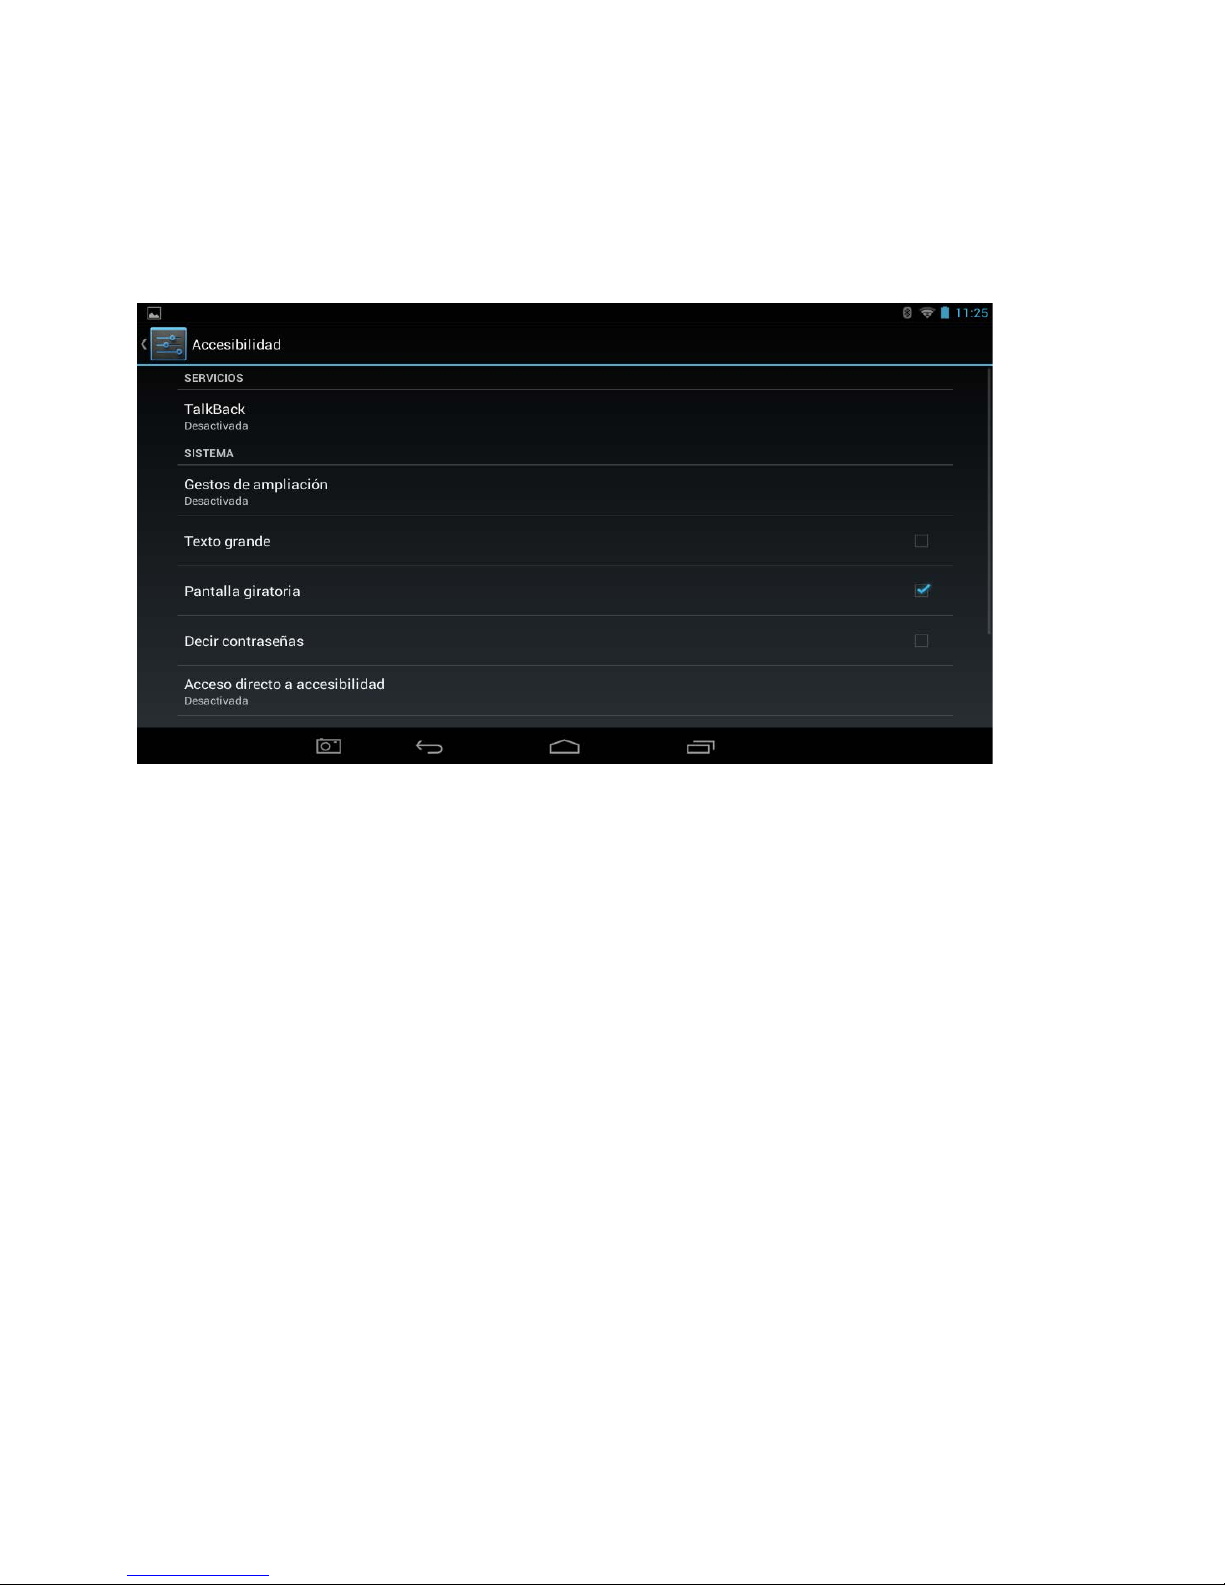
8.14 Accesibilidad
La opción Accesibilidad permite que la Tablet se configure para que la use cualquier persona.
Para acceder a las configuraciones de Accesibilidad, deberá acceder al menú configuraciones. Toque suavemente
el ícono del Arranque de aplicaciones en la parte inferior de la Pantalla Inicio. Toque suavemente el ícono
Configuraciones de la página del Arranque de aplicaciones.
En las opciones del menú de la izquierda, desplácese hacia abajo en la pantalla deslizando su dedo hacia arriba
hasta que pueda ver la opción Accesibilidad, y luego Toque suavemente sobre esta opción.
Se encuentran disponibles las siguientes opciones:
TalkBack
La opción TalkBack ofrece una devolución hablada para
ayudar a los usuarios ciegos o con poca visión a guiar sus
dedos alrededor de la pantalla usando un recordatorio
de audio. Describe lo que se toca, selecciona y activa.
Texto grande
Si se habilita, aumentará el tamaño de texto usado para
todas las funciones de la Tablet.
Pantalla de auto rotación
Habilitar o deshabilitar la rotación de pantalla
automática cuando se rota la Tablet.
Contraseñas habladas
Permite que se ingresen las contraseñas usando el habla
en vez del teclado.
Texto a habla
Permite la configuración del motor de texto a habla que
se usa por una opción predeterminada de salida
mediante la Tablet
Demora de tocar y mantener
Habilita las configuraciones de demora para que cambien
los gestos en la pantalla.
Instalar scripts web
Habilita que las Aplicaciones instalen scripts de Google
que hagan más accesible su contenido web.
52
Page 100
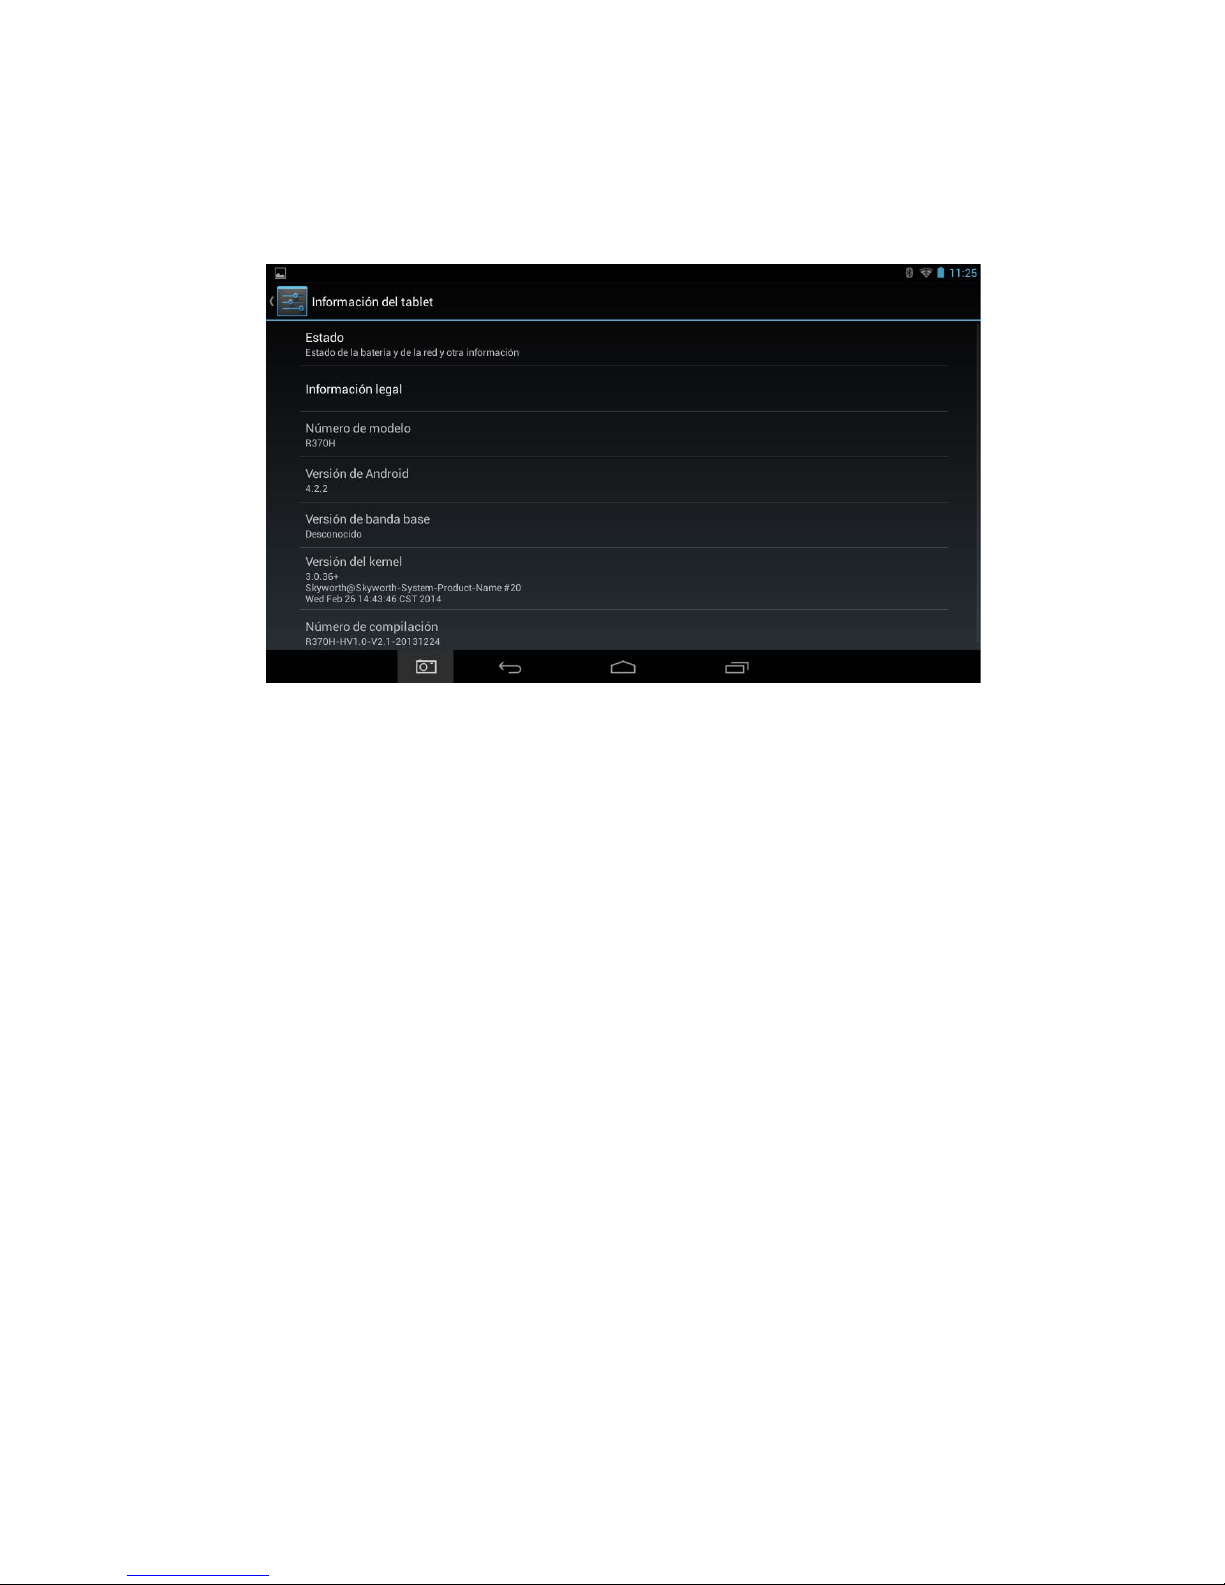
53
8.15 Opciones del desarrollador
Las configuraciones de opciones del Desarrollador son solo para el desarrollo
del sistema y no deben cambiar a menos que se lo indique un ingeniero de
soporte.
Referencias:
Developer options: opciones del desarrollador
Take bug report: iniciar informe de errores
Desktop backup password: contraseña de copia de seguridad de escritorio
Desktop full backups arent currently protected: las copias de seguridad completas del
escritorio no están protegidas actualmente
Stay awake: sin suspensión
Screen will never sleep while charging: la pantalla nunca se suspenderá mientras se carga
HDCP checking: verificación de HDCP
Use HDCP checking for DRM content only: use verificación de HDCP solo para contenido
DRM
Protect SD card: proteger tarjeta SD
Apps must request permission to read SD card: las aplicaciones deben solicitar permiso
para leer la tarjeta SD
DEBUGGING: depuración
USB debugging: depuración de USB
Debug mode when USB is connected: modo de depuración cuando se conecta el USB
 Loading...