

Reliable VIVIO 500GC, VIVIO 550GC Instruction Manual
VIVIO 500GC/550GC
PROFESSIONAL GARMENT STEAMERS
CENTRALES VAPEUR PROFESSIONNELLES
VAPORIZADOR DE PRENDAS PROFESSIONAL
INSTRUCTION MANUAL
GUIDE D’UTILISATION
MANUAL DE INSTRUCCIONES


VIVIO 500GC & VIVIO 550GC COMPONENTS 01
INSTRUCTION MANUAL ENGLISH 03
GUIDE D’UTILISATION FRANÇAIS 17
MANUAL DE INSTRUCCIONES ESPAÑOL 29
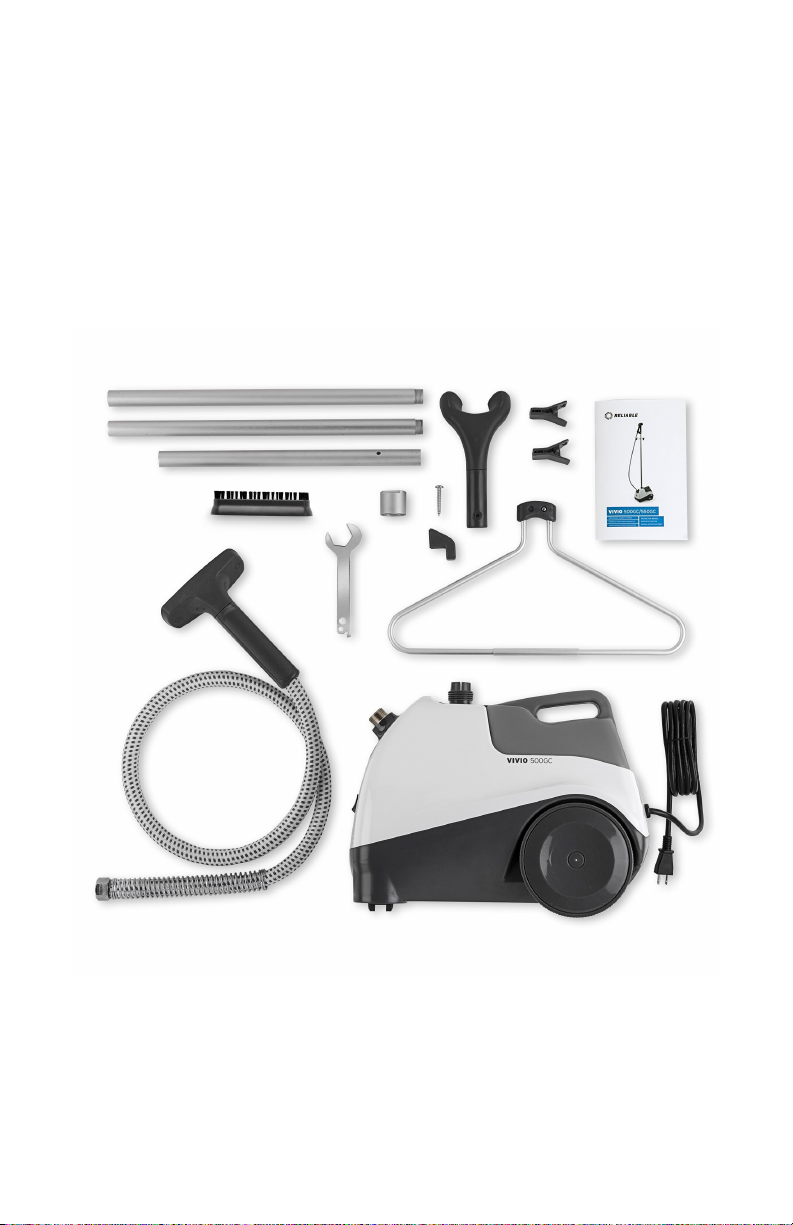
WHAT'S IN THE BOX - VIVIO 500GC
QU'Y A-T-IL DANS LA BOITE - VIVIO 500GC
QUÉ HAY EN LA CAJA - VIVIO 500GC
01
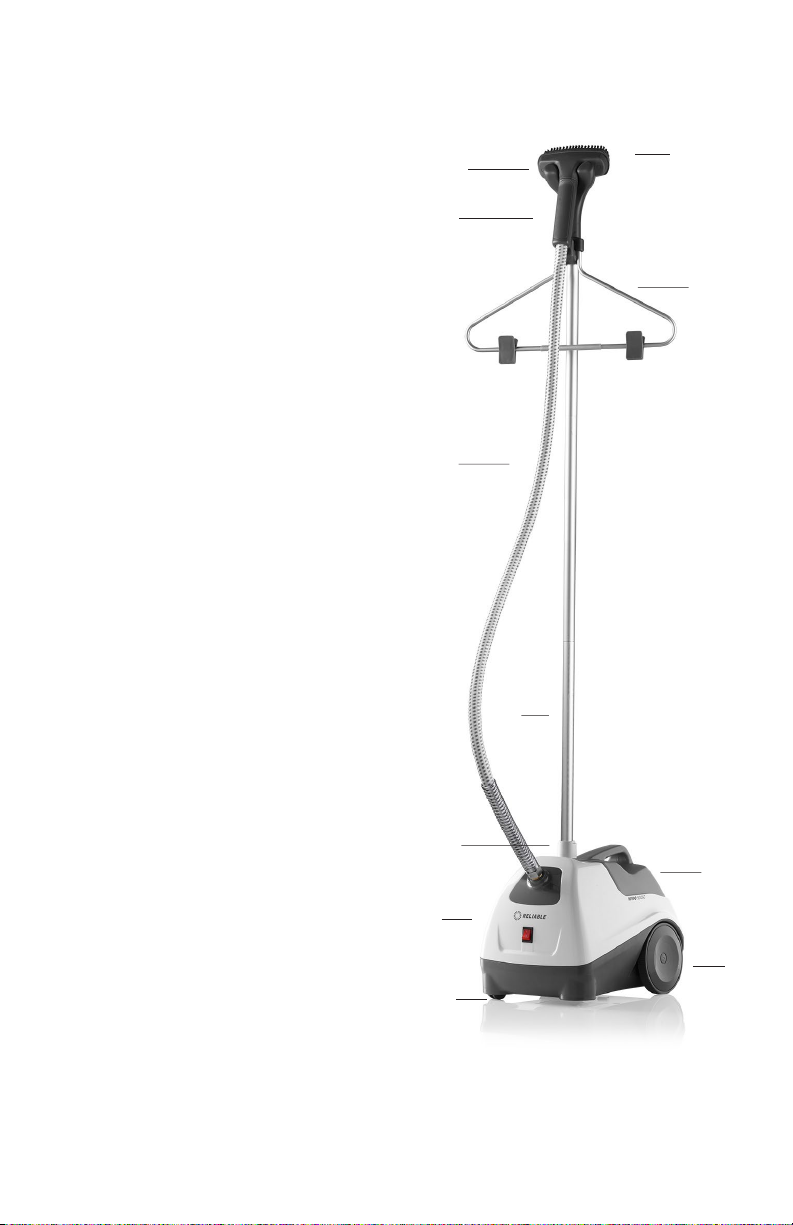
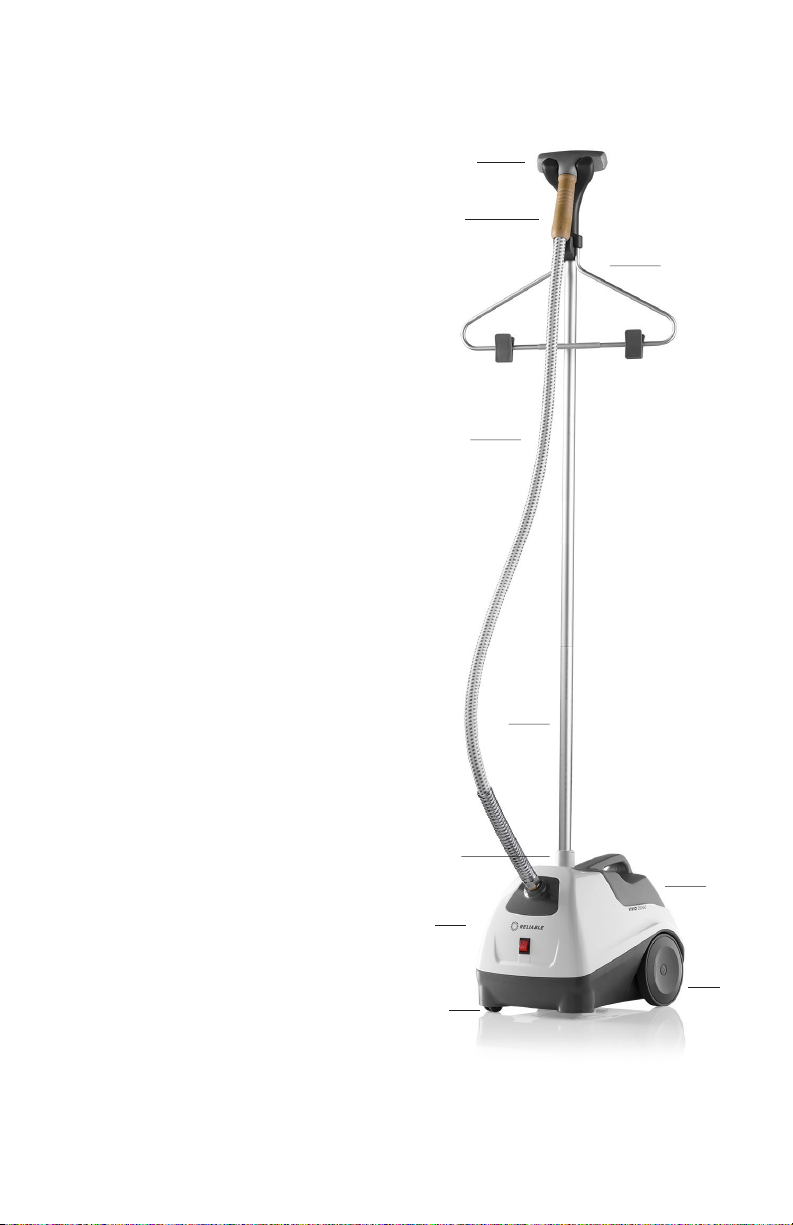
VIVIO 500GC PARTS IDENTIFIER
ENGLISH
1 Brush (removable)
2 Steam head
3 Handle
4 Hanger
5 Steam Hose
6 Rod set (supports steam hose)
7 Bottle
8 Rod set holder
9 Body of steamer
10 Wheels
11 Casters
FRANÇAIS
1 Brosse (amovible)
2 Collecteur de vapeur
3 Manette
4 Cintre
5 Boyau de vapeur
6 Ensemble de tirant
(soutient le boyau de vapeur)
7 Bouteille
8 Support pour ensemble de tirant
9 Corps du vaporisateur
10 Volants
11 Roulettes
2
3
5
6
1
4
ESPAÑOL
1 Cepillo (para remover)
2 Cabezal de vapor
3 Mango
4 Percha
5 Manguera de vapor
6 Varilla (soporta la manguera de vapor)
7 Botella
8 Soporte de la varilla
9 Cuerpo del vaporizador
10 Ruedas
11 Rueditas
8
7
9
10
11
02
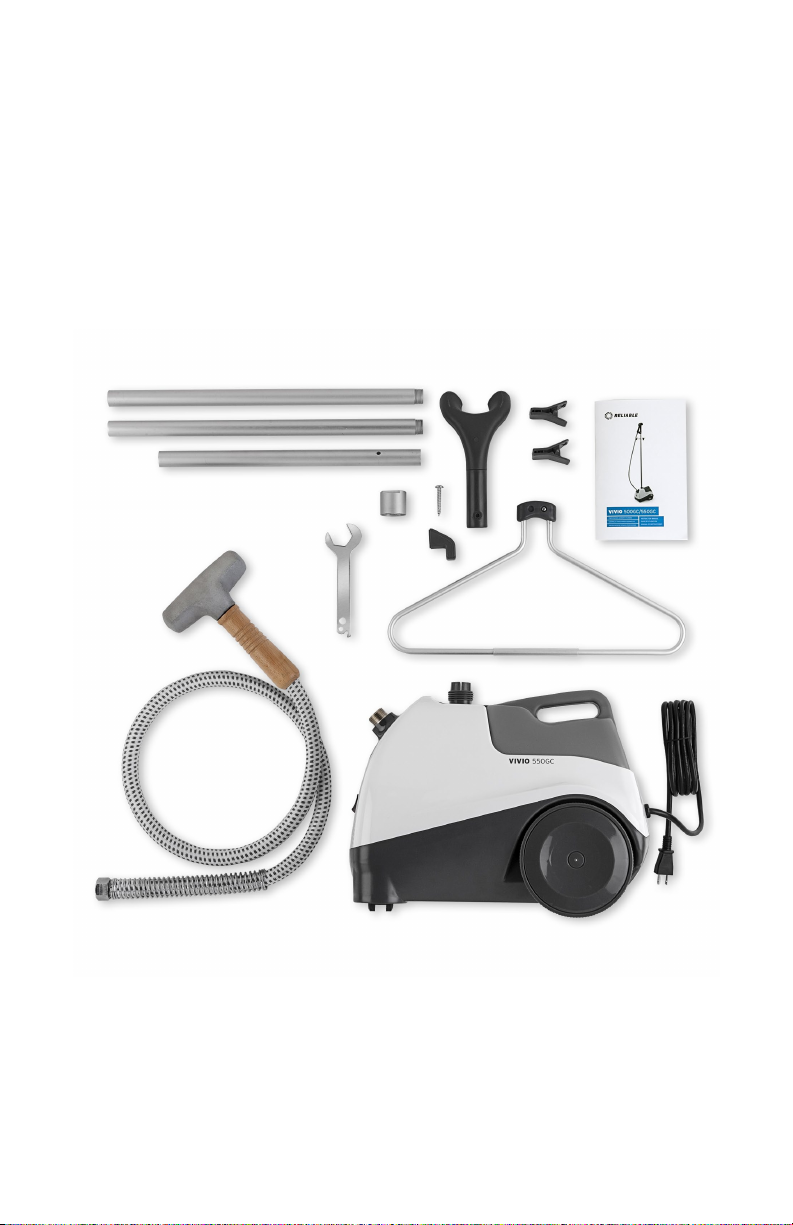
WHAT'S IN THE BOX - VIVIO 550GC
QU'Y A-T-IL DANS LA BOITE - VIVIO 550GC
QUÉ HAY EN LA CAJA - VIVIO 550GC
03
VIVIO 550GC PARTS IDENTIFIER
ENGLISH
1 Metal steam head
2 Wood handle
3 Hanger
4 Steam hose
5 Rod set (supports steam hose)
6 Bottle
7 Rod set holder
8 Body of steamer
9 Wheels
10 Casters
FRANÇAIS
1 Collecteur de vapeur métallique
2 Manette en bois
3 Cintre
4 Boyau de vapeur
5 Ensemble de tirant
(soutient le boyau de vapeur)
6 Bouteille
7 Support pour ensemble de tirant
8 Corps du vaporisateur
9 Volants
10 Roulettes
ESPAÑOL
1 Cabezal de vapor metálico
2 Mango de madera
3 Percha
4 Manguera de vapor
5 Varilla (soporta la manguera de vapor)
6 Botella
7 Soporte de la varilla
8 Cuerpo del vaporizador
9 Ruedas
10 Rueditas
1
2
3
4
5
7
6
8
9
10
04

VIVIO 500GC & VIVIO 550GC
INSTRUCTION MANUAL
ENGLISH
05

RELIABLE. RIGHT THERE WITH YOU.
At Reliable, we do what we love, and take pride in doing it right.
You want what’s best for the people, places and things that matter
in your life – from where you live to what you wear. So do we. From
the start, we approach every product with a craftsman’s attention
to detail and passion for making it right. Quality, functionality,
design and customer service play an equally important part in
delivering what’s right for you.
With its vigorous, firm stance the 500GC/550GC was designed
to withstand the rigor of daily retail use while presenting a
totally new, fresh face that will fit into any modern retail or home
environment.
For your safety and to fully enjoy the advantages of this product,
please take a few minutes to read all the important safeguards and
care instructions. Keep this manual handy and review the product
warranty for your reference.
THANK YOU FOR YOUR PURCHASE. PLEASE SHARE YOUR
RELIABLE PRODUCT EXPERIENCE BY POSTING AN ONLINE
REVIEW ON THE WEBSITE FROM WHICH YOU PURCHASED.
WE GREATLY APPRECIATE IT!
06

IMPORTANT SAFETY
INSTRUCTIONS
Your Reliable Vivio 500GC/Vivio 550GC steamer is made for professional and
home use. Please follow these basic instructions to ensure your safety:
• Read all instructions before using the steamer.
• In order to prevent harm, when the steamer begins to steam, be sure to face the
steam head away from your body.
• Use the steamer only for its intended use.
• To protect against electrical shock, do not immerse the steamer in water or
other liquids.
• To disconnect the plug from the wall outlet, gently remove the plug (do not pull
on the cord).
• Do not allow the cord to touch a hot surface. After use, allow to completely
cool before storage.
• When filling with water, emptying or while not in use, always make sure that the
steamer is disconnected.
• Make sure the power switch is in the off position when plugging or unplugging
the unit from the wall circuit.
• Before turning the power switch on, make sure the water bottle has been filled.
• Do not operate the garment steamer with a damaged cord, plug or if the steamer
has been dropped or damaged. This will void any and all warranties. Please
contact the place of purchase for repair procedure.
• Close supervision is necessary for any steamer being used by or near children.
Do not leave the steamer unattended while connected
• Burns could occur from touching hot metal parts, hot water, or steam. Use care
when you turn a steam appliance upside down - there may be hot water in the
reservoir.
• Never steam near a person’s body, as the steam is extremely hot.
• If an extension cord is necessary, use a 15 amp rated cord. Cords rates for less
amperage may overheat. Care should be taken to arrange the cord so that the
cord cannot be pulled or tripped over.
• To reduce the likelihood of a circuit overload, do not operate another high wattage
appliance on the same circuit.
SAVE THESE INSTRUCTIONS
07

FEATURES & PERFORMANCE
• One-gallon (3.8L) water capacity
• Heavy-duty brass heating element
• Super-flex steam hose
• Bottle won't fall off steamer
• No need to empty steamer after each use
• Automatic shut-off feature with thermal fuse
• Stores upright in a small space
• Steam head – 2x the thickness of other brands (Vivio 500GC model)
• Removable brush (Vivio 500GC model)
• Metal head with wood handle (Vivio 550GC model)
• Easy roll casters for maneuverability
HOW TO STEAM
Fabric care professionals know and appreciate the value of steam for gently
de-wrinkling all type of fabrics. Fabric steaming is fast and safe, and has a myriad
of applications including clothing, upholstery, (auto and home) window fashions, and
linens. Your Reliable Vivio 500GC/Vivio 550GC garment steamer has been designed to
provide the best quality steam for these tasks. Here are a few tips:
1. It is important to make sure that the steam hose is in an upright (vertical)
position so that any condensation can flow back to the steamer. If you do have
to steam in a low position it is suggested that you frequently lift the steam head
up so that the hose is extended.
2. For very long articles, like pants or coats, it might be helpful to put the garment
on the Vivio's available hanger.
3. This will allow you to steam higher up, and reduce the chance of condensation
forming in the steam hose.
4. It may be helpful to gently pull the bottom of the garment (hem) to allow
the steam to penetrate the fabric and release the wrinkles. This may be
particularly useful at the seam of a garment.
5. It is not necessary to “push” the steam head onto the fabric. Lightly touching
the material is all that is usually needed. For fabrics with a nap (corduroy, velvet,
velour), the brush that is included with the Vivio 500GC model is very helpful for
refreshing the fabric while protecting the nap of the fabric.
6. Some garments may react better if they are steamed from the inside.
7. Retail clothing stores know the advantage of having a garment steamer on the
sales floor, ready for quick touch ups to make the garment look like new again.
While you can easily store the Vivio 500GC/Vivio 550GC when not in use (the
water should be drained from the unit if it will be stored for a long period of
time) the best way to use the steamer is like the pros. Have it in a convenient
spot where you will use it the most frequently. For some people that would be
in their laundry room, for others it’s in their bedroom. Because the Vivio 500GC/
Vivio 550GC heats up so quickly (less than one minute) it is the perfect solution to the un-wearable wrinkled blouse or sweater. Plug it in, turn it on, sixty
seconds later a few waves of the steam head and you are looking your best…
everyday.
08
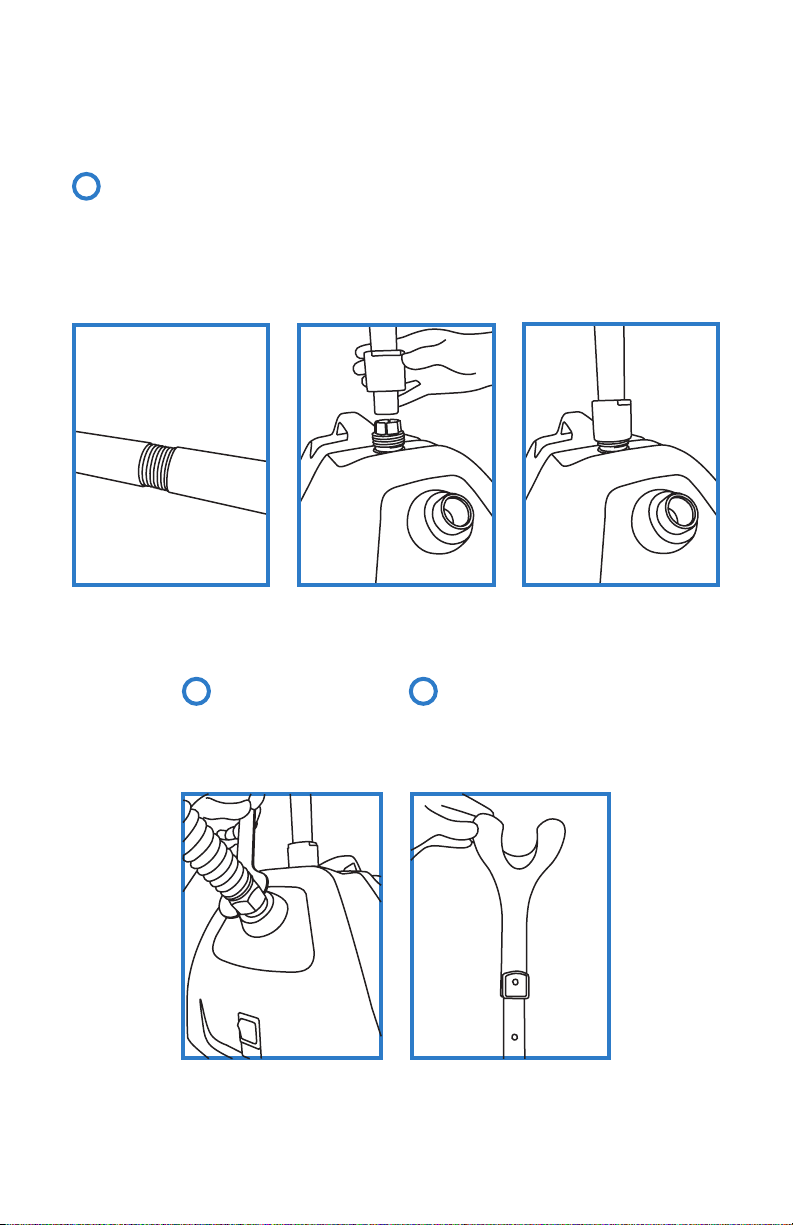
ASSEMBLY INSTRUCTIONS
1
The 3-piece rod set that holds
up the steam head needs to be
screwed together. When done, place
the rod set into the rest that holds
it in place and tighten until secure.
09
2 3
With the supplied wrench (found
underneath the unit), attach the
hose to the body of the steamer
and tighten until it is snug.
Place the yoke/rest onto the top
of the rod set.

4
The hook needs to be attached
to the rod set using the screw
provided. Use this hook to rest
the removable hanger.
INSTRUCTIONS FOR USE
The Vivio 500GC/Vivio 550GC is easy to use, and easy to set up.
1. The clothing clips can be added or removed from the hanger.
2. Remove the cap from the water bottle. Fill the water bottle with regular tap
or distilled water; replace the cap and invert the bottle, placing
it in the body of the steamer.
3. Always make sure there is water in the bottle. DO NOT ALLOW THE STEAMER
TO RUN DRY.
4. Turn the unit on, wait for about sixty seconds for the steam to start.
5. It is a good idea to periodically pour old water out of the steamer to avoid
mineral build-up.
NOTE: If rinsing the unit does not improve the performance, the steamer
may require more thorough cleaning. This must be done by an authorized service
center only, or the warranty will be void.
10

TROUBLESHOOTING
Do not operate the garment steamer with a damaged cord, plug or if the steamer
has been dropped or damaged. To avoid risk of electric shock, do not disassemble
or attempt to repair the unit on your own. Return the unit to Reliable Corporation
(see warranty) for examination, repair or replacement.
PROBLEM
Steamer does not get
hot.
The unit is not
producing steam.
Unit produces little
steam
and cycles on/off.
The switch light does
not illuminate when the
switch is turned to the on
position.
Water drips from nozzle.
POSSIBLE CAUSES
1. Steam unit is not
plugged
in or turned on.
2. Automatic shut-off has
engaged. The water
bottle is empty and the
reservoir has drained.
1. Water level is too low.
2. Element may not be
functioning.
1. Unit is dirty and
requires cleaning.
2. The thermostat may be
defective.
1. Switch is not working.
2. Cord is not good.
3. Fuse wire is bad.
4. The outlet may not
have power.
1. Condensation has
formed inside the
steamer hose.
REMEDY
1. Plug the steamer in.
Turn it on.
2. Push the on/off switch
to the off position. Fill
the water bottle and
fit it in place. Turn on.
1. Push the on/off switch
to the off position.
Refill the water bottle
and fit it in place. Turn
on.
2. Replace heating
element.
1. Throw the old water
out
and flush the unit.
2. Replace thermostat.
1. Replace part.
2. Replace part.
3. Replace part.
4. Try plugging into a
different outlet.
1. Hold the hose upright
and allow to drain back
into the base of the
unit.
11
 Loading...