

Page 1

PROFESSIONAL GARMENT STEAMERS
CENTRALES VAPEUR PROFESSIONNELLES
VAPORIZADOR DE PRENDAS PROFESSIONAL
INSTRUCTION MANUAL
GUIDE D’UTILISATION
MANUAL DE INSTRUCCIONES
VIVIo SERIES
Page 2

VIVIO 100GC & VIVIO 150GC PARTS IDENTIFIER 01
INSTRUCTION MANUAL ENGLISH 03
GUIDE D’UTILISATION FRANÇAIS 13
MANUAL DE INSTRUCCIONES ESPAÑOL 23
Page 3

01
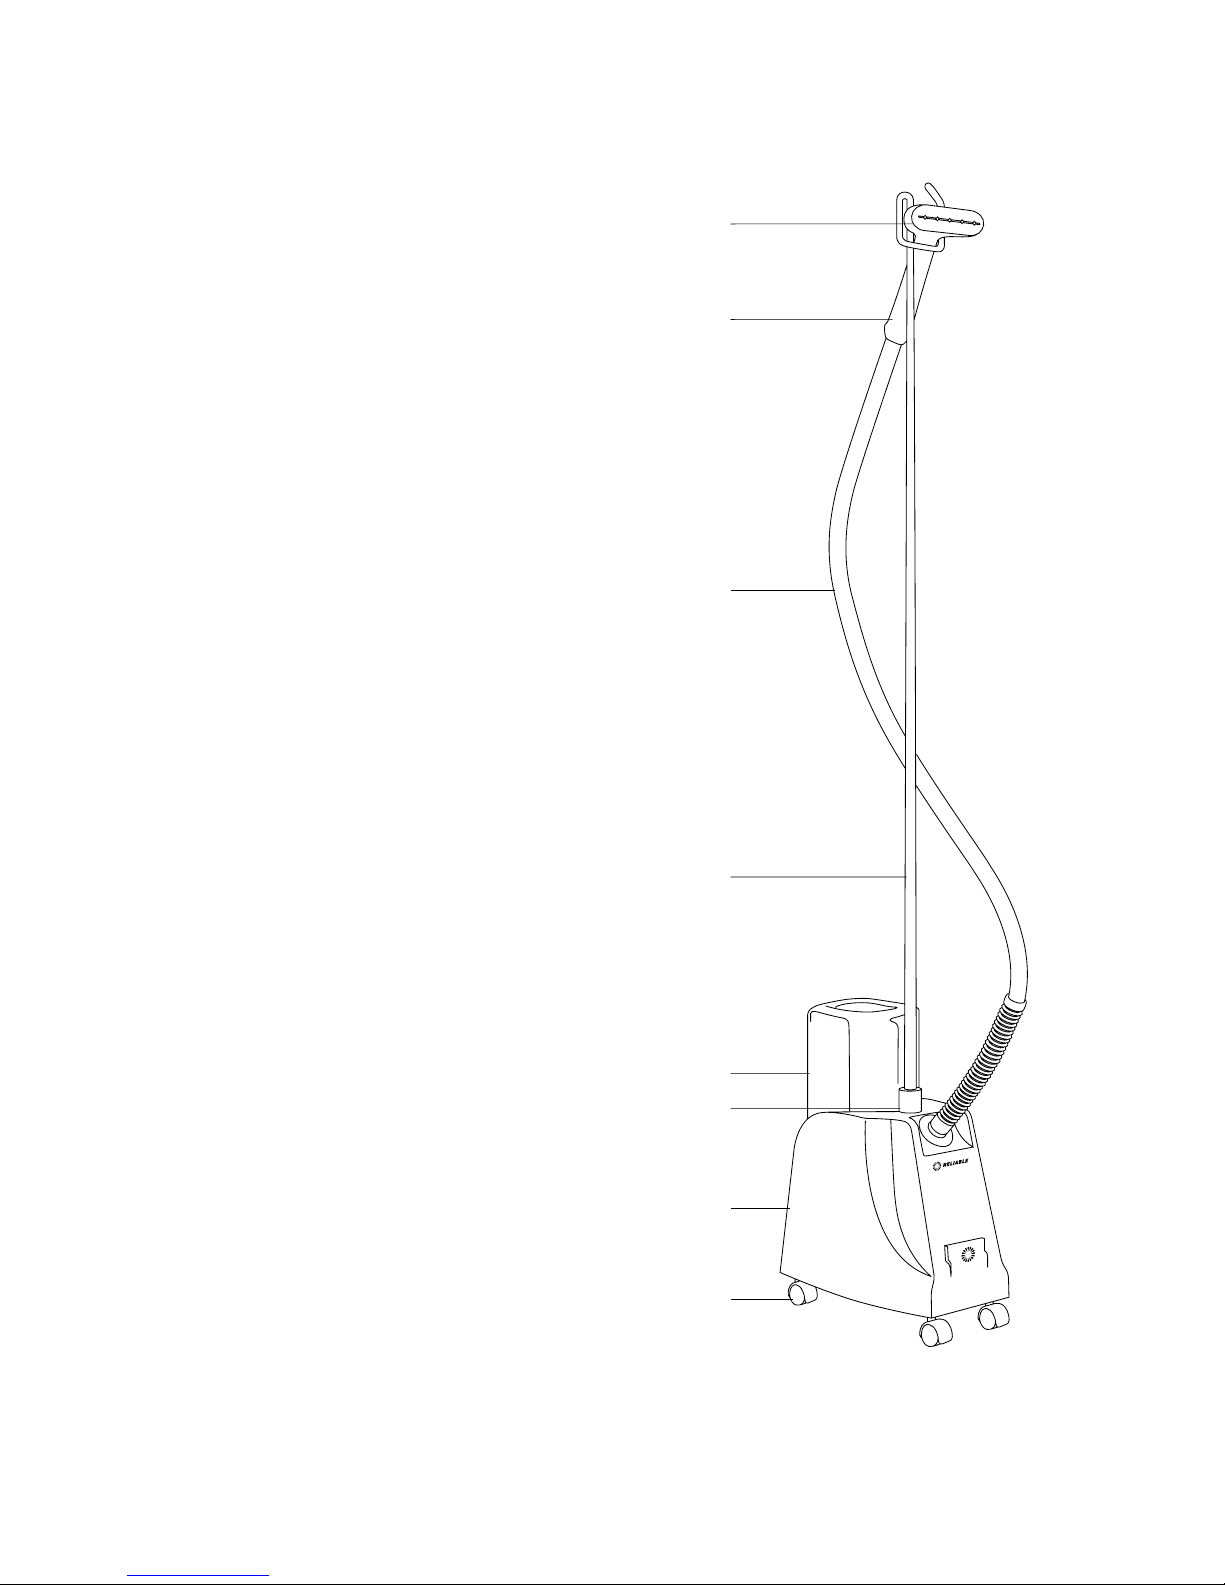
VIVIO 100GC PARTS IDENTIFIER
ENGLISH
1 Brush (removable)
2 Steam head
3 Handle
4 Steam hose
5 Rod set (supports steam hose)
6 Bottle
7 Rod set holder
8 Body of steamer
9 Wheels
FRANÇAIS
1 Brosse (amovible)
2 Collecteur de vapeur
3 Manette
4 Boyau de vapeur
5 Ensemble de tirant
(soutient le boyau de vapeur)
6 Bouteille
7 Support pour ensemble de tirant
8 Corps du vaporisateur
9 Volants
ESPAÑOL
1 Cepillo (para remover)
2 Cabezal de vapor
3 Mango
4 Manguera de vapor
5 Varilla (soporta la manguera de vapor)
6 Botella
7 Soporte de la varilla
8 Cuerpo del vaporizador
9 Ruedas
3
1
2
4
5
6
7
8
9
Page 4
02
VIVIO 150GC PARTS IDENTIFIER
ENGLISH
1 Metal steam head
2 Wood handle
3 Steam hose
4 Rod set (supports steam hose)
5 Bottle
6 Rod set holder
7 Body of steamer
8 Wheels
FRANÇAIS
1 Collecteur de vapeur métallique
2 Manette en bois
3 Boyau de vapeur
4 Ensemble de tirant
(soutient le boyau de vapeur)
5 Bouteille
6 Support pour ensemble de tirant
7 Corps du vaporisateur
8 Volants
ESPAÑOL
1 Cabezal de vapor metálico
2 Mango de madera
3 Manguera de vapor
4 Varilla (soporta la manguera de vapor)
5 Botella
6 Soporte de la varilla
7 Cuerpo del vaporizador
8 Ruedas
2
1
3
4
5
6
7
8
Page 5

03
VIVIO 100GC & VIVIO 150GC
INSTRUCTION MANUAL
ENGLISH
Page 6

04
Thank you for purchasing the Reliable™ Vivio 100GC/Vivio
150GC garment steamer. Please follow the instructions carefully.
With proper care and maintenance, your steamer will provide
years of dependable service.
IMPORTANT SAFETY INSTRUCTIONS
Your Reliable™ Vivio 100GC/Vivio 150GC steamer is made for professional and
home use. Please follow these basic instructions to ensure your safety:
• Read all instructions before using the steamer.
• Use the steamer for its intended use only.
• In order to prevent harm, when the steamer begins to steam, be sure to face the
steam head away from your body.
• To protect against electrical shock, do not immerse the steamer in water or
other liquids.
• To disconnect the plug from the wall outlet, gently remove the plug (do not pull
on the cord).
• Do not allow the cord to touch a hot surface. After use, allow to completely
cool before storage.
• When filling with water, emptying or while not in use, always make sure that the
steamer is disconnected.
• Make sure the power switch is in the off position when plugging or unplugging
the unit from the wall circuit.
• Before turning the power switch on, make sure the water bottle has been filled.
• Do not operate the garment steamer with a damaged cord, plug or if the steamer
has been dropped or damaged. This will void any and all warranties. Please contact the place of purchase for repair procedure.
• Close supervision is necessary for any steamer being used by or near children.
Do not leave the steamer unattended while connected
• Caution must be used when the steamer is on, as some parts can get very hot.
Please use care when you turn a steamer upside down as there may be hot
water in the reservoir.
• Never steam near a person’s body, as the steam is extremely hot.
• If an extension cord is necessary, use a 15 amp heavy-duty grounded extension
cord only.
Page 7

05
FEATURES & PERFORMANCE
• One-gallon (3.8L) water capacity
• Heavy-duty brass heating element
• Super-flex™ steam hose
• Bottle wont fall off steamer
• No need to empty steamer after each use
• Automatic shut-off feature with thermal fuse
• Stores upright in a small space
• Steam head – 2x the thickness of other brands (Vivio 100GC model)
• Removable brush (Vivio 100GC model)
• Metal head with wood handle (Vivio 150GC model)
• Easy roll casters for maneuverability
HOW TO STEAM
Fabric care professionals know and appreciate the value of steam for gently
de-wrinkling all type of fabrics. Fabric steaming is fast and safe, and has a myriad
of applications including clothing, upholstery, (auto and home) window fashions, and
linens. Your Reliable Vivio 100GC/Vivio 150GC garment steamer has been designed
to provide the best quality steam for these tasks. Here are a few tips:
1. It is important to make sure that the steam hose is in an upright (vertical)
position so that any condensation can flow back to the steamer. If you do
have to steam in a low position it is suggested that you frequently lift the
steam head up so that the hose is extended.
2. For very long articles light pants or coats, it might be helpful to put the garment
on a hanger and place the hanger on the top of a doorframe (or any high shelf
that would accommodate a hanger).
3. This will allow you to steam higher up, and reduce the chance of condensation
forming in the steam hose.
4. It may be helpful to gently pull the bottom of the garment (hem) to allow
the steam to penetrate the fabric and release the wrinkles. This may be
particularly useful at the seam of a garment.
5. It is not necessary to “push” the steam head onto the fabric. Lightly touching
the material is all that is usually needed. For fabrics with a nap (corduroy,
velvet, velour), the brush that is included with the Vivio 100GC model is very
helpful for refreshing the fabric while protecting the nap of the fabric.
Page 8

06
HOW TO STEAM CONTINUED…
6. Some garments may react better if they are steamed from the inside.
7. Retail clothing stores know the advantage of having a garment steamer on
the sales floor, ready for quick touch ups to make the garment look like new
again. While you can easily store the Vivio 100GC/Vivio 150GC when not in
use (the water should be drained from the unit if it will be stored for a long
period of time) the best way to use the steamer is like the pros. Have it in a
convenient spot where you will use it the most frequently. For some people
that would be in their laundry room, for others it’s in their bedroom. Because
the Vivio 100GC/Vivio 150GC heats up so quickly (less than one minute) it is
the perfect solution to the un-wearable wrinkled blouse or sweater. Plug it
in, turn it on, sixty seconds later a few waves of the steam head and you are
looking your best… everyday.
DIRECTIONS FOR USE
The Vivio 100GC/Vivio 150GC is easy to use, and easy to set up.
1. The 3-piece rod set that holds up the steam head needs to be screwed
together. When done, place the rod set into the device that holds it in place.
2. With the supplied wrench, attach the hose to the body of the steamer and
tighten until it is snug.
3. The same wrench can also be used for tightening the device that holds the rod
set. The steam head can be placed in the upper portion of the rod set until
it is ready for use.
4. Remove the cap from the water bottle. Fill the water bottle with regular tap
or distilled water; replace the cap and invert the bottle, placing
it in the body of the steamer.
5. Always make sure there is water in the bottle. DO NOT ALLOW THE STEAMER
TO RUN DRY.
6. Turn the unit on, wait for about sixty seconds for the steam to start.
7. It is a good idea to periodically pour old water out of the steamer to avoid
mineral build-up.
NOTE: If rinsing the unit does not improve the performance, the steamer
may require more thorough cleaning. This must be done by an authorized service
center only, or the warranty will be void.
Page 9

07
TROUBLESHOOTING
Do not operate the garment steamer with a damaged cord, plug or if the steamer
has been dropped or damaged. To avoid risk of electric shock, do not disassemble
or attempt to repair the unit on your own. Return the unit to Reliable Corporation
(see warranty) for examination, repair or replacement.
PROBLEM
Steamer does not get hot.
The unit is not
producing steam.
Unit produces little steam
and cycles on/off.
The switch light does not
illuminate when the switch is
turned to the on position.
Water drips from nozzle.
REMEDY
1. Plug the steamer in.
Turn it on.
2. Push the on/off switch to
the off position. Fill the
water bottle and fit it in
place. Turn on.
1. Push the on/off switch to
the off position. Refill the
water bottle and fit it in
place. Turn on.
2. Replace heating element.
1. Throw the old water out
and flush the unit.
2. Replace thermostat.
1. Replace part.
2. Replace part.
3. Replace part.
4. Try plugging into a different
outlet.
1. Hold the hose upright and
allow to drain back into the
base of the unit.
POSSIBLE CAUSES
1. Steam unit is not plugged
in or turned on.
2. Automatic shut-off has
engaged. The water bottle
is empty and the reservoir
has drained.
1. Water level is too low.
2. Element may not be
functioning.
1. Unit is dirty and requires
cleaning.
2. The thermostat may be
defective.
1. Switch is not working.
2. Cord is not good.
3. Fuse wire is bad.
4. The outlet may not have
power.
1. Condensation has formed
inside the steamer hose.
Page 10
08
G4
1
2
3
20
21
22
23
24
25
26
27
28
29
30
31
32
33
34
35
36
37
38
39
4
40
41
42
43
44
45
5
6
7
8
11
12
13
14
15
16
17
18
19
9
10
Page 11

09
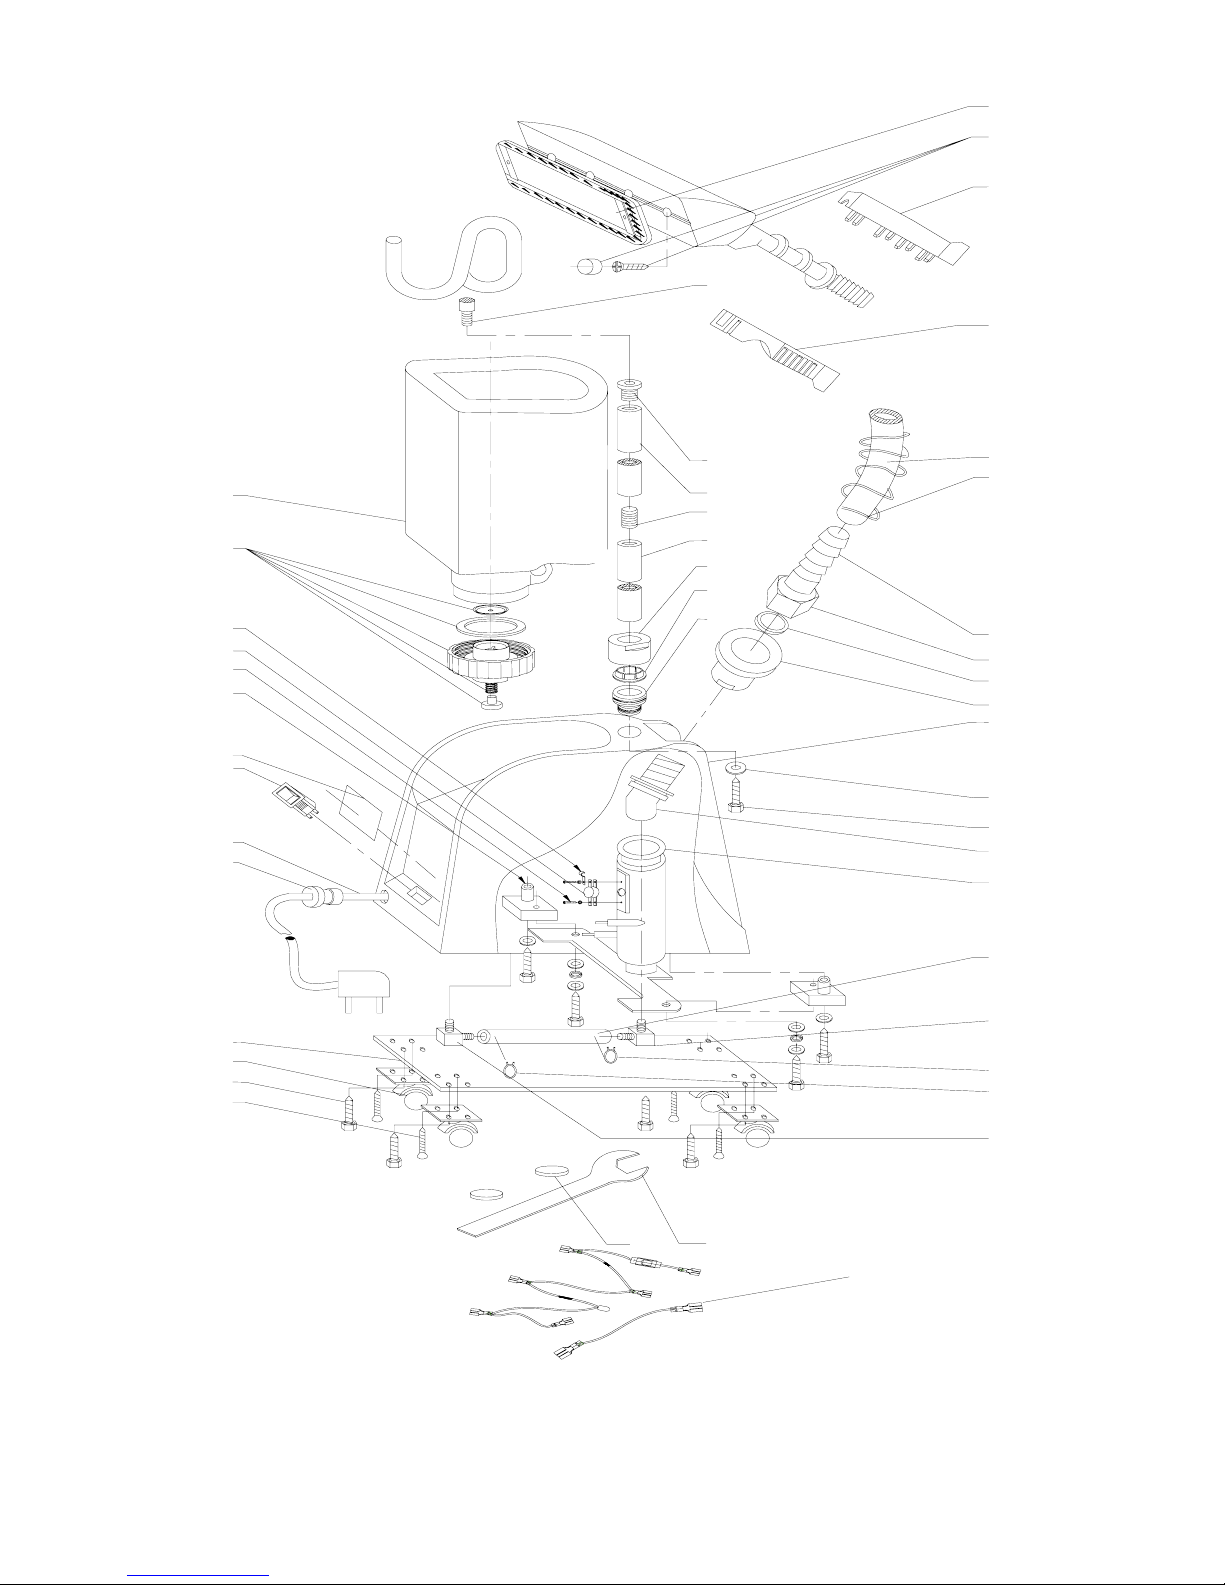
VIVIO 100GC PARTS LIST
REF. NO. PART NUMBER DESCRIPTION
1 HS-3 Outer Housing
2 HS-9 Cap
3 HS-10 Hose Barb Nut
4 HS-11 Hose Barb
5 HS-12 Spring
6 HS-14W Hose
7 HS-20 Handle Cover Bottom
8 HS-21 Handle Cover Top
9 HS-22/23 Steam Head
10 HS-32 Brush
11 HS-19 Hanger Rod Top
12 HS-18 Nut Cap
13 HS-17 Hanger Rod Middle
14 HS-16 Threaded Connector
15 HS-24 Hanger Rod Bottom
16 HS-13 Rod Base
17 HS-29 Rod Base washer
18 HS-28 Rod Base Fitting
19 HS-8 Washer
20 GB818-85 Screw
21 HS-7 Element Cap
22 HS-2-0 Heater element
23 HS-1-0 Silicone Tubing
24 HS-4 Elbow Connector
25 HS-SP Spanner
26 HS-MAG Magnet
27 GB845-85 Screw
28 GB5285-85 Screw
29 HS-A-6 Caster
30 HS-1 Base Plate
31 HS-2W Cord Bushing
32 HS-A-3 Power Cord
33 HS-A-1 On/Off Switch
34 HS-27W Name Plate
35 HS-25 Footer
36 GB818-85 Screw
37 HS-A-2 Thermostat
38 HS-A-5 Clamp
39 HS-A-4 Fuse
40 HS-5 Bottle Cap
41 HS-15 Water Bottle
42 HS-4 Elbow (same as HS-4)
43,44 HS-CLIP Clip
45 HS-SEAL Seal
ASSEMBLIES: NOT SHOWN IN DIAGRAM
HHC Plastic Head and Handle Complete
HSHHC Plastic Head/Handle w/Hose Complete
HSMHHC Metal Head w/Hose Complete
HS-HR Hanger Rod Complete
Page 12

10
G4m
1
2
3
20
21
22
23
2425
26
27
28
29
30
31
32
33
34
35
36
37
38
39
4
40
41
42
43
44
45
46
5
6
7
8
11
12
13
14
15
16
17
18
19
9
10
Page 13

11
VIVIO 150GC PARTS LIST
REF. NO. PART NUMBER DESCRIPTION
1 HS-3 Outer Housing
2 HS-9 Cap
3 HS-10 Hose Barb Nut
4 HS-11 Hose Barb
5 HS-12 Spring
6 HS-14W Hose
7-9,45,46 METALH Metal Head w/Wood Handle
10 HS-19 Hanger Rod Top
11 HS-18 Nut Cap
12 HS-17 Hanger Rod Middle
13 HS-16 Threaded Connector
14 HS-24 Hanger Rod Bottom
15 HS-13 Rod Base
16 HS-29 Rod Base washer
17 HS-28 Rod Base Fitting
18 HS-8 Washer
19 GB818-85 Screw
20 HS-7 Element Cap
21 HS-2-0 Heater element
22 HS-1-0 Silicone Tubing
23 HS-4 Elbow Connector
24 HS-SP Spanner
25 HS-MAG Magnet
26 GB845-85 Screw
27 GB5285-85 Screw
28 HS-A-6 Caster
29 HS-1 Base Plate
30 HS-2W Cord Bushing
31 HS-A-3 Power Cord
32 HS-A-1 On/Off Switch
33 HS-27W Name Plate
34 HS-25 Footer
35 GB818-85 Screw
36 HS-A-2 Thermostat
37 HS-A-5 Clamp
38 HS-A-4 Fuse
39 HS-5 Bottle Cap
40 HS-15 Water Bottle
41 HS-4 Elbow (same as HS-4)
42,43 HS-CLIP Clip
44 HS-SEAL Seal
ASSEMBLIES: NOT SHOWN IN DIAGRAM
HHC Plastic Head and Handle Complete
HSHHC Plastic Head/Handle w/Hose Complete
HSMHHC Metal Head w/Hose Complete
HS-HR Hanger Rod Complete
Page 14

Reliable Corporation (“Reliable”) warrants to the original purchaser of the garment steamer
noted above from Reliable (the “Vivio”) that for a period of three (3) years from the date of
purchase it will be free from defects in materials and workmanship when utilized for
normal
use by the original purchaser only.
Subject to the conditions and limitations set forth herein, Reliable will either repair or replace
any part of a Vivio that proves defective by reason of improper workmanship or materials. If
the defective Vivio is no longer available and cannot be repaired effectively or replaced with an
identical model, Reliable shall replace the defective machine with a current Reliable machine of
equal or greater value. Replacement products will be provided by Reliable on an exchange basis,
and will be either new or refurbished to be functionally equivalent to new. If Reliable is unable to
replace a Vivio, it will refund the current value of that Reliable machine at the time the warranty
claim is made.
This limited warranty does not cover any damage to the Vivio that results from improper
installation, accident, abuse, misuse, unreasonable use, natural disaster, abnormal mechanical or
environmental conditions or any unauthorized disassembly, repair or modification. This limited
warranty does not extend to any indirect, consequential or incidental damages that may be
suffered by a user from the use of the Reliable Vivio, including without limitation, any liability
for third party claims for damage, and is limited to the amount paid by the original purchaser
for the Vivio with respect to which this limited warranty protection applies. This limited warranty
does not apply with respect to products that have been altered or for products not purchased
directly from Reliable or a dealer authorized by Reliable to sell the Reliable Vivio.
This limited warranty is the only warranty that applies to the Reliable Vivio garment steamer,
supersedes any and all terms that may be contained in any other document or purchase order
and may not be altered or amended except expressly in writing by Reliable.
To obtain a repair or replacement under the terms of this warranty, please contact our customer
service group at 1 800 268 1649 or at support@reliablecorporation.com. You will be required
to submit an original receipt via fax or e-mail. The receipt must reflect that you are the original
purchaser, the product was bought directly from Reliable or from an authorized Reliable dealer
and that the warranty claim is being made in compliance with the terms set out in this document
or any subsequent document issued by Reliable in connection with this policy. You will be issued
a return authorization number (RA#) and asked to ship the defective product together with
proof of purchase and RA#, prepaid insured to the following address: Reliable Corporation,
5–100 Wingold Ave, Toronto, ON M6B 4K7.
Freight collect shipments will be refused. The risk of loss or damage in transit will be borne
by the customer. Once Reliable receives the defective product, it will initiate the repair or
replacement process.
If you have any questions regarding this warranty, you may write to:
Reliable Corporation
100 Wingold Avenue, Unit 5
Toronto, Ontario
Canada M6B 4K7
www.reliablecorporation.com
RELIABLE CORPORATION 3-YEAR
PRODUCT WARRANTY POLICY FOR THE
VIVIO GARMENT STEAMER (MODEL
100GC + 150GC)
Page 15

13
VIVIO 100GC & VIVIO 150GC
GUIDE D’UTILISATION
FRANÇAIS
Page 16

14
Merci d’avoir acheté un centrale vapeur ReliableMC
Vivio 100GC/Vivio 150GC. Veuillez suivre les consignes suivantes
attentivement. Prenez bien soin de votre défroisseur et de son
entretien an de lui assurer plusieurs années de service able.
IMPORTANTES CONSIGNES DE SÉCURITÉ
Votre défroisseur ReliableMC Vivio 100GC/Vivio 150GC est construit pour l’usage
professionnel ainsi que ménager. Suivez toujours les précautions suivantes pour
assurer votre sécurité :
• Lire toutes les instructions avant l’utilisation de votre défroisseur.
• N’utilisez votre défroisseur que pour les applications prévues.
• Pour éviter les blessures, assurez-vous de pointer le diffuseur de vapeur loin
du corps aussitôt que la vapeur commence à s’échapper de l’appareil.
• Pour réduire tout risque de choc électrique, n’immersez jamais votre appareil
dans l’eau ou tout autre liquide.
• Ne débranchez jamais le défroisseur en tirant sur le cordon électrique, saisissez
plutôt la fiche d’alimentation et retirez-la de la prise de courant.
• Protégez le cordon des surfaces chaudes. Après chaque utilisation, laissez
l’appareil refroidir avant de le ranger.
• Assurez-vous que l’appareil est débranché lors du remplissage et du vidage ainsi
que lorsque l’appareil n’est pas utilisé.
• Assurez-vous que l’interrupteur est en position d’arrêt (OFF) avant de brancher
ou de débrancher l’appareil d’une prise de courant.
• Assurez-vous que le bac d’eau a été rempli avant de mettre le défroisseur
en marche.
• N’utilisez pas le centrale vapeur si le cordon ou la fiche est endommagé ou si
l’appareil a été échappé ou endommagé. Toute garantie ne sera plus valable.
Veuillez contacter le magasin d’achat pour toute réparation nécessaire.
• Une étroite surveillance est nécessaire lorsque cet appareil est utilisé par ou près
d’un enfant. Ne jamais laisser un appareil branché sans surveillance.
• Soyez prudent lorsque le défroisseur est en marche puisque certains de ses composants peuvent devenir très chauds. Veuillez inverser le défroisseur avec le
plus grand soin puisque le réservoir pourrait encore contenir de l’eau chaude.
• N’utilisez jamais le défroisseur près du corps puisque la vapeur est extrêmement
chaude.
• Si une rallonge est nécessaire, n’utilisez qu’une rallonge robuste de 15 A avec
mise à la terre.
Page 17

15
CARACTÉRISTIQUES ET PERFORMANCE
• Capacité d’eau – 3.8 litres (1 Gal)
• Élément chauffant durable en laiton
• Tuyau à vapeur Super-flex
MC
• Bac d’eau restant bien en place
• Aucun besoin de vider l’appareil après chaque usage
• Arrêt automatique de sécurité avec fusible thermique
• Se range verticalement dans un espace restreint
• Diffuseur de vapeur – 2 fois l’épaisseur d’autres marques (modèle Vivio 100GC)
• Brosse amovible (modèle Vivio 100GC)
• Diffuseur en métal avec poignée en bois (modèle Vivio 150GC)
• Roulettes facilitant le déplacement
COMMENT DÉFROISSER
Les professionnels d’entretien de textiles connaissent et apprécient la valeur de la
vapeur pour enlever doucement les plis de toutes sortes de tissus. Le défroissage
de tissus grâce à la vapeur a plusieurs applications telles les vêtements, les tissus
d’ameublement (auto et maison), les tentures et les literies tout en étant rapide et
sécuritaire. Votre centrale vapeur Reliable Vivio 100GC/Vivio 150GC a été conçu
pour offrir la meilleure qualité de vapeur requise pour ces tâches. Voici quelques
suggestions:
1. Il est important de s’assurer que le tuyau à vapeur soit dans une position
verticale pour que toute condensation s’égoutte dans le réservoir. Si vous
devez travailler dans une position horizontale, il est préférable de lever le
diffuseur de vapeur fréquemment afin que le tuyau puisse s’égoutter.
2. Pour des articles longs tels des pantalons ou un manteau, il est suggéré de les
placer sur un porte-vêtement soutenu par le haut d’un cadre de porte
(ou toute étagère haute pouvant soutenir un porte-vêtement).
3. Cette méthode garde le tuyau de vapeur vertical et permet de réduire la
formation de condensation dans ce dernier.
4. Il est suggéré de tirer doucement sur le bas du vêtement (ourlet) pour
permettre à la vapeur de pénétrer le tissu et relâcher les plis. Cela pourrait
être utile particulièrement près des coutures d’un vêtement.
5. Il n’est pas nécessaire de forcer le diffuseur dans le tissu. Il est habituellement
suffisant de toucher le matériel légèrement. La brosse qui accompagne
le modèle Vivio 100GC est très utile pour rafraîchir les tissus avec poil (velours,
velours côtelé, velours épais) tout en protégeant le poil du tissu.
Page 18

COMMENT DÉFROISSER CONTINUÉ...
6. Certains vêtements semblent mieux se défroisser à partir de l’intérieur.
7. Les magasins de vêtements reconnaissent les bénéfices d’avoir un défroisseur
à portée de la main pour les dernières retouches offrant une présentation parfaite à tous leurs vêtements. Bien que vous pouvez ranger le Vivio 100GC/Vivio
150GC avec de l’eau dans le réservoir entre les usages, il vaut mieux le vider
pour un rangement prolongé. La meilleure façon de l’utiliser est d’imiter les
professionnels. Le défroisseur devrait être gardé dans un endroit où il sera facile d’accès et où vous l’utiliserez fréquemment : pour certaines personnes, ce
sera leur salle de lavages et pour d’autres, leur chambre à coucher. Puisqu’il
se réchauffe tellement rapidement, le Vivio 100GC/Vivio 150GC est la solution
idéale pour un vêtement qu’on ne peut porter tant il est froissé. Branchez le
défroisseur, mettez-le en marche et soixante secondes plus tard il ne suffit
que de quelques passes avec le diffuseur pour être à votre meilleur… comme
toujours.
MODE D’EMPLOI
Le Vivio 100GC/Vivio 150GC est facile d’emploi et simple à assembler.
1. Les trois tiges qui soutiennent le diffuseur doivent être vissées ensemble.
Ensuite, placez les tiges assemblées dans le dispositif les tenant en place.
2. Attachez le tuyau au corps du défroisseur à l’aide de la clé fournie et
serrez jusqu’à ce qu’il soit bien ajusté.
3. La même clé peut être utilisée pour ajuster le dispositif tenant l’ensemble
de tiges. Le diffuseur de vapeur peut être accroché à la partie supérieure
de l’ensemble de tiges jusqu’à son utilisation.
4. Enlevez le bouchon du bac d’eau. Remplissez le bac avec de l’eau du robinet ou
de l’eau distillée; replacer le bouchon et inversez le bac en le plaçant
sur la base du défroisseur.
5. Assurez-vous toujours qu’il y a de l’eau dans le bac. NE PERMETTEZ PAS
AU DÉFROISSEUR DE MANQUER D’EAU.
6. Mettez l’appareil en marche et attendez environ 60 secondes pour obtenir
de la vapeur.
7. Il est préférable de vider l’eau sale du réservoir périodiquement afin
d’éviter les dépôts minéraux.
REMARQUE: Si un rinçage du défroisseur n’améliore pas sa performance,
l’appareil peut nécessiter un nettoyage en profondeur. Ce service ne doit être
effectué que par le personnel d’un centre de service après-vente autorisé
par le fabricant ou la garantie ne sera plus valable.
16
Page 19

DÉPANNAGE
N’utilisez jamais le centrale vapeur si le cordon ou la fiche de l’appareil est endommagé ou si l’appareil a été échappé ou endommagé. N’essayez jamais de démonter
ou de réparer vous-même le défroisseur afin d’éviter tout risque de choc électrique.
Pour inspection, réparation ou remplacement, veuillez apporter l’appareil
défectueux à Reliable Corporation (voir garantie).
PROBLÈME
Le défroisseur ne se
réchauffe pas.
L’appareil ne produit pas
de vapeur.
L’appareil produit peu
de vapeur et alterne
entre l’état de marche
(ON) et d’arrêt (OFF).
Le voyant de mise en
circuit ne s’illumine pas
lorsque l’interrupteur
est en position de
marche (ON).
De l’eau dégoutte du
diffuseur de vapeur.
SOLUTION
1. Branchez l’appareil.
Mettez l’appareil en marche.
2. Mettez l’interrupteur en
position d’arrêt (OFF).
Remplissez le bac d’eau et
mettez-le en place.
Mettez l’appareil en marche.
1. Mettez l’interrupteur en
position d’arrêt (OFF).
Remplissez le bac d’eau
et mettez-le en place.
Mettez l’appareil en marche.
2. Remplacez l’élément
chauffant.
1. Jetez l’eau sale et nettoyez
l’unité à grande eau.
2. Remplacez le thermostat.
1. Remplacez la pièce.
2. Remplacez la pièce.
3. Remplacez la pièce.
4. Essayez de brancher
l’appareil dans une prise
de courant différente.
1. Tenir le tuyau en position
verticale pour permettre
l’écoulement dans la base de
l’appareil.
CAUSE POSSIBLE
1. L’appareil n’est pas branché
ou en position de marche (ON).
2. L’arrêt automatique s’est
déclenché. Le bac d’eau est
vide et le réservoir s’est
égoutté.
1. Le niveau d’eau est trop bas.
2. Il est possible que l’élément
ne fonctionne pas.
1. L’appareil est sale et
nécessite un nettoyage.
2. Le thermostat peut
être défectif.
1. L’interrupteur ne fonctionne
pas.
2. Le cordon est endommagé.
3. Le fil fusible est défectueux.
4. La prise de courant n’est peutêtre pas alimentée de courant.
1. De la condensation s’est formée
à l’intérieur du tuyau
à vapeur.
17
Page 20

G4
1
2
3
20
21
22
23
24
25
26
27
28
29
30
31
32
33
34
35
36
37
38
39
4
40
41
42
43
44
45
5
6
7
8
11
12
13
14
15
16
17
18
19
9
10
18
Page 21

VIVIO 100GC – LISTE DES PIèCES
N° DE RÉF. NUMÉRO DE PIÈCE DESCRIPTION
1 HS-3 Boîtier extérieur
2 HS-9 Calotte
3 HS-10 Écrou cannelé pour boyau
4 HS-11 Cannelure de boyau
5 HS-12 Ressort
6 HS-14W Boyau
7 HS-20 Poignée – plaque inférieure
8 HS-21 Poignée – plaque supérieure
9 HS-22/23 Collecteur de vapeur
10 HS-32 Brosse
11 HS-19 Tirant de suspension – supérieur
12 HS-18 Calotte d’écrou
13 HS-17 Tirant de suspension – médian
14 HS-16 Raccord fileté
15 HS-24 Tirant de suspension – inférieur
16 HS-13 Base de tirant
17 HS-29 Base de tirant – rondelle
18 HS-28 Base de tirant – Raccord
19 HS-8 Rondelle
20 GB818-85 Vis
21 HS-7 Calotte d’élément
22 HS-2-0 Élément chauffant
23 HS-1-0 Tubulure de silicone
24 HS-4 Raccord de coude
25 HS-SP Tricoise
26 HS-MAG Aimant
27 GB845-85 Vis
28 GB5285-85 Vis
29 HS-A-6 Roulette
30 HS-1 Plaque de fond
31 HS-2W Rondelle du cordon
32 HS-A-3 Cordon d’alimentation
33 HS-A-1 Interrupteur
34 HS-27W Plaque signalétique
35 HS-25 Pied
36 GB818-85 Vis
37 HS-A-2 Thermostat
38 HS-A-5 Bague de serrage
39 HS-A-4 Fusible
40 HS-5 Bouchon de bouteille
41 HS-15 Bouteille d’eau
42 HS-4 Coude (identique à HS-4)
43, 44 HS-CLIP Étrangleur
45 HS-SEAL Joint d’étanchéité
JEUX : NON ILLUSTRÉS
HHC Tête et manette en plastique – jeu complet
HSHHC Tête et manette en plastique avec boyau – jeu complet
HSMHHC Tête métallique avec boyau – jeu complet
HS-HR Tirant de suspension – jeu complet
19
Page 22

G4m
1
2
3
20
21
22
23
2425
26
27
28
29
30
31
32
33
34
35
36
37
38
39
4
40
41
42
43
44
45
46
5
6
7
8
11
12
13
14
15
16
17
18
19
9
10
20
Page 23

VIVIO 150GC – LISTE DES PIèCES
N° DE RÉF. NUMÉRO DE PIÈCE DESCRIPTION
1 HS-3 Boîtier extérieur
2 HS-9 Calotte
3 HS-10 Écrou cannelé pour boyau
4 HS-11 Cannelure de boyau
5 HS-12 Ressort
6 HS-14W Boyau
7-9,45,46 METALH Tête métallique avec manette en bois
10 HS-19 Tirant de suspension – supérieur
11 HS-18 Calotte d’écrou
12 HS-17 Tirant de suspension – médian
13 HS-16 Raccord fileté
14 HS-24 Tirant de suspension – inférieur
15 HS-13 Base de tirant
16 HS-29 Base de tirant – rondelle
17 HS-28 Base de tirant – Raccord
18 HS-8 Rondelle
19 GB818-85 Vis
20 HS-7 Calotte d’élément
21 HS-2-0 Élément chauffant
22 HS-1-0 Tubulure de silicone
23 HS-4 Raccord de coude
24 HS-SP Tricoise
25 HS-MAG Aimant
26 GB845-85 Vis
27 GB5285-85 Vis
28 HS-A-6 Roulette
29 HS-1 Plaque de fond
30 HS-2W Rondelle du cordon
31 HS-A-3 Cordon d’alimentation
32 HS-A-1 Interrupteur
33 HS-27W Plaque signalétique
34 HS-25 Pied
35 GB818-85 Vis
36 HS-A-2 Thermostat
37 HS-A-5 Bague de serrage
38 HS-A-4 Fusible
39 HS-5 Bouchon de bouteille
40 HS-15 Bouteille d’eau
41 HS-4 Coude (identique à HS-4)
42,43 HS-CLIP Étrangleur
44 HS-SEAL Joint d’étanchéité
JEUX : NON ILLUSTRÉS
HHC Tête et manette en plastique – jeu complet
HSHHC Tête et manette en plastique avec boyau – jeu complet
HSMHHC Tête métallique avec boyau – jeu complet
HS-HR Tirant de suspension – jeu complet
21
Page 24

Reliable Corporation (« Reliable ») garantit à l’acheteur initial du défroisseur vapeur de Reliable
spéci
fié ci-avant (le « Vivio »), pour une période de trois (3) ans à compter de la date d’achat
originale, que ce dernier sera exempt de tout défaut de pièce et de fabrication dans le cadre
d’une utilisation normale par l’acheteur initial uniquement.
Sous réserve des conditions et limitations spécifiées dans les présentes, Reliable procédera à
la réparation ou au remplacement d’un Vivio si ce dernier s’avère défectueux en raison d’un
problème de pièce ou de fabrication. Si le Vivio défectueux n’est plus disponible et ne peut
pas être réparé efficacement ni remplacé par un modèle identique, Reliable procédera au
remplacement de la machine défectueuse par une machine Reliable actuelle d’une valeur égale
ou supérieure. Les produits de remplacement seront fournis par Reliable à titre d’échange, et
sont soit neufs, soit remis en état pour être fonctionnellement équivalents aux équipements
neufs. Si Reliable est dans l’incapacité de remplacer un Vivio, il remboursera la valeur actuelle
de la machine Reliable au moment où la réclamation de garantie est introduite.
La présente garantie limitée ne couvre pas les dommages subis par le Vivio résultant d’une
installation incorrecte, d’un accident, d’une utilisation inadéquate, d’une catastrophe naturelle,
de conditions mécaniques ou environnementales anormales ou de tout(e) démontage,
réparation ou modification. La présente garantie limitée ne s’applique pas aux dommages
indirects, consécutifs ou accessoires pouvant être subis par un utilisateur dans le cadre de
l’utilisation du Vivio Reliable, y compris, sans limitation, toute responsabilité concernant les
réclamations de tierces parties concernant des dommages, et se limite au montant payé
par l’acheteur original du Vivio et au champ d’application de la présente garantie limitée. La
présente garantie limitée ne s’applique pas aux produits ayant été modifiés ou aux produits non
achetés directement auprès de Reliable ou d’un revendeur agréé par Reliable pour la vente du
Vivio Reliable.
La présente garantie limitée est la seule garantie qui s’applique au défroisseur vapeur Vivio
Reliable et remplace les conditions pouvant être présentées par tout autre document ou bon de
commande et ne peut pas être modifiée ou amendée sauf expressément et par écrit de la part
de Reliable.
Pour obtenir une réparation ou un remplacement dans le cadre de la présente garantie, veuillez
contacter notre groupe d’assistance à la clientèle au 1 800 268 1649 ou à l’adresse
support@reliablecorporation.com. Il vous sera demandé de fournir un reçu original par télécopie
ou courrier électronique. Le reçu doit indiquer que vous êtes l’acheteur original, que le produit
a été acheté directement auprès de Reliable ou d’un revendeur agréé par Reliable et que la
réclamation de garantie est réalisée conformément aux conditions spécifiées dans le présent
document ou tout document ultérieur fourni par Reliable en rapport avec la présente politique.
Un numéro d’autorisation de retour d’article (RA#) vous sera fourni et il vous sera demandé
d’expédier le produit défectueux accompagné de la preuve d’achat et du numéro RA#, par
courrier préaffranchi à l’adresse suivante : Reliable Corporation, 5–100 Wingold Ave, Toronto, ON
M6B 4K7.
Les frets payables à destination seront refusés. Le risque de perte ou de dégât lors du transport
sera assumé par le client. Une fois que Reliable aura reçu le produit défectueux, le processus de
réparation ou de remplacement sera mis en œuvre.
Si vous avez la moindre question concernant la présente garantie, veuillez écrire à :
Reliable Corporation
100 Wingold Avenue, Unit 5
Toronto, Ontario
Canada M6B 4K7
www.reliablecorporation.com
POLITIQUE DE GARANTIE DE 3 ANS DE
RELIABLE CORPORATION CONCERNANT
LE DÉFROISSEUR VAPEUR VIVIO (MODÈLE
100GC + 150GC)
Page 25

23
VIVIO 100GC Y VIVIO 150GC
MANUAL DE INSTRUCCIONES
ESPAÑOL
Page 26

24
Gracias por comprar el vaporizador de prenda
Vivio 100GC/Vivio 150GC de Reliable
®
. Por favor siga las instruc-
ciones cuidadosamente. Con el cuidado y mantenimiento adecuado,
su vaporizador le proveerá servicio conable durante años.
INSTRUCCIONES IMPORTANTES DE SEGURIDAD
Su vaporizador de prenda Vivio 100GC/Vivio 150GC está fabricado para uso profesional y para el hogar. Por favor siga estas instrucciones básicas para cuidar su
seguridad.
• Lea todas las instrucciones antes de usar su vaporizador.
• Sólo use el vaporizador para lo que está diseñado.
• Para evitar lesiones, cuando el vaporizador comience a emitir vapor, oriéntelo
en dirección contraria a usted.
• Para evitar choques eléctricos, no sumerja el vaporizador en agua ni otros líquidos.
• Al desconectar el tomacorriente, jale suavemente del enchufe (no jale
del cordón).
• No permita que el cordón haga contacto con superficies calientes. Después
de usar la unidad, espere que se enfríe completamente antes de guardarla.
• Cerciórese que la unidad esté desenchufada del tomacorriente siempre que la
llene de agua, la vacíe o no esté en uso.
• Cerciórese que el interruptor esté en posición de “Apagado” al enchufar o des-
enchufar la unidad del tomacorriente.
• Cerciórese que la botella de agua esté llena antes de encender la unidad.
• No opere el vaporizador si el cordón o su enchufe estuviesen dañados ni después
que se haya caído o dañado; porque esto anulará su garantía. Para reparaciones,
comuníquese con el establecimiento donde compró la unidad.
• Se requiere una supervisión estrecha si un niño usa cualquier vaporizador
o si hay niños cerca cuando se usa. No desatienda el vaporizador mientras esté
enchufado a la corriente.
• Se debe tener cuidado cuando el vaporizador esté encendido porque algunas de
sus partes se calientan mucho. Tenga cuidado al invertir el vaporizador porque
podría haber agua caliente en el reservorio.
• Nunca vaporice cerca del cuerpo de una persona porque el vapor es extremada-
mente caliente.
• Si fuese necesario usar un cordón de extensión, sólo use uno de 15 amperios con
conexión a tierra.
Page 27

25
CARACTERÍSTICAS Y FUNCIONAMIENTO
• Capacidad para 3,8L (1 Gal) de agua.
• Elemento calentador de bronce reforzado.
• Manguera Súper-Flex
®
para vapor.
• La botella de agua no se caerá del vaporizador.
• No es necesario vaciar el vaporizador después de cada uso.
• Dispositivo de apagado automático con fusible térmico.
• Se guarda en posición vertical en un espacio pequeño.
• Cabezal vaporizador con el doble de espesor que las otras
marcas (Modelo Vivio 100GC).
• Escobilla desmontable (Modelo Vivio 100GC).
• Cabezal aplicador de metal con mango de madera (Modelo Vivio 150GC).
• Ruedas para desplazamiento fácil.
CÓMO SE VAPORIZA
Los profesionales dedicados al cuidado de las telas saben y aprecian el valor del
vapor para desarrugar suavemente todo tipo de telas. La vaporización es rápida
y segura, y se aplica a una infinidad de telas como ropa, tapices (automóviles y
hogar), cortinas de moda, sábanas, manteles, etc. Su vaporizador Reliable Vivio
100GC y Vivio 150GC está diseñado para proveerle la mejor calidad de vaporización para estas tareas. He aquí algunos consejos:
1. Es importante mantener la manguera de vapor en posición vertical para que
la condensación regrese al tanque del vaporizador. Si fuese necesario
vaporizar en una posición baja, se sugiere levantar el cabezal aplicador con
frecuencia para extender la manguera hacia arriba.
2. Podría ser útil colocar prendas largas como pantalones o abrigos en colgadores
en el canto superior o marco de una puerta (o repisa alta que pueda acomodar el colgador).
3. Esto le permitirá vaporizar hacia arriba y reducir la condensación en la
manguera de vapor.
4. Esto puede ser útil para jalar suavemente la parte inferior de la prenda para
que el vapor penetre en la tela y deshaga las arrugas. Esto es especialmente
útil en las costuras de las prendas.
5. No es necesario empujar el cabezal aplicador contra la tela. Usualmente sólo
se necesita tocar la tela levemente con el cabezal vaporizador. Para las telas
con pelo (corduroy, terciopelo, velour) la escobilla que se incluye
con el vaporizador modelo Vivio 100GC es muy útil para refrescar la tela a la
vez que se protegen los pelos de la tela.
Page 28

26
CÓMO SE VAPORIZA CONTINUADO…
6. Algunas prendan reaccionan mejor si se vaporizan desde el interior.
7. Algunas tiendas de ropa conocen la ventaja de disponer de vaporizadores
en el piso de ventas para retoques rápidos que le devuelven la apariencia de
nuevas. No obstante que el vaporizador Vivio 100GC o el Vivio 150GC puede
guardarse fácilmente cuando no esté en uso, pero debe drenarse el agua si no
se va usar por largo tiempo. La mejor forma para usar el vaporizador es como
los profesionales, manteniéndolo en un lugar conveniente donde se usa más
frecuentemente. Para algunas personas eso significa en la lavandería, pero
para otros puede ser el dormitorio. Debido a que el vaporizador Vivio 100GC
o el Vivio 150GC se calienta rápidamente (menos de un minuto) es la solución
perfecta para desarrugar blusas y suéteres. Enchufe el vaporizador, enciéndalo y 60 segundos después pase el cabezal del vaporizador varias veces por la
prenda y tendrá una buena apariencia todo el día.
INSTRUCCIONES PARA EL USO
El vaporizador Vivio 100GC y el Vivio 150GC es fácil de usar y de armar.
1. Las 3 piezas del soporte del cabezal aplicador deben unirse enroscándose.
Luego coloque el soporte en el dispositivo que lo mantiene en posición.
2. Usando la llave provista, instale la manguera en el cuerpo del vaporizador
y ajústela.
3. La misma llave puede usarse para ajustar el dispositivo que sujeta el
soporte donde se coloca el cabezal (en la parte superior) hasta que esté
listo para usarse.
4. Destape la botella y llénela de agua regular de la llave o de agua destilada,
tape la botella, inviértala y colóquela en el cuerpo del vaporizador.
5. Siempre asegúrese que la botella contenga agua. NO PERMITA QUE EL
VAPORIZADOR SE QUEDE SECO.
6. Encienda la unidad, espere por sesenta segundos para que produzca vapor.
7. Es buena idea vaciar periódicamente el agua vieja del vaporizador para evitar
la formación de sarro.
NOTA: Si lavar la unidad internamente no mejora su rendimiento, el vaporizador
requiere una limpieza más profunda que sólo la puede hacer un centro de servicio
autorizado, o se anulará la garantía.
Page 29

27
DIAGNÓSTICO Y SOLUCIÓN DE PROBLEMAS
No opere el vaporizador de prenda si el cordón o su enchufe estuviesen dañados
ni después que se haya caído o dañado; porque esto anulará su garantía. Para
evitar el riesgo de choque eléctrico, no intente desarmar la unidad por su cuenta;
devuélvala a Reliable Corporation para su inspección, reparación o reemplazo
(vea la garantía).
PROBLEMA
El vaporizador
no calienta.
La unidad no
produce vapor.
La unidad produce
poco vapor y se apaga
y enciende.
La luz del interruptor no
se enciende en posición
de encendido.
Gotea agua de
la boquilla.
SOLUCIÓN
1. Enchufe y encienda el
vaporizador.
2. Presione el interruptor a la
posición de apagado (OFF).
Llene la botella de agua
y colóquela en su posición.
Encienda la unidad.
1. Presione el interruptor a la
posición de apagado (OFF).
Llene la botella de agua
y colóquela en su posición.
Encienda la unidad.
2. Reemplace el elemento
calentador.
1. Vacíe el agua vieja y lave la
unidad internamente.
2. Reemplace el termostato.
1. Reemplazar la pieza.
2. Reemplazar la pieza.
3. Reemplazar la pieza.
4. Pruebe enchufar a otro
tomacorriente.
1. Sostenga la manguera
derecha hacia arriba
para que el agua drene de
regreso a la unidad.
CAUSAS POSIBLES
1. El vaporizador no está enchufado o encendido.
2 El interruptor automático esta
activado. La botella de agua
está vacía y el reservorio se ha
drenado.
1. Nivel de agua muy bajo.
2. El elemento calentador podría
estar defectuoso.
1. La unidad está sucia y
requiere limpieza.
2. El termostato podría estar
defectuoso.
1. El interruptor está defectuoso.
2. El cordón está defectuoso.
3. El fusible está defectuoso.
4. El tomacorriente de la pared
podría no tener corriente.
1. El vapor se ha condensado
dentro de la manguera.
Page 30

28
G4
1
2
3
20
21
22
23
24
25
26
27
28
29
30
31
32
33
34
35
36
37
38
39
4
40
41
42
43
44
45
5
6
7
8
11
12
13
14
15
16
17
18
19
9
10
Page 31

29
LISTA DE PARTES DEL VIVIO 100GC
NO. DE REF. NÚMERO DE PARTE DESCRIPCIÓN
1 HS-3 Cubierta exterior
2 HS-9 Tapa
3 HS-10 Tuerca de la lengüeta de la manguera
4 HS-11 Lengüeta de la Manguera
5 HS-12 Resorte
6 HS-14W Manguera
7 HS-20 Parte inferior de la cubierta del mango
8 HS-21 Parte superior de la cubierta del mango
9 HS-22/23 Cabezal de vapor
10 HS-32 Cepillo
11 HS-19 Parte superior de la varilla de soporte
12 HS-18 Tapa de tuerca
13 HS-17 Parte media de la varilla de soporte
14 HS-16 Conector roscado
15 HS-24 Parte inferior de la varilla de soporte
16 HS-13 Base de la varilla
17 HS-29 Arandela de la base de la varilla
18 HS-28 Acople de la base de la varilla
19 HS-8 Arandela
20 GB818-85 Tornillo
21 HS-7 Tapa del elemento
22 HS-2-0 Elemento calefactor
23 HS-1-0 Tubo de silicona
24 HS-4 Conector codo
25 HS-SP Llave
26 HS-MAG Imán
27 GB845-85 Tornillo
28 GB5285-85 Tornillo
29 HS-A-6 Ruedita
30 HS-1 Placa base
31 HS-2W Cojinete del cable
32 HS-A-3 Cable de Alimentación
33 HS-A-1 Llave de Encendido
34 HS-27W Etiqueta
35 HS-25 Pata
36 GB818-85 Tornillo
37 HS-A-2 Termostato
38 HS-A-5 Gancho de sujeción
39 HS-A-4 Fusible
40 HS-5 Tapa de la botella
41 HS-15 Botella de agua
42 HS-4 Codo (igual al HS-4)
43,44 HS-CLIP Gancho
45 HS-SEAL Borde de goma
CONJUNTOS: NO SE MUESTRAN EN EL DIAGRAMA
HHC Cabezal y mango de plástico completos
HSHHC Cabezal y mango de plástico con manguera completos
HSMHHC Cabezal y mango de metal completos
HS-HR Varilla de soporte completa
Page 32

30
G4m
1
2
3
20
21
22
23
2425
26
27
28
29
30
31
32
33
34
35
36
37
38
39
4
40
41
42
43
44
45
46
5
6
7
8
11
12
13
14
15
16
17
18
19
9
10
Page 33

31
LISTA DE PARTES DEL VIVIO 150GC
NO. DE REF. NÚMERO DE PARTE DESCRIPCIÓN
1 HS-3 Cubierta exterior
2 HS-9 Tapa
3 HS-10 Tuerca de la lengüeta de la manguera
4 HS-11 Lengüeta de la Manguera
5 HS-12 Resorte
6 HS-14W Manguera
7-9,45,46 METALH Cabezal metálico con mango de madera
10 HS-19 Parte superior de la varilla de soporte
11 HS-18 Tapa de tuerca
12 HS-17 Parte media de la varilla de soporte
13 HS-16 Conector roscado
14 HS-24 Parte inferior de la varilla de soporte
15 HS-13 Base de la varilla
16 HS-29 Arandela de la base de la varilla
17 HS-28 Acople de la base de la varilla
18 HS-8 Arandela
19 GB818-85 Tornillo
20 HS-7 Tapa del elemento
21 HS-2-0 Elemento calefactor
22 HS-1-0 Tubo de silicona
23 HS-4 Conector codo
24 HS-SP Llave
25 HS-MAG Imán
26 GB845-85 Tornillo
27 GB5285-85 Tornillo
28 HS-A-6 Ruedita
29 HS-1 Placa base
30 HS-2W Cojinete del cable
31 HS-A-3 Cable de Alimentación
32 HS-A-1 Llave de Encendido
33 HS-27W Etiqueta
34 HS-25 Pata
35 GB818-85 Tornillo
36 HS-A-2 Termostato
37 HS-A-5 Gancho de sujeción
38 HS-A-4 Fusible
39 HS-5 Tapa de la botella
40 HS-15 Botella de agua
41 HS-4 Codo (igual al HS-4)
42,43 HS-CLIP Gancho
44 HS-SEAL Borde de goma
CONJUNTOS: NO SE MUESTRAN EN EL DIAGRAMA
HHC Cabezal y mango de plástico completos
HSHHC Cabezal y mango de plástico con manguera completos
HSMHHC Cabezal y mango de metal completos
HS-HR Varilla de soporte completa
Page 34

Re
liable Corporation (“Reliable”) le garantiza al comprador original del vaporizador de prendas
mencionado anteriormente de Reliable (“Vivio”) que por un periodo de tres (3) años desde la fecha de
compra el producto estará libre de defectos relacionados con los materiales y la fabricación cuando
el comprador original únicamente lo utiliza para el uso normal.
Sujeto a las condiciones y limitaciones establecidas en el presente documento, Reliable se encargará de
la reparación o el reemplazo de cualquier pieza de Vivio que esté dañada por razones vinculadas con
la fabricación o los materiales inadecuados. Si el producto defectuoso ya no se encuentra disponible y
no puede ser reparado ni reemplazado por un modelo idéntico, Reliable deberá reemplazar la máquina
defectuosa por una máquina de la empresa que tenga el mismo valor o uno mayor y que se encuentre
disponible. Reliable proporcionará los productos de reemplazo a modo de intercambio. Esos productos
podrán ser nuevos o renovados para que sean equiparables en cuanto a sus funciones a un producto
nuevo. Si Reliable no puede reemplazar el producto Vivio, reembolsará el valor actual de la máquina de
Reliable al momento en el que se realice el reclamo de la garantía.
La garantía limitada no cubre daños en el producto Vivio ocasionados por: instalación inadecuada,
accidente, abuso, uso indebido, uso irrazonable, desastre natural, condiciones ambientales o mecánicas
anormales o por cualquier modificación, reparación o desmontaje no autorizado. La garantía limitada
no se extiende a los daños incidentales o indirectos que un usuario pueda sufrir a partir del uso
de Vivio, incluida, a modo de ejemplo, la responsabilidad de reclamos por daños manifestados por
terceros. La garantía se limita al importe pagado por el comprador original por el producto Vivio al
cual se aplica esta garantía de protección. Esta garantía limitada no se aplica a productos que hayan
sido alterados ni a productos que no hayan sido comprados directamente a Reliable o a un distribuidor
autorizado por la empresa para vender este producto Vivio.
Esta garantía limitada es la única garantía que aplica al vaporizador de prendas Vivio de Reliable,
sustituye todos los términos que figuren en otros documentos u órdenes de compra. Además, esta
garantía no puede ser alterada ni modificada excepto cuando Reliable lo indique por escrito.
Para obtener el servicio de reparación o reemplazo conforme a los términos de esta garantía, póngase
en contacto con nuestro grupo de atención al cliente al 1 800 268 1649 o por correo electrónico a
support@reliablecorporation.com. Deberá entregar el recibo original por fax o correo electrónico. El
recibo debe demostrar que usted es el comprador original, que el producto fue comprado directamente
a Reliable o a un distribuidor autorizado y que el reclamo de la garantía se realiza conforme a los
términos establecidos en este documento o cualquier documento subsiguiente emitido por Reliable en
relación con esta política. Se le proporcionará un número de autorización por devolución (RA, por sus
siglas en inglés) y se le pedirá que envíe el producto defectuoso junto con el comprobante de compra
y el número RA (envío prepagado) a la siguiente dirección: Reliable Corporation, 5–100 Wingold Ave,
Toronto, ON M6B 4K7.
Se rechazarán los envíos a cobrar. El cliente asumirá el riesgo de la pérdida o el daño durante el envío.
Una vez que Reliable reciba el producto defectuoso, iniciará el proceso de reparación o reemplazo.
Si tiene alguna pregunta relacionada con esta garantía, puede escribir a:
Reliable Corporation
100 Wingold Avenue, Unit 5
Toronto, Ontario
Canada M6B 4K7
www.reliablecorporation.com
POLÍTICA DE LA GARANTÍA DE PRODUCTO
DE 3 AÑOS DE RELIABLE CORPORATION
PARA EL VAPORIZADOR DE PRENDAS VIVIO
(MODELO 100GC + 150GC)
Page 35

Page 36

1 800 268 1649
www.reliablecorporation.com
 Loading...