

Page 1
digital
velocit
y
Instructions for use
Mode d’emploi
Instrucciones de uso
Page 2

English 03 – 10
Français 11 – 19
Español 20 – 28
1
Page 3
IMPORTANT SAFETY INSTRUCTIONS
When using your new iron, basic safety precautions should always be
followed, including the following:
READ ALL INSTRUCTIONS BEFORE USING
1. Use iron only for its intended use.
2. To protect against a risk of electric shock, do not immerse the iron in
water or other liquids.
3. The iron should always be turned to «Off» before plugging or unplugging from an outlet. Never yank the cord to disconnect from the
outlet. Instead, grasp the plug and pull to disconnect.
4. Do not allow the cord to touch hot surfaces. Let the iron cool completely before putting away. Loop cord loosely around the iron when
storing.
5. It is always recommended to disconnect the iron from the electrical
outlet when filling with water or emptying. It should also be disconnected when not in use.
6. Do not operate the iron with a damaged cord or if the iron has been
dropped or damaged. To avoid the risk of an electric shock, do not
disassemble the iron. Take it to a qualified service depot for exami
nation and repair. Incorrect reassembly can cause a risk of electric
shock when the iron is used.
7. Close supervision is necessary for any appliance being used by or
near children. Do not leave the iron unattended while connected or
on an ironing board.
8. Burns can occur from touching hot metal parts, hot water, or steam.
Use caution when you turn a steam iron upside down – there may
be hot water in the reservoir.
SPECIAL INSTRUCTIONS
1. To avoid a circuit overload, do not operate another high wattage appliance on the same circuit.
2. If an extension cord is absolutely necessary, a 15-amp cord should
be used. Cords rated for less amperage may overheat. Care should
be taken to arrange the cord so that it cannot be pulled or tripped
over.
SAVE THESE INSTRUCTIONS IN A SAFE PLACE FOR FUTURE REFERENCE
2
3
Page 4

Thank you for choosing the RELIABLE Velocity iron. With its unique
Compact Vapor Generator (CVG) it will allow you to obtain the benefits of
professional pressing combined with the advantages of traditional ironing.
ATTENTION
• Before using your Velocity iron, remove all the paper or plastic bags,
plastic sheets, cards and possible stickers that may be on the outside
or inside of the appliance that acted as handling protection or sales
promotion material.
• Read these instructions before first using the iron.
• Do not plug it in without checking that the voltage of the iron is the
same as your home power.
• Check that the socket outlet has a suitable ground connection.
• Take care that the iron cord does not touch the hot parts of the appli-
ance.
• If you are going to iron with steam, refer to the section “Before Starting
To Iron” to extend the life of the independent steam chamber.
• To fill the iron or refill it during ironing, follow the instructions set out in
the section “Before Starting To Iron,” unplugging it from the main power
and using the accompanying water jug.
• Do not worry if the iron gives off a little smoke during first use. It will
soon disappear.
• Do not spray “vertical” steam on a garment hanging in the wardrobe
or on a person. Vertical ironing (steaming) must be done with the garment on a hanger and away from people or animals.
• Stand the V95 in the vertical position resting on its heel when storing.
It is advisable to use a stable ironing board.
• When you finish ironing, always empty the water from the tank. If you
want to drain it while ironing, always unplug the appliance from the
main outlet first.
• To disconnect the CVG, never pull on the power cord, take out the plug.
• If the power cord is damaged; to prevent risks, have it replaced at an
A.S.S. (After Sale Service) authorized by RELIABLE, as special tools are
needed.
• The V95 should not be used if it has been dropped or has a crack or
leak in the water tank. If you observe any of these problems, take the
iron to Reliable Corporation or an authorized service depot.
• Do not leave the appliance in operation unattended. Keep it out of the
reach of children.
MAIN COMPONENTS AND ACCESSORIES (Fig 1)
1. Water filler hole cap
2. Spray outlet
3. Spray button
4. Water tank
5. Removable anti-scale filter
6. Non-slip legs
7. LCD display (Fig 2)
a) Temperature change indicator
b) Temperature selected
c) Steam selected
d) Water filling indicator
e) Anti-scale filter icon
f) Automatic Auto-Pause icon
g) Steam On/Off switch
h) On/Off & temperature selector button
i) Steam flow selector button
8. Water jug
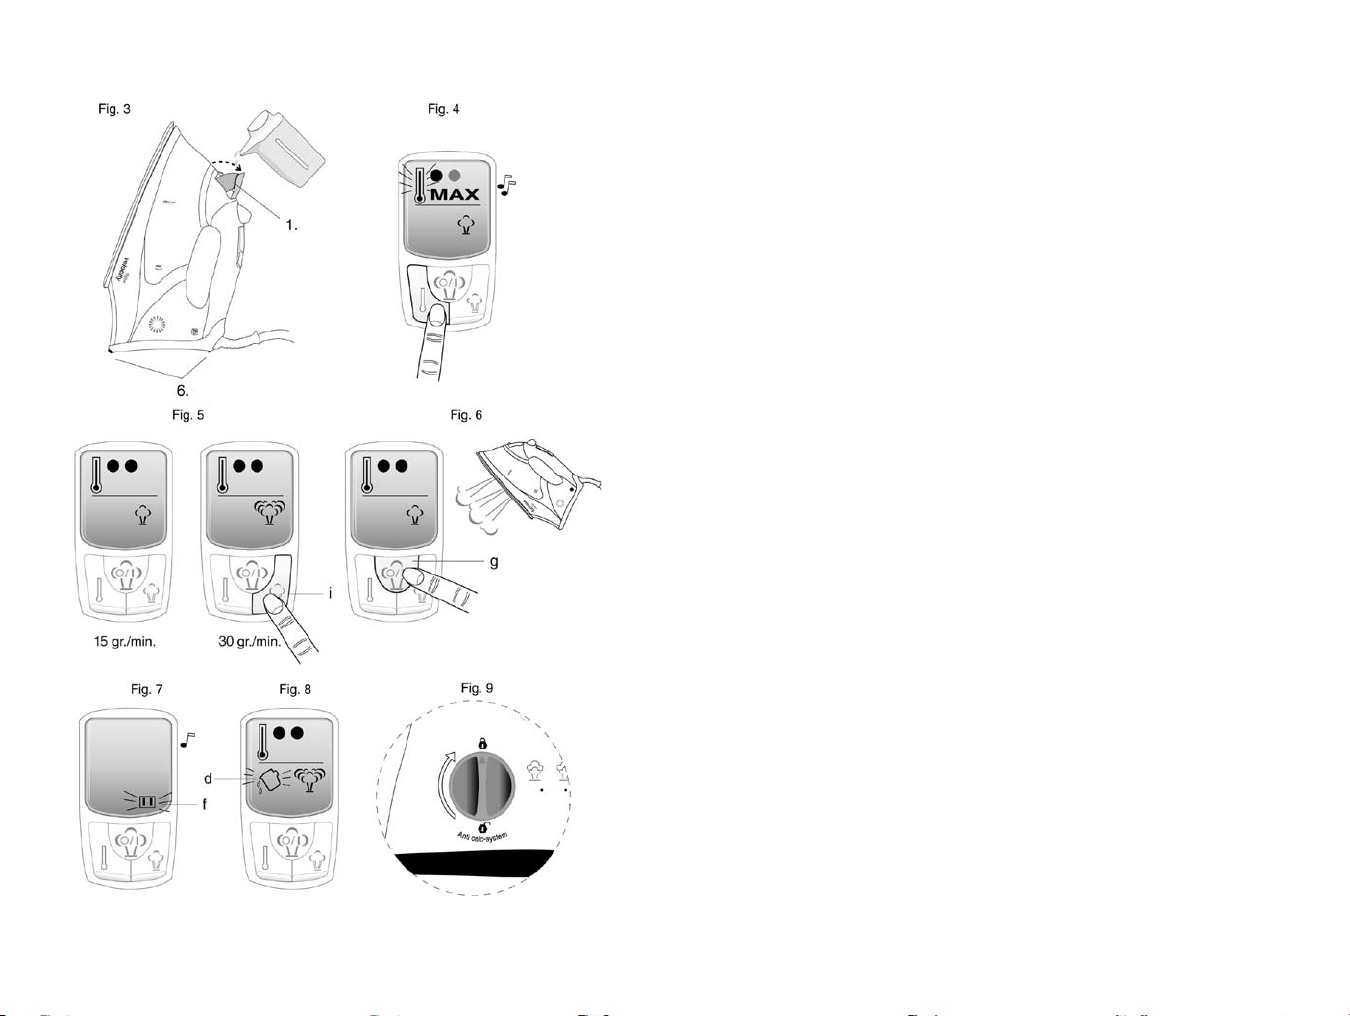
BEFORE STARTING TO IRON
• With your Compact Vapor Generator unplugged from the main outlet,
open the filler hole cap Fig 3 (1) by turning it backwards (see arrow).
• Due to the importance of keeping the Compact Vapor Generator’s
internal system in proper condition, it is always recommended to use
the best quality of water available to you. If you are unaware of the hardness of the water in your home, ask your local council for information.
WATER INSTRUCTIONS
• The following is a list of the best water for your Velocity iron in order of
preference:
o Distilled water
o Softened water (from a household water softener)
o Filtered water (counter top unit or store bought)
o Tap water
• Fill the tank, without exceeding the maximum level, with the water jug
supplied Fig 1 (8), keeping the iron in the vertical position, resting on
the non-slip rear cover legs Fig 3 (6). When the tank is full, close the
cap.
4
5
Page 5

• We advise you to fill the tank up to the maximum level marked on it
as this appliance generates a substantial flow of steam, otherwise
you will need to fill the water tank more often.
• Check whether the garment you are going to iron has a label indicat-
ing the ironing temperature. We recommend that you to classify the
garments according to their required ironing temperature and to
begin with the garments that are ironed with the lowest temperature
(•).
SYNTHETIC FIBRES: minimum temperature (•)
SILK, WOOL: medium temperature (••)
COTTON, LINEN: high temperature (•••)
LINEN: high temperature (MAX)
ATTENTION: Ironing delicate garments with a temperature higher than
necessary is harmful for the fabric and causes burnt residue to get
stuck to the soleplate.
OPERATION
Plug the Velocity into the main outlet. A buzzer will sound; the display
will light up automatically and the thermometer symbol will appear
(blinking) alongside the temperature position 1 (•) and the medium
steam position Fig 5. In addition, an icon will appear with the scalepreventing cartridge, for 30 sec, indicating that your iron has a scaleprevention system Fig 2 (e). To replace it, follow the instructions in the
section “Anti-scale System.” By default, when switched on, the iron
marks these positions.
Temperature selection
With your Compact Vapor Generator you will easily know when it
reaches the selected temperature and is ready for ironing. On the
communication display the thermometer icon will cease to blink and at
the same time a buzzer will sound Fig 2.
The CVG has four temperature positions for you to choose between by
pressing the temperature selector button Fig 2 (h). If you press once,
another dot will appear alongside the one already there (••), indicating that it is at temperature level 2. The thermometer icon will blink
again until the selected temperature is reached. When it has reached
it, the warning buzzer will sound and the thermometer will cease to blink
Fig 4. Temperature levels 3 and MAX are selected in the same way.
From the MAX temperature position, if you press the button again, the
iron will revert to the initial position with one temperature dot, and so on.
Press the temperature button for two seconds to disconnect the iron. To
restart it, simply press the button again.
Steam selection
The Compact Vapor Generator has two steam positions, medium steam
(15 gr/min) and maximum steam (30 gr/min). The medium value
always appears by default when the iron is switched on.
To obtain maximum steam, simply press the steam selector button once
Fig 2 (i), and the steam icon will appear in the display at its highest flow
Fig 5. To revert to medium flow, you just have to press the selector but
-
ton again. Fig 2 (i).
When you have chosen the appropriate temperature and steam flow for
the garment, press the steam On/Off switch Fig 6 (g) once and you may
start to iron. It is not necessary to be pushing the steam button continually, just press once and the steam will issue without interruption. To cut
off steam output, press the steam On/Off switch Fig 2 (g) again and it
will cease to steam automatically.
AUTOMATIC SWITCH OFF: AUTO-PAUSE
The Compact Vapor Generator has an automatic switch-off system. It is
switched off automatically three minutes after the last time it was used.
This means that once the device is actuated, the CVG ceases to heat
and begins to cool down. At that moment a buzzer will sound and the
icon Fig 2 (f) will appear (blinking) for five seconds on the illuminated
display, and it will continue blinking afterwards on the display when it is
not lit up Fig 7, indicating that the appliance has been switched off. To
switch it back on, just move it slightly (vertically) or else press any of the
three control buttons Fig 2 (g, h, i). The CVG will revert to the tempera
ture and steam position it had before being switched off.
Remember that the period between being switched off and switched
back on again will affect the time that the CVG may need to regain the
temperature selected previously.
6
7
Page 6

IRONING RECOMMENDATIONS
Since the working of this model is similar to an ironing centre (with separate boiler) and due to its strong flow of steam at max. 30 gr/min, we
recommend that you iron with medium steam at temperature positions
1 and 2, and maximum steam for temperature positions 3 and MAX.
We also recommend that you iron first with steam (the level appropriate to the garment you are going to iron) and go over the clothes dry to
remove the moisture and obtain results comparable with professional
pressing.
Whenever you leave the Compact Vapor Generator in the vertical position, we recommend that you shut off the steam output by pressing the
steam On/Off Fig 2 (g) switch once.
• To iron without steam, simply do NOT press the steam On/Off switch
Fig 2 (g).
• It is NOT necessary to drain the water tank when dry ironing.
STEAM IRONING
This model enables you to iron with steam at temperature position 1
(•). It has two steam flow rates, med. 15gr/m and max. 30gr/m. For
correct use of the flow refer to the section “Ironing Recommendations.”
VERTICAL IRONING
• It enables you to remove creases from delicate garments without
having to lay them on the ironing board: jackets, coats, curtains,
synthetics, etc.
• Place the garment on a hanger, away from other garments (& per-
sons).
• Set the temperature selector at position (••), (•••) or (MAX),
place the iron in the vertical position and press the button. At position (••) you will obtain a more humid white steam, which will be
more apparent, whereas at setting (•••) and (MAX) the steam is
drier and, although the same flow is maintained, it will be harder for
you to see.
SPRAY
• With water in the tank, you may spray water over the garment by
pressing the button Fig 1 (3).
FILLING WITH WATER
If the water is running out, after approximately 30 seconds the waterfilling icon will blink to indicate the water tank must be refilled Fig 2
(d). If the tank is not filled, the pump will stop automatically within one
minute to prevent damage to it.
Unplug the CVG and fill the tank with the water jug that is supplied Fig 1
(8), in the vertical position as shown in figure Fig 3.
When the tank is full, the icon does not disappear from the display until
you press the steam On/Off switch and start ironing again.
If the CVG were to run out of water completely, you will hear a strange
noise from the micro-pump. In this case, press the steam switch Fig 2
(g) off, then press the power button off Fig 2 (h), unplug the appli
ance and fill the tank with water. Plug in the CVG, when you press the
temperature (On/Off) switch again, this noise will disappear and you
can begin to iron again.
ANTI-SCALE SYSTEM
The Compact Vapor Generator is fitted with a replaceable anti-scale
system consisting of a resin filter, which retains the mineral substances
in the water, preventing these from reaching the steam chamber in the
soleplate and thereby extending the life of your Velocity iron. If you so
wish, on this model you may replace the resin so that the iron is kept
in optimum condition. If you want to replace the resin, we recommend
you to do it every six months. Changing the resin does not mean that
you may overlook the advice about water hardness given in the section
“Before Starting To Iron.”
In the event of not changing the resin of this iron, it will be subject to
the effects of scale just like other irons. For replacement and before
removing it, make sure there is no water in the tank.
Turn the part, situated in the rear of the iron, in an anticlockwise direc
tion as far as it will go, and the arrow lines up with the open padlock
(approx. 180°) and pull it back.
To replace it, line up the arrow with the open padlock and turn it in a
clockwise direction, following the directions in the drawing, pressing
the part inwards at the same time, until reaching the padlock closed
position Fig 9.
8
9
Page 7

When the filter is in place, make sure that it DOES NOT STAND OUT of
the back of the iron, otherwise you will not have fitted it properly and
water will leak from the tank.
CLEANING
A) Sole-plate
• Unplug the iron and let it cool down.
• Use environment-friendly clay-based products to clean the sole-
plate.
B) Outside
• To clean the outside of your iron, use a cloth moistened in soapy
water.
• Do not clean with abrasive chemical products or solvents as it may
attack certain plastic parts and/or remove some of the marks and/
or indications.
• Store your iron in the vertical position, wind the cord round the heel
and secure it with the clip.
• Although the power cord is fitted with a 360° rotational elbow,
NEVER FORCE this cord when winding it around the iron on the first
turn.
TIPS FOR DISPOSING OF THE USED IRON
Before disposing of your used iron, you should make it visibly unserviceable and have it disposed of according to current national legislation. Ask your Distributor, Town Council or Local Authority for detailed
information.
WARRANTY CONDITIONS
Reliable Corporation accepts no liability for faults in your iron in the
event of non-compliance with the specifications of the warranty conditions or failure to follow the operating or maintenance directions included in instruction book. The warranty card may be found separately.
We remind you that the damage caused by the effects of scale is not
covered by the warranty.
FRANÇAIS
CONSIGNES DE SÉCURITÉ IMPORTANTES
Lorsque vous utilisez votre nouveau fer à repasser, vous devez toujours
suivre les consignes de sécurité suivantes :
LISEZ TOUTES LES CONSIGNES DE SÉCURITÉ AVANT L’ UTILISATION
1. N’utilisez le fer que pour l’usage prévu.
2. Afin d’éviter les chocs électriques, n’immergez pas le fer dans l’eau
ou dans tout autre liquide.
3. Le fer doit toujours être à la position «arrêt» avant de le brancher ou
de le débrancher. Ne tirez jamais sur le cordon pour le débrancher.
Tirez plutôt sur la fiche.
4. Évitez que le cordon n’entre en contact avec des surfaces chaudes.
Laissez le fer refroidir complètement avant de le ranger. Enroulez
librement le cordon autour du fer pour le ranger.
5. Débranchez toujours le fer pour remplir d’eau son réservoir, le vider
ou lorsque vous ne l’utilisez pas.
6. N’utilisez pas le fer s’il est tombé, a été endommagé ou si son cordon
est abîmé. Afin d’éviter les chocs électriques, ne démontez pas le
fer. Apportez-le à un centre de service agréé aux fins d’examen et
de réparation. Le remontage inexact du fer peut causer des chocs
électriques lorsque vous l’utilisez.
7. Redoublez de prudence lorsqu’un enfant utilise le fer ou que vous
l’utilisez près d’un enfant. Ne laissez pas le fer sans surveillance
lorsqu’il est branché ou sur la planche à repasser.
8. Vous pouvez vous brûler en touchant les parties métalliques chaudes
du fer ou avec l’eau chaude et la vapeur. Faites preuve de prudence
quand vous retournez le fer à l’envers, car il pourrait y avoir de l’eau
chaude dans le réservoir.
CONSIGNES PARTICULIÈRES
1. Pour éviter une surcharge, n’utilisez pas un autre appareil de puis-
sance élevée sur le même circuit.
2. Si une rallonge est absolument nécessaire, utilisez-en une de 15
ampères. Une rallonge d’ampérage inférieur pourrait surchauffer.
Disposez-la minutieusement afin d’éviter de la tirer ou de trébucher.
CONSERVEZ CES INSTRUCTIONS DANS UN ENDROIT SÉCURITAIRE POUR POUVOIR
VOUS Y REPORTER ULTÉRIEUREMENT
10
11
Page 8

Merci d’avoir choisi le fer à repasser Velocity de RELIABLE. Sa mini-bouilloire exclusive combine les avantages du pressage professionnel à ceux
du repassage traditionnel.
PRÉCAUTIONS
• Avant d’utiliser votre fer Velocity, retirez tous les sacs en papier ou en
plastique, les feuilles en plastique, les cartons et les autocollants qui
servaient à en faire la promotion ou à le protéger lors de son transport.
• Lisez ces instructions avant d’utiliser le fer pour la première fois.
• Ne le branchez pas sans avoir vérifié si la tension de l’appareil cor-
respond à celle de votre alimentation électrique.
• Vérifiez si la prise de courant utilisée possède bien une mise à la terre.
• Évitez que le cordon du fer entre en contact avec ses parties chaudes.
• Si vous repassez à la vapeur, reportez-vous à la rubrique “Avant de
Commencer à Repasser” pour prolonger la durée de la chambre de
vapeur.
• Pour emplir le fer ou le remplir pendant le repassage, veuillez suivre
les instructions de la rubrique “Avant de Commencer à Repasser,”
débranchez-le et utilisez le récipient fourni avec l’appareil.
• Ne vous inquiétez pas si l’appareil dégage un peu de fumée lors de sa
première utilisation. Cela devrait cesser rapidement.
• Ne vaporisez pas à la verticale un vêtement suspendu dans une
garde-robe ou porté par quelqu’un. On effectue le défroissage à la
verticale lorsque le vêtement est sur un cintre, loin des gens ou des
animaux.
• Rangez toujours le fer V95 en position verticale, reposant sur son
talon d’appui. Il est recommandé d’utiliser une planche à repasser
stable.
• Après le repassage, videz toujours l’eau du réservoir. Si vous voulez la
vider pendant le repassage, débranchez toujours l’appareil au préalable.
• Pour débrancher la mini-bouilloire, ne tirez jamais sur le cordon, tirez
plutôt sur la prise.
• Si le cordon est endommagé, pour éviter tout risque, faites-le remplac-
er dans un centre de service après-vente agréé par RELIABLE, car cela
exige des outils spécialisés.
• N’utilisez pas le fer V95 s’il est tombé ou si le réservoir est fendu ou
fuit. Si vous constatez un de ces problèmes, apportez votre fer dans
un centre RELIABLE ou un centre de service agréé.
Ne laissez pas l’appareil fonctionner sans surveillance. Gardez-le hors
de la portée des enfants.
ÉLÉMENTS ET ACCESSOIRES PRINCIPAUX (Fig 1)
1. Couvercle de l’orifice de remplissage
2. Sortie du jet de vapeur
3. Bouton du vaporisateur
4. Réservoir d’eau
5. Filtre anti-tartre amovible
6. Pieds antidérapants
7. Affichage à cristaux liquides (Fig 2)
a) Indicateur de changement de température
b) Température choisie
c) Vapeur choisie
d) Indicateur de remplissage d’eau
e) Icône du filtre anti-tartre
f) Icône d’arrêt automatique
g) Interrupteur de vapeur
h) Interrupteur et bouton de sélection de température
i) Bouton de sélection du jet de vapeur
8. Récipient
AVANT DE COMMENCER À REPASSER
• Votre fer polyvalent étant débranché, ouvrez le couvercle de l’orifice de
remplissage Fig 3 (1) en le tournant vers l’arrière (voir la flèche).
• Comme il importe de conserver en bon état la mini-bouilloire de votre
fer, il est toujours recommandé d’utiliser de l’eau de qualité optimale.
Si vous ne savez pas quelle est la dureté de l’eau de votre domicile,
renseignez-vous auprès de votre municipalité.
INSTRUCTIONS RELATIVES À L’EAU
• Par ordre de préférence, vous devriez alimenter votre fer Velocity avec:
o de l’eau distillée
o de l’eau adoucie (au moyen d’un adoucisseur d’eau domestique)
o de l’eau filtrée (au robinet ou achetée en magasin)
o de l’eau du robinet
• Remplissez le réservoir au moyen du récipient fourni sans dépasser
le niveau maximum, Fig 1 (8), en gardant le fer à la verticale, sur son
12
13
Page 9

talon antidérapant, Fig 3 (6). Une fois le réservoir rempli, refermez
son couvercle.
• Nous vous recommandons de remplir le réservoir jusqu’au niveau
maximum indiqué, car l’appareil génère un important jet de vapeur.
Si vous ne le faites pas, vous devrez remplir le réservoir d’eau plus
fréquemment.
• Vérifiez si le vêtement que vous allez repasser porte une étiquette
sur laquelle la température de repassage est indiquée. Nous vous
recommandons de classer les vêtements en fonction de leur température de repassage et de commencer par ceux qui se repassent à
basse température (•).
Si vous appuyez une fois, l’écran affiche un deuxième point à côté de
celui qui y figurait déjà (••) pour indiquer que le réglage de température
est 2. L’icône du thermomètre se remet à clignoter jusqu’à ce que la
température voulue soit atteinte. Lorsqu’elle est atteinte, le fer émet un
bip, et le thermomètre cesse de clignoter, Fig 4. Procédez de la même
façon pour obtenir les réglages 3 et MAX.
Au réglage MAX, si vous appuyez de nouveau sur le bouton, le fer revient
à sa position initiale correspondant au réglage 1, et ainsi de suite. Appuyez pendant 2 secondes sur le bouton de sélection de température
pour mettre le fer hors tension. Pour le remettre en marche, il suffit
d’appuyer de nouveau sur ce bouton.
FIBRES SYNTHÉTIQUES: basse température (•)
SOIE, LAINE: température moyenne (••)
COTON: température élevée (•••)
LIN: température élevée (MAX)
PRÉCAUTION: Repasser les vêtements délicats à une température plus
élevée que celle qui est requise endommage le tissu et fait adhérer à la
semelle des résidus brûlés.
FONCTIONNEMENT
Branchez le fer Velocity dans la prise de courant. Un bip retentit, l’écran
s’allume automatiquement et affiche l’icône (clignotante) du thermomètre, ainsi que le réglage 1 de température (•) et l’intensité moyenne de vapeur, Fig 5. De plus, l’icône du dispositif anti-tartre s’affiche
pendant 30 secondes, indiquant que votre fer est doté d’un dispositif
anti-tartre, Fig 2 (e). Pour le remplacer, suivez les instructions données
à la rubrique “SYSTÈME ANTI-TARTRE.” Le fer marque par défaut ces
réglages lorsqu’on le met sous tension.
Sélection de la température
Votre mini-bouilloire vous permet de savoir aisément à quel moment la
température voulue est atteinte et quand le fer est prêt pour le repassage. L’icône du thermomètre de l’écran d’affichage cesse de clignoter,
et un bip retentit, Fig 2.
La mini-bouilloire comporte 4 réglages de température que vous pouvez
choisir en appuyant sur le bouton de sélection de température, Fig 2 (h).
Sélection de la vapeur
La mini-bouilloire est dotée de deux intensités de vapeur : moyenne (15
g/mn) et maximale (30 g/mn). L’intensité moyenne est toujours choisie
par défaut à la mise sous tension du fer.
Pour obtenir l’intensité maximale, il suffit d’appuyer une fois sur le
bouton de sélection de vapeur, Fig 2 (i), et l’écran affiche l’icône de
vapeur correspondant au plus gros jet de vapeur, Fig 5. Pour revenir à
un jet moyen de vapeur, il suffit d’appuyer de nouveau sur le bouton de
sélection de vapeur, Fig 2 (i).
Quand vous avez choisi la température et l’intensité de vapeur cor
respondant au vêtement, appuyez une seule fois sur l’interrupteur de
vapeur, Fig 6 (g), et vous pouvez commencer à repasser. Il n’est pas
nécessaire d’appuyer constamment sur l’interrupteur de vapeur, il suffit
d’appuyer une seule fois pour que le jet de vapeur s’échappe continuellement. Pour interrompre le jet de vapeur, appuyez de nouveau sur
l’interrupteur de vapeur, Fig 2 (g), et la vapeur cesse instantanément.
ARRÊT AUTOMATIQUE
Le fer est doté d’un interrupteur automatique. Après 3 minutes sans
utilisation, il cesse automatiquement de fonctionner. Cela signifie
qu’une fois le dispositif actionné, la mini-bouilloire cesse de chauffer, et
il commence à refroidir. À ce moment-là, un bip retentit et l’icône Fig 2
(f) s’affiche en clignotant pendant 5 secondes sur l’écran éclairé, et il
continue ensuite à clignoter sur l’écran éteint, Fig 7, pour vous indiquer
que l’appareil est hors tension. Pour le remettre en fonction, il suffit
14
15
Page 10

de soulever légèrement le fer ou d’appuyer sur n’importe lequel des
trois boutons de contrôle, Fig 2 (g, h, i). Le fer revient aux réglages de
température et d’intensité de vapeur qu’il indiquait avant sa mise hors
tension.
N’oubliez pas que le temps écoulé entre la mise hors tension du fer et
sa remise sous tension détermine le temps nécessaire pour revenir à
la température qui avait été choisie précédemment.
CONSEILS DE REPASSAGE
Étant donné que ce fer fonctionne de la même manière qu’une installation de pressage (à chaudière distincte), et en raison de son puissant
jet de vapeur à l’intensité maximale de 30 g/mn, nous vous recommandons de repasser à vapeur moyenne aux réglages de température
1 et 2, et à vapeur maximale aux réglages de température 3 et MAX.
Nous vous conseillons également de repasser tout d’abord à la vapeur
(en choisissant le jet approprié au vêtement à repasser), puis de repasser à sec afin d’assécher le vêtement et obtenir ainsi des résultats
de qualité professionnelle.
Chaque fois que vous déposez le fer à la verticale, nous vous recommandons de stopper le jet de vapeur en appuyant une fois sur
l’interrupteur de vapeur, Fig 2 (g).
• Pour repasser à sec, il vous suffit de ne PAS appuyer sur
l’interrupteur de vapeur, Fig 2 (g).
• Il n’est PAS nécessaire de vider le réservoir pour repasser à sec.
REPASSAGE À LA VAPEUR
Ce modèle vous permet de repasser à la vapeur dès le réglage 1 (•)
de la température. Il est doté de 2 intensités de vapeur, une intensité
moyenne de 15 g/mn et une intensité maximale de 30 g/mn. Pour
choisir correctement l’intensité de la vapeur, veuillez consulter la
rubrique “Conseils de repassage.”
DÉFROISSAGE À LA VERTICALE
• Permet de défroisser des articles délicats sans devoir les disposer
sur la planche à repasser : vestes, manteaux, rideaux, tissus synthétiques, etc.
• Disposez le vêtement sur un cintre, loin des autres vêtements (et
de toute personne).
• Réglez la température à (••), (•••) ou (MAX), mettez le fer à la
position verticale et appuyez sur l’interrupteur de vapeur. Le réglage
(••), donne une vapeur plus humide et plus blanche facile à voir, alors que les réglages (•••) et (MAX) donnent une vapeur plus sèche
qui, bien qu’à la même intensité, est plus difficile à voir.
VAPORISATION
• Lorsqu’il y a de l’eau dans le réservoir, vous pouvez pulvériser à froid
de l’eau sur le vêtement en appuyant sur le bouton Fig 1 (3).
REMPLISSAGE D’EAU
Environ 30 secondes avant que le réservoir ne soit vide, l’icône de remplissage d’eau se met à clignoter, Fig 2 (d). Si vous ne remplissez pas
le réservoir, la pompe s’arrête automatiquement au bout d’une minute,
pour éviter de s’endommager.
Débranchez le fer et remplissez-le à la verticale, comme indiqué sur la
figure Fig 3, à l’aide du récipient fourni avec l’appareil, Fig 1 (8).
Une fois le réservoir rempli, l’icône ne disparaît de l’affichage que
lorsque vous appuyez sur l’interrupteur de vapeur et que vous pour
-
suivez votre repassage.
S’il arrivait que la mini-bouilloire s’assèche complètement, vous en
tendriez un bruit inhabituel provenant de la micro-pompe. Arrêtez alors
la vapeur, Fig 2 (g), puis mettez le fer hors tension, Fig 2 (h), débranchez-le et remplissez d’eau le réservoir. Branchez le fer. Lorsque vous
appuierez de nouveau sur l’interrupteur de vapeur, ce bruit disparaîtra
et vous pourrez poursuivre votre repassage.
FILTRE ANTI-TARTRE
La mini-bouilloire est dotée d’un filtre anti-tartre remplaçable en résine,
qui retient les dépôts minéraux de l’eau afin d’éviter qu’ils n’atteignent
la chambre de vapeur de la semelle, ce qui permet de prolonger la vie
du fer Velocity. Ce modèle vous permet, si vous le désirez, de remplacer le filtre en résine pour conserver votre fer en état optimal. Si
vous désirez remplacer le filtre en résine, nous vous recommandons
de le faire tous les six mois. Le changement du filtre en résine ne vous
16
17
Page 11

autorise pas à passer outre aux consignes sur la dureté de l’eau mentionnées à la rubrique “Avant de Commencer à Repasser.”
Si vous ne changez pas le filtre en résine, ce fer subira les effets du tartre comme tous les autres fers à repasser. Lorsque vous le remplacez,
assurez-vous avant de le retirer qu’il n’y a pas d’eau dans le réservoir.
Dans le sens contraire des aiguilles d’une montre, jusqu’à ce que
la flèche coïncide avec le cadenas ouvert (environ 180°), tournez
jusqu’au bout le couvercle situé à l’arrière du fer et retirez-le.
Pour le remettre en place, faites coïncider la flèche avec le cadenas
ouvert, enfoncez-le et tournez-le dans le sens des aiguilles d’une
montre, en suivant les indications du dessin, jusqu’à ce que la flèche
se trouve vis-à-vis du cadenas fermé, Fig 9.
Assurez-vous qu’une fois installé, le filtre NE FASSE PAS SAILLIE à
l’arrière du fer. Si le filtre n’est pas correctement installé, l’eau fuira du
réservoir.
ENTRETIEN
A) Semelle
• Débranchez l’appareil et attendez qu’il refroidisse.
• Pour le nettoyage de la semelle, utilisez des produits écologiques à
base d’argile.
B) Extérieur
• Pour nettoyer l’extérieur de votre fer, utilisez un chiffon imbibé d’eau
savonneuse.
• N’utilisez pas de produits chimiques abrasifs, ni de solvants, car ils
pourraient endommager certaines parties en plastique et/ou effacer les marques et/ou indications.
• Rangez votre fer en position verticale, enroulez le cordon autour du
talon et fixez-le à l’aide de la bride.
• Bien que le cordon dispose d’un coude de rotation de 360°, NE LE
FORCEZ JAMAIS en l’enroulant trop serré autour de l’appareil au
premier tour.
auprès de votre distributeur, de votre municipalité ou de votre administration locale.
CONDITIONS DE GARANTIE
Reliable Corporation ne sera aucunement tenue responsable des
défauts de votre appareil en cas de non-respect des conditions de
garantie ou d’inobservation des instructions de fonctionnement et
d’entretien figurant dans le manuel d’instructions. Vous trouverez une
carte de garantie distincte.
Nous vous rappelons que tout dommage occasionné par le tartre n’est
pas couvert par la garantie.
CONSEILS POUR VOUS DÉPARTIR DE L’APPAREIL
Avant de jeter votre fer, vous devrez le rendre visiblement inutilisable
et respecter les règlements en vigueur. Renseignez-vous à ce sujet
18
19
Page 12

ESPAÑOL
IMPORTANTE INSTRUCCIONES DE SEGURIDAD
Cuando utilice su Centro de Planchado Compacto, deberá siempre
seguir siempre unas medidas básicas de seguridad, como las indicadas en el siguiente apartado:
LEA TODAS LAS INSTRUCCIONES ANTES DE PONER EN FUNCIONAMIENTO
1. Utilice su Centro de Planchado Compacto para uso doméstico.
2. Para evitar riesgos de descarga eléctrica, no debe sumergir su
Centro de Planchado Compacto en agua u otros líquidos.
3. Verifique que su Centro de Planchado Compacto está en posición
de apagado antes de enchufar ó desenchufar de la red su pro
ducto. Para desconectar el Centro de Planchado Compacto de la
red no tire del cable de alimentación, hágalo de la clavija.
4. No permita que el cable de conexión esté en contacto con superficies calientes. Deje enfriar su Centro de Planchado Compacto
antes de guardarlo. Enrolle sin apretar el cable de alimentación
alrededor de su Centro de Planchado Compacto.
5. Desconecte siempre su Centro de Planchado Compacto de la red
eléctrica al llenar o vaciar el depósito de agua y cuando no use el
producto.
6. Si el cable de alimentación está dañado, para evitar peligros, debe
de ser sustituido en un S.A.T. (Servicio de Asistencia Técnica)
autorizado por el fabricante, ya que son necesarias herramientas
especiales. No utilice su Centro de Planchado Compacto si se ha
caído o si tiene alguna rotura o fuga en el depósito del agua. Si
observa alguno de estos problemas lleve el Centro de Planchado
Compacto a un S.A.T. autorizado por el fabricante. Una reparación incorrecta puede ser causa de riesgo de descarga eléctrica
durante el uso del producto.
7. Mantenga su Centro de Planchado Compacto fuera del alcance de
los niños. No deje su Centro de Planchado Compacto sin vigilancia
mientras esté conectado a la red ó sobre una tabla de planchar.
8. Quemaduras pueden ocurrir al tocar partes metálicas calientes,
agua caliente o vapor. Preste atención al colocar su Centro de
Planchado Compacto al revés, puede haber agua caliente en el
depósito.
INSTRUCCIONES ESPECIALES
1. Para evitar un cortocircuito por sobrecarga en la red, no utilice otro
aparato de potencia elevada en el mismo circuito.
2. Si fuera absolutamente necesario utilizar una extensión del cable
de alimentación, debe usar un cable de 10 amperios. Un cable
de menor amperaje puede sobrecalentarse. Coloque la extensión
del cable de alimentación de forma que no pueda engancharse o
tropezar.
GUARDE ESTAS INSTRUCCIONES EN LUGAR SEGURO PARA FUTURAS CONSULTAS
Gracias por haber elegido Velocity de RELIABLE, el único Centro de
Planchado Compacto del mundo, con el que disfrutará de un planchado profesional con las ventajas de una plancha tradicional.
ATENCIÓN
• Antes de utilizar su plancha Velocity, retire todas las bolsas de pa-
pel o plástico, láminas plásticas, cartones y pegatinas eventuales
que se encuentran dentro o fuera del aparato que sirvieron como
protección de transporte o promoción de venta.
• Lea estas instrucciones antes de poner su aparato en funciona-
miento.
• No lo conecte sin comprobar que el voltaje del aparato y el de su
casa coinciden.
• Verifique que la base del enchufe dispone de una toma de tierra
adecuada.
• Tenga cuidado de que el cable no toque las partes calientes del
aparato.
• Si Vd. plancha con vapor, remítase al apartado “Antes de Empezar
a Planchar” para alargar la vida de la cámara de vapor autónoma.
• Para llenar su Centro de Planchado Compacto (CPC) o rellena-
rlo durante el planchado, siga las instrucciones indicadas en el
apartado “Antes de Empezar a Planchar,” desconectándolo de la
red y usando el vaso que lo acompaña.
• No se preocupe si el aparato desprende un poco de humo durante
el primer uso. Desaparecerá rápidamente.
• No proyecte el vapor “vertical” sobre una prenda colgada en el ar-
20
21
Page 13

mario o puesta en una persona. El planchado vertical debe hacerse
con la prenda sobre un colgador y aislada de animales o personas.
• Mantenga su V95 en posición vertical cuando la guarde, apoyado
sobre la talonera del mismo. Es conveniente utilizarlo sobre una
mesa de planchado estable.
• Al término del planchado vacíe siempre el agua del depósito. Y si
desea vaciarlo durante el planchado, desconecte también previamente el aparato de la red.
• Para desconectar su V95 no tire del cable de alimentación, hágalo
de la clavija.
• Si el cable de alimentación está dañado, para evitar peligros, debe
de ser sustituido en un S.A.T. (Servicio de Asistencia Técnica) autorizado por RELIABLE, ya que son necesarias herramientas especiales.
• Su V95 no debería ser usado si se ha caído o si tiene alguna rotura
o fuga en el depósito del agua. Si observa alguno de estos problemas lleve su plancha a un S.A.T. autorizado por RELIABLE.
No deje el aparato en funcionamiento sin vigilancia. Manténgalo fuera
del alcance de los niños.
COMPONENTES PRINCIPALES Y ACCESORIOS (Fig 1)
1. Tapa del orificio de llenado de agua
2. Salida de spray
3. Pulsador de spray
4. Depósito del agua
5. Filtro antical extraíble
6. Pies antideslizantes
7. Pantalla LCD (Fig 2)
a) Indicador cambio temperatura
b) Temperatura seleccionada
c) Vapor seleccionado
d) Indicador llenado de agua
e) Icono filtro antical
f) Icono desconexión automática Auto-Pause
g) Interruptor On/Off vapor
h) Botón selección de la temperatura
i) Botón selección caudal de vapor
8. Vaso
22
ANTES DE EMPEZAR A PLANCHAR
• Con su Centro de Planchado Compacto desconectado de la red
eléctrica, abra la tapa del orificio de llenado Fig 3 (1) girándola
hacia atrás (ver flecha).
• Debido a la importancia de mantener en condiciones óptimas
el sistema de evacuación de la cámara de vapor autónoma, se
recomienda siempre emplear la mejor calidad de agua que usted
disponga. En caso de desconocer la dureza del agua de su hogar,
solicite información a su ayuntamiento.
INDICACIONES RESPECTO AL AGUA
• A continuación le indicamos el mejor tipo de agua para su Velocity
ordenado de mejor a peor calidad:
o Agua destilada
o Agua desmineralizada (obtenida en su hogar a través de un
filtro de agua)
o Agua embotellada
o Agua de grifo
• Llene el depósito sin rebasar el nivel máximo con ayuda del vaso
que se adjunta Fig 1 (8) y manteniendo el CPC en posición vertical,
apoyado sobre los pies anti-deslizantes de la tapa trasera Fig 3
(6). Una vez lleno el depósito cierre la tapa.
• Le aconsejamos que llene el depósito hasta el nivel máximo
indicado en el mismo debido a que este producto genera gran
caudal de vapor y de lo contrario tendría que rellenar el depósito
de agua con más frecuencia.
• Compruebe si la prenda a planchar tiene alguna etiqueta con indi-
cación de la temperatura de planchado. Recomendamos clasifique
las prendas en función de la temperatura que requieran para su
planchado y empiece por las prendas que se planchen con la
temperatura más baja (•).
FIBRAS SINTÉTICAS: temperatura mínima (•)
SEDA, LANA: temperatura media (••)
ALGODÓN, LINO: temperatura alta (•••)
NOTA: Planchar prendas delicadas con una temperatura superior a
la necesaria, perjudica al tejido y provoca la adherencia de residuos
quemados a la suela.
23
Page 14

FUNCIONAMIENTO
Conecte Velocity a la red. Sonará un pitido, la pantalla se encenderá
automáticamente y aparecerá el símbolo del termómetro parpadeando junto con la posición 1 de temperatura (•) y la posición media de
vapor Fig 5. Adicionalmente, aparecerá un icono con el cartucho antical, durante 30 seg, indicando que su plancha dispone de un sistema
antical Fig 2 (e). Para reemplazarlo siga las instrucciones del apartado
“Sistema Antical.” Por defecto la plancha cuando se enciende, marca
estas posiciones.
Selección de temperatura
Con su Centro de Planchado Compacto sabrá fácilmente en qué momento alcanza la temperatura seleccionada y está listo para planchar,
ya que en la pantalla de comunicación el icono del termómetro dejará
de parpadear y al mismo tiempo sonará un pitido, Fig 2.
El CPC tiene 4 posiciones de temperatura entre las que podrá selec
cionar oprimiendo el botón de selección de temperatura Fig 2 (h). Si
pulsa una vez, en la pantalla aparecerá un nuevo punto junto al que ya
existía antes (••), indicando que se encuentra en el nivel de tempera
tura 2. El termómetro parpadeará de nuevo hasta alcanzar la temperatura seleccionada.
Cuando haya alcanzado avisará con un pitido y el termómetro dejará
de parpadear Fig 4. Los niveles 3 y MAX de temperatura se seleccio
-
nan de la misma manera.
Desde la posición MAX de temperatura si pulsa una vez más, la plan
cha volverá a la posición inicial con el punto 1 de temperatura y así
sucesivamente.
Si mantiene pulsado el botón de temperatura durante 2 segundos se
desconectará la plancha. Para volver a conectarla bastará con volver a
pulsarlo.
Selección de vapor
El Centro de Planchado Compacto tiene dos posiciones de vapor;
vapor medio (15 gr/min) y vapor máximo (30 gr/min). El valor medio
aparece siempre por defecto al conectar la plancha.
Para obtener vapor máximo basta con pulsar el botón de selección de
vapor una vez Fig 2 (i), y en la pantalla aparecerá el icono del vapor en
su mayor caudal, Fig 5. Para volver al caudal medio de vapor sólo tiene
que presionar de nuevo el botón de selección, Fig 2 (i).
Una vez haya elegido la temperatura así como el caudal de vapor adecuados a la prenda, presione una vez el interruptor On/Off del vapor Fig
6 (g) y ya puede comenzar a planchar. No es necesario estar pulsando
el interruptor del vapor de forma continua, basta con presionar una
sola vez y el vapor saldrá de forma ininterrumpida. Para cortar la salida
del vapor, presione de nuevo el interruptor On/Off del vapor Fig 2 (g) y
éste dejará de salir automáticamente.
DESCONEXIÓN AUTOMÁTICA: AUTO-PAUSE
El Centro de Planchado Compacto posee un sistema de desconexión automática. Transcurridos 3 minutos desde la última vez que se
utilizó, éste se desactiva de forma automática. Esto significa que una
vez que actúa el dispositivo, su CVG deja de calentar y comienza a
enfriarse. En ese momento sonará un pitido y aparecerá el icono Fig
-
2 (f) parpadeando durante 5 segundos sobre la pantalla iluminada, y
que posteriormente seguirá parpadeando sobre la pantalla apagada
Fig 7, indicándole que el aparato se ha desconectado. Para volverlo a
activar, basta con moverlo ligeramente con un movimiento vertical o
bien pulsar cualquiera de los tres botones de control Fig 2 (g, h, i). El
CPC volverá a la posición de temperatura y vapor que tenía antes de la
desconexión.
Téngase en cuenta que el período transcurrido desde la desconexión
hasta que se vuelva a activar influirá en el tiempo que necesite el CPC
para volver a recuperar la temperatura seleccionada anteriormente.
RECOMENDACIONES DE PLANCHADO
Dado que el funcionamiento de este modelo se asemeja a un centro
de planchado y debido a su fuerte caudal de vapor al máx, 30 gr/min,
le recomendamos planchar con vapor medio en las posiciones 1 y
2 de temperatura, y vapor máximo para las posiciones 3 y Máx. de
temperatura. Asimismo le recomendamos primero planchar con vapor
(el adecuado a la prenda que vaya a planchar) y repasar en seco
para deshumedecer la ropa y obtener los resultados de un planchado
profesional.
24
25
Page 15

Cada vez que deje el Centro de Planchado Compacto en posición vertical, le recomendamos quitar la salida de vapor pulsando una vez el
interruptor On/Off del vapor Fig 2 (g).
• Para planchar sin vapor, basta con NO accionar el interruptor On/Off
del vapor Fig 2 (g)
• NO es necesario vaciar el depósito de agua
PLANCHADO CON VAPOR
Este modelo le permite planchar con vapor en la posición 1 de temperatura (•). Dispone de dos caudales de vapor, med 15 gr/m y máx
30 gr/m. Para la correcta utilización del caudal remítase al apartado de
“Recomendaciones de Planchado.”
PLANCHADO VERTICAL
• Permite eliminar arrugas de prendas delicadas sin necesidad de
apoyarlas en la tabla de planchado: chaquetas, abrigos, cortinas, prendas de ante, etc.
• Coloque la prenda en un colgador, aislada de otras prendas, personas.
• Ponga el selector de temperatura en posición (••), (•••) ó (MAX),
sitúe la plancha en posición vertical y accione el pulsador. En el punto
(••) obtendrá un vapor más húmedo y blanco que percibirá mejor,
mientras que en el punto (•••) y (MAX) el vapor es más seco y
aunque sigue manteniendo el mismo caudal le será más difícil verlo.
SPRAY
• Con agua en el depósito, puede pulverizar agua sobre la prenda pre-
sionando el pulsador Fig 1 (3).
RELLENADO DE AGUA
Si durante el planchado el agua del depósito se está acabando, en
aproximadamente 30 segundos aparecerá el icono Fig 2 (d) indicando
que se ha de rellenar de agua. Si no se rellena el depósito, la bomba se
desconectará automáticamente en el plazo de 1 minuto para evitar ser
dañada.
Desconecte el CPC y rellene el depósito, con el vaso que lleva incorporado Fig 1 (8), en posición vertical según se indica en la figura Fig 3.
Rellenado el depósito, el icono no desaparece de la pantalla hasta que
26
no pulse el interruptor On/Off y comience a planchar de nuevo.
Si se llegase a quedar completamente sin agua, se oiría un ruido extraño procedente de la micro-bomba. En este caso pulse el interruptor
On/Off Fig 2 (g), desconecte el aparato y rellene el depósito de agua.
Al pulsar nuevamente el interruptor On/Off, dicho ruido desaparecerá.
SISTEMA ANTICAL
El Centro de Planchado Compacto incorpora un innovador sistema
antical recambiable consistente en un filtro de resina que retiene las
sustancias calcáreas del agua, evitando que éstas lleguen a la cámara
de vapor de la suela dando como resultado un alargamiento de la vida
de su plancha Velocity. Este modelo permite, en caso de desearlo,
reemplazar la resina por una nueva con el objeto de que el CPC se
mantenga siempre en óptimo estado. En caso de desear reemplazar
la resina, le recomendamos que lo haga cada 6 meses. El cambio de
la resina no implica que se puedan evitar los consejos sobre la dureza
del agua mencionadas en el apartado “Antesde Empezar a Planchar.”
En caso de no cambiar la resina de este CPC, éste se verá afectado
por los efectos de la cal igual que otras planchas. Para el cambio y
antes de retirarlo asegúrese de que no hay agua en el depósito.
Situado en la talonera del aparato, gire la pieza en el sentido contrario
de las agujas del reloj hasta que haga tope, y la flecha coincida con el
candado abierto (aprox. 180°) y tire hacia atrás del mismo.
Para colocarlo de nuevo, haga coincidir la flecha con el candado
abierto y gire en el sentido de las agujas del reloj, siguiendo las
indicaciones del dibujo, presionando a su vez la pieza hacia el interior,
hasta situarse en el candado cerrado, Fig 9.
Asegúrese de que una
vez colocado el filtro, éste NO SOBRESALE de la parte trasera de la
plancha. De lo contrario, Ud. lo habrá colocado incorrectamente y el
agua se saldrá del depósito.
LIMPIEZA
A) Suela
• Desconecte el aparato y deje que la suela se enfríe.
• Para la limpieza de la suela utilice productos ecológicos basados en
arcillas.
27
Page 16

B) Parte exterior
• Para limpiar la parte exterior de su plancha, utilice un paño humedecido con agua y jabón.
• No lo limpie con productos químicos abrasivos, ni disolventes ya
que puede atacar ciertas partes plásticas y/o eliminar algunas de
las marcas y/o indicaciones.
• Guarde su plancha en posición vertical, enrolle el cable alrededor
de la talonera y fije el cable con la presilla.
A pesar de disponer en el cable de alimentación de un codo de 360°
de giro, NUNCA FUERCE dicho cable al enroscarlo alrededor del producto en la primera vuelta.
CONSEJOS PARA DESPRENDERSE DEL APARATO USADO
Antes de deshacerse de su aparato usado deberá inutilizarlo de modo
visible, encargándose de su evacuación de conformidad a las leyes
nacionales vigentes. Solicite información detallada a este respecto a
su Distribuidor, Ayuntamiento o Administración local.
CONDICIONES DE GARANTÍA
Corporación Reliable no se responsabiliza de las averías de su aparato
en caso que no cumpla las especificaciones de las condiciones de
garantía o falta de seguimiento de las instrucciones de funcionamiento
y mantenimiento que para cada aparato se incluyen en el folleto de
instrucciones. Las condiciones de garantía las puede encontrar de
forma separada.
Le recordamos que los daños producidos por el efecto de la cal no
están cubiertos por la garantía.
RELIABLE PRODUCTS WARRANTY
LIMITED 1 YEAR WARRANTY
For a period of one year from date of purchase we will, free of charge,
repair defects in material or workmanship which appear in the mechani
cal or electrical parts of all
wear and tear components.
Wear and Tear Component List:
Steam Equipment: Press pad and cover, Teflon® seals, Teflon®
shoe, steam-electric hoses
Sewing Equipment: Hooks, loopers, stitch plates, feed dogs,
needles, motor clutch disc
Cloth Cutting Equipment: Blades, stones, sharpening bands, shoe
Halogen Lights: Bulbs
LIMITED 90-DAY WARRANTY ON ALL PARTS AND ADJUSTMENTS
For a period of 90 days from date of purchase we will, free of charge,
provide required adjustments and repairs to your
Warranty service is available by returning the product with this warranty document and proof of purchase to your nearest authorized
RELIABLE™ service center.
This limited warranty is in effect provided that your machine is used
for normal purposes for which it was intended, and is given reason
able good care and maintenance in accordance with the instructions
contained in the instruction booklet.
Your authorized dealer (or Reliable Corporation) will not be held respon
sible for damage if the machine has been repaired by an unauthorized
dealer.
These warranties give you specific legal rights and you may have other
rights, which vary from province/state to province/state.
If you have any questions regarding these warranties, you may write to:
RELIABLE CORPORATION
100 WINGOLD AVENUE, UNIT 5
TORONTO, ONTARIO M6B 4K7
CANADA
RELIABLE™ brand products excluding all
RELIABLE™ product.
-
-
-
28
Page 17

www.reliablecorporation.com
 Loading...