

Page 1
INSTRUCTION MANUAL
GUIDE D’UTILISATION
MANUAL DE INSTRUCCIONES
SENZA 200DS
DUAL IRONING SYSTEM
SYSTÈME DE REPASSAGE DOUBLE
SISTEMA DE PLANCHADO DE DOBLE
Page 2

Page 3

ENGLISH 01
FRANÇAIS 15
ESPAÑOL 31
Page 4

SENZA 200DS
INSTRUCTION MANUAL
ENGLISH
01
Page 5

RELIABLE. RIGHT THERE WITH YOU.
At Reliable, we do what we love, and take pride in doing it right.
You want what’s best for the people, places and things that matter
in your life – from where you live to what you wear. So do we. From
the start, we approach every product with a craftsman’s attention
to detail and passion for making it right. Quality, functionality,
design and customer service play an equally important part in
delivering what’s right for you. With a non-stop refill function, the
200DS will double the efficiency of any traditional ironing system.
Top quality steam ensures a crisp and professional finish to your
garments.
For your safety and to fully enjoy the advantages of this product,
please take a few minutes to read all the important safeguards and
care instructions. Keep this manual handy and review the product
warranty for your reference.
THANK YOU FOR YOUR PURCHASE. PLEASE SHARE YOUR
RELIABLE PRODUCT EXPERIENCE BY POSTING AN ONLINE
REVIEW ON THE WEBSITE FROM WHICH YOU PURCHASED!
WE GREATLY APPRECIATE IT!
02
Page 6

IMPORTANT SAFETY INSTRUCTIONS
When using your Reliable™ dual ironing system, basic safety precautions should always
be followed. Please read the following instructions carefully as they provide important
information concerning how to install, use and care for this steam iron station.
• Use the ironing system only for its intended use.
• Always connect the iron to a grounded socket.
• Never pull the power cable or the appliance with wet or damp feet.
• Do not start ironing if your hands are wet or if you are barefoot.
• Burns can occur from touching hot metal parts, hot water, or steam.
• Never use this appliance in bathrooms.
• Always disconnect the ironing system from the electrical outlet before filling with
water and when the iron is not in use.
• In the event that the malfunction indicator comes on, the ironing system is not
operating properly. Disconnect the ironing system from the electrical outlet and have
the ironing system serviced by qualified service personnel.
• Before cleaning or servicing, always disconnect the plug from the electrical outlet.
• Do not direct the steam jet towards people, animals or iron clothes when they are
being worn, as this could be dangerous.
• Always disconnect the ironing system from the electrical outlet before filling with
water and when the iron is not in use.
• To protect against a risk of electric shock, do not immerse the iron or boiler in water
or any other liquids.
• The ironing system should always be turned OFF before plugging it into or unplugging
from a wall outlet. Never pull the power cord to disconnect from the outlet; instead
grasp the plug and pull to disconnect.
• Do not let the power cord to touch hot surfaces. Let the ironing system cool
completely before putting it away.
• Fill up the tank with water before starting up the appliance. Be sure to unplug the
appliance before pouring water into the tank.
• Using the appliance with no water in the tank may damage the pump.
• Do not operate this product with a damaged cord, plug, or if it has been dropped or
damaged. To avoid risk of electric shock, do not disassemble or attempt to repair
the unit on your own. Return the unit to Reliable Corporation (see warranty) for
examination, repair or replacement.
• Close supervision is necessary for any appliance being used by or near children. Do
not leave the ironing system on while unattended.
• When you are using the iron, make sure it is rested on a stable surface and not left
standing on inflammable material.
• Keep ventilation slots free from dust.
• Never drop or insert any object into ventilation slots
• To prevent overheating, unravel the electrical cord completely.
• Do not operate where aerosol (spray) products are being used or where oxygen is
being administered.
• To disconnect, turn all controls to the off position, then remove plug from the main
power.
• To avoid circuit overload, do not operate an iron on the same circuit with another
high voltage appliance.
03
Page 7

• If an extension cord is absolutely necessary, a cord with an ampere rating equal to
or greater than the maximum rating of the iron shall be used. A cord rated for less
amperage can result in a risk of fire or electric shock due to overheating. Care shall
be taken to arrange the cord so that it cannot be pulled or be tripped over.
• This appliance is not intended for use by persons (including children) with reduced
physical, sensory, or mental capabilities, or lack or experience or knowledge, unless
they have been given supervision or instruction concerning use of the appliance by a
person responsible for their safety.
• Children should be supervised so that they do not play with the appliance.
• The iron is not to be used if it has been dropped, if there are visible signs of damage
or if it leaking.
• Use caution when turning the steam iron upside down, there might be hot water in
the reservoir.
• Place the appliance on a work surface that bears a temperature of at least 90°C
• Never put away your steam iron while it is still hot. There is no need for emptying the
tank unless you intend to leave it unused for a long period of time.
SAVE THESE INSTRUCTIONS
• ATTENTION: Please make sure that before you begin ironing, you wait for the steam
ready light to light up. If it does not, please call contact an authorized service depot
before using.
• This product is intended for household use only – maximum 15-20 hours per week.
Follow all user instructions in this manual. Please do not leave the hot iron on the
iron rest (that sits on top of the boiler) unattended or for a period longer than 1 hour.
If the iron needs to stay on for longer than 1 hour, reduce the temperature to the
lowest setting.
FAILURE TO FOLLOW THESE INSTRUCTIONS WILL
VOID THE WARRANTY.
WATER INSTRUCTIONS
Your steam iron system has been planned for use with normal tap water. In
order to extend the life of this product, if where you are living the level of water
hardness is very high, we recommend to use 50% of normal water with 50% of
demineralized or distilled water. Do not use softened water or well water.
TEST FIRST, THEN IRON
Prior to ironing on delicate fabrics, it is a good idea to do a test in a hidden area
(like the reverse side) to ensure that no damage is done to the fabric. We will not
assume any responsibility in case you do not comply with these instructions.
04
Page 8

DESCRIPTION OF THE STEAM IRON SYSTEM
DESCRIPTION OF THE APPLIANCE
A - Power cord
B - Tank
C - Tank cover
D - Iron support rest
E - Carrying handle
F - Measuring cup
G - Spray nozzle
H - Tank filler cover
I - Spray button
J - Continuous steam lock slider
K - Steam button
L - Temperature adjustment knob
M - Tank of the iron
N - Iron temperature control indicator light
O - Soleplate
P - Iron/boiler connecting cable
Q - Cables release hook
R - Steam ready light
S - Boiler on-off switch
T - Steam adjustment knob
U - Iron on-off switch
V - Boiler cleaning cap
W - Boiler cleaning cap door
X - Cable compartment
Y - Cord storage device
05
Page 9
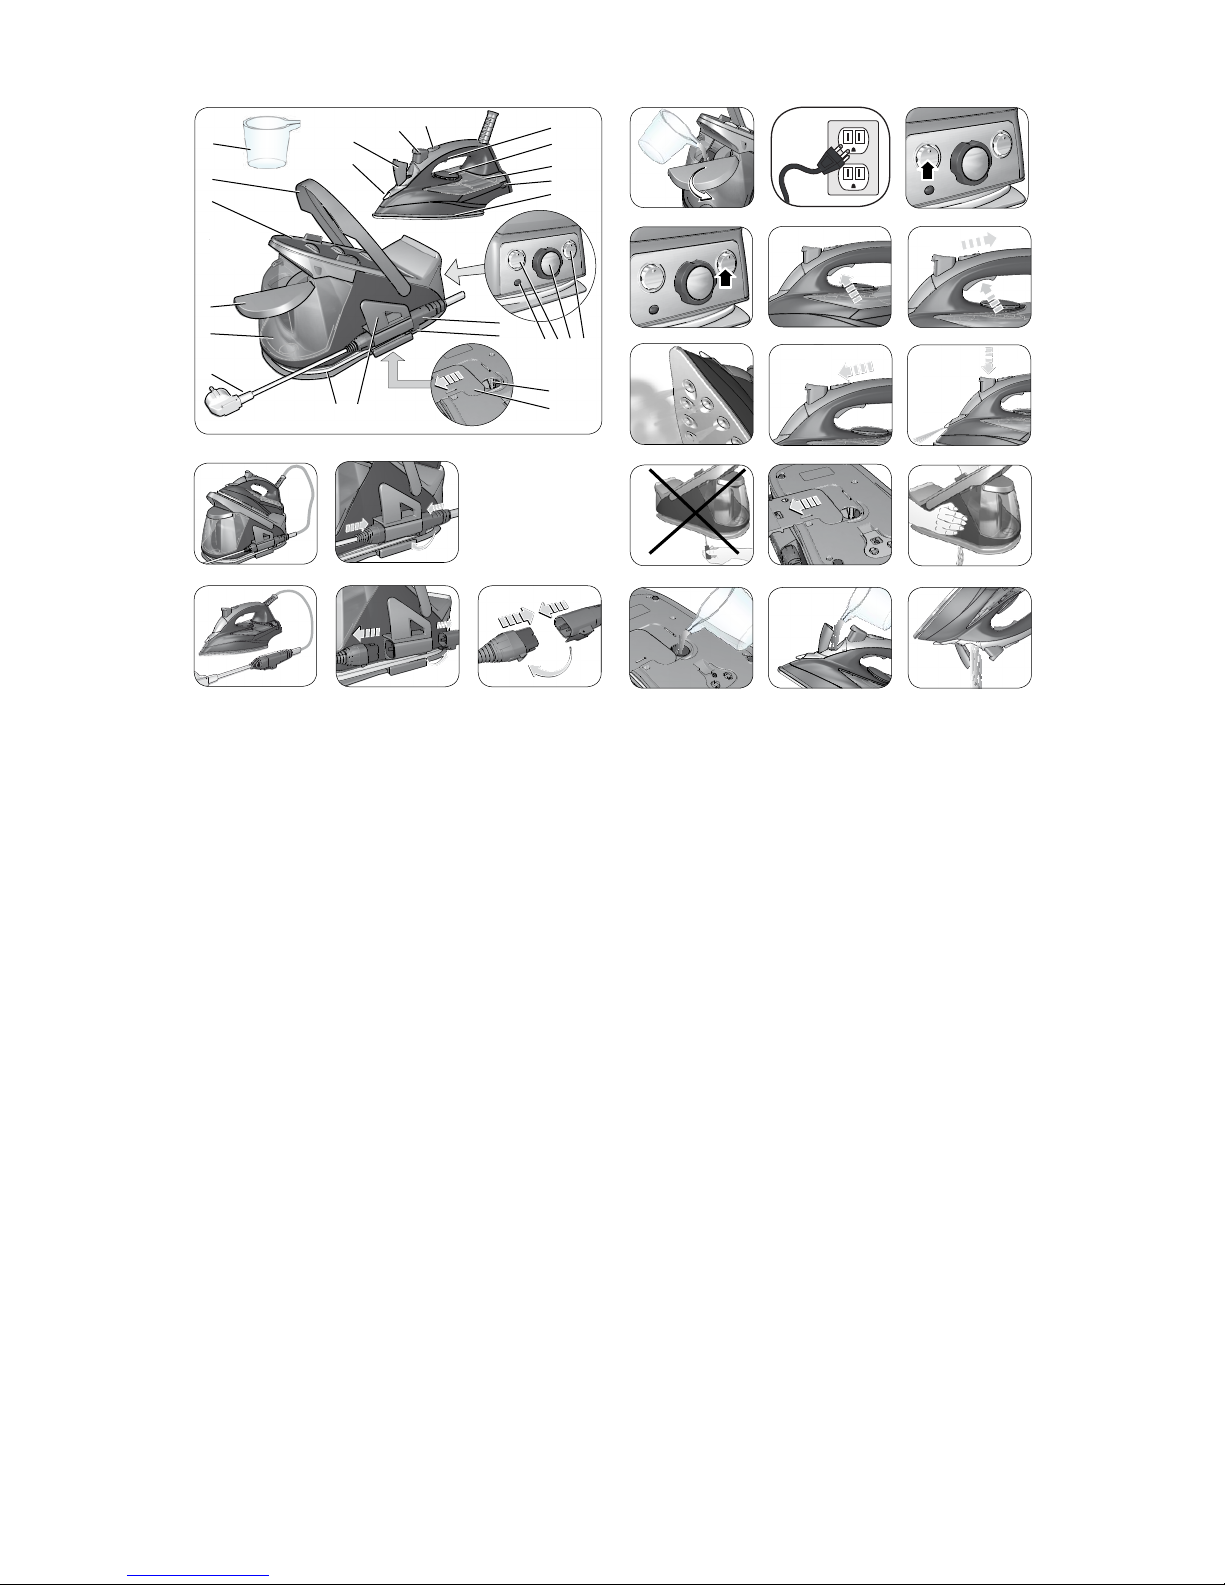
Fig. 1
E
B
H
I
N
C
J
L
G
A
D
Fig. 2 Fig. 3
Fig. 10
Fig. 9
Fig. 8
Fig. 11
Fig. 17
Fig. 16
Fig. 12
Fig. 13
Fig. 18
R S T U
V
W
P
O
YMX
Fig. 14 Fig. 15
Fig. 7
Fig. 4 Fig. 5 Fig. 6
K
Fig. 21Fig. 19 Fig. 20
F
Q
HOW TO USE YOUR IRONING SYSTEM
Remove any labels from the soleplate before using the appliance.
Disconnecting the iron from the tank must occur always and only with the power
plug unplugged from the outlet.
The Senza 200DS can be used in two ways: as an ironing system or as a traditional
iron.
The ironing system mode is recommended for large quantities of clothes and long
ironing times, while for lesser quantities or less ironing time it is recommended to
use the traditional ironing mode.
To use it as ironing system make sure that the iron/boiler connecting cable
(P) and the power cord (A) are inserted in the connection on the cord storage
compartment (X) at the base of the appliance (Fig. 3). See “Using the iron as an
ironing system”.
For use in traditional iron mode, unplug the power cord (A) and the iron/boiler
connecting cable (P) from the connections on the cord storage compartment (X)
by pressing the release hook (Q). Connect the cables to each other (Fig. 6) until
you hear a slight click. See “Using as a traditional iron”.
To return to using the ironing system mode, unplug the power cord (A) and the
iron/boiler connecting cable (P), by pressing the release hook (Q). Insert the two
cables into the connections on the cord storage compartment (X) at the base of
the appliance until you hear a slight click.
06
Page 10

USING THE IRON AS IRONING SYSTEM (FIG. 2)
FILLING THE TANK BEFORE USE
WARNING: Make sure the unit has been disconnected from the power supply
before filling the tank (B) with water.
Before plugging it in, completely unwind the power cord. Rotate the tank lid (C).
Fill the tank with cool tap water (Fig. 7).
NEVER fill the tank beyond the MAX level.
Do not add any additives or chemicals (such as: amides, starches, perfume or
other); otherwise, the warranty may be revoked.
WARNING: To avoid damaging the pump, never operate the appliance without any
water in the tank, even for dry ironing.
Close the tank lid (C).
SWITCHING ON THE APPLIANCE
Place the appliance on a horizontal and stable surface. The power cord (A) and
the iron/boiler connecting cable (P) are coupled to the connections on the cord
storage compartment (X) (Fig. 3). Connect the appliance to the power supply,
ensuring that the voltage indicated on the identification plate corresponds to your
local power supply.
Before you turn on the appliance, make sure there is sufficient water inside of the
tank.
Press the iron power switch (Fig. 10) and set the temperature control knob to the
desired temperature. Press the boiler on-off switch (Fig. 9). When the steam ready
light (R) turns on, the steam is ready.
When first used, the iron may give out a little smoke: This transitory effect is
perfectly normal and will disappear very soon.
Upon first use, after filling the tank, it is necessary to adjust the temperature
control knob (L) over the symbol (•••) and press the steam button (K) Fig. 11 until
the iron does not produce steam (about one minute) Fig. 13. The iron is now ready
for use. Before applying a jet of steam to the article to be ironed, release two or
three good jets of steam towards the floor to stabilize the steam flow.
WARNING: Do not release steam when the iron is standing on its support rest (D).
A decrease in the steam output may occur soon after the pump starts operating:
it is perfectly normal and after a few seconds the steam will be normal. If the iron
has not been used for a long period of time, it is advisable to keep it in a horizontal
position and send a few shots of steam to the floor in order to stabilize the jet
before ironing.
07
Page 11

STEAM ADJUSTMENT
The appliance is equipped with a regulator (T) that allows the steam output
to be adjusted from a minimum to a maximum setting according to ironing
requirements.
SHOT OF STEAM
For ironing thicker fabrics and for a powerful anti-crease action in vertical
position, it is possible to operate the turbo steam function. Make sure that there
is water in the tank (B) and in the iron tank (M). Place the control knob (T) on
the MAX setting. Wait for the steam ready light (R) to turn on. Set the ironing
temperature by turning the adjustment knob (L) past the symbol (•••). Wait for the
indicator lamp (N) of the iron to turn off. Press the steam button (K) from 3 to 5
seconds.
(Fig. 11). If the steam supply button (K) is operated continuously for more than 30
seconds, drops of water may come from the steam holes in the plate of the iron. It
is recommended that the button (K) be used for shorter periods.
CONTINUOUS STEAM
Turn the steam adjustment knob (T) to MAX. Wait for the steam ready light (R)
to turn on. Set the ironing temperature by turning the adjustment knob (L) past
the symbol (•••). Wait for the indicator lamp (N) of the iron to turn off. When
the temperature has reached, press the steam button (K) Fig. 12. The cursor (J)
will lock the button, allowing the jet of steam to exit continuously. To unlock the
button (K) and stop the continuous jet, press the cursor (J) forward (Fig. 14).
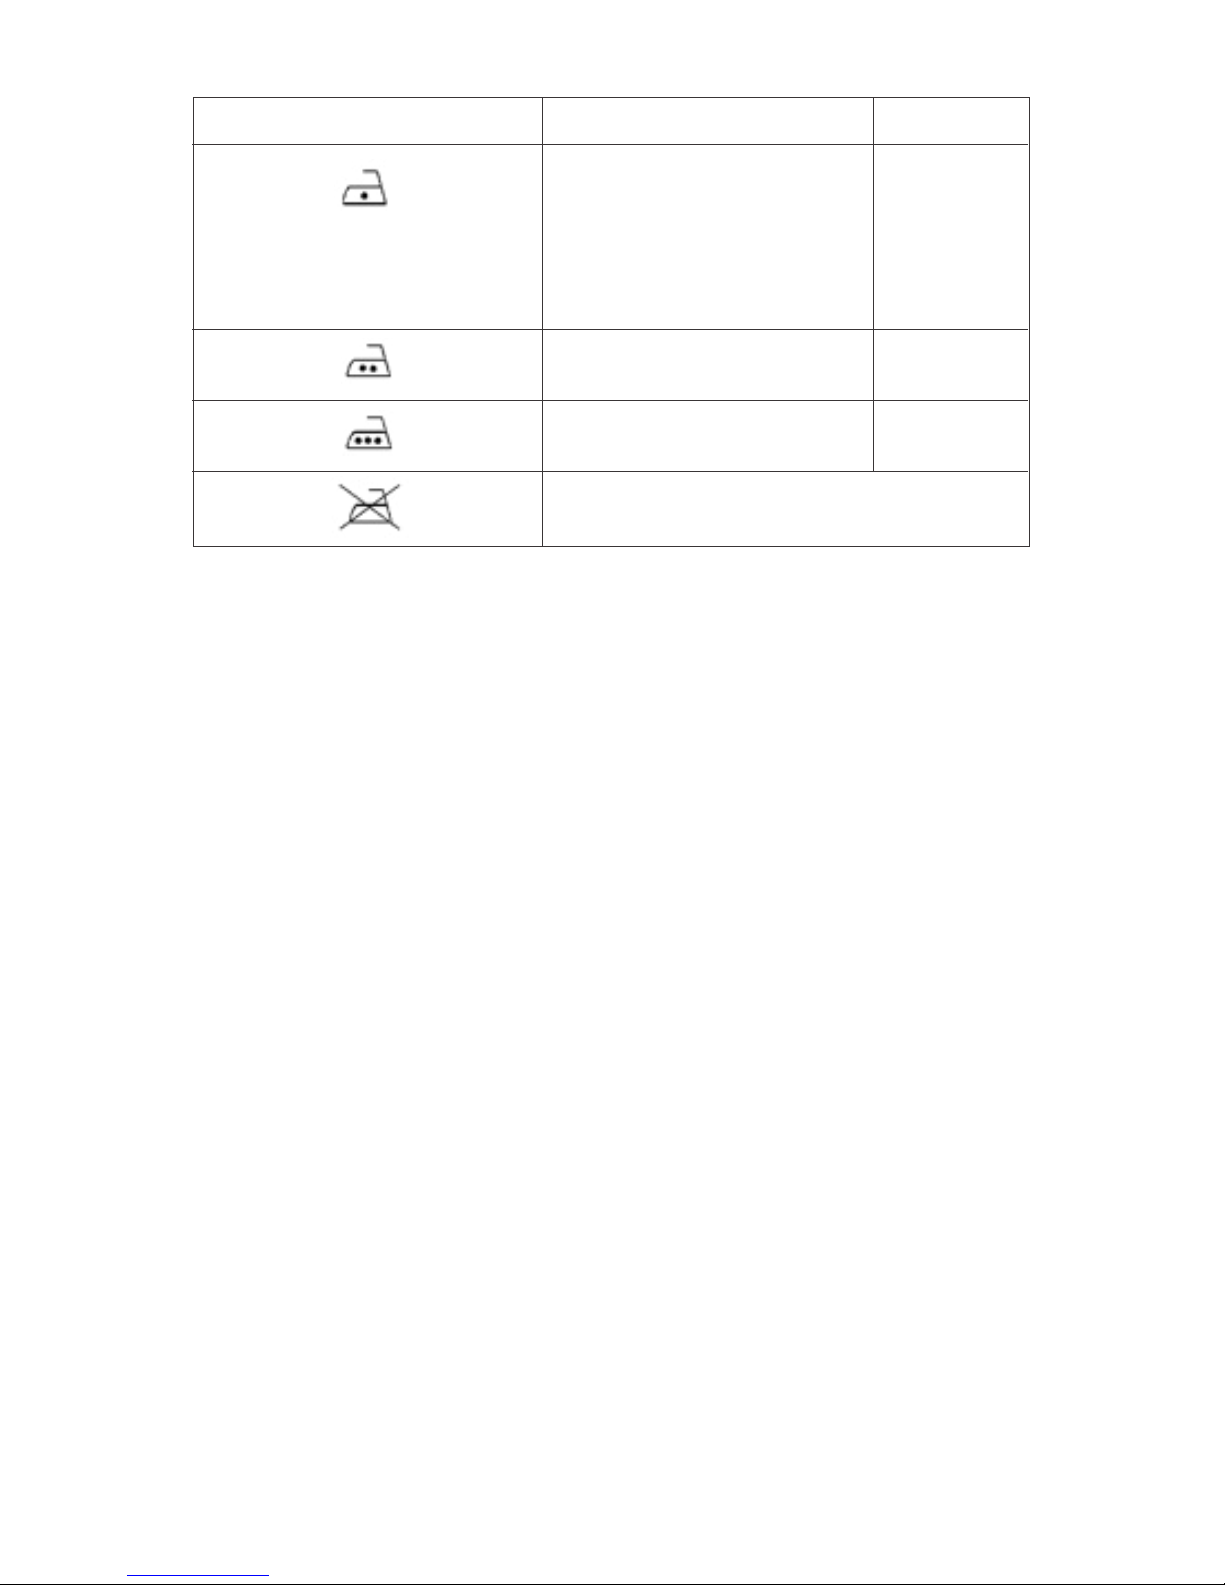
TEMPERATURE SELECTION
First check whether the fabric has a label containing ironing instructions and
compare the symbol with the instructions that follow. If there is no label with
instructions, and you know the type of material, follow the instructions below.
Note that the table refers to fabrics not treated with sizing agents or similar
products; if they have been, you can also iron at a lower temperature.
When you change the temperature by turning the adjustment knob (L), the light
(N) will turn on and stay on until the iron reaches the new temperature.
08
Page 12
FILLING THE TANK
Always check the level of water in the tank while you are ironing.
Add enough water to the tank so that the water level is always visible. Do not go
past the MAX level. If the tank remains without water, you will notice a vibration
and loud noise. Turn off the appliance by pressing the switches (S) and (U) and
unplug it from the electrical outlet.
WARNING: Always turn off the appliance and remove the power cable plug from the
outlet before filling the tank with water.
Add water directly in the tank (Fig. 7). Insert the plug into the electrical outlet and
turn on the appliance again.
If the appliance is not switched off promptly, overheating of the pump could cause
a momentary stoppage of the appliance. Therefore it is necessary to switch off the
appliance and fill the tank. Wait for the appliance to cool down to resume normal
operation.
SPRAY BUTTON
Make sure there is water in the tank of the iron (M). Press the spray button (I). To
enable this feature you may need to press the spray button repeatedly (Fig. 15).
DRY IRONING
To iron dry - i.e. without steam - all you have to do is turn the iron on by pressing
the switch (U) after connecting it to the power supply. Place the steam control
knob to the minimum and adjust the temperature control knob (L) to the desired
temperature. Do not press the steam button.
LABEL IRONING INSTRUCTIONS KIND OF FABRIC
Synthetic fabrics:
Acetate
Acrylic
Viscose
Polyamide (Nylon)
Viscose (Rayon)
Silk
Wool
Cotton
Linen
THERMOSTAT
•
• •
• • •
The mark on the label means do not iron
09
Page 13

VERTICAL IRONING
You can use the jet of continuous steam for ironing hanging fabrics. This special
ironing procedure serves to remove creases from curtains, fabrics, etc... Turn the
steam adjustment knob (T) to MAX. Wait for the steam ready light (R) to turn on.
Set the ironing temperature by turning the adjustment knob (L) past the symbol
(•••). Put the curtain or fabric in the position you would like to iron it and press the
steam button.
WARNING: Do not iron fabrics held by other people.
AFTER IRONING
To prevent lime residue from forming, empty the tank following use and after
having turned off the appliance and unplugged it from the outlet.
Turn off the boiler by pressing the switch (S). The appliance is still energized when
plugged in and it is possible to eliminate the pressure remaining in the boiler by
pressing the steam button (K). Turn the appliance off by pressing the switch (U).
Remove the power cable from the outlet. Empty the water tank completely so
as to prevent the water from stagnating, which may form lime deposit. Store the
power cord in the cord storage compartment (Y). Put back the cable connecting
the iron to the tank in the cord storage compartment (X). Let the iron cool down
on its stand, taking care not to touch the power cables and connection with the
hot parts of the appliance.
USING AS A TRADITIONAL IRON (FIG. 4)
REFILLING THE RESERVOIR
WARNING: Make sure the iron is unplugged from the power supply before filling the
iron tank (M) with water.
Open the door (H). Hold the iron vertically and fill the tank with fresh tap water to
the maximum level (Fig. 20). Use the measuring unit (F) provided. Close the cover
(H) again. If your tap water is very hard, use demineralized water.
NEVER fill the tank above the level indicated by “max”.
Do not pour vinegar, mmers or other scented substances into the tank: Otherwise,
the warranty may be revoked.
WARNING: Do not try to fill the tank holding the iron in a horizontal position.
To add water while ironing, always turn off the iron and unplug the power cord
before filling the tank with water.
10
Page 14

SWITCHING ON THE APPLIANCE
Place the iron on the iron support rest (D). Disconnect the cables from the
connections on the cord storage compartment (Fig. 5). Connect the power cord
(A) with the iron/boiler connecting cable (P) until you hear a slight “click” (Fig. 6).
Plug into the power supply. The temperature control lamp (N) turns on. Now select
the required temperature using the thermostat knob (L). When the iron reaches
the selected temperature, the lamp (N) turns off (the temperature lamp turns off
and on while ironing, indicating that the iron is maintaining the right temperature).
Follow the instructions on the care label of the garment to be ironed. Make sure
the dots shown on the iron correspond to those shown on the label.
STEAM IRONING
Steam ironing is only possible at a high temperature.
Ensure that there is enough water in the water tank. Place the iron on the iron
stand grid (D). Plug into the main socket.
Position the temperature adjustment knob (L) on position (•••) or higher. When
the indicator light (N) turns off, this means that the soleplate has reached the
selected temperature, and the iron is ready for use.
SHOT OF STEAM
If there is water in the tank and the temperature is set on (•••) or on a higher level,
all you have to do is press the steam button (K).
SPRAY BUTTON
Make sure there is water in the tank of the iron (M). Press the spray button (I). To
enable this feature you may need to press the spray button repeatedly (Fig. 15).
DRY IRONING
Plug into the power supply. Set the temperature control knob (L) depending on the
type of fabric to be ironed. Wait a few minutes for the soleplate to reach the set
temperature. Do not press the steam button.
VERTICAL IRONING
Vertical ironing This special ironing procedure serves to remove creases from
curtains, fabrics, etc. Set the ironing temperature by turning the adjustment knob
(L) past the symbol (•••). Put the curtain or fabric in the position you want to iron
it vertically and press the steam button. If the temperature lamp is on, do not
press the steam button more than three times in a row.
WARNING: Do not iron fabrics held by other people.
11
Page 15

AFTER IRONING
Set the temperature control knob (L) to “min” and unplug it from the electrical
outlet. Let the iron cool down on its stand (D). Empty the tank: open the tank
filling cover (H), overturn the iron and let water drain (Fig. 21).
WARNING: Let the iron cool down before emptying the tank.
Store the power cord in the cord storage compartment (Y). Put back the cable
connecting the iron to the tank in the cord storage compartment (X). Let the iron
cool down on its stand, taking care not to touch the power cables and connection
with the hot parts of the appliance.
MAINTENANCE OF THE BOILER
To maintain your steam ironing system in good condition and to ensure consistent
performance, we recommend that you periodically clean the boiler once or twice a
year depending on the hardness of the water.
CLEANING INSTRUCTIONS
ATTENTION: Before cleaning the boiler, please make sure that the boiler is at room
temperature and that it has not been used for at least 8 hours, and that the boiler
is disconnected from the power source.
Do not unscrew the boiler cap (V) with the appliance in its working position, as this
may cause the water in the boiler to escape unexpectedly (Fig. 16).
Place the appliance so as to obtain the tank-cleaning cap (V) on the top (Fig. 17).
Open the door (W). With a flathead screwdriver, unscrew the tank cleaning cap (V).
Overturn the appliance on a sink and completely drain the tank (Fig. 18).
Place one measuring cup of tap water in the boiler (Fig. 19). Using a de-scaling
powder (can be purchased at www.reliablecorporation.com), pour the contents of
the package into the filled (with water) boiler, let it sit for a few hours, then rinse
3-4 times.
Repeat this operation until the water coming out of the boiler is clean and clear.
After cleaning the boiler, pour approximately 400ml of water into the boiler (Fig.
19) and refit the cap (V) tightening it slightly, without forcing it excessively. Close
the door (W).
TECHNICAL DESCRIPTION
120V Power 1750W
Cold water tank capacity 1L
Working pressure 3.5bar
12
Page 16

13
Reliable Corporation (“Reliable”) warrants to the original purchaser of the boiler noted
above from Reliable (the “Reliable Boiler Tank”) that it will be free from defects in materials
and workmanship when utilized for normal use by the original purchaser only. Should the
Reliable Boiler Tank need replacement, Reliable will do so at no parts and labor cost to the
original purchaser, exclusive of shipping.
Subject to the conditions and limitations set forth below, Reliable will either repair or replace
any part of a Reliable Boiler Tank that proves defective by reason of improper workmanship
or materials. If the defective Reliable Boiler Tank is no longer available and cannot be repaired
effectively or replaced with an identical model, Reliable shall replace the defective Reliable
Boiler Tank with a current Reliable Boiler Tank of equal or greater value. Repaired parts or
replacement products will be provided by Reliable on an exchange basis, and will be either new
or refurbished to be functionally equivalent to new. If Reliable is unable to repair or replace a
Reliable Boiler Tank, it will refund the current value of that Reliable Boiler Tank at the time the
warranty claim is made.
This limited warranty does not cover any damage to a Reliable Boiler Tank that results from
improper installation, accident, abuse, misuse, unreasonable use, natural disaster, insufficient
or excessive electrical supply, abnormal mechanical or environmental conditions or any
unauthorized disassembly, repair or modification. This limited warranty does not extend to
any indirect, consequential or incidental damages that may be suffered by a user from the use
of a Reliable Boiler Tank, including without limitation, any liability for third party claims for
damage, and is limited to the amount paid by the original purchaser for the Reliable Boiler Tank
with respect to which this limited warranty protection applies. This limited warranty does not
apply with respect to products that have been altered or which are missing serial numbers or
for products not purchased directly from Reliable or a dealer authorized by Reliable to sell the
Reliable Boiler Tank.
This limited warranty is the only warranty that applies to the Reliable Boiler Tank, supersedes
any and all terms that may be contained in any other document or purchase order and may not
be altered or amended except expressly in writing by Reliable.
To obtain a repair or replacement under the terms of this warranty, please contact our
customer service group at 1 800 268 1649 or at support@reliablecorporation.com. You will be
required to submit an original receipt via fax or e-mail. The receipt must reflect that you are
the original purchaser, the product was bought directly from Reliable or from an authorized
Reliable dealer and that the warranty claim is being made in compliance with the terms set out
in this document or any subsequent document issued by Reliable in connection with this policy.
You will be issued a return authorization number (RA#) and asked to ship the defective product
together with proof of purchase and RA#, prepaid insured to the following address: Reliable
Corporation, 5–100 Wingold Ave, Toronto, ON M6B 4K7.
Freight collect shipments will be refused. The risk of loss or damage in transit will be borne
by the customer. Once Reliable receives the defective product, it will initiate the repair or
replacement process.
RELIABLE CORPORATION LIFETIME
PRODUCT WARRANTY POLICY FOR
PRESSURIZED STEAM BOILER TANKS
Page 17

Reliable Corporation (“Reliable”) warrants to original purchaser of its products that
every product sold by Reliable (a “Reliable Product”) is free from defects in material and
workmanship for a period of one year from the date of purchase if properly used and
maintained. Subject to the conditions and limitations set forth below, Reliable will either
repair or replace any part of a Reliable Product that proves defective by reason of improper
workmanship or materials. If the defective Reliable Product is no longer available and
cannot be repaired effectively or replaced with an identical model, Reliable shall replace
the defective Reliable Product with a current Reliable Product of equal or greater value.
Repaired parts or replacement products will be provided by Reliable on an exchange basis,
and will be either new or refurbished to be functionally equivalent to new. If Reliable is
unable to repair or replace a Reliable Product, it will refund the current value of that Reliable
Product at the time the warranty claim is made.
This limited warranty does not cover any damage to a Reliable Product that results from
improper installation, accident, abuse, misuse, natural disaster, insufficient or excessive
electrical supply, abnormal mechanical or environmental conditions, wear and tear resulting
from normal use of the product, or any unauthorized disassembly, repair, or modification.
This limited warranty does not extend to any indirect, consequential or incidental damages
that may be suffered by a user or from the use of a Reliable Product, including without
limitation, any liability for third party claims for damage, and is limited to the amount paid
by the original purchaser Reliable Product with respect to which this limited warranty
protection applies. This limited warranty does not apply with respect to products that have
been altered or which are missing serial numbers or for products not purchased directly
from Reliable or a dealer authorized by us to sell Reliable Products.
This limited warranty is the only warranty that applies to any Reliable Product, supersedes
any and all terms that may be contained in any other document or purchase order and may
not be altered or amended except expressly in writing by Reliable.
To obtain a repair or replacement under the terms of this warranty, please contact our
customer service group at 1-800-268-1649 or at support@reliablecorporation.com.
You will be required to submit an original receipt via fax or e-mail. The receipt must reflect
that you are the original purchaser, the product was bought directly from
us or from an authorized Reliable dealer and that the warranty claim is being made within
the warranty period. You will be issued a return authorization number (RA#) and asked to
ship the defective product together with proof of purchase and RA#, prepaid insured to the
following address:
Reliable Corporation, 5-100 Wingold Avenue, Toronto, ON M6B 4K7. Freight collect
shipments will be refused. The risk of loss or damage in transit will be borne by
the customer. Once Reliable receives the defective product, it will initiate the repair or
replacement process.
If you have any questions regarding this warranty, you may write to:
Reliable Corporation
100 Wingold Avenue, Unit 5
Toronto, Ontario
Canada M6B 4K7
www.reliablecorporation.com
RELIABLE PRODUCTS WARRANTY
14
Page 18

15
SENZA 200DS
MANUEL D’INSTRUCTIONS
FRANÇAIS
Page 19

RELIABLE. TOUJOURS LÀ POUR VOUS.
Chez Reliable, nous aimons ce que nous faisons, et nous sommes
fiers de ce que nous accomplissons. Vous voulez ce qu’il y a de
mieux pour les gens, les endroits ainsi que les choses qui sont
importantes pour vous - depuis l’endroit où vous habitez jusqu’aux
vêtements que vous portez. C’est également ce que l’on souhaite.
Depuis le début, nous concevons chaque produit avec l’attention
qu’un artisan porte aux détails et une passion pour bien les
réaliser. La qualité, la fonctionnalité, la conception et le service
à la clientèle jouent des rôles également importants pour vous
fournir ce qui vous correspond. La vapeur est le « secret » d’un fini
propre, net et professionnel pour vos vêtements. La vapeur sert
à assouplir les fibres, et le poids du fer donne une forme au tissu.
Tout cela se fait sans effort avec le 200DS.
Avec une fonction de recharge non-stop, le 200DS double
l'efficacité de tout système de repassage traditionnel. La vapeur de
qualité exceptionnelle garantit une finition nette et professionnelle
pour vos vêtements.
NOUS VOUS REMERCIONS DE VOTRE ACHAT. NOUS VOUS
INVITONS À FAIRE PART DE VOTRE EXPÉRIENCE EN PUBLIANT
UNE ÉVALUATION EN LIGNE SUR LE SITE WEB AUPRÈS DUQUEL
VOUS AVEZ EFFECTUÉ VOTRE ACHAT ! NOUS VOUS EN SERIONS
RECONNAISSANTS !
16
Page 20

IMPORTANTES MESURES DE SÉCURITÉ
Des mesures fondamentales de sécurité doivent toujours être respectées lorsque vous utilisez
votre système de repassage pour la maison ReliableMC. Veuillez lire attentivement les instructions
suivantes, car elles fournissent des informations importantes concernant l’installation, l’utilisation
et l’entretien de cette station de repassage à vapeur.
• Utilisez le système de repassage uniquement pour son utilisation prévue.
• Connectez toujours le fer à une prise de terre.
• Ne jamais tirer sur le câble d'alimentation ou de l'appareil avec les pieds mouillés ou humides.
• Ne pas commencer à repasser si vos mains sont mouillées ou si vous êtes pieds nus.
• Les brûlures peuvent survenir lorsqu'on touche des pièces chaudes en métal, de l'eau chaude ou
la vapeur.
• Ne jamais utiliser cet appareil dans une salle de bains.
• Débranchez toujours le poste de repassage de la prise électrique avant de le remplir avec de l'eau
et lorsque le fer ne est pas utilisé.
• Dans le cas où l'indicateur de défaut de fonctionnement se poursuit, le système de repassage ne
fonctionne pas correctement. Débranchez le système de repassage de la prise électrique et avoir
le poste de repassage desservie par du personnel qualifié.
• Avant le nettoyage ou d'entretien, débranchez toujours la fiche de la prise électrique
• Ne pas diriger le jet de vapeur vers des personnes, des animaux ou des vêtements de fer quand
ils sont portés, car cela pourrait être dangereux.
• Débranchez toujours le poste de repassage de la prise électrique avant de le remplir avec de l'eau
et lorsque le fer ne est pas utilisé.
• Pour éviter tout risque de décharge électrique, ne pas immerger le nettoyeur à vapeur dans l’eau
ou tout autre liquide.
• Le système de repassage doit toujours être éteint avant de le brancher ou le débranche d’une
prise murale. Ne tirez jamais sur le cordon d’alimentation pour le débrancher de la prise,
empoignez plutôt la fiche et tirez pour débrancher.
• Ne laissez pas que le cordon d’alimentation touche des surfaces chaudes. Laissez le système de
repassage refroidir complètement avant de le ranger.
• Remplir le réservoir d’eau avant de faire fonctionner l’appareil. Le remplissage en eau s’effectue
avec l’appareil débranché de la prise de courant.
• N’utilisez pas le fer sans eau car la pompe pourrait être endommagée.
• Ne faites pas fonctionner ce produit avec un cordon ou une prise endommagée, ou s’il a été
échappé ou endommagé. Pour éviter tout risque de décharge électrique, ne démontez pas ou
n’essayez pas de réparer l’appareil par vousmême. Retournez l’appareil à Reliable Corporation
(voir garantie) pour la vérification, la réparation ou le remplacement.
• Une surveillance attentive est nécessaire lorsque tout appareil est utilisé par ou près des enfants.
Ne laissez pas le système de repassage branché sans surveillance.
• Lorsque vous utilisez le fer à repassage, assurez-vous qu’elle soit sur une surface firme et qu’elle
ne reste pas sur des matériels inflammables.
• Gardez les fentes de ventilation sans poussière.
• Évitez de laisser tomber ou d’insérer un objet dans les fentes de ventilation.
• Afin de prévenir la surchauffe, déroulez complètement le cordon électrique.
• Ne faites pas fonctionner l’appareil en cas d’utilisation de produits en aérosol (vaporisateurs) ou
d’administration d’oxygène.
• Pour débrancher, tournez les boutons de réglage à la position « Off » (arrêt) puis retirez la fiche
de l’alimentation principale.
• Pour éviter une surcharge du circuit , ne pas utiliser un fer à repasser sur le même circuit avec un
autre appareil de haute tension.
17
Page 21

• Si une rallonge est absolument nécessaire, un cordon avec un ampérage égal ou supérieur à la
cote maximale du fer doit être utilisé être utilisé. Un cordon électrique de moins ampérage peut
entraîner un risque d'incendie ou de choc électrique dû à une surchauffe. Des précautions doivent
être prises pour organiser le cordon de sorte qu'il ne peut pas être tiré ou faire trébucher.
• Cet appareil n'a pas destiné à être utilisé par des personnes (y compris les enfants) ayant
un handicap physique réduite, sensorielle, ou les capacités mentales, ou le manque ou de
l'expérience ou de connaissance, sauf si elles ont été encadrées pour l'utilisation de l'appareil
donnée par une personne responsable de leur sécurité.
• Les enfants doivent être surveillés afin qu'ils ne jouent pas avec l'appareil.
• Le fer est de ne pas être utilisée si elle a été abandonnée, si il ya des signes visibles de
dommages ou si elle fuit.
• Faites preuve de prudence lorsque vous tournez le fer à vapeur à l'envers, il pourrait y avoir de
l'eau chaude dans le réservoir.
• Positionner l’appareil sur une surface qui puisse supporter une température d’au moins 90°C.
• Ne rangez jamais votre planche à vapeur lorsqu’elle est encore chaude. Il n’est pas nécessaire de
vider le réservoir à moins que vous souhaitiez ne pas l’utiliser pour une longue période.
CONSERVER CES INSTRUCTIONS
• Attention : Avant de repasser, veuillez vous assurer d’attendre jusqu’à ce que l’indicateur
lumineux orange de vapeur s’allume. S’il ne s’allume pas, veuillez contacter un dépôt de
service autorisé avant de l’utiliser.
• Ce produit a été conçu seulement pour un usage ménager – 15-20 heures par semaine
maximum. Suivre toutes les instructions de ce manuel. Veuillez ne pas laisser le fer chaud sur
son appui (qui se place sur la chaudière), sans surveillance ou pour une période de plus de 1
heure. Si la place à repassage a besoin de rester en marche pour plus de 1 heure, réduisez la
température au réglage inférieur.
SI VOUS NE SUIVEZ PAS CES INSTRUCTIONS, CELA
POURRAIT ANNULER VOTRE GARANTIE.
INSTRUCTIONS DE L’EAU
Votre système de repassage à vapeur a été conçu pour utiliser de l’eau du robinet standard.
Afin de prolonger la durée de vie de ce produit, si là où vous habitez le niveau de dureté de
l’eau est très élevé, nous vous suggérons d’utiliser 50% de l’eau normale avec 50% de l’eau
distillée ou déminéralisée. N’utilisez pas l’eau de puits ou d’un adoucisseur.
PREMIÈREMENT, EPREUVEZ PUIS REPASSEZ
Avant de repasser sur les tissus délicats, il est recommandé de tester sur une surface cachée
(par exemple de l’autre côté) pour vous assurer qu’aucun dommage n’est fait aux tissus. Nous
ne prendrons aucune responsabilité si vous ne suivez pas ces instructions.
18
Page 22

DESCRIPTION DU SYSTÈME DU FER À VAPEUR
DESCRIPTION DE L’APPAREIL
A - Cordon d'alimentation
B - Réservoir
C - Couvercle du réservoir
D - Grille du repose-fer
E – Poignée de transport de l’appareil
F - Tasse à mesurer
G - Buse de pulvérisation
H - Couvercle de remplissage du réservoir
I - Bouton de pulvérisation
J – Curseur de verrouillage de la vapeur continue
K - Bouton de vapeur
L – Bouton de réglage de la température
M - Réservoir du fer
N - Voyant de contrôle de la température du fer
O – Semelle
P – Câble de raccordement du fer / du chauffe-eau
Q – Crochet de libération des câbles
R - Voyant lumineux de « vapeur prête »
S - Interrupteur marche-arrêt du chauffe-eau
T – bouton de réglage de la vapeur
U – Interrupteur marche-arrêt du fer
V - Bouchon de nettoyage du réservoir
W - Clapet du bouchon de nettoyage du réservoir
X – Compartiment du câble
Y - Dispositif de rangement du cordon
19
Page 23

Fig. 1
E
B
H
I
N
C
J
L
G
A
D
Fig. 2 Fig. 3
Fig. 10
Fig. 9
Fig. 8
Fig. 11
Fig. 17
Fig. 16
Fig. 12
Fig. 13
Fig. 18
R S T U
V
W
P
O
YMX
Fig. 14 Fig. 15
Fig. 7
Fig. 4 Fig. 5 Fig. 6
K
Fig. 21Fig. 19 Fig. 20
F
Q
COMMENT UTILISER VOTRE SYSTÈME DE
REPASSAGE
Ôtez toutes les étiquettes de la semelle avant d’utiliser l’appareil.
Vous devez seulement déconnecter le fer du réservoir lorsque le cordon
d'alimentation est débranché de la prise.
Le Senza 200DS peut être utilisé de deux façons : en tant que système de
repassage ou comme fer à repasser traditionnel.
Le mode de système de repassage est recommandé pour les grandes quantités
de vêtements et les longues durées de repassage, alors que pour les plus petites
quantités ou les durées de repassages plus réduites, il est recommandé de
recourir au mode de repassage traditionnel.
Pour l'utiliser comme système de repassage, assurez-vous que le câble de
raccordement du fer / du chauffe-eau (P) et que le cordon d'alimentation (A)
sont insérés dans le branchement du compartiment de rangement du cordon (X)
à la base de l'appareil (Fig. 3). Voir « Utilisation du fer en tant que système de
repassage ».
Pour une utilisation traditionnelle en mode de fer à repasser, débranchez le
cordon d'alimentation (A) et le câble de raccordement du fer / du chauffe-eau (P)
des branchements du compartiment de rangement du cordon (X) en appuyant sur
le crochet de libération (Q). Raccordez les câbles l’un avec l’autre (Fig. 6) jusqu’à
ce que vous entendiez un petit clic. Voir « Utiliser en tant que fer à repasser
traditionnel ».
20
Page 24

Pour revenir à l'utilisation en mode système de repassage, débranchez le
cordon d'alimentation (A) et le câble de raccordement du fer / du chauffe-eau
(P) en appuyant sur le crochet de libération (Q). Insérez les deux câbles dans
les branchements sur le compartiment de rangement du cordon (X) à la base de
l'appareil jusqu'à ce que vous entendiez un léger clic.
UTILISATION DU FER EN TANT QUE SYSTÈME DE
REPASSAGE (FIG. 2)
REMPLISSAGE DU RÉSERVOIR AVANT UTILISATION
AVERTISSEMENT : Assurez-vous que l’unité est déconnectée de l’alimentation
électrique avant de remplir le réservoir (B) d’eau.
Avant de le brancher, détendez complètement le cordon d'alimentation. Faites
tourner le couvercle du réservoir (C). Remplissez le réservoir avec de l’eau froide
du robinet (Fig.7).
NE REMPLISSEZ JAMAIS le réservoir au-delà du niveau MAX.
N’ajoutez pas d’additifs ou de produits chimiques (tels qu’amides, amidons,
parfums ou autres) ; dans le cas contraire, la garantie pourrait être révoquée.
AVERTISSEMENT : Pour éviter d’endommager la pompe, ne faites jamais
fonctionner l’appareil sans eau dans le réservoir, même pour repasser à sec.
Fermez le couvercle du réservoir (C).
MISE EN MARCHE DE L’APPAREIL
Posez l’appareil sur une surface horizontale et stable. Le cordon d'alimentation
(A) et le câble de raccordement du fer / du chauffe-eau (P) sont couplés aux
branchements du compartiment de rangement du cordon (X) (Fig. 3). Connectez
l’appareil à l’alimentation électrique en vous assurant que la tension indiquée sur
la plaque d’identification correspond à votre alimentation électrique locale.
Avant d’allumer l’appareil, vérifiez que la quantité d’eau à l’intérieur du chauffeeau est suffisante.
Appuyez sur l'interrupteur d'alimentation du fer (Fig. 10) et réglez le bouton de
contrôle de la température à la température désirée. Appuyez sur l’interrupteur
d’alimentation du réservoir (Fig. 9). Lorsque le voyant de vapeur (R) s’allume, la
vapeur est prête.
Lors de la première utilisation, un peu de fumée peut émaner du fer : Cet effet
transitoire est parfaitement normal et disparaîtra très bientôt.
Lors de la première utilisation, après le remplissage du réservoir, il est nécessaire
de régler le bouton de commande de température (L) sur le symbole (•••) et
d’appuyer sur le bouton de vapeur (K) Fig. 11 jusqu'à ce que le fer ne produise plus
de vapeur (environ une minute) Fig. 13. Le fer est désormais prêt à l’usage. Avant
d’appliquer un jet de vapeur sur l’article à repasser, libérez deux ou trois bons jets
de vapeur vers le sol pour stabiliser le débit de vapeur.
21
Page 25

AVERTISSEMENT : Ne libérez pas de la vapeur lorsque le fer est sur le repose-fer
(D). Une diminution de la production de vapeur peut se produire peu de temps
après que la pompe commence à fonctionner : ceci est parfaitement normal et
la vapeur se normalise au bout de quelques secondes. Si le fer n’a pas été utilisé
depuis longtemps, il est recommandé de le maintenir en position horizontale et de
libérer quelques jets de vapeur vers le sol pour stabiliser le jet avant de repasser.
RÉGLAGE DE LA VAPEUR
L’appareil est équipé d’un régulateur (T) qui permet de régler le débit de vapeur
d’un réglage minimum à un réglage maximum en fonction des exigences de
repassage.
JET DE VAPEUR
Pour repasser les tissus plus épais et pour une action anti-pli puissante en
position verticale, il est possible d'utiliser la fonction turbo vapeur. Assurez-vous
qu’il y a de l’eau dans le réservoir (B) et dans le réservoir du fer (M). Placez le
bouton de contrôle (T) sur le réglage MAX. Attendez que le voyant lumineux de
« vapeur prête » (R) s’allume. Réglez la température de repassage en faisant
tourner le bouton de réglage (L) jusqu’à ce que vous ayez passé le symbole (•••).
Attendez que le voyant (N) du fer s’éteigne. Appuyez sur le bouton de vapeur (K)
pendant 3 à 5 secondes.
(Fig. 11). Si le bouton d'alimentation en vapeur (K) est actionné en continu pendant
plus de 30 secondes, des gouttes d'eau peuvent sortir des trous de vapeur de
la plaque du fer. Il est recommandé d’utiliser le bouton (K) pendant de courtes
durées.
VAPEUR CONTINUE
Placez le bouton de réglage de la vapeur (T) sur MAX. Attendez que le voyant
lumineux de « vapeur prête » (R) s’allume. Réglez la température de repassage
en faisant tourner le bouton de réglage (L) jusqu’à ce que vous ayez passé le
symbole (•••). Attendez que le voyant (N) du fer s’éteigne. Lorsque la température
est atteinte, appuyez sur le bouton de vapeur (K) Fig. 12. Le curseur (J) verrouille
le bouton, ce qui permet au jet de vapeur de sortir de façon continue. Pour
déverrouiller le bouton (K) et interrompre le jet continu, appuyez sur le curseur (J)
vers l’avant (Fig. 14).
22
Page 26

SÉLECTION DE LA TEMPÉRATURE
Vérifiez d’abord si le tissu a une étiquette comportant des instructions de
repassage et comparez le symbole aux instructions qui suivent. S’il n’y a pas
d’étiquette d’instructions et que vous connaissez le type de tissu, suivez les
instructions ci-dessous.
Veuillez noter que le tableau fait référence à des tissus non traités avec
des agents de collage ou des produits similaires ; s’ils l’ont été, vous pouvez
également repasser à une température inférieure.
Lorsque vous modifiez la température en faisant tourner le bouton de réglage (L),
le voyant (N) s’allume et reste allumé jusqu’à ce que le fer atteigne la nouvelle
température.
REMPLISSAGE DU RÉSERVOIR
Vérifiez toujours le niveau d’eau dans le réservoir pendant que vous repassez.
Ajoutez suffisamment d’eau au réservoir de façon à ce que le niveau d’eau soit
toujours visible. Ne dépassez pas le niveau MAX. Si le réservoir n’a toujours pas
d’eau, vous remarquerez une vibration et un bruit fort. Éteignez l’appareil en
appuyant sur les interrupteurs (S) et (U) débranchez-le de la prise électrique.
AVERTISSEMENT : Éteignez toujours l’appareil et enlevez toujours la fiche du câble
d’alimentation de la prise avant de remplir le réservoir d’eau.
Ajouter directement de l’eau dans le réservoir (Fig. 7). Mettez la fiche dans la
prise électrique et rallumez l’appareil.
Si vous n’éteignez pas l’appareil rapidement, une surchauffe de la pompe pourrait
interrompre momentanément le fonctionnement de l’appareil. C’est pourquoi il est
INSTRUCTIONS DE REPASSAGE SUR
ÉTIQUETTE
TYPE DE TISSU
Tissus synthétiques :
Acétate
Acrylique
Viscose
Polyamide (Nylon)
Viscose (Rayonne)
Soie
Laine
Coton
Lin
THERMOSTAT
•
• •
• • •
Ce symbole sur l’étiquette signifie ne pas
repasser
23
Page 27

nécessaire d’éteindre l’appareil et de remplir le réservoir. Attendez que l’appareil
ait refroidi pour reprendre une utilisation normale.
BOUTON DE PULVÉRISATION
Assurez-vous qu’il y a de l’eau dans le réservoir du fer (M). Appuyez sur le bouton
de vapeur (I). Pour activer cette fonctionnalité, vous pourrez devoir appuyer sur le
bouton de vapeur plusieurs fois (Fig. 15).
REPASSAGE À SEC
Pour repasser à sec – c’est-à-dire sans vapeur - vous devez seulement allumer
le fer en appuyant sur l’interrupteur (U) après l’avoir branché à l’alimentation
électrique. Placez le bouton de réglage de la vapeur au minimum et le bouton de
commande de la température (L) à la température désirée. N’appuyez pas sur le
bouton de vapeur.
REPASSAGE VERTICAL
Vous pouvez utiliser le jet de vapeur continue pour repasser des vêtements sur
cintre. Ce procédé particulier de repassage sert à défroisser les rideaux, les tissus,
etc... Placez le bouton de réglage de la vapeur (T) sur MAX. Attendez que le voyant
lumineux de « vapeur prête » (R) s’allume. Réglez la température de repassage en
faisant tourner le bouton de réglage (L) jusqu’à ce que vous ayez passé le symbole
(•••). Mettez le rideau ou le tissu dans la position dans laquelle vous souhaitez le
repasser et appuyez sur le bouton de vapeur.
AVERTISSEMENT : Ne repassez pas des tissus tenus ou portés par d'autres
personnes.
APRÈS LE REPASSAGE
Pour éviter que se forment des résidus de tartre, videz le réservoir après
utilisation et après avoir éteint l'appareil et l’avoir débranché de la prise de
courant.
Éteignez le chauffe-eau en appuyant sur l’interrupteur (S). L'appareil est toujours
sous tension lorsqu'il est branché et il est possible d'éliminer la pression résiduelle
dans le chauffe-eau en appuyant sur le bouton de vapeur (K). Éteignez l’appareil
en appuyant sur l’interrupteur (U). Retirez le câble d'alimentation de la prise de
courant. Videz le réservoir d'eau complètement de manière à empêcher l'eau
de stagner, ce qui pourrait générer des dépôts de calcaire. Rangez le cordon
d’alimentation dans le compartiment de rangement du cordon (Y). Replacez le
câble raccordant le fer au réservoir dans le compartiment de stockage du cordon
(X). Laissez le fer refroidir sur le repose-fer en prenant garde à ne pas toucher les
câbles d’alimentation et les raccordements avec les parties chaudes de l’appareil.
24
Page 28

UTILISATION COMME UN FER À REPASSER
TRADITIONNEL (FIG. 4)
REMPLISSAGE DU RÉSERVOIR
AVERTISSEMENT : Assurez-vous que le fer est déconnecté de l’alimentation
électrique avant de remplir le réservoir du fer (M) d’eau.
Ouvrez le clapet (H). Tenez le fer à la verticale et remplissez le réservoir avec
de l’eau du robinet fraîche jusqu’au niveau maximum (Fig. 20). Utilisez la tasse à
mesurer (F) fournie. Refermez le couvercle (H). Si votre eau du robinet est très
calcaire, utilisez de l’eau déminéralisée.
Ne remplissez JAMAIS le réservoir au-delà du niveau indiqué par « max ».
Ne versez pas de vinaigre, de détartrants ou d'autres substances parfumées dans
le réservoir : sinon, la garantie peut être révoquée.
AVERTISSEMENT : N’essayez pas de remplir le réservoir en tenant le fer en
position horizontale.
Pour ajouter de l'eau pendant le repassage, éteignez toujours le fer et débranchez
le cordon d'alimentation avant de remplir le réservoir avec de l'eau.
MISE EN MARCHE DE L’APPAREIL
Placez le fer sur la grille du repose-fer (D). Débranchez les câbles des
branchements du compartiment de stockage du cordon (Fig. 5). Connectez le
cordon d'alimentation (A) au câble de raccordement du fer / au chauffe-eau (P)
jusqu'à ce que vous entendiez un léger « clic » (Fig. 6).
Branchez dans l’alimentation électrique. Le voyant de contrôle de la température
(N) s’allume. Sélectionnez maintenant la température requise à l’aide du bouton
du thermostat (L). Lorsque le fer atteint la température sélectionnée, le voyant
(N) s’éteint (le témoin de température s’éteint et s’allume pendant le repassage,
indiquant que le fer conserve la bonne température).
Suivez les instructions de l’étiquette d’entretien du vêtement à repasser.
Assurez-vous que les points indiqués sur le fer correspondent à ceux figurant sur
l'étiquette.
REPASSAGE À LA VAPEUR
Le repassage à la vapeur est possible seulement à haute température.
Assurez-vous qu’il y a assez d’eau dans le réservoir d’eau. Placez le fer sur la grille
du repose-fer (D). Branchez-le dans la prise de courant.
Positionnez le bouton de réglage de température (L) sur la position (•••) ou à
un niveau supérieur. Lorsque le voyant lumineux (N) s’éteint, cela signifie que la
semelle a atteint la température sélectionnée et que le fer est prêt à l'emploi.
25
Page 29

JET DE VAPEUR
S’il y a de l'eau dans le réservoir et que la température est réglée sur (•••) ou à
un niveau supérieur, tout ce que vous avez à faire est d'appuyer sur le bouton de
vapeur (K).
BOUTON DE PULVÉRISATION
Assurez-vous qu’il y a de l’eau dans le réservoir du fer (M). Appuyez sur le bouton
de vapeur (I). Pour activer cette fonctionnalité, vous pourrez devoir appuyer sur le
bouton de vapeur plusieurs fois (Fig. 15).
REPASSAGE À SEC
Branchez dans l’alimentation électrique. Réglez le bouton de commande de
la température (L) en fonction du type de tissu à repasser. Attendez quelques
minutes jusqu’à ce que la semelle atteigne la température réglée. N’appuyez pas
sur le bouton de vapeur.
Le repassage vertical Ce procédé particulier de repassage sert à défroisser les
rideaux, les tissus, etc. Réglez la température de repassage en faisant tourner
le bouton de réglage (L) jusqu’à ce que vous ayez passé le symbole (•••). Mettez
le rideau ou le tissu dans la position dans laquelle vous souhaitez le repasser
et appuyez sur le bouton de vapeur. Si le voyant de température est allumé,
n’appuyez pas sur le bouton de vapeur plus de trois fois de suite.
AVERTISSEMENT : Ne repassez pas des tissus tenus ou portés par d'autres
personnes.
APRÈS LE REPASSAGE
Réglez le bouton de contrôle de la température (L) sur « min » et débranchez le
fer de la prise électrique. Laissez le fer refroidir sur le repose-fer (D). Videz le
réservoir : ouvrez le couvercle de remplissage du réservoir (H), renversez le fer et
laissez égoutter l'eau (Figure 21).
AVERTISSEMENT : Laissez refroidir le fer avant de vider le réservoir.
Rangez le cordon d’alimentation dans le compartiment de rangement du cordon
(Y). Replacez le câble raccordant le fer au réservoir dans le compartiment de
stockage du cordon (X). Laissez le fer refroidir sur le repose-fer en prenant garde
ENTRETIEN DU CHAUFFE-EAU
Pour maintenir votre système de repassage à vapeur en bon état et pour garantir
une performance constante, nous vous recommandons de nettoyer le chauffe-eau
une à deux fois par an en fonction de la dureté de l'eau.
26
Page 30

INSTRUCTIONS DE NETTOYAGE
ATTENTION : : Avant de nettoyer le chauffe-eau, veuillez vous assurer que le
chauffe-eau est à la température ambiante et qu'il n'a pas été utilisé pendant au
moins 8 heures, et que le chauffe-eau est déconnecté de la source d'alimentation.
Ne dévissez pas le bouchon du chauffe-eau (W) avec l'appareil en position de
fonctionnement, car cela pourrait provoquer un échappement soudain de l'eau
(Fig. 16).
Placez l'appareil de manière à ce que le bouchon de nettoyage du réservoir (W) se
retrouve sur le dessus (fig. 17). Ouvrez le clapet (X). À l’aide d’un tournevis à tête
plate, dévissez le bouchon de nettoyage du réservoir (W). Retournez l’appareil
au-dessus d’un évier et videz complètement le réservoir (Fig. 18).
Placez une tasse à mesurer de l'eau du robinet dans la chaudière (fig . 19. Utilisation
d'un détartrage poudre (peut être acheté au www.reliablecorporation.com), versez le
contenu de l'emballage dans la chaudière remplie (avec de l'eau), laissez-le reposer
pendant quelques heures , puis rincer 3-4 fois.
Renouvelez cette opération jusqu’à ce que l’eau sortant du chauffe-eau soit propre
et claire.
Après avoir nettoyé le chauffe-eau, versez environ 400 ml d’eau dans le chauffeeau (Fig. 19) et replacez le bouchon (W) en le serrant légèrement, sans trop forcer.
Fermez le clapet (X).
DESCRIPTION TECHNIQUE
120V Puissance 1750W
Capacité du réservoir d’eau froide 1L
Pression de fonctionnement 3.5 bar
27
Page 31

28
Reliable Corporation (« Reliable ») garantit à l'acheteur original du chauffe-eau
susmentionné de Reliable (le « réservoir de chauffe-eau Reliable ») qu'il sera exempt de
tout défaut de fabrication et de main d'œuvre dans le cadre d'une utilisation normale par
l'acheteur original uniquement. Si un remplacement du réservoir de chauffe-eau Reliable
s'avérait nécessaire, Reliable y procédera sans aucun frais de pièces ni de main d'œuvre
pour l'acheteur original, à l'exclusion des frais d'expédition.
Soumis aux conditions et limitations établies ci-après, Reliable réparera ou remplacera toute
pièce d'un réservoir de chauffe-eau Reliable qui s'avère défectueux en raison d'un défaut de
fabrication ou de matériaux défectueux. Si le réservoir de chauffe-eau Reliable défectueux
n'est plus disponible et ne peut pas être réparé efficacement ou remplacé par un modèle
identique, Reliable remplacera le réservoir de chauffe-eau Reliable défectueux par un réservoir
de chauffe-eau Reliable actuel de valeur équivalente ou supérieure. Les pièces réparées ou les
produits remplacés seront fournis par Reliable sur la base d'un échange, et seront soit neufs ou
remis à neuf pour être fonctionnellement équivalents aux neufs. Si Reliable n'est pas en mesure
de réparer ou de remplacer un réservoir de chauffe-eau Reliable, elle remboursera la valeur
actuelle dudit réservoir de chauffe-eau Reliable au moment où la réclamation de garantie est
réalisée.
Cette garantie limitée ne couvre aucun dommage subi par un réservoir de chauffe-eau Reliable
résultant d'une installation incorrecte, d'un accident, d'un abus, d'une mauvaise utilisation,
d'une utilisation déraisonnable, d'une catastrophe naturelle, d'une alimentation électrique
insuffisante ou excessive, de conditions mécaniques ou environnementales anormales, ou de
tout démontage, réparation ou modification non autorisé. Cette garantie limitée ne s'étend à
aucun dommage indirect ou direct dont peut être victime un utilisateur suite à l'utilisation d'un
réservoir de chauffe-eau Reliable, y compris mais sans s'y limiter, toute responsabilité pour des
réclamations de tiers pour des dégâts, et se limite au montant payé par l'acheteur original du
réservoir de chauffe-eau auquel cette protection de garantie limitée s'applique. Cette garantie
limitée ne s'applique pas aux produits qui ont été modifiés ou dont les numéros de séries sont
manquants, ou aux produits non achetés directement auprès de Reliable ou d'un revendeur
agréé par Reliable pour vendre des réservoirs de chauffe-eau Reliable.
Cette garantie limitée est l'unique garantie qui s'applique au réservoir de chauffe-eau Reliable,
elle remplace toutes conditions qui peuvent être contenues dans un autre document ou bon de
commande et ne peut être transformée ou modifiée, sauf dérogation expressément écrite de
Reliable.
Pour obtenir une réparation ou un remplacement en vertu des conditions de cette garantie,
veuillez contacter notre service à la clientèle au 1 800 268 1649 ou par courriel à support@
reliablecorporation.com. Il vous sera demandé d'envoyer le reçu original par fax ou courriel.
Le reçu doit prouver que vous êtes l'acheteur original, que le produit a été acheté directement
chez Reliable ou chez un revendeur agréé par Reliable et que la réclamation de garantie est
effectuée conformément aux conditions définies dans le présent document ou tout document
subséquent publié par Reliable en rapport avec la présente garantie. Un numéro d'autorisation
de retour (Nº AR) vous sera donné et il vous sera demandé d'expédier le produit défectueux
accompagné de la preuve d'achat et du Nº AR, les frais d'assurances étant prépayés à l'adresse
suivante : Reliable Corporation, 5–100 Wingold Ave, Toronto, ON M6B 4K7.
Les expéditions avec fret à destination seront refusées. Le risque de perte ou
d'endommagement lors du transport sera assumé par le client. Une fois que Reliable aura reçu
le produit défectueux, elle initiera la réparation ou le remplacement.
POLITIQUE DE GARANTIE À VIE DES
RÉSERVOIRS DE CHAUFFE-EAU SOUS
PRESSION DE RELIABLE CORPORATION
Page 32

Reliable Corporation (« Reliable ») garantit à l'acheteur original de ce produit que chaque
produit vendu par Reliable (un « Produit Reliable ») est exempt de tout défaut de pièce et
de main d'œuvre pour une période d'un an à compter de la date d'achat, s'il est utilisé et
entretenu correctement. Soumis aux conditions et limitations établies ci-après, Reliable
réparera ou remplacera toute pièce d'un produit Reliable qui s'avère défectueuse en raison
d'un défaut de fabrication ou de main d'œuvre. Si le Produit Reliable défectueux n'est plus
disponible et ne peut pas être réparé efficacement ou remplacé par un modèle identique,
Reliable remplacera le Produit Reliable défectueux par un Produit Reliable actuel de
valeur équivalente ou supérieure. Les pièces réparées ou les produits remplacés seront
fournis par Reliable sur la base d'un échange, et seront ou neufs ou remis à neuf pour être
fonctionnellement équivalents aux neufs. Si Reliable n'est pas en mesure de réparer ou de
remplacer le Produit Reliable, elle remboursera la valeur actuelle du Produit Reliable au
moment où la réclamation de garantie est réalisée.
Cette garantie limitée ne couvre aucun dommage subi par un Produit Reliable résultant
d'une installation incorrecte, d'un accident, d'un abus, d'une mauvaise utilisation,
d'une catastrophe naturelle, d'une alimentation électrique insuffisante ou excessive, de
conditions mécaniques ou environnementales anormales, de l'usure et de la détérioration
résultant de l'usure normale du produit, ou de tout démontage, réparation ou modification
non autorisé(e). Cette garantie limitée ne s'étend à aucun dommage indirect ou direct dont
peut être victime un utilisateur ou suite à l'utilisation d'un Produit Reliable, y compris mais
sans s'y limiter, toute responsabilité pour des réclamations de tiers pour des dégâts, et se
limite au montant payé par l'acheteur original du Produit Reliable auquel cette protection
de garantie limitée s'applique. Cette garantie limitée ne s'applique pas aux produits qui ont
été modifiés ou dont les numéros de séries sont manquants, ou aux produits non achetés
directement auprès de Reliable ou d'un revendeur agréé pour la vente de Produits Reliable.
Cette garantie limitée est l'unique garantie qui s'applique à tout Produit Reliable, elle
remplace toutes conditions qui peuvent être contenues dans un autre document ou bon de
commande et ne peut être transformée ou modifiée, sauf dérogation expressément écrite
de Reliable.
Pour obtenir une réparation ou un remplacement en vertu des conditions de cette garantie,
veuillez contacter notre service à la clientèle au 1-800-268-1649 ou par courriel à
support@reliablecorporation.com.
Il vous sera demandé d'envoyer le reçu original par télécopie ou courriel. Le reçu doit
prouver que vous êtes l'acheteur original, que le produit a été acheté directement chez
nous ou chez un revendeur agréé par Reliable et que la réclamation de garantie est
effectuée pendant la période de garantie. Un numéro d'autorisation de retour (Nº AR) vous
sera fourni et il vous sera demandé d'expédier le produit défectueux accompagné de la
preuve d'achat et du Nº AR, les frais d'assurances étant prépayés à l'adresse suivante :
Reliable Corporation, 5-100 Wingold Avenue, Toronto, ON M6B 4K7. Les expéditions avec
fret payable à destination seront refusées. Le risque de perte ou d'endommagement lors du
transport sera assumé par le client. Une fois que Reliable aura reçu le produit défectueux,
elle initiera la réparation ou le remplacement.
Si vous avez des questions concernant la présente garantie, vous pouvez écrire à :
Reliable Corporation
100 Wingold Avenue, Unit 5
Toronto, Ontario
Canada M6B 4K7
www.reliablecorporation.com
GARANTIE DES PRODUITS RELIABLE
29
Page 33

30
Page 34

31
SENZA 200DS
MANUAL DE INSTRUCCIONES
ESPAÑOL
Page 35

RELIABLE. A SU LADO JUNTO A USTED.
En Reliable, hacemos lo que nos gusta, y nos enorgullecemos de
hacer las cosas bien. Usted quiere lo mejor para las personas,
lugares y cosas que son importantes en su vida - desde donde
vive hasta lo que viste. Lo mismo ocurre con nosotros. Desde
el principio, nos acercamos a cada producto con el detalle
de un artesano y la pasión por hacer las cosas bien. Calidad,
funcionalidad, diseño y atención al cliente juegan un papel
igualmente importante en la entrega de lo que precisa. El vapor es
el “secreto” para conseguir un acabado limpio, nítido y profesional
en sus prendas. El vapor se utiliza para ablandar las fibras, y el
peso de la plancha da forma a la tela. Esto se hace sin esfuerzo con
la 200DS.
Con una función de recarga continua, la 200DS duplicará la
eficiencia de cualquier sistema de planchado tradicional. La
calidad superior del vapor le garantiza que sus prendas tendrán un
acabado nítido y profesional.
GRACIAS POR SU COMPRA. COMPARTA SU EXPERIENCIA CON
UN PRODUCTO CONFIABLE PUBLICANDO UN COMENTARIO
ONLINE EN EL SITIO WEB DONDE REALIZÓ SU COMPRA. SE LO
AGRADECEREMOS MUCHO.
32
Page 36

NOTICIA IMPORTANTE PARA SU SEGURIDAD
Cuando use su plancha de vapor marca Reliable™ siempre debe seguir las instrucciones de
precaución y seguridad. Por favor lea todas las instrucciones cuidadosamente pues ellas
tienen información importante concerniente a como se debe instalar, usar y cuidar la plancha
de vapor.
• Utilice la plancha de vapor solo para el uso que esta previsto.
• Siempre conecte el hierro a una toma de tierra.
• No tire del cable de alimentación o el aparato con los pies mojados o húmedos.
• No empezar a planchar si tiene las manos mojadas o si está descalzo.
• Pueden ocurrir quemaduras al tocar partes metálicas, el agua caliente o el vapor.
• Nunca utilice este aparato en cuartos de baño.
• Desconecte siempre la estación de planchado de la toma eléctrica antes de llenar con agua
y cuando el hierro no está en uso.
• En el caso de que el indicador de mal funcionamiento se enciende, el sistema de planchado
no está funcionando correctamente. Desconecte el sistema de planchado de la toma
eléctrica y tener la estación de planchado atendidos por personal cualificado.
• Antes de la limpieza o mantenimiento, desconecte siempre el enchufe de la toma de
corriente
• No dirigir el chorro de vapor hacia personas, animales o planchar la ropa cuando están
siendo usados, ya que esto podría ser peligroso.
• Desconecte siempre la estación de planchado de la toma eléctrica antes de llenar con agua
y cuando el hierro no está en uso.
• Para que la persona que use el equipo se proteja de un electroshock, no sumerja la plancha
de vapor en agua u otros líquidos.
• Siempre debe apagar la plancha de vapor antes de conectarla o desconectarla del
tomacorriente. Nunca hale el cordón eléctrico del tomacorriente para apagar el equipo.
Primero ponga el interruptor en apagado y luego debe desenchufar el cordón de
alimentación de la corriente.
• No deje que el cordón de alimentación toque superficies calientes. La plancha de vapor
debe estar fría antes de guardarse.
• Llenar el depósito con agua antes de poner en funcionamiento el aparato. Las operaciones
de llenado de agua se deben efectuar con el enchufe del cable de alimentación eléctrico
desconectado de la toma.
• No utilizar la máquina sin agua, en este caso la bomba podría dañarse.
• No opere el limpiador de vapor si este tiene dañado el cordón de alimentación, el enchufe
o si el equipo se ha caído o tiene algún daño. Para evitar el riesgo de un electroshock,
nunca desarme el equipo o trate de arreglarlo por si mismo. Devuelva el sistema a Reliable
Corporation (ver la garantía) para que nosotros lo podamos revisar, reparar, o remplazar.
• Es necesario mantener una alta preocupación cuando el equipo sea manipulado por o
alrededor de los niños. Nunca deje la plancha de vapor encendida cuando no se este
supervisando.
• Cuando la plancha este en uso, asegure que esta puesta encima de una base firme y que
no se deje encima de ningún material inflamable.
• Mantenga las ranuras de ventilación libre de polvo.
• Nunca introduzca o deje caer ningún objeto dentro de las ranuras de ventilación.
• Para prevenir que se sobrecaliente el equipo, desenrolle el cordón de alimentación
completamente.
• No utilice el equipo donde se estén usando productos con aerosol o donde se este
suministrando oxígeno.
• Para evitar una sobrecarga del circuito , no opere una plancha en el mismo circuito con
otro aparato de alto voltaje.
33
Page 37

• Si es absolutamente necesario un cable de extensión, se utilizará un cable con un
amperaje igual o mayor que el valor máximo de la plancha se utilizará. Un cable de
menor amperaje puede resultar en un riesgo de incendio o descarga eléctrica debido a un
sobrecalentamiento. Se debe tener cuidado de colocar el cable de manera que no se puede
tirar o tropezones.
• Este aparato no está diseñado para ser utilizado por personas (incluidos niños) con
capacidades físicas, sensoriales o capacidades mentales, o la falta o la experiencia o
conocimiento, a menos que sean supervisados o instruidos acerca del uso del aparato por
una persona responsable de su la seguridad.
• Los niños deben ser supervisados para que no jueguen con el aparato.
• El hierro no debe ser utilizado si se ha caído, si hay signos visibles de daños o si se escapa.
• Tenga cuidado al girar la plancha de vapor al revés, puede haber agua caliente en el
depósito.
• Para evitar una sobrecarga del circuito, no opere ningún otro aparato de alto voltaje en el
mismo circuito de forma simultánea con la plancha de vapor.
• Colocar el aparato en una superficie plana de trabajo che aguante una temperatura de al
menos 90°C.
• Nunca guarde la plancha de vapor si esta caliente. No necesita vaciar el tanque de agua a
menos que usted no lo va a usar por un largo periodo de tiempo.
GUARDAR SIEM PRE ESTAS INSTRUCCIONES
• Aviso: Por favor verifique que se encienda la luz anaranjada que indica que está
funcionando el vapor antes de que empiece a planchar. Si no se enciende, por favor
contacte al departamento de servicio antes de utilizarla.
• Este equipo se ha creado para ser usado solo en el hogar – con un máximo de 15-20 horas
por semana. Sigue todas las instrucciones de este manual. Por favor no deje la plancha
caliente encima del agarrador de la plancha (que esta encima de la caldera) sin supervisión
o por más de 1 hora. Si necesita tener la plancha prendida por más de 1 hora, reduzca la
temperatura a la temperatura más baja.
SI NO SEGUE ESTAS INSTRUCCIONES, SE
CANCELARA LA GARANTIA DEL PRODUCTO.
INSTRUCCIONES SOBRE EL AGUA
Su limpiador de vapor ha sido creado para ser utilizado con agua normal del grifo. Si el agua
donde usted vive es agua dura, le recomendamos que utilice 50% de agua del grifo y 50% de
agua destilada para extender la durabilidad del producto. No utilice agua blanda o agua del
pozo.
COMPRUEBE PRIMERO, PLANCHE DESPUES
Antes de planchar telas delicadas, es importante comprobar la plancha en un lugar discreto
(por ejemplo, en la parte de atrás) para asegurar que no le haga daño a la tela. Nosotros no
asumimos ninguna responsabilidad sobre los daños que puedan ser provocados si no sigue
estas instrucciones.
34
Page 38

DESCRIPCIÓN DEL SISTEMA DE PLANCHADO A
VAPOR
DESCRIPCIÓN DEL ARTEFACTO
A - Cable de alimentación
B - Tanque
C - Cubierta del tanque
D - Rejilla de soporte de la plancha
E - Mango de transporte del aparato
F - Taza medidora
G - Boquilla del aerosol
H - Tapa de llenado del tanque
I - Botón del aerosol
J - Control deslizable de vapor continuo
K - Botón de vapor
L - Perilla de ajuste de temperatura
M - Tanque de la plancha
N - Luz indicadora de control de la temperatura de la plancha
O - Suela
P - Cable de conexión de la plancha/caldera
Q - Cables de gancho de liberación
R - Luz indicadora de vapor
S - Encendido y apagado de la caldera
T - Perilla de ajuste de vapor
U - Encendido y apagado de la plancha
V - Tapa de limpieza del tanque
W - Puerta de la tapa de limpieza del tanque
X - Compartimento de cables
Y - Dispositivo de almacenamiento de cables
35
Page 39

Fig. 1
E
B
H
I
N
C
J
L
G
A
D
Fig. 2 Fig. 3
Fig. 10
Fig. 9
Fig. 8
Fig. 11
Fig. 17
Fig. 16
Fig. 12
Fig. 13
Fig. 18
R S T U
V
W
P
O
YMX
Fig. 14 Fig. 15
Fig. 7
Fig. 4 Fig. 5 Fig. 6
K
Fig. 21Fig. 19 Fig. 20
F
Q
CÓMO USAR SU SISTEMA DE PLANCHADO
Retire cualquier etiqueta de la suela antes de utilizar el aparato.
Procure siempre que el enchufe de alimentación esté desconectado del toma
corriente cada vez que desconecte la plancha del tanque.
La Senza 200DS se puede utilizar de dos maneras: como un sistema de planchado
o como una plancha tradicional.
Para grandes cantidades de ropa y largos tiempos de planchado se recomienda
el modo sistema de planchado, mientras que para cantidades menores o menos
tiempo de planchado, se recomienda utilizar el modo de plancha tradicional.
Para utilizarlo como sistema de planchado, asegúrese de que el cable de
conexión de la plancha/caldera (P) y el cable de alimentación (A) se inserten en el
compartimiento de almacenamiento de cables (X) en la base del aparato (Fig. 3).
Consulte “Uso de la plancha como un sistema de planchado”.
Para su uso en modo tradicional, desconecte el cable de alimentación (A) y el
cable de conexión de la plancha/caldera (P) de las conexiones en el compartimento
para almacenar los cables (X) pulsando el gancho de liberación (Q). Conecte los
cables entre sí (Fig. 6) hasta que escuche un ligero clic. Consulte “Uso como
plancha tradicional”.
Para volver a utilizar el modo de sistema de planchado, desconecte el cable de
alimentación (A) y el cable de conexión de la plancha/caldera (P), presionando
el gancho de liberación (Q). Inserte los dos cables en las conexiones en el
36
Page 40

compartimento para almacenar los cables (X) en la base del aparato hasta que
escuche un ligero clic.
UTILIZAR LA PLANCHA COMO SISTEMA DE
PLANCHADO (FIG. 2)
LLENAR EL DEPÓSITO ANTES DE SU USO
ADVERTENCIA: Asegúrese de que el aparato esté desconectado de la red eléctrica
antes de llenar el tanque (B) con agua.
Antes de enchufarlo, desenrolle por completo el cable de alimentación. Gire la
tapa del tanque (C). Llene el tanque con agua fría del grifo (Fig. 7).
NUNCA llene el tanque más allá del nivel MAX.
No agregue ningún tipo de aditivos o productos químicos (tales como: amidas,
almidones, perfume u otros); de lo contrario, la garantía puede ser revocada.
ADVERTENCIA: Para evitar daños en la bomba, nunca haga funcionar el aparato sin
agua en el depósito, incluso para el planchado en seco.
Cierre la tapa del tanque (C).
ENCENDER EL APARATO
Coloque el aparato sobre una superficie horizontal y estable. El cable de
alimentación (A) y el cable de conexión de la plancha/caldera (P) se acoplan a las
conexiones en el compartimento para almacenar cables (X) (Fig. 3). Conecte el
aparato a la red eléctrica, asegurándose de que el voltaje indicado en la placa de
identificación corresponda a su fuente de alimentación local.
Antes de encender el aparato, asegúrese de que haya suficiente agua en el interior
del tanque.
Pulse el interruptor de alimentación de la plancha (Fig. 10) y ajuste la perilla
de control de temperatura a la temperatura deseada. Pulse el interruptor de
alimentación del tanque (Fig. 9). Cuando la luz de vapor listo (R) se enciende, el
vapor está listo.
Cuando se utiliza por primera vez, la plancha puede arrojar un poco de humo: Este
efecto transitorio es perfectamente normal y desaparecerá muy pronto.
Tras el primer uso, después de llenar el tanque, es necesario ajustar la perilla de
control de temperatura (L) sobre el símbolo (•••) y pulsar el botón de vapor (K)
Fig. 11 hasta que la plancha no produzca vapor (aproximadamente un minuto) Fig.
13. La plancha está lista para su uso. Antes de aplicar un chorro de vapor sobre el
artículo a planchar, liberar dos o tres buenos chorros de vapor hacia el suelo para
estabilizar el flujo de vapor.
ADVERTENCIA: No suelte vapor cuando la plancha esté apoyada sobre su parrilla
37
Page 41

(D). Puede ocurrir una disminución en la salida de vapor poco después de que
la bomba comience a funcionar: es perfectamente normal y después de unos
segundos el vapor será normal. Si la plancha no se ha utilizado durante un largo
período de tiempo, es aconsejable mantenerla en posición horizontal y disparar
algunos chorros de vapor hacia el suelo con el fin de estabilizar el chorro antes de
planchar.
REGULACIÓN DE VAPOR
El aparato está equipado con un regulador (T), que permite ajustar la salida de
vapor desde un mínimo hasta un máximo de acuerdo a los requerimientos de
planchado.
TIRO DE VAPOR
Para planchar telas más gruesas y para una acción potente anti-arrugas en
posición vertical, es posible operar la función de vapor turbo. Asegúrese de que
haya agua en el tanque (B) y en el tanque de la plancha (M). Coloque la perilla
de control (T) en el ajuste MAX. Espere que se encienda la luz de vapor listo (R).
Ajuste la temperatura de planchado girando la perilla de ajuste (L) más allá del
símbolo (•••). Espere que se apague a la luz indicadora (N) de la plancha. Pulse el
botón de vapor (K) durante 3 a 5 segundos.
(Fig. 11). Si el botón de suministro de vapor (K) se opera de forma continua durante
más de 30 segundos, pueden salir gotas de agua de los orificios de vapor en la
placa de la plancha. Se recomienda que el botón (K) se utilice durante períodos
más cortos.
VAPOR CONTINUO
Gire la perilla de ajuste de vapor (T) a MAX. Espere que se encienda la luz de
vapor listo (R). Ajuste la temperatura de planchado girando la perilla de ajuste
(L) más allá del símbolo (•••). Espere que se apague a la luz indicadora (N) de la
plancha. Cuando se ha alcanzado la temperatura, pulse el botón de vapor (K) Fig.
12. El cursor (J) bloqueará el botón, lo que permite que el chorro de vapor salga en
forma continua. Para desbloquear el botón (K) y detener el chorro continuo, pulse
el cursor (J) hacia adelante (Fig. 14).
38
Page 42

SELECCIÓN DE TEMPERATURA
En primer lugar, compruebe si la tela tiene una etiqueta con instrucciones de
planchado y compare el símbolo con las instrucciones a continuación. Si no
hay una etiqueta con las instrucciones, y ya conoce el tipo de material, siga las
instrucciones a continuación.
Tenga en cuenta que la tabla se refiere a los tejidos no tratados con agentes
de encolado o productos similares; si es el caso, también puede planchar a una
temperatura más baja.
Cuando cambia la temperatura girando la perilla de ajuste (L), la luz (N) se
encenderá y permanecerá encendida hasta que la plancha alcance la nueva
temperatura.
LLENAR EL DEPÓSITO
Compruebe siempre el nivel de agua en el tanque mientras está planchando.
Agregue suficiente agua al tanque para que el nivel del agua sea siempre visible.
No vaya más allá del nivel MAX. Si el tanque se queda sin agua, apreciará una
vibración y ruido fuerte. Apague el aparato pulsando los interruptores (S) y (U) y
desenchúfelo del toma corriente.
ADVERTENCIA: Apague siempre el aparato y quite el cable de alimentación del
toma corriente antes de llenar el tanque con agua.
Añada agua directamente en el tanque (Fig. 7). Inserte el enchufe en el toma
corriente y encienda el aparato de nuevo.
INSTRUCCIONES DE PLANCHADO
EN LA ETIQUETA
TIPO DE TELA
Tejidos sintéticos:
Acetato
Acrílico
Viscosa
Poliamida (Nylon)
Viscosa (Rayón)
Seda
Lana
Algodón
Lino
TERMOSTATO
•
• •
• • •
La marca en la etiqueta significa no planchar
39
Page 43

Si el aparato no se apaga de inmediato, el sobrecalentamiento de la bomba podría
causar una interrupción momentánea del aparato. Por lo tanto, es necesario apagar
el aparato y llenar el tanque. Espere a que el aparato se enfríe para reanudar el
funcionamiento normal.
BOTÓN DE AEROSOL
Asegúrese de que haya agua en el tanque de la plancha (M). Pulse la tecla de
aerosol (I). Para activar esta función es posible que tenga que pulsar la tecla de
aerosol varias veces (Fig. 15).
PLANCHADO EN SECO
Para planchar en seco —es decir, sin vapor— todo lo que tiene que hacer es
encender la plancha pulsando el interruptor (U) luego de conectarlo a la fuente de
alimentación. Coloque la perilla de control de vapor al mínimo y ajuste la perilla
de control de temperatura (L) a la temperatura deseada. No presione el botón de
vapor.
PLANCHADO VERTICAL
Usted puede utilizar el chorro de vapor continuo para planchar telas colgadas.
Este procedimiento de plancha especial sirve para eliminar las arrugas de cortinas,
telas, etc ... Gire la perilla de ajuste de vapor (T) a MAX. Espere que se encienda
la luz de vapor listo (R). Ajuste la temperatura de planchado girando la perilla de
ajuste (L) más allá del símbolo (•••). Ponga la cortina o tela en la posición en la que
le gustaría planchar y pulse el botón de vapor.
ADVERTENCIA: No planche telas sostenidas por otras personas.
DESPUÉS DE PLANCHAR
Para evitar que se formen residuos de cal, vacíe el tanque después de su uso y
después de apagar el aparato y desenchufarlo del toma corriente.
Apague la caldera pulsando el interruptor (S). El aparato todavía tiene energía
cuando está enchufado y es posible eliminar la presión restante en la caldera
pulsando el botón de vapor (K). Apague el aparato pulsando el interruptor (U).
Retire el cable de alimentación del toma corriente. Vacíe el tanque de agua
completamente con el fin de evitar que el agua se estanque, lo cual puede
formar depósitos de cal. Guarde el cable de alimentación en el compartimento de
almacenamiento de cables (Y). Vuelva a colocar el cable que conecta la plancha al
tanque en el compartimento para almacenar los cables (X). Deje que la plancha se
enfríe en su soporte, teniendo cuidado de no tocar los cables de alimentación y la
conexión con las partes calientes del aparato.
40
Page 44

UTILIZACIÓN COMO PLANCHA TRADICIONAL (FIG. 4)
LLENADO DE LA RESERVA
ADVERTENCIA: Asegúrese de que la plancha esté desconectada de la red eléctrica
antes de llenar el tanque (M) de la plancha con agua.
Abra la puerta (H). Sujete la plancha verticalmente y llene el tanque con agua
fresca del grifo hasta el nivel máximo (Fig. 20). Utilice la unidad de medida (F)
provista. Cierre la tapa (H) de nuevo. Si el agua del grifo es muy dura, utilice agua
desmineralizada.
NUNCA llene el tanque por encima del nivel indicado como “max”.
No vierta vinagre, descalcificadores u otras sustancias aromatizadas en el tanque:
De lo contrario, la garantía puede ser revocada.
ADVERTENCIA: No trate de llenar el tanque sosteniendo la plancha en posición
horizontal.
Para añadir agua durante el planchado, apague siempre la plancha y desconecte el
cable de alimentación antes de llenar el tanque con agua.
ENCENDER EL APARATO
Coloque la plancha sobre la rejilla de soporte (D). Desconecte los cables de las
conexiones en el compartimento para almacenar el cable (Fig. 5). Conecte el cable
de alimentación (A) con el cable de conexión de la plancha/caldera (P) hasta que
escuche un ligero “clic” (Fig. 6).
Enchufe a la fuente de alimentación. La lámpara de control de la temperatura (N) se
enciende. Ahora seleccione la temperatura deseada con la perilla del termostato (L).
Cuando la plancha alcanza la temperatura seleccionada, la lámpara (N) se apaga (la
lámpara de temperatura se apaga y se enciende durante el planchado, lo que indica
que la plancha está manteniendo la temperatura adecuada).
Siga las instrucciones en la etiqueta de cuidado de la prenda a planchar. Asegúrese
de que los puntos que aparecen en la plancha se correspondan con los que aparecen
en la etiqueta.
PLANCHADO AL VAPOR
Planchar con vapor sólo es posible a una temperatura alta.
Asegúrese de que haya suficiente agua en el tanque de agua. Coloque la plancha
sobre la rejilla de soporte (D). Enchufe en el toma corriente principal.
Coloque la perilla de ajuste de temperatura (L) en la posición (•••) o superior.
Cuando la luz indicadora (N) se apaga, significa que la suela ha alcanzado la
temperatura seleccionada, y la plancha está lista para ser usada.
41
Page 45

TIRO DE VAPOR
Si hay agua en el tanque y la temperatura se encuentra en (•••) o en un nivel
superior, todo lo que tiene que hacer es presionar el botón de vapor (K).
BOTÓN DE AEROSOL
Asegúrese de que haya agua en el tanque de la plancha (M). Pulse la tecla de
aerosol (I). Para activar esta función es posible que tenga que pulsar la tecla de
aerosol varias veces (Fig. 15).
PLANCHADO EN SECO
Enchufe a la fuente de alimentación. Ajuste la perilla de control de temperatura
(L) en función del tipo de material a planchar. Espere unos minutos para que la
suela alcance la temperatura programada. No presione el botón de vapor.
Planchado Vertical: Este procedimiento especial sirve para eliminar las arrugas de
cortinas, telas, etc. Ajuste la temperatura de planchado girando la perilla de ajuste
(L) más allá del símbolo (•••). Ponga la cortina o tela en la posición que desee
planchar verticalmente y pulse el botón de vapor. Si la luz de temperatura está
encendida, no pulse el botón de vapor más de tres veces seguidas.
ADVERTENCIA: No planchar telas sostenidas por otras personas.
DESPUÉS DE PLANCHAR
Ajuste la perilla de control de temperatura (L) a “min” y desenchúfelo del toma
corriente. Deje que la plancha se enfríe en su soporte (D). Vacíe el depósito: abra
la tapa de llenado del depósito (H), vuelque la plancha y deje escurrir el agua (Fig.
21).
ADVERTENCIA: Deje que se enfríe la plancha antes de vaciar el tanque.
Guarde el cable de alimentación en el compartimento de almacenamiento de
cables (Y). Vuelva a colocar el cable que conecta la plancha al tanque en el
compartimento para almacenar los cables (X). Deje que la plancha se enfríe en su
soporte, teniendo cuidado de no tocar los cables de alimentación y la conexión
con las partes calientes del aparato.
MANTENIMIENTO DE LA CALDERA
Para mantener su sistema de planchado a vapor en buenas condiciones y
asegurarse un rendimiento constante, se recomienda limpiar periódicamente la
caldera una vez o dos veces al año, dependiendo de la dureza del agua.
42
Page 46

INSTRUCCIONES DE LIMPIEZA
ATENCIÓN: Antes de limpiar la caldera, por favor asegúrese de que la caldera esté
a temperatura ambiente y que no se haya utilizado durante al menos 8 horas, y que
la caldera se desconecte de la fuente de alimentación.
No desenrosque el tapón de la caldera (V) con el aparato en su posición de trabajo,
ya que esto puede causar que el agua de la caldera se escape en forma inesperada
(Fig. 16).
Coloque el aparato para poder acceder al tapón de limpieza del tanque (V)
en la parte superior (Fig. 17). Abra la puerta (W). Con un destornillador plano,
desenrosque el tapón de limpieza de tanques (V). Vuelque el aparato sobre un
lavabo y drene completamente el tanque (Fig. 18).
Coloque una taza de medición de agua del grifo en la caldera (Fig. 19 ). El uso de
un polvo de- escalamiento (se pueden comprar en www.reliablecorporation.com),
vierta el contenido del paquete en la caldera llena (con agua ), dejar que repose
durante unas horas , luego enjuague 3-4 veces.
Repita esta operación hasta que el agua que sale de la caldera sea limpia y clara.
Después de la limpieza de la caldera, vierta aproximadamente 400 ml de agua
en la caldera (Fig. 19) y vuelva a colocar la tapa (V) ajustándola suavemente, sin
forzarla en exceso. Cierre la puerta (W).
DESCRIPCIÓN TÉCNICA
120V Potencia 1750W
Capacidad del tanque de agua fría 1L
Presión de trabajo 3.5 bar
43
Page 47

44
Reliable Corporation (“Reliable”) garantiza al comprador original de la caldera descrita
arriba vendida por Reliable (la “Caldera Reliable”) que se encuentra libre de defectos de
material y mano de obra si es utilizada correctamente solo por el comprador original. Si la
Caldera Reliable necesitara algún cambio, Reliable no le cobrará al comprador original el
costo de las piezas y la mano de obra, excepto el envío.
Conforme a las condiciones y limitaciones establecidas a continuación, Reliable reparará o
cambiará la pieza de la Caldera Reliable que demuestre estar defectuosa a causa de material
o fabricación inadecuadas. Si la Caldera Reliable defectuosa deja de estar disponible y no
puede ser reparada con eficacia o reemplazada por un modelo idéntico, Reliable cambiará la
Caldera Reliable defectuosa por otra Caldera Reliable vigente de igual o mayor valor. Las piezas
de recambio o repuestos serán suministrados por Reliable a cambio de las piezas originales,
y serán piezas nuevas o piezas que estarán reacondicionadas para convertirse en productos
funcionalmente equivalentes a piezas nuevas. Si Reliable no puede reparar o reemplazar una
Caldera Reliable, la compañía reembolsará el valor de la Caldera Reliable que esté vigente al
momento de reclamar la garantía.
Esta garantía limitada no cubre los daños que sufra una Caldera Reliable como resultado de
una instalación inadecuada, accidente, abuso, uso incorrecto o irrazonable, desastre natural,
suministro de energía eléctrica insuficiente o excesivo, condiciones mecánicas o ambientales
anormales, o cualquier desarme, reparación o modificación no autorizada. Esta garantía
limitada no se extiende a ningún daño indirecto, resultante o accidental que el usuario pueda
sufrir por el uso de una Caldera Reliable, incluyendo, entre otros, la responsabilidad ante los
reclamos presentados por terceros; y se limita al monto pagado por el comprador original de
la Caldera Reliable respecto del cual tiene aplicación esta protección de garantía limitada. Esta
garantía limitada no es válida para los productos que hayan sido modificados o que no tengan
número de serie, o para los productos que no hayan sido comprados directamente a Reliable o
a través de un vendedor autorizado por Reliable para comerciar la Caldera Reliable.
Esta garantía limitada es la única garantía que se aplica a la Caldera Reliable, reemplaza todos
los términos que puedan estar contenidos en cualquier otro documento u orden de compra, y
no puede ser alterada o modificada, excepto que Reliable así lo haya autorizado expresamente
por escrito.
Para obtener la reparación o cambio según los términos de esta garantía, comuníquese con
nuestro grupo de servicio al cliente al 1 800 268 1649 o escriba a support@reliablecorporation.
com. Usted deberá presentar, por fax o correo electrónico, el comprobante original. Este
comprobante debe demostrar que usted es el comprador original, que el producto fue
adquirido directamente de nuestras oficinas o de un vendedor de Reliable autorizado y que el
reclamo de la garantía se realiza dentro del período establecido en este documento o en un
documento posterior emitido por Reliable en relación con esta póliza. Usted recibirá un número
de autorización (RA#) y deberá enviar el producto defectuoso, junto con el comprobante
de compra, el RA# y los seguros pagados por adelantado, a la siguiente dirección: Reliable
Corporation, 5-100 Wingold Ave, Toronto, ON M6B 4K7.
Los costos de envío por cobrar serán rechazados. El riesgo de sufrir una pérdida o daño en
tránsito será asumido por el cliente. Una vez que Reliable reciba el producto defectuoso, la
compañía iniciará el proceso de reparación o cambio.
RELIABLE CORPORATION – GARANTÍA DEL
PRODUCTO DE POR VIDA – PÓLIZA PARA
CALDERAS PRESURIZADAS A VAPOR
Page 48

Reliable Corporation (“Reliable”) garantiza al comprador original de sus productos que todas
las unidades vendidas por Reliable (un “Producto Reliable”) se encuentran libres de defectos
de material y de mano de obra durante el período de un año a partir de la fecha de compra,
si son utilizadas correctamente y han recibido el mantenimiento adecuado. En virtud de las
condiciones y limitaciones establecidas a continuación, Reliable reparará o reemplazará
la pieza de un Producto Reliable que demuestre estar defectuosa a causa de material o
fabricación inadecuadas. Si el Producto Reliable defectuoso deja de estar disponible y no se
lo puede reparar en forma eficaz ni reemplazar por un modelo idéntico, Reliable cambiará el
Producto Reliable defectuoso por un Producto Reliable vigente de igual o mayor valor. Reliable
proporcionará piezas reparadas o de repuesto a cambio de las piezas originales, y serán piezas
nuevas o reacondicionadas para convertirse en productos funcionalmente equivalentes a piezas
nuevas. Si Reliable no puede reparar ni reemplazar un Producto Reliable, reembolsará el valor
del Producto Reliable que esté vigente al momento de reclamar la garantía.
Esta garantía limitada no cubre los daños que sufra un Producto Reliable como resultado de una
instalación inadecuada, accidente, abuso, uso incorrecto, desastre natural, suministro de energía
eléctrica insuficiente o excesivo, condiciones mecánicas o ambientales anormales, desgaste
provocado por el uso normal del producto, o cualquier desarme, reparación o modificación no
autorizada. Esta garantía limitada no se extiende a ningún daño indirecto, resultante o accidental
que el usuario pueda sufrir o que pueda causar el uso de un Producto Reliable, incluyendo,
entre otros, la responsabilidad ante los reclamos presentados por terceros; y se limita al monto
pagado por el comprador original del Producto Reliable respecto del cual tiene aplicación
esta protección de garantía limitada. Esta garantía limitada no es válida para productos que
hayan sido modificados o que no tengan número de serie, o para productos que no hayan sido
comprados directamente a Reliable o mediante un vendedor certificado que cuente con nuestra
autorización para vender Productos Reliable.
Esta garantía limitada es la única que se aplica a todos los Productos Reliable, reemplaza todos
los términos que puedan estar contenidos en cualquier otro documento u orden de compra, y no
puede ser alterada ni modificada excepto que Reliable así lo haya autorizado expresamente por
escrito.
Para obtener una reparación o cambio según los términos de esta garantía,
comuníquese con nuestro grupo de atención al cliente al 1-800-268-1649 o escriba a
support@reliablecorporation.com.
Usted deberá presentar, por fax o correo electrónico, el comprobante original. Este comprobante
debe demostrar que usted es el comprador original, que el producto fue adquirido directamente
en nuestras oficinas o a un vendedor de Reliable autorizado y que el reclamo de la garantía se
realiza dentro del período correspondiente. Usted recibirá un número de autorización (RA#) y
deberá enviar el producto defectuoso, junto con el comprobante de compra, el RA# y seguros
pagados por adelantado, a la siguiente dirección:
Reliable Corporation, 5-100 Wingold Avenue, Toronto, ON M6B 4K7. Los costos de envío por
cobrar serán rechazados. El riesgo de sufrir una pérdida o daño en tránsito será asumido por el
cliente. Una vez que Reliable reciba el producto defectuoso, la compañía iniciará el proceso de
reparación o reemplazo.
Si tiene preguntas sobre esta garantía, puede escribir a la siguiente dirección:
Reliable Corporation
100 Wingold Avenue, Unit 5
Toronto, Ontario
Canada M6B 4K7
www.reliablecorporation.com
GARANTÍA DE LOS PRODUCTOS RELIABLE
45
Page 49

Page 50

Page 51

Page 52

1 800 268 1649
www.reliablecorporation.com
DID YOU KNOW?
We supply thousands of dry
cleaners and major
department store alteration
shops with ironing stations
and ironing tables.
 Loading...