

Page 1
MAVEN 120IS
HOME IRONING STATION
LE SYSTÈM E DE REPASSAGE POUR L A MAISON
EL SISTEMA HOGAREÑO DE PL ANCHADO
INSTRUCTION MANUAL
GUIDE D’UTILISATION
MANUAL DE INSTRUCCIONES
Page 2

ENGLISH 01
FRANÇAIS 22
ESPAÑOL 42
Page 3

THE MAVEN 120IS
HOME IRON STATION
INSTRUCTION MANUAL
ENGLISH
01
Page 4

RELIABLE. RIGHT THERE WITH YOU.
At Reliable, we do what we love, and take pride in doing it right.
You want what’s best for the people, places and things that matter
in your life – from where you live to what you wear. So do we. From
the start, we approach every product with a craftsman’s attention
to detail and passion for making it right. Quality, functionality,
design and customer service play an equally important part in
delivering what’s right for you.
For your safety and to fully enjoy the advantages of this product,
please take a few minutes to read all the important safeguards and
care instructions. Keep this manual handy and review the product
warranty for your reference.
THANK YOU FOR YOUR PURCHASE. PLEASE SHARE YOUR
RELIABLE PRODUCT EXPERIENCE BY POSTING AN ONLINE
REVIEW ON THE WEBSITE FROM WHICH YOU PURCHASED.
WE GREATLY APPRECIATE IT!
02
Page 5

03
Page 6
IMPORTANT SAFEGUARDS – SAVE
THESE INSTRUCTIONS IN A SAFE PLACE
FOR FUTURE REFERENCE
READ ALL INSTRUCTIONS BEFORE USE
When using your Maven 120IS steam cleaner, basic safety precautions should
always be followed. Please read the following instructions carefully as they provide
important information concerning how to install, use and care for this product. The
appliance is designed for domestic use and may only be operated in accordance
with these instructions The appliance generates high temperature steam. Always
handle with care and warn other users of potential danger.
DANGER TO CHILDREN
• This appliance is not suitable for use by people – including children – with
reduced physical, sensorial or mental capabilities; by people with little or
no experience or awareness of the appliance, unless carefully supervised or
trained in the use of the appliance by a person responsible for their safety.
• It is necessary to supervise children to make sure that they do not play with
the appliance.
• When disposing of the appliance as waste, it must be made inoperative by
removing the power cord. Also remember to make any parts of the potentially
hazardous parts of the appliance safe, as there is a risk that children may use
them as playthings.
• Packaging elements must not be left in reach of children as they are
potentially hazardous.
ELECTRICAL DANGER
• Make sure that the power voltage of the appliance corresponds to that of
your electricity.
• Always connect the appliance to a properly grounded socket.
• Never leave the appliance unattended when it is plugged in; unplug it after
every use and before servicing.
• Always switch off the appliance using the main switch and unplug it from the
socket before refilling it.
• Make sure that your hands are dry before using or adjusting the appliance
switches, touching the plug or power connections.
04
Page 7

DANGER FROM OTHER CAUSES
• Never leave the appliance exposed to the elements (rain, sun, etc.).
• Never place the appliance on or near sources of heat.
• Make sure that the power cord does not come into contact with hot surfaces.
• Never point steam jets in the direction of people, animals or plants or towards
appliances that contain electrical parts (e.g., oven interiors).
• Never direct steam jets onto the appliance itself.
• Never immerse the body of the appliance, plug or power cord in water or other
liquids; clean them with a damp cloth.
• Never use the appliance if the power cord or plug are damaged or if the appliance is faulty/damaged.
• All repairs, including the replacement of the power cord, must only be carried
out by Reliable corporation or technicians authorized by Reliable.
• This appliance has been designed for domestic use only and may not be used
for commercial or industrial purposes. This appliance is for household use only.
• During use, the appliance contains pressurized steam: Improper use can be
dangerous. The appliance is designed for domestic use only, as stated in the
manual. The manufacturer cannot accept any liability for damage cause by
improper or incorrect use of the appliance.
• When the appliance is not in use, always lock the steam dispensing button.
SCALDING DANGER
• If the steam button is pressed before the boiler has reached the optimum temperature, then water instead of steam could come out of the nozzle.
• Never touch hot surfaces while using the product. Leave attachments to cool
before replacing them.
• Even when the appliance is not in operation, unplug it from the power outlet
and leave it to cool before inserting or removing single parts or before
cleaning it.
NEVER OPEN THE CAP ON THE BOILER TANK DURING USE. BEFORE
UNSCREWING THE CAP ON THE BOILER TANK, PROCEED AS FOLLOWS:
• Switch off the appliance using the main switch.
• Release the remaining pressure from the boiler tank: using the steam button on
the handle, point the jet into a suitable container.
• Leave the appliance to cool for a few minutes; slowly loosen the boiler tank cap
partway and wait for a few seconds
• Unplug the power cord from the power outlet.
05
Page 8

RECOMMENDATIONS
DO’S
1. Check that the main voltage stated on the rating plate corresponds to the local
electricity supply.
2. Unwind and straighten the power cord and supply cord before use.
3. Place the appliance on a firm and steady surface.
4. The iron must be used and rested on a stable surface
5. Avoid the power cord or steam hose touching the soleplate.
6. Insert the anti-cal cartridge before use.
7. The plug of the power cord must be removed from the electrical outlet before the
water reservoir is filled with water
8. Keep the anti-cal cartridge and granules away from children at all times.
9. Keep electrical appliances out of reach of children. Do not let them use the appliances without supervision.
10. When placing the appliance on its stand, ensure that the surface on which the stand
is placed is stable.
11. If the power cord or supply cord is damaged, the manufacturer, its service agent or a
similarly qualified person must replace it in order to avoid a hazard.
12. Empty the water tank after use.
13. Do not allow children to play with the appliance.
14. This appliance can be used by children aged 8 years and above and persons with
reduced physical, sensory or mental capabilities or persons that lack experience
and knowledge if they are being supervised and instructed in the use of the appliance in a safe way and understand the hazards involved.
15. Keep the iron and its cord out of reach of children less than 8 years of age when it is
on or cooling down.
16. Always turn the iron OFF before plugging or unpligging the iron from the electrical outlet. Never pull on the cord to disconnect the iron from the electrical outlet;
instead, grasp the plug and pull on the plug to disconnect the iron.
17. Always diconnect the iron from the electrical outlet before filling the iron with water,
emptying the water from the iron and when the iron is not in use.
18. Burns can occur from touching hot metal parts, hot water, or steam. Use caution
when you trun a STEAM IRON upside down - there might be hot water in the
reservoir.
19. If an extension cord is absolutely necessary, a cord with an ampere rating equal to
or greater than the maximum rating of the iron shall be used. A cord rated for less
amperage can result in a risk of fire or electric shock due to overtheating. Care shall
be taken to arrange the cord so that it cannot be pullde or be tripped over.
06
Page 9

CAUTION
DONT’S
1. Do not allow children to touch the appliance when ironing.
2. Do not leave the appliance unattended when it is connected to a main supply outlet.
3. Do not use an extension power cord set unless it corresponds with your local manufacturing standards.
4. Do not add perfume, vinegar or anything other than water into the water tank; this
can seriously damage the appliance.
5. Do not immerse the appliance in water or any other liquids.
6. Do not use the appliance if it is damaged or performs abnormally.
7. Do not use the appliance if it has been dropped, if there are visible signs of damage
or if it is leaking.
8. Do not touch the iron rest during or just after ironing. It is hot!
9. Do not roll the power cord or supply cord around the iron unit or base for storage
until it has cooled down completely.
10. Do not attempt to open the water tank or dismantle any part of the appliance, there
are no serviceable parts inside.
11. Do not open the water inlet cover during use. See instructions for the safe refilling of
the water tank.
12. Cleaning and user maintenance should not be done by children without supervision.
13. Do not touch the surfaces marked with this symbol during or just after ironing. The
appliance will be hot! (Please refer to the following figure 1 and figure 2)
14. Do not let the cord touch hot surfaces. Let the iron cool completely before putting
the iron away. Coil the cord loosely around the iron when storing.
15. Do not operate the iron with a damaged cord or in the event the iron has been
dropped or damaged.To avoid the risk of electric shock, do not disassemble the iron.
Take it to a qualified serviceman for examination and repair. Incorrect assembly
might result in a risk of electric shock when the iron is used after reassembly.
16. To avoid a circuit overload, do not operate an iron on the same circuit with another
high wattage appliance.
07
Page 10

08
Page 11
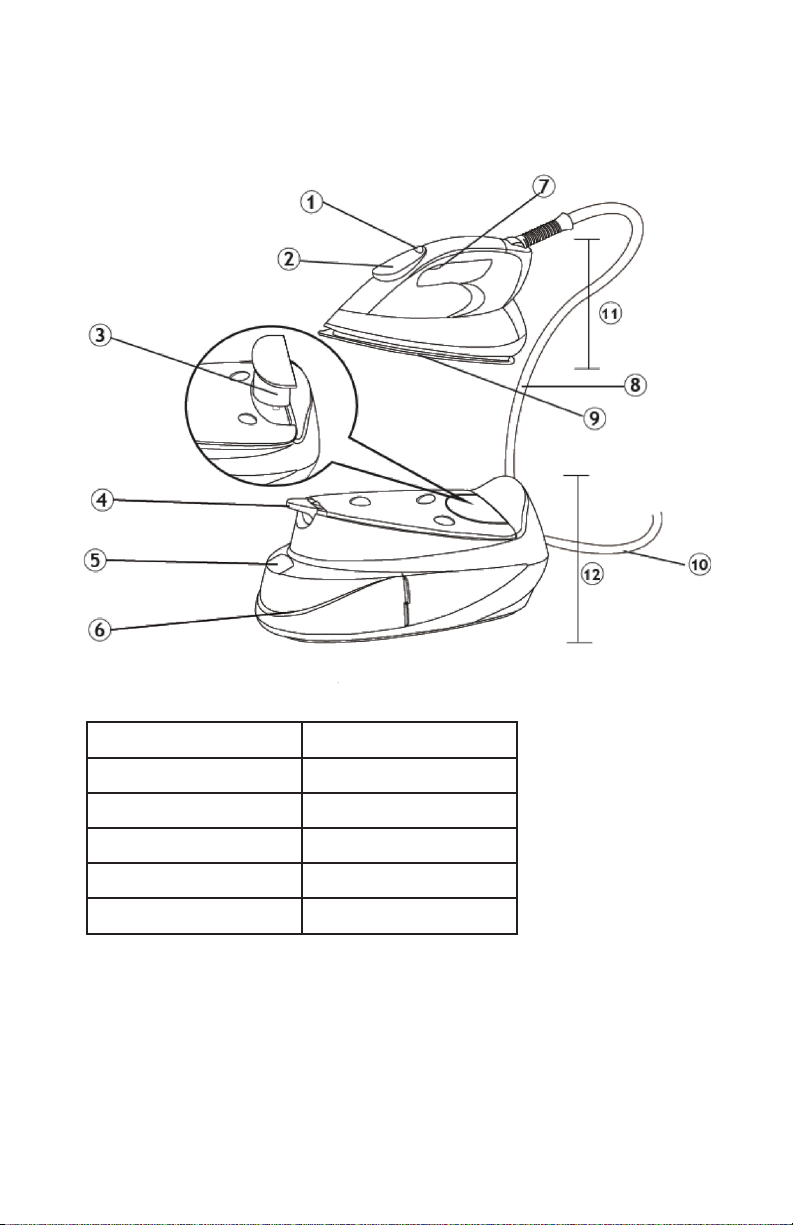
MAVEN 120IS KEY FEATURES
1. Function Button 7. Steam Trigger
2. Control Panel 8. Steam Hose
3. Anti-scale Cartridge 9. Soleplate
4. Carry Lock 10. Power Cord
5. Water Inlet Cover 11. Iron Unit
6. Water Tank 12. Base
09
Page 12
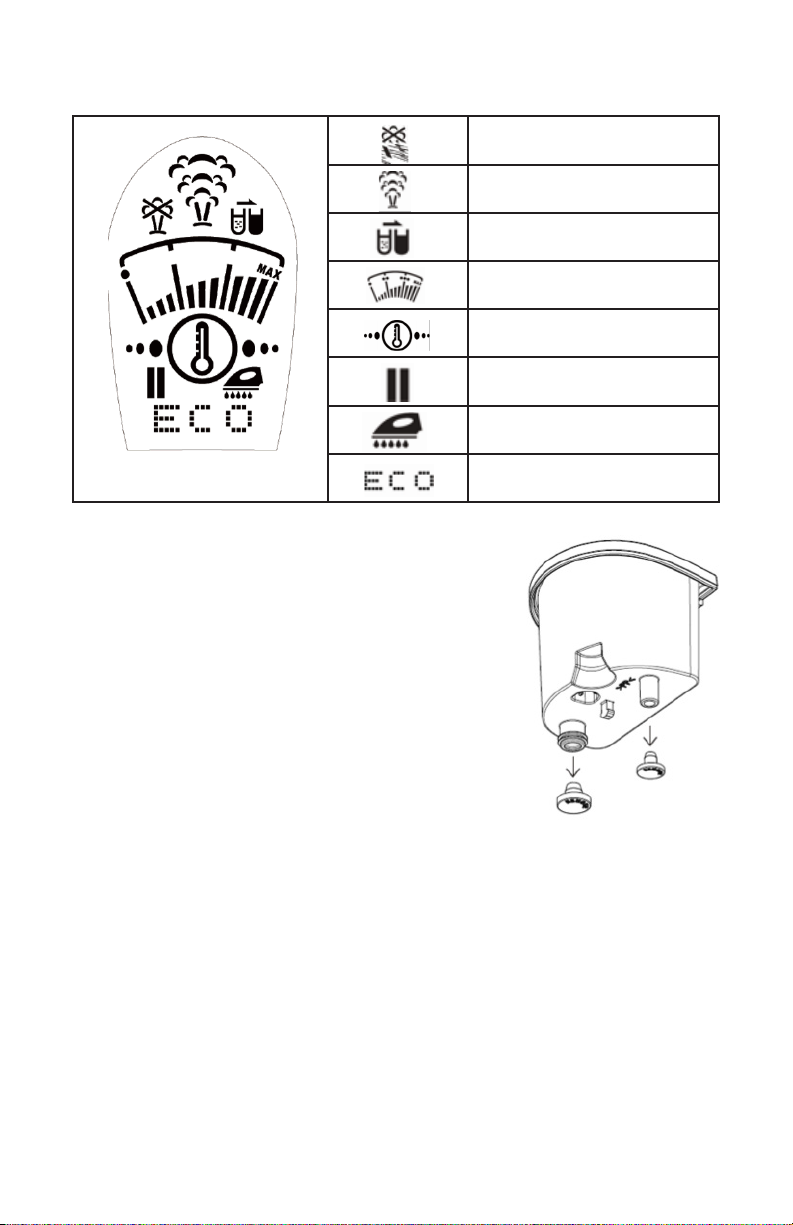
CONTROL PANEL
No Steam Indicator
Steam Level Indicator
Anti-scale Cartridge Indicator
Temperature Settings
Auto Indicator
Auto Shut Off Indicator
Self-clean Indicator
ECO Indicator
BEFORE THE FIRST USE
1. Remove any protective films or stickers from the
appliance
2. Unwind and straighten the power cord.
3. Remove the cover from the new anti-scale cartridge
(Figure 1).
4. Immerse new anti-scale cartridge into water for 5
minutes before first use for improved performance
(see “ANTI-SCALE CARTRIDGE”)
Note: When using the steam function for the first time,
do not use on your laundry. Some residue may
remain inside the appliance. Iron an old towel for
the first time and press the steam trigger to ensure
the residue is completely released.
FIGURE 1
USING YOUR APPLIANCE
1. This appliance is designed for use with normal tap water. Other liquids might
damage the appliance.
2. Connect the appliance to a suitable main supply outlet.
3. Start ironing after the icons on the display panel stop flashing. This indicates
the required temperature has been reached and the appliance is ready to use.
4. Always disconnect the appliance from the main power supply after use.
10
Page 13
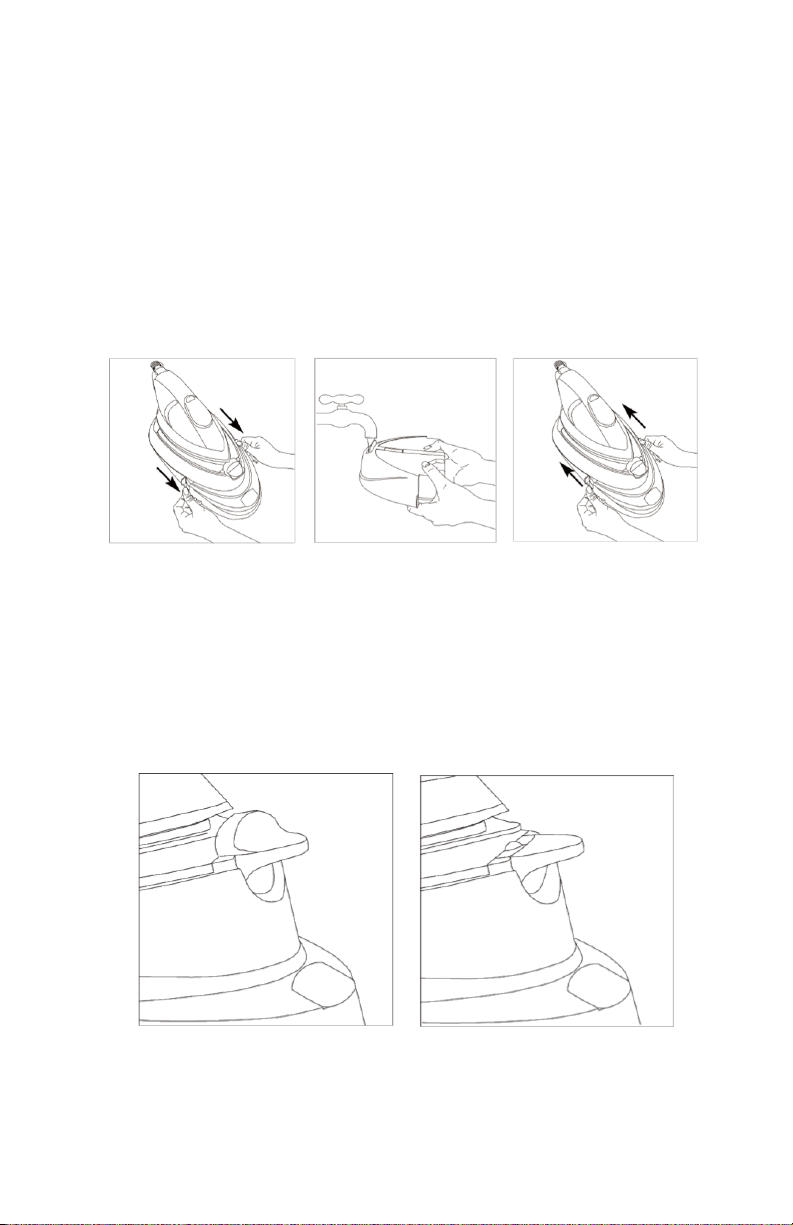
FILLING THE WATER TANK
1. Disconnect the power cord from the electric outlet.
2. Pull out the water tank (Figure 2).
3. Open the water inlet cover and fill tank with water until the maximum level
(Figure 3).
4. Put the water tank back and make sure that it is firmly positioned in place
(Figure 4).
FIGURE 2
FIGURE 3 FIGURE 4
CARRY LOCK
The appliance is equipped with a carry lock. You can carry the appliance with one
hand using the handle of the iron unit when the iron is locked to the base (Figure 5).
To release the iron unit from the base, turn the carry lock to the unlocked position.
FIGURE 2
Locked Postion
FIGURE 3
Unlocked Postion
11
Page 14
PROGRAMMED TEMPERATURE
Auto Mode
The appliance is equipped with a programmed temperature feature which allows it
to iron all ironable fabrics without adjusting the temperature of the iron. It is the
default mode of this appliance.
Fabrics with these symbols are ironable, for example,
Polyester, Silk, Viscose, Wool, Cotton and Linen.
Fabrics with this symbol are not ironable, for example, Polypropylene, Elastane and Acrylic Fabric.
The ECO indicator will light up when the lowest temperature is being used.
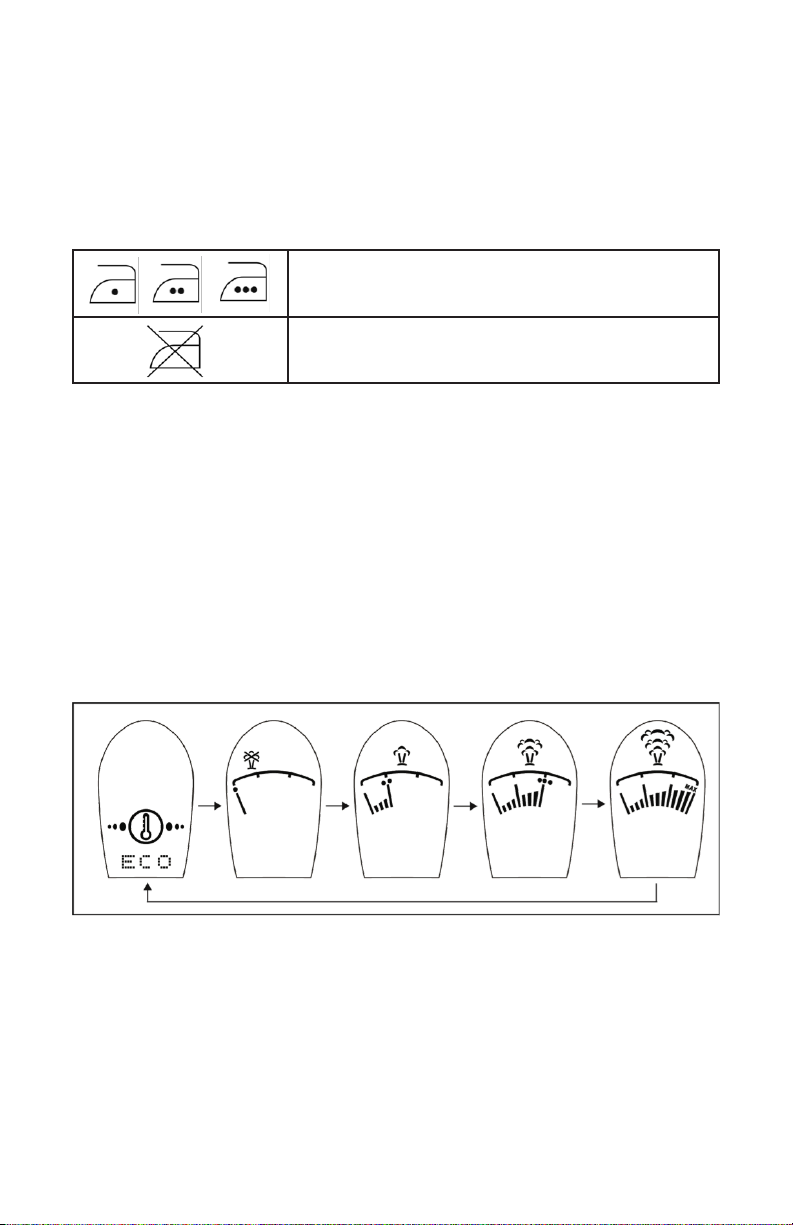
SETTING THE TEMPERATURE
The appliance has different temperature settings for different kinds of fabrics.
Press the function button to turn on the appliance. The appliance will start in auto
mode. If you want to switch to another ironing temperature, press the function key
and the temperature display will loop through the following sequence:
‘auto mode’ -> ‘Dot 1’ -> ‘Dot 2’ -> ‘Dot 3’ - > ‘Dot 4’ -> ‘Max’
IMPORTANT” Before starting to iron, read the garment labels and follow the
manufacturer’s ironing instructions.
12
Page 15
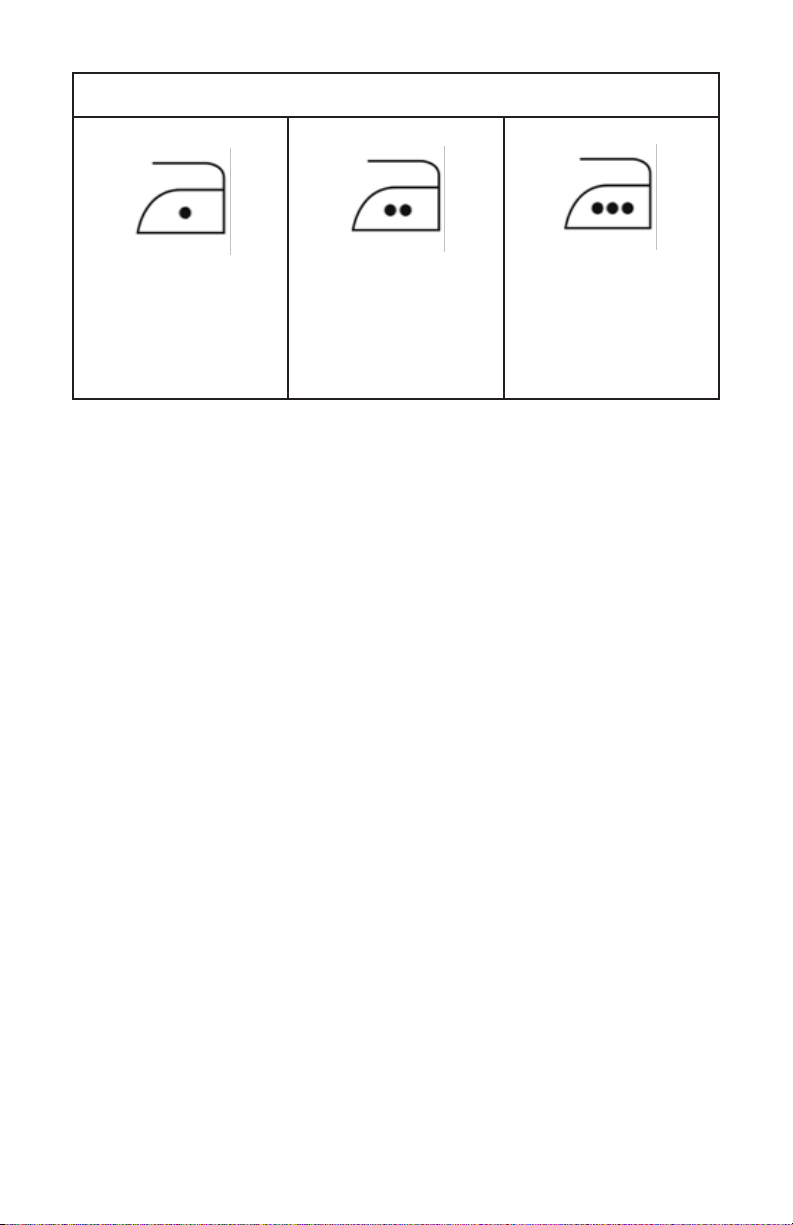
TEMPERATURE CONTROL SETTINGS
Acetate
Elastane
Polyamide
If you are not sure about the fabric is made of, use the auto mode or start ironing
at a low temperature.
Polyester
Silk
Viscose
Wool
Cotton
Linen
AUTO STEAM FUNCTION
The appliance will automatically adjust the steam output to the selected temperature. The function provides the right amount of steam for each temperature to
achieve the best results.
13
Page 16
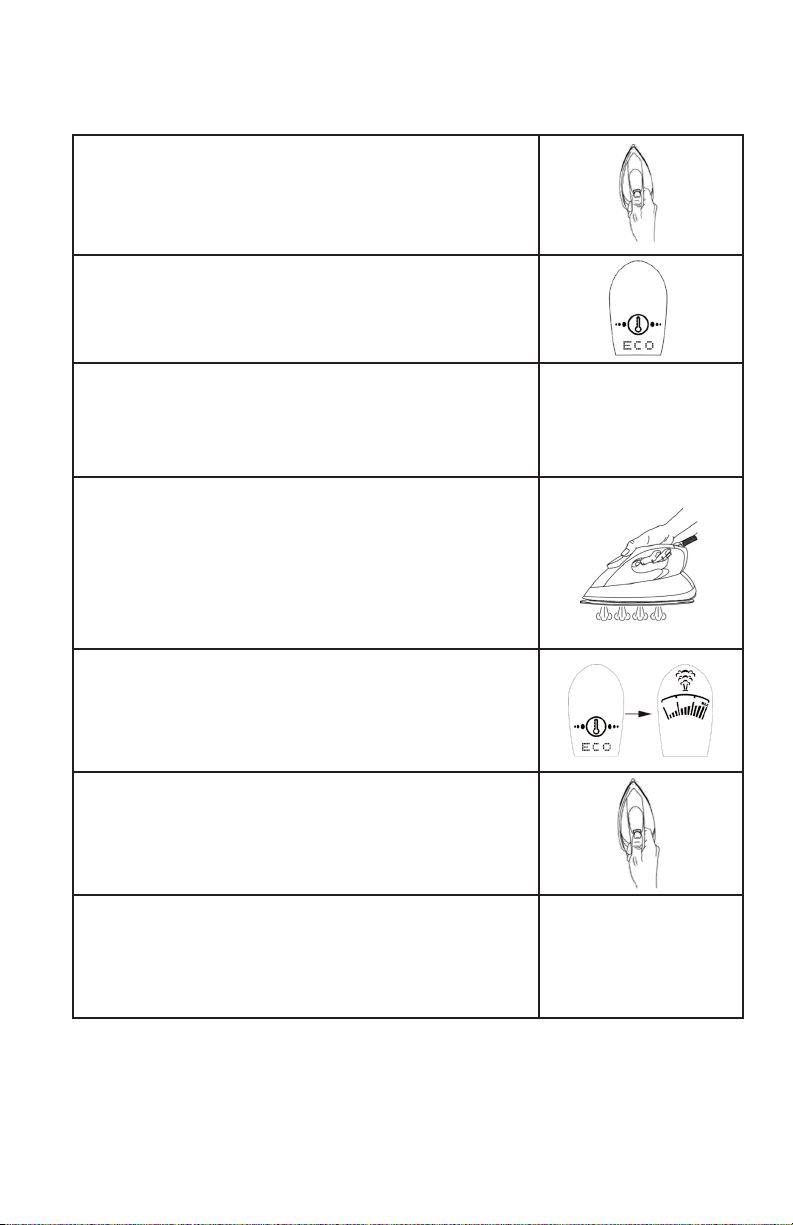
PROGRAMMED TEMPERATURE
Press the function button to turn on the appliance and
select your desired temperature. Beeping sounds will be
heard when the function button is pressed.
Depending on the temperature setting you selected, the
corresponding temperature symbol on the control panel
will be flashing. When the iron is ready for use, the temperature symbol will stop flashing and remain on..
Important note: The first time you use the iron, the
pump will take a few seconds to generate steam. During
this time, you may hear a “pumping” sound. This is
normal and will occur before the iron is ready to use.
Steam ironing is available for all temperature settings
except ‘Dot 1’. You can press and hold the steam trigger
to generate steam for steam ironing. A beep will be heard
when the steam trigger is pressed and the respective
steam indicator for ‘Auto Mode’, ‘Dot 2’, ‘Dot 3’ and ‘Max’
will flash, indicating it is generating steam. Release the
steam trigger to stop generating steam.
Adjust the temperature setting of the appliance by
pressing the function button.
After use, press and hold the function button for 2 seconds to turn off the appliance.
It is recommended to drain the water inside the water
tank after every use. See ‘”Draining the water tank”
instructions.
14
Page 17
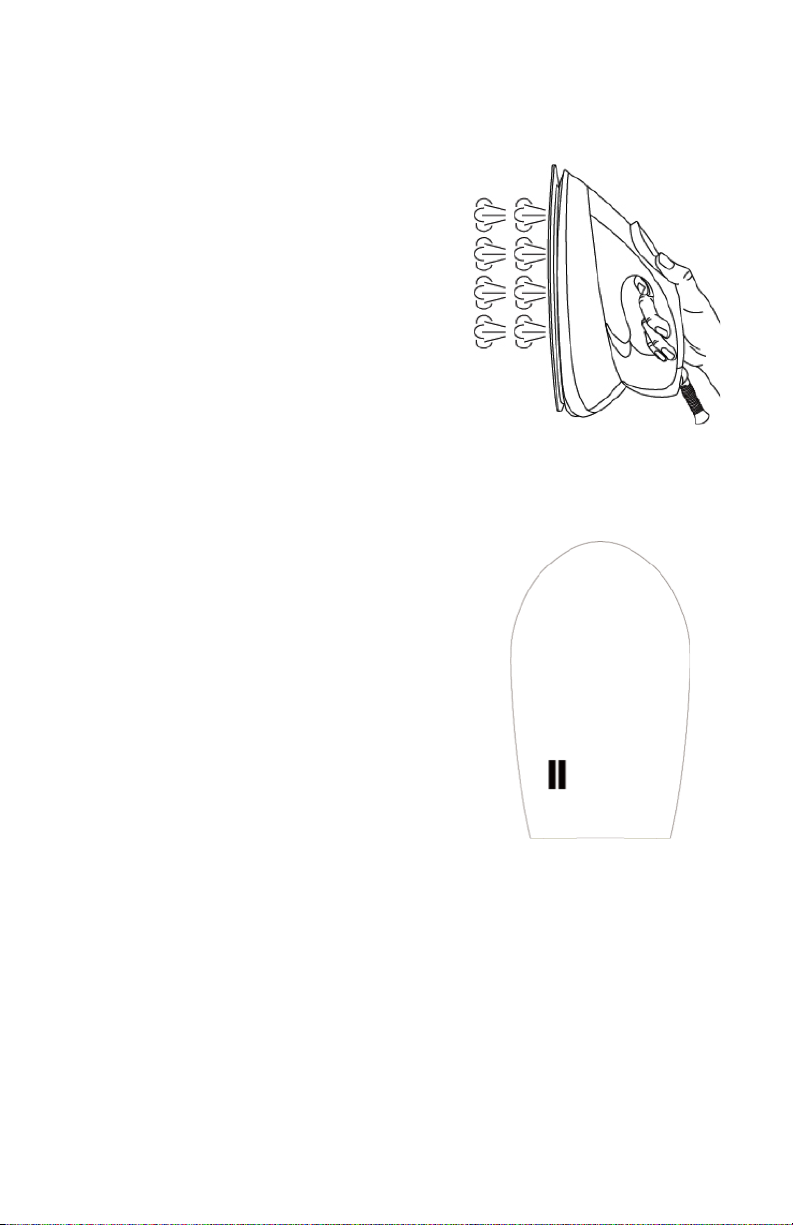
VERTICAL STEAMING
You can remove wrinkles from garments, curtains
and fabrics in hanging positions.
1. Select your desired steam temperature
setting.
2. Hold the iron in a vertical position (Figure 7)
15 to 30 centimeters away from the garment.
3. Press the steam trigger.
Warning: Do not apply steam to clothes or fabrics
that are being worn by humans or pets. The temperature of the steam is very high.
SAFETY AUTO SHUT-OFF
FUNCTION
The auto shut-off function will operate automatically when the iron is immobile or the function
button or steam trigger have not been pressed for
10 minutes.
1. A beep will be heard and the auto shut-off
indicator will be flashing (Figure 8) to indicate
the appliance is in auto shut-off mode.
2. To reactivate the iron, simply move it or press
the function button or steam trigger. The
control panel will start heating up and return
to its previous temperature setting. It may take
about 60 seconds for the iron to be ready for
use.
FIGURE 7
FIGURE 8
Note: The appliance is not switched completely
when it is in auto shut-off mode. Press and hold the
function button to turn the appliance off completely, and unplug from the main power supply outlet.
15
Page 18

DRAINING THE WATER TANK
Disconnect the iron from the main supply outlet
1. Pull out the water tank (Figure 9).
2. Open the Water Inlet Cover and drain the water tank (Figure 10).
3. Put the water tank back and make sure that it is firmly positioned in place
(Figure 11)
FIGURE 9
FIGURE 10
ANTI-SCALE CARTRIDGE
This appliance has an anti-scale cartridge to prolong its
lifespan.
1. When the anti-scale cartridge indicator lights up and
beeps, it indicates the anti-scale cartridge needs to be
changed. It is very important to change the cartridge
before continuing to iron.
2. Remove the cover from the new anti-scale cartridge.
3. Immerse the new anti-scale cartridge into water
for 5 minutes (Figure 13) before first use for better
performance.
4. Press to release the cartridge from the appliance (you
will hear a beep) and pull out the old cartridge from the
appliance (Figure 14). Caution: The cartridge can be very
hot due to the heat from the soleplate. Make sure the
cartridge has cooled down before pressing it.
5. Insert the new anti-scale cartridge (Figure 15)
FIGURE 11
FIGURE 12
FIGURE 13 FIGURE 14 FIGURE 15
16
Page 19

Note: If the anti-scale cartridge is not installed, or installed
incorrectly, you will not be able to use the appliance and the
anti-scale cartridge indicator will be flashing.
SELF CLEANING
This function removes the scale and mineral build-up from the
steam chamber. The appliance will remain in the best condition if this function is performed at least once a month or
more often, depending on the hardness of water used.
1. When the self-clean indicator lights up with a beep, it
indicates that the appliance needs to undergo a selfcleaning (Figure 17).
2. Fill the water tank to the max level (See ‘FILLING THE
WATER TANK’) and plug in the appliance.
3. Press the function button followed by the steam trigger
and hold both buttons for 3 seconds. The appliance will
then enter self-cleaning mode with a beep sound.
4. Press the function to proceed with self-cleaning. Press
the steam trigger to resume ironing. (Note: when selfcleaning is confirmed, you will not be able to terminate it
until the process is completed).
5. Hold the iron about 15 centimeters above the sink in
the ironing position. Loose material and water will come
out through the steam holes (Figure 18). The appliance
will resume the previous ironing setting when this is
complete.
6. Iron with a damp cloth to remove any deposits on the
soleplate. Remove any water stains that may have
formed on the soleplate.
7. Press and hold the function button to turn the appliance
off and unplug from the main power supply outlet.
FIGURE 16
FIGURE 17
FIGURE 18
17
Page 20

CLEANING AND MAINTENANCE
1. Disconnect the power cord from the main power supply.
2. Use a damp cloth to remove deposits from the soleplate and exterior parts of
the iron.
3. Never use sharp or rough objects to remove deposits from the sole plate.
STORAGE
1. Make sure the water is completely drained from the water tank
2. Place the iron unit on the base.
3. Turn the carry lock to the lock position.
4. You can carry the appliance with one hand by the handle of the iron unit when
the iron is locked on the base.
IRONING TIPS
1. Sort out articles to be ironed according to types of fabric. This will minimize the
frequency of temperature adjustments.
2. Test iron a small area on the backside or inside the garment if you are unsure
about the type of fabric. Start with a low temperature and increase gradually.
3. Wait 2 minutes between temperature adjustments while ironing heat sensitive
fabrics.
18
Page 21

TROUBLESHOOTING
If your steam station does not work well, check the following points:
PROBLEM CAUSE SOLUTION
The unit does not work There is not enough heat Wait for unit to heat up
It is not plugged in Plug unit in
The anti-scale cartridge
is not installed/installed
improperly
Socket doesn’t work Plug into a functioning
No steam coming out
when pressing the steam
trigger
Sole-plate doesn’t heat
well
Loud noise First time use This is normal
Water tank empty Fill water tank
The appliance is still
heating up
Steam ironing is not
available
Incorrect fabric setting Press the function
Install the scale
cartridge properly
socket
Wait for unit to heat up
Press the function
button for a higher temperature setting
button for a higher temperature setting
19
Page 22

RELIABLE PRODUCTS WARRANTY
Reliable Corporation (“Reliable”) warrants to original purchaser of its products that
every product sold by Reliable (a “Reliable Product”) is free from defects in material and
workmanship for a period of one year from the date of purchase if properly used and
maintained. Subject to the conditions and limitations set forth below, Reliable will either
repair or replace any part of a Reliable Product that proves defective by reason of improper
workmanship or materials. If the defective Reliable Product is no longer available and cannot
be repaired effectively or replaced with an identical model, Reliable shall replace the defective
Reliable Product with a current Reliable Product of equal or greater value. Repaired parts or
replacement products will be provided by Reliable on an exchange basis, and will be either new
or refurbished to be functionally equivalent to new. If Reliable is unable to repair or replace
a Reliable Product, it will refund the current value of that Reliable Product at the time the
warranty claim is made.
This limited warranty does not cover any damage to a Reliable Product that results from
improper installation, accident, abuse, misuse, natural disaster, insufficient or excessive
electrical supply, abnormal mechanical or environmental conditions, wear and tear resulting
from normal use of the product, or any unauthorized disassembly, repair, or modification. This
limited warranty does not extend to any indirect, consequential or incidental damages that
may be suffered by a user or from the use of a Reliable Product, including without limitation,
any liability for third party claims for damage, and is limited to the amount paid by the original
purchaser Reliable Product with respect to which this limited warranty protection applies.
This limited warranty does not apply with respect to products that have been altered or which
are missing serial numbers or for products not purchased directly from Reliable or a dealer
authorized by us to sell Reliable Products.
This limited warranty is the only warranty that applies to any Reliable Product, supersedes any
and all terms that may be contained in any other document or purchase order and may not be
altered or amended except expressly in writing by Reliable.
To obtain a repair or replacement under the terms of this warranty, please contact our
customer service group at 1-800-268-1649 or at support@reliablecorporation.com.
You will be required to submit an original receipt via fax or e-mail. The receipt must reflect that
you are the original purchaser, the product was bought directly from
us or from an authorized Reliable dealer and that the warranty claim is being made within the
warranty period. You will be issued a return authorization number (RA#) and asked to ship the
defective product together with proof of purchase and RA#, prepaid insured to the following
address:
Reliable Corporation, 5-100 Wingold Avenue, Toronto, ON M6B 4K7. Freight collect shipments
will be refused. The risk of loss or damage in transit will be borne by
the customer. Once Reliable receives the defective product, it will initiate the repair or
replacement process.
If you have any questions regarding this warranty, you may write to:
Reliable Corporation
100 Wingold Avenue, Unit 5
Toronto, Ontario
Canada M6B 4K7
www.reliablecorporation.com
202122
Page 23

Page 24

LE MAVEN 120IS
LE SYSTÈME DE REPASSAGE POUR LA MAISON
GUIDE D’UTILISATION
FRANÇAIS
Page 25

RELIABLE, VOTRE PARTENAIRE EN TOUTES
CIRCONSTANCES.
Chez Reliable, nous sommes passionnés par notre métier et
éprouvons de la fierté à l’exercer dans les règles de l’art. De l’endroit
où vous vivez à ce que vous portez, vous voulez le meilleur pour les
personnes, les endroits et les choses qui comptent dans votre vie.
Eh bien, figurez-vous que nous aussi! Dès le début, nous étudions
chaque produit avec le souci scrupuleux du détail et la passion du
travail bien fait. Qualité, fonctionnalité, conception et service à la
clientèle sont autant d’avantages, tous aussi importants, que nous
vous offrons pour vous satisfaire.
Pour votre sécurité et pour tirer le meilleur parti de ce produit,
veuillez prendre quelques minutes pour lire toutes les importantes
mesures de protection et les instructions d’entretien. Conservez ce
manuel à portée de main et consultez la garantie du produit à titre
de référence.
MERCI DE VOTRE ACHAT. VEUILLEZ PARTAGER VOTRE EXPÉRIENCE
DE PRODUIT RELIABLE EN PUBLIANT UN COMMENTAIRE EN LIGNE
SUR LE SITE WEB SUR LEQUEL VOUS AVEZ ACHETÉ LE PRODUIT.
NOUS VOUS EN SOMMES TRÈS RECONNAISSANTS!
23
Page 26

MESURES DE SÉCURITÉ IMPORTANTES
— GARDEZ CES INSTRUCTIONS DANS
UN LIEU SÛR POUR CONSULTATION
ULTÉRIEURE
VEUILLEZ LIRE TOUTES LES INSTRUCTIONS AVANT L’UTILISATION
Lorsque vous utilisez votre nettoyeur à vapeur Maven 120IS, vous devez toujours
prendre des précautions de sécurité de base. Veuillez lire attentivement les
instructions suivantes, car elles fournissent des informations importantes sur
l’installation, l’utilisation et l’entretien de ce produit. L’appareil est conçu pour un
usage domestique et doit être utilisé conformément à ce mode d’emploi uniquement.
L’appareil produit de la vapeur à haute température. Manipulez toujours le produit
avec précaution et avertissez les autres utilisateurs des dangers potentiels.
DANGER POUR LES ENFANTS
• Cet appareil ne convient pas aux personnes (y compris les enfants) ayant des
capacités physiques, sensorielles ou mentales réduites; aux personnes ayant peu
ou pas d’expérience ou de connaissance de l’appareil, à moins qu’une personne
responsable de leur sécurité ne les supervise ou ne les forme soigneusement à
l’utilisation de l’appareil.
• Il est nécessaire de surveiller les enfants pour s’assurer qu’ils ne jouent pas avec
l’appareil.
• Lorsque vous jetez l’appareil comme un déchet, vous devez le rendre inopérant
en retirant le cordon d’alimentation. N’oubliez pas non plus de sécuriser les
parties potentiellement dangereuses de l’appareil, car il y a un risque que les
enfants les utilisent comme jouets.
• Les éléments d’emballage ne doivent pas être laissés à la portée des enfants, car
ils sont potentiellement dangereux.
DANGER ÉLECTRIQUE
• Veillez à ce que la tension d’alimentation de l’appareil corresponde à celle de votre
alimentation électrique.
• Branchez toujours l’appareil sur une prise de courant correctement mise à la terre.
• Ne laissez jamais l’appareil sans surveillance lorsqu’il est branché; débranchez-le
après chaque utilisation et avant tout entretien.
• Éteignez toujours l’appareil avec l’interrupteur principal et débranchez-le de la
prise avant de le recharger.
• Assurez-vous d’avoir les mains sèches avant d’utiliser ou de régler les interrupteurs
de l’appareil, et avant de toucher la fiche ou les connexions électriques.
24
Page 27

AUTRES SOURCES DE DANGER
• Ne laissez jamais l’appareil exposé aux intempéries (pluie, soleil, etc.).
• Ne placez jamais l’appareil sur ou près d’une source de chaleur.
• Assurez-vous que le cordon d’alimentation n’entre pas en contact avec des surfaces
chaudes.
• Ne dirigez jamais les jets de vapeur vers des personnes, des animaux ou des plantes,
ou vers des appareils contenant des pièces électriques (p. ex., à l’intérieur d’un four).
• Ne dirigez jamais les jets de vapeur sur l’appareil lui-même.
• N’immergez jamais le corps de l’appareil, la fiche ou le cordon d’alimentation dans
l’eau ou dans d’autres liquides; nettoyez-les avec un chiffon humide.
• N’utilisez jamais l’appareil si le cordon d’alimentation ou la fiche sont endommagés, ou
si l’appareil est défectueux ou endommagé.
•
Toutes les réparations, y compris le remplacement du cordon d’alimentation, ne doivent
être effectuées que par Reliable ou par des techniciens autorisés par Reliable.
• Cet appareil a été conçu pour un usage domestique seulement et ne peut être
utilisé à des fins commerciales ou industrielles. Cet appareil est destiné à un usage
domestique uniquement.
• Pendant l’utilisation, l’appareil contient de la vapeur sous pression : une mauvaise
utilisation peut être dangereuse. L’appareil est conçu pour un usage domestique
uniquement, comme indiqué dans le guide d’utilisation. Le fabricant décline toute
responsabilité en cas de dommages causés par une utilisation inappropriée ou
incorrecte de l’appareil.
•
Verrouillez toujours le bouton de distribution de vapeur lorsque l’appareil n’est pas
utilisé.
RISQUE DE BRÛLURES
• Si vous appuyez sur le bouton vapeur avant que la chaudière n’ait atteint la
température optimale, de l’eau pourrait sortir de la buse au lieu de la vapeur.
• Ne jamais toucher les surfaces chaudes pendant l’utilisation du produit. Laisser
refroidir les accessoires avant de les remettre en place.
• Même lorsque l’appareil n’est pas en marche, débranchez-le de la prise de courant et
laissez-le refroidir avant de placer ou de retirer des pièces ou avant de le nettoyer.
N’OUVREZ JAMAIS LE BOUCHON DU RÉSERVOIR DE LA CHAUDIÈRE PENDANT
L’UTILISATION. AVANT DE DÉVISSER LE BOUCHON DU RÉSERVOIR DE LA
CHAUDIÈRE, PROCÉDEZ COMME SUIT :
• Éteignez l’appareil à l’aide de l’interrupteur principal.
• Relâchez la pression restante du réservoir de la chaudière : à l’aide du bouton
vapeur sur la poignée, dirigez le jet vers un récipient adapté.
• Laissez refroidir l’appareil pendant quelques minutes; desserrez lentement le
bouchon du réservoir de la chaudière à moitié et attendez quelques secondes.
• Débranchez le cordon d’alimentation de la prise de courant
25
Page 28

PRINCIPALES CARACTÉRISTIQUES
DU MAVEN 120IS
1. Touche fonction 7. Gâchette à vapeur
2. Panneau de commande 8. Tuyau à vapeur
3. Cartouche anticalcaire 9. Semelle
4. Loquet de transport 10. Cordon d’alimentation
5. Clapet d’entrée d’eau 11. Fer à repasser
6. Réservoir d’eau 12. Socle
26
Page 29

RECOMMANDATIONS
OUI
1. Vérifiez que la tension principale indiquée sur la plaque signalétique correspond à
l’alimentation électrique locale.
2. Déroulez le cordon d’alimentation et faites en sorte qu’il soit bien droit avant
l’utilisation.
3. Placez l’appareil sur une surface ferme et stable.
4. Le fer à repasser doit être utilisé et posé sur une surface stable.
5. Évitez que le cordon d’alimentation ou le tuyau de vapeur ne touche la semelle.
6. Insérez la cartouche anticalcaire avant utilisation.
7. La fiche du cordon d’alimentation doit être débranchée de la prise électrique avant de
remplir d’eau le réservoir.
8. Gardez la cartouche et les granules anticalcaires hors de la portée des enfants en tout
temps.
9. Gardez les appareils électriques hors de la portée des enfants. Ne les laissez pas utiliser
les appareils sans surveillance.
10. Lorsque vous placez l’appareil sur son support, assurez-vous que la surface sur laquelle
le support est placé est stable.
11. Si le cordon d’alimentation est endommagé, le fabricant, son réparateur ou une autre
personne qualifiée doit le remplacer pour éviter tout risque.
12. Videz le réservoir d’eau après l’utilisation.
13. Ne laissez pas les enfants jouer avec l’appareil.
14. Cet appareil peut être utilisé par des enfants âgés de 8 ans et plus, et par des
personnes ayant des capacités physiques, sensorielles ou mentales réduites, ou par des
personnes qui manquent d’expérience et de connaissances, si elles sont supervisées et
formées à l’utilisation de l’appareil en toute sécurité et sont conscientes des dangers
inhérents à l’appareil.
15. Gardez le fer à repasser et son cordon hors de la portée des enfants de moins de 8 ans
lorsqu’il est allumé ou en train de refroidir.
16. Eteignez toujours le fer avant de le brancher ou de le débrancher de la prise électrique.
Ne tirez jamais sur le cordon pour débrancher le fer à repasser de la prise électrique; à
la place, saisissez la fiche et tirez sur la fiche pour débrancher le fer.
17. Toujours débrancher le fer à repasser de la prise de courant avant de remplir le fer avec
de l’eau, de vider l’eau du fer et lorsque le fer n’est pas utilisé.
18. Le contact avec des pièces métalliques chaudes, de l’eau chaude ou de la vapeur peut
provoquer des brûlures. Soyez prudent lorsque vous faites passer un fer à repasser à
l’envers - il pourrait y avoir de l’eau chaude dans le réservoir.
19. Si une rallonge est absolument nécessaire, vous devez utiliser une rallonge d’intensité
égale ou supérieure à la capacité maximale du fer. Un cordon conçu pour une ampérage
moindre peut entraîner un risque d’incendie ou de choc électrique en cas de surchauffe.
Il faut prendre soin d’organiser le cordon de sorte qu’il ne puisse pas être tiré ou
trébuché.
27
Page 30

MISE EN GARDE
NON
1. Ne laissez pas les enfants toucher l’appareil pendant le repassage.
2. Ne laissez pas l’appareil sans surveillance lorsqu’il est branché à une prise de courant.
3. N’utilisez pas de rallonge électrique à moins qu’elle ne corresponde aux normes de
fabrication locales.
4. N’ajoutez pas de parfum, de vinaigre ou autre chose que de l’eau dans le réservoir
d’eau; cela pourrait gravement endommager l’appareil.
5. Ne plongez pas l’appareil dans l’eau ni dans d’autres liquides.
6. N’utilisez pas l’appareil s’il est endommagé ou s’il fonctionne anormalement.
7. N’utilisez pas l’appareil s’il est tombé, s’il présente des dommages visibles ou s’il fuit.
8. Ne touchez pas le support du fer à repasser pendant ou juste après le repassage. Il
sera chaud!
9. N’enroulez pas le cordon d’alimentation autour du fer ou du socle avant qu’ils ne se
soient complètement refroidis.
10. N’essayez pas d’ouvrir le réservoir d’eau ou de démonter une partie de l’appareil. Il n’y
a aucune pièce de rechange à l’intérieur.
11. N’ouvrez pas le clapet d’entrée d’eau pendant l’utilisation. Voir les instructions pour le
remplissage du réservoir d’eau en toute sécurité.
12. Le nettoyage et l’entretien ne doivent pas être effectués par des enfants sans
surveillance.
13. Ne touchez pas les surfaces marquées de ce symbole pendant ou juste après le
repassage. L’appareil sera chaud! (Se reporter à la figure 1 et à la figure 2 ci-dessous).
14. Ne laissez pas le cordon toucher des surfaces chaudes. Laissez le fer refroidir
complètement avant de le ranger. Enroulez le cordon autour du fer sans serrer
pour le ranger.
15. Ne faites pas fonctionner le fer avec un cordon endommagé ou en cas de chute ou
d’endommagement du fer. Pour éviter tout risque de choc électrique, ne démontez
pas le fer. Confiez-le à un réparateur qualifié. Un assemblage incorrect peut
entraîner un risque de choc électrique lorsque le fer est utilisé après le remontage.
16. Pour éviter une surcharge du circuit, ne faites pas fonctionner un fer à repasser
sur le même circuit avec un autre appareil électroménager de forte puissance.
28
Page 31

29
Page 32

PANNEAU DE COMMANDE
Indicateur d’absence de vapeur
Indicateur de niveau de vapeur
Indicateur de cartouche
anticalcaire
Réglages de température
Indicateur du mode automatique
Indicateur d’arrêt du mode
automatique
Indicateur d’autonettoyage
Indicateur ÉCO
AVANT LA PREMIÈRE UTILISATION
1
. Retirez les films de protection ou les autocollants de
l’appareil.
2. Déroulez et faites en sorte que le cordon d’alimentation
soit bien droit.
3. Retirez le couvercle de la nouvelle cartouche
anticalcaire (Figure 1).
4. Plongez la nouvelle cartouche anticalcaire dans
l’eau pendant 5 minutes avant la première utilisation
pour de meilleurs résultats (voir « CARTOUCHE
ANTICALCAIRE »).
Remarque : Lorsque vous utilisez la fonction vapeur pour la
première fois, ne l’utilisez pas sur votre linge. Certains
résidus peuvent rester à l’intérieur de l’appareil. Pour la
première utilisation, repassez une vieille serviette et
appuyez sur la gâchette à vapeur pour vous assurer
qu’il n’y a plus de résidus.
UTILISATION DE VOTRE APPAREIL
1. Cet appareil est conçu pour être utilisé avec de l’eau du robinet normale. Tout autre
liquide pourrait endommager l’appareil.
2. Branchez l’appareil à une prise de courant adaptée.
3. Commencez à repasser une fois que les icônes sur le panneau d’affichage arrêtent
de clignoter. Cela indique que la température requise a été atteinte et que l’appareil
est prêt à fonctionner.
4. Débranchez toujours l’appareil de la prise de courant quand vous avez fini de
l’utiliser.
30
FIGURE 1
Page 33

REMPLIR LE RÉSERVOIR D’EAU
1. Débranchez le cordon d’alimentation de la prise de courant.
2. Retirez le réservoir d’eau (Figure 2).
3. Ouvrez le clapet d’entrée d’eau et remplissez le réservoir d’eau jusqu’au niveau
maximum (Figure 3).
4. Remettez le réservoir d’eau en vous assurant qu’il reste bien en place
(Figure 4).
FIGURE 2
FIGURE 3 FIGURE 4
LOQUET DE TRANSPORT
L’appareil est équipé d’un loquet de transport. Vous pouvez porter l’appareil avec
une seule main en le tenant par la poignée du fer à repasser quand le fer est fixé sur
le socle (Figure 5). Pour dégager le fer à repasser de son socle, mettez le loquet de
transport en position déverrouillée.
FIGURE 2
Position verrouillée
FIGURE 3
Position déverrouillée
31
Page 34

TEMPÉRATURE PROGRAMMÉE
Mode auto
L’appareil est équipé d’une fonction de température programmée qui permet l’utilisation
du fer sur tous les tissus pouvant être repassés sans en régler la température. C’est le
mode par défaut de cet appareil.
Les tissus portant ces symboles peuvent être repassés, par exemple, le polyester, la soie, la viscose, la
laine, le coton et le lin.
Les tissus portant ce symbole ne doivent pas être
repassés, par exemple, le polypropylène, l’élasthanne
et les tissus acryliques.
L’indicateur ECO s’allume lorsque la température la plus basse est utilisée.
RÉGLAGE DE LA TEMPÉRATURE
L’appareil a différents réglages de température pour différents types de tissus.
Appuyez sur la touche fonction pour allumer l’appareil. L’appareil démarrera en mode
automatique. Si vous voulez passer à une autre température de repassage, appuyez
sur la touche fonction et l’affichage de la température se fera dans l’ordre suivant :
« mode auto » ->« Point 1 » ->« Point 2 » ->« Point 3 » - >« Point 4 » ->« Max ».
IMPORTANT : Avant de commencer à repasser, lisez les étiquettes des vêtements et
suivez les instructions du fabricant.
32
Page 35

RÉGLAGES DE LA TEMPÉRATURE
Acétate
Élasthanne
Polyamide
Si vous n’êtes pas sûr de la nature du tissu, utilisez le mode automatique ou repassez à basse température.
Polyester
Soie
Viscose
Laine
Coton
Lin
FONCTION VAPEUR AUTOMATIQUE
L’appareil ajustera automatiquement le débit de vapeur à la température sélectionnée. La fonction fournit la bonne quantité de vapeur pour chaque température afin
d’obtenir les meilleurs résultats.
33
Page 36

TEMPÉRATURE PROGRAMMÉE
Appuyez sur la touche fonction pour allumer l’appareil et
sélectionnez la température désirée. Des bips sont émis
lorsque vous appuyez sur la touche fonction.
Selon le réglage de température que vous avez sélectionné,
le symbole de température correspondant sur le panneau
de commande clignote. Lorsque le fer à repasser est prêt à
l’emploi, le symbole de température cesse de clignoter et
reste allumé.
Remarque importante : La première fois que vous
utiliserez le fer à repasser, la pompe prendra quelques
secondes pour générer de la vapeur. Pendant ce temps, il
se peut que vous entendiez un bruit de « pompage ». C’est
tout à fait normal et cela se produit avant que le fer ne
soit prêt à l’emploi.
L’option vapeur est disponible pour tous les réglages de
température à l’exception du « point 1 ». Vous pouvez
appuyer sur la gâchette à vapeur et la maintenir enfoncée
afin d’en produire pour le repassage à la vapeur. Un bip
retentit lorsque vous appuyez sur la gâchette à vapeur
et l’indicateur de vapeur correspondant pour les modes
« Auto », « Point 2 », « Point 3 » et « Max » clignote,
indiquant que la vapeur est prête. Relâchez la gâchette à
vapeur pour arrêter la production de vapeur.
Réglez la température de l’appareil en appuyant sur la
touche fonction.
Après utilisation, appuyez sur la touche fonction et
maintenez-la enfoncée pendant 2 secondes pour éteindre
l’appareil.
Il est recommandé de vider l’eau du réservoir d’eau après
chaque utilisation. Voir les instructions « Vider le réservoir
d’eau ».
34
Page 37

REPASSAGE À LA
VAPEUR VERTICAL
Vous pouvez enlever les plis des vêtements, rideaux
et tissus suspendus.
1. Sélectionnez la température de vapeur désirée.
2. Tenez le fer à repasser en position verticale
(Figure 7) à une distance de 15 à 30 centimètres
du vêtement.
3. Appuyez sur la gâchette à vapeur.
Avertissement : Ne pas appliquer de vapeur sur les
vêtements ou les tissus pendant qu’ils sont portés
par des humains ou des animaux de compagnie. La
température de la vapeur est très élevée.
FONCTION D’ARRÊT
AUTOMATIQUE DE
SÉCURITÉ
FIGURE 7
La fonction d’arrêt automatique se déclenche
automatiquement lorsque le fer à repasser est
immobile ou lorsque la touche fonction ou la gâchette
à vapeur n’a pas été actionnée pendant 10 minutes.
1. Un bip retentit et l’indicateur d’arrêt
automatique clignote (Figure 8) pour indiquer
que l’appareil est en mode arrêt automatique.
2. Pour réactiver le fer à repasser, il suffit de le
déplacer, ou d’appuyer sur la touche fonction
ou sur la gâchette à vapeur. Le panneau de
commande commence à chauffer et revient au
réglage de température précédent. Cela peut
prendre environ 60 secondes pour que le fer soit
prêt à l’emploi.
Remarque : L’appareil n’est pas complètement éteint
lorsqu’il est en mode d’arrêt automatique. Appuyez
sur la touche fonction et maintenez-la enfoncée pour
éteindre complètement l’appareil et débranchez-le de
la prise de courant.
FIGURE 8
35
Page 38

VIDER LE RÉSERVOIR D’EAU
Débranchez le fer à repasser de la prise de courant.
1. Retirez le réservoir d’eau (Figure 9).
2. Ouvrez le clapet d’entrée d’eau et videz le réservoir (Figure 10).
3. Remettez le réservoir d’eau en vous assurant qu’il reste bien en place
(Figure 11).
FIGURE 9
FIGURE 10
CARTOUCHE ANTICALCAIRE
Cet appareil est équipé d’une cartouche anticalcaire pour
prolonger sa durée de vie.
1. Lorsque l’indicateur de cartouche anticalcaire s’allume
et émet un bip, cela indique que la cartouche anticalcaire
doit être remplacée. Il est très important de changer la
cartouche avant de continuer à repasser.
2. Retirez le couvercle de la nouvelle cartouche anticalcaire.
3. Plongez la nouvelle cartouche anticalcaire dans l’eau
pendant 5 minutes (Figure 13) avant la première utilisation
pour de meilleurs résultats.
4. Appuyez pour retirer la cartouche de l’appareil (vous
entendrez un bip) et retirez l’ancienne cartouche
(Figure 14). Mise en garde : La cartouche peut être très
chaude en raison de la chaleur de la semelle. Assurez-vous
que la cartouche a refroidi avant d’appuyer dessus.
5. Insérez la nouvelle cartouche anticalcaire (Figure 15).
FIGURE 11
FIGURE 12
36
FIGURE 13 FIGURE 14 FIGURE 15
Page 39

Remarque : Si la cartouche anticalcaire n’est pas installée ou si
elle est mal installée, vous ne pourrez pas utiliser l’appareil et
l’indicateur de la cartouche anticalcaire clignotera.
AUTO NETTOYAGE
Cette fonction permet d’éliminer le tartre et l’accumulation de
minéraux de la chambre à vapeur. L’appareil fonctionnera au
mieux si cette fonction est utilisée au moins une fois par mois
ou plus souvent, en fonction de la dureté de l’eau utilisée.
1. Lorsque l’indicateur d’autonettoyage s’allume avec un
bip, cela indique que l’appareil a besoin d’un nettoyage
automatique (Figure 17).
2. Remplissez le réservoir d’eau jusqu’au niveau maximum
(voir « REMPLIR LE RÉSERVOIR ») et branchez l’appareil.
3. Appuyez sur la touche fonction, puis sur la gâchette à
vapeur et maintenez les deux touches enfoncées pendant
3 secondes. L’appareil passe alors en mode autonettoyage
et émet un bip.
4. Appuyez sur la touche pour procéder à l’autonettoyage.
Appuyez sur la gâchette à vapeur pour reprendre le
repassage. (Remarque : lorsque l’autonettoyage est
confirmé, vous ne pourrez pas l’arrêter tant que le
processus ne sera pas terminé).
5. Tenez le fer à repasser à environ 15 centimètres au-dessus
de l’évier en position de repassage. Les impuretés et l’eau
sortiront par les trous de la vapeur (Figure 18). L’appareil
reprendra le réglage de repassage précédent une fois le
processus terminé.
6. Repassez avec un chiffon humide pour enlever les dépôts
sur la semelle. Enlevez toutes les taches d’eau qui se sont
formées sur la semelle.
7. Appuyez sur la touche fonction et maintenez-la enfoncée
pour éteindre l’appareil et débranchez-le de la prise de
courant.
FIGURE 16
FIGURE 17
FIGURE 18
37
Page 40

NETTOYAGE ET ENTRETIEN
1. Débranchez le cordon d’alimentation de la prise de courant.
2. Utilisez un chiffon humide pour enlever les résidus sur la semelle et les parties
extérieures du fer.
3. N’utilisez jamais d’objets pointus ou rugueux pour enlever les résidus sur la
semelle.
RANGEMENT
1. Veillez à ce que le réservoir d’eau soit complètement vide.
2. Placez le fer à repasser sur le socle.
3. Mettez le loquet de transport en position verrouillée.
4. Vous pouvez porter l’appareil avec une seule main en le tenant par la poignée du
fer à repasser quand le fer est fixé sur le socle.
CONSEILS POUR LE REPASSAGE
1. Triez les articles à repasser selon les types de tissus. Cela réduira au minimum la
fréquence de réglage de la température.
2. Testez le fer à repasser sur une petite surface au dos ou à l’intérieur du vêtement
si vous n’êtes pas sûr du type de tissu. Commencez par une température basse
et augmentez graduellement.
3. Attendez deux minutes entre les réglages de température pour le repassage des
tissus sensibles à la chaleur.
38
Page 41

DÉPANNAGE
Si votre centrale vapeur ne fonctionne pas bien, vérifiez les points suivants :
PROBLÈME CAUSE SOLUTION
L’appareil ne fonctionne
pas
Aucune vapeur ne sort
quand on appuie sur la
gâchette à vapeur
La semelle ne chauffe pas
bien
Beaucoup de bruit Première utilisation C’est normal
Il n’est pas assez chaud Attendez que l’appareil
chauffe
Il n’est pas branché Branchez l’appareil
La cartouche anticalcaire
n’est pas installée ou n’est
pas bien installée
La prise de courant ne
fonctionne pas
Réservoir d’eau vide Remplissez le réservoir
L’appareil est encore en
train de chauffer
Le repassage à la vapeur
n’est pas disponible
Réglage incorrect du tissu Appuyez sur la touche
Installez correctement la
cartouche anticalcaire
Branchez l’appareil sur
une prise de courant
fonctionnelle
d’eau
Attendez que l’appareil
chauffe
Appuyez sur la touche
fonction pour un réglage
de température plus
élevée
fonction pour un réglage
de température plus
élevée
39
Page 42

GARANTIE DES PRODUITS RELIABLE
Reliable Corporation (« Reliable ») garantit à l'acheteur original de ce produit que chaque
produit vendu par Reliable (un « Produit Reliable ») est exempt de tout défaut de pièce et
de main d'œuvre pour une période d'un an à compter de la date d'achat, s'il est utilisé et
entretenu correctement. Soumis aux conditions et limitations établies ci-après, Reliable
réparera ou remplacera toute pièce d'un produit Reliable qui s'avère défectueuse en raison
d'un défaut de fabrication ou de main d'œuvre. Si le Produit Reliable défectueux n'est plus
disponible et ne peut pas être réparé efficacement ou remplacé par un modèle identique,
Reliable remplacera le Produit Reliable défectueux par un Produit Reliable actuel de
valeur équivalente ou supérieure. Les pièces réparées ou les produits remplacés seront
fournis par Reliable sur la base d'un échange, et seront ou neufs ou remis à neuf pour être
fonctionnellement équivalents aux neufs. Si Reliable n'est pas en mesure de réparer ou de
remplacer le Produit Reliable, elle remboursera la valeur actuelle du Produit Reliable au
moment où la réclamation de garantie est réalisée.
Cette garantie limitée ne couvre aucun dommage subi par un Produit Reliable résultant
d'une installation incorrecte, d'un accident, d'un abus, d'une mauvaise utilisation,
d'une catastrophe naturelle, d'une alimentation électrique insuffisante ou excessive, de
conditions mécaniques ou environnementales anormales, de l'usure et de la détérioration
résultant de l'usure normale du produit, ou de tout démontage, réparation ou modification
non autorisé(e). Cette garantie limitée ne s'étend à aucun dommage indirect ou direct dont
peut être victime un utilisateur ou suite à l'utilisation d'un Produit Reliable, y compris mais
sans s'y limiter, toute responsabilité pour des réclamations de tiers pour des dégâts, et se
limite au montant payé par l'acheteur original du Produit Reliable auquel cette protection
de garantie limitée s'applique. Cette garantie limitée ne s'applique pas aux produits qui ont
été modifiés ou dont les numéros de séries sont manquants, ou aux produits non achetés
directement auprès de Reliable ou d'un revendeur agréé pour la vente de Produits Reliable.
Cette garantie limitée est l'unique garantie qui s'applique à tout Produit Reliable, elle
remplace toutes conditions qui peuvent être contenues dans un autre document ou bon de
commande et ne peut être transformée ou modifiée, sauf dérogation expressément écrite
de Reliable.
Pour obtenir une réparation ou un remplacement en vertu des conditions de cette garantie,
veuillez contacter notre service à la clientèle au 1-800-268-1649 ou par courriel à
support@reliablecorporation.com.
Il vous sera demandé d'envoyer le reçu original par télécopie ou courriel. Le reçu doit
prouver que vous êtes l'acheteur original, que le produit a été acheté directement chez
nous ou chez un revendeur agréé par Reliable et que la réclamation de garantie est
effectuée pendant la période de garantie. Un numéro d'autorisation de retour (Nº AR) vous
sera fourni et il vous sera demandé d'expédier le produit défectueux accompagné de la
preuve d'achat et du Nº AR, les frais d'assurances étant prépayés à l'adresse suivante :
Reliable Corporation, 5-100 Wingold Avenue, Toronto, ON M6B 4K7. Les expéditions avec
fret payable à destination seront refusées. Le risque de perte ou d'endommagement lors du
transport sera assumé par le client. Une fois que Reliable aura reçu le produit défectueux,
elle initiera la réparation ou le remplacement.
Si vous avez des questions concernant la présente garantie, vous pouvez écrire à :
Reliable Corporation
100 Wingold Avenue, Unit 5
Toronto, Ontario
Canada M6B 4K7
www.reliablecorporation.com
40
Page 43

41
Page 44

MAVEN 120IS
ESTACIÓN DE PLANCHADO PARA EL HOGAR
MANUAL DE INSTRUCCIONES
ESPAÑOL
42
Page 45

SOMOS CONFIABLES. ESTAMOS CUANDO NOS
NECESITA.
En Reliable, hacemos lo que nos apasiona y nos enorgullece hacerlo
bien. Uno quiere lo mejor para el otro, los lugares y las cosas que
importan en la vida, desde el lugar donde se vive hasta la ropa que se
viste. Nosotros, también. Desde el principio, abordamos cada producto
con la atención de un artesano, enfocándonos en los detalles y con
pasión por hacerlo bien. La calidad, la funcionalidad, el diseño y el
servicio al cliente son una parte igualmente importante a la hora de
ofrecerle el producto correcto para usted.
Para su seguridad y para disfrutar plenamente de las ventajas de este
producto, tómese unos minutos para leer todas las advertencias y las
instrucciones de mantenimiento importantes. Tenga este manual a
mano y consulte la garantía del producto en caso de ser necesario.
GRACIAS POR SU COMPRA. COMPARTA SU EXPERIENCIA DEL
PRODUCTO PUBLICANDO UNA RESEÑA EN LÍNEA EN EL SITIO WEB
EN EL QUE REALIZÓ LA COMPRA. ¡SE LO AGRADECEMOS MUCHO!
43
Page 46

SALVAGUARDAS IMPORTANTES:
GUARDE ESTAS INSTRUCCIONES EN
UN LUGAR SEGURO PARA FUTURAS
REFERENCIAS
LEA TODAS LAS INSTRUCCIONES ANTES DE USARLA.
Cuando utilice su limpiador a vapor Maven 120IS, siempre se deben seguir las
precauciones básicas de seguridad. Lea atentamente las siguientes instrucciones,
ya que proporcionan información importante sobre cómo instalar, usar y cuidar este
producto. El aparato está diseñado para uso doméstico y solo debe operarse de
acuerdo con estas instrucciones de uso. Genera vapor a alta temperatura. Manipule
siempre con cuidado y advierta a otros usuarios sobre los posibles peligros.
PELIGRO PARA LOS NIÑOS
• A menos que una persona responsable de su seguridad los supervise o los
entrene cuidadosamente, este aparato no es adecuado para lo usen personas
o niños con capacidades físicas, sensoriales o mentales reducidas, ni personas
con poca o ninguna experiencia o conocimiento del aparato.
• Es necesario supervisar a los niños para asegurarse de que no jueguen con el
aparato.
• Cuando deseche el aparato, debe dejarlo fuera de servicio y retirar el cable
de alimentación. También recuerde que debe hacer que cualquier pieza de
las partes potencialmente peligrosas del aparato sea segura, ya que existe el
riesgo de que los niños puedan usarlas como juguetes.
• Los elementos de embalaje no deben dejarse al alcance de los niños, ya que
son potencialmente peligrosos.
PELIGRO ELÉCTRICO
• Asegúrese de que la tensión de alimentación del aparato corresponda con la
de su electricidad.
• Enchufe siempre el aparato a una toma de corriente correctamente
conectada a tierra.
• Nunca deje el aparato desatendido cuando esté enchufado; desenchúfelo
después de cada uso y antes de realizar el mantenimiento.
• Siempre apague el aparato con el interruptor principal y desenchúfelo de la
toma de corriente antes de volver a llenarlo.
• Asegúrese de que sus manos estén secas antes de usar o ajustar los
interruptores del aparato, de tocar la toma de corriente o las conexiones de
alimentación.
44
Page 47

PELIGRO POR OTRAS CAUSAS
• Nunca deje el aparato expuesto a los elementos de la naturaleza (por ej. lluvia, sol,
etc.).
• Nunca coloque el aparato sobre o cerca de fuentes de calor.
• Asegúrese de que el cable de alimentación no entre en contacto con superficies
calientes.
• Nunca apunte los chorros de vapor en dirección a personas, animales, plantas o
aparatos que contengan partes eléctricas (por ej., interiores del horno).
• Nunca dirija chorros de vapor hacia el aparato.
• Nunca sumerja el cuerpo del aparato, el enchufe o el cable de alimentación en agua
u otros líquidos; límpielos con un paño húmedo.
• Nunca utilice el aparato si el cable de alimentación o el enchufe está dañado, o si el
aparato está defectuoso o dañado.
• Todas las reparaciones, incluida la sustitución del cable de alimentación, solo deben
ser realizadas por Reliable Corporation o por técnicos autorizados por Reliable.
• Este aparato se diseñó solo para uso doméstico y no puede utilizarse para fines
comerciales o industriales. Este aparato es solo para uso doméstico.
• Durante el uso, el aparato contendrá vapor presurizado: El uso inadecuado puede
ser peligroso. El aparato está diseñado para uso doméstico solamente, como se
indica en el manual. El fabricante no puede aceptar ninguna responsabilidad por
daños causados por un uso inadecuado o incorrecto del aparato.
• Cuando el aparato no esté en uso, siempre bloquee el botón de suministro de vapor.
PELIGRO DE ESCALDADURAS
• Si se presiona el botón de vapor antes de que el calentador alcance la temperatura
óptima, por la boquilla podría salir agua en lugar de vapor.
• Nunca toque las superficies calientes mientras usa el producto. Deje que los
accesorios se enfríen antes de reemplazarlos.
• Incluso si el aparato no está en funcionamiento, desconéctelo de la toma de corriente
y déjelo enfriar antes de insertar o retirar piezas, o bien, antes de limpiarlo.
NUNCA ABRA LA TAPA DEL DEPÓSITO DE LA CALDERA DURANTE EL USO. ANTES
DE DESENROSCAR LA TAPA DEL DEPÓSITO DE LA CALDERA, PROCEDA DE LA
SIGUIENTE MANERA:
• Apague el aparato con el interruptor principal.
• Libere la presión restante del depósito de la caldera: utilice el botón de vapor del asa
y apunte el chorro hacia un recipiente adecuado.
• Deje que el aparato se enfríe por unos minutos; luego, afloje lentamente la tapa del
depósito de la caldera parcialmente y espere unos segundos.
• Desconecte el cable de alimentación de la toma de corriente.
45
Page 48

CARACTERÍSTICAS CLAVE DE LA
MAVEN 120IS
1. Botón de función 7. Gatillo para el vapor
2. Panel de control 8. Manguera de vapor
3. Cartucho antical 9. Base
4. Bloqueo de seguridad
para el transporte
5. Cubierta de la entrada
de agua
46
10. Cable de alimentación
11. Plancha
Page 49

RECOMENDACIONES
QUÉ HACER
1. Compruebe que el voltaje principal indicado en la placa de características corresponda
con el suministro de energía eléctrica local.
2. Desenrolle y enderece el cable de alimentación antes de su uso.
3. Coloque el aparato en una superficie firme y estable.
4. La plancha debe utilizarse y apoyarse sobre una superficie estable.
5. Evite que el cable de alimentación o la manguera de vapor entren en contacto con la
base.
6. Inserte el cartucho antical antes de usar.
7. Debe retirar el enchufe del cable de alimentación de la toma de corriente antes de
llenar el depósito con agua.
8. Mantenga el cartucho antical y los gránulos lejos de los niños en todo momento.
9. Mantenga los aparatos eléctricos fuera del alcance de los niños. No deje que usen los
aparatos sin supervisión.
10. Cuando coloque el aparato en su soporte, asegúrese de que la superficie sobre la que
se coloca el soporte sea estable.
11. Si el cable de alimentación está dañado, deberá reemplazarlo el fabricante, un
agente de servicio técnico o alguna persona igualmente calificada con el fin de evitar
cualquier peligro.
12. Vacíe el depósito de agua después de usar.
13. No permita que los niños jueguen con el aparato.
14. Este aparato puede ser utilizado por niños de 8 años en adelante y por personas
con capacidades físicas, sensoriales o mentales reducidas, o por personas con falta
de experiencia y conocimiento solo si son supervisadas y han recibido instrucciones
sobre el uso seguro del aparato y comprenden los peligros involucrados.
15. Mantenga la plancha y su cable fuera del alcance de los niños menores de 8 años
cuando esté encendida o mientras se enfría.
16. Siempre apague la plancha antes de enchufar o desenchufar la plancha de la toma
eléctrica. Nunca tire del cable para desconectar la plancha de la toma eléctrica; en su
lugar, sujete el enchufe y tire del enchufe para desconectar la plancha.
17. Desconecte siempre la plancha de la toma de corriente eléctrica antes de llenarla con
agua, vaciar el agua de la plancha y cuando la plancha no esté en uso.
18. Se pueden producir quemaduras al tocar partes metálicas calientes, agua caliente o
vapor. Tenga cuidado cuando mueva un HIERRO DE VAPOR boca abajo, ya que puede
haber agua caliente en el depósito.
19. Si un cable de extensión es absolutamente necesario, se debe usar un cable con una
clasificación de amperios igual o mayor que la capacidad máxima de la plancha. Un
cable clasificado para menos amperaje puede provocar un incendio o una descarga
eléctrica debido al sobrecalentamiento. Se debe tener cuidado de colocar el cable de
modo que no se pueda tirar o tirar.
47
Page 50

PRECAUCIÓN
QUÉ NO HACER
1. No permita que los niños toquen el aparato mientras plancha.
2. No deje de supervisar el aparato mientras esté conectado a la toma de corriente de la
red eléctrica.
3. No utilice un set de cables de alimentación de extensión a menos que corresponda con
los estándares locales de fabricación.
4. No agregue perfume, vinagre o cualquier otro líquido que no sea agua en el depósito de
agua. Esto podría ocasionar daños graves en el aparato.
5. No sumerja el aparato en agua o en cualquier otro líquido.
6. No utilice el aparato si está dañado o si no funciona con normalidad.
7. No utilice la plancha si se ha caído, si hay signos visibles de daño o si presenta una
pérdida.
8. No toque la base de reposo de la plancha durante o inmediatamente después del
planchado porque está caliente.
9. No enrolle el cable de alimentación alrededor de la plancha o el soporte para guardarlo
hasta que se haya enfriado por completo.
10. No trate de abrir el depósito de agua ni desarme ninguna pieza del aparato, ya que no
hay partes en el interior que se puedan reparar.
11. No abra la cubierta de la entrada de agua durante el uso. Lea las instrucciones para el
llenado seguro del depósito de agua.
12. Sin supervisión, los niños no pueden realizar la limpieza y el mantenimiento por parte
del usuario.
13. No toque las superficies marcadas con este símbolo durante o inmediatamente
después del planchado, porque el aparato estará caliente. (Consulte las figuras 1 y 2 a
continuación).
14. No deje que el cable toque superficies calientes. Deje que la plancha se enfríe por
completo antes de guardarla. Enrolle el cable sin apretar alrededor de la plancha
cuando la almacene.
15. No opere la plancha con un cable dañado o en caso de que se caiga o se dañe. Para
evitar el riesgo de descarga eléctrica, no desarme la plancha. Diríjala a un técnico
de servicio calificado para que la examinen y la reparen. Un montaje incorrecto
puede provocar un riesgo de descarga eléctrica cuando se utiliza la plancha
después del reensamblaje.
16. Para evitar una sobrecarga del circuito, no opere una plancha en el mismo circuito
con otro aparato de alto vataje.
48
Page 51

49
Page 52

PANEL DE CONTROL
Indicador de la función de
vapor desactivada
Indicador del nivel de vapor
Indicador del cartucho antical
Ajuste de temperatura
Indicador automático
Indicador de anulación del
apagado automático
Indicador de limpieza
automática
Indicador ECO
ANTES DEL PRIMER USO
1. Retire las cintas o las etiquetas adhesivas protectoras
del aparato.
2. Desenrolle y enderece el cable de alimentación.
3. Retire la cubierta del nuevo cartucho antical (Figura 1).
4. Sumerja el nuevo cartucho antical en agua por
5 minutos antes del primer uso para un mejor
rendimiento (consulte la sección "CARTUCHO
ANTICAL").
Nota: Cuando utilice la función de vapor por primera vez, no
la utilice sobre la ropa sucia. Pueden quedar algunos
residuos dentro del aparato. Planche una toalla vieja
por primera vez y presione el gatillo para el vapor para
garantizar la eliminación completa de los residuos.
FIGURA 1
USO DEL APARATO
1. Este aparato está diseñado para utilizarlo con agua normal de grifo. Otros
líquidos podrían dañarlo.
2. Conecte el aparato a una toma de corriente adecuada para la red eléctrica.
3. Empiece a planchar después de que los íconos en el panel indicador dejen de
parpadear. Esto indica que se alcanzó la temperatura deseada, y que el aparato
está listo para usar.
4. Siempre desconecte el aparato del suministro de alimentación principal
después de su uso.
50
Page 53

LLENADO DEL DEPÓSITO DE AGUA
1. Desconecte el cable de alimentación de la toma de corriente.
2. Retire el depósito de agua (Figura 2).
3. Abra la cubierta de la entrada de agua y llene el depósito con agua hasta el
nivel máximo (Figura 3).
4. Coloque nuevamente el depósito de agua y asegúrese de que está posicionado
firmemente en su lugar (Figura 4).
FIGURA 2
FIGURA 3 FIGURA 4
BLOQUEO DE SEGURIDAD PARA EL
TRANSPORTE
El aparato está equipado con un bloqueo de seguridad para el transporte. Puede
transportar el aparato con una mano utilizando al asa de la plancha cuando esta
esté asegurada al soporte (Figura 5). Para retirar la plancha del soporte, gire el
bloqueo de seguridad para el transporte hacia la posición de desbloqueo.
FIGURA 2
Posición de bloqueo
FIGURA 3
Posición de desbloqueo
51
Page 54

TEMPERATURA PROGRAMADA
Modo automático
El aparato cuenta con una función de temperatura programada que le permite
planchar todos los tipos de telas que se puedan planchar sin necesidad de ajustar la
temperatura de la plancha. Este es el modo predeterminado del aparato.
Las telas con estos símbolos se pueden planchar;
por ejemplo: poliéster, seda, viscosa, lana, algodón
y lino.
Las telas con este símbolo no se pueden planchar;
por ejemplo: polipropileno, elastano y tela acrílica.
El indicador ECO se encenderá cuando se utilice la temperatura mínima.
AJUSTE DE LA TEMPERATURA
El aparato tiene diferentes niveles de temperatura para diferentes tipos de telas.
Presione el botón de función para encender el aparato. El aparato iniciará en el modo
automático. Si desea cambiar la temperatura de planchado, presione la tecla de
función, y el indicador de temperatura se encenderá según la secuencia a continuación:
"Modo automático" -> "Punto 1" -> "Punto 2" -> "Punto 3" -> "Punto 4" -> "Máx."
IMPORTANTE: Antes de empezar a planchar, lea las etiquetas de las prendas y siga las
instrucciones de planchado de los fabricantes.
52
Page 55

AJUSTES DEL CONTROL DE TEMPERATURA
Acetato
Elastano
Poliamida
Si no está seguro acerca de qué material está hecha la tela, utilice el modo
automático o empiece a planchar a baja temperatura.
Poliéster
Seda
Viscosa
Lana
Algodón
Lino
FUNCIÓN DE ROCIADO AUTOMÁTICO
DE VAPOR
El aparato ajustará automáticamente la salida de vapor a la temperatura
seleccionada. La función brinda la cantidad correcta de vapor para cada temperatura
a fin de lograr los mejores resultados.
53
Page 56

TEMPERATURA PROGRAMADA
Presione el botón de función para encender el aparato
y seleccione la temperatura deseada. Escuchará pitidos
cuando presione el botón de función.
Dependiendo del nivel de temperatura que seleccione,
el símbolo de temperatura correspondiente parpadeará
en el panel de control. Cuando la plancha esté lista para
usar, el símbolo de temperatura dejará de parpadear y se
mantendrá encendido.
Nota importante: La bomba tardará algunos segundos en
generar vapor cuando utilice la plancha por primera vez.
Durante este tiempo, es posible que escuche un sonido
de bombeo. Esto es normal y ocurrirá antes de que la
plancha esté lista para usar.
El planchado con vapor está disponible para todos
los niveles de temperatura, excepto para el "Punto 1".
Puede mantener presionado el gatillo para el vapor para
planchar con vapor. Escuchará un pitido cuando presione
el gatillo para el vapor, y el indicador de vapor respectivo
para el "Modo automático", "Punto 2", "Punto 3" y
"Máx”. empezará a parpadear, lo que indica que se está
generando vapor. Suelte el gatillo para el vapor, a fin de
que se deje de generar vapor.
Ajuste el nivel de temperatura del aparato al presionar el
botón de función.
Después del uso, mantenga presionado el botón de
función durante 2 segundos para apagar el aparato.
Se recomienda vaciar el agua del depósito después de
cada uso. Lea las instrucciones para el "Vaciado del
depósito de agua".
54
Page 57

ROCIADO VERTICAL DE
VAPOR
Puede eliminar las arrugas de prendas, cortinas y
telas que estén colgadas.
1. Seleccione el nivel que se desea para la
temperatura del vapor.
2. Mantenga la plancha en posición vertical
(Figura 7) a una distancia de 15 a
30 centímetros de la prenda.
3. Presione el gatillo para el vapor.
Advertencia: No aplique vapor sobre ropa o telas
si una persona o una mascota las tiene puestas. La
temperatura del vapor es muy alta.
FUNCIÓN DE SEGURIDAD
PARA EL APAGADO
AUTOMÁTICO
L
a función de apagado automático se ejecutará
automáticamente cuando la plancha esté inmóvil o
cuando no se haya presionado el botón de función o el
gatillo para el vapor durante más de 10 minutos.
1. Escuchará un pitido, y el indicador de apagado
automático empezará a parpadear (Figura 8) para
indicar que el aparato está en el modo de apagado
automático.
2. Para activar nuevamente la plancha, simplemente
muévala o presione el botón de función o el
gatillo para el vapor. El panel de control empezará
a calentarse y volverá al nivel de temperatura
anterior. Es posible que la plancha tarde
60 segundos hasta estar lista para usar.
FIGURA 7
FIGURA 8
Nota: El aparato no se apaga completamente cuando
está en el modo de apagado automático. Mantenga
presionado el botón de función para apagar por
completo el aparato y desconéctelo de la toma de
corriente de la red eléctrica.
55
Page 58

VACIADO DEL DEPÓSITO DE AGUA
Desconecte la plancha de la toma de corriente de la red eléctrica.
1. Retire el depósito de agua (Figura 9).
2. Abra la cubierta de la entrada de agua y vacíe el depósito de agua (Figura 10).
3. Coloque nuevamente el depósito de agua y asegúrese de que está
posicionado firmemente en su lugar (Figura 11).
FIGURA 9
FIGURA 10
CARTUCHO ANTICAL
Este aparato cuenta con un cartucho antical para prolongar su
vida útil.
1. Si el indicador del cartucho antical se enciende y emite
un pitido, significa que deberá cambiar el cartucho. Es
muy importante cambiar el cartucho antes de seguir
planchando.
2. Retire la cubierta del nuevo cartucho antical.
3. Sumerja el nuevo cartucho antical en agua por
5 minutos (Figura 13) antes del primer uso para un mejor
rendimiento.
4. Presione para retirar el cartucho del aparato (escuchará
un pitido) y saque el cartucho viejo del aparato (Figura 14).
Precaución: El cartucho puede estar muy caliente debido
al calor de la base. Asegúrese de que el cartucho se haya
enfriado antes de presionarlo.
5. Inserte el nuevo cartucho antical (Figura 15).
FIGURA 11
FIGURA 12
56
FIGURA 13
FIGURA 14 FIGURA 15
Page 59

Nota: Si no instala el cartucho antical, o si no lo instala
correctamente, no podrá utilizar el aparato; y el indicador del
cartucho antical empezará a parpadear.
LIMPIEZA AUTOMÁTICA
Esta función elimina la cal y la acumulación de minerales del
compartimento de vapor. El aparato se mantendrá en las mejores
condiciones si se realiza esta función al menos una vez al mes
o con mayor frecuencia, dependiendo de la dureza del agua
utilizada.
1. Si se enciende el indicador luminoso de limpieza automática
y se emite un pitido, significa que el aparato deberá
someterse a una limpieza automática (Figura 17).
2. Llene el depósito de agua hasta el nivel máximo (consulte la
sección "LLENADO DEL DEPÓSITO DE AGUA") y conecte el
aparato.
3. Presione el botón de función seguido del gatillo para el
vapor y mantenga presionados ambos botones durante
3 segundos. El aparato iniciará el modo de limpieza
automática y emitirá un pitido.
4. Presione el botón de función para proceder con la limpieza
automática. Presione el gatillo para el vapor, a fin de
volver a planchar. (Nota: Cuando se confirme la limpieza
automática, no podrá cancelarla hasta que el proceso se
haya completado).
5. Sujete la plancha a 15 centímetros de distancia por encima
del lavabo en la posición de planchado. Por los orificios
de vapor saldrán materiales sueltos y agua (Figura 18). El
aparato volverá al ajuste anterior de planchado cuando se
haya completado el proceso.
6. Planche con un paño húmedo para retirar los depósitos de
la base. Elimine las manchas de agua que puedan haberse
formado en la base.
7. Mantenga presionado el botón de función para apagar el
aparato y desconéctelo de la toma de corriente de la red
eléctrica.
FIGURA 16
FIGURA 17
FIGURA 18
57
Page 60

LIMPIEZA Y MANTENIMIENTO
1. Desconecte el cable de alimentación del suministro eléctrico principal.
2. Utilice un paño húmedo para retirar los depósitos de la base y de las partes
exteriores de la plancha.
3. Nunca utilice objetos afilados o ásperos para retirar los depósitos de la base.
ALMACENAMIENTO
1. Asegúrese de vaciar completamente el agua del depósito.
2. Coloque la plancha en el soporte.
3. Gire el bloqueo de seguridad para el transporte hacia la posición de bloqueo.
4. Puede transportar el aparato con una mano con el asa de la plancha cuando
esta esté asegurada al soporte.
CONSEJOS PARA EL PLANCHADO
1. Clasifique los artículos para planchar según el tipo de tela. Esto reducirá la
frecuencia de los ajustes de temperatura.
2. Pruebe planchar un área pequeña en la parte posterior o interior de la prenda
si no está seguro del tipo de tela. Empiece con una temperatura baja y aumente
gradualmente.
3. Espere 2 minutos entre cada ajuste de temperatura cuando planche telas
sensibles al calor.
58
Page 61

SOLUCIÓN DE PROBLEMAS
Si su estación de planchado no funciona bien, verifique los siguientes puntos:
PROBLEMA CAUSA SOLUCIÓN
La estación no funciona. No hay suficiente calor. Espere a que la estación
se caliente.
No está conectada. Conecte la estación.
No sale vapor al presionar
el gatillo para el vapor.
La base no se calienta
correctamente.
Se escucha un ruido
fuerte.
El cartucho antical no
está instalado o no se
instaló correctamente.
La toma de corriente no
funciona.
El depósito de agua está
vacío.
El aparato aún se está
calentando.
El planchado con vapor no
está disponible.
El ajuste de tela es
incorrecto.
Es el primer uso. Esto es normal.
Instale correctamente el
cartucho antical.
Conecte la estación a una
toma de corriente que
funcione.
Llene el depósito de agua.
Espere a que la estación
se caliente.
Presione el botón de
función para escoger un
nivel de temperatura más
alto.
Presione el botón de
función para escoger un
nivel de temperatura más
alto.
59
Page 62

GARANTÍA PARA LOS PRODUCTOS RELIABLE
Reliable Corporation ("Reliable") garantiza al comprador original de sus productos que cada
producto vendido por Reliable (un "Producto Reliable") está libre de defectos en materiales
y acabados por un período de un año a partir de la fecha de compra si se usa y mantiene
correctamente. Sujeto a las condiciones y limitaciones que se detallan a continuación, Reliable
reparará o reemplazará cualquier parte de un Producto Reliable que se compruebe que
está defectuoso por motivos de acabado o materiales inadecuados. Si el Producto Reliable
defectuoso ya no está disponible y no se puede reparar o reemplazar con un modelo idéntico,
Reliable reemplazará el Producto Reliable defectuoso con un Producto Reliable actual de
igual o mayor valor. Las piezas reparadas o los productos de reemplazo serán proporcionados
por Reliable en una base de intercambio, y serán nuevos o reacondicionados para que sean
funcionalmente equivalentes a nuevos. Si Reliable no puede reparar o reemplazar un Producto
Reliable, reembolsará el valor actual de ese Producto Reliable en el momento en que se realice la
reclamación de garantía.
Esta garantía limitada no cubre ningún daño a un Producto Reliable que resulte de una instalación
inadecuada, accidente, abuso, uso indebido, desastre natural, suministro eléctrico insuficiente o
excesivo, condiciones mecánicas o ambientales anormales, uso y desgaste propios del uso normal
del producto, o cualquier desmontaje, reparación o modificación no autorizados. Esta garantía
limitada no se extiende a ningún daño indirecto, consecuente o incidental que pueda sufrir un
usuario por el uso de un Producto Reliable, lo que incluye sin limitación, cualquier responsabilidad
por reclamaciones de terceros por daños, y se limita al monto pagado por el comprador original
del Producto Reliable con respecto al cual se aplica esta protección de garantía limitada. Esta
garantía limitada no se aplica a los productos que han sido alterados o a los que les faltan
números de serie, o a los productos que no se han comprado directamente en Reliable o en un
distribuidor autorizado por nosotros para vender los Productos Reliable.
Esta garantía limitada es la única garantía que se aplica a cualquier Producto Reliable, reemplaza
cualquiera y todos los términos que puedan estar contenidos en cualquier otro documento u
orden de compra, y no puede ser alterada o enmendada, excepto expresamente de manera escrita
por Reliable.
Para obtener una reparación o un reemplazo según los términos de esta garantía, comuníquese
con nuestro grupo de servicio al cliente al 1-800-268-1649, o a support@reliablecorporation.com.
Se le pedirá que envíe un recibo original por fax o correo electrónico. El recibo debe reflejar
que usted es el comprador original, que nos compró el producto directamente a nosotros o a un
distribuidor Reliable autorizado, y que la reclamación de garantía se realiza dentro del período
de garantía. Se le otorgará un número de autorización de devolución (N.° RA) y se le pedirá que
envíe el producto defectuoso junto con el comprobante de compra y el seguro prepagado del N.°
RA a la siguiente dirección:
Reliable Corporation, 5-100 Wingold Avenue, Toronto, ON M6B 4K7. Los envíos por cobrar serán
rechazados. El riesgo de pérdida o de daño en tránsito correrá a cargo del cliente. Una vez que
Reliable reciba el producto defectuoso, iniciará el proceso de reparación o de reemplazo.
Si tiene alguna pregunta sobre esta garantía, puede escribir a:
Reliable Corporation
100 Wingold Avenue, Unit 5
Toronto, Ontario
Canadá M6B 4K7
www.reliablecorporation.com
60
Page 63

Page 64

1 800 268 1649
www.reliablecorporation.com
 Loading...