

Page 1
MS
UHF Wireless Microphone System
UHF 无线麦克风系统
Page 2
Introduction
Thank you for choosing Relacart.
The Relacart MS1 is a versatile, lightweight, yet rugged UHF wireless
microphone system, which can be compatible with smart phones (3.5mm
interface), digital /SLR cameras, camcorders, recorders, tablets and other
devices to help pick up high fidelity audio. This model is suitable for interview,
microfilm recording or commercial demonstration and other applications.
The portable receiver features a one-touch frequency scan and infrared
sync that allows you to effortlessly find a clear channel for your devices.
This true-diversity receiver uses dual antennas and reception circuits that
eliminate audio dropouts and RF interference. To further protect audio from
unwanted interference, MS1 system includes 3-level squelch and pilot tone.
The transmitter supports mic input, enabling the wireless system to provide
clean, accurate and pristine audio. The receiver is equipped with earphone
monitoring function; AFS automatically scans the clean frequency, the
current application connection scan function, etc. The effective working
distance can reach 50m (open and wide occasions).
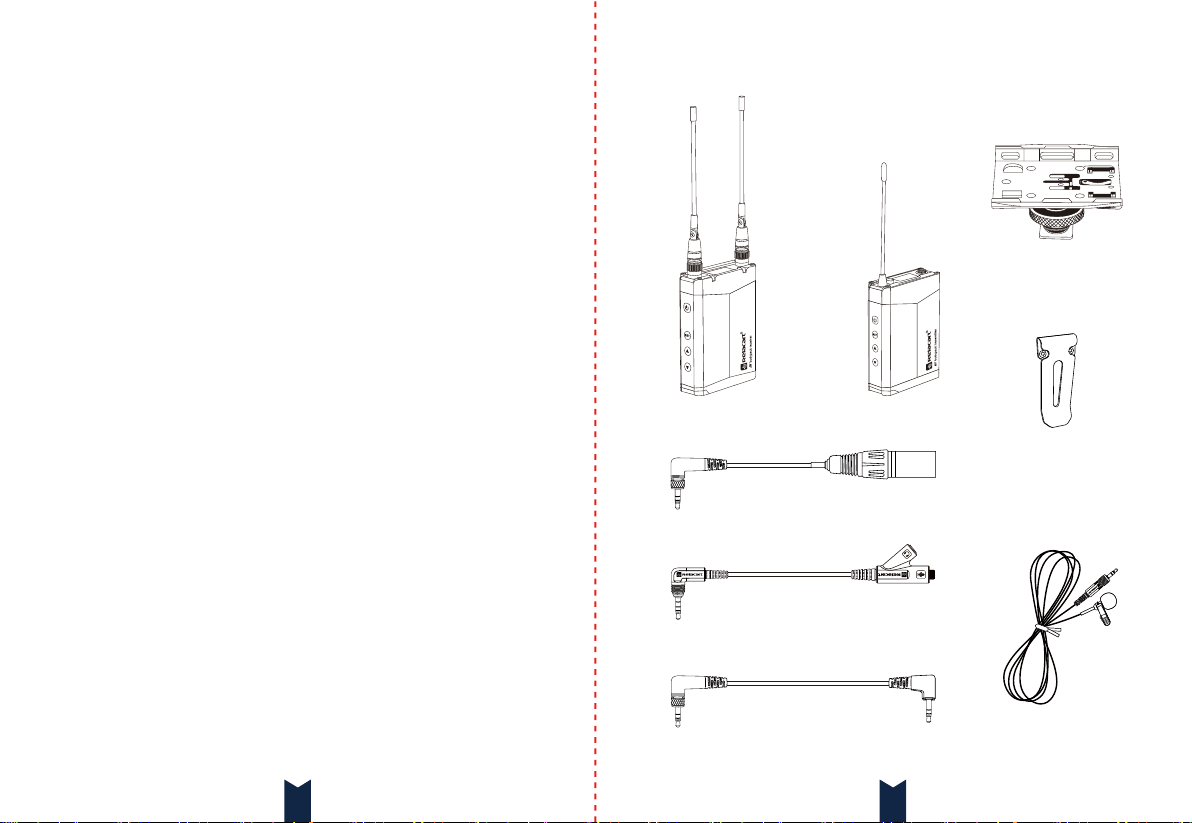
Packing List
Bracket holder
MS1-R Receiver MS1-T Transmitter
Characteristic
· UHF wireless transmission, providing high fidelity sound source.
· Widely compatible with smart phones, digital SLR cameras, portable cameras,
tape recorders, tablets,etc.
· 10 switchable frequencies to realize the operation without environmental
interference.
· The working distance is up to 50m (up to 50 meters in an open and non interference environment, up to 30 meters in an obstacle environment)
· Real-time monitoring function with headphones.
· The volume of receiver and transmitter can be adjusted arbitrarily to adapt to
the volume level of different equipment.
· Mute mode.
· Adopt OLED display, high-definition and easy to see.
· Receiver and transmitter are powered by two AA batteries.
AWS-C-XLR-B
3.5mm balanced XLR cable
TRRS to dual 3.5mm conversion cable
ME4-J
AWS-C-MINI-B
3.5mm balanced cable
21
Belt Clip
LM-P01 Clip microphone
Page 3
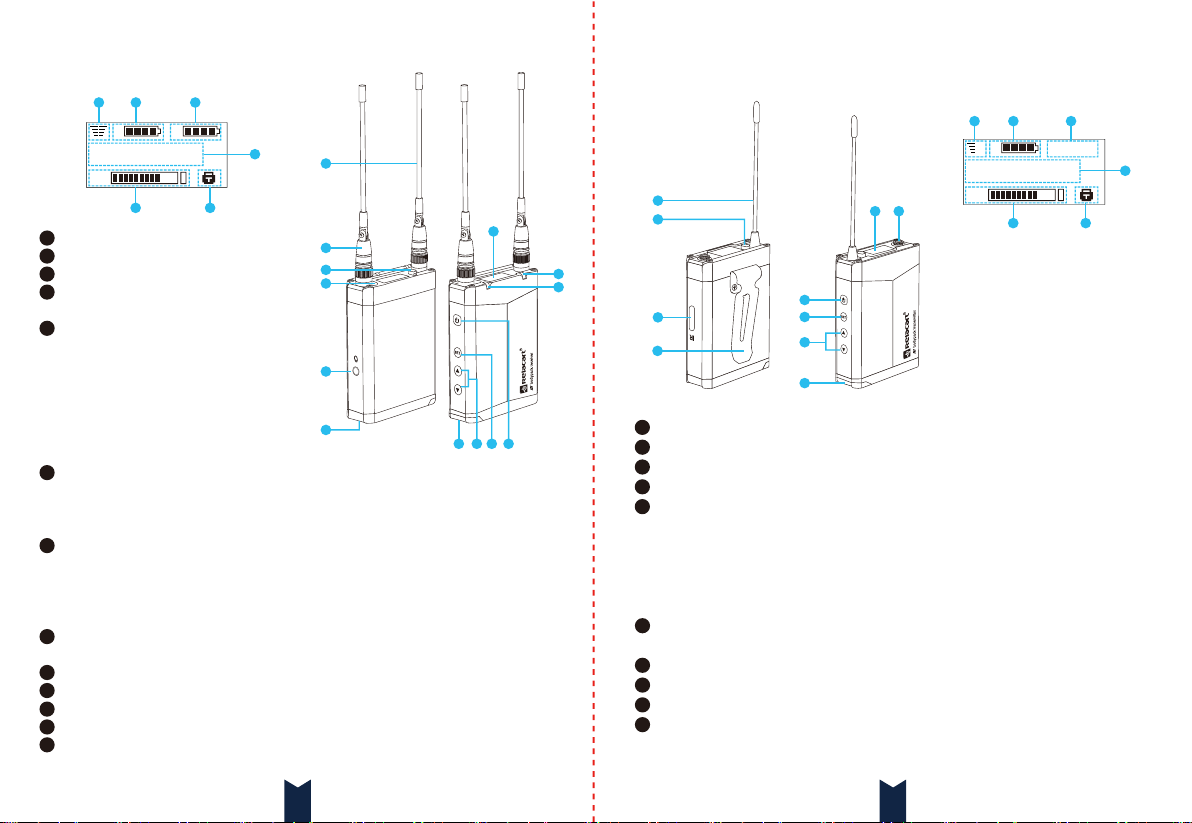
MS1-R Bodypack receiver
a
R
G.01 C.02
AF
Receiving antenna B.
1
2
Receiving antenna A.
3
AFS button: Automatic frequency scan.
4
Infrared counter frequency transmission
window.
5
OLED display:
a. True diversity, A and B channel radio
frequency signals;
b. Receiver battery indication;
c. Transmitter battery indication;
d. Frequency or channel display;
e. AF indicator;
f . Lock indicator.
6
RF indicator: Shows the connection status between the transmitter and receiver.
Red: No RF signal is detected by the receiver.
Blue: The receiver detects a strong RF signal.
Flashing: Low power indication.
7
Peak indicator: Record whether the output signal of the device is too strong and
distorted.
Blue: The output level is normal and there is no distortion.
Flashing red: The output signal reaches the peak value and may cause
distortion.
8
Power/Mute button: Long press device power to be on or off, short press to mute.
(In the menu mode, short press to return to the previous menu)
9
Setting button: Long press to enter menu mode or confirm the menu setting.
10
▲ / ▼ button: select menu settings.
11
Battery bin: can hold two AA batteries.
12
3.5mm headphone monitoring interface.
13
3.5mm balanced output interface.
c
b
T
d
e
f
1
2
3
4
12
13
5
1011 89
MS1-T Bodypack transmitter
a
T
G.01 C.02
1
2
6
7
3
10
1
Transmitter Antenna (ANT).
2
Mute switch.
3
Infrared counter frequency transmission window.
4
3.5mm microphone input interface.
5
OLED display: a. Signal power setting;
6
7
8
9
45
b. Transmitter battery indication;
c. Volume setting;
d. Frequency or channel display;
e. AF indicator;
f. Lock indicator.
6
Power button: Long press device power to be on or off.
(In the menu mode, short press to return to the previous menu)
7
Setting button: Long press to enter menu mode or confirm the menu setting.
8
▲ / ▼ button: select menu settings.
9
Battery bin: can hold two AA batteries.
10
Belt clip: Fix the transmitter around the user's waist.
AF
c
b
-02dBH
d
e
f
3 4
Page 4
Getting Started
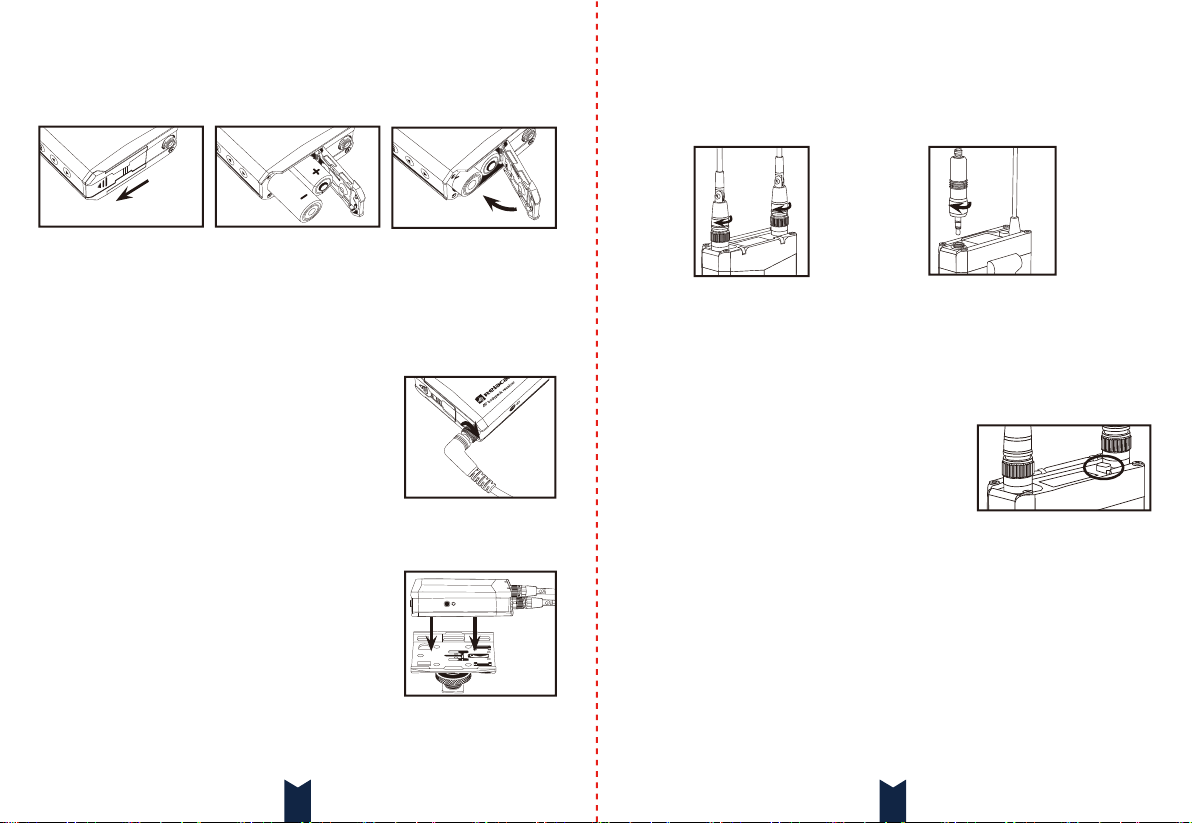
Installing the Batteries
1. Open the battery compartment by sliding the battery compartment door in the
directions indicated by the arrow.
2. Install the batteries into the battery compartment. Make sure to match the
polarity indicated on the inside of the battery compartment door.
3. Press the battery compartment door down, and slide it back into place until it
locks shut.
Connecting the Receiver
The MS1 microphone system includes two output
cables for devices with an XLR input or a 3.5 mm TRS
input. The output cable adopts a right-angle locking
3.5mm connector, which can be flexibly positioned
whether the receiver is installed on a camera or used
on other equipment. Choose the appropriate cable for
your device, and follow these steps:
1. Plug the right-angle male 3.5 mm plug into the output jack on the bottom of the
MS1-R receiver, and turn the locking sleeve clockwise until tight.
2. Connect the other end of the cable to your device.
Mounting the Receiver
To use the MS1 as a shoe- mounted wireless
system mounted on a camera, follow these steps:
1. Align the camera mount with the back of the MS1-R
receiver. Press it onto the receiver until it snaps into
place.
2. Loosen the locking ring by turning it counterclockwise and slide the mounting
foot into your camera’s shoe mount.
3. Tighten the locking ring by turning it clockwise until it’s secure.
Receiver antenna installation and transmitter connection
microphone
(Receiver Antenna Installation) (Transmitter Connect to Microphone)
1. Screw the A and B antennas clockwise into the threaded antenna sockets.
Make sure they are tightly attached.
2. Plug the microphone’s male 3.5 mm plug into the input jack on the top of the
MS1-T transmitter, Secure the cable by turning the locking sleeve clockwise
until tight.
Auto Frequency Scanning【AFS】
1. Power on the receiver and transmitter.
2. Press and hold the AFS button on the receiver to
initiate a frequency scan. The receiver will scan
all available frequencies and select a frequency
without interference. Once the scan is complete,
and the receiver will automatically send out a sync signal from its IR port.
3. Position the transmitter and receiver so their iR ports face each other, [SYNC√]
will appear on the receiver’s screen when the devices have been successfully
synced.
Note: The receiver sends an IR sync signal for approximately 10 seconds. If
syncing is not accomplished in that time, you can restart the process by pressing
and holding the AFS button again.
Manual Sync
To manually sync the receiver and transmitter to the same frequencies, follow
these steps:
1. On the receiver or transmitter press and hold the “Set” to enter the setting menu.
2. Find the “Frequency” function, select “Channel or Pilot” to confirm, and SYNC.
5 6
Page 5
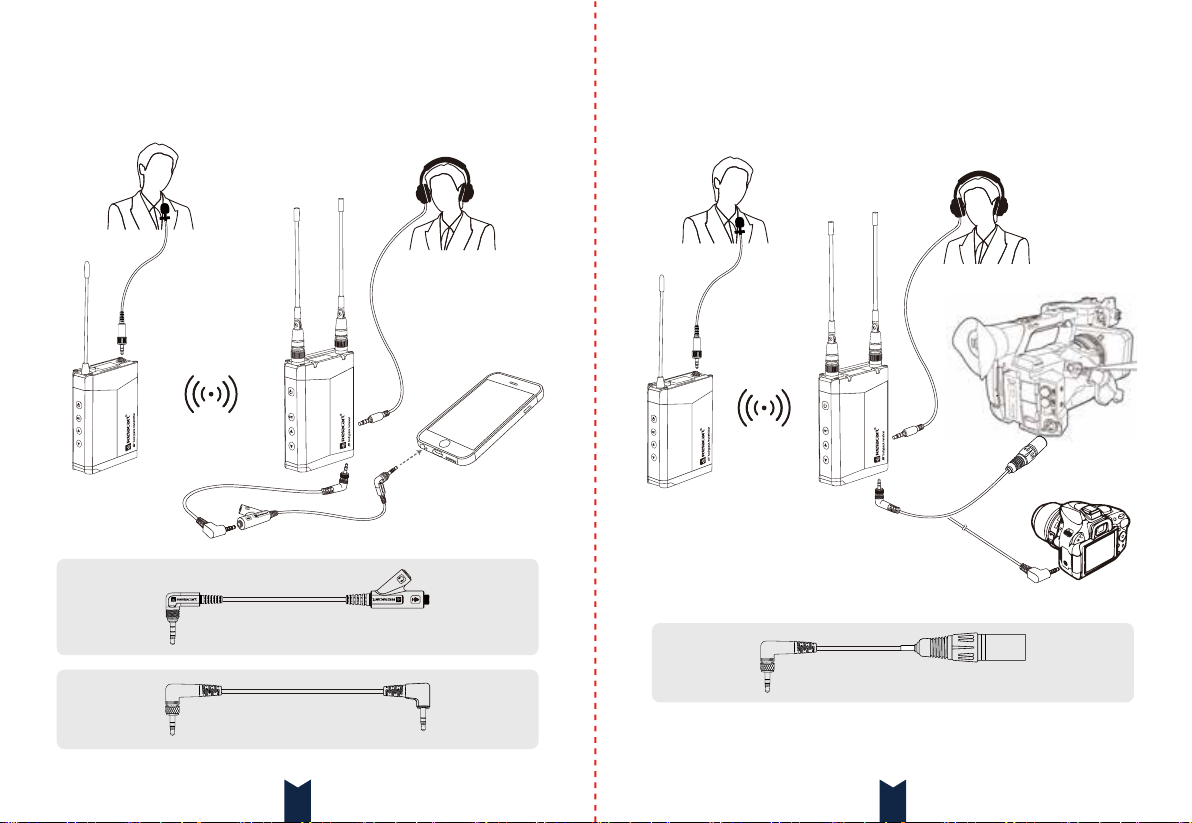
Product connection use
Products with smart phone connection schematic diagram Products with ordinary or professional camera connection
Monitor connection
3.5mm
4-pole jack
Smartphone
connection
3.5mm
3-pole jack
Audio output
connection
ME4-J
AWS-C-MINI-B
Microphone connection
3.5mm
3-pole jack
Ordinary camera
connection
schematic diagram
or
3.5mm
3-pole jack
Audio output
connection
* Please connect the cable to the same terminal as the above picture according to the device
you are using.
AWS-C-XLR-B
balanced XLR jack
Professional camera
connection
7 8
Page 6

Matching of receiver and transmitter
Before leaving the factory, the receiver and transmitter of each product have
been set up in pairs, and can be used directly when starting.
If the radio signals of the receiver and transmitter are connected properly,
the blue light indicator of the receiver will be long on, and the parameters of the
display screen will be the same as that of the transmitter; if not connected, the
receiver blue light indicator will not be on.
However, if the channel is noisy, you can change the interference-free channel
or frequency through the “AFS” function or manual synchronization.
Specifications
MS1-R Receiver Specifications
Frequency response: 80 Hz ~ 15 KHz
Total harmonic distortion: <0.9%
Pilot tone frequency: 32.768 KHz
Power requirement: 2.0 ~ 3.6 V
Operating temperature: 0°C ~ 55°C
Dimensions without antennas: 80mm(H) × 58mm(W) × 20mm(D)
Weight: 116g (Without batteries)
MS1-T Transmitter Specifications
Reference input level: -26dBV
Frequency response: 80 Hz ~ 15 KHz
Signal-to-noise ratio: <100 dB
Pilot tone frequency: 32.768 KHz
Power requirement: 2.0 ~ 3.6 V
Operating temperature: 0°C ~ 55°C
Dimensions without antenna: 70mm(H) × 50.8mm(W) × 20mm(D)
Weight: 84g (Without batteries)
109
 Loading...