

Page 1
DIGITAL CAMCORDER
DVC-340
USER MANUAL
Page 2

CONTENTS
1. PARTS OF THE DIGITAL VIDEO CAMERA..................................................4
2. SETUP GUIDE . . . . . . . . . . . . . . . . . . . . . . . . . . . . . . . . . . . . . . . . . . . . . . . . . . . . . . . . . . . . . . . . . . . . . . . . . . . 5
HOW TO INSTALL THE BATTERY.................................................................. 5
2.1
2.2 HOW TO CHARGE THE BATTERY.................................................................. 6
2.3 HOW TO INSERT THE MEMORY CARD..............................................................7
2.4 HOW TO FORMAT THE MEMORY CARD............................................................ 8
2.5 HOW TO SELECT A LANGUAGE ................................................................... 9
2.6 HOW TO SET THE DATE AND TIME...............................................................10
2.7 EXPLANATION OF THE MONITOR SCREEN DISPLAY .............................................11
3. HOW TO USE THE DIGITAL VIDEO CAMERA..............................................18
3.1 HOW TO TURN THE DIGITAL VIDEO CAMERA ON AND OFF . . . . . . . . . . . . . . . . . . . . . . . . . . . . . . . . . . . . . . . 18
3.2 HOW TO CHANGE THE RECORD MODE ..........................................................18
3.3 HOW TO RECORD A VIDEO CLIP . . . . . . . . . . . . . . . . . . . . . . . . . . . . . . . . . . . . . . . . . . . . . . . . . . . . . . . . . . . . . . . . . 19
3.4 HOW TO TAKE STILL IMAGES....................................................................20
3.5 HOW TO USE THE SELF
3.6 HOW TO RECORD AUDIO........................................................................22
4. HOW TO USE THE MENU IN RECORD MODE .............................................22
4.1 MENU IN CAPTURE MODE ......................................................................22
4.2 CAPTURE MENU LIST ...........................................................................23
4.3 MENU IN VIDEO MODE .........................................................................27
4.4 SETUP MENU................................................................................... 29
5. PLAYBACK.............................................................................31
5.1 HOW TO PLAYBACK MOVIE CLIPS ...............................................................31
5.2 HOW TO PLAYBACK STILL IMAGES ..............................................................31
5.3 HOW TO PLAYBACK AUDIO FILES ...............................................................32
5.4 HOW TO VIEW THUMBNAILS ....................................................................32
5.5 MENU IN PLAYBACK MODE .....................................................................33
6. HOW TO CONNECT THE DIGITAL VIDEO CAMERA TO A TV/HDTV/PC......................35
6.1 HOW TO CONNECT THE DIGITAL VIDEO CAMERA TO A TV ........................................35
6.2 HOW TO CONNECT THE DIGITAL VIDEO CAMERA TO A HDTV..................................... 36
6.3 HOW TO CONNECT THE DIGITAL VIDEO CAMERA TO A PC . . . . . . . . . . . . . . . . . . . . . . . . . . . . . . . . . . . . . . . . 37
6.4 HOW TO USE THE CARD READER................................................................ 37
6.5 HOW TO CONNECT THE DIGITAL VIDEO CAMERA TO A PC WITH A USB CABLE ....................38
7. TECHNICAL SPECIFICATIONS...........................................................39
-
TIMER . . . . . . . . . . . . . . . . . . . . . . . . . . . . . . . . . . . . . . . . . . . . . . . . . . . . . . . . . . . . . . . . . . 21
Page 3

Please read these operating instructions carefully in order to
use the digital video camera correctly. Keep the instructions in
a safe place after reading so that you can refer to them later.
Precautions:
Before using the digital video camera, please ensure that you
read and understand the safety precautions described below.
• Should the digital video camera malfunction in any way,
do not attempt to repair it yourself. Maintenance and repairs
should only be carried out by authorized service providers.
• Keep the digital video camera away from water and other
liquids. Do not use the camcorder with wet hands. Never use
the camcorder in the rain or snow. Moisture creates the risk of
electric shock.
• Use only the recommended power accessories. Use of power
sources not expressly recommended for this unit may lead to
overheating, distortion of the equipment, re, electrical shock
or other hazards.
3
Page 4
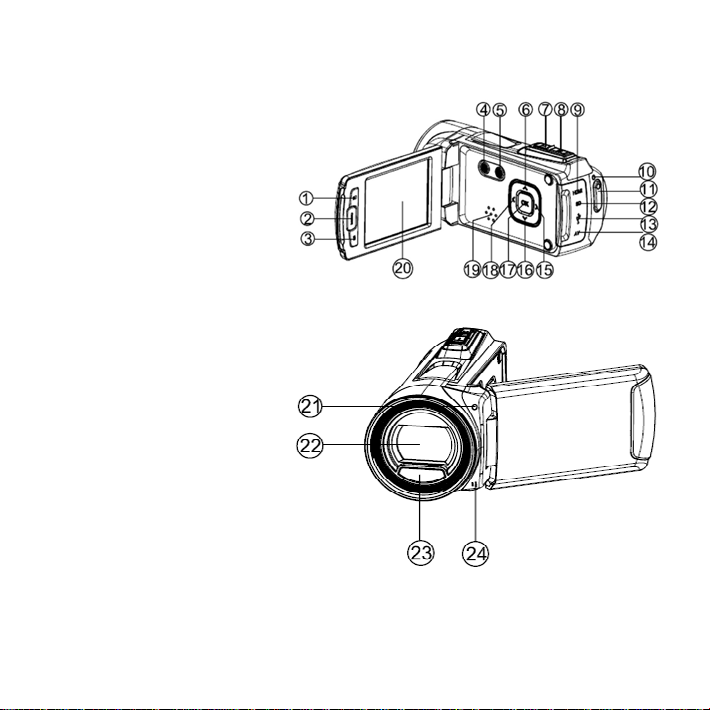
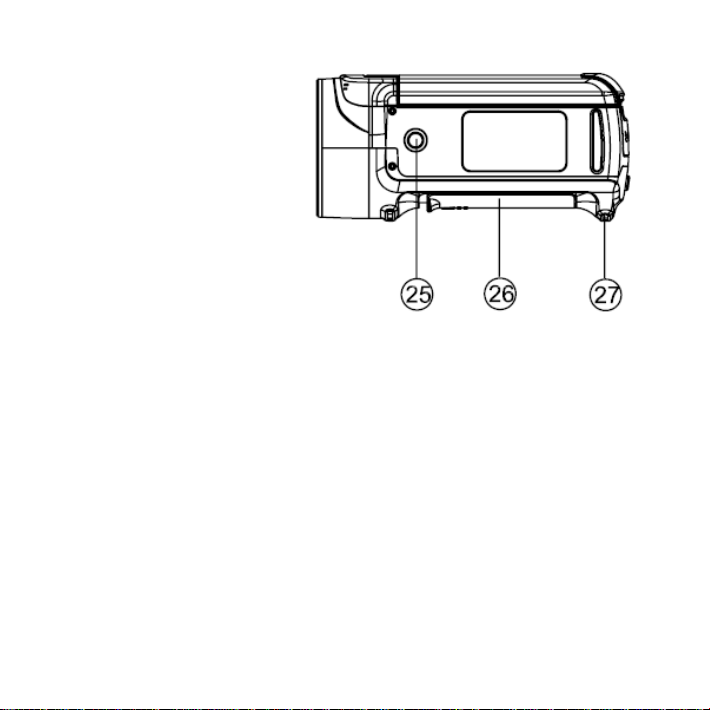
1. PARTS OF THE DIGITAL VIDEO CAMERA
1. Playback Button.
2. Menu Button.
3. Delete.
4. Power Button.
5. Mode Button.
6. Up Button.
7. Zoom In Button.
8. Zoom Out Button.
9. HDMI Jack.
10. Power/Charging
Indicator Light.
11. Shutter Button.
12. SD Card Slot.
13. USB Jack.
14. AV Out Jack.
15. Right/LED On/Off
Button.
16. Down Button.
4
Page 5
17. OK Button.
18. Left/Display
Button.
19. Speaker.
20. LCD Screen.
21. Self-timer LED.
22. Lens.
23. LED Light.
24. Microphone.
25. Tripod Socket.
26. Battery Cover.
27. Wrist Strap.
2. SETUP GUIDE
2.1 HOW TO INSTALL THE BATTERY
1. Slide the battery cover and open it.
5
Page 6

2. Place the accessory li-ion battery into the compartment.
Please note: The metallic contacts must be aligned with
the contacts in the compartment.
3. After the battery is properly installed, close the battery
cover.
2.2 HOW TO CHARGE THE BATTERY
Charge the battery for at least eight hours prior to rst use.
a. Power OFF and connect the USB cable to the digital video
camera and the computer for battery charging.
b. Charging starts when charging LED turns BLUE. The charge
indicator
6
Page 7

light turns OFF when charging is completed.
c. Disconnect the camcorder.
2.3 HOW TO INSERT THE MEMORY CARD
This digital video camera has no internal memory, it can’t record pictures or movie clips. If you want record you have to
use a SD or MMC card (The MAX.SD/MMC card that this digital
video camera could support is up to 32GB).Turn off the digital
video camera before inserting or removing the memory card.
Be sure to align and position the card correctly when inserting it. Never try to force the memory card into the slot if you
feel resistance. The memory card has a write protect switch
which used to protect data from accidental deletion. There-
fore, whenever you want to record, format or delete les in the
SD card, disable the write protection beforehand.
7
Page 8
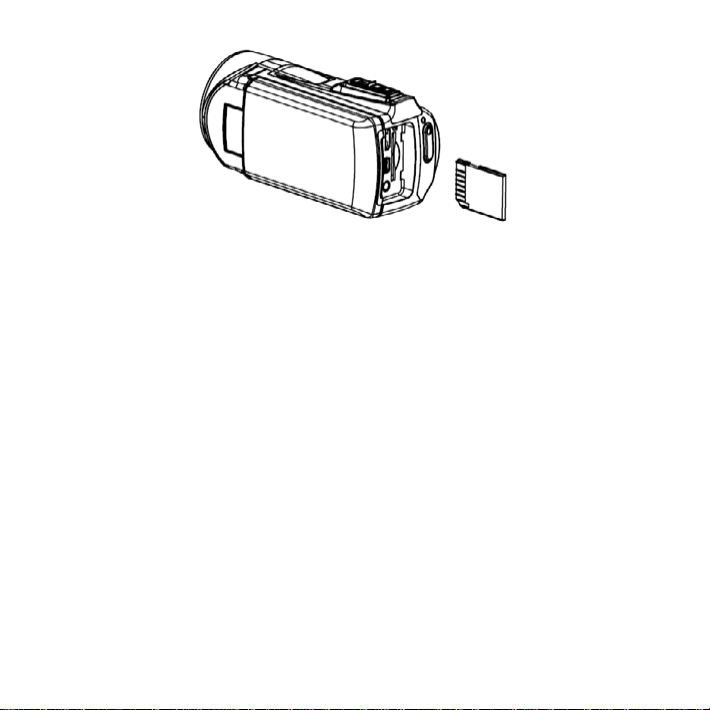
1. Turn off the camcorder.
2. Find the rubber cover at the side of digital video camera
and then you will see the SD card slot.
3. Insert the memory card as illustrated.
4. Close the rubber cover.
5. To release the memory card, press the edge of the card
gently.
2.4 HOW TO FORMAT THE MEMORY CARD
It is important to format the memory card the rst time you
use this digital video camera. All data will be deleted includ-
ing protected les. Be sure to download the important les to
your computer before formatting.
8
Page 9

1. Turn the power on, and set the digital video camera to the
Setup Menu.
2. Press the UP or DOWN buttons to select [Format], then
press OK button to launch the submenu.
3. Press the UP or DOWN buttons to select the item [YES]
and then press the OK button to erase all data.
2.5 HOW TO SELECT A LANGUAGE
Be sure to choose a language and set the date & time before
rst time
using the digital video camera.
1. Turn the power on, and set the digital video camera to the
Setup Menu.
2. Press the UP or DOWN buttons to select [Language] then
press OK button to launch the submenu.
3. Press the UP or DOWN buttons to select the desired
language and then press the OK button to conrm the
setting and exit the menu.
9
Page 10
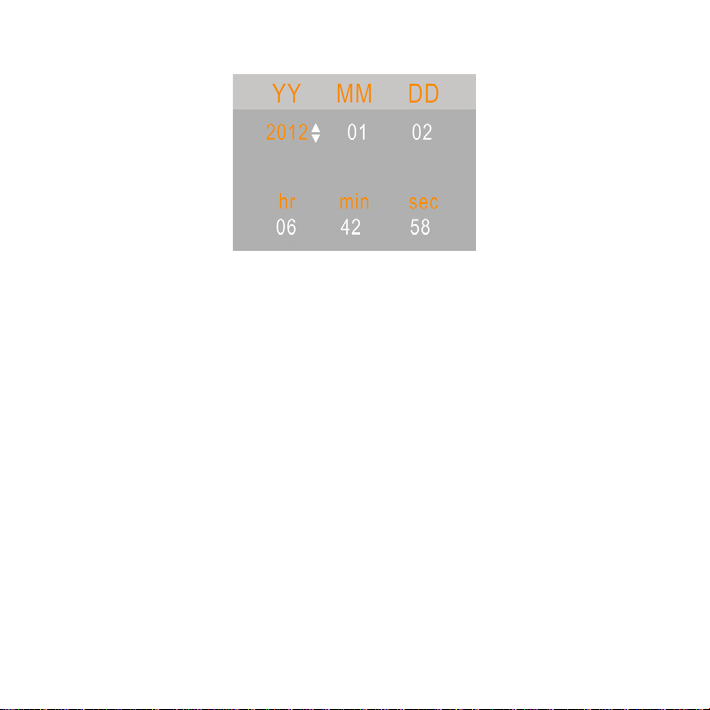
2.6 HOW TO SET THE DATE AND TIME
1. Turn the power on, press the MENU button to display the
menu, and then press the RIGHT button twice to select
[Setup] Menu.
2. Press the UP or DOWN buttons to select [Set Date] then
press the OK button to launch the submenu.
3. Press the UP or DOWN buttons to change the highlighted
value. Press the LEFT or RIGHT buttons to move the cursor
between settings.
4. Press the OK button to conrm the setting and close the
menu.
10
Page 11
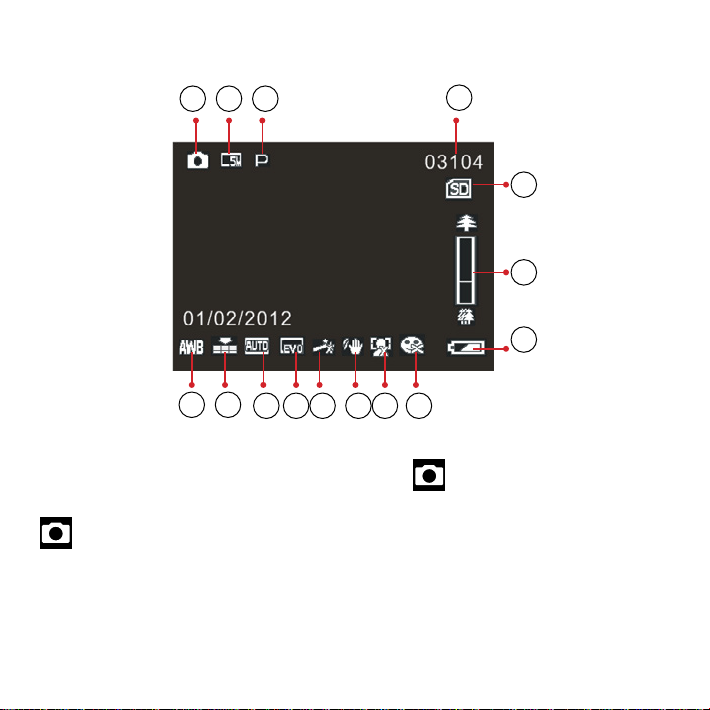
2.7 EXPLANATION OF THE MONITOR SCREEN DISPLAY
1 2 3
1. Camera Mode
Still Image Capture
14 15
Capture Mode:[ ]
11
4
5
6
7
8 9 10 11 12 13
Page 12
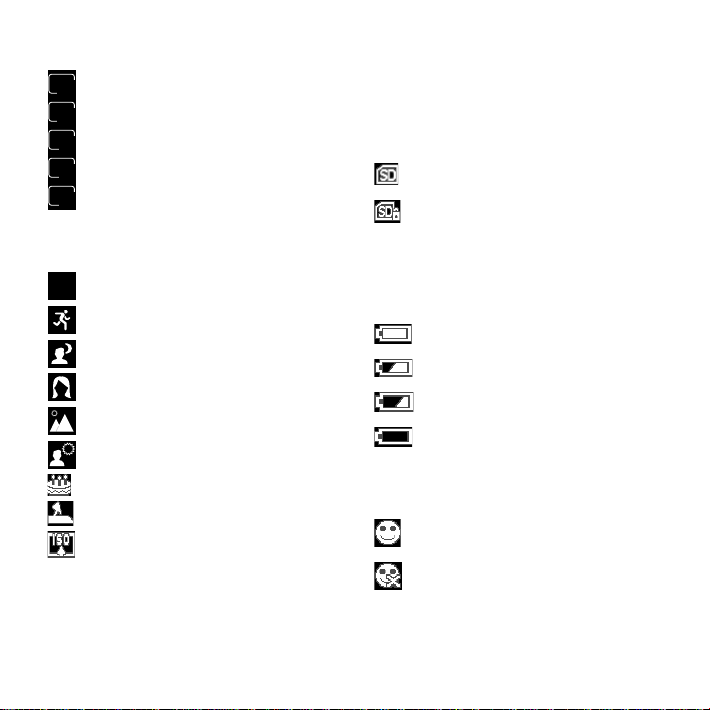
2. Image Size.
21M
12M
8M
5M
3M
P
5616×3744
4000×3000
3264×2448
2592×1944
2048×1536
3. Scene Mode.
Auto
Sport
Night
Portrait
Landscape
Backlight
Party
Beach
High Sensitivity
4. Number of pictures available in SD Card.
5. SD Card inserted.
No protect status
Protect status
6. Zoom Value Level.
7. Battery Power Level.
Full
Medium
Low
None
8. Smile Capture.
On
Off
12
Page 13
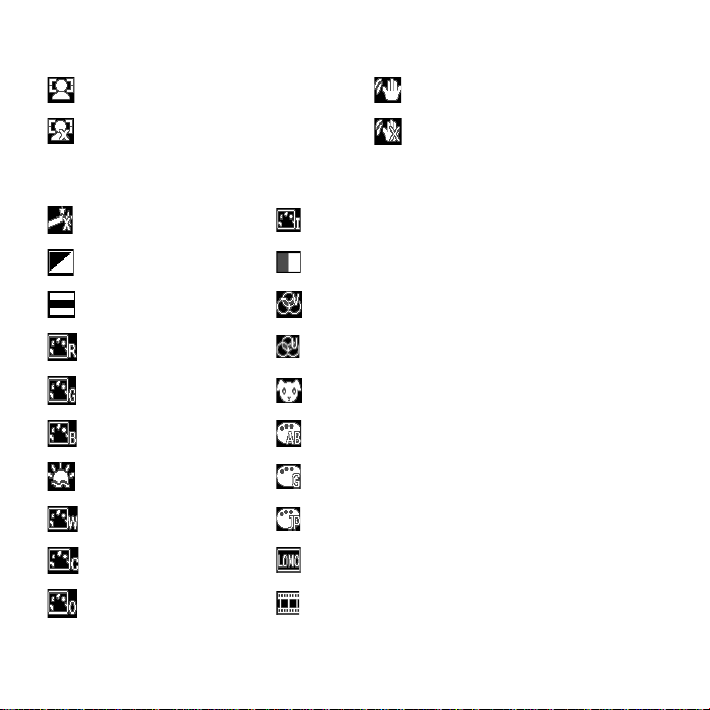
9. Face Detect.
10. Anti-Shake.
On
Off
11. Effect.
Normal IR
B & W Binary
Sepia Vivid
Red Undertone
Green Dog Eye
Blue Aibao
Sunset Gothic
Warm Japan Style
Cool LOMO
Over Exposure Negative
On
Off
13
Page 14
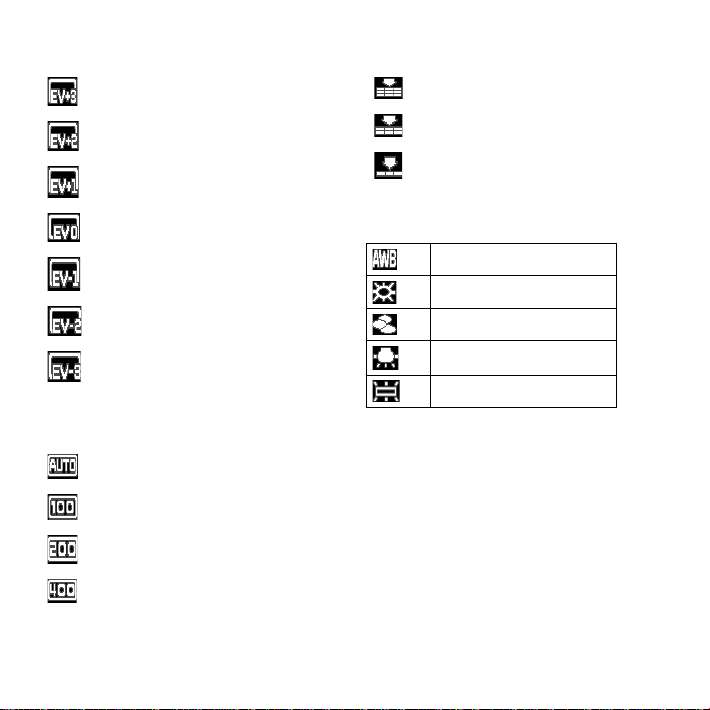
12. Exposure.
14. Image Quality.
+3
+2
+1
13. ISO.
0
-1
-2
-3
Auto
100
200
400
Super Fine
Fine
Normal
15. White Balance.
Auto
Daylight
Cloudy
Tungsten
Fluorescent
16. Date Imprint.
14
Page 15
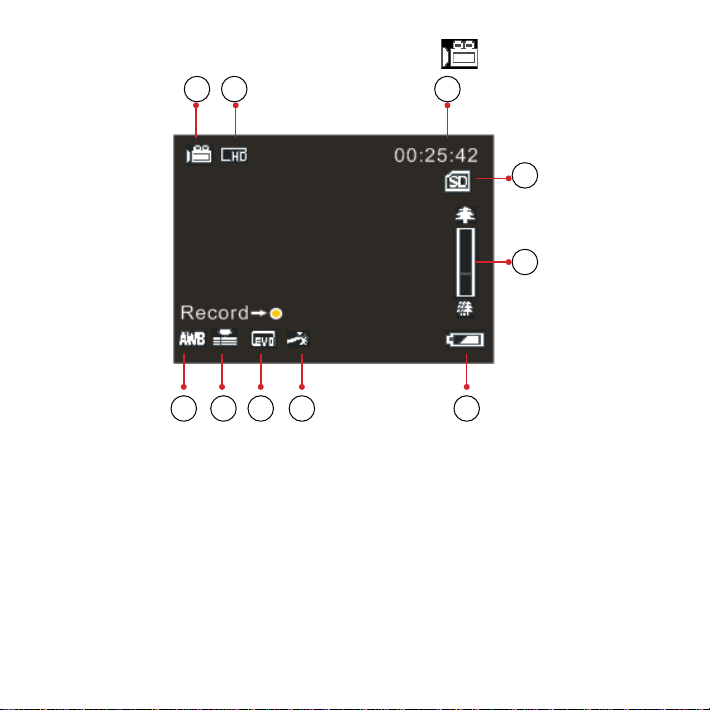
Video Record Mode: [ ]
1 2 3
1. Video recording icon.
2. Video size.
3. Recording time available.
4. SD Card inserted.
5. Zoom value level.
6. Battery power level.
4
5
6 7 8 9 10
15
Page 16
7. Effect.
8. Exposure.
9. Video Quality.
10. White Balance.
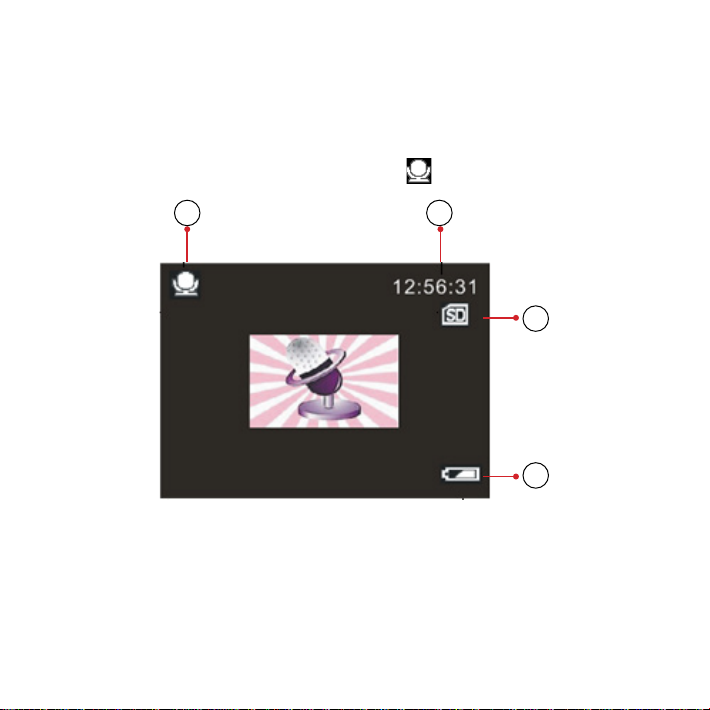
Audio Mode:[
1 2
1. Audio recording icon.
2. Audio recording time available.
3. SD Card inserted.
4. Battery power level.
]
3
4
16
Page 17
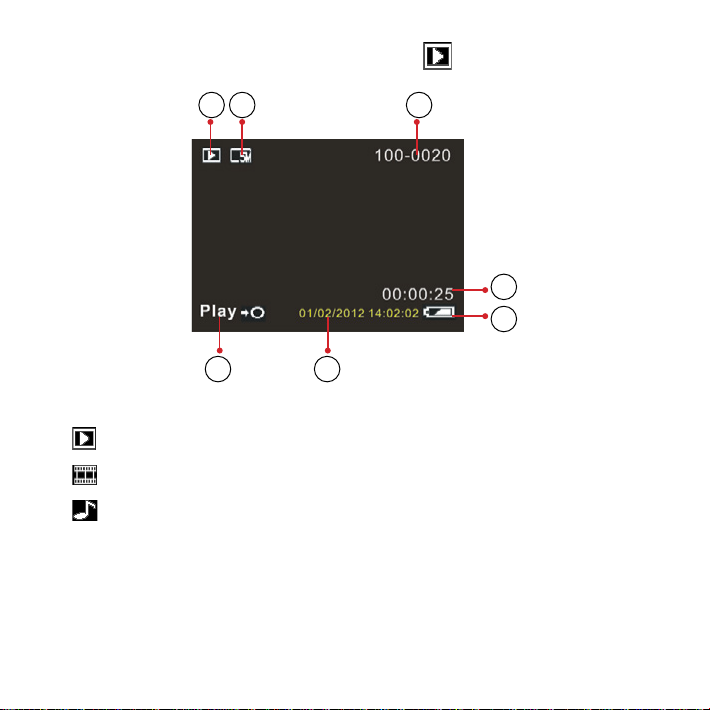
Playback Mode: [ ]
1 2 3
4
7
5 6
1.
Playback still image icon.
Playback movie clips icon.
Playback audio recording icon.
2. Image/Video size.
3. File catalogue on SD card / Current Image Number#/Video#.
4. Video recording time.
17
Page 18

5. Battery Power Level.
6. Date Imprint.
7. Press the shutter button to playback video le.
3. HOW TO USE THE DIGITAL VIDEO CAMERA
3.1 HOW TO TURN THE DIGITAL VIDEO CAMERA ON AND OFF
1. Open the LCD panel to power on the digital video camera
and close the LCD panel to turn off the digital video
camera.
2. You can also press the POWER button to turn on the digital
video camera and press it again for 3 second to turn it off.
To save battery power, you can change the power-off time by
setting the function [Power Save] in the Setup menu.
3.2 HOW TO CHANGE THE RECORD MODE
There are four modes in this digital video camera. Press the
MODE button to change the mode, each time the MODE button is press the mode is changed.
18
Page 19
Display Title Description
Capture mode For taking still photos.
Video mode For recording movie clips.
Audio mode For recording audio les.
Playback mode For previewing record les.
Please Note: Press the playback button to enter playback mode.
3.3 HOW TO RECORD A VIDEO CLIP
1. Turn on the digital video camera and set it to video record
mode (
).
2. Zooming: Press the UP or DOWN buttons to zoom in or
zoom out the subject. The value of magnication level
appears on the LCD monitor.
3. Press the SHUTTER button to start recording.
4. Press the OK button to pause and press it again to continue
to recording.
19
Page 20

5. Press the SHUTTER button again to end the recording. If
the memory is full the video camera will stop recording
automatically.
• On the upper of the LCD monitor displays the recorded time.
• When the light is insufcient press the RIGHT/LED ON/OFF
button to turn on the compensating lamp and when the light is
enough press the RIGHT/LED ON/OFF button again to turn off.
3.4 HOW TO TAKE STILL IMAGES
1. Set the digital video camerar to capture mode, the icon
appears on the LCD screen.
2. Zooming: Press the ZOOM IN or ZOOM OUT buttons to
zoom in or zoom out the screen. The value of magnication
level appears on the LCD monitor.
3. Hold the camcorder steady and then press the SHUTTER
button down to take a picture.
• When the light is insufcient press the RIGHT/LED ON/OFF
button to turn on the compensating lamp and when the light
is enough press the RIGHT/LED ON/OFF button again to turn
off.
20
Page 21

3.5 HOW TO USE THE SELF-TIMER
Use the self-timer to set a delay from the time the shutter
button is pressed to the time the image is shot.
1. Turn the power on, and set the digital video camera to the
Capture mode.
2. Press the MENU button to display the capture menu, and
then press the LEFT or RIGHT buttons select [Shooting]
Menu.
3. Press the UP or DOWN buttons to select the items [Self
Timer] or [Multi-Snapshot]. And press the OK button to
launch the submenu:
Off: Don’t use self-timer without delay.
Self-timer 2S: The shutter release will delay for 2 seconds.
Self-timer 5S: The shutter release will delay for 5 seconds.
Self-timer 10S: The shutter release will delay for 10 seconds.
Multi-Snapshot: Press the shutter button once to take three pictures
continuously.
21
Page 22

4. Press the UP or DOWN buttons to select the desired item,
and then press OK button to conrm the setting and close
the menu.
5. Press the SHUTTER button to take picture.
3.6 HOW TO RECORD AUDIO
1. Turn on the digital video camera and set it to audio record
mode (
).
2. Press the SHUTTER button to start recording.
3. Press the SHUTTER button again to end the recording. If
the memory is full the video camera will stop recording
automatically.
4. HOW TO USE THE MENU IN RECORD MODE
When a menu is displayed, the UP, DOWN and OK buttons is
used to make the desired setting.
4.1 MENU IN CAPTURE MODE
1. Turn on the digital video camera and set it to capture
mode.
22
Page 23

2. Press the MENU button to display the menu, and press the
LEFT or RIGHT buttons to select the desired menu.
3. Press the UP or DOWN buttons to select an item.
4. Press the OK button to enter the submenu.
5. Use the UP or DOWN buttons to select the desired item.
6. Press the OK button to conrm the setting and close the
menu.
4.2 CAPTURE MENU LIST
Menu item Function
You can select the scene mode according to the image
Mode Set:
Size:
Face Detect:
Smile Capture:
your wish to capture. There are 10 available modes.
[Auto]/[Sport]/[Night]/[Portrait]/[Landscape]/[Backlight]/
[Party]/[Beach]/[High Sensitivity]/[Cancel].
There are six options for choice:
[21M]: 5616x3744; [12M]: 4000x3000; [8M]: 3264x2448;
[5M]: 2592x1944; [3M]: 2048x1536;
[Cancel].
Use this function to detect our faces when taking pictures.
There are three options for choice. [On]/[Off]/[Cancel].
Sets smile capture is on, Face Detect will be automatically
opened. Once it detects smile, the digital video camera will
automatically take a picture. [On]/[Off]/[Cancel].
23
Page 24

Menu item Function
Multi-Snapshot:
Panorama:
Shooting:
Multi-Exposure:
Self-Timer:
Cancel: Cancel this operation.
Capture Setting: ISO:
Use this function to take 3 pictures
continuously.
[Single]: Press the shutter button once to
take one picture.
[Continuous]: Press the shutter button
once to take three pictures continuously.
[Cancel]: Cancel this operation.
Use the function to shoot an entire
surrounding area. Shooting the
directional position at 180 degrees
horizontally and 90 degrees vertically.
[Off]/[Up]/[Right]/[Cancel].
Use the function to overlap two scene images into a image for the special effect.
[Off]/[Double Exposure]/
[Long Exposure]/[3D Capture]/[Cancel]
Use the self-timer to set a delay from the
time the shutter button is pressed to the
time the image is shot.
[Off]/[2 Sec.]/[5 Sec.]/[10 Sec.]/[Cancel].
The ISO menu allows you to set the level
of sensitivity that your camera has to light
in the surrounding environment.
[Auto]/[100]/[200]/[400]/[Cancel].
24
Page 25

Menu item Function
Anti-Shake:
Use the function to aviod our hands
shaking when taking pictures.There are
three options for choice.
[On]/[Off]/[Cancel].
Best Shutter
Selector:
Capture Setting:
Imprint:
Cancel: Cancel this operation.
Image Setting: White Balance:
It is used to anti-shake for shooting
images. There are three options
for choice.[On]/[Off]/[Cancel].
This function can be used to add a date
or time to your pictures as you take them.
There are four items for option:
[Off]: Do not add the recording date &
time to printed images.
[Date]: Only add the recording date to
printed images.
[Date & Time]: Add the recording date &
time to printed images.
[Cancel]: Cancel this operation.
Adjust the white balance to suit different
light sources. There are six items for
option:[Auto]/[Daylight]/[Cloudy]/
[Tungsten]/[Fluorescent]/[Cancel].
25
Page 26

Menu item Function
Exposure:
Light Frequency:
Set the exposure value manually to
compensate for unusual lighting
conditions such as indirect indoor
lighting, dark backgrounds, and strong
backlighting. The exposure value range
is –3 to +3.
Light Frequency should be set to either
60Hz or 50Hz depending on your region.
[50HZ]/[60HZ]/[Canel].
Image Setting:
Quality:
Sharpness:
Select a lower image quality to decrease
the image size in order to capture more
images. There are four options for choice:
[Super Fine]/[Fine]/[Normal]/[Cancel].
You can set the level of sharpness in
the images taken with your camera. The
sharpness level dictates if the edges of
objects in the image are more or less
distinct.
[Soft]/[Normal]/[Vivid]/[Cancel].
26
Page 27

Menu item Function
Set the color effect to add a color tone to
the picture.[Normal]/[B&W]/[Sepia]/
[Red]/[Green]/[Blue]/[Sunset]/[Warm]/
Effect:
Image Setting:
Saturation:
Cancel: Cancel this operation.
4.3 MENU IN VIDEO MODE
[Cool]/[OverExposure]/[IR]/[Binary]/
[Vivid]/[Undertone]/[DogEye]/[Aibao]/
[Gothic]/[Japan Style]/[LOMO]/
[Negative]/[Cancel].
Sets the image’s saturation.
[High]/[Normal]/[Low]/[Cancel].
1. In video record mode press the MENU button to display
the menu. and press the LEFT or RIGHT buttons to select
the desired menu.
2. Press the UP or DOWN buttons toselect an item.
3. Press the OK button to enter the submenu.
4. Use the UP or DOWN buttons to select the desired item.
5. Press the OK button to conrm the setting and exit the
menu.
27
Page 28

Menu item Function
Select small movie size to record longer time. There are
Size:
Image
Setting:
ve items for option:
FHD:1920x1080 FHD; HD:1280x720 HD;
VGA: 640x480; QVGA: 320x240; Cancel.
White Balance:
Exposure:
Light Frequency:
Quality:
Sharpness:
Adjust the white balance to suit different light
sources. There are six items for option:
[Auto]/[Daylight]/[Cloudy]/[Tungsten]/
[Fluorescent]/[Cancel].
Set the exposure value manually to
compensate for unusual lighting
conditions such as indirect indoor
lighting, dark backgrounds, and strong
backlighting. The exposure value range
is –3 to +3.
Light Frequency should be set to either
60Hz or 50Hz depending on your region.
[50HZ]/[60HZ]/[Cancel].
Select a lower image quality to decrease
the image size in order to capture more
images. There are four options for choice:
[Super Fine]/[Fine]/[Normal]/[Cancel].
You can set the level of sharpness in the
images taken with your camera. The
sharpness level dictates if the edges of
objects in the image are more or less
distinct.[Soft]/[Normal]/[Sharp]/[Cancel].
28
Page 29

Menu item Function
Set the color effect to add a color tone to the
picture.
[Normal]/[B&W]/[Sepia]/[Red]/[Green]/[Blue]/
Effect:
Image
Setting:
Saturation:
Cancel: Cancel this operation.
4.4 SETUP MENU
[Sunset]/[Warm]/[Cool]/[Over Exposure] /[IR]/
[Binary]/[Vivid]/[Undertone]/[Dog Eye]/
[Aibao]/[Gothic]/[Japan Style]/[LOMO]/
[Negative]/[Cancel].
Sets the image’s saturation.
[High]/[Normal]/[Low]/[Cancel].
You can set the system items in setup menu.
1. Turn the power on and press the MENU button to display
the menu.
2. Press the LEFT or RIGHT buttons to select [Setup] Menu.
3. Press the UP or DOWN buttons to select an item.
4. Press the OK button to enter the submenu.
5. Press the UP or DOWN buttons to select the desired item.
6. Press the OK button to conrm the setting and exit the
menu.
29
Page 30

Menu item Function
To save power, the camera is turned off automatically after a
Power Save:
Beep: Set the operation sound on or off.
Language:
Set Date: Allow you to set date&time for the digital video camera.
TV Output:
Format:
Default
Setting:
Cancel: Cancel this operation.
period of time. There are six options for choice:
[Off]/[1Min.]/[3 Min.]/[5 Min.]/[10 Min]/[Cancel].
Select a language for the Display menu and other
information.
You can review images on a television with the supplied AV
cable. TV Out should be set to either NTSC or PAL depending on
your region.
[NTSC]: America, Japan and others;
[PAL]: Europe, Oceania and others.
[Cancel]: Cancel this operation.
To erase all data stored on the memory card if you are using a
memory card, or all data stored in the internal memory if there
is no card inserted. All data will be deleted including protected
les. Be sure to download important les to your computer
before formatting.
[Yes]/[No].
To reset the entire menu and button operation settings to
initial default. [Yes]/[No].
30
Page 31

5. PLAYBACK
5.1 HOW TO PLAYBACK MOVIE CLIPS
1. Press the PLAYBACK button to set the digital video camera
to playback mode.
2. Press the LEFT or RIGHT buttons to select the movie clips
you want to playback.
3. Press the SHUTTER button to start playing. Press the OK
button to pause it and press it again to continue. Press the
RIGHT button to fast forward and press the LEFT button
to back forward.
4. Press the SHUTTER button again to stop playing.
5.2 HOW TO PLAYBACK STILL IMAGES
1. Set the digital video camera to playback mode. The latest
recorded le appears on the LCD screen. If there are no
images stored, a message [NO IMAGE] appears.
2. Press the LEFT or RIGHT buttons to preview the previous
or next image.
31
Page 32

3. Zooming: Press the ZOOM IN or ZOOM OUT buttons
to zoom in or zoom out the image. When the picture is
enlarged you can use the LEFT/RIGHT/UP/DOWN buttons
to browse the details of the image.
4. Press the ZOOM OUT button to resume the normal mode.
5.3 HOW TO PLAYBACK AUDIO FILES
1. Press the PLAYBACK button to set the digital video camera
to playback mode.
2. Press the LEFT or RIGHT buttons to select the audio les
you want to playback.Press the OK button to pause it and
press it again to continue.Press the RIGHT button to fast
forward and press the LEFT button to back forward.
3. Press the SHUTTER button to start playing.
4. Press the SHUTTER button again to stop playing.
5.4 HOW TO VIEW THUMBNAILS
Press the ZOOM OUT button in playback mode to view the le
in thumbnails mode. Use the LEFT/RIGHT/ UP/DOWN buttons
32
Page 33

to select a le. Press the OK button to view the le in full
screen.
5.5 MENU IN PLAYBACK MODE
1. In playback mode press the MENU button to display the
menu, and press the LEFT or RIGHT buttons to select the
desired menu.
2. Press the UP or DOWN buttons to select an item.
3. Press the OK button to enter the submenu.
4. Press the UP or DOWN buttons to select the desired item.
5. Press the OK button to conrm the setting and close the
menu.
Menu item Function
Use this function to delete a single le or all les.
Delete:
Slide:
[This Image]: Delete current singe le.
[All]: Delete all les except locked les.
[Cancel]: No delete the le.
Plays the les automatically interval a few seconds.
[3 Sec.]/[5 Sec.]/[10 Sec.]/[Cancel].
33
Page 34

Menu item Function
Use this function to rotate the images.
o
]: Rotate the image 90 degrees in clockwise.
[90
Rotate:
[180o]: Rotate the image 180 degrees in clockwise.
[270o]: Rotate the image 270 degrees in clockwise.
[Cancel]: No rotate the image.
Use this function to crop the images.
[Crop]: Use the UP or DOWN buttons to select a select
Crop Image:
a range, and then press the SHUTTER button to crop
the selected range, at last press it again to save the
cropped image. [Cancel]: No crop the image.
Use this function to protect the les from being deleted by
accident.
[Lock This]: Lock the current le.
Protect:
[Unlock This]: Unlock the current le.
[Lock All]: Lock all les.
[Unlock All]: Unlock all les.
[Cancel]: Cancel this operation.
Use this function to print a picture without a computer.
Print:
Make sure you have a printer which supports picture
bridge function and then connect it to the camcorder via
the USB cable.[Execute]/[Cancel].
34
Page 35

6. HOW TO CONNECT THE DIGITAL VIDEO CAMERA TO
A TV/HDTV/PC
6.1 HOW TO CONNECT THE DIGITAL VIDEO CAMERA TO A TV
When plug in the TV-out cable (supplied) to the digital video
camera AV out jack the LCD screen turns black, Connect the
digital video camera to a TV and the TV screen now performs
as the digital video camera LCD screen.
1. Connect the digital video camera to a TV via the TV-out
cable (supplied).
2. Turn on the TV and the digital video camera, and then set
the TV to “AV” mode.
3. When the digital video camera is set to record mode, you
can preview the subjects you want to record on the TV
screen.
4. When the digital video camera is set to Playback mode,
you can review all the pictures, video and audio clips
stored in the camera on the TV.
35
Page 36

6.2 HOW TO CONNECT THE DIGITAL VIDEO CAMERA TO A
HDTV
HD-TV hereby means the HDTV built-in component input ports,
thus can perform HD (720P) high resolution quality while connected.
1. Connect the digital video camera to HDTV by the HDMIcable.
2. Power on HDTV and switch to HDMI-mode.
3. Power ON the digital video camera. Set the digital video
camera to playback mode.Push the joystick leftward or
rightward to select the le demanded.
4. Press SHUTTER button to “Play” the selected video le
on HDTV, press the SHUTTER button again to “Stop” the
playing.
5. Press the OK button to “Pause”, press it again to “Continue”
the playing.
6. Press the LEFT button to reward, press the RIGHT button
to forward.
7. Press the UP or DOWN button to adjust the volume.
36
Page 37

6.3 HOW TO CONNECT THE DIGITAL VIDEO CAMERA TO A PC
There are two ways to download les from the digital video
camera’s internal memory or memory card to a computer:
By inserting the memory card into a card reader
By connecting the camera to a computer using the supplied
USB cable.
6.4 HOW TO USE THE CARD READER
1. Eject the memory card from the digital video camera and
insert it into a card reader that is connected to a computer.
2. Open [My Computer] or [Windows Explorer] and doubleclick the removable disk icon that represents the memory
card.
3. Copy images from the card into a directory of your choice
on the computer’s hard disk.
37
Page 38

6.5 HOW TO CONNECT THE DIGITAL VIDEO CAMERA TO A PC
WITH A USB CABLE
1. Connect the supplied USB cable to the computer’s USB
port and turn on the digital video camera. An icon “Mass
storage” appears on the screen when connection to the
computer has been successfully completed. Please ensure
that there is SD card in the digital video camera.Since the
digital video camera does not have an internal memory,
there will be no content to view when connecting the
digital video camera to the PC.
Note: If you want to enter PC CAM mode, at rst you have to
hold and press the shutter button for a few seconds, then connect the digital video camera to the computer with the supplied USB cable. An icon “PC CAM” will appear on the screen.
If not, please continue to press the shutter button and press
the power button as well. An icon”PC CAM” will appear on the
screen. Open [My Computer], there will be a le named “USB
video tool”. Double click the icon. The digital video camera will
work as the webcam.
38
Page 39

2. Open [My Computer] or [Windows Explorer]. A “Removable
Disk” appears in the drive list. Double-click the “Removable
Disk” icon to view its contents. Files stored on the camera
are located in the folder named “DCIM”.
3. Copy the photos or les to your computer.
7. TECHNICAL SPECIFICATIONS
Display: 2.7" (4:3) TFT Color LCD
Focus Range: Standard: 1.5m ~ innity
Aperture: F/3.1, f=7.5mm
Shutter: Electronic Shutter: 1/2 ~ 1/1800sec.
Still Image:
[21M]: 5616×3744; [12M]: 4000×3000; [8M]: 3264×2448;
Resolution:
Sensitivity: Auto /100/200/400
White Balance: Auto/Daylight/Cloudy/Tungsten/Fluorescent
Exposure Control: -3EV to +3EV in 1.0 step
Burst: Included
[5M]: 2592×1944; [3M]: 2048×1536;
Video:
FHD:1920×1080 FHD; HD:1280×720 HD;
VGA: 640×480; QVGA: 320×240;
39
Page 40

[Normal]/[B&W]/[Sepia]/[Red]/[Green]/[Blue]/
[Sunset]/[Warm]/[Cool]/[Over Exposure]/
Photo Effect:
Self-timer: 2/5/10 sec.
Storage: External memory: SD / MMC
TV System: NTSC / PAL
Digital Zoom: 8X
Power Supply: Li-ion battery
Ambient
Temperature:
Microphone: Built-in
Speaker: Built-in
Dimension: 120.2×58.3×56 (mm)
Included
[IR]/[Binary]/[Vivid]/[Undertone]/[Dog Eye]/
[Aibao]/[Gothic]/[Japan Style]/ [LOMO]/
[Negative]
Operating: 0°C to 40°C
Storage: –20 to 60°C
Camera; USB charger; USB cable; Soft case; Battery;
AVcable; User manual
Manufacturer is not responsible for accidental mistakes and
misprinting in this document.
Specication is subject for changing without prior notication.
Page 41

ЦИФРОВАЯ ВИДЕОКАМЕРА
DVC-340
РУКОВОДСТВО ПОЛЬЗОВАТЕЛЯ
Page 42

СОДЕРЖАНИЕ
1. ОСНОВНЫЕ ЭЛЕМЕНТЫ ЦИФРОВОЙ ВИДЕОКАМЕРЫ .................................44
2. РУКОВОДСТВО ПО НАСТРОЙКЕ .......................................................46
УСТАНОВКА БАТАРЕИ ..........................................................................46
2.1
2.2 КАК ЗАРЯЖАТЬ БАТАРЕЮ ......................................................................46
2.3 УСТАНОВКА КАРТЫ ПАМЯТИ................................................................... 47
2.4 КАК ОТФОРМАТИРОВАТЬ КАРТУ ПАМЯТИ .....................................................48
2.5 ВЫБОР ЯЗЫКА МЕНЮ ..........................................................................48
2.6 КАК УСТАНОВИТЬ ДАТУ ИВРЕМЯ ..............................................................49
2.7 СПИСОК ИНДИКАТОРОВ НА ДИСПЛЕЕ......................................................... 50
3. КАК ПОЛЬЗОВАТЬСЯ ЦИФРОВОЙ ВИДЕОКАМЕРОЙ ...................................58
3.1 КАК ВКЛЮЧИТЬ ЦИФРОВУЮ ВИДЕОКАМЕРУ ..................................................58
3.2 КАК ИЗМЕНИТЬ РЕЖИМ СЪЕМКИ..............................................................59
3.3 КАК ЗАПИСАТЬ ВИДЕОРОЛИК .................................................................59
3.4 КАК СНИМАТЬ ФОТО...........................................................................60
3.5 ИСПОЛЬЗОВАНИЕ ТАЙМЕРА ПРИ СЪЕМКЕ . . . . . . . . . . . . . . . . . . . . . . . . . . . . . . . . . . . . . . . . . . . . . . . . . . . . . 61
3.6 ЗАПИСЬ ЗВУКА.................................................................................62
4. ИСПОЛЬЗОВАНИЕ МЕНЮ ВРЕЖИМЕ ЗАПИСИ . . . . . . . . . . . . . . . . . . . . . . . . . . . . . . . . . . . . . . . . .63
4.1 МЕНЮ ВРЕЖИМЕ ЗАПИСИ.....................................................................63
4.2 СПИСОК ЭЛЕМЕНТОВ ВМЕНЮ................................................................. 64
4.3 МЕНЮ ВРЕЖИМЕ ВИДЕО ......................................................................68
4.4 МЕНЮ НАСТРОЕК..............................................................................70
5. РЕЖИМ ВОСПРОИЗВЕДЕНИЯ..........................................................72
5.1 КАК ПРОСМАТРИВАТЬ ВИДЕОРОЛИКИ ........................................................72
5.2 ПРОСМОТР ФОТО . . . . . . . . . . . . . . . . . . . . . . . . . . . . . . . . . . . . . . . . . . . . . . . . . . . . . . . . . . . . . . . . . . . . . . . . . . . . . . 73
5.3 ВОСПРОИЗВЕДЕНИЕ АУДИОФАЙЛОВ..........................................................74
5.4 ПРОСМОТР МИНИАТЮР........................................................................74
5.5 МЕНЮ ВРЕЖИМЕ ВОСПРОИЗВЕДЕНИЯ........................................................ 75
6. ПОДКЛЮЧЕНИЕ ЦИФРОВОЙ ВИДЕОКАМЕРЫ КТЕЛЕВИЗОРУ /КОМПЬЮТЕРУ.........77
6.1 ПОДКЛЮЧЕНИЕ ЦИФРОВОЙ ВИДЕОКАМЕРЫ КТЕЛЕВИЗОРУ..................................77
6.2 ПОДКЛЮЧЕНИЕ ЦИФРОВОЙ ВИДЕОКАМЕРЫ КТЕЛЕВИЗОРУ
ВЫСОКОЙ ЧЕТКОСТИ (HDTV) .....................................................................78
6.3 ПОДКЛЮЧЕНИЕ ЦИФРОВОЙ ВИДЕОКАМЕРЫ ККОМПЬЮТЕРУ ................................79
6.4 ИСПОЛЬЗОВАНИЕ УСТРОЙСТВА ДЛЯ ЧТЕНИЯ КАРТ ПАМЯТИ.................................. 80
6.5 ПОДКЛЮЧЕНИЕ ЦИФРОВОЙ ВИДЕОКАМЕРЫ ККОМПЬЮТЕРУ СПОМОЩЬЮ
USB КАБЕЛЯ (ВХОДИТ ВКОМПЛЕКТ)..............................................................81
7. СПЕЦИФИКАЦИЯ......................................................................82
42
Page 43

Пожалуйста, прочтите данное руководство пользователя,
чтобы использовать цифровую видеокамеру правильно.
Сохраните инструкцию после прочтения, чтобы вы могли
обратиться кней позже.
Меры предосторожности:
Перед использованием цифровой видеокамеры, пожалуйста, убедитесь, что вы прочитали иприняли все меры предосторожности, описанные ниже.
• В случае возникновения неисправности, не пытайтесь ремонтировать видеокамеру самостоятельно. Техническое обслуживание и ремонт должны выполняться только уполномоченными поставщиками услуг.
• Храните цифровую видеокамеру вдали от воды и других
жидкостей. Не прикасайтесь квидеокамере влажными руками. Никогда не используйте видеокамеру под дождем или
снегом. Влага создает риск поражения электрическим током.
• Используйте только рекомендованные источники питания.
Использование источников питания, не рекомендованных
для данного устройства может привести кперегреву, деформации оборудования, возгоранию, поражению электрическим током или другим нежелательным последствиям.
43
Page 44

1. ОСНОВНЫЕ ЭЛЕМЕНТЫ ЦИФРОВОЙ
ВИДЕОКАМЕРЫ
Кнопка
1.
Воспроизведения.
2. Кнопка Меню.
3. Кнопка Удалить.
4. Кнопка Включения
питания.
5. Кнопка Режимы.
6. Кнопка Вверх.
7. Кнопка Увеличения
масштаба.
8. Кнопка
Уменьшения
масштаба.
9. HDMI Разъем.
10. Питание/Зарядка
индикатор.
11. Кнопка спуска
Затвора.
12. Слот SD карты.
13. USB-разъем.
14. AV Out Разъем.
44
Page 45

15. Вправо/Подсветка
Вкл/Выкл кнопка.
16. Кнопка Вниз.
17. Кнопка OK.
18. Кнопка Влево/
Дисплей.
19. Динамик.
20. LCD дисплей.
21. Индикатор съемки
по таймеру.
22. Объектив.
23. LED подсветка.
24. Микрофон.
25. Крепеж для
штатива.
26. Крышка
батарейного блока.
27. Ремешок.
45
Page 46

2. РУКОВОДСТВО ПО НАСТРОЙКЕ
2.1 УСТАНОВКА БАТАРЕИ
1. Сдвиньте крышку батарейного блока иоткройте ее.
2. Поместите литий-ионный аккумулятор вотсек. Приме-
чание: металлические контакты батареи должны совпадать сконтактами вотсеке!
3. После того как аккумулятор будет правильно установлен, закройте крышку батарейного отсека.
2.2 КАК ЗАРЯЖАТЬ БАТАРЕЮ
Заряжайте аккумулятор не менее восьми часов перед первым использованием.
d. Перед зарядкой аккумулятора выключите камеру ипод-
ключите ее ккомпьютеру или другому источнику питания
при помощи USB кабеля.
e. Во время зарядки индикатор камеры загорается синим
цветом. Индикатор зарядки погаснет, когда зарядка будет завершена.
f. Отсоедините видеокамеру.
46
Page 47

УСТАНОВКА КАРТЫ ПАМЯТИ
2.3
Эта цифровая видеокамера не имеет встроенной памяти.
Чтобы снимать фото исохранять видеоролики, необходимо
использовать SD или MMC карты (максимальный объем SD/
MMC карты, который может поддерживать эта цифровая видеокамера
—
до 32ГБ). Выключите видеокамеру перед установкой или извлечением карты. Убедитесь, что вы расположили карту правильным образом при установке. Никогда не
пытайтесь вставить карту в гнездо при помощи силы, если
вы чувствуете сопротивление. Карта памяти имеет переключатель защиты от записи, который используется для защиты данных от случайного удаления. Таким образом, всякий
раз, когда вы хотите записать, отформатировать или удалять
файлы сSD-карты, заранее отключите защиту записи.
1. Выключите видеокамеру.
2. Найдите резиновую крышку на боковой поверхности
цифровой видеокамеры, под ней располагается слот
для SD-карты.
3. Вставьте карту памяти, как показано на рисунке.
4. Закройте резиновую крышку.
5. Чтобы извлечь карту памяти, аккуратно нажмите на край
карты.
47
Page 48

КАК ОТФОРМАТИРОВАТЬ КАРТУ ПАМЯТИ
2.4
Необходимо отформатировать карту памяти перед первой
эксплуатацией. Все данные будут удалены, включая защищенные файлы. Убедитесь, что важные файлы были предварительно сохранены на компьютер перед форматированием.
1. Включите питание и откройте меню настроек на цифровой видеокамере.
2. При помощи кнопок «Вверх» и«Вниз», выберете пункт
меню [Форматировать], затем нажмите кнопку «OK»
чтобы перейти вподменю.
3. При помощи кнопок «Вверх» и«Вниз», выберете пункт
меню [ДА], азатем нажмите кнопку «OK», чтобы подтвердить форматирование иудалить все данные.
2.5 ВЫБОР ЯЗЫКА МЕНЮ
Не забудьте выбрать язык, установить дату ивремя, перед
первой эксплуатацией устройства.
1. Включите питание иоткройте меню настроек цифровой
видеокамеры.
48
Page 49

2. При помощи кнопок «Вверх» и«Вниз», выберете пункт
меню [Язык], затем нажмите кнопку «OK», чтобы запустить подменю.
3. При помощи кнопок «Вверх» и«Вниз», выберете нужный язык, азатем нажмите кнопку «OK», чтобы подтвердить установку ивыйти из меню.
2.6 КАК УСТАНОВИТЬ ДАТУ ИВРЕМЯ
1. Включите питание, нажмите кнопку «Меню» для отображения меню, азатем нажмите кнопку «Вправо» дважды, чтобы выбрать меню [Настройки].
2. При помощи кнопок «Вверх» и«Вниз», выберете пункт
меню [Установка даты], затем нажмите кнопку «OK»,
чтобы запустить подменю.
49
Page 50

3. При помощи кнопок «Вверх» и «Вниз» корректируйте
выделенное значение. При помощи кнопок «Влево»
и«Вправо» перемещайте курсор.
4. Нажмите кнопку «OK», чтобы подтвердить настройки
изакрыть меню.
2.7 СПИСОК ИНДИКАТОРОВ НА ДИСПЛЕЕ
8 9 10
21 22
11
12
13
14
15 16 17 18 19 20
50
Page 51

Режим фотосъемки [ ]
21M
12M
8M
5M
3M
P
1. Режим фотосъемки
Камера находится врежиме фотосъемки
2. Разрешение изображения.
5616×3744
4000×3000
3264×2448
3. Выбор режима съемки.
Auto
Sport
Night
Portrait
Landscape
2592×1944
2048×1536
Backlight
Party
Beach
High Sensitivity
51
Page 52

4. Количество снимков,
которые поместятся
на карту SD.
5. SD Card inserted.
Без блокировки
Заблокирована
6. Значение уровня
масштаба.
8. Детектор улыбки.
Вкл.
Выкл.
9. Детектор лица.
Вкл.
Выкл.
10. Подавление вибрации.
7. Уровень заряда батареи.
Высокий
Средний
Низкий
Нет заряда
Вкл.
Выкл.
52
Page 53

11. Эффекты.
Нормально IR
Ч & Б Двоичный
Сепия Vivid
Красный Полутона
Зеленый Dog Eye
Синий Aibao
Закат Готика
Теплый Японский стиль
Холодный LOMO
Передержка Инверсия
53
Page 54

12. Экспозиция.
14. Качество изображения.
+3
+2
+1
13. ISO.
0
-1
-2
-3
Авто
100
200
400
Отлично
Хорошо
Нормально
15. Баланс белого.
Авто
Солнечно
Облачно
Лампа накаливания
Лампа дневного света
16. Отпечаток даты.
54
Page 55

Режим видеозаписи [ ]
1 2 3
1. Пиктограмма режима съемки.
2. Разрешение файла видеозаписи.
3. Доступное для видеозаписи время.
4. SD карта установлена.
5. Уровень масштабирования.
6. Уровень заряда батареи.
7. Эффект.
55
4
5
6 7 8 9 10
Page 56

8. Экспозиция.
9. Качество видео.
10. Баланс белого.
Режим аудиозаписи: [
1 2
1. Пиктограмма аудиозаписи.
2. Доступное для аудиозаписи время.
3. SD карта установлена.
4. Заряд батареи.
]
3
4
56
Page 57

Режим воспроизведения: [ ]
1 2 3
4
7
5 6
1.
Пиктограмма режима воспроизведения изображений..
Пиктограмма режима воспроизведения видео.
Пиктограмма режима воспроизведения аудио
2. Размер Фото/Видео.
3. Каталог файлов на SD карте/ Номер текущего изобра-
жения/Видео.
57
Page 58

4. Время видеозаписи.
5. Уровень заряда батареи.
6. Штамп даты.
7. Нажмите кнопку спуска затвора для воспроизведения
видео файлов.
3. КАК ПОЛЬЗОВАТЬСЯ ЦИФРОВОЙ
ВИДЕОКАМЕРОЙ
3.1 КАК ВКЛЮЧИТЬ ЦИФРОВУЮ ВИДЕОКАМЕРУ
Включение ивыключение:
1. Откройте LCD экран, чтобы включить питание цифровой видеокамеры, изакройте LCD экран, чтобы выключить цифровую видеокамеру.
2. Так же включить цифровую видеокамеру можно нажав
кнопку питания; что бы выключить цифровую видеокамеру нажмите кнопку питания снова, иудерживайте ее
3 секунды.
58
Page 59

Для экономии заряда батареи, вы можете изменить время
автоотключения, установив функцию [Автовыключение]
вменю настроек.
3.2 КАК ИЗМЕНИТЬ РЕЖИМ СЪЕМКИ
В цифровой видеокамере существует четыре режима работы. Для смены режима нажмите кнопку «Режим». Каждый
раз, при нажатии на кнопки «Режим» происходит изменение режима работы камеры.
Пиктограмма Заголовок Описание
Фото режим Режим фотосъемки.
Видео режим Для записи видеороликов.
Аудио режим Для записи аудио.
Режим
воспроизведения
Для просмотра записанных данных.
Примечание: Нажмите кнопку «Воспроизведение», чтобы
перейти врежим воспроизведения.
3.3 КАК ЗАПИСАТЬ ВИДЕОРОЛИК
1. Включите цифровую видеокамеру и активируйте режим записи видео.
59
Page 60

2. Изменение масштаба: При помощи кнопок «Вверх»
или «Вниз», увеличьте или уменьшите масштаб объекта
съемки. На ЖК-мониторе отобразится значение уровня
увеличения.
3. Нажмите кнопку спуска затвора, чтобы начать запись.
4. Что бы приостановить запись нажмите кнопку «OK»; что
бы продолжить запись нажмите кнопку «OK» еще раз.
5. Нажмите кнопку спуска затвора еще раз, чтобы закончить запись. Если память заполнена, видеокамера остановит запись автоматически.
• На верхней части LCD- экрана отображается время
записи.
• При недостаточном освещении нажмите кнопку
«Вправо», чтобы включить лампу подсветки. Когда окружающего света достаточно, нажмите кнопку
«Вправо» еще раз, чтобы выключить лампу подсветки.
3.4 КАК СНИМАТЬ ФОТО
1. Установите камеру в режим фотосъемки, на LCD-дисплее появляется соответствующий значок.
60
Page 61

2. Изменение масштаба: Нажмите кнопку увеличения или
уменьшения масштаба для изменения размера объекта
съемки на экране. На LCD-мониторе будет отображаться значение уровня приближения.
3. Держите видеокамеру устойчиво, а затем нажмите
кнопку спуска затвора.
• При недостаточном освещении нажмите кнопку
«Вправо», чтобы включить лампу подсветки. Когда окружающего света достаточно, нажмите кнопку
«Вправо» еще раз, чтобы выключить лампу подсветки.
3.5 ИСПОЛЬЗОВАНИЕ ТАЙМЕРА ПРИ СЪЕМКЕ
Используйте функцию таймера, чтобы установить задержку
между нажатием кнопки спуска затвора и выполнением
съемки.
1. Включите питание иустановите цифровую видеокамеру врежим фото.
2. Нажмите кнопку Меню, чтобы перейти в меню, а затем при помощи кнопок «Влево» и«Вправо» выберете
[съемка].
61
Page 62

3. При помощи кнопок «Вверх» и«Вниз», выберете пункт
[Авто-спуск] или [Серия снимков]. И нажмите кнопку
OK, чтобы запустить подменю:
Выкл: Не использовать таймер.
Таймер 2сек: Съемка сзадержкой 2 секунды.
Таймер 5сек: Съемка сзадержкой 5 секунд.
Таймер 10сек: Съемка сзадержкой 10 секунд.
Серия:
При нажатии на кнопку спуска затвора будет сделано три снимка подряд.
4. При помощи кнопок «Вверх» и «Вниз» выберете нужный пункт, а затем нажмите кнопку «OK», чтобы подтвердить выбор изакрыть меню.
5. Нажмите кнопку спуска затвора, чтобы сделать снимок,
используя функции таймера.
3.6 ЗАПИСЬ ЗВУКА
1. Включите цифровую видеокамеру и переключите её
врежим аудио записи ().
2. Нажмите кнопку спуска затвора, чтобы начать запись.
62
Page 63

3. Нажмите кнопку спуска затвора еще раз, чтобы закончить запись. Если память будет заполнена, видеокамера
остановит запись автоматически.
4. ИСПОЛЬЗОВАНИЕ МЕНЮ ВРЕЖИМЕ ЗАПИСИ
Перемещение ивыбор по меню осуществляется при помощи кнопок «Вверх», «Вниз», «ОК».
4.1 МЕНЮ ВРЕЖИМЕ ЗАПИСИ
1. Включите цифровую видеокамеру и переключите её
врежим съемки.
2. Нажмите кнопку «Меню», чтобы отобразить меню, ипри
помощи кнопок «Влево», «Вправо» выберете нужное
меню.
3. Перемещайтесь по меню используя кнопки «Вверх»
и«Вниз».
4. Нажмите кнопку «OK» для входа вподменю.
5. Перемещайтесь используя кнопки «Вверх» и«Вниз».
6. Нажмите кнопку «OK», чтобы подтвердить выбор иза-
крыть меню.
63
Page 64

СПИСОК ЭЛЕМЕНТОВ ВМЕНЮ
4.2
Элемент меню Функция
Выбор режима: Вы можете выбрать подходящий режим съемки. Всего
доступно 10 режимов.
[Авто] / [Спорт] / [Ночной] / [Портрет] / [Пейзаж] /
[Встречный свет] /[Вечеринка] / [Пляж] / [Высокая
чувствительность].
Размер: Вы можете выбрать подходящий размер изображения:
21M (5616×3744)
12M (4000×3000)
8M (3264×2448)
5M (2592×1944)
3M (2048×1536).
Определение лица: Используйте эту функцию, чтобы определить лица при
съемке. Можно выбрать один из двух вариантов: [Вкл.]/
[Выкл.].
Определение
улыбки:
Если функция включена, то камера автоматически
сделает снимок после того, как обнаружит улыбку. [Вкл.]
/ [Выкл.].
64
Page 65

Элемент меню Функция
Съемка: Серия снимков: Используйте эту функцию, чтобы снять
серию из 3 фотографий подряд.
[Покадровая]: при нажатии на кнопку
спуска затвора будет сделан один
снимок.
[Непрерывная]: при нажатии на кнопку спуска затвора будет сделано три
снимка подряд.
Панорама: Используйте функцию для съемки
целого окружающего пространства.
За один раз можно сделать снимок
на 180 градусов по горизонтали
и90 градусов по вертикали. [Выкл.] /
[Вверх.] / [Вправо]
Мультиэкспозиция:
Таймер: С помощью функции таймера можно
Отмена: Отменить текущую операцию.
Используйте эту функцию, чтобы
выполнить наложение двух изобра-
жений водно. [Выкл.] / [Двойная
экспозиция] / [Длинная выдержка] /
[3D захват]
установить задержку во времени
смомента нажатия на кнопку спуска
затвора до времени выполнения
съемки изображения. [Выкл.] / [2 сек.]
/ [5 сек.] / [10 сек.].
65
Page 66

Элемент меню Функция
Настройки съемки: ISO: Настройка ISO позволяет установить
уровень чувствительности вашей
камеры.
[Авто] / [100] / [200] / [400].
Подавление
вибрации:
Выбор лучшего
изображения:
Штамп даты: Эта функция позволяет добавить дату
Отмена: Отменить текущую операцию.
Используйте эту функцию, чтобы ком-
пенсировать мелкое дрожание рук
при съемке. [Вкл] / [Выкл].
Функция используется для автомати-
ческого определения момента съемки.
[Вкл] / [Выкл].
или время съемки на ваши фотогра-
фии.
[Выкл]: Не добавлять дату ивремя на
изображения.
[Дата]: Добавить только дату на изо-
бражения.
[Дата ивремя]: Добавить дату ивремя
на изображения.
[Отмена]: Отменить эту операцию.
66
Page 67

Элемент меню Функция
Настройки
изображения:
Баланс белого: Настройка баланса белого всоот-
Экспозиция: Установка значения экспозиции вруч-
Частота сети: Частота должна быть установлена для
Качество: Установите низкое качество, чтобы на
Резкость: Вы можете установить уровень
ветствии сразличными условиями
освещения.
[Авто]/[Солнечно]/[Пасмурно]/
[Лампа накаливания]/[Лампа дневно-
го света].
ную, для необычных условий освеще-
ния, например, темный фон, сильный
встречный свет ит. д. Значения можно
выбрать от –3 до +3.
вашего региона. [50HZ]/[60HZ].
карту памяти поместилось большее
количество кадров. [Отличное]/[Хоро-
шее]/[Нормальное].
резкости изображений, сделанных
спомощью камеры. Уровень резкости
определяет, насколько сильно выра-
жены края объектов на изображении.
[Мягко] / [Нормально] / [Резко].
67
Page 68

Элемент меню Функция
Настройки
изображения:
Эффект: Установите цветовой эффект, чтобы
добавить цветовой тон кизображе-
нию. [Нормально] / [Ч & Б] / [Сепия] /
[Красный] / [Зеленый] / [Синий] /
[Закат] / [Теплый] /
[Холодный] / [Передержка] / [IR] /
[Двоичный] /
[Яркий] / [Оттенок] / [DogEye] /
[Aibao] /
[Готика] / [Японский стиль] / [ЛОМО] /
[Инверсия].
Насыщенность: Значение насыщенности.
[Высокая]/[Нормальная]/[Низкая].
Отмена: Отменить текущую операцию.
4.3 МЕНЮ ВРЕЖИМЕ ВИДЕО
1. В режиме записи видео нажмите кнопку «Меню» для
отображения меню и при помощи кнопок «Влево»
и«Вправо» выберете нужное меню.
2. При помощи кнопок «Вверх» и «Вниз» выберете элемент меню.
3. Нажмите кнопку «OK» для входа вподменю.
68
Page 69

4. При помощи кнопок «Вверх» и «Вниз» выберете элемент меню.
5. Нажмите кнопку «OK», чтобы подтвердить установку
ивыйти из меню.
Элемент меню Функция
Выберете наименьший размер, чтобы время записи файла
Размер:
Настройки
изображения:
было максимальным.
FHD:1920x1080 FHD; HD:1280x720 HD;
VGA: 640x480; QVGA: 320x240
Настройка баланса белого всоответствии
Баланс белого:
Экспозиция:
сразличными условиями освещения.
[Авто]/[Солнечно]/[Пасмурно]/
[Лампа накаливания]/[Лампа дневного света].
Установка значения экспозиции вручную, для
необычных условий освещения, например,
темный фон, сильный встречный свет ит. д.
Значения можно выбрать от –3 до +3.
Частота сети:
Качество:
Частота должна быть установлена для вашего
региона. [50HZ]/[60HZ].
Установите низкое качество, чтобы на карту
памяти поместилось большее количество
кадров. [Отличное]/[Хорошее]/[Нормальное].
69
Page 70

Элемент меню Функция
Вы можете установить уровень резкости
изображений, сделанных спомощью камеры.
Резкость:
Настройки
изображения:
Эффект:
Насыщенность:
Отмена: Отменить текущую операцию.
Уровень резкости определяет, насколько
сильно выражены края объектов на изобра-
жении.
[Мягко] / [Нормально] / [Резко].
Установите цветовой эффект, чтобы добавить
цветовой тон кизображению. [Нормально] /
[Ч & Б] / [Сепия] /
[Красный] / [Зеленый] / [Синий] / [Закат] /
[Теплый] /
[Холодный] / [Передержка] / [IR] / [Двоич-
ный] /
[Яркий] / [Оттенок] / [DogEye] / [Aibao] /
[Готика] / [Японский стиль] / [ЛОМО] /[Нега-
тив].
Значение насыщенности.
[Высокая]/[Нормальная]/[Низкая].
4.4 МЕНЮ НАСТРОЕК
1. В режиме записи видео нажмите кнопку «Меню» для
отображения меню и при помощи кнопок «Влево»
и«Вправо» выберете нужное меню.
70
Page 71

2. При помощи кнопок «Вверх» и «Вниз» выберете элемент меню.
3. Нажмите кнопку «OK» для входа вподменю.
4. При помощи кнопок «Вверх» и «Вниз» выберете эле-
мент меню.
5. Нажмите кнопку «OK», чтобы подтвердить установку
ивыйти из меню.
Элемент меню Функция
Автовыключение:
Звук: Включить или выключить звуки работы.
Язык: Выберете язык меню идополнительной информации.
Установка
даты:
TV Выход:
Для экономии электроэнергии, камера выключается автоматически по истечении определенного периода времени.
[Откл] / [1 мин.] / [3 мин.] / [5 мин.] / [10 мин].
Позволяет установить дату ивремя для цифровой видеокамеры.
Вы можете просматривать изображения на экране телевизора спомощью прилагаемого AV-кабеля. Настройки вывода
должны быть установлены либо вNTSC или PAL взависимости от региона. [NTSC]: Америка, Япония идругие; [PAL]:
Европа, Океания идр.
71
Page 72

Элемент меню Функция
Используйте эту функцию, чтобы отформатировать карту
Форматирование:
Настройки по
умолчанию:
Отмена: Отменить текущую операцию.
иудалить все данные, хранящиеся на ней. Все данные будут
удалены, включая защищенные файлы. Убедитесь, что важные файлы были предварительно сохранены на компьютер
перед форматированием. [Да]/[Нет].
Используйте эту функцию, чтобы сбросить все настройки
меню ивернуть функции кнопок кпервоначальным значениям. [Да]/[Нет].
5. РЕЖИМ ВОСПРОИЗВЕДЕНИЯ
5.1 КАК ПРОСМАТРИВАТЬ ВИДЕОРОЛИКИ
1. Нажмите кнопку «Воспроизведение», чтобы переключить цифровую видеокамеру врежим воспроизведения.
2. При помощи кнопок «Влево» и «Вправо» выберете
клип, который нужно воспроизвести.
3. Нажмите кнопку спуска Затвора, чтобы начать воспроизведение. Нажмите кнопку «OK», чтобы приостановить
воспроизведение и нажмите кнопку еще раз, чтобы
72
Page 73

продолжить. Нажмите кнопку «Вправо» для быстрой
перемотки вперед, и нажмите кнопку «Влево», чтобы
перемотать назад.
4. Нажмите кнопку спуска Затвора еще раз, чтобы остановить воспроизведение.
5.2 ПРОСМОТР ФОТО
1. Переключите цифровую видеокамеру врежим воспроизведения.
На LCD-экране появится последний записанный файл.
Если на карте памяти пока нет изображений, то появится сообщение [НЕТ СНИМКОВ].
2. При помощи кнопок «Влево» и«Вправо» можно просматривать предыдущее или последующее изображение.
3. Изменение масштаба:
Нажмите кнопки увеличения иуменьшения масштаба
изображения. Когда изображение увеличится, вы сможете использовать кнопки «Влево» / «Вправо» / «Верх»/
«Вниз», чтобы просмотреть детали изображения.
73
Page 74

4. Нажмите кнопку уменьшения масштаба, чтобы возобновить нормальный режим работы.
5.3 ВОСПРОИЗВЕДЕНИЕ АУДИОФАЙЛОВ
1. Нажмите кнопку «Воспроизведение», чтобы переключить цифровую видеокамеру врежим воспроизведения.
2. При помощи кнопок «Влево» и«Вправо» выберете звуковые файлы, которые нужно воспроизвести. Нажмите
кнопку «OK», чтобы приостановить воспроизведение
инажмите на кнопку еще раз, чтобы продолжить. Нажмите кнопку «Вправо» для быстрой перемотки вперед
инажмите кнопку «Влево», чтобы перемотать назад.
3. Нажмите кнопку спуска Затвора, чтобы начать воспроизведение.
4. Нажмите кнопку спуска Затвора еще раз, чтобы остановить воспроизведение.
5.4 ПРОСМОТР МИНИАТЮР
Нажмите кнопку уменьшения масштаба в режиме воспроизведения, чтобы просмотреть список файлов врежиме ми-
74
Page 75

ниатюр. При помощи кнопок «Влево» / «Вправо» / «Верх» /
«Вниз» выберете файл. Нажмите кнопку «OK», чтобы просмотреть файл вполноэкранном режиме.
5.5 МЕНЮ ВРЕЖИМЕ ВОСПРОИЗВЕДЕНИЯ
1. В режиме записи видео нажмите кнопку «Меню» для
отображения меню и при помощи кнопок «Влево»
и«Вправо» выберете нужное меню.
2. При помощи кнопок «Вверх» и «Вниз» выберете элемент меню.
3. Нажмите кнопку «OK» для входа вподменю.
4. При помощи кнопок «Вверх» иВниз выберете элемент
меню.
5. Нажмите кнопку OK, чтобы подтвердить установку
ивыйти из меню.
Элемент меню Функция
Используйте эту функцию, чтобы удалить один или все
файлы.
Удалить:
[Это изображение]: Удалить текущий файл.
[Все изображения]: Удалить все файлы, кроме заблокированных.
75
Page 76

Элемент меню Функция
Автоматическая демонстрация изображений через
Слайдшоу:
определенный интервал.
[3 сек.]/[5 сек.]/[10 сек.].
Используйте эту функцию для поворота изображений.
o
]: Повернуть изображение на 90 градусов по
[90
часовой.
Повернуть:
[180o]: Повернуть изображение на 180 градусов по
часовой.
[270o]: Повернуть изображение на 270 градусов по
часовой.
Используйте эту функцию для обрезки изображения.
[Обрезать]: Используйте кнопки «Вверх» и«Вниз»
Обрезать изображение:
чтобы определить диапазон обрезки, азатем нажмите
кнопку спуска Затвора, чтобы обрезать изображе-
ние, затем нажмите кнопку еще раз, чтобы сохранить
изображение.
Используйте эту функцию, чтобы поставить на файл
защиту от случайного удаления.
Защита:
[Заблокировать этот файл] \ [Разблокировать этот
файл] [Заблокировать все файлы] \ [Разблокировать
все файлы]
76
Page 77

Элемент меню Функция
Используйте эту функцию что бы напечатать фото-
Печать:
графию без компьютера. Убедитесь, что ваш принтер
поддерживает функцию [picture Bridge], азатем под-
ключите цифровую видеокамеру кпринтеру/
6. ПОДКЛЮЧЕНИЕ ЦИФРОВОЙ ВИДЕОКАМЕРЫ
КТЕЛЕВИЗОРУ /КОМПЬЮТЕРУ
6.1 ПОДКЛЮЧЕНИЕ ЦИФРОВОЙ ВИДЕОКАМЕРЫ
КТЕЛЕВИЗОРУ
Когда вы подключите цифровую видеокамеру ктелевизору при помощи специального кабеля, экран камеры автоматически выключится, а вся информация, которая ранее
отображалась на экране цифровой видеокамеры, будет отображаться на экране телевизора.
1. Подключите цифровую видеокамеру ктелевизору спомощью телевизионного кабеля (входит вкомплект).
77
Page 78

2. Включите телевизор ицифровую видеокамеру, азатем
установите телевизор врежим «AV».
3. Когда цифровая видеокамера находится врежиме записи, вы можете просматривать на экране телевизора
объекты съемки, которые вы хотите записать.
4. Когда цифровая видеокамера установлена в режим
просмотра, вы сможете просмотреть на телевизоре все
фотографии, видео и аудио ролики, хранящиеся вкамере.
6.2 ПОДКЛЮЧЕНИЕ ЦИФРОВОЙ ВИДЕОКАМЕРЫ
КТЕЛЕВИЗОРУ ВЫСОКОЙ ЧЕТКОСТИ (HDTV)
Телевизоры высокой четкости (HDTV) обладают встроенным
портом, через который, можно передавать сигнал HD (720P)
качества свысоким разрешением.
1. Подключите цифровую видеокамеру ктелевизору высокой четкости спомощью HDMI-кабеля (вкомплект не
входит).
2. Включите телевизор ипереключитесь на HDMI-режим.
78
Page 79

3. Включите цифровую видеокамеру. Переключите цифровую видеокамеру врежим воспроизведения. Используя кнопки «Влево» \ «Вправо» \ «Вверх» \ «Вниз» выберете нужный файл.
4. Нажмите кнопку спуска Затвора для воспроизведения
выбранного видеофайла, нажмите кнопку еще раз, чтобы остановить воспроизведение.
5. Нажмите кнопку «OK», чтобы поставить воспроизведение не паузу, нажмите на нее еще раз, чтобы продолжить.
6. Нажмите кнопку «Влево», чтобы отмотать назад, нажмите кнопку «Вправо» чтобы перемотать вперед.
7. Нажмите кнопку «Вверх» или «Вниз» для регулировки
громкости.
6.3 ПОДКЛЮЧЕНИЕ ЦИФРОВОЙ ВИДЕОКАМЕРЫ
ККОМПЬЮТЕРУ
Есть два способа загрузки файлов скарты памяти цифровой
видеокамеры на компьютер:
79
Page 80

• Вставив карту памяти в устройство для чтения карт
(вкомплект не входит).
• При подключении камеры к компьютеру с помощью
прилагаемого USB-кабеля.
6.4 ИСПОЛЬЗОВАНИЕ УСТРОЙСТВА ДЛЯ ЧТЕНИЯ КАРТ
ПАМЯТИ
1. Извлеките карту памяти из цифровой видеокамеры
ивставить ее вустройство для чтения карт, подключенного ккомпьютеру.
2. Откройте [Мой компьютер] или [Проводник Windows]
и дважды щелкните значок съемного диска, который
представляет собой карту памяти.
3. Скопируйте изображения скарты впапку компьютера.
80
Page 81

ПОДКЛЮЧЕНИЕ ЦИФРОВОЙ ВИДЕОКАМЕРЫ
6.5
ККОМПЬЮТЕРУ СПОМОЩЬЮ USB КАБЕЛЯ (ВХОДИТ
ВКОМПЛЕКТ)
1. Подключите цифровую видеокамеру кUSB-порту компьютера при помощи USB-кабеля. Включите камеру. На
экране появится значок «Накопитель», если подключение ккомпьютеру был успешно выполнено. Пожалуйста,
убедитесь, что SD-карта установлена вцифровой видеокамере.
Примечание: Если вы хотите войти врежим WEB камеры
(PC-камеры), сначала вы должны нажать удерживать кнопку
спуска Затвора втечение нескольких секунд, азатем подключить цифровую видеокамеру ккомпьютеру спомощью
прилагаемого USB-кабеля. Значок «PC-Камера» появится на
экране. Если не получилось, пожалуйста, попробуйте нажать
кнопку спуска Затвора и кнопку питания одновременно.
Значок « PC-Камера « появится на экране. Откройте [Мой
компьютер], появится папка сименем «USB vide tools». Дважды щелкните по значку. Цифровая видеокамера будет работать вкачестве веб-камеры.
81
Page 82

2. Откройте [Мой компьютер] или [Проводник Windows].
«Съемный диск» появляется всписке дисков. Дважды
щелкните значок «Съемный диск», чтобы просмотреть
его содержимое. Файлы, хранящиеся на камере, находятся впапке под названием «DCIM».
3. Скопируйте фотографии или файлы на ваш компьютер.
7. СПЕЦИФИКАЦИЯ
Дисплей: 2.7” (4:3) TFT цветной LCD
Диапазон фокусировки: 1.5м ~ бесконечность
Диафрагма: F/3.1, f=7.5мм
Затвор: Электронный спуск: 1/2 ~ 1/1800 сек.
Фото:
21M (5616×3744)
12M (4000×3000)
Разрешение:
8M (3264×2448)
5M (2592×1944)
3M (2048×1536)
82
Page 83

Видео:
FHD (1080×1920)
Разрешение:
Чувствительность: Авто /100/200/400
HD (1280×720)30fps
VGA (640×480)30fps
QVGA: 320×240
Баланс белого:
Компенсация экспозиции: -3EV до +3EV с1.0 шагом
Серийная съемка: Поддерживается
Фото эффекты:
Автоспуск: 2/5/10 сек.
Накопитель: Карты памяти: SD / MMC
TV системы: NTSC / PAL
Приближение (Zoom): 8X кратное, цифровой
Авто/Солнечно/Облачно/Лампа накаливания/
Лампа дневного света
[Нормально]/[Ч&Б]/[Сепия]/[Красный]/[Зеленый]/
[Синий]/[Закат]/[Теплый]/[Холодыый]/[Передежка]/[IR]/[Двоичный]/[Vivid]/[Оттенки]/[Dog Eye]/
[Aibao]/[Готический]/[Японский стиль]/ [LOMO]/
[Инверсия]
83
Page 84

Источник питания: Li-ion батарея
Допустимая температура
окружающей среды:
Микрофон: Встроенный
Динамик: Встроенный
Размеры: 120.2×58.3×56 (мм)
Комплектация:
Рабочая: 0°C to 40°C
Хранение: –20 to 60°C
Камера; СЗУ; USB кабель; Чехол; Батарея;
AVкабель; Руководство пользователя
Производитель не несет ответственность за возможные ошибки
иопечатки внастоящем документе.
Спецификация продукта может быть изменена без предварительного
уведомления.
 Loading...