

Page 1
AM/FM/DVD/CD/MP3 Receiver with USB/SD & Auxiliary Inputs
3 Built-in Microphone inputs for PA Announcements
Installation/Operation Manual
50W x 4 VR-3000
Page 2

2
Th a nk you for p urchas i ng the VR-3000 AM/FM/DVD/CD/MP3/USB/SD Recei ver
from REI. This product is designed and tested to withstand temperature and vibration
extremes. Please r ead the owner’s manua l careful ly befor e attem p ting to install.
If you have an installation question or need installation as sistan ce, pl ease call the:
SERVICE HOT LINE
1-877-726-4617 Toll Free USA & CANADA
1-402-339-2200
Your player will only play comm ercia l DV Ds with regi on co d e l a bels on th em.
FEATURES:
Electronic AM/FM Stereo Tuner w/RBDS
Anti-skip DVD/CD M e chani s m
Front-panel USB type-A input
Front-panel SD/SDHC CARD input
Plays MP3/W M A/ AAC file format s
Independent front panel 3.5mm Audio Input jack
Independent rear RCA A/V AUX 2 input jacks w/ automatic trigger
Wireless Remo te Control
Non-Volatil e m e mory ba ck -up
50W x 4 Output powe r
USA/EURO Radio Frequency bands
Radio Station Lock-Out
Green LE D ba ck l i ghti ng
Displays ID3 tag information
Composite Video Output via locking BNC connection
3 Micr ophone inp ut jacks for PA announce ments
IF ADDITIONAL INS TALLATION COMPONENTS ARE NECESSARY, CONTACT YOUR REI
SA LES REP FOR:
** OEM /FACTORY WIRING HARNESS ADAPTERS
** ANTENNAS & ANTENNA A DAPTERS
** SPEAKERS & GRILLS
Radio Engineering Industries, Inc.
6534 “L” Street
Omaha, Nebraska 68117
www.radioeng.com
Page 3
3
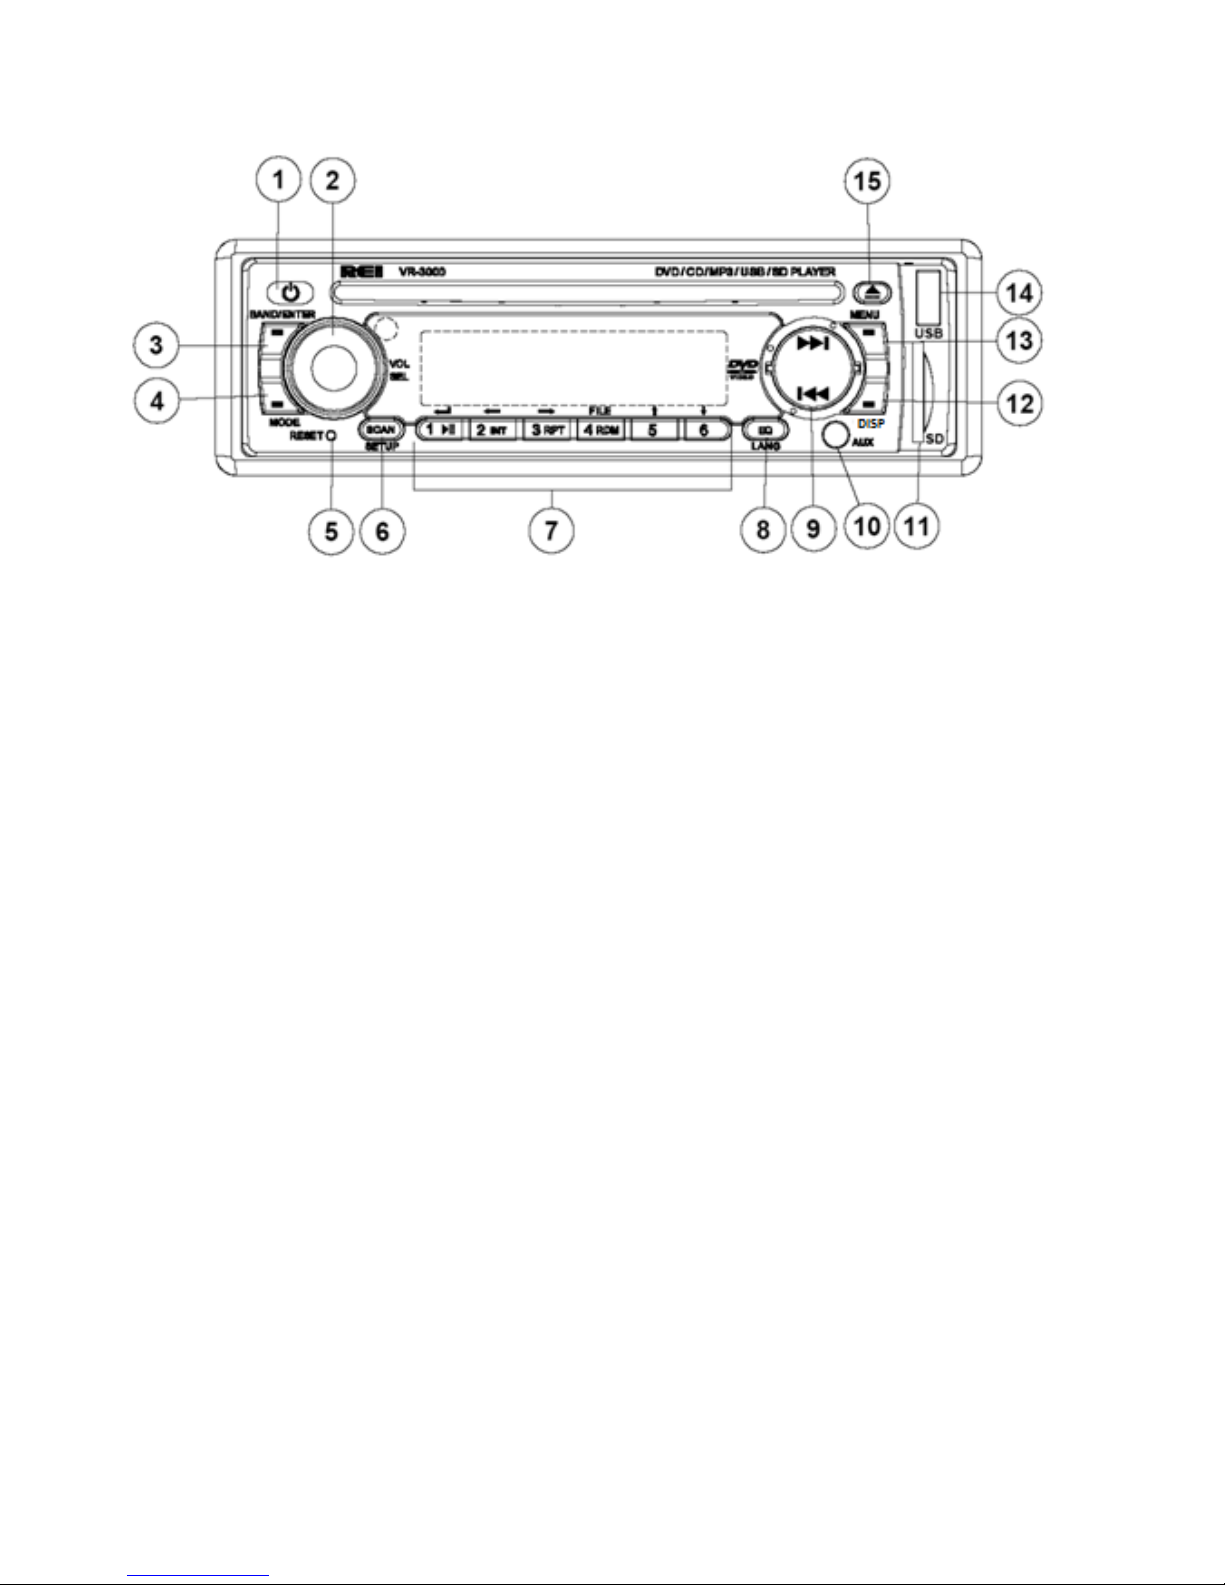
CONTROLS AND INDICA TORS
(1) Power Butt on
(2) Volume/Select Knob
(3) Band/Enter Button
(4) Mode Button
(5) Rese t Button
(6) Scan/Setup Button
(7) Pres et Memory/ Menu Scroll Buttons
(8) EQ/Language Button
(9) Radio Station Tune/Seek, Track Control Buttons
(10) Front Auxiliary Input Jack
(11) SD C a rd Input s lot
(12) Display Button
(13) Menu Bu t ton
(14) USB I np ut Slot
(15) Eject Button
Page 4

4
OPERATION
1) Power Button
Press the Power Butt on to turn ON or OFF the unit. A red light means the unit is in
standby, a Blue light means the radio is on.
2) Volume/Select Knob
Rot ate t he knob left o r righ t to change the volu me level .
Press t he knob to sel e c t one of the fol lowin g fun c tions :
VOL---BASS---TREB---BAL---FAD
Rotate t he knob to adjust t he desired settin g.
3) Band/Enter Button
Press this button to change radio bands as follows:
FM1—FM2—FM3—AM1—AM2
Press this button to confirm changes in the SETUP menu
4) Mode Button
Pres s th is button to select sour ce mode (RADIO/DISC/USB/CARD/AUX1/AUX2)
*USB and SD card must be insert ed to activate these modes
5) Reset Button
If there is a malfunction of the unit, pressing the RESET button will clear the system
6) Scan/Setup Button
Press a nd h old this button for 2 sec ond s to auto prog ram avail abl e stations into all the
preset memory buttons. This function will erase previous memorized stations and store
the n ewly searched stations. Once com p leted, the rad io will scan for 5 seconds through
each of the pres e t stations of e i ther the AM or FM band.
Press this button to automatically preview all radio stations in that band for 5 seconds
Setup Button
During video playback operation only, th e Setup button can be pressed to access the
radio’s SETUP MENU. Doing so will PAUSE the source mater ial until the user
exits.
**The SETUP options can only be seen with a mon itor connec ted t o the
composi te video output. The radio will displa y PAUSE, cont in ue to press SE T UP
to e xit this menu.
7) Preset Memory, Scroll, Recall Buttons
Press these buttons momen tarily to select the pr eset stations.
Press and holding a button will preset the current station to the button being pr essed.
While in video SETUP, use these buttons to scroll through
availabl e options. Press or BAND/ENTER to confirm the desir ed selection.
The Button selects th e d esired fi le forma t for playback ie. MUSIC, PHOTO, or
MOVIE when mu ltiple formats are av ailable on the source media(CD/DVD /USB/SD) .
Page 5

5
Press this button to PAUSE/PLAY the m edia (CD/DVD/SD/USB)
Press and hold this butt on to select INT RO ON/OFF on CD p l aybac k
Press and hold this button to change REPEAT from Track, Folder, All
Press and hold this button to turn RANDOM ON/OFF
8) EQ/Language Button
Press this button to apply preset sound effects to the units audio output signal. Pressing
this button selects E Q POP, EQ CLASS, EQ ROCK, & EQ CUST. When any of the
soun d modes ot her th an EQ CUST is sel ected, the BASS & TREBLE contr ol s are
disabled on the volume sele c t kn ob.
Langu age Butt on
Press and hold this bu tton dur i ng DVD playbac k to select one of the optional subtitle
languages available on multi-language DVD discs.
9) TUNE / SEEK /TRACK Buttons
Under Radio mode, pres s the desired button to manu ally tun e a station movin g upward
or downward. Press and hold button momentarily and the radio will automatically seek
or down to the next available radio st ation. Pr e s s an d hold button for 2 se c ond s a nd the
radio continuously tunes up or down until the but ton is released.
When pl aying dig ital m edi a, use thes e buttons to track UP/DOWN t o the desired
ch apt er to pla ybac k.
10) Auxiliary Input Jacks
The unit is equipped with a front pan el 3.5mm auxiliary audio input so you can
connect your extern al port a ble audi o player or portable s atel lite rad io receiver. Press
Mode to display AUX 1 for operat ion .
The r ad io is also equipped with a second Rea r AUX 2 Audio/Video RCA input for
connecting a second ary A/V device. Press Mode for AUX 2 for op erati on. When
vid eo is connected a nd the player is in AUX 2 mode , the video will output through the
main VIDE O O UT BNC connection.
When connecte d to GROUND, the Brown AUX 2 trigger wire on the rear of the
radio will automatically power the VR-3000 and switch the source to AUX 2. When
the ground is removed, the Radio will return to its previous state.
*It may be necessary to adju st the vol u me level on the auxiliary devis e to ach ieve the
optimal volume level.
Page 6

6
11) SD Card Input
Insert the SD card and the radio will automatically switch to the CA RD input and
begin playback .
12) DIS Button
Pres s th is button to change between Time and Mode Inform ation displa y.
Setting the Time:
Press this button momentarily to display the time. Next, press and h old this button
until the hour displ ay begins to flas h . Ro tate Volume/S elect Knob to adjus t the hour.
Press the DISP button again, and the minute display will f lash. Rotate Volume/Sele c t
Knob to adjus t th e mi nute. Press Volume/Select to s ave the desired time.
13) Menu Butt on
Press this button to go to the mai n menu of the DVD disc. This button also serves as
Root DIR access for available digital files on the source media bein g playe d.
14) USB Input
Insert a USB drive and the radio will automatically switch to USB input and be gin
playback.
**Note : Th e unit 's USB por t does n ot s upp ort the Apple iPod or iPhone.
15) Eject Button
Press this button to eject the CD/DVD
RADIO SYSTEM MENU
Press and hold the VOL/SEL button for 2 seconds. LCD will display MENU, make
the d esired selecti on below:
To chan g e d ispla y SCROLL OPTIONS, rotate VOL/SEL, then press t o c hoose :
• Scroll OFF - RDS text will not display automaticall y, must press th e DISP
key to view.
• Scrol l ONCE - RDS text will display automatically but is limited to one time.
It will update automatically when new information is received.
• Scroll ON - RDS text will display automatically and continuously.
To enable t he RDS option, rotate VOL/S EL, then press to choose:
• RDS ON
• RDS OFF
This is the firmwar e version present on th e r ad io.
• VER 001
To save and exit MENU mode, pres s and hold t he VOL /SEL but ton.
Note: Menu will exit automatically after 5 continuous seconds without saving any
selections.
Page 7
7
RADIO STAT IO N LOCK-OUT
Rad io station L oc k-Out gives Fleet managers the ability to restrict AM/FM
pla yba ck . To enabl e op eration, set acceptable st ations in to all th e AM & FM
pr esets. I f onl y one s tati on is allowed, pres et that same station into all pr es ets of
eith er the F M or AM band. On ce th e s t ations ar e set, Press and h ol d both the
VOL/SEL (2) and BAND (3) buttons for 3 seconds. The display will scroll
“ENTER CODE”, at which time the user can enter a personal 4 digit code using
pr esets 1-6. Once entered, the display will show “LOCKED” giving the user
confirmation. The user will have access to only the AM & FM station s found in
pr esets 1-6. If the user attempts to change t he station using the SEEK /TUNE
button s, the display will scr oll “ENTER CODE”. Entering the wrong code will
scrol l “ERR CODE”. On ce the user enters the corr ect code, the disp lay will
show “UNLOCKED” and restore the radio to normal operation.
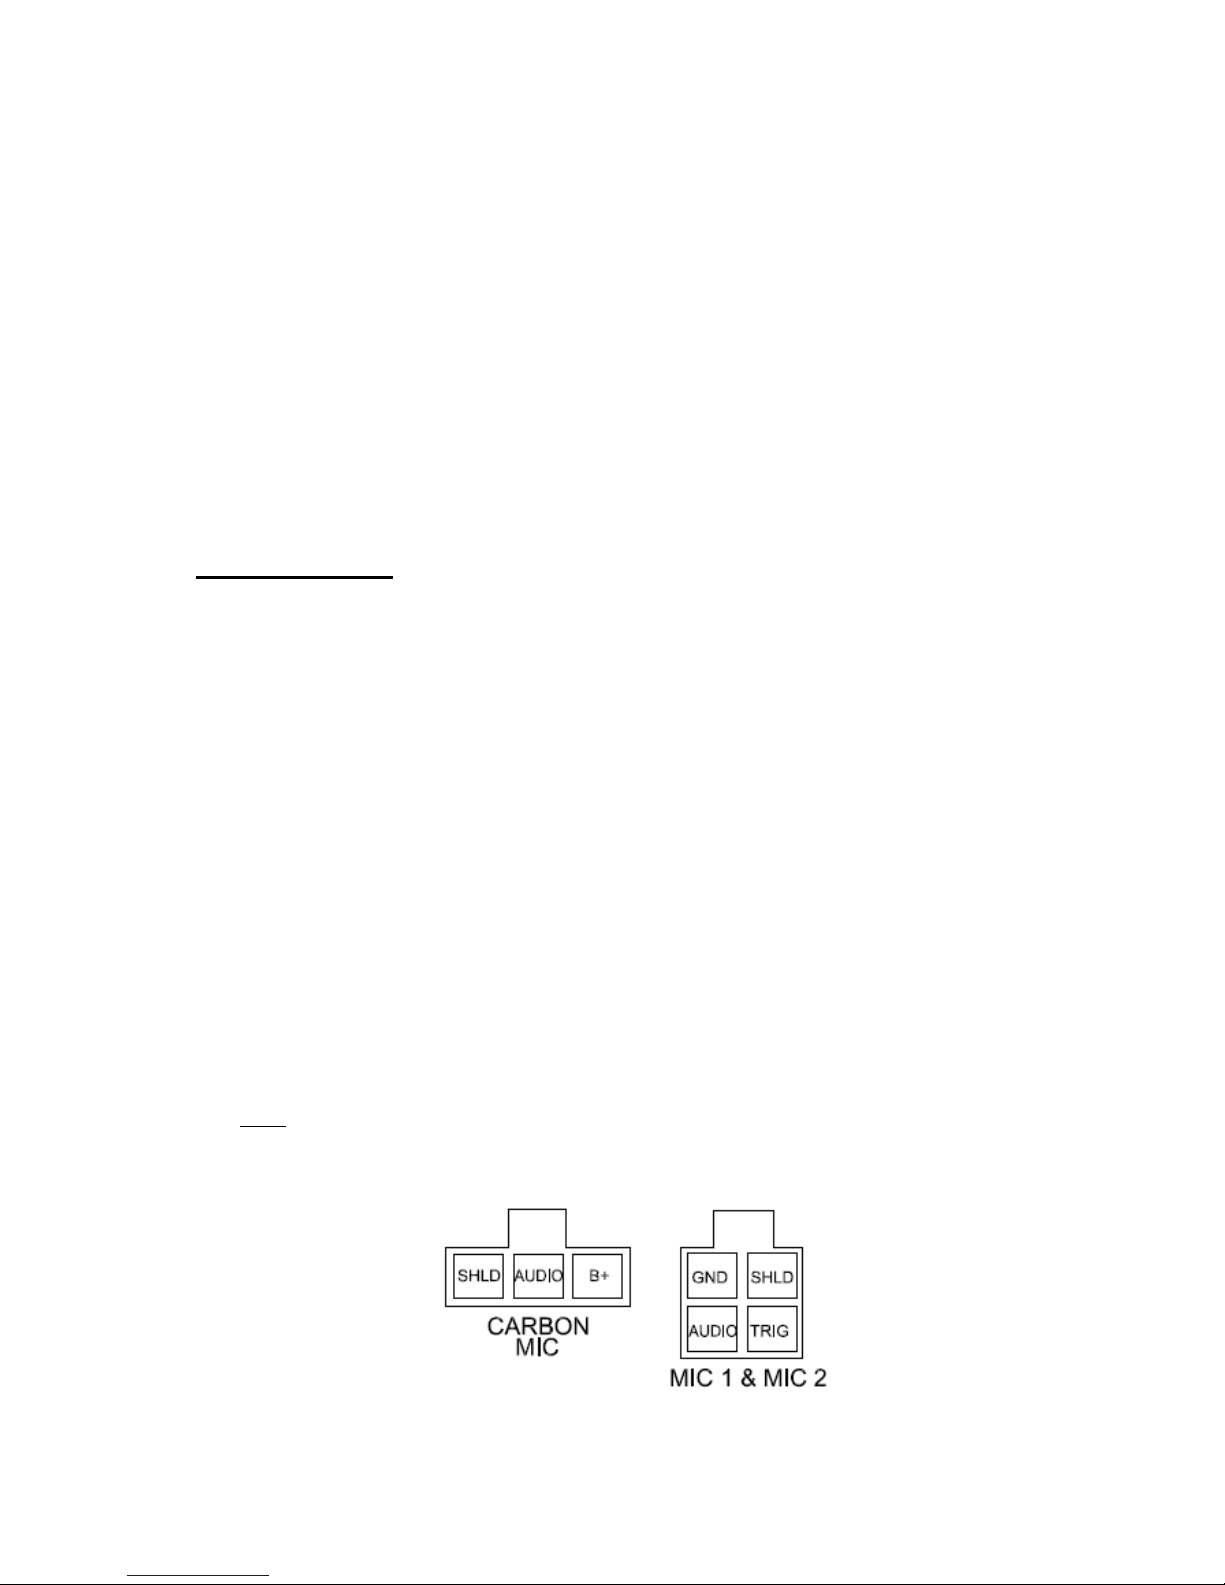
PA OPERATION
The VR-3000 has three PA Microphone inputs, 2 Dynamic & 1 Carbon
microphone input. All microphones have pri ority over al l ot her audio modes and
MUTE th e source audio bein g played when keyed. W hen t he PA is trigg ered, the
front dis pla y wi ll show MIC 1, MIC 2 or M IC, until the trigger is un-keyed.
Once released, it wi ll r e turn to the pr evious source mode a t th e previous volume
level.
The Dyn amic MI C 1 input is the Primary, and the other input MIC 2 is the
Secon dary. When the two are keyed simultaneously, the MIC 1 microphone will
always have priority over the MIC 2.
All PA inputs operate regardless of radio power status, as long as both ACC a nd
Battery pow e r is applied to the radio. Th e volume l e vels of MIC 1 & M IC 2 can
be independently adjusted from t he r ad io’s ma in Volume/Select knob on the front
of the radio. Once released, th eir final volume levels ar e s tored into memory as
default for the next time they ar e keyed. The volume levels of MIC 1 & MIC 2
can only
be adjusted when they a re keyed. The volume of the Carbon m icrophon e
MIC is only adjustable on the micro phone itself and therefore its l evel is not saved.
A rear vi ew of the rad io’s PA pin connections ar e sh o wn b e lo w:
Page 8

8
REMOTE CONTROL
*Requires 2AA Batteries (included)
(1) Power Button
(2) Langu age Butt on
(3) Menu Button
(4) Volume Up/Down Buttons
(5) Enter/Play/Pause Button
(6) Scroll Buttons
(7) Setup Button
(8) Mode Button
(9) Playba c k But tons
(10) Z oom Button
NOTE:
For easy viewin g at night, the backlighting will always be on when ACC +12V
switched power is applied. Backlighting will only shut off when the switched ACC
+12V power is removed.
Page 9

9
SETUP OPERATION
Setup operation requires the user be in either DVD/CD/ USB or SD CARD mode to
operate. When in on of th ese s ource mod es, press SETUP to activate the on-screen
display. Press SETUP a g ain to go BACK and/or EXIT at an y time. Changes made in
the SETUP menu will not
return to default by pressing the RESET but t on on the front
of the radio. To reset th es e ch an ges, see the DEFAULT option in th e S ETUP menu.
SYSTEM OPTIONS:
NTSC/PAL/AUTO:
This option allows the u s er to choose a com posite output signa l to either NTSC or
PAL depending on the video m onitor used. The AUTO option will outp ut the si gn al
accor d ing to the curr en t DV D ti tle. Scroll to highlig ht the desired sele ction a s sh o wn
on the right. Press the BAND/ENTER button to confirm selection.
ANY KEY POWER ON:
This option gives th e u s er a choic e between having any of t he front panel buttons turn
th e radio on, or only the power button. Having the s e lection at ON m ea ns any button
will power up the radio, having it set to OFF means only th e power button can turn the
radio on. Press th e BAND/ENTER button to con firm selection.
Page 10

10
RADIO:
Th e RA D IO op tion al lows the user choices between either EURO MODE or USA
MODE. These modes wil l change the fr equency steps of the FM/AM tuner in the
radio. Press the BAND/ENTER button to confirm selection.
MUSIC VIDEO:
The MUSIC VIDEO option gives th e user t he option to output a compos it e video
image during digital music pl aybac k. When ON i s sel ected, the file i nf ormation is
displayed on the VIDEO OUT signal. When OFF is selected, the VIDEO OUT is not
active. Press the BAND/ENTER button to confirm selection.
Below is CD IMAGE when set to ON Below is MP3/WMA image when set to ON
Page 11

11
DEFAULT:
The DEFAULT option allows the user the option to return all SETUP settings to their
default conditions including language optio ns. Press the BAND/E NTE R butt on to
confirm sel ection .
DISC OPTIONS
OSD LANG:
The OSD LANG option allows th e user to chang e the default On-Screen Displa y
(OSD) language displayed on the SETUP menu from ENGLISH to PORTUGUESE .
Press the BAND/ENTER button to confirm selection.
Page 12

12
AUDIO LANG:
The AUDIO LANG opti on allows the user to change the default audio soundtrack on a
DVD disc. The disc must support the language type. Due to different DVD
encodings, th is feature may not work on all Disc’s, and the user may be required to
access t hi s feat u re from th e DV D’s main m enu. Press the BAND/ENTER button to
confirm sel ection .
SUBTITLE LANG:
The SUBTITLE LANG option allows the user to change the default Subti tl e Langua g e
displayed on the bottom of t he screen for DVD discs. The disc must support the
language type selected. Due to different DVD encodings, this feature may not work
on a ll discs. If playing DIVX encoded media, select DIVX SUBTITLE LANG to
chan g e the subtitle language. Press the BAND/ENTER button to confirm selection.
Page 13

13
AUTOPLAY:
The AUTOPLAY option enables AUTO PLAY of most th e DVD discs. When set
to ON the disc will immediately begin playback when inserted, allowing th e user to
skip the MENU and previews section . When set to OFF the user must navigate to
the disc MENU to playback the disc.
VIDEO OPTIONS
ADJUST:
The VIDEO options give the u ser control of the Video Ou tput set tings. To chang e,
scroll t o select ADJUST and press the BAND/ENTER button. Once selected, the
user can scroll to choose the desired screen option to modify. Press the
BAND/ENTER button to select the option; th en scroll to choose the desired s etting
from 0 to 100. Press the BAND/ENTER button to con firm.
Page 14

14
B RIG HTNE SS 0-100 CONTRAST 0-100
HUE 0-100 SATURATION 0 -100
SHARPNESS 0-100
Page 15

15
TV RATIO:
To select the appropri a te aspect ra tio of the con nected monitors, s elect TV RAT I O and
pr ess the BAND/E N TER button . Once selected, the user can scroll to ch oose ei ther ;
4:3 PAN & SCAN, 4:3 LE TTE RBO X, or 1 6:9 WIDE-SCREEN. Press the
BAND/ENTER button to select th e option.
TV RATIO SELEC T TV A SP EC T RATIO
*The ZOOM button found on the remote control will also allow the user to adjust
the picture during DVD playback to ZOOM in by 2X, 3X, 4X, 1/2, 1/3, ¼ , or OFF
Page 16

16
RADIO CONNECTIONS
Follow this easy wiring diagram when installin g . Be sure to disconnect the
batteries neg ative ter minal bef ore begin nin g.
Page 17

17
AUDIO FILE REQUIREMENTS (.MP3/.WMA using ISO9660 for matting)
• The MP3 files with a sampling rate of 32, 44.1, or 48 kHz. And a bitrates
between 32 to 320 kbps. (44.1khz/128kbps or higher is recommended)
• Th e WMA file with a sampling rate of 32, 44. 1, or 48 k Hz . And a bitra tes
between 62 to 192 kbps. (44.1khz/128kbps is recommended)
MPEG-4 FILE REQUIREMENTS (.MP4)
• Profile: MPEG-4 Simple profile
• Bitra te: Max. 7 Mbps on USB FS, 10 Mbps on DVD, 7 Mbps on CD
• Frame rate: Max. 30 fps
• Image size: Max. 800 *480 pixels
• Audio: Maximum bitrate 320 kbps (AAC-LC)
• File extensio n : .mp4
• Ma x F ile size li mit is 2G Fa t16
DivX® FILE REQUIREMENTS (. AVI)
• Files encoded wit h Xvid or divX Profiles, using bitrates of 4854kbps or less, and
a resolution of 30fps from 32*32 to 800*480
MPEG-1/MPEG-2 BITRATES (.MPG)
• MPEG1: 44.1 kHz/48 kHz/32 kHz
• MPEG2: 22.05 kHz/24 kHz/16 kHz
• MPEG2.5: 11.025 kHz/12 kHz/8 kHz
NOTE:
Individual file size limit is 2G in accordance with Fat16/32 file restrictions.
REQUIRED RADIO DIMENSIONS
Verify the radio will fit by following th e suggested dimensions below.
Page 18

18
RADIO INSTALLATION
1. Veri fy lock Cli ps on th e DIN col lar ar e pr ess ed inward . Place the collar into
th e dash opening. Bend the ta bs outwar d as shown on the drawi ng below to secure
into place in the Da sh Opening.
2. Route a ll cable through the DIN collar and ma k e all the n eces sar y rear
connec t ions with the rad io. Ver ify clearan ce; then gently insert the radio into the DIN
Col lar until both s i des are locked. Install Trim Ring if not already installed. Secure
rear mounting stud for additional support.
RADIO REMOVAL
3. T o remove the radio, disconn ect the rear support if installed. C areful ly relea s e
th e fron t Trim Ring loc k tabs at the top and bottom of th e nosep iec e. Then insert the
two rel ease ke ys on both side s of the nosepiece and pull the radio out.
Page 19

19
TROUBLESHOOTING
Problem Cause Measure
Power light does not turn on No power to yellow wire; no power to red
wire; blown fuse
Check for ACC/BATTERY voltage with
Multi-meter, check fuse; press RESET
button.
Speakers have no sound Speakers not connected; speakers
connected with bad splices; Speakers
shorte d to ground; total speakers load not
within 4-8Ω/ch
Connect speakers to harness; check all
spliced wires; verify speakers not
shorted to chassis; verify total speaker
impedance.
No Video Out on monitors Video output BNC cable not connec ted;
Video monitors don’t hav e power; Video
signal not the right format; Video Trigger
set to OFF
Re-connect Video out cable; confirm
Monitors have power; Press SETUP and
chang e the System option to NTSC or
PAL; change VIDEO TRIGGER to ON
in SETUP menu
Public Addre ss can NOT be heard over
speakers
Mi crophone volume level is “0”;
microphone is plugged into t he wrong
input; wrong microphone type is used
Turn the volume up when the LCD
display’s MIC 1 or MIC 2; Check that
the correct microphone type is
connected
DVD stops after loading or Digital
Media says “Unsupported Video”
Media is an unsupported file type or DVD
is not a region 1 Coded Disk.
Encode media with a supported file
type; make sure disc has been finalized;
use different software
DVD requires a PASSWORD for
playback
Dis c is not a ut hored to skip trailers and the
start menu automatically
Enter the SETUP menu and scroll to the
DISC menu. Turn the AUTOPLAY to
OF F.
LCD Display says MIC /MIC 1/ or
MIC 2 and front controls are locked
PA system is triggered Remove microphone connections and
verify correct pinning; replace
microphone
SPECIFICATIONS:
General Specifications
Operating Voltage (10.0 –15.6V allowable)
Maximum Current Co nsumption 10A
Standby Cu rrent Consumption less than 2 0m A
POWER OUTPUT
Continuous Output (4Ω, 20 to 20,000 Hz at 1% THD) 4 x 22 Wa tts
Maximum Power Outpu t 4 x 50 Watts
Speaker Impedance 4-8 Ohms
Page 20

20
FM STEREO RADIO
Freq uency range USA 87.5MHZ – 107.9MHZ (0.2 MHz step)
EURO 87.50MHZ –108.00MHz (0.05 MHz step)
Usable Sen sitivity 10.2 dBf. (0.9 uV, 75Ω)
50db Quietin g Sensitivity 15.2 dBf. (1.6 uV, 75Ω)
Freq uency Response 30Hz – 15kHz (+ /- 3dB)
Alternate Ch annel Selectivity 75dB
Stereo Separ ation 40dB (1kHz)
Image Rejecti on Ration 75dB
IF rejection ratio 100dB
Signal to Noise ratio 70dB
AM RADIO
Freq uency range USA 530kHz – 1710kHz (10 kHz step)
EURO 522kHz – 1620kHz (9 kHz step)
Usable Sen sitivity 27 dB/uV (25uV, S/N 20dB)
CD/DVD PLAY E R
Signal/Noise Ratio (1kHz) 75dB
Freq uency Response (+/- 1dB) 5 – 20,000Hz
Total Harmonic Distortion (1kHz) less than 0.20% (1Khz)
Number of Chann els 2 (stereo)
MP3 decoding format MPEG-1 & 2 Audi o layer 3
WMA decoding format Ver. 7, 7.1,8,9,10,11 (2ch audio)
(Windows Media Player )
AAC decod in g f orm at MPEG-4 AAC (iTunes encod e d on ly)
(.m 4a) (ver 8.0 and earlier)
DivX decodin g format Home theater Ver. 3,4,5.2,6 (.avi, dixv)
Usable Discs: DVD-Video, DVD-R/RW, DVD+ R/RW/DL,
Video CD, SVCD, CD-R/RW, CD-Audio,
MPG, CD-MP3, DVD-MP3 WMA, JPEG
USB INTERFACE
USB Standard USB1.1/2.0 (Full Speed)
Maximum Supply Current 500mA
File System Fat16/32
Decoding Format same as DVD
SD CARD INTERFACE
Frequency Response (+/- 1dB) 10 – 20,000Hz
Page 21

21
Dyna mic Rang e 80dB (1kHz)
Harmonic Distortion 0.01%
Decoding Format same as DVD
AUDIO PRE-AMP SPECIFICATIONS
Max Output level 5V
Output Impedance 600Ω
Subwoofer output Not adjustable
AUXILIARY INPUT SPECIFICATIONS
Frequency Response (+/- 1db) 20HZ – 20Khz
Input Voltage Max imu m Voltage 1200mV
Input im p edance 100KΩ
VIDEO PLAYBACK
Format: NTSC/PAL/AUTO
Video Output level 1.0 V p-p/75Ω (+/-0.2V)
Page 22

22
Radio Engineering Industries, Inc.
6534 “L” Street
Omaha, Nebraska 68117
Phone: 402-339-2200 Toll-Fr ee 1 -800-228-9275
www.radioeng.com
Rev B.4 8-14-15
 Loading...