

Page 1
6.2” Touch Screen AM/FM Multi media Receiv er with CD/DVD,
USB, iPo d ®, Auxil iary A/V Inputs, & Bluetooth® Audio Streaming
Installation/ Operation M anual
EVR-6500D
Page 2

Page | 2
Th a nk you for p urchas i ng the 6.2 ” Touch Screen AM/FM Multimed ia Recei ver
from REI. This prod uct is designed and tested to with stand temperature and
vibrati on ex tremes. Please r ead the owner’s manual carefully before a ttem pting
to in stall this unit.
If you have an in stalla tion ques tion or n eed instal lati on ass istan ce, please call
the:
SERVICE HOT LINE
1-877-726-4617 Tol l Free USA & CANADA
Your pl ayer will play com mercial DVD s wi th r egion code l abels on them.
FEATURES:
6.2” Touch Scr een Operation
Elect ro nic A M/F M Ste reo Tu ne r
Preset Up to 30 Ra dio Stat ions (1 8 F M , 12 AM)
EURO and USA frequency bands
Rear A/V RCA Inputs
Supports USB & microSD m emory cards
MP3/WMA playback w/ ID3 Tag Support
MPEG-1/MPEG-2/MPEG-4/ & DIVIX playback
iPod® /iPhone® Playback Control
CD/DVD Playback
Back-up Cam er a input
Bluetooth® audio Streaming w/ support for Hands Free call ing
RCA Composite video Output
IF ADDITIONAL INSTALLATION COMPONENTS ARE NECESSARY, CONTACT YOUR
REI SALES REP FOR:
** OEM /FACTORY W IRING HARNESS ADAPTERS
** ANTENNAS & ANTENNA ADAPTERS
** SPEAKERS & GRILLS
Radio Engineering Industries, Inc.
6534 “L” Street
Omaha, Nebraska 68117
(800)228-9275
www.radioeng.com
Page 3

Page | 3
CONTENTS
Front controls and Indicators................................. ................................. .............. ................................4
Home Screen................................. ................................. ................................ ...... ...............................5
General Setup........................... ................................. ................................. ......................................... 6
Navigation Pat h.......................................................................................................................................9
Setting the Time....................................................................................................................................10
Changing the Background ....................................................................................................................10
Connecting a Bluetooth® Device..........................................................................................................11
Bluetooth® Operation...........................................................................................................................12
Recent C alls..........................................................................................................................................13
Bluetooth® Setup..................................................................................................................................13
Phone book............................................................................................................................................14
Bluetooth® Audio Streaming......... .......................................................................................................15
AM/FM O p era ti o n................................................................................................................................16
USB/mi croSD/CD medi a ......................................................................................................................17
iPod®/iPhone® Operation....................................................................................................................18
DVD Operation.....................................................................................................................................19
DVD Setup............................................................................................................................................22
Back-up Camera Operation...................................................................................................................27
File Requirements.................................................................................................................................27
Remote Control.....................................................................................................................................28
Troubleshooting....................................................................................................................................30
Radio Dimensions.................................................................................................................................30
Radio Installation..................................................................................................................................31
Radio Removal......................................................................................................................................33
Electrical Connections...........................................................................................................................34
Specifications........................................................................................................................................35
Page 4
Page | 4
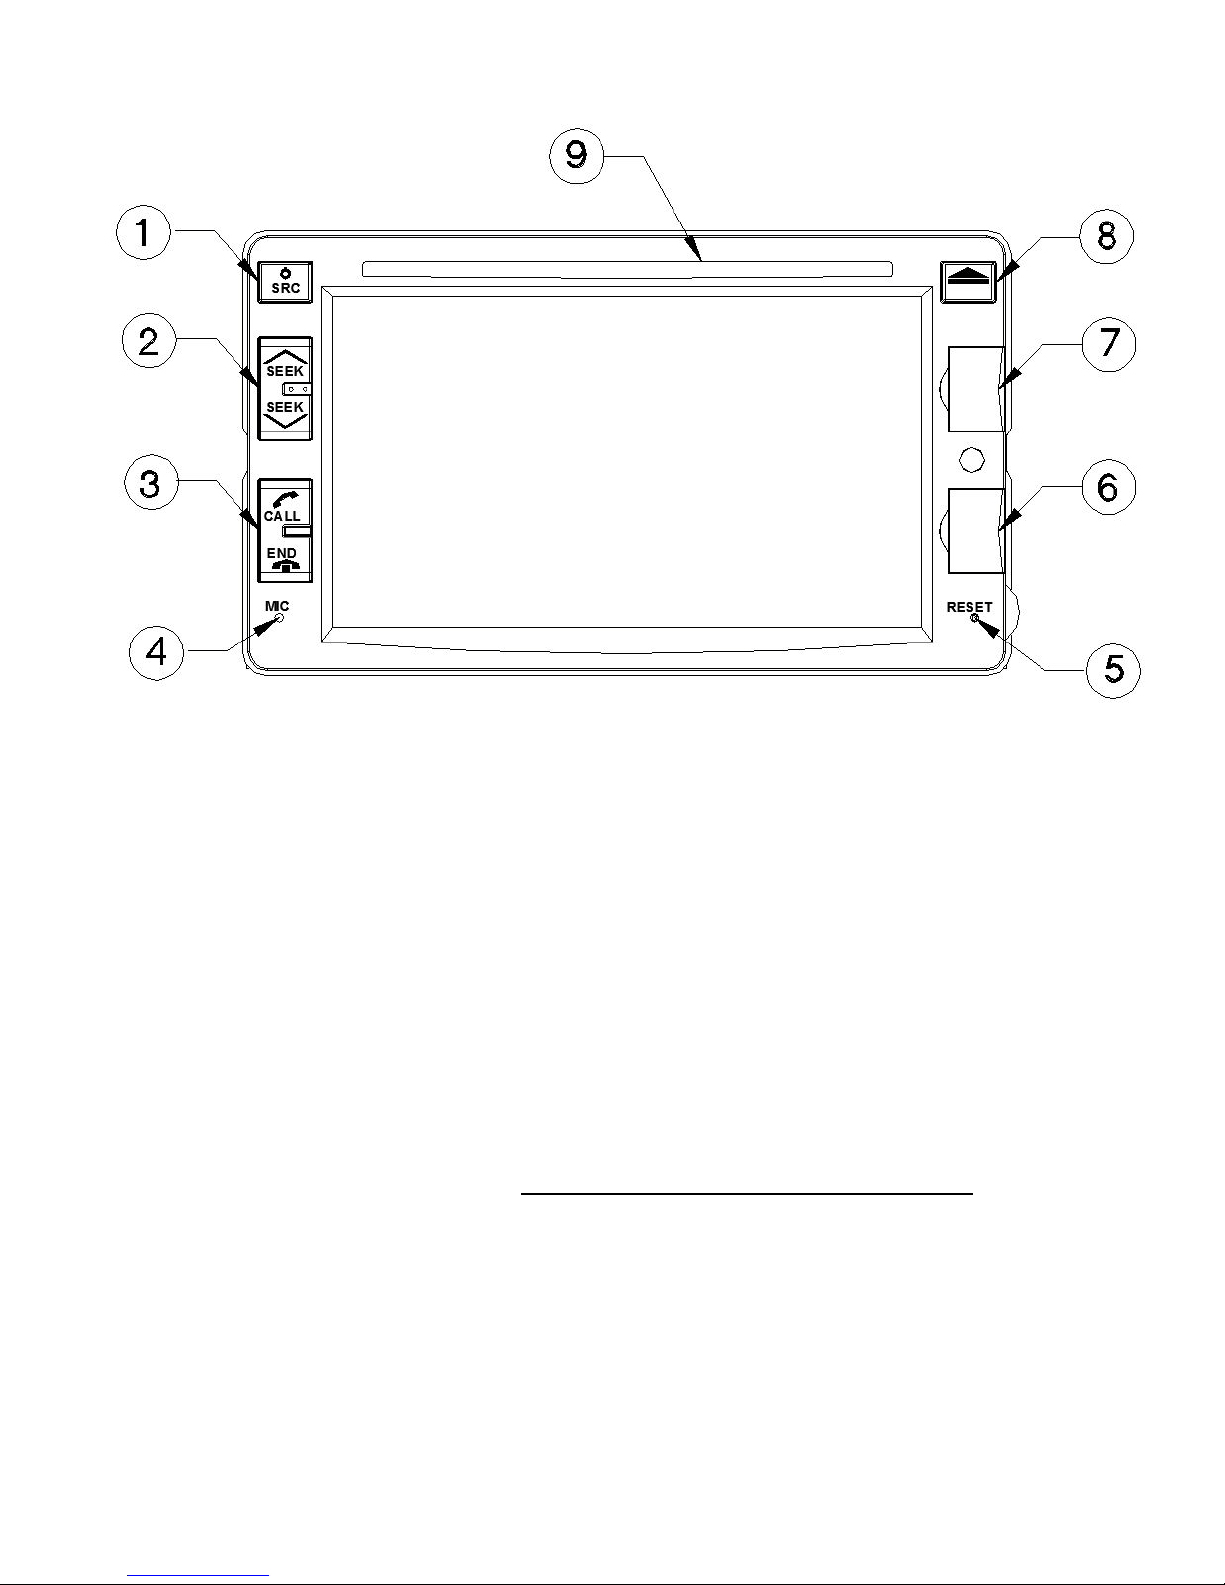
FRONT CONTROLS AND INDICA T ORS
1. Power/Source Button
Press and HOLD the Power Butt on to turn the unit ON or OFF. Press this
button to return to the home menu screen.
2. Seek/Track Buttons
Press either to change stations, tracks, or chapters.
3. Bluetooth® Phone Control Buttons
Press CALL button t o Plac e or Answer a call.
Press the END button End Bluetooth® conn ected calls.
4. Bluetooth® Microphone
Inter nal microphone f or Bluetooth® calls. (CURRENTLY NO T
AVALIABLE).
5. Reset Button
Press to reset system settin gs to factory default.
6. Front Panel mini-B USB input
Connect to USB memory for playback of music/video files.
7. Front Panel microSD Inputs (RIGHT SIDE SLOT IS RESERVED FOR FUTURE USE ONLY)
Connect to microSD memory for playback of music/video files.
8. Disc Eject button
Press t o eje ct a di sc.
9. Di sc Slot
Insert CD/DVD disc here.
Page 5
Page | 5
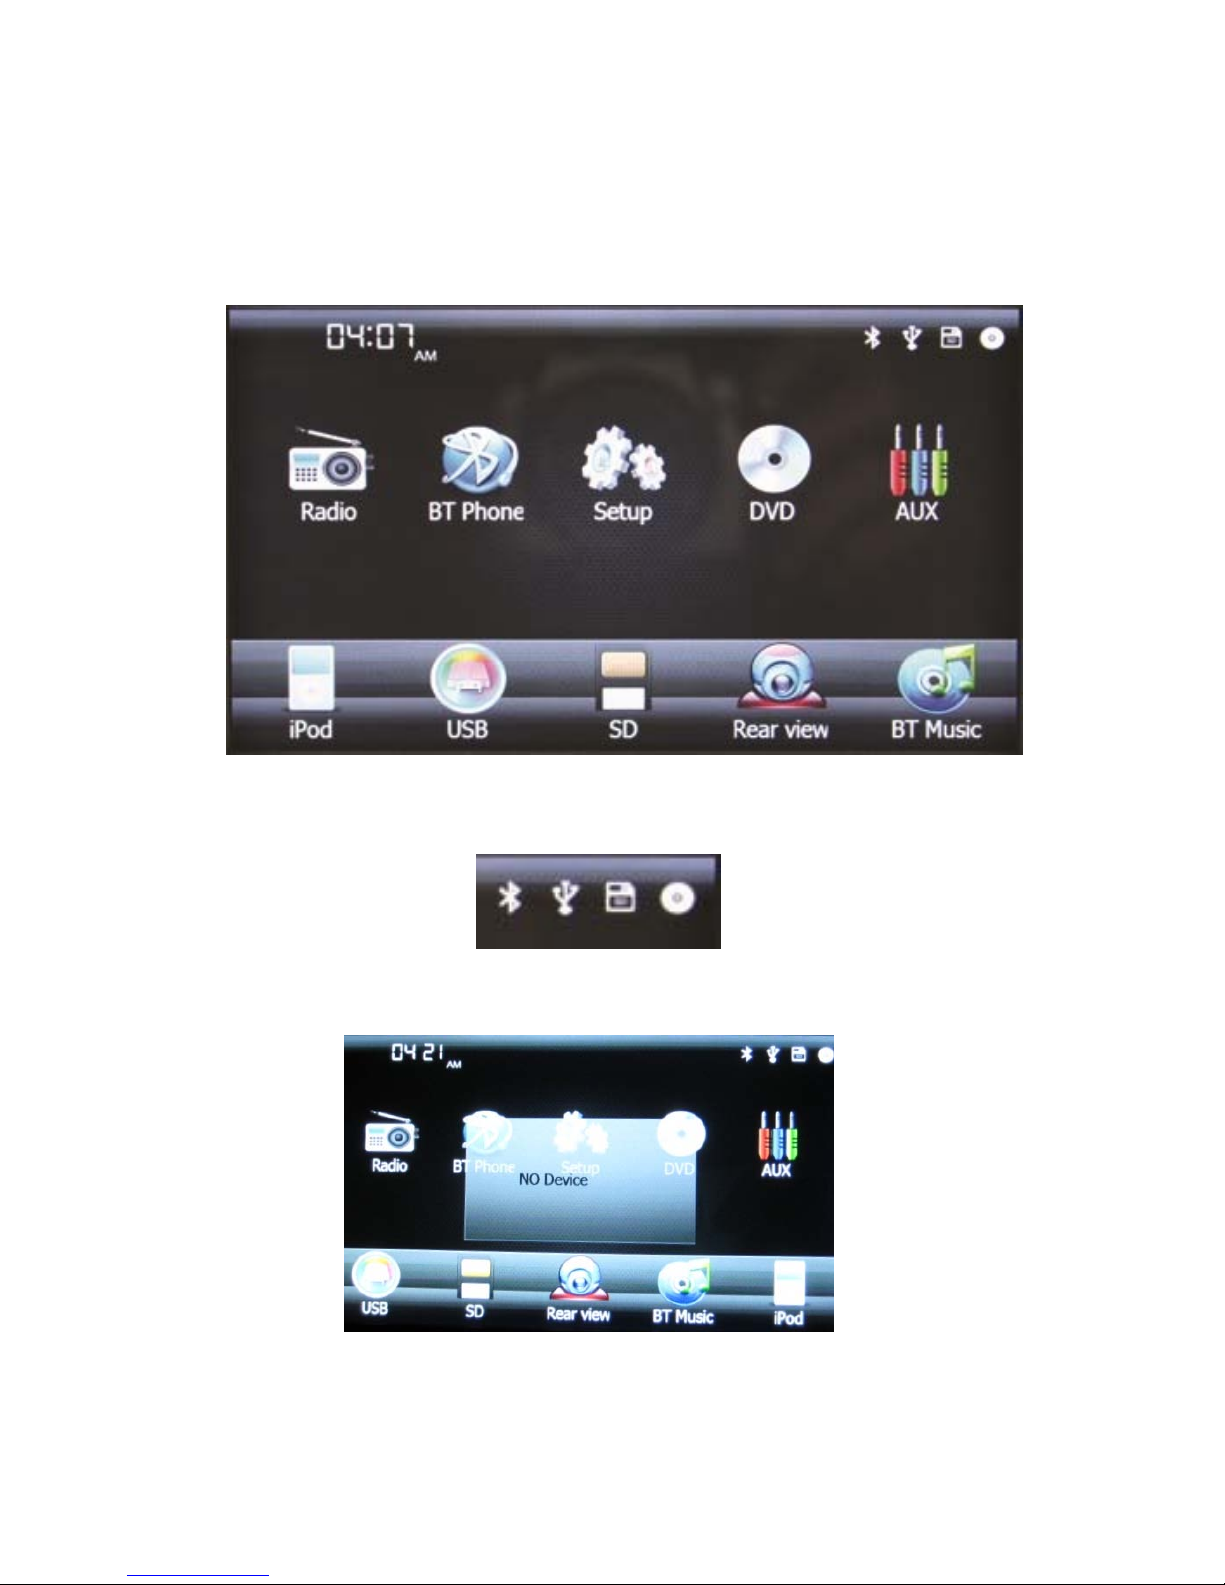
HOME SCREEN
From the HOME screen you can use the touch screen t o chan ge the s ource. To
access t he HOME s creen, touch the HOME but ton in top left corner of the screen
or press the SRC button. Touch either th e Radi o, BT Phon e, Setup, DVD, AUX,
iPod®, USB, SD , Rear View, or BT M usic to ch ange to the corr e s pon di ng
source.
The upper right hand icons sho wn b e lo w, will change color to RED wh en the
corresponding source is connected to th e Radio.
If th e source ch osen is not con nected , NO DEVICE i s displayed.
Page 6
Page | 6
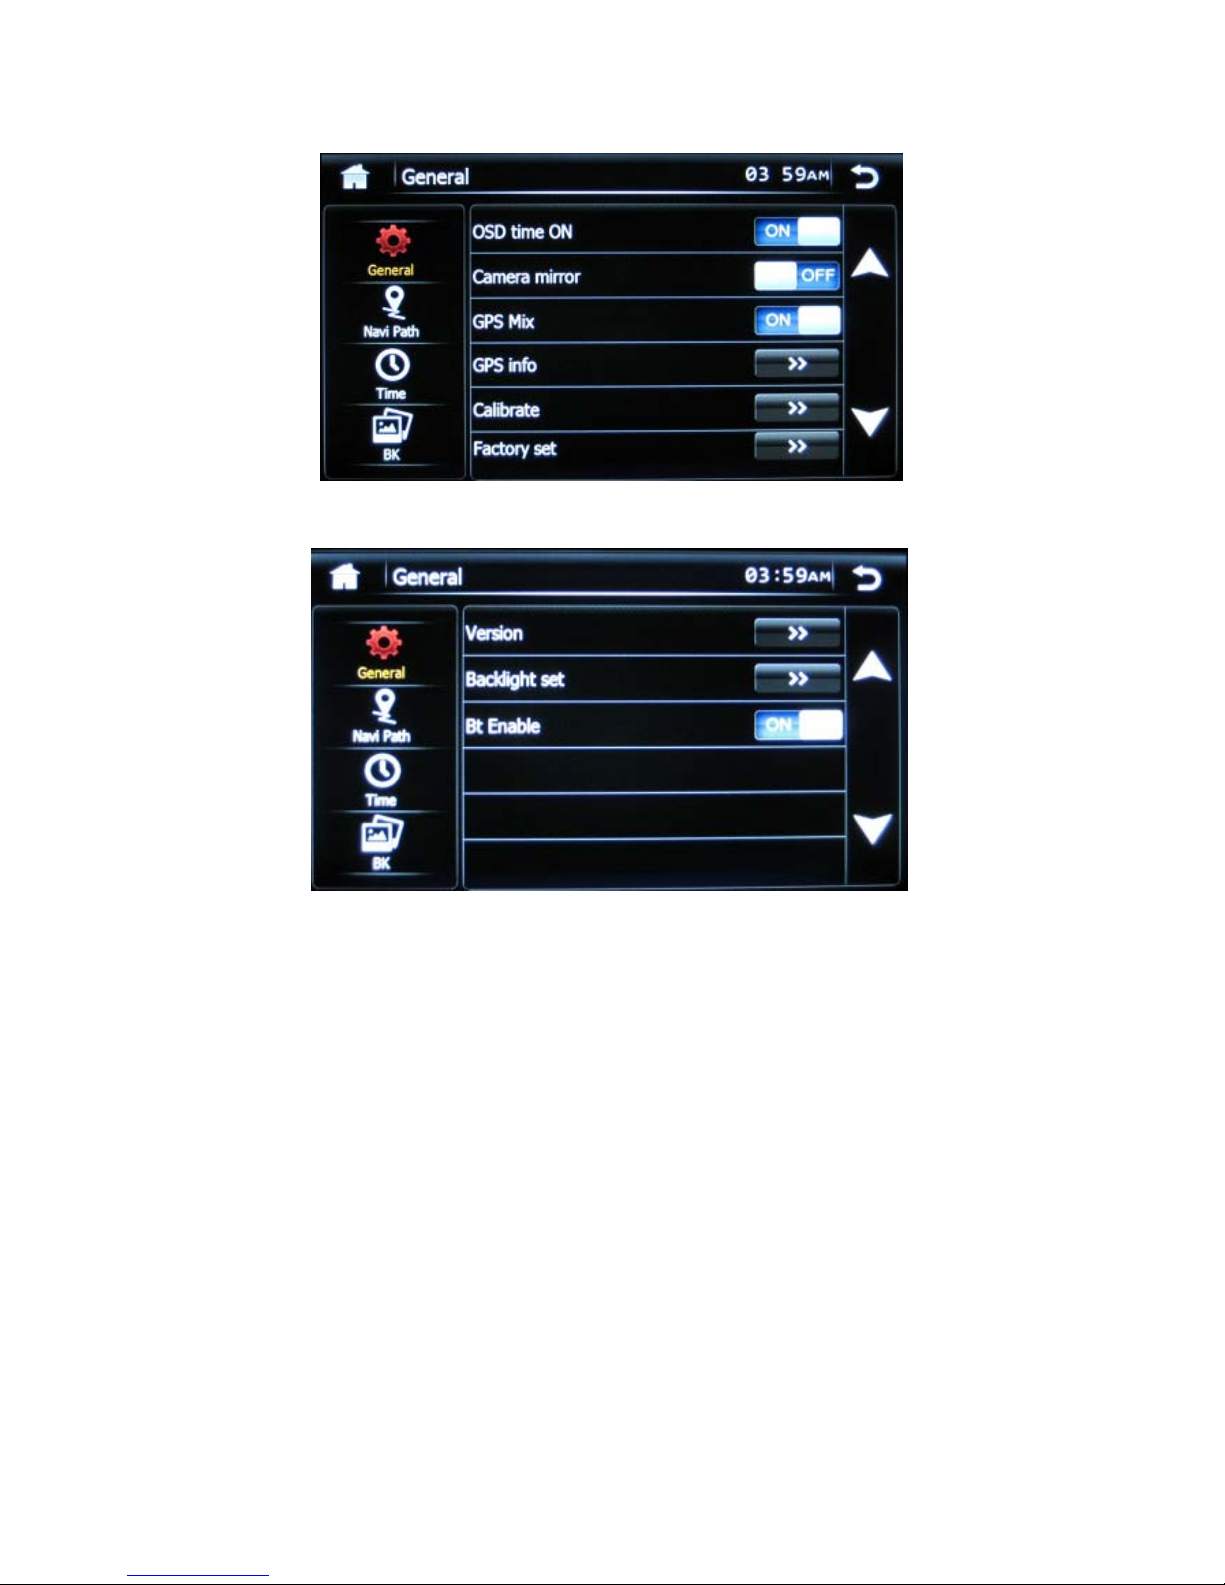
GENERAL SETUP
Press the SETUP icon to access the General Setu p Pa g es , page 1 is below:
Gener al Setu p Pa g es 2 i s below:
Use the up/down arrows on the right sid e of the page t o access th e d es ired
opt ions. The genera l Setup options include:
1) OSD TIME ON/OFF
Switches the clock disp la y ON/OFF when is enabled vid eo on the front panel .
2) CAMERA MIRROR ON/OFF
Reverses the input image from the Back-u p camera input.
3) GPS MIX ON/OFF
Rese rved for fu tur e use only.
Page 7
Page | 7
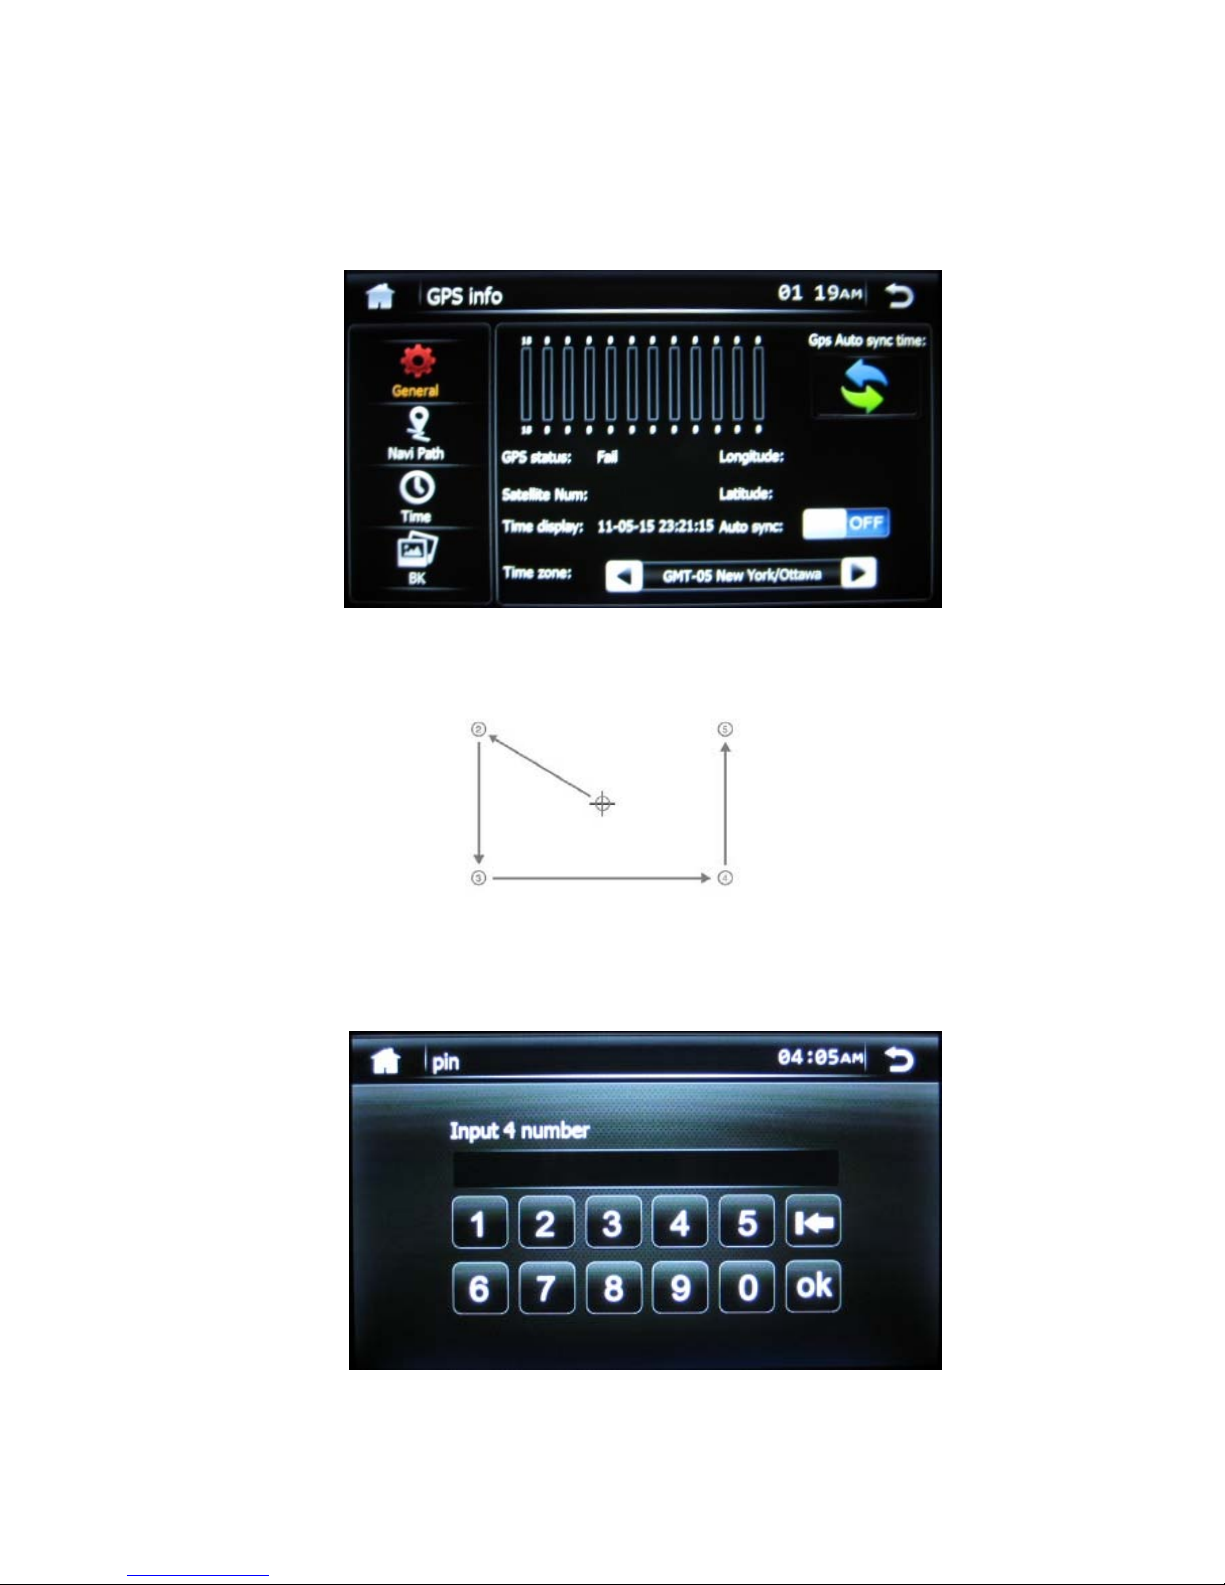
4) GPS INFO
Screen displays the current GPS location status, if GPS is installed.
If auto SYNC is set to on, th e GPS will automatically update the clock setting on
the RADI O , and NOT al low the user to manually set the clock. To manuall y set
the cl ock , verify that AUTO SYNC is set to OFF first.
5) CALIBRATE SCREEN
Touch only th e cr oss hairs as it ch an g es locations to ca librate the tou ch screen.
6) FACT ORY SE T
Screen allows access to Factor y setu p opti ons. The user must press pin numbers
3368 then OK to enter. Setting s mad e h ere are sa ved d urin g a master reset.
Page 8
Page | 8
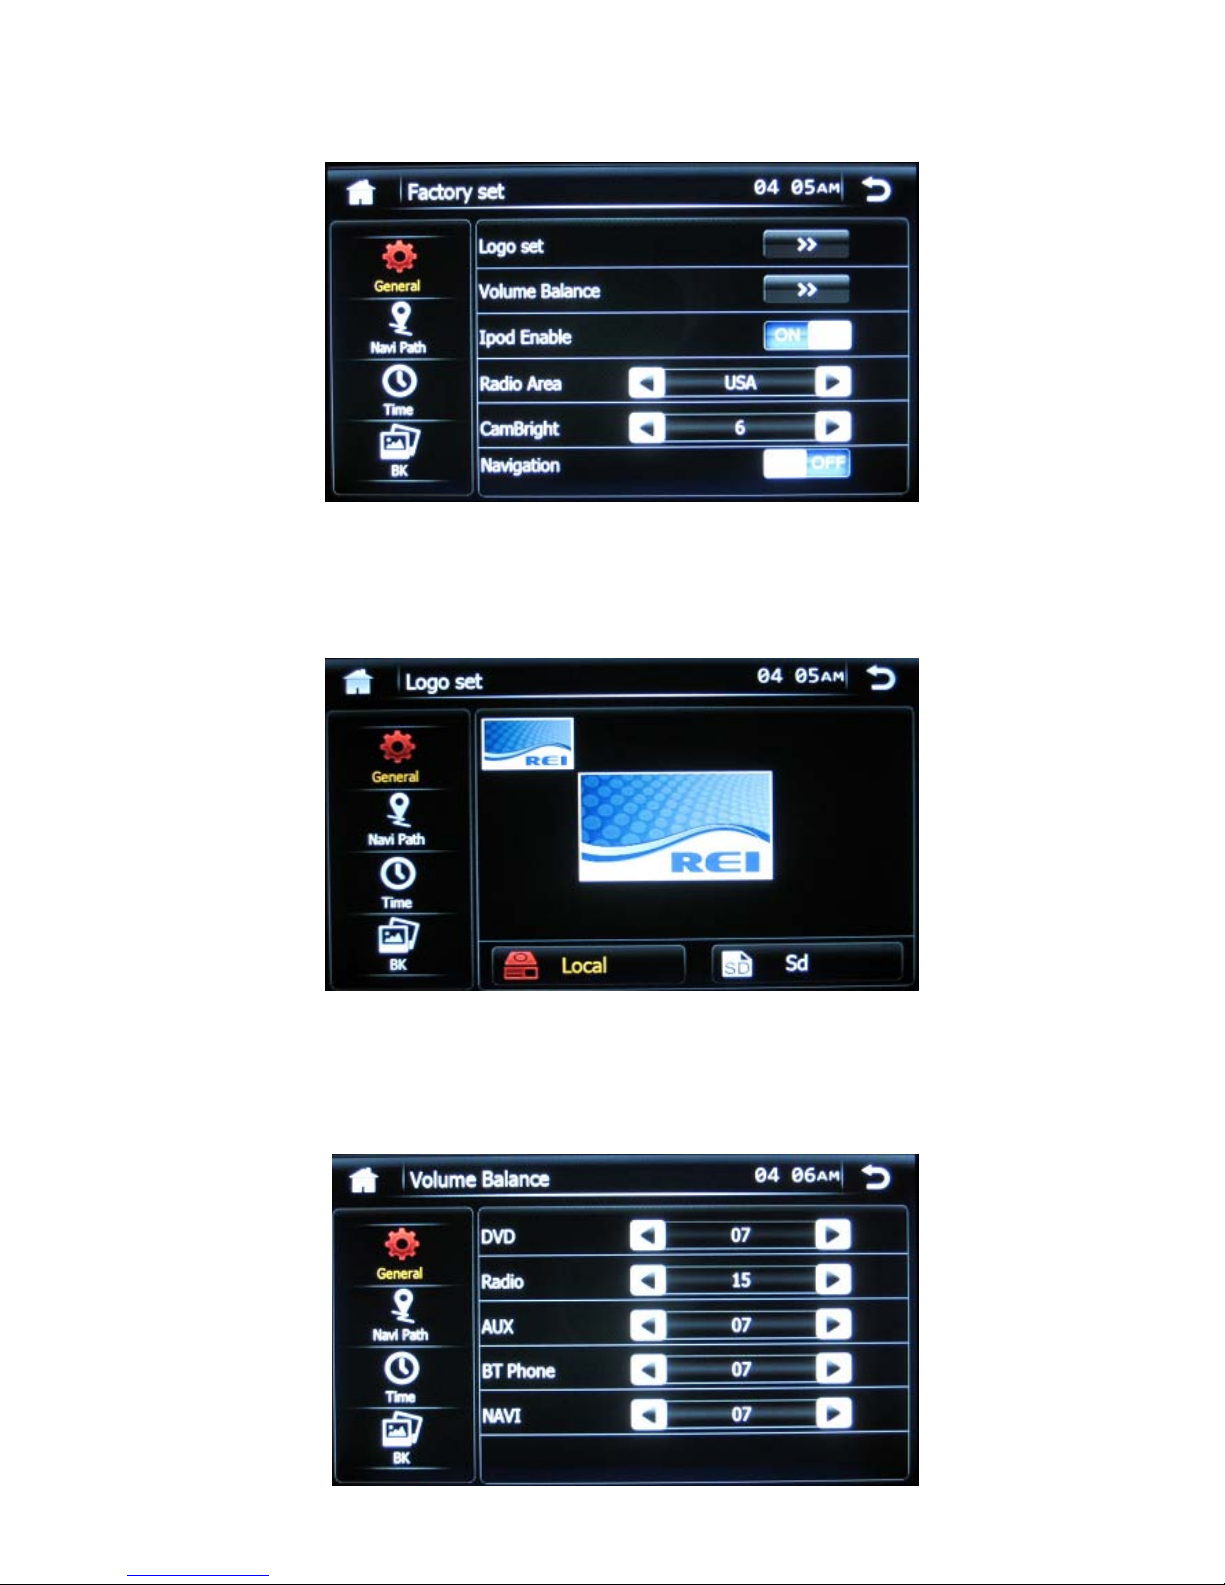
Within the Factor y set options, the following options can be changed:
a. LOGO SET
Th e u ser can chan g e the init ial logo screen t o a cus tom 800*480.bmp file
using a microSD card. Select th e SD i con , then choose the imag e.
b. VOLUME BALANCE
Adjusts the gain setting s of the sour ce. Recommended settings are belo w.
Exceeding these settings may r esult in clipping or overdriving th e signal
levels. Use t he arrows t o a d ju s t the desired setting if neces sary.
Page 9
Page | 9
c. IPOD® ENABLE
Turns the iPod® pl ayback control icon ON/OFF in the HOME screen.
d. RADIO AREA
Use the arrows t o s e lect the regi on of op e ra t ion for the AM/FM tuner.
Choices incl u de USA, LATIN, EUROPE, OIRT, & JAPAN.
e. CAMBRIGHT
Use the arrows t o sel ect the desired backlight br ightn ess level of the Back-up
came ra i mage.
f. NAVIGATION (Reserved for future use)
Turns the Navigation icon ON/ OFF in the HOME screen.
7) VERSION
Displays the current firmwar e on the Multimedia player.
8) BACKLIGHT SET
Allows th e user to customize t he ba cklight brightness settings of t he screen
Depen ding on the time on the clock.
9) BT ENABLE ON/OFF
Turns the Blu e tooth® Dis c ove ry mode on the pl ayer O N or OFF.
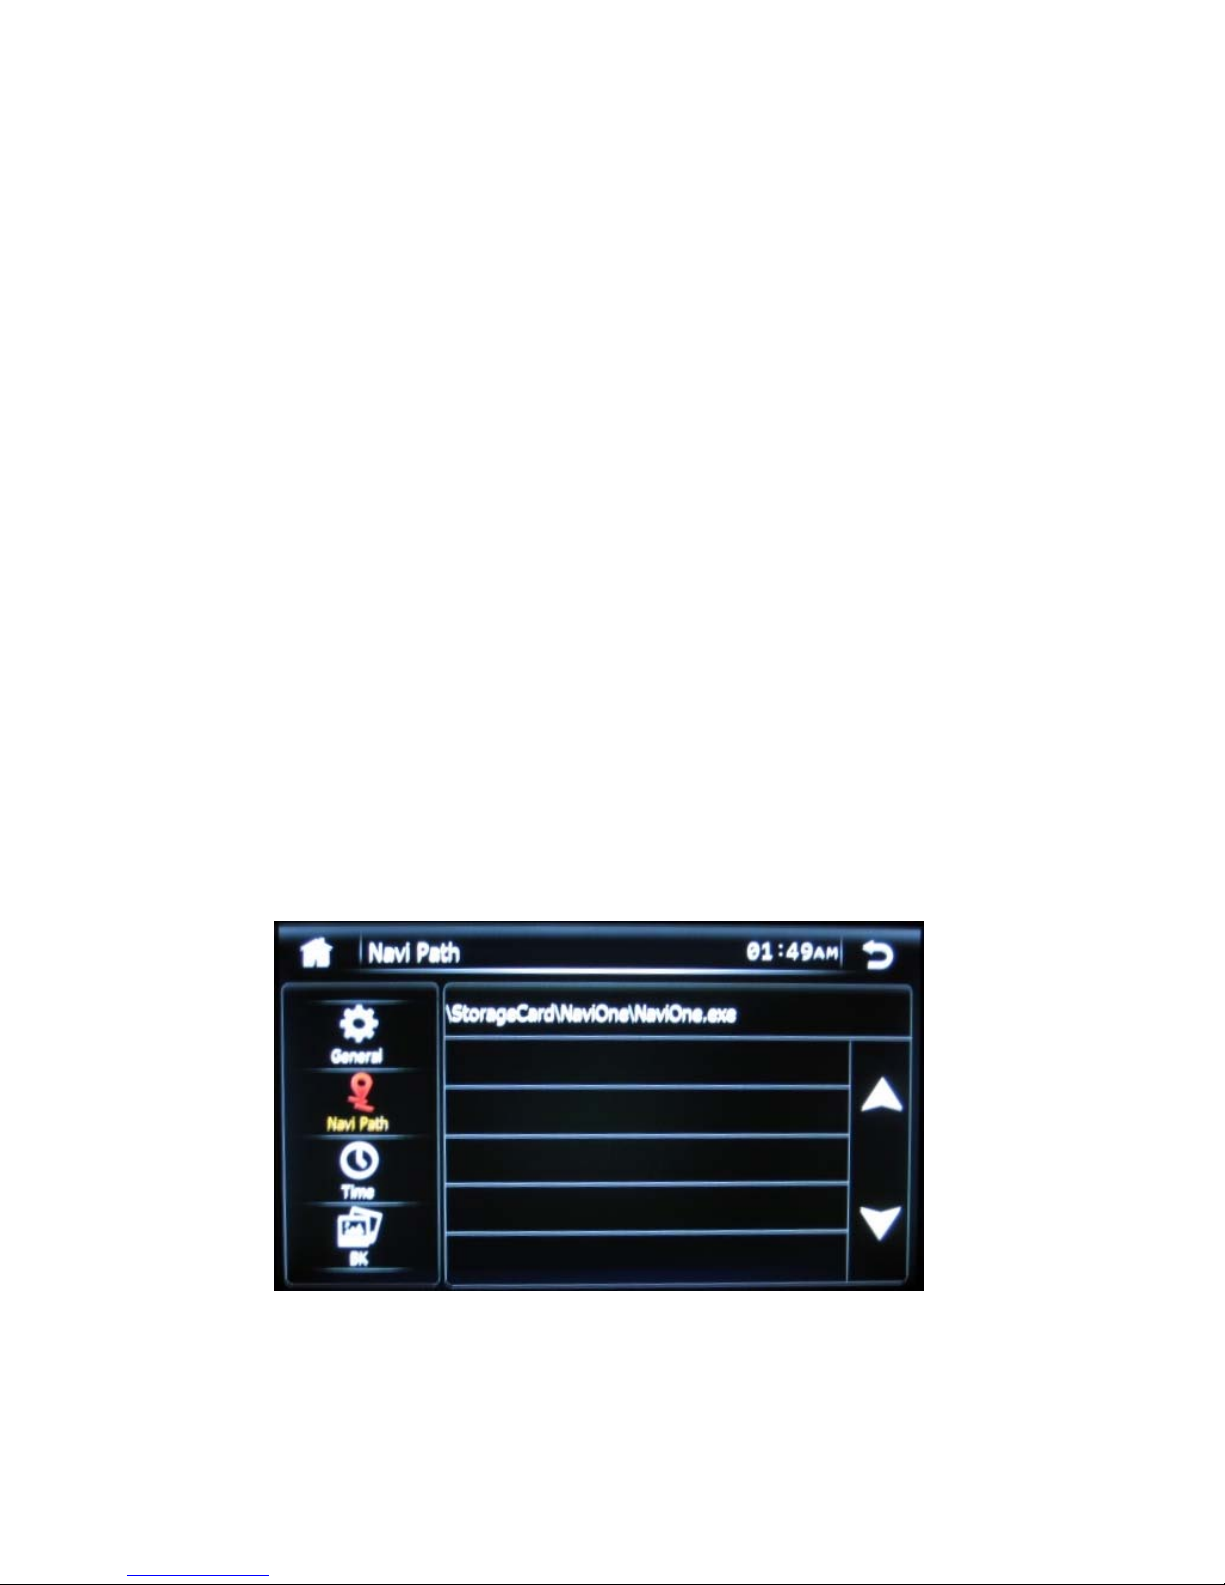
NAVIGATION PATH (Currently Reserved for future use)
Page 10
Page | 10
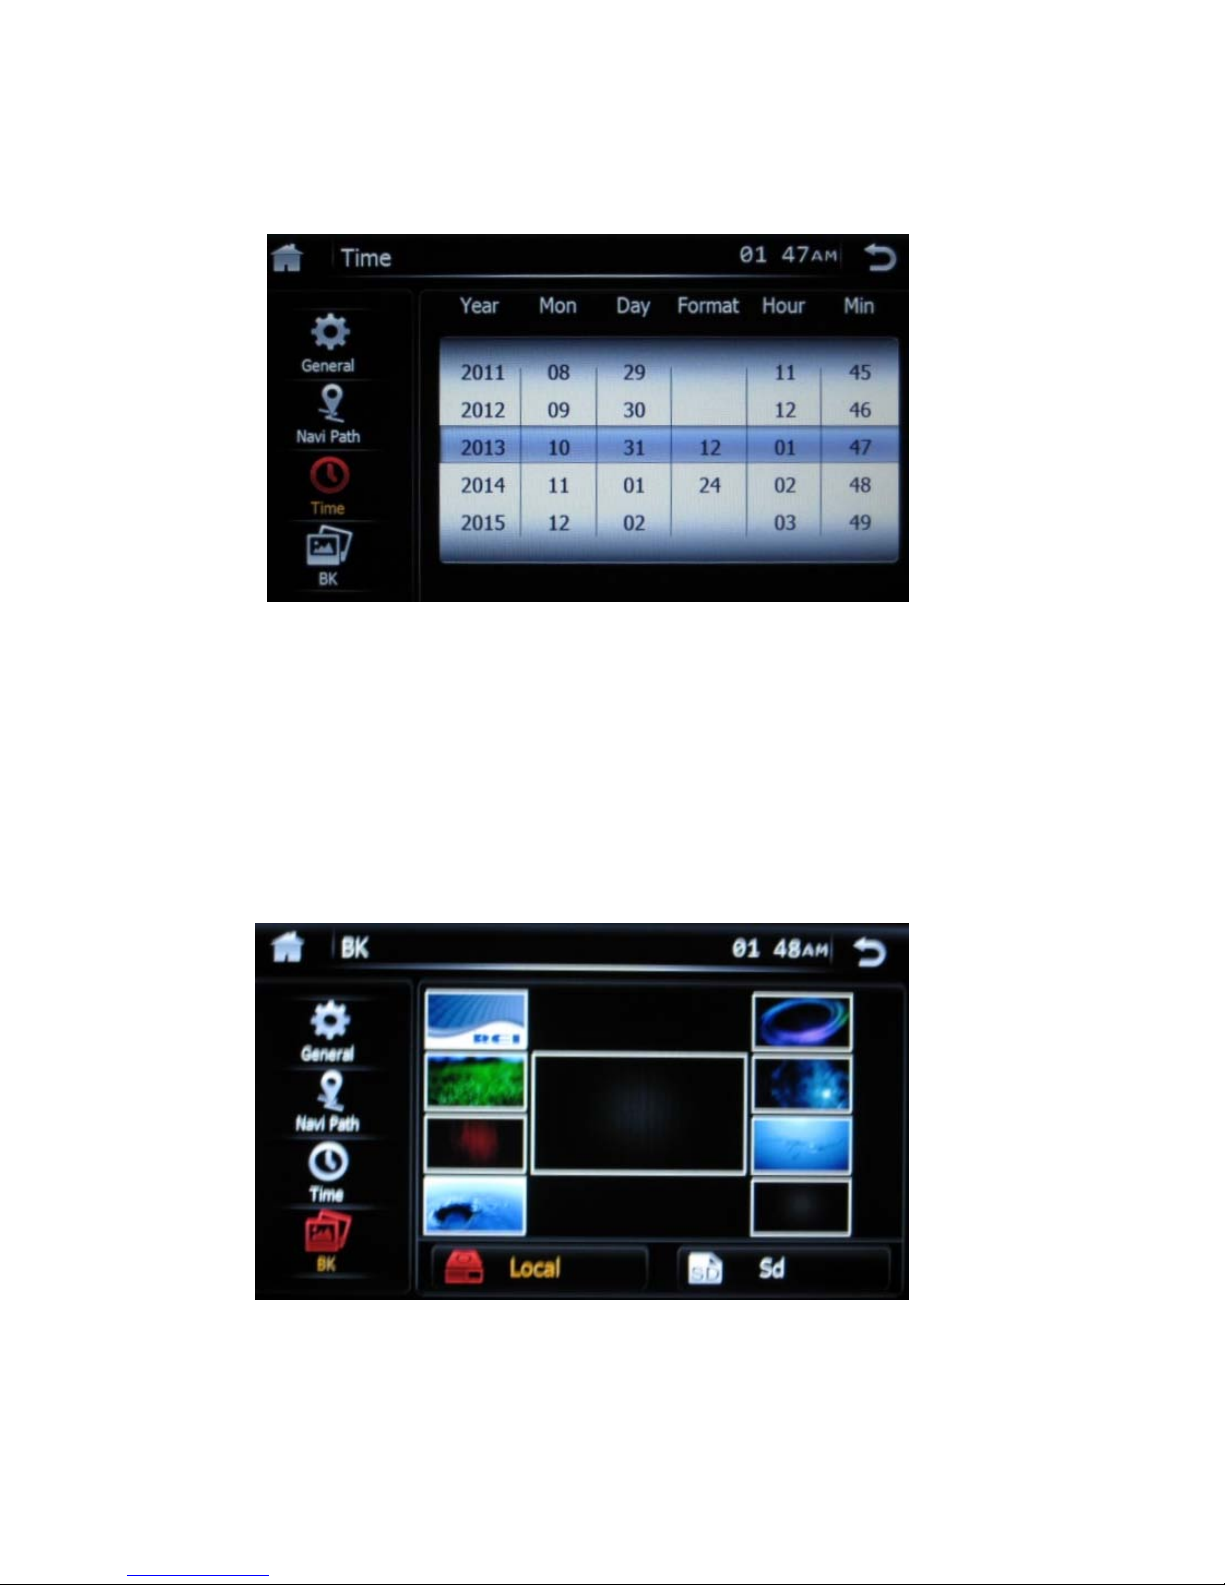
SETTING THE TIME
Touch above or be low th e h ighli ghted are a of the screen, t hen slide to move
settings either up or down.
CHANGING THE BACKGROUND
Touch the desired backgr ound image on the scr een to change. If the user has a
custom image, it must first be loaded onto a microSD card with a resolution of
800*480 and saved as a .BMP fil e. Then press th e SD icon on the bott om of the page
to access the cus tom image files on the card, an d s elect from available ima g es.
NOTE
The mi croSD card must be presen t at all tim es for continuous use.
Page 11

Page | 11
CONNECTING A BLUETOOTH® DEVICE
To connect your Bluetooth® device to th e Ra d io, the d evice must firs t be paired.
You will need to verify that “BT Enable” is set to ON (See SE TUP page 6), and
verify the passkey on the Rad io to complet e t he pairi ng. (See BT SET page 13).
Pairing the Your mobile device with the Head Unit
Your mobi le ph on e can in itia te a sear ch for n ew devi ces and pair to the unit. The
following paragraph describes the pair ing process :
NOTE: Procedures for pairing mobile phones may vary slightly from
manufacturer to manufacturer.
1. Verify th at th e Radio i s power e d up and ON .
2. Set th e Bluetooth® function of the Mobile D e vic e to ON.
3. Access t he” Look for devices” feature of th e Mobile device and begin
searching. Aft er s earching, th e Radio should appear in the lis t of de vic es
as REI_ELITE. Press to accept.
4. A pr ompt to bond should appear on your Mobile device. Press to accept
and continue the process. The devi ce will then ask for the passkey, enter it
on t he m obile devi ce .
NOTE: Some mobile devices require the passkey to connect. If your moblie
devic e r eq uires th e p a s s key, you will need to enter it now. Th e de fault code for
the Radio unit is “0000”.
5. After enterin g the passkey, press OK. The Mobile devi ce shou ld display
connected. The Radio’s Bluetooth® icon in the upper right hand corner
of the HOME page should chan ge to RED i nd icating this also.
NOTES:
• Only ONE mobile device can be paired with the Radio at a time.
• Once a paired Mobile device is disconnected, c ha nging the passkey will NOT
disable the device from reconnecting. Turn BT OFF to disable any unwanted
Bluetooth® device s. When set to ON, the Radio is always in discovery mode.
• Afte r turni ng off the ignition, the Radio will automatically search for the
last-connected Bluetooth® device, and if possible, restore the connection.
• This Radio does NOT support HSP (Head Set Pr ofi le)
Page 12

Page | 12
BLUETOOTH® PHONE OPERATION
1. Bluetooth® Status: Displays the con nection status of th e Radio and the incoming
or outgoing phone number. The conn ected Phone ID is also displayed, an ex ampl e
is below usi ng a M otorola phone:
2. Number K eys: Touch 0-9,*, # to enter the phone number you wish to dial.
3. Re dial button: Touch to automatically redial t hat last number.
4. Recent calls: Press to access the call history page.
5. BT Set: Press t o a cces s the Bluetooth® setup page.
6. Transfer button: Press to tran sfer audio controls betwe en the ra d io and phone.
NOTE: If n o audio is presen t after the call is answered, p re ss this button to transfer th e call back to the
phone
.
7. L i nk button: Press t o con nect to a pr eviously pair ed d evi ce.
8. Di sconnect button: Press t o disconn ect from a previous ly paired device.
9. Phonebook button: Press to access the contacts of the pair ed d evi ce.
10. Cal l End/Ignore button: Pr es s to End a connected calls.
11. Answer/Place Call button: Press to Place or Answer an incoming call.
12. Bluetooth® Music shortcut button: Press to chan g e th e mode to Bluetooth®
steaming music.
13. Dele te button: Press to delete the last di gits entered in the display.
Page 13

Page | 13
RECENT CALLS
1. Display a list of all INCOMING calls.
2. Displays a list of all OUTGOING calls.
3. Displays a list of all MISSED calls.
4. Press to DELETE all calls in the list.
5. SCROLL UP/DOWN to a ccess addit ion pages on the list.
BT S ET
1. Auto Answer: Turns the Auto Answer feature of a pai red Bluetooth® phone
ON or OFF. When set to ON, the radio will automatically answer all
incoming calls.
2. Input 4 number: This is the customizable PASSKEY necess ary to pair a
Bluetooth® device. NOTE: If the num ber is changed, it does NOT affect
previously pair ed devices.
Page 14

Page | 14
PHONEBOOK BUTTON
Accessing the Phonebook menu, the user ha s the following options:
1. REQUEST contact s of the conn ected devi ce.
2. SAVE the contac ts list into the radio’s memory.
3. DELETE the curr en t list of Con tact s
After accessi ng the list of cont acts, simply scroll Up/Down an d press th e screen
on the desired contact. The number will display in the Status window, but the
number will n ot be dialed until the Place Call Button is pressed.
Page 15

Page | 15
BLUETOOTH® STREAMING AUDIO BUTTON
Th e unit a llows you to play ba ck audio files from your mobile device using a
Blu e tooth® connect i on. The Radio can control a Blue toot h® audio player via
Advanced Audio Distribution Profile (A2DP) or Audio/Video Remote Control
Profile (AV RCP). Bl uet ooth® audio players (or Bluetoot h® adapters) compati ble
with these pr ofi les can be con nect ed to this Radio. Verify the device is
connected via Bluetooth®, or follow the parin g a device procedu re foun d earli er
in th e manual t o connect. Touc h the BT A udio ic on from the HOME screen or the
shortcut icon on the BT Phone screen.
Press the PLAY icon on the screen and verify audio is present. While lis tening to
audio the following functions are available:
1. PREVIOUS button: Touch to play the previous track.
2. STOP button: Press to stop playback .
3. PLAY/PAUSE button: T o uch to pause playb ac k. Touch again to resume
playback.
4. NEXT button: Touch to pla y the next track.
NOTE:
When th ere is an in com ing call, the s on g will be pau s ed . After the incomin g call is
finish ed, the screen will return to the music function screen and playback will
continue.
Functionality may vary depending on the profile or device used.
Page 16

Page | 16
AM/FM OPERATION
1. Home b ut ton : Pres s to re turn to the HOME screen.
2. Tune DOWN button: P ress t o t une to lower r adio frequen cies .
3. Preset M emory/Rec all butt on: Pres s momentarily to select the d ispla yed preset
station . Press and h old a ny but ton to prese t the cur rent station t o the butt on bei ng
pressed.
4. ST / MO NO button: Press t o turn FM stereo reception ON/OFF.
5. L O C/ DISTANCE butt on: Press to adjust the tuner SEEK sensitivity to select
weaker or strong station only.
6. AS/ PS butt on: Pr e s s a nd h old thi s bu tton for 2 second s to a uto program avai la ble
stations into the preset memory buttons. This function will erase previously
memorized s ta tions an d store the newly searched stati on s. Once compl eted, the
rad io will scan for 5 seconds through ea ch of the preset stations of eith er th e AM
or FM band an d stop . Press this button momentarily to scan only the presets.
7. SCAN butt on: Press this button to automatically pr eview all radio stations for 5
seconds.
8. AM button: Press this but t on to change to AM frequency. Thi s pr ovi d es access
to AM1 and AM2 presets.
9. FM button: Press this button t o chan ge to FM frequency. Th is provides acce s s
to FM1, FM2, and FM3 presets.
10. SEEK button: Press this button to change the tune operation on the touch screen
to SEEK tune mode.
11. M ANUAL button: Press this button to chan ge the tune operation on the touch
screen to MANUA L tune mode.
12. Tune UP button: Press to tune to higher ra dio frequ encie s.
13. RET URN button: Press to return to the previ ou s s creen.
14. CLO CK DISPLAY: Displays the curr en t time.
15. SO URCE indicator: This section displays the current operational mode.
Page 17

Page | 17
USB/microSD/CD Media Operation
Insert a USB/micro SD/ or CD into the radio and it will automatical ly switch to this
input and begin playback of compatible media files. If in any o t her source, press
the HOME but t on an d change the source to USB to begin playback. If ID3 tag
information is presen t, it will display automatically on the front LCD as shown
below:.
The pl ayback screen allows access to the follow:
1. Spectrum Analyzer View: press t o playback with this view.
2. Info button: press to playback with this view.
3. L IST media file s: press to view all available files. After pressing this
but ton, the icons on the left side of the menu gives t he u ser playback
con trol of t he available file formats on the media. Select th e tit le by
pressing the corresponding filename on the screen.
SELECTS ONLYAUDIO TRACKS SELECTS ONLY VIDEO TRACKS
SELECTS ONLY IMAGE FILES
Page 18

Page | 18
4. PLAY/PAUSE button: Touch to pause playback. Touch again to resume
playback.
5. PREVIOUS button: Touch to skip t o the previous track or chapter. Hold
for 1 second then release to rewind by x2, x4, x8, x20, or PLAY
6. NEXT button: Touch to skip to the ne xt track or chapter. Hold for 1
secon d then release to advance by x2, x4, x8, x20, or PLAY
7. EJECT button: Touch to EJECT disc fr om slot if present.
8. REPEAT button: Touch repeat by, Track, Folder, All, or turn repeat OFF
**Note: The Radio’s USB po rt do es not suppo r t the Apple iPo d® or
iPhone
®.
iPod®/iPhone® OPERATION
To listen to audio through your apple device, veri fy that the Black 30-pin
extensi on is connect ed to th e pi gt ail on th e r ear of th e ra di o. Next, con nect the
30-pin ca bl e to the Apple device. Once con nected , the radio will automatically
switch the source to iPod®. When connected, you c an control your device via
touch scr een , and access Playlist s, Artists, Alb ums, etc.
To return to the iPod® source from any other source menu, touch SRC on the
front panel until the HOME menu appears on the screen. Choose the iPod® icon
from the sour ce menu.
1. NOT USED: Reserved for fu ture us e
2. PLAY/PAUSE button: Touch to pause playback. Touch again to resume
playback.
3. PREVIOUS button: Touch to sk i p to the previous track. Hold to
manually scan backwards.
4. NEXT button: Touch to skip to the next track. Hold to manually scan
forewords.
Page 19

Page | 19
5. REPEAT button: Touch to repeat current track, all tracks, or to turn
repeat off.
6. LIST bu tton: Touch to ret urn back to t he previous d etail s creen. Or
conti nue pressing to reach the search menu.
The Search Menu allows you to search for Playlists, Artists, Album, Genre, Song,
or Composer.
Pres s the screen to select th e d esired categor y to sea rch from.
DVD Operation
Insert a Disc into the top disc slot and disc play begins automatically. You
cannot in s er t a disc if there i s already a disc in th e un it or if the Radio i s off.
To access DVD Mode from another SOURCE, switch to the HOME screen by
eith er press ing SRC on the front panel, or th e HOME icon. Then press the DVD
icon on the scr een . A blank control s creen will be shown for playbac k control.
The screen will not display video unless the BROWN HANDB RAKE wire is
correctly installed, and th e vehicle i s in park.
PAGE 1 of 3
Page 20

Page | 20
1. PREVIOUS CHAPTER: Press to ski p t o the PREVIOUS chapter.
2. REWIND: Press REW rapidly x2, x4, x8, or x20
3. PLAY/PAUSE button: To uc h to pause playback. Touch again
resu me pla yback.
4. STOP: Pres s to stop p l aybac k.
5. NEXT CHAPTER: Touch to sk ip to the NEXT chapter.
6. FAST FORWARD: Press FF rapidly x2, x4, x8, or x20
7. PAGE: Shows the current page, press to a cces s th e n ext pa ges.
8. DISPLAY SETTINGS: Press to access the video settings of the
front panel d uring playbac k
9. PR ESE T EQ: NOT USED
PAGE 2 of 3
1. TRACK DISPLAY:
Displays statistical disc infor mation during
playback. Contin u e pressing to access :
Curre nt T itle / T o tal Tit le s
Current Chapter / Total Chapters for Current Ti tle
Title Elapsed Time
Current Audio Language / T o tal Aud io Languages Available
Current Subtitle Language / Tota l Subtitle Languages A vailable
V ideo Angle
Page 21

Page | 21
2. AUDIO: Changes th e language on mul ti-lan g uage DVD di s cs.
3. REPEAT: Switch the repeat mode
4. MENU: Di spla ys th e root menu that is stor ed on the DVD disc.
5. SUBTITLE: Changes the subtitle languag e on multi-subtitle DVD di scs.
6. ZOOM: press to Zoom in by 2X, 3X, 4X, 1/ 2, 1/3 or 1/4.
7. PAGE: Shows current pag e, press t o a ccess the next page
PAGE 3 of 3
1. MUSIC FILES: Pr es s t o access mu s ic files on the media.
2. IMAG E FILES: Pr ess to access images files on the media .
3. VIDEO FILE S: Pr es s to access vi d eo fil es on th e med ia.
4. EJECT: Eject button.
5. NAVIGATIO N CONTROLS: Pres s t o access G UI control s to easi ly
navigate through DVD media.
6. NUMERIC: Press t o directl y acc ess chap ters using the numbe r k e ys.
7. PAGE: Shows cu rrent pag e, press t o a cces s the nex t p age.
Page 22

Page | 22
DVD SETUP
After a DVD begins playing, press the SETUP button on the re mote c ontrol.
There are six setup p ag es available.
SYSTEM SETUP MENU
TV SYSTEM
This setting determin ates the video system of the output signal. Please select the
proper signal according to your monitor.
The AUTO option will output the video signal accor din g to current DVD title.
SCREENSAVER
This is to enable (ON) or disable (OFF) th e screen sa ver. When the D VD is in
the STO P or PAUSE mod e, or th er e is no disc in the slot, the screen s aver will be
pla yed a ft er 3 min u tes of no ac tivity.
TV TYPE
Th is is t o s e t appropriate asp e c t (4:3 or 16: 9) accord i ng to the c onnected moni tor.
1. 4:3PS (for 4:3 TV) Playback in the PAN & S C AN style. (I f wid e screen
mon itor is connect ed , the left and righ t ed g es are cut off.)
2. 4:3LB (for 4:3 TV) Playback in the letterbox style. ( I f wid e s creen is
connected, bla ck bands app ear at bottom an d top of the screen.)
3. 16:9 Select when a wide-scr een monitor is conn ected.
Page 23

Page | 23
Default
Highlight RESTORE an d pres s ENTER butt on to restore the system setti ngs to
the initial factory settings.
LANGUAGE SETUP MENU
OSD LANGUAGE
This item sets the default language for the On-Screen Display (OSD) messages.
Pres s ENTER and then to move cursor over the available sel ect ions, and press
ENTE R a ga in to select d es ired languag e s etting.
AUDIO LANG
This item sets the default language soundtrack for DVD discs.
Page 24

Page | 24
SUBTITLE LANG
This item sets the default SUBTITLE language for DVD discs.
MENU LANG
This item is for setting the default MENU language for DVD discs.
DIVX® VOD
Not used
VIDEO SETUP MENU
Valid for Digital output settings only, NOT USED FOR THIS MODEL
VIDEO SETUP MENU
Page 25

Page | 25
BRIGHTNESS
This item adjusts the BRIGHTNESS of the video output of the unit.
CONTRAST
This item adjusts the CONTRAST of the video output of the unit.
HUE
This item adjusts the HUE of the video output of the unit.
SATURATION
This item is for adjusting th e SATURATION of video output of the unit.
SHARPNESS
This item is for the SHARPNESS adjustment of the video output of the unit.
Page 26

Page | 26
SPEAKER SETUP MENU
DOWNMIX
This allows users t o select the soun d effect mode for a 2-channel audio output.
Audio Down m ix Modes:
1. LT/RT Mixes the signals from center and al l left positions into one Mixes
the signals from center/rear-right/front-right positions.
2. STEREO Mixes the signals from cen ter/r ear -left/front-left and rear-right
positions. Mixes th e s ignal s fr om center /rear-right/front-right and rear-left
positions.
3. VSS Vi rtual S urr ound S oun d
FRONT
1. LARGE Sends all frequencies out t he audio outpu t
2. SMALL Filters the audio output at 60Hz
DIGITAL SETUP MENU
*All settings are reser ved f or fut ure use
Page 27

Page | 27
BACK-UP CAMERA OPERATION
The Radio has rear Back-up camer a input. You mu s t insta ll the Back -up
camera to t he BROWN CAMERA RCA inpu t of the Ra dio. The PINK trigger
wire must then be connected t o the REVERSE GEAR lamp indicator lead of the
vehicle.
When the camera is not installed and th e fu nction i s access ed by the gear selector
bein g pl aced in r everse or by th e unit’s menu, the message “NO SIGNAL” will
appear, indic ating the fu nc tion is not av ailable. The picture from the rear vi ew
camer a appears when the shift le ve r is set to the R (r eve rs e) pos ition regardless
of t he Ra dio’s mode. When leaving reverse gear, the unit displays the previous
screen. I f a cces s ed b y t he uni t’s menu, s imply ta p the screen to exi t to the
previ ous sour c e .
Note:
Wh en ba cking up your car, watch the surr oundings careful ly for safety. Do not depend
on the rear view camera exclusi vely.
AUDIO FILE REQUIREMENTS (.M P3/.WM A using ISO9660 formatting)
• The MP3 files with a sampling rate of 32, 44.1, or 48 kHz. And a bitrates
between 32 to 320 kbps. (44.1khz/128 kbps or higher is recomme nded)
• The WMA file with a s amplin g r ate of 32, 44.1, or 48 kHz. And a bitrates
between 62 t o 192 kbps. (44.1khz/128kbps is recommended)
MPEG-4 FILE REQUIREMENTS (.MP4)
• Profile: MPEG-4 Simple profile
• Bitrat e: Max. 7 Mbps on USB FS, 10 Mbps on DVD, 7 Mbps on CD
• Frame rate: Max. 30 fps
• Image size: Max. 800 *480 pixels
• Audio: Maxim u m bi trat e 320 kbps (AAC-LC)
• File extension: .mp4
• Max F ile size limit is 2G Fat16
DivX® FILE REQUIREME NTS (. AVI)
• Files encoded with Xvid or di vX Profiles, using bitrates of 4854kbps or less, and
a resolution of 30fps from 32*32 to 800*480
MPEG-1/MPEG-2 BITRATES (.MPG)
• MPEG1: 44.1 kHz/48 kHz/32 kHz
• MPEG2: 22.05 kHz/24 kHz/16 kHz
• MPEG2.5: 11.025 kHz/12 kHz/8 kHz
NOTE:
This Radio does not support playback of aac (.m4a) audio. Individual file size limit is
2G in a ccordance with Fat16/32 file res trictions .
Page 28

Page | 28
The Bluetooth® word mark and logos are registered trademarks owned by
Bluetooth SIG, Inc. and any use of such marks by REI under license.
DivX®, DivX Certified® and associated logos are trademarks of Rovi
Corporation or its subsidi aries and are used under license. DivX Certified® to
play DivX® vide o, i ncl uding premium content. Covere d b y one or mor e of the
following U.S. patents: 7,295,673; 7,460,668; 7,515,710; 7,519,274
iPod® and iPhone® are trademark s of Apple Inc., regi ster e d in the U.S. and
other countries.
REMOTE CONTROL
Page 29

Page | 29
1. NUMBER (1-10) BUTTONS
In radio mode, press number key 1-6 to store up to 6 ra dio stations. I n DVD /U SB /microS D m ode,
press any number 1-9 for the desire track. Press 10+ to increment the number by 10.
2. SEEK+/- BUTTONS
In radio mode, press and hold to SEEK stations. Press and release to change preset stations. In
DVD/USB/microSD mode, press and hold to advance x2, x4, x8, or x20. Press to skip chapters.
3. SEL BUTTON (Not used)
4. CLK BUTTON
Press to access the clock adjust menu.
5. SETUP BUTTON
Press to acces s the D VD contr ol settings during DVD dis c playback.
6. OSD BUTTON
Press to access statistical disc information during playback.
7. MENU B UTTO N
Press to a ccess the HOME screen.
8. SUB-T BUTTON
Press to activate and/or change the SUBTITLE language on multi-subtitle language DVD discs.
9. ENTER BUTTON
Confirms the track/chapter selected with the numbers keys and with the cursor buttons .
10. EJECT BUTTON
Press to EJECT the disc.
11. CURSOR BUTTONS
In menu mode, these buttons moves the cu rs o r.
12. TITLE/PBC BUTTON
Dur ing D VD m o de , press to r etu rn to th e disc tit l e m e nu.
13. PLAY/PAUSE BUTTON
Press to PAUSE in playback mode, press again to PLAY in pause mode.
14. STOP BUTTON
In playback mode, press once to pau se play, press twice to STOP.
15. ST/RPT BUTTON
In radio mode, press to switch from ST to MONO. In DVD mode, press to activate REPEAT CHAPTER,
REPEAT TITLE, REPEAT ALL, & REPEAT OFF.
16. APS/PRG BUTTON
In radio mode, press to begin AUTO PRESET SCAN. I n D VD mod e, pres s t o pr o gr am th e tr a ck playi ng order.
17. GOTO BUTTON
Press to disp lay the disc status, then ent er 0-9 directly and press ENTER to go directl y to the selected chapter.
18. R/L BUTTON
During DVD disc, pr e ss to changes the AUDIO soundtra ck on multi-au di o s oundtr ack D VD disc s.
19. BAND/RDM BUTTON
In radio mode, press to chang e t h e f r e q uen c y. In DVD mode, press to turn RANDOM mode ON/OFF.
20. MODE BUTTON
Press to change to the next source on the unit.
21. POWER BUTTON
Press POWER to turn the unit ON or OFF.
Page 30

Page | 30
TROUBLE SHOOTING
Problem Cause Solution
Unit will not power on. No power to BATTE RY wire or ACC wire,
blown 10A ma in fuse or 1A accessory fuse.
Check for both A CC & BATTERY voltage
with Multi-meter, check all fuses.
Cannot tune radio stations. The antenna cable is not connected. The
signal is too we ak. The radio is in the
wrong fre quenc y ARE A.
Connect the antenna cable. Check that the
RADIO AREA is set to the correct location.
USB media not playing, or says Invalid File
Type.
Media is the wrong file t ype. Convert files to a usable format, see file
requirements section of the manual.
Cannot stream Bluetooth® audio. Bluetooth® device was not successfully
paired. Verify RED Bluetooth® connected
icon.
Pair the Bluetooth® device following the
steps in the manual and retry.
Audio is distorted or low. Source audio le vel is too weak or
overdriven. Bitrate of audio file is too large.
Adjust the volume level of the auxiliary
source. Check the VOLUME BALANCE
section of SETUP. Change the sample
fre quency or Bitrate of t he file.
iPod® screen displays “iPod Linking” for
a long period of time.
iPod® is not a supported dev ice. Wait for iPod® to load or reconnect 30-pin
plug. If still Li nking, the n device is not
supported, use the AUX input or a
Bluetooth® connection instead.
Disc’s will not play or display loading for
an extended period.
DVD-R and DVD-RW will not play unless
the disc is finalized after authorizing in
software.
Finalize the media before playing in the unit
.
Verify that the files meet the requirements of
the Radio.
Rear view Camera is not displayed
Camer a not working or trigger is not
connect ed prope rly.
Verify camera has power and that the trigger
is connected properly.
Touch screen operation is not functioning
correctly
Front display is dirty front or requires
calibration.
Gently wipe t he front display. Enter the
SETUP menu and calibrate the screen.
RADIO DIMENSIO NS
Page 31

Page | 31
RADIO INSTALLATION
ISO INSTALLATION:
For insta llati on s th at do NOT requ ire the us e of the DIN collar. The ra di o h a s
thr eaded holes in the ch assi s s ide panels for ISO mount a p p licati ons. If necessa ry,
four M5x10mm screws are included with the har dware pack to assist you.
COLLAR INSTALLATION:
RECOMMENDED CUTOUT DIMENSIONS
Page 32

Page | 32
Pla ce the DIN collar into the dash opening. Ben d the t abs ou tward as shown on
th e drawin g be low to lock into place.
Pass the harnesses and antenna cabl e t hr ough the DIN colla r, and connect to the
back of the radio. Ver ify clear ance; th en gentl y insert the radio into the DI N
Collar until both spring cli p s are locked i n to place. A Tr im plate is provided to
improve the appearance if necessary.
Page 33

Page | 33
For installations requiring additional support, install a rear supp ort bracket a s
shown be lo w:
RADIO REMOVAL
To remove the radi o wh en instal led usin g the DIN coll ar, r emove the Fa ce P late
is installed. Then in sert th e removal keys in both sides to release the lock clips.
Page 34

Page | 34
ELECTRICAL CONNECTIONS
**An optional USB Pane l mount extensi on is avai l a ble (P/N 512485), contact
an REI sales representative for details
Warning:
For s afety reasons, you cannot view a video sour c e on the built-in monitor as long as the vehicle
is in motion. This is a violation of federal law.
In order to display vid e o, the Brown handbrake
Trigger wire of the included harness must be hardwired into the vehicle's parking brake
ground circuit, and the vehicle's parking brake must be engaged.
Page 35

Page | 35
SPECIFICATIONS:
General Specifications
Operating Voltage (10.0 –15.6V allowable)
Maximum Current Co nsumption 10A (15mA Standby)
Handbrake T rigger Ground
Backup Camera trigger 12-24V allowable
FM STEREO RADIO
Frequency range USA 87.5MHZ – 107.9MHZ (0.2 MHz step)
EURO 87.50MHZ –108.00MHz (0.05 MHz step)
Usa ble Sensitivity 10.2 dBf. (0.9 uV, 75Ω)
50db Quieting Sensitivity 15.2 dBf. (1.6 uV, 75Ω)
Freq uency Response 30Hz – 15kHz (+/- 3dB)
Alternate Channel Selectivity 75dB
Stereo Sep ara t ion 40dB (1kHz)
Image Rejection Ration 75dB
IF rejection ratio 100dB
Signal to Noise ratio 70dB (stereo)
AM RADIO
Freq uency r an g e USA 530kHz – 1710kHz (10 kHz step)
EURO 522kHz – 1620kHz (9 kHz step)
Usa ble Sensitivity 28 dB/uV (25uV, S/N 20dB)
CD/DVD PLAYER
Signal/Noise Ratio (1kHz) 120dB
Freq uency Response (+/- 1dB) 10 – 20,000Hz (+/-1dB)
Total Harmonic Distortion (1kHz) less than 0.20% (1Khz)
Number of Channels 2 (stereo)
MP3 decodin g format MPEG-1 & 2 Audio laye r 3
WMA decoding format Ver. 7, 7.1 ,8 ,9 (2ch audio)
(Windows Media Pla yer)
DivX® decoding for mat Home theater Ver. 3,4,5.2,6
Xvid(.avi)
Video decoding format MPEG-1, & MPEG-2
Max resolutio n 800*480 (30fps)
Page 36

Page | 36
BLUETOOTH®
Version Bluetooth® 2.0 Certified
Frequency Range 2.402 – 2.480 G Hz
Output power +4dBm Max
Profiles supp or t ed HFP 1.5, A2DP 1.2, AVRCP 1.0,
& PBAP
USB INTERFACE
USB Standard USB1.1/2. 0 (Full Speed)
Maximum Supply Current 500mA
File System Fat16/32
microSD CARD INTERFACE
Freq uency Response (+/- 1dB) 10 – 20,000Hz
File System Fat16/32
Dyna mic Rang e 80dB (1kHz)
Harmonic Distortion 0.01%
AUXILIARY INPUT SPECIFICATIONS
Freq uency Response (+/- 1db) 20HZ – 20Khz (+/-3dB)
Input Voltag e Max imu m Voltag e 1200mV
Input impedan ce 10KΩ
VIDEO PLAYBACK
Format NTSC/PAL/AUTO
Video Input/Output level 1. 0V p-p/75Ω (+/-0.2V)
GPS
Freq uency Range L1 (1575.42MHz)
MONITOR
Screen Size 6.2” Measured Diagonally (16:9 Widescreen)
Resolution (800*480)
*Due to continuous product improvement, speci fications and design are s ubject to change without notice.
Radio Engineeri ng Industri e s, Inc .
www.radioeng.com
Rev 0.6 Date: 5-12-15
 Loading...