

Page 1
ECVR-1500D
AM/FM/WB/CD/DVD/USB/BT
Motor Coach Radio User’s Guide
© 2018 Radio Engineering Industries, Inc.
Page 2

User’s Guide 2
ECVR-1500D AM/FM/WB/CD/DVD/USB/BT Motor Coach Radio User’s Guide Radio Engineering Industries, Inc. | 6534 L Street | Omaha, NE 68117
Table of Contents
1 Introduction 6
Features 6
2 Controls and Indicators 11
2.1 Reset Switch 11
2.2 Rear Inputs 12
3 Cable Connection Points 12
3.1 Rear Driver’s USB Jack 12
3.2 Driver’s AUX Input Jack 12
3.3 P.A. Inputs 1-3 12
3.4 External Amplifier Audio Output 12
3.5 External Audio Input 12
3.6 External IR Input 13
3.7 RS485 Communication 13
3.8 Antenna Input 13
3.9 Type E HDMI Output 13
3.10 Aux 2 Composite Video Input BNC 13
3.11 Composite Video Output BNC 13
3.12 Rear Passenger’s USB Jack 13
3.13 CAN BUS 13
© 2018 Radio Engineering Industries, Inc. 800.228.9275 | p: 402.339.2200 | f: 402.339.1704 | radioeng.com
Page 3

User’s Guide 3
ECVR-1500D AM/FM/WB/CD/DVD/USB/BT Motor Coach Radio User’s Guide Radio Engineering Industries, Inc. | 6534 L Street | Omaha, NE 68117
3.14 Dimmer Trigger 13
3.15 Video Disable 13
3.16 Aux Trigger 13
3.17 MUTE 13
4 Drivers Operation/Functions 14
4.1 Service Menu 14
4.2 Setup Menu 17
4.3 Clock 21
4.4 Power and Mute Function 21
5 Driver’s Section 22
5.1 Driver’s VOL/SEL Selection 22
5.2 Driver’s BASS/TREBLE/BALANCE Selection 22
5.3 RAD button 22
Auto Program/Scan 23
Preset Memory/Recall Operation 23
TUNE/SEEK DOWN 24
TUNE/SEEK UP 24
5.4 Weather Band 24
5.5 SRC Button 25
5.6 USB Playback 25
5.7 AUX Button 26
© 2018 Radio Engineering Industries, Inc. 800.228.9275 | p: 402.339.2200 | f: 402.339.1704 | radioeng.com
Page 4

User’s Guide 4
ECVR-1500D AM/FM/WB/CD/DVD/USB/BT Motor Coach Radio User’s Guide Radio Engineering Industries, Inc. | 6534 L Street | Omaha, NE 68117
5.8 Public Address system (P.A.) 26
5.9 Bluetooth Connection 27
5.10 Using a Bluetooth Device as an Audio Source 27
6 Passenger’s Section 28
6.1 Passenger’s VOL/SEL Selection 28
6.2 SETTING THE TIME 29
Passenger’s RAD button 29
6.3 Preset Memory/Recall Operation 30
6.4 TUNE/SEEK DOWN 30
6.5 TUNE/SEEK UP 30
6.6 Auto Program/Scan 30
6.7 Passenger’s SRC button 31
6.8 USB iPod®/iPhone® Operation 33
6.9 Passenger’s VID button 36
6.10 TRACK UP/TRACK DOWN 36
6.11 STOP 36
6.12 PLAY/PAUSE 37
6.13 DVD OPERATION: 37
6.14 CHAPTER UP/ CHAPTER DOWN 37
6.15 PLAY/PAUSE 37
6.16 STOP 38
© 2018 Radio Engineering Industries, Inc. 800.228.9275 | p: 402.339.2200 | f: 402.339.1704 | radioeng.com
Page 5

User’s Guide 5
ECVR-1500D AM/FM/WB/CD/DVD/USB/BT Motor Coach Radio User’s Guide Radio Engineering Industries, Inc. | 6534 L Street | Omaha, NE 68117
6.17 MENU 38
6.18 SEARCH/BACK 38
6.19 Ejecting the disc 38
6.20 Changing the Splash screen output file 38
6.21 VERIFYING THE APP FIRMWARE OF THE UNIT 39
6.22 Bluetooth Connection 41
6.23 Using a Bluetooth Device as an Audio Source 41
6.24 Front IR input for Remote control 42
7 Remote Control 43
7.1 Remote Control Functionality 44
7.2 Remote Control Setup Display 46
Radio Engineering Industries, Inc. 52
© 2018 Radio Engineering Industries, Inc. 800.228.9275 | p: 402.339.2200 | f: 402.339.1704 | radioeng.com
Page 6

User’s Guide 6
ECVR-1500D AM/FM/WB/CD/DVD/USB/BT Motor Coach Radio User’s Guide Radio Engineering Industries, Inc. | 6534 L Street | Omaha, NE 68117
1 Introduction
This document outlines the full step-by-step process for using the ECVR-1500D. The REI ECVR-1500D
is an SAEJ1939-compliant, double din, electronically-tuned radio designed for use with commercial
road vehicles.
If you have any questions or need assistance, please call the Service Hot Line: 1-877-726-4617 Toll
Free USA & CANADA.
IF ADDITIONAL INSTALLATION COMPONENTS ARE NECESSARY, CONTACT YOUR
REI SALES REP FOR:
** OEM /FACTORY WIRING HARNESS ADAPTERS
** ANTENNAS & ANTENNA ADAPTERS
** SPEAKERS & GRILLS
Radio Engineering Industries, Inc.
6534 “L” Street
Omaha, Nebraska 68117
(800)228-9275
www.radioeng.com
Features:
• All in one Automotive DVD player supports playback of CD, DVD, MPEG, and compressed
audio/video files with HD 1080p upscaling via Type-E HDMI connection.
• Locking BNC Composite video Output for non-HD systems
• Drivers Analog Auxiliary audio input & Passengers A/V input
• Independent AM/FM Digital tuners for Driver and Passenger Zones
• Presets for up to 30 Radio Stations (18 FM, 12 AM)
• Passenger subwoofer level and LPF controls
• Built-in Drivers/Passengers audio amplifier with 2V RMS Passengers line output
• Dual Zone USB inputs supports 1.5A Charging
• Apple iPod®, iPhone®, and iPad® compatibility and control from Passengers USB input
• Independent Bluetooth® modules, supports HFP (Drivers only), AVRCP, and A2DP Profiles
• Built in front panel microphone and optional External input
• SAE J1939 CAN Bus interface
• Serial RS-485 Communication with external REI devices
© 2018 Radio Engineering Industries, Inc. 800.228.9275 | p: 402.339.2200 | f: 402.339.1704 | radioeng.com
Page 7
User’s Guide 7
ECVR-1500D AM/FM/WB/CD/DVD/USB/BT Motor Coach Radio User’s Guide Radio Engineering Industries, Inc. | 6534 L Street | Omaha, NE 68117
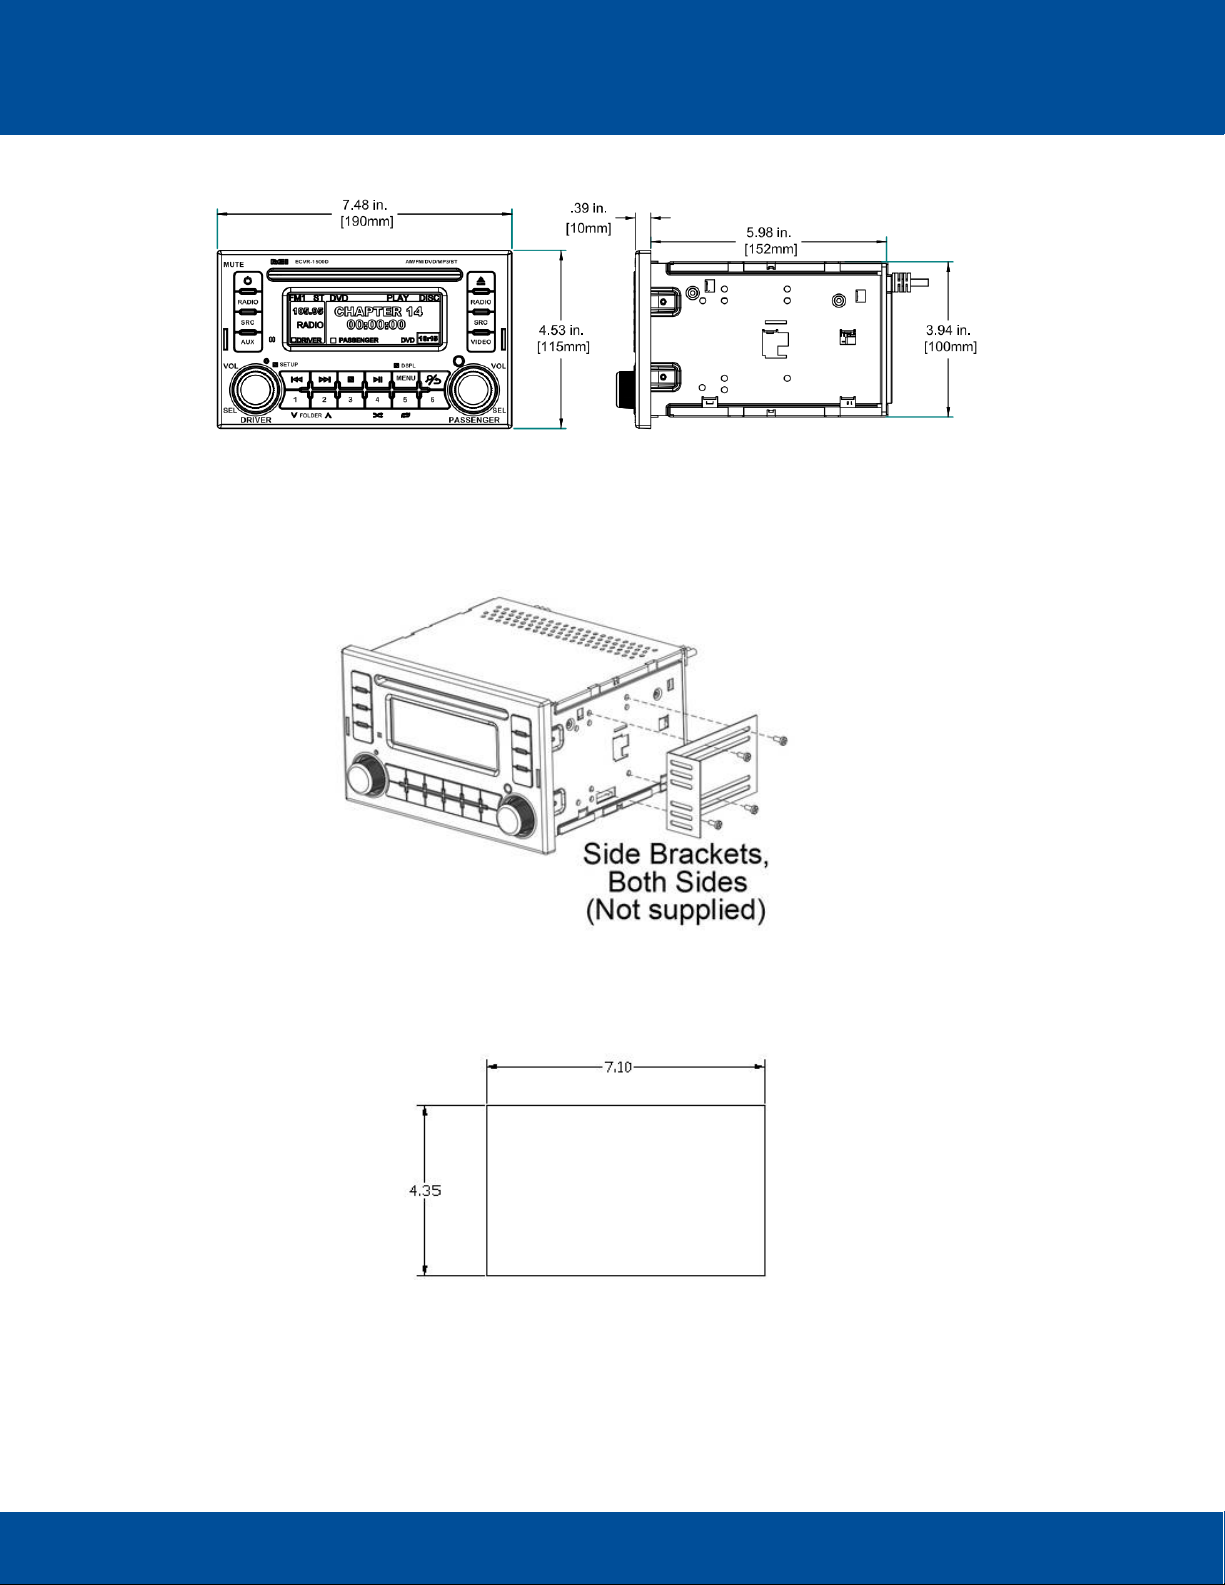
RADIO DIMENSIONS
RADIO INSTALLATION
ISO INSTALLATION:
For installations that do NOT require the use of the DIN collar. The radio has threaded holes in the
chassis side panels for ISO mount applications. If necessary, four M5x10mm screws are included with
the hardware pack to assist you.
COLLAR INSTALLATION:
RECOMMENDED CUTOUT DIMENSIONS
© 2018 Radio Engineering Industries, Inc. 800.228.9275 | p: 402.339.2200 | f: 402.339.1704 | radioeng.com
Page 8
User’s Guide 8
ECVR-1500D AM/FM/WB/CD/DVD/USB/BT Motor Coach Radio User’s Guide Radio Engineering Industries, Inc. | 6534 L Street | Omaha, NE 68117
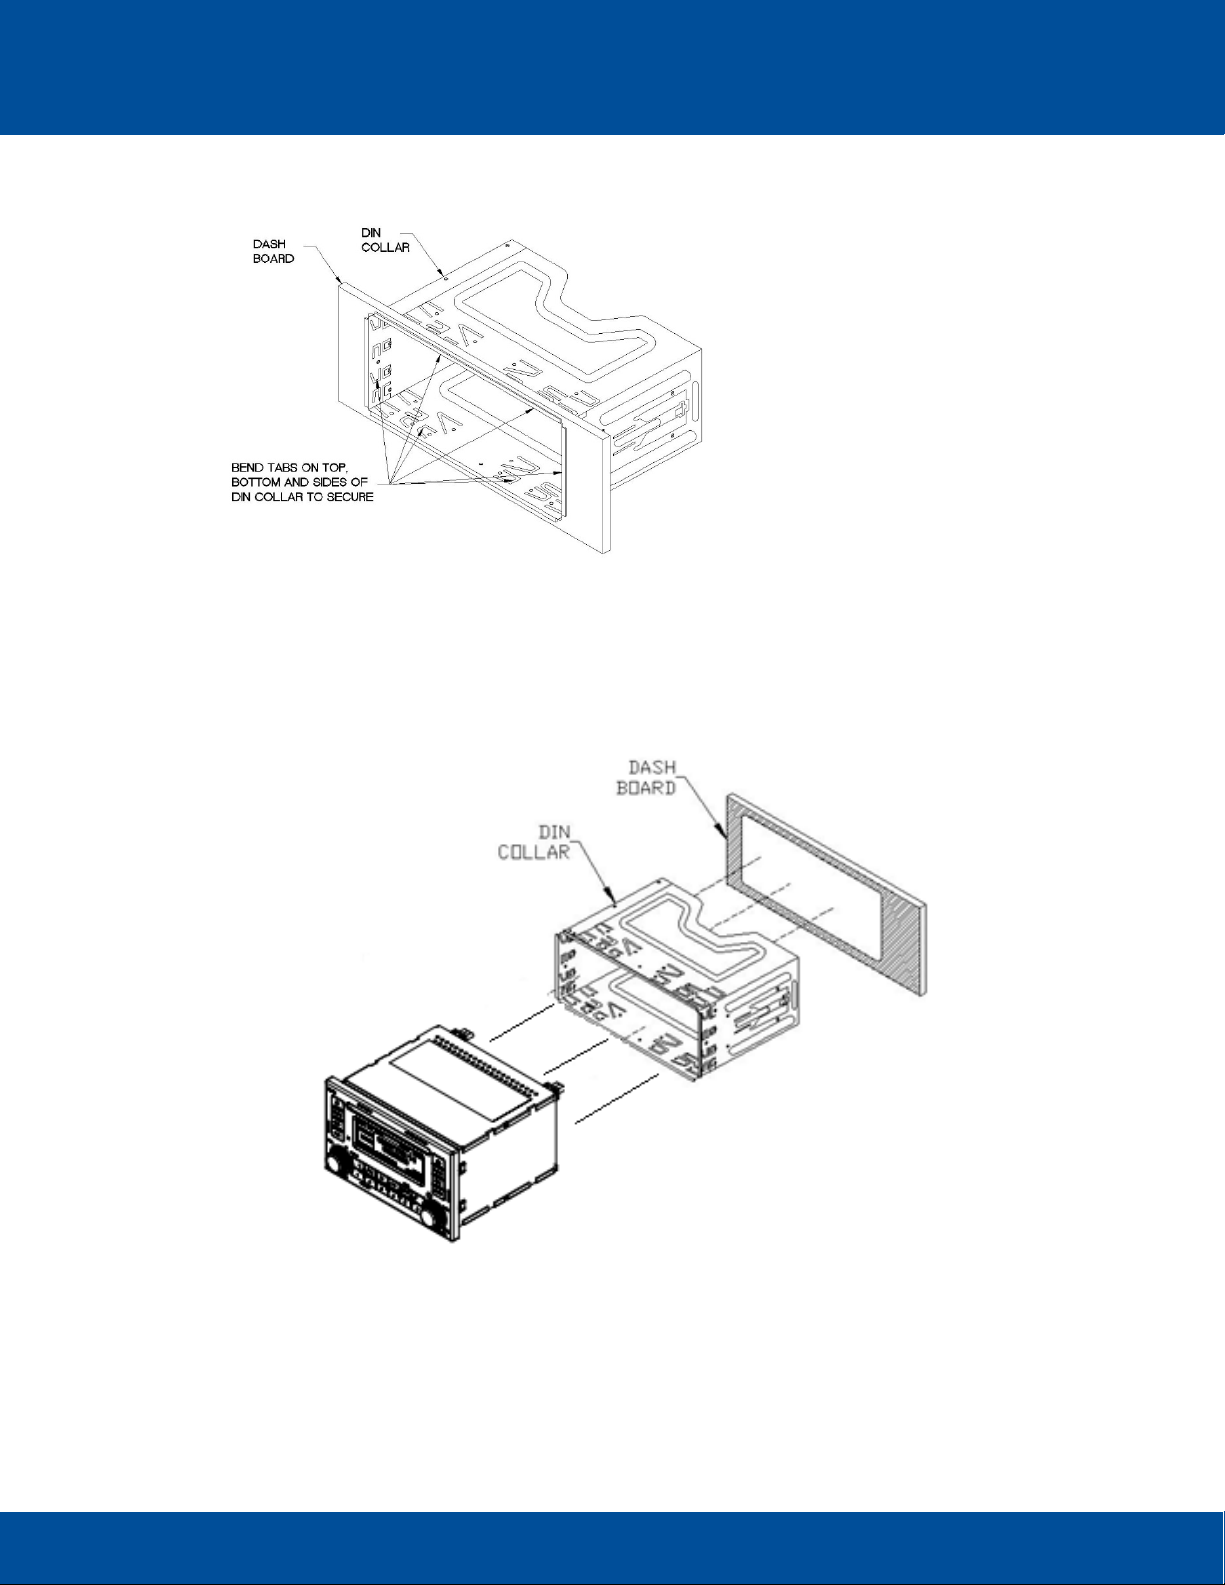
Place the DIN collar into the dash opening. Bend the tabs outward as shown on the drawing below to
lock into place.
Pass the harnesses and antenna cable through the DIN collar, and connect to the back of the radio.
Verify clearance; then gently insert the radio into the DIN Collar until both spring clips are locked into
place. A Trim plate is provided to improve the appearance if necessary.
© 2018 Radio Engineering Industries, Inc. 800.228.9275 | p: 402.339.2200 | f: 402.339.1704 | radioeng.com
Page 9
User’s Guide 9
ECVR-1500D AM/FM/WB/CD/DVD/USB/BT Motor Coach Radio User’s Guide Radio Engineering Industries, Inc. | 6534 L Street | Omaha, NE 68117
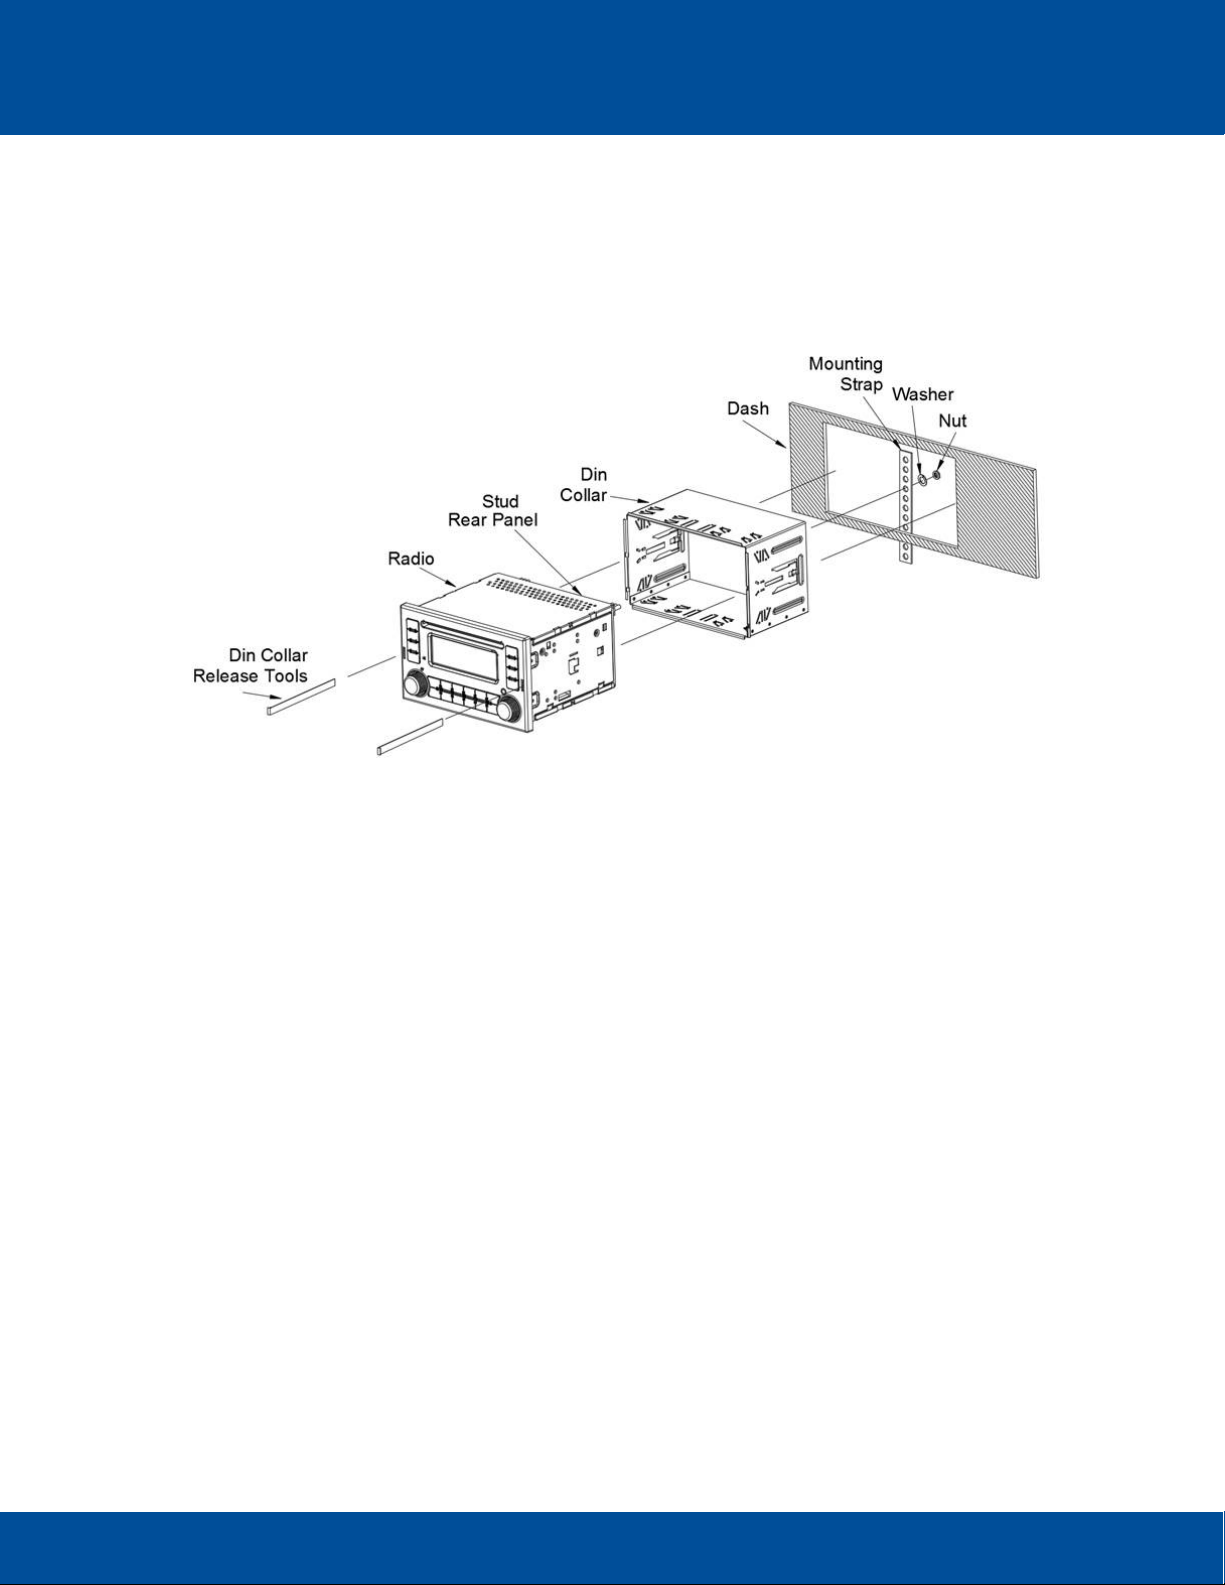
For installations requiring additional support, install a rear support bracket as shown below:
RADIO REMOVAL
To remove the radio when installed using the DIN collar, remove the Face Plate is installed. Then insert the
removal keys in both sides to release the lock clips.
© 2018 Radio Engineering Industries, Inc. 800.228.9275 | p: 402.339.2200 | f: 402.339.1704 | radioeng.com
Page 10
User’s Guide 10
ECVR-1500D AM/FM/WB/CD/DVD/USB/BT Motor Coach Radio User’s Guide Radio Engineering Industries, Inc. | 6534 L Street | Omaha, NE 68117
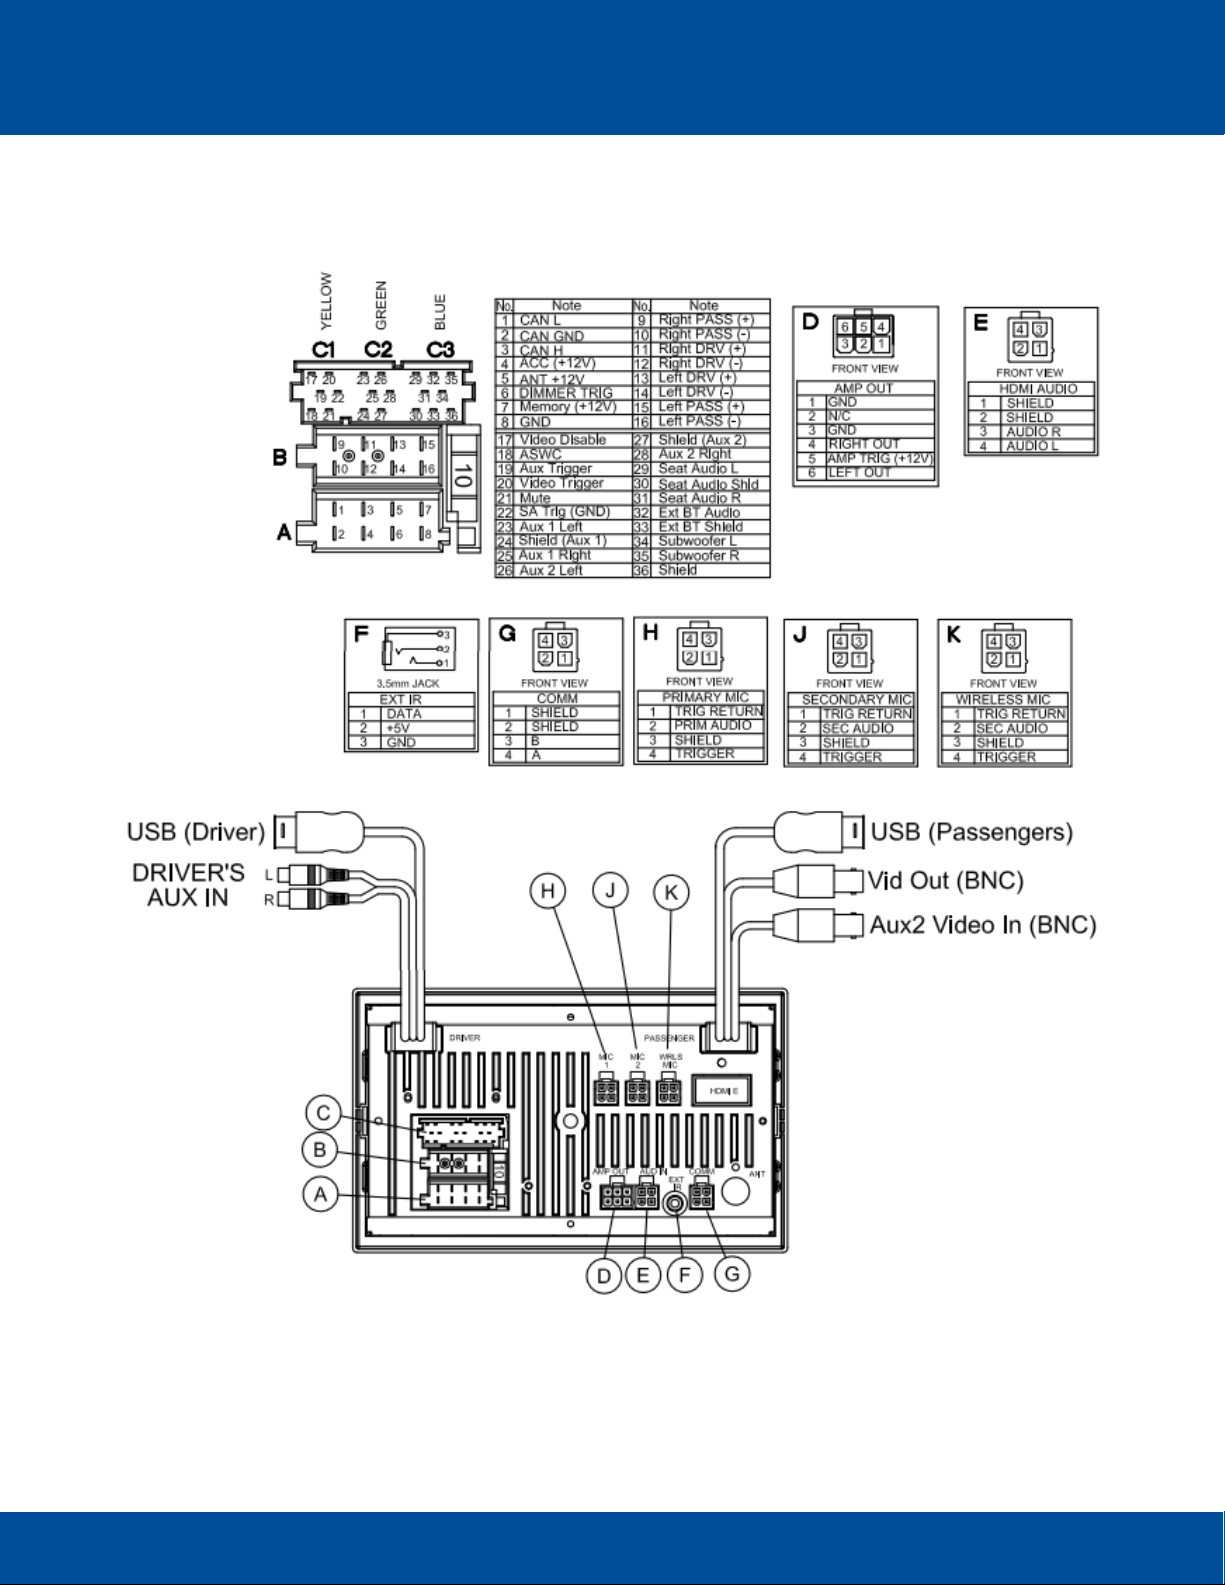
ELECTRICAL CONNECTIONS
© 2018 Radio Engineering Industries, Inc. 800.228.9275 | p: 402.339.2200 | f: 402.339.1704 | radioeng.com
Page 11
User’s Guide 11
ECVR-1500D AM/FM/WB/CD/DVD/USB/BT Motor Coach Radio User’s Guide Radio Engineering Industries, Inc. | 6534 L Street | Omaha, NE 68117
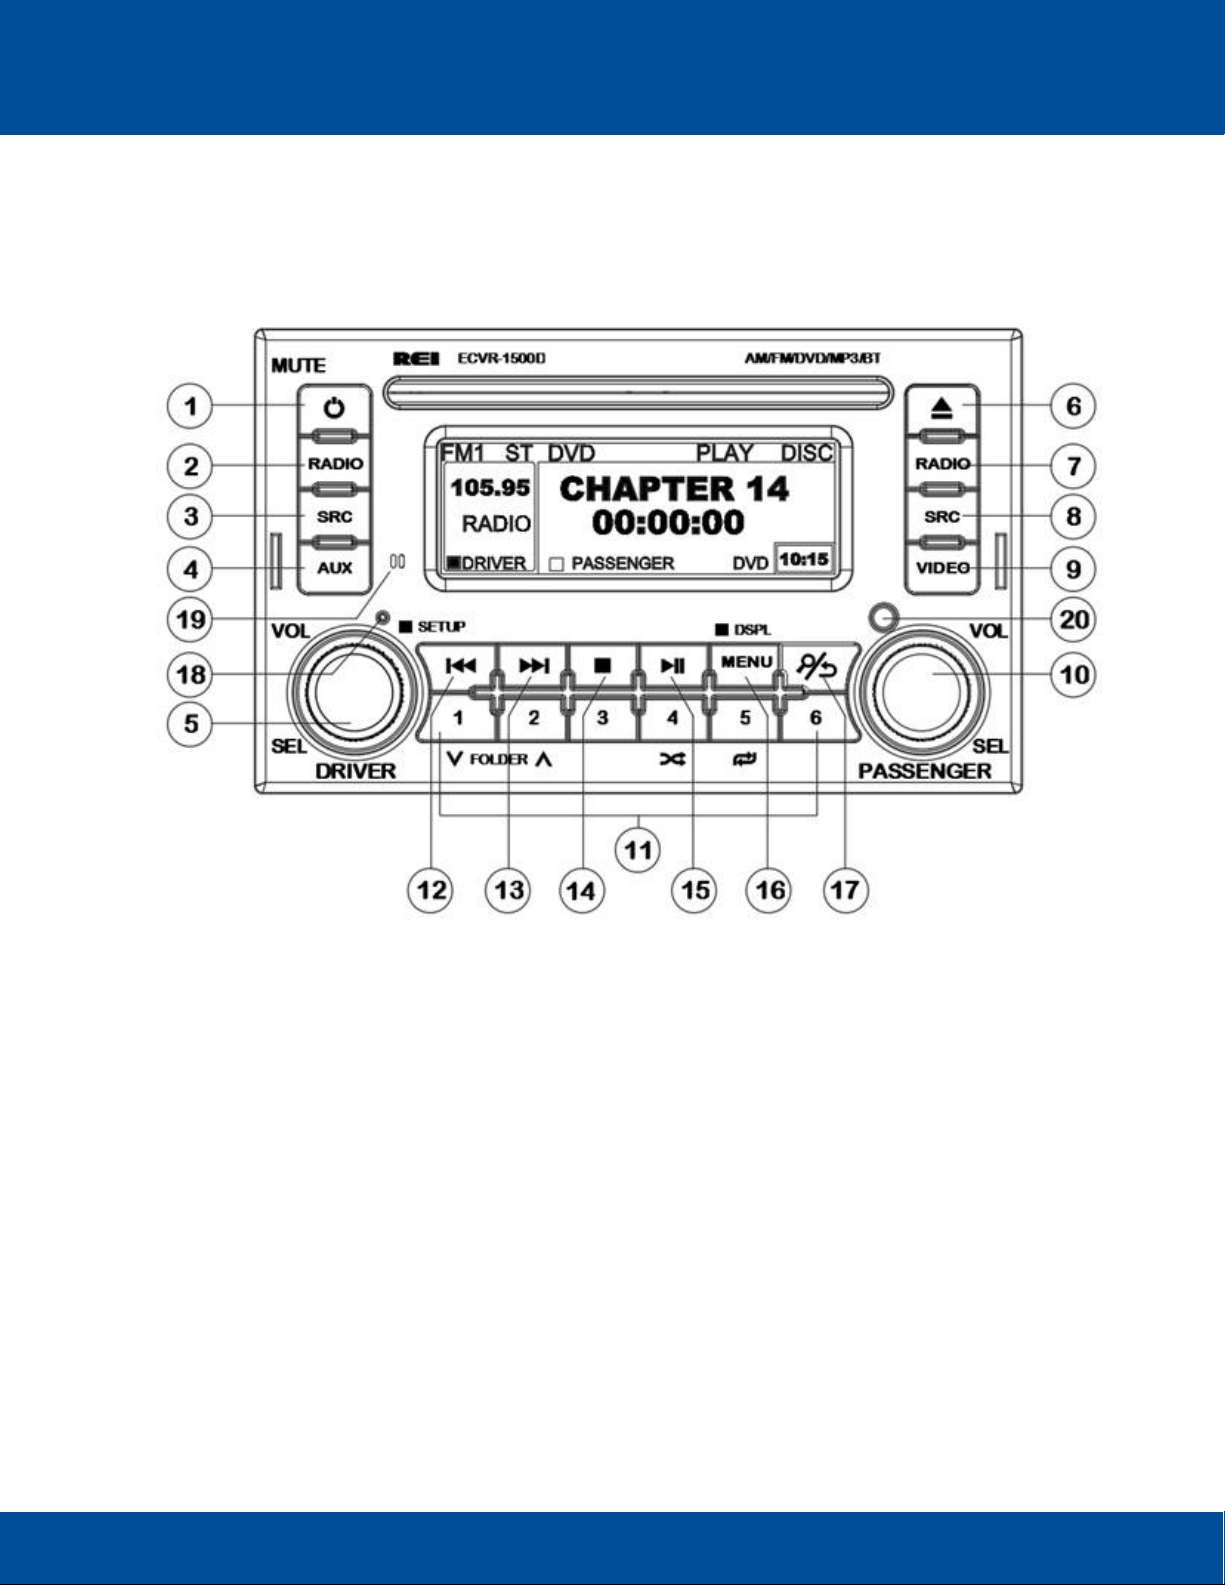
2 Controls and Indicators
Radio Control Layout
1. Power/Mute 2. Driver’s Radio 3. Driver’s SRC 4. Driver’s AUX 5. Driver’s Select Knob
6. Disc EJECT 7. Passenger’s Radio 8. Passenger’s SCR 9. Passenger’s VID 10. Passenger’s Select
Knob 11. Preset Memory/Recall, Media Control Buttons 12. Tune /Seek Down 13. Tune /Seek Up
14. Media Stop 15. Media Play/Pause 16. Media Menu Button (Display Button) 17. Media Search/Back
18. Reset 19. Bluetooth Microphone (internal) 20. IR input
2.1 Reset Switch
If the Control head is not operating correctly, press the RESET button to restart the operating system.
The RESET button must also eject a disc if inserted, or simply cycle eject without a disc inserted.
© 2018 Radio Engineering Industries, Inc. 800.228.9275 | p: 402.339.2200 | f: 402.339.1704 | radioeng.com
Page 12
User’s Guide 12
ECVR-1500D AM/FM/WB/CD/DVD/USB/BT Motor Coach Radio User’s Guide Radio Engineering Industries, Inc. | 6534 L Street | Omaha, NE 68117
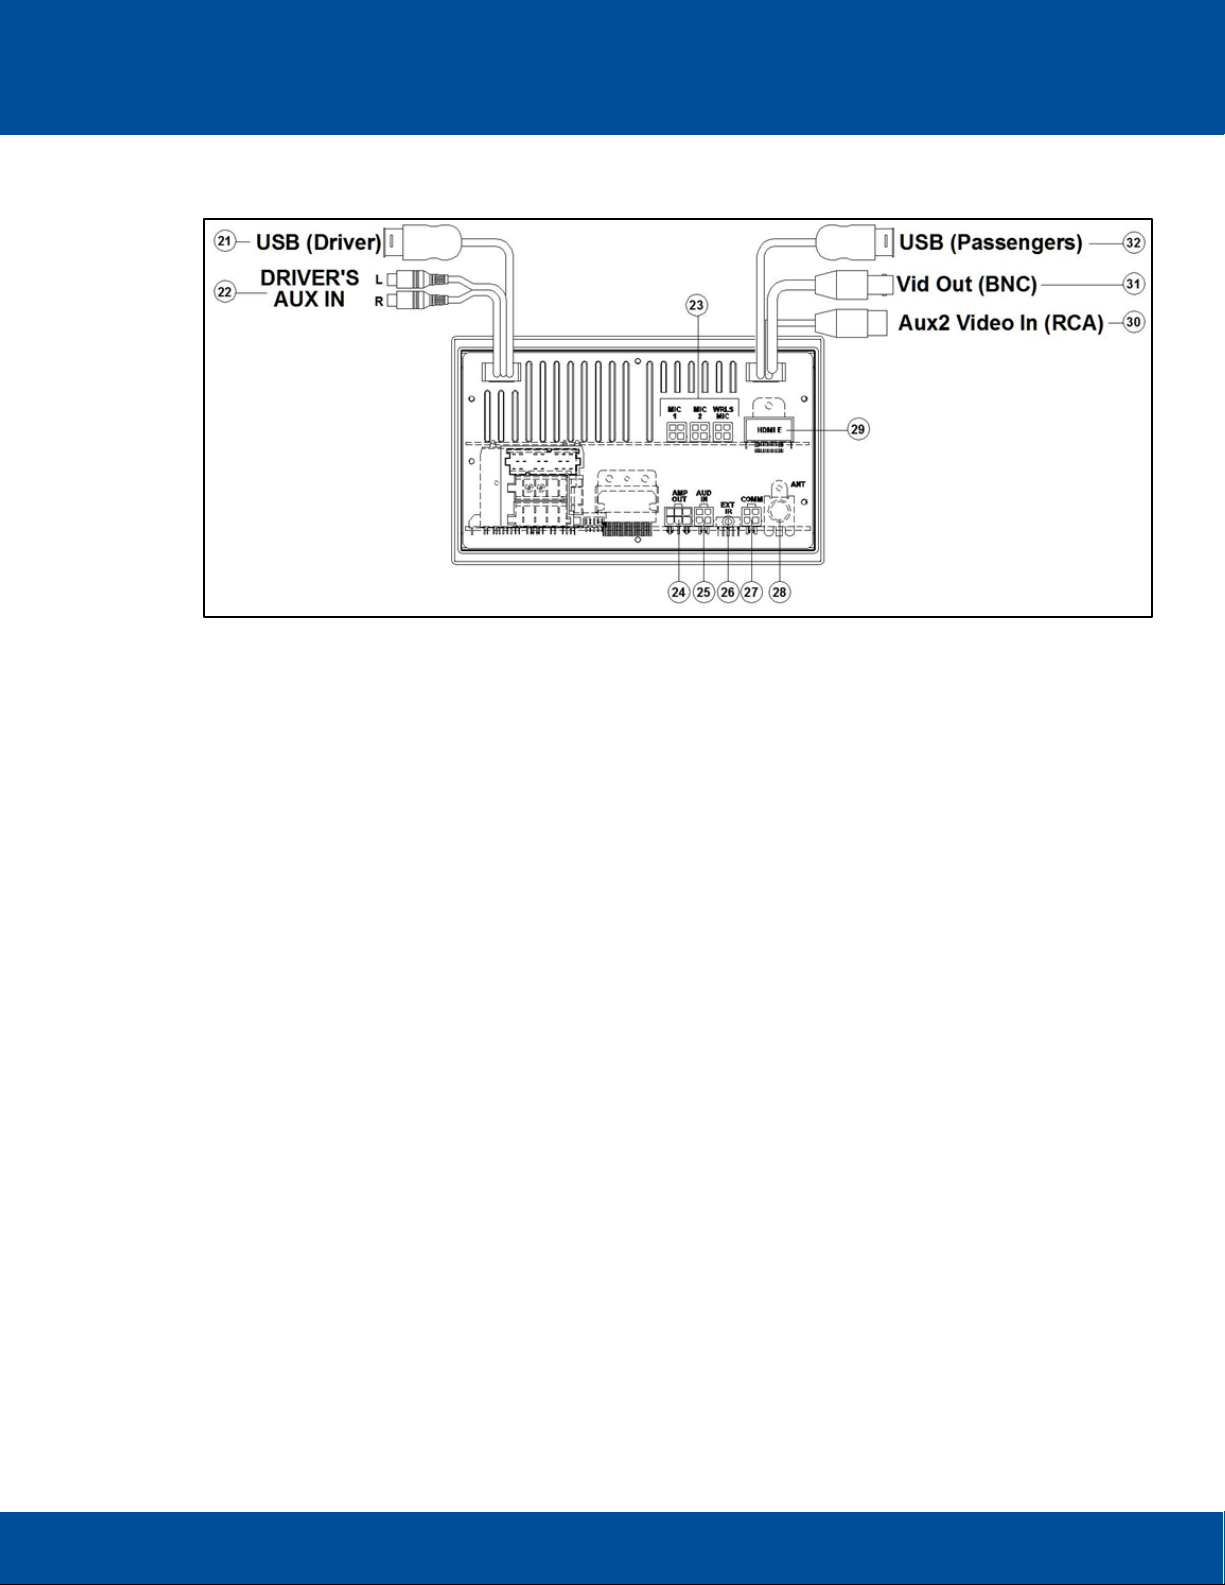
2.2 Rear Inputs
Radio Cable Connections
21. Rear Driver’s USB 2.0 (Type A) Input 22. Rear Driver’s AUX1 Input Jacks 23. Microphone inputs
24. Audio Amplifier line output 25. HDMI Switcher/external DVD line input
26. External IR Input 27.RS485 communication port 28. Rear antenna input (Motorola style, 6” pigtail)
29. HDMI Video output (automotive HDMI Type E Receptacle) 30. Aux 2 composite video input
31. Composite Video Output (BNC, 6” pigtail) 32. Rear USB input (2.0 Type A Jack, 6” pigtail)
3 Cable Connection Points
3.1
Rear Driver’s USB Jack
Access to compressed audio files and device charging for the DRIVER’S USB.
3.2 Driver’s AUX Input Jack
Access to the driver’s stereo RCA analog inputs.
3.3 P.A. Inputs 1-3
Public Address Microphone inputs for Passenger announcements.
3.4 External Amplifier Audio Output
Line output for connection to REI amplifier.
3.5 External Audio Input
Input for audio from either the external REI HDMI switcher or separate external REI DVD player.
© 2018 Radio Engineering Industries, Inc. 800.228.9275 | p: 402.339.2200 | f: 402.339.1704 | radioeng.com
Page 13

User’s Guide 13
ECVR-1500D AM/FM/WB/CD/DVD/USB/BT Motor Coach Radio User’s Guide Radio Engineering Industries, Inc. | 6534 L Street | Omaha, NE 68117
3.6 External IR Input
External wireless remote control input for control head, works with front IR.
3.7 RS485 Communication
Input for communication of external REI devices using an RS485 link.
3.8 Antenna Input
Antenna input for both Driver and Passenger tuner modules.
3.9 Type E HDMI Output
Provides 1080P HD video output from the digital Media.
3.10 Aux 2 Composite Video Input BNC
Allows connection for an external composite video source.
3.11 Composite Video Output BNC
Outputs composite video from digital media sources or Aux 2 Input source.
3.12 Rear Passenger’s USB Jack
Access to compressed audio/video files and device charging for the Passenger’s USB.
3.13 CAN BUS
Optional SAEJ1939 CAN bus connections, CAN H/L/GND (Reserved for Future USE)
3.14 Dimmer Trigger
Optional LCD dimmer option, when connected to +12V the LCD display invers to reduce output intensity
3.15 Video Disable
When Connected to Chassis Ground, this input disables the PLAY/STOP/FF/REW/MENU button
operation from the front of the unit. The remote must then be used for DVD playback operation
3.16 Aux Trigger
When Connected to Chassis Ground, the unit will default to the passengers AUX 2 input source
3.17 MUTE
When Connected to Chassis Ground, the unit will MUTER the passengers source
© 2018 Radio Engineering Industries, Inc. 800.228.9275 | p: 402.339.2200 | f: 402.339.1704 | radioeng.com
Page 14
User’s Guide 14
ECVR-1500D AM/FM/WB/CD/DVD/USB/BT Motor Coach Radio User’s Guide Radio Engineering Industries, Inc. | 6534 L Street | Omaha, NE 68117
4 Drivers Operation/Functions
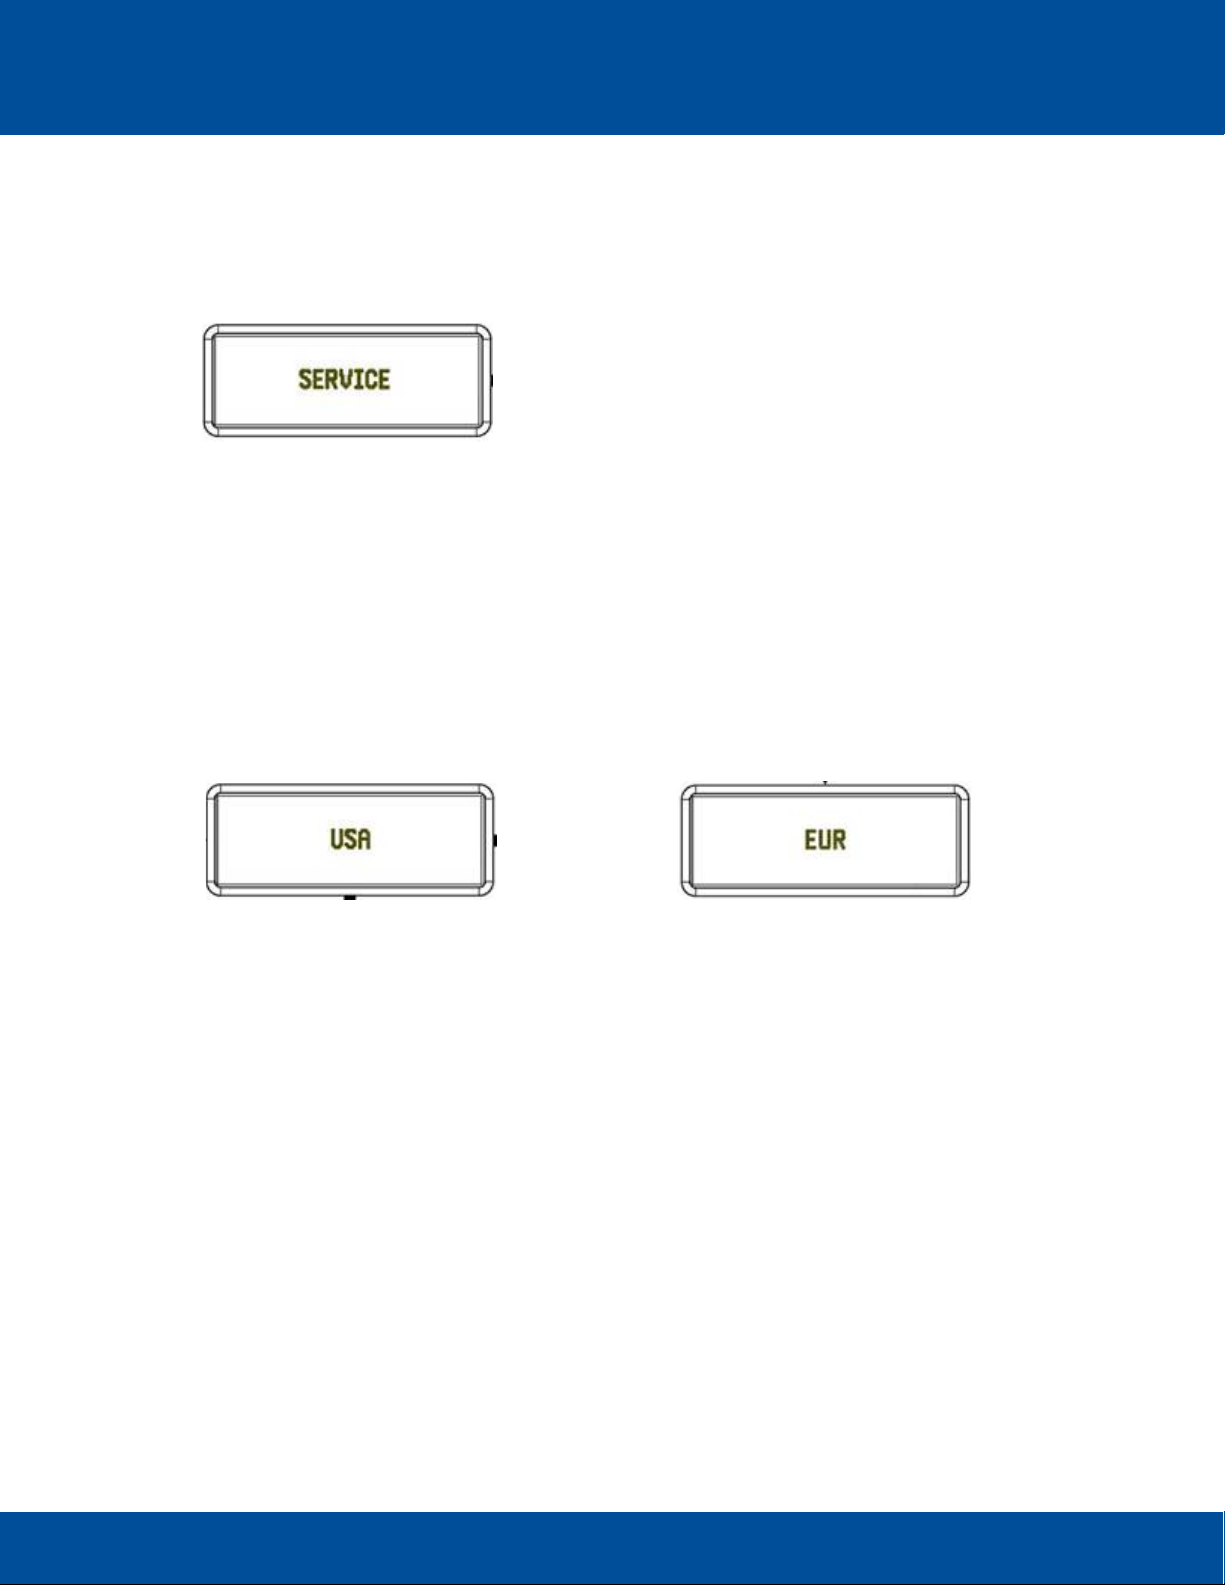
4.1
Service Menu
From the Driver’s radio mode, press and hold “1”, “3”, and the VOL/SEL knob in sequence for three
second search to access the Service mode menu.
From the Service menu the USA or EURO frequency can be selected, Passengers AUX 1 can be turned
on or off, the Passenger’s AUX 2 can be turned on or off, CD HDMI can be turned on or off, select
Reset to Default, and the Driver’s and Passenger’s Blue Tooth can be turned on or off.
USA or EURO
Rotate the VOL/SEL knob to select either USA or EURO for frequency steps and time. Press VOL/SEL
to apply.
FM (USA) 87.5 – 107.9 MHz
(EUR) 87.50 – 108.00 MHz
AM (USA) 530 – 1,710 kHz
(EUR) 522 – 1,620 kHz
USA (12-hour clock) EURO (24-hour clock)
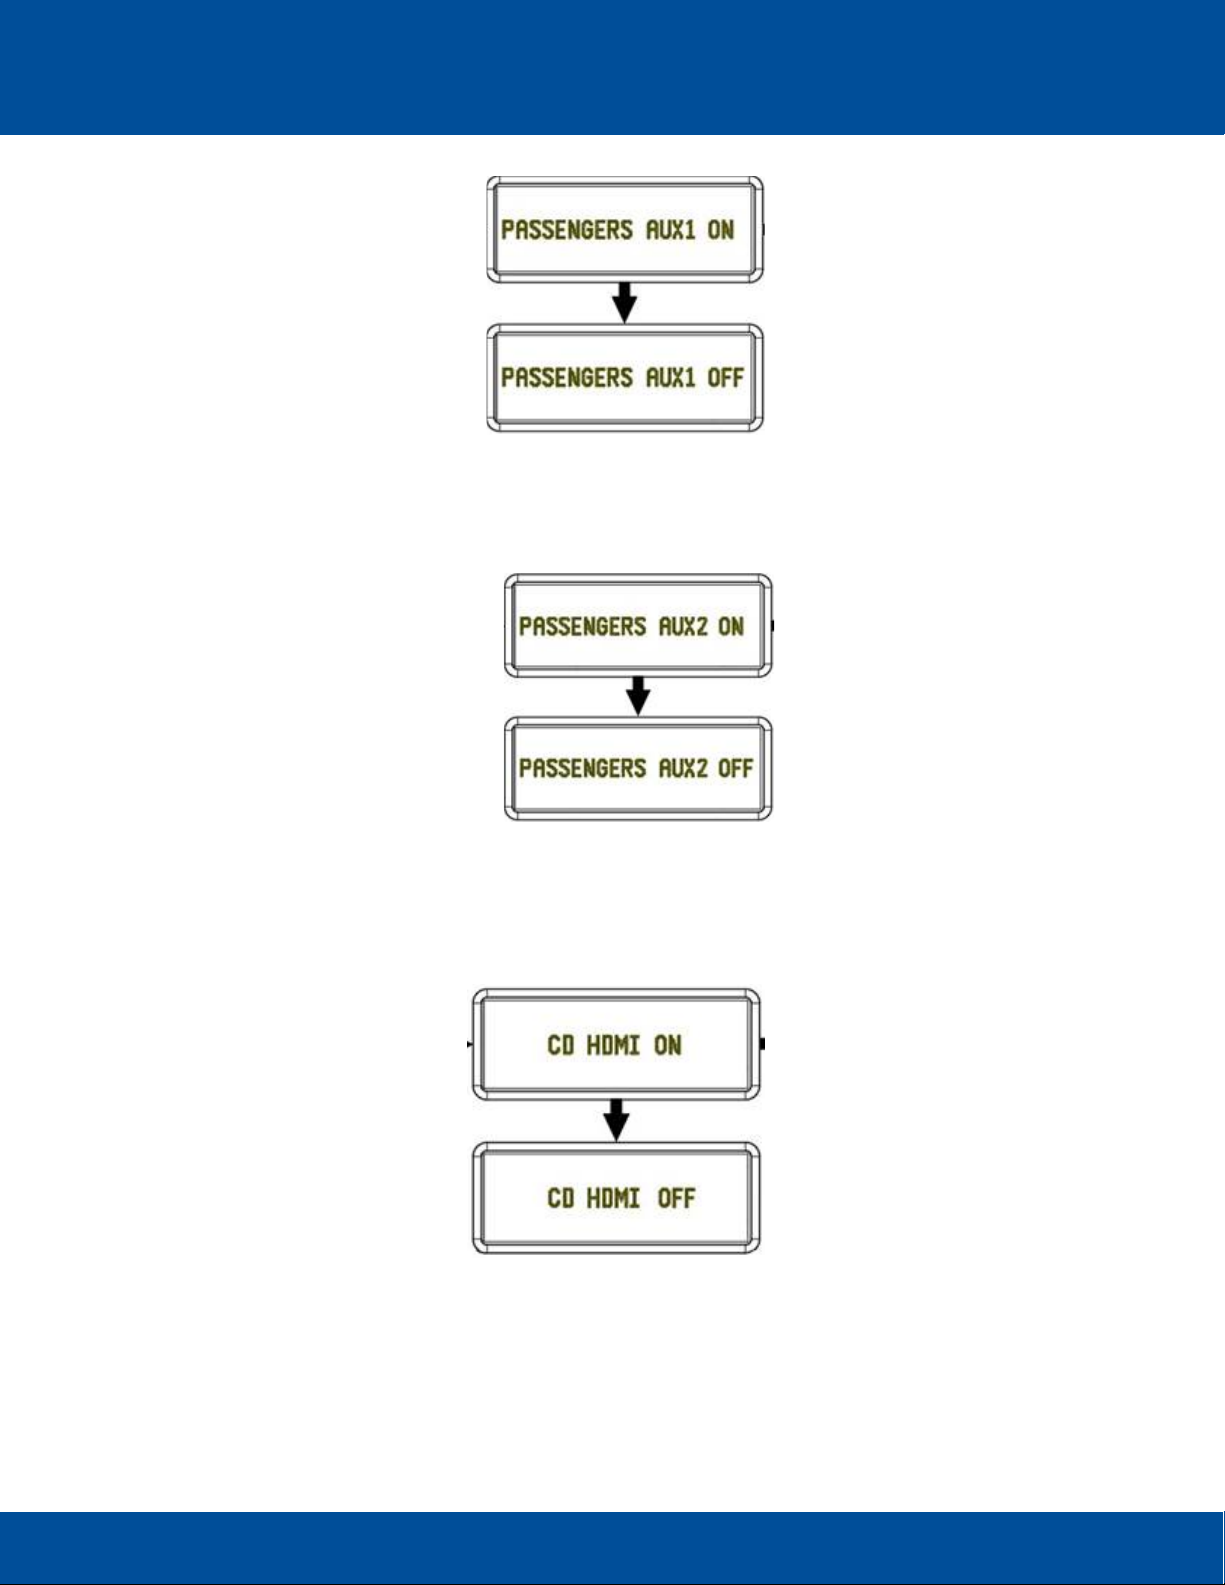
Passenger’s AUX 1 ON/OFF
Once SERVICE is displayed on the radio screen, rotate the VOL/SEL knob until PASSENGERS AUX
1 ON appears on the radio screen. Push VOL/SEL knob to turn PASSENGERS AUX 1 ON or OFF.
Press and rotate the VOL/SEL knob to continue on reviewing the options on the Service menu. A few
moments of inactivity will close the menu and return the user to the previous radio setting.
© 2018 Radio Engineering Industries, Inc. 800.228.9275 | p: 402.339.2200 | f: 402.339.1704 | radioeng.com
Page 15
User’s Guide 15
ECVR-1500D AM/FM/WB/CD/DVD/USB/BT Motor Coach Radio User’s Guide Radio Engineering Industries, Inc. | 6534 L Street | Omaha, NE 68117
Passenger’s AUX 2 ON/OFF
Once SERVICE is displayed on the radio screen, rotate the VOL/SEL knob until PASSENGERS AUX
2 ON appears on the radio screen. Push VOL/SEL knob to turn PASSENGERS AUX 2 ON or OFF.
Press and rotate the VOL/SEL knob to continue on reviewing the options on the Service menu. A few
moments of inactivity will close the menu and return the user to the previous radio setting.
CD HDMI ON/OFF
Once SERVICE is displayed on the radio screen, rotate the VOL/SEL knob until CD HDMI ON appears
on the radio screen. Push VOL/SEL knob to turn CD HDMI ON or OFF. Press and rotate the VOL/SEL
knob to continue reviewing the options on the Service menu. A few moments of inactivity will close the
menu and return the user to the previous radio setting.
© 2018 Radio Engineering Industries, Inc. 800.228.9275 | p: 402.339.2200 | f: 402.339.1704 | radioeng.com
Page 16
User’s Guide 16
ECVR-1500D AM/FM/WB/CD/DVD/USB/BT Motor Coach Radio User’s Guide Radio Engineering Industries, Inc. | 6534 L Street | Omaha, NE 68117
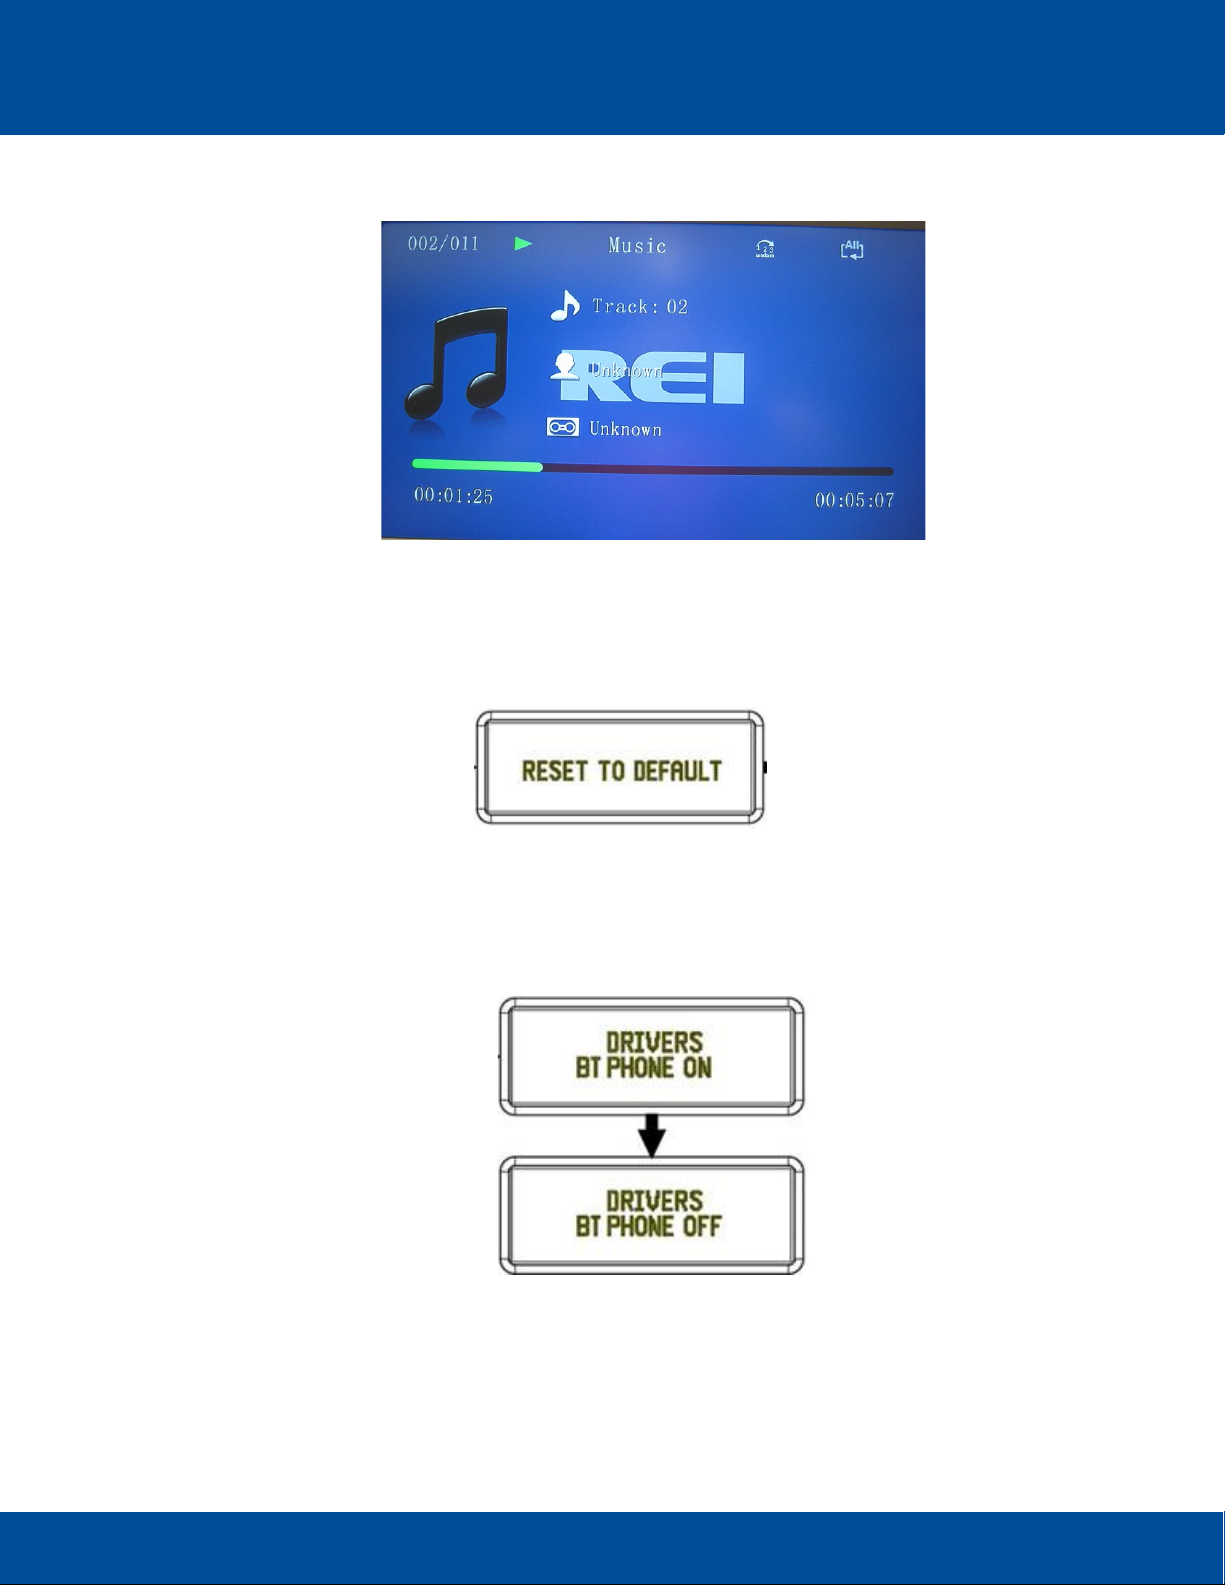
Note: With CD HDMI set to ON, the following will be displayed on the LCD monitors during CD playback:
Reset to Default
Once SERVICE is displayed on the radio screen, rotate the VOL/SEL knob until RESET TO DEFAULT
appears on the radio screen. Push VOL/SEL knob to reset the Bluetooth module to its default setting.
Press and rotate the VOL/SEL knob to continue on reviewing the options on the Service menu. A few
moments of inactivity will close the menu and return the user to the previous radio setting.
Driver’s Bluetooth Phone
Once SERVICE is displayed on the radio screen, rotate the VOL/SEL knob until DRIVERS BT PHONE
ON appears on the radio screen. Push VOL/SEL knob to turn DRIVERS BT PHONE ON or OFF. Press
and rotate the VOL/SEL knob to continue on reviewing the options on the Service menu. A few moments
of inactivity will close the menu and return the user to the previous radio setting.
© 2018 Radio Engineering Industries, Inc. 800.228.9275 | p: 402.339.2200 | f: 402.339.1704 | radioeng.com
Page 17

User’s Guide 17
ECVR-1500D AM/FM/WB/CD/DVD/USB/BT Motor Coach Radio User’s Guide Radio Engineering Industries, Inc. | 6534 L Street | Omaha, NE 68117
4.2 Setup Menu
From the Setup menu the firmware version is displayed, the Driver’s and Passenger’s Blue Tooth can
be turned on or off, Contrast can be adjusted, Brightness can be adjusted, set Buttons Brightness, set
LCD, Subwoofers can be turned on or off, Wireless Mix can be turned on or off, set the LPF and
Subwoofers Gain.
With the unit ON, and the active source set to Driver, press and hold the Driver’s VOL/SEL button for
two seconds. LCD will display SETUP.
Rotate the VOL/SEL knob to choose the option, then press to make a selection.
MCU FIRMWARE VERSION
The first option displayed on the Setup menu. Indicates the firmware version present on the radio. The
APP and MCU must be displayed.
Driver’s and Passenger’s Bluetooth
Press and hold the Driver’s VOL/SEL knob until SETUP appears on the radio screen. Once SETUP
appears, release the VOL/SEL knob and rotate the VOL/SEL knob until DRIVER’S BT ON appears on
the radio screen. Push VOL/SEL knob to turn DRIVER’S BT ON or OFF. Turn the Driver’s VOL/SEL
knob until PASSENGER’S BT ON appears. Push the VOL/SEL knob to turn either the DRIVER’S or
PASSENGER’S BT OFF or back ON. Press and rotate the VOL/SEL knob to continue on reviewing the
options on the Setup menu. A few moments of inactivity will close the menu and return the user to the
previous radio setting.
© 2018 Radio Engineering Industries, Inc. 800.228.9275 | p: 402.339.2200 | f: 402.339.1704 | radioeng.com
Page 18

User’s Guide 18
ECVR-1500D AM/FM/WB/CD/DVD/USB/BT Motor Coach Radio User’s Guide Radio Engineering Industries, Inc. | 6534 L Street | Omaha, NE 68117
Contrast
Press and hold the Driver’s VOL/SEL knob until SETUP appears on the radio screen. Once SETUP
appears, release the VOL/SEL knob and rotate the VOL/SEL knob until CONTRAST appears on the
radio screen. Press and release the VOL/SEL knob to open the Contrast scale. Turn the VOL/SEL
knob clockwise to increase, or counter clockwise to decrease, the Contrast percentage measured on
a scale of +/- 0-100. Press and rotate the VOL/SEL knob to continue on reviewing the options on the
Setup menu. A few moments of inactivity will close the menu and return the user to the previous radio
setting.
Brightness Set Buttons and Brightness Set LCD
Press and hold the Driver’s VOL/SEL knob until SETUP appears on the radio screen. Once SETUP
appears, release the VOL/SEL knob and rotate the VOL/SEL knob until BRIGHTNESS SET BUTTONS
appears on the radio screen. Turn the knob further for BRIGHTNESS SET LCD. Press and release the
VOL/SEL knob to open the Brightness scale for either BRIGHTNESS SET BUTTONS or BRIGHTNESS
SET LCD. Turn the VOL/SEL knob clockwise to increase, or counter clockwise to decrease, the
Brightness percentage for both the BRIGHTNESS SET BUTTONS and BRIGHTNESS SET LCD is
measured on a scale of +/- 0-100. Press the VOL/SEL knob to continue on reviewing the options on
the Setup menu. Press and rotate the VOL/SEL knob to continue on reviewing the options on the Setup
menu. A few moments of inactivity will close the menu and return the user to the previous radio setting.
© 2018 Radio Engineering Industries, Inc. 800.228.9275 | p: 402.339.2200 | f: 402.339.1704 | radioeng.com
Page 19

User’s Guide 19
ECVR-1500D AM/FM/WB/CD/DVD/USB/BT Motor Coach Radio User’s Guide Radio Engineering Industries, Inc. | 6534 L Street | Omaha, NE 68117
Subwoofers ON/OFF
Press and hold the Driver’s VOL/SEL knob until SETUP appears on the radio screen. Once SETUP
appears, release the VOL/SEL knob and rotate the VOL/SEL knob until SUBWOOFERS ON appears
on the radio screen. Push VOL/SEL knob to turn SUBWOOFERS ON or OFF. Press and rotate the
VOL/SEL knob to continue on reviewing the options on the Setup menu. A few moments of inactivity
will close the menu and return the user to the previous radio setting.
© 2018 Radio Engineering Industries, Inc. 800.228.9275 | p: 402.339.2200 | f: 402.339.1704 | radioeng.com
Page 20

User’s Guide 20
ECVR-1500D AM/FM/WB/CD/DVD/USB/BT Motor Coach Radio User’s Guide Radio Engineering Industries, Inc. | 6534 L Street | Omaha, NE 68117
Wireless Mix On/Off
Press and hold the Driver’s VOL/SEL knob until SETUP appears on the radio screen. Once SETUP
appears, release the VOL/SEL knob and rotate the VOL/SEL knob until WIRELESS MIX appears on
the radio screen. Push VOL/SEL knob to turn WIRELESS MIX ON or OFF. Press and rotate the
VOL/SEL knob to continue on reviewing the options on the Setup menu. A few moments of inactivity
will close the menu and return the user to the previous radio setting.
Subwoofer LPF
The Subwoofers must be turned ON for Subwoofer LPF to be available. Press and hold the Driver’s
VOL/SEL knob until SETUP appears on the radio screen. Once SETUP appears, release the VOL/SEL
knob and rotate the VOL/SEL knob until SUBWOOFERS LPF appears on the radio screen. Turn the
VOL/SEL knob clockwise to increase, or counter clockwise to decrease, the SUBWOOFER LPF setting
measured in Hz. The settings are 50, 60, 80, 100, and 120Hz. Press and rotate the VOL/SEL knob to
continue on reviewing the options on the Setup menu. A few moments of inactivity will close the menu
and return the user to the previous radio setting.
© 2018 Radio Engineering Industries, Inc. 800.228.9275 | p: 402.339.2200 | f: 402.339.1704 | radioeng.com
Page 21

User’s Guide 21
ECVR-1500D AM/FM/WB/CD/DVD/USB/BT Motor Coach Radio User’s Guide Radio Engineering Industries, Inc. | 6534 L Street | Omaha, NE 68117
Subwoofer Gain
The Subwoofers must be turned ON for Subwoofer Gain to be available. Press and hold the Driver’s
VOL/SEL knob until SETUP appears on the radio screen. Once SETUP appears, release the VOL/SEL
knob and rotate the VOL/SEL knob until SUBWOOFERS GAIN appears on the radio screen. Turn the
VOL/SEL knob clockwise to increase, or counter clockwise to decrease, the SUBWOOFERS GAIN +/decibel level (dB). Press and rotate the VOL/SEL knob to continue on reviewing the options on the
Setup menu. A few moments of inactivity will close the menu and return the user to the previous radio
setting.
4.3 Clock
The digital clock can display time in either 12 or 24 hour format. The radio must be in Driver’s mode to
set the time. Press and hold the MENU button to access the clock set time operation. The HR will flash,
rotate the Driver’s VOL/SEL knob to adjust. Press VOL/SEL knob again and the MINUTES will flash.
Rotate the Driver’s VOL/SEL knob to adjust, press MENU to save.
The time remains displayed on the radio screen when the radio is manually powered off.
4.4 Power and Mute Function
Press the Power button to turn the unit ON or hold to turn the unit OFF. The button will illuminate RED
when OFF and BLUE when ON. After the unit turns on, the screen will display Loading while
establishing communication with all devices.
When ON, press to MUTE the Driver’s and Passenger’s audio and again to un-mute.
Note: The Control head can also be powered on by pressing any front button.
© 2018 Radio Engineering Industries, Inc. 800.228.9275 | p: 402.339.2200 | f: 402.339.1704 | radioeng.com
Page 22

User’s Guide 22
ECVR-1500D AM/FM/WB/CD/DVD/USB/BT Motor Coach Radio User’s Guide Radio Engineering Industries, Inc. | 6534 L Street | Omaha, NE 68117
5 Driver’s Section
5.1
Driver’s VOL/SEL Selection
Rotate the knob left or right to change the volume level up or down from the Driver audio Processor.
5.2 Driver’s BASS/TREBLE/BALANCE Selection
Press the knob to select one of the following functions: BASS---TREB
Rotate the knob to adjust the desired setting from -7----0 ----+7.
For Balance rotate the knob to adjust the setting from left to right.
5.3 RAD button
Press the RADIO button to pass audio from the tuned station in the Driver’s section. Each press of the
RADIO button will cycle through the available options: FM1, FM2, FM3, and AM. Press and hold the
RADIO button to access the WB channels 1-7.
Press the Driver button to activate the Driver tuner as the source. The band will default to the last band
and frequency selected.
Press the Driver button again to change radio bands as follows:
FM1—FM2—FM3—AM
© 2018 Radio Engineering Industries, Inc. 800.228.9275 | p: 402.339.2200 | f: 402.339.1704 | radioeng.com
Page 23

User’s Guide 23
ECVR-1500D AM/FM/WB/CD/DVD/USB/BT Motor Coach Radio User’s Guide Radio Engineering Industries, Inc. | 6534 L Street | Omaha, NE 68117
Driver's Radio in FM band
Driver's Radio in AM band
After selecting this button, the SEEK/MANUAL TUNE UP/DOWN, PRESETS, and DISP operation will
function for the Driver’s tuner section only.
Preset Memory Recall
To set stations to Memory Location buttons 1-6, navigate to the desired station pressing the
TUNE/SEEK UP and TUNE/SEEK Down buttons. Press and hold the preset button until the channel
identifier appears on the radio screen. For example, if station FM 105.95 is selected as preset channel
6, hold preset button 6 until “CH6” appears on the top of the current driver settings area header.
Auto Program/Scan
Press and Hold the SEARCH/BACK button in radio mode to auto program the passengers presets for
the selected band. A SCAN option is also available, press and quickly release the SEARCH/BACK to
preview available stations for 5 seconds on the selected band.
\
Preset Memory/Recall Operation
Use presets 1-6 to set or selected desired stations from the preset memory locations.
Press these buttons momentarily to select the preset stations for the drivers. Press and holding a button
will set the current station to the button being pressed.
© 2018 Radio Engineering Industries, Inc. 800.228.9275 | p: 402.339.2200 | f: 402.339.1704 | radioeng.com
Page 24

User’s Guide 24
ECVR-1500D AM/FM/WB/CD/DVD/USB/BT Motor Coach Radio User’s Guide Radio Engineering Industries, Inc. | 6534 L Street | Omaha, NE 68117
TUNE/SEEK DOWN
Under Radio mode, press this button momentarily to manually tune downward. Press and hold a button
and the radio will automatically seek to the previous radio station once released.
TUNE/SEEK UP
Under Radio mode, press this button momentarily to manually tune upward. Press and hold the button
and the radio will automatically seek to the next radio station once released.
This button also functions as Weather Band Channel access. Under Driver’s Weather Band mode,
press this button to select Weather Band channels 1-7.
5.4 Weather Band
The Weather Band (WB) allows access to all seven national weather broadcast stations. Only when the
control head is in RADIO mode, and on the Driver’s tuner, is the Weather Band available.
NOAA National Weather Radio Broadcasts from over 380 Locations throughout the U.S. on seven
VHF/FM frequencies are available. Tune to receive continuous weather information 24 hours a day on
one of the following frequencies. For local station listing see:
http://www.nws.noaa.gov/nwr/nwrbro.htm
The Weather Band is accessed with a PRESS and HOLD of the RADIO button. Exit WB mode with by
pressing the RADIO button to return to the previous AM or FM mode.
Tuning up or down while in weather band (WB) mode changes the frequency in the following order:
162.400MHZ, 162.425MHZ, 162.450MHZ, 162.475MHZ, 162.500MHZ, 162.525MHZ, 162.550MHZ
Direct access to any single frequency is as follows:
Press preset 1 to select weather band channel 1 - 162.400MHZ
Press preset 2 to select weather band channel 2 - 162.425MHZ
Press preset 3 to select weather band channel 3 - 162.450MHZ
Press preset 4 to select weather band channel 4 - 162.475MHZ
Press preset 5 to select weather band channel 5 - 162.500MHZ
Press preset 6 to select weather band channel 6 - 162.525MHZ
**Press SEEK UP/DOWN to select weather band channel 7 - 162.550 MHz
Press and hold to select WB (Weather Band)
Driver's Radio in Weather Band
© 2018 Radio Engineering Industries, Inc. 800.228.9275 | p: 402.339.2200 | f: 402.339.1704 | radioeng.com
Page 25

User’s Guide 25
ECVR-1500D AM/FM/WB/CD/DVD/USB/BT Motor Coach Radio User’s Guide Radio Engineering Industries, Inc. | 6534 L Street | Omaha, NE 68117
5.5 SRC Button
Press the SRC button to pass audio from either the passenger’s video section when active, or the
driver’s USB input.
Note: Mode will skip SOURCES if media is not present or if the source is turned off.
D USB—P USB —DISC—BT PHONE (If enabled)—BT AUDIO (if paired).
Playing Internal DVD/CD (Must be controlled in the Passengers section)
Playing Drivers USB Audio
Playing USB Device (Must be controlled in the Passengers section)
Playing BT Audio
5.6 USB Playback
Presets 1 and 2 function as Folder UP/DOWN operation for either the Passenger’s or Driver’s
.MP3/.WMA playback. Pressing Folder UP or DOWN will select the next or previous folder on the media.
© 2018 Radio Engineering Industries, Inc. 800.228.9275 | p: 402.339.2200 | f: 402.339.1704 | radioeng.com
Page 26

User’s Guide 26
ECVR-1500D AM/FM/WB/CD/DVD/USB/BT Motor Coach Radio User’s Guide Radio Engineering Industries, Inc. | 6534 L Street | Omaha, NE 68117
Playback will begin with the first song in the selected folder. The root directory should be is treated as
a folder. All files contained directly under the root directory are accessed prior to any root directory
folders.
Presets 4 and 5 must function as shuffle and repeat operation for any digital media.
Press and hold the SHUFFLE button to turn SHUFFLE ONE, ALL, or OFF.
Press and hold the REPEAT button to turn REPEAT ON or OFF.
5.7 AUX Button
Press the AUX button to pass the desired audio input source from the Driver’s AUX input.
Driver's AUX function
5.8 Public Address system (P.A.)
When any of the microphone inputs are keyed, the control head switches over to the P.A. function. The
P.A. has priority over all other channels and the microphone has priority over the wireless microphone.
When the P.A. is turned ON, all other audio is muted. The P.A. system may be activated when the
control unit power button is off. While the P.A. system is active, the sound levels and tone of the P.A.
system can be adjusted. When the P.A. is in use the screen will display MIC 1, MIC 2 or Wireless.
When the P.A. is activated MIC 1 is the primary microphone while MIC 2 and the wireless microphone
are the secondary microphones. If multiple microphones are deployed, to indicate the P.A function is
active. When the microphone is released, the previous settings are restored.
© 2018 Radio Engineering Industries, Inc. 800.228.9275 | p: 402.339.2200 | f: 402.339.1704 | radioeng.com
Page 27

User’s Guide 27
ECVR-1500D AM/FM/WB/CD/DVD/USB/BT Motor Coach Radio User’s Guide Radio Engineering Industries, Inc. | 6534 L Street | Omaha, NE 68117
5.9 Bluetooth Connection
Verify the Bluetooth is turned on for the device and scan for either driver or passenger. If prompted for
a pass key, enter the pass key code. The default code for the radio unit is 0000. Access the” Look for
devices” feature of the mobile device and begin searching. After searching, the radio should appear in
the list of devices as DRIVER’S. Press to accept.
A prompt to bond should appear on the mobile device. Press to accept and continue the process. The
device will then ask for the pass key, enter it on the mobile device. After entering the pass key, press
OK. The mobile device should display connected. The Bluetooth® icon of the radio should appear on
the screen.
Once selected, the pairing of the device and the radio should have occurred. If successful, the Bluetooth
symbol will be visible on the Control Module in the corresponding display area. The device will indicate
it is connected to phone and media audio.
Notes:
• Only one mobile device can be paired with the radio at a time.
• Once a paired mobile device is disconnected, changing the pass key will NOT disable the
device from reconnecting. Turn Driver’s Bluetooth OFF in the setup to disable any unwanted
Bluetooth® devices. When set to ON, the radio is always in discovery mode.
• After turning off the ignition, the radio will automatically search for the last-connected
Bluetooth® device, and if possible, restore the connection.
5.10 Using a Bluetooth Device as a Phone Source
Verify the Bluetooth device is paired to the radio. Press the driver’s SRC button to select Bluetooth. To
receive an incoming call, press the Driver’s volume knob. The Volume can be adjusted by rotating the
Driver’s volume knob. To end a call, press the Driver’s volume knob again. You can also use your
phone to send and receive calls while using the 1500D for hands free conversations.
Bluetooth Phone
5.11 Using a Bluetooth Device as an Audio Source
Verify the Bluetooth device is connected to the radio.
Use the driver’s SRC button on the Control module to select Bluetooth audio.
Controlling the audio playback can be achieved using the playback controls, including Play, Pause,
Next Track, and Previous Track. The Volume can be adjusted using the Driver’s volume knob on the
Control Head and the Bluetooth device. Press the STOP button once to Pause. Press STOP twice to
restart playing the disc.
© 2018 Radio Engineering Industries, Inc. 800.228.9275 | p: 402.339.2200 | f: 402.339.1704 | radioeng.com
Page 28

User’s Guide 28
ECVR-1500D AM/FM/WB/CD/DVD/USB/BT Motor Coach Radio User’s Guide Radio Engineering Industries, Inc. | 6534 L Street | Omaha, NE 68117
The unit allows audio files to be played back from a mobile device using a Bluetooth® connection. The
Radio can control a Bluetooth® audio player via Advanced Audio Distribution Profile (A2DP) or
Audio/Video Remote Control Profile (AVRCP). Bluetooth® audio players (or Bluetooth® adapters)
compatible with these profiles can be connected to this Radio. Verify the device is connected via
Bluetooth®, then Touch the MODE button on the front to access BT AUDIO.
Playing Bluetooth Audio
When the Bluetooth icon is displayed it indicates the radio is successfully connected.
Press the Play/Pause button to listen to audio. While audio plays the following functions are available:
• SEEK UP button—Touch to play the next track.
• PLAY/PAUSE button—Touch to pause playback. Touch again to resume playback.
• SEEK DOWN button—Touch to play the previous track.
Press the radios DISP button to display Metadata information on the track itself (artist, track name, etc.).
This option is only available on compatible devices.
Functionality may vary depending on the profile or device used.
6 Passenger’s Section
6.1
Passenger’s VOL/SEL Selection
Rotate the knob left or right to change the volume level up or down from the passenger’s audio
processor.
Press the knob to select one of the following functions: BASS---TREB
Rotate the knob to adjust the desired Bass and Treble setting from -7----0 ----+7.
© 2018 Radio Engineering Industries, Inc. 800.228.9275 | p: 402.339.2200 | f: 402.339.1704 | radioeng.com
Page 29

User’s Guide 29
ECVR-1500D AM/FM/WB/CD/DVD/USB/BT Motor Coach Radio User’s Guide Radio Engineering Industries, Inc. | 6534 L Street | Omaha, NE 68117
6.2 SETTING THE TIME
DISP
Press this button to change between Clock and Mode Information display.
Setting the Time
With the Control Heads BLUE power light ON, press and hold the DISP button until the hour display
begins to flash. Rotate Volume/Select Knob to adjust the hour. Press the DISP button again, and the
minute display will flash. Rotate VOL/SEL Knob to adjust the minute. Press either the DISP or VOL/SEL
button to save the time on the LCD.
Passenger’s RAD button
The passenger’s radio works similar to the driver’s radio. Press the RAD button on the PASSENGERS
section to change radio bands from FM1—FM2—FM3—AM.
Layout of Passenger's FM Radio
After selecting this button, the SEEK/MANUAL TUNE UP/DOWN, PRESETS, will function for the
Passenger’s tuner section.
© 2018 Radio Engineering Industries, Inc. 800.228.9275 | p: 402.339.2200 | f: 402.339.1704 | radioeng.com
Page 30

User’s Guide 30
ECVR-1500D AM/FM/WB/CD/DVD/USB/BT Motor Coach Radio User’s Guide Radio Engineering Industries, Inc. | 6534 L Street | Omaha, NE 68117
Layout of Passenger's AM Radio
6.3 Preset Memory/Recall Operation
Use presets 1-6 to set or selected desired stations from the preset memory locations.
Press these buttons momentarily to select the preset stations for the passengers. Press and holding a
button will set the current station to the button being pressed.
6.4 TUNE/SEEK DOWN
Under Radio mode, press this button momentarily to manually tune downward. Press and hold a button
and the radio will automatically seek to the previous radio station once released.
6.5 TUNE/SEEK UP
Under Radio mode, press this button momentarily to manually tune upward. Press and hold the button
and the radio will automatically seek to the next radio station once released.
This button also functions as Weather Band Channel access. Under Driver’s Weather Band mode,
press this button to select Weather Band channels 1-7.
6.6 Auto Program/Scan
Press and Hold the SEARCH/BACK button in radio mode to auto program the passengers presets for
the selected band. A SCAN option is also available, press and quickly release the SEARCH/BACK to
preview available stations for 5 seconds on the selected band.
\
© 2018 Radio Engineering Industries, Inc. 800.228.9275 | p: 402.339.2200 | f: 402.339.1704 | radioeng.com
Page 31

User’s Guide 31
ECVR-1500D AM/FM/WB/CD/DVD/USB/BT Motor Coach Radio User’s Guide Radio Engineering Industries, Inc. | 6534 L Street | Omaha, NE 68117
6.7 Passenger’s SRC button
Press the SRC button to pass audio from either AUX 1, AUX 2, or the passenger’s USB input.
AUX 1/AUX 2 OPERATION
Aux 1 RCA inputs are audio only. Aux 2 is an A/V input using both the Composite BNC video input and
the Aux 2 Stereo RCAs. When in AUX 2 mode, video is upconverted through the HDMI-E to 1080P.
There is also an optional “active low” AUX 2 trigger that automatically enables AUX 2 as the Passenger
source.
Passenger AUX 1 or AUX 2
USB OPERATION
Insert a USB storage device into the Passenger USB. Select the USB input using the SRC button.
Playback will begin automatically, to access a specific file, first press the MENU button:
Use the SEEK UP/DOWN & FOLDER UP/DOWN to navigate the menu and choose the desired file
type, either by file folder, AUDIO files, or VIDEO files. Then choose the desired file:
© 2018 Radio Engineering Industries, Inc. 800.228.9275 | p: 402.339.2200 | f: 402.339.1704 | radioeng.com
Page 32

User’s Guide 32
ECVR-1500D AM/FM/WB/CD/DVD/USB/BT Motor Coach Radio User’s Guide Radio Engineering Industries, Inc. | 6534 L Street | Omaha, NE 68117
USB Audio Playback
© 2018 Radio Engineering Industries, Inc. 800.228.9275 | p: 402.339.2200 | f: 402.339.1704 | radioeng.com
Page 33

User’s Guide 33
ECVR-1500D AM/FM/WB/CD/DVD/USB/BT Motor Coach Radio User’s Guide Radio Engineering Industries, Inc. | 6534 L Street | Omaha, NE 68117
USB Video Playback
Press the VOL/SEL knob to select an option. To return to a previous menu, press the RETURN
button and select again using the VOL/SEL knob. Use the TUNE/SEEK up/down buttons of the radio
to change tracks, or press PAUSE/PLAY to pause or play the track. Press the Stop button to stop
playing. To return to the iPod® source from any other source menu, touch SRC on the front panel until
USB is shown on the front display.
6.8 USB iPod®/iPhone® Operation
To listen to audio through an Apple device, verify that Apple-certified USB extension is connected to
the USB pigtail on the rear of the radio. Next, connect the cable to the Apple device. Once connected,
the radio will automatically switch the source to iPod® and begin charging the device. If the device has
enough battery power. It will begin playback. If switching from radio to playing audio from the Apple
device, connect to the USB pigtail and press the SRC button to where the operational mode indicates
IPOD and the device will begin playing audio.
When connected, the user can playback specific files or folders. First press the SEARCH button.
The user can rotate the VOL/SEL knob to select from one of the following search options:
Use the SEEK UP/DOWN & FOLDER UP/DOWN to navigate the menu and choose the desired file or
Rotate the Passengers VOL/SEL knob to scroll through the playback options. Press the VOL/SEL knob
to make the selection:
© 2018 Radio Engineering Industries, Inc. 800.228.9275 | p: 402.339.2200 | f: 402.339.1704 | radioeng.com
Page 34

User’s Guide 34
ECVR-1500D AM/FM/WB/CD/DVD/USB/BT Motor Coach Radio User’s Guide Radio Engineering Industries, Inc. | 6534 L Street | Omaha, NE 68117
USB iPod Options
• Playlists
o Select a playlist name to view a list of all songs in the playlist.
o Use the Folder buttons to navigate within the playlist to select a song.
o After selecting the song from the list begin playback by pressing the VOL/SEL knob of
the active section.
• Podcasts
o Select a Podcast name to view a list of all songs in the playlist.
o Select the Podcast from the list to begin playback pressing the VOL/SEL knob of the
active section.
• Audiobooks
o Select to view the audio books on the iPod.
o Select the audio book from the list to begin playback pressing the VOL/SEL knob of
the active section.
• Songs
o Select to view a list of all songs on the iPod.
o Use the Folder buttons to navigate within the list to select a song.
o After selecting the song from the list begin playback by pressing the VOL/SEL knob of
the active section.
• Albums
o Select to view the albums on the iPod.
o Use the Folder buttons to navigate within the list and select an album name to view a
list of all songs on the album or select All Songs to view all songs on the iPod.
o After selecting the song from the list begin playback by pressing the VOL/SEL knob of
the active section.
• Artists
o Select an artist name to view a list of all albums with songs by the artist using the
VOL/SEL knob of the active section.
o Use the Folder buttons to navigate within the list and select an album using the
VOL/SEL knob of the active section.
© 2018 Radio Engineering Industries, Inc. 800.228.9275 | p: 402.339.2200 | f: 402.339.1704 | radioeng.com
Page 35

User’s Guide 35
ECVR-1500D AM/FM/WB/CD/DVD/USB/BT Motor Coach Radio User’s Guide Radio Engineering Industries, Inc. | 6534 L Street | Omaha, NE 68117
o After selecting the song from the list begin playback by pressing the VOL/SEL knob of
the active section.
The options are also displayed on the HDMI output to the monitors:
After making your selection, the LCD will display the current track information. to change tracks, or
press PAUSE/PLAY to pause or play the track. Press the Stop button to stop playing.
USB RDM and RPT Playback
In addition to the front display, the HDMI out signal will also show current track information:
© 2018 Radio Engineering Industries, Inc. 800.228.9275 | p: 402.339.2200 | f: 402.339.1704 | radioeng.com
Page 36

User’s Guide 36
ECVR-1500D AM/FM/WB/CD/DVD/USB/BT Motor Coach Radio User’s Guide Radio Engineering Industries, Inc. | 6534 L Street | Omaha, NE 68117
6.9 Passenger’s VID button
Press the VID button to activate Disc playback, EMS-1000 HD HDMI switch, or a secondary DVD2. The
video will be displayed on the monitors inside the motor coach.
Internal Disc playback
CD OPERATION:
Insert a Compact Disc into the disc slot label side up. The radio will automatically switch modes and
begin playback after the media is successfully loaded.
6.10 TRACK UP/TRACK DOWN
Use the TUNE/SEEK up/down buttons of the radio to change tracks.
6.11 STOP
When playing digital media, use this button to STOP playback and display the REI splash screen. Press
twice to start digital media from the beginning of the track.
© 2018 Radio Engineering Industries, Inc. 800.228.9275 | p: 402.339.2200 | f: 402.339.1704 | radioeng.com
Page 37

User’s Guide 37
ECVR-1500D AM/FM/WB/CD/DVD/USB/BT Motor Coach Radio User’s Guide Radio Engineering Industries, Inc. | 6534 L Street | Omaha, NE 68117
6.12 PLAY/PAUSE
When playing digital media, use this button to PAUSE STILL and PLAYBACK digital files. Press
PAUSE/PLAY to pause or play the track.
6.13 DVD OPERATION:
Insert a DVD into the disc slot label side up. The radio will automatically switch modes and begin
playback after the media is successfully loaded.
Internal DVD/CD playing
6.14 CHAPTER UP/ CHAPTER DOWN
Use the TUNE/SEEK up/down buttons of the radio to change Chapters.
6.15 PLAY/PAUSE
Use this button to PAUSE STILL and PLAYBACK.
© 2018 Radio Engineering Industries, Inc. 800.228.9275 | p: 402.339.2200 | f: 402.339.1704 | radioeng.com
Page 38

User’s Guide 38
ECVR-1500D AM/FM/WB/CD/DVD/USB/BT Motor Coach Radio User’s Guide Radio Engineering Industries, Inc. | 6534 L Street | Omaha, NE 68117
6.16 STOP
Use this button to STOP playback and display the REI splash screen. Press twice to start the DVD from
the first chapter.
6.17 MENU
When playing DVD digital media, use this button to displays the root menu that is stored on the DVD
disc.
6.18 SEARCH/BACK
Press to navigate on the device and select a specific song or play context (applicable to USB flash
drives, CD MP3 discs and iPods). Press again to go BACK one level when searching.
6.19 Ejecting the disc
Press the EJECT button to eject the disc from the radio.
When there is no DISC in the unit and in VID mode, the PASSENGERS LCD will display.
6.20 Changing the Splash Screen Output File
While still in Passengers VIDEO mode, press the MENU button to modify the splash screen. Use the
NEXT and PREV arrows to scroll from page to page, or press PLAY to load a custom 800x480 .jpg
from the Passengers USB. Press the BACK button to EXIT and save.
© 2018 Radio Engineering Industries, Inc. 800.228.9275 | p: 402.339.2200 | f: 402.339.1704 | radioeng.com
Page 39

User’s Guide 39
ECVR-1500D AM/FM/WB/CD/DVD/USB/BT Motor Coach Radio User’s Guide Radio Engineering Industries, Inc. | 6534 L Street | Omaha, NE 68117
Splash Screen
6.21 VERIFYING THE APP FIRMWARE OF THE UNIT
After the disc is ejected, verify the ECVR-1500D is still in Passenger mode. While the splash screen
remains on screen, press preset #6:
The APP version number will display in the lower right of the screen. Press preset #6 again to remove.
© 2018 Radio Engineering Industries, Inc. 800.228.9275 | p: 402.339.2200 | f: 402.339.1704 | radioeng.com
Page 40

User’s Guide 40
ECVR-1500D AM/FM/WB/CD/DVD/USB/BT Motor Coach Radio User’s Guide Radio Engineering Industries, Inc. | 6534 L Street | Omaha, NE 68117
EMS-1000 OPERATION
To use the HDMI switch, press the passenger’s VID button to access available Audio/Video sources.
The available sources are as follows:
1. Video 1 2. Video 2 3. 3.5 mm 4. HDMI 1 5. HDMI 2 6. HDMI 3
External HDMI Switcher sources
Playing External DVD using DVD 2
Press the passenger’s video button to access the selected Audio/Video source and select Video 2
source to switch to the second active DVD source (DVD 2). The external DVD player will play video
automatically if the DVD player is already loaded and powered on. The PLAY, STOP, REWIND, and
FAST FORWARD playback functions can be altered using the radio controls if DVD2 is selected.
External DVD Playing
© 2018 Radio Engineering Industries, Inc. 800.228.9275 | p: 402.339.2200 | f: 402.339.1704 | radioeng.com
Page 41

User’s Guide 41
ECVR-1500D AM/FM/WB/CD/DVD/USB/BT Motor Coach Radio User’s Guide Radio Engineering Industries, Inc. | 6534 L Street | Omaha, NE 68117
External DVD Player Control Layout
6.22 Bluetooth Connection
Verify the Bluetooth is turned on for the device and scan for either driver or passenger. If prompted for
a pass key, enter the pass key code. The default code for the radio unit is 0000. Access the” Look for
devices” feature of the mobile device and begin searching. After searching, the radio should appear in
the list of devices as DRIVER’S. Press to accept.
A prompt to bond should appear on the mobile device. Press to accept and continue the process. The
device will then ask for the pass key, enter it on the mobile device. After entering the pass key, press
OK. The mobile device should display connected. The Bluetooth® icon of the radio should appear on
the screen.
Once selected, the pairing of the device and the radio should have occurred. If successful, the Bluetooth
symbol will be visible on the Control Module in the corresponding display area. The device will indicate
it is connected to phone and media audio.
Notes:
• Only one mobile device can be paired with the radio at a time.
• Once a paired mobile device is disconnected, changing the pass key will NOT disable the
device from reconnecting. Turn Driver’s Bluetooth OFF in the setup to disable any unwanted
Bluetooth® devices. When set to ON, the radio is always in discovery mode.
• After turning off the ignition, the radio will automatically search for the last-connected
Bluetooth® device, and if possible, restore the connection.
6.23 Using a Bluetooth Device as an Audio Source
Verify the Bluetooth device is connected to the radio.
Use the driver’s SRC button on the Control module to select Bluetooth audio.
© 2018 Radio Engineering Industries, Inc. 800.228.9275 | p: 402.339.2200 | f: 402.339.1704 | radioeng.com
Page 42

User’s Guide 42
ECVR-1500D AM/FM/WB/CD/DVD/USB/BT Motor Coach Radio User’s Guide Radio Engineering Industries, Inc. | 6534 L Street | Omaha, NE 68117
Controlling the audio playback can be achieved using the playback controls, including Play, Pause,
Next Track, and Previous Track. The Volume can be adjusted using the Driver’s volume knob on the
Control Head and the Bluetooth device. Press the STOP button once to Pause. Press STOP twice to
restart playing the disc.
The unit allows audio files to be played back from a mobile device using a Bluetooth® connection. The
Radio can control a Bluetooth® audio player via Advanced Audio Distribution Profile (A2DP) or
Audio/Video Remote Control Profile (AVRCP). Bluetooth® audio players (or Bluetooth® adapters)
compatible with these profiles can be connected to this Radio. Verify the device is connected via
Bluetooth®, then touch the MODE button on the front to access BT AUDIO.
Playing Bluetooth Audio
When the Bluetooth icon is displayed it indicates the radio is successfully connected.
Press the Play/Pause button to listen to audio. While audio plays the following functions are available:
• SEEK UP button—Touch to play the next track.
• PLAY/PAUSE button—Touch to pause playback. Touch again to resume playback.
• SEEK DOWN button—Touch to play the previous track.
Press the radios DISP button to display Metadata information on the track itself (artist, track name, etc.).
This option is only available on compatible devices.
Functionality may vary depending on the profile or device used.
6.24 Front IR input for Remote control
External wireless remote control input for control head. The unit is also supplied with an optional
external remote IR sensor for installations requiring one.
© 2018 Radio Engineering Industries, Inc. 800.228.9275 | p: 402.339.2200 | f: 402.339.1704 | radioeng.com
Page 43

User’s Guide 43
ECVR-1500D AM/FM/WB/CD/DVD/USB/BT Motor Coach Radio User’s Guide Radio Engineering Industries, Inc. | 6534 L Street | Omaha, NE 68117
Remote Control
7 Remote Control
The ECVR-1500D includes a remote control providing access to all DVD player functions. The main
sensor for the remote control is located on the front panel of the unit.
The remote is powered with a CR2025 coin cell battery.
© 2018 Radio Engineering Industries, Inc. 800.228.9275 | p: 402.339.2200 | f: 402.339.1704 | radioeng.com
Page 44

User’s Guide 44
ECVR-1500D AM/FM/WB/CD/DVD/USB/BT Motor Coach Radio User’s Guide Radio Engineering Industries, Inc. | 6534 L Street | Omaha, NE 68117
7.1 Remote Control Functionality
Power Power On/Off
Display Toggles OSD Display (Title Elapsed>Remain>Chapt er Elapsed>Remain>Off)
Eject Eject Disc
Menu Display DVD (Disc) Menu
Setup Display Setup Menu (SEE TABLE XX)
Mute Audio Mute
Pause/Play Pause/Playback control
Enter Select (Menu Mode confirmation)
Stop Stop Playback
FLD- Increment Folders for compressed audio/video playback
FLD+ Decrement Folders for compressed audio/video playback
Track/Fr ame Forward Next Track (Play) or Frame Forward, SEEK +
Track/Frame Backward Previous Track (Playing) or Frame Backward, SEEK Fast Forward Fast Forward - Increment Playback Speed (>X2>X4>X8>X16>X32>NORMAL), Manual Tune Fast Backward Fast Backward - Increment Revers e Playback Speed (>X2>X4>X8>X16>X32>NORMAL), Manual Tune +
Arrows UP/DOWN/LEFT/RIGHT are for DVD Menu, Media playback, and SETUP Navigation Keys
0-9 Numeric Keys for disc direct access and preset radio access
Repeat Toggle Repeat Mode (DVD: Chapter>Title>All>Off)
(USB/DIGITAL MEDIA: Track>Folder> All> Off)
(ipod: One> All>Off)
Display
Repeat Control
© 2018 Radio Engineering Industries, Inc. 800.228.9275 | p: 402.339.2200 | f: 402.339.1704 | radioeng.com
Page 45

User’s Guide 45
ECVR-1500D AM/FM/WB/CD/DVD/USB/BT Motor Coach Radio User’s Guide Radio Engineering Industries, Inc. | 6534 L Street | Omaha, NE 68117
Random Toggle Random Mode (USB/DIGITAL MEDIA: Track>Folder > All> Off)
(ipod: Songs>Album>Off)
Random Control
Search Search mode (ipod: Playlists> Podc asts> A udiobooks>Songs>Albums>Artist)
Use ENTER to select
Back/Return Press to RETURN to a previous menu
Slow Slow Play - Decrement Playback Speed (>1/2>1/4>1/8>1/16>NORMAL)
Zoom Zoom Video I mage (X 2>X3>X4>NORMAL)
Title Press to Toggle between Available Titles on DVD ( disc)
Audio Press to Toggle between Available Audio Tr acks on DVD (disc) i.e. (>ENG>SPAN. Etc…)
Sub Title Press to Toggle between Available Subtitles on DVD (disc) i.e. (>Sub1>Sub2>Off)
Angle Press to Toggle between Available Angles on DVD (disc)
Pal/NTSC Press to Toggle between PAL and NTSC outputs
Goto Press to D isplay Disc Information - Available Title, Audio, Sub-Title, etc. (half screen menu), press again to
exit
Zoom Control
Subtitle Control
© 2018 Radio Engineering Industries, Inc. 800.228.9275 | p: 402.339.2200 | f: 402.339.1704 | radioeng.com
Page 46

User’s Guide 46
ECVR-1500D AM/FM/WB/CD/DVD/USB/BT Motor Coach Radio User’s Guide Radio Engineering Industries, Inc. | 6534 L Street | Omaha, NE 68117
PASSENGER SECTION (RAD/SRC/VID) same as front buttons on PASSENGER section of radio
DRIVER SECTION (RAD/SRC/AUX) same as front buttons on Drivers section of radio
DRIVER + Increment Audio Volume Settings Driv er
DRIVER - Decrement Audio Volume Settings Driver
PASSENGER+- Increment Audio Volume Setting Passenger
PASSENGER - Decrement Audio Volume Setting Passenger
7.2 Remote Control Setup Display
Press Setup on Remote During
DVD Playback:
Use the SCROLL Arrows:
Up/Down/left/right.
Press OK to select
Options:
This is to select the appropriate aspect (4:3 or 16:9) according to the connected monitor.
Normal Pan Scan (For 4:3 TV)
(If widescreen monitor is connected, the left and right edges are cut off.)
Normal Letter Box (For 4:3 V)
(If wide screen is connected, black bands appear at bottom and top of the screen.)
Widescreen (For 16:9 V)
Select when connected to a wide-screen monitor.
This item sets the appropriate language for the On-Screen Display (OSD) messages.
English is currently the only option.
Choose to turn Close Captioning either On or Off
This is to enable (On) or disable (Off) the ability to memorize the last playing position of the
disc when the system is powered off.
© 2018 Radio Engineering Industries, Inc. 800.228.9275 | p: 402.339.2200 | f: 402.339.1704 | radioeng.com
Page 47

User’s Guide 47
ECVR-1500D AM/FM/WB/CD/DVD/USB/BT Motor Coach Radio User’s Guide Radio Engineering Industries, Inc. | 6534 L Street | Omaha, NE 68117
Select addition options Menu
This player can play discs whose contents are recorded in either PAL or NTSC formats.
Select either format when you’re connected to a corresponding NTSC or PAL monitor.
Select either ON or OFF to enable menu’s when playing back VCD’s or SVCD’s.
This item sets the default AUDIO soundtrack for DVD discs. Select the preferred AUDIO
soundtrack
This item selec ts the preferred Default Subtitle Language
This item selec ts the Default Disc Menu Language
© 2018 Radio Engineering Industries, Inc. 800.228.9275 | p: 402.339.2200 | f: 402.339.1704 | radioeng.com
Page 48

User’s Guide 48
ECVR-1500D AM/FM/WB/CD/DVD/USB/BT Motor Coach Radio User’s Guide Radio Engineering Industries, Inc. | 6534 L Street | Omaha, NE 68117
Highlight RESET and press OK button to
restore the system settings to the initial
factory settings.
Press OK to EXIT SETUP
The Bluetooth® word mark and logos are registered trademarks owned by Bluetooth SIG, Inc. and any
use of such marks by REI under license.
DivX®, DivX Certified® and associated logos are trademarks of DivX, LLC, and its affiliates in the Unites
States and other countries. DivX Certified® to play DivX® video, including premium content. Covered
by one or more of the following U.S. patents: 7,295,673; 7,460,668; 7,515,710; 7,519,274
TROUBLE SHOOTING
Problem Cause Solution
Unit will not power on. No power to BATTERY wire or ACC wire,
blown 10A main fuse or 1A accessory
fuse.
Cannot tune radio stations. The antenna cable is not connected. The
signal is too weak. The radio is in the
wrong frequency AREA.
USB media not playing, or sa ys Invalid
File Type.
Cannot stream Bluetooth® audio. Bluetooth® device was not successfully
Audio is distorted or low. Source audio level is too weak or
Disc’s will not play or display loading
for an extended per iod.
Media is the wrong file type. Convert files to a usable format, see file
paired. Verify Bluetooth® connected
icon.
overdriven. Bitrate of digital audio file is
too large.
DVD-R and DVD-RW will not play unless
the disc is finalized after authorizing in
software.
Check for both ACC & BATTERY voltage
with Multi-meter, check all fuses.
Connect the antenna cable. Check that
the RADIO AREA is set to the correct
location. Verify radio is in STEREO
mode.
requirements section of the manual.
Pair the Bluetooth® device following the
steps in the manual and retry.
Adjust the volume level of the auxiliary
source. Change the sample frequency or
Bitrate of the file.
Finalize the media before playing in the
unit. Verify that the files meet the
requirements of the Radio.
© 2018 Radio Engineering Industries, Inc. 800.228.9275 | p: 402.339.2200 | f: 402.339.1704 | radioeng.com
Page 49

User’s Guide 49
ECVR-1500D AM/FM/WB/CD/DVD/USB/BT Motor Coach Radio User’s Guide Radio Engineering Industries, Inc. | 6534 L Street | Omaha, NE 68117
Verifying Communication with other devices
In the even the EMS of the Second DVD player is not accessible, verify communication using the following steps.
Power off the unit, next press the STOP button, the display will show the following, item shown as NOT CON are
nor receiving valid communication.
MP-1000 Media Player
If the external HDMI switcher source is locked, such as Video 1, a lock symbol will appear to indicate the source
is locked. The video source will remain locked until the video has finished playing. This ensures a high priority
video, such as a safety video, will have been played. A green light embedded in the Video Event button will be
illuminated to indicate the message is playing and will go out when the video ends.
HDMI Switcher Source locked
© 2018 Radio Engineering Industries, Inc. 800.228.9275 | p: 402.339.2200 | f: 402.339.1704 | radioeng.com
Page 50

User’s Guide 50
ECVR-1500D AM/FM/WB/CD/DVD/USB/BT Motor Coach Radio User’s Guide Radio Engineering Industries, Inc. | 6534 L Street | Omaha, NE 68117
SPECIFICATIONS:
General Specifications
Operating Voltage 14.4V(10.5 –16V allowable)
Current Consumption 10A max (15mA Standby)
Audio Section
Max Output Power 50W x2 (Drivers)
50W x2 (Passengers)
Line Output 4V/10KΩ
Subwoofer Output 4V/10KΩ
LPF 50Hz,60Hz,80Hz,100Hz,120Hz
FM STEREO RADIO
Frequency range USA 87.5MHZ – 107.9MHZ (0.2 MHz step)
EURO 87.50MHZ –108.00MHz(0.05 MHz step)
Usable Sensitivity 10.2 dBf. (0.9 uV, 75Ω)
50db Quieting Sensitivity 15.2 dBf. (1.6 uV, 75Ω)
Frequency Response 30Hz – 15kHz (+/- 3dB)
Alternate Channel Selectivity 75dB
Stereo Separation 40dB (1kHz)
Image Rejection Ration 75dB
IF rejection ratio 100dB
Signal to Noise ratio 70dB (stereo)
AM RADIO
Frequency range USA 530kHz – 1710kHz (10 kHz step)
EURO 522kHz – 1620kHz (9 kHz step)
Usable Sensitivity 28 dB/uV (25uV, S/N 20dB)
WEATHER BAND TUNER
Range 162.400 –162.550MHz
Usable Sensitivity (S/N = 20dB)0.7uV(-9dBuV)
Signal to noise ratio (LEVEL40dbuV)50dB
CD/DVD PLAYER
Signal/Noise Ratio (1kHz) 120dB
Frequency Response (+/- 1dB) 10 – 20,000Hz (+/-1dB)
Total Harmonic Distortion (1kHz) less than 0.20% (1Khz)
Number of Channels 2 (stereo)
AUDIO CD CD Recordable/Rewritable (CD-R/-RW)
-ISO 9660 level 1, level 2, Romeo, Joliet
© 2018 Radio Engineering Industries, Inc. 800.228.9275 | p: 402.339.2200 | f: 402.339.1704 | radioeng.com
Page 51

User’s Guide 51
ECVR-1500D AM/FM/WB/CD/DVD/USB/BT Motor Coach Radio User’s Guide Radio Engineering Industries, Inc. | 6534 L Street | Omaha, NE 68117
ISO standard DVD video playback
DVD+/-R/DVD+/-RW 4.7G and dual layer
8.4G media Recordable/Rewritable (DVD-R/RW,+R/+RW)
-ISO 9660 level 1, level 2, Romeo, Joliet
BLUETOOTH®
Version Bluetooth® 3.0 Certified
Frequency Range 2.402 – 2.480 GHz
Output power +4dBm Max
Range light of sight 10m (32.8ft)
Profiles supported HFP 1.5, A2DP 1.2, AVRCP 1.0, & PBAP
Microphone Built-In and optional External input 3.5mm
USB INTERFACES
USB Standard USB Type A 1.1/2.0 (Full Speed)
Maximum Supply Current 1.5A
File System Fat16/32
Supported file types (Passengers) MPEG1/MPEG2/MP4/AVI(XVID)/H.264
WAV /MP3 /WMA /JPEG
Supported file types (Drivers) MP3 /WMA
*Individual file size limit is 2G in accordance with Fat16/32 file restrictions.
AUXILIARY INPUT SPECIFICATIONS
Frequency Response (+/- 1db) 20HZ – 20Khz (+/-3dB)
Input Voltage Maximum Voltage 1200mV
Input impedance 10KΩ
VIDEO OUTPUTS
Format NTSC/PAL
Composite Video Input/Output level 1.0V p-p/75Ω (+/-0.2V)
HD Output Connection HDMI-E
Max. Output Video Resolution 1080p upconverted
Composite In/Out Connector BNC
MICROPHONE INPUTS
Audio input level 10-150mV RMS
Trigger Active Low
© 2018 Radio Engineering Industries, Inc. 800.228.9275 | p: 402.339.2200 | f: 402.339.1704 | radioeng.com
Page 52

User’s Guide 52
ECVR-1500D AM/FM/WB/CD/DVD/USB/BT Motor Coach Radio User’s Guide Radio Engineering Industries, Inc. | 6534 L Street | Omaha, NE 68117
Radio Engineering Industries, Inc.
www.radioeng.com
Rev A.0 Date: 12/12/18
© 2018 Radio Engineering Industries, Inc. 800.228.9275 | p: 402.339.2200 | f: 402.339.1704 | radioeng.com
 Loading...