

Page 1
Heavy Duty AM/FM/CD Ster e o Weather Band Radio, USB iPod® Control
and Charging, Bl uet ooth® Hands Free C a l ling and Wireless Audio
Streaming, Front/Rear Auxiliary Inputs
Installation/ Operation Manual
ECD-5500
Page 2

2
Th a nk you for p urchasi ng ECD-5500 AM/FM/CD Receiver from REI. This pr oduct is
desig ne d and tes ted to with stand t emperature and vibr ation extremes. Please r ead the
owner’s manual carefully before attempting to install this unit.
If you have an installation question or need installation ass istance, please call th e:
SERVICE HOT LINE
1-877-726-4617 Toll Free USA & CANADA
FEATURES:
Hea vy Duty construction for Tough Environments
Non-volatile memory back-up stores u s er setting s when batt ery is dis connected
30 Day Clock back-up
Full Dot Matri x LCD displ a y
10s Anti-skip Gear dri ven CD Mechanism
7 channel NOAA® Weather Band Tuner
Electronic AM/FM Stereo Tuner
Preset Up to 3 0 Radi o Station s (18 FM , 12 AM)
EURO and USA frequency bands
MP3/WMA playback w/ ID3 Tag Support
2 Aux In puts (Front 3.5mm Stereo Jack/Rear RCA)
iPod® /iPhone® Charging and Playback Contr ol via US B
Bluetooth® au dio Str e aming w/ support for Hands Free calling
Integrated Bluetooth® Microphone input
IF ADDITIONAL INSTALLATION COMPONENTS ARE NECESSARY, CONTA CT YOUR
REI SALES REP FOR:
** OEM /FACTORY W IRING HARNESS ADAPTERS
** ANTENNAS & ANTENNA ADAPTERS
** SPEAKERS & GRILLS
Radio Engineering Industries, Inc.
6534 “L” Street
Omaha, Nebraska 68117
(800)228-9275
www.radioeng.com
Page 3
3
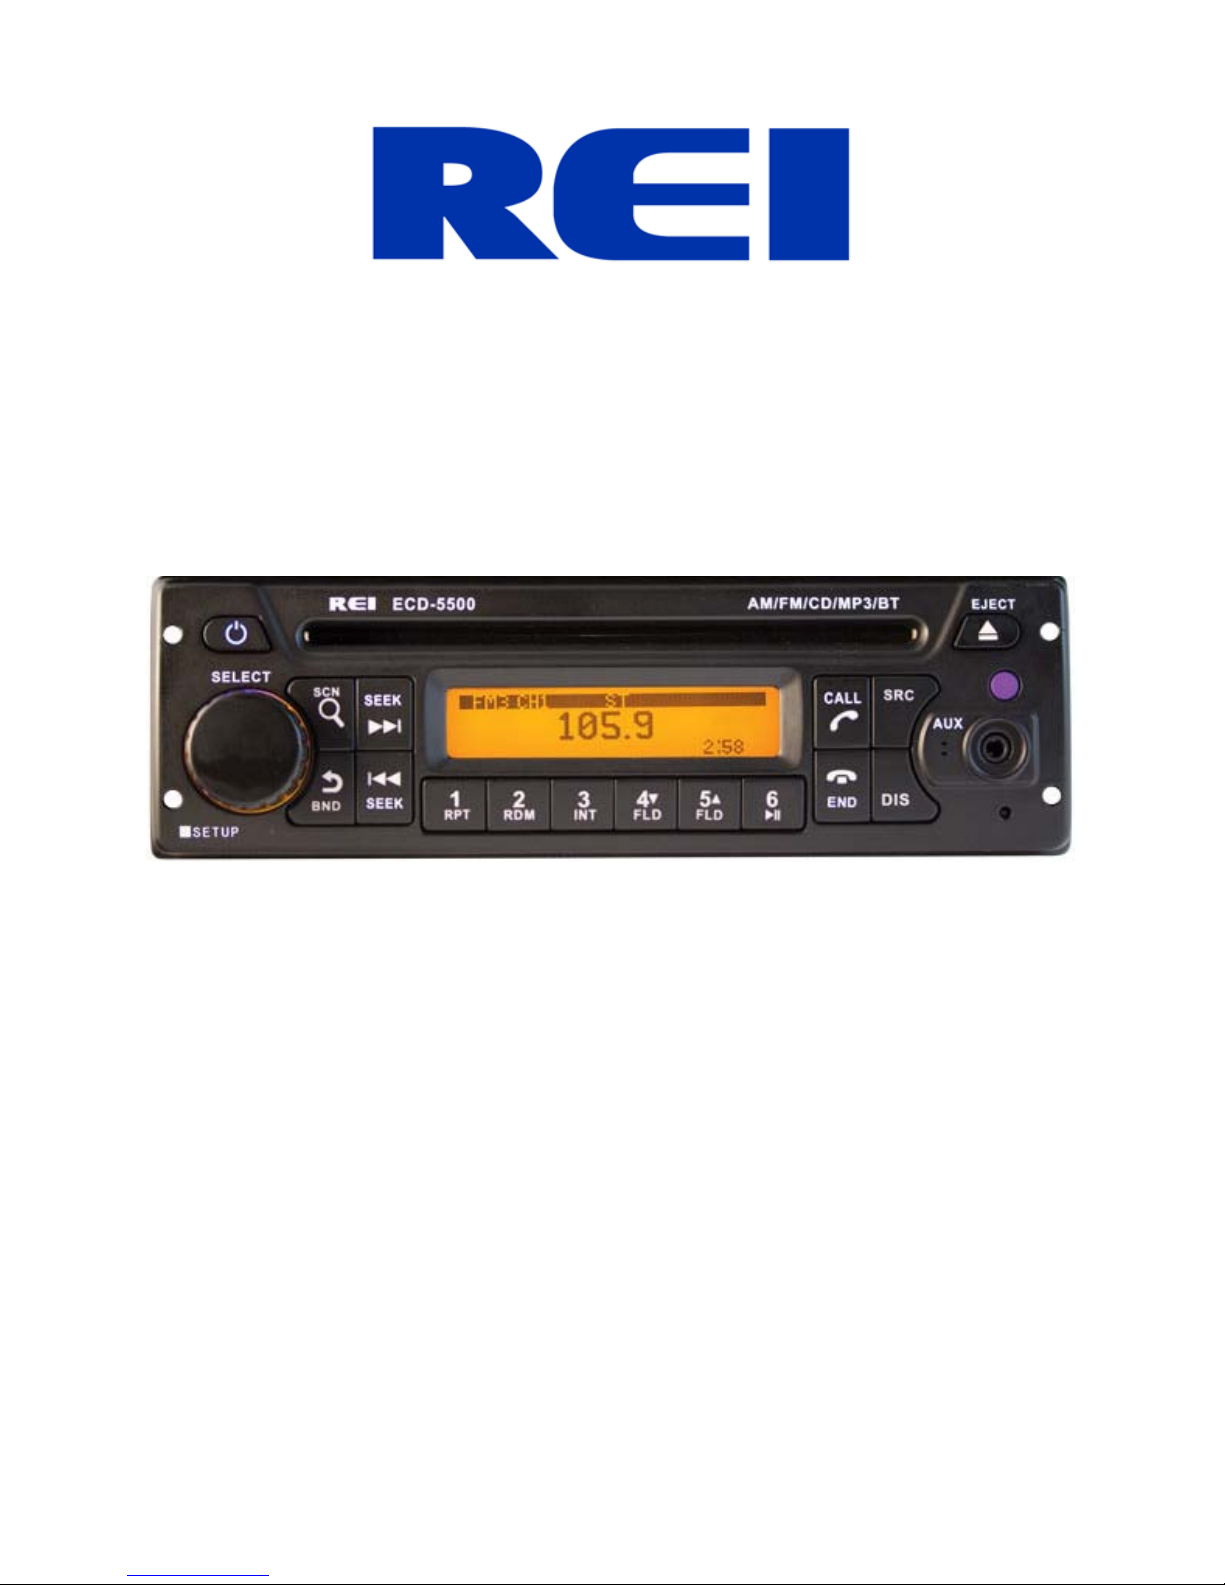
CONTROLS AND INDICA TORS
1. Power
2. S elect Knob
3. Scan /Search Button
4. Ban d /Back But ton
5. Tune /Seek Down Button
6. Tune /Seek Up Bu tton
7. P reset Memory/Recall, Medi a Control Buttons
8. C all Connect/Transfer Button
9. Call End Button
10. Display Button
11. Source Select Button
12. In ternal Bluetooth Microphon e
13. Reset swi tch
14. Front AUX1 Input Jack
15. Disc EJECT Button
16. Disc Slot
17. Dot Matrix Displa y
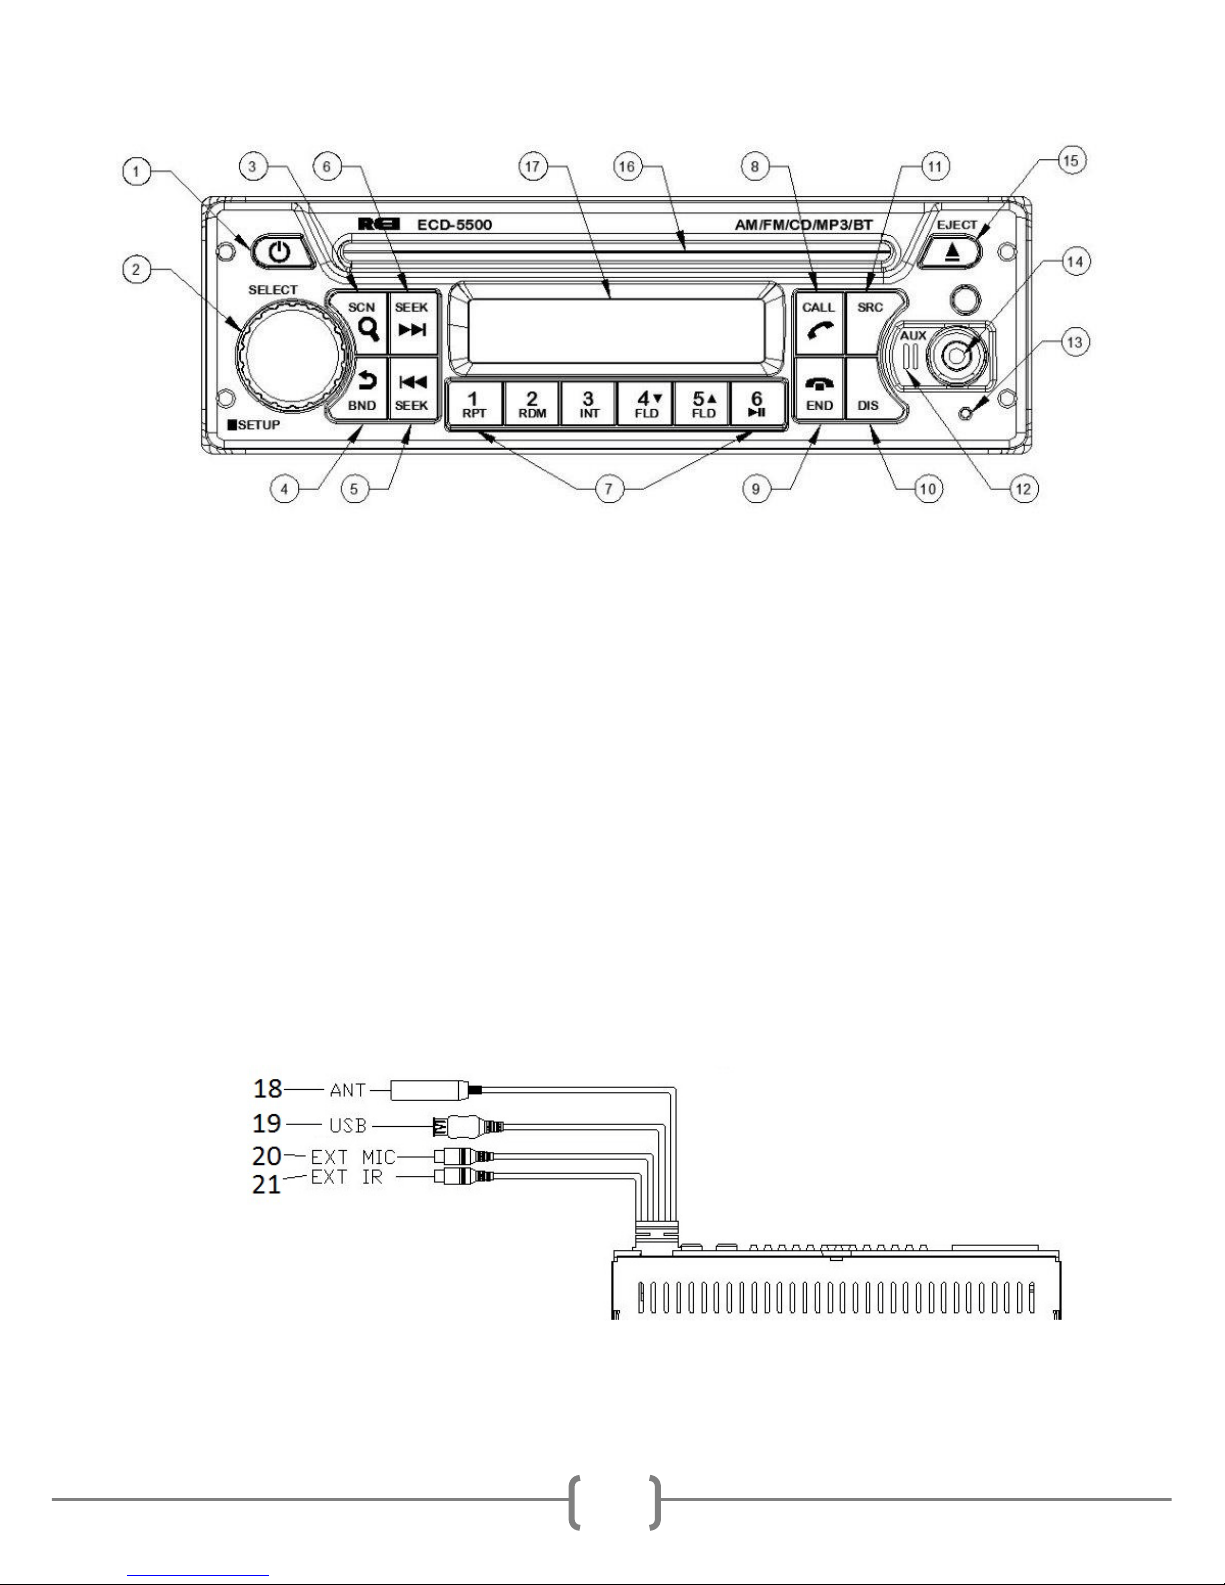
REAR INPUTS SHOWN
18. Antenna input
19. Rear USB in put
20. Rear EXTERNAL Bluetooth Microphone input
21. Rear I R Remote extension input
Page 4

4
OPERATION
1) Power Button
Press the Power Bu tton to turn th e unit ON or hold to turn the unit OFF. The bu tton
will illuminate RED when OFF and BLUE when ON. No te: Rad io can also be
powered on by pressing any front button when ANY .
2) Select Knob
Press and h old this button to access the radio SETUP MENU.
3) Scan/Search Button
Press and hold this button for 2 seconds to auto progra m avail able stations int o the
preset memory buttons. This function will erase previous memorized stations and
stor e the newly searched s tations . Once compl eted, th e r ad io wil l s can for 5 seconds
through ea ch of the preset stations of either the AM or FM band and stop.
4) BAND/Back Button
Press this button to chan ge radio bands as follows:
FM1—FM2—FM3—AM1—AM2
5) TUNE/SEEK DOWN Button
Under Radio mode, pr ess this button momentarily to man u ally tune downward. Press
an d hol d a button an d the radio will automatically seek to the previous radio station.
When playi ng digital media, use this but t on to track backwards to the previous track.
This button also functions as Weather Band Chann el access. Under Weather Band
mod e , pr e s s this button to select Weather Band channels 1-7.
6) TUNE/SEEK UP Butt on
Under Radio mode, pr ess this button momentarily to man u ally tune upward. Press
an d hol d a button an d the radio will automatically seek to the next radio station.
When playing digital media, use this button to track forwards to the next track.
This button also fun ctions as Weather Band Chan nel access. Under Weather Band
mod e , pr e s s this button to select Weather Band channels 1-7.
7) Pres et Memor y/Recall Buttons 1-6
Press these buttons momentarily to select the preset stations.
Press and holding a butt on will set the cur ren t s t ation to the bu tton being pressed.
**Preset buttons are pre-assigned frequencies in Weather Band Mode.
8) CALL Button
Press this button to Place or Answer an incomin g call when successfully paired using
the Hands Free Profile on a Bl uetooth ® enabled phone. Press this button to transf e r
the call from the radio to the phone and vise versa.
9) END Button
Press this button to END a call when successfully pair ed us in g the Hand s Free P rofile
on a Bluetooth® enabl ed phone. Press this button to qu ickly disconnect a paired
device from the radio when in BT PHONE mode.
Page 5

5
10) DISP Button
Pres s th is button to chang e bet w een Clock and Mode Information display.
Setting the Time:
With t he radio’s BLUE power lig ht ON, press and hold this button until the hour
display begins to flash. Rotate Volume/Select Knob to adjust th e hour. Press the DISP
button again, and the minute display will flash. Rotate VOL/SEL Kn ob to adjust the
min ute. Pres s either the DISP or VOL/SEL button to sa ve t he time on the LCD.
11) SRC Button
Press this button to navigate between modes:
Note: Mode will skip SOURCES if med ia is not present or t he source is t urn ed off.
TUNER—Weather Band—USB—CD—BT PHONE—BT AUDIO (if
paired)—AUX1—AUX2.
12) Internal Bluetooth ® Microphone
Internal M icrophone for Hand s Free Bluetooth cal ling.
13) Reset S witch
In the unlikely event that th e radio is not operating correctly, press the RESET button
to r es tart th e op er ating system of th e radio.
14) Front AUX 1 Input Jack
The unit is equipped wi th a front panel 3.5mm auxiliary input (AUX 1) so you can
connect your external p or table a ud i o p layer or por table satellite radio r eceiver. A
second REAR (AUX 2) RCA jack is also included on the rear of the radio.
15) Disc EJECT button
With the radio ON, pr ess this button to EJECT the Compact Disc from the radio.
16) Disc Slot
Insert a Compact Disc label side up here. The radio will switch modes and begin
playback after the file is loaded.
17) Dot Matrix Display
LED Dot Matr ix display shows the radios operational infor mation.
*It may be necessary to adjust the volu me level of your por tabl e d evi se to ach ieve an
optimal volume level.
Page 6

6
WEATHER BAND MODE
NOAA National Wea ther Radio Broadcasts from over 3 80 Locat ion s t hroughout
the U.S . on seven V HF/ FM frequencies. Tune to receiv e continuous weat her
information 24 hours a day on one of th e followi ng freq uencie s .
For local station listing see: http://www.nws.noaa.gov/nwr/nwrbro.htm
Press preset 1 to select weather band ch an nel 1 - 162.400MHZ
P ress pr es et 2 to select weather band channel 2 - 162.425MHZ
P ress pr es et 3 to select weather band channel 3 - 162.450MHZ
P ress pr es et 4 to select weather band channel 4 - 162.475MHZ
P ress pr es et 5 to select weather band channel 5 - 162.500MHZ
P ress pr es et 6 to select weather band channel 6 - 162.525MHZ
**Press SEEK UP/DOWN to select wea ther band channel 7 - 162.550 MHz
SETUP MENU
With the unit O N, press and hold the VOL/SEL button for 2 seconds. LCD will
display SETUP. Rotate the VOL/SE L knob t o c hoose th e option, then press to
make a selection:
• SCROLL ON/ OFF
Choose how iPod®, an d ID3 ta g informa tion i s disp layed on th e LCD. Wi th the scrol l
set to ON, information is repeated continuously on the front displ ay. When set to OFF,
information is not displayed unless the user pr esses th e DISPLAY button.
• WBALERT ON/ OFF
Choose t o turn the W e ath er Band Aler t ON or OFF. (ONLY ACTIVE WITH
WEATHER BAND MODE TURNED ON)
• BT SET
BLUETOOTH ON/OFF (Must be set t o ON to access furth er )
PAIR DEV
SEL DEV
DISCOVER ON/OFF
ANSWER AUTO ON/OFF
DELETE ALL NO/YES
BT RESET NO/YES
Press the BACK button to EXIT the BT SET menu and return to previous
• BRIG HTNE SS 0 -35
Rot ate t he VOL /SE L knob to choose t he d e s i red CO NTRAS T level of the display.
Press the VOL/SEL knob to select.
• VER 200
This is the firmware version present on th e r ad io. Not all fea tures des cr ibed
in this man ual may be available on the radio at this time.
To save and exit MENU mod e , press and hold the VOL/SEL button.
Note: M enu will exi t au tomatically after 5 continuou s s e c onds without saving any
selections.
Page 7

7
RADIO OPERATION
1. AM/FM Preset Mode
Press the BAND button t o switch fr om FM-1, FM-2, F M-3, AM-1, or AM -2.
2. Prese t Number
Disp lays th e Preset Channel of the frequency.
3. Frequenc y Display
Displays the Frequen cy of th e current tuned station.
4. Stereo Indicator
Displays when the FM frequen cy is tuned in Stereo.
WEA TH ER BAND ALE R T
1. Weather Band ALER T Statu s Indication
When Wea ther Band al ert is set to ON, ALERT is displayed in the LCD window. The
Nat ional Wea ther Ser vi ce wi ll send a 1050 Hz tone alar m before m ost warning and
many watch messa g es are br oa d cast. The ton e will activa te and switch to the alert
frequency even if the audio is t urne d off. After the alert message has completed, the
ra dio wi ll return to the previous mode.
Page 8

8
CONNECTING A NEW BLUETOOTH® DEVICE
To connect your Bluetooth ® device to the Radi o, the device must first be paired.
You will need to verify that “BLUETOOTH” is set to “ON”. (See BT SET menu),
and verify that “DISCOVERY” is set to “ON”. (See BT SET menu).
Pairing the Your mobile device with the Head Unit
Your mobile phone can initiate a search for n ew devi ces and pair to the unit. Th e
following paragra ph des cribes the pairing process:
NOTE: Procedures for pairing mobile phones may vary slightly from
manufacturer to manufacturer.
1. Verify that the Radi o is powered up and ON.
2. Set the Bluetooth® function of the Mobil e D e vice to ON.
3. Access the” Look for devices” feature of the Mobi le de vice a nd beg in
sea rch i ng. After s ea rch i ng, the Radio should appear in th e list of devices
as ECD-5500. Press to accept.
4. A prompt to bon d should appear on your Mobile device. Press to accept
and continue the process. Th e d evice will then ask for the passkey, enter i t
on t he mobile devic e.
NOTE: Some mobile devices require the passkey to connect. If your moblie
devic e r eq uires th e pa sskey, you will need to enter it now. The default code is
“0000”.
5. Aft er ent er ing the pa ss k ey, press OK. The Mobile device sh ould d ispl ay
connected. The Radio’s Bl uetooth® icon should appear in the upper
right hand corner of the screen.
NOTES:
• Only ONE mobile device can be paired with the Radio at a time.
• Turn “DISCOVERY OFF” to disable any unwanted Bluet oot h® device s.
• After turning off the ignition, the Radio will automatically search for the
last-connected Bluetooth® device, and if possible, restore the connection.
• T hi s Radi o does NOT support HSP (Head Set Profile)
Page 9

9
BLUETOOTH® PH ONE MODE
1. Bl uetooth Phone ID
Displays the ID of previously paired Bluetooth Phones. Rotate to the V O L/SEL
kn ob to d isplay oth er paired devices and press th e VOL/ S EL to initiate
re-connection.
2. Display information
Shows t he conn ection sta tus and phone number of the incoming or outgoing call.
3. O pt i ons Menu
Wh en connected to a Bluetooth Enable d phone, Rotate the VOL/SEL knob to
access DIALED, RECE I VE D, MISSED, or PHONEBOOK.
DIALED Displays all dialed calls from the currently connect ph one.
RECEIVED Displays all answered in com ing calls from the currently
connect phone.
MISSED Displays all missed call s fr om th e cur rently connect phone.
PHONEBOOK Displays the contacts cur rent ly stored on the con nected
ph one. Some phones require the user to accept the radio’s permission
to view contacts before displaying them on the radio.
The u se can rotat e and choose usin g t he VOL/SEL but ton an d pre s s i t to also
select the desired number. Use the button to return to the pr evious menu.
Once the phone number is displayed, press the CALL button to place the call.
4. Connec t i on Status
Displays the Bluetooth® icon connection status of the radio.
Page 10

10
BLUETOOTH® STREAMING AUDI O MODE
Th e unit allows you t o play back aud io files from your m obile device using a
Bluetooth® connection. The Radio can c ontr ol a Bluetooth ® audio pla ye r vi a
Advanced Audio Distribution Profi le (A2DP) or Audio/Video Remote Control
Profil e (AVRCP). Bluetooth® a udio p layers (or Bluetooth® adapte rs) compatible
with these pr ofiles can be connect ed to this Radio. Verif y the device i s
con nected via Bluetooth®, then Touch the MODE bu tton on th e front to acces s
BT AUDIO.
1. Bl uetooth Phone ID
Displa ys th e ID of the pair e d Blu e tooth Ph one you are trying to stream audio
from.
2. Connec t i on Status
Displays the Bluetooth® icon connection status of the radio
Press the PLAY/PAUSE butto n to liste n to aud io. While listening to aud io the
following functions are available:
SEEK UP button: Touch t o play the next track.
PLAY/PAUSE button: T ouc h to pause playback. Touch again to resume
playback.
SEEK DOWN button: Touch to play the previous track.
NOTE:
When th ere is an incoming call, the son g wi ll be p aused. After the incoming call is
fin ished, the screen will return to the mu si c function screen and playback will
continue.
Functionality may vary depending on the profile or device used.
Page 11

11
iPod®/iPhone® OPERATION
To listen to audio through your apple device, verify that a 30-pin USB extension is
connected t o the USB pigtail on t he re ar of the rad io. Next, con nect the 30-pin
cable to the Apple device. Once connected, the radio will automatically s witch
the sou rce to iPod® and begin ch arging th e d evi ce. If the device ha s enough
battery power. It will begin playback.
1. Operational Mode
2. Shows the e l a pse time of the audio track.
3. Indicates the file number and number of files in the folder.
4. Displays the Track Title, Artist, and Album information of the file if
available.
When connected , the user can pl ayback specific fi l es or folders. First press the
SEARCH button. The user can then rotate the VOL/ S EL knob t o sel ect one
of the followin g search options:
• Playlists
• Podcasts
• Audiobooks
• Songs
• Albums
• Artists
Press the VOL/SE L kn ob to choose. To return to a previous menu, press
th e RETURN button and choose again using the VOL/SEL knob. Use the
radio’s SEEK up/down buttons to change tracks, or the button to PAUSE or
PLAY the track.
To return to the iPod® source from any other source menu, touch MODE on the
front pan el un til the i P od ® icon i s sh own on the front display.
AUX OPERATION
Press the MODE button on the front panel until the display shows either AUX 1
or AUX2. AUX 1 uses the front 3.5mm audio input while AUX 2 uses the rear
RCA L/R audio inputs. It may be n ecess ary to ad ju st the VOLUME level of th e
AUXILARLY input device if too little or too much signal is pr esent.
Page 12

12
USB/CD OPERATION
In s er t a C D into the disc s lot, or connect a USB st orage d evice t o t he unit. Th e
radio will automatically switch MODE’S and begin playback after the media is
successfully loaded. Press and hold the SEEK UP/DOWN buttons to manually
FF/REW though a track, or pre s s an d release to change tr acks UP/DOWN.
If playing compr essed digital media, use the FOLDER UP/DOWN
button s to select the desire d fold e r for playback .
Press and h old this button t o REPE AT Track, F older, All, or Off
Pre s s a nd hold this but ton t o turn RA NDOM on/ off
Press and hold this but ton t o s e lect INTRO on/off during playback
Press this button to PAUSE/PLAY the media
1. Operational Mode
2. Co mpressed me di a file f ormat
Displa ys eith er WMA or MP3 Compres sed media file format fi le formats.
3. Playback Mode of Ope ration
Displa ys eith er RDM, I N T, RPT or noth i ng at a l l
4. Shows the T rack number of the ID3 tag information of the MP3 file.
Press the DISPLAY button to switch from Title, Artist, or Album information
5. Shows the e l a pse time of the audio track.
6. Fil e number and number of files in the folder.
AUDIO FILE REQUIREMENTS (.MP3/.WMA using IS O9660 formatting)
• The MP3 files with a sampling rate between 16 kHz & 48 kHz. And bitrates between 32 to
384 kbp s . (44.1khz/128kb ps or higher is recommended)
• The WMA file with a sa mpling rate of 32, 44. 1, or 48 kHz. A nd a bitra tes bet w ee n 62 to 192
kbps . ( 44.1khz/128kbps is recom m ended)
•
NOTE:
This R adio does not support playback of aac (.m4a, MPEG-4) audio.
Page 13

13
7
6
1
2
5
3
4
9
8
OPTIONAL REMOTE CONTROL NOT INCLUDED
*Requires 2AA Batteries
(1) Power Button
(2) Language Button (N/A)
(3) Menu Button (N/A)
(4) Volume Up/Down Buttons (N/A)
(5) Enter Button (N/A)
(6) Scroll Buttons (N/A)
(7) Setup Button (N/A)
(8) Mode Button
(9) Control Buttons for changing
stations and tracks on digital media
iPod® and iPhone® are trademarks of Apple Inc., registere d in the U.S. and
other countries. Functionality may vary by model number, operation is not
guaranteed.
The Bluetooth® word mark and logos are registered trademarks owned by
Bluetooth SIG, Inc. and any use of such marks by REI under license.
Page 14

14
REQUIRED RADIO DIMENSIONS
Verify the radio will fit by following the suggested dimensions below. Carefully cut or
file a s n eces sary un til the sleev e easil y slides in to the opening.
ISO INSTALLATION
1. For installations that do NOT require the use of the DIN collar. The radio has
threaded holes in the cha ssis side panels for ISO mount applications. If necessary, four
M5x10mm screws are included with the hardware pack to a ssist you.
INSTALLING THE RADIO
1. Pla ce the DIN collar into the dash opening. Ben d the t abs outward as shown on
th e dra wing below to lock int o place.
Page 15

15
2. Pass the harness and antenna cable through t he DIN collar, an d c onnect to the
back of the radio. Verify clearance; then gently insert the radio into the DIN Collar
until both spring clips are locked into place.
3. If additional support is needed, bend the included support bracket, and secur e it
to th e vehicle using a scr ew. Secure th e opposite end to th e radio’s rear stud using the
nut and washer provided.
Page 16

16
4. To remove the radi o, in s er t the two r elease keys into the hol es on t he fr ont fa c e o f
the radio. The tools must be inserted with the notched side facing the radio. Slide th e
ke ys fore word unt i l you hear a click. Then pull the radio out, releasing it from the
DIN collar.
ELECTRICAL CONNECTIONS
Follow this easy wiring diagram when inst alli ng Ra dio an d Speak e rs.
Warning:
*This r adio is designed for 12V DC Negative Ground Systems Only.
**NOTE: BOTH THE RADIO’S BA TTERY +12V & ACC +12V POWER
WIRES MUST BE CONNECTED FOR OPERATION.
Page 17

17
TROUBLE SHOOTING
Problem Cause Solution
Backlighting is on, but no LCD display No power to BATTERY wire or blown 10A
main fuse.
Check for both AC C & BATTERY voltage
with Multi-meter, check all fuses.
Cannot tune radio stations The antenna cable is not connected. The signal
is too weak. The radio is in the wrong
fre quency steps.
Connect the antenna cable. Check the
fre quency spacing in the radio’s SERVICE
menu.
USB media not playing, or says loading. Media is the wr ong file type. Convert files to a usable format, see file
requirements section of the manual.
Audio is distorted or low. Source audi o level is t oo weak or overdriven.
Bitrate of audio file is too l arge.
Adjust the volume level of the auxiliary
source . Change the sample frequency or
Bitrate of the file.
iPod® screen displays “loading” for a
long period of time.
Device is not a suppor ted dev ice. The radio
supports a majority of iPod® models , but not all
are guaranteed.
W ait for iPod® to load or r econnect 30 -pin
plug. If still loading, then device is not
supported, or has low battery . Use the
AU X input or a Blue tooth® connect ion
instead.
The Radio does NOT respond to the front
buttons
An error in operation has occurred Reset the uni t from t he front pane l.
The Radio does not charge my device The devi ce requires additional current via t he
USB to charge the device
Unplug and try agai n. The USB cannot
support more than 5V/500mA.
Page 18

18
SPECIFICATIONS
AUDIO SECTION
Power supply voltage (negative ground) ……………….……….12V DC (10V-18V)
Standby Current…...……………………..…………..…………………………20mA
Max Current Con s umption ……….… …………………….……….….………........5A
FM TUNER
Range …………………………………………………..….(USA) 87.5 – 107.9 MHz
(EUR) 87.50 – 108.00 MHz
Usable Sensitivity (S/N = 30dB)…………………………...7.34dBf.(0.6uV/75ohms)
Signal to noise ratio ………………………………….………………...58dB (Mono)
Stereo separation (@ 1K Hz) ………………………….……..……………..…42 dB
AM TUNER
Range …………………………………………………..….…(USA)530 – 1,710 kHz
(EUR) 522 – 1,620 kHz
Usable Sen sitivity (S/N = 20dB)………………………..………....23dBuV (14.4uV)
Signa l to noise ratio (LEVEL60dbuV)…….………………...………………... 60 dB
WEATHER BAND TUNER
Range …………………………………………………..…….162.400 –162.550MHz
Usable Sensitivity (S/N = 20dB)……………………..………………0.7uV(-9dBuV)
Signa l to noise ratio (LEVEL40dbuV)…….…………………...……………….42dB
CD/PLAYER
Signal/Noise Ratio (1kHz)……………………………………………………..120dB
Freq uency Response (+/- 1dB)………………………………10 – 20,000Hz (+/-1dB)
Total Ha rmonic Distortion (1kHz)…………………………...less than 0.20% (1Khz)
MP3 decoding format……………………………………MPEG-1 & 2 Audio layer 3
WMA decoding format………………………………….Ver. 7, 7.1,8,9 (2ch audio)
(Windows Media Pl ayer)
BLUETOOTH®
Version……………………………………………………...Bluetooth® 2.0 Certified
Frequency Range………………………………………………….2.402 – 2.480 GHz
Output power……………………………………………………………+4dBm Max
USB I N TERFACE
USB Sta ndard……………………………………………….US B1.1/2. 0 (Full Speed)
Maximum Supply ……….………………………………………………...5V/500mA
File System…………………………………………………………………..Fat16/32
Page 19

19
AUXILIARY INPUT SPECIFIC ATI ONS
Input Voltage Maximum Voltage…………………… ………………… ………...1.0V
Input impedance………………………………………………………………..10KΩ
DIMENSIONS
Chassis (W x H x D) ………...…………….178mm (7”) x 50mm (2”) x 154mm (6”)
Nosepiece (W x H x D) ……….….188mm (7-3/8”) x 58mm (2-1/4”) x 17mm (5/8”)
Weight ……………………………………………….…………………………3.5Ibs
*Due to continuous product improvement, spe c ifications and design are subject to
change without notice.
Page 20

20
Radio Engineeri ng Industri e s, Inc .
www.radioeng.com
Rev 0.1 Date: 05-15-14
 Loading...