

Page 1

Heavy Duty Gauge-Styl e AM/ F M Stereo Receiver, with built in USB,
Auxiliary Inputs, and Bluetooth® Audio Streaming
Installation/ Operation Manu al
40 W x 4 AW-10
Page 2

2
Th a nk you for p urchas ing the AW-10 AM/FM/USB/Bluetooth®/AUX Receiver from
REI. This product is designed and tested to withstand temperature and vibration
extremes. Please r ead the owner’s manua l carefully befor e attem p ting to install this
unit.
If you have an in stalla tion question or n eed installat ion assis tance, pleas e call th e:
SERVICE HOT LINE
1-877-726-4617 Toll Free USA & CANADA
1-402-339-2200
FEATURES:
Non-vo latile memory back-up
Elect ro nic A M/F M Ste reo Tu ne r
Pres et Up to 30 Radio Stations (18 FM, 12 AM)
EURO and USA frequency bands
12/24 hr Clock modes
Compact Chassis fits Standard Gauge Openings
Rear RCA Aux Input
USB in put s upports MP3/WMA playback
Displays ID3 tag information
Electron ic Bass, Treble, Ba lance, and Fader C on trols
LED Backlighting
Output Power 40W x 4
IF ADDITIONAL INSTALLATION COMPONENTS A RE NECESSARY, CONTACT YOUR REI
SA LES REP FOR:
** OEM /F ACTORY WIRING HARNESS ADAPTERS
** ANTENNAS & ANTENNA ADAPTERS
** SPEAKERS & GRILLS
Radio Engineering Industries, Inc.
6534 “L” Street
Omaha, Nebraska 68117
www.radioeng.com
Page 3
3
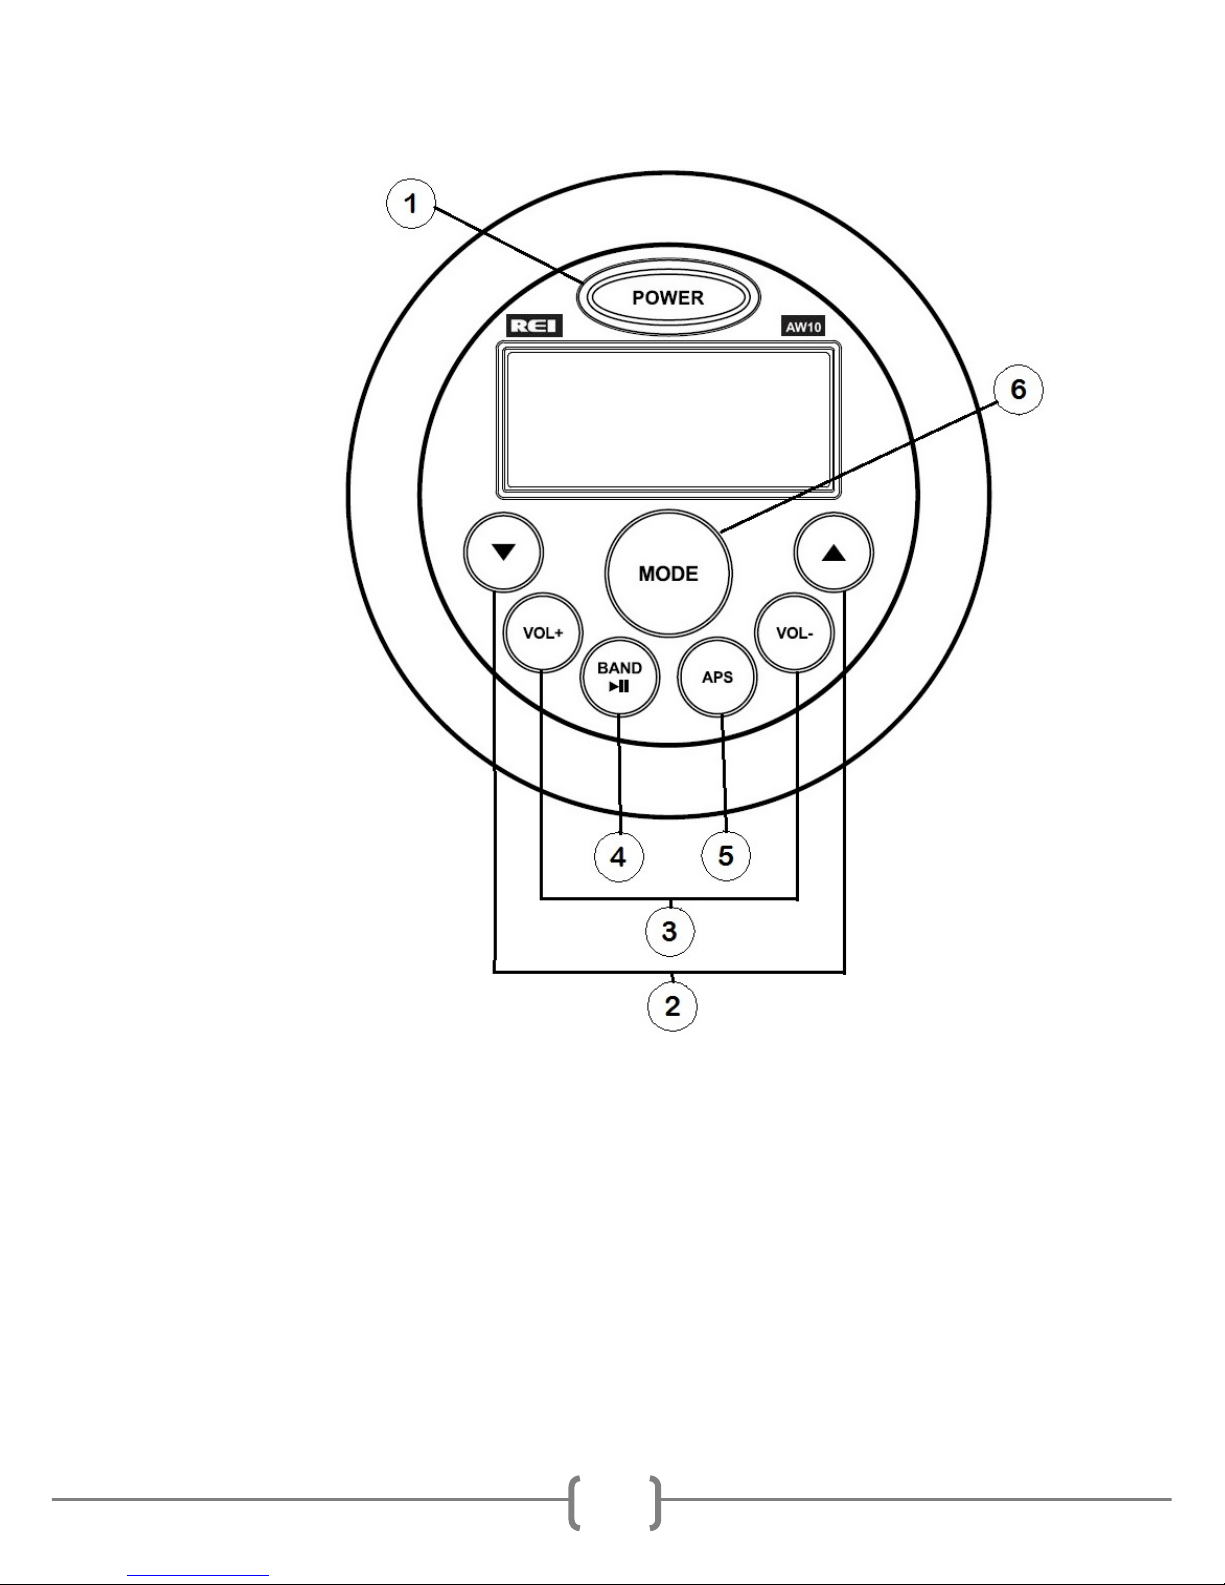
CONTROLS AND INDICA TORS
1. Power ON/OFF/MUTE Button
2. Radio Station Tune Buttons
3. Volume Up/Down Buttons
4. Band Select/ Clock Display/PLAY PAUSE Button
5. Auto Stor e / Seek Button
6. Mode Button
Page 4

4
BUTTON OPERATION
1) Power Button
Press a nd HOLD the P ower But ton to turn the un it ON or OFF. Once on, a quick
press an d release will MUTE the audio.
2) Tune Buttons
Press these butt on s to select th e PREVIOUS or NEXT track while in USB mode.
Press these butt on s to tune AM/FM stations.
3) Volume UP/DOWN buttons
Press eith er VOL+ / VOL- buttons to increase or d ecrease the volume level
4) Band Button
Press this button to change radio bands as follows:
FM1—FM2—FM3—AM1—AM2
Press an d HOLD this button to chan g e bet we en Clock and Mode In formation disp l ay.
Pres s the butt on to select the desired FM or AM band.
5) Auto St ore / Seek Button
Press a nd h old this bu tt on for 2 s e cond s to auto prog ram a vail able s tation s into the
prese t memory b u ttons. Q uick pres s to auto SEEK up to the next sta tion.
6) Mode Button
Press this button to navigate between modes TUNER-USB-Bluetooth®-AUX.
NOTE: USB mode will not appear unless a USB drive is inserted.
Press and HOLD to select BT PAIR, then q ui ck ly press again t o a cces s either:
BASS
(allows the user to adjust the BASS level)
TREB
(allows the user to adjust the TREBLE level)
BAL (allows the user to adjust the BALANCE from left to right)
FAD
(allows the user to adjust the FADER from front to back)
LOUD (selects either LOUDNESS ON or OFF)
EQ
(d isabl e s the tone se ttings and selects between OFF, FLAT, CLASS, POP, or ROCK)
AREA TU NING (sel e cts betwe en USA & EUR O PE AN freq u e ncy bands)
BEEP (turns the audible bee p O N or OFF with each key press)
TIME FORMAT (selects between 12Hr and 24Hr formats)
Change using th e VOL+/VOL- buttons. If either Volume buttons have not been
pressed for 5 seconds it will automatically r evert back to the previous operation.
Page 5

5
Radio Operation
a. Press an d HOLD the APS button. This function will erase previously
memorized stations and store the newly searched stations. To CANCEL,
press APS again. Once completed, the radio will scan for 5 seconds
through each of the preset stations of either the AM or FM band and stop.
b. Quick press and release the APS button to SEEK to the next strongest
station.
c. Press either buttons momentarily to AUTO s c roll avail able
preset sta tions. Pr ess an d HOLD eith er button again and the
radio will display MANUAL. This mode allows the operator to
manually tune UP or DOWN to a desired station. This mode will
disappear after 3 continuous se cond s wit hou t a tun e u p/down butt on pr ess,
and the radio will return to AUTO mode .
d. Pr ess the BAND button to access available AM and FM modes.
Auxiliary Operation
The AW-10 is equipped with a Rear RC A auxiliary input s o you ca n connect
to your por t able audio p layer or satell ite radi o receiver.
*It ma y be necessa ry to adjust t he volume le ve l of you r p orta ble de vis e to
achi eve an optimal volu me level.
USB Operation
a. Insert a USB drive and the radio will automatically switch to USB input
and begin playback of compatible media files. If ID3 t ag information is
present, it will scroll automatically on the front LCD.
b. If in any other mode, pr ess MODE to switch to USB P LAY to begin
playback.
c. Press the buttons to p lay eith er the Previous or N ext t racks.
d. Press and HOLD the buttons to manually Fast Forward or
Rewi nd a s ong.
e. Press the button to PAUSE/REUME playback of the current song.
**Note : The unit 's USB p ort does not s upp ort the Appl e iPod® or iPhone®.
Page 6

6
Setting the Time
With the radio’s p ower ON , press hold the BAND button to display the time. Next,
press and hold this button again until the hour display begins to flash. Press either
VOL+/VOL- button to adjus t t he hour. Pres s BAND butt on aga in , and the minute
display will flash. Press either VOL+/VOL- button to adjust the minutes. Press and
hold the BAN D button again to save the tim e on the LCD.
Bluetooth® Setup Operation
This unit supports Bl uetooth str e aming from your iPhone®/A ndroid a nd s imil a r device.
Pairing a device is as follows:
a. Turn on the Bluetooth® on your Bluetooth® device.
b. Press MODE to switch t o the BT MUSIC.
c. Press and hold MODE again to display BT PAIR.
d. Press and hold MODE again to display PAIRING.
e. Scan for the unit using your BT d e vice.
f. Select the “AW_10” to complete the pairing process. If a pas s cod e is
req u ired, en ter “0000 ” an d the connection will be automatically ma de.
Bluetooth® Audio Streaming
On ce a connection is successfully made, press MODE to select BT MUSIC.
a. Press the button to PAUSE/REUME playback of the current song.
b. Press the buttons to play either the Previous or Next tracks.
Page 7

7
TROUBLE SHOOTING
Problem Cause Solution
Unit will no t power on No power to BATTERY wire or
ACC wi re, blown 10A m ain fuse or
1A accessory fuse.
Check for both ACC &
BATTERY voltage with
Multi-m eter, check all fuses.
No sound Spea kers not connected; speakers
conn ec t e d w ith bad s pl i c e s;
Spea kers shorted to ground;
speaker load is not within 4-8 Ω.
Connect speakers to harness;
che ck al l spliced w ire s; v er ify
speaker s not s horted t o chassi s;
verify total speaker impedance.
Check volume level.
Cannot tune radio
stations
The antenna cable is not connected.
The s ignal is too we ak. The radio
is in the wrong frequency AREA.
Conn e ct t h e a ntenna cable.
Check that t he fr equenc y AREA
is set to USA .
USB med ia not pl ay ing,
or says NO SONG
Media is the wrong file type. Convert files to a usable format,
unit will only play MP3 or WMA
file extensions.
Cannot stream
Bluetooth
® audio
Bluetooth® de vice wa s not
successfully paired.
Pair the Bluetooth® device and
retry.
AUX audio is distorted
or low
Aux source audio level is too weak
or over dr iven .
Adjus t the audio level of the
auxiliary source then adjus t the
radio volume.
Page 8

8
RADIO DIMENSIO NS
Check the opening to ve rify the radio will fit the following dimensions below.
Ch eck for clearance of the rear bracket also.
INSTALLING THE RADIO
1. Verify that the round self-adhesive gasket is installed. If not, add the gasket
to th e r ear of t he unit. Route the ra dio’s wires t hr ough the fr ont of t he h ole,
then p lace the radio into the opening. Align the front face for the best
viewing angle.
Page 9

9
2. With the radio in the desired location, install the rear mounting bracke t. If
th e bra c ket i s too tall t o fit snu g, rem ove a tab from the mou nting br acke t at
the break lines on both sides to shorten its length. Once the fit is verified,
add the supplied mounting nuts to the studs and tighten firmly. The bracket is
ad j ust able for both vertical or horizontal mo unting. To finish the insta llati on,
following the wiring diagram on the next page.
.
Page 10

10
ELECTRICAL CONNECTIONS
Follow this easy wiring diagram when installing the Radio and Speakers.
**An optional 10’ USB Panel mount extension is available (P/N 512485), contact
an REI sales representative for details
Warning:
Th is radio is de signed for 12V DC Negative Ground Sys tem s Onl y.
Short i ng or groundi ng any of the speaker wir es can d amage th e ra dio and is n ot
covered by warranty.
Page 11

11
SPECIFICATIONS
AUDIO SECTION
Power supply voltage (negative ground) ……………….…….12V DC (10V-18V)
Standby Current…...………………………..…………..……………………. 3mA
Max Curren t Con s umpt ion …. .……………………….……….…. ………. ….. 7.5A
Speaker impedance ………….…….……………….……… 4-8 Ohms per channel
POWER OUTPUT
Continuous Output into 4Ω, 20 to 20,000 Hz at 10 % THD …..…...…4 x 18Watts
Maximum Power Output (Volume control Maximum)……….…40W×4 (at 1kHz)
FM TUNER
Ran ge ………………………………………………….(USA) 87.5 – 1 07.9 MHz
(E UR) 87.50 – 108.00 MHz
Usable Sensitivity (S/N = 30dB)………………………..7.34dBf.(0.6uV/75ohms)
Signal to noise ratio ………………………………………………...58dB (Mono)
Stereo separation (@ 1K Hz) ………………………….………...………..…42dB
AM TUNER
Range ………………………………………………….…(USA)530 – 1,710 kHz
(EUR) 522 – 1,620 kHz
Usable Sensitivity (S/N = 20dB)………………………..……....23dBuV (14.4uV)
Signa l to noise ratio (LEVEL60dbuV)…….……………....………………... 60 dB
USB I N TE RFACE
USB Stan d ard …………………………………………...USB1.1/2.0 (Full Speed)
Maximum Supply Current ………………………..………..……………....500mA
File System …….………………...…………………………...…………. Fat16/32
MP3 decoding format …….………………………….MPEG-1 & 2 Audio layer 3
WMA decoding format …………………………Ve r. 7, 7.1,8,9 ,10,11 (2ch audio)
(Windows Media Player)
BLUETOOTH®
Version ……………………………………………………B luetooth® 2 .0 C ertifie d
Freq uency Range……………………………………………….2.402 – 2.480 GHz
Output power………………………………………………………….+4dBm Max
AUXILIARY INPUT SPECIFICAT I ONS
Input Voltage Max imum Voltage…………… ……… ………………… ….....1.2V
Input impedance…………………………………………………………….10KΩ
DIMENSIONS
Chassis (W x H x D *does NOT include bracket depth)..…..… 80 x 105 x 41 mm
Weight ……………… ………………………………………………….…. 15.8oz
*Due to continuous product improvement, specifications and design are subject to
change without notice.
Page 12

12
Radio Engineeri ng Industri e s, Inc .
www.radioeng.com
Rev 0.3 Date: 12-04-13
 Loading...