

REHM TIGER 170 DC, TIGER 170 AC/DC, TIGER 170 DC SET, TIGER 210 DC, TIGER 210 DC SET Operating Instructions Manual
...
GB
OPERATING INSTRUCTIONS
TIG welding units
TIGER 170 / 210 DC / AC/DC / SET

Product identification
Product identification
TIG - Gas Shielded Tungsten Arc Welding units
TIGER 170 DC 150 3310
TIGER 170 DC SET 150 3311
TIGER 170 AC/DC 150 3320
TIGER 170 AC/DC SET 150 3321
TIGER 210 DC 150 3350
TIGER 210 DC SET 150 3351
TIGER 210 AC/DC 150 3360
TIGER 210 AC/DC SET 150 3361
Rehm GmbH u. Co. KG
Ottostr. 2
D-73066 Uhingen
Telephone: +49 (0) 7161/3007-0
Telefax: +49 (0) 7161/3007-20
e-mail: rehm@rehm-online.de
Internet: http://www.rehm-online.de
Doc.-No.: 730 1012
Version dated: 06.13
Rehm GmbH u. Co. KG, Uhingen, Germany
The contents of this description are the sole property of Rehm GmbH u. Co. KG
Distribution and reproduction of this document is strictly prohibited. The use and
distribution of its contents to a third party is strictly prohibited, unless otherwise
specifically agreed in writing by the company.
Any infringement will result in a claim for damages. All rights to submit a patent,
utility model, or registered design are reserved.
Third party manufacture based on these documents is not permitted.
Subject to change without prior notice.
Manufacturer:
Product
identification:
Type:

Contents
3
Contents
Product Identification
1. Introduction 5
1.1 Foreword 5
1.2 General description 7
1.2.1 Performance features of the TIGER gas shielded tungsten arc welding unit 8
1.2.2 Principle of TIG welding 10
1.2.3 Areas of application for TIG welding units 10
1.2.4 Operating principle of TIG welding units 10
1.2.5 Correct use 10
1.3 Symbols used in this manual 11
2. Safety information 12
2.1 Safety symbols in this operating manual 12
2.2 Warning symbols on the machine 12
2.3 General 13
3. Description of function 14
3.1 The REHM-Operating concept: Turn and Set 14
3.2 The REHM-Operators panel 14
3.2.1 General description 14
3.2.2 The operators panel at a glance 16
3.2.3 Special characteristics relating to the operating panel 17
3.3 The function of the REHM operators panel 17
3.3.1 The welding current setting I1 17
3.3.2 The Pulse-Function (Pulse time t1) 18
3.3.3 The intermediate welding current setting I2 20
3.3.4 The Pulsed Function (Pulse time t2 – see chapter 3.3.2) 21
3.3.5 Current downslope and manual pulsing 21
3.3.6 Post flow gas time 21
3.3.7 Setting for Direct Current (DC) 22
3.3.8 Setting for Alternating Current (AC) 22
3.3.9 Wave balance 22
3.3.10 AC-Frequency 22
3.3.11 The TIG latched trigger mode (4-step) 23
3.3.12 The non-latched torch trigger mode (2 step) 24
3.3.13 TIG welding with high voltage ignition 25
3.3.15 Stick-electrode welding with the Booster-Function 26
3.3.16 Stick-electrode welding in the Fuse Hold mode 26
3.3.17 TIG - welding 26
3.3.18 The Special mode 27
3.3.19 The control LED’s 31
3.3.20 The Digital display 32
3.3.21 The Turn and Set knob 32
3.4 Anti-Stick Function 32
3.5 INTIG-Energy 33
3.6 EPC: Continuous Mains voltage monitoring 33
3.7 Resetting to Factory settings 34

Contents
4
4. Accessories 35
4.1 WIG PLUS 1 foot operated remote control 35
4.1.1 Switch position; Foot-operated control signal 35
4.1.2 Switch position; Hand-operated control signal 35
4.2 WIG PLUS 2 Hand remote control 35
4.3 REHM TIG-torch R-SR 7-17 und R-SR 7-26 DD with potentiometer and leather 36
4.4 TIGER SET 36
4.5 REHM water cooler RWK 1100 36
4.6 Adapter cable 36
4.7 Tiger-Mechanised welding 37
5. Commissioning 38
5.1 Safety Notes 38
5.2 Working with an increased electrical hazard 38
5.3 Setting up the welding unit 38
5.4 Connecting the welding unit 39
5.5 Ventilation of the welding power source 39
5.6 Guidelines for working with welding power sources 39
5.7 Connecting of the torch or electrode holder cables 39
5.9 Recommended welding lead cross sections 40
6. Operation 41
6.1 Safety instructions 41
6.2 Electrical hazard 41
6.3 Personal safety instructions 42
6.4 Fire prevention 42
6.5 Ventilation 42
6.6 Tests before switching on 42
6.7 Connecting the earth cable 43
6.8 Practical hints for use 43
7. Troubleshooting 46
7.1 Safety instructions 46
7.2 Fault finding table 47
8. Service and maintenance 50
8.1 Safety instructions 50
8.2 Preventative maintenance table 50
8.3 Cleaning the inside of the unit 51
8.4 Proper waste disposal 56
9. Circuit diagrammes 52
10. Spare parts list 56
10.1 Spare parts list with REHM article numbers 56
10.2 Machine components photographs 57
11. Technical Data 59
12. Index 60

Introduction
5
1. Introduction
1.1 Foreword
Dear Customer
Congratulations, you have purchased a REHM TIG / Stick-electrode
welding unit, and therefore a German branded appliance. Thank you for
the confidence you have shown in our quality product.
Only components of the highest quality are used in the development and
production of REHM welding units. In order to ensure a high service life
that can be used under arduous working conditions, only components that
satisfy the REHM stringent quality control requirements are used in our
production. The TIGER range of welding units have been developed and
designed in accordance with the current valid recognised technical safety
regulations. All of the relevant statutory provisions have been observed
and incorporated; confirmation of this is given through the CE mark and
the Declaration of Conformity.
REHM welding units are manufactured in Germany and bear the
corresponding quality indicator "Made in Germany".
REHM endeavours to respond quickly to technological progress in the
interests of the customer. We reserve the right to change the design of
these welding units from time to time, and without notice in order to
ensure compatibility with the current state of the art technical
requirements.
Introduction
6
Unless specifically stated in writing to the contrary by REHM Schweißtechnik und
Co., REHM welding units are only for sale to commercial / industrial users and
are intended only for use by these users.
TIGER gas shielded tungsten arc welding units are only to be used:
a) For the correct purpose.
b) Under perfect safety conditions.
REHM welding units must only be operated and maintained by people who are
trained in the use and maintenance of welding units. Only qualified, authorised
and assigned staff may work on, and with these units.
This operating manual contains important instructions as to how you can operate
this equipment, safely, correctly and economically. A copy of the operating
manual is always to be kept at a suitable location at the site where the unit is
being used. It is imperative that you read the information that is compiled for you
in this operating manual before you use the unit. You will find important
instructions for use of the equipment, which will allow you to fully make use of the
technical superiority of your REHM equipment. In addition, you will find
information on servicing, maintenance, and operating safety, as well as functional
reliability.
TIGER gas shielded tungsten arc welding units are designed according to EN
60974-1 Arc welding equipment - Welding power sources for overvoltage
category III and pollution degree 3 and according to EN 60974-10 Arc welding
equipment, Electromagnetic compatibility (EMC) and may only be used with
mains supply systems, which are three phase four wire systems with earthed
neutral conductors.
This operating manual does not replace the instructions from the REHM service
staff.
Documentation about any additional options that are provided must also be
observed.
Modifications to the unit or the attachment of, or installation of any additional
devices is strictly forbidden. Such alterations automatically invalidate all warranty
and liability claims.
The interference by non-authorised third parties, and the tampering of safety
interlocks, or devices automatically invalidate all warranty and liability claims.
Areas of use
Qualification of
operating
personnel
Purpose of this
document
Alterations to the
unit

Introduction
7
1.2 General description
Fig 1.1: TIGER 170 DC and Tiger 210 AC/DC

Introduction
8
1.2.1 Performance features of the TIGER gas shielded
tungsten arc welding unit
The TIGER is a real powerhouse, compact in size and weighing a mere 5,4 kg
(Tiger 170 DC; 8,4 kg for the Tiger 210 AC/DC). The robust housing makes the
TIGER the ideal companion for coping with the arduous working conditions onsite. However the TIGER is also at home in the workshop as well, having all of
the attributes associated and expected of professional units.
The TIGER is based on the primary inverter design principle. The user has a fully
portable unit and also enjoys the Ingress protection classification of IP23 so it
can be used under difficult operating conditions. The units offer flexibility and are
for the universal use on high and low alloyed steels as well as Aluminium and its
alloys (only for AC/DC units).
REHM-Design housing
The ergonomic design of the machine is a result of the further development of
the REHM-Design concept. The housing has ingress protection classification
IP23. The plastic housing is formed such that is it completely enclosed, the
turn and set knob has a rubber seal, this enables the machine suitable for
welding outside.
REHM Thermal protection
The Tiger is protected against damage caused by over heating by a thermal
sensor. The position of the sensor is directly next to the power transistors and
measures the temperature directly from within the „Hot Spot“.
REHM All round protection
The power transistors are the heart of any inverter; they are completely potted
and sealed together with the primary rectifier and the thermal protection probe
in a single module. This means that dirt and damp will have no affect on this
module. The outer plastic housing is a composite with fibreglass and ensures
the highest protection against mechanical damage. The turn and set knob is
set into the recess in the housing that also serve to prevent accidental
damage. Should the knob receive direct vertical force then this has no
influence on the electrical components. All of the electrical components are
coated with a protective lacquer to protect them against dirt and dampness.
REHM Automation
Connection to an automatic welding system is extremely easy due to the
precise processor control system.
REHM Inverter Technology
The Rehm inverter technology ensures excellent ignition characteristics, and
a steady, stable arc.
By the use of high quality and performance components, the machine can be
produced in an extremely compact design with a low weight.
REHM Ergonom-System ®
The REHM Ergonom-System enables your Tiger to be your sympathetic
partner for all of your welding applications. Apart from the obvious ergonomic
advantages such as the turn and set control knob - which is ideal for right or
left handed persons, the carrying strap and the clearly arranged, easy to
understand operating panel simplify life for the operator. These are many
small details, which help the operator do his job better.

Introduction
9
REHM Operating concept
The TIGER has an entirely new operating concept; this enables setting up the
machine very simply, quickly and safely. The numerous options can all be
accessed from this single control knob The settings are all done via a single
control knob, this can be turned to select or alter the parameter and then
pressed to confirm the setting. Using the combination of LED’s and the 3-digit
digital display the setting can always be accurately set and reproduced for all
welding applications.
REHM Noise Reduction System for AC
The noise is significantly reduced during the welding of Aluminium, by means
of a patented noise reduction process.
REHM Automatic Frequency Control
Low stress and long service life combined with optimum economy by means
of patented Automatic frequency control.
REHM Wave Balance Control
Improved welding speed by the use of a small diameter electrode, combined
with optimum penetration.
REHM ADAPT
®
System
The processor control system makes this generation of welding units ready to
face the future. New process variants and application developments can
simply be retrofitted by means of a software updates.
REHM Dual Wave
The Dual Wave is a newly developed welding process for the welding of
Aluminium or its alloys. This process enables a much more controllable
welding pool and better welding results.
REHM INTIG-Energy (Intelligent Ignition Energy)
INTIG-Energy results in an intelligent control sequence for both TIG and stickelectrode welding. The ignition process takes into consideration the welding
process that has been selected and is controlled via the processor. This
results in a reliable start every time with a stable arc, cleaning the electrode
and the workpiece.
REHM ELSA-System (Electronic Stabilised Arc)
The ELSA-System: The optimum welding performance, even with mains
supply cables up to 100m long is ensured.
REHM EPC (Electronic Power Control)
The EPC continuously monitors the mains supply voltage and protects the
machine under critical situations.

Introduction
10
1.2.2 Principle of TIG welding
With the TIG welding processes, the arc is established between a Tungsten
electrode and the workpiece. The inert gas used is a rare gas, such as Argon,
Helium, or a mixture of these gases. One of the electrical poles of the power
source is connected to the tungsten electrode, the other against the workpiece.
The tungsten electrode is the current conductor and sustains the arc (nonconsumable). The filler material is usually introduced into the weld pool by hand,
in the form of a rod, or by a separate cold wire feed unit, in the form of a wire.
The tungsten electrode and the molten pool, as well as the molten end of the
filler material, are protected from the atmosphere by the inert shielding gas,
which flows from the shielding-gas nozzle, which is positioned concentrically
around the electrode.
1.2.3 Areas of application for TIG welding units
TIGER DC welding units are direct current power sources. They are suitable for
welding all mild, low and high-alloyed steels, stainless steels, and non-ferrous
metals.
TIGER AC/DC welding units are direct current and alternating current power
sources. They can be used to weld all mild, low and high-alloyed steels, stainless
steels, and non-ferrous metals, Aluminium and Aluminium alloys.
1.2.4 Operating principle of TIG welding units
With the TIG welding processes, the arc is established between a Tungsten
electrode and the workpiece. The inert gas used is a rare gas, such as Argon,
Helium, or a mixture of these gases.
One of the electrical poles of the power source is connected to the tungsten
electrode, the other against the workpiece. The tungsten electrode is the current
conductor and sustains the arc (non-consumable). The filler material is usually
introduced into the weld pool by hand, in the form of a rod, or by a separate cold
wire feed unit, in the from of a wire. The tungsten electrode and the molten pool,
as well as the molten end of the filler material, are protected from the atmosphere
by the inert shielding gas, which flows from the shielding-gas nozzle, which is
positioned concentrically around the electrode.
1.2.5 Correct use
REHM welding units are designed for welding various metals, such as mild, low
and high-alloyed steels, stainless steels, and non-ferrous metals, Aluminium and
Aluminium alloys. The special safety instructions that apply to the area in which
the welding takes place must be observed at all times. If you are unsure about
anything at all, then consult your Health and Safety officer, or contact the REHM
Customer Services department.
Unless specifically stated in writing to the contrary by REHM Schweißtechnik und
Co., REHM welding units are only for sale to commercial / industrial users and
are only intended for use by these users. Persons who are trained in the use and
maintenance of welding units are the only person qualified to operate this
equipment.
Welding power sources must not be placed in areas of high electrical risk.
see Chapter 5, Commissioning.

Introduction
11
This operating manual contains rules and guidelines relating to the correct use of
your unit. If these rules and guidelines are adhered to then the use of the
equipment can be considered to be correct. Risks generated from use of this
equipment are the sole responsibility of the operator. Where special care and
attention is required, provision must be made for this where appropriate.
If you are unsure about anything at all, then consult your Health and Safety
officer, or contact the REHM Customer Services department.
The documentation supplied with the machine explains the limitations of use of
the equipment and must be adhered to.
The use of this equipment must also be carried out in strict accordance with the
local Health and Safety regulations.
Correct use also entails observing the prescribed assembly, dismantling and reassembly, commissioning, operating and maintenance conditions as well as
disposal measures. Please observe in particular the information contained in
chapter 2 Safety.
The unit must only be operated under the above conditions. Any other form of
use is not regarded as correct. The operator bears sole from responsibility for the
consequences of such actions.
1.3 Symbols used in this manual
Lists preceded by a bullet mark: General list
Lists preceded by a square symbol: Working or operating steps which must
be carried out in the order listed.
Chapter 2.2, Warning symbols on the unit
Cross-reference: Refer here to Chapter 2.2, Warning symbols on the unit
Bold type is used for emphasis
Note!
... indicates tips for use and other particularly useful information.
The safety symbols used in this chapter:
Chapter 2.1
Typographical
markings
Safety symbols

Safety information
12
2. Safety information
2.1 Safety symbols in this operating manual
Warning notes and
symbols
You will find this symbol or a symbol giving more precise details of the
hazard with all safety notes in this operating manual that involve any
danger to life or limb.
One of the following instructions (Danger!, Warning!, Caution!) will be used
to show the severity of the hazard:
Danger! … Warns of a hazard which and represents a direct threat. If this is
disregarded, death or very serious injury may be the result.
Warning! ... Warns of a potentially dangerous situation. If this is
disregarded, death or very serious injury may be the result.
Caution! ... Warns of the possibly of harmful situation. If this is
disregarded, the result may be slight or minor injury and material damage
may ensue.
Important!
Indicates a potentially harmful situation. If this is disregarded, the product,
persons, or nearby objects may sustain damage.
Substances that can damage health and/or the environment.
Materials/substances that need to be handled carefully and/or disposed of
according to statutory requirements.
2.2 Warning symbols on the machine
Identify hazards and sources of hazard on the unit.
Danger!
Electrical voltage hazard!
Non-compliance may result in death or injury.

Safety information
13
2.3 General
The unit has been designed, developed and produced on current generally
accepted engineering regulations and standards.
Nevertheless, using it may endanger life and limb for the user, any bystander, or
result in damage to the unit or other items of value.
No safety equipment should ever be dismantled or disabled as this risks creating
hazards and no longer guarantees that the unit is being used correctly and
safely. There are particular guidelines for dismantling safety equipment when
carrying out equipment, repair and servicing work. Safety equipment must always
be reassembled immediately after such work has been completed.
When the use of unusual materials is necessary (e.g. cleaning solvents), the
operator must ensure that the unit is safe to use before switching on and using
the equipment.
All safety and hazard notes as well as the manufacturer’s nameplate on the unit
should, without exception, be maintained in a legible state and must be heeded.
Safety notes are used for work safety and for the prevention of accidents. They
must be heeded.
It is not only the safety notes contained in this chapter that have to be complied
with, but also the special safety notes contained throughout the text.
Besides the notes contained in this operating manual, all safety and accidentprevention regulations with general validity (in Germany, these include UVV BGR
500 - formerly VBG15 -/ BGV-D1: “Schweißen, Schneiden und verwandte
Verfahren [Welding, Cutting and Related Processes]” as well as, in particular,
stipulations for arc welding and cutting mentioned in this publication, or the
relevant National regulations) must be heeded.
In addition, make sure that you read the safety notices posted in the factory
where the machine is being used.
TIGER 210 DC / AC/DC
This device complies with IEC 61000-3-12.
TIGER 170 DC / AC/DC
WARNING: This equipment does not comply with EN/IEC 61000-3-12. If it is
connected to a public low voltage system, it is the responsibility of the installer or
user of the equipment to ensure, by consultation with the distribution network
operator if necessary, that the equipment may be connected.
Dangers of noncompliance
Safety-notes
Requirements
made of the main
power supply

Description of function
14
3. Description of function
3.1 The REHM-Operating concept: Turn and Set
The TIGER has an entirely new operating concept; this enables setting up the
machine very simply, quickly and safely. The numerous options can all be
accessed from this single control knob
The settings are all done via a single control knob, this can be turned to select or
alter the parameter and then pressed to confirm the setting. Using the
combination of LED’s and the 3-digit digital display the setting can always be
accurately set and reproduced using the same principle:
1. Rotate the knob until the required setting is found, the LED’s associated with
the setting will illuminate, and the set value for this setting will show on the
digital display.
2. Depress the knob to select the setting to be changed; the associated LED will
start to blink.
3. Turn the knob to alter the value of the parameter selected.
4. Depress the knob once again to confirm the new value (enter). The
associated LED will then remain continually lit.
For the settings which can only be switched on or off (e.g. non-latch (2-step) with
TIG), the LED will start to blink immediately, once the knob is depressed then the
function is immediately selected.
3.2 The REHM-Operators panel
3.2.1 General description
The operation of the TIG welding units is achieved via panel as shown in Fig 3.1
(for Tiger 170 / 210 DC) or Fig 3.2 (for Tiger 170 / 210 AC/DC).
The only operating element is the turn and set knob (22). This knob is position
centrally and integrated within the operating panel and is therefore well protected
against mechanical damage. This knob is simple and precise and can be turned
easily with the thumb. All of the operating elements including the turn and set
knob (22), the LED’s (1)-(21) and the digital display (23), are fully protected
against both mechanical and moisture. This enables the machine to be used in
the most arduous of operating environments (e.g. site work).
The operating panel is split into several elements, the welding parameter settings
in the welding cycle diagram (1)-(6). The section below this is the AC operating
section (7)-(10). On the right hand side are the TIG functions (11)-(14). In the
middle is the digital display (23). On the left hand side is the welding process
selection (15)-(17). To the left of the control knob is the “special mode” (18). The
sequence in which the LED’s are selected is according to the numbering shown
in Fig 3.1 and 3.2.

Description of function
15
Fig 3.1: The REHM-Operators panel for TIGER 170 AC/DC and Tiger 210 AC/DC
Fig 3.2: The REHM-Operators panel for TIGER 170 DC and Tiger 210 DC
2sec
8
7
4
3
6
5
9
1
2
2sec
4
3
6
5
1
2

Description of function
16
3.2.2 The operators panel at a glance
No.
Symbol
Meaning
1
Setting for welding current I1 for TIG - and Stick-electrode welding (see
Chapter 3.3.1) (Stick-electrode welding means manual metal arc welding)
2
Setting for t1-peak time for pulsed TIG-Welding (see Chapter 3.3.2)
3
Setting for welding current I2 for TIG welding (see Chapter 3.3.3)
4
Setting for t1-background time for pulsed TIG-Welding (see Chapter 3.3.4)
5
Setting for downslope time td for TIG-welding (see Chapter 3.3.5)
6
Setting for Gas post flow time for TIG-welding (see Chapter 3.3.6)
7
Direct current welding (DC) is selected, the electrode is connected to the
minus pole (see Chapter 3.3.7)
8
Alternating current (AC), the electrode is alternately connected to the positive
and negative polarity, according to the Frequency and Balance setting. (only for
AC/DC-machines, see. Chapter 3.3.8).
9
Setting for Balance for AC-TIG-welding (only for AC/DC-machines, see.
Chapter 3.3.9).
10
Setting for Frequency & for activating the Automatic Frequency control for
AC-TIG-welding (only for AC/DC-machines, see. Chapter 3.3.10).
11
Latched torch trigger mode (4-Step) for TIG-welding (see Chapter 3.3.11)
12
Non-Latched torch trigger mode (2-Step) for TIG-welding (see Chapter
3.3.12)
13
The high frequency start (HF) is switched on for igniting the arc during TIGwelding (see Chapter 3.3.13)
14
The high frequency start (HF) is switched off for igniting the arc during TIGwelding (see Chapter 3.3.14)
15
The machine is set to the stick-electrode welding mode with Booster-Function
(see Chapter 3.3.15)
16
The machine is set to the stick-electrode welding mode with Fuse-Hold
function (see Chapter 3.3.16)
17
The machine is set to the TIG-Welding mode (see Chapter 3.3.17)
18
For the activating of the Special-Mode setting of special parameters (see
Chapter 3.3.18)
19
This control lamp indicates that the machine has switched because of over-
temperature (see Chapter 3.3.19)
20
This control lamp indicates: operation, meaning that the machine is in
operation, and there is a voltage on the welding output sockets. (see
Chapter 3.3.19)
21
This control lamp indicates that the Pulse mode is on (see Chapter 3.3.19)
22
23
The turn and set knob, and the digital display (see Chapter 3.3.20 and Chapter
3.3.21)

Description of function
17
3.2.3 Special characteristics relating to the operating panel
The microprocessor controller supports the function of the control panel ensuring
that simplicity and speed are the result.
All of the parameters, which have been set on the machine and last used for
welding, remain stored even after the mains switch has been switched off.
When the machine is switched on again the settings that will be displayed
are those that were last use for welding. NOTE: In order to ensure that the
parameters are saved after switching off, the arc must be ignited with those
settings.
Only those parameters that are relevant to the process can be set. E.g. in the
stick-welding mode the setting for 2/4 step, H.F. on/off etc. cannot be set. In
the same way when in the DC mode the parameters for balance and
frequency cannot be set.
After machine is switched on the display runs through all of the settings one
after the other, showing the values set on the display. This enables the
operator to see how the machine is set up. Either by pressing the turn and
set knob, or the torch trigger then this sequence can be interrupted at any
time.
If the turn and set knob is not depressed for 20 seconds then the display
automatically returns to the I1 welding current setting. Thereby the start
setting on the display is the value of the current I1, which is also important for
the orientation for the operator.
If the turn and set knob is not pressed for 20 seconds, then the display
automatically returns to the I1 welding current setting. As a result, you always
have as the start setting the display of the most important value, current I1,
and the same starting point for the operator. The exception to this is the
selection of the welding current I1 (LED I1 flashing), which remains selected
until the knob is pressed again. This makes it easier – for example – to
quickly find and set the suitable welding current I1 by means of welding tests.
In the interests of safety, and to prevent incorrect operation by mistake, the
turn and set knob must be pressed for more than 2 seconds in order to
activate the special mode or to save or load a program.
3.3 The function of the REHM operators panel
The functions are described in sequence as per Fig. 3.1. and Fig. 3.2.
3.3.1 The welding current setting I1
The setting of the welding current I1 is performed as described in sections 3.1
and 3.2.3. The setting of welding current I1 is done as described in section 3.1,
and is dependant upon the welding process and the power source, either the
Tiger 170 or Tiger 210.
The setting of the welding current I1 can also be done quickly without selecting it
on the operating panel. This is done by depressing the torch button whilst at the
same time alter the current setting to the required value by using the turn and set
knob.
WARNING: Care must be taken when setting the current in this manner, as the
high voltage generator, open circuit voltage, and gas solenoid will be switched on
for 3 seconds; this results in danger for the operator. Furthermore the operator
must also take care that the torch does not come in contact with the workpiece
when using this function as he may strike the arc accidentally.

Description of function
18
The Tiger is a 230V-mains supply primary inverter, due to the high efficiency
virtually all of the mains supply power is converted into power for welding
operation.
During TIG welding the arc voltage is as defined by EN 60974 (UA=0,04*I1+10V)
is less than that as defined for stick-electrode welding (UA=0,04*I1+20V).
Therefore with the same input power TIG welding can supply a higher current.
In addition to this the Tiger 210 DC and Tiger 210 AC/DC have PFC (Power
Factor Correction) to ensure the power from the mains has a pure sine wave
form. This results in a power factor (Cos. phi 0,99) this increases the electrical
efficiency of the unit, enabling a higher welding current to be available for
welding.
The special features offered by the TIGER include the choice of the Fuse hold
mode or the Booster mode when stick-electrode welding. When using the Fuse
hold mode the actual mains current being drawn is monitored and according to
the output required for welding is automatically reduced so that the fuse does not
trip. The machine uses the trip-switching characteristic of the fuse (Fast acting,
Class L) to ensure that welding can always take place. In the Booster mode the
mains current monitoring function is deactivated, and the machine always welds
with the welding current set (I1).
The following ranges can be set:
Tiger 170 DC and AC/DC
Tiger 210 DC and AC/DC
TIG
3 A … 170 A
3 A … 210 A
Stick- electrode
Fuse hold mode
3 A … 140 A
3 A … 160 A
Electrode
BOOSTER-Mode
3 A … 150 A
3 A … 170 A
3.3.2 The Pulse-Function (Pulse time t1)
The setting of the pulse time t1 is performed as described in section 3.1. The
setting of the pulse time t1 is done as described in section 3.1. The pulsed
welding function is basically divided into two distinct ranges:
1. Conventional pulsing, with pulse times between 0,1 ... 5,0 Seconds
2. High frequency pulsing, with pulsed frequencies between 50 ... 500 Hz
Switching of the pulse function “on” or “off”, as well as the setting of the pulse
times for conventional pulsing as well as high frequency pulsing can be done
either from the setting of t1 or t2. The pulse mode “off” can also be selected by
either of these settings. The setting of Pulse time or the Pulse frequency is
achieved via the turning the “turn and set” setting knob with to the left or the right.
The pulse times t1 and t2 can be set independent from each other between
0,1...5,0 seconds. The high pulse frequency for t1 and t2 can be set between
50...500 Hz in 50-Hz-steps.
During Pulsed TIG welding the current continuously changes between the current
levels I1 and I2. Thereby it is selectable to choose the values of the peak and
background current levels. Fig. 3.3 displays the current/time sequence during
pulsing.

Description of function
19
Fig 3.3: Welding current during pulsed welding
If a twin-button torch is used, pulsing can be switched off and also back on during
welding by pressing torch button 2. If torch button 2 is pressed while the welding
current is pulsing, pulsing is switched off and welding is continued using welding
current I2. This can for example be used to ensure that the lower welding current
I2 is used until a new filler metal is provided and welding is continued with
pulsing welding current by again pressing the torch button 2.
Conventional pulsing: Pulsing with pulse times greater than 0,1 second
The settings of the peak current time (t1) and the background current (t2) times
determine the time in which the peak current (I1) and the background current (I2)
is switched on and off. The digital display instrument always shows the currently
emitted welding current.
The welding current and the time for each pulse should be such that the
workpiece melts during the peak current phase and then is allowed to cool down
during the background current phase. Pulsed TIG welding allows the operator to
have better control of the welding pool under difficult conditions. Particularly
when for example, when welding out of position, bridging gaps, and welding thin
materials.
Note: If a twin button torch is being used, and button 2 is depressed during
pulsing, the pulsing will be switched off and the welding will continue with the
welding current setting I2. Depressing torch button 1 restores the pulsing process
once again.
High frequency pulsing: with a pulse frequency of 50 Hz up to 500 Hz
The welding current values set for the current I1 and I2 determine the pulse
amplitude. The active time for duration of these current settings is equal. With HF
pulsing switching from one current level to another occurs very quickly, hence the
name high frequency pulsing.
In order to calculate the pulse frequency, the following relationship exists
between the pulse timing t1 and t2:
Total pulse time = I1-Pulse time + I2-Pulse time = 1 / Pulse frequency
I1-Pulse time = I2-Pulse time = 0,5 * Total / Pulse time
Example:
Pulse frequency = 50 Hz
Total Pulse time = I1-Pulse time + I2-Pulse time = 1 / 50 Hz = 20 ms = 0,02 s
I1-Pulse time = 0,5 * Total Pulse time = 0,01s
I2-Pulse time = 0,5 * Total Pulse time = 0,01s
This means that the welding current has the value set for I1 for 0,01 s (=10 ms)
and that the welding current has the value set for I2 for 0,01 s (=10 ms), the
switching from once current to the other continues ad. Infinitum.
Current I1
Current I2
Pulse time I1
Pulse time I2
Time
0

Description of function
20
The pulse time can be reduced down to 0,001s (= 1 ms) peak current I1 and
0,001s (= 1 ms) background current I2 this gives a pulsed frequency of = 500 Hz.
When pulsing at this very high frequency the arc is extremely concentrated and
focused, resulting in high stability with deep penetration.
The digital display instrument shows, because of the rapid changes, always the
prevailing mean value, i.e. with a welding current I1 = 100A and I2 = 50A 75A is
displayed.
Pulsing with synchronised pulse start
The program-controlled synchronisation fixes a precisely defined sequence for
each welding operation, thus ensuring that welding results can be reliably
reproduced. This is for extremely important when mechanised welding. Once the
ignition has successfully established the arc, the peak current time (t1) always
commences the welding process. Following this the pulse process is active
pulsing the welding current between the peak and background current settings
for the respective peak and background times (t1 and t2). The settings for the
start current, the welding current upslope downslope and crater fill current can
influence the actual pulsed welding currents.
3.3.3 The intermediate welding current setting I2
The setting of the welding current I2 is performed as described in section 3.1.
The setting of welding current I2 is done as described in section 3.1. The use of
the intermediate welding current I2 only makes sense when TIG welding,
therefore it can only be set in the TIG welding mode. The I2 current level setting
is used for pulsed TIG welding (See chapter 3.3.2) and when it is required to
switch from the main welding current a lower setting during welding, dual current
level control:
Dual level control:
General notes on this function:
Using the dual level current control and a torch equipped with a double pole
switch makes it possible for the user to work between two different current levels
during welding. The welding current can be switched between two different levels
I1 and I2. Pressing the switch 2 on the welding torch changes over the current
level. Some applications are as given below:
Changing from a high current to a low current or visa versa. Useful when
changing position.
Manual pulsing.
Starting with a higher current I1 to heat up the workpiece, then weld with a
reduced current I2.
Starting with a low current I1 on the edge of the workpiece, and then weld with
a higher current I2.
The dual current switching can only be done in the latched torch trigger mode (4step) without pulsing.
The welding current I1 can be set within the following range:
Tiger 170 DC and. AC/DC
Tiger 210 DC and AC/DC
TIG
3 A … 170 A
3 A … 210 A
The setting of the intermediate current I2 can be done by setting the level
required in the parameter I2, or quickly and simply by pressing the torch button 2

Description of function
21
before starting the welding operation. Whilst holding the button 2 down the value
for the current will be shown on the digital display and using the turn and set
knob the value can be adjusted as required.
3.3.4 The Pulsed Function (Pulse time t2 – see chapter 3.3.2)
See chapter 3.3.2
3.3.5 Current downslope and manual pulsing
The setting of the current downslope time is performed as described in section
3.1. The downslope time is the time is which the welding current decays in a
linear progression to the crater fill current. In the non-latched torch trigger mode,
(2-step) the downslope time starts when the trigger is released. In the latched
torch trigger mode (4-step), the downslope time starts when the torch button 1 is
depressed during welding. The controlled decay in the current level reduces the
possibility of end crater cracking.
Manual Pulsing:
If the torch trigger is depressed during the downslope then the welding current
jumps back up to the I1 value. This torch operation enables manual pulsing to be
achieved. (see Chapter 3.2.6) The operator controls the heat input during the
pulsing manually by the length of time that has elapsed between the activating of
the torch trigger during the downslope time.
t
t
t
Fig. 3.4: The current cycle diagram when manual pulsing.
3.3.6 Post flow gas time
The setting of the gas post-flow time is performed as described in section 3.1.
The gas post-flow time is the time that elapses after the arc is extinguished
before the shielding gas solenoid closes again. The shielding gas post-flow
protects the weld pool and the tungsten electrode from oxidisation until they have
cooled down. The pre-selected post-flow time is only activated at the end of the
welding cycle. Accidental activation of the torch button does not result in the
activating the post-flow time. This gas management function lowers the shielding
gas consumption.
Solenoid valve
Welding current
Torch trigger 1

Description of function
22
3.3.7 Setting for Direct Current (DC)
The setting for direct current is performed as described in section 3.1. The Tiger
170 AC/DC and Tiger 210 AC/DC can weld with either direct current (DC) or
alternating current (AC). The Tiger 170 DC und Tiger 210 DC can only be use for
direct current (DC).
When welding with DC the polarity of the output sockets always remains the
same. The marking on the outlet sockets indicate which outlet is positive polarity
and which is the negative polarity. When TIG welding the torch is always
connected to the negative pole. The reason for this is that the positive pole has
an extremely high thermal loading during welding. The negative pole also has the
torch symbol assigned to it.
When stick-electrode welding the polarity is dependant upon the type of
electrode being used, and therefore which socket should be connected to the
electrode holder. For this information the manufacturers data sheet should be
referred to ensure correct usage.
3.3.8 Setting for Alternating Current (AC)
The setting for alternating current is performed as described in section 3.1. The
Tiger 170 AC/DC and Tiger 210 AC/DC has the possibility of operating in the
Direct Current (DC) or the Alternating Current (AC) welding output modes
With AC welding mode the electrode polarity continually changes from positive to
negative. The electrical loading on the electrode alters from negative to positive
according to the balance and frequency setting on the machine for each positive
or negative cycle. During TIG welding the torch is connected to the negative pole
of the power source. The use of AC enables the welding of Aluminium and
Aluminium alloys.
When stick-electrode welding the machine parameters for frequency and balance
are automatically set to 50Hz and 50% respectively. This mean that it is then
irrelevant which socket is connected to the stick-electrode holder and which is
connected to the workpiece cable. AC stick-electrode welding offers the
advantage that arc blow because of strong magnetic fields can be minimised.
3.3.9 Wave balance
The setting of the wave balance is performed as described in section 3.1. The
wave balance setting option is possible with alternating current (AC) welding. It
can be varied from -80 % to +80 % and makes it possible to influence the arc
from, the penetration, and cleaning effect when welding Aluminium within a very
wide range. In the middle position (50 %), the negative and positive welding
current is distributed equally for each current cycle. In the event of increasing
negative balance, the proportion of negative welding current is increased (up to
- 80 %) and the positive proportion is reduced. This makes the arc slimmer and
produces a deeper penetration combined with a reduced electrode load. In the
event of increasing positive balance, the proportion of positive welding current is
increased (up to + 80 %) and the negative proportion is reduced. The positive
proportion improves cleaning of the weld pool. The arc becomes wider and the
penetration is reduced.
3.3.10 AC-Frequency
The setting of the frequency is performed as described in section 3.1. The setting
for the frequency can only be done in conjunction with the AC TIG welding. The
value for the frequency determines how fast the polarity changes from negative
to positive on the welding outlet sockets of the power source. The setting range
for this parameter is between 50Hz to 200Hz for example with a frequency
setting of 200Hz the polarity changes from plus to minus every 5ms (=0.005

Description of function
23
seconds). As the welding current changes from one polarity to the other it passes
through zero, and the arc has to be re-stuck as the current changes direction and
rises to the desired current value. The processor controls this whole process.
This processor regulates the manner in which the current rises, such that the arc
is extremely responsive. A further advantage is that it has a noise level reduction
effect. This not only provides significant advantages for the operator, but also
substantially improves the welding result.
Another special feature of the Tiger AC/DC machines is that in the AC welding
mode the patented Rehm Automatic Frequency Control can also be selected. To
active this function the selection “Aut” is made, this is the one before the 50Hz
setting in the frequency function parameter.
The automatic frequency control, which is a Rehm development, enables that the
machine has an extremely stable arc in the lower operating current range and
that the electrode can carry high current loads in the upper current ranges. The
AC operating frequency is automatically synchronised to the actual welding
current.
This function means simplifies the job for the operator, as he no longer has to
select the frequency for welding task. However in some special cases the
operator can also override this control and set the value for the application as
required, giving him a free choice for flexibility.
3.3.11 The TIG latched trigger mode (4-step)
The setting for the 4-step function is performed as described in section 3.1. In
the latched trigger mode (4-Step) the torch trigger must not be permanently
depressed which minimises operator fatigue.
Step 1: Torch button is depressed.
The gas solenoid opens and gas flows.
The arc will be struck once the pre-flow gas time has elapsed.
The welding current level will be that as set by the start current parameter.
Step 2: Torch button is released.
The welding current will rise automatically for the time set by the upslope time
parameter to the welding current level I1.
Step 3: Torch button is depressed.
The welding current will decay automatically for the time set by the downslope
time parameter to the crater fill current level.
The current stays at the crater fill current level.
Step 4: Torch button is released.
The arc extinguishes itself.
The shielding continues to flow for the time set by the post-flow gas time
parameter.

Description of function
24
Fig. 3.5 The current cycle diagram for latched trigger operation (4 step)
Special Note:
to Step 2 If the torch button is pressed during the downslope phase, the arc
will extinguish and the shielding gas flows for the time set by the
post flow gas parameter.
to Step 3 The arc can be extinguished at any time during the downslope
phase. Releasing the torch button before the crater fill current
extinguishes the arc and the shielding gas flows for the time set by
the post flow gas parameter.
3.3.12 The non-latched torch trigger mode (2 step)
The setting for the 2-step function is performed as described in section 3.1. The
non-latched torch trigger mode is recommended for fast controlled tacking, and
for manual spot welding operations.
Step 1: Torch button is depressed.
The gas solenoid opens and gas flows.
The arc will be struck once the pre-flow gas time has elapsed.
The welding current level will automatically rise in the time set by the upslope
time parameter for the start current up to the welding current (I1).
Step 2: Torch button is released.
The welding current will decay automatically for the time set by the downslope
time parameter to the crater fill current level and the arc extinguishes itself.
The shielding continues to flow for the time set by the post-flow gas time
parameter.
Torch trigger 1
Solenoid valve
Welding current
t
t
t

Description of function
25
Fig. 3.6 The current cycle diagram for non-latched trigger operation (2 step).
Special note:
to step 2 If the torch trigger is depressed during the downslope then the
welding current jumps back up to the I1 value. This torch operation
enables manual pulsing to be achieved. (see Chapter 3.2.6)
3.3.13 TIG welding with high voltage ignition
The setting for HF ignition is performed as described in section 3.1. The Tiger is
equipped with a high voltage ignition unit as standard. When the stick-electrode
welding mode is selected, the high frequency ignition unit is automatically
disconnected.
The high voltage ignition unit pre-ionises the gas surrounding the tip of the
electrode. This enables contact free ignition to take place between the electrode
and the workpiece in both the AC and the DC welding modes. Contact free
ignition eliminates tungsten inclusions that result in faulty welds. In both modes of
operation the high voltage generator is automatically switched off after the arc
has struck. Chapter 3.3.10 describes the re-ignition process when AC welding,
this is achieved without a high voltage generator.
This results in a significant reduction in the electrical radiation emitted by the high
voltage generator. Furthermore the AC welding process can then be completely
HF free, as has been the case for DC welding for some time now. (See chapter
3.3.14)
3.3.14 TIG welding without high voltage ignition, (Lift Arc)
The setting for Lift Arc is performed as described in section 3.1. When welding
with DC contact arc ignition (Lift Arc) ignition can be carried out. “HF-Off” is
selected, microprocessor controlled contact ignition takes place to strike the arc.
In order to ignite the welding arc, the tip of the electrode must be placed on the
workpiece and the torch button depressed. The processor control system
reduces the ignition current so that the tip of the electrode does not heat up. The
electrode is then gradually lifted away from the workpiece, this action ignites the
arc under the system processor control, this results in arc ignition without HF and
also minimum wear on the tungsten electrode. This process is essential when
welding in areas where sensitive electronic equipment is in operation (e.g. repair
welds on CNC-controlled machines in hospitals etc.) and where there may be a
risk of damage caused by high-voltage.
Solenoid valve
Welding current
Torch trigger 1
t
t
t

Description of function
26
3.3.15 Stick-electrode welding with the Booster-Function
The setting for Booster function is performed as described in section 3.1. In the
Booster mode the mains current monitoring function is deactivated, and the
machine always welds with the welding current set (I1), which is on the TIGER
170 150 A and the TIGER 210 170 A. If a higher value is set, then the machine
automatically reduces this to 150 A or 170 A respectively.
When stick welding, improved ignition and a more stable arc can be achieved by
fine tuning of the settings for Hot-start and Arc-force (see chapters 3.3.18.7 and
3.3.18.8)
3.3.16 Stick-electrode welding in the Fuse Hold mode
The setting for Fuse Hold function is performed as described in section 3.1. In
this mode of operation, the actual current drawn from the mains is continuously
monitored. If necessary, the welding current is reduced to the level required to
prevent the mains fuse form tripping out. A fast acting circuit breaker Type L,
similar to the type normally installed in households should be installed in the
mains supply cabinet as the Fuse Hold function is designed for use in
conjunction with this type of circuit breaker.
The machine is designed for use with all the common types of stick-electrodes.
The maximum current on the Tiger 170 is 140 A, and on the Tiger 210 is 160 A. If
a higher current is set, the current is automatically limited to 140 A or 160A
respectively.
This current enables the welding of standard electrodes up to 3.25mm to be used
The polarity of the electrode can be obtained from the manufacturers data sheet.
If there is a permanent short circuit between the electrode and the workpiece
during welding, the Anti-Stick Function is automatically activated after approx.
1.3s. This function automatically limits the welding current to approx. 35 A. This
prevents the electrode from overheating and burning out. The operator
terminates the short circuit simply by removing the contact between the electrode
and the workpiece.
When stick welding, improved ignition and a more stable arc can be achieved by
fine tuning of the settings for Hot-start and Arc-force (see chapters 3.3.18.7 and
3.3.18.8)
3.3.17 TIG - welding
The setting for TIG welding is performed as described in section 3.1. It is
possible to weld with up to 170 A on the TIGER 170, and up to 210 A on the
TIGER 210. The mains current monitoring is deactivated in the TIG welding
mode. Even though the welding current is higher, the load on the mains supply is
lower than by stick-electrode welding, therefore the chances of the mains fuse
tripping are greatly reduced.
When TIG welding the arc is established between the end of the nonconsumable Tungsten electrode and the workpiece. An inert shielding gas
protects the electrode and the weld pool and prevents them from oxidising during
the welding process. The usual selection of gas is pure Argon, however Helium
and other mixtures can also be used depending upon the application.
The negative pole of the power source is connected to the torch, and the positive
pole to the workpiece. The tungsten electrode is the current conductor and
sustains the arc (non-consumable). The filler material is usually introduced into
the weld pool by hand, in the form of a rod, or by a separate cold wire feed unit,
in the from of a wire. The tungsten electrode and the molten pool, as well as the
molten end of the filler material, are protected from the atmosphere by the inert

Description of function
27
shielding gas, which flows from the shielding-gas nozzle, which is positioned
concentrically around the electrode.
3.3.18 The Special mode
3.3.18.1 General Description
The operating panel enables the complete overview of the important settings for
the both TIG and stick-electrode welding on the TIGER machine. In addition to
this the numerous special parameters and functions in the special mode can also
be set and altered according to the individual requirements.
These are:
A – The gas pre-flow time
B – The ignition energy
C – The start current
D – The up-slope time
E – The crater fill current
F – Dual Wave
H – Hot Start
I – Arc Force
S – Save programme
L – Load programme
The special mode is activated by turning the turn and set knob until the special
mode LED (Fig 3.1 and Fig 3.2, LED18) is illuminated, and then depressing the
turn and set knob for longer than 2 seconds. Once the mode is activated the
digital display show the letter assigned to the special parameter and the value
set. (e.g. “A2.4” means that the gas pre flow time (A) is set to 2.4 seconds). The
alteration of the parameters and their values is done by using the turn and set
knob as described on the following page:
The alteration of the parameters,
Turn the knob until the required parameter is displayed
Depress the knob to select the parameter, the letter on the digital display
starts to blink
Turn the knob until the required value is reached
Press the knob to save the value (enter)
Particular characteristics of the Special mode
The processor also controls the special mode, in that only those functions that
relate to the operating mode selected can be accessed and altered.
For TIG-welding A – The gas pre-flow time
B – The ignition energy
C – The start current
D – The up-slope time
E – The crater fill current
F – Dual Wave

Description of function
28
For Stick-electrode welding: H – Hot Start
I – Arc Force
For TIG- and Stick-electrode welding: S – Save programme
L – Load programme
For loading and saving programs, the turn and set knob must be pressed for
longer than 2 seconds. This prevents already selected settings or saved
programs from being overwritten inadvertently or due to incorrect operation.
In order to recognise whether or not a programme is already stored in a certain
programme number, then the digital displays shows a point next to the letter „S“.
Fig. 3.7. Saving a program. Program 16 is not yet reserved (the point on the
„S“ is not illuminated). Program 17 is reserved (the point on the „S“
is illuminated)
When the newly developed welding process is activated („F-1“), both LED’s for
DC and AC illuminate (see Fig 3.1 LED7 und LED8)
The orientation of the letters to the machine parameter settings
The orientation of the letters to the machine parameter settings is simplified by
following the letters placed along the current cycle diagram printed next to the
special mode on the panel. As shown in Fig. 3.8: The gas pre flow time (A), the
ignition energy (B), the start current (C), the upslope time (D), and the crater fill
current (E) easily recognisable by their position.
2sec
Fig. 3.8: Position of the special mode on the operator’s panel
The alteration and setting of the parameters can be made by the selection of the
letter for the parameter as shown:
H – Hot Start: Hot Start begins with H
I – Arc Force: for changing the current characteristic, Current = I
S – Save programme: Save begins with S
L – Load programme: Load begins with L
F – Dual Wave: V from Dual Wave cannot be displayed, but F is used instead

Description of function
29
3.3.18.2 Pre-flow gas time ( A )
The pre-flow gas time is the time for which the gas solenoid opens after
depressing the torch button 1 until the arc ignition cycle starts. This ensures that
the tip of the tungsten electrode and the workpiece is protected from the
atmosphere before the ignition takes place
If during the gas post flow time the welding process is re-started, the processor
automatically set the gas pre-flow time to „zero“. This reduces the waiting time
and improves efficiency of the machine. This is very important when tack welding
for example.
3.3.18.3 Ignition Energy ( B )
The ignition energy is infinitely variable between 10% and 99% for both the Lift
Arc and HF ignition arc starting modes.
In direct relationship to the welding current setting I1, the processor then
automatically applies the pre-selected value depending upon the setting of the
welding current I1 during the ignition cycle. The pre-selected value of the ignition
energy will be dependant upon the type of tungsten electrode, and the diameter,
as well as the welding application.
When welding on thin materials and when using small diameter tungsten
electrodes the value for the ignition energy will be lower.
3.3.18.4 Start current ( C )
The start current is the current at which the machine produces directly after the
arc is struck. The value is infinitely variable between 10% and 99% of the welding
current I1. E.g. if the start current is set at 40% (C40) and the welding current is
set at 100A then the start current will be 40A. The advantages of adjusting the
start current are:
Lower loading on the electrode due to lower thermal shock.
Search arc can be set in the latched (4 step) trigger mode, to start at the
beginning of a weld.
The welding with a reduced current is possible at the beginning of a weld, or
where heat build up occurs.
3.3.18.5 Current upslope time ( D )
The current upslope time is the time in which the welding current rises in a linear
transition from the start current to the welding current (I1). In the non-latched
torch trigger mode (2step), the time commences directly after the arc has ignited.
In the latched torch trigger mode (4step), the time starts as soon as the trigger is
released after step 1 and current is flowing.
3.3.18.6 Crater fill current ( E )
The crater fill current is the current at which the welding process will be
terminated. The setting is infinitely variable between 10% and 99% of the welding
current I1. E.g. if the crater fill current is set at 40% (E40) and the welding current
is set at 100A then the crater fill current will be 40A. The advantages of adjusting
the crater fill current are:
The elimination of crater cracking and cracking at the end of the weld seam
due to rapid cooling of the weld pool.
Manual pulsing (see chapter 3.2.6).
The welding with a reduced current is possible at the end of the weld on
edges, or where heat build up occurs.

Description of function
30
3.3.18.7 Hot start ( H )
In order to improve the ignition when stick-electrode welding, the ignition current
is given a short boost when starting. This hot start current is higher than the
welding current that has been set (I1). The setting value for the hot start is a
direct relationship to the welding current. The setting can be adjusted between
0% and 70%; this means that with a setting of 30% (H30) and the welding current
of 100A the hot start current is 130A.
3.3.18.8 Arc Force ( I )
In order to ensure a stable arc during stick-electrode welding it is very important
for the smooth droplet transfer that in addition to the welding current (I1) that a
very short current pulse is also given by the welding unit this is called the Arc
force. The size of the pulse is defined by the Arc force setting which can be
infinitely variable from 0% to 70% of the welding current (I1) which is set, this
means that with a setting of 50% (I50) and the welding current at 100A the arc
force current will be 150A.
3.3.18.9 Program save and load ( S ) ( L )
There can be up to 99 different programmes with machine settings stored under
a freely selectable programme number and recalled for use. All for the machine
parameters settings that can be set are stored and then reloaded for
implementation.
Thereby the entire machine settings can be simply reloaded for those repeat jobs
within seconds saving a great deal of time and ensuring consistent quality
Additionally the basic parameter setting of the machine such as the start current,
crater fill current, ignition energy, etc. can be individually set for each person who
uses the machine. Recalling these is done at the touch of a button.
Loading a programme:
Selecting the load setting in the special mode does the loading of a
programme. The first digit of the digital display shows the letter „L“ which
stands for Load
By depressing the turn and set knob the function load is activated and the „L“
begins to blink.
The turn and set knob is then turned and the required programme number can
be selected.
The turn and set knob is depressed once again for more than 2 seconds and
the selected programme number will be loaded into the machine. The loading
of the programme can be recognised as the display will go blank for a short
time, additionally the LED’s will change their position according to those
determined by the programme settings.
Saving a Programme:
Selecting the load setting in the special mode does the loading of a
programme. The first digit of the digital display shows the letter „S“ which
stands for Save.
Depressing the turn and set knob activates the load function, and the „S“
begins to blink.
The turn and set knob is then turned and the required programme number can
be selected.
The turn and set knob is depressed once again for more than 2 seconds
then all of the parameters which are set at that time will be saved. The saving
of the programme can be recognised, as the display will go blank for a short
time. The knob must be pressed for more than 2 seconds in order to prevent
the accidental saving or overwriting of an existing programme, (similar to a car
radio).

Description of function
31
In order to recognise whether or not a programme is already stored in a certain
programme number, then the digital displays shows a point next to the letter „S“.
It is also recommended that a list is made of the programmes stored in the
machine together with their application, this will reduce the risk of mistakes when
loading a programme.
3.3.18.10 Dual-Wave ( F )
The Dual Wave process from REHM is a combination of AC and DC welding.
The processor controls the welding process and automatically alternates the
current from AC for 0.2 seconds to DC for 0.3 seconds. The selected values for
the welding current I1 or I2, the frequency and the wave balance are applied as
for DC-only or AC-only welding.
The Dual Wave process is activated by setting the value "1" at the "F" setting
option in the Special mode. In the display, the LEDs for DC and AC light up at the
same time. To deactivate the Dual Wave process, either the value can be altered
to "0" or DC or AC can be set directly (see sections 3.3.7 and 3.3.8).
NOTE: The Dual Wave function is activated by the special mode, when it is
active both the AC and DC LED’s (7 and 8) illuminate. Deactivating the Dual
Wave can be done either via the special mode, or by selecting either the AC or
the DC mode on the control panel.
The Dual-Wave process enables the operator to have more control over the
welding pool. This is particularly important, when for example welding out of
position or when joining two differing thickness together on Aluminium or
Aluminium alloys.
Fig. 3.9: The welding current cycle for the Dual-Wave- process
__
+

Description of function
32
3.3.19 The control LED’s
The following control LED’s give an overview of the important status conditions of
the machine:
Whether conventional or high frequency pulsing this LED will
illuminate to indicate that pulsing is activated. (See chapter 3.3.2.
und 3.3.4.)
There is open circuit voltage on the torch or the electrode holder.
In the case that this LED flashes on and off then an internal fault
condition has been recognised. This can be reset by power off and
then on again. If fault cannot be cleared then please contact Rehm
customer service (RKS).
Temperature control. This (yellow) LED will illuminate if the
maximum allowable temperature of the machine has been exceeded.
As long as this LED is illuminated then the power module is disabled,
therefore there is no output from the power source possible. In the
TIG welding mode when this fault condition occurs the post flow gas
time will still elapse. Once the machine cools down again the LED
will extinguish and the welding operation can continue as before. If
this Led starts to flash off and on, and the digital display shows and
„Err“ then an internal fault has been recognised. This can be reset
by power off and then on again. If fault cannot be cleared then
please contact Rehm customer service (RKS).
3.3.20 The Digital display
The digital display enables the selection of the parameters and their values to be
displayed. The display is a three-digit display. Its large display area with selfilluminating digits enables the display to be easily read, even from a distance and
also in poorly lit conditions. As the display is control via the processor it always
show the values and status in real time. This means for example that when a
programme is to be stored the point beside the letter “S” can also be displayed to
indicate that the programme is already number selected is already occupied.
3.3.21 The Turn and Set knob
The settings are all done via a single control knob, this can be turned to select or
alter the parameter and then pressed to confirm the setting. Using the
combination of LED’s and the 3-digit digital display the setting can always be
accurately set and reproduced using the same principle. This turn and set knob is
positioned centrally on the operating panel and is suitable for both right handed
and left handed personnel, as it can easily be operated with the thumb. The form
of the knob enables both simple and precise setting of the parameters and
functions. It is fully integrated within the housing of the Tiger and is therefore
protected by mechanical damage. Even if it is knocked from above the electrical
components within the housing remain undamaged. The turn and set knob is a
combined encoder and switch. As such it does not have an end stop therefore it
cannot be damage by truing it past the end point.
3.4 Anti-Stick Function
If there is a permanent short circuit between the electrode and the workpiece
during welding, the Anti-Stick Function is automatically activated after approx.
1.3s. This function automatically limits the welding current to approx. 35 A. This

Description of function
33
prevents the electrode from overheating and burning out. The operator
terminates the short circuit simply by removing the contact between the electrode
and the workpiece.
3.5 INTIG-Energy
The highly intelligent processor ensures that the ideal ignition energy is
automatically chosen depending upon the actual weld current setting; this applies
not only for HF, but also for the Lift-Arc ignition sequence.
When "HF-On", is selected the high-frequency ignition unit is ready for operation.
To ignite the arc, the electrode must be held about 3 to 5 mm above the
workpiece. When the torch button is pressed, the shielding gas is pre-ionised by
a high-voltage, the current flows between the end of the electrode and the
workpiece so that the main arc is established. The ignition of the arc without
contact between the tungsten electrode prevents tungsten inclusions in the weld.
Once the arc has successfully been ignited the high-frequency ignition unit is
switched off automatically during welding
When “HF-Off” is selected, microprocessor controlled contact ignition takes place
(Lift Arc) to strike the arc. In order to ignite the welding arc, the tip of the
electrode must be placed on the workpiece and the torch button depressed. The
processor control system reduces the ignition current so that the tip of the
electrode does not heat up.
The electrode is then gradually lifted away from the workpiece, this action ignites
the arc under the system processor control, this results in arc ignition without HF
and also minimum wear on the tungsten electrode. This process is essential
when welding in areas where sensitive electronic equipment is in operation (e.g.
repair welds on CNC-controlled machines in hospitals etc.) and where there may
be a risk of damage caused by high-voltage.
The electrode diameter depends on the welding current. A diameter of 1.6 mm is
recommended for welding currents up to 70 A and 2.4 mm for higher currents.
When stick-electrode welding in either the Booster or Fuse-hold mode is
selected, then the HF-ignition is automatically switched off.
During stick-electrode welding the INTIG-Energy is always determines the
correct setting of the Hot-start current. The ignition process is carefully controlled
by the processor and ensures that the output for a soft and safe start is realised.
Even the re-starting of difficult electrodes (e.g. Basic coated) can be achieved as
the power is controlled when the electrode makes contact with the workpiece
(similar to the Lift-Arc process during TIG welding).
3.6 EPC: Continuous Mains voltage monitoring
The EPC (Electronic Power Control) system continually monitors the mains
supply voltage. As soon as an over voltage is detected, the EPC unit disconnects
the machine electronics from the mains supply. The separation is via electrical
components that due to the fault condition become overheated, and thereby alter
their electrical resistance. Thereby it is essential that when the over voltage fault
has been corrected, that sufficient time is allowed to enable these components to
reach their required operating temperature again, which can depending upon the
ambient and machine temperature be more than a few minutes.
If the Tiger is switched on and off several times in succession then the EPC unit
operates as described above. This is a safety function that prevents the inverter
from becoming damaged from voltage or current surges.

Description of function
34
Resetting to Factory settings
If the turn and set knob is depressed and at the same time the machine is
switched on by the mains switch then the function of the Tiger will be reset to that
which was delivered from the factory. The welding current I1 will remain saved.
The factory setting resets your Tiger to the default values in all parameters for
TIG welding in 2-step mode with high-voltage ignition.
Please note that ignition with high-voltage pulses is selected for TIG
welding in the factory setting.
Extra care must be taken when the HF is activate by the factory setting, The
HF ignition may cause a safety hazard if incorrectly used.
Care must also be taken when using the factory reset. All of the set-up
parameters are set to the default values. This includes the parameters in the
Special mode as well. This means that before the machine can be used each
parameter must be checked and altered in necessary before welding.
The resetting of the machine to the factory setting does not affect programmes
that have been saved in the machine (see Chapter 3.3.18.9)
Accessories
35
4. Accessories
The equipment listed below can be supplied as accessories. This equipment is
connected to the remote control socket, which is fitted as standard. This
connection is automatically recognised by the control unit. There is no need for
manual switchover. Remote control units remain active for as long as they are
plugged into the power source!
4.1 WIG PLUS 1 foot operated remote control
By means of the WIG PLUS 1 foot remote control, the welding current can be
adapted to the welding job all the time during welding, via a foot pedal. The
current set at the machine is the current set when the pedal is depressed. This
makes it possible to set the maximum desired current, resulting in optimum
resolution in the particular current range!
When the foot-operated remote control is used, the torch control cable is not to
be plugged into the 7-pole socket. The remote control is connected to this socket
and the ignition of the torch is achieved by depressing the foot control. Striking
the arc and switching between two current with the torch button is not possible
when using the foot control.
Attention: The adapter cable Article number (Article No. 3600390, see
chapter 4.5) is required in order to connect a foot or hand operated remote
control to the Tiger machine!
The WIG PLUS 1 foot operated remote control has a selector switch, which has
the following functions:
4.1.1 Switch position; Foot-operated control signal
In this operating mode, the welding current is switched on and off automatically
using the foot pedal and is controlled using the foot. The welding machine
automatically operates in the 2-step mode of operation. The upslope and
downslope times are automatically disabled.
Warning: The operator must make sure that his foot does not switch on the
machine inadvertently. When the foot pedal is actuated, there is a risk of
electric shock from high-voltage!
4.1.2 Switch position; Hand-operated control signal
The welding current is controlled via the foot pedal. This enables that during
stick-electrode welding the welding current can be varied as required. This
possibility is not suitable for TIG welding, as the torch trigger control cable is not
plugged in, therefore the ignition via the torch button cannot take place.
4.2 WIG PLUS 2 Hand remote control
Using the WIG PLUS 2 hand remote control on the machine enables the welding
current to be altered from between 0 % und 100 % of the set value. This remote
control is designed for stick-electrode welding. This remote control is not
designed for use in conjunction with TIG welding, as the torch trigger control
cable is not plugged in, therefore the ignition via the torch button cannot take
place.

Accessories
36
4.3 REHM TIG-torch R-SR 7-17 und R-SR 7-26 DD
with potentiometer and leather
(Article Nos.: R-SR 7-17 4m: 763 1720, R-SR 7-17 8m: 763 1721
R-SR 7-26 4m: 763 1722, R-SR 7-26 8m: 763 1723)
The TIG torch R-SR 7-17 and R-SR 7-26 4m/8m with potentiometer and leather
covering enables the welding current to be adjusted remotely from the torch
handle. The connection of the torch to the machine is via the built-in 7-pole
connection socket. The R-SR 7-17 TIG and R-SR 7-26 4m/8m TIG torches with
integrated potentiometer and leather covering are specifically designed for use
with the Tiger machine series. The use of any other torch with remote control
potentiometer can cause damage to the electrical components of the machine
When the torch button 1 is pressed the display insrument shows the value that
would result during welding from the setting of the torch potentiometer. This
permits precise setting of the welding current prior to welding. Please note here
that when HF ignition is activated high-voltage pulses are applied to the
electrode.
ATTENTION: The use of TIG torches with remote control potentiometers of
any other type other than expressly specified or recommended by Rehm,
will invalidate the manufacturers warranty.
4.4 TIGER SET
(Article No. Tiger 170 DC Set: 150 3311 Tiger 170AC/DC Set: 150 3321
Tiger 210 DC Set: 150 3351 Tiger 210AC/DC Set: 150 3361)
The set comprises of: TIGER 170 / 210 DC or AC/DC complete with metal
carrying case, REHM TIG-torch R-SR 7-17 or R-SR 7-26 with potentiometer and
leather covering, gas regulator and workpiece cable 4m long. The robust metal
carrying case is internal separation compartments. The high quality case locks
offers protection for the machine and its accessories. The case measures
(LxBxH: 640x390x200 mm) and is the ideal way to ensure that the Tiger is
always tidy, complete, and ready for use.
4.5 REHM water cooler RWK 1100 (order no. 753
2310)
The REHM water cooler RWK 1100 has performance data and design matched
to the Tiger 170 /210 DC +AC/DC, and allows you to use water-cooled TIG
torches. This is particularly recommended for welding work at higher currents
and for welding with alternating current. The water cooler forms together with the
Tiger a mobile unit, offering monitoring of the flow quantity and the temperature
of the coolant in addition to the operating states Auto (requirement-controlled fan
and pump operation), On (permanently activated) and Off (permanently
deactivated).
4.6 Adapter cable (Article No. 360 0390)
This cable is required in order to connect a remote foot or hand control to the
7–pole torch connection socket on the machine.

Accessories
37
4.7 Tiger-Mechanised welding (Article No. 148 0100)
The option mechanised welding enables the Tiger to be used in conjunction with
simple automated applications. The connection is via the standard 7-pole torch
connection socket. The following signals are available:
Torch socket Pin1: Welding cycle On/Off
Torch socket Pin2: GND
Torch socket Pin3: Switching to current I2
Torch socket Pin4: +5V
Torch socket Pin5: Set value for I1
Torch socket Pin6: Arc established signal (AES)
Torch socket Pin7: Earth
Machines fitted with the mechanised welding interface the machine can also be
used with the options described in chapter 4.1 to chapter 4.4. Note: the automatic
setting of non-latch (2 step) and the minimum upslope and downslope does not
operate, and must be set manually.

Commissioning
38
5. Commissioning
5.1 Safety Notes
Before the unit is used for the first time, read through the operating manual,
particularly Chapter 2, Safety, thoroughly prior to starting to work with this
welding power supply.
Warning!
Only persons trained in the use and servicing of welding equipment and in
the relevant safety regulations must operate REHM welding equipment.
Always wear protective clothing when welding and make sure that other
people nearby are not endangered by the UV radiation of the arc.
5.2 Working with an increased electrical hazard in
accordance with regulations of IEC 974, EN 60
974-1, TRBS 2131 and BGR 500 (formerly VBG
15 (S))
The REHM TIG welding units comply with the regulations listed above. REHM
TIG welding units have an open circuit voltage of 85VDC max, (113 V is
permitted).
When AC welding, a safety device has been installed in the electronic control
unit. In this way, during AC welding the arc is in principle only ignited by means
of a DC voltage, and the unit only switches over to AC once the welding current
is flowing. If the arc is suddenly interrupted during welding, the machine
automatically switches off the welding current. The machine is then in the safe
condition.
It is necessary to ensure that when working with a high electrical hazard, the
welding power source is not set up in this area. Observe the stipulations given in
EN 60974-1, TRBS 2131 and BGR 500 (formerly VBG 15 / BGV-D1).
5.3 Setting up the welding unit
Set up the REHM welding equipment so that the welder has sufficient space in
front of the equipment to be able to monitor and operate the controls.
The relevant accident prevention regulations must be complied with whenever
the equipment is being transported.
Danger! Electricity!
Do not use the welding unit outdoors when it is raining!

Commissioning
39
5.4 Connecting the welding unit
Always comply with current VDE regulations when connecting the REHM welding
power supply to the mains power supply, and, in addition, make sure that the
regulations of the appropriate professional associations are complied with.
When connecting the equipment, observe the details provided relating to the
mains supply voltage and the mains protective fuse sizing. Safety cut outs and
fuses must always be designed for the current specified. The necessary
information can be found in:
Chapter 11, Technical Data.
Always turn the equipment off when it is not in use.
Secure the gas regulator correctly on the gas cylinder, and check the connection
is leak-tight. Always close the cylinder valve when work is finished. Ensure that
the appropriate regulations of the relevant professional associations are complied
with at all times.
5.5 Ventilation of the welding power source
The REHM welding unit must be positioned so that ventilating and cooling air can
enter and leave without obstruction. The duty cycle specified for the power
source can only be achieved if there is sufficient ventilation (see also “Technical
Data”). Make sure that it is not possible for any metal parts, dust or other foreign
bodies to enter the equipment through the ventilation slots.
5.6 Guidelines for working with welding power
sources
Only specialists or trained personnel who are experienced in the use of the
equipment and the process may undertake welding work. When welding, wear
protective clothing and make sure that there is no risk to other people in the area.
When the welding work is complete, you should leave the unit switched off for a
few minutes, so that the fan continues to run and is able to dissipate the heat
from the unit.
5.7 Connecting of the torch or electrode holder
cables
REHM welding equipment is fitted with quick action connections for connecting
the earth cable, the TIG welding torch, or the electrode cable. Plugging it in and
turning it to the right makes the connection. The shielding gas hose of the TIG
welding torch are also connected to the power source by means of quick action
connections. The torch button control plug is plugged into the 7-pole control
socket.
Important!
To avoid loss of welding power during welding, ensure that all the welding leads
are secure connected and well insulated.

Commissioning
40
5.8 Recommended welding lead cross sections
Cross sections for copper leads:
With a length of
up to 5m
up to 10m
up to 15m
up to 170A
16 mm2
25 mm2
25 mm2
up to 210A
25 mm2
25 mm2
35 mm2

Operation
41
6. Operation
6.1 Safety instructions
Read the operating instructions, in particular Chapter 2, Safety Instructions,
thoroughly before commissioning and before you start to work with this welding
power source.
Warning!
Personnel who are trained in the use and maintenance of welding units and
are familiar with the relevant safety regulations are the only persons who
are qualified to operate REHM welding units.
Working with and maintenance of electrical welding units always involves
possible hazards. People who are not familiar with such equipment and units
may harm themselves or other people. For these reasons, the operating staff
must be warned of the following potential hazards and the safety measures
which are required in order to avoid possible harm. Irrespective of the above, the
operator of a welding unit must be informed of the safety regulations that apply in
the particular area in which he is working.
6.2 Electrical hazard
Connection of and maintenance work on welding units and their accessories
must only be carried out in accordance with the applicable VDE regulations and
the regulations of the appropriate trade associations.
Never touch metal parts to which voltage is applied with your bare skin or with
wet clothing.
When welding, always wear gloves, welder’s protective clothing, and eye
protection with the correct protective filter glass.
Make sure that all parts which you have to touch when working, such as your
clothing, your working area, the welding torch, the electrode holder and the
welding unit are always dry. Never work in wet surroundings.
Make sure you are well insulated; by only wearing dry gloves and rubber-
soled shoes and by standing on a dry insulated surface, particularly when you
are standing on metal when working or are in areas with increased electrical
hazard.
Do not use worn or damaged welding cables. Make sure that welding cables
are not overloaded. Replace any damaged items of equipment or cabling
immediately.
Switch off the welding unit in the event of a prolonged interruption to work.
Do not either wrap the welding cables around power source, or in lay in coils.
Never leave the welding machine unattended when it is switched on.

Operation
42
6.3 Personal safety instructions
The action of the radiation of the electric arc or of pieces of the hot metal may
lead to severe burns to the unprotected skin and eyes.
Only use undamaged welder’s protective clothing, and eye protection with the
correct protective filter glass: The use of leather gloves and a welder’s helmet
to protect your eyes and body from sparks and radiation from the arc is
essential (see BGR 500 [formerly VBG 15, § 27]). Wear this protection even
when you are only supervising the welding work.
Warn bystanders of the dangers of arc radiation and of splashes of hot metal,
and protect them by the use of non-flammable screens.
Compressed-gas cylinders represent a potential hazard. Therefore, make
sure you adhere rigidly to the safety regulations of the appropriate trade
associations and suppliers. Secure all gas cylinders so that they cannot
accidentally fall over.
6.4 Fire prevention.
Hot slag or sparks may cause fires if they come into contact with flammable
substances, liquids or gases. Remove all flammable materials from the welding
area and make sure a fire extinguisher is ready and available.
6.5 Ventilation.
Fume extraction equipment must always be used in conjunction when welding.
This must be in good working condition, regularly maintained and served.
The place of work must be designed and arranged in such a way that it is best
suited to the processes, materials, and conditions of use. The working area must
be clear of dangerous substances that represent a health hazard within the
operators breathing zone. (see BGR 500 [formerly VBG 15, 4 and 29]).
Make sure that the welding area is fully ventilated either by natural ventilation or
by industrial extraction equipment.
Do not carry out any welding work on workpieces that have been painted or
treated with degreasing agents, as they may give off toxic vapours.
6.6 Tests before switching on.
It is assumed that:
The unit has been set up correctly as specified in Chapter 5,
Commissioning
All the connections (inert gas, torch connection) have been made correctly as
specified in Chapter 5, Commissioning,
The tasks due at each maintenance interval have been carried out
Chapter 8, Maintenance,
The safety devices and the components of the unit (particularly the torch
connection hoses) have been tested by the operator and are ready for
operation.
The operator and all participating staff will wear the right protection clothing
and the welding place will be protected safely.

Operation
43
6.7 Connecting the earth cable.
Warning!
Chapter 6.2; Electrical Hazard. Ensure that the welding current cannot
flow through chains of lifting appliances, crane cables or other electrically
conductive components.
Chapter 6.2, Electrical Hazard. Ensure that the earth cable is connected
to the workpiece as close as possible to the welding position. Earth
connections that are at a distance to the welding operation reduce
effectiveness, and increase the risk of electric shocks and stray currents.
6.8 Practical hints for use.
Practical hints for use listed below are only able to portray an overview of the
various applications of REHM TIG welding units. In the event of questions
concerning special welding jobs, materials, inert gases or welding equipment,
please refer to appropriate technical literature or manufacturer’s
recommendations.
For TIG welding, a distinction is drawn between materials that can be welded
using DC and those which can be welded using AC. DC can be used to weld
Copper, Nickel, Titanium and their alloys as well as mild steel, low and highalloyed. AC is generally used to weld Aluminium and its alloys.
Various tungsten electrodes are offered and used for TIG welding. The difference
lies in the level of oxide additions and in the oxides used. The compositions are
listed in EN 26848 and generally consist of Thorium oxide, Cerium oxide,
Zirconium oxide, or Lanthanum oxide. Advantages of oxide-enriched tungsten
electrodes have:
Improved ignition properties.
A more stable arc.
Higher current-carrying capacity.
Longer lifetime.
The relevant literature provides details of the most common electrode diameters
and their current-carrying capacity. Please note that the values given in this
literature have usually been established using machines that fall well short of the
balance range of the REHM TIG welding units. A suitable guideline is that for a
given electrode the current is too high if it forms droplets or assumes a broom
type structure. You can then choose between reducing the current or, in the AC
mode, increase the negative proportion of the wave balance.
When DC welding, the tip of the electrode should be a point.
With the REHM TIG welding units, a pointed electrode may also be used in AC
mode with balance settings in the minus range. This has the advantage that the
arc becomes even more concentrated and effective. In most cases, the welding
speed is increased as a result.
Special care and attention should be taken when grinding tungsten electrodes,
always use a protective mask and eye shields. In addition a suitable dust
extraction unit must also be used to protect the operator for the grinding dust,
which are dangerous if inhaled.
Weldable materials
Tungsten
electrodes

Operation
44
Argon is the main shielding gas used for TIG welding. For particular applications,
Helium, Argon-Helium mixtures or Argon-Hydrogen mixtures may be used.
Increasing the Helium content makes the arc more difficult to ignite and
increases the introduction of heat. The volume of shielding gas required is
dependent on the electrode diameter, the size of the gas nozzle, the welding
current level and the movement of air caused by workplace conditions. For a
workpiece thickness of 4 mm, when Argon is the shielding gas used, an initial
guideline for Aluminium, for example, is approx. 8 litres/minute, and for steel and
chrome/nickel steel is approx. 6 litres/minute. If Helium is used, the volume
required is significantly higher.
The standard length of the TIG welding torch is 4 metres. However, longer
torches may also be connected to these machines. The appropriate tungsten
electrode, clamping collet, and gas nozzle have to be selected depending on the
welding job and current intensity. In torches with two buttons, the two-current
controller can be used to switch the current between two differing values during
welding.
During manual welding, welding filler material is usually provided in rod form. The
correct material is to be selected depending on the base metal. However,
excellent results can also be achieved if the weld pool from two parts is simply
allowed to run together, for example at corner seams.
In DC welding, the negative pole is usually to the electrode. The negative pole is
the cooler, with the result that the current carrying capacity, and the service life of
the tungsten electrodes are significantly higher than with positive pole welding.
In AC welding, the current-carrying capacity of the electrode is affected to a
considerable extent by the wave balance setting. The wave balance setting
distributes the positive and negative components of the welding current between
the electrode and the workpiece. During the positive half wave, the Aluminium
oxide skin is destroyed and a higher temperature is generated at the electrode.
During the negative half wave, the electrode cools down again and the
Aluminium is heated. Since usually only a short positive pulse is needed in order
remove the Aluminium oxide skin, a greater negative proportion can be used with
REHM TIG units.
This has a number of advantages:
1. The temperature load on the electrode is reduced.
2. A higher current can be applied to the electrode.
3. The current range of the electrode is increased.
4. A pointed electrode can be used for welding.
5. The arc becomes more slender.
6. The penetration becomes deeper.
7. The heat-affected zone of the electrode becomes smaller.
8. The welding speed becomes higher.
9. Less heat is introduced into the workpiece.
Practical values for setting the wave balance for AC welding are:
for butt-welds negative proportion 60% to 70%.
for fillet welds negative proportion 70% to 80%.
see also "Tungsten Electrodes"
Shielding gases
TIG -
Welding torch
Welding with and
without filler
material
Direct current
welding
Alternating current
welding

Operation
45
High-voltage ignition units are fitted as standard in the REHM Tiger machines in
order to provide contact-free ignition of the welding arc. The high voltage
electrically ionises the distance between the tungsten electrode and the
workpiece in such a way that the welding arc can bridge this gap. A high oxide
content in the tungsten electrode and a close distance between it and the
workpiece has a beneficial effect on the ignition performance.
For DC welding, the arc can also be ignited without high voltage using the
installed program control unit:
The function selector switch HF is set to “Off”, the tungsten electrode is set on
the workpiece, then the torch button is pressed and the electrode is lifted off the
workpiece by tilting the torch. Igniting the arc without high voltage is important if,
for example, repair welding work in which the high-voltage ignition unit may
interfere with the control sequence is being carried out on electronically
controlled machines.
The REHM TIG welding units are eminently suitable as current sources for stickelectrode welding, due to their rapid and fast control dynamics. The current
intensity and polarity which are to be set are specified by the electrode
manufacturers. Positive pole welding is to be used for welding basic electrodes.
You can find more information in the series of textbooks published by
DVS-Verlag GmbH
Aachener Str. 172
40223 Düsseldorf
www.dvs-verlag.de
Welding of stickelectrodes
Ignition with and
without high
frequency (HF)

Machine faults
46
7. Troubleshooting
7.1 Safety instructions
WARNING!
If a fault occurs which represents a risk to personnel, equipment and/or
their surroundings; the equipment and all work MUST BE STOPPED
immediately. It must also be ensured that it is not possible to turn on the
equipment again until the fault is cleared and made safe.
The equipment should only be used the unit again once the cause of the
fault has been traced and there is no longer any danger represented to
personnel, equipment and/or their surroundings.
Faults can only to be corrected repaired or eliminated by qualified staff,
which observe and implement all of the relevant safety instructions.
Chapter 2
Following a fault, the equipment can only be put back into service after it
has been checked by and approve by suitably qualified staff.

Machine faults
47
7.2 Fault finding table
REHM-operators panel does not function
The digital display does not illuminate and neither does any of the LED’s
Possible cause: Possible remedy:
No mains voltage (e.g. mains fuse) Check mains voltage and fuses
Cable break or plug defect Check and repair
Mains supply over-voltage Check mains voltage, (use other socket)
Machine has been switched on and several times Allow machine to cool down app. 10 mins.
(see Ch. 3.6)
Error messages.
The display shows “Err“ and the over-temperature LED is blinking.
Possible cause: Possible remedy:
Primary current has reached the critical value. Call for service.
The Upslope and Downslope times are set at „0.0“ and cannot be changed.
Possible cause: Possible remedy:
The remote foot-control is plugged in. These times are controlled manually by the
foot-control. Unplug foot-control.
The Upslope and/or the Downslope times are not correct as set.
Possible cause: Possible remedy:
Start current set at 100 %. Change the start current.
Crater fill current set at 100%. Change the crater fill current.
Trigger latch (4-step) cannot be set.
Possible cause: Possible remedy:
The remote foot-control is plugged in. Unplug foot-control.
Balance and Frequency cannot be selected.
Possible cause: Possible remedy:
Polarity is not set on „ “ Can only be selected in AC mode.
The unit has different parameters than it had when switched off.
Possible cause: Possible remedy:
The values will only be saved after the first Weld with the machine.

Machine faults
48
No gas flows.
Possible cause: Possible remedy:
The cylinder is empty or the gas hose is kinked. Check and rectify.
Defective regulator. Check and rectify.
Solenoid valve in the machine is defective. Call for service.
The cable connection to valve is loose. Check and rectify.
Stick welding mode is selected. The gas valve remains closed.
The fan cannot be heard.
Possible cause: Possible remedy:
The fan is dependant upon temperature. Check whether the fan increases its speed
and increases its speed on demand during higher temperature loading
Fan is defective. Call for service.
No high voltage (HF) impulse
Possible cause: Possible remedy:
HF-Ignition is off Switch on HF-ignition
No shielding gas Check and rectify.
Workpiece cable has a poor connection Check and rectify.
Electrode is contaminated Re-grind electrode
Wrong electrode is being used Change electrode
Gas pre-flow set too long Shorten gas pre-flow time or wait longer
High voltage tracking in torch Change torch
Torch and workpiece polarity swapped Connect to correct polarity
Required welding current is not reached
or arc will not establish
Possible cause: Possible remedy:
Workpiece cable wrongly connected. Check and rectify.
Remote foot control is connected but not Check and rectify.
depressed.
Hand remote is connected Set current on remote control.
Incorrect or no shielding gas Check and rectify.
Arc jumps and flutters
Possible cause: Possible remedy:
The workpiece and electrode does not Use smaller diameter electrode
reach the right working temperature.
The electrode is not correctly ground Re-grind electrode
Incorrect electrode Change electrode

Machine faults
49
Arc has an unusual colour
Possible cause: Possible remedy:
No, too little, or wrong shielding gas Check and rectify.
Electrode is contaminated Re-grind electrode
Tungsten electrode burns away
Possible cause: Possible remedy:
No shielding gas Check and rectify.
Loading is too high Use thicker electrode
Too much positive component during AC welding Increase the minus component with balance
Torch and workpiece cable exchanged Connect correctly
Stick-electrode setting is selected Set up for TIG welding
Unit will not pulse
Possible cause: Possible remedy:
Pulsing is not selected Set peak and background times T1 and T2
Values for I1 and I2 are the same Change the values
Arc extinguishes during ignition
Possible cause: Possible remedy:
Ignition energy is set too low Set the ignition energy to higher value,
or use thinner electrode.
Electrode is damaged or contaminated Re-grind electrode

General maintenance
50
8. Service and maintenance
8.1 Safety instructions
Warning!
Only people who have been trained by REHM are authorised to carry out
maintenance and repair work. Contact your REHM distributor. In the event
of parts being required, only use original REHM spares.
If people who have not been trained by REHM, or are not authorised to
carry out such work undertake maintenance or repair work then the
warranty and liability claims against REHM are automatically invalidated.
Before commencing any cleaning, the welding unit must be switched off
and disconnected from the mains.
Before carrying out maintenance work, the welding unit must be switched
off and disconnected from the mains. It must be ensured that it cannot be
switched on again inadvertently.
Gas supply lines must be shut off and emptied.
The warning notes listed in Chapter 2 “Safety” are to be taken into
account.
The welding unit and its components are to be maintained in accordance with the
instructions given in the maintenance table.
Inadequate or incorrect servicing or maintenance may lead to operating faults.
Regular servicing of the unit is therefore essential. No modifications, alterations,
or additions to the unit are to be carried out.
8.2 Preventative maintenance table.
The maintenance intervals are a REHM recommendation given normal standard
demands (e.g. single shift operation, use in clean and dry surroundings). Your
Safety Supervisor should determine the exact intervals.
Action
Chapter
Interval
Cleaning the machine internals
In accordance with the working
environment
Functionality and Safety
inspection by operators
Daily
Visual inspection of equipment,
particularly the torch hoses.
Daily
Check that earthing trip is
operational.
Daily
(for portable equipment)
otherwise monthly

General maintenance
51
Action
Chapter
Interval
Have connection cables and
torch hoses checked by
specialist staff; record testing
in test book provided for that
purpose.
Test also to be carried out
more frequently depending
on local regulations.
Every six months
Have entire welding unit
checked by specialist staff;
record testing in test book
provided for that purpose.
Test also to be carried out
more frequently depending
on state law
Annually
8.3 Cleaning the inside of the unit
If the REHM welding unit is used in a dusty atmosphere, the inside of the unit
must be cleaned at regular intervals by either blowing them out or using suction.
The frequency of this cleaning is dependent on the particular conditions of use.
Use only clean dry air for blowing through the unit, or employ a vacuum cleaner.
If maintenance or repair work is carried out on this equipment by non-authorised
personnel, or by personnel who have not been specifically trained by Rehm in
the use and repair of this equipment, then manufactures warranty is
automatically invalidated.
8.4 Proper waste disposal
Only for EU countries!
Do not dispose of electric tools together with household waste material!
In observance of European Directive 2002/96/EC on waste electrical and
electronic equipment and its implementation in accordance with national law,
electric tools that have reached the end of their life time must be collected
separately and returned to an environmentally compatible recycling facility.
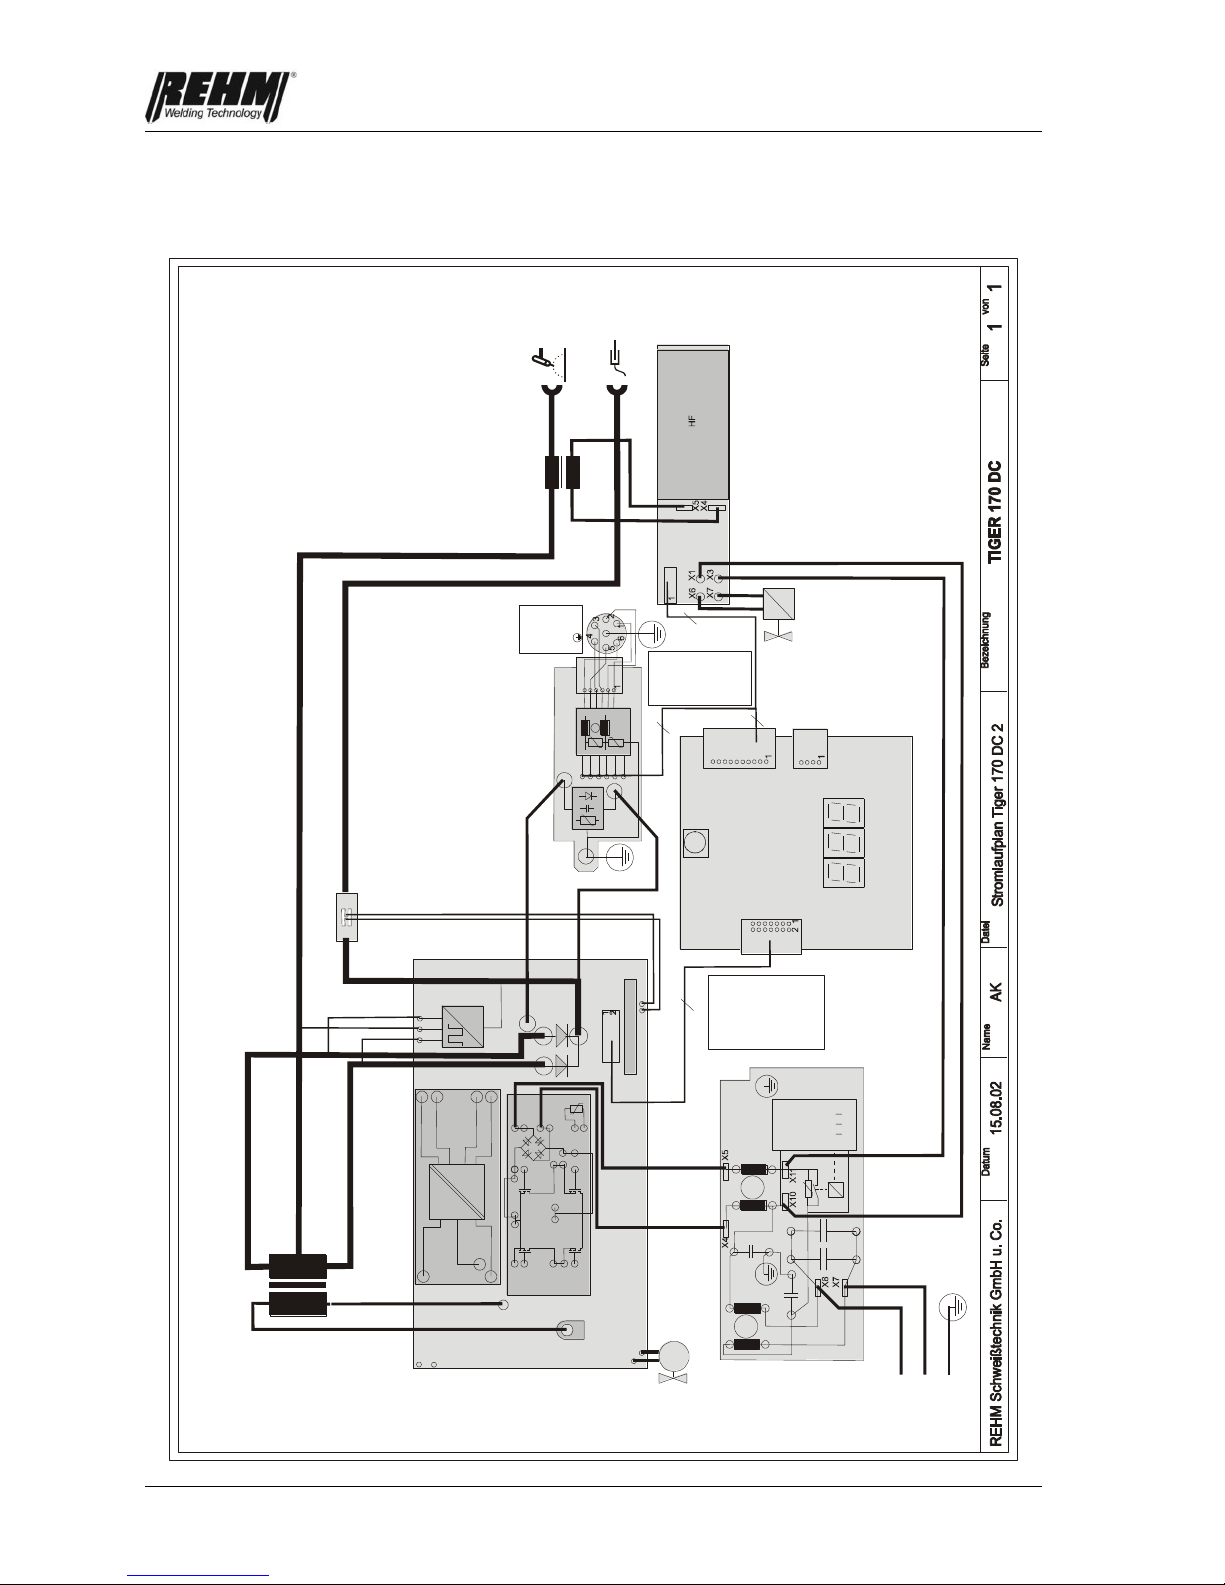
Circuit diagrammes
52
9. Circuit diagrammes
X1
2
1
2 1
1
1
=
=
=
14
4
6
+DC
-DC
+14V
GND
-12V
690 0342
1: I_actual value
2: I_desired value
3: ENTR
4: I_max
5: desired value_GND
6: fan
7: GND
8: NTC
9: PWM1
10: PREG
11: U_actual value
12: GND
13: +14V
14: GND
L1
N
PE
E
P
C
lectronic
ower
ontrol
10
BU BU
BUBU BNBN
BN
RD
BK
VT
WH
GN
BUBK
BU
BN
BU
BN
BU RD
BK BK
RDRDBU
Cu
Cu
BK
M
Cu Cu
BK
BK
10: VCC
9: HF
8: VCC
7: GAS
6: FR2T
5: GND
4: I1
3: VCC
2: BT2
1: Bt1
[OG]
[GN]
[YE]
[BU]
[GY]
[WH]
[RD]
[BK]
[VT]
[BN]
1: BT1
2: GND
3: BT2
4: +5V
5: I1
6: Fernb
7:
[WH]
[BU]
[YE]
[GN]
[GY]
[OG]
WH
BU
YE
GN
GY
OG

Circuit diagrammes
53
X1
2
1
2 1
1
1
1
1
=
=
=
14
4
6
4
+DC
-DC
+14V
GND
-12V
690 0342
L1
N
PE
E
P
C
lectronic
ower
ontrol
10
BU
GN
GY
WH
BK
BU BU
BUBU BNBN
BN
RD
BK
VT
WH
GN
BUBK
BU
BN
BU
BN
BU
RD
BK BK
BK RD
RDRDBU
Cu
Cu
Cu
M
M
Cu Cu
BK
BK
10: VCC
9: HF
8: VCC
7: GAS
6: FR2T
5: GND
4: I1
3: VCC
2: BT2
1: Bt1
[OG]
[GN]
[YE]
[BU]
[GY]
[WH]
[RD]
[BK]
[VT]
[BN]
4: POL
3: VCC
2: GND
1:NTC
[GN]
[GY]
[WH]
[BU]
1: BT1
2: GND
3: BT2
4: +5V
5: I1
6: Fernb
7:
WH
BU
YEGNGY
OG
400V DC
1

Circuit diagrammes
54
2 1
1
1
=
=
=
14
4
6
+DC
-DC
+14V
GND
-12V
690 0342
1: I_actual value
2: I_desired value
3: ENTR
4: I_max
5: actual value_GND
6: fan
7: GND
8: NTC
9: PWM1
10: PREG
11: U_actual value
12: GND
13: +14V
14: GND
L1
N
PE
E
P
C
lectronic
ower
ontrol
10
BU BU
BUBU BNBN
BN
RD
BK
VT
WH
GN
BUBK
BU
BN
BU BN
BU RD
BK BK
BK
RD
RDRD BU
Cu
Cu
BK
M
Cu BK
BK
BK
10: VCC
9: HF
8: VCC
7: GAS
6: FR2T
5: GND
4: I1
3: VCC
2: BT2
1: Bt1
[OG]
[GN]
[YE]
[BU]
[GY]
[WH]
[RD]
[BK]
[VT]
[BN]
1: BT1
2: GND
3: BT2
4: +5V
5: I1
6: Fernb
7:
[WH]
[BU]
[YE]
[GN]
[GY]
[OG]
WH
BU
YE
GN
GY
OG
PFC

Circuit diagrammes
55
2 1
1
1
1
1
=
=
=
14
4
6
4
+DC
-DC
+14V
GND
-12V
690 0342
1: I_aactual value
2: I_desired value
3: ENTR
4: I_max
5: actual value_GND
6: fan
7: GND
8: NTC
9: PWM1
10: PREG
11: U_actual value
12: GND
13: +14V
14: GND
L1
N
PE
E
P
C
lectronic
ower
ontrol
10
BU
GN
GY
WH
BK
BU
BU
BUBU BNBN
BN
RD
BK
VT
WH
GN
BUBK
BU
BN
BU
BN
BU RD
BK BK
BK RD
RD
RD
BU
Cu
Cu
Cu
M
M
Cu Cu
BK
BK
10: VCC
9: HF
8: VCC
7: GAS
6: FR2T
5: GND
4: I1
3: VCC
2: BT2
1: Bt1
[OG]
[GN]
[YE]
[BU]
[GY]
[WH]
[RD]
[BK]
[VT]
[BN]
4: POL
3: VCC
2: GND
1:NTC
[GN]
[GY]
[WH]
[BU]
1: BT1
2: GND
3: BT2
4: +5V
5: I1
6: Fernb
7:
[WH]
[BU]
[YE]
[GN]
[GY]
[OG]
WH
BU
YE
GNGYOG
400V DC
1
PFC

Spare parts
56
10. Spare parts list
10.1 Spare parts list with REHM article numbers.
TIGER
170 DC
TIGER
210 DC
TIGER
170 AC/DC
TIGER
210 AC/DC
B1 - Control PCB
690 0475
690 0475
690 0475
690 0475
B2 - Main PCB
690 0450
690 0455
690 0450
690 0455
B3 - AC-Module
690 0460
690 0460
B4 - DC/DC-Converter
690 0342
690 0342
690 0342
690 0342
B5 - Transistor Module
690 0392
690 0392
690 0392
690 0392
B6 - PWM-Regulator
690 0485
690 0485
690 0485
690 0485
B7 - EMV-Start-up PCB
690 0367
690 0367
690 0367
690 0367
B8 - Filter PCB
690 0413
690 0413
690 0413
690 0413
B9 - Ignition unit PCB
690 0381
690 0381
690 0381
690 0381
B10 - Ignition unit
690 0385
690 0385
690 0385
690 0385
Dr2 - Ferrite ring
450 0033
450 0036
450 0033
450 0036
Tr1 - Transformer
470 0255
470 0262
470 0255
470 0262
Tr2 - HF-choke
220 0631
220 0634
220 0632
220 0632
Tr3 - Ignition transfer unit
470 0090
470 0090
470 0090
470 0090
Dr1 - PFC-Choke
220 0915
220 0915
R1 - Shunt
670 0037
670 0038
670 0038
670 0038
Gr1, Gr2 - Rectifier
530 0061
530 0061
530 0061
530 0061
T1 - PFC-Transistor
570 0030
570 0030
D1 - PFC-Diode
530 0069
530 0069
S1 - Mains switch
420 0126
420 0126
420 0126
420 0126
M1, M2 - Fan
410 0034
410 0034
410 0034
410 0034
Y1 - Solenoid valve
420 0114
420 0114
420 0114
420 0114
Y2 - Relay
420 0155
420 0155
420 0155
420 0155
X1, X2 - Housed socket
430 0023
430 0023
430 0023
430 0023
X3 - Torch trigger socket
360 0380
360 0380
360 0380
360 0380
G1 - Machine frame
210 1220
210 1230
210 1240
210 1240
G2 - Cover
210 1231
210 1241
210 1241
G3 - Foot
260 0150
260 0150
260 0150
260 0150
G4 - Mains cable
360 0356
360 0356
360 0356
360 0356
G5 - Rating plate
730 1060
730 1070
730 1065
730 1075
G6 - Carrying belt
250 0085
250 0085
250 0085
250 0085
G7 - Gas hose
220 0612
220 0612
220 0612
220 0612
G8 - Plastic housing
260 0170
260 0170
260 0170
260 0170
G9 - Operating knob
260 0181
260 0181
260 0181
260 0181
G10 - Display membrane
730 1030
730 1030
730 1010
730 1010
G11 - Connection plate
210 1242
210 1242
210 1243
210 1243
G12 - Quick release coupling
310 0186
310 0186
310 0186
310 0186
G13 - Elbow bend
310 0120
310 0120
310 0120
310 0120
G14 - Screwed coupling
310 0182
310 0182
310 0182
310 0182
C1 - Capacitor 470uF/400V
520 0118
520 0118
520 0118
520 0118
Adapter cable (see. Ch. 4.5)
360 0390
360 0390
360 0390
360 0390

Spare parts
57
10.2 Machine components photographs
2

Spare parts
58

Technical Data
59
11. Technical Data
Type
TIGER 170 DC
TIGER 210 DC
TIGER 170
AC/DC
TIGER 210
AC/DC
Setting range
TIG
[A]
3 - 170
3 - 210
3 - 170
3 - 210
Stick
[A]
3 - 150
3 - 170
3 - 150
3 - 170
Duty cycle at I
max.
TIG
[%]
50 / 30
50 / 30
50 / 30
50 / 30
(10 min) at 20°C / 40°C
Stick
[%]
60 / 35
90 / 35
60 / 35
90 / 35
Welding current at 100 %
duty cycle
TIG
[A]
135 / 100
175 / 140
135 / 100
175/140
at 20°C / 40°C
Stick
[A]
120 / 100
160 / 120
120 / 100
160 / 120
Power consumption at I
max
[kVA]
5,4
5,5
5,4
5,5
Mains voltage
230V/50Hz
230V/50Hz
230V/50Hz
230V/50Hz
Mains voltage compensation
-15% +10%
-15% +10%
-15% +10%
-15% +10%
Fuse rating
[A]
16
16
16
16
Power factor
[%]
0,7
0,99
0,7
0,99
Protection classification
IP 23
IP 23
IP 23
IP 23
Insulation classification
H H H
H
Torch cooling
Gas
Gas
Gas
Gas
Dimensions L/B/H
[mm]
290/150/215
340/150/215
340/150/275
340/150/275
Weight
[kg]
5,4
6,5
7,8
8,4
The use of a free-standing mobile generator.
The Tiger is designed to run in conjunction with a free-standing mobile generator.
However the section relating to the technical must be strictly adhered to.
We recommend that the generator has a capacity of 8kVA continuously available
for the Tiger unit. The generator should also be of the Asynchronous type.
It should be noted that the EPC-System (see Chapter 3.6) which continuously
monitors the mains supply voltage will also operate during use with the
generator, this means that in the case whereby the voltage fluctuations are
outside of the pre-described limits then the safety cut-out will operate on the
machine.
In addition to this if the mobile generator is unable to supply a stable voltage due
to the lack of power available (e.g. the mobile generator is undersized). Then the
welding result can be diversely affected, this is particularly the case when using
the Tiger in used in the higher power range.

Index
60
12. Index
A
Accessories 35
Accident prevention 14
Alterations to the unit 6
Alternating current (AC) welding 44
Areas of use 6
Automatic frequency control 23
C
CE - Mark 5
Cleaning the inside of the unit 52
Commissioning 37
Connecting the earth cable 43
Connecting the welding unit 38
Contents 3
Correct use of equipment 11
D
Direct current (DC) welding 44
E
Earth cable connection 43
F
Fault finding table 48
Foreword 5
H
Health and Safety regulations 11
HF Pulsing 20
High voltage ignition unit 25
Hints for use 43
I
Index 63
Introduction 5
L
Lift-Arc 26
M
Machine components photographs 58
Mobile generator 61
O
Operation tests before switching on 42
Operators Manual, safe keeping 6
Operators panel 15
P
Performance features of TIG welding machines 8
Principle of TIG welding 10

Index
61
Product identification 2
Programme 31
Purpose of this document 6
Q
Qualified staff 6
R
Remote control 35
Residual risks 14
S
Safety information 13
Safety notes 14, 37
Safety regulations 13
Safety symbols 13
Service and maintenance 51
Shielding gas consumption 22
Shielding gases 44
Symbols used 11
T
Technical Data 61
Tests before switching on 42
TIG - torch with potentiometer and leather 36
TIG - welding torch 44
Tungsten electrodes 43
Typographical markings 11
W
Warning symbols on the machine 13
Work safety 14
Working with an increased electrical hazard 37

EC Declaration of Conformity
We hereby confirm that the following products
TIG Gas-Shielded Welding Equipment
Tiger 170 DC
Tiger 210 DC
Tiger 170 AC/DC
Tiger 210 AC/DC
meet all the major protection requirements laid down in the Council Directive 2004/108/EC (EMC
directive) on the approximation of the laws of the Member States relating to electromagnetic
compatibility and stipulated in the Directive 2006/95/EC relating to electrical equipment designed
for use within certain voltage limits.
The aforementioned products comply with the provisions of this Directive and meet the safety
requirements applicable to equipment for arc welding in accordance with the following product
standards:
EN 60 974-1: 2006-07
Arc welding equipment – Part 1: Welding power sources
EN 60 974-3: 2004-04
Arc welding equipment – Part 3: Arc striking and stabilizing devices
EN 60974-10: 2004-01
Arc welding equipment – Part 10: Electromagnetic compatibility (EMC) requirements
According to EC Directive 2006/42/EG Article 1, para. 2, the above products come exclusively
within the scope of Directive 2006/95/EG relating to electrical equipment designed for use within
certain voltage limits.
This declaration is made on behalf of the manufacturer:
REHM GmbH u. Co. KG Schweißtechnik
Ottostr. 2
73066 Uhingen Germany
Uhingen, 11.06.2013
Declaration made by
R. Stumpp
Managing Director


Stand 06/13 · Artikel-Nr. 730 1012
REHM – Setting the pace in welding and cutting
The REHM range
REHM MIG/MAG inert gas welding units
SYNERGIC.PRO² gas- and water-cooled to 450 A
SYNERGIC.PRO² water-cooled 500 A to 600 A
MEGA.ARC stepless regulation to 450 A
RP REHM Professional to 560 A
PANTHER 202 PULS pulse welding unit with 200 A
MEGAPULS pulse welding units to 500 A
REHM TIG inert gas welding units
TIGER, portable 100 KHz inverter
INVERTIG.PRO TIG welding unit
INVERTIG.PRO digital TIG welding unit
REHM MMA inverter technology
TIGER and BOOSTER.PRO 100 KHz electrode inverter
REHM plasma cutting units
Welding accessories and additional materials
Welding smoke extraction fans
Welding rotary tables and positioners
Technical welding consultation
Torch repair
Machine Service
Please contact your local distributor:
REHM WELDING TECHNOLOGY –
German Engineering and Production at its best
Development, construction and production – all under one
roof – in our factory in Uhingen. Thanks to this central
organisation and our forward-thinking policies, new
discoveries can be rapidly incorporated into our production.
The wishes and requirements of our customers form the
basis for our innovative product development. A multitude of
patents and awards represent the precision and quality of
our products. Customer proximity and competence are the
principles which take highest priority in our consultation,
training and service.
WEEE-Reg.-Nr. DE 42214869
 Loading...