

Page 1
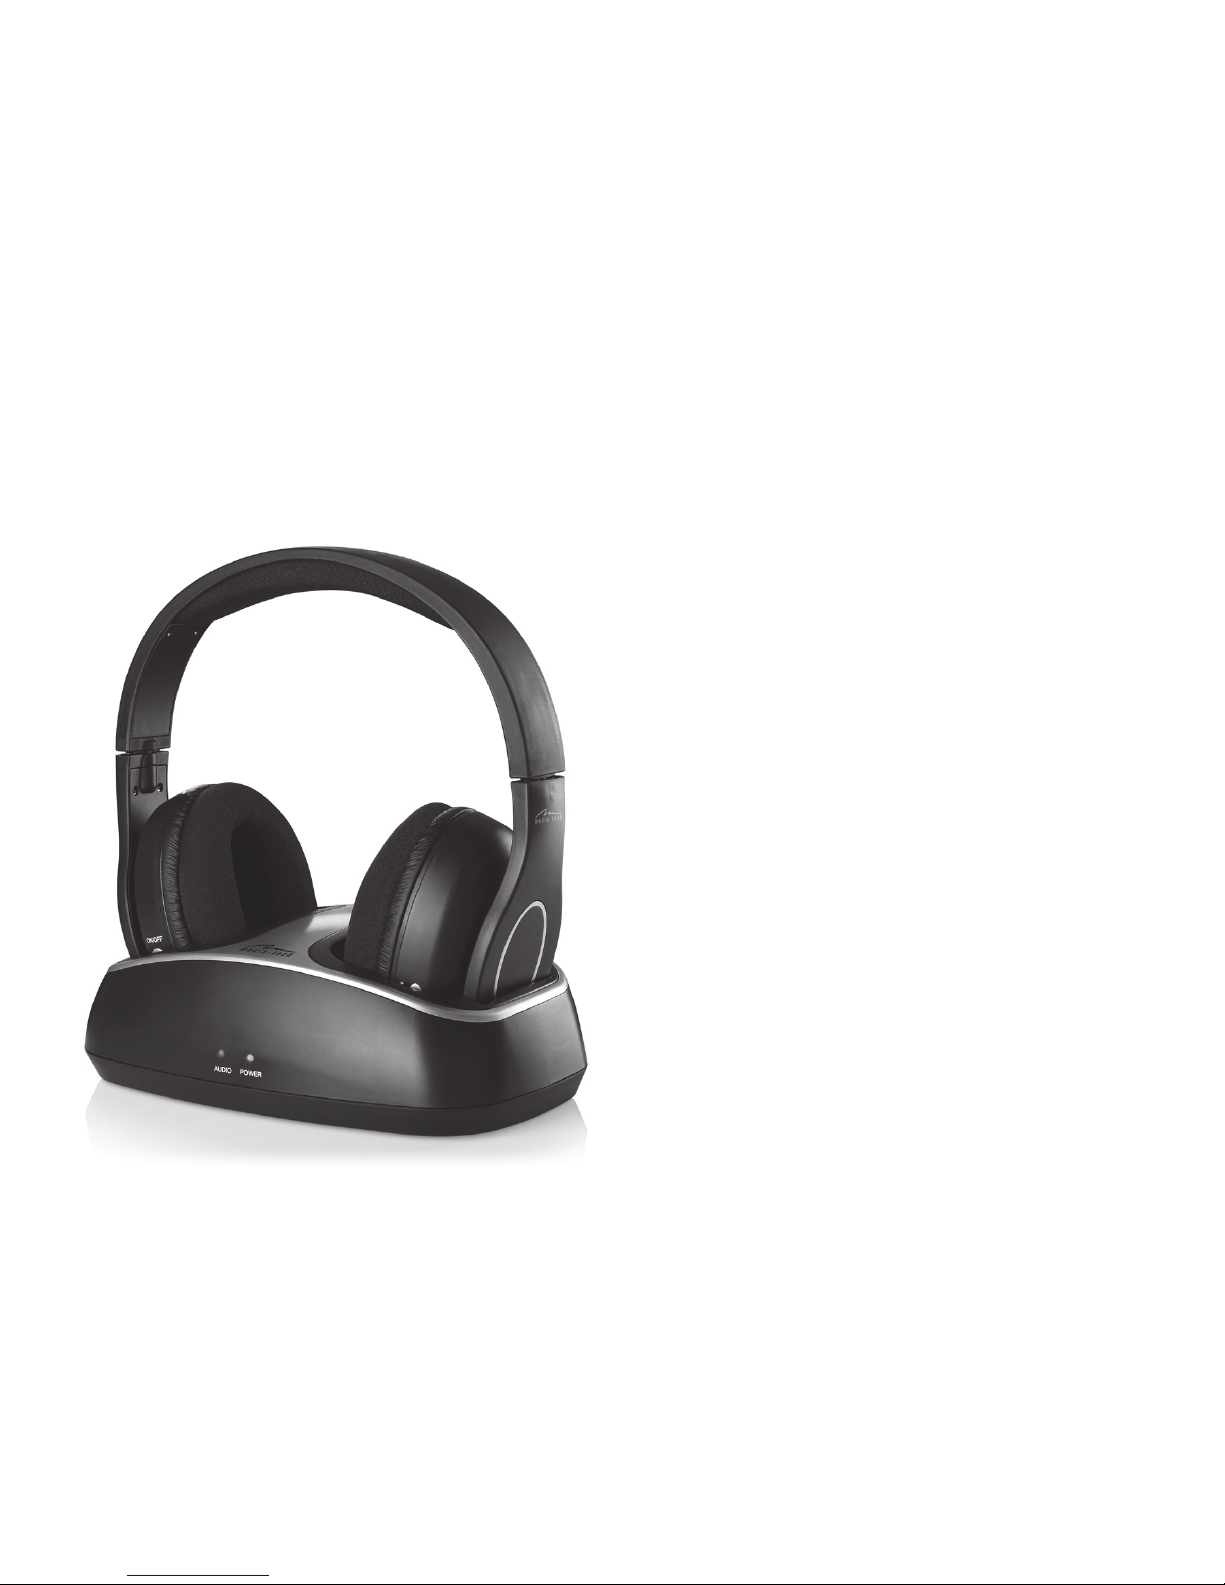
Instruction Manual
REGULUS
Stereo Wireless Headset
MT3551
Page 2
2
EN
Index
Introduction ................................................................................................ 2
Package Contents ...................................................................................... 2
Connectors and Controls ........................................................................ 3
Headphones ................................................................................................ 3
Transmitter cradle (Back Panel) ............................................................3
Transmitter cradle (Front and Top) ...................................................... 4
Transmitter cradle (Bottom) ..................................................................4
LED Indicators on the Headphones .................................................... 4
Transmitter cradle LED Indicators ....................................................... 5
Getting Started........................................................................................... 5
Connecting the Transmitter Cradle..................................................... 5
Charging the Battery of the Wireless ................................................. 6
Headphones ................................................................................................ 6
Powering the Headphones On/O ..................................................... 6
Selecting the Operating Mode ............................................................. 6
Powering the Transmitter Cradle On .................................................. 6
Powering the Transmitter Cradle O .................................................. 7
Synchronising the Headphones .......................................................... 7
and Transmitter Cradle ............................................................................ 7
Adjusting the Volume ..............................................................................7
Receiving Radio Stations ........................................................................ 8
Using the Headphones with a Cable .................................................. 8
Battery operation ......................................................................................9
Powering the headphones using batteries ...................................... 9
Powering the Transmitter Cradle Using ...........................................9
Batteries ........................................................................................................ 9
Appendix ....................................................................................................10
Troubleshooting ......................................................................................10
Technical Speci cations ........................................................................11
Introduction
Thank you for choosing our 2.4G wireless headphones
product. These 2.4G Wireless Headphones on your hands
have been designed for receiving wireless high-quality
stereo sound from audio playback devices. The range of
the wireless signals is up to 50 m (150 ft) outdoors and 25
m (75 ft) indoors under optimum conditions, depending
on the environment. The device also features an FM radio
receiver.
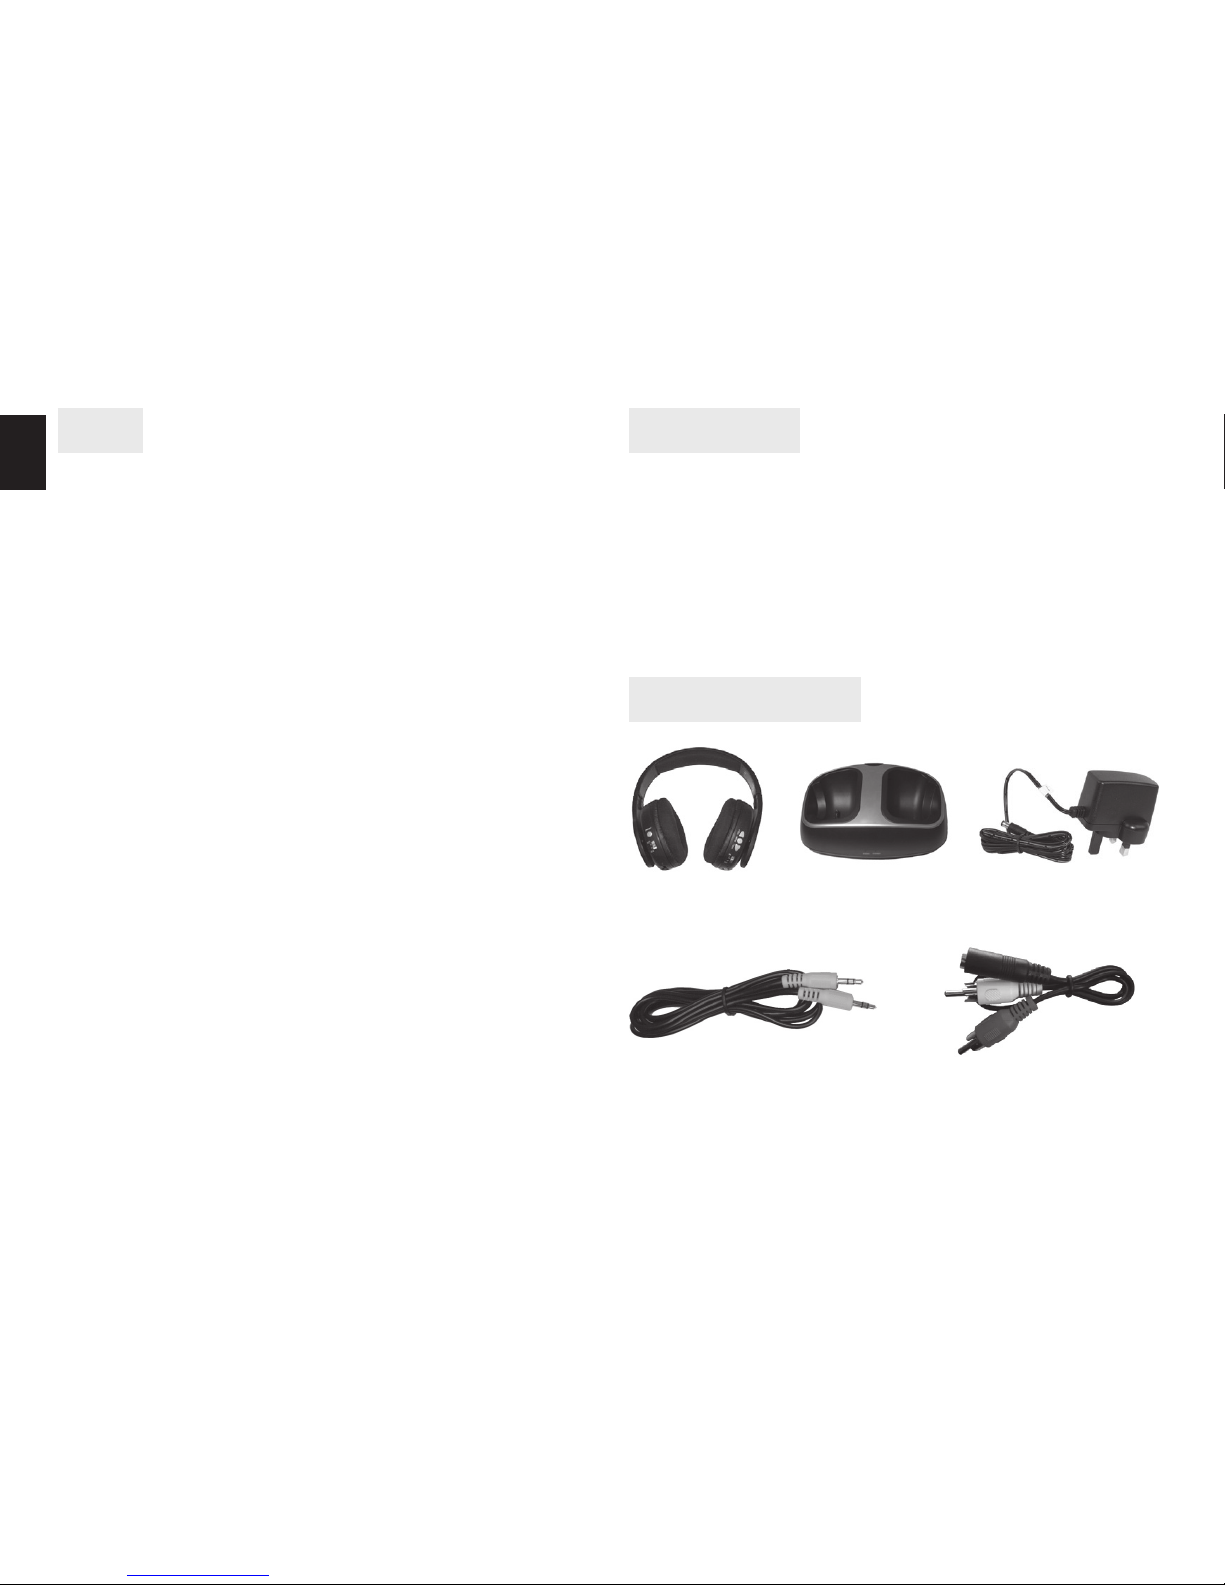
Package Contents
Wireless
headphones
Audio cable, 2m, 3.5 mm
stereo jack to 3.5 mm
stereo jack
Adapter cable, 30 cm 3.5 mm
stereo jack socket to 2x
Cinch plugs
Transmitter
cradle
Power Supply
Page 3
3
EN
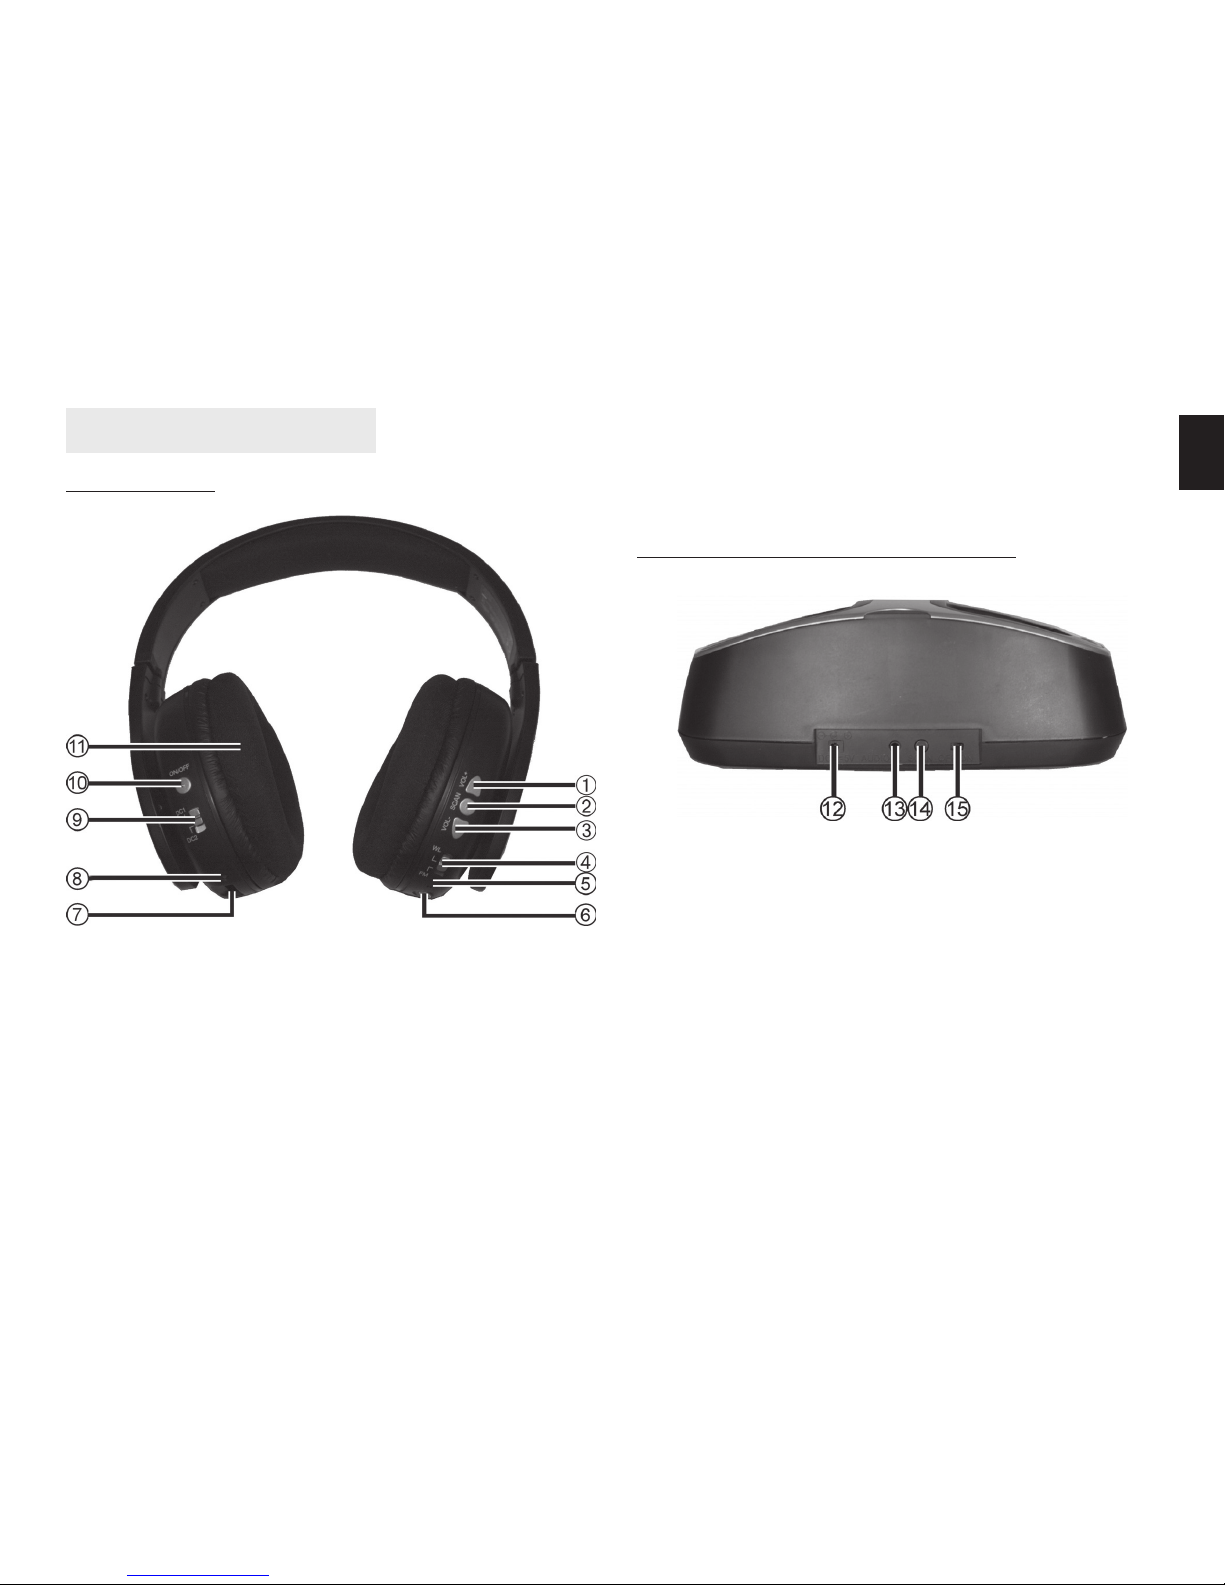
1. Increase the volume
2. Search for radio station/synchronize headphones with
transmitter cradle
3. Reduce the volume
4. Mode selection switch
5. Radio and RF signal reception indicator
6. Headphones audio input socket
7. Charger connection
Connectors and Controls
Headphones
Transmitter cradle (Back Panel)
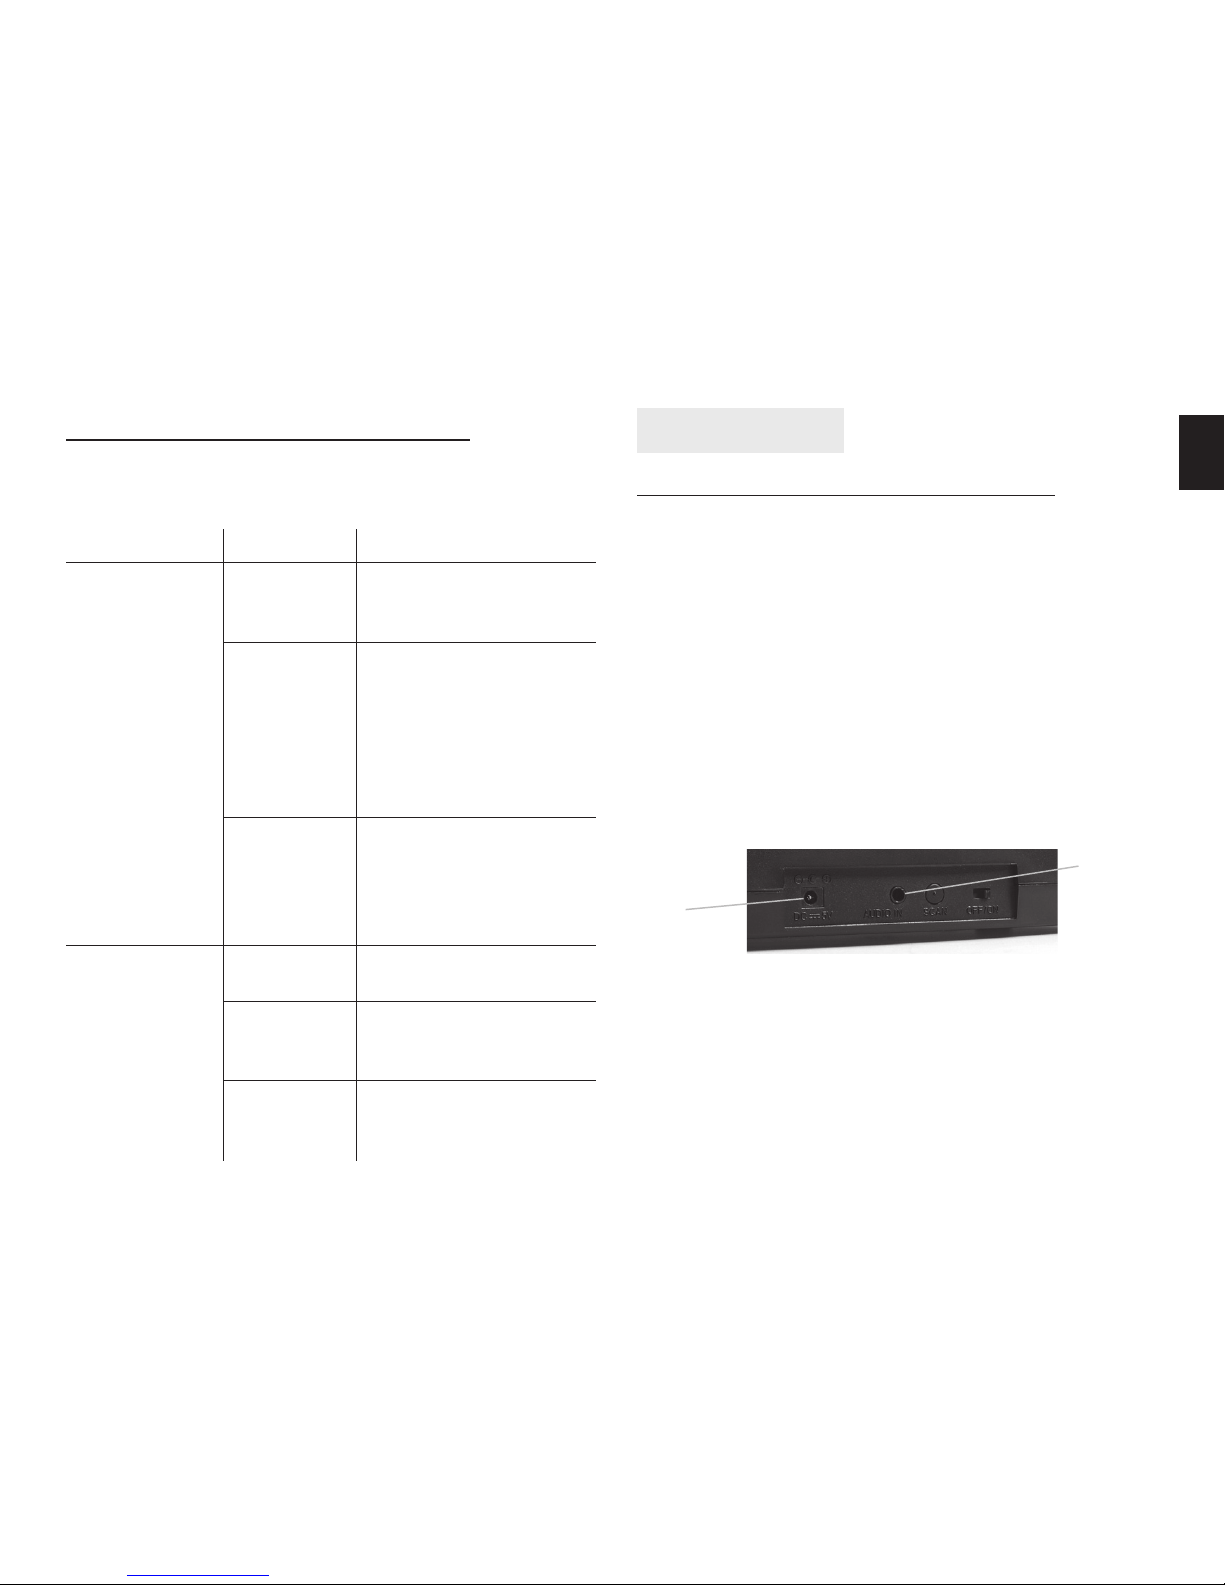
12. Power socket
13. Transmitter cradle audio input socket
14. “SCAN” synchronisation button
15. On/O button of the transmitter cradle
8. Headphones power indicator
9. Power source DC1/DC2 selection switch
10. Headphones On/O button
11. Removable ear cushion pad with battery compartment
Page 4
4
EN
LED Indicators on the Headphones
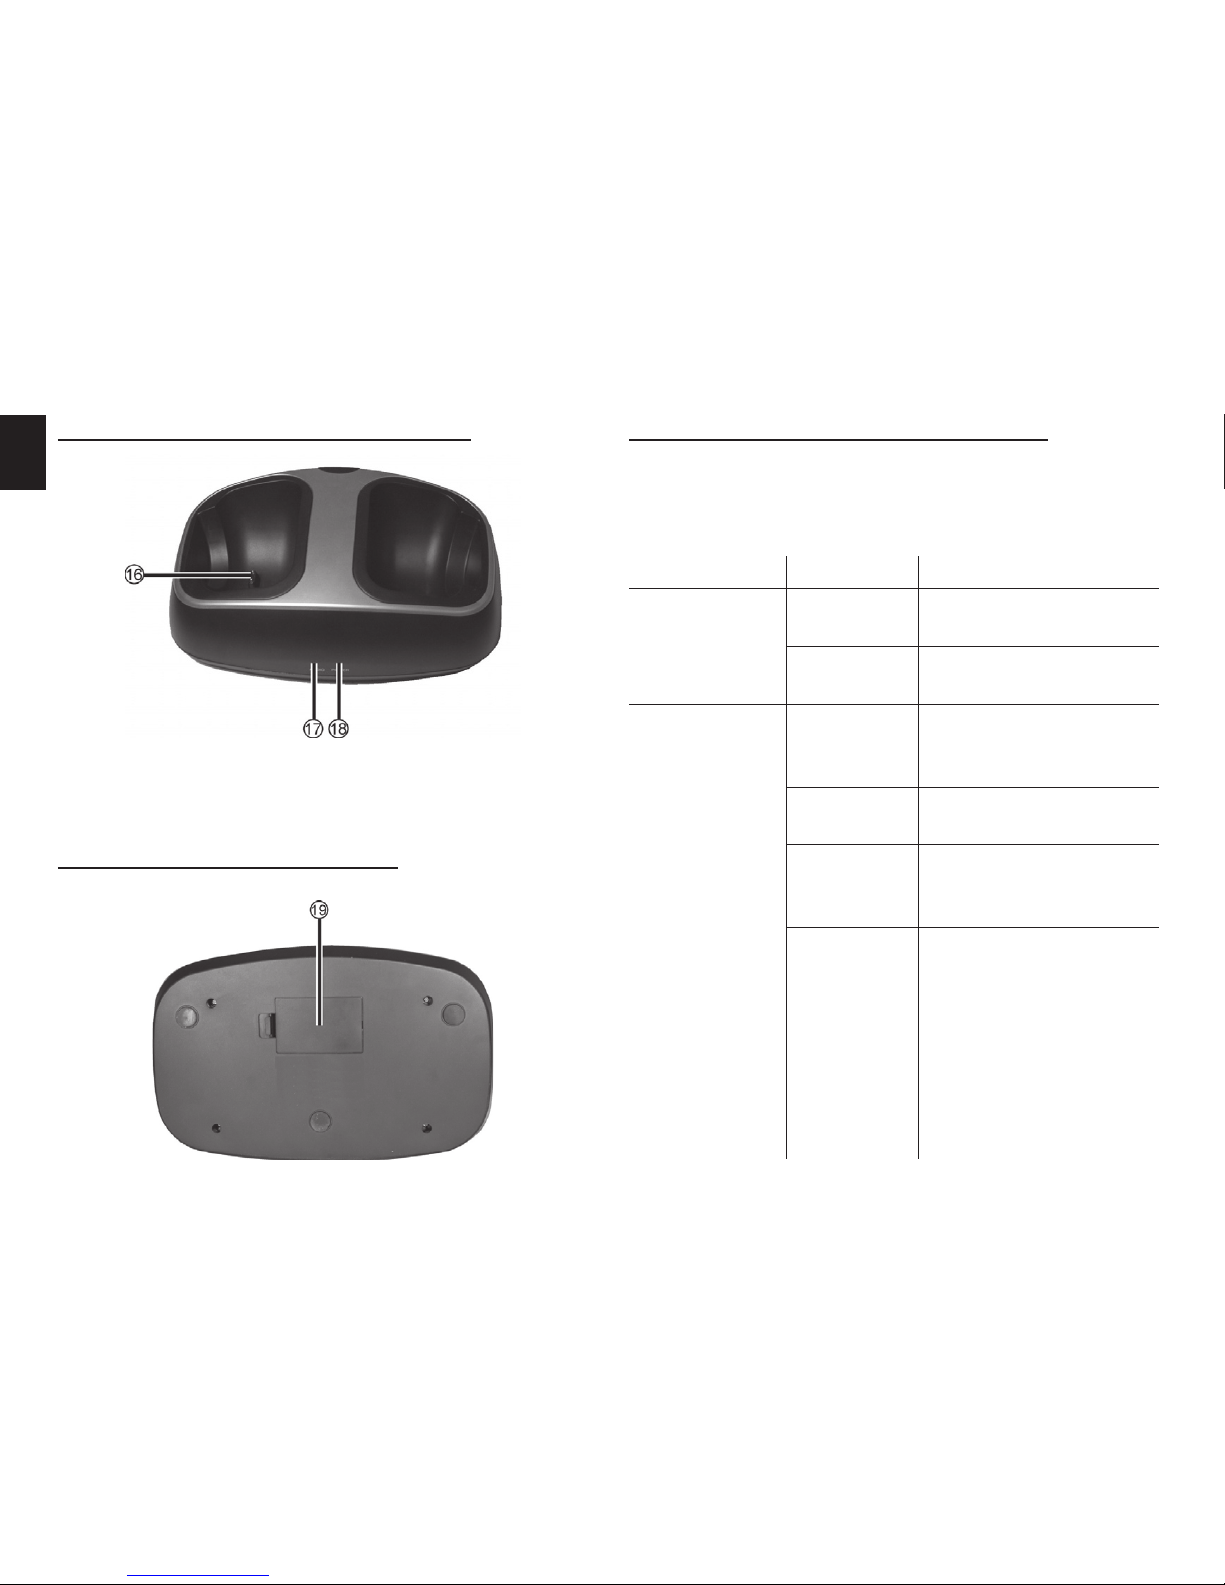
The headphones have two LED indicators: the power indicator (8) and the radio and RF reception indicator. The
following table contains a description of their meaning
depending on their colour and status:
LED indicator Status Description
Power
indicator (8)
On,
orange
The headphones are
powered on.
O The headphones are
powered o .
Reception
indicator (5)
Blinking,
orange
Attempting to establish
a connection with the
transmitter cradle.
Blinking,
green
The device is scanning
for a radio station.
On, green The RF link to the
transmitter cradle has
been established.
On, orange The RF link to the
transmitter cradle
has been established.
However, the
transmitter cradle is
not receiving an audio
signal from an external
audio source (e.g. your
hi- equipment).
16. Transmitter
17. Transmitter cradle send indicator (AUDIO)
18. Transmitter cradle power and charging indicator
(POWER)
Transmitter cradle (Front and Top)
Transmitter cradle (Bottom)
19. Battery compartment
Page 5
5
EN
Transmitter cradle LED Indicators
The transmitter cradle has two LED indicators: the power/
charging indicator (18) and the RF send indicator. The following table contains:
LED indicator Status Description
AUDIO (17) Blinking,
orange
Attempting to establish a
connection with the headphones.
On,
orange
The RF link to the headphones has been established. However, the transmitter cradle is not receiving an audio signal from
an external audio source
(e.g. your hi- equipment).
On,
green
A connection to the headphones has been established and audio data is
being sent to the headphones.
POWER (18) On, orange
The headphones battery
is being charged.
On, green
The transmitter cradle is
powered via the integrated mains adapter.
O
The transmitter cradle is
not powered via the integrated mains adapter.
Getting Started
Connecting the Transmitter Cradle
To connect to hi- equipment, use one of the supplied audio cables.
1. Connect one end of the audio cable to the audio input
socket (13).
2. Connect the other end of the cable to the headphones
output socket of your hi- equipment.
If your hi- equipment has a 6.3 mm jack socket, con-
nect the adapter plug to the audio cable.
You may also connect the adapter cable to the cable to
use the Cinch audio outputs of your hi- equipment.
3. Plug the small plug at the cable end of the mains adapter into the power socket (12).
4. Plug the power adapter into a wall outlet.
5. Turn on the transmitter cradle. See page 8 - Powering
the Transmitter Cradle On/O .
As soon as you connect the power adapter to the transmitter cradle and the mains, the transmitter cradle
power indicator (18) lights up green. This is independent of the position of the On/O switch (15).
Only use the integrated mains adapter indoors.
CD, MP3 etc.
Power
adapter
Page 6
6
EN
Charging the Battery of the Wireless
Headphones
Please charge the battery before using the product for the
rst time. A charging cycle takes approx. four hours.
Connect the integrated mains adapter to the transmitter
cradle and to a wall outlet.
■
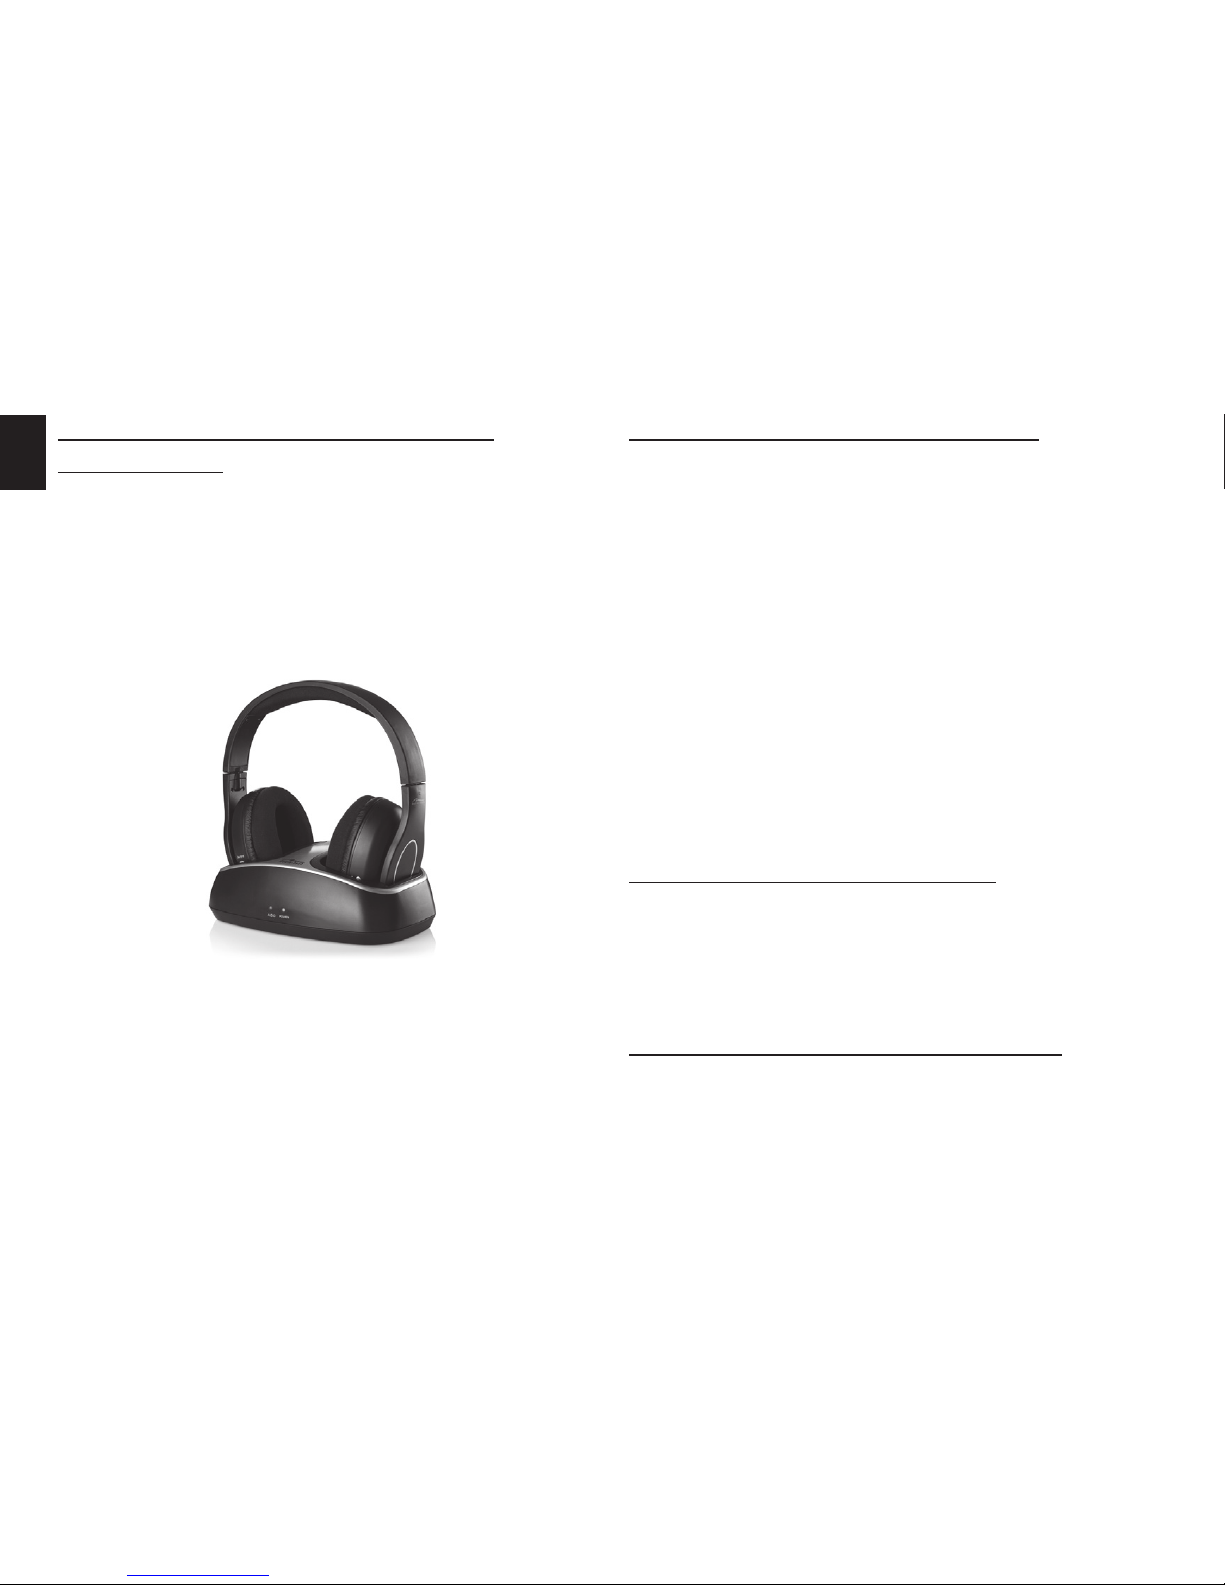
Place the headphones onto the cradle as shown below.
The chargingcontacts (16) of the transmitter cradle must
touch the charging contacts of the headphones (7).
The power and charge indicator (18) of the transmitter cradle will light up orange while the battery is charging. When
the charging process is completed, the power and charge
indicator will light up green.
If you place the headphones onto the transmitter cradle while they are switched on, they will be switched o
automatically.
Powering the Headphones On/O
If the battery level of the headphones is high enough (the
power and charge indicator (12) on the transmitter must
be green), you may remove the headphones from the
transmitter cradle.
You may optionally power the headphones using conventional batteries.
1. Press the On/O button (10) of the headphones once
to switch them on. The power indicator (8) will light up
orange.
2. Press the On/O button of the headphones again to
switch them o . The power indicator then goes out.
Please remember to set the correct position for the
Power source DC1/DC2 selection switch (9). When set at
DC2 position, the device will power on only if charged
batteries have been inserted into the headphones.
Selecting the Operating Mode
1. Slide the mode selection switch (4) to the “WL” position
to use the wireless headphones to listen to an external
audio source (e.g. your hi- equipment).
2. Slide the mode selection switch (4) to the “FM” position
to receive your favorite FM radio programs.
Powering the Transmitter Cradle On
1. To power the transmitter cradle on, slide the On/O
switch to the “ON” position.
After powering on, the send indicator (17) lights up orange.
Thisindicates that the transmitter cradle is attempting to
Page 7

7
EN
establish a connection with the headphones. Synchronizing the Headphones and Transmitter Cradle.
Synchronizing the transmitter cradle and the headphones
can take a while.
Powering the Transmitter Cradle O
You may power the transmitter cradle o whenever it is
not needed. When powered o , it will not transmit any RF
signals but the headphones battery will still be charged.
1. Slide the On/O switch (15) on the transmitter cradle to
the “OFF” position. The send indicator (17) on the transmitter goes out.
You may optionally power the transmitter cradle using
conventional batteries.
Synchronising the Headphones
and Transmitter Cradle
After powering the headphones and the transmitter cradle
on, both devices should synchronize automatically. This
process may take a while (sometimes more than 1 minute),
but normally you just have to be patient.
Under unfavourable circumstances, however, the audio
signal may be subject to interference. This may happen
if you are using a baby phone or a wireless keyboard and
mouse set nearby. In this case you can synchronize the devices manually to locate an interference-free channel.
1. Power the transmitter cradle on by sliding the On/O
switch (15) on the transmitter cradle to the “ON” position.
2. Power on the connected audio source and start playback. The send indicator (17) on the transmitter cradle
should light up green.
3. Slide the mode selection switch (4) of your headphones
to the “WL” position.
4. Power the wireless headphones on by pressing the On/
O button (10) once.
5. Press and hold the synchronization button (2) of the
headphones and the synchronization button (14) of the
transmitter cradle for at least 1 second.
The RF reception indicator on the headphones (5) and
the send indicator on the transmitter cradle (17) start
blinking. As soon as both devices have synchronized,
both indicators will light up green.
6. If necessary, repeat step 5 if you are not satis ed with
the reception quality or you still have interference from
other devices.
Synchronizing the transmitter cradle and the headphones
can take a while. If there are many wireless devices nearby
using the 2.4 GHz RF technology, the transmitter cradle
andheadphones rst have to nd a free communications
frequency. Any frequencies that are already occupied by
other devices will not be used. This is also known as “WLAN
Skipping and Hopping”.
Adjusting the Volume
1. Press the VOL+ button (1) once or several times to increase the sound volume.
2. Press the VOL- button (3) once or several times to decrease the sound volume.
Page 8

8
EN
If you have connected your headphones to an external audio source, you may also adjust the volume directly on the
audio source (e.g. by using the remote control of your hi-
equipment). However, please remember that many audio
devices provide a constant signal level on their Cinch audio
outputs, thus not allowing a volume adjustment when using this type of connection.
Receiving Radio Stations
You may change the operating mode of your headphones
to FM radio reception at any time.
1.
Power the headphones on by pressing the On/O button
(10) once. The power indicator (8) will light up orange.
2. Slide the mode selection switch (4) of your headphones
to the “FM” position. The radio reception indicator (5)
will not light up if no radio station has been tuned-in. It
will light up green as soon as a station has been properly
tuned in.
3. Press the Search button (2) on the headphones once to
search for the next available station.
During radio station scanning the radio reception indicator
(5) will blink green.
4. Each press of the Search button will nd the next available station until the end of the FM band has been
reached. After this the scan will automatically continue
from the beginning of the FM band.
The FM signal reception depends on environmental conditions. If the desired station cannot be received without
noise or interference, try changing your location.
The last tuned-in station will not be saved when changing
the operating mode or after powering the headphones o .
To use the built-in FM tuner it is not necessary to power the
transmitter cradle on. You may turn it o by pressing the
On/O button (15).
Using the Headphones with a Cable
If your location is close to the audio source and you don’t
wish to make portable use of your headphones, you may
use them with a normal cable connection. In this case you
don’t need the wireless capabilities of the transmitter cradle.
1.
Music output via the audio cable is possible while the
headphones are powered o . To save battery power, press
the On/O button (10) to power the headphones o .
2. Connect one end of the audio cable to the audio input
socket (6) of your headphones. Connect the other end
of the cable to the headphones output socket of your
hi- equipment.
If your hi- equipment has a 6.3 mm stereo socket, connect
the adapter plug to the cable.
You may also connect the adapter cable to the cable to use
any of the Cinch audio outputs of your hi- equipment.
With this type of connection, the headphones work as a
passive device. The volume can therefore only be adjusted
on the audio source.
Switching to radio reception is not possible during cable
operation. If you want to listen to radio stations, you must
rst disconnect the connection cable from the audio input
socket (6) of your headphones.
Page 9
9
EN
Battery operation
You may power both the transmitter cradle and the headphones usingrechargeable or conventional batteries (only
base). Batteries are not included in the package.
Remove the batteries when the device is not to be used
for a long time.
Respect the environment. Old batteries do not belong
in thedomestic waste. They must be handed in to a collection point for waste batteries.
Rechargeable AAA batteries cannot be recharged
when inserted into the base.
Powering the headphones using batteries
The headphones battery compartment is located in the
left earpiece.
1. Power the headphones o . To do this, press the On/O
button (10).
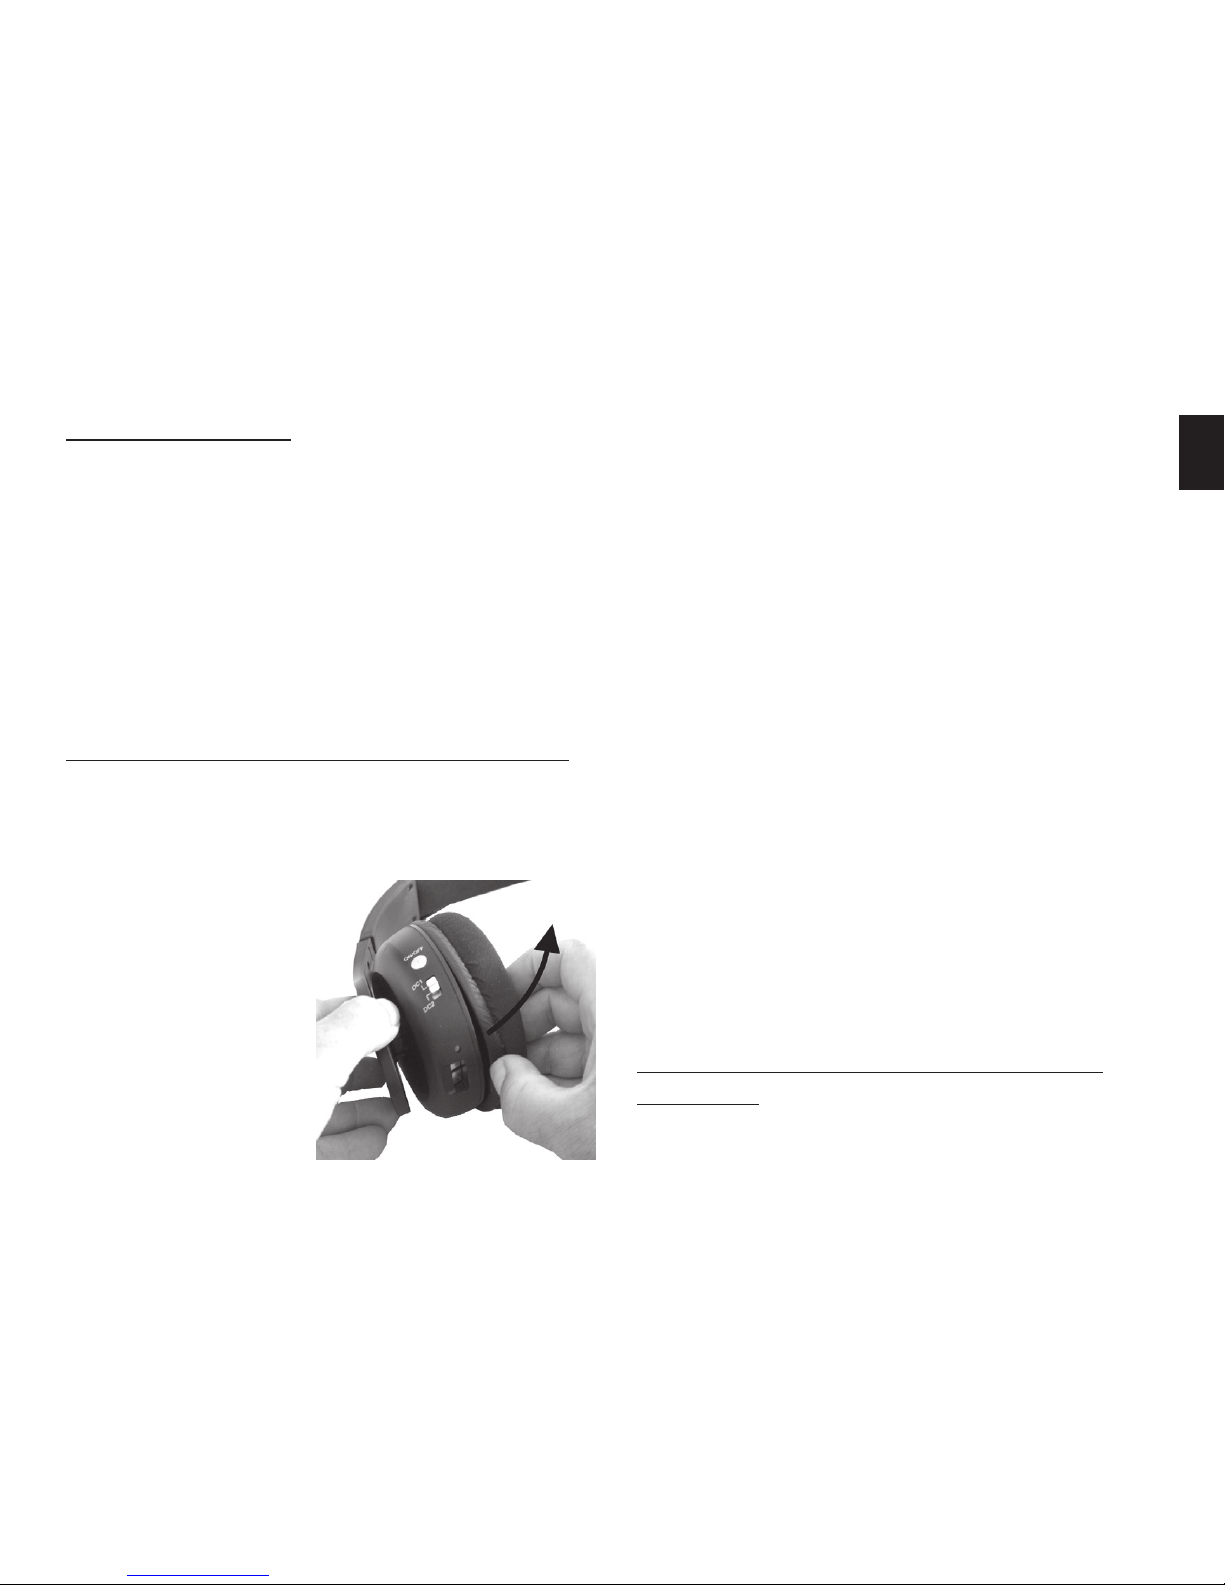
2. Hold the left earpiece
with your hand and
use the other hand to
pull the ear cushion o
the left earpiece. To do
this, insert a ngernail
into the slot between
the plastic frame of the
ear cushion and the
earpiece at the bottom
of the headphones.
The ear cushion is xed on a plastic frame. You need to
remove this frame from the locking mechanism together
with the ear cushion. Do not pull on the ear cushion itself.
3. Insert two AAA batteries into the earpiece battery compartment. Make sure you match the correct polarity.
Note the + and – icons on the batteries and inside the
battery compartments.
4. Slide the function switch (9) to the “DC2” position to
switch to battery mode.
5. Place the ear cushion onto the earpiece so that the locking noses of the plastic frame are inserted into the corresponding notches on the earpiece. Replace the ear
cushion by pushing it carefully onto the earpiece until
it clicks into place.
To switch between conventional batteries and internal rechargeable battery operation you must select the proper
position with the function switch (9).
■ Position “DC1” represents internal rechargeable battery
operation
■
Position “DC2” represents conventional battery operation
Pay attention to the proper setting of the function switch.
If no batteries are inserted and you have left the function
switch at the “DC2” position, the headphones will not
power on.
Powering the Transmitter Cradle Using
Batteries
The transmitter cradle battery compartment is located on
the bottom.
Page 10

10
EN
1. Remove any cable connections and turn the transmitter
cradle upside down, holding it in your hand.
2. Open the battery compartment by sliding the lock of
the compartment cover into the direction of the compartment. The cover can be opened and then removed.
3. Insert three AAA batteries into the battery compartment. Note the + and – icons on the batteries and inside
the battery compartment.
4. Place the battery compartment cover over the battery
compartment so that the locking nose of the cover is inserted into the corresponding notch on the transmitter
cradle. Then close the battery compartment cover until
it locks in place.
If you have inserted batteries into the transmitter cradle
and you connect the power adapter to the power socket
(12), battery operation will be disabled automatically. This
helps,you to save battery power whenever the device is
connected to the mains via the power adapter.
While the transmitter cradle is on battery power, it will not
charge the built-in headphone battery
Appendix
Troubleshooting
You can solve most common problems yourself by using
the following hints. If the problem persists after checking
the suggested solutions, please contact our company (see
gift box). Do not attempt to repair the product yourself.
The headphones do not power on, there are no indicator lights.
■ Recharge the built-in battery or insert conventional batteries.
■ Check the position of the function switch (9). For conventional battery operation it must be set to the “DC2”
position: for operation from the internal rechargeable
battery it must be set to “DC1”.
The headphones power on but there is no sound output.
■ Check that the transmitter cradle has been powered
on and connected properly to your audio source. Start
playback on the sound source.
■ Check if the transmitter is sending an audio signal. The
send indicator (17) should light up green.
■ Check if the headphones and transmitter cradle have to
be synchronised.
■ Check if the audio source is playing an audio signal. You
can use a connection cable to connect the headphones
directly to the audio source.
Unable to power the transmitter cradle on.
■ Did you connect the power adapter or are the inserted
batteries su ciently charged?
Page 11

11
EN
Sound is interrupted or noisy.
■ The rechargeable battery or the inserted batteries of the
headphones are depleted. Recharge the internal battery
or replace the batteries with new batteries of the same
type.
■ You are outside the maximum range of the transmitter.
Move closer to the transmitter cradle.
Technical Speci cations
Model Wireless stereo headphones
with FM radio
Frequency response 22 - 20,000 Hz
Signal to noise ratio 50 dB
R/L channel separation
30 dB
Carrier frequency 2.40 – 2.48 GHz (WLAN hopping)
Modulation digital
Maximum
transmission power
9.9 dBm
Radio tuning band FM Radio 87.5 MHz to 108 MHz
Transmission range 50 m (150 ft)
(under optimum conditions)
Broadband
characteristics voltage
327 mV
Connectors
and ports
1 x stereo Audio-In 3.5 mm
jack (headphones)
1 x stereo Audio-In 3.5 mm
jack (transmitter)
1 x 5V DC-In
Power supply Integrated mains adapter
(for transmitter cradle)
Manufacturer:
Type EU: (optional)
Type UK: (optional)
Input: 100-240VAC, 50/60Hz, 0.2A
Output: 5V , 300 mA
Rechargeable
battery/
battery operation
Rechargeable Lithium-Polymer battery, 3.7V, 900 mAh (built-in in headphones, Optional)
Alternative power supply for headphones: 2x AAA R03/LR03 batteries
(not included in the package)
Alternative power supply for transmitter cradle: 3x AAA R03/LR03 batteries (not included in the package)
Weights Headphones: 260g
Transmitter cradle: 240g
Dimensions
(W x H x D)
Transmitter cradle:
215 x 134 x 73 mm
Transmitter cradle
Headphones: 216 x 237 x 134 mm
Design and equipment speci cations are subject to
change without prior notice.
Page 12

12
EN
 Loading...