

Page 1
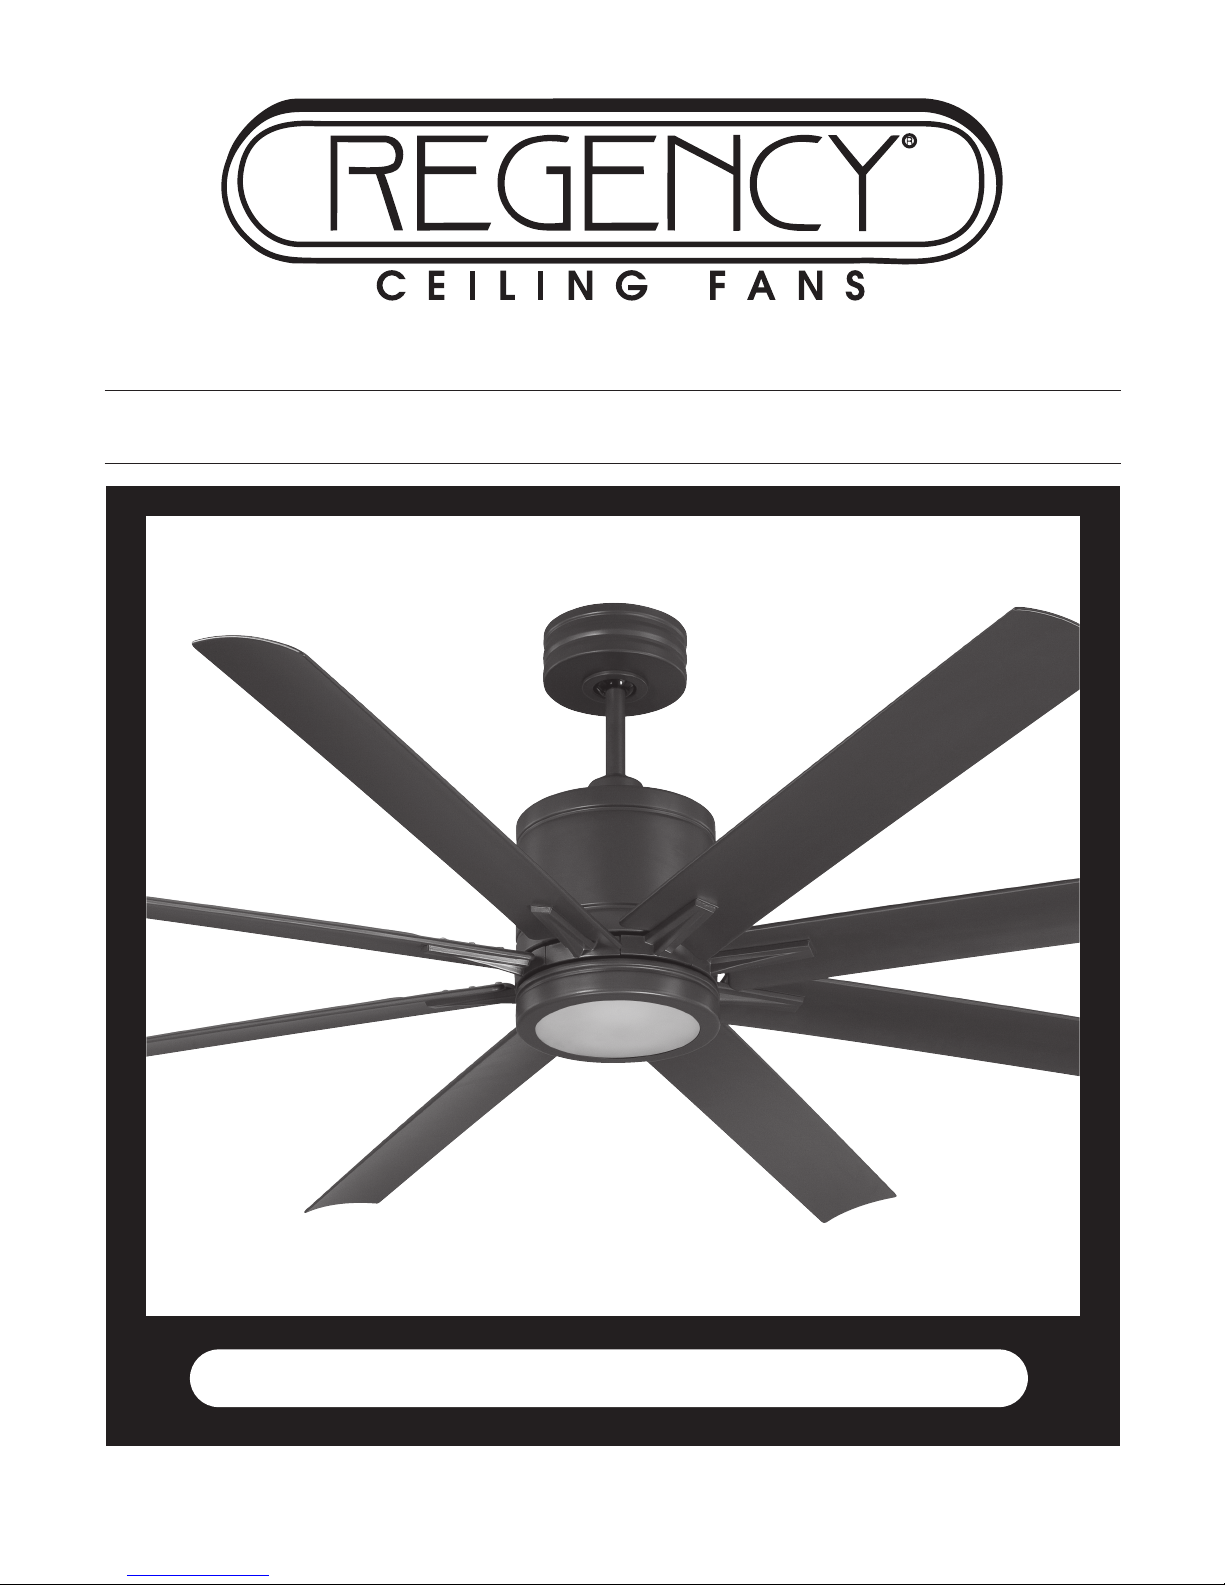
• VANTAGE • with DC motor
• C
EILING
F
AN
O
WNER'S
M
ANUAL
•
12/14
Style that revolves around you.
WARNING: Read and follow these instructions carefully and be mindful of all warnings shown throughout.
Page 2
G
ENERAL INSTALLATION
& O
PERATION INSTRUCTIONS
IMPORTANT SAFEGUARDS:
1. To ensure the success of the installation, be sure to read the instructions and review the diagrams thoroughly
To ensure the success of the installation, be sure to read the instructions and review the diagrams thoroughly
before beginning.
before beginning.
2. To avoid possible electric shock, be sure electricity is turned off at the main power box before wiring.
To avoid possible electric shock, be sure electricity is turned off at the main power box before wiring.
All
electrical connections must be made in accordance with local codes, ordinances and/or the National Electric
Code. If you are unfamiliar with the methods of installing electrical wiring and products, secure the services of a
qualified and licensed electrician as well as someone who can check the strength of the supportive ceiling
members and make the proper installation(s) and connections.
3. Make sure that your installation site will not allow rotating fan blades to come in contact with any object. Blades
should be at least 7 feet from floor.
4. When mounting on a ceiling outlet box, an approved box UL listed as "suitable for fan support"
"suitable for fan support"
is required. The
box and its supporting members must be able to support the moving weight of the fan's listed weight. The box
must not be able to twist or work loose. Installation on a concrete ceiling should be performed by qualified
personnel.
5. Blades should be attached after motor housing is hung and in place. Fan motor housing should be kept in the
carton until ready to be installed to protect its finish. If you are installing more than one ceiling fan, make sure
that you do not mix fan blade sets,
do not mix fan blade sets,
as each blade is part of a weighted set.
6. After making electrical connections, spliced conductors should be turned upward and pushed carefully up into
outlet box. The wires should be spread apart with the common conductor and the grounding conductor on one
side of the outlet box, and the "HOT" wires on the other side.
7. Electrical diagrams are for reference only. Light kits that are not packed with the fan must be UL listed and
should be installed per the light kit's installation instructions.
8. After fan is completely installed, check to make sure that all connections are secure to prevent fan from falling
and/or causing damage or injury.
9. The fan can be made to work immediately after installation - the bearings are adequately charged with grease so
that, under normal conditions, further lubrication should not be necessary for the life of the fan.
10. To operate the reverse function on this fan, press the reverse button while the fan is running.
1
Weight of Fan: 24.12 Lbs
Page 3
I
MPORTANT SAFETY PRECAUTIONS
2
Thank you for choosing a Regency Ceiling Fan. You have chosen the best!
Your new ceiling fan has been designed to provide many years of service and enjoyment.
• Disconnect power by removing fuse or turning off circuit breaker before installing the fan and/or optional lighting.
Disconnect power by removing fuse or turning off circuit breaker before installing the fan and/or optional lighting.
• Support directly from building structure.
• To reduce the risk of fire, electric shock, or personal injury, mount to outlet box marked "acceptable for fan
"acceptable for fan
support"
support"
and use mounting screws provided with the outlet box. Most outlet boxes commonly used for the support
of lighting fixtures are not acceptable for fan support and may need to be replaced. Consult a qualified electrician if
in doubt.
• Do not use an incandescent light dimmer. Do not use this fan with any transformer type fan speed control device.
• To reduce the risk of personal injury, do not bend the blade arms when installing them, balancing the blades or
cleaning the fan. Do not insert any objects(s) between rotating fan blades.
NOTE:The important precautions, safeguards and instructions appearing in this manual are not meant to cover all
NOTE:The important precautions, safeguards and instructions appearing in this manual are not meant to cover all
possible conditions and situations that may occur. It must be understood that common sense, caution and
possible c onditi ons and situati ons that m ay occur. It must be unders tood tha t common sense, c aution a nd
carefulness are factors which cannot be built into this product. These factors must be supplied by the person(s)
carefulness are factors which cannot be built into this product. These factors must be supplied by the person(s)
installing, caring for, and operating the unit.
installing, caring for, and operating the unit.
Warnings:
Warnings:
T
OOLS AND
M
ATERIALS REQUIRED
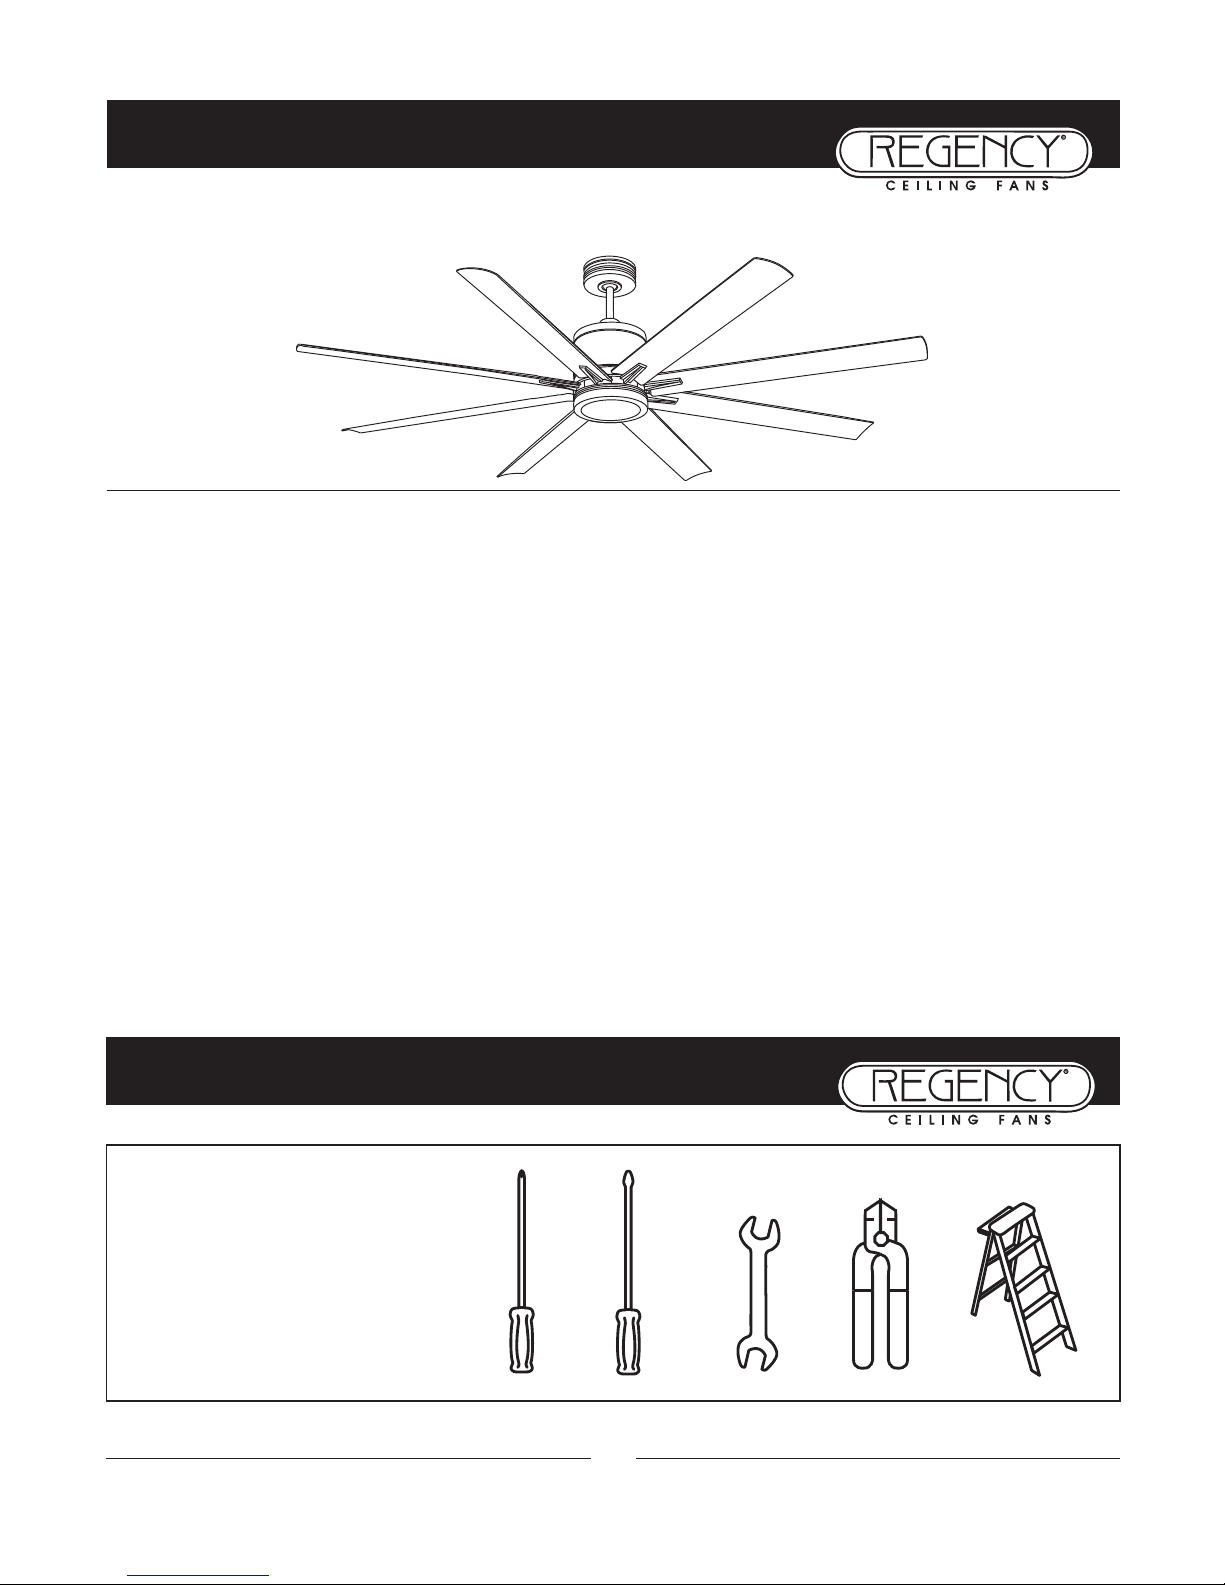
• Phillips screwdriver
• Blade screwdriver
• Wrench or pliers
• Wire cutter
• Stepladder
• Wiring supplies as required by
electrical code
Page 4
3
13
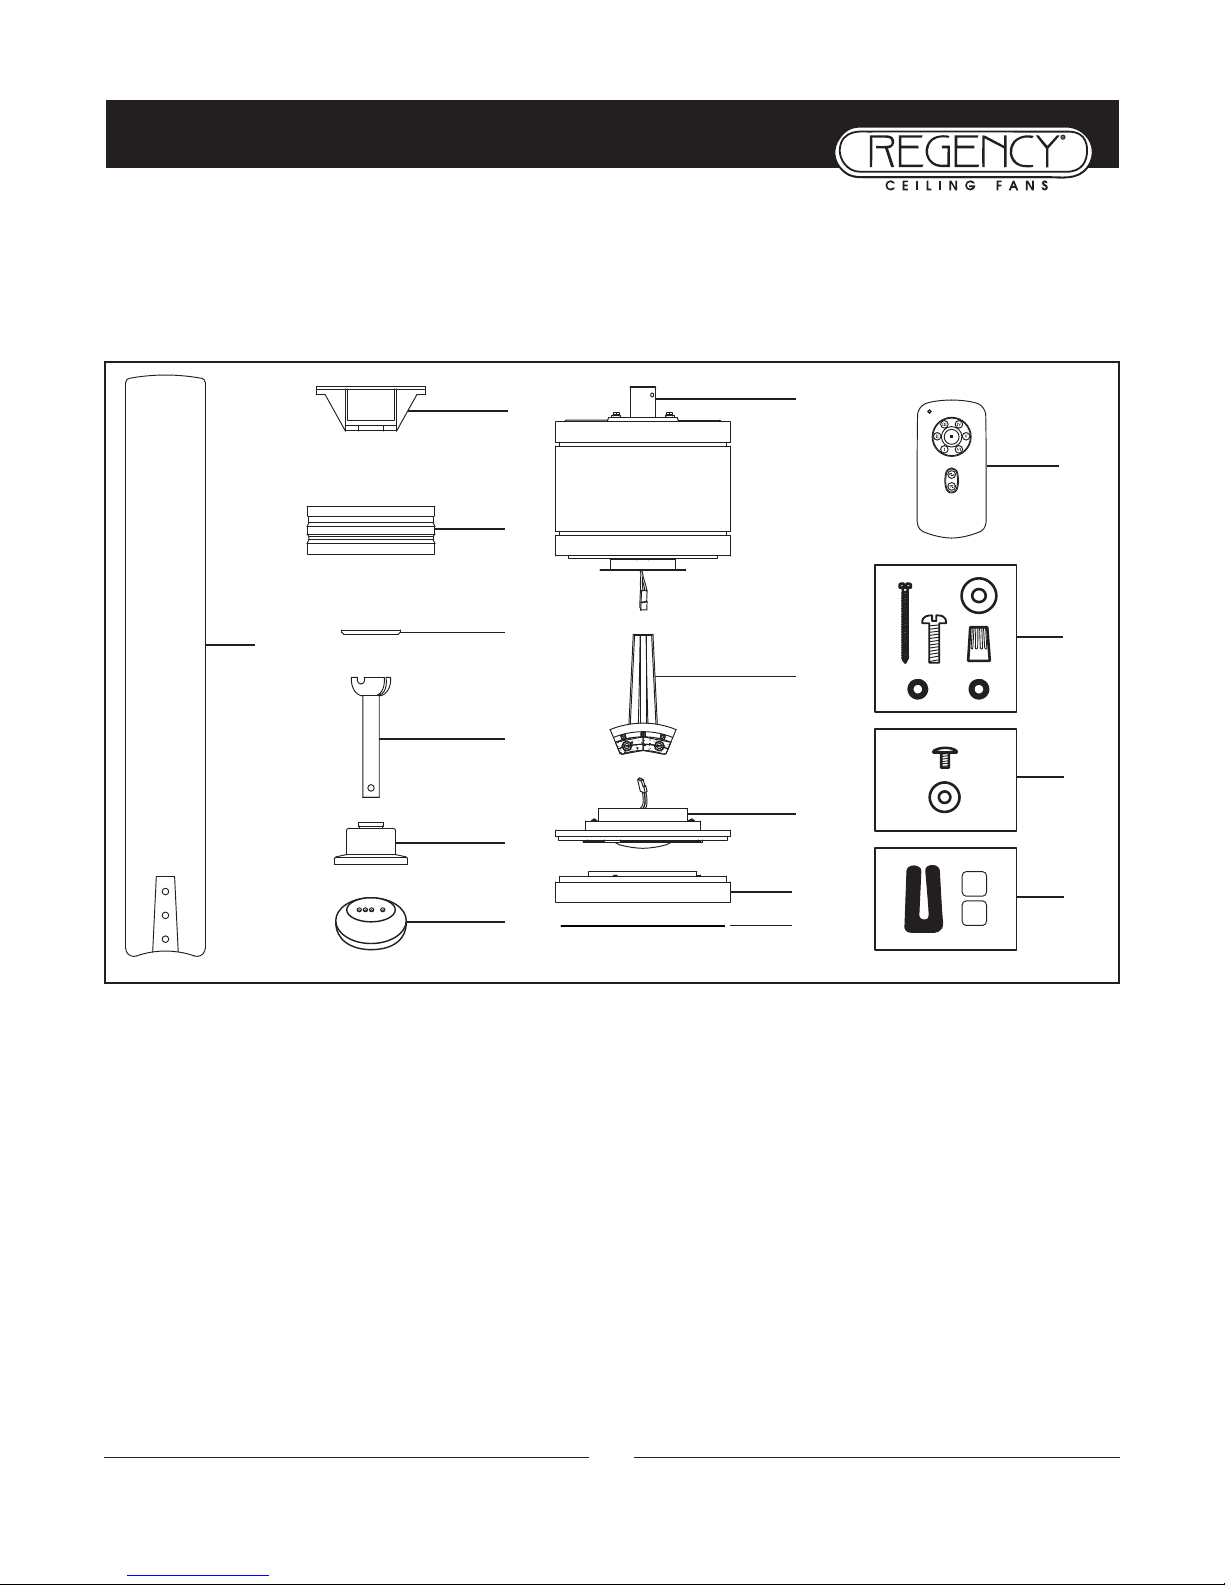
1. Fan blades (8)
2. Hanging bracket
3. Ceiling canopy
4. Canopy screw cover plate
5. Downrod/ball assembly
6. Collar cover
7. Ball moisture cap
8. Fan housing with motor (Remove rubber shipping supports around motor, if included on your fan. Save screws.)
9. Blade arms (8)
10. 16W LED light kit
11. Light cover
12. Metal cover
13. Transmitter+holder+2 mounting screws
14. Bracket mounting hardware (wood screws, screws, lock washers, washers, wire nuts)
15 Blade arm to blade screws, w/washers (25)
* 2 set of screws are provided-a long set and a short set, depending on which type of blades you choose for your fan.
16. Balance kit
NOTE:
NOTE:
Design of parts shown above may look slightly different for your specific model of fan.
U
NPACKING YOUR FAN
1. Unpack your fan and check the contents. Do not discard the carton. If warranty replacement or repair is ever
necessary, the fan should be returned in original packing. Remove all parts and hardware. Do not lay motor
housing on its side, or the decorative housing may shift, be bent or damaged.
2. Examine all parts. You should have the following:
1
2
6
7
3
4
5
15
14
16
8
9
10
11
12
Page 5
P
REPARATION
PREPARATION:
Verify you have all parts before beginning the installation. Check foam insert closely for missing parts. Remove motor
from packing. To avoid damage to finish, assemble motor on soft padded surface or use the original foam inset in
motor box. Do not lay motor housing on its side as this could result in shifting of motor in decorative enclosure
Do not lay motor housing on its side as this could result in shifting of motor in decorative enclosure
.
Caution
Caution
: To avoid possible electrical shock, be sure
electricity is turned off at the main power box before
wiring. All wiring must be in accordance with National
and Local Electrical Codes and the ceiling fan must be
grounded as a precaution against possible electric shock.
1. Locate ceiling joist where fan is to be mounted, being
sure location agrees with the requirements in the minimum clearance section of this guide. Wood joist must be
sound and of adequate size to support 35 lbs. (See Page 1,
Items 3 and 4).
2. If not already present, mount a UL listed outlet box
marked "suitable for fan support" following the instructions provided with the outlet box. The outlet box must be
able to support a minimum of 35 pounds.
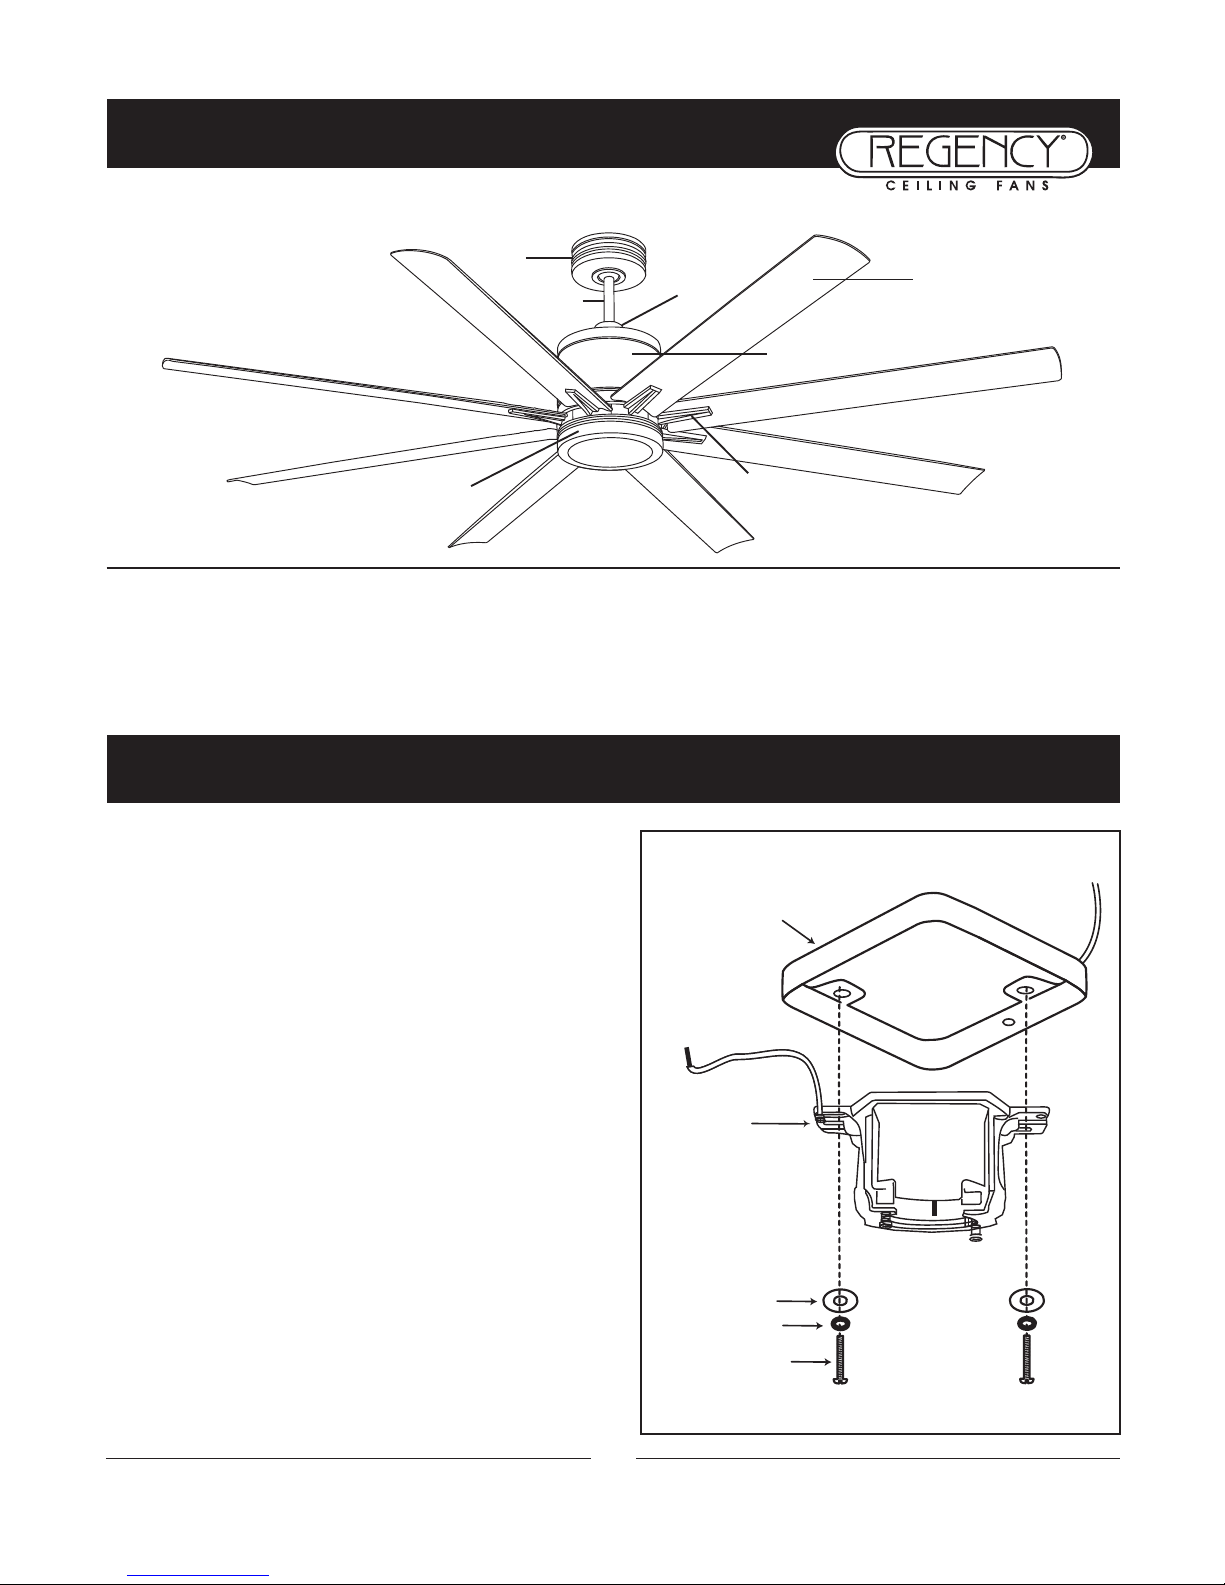
3. Attach hanging bracket to outlet box using screws
provided with the outlet box.
4
Parts identification on assembled fan
I
NSTALLING THE HANGING BRACKET
Ceiling Fan
Outlet Box
Hanger
Bracket
Outlet Box
Screw
Flat Washer
Spring Washer
Fig. 1
Blade
Blade
Arm
Collar Cover
Downrod
Canopy
Motor Housing
Light Cover
Page 6
I
NSTALLING THE FAN
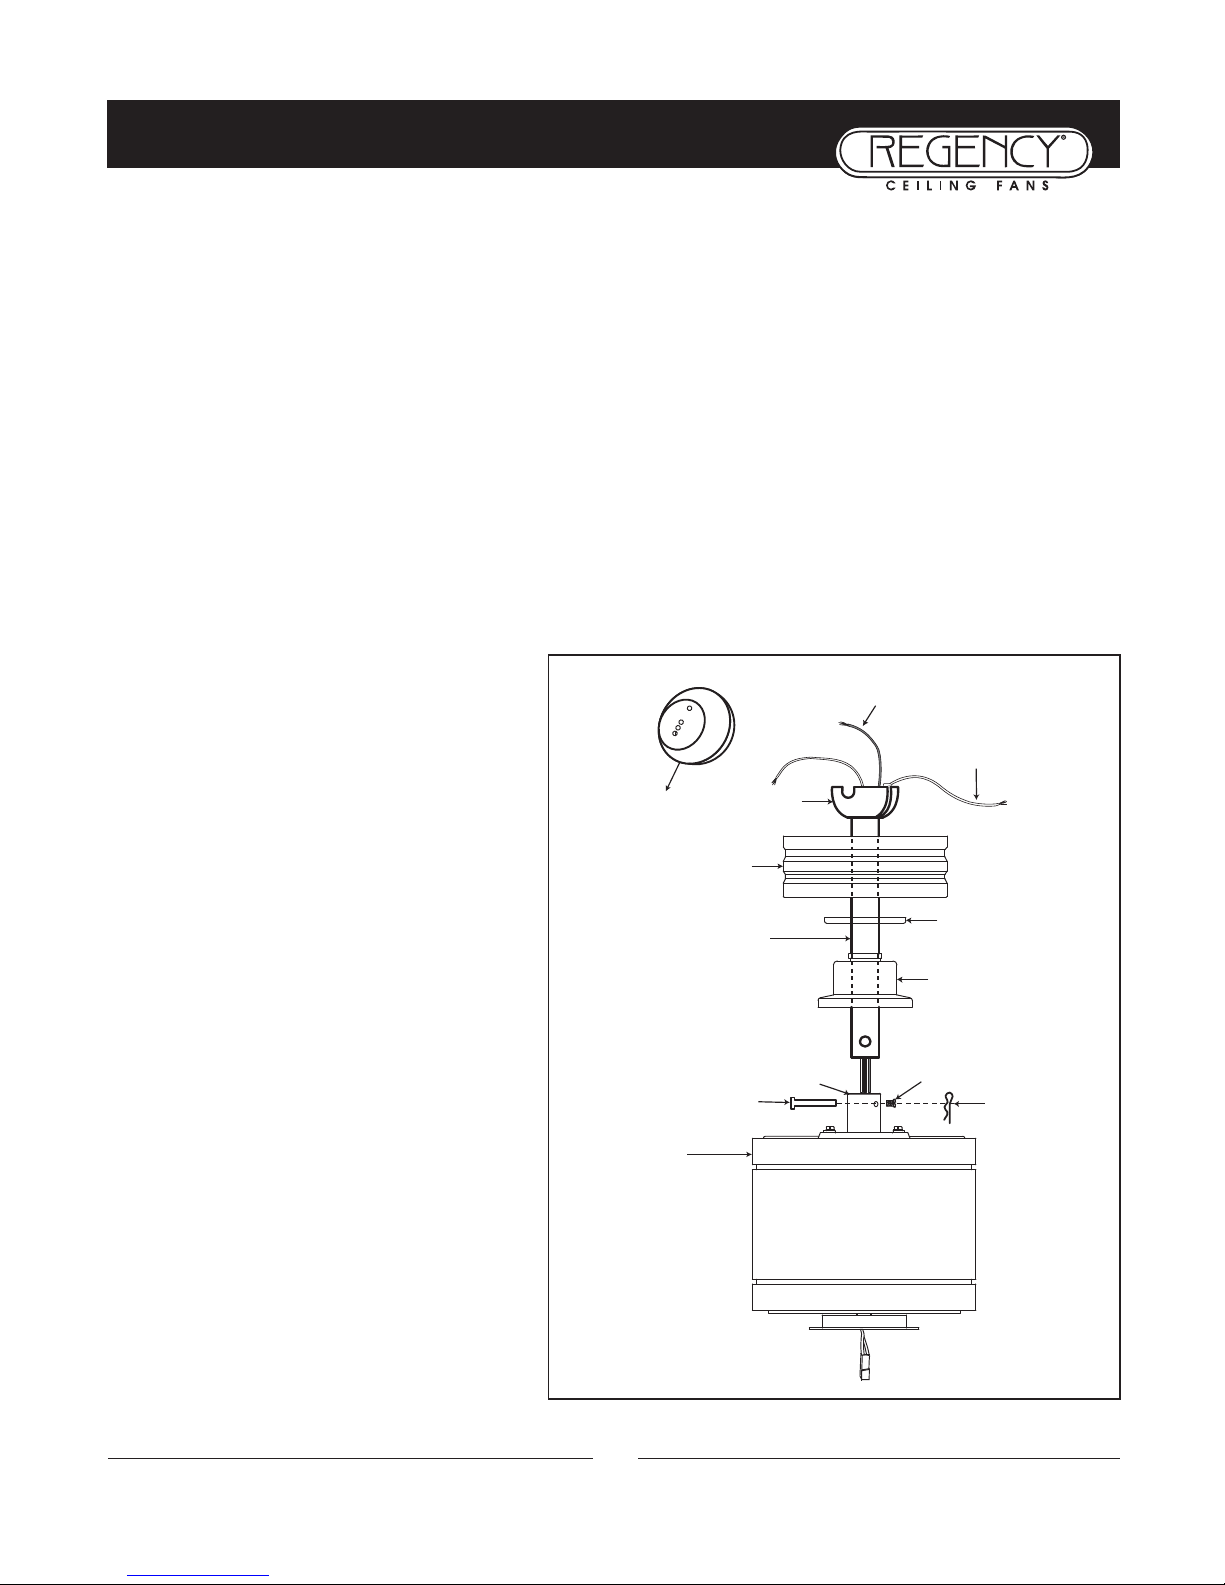
1. Carefully support fan body (motor) in its styrofoam packing with the mounting collar (where the wires come out)
facing upward.
2. Loosen the two set screws and remove the downrod pin and cotter pin from the top coupling of the motor assembly.
3. Remove ball from the downrod by loosening set screw in the side of the ball. Slide ball down and remove ball pin;
remove ball.
4. Feed the wires from top of fan through end of the downrod of choice and set end of downrod into mounting collar so
the hole in the downrod lines up with the hole in the side of the mounting collar.
5. Insert downrod pin through holes in mounting collar and downrod; slip cotter pin through small hole in end of
downrod pin to hold downrod in place.
6. Tighten jam screws against downrod using a large flat blade screwdriver to ensure a tight fit against downrod. Tighten
nuts against mounting collar.
5
Hook-up (3)
Wires
Ground
Wire
Ball
Canopy
Downrod
Mounting Collar
Downrod Pin
Top of
Fan Body
Collar Cover
Canopy Screw
Cover Plate
Security Screws
Cotter
Pin
Ball Moisture Cap
(Outdoor Fans Only)
NOTE
NOTE
: Fan has 6 feet of hook-up wire in case
you are using a long extension downrod. Wires
can be cut so only 8 inches or so extend beyond
7. Feed wires through canopy screw cover plate
and canopy, then slide both over downrod to
lay on top of collar rubber cover. It will be
attached to ceiling later.
8 . Feed wires through ball and slide ball over
downrod, past hole in the top end of the
downrod. Insert ball pin (removed in step 3),
slide ball up, and tighten set screw to secure
ball in place.
9. (Outdoor rated fans only)
Feed wires through holes in rubber ball
moisture cap and slide cap down over top of
ball.
Page 7
I
NSTALLING THE FAN
E
LECTRICAL CONNECTIONS
WARNING: To avoid damaging the blade arms and blades,
do not install them onto fan until fan is fastened to ceiling.
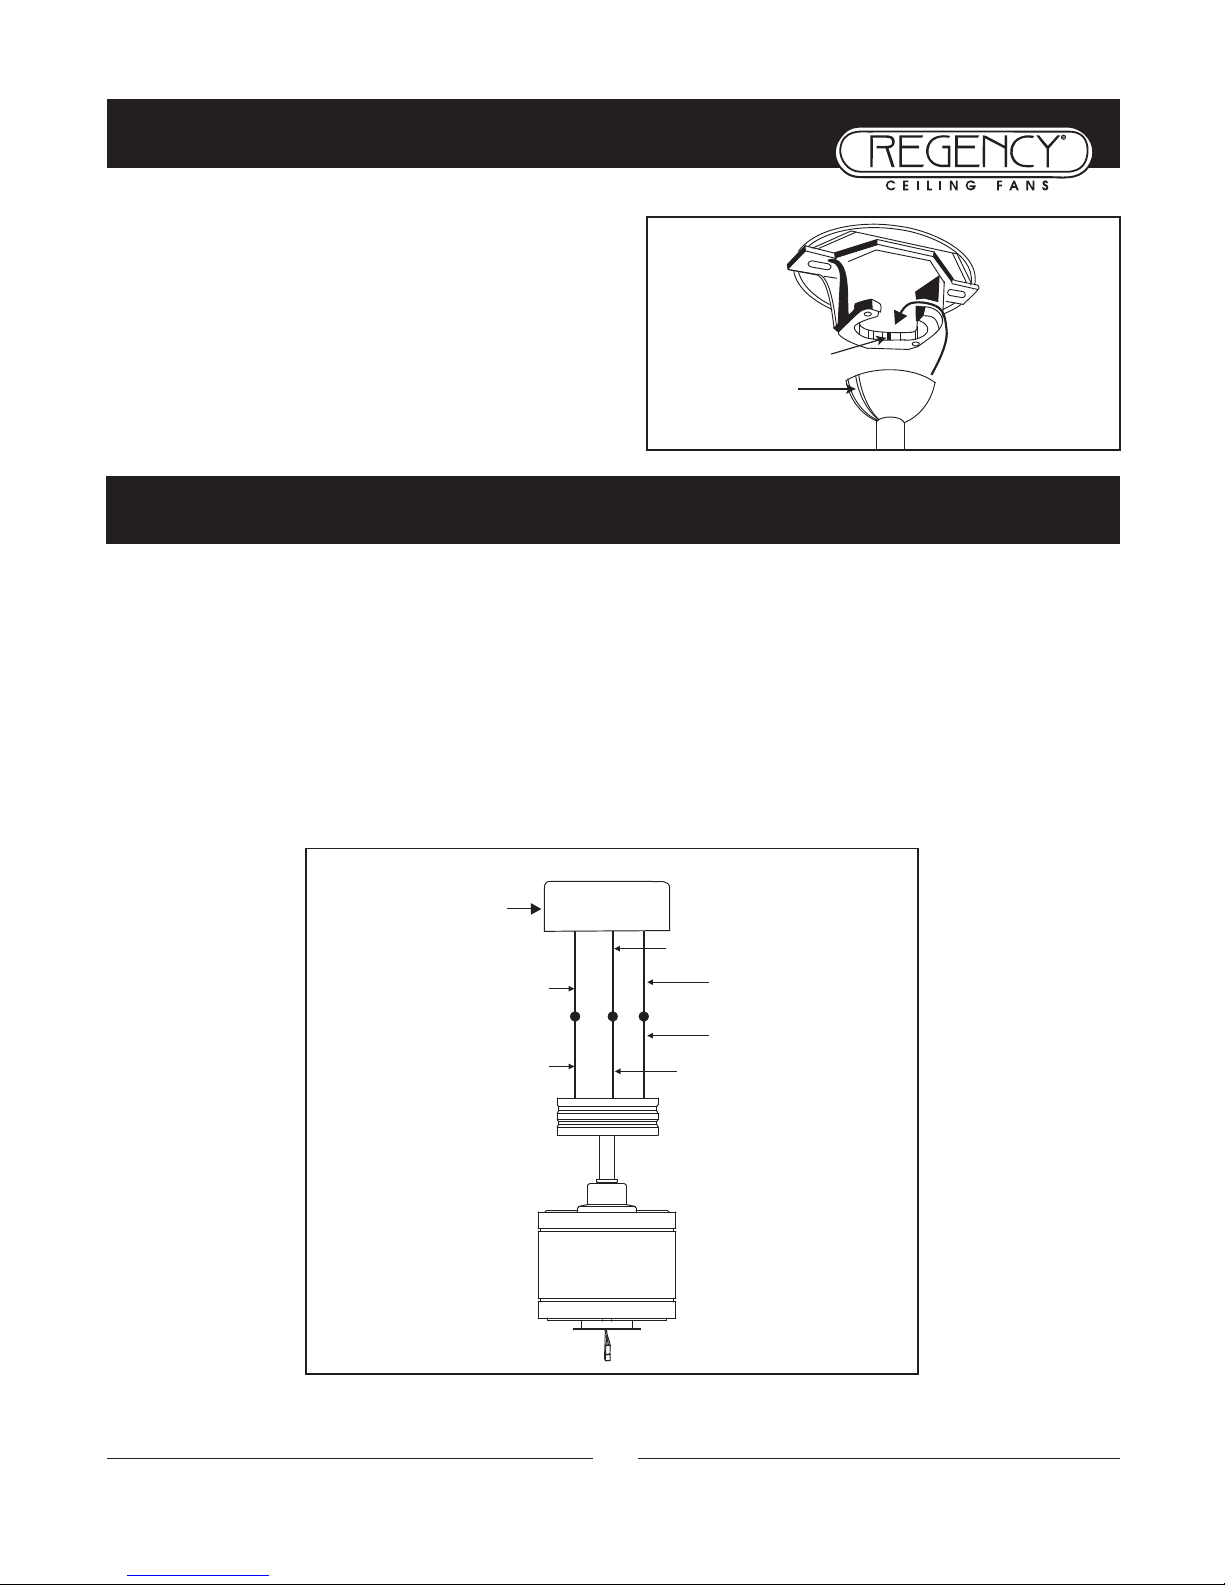
1. Lift ball/downrod/fan into hanging bracket opening.
NOTE: The tab opposite hanging bracket opening should fit
in slot on ball.
WARNING: To avoid possible electrical shock be sure electricity is turned off at the main fuse or breaker box before
wiring.
1. Connect the fan supply (black) wire to the black household supply wire as shown in Figure 4.
2. Connect the neutral fan (white) wire to the white neutral household wire. (Fig. 4)
3. After all splices are made, check to make sure there are no loose strands. As an additional precaution we suggest to
secure the plastic wire connectors to the wires with electrical tape.
6
Slot
Tab
Outlet Box
Black ("AC IN L")
White ("AC IN N")
White (Neutral)
Black (Motor)
Fig. 3
Fig. 4
Green or bare
copper (ground)
Ground (green)
(Connect to ground wire on
hanger bracket if no house
ground wire exists.)
Page 8
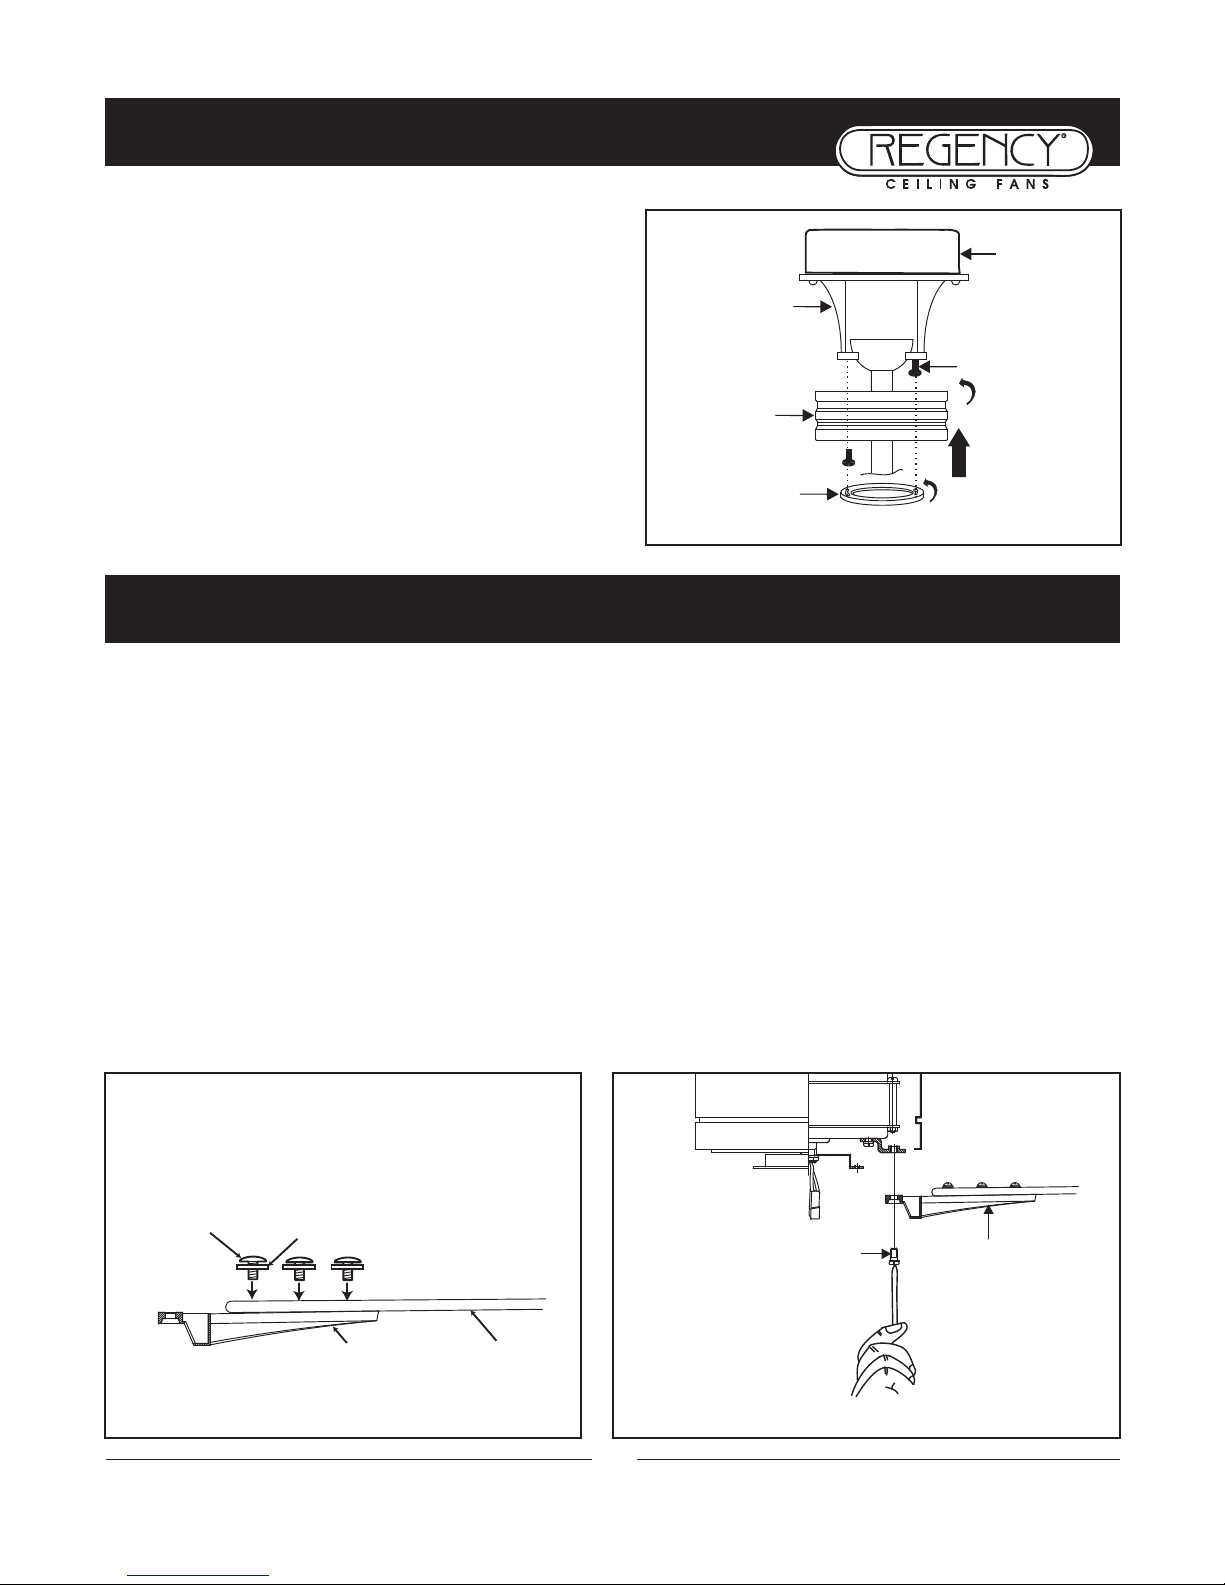
1. Place washer on screw. Insert this assembly through the blade and start the screw into the blade arm. Repeat this
procedure without tightening the screw until all 3 screws have been started into the blade arm (Fig. 1).
NOTE:
NOTE:
Fans that have painted finishes are packed with gaskets that can be used between the blade arm and blade to
help prevent a clicking noise that may develop if blade screws loosen over time.
2. Tighten each screw starting with center screw.
3. Fasten blade assembly to motor with provided screws and lock lockwashers. Repeat procedure for remaining
blades (Fig. 2). Make sure screws are TIGHT!
TIGHT!
Loose motor screws can contribute to unnecessary hum during
operation.
NOTE:
NOTE:
Cordless power screwdrivers are NOT
NOT
recommended, as they tend to strip the heads of the screws and usually
will not fully compress the lock washers on the motor screws. Use a large flat blade screwdriver for final tightening to
fully compress the washers. This will help ensure proper alignment of the blades and noise-free, wobble-free running.
7
Fig. 1 Fig. 2
Screws
Blades
Assembly
Screw
Washer
Blade Arm
Blade
Install gasket between
blade arm and blade
(optional)
F
INISHING THE INSTALLATION
B
LADE ATTACHMENT
1. Tuck connections neatly into ceiling outlet box.
2. Slide the canopy up to mounting bracket and place the
key hole on the canopy over the screw on the mounting
bracket, turn canopy until it locks in place at the narrow
section of the key holes.
3. Align the circular hole on canopy with the remaining hole
on the mounting bracket, secure by tightening the two set
screws. Note: Adjust the canopy screws as necessary until
the canopy and canopy cover are snug.
WARNING:
WARNING:
Make sure the hook on the hanging bracket
properly sits in the groove in the hanger ball before attaching
the canopy to the bracket by turning the housing until it
drops into place.
Canopy
Screws
Canopy Screw
Cover Plate
Ceiling Fan
Outlet Box
Hanger
Bracket
I
NSTALLING THE FAN
Page 9
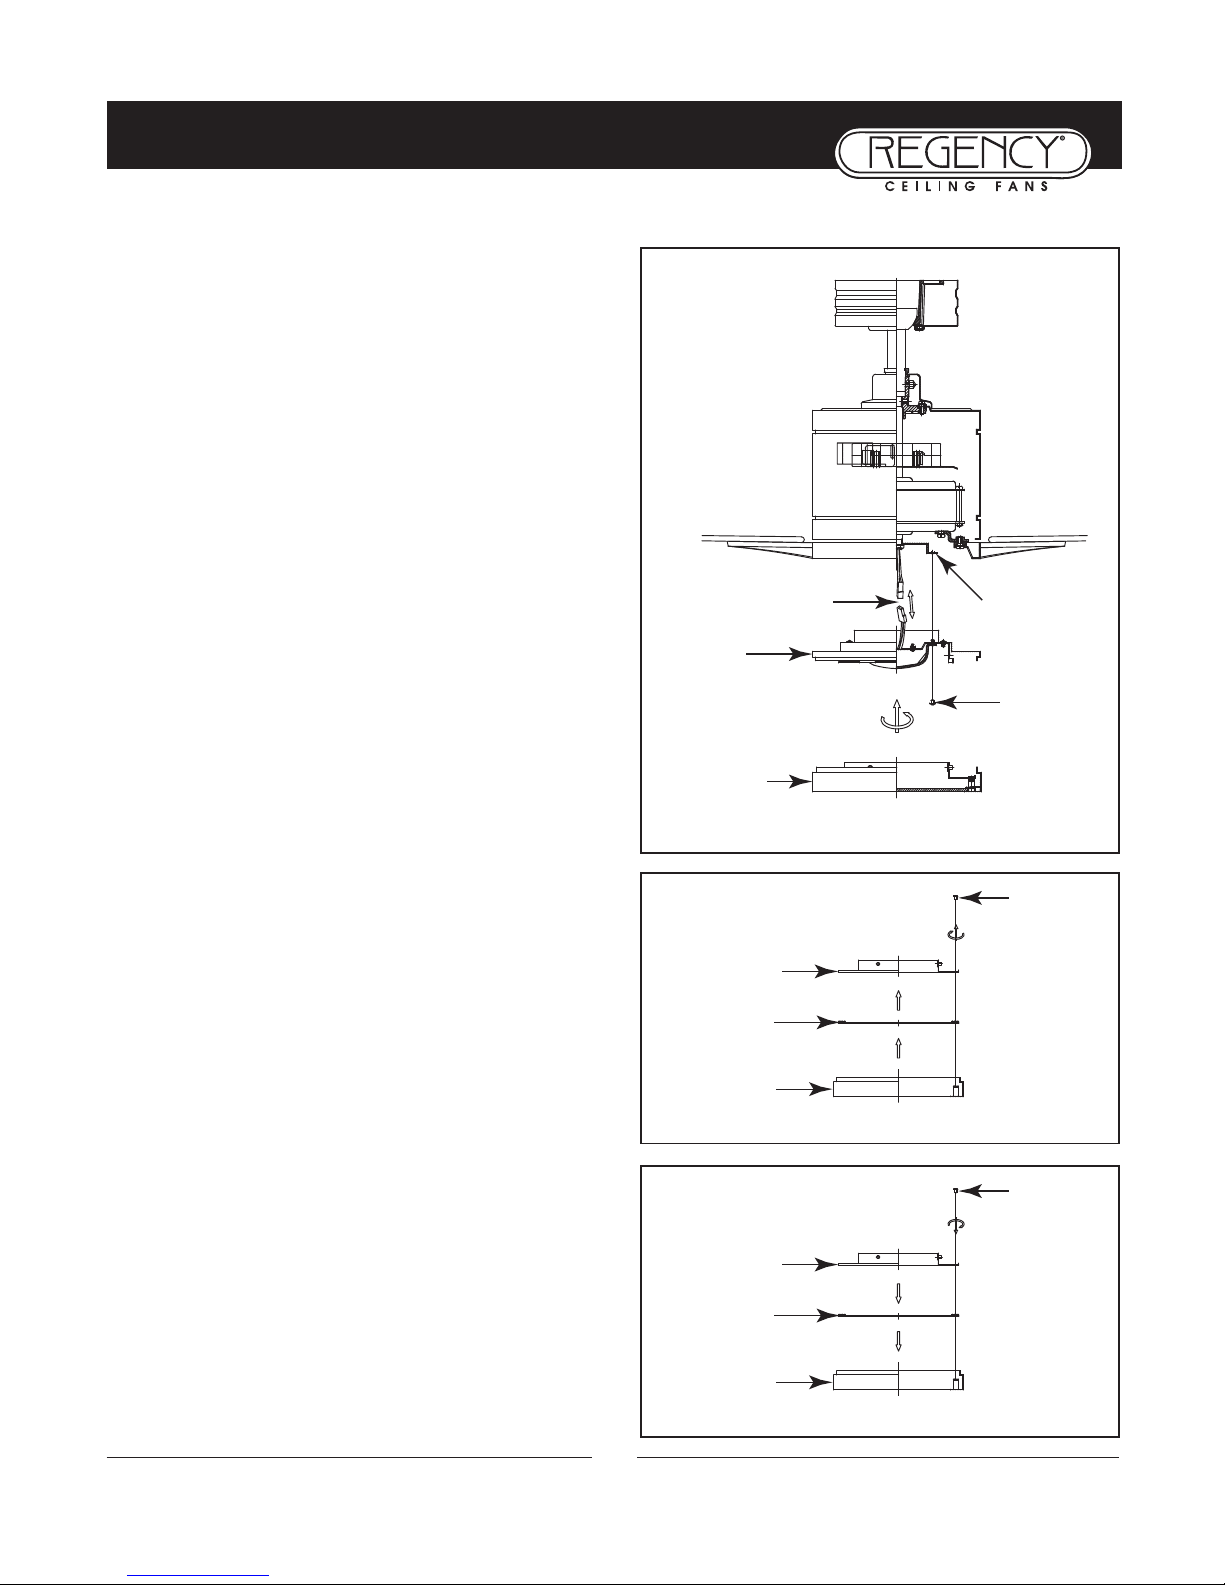
I
NSTALLING THE LIGHT KIT AND GLASS SHADE
Step1. Remove one of the three screws on the mounting
hub located on the fan motor. (Fig. 1)
Step 2. While holding the LED light kit under your fan,
make the polarized plug connections: (Fig. 1)
- Red to white
- Black to black
NOTE: If you do not plan to install the LED light kit with
your fan at this time, don’t make the wire connections.
Remove the screws and take out the glass board form the
light cover (Fig. 2), then attach the metal cover to the
light cover B and light cover A with the screws provided.
(Fig. 3)
Step 3. Tuck connections neatly into LED light kit, place
the LED light kit to the mounting hub with 3 screws provided. (Fig. 1)
Step 4. Raise the light cover against the LED light kit and
turn clockwise until snug, DO NOT OVERTIGHTEN.
(Fig. 1)
Step 5. Restore power and your light kit is ready for operation.
8
Fig. 1
Screws
Mounting Hub
(bottom of motor)
Light Kit
Wire connectors
Fig. 2
Light
Cover B
Light
Cover A
Glass
Board
Screws
Fig. 3
Light
Cover B
Light
Cover A
Metal
Cover
Screws
Light Cover
Page 10
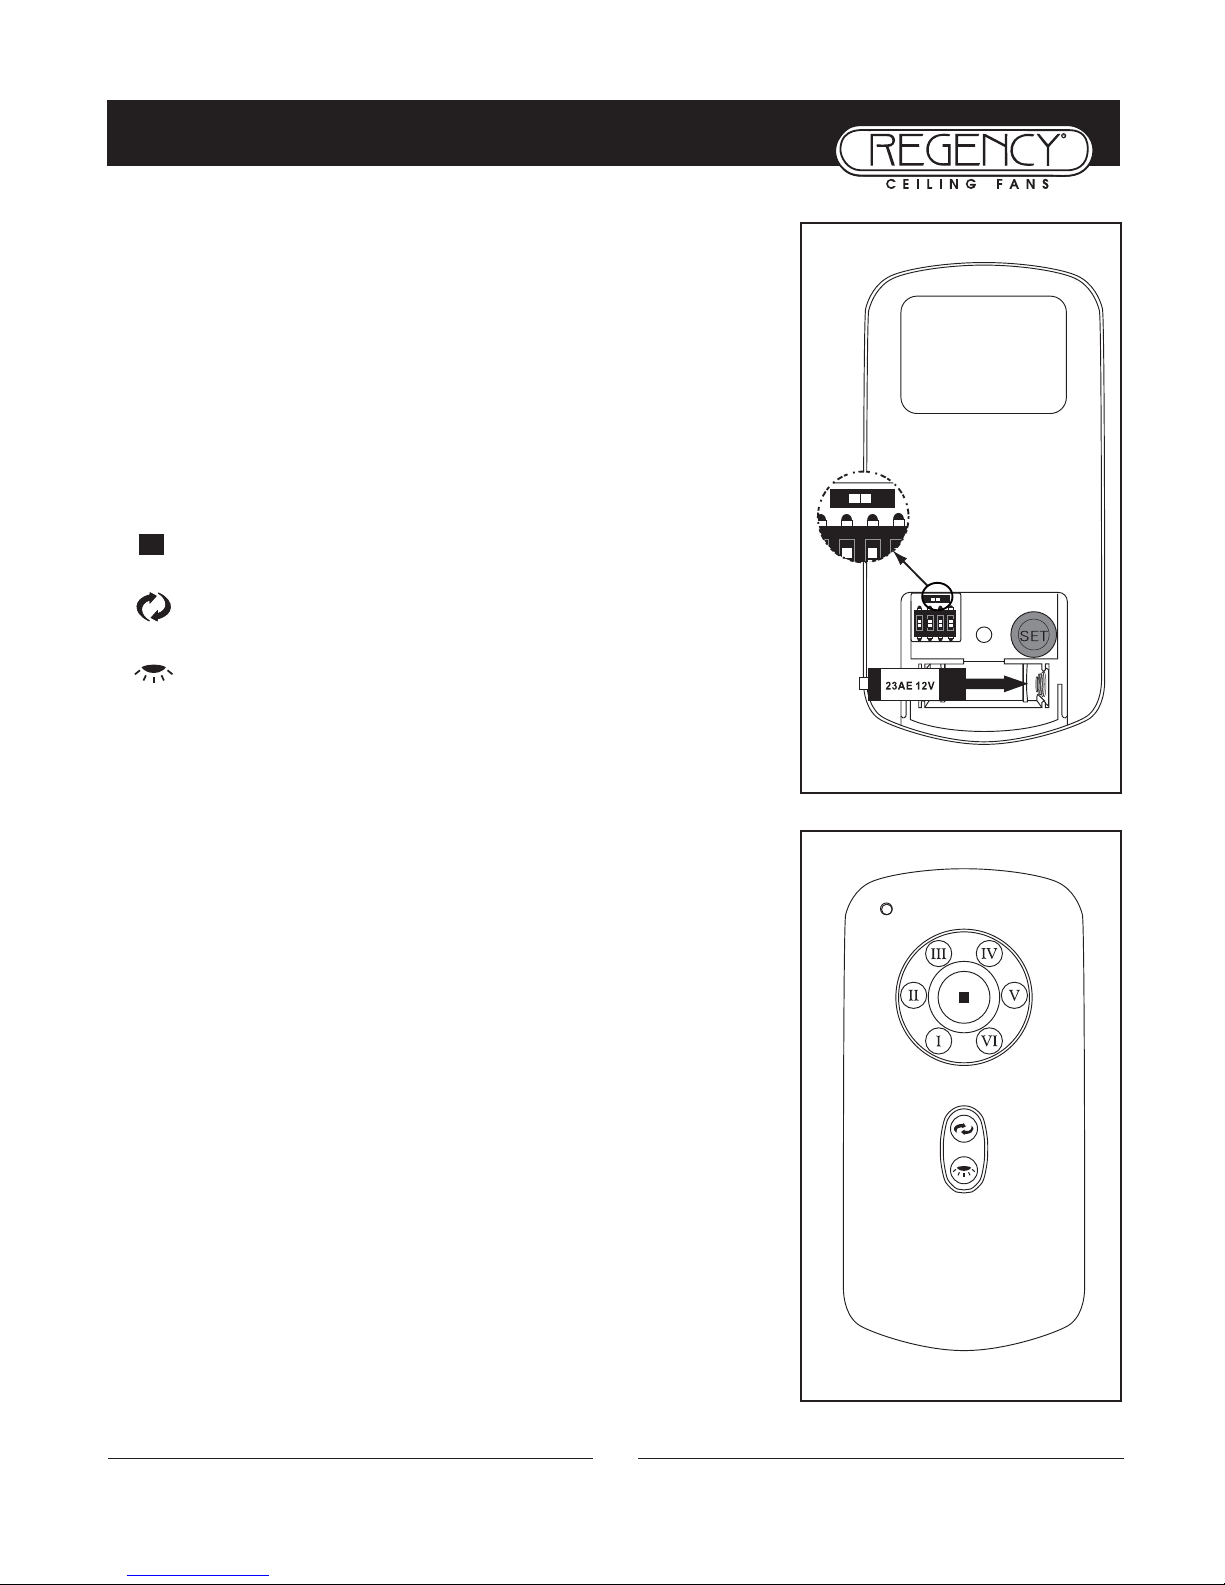
O
PERATING YOUR TRANSMITTER
Fig. 1
Fig. 2
ON ECE
1234
ON
D
ON ECE
ON
D
Your DC brushless motor is equipped with a automatically learned type
remote control. Restore power to ceiling fan and test the transmitter as below
for proper operation:
Install one 23A/12V battery (included). To prevent damage to transmitter,
remove the battery if not used for long periods of time (Fig. 1)
A. I, II, III, IV, V and VI button:
These six buttons are used to set the fan speed as follows:
I = minimum speed
II = low speed
III = medium low speed
IV = medium speed
V = medium high speed
VI = high speed
B. button:
This button turns the fan off.
C. Reverse button:
This button is to control fan direction
D. Light button
This button is to control light. Switch the “D” and “ON” dip switch on the
back of transmitter to decide the light in “ON/OFF” or “Dimmable” condition.
E. SET code setting button:
Follow the below steps to use the SET button:
a) With the fan’ s power off, arrange code switches to new code settings other
than the default settings if at all possible. Note: Fan should be completely
assembled.
b) After installing the unit and restoring power to the fan, the fan’ s self-learn
programming should be activated to set new codes to fan. Note: Code switches
are only located in the hand or wall transmitters only, no code switches are on
the body of fan.
c) Turn power on to fan, press and hold the “SET” button 3-5 seconds. If you
have a light fixture installed on fan, then light fixture will flash twice to indicate programming is complete.
d) Turn power off to fan and wait 5 to 10 seconds and reestablish power to
fan.
If light or fan function was active during the programming, the fan will resume
that function. At this point the fan needs to run on a high speed setting. The
fan needs to run so that the current monitor function can test the motor for
proper operation. After this time period you can use the fan as needed from
this point on.
F. “D” and “ON” dip switch:
The “ON” selection is the light dimmable selection and is to be used with all
bulbs except for CFL bulbs. The “D” selection is the light ON only (no dimming function) and is to be used with CFL bulbs as CFL bulbs in most cases
cannot be used with dimming controllers.
9
Page 11
10
This receiver provides the following protective function:
1. Lock Rotor Position: The DC motor has a built-in safety against a stalled or locked rotor condition (stalled blade
rotation). If there is an obstruction or fault with the motor, the current monitoring function will automatically turn
power off to the motor after 30 seconds. Remove the obstruction and select speed function again to re-start fan motor.
Note: When re-programming the fan or if safety is activated because of an obstruction, fan blades may rotated back
and forth during startup. This may continue for a brief time because safety is checking current to the motor for
proper function. This testing can take up to 1 minute and 30 seconds depending on issue. After this period of time
the fan should resume normal mode.
2. Over 80W protection: When the receiver detects motor power consumption which is greater than 80W, the
receiver power will be stopped and operation will immediately discontinue. Wait for 5 seconds and then turn the
receiver power back on.
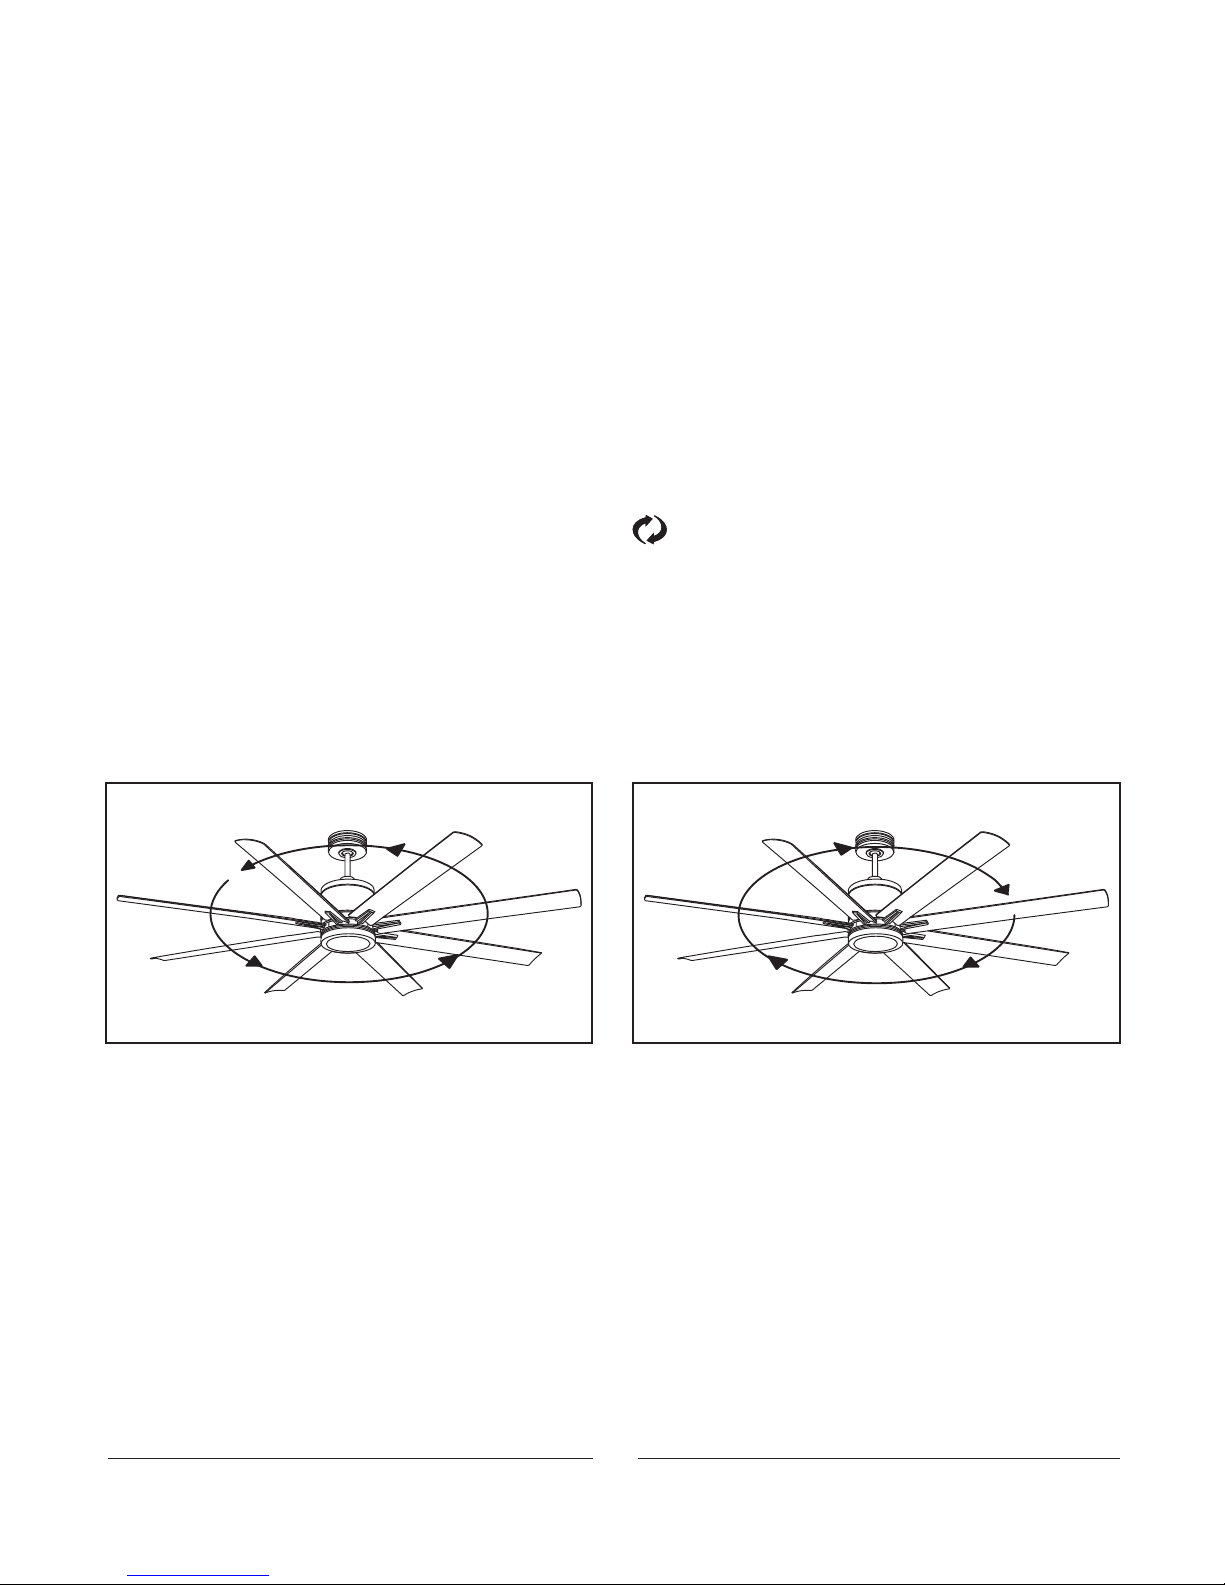
Speed settings for warm or cold weather depend on factors such as room size, ceiling height and number of fans.
NOTE: To operate the reverse function on this fan, press the button while the fan is running.
Warm Weather (forward):
A DOWNWARD airflow creates a cooling effect as shown in Figure 1. This allows you to set your air conditioner on a
warmer setting without affecting your comfort.
Cool Weather (Reverse):
An UPWARD airflow moves warmer air off the ceiling area as shown in Figure 2. This allows you to set your heating
unit on a cooler setting without affecting your comfort.
Fig. 1 Fig. 2
Page 12
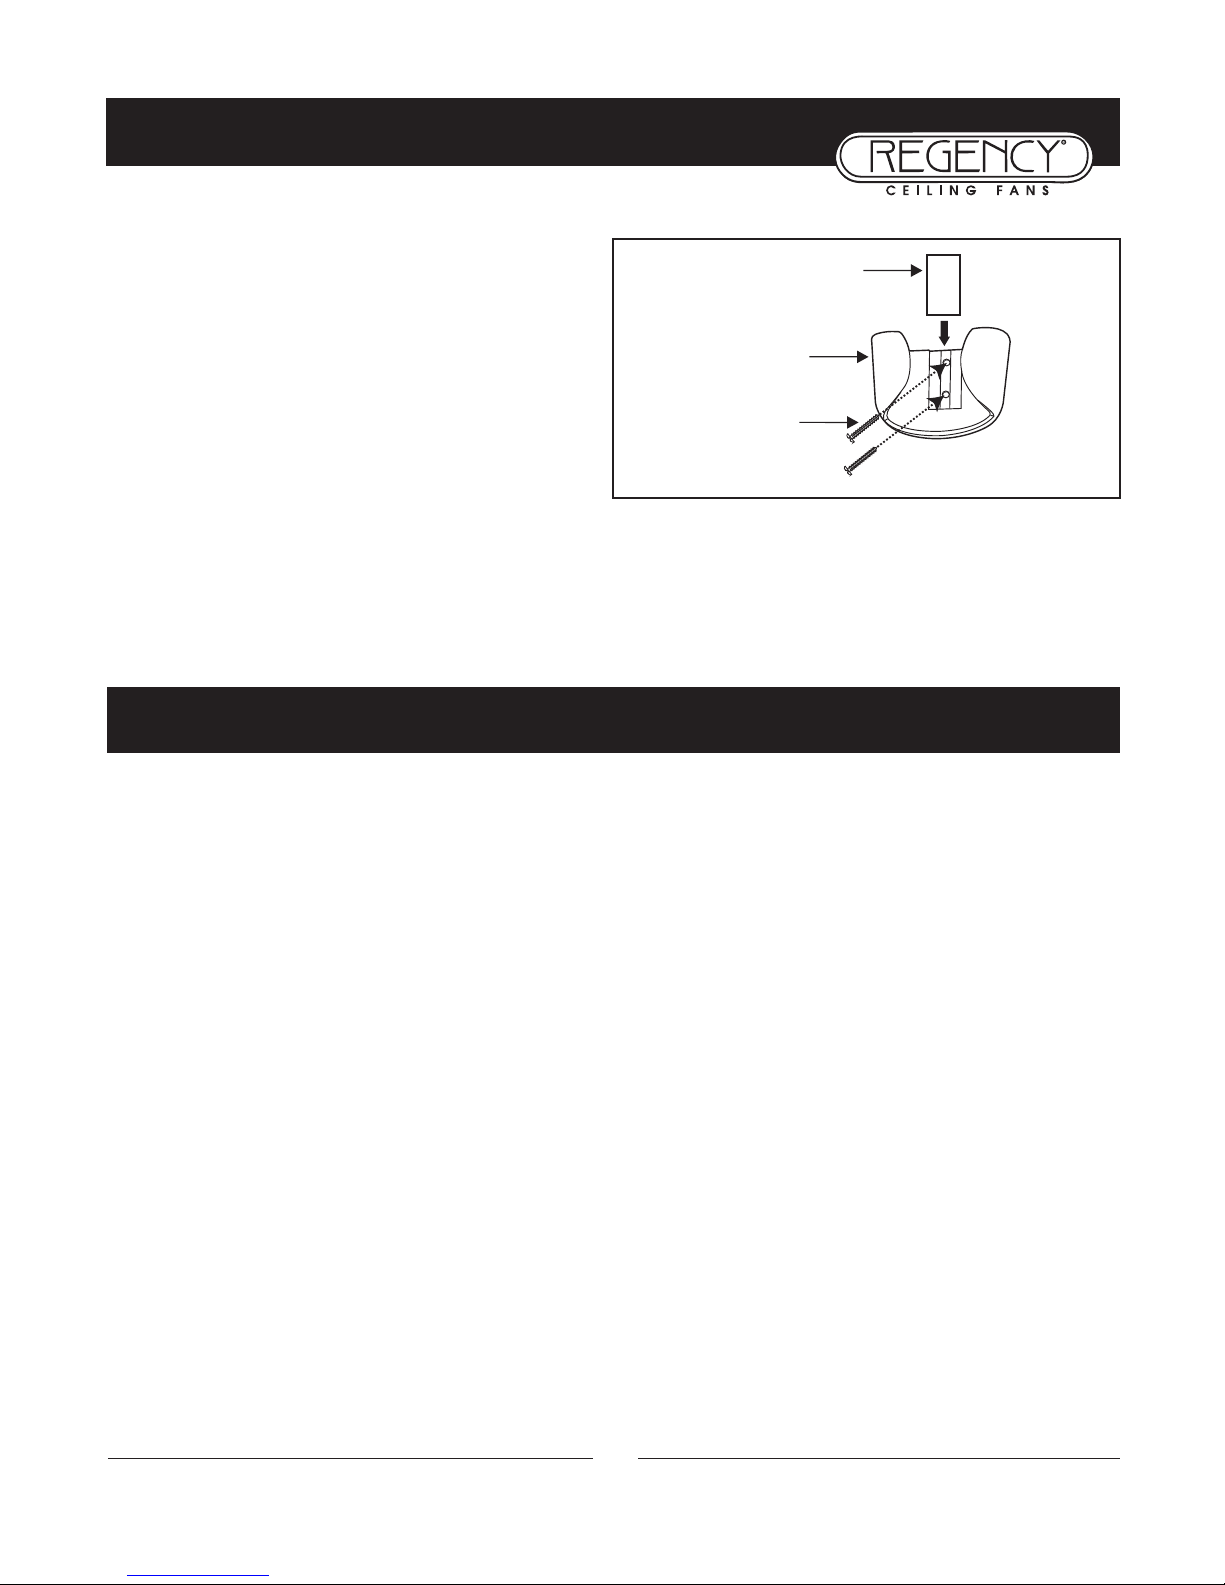
I
NSTALLING THE TRANSMITTER HOLDER
1. Remove the cover from the holder.
2. Attach the holder with the two screws provided.
3. Replace the cover into holder.
Fig. 14
Cover
Holder
Screws
C
ARE AND CLEANING
Periodically it may be necessary to re-tighten blade to blade arm screws or blade arm to motor screws to prevent
clicking or humming sound during operation. This is especially true in climates with broad temperature and
humidity ranges.
When dusting the blades, you must support the blade to prevent bending - no pressure should be applied to the
blades. If you experience any flaws in the operation of your fan, please check the following points.
11
Page 13

T
ROUBLESHOOTING
- IN C
ASE OF DIFFICULTY
CAUTION:
CAUTION:
Switch off power supply before carrying out any of these checks.
1. If fan will not start: Check main and branch circuit breakers and/or fuses. Check line wire connections to fan housing
wiring. Make sure forward/reverse switch is set to one or the other position, not stuck in between.
2. If fan is noisy: Check and make sure that all screws in motor housing are snug (but not over tight). Check that the
screws securing blade arms to the motor are tight. Check that wire connectors in switch housing are not rattling
against each other or the interior wall of the switch housing. Check that all glassware is finger tight and that bulb(s)
are well held in the sockets, if a light kit is used. Check that the canopy is firmly attached to hanging bracket and not
vibrating against ceiling.
3. If fan wobbles: Check that all blades are firmly screwed into blade arms. Check that all blade arms are firmly secure to
the motor. Check to make sure that light kit (if present) is firmly attached to switch housing and that all glassware
and shades are fastened properly. Wobble can also result from even the smallest deviations in distance from blade tip
to blade tip. If measurements from blade tip to blade tip are not equal, loosen screws connecting blade to blade arm
one at a time and adjust blade(s) so that distances are equal. Interchanging adjacent blades may redistribute mass and
result in smoother operation. Blade arms can be bent slightly to restore same pitch to all blades if a blade is different
than the other blades when viewed edge on. Most wobble can be traced to a loose electrical box or mounting bracket.
Make sure these are tight and the ball is completely seated in the bracket.
12
THANK YOU FOR PURCHASING A REGENCY CEILING FAN.
Write to us at:
Regency Ceiling Fans
P.O. Box 730
Fenton, MO 63026
Visit us on the Web at: www.regencyfan.com
12/14 Regency Ceiling Fans
 Loading...