

Page 1
Owners &
Installation
BELLERIVE FIREPLACE INSERT
Model: I200B
Manual
PLEASE KEEP THESE INSTRUCTIONS FOR
FUTURE REFERENCE
WARNING:
Improper installation, adjustment, alteration, service or maintenance can
cause injury or property damage. Refer to this manual. For assistance
or additional information consult an authorised installer, service agency
or the distributor.
918-696d
FPI - FIREPLACE PRODUCTS AUSTRALIA PTY LTD.
1 CONQUEST WAY HALLAM VICTORIA 3803
April-07-2015
Page 2

Thank-you for purchasing a
REGENCY FIREPLACE PRODUCT.
The pride of workmanship that goes into each of our products will give you years of trouble-free enjoyment. Should you
have any questions about your product that are not covered in this manual, please contact the REGENCY DEALER
in your area.
Keep those REGENCY FIRES burning.
SAFETY NOTE: If this wood re is not properly installed, a house re may result. For your safety, follow the installation instructions, contact local building, re ofcials, or authority having jurisdiction about restrictions and installation
inspection requirements in your area.
The authority having jurisdiction should be consulted before installation to determine the need to obtain a permit.
CAUTION: BURN UNTREATED WOOD ONLY. OTHER MATERIALS SUCH AS WOOD PRESER-
VATIVES, METAL FOILS, COAL, PLASTIC, GARBAGE, SULPHUR OR OIL WILL DAMAGE THE
FIRE AND ATMOSPHERE.
"This wood heater is designed to burn natural wood only. Higher efciencies and lower emissions gener-
ally result when burning air dried seasoned hardwoods, as compared to green or freshly cut hardwoods."
DO NOT BURN (WILL VOID WARRANTY):
• Treated wood • Tea Tree • Oil Based woods • Coal • Garbage
• Cardboard • Solvents • Colored Paper • Trash
Save these
Instructions
ONLY CLEAN APPLIANCE WITH A DAMP
CLOTH (NEVER WHEN UNIT IS HOT)
DO NOT USE ANY ABRASIVE CLEANERS
2
Regency Bellerive Fireplace Insert
Page 3

Data Badge............................................................................4
Unit Dimensions ....................................................................5
INSTALLATION
Before Installing Your Insert...................................................6
Residential Installation...........................................................6
Safety Guidelines and Warnings ...........................................7
Chimney Specications .........................................................7
Wood Insert Specications ....................................................7
Brick & Cast Installation.........................................................7
Zero Clearance Dimensions..................................................7
Zero Clearance Box Dimensions...........................................7
Fireplace Clearances.............................................................8
Installation into a Masonry Fireplace .....................................9
Installation into a Factory Built Fireplace ...............................9
Faceplate & Fan Installation ................................................10
TABLE OF CONTENTS
OPERATING INSTRUCTIONS
Operating Instructions .........................................................11
Air Slide Control...................................................................11
First Fire ..............................................................................11
MAINTENANCE
Creosote ..............................................................................12
- Ways to Prevent & Keep Units Free of Creosote .......12
Maintenance ........................................................................12
Glass Maintenance ..............................................................12
Door Latch Adjustment ........................................................ 12
Wood Storage ......................................................................12
PARTS LIST
Stove Assembly ...................................................................13
WARRANTY
Warranty ..............................................................................15
Regency Bellerive Fireplace Insert
3
Page 4

SAFETY LABEL
This is a copy of the label that accompanies each
I200B Fireplace Insert. We have printed a copy of
the contents here for your review.
NOTE: Regency units are constantly being
improved. Check the label on the unit and if
there is a difference, the label on the unit is the
correct one.
4
Regency Bellerive Fireplace Insert
Page 5
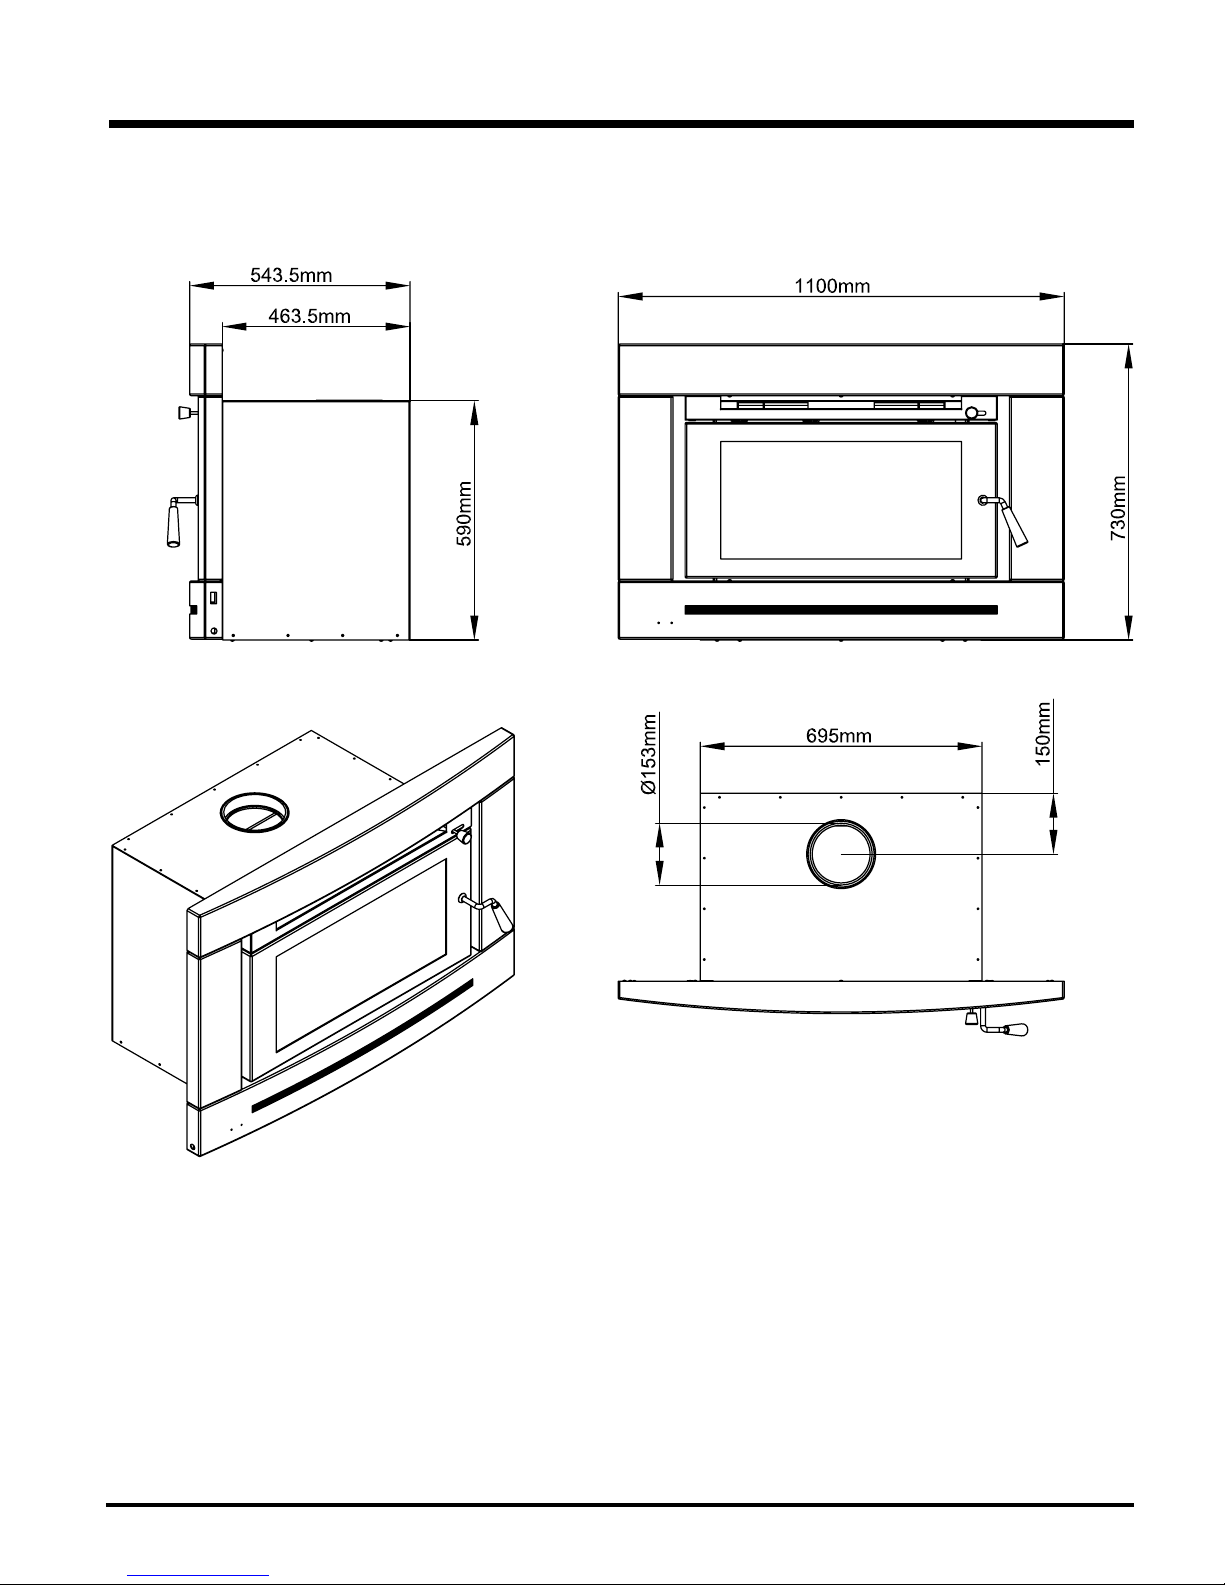
UNIT DIMENSIONS
Regency Bellerive Fireplace Insert
5
Page 6

INSTALLATION
Regency Inserts are constructed with the highest quality materials and assembled under strict
quality control procedures that insure years of
trouble free and reliable performance.
It is important that you read this manual thoroughly and fully understand the safe installation and operating procedures. The more
you understand the way your Regency Insert
operates, the more enjoyment you will experience from knowing that your unit is operating
at peak performance.
BEFORE INSTALLING
YOUR INSERT
1) Please read this entire manual before you
install and use your new wood insert. Failure
to follow instructions may result in property
damage, bodily injury or even death. Install
and use only in accordance with manufacturer’s installation and operating instructions.
2) Check your local building codes - Building
Inspection Department. You may require
a permit before installing your insert. Be
aware that local codes and regulations may
override some items in the manual.
WARNING: Careless installation is the
major cause of safety hazard. Check all
local building and safety codes before
installation of unit.
3) Notify your home insurance company that
you plan to install a replace insert or hearth
heater.
4) Your replace insert is heavy and requires
two or more people to move it safely. The
insert can be badly damaged by mishandling.
5) If your existing replace damper control
will become inaccessible once you have
installed your Regency Insert, you should
either remove or secure it in the open position.
6) Inspect your replace and chimney prior
to installing your insert to determine that it
is free from cracks, loose mortar or other
signs of damage. If repairs are required,
they should be completed before installing
your insert. Do not remove bricks or mortar
from your masonry replace.
7) Do not connect the insert to a chimney
system servicing another appliance or
an air distribution duct.
RESIDENTIAL
INSTALLATION
1) Please read this entire manual before you
install and use your new wood re. Failure
to follow instructions may result in property
damage, bodily injury or even death. Be
aware that local Codes and Regulations may
override some items in this manual. Check
with your local inspector.
2) THE APPLIANCE AND FLUE-SYSTEM
SHALL BE INSTALLED IN ACCORDANCE WITH AS/NZS 2918:2001 AND
THE APPROPRIATE REQUIREMENTS
OF THE RELEVANT BUILDING CODE OR
CODES.
APPLIANCES INSTALLED IN ACCORD-
ANCE WITH THIS STANDARD SHALL
COMPLY WITH THE REQUIREMENTS OF
AS/NZS 4013 WHERE REQUIRED BY THE
REGULATORY AUTHORITY.
CAUTION: MIXING OF APPLIANCE OR
FLUE-SYSTEM COMPONENTS FROM
DIFFERENT SOURCES OR MODIFYING
THE DIMENSIONAL SPECIFICATION OF
COMPONENTS MAY RESULT IN HAZARDOUS CONDITIONS. WHERE SUCH
ACTION IS CONSIDERED, THE MANUFACTURER SHOULD BE CONSULTED
IN THE FIRST INSTANCE.
3) Re-conrm the clearance from the insert to
combustibles to insure that they are within
the prescribed limits.
4) Install chimney according to chimney manu-
facturers instructions. The performance of
your wood re is governed to a very large
part by the chimney system. Too short a
chimney can cause difcult start-up, dirty
glass, backsmoking when door is open, and
even reduced heat output. Too tall a chimney
may prompt excessive draft which can result
in very short burn times and excessive heat
output.
5) The oor protector must be of non-combus-
tible material.
6) Do not connect this unit to a chimney
serving another appliance.
6
ANY MODIFICATION OF THE APPLIANCE
THAT HAS NOT BEEN APPROVED IN
WRITING BY THE TESTING AUTHORITY
IS CONSIDERED TO BE IN BREACH OF
THE APPROVAL GRANTED FOR COMPLIANCE WITH AS/NZS 4013.
Regency Bellerive Fireplace Insert
Page 7
INSTALLATION
SAFETY GUIDELINES
AND WARNINGS
1) Never use petrol, petrol type lantern fuels,
kerosene, charcoal lighter fuel, or similar
liquids to start or ‘freshen up’ a re in your
heater. Keep all such liquids well away from
the heater while it is in use.
2) Keep the door closed during operation and
maintain all seals in good condition.
3) Do not burn any quantities of paper, garbage,
and never burn ammable uids such as
petrol, naptha or engine oil in your stove.
4) If you have smoke detectors, prevent smoke
spillage as this may set off a false alarm.
5) Do not overre heater. If the chimney con-
nector, ue bafe or the stove top begin to
glow, you are overring. Stop adding fuel and
close the draft control. Overring can cause
extensive damage to your stove including
warpage and premature steel corrosion.
Overring will void your warranty.
6) Do not permit creosote or soot build-up
in the chimney system. Check and clean
chimney at regular intervals. Failure to do
so can result in a serious chimney re.
7) Your Regency stove can be very hot. You
may be seriously burned if you touch the
stove while it is operating, keep children,
clothing and furniture away. Warn children
of the burn hazard. For safety reasons a
guard around the re is recommended.
8) The stove consumes air while operating,
provide adequate ventilation with an air
duct or open a window while the stove is in
use.
9) Do not use grates or andirons or other
methods for supporting fuel. Burn directly
on the base or bricks where supplied.
10) Open the draft control fully for 10 to 15
seconds prior to slowly opening the door
when refuelling the re.
11) Do not connect your unit to any air distribu-
tion duct.
CHIMNEY
SPECIFICATIONS
Before installing, check and clean your chimney
system thoroughly. If in doubt about its condition, seek professional advice. Your Regency
Insert is designed for installation into a masonry
replace.
The appliance, when installed, must be electrically grounded in accordance with local codes.
WOOD INSERT
SPECIFICATIONS
Your replace opening requires the following
minimum sizes:
Height 597mm
Width 699mm
Depth 468mm
BRICK & CAST
INSTALLATION
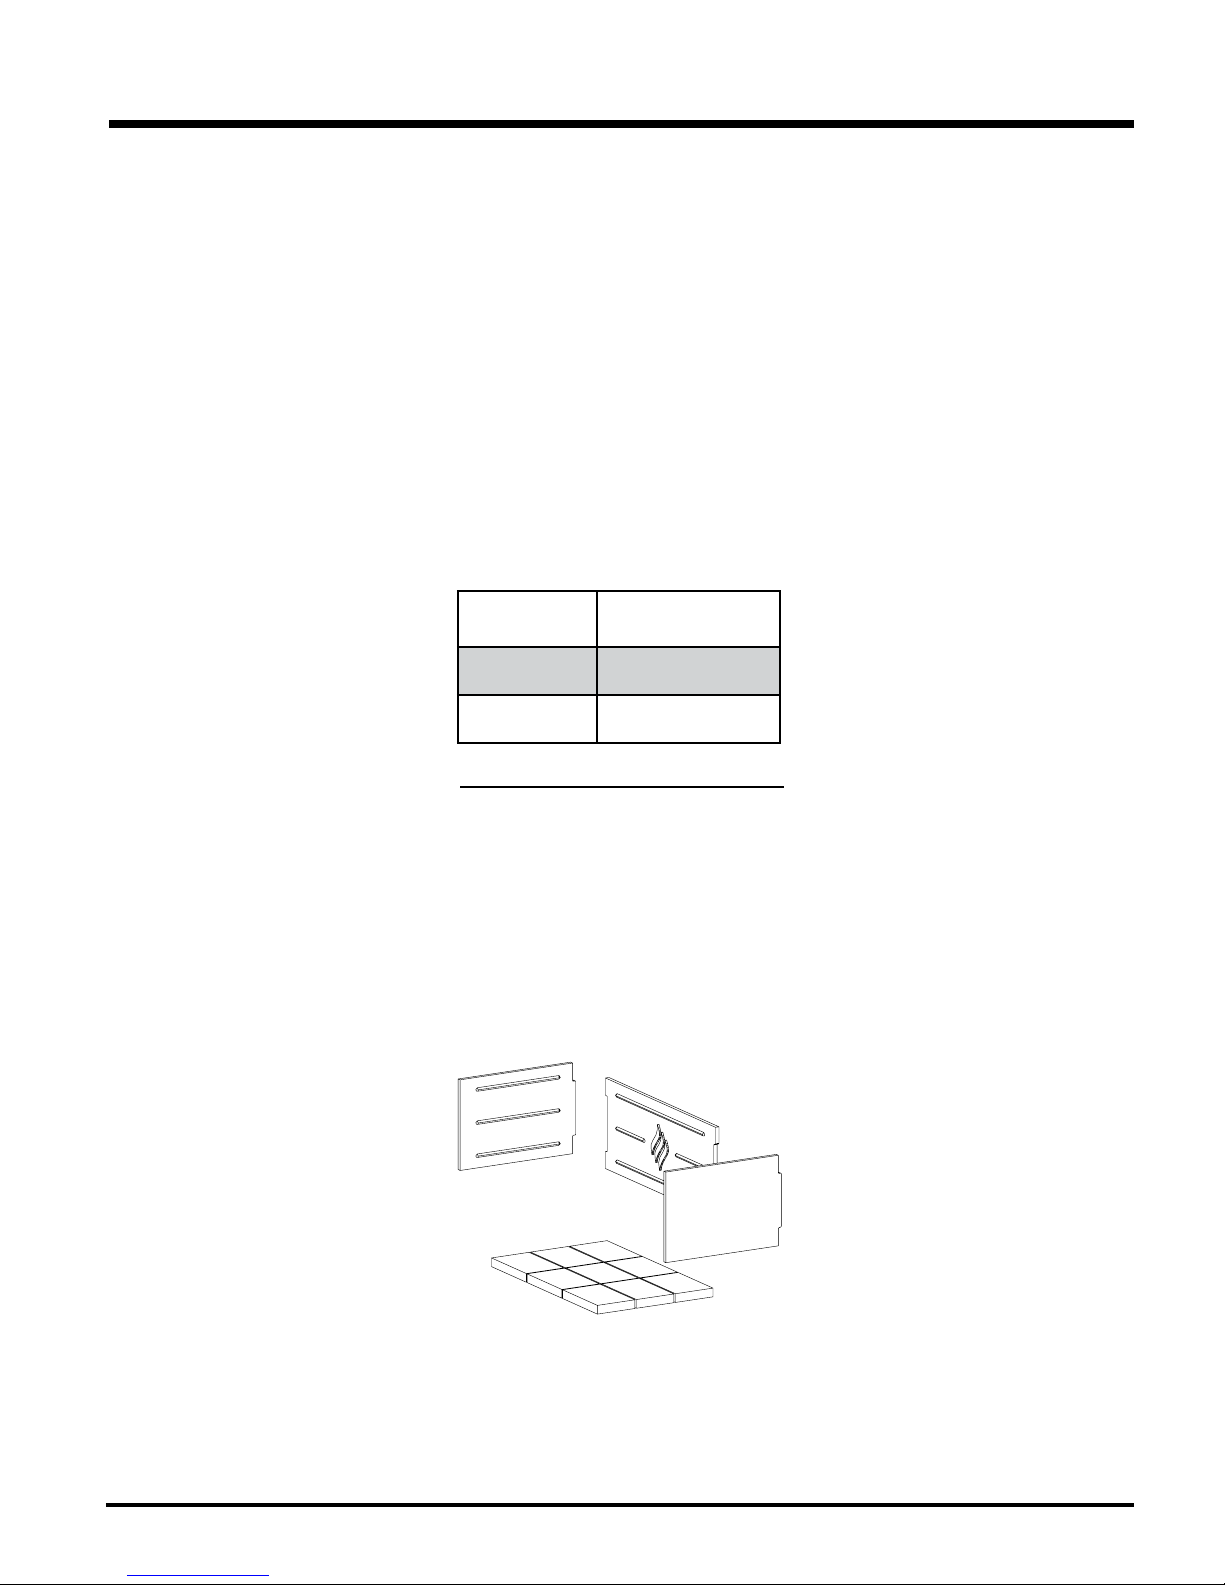
Insert the rear cast plate rst and then the side
plates ensuring the cut out sections lock in rmly.
The bricks can then be placed on the base of the
rebox between the cast side and rear plates.
Firebrick is included to extend the life of your
stove and radiate heat more evenly.
GLASS INSTALLATION
Remove the door from the stove and remove
the glass retainer. Position the glass in the door,
make sure that the glass gasketing will properly
seal your unit, and replace the retainer, it should
rest on the gasket not the glass. Tighten securely,
but do not wrench down on the glass as this
may cause the glass to break.
12) Your wood re should burn dry, standard
rewood only. The use of cut timber, ply-
wood, “mill ends”, etc. is not allowed as this
fuel can easily overheat your wood re.
Evidence of excessive overheating will void
your warranty. As well, a large portion of
sawmill waste is chemically treated timber,
which is illegal to burn in many areas. Salt
drift wood and chemically treated re logs
also must not be burned in your wood re.
13) DO NOT OPERATE WITH BROKEN
GLASS.
Regency Bellerive Fireplace Insert
7
Page 8

INSTALLATION
ZERO CLEARANCE
DIMENSIONS
ZERO CLEARANCE
BOX DIMENSIONS
8
Regency Bellerive Fireplace Insert
Page 9
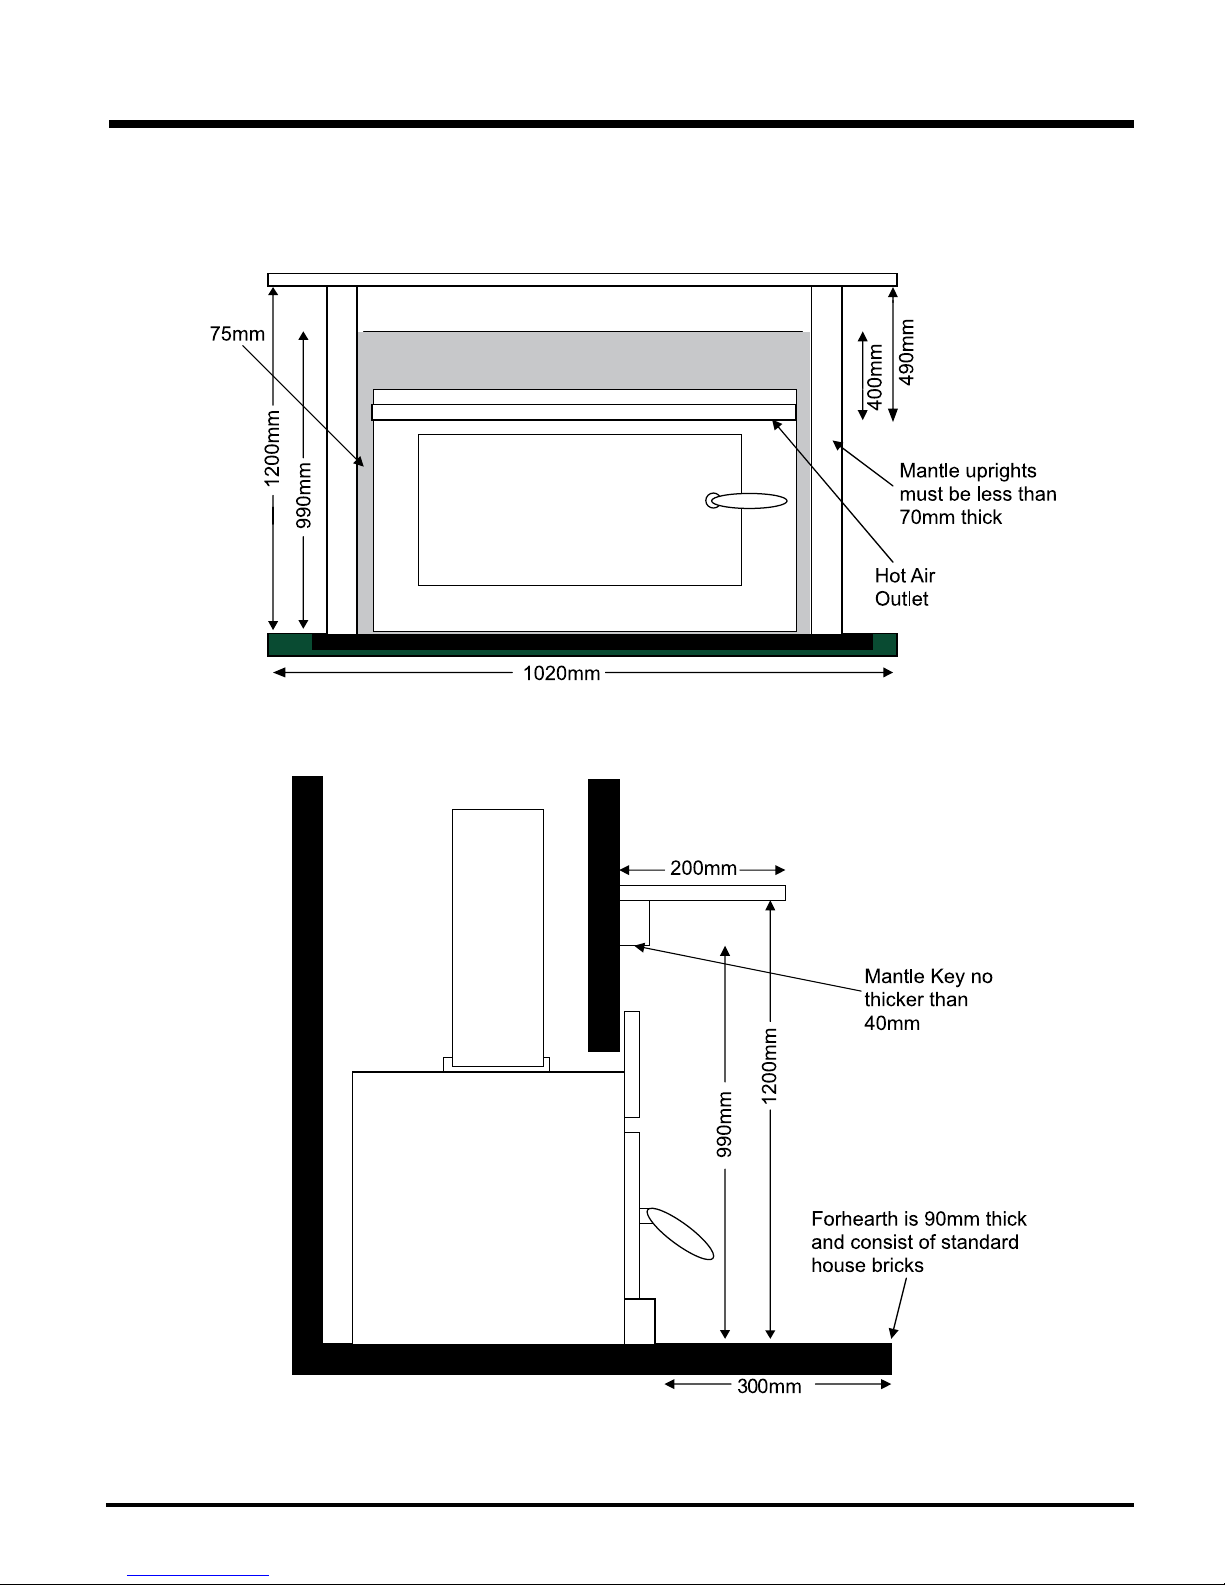
FIREPLACE CLEARANCES
INSTALLATION
Regency Bellerive Fireplace Insert
9
Page 10
INSTALLATION
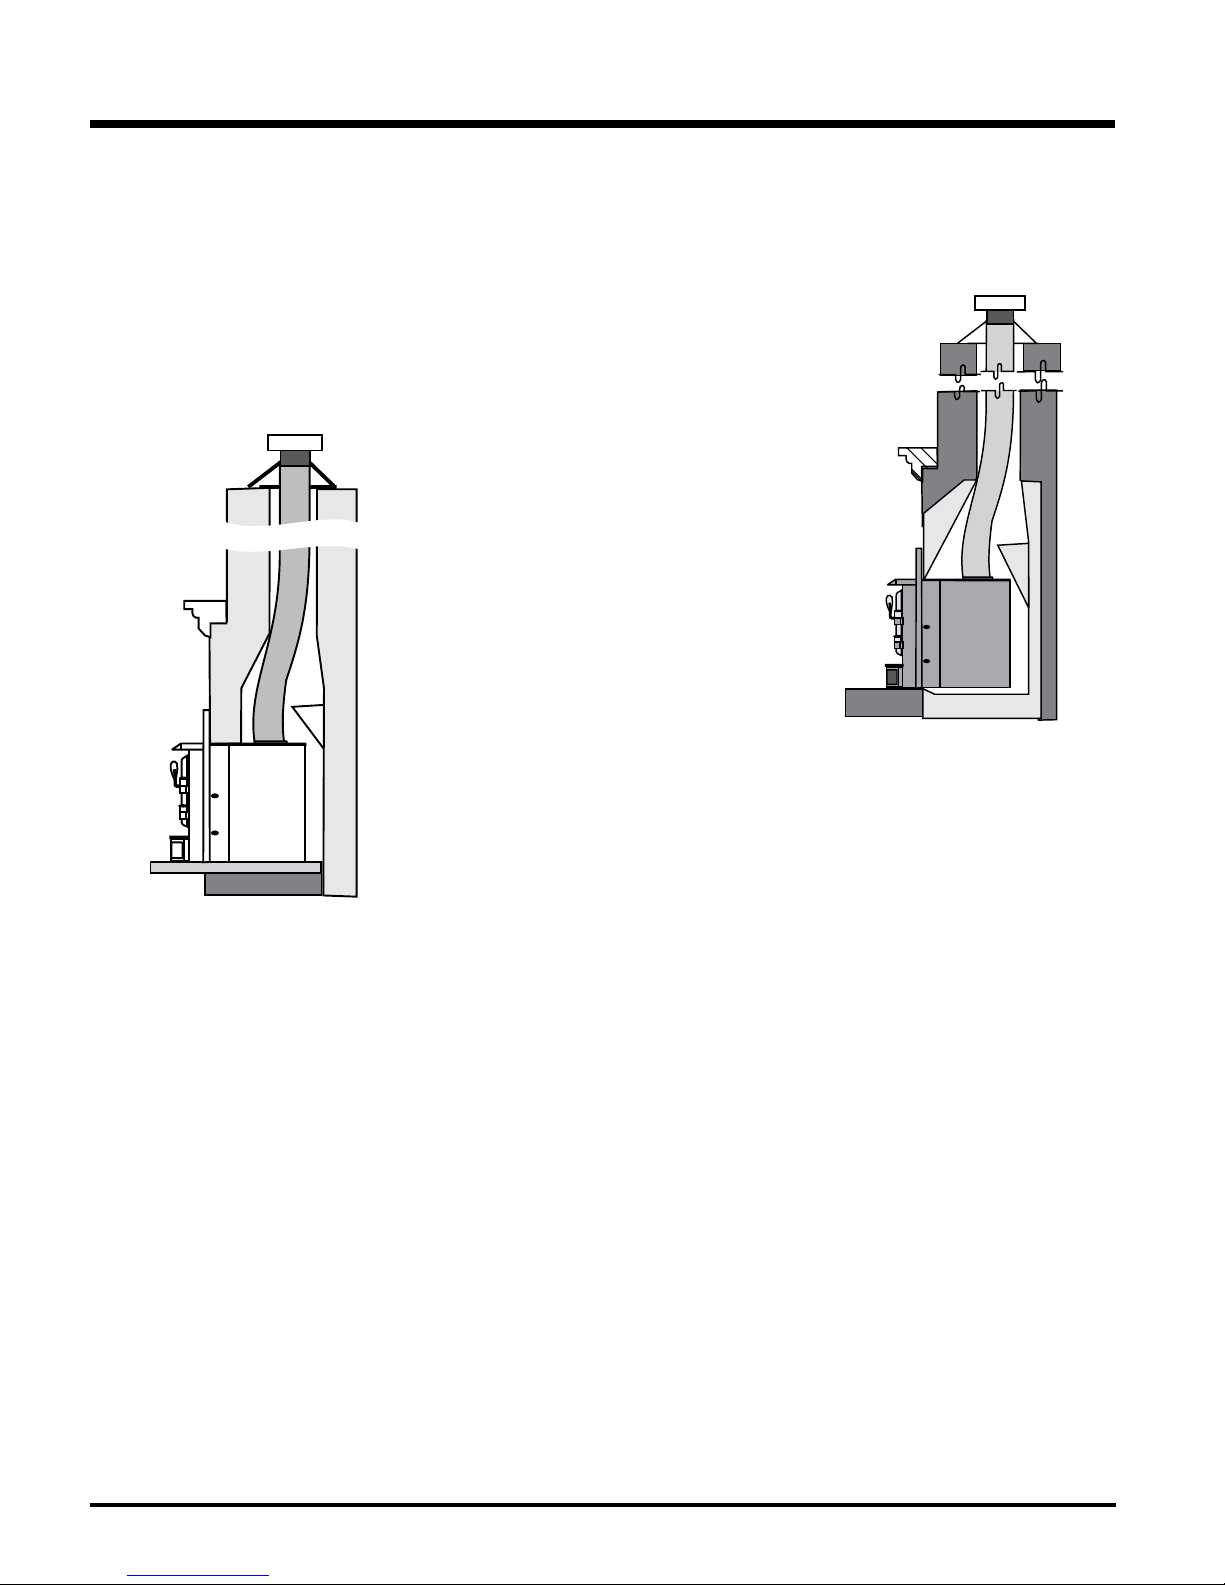
INSTALLATION INTO A
MASONRY FIREPLACE
The insert must be installed as per the requirements of your local inspection authority.
Regency highly recommends the use of a full
liner as the safest installation and provides the
most optimum performance. Your retailer should
be able to help you decide which system would
be the best for your application.
INSTALLATION INTO A
FACTORY BUILT
FIREPLACE
1) When installed in a factory built replace, a
full stainless steel rigid is mandatory, for both
safety and performance purposes. When
a ue or liner is in use, the insert is able to
breathe better by allowing a greater draft to
be created. The greater draft can decrease
problems such as, difcult start-ups, smoking
out the door, and dirty glass.
2) In order to position the ue liner, the exist-
ing rain cap must be removed from your
chimney system. In most cases the ue
damper should also be removed to allow
passage of the liner.
3) In most cases opening the existing spark
screens fully should give enough room for
the insert installation. If it does not, remove
and store.
4) If the oor of your replace is below the
level of the replace opening, adjust the
insert's levelling bolts to accommodate the
difference. When additional shimming is
required, use non-combustible masonry or
steel shims.
6) Once the above items have been checked,
slide your insert into position after rst positioning the ue liner and offset if required.
(Re-install raincap at completion of installation).
Full Flue Liner
The use of this connection method not only
increases the safety of your insert by directing
the hot gases up the ue, but will also help
increase the unit's efciency and decrease
creosote deposits in the chimney.
When a connected ue or liner is in use, the
insert is able to “breathe” better by allowing a
greater draft to be created. The greater draft can
decrease problems such as, difcult start-ups,
smoking out the door, and dirty glass.
5) Measure approximately the alignment of
the ue liner with the position of the smoke
outlet hole on the insert to check for possible offset. If an offset is required, use a
proper stainless steel unit available with the
chimney liner.
10
Regency Bellerive Fireplace Insert
Page 11

INSTALLATION
HEATSHIELD, FACEPLATE & FAN INSTALLATION
1) Remove the door from the unit by lifting it up off the hinges.
2) Position the heat shield ush against bottom front of rebox on
the inside of the unit.
Note: Heat shield must be tted into place to protect the fan.
Heat shield
3) Position the faceplate up against the unit by sliding the left side of the
fascia in behind the door hinges and align the 4 screw holes with the
the bottom faceplate. See page 13 for fan wiring diagram.
5) Re-install door.
Draft Plate Cover
Damper
Control Rod
holes in the rebox. Secure in place using 2 screws on top.
4) Install the fan fascia by aligning the bottom screw locations with
Fan Fascia
Regency Bellerive Fireplace Insert
6) Install the draft plate cover by sliding the tabs into the tab brackets
on the inside top of the rebox, ensure the damper control rod ts
thru the opening in the draft plate cover.
7)
Install knob on damper control rod.
11
Page 12

OPERATING INSTRUCTIONS
OPERATING
INSTRUCTIONS
With your unit now correctly installed and safety
inspected by your local authority, you are now
ready to start a re. Before establishing your
rst re, it is important that you fully understand
the operation of your draft control.
CAUTION: THIS APPLIANCE MUST BE
MAINTAINED AND OPERATED AT ALL TIMES
IN ACCORDANCE WITH THESE INSTRUCTIONS.
CAUTION: THE USE OF SOME TYPES OF
PRESERVATIVE-TREATED WOOD AS A FUEL
CAN BE HAZARDOUS.
WARNING: ANY MODIFICATION OF THE APPLIANCE THAT HAS NOT BEEN APPROVED
IN WRITING BY THE TESTING AUTHORITY
IS CONSIDERED AS BREACHING AS/NZS
4013.
WARNING: DO NOT USE FLAMMABLE
LIQUIDS OR AEROSOLS TO START OR
REKINDLE THE FIRE.
WARNING: DO NOT USE FLAMMABLE LIQUIDS OR AEROSOLS IN THE VICINITY OF
THIS APPLIANCE WHEN IT IS OPERATING.
WARNING: DO NOT STORE FUEL WITHIN
HEATER INSTALLATION CLEARANCES.
WARNING: OPEN AIR CONTROL AND
DAMPER WHEN FITTED BEFORE OPENING
FIRING DOOR.
For safety reasons and in order to avoid
overringofyourunitdonotburnyour
rewiththedooropenorajar.
AIR SLIDE CONTROL
Both the primary and air wash drafts are controlled by the control rod located on the right side
of the unit (when facing the unit). To increase
your draft - pull open, and to decrease - push
closed. All units have a secondary draft system
that continually allows combustion air to the
induction ports at the top of the rebox, just
below the ue bafe.
Pull - Open
Push - Closed
WARNING:Tobuildareinignorance
or to disregard the information contained in this section can cause serious
permanent damage to the unit and void
your warranty!!
FIRST FIRE
When your installation is completed and in-
spected you are ready for your rst re.
1) Open control fully.
2) Open rebox door and build a small re us-
ing paper and dry kindling on the rebrick
base. Secure door on the rebox and wait a
few minutes for a good updraft in the ue to
establish the re. (Leaving the door slightly
open will help your re start more rapidly.)
CAUTION: Never leave unit unattended
if door is left open. This procedure is for
restart-uponly,asunitmayoverheat
if door is left open for too long.
3) With the draft still in the fully open position
add two or three seasoned logs to your re.
Form a trench in the ash bed to allow air to
reach the rear of the rebox prior to closing
the door.
4) After about 45 minutes, when your wood
has begun to burn strongly, adjust your draft
control down to keep the re at a moderate
level.
WARNING:Neverbuildaroaringrein
a cold stove. Always warm your stove
up slowly!
5) Once a bed of coals has been established
on the base of the rebox, you may adjust
the draft control to a low setting to operate
the unit at its most efcient mode.
6) During the rst few res, keep the combus-
tion rate at a moderate level and avoid a
large re. Only after 5 or 6 such res can
you operate the stove at its maximum
setting, and only after the metal has been
warmed.
12
7) For the rst few days, the stove will give
off an odour from the paint. This is to be
expected as the high temperature paint
becomes seasoned. Windows and/or doors
should be left open to provide adequate
ventilation while this temporary condition
exists. Burning the stove at a very high
temperature the rst few times may damage
the paint. Burn res at a moderate level the
rst few days.
8) Do not place anything on the stove top
during the curing process. This may result
in damage to your paint nish.
Regency Bellerive Fireplace Insert
Page 13

MAINTENANCE
9) During the rst few days it may be more
difcult to start the re. As you dry out your
rebrick and your masonry ue, your draft
will increase.
10) For those units installed at higher elevations
or into sub-standard masonry replaces,
drafting problems may occur. Consult an
experienced dealer or mason on methods
of increasing your draft.
11) Some cracking and popping noises may be
experienced during the heating up process.
These noises will be minimal when your unit
reaches temperature.
12) Before opening your door to reload, open
draft fully for approximately 10 to 15 seconds
until re has been re-established. This will
minimize any smoking.
13) All fuel burning appliances consume oxygen
during operation. It is important that you
supply a source of fresh air to your unit
while burning. A slightly opened window is
sufcient for the purpose. If you also have
a replace in your home, a downdraft may
be created by your Regency Stove causing
a draft down your chimney. If this occurs,
slightly open a window near your unit.
CAUTION:Ifthebodyofyourunit,uebafe
or any part of the chimney connector starts
toglow,youareoverring.Stoploadingfuel
immediately and close the draft control until
the glow has completely subsided.
14) Green or wet wood is not recommended for
your unit. If you must add wet or green fuel,
open the draft control fully until all moisture
has been dispersed by the intense re.
Once all moisture has been removed, the
draft control may be adjusted to maintain
the re.
15) If you have been burning your stove on a
low draft, use caution when opening the
door. After opening the damper, open the
door a crack, and allow the re to adjust
before fully opening the door.
16) The controls of your unit or the air supply
passages should not be altered to increase
ring for any reason.
CREOSOTE
When wood is burned slowly, it produces
tar and other organic vapours, which when
combined with moisture, form creosote. The
creosote vapours condense in the relatively
cool chimney ue of a slow burning re. As a
result, creosote residue accumulates on the ue
lining. When ignited, this creosote can result
in an extremely hot re.
WARNING: Things to remember in case
ofachimneyre:
1. Close all draft and damper controls.
2. CALL THE FIRE DEPARTMENT.
Ways to Prevent and Keep Unit
Free of Creosote
1) Burn stove with the draft control wide open
for about 10-15 minutes every morning
during burning season.
2) Burn stove with draft control wide open for
about 10 - 15 minutes every time you apply
fresh wood. This allows the wood to achieve
the charcoal stage faster and burns up any
unburned gas vapours which might otherwise be deposited within the system.
3) Only burn seasoned wood! Avoid burning
wet or green wood. Seasoned wood has
been dried at least one year.
4) A small hot re is preferable to a large
smouldering one that can deposit creosote
within the system.
5) The chimney and chimney connector should
be inspected at least once every two months
during the heating season to determine if a
creosote buildup has occured.
6) Have chimney system and unit cleaned
by competent chimney sweeps twice a
yearduring therstyear of useandat
least once a year thereafter or when a
signicantlayerof creosote has accumulated (3 mm/1/8" or more) it should be
removed to reduce the risk of a chimney
re.
MAINTENANCE
It is very important to carefully maintain your
replace insert, including burning seasoned
wood and maintaining a clean replace and
chimney system. Have the chimney cleaned
before the burning season and as necessary
during the season, as creosote deposits may
build up rapidly. Moving parts of your stove
require no lubrication.
GLASS MAINTENANCE
Your Regency stove is supplied with Neoceram
ceramic glass that will withstand the highest
heat that your unit will produce. In the event
that you break your glass by impact, purchase
your replacement from an authorized Regency
dealer only, and follow our step-by-step instructions for replacement.
Allow the stove to cool down before cleaning
the glass, do not clean the glass when it is hot.
Do not use abrasive cleaners.
DOOR LATCH
ADJUSTMENT
The door latch may require adjustment as the
door gasket material compresses over time.
Follow the steps below to allow the latch to
be moved closer to the door frame, causing a
tighter seal;
1) Unscrew latching sleeve.
2) Remove allen screw.
3) Spin door handle clockwise to desired depth.
4) Re-install allen screw and latching sleeve.
5) Adjust set screw to proper depth to ensure
that the handle does not rotate 360 degrees.
17) If you burn the unit too slowly or at too low
a setting your unit will not be operating as
efciently as it can. An easy rule of thumb
says that if your glass is clean, then your
ue is clean and your exhaust is clean.
Burn the stove hot enough to keep your
glass clean and you won't need to clean
your ue as often.
Regency Bellerive Fireplace Insert
WOOD STORAGE
Store wood under cover, such as in a shed, or
covered with a tarp, plastic, tar paper, sheets
of scrap plywood, etc., as uncovered wood can
absorb water from rain or snow, delaying the
seasoning process.
Latching
Sleeve
Allen
Screw
Set
Screw
Rear View of Door shown
13
Page 14
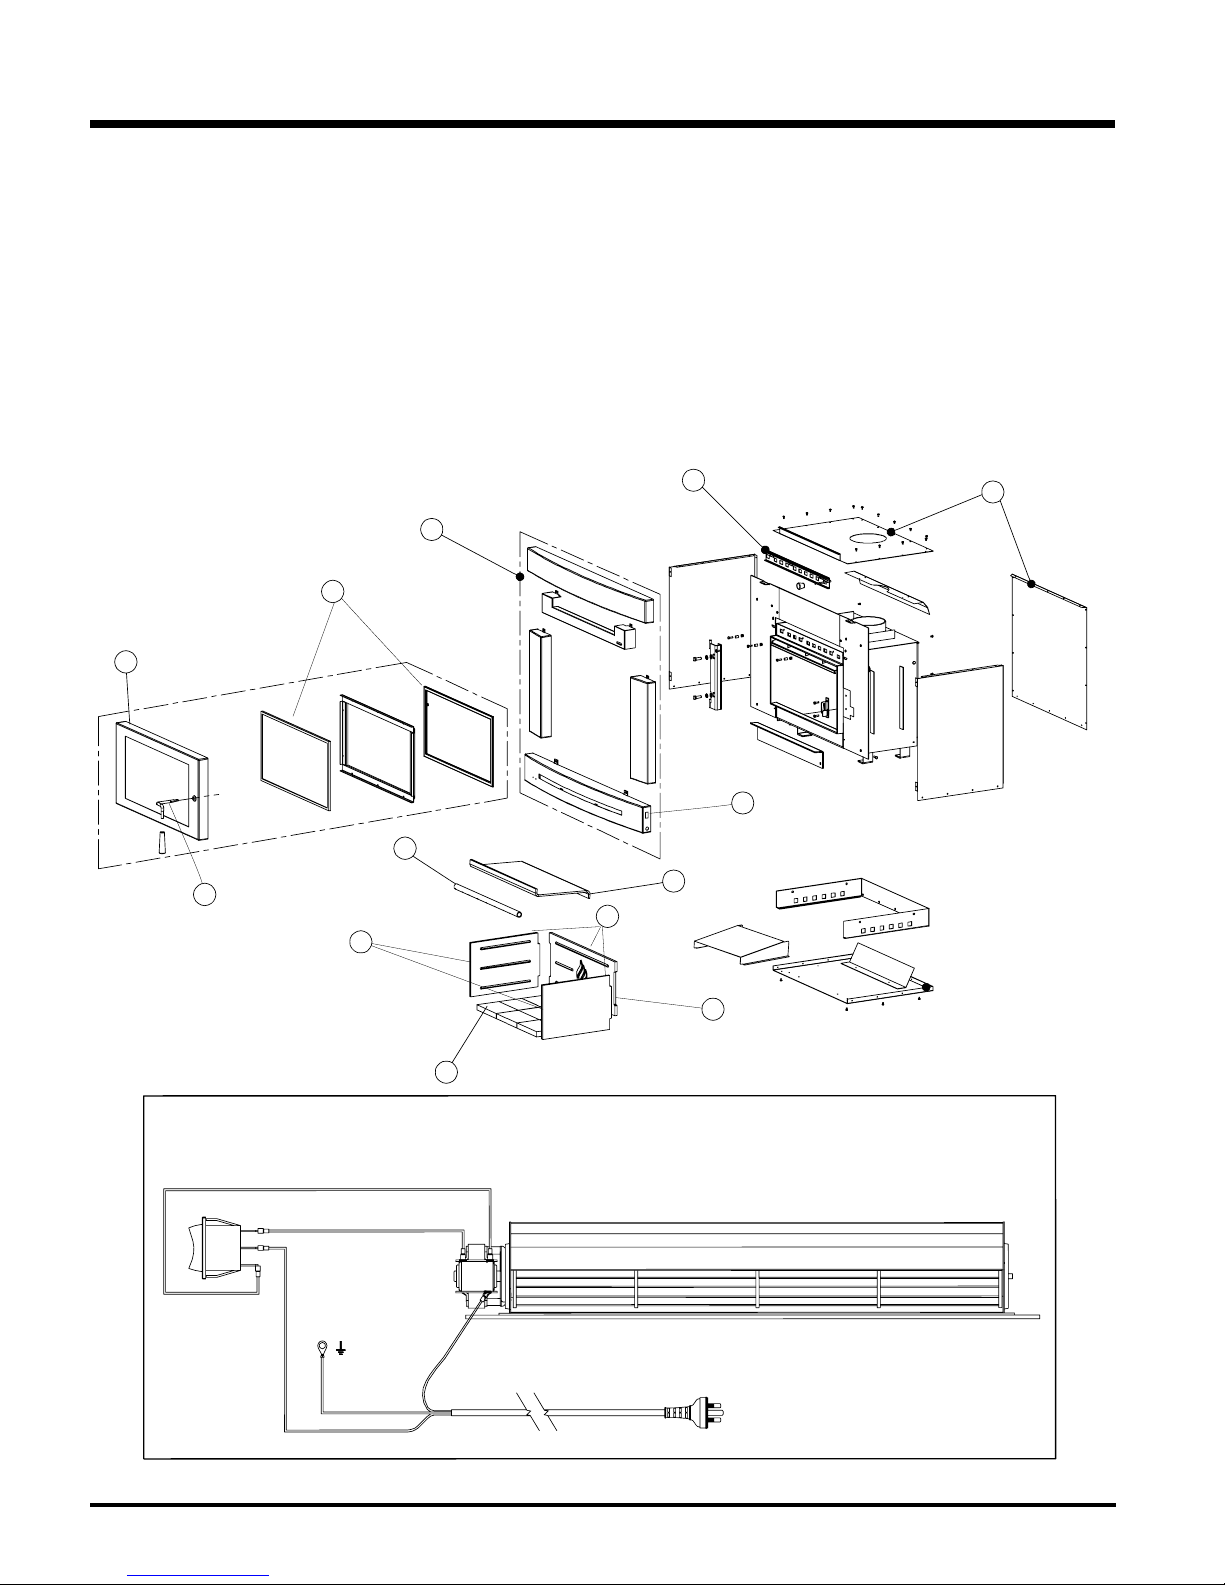
PARTS LIST
STOVE ASSEMBLY
Part # Description
1) 1160106 Bafe Top
2) I200-910 Faceplate & Fan
1161100 Faceplate & Fan Housing w/o Blower
3) 6150214 Fan & Housing Only
910-173 Fan (replacement) (not shown)
4) 8010301 Brick Set (9 pcs)
5) 8010302 Cast Iron Liner (set)
6) 8010303 Cast Iron Liner Sides (L or R)
7) 8010305 Cast Iron Liner Back
8) 8010306 Stainless Steel Air Bar
2
9
11
9) 8010402 Glass Neoceram w/Gasket
10) 8010403 Air slide
11) 8010406 Door Assembly (without handle)
12) 8010114 Door Handle Set
8010408 Hinge Bar
8010409 Latch Plate
13) 936-060 Door rope seal 5 ft .6" (not shown)
10
3
3
8
12
5
6
4
1
7
Internal Blower Wiring Diagram (240V)
Black
Ⅰ
Ⅱ
Red
Attach to Fan
Neutral-“Blue”
Hot-"Brown”
Green-Yellow
14
Regency Bellerive Fireplace Insert
Page 15

WARRANTY
Regency® Fireplace Products are designed with reliability and simplicity in mind. In addition, our internal Quality Assurance Team carefully inspects each unit
thoroughly before it leaves our door. Regency® is pleased to extend this limited lifetime warranty to the original purchaser of a Regency
repair or replace goods free of charge in the event of defects arising from faulty materials or workmanship in accordance with the warranty terms in relation to
Denitions,WarrantyConditionsandExclusionsstatedinthisdocument.
The bene ts to the consumer given by this warranty are in addition to all other rights and remedies of the consumer under a law in relation to the goods or services to which
the warranty relates.
Our goods come with the guarantees that cannot be excluded under the Australian Consumer Law. You are entitled to a replacement or refund for a major failure and for
compensation for any other foreseeable loss or damage. You are also entitled to have the goods repaired or replaced if the goods fail to be of acceptable quality and the failure
does not amount to a major failure.
The Warranty:
Covered under the agreement against manufacturer's defects from the date of purchase are the following components:
The Firebox for 15 years; (Parts&labourfortherst5Yearsandpartsonlythereafter)
Steel Baf es for 12 months;
Cast Iron Liners / Baf es for 2 years;
Electrical components (ie. fans, switches) for 12 months. (Parts & labour from the invoiced purchase date)
Regency Fireplace Products is not liable for freight or labour on any wood burning appliance replaced in eld.
Repair/replacement parts purchased by the consumer from Regency Fireplace Products after the original coverage has expired on the unit will carry a
90 day warranty, valid with a receipt only. Any item shown to be defective will be repaired or replaced at our discretion. No labour coverage is included
with these parts.
Conditions:
Any part or parts of this unit which in our judgement show evidence of such defects will be repaired or replaced at Regency Fireplace Product's option, through an
accredited distributor or agent provided that the defective part be returned to the distributor or agent Transportation Prepaid, if requested. In areas where there
is not an approved service agent or the closest approved service agent is situated more than thirty (30) kilometres from the installation, Regency is not obliged to
arrange warranty repairs and travel and/or additional labour charges will apply.
It is the general practice of Regency Fireplace Products to charge for larger, higher priced replacement parts and issue credit once the replaced component has
been returned to Regency Fireplace Products and evaluated for manufacturer defect.
The authorised selling dealer is responsible for all in- eld service work carried out on your Regency product. Regency Fireplace Products will not be liable for results
or costs of workmanship from unauthorised service persons or dealers.
At all times Regency Fireplace Products reserves the right to inspect product in the eld which is claimed to be defective.
All claims must be submitted to Regency Fireplace Products by authorized selling dealers. It is essential that all submitted claims provide all of the necessary in-
formation including customer name, purchase date, serial #, type of unit, problem, and part or parts requested, without this information the warranty will be invalid.
Exclusions:
This warranty does not extend to or include paint, door or glass gasketing, neo-ceramic glass, rebrick or trim. It does not cover installation and operational related
problems such as over- ring, use of corrosive driftwood, downdrafts or spillage caused by environmental conditions, nearby trees, buildings, hilltops, mountains,
inadequate ueing or ventilation, excessive offsets, negative air pressures caused by mechanical systems such as furnaces, fans, clothes dryers etc.
At no time will Regency Fireplace Products be liable for any consequential damages which exceed the purchase price of the unit. Regency
Fireplace Products has no obligation to enhance or modify any unit once manufactured. ie. as products evolve, eld modi cations or upgrades will not be performed.
Regency Fireplace Products will not be liable for travel costs for service work.
Installation and environmental problems are not the responsibility of the manufacturer and therefore are not covered under the terms of this warranty policy.
Any unit which shows signs of neglect or misuse is not covered under the terms of this warranty policy.
The warranty will not extend to any part which has been tampered with or altered in any way, or in our judgment has been subject to misuse.
Freight damage to stoves and replacement parts is not covered by warranty and is subject to a claim against the freight carrier by the dealer.
Regency Fireplace Products will not be liable for acts of God, or acts of terrorism, which cause malfunction of the appliance.
Performance problems due to operator error will not be covered by this warranty policy.
Products made or provided by other manufacturers and used in conjunction with the operation of this appliance without prior authorisation from Regency Fireplace
Products may nullify your warranty on this product.
SUBJECT TO CHANGE.
®
Product. Regency® will
Regency Bellerive Fireplace Insert
15
Page 16
Register your Regency® warranty online
www.regency-re.com.au
Reasons to register your product online today!
• View and modify a list of all your registered products.
• Requestautomaticemailnoticationofnewproductupdates.
• Stay informed about the current promotions, events, and special
offers on related products.
• Help assure you get the most out of your warranty.
• Eliminate confusion and frustration if warranty** service is required in
the future.
** Proof of purchase required at time of warranty request.
Installer: Please complete the following information
Dealer Name & Address: ______________________________________________
___________________________________________________________________
Installer: ___________________________________________________________
Phone #: ___________________________________________________________
Date Installed: ______________________________________________________
Serial No.: __________________________________________________________
© Copyright 2014, FPI Fireplace Products International Ltd. All rights reserved.
Printed in Canada
 Loading...