

Page 1
06/21/2013_DC
FOR THE MOST IMPORTANT PEOPLE
IN THE WORLD
CONVERTIBLE CRIB RAIL
INSTRUCTIONS
Model: 2015
www.regalo-baby.com
...........................................................................
Regalo International, LLC.
3200 Corporate Center Drive, Suite 100
Burnsville, MN 55306-9803, USA
Toll Free: 866-272-5274
Made in China
Page 2

WARNING:
IMPORTANT ! KEEP FOR FUTURE REFERENCE !
• Failure to follow these instructions for the assembly and use of your
crib rail could result in serious injury or death.
• This crib rail is intended for use with children 2 years to 5 years of age.
WARNING:
SUFFOCATION AND STRANGULATION HAZARD
-Gaps in and around crib rails have entrapped young children
and killed infants.
-NEVER use with children younger than 2 years old. Use
ONLY with older children who can get in and out of toddler bed
without help. NEVER use in place of crib.
-NEVER use unless crib rail is tight against mattress, without
gaps, and at least 9 in. from headboard and footboard. Do not
fill gaps with pillows, blankets, or other items that can suffocate
children.
-NEVER use on adult bed, bunk bed, water bed, or bed with
inflatable mattress.
-Use ONLY on convertible crib.
-Discontinue use if damaged, broken or if parts are missing.
1
Page 3
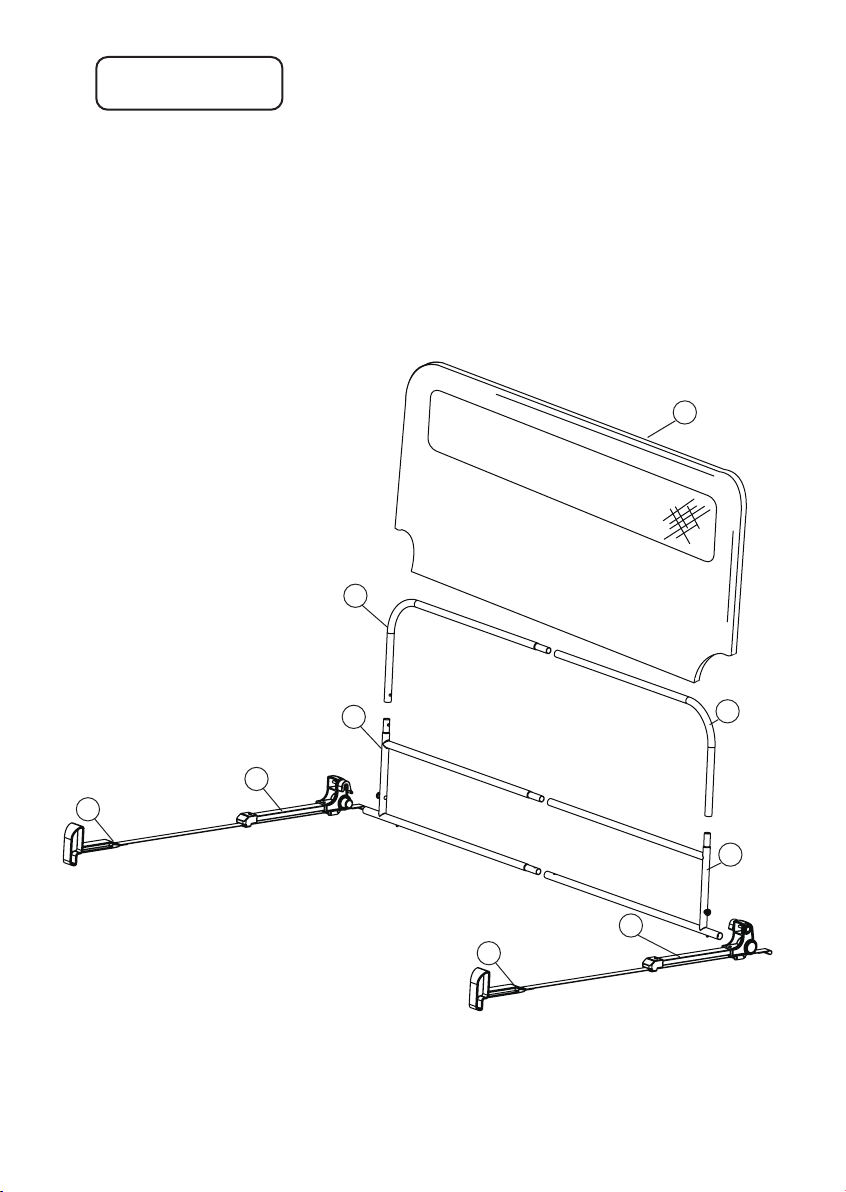
PART LIST :
1. Crib Rail Mesh Wall
2. Right Upper Support Bar
3. Left Upper Support Bar
4. Right Bottom Support Bar
5. Left Bottom Support Bar
6. Right Under Bar
7. Left Under Bar
8. Right Anchor and Strap
9. Left Anchor and Strap
1
2
4
6
8
7
9
3
5
2
Page 4
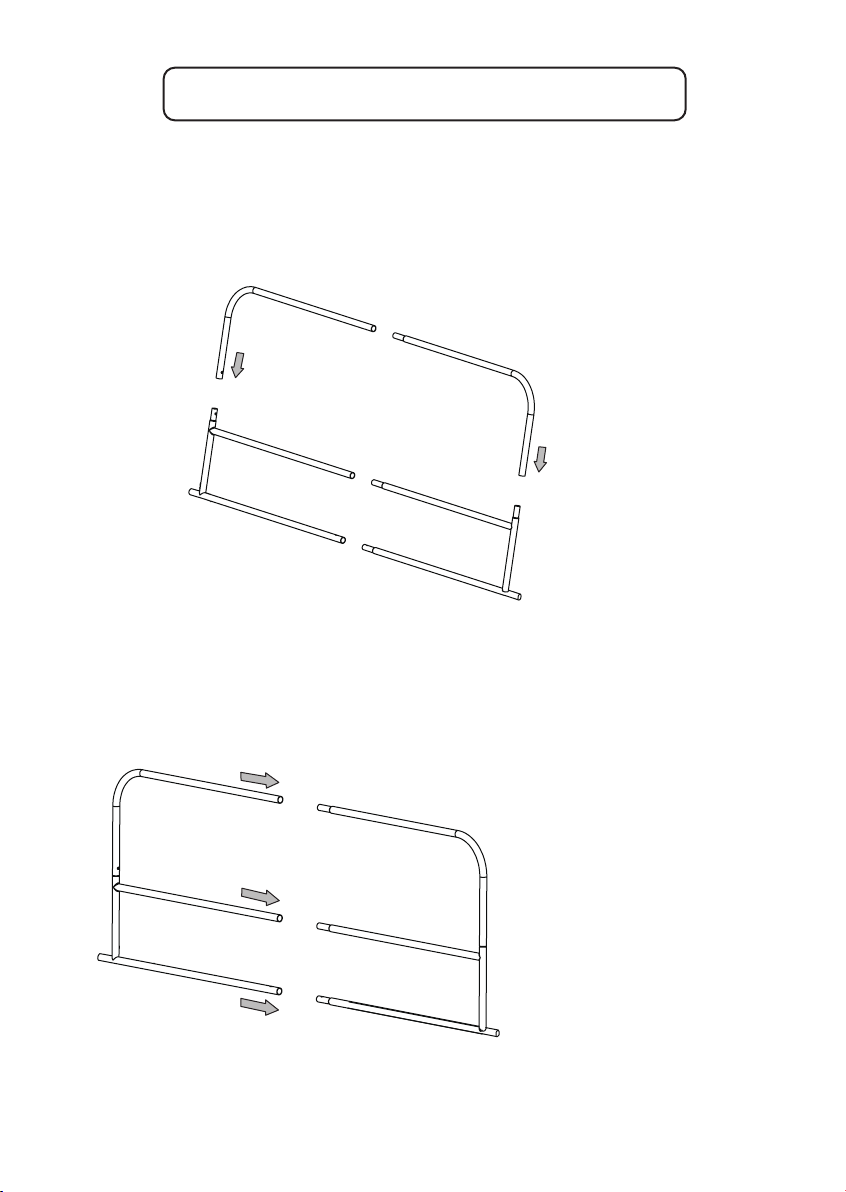
CRIB RAIL ASSEMBLY AND SET UP
Step 1 : Remove crib rail from packaging and set all parts out in front of you.
Step 2 : Insert Left Upper Support Bar into Left Bottom Support Bar. Make sure the
spring pin fits securely into opposing hole so that the two pieces cannot pull apart.
(Diagram A1)
Step 3 : Repeat Step 2 directions to assemble the right side of the crib rail.
(Diagram A2)
(Diagram A1)
(Diagram A2)
Step 4 : With the left and right sides of the crib rail assembled, connect the two
sides. (Diagram B1)
NOTE : Make sure that the spring pins are secured into the opposing holes so that
the crib rail cannot pull apart.
(Diagram B1)
3
Page 5
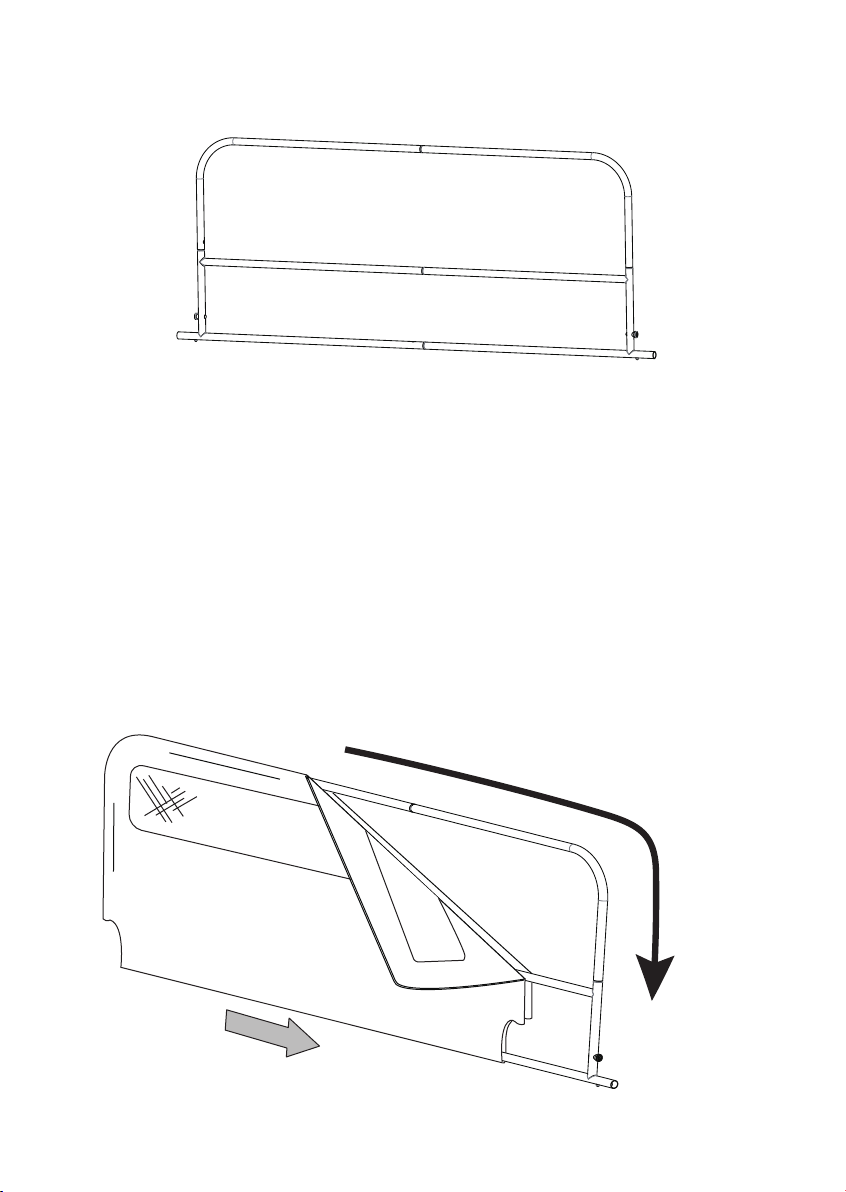
Frame assembly should look like the image below. (Diagram B2)
(Diagram B2)
Step 5 : To install the mesh wall on the crib rail, slide the mesh wall over the frame
until it reaches the other end and zip it shut to complete the installation. (Diagram C1)
NOTE : If the zipper does not close securely, make the necessary adjustments to ensure
proper closure. DO NOT use the crib rail withough securely zipping the mesh wall
properly!
(Diagram C1)
zipper direction
4
Page 6
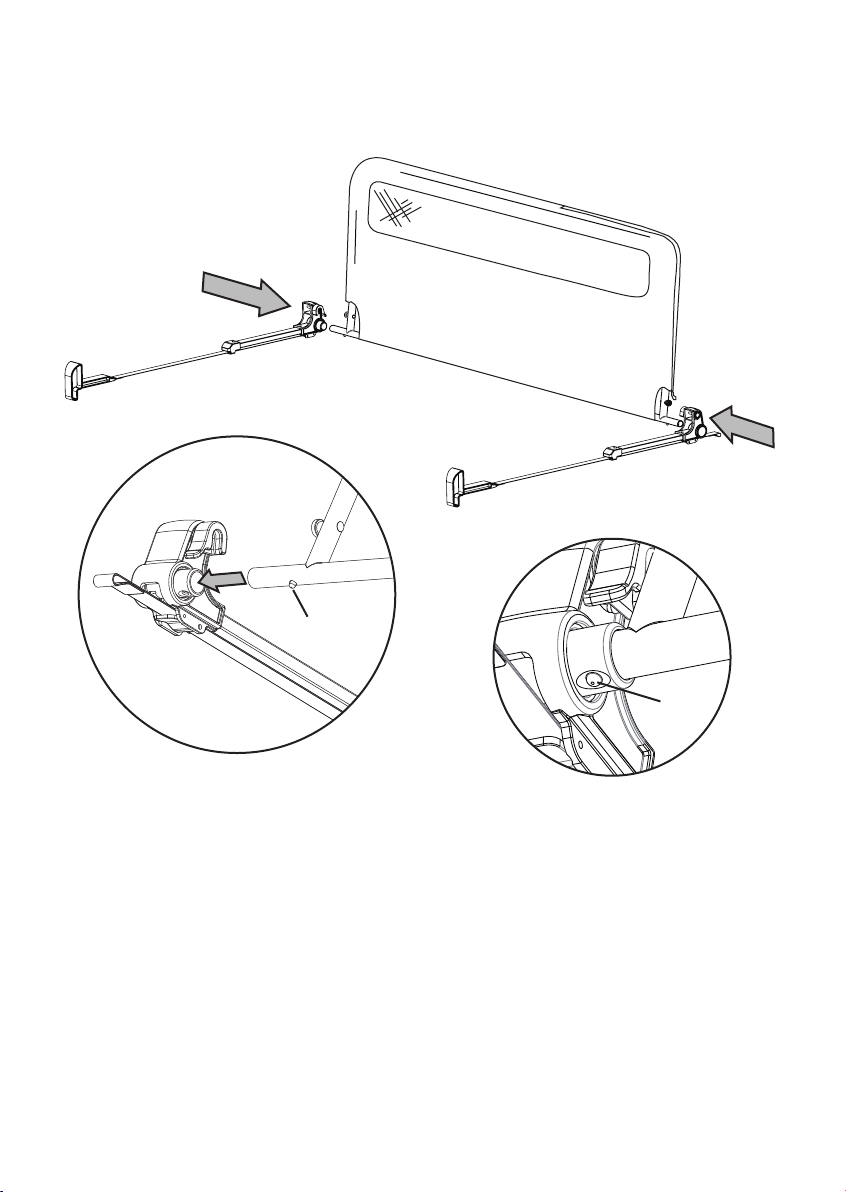
Step 6: With the wall of the crib rail completely assembled, you will now connect
the remaining legs with the anchor straps.
(Diagram D1)
(Diagram D1)
Spring button
Spring
(Diagram D2)
button
(Diagram D3)
Step 7:
Insert one side of the wall frame into one of the leg pieces. Press in the
metal spring button to fully insert the tube into the hole in the plastic hinge.
(Diagram D2)
The spring button should line up with the access hole in the plastic sleeve
on the hinge. The spring button will rebound and lock the tube in place.
(Diagram D3)
Repeat Step 7 to complete the assembly of the other leg.
With completion of Step 7, the assembly of your crib rail is now complete. It is now
ready to be installed on your convertible crib!
5
Page 7
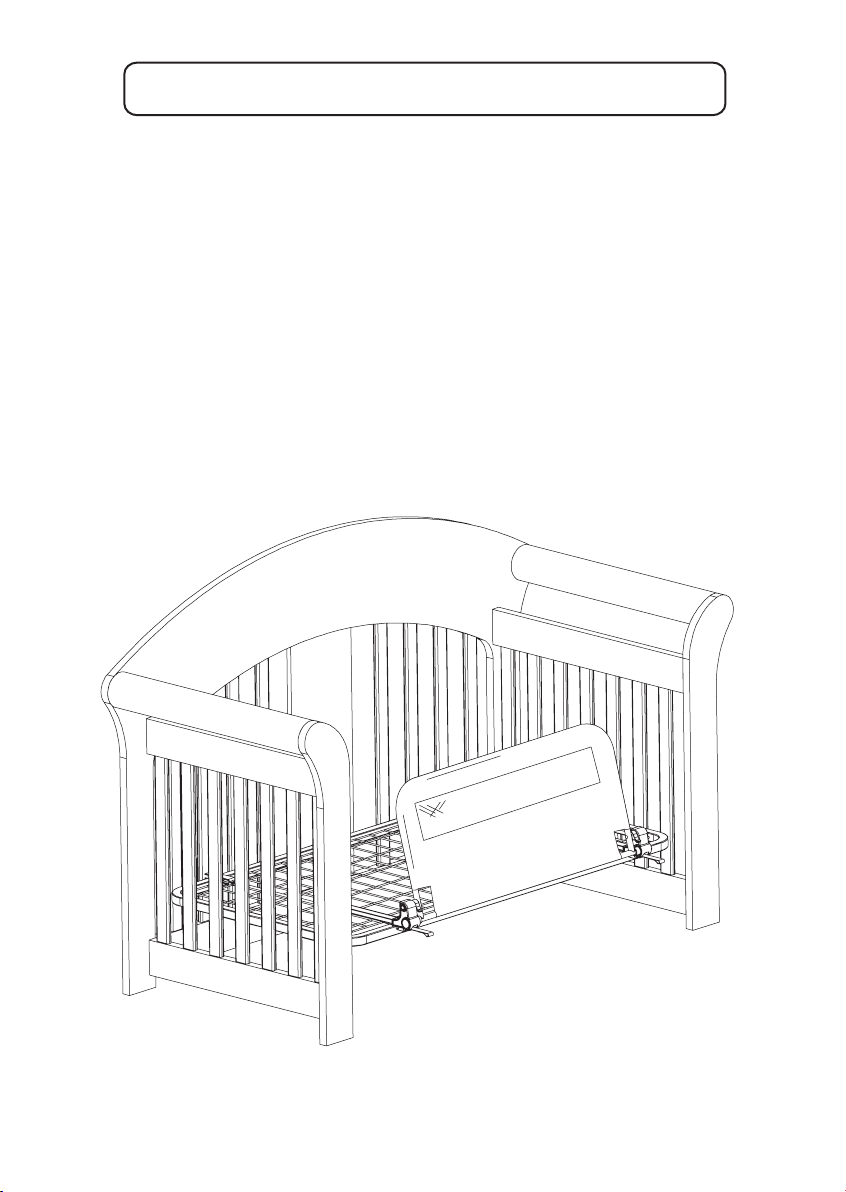
MOUNTING THE CRIB RAIL TO THE CRIB
Note : The next steps may require the help of a secondary person.
Step 1:
You may need to release the strap locking buckles located on the under side of the
plastic hinges. Ensure that the large end of the anchor is pointing up. The
anchoring straps should not be twisted. If twisted, the anchoring straps will not tighten
properly.
Make sure that you have configured your convertible crib into its toddler
bed configuration, and the crib mattress has been removed. Then, place
the crib rail atop the mattress support structure so that it is poitioned to
create a barrier across the opening of your convertible crib.
(Diagram E2)
(Diagram E1)
(Diagram E1)
6
Page 8
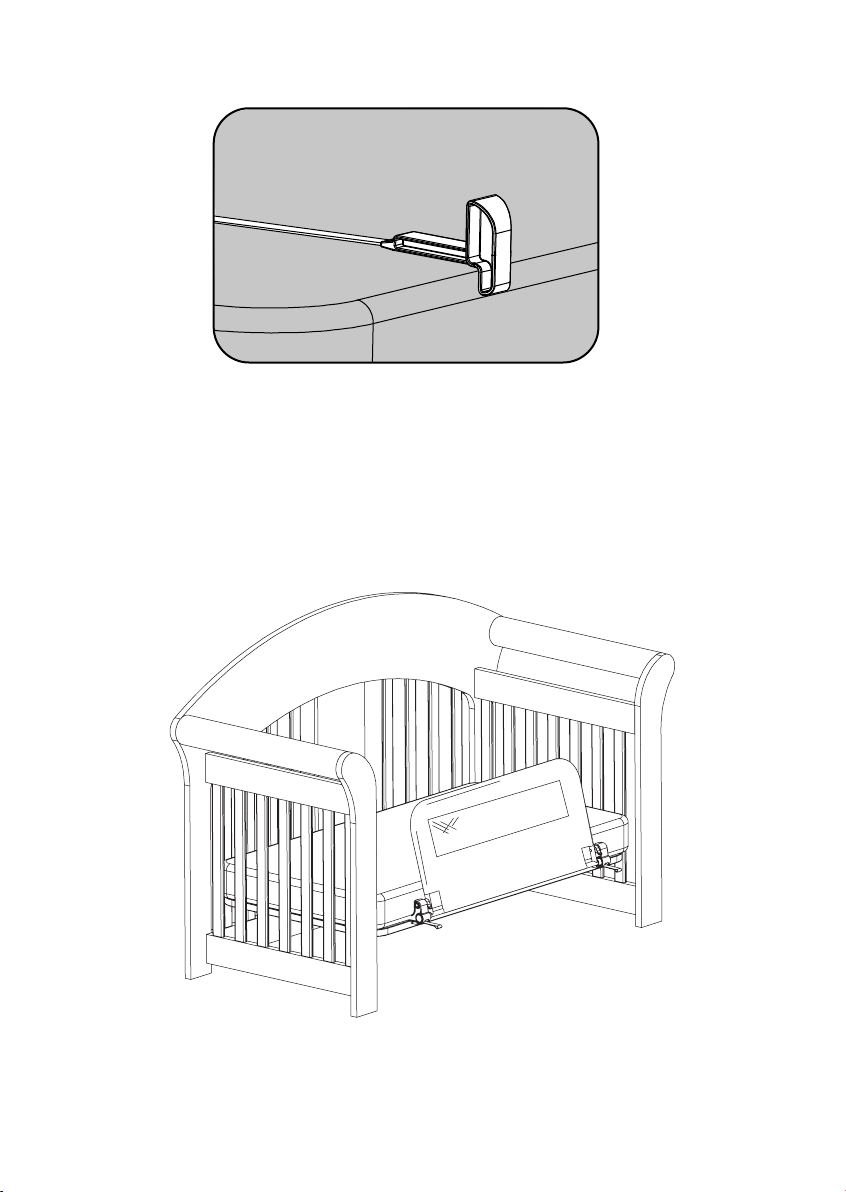
(Diagram E2)
Step 2: Once the crib rail is properly placed, check to make sure the left and right Guide
Bar Assemblies are parallel to one another. Then, place the mattress on top of the
assembly. (Diagram E3)
(Diagram E3)
7
Page 9
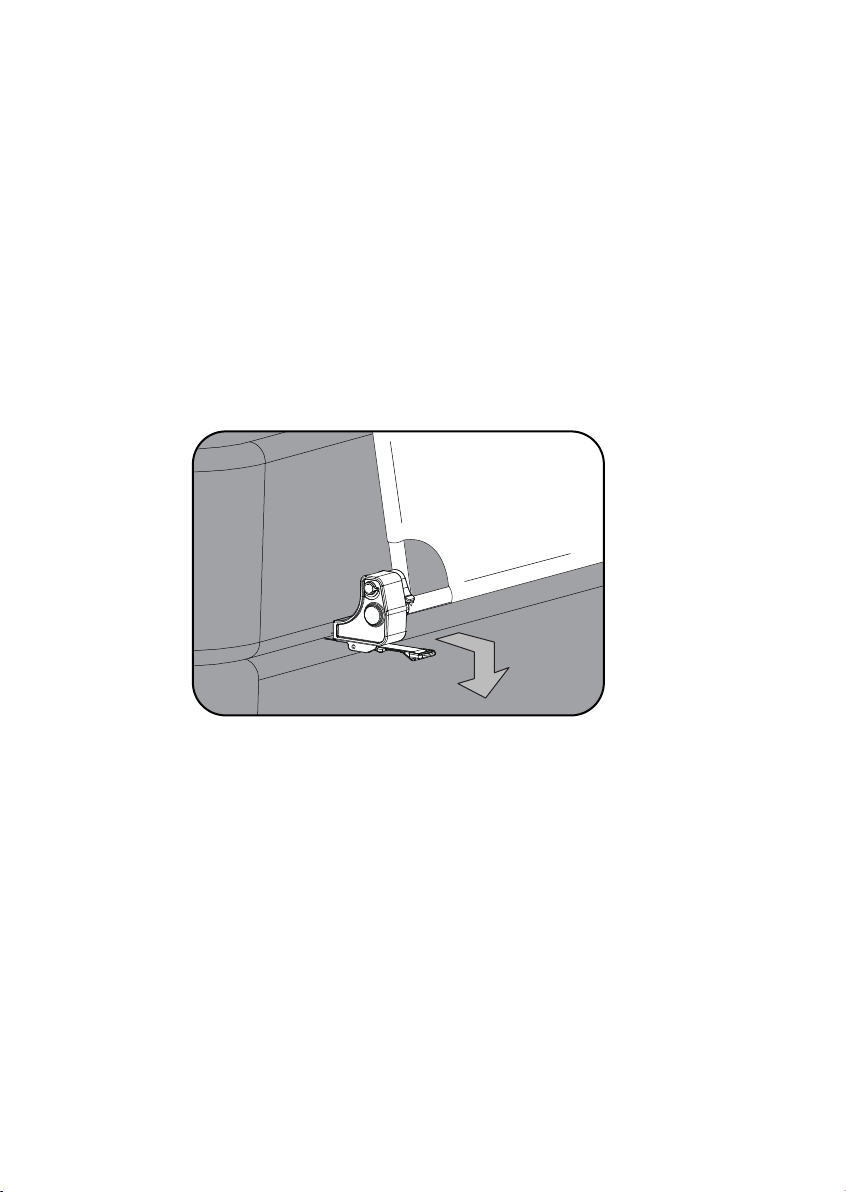
WARNING : In order for the crib rail fabric wall to be firmly held against the side of
the mattress you MUST properly tighten the anchoring straps. Please follow the
directions below very carefully.
Step 3 : Tighten the straps to bring the crib rail into it’s proper position. To tighten
the straps, first release the strap locks on the under side of the Left and Right Under Bars.
Pull the straps towards you until all the excess slack has been pulled out from
under the mattress.
(Diagram E4)
CAUTION: When using this crib rail on a foam mattress with little or no internal structure,
make sure not to over tighten the mounting straps. If over-tightened, the mattress will
likely fold or buckle in the middle and this will cause the crib rail to not provide your child
with the highest level of safety. Make slight adjustments to find the best level of tightness
on your mattress.
(Diagram E4)
Step 4 : If the strap does not pull through smoothly, the strap may be twisted under
the mattress. Correct this before continuing with the installation.
Once you have taken the slack out of the straps, give one final pull on the strap end,
hold it, and lock the locking tab on the locking buckle by pushing up on the thumb
tab. Use the same procedure for each side to properly secure the crib rail.
IMPORTANT : After locking both buckles, check to make sure that the mesh wall of
the crib rail is firmly up against the side of the mattress. There should be NO GAPS.
If the mesh wall is not firmly against the side of the mattress, check to make sure
the locking buckle is functioning properly and that the strap is not twisted beneath
the mattress. Once this has been checked and corrected if needed, unlock the
buckle, pull on the end of the strap to tightly and lock the buckle again.
NOTE : Store the excess anchoring strap material by tucking it under the mattress.
8
Page 10
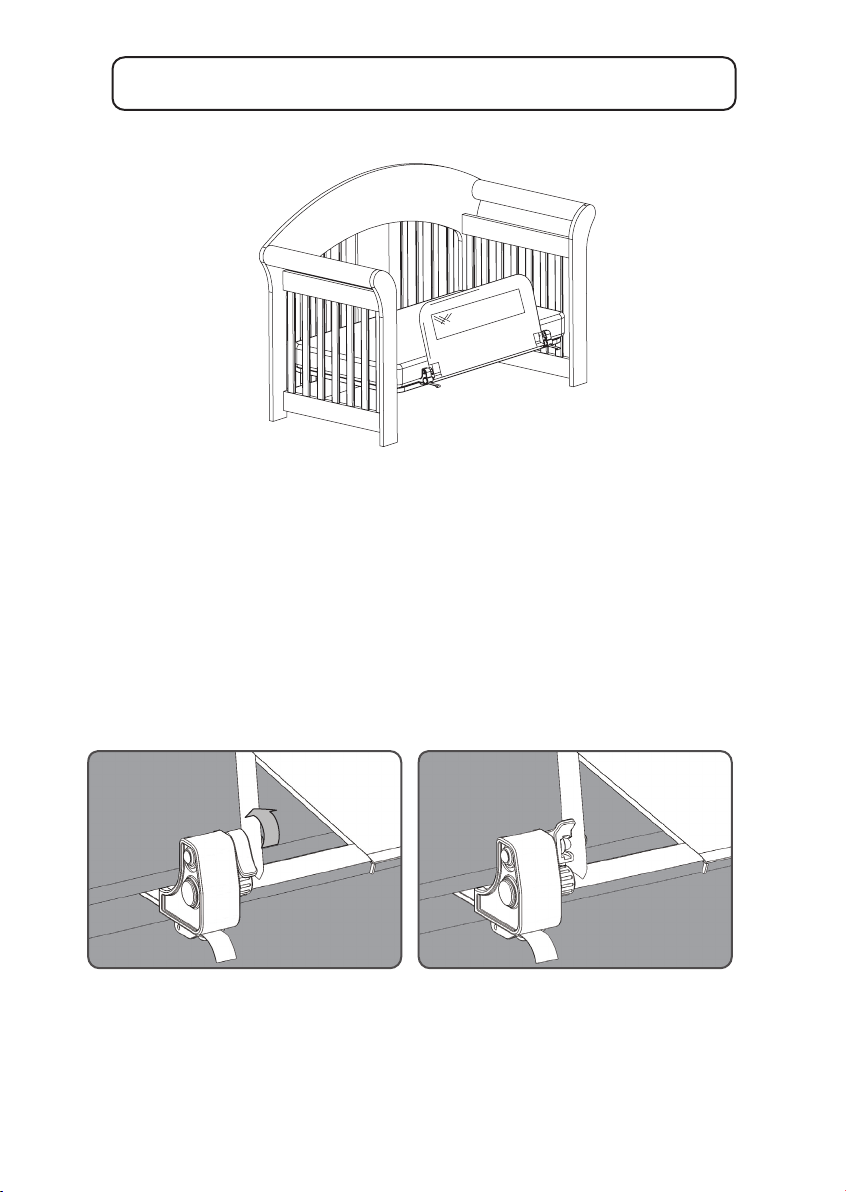
OPERATION OF SWING DOWN FEATURE
(Diagram F)
Step 1: With the crib rail side in the ‘up’ position, locate the locking tab on each of
the hinges. (Diagram F) A close up view of the hinge is shown in (Diagram G1).
Step 2: Once the locking tabs have been located, flip the tab up to expose the open
side of the lock. (Diagram G2) This will allow the upper part of the crib rail to move
freely.
NOTE : Be sure to continue to hold the upper part of the crib rail so that it does not
fall on its own!
(Diagram G1)
(Diagram G2)
9
Page 11
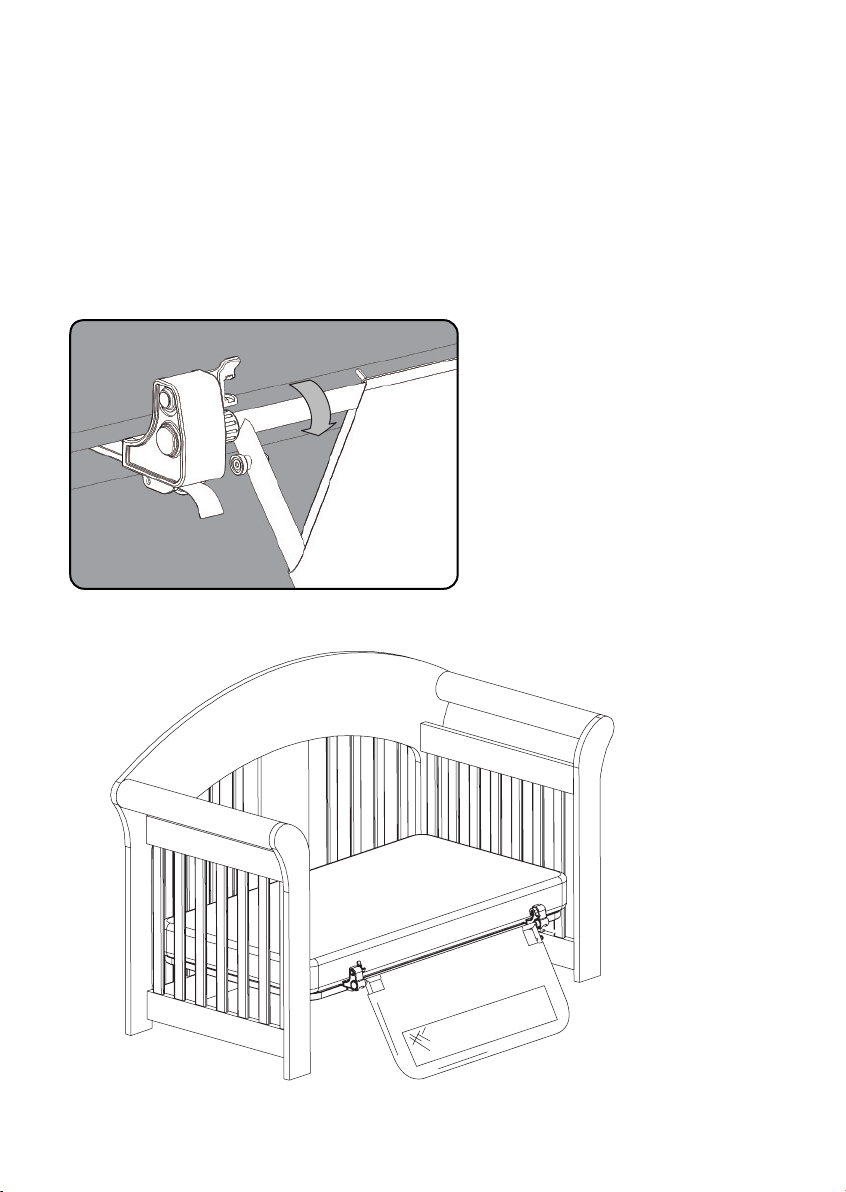
Step 3 : With both locking tabs turned to the ‘open’ position, hold the upper part of
the crib rail firmly and swing it down.(Diagram H1) The crib rail should now be in
the ‘down’ position. (Diagram H2)
NOTE : To return the crib rail to the ‘up’ position, reverse the previous instructions.
IMPORANT: Make sure that the crib rail is in the ‘up’ position and the locking tabs are
securely closed before leaving a child alone in the bed.
(Diagram H1)
10
(Diagram H2)
Page 12

CARE AND MAINTENANCE
Periodically check the crib rail for signs of damage, wear and/or for missing
components.
Do not use if any part is missing, worn or damaged.
Check the crib rail regularly to make sure all hardware and mountings are
tight and secure.
Do not use abrasive cleaners or bleach when cleaning.
Proper cleaning of crib rail can be done by sponging it with warm water and
mild detergent.
90 Days Limited Warranty:
If, during the first 90 days after consumer purchase of this item, under reasonable
and non-commerical use and conditions of maintenance, it fails while owned by
the original purchaser because of the quality of materials or workmanship of finish
and assembly, Regalo International LLC will replace or repair it at Regalo’s option,
Proof of purchase required.
11
Page 13

COPYRIGHT 2013 Regalo International, LLC.
3200 Corporate Center Drive, Suite 100
Burnsville, MN 55306-9803, USA
Toll Free: 866-272-5274
Made in China
06/21/2013_DC
 Loading...