

Page 1
World class hi-fi made in England.
Page 2

English: For user instructions in your language, please visit www.rega.co.uk and go to
the download section of your chosen product page.
Français: Pour obtenir les instructions aux utilisateurs dans votre langue, veuillez visiter
www.rega.co.uk et vous rendre dans la section téléchargement de la page de votre
produit choisi.
Deutsch: Eine Gebrauchsanleitung in Ihrer Sprache nden Sie auf www.rega.co.uk im
Download-Bereich der Seite zu dem von Ihnen gewählten Produkt.
Italiano: Puoi trovare le istruzioni d’uso su www.rega.co.uk cliccando sulla sezione
Download della pagina del prodotto scelto.
Español: Para instrucciones del usuario en su idioma, por favor visite www.rega.co.uk y
vaya a la sección de descargas de la página del producto que ha elegido.
Português: Para instruções do utilizador no seu idioma, visite www.rega.co.uk e entre na
secção de transferências da página do produto escolhido.
Nederlands: Ga voor verdere instructies in uw taal naar www.rega.co.uk en vervolgens
naar de downloadsectie van de productpagina van uw keuze.
Dansk: Find brugsvejledningen på dit sprog ved at gå til www.rega.co.uk og fortsætte til
downloadafsnittet på siden for det produkt, du har valgt.
Svenska: För bruksanvisning på ditt språk, besök www.rega.co.uk och gå till
nedladdningssektionen på din valda produktsida.
Polski: Instrukcje użytkowania w danym języku są dostępne na stronie www.rega.co.uk,
gdzie można ściągnąć część strony, której dotyczy wybrany produkt.
Page 3
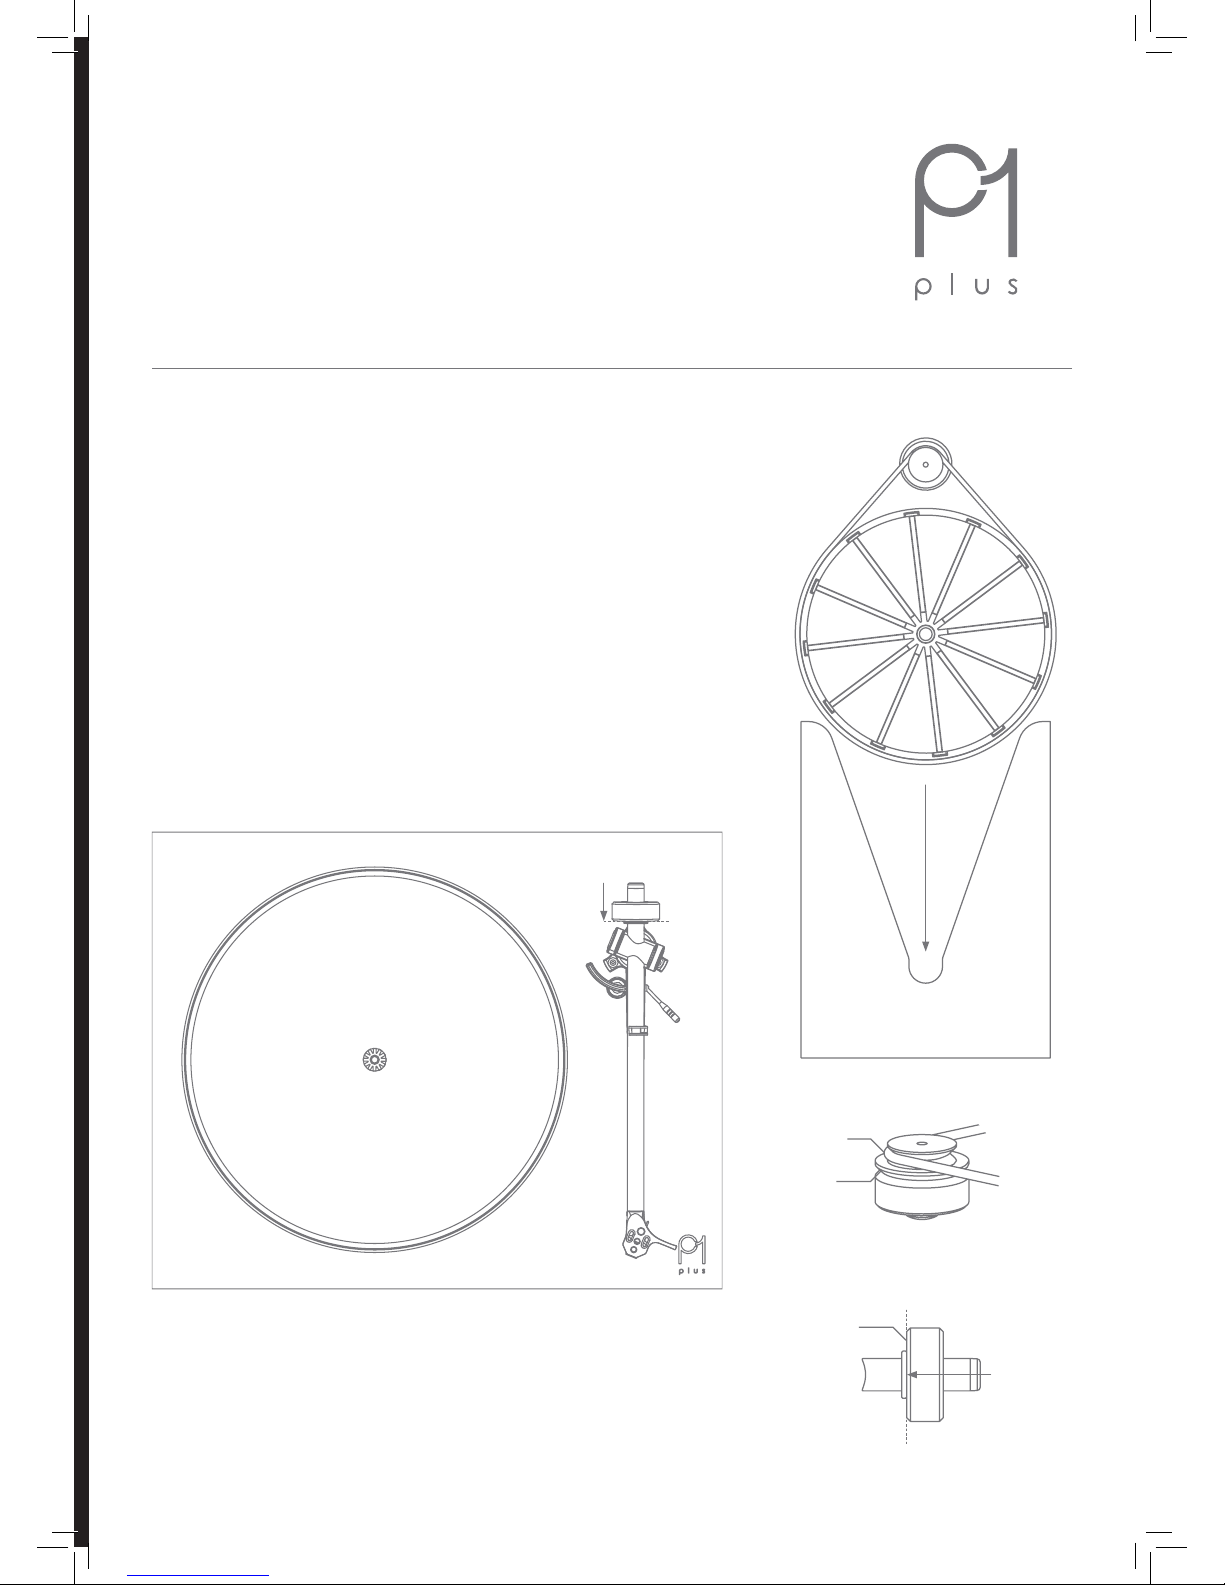
Setting Up Your Planar 1 Plus
• Carefully unpack the turntable, always keeping it upright.
• Check the belt is tted around the drive pulley (A) and sub-platter (B).
• Remove the packing card (C) from beneath the sub-platter (B) and t the
platter (1) and mat.
• Push the balance weight (4) fully onto the rear of the tonearm (3) until it
reaches the stop point as shown (D).
• Connect the phono output to an appropriate line level input (see page 2).
• Connect the power supply to the rear of the turntable (see page 2).
• Carefully remove the stylus guard from the cartridge (2).
• Turn on the Planar 1 Plus via the on/o switch located on the underside of
the plinth (5).
• Change the speed by moving the drive belt from the 33 ⁄ and 45 steps of
the pulley (A).
• The RB110 tonearm (3) is preset for bias adjustment, no other set-up is
required.
D
D
A, B & C (located
beneath the platter)
B
C
A
A
33 ⁄ RPM
Stop point
45 RPM
• IMPORTANT: Please turn down the volume on the amplier before
switching the unit on or o.
1
2
3
5 (the on/o switch is located
underneath the plinth)
4
1
Page 4

Built-in Phono Stage
The built-in phono stage is a high specication pre-amplier. It is designed
to amplify the signal from a moving magnet cartridge to a suitable level
for all line level inputs of an appropriate system or audio amplier. This
allows simple connection to a wide variety of products using either the
standard twin phono to phono lead (supplied) or phono to 3.5 mm plug (not
supplied).
Note: A 3.5 mm to phono lead must only be plugged into an appropriate
input. DO NOT CONNECT TO A HEADPHONE OUTPUT SOCKET (as found on a
mobile device or similar), as this could damage both the device and player.
Output Connections
Connect the output sockets of the built-in phono stage to a suitable ‘line
level’ input on your amplier using the appropriate phono leads.
IMPORTANT: Many ampliers have a built-in phono stage. Never connect
the P1 Plus to an integrated phono stage. These are usually marked ‘Phono’
or ‘Disk’ input.
Output Connections Power Connection
Note: Some ampliers and all in one systems oer adjustable gain settings.
If this option is available, we recommend that the connection used for
the turntable is set to the lowest gain setting to avoid any unnecessary
background noise.
Note: When switching the P1 Plus on or o, a noise may be heard through
the speakers. This is the phono stage powering up momentarily after the
turntable. This is perfectly normal.
Positioning
As with any turntable, take care when positioning. Always place it on a rm
level surface. Never place the turntable on the same surface as desktop
or bookshelf loudspeakers as the energy created by the loudspeakers
can distort the music and aect performance. To optimise performance,
the turntable should be mounted on a hi- rack or the dedicated Rega
wallbracket.
Power Connection
Plug in the Rega PS1 350 mA power supply in to the wall socket. Set-up is
now complete. Simply switch on, sit back and enjoy!
Service
With the unit disconnected from the mains, only clean with a micro bre
cloth, (lightly damp if necessary). Do not remove any coverings; there are no
user serviceable parts inside. If the unit performs erratically or emits smoke
or odour, disconnect from the power supply and take it to a qualied service
technician.
Warranty
All Rega products are covered by a lifetime warranty against manufacture
defects. This warranty does not cover wear and tear. Any unauthorised
modications or failure to follow the Rega recommended guidelines may
invalidate the warranty. If returning goods for inspection to your retailer, the
original packaging must be used to preserve the warranty. Damage caused
during transport due to incorrect packaging may invalidate your warranty.
Replacement packaging is available from any Rega retailer. Your statutory
rights are not aected.
Warning
Only use the supplied mains adaptors with this product.
PS1 (UK)
Input 230 V AC 50 Hz 0.07 A
Output 24 V AC 350 mA AC
PS1 (EU - Euro 2 pin)
Input 230 V AC 50 Hz
Output 24 V AC 350 mA AC
PS1 (Australian)
Input 240 V AC 50 Hz 0.07 A
Output 24 V AC 350 mA AC
PS1 (UL - American)
Input 115 V AC 60 Hz
Output 24 V AC 350 mA AC
2
Page 5

Safety Instructions
Do not use this unit near liquids or expose to moisture.
Do not use near sources of heat such as radiators, vents, stoves, or candles.
Ensure adequate ventilation around the product, at least 10 cm in all
directions, and avoid placing the unit on soft surfaces such as long carpet
and fabric.
Do not open the product enclosure or force objects into openings in the
unit.
Place the unit on a xed level surface where it will not fall or tip.
The unit should only be used in moderate climates between 5 ˚C (41 ˚F)
and 35 ˚C (95 ˚F).
Keep packaging material and small pieces out of reach of children.
Use only with a Rega PS1 350 mA power supply.
50 Hz: 24 V AC 0.142 mA maximum power consumption 3.4 W.
60 Hz: 24 V AC 0.129 mA maximum power consumption 3.1 W.
Unplug the power supply if the unit is unused for extended periods of time.
Specications
Maximum Output Level (3.54 cm/s RMS 45˚ CBS STR100 Band 6a and 7a):
370-410 mV
Output Impedance: 1 k
Frequency Response (pre-amplier only): 14 Hz (-3 dB Point) to 100 kHz (-0.6
dB Point)
RIAA Accuracy (pre-amplier only): (100 Hz to 20 kHz) ± 0.4 dB typically
better than ± 0.25 dB
Pre-amplier Gain: 40 dB
Pre-amplier Input Loading: 47 k in parallel with 220 pF
Signal to Noise Ratio: -75 dB A-weighted ref maximum output.
Power Requirements: 50 Hz 24 V AC 0.142 mA 3.4 W – 60 Hz 24 V AC
0.129 mA 3.1 W
Sicherheitsanweisungen
Dieses Gerät weder in der Nähe von Flüssigkeiten verwenden, noch
Feuchtigkeit aussetzen.
Nicht in der Nähe von Hitzequellen, wie Heizkörpern, Lüftungsschlitzen,
Öfen oder Kerzen verwenden. Sorgen Sie für eine geeignete Luftzufuhr rund
um das Produkt, mindestens 10 cm in alle Richtungen, und vermeiden Sie
es, das Gerät auf weiche Oberächen zu stellen, wie auf lange Teppiche oder
Stoe.
Das Produktgehäuse nicht önen und keine Gegenstände mit Gewalt in die
Önungen des Gerätes stecken.
Das Gerät auf eine stabile ebene Oberäche stellen, wo es nicht
herunterfallen oder umkippen kann.
Verwenden Sie das Gerät nur in gemäßigten Klimazonen zwischen 5 °C (41
°F) und 35 °C (95 °F).
Das Verpackungsmaterial und kleine Bestandteile außerhalb der Reichweite
von Kindern aufbewahren.
Nur mit einem Rega PS1 350 mA Netzteil verwenden.
50 Hz: 24 V AC 0,142 mA maximale Leistungsaufnahme 3,4 W.
60 Hz: 24 V AC 0,129 mA maximale Leistungsaufnahme 3,1 W.
Den Netzstecker ziehen, falls das Gerät über einen längeren Zeitraum nicht
verwendet wird.
Technische Daten
Maximale Ausgabeleistung (3,54 cm/s RMS 45˚ CBS STR100 Band 6a und 7a):
370-410 mV
Ausgangsimpedanz: 1 k
Frequenzgang (nur Vorverstärker): 14 Hz (-3 dB-Punkt) bis 100 kHz (-0.6 dBPunkt)
RIAA-Präzision (nur Vorverstärker): (100 Hz bis 20 kHz) ± 0,4 dB
typischerweise besser als ±0,25 dB
Verstärkung des Vorverstärkers: 40 dB
Vorverstärker-Eingangslast: 47 k parallel zu 220 pF Signal-RauschVerhältnis: -75 dB A-gewichtet Ref. maximale Ausgabeleistung.
Stromversorgungsart: 50 Hz 24 V AC 0,142 mA 3,4 W – 60 Hz 24 V AC
0,129 mA 3,1 W
Consignes de sécurité
N’utilisez pas cet appareil à proximité de liquides ou dans un endroit exposé à
l’humidité.
N’utilisez pas cet appareil à proximité de sources de chaleur, telles que des
radiateurs, des conduits, des poêles ou des bougies. Ménagez une ventilation
susante autour du produit, au moins 10 cm de chaque côté, et évitez
d’installer l’appareil sur des surfaces molles comme du tissu ou un tapis.
N’ouvrez pas le boîtier du produit et n’insérez aucun objet de force dans les
ouvertures que présente l’appareil.
Installez l’appareil sur une surface plane et xe où il ne risque pas de tomber
ou de se renverser.
L’appareil doit être utilisé sous des températures tempérées, entre 5 ˚C (41 ˚F)
et 35 ˚C (95 ˚F).
Veuillez conserver le matériel d’emballage et les petites pièces hors de portée
des enfants.
Utilisez le produit uniquement avec un raccordement d’alimentation Rega PS1
350 mA.
50 Hz : 24 V c.a. 0,142 mA, consommation électrique maximale de 3,4 W.
60 HZ : 24 V c.a. 0,129 mA, consommation électrique maximale de 3,1 W.
Débranchez l’appareil de la prise de courant si vous ne l’utilisez pas pendant
de longues périodes.
Spécicités
Niveau de sortie maximum (3,54 cm/s RMS 45˚ CBS STR100 Band 6a et 7a) :
370-410 mV
Impédance de sortie : 1 k
Réponse de fréquence (préamplicateur uniquement) : 14 Hz (Point -3 dB) à
100 kHz (Point -0,6 dB)
Précision RIAA (préamplicateur uniquement) : (100 Hz à 20 kHz) ± 0,4 dB en
général mieux que ± 0,25 dB
Gain du préamplicateur : 40 dB
Charge d’entrée du préamplicateur : 47 k en parallèle avec 220 pF Rapport
signal sur bruit : -75 dB intensité maximale de référence pondérée A.
Alimentation requise : 50 Hz 24 V c.a. 0,142 mA 3.4 W – 60 Hz 24 V c.a.
0,129 mA 3,1 W
Istruzioni di sicurezza
Non usare l’apparecchio nelle vicinanze di liquidi e non esporlo all’umidità.
Non usare nelle vicinanze di fonti di calore come radiatori, bocchette di
aerazione, stufe o candele. Assicurare un’adeguata ventilazione intorno
al prodotto, lasciando uno spazio di almeno 10 cm in tutte le direzioni ed
evitare di posizionare l’apparecchio su superci non rigide come tappeti e
tessuti.
Non aprire l’involucro del prodotto e non forzare oggetti al suo interno.
Posizionare l’apparecchio su una supercie piana da cui non possa cadere o
rovesciarsi.
L’apparecchio deve essere utilizzato unicamente in climi moderati, a
temperature comprese fra 5 C e 35 C.
Tenere il materiale dell’imballaggio e le parti minute lontano dalla portata
dei bambini.
Utilizzare solo con un adattatore Rega PS1 350 mA. 50 Hz: 24 V CA 0,142 mA,
consumo energetico max 3,4 W.
60 Hz: 24 V CA 0,129 mA, consumo energetico max 3,1 W.
Staccare l’apparecchio dalla presa se non lo si utilizza per periodi di tempo
prolungati.
Speciche
Livello d’uscita massimo (3,54 cm/s RMS 45˚ CBS STR100 Banda 6a e 7a):
370-410 mV
Impedenza d’uscita: 1 k
Risposta in frequenza (solo preamplicatore): fra 14 Hz (punto -3 dB) e 100
kHz (punto -0,6 dB)
Precisione RIAA (solo preamplicatore): (fra 100 Hz e 20 kHz) ± 0,4 dB
normalmente meglio di ± 0,25 dB
Gain preamplicatore: 40 dB
Carico d’ingresso preamplicatore 47 k in parallelo con rapporto segnale/
rumore 220 pF : livello d’uscita max equivalente -75 dB ponderato “A”
Requisiti di alimentazione: 50 Hz 24 V CA 0,142 mA, 3,4 W – 60 Hz 24 V CA
0,129 mA, 3,1 W
3
Page 6

4
Instrucciones de seguridad
No utilice esta unidad cerca de líquidos ni la exponga a la humedad.
No la emplee cerca de fuentes de calor como radiadores, respiraderos,
estufas o velas. Asegúrese de que el producto tiene suciente espacio
alrededor para su ventilación, al menos 10 cm en cada dirección, y evite
colocarlo sobre supercies blandas como telas o alfombras grandes.
No abra la carcasa del producto ni introduzca objetos a la fuerza en las
aberturas de la unidad.
Coloque la unidad en una supercie ja y nivelada donde no sea posible que
se caiga o se vuelque.
La unidad solamente se debe utilizar en climas moderados entre 5 ˚C (41 ˚F)
y 35 ˚C (95 ˚F).
Mantenga el material de embalaje y las piezas pequeñas fuera del alcance de
los niños.
Utilícela solamente con una fuente de alimentación Rega PS1 350 mA.
50 Hz: 24 V CA, 0,142 mA, consumo eléctrico máximo de 3,4 W.
60 Hz: 24 V CA, 0,129 mA, consumo eléctrico máximo de 3,1 W.
Desenchufe la fuente de alimentación si no se va a utilizar durante períodos
prolongados.
Especicaciones
Nivel máximo de salida (3,54 cm/s RMS 45˚ CBS STR100 Banda 6a y 7a): 370410 mV
Impedancia de salida: 1 k
Respuesta en frecuencia (solamente preamplicador): 14 Hz (Punto de -3 dB)
a 100 kHz (Punto de -0,6 dB)
Precisión de RIAA (solamente preamplicador): (100 Hz a 20 kHz) ± 0,4 dB
generalmente mejor que ± 0,25 dB
Ganancia del preamplicador: 40 dB
Carga de entrada del preamplicador: 47 k en paralelo con relación señal/
ruido de 220 pF: Salida máxima de referencia ponderada A de -75 dB.
Requisitos de potencia: 50 Hz 24 V CA 0,142 mA 3,4 W – 60 Hz 24 V CA
0,129 mA 3,1 W
Veiligheidsinstructies
Houd het apparaat uit de buurt van vloeistoen en vocht.
Houd het apparaat uit de buurt van hittebronnen zoals radiatoren,
ontluchtingsroosters, ovens of kaarsen. Gebruik het product alleen in
ruimtes met voldoende ventilatie en zorg ervoor dat er tenminste 10 cm
ruimte vrij blijft aan alle zijden van het apparaat. Zet het apparaat niet op
zachte oppervlakken, zoals hoogpolig tapijt en andere weefsels.
Verwijder de behuizing van het apparaat niet en steek geen objecten in of
door de openingen van het apparaat.
Plaats het apparaat op een stabiel en vlak oppervlak waar het niet van af kan
vallen of kan kantelen.
Het apparaat moet alleen worden gebruikt in een gematigd klimaat met een
temperatuur tussen 5 °C en 35 °C.
Houd het verpakkingsmateriaal en kleine onderdelen uit de buurt van
kinderen.
Alleen gebruiken met een Rega PS1-voeding van 350 mA.
50 Hz: 24 V AC 0,142 mA, maximaal stroomverbruik van 3,4 W.
60 Hz: 24 V AC 0,129 mA, maximaal stroomverbruik van 3,1 W.
Koppel het apparaat los van de voeding als het gedurende een langere
periode niet zal worden gebruikt.
Specicaties
Maximaal uitgangsniveau (3,54 cm/s RMS 45˚ CBS STR100 Band 6a en 7a):
370-410 mV
Uitgangsimpedantie: 1 k
Frequentierespons (alleen voorversterker): 14 Hz (-3 dB Punt) tot 100 kHz
(-0,6 dB Punt)
RIAA-nauwkeurigheid (alleen voorversterker): (100 Hz tot 20 kHz) ± 0,4 dB
over het algemeen beter dan ± 0,25 dB
Versterking voorversterker: 40 dB
Ingangsbelasting voorversterker: 47 k in parallel met 220 pF Signaalruisverhouding: maximale referentie-uitgang van -75 dB(A) (A-gewogen
decibelwaarde).
Stroomvereisten: 50 Hz 24 V AC 0,142 mA 3,4 W – 60 Hz 24 V AC
0,129 mA 3,1 W
Instruções de segurança
Não utilize o PL1 Plus perto de líquidos ou em locais com excesso de
humidade.
Não o exponha a fontes de calor, tais como, radiadores, aberturas de
ventilação, fogões ou velas. Assegure uma ventilação adequada à volta do
gira-discos, pelo menos 10 cm em todas as direções, e evite colocar o giradiscos em superfícies macias, como carpetes e tecidos.
Não remova as tampas que estão xas na base inferior do gira-discos.
Coloque o gira-discos numa superfície estável e nivelada, de forma a que
não caia.
O gira-discos só deve ser usado em climas moderados entre 5 °C e 35 °C.
Mantenha o material da embalagem e as peças pequenas fora do alcance
das crianças.
Utilize apenas o transformador de alimentação fornecido Rega PS1 350 mA.
Desligue o transformador de alimentação se o gira-discos não for utilizado
durante longos períodos de tempo.
Especicações
Nível máximo de saída: 370-410 mV
Impedância de Saída: 1 k
Resposta de Frequência (pré-amplicador): 14 Hz (-3 dB) a 100 kHz (-0,6 dB)
Precisão RIAA (pré-amplicador): (100 Hz a 20 kHz) ± 0,4 dB
Ganho do pré-amplicador: 40 dB
Carga de entrada do pré-amplicador: 47 k em paralelo com 220 pF
Relação Sinal / Ruído: 75 dB A (saída máxima de ref. ponderada).
Requisitos de alimentação: 50 Hz 24 V CA 0,142 mA
Consumo de energia: 3,4 W
Se tiver algum problema com o seu gira-discos REGA PLANAR 1 PLUS, ou
desejar algum esclarecimento, por favor, contacte o seu agente Rega ou
directamente a Audio Team.
Page 7

5
Säkerhetsanvisningar
Använd inte enheten i närheten av vätska eller där den kan utsättas för fukt.
Använd den inte i närheten av värmekällor som element, värmeventiler,
spisar eller stearinljus. Se till att produkten har god ventilation med minst 10
cm fritt utrymme på alla sidor, samt undvik att placera enheten på ett mjukt
underlag som tjocka mattor eller tyger.
Öppna inte produktens hölje eller tvinga in föremål i enhetens öppningar.
Placera enheten på en stadig, plan yta där den inte kan ramla ner eller falla
omkull.
Enheten ska endast användas i måttliga klimat mellan 5 °C (41 ˚F) och 35°C
(95 ˚F).
Håll förpackningsmaterial och smådelar utom räckhåll för barn.
Används endast med en Rega PS1 350 mA strömförsörjning.
50 Hz: 24 V AC 0,142 mA maximal strömförbrukning på 3,4 W.
60 Hz: 24 V AC 0,129 mA maximal strömförbrukning på 3,1 W.
Koppla bort nätaggregatet om enheten inte ska användas under en längre
period.
Specikationer
Maximal utgångsnivå (3,54 cm/s RMS 45˚ CBS STR100 Band 6a och 7a): 370410 mV
Utgångsimpedans: 1 k
Frekvensrespons (endast förförstärkare): 14 Hz (-3 dB punkt) till 100 kHz (-0,6
dB punkt)
RIAA Noggrannhet (endast förförstärkare): (100 Hz till 20 kHz) ± 0,4 dB är
vanligtvis bättre än ± 0,25 dB
Förstärkning av förförstärkare: 40 dB
Inmatning av förförstärkare: 47 k parallellt med 220 pF Signal till
brusförhållande: -75 dB A-viktad maximal uteekt som referens.
Strömkrav: 50 Hz 24 V AC 0.142 mA 3,4 W – 60 Hz 24 V AC
0,129 mA 3,1 W
Sikkerhedsanvisninger
Brug ikke pladespilleren i nærheden af væsker, og udsæt den ikke for fugt.
Brug ikke pladespilleren i nærheden af varmekilder som radiatorer,
ventilationsriste, komfurer eller stearinlys. Sørg for tilstrækkelig ventilation
omkring pladespilleren – mindst 10 cm i alle retninger, og undgå at placere
pladespilleren på et blødt underlag som tæpper og stof.
Åbn ikke pladespillerens beklædninger, og før ikke genstande ind i
pladespillerens åbninger.
Placer pladespilleren på et fast, jævnt underlag, hvor den ikke vil falde eller
vippe.
Pladespilleren bør kun anvendes i moderate klimaer mellem 5 ˚C og 35 ˚C.
Hold emballagematerialet og små dele væk fra børn.
Anvendes kun med en Rega PS1 350 mA strømforsyning.
50 Hz: 24 V AC 0,142 mA og et maks. strømforbrug på 3,4 W.
60 Hz: 24 V AC 0,129 mA og et maks. strømforbrug på 3,1 W.
Frakobl strømforsyningen, hvis pladespilleren ikke bruges i længere tid.
Specikationer
Maks. udgangsniveau (3,54 cm/s RMS 45˚ CBS STR100 Band 6a og 7a): 370410 mV
Udgangsimpedans 1 k
Frekvensrespons (gælder kun forforstærker): 14 Hz (-3 dB point) til 100 kHz
(-0,6 dB point)
RIAA-nøjagtighed (gælder kun forforstærker): (100 Hz til 20 kHz) ± 0,4 dB
typisk bedre end ± 0,25 dB
Forforstærker-gain: 40 dB
Forforstærkerens indgangsbelastning: 47 k parallelt med 220 pF signal til
støjratio: -75 dB A-vægtet ref. maks. udgangseekt.
Strømbehov: 50 Hz 24 V AC 0,142 mA 3,4 W – 60 Hz 24 V AC
0,129 mA 3,1 W
Instrukcje bezpieczeństwa
Nie używać urządzenia w pobliżu cieczy i wystawiać go na działanie wilgoci.
Nie używać go w pobliżu źródeł ciepła takich, jak grzejniki, odpowietrzniki,
piece lub świece. Zapewnić odpowiednią wentylację wokół produktu,
osiąganą dzięki odstępom wynoszącym co najmniej 10 cm we wszystkich
kierunkach. Unikać umieszczania urządzenia na miękkich powierzchniach,
takich jak długie dywany oraz tkaniny.
Nie otwierać obudowy urządzenia ani wciskać do jego otworów żadnych
przedmiotów.
Umieścić urządzenie na twardej, równej powierzchni, z której nie może spaść
ani przewrócić się.
Urządzenia można używać wyłącznie w umiarkowanych warunkach
klimatycznych, w temperaturach od 5 do 35˚C (od 41 do 95˚F).
Opakowanie i małe elementy przechowywać w miejscach niedostępnych dla
dzieci.
Używać urządzenia wyłącznie z zasilaczem Rega PS1 350 mA.
50 Hz: 24 V AC 0,142 mA przy maksymalnym zużyciu energii 3,4 W
60 Hz: 24 V AC 0,129 mA przy maksymalnym zużyciu energii 3,1 W.
Jeśli urządzenie ma pozostawać nieużywane przez dłuższy czas, odłączyć
zasilacz.
Dane techniczne
Maksymalny poziom sygnału wyjściowego (3,54 cm/s RMS 45˚ CBS STR100
Pasek 6a i 7a): 370–410 mV
Impedancja wyjściowa: 1 k
Pasmo przenoszenia (tylko przedwzmacniacz): 14 Hz (punkt -3 dB) do 100
kHz (punkt -0,6 dB)
Dokładność RIAA (tylko przedwzmacniacz): (od 100 Hz do 20 kHz) ±0,4 dB,
najczęściej ponad ±0,25 dB
Wzmocnienie sygnału przedwzmacniacza: 40 dB
Obciążenie wejściowe przedwzmacniacza: 47 k przy 220 pF, Stosunek
sygnał/szum: -75 dBA, średnia ważona maksymalnej referencyjnej wartości
wyjściowej.
Wymagania dotyczące zasilania: 50 Hz, 24 V prądu przemiennego, 0,142 mA,
3,4 W – 60 Hz, 24 V prądu przemiennego,
0,129 mA, 3,1 W
Page 8

Rega Research Ltd., 6 Coopers Way, Temple Farm Industrial Estate,
Southend-on-Sea, Essex, SS2 5TE
 Loading...