

Page 1

Ios english manual:Ios english manual.qxd 07/08/2008 10:35 Page 1
All manuals and user guides at all-guides.com
all-guides.com
Page 2
Contents
Introduction..............................................................................1
Design Innovation.................................................................2-3
Installation................................................................................3
Ventilation................................................................................4
Connections.............................................................................4
Earthing...................................................................................5
Cartridge Selection..................................................................6
Powering Up............................................................................7
Controls.............................................................................8- 10
Troubleshooting................................................................11-14
Specifications....................................................................15-16
Owners Log...........................................................................17
Mission Statement
Rega’s philosophy is to make high quality products at sensible prices, as a means
of reproducing music as faithfully as possible. Rega is committed to the design and
development of new and existing products, both in hi-fi and other areas, that will
perpetuate Rega’s values of quality and value for money.
Ios english manual:Ios english manual.qxd 07/08/2008 10:35 Page 2
All manuals and user guides at all-guides.com
Page 3
1
Introduction
The function of a phono pre amplifier is to match the output
from a pick up cartridge to the input of a line level amplifier. It
is required to amplify the very low signals produced by the
cartridge and also to equalise the in accordance with RIAA
record cutting standard.
Rega believes that moving coil and moving magnet cartridges
require different types of phono pre amplifiers to achieve
optimum performance.
The Ios is therefore dedicated to moving coil cartridges and
avoids compromises.
We have avoided including any superfluous gadgets as they
obstruct the signal path and degrade the sound quality.
The Ios phono pre-amp incorporates remarkable and
innovative design ideas. For those interested in the technical
details, these innovations are described more fully in the
nextsection of this manual.
Alternatively, you can simply switch on, sit back and let your
Ios speak for itself.
Please Note: Read this manual with care - failure to do so may result in operational
difficulties not covered by any warranty.
Ios english manual:Ios english manual.qxd 07/08/2008 10:35 Page 3
All manuals and user guides at all-guides.com
Page 4
2
Design Innovation
The Rega Ios is a four stage all symmetrical amplifier. To
provide optimum performance it is dedicated to amplifying the
very low level signals that are generated by moving coil
cartridges.
The first stage uses a 1:10 step-up transformer, which can be
optimised to the cartridge by the selection of the correct
loading and zobel DC resistance correction network connected
across the MC transformer secondary.
The second stage is symmetrical compound pair class A
amplifier, using paralleled low noise Hitachi transistors in the
input stage. This drives the passive high frequency part of the
RIAA equalisation stage.
The third stage is a symmetrical class A differential amplifier
with a common base driver stage; this is also used as the
active amplifier in the low frequency part of the RIAA
equalisation stage.
The fourth stage is the active filter, this configuration uses the
same circuit as found in the second stage. The filter element
uses a very high bandwidth operational amplifier gyrator as the
simulated inductance part of the tuned filter.
Ios english manual:Ios english manual.qxd 07/08/2008 10:35 Page 4
All manuals and user guides at all-guides.com
Page 5
3
The power supply is a symmetrical discrete tracking power
supply using fast diodes and a low noise voltage reference.
Each stage has it’s own localised power supply, and LED
referenced current generators.
Very high quality, polyproplene capacitors have been used in
the signal path. 1% tolerance polypropylene capacitors are
used in the RIAA EQ stages and audio grade capacitors are
used in the rest of the circuit.
Installation
Ios will work well on most surfaces, such as a shelf or a table,
provided there is sufficient air around it to prevent overheating.
To avoid any possible magnetic interference and increased
hum levels, site the Ios as far away from the turntable as the
tonearm lead will allow. If possible, try to place Ios to the left of
the turntable. Ideally the equipment should be placed next to
one another in a line (Ios to the right). This keeps Ios’s most
delicate electronics away from other transformers.
Try not to stack other Hi-Fi components, (tuners, cassette
decks, power amps or CD players), on top of, or underneath
Ios. If this is unavoidable, use an equipment stand.
Ios english manual:Ios english manual.qxd 07/08/2008 10:35 Page 5
All manuals and user guides at all-guides.com
Page 6
4
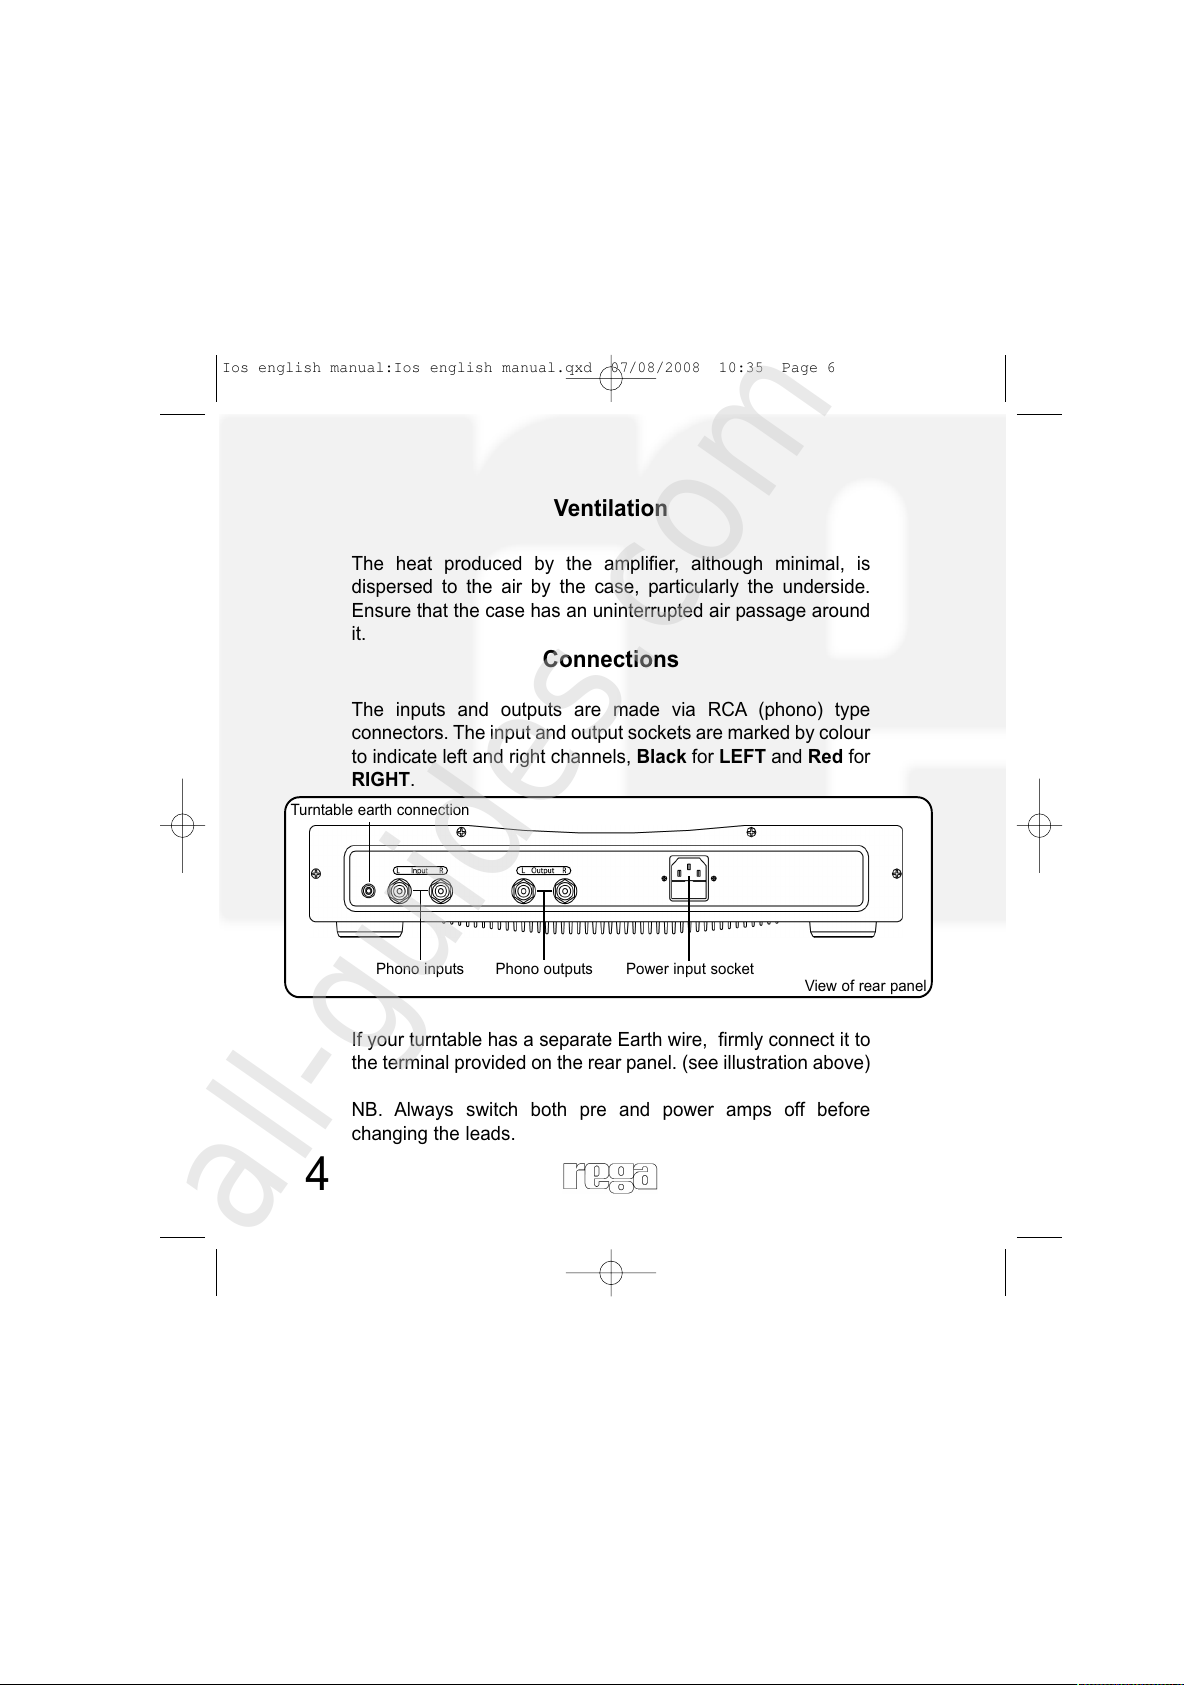
Ventilation
The heat produced by the amplifier, although minimal, is
dispersed to the air by the case, particularly the underside.
Ensure that the case has an uninterrupted air passage around
it.
Connections
The inputs and outputs are made via RCA (phono) type
connectors. The input and output sockets are marked by colour
to indicate left and right channels, Black for LEFT and Red for
RIGHT.
If your turntable has a separate Earth wire, firmly connect it to
the terminal provided on the rear panel. (see illustration above)
NB. Always switch both pre and power amps off before
changing the leads.
Phono inputs Phono outputs Power input socket
Turntable earth connection
View of rear panel
Ios english manual:Ios english manual.qxd 07/08/2008 10:35 Page 6
All manuals and user guides at all-guides.com
all-guides.com
Page 7

5
Earthing
The Ios uses a Class I earth system, where the case metal
work and earth screen between the primary and secondary
windings in the toroidal transformer, are connected to the line
safety earth, by means of the mains lead.
The internal signal earth is linked to this earth by the use of a
network to eliminate the risk of earth/ground loops.
This earthing method provides a safe and efficient discharge
path for any static charge generated by the cartridge.
Ios english manual:Ios english manual.qxd 07/08/2008 10:35 Page 7
All manuals and user guides at all-guides.com
Page 8

6
Cartridge selection
The Ios phono pre amplifier is not suitable for use with any
Moving Magnet (MM) cartridges, it can only be used with
moving coil (MC) cartridges.
The Ios has been designed to work with most manufacturers
moving coil (MC) cartridges.
There are five different input load settings, select the required
load to match to that specified by the cartridge manufacturer.
The Ios has five different DC resistance settings 1-5.
Note: It is permissible to try different loading conditions and
resistance settings as sometimes changing the load gives a
different sonic performance more suited to your personal taste.
These variables are explained in greater detail in the controls
section of this manual.
Your Rega dealer will be able to give guidance to help match
your specific cartridge to the correct gain settings.
Ios english manual:Ios english manual.qxd 07/08/2008 10:35 Page 8
All manuals and user guides at all-guides.com
Page 9

7
Powering Up
Ios is activated by depressing the On/Off button situated to the
left of the control panel. The power indicator LED will glow
steadily.
Always activate Ios before the power amplifiers and de-
activate after they have been switched off.
After switching off, the indicator will extinguish.
Due to the nature of the circuit topology, there is a short period
immediately after switching on when the quiescent current has
not stabilised. This condition results in reduced output from the
pre-amp.
This Rega amplifier circuit has been carefully designed to work
with a minimal “ warm up” period. Some manufacturers and
retailers may recommend leaving amplifiers permanently
switched on, Rega cannot condone such practise in these
environmentally sensitive times.
We would recommend that your Rega amplifier is always
switched off after use. Full sound quality is attained after less
than ten minutes (a process speeded up by playing music!)
Ios english manual:Ios english manual.qxd 07/08/2008 10:35 Page 9
All manuals and user guides at all-guides.com
Page 10

8
Controls
The Load Switch
The DC resistance of the cartridge affects the transient or
square wave response of the transformer; this network has to
be optimised to get the best out of the cartridge and
transformer combination.
There are five different input load settings of 50, 100, 150, 300
& 400Ω. Select the required load to match to that specified by
the manufacturer in the cartridge specifications. It is
permissible to try different loading conditions as sometimes
changing the load gives a different sonic performance more
suited to your personal taste.
The 100Ωsetting is optimised for the Rega Apheta cartridge.
Load switch
Filter switch
DCΩ switch
On/Off button
Gain setting
Filter On/Off
Ω
Ios english manual:Ios english manual.qxd 07/08/2008 10:35 Page 10
All manuals and user guides at all-guides.com
Page 11

9
The DCΩResistance Switch
Setting 1 - nominal 6.25Ω(5 to 7.5Ω)
Setting 2 - nominal 8.75Ω(7.5 to 10Ω)
Setting 3 - nominal 11.25Ω(10 to 12.5Ω)
Setting 4 - nominal 13.5Ω(12.5 to 15Ω)
Setting 5 - nominal 15Ω. (15Ω)
Select the switch for the nearest DC resistance of the cartridge
this information is usually found in the cartridge specifications,
if your cartridge falls in-between two settings, try both settings
and choose the one that gives the best sonic results. It is
permissible to try different DC resistance conditions as
sometimes changing this condition gives a different sonic
performance more suited to your personal taste.
The 15Ωsetting is optimised for the Rega Apheta cartridge.
The Gain setting switch
The gain setting switch selects the voltage gain of the phono
amplifier. Gain I selects 70dB (switch up) and gain II selects
64dB (switch down), this will provide an input sensitivity of
61uV and 118uV respectively for an output level of 200mV. It is
advisable to start with the lower gain setting II, and if
necessary, increase the gain level to I if more level is required
for lower output cartridges. Please note mute or turn the
volume control to minimum when changing the gain setting.
Ios english manual:Ios english manual.qxd 07/08/2008 10:35 Page 11
All manuals and user guides at all-guides.com
all-guides.com
Page 12

10
The Filter control
The filter is designed to enhance the Apheta cartridge by
reducing unwanted high frequency energy present. The level is
continuously variable from 0db to –6.5dB at a frequency and
‘Q’ chosen to match that of the Apheta cartridge.
As a rough guide the filter is useful with older (early 1960’s)
pressings with higher than normal surface noise, typical
position being roughly 1 o’clock. Later and newer recordings
may not need this filter.
When the filter switch is in the off position the filter is
completely removed from the signal path.
The filter is a ‘notch’ filter working at around 8.5Khz. It may
sometimes improve the sonic performance of various makes of
MC cartridges that are a little ‘bright’ sounding or under
damped in construction.
Note: The filter is only for use in some circumstances. If you
find that the filter does nothing or degrades the sound, simply
switch it off.
Ios english manual:Ios english manual.qxd 07/08/2008 10:35 Page 12
All manuals and user guides at all-guides.com
Page 13

11
Troubleshooting
(no power, front panel does not light)
No
Yes
No
No
Yes
Yes
No
Yes
Correct the fault.
Contact your
Rega Dealer if it
appears faulty.
Replace
fuse in plug
Check
household
fuses or contact
an electrician!
Is the mains supply
connected and the
socket switched on?
Is the front panel on/off
button fully depressed?
Has the fuse
in the mains
plug blown?
Is the mains socket
live? (plug in another
appliance to check).
Contact your Rega Dealer.
Ios english manual:Ios english manual.qxd 07/08/2008 10:35 Page 13
All manuals and user guides at all-guides.com
Page 14

12
Troubleshooting
(Power on, front panel lit but no output)
No
No
Yes
Yes
Yes
No
Correct the fault.
Correct the fault.
Correct the fault.
Is the pre-amp
connected to the
desired input and the
correct input selected?
Is the volume
set to minimum
or is MUTE
selected?
Are the power amplifiers
connected correctly to the
speakers?
Contact your Rega Dealer.
Ios english manual:Ios english manual.qxd 07/08/2008 10:35 Page 14
All manuals and user guides at all-guides.com
Page 15

13
Is the ground lead from
the turntable (when fitted)
firmly attached to the earthing
terminal on the rear panel?
Refer to pages 4 & 5
of this manual and
reconnect the ground
lead. If this is not easy,
contact your Rega dealer
Is the pre-amplifier
mounted directly
underneath the cartridge?
Move the amplifier to
see if the hum level
changes. See page 3
Are there any other pieces
of Hi-Fi equipment close to
the turntable or pre-amp?
Move them away.
See page 3
No
Yes
Yes
Yes
No
No
Troubleshooting
(Loud hum when “phono” is selected)
Contact your Rega Dealer.
Ios english manual:Ios english manual.qxd 07/08/2008 10:35 Page 15
All manuals and user guides at all-guides.com
Page 16

14
No
No
No
Yes
Yes
Troubleshooting
(Power on, sound from one speaker only)
Correct the
problem
Are the connections
between the speakers and
the amplifier secure and
functioning properly?
Correct the fault by
plugging in the
connection. If the wires
are loose or not correctly
soldered, contact your
Rega dealer.
Are both channels
of the selected source
connected and
working properly
Are the interconnection
leads to the power
amplifiers secure?
Contact your Rega Dealer.
Are the cartridge connections
at the headshell functioning?
Check cartridge tags.
Yes
Yes
Yes
Source is
at fault
No
Refer to the
power amplifier
manuals
Check the source
component for faults.
Swap the output leads
and check to see if the
fault swaps over.
Ios english manual:Ios english manual.qxd 07/08/2008 10:35 Page 16
All manuals and user guides at all-guides.com
all-guides.com
Page 17

15
Ios Specifications
General conditions
Generator source resistance 15Ω
Load set to 100Ω & DC resistance set to 15 Ω (Apheta)
Output load resistance 100KΩ
Filter Off (unless otherwise stated)
Input sensitivity for 200mV output 61uV - 70dB gain setting I
118uV - 64dB gain setting II
Gain input to output 64dB Minimum
70dB Maximum
Input load 50, 100, 150, 300 & 400Ω
DC resistance (Zobel network) 5 to 7.5Ω (6.25Ω nominal)
7.5 to 10Ω (8.75Ω nominal)
10 to 12.5Ω (11.25Ω nominal)
12.5 to 15Ω (13.5Ω nominal)
15Ω (Apheta)
MC Transformer Sowter 8055
Input overload @ 1KHz 8.7mV - 64dB gain setting
4.5mV - 70dB gain setting
Maximum output level 14.7V RMS
Rated output level 200mV
Ios english manual:Ios english manual.qxd 07/08/2008 10:35 Page 17
All manuals and user guides at all-guides.com
Page 18

16
Output resistance 100Ω
Minimum output load resistance 1KΩ
for –3dB point @ 15Hz
RIAA accuracy Better than 0.2dB 100Hz to 40KHz
Frequency Response 14Hz (-3dB) to 54KHz (-0.5dB)
THD Better than 0.008% @ 1.5V 20Hz to
20KHz
THD bandwidth 100Hz to 22KHz
Output noise level -80dBV
(64dB gain setting & 15Ω input load)
Notch Filter centre frequency 8.5KHz
Notch Filter maximum depth -6.5dB
Notch Filter Q 2.5
AC Supply 230V & 115V Nominal +/-10%
Power Consumption 21 Watts
Ios english manual:Ios english manual.qxd 07/08/2008 10:35 Page 18
All manuals and user guides at all-guides.com
Page 19

17
Owners Log
(1)
Owner.......................................................................................
Date..........................................................................................
Where Purchased.....................................................................
..................................................................................................
(2)
Owner.......................................................................................
Date..........................................................................................
Where Purchased.....................................................................
..................................................................................................
(3)
Owner.......................................................................................
Date..........................................................................................
Where Purchased.....................................................................
..................................................................................................
Ios english manual:Ios english manual.qxd 07/08/2008 10:35 Page 19
All manuals and user guides at all-guides.com
Page 20

Ios english manual:Ios english manual.qxd 07/08/2008 10:35 Page 20
All manuals and user guides at all-guides.com
 Loading...