

Page 1

UltraMedia
GmbH & Co. Handels KG
Wichtige Mitteilung!
Anlage zur Bedienungsanleitung Roadstar HIF-6880USMPT
Artikel-Nr. 341803
Sehr geehrte Kundin,
sehr geehrter Kunde,
wir bedanken uns, daß Sie sich für ein Roadstar-Gerät entschieden haben.
Leider hat sich bei der Erstellung der Bedienungsanleitung ein Fehler eingeschlichen, den
wir wie folgt korrigieren möchten:
SEITE 25, Uhreinstellung
Erster Absatz unter „Uhreinstellung“:
Falsch =
„...., wenn keine Stützbatterien eingelegt worden sind“
Richtig =
Dieses Gerät hat KEINE Stützbatterie - Funktion!
Wir bedauern diesen Fehler und wünschen Ihnen viel Freude an Ihrem Roadstar-Gerät.
Page 2
MICRO HIFI SYSTEM WITH
TOP LOADING CD/MP3 PLAYER, USB
HIF-6880USMPT
is aregistered Trademark ofRoadstar S.A.- Switzerland All rightsreserved
Instruction manual
Bedienungsanleitung
Manuel d’instructions
Manuale d’istruzioni
Manual deinstrucciones
Manual deinstruções
Page 3
English Page 1
Deutsch Seite 21
Français Page 41
Italiano Pagina 61
Español Página 81
Português Pagina 101
INDEX
HIF-6880USMPT
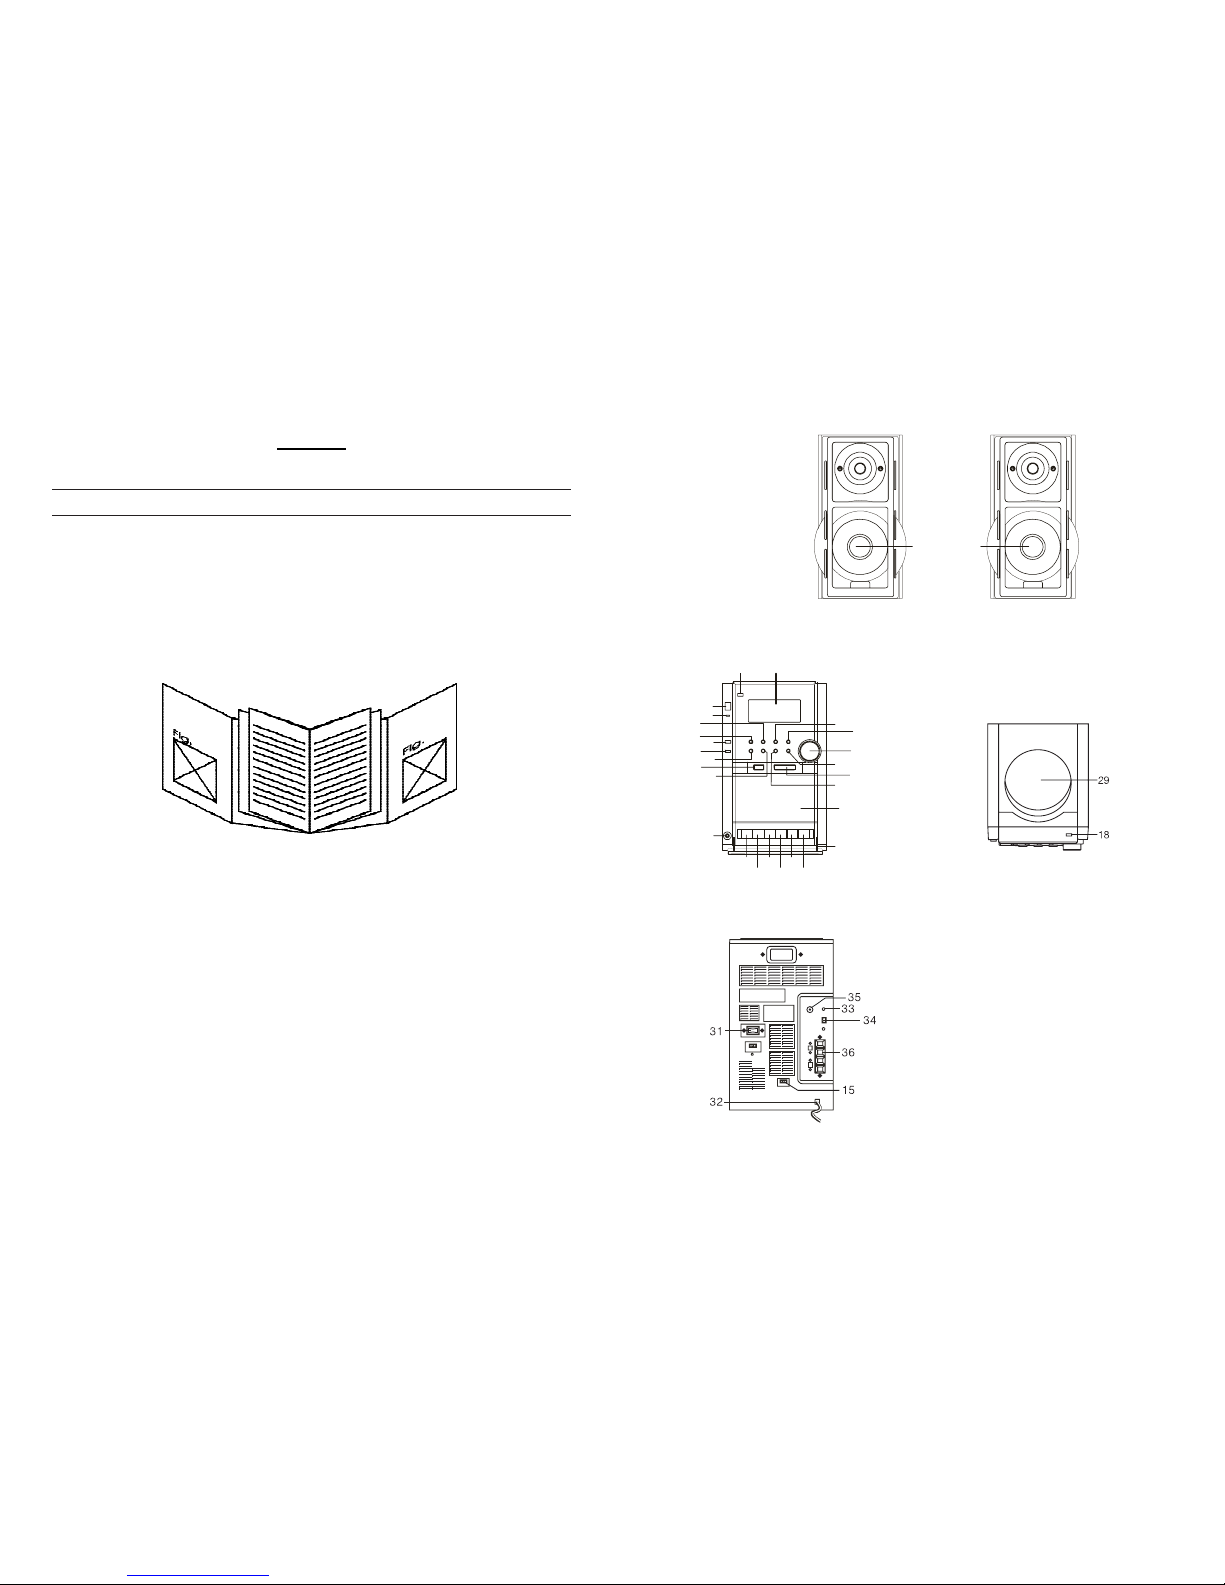
SPEAKERS
FRONT TOP
REAR
• Your new unit was manufactured and assembled
under strict ROADSTAR quality control.
Thank-you for purchasing our product for your music
enjoyment.
Before operating the unit, please read this instruction manual carefully. Keep it also handy for further
future references.
• Votre nouvel appareil a été fabriqué et monté en
étant soumis aux nombreauxtests ROADSTAR. Nous
espérons que cet appareil vous donnera entière satisfaction.
Avant de vous adonner à ces activités, veuillez lire
attentivement ce manuel d’instructions. Conservezle à portée de main à fin de référence ultérieure.
• Vuestro nuevo sistema ha sido construido según las
normas estrictas de control de calidad ROADSTAR.
Le felicitamos y le damos las gracias por su elección
de este aparado. Por favor leer el manual antes de
poner en funcionamiento el equipo y guardar esta
documentación en case de que se necesite
nuevamente.
• Ihr neues Gerät wurde unter Beachtung der strengen
ROADSTAR-Qualitätsvorschriften gefertigt.
Wir danken Ihnen für den Kauf unseres Produktes
und wünschen Ihnen optimalen Hörgenuss. Bitte
lesen Sie diese Bedienungsanleitung durch, und
heben Sie sie auf, um jederzeit darin nachschlagen
zu können.
• Il vostro nuovo apparecchio é stato prodotto ed
assemblato sotto lo stretto controllo di qualitá
ROADSTAR.
Vi ringraziamo di aver acquistato un nostro prodotto
per il vostro piacere d’ascolto.
Prima di procedere all'utilizzo dell'apparecchio,
leggete attentamente il manuale d’istruzioni e
tenetelo sempre a portata di mano per futuri
riferimenti.
• Seu novo aparelho foi construido e montado sob o
estrito controle de qualidade da ROADSTAR.
Agradecemos por ter comprado nosso produto para
a sua diversão.
Antes de usar esta unidade é necessário ler com
atençâo este manual de instruções pare que possa
ser usada apropriadamente; mantenha o manual
ao seu alcance para outras informações.
1
1
5
4
19
2
0
11
1
3
6
22
17
8
23
2
4
2
5
26
2
7
8
0
7
3
12
9
6
4
1
10
Page 4
EnglishEnglish 1 2
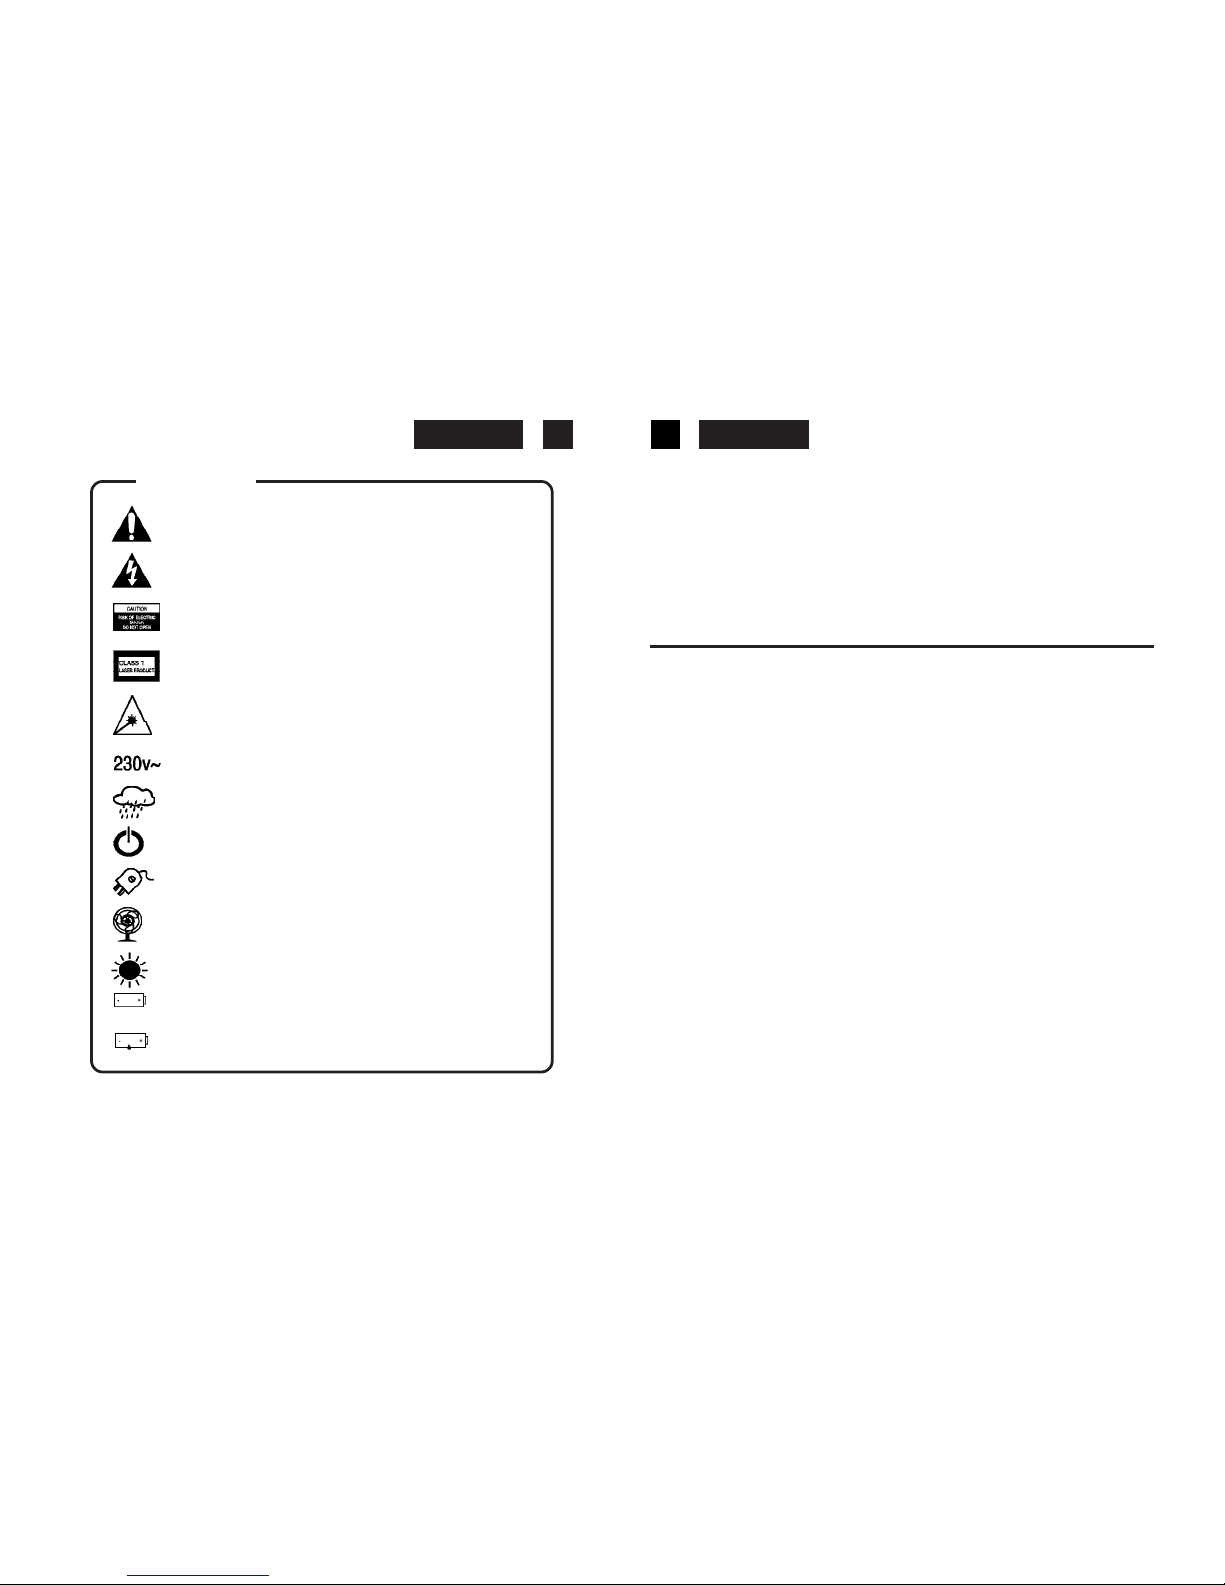
WARNINGS
The exclamation point within the triangle is a warning sign alerting the user of important instructions accompanying the
product.
The lightening flash with arrowhead symbol within the triangle
is a warning sign alerting the user of “dangerous voltage” inside
the unit.
To reduce the risk of electric shock, do not remove the cover. No
user serviceable parts inside the unit. Refer all servicing to
qualified personnel.
This unit employs a laser. Only a qualified service person should
remove the cover or attempt to service this device, due to
possible eye injury.
Invisible laser radiation when the unit is opened or interlocks
defeated. Avoid exposure to laser beam. Use of controls,
adjustments or procedures other than those specified herein
may result in hazardous radiation exposure.
This unit operates on 230V ~ 50Hz. If the unit is not used for a
long period of time, remove the plug from the AC mains.
This unit must not be exposed to moisture or rain.
The power switch in this unit is mounted on the secondary
circuit and does not disconnect the whole unit from the mains in
OFF position.
Ensure all connections are properly made before operating the
unit.
This unit should be positioned so that it is properly ventilated.
Avoid placing it,for example, closeto curtains, onthe carpet orin
a built-in installation such as a bookcase.
Do notexpose thisunit todirect sunlightor heatradiating sources.
Make sure all batteries are inserted according to the proper
polarity.
If the unit is not used for a long period of time (more than 1
month), remove all batteries from their compartment to avoid
possible leaking.
HIF-6880USMPT
MICRO HIFISYSTEM WITH TOPLOADING CD/MP3 PLAYER,USB AND SD/MMC
READER, ENCODINGFUNCTION, 2-BANDTUNER, AUTOSTOPCASSETTE AND
FULL FUNCTIONREMOTE CONTROL.
INSTRUCTION MANUAL
Please read this instruction manual carefully and familiarize yourself with your new HiFi
System before using it for the first time. Please retain this manual for future reference.
LOCATION OF CONTROLS
1. SPEAKER
2. CASSETTE DOOR
3. LCD DISPLAY
4. STANDBY INDICATOR
5. STANDBY BUTTON
6. PROG/MEMORY/ERASEBUTTON
7. IR SENSOR
8. HEADPHONES JACK
9. CD PLAY/PAUSE BUTTON
10. SKIP/SEARCH/TUNINGDOWN BUTTON
11. ENCODING BUTTON
12. SKIP/SEARCH/TUNING UP BUTTON
13. MENU BUTTON
14. CD STOP/BAND BUTTON
15. BEAT-CUTBUTTON
16. VOLUMEKNOB
17. M-DN/ RANDOMBUTTON
18. CD DOOR OPEN/CLOSE BUTTON
19. M-UP/ REPEATBUTTON
20. FUNCTION BUTTON
21. MEMORY CARD JACK
22. USB IN JACK
23. CASSETTE RECORDBUTTON
24. CASSETTE PLAYBUTTON
25. CASSETTE REWIND BUTTON
26. CASSETTE FASTFORWARD BUTTON
27. CASSETTESTOP/ELECT BUTTON
28. CASSETTEPAUSE BUTTON II
29. CD DOOR
Page 5
EnglishEnglish
Extend the FM antena on the rear of the unit (33).
AC Power Operation- Main Switch
Select ON with the main Power Switch (31) to power the unit.
Select OFF with the main Power Switch (31) to switch off power.
Disconnect the power cord from the mains if the unit is not going to be used for some time.
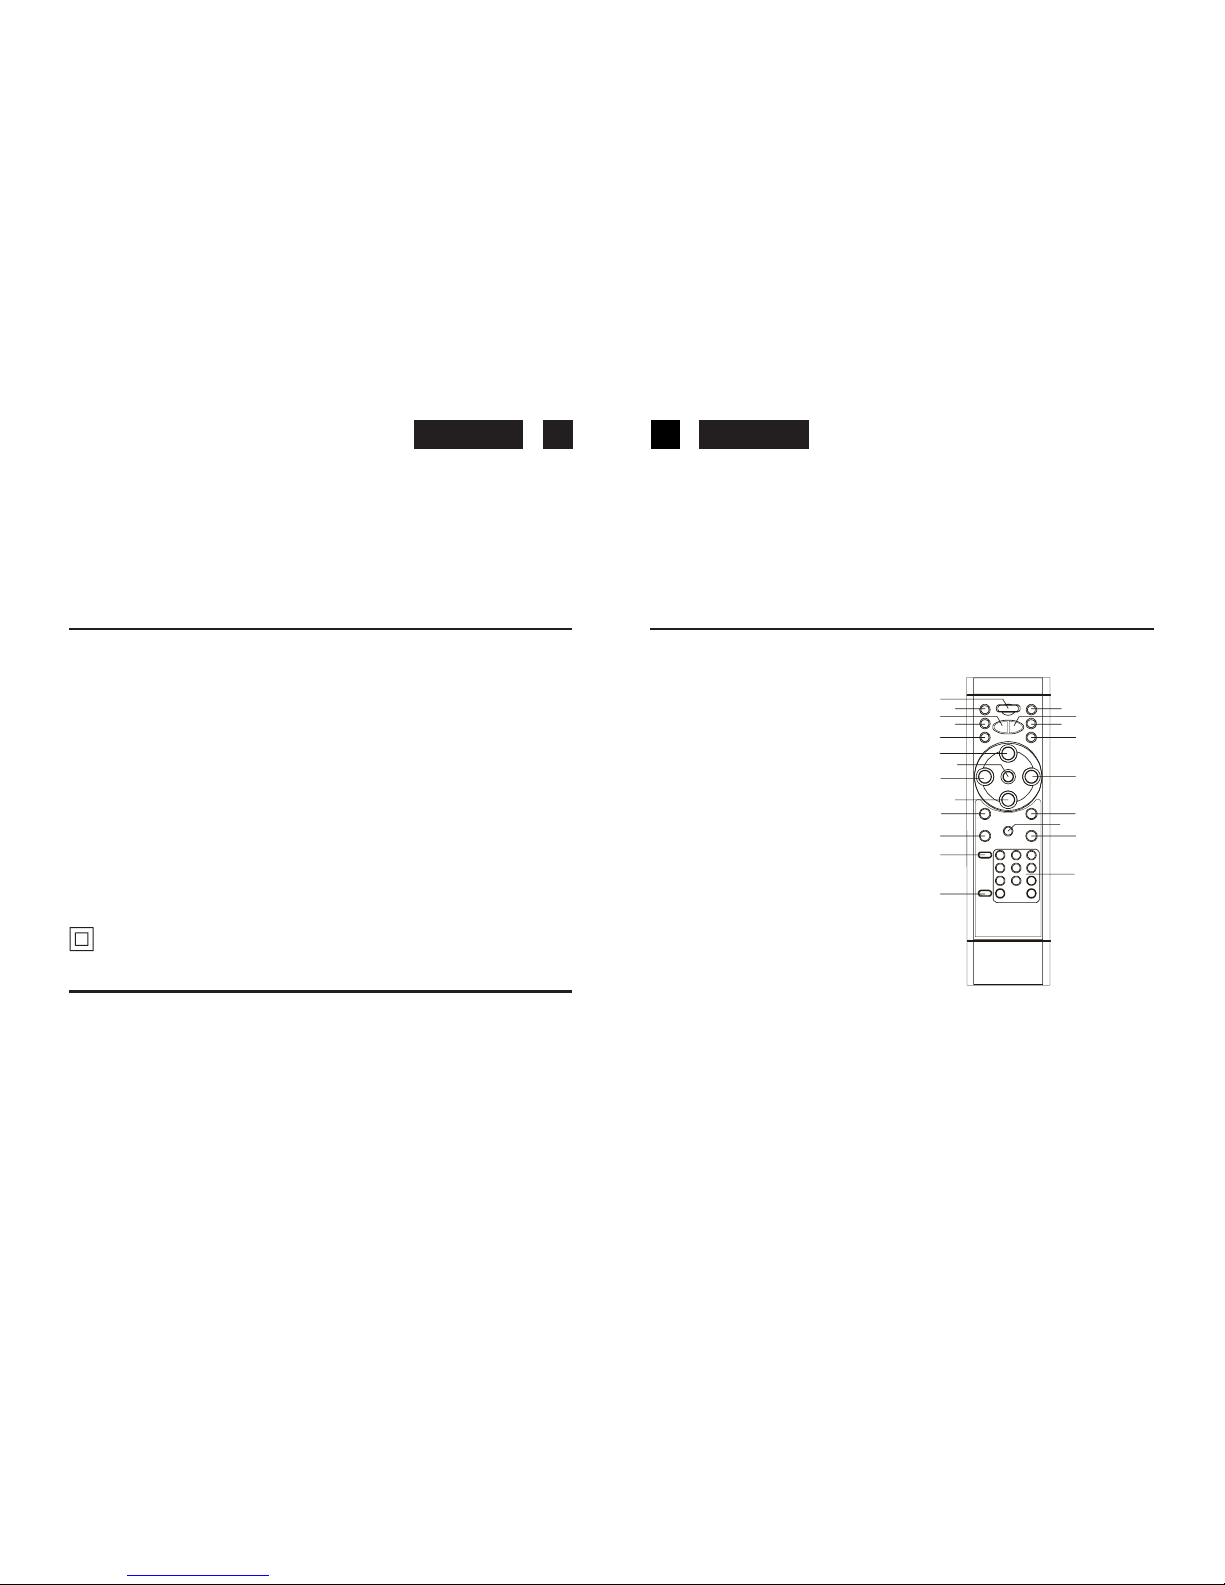
REMOTECONTROL
1. STANDBYBUTTON
2. MUTEBUTTON
3. VOLUME DOWN BUTTON
4. SLEEP BUTTON
5. TIMERBUTTON
6. CDPLAY/PAUSE BUTTON
7. PROGRAM/MEMORY/ERASE BUTTON
8. SKIP/TUNING/NAMESEARCH
DN BUTTON
9. CD STOP BUTTON
10. REPEAT/M-UP BUTTON
11. RANDOM/M-DN BUTTON
12. ID3 BUTTON
13. CD DOOR OPEN/CLOSE
14. VOLUME UPBUTTON
15. FUNCTION BUTTON
16. MENU BUTTON
17. SKIP/TUNING/NAME SEARCH
UP BUTTON
18. EQ BUTTON
19. ENCODING BUTTON
20. CLOCK BUTTON
21. NUMBER SEARCH BUTTON
22. INTRO/MONO/ST. BUTTON
BATTERYINSTALLATION
Insert two UM-4 batteries into the battery compartment of the remote controller and replace
the cover.
BATTERYREPLACEMENT
When thebatteries become tooweak, the operatingdistance of theremote controller is greatly
reduced and you will need to replace the batteries.
Notes: To maintain the accuracy and long life of the transmitter, do not press two or more
Buttons simultaneously.
34
30. CASSETTEBUTTON COVER
31. ACMAIN POWER SWITCH
32. AC CORD
33.FM ANTENNA
34.AMANTENNA TERMINAL
35. Covered 75 ohm Antenna
36. SPEAKER TERMINALS
CONNECTINGTO POWER
Before switching on make sure that the voltage of your electricity supply is the same as
that indicated on the rating plate.
For your own safety read the following instructions carefully before attempting to connect
this unit to the mains.
MAINS (AC)OPERATION
This unit is designed to operate on AC 230V 50Hz current only. Connecting it to other
power sources may damage the unit.
Caution
To prevent electric shock disconnect from the mains before removing cover. No user
serviceable parts inside. Refer servicing to qualified service personnel.
Safety Precaution
Do not allow this unit to be exposed to rain or moisture.
Mains Supply: AC230Volts / 50Hz - AC only
This symbol means that this unit is double insulated. An earth connection is not
required.
POWERSUPPLY
Remove the stereo carefully from the box, retaining the packaging for future use.
Read these instructions carefully before use.
Connections
Connect the speakers to the speaker terminals on the back of the unit (36).
Connect the right speaker to the right terminal and the left speaker to the left terminal.
Connect the Mains Lead to an AC outlet. Check that your mains supply is 230V, 50Hz.
Connect the AM Loop antenna to the AM antenna inlet (34).
1
2
3
4
5
6
7
8
9
10
11
12
3
4
5
6
17
18
19
20
1
2
Page 6
EnglishEnglish 5 6
If the remote control is not to beused for a long time,remove the batteries to prevent possible
damage through leaking batteries.
USINGTHEREMOTECONTROLLERCORRECTLY
Point the remote controller at the Remote Sensor (7).
The functionsof thebuttons onthe remotecontrol arethe sameas thecorresponding controls
on the main unit.
When there is a strong ambient light source, the performance of the infrared Remote Sensor
may be degraded, causing unreliable operation.
The maximum effective distance for remote control operation is about 5 metres (16.5 feet).
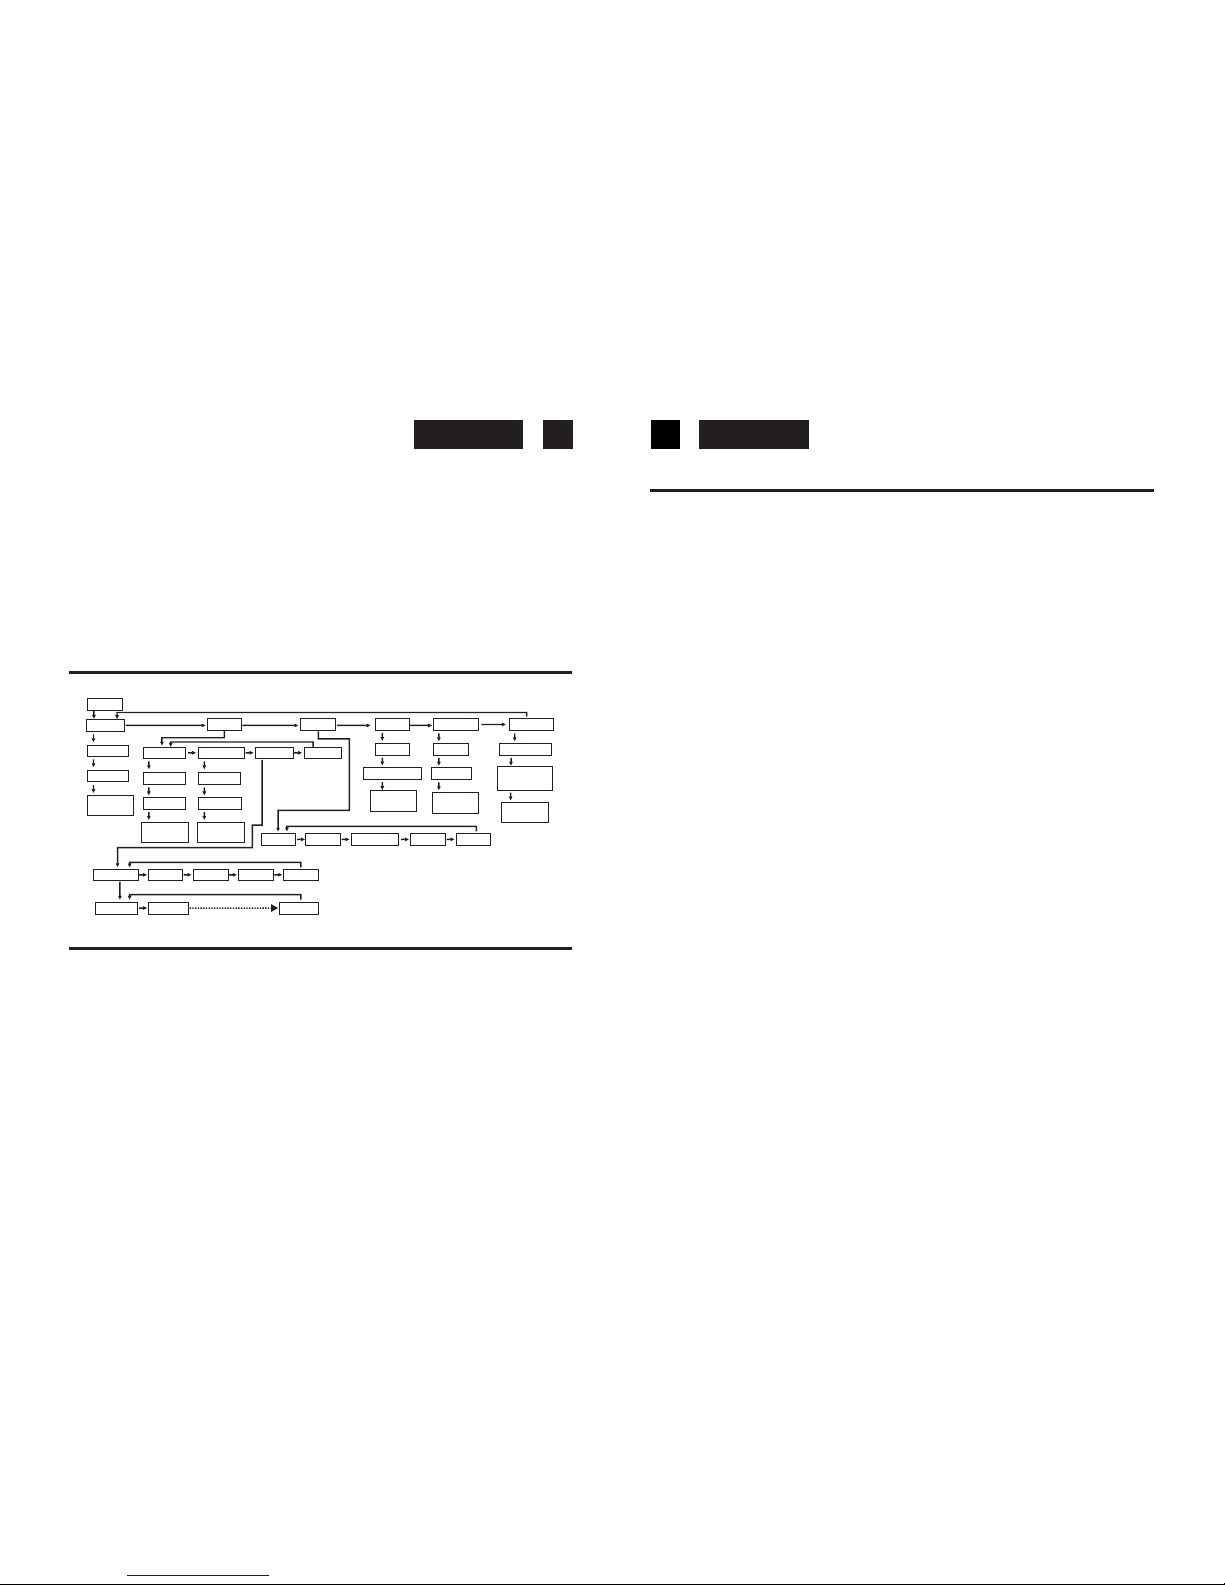
MENUOPERATION
SETTINGTHE CLOCK
This unit has its own digital clock function in the STANDBY mode. If the unit is disconnected
from the mains, you will need to reset the clock, if no Back-up Batteries have been installed.
The first time you use the unit the clock has to be set.
• Press and hold the CLOCK button on the remote control.
The hours will start flashing.
• Adjust by pressing the Frequency Up or Down Buttons on unit (12,10) or remote (17,8).
• Press the CLOCK button on the remote control (20).
Minutes will start flashing.
• Adjust by pressing the Frequency Up or Down Buttons unit (12,10) or remote (17,8).
• Press the CLOCK button (20) to store the time.
RADIOOPERATION
Operation
• Select ON with the Main Power Switch (31) on the rear of the unit.
• Press the STANDBY Button on the unit (5) or the remote control (1) to turn the unit on.
• Select the TUNER function with the Function Button on the unit (20) or on the remote
control (13).
• Select thedesired frequencyband usingthe Band button on theunit (14)or onthe remote
control (15).
• There are a number of ways that you can tune to radio stations. Follow the instructions
in the sections below.
• Adjust theVOLUME to thedesired level usingthe VOLUME-/+ (16) Knob or theVOLUME
-/+ Buttons (14,3) on the remote control .
• To turn off the radio, press the STANDBY Button again.
ManualTuning
Manual tuning is useful when you already know the frequency of the desired transmitter.
• Select the desired frequency band using the Band button.
• Press the TUNING up or down Buttons to change the frequency.
• Repeatedly pressthe TUNING up or down buttons until the precise frequency is reached.
AutomaticTuning
• Select thedesired frequency bandusing the Band button onthe unit (14)or onthe remote
control (15).
• Press and hold the TUNING up or down Buttons for about a second. The radio will start
automatically scanningfor strong radiosignals. The TUNERDisplay shows thefrequency
inMHzforFM,orkHzforMW.
• The tuner will stop scanning when it finds a strong signal.
• Repeat this process until the desired station is found.
Notes: As automatic tuning depends on the signal strength of the transmitters, weak
transmitters are sometimes skipped. In such a case, tune manually to find the
weaker transmitters.
On the other hand, with a very strongsignal, the tuner may stop before it reaches
the optimum setting. Tune manually for the best reception.
StoringStations
This unit allows you to store the frequencies of up to 30 radio stations (20 x FM, 10 x MW) in
the memory;
• First tune into the station you want to store using one of the methods above.
CLOCK
TIMER
EQ
ID3
FLAT
BROWSE
ON
REOCRD
Press “P”
ON/OFF
ID3 ON
ID3 ON/OFF
REC CARD
REC
CARD/USB
ON TIMER OFF TIMER
ROCK
CLASSIC
JAZZ
POP
PRESET
DISC USB
CARD
TUNER
PRE 01 PRE 02 PRE 20
SOURCE
VOLUME
MENU
Press “P”
Press “P”
Press “P” to
confirm
To set hour
To set min
To set hour
To set min
Press “P” to
confirm
Press “P” to
confirm
To set hour
To set min
Press “P” Press “P”
Press “P” Press “P”
Press “P”
Press “P”
Press “P” to
confirm
Press “P” to
confirm
Press “P” to
confirm
Press “P” Press “P”
Press “P”
Press UP/DN button
Press UP/DN button
Press UP/DN button
Press UP/DN button
Press “UP/DN” Press “UP/DN” Press “UP/DN”
Press UP/DN button
Page 7
EnglishEnglish
TO RECORDON ACASSETTE
• This unit has Automatic Level Control circuitry. This means that the recording level is
set automatically. The volume or tone controls will not affect the recording.
• Record Key will not be pressed down when the record prevention tab is broken or
removed from the tape.
RECORDING FROMTHE RADIO
• Press the Function Button (20) to select TUNER function.
• Tune in your station and put in your cassette tape.
• Press the Record Key (
Q
) and the Play Key ( ) at the same time to start recording.
• Press the Stop/Eject Key when finished.
RECORDING FROMCD
• Press the Function Button (20) to select CD function. Press the CD Open/Close Button
(18), insert a disc and close CD compartment by pressing again the CD Open/Close
Button (18).
• Press the Pause key (II)) then press the Record Key (
Q
)andthePlayKey ()atthe
same time.
• Press the CD Play / Pause button (9) and immediatly repress the Pause key ( II)).
• To stop recording,press the Stop button (14) of the CD player.Then press the Stop / Eject
button of the cassette deck.
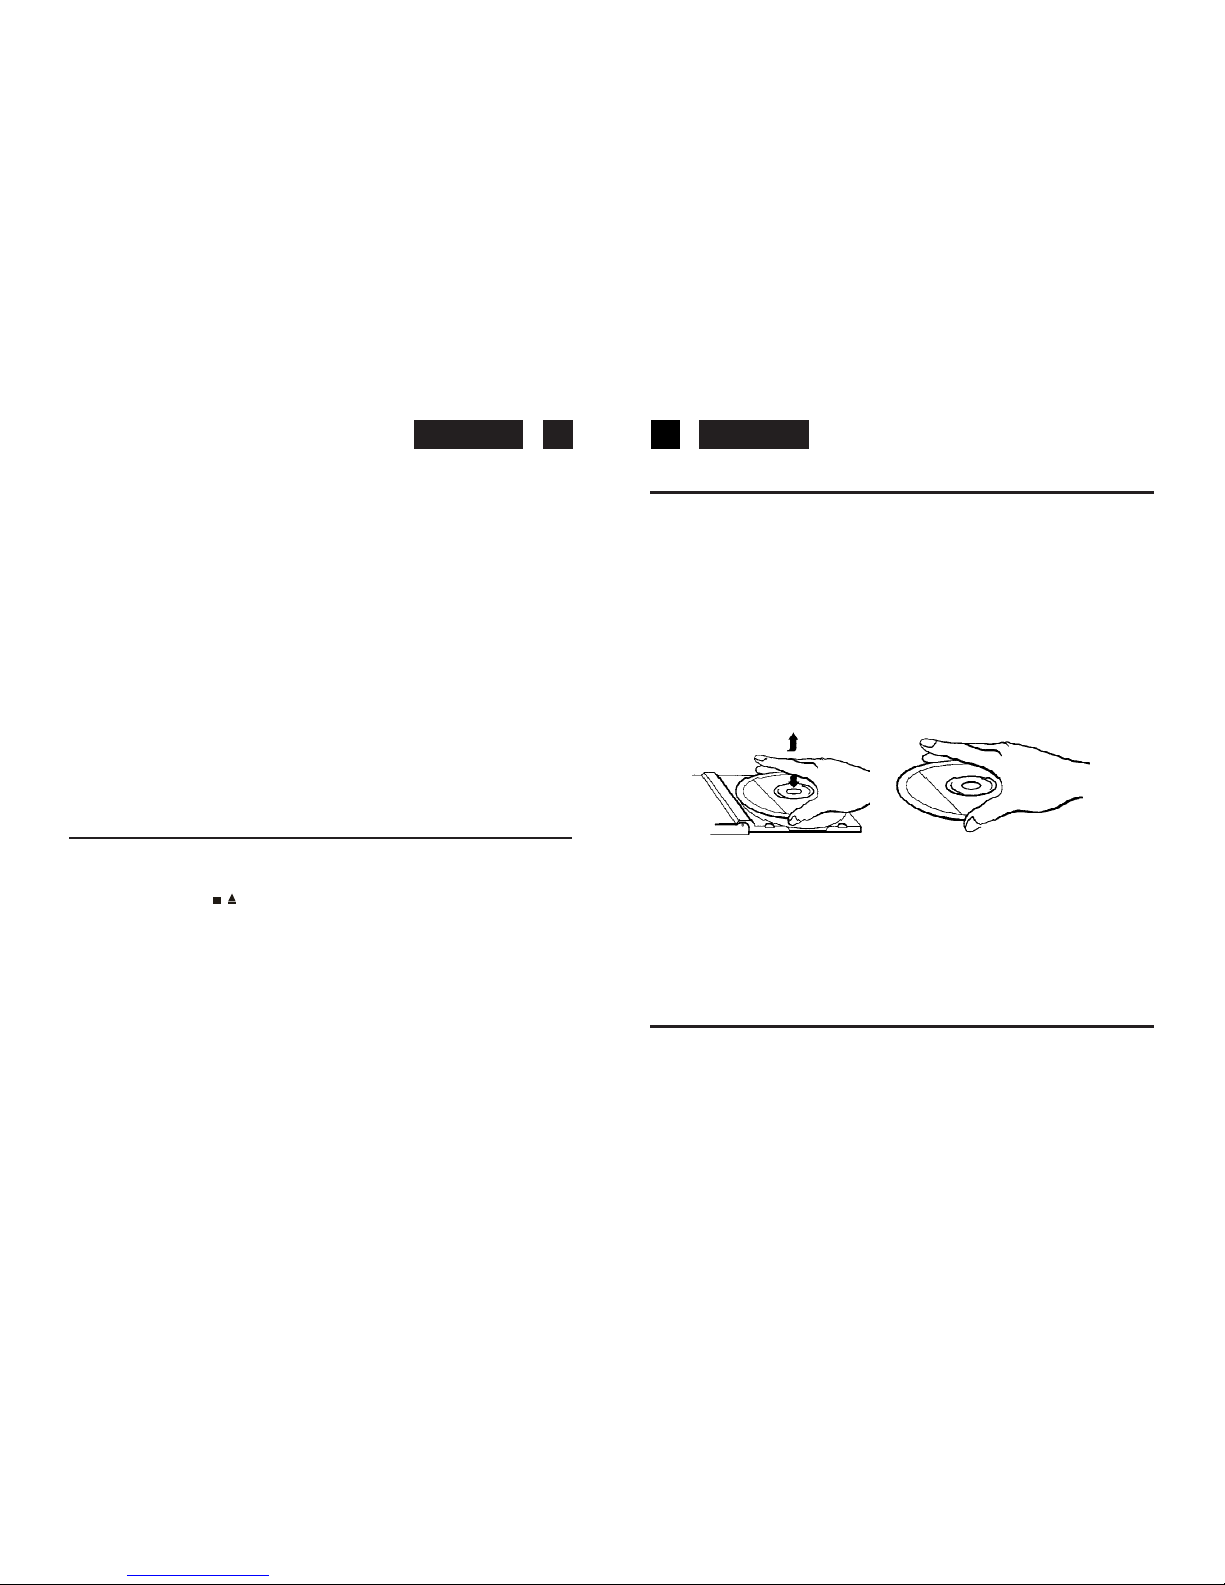
HANDLINGCOMPACT DISCS
To remove a disc from its storage case, press down on the centre of the case and lift the disc
out, holding it carefully by the edges.
Fingerprints and dust should be carefully wiped off the disc’s recorded surface with a soft
cloth. Unlike conventional records, compact discs have no grooves to collect dust and
microscopic debris so gently wiping with a soft cloth should remove most particles. Wipe in
a straight line from the inside to the outside of the disc. Small dust particles and light stains
will have absolutely no effect on reproduction quality.
78
• Then press the PROG/ MEMORY button (6) on the unit.
• Press M-UP orM-DN Buttons on theunit (19,17) or onthe remote control(10,11) toselect
the desired channel memory and press the PROG/ MEMORY button button within 5
seconds to store it.
To reprogram a preset station repeat the procedure above.
Selecting a preset station
To select apreset station,press theM-UP orM-DN Buttons on theunit (19,17) or on the remote
control (10,11) until the desired preset program is displayed.
FM Stereo Reception
When an FM signal is tuned in, the ((( ST. ))) indicator will appear in the display.
In case of noisy reception, if you push the INTRO/MONO-STEREO button (22) to FM MONO
position, the FM STEREO indicator will turn off & switch to MONO FM status.
Antenna
For FMreception there is awire antenna (33)at the rearof theunit. Extend it forbest reception.
For MW reception the signals are picked up through an external Loop antenna (34). Your
may have to orient the antenna to obtain the best reception.
CASSETTE OPERATION
INSERTIONAND REMOVALOF CASSETTES
• Open the cassette keys cover (30).
• Press the Stop/Eject (
) Button (27) to open the Cassette Door..
• Slip your cassette tape into the holder, with the exposed section downward and the
playback side facing you.
• Close the Cassette Door (2) securely before starting.
• When finished, pressthe Stop/Eject Button to open the Cassette Door, and retrieve your
cassette tape.
PLAYBACK
• Press the Function Button (20) to select TAPE function.
• Insert your cassette tape.
• Press the Play button () to active playback.
• Use the Pause button (II) whenever you want to suspend playback.
• Press the Stop/Eject button to stop playback.
Page 8

EnglishEnglish 9 10
Never use chemicals such as record sprays, antistatic sprays, benzine, or thinners to clean
compact discs. These chemicals can irreparably damage the disc’s surface.
Discs should be returned to their cases after use. This avoids serious scratches that could
cause the Laser pickup to skip.
Do not expose discs to direct sunlight, high humidity, or high temperatures for extended
periods. Long exposure to high temperatures can warp the disc.
Do not stick paper or write anything with a ballpoint pen on the label side of the disc.
CD/MP3OPERATION
Loading and UnloadingCompact Discs
Press the STANDBY button to turn the unit on.
Press the FunctionButton (20) on the unit or (15) on the remote control to select CD function.
Press the CD door open/close button (18) to open the CD compartment.
When the disc compartment has opened, remove a disc from its case and place it carefully
in the compartment with the label side facing up. Locate smaller, 3” discs, on the central
spindle in the compartment.
Close thedisc compartment by pressing CD door open/close button (18).
When thecompartment is fully closed,the discwill start turning automatically.Thetotalnumber
of tracks and the total playing time of the CD will appear on the display (3).
The disc compartment may be opened at any time by pressing the CD door button (
18).
Remove the CD only after the compartment has fully opened.
Caution
Do notput anything excepta compact discinto the compartment.Foreign objectscan damage
the mechanism. Keep the disc compartment closed when not in use to prevent dirt and dust
from entering the mechanism.
Never place more than one disc into the disc compartment at any time.
If the disc is correctly loaded, the following information will be displayed:
Total number of tracks on the disc
Total playing time
Notes: After the disc compartment is fully closed, the disc information may not appear on
the display. This means that the disc is improperly loaded (most likely it is upside
down). To check, open the disc compartment again and reload the disc.
DISCPLAY
Press the CD door button (18) to open the disc compartment, and insert a CD.
Close thedisc compartmentby pressing theCD DoorButton (
18).
Press the PLAY/PAUSE button (9) on the unit or (6) on theremote control . Disc playwill begin
from the start of the first track of the disc.
Notes: If the disc is deeply scratched, or too dirty, disc play may not start. If an improperly
centred disc is played, noise can be heard in the mechanism. The use of such discs
should be avoided.
Disc Errors
This compact disc player has built-in error compensation circuits to correct for minor defects
in a disc. There are limits, however, to the amount of corrections possible.
In some cases, the CD player may skip some tracks, or parts of tracks, on a disc during disc
play. This problem may be caused by defects (such as scratches) in the disc being played,
which aretoo large for theerror compensation circuits tohandle. If youencounter this problem,
check the CD player's operation as follows, before having the unit serviced:
Play a new disc. If the CD player operates normally, the skipping problem is probably due to
a defective disc.
A) In the CD mode
1. This unit can play CD, CD-R, CD-RW and MP3 discs.
2. If no disc or can't read TOC, NO DISC will be displayed (F7)
B)Playing The Entire CD/MP3
1. Playback will be start by pressing PLAY/PAUSE (9). Playback starts with the first track .
The display shows the current track number and its elapsed time.
2. To interrupt playback , press PLAY/PAUSE button. The time elapsed indicator will flash.
3. To resume playback, press the PLAY/PAUSE again.
4. To stop playback, press the STOP (14) button.
F7F6
F8 F9
Page 9

EnglishEnglish 11 12
ID3OPERATION
1. Press the ID3 button once to open the ID3 function.
2. If the mp3file is writein “ID3” it willautomatically to searchthe information of “TITLENAME”
“ARTIST NAME”and “ALBUM NAME” to show inthe display.
3. Press the ID3 button on the remote again. Then resume to normally play.
.
BROWSEOPERATION…
1. Press the MENU button, then press theSKIP/TUNING/NAME SEARCH (UP or DOWN)
button to select “BROWSE”.
2. Press the PLAY/PAUSE button to enter into the set up menu.
3. Press the SKIP/TUNING/NAME SEARCH (UP or DOWN) button to select “ON” .then
press PLAY/PAUSE button to confirm.
4. A. In the STOPmode pressthe SKIP/TUNING/NAME SEARCH (UP or DOWN)button to
the first step menu and select the desired folder.
B. Press the PLAY/PAUSE button toconfirm and into the second step menu.(Max Depthof
file is 8)
C. Press the SKIP/TUNING/NAME SEARCH (UP or DOWN) button to select you desired
track.
D. Press the PLAY/PAUSE button, playback will begin from this track.
Note: When browse is OFF the display will show the track number ;
When browse is ON the display will show the track name
TRACKSKIP
Starting disc playfrom the beginning of a particular track
Press the Reverse Skip (10) on the unit or (8) on the remote control or Forward Skip Track
button (12) on the unit or (17) on the remote control to select the desired track. The number
of the selected track will be shown on the display. Press the Play/Pause button to start play.
To skip to the next track
To skip ahead to the beginning of the next track.
Press the Forward Skip Track button (12) onthe unit or (17) on the remotecontrol once. Disc
play will resume at the beginning of the next track.
The CD player will skip ahead to the next track each time the Forward Skip Track button
is pressed. Repeatedly pressing the Forward Skip Track button makes the CD player skip
ahead through the disc track by track. Once thebeginning of the last track is reached the CD
player will return to track 1.
RTIST NAMETITLE NAME
LBUM NAME
CURRENT TIME
F17
To skip back tothe previous track on a disc
To skip back to the beginning of the previous track.
Press theReverse Skip(10) onthe unit or (8)on the remote controltwice. Disc play willresume
at the beginning of the previous track.
The CD player will skip back one track each time the Reverse Skip Track button is pressed.
If this button is pressed in the middle of a track, the CD player will skip back to the beginning
of that track. Tomake itskip backto theprevious track press theReverse SkipTrack button twice.
Repeatedly pressing the Reverse Skip Track button makes the CD player skip back through
the disc track by track. Once the beginning of the first track is reached, the CD player will go
back to the last track.
Manual Search
During playback,by pressing andholding the ForwardSkip or ReverseSkip buttons willcause
the playerto scanthrough thecurrent track.At theend ofa trackthe playerwill skip to the next
track and continue scanning. At the beginning of a track the player will skip to the previous
track and continue scanning.
When theplayer reachesthe end of the final track, or the beginning of the first track, it will stop
scanning.
PROGRAMMEDDISC PLAY
It is not possible to enter programs during disc play. Press the STOP button (14) on the unit
or (9) on the remote control first, then follow the instructions below.
CD /MP3
1) Press the PROG / MEMORY button (6), shift to PROGRAM mode.(F17)
2) Press the SKIP/SEARCH/TUNING (UP or DOWN) button, the track number will be changed.
3) Press the PROG / MEMORY button button to confirm the track number.
4) Repeat the above steps to program other tracks a maximum number of 32
tracks be programmed.
After programming songs, press the PLAY/PAUSE button and it will play the songs as
you programmed.
Page 10

EnglishEnglish
NOTE: 1. The unit can play MP3 only in this mode.
2.Thevolume of SD/MMC card is 2GB MAX.But it can’tsupport some brand flash
disc USB hard disk and ipod 40GB.
3. It can support USB version 1.1 and 2.0.
4. If the WMA file is a protected “DRM file” , the display will show “unsupport
WMA”.
Playing TheEntire CARD
1. Playback will start by pressing PLAY/PAUSE . Playback starts with the first track , The
display shows the current track number and its elapsed time.
2. To interrupt playback , press PLAY/PAUSE button. The time elapsed indicator will
flash.(F12)
3. To resume playback, press the PLAY/PAUSE again.
4. To stop playback, press the STOP button
ENCODINGOPERATION
1. Press the MENU buttonthen press the SKIP/TUNING/NAMESEARCH UPor DN button
toselect REC CARD.
2. Press the PLAY/PAUSE button to enter into the set up menu the display will show the
“REC CARD”.
3. Press the SKIP/TUNING/NAMESEARCH UP orDN button toselect “REC USB”or “REC
CARD” then press the PLAY/PAUSE button to confirm.
ENCODINGAND STORINGFROM RADIO
You can encode your favorite radio program into mp3 format and store then into you
memory device through the USB port or SD/MMC card slot.
1. Press the function button to select tuner function.
2. Press the SKIP/TUNING/NAME SEARCH UP or DN button toselect yourfavorite station
13 14
To Clear The Program Memory
If the disc is playing, press the Stop button to stop the disc.
Pressing again the STOP button, the Program Memory will be cleared.
REPEATFUNCTION(CD/MP3/USB/CARD)
Use the REPEAT button on the remote control (10) to listen to an entire disc or one track.
1. Press the REPEAT button once on the remote, REPEAT “ “ is displayed. CD will play
the current track repeatedly.
2. Press the REPEAT button twice, REPEAT “ “ ALL is displayed. CD will play all tracks
repeatedly.
3. Press the REPEAT button third, REPEAT function will be off.
RANDOMPLAY
• Press the RANDOM Button (11) on the remote control in STOP mode. “RANDOM” will
appear in the display before the track playing.
• Press the PLAY/PAUSE Button.
• The CD player will select a track at random and begin to play.
At the end of that track another randomly selected track will be played.
• When all the tracks have been played in this way, the CD player will stop.
INTROPLAY
• Press the INTRO on the remote control (22), then INTRO is displayed. INTRO will play
the first 10 seconds of each track.
• Press the INTRO button twice, then resume to normally play.
CARD-USBOPERATION
1. Insert the memory card /USB card .
2. Press FUNCTION button on the unit to select the CARD-USB mode, the unit will
automatically read the total folders and the number of the total tracks.(F10)
F13
14
F11
Page 11

EnglishEnglish 15 16
be encoded.(F19)
3. Press the ENCODING button to start encoding and flash the display will show “REC”
“CORD/USB”
4. Press the encoding button or STOP/BAND button to stop encoding.
ENCODINGANDSTORING FROMA NORMALCD.
You can encode you favorite CD songsinto mp3 format andstore theninto yourmemory
device through the USB port or SD/MMC card slot.
1. Press the function button to select CD function.
2. Press the SKIP/TUNING/NAME SEARCH UP or DN button to select the track to be
encoded.
3. Press the encoding button to start sync encoding and the display will show “REC”
“CORD/USB” flash.(F20)
4. Press the encoding button or STOP/BAND button to stop encoding.
COPYINGFROMMP3 DISC
you can copy the files from on mp3 disc and storethen into yourmemory device through
the USB port or SD/MMC cord slot.
1. Insert the mp3 disc and press the function button to sleuth the CD function.
2. Press theSKIP/TUNING/NAME SEARCHUP orDN buttonto selectthe trackthat youwant
to copy.
3. Press the encoding button to startcopy the files andthe displaywill show“REC” “CORD/
UAB” and flash.(F21)
ERASINGFILESFROM THESD/MMC CARD
You can use this function to the files.
1. Press the function button to select USB/CARD function.
2. Press the erasing SKIP/TUNING/NAME SEARCH UP or DN button to select the tile for
you want to erasing.
3. Press the SKIP/TUNING/NAME SEARCH UP or DN button to play .
4. Press the EASER/MEMORY button twice the file will be erased, the display will shim
“DEL FILE”.(F22)
F19
F21
20
22
NTIMER OFFTIMER
OURCE
TIMEROPERATIONS
Press the MENU button then press the SKIP/TUNING/NAME SEARCH(UP or DN) button to
selecting
the TIMER then press the PLAY/PAUSE to confirm.
1. ONTIMER SETTING
When the display showing “ON TIMER”.
A. Pressthe PLAY/PAUSE button thehour digit hourflash in thedisplay ,press SKIP/TUNING/
NAME SEARCH(UP or DN) button to set to your desired hour.
B. Press thePLAY/PAUSE buttonagain theminute digitswill flash pressSKIP/TUNING/NAME
SEARCH(UP or DN) button to set to your desired minute.
C. Press the PLAY/PAUSE button again to confirm.
2. OFF TIMERSETTING
When the display showing “OFF TIMER”.
A. Pressthe PLAY/PAUSE button thehour digit hourflash in thedisplay ,press SKIP/TUNING/
NAME
SEARCH(UP or DN) button to set to your desired hour.
B. Press the PLAY/PAUSE button the minute digits will flash press SKIP/TUNING/NAME
SEARCH(UP
or DN) button to set to your desired minute.
C. Press the PLAY/PAUSE button again to confirm.
3. SOURCE SETTING
When the display showing “SOURCE”.
A. Press the PLAY/PAUSE button to enter source setting.
B. Press the SKIP/TUNING/NAME SEARCH(UP or DN) button to set to your desired source.
C. Press the PLAY/PAUSE button again to confirm.
PRESETSTATION RECORD SETTING
1. Press the PLAY/PAUSE button to enter into preset station record setting.(F3)
2. Press the SKIP/TUNING/NAME SEARCH(UP or DN) button to set to your desired station
number.
3. Press the PLAY/PAUSE button but again to confirm.
PRESETDISC USB CARD TUNER
ON TIMER OFF TIMER SOURCE VOLUME
PRESET
DISC USB CARD TUNER
PRE 01 PRE 02 PRE 20
Page 12

EnglishEnglish
17 18
SLEEP TIMER
The Sleep Timer is a count-down timer for switching the system to a stand-by mode after
a specified time. It enables you to listen to the radio or a CD prior to falling
asleep. The Sleep Timer can be set from 120 to 5 minutes.
• Switch on the system by pressing the STANDBY (POWER) button either on the system
or on the remote control.
• Select the sound source by pressing the FUNCTION Button (20) on the remote control
to select TUNER / CD / MEMORY CARD or USB .
• Press the SLEEP button on the remote control (4) to set the sleep time.
• The word SLEEP and the number 120 appear on the display.
• The system will now play for 120 minutes.
• To decrease the sleep time in steps of 120>90>60>45>30>15>05 minutes, press and
hold SLEEP button until number 05 appears.
• After a few seconds, the previous display is shown again (e.g. with Tuner or CD
information).
• To switch off the system before the SLEEP time has elapsed, press the Stand-by button
on the system or the remote control.
HEADPHONESJACK(8)
Headphones should have a 3.5mm diameter stereo plug and an impedance of 8-32 ohms.
When headphones are connected (8), the speakers are automatically disconnected.
IMPORTANT
Since movement of the CD mechanism and the sensitive circuitry may cause interference
to a radio tuner nearby, switch this unit off while operating other radio devices.
This product utilizes a laser
Danger - Invisible laser radiation when openedand interlock failed or defeated. Avoid direct
exposure to the beam.
Caution - Use of controls, adjustments, or procedures not listed in this manual may result
in hazardous radiation exposure.
Concerning Compact Discs
Only compact discs identified with this mark can be used
with this player.
Playability of self-made CDs on Roadstar CD drive mechanisms.
CD-R/CD-RW in CD-DA and in MP3 format can be played back. However it
can occur, due to differences in the quality of the media as well as the
characteristics of the recording, that individual self-made CDs cannot be
read. This does not indicate an incorrect function of the playback unit in
thesecases.
SPECIALFUNCTIONS
BEATCUT SETTING
If beat noise is present when recording, adjust the position of the BEAT CUT switch (15 ) on
the rear of the unit. (For MW only)
NOTE: When you perform the all setting
1. Press the TIMER button on the remote “ ” appears on the display.
2. The unit will be switched on automatically at “TIMER ON” order and start playing.
The unit will switched off automatically at “TIMER OFF” order.
5
AUDIO CONTROLS
ELECTRONIC EQUALIZER
• The Quality of the sound can be adjusted to suit the type of music playing.
• Simply press the EQ(UALIZER) button (18) on the remote control until it matches the
type of music playing. The corresponding indication will appear on the display (pass,
classic , rock , flat, pop, or jazz).
MUTE
• Press theMUTE button(2) onthe Remote Control to switchoff thesound. MUTEappears
on the LCD.
• Press MUTE again to restore the sound at the previous level.
k
Page 13

EnglishEnglish
SPECIFICATIONS
Power Supply
AC: 230V ~ 50 Hz
Battery: 2 x UM-4, 3V for remote control
RadioFrequencyCoverage
FM: 87.5 - 108 MHz
MW: 522 - 1620 kHz
Cassette section
Recording System: AC Bias
Erasing System: Magnetic Erase
CDPlayer
Pick Up: 3-Beam, Semiconductor Laser
Encoding: 16-Bit Linear 2x Oversampling
General
Headphones: 3.5mm stereo jack plug, 8-32 W
Design and specifications are subject to change without notice.
Correct Disposal of This Product
(Waste Electrical & Electronic Equipment)
This marking shown on the product or its literature, indicates that it should not
be disposed with other household wastes at the end of its working life. To prevent
possible harm to the environment or human health from uncontrolled waste
disposal, please separate this from other types of wastes and recycle it
responsibly to promote the sustainable reuse of material resources.
Household users should contact either the retailer where they purchased this
product, or their local government office, for details of where and how they
can take this item for environmentally safe recycling.
Business users should contact their supplier and check the terms and conditions
of the purchase contract. This product should not be mixed with other commercial
wastes for disposal.
19 20
Page 14

DeutschDeutsch 21 22
SICHERHEITSHINWEISE
HIF-6880USMPT
MICRO-HIFI-SYSTEM MITTOP LOADINGCD-/MP3-SPIELER, SD/MMC UND USB
SPIELER, ENCODINGFUNKTION, 2-WELLEN-TUNER,AUTOSTOP-KASSETTENDECK UND FERNBEDIENUNG.
BEDIENUNGSANLEITUNG
Bitte lesen Sie diese Bedienungsanleitung aufmerksam durch, um sich mit Ihrem neuen
Hifi-System vertraut zu machen, bevor Sie es zum ersten Mal in Betrieb nehmen. Bitte
bewahren Sie diese Anleitung auf, um später jederzeit nachschlagen zu können.
LAGEDERBEDIENUNGSELEMENTE
1. Lautsprecher
2. Kassettenfach
3. LCD-Anzeige
4. Standby-Anzeige
5. Ein-/Standby-Taste
6. PROG/MEMORY/ERASE -Taste
7. Fernbedienungssensor
8. Kopfhörerbuchse
9. CD-Wiedergabe/Pause-Taste
10. Radio: Abstimmtaste Abwärts/CD: Sprungtaste Rückwärts
11. ENCODING Taste
12. Radio: Abstimmtaste Aufwärts/CD: Sprungtaste Vorwärts
13. MENU Taste
14. CD STOP-Band- Taste
15. BEAT-CUT-Taste
16. Lautstärkeknopf
17. M-DN /RANDOM-Taste
18. CD-Fach-Öffnen/Schliessen-Taste
19. M-UP / REPEAT-Taste
20. FUNKTION-Taste
21. SD/MMC-KARTENEINSCHUB
22.
USB-EINGANGSBUCHSE
23. AUFNAHME-Taste
24. WIEDERGABE-Taste
25. RÜCKWÄRTS-Taste
26. VORWÄRTS-Taste
27. STOP/AUSWURF-Taste
Das Ausrufszeichen im Dreieck weist den Benutzer auf wichtige
Bedienungs- undWartungsanweisungen (Service)in diesem Handbuch
hin, dieunbedingt zubefolgen sind.
Das Blitzsymbol im Dreieck weist den Benutzer auf “gefährliche
Spannungen”an einigenfreiliegenden Bauteilenim Innem des Gerätes
hin.
Um dieGefahr elektrischer Schläge auszuschliessen,Gehäuse auf keinen
Fall abnehmen. Im Innem befinden sich keine vom Benutzer selbst
instandsetzbaren Teile. Reparaturen dürfennur von einer autorisierten
Fachwerkstatt durchgeführt werden.
Dieses Gerät arbeitet mit einem Laserstrahl. Da die Gefahr von
Augenschäden besteht,darf nurqualifiziertes Personalden Deckeldes
Gerätes aufheben,entfernen oderreparieren.
Dunkelstrahlung bei geöffneten Geräten und defektem Verschluss.
Bedienung oder Regulierung der technischen Eigenschaften oder
sonstige nichtspezifierte Prozedurenauf diesermanuellen Betriebsart
können zurAusetzung gefährlicher Laserstrahlenführen.
Dieses Gerätist für230V ~ 50Hz Netzspannungausgelegt. Bei längerer
Nichtbenutzung desGeräts ziehenSie den Steckeraus der Steckdose.
Setzen Siedas Gerätweder Feuchtigkeit noch Regenaus.
Der EIN-Schalter dieses Geräts ist anden Sekundärschaltkreis angeschlossen. Seine Abschaltung unterbricht die Hauptstromzufuhr des
Geräts nicht.
Schalten Sie das System erst dann ein, wenn Sie alle Verbindungen
genau geprüfthaben.
StellenSie dasGerät soauf, dass immereine ungestörteFrischluftzufuhr
sichergestellt ist.Stellen Sie das Gerät keinesfalls auf Teppiche und in
die Nähevon Gardinenundbauen Siees nicht in Bücherregaleein.
Setzen Sie das Gerät weder direkter Sonneneinstrahlung noch
Wärmequellen aus.
Beim Einlegender Batterieachten Sieauf die richtige Polarität.
Bei längererNichtbenutzung desGeräts (mehrals einen Monat) ziehen
Sie die Batterie heraus,um Auslaufen zu vermeiden, die schädlich für
das Gerätsein konnen.
Page 15

DeutschDeutsch 23 24
28. PAUSE-Taste II
29. CD-Fach
30. Kassetten-Tasten-Deckel
31. Netz-Hauptschalter
32. Netzkabel
33. UKW-Antennenkabel
34. MW-Antennenbuchse
35. 75 ohm Antenna
36. Lautsprecherbuchsen (Links/Rechts)
NETZANSCHLUSS
Bevor Sie das Gerät einschalten, vergewissern Sie sich, daß Ihre örtliche Netzspannung mit
der auf dem Typenschild angegebenen Spannung übereinstimmt.
Zu Ihrer eigenen Sicherheit lesen Sie die folgende Bedienungsanleitung sorgfältig durch,
bevor Sie das Gerät ans Netz anschließen.
NETZBETRIEB(AC)
Dieses Gerät funktioniert nur mit einer Spannung von AC 230V 50Hz. Wird das Gerät an
andere Stromquellen angeschlossen, könnte es Schaden nehmen.
Vorsicht
Um elektrischen Schlägen vorzubeugen, ziehen Sie den Hauptstecker aus, bevor Sie den
Deckel entfernen. Für die Wartung wenden Sie sich an qualifiziertesKundendienstpersonal.
Sicherheitsmaßnahmen
Setzen Sie das Gerät weder Regen noch Feuchtigkeit aus.
Stromversorgung: AC 230Volt / 50Hz - nur Wechselstrom (AC)
Dieses Zeichen bedeutet, daß dieses Gerät doppelt isoliert ist. Eine Erdung ist nicht
notwendig.
VORBEREITUNGFÜRDEN BETRIEB
Nehmen Sie das Gerät vorsichtig aus der Verpackung und heben Sie diese für eine spätere
Verwendung auf.
Vor der Inbetriebnahme lesen Sie bitte aufmerksam diese Bedienungsanleitung.
ANSCHLÜSSE
Schließen Sie die Lautsprecher an die Lautsprecherbuchsen an der Rückseite des Gerätes an.
Schließen Sie den rechten Lautsprecher an die rechte Buchse und den linken Lautsprecher
an die linke Buchse an (36).
Schließen Sie das Netzkabel (32) an eine AC-Steckdose an. Überprüfen Sie, daß Ihre
Stromversorgung 230V, 50Hz beträgt.
Schließen Sie die AM-Antenne an die AM-Buchse (34).
Strecken Sie das UKW-Antennenkabel aus (33).
NETZ-HAUPTSCHALTER(31)
Wählen Sie ON mit dem Netz-Haupschalter ander Rückseite des Geräts, um das Gerät
einzuschalten.
Wählen Sie OFF mit dem Netz-Haupschalter , um das Gerät auszuschalten.
Wenn Sie das Gerät einige Zeit nicht benutzen, ziehen Sie den Hauptstecker aus.
FERNBEDIENUNG
1. STANDBY-TASTE
2. MUTE-TASTE
3. LAUTSTÄRKEREGLER VOL-
4. SLEEP-TASTE
5. TIMER-TASTE
6. CD PLAY/PAUSE-TASTE
7. PROGRAM/MEMORY/ERASE-TASTE
8. SKIP/TUNING/NAME SEARCHDN-TASTE
9. CD STOP-TASTE
10. REPEAT/M-UP-TASTE
11. RANDOM/M-DN-TASTE
12. ID3-TASTE
13. CD-FACH ÖFFNEN/SCHLIEßEN
14. LAUTSTÄRKEREGLER VOL +
15. FUNCTION-TASTE
16. MENU-TASTE
17. SKIP/TUNING/NAME SEARCH UP-TASTE
18. EQ-TASTE
19. ENCODING-TASTE
20. CLOCK-TASTE
21. NUMMERNSUCHTASTE
22. INTRO/MONO/ST.-TASTE
EINSETZENDER BATTERIEN
Setzen Sie zwei Batterien UM-4, in das Batteriefach der Fernbedienung ein und schließen
Sie den Deckel wieder.
1
2
3
4
5
6
7
8
9
10
11
12
13
14
15
16
17
18
19
0
1
2
Page 16

DeutschDeutsch
ERSETZENDER BATTERIEN
Wenn die Batterien zuschwach werd, werden dieReichweite der Fernbedienung bedeutend
verringert und Sie müssen die Batterien ersetzen.
Hinweise: Um die Genauigkeit und eine lange Betriebsdauer des Senders beizubehalten,
drücken Sie niemals zwei oder mehr Tasten gleichzeitig.
Wenn Sie die Fernbedienung längere Zeit nicht benutzen, entfernen Sie die Batterien, um
dem Auslaufen von Säure vorzubeugen.
RICHTIGEVERWENDUNG DERFERNBEDIENUNG
Richten Sie die Fernbedienung auf den Sensor (7).
Die Funktionstasten auf der Fernbedienung sind dieselben wie auf dem Hauptgerät.
Eine starke Lichtquelle im Raum kann die Leistung des Infrarot-Sensor beeinträchtigen und
ein unzuverlässiges Funktionieren hervorrufen.
Die maximale effektive Reichweite der Fernbedienung beträgt ca. 5 Meter.
MENUOPERATION
UHRZEIT-EINSTELLUNG
Dieses Gerät hat seine eigene digitale Uhr-Funktion im STAND-BY-Modus. Wenn das Gerät
vom Netzstrom getrennt wird, muss die Uhr wieder neu eingestellt werden, wenn keine
Stützbatterien eingelegt worden sind.
Das erste Mal Sie die Einheit benutzen, muß die Uhr eingestellt sein.
• Halten Sie die CLOCK-Taste auf der Fernbedienung gedrückt (20): die Stundenzeilen
blinken.
• Einstellen durch Drücken der Abstimm (Frequenz) Aufwärts- und Abwärts-Tasten (12,10)
oder auf der Fernbedienung (17,8).
25 26
• Drücken Sie die CLOCK-Taste: die Minutenzeilen blinken.
• Einstellen durch Drücken der Abstimm (Frequenz) Aufwärts- und Abwärts-Tasten.
• Drücken Sie die CLOCK-Taste, um die Zeit zu speichern.
RADIOBETRIEB
BETRIEB
• Wählen Sie ON mit dem Netz-Haupschalter (31) an der Rückseite des Geräts.
• Drücken Sie dieSTANDBY-Taste auf dem Gerät (5)oder auf derFernbedienung (1), um
das Gerät einzuschalten.
• Wählen Sie die TUNER-Funktion mit der Funktion-Taste (20).
• Wählen Sie das gewünschte Frequenzband mit der BAND-Taste (14).
• Es gibt mehrere Möglichkeiten, um eine Rundfunkstation einzustellen. Lesen Sie dazu
die unteren Abschnitte.
• Stellen Sie die LAUTSTÄRKE auf den gewünschten Pegel ein, indem Sie den
Lautstärkeknopf (16) oder die Tasten LAUTSTÄRKE Auf/Ab (14,3) verwenden.
• Um das Radio auszuschalten, drücken Sie die Power Ein-/Standby-Taste.
MANUELLESABSTIMMEN
Manuelles Abstimmen ist nützlich, wenn Sie schon die Frequenz des gewünschten Senders
kennen.
• Vergewissern Sie sich, daß die MW-Antenne (36) angeschlossen ist und die UKWAntenne (34) ganz ausgestreckt ist.
• Wählen Sie das gewünschte Frequenzband mit der BAND-Taste (14).
• Drücken Sie die ABSTIMM-Taste Aufwärts oder Abwärts (12,10), um die Frequenz zu
verändern.
• Drücken Sie mehrmals die ABSTIMM-Taste Aufwärts oder Abwärts, bis die genaue
Frequenz erreicht ist.
AUTOMATISCHESABSTIMMEN
• Vergewissern Sie sich, daß die MW-Antenne (34) angeschlossen ist und die UKWAntenne (34) ganz ausgestreckt ist.
• Wählen Sie das gewünschte Frequenzband mit der BAND-Taste (14).
• Halten Sie die ABSTIMM-Taste Aufwärts oder Abwärts ungefähr eine Sekunde lang
gedrückt. Das Radio beginnt automatisch das Abtasten nach starken Radiosignalen.
Das TUNER-Display zeigt die Frequenzen in MHz für UKW oder in kHz für MW an.
• Wenn ein starkes Signal gefunden wird, stoppt der Tuner das Abtasten.
• Wiederholen Sie diesen Vorgang, bis Sie die gewünschte Station gefunden haben.
Hinweise: Da das Automatische Abstimmen von der Signalstärke der Sender abhängt,
werden schwache Sender manchmal übersprungen. In diesem Fall stimmen
CLOCK
TIMER
EQ
ID3
FLAT
BROWSE
ON
REOCRD
Press “P”
ON/OFF
ID3 ON
ID3 ON/OFF
REC CARD
REC
CARD/USB
ON TIMER OFF TIMER
ROCK
CLASSIC
JAZZ
POP
PRESET
DISC USB
CARD
TUNER
PRE 01 PRE 02 PRE 20
SOURCE
VOLUME
MENU
Press “P”
Press “P”
Press “P” to
confirm
To set hour
To set min
To set hour
To set min
Press “P” to
confirm
Press “P” to
confirm
To set hour
To set min
Press “P” Press “P”
Press “P” Press “P”
Press “P”
Press “P”
Press “P” to
confirm
Press “P” to
confirm
Press “P” to
confirm
Press “P” Press “P”
Press “P”
Press UP/DN button
Press UP/DN button
Press UP/DN button
Press UP/DN button
Press “UP/DN” Press “UP/DN” Press “UP/DN”
Press UP/DN button
Page 17

DeutschDeutsch 27 28
Sie manuell ab, um die schwächeren Sender zu finden.
Andererseits könnte der Tunerbei einem sehr starken Signal stoppen, bevor
die optimale Einstellung erreicht ist. Für den besten Empfang stimmen Sie
manuell ab.
STATIONSSPEICHERUNG
Dieses Gerät ermöglicht es Ihnen, Frequenzen von bis zu 30 Stationen zu speichern: 20 x
UKW, 10x MW.
• Zuerst stellen Sie mit einer der obigen Methoden die Station ein, die Sie speichern
möchten.
• Dann drücken Sie die PROG/MEMORY-Taste (6).
• Wählen Sieden gewünschtenSpeicherplatz mit dieM-UP oderM-DN Tasten(19,17) auf
dem Gerätund drücken Sie diePROG/MEMORY-Taste (6) innerhalb5 Sekunden, um ihn
zu speichern.
Um eine gespeicherte Station neu zu programmieren, wiederholen Sie den obigen Vorgang.
ABRUFENEINER GESPEICHERTENSTATION
Um eine gespeicherte Station abzurufen, drücken Sie einfach die mit die M-UP oder M-DN
Tasten (19,17) bis der gewünschte Stationsspeicher angezeigt wird.
UKW-STEREO--EMPFANG
Wenn ein UKW-Stereo-Signal abgestimmt wird und Sie auf UKW-Stereo sind, können Sie
das Programm in Stereo empfangen. Die ((( ST. ))) Anzeige leuchtet in dem Display auf.
Bei schwachen Stereo-Signalen und einem geräuschvollen Empfang ist es oft vorzuziehen,
das Programm in Mono zu empfangen. Stellen Sie den INTRO/MONO-STEREO-Taste (22)
auf Mono. Der Empfang erfolgt mit weniger Störgeräuschen.
ANTENNE
Für den UKW-Empfang befindetsich auf derRückseite desGerätes ein UKW-Antennenkabel.
Für optimer Empfang, strecken Sie es aus.
Für den MW-Empfang werden die Signale über eine externe Loop-Antenne empfangen.
Sie brauchen die Antenne nur auszurichten, bis Sie den besten Empfang erreichen.
KASSETTENWIEDERGABE
EINLEGEN UNDHERAUSNEHMEN DER KASSETTEN
• Öffnen Sie den Kassetten-Tasten-Deckel (30).
• Drücken Sie die Kassetten-Stop/Auswurf-Taste (
), um das Kassettenfach zu öffnen.
• Legen Sie eine Kassette ein, mit der sichtbaren Bandseite nach unten und der
abzuspielenden Seite gegen Sie gerichtet.
• Schließen Sie das Kassettenfach vollständig, bevor Sie die Wiedergabe beginnen.
• Am Ende der Wiedergabe drücken Sie die Stop/Auswurf-Taste, um das Kassettenfach
zu öffnen und die Kassette herauszunehmen.
WIEDERGABE
• Drücken Sie die Funktion-Taste (20) um TAPE zu wählen.
• Legen Sie Ihre Kassette ein.
• Drücken Sie die Wiedergabetaste (), um die Wiedergabe zu aktivieren.
• Verwenden Sie die Pause-Taste (II), um die Wiedergabe jederzeit zu unterbrechen.
• Drücken Sie die Stop-Taste, um die Wiedergabe zu stoppen.
KASSETTENAUFNAHME
AUFNAHME VOMRADIO
• Drücken Sie die Funktion-Taste (20) um TUNER zu wählen.
• Stellen Sie Ihre Station ein und legen Sie Ihre Kassette ein.
• Drücken Sie gleichzeitig die Aufnahme- (
Q ) und die Wiedergabe-Taste (), um die
Aufnahme zu starten.
• Am Ende der Aufnahme drücken Sie die Stop/Auswurf-Taste.
AUFNAHME VONCD
• Drücken Sie die Funktion-Taste (20) um CD zu wählen.
• Die CD-Fach-Taste (Öffnen) (18) drücken, legen Sie eine Disc ein und schließen Sie
das CD-Fach.
• Drücken Sie die Stop/Auswurf-Taste, um das Kassettenfach zu öffnen.
• Legen Sie eine Kassette ein.
• Drücken Sie gleichzeitig die Aufnahme- (
Q ) und die Wiedergabe-Taste ().
• Drücken Sie die CD-Wiedergabe/Pause-Taste (9).
• Um die Aufnahme zu stoppen, drücken Sie die Stop-Taste (14) des CD-Spielers. Dann
drücken Sie die Stop-Taste des Kassettendecks.
ZUM UMGANG MITDEN COMPACTDISCS
Page 18

DeutschDeutsch 29 30
Mechanismus beschädigen.
Halten Sie das Disc-Fach geschlossen, wenn Sie das Gerät nicht benutzen, um dem
Eindringen von Schmutz und Staub in den Mechanismaus vorzubeugen.
Legen Sie niemals mehrere CDs gleichzeitig ins CD-Fach ein.
Wenn die Disc richtig eingelegt worden ist, erscheinen die folgenden Informationen auf dem
Display:
Gesamtanzahl der Titel auf der Disc
Gesamtspielzeit
Hinweise: Nach dem Schließen des CD-Fachs könnte die Disc-Information nicht auf dem
Display erscheinen. Das bedeutet, daß die Disc nicht richtig eingelegt worden ist
(oft falsch herum). Kontrollieren Sie, indem Sie das CD-Fach erneut öffnen und
die CD wieder einlegen.
DISC-WIEDERGABE
Drücken Sie die CD-Fach-Taste (19), um das Disc-Fach zu öffnen, und legen Sie eine CD ein.
Schließen Sie das Disc-Fach, durch Drücken der CD-Fach-Taste (19).
Drücken Sie die Wiedergabe/Pause-Taste (9) auf dem Gerät oder auf der Fernbedienung
(6). Die Wiedergabe der Disc beginnt vom Anfang des ersten Titels der Disc.
Am Ende der Disc schaltet das Gerät in den Stop-Modus um.
Hinweise: Wenn die Disc sehr stark zerkratztoder zu schmutzig ist, könnte die Wiedergabenicht
starten. Wenneine nichtrichtig zentrierte Discwiedergegeben wird,könnten Geräusche
im Mechanismus hörbar sein. Vermeiden Sie es, solche Discs zu verwenden.
DISC-FEHLER
Dieser Compact Disc Spieler hat einen eingebauten Fehlerkompensationsschaltkreis, um
geringfügige Fehler der Disc zu korrigieren. Dieser Funktion sind jedoch Grenzen gesetzt.
Manchmal könnte der CD-Spieler während der Wiedergabe einige Titel oder Titelstellen der
Disc überspringen. Dieses Problem könnte durch Fehler (wie Kratzer) auf der gerade
wiedergegebenen Disc verursacht werden, die die Fehlerausgleichfunktion nicht beseitigen
kann. Sollten Sie auf dieses Problem stoßen, überprüfen Sie die Funktionstüchtigkeit des
CD-Spielers wie folgt, bevor Sie das Gerät zum Kundendienst bringen:
Spielen Sie eine neue Disc ab. Wenn der CD-Spieler normal funktioniert, ist das Problem
des Springens sicher auf eine defekte Disc zurückzuführen.
A) CD-Modus
1. Dieses Gerät kann CD, CD-R, CD-RW und MP3 Diske abspielen.
2. Wenn keine Disk abgelesen kann, erscheint TOC, NO DISC.(F7)
Um eine Disc aus ihrer Schutzhülle zu nehmen, drücken Sie auf die mittlere Halterung und
heben Sie die Disc hoch, wobei Sie vorsichtig an den Rändern halten sollten.
Fingerabdrücke und Staub sollten von der bespielten Oberfläche der Disc vorsichtig mit
einem weichen Tuch entfernt werden. Im Unterschied zu den herkömmlichen Platten, haben
Compact Discs keine Rillen, in denen sich Staub und feinste Schmutzteilchen ansammeln
können. Somit werden durch das Abwischen mit einem weichen Tuch die meisten Teilchen
entfernt. WischenSie ingeraden Bewegungen von der Mitte der Disc zum Außenrand. Kleine
Staubteilchen oder leichte Streifen beeinflussen keinesfalls die Wiedergabequalität.
Verwenden sie niemals chemische Produkte, wie Plattensprays, Antistatik-Sprays, Benzin
oder Verdünner, um Compact Discs zu reinigen. Diese Produkte könnten die Oberfläche der
CD ernsthaft beschädigen.
Nach derVerwendung sollten dieCDs wieder inihre Schutzhülle zurückgelegt werden. Damit
werden ernsthafte Kratzer vermieden,die dasSpringen desLaser-Tonabnehmers hervorrufen
könnten.
Setzen Sie die Discs nicht längere Zeit dem direkten Sonnenlicht, hoher Feuchtigkeit oder
hohen Temperaturen aus. Werden die CDs längere Zeit hohen Temperaturen ausgesetzt,
könnten sie sich verformen.
Vermeiden Sie es, auf die beschriftete Seite der CD Aufkleber anzubringen oder mit einem
Kugelschreiber darauf zu schreiben.
CD-BETRIEB
EINLEGENUND HERAUSNEHMENDER COMPACTDISCs
• Drücken Sie die Power Ein-/Standby-Taste, um das Gerät einzuschalten.
• Drücken Sie die Funktion-Taste (20) auf demGerät oder auf derFernbedienung (15),um
die CD-Funktion zu wählen.
• Drücken Sie die CD-Fach-Taste (18), um das CD-Fach zu öffnen.
Wenn das CD-Fachgeöffnet ist, entnehmenSie die Disc aus ihrer Schutzhülle und legen Sie
sie vorsichtig, mit der beschrifteteten Seite nach oben, ins CD-Fach ein. Kleinere Discs als
3” legen Sie auf die mittlere Spindel des Fachs.
Drücken Sie die CD-Fach-Taste(18), umdas CD-Fachzu schließen. Wenn das Fachrichtig
geschlossen ist, beginnt sich die CD automatisch zu drehen. Auf dem CD-Display (3) wird
die Gesamtanzahl der Titel und die Gesamtspielzeit der CD angezeigt.
Sie können das CD-Fach jederzeit öffnen, indem Sie die CD-Fach-Taste (18) drücken.
Nehmen Sie die CD erst heraus, wenn das Fach vollständig geöffnet ist.
ACHTUNG
Legen Sie nichts anderes als eine Compact Disc ins Fach ein. Fremdkörper könnten den
Page 19

DeutschDeutsch 31 32
B) MP3-Modus
1. Die Wiedergabe beginnt durch Drücken der Taste PLAY/PAUSE (9). Die Wiedergabe
beginnt mit dem ersten Lied. Die Anzeige zeigt die aktuelle Liednummer und die
abgelaufene Zeit.
2. Um die Wiedergabe zu unterbrechen, drücken Sie PLAY/PAUSE. Die abgelaufen Zeit
blinkt.
3. Um mit der Wiedergabe fortzusetzen, drücken Sie PLAY/PAUSE erneut.
4. Um die Wiedergabe zu halten, drücken Sie STOP (14) button.
ZEITWEILIGESSTOPPENEINER CD
Drücken Siedie STOPN-Taste (14) aufdem Gerätoder aufder Fernbedienung (9).Die DiscWiedergabe wird gestoppt und auf dem Display erscheint die Gesamtanzahl der Titel und
die Gesamtspielzeit der CD.
Um die CD-Wiedergabe zeitweilig zu unterbrechen (Pause-Modus), drücken Sie die
Wiedergabe/Pause-Taste. Die Disc-Wiedergabe stoppt an der gerade gespielten Stelle. Die
Wiedergabezeit blinkt auf dem Display.
Um die Wiedergabe fortzusetzen, drücken Sie erneut die Wiedergabe/Pause-Taste.
ID3-FUNKTION
1. Drücken Sie die ID3-Taste einmal, um die ID3-Funktion aufzurufen.
2. Ist die MP3-Datei mit ID3-Zusatzinformationen versehen, werden automatisch die
informationen für„TITELNAME“, „KÜNSTLERNAME“ und„ALBUMNAME“ auf demDisplay
angezeigt.
3. Drücken Sie die ID3-Taste erneut, um zur normalen Wiedergabe zurückzukehren.
SUCHVORGANG(BROWSE)
1. Betätigen Sie zunächst die Taste MENU und wählen Sie dann mithilfe der Taste SKIP/
TUNING/NAME SEARCH (UP oder DOWN) die Option „BROWSE“ aus.
2. Drücken Sie auf die Taste PLAY/PAUSE, um das Einstellmenü zu öffnen.
3. Wählen Sie mittels der Taste SKIP/TUNING/NAME SEARCH (UP oder DOWN) die
Einstellung „ON“ aus und drücken Sie anschließend zur Bestätigung auf PLAY/PAUSE.
4. A. Drücken Sie im Stoppmodus auf die Taste SKIP/TUNING/NAME SEARCH (UP oder
DOWN), um das Menü der ersten Ebene aufzurufen, und wählen Sie den gewünschten
Ordner aus.
B. DrückenSie auf dieTaste PLAY/PAUSE,um die Auswahlzu bestätigenund zum Menüder
zweiten Ebene zu gelangen. (Es sind bis zu acht Menüebenen möglich.)
C. Wählen Sie mittels der Taste SKIP/TUNING/NAME SEARCH (UP oder DOWN) den
gewünschten Track aus.
D. Bei Betätigung der Taste PLAY/PAUSE startet die Wiedergabe ab diesem Track.
Hinweis: Wenn die Suchfunktion abgeschaltet (OFF) ist, wird auf dem Display die
Tracknummer angezeigt. Bei aktivierter Funktion (ON) erscheint hingegen der Trackname.
TITELSPRUNG
STARTENDERDISC-WIEDERGABE VOMANFANG EINESBESTIMMTENTITELS
Drücken Sie eine der Titelsprungtasten Vorwärts (10) auf dem Gerät oder auf der
Fernbedienung (8) oder Rückwärts (12) auf dem Gerät oder auf der Fernbedienung (17),um
den gewünschten Titel zu wählen. Die Nummer des gewünschten Titels erscheint auf dem
CD-Display. Drücken Sie die Wiedergabe/Pause-Taste, um die Wiedergabe zu starten.
ZUMNÄCHSTENTITEL SPRINGEN
Um an den Anfang des nächsten Titels zu springen:
Drücken Sie einmal die Titelsprungtaste Vorwärts. Die Disc-Wiedergabe wird vom Anfang
des nächsten Titels fortgesetzt.
Der CD-Spieler springt jedesmal voraus zum nächsten Titel, wenn Sie die Titelsprungtaste
Vorwärts drücken. Wenn Sie die Titelsprungtaste Vorwärts wiederholt drücken, durchspringt
der CD-Spieler die Disc vorwärts, Titel für Titel. Wenn der Anfang des letzten Titels erreicht
ist, kehrt der CD-Spieler zu Titel 1 zurück.
ZURÜCKSPRINGENZUM VORHERIGENTITEL AUFEINER DISC
Um an den Anfang des vorherigen Titels zurückzuspringen:
Drücken Sie die Titelsprungtaste Rückwärtszweimal. Die Disc-Wiedergabe wird vom Anfang
des vorherigen Titels fortgesetzt.
Der CD-Spieler springt jedesmal einen Titel zurück, wenn die Titelsprungtaste Rückwärts
gedrückt wird.Wenn diese Taste inder Mitte einesTitels gedrückt wird,springt der CD-Spieler
zurückan den Anfang dieses Titels.Um an denAnfang desvorherigen Titels zurückzuspringen,
F7F6
F8 F9
RTIST NAME
ITLE NAME
LBUM NAME
URRENT TIME
Page 20

DeutschDeutsch
drücken Sie die Titelsprungtaste Rückwärts zweimal.
Wenn Sie die Titelsprungtaste Rückwärts wiederholt drücken, durchspringt der CD-Spieler
die Discrückwärts, Titelfür Titel. Wenn der Anfang des ersten Titels erreicht ist, kehrt der CDSpieler zum letzten Titel zurück.
MANUELLERSUCHLAUF
Wenn Sie während derWiedergabe dieSprungtaste Vorwärtsoder dieSprungtaste Rückwärts
gedrückt halten, tastet der CD-Spieler den geradewiedergegebenen Titelab. Am Ende eines
Titels springtder CD-Spielerzum nächsten Titelund setztdas Abtasten fort.Am Anfangeines
Titels springt der CD-Spieler zum vorherigen Titel und setzt das Abtasten fort.
Wenn der CD-Spieler das Ende des letzten Titels oder den Anfang des ersten Titels erreicht
hat, stoppt er.
PROGRAMMIERTEDISC-WIEDERGABE
Es ist nicht möglich, Programme während der Disc-Wiedergabe einzugeben. Drücken
Sie zuerst die STOP-Taste (17) auf dem Gerät oder (9) auf der Fernbedienung und
befolgen Sie dann die untenstehenden Anweisungen.
- CD/MP3
1) Drücken Siedie PROG/MEMORY (6),um zum PROGRAMMODUS
umzuschalten.(F17)
2) Drücken Sie die SKIP/SEARCH/TUNING-Taste Aufwärts oder Abwärts (12,10), die
Spurnummer wechselt.
3) Drücken Sie die PROG/MEMORY-Taste (6), um die Spurnummer zu bestätigen.
4) Wiederholen Sie die obigen Schritte zur Programmierung weiterer Tracks; es können
maximal 32 Tracks programmiert werden.
Drücken Sie die Wiedergabe/Pause-Taste, um die programmierten Spuren anzuspielen.
LÖSCHENDES PROGRAMMSPEICHERS
Wenn die Disc gerade wiedergegeben wird, drücken Sie die Stop-Taste, um die Wiedergabe
zu stoppen.
Drücken Sie die Stop-Taste erneut, um die programmierten Spuren zu löschen.
WIEDERHOLTEDISC-WIEDERGABE(CD/MP3/USB/CARD)
Verwenden Siedie REPEAT-Taste auf derFernbedienung (10), um dieganze Disc oder einen
Titel wiederholt zu hören.
1. Drücken Sie die REPEAT-Taste, REPEAT “ “ erscheint auf der Anzeige. Der Titel wird
dann kontinuierlich wiedergegeben.
2. Drücken Siedie REPEAT-Taste zweimal,REPEAT “ “ ALL erscheintauf derAnzeige. Die
Disc wird dann bis zum Ende des letzten Titels wiedergegeben.
3. Drücken Sie die REPEAT-Taste dreimal, die REPEAT-Funktion wird gelöscht.
ZUFALLSWIEDERGABE(RANDOM)
Drücken Sie die RANDOM-Taste (11) auf der Fernbedienung im Stop-Modus. Die Anzeige
“RANDOM” erscheint auf dem Display.
Drücken Sie die Wiedergabe/Pause-Taste.
Der CD-Spieler wählt willkürlich einen Titel und startet dessen Wiedergabe. Am Ende dieses
Titels wird ein anderer Titel willkürlich gewählt und wiedergegeben.
Wenn alle Titel auf diese Weise wiedergegeben worden sind, stoppt der CD-Spieler.
INTRO-WIEDERGABE
• Drücken Sie die INTRO-Taste auf der Fernbedienung (22), INTRO erscheint auf der
Anziege. INTRO wird die ersten 10 Sekunden jedes Titels abspielen.
• Drücken Sie die INTRO-Taste zweimal, um zur normalen Wiedergabe zurückzukehren.
KARTEN-/USB-BETRIEB
1. Schieben Sie die Speicherkarte/USB-Karte ein.
2. Betätigen Sie die Funktionstaste am Gerät, um den Modus CARD-USB auszuwählen.
Das gerät liest daraufhin automatisch die Gesamtzahl derOrdner und die Zahl derinsgesamt
33 34
F17
18
F13
Page 21

DeutschDeutsch
auf dem Display die Anzeige „REC“ „CARD/USB“ blinkt.
4. Betätigen Sie zum Beenden der Funktion die ENCODING-Taste oderdie STOP/BAND-
Taste.
AUFNAHME UND SPEICHERN VON EINERNORMALEN CD.
Sie können Ihre Lieblingslieder direkt von einer CD in das MP3-Format übertragen und
dann über den USB-Port oder den SD/MMC-Kartensteckplatz auf Ihrem Speichergerät
abspeichern.
1. Wählen Sie mithilfe der FUNCTION-Taste die CD-Funktion aus.
2. Wählen Sie mittels der Taste SKIP/TUNING/NAME SEARCH UP oder SKIP/TUNING/
NAME SEARCH DN den gewünschten Track aus.
3. Drücken Sie auf die ENCODING-Taste, um die Synchronübertragung zu starten; auf
dem Display blinkt dabei „REC” „CARD/USB”. (F20)
4. Betätigen Sie zum Beenden der Funktion die ENCODING-Taste oderdie STOP/BAND-
Taste.
KOPIEREN VON EINER MP3-DISC
Sie könnenDateien voneiner MP3-Disckopieren undüber denUSB-Port oder den SD/MMCKartensteckplatz auf Ihrem Speichergerät abspeichern.
1. Stecken Sie die MP3-Disc ein und wählen Sie dann mittels der FUNCTION-Taste die
CD-Funktion aus.
2. Wählen Sie mittels der Taste SKIP/TUNING/NAME SEARCH UP oder SKIP/TUNING/
NAME SEARCH DN den Track aus, den Sie kopieren möchten.
3. Drücken Sie auf die ENCODING-Taste, um den Kopiervorgang der Dateien zu starten;
auf dem Display blinkt dabei „REC“ „CARD/USB”. (F21)
LÖSCHEN VONDATEIEN VONDER SD/MMC-KARTE
Diese Funktion ermöglicht das Löschen von Dateien.
1. Wählen Sie mithilfe der FUNCTION-Taste die Funktion USB/CARD aus.
2. Wählen Sie mittels der Taste SKIP/TUNING/NAME SEARCH UP oder SKIP/TUNING/
NAME SEARCH DN die Datei aus, die Sie löschen möchten.
3. Drücken Siezur Wiedergabeauf SKIP/TUNING/NAMESEARCH UPoder SKIP/TUNING/
NAME SEARCHDN.
4. Drücken Sie zum Löschen der Datei zweimal auf ERASE/MEMORY, wobei auf dem
Display „DEL FILE” angezeigt wird. (F22)
35 36
verfügbaren Tracks.(F10)
HINWEIS: 1. Die MP3-Wiedergabe ist nur in diesem Modus möglich.
2. Die Größe von SD/MMC-Karten beträgt MAX. 2GB. Einige externe USBFlash-Speichermedien sowie iPods mit 40 GB werden nicht unterstützt.
3. USB-Unterstützung für Version 1.1 und 2.0.
4. Handeltes sich bei derWMA-Datei umeine geschüzte DRM-Datei, erscheint
auf dem Display die Anzeige „unsupport WMA“ (WMA nicht unterstützt).
Wiedergabe der gesamten KARTE
1. Zum Starten der Wiedergabedrücken Sieauf PLAY/PAUSE. DieWiedergabe beginntbei
dem ersten Track, wobei auf dem Display die aktuelle Tracknummer und die bereits
verstrichene
Zeit angezeigt werden. (F8)
2. Zur Unterbrechung der Wiedergabe drücken Sie auf die Taste PLAY/PAUSE, woraufhin
die
Anzeige für die verstrichene Zeit blinkt. (F9)
3. Um die Wiedergabe fortzusetzen, drücken Sie erneut auf PLAY/PAUSE.
4. Zum Stoppen der Wiedergabe betätigen Sie die Taste STOP.
ENCODING-FUNKTION
1. Drücken Sie auf die MENU-Taste und wählen Sie anschließend REC CARD mittels der
Taste SKIP/TUNING/NAMESEARCH UP oderSKIP/TUNING/NAME SEARCH DNaus.
2. Drücken Sie auf die PLAY/PAUSE-Taste, um das Einstellmenü zu öffnen; auf dem
Display wird dabei „REC CARD“ angezeigt.
3. Wählen Sie mittels der Taste SKIP/TUNING/NAME SEARCH UP oder SKIP/TUNING/
NAME SEARCHDN dieOption „REC USB“bzw. „REC CARD“ ausund drücken Sie dann
zur Bestätigung auf die Taste PLAY/PAUSE.
AUFNAHME UND SPEICHERNVOM RADIO
Sie können Ihr Lieblingsradioprogramm direkt in das MP3-Format übertragen und auf
Ihrem Speichergerätüber den USB-Portoder den SD/MMC-Kartensteckplatzspeichern.
1. Wählen Sie mithilfe der FUNCTION-Taste die Tunerfunktion aus.
2. Wählen Sie mittels der Taste SKIP/TUNING/NAME SEARCH UP oder SKIP/TUNING/
NAME SEARCH DN den gewünschten Sender aus. (F19)
3. Drücken Sie auf die ENCODING-Taste, umden Übertragungsvorgang zu starten,wobei
F19
F21
F20
F22
Page 22

DeutschDeutsch
37 38
TIMER-BETRIEB
Drücken Sie auf die MENU-Taste und wählenSie anschließend die Option TIMER mittels der
Taste SKIP/TUNING/NAME SEARCH UP oder SKIP/TUNING/NAME SEARCH DN aus.
Betätigen Sie zur Bestätigung die PLAY/PAUSE-Taste.
1. EINSTELLUNG DES EINSCHALTTIMERS
Bei Displayanzeige „ON TIMER“:
A. Drücken Sie auf die PLAY/PAUSE-Taste, woraufhin die Stundenanzeige auf dem Display
blinkt. Stellen Sie nun mittels der Taste SKIP/TUNING/NAME SEARCH UP oder SKIP/
TUNING/NAME SEARCH DN die gewünschte Stunde ein.
B. Drücken Sie erneut auf die PLAY/PAUSE-Taste und stellen Sie dann bei blinkender
Minutenanzeige mittels der Taste SKIP/TUNING/NAME SEARCH UP oder SKIP/TUNING/
NAME SEARCH DN den gewünschten Minutenwert ein.
C. Drücken Sie abschließend zur Bestätigung ein weiteres Mal auf die PLAY/PAUSE-Taste.
2. EINSTELLUNGDES AUSSCHALTTIMERS
Bei Displayanzeige „OFF TIMER“:
A. Drücken Sie auf die PLAY/PAUSE-Taste, woraufhin die Stundenanzeige auf dem Display
blinkt. Stellen Sie nun mittels der Taste SKIP/TUNING/NAME SEARCH UP oder SKIP/
TUNING/NAME SEARCH DN die gewünschte Stunde ein.
B. Drücken Sie erneut auf die PLAY/PAUSE-Taste und stellen Sie dann bei blinkender
Minutenanzeige mittels derTaste SKIP/TUNING/NAME SEARCH UP oder SKIP/TUNING/
NAME SEARCH DN den gewünschten Minutenwert ein.
C. Drücken Sie abschließend zur Bestätigung ein weiteres Mal auf die PLAY/PAUSE-Taste.
3. EINSTELLUNG DER QUELLE
Bei Displayanzeige „SOURCE“:
A. Drücken Sie auf die PLAY/PAUSE-Taste, um das Untermenü zur Einstellung der Quelle
zu öffnen.
B. Stellen Sie die gewünschte Quelle mittels der Taste SKIP/TUNING/NAME SEARCH UP
oder SKIP/TUNING/NAME SEARCH DN ein.
EINSTELLUNGDERAUFNAHMEVOREINGESTELLTER SENDER
1. DrückenSie auf die PLAY/PAUSE-Taste,um das Untermenü zurEinstellung der Aufnahme
voreingestellter Sender zu öffnen. (F5)
2. Stellen Sie die gewünschte Sendernummer mittels der Taste SKIP/TUNING/NAME
SEARCH UP oder SKIP/TUNING/NAME SEARCH DN ein.
3. Drücken Sie abschließend zur Bestätigung ein weiteres Mal auf die PLAY/PAUSE-Taste.
Hinweis: Beachten Sie bitte Folgendes, wenn Sie alle Timer-Einstellungen ausgeführt
haben:
1. Bei Betätigung der TIMER-Taste auf der Fernbedienung erscheint „ ” auf dem Display.
2. Das Gerät schaltet sich entsprechend der „TIMER ON“-Einstellung automatisch ein und
beginnt mit der Wiedergabe.
Die „TIMER OFF“-Einstellung dient hingegen der automatischen Abschaltung.
SLEEP-TIMER
Der Sleep-Timer schaltet das Gerät nach einer bestimmten Zeitdauer automatisch aus (in
Standby-Modus). Das erlaubt Ihnen vor dem Einschlafen das Radio,oder eine CD
anzuhören. Der Sleep-Timer kann von 120 bis 5 Minuten eingestellt werden.
• Drücken Sie die POWER-Taste auf dem Gerät oder auf der Fernbedienung.
• Wählen Sie die Musik-Quelle TUNER/CD/MEMORY-CARD/USB durch Drücken der
Funktion-Taste (20) auf der Fernbedienung.
• Drücken Siedie SLEEP-Taste auf der Fernbedienung (20), um die Schlaf-Zeit einzustellen.
• Das Stichwort SLEEP und die Zahl 120 erscheinen auf dem Display.
• Das Gerät wird nun während 120 Minuten eingeschaltet bleiben.
• Um die Dauer der Schlaf-Zeit in Stufen von 120>90>60>45>30>15>05 Minuten zu
verringern, halten Sie die SLEEP-Taste gedrückt bis die Zahl 05 erscheint.
• Nach einigen Sekunden wird wieder das vorherige Display angezeigt (zB mit Tuner-
oder CD-Information).
• Um das Gerät auszuschalten bevor die Schlaf-Zeit beendet ist, drücken Sie die Stand-
by-Taste auf dem Gerät oder auf der Fernbedienung.
AUDIO-KONTROLLEN
Vorwahl-Equalizer
Wenn die Preset Equalizer-Taste (EQ) (18) auf der Fernbedienung gedrückt wird, können
Sie zwischen der folgenden Einstellungen wählen: pass, classic , rock , flat, pop, oder jazz.
Mute (Ton weg)
• Zum Tonabschalten drücken SIE die MUTE-Taste (2) auf der Fernbedienung. MUTE
erscheint auf dem Display.
• Wird die Taste erneut gedrückt, spielt die Anlage mit der bisherigen Lautstärke weiter.
5
k
ON TIMER
FF TIMER SOURCE
OLUME
k
PRESETDISC USB CARD TUNER
ON TIMER OFF TIMER SOURCE VOLUME
PRESET
DISC USB CARD TUNER
PRE 01 PRE 02 PRE 20
Page 23

DeutschDeutsch
BESONDEREFUNKTIONEN
BEATCUT
Wenn Beat-Geräusche während der Aufnahme hörbar sind, wechseln Sie die Position der
BEAT CUT -Schalter (15) an der Rückseite des Geräts. (Nur für MW-Band).
WICHTIG
Da die Bewegung des CD-Mechanismus und der empfindliche Schaltkreis Störungen bei
einem nahestehenden Radio hervorrufen könnten, schalten Sie dieses Gerät aus, wenn Sie
andere Radios eingeschaltet haben.
Dieses Gerät verwendet einen Laser
GefahrUnsichtbare - Laserstrahlung beim Öffnen und bei defektem oder nicht
funktionierendem Schließsystem. Vermeiden Sie es, sich den Strahlen auszusetzen.
Warnung - Das Verwenden von Bedienelementen, das Vornehmen von Regulierungen oder
Einstellungen,die nicht in dieser Anleitungbeschrieben werden, könntenSie einer gefährlichen
Strahlung aussetzen.
TECHNISCHEDATEN
Stromversorgung
AC: 230V – 50Hz
Batterie: 2 x UM-4, für die Fernbedienung
Radio-Frequenzbereich
UKW: 87.5 – 108 MHz
MW: 522 – 1620 kHz
CD-Spieler
Tonabnehmer: 3-Beam, Halbleiter-Laser
Encoding: 16-Bit, linear, 2 x Oversampling
Aufnahme-System
Aufnahme-System: AC-Bias
Lösch-System: Magnetisches Löschen
Allgemeines
Kopfhörer: 3.5mm-Stereo-Stecker, 8-32 Ohm
Technische Änderungen vorbehalten
Korrekte Entsorgung dieses Produkts (Elektromüll)
Die Kennzeichnung auf dem Produkt bzw. auf der dazugehörigen Literatur gibt
an, dass es nach seiner Lebensdauer nicht zusammen mit dem normalen
HaushaltsmüIl entsorgt werden darf. Entsorgen Sie dieses Gerat bitte getrennt
von anderen Abfallen, um der Umwelt bzw. der menschlichen Gesundheit nicht
durch unkontrollierte Müllbeseitigung zu schaden. Recyceln Sie das Gerät, um
die nachhaltige Wiederverwertung von stofflichen Ressourcen zu fördern.
Private Nutzer sollten den Händler, bei dem das Produkt gekauft wurde, oder
die zuständigen Behörden kontaktieren, um in Erfahrung zu bringen, wie sie das
Gerät auf umweltfreundliche Weise recyceln können.
Gewerbliche Nutzer sollten sich an Ihren Lieferanten wenden und die
Bedingungen des Verkaufsvertrags konsultieren. Dieses Produkt darf nicht
zusammen mit anderem Gewerbemüll entsorgt werden.
39 40
KOPFHÖRER
Die Kopfhörer sollten einen 3.5mm-Stereo-Stecker und eine Impedanz von 8-32 Ohm haben.
Wenn die Kopfhörer angeschlossen werden (8), werden die Lautsprecher automatsich
abgeschaltet.
 Loading...