

Page 1
2.4GHz DIGITAL WIRELESS SOUNDBAR SYSTEM2.4GHz DIGITAL WIRELESS SOUNDBAR SYSTEM
Aktives 2.1 Soundbar-Set mit Funk-SubwooferAktives 2.1 Soundbar-Set mit Funk-Subwoofer
OWNER`S MANUAL
BEDIENUNGSANLEITUNG
AIO-240WSAIO-240WS
Read this manual carefully to get the best performance from 2.1 System
Page 2
SICHERHEITSHINWEISE
TECHNISCHE DATEN
!
ACHTUNG!
GEFAHR EINES ST ROMSCHLAGS.
ÖFFNEN SIE NIC HT DAS G EHÄUSE.
DIESES SYMBOL, EIN BLITZ IN EINEM AUSGEFÜLLTEN
DREIECK, WARNT VOR NICHT ISOLIERTEN, HOHEN
ELEKTRISCHEN SPANNUNGEN IM INNEREN DES GERÄTS,
DIE ZU EINEM GEFÄHRLICHEN STROMSCHLAG FÜHREN
KÖNNEN.
DIESES SYMBOL, EIN AUSRUFEZEICHEN IN EINEM
AUSGEFÜLLTEN DREIECK, WEIST AUF WICHTIGE
BEDIENUNGS- UND WARTUNGSHINWEISE IN DER
BEILIEGENDEN BEDIENUNGSANLEITUNG HIN.
!
1.Stromversorgung.................................................................... AC 230V/50Hz
2.Gesamtstromverbrauch....................................240 Watt Max / 80 Watt Sinus
3.Eingangsempfindlichkeit (Subwoofer)...................................200mV 20mV
4.Eingangsempfindlichkeit (Satellit).........................................750mV 50mV
5.Lautsprecher-Impedanz (Subwoofer)...................................................8 Ohm
6.Lautsprecher-Impedanz (Satellit)..........................................................8 Ohm
7.S/N Ratio.................................................................................................80dB
8.Subwoofer-Ausgangsleistung .........................120 Watt Max / 40 Watt Sinus
9.Soundbar-Ausgangsleistung .................2 x 60 Watt Max / 2 x 20 Watt Sinus
10.Klirrfaktor (1kHz, 1W)..........................................................................0.5%
11.Frequenzbereich............................................................20Hz~20KHz 3dB
12.L/R-Separation (1kHz)..........................................................................30dB
13.L/R-Balance (Stereo)........................................................................... 2dB
Anmerkung: Die technischen Daten können im Zuge von
geändert werden.Produktverbesserungen
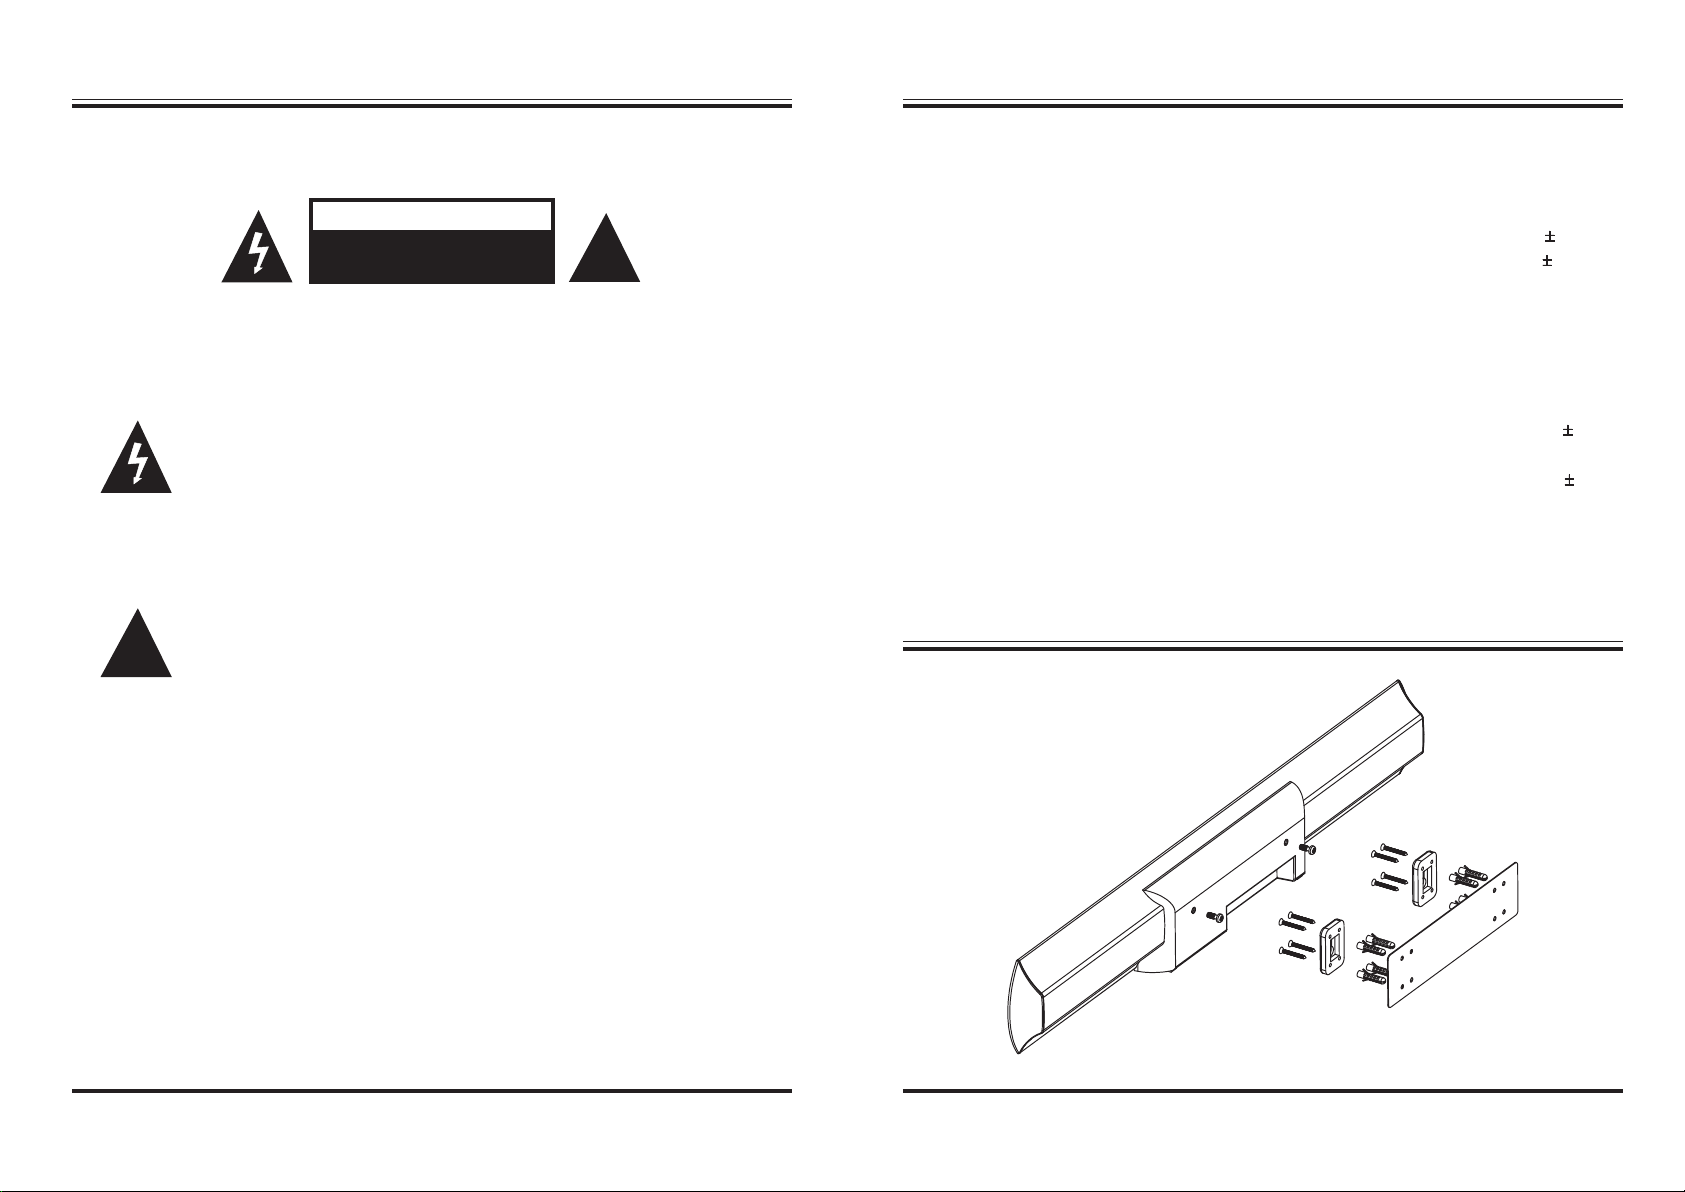
BEFESTIGUNGSSCHABLONE
.
Vorsichtsmaßnahmen
WARNUNG: ZUR VERMEIDUNG VON FEUER- ODER
STROMSCHLAGGEFAHR, SETZEN SIE DIESES GERÄT
BITTE NIEMALS REGEN ODER STARKER FEUCHTIGKEIT AUS.
Lieferumfang:
- Fernbedienung x 1 - Schraube x 8
- Wandhalterung x 2 - Wandhalterung Schraube x 2
- Cinch-kabel (AUX/TV) x 2 - Montagebolzen x 8
- Bedienungsanleitung x 1 - Befestigungsschablone x 1
1
10
Page 3

BEDIENUNG
WICHTIGE SICHERHEITSVORKEHRUNGEN
A. Ein-/Ausschalten des Geräts
1. Bevor Sie das Gerät einschalten, schließen Sie es bitte gemäß der
Bedienungsanleitung an.
2. Stecken Sie das Netzkabel von Soundbar und Subwoofer in die Steckdose.
(Achtung! Die Stromversorgung muss für dieses Gerät geeignet sein.)
3. Betätigen Sie zum Einschalten den SCHALTER auf der Rückseite des
Soundbars und der Unterseite des Subwoofers.Die Bereitschaftsanzeige
leuchtet auf. Drücken Sie dann den STANDBY-Knopf auf der Fernbedienung,
um den Normalmodus zu aktivieren. Drücken Sie den Knopf auf der
Fernbedienung erneut, um das Gerät im Bereitschaftsmodus zu halten.
B. Einstellen der LAUTSTÄRKE
1.Betätigen Sie den VOL+ Taste auf der Vorderseite des
Hauptelements oder den VOL+ Knopf auf der Fernbedienung, um
die Lautstärke zu erhöhen.
2.Betätigen Sie den VOL- Taste auf der Vorderseite des
Hauptelements oder den VOL- Knopf auf der Fernbedienung, um
die Lautstärke zu verringern.
C. TON AUS einstellen (Stummschaltung)
1. Betätigen Sie den MUTE-Knopf auf der Fernbedienung ein Mal, um
den Ton auszuschalten.
D. RESET - Zurückstellung
Drücken Sie den RESET-Knopf auf der Fernbedienung, um alle
Einstellungen, einschließlich der SW-Lautsprecherleistung, der Leistung des
MITTLEREN Lautsprechers und der Surround-Lautsprecherleistung auf die
Achtung: Bitte machen Sie sich mit den nachstehenden wichtigen
Sicherheitsvorkehrungen eingehend vertraut, um einen sicheren Betrieb
des Geräts zu gewährleisten.
1. Lesen Sie die Anweisungen – Alle Sicherheits- und Bedienungshin weise sollten vor der Inbetriebnahme durchgelesen werden.
2. Bewahren Sie diese Anleitung auf – Die Sicherheits- und Bedienung shinweise müssen sorgfältig aufbewahrt werden, um bei Bedarf zum
Nachschlagen verwendet werden zu können.
3. Befolgen Sie die Anweisungen – Alle Bedienungsanweisungen müssen
befolgt werden.
4. Beachten Sie die Warnhinweise – Alle am Gerät und in der Anleitung
befindlichen Warnhinweise müssen beachtet werden.
5. Stromversorgung – das Gerät darf nur mit der auf dem Gerät oder in
der Bedienungsanleitung angegebenen Netzspannung betrieben
werden.
6. Netzkabelschutz – Das Netzkabel muß so verlegt werden, dass man
nicht darauf treten kann oder es durch Gegenstände in der unmittel-
baren Umgebung eingeklemmt wird. Achten Sie darauf insbesondere
am Stecker, der Steckdose oder am Austrittspunkt des Kabels am Gerät.
7. Wasser und Feuchtigkeit – Benutzen Sie das Gerät nicht in der Nähe
von Wasser (zum Beispiel in der Nähe von Badewannen, Waschbecken,
Spülbecken, Waschkübeln, in nassen Kellern oder in der Nähe von
Swimmingpools o.Ä.).
Werkseinstellungen zurückzustellen.
9
2
Page 4
WICHTIGE SICHERHEITSVORKEHRUNGEN
FERNBEDIENUNG
8. Belüftung – Das Gerät muß so aufgestellt werden, dass die Luftzirkulation
nicht beeinträchtigt wird. Deshalb das Gerät beispielsweise nicht auf
einem
Bett, einem Sofa, Teppich oder einer ähnlichen Fläche zur Benutzung
aufgestellt werden, da dadurch unter Umständen die Ventilationsöffnungen des
Geräts blockiert werden.
9. Hitzeeinwirkung – Stellen Sie das Gerät nicht in der Nähe von Hitzequellen,
wie z.B. Heizkörpern, Heizregistern, Herden oder anderen Geräten, die Hitze
abgeben (z.B. Verstärker), auf.
10.Nichtbenutzung – Ziehen Sie das Netzkabel des Geräts aus der Steckdose,
wenn das Gerät für längere Zeit nicht benutzt wird.
11.Schadensbehebung in Fachwerkstätten – in den folgenden Fällen müssen
Prüf- und/oder Wartungsarbeiten von qualifiziertem Fachpersonal
durchgeführt werden:
a)Bei beschädigtem Netzkabel oder -stecker
b)Wenn sich Flüssigkeit oder Fremdkörper im Geräteinneren befinden
c)Wenn das Gerät Nässe oder Feuchtigkeit ausgesetzt wurde
d)Wenn bei vorschriftsmäßiger Handhabung Betriebsstörungen auftreten oder
bei Leistungsbeeinträchtigungen jeder Art
e)Wenn das Gerät heruntergefallen ist oder das Gehäuse beschädigt wurde.
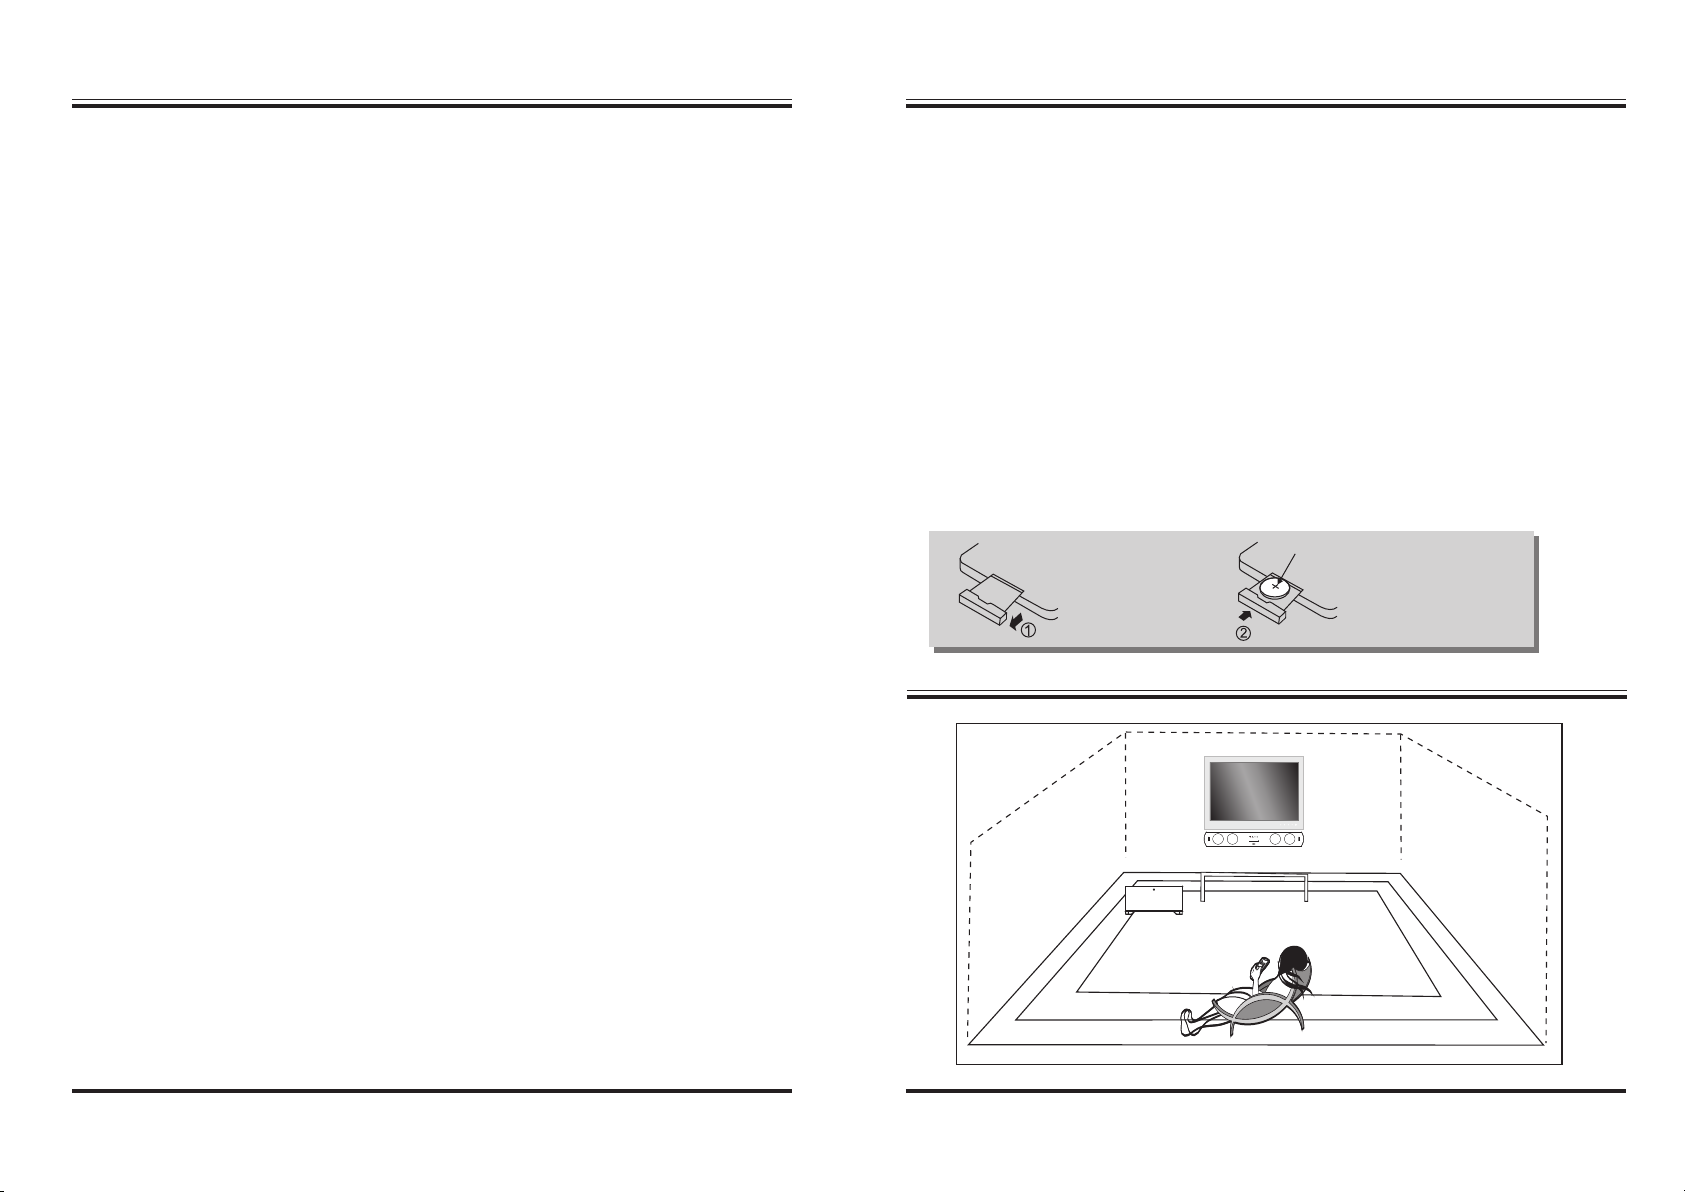
BATTERIEWECHSEL FÜR DIE FERNBEDIENUNG
1. Wenn die Fernbedienung nicht mehr funktioniert oder der
Funktionsabstand sich beträchtlich verringert hat, muß die Batterie der
Fernbedienung ausgetauscht werden.
2. Benutzen Sie ausschließlich Lithium-Batterien 3 Volt Typ CR2025 oder
D12032.
3. Denken Sie daran, dass neben dem Alter der Batterie auch die
Beleuchtung sowie andere Raumbedingungen die Reichweite einer
Infrarot-Fernbedienung beeinträchtigen können.
4.BATTERIE-ENTSORGUNGSHINWEIS:
BATTERIEN UND AKKUS DÜRFEN NICHT IN DEN HAUSMÜLL.
CR2025
AUFSTELLEN DES GERÄTS
12.Wartung – Bei Störungen nur Gegenmaßnahmen ergreifen, die in der
Bedienungsanleitung beschrieben sind. Wartungs- und Reparaturarbeiten
dürfen nur von qualifiziertem Fachpersonal ausgeführt werden.
13.Das Gerät sollte ausschließlich mit einem trockenen Tuch gereinigt werden.
14.Gehen Sie beim Anschließen von Geräten an das Stromnetz stets sorgfältig vor.
15.Ziehen Sie während eines Gewitters oder bei längerem Nichtgebrauch den
Netzstecker des Geräts aus der Steckdose.
3
8
Page 5

FERNBEDIENUNG
GERÄTEVORDERSEITE – STEUERUNGEN UND FUNKTIONEN
1
2
3
4
5
6
1. STANDBY-TASTE
2. MUSIC: Musikmoduswahl
3. NORMAL: Normalmoduswahl
4. VOL-: Lautstärke verringern
5. BASS-: Bass verringern
6. TREBLE-: Höhenregler niedriger stellen
7. INPUT: Eingangsauswahl
8. MUTE: Ton aus
9. RESET: auf frühere Einstellung zurückstellen
10. MOVIE: Filmmoduswahl
11. VOL+: Lautstärke erhöhen
12. BASS+: Bass stärker einstellen
13. TREBLE+: Höhenregler stärker einstellen
7
8
9
10
11
12
13
3
1 2
5 6 7 8
4
1. Signalempfänger für Fernbedienung
2. STANDBY-TASTE
3. TV: TV-Signalanzeige
4. AUX: AUX-Signalanzeige
5. STANDBY: Bereitschaftsanzeige
6. INPUT: Eingangsauswahl
7. VOL-: Lautstärke verringern
8. VOL+: Lautstärke erhöhen
7
4
Page 6

GERÄTERÜCKSEITE – STEUERUNGEN UND FUNKTIONEN
AIO-240WS
SOUNDBAR
2.4GHz DIGITAL WIR ELESS
SYSTEM
2 x 60 Watt Max / 2 x 20 Watt Sinu s
AC 230V~50Hz
MADE IN CHINA
AC 230 V/50H z
5
3
1
2
4
6
1. AC Netzkabel (Soundbar)
2. Schalter ein/aus (Soundbar)
GERÄTERÜCKSEITE – STEUERUNGEN UND FUNKTIONEN
7. STANDBY: Bereitschaftsanzeige Eingangsindikator Subwoofer
8. Schalter ein/aus (Subwoofer)
9. AC Netzkabel (Subwoofer)
SYSTEMANSCHLUSS
Videoeingang
Audioeingang
TV
3. CD-Stereo-Audioeingang links
4. CD-Stereo-Audioeingang rechts
5. TV-Stereo-Audioeingang links
6. TV-Stereo-Audioeingang rechts
2.4GH z DIGITAL W IRELE SS
SYSTE M
120 Watt M ax / 40 Wat t Sinus
AC 230V ~50Hz
MADE IN C HINA
AIO-2 40WS
SOUND BAR
AC 230 V/50H z
7
Cinch-kabel
8
Rear-L
Front-L
9
Audio-Ausgang
Audio Out
Rear-L
Woofer
Optical
Rear-R
Center
Coaxial
Woofer
Rear-R
Front-R
Center
Video Out
Front-L
S-Video
Front-R
U
Video
VY
Video
Scart out
Manufactured under license from Dolby Laboratories.
"Doldy","Dolby Digital", and the double-D symbol are
trademarks of Dolby Laboratories. Confidential
Unpublished Works.
@1992-1997 Dolby Laboratories, Inc.
All rights reserved.
WARNING
RISK OF ELECTRIC SHOCK
DO NOT OPEN
Apparatus Claims of U.S. Patent Nos.
4,631,603;4,577,216;4,819,098 and 4,907,093
licensed for limited viewing uses only.
!
Video-Ausgang
AC 100V~240V
50/60Hz
DVD
65
Page 7

SAFETY INFORMATION
SPECIFICATIONS
!!
CAUTIONCAUTION
RISK OF ELECTRIC SHOCKRISK OF ELECTRIC SHOCK
DO NOT OPENDO NOT OPEN
THE LIGHTNING FLASH WITH ARROWHEAD SYMBOL,
WITHIN AN EQUILATERAL TRIANGLE, IS INTENDED
TO ALERT THE USER TO THE PRESENCE OF
UNINSULATED, DANGEROUS VOLTAGE , WITH IN THE
PRODUCTS ENCLOSURE THAT MAY BE OF SUFFICIENT
MAGNITUDE TO CONSTITUTE A RISK OF ELECTRIC
SHOCK TO PERSONS.
THE EXCLAMATION POINT WITHIN AN EQUILATERAL
TRIANGLE IS INTENDED TO ALERT THE USER TO THE
PRESENCE OF IMPORTANT OPERATING AND MAINTENANCE (SERVICING) INSTRUCTIONS IN THE LITERATURE ACCOMPANYING THE APPLIANCE.
""
!!
1.Power Supply.................................................................... AC 230V/50Hz
2.Total Power Consumption...............................
3.Input Sensitivity (Subwoofer).................................................200mV 20mV
4.Input Sensitivity (Soundbar)...................................................750mV 50mV
5.Speaker Impedance (Subwoofer)......................................................... 8 Ohm
Speaker Impedance (Soundbar)............................................................8 Ohm
6.
7.
S/N (A Weight)........................................................................................80dB
8.Subwoofer Power Output .............................. .120 Watt Max / 40 Watt Sinus
9.Soundbar Power Output .......................
10.THD (1kHz, 1W)...................................................................................0.5%
11.Frequency Response..................................................... 20Hz~20KHz 3dB
12.L/R Separation (1kHz)..........................................................................30dB
13.L/R Balance (Stereo)........................................................................... 2dB
Note: Specifications are subject to change for improvements.
WALL MOUNTING BRACKET INSTALLATION GUIDE
.240 Watt Max / 80 Watt Sinus
.
.2 x 60 Watt Max / 2 x 20 Watt Sinus
......
.
Safety Precautions
WARNING: TO PREVENT FIRE OR ELECTRIC SHOCK. DO NOT
EXPOSE THIS APPLIANCE TO RAIN OR MOISTURE.
Contents:
- Remote Control x 1 - S x 8
- Wall mounting brackets x 2 - W x 2
- Cinch-Cable (AUX/TV) x 2 - A x 8
- User's Manual x 1 - Installation Guide x 1
1
crew
all mounting screw
ssembling bolt
10
Page 8

OPERATION
IMPORTANT SAFEGUARDS
A. Switch On/Off the Product
1. Before turning on the system, please connect it according to
the System Connection Instruction.
2. Connect AC power supply with this product.
(Caution: Power source must be consistent with this product.) (Caution: Power source must be consistent with this product.)
3. Press on the POWER switch button on the Rear Panel of the main
unit to switch on the system, the standby indicator will light up.
Then press the STANDBY button on the remote controller to enter
the normal status. Press the button on the remote controller once
again to keep power in standby status.
B. VOLUME Selection
1.Press the VOL + button on the front of the main unit, or the
VOL + button on the remote control to increase the volume.
2.Press the VOL - button on the front of the main unit, or the
VOL - button on the remote control to decrease the volume.
C. MUTE Selection
1. Press the MUTE button on the remote controller once to
keep the performance silent.
D. RESET
Press the RESET button on the remote controller and it will reset
Caution: Please read carefully all the following important safeguards to ensure safe operation.
1. Read Instructions - All the safety and operating instructions should be
read before the appliance is operated.
2. Retain Instructions - The safety and operating instructions should be
retained for future reference.
3. Follow Instructions - All operating instructions should be followed.
4. Heed Warnings - All warnings on the appliance and in the operating
instructions should be adhered to.
5. Power Source - The appliance should be connected to a power supply
only of the type specified in the operating instructions or as marked on
the appliance.
6. Power-cord Protection - Power-supply cords should be routed so that
they are not likely to be walked on or pinched by items placed upon or
against them, pay particular attention to cords at plugs, convenience
receptacles, and the point where they exit from the appliance.
7. Water and Moisture - The appliance should not be used near water
(for example, near a bathtub, washbowl, kitchen sink, laundry tub, in a
wet basement, or near a swimming pool, etc.)
8.Ventilation - The appliance should be situated so that its location or
position does not interfere with its proper ventilation. Do not use the
appliance on a bed, sofa, rug or similar surface that may block the
ventilation openings.
all settings including SW Speaker output, Front Speaker output to
factory default settings.
9
2
Page 9

IMPORTANT SAFEGUARDS
REMOTE CONTROL
9. Heat - Keep the appliance away from heat sources such as radiators, heat
registers, stoves, or other appliances (including amplifiers) that produce heat.
10. Nonuse Periods - The power cord of the appliance should be unplugged
from the outlet when left unused for a long period of time.
11. Damage requiring service - The appliance should be serviced by qualified
service personnel when:
a/ The power-supply cord or the plug has been damaged; or
b/ Objects have fallen or liquid has been spilled into the appliance; or
c/ The appliance has been exposed to rain; or
d/ The appliance does not appear to operate normally or exhibits a marked
change in performance; or
e/ The appliance has been dropped, or the enclosure damaged.
12. Servicing - The user should not attempt to service the appliance beyond
that specified in the operating instructions. All other servicing should be
referred to qualified service personnel.
13. Clean only with dry cloth.
14. Do not defeat the safety purpose of the unpolarized or grounding type
plug. If the provided plug does not fit into your outlet, consult with
electrician for replacement of the obsolete outlet.
REMOTE CONTROL BATTERY REPLACEMENT
1.Replace the remote control battery when it no longer operates the
unit, or the range is reduced considerably.
2.Use only CR2025 or CR2032 3V lithium batteries
3.Bear in mind that lighting & other room conditions, in addition to
battery age, can affect the operating range of an infrared remote control.
4.Battery disposal:
Batteries and rechargeable batteries are prohibited to dispose into
household waste.
CR2025
PLACING THE UNIT
15. Unplug this apparatus during lightning storms or when unused for
long periods of time.
3
8
Page 10

REMOTE CONTROL
FRONT PANEL - CONTROLS AND FUNCTIONS
1
2
3
4
5
6
7
8
9
10
11
12
13
1. : Power Standby.STANDBY
2.MUSIC: Music Mode .Selection
3.NORMAL: Normal Mode .Selection
4.VOL-: Volume Downward Adjustment Button.
5.BASS-: Bass Downward Adjustment Button.
6.TREBLE-: Treble Downward Adjustment Button.
7. INPUT: Input . Selection Button
8.MUTE: Mute Function Button .
9.RESET: Location Retrieval Button .
10.MOVIE: M ovie Mode .Selection
11.VOL+: Volume Upward Adjustment Button.
12.BASS-: Bass Upward Adjustment Button.
13.TREBLE-: Treble Upward Adjustment Button.
3
1 2
5 6 7 8
4
1. Remote Sensor.
2. STANDBY:Standby Input Indicator.
3. TV:TV Input Indicator.
4. AUX:AUX Input Indicator.
5. : Power Standby STANDBY Button.
6.INPUT:Input Selection Button.
7.VOL-: Volume Downward Adjustment Button.
8.VOL+: Volume Upward Adjustment Button.
7
4
Page 11

REAR PANEL - CONTROLS AND FUNCTIONS
AIO-240WS
2.4GHz DIGITAL WIRELESS SOUNDBAR
SYSTEM
2 x 60 Watt Max / 2 x 20 Watt Sinus
AC 230V~50Hz
MADE IN CHINA
AC 230V/50Hz
REAR PANEL - CONTROLS AND FUNCTIONS
7.STANDBY:Subwoofer Standby Input Indicator.
8.Power On/Off Switch.(Subwoofer)
9. AC Power Cord.(Subwoofer)
SYSTEM CONNECTION INSTRUCTIONS
1
2
1. AC Power Cord.(Soundbar)
2.Power On/Off Switch.(Soundbar)
3.CD Stereo Left Audio Input.
4.CD Stereo Right Audio Input.
5.TV Stereo Left Audio Input.
6.TV Stereo Right Audio Input.
2.4GHz DIGITAL WIRELESS SOUNDBAR
SYSTEM
120 Watt Max / 40 Watt Sinus
AC 230V~50Hz
MADE IN CHINA
AIO-240WS
3
AC 230V/50Hz
5
4
6
To Stereo Output
TV
Video In
7
RCA Cable
8
Rear-L
Front-L
9
Audio Out
Audio Out
Rear-L
Woofer
Optical
Rear-R
Center
Coaxial
Woofer
Rear-R
Front-R
Center
Video Out
Front-L
S-Video
Front-R
U
Video
VY
Video
Scart out
Manufactured under license from Dolby Laboratories.
"Doldy","Dolby Digital", and the double-D symbol are
trademarks of Dolby Laboratories. Confidential
Unpublished Works.
@1992-1997 Dolby Laboratories, Inc.
All rights reserved.
WARNING
RISK OF ELECTRIC SHOCK
DO NOT OPEN
Apparatus Claims of U.S. Patent Nos.
4,631,603;4,577,216;4,819,098 and 4,907,093
licensed for limited viewing uses only.
AC 100V~240V
50/60Hz
!!
Video Out
DVD Player
65
 Loading...