

Page 1
LED ILLUMINATED ALUMINIUM CABINETS
REFLECTIONS
DESIGNER LED MIRRORS
ELECTRICAL SAFETY INSTRUCTIONS
All connections must be installed by a licensed
electrician, in accordance with current building codes.
Consult a qualified electrician.
IMPORTANT
Always switch off the electrical supply at the main
during installation and maintenance. It is
recommended that the circuit breaker is switched off
for the necessary circuit before installation
commences.
Fitting in Bathrooms is subject to the appropriate
building code Regulations. This product is NOT
suitable for outside zones. It is also Not suitable for
installation in saunas, steam rooms or shower
cubicles. This product is only suitable for permanent
installation. DO NOT connect to a trailing plug
and socket outlet. This product is only suitable for
indoor use. Do not attach the product to surfaces that
are damp or otherwise electrically conductive.
INSTALLATION CARE & SAFETY
Wear suitable eye protection when drilling. Take care
when using power tools. Beware of hidden cables or
pipes. Take care if drilling on tiled surfaces in case the
drill slips. A piece of masking tape applied to the wall
before marking out the fixing holes will stop the drill
from wandering.
by LTL
Carrera
Installation Instructions
IMPORTANT
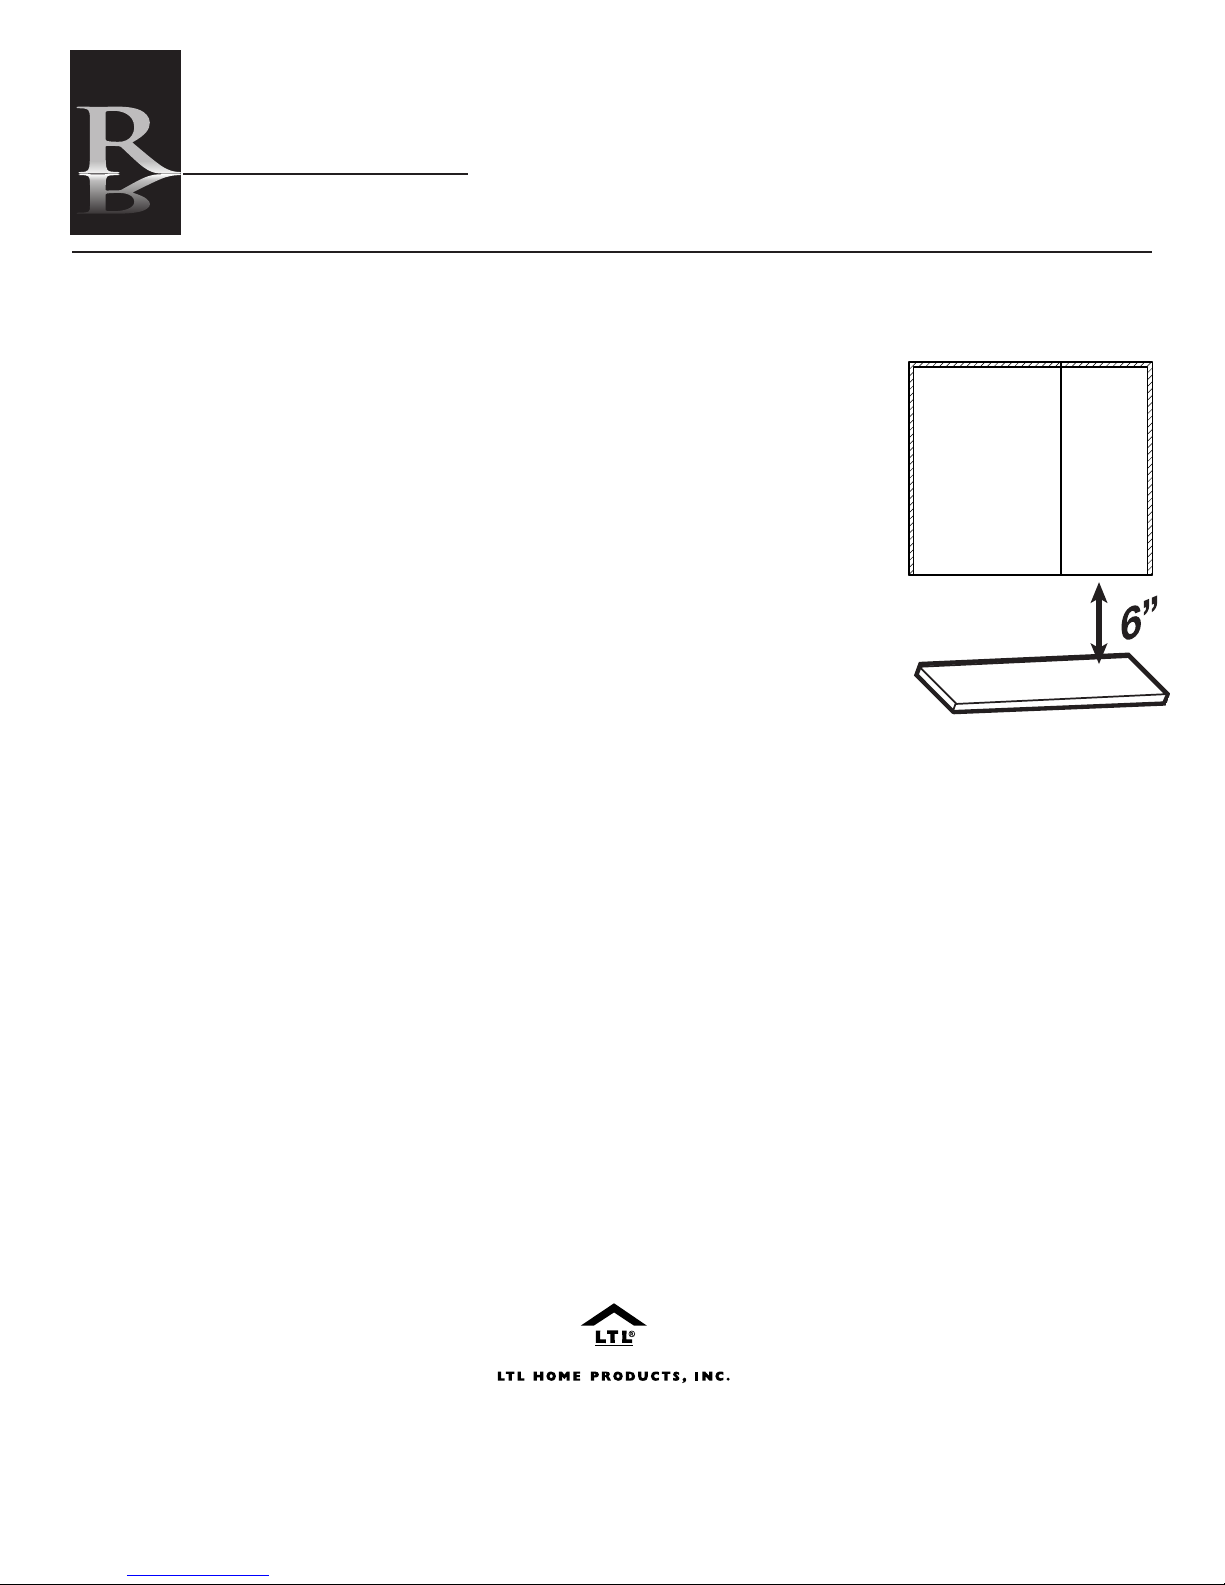
The product must be
installed with a minimum
distance of 6” between
the infrared sensor and
an adjacent wall or
obstruction to ensure
correct function of
the sensor.
(See diagram A)
DO NOT strike glass
components with hard or
pointed items. DO NOT
place very hot or very
cold items against or in
close proximity to glass
surfaces unless an
adequately thick
insulation material is
used to prevent such items coming in contact with
the glass. The nominal thickness of the mirror glass
used in this product is 1/4” and is film backed for
safety. If the glass becomes chipped or broken
replace immediately.
Diagram A
It is recommended that the unit is cleaned with a soft, dry, non
abrasive cloth when turned off. Never use cleaning agents or
abrasive materials on any type of surface finish. Do not allow
moisture to come into contact with the electrical components.
1-800-360-1585 • fax 570-385-5475 • [email protected]
CLEANING
125 Rt. 61 Schuylkill Haven, PA 17972
www.ltlhomeproducts.com
Page 2
LED ILLUMINATED ALUMINIUM CABINETS
Release Lever
E
E
F
G
Release Lever
Release Lever
E
F
G
Release Lever
Installation Instructions
Carrera
1. Remove the packaging taking special care with the
doors and separate shelves. Open the cabinet doors
and remove the screws on the doors. Take care not to
lose the screws.
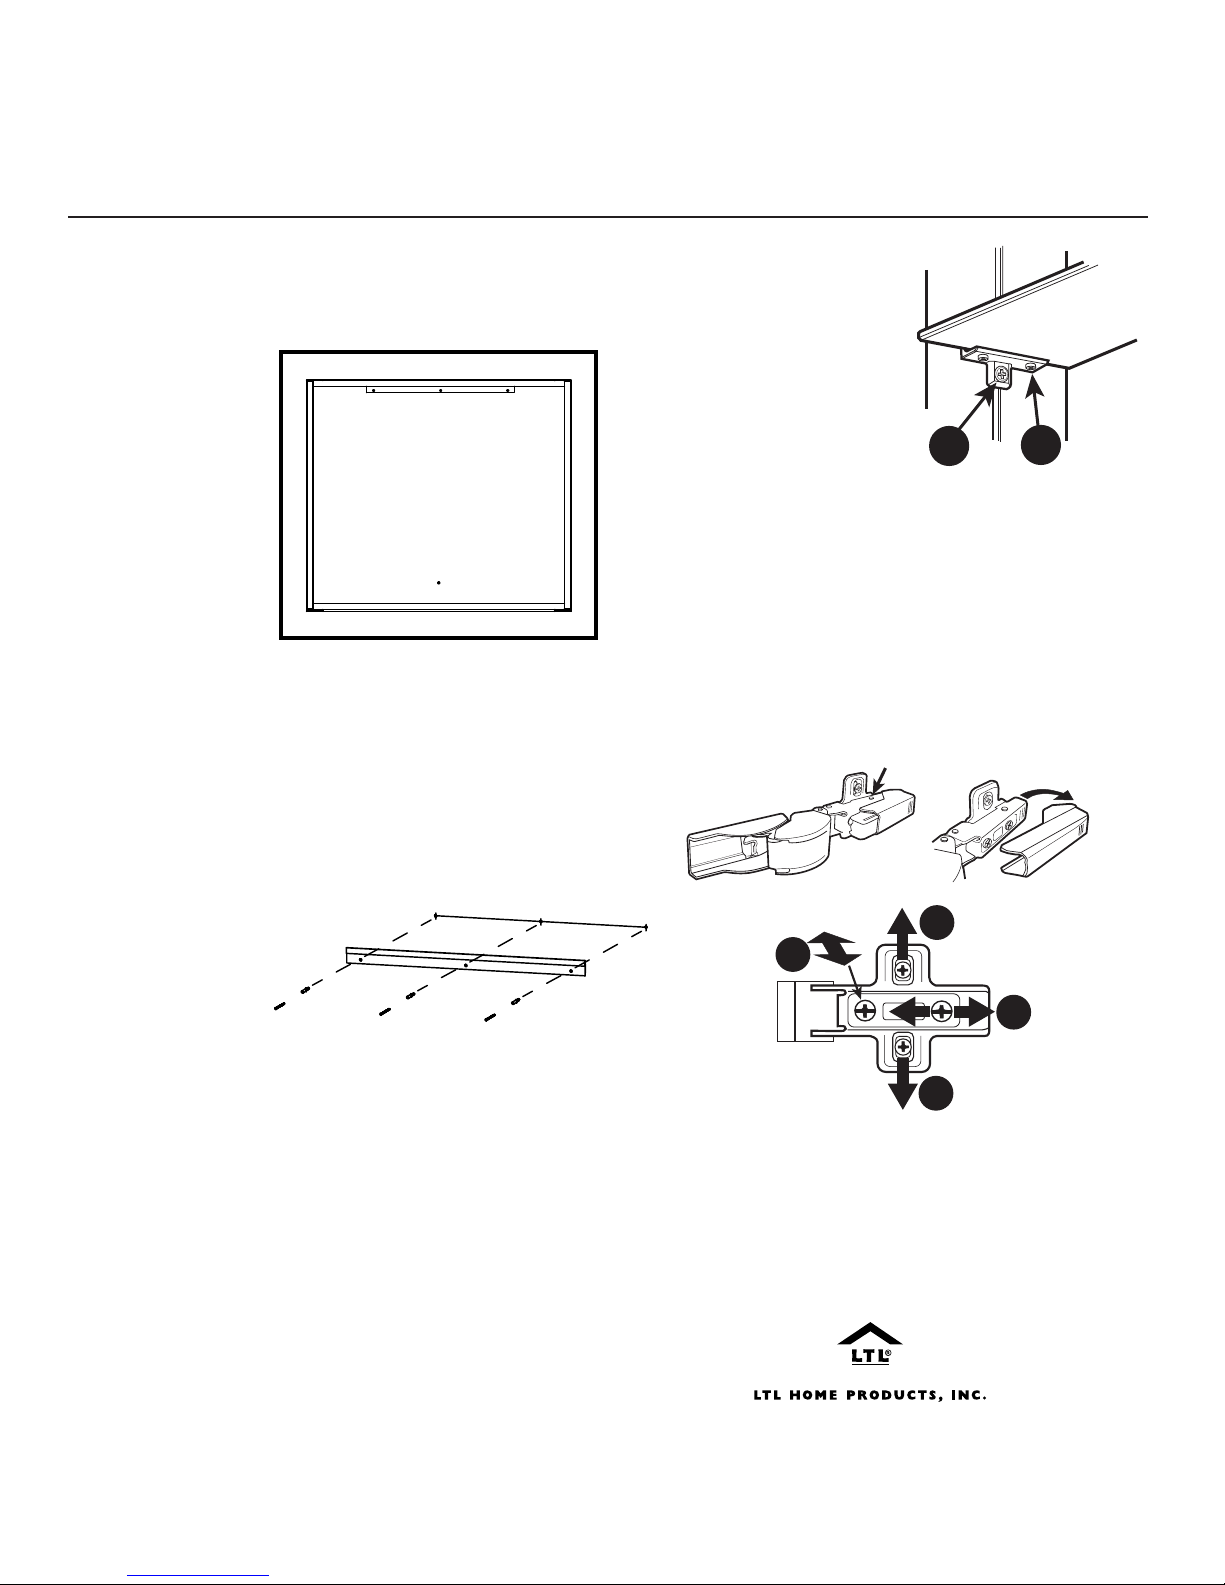
2. Using a level,
mark off a horizontal line approximately 2¾” below
where the top of
the cabinet is to be.
Position the bracket
hole so that they
are centred on the
line, and ensure
that the ends of
the brackets are
spaced to the
width between the
inner edges of the
vertical aluminium
extrusions (see
illustration 1). Mark off the holes using a pencil.
3. Note: Screws supplied are only suitable for stud
walls. For drywall walls use special wall fasteners,
available from DIY or hardware stores. Seek advice from
a specialist about the suitability of screws to be used.
Drill the required holes and insert wall screws.
4. Screw the
bracket to
the wall using the
screws provided.
Please ensure the
screws are fully tight
but take care not to
overtighten.
5. Before making
any electrical connections it is necessary to turn off the main electricity supply. This unit is provided with a supply cable already fitted. This cable should be fitted to the household lighting
circuit or to a fused 3 AMP supply. Connections should
be made in accordance with the latest regulations. This
cabinet is manufactured to CLASS 1 and requires an
earth connection.
6. When the cabinet is fully secure the internal top cover
should be closed and secured with the small screws
removed earlier. When the cover is closed and secure
restore the
the shaver socket. If the light fails to function properly it is likely
the IR sensor has been positioned too close to an adjacent wall
or reflective surface
main power and test the function of the lights and
Illustration 1
Fitting the glass shelves.
7.
Firstly insert a shelf into the
top two shelf support brackets then slide upwards so the
grub screws on the underside of the support brackets
(Screw C) can be sufficiently
tightened to hold glass in
place. Repeat for the bottom
shelf (NOTE: be careful not
to overtighten). Shelves can
be positioned accordingly by sliding the supports up or
down (NOTE: Take care to use both hands when sliding
shelves and ensure thatsupport brackets at both ends
slide simultaneously). Once shelves are in their desired
locations turn screw D to secure in position. A level
should be used to ensure shelves are level.
9. If the doors are out of alignment first remove the softclose buffer (from the relevant hinges) which clips into
the main hinge plate. The soft-close hinges offer
adjustment in 3 directions via adjustment screws
E,F and G (see diagram).
Release Lever
D
C
E
G
F
E
OPERATING INSTRUCTIONS
Light can be controlled by using the IR sensor switch under the cabinet
125 Rt. 61 Schuylkill Haven, PA 17972
1-800-360-1585 • fax 570-385-5475 • [email protected]
www.ltlhomeproducts.com
Page 3

LED ILLUMINATED ALUMINIUM CABINETS
Installation Instructions
Carrera
Pairing
Pairing occurs when two Bluetooth® wireless technology enabled devices communicate with each other and establish
a connection. This information is then stored in the memory of each device meaning that once initially connected, the
two devices will not need to pair again.
Your Mirror can link with up to seven separate devices. When this limit is reached any additional devices paired will
erase previous connections to accomodate the new pairing.
Connecting your Bluetooth
1. It is recommended that the Bluetooth
first to make connection easier.
2. The Bluetooth
3. On the selected Bluetooth
the mirror.
Note: Devices running Bluetooth
This code is a device default of 0000 or 1234. These devices will not need to enter a pairing code again after the initial
set-up. Some devices may also ask for the connection to be accepted, which will be prompted on the device screen.
4. Once connected, any music played on the paired device will play through the Cabinet.
Bluetooth® enabled devices:
®
enabled device to your Cabinet:
®
connectivity of the device you want to pair with your Cabinet is turned on
®
device will be turn on by using the rocker switch inside the Cabinet
®
enabled device select ‘Bluetooth’ from the Bluetooth® device list to connect to
®
Version 2.0 or earlier may need to enter a pairing code before a connection is made.
®
The Bluetooth
To turn off the Bluetooth® functionailty simply turn off the rocker switch on the inside of the cabinet on the left hand
side.
connection will automatically cease when the two paired devices are out of range.
125 Rt. 61 Schuylkill Haven, PA 17972
1-800-360-1585 • fax 570-385-5475 • [email protected]
www.ltlhomeproducts.com
Page 4

LED ILLUMINATED ALUMINIUM CABINETS
Installation Instructions
Carrera
There is no sound from my Cabinet
- The volume on your device is muted or turned down.
- There is a problem with the Bluetooth® connection - try erasing the connection on the audio device and then re-pairing.
- There may be interference from other nearby Bluetooth
- The connected devices are too far apart and out of range - try moving the devices closer together.
®
enabled devices - try turning them off.
I cannot pair the Cabinet with my Bluetooth device
-The cabinet may not be in pairing mode – to do this turn the rocker switch on located on the underside of the cabinet.
The indicator light located on the inside lower right hand side will flash quickly to confirm pairing mode.
- The Bluetooth
- There was a problem during pairing - some devices will pair automatically when selected some will require a pass code
or acceptance of the connection before they will finalise the pairing.
- Refer to your Bluetooth
- If attempting to connect to a PC or Mac computer, ensure that your cabinet is set as the audio output device within the
audio settings menu of the device. You may need to play a track to finalise the
connection.
®
capability of your chosen device is turned off or out of range.
®
device’s instruction manual to ensure it supports the A2DP (stereo Bluetooth®) profile.
®
The sound quality is poor
- Your Bluetooth
- For those devices that support the use of Applications, there may be too many running in the background which can
affect the amount of internal resources available on the device to transmit audio. Closing any non-essential applications
may improve audio quality.
- Similarly, if the selected device has Wi-Fi capabilities, turning this off may improve audio quality.
- There could have been a problem during the initial pairing of devices. Erase the connection using your Bluetooth
device and re-pair.
- For those devices with in-built sound equalisation, adjusting these settings can greatly improve the sound quality of any
audio played through your cabinet.
My Cabinet is not automatically reconnecting with my Bluetooth device
- The Cabinet will automatically reconnect with paired devices when both devices Bluetooth® capabilities are turned on.
Depending on the manufacturer of the Bluetooth® device, the order in which the devices are turned on to automatically
connect may vary. In some cases it will be necessary to turn on Bluetooth® capabilities on the audio device before
turning on the cabinet.
I turned the Bluetooth on-off-on and now I can't pair my device
When the Bluetooth
sequence is interrupted by turning the module back on during this shutdown process a software conflict may occur.
During a software conflict the Bluetooth
Bluetooth
time. To avoid software conflicts always leave10-30 seconds between turning the Bluetooth
again.
®
device may be close to being out of range and should be moved closer to the cabinet.
®
®
®
®
module is turned off it enters a shutdown procedure that takes between 10-30 seconds, if this
®
®
module using the rocker switch and allow to stand for 10 minutes. Normal functionality will resume after this
module will become unresponsive. To reboot the module turn off the
®
module off and back on
125 Rt. 61 Schuylkill Haven, PA 17972
1-800-360-1585 • fax 570-385-5475 • [email protected]
www.ltlhomeproducts.com
Page 5
REFLECTIONS
by LTL
DESIGNER LED MIRRORS
Installation Instructions:
LED ILLUMINATED ALUMINIUM CABINETS
Installation Instructions
-220 240V AC
Mains Supply
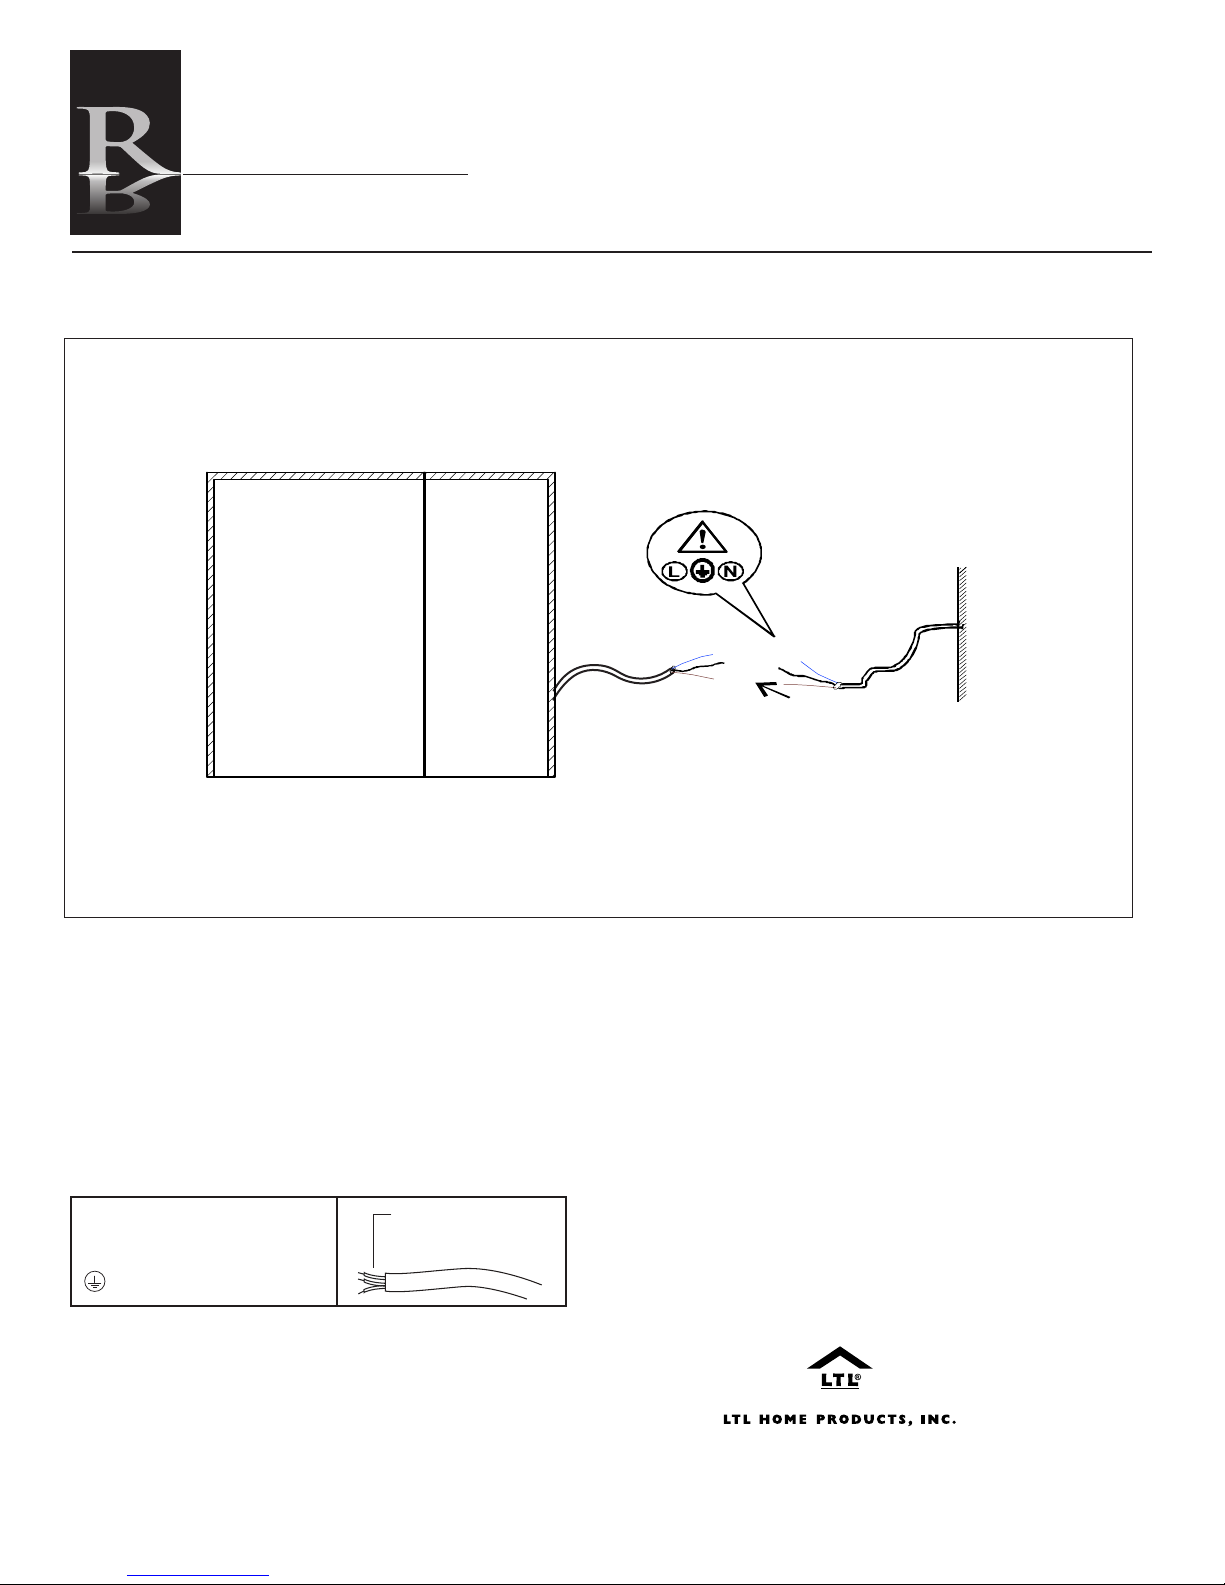
The next step is to make the electrical connection from the mirror to the
mains supply. Use the connection wire found at the rear of the mirror to make the
necessary connections. A second
electrical connections are
THIS PRODUCT IS MANUFACTURED TO CLASS I
CATEGORY AND MUST HAVE AN EARTH CONNECTION.
COLOUR CODING:
L - Live = Black
N - Neutral =
- Earth = Green
White
! IF IN DOUBT CONSULT YOUR ELECTRICIAN !
made.
person will need to hold the mirror in place whilst
Strip wires to a suitable
length. DO NOT connect
to a plug & socket outlet.
125 Rt. 61 Schuylkill Haven, PA 17972
1-800-360-1585 • fax 570-385-5475 • [email protected]
www.ltlhomeproducts.com
 Loading...