

Page 1
x22-Scan
User’s Manual
Page 2

Preface
Thank you for purchasing this product! Please read this instruction manual
carefully before using this product.
Attention and maintenance
Do not attempt to disassemble or modify any part of the machine.
After the product has been dropped or other damage occurred, do not touch
the inside of the scanner to avoid injury. If the product emits smoke, odour or
other abnormalities, stop using it immediately.
Do not use organic solvents such as alcohol, benzene or thinner to clean the
equipment.
Do not work in wet or dusty areas.
Please use film strips and mounted slides that meets the standard sizes.
Please confirm the cleanliness of the machine before use.
When the product is not in use for a long time, remove the power supply.
Page 3
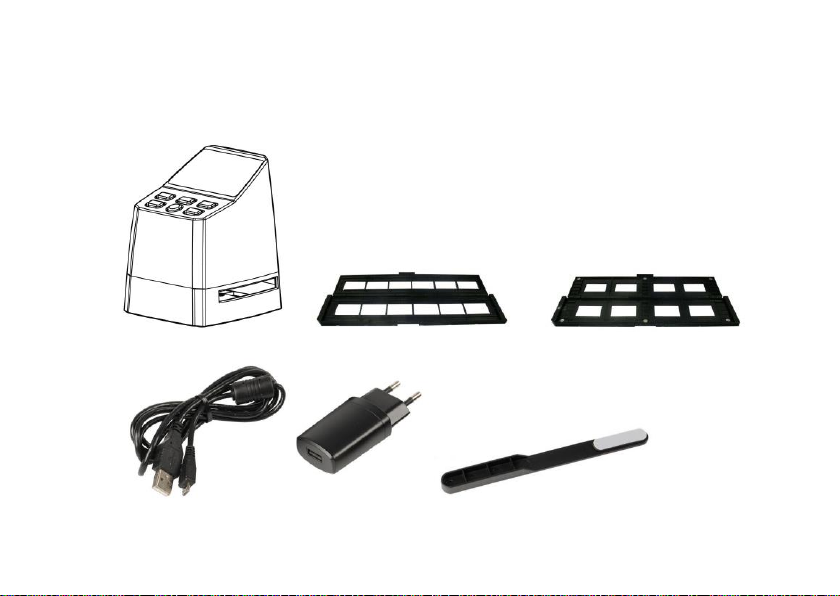
Check the contents of the package
Please check if your scanner package contains the following items:
Scanner holder for film strips holder for mounted slides
USB cable power adapter cleaning brush
Page 4
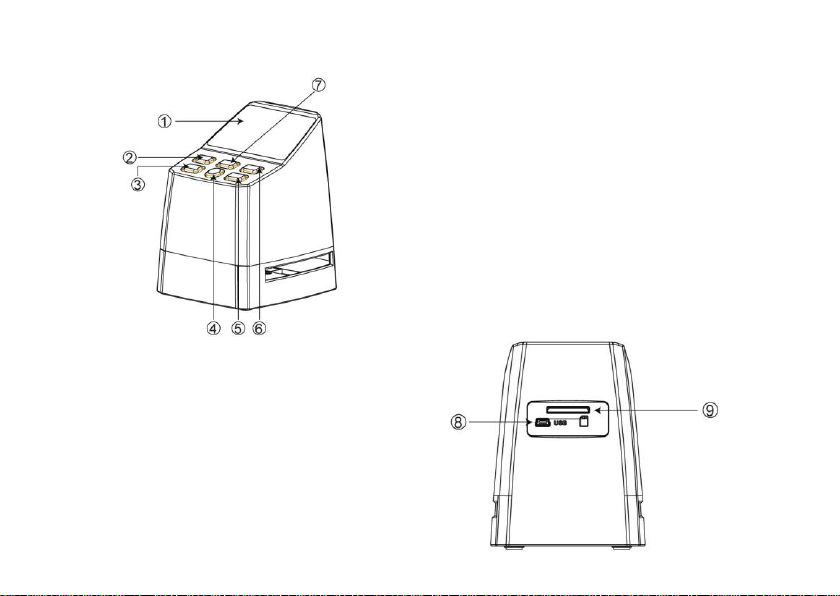
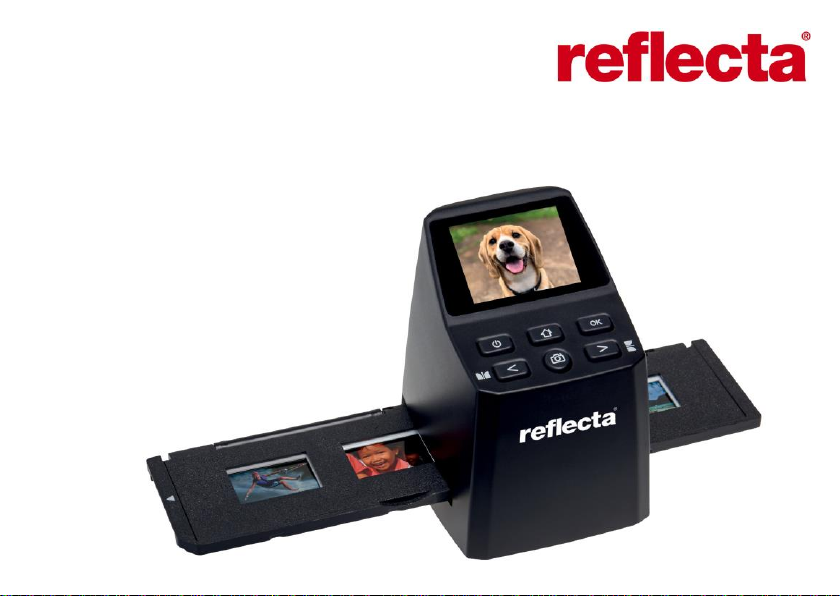
Product diagram
1. LCD Monitor
2. Power button
3. Left button / mirror
4. SCAN button
5. Right button / flip
6. Enter button
7. Home button (will always bring you
back to the main interface)
8.Mini USB port
9.SD card socket
Page 5
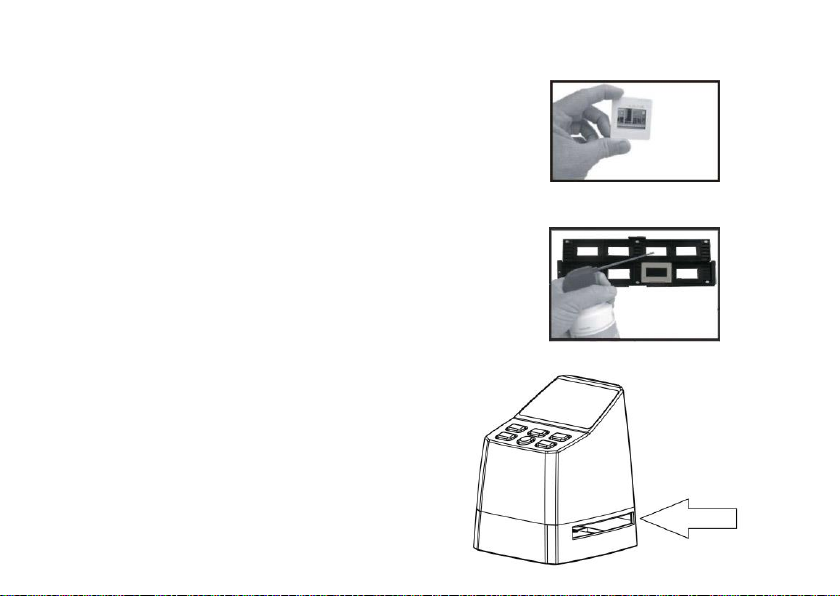
Loading mounted slides
Open the slide holder at the marked spot on
the top.
With the slide holder laid open place the slide
into recessed area in the holder- the slide
should fit perfectly.
Close the slide holder and press the edges
so that it locks in place.
It is recommended to blow off dust by using
compressed air.
Insert the slide holder into the slot on the
right side of the scanner.
Page 6

Loading film strips
Open the film strip holder at the marked
spot on the top.
With the film strip holder laid open place
the film strip into holder so the notches
line up with the notches on the holder.
Make sure that the film strip’s shiny side
is facing upwards.
Note: Handle film strips with care. Any dust,
scratches or fingerprints will show up on your
saved images. If possible use cotton gloves
when handling film strip.
Close the slide holder and press the edges
so that it locks in place.
Insert the slide holder into the slot on the
right side of the scanner.
Page 7

OPERATION GUIDE
Language selection
Press < or > button in the main menu mode to select
Press “OK” then use < or > buttons to choose your preferred language
between English, French, German, Italian or Spanish.
Confirm by pressing “OK”.
Page 8

Image resolution setting
Press < or > button in the main menu mode to select
Press “OK” then use < or > buttons to choose between 8MP and 16MP.
When film type 126 was selected, resolution will be automatically set to 9mp.
Page 9

Main menu settings
1 2 3 4 5
1. Film selection
2. Resolution setting
3. Scan mode
4. Play mode
5. SD card formatting
Page 10

Film selection
Press < or > button in the main menu mode to select
Choose between
SLIDE (color positive)
COLOR NEGATIVE
BLACK & WHITE (negative)
Type 135 film will be pre-selected by default (standard 35mm film with
24 x 36 mm image area).
For scanning ‘Instamatic’ type film (28 x 28mm) use setting “126”.
Page 11

The SCAN button (camera symbol) only has the function of previewing
and saving images.
The HOME button (house symbol) is just a single function to return to
the main interface.
Scanning Images
Please check if the scanner’s backlight is clean before starting to scanning.
If the backlight is dirty, please clean it using the velvet brush that comes
with the scanner by inserting it into the scanner’s film holder slit with the
velvet side facing down.
After confirming that the backlight is clean, press the "OK" button or
the SCAN button in the main menu to enter the scan mode.
Press the SCAN button in the scan mode to save the current image.
In the SCAN mode, if you press the left button ‘<’ before scanning, the current
image will be mirrored; press the right button ‘>’ to flip the current image up and
down.
Page 12

Press OK to enter the EV and RGB menu for exposure control and color correction.
Use < or > button to select, then press ‘OK’ to confirm.
The selected settings bar will be displayed on the preview image. Set your desired
value for Brightness, Red, Green, or Blue and confirm by pressing ‘OK’
Select the RESET option to return to the default values.
Page 13

Gallery mode
Press < or > button in the main menu mode to select
Press “OK”, to enter the automatic slide show mode, alternatively
press "OK" again to enter the manual display mode for your scanned
images. In this mode please use < or > buttons to navigate.
Page 14

Formatting SD card
The scanner can support SD cards with a capacity of up to 128 GB. All cards must
be formatted according to the FAT32 standard. You can format your card by using
the scanner in the following way:
Press < or > button in the main menu mode to select
Page 15

USB upload
Connect the scanner to a computer using the enclosed USB cable.
Press < or > button in the main menu mode to select
Press ‘OK’ and the scanner will appear as a mass
storage device on your PC. You can then copy the scanned images to
your hard disk to get a higher data security.
Page 16

This symbol on the product or in the instructions
means that your electrical and electronic equipment
should be disposed at the end of its life separately
from your household waste. There are separate
collection systems for recycling in the EU.
For more information, please contact the local authority
or your retailer where you purchased the product.
reflecta GmbH
Merkurstraße 8
72184 Eutingen
Germany
www.reflecta.de
 Loading...