

Page 1
Page 2

1
Table of Content s
1. Precaution…………………………………………….…3
2. Preparation……………………………………………..6
z Standard Accessories……………………………6
z Part Names & Functions………………………..7
3. key features…………………….….………..…….……8
4. Use the Microscope………..……….………………..9
z Install Battery…………………….…..…………9
z Insert a MicroSD Card…………..……….……10
z Display Icons & Meanings…….……….….…...11
z Turn on the Microscope…….……....…….……12
z Turn off the Microscope…….…………………12
z How to Capture………………..…..………….13
z Download to Computer.….……..….…..………20
z Preview on Computer……….…………..…...20
z Charge Battery……….…………………………21
z Connect to TV…………………………………...22
5. Menu Introductions………………….……….……..…23
z Set Resolution………………………………...23
z Timer…………………………………….……….24
z Quality…………………………………………...25
z Sharpness…………………………………….....26
z Language………………………………………..27
z Power Save……………………………………27
z Date Stamp……………………………………...28
z TV out………………………………………….28
z Date/Time……………………………………..…29
z Format SD………………………………………29
z System Reset……………………………….…..30
z Version…………………………………………...30
6. Specifications…………………..……………….…..…31
EN
Page 3

2
7. Computer System Minimum Requirement……….…31
8. Troubleshooting………………………………….……32
PortableCapture Pro Software Introductions……....33
1. Install Software………………………………………..33
2. Start Microscope………………………………………34
3. Software Introductions………………………………..35
• Preview size…………………………………..35
• Rotate Image……………………..…………..36
• Date/Time……………………………………..36
• Language……………………………………..37
• Full Screen…………………………………....38
• Capture…………………………………….….39
• Edit Photos………………………………..….40
• Edit Video………………………………….….42
• Quit PortableCapture……….……………...43
4. Measurement………………………………………….44
5. PortableCapture for Mac………………….………...50
Part I Install PortableCapture……….……………...51
Part II Use PortableCapture…….……………….…51
• Preview………………………………………..51
• Date/Time………………………………..……52
• Photo Capture……………………………..…53
• Video Capture………………………………...54
• Edit Photo/Video……………………………..55
• Help…………………………………………....56
• Quit…………………………………………….56
Page 4

3
Welcome
Thank you for purchasing a Portable Stand Alone LCD
Digital Microscope.
Please take a moment to read through this manual. Its
contents will help you to get the best use of the smart
microscope.
1. Precaution
Before using the LCD Digital Microscope, please ensure
that you read and understand the safety precautions
described below. Always ensure that the LCD Digital
Microscope is operated correctly.
• Never operate LCD Digital Microscope where
operation of such devices is restricted. Improper use
creates the risk of serious accident.
• Do not try to open the case of LCD Digital
Microscope or attempt to modify LCD Digital
Microscope in any way. Maintenance and repairs
should be performed only by authorized service
providers.
• Keep LCD Digital Microscope away from water and
other liquids. Do not use LCD Digital Microscope
with wet hands. Never use LCD Digital Microscope
in the rain or snow. Moisture creates the danger of
fire and electric shock.
EN
Page 5

4
If you notice smoke or a strange odor coming from LCD
Digital Microscope, turn the power off immediately.
Take LCD Digital Microscope to the nearest authorized
service center for repair. Never attempt to repair LCD
Digital Microscope on your own.
• LCD Digital Microscope may become slightly warm
during use. This does not indicate malfunction.
• If the exterior of LCD Digital Microscope needs
cleaning, wipe it with a soft, dry cloth.
Page 6

5
FCC Notice
z This equipment has been tested and found to
comply with the limits for a Class B digital device,
pursuant to Part 15 of the FCC Rules. These limits
are designed to provide reasonable protection
against harmful interference in a residential
installation.
CAUTION
To comply with the limits for a Class B digital device,
pursuant to Part 15 of the FCC Rules, this device, when
needed, must only be connected to computer equipment
certified to comply with the Class B limits.
EN
Page 7
6
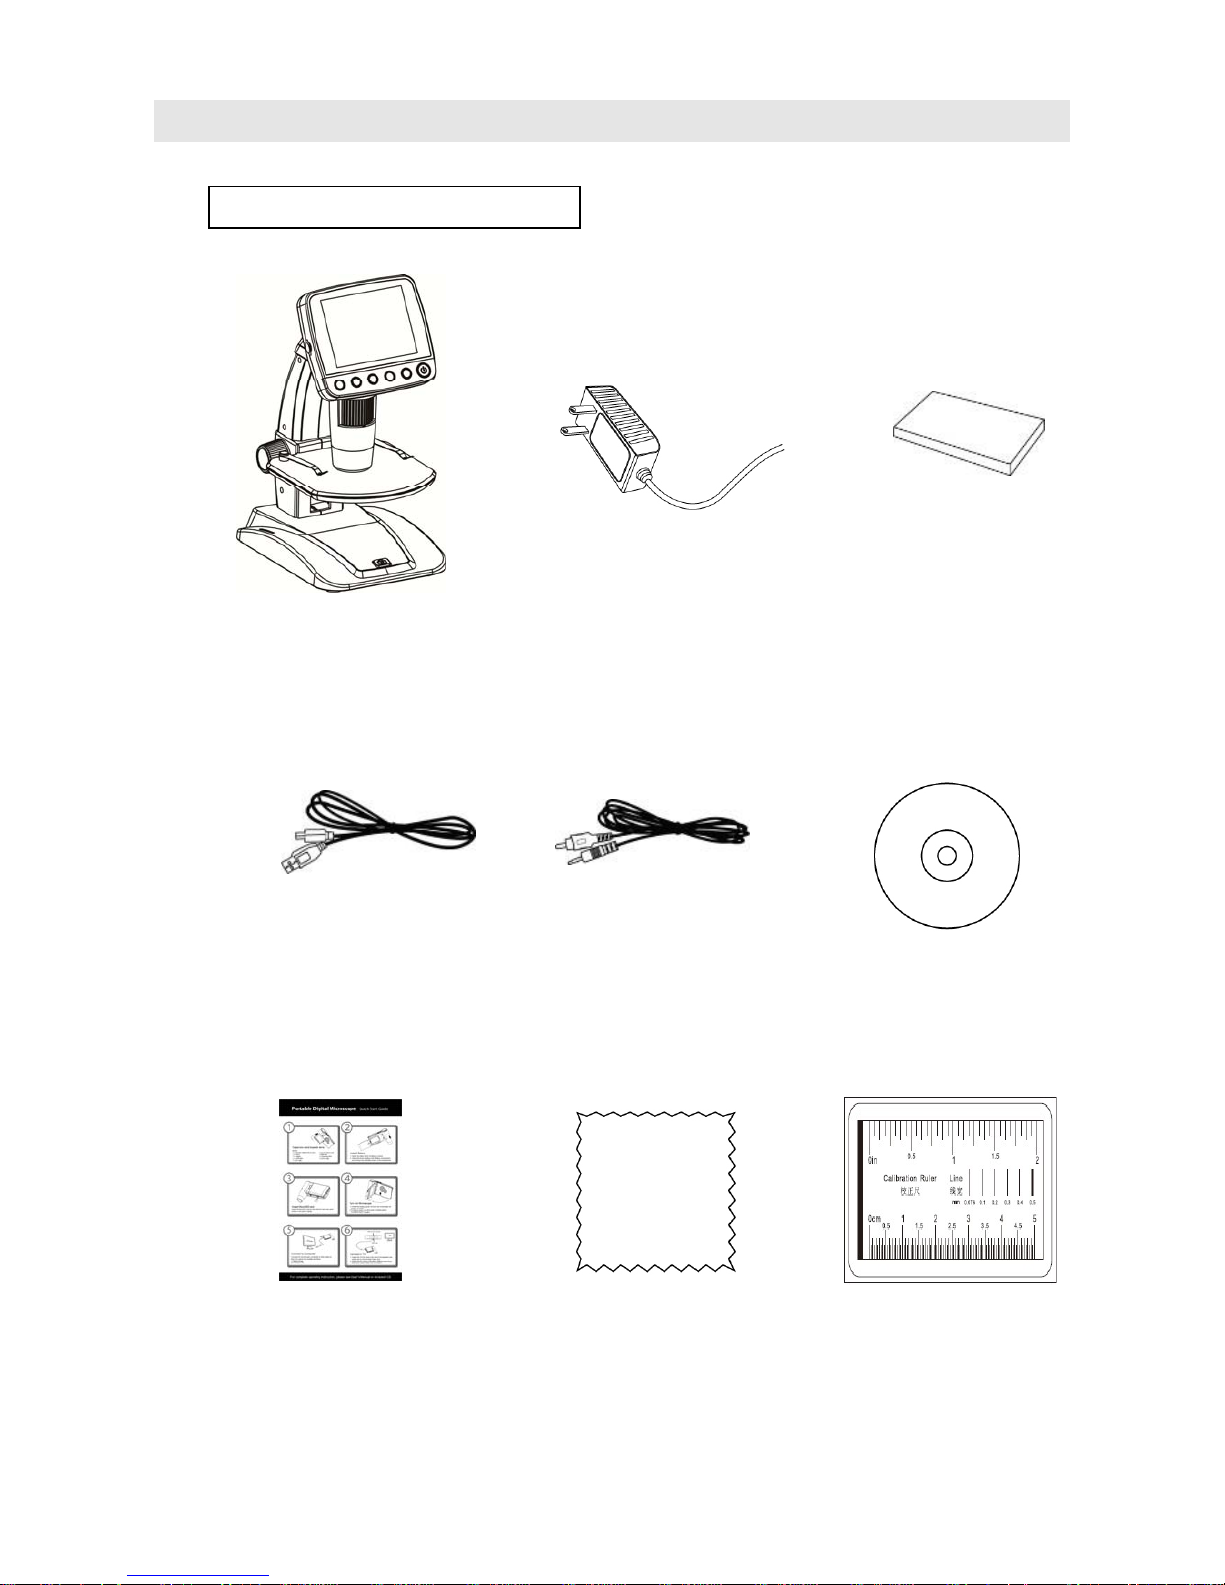
2. Preparation
■ Standard accessories
LCD Digital
Microscope
AC adaptor Lithium Battery
USB cable TV cable CD
QSG Cleaning fabric
Calibration
chart
Page 8
7
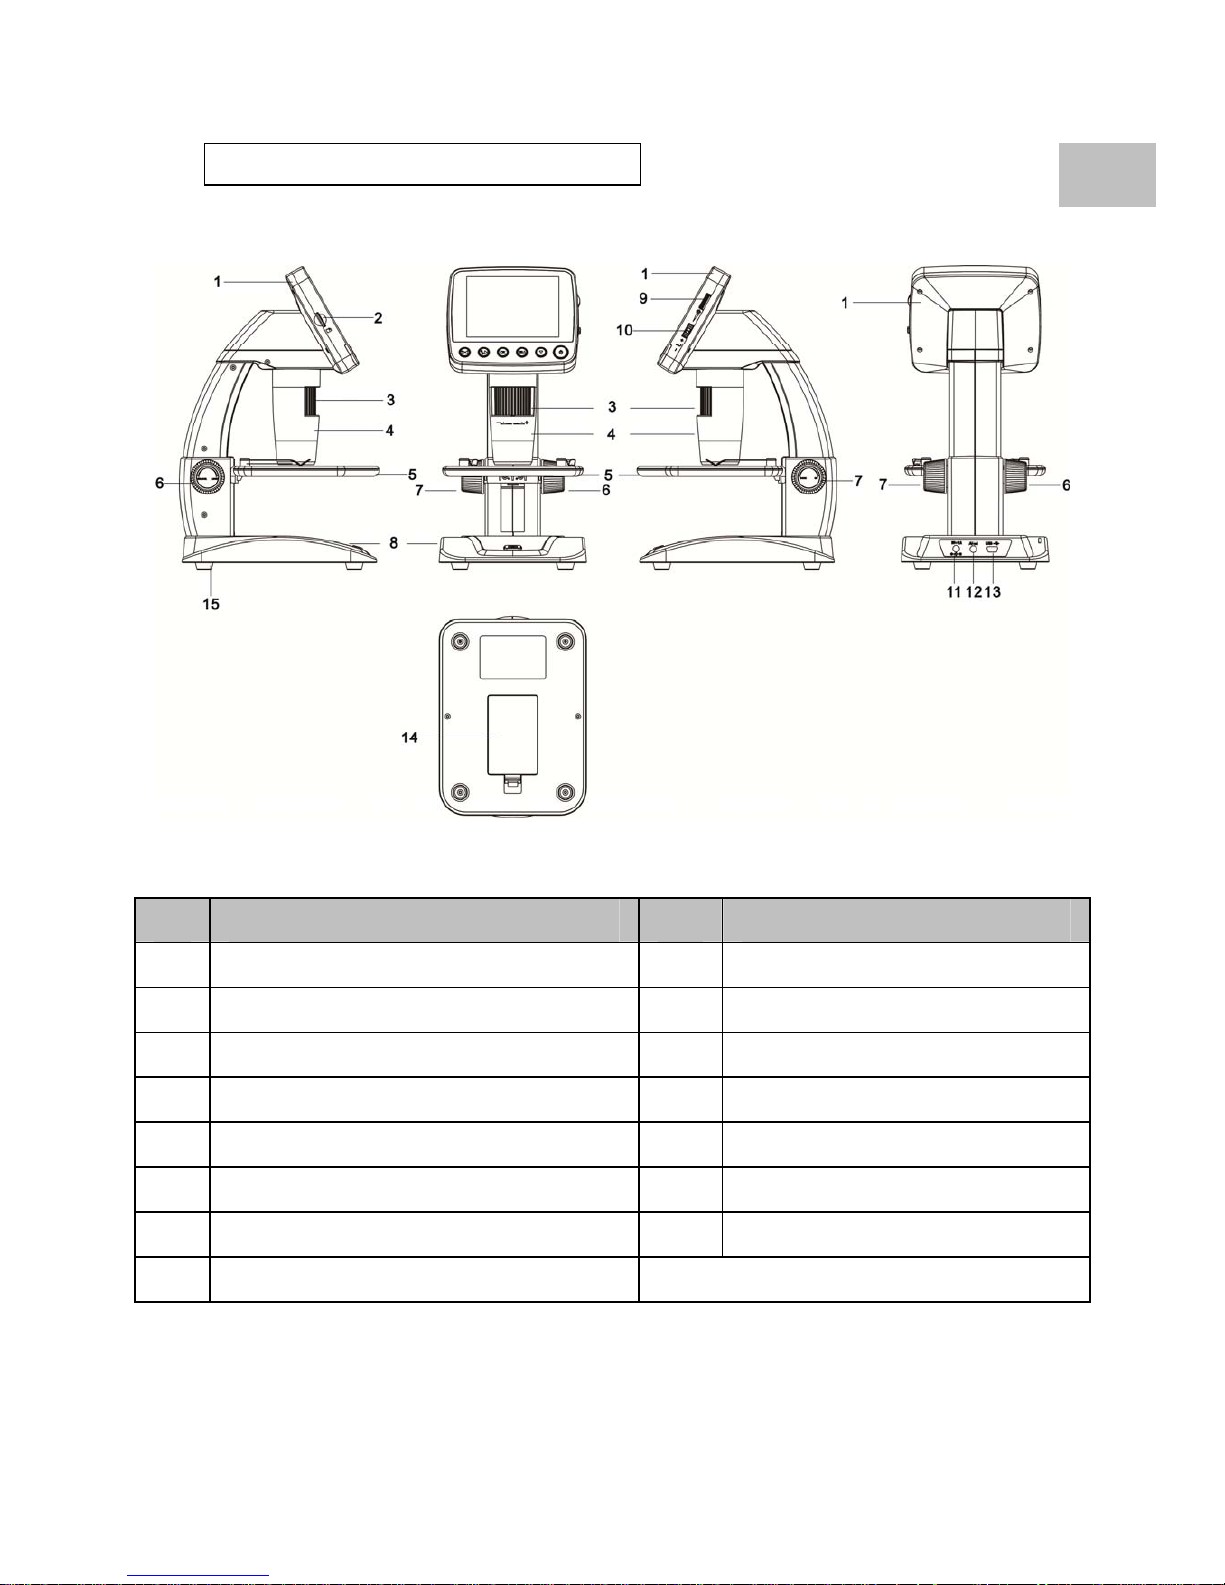
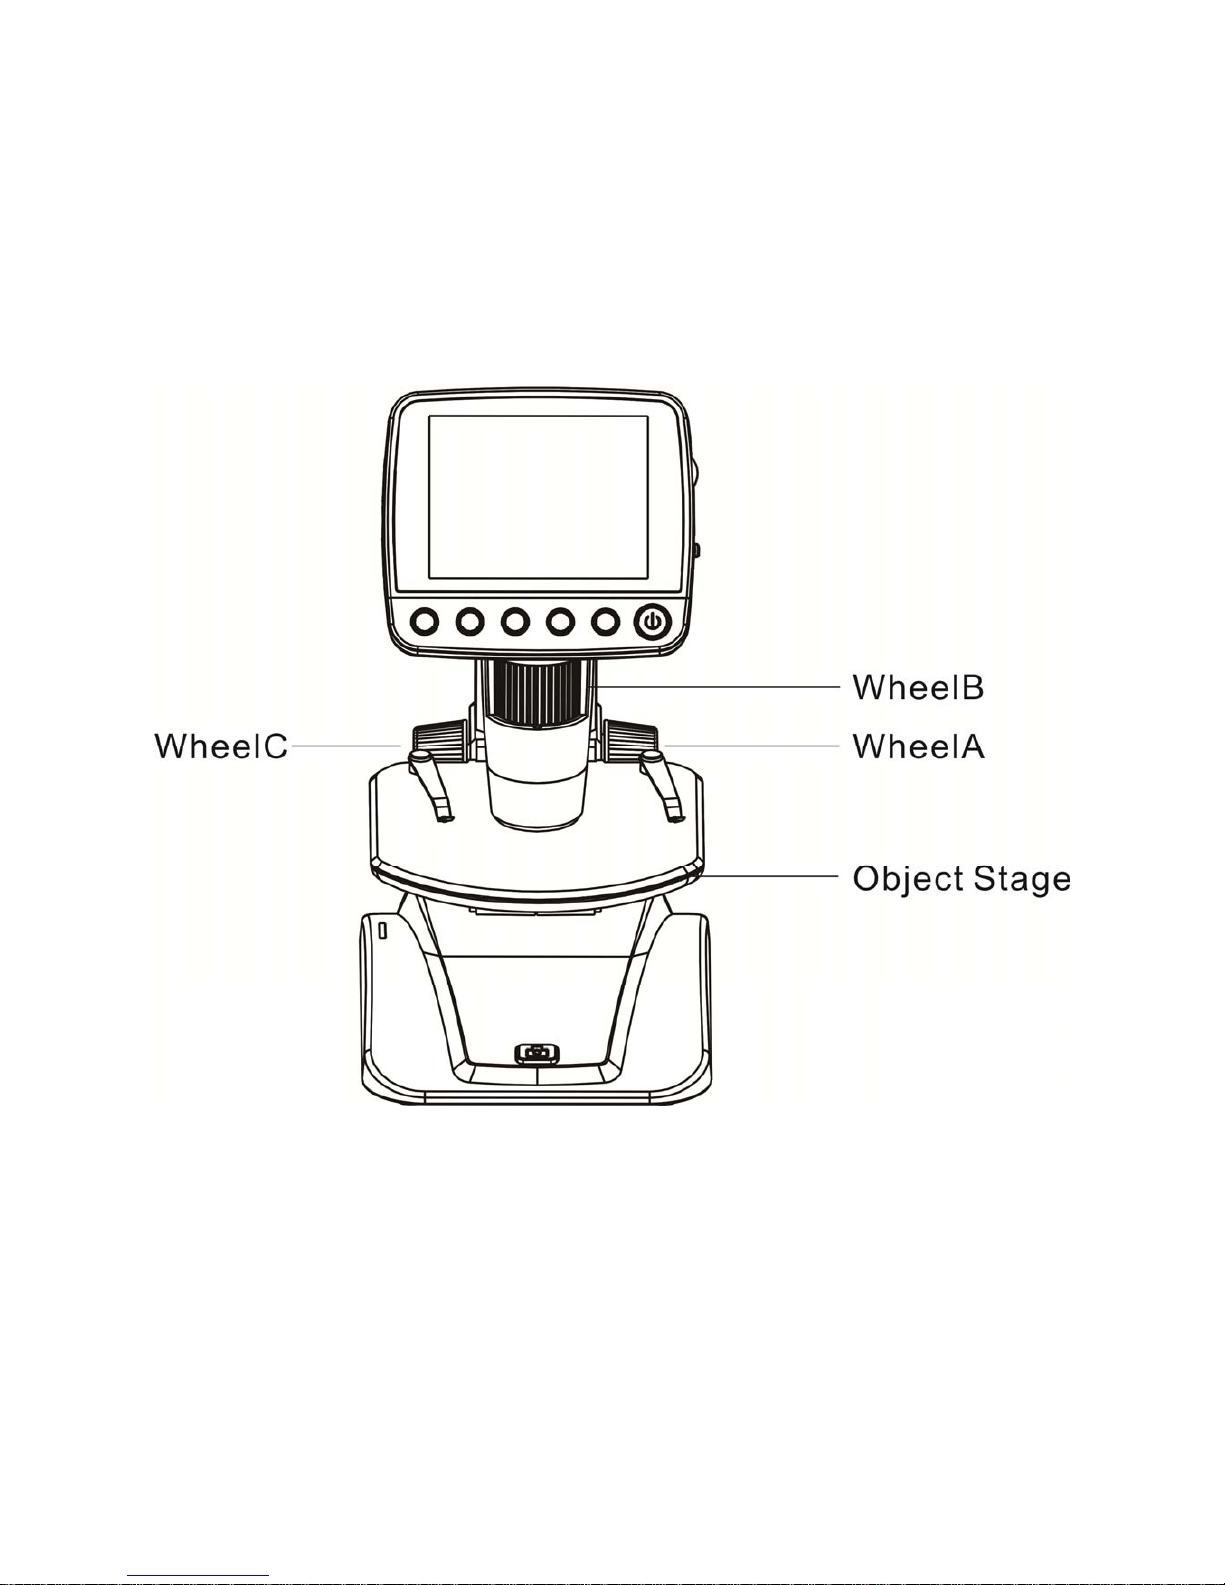
■ Parts Names & Functions
No. Functions No. Functions
1 3.5” LCD display 9 LED brightness dimmer
2 MicroSD card slot 10 Zoom +/-
3 Wheel B 11 5v DC in
4 Microscope tube 12 TV out
5 Object stage 13 USB port
6 Wheel A 14 Battery compartment
7 Wheel C 15 Battery charging indicator
8 Capture button
EN
Page 9
8
3. Key Features
z 3.5 inches TFT panel
z 5M high quality image sensor
(up to 12M by interpolation)
z 20x-250x-500x magnification
z Photo & Video
z Timer
z Measurement (when working on computer)
z Support MicroSD card up to 32GB
z Driver free to download for Windows XP SP2/
Vista/Win7 and Mac OS 10.5 -10.7 (direct plug-in,
EN
Page 10
9
driver installation not required)
z Rechargeable Lithium Battery
4. Use the Microscope
4.1 Install battery
1). Open the battery door by sliding its door latch..
2). Insert the lithium battery to the battery compartment
according to the polarities shown in the compartment.
Note: Before using the microscope, you must charge its
battery. Please refer to section 4.9 on how to
charge the battery.
EN
Page 11

10
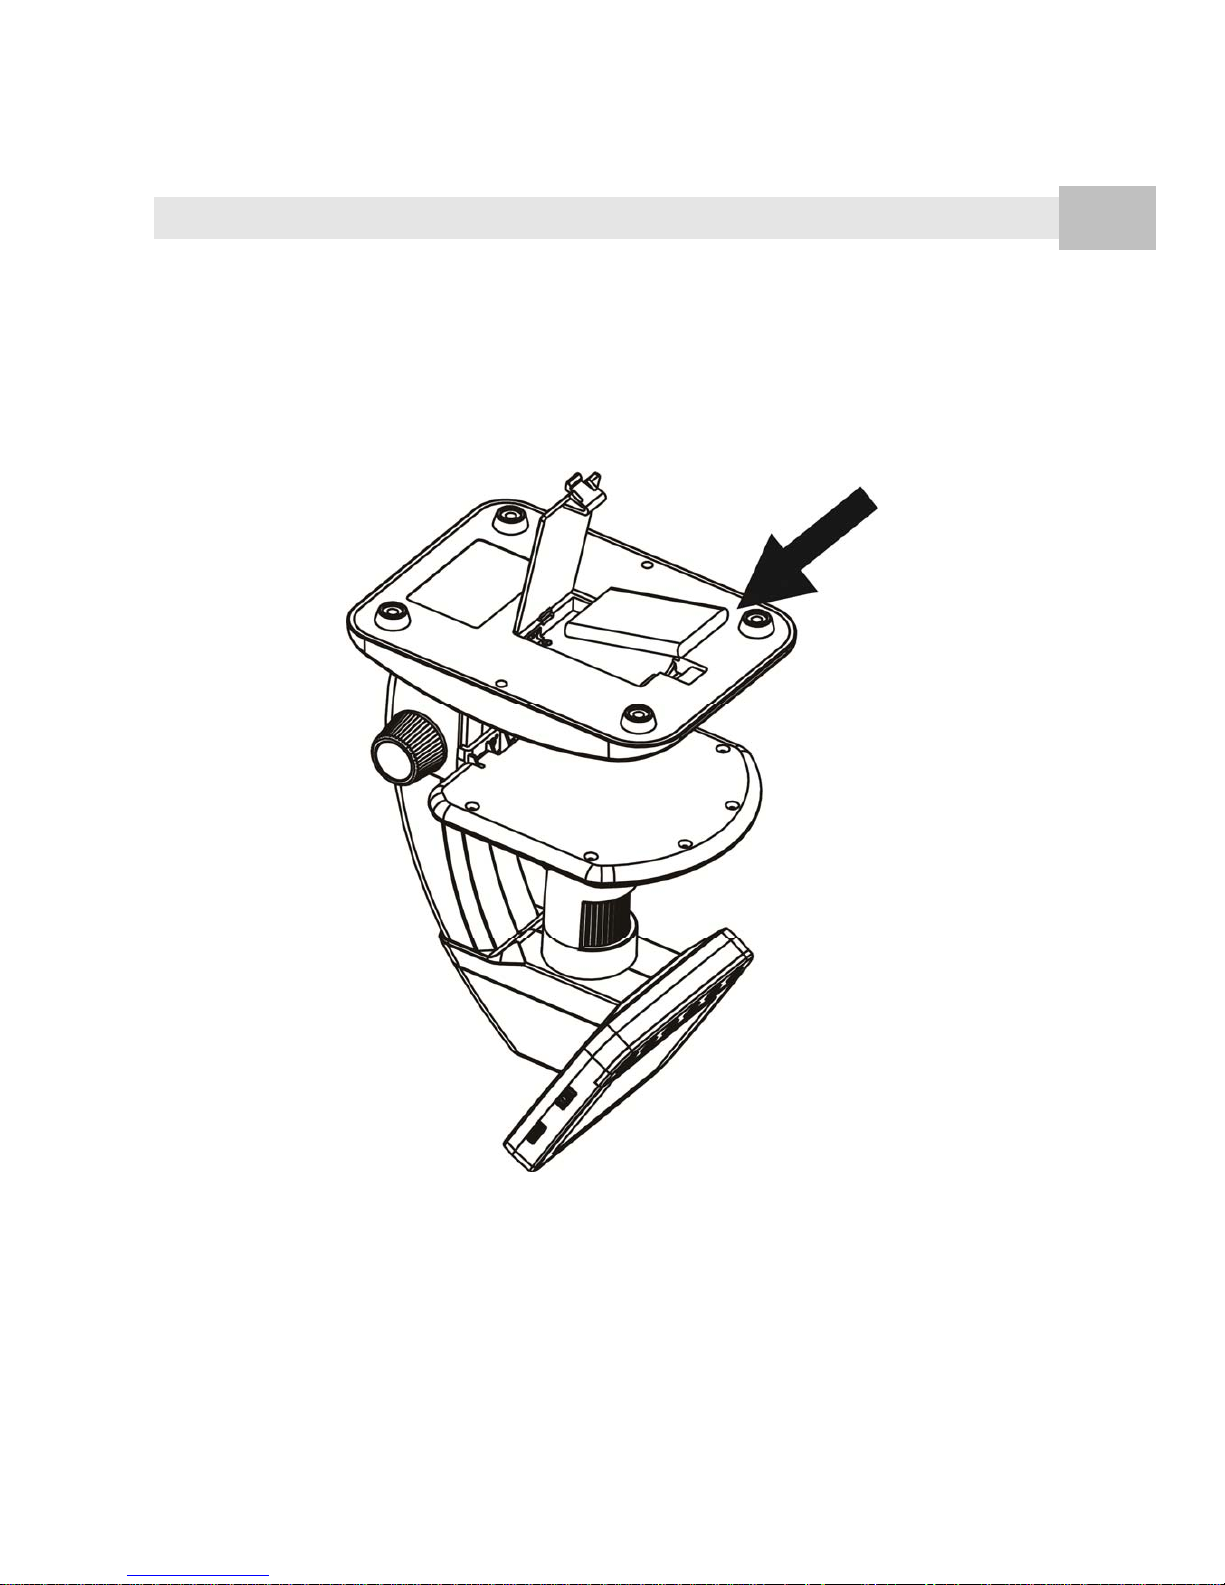
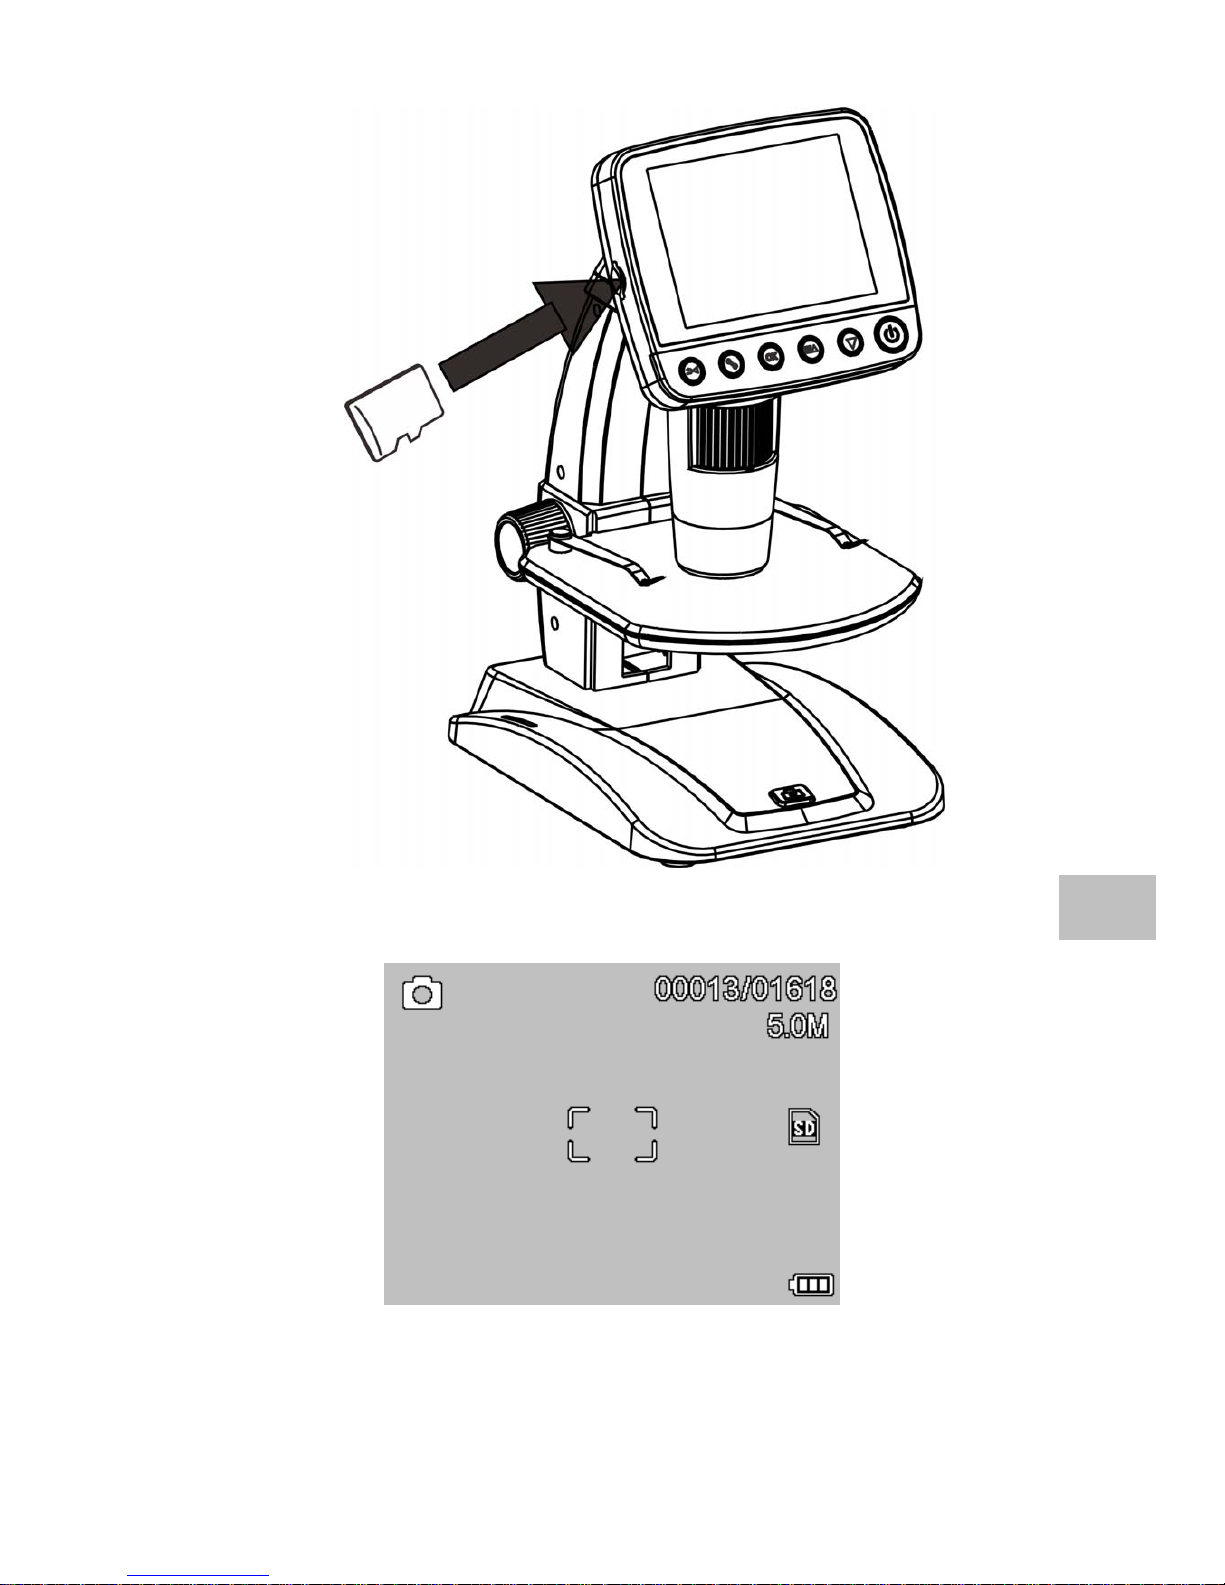
4.2 Insert a MicroSD Card (not included)
You must insert a MicroSD card (not supplied) to
record and store your pictures and videos.
Inserting the MicroSD memory card:
1) Turn off the microscope
2) Insert the MicroSD card into the MicroSD card
slot; gently press in until card is latched.
Note: Do not force the card into the slot; forcing may
damage microscope and the MicroSD memory card.
Align MicroSD card position (as marked) and try
again. The MicroSD memory card must be formatted
before capture.
See following instruction and Sec.5.2.5 Format SD.
Page 12
11
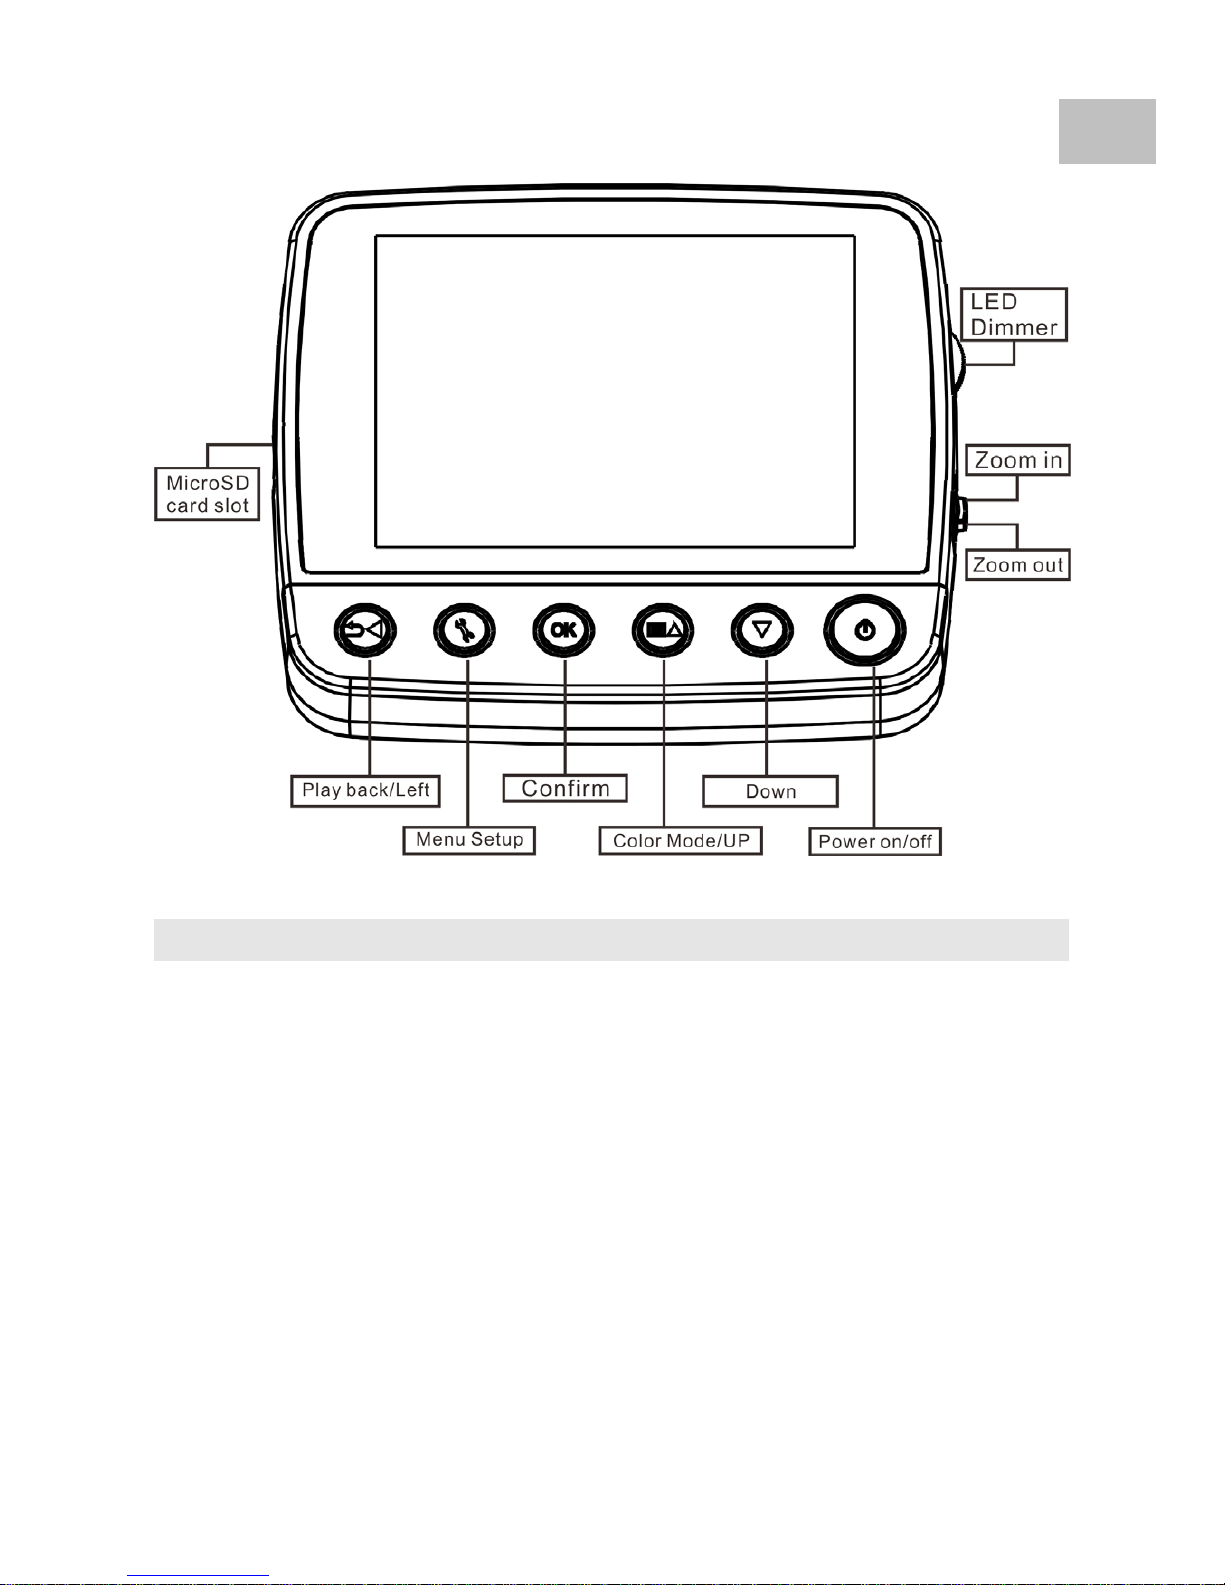
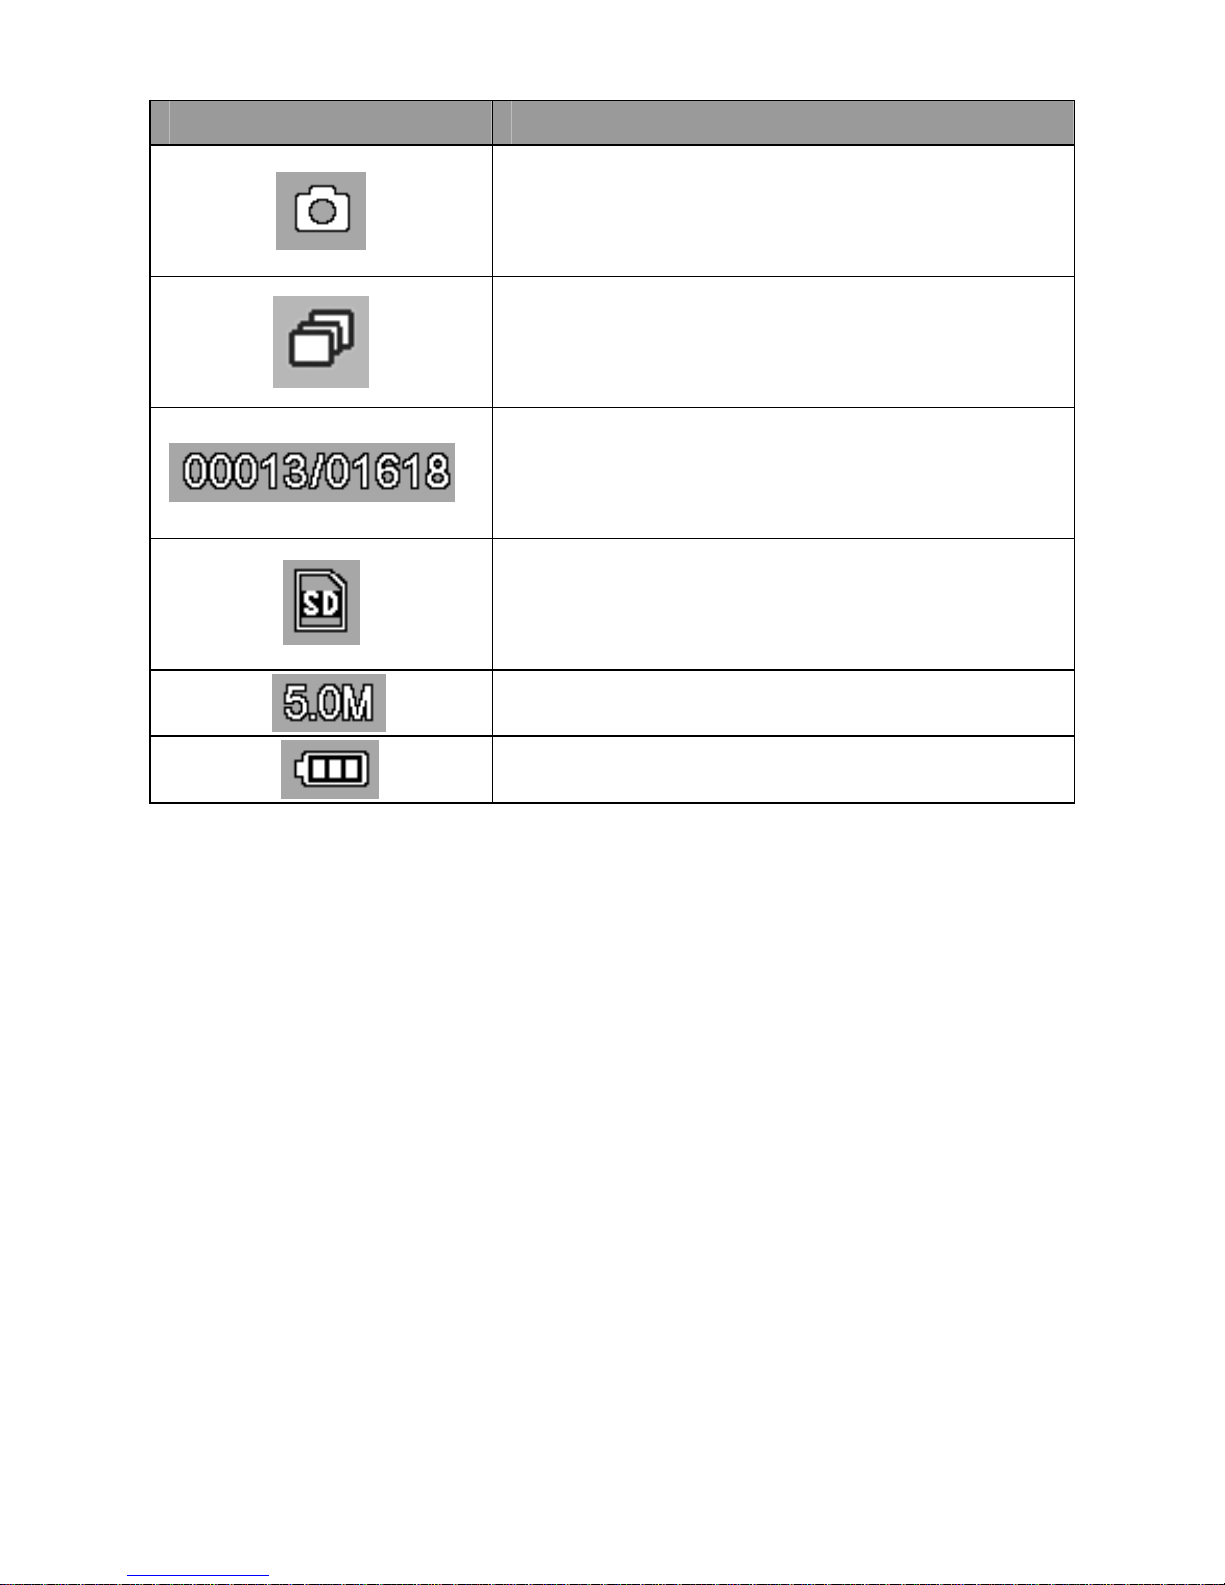
4.3 Display Icons & Meanings
EN
Page 13
12
ICON Meaning
Still image capture
Timer capture
Captured image qty/total qty that
could be captured (based on the
current resolution)
MicroSD inserted
Current resolution
Battery electricity indicator
Note: The icon displays can be switched on/off by
pressing Zoom Wheel⑵downward vertically.
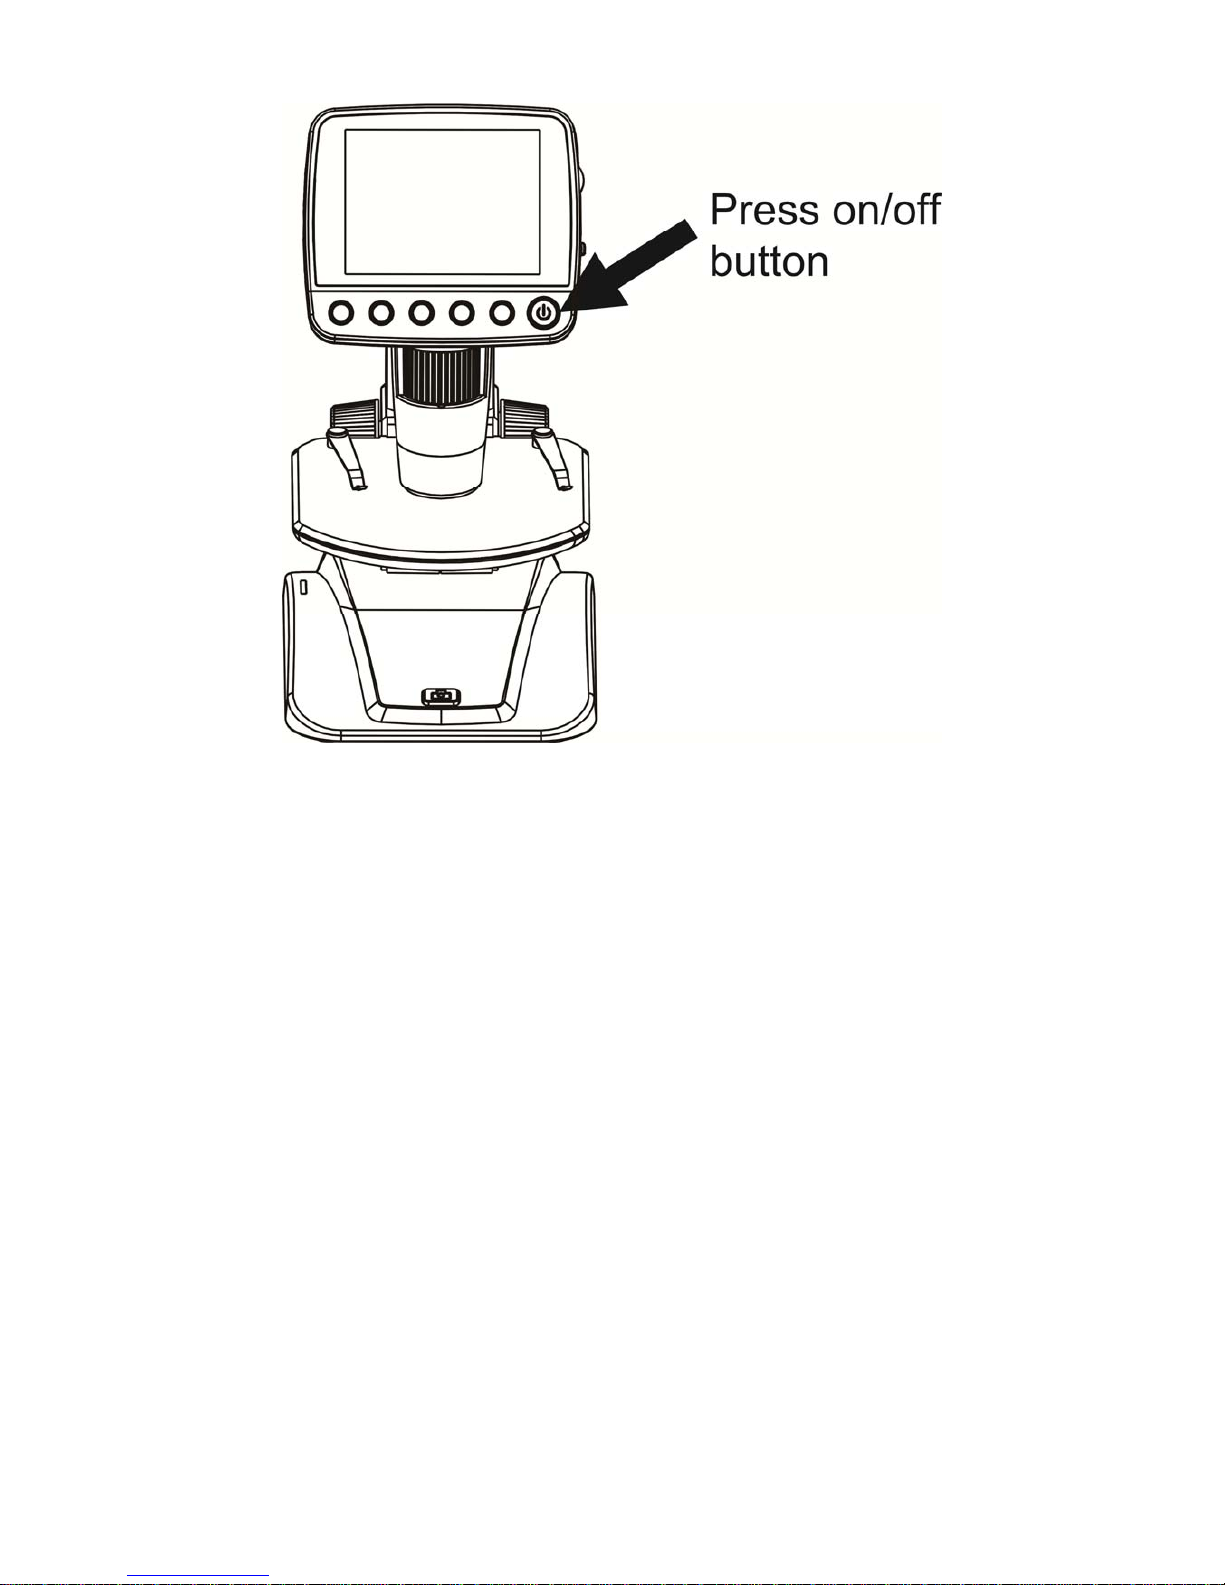
4.4 Turn on the Microscope
Press on/off button to turn it on.
Page 14
13
4.5 Turn off the Microscope
1) Press on/off button
2) By Power Save. Please refer to Section 5.2.2 for
Power Save setup.
Page 15
14
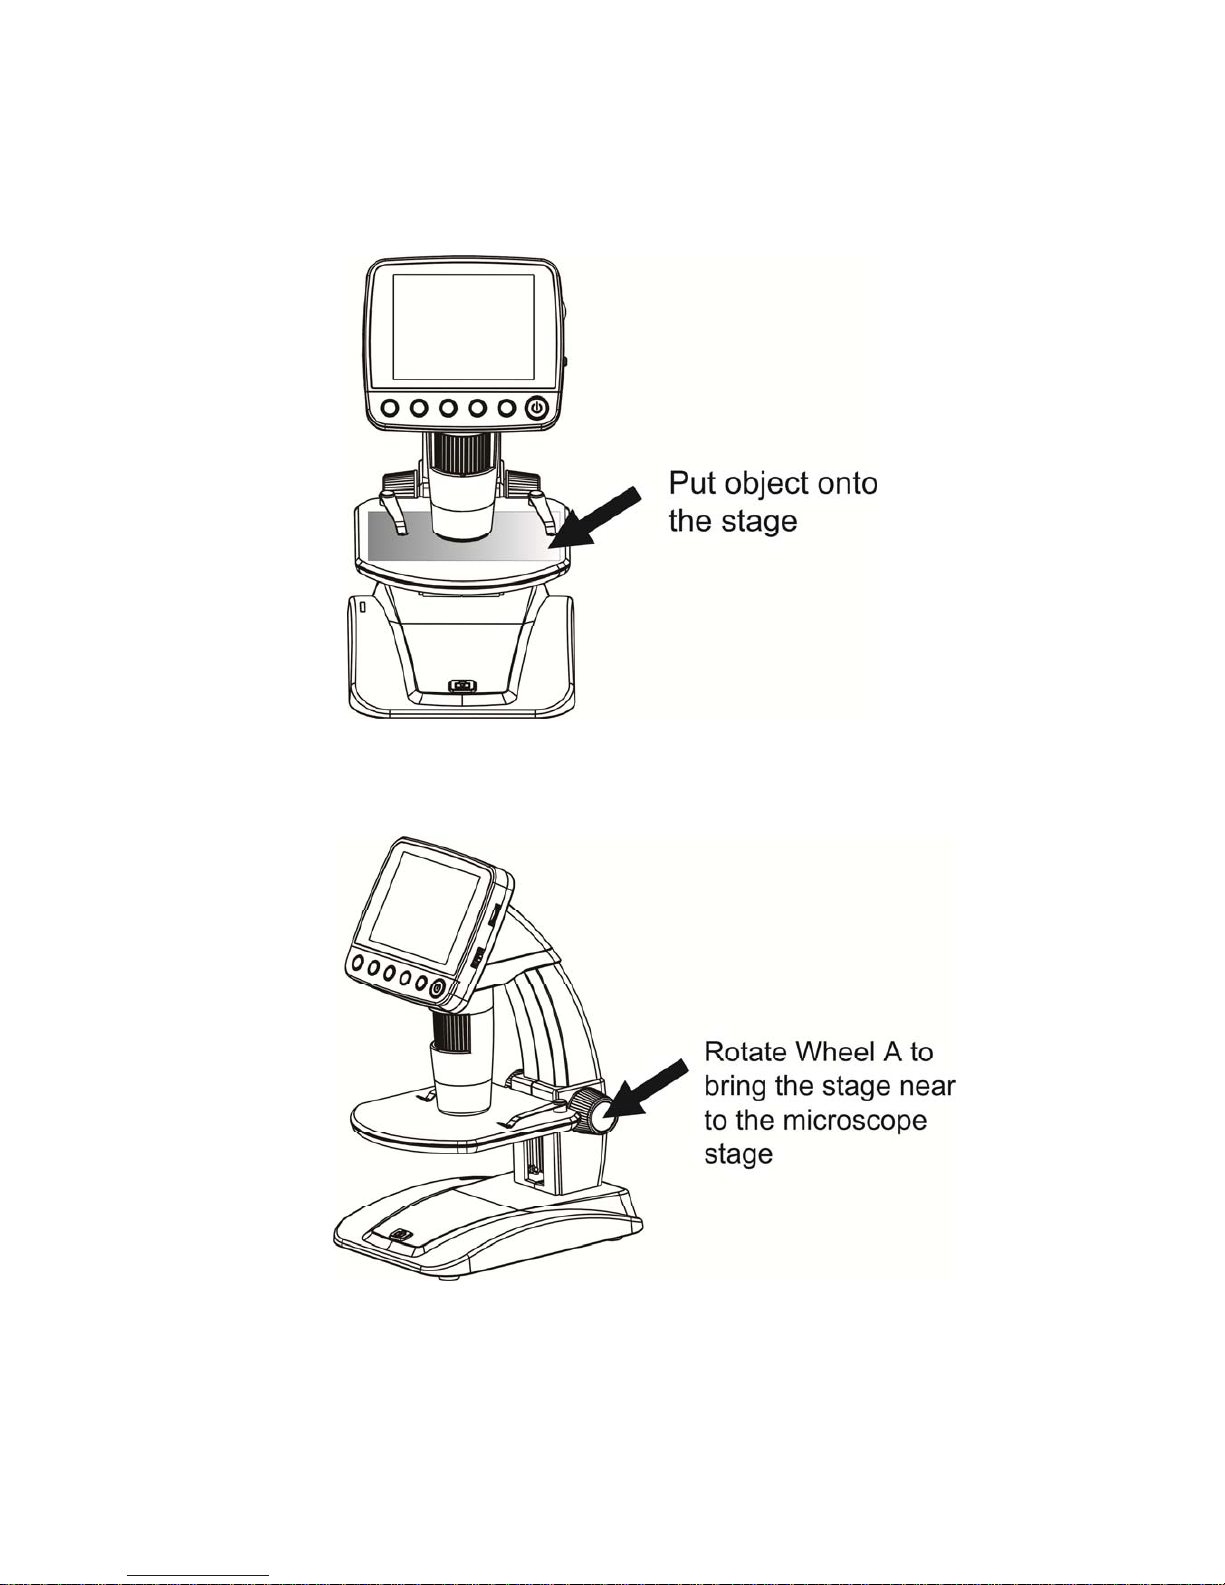
4.6 How to Capture?
Page 16
15
1) Turn on the microscope, put object to be observed
onto the object stage.
2) Rotate Wheel A to bring the object near to the
microscope tube.
If wheel A is locked, rotate wheel C counter clockwise to
release the lock.
Page 17

16
3) Rotate Wheel B to get fine focus.
4) When a clear focus got, rotate Wheel C clockwise
to lock the object stage.
Page 18

17
5) Take Photo or Record Video
Press Capture button to take a photo or record video.
(1) Press Playback/Left to enter video mode as
follows. There is video icon on the left corner.
(2) Press Capture button to start recording video.
Press again to stop.
EN
Page 19

18
6) Play Back
(1) Press Playback/Left to enter play back mode as
follows. There is review icon on the left corner.
(2) Press UP/DOWN to select among captured
pictures and video clips.
(3) Delete
At play back mode, press
to enter sub-menu as
follows, then confirm delete.
Page 20

19
(4) Protect
At play back mode, press
to enter sub-menu as
follows, then confirm protect pictures from delete.
(5) Slide Show
At play back mode, press
to enter sub-menu as
follows, select interval time, and then confirm by OK.
EN
Page 21

20
7) Color Mode
At preview status, press
to switch among
Color/Positive/Negative!
8) Zoom in: push Zoom Wheel upwardly
9) Zoom out: push Zoom Wheel downwardly
Note: The zoom ranges from 1x – 4.0x
Page 22

21
4.7 Download to Computer
1) Connect the microscope to computer by USB cable.
2) Choose Mass Storage and then you can view stored
photos & videos.
4.8 Preview on Computer
1) Connect the microscope to computer by USB cable.
2) Choose PC Camera mode
3) Start PortableCapture software. Please refer to Part II
on how to use the microscope by PortableCapture
software.
Note: When working on computer, the button
functions are no longer valid, but most of functions
are available by PortableCapture software.
EN
Page 23

22
4.9 Charge Battery
Before using the microscope, you must charge its
battery.
1. Plug the small end of the power adaptor into
the DC-in port located on the bottom side of
the unit. Then plug the other end of the power
adaptor into a standard AC outlet. The battery
indicator LED at the end corner of the unit will
be in red to show that the battery is charging.
2. When the battery is finished charging, the
battery indicator LED will be in off. Unplug the
unit.
3. You can now use your microscope for up to
two hours of continuous use. When the
battery is low, there will be low-power
indicator on the right down corner of the panel,
front LED light will become weak and image
quality becomes poor. Then you have to
connect the power adaptor and plug it in to
recharge the battery.
Page 24

23
4.10 Connect to TV
1. Insert the 1/8-inch plug on the end of the supplied
video cable into the microscopes Video port.
2. Insert the RCA plug on the video cable into one of
your television’s yellow video input connectors.
Refer to your television’s manual for more
information on locating these connectors.
3. Turn on the television. If necessary, switch your
television to the appropriate input channel. Items
that you magnify appear on the television screen.
EN
Page 25

24
5. Menu Introductions
5.1 Main MenuⅠ
Press
to enter main menuⅠ as follows:
Here you can setup Resolution/Timer/Quality/Sharpness.
5.1.1 Set Resolution
1) From the main menuⅠ, choose Resolution and
select a resolution between VGA/1.3M/3M/5M/8M/12M.
2) Press OK to confirm selection.
EN
Page 26

25
5.1.2 Timer
1) From the main menu Ⅰ, choose Timer and then
enter Timer setup:
Frames: input quantity of frames you want to take by
UP/DOWN and LEFT/RIGHT.
The above setup means 32 frames.
Interval: input interval time between frame capture
by UP/DOWN and LEFT/RIGHT.
The above setup means interval time is 15 seconds
between each two captures.
Page 27

26
3) Press OK to confirm selection and press Menu Setup
back to preview status. Then press Capture (8) to
start auto capture. When at auto capture status, there
is
at the left corner of the screen.
4) When all frames captured, microscope will return to
normal preview.
5) If you need to stop auto capture during the capture
process, press Capture one time.
Interval capture is only effective in still image capture
mode.
5.1.3 Quality
From the main menuⅠ, choose Quality and then
select among Super Fine/Fine/Normal.
The three selections will result in different image
compress ratio.
Page 28

27
5.1.4 Sharpness
From the main menuⅠ , choose Sharpness and
then select among Super Fine/Fine/Normal.
5.2 Main Menu Ⅱ
Press
to enter main menu I, and then press LEFT
to enter Main Menu Ⅱ as follows:
Here you can setup Language/Power Save/
Date Stamp/TV Out/Date and Time/Format SD/
System Reset/Version.
Page 29

28
5.2.1 Language
From the main menu Ⅱ, choose Language and then
select a target language by UP/DOWN.
5.2.2 Power Save
1) From the main menu Ⅱ, choose Power Save and
then select among the following a target time for the
microscope to power off without key operation.
EN
Page 30

29
5.2.3 Date Stamp
1) From the main menu Ⅱ, choose Date Stamp to
enter the following menu:
2) Select Date/Time, Date or Off.
Date/Time: both date and time will be marked on
images taken.
Date: on date will be marked on images taken
Off: None of date and time info will be marked on
images taken.
5.2.4 TV Out
From the main menu Ⅱ, choose TV Out and then
select, between NTSC and PAL, the correct mode
compatible with your TV.
Page 31

30
5.2.4 Date/time
From the main menu Ⅱ, choose Date/Time to setup
date and time.
1) Setup date and time by LEFT/RIGHT/UP/DOWN
2) Setup date mode among YY/MM/DD, DD/MM/YY,
and MM/DD/YY.
5.2.5 Format SD
From the main menu Ⅱ , choose Format SD to
format the MicroSD card inserted.
Page 32

31
5.2.6 System Reset
From the main menu Ⅱ, choose Sys. Reset to reset
the system back to default.
5.2.7 Version
From the main menu Ⅱ, choose Version to view the
current machine version.
Page 33

32
6. Specifications
Image sensor: 5M high quality Image Sensor
Magnifications: 20x-250x-500x
Resolutions: 12M, 8M, 5M, 3M, 1.3M, VGA
Lens: High quality microscopic lens
Display: 3.5inches TFT panel, 4:3 ratio
Light sources: 8 LEDs with adjustable brightness
Power sources:
Li-ion 3.7V / 800mAh battery
Working time: 2 hours; Charging time: 5 hours
Frame rate: 30fps
Adaptor: Input:100-240V, 50/60Hz; Output: 5V, 1A
OSD languages:
English/Germany/French/Spanish/Italian/
Portugese/Japanese/Chinese
Software languages: English/Germany/French/Spanish
Image Measurement: By software
Size: L149mm*W104mm*H227mm
Weight: 780 gm.(with battery)
7. Computer System Minimum Requirement
Operating system Windows XP SP2/Vista/Win7, Mac 10.5 -10.7
CPU Pentium 11 or above
RAM 256MB
Interface USB port2.0
EN
Page 34

33
8. Troubleshooting
Problems Solution
The unit does not turn on. Charge the battery.
The screen is blank.
Ensure that the power is on.
Charge the battery.
Verify that the item you want to magnify is
Positioned correctly under the lens.
There are smudges or
blemishes on the screen
Clean the screen and lens carefully with soft
fabric
Microscope is connected
to a television, but no
image appears on the
television screen.
Ensure that the television is on.
Switch to the appropriate video input channel on
your television.
Ensure that the video cable is securely connected
to the Microscope Video-out port and plugged
into the correct video input on your television.
The battery indicator LED
is not in red, even though
the power adaptor is
connected and plugged
into a wall socket.
-or-
The battery is not
charging.
Plugged into the Microscope’s DC-in port.
Ensure that the outlet has power and is not
malfunctioning. If the outlet is connected to a wall
switch, make sure that the switch is on.
EN
Page 35

34
PortableCapture Pro Software
Introdcution
■ Install the software
Insert the driver CD into CD-ROM Drive and this will
automatically display the following interface:
1. Install the PortableCapture Pro software
Click PortableCapture Pro software and then reboot
the system when asked.
2. You can also browse the User manual in PDF format
and the CD contents by choosing the corresponding
menus.
Page 36

35
3. Start the Microscope
Connect your Microscope to your PC USB port as shown
on Page20, start the software by clicking the
icon generated on the desktop after
installation and you will see the following screen pop up.
Page 37

36
5. Software functions
■ Capture Photo
a. Click ‘Photo’ shortcut icon
in the main menu
bar.
b. Click ‘Capture > Photo’.
■ Capture Video
a. Click ‘Video’ shortcut icon
in the main menu
bar.
b. Click ‘Capture > Video’.
Page 38

37
■ Timer (Photo / Video)
Click ‘Timer’ shortcut icon
in the main menu bar.
* Under Timer photo, you can set the start time, interval
time and total picture number.
* Under Timer video, you can set the start time, interval
time and total video number.
Page 39

38
■ Calibration and Measurement
Please make calibration before measurement.
Calibration
Display Crossing from ‘Options>Crossing’’.
It’s used to check the dial is parallel or not.
Page 40

39
1. Focus microscope on the attached dial and then adjust
the magnification till the picture is clear. Take a picture for
the selected area when the dial is parallel to the crossing
as below.
2. Double-click on the picture to enter into measurement
interface as below.
Page 41

40
3. Click Calibration icon , and then move mouse
to the picture. Click on the beginning and ending points
across a known value. Now a dialog will popup as below
and you need to enter the exact value of the
measurement sample into ‘Actual dimension’.
Then the software will automatically calibrate the
magnification rate. Click ‘OK’ and the adjusted
magnification rate will show in the upper right corner.
* Remark: The broken line should be parallel to the dial
during measurement.
Page 42

41
4. Now you can use ‘Any angle Line’ under Measurement
icon
to measure the value again. If the value
you measure by software is nearly the same as the exact
value of the dial means the calibration finish.
Page 43

42
Measurement
Double-click on the picture to enter into measurement
interface. Under the ‘Measurement’ icon
, you
can choose any desired options to measure.
1. Any Angle Line Measurement
Simply click from one point and drag to the next point, and
then release the click.
2. Continuous Line Measurement
The Continuous Line measurement allows you to
measure any continuous desired length.
Simply click and drag from one point to other desired
points, and then release the click.
3. Radius Circle Measurement
Simply click and extend out to the desired radius, the
radius, circumference and area of the circle will show up
accordingly.
4. Diameter Circle Measurement
Simply click and extend out to the desired diameter, the
diameter, circumference and area of the circle will show
up accordingly.
5. Three Points Angle Measurement
Simply define any three points angle and click, the angle
value will then display.
Page 44

43
Change Calibration
If you need to change the magnification rate and adjust
focus to capture picture, please calibrate the
magnification rate again.
1. Double click to open the picture, Click ‘
>
Reset magnification > Reset picture magnification’ as
below. And then start calibration again (Calibration details
please refer to page37).
Page 45

44
2. Change the magnification rate and capture several
pictures, click on the picture to enter into measurement
interface. And click ‘
> Set magnification > Set
picture magnification’, now a dialog will show up as below;
enter the magnification rate into the dialog and click ‘OK’.
Page 46

45
3. If you want to use the same magnification rate to
capture pictures, just click ‘
> Set magnification
>Set capture magnification’. Now all pictures will use the
same magnification rate and you can start measurement
directly.
Page 47

46
Draw and Text
You can draw or add a text on the picture and save for
later analysis.
1. Click icon
to choose any kinds of drawing
under the pull-down manual as below.
2. Click icon
and set the font for the text in the
popup dialogue as below.
Page 48

47
6. Software Interface Instructions
Main Interface Icons
Capture photo – It’s used to capture photo one
by one.
Start / Stop record video.
Timer for photo / video – Set the start time,
interval time and total photo/video number.
Full screen mode,
Press ESC or double-click to exit.
Page 49

48
Main Menu
File
Photos Directory: set the directory to store photos
taken;
Videos Directory: set the directory to store video taken;
Page 50

49
Options
Preview Si ze: change preview size
Date/Time: set to display system date/time on preview
window
Language: choose different OSD language
Crossing: display cross on preview window
Fullscreen mode: enter into full screen. Click ESC or
double click to exit
Page 51

50
Capture
Photo: take a photo
Video: record a video clip
Page 52

51
Measurement Interface Instructions
Save as
Redo
Copy to
clipboard
Draw
Copy file
Te x t n o t e
Previous
Measurement
Next
Calibration
Undo
Page 53

52
This symbol on the product or in the
instructions means that your
electrical and electronic equipment
should be disposed at the end of its
life separately from your household
waste. There are separate collection
systems for recycling in the EU.
For more information, please
contact the local authority or your
retailer where you purchased the
product.
EN
 Loading...