

Page 1
Combo Album-Scanner
Bedienungsanleitung
Page 2

Inhaltsverzeichnis
1. Vorbereitung ............................................................ 2
Lieferumfang ........................................................... 2
Teilnamen ................................................................ 3
Einlegen des Akkupacks ......................................... 6
Akku laden ............................................................... 7
Vorbereitung des Combo Album Scanners ............. 9
2. Scannen von Fotoalben/Magazinen/Fotos ........... 11
3. Einen Film scannen ............................................... 14
Setzen Sie den Film/das Dia in den Halter ein ..... 14
Scannen eines Films und Dias .............................. 15
4. Wiedergabemodus ................................................ 20
5. Löschen-Modus ..................................................... 22
6. Anschließen der Karte an den Computer .............. 24
7. Anhang .................................................................. 25
DE
Spezifikationen ...................................................... 25
Symbole und Indikatoren ...................................... 26
-1-
Page 3
1. Vorbereitung
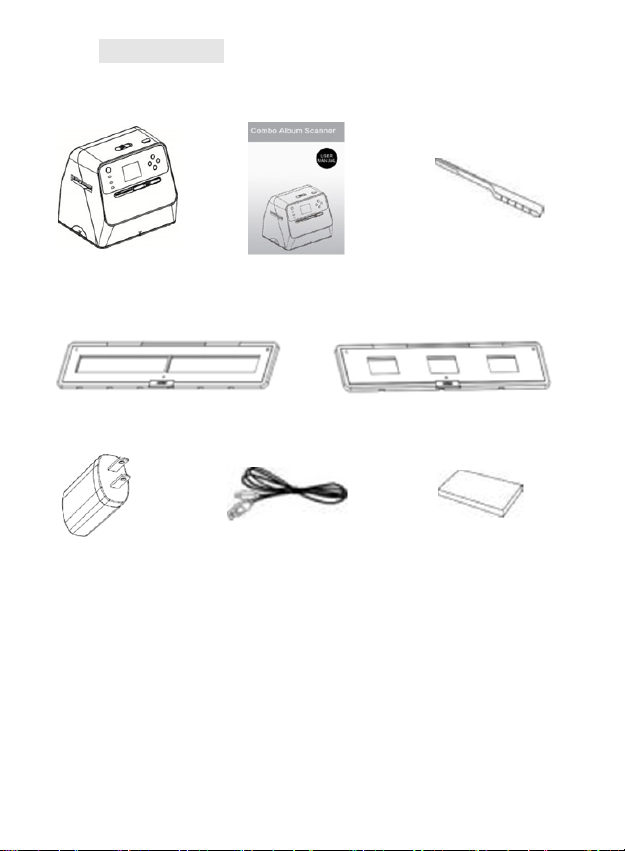
Lieferumfang
Combo
AlbumScanner
Bedienungsanleitung Reinigungsbürste
135 Negativ-Halter 135 Dia-Halter
Adapter USB-Kabel Lithiumbatterie
Page 4
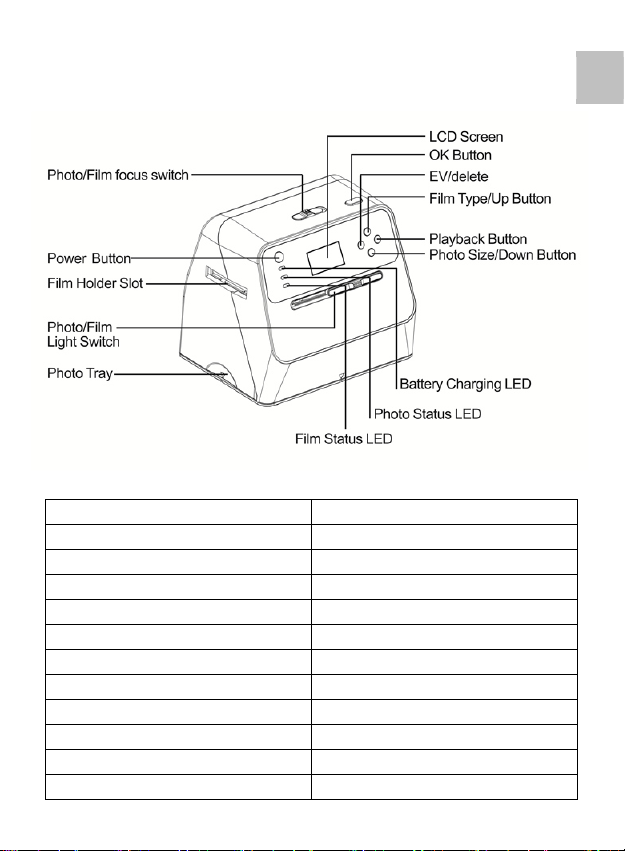
Teilnamen
DE
EN DE
Photo/Film focus switch Foto/Film-Fokus-Schalter
Power Button Ein-/Austaste
Film Holder Slot Filmhalter-Einschub
Photo/Film Light Switch Foto/Film-Lichtschalter
Photo Tray Fotoablage
LCD Screen LCD-Display
OK Button OK-Taste
EV/delete EV/Löschen
Film Type/Up Button Filmtyp/Aufwärts-Taste
Playback Button Wiedergabetaste
Photo Size/Down Button Fotogröße/Abwärts-Taste
-3-
Page 5
Battery Charging LED LED für Akku-Ladestand
Photo Status LED LED für Fotostatus
Film Status LED LED für Filmstatus
EN DE
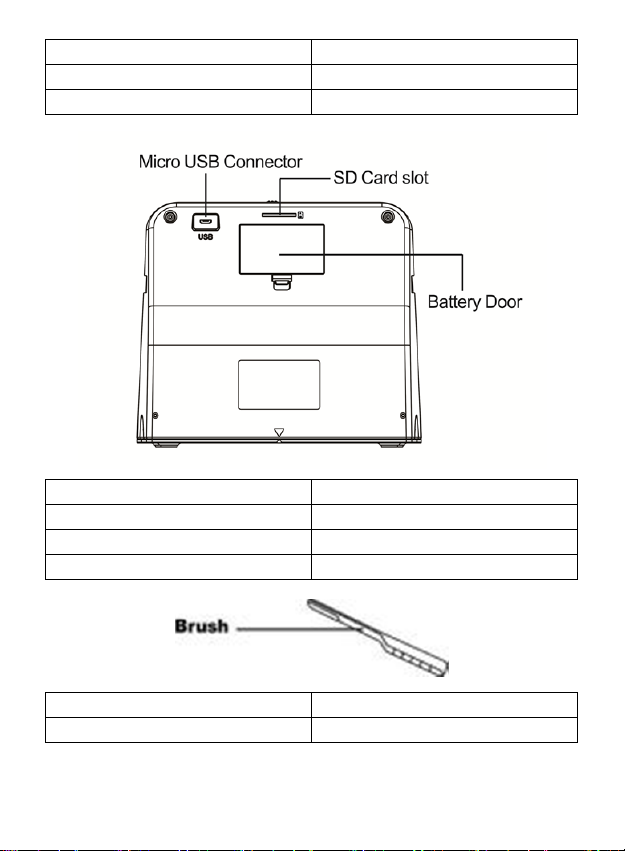
Micro USB Connector Micro-USB-Anschluss
SD Card slot SD-Kartensteckplatz
Battery Door Batteriefach
EN DE
Brush Bürste
Page 6
EN DE
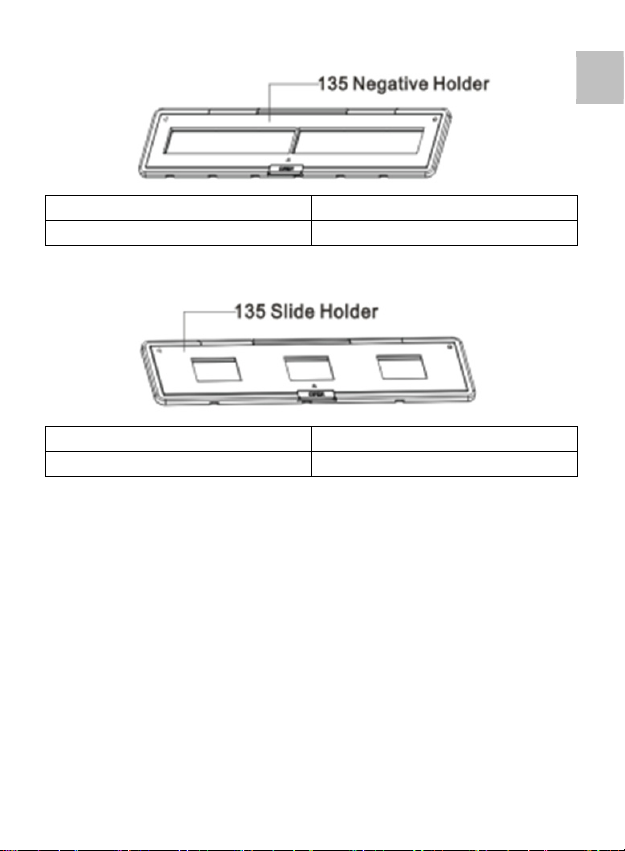
135 Negative Holder 135 Negativ-Halter
EN DE
135 Slide Holder 135 Dia-Halter
Hinweis: Wir empfehlen, die mitgelieferte Bürste in regelmäßigen
Abständen zum Reinigen der Glasfläche im Combo Album
Scanner zu verwenden, um klare Bilder zu produzieren. Stellen
Sie bitte sicher, dass Ihre Filmnegative/gerahmten Dias in ihren
Halterungen sauber sind, bevor Sie dies in den Combo Album
Scanner einsetzen. Staub oder Schmutz von den Filmhalter
beeinflusst die Qualität der gescannten Bilder.
DE
-5-
Page 7
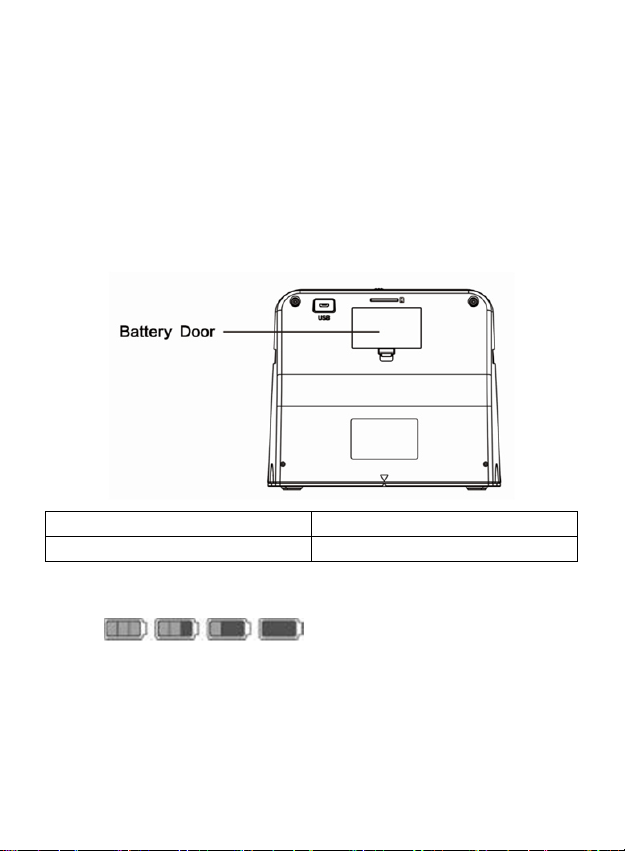
Einlegen des Akkupacks
1. Öffnen Sie das Batteriefach, indem Sie die
Fachverriegelung leicht herunterdrücken und schieben.
2. Legen Sie den mitgelieferten Akku ein. Stellen Sie
dabei sicher, dass die (+ und -) Enden des Akkus der
im Batteriefach angegebenen Polarität entsprechen.
3. Setzen Sie die Abdeckung wieder auf und rasten die
Verriegelung ein.
EN DE
Battery Door Batteriefach
Akku-Leistungszustand
Voll Leer
Page 8
Akku laden
Zum Zeitpunkt des Kaufs ist der Akku nicht vollständig
aufgeladen und muss daher vor der Verwendung
aufgeladen werden. Wenn der Akku während der
Gerätenutzung schwach wird, empfiehlt es sich, ihn so
bald wie möglich wieder aufzuladen.
1. Setzen Sie den Akku in das Batteriefach ein
(siehe Seite 8).
2. Der Akku kann auf zwei Arten aufgeladen werden:
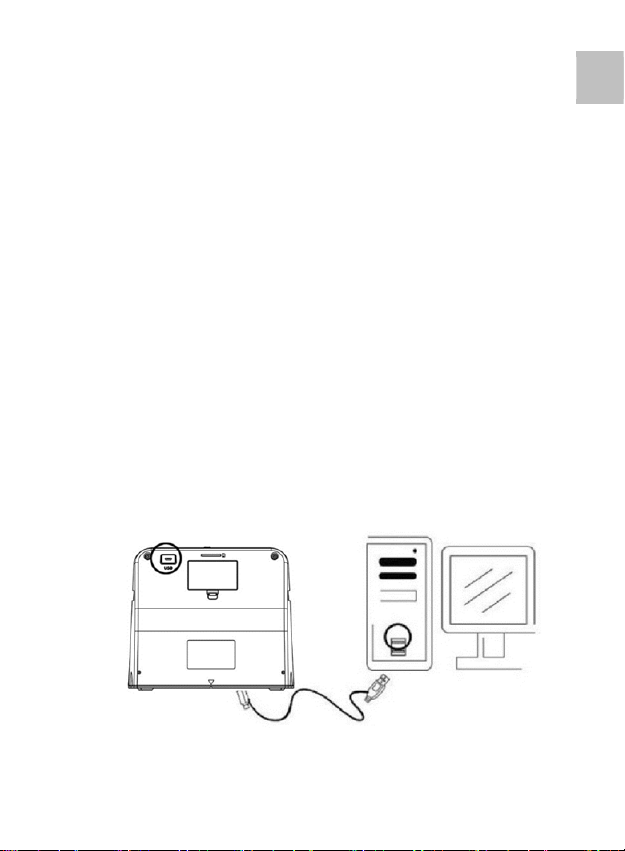
(a) Schließen Sie den Micro-USB-Adapter des
mitgelieferten USB-Kabels an den
USB-Anschluss des Scanners an und das andere
Ende des USB-Kabels an dem USB-Anschluss
Ihres Computers oder Notebooks.
Bitte laden Sie den Akku vor der ersten
Verwendung für mindestens 3 Stunden auf.
DE
-7-
Page 9
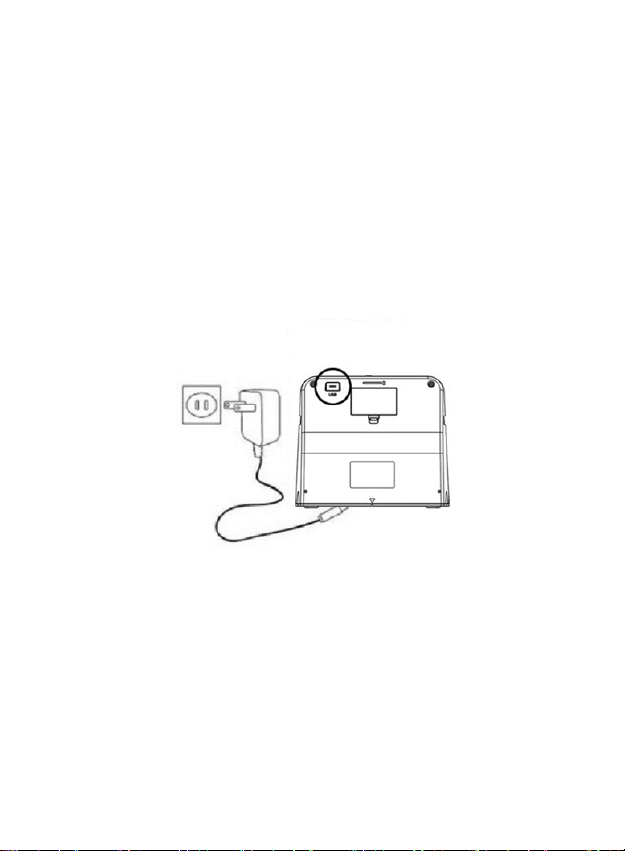
(b) Schließen Sie das Micro-USB-Kabel an das
Netzteil an und und dieses dann an einer
haushaltsüblichen Steckdose. Schließen Sie den
Micro-USB-Anschluss am Micro-USB-Stecker
des Scanners an. Während der Akku geladen
wird leuchtet die rote LED auf, wenn der Scanner
nicht verwendet wird. Die LED erlischt, wenn der
Akku vollständig aufgeladen ist.
Bitte laden Sie den Akku für mindestens 3 Stunden
auf.
Hinweis:
Der Scanner kann auch ohne den Akku betrieben werden,
wenn das Netzteil und das USB-Kabel am Scanner
angeschlossen sind.
Page 10

LED-Statusanzeige:
Rote LED: (1) Leuchtet, wenn der Scanner
eingeschaltet ist.
(2) Wenn der Scanner nicht verwendet
wird und ausgeschaltet ist, leuchtet die
LED während des Ladevorgangs des
Akkus auf und erlischt, wenn der Akku
vollständig aufgeladen ist.
Grüne LED: Leuchtet, wenn Foto-Scanning eingestellt ist.
Blaue LED: Leuchtet, wenn Film-Scanning eingestellt ist.
Vorbereitung des Combo Album Scanners
1. Setzen Sie eine SD-Karte in den SD-Kartenschlitz
ein, bis die Karte einrastet. Drücken Sie die Karte
einmal, um sie auszuwerfen. Das Gerät arbeitet nur
mit SD- oder SDHC-Karten mit maximal 32 GB
Speicherkapazität.
2. Setzen Sie den Akku ein, wie in Abschnitt „Einlegen
des Akkupacks“ beschrieben.
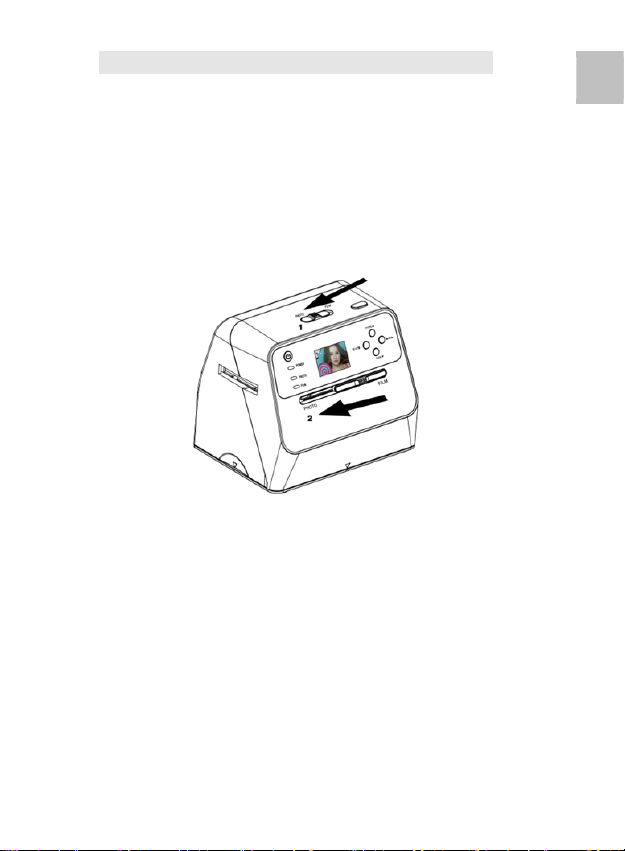
3. Wählen Sie das zu scannende Medium aus.
Verschieben Sie den Foto/Film-Fokusschalter und
den Foto/Film-Lichtschalter in die Stellung für das
entsprechende Medium.
DE
-9-
Page 11

4. Schließen Sie das Netzteil an eine haushaltsübliche
Steckdose an. Verbinden Sie danach das Netzteil
mithilfe des Micro-USB-Kabels mit dem Scanner.
Achten Sie darauf, dass der USB-Anschluss mit der
richtigen Ausrichtung angeschlossen wird. Verwenden
Sie nicht zu viel Kraft, um den USB-Anschluss mit dem
Micro-USB-Anschluss zu verbinden.
5. Drücken Sie die Ein-/Aus-Taste und dann die Taste
„OK“, um in dem Popup-Dialog auf dem
LCD-Bildschirm „NO“ auszuwählen (nicht mit einem
Computer verbunden). Je nach ausgewähltem
Medium leuchtet die Foto-LED (grün) oder die
Film-LED (blau) auf.
6. Der Scanner ist nun einsatzbereit.
Hinweis:
Wenn Sie kein Licht von Ihrem LCD-Bildschirm sehen,
schieben Sie den Foto/Film-Lichtschalter in die richtige
Stellung.
Page 12
2. Scannen von Fotoalben/Magazinen/Fotos
HINWEIS: Die Filmablage dient auch als Basis für dieses
Gerät. Sie müssen diese abnehmen, um Fotos zu scannen.
1. Schieben Sie den Foto/Film-Fokus-Schalter auf
„PHOTO“
2. Schieben Sie den Foto/Film-Lichtschalter auf
„PHOTO“
3. Platzieren Sie den Scanner mit entfernter Filmablage
auf dem Bild im Fotoalbum, Magazin oder auf dem
Foto, das Sie scannen möchten.
4. Drücken Sie die Ein-/Aus-Taste, um den Scanner
einzuschalten. Sie werden auf dem LCD-Bildschirm
das Bild des Mediums sehen, das sich unter dem
Scanner befindet.
5. Wählen Sie die Größe des Fotos aus (3,5” x 5” oder
4” x 6”, 4” x 4”, 4,2” x 3,2”, 3,4” x 2,1”), indem Sie die
Abwärts-Taste drücken.
DE
-11-
Page 13
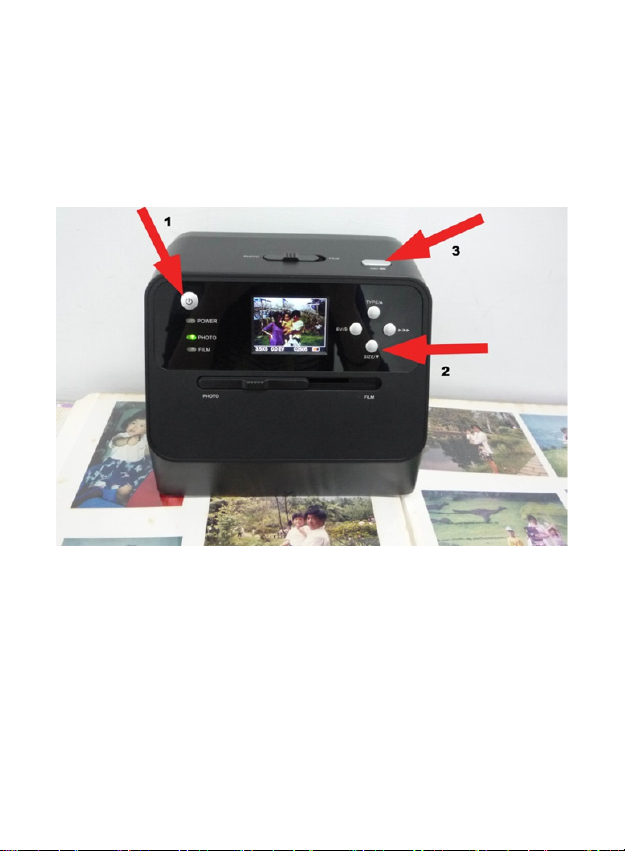
6. Drücken Sie die Taste „OK“, um das Bild zu scannen.
Das gescannte digitale Bild wird automatisch auf der
SD-Karte gespeichert.
Hinweis:
4 x 4”, 4,2 x 3,2” und 3,4 x 2,1” sind Größen von
Sofortbildfilm-Fotos der Marken Poloroid und Fuji.
Hinweis:
Sie können Ihr Foto scannen, indem Sie es auf die
Fotoablage legen. Sie können ebenfalls direkt aus Ihrem
Fotoalbum scannen, ohne die Bilder vorher daraus zu
entfernen.
Wenn der LCD-Bildschirm schwarz ist und Sie das Bild, das
Sie scannen möchten, nicht sehen, stellen Sie sicher, dass
sich beide Schalter in der Stellung „PHOTO“ befinden. Bitte
setzen Sie keinen Filmhalter in den Scanner ein, während
Sie Fotos scannen.
Page 14
1. Einstellung der Helligkeit: Die Belichtung des Scanners
wird automatisch eingestellt. In einigen Fällen müssen
Sie die Helligkeit (Belichtung) des Motivs anpassen.
Drücken Sie die Taste EV/Löschen, um den Belichtungswert
anzupassen.
Drücken Sie die Aufwärts- oder Abwärts-Taste, um die
Belichtungskorrektur zwischen +2EV bis -2EV in
0,5-Schritten einzustellen.
Die Höhe der Korrektur wird am unteren Rand des
LCD-Bildschirms angezeigt. Drücken Sie die Taste
EV/Löschen erneut, um die Einstellung abzuschließen.
DE
-13-
Page 15

3. Einen Film scannen
Setzen Sie den Film/das Dia in den Halter ein
1. Achten Sie darauf, dass die Glanzseite des Films
nach oben zeigt.
Öffnen Sie den Negativ/Positiv Dia-Halter wie
dargestellt.
2. Setzen Sie einen 135 Positiv-/Negativ-Film wie
dargestellt in den Halter ein.
3. Schließen Sie den Halter und achten Sie darauf, dass
der Halter richtig geschlossen ist.
Page 16
Scannen eines Films und Dias
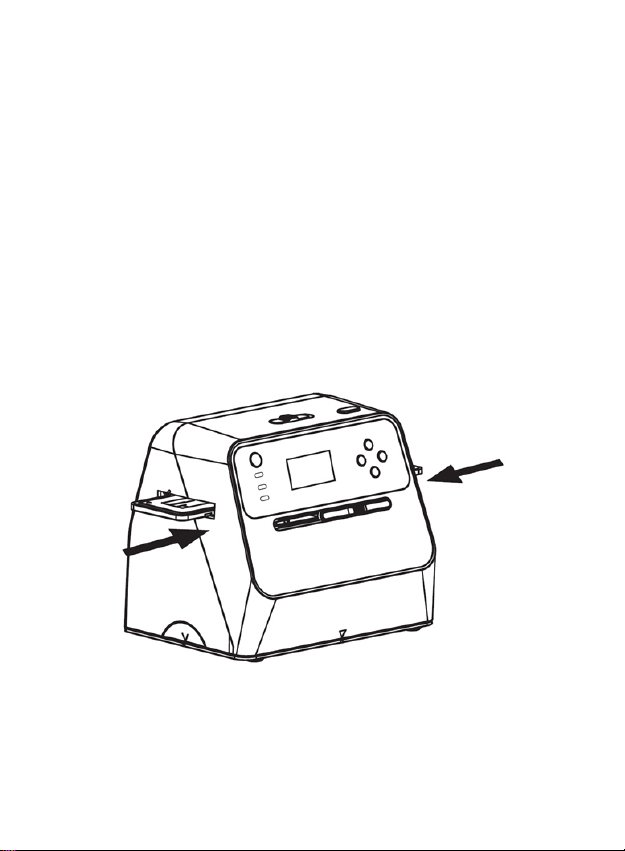
1. Schieben Sie den Foto/Film-Fokus-Schalter auf „FILM“
2. Schieben Sie den Foto/Film-Lichtschalter auf „FIML“
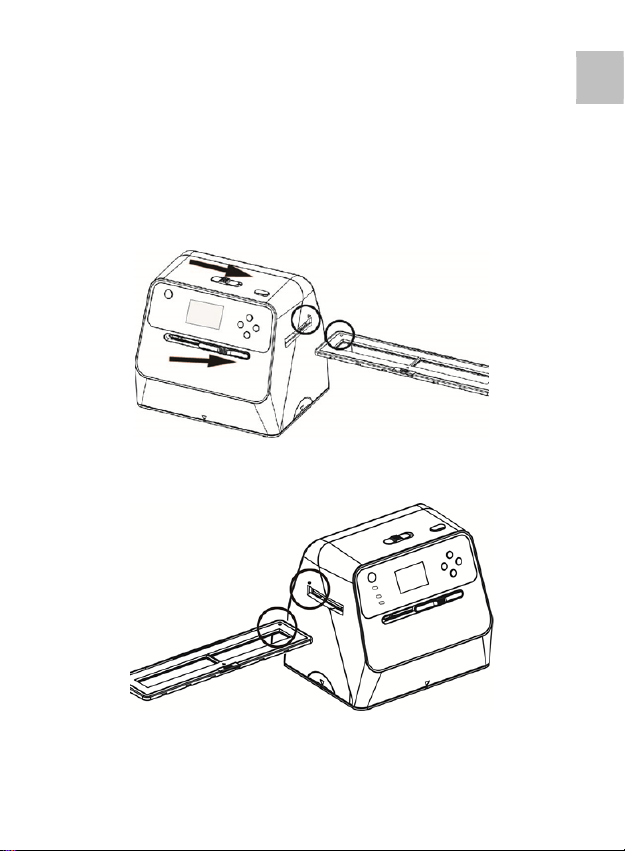
Setzen Sie den geladenen Film-/Dia-Halter richtig in den
Einschub ein. Beachten Sie hierbei die auf dem Scanner
und Filmhalter befindlichen Zeichen ▲ oder ●.
(▲ Im rechten Schacht einsetzen)
DE
(● Im linken Schacht einsetzen)
-15-
Page 17
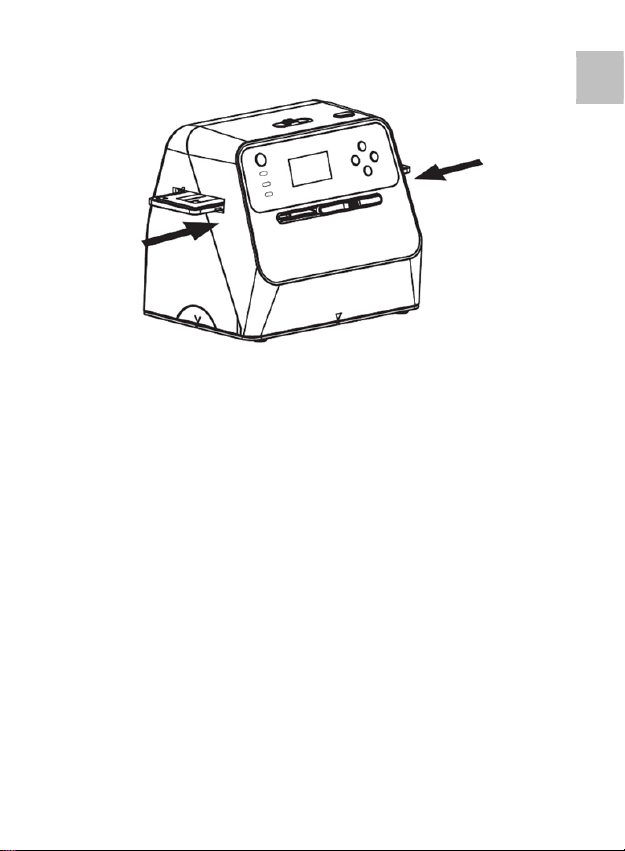
Sie können die Position des Films anpassen, indem Sie
den Filmhalter verschieben. Der Filmhalter kann in beide
Richtungen verschoben werden.
Achten Sie darauf, dass sich das Bild in dem rechteckigen
weißen Rahmen befindet, der auf dem LCD-Bildschirm
angezeigt wird. Eine falsche Einstellung des Bildes kann
dazu führen, dass die schwarzen Ränder des Filmhalters
kopiert werden.
Wenn die schwarzen Ränder des Diafilms am oberen
oder unteren Rand des LCD-Bildschirms erscheinen,
kippen Sie den Scanner nach vorn oder hinten, um die
schwarzen Ränder zu beseitigen.
Page 18
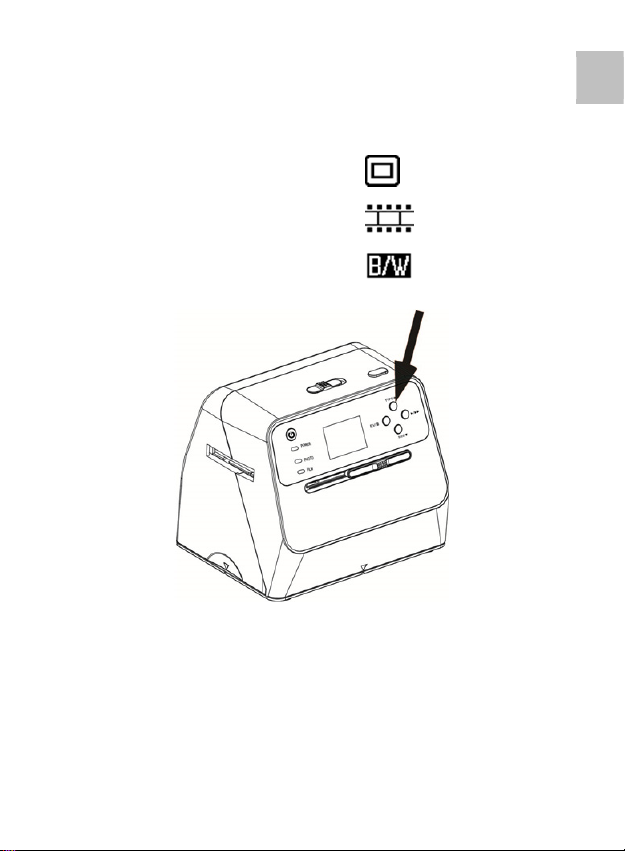
Filmtyp-Auswahl:
Zur Auswahl eines Filmtyps drücken Sie die Filmtyp-Taste.
135 positiv (Dia)
135 negativ
135 schwarzweiß
DE
Hinweis: Die Auswahl eines falschen Filmtyps kann zu
falschen Farben auf dem LCD-Bildschirm und den
gescannten Bildern führen.
Drücken Sie die Taste „OK“, um die Bilder in digitale
Bilder umzuwandeln.
-17-
Page 19
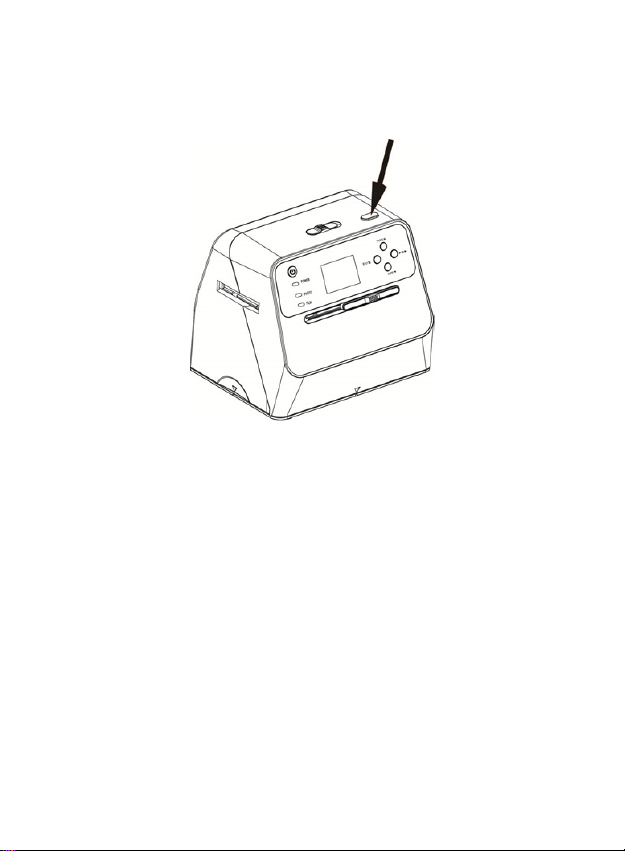
Um die besten digitalisierten Bilder zu erhalten, warten
Sie, bis das Bild auf dem LCD-Bildschirm der Helligkeit
angepasst und scharf ist. Dies dauert normalerweise
3 bis 4 Sekunden, je nach Helligkeit des Films.
Hinweis: Wenn der Scanner für mehr als 3 Minuten
nicht genutzt wird, wechselt er automatisch in
den Ruhezustand, um Energie zu sparen. Sie
können den Scanner wieder aktivieren, indem
Sie eine beliebige Taste betätigen.
Wird der Scanner für mehr als 6 Minuten nicht
benutzt, schaltet er sich automatisch aus.
Page 20
Verschieben Sie den Filmhalter zum nächsten Bild.
Einstellung der Helligkeit: Die Belichtung des Scanners
wird automatisch eingestellt. In einigen Fällen müssen Sie
die Helligkeit (Belichtung) des Motivs anpassen.
Drücken Sie die Taste EV/Löschen, um den
Belichtungswert anzupassen.
Drücken Sie die Aufwärts- oder Abwärts-Taste, um die
Belichtungskorrektur zwischen +2EV bis -2EV in
0,5-Schritten einzustellen.
DE
-19-
Page 21
Die Höhe der Korrektur wird am unteren Rand des
LCD-Bildschirms angezeigt. Drücken Sie die Taste
EV/Löschen erneut, um die Einstellung abzuschließen.
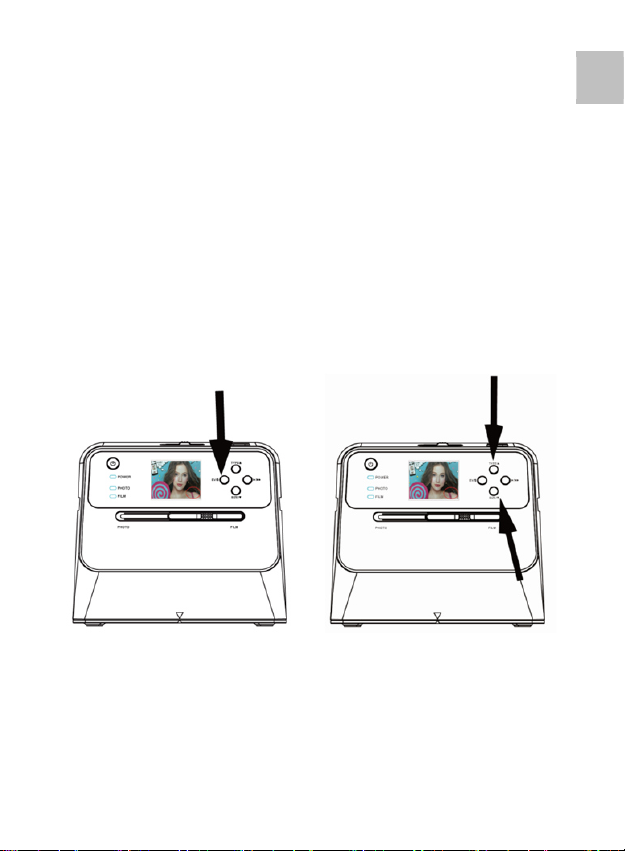
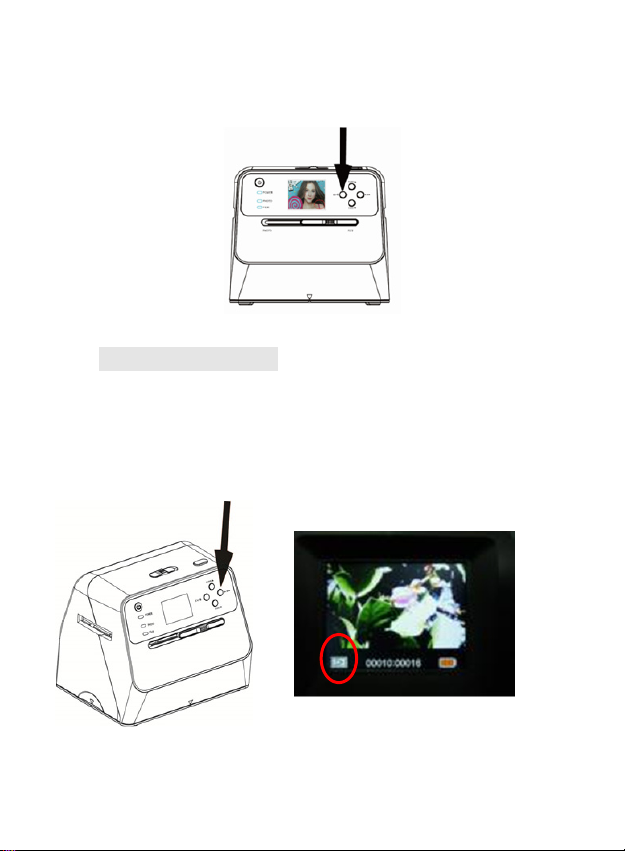
4. Wiedergabemodus
1. Drücken Sie die Wiedergabetaste, um die auf der
Karte gespeicherten Bilder anzuzeigen. Sie sehen
das Wiedergabe-Symbol in der linken unteren Ecke,
wie unten dargestellt.
Page 22
2. Drücken Sie die Aufwärts-Taste, um das nächste Bild
zu überprüfen.
Drücken Sie die Abwärts-Taste, um das vorherige
Bild zu überprüfen.
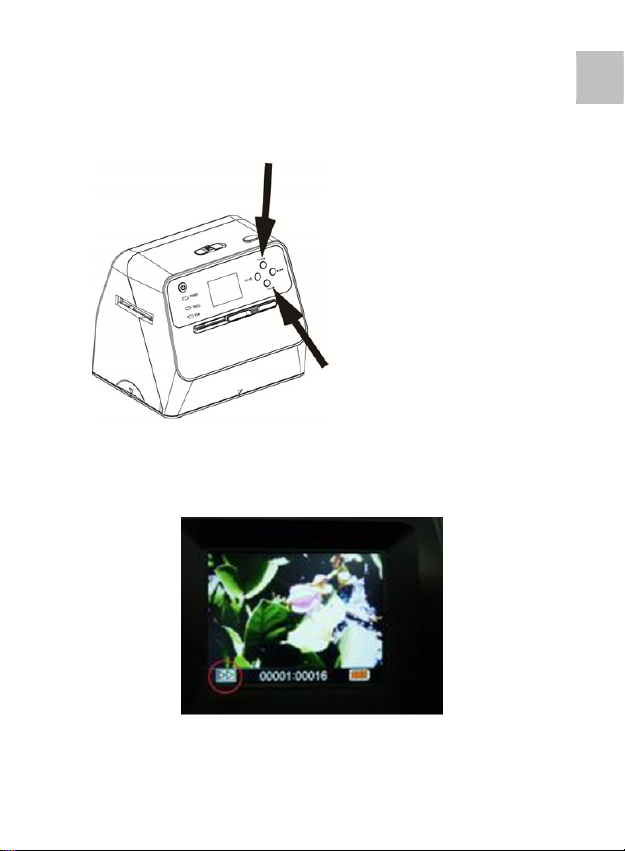
3. Drücken Sie die Wiedergabetaste erneut für die
Diashow.
Symbol, wie unten dargestellt:
DE
-21-
Page 23
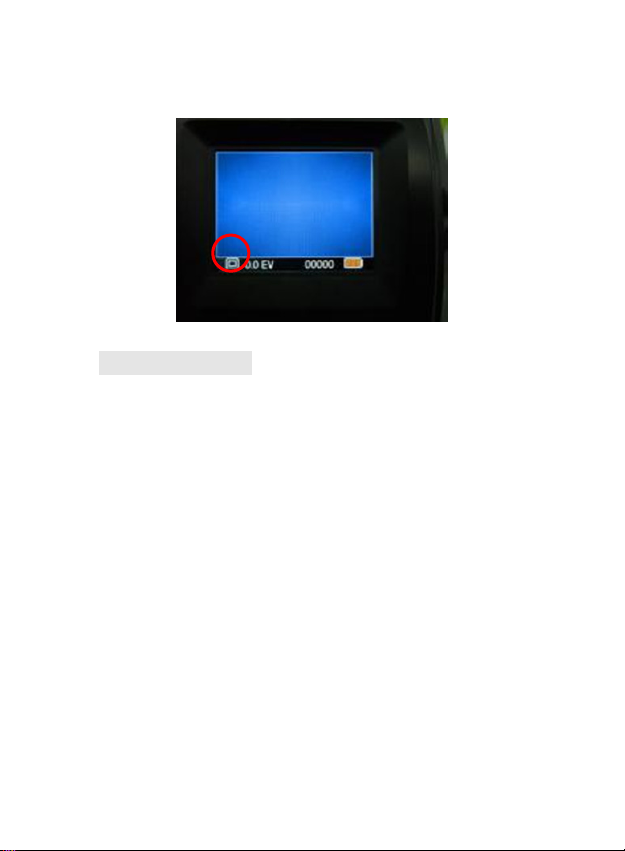
4. Drücken Sie die Wiedergabetaste erneut, um zum
Originalbildschirm zurückzukehren.
Symbol, wie unten dargestellt:
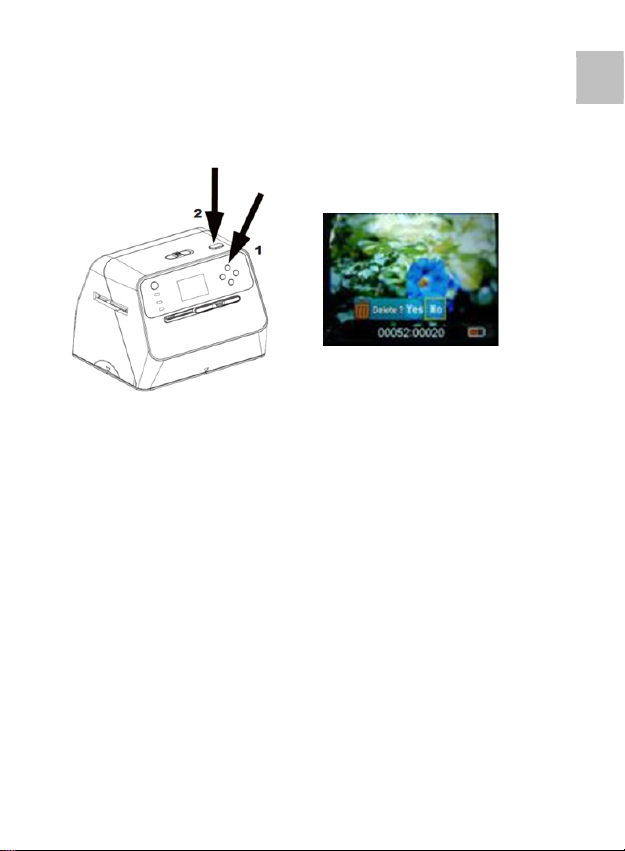
5. Löschen-Modus
1. So löschen Sie ein Bild: Drücken Sie im
Wiedergabe-Modus einmal die Löschen-Taste und
danach die Aufwärts-Taste, um „YES“ auszuwählen.
Drücken Sie die Taste „OK“ erneut, um das aktuelle
Bild zu löschen.
2. So löschen Sie alle Bilder: Drücken Sie zweimal die
Löschen-Taste und danach einmal die Aufwärts-Taste,
um „YES“ auszuwählen. Drücken Sie zum Löschen die
Taste „OK“.
Page 24
3. So formatieren Sie eine SD-Karte: Drücken Sie die
Löschen-Taste dreimal und anschließend die
Aufwärts-Taste, um „YES“ auszuwählen. Drücken Sie
„OK“, um die Formatierung zu beginnen.
Hinweis: a. Es muss mindestens ein Bild
aufgenommen worden sein, um den
Löschen-Modus aufrufen zu können und
die SD-Karte zu formatieren.
b. Das Formatieren der SD-Karte löscht alle
auf der Karte befindlichen Dateien. Laden
Sie die Dateien auf der SD-Karte auf Ihren
Computer herunter, bevor Sie die SD-Karte
formatieren.
c. Wenn Sie die Bilder nicht löschen möchten,
drücken Sie einmal die Abwärts-Taste, um
„NO“ auszuwählen und im Anschluss die
Taste „OK“, um den Löschen-Modus zu
verlassen.
-23-
DE
Page 25

6. Anschließen der Karte an den Computer
1. Verbinden Sie den Scanner über das USB-Kabel mit
dem Computer.
2. Schalten Sie den Scanner ein.
3. Drücken Sie die Aufwärts-Taste, um „SD to PC“
auszuwählen und im Anschluss wählen Sie „YES“,
Drücken Sie zur Bestätigung die Taste „OK“.
zu sparen, wird der LCD-Bildschirm ausgeschaltet,
wenn das Gerät an einen Computer angeschlossen ist.
Um Strom
Page 26

7. Anhang
Spezifikationen
Bildsensor 1/2,33” 14 Mega CMOS-Sensor,
Vorschau und
Überprüfung
Objektiv-Spezifikation F/No = 3,4, f = 5,2 mm
Farbabgleich Automatisch
Belichtungssteuerung Automatische und manuelle
Unterstützte Bildgröße 4 x 6 Zoll und 3,5 x 5 Zoll
Unterstützte Bildmedien Fotoalbum/Magazin/Foto
Unterstütze
automatische
Zuschneidung der
Filmgröße
Unterstützte
automatische
Konvertierung des
Filmtyps
Fokussierung Fixfokus/Dual-Fokus
EV-Anpassung Ja, ± 2,0 EV
PC-Anschluss USB 2.0
USB-Typ Micro-USB Typ B
Bildformate Foto Verhältnis 3:2
Lichtquelle Foto: 24 und Film 3 weiße LEDs
Ein-/Austaste Netzadapter: 5 V/1 Ampere
2,4” LCD-Farbdisplay
Anpassung
135 Negativ & Dia (3:2)
135 Dia
Farb-Negativfilm (135, 110 & 126)
Schwarzweiß Negativfilm
135 Film Verhältnis 3:2
110 Negativ Verhältnis 4:3
126 Negativ Verhältnis 1:1
Li-Ion-Akku 3,7 V/1050 mAh
-25-
DE
Page 27
Eigengewicht Ca. 1050 g.
Abmessungen 18,2 (H) x 20,9 (B) x 16,2 (T) cm
Spezifikationen können ohne vorherige Angabe geändert
werden.
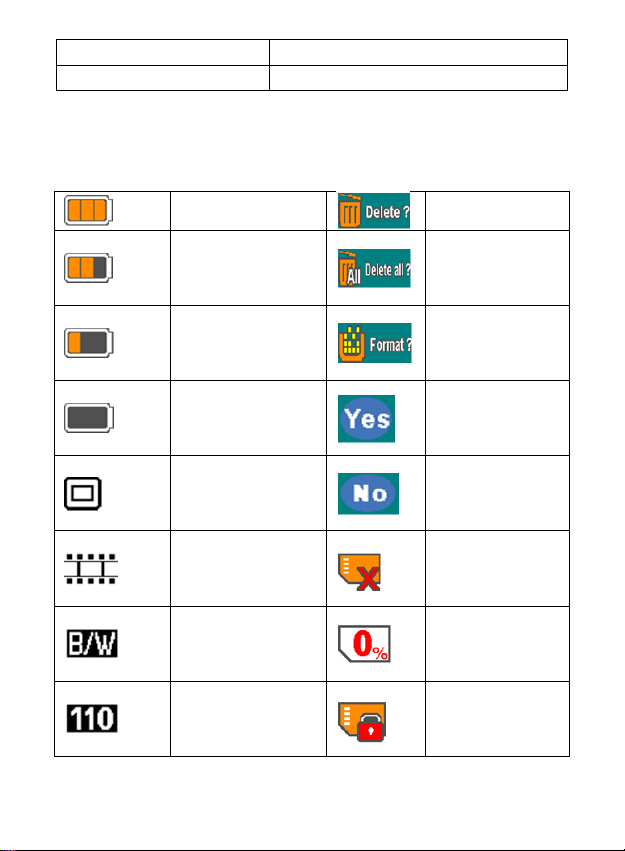
Symbole und Indikatoren
Akku voll Eins löschen
Akku 2/3 voll
Alle löschen
SD-Karte
Akku 1/3 voll
Akku leer
135 Dia
formatieren
Ja
Nein
135
Negativfilm
Kartenfehler
Schwarzweiß
135 Negativfilm
110 Negativfilm
Karte voll
Kartenschloss
Page 28
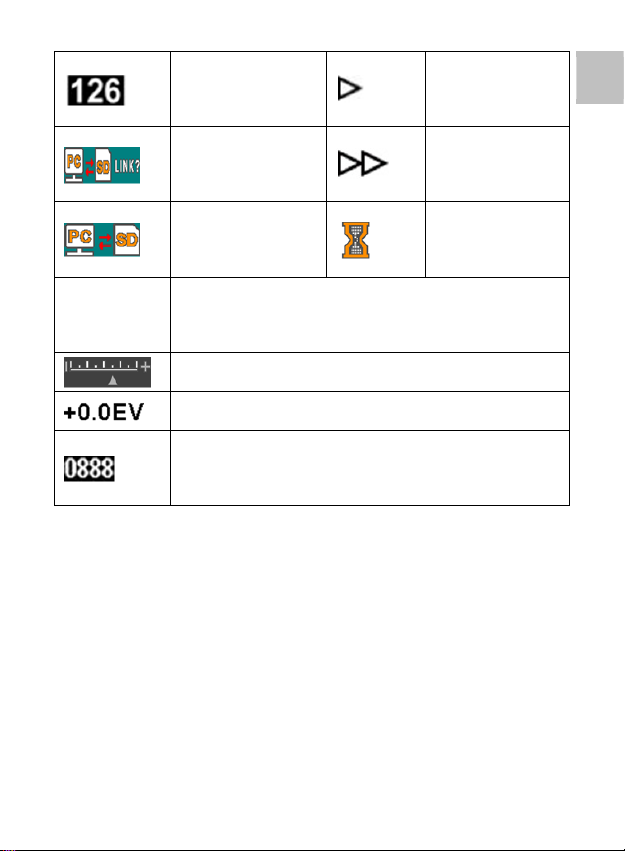
126 Negativfilm
Wiedergabe-
modus
DE
3,5 X 5/
4 X 6
PC-SD-
Kartenauswahl
PC-SD-Karte
verbunden
Ausgewählte Fotogröße
EV-Kompensations-Indikator
EV-Kompensation
Verfügbare Aufnahmekapazität auf
SD-Karte
Diashow
Warten
-27-
Page 29

PC-Systemanforderungen
Pentium® P4 1,6 GHz oder gleichwertiger AMD Athlon
Freier USB 2.0-Anschluss
512 MB RAM
500 MB freier Festplattenspeicher
1024 x 768 Pixel Farbmonitor
CD-ROM-Laufwerk
Windows® XP Service Pack II/Vista™, 32/64 Bit
Windows 7/Windows 8/Windows 10
Mac-Systemanforderungen
PowerPC G5/Intel Core Duo empfohlen
Freier USB 2.0-Anschluss
768MB RAM
500 MB freier Festplattenspeicher
1024 x 768 Farbmonitor
CD-ROM-Laufwerk
Mac 10.5 ~ höher
Dieses Symbol auf dem Gerät oder in der
Bedienungsanleitung bedeutet, dass das Elektro- oder
Elektronikgerät am Ende seiner Nutzungstauglichkeit
getrennt vom Hausmüll entsorgt werden muss. In der EU
gibt es getrennte Sammelsysteme für Recycling.
Weitere Informationen erhalten Sie bei der für Sie
zuständigen Behörde oder beim Verkäufer des Produkts.
Page 30

reflecta GmbH
Merkurstraße 8 Telefon: +49 74 57/94 65 60
72184 Eutingen, Deutschland Fax: +49 74 57/94 65 72
E-Mail: mail@reflecta.de Web: www.reflecta.de
DE
-29-
Page 31

Combo Album Scanner
User’s manual
Page 32

Table of Contents
1. Preparation .................................................... 2
Standard Accessories ..................................... 2
Part Names .................................................... 3
Installing the battery pack ............................... 5
Charging the battery pack .............................. 7
Preparing Your Combo Album Scanner .......... 9
2. Scanning Photo Albums/Magazines/Photos . 10
3. Scanning Film .............................................. 12
Placing film/slide into the holder ................... 12
Scanning Film and Slide ............................... 13
4. Playback Mode ............................................. 19
5. Delete Mode ................................................. 20
6. Linking the Card to Computer ....................... 21
7. Appendix ...................................................... 23
EN
Specifications ............................................... 23
Icons & Indicators ......................................... 24
-1-
Page 33

1. Preparation
Standard Accessories
Combo Album Scanner Manual
Cleaning
brush
135 negative holder 135 slide holder
Adaptor USB cable
Lithium
battery
Page 34

Part Names
EN EN
Photo/Film focus switch Photo/Film focus switch
Power Button Power button
Film Holder Slot Film holder slot
Photo/Film Light Switch Photo/Film light switch
Photo Tray Photo tray
LCD Screen LCD screen
OK Button OK button
EV/delete EV/delete
Film Type/Up Button Film type/up button
Playback Button Playback button
Photo Size/Down Button Photo size/down button
-3-
EN
Page 35

Battery Charging LED Battery charging LED
Photo Status LED Photo status LED
Film Status LED Film status LED
EN EN
Micro USB Connector Micro USB connector
SD Card slot SD card slot
Battery Door Battery door
EN EN
Brush Brush
Page 36

EN EN
135 Negative Holder 135 negative holder
EN EN
135 Slide Holder 135 slide holder
Note: We suggest using the bundled brush to clean the glass
surface in the Combo Album Scanner periodically to produce
clear images. Please make sure your film negatives/mounted
slides and their holders are clean before inserting into the
Combo Album Scanner. Dust or dirt from the film holder will
affect the quality of your scanned images.
Installing the battery pack
1. Open the battery door by lightly pressing and sliding
the door latch.
EN
-5-
Page 37

2. Insert the supplied battery. Make sure the (+ and -)
ends of the battery match the polarities indicated in
the battery compartment.
3. Snap the cover back and press the latch into place.
EN EN
Battery Door Battery door
Battery power status
Full Empty
Page 38

Charging the battery pack
The battery pack will not be fully charged at the time of
purchase and therefore needs to be charged before use.
If the battery charge becomes low while you are using the
scanner, it is recommended to recharge it as soon as
possible.
1. Insert the battery pack into the battery compartment
(see page 8)
2. You may charge the battery in 2 ways:
(a) Plug the Micro USB adaptor of the supplied USB
cable to the USB connector of the scanner, and
plug the other USB end into the USB port of your
computer/notebook.
Please charge the battery for at least 3 hours
prior to first use.
EN
(b) Connect the Micro USB cable to the power
adaptor then plug it to the household power
outlet. Connect the micro USB terminal to the
-7-
Page 39

Micro USB connector of the scanner. The red
LED will turn on during battery charging when the
scanner is not in use, and will be off when it is
fully charged.
Please charge the battery for at least 3 hours
Note:
The scanner can also be operated without the battery
when the power adaptor and USB cable is connected to
the scanner.
Status LED indication:
Red LED: (1) On when the power of the scanner is on.
(2) When the scanner is not in use and the
power is off, it will be on during battery
charging and off when battery is fully
charged.
Green LED: Lights up when photo scanning is set.
Blue LED: Lights up when film scanning is set.
Page 40

Preparing Your Combo Album Scanner
1. Insert and push an SD card into the SD card slot until
the card locks in place. Push once again to release
the card. Unit only accepts SD or SDHC card up to a
maximum of 32GB.
2. Load the battery into the scanner as described in the
section “Installing the Battery Pack”.
3. Select the media you want to scan. Slide the
photo/film focus switch and photo/film light switch to
the appropriate media.
4. Connect the power adapter to the household electric
power plug, then connect the power adapter to the
scanner via the micro USB cable. Make sure the USB
terminal is inserted in the correct orientation. Do not
use too much force to connect the USB terminal into
the micro USB connector.
5. Press the power button, then the OK button to select
NO (not linked to a computer) on the pop up dialog on
the LCD screen. The photo LED (green) or the film
LED (Blue) will light up depending on the media
chosen.
6. The scanner is now ready for use.
Note:
If you do not see the light from your LCD screen, slide the
-9-
EN
Page 41

photo/film light switch to its proper position.
2. Scanning Photo Albums/Magazines/Photos
NOTE: the film tray doubles as the base for this unit. You
must detach it to scan photos.
1. Slide the photo/film focus switch to “PHOTO”
2. Slide the photo/film light switch to “PHOTO”
3. With the film tray removed, place the scanner on the
picture in the photo album, magazine or photo you
want to scan.
4. Press the power button to turn on the scanner. You
will see the image of the media under the scanner on
the LCD screen.
5. Select the size of the photo (3.5” x 5” or 4” x 6”, 4” x
4”, 4.2” x 3.2”, 3.4” x 2.1”) by pressing the down
button
6. Press the OK button to scan the picture. The scanned
digital image will be automatically stored on your SD
card.
Page 42

Note:
4 x 4”, 4.2 x 3.2” and 3.4 x 2.1” are the sizes of Poloroid
and Fuji instant film photos.
Note:
You may scan your photo by placing it on the photo tray.
You can also scan directly from your photo album without
removing the pictures from their holder.
If you see a black image on the LCD screen and do not
see the image you want to scan, please check that both
switches are on the “PHOTO” setting. Please do not insert
the film holder into the scanner while scanning photos.
1. Brightness adjustment: the exposure of the scanner is
set automatically. On some occasions you need to
-11-
EN
Page 43

adjust the brightness (exposure) of your subject.
Press the EV/delete button to adjust exposure value.
Press the up or down button to adjust the exposure
compensation between +2EV to -2EV in 0.5 increments.
The amount of compensation is shown at the bottom of
the LCD screen. Press the EV/delete button again to
complete the setting.
3. Scanning Film
Placing film/slide into the holder
1. Keep the glossy side of your film upwards.
Open the negative/positive slide holder as Illustrated.
Page 44

2. Put a 135 positive slide/negative film into holder as
shown.
3. Close the holder and make sure the holder is closed
properly.
Scanning Film and Slide
1. Slide the photo/film focus switch to “FILM”
2. Slide the photo/film light switch to “FILM”
Insert the loaded film/slide holder properly into the slot
according to the ▲ or ● sign shown on the scanner
and film holder.
EN
-13-
Page 45

(▲ Insert through the right entrance)
(● Insert through the left entrance)
You can adjust the location of the film by moving the film
holder; the film holder can be moved in both directions.
Keep your picture in the rectangular white frame shown
on the LCD screen. Improper adjustment of picture may
result in copying of the black edges of the film holder.
If the black edges of the slide film appears on the top or
bottom of the LCD screen, tilt the scanner forward or
Page 46

backward to eliminate the black edge.
Film Type Selection:
To select film type, press the Film type button.
135 positive (slide)
135 negative
EN
135 black & white
-15-
Page 47

Note: Improper selection of film type may result in
improper colour in your LCD screen and the scanned
images.
Press the OK button to convert the pictures to digital
images.
To get the best digitized images, wait for the image
display on the LCD screen to adjust to the brightness and
become stable. It normally takes 3~4 seconds, depending
on the brightness of your film.
Page 48

Note: To save power, the scanner will automatically go
into sleep mode if you do not use it for more than
3 minutes. You may wake up the scanner by
pressing any button.
It will turn off automatically if it has not been used
for more than 6 minutes.
Move the film holder to the next picture.
EN
-17-
Page 49

Brightness adjustment: the exposure of the scanner is set
automatically. On some occasions you need to adjust the
brightness (exposure) of your subject.
Press the EV/delete button to adjust exposure value.
Press the up or down button to adjust the exposure
compensation between +2EV to -2EV in 0.5 increments.
The amount of compensation is shown at the bottom of
the LCD screen. Press the EV/delete button again to
complete the setting.
Page 50

4. Playback Mode
1. Press the playback button to playback the digital
images saved on your card. You will see the playback
icon in the lower left hand corner, as shown below.
2. Press the up button to review the next image.
Press the down button to review the previous image.
EN
-19-
Page 51

3. Press the playback button again for slideshow
Icon shown as below:
4. Press the playback button again to go back to the
original screen.
Icon shown as below:
5. Delete Mode
1. To delete an image: Under Playback Mode, press
the delete button once and then the up button to
select YES. Press the OK button to delete current
image.
Page 52

2. To delete all images: Press the delete button twice
and then the up button once to select YES. Press the
OK button to delete.
3. To format the SD card: Press the delete button three
times and then the up button and select YES. Press
OK to begin formatting.
Note: a. At least one picture has to be taken for you to
enter Delete Mode and format your SD card.
b. Formatting the SD card will delete all the files
in the card. Download your files in the SD card
onto your computer before formatting the SD
card.
c. If you don’t want to delete images, push the
down button once to select NO, then press the
OK button to leave Delete Mode.
6. Linking the Card to Computer
EN
1
2
-21-
Page 53

1. Connect the scanner to the computer via the USB
cable.
2. Turn on the power of the scanner.
3. Press the up button to select “SD to PC”, then select
YES, then press the OK button for confirmation. To
save power, the LCD screen will be turned off when
connected to a computer.
Page 54

7. Appendix
Specifications
Image Sensor 1/2.33” 14 Mega CMOS Sensor,
Preview and Review 2.4” Colour LCD Display
Lens Specification F/No = 3.4, f = 5.2 mm
Colour Balance Automatic
Exposure Control Automatic & Manual adjustment
Supported photo size 4 X 6 inches. and 3.5 X 5 inches
Supported photo
media
Supported Film Size
Auto Cropping
Supported Film Type
Auto Conversion
Focusing Fixed Focus/Dual Focus
EV adjustment Yes, ± 2.0 EV
PC Interface USB 2.0
USB Type Micro USB Type B
Image Format Photo 3:2 Ratio
Light Source Photo:24 and film 3 white LED
Power Power adaptor: 5V/1 amp.
Net Weight Approximately 1050 gm.
Dimension 18.2 (H) x 20.9 (W) x 16.2 (D) cm
Photo album/magazine/photo
135 Negative & Slide (3:2)
135 Slide
Colour Negative Film (135, 110 &
126)
Black & White Negative Film
135 film 3:2 Ratio
110 Negative 4:3 Ratio
126 Negative, 1:1 Ratio
Li-ion 3.7V/1050mAh Battery
EN
-23-
Page 55

Specifications are subject to change without prior notice.
Icons & Indicators
Battery Full
Battery 2/3
Battery 1/3
Battery Empty
135 Slide
135 Negative
Film
B/W 135
Negative Film
110 Negative
Film
Delete
One
Delete All
Format SD
Card
Yes
No
Card Error
Card Full
Card Lock
126 Negative
Film
Playback
Mode
Page 56

Slide
Show
EN
PC-SD-Card
Selection
PC-SD Card
Link-connected
3.5 X 5/4 X 6
PC System Requirements
Pentium® P4 1.6GHz or equivalent AMD Athlon
Free USB 2.0 port
512MB RAM
500MB free hard disk space
1024 x 768 pixel colour monitor
CD-ROM drive
Windows® XP Service Pack II/Vista™, 32/64 bits
Windows 7/Windows 8/Windows 10
Mac System Requirements
PowerPC G5/Intel Core Duo recommended
Free USB 2.0 port
768MB RAM
500MB free hard disk space
1024 x 768 colour monitor
CD-ROM drive
Photo size selected
EV Compensation Indicator
EV Compensation
Available number take in SD card
-25-
Wait
Page 57

Mac 10.5 ~ Up
This symbol found on the product or in the instructions
indicate that your electrical and electronic equipment
should be disposed of separately from your household
waste at the end of its life. There are separate collection
systems for recycling in the EU.
For more information, please contact the local authority or
your retailer where you purchased the product.
Page 58

reflecta GmbH
Merkurstrasse 8 Fon +49 74 57/94 65 60
72184 Eutingen, Germany Fax +49 74 57/94 65 72
E-Mail: mail@reflecta.de Web: www.reflecta.de
EN
-27-
Page 59

Escáner de fotografías
combinado
Manual del usuario
Page 60

ES
Índice de contenidos
1. Preparación ............................................................. 2
Accesorios estándar ................................................ 2
Denominación de las piezas ................................... 3
Instalación de la batería .......................................... 6
Carga de la batería ................................................. 7
Preparar el Escáner de fotografías combinado ...... 9
2. Escanear álbumes fotográficos/revistas/fotografías . 10
3. Escanear película .................................................. 13
Coloque la película/diapositiva en el soporte ........ 13
Escanear película y diapositivas ........................... 14
4. Modo reproducción ............................................... 20
5. Modo borrado ........................................................ 22
6. Conectar la tarjeta al ordenador ............................ 24
7. Apéndice ............................................................... 25
Especificaciones ................................................... 25
Icono e indicadores ............................................... 26
-1-
Page 61

1. Preparación
Escáner de fotografías
combinado
Manual
Cepillo para
limpieza
Soporte de negativos 135
Soporte de diapositivas 135
Adaptador
Cable USB
Batería de litio
Accesorios estándar
Page 62

ES
EN
ES
Photo/Film focus switch
Selector de foco de
fotografía/película
Power Button
Botón de encendido
Film Holder Slot
Ranura para soporte de
película
Photo/Film Light Switch
Selector de iluminación de
fotografía/película
Photo Tray
Bandeja para fotografías
LCD Screen
Pantalla LCD
OK Button
Botón OK
EV/delete
EV/borrar
Denominación de las piezas
-3-
Page 63

Film Type/Up Button
Botón tipo de película/arriba
Playback Button
Botón de reproducción
Photo Size/Down Button
Botón tamaño de
fotografía/abajo
Battery Charging LED
LED de carga de batería
Photo Status LED
LED de modo fotografía
Film Status LED
LED de modo película
EN
ES
Micro USB Connector
Conector micro USB
SD Card slot
Ranura para tarjeta SD
Battery Door
Tapa de la batería
Page 64

ES
EN
ES
Brush
Cepillo
EN
ES
135 Negative Holder
Soporte de negativos 135
EN
ES
135 Slide Holder
Soporte de diapositivas 135
Nota: Recomendamos utilizar el cepillo incorporado para limpiar
la superficie de cristal del Escáner de fotografías combinado
para generar imágenes claras. Por favor, asegúrese de que los
negativos o diapositivas montados y sus soportes están limpios
antes de introducirlos en el Escáner de fotografías combinado
El polvo o la suciedad del soporte de la película afectará la
calidad de las imágenes escaneadas.
-5-
Page 65

Instalación de la batería
EN
ES
Battery Door
Tapa de la batería
Llena
Vacía
1. Abra la tapa de la batería presionando ligeramente y
desplazando la lengüeta.
2. Introduzca la batería suministrada. Asegúrese de que
los terminales (+ y -) de la batería coinciden con la
polaridad indicada en el compartimento de la batería.
3. Vuelva a cerrar la tapa y coloque la lengüeta en su
lugar presionando.
Estado de carga de la batería
Page 66

ES
Carga de la batería
La batería no está totalmente cargada cuando se compra
la unidad, por lo que es necesario cargarla antes de
usarla. Si la batería se queda con poca carga mientras se
está utilizando el escáner, se recomienda recargarla tan
pronto como sea posible.
1. Introduzca la batería en su compartimento (consulte
la página 8)
2. Puede cargar la batería de 2 modos:
(a) Enchufe el adaptador micro USB del cable USB
suministrado al conector USB del escáner y
conecte el otro extremo del cable USB en un
puerto USB de su ordenador/portátil.
Cargue la batería al menos 3 horas antes de
utilizarla por primera vez.
-7-
Page 67

(b) Conecte el cable micro USB al adaptador de
LED rojo:
(1) Encendido cuando está encendido el
escáner.
(2) Cuando no se esté utilizando el escáner y
el equipo esté apagado, se encenderá el
LED durante la carga de la batería y se
apagará cuando esté totalmente cargada.
corriente y a continuación conecte el adaptador en
un enchufe de corriente. Conecte el terminal micro
USB al conector micro USB del escáner. El LED
rojo se encenderá mientras se esté cargando la
batería, si no se está utilizando el escáner, y se
apagará cuando esté totalmente cargada.
Cargue la batería al menos 3 horas.
Nota:
El escáner puede funcionar también sin la batería cuando
el adaptador de corriente y el cable USB están conectados
al escáner.
Indicación LED de estado:
Page 68

ES
LED verde: Se ilumina cuando está puesto el escaneado
de fotografías.
LED azul: Se ilumina cuando está puesto el escaneado
de película.
Preparar el Escáner de fotografías combinado
1. Introduzca y presione una tarjeta SD en la ranura
para la misma hasta que la tarjeta encaje en su sitio.
Presione una vez para soltar la tarjeta. La unidad solo
acepta tarjetas SD o SDHC hasta un máximo de
32GB.
2. Cargue la batería en el escáner tal y como se
describe en la sección “Instalar la batería”.
3. Seleccione el medio que desea escanear. Coloque el
selector de foco de fotografía/película y el selector de
iluminación de fotografía/película en el medio
adecuado.
4. Conecte el adaptador de corriente a un enchufe y a
continuación conecte el adaptador al escáner por
medio del cable micro USB. Asegúrese de que el
terminal se introduce con la orientación correcta. No
haga demasiada fuerza para introducir el terminal
USB en el conector.
-9-
Page 69

5. Pulse el botón de encendido, después del botón OK
para seleccionar NO (no conectado a un ordenador)
en el diálogo emergente de la pantalla LCD. Se
iluminará el LED de fotografía (verde) o de película
(azul), dependiendo del medio seleccionado.
6. El escáner está listo para usarse.
Nota:
Si no ve la luz de la pantalla LCD, mueva el selector de
iluminación de fotografía/película a su posición adecuada.
2. Escanear álbumes fotográficos/revistas/fotografías
NOTA: la bandeja de películas tiene una doble función
como base de esta unidad. Debe extraerla para escanear
fotografías.
1. Mueva el selector de foco de fotografía/película a
“PHOTO”
2. Mueva el selector de iluminación de fotografía/película
a “PHOTO”
Page 70

ES
3. Con la bandeja de películas extraída, coloque el
escáner sobre la imagen del álbum, de la revista o la
fotografía que desee escanear.
4. Pulse el botón de encendido para poner en
funcionamiento el escáner. Verá la imagen que se
encuentra bajo el escáner en la pantalla LCD.
5. Seleccione el tamaño de la fotografía (3,5” x 5” o 4” x 6”,
4” x 4”, 4,2” x 3,2”, 3,4” x 2,1”) pulsando el botón abajo
6. Pulse el botón OK para escanear la imagen. La imagen
digital escaneada se guardará automáticamente en su
tarjeta SD.
Nota:
Los tamaños de las fotografías instantáneas Polaroid y
Fuji son 4 x 4”, 4,2 x 3,2” y 3,4 x 2,1”.
-11-
Page 71

Nota:
Puede escanear la fotografía colocándola en la bandeja.
También puede escanear directamente de un álbum de
fotos sin sacarla de su soporte.
Si ve una imagen negra en la pantalla LCD en vez de la
imagen que desea escanear, compruebe que ambos
selectores están en la posición “PHOTO”. No introduzca
el soporte de películas en el escáner mientras esté
escaneando fotografías.
1. Ajuste del brillo: la exposición del escáner se ajusta
automáticamente. En algunas ocasiones puede que
necesite ajustar el brillo (exposición) de su imagen.
Pulse el botón EV/borrar para ajustar el valor de la
exposición.
Pulse el botón arriba o abajo para ajustar la compensación
de exposición entre +2EV y -2EV en incrementos de 0,5.
Page 72

ES
Se muestra la cantidad de compensación en la parte
inferior de la pantalla LCD. Pulse el nuevamente botón
EV/borrar para finalizar el ajuste.
3. Escanear película
Coloque la película/diapositiva en el soporte
1. Mantenga la cara satinada de la película hacia arriba.
Abra el soporte de diapositivas negativo/positivo tal y
como se muestra.
-13-
Page 73

2. Coloque una película 135 positiva/negativa en el
soporte como se indica.
3. Cierre el soporte asegurándose de que está bien
cerrado.
Escanear película y diapositivas
1. Mueva el selector de foco de fotografía/película a
“FILM”
2. Mueva el selector de iluminación de fotografía/película
a “FILM”
Page 74

ES
Introduzca el soporte con la película/diapositiva
adecuadamente colocada en la ranura de acuerdo con los
signos ▲ o ● mostrados en el escáner y en el soporte.
(▲ introducir por la entrada derecha)
(● introducir por la entrada izquierda)
Puede ajustar la colocación de la película moviendo el
soporte; el soporte puede moverse en ambas direcciones.
-15-
Page 75

Mantenga la película en el marco rectangular blanco que
se muestra en la pantalla LCD. Si no se coloca
adecuadamente la película, puede suceder que se copien
los bordes negros del soporte.
Si aparecen los bordes negros de la diapositiva en la
parte superior o inferior de la pantalla LCD, incline el
escáner hacia adelante o hacia atrás para eliminarlos.
Selección del tipo de película:
Para seleccionar el tipo de película, pulse el botón de
selección de tipo de película:.
Page 76

ES
135 positiva (diapositiva)
135 negativa
135 blanco y negro
Nota: Una selección incorrecta del tipo de película puede
producir un color incorrecto en la pantalla LCD y en las
imágenes escaneadas.
Pulse el botón OK para convertir las fotografías en
imágenes digitales.
-17-
Page 77

Para conseguir los mejores resultados en las imágenes
Nota:
Para ahorrar energía, el escáner se pondrá
automáticamente en modo sleep si no lo usa
durante más de 3 minutos. Puede volver a
activarlo pulsando cualquier botón.
Se apaga automáticamente si no se usa durante
más de 6 minutos.
digitalizadas, espere hasta que la imagen de la pantalla
ajuste el brillo y se vuelva estable. Normalmente suele
tardar de 3 a 4 segundos, dependiendo del brillo de la
película.
Page 78

ES
Mueva el soporte de película a la siguiente imagen.
Ajuste del brillo: la exposición del escáner se ajusta
automáticamente. En algunas ocasiones puede que
necesite ajustar el brillo (exposición) de su imagen.
Pulse el botón EV/borrar para ajustar el valor de la
exposición.
Pulse el botón arriba o abajo para ajustar la
compensación de exposición entre +2EV y -2EV en
incrementos de 0,5.
-19-
Page 79

Se muestra la cantidad de compensación en la parte
inferior de la pantalla LCD. Pulse el nuevamente botón
EV/borrar para finalizar el ajuste.
4. Modo reproducción
1. Pulse el botón de reproducción para reproducir las
imágenes digitales guardadas en su tarjeta. Verá el
icono de reproducción en la esquina inferior izquierda,
tal y como se muestra a continuación.
Page 80

ES
2. Pulse el botón arriba para revisar la imagen siguiente.
Pulse el botón abajo para revisar la imagen anterior.
3. Pulse el botón reproducción nuevamente para pasar
al modo presentación de diapositivas
El icono se muestra del siguiente modo:
-21-
Page 81

4. Vuelva a pulsar el botón reproducción para volver a la
pantalla original.
El icono se muestra del siguiente modo:
5. Modo borrado
1. Para borrar una imagen: En el modo reproducción,
pulse una vez el botón borrar y a continuación el
botón arriba para seleccionar YES. Pulse el botón OK
para borrar la imagen actual.
2. Para borrar todas las imágenes: Pulse dos veces el
botón borrar y a continuación una vez el botón arriba
para seleccionar YES. Pulse el botón OK para borrar.
Page 82

ES
Nota:
a. Tiene que haber tomado al menos una imagen
para entrar en el el modo borrar y formatear la
tarjeta SD.
b. Al formatear la tarjeta SD borrará todos los
archivos que haya en ella. Descargue los
archivos de la tarjeta SD en su ordenador
antes de formatearla.
c. Si no desea borrar imágenes, pulse el botón
abajo una vez para seleccionar NO y a
continuación el botón OK para abandonar el
modo borrado.
3. Formatear la tarjeta SD: Pulse tres veces el botón
borrar y a continuación el botón arriba y seleccione
YES. Pulse OK para empezar a formatear.
-23-
Page 83

6. Conectar la tarjeta al ordenador
1. Conecte el escáner al ordenador por medio del cable
USB:
2. Encienda el escáner.
3. Pulse el botón arriba para seleccionar “SD to PC”,
seleccione YES y a continuación el botón OK para
confirmar. Para ahorrar energía, la pantalla LCD se
apagará cuando esté conectado al ordenador.
Page 84

ES
Sensor de imagen
Sensor 1/2,33” 14 Mega CMOS,
Vista previa y revisión
Pantalla LCD de 2,4” en color
Especificaciones de
las lentes
F/No = 3,4, f = 5,2 mm
Balance de color
Automático
Control de exposición
Ajuste automático y manual
Tamaños de fotos
compatibles
4 x 6 pulgadas y 3,5 x 5 pulgadas
Medios de fotografía
compatibles
Álbum fotográfico/revista/fotografía
Tamaño de película
compatible con auto
encuadre
Negativos y diapositivas (3:2) 135
Tamaño de película
compatible con auto
conversión
Diapositiva 135
Negativos de color (135, 110 y 126)
Negativos en blanco y negro
Enfoque
Foco fijo/foco dual
Ajuste EV
Sí, ± 2,0 EV
Conexión a PC
USB 2.0
Tipo de USB
Micro USB tipo B
Formato de imagen
Foto 3:2
Película 135 3:2
Negativo 110 4:3
Negativo 126 1:1
Fuente luminosa
Fotografía: 24 y película 3 LEDs
blancos
7. Apéndice
Especificaciones
-25-
Page 85

Alimentación
Transformador de alimentación: 5
V/1 amp.
Batería de iones de litio 3,7 V/1050
mAh
Peso neto
Aproximadamente 1050 gr.
Dimensiones
18,2 (Al) x 20,9 (An) x 16,2 (Pr) cm
Las especificaciones pueden cambiar sin previo aviso.
Batería
completa
Borrar uno
Batería 2/3
Borrar todos
Batería 1/3
Formatea la
tarjeta SD.
Batería
descargada
Si
Diapositiva
135
No
Negativos 135
Error de
tarjeta
Negativos
135 B/N
Tarjeta llena
Icono e indicadores
Page 86

ES
Negativos 110
Bloquear
tarjeta
Negativos 126
Modo
reproducción
Selección
PC-tarjeta SD
Presentación
de imágenes
PC-tarjeta SD
conectados
Espere
3,5 x 5/
4 x 6
Tamaño de fotografía seleccionado
Indicador de compensación EV
Compensación EV
Número de tomas disponibles en tarjeta
SD
-27-
Page 87

Requisitos del sistema PC
Este símbolo en el producto o en las instrucciones indica
que su equipamiento eléctrico y electrónico debe
eliminarse,al final de su vida útil, separado de los
residuos domésticos. Hay sistemas diferentes de
recogida para el reciclado en la UE.
Para mayor información, póngase en contacto con las
autoridades locales o con el distribuidor en el que ha
adquirido el producto.
Pentium® P4 1,6GHz o similar AMD Athlon
1 puerto USB 2.0 libre
512MB RAM
500 MB de espacio libre en el disco duro
Monitor en color de 1024 x 768 píxeles
Unidad CD-ROM
Windows® XP Service Pack II/Vista™, 32/64 bits
Windows 7/Windows 8/Windows 10
Requisitos del sistema Mac
PowerPC G5/Intel Core Duo recomendado
1 puerto USB 2.0 libre
768MB RAM
500 MB de espacio libre en el disco duro
Monitor en color de 1024 x 768
Unidad CD-ROM
Mac 10.5 ~ superior
Page 88

ES
Merkurstrasse 8
Tel.: +49 74 57/94 65 60
72184 Eutingen, Alemania
Fax: +49 74 57/94 65 72
E-Mail: mail@reflecta.de
Web: www.reflecta.de
reflecta GmbH
-29-
Page 89

Scanner d'albums
combiné
Manuel d’utilisation
Page 90

Table des matières
1. Préparation .............................................................. 2
Accessoires standard .............................................. 2
Description des pièces ............................................ 3
Installation de la batterie ......................................... 6
Chargement de la batterie ....................................... 7
Préparation de votre scanner d'albums combiné .... 9
2. Scanner des albums photos/magazines/photos ... 10
3. Scanner des négatifs ............................................ 14
Placer les négatifs/diapositives dans le bac ......... 14
Scanner des négatifs et des diapositives .............. 15
4. Mode lecture .......................................................... 20
5. Mode suppression ................................................. 22
6. Connexion de la carte à l'ordinateur ..................... 24
7. Annexe .................................................................. 25
FR
Caractéristiques techniques .................................. 25
Icônes et indicateurs ............................................. 26
-1-
Page 91

1. Préparation
Accessoires standard
Scanner d'albums
combiné
Manuel
Brosse de
nettoyage
Porte-négatifs 135 Porte-diapositives 135
Adaptateur Câble USB Batterie au lithium
Page 92

Description des pièces
FR
EN FR
Photo/Film focus switch Commutateur de mise au point
photos/négatifs
Power Button Bouton Alimentation
Film Holder Slot Fente passe-vues
Photo/Film Light Switch Commutateur de lumière
photos/négatifs
Photo Tray Bac photo
LCD Screen Écran LCD
OK Button BoutonOK
EV/delete EV/supprimer
Film Type/Up Button Bouton type de négatifs/haut
-3-
Page 93

Playback Button Bouton lecture
Photo Size/Down Button Bouton taille des photos/bas
Battery Charging LED Témoin de charge batterie
Photo Status LED Témoin d'état photos
Film Status LED Témoin d'état négatifs
EN FR
Micro USB Connector Connecteur micro-USB
SD Card slot Fente pour carte SD
Battery Door Logement de la batterie
EN FR
Brush Brosse
Page 94

EN FR
135 Negative Holder Porte-négatifs 135
EN FR
135 Slide Holder Porte-diapositives 135
Remarque : Nous vous conseillons d'utiliser la brosse incluse
pour nettoyer la surface en verre du scanner d'albums combiné
régulièrement afin de produire des images nettes. Assurez-vous
que vos négatifs/diapositives montées et leurs supports soient
propres avant de les insérer dans le scanner d'albums combiné.
La présence de poussière ou de saleté sur le porte-négatifs
affectera la qualité de vos images scannées.
FR
-5-
Page 95

Installation de la batterie
1. Ouvrez le logement de la batterie en appuyant
légèrement et en faisant glisser le loquet du logement.
2. Insérez la batterie fournie. Assurez-vous que les
pôles (+ et -) de la batterie correspondent à la polarité
indiquée dans le logement de la batterie.
3. Replacez le couvercle du logement et appuyez sur le
loquet pour le remettre en place.
EN FR
Battery Door Logement de la batterie
État de charge de la batterie
Pleine Vide
Page 96

Chargement de la batterie
La batterie ne sera pas entièrement chargée au moment
de l'achat et doit donc être chargée intégralement avant
utilisation. Si le niveau de charge de la batterie devient
faible pendant que vous utilisez le scanner, il est conseillé
de la recharger aussi vite que possible.
1. Insérez la batterie dans le logement prévu à cet effet
(voir page 8).
2. Vous pouvez charger la batterie de deux façons
différentes :
(a) Branchez l'adaptateur micro-USB ou le câble
USB fourni au connecteur USB du scanner, et
branchez l'autre extrémité dans le port USB de
votre ordinateur de bureau/portable.
Veuillez charger la batterie au moins trois heures
avant la première utilisation.
FR
-7-
Page 97

(b) Connectez le câble micro-USB à l'adaptateur
électrique et branchez celui-ci dans une prise
électrique. Connectez la fiche micro-USB au
connecteur micro-USB du scanner. Le témoin
rouge s'allumera au cours de la charge de la
batterie lorsque le scanner ne sera pas en cours
d'utilisation, et s'éteindra une fois la charge
terminée.
Veuillez charger la batterie pendant au moins
trois heures.
Remarque :
Le scanner peut également fonctionner sans la batterie
lorsque l'adaptateur électrique et le câble USB sont
raccordés au scanner.
Page 98

Indication du témoin d'état :
Voyant rouge : (1) Allumé lorsque le scanner est sous
tension.
(2) Si le scanner n'est pas en cours
d'utilisation et est hors tension, le
voyant rouge s'allumera au cours de
la charge de la batterie et s'éteindra
une fois la batterie intégralement
chargée.
Voyant vert : S'allume lorsque le mode scan de photos est
activé.
Voyant bleu : S'allume lorsque le scan de négatifs est
activé.
Préparation de votre scanner d'albums combiné
1. Insérez une carte SD dans le logement prévu à cet
effet jusqu'à ce que la carte soit correctement
installée. Appuyez une fois sur la carte pour la libérer.
L'appareil accepte uniquement les cartes SD ou
SDHC jusqu'à un maximum de 32 Go.
2. Chargez la batterie dans le scanner comme décrit à la
section « Installation de la batterie ».
3. Sélectionnez le support que vous souhaitez scanner.
Basculez le commutateur de mise au point et le
commutateur de lumière photos/négatifs en fonction
du support utilisé.
-9-
FR
Page 99

4. Branchez l'adaptateur électrique à une prise
électrique, puis raccordez l'adaptateur électrique au
scanner à l'aide du câble micro-USB. Assurez-vous
que la fiche USB est insérée dans le bon sens. Ne
forcez pas pour insérer la fiche USB dans le
connecteur micro-USB.
5. Appuyez sur le bouton de mise en marche, puis sur le
bouton OK pour sélectionner NO (non raccordé à un
ordinateur) dans la boîte de dialogue qui s'affiche sur
l'écran LCD. Le voyant photo (vert) ou négatif (bleu)
s'allumera selon le support choisi.
6. Le scanner est maintenant prêt à être utilisé.
Remarque :
Si vous ne voyez pas de lumière sur votre écran LCD,
basculez le commutateur de lumière photos/négatifs sur
la bonne position.
2. Scanner des albums photos/magazines/photos
REMARQUE : le bac à négatifs sert aussi de base à
l'appareil. Vous devez le détacher pour scanner des
photos.
1. Basculez le commutateur de mise au point photos/
négatifs sur « PHOTO »
Page 100

2. Basculez le commutateur de lumière photos/négatifs
sur « PHOTO »
3. Une fois le bac à négatifs retiré, placez le scanner sur
l'image de l'album photo, du magazine, ou sur la
photo que vous souhaitez scanner.
4. Appuyez sur le bouton de mise en marche pour
allumer le scanner. Vous verrez l'image du support
placé sous le scanner s'afficher sur l'écran LCD.
5. Sélectionnez le format de la photo (3,5” x 5” ou 4” x 6”,
4” x 4”, 4,2” x 3,2”, 3,4” x 2,1”) en appuyant sur le
bouton bas.
6. Appuyez sur le bouton OK pour scanner l'image.
L'image numérique scannée sera automatiquement
stockée sur votre carte SD.
FR
-11-
 Loading...