

Page 1
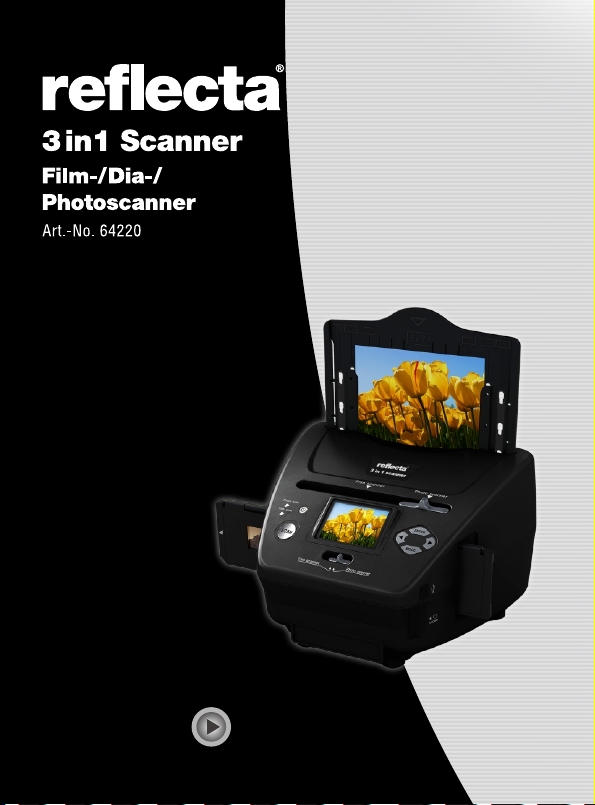
US ER 'S M AN UA L
US ER 'S M AN UA L
Page 2

Page 3

User’s Manual
For correct usage please read these instructions carefully and
keeps in a safe place for future reference!
Contents
1: Safety precautions
2: Package contents ……………………………………………2
3: Description of parts ……………………………………………3
4: Loading Slides …………………………………………………4
5: Loading Negatives ……………………………………………5
6: Loading photo …………………………………………………6
7: General operations ……………………………………………9
8: Trouble shooting ………………………………………………26
9: Technical Specifications ………………………………………27
* Illustrations are for instructional purposes only, and may be
different from the actual product.
……………………………………………1
Page 4

1: Safety precautions
Important: Do not expose this product to rain or moisture to
Caution: Do not disassemble this unit. To prevent the risk of
Ventilation: The device should be situated so that its location
Heat: The device should be situated away from sources
Cleaning: We strongly suggest using a clean, dry, non-alcohol
Non use period: The USB cord for the device should be unplugged
USB overloading: Do n ot overload the USB connections on your
Servicing: The user should not attempt to service the device
Film Holder: The design of the film holder follows ISO standard.
preserve the life of your product.
electric shock, do not remove cover.
or po sition doe s not in te rfere with it s pro pe r
ventilation. For example, the unit should not be
situated on a bed, sofa, rug or similar surface that
may block the ventilation openings.
of high heat such as radiators or stoves.
cotton swab to clean the glass surface periodically
to produce a clear image.
from the computer when the unit is left unused for a
long period of time.
computer. If you have too many devices connected
to yo ur compu te r such as a wirel ess mouse,
media player, mobile phone or other USB powered
devices. There may not be enough power for the
film & photo scanner to operate properly.
beyond those means described in the operating
instructions. All other servicing should be referred
to qualified person.
In some cases the holes on the film will not match
exactly to th e al ignment of the holder. This is
caused by a non-standard camera. In this case
there will be a small black line on the edge of the
frame that can easily be cropped out using photo
editing software.
1
Page 5

ISO-- International Organization for Standardization
For envir onm ent al protectio n an d en ergy conservation, besides
in PL AYB ACK and US B mod e, th e dev ic e wil l be powered off
automatically without any operation in 30 minutes of inactivity.
2: Package contents
Film & photo scanner•
USB cable•
Negative Film Holder•
Positive Slide Holder•
4 in 1 Photo Tray•
OCR CD•
AC/DC adapter•
User’s Manual•
Please remove the adaptor from the mains when not in use.
2
Page 6
3: Description of parts
Film and Photo Scanner
Positive Slide Holder
Negative Film Holder
Photo/Name card Holder USB cable
3
Page 7
4: Loading Slides
Hold up the slide toward the light. Face the
trademark side of the slide away from you.
Look through the slide and it should appear
normally (not a mirror image).
Now turn the slide so the image is upside
down while looking at the same side.
Open the slide holder at the marked spot on
the top.
With the slide holder laid open place the slide
into recessed area in the holder- the slide
should fit perfectly.
Note: Handle sl ides with care. A ny dust
scratches or fingerprints will show up on your
saved images. You’d better to cotton gloves
when handling slides. It is recommended to
use compressed air to remove any dust on
the slides. You can purchase it from an office
supply or electronics retailer.
Close the slide holder and press the edges
so that it locks in place.
Hold it in the position as shown in the film &
photo scanner.
Insert the Slide Holder into the slot on the
right s ide of the fi lm & photo scanner as
shown.
4
Page 8
5: Loading Negatives
Hold up the negative toward the light. As you
look through the negative you should be able to
read the small negative numbers normally (not a
mirror image).
Now turn the negative so the image is upside
down while looking at the same side.
Open the negative holder at the marked spot on
the top.
With the negative holder laid open place the
negative into holder so the notches line up with
the notches on the holder.
Note: Handle negatives with ca re. Any dust,
scratches or fingerprints will show up on your
sav ed images. If possible use cotton gloves
when handling negatives. It is recommended
to use compressed air to remove any dust on
the negatives. This is not included with the film
& photo scanner but can be purchased from an
office supply or electronics retailer.
Close the negative holder and press the edges
so that it locks in place.
Hold it in the position as shown in the film &
photo scanner.
Insert the negative holder into the slot on the
right side of the film & photo scanner as shown.
Film Holder: The design of th e fi lm holder
follows ISO standard. In some cases the holes
on the film will not match exactly to the alignment
of the holder. This is caused by a non-standard
camera. In this case there will be a small black
line on the edge of the frame that can easily be
cropped out using photo editing software.
I S O - - I n t e r n a t i o na l O rgan i z a t i o n fo r
Standardization
5
Page 9

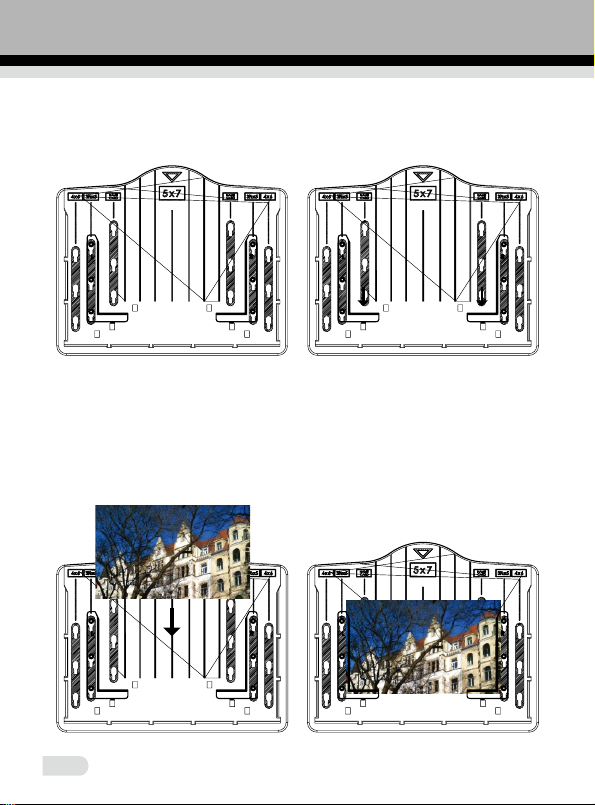
6: Loading photo
Left bracket Right bracket
Photo tray
Position the brackets according to the marked dimensions on the photo
tray.
Note that for 5x7” photographs, the brackets do not need to be fitted
into the photo tray.
6
Page 10
Place the brackets into the slots and slide the brackets downwards to
secure. Check that they are securely fastened by turning the photo tray
upside down. The brackets should not fall off.
1. Place brackets in photo tray
Insert the photo into appropriately sized photo tray (5”x7” (5R), 4”x6”
(4R), 3 ½”x5” (3R), name card)
2. Slide brackets downwards
to secure
7
Page 11

Insert the photo tray into the photo tray slot from the top of the film &
photo scanner as shown.
Note:
• Please use the provided OCR CD to organize the name cards.
• Handle photo with care. Any dust scratches or fingerprints will show
up on your saved images.
• Scanned name cards will capture a standard dimension of 91x55mm.
The scanned image will have a slight border around the name card.
8
Page 12

7: General operations
Note: Maybe there is some difference between the preview image and
saved image, please subject to the image that you saved in SD card.
♦
Quick Start
1. If you want to scan the films, please switch two switches on the top of
the device to the left side. Otherwise if you want to scan the photos,
please switch to the right side.
2. Put Slide/Negative onto the Slide/Negative Holder or insert photo into
appropriately sized photo tray (5”x7” (5R), 4”x6” (4R), 3 ½”x5” (3R),
name card)
3. Insert the Slide/Negative Holder into the slot on the right of the device
or insert photo tray into photo tray slot from the top of the device.
4. Apply the power to the film & photo scanner by two ways:
(1) USB: Connect the film & photo scanner to PC with USB cable
(2) 5V adapter: Connect the adapter to the device with USB cable
5. Press POWER button to turn on the film & photo scanner.
Note: (1) When the Film scanner mode is selected, the Film scan
indication LED is on. (2) When the Photo scanner mode is selected, the
Photo scan indication LED is on.
6. Follow the menu on screen for scanning.
7. After finished the scanning, take out the memory card.
Note: The film & photo scanner has a built-in memory for recording,
when there is a memory card inserted, it will be the top priority for
saving data.
8. Or read pictures from PC by USB mode
9. When capturing in either photo or film modes, please remember to
push both slide switches to the correct placement.
A notification will appear on-screen as a reminder to carry out the
following:
1. Photo: push both sliders to the right
2. Film: push both sliders to the left.
9
Page 13
Operation Guide
♦
Home/MODE: Main menu
When the Film scanner mode is selected, the following main menu will
appear.
① ② ③ ④ ⑤ ⑥
Language mode ④ Playback mode
①
USB mode ⑤ Film Type
②
Capture mode ⑥ Resolution
③
When the Photo scanner mode is selected, the following main menu
will appear:
① ② ③ ④ ⑤ ⑥ ⑦
Language mode
①
USB mode
②
Capture mode
③
Playback mode
④
Effect: multicolor, B&W
⑤
Crop proportion: (5”x7” (5R), 4”x6” (4R), 3 ½”x5” (3R), name card)
⑥
Resolution
⑦
10
Page 14
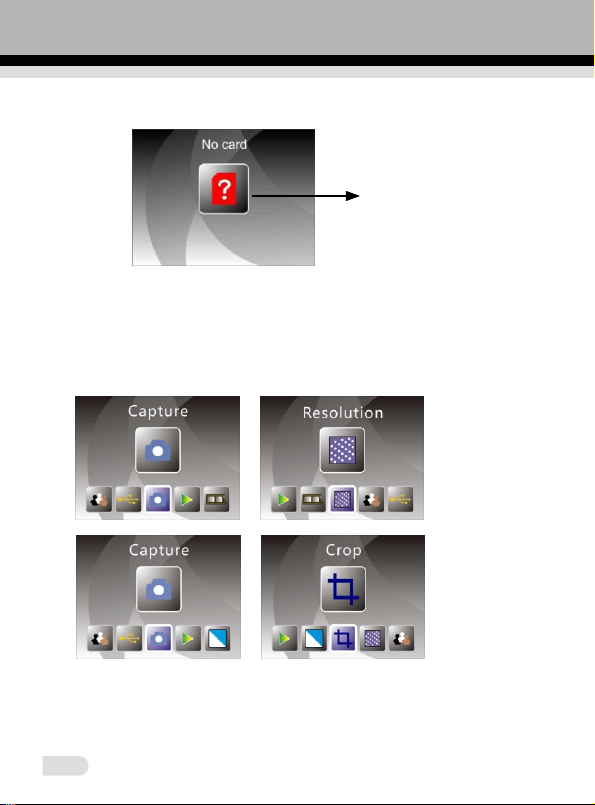
Home/MODE: No memory card
No memory card indicator
If there is no memory card inserted into the device, a warning icon will
be shown on screen when entering the main menu.
1: Capture
or
After the welcome page, the above menu will appear. User can press
LEFT/RIGHT button for desired menu, then press ENTER button to
confirm the selection.
11
Page 15
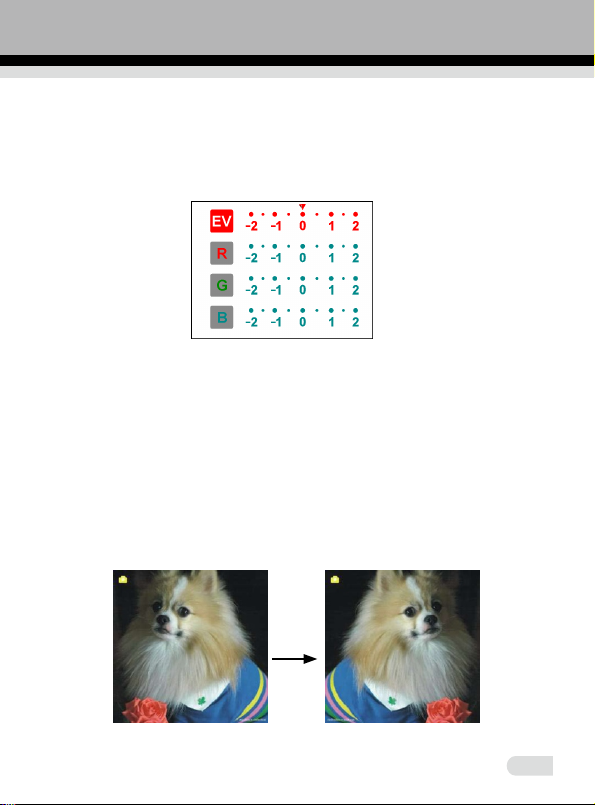
1.1 Adjust brightness and color of image
You can adjust brightness and color of image in capture mode.
When enter into capture mode, press ENTER button, following picture
will show on:
EV means brightness; R means red; G means green; B means blue.
Press ENTER button to switch, press LEFT/RIGHT button to adjust
data
Press SCAN button back to image preview mode
1.2 Capture: Mirror/Flip(Hard Key)
If any image requires for Mirror or Flip before capture, press LEFT/
RIGHT button for Mirror/Flip function, the live view will be adjusted
accordingly(This step is to correct user misplaced the film/photo either
upside down or flip). Mirror and Flip function can only be used while in
the live view mode.
Mirror
Press LEFT button to change image left to right
12
Page 16
Flip
Press RIGHT button to upside down image
1.3 Capture mode
live view indicator
Once entered capture mode, there will be an indicator on the left top
corner to indicate it is in live view mode.
User can also press ENTER button, then press LEFT/RIGHT button to
adjust EV value, press ENTER button again to confirm and back to live
view mode.
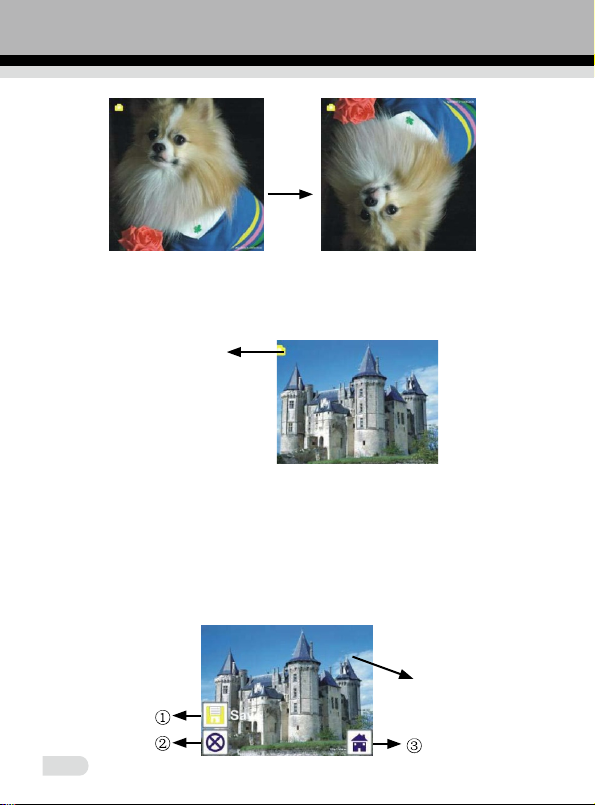
1.4 Capture: Edit Menu
Selected image
13
Page 17
Save: save captured image
①
Cancel: cancel any editing with this image
②
Home: back to main menu
③
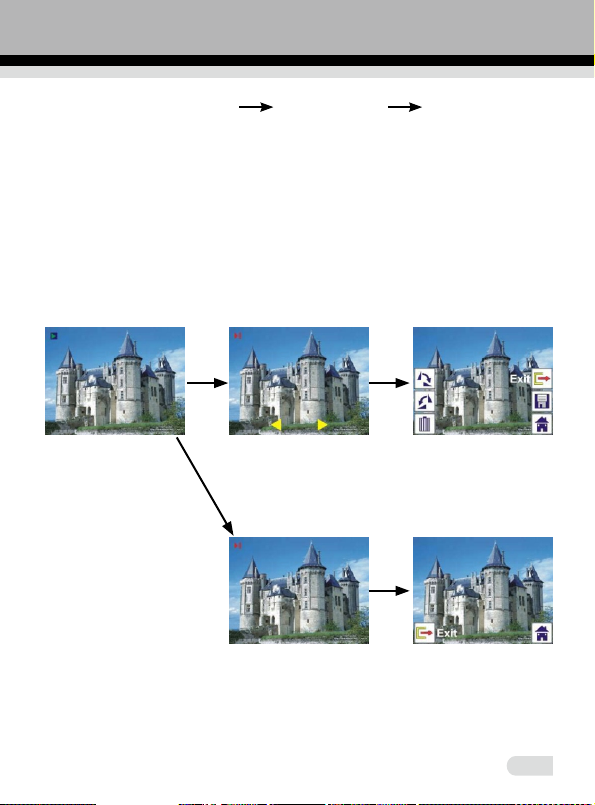
1.5 Live view
Once press SCAN button in live view, the edit menu will appear. When
user press ENTER button, the current image will be saved to internal
memory or memory card when there is a memory card inserted, the
display will return to live view again.
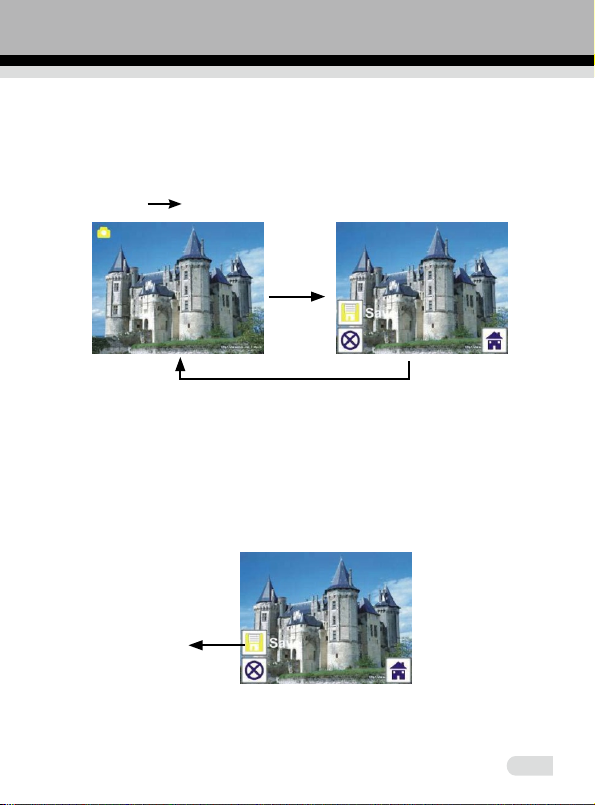
1.6 Capture: Save
Onc e use r press SCAN button, preview (live view) image will be
Capture/Edit menu
SCAN
ENTER
Save
14
Page 18
selected and shown on the TFT which will take between 1~2 second
with 2 icons shown on the left side of the screen. Save icon will be
highlighted for user to confirm by ENTER button, after the above step,
the display will go back to live view mode (preview)
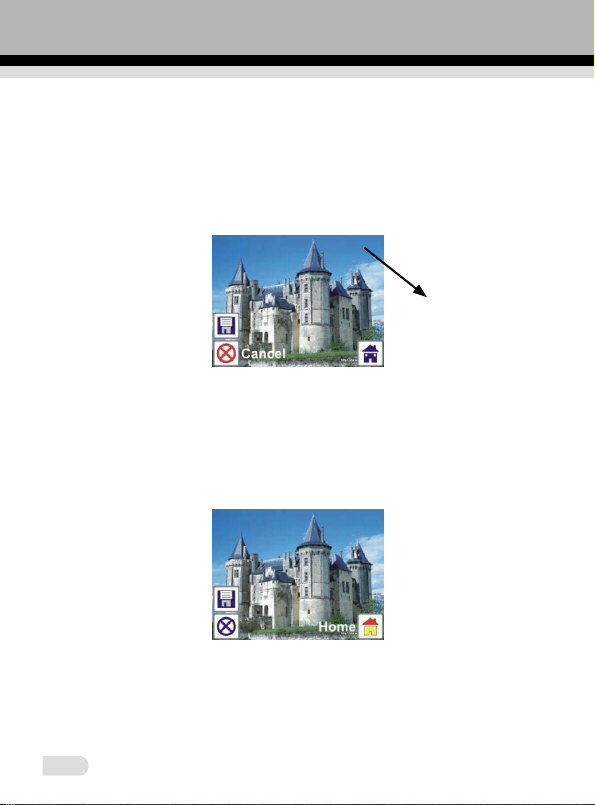
1.7 Capture: Cancel
Selected image
Select Cancel icon with LEFT/RIGHT button and press ENTER button
to cancel any editing step with present selected image and the display
will return to live view mode (nothing will be saved)
1.8 Capture: Home
Select Home icon with LEFT/RIGHT button, then press ENTER button
or press MODE button on top of the device anytime to return to main
menu
15
Page 19
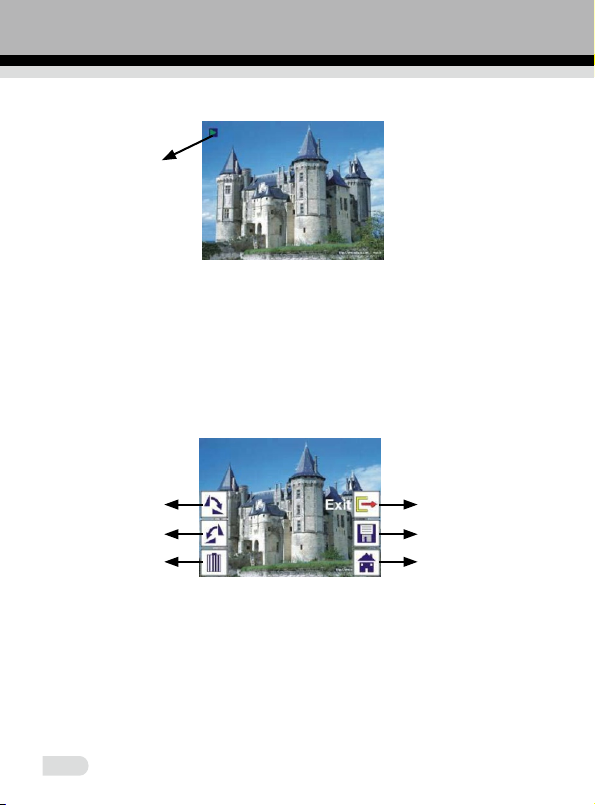
1.9 Exit from Edit mode back to Capture mode (live view)
Once user press ENTER button for save or cancel option, the display
will return to capture mode/live view. Then user can move the fi lm
holder to next target film or change another photo to capture.
1.10 Memory full
Once the images in internal memory or memory card is full, a memory
full icon will be shown on screen when press SCAN button. User has
to download the images to PC or replace another memory card for
continue capture.
Memory full indicator
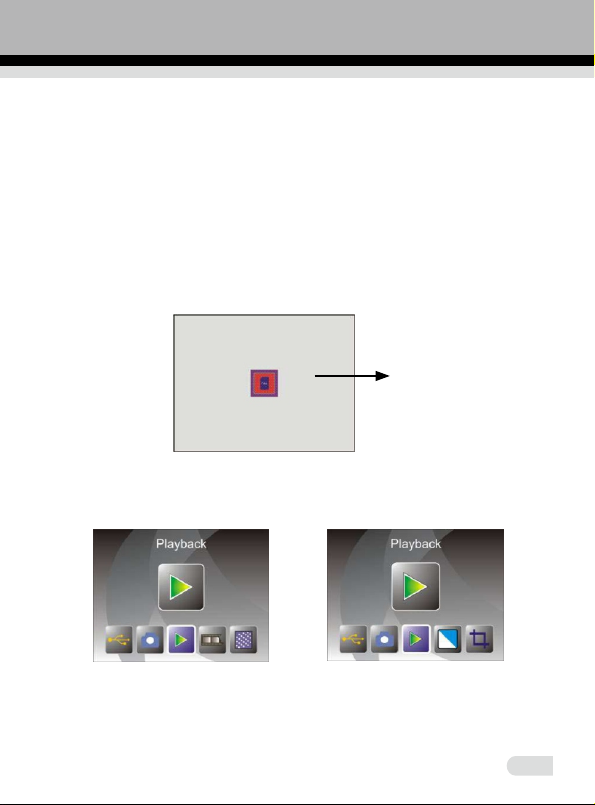
2: Playback
or
Press LEFT/RIGHT button to playback mode when power on the device
or access the main menu by Home icon/MODE button anytime. Press
ENTER button to confirm the selection.
16
Page 20
2.1 Playback: Auto Slide Show
Slide show mode
Once user enter playback mode (default to slide show), TFT will auto
display all images stored in internal memory or memory card with 2
seconds interval from previous captured image. User can also stop the
slide show by press ENTER button (Only the images captured by the
film & photo scanner are available in playback mode)
2.2 Playback: Edit Menu
①
②
③
Rotate +90: captured image rotate +90 degrees
①
Rotate –90: captured image rotate –90 degrees
②
Delete: delete this picture stored in internal memory or memory
③
card
Exit: return to Slide show mode
④
Save: save the modified image to internal memory or memory card
⑤
Home: return to main menu
⑥
④
⑤
⑥
17
Page 21
2.3 Playback: Slide show
Single picture Edit mode
User can interrupt (stop) slide show mode to stand alone playback
mode (single picture playback) by press ENTER button. (Pause slide
show) Then user is able to scroll each picture by LEFT/RIGHT button.
Once user select the picture stored in internal memory or memory card
which intended to be modified, press ENTER button again to bring out
the edit mode for modification.
If there is no memory card inserted or no image in internal memory,
TFT will auto display 20 frames stored in internal memory when enter
playback mode, but they will not be edited anytime.
Enter
Slide show mode Edit modeSingle picture mode
Use LEFT/RIGHT button
to scroll picture
Enter
Enter
Enter
18
Page 22
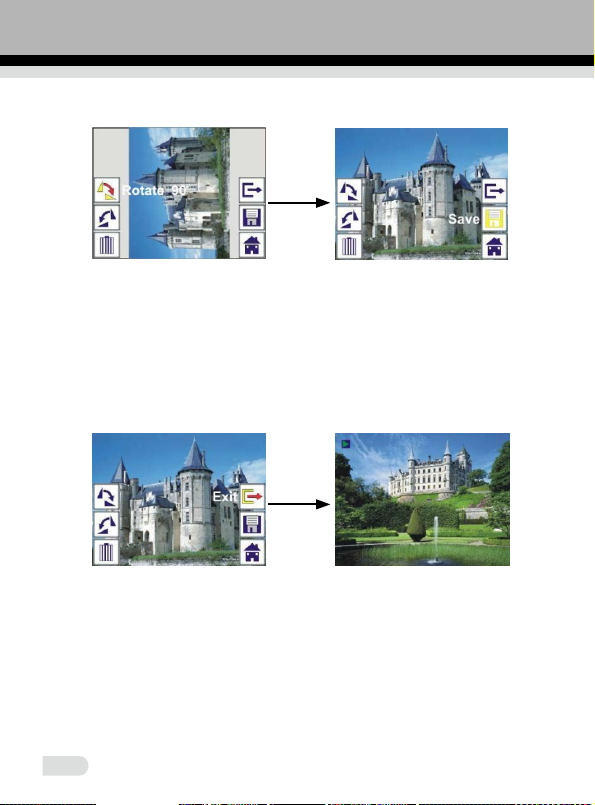
2.4 Playback: Rotate/Save
Enter
If user wants to rotate +90 degrees by ENTER button, the image will
be rotated +90 degrees and cursor will remain at Save. Press ENTER
button again to save modified result and next picture will be shown. For
continuously rotate +90 degrees, move cursor to rotate again and press
ENTER button. (Same for Rotate –90 function)
2.5 Playback: Exit
Enter
Once user select Exit function in edit menu, the display will go back to
slide show starting with the current picture without any change
19
Page 23
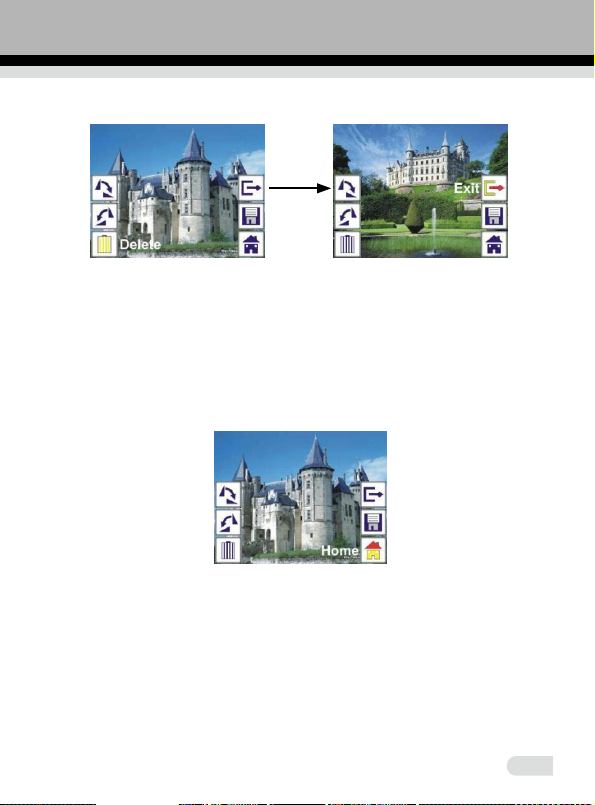
2.6 Playback: Delete
Enter
Select delete icon with LEFT/RIGHT button then press ENTER button,
that will delete the present s elected picture and next p icture will
be shown. Cursor will remain at Exit icon. If user intend to process
continuously delete, just move cursor to delete icon again and press
ENTER button to confirm.
2.7 Playback: Home
Select Home icon with LEFT/RIGHT button, then press ENTER button
or press MODE button on top of the device anytime to return to main
menu
20
Page 24
2.8 Playback: No Picture
If there is no picture when enter playback mode, a No picture symbol
will show on screen
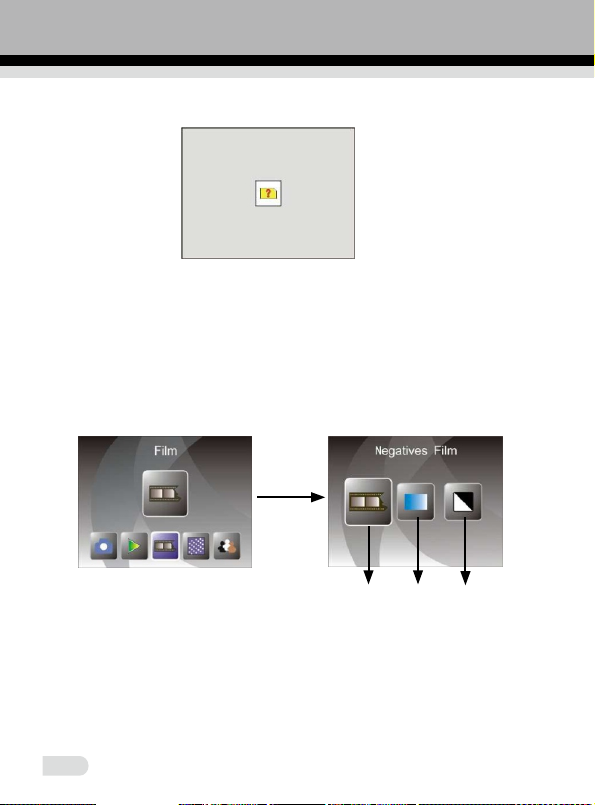
3: Film Type
When the Film scanner mode is selected, user can change film type by
enter Film Type menu when power on the device or access the main
menu by Home icon/MODE button anytime. Press LEFT/RIGHT button
for Film Type and press ENTER button to confirm.
① ② ③
Negatives Film: select Negatives film when load color negative film
①
in holder
Slides: select Slides when load slide in holder
②
B&W: select B&W when load B&W negative film in holder
③
User can press LEFT/RIGHT button to select fi lm type, then press
ENTER button to confirm
21
Page 25

4: Effect
When the Photo scanner mode is selected, user can change color
effect by enter Effect menu when power on the device or access the
main menu by Home icon/MODE button anytime. Press LEFT/RIGHT
button for Effect and press ENTER button to confirm
Multicolor effect
①
B&W effect
②
User can press LEFT/RIGHT button to select color effect, then press
ENTER button to confirm.
5: Crop proportion
When the Photo scanner mod e is selected, user can change crop
proportion by enter Crop menu when power on the device or access the
main menu by Home icon/MODE button during operation. Press LEFT/
RIGHT button for Crop and press ENTER button to confirm
① ②
① ② ③ ④
22
Page 26
5R (5’’X7’’) crop proportion
①
4R (4’’X6’’) crop proportion
②
3R (3 ½ ‘’x5’’) crop proportion
③
Name card crop proportion
④
User can press LEFT/RIGHT button to select crop proportion, then
press ENTER button to confirm.
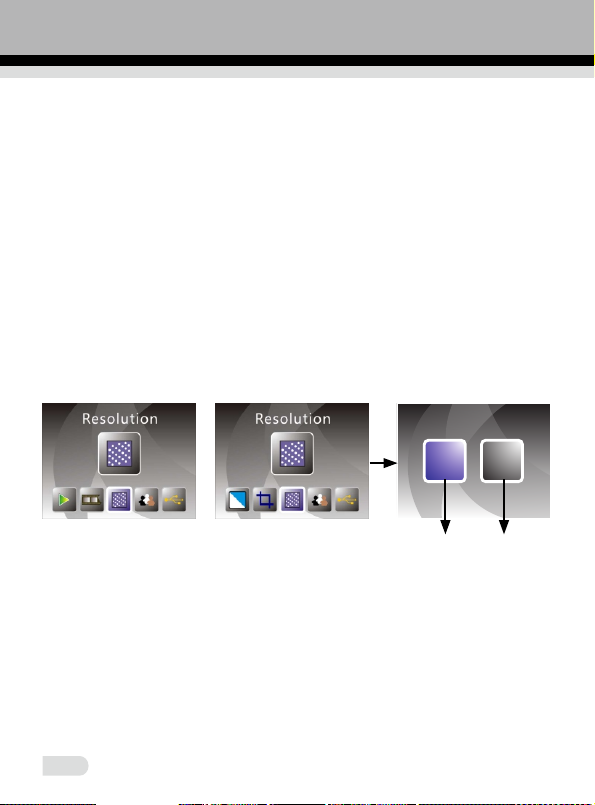
6: Resolution
Change resolution by enter Resolution menu when power on the device
or access the main menu by Home icon/MODE button anytime. Press
LEFT/RIGHT button for Resolution and press ENTER button to confirm.
8M 16M
or
① ②
8M resolution
①
16M resolution
②
User can press LEFT/RIGHT button to select resolution, then press
ENTER button to confirm.
23
Page 27
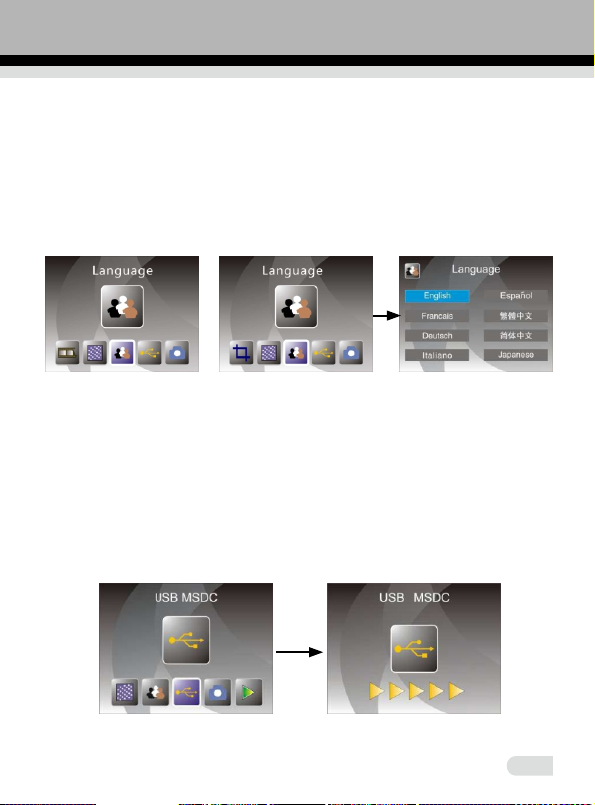
7: Language
Change language defi nition by enter language menu when power
on the device or access the main menu by Home icon/MODE button
anytime. Press LEFT/RIGHT button for language and press ENTER
button to confirm.
User can press LEFT/RIGHT button to select language, then press
ENTER button to confirm
or
8: USB mode
After finished capture, please take out the memory card from the film &
photo scanner to download the stored images from the memory card.
When the device is connected with USB cable to PC, User can also
press MODE button to main menu, then press LEFT/RIGHT button
to select USB mode, then press ENTER button to confirm, the film &
photo scanner will become a mass storage device and user can review
or edit images on PC.
User can also press MODE button to back to main menu.
24
Page 28

8: Trouble shooting
Question:
Answer: If it is slight stripe, move the slide holder gently to and fro in
If the stripe is still, please contact with our retailer.
Question: The device cannot connect to the computer.
Answer: Please check if the cable has already connected to the USB
Turn on the power button, enter USB mode, it acts as a
There is unwanted stripe appearance at the edge of the
image.
the device until the stripe is no longer visible in the preview
window.
port of the computer. Or connect the cable to another USB
port. It is recommended that connect it to the motherboard
directly, not to the front panel.
mass storage device.
25
Page 29

9: Technical Specifications
Lens :
♦
♦
Sensor : 8.1 mega pixels CMOS sensor
♦
LCD: 2.4 inch LTPS LCD Display
♦
External memory: SD/MMC
♦
Exposure : Auto
♦
Color balance : Auto
♦
Scan high resolution : 16M interpolation resolution
♦
Data conversion : 12 bits per color channel
♦
Scan Method : Single pass
♦
Light source : Backlight Panel
♦
LED light lifetime for
on & off:
♦
Power : Powered from USB/5V adapter
♦
Interface: USB 2.0
♦
Dimension: 220 x 208 x 147mm
♦
Weight: 850g
♦
Language:
MADE IN CHINA
2G3P F/NO=3.97 f=4.04 Film Range:51.5mm
F/NO=4 f=3.93 Photo Range:170mm
10000 times
English, French, German, Italian, Spanish,
Traditional Chinese, Simplified Chinese,
Japanese
26
Page 30

Page 31

Gebruikershandleiding
Lees vo or corr ect gebruik deze instructies zorgvul dig , en
bewaar deze op een veilige plaats voor toekomstig gebruik!
Inhoudsopgave
1: Veiligheidsvoorschriften
2: Inhoud verpakking ……………………………………………2
3: Omschrijving van onderdelen ………………………………3
4: Laden van dia’s ………………………………………………4
5: Laden van negatieven …………………………………………5
6: Laden van foto …………………………………………………6
7: Algemeen gebruik ……………………………………………9
8: Oplossen van problemen ……………………………………26
9: Technische specificaties ………………………………………27
* Illu str aties zijn voor educatieve doele ind en en kunnen
afwijken van het werkelijke product.
………………………………………1
Page 32

1: Veiligheidsvoorschriften
Belangrijk: Om de houdbaarheid van dit product te bewaren,
Let op: Dit apparaat niet demonteren. Verwijder de deksel
Ventilatie: Dit apparaat moet op een dergelijke plaats worden
Hitte: Dit apparaat moet worden geplaatst op een plek
Schoonmaak: We raden ten sterkste aan om een schone, droge
Periode zonder De U SB-kabe l voor het apparaat moet wo rden
gebruik:
Overbelasting Overbelast de USB-aansluitingen op uw computer
USB:
Onderhoud: De gebruiker dient niet meer onderhoud te doen
Filmhouder: Het ontwerp van de filmhouder volgt ISO-normen.
dit product niet blootstellen aan regen of vocht.
niet zodat een risico op een elektrische schok kan
worden vermeden.
neergezet zodat de ventilatie van het apparaat niet
gehinderd wordt. Bijvoorbeeld, plaats het apparaat
niet op een bed, bank, kleed of een vergelijkbaar
o pp er v lak wa a rbi j de ven t ila t ieop e nin g en
geblokkeerd worden.
zonder extreme hitte zoals radiatoren of kachels.
wattenstaaf zonder alcohol te gebruiken om het
glazen oppervlak regelmatig mee schoon te maken.
lo sg ekoppeld v an de computer wan neer het
apparaat gedurende lange tijd niet wordt gebruikt.
niet. Wanneer u teveel apparaten op uw computer
heeft aan ges lot en, zoals een draadl oze muis,
medias peler, m obiele tel efoon of ande re USBgev oede apparaten, is er mogelijk niet genoeg
stroom voor de fi lm & f otoscan ner om goed te
functioneren.
dan staat omschreven in de handleiding. Al het
andere onderhoud moet worden overgelaten aan
een professional.
In sommige gevallen zullen de perforatiegaatjes
op de film niet overeenkomen met de uitlijning van
de houder. Dit wordt veroorzaakt door een niet-
1
Page 33

standaard camera. In dit geval zal er een kleine
zwarte lijn aanwezig zijn aan de rand van de frame
die eenvoudig kan worden bijgesneden met behulp
ISO-- Internationale Organisatie voor Standaardisatie
Voor mi lieub es ch erming en en er giebesp ar in g, behalve in de
wee rgav emodus en USB-modus, wordt het apparaat automatisch
uitgeschakeld wanneer 30 minuten niets wordt gedaan.
van fotobewerkingssoftware.
2: Inhoud verpakking
Film & fotoscanner•
USB-kabel•
Negatieve filmhouder•
Positieve diahouder•
4-in-1 fotolade•
OCR CD•
AC/DC adapter•
Gebruikershandleiding•
Verwijder de adapter uit het stopcontact wanneer deze niet wordt
gebruikt.
2
Page 34

3: Omschrijving van onderdelen
Film & fotoscanner
Positieve diahouder
Negatieve filmhouder
Houder voor foto/naamkaartje USB-kabel
3
Page 35

4: Laden van dia’s
Houd de dia tegen het licht. Plaats de kant
van de dia met het handelsmerk van u af.
Wanne er u door de dia kijkt moet deze er
normaal uitzien (niet in spiegelbeeld).
Draai de dia zodat de afbeelding op zijn kop
is terwijl u nog door dezelfde kant kijkt.
Open de diahouder bij de gemarkeerde plek
op de top.
Met de diahouder open, plaats u de dia in de
uitsparing van de houder zodat deze perfect
past.
Op me rking: Ga met zorg met de d ia ’s
om. St of , k ra s se n o f vin ger afd ruk ken
zu ll en zi ch tbaar zijn op uw opg es la gen
afbeeldingen. Draag katoenen handschoenen
tijden s het han teren va n dia’s. Het w ordt
aanbevolen om perslucht te gebruiken om
st of van de dia’s te ver wijde ren. U ku nt
deze kopen bij een ka ntoorboekhandel of
elektronicaverkoper.
Sluit de diahouder en druk op de randen
zodat deze vastklikt.
Houd deze in de positie zoals weergegeven
op de film & fotoscanner.
Pl aats de dia ho uder in de gle uf aa n de
rechterzijde van de film & fotoscanner, zoals
aangegeven.
4
Page 36

5: Laden van negatieven
Houd de negatief tegen het licht. Normaliter zou u
tijdens het kijken door de negatief kleine negatieve
nummers moeten zien (niet als spiegelbeeld).
Draai de negatief zodat de afbeelding op zijn kop is
terwijl u nog door dezelfde kant kijkt.
Open de negatievenhouder op de gemarkeerde
plek aan de bovenkant.
Met de diahouder open, plaats u de negatief in de
uitsparing van de houder zodat deze uitlijnt met de
perforatiegaatjes op de houder.
Opmerking: Ga voorzichtig met negatieven om.
Stof, krassen of vingerafdrukken zullen zichtbaar
zi jn op uw op ge sl ag en af be eldingen. Draa g
katoenen handschoenen tijdens het ha nte ren
van ne ga ti eve n. He t wo rd t aanb ev ol en o m
perslucht te gebruiken om stof van de negatieven
te ver wi jdere n. U ku nt de ze k op en bij ee n
kantoorboekhandel of elektronicaverkoper.
Sluit de negatievenhouder en druk op de randen
zodat deze vastklikt.
Houd deze in de positie zoals weergegeven op de
film & fotoscanner.
Plaats de negatievenhouder in de gleuf aan de
recht erz ijd e v an de film & fotoscann er, zoa ls
aangegeven.
Filmhouder: Het ontwerp van de filmhouder volgt
IS O-nor me n. In sommi ge ge valle n z ul len de
perforatiegaatjes op de film niet overeenkomen met
de uitlijning van de houder. Dit wordt veroorzaakt
door een niet-standaard camera. In dit geval zal er
een kleine zwarte lijn aanwezig zijn aan de rand van
de frame die eenvoudig kan worden bijgesneden
met behulp van fotobewerkingssoftware.
I S O — I n t ernat ion ale O r g a n i satie v o o r
5
Standaardisatie
Page 37

6: Laden van foto
Linker
beugel
Fotolade
Plaats de beugels volgens de aangegeven maten op de fotolade.
Let op dat voor 5 x 7” foto’s, de beugels ni et hoeven te worden
aangebracht in de fotolade.
Rechter
beugel
6
Page 38

Plaats de beugels in de gleuven en schuif de beugels naar beneden om
deze vast te zetten. Controleer dat ze goed vastzitten door de fotolade
ondersteboven te houden. De beugels horen als het goed is niet te
vallen.
1. Plaats de beugels in de
fotolade
Plaats een foto in een fotolade met de juiste maat (5 x 7” (5R), 4 x 6”
(4R), 3½ x 5” (3R), name card).
2. Schuif de beugels naar
beneden om deze vast te zetten
7
Page 39

Plaats de fotolade in de gleuf van de fotolade vanaf de top van de film
& fotoscanner, zoals aangegeven.
Opmerking:
• Ge br ui k de me eg el ev er de OCR-c d om de na am ka artjes te
organiseren.
• Ga voorzichtig met de foto om. Stof, krassen of vingerafdrukken
zullen zichtbaar zijn op uw opgeslagen afbeeldingen.
• G escande naamkaartjes zullen een standaard opname-afmeting
hebben van 91 x 55 mm. De gescande afbeeldingen zal een lichte
randen hebben rond het naamkaartje.
7: Algemeen gebruik
Opmerking: Er kan een klein verschil zijn tussen de voorbeeldafbeelding
en de opgeslagen afbeeldingen, controleer de afbeelding die op de SDkaart is opgeslagen.
8
Page 40

♦
Snel beginnen
1. Wanneer u de films wilt inscannen, schuif dan de twee knoppen aan de
bovenkant van het apparaat naar de linkerzijde. Indien u de foto’s wilt
inscannen, schuif naar de rechterzijde.
2. Plaats de dia/negatief in de dia/negatievenhouder of plaats een foto in
een fotolade met de juiste maat (5 x 7” (5R), 4 x 6” (4R), 3½ x 5” (3R),
name card).
3. Plaats de dia/negatievenhouder in de gleuf aan de rechterzijde van
het apparaat of plaats de fotolade in de gleuf voor de fotolade aan de
bovenkant van het apparaat.
4. Zet stroom op de film & fotoscanner door middel van twee manieren:
(1)USB: Sluit de film & fotoscanner aan op een PC met de USB-kabel.
(2)5V adapter: Sluit de adapter aan op het apparaat met de USB-kabel.
5. Druk op de STROOM-knop om de film & fotoscanner aan te zetten.
Opmerking:
(1)Wanneer de Film-scanmodus is geselecteerd, zal de LED van de
Film-scan-indicator aan staan.
(2)Wanneer de Foto-scanmodus is geselecteerd, zal de LED van de
Foto-scan-indicator aan staan.
6. Volg het menu op het scherm om te scannen.
7. Nadat het scannen is voltooid, verwijderd u de geheugenkaart.
Opmerking: De film & fotoscanner heeft een ingebouwde geheugen
voo r opname; wanneer een geheugenkaart is geplaatst zal deze
geh eugenkaart de hoogte prioriteit hebben voor het ops laan van
gegevens.
8. Of lezen van afbeeldingen vanaf de PC via de USB-modus.
9. Tijdens het maken van een opname in ofwel de foto- of filmmodus,
onthoud om beide diaschakelaars in te drukken om zeker te zijn dat
alles goed is geplaatst.
Er zal een melding op het scherm komen ter herinnering om het volgende
te doen:
1.Foto: duw beide schuifregelaars
naar rechts
2.Fi lm: duw beide schuifregelaars
naar links.
9
Page 41

Bedieningshandleiding
♦
Start/MODUS: Hoofdmenu
Wan neer de Film- scanmodus is geselect eer d, zal het vol gende
hoofdmenu verschijnen:
① ② ③ ④ ⑤ ⑥
Taalmodus ④ Afspeelmodus
①
USB-modus ⑤ Filmtype
②
Opnamemodus ⑥ Resolutie
③
Wan neer de Fo to-scanmodu s is ge sel ect eerd, zal het volgend e
hoofdmenu verschijnen:
① ② ③ ④ ⑤ ⑥ ⑦
①
Taalmodus
USB-modus
②
Opnamemodus
③
Afspeelmodus
④
Effect: veelkleurig, Z&W
⑤
Bijsnijverhouding: (5 x 7” (5R), 4 x 6” (4R), 3½ x 5” (3R), naamkaartje)
⑥
Resolutie
⑦
10
Page 42

Start/MODUS: Geen geheugenkaart
Geen geh eugenkaartindicator
Als er ge en geheugenkaart in het apparaat is ge plaatst, zal een
wa arschuw in gspicto gr am worde n wee rg egeven wan ne er u het
hoofdmenu binnengaat.
1: Opname
of
Na de we lkomstpagina z al het bovenstaande menu verschi jne n.
De gebruiker kan de LINKS/RECHTS-knop indrukken om naar het
gewenste menu te gaan, en vervolgens de ENTER-knop indrukken om
de selectie te bevestigen.
11
Page 43

Aanpassenvandehelderheidenkleurvandeafbeelding
1.1
U kunt de helderheid en kleur van de afbeeldingen aanpassen in de
opnamemodus.
Nadat u in de opnamemodus bent gekomen, druk op de ENTER-knop,
waarna de volgende afbeeldingen zal worden weergegeven:
EV betekent helderheid; R betekent rood; G betekent groen; B betekent
blauw.
Druk op de ENTER-knop om te schakelen, druk op de LINKS/RECHTSknop om de gegevens aan te passen. Druk op de SCAN-knop om
terug te gaan naar de afbeeldingsvoorbeeldmodus.
1.2 Opname: Spiegelen/draaien (toets)
Als een afbeelding moet worden gespiegeld/gedraaid vóór de opname,
druk dan de LINKS/RECHTS-knop in voor de spiegel/draaifunctie,
waarna de liveweergave dienovereenkomstig wordt aangepast (deze
stap wordt gebruikt wanneer de gebruiker de dia/foto per ongeluk
ondersteboven of gedraaid heeft geplaatst). De spiegel- en draaifunctie
kunnen alleen worden gebruikt in de live weergavemodus.
Spiegelen
Druk de LINKS-knop in om de afbeelding te veranderen van links naar
rechts.
12
Page 44

Draaien
Druk de RECHTS-knop in om het beeld ondersteboven te draaien.
1.3 Opnamemodus
live weergaveindicator
Na da t u in de op na me mo du s terech t bent ge ko me n, zal ee n
indicator aan de linkerbovenzijde zichtbaar zijn die aangeeft dat live
weergavemodus is ingeschakeld.
De gebruiker kan ook de ENTER-knop indrukke n, vervolgens de
LINKS/RECHTS-knop indrukken om de EV-waarde aan te passen, en
vervolgens de ENTER-knop weer indrukken om terug te gaan naar de
live weergavemodus.
1.4 Opname: Het menu bewerken
Geselecteerde
afbeelding
13
Page 45

Opslaan: sla vastgelegde afbeelding op
①
Annuleren: annuleer elke bewerking van deze afbeelding
②
Start: terug naar het hoofdmenu
③
1.5 Live weergave Menu voor opname/bewerken
SCAN
ENTER
Nadat u de SCAN-knop in de live weergave heeft ingedrukt zal het
menu voor bewerken verschijnen. Wanneer de gebruiker op de ENTERknop drukt wordt de hui dige afbeelding opgeslagen in het interne
geheugen, of op een geheugenkaart indien deze is geplaatst, en zal de
weergave vervolgens weer terugkeren naar de live weergave.
1.6 Opname: Opslaan
Opslaan
Wanneer de gebruiker op de SCAN-knop drukt zal de voorvertoning (live
weergave) worden geselecteerd en worden weergegeven op de TFT,
hetgeen ongeveer 1~2 seconden duurt waarbij 2 pictogrammen aan de
14
Page 46

linkerkant van het scherm zullen worden weergegeven. Het pictogram
voor opslaa n zal worden g emarkeerd zodat de gebruiker dit kan
bevestigen door te drukken op de ENTER-knop, na deze bovenstaande
stap zal de weergave terugkeren naar de live weergave (voorvertoning).
1.7 Opname: Annuleren
Ge se le ct ee rd e
afbeelding
Sel ecteer het pictogram voor annuleren met de LINKS/RECHTSknop en druk op de ENTER-k nop om een bewerkingsstap met de
huidig geselecteerde afbeelding te annuleren waarna de weergave
za l te rugke ren na ar de live weergav e-mod us (niets zal wo rden
opgeslagen).
1.8 Opname: Start
Selecteer het pictogram voor start met de LINKS/RECHTS-knop en
druk vervolgens op de ENTER-knop of druk op de MODE-knop op de
bovenkant van het apparaat om terug te keren naar het hoofdmenu.
15
Page 47

1.9 Verl aten van de modus voor be werken e n terug n aar de
opname modus (live weergave)
Nadat de gebruiker op de ENTER-knop heeft gedrukt om op te slaan
of te bewerken, zal de weergaven terugkeren naar de opnamemodus/
live weergave. De gebruiker kan vervolgens de filmhouder naar de
volgende film plaatsen, of de foto te veranderen die wordt opgenomen.
1.10 Geheugen vol
Zodra het intern geheugen of de geheugenkaart vol is zal een pictogram
van vol geheugen worden weergegeven op het scherm wanneer de
SCAN-knop wordt ingedrukt. De gebruiker moet de afbeeldingen naar
de PC downloaden, of de geheugenkaart vervangen, om verder te gaan
met de opnames.
Geheugen-vol-indicator
2: Afspelen
of
Druk op de LINKS/RECHTS-knop om naar de afspeelmodus te gaan
wanneer het apparaat aanstaat, of ga naar het hoofdmenu door op elk
moment het pictogram van start of de MODE-knop in te drukken. Druk
op de ENTER-knop om de selectie te bevestigen.
16
Page 48

2.1 Afspelen: Automatische diapresentatie
Diapresentatiemodus
Nadat de gebruiker de afspeelmodus is ingegaan (standaard voor
diapresentatie) zal de TFT automatisch alle afbeeldingen weergeven
die staan opgeslagen in het interne geheugen of geheugenkaart, met
een interval van 2-seconden t.o.v. van de vorige opgeslagen afbeelding.
De gebruiker kan de diapresentatie stoppen door op de ENTER-knop
te drukken (Alleen de afbeeldingen die zijn opgenomen met de film &
fotoscanner zijn beschikbaar in de afspeelmodus).
2.2 Afspelen: Het menu bewerken
①
②
③
+90 draaien: draai de vastgelegde afbeelding met +90 graden
①
-90 draaien: draai de vastgelegde afbeelding met -90 graden
②
Verwijderen: verwijder de foto die is opgeslagen in het interne
③
geheugen of op de geheugenkaart
Afsluiten: terug naar de diapresentatiemodus
④
Opslaan: sla de gewijzigde afbeelding op, op het interne geheugen
⑤
of op de geheugenkaart
Start: terug naar het hoofdmenu
⑥
④
⑤
⑥
17
Page 49

2.3 Afspelen: Diapresentatie Enkele afbeelding Modus voor
bewerken
De gebruiker kan de diapresentatie onderbreken (stoppen) om terug te
keren naar de afspeelmodus (afspelen van een enkele afbeelding) door
te drukken op de ENTER-knop (diapresentatie wordt onderbroken). De
gebruiker kan door elke afbeelding scrollen via de LINKS/RECHTSknop. Wann eer de a fbeelding in het interne geheugen of op de
geheugenkaart is geselecteerd, druk nogmaals op de ENTER-knop om
de modus voor bewerken te openen.
Als g een geheugenkaart is geplaatst of wanneer geen afbeelding
aanwezig is in het interne geheugen zal de TFT automatisch 20 frames
in het interne geheugen opslaan tijdens de afspeelmodus. Maar deze
kunnen niet bewerkt worden.
Enter
Diapresentatiemodus Modus voor
Enter
Modus voor enkele
afbeelding
Gebruik de LINKS/
RECHTS-knop om
door de afbeeldingen
te scrollen
Enter
bewerken
Enter
18
Page 50

2.4 Afspelen: Draaien/opslaan
Enter
Als de gebruiker +90 graden wil draaien via de ENTER-knop zal de
afbeelding +90 graden worden gedraaid en de cursor blijven bij Save.
Druk de ENTER-knop opnieuw in om het aangepaste resultaat op te
slaan en waarna de volgende afbeelding zal worden getoond. Om
continu +90 graden te draaien, beweeg de cursor om weer te draaien
en druk op de ENTER-knop (hetzelfde geldt voor de functie voor –90
graden draaien).
2.5 Afspelen: Afsluiten
Enter
Wanneer de functie voor afsluiten gebruikt in het menu voor bewerken,
zal de weergave terugkeren naar de diapresentatie vanaf de huidige
foto.
19
Page 51

2.6 Afspelen: Wissen
Enter
Selecteer de pictogram van verwijderen met de LINKS/RECHTS-knop
en druk vervolgens op de ENTER-knop; de huidige geselecteerde foto
zal worden verwijderd en de volgende foto zal worden getoond. De
cursor zal blijven bij het pictogram voor afsluiten. Als de gebruiker van
plan is om herhaaldelijk te verwijderen, beweeg de cursor weer naar het
pictogram van verwijderen en druk op de ENTER-knop ter bevestiging.
2.7 Afspelen: Start
Selecteer het pictogram voor start met de LINKS/RECHTS-knop en
druk vervolgens op de ENTER-knop of druk op de MODE-knop op de
bovenkant van het apparaat om terug te keren naar het hoofdmenu.
20
Page 52

2.8 Afspelen: Geen afbeelding
Als geen afbeelding is geselecteerd tijdens de afspeelmodus zal de
pictogram van Geen afbeelding op het scherm worden weergegeven.
3: Filmtype
Wanneer de Film-scanmodus is geselecteerd kan de gebruiker de
filmtype veranderen door naar het menu voor Filmtype te gaan wanneer
er stroom op het apparaat staat of op elk moment in het hoofdmenu via
het pictogram voor Start/MODE-knop. Druk de LINKS/RECHTS-knop in
voor Filmtype en druk op de ENTER-knop ter bevestiging.
① ② ③
Negatieven-film: s electee r Neg atieven-film wanneer films met
①
negatieven in kleur in de houder worden geladen
Dia’s: selecteer Dia’s wanneer dia’s in de houder worden geplaatst
②
Z&W: selecteer Z&W wanneer films met negatieven in Z&W in de
③
houder worden geladen
De gebruiker kan de LINKS/RECHTS-knop gebruiken om het type film
te selecteren en de ENTER-knop gebruiken ter bevestiging
21
Page 53

4: Effecten
Wanneer de Foto-scanmodus is geselecteerd kan de gebruiker het
kleureffect veranderen door naar het menu v oor Effecten te gaan
wanneer er stroom op het apparaat staat of op elk moment in het
hoofdmenu via het pictogram voor Start/MODE-knop. Druk de LINKS/
RECHT S-k nop in voo r Effec ten en druk op de ENTER- knop ter
bevestiging
Meerkleureneffect
①
Z&W-effect
②
De gebruiker ka n de LINKS/RECHTS-knop geb ru iken om het
kleureffect te selecteren en de ENTER-knop gebruiken ter bevestiging
5: Bijsnijverhouding
Wanneer de Foto-scanmodus is geselecteerd kan de gebruiker de
bijsnijverhouding veranderen door naar het menu voor Bijsnijden te
gaan wanneer er stroom op het apparaat staat of tijdens gebruik in het
hoofdmenu via het pictogram voor Start/MODE-knop. Druk de LINKS/
REC HTS-kno p in voor Bijsnijden en druk op de ENTER-knop ter
bevestiging
① ②
① ② ③ ④
22
Page 54

5R (5 x 7”) bijsnijverhouding
①
4R (4 x 6”) bijsnijverhouding
②
3R (3½ x 5”) bijsnijverhouding
③
Bijsnijverhouding naamkaartje
④
De g eb ru ik er kan de LI NK S/REC HT S- kn op gebruike n om de
bij snijver houding te select eren en de ENTER-knop gebruike n ter
bevestiging
6: Resolutie
Verander de resolutie door naar h et menu voor Resolutie te gaan
wanneer het apparaat aanstaat, of ga naar het hoofdmenu door op elk
moment het pictogram van start of de MODE knop in te drukken. Druk
de LINKS/RECHTS-knop in voor Resolutie en druk op de ENTER-knop
ter bevestiging
8M 16M
of
8M resolutie
①
16M resolutie
②
De gebruiker kan de LINKS/RECHTS-knop gebruiken om de resolutie
te selecteren en de ENTER-knop gebruiken ter bevestiging
① ②
23
Page 55

7: Taal
Verander de taal door naar het menu voor Taal te gaan wanneer het
apparaat aanstaat, of ga naar het hoofdmenu door op elk moment het
pictogram van start of de MODE knop in te drukken. Druk de LINKS/
RECHTS-knop in voor kiezen van taal en druk op de ENTER-knop ter
bevestiging.
of
De gebruiker kan de LINKS/RECHTS-knop gebruiken om de taal te
selecteren en de ENTER-knop gebruiken ter bevestiging.
8: USB-modus
Verwijder na opname de geheugenkaart van de film & fotoscanner om
de opgeslagen afbeeldingen van de geheugenkaart te downloaden.
Wanneer het apparaat via een USB-kabel is verbonden aan de PC
kan de gebruiker ook de MODE-knop indrukken in het hoofdmenu,
gevolgd door het indrukken van de LINKS/RECHTS-knop om de USBmodus te selecteren, en de ENTER-knop indrukken ter bevestiging,
waarna de film & fotoscanner zal worden gezien als een apparaat voor
massaopslag en de gebruiker via de PC de afbeeldingen kan bekijken,
en bewerken.
De gebruiker kan ook de MODE-knop indrukken om terug te gaan naar
het hoofdmenu.
24
Page 56

8: Oplossen van problemen
Vraag:
Antwoord: Als het een licht streep i s, beweeg de diahouder dan
Als de streep aanwezig blijft, neem dan contact op met onze
Vraag: Het apparaat kan geen verbinding maken met de computer.
Antwoord: Controleer of de kabel is aangesloten op de USB-poort van
Er zijn ongewenste strepen aan de rand van de afbeelding.
voorzichtig in en uit het apparaat totdat de streep niet meer
zichtbaar is in het voorbeeldvenster.
leverancier.
de computer. Of, sluit de kabel op een andere USB-poort
aan. Het wordt aanbevolen om de aansluiting direct op het
moederbord te doen, en niet op het voorpaneel. Druk de
stroomknop in, ga naar de USB-modus, en het apparaat zal
als massaopslag worden gezien.
25
Page 57

9: Technische specificaties
Lens :
♦
♦
Sensor : 8,1 megapixels CMOS-sensor
♦
LCD: 2,4 inch LTPS LCD-scherm
♦
Extern geheugen: SD/MMC
♦
Blootstelling: Auto
♦
Kleurbalans: Auto
♦
Hoge resolutiescan: 16M interpolatieresolutie
♦
Gegevensomzetting: 12 bits per kleurkanaal
♦
Scanmethode: Enkelvoudige doorgaan
♦
Lichtbron: Backlight paneel
♦
LED-licht levensduur
voor aan & uit:
♦
Stroom: Gevoed door USB/5 V adapter
♦
Interface: USB 2.0
♦
Afmetingen: 220 x 208 x 147mm
♦
Gewicht: 850g
♦
Taal:
GEMAAKT IN CHINA
2G3P F/NO=3.97 f=4.04 Filmbereik:51.5mm
F/NO=4 f=3.93 Fotobereik: 170 mm
10000 keer
Engels, Frans, Duits, Italiaans, Spaans,
Tradi ti oneel Chin ees, Vereen vo udigd
Chinees, Japans
26
Page 58

Page 59

Guide d'utilisation
Pour bien utiliser cet appareil, lisez attentivement ce manuel et
le conserver dans un endroit sûr pour toute référence future !
Sommaire
1: Consignes de sécurité
2: Contenu de l'emballage ………………………………………2
3: Description des composants …………………………………3
4: Chargement des diapositives…………………………………4
5: Chargement de négatifs ………………………………………5
6: Chargement de photos ………………………………………6
7: Utilisation générale ……………………………………………9
8: Dépannage ……………………………………………………26
9: Spécifications techniques ……………………………………27
* Les illustrations sont données à titre indicatif seulement et
peuvent être différentes du produit réel.
………………………………………1
Page 60

1: Consignes de sécurité
Important : N'exposez pas cet appareil à la pluie ou à l'humidité
Attention : Ne démontez pas cet appareil. Pour éviter tout
Ventilation : L' apparei l doi t être pl ac é de man ière que sa
Chaleur : L'appareil doit être placé loin de toute source de
Nettoyage : I l e st for t eme nt re c omm a ndé de net t oye r
Période de non- Débranchez le câble USB de l'ordinateur si l'appareil
utilisation :
Surcharge USB : Ne surchargez pas les connexions USB de votre
Réparation : N' es sa ye z pas de réparer l'appareil par une
Trous de film : La conception du porte-film es t co nfo rme à la
pour en assurer une longue durée de vie.
ri sque de ch oc é le ct rique , n' en le vez pa s le
couvercle.
ve nt il at io n ne so it pa s gênée. Pa r exemple,
l'appareil ne doit pas être placé sur un lit, canapé,
tap is ou une su rface sim ilaire où les fentes de
ventilation pourraient être bloquées.
chaleur telle que radiateurs, cuisinières etc.
périodiquement la surface en verre au moyen d'un
coton-tige propre, sec, sans alcool afin de la garder
propre.
ne va pas être utilisé pendant une longue période.
ordinateur. Si plusieurs appareils sont connectés
à votre ordinateur tels que souris sans fil, lecteur
multi mé dia , té lépho ne port ab le ou d' aut re s
appar eil s aliment és via USB, le sca nner pour
fil ms/diap ositives ris que d e ne pas fonctionner
correctement.
méthode autre que celles décrites dans ce manuel.
Tout autre en treti en doi t êtr e effectué par un
technicien qualifié.
norme ISO. Dans certains cas, les trous de la
pellicule ne sont pas alignés exactement à ceux du
porte-film. Ceci est dû à une caméra non-standard.
Dans ce cas, il y aura une petite ligne noire sur le
1
Page 61

bord du cadre pouvant facilement être enlevée à
ISO-- Organisation internationale de normalisation
Pour la protection de l'environnement et l'économie d'énergie, en mode
LECTURE et USB, l'appareil sera éteint automatiquement s'il reste
inactif pendant 30 minutes.
l'aide d'un logiciel de retouche photo.
2: Contenu de l'emballage
Scanner Films/Diapositives•
Câble USB•
Porte-film (négatif)•
Porte-diapositive (positif)•
Porte-photo 4 en 1•
OCR CD(reconnaissance optique de caractères)•
Adaptateur secteur•
Guide d'utilisation•
Débranchez l'adaptateur du secteur lorsqu'il n'est pas utilisé.
2
Page 62

3: Description des composants
Scanner Films /
Diapositives
Porte-diapositive (positif)
Porte-film (négatif)
Porte-photo/Nom Câble USB
3
Page 63

4: Chargement des diapositives
Orientez la diapositive vers la lumière. Orientez
le côté ma rq ue de l a d ia posit iv e v ers le
côté op posé à v ous. Regar dez à travers la
diapositive ; elle doit apparaître normale (pas
une image miroir).
Re to ur ne z l a dia po si ti ve de manière que
l'image soit à l'envers tout en gardant la même
orientation.
Ouvrez le porte-diapositive à l'endroit marqué
en haut.
Avec l e p orte-diapos iti ve ouvert, placez la
diapositive dans la zone en retrait du portediapositive de manière à reposer parfaitement
en place.
Re marque : Man ip ulez les diap os itive s à
avec précaution. Toute poussière, rayures ou
traces de doigts apparaissent sur les images
enregistrées. Il est préférable d e porter des
gants en coto n lors de la manipul ation d es
diapositives. Il est recomman dé d'utiliser de
l'air comprimé pour enlever la poussière des
diapos iti ves. Vou s pouvez e n acheter chez
une boutique de fournitures de bureau ou de
matériel électronique.
Refermez le porte-diapositive en appuyant sur
les bords jusqu'à ce qu'ils soient en place.
Il faut le tenir dans la position indiquée dans le
scanner pour films/diapositives.
In sére z l e p or te-diap ositive dans la fe nt e
située sur le côté droit du scanner pour films/
diapositives comme illustré.
4
Page 64

5: Chargement de négatifs
Orientez le négatif vers la lumière. Lorsque vous
regardez à travers le négatif, vous devez pouvoir
lire normalement les petits nombres du négatif (pas
une image miroir).
Retournez le négatif de manière que l'image soit à
l'envers tout en gardant la même orientation.
Ouvrez le porte-négatif à l'endroit marqué en haut.
Avec le porte-négatif ouvert, y placez le négatif de
manière que ses encoches soient alignées avec
celles du porte-négatif.
Remarque : Manipulez le négatif à avec précaution.
Tout e p oussière, ray ures ou t races de do igts
apparaissent sur les images enregistrées. Il est
préférable de porter des gants en coton lors de
la manipulation des négatifs. Il est recommandé
d'utiliser de l'air comprimé pour enlever la poussière
des négatifs. Vous pouvez en acheter chez une
boutique de fournitures de bureau ou de matériel
électronique.
Refermez le porte-négatif en appuyant sur les bords
jusqu'à ce qu'ils soient en place.
Il faut le tenir dans la position indiquée dans le
scanner pour films/diapositives.
Insérez le porte- négatif dans la fente située sur le
côté droit du scanner pour films/diapositives comme
illustré.
Trou s de film : La concepti on du porte-film est
conforme à la norme ISO. Dans certains cas, les
trous de la pellicule ne sont pas alignés exactement
à ceux du porte-film. Ceci est dû à une caméra nonstandard. Dans ce cas, il y aura une petite ligne
noire sur le bord du cadre pouvant facilement être
enlevée à l'aide d'un logiciel de retouche photo.
ISO — Organisation internationale de normalisation
5
Page 65

6: Chargement de photos
Equerre
gauche
Porte-photo
Placez les équerres en fonction de dimensions marquées sur le portephoto.
Il convient de noter que pour photos 5 x 7 pouces les équerres ne sont
pas nécessaires.
Equerre
droit
6
Page 66

Placez les équerres dans les fentes et les faire glisser vers le bas pour
les fixer. Vérifiez qu'elles sont bien fixées en retournant le porte-photo.
Les équerres ne doivent pas tomber.
1.Placez les équerres dans le
porte-photo
Insérez la photo dans le tiroir photo approprié (5 x 7 pouces (5R), 4 x 6
pouces (4R), 3½ x 5 pouces (3R), porte-nom).
2. Faites glisser les équerres
vers le bas pour les fixer
7
Page 67

Insérez le porte-photo dans la fente pour porte-photo à partir du haut
du scanner pour films/diapositives comme illustré.
Remarque :
• Utilisez le CD OCR fourni pour organiser les porte-nom.
• Manipulez les photos à avec précaution. Toute poussière, rayures ou
traces de doigts apparaissent sur les images enregistrées.
• Les porte-nom numérisés prennent une dimension standard de 91 x
55 mm. L'image numérisée aura une légère bordure autour du portenom.
7: Utilisation générale
Remarque : Il se peut qu'il y'ait une certaine différence entre l'image
de prévisualisa tion et l'image e nregistrée, cela dépe nd de l 'image
enregistrée sur la carte SD.
8
Page 68

♦
Démarrage rapide
1. Pour numériser des films, faites glisser les deux boutons en haut de
l'appareil vers la gauche. Pour numériser des photos, les faire glisser
vers la droite.
2. Insérez la diapositive/négatif dans le porte-diapositive/porte-négatif
approprié (5 x 7 pouces (5R), 4 x 6 pouces (4R), 3½ x 5 pouces (3R),
porte-nom).
3. Insérez le porte-diapositive/ porte-négatif dans la fente située sur le côté
droit de l'appareil ou insérer porte-photo dans fente en haut de l'appareil.
4. L'ali mentation du scanner po ur films/di apositives se fait d e deux
manières :
(1)USB : Connectez le scanner pour films/diapositives à un PC à l'aide
d'un câble USB.
(2)Adaptateur 5 V : Branchez l'adaptateur à l'appareil avec un câble
USB.
5. Appuyez sur la touche ALIMENTATION pour allumer le scanner pour
films/diapositives.
Remarque :
(1 )Lo rsq ue le mode scannage de film e st sélec tio nné, le témoin
scannage de film sera allumé.
(2)Lorsque le mode scannage de Photo est sélectio nné, le témoin
scannage de Photo sera allumé.
6. Suivez les instructions du menu à l'écran pour le scannage.
7. Une fois le scannage terminé, retirez la carte mémoire.
Remarque : Le scanner pour films/diapositives comprend une mémoire
intégrée pour l'enregistrement, si une carte mémoire est insérée, elle a
la première priorité pour la sauvegarde des données.
8. Ou lecture d'images à partir d'un PC en mode USB.
9. Lors de capture en mode photo ou film, n'oubliez pas de faire glisser les
deux boutons à l'emplacement correspondant.
Un message apparaît à l'écran pour rappeler d'effectuer les opérations
suivantes :
1.Photo : faire glisser les deux
boutons vers la droite
2.Fi lm : faire glisser l es deux
boutons vers la gauche.
9
Page 69

Mode d'emploi
♦
Accueil/MODE : Menu principal
Lorsque le mode de scannage de film est sélectionné, le menu principal
suivant apparaît :
① ② ③ ④ ⑤ ⑥
Mode Langue ④ Mode de lecture
①
Mode USB ⑤ Type de film
②
Mode Capture ⑥ Résolution
③
Lorsque le m ode de scannage de Photo est s électionné, le menu
principal suivant apparaît :
① ② ③ ④ ⑤ ⑥ ⑦
①
Mode Langue
Mode USB
②
Mode Capture
③
Mode de lecture
④
Effet : multicouleur, Noir et Blanc
⑤
Proportion de rognage : (5 x 7 pouces (5R), 4 x 6 pouces (4R), 3½ x 5 pouces (3R),
⑥
porte-nom)
Résolution
⑦
10
Page 70

Accueil/MODE : Pas de carte mémoire
Pas d'indicateur de
carte mémoire
S'i l n'y a pas de carte mémoire insérée dans l'appareil, un icône
d'avertissement sera affiché sur l'écran lors de l'ouverture du menu
principal.
1: Option Capture
ou
Après l'affichage de la page d'accueil, le menu ci-dessus apparaît. Vous
pouvez utiliser les touches GAUCHE/DROITE pour accéder à un menu,
puis d'appuyer sur la touche ENTER pour confirmer votre choix.
11
Page 71

1.1 Réglage de la luminosité et de la couleur de l'image
Vous pouvez régler la luminosité et la couleur de l'image en mode
capture.
Lorsque vo us accé dez au mode capture , appuyez sur la touche
ENTER, l'image suivante sera affichée :
EV pour luminosité ; R pour rouge ; G pour vert ; B pour bleu.
Appuyez sur la t ouch e ENTER pour changer, utilisez le s touches
GAUCHE/DROITE pour régler données.
Appuyez sur la touche SCAN pour retourner au mode prévisualisation
de l'image.
1.2 Option Capture : Miroir/Faire pivoter (touche physique)
Pour miroiter ou faire pivoter une image avant la capture, utilisez
les touches GAUCHE/DROITE pour atteindre la fonction Miroir/Faire
pivoter (cette étape permet de corriger un film/photo mis à l'envers).
La fonction Miroir/Faire pivoter ne peut être utilisée qu'en mode
visualisation en direct.
Miroir
Appuyez sur la touche GAUCHE pour faire passer l'image de gauche à
droite.
12
Page 72

Faire
pivoter
Appuyez sur la touche DROITE pour faire pivoter l'image à l'envers.
1.3 Mode Capture
Indicateur
visualisation
en direct
Une fois en mode capture, un indicateur apparaît dans le coin supérieur
gauche pour indiquer qu'on est en mode visualisation en direct.
Vous pouvez également appuyer sur la touche ENTER, puis d'utiliser
les touches GAUCHE/DROITE pour régler la luminosité EV, appuyez
de nouveau sur la touche ENTER pour confirmer et retourner au mode
visualisation en direct.
1.4 Option Capture : Menu Edition
Image sélectionnée
13
Page 73

Enregistrer : Enregistrer l'image capturée
①
Annuler : Annuler toute modification apportée à cette image
②
Accueil : retour au menu principal
③
1.5 Visualisation en direct Capture/menu Edition
SCAN
ENTER
Une fois la touche SCAN appuyée en mode Visualisation en direct, le
menu édition apparaît. Lorsque la touche ENTER est appuyée, l'image
actuelle sera sauvegardée dans la mémoire interne ou la carte mémoire
s'il y'en a une insérée, l'écran revient au mode visualisation en direct.
1.6 Option Capture : Enregistrer
Enregistrer
Une fois la touche SCAN appuyée, la visualisation (visualisation en
direct) de l'image sera sélectionnée et l'image sera affichée sur l'écran
TFT pendant 1 à 2 secondes ainsi que 2 icônes sur le côté gauche
14
Page 74

de l'écran. L'icône Save sera mis en surbrillance et peut être confirmé
par la touche ENTER, après l'étape ci-dessus, l'affichage retourner au
mode visualisation en direct (Aperçu).
1.7 Option Capture : Annuler
Image
sélectionnée
Sélectionnez l'icône Annuler à l'aide des touches GAUCHE/DROITE et
appuyez sur la touche ENTER pour annuler toute modification apportée
à l'image sélectionnée et l'affichage retourne au mode visualisation en
direct (rien ne sera enregistré).
1.8 Option Capture : Accueil
Sélectionnez l'icône Accueil à l'aide des touches GAUCHE/DROITE
et appuyez sur la touche ENTER ou sur la touche MODE en haut de
l'appareil pour retourner au menu principal.
15
Page 75

1.9 Quitte le mode Edition et retour au mode Capture (visualisation
en direct)
Une fois la touche ENTER appuyée pour enr egistrer ou annuler,
l'affichage retourne au mode capture/visualisation e n direct. Vous
pouvez déplacer le porte-film sur le prochain film cible ou passer à une
autre capture de photo.
1.10 Mémoire pleine
Une fois la mémoire interne ou celle de la carte mémoire est pleine, un
icône mémoire pleine sera affiché sur l'écran lorsque vous appuyez sur
la touche SCAN. Vous pouvez transférer des images vers un PC ou
mettre une autre carte mémoire pour continuer la capture.
Indicateur de mémoire pleine
2: Lecture
ou
Utilisez les touches GAUCHE/DROITE pour accéder au mode lecture
lors de la mise en marche de l'appareil ou accéder au menu principal
par l'icône Accueil/touche MODE. Appuyez sur la touche ENTER pour
confirmer votre choix.
16
Page 76

2.1 Lecture : Diaporama automatique
Mode diaporama
Une fois en mode lecture (par défaut diaporama), l’écran TFT affiche
automa tiquement t outes le s images précédemment capturées et
sauvegardées dans la mémoire interne ou la carte mémoire avec un
intervalle 2 secondes. Vous pouvez arrêter le diaporama en appuyant
sur la touche ENTER (Seules les images capturées par le scanner pour
films/diapositives sont disponibles en mode lecture).
2.2 Lecture : Menu Edition
①
②
③
Rotation +90 : faire pivoter l'image capturée de +90 degrés
①
Rotation -90 : faire pivoter l'image capturée de -90 degrés
②
Supprimer : sup prim er l'image sauvegardée dans la mémo ire
③
interne ou la carte mémoire
Quitter : retour au mode diaporama
④
Enregistrer : enregistrer l'image modifiée dans la mémoire interne
⑤
ou la carte mémoire
Accueil : retour au menu principal
⑥
④
⑤
⑥
17
Page 77

2.3 Lecture : Mode Diaporama ne seule image Edition
Vous pouvez suspendre (arrêter) le mode diaporama pour passer en
mode lecture (lecture d'une seule image) en appuyant sur la touche
ENTER (le diaporama est suspendu). Vous pouvez faire défiler chaque
image en utilisant les touches GAUCHE/DROITE. Une fois l'image à
modifier est sauvegardée dans la mémoire interne ou la carte mémoire,
appuyez sur la touche ENTER pour retourner au mode édition.
S'il n'y a pas de carte mémoire insérée ou aucune image dans la
mém oire interne, l’écran TFT affiche automatiq uement 20 cadres
sto ckés dans la mémoire interne lorsque vous accédez au mode
lecture. Mais ils ne peuvent pas être modifiés à tout moment.
Enter
Mode diaporama Mode éditionMode une seul image
Enter
Utilisez les touches
Gauche/Droite pour
faire défiler l'image
Enter
Enter
18
Page 78

2.4 Lecture : Faire pivoter/Enregistrer
Enter
Vous pouvez faire pivoter l'image de +90 degrés par la touche ENTER,
l'image ser a pivoté e de +90 degrés et le curseu r pointe ra Save.
Appuyez sur la touche ENTER pour enregistrer l'image modifiée et
afficher la suivante. Pour faire pivoter l'image de +90 degrés, déplacez
le curseur sur faire pivoter et appuyez sur la touche ENTER (même
chose pour Rotation à –90).
2.5 Lecture : Quitter
Enter
Une fois vous sélectionnez la fonction Quitter dans le menu édition,
l'affichage retourne au mode diaporama en commençant par l'image
actuelle sans aucune modification.
19
Page 79

2.6 Lecture : Suppression
Enter
Sélectionnez l'icône de suppression à l'aide des touches GAUCHE/
DROITE puis appuyez sur la touche ENTER, l'image sélectionnée sera
supprimée présente et l'image suivante sera affichée. Le curseur reste
sur l'icône Quitter. Pour effectuer d'autres suppressions, il suffit de
déplacer le curseur sur l'icône suppression et d'appuyez sur la touche
ENTER pour confirmer.
2.7 Lecture : Accueil
Sélectionnez l'icône Accueil à l'aide des touches GAUCHE/DROITE
et appuyez sur la touche ENTER ou sur la touche MODE en haut de
l'appareil pour retourner au menu principal.
20
Page 80

2.8 Lecture : Pas d'image
S'il n'y a pas d'image lorsque vous accédez au mode lecture, un
symbole Pas d'image s'affiche à l'écran.
3: Type de film
Lor sque le mode scannage de film est sélectionné, vous pouvez
changer le type de film en accédant au menu Type de film lorsque vous
allumez l'appareil ou accédez au menu principal par l'icône Accueil/
touche MODE. Utilisez les touches GAUCHE/DROITE pour atteindre
Type de film et appuyez sur ENTER pour confirmer.
Négatifs de film : Sélectionnez négatifs de film lorsque des négatifs
①
de film couleur sont chargés dans le porte-film
Diapositives : Sélectionnez Diapositives lorsque des Diapositives
②
sont chargées dans le porte-diapositive
Noir et Blanc : Sélectionnez Noir et Blanc lorsque des négatifs de
③
film Noir et Blanc sont chargés dans le porte-film
Vous pouvez utiliser les touches GAUCHE/DROITE pour sélectionner
un type de film, puis appuyez sur la touche ENTER pour confirmer
① ② ③
21
Page 81

4: Effets
Lorsque le mode scannage de Photo est sélectionné, vous pouvez
changer l'effet de couleur en accédant au menu Effets lorsque vous
allumez l'appareil ou accédez au menu principal par l'icône Accueil/
touche MODE. Utilisez les touches GAUCHE/DROITE pour atteindre
Effets et appuyez sur ENTER pour confirmer
Effet multicouleur
①
Effet Noir et Blanc
②
Vous pouvez utiliser les touches GAUCHE/DROITE pour sélectionner
un effet couleur, puis appuyez sur la touche ENTER pour confirmer
5: Proportion de rognage
Lorsque le mode scannage de Photo est sélectionné, vous pouvez
changer la proportion de rognage en accédant au menu Rognage
lorsque vous allumez l'appareil ou accédez au menu principal par l'icône
Accueil/touche MODE. Utilisez les touches GAUCHE/DROITE pour
atteindre Rognage et appuyez sur ENTER pour confirmer
① ②
① ② ③ ④
22
Page 82

Proportion de rognage 5R (5 x 7”)
①
Proportion de rognage 4R (4 x 6”)
②
Proportion de rognage 3R (3½ x 5”)
③
Proportion de rognage pour porte-nom
④
Vous pouvez utiliser les touches GAUCHE/DROITE pour sélectionner
une proportion de rognage, puis appuyez sur la touche ENTER pour
confirmer
6: Résolution
Changez la résolution en accédant au menu Résolution lorsque vous
allumez l'appareil ou accédez au menu principal par l'icône Accueil/
touche MODE. Utilisez les touches GAUCHE/DROITE pour atteindre
Résolution et appuyez sur ENTER pour confirmer
8M 16M
ou
Résolution 8M
①
Résolution 16M
②
Vous pouvez utiliser les touches GAUCHE/DROITE pour sélectionner
une résolution, puis appuyez sur la touche ENTER pour confirmer
① ②
23
Page 83

7: Langue
Changez la langue en accédant au menu langue lorsque vous allumez
l'appareil ou accédez au menu principal par l'icône Accueil/touche
MODE. Utilisez les touches GAUCHE/DROITE pour choisir une langue
et appuyez sur ENTER pour confirmer.
ou
Vous pouvez utiliser les touches GAUCHE/DROITE pour choisir une
langue, puis appuyez sur la touche ENTER pour confirmer
8: Mode USB
Après la ca pt ure , re ti rez la ca rt e mé mo ire du sc an ner pour
films /di apositives pour pouvo ir t ransférer le s im ages qui y sont
sauvegardées.
Lorsque l'appareil est connecté avec un câble USB à un PC, vous
pouvez appuyer sur la touche MODE pour accéder au menu principal,
puis d'utiliser les touches GAUCHE/DROITE pour sélectionner le mode
USB ; appuyez ensuite sur la touche ENTER pour confirmer, le scanner
pour film s/diapositives sera considéré comme un périphérique de
stockage de masse et vous pouvez consulter ou modifier des images
sur PC.
Vous pouvez également appuyer sur la touche MODE pour retourner
au menu principal.
24
Page 84

8: Dépannage
Question :
Répo nse:S i l es rayur es sont insig nifian tes, dépla cez le porte-
Si les rayures persistent, contactez notre revendeur.
Question : Impossible de connecter l'appareil à l'ordinateur.
Réponse : Vérifiez si le câ ble e st dé jà connecté a u port USB de
Apparition de rayures indésirables au niveau des bords de
l'image.
di ap os it iv e légèremen t en av an t et en arrière dan s
l'appareil jusqu'à disparition des rayures dans la fenêtre de
prévisualisation.
l'ordinateur. Ou connectez le câble à un autre port USB.
Il est re comma ndé de le conne cter dir ectem en t à la
carte mère, pas sur le panneau avant. Allumez l'appareil,
passez en mode USB, l'appareil sera considéré comme un
périphérique de stockage de masse.
25
Page 85

9: Spécifications techniques
♦
Objectif :
♦
Capteur : Capteur CMOS 8,1 méga pixels
♦
LCD: Ecran LTPS LCD 2,4 pouces
♦
Mémoire externe: SD/MMC
♦
Exposition : Automatique
♦
Balance des couleurs: Automatique
♦
Scannage haute
résolution :
♦
Conversion des
données :
♦
Méthode de scannage : Un seul passage
♦
Source de lumière: Panneau de contre-jour
♦
Durée de vie des LED
pour Marche/Arrêt :
♦
Alimentation : Alimenté par USB/ adaptateur 5 V
♦
Interface: USB 2.0
♦
Dimensions : 220 x 208 x 147mm
♦
Langue :
♦
Taal:
2G3P F/NO=3.97 f=4.04 Gamme de
film:51.5mm
F/NO=4 f=3.93 Gamme d'image: 170 mm
Résolution par interpolation 16M
12 bits par canal de couleur
10000 fois
850
g
An gl ai s, Fr ançais, Allemand, Italie n,
Espagnol, Chinois Traditionnel, Chinois
Simplifie, Japonais
FABRIQUE EN CHINE
26
Page 86

Page 87

Bedienungsanleitung
Bitte lesen Sie diese Anleitungen vor dem Gebrauch des Geräts
und bewahren Sie sie für späteres Nachschlagen auf!
Inhalt
1: Sicherheitshinweise
2: Lieferumfang ……………………………………………………2
3: Einzelteile ………………………………………………………3
4: Dias laden ………………………………………………………4
5: Negative laden …………………………………………………5
6: Foto laden ………………………………………………………6
7: Allgemeine Bedienungshinweise ……………………………9
8: Störungsbehebung ……………………………………………26
9: Technische Spezifikationen …………………………………27
* Die Abbildungen dienen nur als Referenz und können vom
Gerät abweichen.
…...........……………………………..…1
Page 88

1: Sicherheitshinweise
Wichtig: Setzen Sie das Gerät nicht Regen oder Feuchtigkeit
Vorsicht: Demontieren Sie das Gerät nicht. Zur Vermeidung
Belüftung: Das Gerät muss so aufgestellt werden, dass die
Hitze: Schützen Sie das Gerät vor Wärmequellen wie
Reinigung: Reinigen Si e da s Gerät regelmäßig mit einem
Nichtgebrauch: Ziehen Si e das USB-Ka bel vom Computer ab,
USB-Überlastung: Übe r las t en Sie ni c ht die US B -P o rts Ih r es
Wartung: Führen Sie Wartungsarbeiten nur in dem Umfang
Perforation des Das Design des Filmhalters entspricht ISO-Norm.
Filmstreifens:
aus.
von Stromschlag öffnen Sie das Gerätegehäuse
nicht.
Bel üftung nicht behindert wird. Stellen Sie das
Gerät beispielsweise nicht auf einem Bett, Sofa,
Teppich oder ähnlichen Oberflächen auf, welche
die Lüftungsöffnungen blockieren können.
beispielsweise Heizungen und Herden.
trockenen Wattestäbchen.
wenn das Gerät für längere Zeit nicht verwendet
wird.
Computers. Bei Anschluss zu vieler Geräte an
Ihrem C omp ute r (wie Fu nkm aus , Mediaplayer,
Handy oder andere über USB versorgte Geräte),
steht möglicherweise nicht ausreichend Kapazität
für den ordnungsgemäßen Betrieb Ihres Film- und
Fotoscanners zur Verfügung.
se lbst durch, wie in der Be dienu ngsanleitu ng
beschrieben. Wenden Sie sich mit allen anderen
Wa rt ung s- und Re pa rat ur arb ei ten an ei ne n
autorisierten Kundendienst.
In einigen Fällen kann es vorkommen, dass sich
der Film nicht gen au mit dem Halter ausrichten
lässt. Dies wird durch eine nicht standardmäßige
Kamera verursacht. In diesem Fall sehen Sie eine
kleine schwarze Linie auf der Seite des Bildes, die
1
Page 89

mit Fotobearbeitungs-Software leicht beschnitten
ISO-- Internationale Organisation für Normung
Aus Gründen des Umweltschutzes und der Energieeinsparung schaltet
sich das Gerät, außer im WIEDERGABE- und USB-MODUS, nach 30
Minuten Untätigkeit automatisch aus.
werden kann.
2: Lieferumfang
Film- und Fotoscanner•
USB-Kabel•
Negativ-Filmhalter•
Dia-Halter•
4-in-1 Foto-Halter•
OCR-CD•
Netzteil•
Bedienungsanleitung•
Ziehen Sie das Netzteil ab, wenn das Gerät nicht in Gebrauch ist.
2
Page 90

3: Einzelteile
Film- und
Fotoscanner
Dia-Halter
Negativ-Filmhalter
Foto-/Visitenkarten-Halter USB-Kabel
3
Page 91

4: Dias laden
Halten Sie das Dia gegen das Licht. Richten
Sie das Dia so aus, dass die Seite mit dem
Firmenlogo von Ihnen weg zeigt. Das Bild muss
normal erscheinen (nicht spiegelverkehrt).
Stellen Sie das Dia nun auf den Kopf.
Öffnen Sie den Dia-Halter am markierten Punkt
oben.
Legen Sie das Dia genau in die Vertiefung des
geöffneten Dia-Halters ein.
Hinweis: Behandeln Sie die Dias vorsichtig.
St au b, Kr at ze r o de r Fin ge ra bd rück e s in d
au f d en gespeich er te n Bildern zu sehen.
Tragen Sie am besten Baumwollhandschuhe,
wenn Sie die Dias handhaben. Benutzen Sie
möglic hst Druckluft , um Staub vo n Dias zu
ent fernen. Erh ältlich als Bürobeda rf oder in
Elektronikläden.
Schließen Sie den Dia-Halter und rasten Sie die
Rändern ein.
Halten Sie den Halter, wie in der Abbildung des
Film- und Fotoscanners gezeigt.
Setzen Sie den Dia-Halter in den Schacht auf
der rechten Seite des Film- und Fotoscanners
ein, wie dargestellt.
4
Page 92

5: Negative laden
Halten Sie das Negativ gegen das Licht. Richten Sie
das Negativ so aus, dass Sie die Nummer normal
lesen können (nicht spiegelverkehrt).
Stellen Sie das Negativ nun auf den Kopf.
Öffnen Sie den Negativ-Halter am markierten Punkt
oben.
Legen Sie das Negativ genau mit den Nasen des
geöffneten Negativ-Halters ausgerichtet ein.
Hinweis:Behandeln Sie die Negative vorsichtig.
St aub, Kra tzer ode r F inger abdrück e s in d a uf
den gespeicherten Bildern zu sehen. Tragen Sie
am besten Baumwollhandschuhe, wenn Sie die
Negative handh abe n. Ben utz en Sie mögli chs t
Druckluft, um Staub von Negativen zu entfernen.
Erhältlich als Bürobedarf oder in Elektronikläden.
Schließen Sie den Negativ-Halter und rasten Sie die
Ränder ein.
Halten Sie den Halter, wie in der Abbildung des
Film- und Fotoscanners gezeigt.
Setzen Sie den Negativ-Halter in den Schacht auf
der rechten Seite des Film- und Fotoscanners ein,
wie dargestellt.
Perfor ation d es Filmstreifens: Das Desig n des
Filmhalters entspricht ISO-Norm. In einigen Fällen
kann es vorkommen, dass sich der Film nicht genau
mit dem Halter ausrichten lässt. Dies wird durch
eine nicht standardmäßige Kamera verursacht. In
diesem Fall sehen Sie eine kleine schwarze Linie
auf der Seite des Bildes, die mit FotobearbeitungsSoftware leicht beschnitten werden kann.
ISO — Internationale Organisation für Normung
5
Page 93

6: Foto laden
Begrenzung
links
Foto-Halter
Setzen Sie die Begrenzungen entsprechend der angegebenen Größen
im Foto-Halter ein.
Für 5 x 7”-Fotos werden die Begrenzungen nicht benötigt.
Begrenzung
rechts
6
Page 94

Setzen Sie die Begrenzungen in den Schlitzen ein und drücken Sie
sie nach unten, bis sie einrasten. Vergewissern Sie sich, dass die
Begrenzungen sicher im Foto-Halter eingesetzt sind. Sie dürfen nicht
abfallen.
1.Begrenzungen in Foto-Halter
einsetzen
Setzen Sie das Foto in den entsprechend begrenzten Foto-Halter ein (5
x 7” (5R), 4 x 6” (4R), 3½ x 5” (3R), Visitenkarte).
2. Begrenzungen nach unten
schieben, bis sie einrasten
7
Page 95

Setzen Sie den Foto-Halter von oben in den Aufnahmeschacht des
Film- und Fotoscanners ein, wie dargestellt.
Hinweis:
• Verwenden Sie die mitgelieferte OCR-CD, um die Visitenkarten zu
organisieren.
• Be han del n Sie die F oto s vo r si cht ig. S ta ub, K rat ze r ode r
Fingerabdrücke sind auf den gespeicherten Bildern zu sehen.
• Gescannte Visitenkarten haben eine Standardgröße von 91 x 55
mm. Das Bild hat einen schmalen Rand um die Visitenkarte.
7: Allgemeine Bedienungshinweise
Hinweis: Es kann zu leichten Abweichungen zwischen dem Vorschaubild
und dem gespeicherten Bild auf der SD-Karte kommen.
8
Page 96

♦
Kurzanleitung
1. Zum Scannen von Filmen schieben Sie die beiden Schalter oben auf
dem Gerät nach links. Für Fotos müssen die Schalter rechts stehen.
2. Legen Sie das Dia/Negativ in den Dia-/Negativ-Halter oder ein Foto in
den entsprechend begrenzten Foto-Halter (5 x 7” (5R), 4 x 6” (4R), 3½ x
5” (3R), Visitenkarte) ein.
3. Setzen Sie den Dia-/Negativ-Halter in den Aufnahmeschacht rechts im
Gerät oder den Foto-Halter oben im Gerät ein.
4. Sie können den Film- und Fotoscanner auf zweierlei Weise anschließen:
(1)USB: Schließen Sie den Film- und Fotoscanner über USB-Kabel am
PC an.
(2)5 Volt Netzteil: Schließen Sie das Netzteil über USB-Kabel am Gerät
an.
5. Drücken Sie EIN/AUS, um den Film- und Fotoscanner einzuschalten.
Hinweis:
(1)Bei Auswahl des Film-Scanner-Modus leuchtet die LED Film Scan.
(2)Bei Auswahl des Foto-Scanner-Modus leuchtet die LED Photo Scan.
6. Folgen Sie dem Menü zum Scannen.
7. Anschließend nehmen Sie die Speicherkarte heraus.
Hinweis: Der Film- und Fotoscanner hat einen integrierten Speicher
zur Aufnahme, bei eingesetzter Speicherkarte hat diese Priorität zum
Speichern der Daten.
8. Alternativ zeigen Sie im USB-Modus Bilder vom PC an.
9. Bei Aufnahmen im Foto- oder Filmmodus achten Sie bitte darauf, die
Umschalter in die richtige Stellung zu bringen.
Im Display wird eine entsprechende Erinnerung angezeigt:
1.Foto: Beide Umschalter nach
rechts
9
2.Film: Beide Umschalter nach
links.
Page 97

Bedienungshinweise
♦
Home/MODE: Hauptmenü
Bei Auswahl des Film-Scanner-Modus wird folgendes Hauptmenü
angezeigt:
① ② ③ ④ ⑤ ⑥
Sprache ④ Wiedergabe
①
USB-Modus ⑤ Filmtyp
②
Aufnahme ⑥ Auflösung
③
Bei Auswahl des Foto-Scanner-Modus wird folgendes Hauptmenü
angezeigt:
① ② ③ ④ ⑤ ⑥ ⑦
①
Sprache
USB-Modus
②
Aufnahme
③
Wiedergabe
④
Effekt: Farbe, Schwarz/Weiß
⑤
Beschneiden: (5 x 7” (5R), 4 x 6” (4R), 3½ x 5” (3R), Visitenkarte)
⑥
Auflösung
⑦
10
Page 98

Home/MODE: Keine Speicherkarte
Anzeige, dass
keine Speicherkarte
eingesetzt ist
Ist keine Speicher kart e eingesetzt, so erfolgt eine Warnung beim
Aufrufen des Hauptmenüs.
1: Option Capture
oder
Nach der Begrüßu ngsseit e wird obiges Menü angezeigt. Mit de n
Pfeiltasten LINKS/RECHTS wählen Sie das gewünschte Menü, dann
drücken Sie ENTER zur Bestätigung.
11
Page 99

1.1
HelligkeitundFarbeeinstellen
Sie könne n di e He lligkeit und die Bildfa rbe im Au fnahmemodus
einstellen.
Be im Aufrufen de s Aufnahmemodus dr üc ke n Sie E NT ER , die
nachstehende Anzeige erscheint:
EV = Helligkeit; R = Rot; G = Grün; B = Blau.
Drücken Sie ENTER zum Umschalten, stellen Sie die Daten mit den
Pfeiltasten LINKS/RECHTS ein.
Drücken Sie SCAN, um in den Vorschaumodus zurückzukehren.
1.2 Aufnahme: Spiegeln/Drehen (mit Taste)
Muss ein Bild vor der Aufnahme gespiegelt oder gedreht werden, so
verwenden Sie die Pfeiltasten LINKS/RECHTS für die Funktion Spiegeln/
Drehen (falls Sie den Film bzw. das Foto verkehrt eingelegt haben).
Die Funktion Spiegeln/Drehen steht Ihnen nur in der Live-Ansicht zur
Verfügung.
Spiegeln
Drücken Sie die LINKE Pfeiltaste, um das Bild zu spiegeln.
12
Page 100

Drehen
Drücken Sie die RECHTE Pfeiltaste, um das Bild zu drehen.
1.3 Aufnahme
Anzeige für die
Live-Ansicht
Nach dem Aufrufen des Aufnahmemodus haben Sie links oben im Bild
die Anzeige für die Live-Ansicht.
Drücken Sie ENTER, danach die Pfeiltasten LINKS/RECHTS, um den
Helligkeitswert (EV) einzustellen, dann drücken Sie erneut ENTER zur
Bestätigung und Rückkehr zur Live-Anzeige.
1.4 Aufnahme: Bearbeitungsmenü
Gewähltes Bild
13
 Loading...