

Page 1

User Manual for your
ICON80IX
NOTE: This User Instruction Manual contains important
information, including safety & installation points, which will
enable you to get the most out of your appliance. Please keep it
in a safe place so that it is easily available for future reference; for
you or any person not familiar with the operation of the appliance.
Page 2

2
Contents
Environmental note 3
Important safety information 4 - 7
Specifications 8 - 10
Product and aperture dimensions 8
Product specifications 8
Standard accessories 9
Electrical details 9
Cooling fan 9
Control panel 10
Setting and using the oven programmer/timer 10-15
Setting clock (the time of day) 10
Before first use 11
Selecting a cooking function and temperature 11
Setting the minute minder function 12
Setting the duration function 13
Setting the end cook function 13
Delayed start cooking time setting 13
Child lock 14
Symbol of temperature sensor short circuit or broken circuit 14
Function introduction 15 - 18
Oven functions 15
Cooking guidelines 16
Warnings 17
Shelf positions 18
Cleaning and maintenance 19-22
Replacing the oven bulb 20
Removing the oven door for cleaning 21
Removing the inner door glass for cleaning 22
Installation 23 - 26
Electrical connection 23
Installing the oven into the kitchen cabinet 25
Positioning the appliance 25
Ventilation requirements 26
My appliance isn’t working correctly 27 - 29
Page 3
3
Environmental note
o The packaging materials that the manufacturer uses are
environmentally friendly and can be recycled.
o Please discard all packaging material with due regard for the
environment.
Page 4

4
IMPORTANT SAFETY INFORMATION
Your safety is of the utmost importance to us. Please
make sure that you read this instruction booklet before
attempting to install or use the appliance. If you are
unsure of any of the information contained in this booklet,
please contact the Customer Care Department.
General Information
o This appliance is design ed fo r domest ic hou sehold use an d can be
built into a standard kitchen cabinet or housing unit.
o IMPORTANT: The adjacent fur niture or housin g and all mate rials
used in the installation must be able to withstand a minimum
temperature of 85°C above the ambient temperature of the room
it is located in, whilst in use.
o Certain types of vinyl or laminate kitchen furniture are particularly
prone to heat damage or discoloura tion at temperatures below the
guidelines given above.
o Any damage caused by the appliance being installed in
contravention of this temperature limit, or by placing adjacent
cabinet materials closer than 4mm to the appliance, will be the
liability of the owner.
o The use of this appliance for any other purpose or in any other
environment without the express agreement of the manufacturer
will invalidate any warranty or liability claim.
o Your new appliance is guaranteed against electrical or mechanical
defects, subject to certain exclusions that are noted in the
manufacturer’s Conditions Of Guarantee. The foregoing does not
affect your statutory rights.
o Repairs may only be carried out by service engineers that
are approved by the manufacturer.
Page 5

5
Warning and safety instructions
o This appliance complies with all current European safety
legislation. The manufacturer does wish to emphasise that this
compliance does not remove the fact that the appliance surfaces
will become hot during use and retain heat after operation.
o This appliance is not intended for use by persons (including
children) with reduced phy sical, se nsory or mental capabilities, or
lack of experience and knowledge, unless they have been given
supervision or instruction concerning use of the appliance by a
person responsible for the ir safety.
Child Safety
o We strongly recommend that babies and young children are
prevented from being near to the appliance and not allowed to
touch the appliance at any time.
o If it is necessary for younger family members to be in the kitchen,
please ensure that they are kept under close supervision at all
times.
General Safety
o Do not place heavy objects on the ove n door or lean on th e ove n
door when it is open, as this can cause damage to the oven door
hinges.
o Do not leave heated oil or fat unattended, as this is a fire risk.
o Do not place pans or baking trays directly on the base of the oven
cavity, or line it with aluminium foil.
o Do not allow electr ical fittings or ca bles to come into conta ct with
areas on the appliance that get hot.
o Do not use the appliance to heat the room it is located in or to
dry clothing.
o Do not install the appliance next to curtains or soft furnishings.
Page 6

6
o Do not attempt to lift or move cooking appliances by using the
oven door or handle, as this may cause damage to the appliance
or result in injury to the person lifting the appliance.
Cleaning
o Cleaning of the oven should be carried out on a regular basis.
o Great care should be taken whilst using this appliance and when
following the cleaning procedure.
o IMPORTANT: The appliance must be disconnected from the
mains before following the cleaning procedure.
Installation
This appliance must be correctly installed by a
suitably qualified person, strictly in accordance
with the manufacturer’s instructions.
o The manufacturer declines any responsibility for injury or
damage, to person or property, as a result of improper use
or installation of this appliance.
o Heat, steam and moisture will be created during use of the
appliance, take care to avoid injury and ensure that the room is
adequately ventilated. If the appliance is going to be used for
prolonged periods of time, then additional ventilation may be
required.
o Please consult with your qualified installer if you are in any doubt
about the amount of ventilation that you will require.
Page 7

7
Declaration of conformity
This appliance complies with the following European Directives:
- 2014/35/EU regarding “low voltage”
- 2014/30/EU regarding “electromagnetic disturbances”
- Regulation (EC) N° 1935/2004 regarding “materials in contact with
food”
o The above directives comply with 93/68/EEC regarding CE marking.
o The manufacturer declares that the oven is built using certified
materials and requires the appliance to be installed in accordance
with the standards currently in force. This appliance must be used by
a trained person for domestic purposes only.
Page 8
8
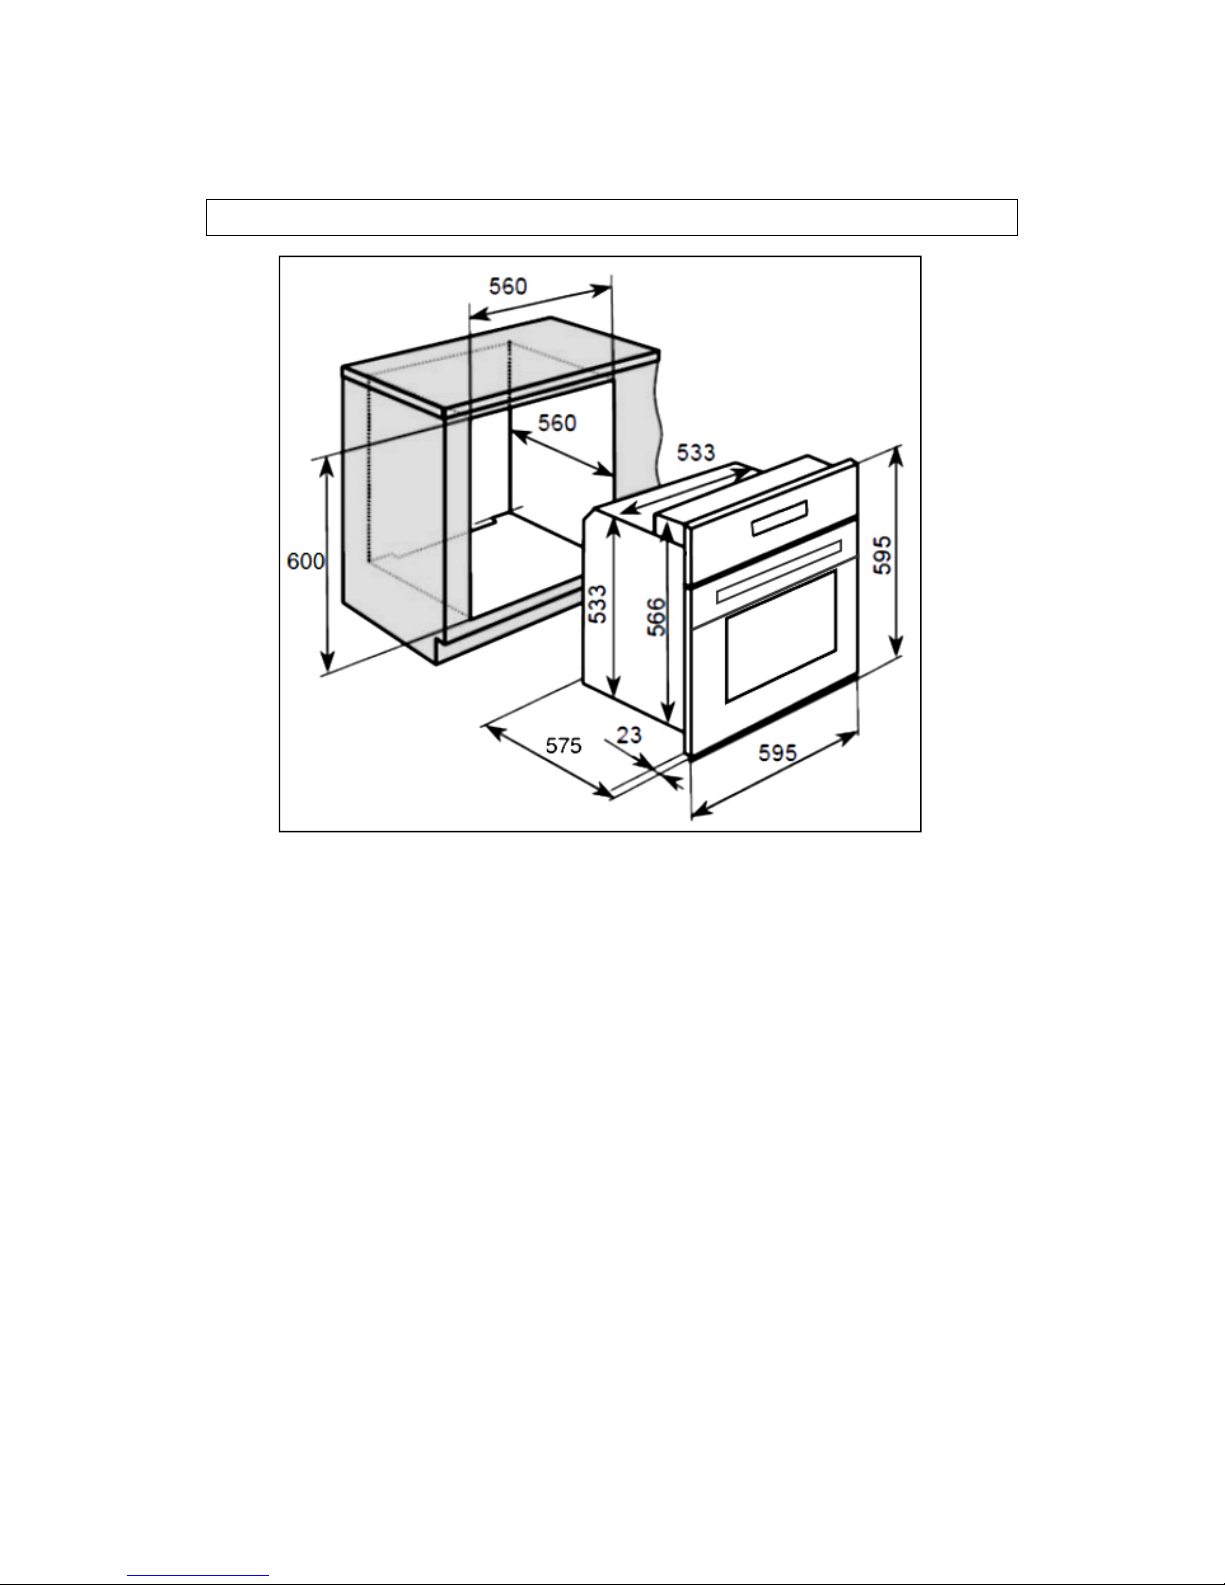
Specifications
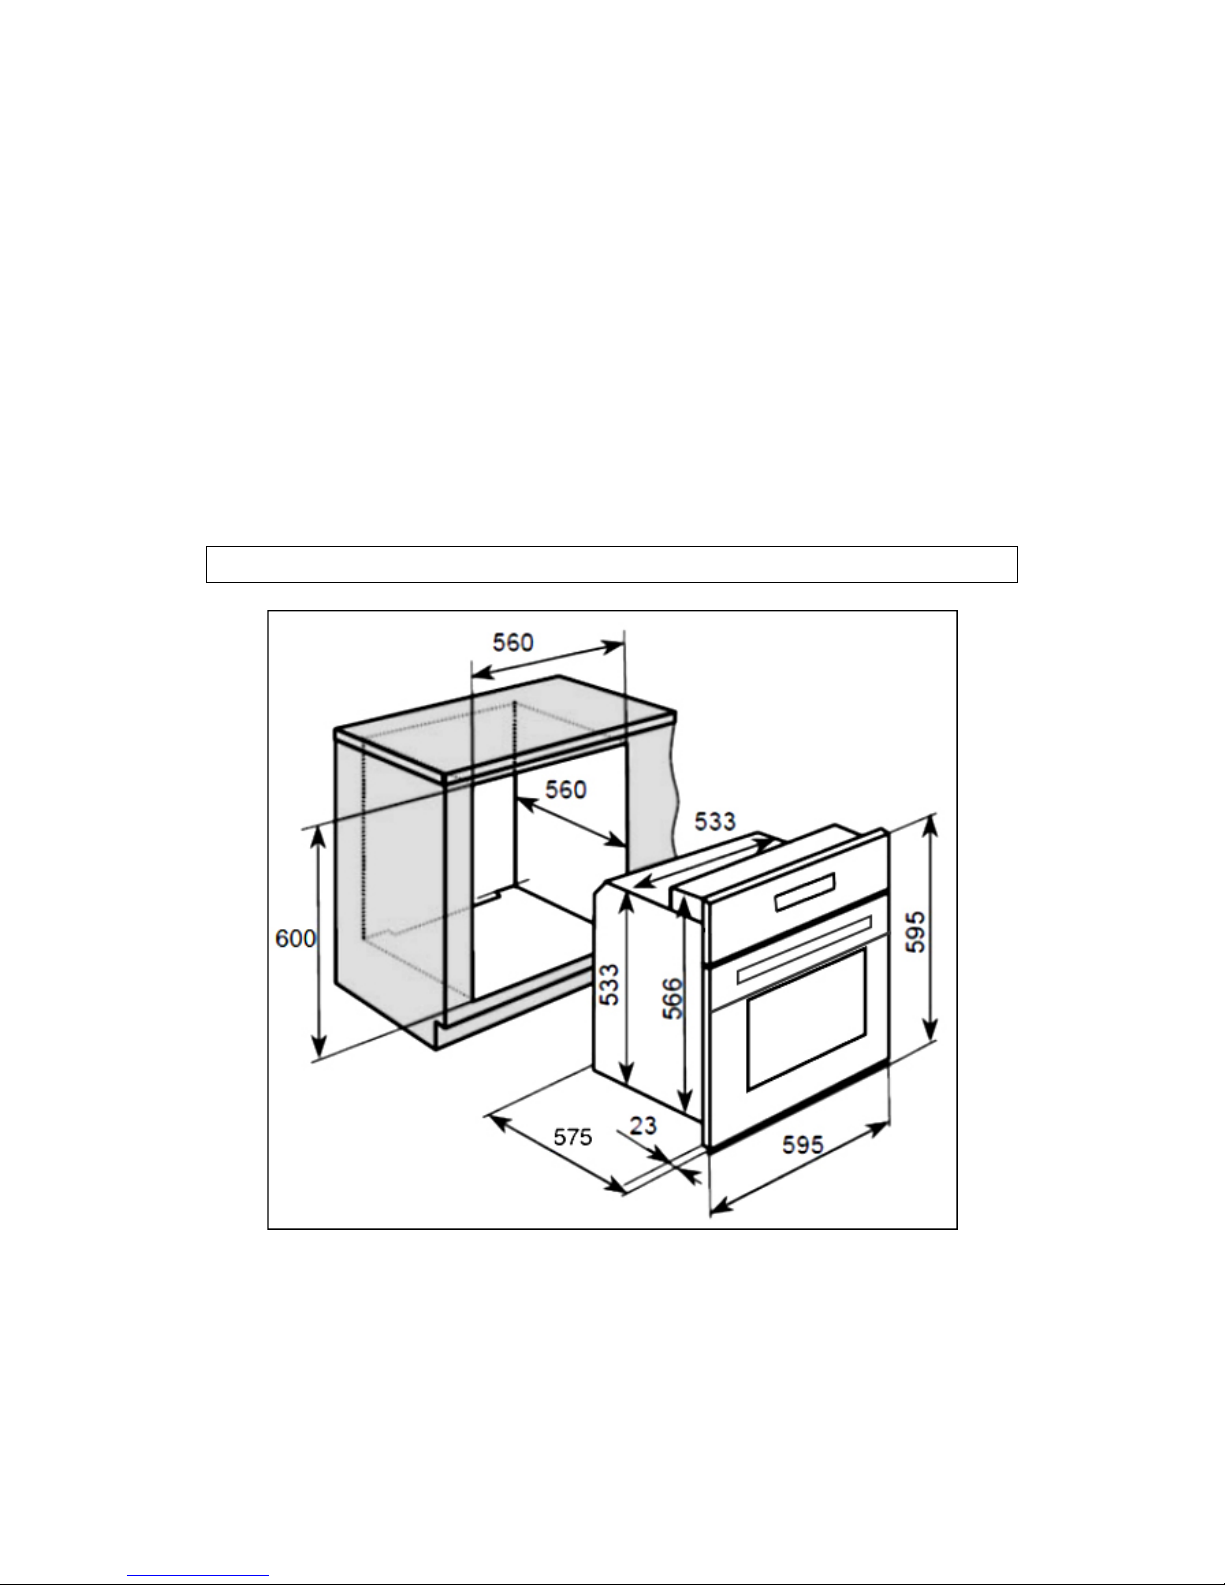
Product Dimensions Aperture Dimensions
Height: 595 mm 600 mm
Width: 595 mm 560 mm
Depth: 575 mm 560 mm (min)
Product specifications
o 10 oven functions
o Energy efficiency class: A
o Oven net/gross capacity: 80/82 liters
o LCD fully programmable timer
o Cooling fan
o Thermostatically controlled grill
o Double-glazed removable door
o Removable inner door glass
o Mark resistant coating
o Oven light
Page 9
9
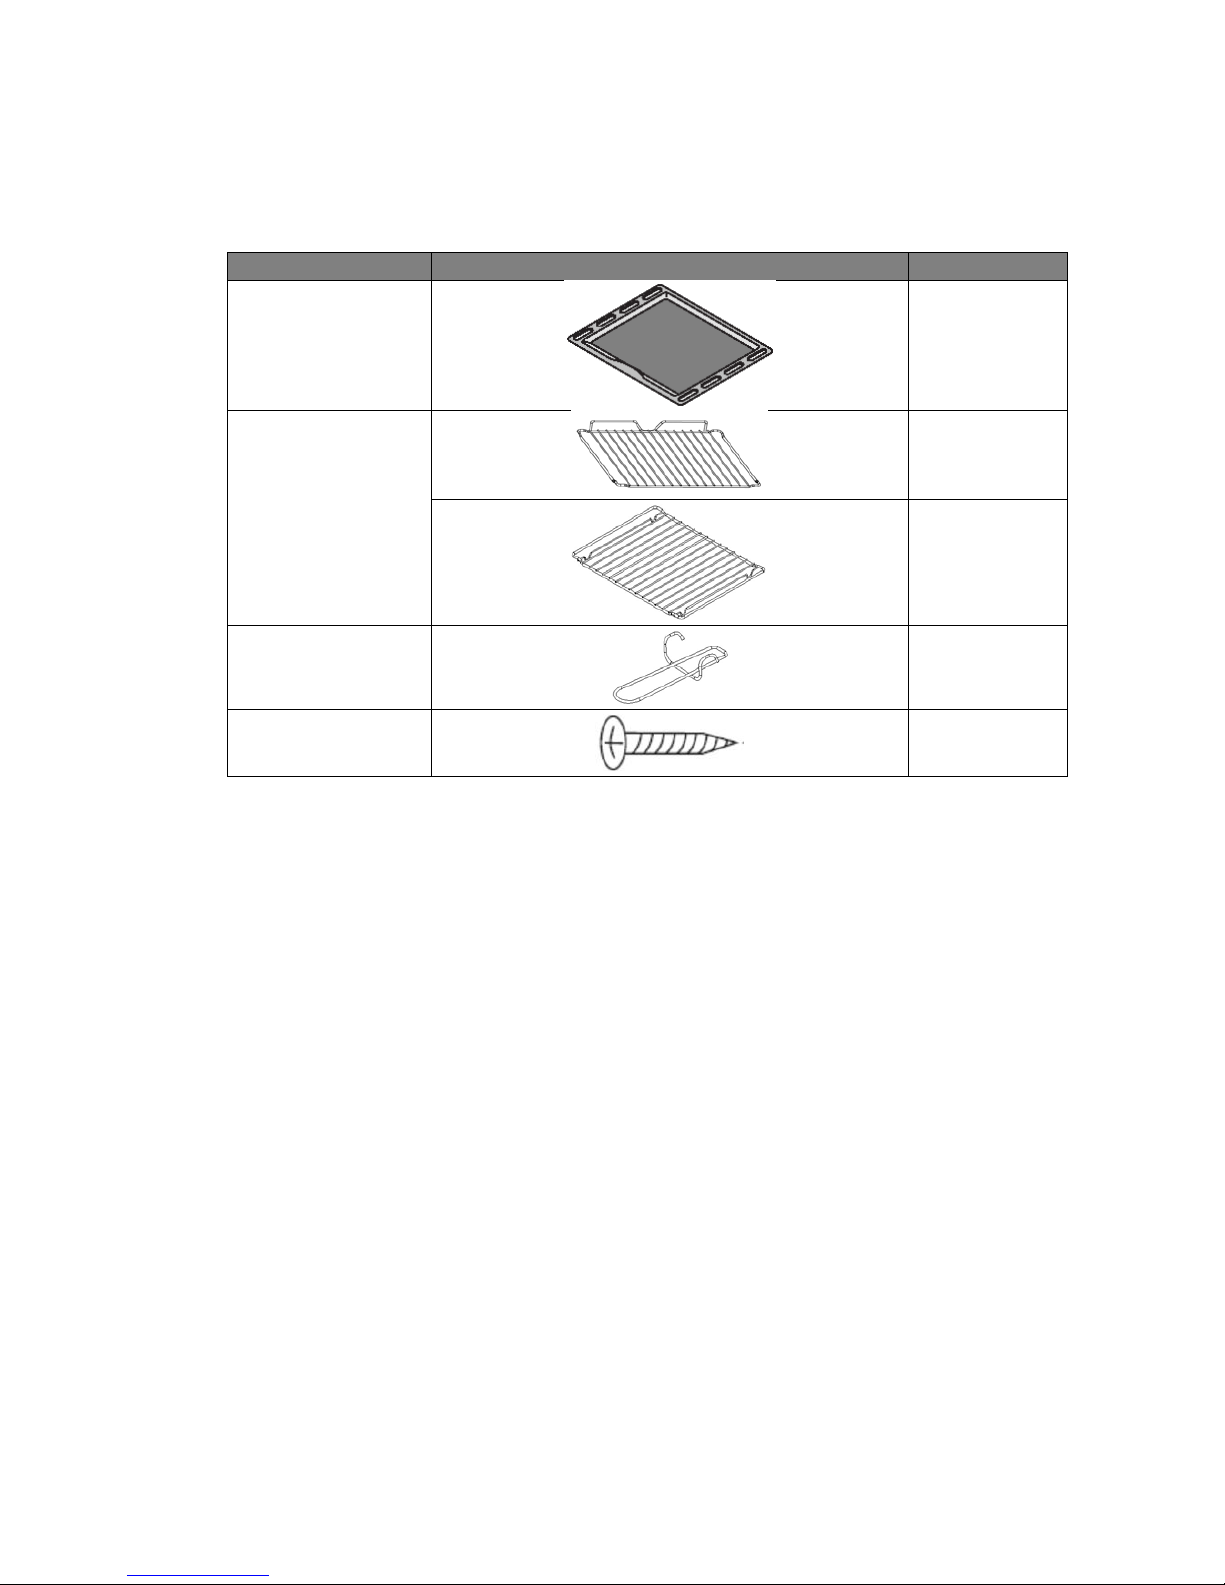
Standard accessories
Accessory Name
Picture
Quantity
Baking tray
1
Grill
2
1
Handle
1
Screws(ST4x35)
4
Electrical details
Rated Voltage: 220-240 Vac, 50/60 Hz
Supply Connection: 13A
Rated max power : 2.90 kW
Mains Supply Lead: 3 x 1.5mm²
Oven Light Bulb: 25 W/300°C screw type pygmy
Cooling fan
o A tangential cooling fan is fitted inside of this appliance, to make
the internal temperature of the oven stable and the external
surface temperature lower.
o After you have finished cooking and switched off the oven, the
cooling fan will conti nue to run for a period of time afterwards .
The length of time will depend on how long the oven has been
switched on for and at how high a temperature.
Page 10
10
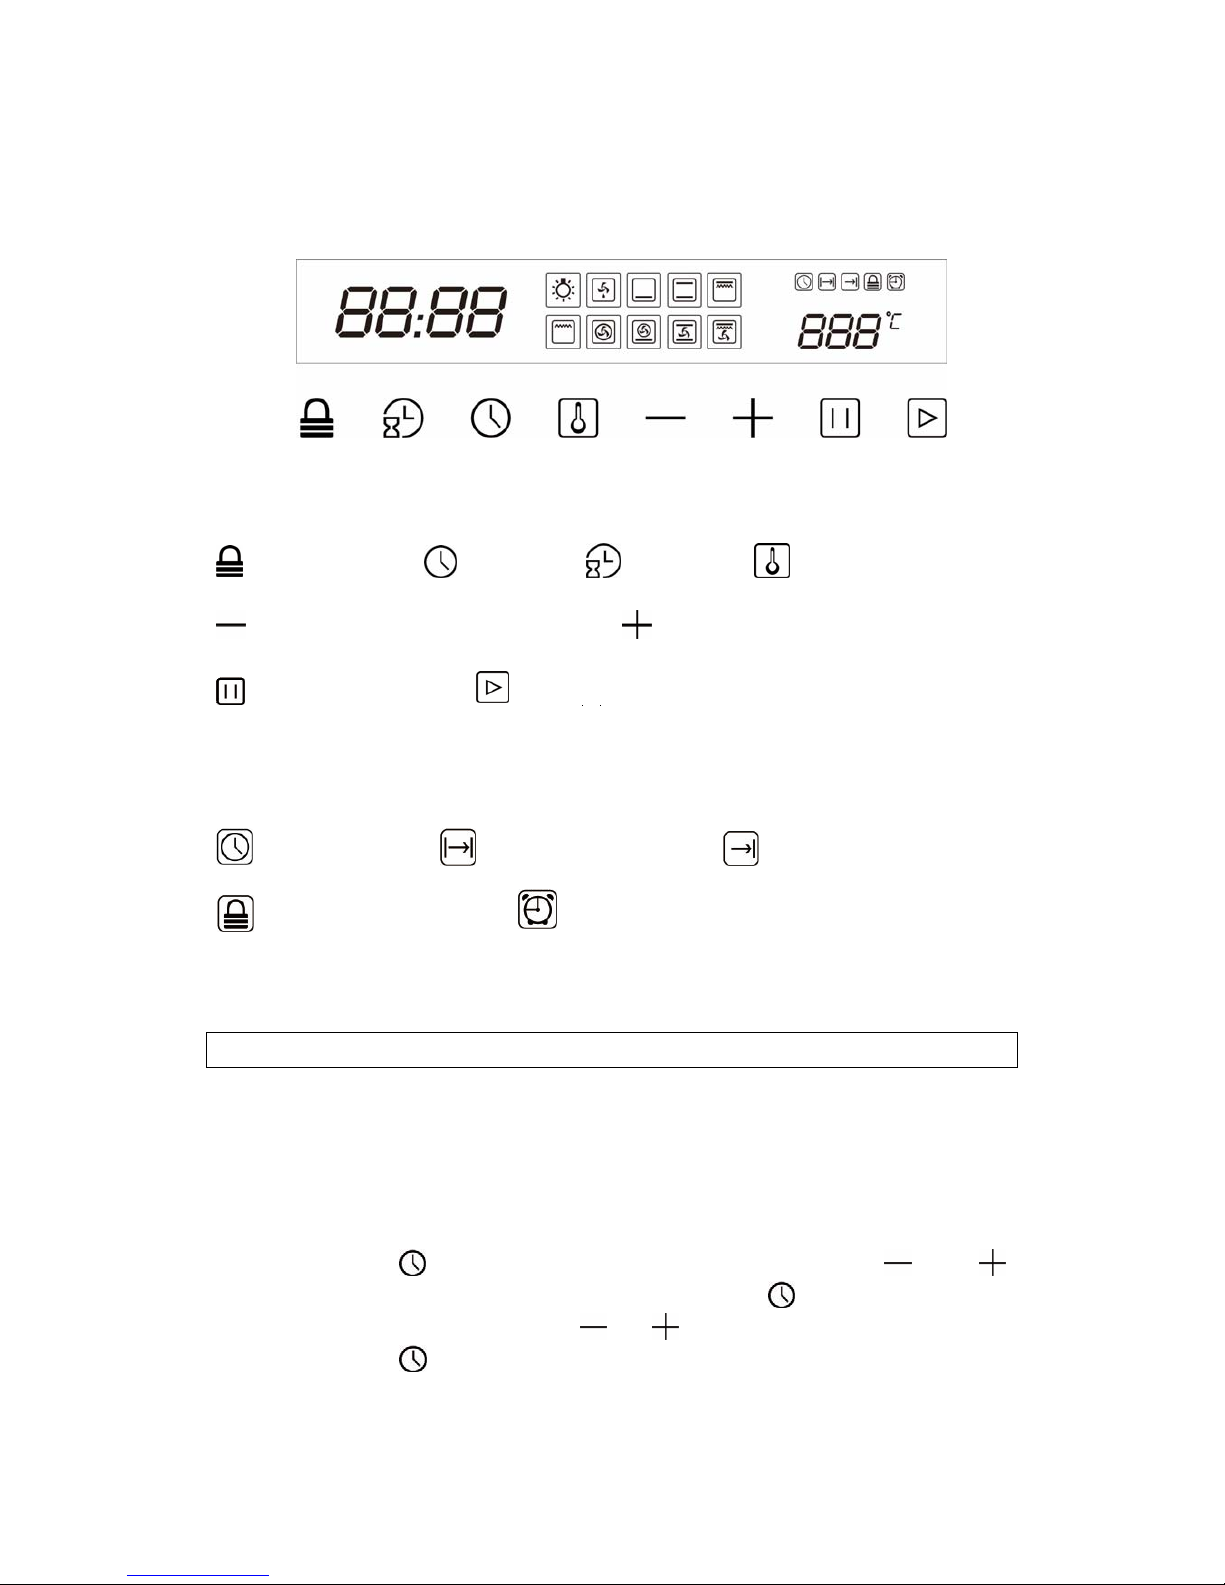
Control Panel
Touch buttons
Child lock Clock Timer Temperature
Time/Temperature decreasing Time/Temperature increasing
Pause/Cancel Confirm/Start
Symbol in the display
Clock time
Cooking duration End cooking time
Child lock indicator Timer
Setting and using the oven programmer/timer
Setting clock (the time of day)
o Once you new appliance has been connected to th e power supply,
the left area of display shows “12:00” as default, while a buzzer
sounds. You can set up the clock now.
o Press the button, the hour digit will flash, use or
buttons to adjust the number. Press the button again, the
minute digit will flash, use or buttons to adjust the number.
Press the button again, the time is applied.
Page 11

11
o If you want to cancel the setting, press the button once. The
display will show “12:00” or the original time.
Before first use
o To remove any residue from the oven that may have been left
from the manufacturing process, you should select the fan oven
function and set the thermostat to its maximum temperature
setting.
o It is perfectly normal for a smell to be produced during this
process.
o You should make sure that any windows in the room are left open
during this process.
o It is advisable for you not to remain in the ro om whilst the burning
off process is taking place.
o You should leave the oven on maximum setting for 30 – 40
minutes.
o After the oven cavity has cooled, it shoul d then be cleaned with
warm soapy water, using either a sponge or soft cloth. No abrasive
cleaners should be used.
o Outer parts of the oven should be cleaned with warm soapy water,
using either a sponge or soft cloth. No abrasive cleaners should
be used.
o We would recommend that an appropriate stainless steel cleaner
and polish is regularly used on the stainless steel surfaces of this
appliance.
Selecting a cooking function and temperature
Ten functions are available in your oven. This allows you to select the
ideal way of preparing every dish.
Page 12
12
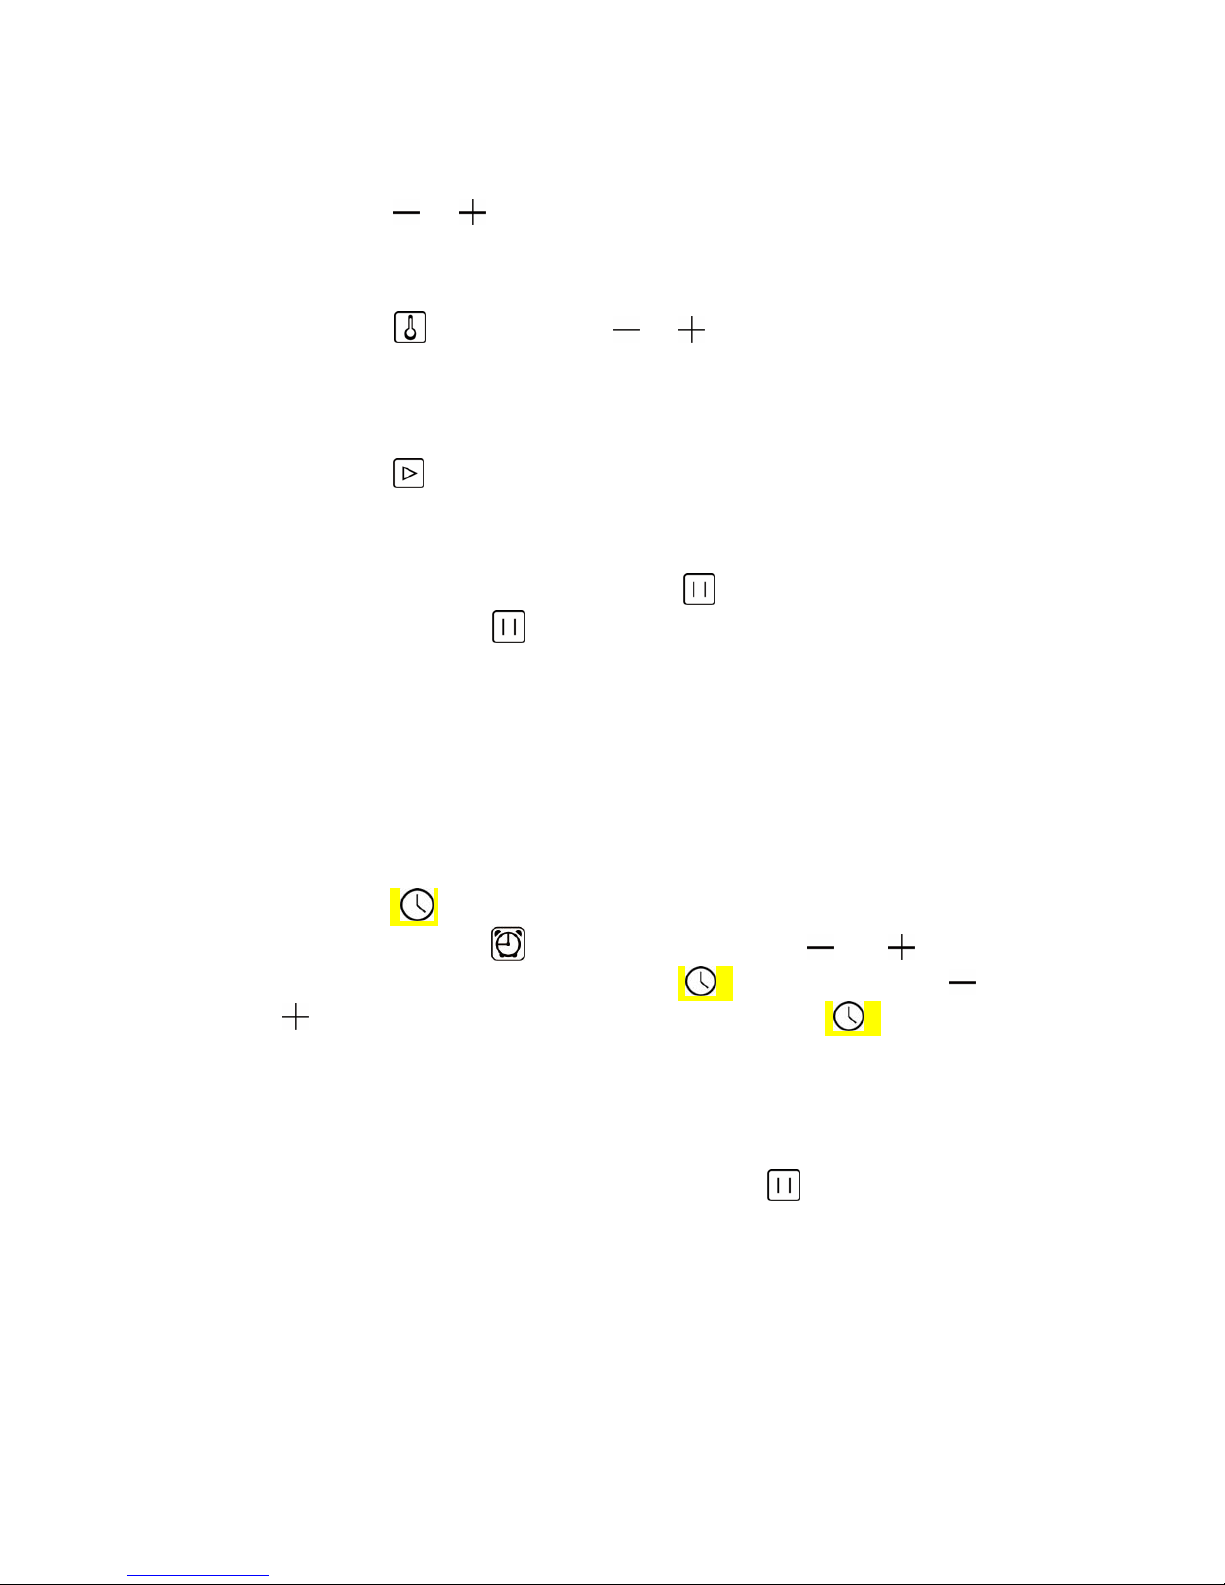
o Press the or buttons to select the desired function and the
display will show the default temperature. The selected sy mbo l of
function will flash, others symbol will be constantly on.
o Press the button and use or buttons to set the desired
temperature of corresponding functions. The a djustment range for
every pressing is 5 ℃. The three digits of temperature and ℃
appear in the right area of LED display.
o Press the button to start operation. The current time appears
in the display. The temperature display flash and the symbol of
the selected function will be constantly on.
o Once the food is cooked, press the button once to pause the
cooking. Press the twice to cancel the cooking.
Setting the minute minder function
You are able to set the minute minder at any time, regardless of whether
an oven function has been selected. You can set a period of time using
the minute minder function and an alarm will sou nd when that period of
time has elapsed.
o Press the button for 3 seconds, the display will show the
current time. The symbol will flash. Press or buttons
to adjust the hour digit. Press the button again, use or
buttons to adjust the minute digit. Press the button, the
setting is applied.
o An alarm will sound when the countdown time has elapsed. The
alarm can be silenced by pressing any buttons.
o If you want to cancel the setting, press the button once.
Setting the duration function
o Select oven function and temperature and you do on above
function setting.
Page 13
13
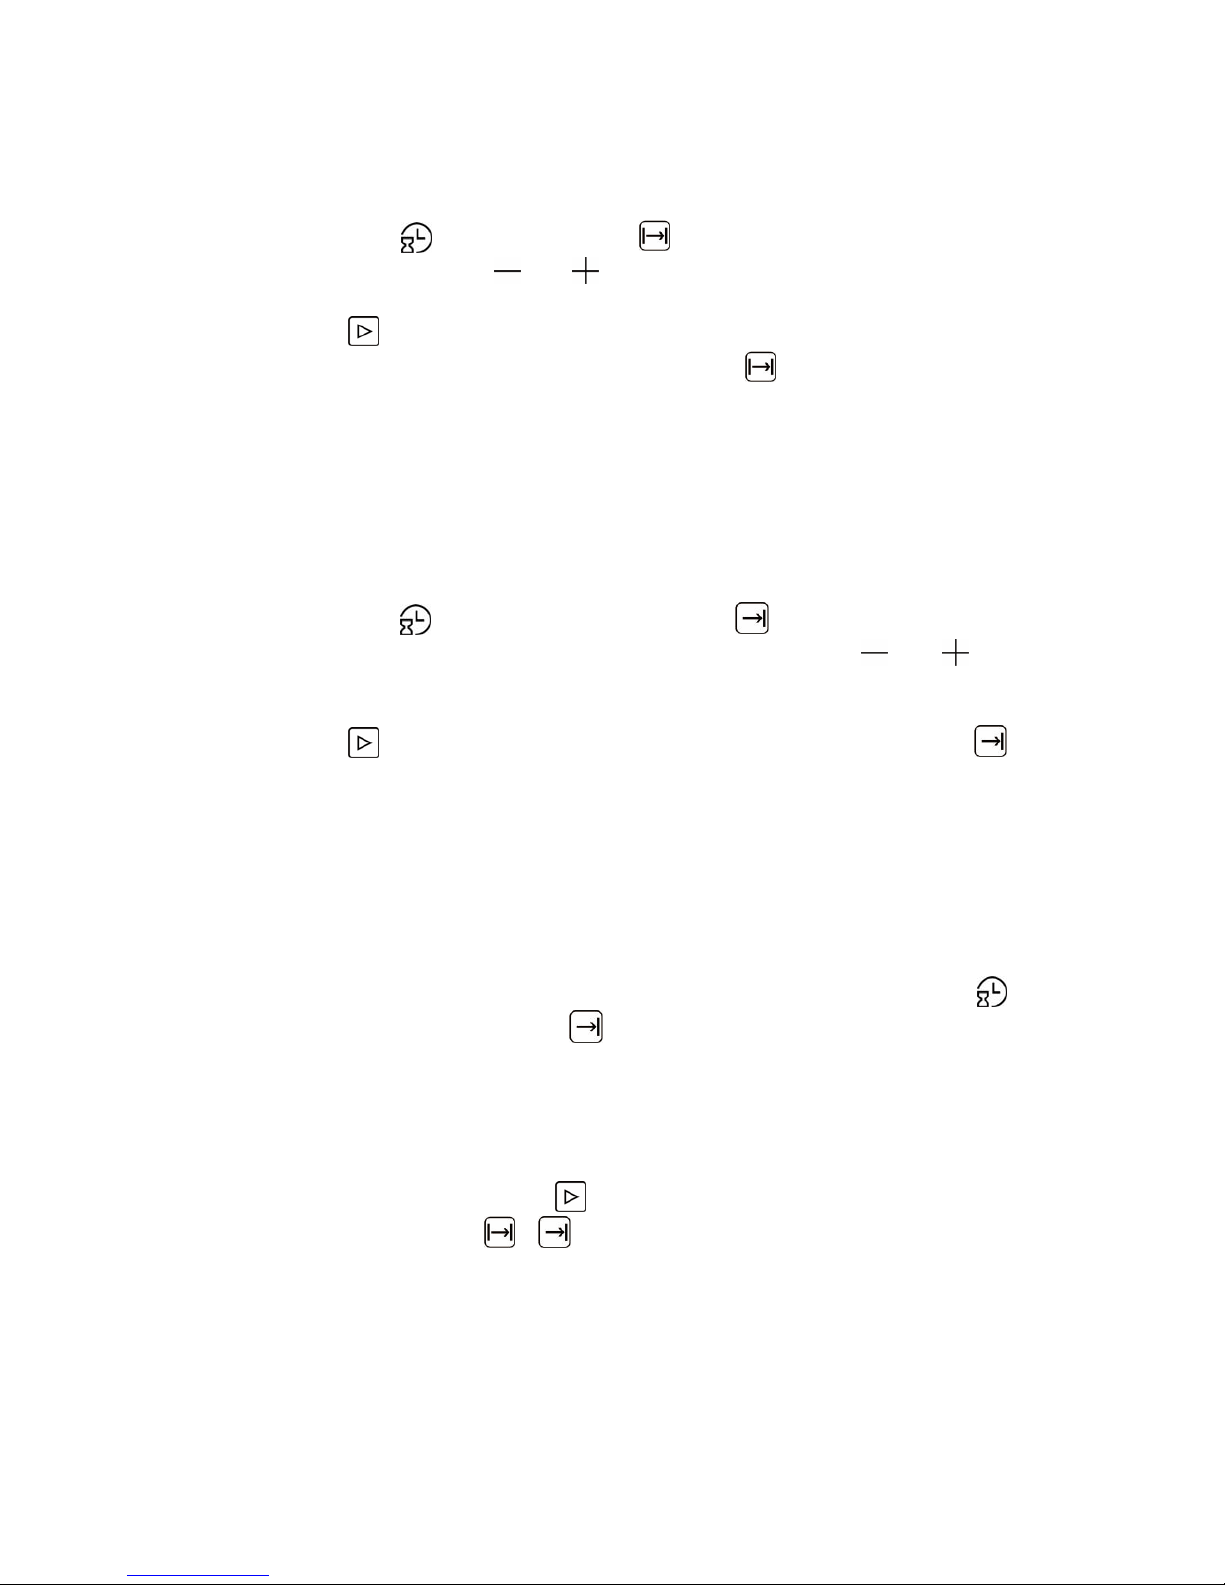
o Press the button once, the symbol and the time digit will
flash, you can use or to adjust the required cooking time.
o Press to start working, display will show cooking duration you
set and start count down till time up. The symbol, temperature
and the symbol of function will be constantly on.
Setting the end cook function
o Select oven function and temperature and you do on above
function setting.
o Press the button for 3 seconds, the symbol will flash and
the display will show the current time. You can use or to
adjust the required ending time.
o Press to start working, display shows the current time. The
symbol and temperature will be constantly on. The symbol of
function will flash. The timer w ill calculate how long the cooking
time will be, based on the time of day that you have selected.
Delayed start cooking time setting
o This function will only work after the “Cooking duration” function
is set in use. After setting the cooking duration, press the
button for 3 seconds. The symbol will be on and the display wil l
show a flashing time ( the current time + cooking duration +
1min. ) . Set the required cooking finishing time as you do on
setting the “Cooking duration”.
o When the finishing time is adjusted, select oven function and
temperature, and press to start working, display will back to
current time. The , and temperature flash and the symbol
of function will be constantly on. The system will automatically
calculate the cooking starting tim e, and when it’s reached, oven
starts heating.
Page 14

14
o When the set cooking finishing time is reached, all display goes
off except the clock and the buzzer will sound for 10 times.
Child lock
o Press the child lock for 3 seconds to activate the function and all
touch buttons are locked for unintended use. The will be light
on, while a audible signal sounds.
o Press the child lock for 3 seconds to activate and allow the use of
touch buttons to operate oven. The will be light off, while a
audible signal sounds.
Symbol of temperature sensor short circuit or open circuit
o If the temperature sensor is short-circuited, “EA-2” will show on
the display.
o If the temperature sensor is broken -circuited, “E A-1” will show on
the display.
Note:
1. When select the oven light and defrost functions, the temperature
won’t be appeared.
2. Press the button to change the new temperature setting when
the oven is in use.
3. When the oven reaches the set temperature, the temperature
display will stay as on while the buzzer sounds. When the oven
temperature is lower than the setting, th e temperature display will flash
till reach.
4. If you want to pause cooking when it is running, press the button
once. Press the again to cancel all setting and stop cooking.
Page 15
15
Function introduction
Oven functions
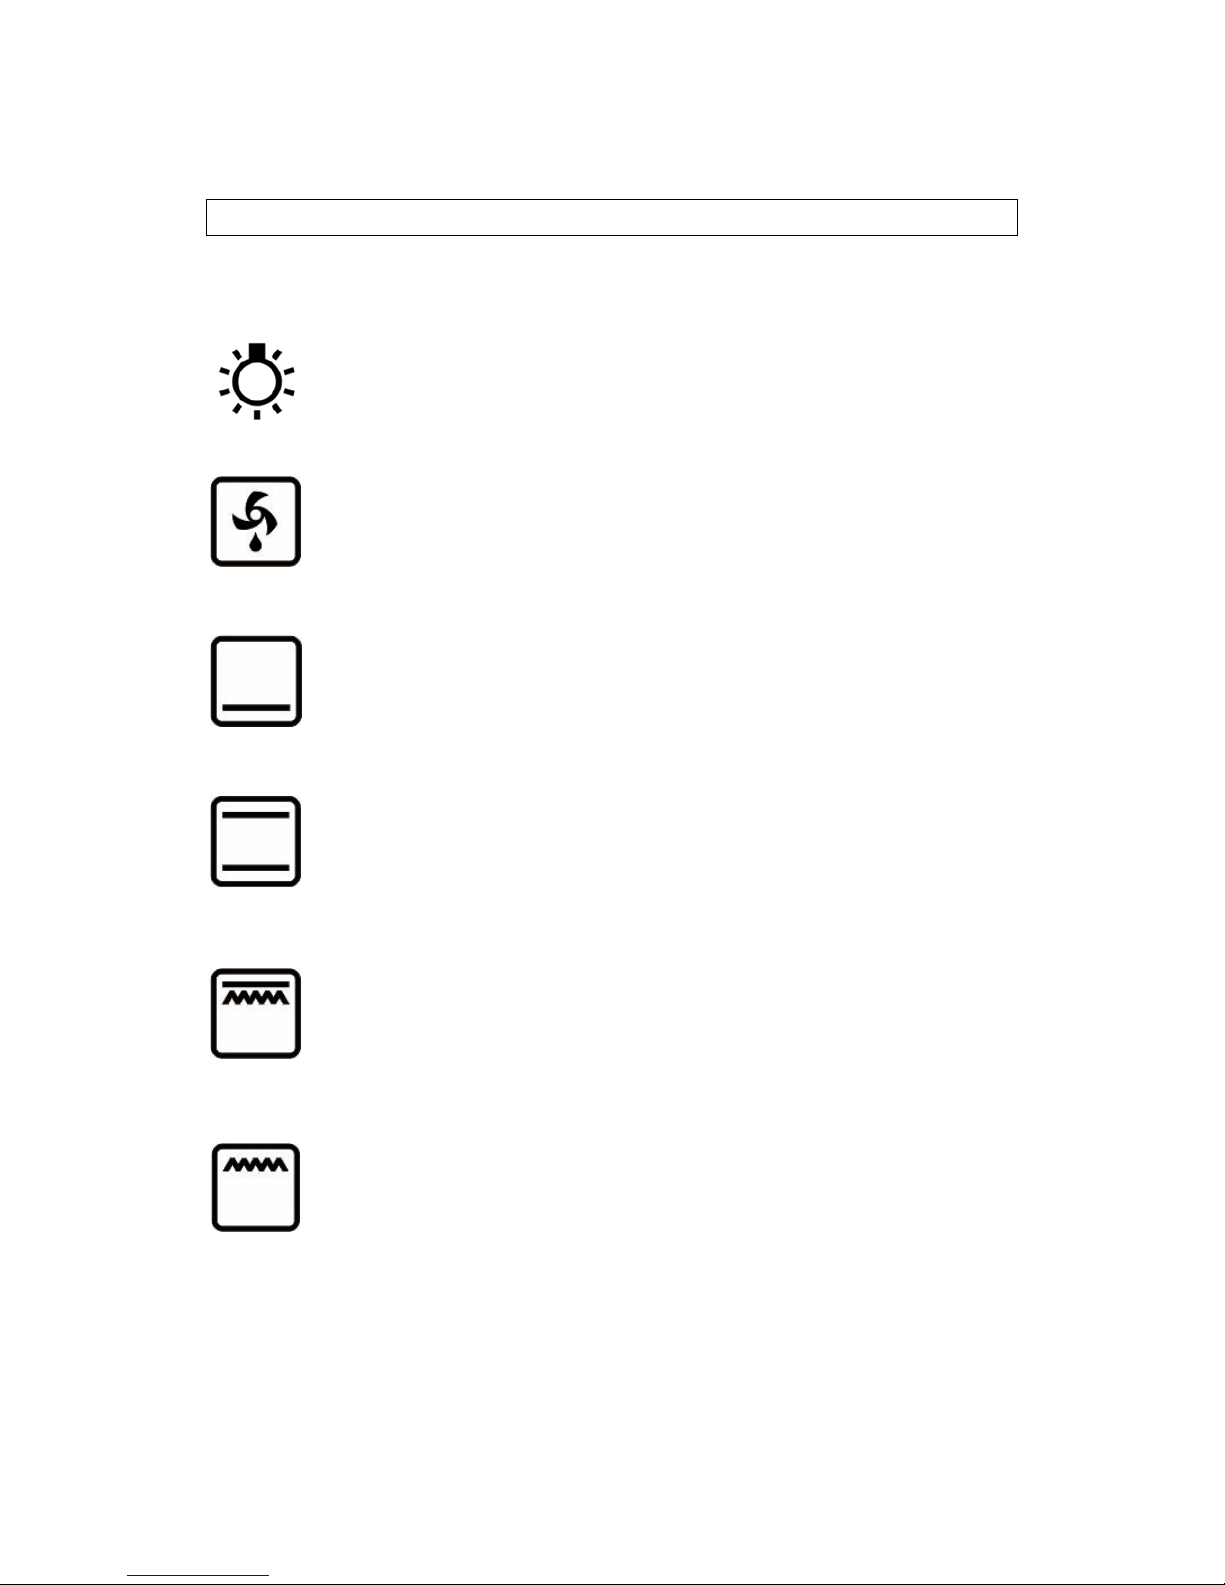
OVEN LIGHT: Separate light control which allows the light to
be switched on, even when the oven is not cooking.
Defrosting:
This function allows all frozen foods to be rapidly and delicately
thawed thanks to the internal fan.
Bottom Element:
Oven is heated using only the bottom element.
Bottom & Top Elements:
Allows the oven to be heated conventionally.
Combined grill (Grill and top heater):
When this function is activated, the grill heating tube and the
top heater will work at the same time. This function allows
roasting.
Grill heater On:
Setting the knob to this position allows dishes to be grilled on
the grate.
Page 16
16
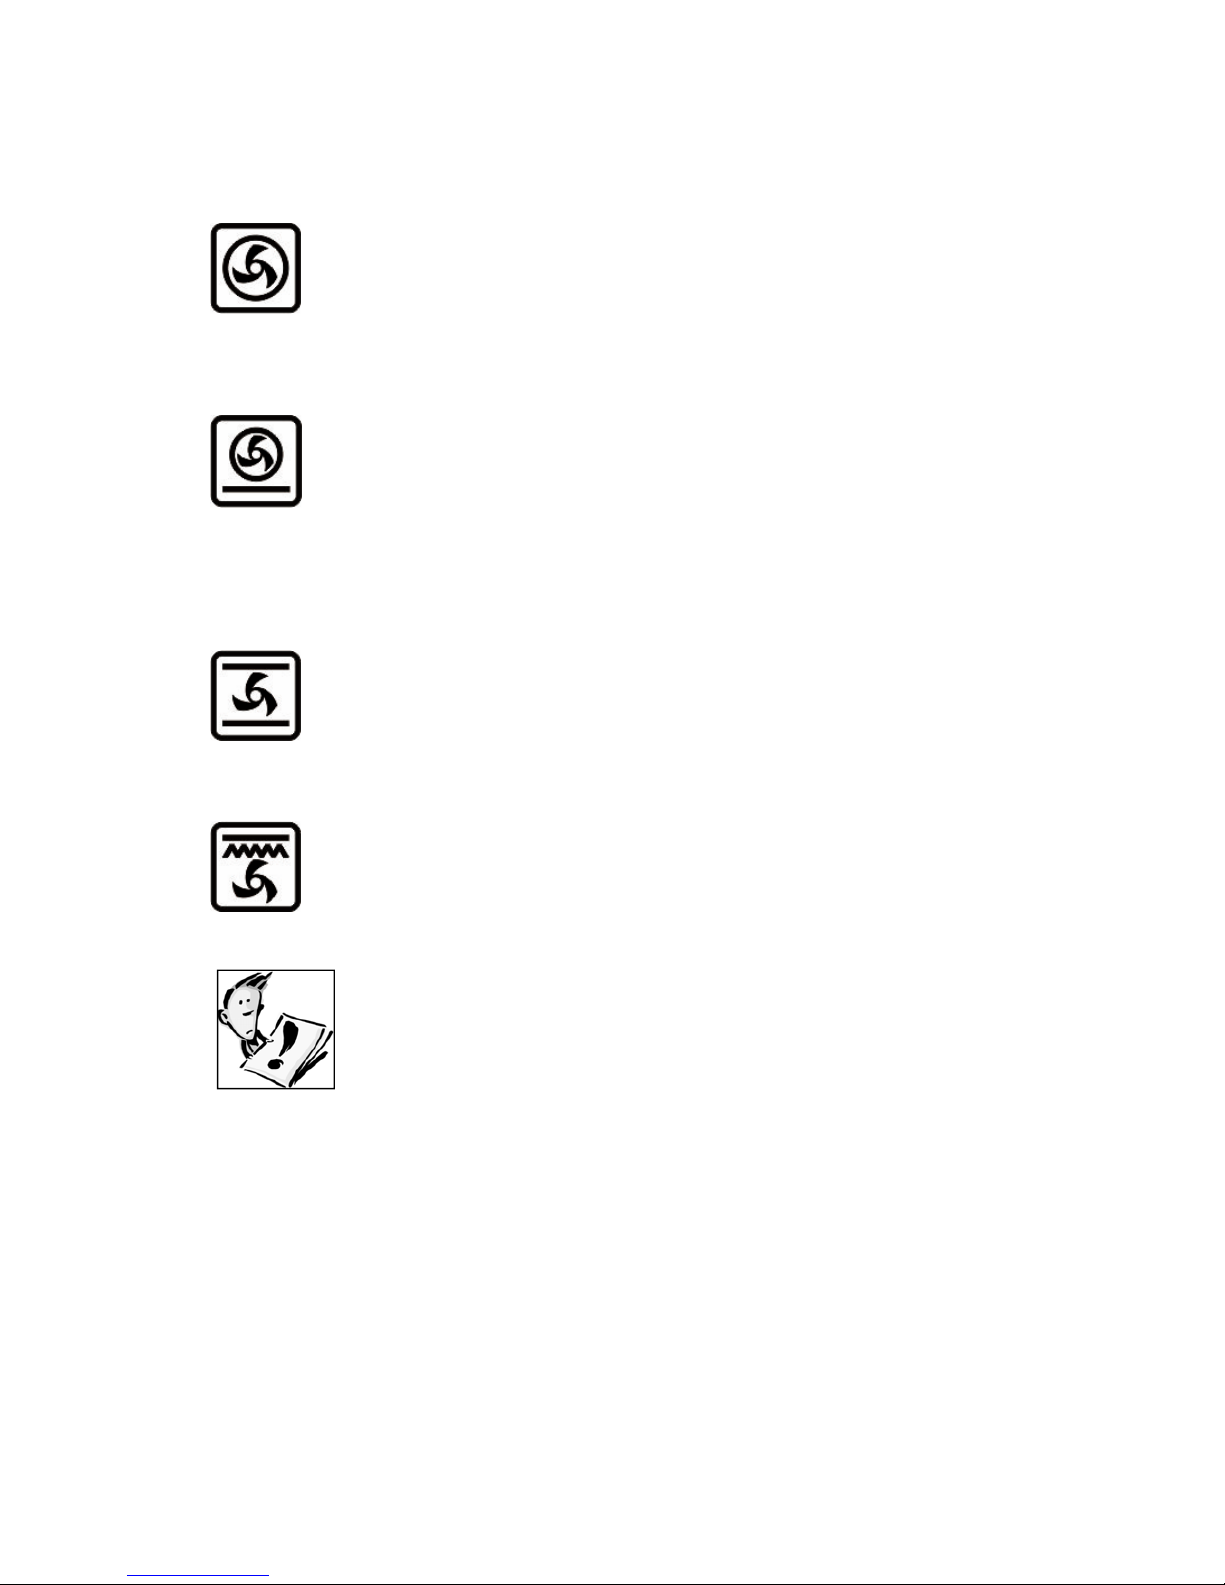
FAN OVEN: This method of cooking uses the circular element
while the heat is distributed by the fan. This results in a faster
and more economical cooking process. The fan oven allows
food to be cooked simultaneously on different shelves,
preventing the transmission of smells and tastes from one d ish
onto another.
Intensive hot air (Rear heater with fan and bottom
element on):
A crisp underside to pizza bas es, quiche s and pastr y cases can
be achieved by activating the intensive hot air setting. No need
to preheat the oven when using this setting when cooking from
frozen.
Fan, bottom and top hea ters on:
When you choose this icon, the oven executes the cake
function. Conventional oven with a fan.
Fan and combined grill on:
When you choose this function, the oven activates the
combined grill and fan functions. This function can accelerate
the process of barbecue and make food taste better.
You should not place food in side the cavity , until the
correct cooking temperature has been reached.
Cooking guidelines
o Please refer to the information given on food packaging for guidance
on cooking temperatures and times. Once familiar with the
performance of your appliance, temperatures and times can be
varied to suit personal preference.
Page 17

17
o If you are using the fan oven function, then you should follow the
information given on the food packaging for this particular mode of
cooking.
o You should pre-heat the oven and no t place foo d inside o f it u ntil the
oven operating light has gone off. You can choose not to pre-heat
when using the fan oven mode; however you should extend the
cooking time given on the food packaging by at least ten minutes.
o IMPORTANT: You should ALWAYS pre-heat the oven if you are
baking.
o If there is no guidance given on the food packaging specifically for
cooking in fan oven mode, you can generally reduce the cooking time
and temperature by 10% from the information given for conventional
oven cooking.
o Make sure that frozen foods are thoroughly thawed before cooking,
unless the instructions on the food packaging advise that you can
“cook from frozen”.
o Before cooking, check that any accessories that are not required are
removed from the oven.
o Place cooking trays in the centre of the oven and leave gaps between
the trays to allow air to circulate.
o Try to open the door as little as possible to view the dishes.
o The oven light will remain on during cooking.
Warnings
o Keep the oven door closed when using any of th e coo k ing functions,
including the grill functions.
o Do not use aluminium foil to co ver the grill pan or heat items wrapped
in aluminium foil under the grill. Th e high refle ctivity of the foil co uld
potentially damage the grill element.
o You should also never line the base of your oven with alumin ium fo il.
Page 18
18
o During cooking, never place pans or cookware directly onto the
bottom of your oven. They should always be placed on the shelves
provided.
o The internal components of the oven become extremely hot during
operation, care should be taken avoid touching them inadvertently.
o Important: Be careful when opening t he door, to avoid conta ct with
hot parts of the oven and steam.
o When removing any item from the oven, you shoul d ALWAYS use
an oven glove.
o Warning: Accessible parts may become hot during use. Young
children should be kept well away from the oven when it is in use.
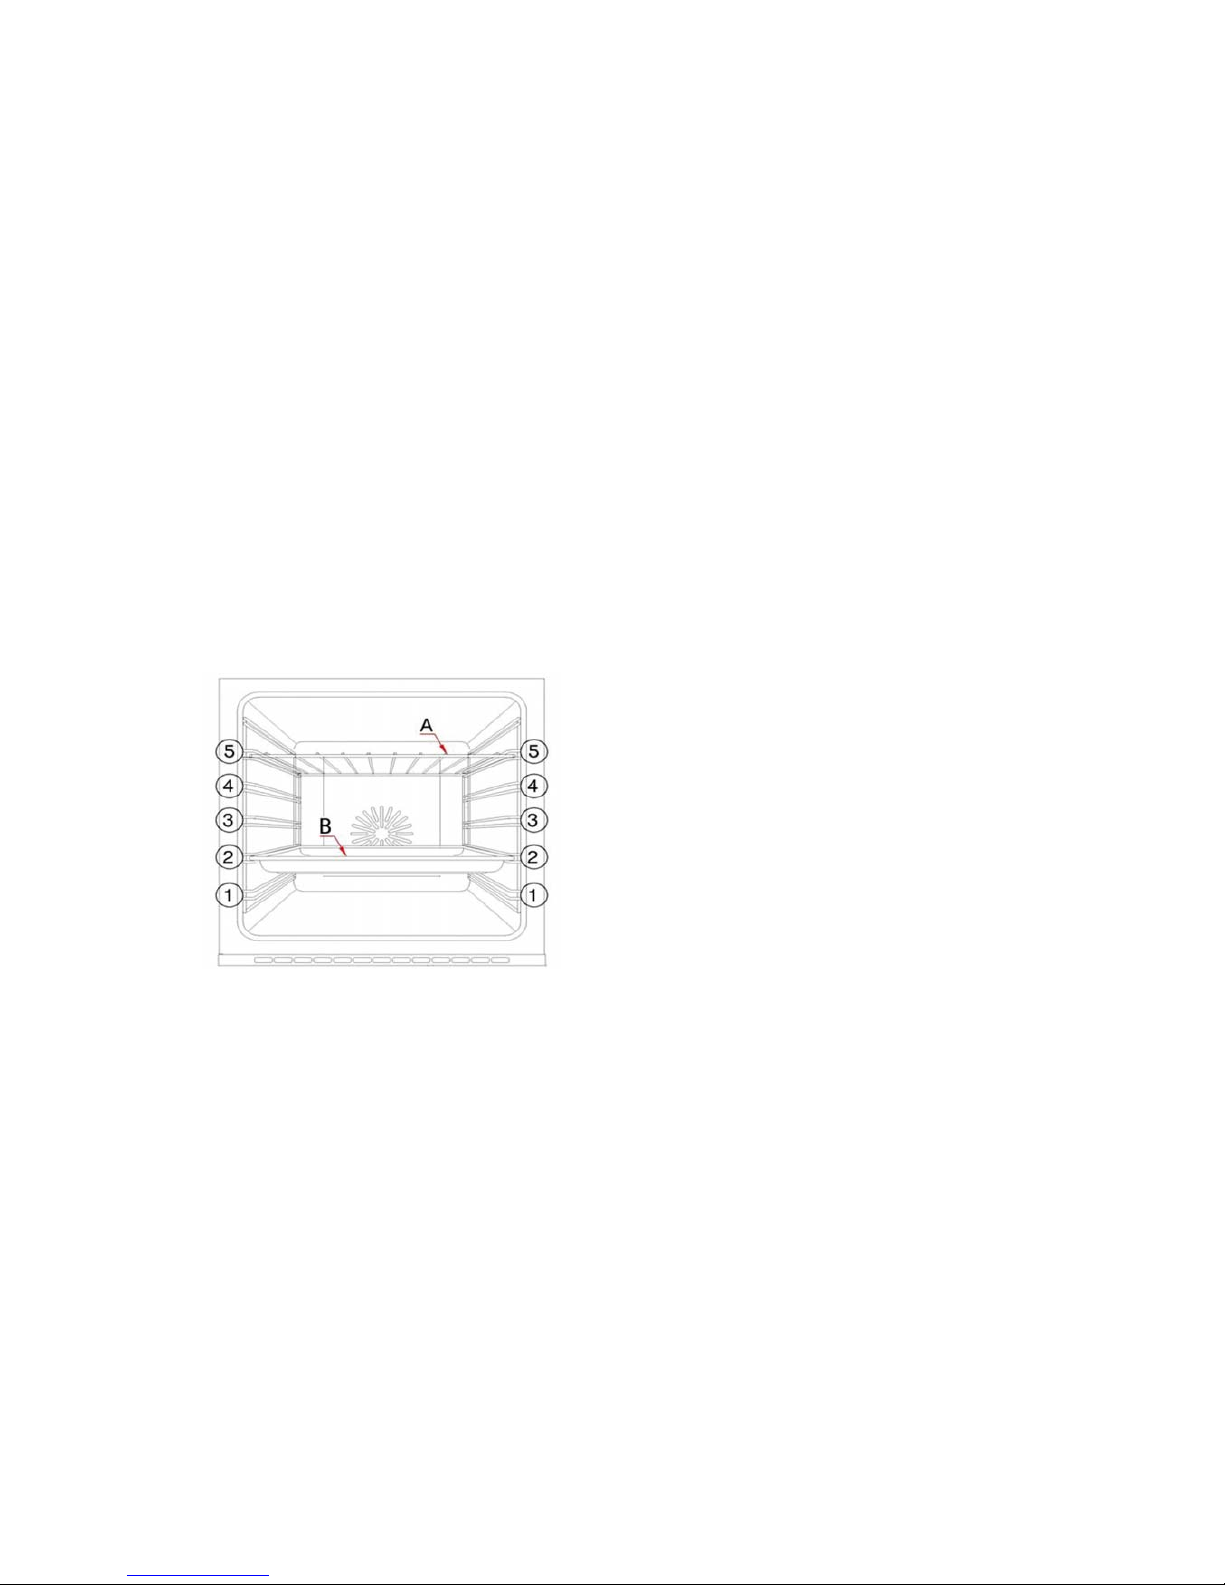
Shelf positions
Your oven will come supplied with the
following oven furniture:
(A) Oven shelf
(B) Enamelled baking tray & trivet
o The numbers 1 – 5, indicate the
different shelf positions that you can
utilise within the oven.
(Image for reference only – actual product may differ slightly)
o The sides of the cavity are moulded to provide positions for the
shelves or enamelled baking tray to rest on. Ensure that you select
a shelf position at the same height on both sides of the cavity. The
oven shelf has safety stops to prevent accidental withdraw. After
engaging the oven shelf into the side racks, as you push the oven
shelf into the oven, lift the front of the shelf slightly to bypass the
stops and allow the oven shelf to slide fully into the racks.
o To remove the oven shelf, gently pull the oven shelf outwards. When
the shelf stops, lift the front slightly to bypass the safety stops and
then completely withdraw the oven shelf from the oven.
Page 19
19
o When installed correctly, the shelf and tray should be horizontal and
not on an angle.
Cleaning and maintenance
Cleaning operations must only be carried out when the
oven is cool.
The appliance should be disconnected from your mains
supply before commencing any cleaning or
maintenance process.
o The oven should be thoroughly cleaned before it is operated for the
first time and after each use. This will avoid residual food stuffs
becoming baked on the oven cavity. After residues have been baked
on several times, they are far more difficult to remove.
o Never clean the oven surfaces by steam cleaning.
o The oven cavity should only be cleaned with warm soapy water, using
either a sponge or soft cloth. No abrasive cleaners should be used.
o Any stains that may appear on the bottom of the oven will have
originated from food splashes or spilt food, these splashes occur
during the cooking process. These could possibly be a resul t of the
food being cooked at an exce ssively high temperature or being p laced
in cookware that is too small.
o You should make sure that the cooking temperature that is selected
is appropriate for the food that you are cooking. You should also
ensure that the food is placed in an adequately sized dish and use
the enamelled baking tray where appropriate.
o Outer parts of the oven should only be cleaned with warm soapy
water, using either a sponge or soft cloth. No abrasive cleaners
should be used.
o We would recommend that an appropriate stainless steel cleaner and
polish is regularly used on the stainless steel surfaces of this
appliance.
Page 20
20
o If you use any form of oven cleaner on your appliance, then you must
check with the manufacturer of the cleaner that it is suitable for use
on your appliance.
o Do not use harsh or abrasive cleaners or sharp metal scrapers to
clean the oven door glass since they can scratch the surface which
may result in shattering.
o Any damage that is caused to the appliance by a cleaning
product will not be fixed by the manufacturer free of charge,
even if the appliance is within the guarantee period.
o Your appliance must be disconnected from your mains supply before
replacing the oven light bulb, to avoid the possibility of electric shock.
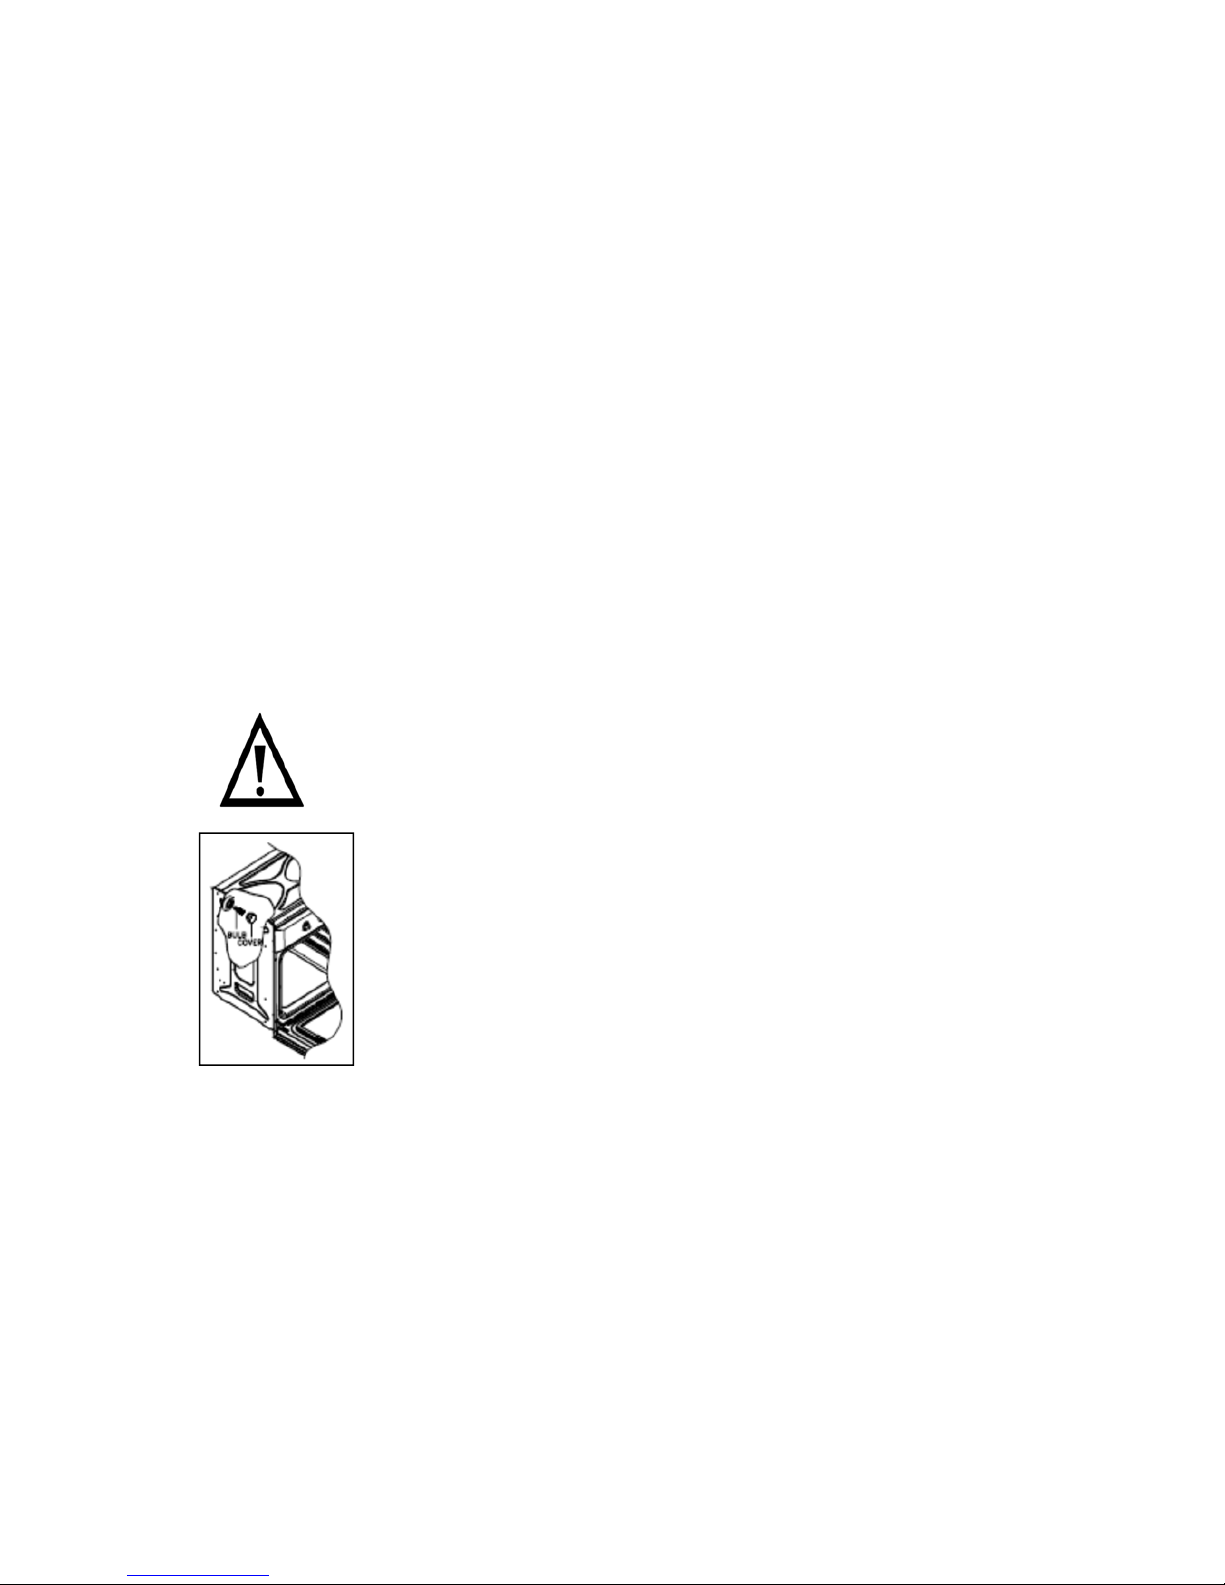
Replacing the oven bulb
IMPORTANT: The oven must be disconnected from your
mains supply before you attempt to either remove or
replace the oven bulb.
o Remove all oven shelves, the drip tray and the side
rack that is on the same side as the oven light.
o Remove the light cover by turning it anti-clockwise.
o Unscrew the bulb anti-clockwise and remove it from
its holder.
Page 21
21
o Replace the bulb with a 25 W/300°C, screw type
pygmy.
o Do not use any other type of bulb.
o Place the lamp cover back into position.
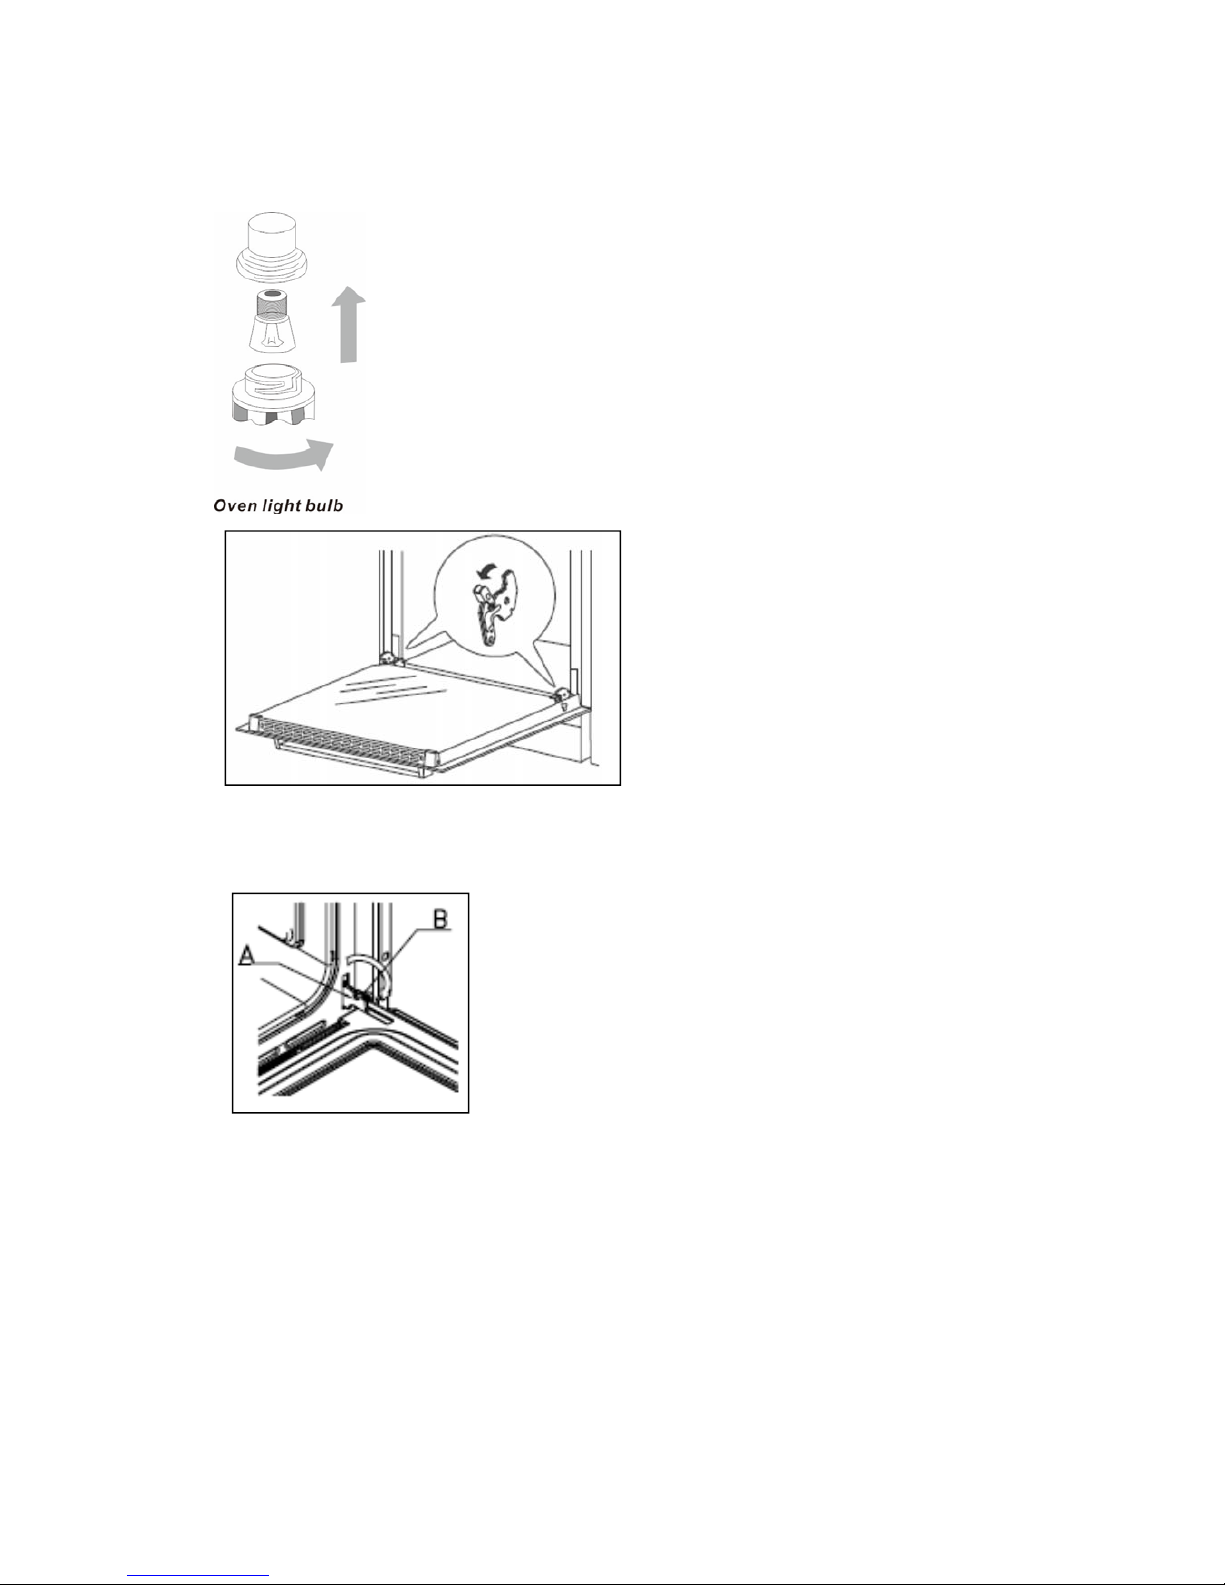
Removing the oven door for cleaning
To facilitate the cleaning of the inside of the oven and the outer frame
of the oven, the door can be removed as follows:
o The hinges (A) have two movable bolts
on them (B).
o If you raise both of the movable bolts (B),
then the hinges (A) are released fro m the oven
housing.
o You should grip the sides of the door at the centre an d then incline
it slightly towards the oven cavity and then pull the door gently
away from the oven cavity.
o IMPORTANT: You should make sure that the door is supported
at all times and that you place the door on some padded material
whilst cleaning it.
Page 22
22
o The oven door and door glass should on ly be cleaned u sing a damp
cloth and a small amount of detergent. The cloth MUST NOT have
come into contact with any form of cleaning product or chemical
previously.
o To refit the door you should slide the hinges back into their slots
and open the door fully.
o IMPORTANT: The movabl e bolts (B) must be closed back into
their original positions before closing the door.
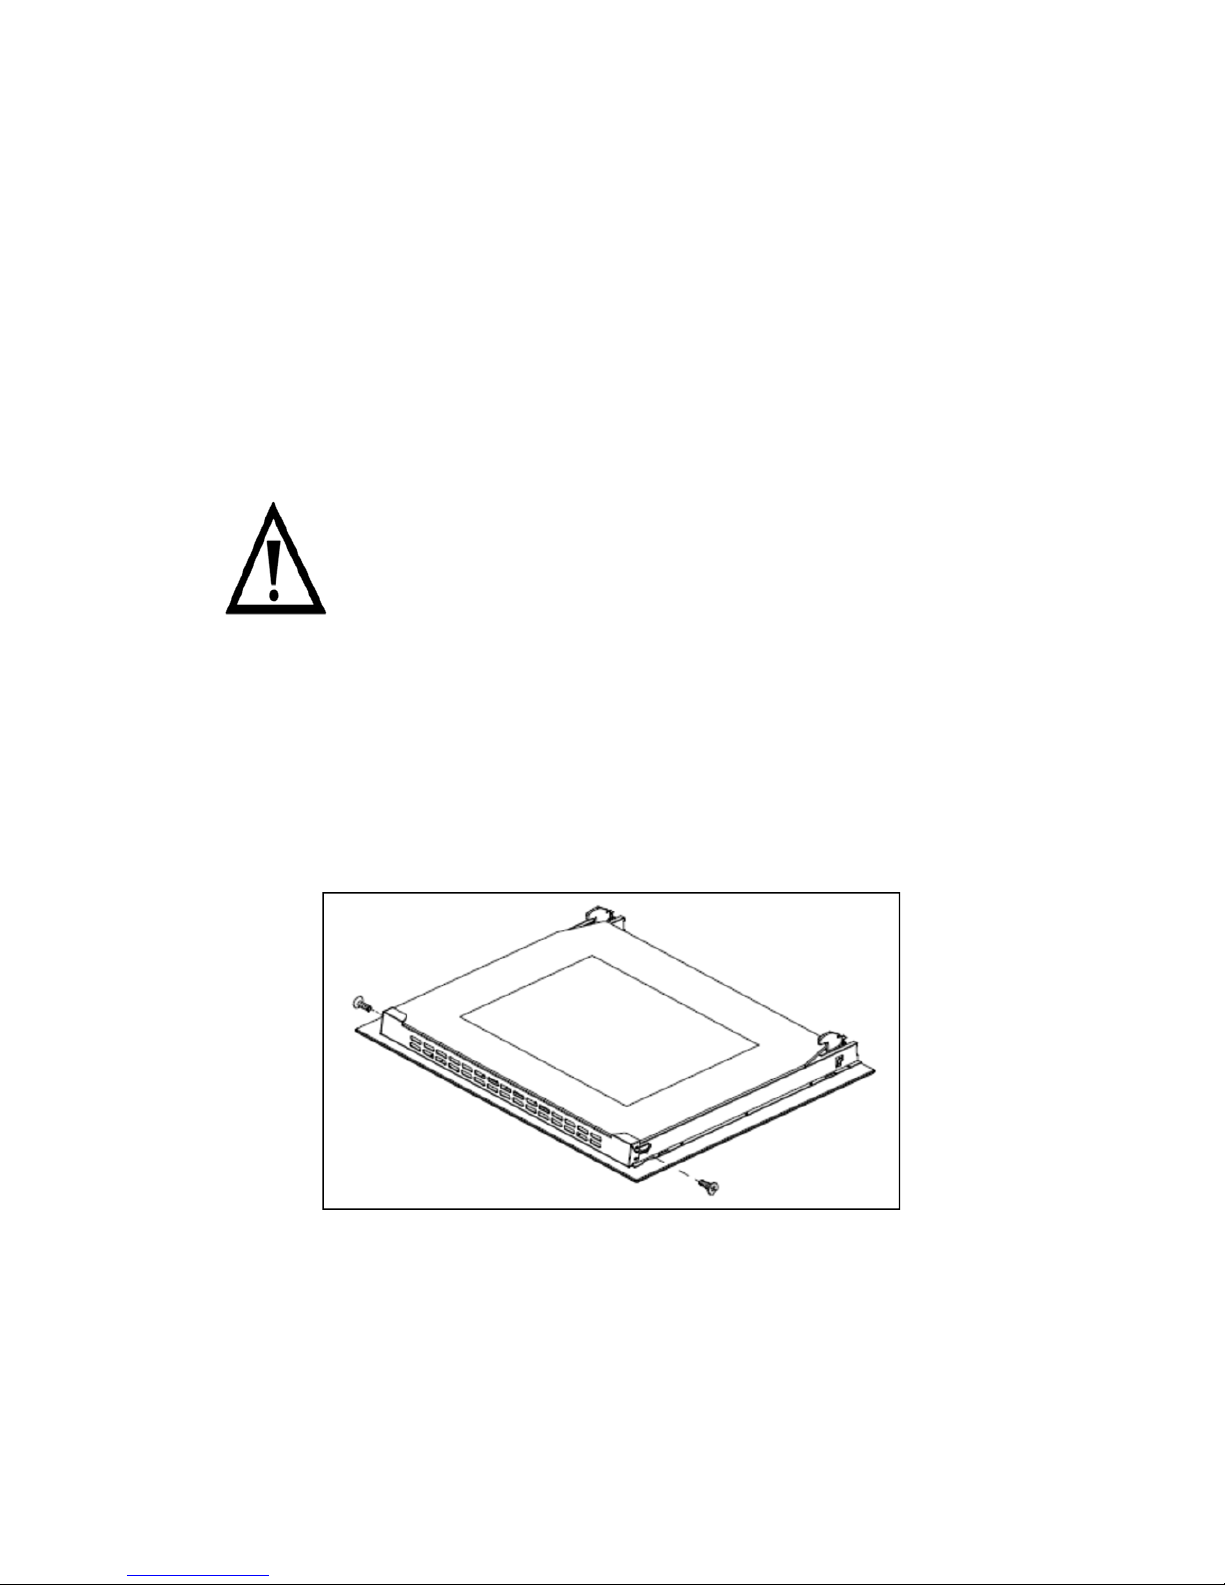
o Take care not to dislodge the hinge locking
system when removing the door, as the hinge
mechanism has a strong spring.
o Do not immerse the door in water at any time.
Removing the inner door glass for cleaning
o Do not use any abrasive cleaner that could cause damage.
o Remember that if the surface of the glass panel becomes
scratched, this could lead to a dangerous failure.
o To facilitate cleaning, the inner door glass can be lifted out.
o Unscrew the bracket latch that is in the corner of the top of the
door. Remove the glass from the door and clean with warm
soapy water.
Page 23

23
o After cleaning, insert the glass panel correctly back into the
door. Screw the bracket latch back into place.
o IMPORTANT: Remember where the panel of glass is
removed from so you can reassemble the door correctly.
Do not mix the glasses up or rearrange the order.
INSTALLATION
The installation must be carried out by a suitably
qualified person, in accordance with the current
version of the following.
o UK Regulations and Safety Standards or their European Norm
Replacements.
o Building Regulations (issued by the Department of the
Environment).
o Building Standards (issued by the Scottish Development
Department).
o IEE Wiring Regulations.
o Electricity At Work Regulations.
Electrical connection
Before connecting the appliance, make sure that the supply voltage
marked on the rating plate corresponds with your mains supply voltage.
WARNING: THIS APPLIANCE MUST BE EARTHED.
o This appliance should be wired into a 13A double p ole swit ched fu sed
spur outlet, having 3 mm contact separation and placed in an easily
accessible position adjacent to the appliance. The spur outlet must
still be accessible even when your oven is located in its housing.
Page 24
24
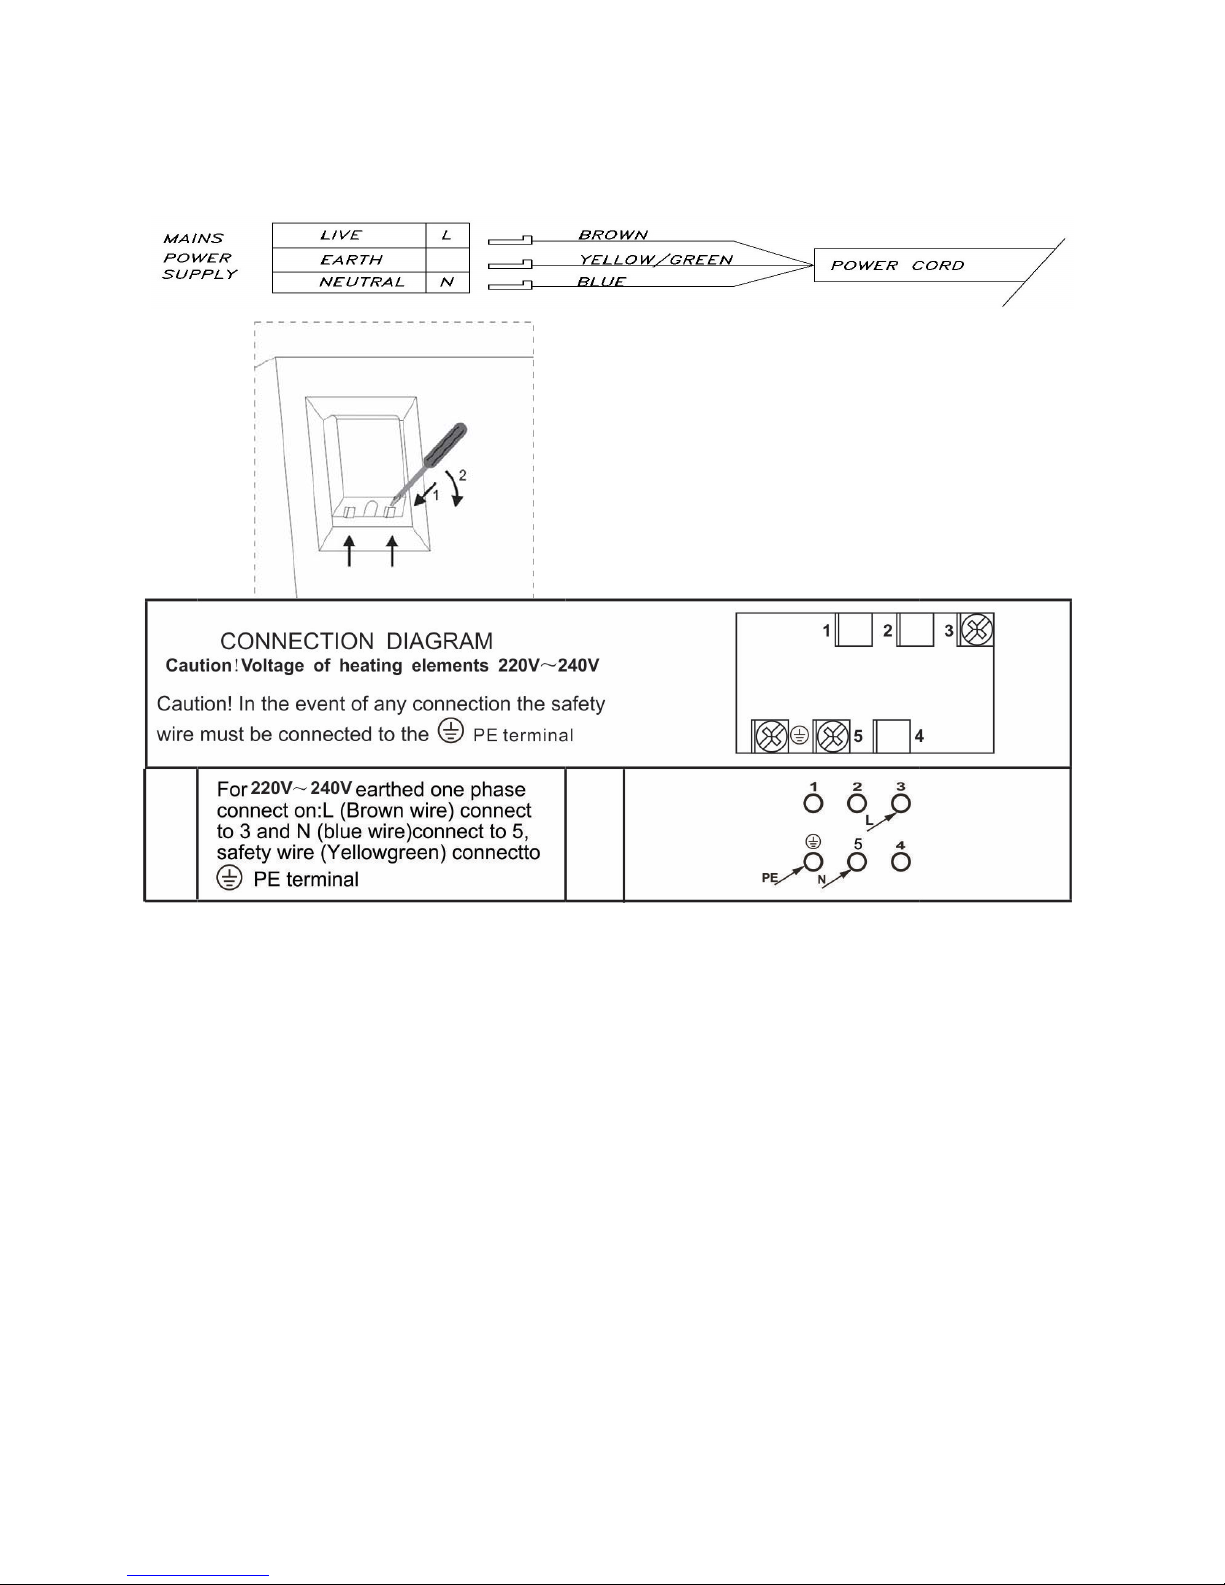
o To connect the oven power cord,
remove the cover on the terminal block,
in order to gain access to the contacts
inside. Make the connection, securing
the cord in place with the cable clamp
provided and then immediately close the
terminal block cover again.
o Connect the wires as indicated in the image above, using the brass
links provided where necessary.
o The earthing (yellow/green) conductor must always be 10 mm longer
than the line conductors.
o Care must be taken to ensure that the temperature of the mains
supply cable does not exceed 50°C.
o Regularly check the power cord for damage. If the supply cord is
damaged, it must be replaced by the manufacturer, its service agent
or similarly qualified persons in order to avoid a danger or injury.
Page 25
25
Installing the oven into the kitchen cabinet
Positioning the appliance
o Ensure that the aperture that you will be fitting the oven into is of
the size given in the above diagram.
Page 26
26
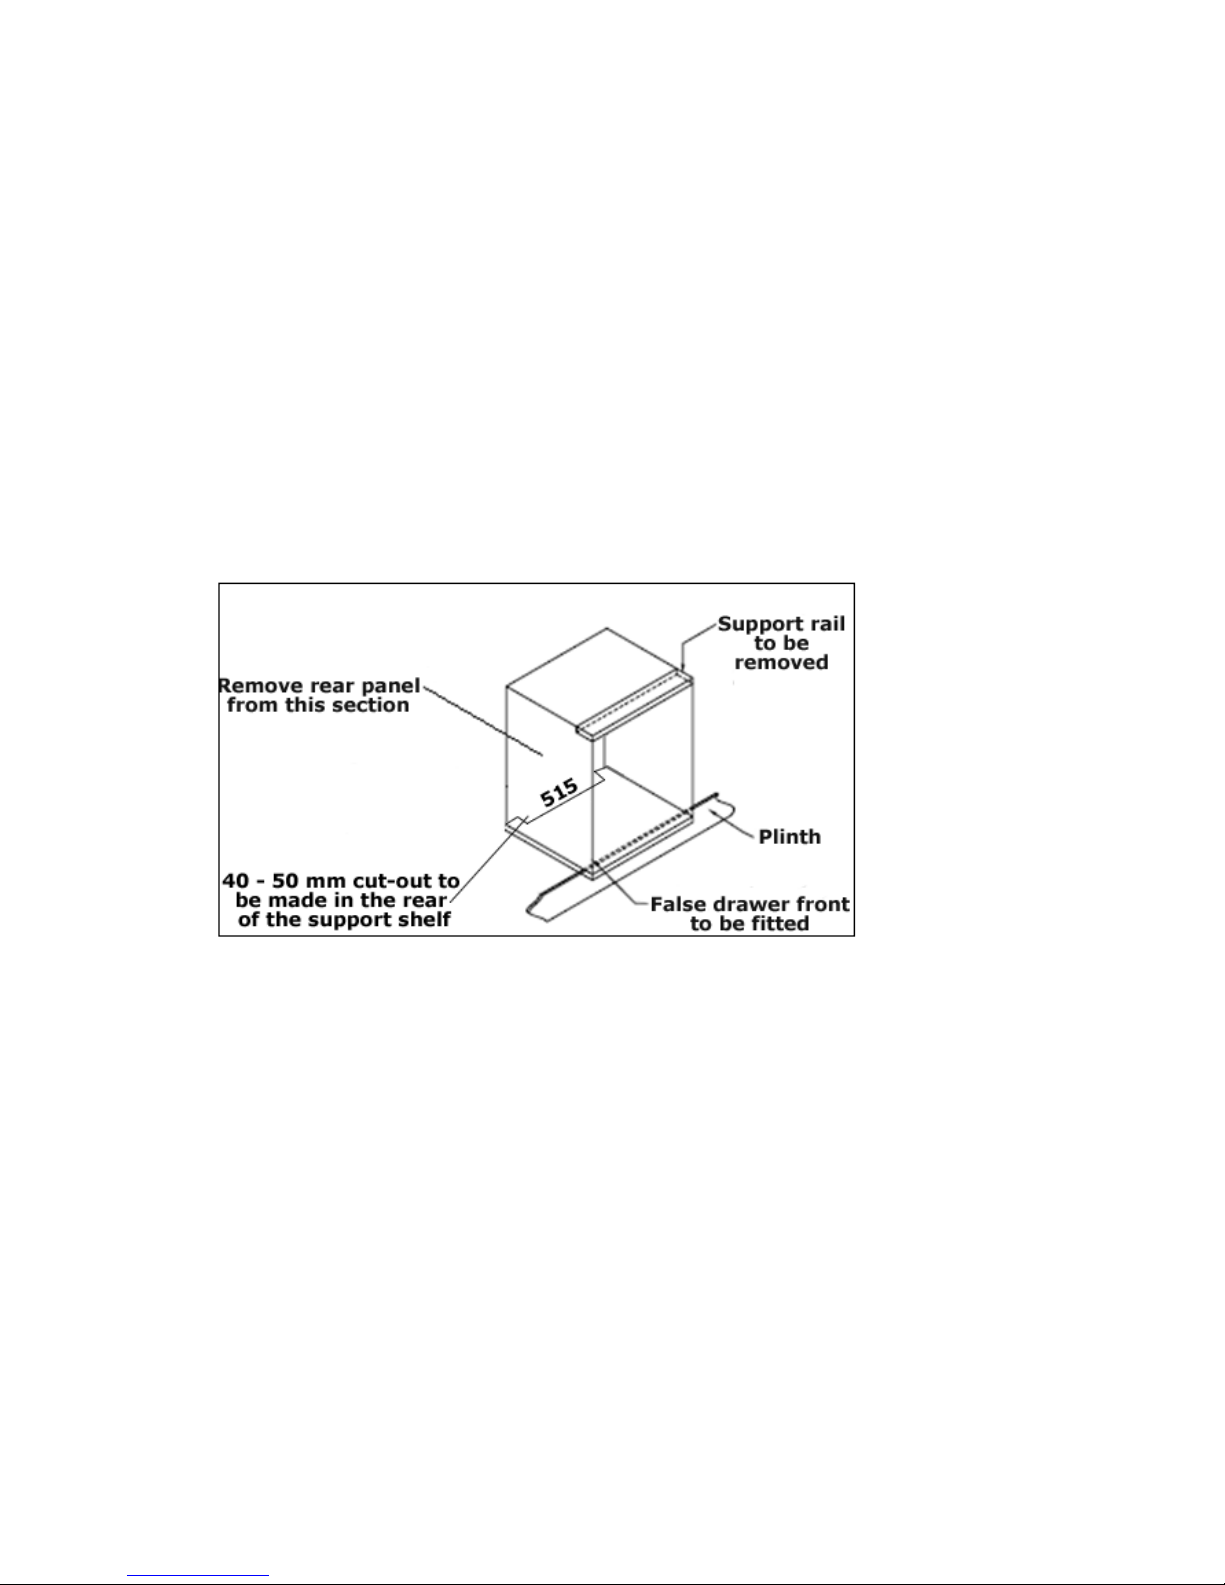
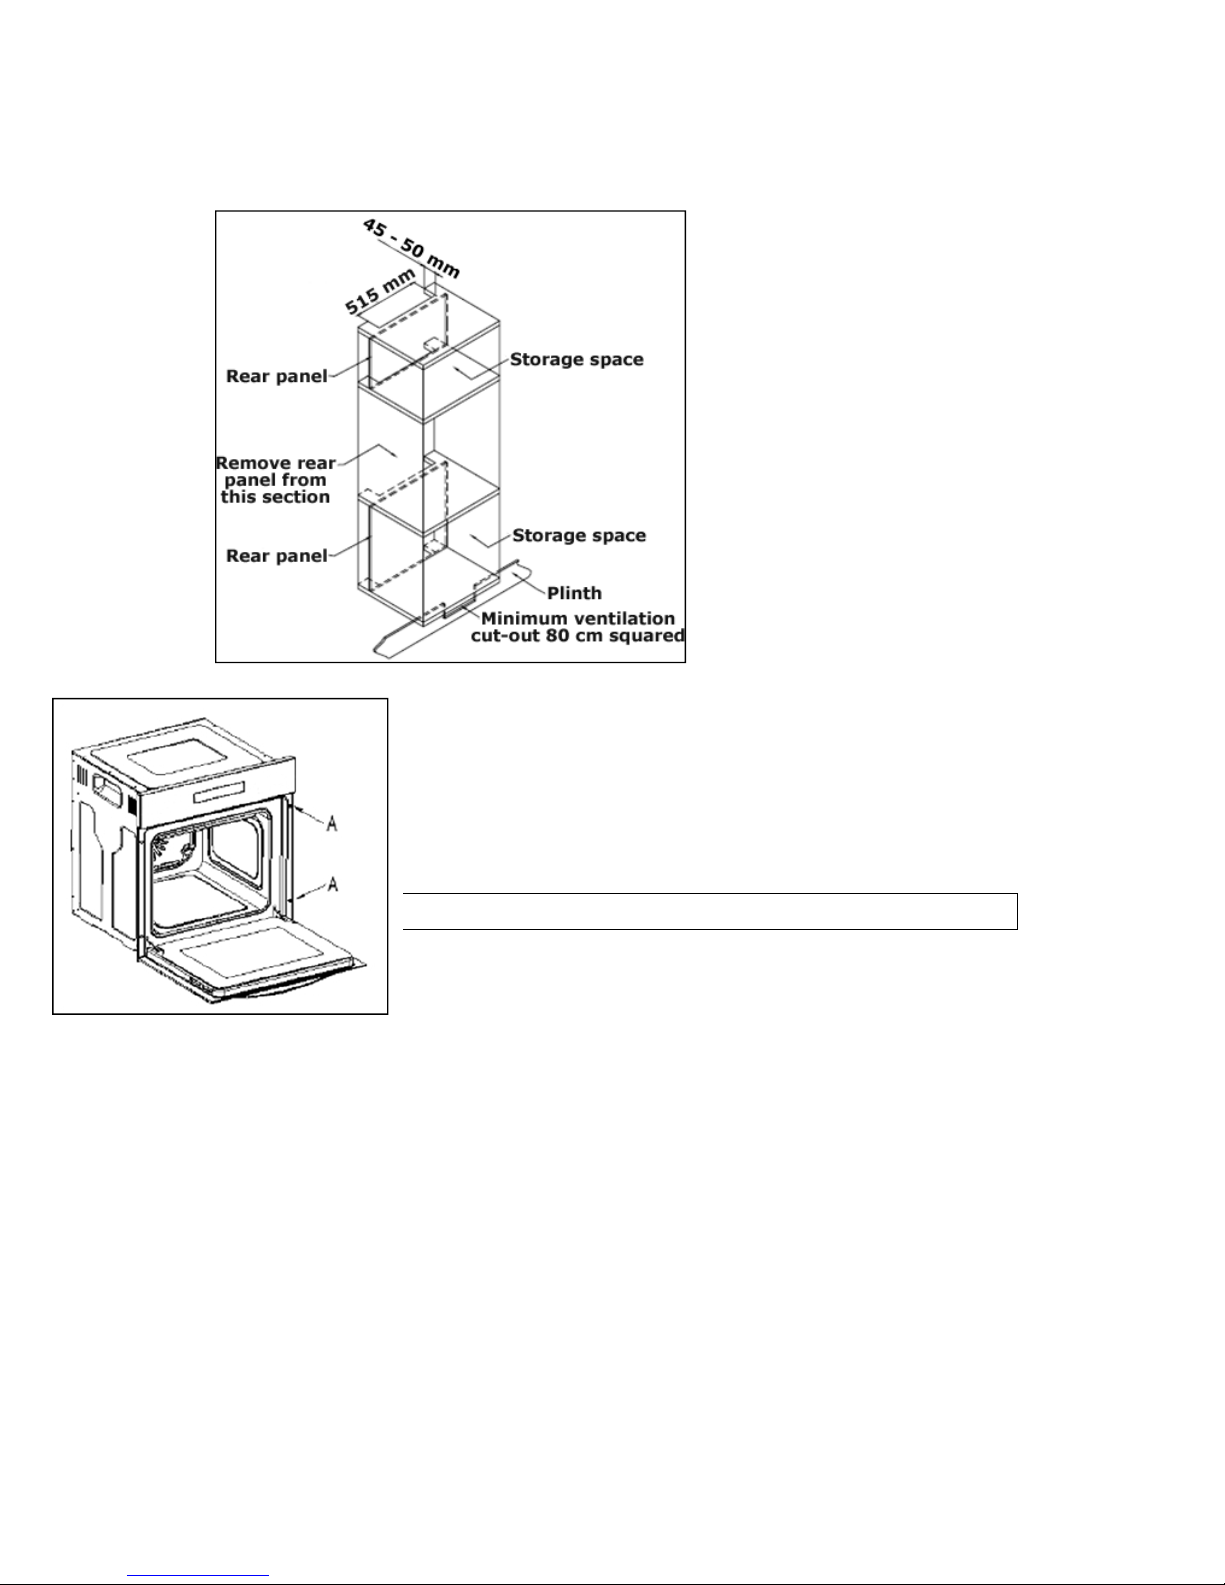
o The oven must be fitted into an oven housing with the ventilation
cut-outs shown in the “Ventilation requirements” section on the
next page.
o Ensure that the rear panel of the furniture housing unit has been
removed.
Ventilation requirements
(Figure shows the ventilation and cut-out requirements for the
installation of the appliance into a standard kitchen unit).
Page 27
27
(Figure shows the
ventilation and cut-out
requirements for the
installation of the
appliance into a tall
housing unit).
o Ensure that the oven has been securely fixed
into the housing unit. The fi xing of the oven into the
housing is made by using four screws. Th ese should be
screwed through the oven cabinet and into the housing
unit.
My appliance isn’t working correctly
o The oven isn’t coming on.
* Check that the oven is in manual operation mode.
* Check that you have selected a cooking function and a cooking
temperature.
o There appears to be no power to the oven and grill.
* Check that the appliance has been connected to the electrical
mains supply correctly.
* Check that the mains fuses are in working order.
Page 28

28
* Check th at the oper ating instr uctions for putting the appliance in to
manual operation mode have been followed.
o The grill function works bu t the main oven does not.
* Check that you have selected the correct cooking function.
o The grill and top oven element is not working, or cuts out
for long periods of time during use.
* Allow the ov en to cool for a pproximately 2 hou rs. Once cool, ch eck
whether the appliance is again working properly.
o My food is not cooking proper ly
* Ensure that you are selecting the correct temperature and the
correct cooking function for the food that you are cooking. It may
be appropriate to adjust your cooking temperature by plus or
minus 10°C, to achieve the best cooking results.
o My food is not cooking evenly
* Check that the oven has been installed correctly and is level.
* Check that the correct temperatu res and she lf positions are being
used.
o The oven light is not working
* Refer to the “Replacing the oven bulb” section.
o I am getting condensation in my oven
* Steam and condensation is a natural by product of cooking any
food with high water content, such as frozen food, chicke n etc.
* You may get conde nsation in the oven cavity and forming between
the oven door glasses. This is not necessarily a sign that the oven
is not working correctly.
* Do not leave food in the oven to cool after it has been cooked an d
the oven has been switched off.
Page 29

29
* Use a covered container, where practical, when coo king to reduce
the amount of condensation that forms.
IMPORTANT: If your appliance appears not to be
operating correctly, then you shou ld disconnect it
from your mains supply and then contact the
Customer Care Department .
DO NOT ATTEMPT TO REPAIR THE APPLIANCE
YOURSELF.
Please note that if an engineer is asked to attend whilst the product is
under guarantee and finds that the problem is not the result of an
appliance fault, then you may be liable for the cost of the ca ll out charge.
The appliance must be accessible for the engineer to perform
any necessary repair. If your appliance is installed in such a way
that an engineer is concerned that damage will be caused to the
appliance or your kitchen, then he will not complete a repair.
This includes situations where appliances have been tiled in,
sealed in with sealant, have wooden obstructions placed in front
of the appliance - like plinths, or any installation other tha n the
one specified by the manufac turer has been completed.
Please refer to the conditions of guarantee that appear on the warranty
card that you receive with the appliance.
IMPORTANT: The manufacturer operates a policy of continuous
improvement and reserves the right to adjust and modify its
products without prior notification.
Page 30
30
ICON80IX IM 20170725
 Loading...