

Page 1
50070 Taurus
DE
Babyphone Rigi Digital
Gebrauchsanleitung, Art .Nr.: 50070
ES
Babyphone Rigi Digital
Manual de uso, N° d‘art.: 50070
Babyphone Rigi Digital
FR
Notice d‘utilisation, Art. Núm .: 50070
PL
Niania elektroniczna Rigi Digital
Instrukcja obsługi, Nr ar t.: 50070
Monitor za bebe Rigi Digital
RS
Uputst vo za upotrebu,
Broj artik la: 50070
GB
Babyphone Rigi Digital
Instructions for use, Art. no:: 50 070
IT
Babyphone Rigi Digital
Istruzioni per l‘uso, Art. Nr.: 50070
Babyfoon Rigi Digital
NL
Gebruiksaanwijzing, Ar t. nr.: 50070
CZ
Dětská chůvička Rigi Digital
Návod kpouži tí, Artikl č: 50070
Аппарат „Радионяня“ Rigi Digital
RU
Руководство по применению,
нόмер: 50070
Page 2
Babyphone Rigi Digital
Inhaltsverzeichnis
DE
Allgemeine Sicherheitshinweise . . . . . . 04
Sicherheitshinweise zur Installation. . . . . 05
Technische Daten . . . . . . . . . . . . . . . . 05
Lieferumfang, Gerätebeschreibung . . . . 06
Inbetriebnahme . . . . . . . . . . . . . . . . . 07
Einstellungen, Betrieb mit Akkus . . . . . 08
Reichweitenkontrolle, ECO-Modus . . . . 09
Contents
GB
General safety instruction . . . . . . . . . . 14
Safety instructions regarding installation . . 15
Technical specication . . . . . . . . . . . . . 15
Scope of delivery . . . . . . . . . . . . . . . . 16
Description of babyphone . . . . . . . . . . 16
Before rst use. . . . . . . . . . . . . . . . . . . 17
Settings, Battery operation . . . . . . . . . 18
ES
Índice
Indicaciones generales de seguridad . . . 24
Indicaciones de seguridad para la
instalación, Datos técnicos . . . . . . . . . . . 25
Volumen de suministro . . . . . . . . . . . . 26
Descripción del dispositivo . . . . . . . . . . 26
Puesta en funcionamiento . . . . . . . . . . 27
Ajustes, Funcionamiento con pilas . . . . . . 28
IT
Contenuto
Avvertenze di sicurezza generali . . . . . . 34
Istruzioni di sicurezza per l‘installazione . . 35
Datos técnicos . . . . . . . . . . . . . . . . . . 35
Dotazione, Descrizione dell‘apparecchio . . 36
Messa in funzione . . . . . . . . . . . . . . . . 37
Impostazioni, Funzionamento a batterie . . 38
Controllo di portata, Modalità ECO . . . . 39
Lautstärkeregelung / Elterneinheit . . . . . 09
Nachtlicht, Mikronfonempndlichkeit . . 10
Erweiterung des Empfangbereichs . . . . 10
Reinigung und Wartung . . . . . . . . . . . . 10
Garantie, Entsorgungshinweise . . . . . . . 11
Problembehebung . . . . . . . . . . . . . . . 12
Range control, ECO mode . . . . . . . . . . 19
Volume control / parent unit . . . . . . . . 19
Night light, Microphone sensitivity. . . . . 20
Tips for extending the range . . . . . . . . . 20
Cleaning and maintenance . . . . . . . . . 20
Warranty, Disposal instructions . . . . . . . 21
Troubleshooting . . . . . . . . . . . . . . . . . 22
Control del alcance, Modo ECO . . . . . . . 29
Regulación de volumen / unidad parental . 29
Luz nocturna, Sensibilidad del micrófono . 30
Consejos para ampliar el alcance . . . . . . 30
Limpieza y mantenimiento . . . . . . . . . .30
Garantía, Indicaciones de eliminación . . 31
Solución de problemas . . . . . . . . . . . . 32
Regolatore del volume / unità genitori . . 39
Luce notturna, Sensibilità del microfono 40
Estendere l‘area di copertura . . . . . . . . . 40
Pulizia e manutenzione . . . . . . . . . . . . 40
Garanzia, Modalità di smaltimento . . . . . 41
Soluzione problemi . . . . . . . . . . . . . . . 42
Content
FR
Consignes générales de sécurité . . . . . . 44
Conseils de sécurité pour l‘installation . . . 45
Caractéristiques techniques . . . . . . . . . 45
Contenu de la livraison. . . . . . . . . . . . . 46
Description de l‘appareil . . . . . . . . . . . . 46
Mise en service . . . . . . . . . . . . . . . . . . 47
Paramètres . . . . . . . . . . . . . . . . . . . . . 48
Fonctionnement avec piles . . . . . . . . . 48
2
Contrôle de la portée, Mode ECO . . . . . 49
Réglage du volume / unité parents . . . . 49
Éclairage de nuit, Sensibilité du microphone 50
L‘extension de la zone de portée . . . . . . 50
Nettoyage et entretien . . . . . . . . . . . . .50
Garantie . . . . . . . . . . . . . . . . . . . . . . . 51
Instructions d‘élimination des déchets . . 51
Résolution des problèmes . . . . . . . . . . 52
Page 3

Inhoudsopgave
NL
Algemene veiligheidsaanwijzingen . . . . 54
Veiligheidsaanwijzing voor de installatie . 55
Technische gegevens . . . . . . . . . . . . . 55
Leveringsomvang. . . . . . . . . . . . . . . . 56
Beschrijving van het apparaat. . . . . . . . 56
Ingebruikname . . . . . . . . . . . . . . . . . . 57
Instellingen, Gebruik met batterijen . . . 58
Spis treści
PL
Ogólne zasady bezpieczeństwa . . . . . . 64
Zasady bezpieczeństwa instalacji . . . . . . 65
Dane techniczne. . . . . . . . . . . . . . . . . 65
Zakres dostawy, Opis urządzenia . . . . . . 66
Uruchomienie. . . . . . . . . . . . . . . . . . . 67
Ustawienia . . . . . . . . . . . . . . . . . . . . . 68
Zasilanie z wykorzystaniem akumulatorów 68
CZ
Obsah
Všeobecné bezpečnostní pokyny . . . . . 74
Bezpečnostní pokyny k instalaci . . . . . . . 75
Technické údaje . . . . . . . . . . . . . . . . . 75
Obsah dodávky, Popis přístroje . . . . . . . 76
Uvedení do provozu . . . . . . . . . . . . . . 77
Nastavení, Provoz s akumulátorem. . . . . 78
Kontrola dosahu, Režim ECO . . . . . . . . . 79
RS
Sadržaj
Opšte bezbednosne informacije . . . . . . 84
Bezbednosne informacije za instalaciju . . 85
Tehnički podaci . . . . . . . . . . . . . . . . . 85
Obim isporuke, Opis uređaja . . . . . . . . . 86
Pre prve upotrebe . . . . . . . . . . . . . . . . 87
Podešavanja, Rad sa punjivim baterijama 88
Kontrola dometa, EKO režim . . . . . . . . . 89
Babyphone Rigi Digital
Bereik controle, ECO-Modus . . . . . . . . . .59
Volumeregelaar / oudereenheid . . . . . . . 59
Nachtlampje, Microfoongevoeligheid . . . 60
Uitbreiding van het ontvangstbereik . . . . 60
Reiniging en onderhoud . . . . . . . . . . . . 60
Waarborg, Verwijdering . . . . . . . . . . . . . 61
Probleemoplossing . . . . . . . . . . . . . . . . 62
Kontrola zasięgu, Tryb EKO . . . . . . . . . . . 69
Regulacja poziomu głośności / stacja rodzica 69
Lampka nocna, Poziom czułości mikrofonu . 70
Zwiększenia obszaru odbioru . . . . . . . . . 70
Czyszczenie i konserwacja . . . . . . . . . . . 70
Gwarancja, Utylizacja . . . . . . . . . . . . . . . 71
Rozwiązywanie problemów . . . . . . . . . . 72
Regulace hlasitosti / rodičovská jednotka . . 79
Noční světlo, Citlivost mikrofonu . . . . . . . 80
Rozšíření oblasti příjmu. . . . . . . . . . . . . .80
Čištění a údržba. . . . . . . . . . . . . . . . . . . 80
Záruka, Vhodné způsoby likvidace . . . . . . 81
Odstraňování problémů . . . . . . . . . . . . .82
Regulacija jačine zvuka / roditeljska jedinica . 89
Noćno svetlo, Osetljivost mikrofona . . . . . 90
Povećanje dometa prijemnika. . . . . . . . . 90
Čišćenje i održavanje . . . . . . . . . . . . . . . 90
Garancija, Uputstvo za odlaganje . . . . . . .91
Otklanjanje problema . . . . . . . . . . . . . . 92
Указатель
RU
Общие указания по технике безопасности . 94
Правила безопасности при установке . . . . 95
Технические данные . . . . . . . . . . . . . . . . . 95
Комплект поставки, Описание устройства . 96
Ввод в эксплуатацию. . . . . . . . . . . . . . . . . 97
Настройки . . . . . . . . . . . . . . . . . . . . . . . . 98
Эксплуатация на аккумуляторах . . . . . . . . 98
Контроль радиуса действия, Режим ЭКО . . 99
Регулировка громкости. . . . . . . . . . . . . . . 99
Ночник, Чувствительность микрофона. . . .100
Расширению диапазона приема . . . . . . . . 100
Техническое обслуживание и уход . . . . . . .100
Гарантия, Порядок утилизации. . . . . . . . . .101
Устранение проблем . . . . . . . . . . . . . . . .102
3
Page 4

Allgemeine Sicherheitshinweise
Herzlichen Glückwunsch zum Erwerb Ihres neuen reer Babyphones. Das intuitive Babyphone mit seinem hochempndlichen Mikrofon überträgt die Geräusche Ihres Babys klar
und zuverlässig. Das beruhigende Nachtlicht an der Babyeinheit hilft Ihrem Kind beim
Einschlafen und sobald Ihr Kind ruhig ist, schaltet das Gerät automatisch in einen „ECOModus“. In diesem ECO-Modus geht von der Babyeinheit keine Strahlung mehr aus. Die
Babyeinheit fängt erst wieder an zu senden, sobald Geräusche empfangen werden. Dank
optionalem Akku-Betrieb und robustem Gürtelclip kann das handliche Babyphone sowohl
stationär als auch mobil verwendet werden. Wir sind sicher, Sie werden lange Zeit Freude
an der Qualität unseres Produktes haben.
Bitte nehmen Sie sich ein paar Minuten Zeit um die Sicherheitshinweise gründlich zu lesen.
Nur wenn alle der hier aufgeführten Punkte gewährleistet sind, kann das reer Babyphone
bedenkenlos verwendet werden. Bewahren Sie die Bedienungsanleitung für späteres
Nachschlagen sorgfältig auf.
! Überprüfen Sie vor jeder Benutzung das Gerät auf oensichtliche Beschädigungen.
Sollten Sie Schäden feststellen, darf dieses Gerät nicht verwendet werden.
! Verwenden Sie nur die im Lieferumfang enthaltenen Ladegeräte und Netzteile. Stellen
Sie sicher, dass die Betriebsspannung der Steckdose der des Netzteils entspricht.
Prüfen Sie, insbesondere auf einer Auslandsreise, ob die lokale Netzspannung mit der
angegebenen Spannung auf den Geräten bzw. den Netzteilen übereinstimmt.
! Die Geräte und Netzteile dürfen, mit Ausnahme des Deckels am Batteriefach, nicht
geönet werden, da dies zu Stromschlägen führen kann. Sollte ein Gerät fehlerhaft
arbeiten, versuchen Sie bitte NICHT das Problem selbst zu beheben. In diesem Fall bitten
wir Sie, sich an Ihren Händler zu wenden.
! Bewahren Sie die Batterie außerhalb der Reichweite von Kindern auf. Es besteht die
Gefahr des Verschluckens.
! Vermeiden Sie die Berührung von metallischen Gegenständen mit den Batterie- bzw.
Stromanschlusskontakten an den Geräten.
! Dieses Produkt ist kein Spielzeug! Lassen Sie Kinder nicht mit dem Gerät spielen.
HINWEIS: Dieses Babyphone wurde ausschließlich als Hilfsmittel für die Beobachtung
Ihres Babys entwickelt. Es darf weder als Ersatz für die Aufsichtspicht der Eltern, noch
als medizinisches Gerät angesehen werden!
4
Page 5

Sicherheitshinweise zur Installation
! Platzieren Sie die Babyeinheit immer außer Reichweite des Kindes.
(Mindestabstand 1 Meter).
! Legen Sie das Babyphone niemals in das Baby- oder Kinderbett bzw. den Laufstall.
! Um eine Strangulation mit dem Netzk abel zu verhindern, sichern Sie die Kabel außerhalb
der Reichweite von Kindern. Verwenden Sie keine Verlängerungskabel.
! Um eine bestmögliche Übertragung zu gewährleisten, sollten die Geräte immer in
aufrechter und in erhöhter Position aufgestellt werden.
! Platzieren Sie den Empfänger NICHT in der Nähe von Funkgeräten oder Mikrowellen. Die
Abstrahlung dieser Geräte kann den Empfang beeinträchtigen.
! Verwenden Sie die Geräte nicht in Wassernähe oder an feuchten Orten. Tauchen Sie die
Geräte nicht in Wasser. Spülen Sie die Geräte nicht unter ießendem Wasser ab.
! Bedecken Sie das Babyphone nicht mit einem Handtuch, Kleidung oder einer Decke.
! Vermeiden Sie extreme Hitze und direkte Sonneneinstrahlung.
Technische Daten
• Technologie: Digital
• Sender: Spannungsversorgung mit
Micro-USB Netzteil oder mit 3 AAA NiMH
Akkus (im Lieferumfang enthalten)
• Empfänger: Spannungsversorgung mit
Micro USB Netzteil oder mit 3 AAA NiMH
Akkus (im Lieferumfang enthalten)
• Input: 100–220 V 50 Hz 0.5 A max.
• Output: 5V / 500mA max.
• Sendeleistung: TX 50 mA , RX 130 mA
• Frequenz: 2,4 GHz
• Reichweite: 300 m im Freien
• Kabellänge: ca. 1,55 m
• Betriebstemperatur: 10°C - 40°C
• Lagertemperatur: 0°C - 55°C
• Standards: EN 300 220-1, EN 301 489-1
und EN 301 489-3
DE
5
Page 6
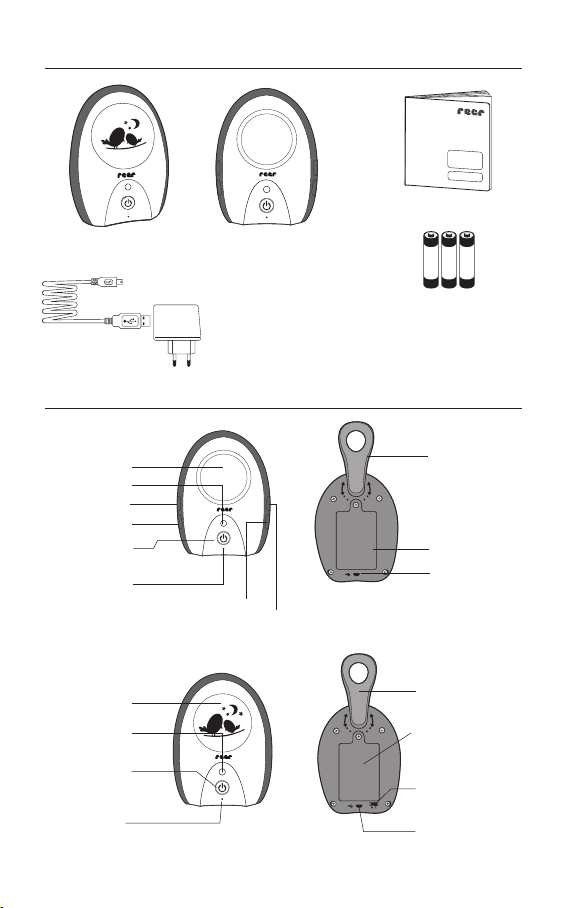
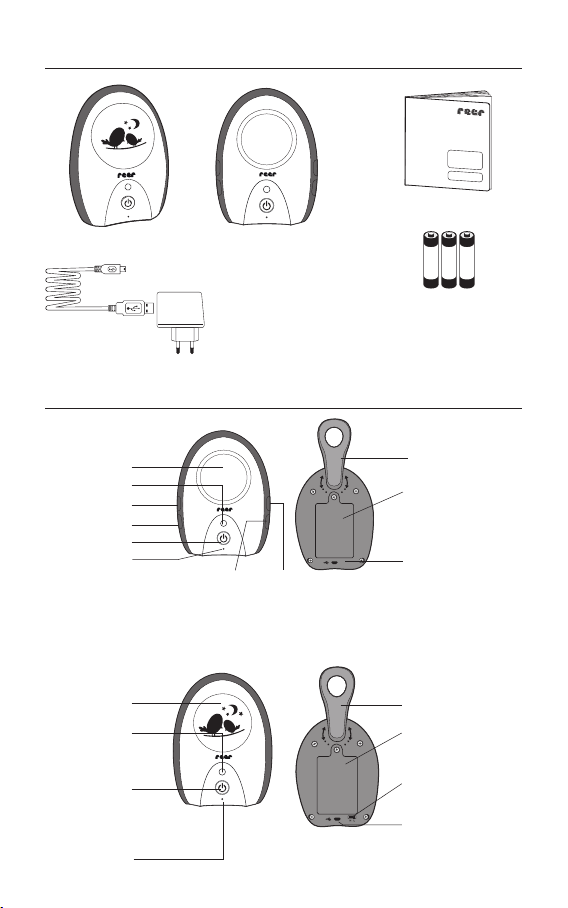
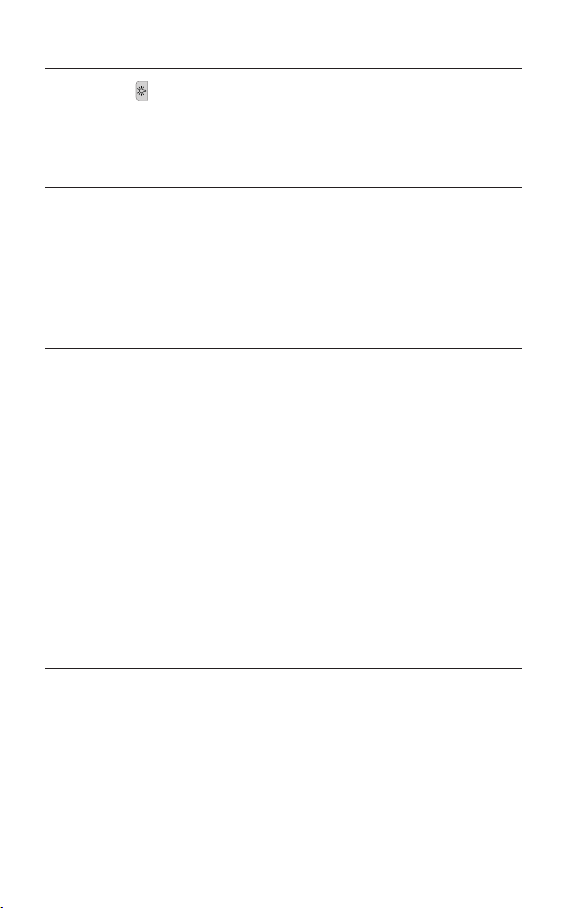
Lieferumfang
Babyeinheit (Sender) Elterneinheit (Empfänger)
1 x USB Netzteil
2 x USB Ladekabel
für Babyeinheit
und Elterneinheit
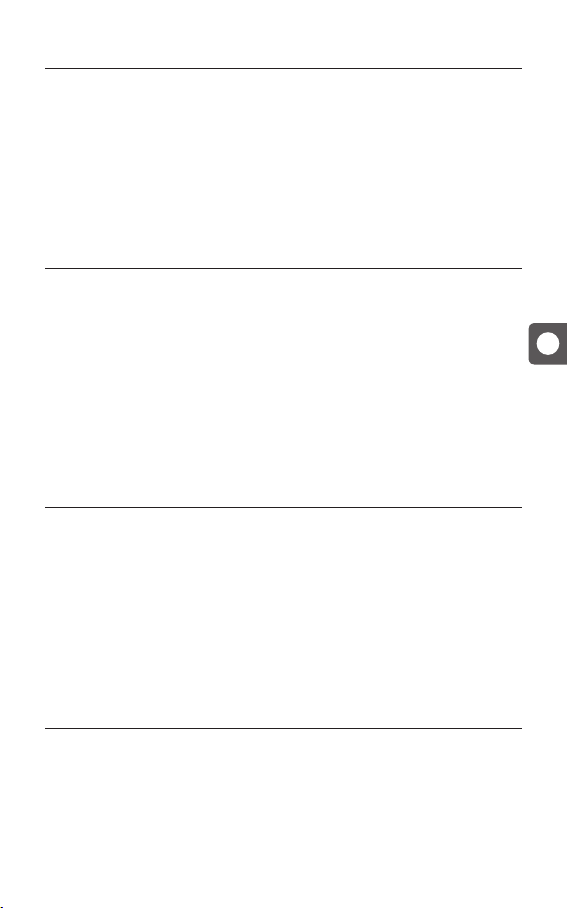
Gerätebeschreibung
Gebrauchsanleitung
3 AAA NiMH Akkus
(für Elterneinheit im
Lieferumfang enthalten)
ELTERNEINHEIT
Lautsprecher
Status-LED
Auswahl (+)
Auswahl (-)
Ein-/Aus-Schalter
Mikrofon
BABYEINHEIT
Nachtlicht
Status-LED
Ein-/Aus- Schalter
Mikrofon
6
Licht Ein-/Aus
Gürtelclip
Batteriefach
Micro USB
Netzteil-Anschluss
Sprechtaste
Gürtelclip
Batteriefach
High-/Low
MicrophoneEmpndlichkeit
Einstellung
Micro USB
Netzteil-Anschluss
Page 7
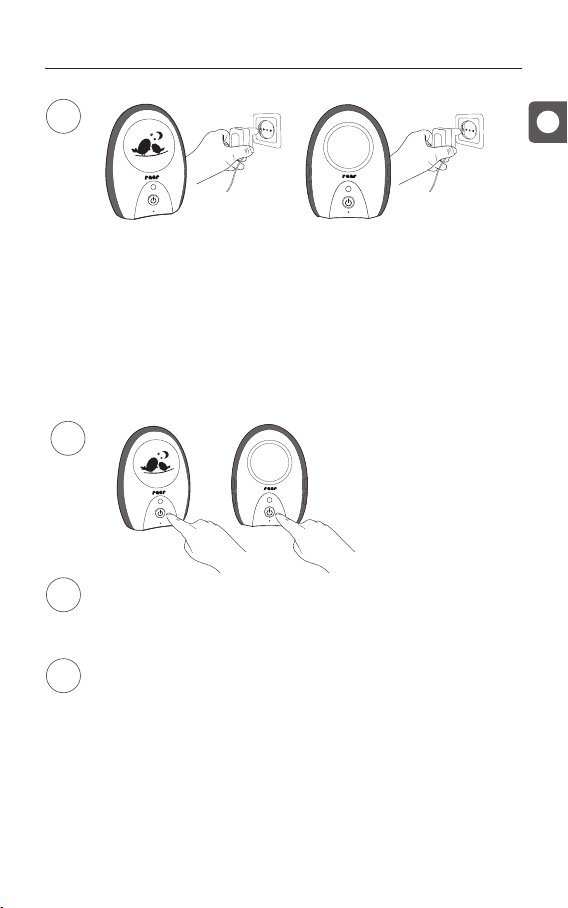
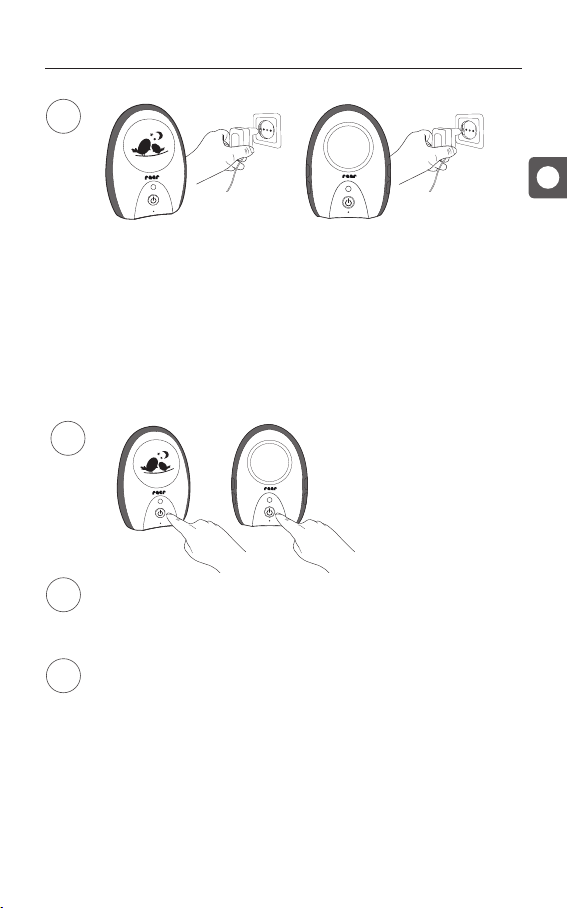
Inbetriebnahme
1
Verwenden Sie nur die im Lieferumfang enthaltenen Netzteile (5VDC / 500 mA)!
Um sicherzustellen, dass das Gerät bei einem Stromausfall betriebsbereit bleibt,
empfehlen wir zusätzlich NiMH-Akkus einzulegen. Diese werden bei Anschluss an
die Stromversorgung automatisch aufgeladen.
HINWEIS: Verwenden Sie nur wieder auadbare NiMH Akkus. Setzen Sie niemals nicht
auadbare Batterien in das Babyphone ein. Bei Verwendung ungeeigneter Batterietypen
besteht Explosionsgefahr.
Zum einschalten der Geräte, halten
2
Sobald das hochempndliche Mikrofon an der Babyeinheit ein Geräusch erfasst,
3
beginnt das Gerät mit der Übertragung zur Elterneinheit. Bei Geräuschempfang
beginnt die Status-LED an der Elterneinheit orange zu blinken.
Wenn Ihr Kind ruhig ist und die Babyeinheit keine Geräusche empfängt, schaltet
4
das Gerät automatisch in einen Standby-Modus um. Bei eingeschalteten ECO-Modus geht von der Babyeinheit im Standby-Modus keine Strahlung aus. Die Babyeinheit fängt erst wieder an zu senden, sobald Geräusche empfangen werden.
Sie den Ein-/ Aus- Taste für 2 Sek.
gedrückt. Die Status-LED an der Babyund an der Elterneinheit leuchtet
grün. Die beiden Geräte koppeln sich
automatisch.
DE
TIPP
Sie können die Geräte mithilfe des Gürtelclips an Ihrem Gürtel befestigen oder mit
geeignetem Befestigungsmaterial an einer Wand aufhängen.
HINWEIS: Die Eltern- und die Babyeinheit können optional auch mit drei NiMH-Akkus (drei
AAA NiMH-Akkus für die Elterneinheit im Lieferumfang enthalten) betrieben werden.
7
Page 8

Status-LED Babyeinheit
Die Status-LED oberhalb des Ein-/Ausschalters gibt den Zustand der Babyeinheit an.
Status-LED Power Zustand
grün ein Gerät ist eingeschaltet
grün blinkend
rot blinkend
rot
ein Akkus werden geladen
ein Akkus sind erschöpft
aus Akkus werden geladen
Status-LED Elterneinheit
Die Status-LED oberhalb des Ein-/Ausschalters gibt den Zustand der Elterneinheit an.
Status-LED Power Zustand
grün
grün blinkend ein Akkus werden geladen
orange blinkend
rot blinkend
rot
ein Gerät ist eingeschaltet
ein Geräusche von der Babyeinheit werden empfangen
kurzes Blinken: maximale Reichweite ist überschritten;
ein
langes Blinken: Akkus sind erschöpft
aus Akkus werden geladen
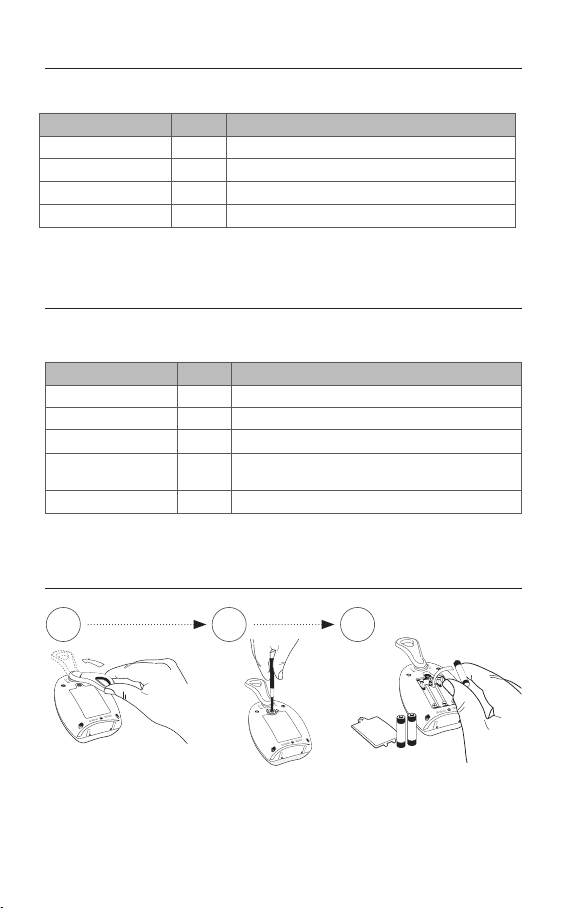
Betrieb mit Akkus
1 32
WICHTIG: Verwenden Sie nur wieder auadbare NiMH Akkus. Schalten Sie die Geräte aus
und entfernen Sie das Netzkabel, bevor Sie einen Batteriewechsel durchführen.
8
Page 9

Betrieb mit Akkus
Sobald die Batterien zu schwach sind, beginnt die Status-LED im eingeschalteten Zustand
rot zu blinken. Wird das Gerät nicht an eine Steckdose angeschlossen, verschlechtert sich
zuerst die Verbindung und bricht automatisch nach kurzer Zeit ab. Die Akkus können direkt
im Babyphone geladen werden. Schließen Sie dafür das Gerät mithilfe des mitgelieferten
Netzteils an die Steckdose an. Der Ladevorgang dauert 10 Stunden bei ausgeschaltetem
Gerät.
Reichweitenkontrolle
Dieses Babyphone ist mit einem optischen und akustischen Reichweitenkontrollsystem
ausgestattet. In regelmäßigen Intervallen kontrollieren die Babyeinheit und die
Elterneinheit den beidseitigen Kontakt (auch im Standby-Modus, wenn die Babyeinheit
keine Geräusche empfängt). Wird die Reichweite überschritten, beginnt die Status-LED an
der Elterneinheit rot zu blinken und es ertönt in regelmässigen Abständen ein Alarmton.
ECO-Modus
Sobald Sie die Elterneinheit an einen xen Standort platzieren, an dem Sie den Empfang
zuvor kontrolliert haben, empfehlen wir Ihnen den ECO-Modus einzuschalten. Im ECOModus ist die Reichweitenkontrolle ausgeschaltet, somit geht im Standby-Modus (wenn
Ihr Kind ruhig ist) keine Strahlung von der Babyeinheit aus. Die Babyeinheit geht nur dann
auf Sendung, sobald Geräusche empfangen werden.
DE
Lautstärkereglung / Elterneinheit
Um die Empfängerlautstärke an der Elterneinheit zu erhöhen oder zu verringern, betädigen
Sie die Taste + (für lauter) oder Taste - (für leiser).
9
Page 10
Nachtlicht
Drücken Sie die -Taste an der Elterneinheit, um das Nachtlicht ein- bzw.
auszuschalten.
Mikrofonempndlichkeit
Betätigen Sie den High-/ Low Schalter für die Mikrofonempndlichkeit an der Babyeinheit,
falls Sie schon bei leisen Geräuschen alarmiert werden wollen oder falls sich die Babyeinheit
weit von dem Babybett bendet. Falls Sie erst bei lauteren Geräuschen alarmiert werden
wollen oder falls die Babyeinheit nah am Babybett steht, kann die Empndlichkeit des
Mikrofons geregelt werden.
Tipps zur Erweiterung des Empfangbereiches
Der Empfangsbereich ist sowohl von der Umgebung als auch von anderen Faktoren
abhängig, die das Übertragungssignal stören oder blockieren können:
große metallische Gegenstände wie z.B. Kühlschränke, Spiegel, Schränke, Metalltüren
oder Stahlbeton
feste Strukturen (Wände) oder Funk-, Elektro- und Elektronikgeräte wie z.B. Fernseher,
Computer, Handys oder Dimmerschalter
HINWEIS: Es wird empfohlen, mindestens einen Meter Abstand zwischen Baby-Einheit
und interferierenden Geräten einzuhalten bzw. diese ggf. auszuschalten. Bei schwacher
Verbindung wird empfohlen, die Eltern- und/oder Baby-Einheit im Zimmer an einer
anderen Stelle zu platzieren.
Reinigung und Wartung
Ziehen Sie immer die Netzteile aus der Netzsteckdose, bevor Sie das Gerät reinigen.
Verwenden Sie ausschließlich ein leicht feuchtes Tuch. Tauchen Sie das Gerät nicht in
Wasser. Benutzen Sie keinerlei chemische Reinigungsmittel.
Entfernen Sie die Batterien aus dem Gerät, wenn es längere Zeit nicht benutzt wird. Dieses
Produkt erfordert keine spezielle Wartung. Reparaturen am Gerät dürfen nur von einem
Fachmann durchgeführt werden.
10
Page 11
Garantie
Bitte Kaufbeleg, Gebrauchsanleitung und Artikelnummer aufbewahren.
Gewährleistungsansprüche oder Ansprüche aus Garantieversprechen sind ausschließlich
mit dem Händler abzuwickeln.
Alle technischen Daten, Informationen sowie Eigenschaften des in diesem Werk
beschriebenen Produktes wurden nach bestem Wissen zusammengestellt und entsprechen dem Stand bei Veröentlichung. Die von reer bereitgestellten Informationen sollten
korrekt und zuverlässig sein. Die Firma reer übernimmt dennoch keinerlei Haftung für
mögliche Fehler in diesem Dokument und behält sich das Recht vor, ohne vorherige
Ankündigung, Änderungen am Produktdesign beziehungsweise an den Spezikationen
vorzunehmen. Vervielfältigung und Weitergabe von Informationen aus diesem urheberrechtlich geschützten Werk in irgendeiner Form oder auf irgendeine Weise, grasch,
elektronisch oder mechanisch, durch Fotokopieren, Aufzeichnen auf Band oder Speichern
in einem Datenabfragesystem, auch auszugsweise, bedürfen einer vorherigen schriftlichen
Genehmigung der Firma reer.
Entsorgungshinweise
Dieses Produkt darf am Ende seiner Lebensdauer nicht über den normalen
Hausmüll entsorgt werden, sondern muss an einer Sammelstelle für das
Recycling von elektrischen Geräten abgegeben werden. Das Symbol
auf dem Produkt, in der Gebrauchsanleitung oder auf der Verpackung
weist darauf hin. Die Werkstoe sind gemäß Ihrer Kennzeichnung wieder
verwendbar. Mit der Wiederverwendung, der stoichen Verwertung
oder anderen Formen der Verwertung von Altgeräten, leisten Sie einen wichtigen Beitrag
zum Schutze unserer Umwelt. Bitte fragen Sie bei Ihrer Gemeindeverwaltung nach der
zuständigen Entsorgungsstelle.
DE
11
Page 12

Problembehebung
Die Status-LED leuchtet nicht
Stellen Sie sicher, dass beide Geräte eingeschaltet sind.
Überprüfen Sie die Verbindung des Netzteils zur Steckdose und zum Gerät.
Tauschen/laden Sie die Akkus und überprüfen Sie die Polarität.
Die Status-LED blinkt orange
Die Elterneinheit empfängt Geräusche. Erhöhen Sie ggf. die Lautstärke an der Elternein-
heit, um die Geräusche Ihres Kindes besser zu hören.
Die Status-LED blinkt rot
Langes Blinken: Akkus sind erschöpft. Tauschen/laden Sie die Akkus oder schließen
Sie das Gerät an die Stromversorgung an.
Kurzes Blinken: maximale Reichweite ist überschritten. Verkürzen Sie die Distanz zwischen
Baby- und Elterneinheit.
Keine Geräuschübertragung trotz bestehender Verbindung
Die Lautstärke ist zu niedrig eingestellt. Drehen Sie den Lautstärkeregler an der Elternein-
heit nach oben.
Die Mikrofonempfindlichkeit ist zu niedrig eingestellt. Betätigen Sie den Mikrofonempfind-
lichkeitsregler an der Babyeinheit auf High.
12
Page 13

Problembehebung
Es ertönt ein lauter Pfeifton aus der Elterneinheit (Rückkopplung)
Der Abstand von Baby- und Elterneinheit ist zu gering. Erhöhen Sie die Distanz zwischen
Baby-und Elterneinheit.
Keine Verbindung zwischen Eltern- und Babyeinheit oder die Verbindung bricht ab
Stellen Sie sicher, dass beide Geräte eingeschaltet sind.
Die maximale Reichweite ist überschritten. Platzieren Sie das Babyphone an eine andere
Stelle und/oder verkürzen Sie die Distanz zwischen Baby- und Elterneinheit.
Baby-/Elterneinheit befinden sich in der Nähe von störenden Geräten (z.B. Mikrowelle)
oder metallischen Gegenständen. Versuchen Sie, die Störquelle ausfindig zu machen
und platzieren sie die Geräte an einer anderen Stelle.
Die Batterien sind zu schwach. Wechseln Sie die Batterien und/ oder schließen Sie die
Elterneinheit an die Stromversorgung an.
DE
13
Page 14

General safety instructions:
Congratulations on the purchase of your new reer baby monitor. This intuitive unit‘s highly
sensitive microphone transmits the sounds your baby makes clearly and reliably. The baby
unit‘s soothing night light helps your child settle to sleep, and the unit then automatically
switches to „ECO mode“ as soon as your baby is quiet. In this ECO mode, the baby unit
no longer emits any radiation. The baby unit starts to send again only when noises are
received. Thanks to its optional battery operation and robust belt clip, the baby monitor is
handy for use as a stationary or mobile unit. We are sure you will enjoy the quality of our
product for many years to come.
Please take a few minutes to read through the safety instructions carefully. You will only
be able to use the reer baby monitor with condence if all of the points mentioned here
have been checked. Please keep the instruction manual in a safe place for future reference.
! Check the unit for visible damage before each use. If you detect any damage, do not use
the unit.
! Only use the supplied chargers and mains adapters. Make sure that the operating
voltage of the power outlet matches that of the mains adapter. Check - especially when
travelling abroad - that the local mains voltage matches the voltage specied on the
units and/or mains adapters.
! Except for the battery compartment cover, never open the units or mains adapters, as
there is a risk of electric shock. If a unit does not work correctly, please do NOT try to x
the problem yourself. Please contact your dealer with any problems.
! Keep the battery out of the reach of children. In order to avoid any risk of swallowing.
! Avoid bringing the battery and/or electrical connection contacts on the units into
contact with metal objects.
! This product is not a toy! Do not allow children to play with the unit.
NOTE: This baby monitor was designed exclusively for monitoring your baby. It may
neither be regarded as a substitute for parental supervision nor as a medical device.
14
Page 15

Safety instructions regarding installation
! Always place the baby unit out of your child´s reach (minimum distance: 1 meter).
! Never place the baby monitor inside the crib, cot or playpen.
! The power lead must be secured out of the reach of children to avoid any risk of
strangulation. Do not use extension cables.
! To ensure optimal transmission, the units must be kept upright at all times and placed in
an elevated position.
! DO NOT place the receiver in the vicinity of radio transceivers or microwaves. Radiant
emissions from these devices can signicantly aect radio reception.
! Do not use the units near water or in humid places. Do not submerge the units in water.
Do not rinse the units under running water.
! Do not cover the baby monitor with towels, clothes or blankets.
! Avoid extreme heat and direct sunlight.
Technical specication
GB
• Technology: digital
• Transmitter: Power supply with micro
USB power supply or with 3 AAA NiMH
batteries (included)
• Receiver: Power supply with micro USB
power supply or with 3 AAA NiMH
batteries (included)
• Input: 100–220 V 50 Hz 0.15 A max.
• Output: 5V / 500 mA max.
• transmitter power: TX 50 mA , RX 130 mA
• frequency: 2,4 GHz
• range: 300 m
• cable length: approx. 1.55 m
• working temperature: 10 °C–40 °C
• storage temperature: 0 °C–55 °C
• standards: EN 300 220-1, EN 301 489-1
and EN 301 489-3
15
Page 16
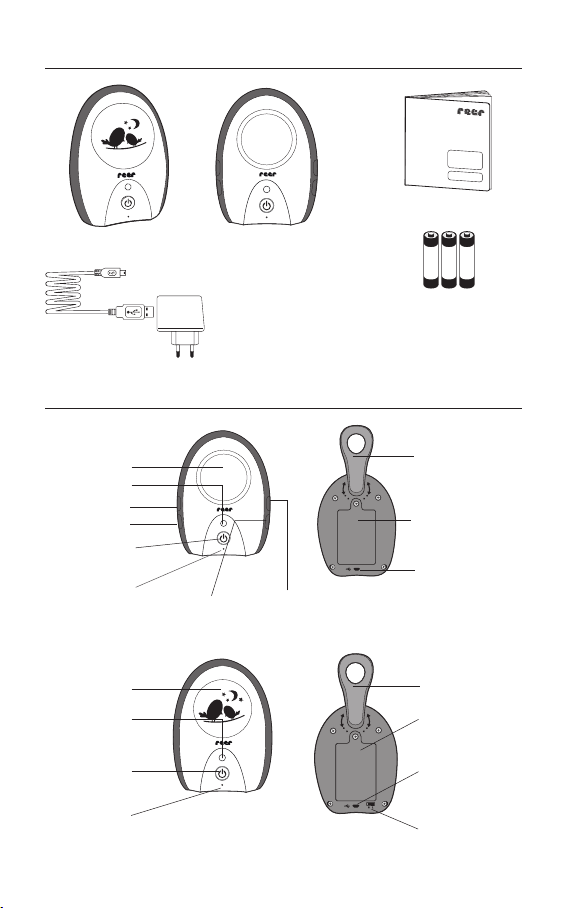
Scope of delivery
baby unit (transmitter) parent unit (receiver)
1 x USB power adapter
2 x USB charging cable
for baby unit
and parent unit
Description of babyphone
PARENT UNIT
speaker
status LED
selection (+)
selection ( - )
on-/o switch
microphone
light on / o talk button
instruction manual
3 AAA NiMH batteries
(for parent unit included)
belt clip
battery compartment
micro USB
power supply
connector
BABY UNIT
on-/o switch
16
Night light
status LED
microphone
belt clip
battery compartment
High / Low
MicrophoneSensitivity control
Micro USB
Power supply
connector
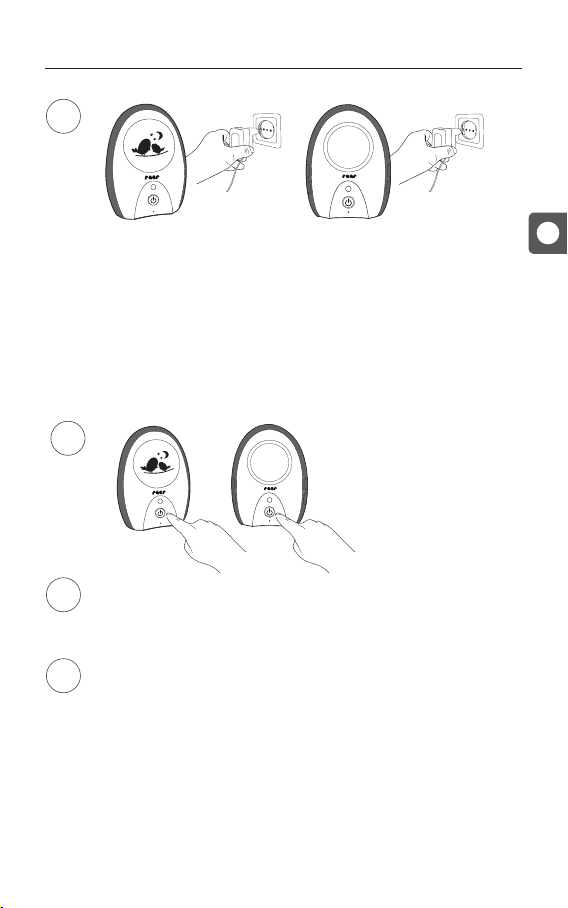
Page 17
Before rst use
1
Only the supplied adapter (5V DC/500 mA) may be used. We recommend also
inserting NiMH batteries to ensure that the units remain operational in case of a
power failure. These will be automatically charged when the unit is connected to
a power supply.
NOTE: Only use rechargeable NiMH AAA batteries! Never use non-rechargeable batteries
in the baby monitor. Using unsuitable battery types poses an explosion hazard!
GB
2
If the highly sensitive microphone on the baby unit detects a sound, the unit will
3
begin transmitting to the parent unit. When noise is received, the status LED on
the parent unit begins to ash orange.
When your child is quiet and the baby unit does not receive any noise, the device
4
automatically switches to standby mode (ECO mode). When ECO mode is switched on, the baby unit does not emit any radiation in standby mode. The baby
unit starts to send again only when noises are received.
To switch on the devices, press and
hold the on / o button for 2 seconds.
The status LED on the baby and
parent unit lights up green. The two
devices automatically connect.
TIP You can attach the units to your belt using the belt clip, or hang them on a wall using
a suitable fastening material.
NOTE: The parent unit and the baby unit can also be optionally operated with three NiMH
batteries (the cells for the parent unit included in delivery).
17
Page 18
Status LED Baby unit
The status LED above the on/o switch indicates the status of the baby unit.
Status LED Power Status
Green on device is switched on
green ashing
red ashing
red
on batteries are charging
on batteries are depleted
on batteries are charging
Status LED parent unit
The status LED above the on/o switch shows the status of the parent unit.
Status LED Power Status
Green
green ashing on batteries are charging
orange ashing
red ashing
red
on device is switched on
on noise is being received from the baby unit
short ashing: maximum range is exceeded;
on
long ashing: batteries are at
o batteries are charging
Battery operation
1 32
IMPORTANT: Only use rechargeable NiMH AAA batteries! Switch the units o and
disconnect the power lead before changing the batteries.
18
Page 19

Battery operation
As soon as the batteries are too weak, the status LED in the switched on state begins to
ash red. If the device is not connected to a power supply, the connection will worsen
and eventually cut o automatically. Rechargeable batteries can be charged directly in the
baby monitor. To do this, connect the device to the wall power supply using the supplied
mains adapter. The batteries take approximately 10 hours to charge (with the device
switched o ).
Range control
This baby monitor is equipped with an optical and acoustic range control system. At
regular intervals, check the baby unit and the parent unit for two-way communication
(also in standby mode, if the baby unit is not receiving any noise). If the range is exceeded,
the status LED on the parent unit begins to ash red and an alarm tone sounds at regular
intervals.
ECO mode
As soon as you place the parent unit at a xed site at which you have checked reception on
a previous occasion, we recommend that you switch ECO mode on. IIn ECO mode, range
control is switched o and therefore in standby mode (whenever your child is quiet) the
baby unit does not emit any radiation. The baby unit then goes to send only when noises
are received.
GB
Volume control / parent unit
To increase or decrease the receiver volume on the parent unit, press + (for louder) or - (for
down).
19
Page 20

Night light
Press the button on the baby unit to switch the night light on or o.
Microphone sensitivity
Turn the microphone sensitivity control on the baby unit up, if you want to be alerted by
slight noises or if the baby unit is a long way from the cot. If you want to be alerted only
by louder noises or if the baby unit is close to the cot, the microphone sensitivity can be
turned down.
Tips for extending the range
The reception range depends on the environment and other factors which may interfere
with or block the transmission signal:
large metallic objects such as fridges, mirrors, wardrobes, metal doors and reinforced
concrete
xed structures (walls) or radio, electrical and electronic appliances such as TVs, PCs,
mobile phones or dimmer switches
NOTE: We recommend keeping a minimum distance of one metre between the baby unit
and interfering devices, or switching the latter o. In case of weak signal, we recommend
moving the parent and/or baby unit to a dierent place in the room.
Cleaning and maintenance
Always disconnect the mains adapters from the wall power socket before cleaning the
unit. Only use a slightly dampened cloth. Do not submerge the unit in water. Do not use
chemical detergents.
Remove the batteries from the unit if it is not to be used for a long period of time. This
product does not require any special maintenance. Repairs to the unit must be carried out
by skilled personnel only.
20
Page 21
Warranty
Please retain your receipt, the user manual and item number.
Warranty claims or claims from promises of guarantee must be processed by the dealer.
The technical specication, information and characteristics of the product described
herein have been compiled to the best of our knowledge and belief and are correct at
the time of printing. Any information provided by reer should be correct and authoritative.
Nevertheless, reer does not accept liability for potential errors in this document and
reserves the right to make changes to the product design and/or specications without
prior notice. Reproduction and disclosure of information contained in this copyrightprotected document, in any form or by any means - graphical, electronic or mechanical by
photocopying, recording on tape or storage in a data retrieval system (even in part), require
prior written consent from reer.
Disposal instructions
At the end of its life, this product must not be disposed of as normal
domestic waste, but should be recycled at a collection point for electrical
appliances. Please see the relevant symbol on the product, in the user
manual and packaging. Materials can be recycled as specied. Do not put
used batteries into household waste. Instead they should be disposed of
as hazardous waste or with a battery collection station provided by the
dealer. An important contribution to the protection of the environment can be made by
reusing the unit, recycling its components or otherwise reusing old appliances. Please
contact your local council to nd out more about an appropriate disposal centre.
GB
21
Page 22

Troubleshooting
The status LED does not light up
Make sure that both units are switched on.
Check the connection of the mains adapter to the wall power socket and the unit.
Exchange the batteries and/or check the polarity.
The status LED ashes orange
The parent unit receives sounds. Turn up the volume on the parent unit to make sure
that you hear the sounds from your baby.
The status LED flashes red
Long flashing: Batteries are flat. Replace the batteries or connect the unit to the power
supply.
Short flashing: maximum range is exceeded. Reduce the distance between the baby and
parent unit.
No sound transmission despite established connection
The volume is set too low. Turn the volume control on the parent unit up.
The microphone sensitivity is set too low. Turn the microphone sensitivity control on the
baby unit up.
22
Page 23

Troubleshooting
Loud whistling tone from the parent unit (feedback)
The baby unit is too close to the parent unit. Increase the distance between the baby
unit and the parent unit.
No connection between parent and baby unit / random noise / connection is lost
Make sure that both units are switched on.
The maximum range has been exceeded. Move the baby monitor to a different position
and/or reduce the distance between the baby and parent unit.
The baby/parent unit is close to interfering devices (e.g. microwave) or metal objects.
Try to find the source of interference and move the units to a different position.
The batteries are almost depleted. Replace the batteries or connect the units to the
power supply.
GB
23
Page 24

Indicaciones generales de seguridad:
Le felicitamos por la compra de su nuevo Babyphone (sistema de vigilancia para bebés)
de reer. El Babyphone transmite los sonidos de su bebé con nitidez gracias al micrófono
de alta sensibilidad. La tranquilizadora luz nocturna en la unidad infantil ayuda a su bebé
a quedarse dormido y en cuanto está tranquilo el aparato cambia a un „modo ECO“. En el
modo ECO la unidad infantil ya no emite ninguna radiación. La unidad infantil vuelve a
emitir de nuevo tan pronto como se reciba ruido. Gracias al funcionamiento por pilas y a la
robusta pinza para cinturón puede utilizar su Babyphone de manera tanto ja como móvil.
Estamos seguros de que va a disfrutar durante mucho tiempo de la calidad de nuestro
producto.
Tómese un par de minutos para leer atentamente las instrucciones de seguridad. Solo si
se cumplen todos los puntos aquí indicados se podrá utilizar el Babyphone de reer sin
problemas. Guarde el manual de instrucciones para consultas futuras.
! Revise antes de cada uso que el aparato no presenta ningún daño visible. Si descubriese
algún daño, no debe utilizar el aparato.
! Utilice solamente las fuentes de alimentación y los cargadores incluidos en el volumen
de suministro del aparato. Asegúrese de que la tensión de la toma de corriente se
corresponda con la de la fuente de alimentación. Compruebe que la tensión nominal
coincida con la tensión indicada en los aparato o en la fuente de alimentación, sobre todo
cuando viaje al extranjero.
! Los aparatos y las fuentes de alimentación no se deben abrir, a excepción de la tapa del
compartimento para las pilas, pues podría recibir una descarga eléctrica. Si un aparato
no funcionase correctamente, NO intente solucionar usted mismo el problema. En este
caso, póngase en contacto con su distribuidor.
! Guarde las pilas fuera del alcance de los niños. Podrían atragantarse.
! Evite el contacto de objetos metálicos con los contactos de las pilas o de la toma de
corriente de los aparatos.
! ¡Este artículo no es un juguete! No deje que los niños jueguen con el aparato.
NO TA: Este Babyphone se ha desarrollado únicamente como dispositivo auxiliar para
la vigilancia de bebés. ¡No debe considerarse como sustituto de la vigilancia paterna ni
como equipo médico!
24
Page 25

Indicaciones de seguridad para la instalación
! Coloque la unidad infantil siempre fuera del alcance del niño (distancia mínima 1 metro).
! No coloque nunca el Babyphone dentro de la cuna o la cama infantil, ni en el parque.
! Para evitar que el niño se estrangule con el cable, mantenga los cables lejos de su
alcance. No utilice ningún cable de prolongación.
! Para garantizar la mejor transmisión posible, debe colocar el aparato siempre en vertical
y en una posición elevada.
! NO sitúe el receptor cerca de equipos de radio, horno o microondas. La radiación de
esos equipos puede interferir en la recepción.
! No utilice los aparatos cerca del agua ni en lugares húmedos. No sumerja los aparatos en
el agua. No lave los aparatos debajo del grifo.
! No tape el Babyphone con una toalla, con ropa ni con una manta.
! Evite el calor extremo y la radiación solar directa.
Datos técnicos
ES
• tecnología: digital
• emisor: fuente de alimentación con
fuente de alimentación micro USB o
con 3 pilas NiMH AAA (incluidas)
• receptor: fuente de alimentación con
fuente de alimentación micro USB o
con 3 pilas NiMH AAA (incluidas)
• entrada: 100–220 V 50 Hz 0.15 A max.
• salida: 5V / 500 mA max.
• potencia de transmisión: TX 50 mA , RX 130 mA
• frecuencia: 2,4 GHz
• alcance: 300 m
• longitud del cable: aprox. 1,55 m
• temperatura de servicio: 10 °C–40 °C
• temperatura de almacenamiento: 0 °C–55 °C
• estándares: EN 300 220-1, EN 301 489-1,
EN 301 489-3
25
Page 26
Volumen de suministro
unidad infantil (emisor) unidad parental (receptor)
instrucciones de uso
Descripción del dispositivo
UNIDAD PARENTA
altavoces
LED de estado
selección ( + )
selección ( - )
Interruptor de en-
cendido / apagado
micrófono
UNIDAD INFANTIL
luz nocturna
LED de estado
Interruptor de en-
cendido / apagado
micrófono
Luz encendida
/ apagada
1 x adaptador de corriente USB
2 x cable de carga USB
para unidad de bebé
y unidad de padres
botón de hablar
3 pilas AAA NiMH
(para unidades de padres
incluidas)
pinza para cinturón
compartimento para
las pilas
micro USB conector
de alimentación
pinza para cinturón
compartimento para
las pilas
micro USB conector
de alimentación
micrófono con control
sensitivo
26
Page 27
puesta en funcionamiento
1
Utilice solamente el adaptador incluido en el suministro (5V CC / 500 mA). Para
asegurarse de que en caso de corte de corriente el aparato siga funcionando le
recomendamos que coloque adicionalmente las pilas recargables NiMH. Esas pilas
se cargan automáticamente cuando el aparato está enchufado.
NO TA: ¡Utilice solamente pilas recargables NiMH AAA! Nunca introduzca pilas normales
no recargables en el babyphone. ¡El uso de un tipo de pilas inadecuado entraña un
peligro de explosión!
Para encender los dispositivos,
2
En cuanto el micrófono de alta sensibilidad de la unidad infantil detecta un ruido,
3
el aparado transmite una señal a la unidad parental. Si se recibe ruido, el LED de la
unidad parental comienza a parpadear en naranja.
Si el bebé está tranquilo y la unidad infantil no recibe ningún ruido, el aparato cam-
4
bia automáticamente al modo standby (modo ECO). Con el modo ECO encendido
la unidad infantil no emite ninguna radiación en standby. La unidad infantil vuelve
a emitir de nuevo tan pronto como se reciba ruido.
mantenga presionado el botón de
encendido / apagado durante 2
segundos. El LED de estado en el bebé
y la unidad para padres se ilumina
en verde. Los dos dispositivos se
conectan automáticamente.
CONSEJO Puede jar el aparato a su cinturón usando la pinza suministrada o puede
colgarlo en la pared con material de sujeción adecuado.
ES
NO TA: La unidad para padres y la unidad para bebés también pueden operarse opcional-
mente con tres b aterías d e NiMH (para unidades de padres incluidas).
27
Page 28

LED de estado unidad infantil
El LED de estado por encima del botón de encendido/apagado indica el estado de la unidad infantil.
LED de estado Potencia Estado
verde encendido el aparato está encendido
parpadeo verde
parpadeo rojo
rojo
encendido las pilas Se están cargando
encendido las pilas están gastadas
encendido las pilas Se están cargando
LED de estado unidad parental
El LED de estado por encima del botón de encendido/apagado indica el estado de la unidad parental.
LED de estado Potencia Estado
verde
parpadeo verde encendido las pilas Se están cargando
parpadeo naranja
parpadeo rojo
rojo
encendido el aparato está encendido
encendido Se reciben ruidos de la unidad infantil
encendido
apagado las pilas Se están cargando
parpadeo breve: se ha superado el alcance máximo;
parpadeo largo: Las pilas están gastadas
Funcionamiento con pilas recargables
1 32
¡IMPORTANTE! Nunca introduzca pilas normales no recargables en el babyphone. Apague
el aparato y desenchufe el cable antes de realizar un cambio de pilas.
28
Page 29

Funcionamiento con pilas recargables
En cuanto las pilas tienen poca carga el LED comienza a parpadear en rojo en estado
conectado. Si no se conecta el aparato a la caja de enchufe empeorará primero la calidad
de la conexión y esta se interrumpirá después de forma automática. Puede cargas las pilas
directamente dentro del babyphone. Para ello enchufe el aparato a la caja de enchufe
utilizando la fuente de alimentación suministrada. El procedimiento de carga dura 10 horas
con el aparato apagado.
Control del alcance
Ese Babyphone está equipado con un sistema de control del alcance óptico y acústico. En
intervalos regulares la unidad infantil y la parental controlan el contacto mutuo (también
en modo standby, cuando la unidad infantil no recibe ningún ruido). Si se supera el alcance,
el LED de estado comienza a parpadear en rojo y se oye un seña de alarma en intervalos
regulares
Modo ECO
Tan pronto como la unidad parental esté situada en una ubicación ja, en la cual ha
controlado previamente la recepción, le recomendamos encender el modo ECO. En el
modo ECO el control del alcance está apagado, por lo que en el modo standby (cuando
el pequeño está tranquilo) la unidad infantil no emite. La unidad infantil emite tan solo
después de haber recibido ruido.
Regulación de volumen / unidad parental
Para aumentar o disminuir el volumen del receptor en la unidad para padres, presione +
(para más alto) o - (para abajo).
ES
29
Page 30
Luz nocturna
Pulse el botón en la unidad infantil para encender o apagar la luz nocturna.
Sensibilidad del micrófono
Gire hacia arriba el regulador de la sensibilidad del micrófono en la unidad infantil si desea
ser alertado con sonidos bajos o si la unidad infantil está alejada de la cuna. Si desea ser
avisado solo con sonidos altos o si la unidad infantil está cerca de la cuna, puede reducir la
sensibilidad del micrófono.
Consejos para ampliar el alcance
El alcance de recepción depende tanto del entorno como de otros factores que pueden
interferir en la transmisión de la señal o bloquearla:
objetos metálicos grandes como, p. ej., neveras, espejos, armarios, puertas metálicas u
hormigón armado
estructuras jas (paredes) dispositivos de radio, eléctricos y electrónicos como, p.ej.,
televisores, ordenadores, teléfonos móviles o reguladores de la intensidad de la luz
NO TA: Se recomienda mantener una distancia mínima de un metro entre la unidad
infantil y los aparatos que producen interferencias o apagar estos últimos. Si la conexión
es débil se recomienda colocar la unidad parental y/o la unidad infantil en otro lugar de
la habitación.
Limpieza y mantenimiento
Desenchufe siempre el aparato antes de limpiarlo. Utilice únicamente un paño humedecido.
No sumerja el aparato en el agua. No utilice ningún detergente químico.
Retire las pilas del aparato si no lo va a utilizar durante un tiempo prolongado. Este producto
no precisa ningún mantenimiento especial. Las reparaciones en el aparato solo deben ser
realizadas por un especialista.
30
Page 31

Garantía
Conserve el justicante de compra, el manual de instrucciones y el número de artículo.
Las reclamaciones de garantía o por compromisos de garantía deben tramitarse
exclusivamente a través del distribuidor.
Todos los datos técnicos, la información y las propiedades del producto descritos en
este manual han sido editadas al mejor saber y entender, y corresponden al estado del
mismo en el momento de la publicación. La información puesta a disposición por reer
es correcta y able. Sin embargo, la empresa reer no asume, ninguna responsabilidad de
posibles errores de este documento y se reserva el derecho a realizar modicaciones sin
previo aviso del diseño del producto o de las especicaciones. Cualquier reproducción y
transmisión de la información de esta obra, protegida por la Ley de propiedad intelectual,
en cualquier método o modo, gráca, electrónica o mecánica, por fotocopias, grabación
en cinta o grabación en un sistema de consulta de datos (también la parcial) precisa la
autorización por escrito de la empresa reer.
Indicaciones de eliminación
Ese producto no debe ser desechado en la basura doméstica cuando
haya concluido su vida útil, sino que debe ser entregado en un punto de
recogida encargado del reciclaje de dispositivos eléctricos. El símbolo en el
producto, en las instrucciones de uso o en el embalaje lo indica claramente.
El símbolo en el producto, en las instrucciones de uso o en el embalaje
lo indica claramente. No tire las pilas usadas en la basura doméstica, sino
en recipientes para residuos tóxicos o en la estación de recolección de pilas del comercio
especializado. Reutilizando los dispositivos, reciclando sus materiales o con otras formas de
utilización de dispositivos usados contribuye a proteger el medio ambiente. Consulte en su
ayuntamiento dónde está el organismo de eliminación de residuos respectivo.
ES
31
Page 32

Solución de problemas
El LED de estado no brilla
Asegúrese de que ambos aparatos estén encendidos.
Revise la unión de la fuente de alimentación con la caja de enchufe y con el aparato.
Sustituya / cargue las pilas y revise la polaridad.
El LED de estado parpadea en naranja
La unidad parental recibe ruidos.En caso necesario, aumente el volumen en la unidad
parental para poder oír mejor los ruidos de su hijo.
El LED de estado parpadea en rojo.
Parpadeo largo: Las pilas están gastadas. Sustituya las pilas o enchufe el aparato a la red
de corriente eléctrica.
Parpadeo breve: Se ha superado el alcance máximo. Reduzca la distancia entre la unidad
infantil y la parental.
No hay transmisión de sonido, pese a que existe una conexión
El volumen se ha configurado muy bajo. Gire hacia arriba el regulador del volumen en la
unidad parental.
La sensibilidad del micrófono se ha configurado muy baja. Gire hacia arriba el regulador
de la sensibilidad del micrófono en la unidad infantil.
32
Page 33

Solución de problemas
Se oye un pitido fuerte de la unidad parental (reacople)
La distancia entre la unidad infantil y la parental es muy baja. Aumente la distancia entre
la unidad infantil y la parental.
No hay conexión entre la unidad parental y la infantil / interferencias / se pierde la
conexión
Asegúrese de que ambos aparatos estén encendidos.
Se ha superado el alcance máximo. Sitúe el babyphone en otro lugar y/o reduzca la
distancia entre la unidad infantil y la parental.
La unidad infantil / parental se encuentra cerca de equipos que ocasionan interferencias
(p.ej., horno microondas) o de otros objetos metálicos. Intente detectar cuál es la fuente
de las interferencias y coloque el aparato en otro lugar.
Las pilas tienen muy poca carga. Cambie las pilas o enchufe el aparato en la red de cor
riente eléctrica.
ES
33
Page 34

Avvertenze di sicurezza generali
Ci congratuliamo con voi per l‘acquisto del vostro nuovo babyphone reer. Questo
babyphone dal funzionamento intuitivo, con il suo microfono ultrasensibile, trasmette
i rumori emessi dal vostro bambino in modo chiaro e adabile. La tranquillizzante luce
notturna dell‘unità bambino aiuta il vostro piccolo ad addormentarsi e non appena il
bambino è calmo, l‘apparecchio passa automaticamente alla „modalità ECO“. In questa
modalità l‘unità non emana radiazioni. Inizierà a emanarle nuovamente non appena
rileverà dei rumori. Grazie all‘opzione di funzionamento a batterie e alla robusta clip da
cintura, il pratico babyphone può essere utilizzato sia in posizione ssa che mobile. Siamo
certi che rimarrete soddisfatti della qualità del nostro prodotto.
Siete pregati di dedicare il tempo necessario a leggere attentamente le istruzioni di sicurezza.
Solo se si rispettano tutti i punti qui indicati, il babyphone reer può essere utilizzato senza
preoccupazioni. Conservare con cura le istruzioni di funzionamento per futura consultazione.
! Prima di ogni utilizzo, vericare l‘eventuale presenza di danni visibili all‘apparecchio. Qualora
si dovesse accertare la presenza di danni, l‘apparecchio non deve essere utilizzato.
! Utilizzare esclusivamente i dispositivi di carica e gli alimentatori forniti in dotazione. Assicurar-
si che la tensione di esercizio della presa di corrente corrisponda a quella dell‘alimentatore.
Vericare, soprattutto quando ci si trova in viaggio all‘estero, che la tensione di rete del
luogo corrisponda alla tensione indicata sugli apparecchi o sugli alimentatori.
! Gli apparecchi e gli alimentatori, ad eccezione del coperchio dello scomparto batterie, non
devono essere aperti, onde evitare il pericolo di scosse elettriche. In caso di funzionamento
difettoso di un apparecchio, NON tentare di risolvere autonomamente il problema. In tal
caso siete pregati di rivolgervi al vostro rivenditore.
! Tenere le batterie fuori dalla portata dei bambini. Pericolo di ingestione.
! Evitare che le batterie o i contatti di collegamento elettrico degli apparecchi entrino in
contatto con oggetti metallici.
! Questo prodotto non è un giocattolo! Non lasciar che i bambini giochino con l‘apparecchio.
AVVISO: Il presente babyphone è destinato esclusivamente a essere utilizzato come aiuto
per vigilare sul vostro bambino. Non è un dispositivo medico, né sostituire il dovere di
vigilanza dei genitori.
34
Page 35

Istruzioni di sicurezza per l‘installazione
! Posizionare sempre l‘unità bambino fuori dalla portata del bambino stesso (distanza
minima di 1 m).
! Non lasciare mai il babyphone nella culla, o nel lettino, o nel box.
! Accertarsi che il cavo di alimentazione si trovi fuori dalla portata dei bambini, onde
evitare il rischio di strangolamento. Non utilizzare cavi di prolunga.
! Per garantire una trasmissione ottimale, l‘apparecchio va posizionato sempre in posizione
dritta e sollevata.
! ! NON collocare il ricevitore in prossimità di apparecchi radio o a microonde. L‘irradiazione
di tali apparecchi può compromettere fortemente la ricezione.
! Non utilizzare gli apparecchi in prossimità di acqua, o in luoghi umidi. Non immergere gli
apparecchi in acqua. Non sciacquare gli apparecchi con acqua corrente.
! Non coprire il babyphone con asciugamani, vestiti o coperte.
! Non esporre l‘apparecchio al calore estremo e ai raggi diretti del sole.
Datos técnicos
• tecnologia: digitale
• unità trasmittente: alimentatore con
alimentatore micro USB o con 3 batterie
NiMH AAA (incluse)
• unità ricevente: alimentatore con
alimentazione micro USB o con 3 batterie
NiMH AAA (incluse)
• ingresso: 100–220V 50 Hz 0.15 A max.
• uscita: 5 V / 500 mA max.
• potenza di trasmissione: TX 50 mA , RX
130 mA
• frequenza: 2,4 GHz
• copertura: 300 m
• lunghezza cavo: 1,55 m circa
• temperatura di esercizio: 10 °C–40 °C
• temperatura di stoccaggio: 0 °C–55 °C
• standard: EN 300 220-1, EN 301 489-1,
EN 301 489-3
IT
35
Page 36

Dotazione
unità bambino (trasmettitore) unità genitori (ricevitore)
1 x alimentatore USB
2 x cavo di ricarica USB
per unità bambino
e unità genitore
Descrizione dell‘apparecchio
istruzioni per l‘uso
3 batterie AAA NiMH
(per unità genitore
incluse)
UNITÀ GENITORI
altoparlante
LED di stato
selezione ( + )
selezione ( - )
selettore on-/o
microfono
UNITÀ BAMBINO
luce notturna
LED di stato
selettore on/o
microfono
36
Pulsante di accensione /
spegnimento luce
tasto voce
clip da cintura
scomparto batterie
micro USB
connettore di
alimentazione
clip da cintura
scomparto batterie
micro USB
connettore di
alimentazione
regolatore sensibilità
del microfono
Page 37

Messa in funzione
1
Utilizzare esclusivamente l‘adattatore in dotazione (5V CC / 500 mA). Per garantire
il funzionamento dell‘apparecchio anche in caso di blackout , si raccomanda di
inserire anche le batterie NiMH al suo interno. Le batterie vengono messe automaticamente in carica al momento del collegamento all‘alimentazione elettrica.
AVVISO: Utilizzare sempre ed esclusivamente batterie ricaricabili NiMH AAA! Non inserire
mai batterie non ricaricabili nel babyphone. In caso di utilizzo di batterie non adatte,
sussiste il rischio di esplosione!
IT
2
Non appena il microfono ultrasensibile dell‘unità bambino rileva un rumore, l‘ap-
3
parecchio inizierà a trasmettere all‘unità genitori. Quando si sta rilevando un rumore, il LED di stato dell‘unità genitore inizia a lampeggiare in arancione.
Quando il vostro bambino è calmo e l‘unità bambino non rileva alcun rumore, l‘ap-
4
parecchio passa automaticamente in modalità standby (modalità ECO). Quando la
modalità ECO è attiva, l‘unità bambino in modalità standby non emana radiazioni.
Inizierà a emanarle nuovamente non appena rileverà dei rumori.
Per accendere i dispositivi, premere
e tenere premuto il pulsante di
accensione / spegnimento per 2
secondi. Il LED di stato sul bambino
e sull‘unità genitore si illumina in
verde. I due dispositivi si connettono
automaticamente.
SUGGERIMENTO Grazie alla clip, potete assicurare l‘apparecchio alla vostra cin-
tura, oppure appenderlo a una parete servendovi di un elemento di ancoraggio adatto.
AVVISO: L‘unità genitore e l‘unità bambino possono anche essere azionate opzionalmente
con tre batterie NiMH (per unità genitore incluse).
37
Page 38

LED di stato unità bambino
Il LED di stato al di sopra dell‘interruttore on/o indica lo stato dell‘unità bambino.
LED di stato Accensione Stato
verde on l‘apparecchio è acceso
verde lampeggiante
rosso lampeggiante
rosso
on le batterie sono in carica
on le batterie sono esaurite
o le batterie sono in carica
LED di stato unità genitori
Il LED di stato al di sopra dell‘interruttore on/o indica lo stato dell‘unità genitore.
LED di stato Accensione Stato
verde
verde lampeggiante on le batterie sono in carica
arancione lampeggiante on Si ricevono rumori dall‘unità bambino
rosso lampeggiante
rosso
on l‘apparecchio è acceso
on
o le batterie sono in carica
lampeggi brevi: si è superata la portata massima
lampeggi lunghi: le batterie sono esaurite
Funzionamento a batterie
1 32
IMPORTANTE: Utilizzare sempre ed esclusivamente batterie ricaricabili NiMH AAA!
Spegnere l‘apparecchio e rimuovere il cavo di alimentazione prima di procedere alla
sostituzione delle batterie.
38
Page 39

Funzionamento a batterie
Quando le batterie sono quasi scariche, ad apparecchio acceso, il LED di stato inizia
a lampeggiare in rosso. Se l‘apparecchio non viene collegato a una presa di corrente, il
collegamento ne risulterà immediatamente peggiorato e in breve tempo si interromperà
automaticamente. Le batterie possono essere caricate direttamente nel babyphone.
Collegare quindi l‘apparecchio alla presa di corrente tramite l‘alimentatore in dotazione. La
procedura di carica dura 10 ore ad apparecchio spento.
Controllo di portata
Il dispositivo Babyphone è dotato di un sistema di controllo della portata ottica e acustica.
Le unità bambino e genitore controllano a intervalli regolari il contatto su entrambi i lati
(anche in modalità standby, quando l‘unità bambino non rileva alcun rumore). Se viene
superata la portata massima, il LED di stato dell‘unità genitore inizia a lampeggiare in rosso
ed emette un segnale acustico a intervalli regolari
Modalità ECO
Non appena l‘unità genitore viene posizionata su una postazione ssa, dove in precedenza
è stata controllata la ricezione, consigliamo di attivare la modalità ECO. In modalità ECO il
controllo di portata è spento e quindi in modalità standby (quando il bambino è tranquillo)
l‘unità bambino non emette radiazioni. Inizierà a emanarle non appena rileverà dei rumori.
Regolatore del volume / unità genitori
Per aumentare o diminuire il volume del ricevitore sull‘unità genitore, premere + (per
maggiore) o - (per giù).
IT
39
Page 40

Luce notturna
Premere il tasto dell‘unità bambino per accendere o spegnere la luce notturna.
Sensibilità del microfono
Ruotare verso l‘alto il regolatore della sensibilità del microfono sull‘unità bambino, se
si desidera essere avvisati in caso di leggeri rumori o se l‘unità è lontana dalla culla.
Consigliamo di abbassare la sensibilità del microfono, se si desidera essere avvisati solo in
caso di rumori più forti o se l‘unità bambino è vicina alla culla.
Suggerimenti per estendere l‘area di copertura
Il campo di ricezione dipende dall‘ambiente e da altri fattori che possono disturbare o
bloccare il segnale di trasmissione:
oggetti metallici di grandi dimensioni, come ad esempio frigoriferi, specchi, armadi,
porte metalliche o cemento armato
strutture sse (pareti) o dispositivi radio, elettrici ed elettronici, come ad esempio
televisori, computer, telefoni o interruttori dimmer
AVVISO: Si raccomanda di mantenere una distanza di almeno un metro tra l‘unità
bambino e apparecchi che possano causare interferenze, oppure di spegnere questi
ultimi. In caso di collegamento debole si raccomanda di collocare l‘unità genitori e/o
l‘unità bambino in un altro punto della stanza.
Pulizia e manutenzione
Estrarre sempre l‘alimentatore dalla presa di corrente prima di pulire l‘apparecchio. Utilizzare
esclusivamente un panno leggermente umido. Non immergere l‘apparecchio in acqua.
Non utilizzare mai alcun detergente chimico.
Rimuovere le batterie dall‘apparecchio quando si prevede di non utilizzarlo per un periodo
prolungato. Il presente prodotto non necessita di alcuna manutenzione particolare.
Le riparazioni all‘apparecchio possono essere eseguite esclusivamente da un tecnico
specializzato.
40
Page 41

Garanzia
Conservare lo scontrino di cassa, le istruzioni per l‘uso e il numero dell‘articolo.
Eventuali richieste di garanzia o diritti di garanzia devono essere gestiti esclusivamente con
il rivenditore.
Tutti i dati tecnici, le informazioni e le caratteristiche del prodotto descritto in questa opera
sono stati elaborati in buona coscienza e corrispondono allo stato attuale al momento
della pubblicazione. Le informazioni messe a disposizione da reer dovrebbero essere
corrette ed adabili. reer non si assume comunque alcuna responsabilità per eventuali
errori contenuti in questo documento e si riserva il diritto di modicare senza preavviso il
design del prodotto e le sue speciche. L‘eventuale copia e trasmissione (anche parziale)
di informazioni delle presenti istruzioni per l‘uso, sottoposte al diritto d`autore, in qualsiasi
forma o in qualsiasi modalità, graca, elettronica o meccanica, mediante fotocopie,
riproduzioni audio o registrazione su un sistema di recupero dati, necessita previa
autorizzazione scritta da parte di reer.
Modalità di smaltimento
Al termine della sua vita il presente prodotto non può essere smaltito
tra i normali riuti domestici, ma va consegnato ad un centro di raccolta
per il riciclo di apparecchi elettrici. Indicato dal simbolo sul prodotto,
nelle istruzioni per l‘uso o sulla confezione. I materiali sono riutilizzabili
conformemente al loro contrassegno. Non gettare le batterie usate tra i
riuti domestici, ma tra i riuti speciali o consegnarle in un punto di raccolta
batterie in u negozio specializzato. Con il riutilizzo, il recupero dei materiali o altre forme
di riciclo di apparecchi usati fornirete un importante contributo alla tutela dell‘ambiente.
Informatevi presso la vostra amministrazione comunale su dove siano collocati i punti di
raccolta per lo smaltimento dei riuti.
IT
41
Page 42

Soluzione problemi
Il LED di stato non si accende
Assicurarsi che entrambi gli apparecchi siano accesi.
Verificare il collegamento dell‘alimentatore alla presa di corrente e all‘apparecchio.
Sostituire/caricare le batterie e verificare la polarità.
Il LED di stato lampeggia in arancione
L‘unità genitori riceve la trasmissione di rumori. Alzare il volume dell‘unità genitori per
ascoltare meglio i rumori del vostro bambino.
Il LED di stato lampeggia in rosso
Lampeggi lunghi: le batterie sono esaurite. Sostituire le batterie o collegare l‘apparecchio
all‘alimentazione elettrica.
Lampeggi brevi: si è superata la portata massima. Ridurre la distanza tra l‘unità bambino e
l‘unità genitori.
Nessuna trasmissione di rumori, nonostante il collegamento stabilito
Il volume è troppo basso. Ruotare il regolatore del volume verso l‘alto sull‘unità genitore.
La sensibilità del microfono è troppo bassa. Ruotare il regolatore della sensibilità del
microfono verso l‘alto sull‘unità bambino.
42
Page 43

Soluzione problemi
L‘unità genitore emette un forte fischio (feedback)
La distanza tra l‘unità bambino e l‘unità genitori è troppo ridotta. Aumentare la distanza
tra l‘unità bambino e l‘unità genitori.
Nessun collegamento stabilito tra l‘unità genitori e l‘unità bambino/fruscio/collegamento interrotto
Assicurarsi che entrambi gli apparecchi siano accesi.
Si è oltrepassata la portata massima. Collocare il babyphone in un altro punto e/o ridurre
la distanza tra l‘unità bambino e l‘unità genitori.
L‘unità bambino e/o l‘unità genitori si trovano in prossimità di apparecchi che possono
causare disturbi (ad esempio apparecchi a microonde), o di oggetti metallici. Tentare di
individuare la fonte di disturbo e collocare gli apparecchi in un punto diverso.
Le batterie sono quasi scariche. Sostituire le batterie e/o collegare gli apparecchi all‘ali-
mentazione elettrica.
IT
43
Page 44

Consignes générales de sécurité
Meilleurs vœux pour l‘achat de votre nouveau babyphone reer. Le babyphone intuitif
avec son microphone sensible transmet les bruits de votre nourrisson de manière able
et claire. L‘éclairage de nuit rassurant sur le babyphone aide votre enfant à s‘endormir et
dès que celui-ci dort, l‘appareil bascule en mode ECO. Dans ce mode ECO , plus aucun
rayonnement n‘est émis par l‘unité bébé. L‘unité bébé ne recommence à émettre que
dès que des bruits sont perçus. Grâce à son alimentation par piles, en option, et le clip
de ceinture robuste, vous pouvez utiliser l‘appareil à la maison ou en déplacement. Nous
sommes convaincus que vous pourrez proter longtemps de la qualité de notre produit.
Veillez prendre quelques minutes pour lire attentivement la notice de sécurité. Le babyphone
reer ne peut être utilisé sans souci que lorsque les points décrits ci-après sont respectés.
Conservez bien ce mode d‘emploi, an de pouvoir le relire ultérieurement.
! Avant chaque utilisation, contrôlez que l‘appareil n‘a pas de défaut apparent. Si vous
constatez un défaut, cet appareil ne doit pas être utilisé.
! N‘utilisez que le chargeur et l‘adaptateur fournis avec l‘appareil. Assurez-vous que la tension
de la prise de courant correspond à celle de l‘adaptateur. Contrôlez, surtout en voyage à
l‘étranger, que la tension locale corresponde à celle de l‘appareil ou de l‘adaptateur.
! Hormis le couvercle du compartiment des piles, les appareils et adaptateurs ne doivent pas
être ouverts, car il y a risque de décharge électrique. Si l‘appareil est défectueux, n‘essayez
PAS de résoudre le problème vous-même. Dans ce cas, veuillez vous adresser à votre
commerçant.
! Conservez les piles hors de por tée des enfants. Cela évite le risque d‘ingestion.
! Évitez de toucher les piles ou les contacts électriques de l‘appareil avec des objets
métalliques.
! Cet article n‘est pas un jouet! Ne laissez pas les enfants jouer avec cet appareil.
REMARQUE: Ce babyphone a été conçu exclusivement comme moyen pour la
surveillance de votre nourrisson. Il ne peut remplacer l‘obligation de surveillance des
parents et ne peut pas être considéré comme un dispositif médical!
44
Page 45

Conseils de sécurité pour l‘installation
! Placez le babyphone hors de portée de l‘enfant (distance minimum d‘un mètre).
! Ne placez jamais le babyphone dans le berceau, le lit de l‘enfant ou dans son parc.
! An d‘éviter que l‘enfant ne s‘étrangle, assurez le câble hors de sa portée. N‘utilisez pas de
rallonge.
! An d‘assurer une meilleure transmission, les appareils devraient être placés verticalement
dans une position élevée.
! NE placez PAS le récepteur à proximité d‘appareils radio ou de micro-ondes. Le
rayonnement de ces appareils peut perturber fortement la réception.
! N‘utilisez pas les appareils à proximité de l‘eau ou dans des endroits humides. Ne plongez
pas l‘appareil dans l‘eau. Ne rincez pas l‘appareil à l‘eau courante.
! Ne recouvrez pas l‘appareil avec une serviette, un vêtement ou un chion.
! Évitez l‘exposition à la chaleur extrême ou aux rayons du soleil.
Caractéristiques techniques
FR
• technologie: numérique
• émetteur: Alimentation avec
alimentation micro USB ou avec 3 piles
AAA NiMH (incluses)
• récepteur: Alimentation avec
alimentation micro USB ou avec 3 piles
AAA NiMH (incluses)
• input: 100–220 V 50 Hz 0.15 A max.
• output: 5V / 500mA max.
• puissance de l‘émetteur: TX 50 mA , RX
130 mA
• fréquence: 2,4 GHz
• portée: 300 m
• longueur de câble: env. 1,55 m
• température de service: 10 °C–40 °C
• température de stockage: 0 °C–55 °C
• standards: EN 300 220-1, EN 301 489-1 et
EN 301 489-3
45
Page 46

Contenu de la livraison
unité bébé (émetteur) unité parents (récepteur)
1 x adaptateur d‘alimentation USB
2 x câble de chargement USB
pour l‘unité de bébé
et unité parentale
Description de l‘appareil
mode d‘emploi
3 piles AAA NiMH
(pour l‘unité parentale
inclus)
UNITÉ PARENTS
haut-parleur
LED d‘état
sélection ( + )
sélection ( - )
interrupteur
marche / arrêt
microphone
UNITÉ BÉBÉ
éclairage de nuit
LED d‘état
interrupteur
marche / arrêt
46
Allumer / éteindre la lumière
microphone
bouton
de conversation
clip de ceinture
logement des piles
micro USB
connecteur
d‘alimentation
clip de ceinture
logement des piles
micro USB
connecteur
d‘alimentation
régulateur de sensibilité
du microphone
Page 47

Mise en service
1
N‘utilisez que l‘adaptateur (5V DC / 500 mA) fourni. An d‘assurer que l‘appareil fonctionne même en cas de coupure de courant, nous recommandons de l‘équiper en
plus de piles NiMH. Elles seront chargées automatiquement dès l‘appareil branché.
REMARQUE: Utilisez exclusivement des piles rechargeables NiMH AAA. N‘insérez jamais
de piles non rechargeables dans le babyphone. L‘utilisation de piles non adaptées peut
provoquer des explosions!
Pour allumer les appareils, appuyez
2
Lorsque le micro sensible de l‘unité bébé enregistre un bruit, l‘appareil lance la
3
transmission à l‘unité parents. En cas de réception de bruits, la LED de statut de
l‘unité parentale commence à clignoter en orange.
Si votre nourrisson est calme et que l‘unité bébé n‘enregistre plus de bruit, l‘appa-
4
reil bascule automatique ment en mode stand-by (mode ECO). Avec le mode ECO
activé, aucun rayonnement n‘est émis par l‘unité bébé. L‘unité bébé ne recommence à émettre que dès que des bruits sont perçus.
sur le bouton marche / arrêt et
maintenez-le enfoncé pendant 2
secondes. Le voyant d‘état de l‘unité
bébé et parent s‘allume en vert. Les
deux appareils se connectent automatiquement.
CONSEIL Vous pouvez transporter l‘appareil à votre ceinture avec le clip de ceinture
ou bien l‘accrocher à une xation adéquate au mur.
REMARQUE: L‘unité parents et l‘unité bébé peuvent également être optionnellement
commandées avec trois piles NiMH (pour l ‘unité paren tale inclu s).
FR
47
Page 48

LED d‘état unité bébé
La LED de statut au-dessus du bouton marche/arrêt indique l‘état de l‘unité bébé.
LED d‘état Power Ètat
vert
clignotant en vert
clignotant en rouge
rouge
marche l‘appareil est en marche
marche les piles sont en cours de charge
marche les piles sont vides
marche les piles sont en cours de charge
LED d‘état unité parents
La LED de statut au-dessus du bouton marche/arrêt indique l‘état de l‘unité parentale.
LED d‘état Power Ètat
vert
clignotant en vert marche les piles sont en cours de charge
clignotant en orange
clignotant en rouge
rouge
marche l‘appareil est en marche
marche des bruits sont transmis par l‘unité bébé
clignotement court: la portée maximale est dépassée;
marche
clignotement long: les piles sont déchargées
arrêt les piles sont en cours de charge
Fonctionnement avec piles
1 32
IMPORTANT: Utilisez exclusivement des piles rechargeables NiMH AAA. Avant de changer
les piles, déconnectez l‘appareil du secteur et débranchez le câble.
48
Page 49
Fonctionnement avec piles
Une fois que les piles sont trop faibles, la LED de statut commence à clignoter en rouge en
état de fonctionnement activé. Si l‘appareil n‘est pas branché au secteur, la liaison devient
plus mauvaise puis s‘interrompt automatiquement après peu de temps. Les piles peuvent
être chargées directement dans le babyphone. Pour ce faire, branché l‘appareil au secteur
à l‘aide de l‘adaptateur fourni. Le temps de charge est de 10 heures, lorsque l‘appareil est
éteint.
Contrôle de la portée
Ce baby phone est équipé d‘un système de contrôle de la portée optique et acoustique.
L‘unité bébé et l‘unité parentale contrôlent à intervalles réguliers le contact réciproque
(également en état de veille, quand l‘unité bébé ne perçoit aucun bruit). Si la portée est
dépassée, la LED de statut de l‘unité parentale commence à clignoter en rouge et un signal
d‘alarme retentit à intervalles réguliers.
Mode ECO
Dès que l‘unité parentale est placée à un emplacement xe, auquel la réception a été
préalablement contrôlée, nous vous conseillons d‘activer le mode ECO. En mode ECO,
le contrôle de la portée est désactivé, de cette façon, aucun rayonnement n‘est émis par
l‘unité bébé en mode veille (quand votre enfant est calme). L‘unité bébé n‘émet alors que
dès que des bruits sont perçus.
FR
Réglage du volume / unité parents
Pour augmenter ou diminuer le volume du récepteur sur l‘unité parents, appuyez sur +
(pour plus fort) ou - (pour bas).
49
Page 50

Éclairage de nuit
Appuyez sur la touche de l‘unité bébé pour allumer ou éteindre l‘éclairage de nuit.
Sensibilité du microphone
Tournez le régulateur de sensibilité du microphone de l‘unité bébé vers le haut si vous
souhaitez être déjà alarmé en cas de faibles bruits ou si l‘unité bébé se trouve loin du lit
de bébé. Si vous souhaitez être seulement alarmé en cas de bruits forts ou si l‘unité bébé
se trouve près du lit de bébé, la sensibilité du microphone peut être tournée vers le bas.
Conseils pour l‘extension de la zone de portée
La portée de l‘appareil dépend de l‘environnement et d‘autres facteurs qui peuvent
perturber ou bloquer le signal de transmission:
objets métalliques de grande taille comme réfrigérateurs, miroirs, armoires, portes en
métal ou béton armé
structures xes (murs) ou appareils radio, électriques et électroniques comme
téléviseurs, ordinateurs, téléphones mobiles ou variateurs (dimmer)
REMARQUE: Nous recommandons de maintenir une distance d‘un mètre en l‘unité bébé
et les appareils interférents, voire d‘éteindre ces derniers. Lorsque la liaison est faible, nous
recommandons de placer l‘unité bébé ou l‘unité parents à un autre endroit de la pièce.
Nettoyage et entretien
Débranchez toujours l‘appareil du secteur avant de le nettoyer. Utilisez toujours un chion
légèrement humide. Ne plongez pas l‘appareil dans l‘eau. N‘utilisez pas de nettoyants
chimiques.
Enlevez les piles de l‘appareil lorsque vous ne l‘utilisez pas pour un long moment. Ce
produit ne nécessite pas de maintenance spéciale. Les réparations de l‘appareil ne doivent
être faites que par un spécialiste.
50
Page 51

Garantie
Veuillez conserver la preuve d‘achat, le mode d‘emploi et le numéro d‘article.
Les droits à la garantie ou les réclamations en vertu de la garantie sont à dénir
exclusivement avec le commerçant.
Les caractéristiques techniques, les informations et les spécicités du produit dans ces
pages sont données de bonne foi, et répondent au stade actuel de la technique. Les
informations fournies par reer devraient être correctes et ables. La société reer ne peut
cependant assumer aucune responsabilité pour les possibles erreurs dans ce document
et elle se réserve le droit de procéder, sans préavis, à des modications du design ou
des caractéristiques du produit. Toute reproduction ou retransmission à tout tiers des
informations de ce document, protégé aux termes de la législation sur les droits d‘auteur,
sous quelque forme que ce soit, graphique, électronique ou mécanique, notamment
par photocopie, enregistrement sur bande ou stockage dans un système d‘interrogation
(même en extraits) nécessite l‘autorisation préalable par écrit de la société reer.
Instructions d‘élimination des déchets
À la n de sa vie, ce produit ne doit pas être jeté avec les ordures
ménagères, mais il doit être porté à un point de collecte approprié pour
le recyclage des appareils électriques et électroniques. Ceci est indiqué
par le symbole sur le produit, dans le mode d‘emploi et sur l‘emballage.
Les matériaux sont recyclables en fonction de leur marquage. Ne jetez
pas les piles usagées avec les ordures ménagères, mais portez-les à une
station de collecte du commerce spécialisé. Par le recyclage des matières, la réutilisation
ou d‘autres formes de valorisation des anciens appareils, vous prenez part à la protection
de notre environnement. Veuillez vous adresser à l‘administration de votre commune pour
connaître les centres compétents pour le traitement des déchets.
FR
51
Page 52

Résolution des problèmes
La lampe d‘état LED ne s‘allume pas
Assurez-vous que les deux appareils sont allumés.
Contrôlez la connexion de l‘adaptateur avec la prise de courant et avec l‘appareil.
Échangez/chargez les piles et vérifier la polarité.
La LED de statut clignote en orange
L‘unité parents reçoit des bruits. Éventuellement, augmentez le volume afin de mieux
entendre les bruits de votre enfant.
La LED de statut clignote en rouge
Clignotement long : les piles sont déchargées. Échangez les piles ou branchez l‘appareil
au secteur.
Clignotement court : la portée maximale est dépassée. Réduisez la distance entre l‘unité
bébé et l‘unité parents..
Malgré une liaison active, pas de transmission de bruits
Le volume sonore est réglé trop bas. Tournez le régulateur de volume sonore de l‘unité
parentale vers le haut.
La sensibilité du microphone est réglé trop faible. Tournez le régulateur de sensibilité du
microphone de l‘unité bébé vers le haut.
52
Page 53

Résolution des problèmes
Un fort sifflement se produit sur l‘unité parentale (rétroaction Larsen)
La distance entre l‘unité bébé et l‘unité parents est insuffisante. Augmentez la distance
entre l‘unité bébé et l‘unité parents.
Pas de liaison entre l‘unité parents et l‘unité bébé/grésillements/la liaison s‘interrompt
Assurez-vous que les deux appareils sont allumés.
La portée maximum est dépassée. Placez le babyphone à un autre endroit ou réduisez
la distance entre l‘unité bébé et l‘unité parents.
L‘unité bébé/unité parents se trouve à proximité d‘appareils perturbants (p. ex. micro-on
des) ou d‘objets métalliques. Essayez de déterminer l‘origine de la perturbation et placez
les appareils à un autre endroit.
Les piles sont trop faibles. Échangez les piles ou branchez les appareils au secteur.
FR
53
Page 54

Algemene veiligheidsaanwijzingen
Gefeliciteerd met de aankoop van uw nieuwe reer babyfoon. De intuïtieve babyfoon met
zijn zeer gevoelige microfoon draagt het geluid van uw baby duidelijk en betrouwbaar
over. Het rustgevende nachtlampje op de babyeenheid helpt uw kind bij het in slaap vallen
en zodra uw kind rustig is, schakelt het apparaat automatisch over naar de „ECO modus“.
In deze ECO-modus gaat van de babyeenheid geen straling meer uit. De babyeenheid
begint pas weer uit te zenden , zodra er geluiden ontvangen worden. Dankzij de optimale
werking van de batterij en een robuuste riemclip kan de handige babyfoon zowel stationair
als mobiel worden gebruikt. Wij zijn ervan overtuigd dat u lange tijd van de kwaliteit van
ons product zult genieten.
Neem een paar minuten de tijd om de veiligheidsaanwijzingen grondig te lezen. Alleen
als alle hier genoemde punten zijn gewaarborgd, kan de reer babyfoon zorgeloos worden
gebruikt. Bewaar deze gebruiksaanwijzing zorgvuldig voor een latere raadpleging.
! Controleer het apparaat voor ieder gebruik op zichtbare schade. Indien u schade
vastgesteld hebt, mag dit apparaat niet worden gebruikt.
! Gebruik uitsluitend meegeleverde oplader en voedingseenheid. Wees er zeker van dat
de bedrijfsspanning van het stopcontact overeenkomt met die van de voedingseenheid.
Controleer vooral bij een reis naar het buitenland of de lokale netspanning overeenkomt
met de aangegeven spanning op de apparaten of de voedingseenheden.
! De apparaten en voedingseenheden mogen, met uitzondering van het deksel op het
batterijvak, niet geopend worden, omdat dit tot elektrische schokken kan leiden. Als een
apparaat foutief functioneert, probeer het probleem dan NIET zelf te verhelpen. In dit
geval verzoeken we u om contact op te nemen met uw verkoper.
! De batterijen buiten het bereik van kinderen bewaren. Er bestaat risico van inslikken.
! Vermijd het contact van metalen voorwerpen met de batterij- of stroomaansluitcontacten
aan de apparaten.
! Dit product is geen speelgoed! Laat kinderen niet met het apparaat spelen.
AANWIJZING: Deze babyfoon is uitsluitend ontwikkeld als hulpmiddel voor het
observeren van uw baby. Het mag niet als vervanging voor de toezichtsplicht als ouders
of als medisch apparaat worden beschouwd!
54
Page 55

Veiligheidsaanwijzing voor de installatie
! Plaats de babyeenheid altijd buiten het bereik van het kind (minimaal één meter afstand).
! Leg de babyfoon nooit in het baby- of kinderbed of de kinderbox.
! Zorg ervoor dat de kabel zich niet in de buurt van kinderen bevindt, om wurging te
vermijden. Gebruik geen verlengsnoeren.
! Om een zo goed mogelijke overdracht te waarborgen, moeten de apparaten altijd
rechtop en in een verhoogde positie worden neergezet.
! Plaats de ontvanger NIET in de buurt van zend- en ontvangstapparatuur of magnetrons.
De straling van deze apparaten kan de ontvangst sterk verminderen.
! Gebruik het apparaat niet in de buurt van water of op vochtige plaatsen. Dompel de
apparaten niet onder in water.Spoel het apparaat niet af onder stromend water.
! Bedek de babyfoon niet met een handdoek, een kledingstuk of deken.
! Vermijd extreme hitte en direct zonlicht.
Technische gegevens
NL
• technologie: digitaal
• zender: voeding met micro USB-
voeding of met 3 AAA NiMH-batterijen
(meegeleverd)
• ontvanger: voeding met micro USB-
voeding of met 3 AAA NiMH-batterijen
(meegeleverd)
• input: 100–220 V 50 Hz 0.15 A max.
• output: 5V / 500 mA max.
• zendvermogen: TX 50 mA , RX 130 mA
• frequentie: 2,4 GHz
• bereik: 300 m
• kabellengte: ca. 1,55 m
• werktemperatuur: 10 °C–40 °C
• bewaartemperatuur: 0 °C–55 °C
• standaards: EN 300 220-1, EN 301 489-1,
EN 301 489-3
55
Page 56

Leveringsomvang
babyeenheid (zender) oudereenheid (ontvanger)
1 x USB-voedingsadapter
2 x USB-oplaadkabel
voor babyeenheid
en oudereenheid
Beschrijving van het apparaat
OUDEREENHEID
luidspreker
statusledlampja
selectie ( + )
selectie ( - )
aan-uit-schakelaar
microfoon
Licht aan / uit talk knop
gebruiksaanwijzing
3 AAA NiMH-batterijen
(voor de oudereenheid
inbegrepen)
riemclip
batterijvak
micro USB
voedingsconnector
BABYEENHEID
nachtlampje
statusledlampje
aan-uit-schakelaar
microfoon
56
riemclip
batterijvak
micro USB
voedingsconnector
High / Low
microfoongevoeligheid aanpassing
Page 57

Ingebruikname
1
Gebruik alleen de meegeleverde adapter (5V DC/500 mA). Om te waarborgen dat
het apparaat bij een stroomuitval nog blijft werken, adviseren we om aanvullend
NiMH-batterijen te plaatsen. Deze worden bij het aansluiten op de stroomvoorziening automatisch opgeladen.
AANWIJZING: Gebruik altijd alleen oplaadbare NiMH AAA-batterijen! Plaats nooit niet-
oplaadbare batterijen in de babyfoon. Bij het gebruik van ongeschikte batterijtypes
bestaat explosiegevaar!
Houd de aan / uitknop gedurende 2
2
Zodra de zeer gevoelige microfoon op de babyeenheid een geluid waarneemt, be-
3
gint het apparaat met de overdracht naar de oudereenheid. Bij het ontvangen van
geluid begint het statusledlampje op de oudereenheid in oranje kleur te knipperen.
seconden ingedrukt om de apparaten
in te schakelen. De status-LED op de
baby- en oudereenheid licht groen op.
De twee apparaten maken automatisch verbinding.
NL
Als uw kind rustig is en de babyeenheid geen geluiden ontvangt, schakelt het ap-
4
paraat automatisch over naar de stand-bymodus (ECO-Modus). Bij ingeschakelde
ECO-modus gaat van de babyeenheid in de standby-modus geen straling meer
uit. De babyeenheid begint pas weer uit te zenden , zodra er geluiden ontvangen
worden.
TIP U kunt de apparaten met behulp van de riemclip aan uw riem bevestigen of met
geschikt bevestigingsmateriaal aan een wand ophangen.
AANWIJZING: de ouderunit en de babyunit kunnen optioneel ook worden gebruikt met
drie NiMH-batterijen (voor de oudereenheid inbegrepen).
57
Page 58

Statusledlampje babyeenheid
Het statusledlampje boven de aan-/uitschakelaar geeft de toestand van de babyeenheid aan.
Statusledlampje Power Toestand
groen aan apparaat is ingeschakeld
groen knipperend
rood knipperend
rood
aan batterijen worden opgeladen
aan Batterijen zijn leeg
uit batterijen worden opgeladen
Statusledlampje oudereenheid
Het statusledlampje boven de aan-/uitschakelaar geeft de toestand van de oudereenheid aan.
Statusledlampje Power Toestand
groen
groen knipperend aan batterijen worden opgeladen
oranje knipperend
rood knipperend
rood
aan apparaat is ingeschakeld
aan geluiden van de babyeenheid worden ontvangen
kort knipperen: het maximale bereik is overschreden;
aan
lang knipperen: accu´s zijn leeg
uit batterijen worden opgeladen
Gebruik met batterijen
1 32
BELANGRIJK: Gebruik altijd alleen oplaadbare NiMH AAA-batterijen! Schakel de apparaten
uit en verwijder de netstekker voordat u de batterijen vervangt.
58
Page 59

Gebruik met batterijen
Zodra de batterijen zwak zijn, begint het statusledlampje in ingeschakelde toestand rood te
knipperen. Als het apparaat niet wordt aangesloten op een stopcontact, verslecht eerst de
verbinding. Daarna wordt de verbinding automatisch na korte tijd verbroken. De batterijen
kunnen direct in de babyfoon worden opgeladen. Sluit hiervoor het apparaat met behulp
van de meegeleverde voedingseenheid aan op het stopcontact. Het laadproces duurt 10
uur bij een uitgeschakeld apparaat.
Bereik controle
Deze babyphone is met een optisch en akoestisch bereik controlesysteem uitgerust. De
babyeenheid en de oudereenheid controleren op regelmatige tijdstippen het wederzijdse
contact (ook in standby-modus als de babyeenheid geen geluiden ontvangt). Als het
bereik overschreden wordt, begint het statusledlampje op de oudereenheid rood te
knipperen en laat regelmatig een geluidssignaal horen.
ECO-Modus
Zodra u de oudereenheid op een vaste locatie plaatst, waar u eerder de ontvangst
gecontroleerd hebt, raden wij u aan de ECO-modus in te schakelen. In de ECO-modus is
de controle van het bereik uitgeschakeld, zodat er geen straling van de babyeenheid in de
standby-modus (als uw kind rustig is) uitgaat. De babyeenheid begint alleen te zenden, als
er geluiden worden ontvangen.
NL
Volumeregelaar / oudereenheid
Druk op + (voor luider) of - (voor omlaag) om het volume van de ontvanger op de
ouderunit te verhogen of te verlagen.
59
Page 60

Nachtlampje
Druk op de -toets op de babyeenheid om het nachtlampje in of uit te schakelen.
Microfoongevoeligheid
Draai de knoop voor de microfoongevoeligheid op de babyeenheid naar boven, als u al bij
zwakke geluiden gealarmeerd wilt worden of als de babyeenheid ver van het babybedje
staat. Als u pas bij sterkere geluiden gewaarschuwd wilt worden, of als de babyeenheid
dicht bij het babybedje staat, kan de gevoeligheid van de microfoon gereduceerd worden.
Tips voor de uitbreiding van het ontvangstbereik
Het ontvangstbereik is afhankelijk van zowel de omgeving als van andere factoren, die het
zendsignaal kunnen storen of blokkeren:
grote metalen voorwerpen zoals koelkasten, spiegels, kasten, metalen deuren of
gewapend beton
vaste structuren (wanden) of zend- en ontvangstapparatuur, elektrische en elektro-
nische apparaten zoals televisies, computers, mobiele telefoons of dimschakelaars
AANWIJZING: Het wordt aanbevolen om minimaal één meter afstand tussen de
babyeenheid en de storende apparaten aan te houden of deze eventueel uit
te schakelen. Bij een zwakke verbinding wordt aanbevolen om de ouder- en/of
babyeenheid in de kamer op een andere plaats neer te zetten.
Reiniging en onderhoud
Trek de voedingseenheden altijd uit het stopcontact voordat u het apparaat reinigt.
Gebruik uitsluitend een licht vochtige doek. Dompel het apparaat niet onder in water.
Gebruik geen chemische reinigingsmiddelen.
Verwijder de batterijen uit het apparaat als u het voor langere tijd niet gaat gebruiken.
Dit product vereist geen speciaal onderhoud. De reparaties van het apparaat mogen
uitsluitend door een specialist worden uitgevoerd.
60
Page 61

Waarborg
Gelieve het aankoopbewijs, de gebruikersaanwijzing en het artikelnummer te bewaren.
Garantieclaims of aanspraken voortvloeiende uit garantie moeten uitsluitend met de
handelaar geregeld worden.
Alle technische gegevens, informatie en eigenschappen van het in dit document
beschreven product zijn naar best weten samengesteld en stemmen overeen met de stand
bij de publicatie. De door reer verstrekte informatie moet nauwkeurig en betrouwbaar zijn.
De rma reer aanvaardt echter geen enkele aansprakelijkheid voor eventuele fouten in
dit document en behoudt zich het recht voor, om zonder voorafgaande kennisgeving,
de veranderingen aan het productdesign, resp. aan de specicaties uit te voeren.
Vermenigvuldiging en verspreiding van de informatie uit dit auteursrechtelijk beschermd
werk in enige vorm of op enige wijze, hetzij grasch, elektronisch of mechanisch, door
fotokopieën, opname op band of opslag in een datasysteem (ook een deel ervan) vereisen
de schriftelijke toestemming van de rma reer.
Aanwijzingen voor de verwijdering
Dit product kan aan het einde van zijn levensduur niet via het normale
huishoudelijke afval verwijderd worden, maar moet worden ingeleverd op
een inzamelpunt voor de recyclage van elektrische toestellen. Het symbool
op het product, in de gebruikershandleiding of op de verpakking, wijst
erop. De materialen zijn overeenkomstig hun etikettering herbruikbaar.
Gooi geen lege batterijen in het huisvuil, maar bij het gevaarlijke afval of
breng deze naar een verzamelingsstation voor batterijen in een gespecialiseerde winkel.
Met het hergebruik, het recycleren van materialen of andere vormen van gebruik van oude
toestellen levert u een belangrijke bijdrage tot de bescherming van ons milieu. Vraag a.u.b.
bij uw gemeentelijk bestuur over de competente plaats voor het verzamelen van dit soort
afval.
NL
61
Page 62

Probleemoplossing
Statusledlampje licht niet op
Wees er zeker van dat beide apparaten zijn ingeschakeld.
Controleer de verbinding van de voedingseenheid naar het stopcontact en naar het
apparaat.
Vervang de batterijen of laad de batterijen op en controleer de polariteit.
Het statusledlampje knippert oranje
Oudereenheid ontvangt geluid. Verhoog eventueel het volume op de oudereenheid
om het geluid van uw kind beter te horen.
Het statusledlampje knippert rood
Lang knipperen: accu´s zijn leeg. Vervang de batterijen op of sluit het apparaat aan op de
stroomvoorziening.
Kort knipperen: het maximale bereik is overschreden. Verkort de afstand tussen baby- en
oudereenheid.
Geen geluidsoverdracht ondanks bestaande verbinding
De geluidssterkte is te laag ingesteld. Draai de geluidssterkte knop op de oudereenheid
naar boven.
De gevoeligheid van de microfoon is te laag ingesteld. Draai de microfoongevoeligheid
knop op de babyeenheid naar boven.
62
Page 63

Probleemoplossing
U hoort dan een luidere fluittoon op de oudereenheid (terugkoppeling)
De afstand van baby- en oudereenheid is te klein. Verhoog de afstand tussen baby- en
oudereenheid.
Geen verbinding tussen ouder- en babyeenheid/ruis/verbinding wordt verbroken
Wees er zeker van dat beide apparaten zijn ingeschakeld.
Maximale reikwijdte is overschreden. Plaats de babyfoon op een andere plaats en/of
verkort de afstand tussen baby- en oudereenheid.
Baby- en oudereenheid bevinden zich in de buurt van storende apparaten (bijvoor-
beeld magnetron) of metalen voorwerpen. Probeer de storingsbron te vinden en plaats
de apparaten op een andere plaats.
Batterijen zijn te zwak. Vervang de batterijen op of sluit het apparaat aan op de stroom-
voorziening.
NL
63
Page 64

Ogólne zasady bezpieczeństwa
Gratulujemy zakupu nowej niani elektronicznej rmy reer. Intuicyjna niania elektroniczna
wyposażona w niezwykle czuły mikrofon transmituje dźwięki wydawane przez dziecko w
sposób wyraźny i niezawodny. Uspokajająca lampka nocna w stacji dziecka pomaga mu
zasnąć, a gdy jest spokojne, urządzenie automatycznie przełącza się w „tryb EKO”. W trybie
EKO stacja dziecka nie emituje promieniowania. Stacja dziecka rozpoczyna transmisję na
nowo dopiero wtedy, gdy odbierze dźwięki. Dzięki opcjonalnemu zasilaniu na baterie
stacji rodzica oraz wytrzymałemu klipsowi na pasek to poręczne urządzenie można
wykorzystywać w sposób stacjonarny jak i mobilny. Jesteśmy pewni, że będą Państwo
mogli przez długi czas cieszyć się korzyściami, które zapewnia nasz wysokiej jakości
produkt.
Prosimy o poświęcenie kilku minut na gruntowne zapoznanie się z zasadami
bezpieczeństwa. Dopiero spełnienie wszystkich opisanych poniżej punktów może
umożliwić bezreeksyjne użytkowanie elektronicznej niani rmy reer. Należy zachować
niniejszą instrukcję obsługi do przyszłego użytku.
! Przed każdym użyciem skontrolować urządzenie pod kątem widocznych uszkodzeń. W
przypadku stwierdzenia uszkodzeń, nie należy korzystać z tego urządzenia.
! Korzystać wyłącznie z ładowarek i zasilaczy dołączonych do zestawu. Upewnić się, że
napięcie robocze gniazdka wtyczkowego nadaje się do użytku z zasilaczem. Upewnić
się, zwłaszcza w przypadku wyjazdów zagranicznych, że lokalne napięcie sieciowe
odpowiada określonemu napięciu urządzeń lub zasilaczy.
! Urządzeń i zasilaczy, z wyjątkiem pokrywy komory baterii, nie należ y otwierać, ponieważ
może to prowadzić do porażenia prądem. W przypadku niewłaściwego działania
urządzenia NIE należy próbować rozwiązać problemu na własną rękę. W takim wypadku
należy zwrócić się do dystrybutora.
! Trzymać baterie z dala od dzieci. Istnieje ryz yko połknięcia.
! Unikać kontaktu metalowych przedmiotów z kontaktami baterii lub przewodu
zasilającego urządzeń.
! Produkt nie jest zabawką! Dzieci nie mogą bawić się urządzeniem.
WSKAZÓWKA: Niania elektroniczna została stworzona wyłącznie jako środek pomocniczy
służący do nadzoru dzieci. Nie zastępuje on jednak obowiązku nadzoru rodzicielskiego ani
nie może być traktowany jako wyrób medyczny!
64
Page 65

Zasady bezpieczeństwa instalacji
! Stawiać stację dziecka zawsze poza zasięgiem dzieci (min. odstęp wynosi 1 metr).
! Nie stawiać stacji w łóżeczku niemowlęcia/dziecka lub w kojcu.
! Aby wyeliminować ryzyko uduszenia kablem, należy zabezpieczyć kabel tak, aby
znajdował się poza zasięgiem dzieci. Nie należy korzystać z przedłużacz y.
! Aby zapewnić możliwie najlepszą transmisję, urządzenia powinny być ustawione na
równej powierzchni na podwyższeniu.
! NIE ustawiać odbiornika w pobliżu urządzeń radiowych lub mikrofalówek. Promienio-
wanie emitowane przez te urządzenia może znacząco pogorszyć odbiór.
! Nie korzystać z urządzeń w pobliżu wody lub wilgotnych miejsc. Nie zanurzać urządzeń
w wodzie. Nie płukać urządzeń pod bieżącą wodą.
! Nie nakrywać produktu ręcznikami, ubraniami lub kocami.
! Unikać skrajnie wysok ich temperatur i bezpośredniego promieniowania słonecznego.
Dane techniczne
PL
• technologia: cyfrowy
• nadajnik: zasilacz z zasilaniem micro USB
lub z 3 bateriami AAA NiMH (w zestawie)
• odbiornik: zasilacz z zasilaniem micro USB
lub z 3 bateriami AAA NiMH (w zestawie)
• wejście: 100 – 220 V 50Hz 0.15 A max.
• wyjście: 5V / 500mA max.
• moc nadawania: TX 50 mA , RX 130 mA
• częstotliwość: 2,4 GHz
• zasięg: 300 m
• długość przewodu: ok. 1,55 m
• temperatura robocza: 10 °C–40 °C
• temperatura przechowywania: 0 °C–55 °C
• standardy: EN 300 220-1, EN 301 489-1
und EN 301 489-3
65
Page 66

Zakres dostawy
Stacja dziecka (nadajnik) Stacja rodzica (odbiornik)
1 x zasilacz USB
2 x kabel ładujący USB
dla jednostki dla dziecka
i jednostkę rodzicielską
Opis urządzenia
STACJA RODZICA
głośnik
dioda LED statusu
wybór (+)
wybór ( - )
włącznik / wyłącznik
mikrofon
swiatło włączone /
wyłączone
talk button
Instrukcja obsługi
3 AAA NiMH-batterijen
(voor de oudereenheid
inbegrepen)
klips na pasek
komora baterii
micro USB
złącze zasilania
STACJA DZIECKA
lampka nocna
dioda LED statusw
włącznik / wyłącznik
mikrofon
66
klips na pasek
komora baterii
micro USB
złącze zasilania
regulator poziomu
czułości mikrofonu
Page 67

Uruchomienie
1
Korzystać wyłącznie z zasilacza dołączonego do zestawu (5V DC / 500 mA). Aby
zapewnić działanie produktu w przypadku przerwy w dostawie prądu, zalecamy
wyposażenie urządzenia dodatkowo w akumulatory niklowo-metalowo-wodorkowe. Po podłączeniu prądu zostaną one automatycznie naładowane.
WSKAZÓWKA: Zawsze korzystać wyłącznie z ładowalnych akumulatorów AAA niklowo-
metalowo-wodorkowych. Nie wkładać nigdy nieładowalnych baterii do stacji dziecka. W
przypadku zastosowania nieodpowiednich rodzajów baterii istnieje ryzyko wybuchu!
Aby włączyć urządzenia, naciśnij
i przytrzymaj prz ycisk włączania /
2
Gdy tylko niezwykle czuły mik rofon w stacji dziecka wychwyci dźwięki, rozpocznie
3
transmisję do stacji rodzica. W przypadku odbioru dźwięków dioda LED statusu w
stacji rodzica zacznie migać na pomarańczowo.
wyłączania przez 2 sekundy. Dioda
LED stanu na urządzeniu dziecięcym i
rodzica świeci na zielono. Dwa urządzenia automatycznie się łączą.
PL
Gdy dziecko jest spokojne i stacja dziecka nie odbiera żadnych dźwięków, urząd-
4
zenie przejdzie automatycznie w tryb uśpienia (tryb EKO). W przypadku włączonego trybu EKO stacja dziecka w trybie uśpienia nie emituje promieniowania. Stacja
dziecka rozpoczyna transmisję na nowo dopiero wtedy, gdy odbierze dźwięki.
Wskazówka Za pomocą klipsa można zamocować urządzenia na pasku lub odpow-
iednim materiale montażowym na ścianie.
WSKAZÓWKA: Jednostka rodzicielska i urządzenie dla dziecka mogą być również
opcjonalnie zasilane trzema akumulatorami NiMH (voor de oudereenheid inbegrepen).
67
Page 68

Dioda LED statusu stacja dziecka
Dioda LED statusu nad włącznikiem/wyłącznikiem wskazuje na stan stacji dzieck a.
Dioda LED statusu Zasilanie Stan
zielona wł. urządzenie jest włączone
zielona migocząca
czerwona migocząca
czerwona
wł. akumulatory są ładowane
wł. akumulatory są wyładowane
wył. akumulatory są ładowane
Dioda LED statusu stacja rodzica
Dioda LED statusu nad włącznikiem/wyłącznikiem wskazuje na stan stacji rodzica.
Dioda LED statusu Zasilanie Stan
zielona
zielona migocząca wł. akumulatory są ładowane
pomarańczowa migocząca
czerwona migocząca wł.
czerwona
wł. urządzenie jest włączone
wł. stacja dziecka odbiera dźwięk i
krótkie miganie: maksymalny zasięg został
przekroczony.; Długie miganie: Akumulatory są
wyładowane
wył. akumulatory są ładowane
Zasilanie z wykorzystaniem akumulatorów
1 32
WAŻNE: Zawsze korzystać wyłącznie z ładowalnych akumulatorów AAA niklowo-
metalowo-wodorkowych. Przed przeprowadzeniem wymiany baterii wyłącz urządzenia i
odłącz kabel sieciowy.
68
Page 69

Zasilanie z wykorzystaniem akumulatorów
Gdy baterie będą za słabe, dioda LED statusu zacznie migać na czerwono (gdy urządzenie
jest włączone). Jeśli urządzenie nie zostanie podpięte do gniazdka, najpierw pogorszy
się jakość połączenia, a niedługo po tym zostanie automatycznie zerwane. Akumulatory
można ładować bezpośrednio w stacji dziecka. W tym celu podłączyć urządzenie
za pomocą dołączonego zasilacza do gniazdka. Proces ładowania trwa 10 godzin w
przypadku wyłączonego urządzenia.
Kontrola zasięgu
Niania elektroniczna jest wyposażona w akustyczną i optyczną kontrolę zasięgu. W
regularnych odstępach czasowych stacja dziecka i rodzica sprawdzają wzajemne
połączenie (także w trybie uśpienia, gdy stacja dziecka nie odbiera żadnych dźwięków).
Gdy zasięg zostanie przekroczony, dioda LED statusu w stacji rodzica zaczyna migać na
czerwono oraz w regularnych odstępach czasowych wydaje sygnał dźwiękowy.
Tryb EKO
Po ustawieniu stacji rodzica na stałe w miejscu, z którego wcześniej przeprowadzona
była próba odbioru, zalecamy włączenie trybu EKO. W trybie EKO kontrola zasięgu jest
wyłączona, aby w trybie uśpienia (gdy dziecko jest spokojne) stacja dziecka nie emitowała
promieniowania. Stacja dziecka rozpoczyna transmisję dopiero wtedy, gdy odbierze
dźwięki.
PL
Regulacja poziomu głośności / stacja rodzica
Aby zwiększyć lub zmniejszyć głośność odbiornika na urządzeniu rodzica, naciśnij + (dla
głośniejszego) lub - (dla dołu).
69
Page 70

Lampka nocna
Nacisnąć przycisk na stacji dziecka, aby włączyć lub wyłącz yć lampkę nocną.
Poziom czułości mikrofonu
Przekręcić regulator poziomu czułości mikrofonu w stacji dziecka do góry, aby urządzenie
reagowało już na ciche odgłosy lub stacja dziecka jest oddalona od jego łóżeczka. Jeśli
urządzenie ma reagować dopiero na głośne dźwięki lub stacja dziecka znajduje się w
pobliżu jego łóżeczka, regulator poziomu czułości mikrofonu można skręcić do dołu.
Wskazówki dotyczące zwiększenia obszaru odbioru
Wielkość obszaru odbioru zależy od otoczenia a także innych czynników zakłócających lub
blokujących transmisję sygnału:
duże metalowe przedmioty np. lodówki, lustra, szafy, metalowe drzwi lub żelbeton
feste stałe struktury (ściany) lub urządzenia radiowe, elektryczne lub elektroniczne np.
telewizory, komputery, telefony komórkowe lub przełączniki przyciemniania światł
WSKAZÓWKA: Zaleca się zachować przynajmniej metrowy odstęp między stacją dziecka
a zakłócającymi urządzeniami lub też wyłączenie takiego sprzętu. W przypadku słabego
połączenia zaleca się zmianę miejsca ustawienia stacji dziecka i rodzica.
Czyszczenie i konserwacja
Przed czyszczeniem urządzenia odłączyć zasilacze od gniazdka. Do czyszczenia korzystać
wyłącznie z lekko wilgotnej szmatki. Nie zanurzać urządzenia w wodzie. Nie używać
chemicznych środków czyszczących.
W przypadku dłuższego braku użytkowania urządzenia, należy wyjąć baterie. Produkt
nie wymaga specjalnej konserwacji. Naprawa urządzenia może być przeprowadzana
wyłącznie przez fachowca.
70
Page 71

Gwarancja
Proszę zachować dowód zakupu, instrukcję obsługi i numer artykułu.
Roszczenia gwarancyjne lub roszczenia z tytułu przyrzeczenia gwarancyjnego mogą być
dochodzone wyłącznie od sprzedawcy.
Wszystkie dane techniczne, informacje a także cechy produktu opisanego w tym
dokumencie zostały opracowane według naszej najlepszej wiedzy i zgodnie ze
stanem obowiązującym w trakcie publikacji. Informacje przygotowane przez rmę
reer są poprawne i wiarygodne. Firma nie ponosi jednak żadnej odpowiedzialności
za ewentualne błędy znajdujące się w tym dokumencie i zastrzega sobie prawo do
wprowadzania niezapowiedzianych zmian do konstrukcji produktu w odniesieniu do
specykacji. Powielanie i rozpowszechnianie informacji zawartych w tym chronionym
prawem autorskim dokumencie w jakiejkolwiek formie lub na jakikolwiek sposób graczny,
elektroniczny lub mechaniczny, kserując, nagrywając na taśmę lub zapisując w systemie
przeglądania danych (także w sposób fragmentaryczny) wymagają wcześniejszej pisemnej
zgody rmy reer.
Utylizacja
Po zakończeniu okresu eksploatacji produktu nie wolno pozbywać się
wraz z odpadami domowymi, należy natomiast oddać go do punktu
zbiórki urządzeń elektronicznych do odzysku. Na tę konieczność wskazuje
symbol na produkcie, w instrukcji obsługi lub na opakowaniu. Materiały
można wykorzystać wtórnie zgodnie z ich oznaczeniami. Zużytych baterii
nie należy wyrzucać wraz z odpadami domowymi, należy natomiast
traktować je jako odpady niebezpieczne lub zanieść do specjalnych punktów zbiórki
baterii. Dzięki ponownemu wykorzystaniu, odzyskowi materiałowemu lub innym formom
recyclingu starych urządzeń przyczyniają się Państwo w znaczący sposób do ochrony
środowiska. Więcej informacji na temat lokalnych punktów zbiórki można uzyskać w
urzędzie gminy.
PL
71
Page 72

Rozwiązywanie problemów
Dioda LED statusu nie świeci się
Upewnić się, że oba urządzenia są włączone.
Sprawdzić połączenie zasilacza z gniazdem i urządzeniem.
Wymienić/naładować akumulatory i sprawdzić polaryzację.
Dioda LED statusu miga na pomarańczowo
Stacja rodzica odbiera dźwięki. Zwiększyć opcjonalnie poziom głośności w stacji rodzica,
aby lepiej słyszeć dźwięki wydawane przez dziecko.
Dioda LED statusu miga na czerwono.
Długie miganie: Akumulatory są wyładowane. Wymienić baterie lub podłączyć urządze
nie do zasilania.
Krótkie miganie: maksymalny zasięg został przekroczony. Zmniejszyć odległość między
stacją dziecka a stacją rodzica.
Brak transmisji dźwięków mimo poprawnego połączenia
Poziom głośności jest zbyt niski. Przekręcić regulator poziomu głośności w stacji rodzica
do góry.
Poziom czułości mikrofonu jest zbyt niski. Przekręcić regulator poziomu czułości mikrofo
nu w stacji dziecka do góry.
72
Page 73

Rozwiązywanie problemów
Stacja rodzica wydaje głośny sygnał (sprzężenie zwrotne)
Odległość między stacją dziecka a stacją rodzica jest zbyt mała. Zwiększyć odległość
między stacją dziecka a stacją rodzica.
Brak połączenia między stacją dziecka a stacją rodzica / szumy / zerwanie połączenia
Upewnić się, że oba urządzenia są włączone.
Maksymalny zasięg został przekroczony. Ustawić nianię elektroniczną w innym miejscu
i/lub zmniejszyć odległość między stacją dziecka a stacją rodzica.
Stacja dziecka/rodzica znajduje się w pobliżu zakłócających urządzeń (np. mikrofalówki)
lub metalowych przedmiotów. Spróbować znaleźć źródło zakłóceń i ustawić urządzenie
w innym miejscu.
Baterie są zbyt słabe. Wymienić baterie i/lub podłączyć urządzenia do zasilania.
PL
73
Page 74

Všeobecné bezpečnostní pokyny
Gratulujeme Vám k zakoupení Vaší nové dětské chůvičky reer. Intuitivní dětská chůvička
se svým vysoce citlivým mikrofonem přenáší jasně a spolehlivě zvuky Vašeho dítěte.
Uklidňující noční světlo na dětské jednotce pomáhá Vašemu dítěti při usínání a jakmile je
dítě klidné, přístroj automaticky přejde do „režimu ECO“. V tomto režimu ECO již nevychází
z dětské jednotky žádné záření. Dětská jednotka začne opět vysílat teprve tehdy, jakmile
přijímá zvuky. Díky volitelnému provozu na baterii rodičovské jednotky a pevné sponě na
opasek můžete praktickou dětskou chůvičku používat jak stacionárně, tak i mobilně. Jsme
si jistí, že Vám náš kvalitní výrobek bude sloužit dlouhou dobu.
Udělejte si prosím chvilku času a pozorně si přečtěte bezpečnostní pokyny. Pouze tehdy,
jsou-li splněny všechny uvedené body, můžete dětskou chůvičku bezpečně používat.
Pečlivě si uchovejte návod k použití pro pozdější nahlédnutí.
! Před každým použitím zkontrolujte, zda přístroj nemá zjevné známky poškození. Pokud
zjistíte poškození, nesmíte přístroj používat.
! Používejte pouze nabíječky a síťové zdroje poskytnuté jako součást dodávky. Zajistěte,
aby provozní napětí zásuvky odpovídalo napětí síťového zdroje. Zkontrolujte, obzvláště
na zahraniční cestě, jestli místní síťové napětí souhlasí s uvedeným napětím na přístrojích
popř. síťových zdrojích.
! S výjimkou víka přihrádky na baterie se nesmí přístroje a napájecí zdroje otevírat, jelikož
to může vést k úrazům elektrickým proudem. V případě, že by přístroj pracoval chybně,
nepokoušejte se problém odstranit sami. V takovém případě Vás žádáme o to, abyste se
obrátili na Vašeho prodejce.
! Uchovávejte baterie mimo dosah dětí. Hrozí nebezpečí spolknutí.
! Zabraňte styku kovových předmětů s kontakty baterií a elektrického napájení na
přístrojích.
! Tento výrobek není hračka! Nedovolte dětem hrát si s tímto přístrojem.
UPOZORNĚNÍ: Tato dětská chůvička byla vyvinuta výhradně jako pomůcka k monitorování
Vašeho dítěte. Nesmí být považována za náhradu povinnosti rodičovského dozoru, ani za
lékařský přístroj!
74
Page 75

Bezpečnostní pokyny k instalaci
! Vždy umístěte dětskou jednotku mimo dosah dětí (minimální vzdálenost 1 metr).
! Nikdy nepok ládejte dětskou chůvičku do dětské postýlky, nebo dětské ohrádky.
! Pro zabránění uškrcení síťovým kabelem zabezpečte kabel mimo dosah dětí.Nepoužívejte
prodlužovací kabely.
! Pro zajištění co nejlepšího přenosu byste měli přístroje vždy umístit svisle a na vyvýšené
místo.
! Neumisťujte přijímač v blízkosti rádia nebo mikrovlnné trouby. Vyzařování těchto přístrojů
může silně rušit příjem.
! Nepoužívejte přístroje v blízkosti vody nebo na vlhkých místech. Neponořujte přístroje do
vody. Neumývejte přístroje pod tekoucí vodou.
! Nezakr ývejte dětskou chůvičku ručníkem, oblečením nebo dekou.
! Nevystavujte zařízení extrémně vysokým teplotám a přímému slunečnímu záření.
Technické údaje
CZ
• technologie: digitální
• vysílač: napájecí zdroj s napájecím
zdrojem micro USB nebo 3 AAA NiMH
bateriemi (součástí dodávky)
• přijímač: napájecí zdroj s napájecím
zdrojem micro USB nebo 3 AAA NiMH
bateriemi (součástí dodávky)
• vstup: 100–220 V 50 Hz 0.15 A max.
• výstup: 5V / 500mA max.
• vysílací výkon: TX 50 mA , RX 130 mA
• frekvence: 2,4 GHz
• dosah: 300 m
• délka k abelu: cca 1,55 m
• provozní teplota: 10 °C–40 °C
• teplota skladování: 0 °C–55 °C
• normy: EN 300 220-1, EN 301 489-1,
EN 301 489-3
75
Page 76

Obsah dodávky
dětská jednotka (vysílač) rodičovská jednotka (přijímač)
1 x napájecí adaptér USB
2 x nabíjecí kabel USB
pro dětskou jednotku
a rodičovskou jednotku
Popis přístroje
RODIČOVSKÁ
JEDNOTKA
reproduktor
kontrolka LED
výběr ( + )
výběr ( - )
spínač zapnutí /
vypnutí
mikrofon
DĚTSKÁ
JEDNOTKA
noční světlo
kontrolka LED
spínač zapnutí /
vypnutí
mikrofon
Zapnutí
/ vypnutí
světla
tlačítko talk
návod kpoužití
3 AAA NiMH baterie
(pro rodičovskou
jednotku v ceně)
spona na opasek
přihrádka na baterii
micro USB
konektor napájení
spona na opasek
přihrádka na baterii
micro USB
konektor napájení
regulátor citlivosti
mikrofonu
76
Page 77

Uvedení do provozu
1
Používejte pouze přibalené síťové zdroje, které jsou součástí dodávky (5V DC / 500
mA). Pro zajištění, že přístroj zůstane provozuschopný i v případě výpadku proudu, doporučujeme také vložit navíc akumulátory NiMH. Ty se budou při připojení k
napájení automaticky nabíjet.
UPOZORNĚNÍ: Používejte vždy pouze nabíjecí AAA akumulátory NiMH! Nikdy nevkládejte
do dětské chůvičky baterie, které nejsou nabíjecí. Při použití nevhodných typů baterií hrozí
nebezpečí exploze!
Chcete-li zařízení zapnout, stiskněte
2
Jakmile vysoce citlivý mikrofon na dětské jednotce zachytí zvuk, začne přístroj s
3
přenosem na rodičovskou jednotku. Při zachycení zvuků začne kontrolka LED na
rodičovské jednotce blikat oranžově.
a podržte tlačítko zapnuto / vypnuto
po dobu 2 sekund. Stavová LED dioda
dítěte a rodiče se rozsvítí zeleně. Obě
zařízení se automaticky připojují.
CZ
Když je Vaše dítě klidné a dětská jednotka nepřijímá žádné zvuky, přepne se přístroj
4
automaticky do režimu Standby (režim ECO). Při zapnutém režimu ECO již nevychází z dětské jednotky v režimu Standby žádné záření. Dětská jednotka začne
opět vysílat teprve tehdy, jakmile přijímá zvuky.
TIP Přístroj můžete upevnit pomocí spony na Váš opasek nebo zavěsit pomocí vhodných
upevňovacích prvků na zeď.
UPOZORNĚNÍ: Rodičovskou jednotku a dětskou jednotku lze také volitelně ovládat třemi
NiMH bateriemi (pro rodičovskou jednotku v ceně).
77
Page 78

Kontrolka LED dětská jednotka
Kontrolka LED nad spínačem/vypínačem udává stav dětské jednotky.
Kontrolka LED Zapnuto Stav
zelená ano přístroj je zapnutý
zeleně blikající
červeně blikající
červená
ano akumulátory se nabíjí
ano akumulátory jsou vybité
ne akumulátory se nabíjí
Kontrolka LED rodičovská jednotka
Kontrolka LED nad spínačem/vypínačem udává stav rodičovské jednotky.
Kontrolka LED Zapnuto Stav
zelená
zeleně blikající ano akumulátory se nabíjí
oranžově blikající
červeně blikající
červená
ano přístroj je zapnutý
ano dětská chůvičk a přijímá zvuky
ano
ne akumulátory se nabíjí
krátké blikání: maximální dosah překročen;
dlouhé blikání: akumulátory jsou vybité
Provoz s akumulátorem
1 32
DŮLEŽITÉ: Používejte vždy pouze nabíjecí AAA akumulátory NiMH! Před výměnou baterií
vypněte zařízení a odpojte síťový kabel.
78
Page 79
Provoz s akumulátorem
Jakmile jsou baterky příliš slabé, začne kontrolka LED v zapnutém stavu blikat červeně.
Pokud není zařízení připojeno do zásuvky, nejprve se spojení zhoršuje a potom se
automaticky po krátkém době přeruší. Akumulátory lze nabíjet přímo v dětské chůvičce.
K tomu zapojte přístroj pomocí dodaného síťového zdroje do zásuvky. Nabíjení trvá u
vypnutého přístroje xx hodin.
Kontrola dosahu
Tato dětská chůvička je vybavena optickým a akustickým systémem kontroly dosahu.
Dětská jednotka a rodičovská jednotka v pravidelných intervalech kontrolují oboustranný
kontakt (také v režimu Standby, pokud dětská jednotka nepřijímá žádné zvuky). Pokud
je dosah překročen, začne kontrolka LED na rodičovské jednotce blikat červeně a v
pravidelných intervalech se ozve výstražný zvuk.
Režim ECO
Jakmile umístíte rodičovskou jednotku na stálém místě, na kterém jste již dříve příjem
kontrolovali, doporučujeme zapnout režim ECO. V režimu ECO je kontrola dosahu vypnutá,
takže dětská jednotka nevydává v režimu Standby (když je dítě klidné) žádné záření. Dětská
jednotka začne vysílat pouze tehdy, jakmile přijímá zvuky.
Regulace hlasitosti / rodičovská jednotka
Chcete-li zvýšit nebo snížit hlasitost přijímače na rodiči, stiskněte tlačítko + (pro hlasitější)
nebo - (pro dolů).
CZ
79
Page 80

Noční světlo
Pro vypnutí popř. zapnutí nočního světla stiskněte tlačítko x na dětské jednotce.
Citlivost mikrofonu
Otočte ovladačem pro citlivost mikrofonu na dětské jednotce nahoru, pokud chcete být
upozorněni již u slabých zvuků, nebo pokud se nachází dětská jednotka daleko od dětské
postele. Pokud chcete být upozorněni teprve u hlasitějších zvuků, nebo pokud je dětská
jednotka umístěna blízko dětské postele, lze snížit citlivost mikrofonu otočením dolů.
Tipy k rozšíření oblasti příjmu
Oblast příjmu je závislá jak na okolí, tak i na jiných faktorech, které mohou narušovat nebo
blokovat přenos signálu:
velké kovové předměty jako např. ledničky, zrcadla, skříně, kovové dveře nebo
železobeton
pevné struktury (stěny) nebo rádia, elektrická a elektronická zařízení jako např. televize,
počítače, mobilní telefony nebo stmívače
UPOZORNĚNÍ: Doporučujeme dodržovat odstup minimálně jeden metr mezi
dětskou jednotkou a rušivými zařízeními, popř. je vypnout. V případě slabého spojení
doporučujeme umístit rodičovskou a/nebo dětskou jednotku v pokoji na jiné místo.
Čištění a údržba
Před čistěním přístroje vždy odpojte síťový zdroj z elektrické zásuvky. Používejte výhradně
lehce navlhčený hadřík. Neponořujte přístroj do vody. Nepoužívejte chemické čisticí
prostředky.
Vyjměte baterie z přístroje, pokud jej nebudete delší dobu používat. Tento výrobek
nevyžaduje žádnou zvláštní údržbu. Opravy přístroje smějí provádět pouze kvalikovaní
odborníci.
80
Page 81

Záruka
Uschovejte, prosím, doklad okoupi, návod kpoužití a číslo výrobku.
Záruční nároky nebo nároky v rámci garance je nutno řešit výlučně s prodejcem.
Všechny technické údaje, informace a vlastnosti výrobku popsaného v tomto návodu
odpovídají stavu našich znalostí v době jeho zveřejnění. Informace poskytnuté rmou
reer by měly být správné a spolehlivé. Přesto rma nepřebírá odpovědnost za případné
chyby vyskytující se v tomto dokumentu a vyhrazuje si právo změnit design výrobku,
resp. jeho specikace bez předchozího upozornění. Rozmnožování a šíření informací
ztohoto autorským zákonem chráněného dokumentu v jakékoliv formě nebo jakýmikoliv
prostředky, gracky, elektronicky či mechanicky, pořizováním fotokopií, nahrávek nebo
ukládáním do databází (a to ijen vpodobě výňatků) je podmíněno předchozím písemným
souhlasem rmy reer.
Vhodné způsoby likvidace
Tento výrobek se po skončení své životnosti nesmí odkládat do běžného
domovního odpadu. Uživatel má povinnost odevzdat vysloužilý výrobek
na sběrném místě určeném k recyklaci elektrospotřebičů. Na tuto
povinnost upozorňuje symbol uvedený na výrobku, vnávodu k použití
a na obalu výrobku. Materiály jsou dle jejich označení znovu použitelné.
Nevyhazujte použité baterie do komunálního odpadu, ale do zvláštního
odpadu nebo do sběrné stanice baterií v příslušných obchodech. Opakované používání,
recyklace nebo jiné formy využití vysloužilých spotřebičů představují důležitý příspěvek
kochraně našeho životního prostředí. Informace opříslušném sběrném místě Vám podá
správa obce.
CZ
81
Page 82

Odstraňování problémů
Kontrolka LED nesvítí
Ujistěte se, že jsou oba přístroje zapnuté.
Zkontrolujte spojení síťového zdroje se zásuvkou a s přístrojem.
Vyměňte/nabijte akumulátor a zkontrolujte polaritu.
Kontrolka LED bliká oranžově
Rodičovská jednotka přijímá zvuky. V případě nutnosti zvyšte hlasitost rodičovské jed-
notky, abyste lépe slyšeli zvuky Vašeho dítěte.
Kontrolka LED bliká červeně
Dlouhé blikání: Akumulátory jsou vybité. Vyměňte baterie nebo připojte zařízení ke zdro
ji napájení.
Krátké blikání: maximální dosah překročen. Zmenšete vzdálenost mezi dětskou a rodičovs
kou jednotkou.
Žádný přenos zvuku i přes existující spojení
Hlasitost je nastavena příliš nízko. Otočte ovladačem hlasitosti na rodičovské jednotce
nahoru.
Citlivost mikrofonu je nastavena příliš nízko. Otočte ovladačem citlivosti mikrofonu na
dětské jednotce nahoru.
82
Page 83

Odstraňování problémů
Z rodičovské jednotky zní hlasitý pískavý zvuk (zpětná vazba)
Vzdálenost dětské a rodičovské jednotky je příliš malá. Zvětšete vzdálenost mezi dětskou
a rodičovskou jednotkou.
Žádné spojení mezi rodičovskou a dětskou jednotkou / šum / spojení je přerušeno
Ujistěte se, že jsou oba přístroje zapnuté.
Maximální dosah překročen. Umístěte dětskou chůvičku na jiné místo a/nebo zmenšete
vzdálenost mezi dětskou a rodičovskou jednotkou.
Dětská/rodičovská jednotka se nachází v blízkosti rušivých zařízení (např. mikrovlnná
trouba) nebo kovových předmětů. Pokuste se najít zdroj rušení a umístěte přístroje na
jiné místo.
Baterie jsou příliš slabé. Vyměňte baterie a/nebo připojte zařízení ke zdroji napájení.
CZ
83
Page 84

Opšte bezbednosne informacije
Čestitamo Vam na kupovini novog Reer monitora za bebe. Intuitivni monitor za bebe
sa veoma osetljivim mikrofonom jasno i pouzdano prenosi zvuke Vaše bebe. Umirujuće
noćno svetlo bebi jedinice pomaže vašem detetu pri uspavljivanju i, čim se vaše dete smiri,
uređaj automatski ulazi u „EKO režim“ i ostaje u njemu dok god je dete mirno. U EKO režimu
bebi jedinica ne vrši nikakve emisije. Bebi jedinica započinje emitovanje čim detektuje
zvuke. Zahvaljujući opcionom baterijskom pogonu roditeljske jedinice i robusnoj štipaljki
za kaiš, ovaj praktični monitor za bebe može da se koristi i stacionarno i mobilno. Sigurni
smo da ćete dugo biti zadovoljni kvalitetom našeg proizvoda.
Molimo Vas da odvojite nekoliko minuta da biste temeljno pročitali informacije o
bezbednosti. Možete sigurno koristiti Reer bebi monitor samo kada su obezbeđene
(proverene) sve navedene stavke. Sačuvajte ovo uputstvo za upotrebu radi kasnijeg
korišćenja.
! Pre svakog korišćenja proverite da li postoje vidljiva oštećenja. Ukoliko ustanovite neko
oštećenje, nemojte koristiti ovaj uređaj.
! Koristite samo punjače i ispravljače koji se nalaze u sadržaju isporuke. Uverite se da radni
napon utičnice odgovara ispravljaču. Proverite, a naročito na putovanjima u inostranstvo,
da li napon lokalne električne mreže odgovara naponu koji je naveden na uređajima,
odnosno ispravljačima.
! Uređaji i ispravljači, osim poklopca odeljk a za baterije, ne smeju da se otvaraju jer to može
dovesti do strujnog udara. Ukoliko uređaj nepravilno funkcioniše, NEMOJTE pokušavati
da sami rešite problem. U takvom slučaju obratite se svom prodavcu.
! Baterije čuvajte van domašaja dece. Postoji opasnost da se progutaju.
! Ne dodirujte metalnim predmetima kontakte baterija, odnosno kontakte za napajanje na
uređajima.
! Ovaj proizvod nije igračka! Nemojte doz voliti deci da se igraju ovim uređajem.
NAPOMENA: Ovaj monitor za bebe je projektovan isključivo kao pomoćno sredstvo
za nadzor beba. Ne može se smatrati zamenom za nadzornu dužnost roditelja niti
medicinskim sredstvom!
84
Page 85

Bezbednosne informacije za instalaciju
! Bebi jedinicu uvek postavite van domašaja deteta (najmanje 1 metar).
! Monitor za bebe nemojte nikada stavljati u kolevku, dečiji krevetac ili ogradicu za decu.
! Da bi se sprečilo davljenje kablom za napajanje, pobrinite se da kabl bude van domašaja
dece. Nemojte da koristite produžni kabl.
! Da bi se obezbedio najbolji mogući prenos, uređaje uvek treba postaviti uspravno i na
većoj visini.
! NEMOJTE da postavljate prijemnik u blizini radio uređaja ili mikrotalasnih pećnica.
Zračenje ovih uređaja može u velikoj meri da ometa prijem.
! Nemojte da koristite uređaje u blizini vode ili na vlažnim mestima. Nemojte da potapate
uređaje u vodu. Nemojte da perete uređaje pod mlazom vode.
! Nemojte da pokrivate monitor za bebe krpom, odećom ili ćebetom.
! Izbegavajte ekstremnu toplotu i direktno sunčevo zračenje.
Tehnički podaci
RS
• tehnologija: digitalna
• predajnik: power adapter s mikro USB
adapterom ili dodatnim AAA NiMH
baterije (uključen)
• prijemnik: power adapter s mikro USB
adapterom ili dodatnim AAA NiMH
baterije (uključen)
• ulaz: 100–220 V 50 Hz 0.15 A max.
• izlaz: 5 V / 500 mA max.
• predajna snaga: TX 50 mA , RX 130 mA
• frekvencija: 2,4 GHz
• domet: 300 m
• dužina kabla: oko 1,55 m
• radna temperatura: 10 °C–40 °C
• temperatura skladištenja: 0 °C–55 °C
• standardi: EN 300 220-1, EN 301 489-1,
EN 301 489-3
85
Page 86
Obim isporuke
bebi jedinica (predajnik) roditeljska jedinica (prijemnik)
1 x USB prilagodnik napajanja
2 x USB kabel za punjenje
za dječju jedinicu
i roditeljsku jedinicu
Opis uređaja
RODITELJSKA
JEDINICA
zvučnik
statusna LED lampica
odabir ( + )
odabir ( - )
Prekidač za uključi-
vanje / isključivanje
mikrofon
BEBI JEDINICA
noćno svetlo
statusna LED lampica
Svjetlo
uključivanje /
isključivanje
tipka za poziv
uputstvo za upotrebu
3 AAA NiMH baterije
(uključeno je za
roditeljsku jedinicu)
štipaljka za kaiš
odeljak za baterije
micro USB
priključak za
napajanje
štipaljka za kaiš
odeljak za baterije
Prekidač za uključi-
vanje / isključivanje
mikrofon
86
micro USB
priključak za
napajanje
regulator osetljivosti
mikrofona
Page 87

Pre prve upotrebe
1
Koristite samo ispravljače koji se nalaze u obimu isporuke (5 V DC / 500 mA). Da bi
se obezbedilo da uređaj ostane pripravan za rad i u slučaju nestanka struje, preporučujemo da dodatno stavite i NiMH punjive baterije. One se automatski dopunjuju kada se uređaj uključi u struju.
NAPOMENA: Uvek koristite samo punjive NiMH baterije veličine AAA! Nemojte nikada da
stavljate nepunjive baterije u monitor za bebe. Postoji opasnost od eksplozije u slučaju da
se koriste neodgovarajuće vrste baterija!
2
Čim visokoosetljivi mikrofon na bebi jedinici detektuje zvuk, uređaj započinje pre-
3
nos ka roditeljskoj jedinici. Kada se prima zvuk, treperi narandžasta statusna LED
lampica roditeljskoj jedinici.
Kada je dete mirno i jedinica za bebe ne prima nikakav z vuk, uređaj se automatski
4
prebacuje u režim pripravnosti (EKO režim). Kada je uključen EKO režim, bebi jedinica u režimu pripravnosti ne vrši nikakve emisije. Bebi jedinica započinje emitovanje čim detektuje zvuke.
Da biste uključili uređaje, pritisnite i
držite gumb za uključivanje / isključivanje 2 sekunde. LED statusa na bebi i
roditeljskoj jedinici svijetli zeleno. Dva
se uređaja automatski povezuju.
SAVET Uređaje možete da pričvrstite na kaiš pomoću štipaljke za kaiš ili da ih zakačite
na zid koristeći odgovarajući pribor za pričvršćivanje.
NAPOMENA: Roditeljska jedinica i jedinica za bebe mogu se po potrebi koristiti s tri NiMH
baterije (uključeno je za roditeljsku jedinicu).
RS
87
Page 88

Statusna LED lampica bebi jedinica
Statusna LED lampica iznad prekidača za uključivanje/isključivanje daje status bebi jedinice.
Statusna LED lampica Napajanje Status
zelena uključeno uređaj je uključen
zelena treperi
crvena treperi
crvena
uključeno baterije se pune
uključeno baterije su ispražnjene
isključeno baterije se pune
Statusna LED lampica roditeljska jedinica
Statusna LED lampica iznad prekidača za uključivanje/isključivanje daje status roditeljske
jedinice.
Statusna LED lampica Napajanje Status
zelena
zelena treperi uključeno baterije se pune
narandžasta treperi
crvena treperi
crvena
uključeno uređaj je uključen
uključeno primaju se zvuci sa bebi jedinice
uključeno
isključeno baterije se pune
brzo treperenje: prekoračen je maksimalan domet;
sporo treperenje: Punjive baterije su ispražnjene
Rad sa punjivim baterijama
1 32
VAŽNO: Uvek koristite samo punjive NiMH baterije veličine AAA! Pre zamene baterija
isključite uređaje i izvucite kabl za napajanje.
88
Page 89

Rad sa punjivim baterijama
Čim baterije previše oslabe, počinje da treperi crvena statusna LED lampica kada je
uređaj uključen. Ako uređaj nije priključen na utičnicu, veza se prvo pogoršava, a zatim
se automatski prekida nakon kraćeg vremena. Punjive baterije mogu da se pune direktno
u monitoru za bebe. Potrebno je da se uređaj priključi na utičnicu pomoću isporučenog
ispravljača. Proces punjenja traje oko 10 časova kada je uređaj isključen.
Kontrola dometa
Ovaj monitor za bebe raspolaže vizuelnim i zvučnim sistemom kontrole dometa. U
redovnim intervalima proveravajte vezu između jedinice za bebe i jedinice za roditelje
(i u režimu pripravnosti, kada jedinica za bebe ne prima nikakve zvuke). Ako se domet
prekorači, počinje da treperi crvena statusna LED lampica na jedinici za roditelje, a u
redovnim intervalima se oglašava alarmni ton.
EKO režim
Kada jedinicu za roditelje postavljate na ksno mesto, na kojem ste prethodno proverili
prijem, preporučujemo da uključite EKO režim. U EKO režimu je isključena kontrola dometa,
pa u režimu pripravnosti (kada je vaše dete mirno),bebi jedinica ne vrši nikakve emisije. Bebi
jedinica započinje da emituje signal čim detektuje zvuke.
RS
Regulacija jačine zvuka / roditeljska jedinica
Da biste povećali ili smanjili glasnoću prijemnika na roditeljskoj jedinici, pritisnite + (za
glasnije) ili - (za dolje).
89
Page 90

Noćno svetlo
Pritisnite taster na bebi jedinici da biste uključili ili isključili noćno svetlo.
Osetljivost mikrofona
Okrenite regulator za osetljivost mikrofona na bebi jedinici nagore ako želite da vas obavesti
već pri najmanjim šumovima ili ako se bebi jedinica nalazi daleko od kreveca za bebe. Ako
želite da budete obavešteni tek pri jačim zvucima ili ako bebi jedinica stoji blizu kreveca,
osetljivost mikrofona može da se smanji.
Saveti za povećanje dometa prijemnika
Oblast příjmu je závislá jak na okolí, tak i na jiných faktorech, které mohou narušovat nebo
blokovat přenos signálu:
velké kovové předměty jako např. ledničky, zrcadla, skříně, kovové dveře nebo
železobeton
pevné struktury (stěny) nebo rádia, elektrická a elektronická zařízení jako např. televize,
počítače, mobilní telefony nebo stmívače
UPOZORNĚNÍ: Doporučujeme dodržovat odstup minimálně jeden metr mezi
dětskou jednotkou a rušivými zařízeními, popř. je vypnout. V případě slabého spojení
doporučujeme umístit rodičovskou a/nebo dětskou jednotku v pokoji na jiné místo.
Čišćenje i održavanje
Pre čišćenja uređaja uvek izvucite ispravljač iz električne utičnice. Koristite isključivo vlažnu
krpu. Nemojte da potapate uređaj u vodu. Nemojte da koristite hemijska sredstva za
čišćenje.
Izvadite baterije iz uređaja ako nećete da ga koristite u dužem vremenskom periodu. Ovaj
proizvod ne zahteva posebno održavanje. Popravke na uređaju smeju da obavljaju samo
stručna lica.
90
Page 91

Garancija
Molimo zadržite dokaz o kupovini, uputstva i broj proizvoda.
Garancijska potraživanja ili potraživanja po osnovu bilo kakvih garancija rešavaju se
isključivo sa trgovcem.
Svi tehnički podaci, informacije i svojstva proizvoda opisanog u ovom dokumentu
su sastavljeni na osnovu naših saznanja i odgovaraju stanju u trenutku objavljivanja.
Informacije kompanije Reer trebalo bi da budu tačne i pouzdane. Ipak, kompanija Reer
ne prihvata nikakvu odgovornost za moguće greške u ovom dokumentu i zadržava
pravo na izmene u dizajnu proizvoda i izmene specikacija bez prethodnog obaveštenja.
Umnožavanje i distribuiranje informacija iz ovog autorskog dela, u celini ili u delovima,
u bilo kom obliku ili bilo kojim sredstvima, grački, elektronski ili mehanički, uključujući
fotokopiranje, snimanje na traku ili skladištenje na nosačima podataka nije dozvoljeno bez
prethodne pismene saglasnosti kompanije Reer.
Uputstvo za odlaganje
Ovaj proizvod na kraju svog životnog veka ne može se odlagati sa običnim
kućnim otpadom, već se mora odložiti na sabirnom mestu za recikliranje
električne opreme. Pogledajte simbol na proizvodu, u uputstvu za
upotrebu ili na pakovanju koji ukazuje na to. Materijali se mogu reciklirati
u skladu sa oznakama. Istrošene baterije nemojte da bacate u kućni
otpad, već ih odložite u poseban otpad ili u mesto za sakupljanje baterija
u specijalizovanim prodavnicama. Ponovnim korišćenjem, reciklažom i drugim oblicima
obrade dotrajalih uređaja pružate važan doprinos zaštiti životne sredine. Od lokalnih vlasti
zatražite informaciju o odgovarajućem mestu za odlaganje.
RS
91
Page 92

Otklanjanje problema
Statusna LED lampica ne svetli
Proverite da li su uključena oba uređaja.
Proverite da li je ispravljač dobro priključen na utičnicu i uređaj.
Zamenite ili napunite punjive baterije i proverite polaritet.
Treperi narandžasta statusna LED lampica
Jedinica za roditelje prima zvuke. Ako je potrebno, povećajte jačinu zvuka na jedinici za
roditelje da biste bolje čuli zvuke deteta.
Treperi crvena statusna LED lampica
Sporo treperenje: Punjive baterije su ispražnjene. Zamenite baterije ili uključite uređaj u
struju.
Brzo treperenje: prekoračen je maksimalan domet. Smanjite rastojanje roditeljske i bebi
jedinice.
Zvuk se ne prenosi iako je veza uspostavljena
Jačina zvuka je podešena na suviše nisku vrednost. Okrenite regulator jačine zvuka na
roditeljskoj jedinici nagore.
Osetljivost mikrofona je podešena na suviše nisku vrednost. Okrenite regulator za osetlji
vost mikrofona na bebi jedinici nagore.
92
Page 93

Otklanjanje problema
Čuje se jako pištanje iz roditeljske jedinice (povratna informacija)
Rastojanje između bebi i roditeljske jedinice je suviše malo. Povećajte rastojanje između
bebi i roditeljske jedinice.
Ne postoji veza između jedinice za roditelje i jedinice za bebe / šumovi / veza se prekida
Proverite da li su uključena oba uređaja.d.
Prekoračen je maksimalan domet. Monitor za bebe postavite na drugo mesto i/ili sman-
jite rastojanje roditeljske i bebi jedinice.
Jedinica za bebe / jedinica za roditelje se nalaze u blizini uređaja koji ih ometaju (npr. mi
krotalasne pećnice) ili metalnih predmeta. Pokušajte da pronađete izvor smetnji i posta vite uređaje na drugo mesto.
Baterije su suviše slabe. Zamenite baterije i/ili uključite uređaje u struju.
RS
93
Page 94

Общие указания по технике безопасности
Сердечно поздравляем Вас с приобретением нового аппарата „Радионяня“ компании „reer“.
Интуитивное устройство „Радионяня“ благодаря своему высокочувствительному микрофону
четко и надежно передает звуки, издаваемые Вашим ребенком. Успокаивающий свет ночника
детского аппарата поможет Вашему ребенку уснуть, а как только он успокоится, аппарат
автоматически переключится в „режим ЭКО“. В данном режиме ЭКО от детского аппарата
не исходит ни одного типа излучения. Детский аппарат снова перейдет в режим передачи,
как-только будут восприняты звуки ребенка. Благодаря альтернативному режиму питания от
батарей родительского аппарата и надежному креплению на ремне устройство „Радионяня“
отличается удобством и может использоваться как стационарно, так и мобильно. Мы уверены,
что качество нашего изделия будут радовать Вас долгое время.
Уделите, пожалуйста, несколько минут тому, чтобы внимательно ознакомиться с указаниями
по технике безопасности. Только после выполнения указанных в данном документе
пунктов можно свободно использовать устройство „Радионяня“. Сохраняйте руководство по
эксплуатации для возможного использования в последующем.
! Перед каждым применением проверяйте аппарат на наличие возможных внешних
повреждений. При обнаружении повреждений использование аппарата не допускается.
! Используйте только входящие в комплект поставки зарядное устройство и блоки питания.
Убедитесь, что рабочее напряжение в розетке соответствует данным, указанным на блоке
питания. Особенно во время путешествий проверяйте, соответствует ли напряжение
местной сети параметрам, указанным на устройствах или блоках питания.
! Запрещается эксплуатация устройств и блоков питания со снятой крышкой отсека питания,
т.к это может привести к удару электрическим током. При возникновении неисправностей
в устройстве НЕ пытайтесь устранить проблему самостоятельно. Обратитесь к своему
продавцу.
! Элементы питания храните в недоступном для детей месте. Существует опасность
проглатывания.
! Избегайте соприкосновения металлических предметов с контактами элементов или блока
питания на аппаратах.
! Данное устройство - не игрушка! Не разрешайте детям играть с ним.
УКАЗАНИЕ: Данное устройство „Радионяня“ было разработано только лишь как
вспомогательное средство наблюдения за Вашим ребенком. Его ни в коем случае не
следует рассматривать в качестве замены обязанностям родителей по надзору за детьми!
94
Page 95

Правила безопасности при установке
! Всегда размещайте детский аппарат вне зоны досягаемости ребенка (минимальное
расстояние - 1 м).
! Никогда не кладите детский аппарат в детскую кроватку или манеж.
! Для предотвращения удушения сетевым кабелем закрепляйте кабель вне зоны
досягаемости детей. Никогда не используйте удлинительный кабель.
! Для обеспечения наилучшей передачи устройства всегда следует устанавливать
вертикально и на возвышении.
! НЕ размещайте приемник вблизи радиоаппаратов или микроволновых излучателей.
Излучение подобных устройств может существенно снизить качество приема.
! Никогда не используйте аппараты вблизи воды или в местах с высокой влажностью. Не
погружайте устройства в воду. Не промывайте аппараты под текущей водой.
! Никогда не накрывайте аппарат „Радионяня“ полотенцем, предметами одежды или одеялом.
! Избегайте экстремальной жары и прямого солнечного света.
• Технология: цифровой
• Передатчик: Источник питания с микро-
USB-источником питания или с тремя
NiMH-батареями AAA (в комплекте)
• Приемник: Источник питания с микро-
USB-источником питания или с тремя
NiMH-батареями AAA (в комплекте)
• Вход: 100–220 V 50 Hz 0.15 A max.
• Выход: 5 V / 500mA max.
Технические данные
• Излучаемая мощность: TX 50 mA , RX 130 mA
• Частота: 2,4 GHz
• Дальность действия: 300 м
• Длина кабеля: ок. 1,55 м
• Рабочая температура: 10 °C–40 °C
• Температура хранения: 0 °C–55 °C
• стандарты: EN 300 220-1, EN 301 489-1 und
EN 301 489-3
RU
95
Page 96

Комплект поставки
Детский блок (передатчик) Родительский блок (приемник)
1 х USB-адаптер питания
2 x USB-кабель для зарядки
для детской части
и родительский блок
Описание устройства
РОДИТЕЛЬСКИЙ
АППАРАТ
Динамик
Светодиод состояния
выбор (+)
выбор (+)
выбор ( - )
выбор ( - )
Вкл / выкл
Вкл / выкл
микрофон
микрофон
Свет вкл. / Выкл.
кнопка
разговора
Руководство по
применению
3 батарейки NiMH AAA
(для родительской единицы и
детской единицы)
Фиксатор для ремня
Отсек питания
Микро USB
pазъем питания
ДЕТСКИЙ АППАРАТ
Ночник
Светодиод состояния
Вкл / выкл
Вкл / выкл
микрофон
микрофон
96
Фиксатор для ремня
Отсек питания
Микро USB
pазъем питания
Регулятор
чувствительности
микрофона
Page 97

Ввод в эксплуатацию
1
Используйте только входящий в комплект поставки блок питания (6В пост.тока/300 мА).
В целях обеспечения гарантированной работы устройства при отключении электросети
рекомендуется дополнительно установить никель-магниевые аккумуляторы. Их зарядка
выполняется автоматически при включении электропитания.
УКАЗАНИЕ: Всегда используйте только заряжаемые никель-магниевые аккумуляторы
размера ААА! Никогда не вставляйте обычные элементы питания в детский аппарат. При
использовании других типов элементов питания существует опасность взрыва!
Чтобы включить устройства, нажмите
2
3
При восприятии какого-либо звука высокочувствительным микрофоном детского
аппарата устройство выполнит его передачу на родительский аппарат. Во время приема звука светодиод состояния родительского аппарата загорится оранжевым цветом.
Когда Ваш ребенок спокоен и детский аппарата не воспринимает никакие звуки,
4
аппарат автоматически переключается в режим ожидания (режим ЭКО). При
включенном режиме ЭКО в состоянии ожидания от детского аппарата не исходит
излучение. Детский аппарат снова перейдет в режим передачи, как-только будут
восприняты звуки ребенка.
и удерживайте кнопку включения
/ выключения в течение 2 секунд.
Светодиод состояния на детском
и родительском блоках загорается
зеленым. Два устройства автоматически
подключаются.
RU
СОВЕТ С помощью фиксатора для ремня устройства можно крепить на ремне или при
помощи соответствующих креплений на стене.
УКАЗАНИЕ: Родительский блок и детское устройство также могут быть дополнительно
оснащены тремя NiMH-батареями (входит в комплект поставки для родительской единицы).
97
Page 98

Светодиод состояния Детский аппарат
Светодиод режима работы, расположенный над включателем/выключателем, показывает
состояние детского аппарата.
Светодиод состояния Питание Состояние
зеленый вкл Аппарат включен
зеленый мигающий
красный мигающий
красный
вкл Зарядка аккумуляторов
вкл Аккумуляторы разряжены
выкл Зарядка аккумуляторов
Светодиод состояния Родительский аппарат
Светодиод режима работы, расположенный над включателем/выключателем, показывает
состояние родительского блока.
Светодиод состояния Питание Состояние
зеленый
зеленый мигающий вк л Зар ядка аккумуляторов
оранжевый мигающий
красный мигающий вкл
красный
вкл Аппарат включен
вкл Прием звуков от детского блока
краткое мигание: максимальный радиус действия
превышен; длительное мигание: Аккумуляторы
разряжены
выкл Зарядка аккумуляторов
Эксплуатация на аккумуляторах
1 32
ВАЖНО: Всегда используйте только заряжаемые никель-магниевые аккумуляторы размера
ААА! Перед заменой элементов питания необходимо выключить устройства и отключить кабель
электросети.
98
Page 99

Эксплуатация на аккумуляторах
При снижении заряда батарей во включенном состоянии светодиод режима работы
начинает мигать красным цветом. Если аппарат не включен в розетку, качество
соединения вначале ухудшается, а через короткое время автоматически прерывается.
Зарядка аккумуляторов возможна непосредственно в самом аппарате „Радионяня“.
Для этого подключите аппарат к электрической розетке через блок питания. При
выключенном устройстве процесс зарядки занимает хх часов.
Контроль радиуса действия
Данное устройство „Радионяня“ оснащено системой оптического и акустического контроля
радиуса действия. Через определенные интервалы времени детский и родительский
аппараты регулярно проверяют наличие двустороннего контакта (в т.ч. в режиме ожидания,
если детский аппарат не воспринимает никаких звуков). При превышении радиуса действия
на родительском аппарате начинает мигать красный светодиод режима работы и через
равные промежутки времени раздаваться предупреждающий звуковой сигнал.
Режим ЭКО
При размещении родительского аппарата в постоянном месте с проверенным ранее
качеством приема рекомендуется включить режим ЭКО. В режиме ЭКО функция контроля
радиуса действия выключена, благодаря чему в режиме ОЖИДАНИЕ (когда Ваш ребенок
спокоен) излучение от детского аппарата отсутствует. Детский блокаппарат переходит в
режим передачи только после приема звуков ребенка.
RU
Регулировка громкости / Родительский аппарат
Чтобы увеличить или уменьшить громкость приемника на родительском блоке, нажмите +
(для громче) или - (для уменьшения).
99
Page 100

Ночник
Для включения или выключения ночника на детском аппарате нажмите кнопку .
Чувствительность микрофона
Поверните регулятор чувствительности микрофона на детском аппарате вверх, если Вы
желаете получать сигнал уже при малейших звуках или если детский блок находится на
удалении от кроватки ребенка. Если Вы желаете получать сигнал только при существенных
звуках или, если детский аппарат находится вблизи кроватки ребенка, регулятор
чувствительности микрофона можно повернуть вниз.
Советы по расширению диапазона приема
Зона приема зависит как от окружающей обстановки, так и от других факторов, которые могут
нарушить или блокировать передаваемый сигнал:
крупные металлические предметы такие, как холодильники, зеркала, шкафы,
металлические двери или железобетонные конструкции
прочные структуры (стены) или радио, электро- и электронная аппаратура как, например,
телевизор, компьютер, мобильные телефоны или регуляторы яркости света.
УКАЗАНИЕ: Рекомендуется поддерживать расстояние между детским аппаратом и
воздействующими устройствами не менее одного метра, либо выключить эти устройства.
При слабом уровне связи рекомендуется разместить родительский и/или детский аппарат в
другом месте в комнате.
Техническое обслуживание и уход
Перед выполнением ухода за аппаратом отсоедините его от электрической розетки. Всегда
пользуйтесь слегка увлажненной салфеткой. Не погружайте аппарат в воду. Не используйте
химические чистящие средства.
Удалите батарейки из аппарата в случае его длительного не пользования. Данное изделие
не требует специального технического обслуживания. Ремонт аппарата должен выполнять
только специалист.
100
 Loading...