

Page 1
- 1 -
FeelWell Wickeltisch-Wärmestrahler
Gebrauchsanleitung // Art.Nr.: 1926
DK
GR
PL
CZ
ES
DE GB
IT
FR
NL
FeelWell - Wickeltisch-Wärmestrahler
Gebrauchsanleitung
FeelWell - changing table heater
Instructions for use
FeelWell - pour table à langer
Notice d‘utilisation
FeelWell - Θερμοπομπός αλλαξιέρας
ΟΔΗΓΙΕΣ
radiador térmico de cambiador - FeelWell
Manual de uso
FeelWell - Warmtelamp voor luiertafel
Gebruiksaanwijzing
FeelWell - Promiennik ciepła do przewijaka
dla niemowląt - Instrukcja obsługi
radiatore per fasciatoio - FeelWell
Istruzioni per l‘uso
FeelWell - puslebord-varmestråler
Brugsvejledning
FeelWell - tepelný zářič na přebalovací stůl
Návod k použití
Page 2
- 2 -
Page 3
- 3 -
DE
Deutsch
GB
English
ES
Español
IT
Italiano
FR
Francais
NL
Nederlands
DK
Dansk
GR
ελληνικός
PL
Polski
CZ
Čestina
Allgemeine Sicherheitshinweise .............03
Technische Daten ........................
04
Lie
ferumfang und Teilebezeichnung ..........
04
Montage
...............................
05
Gener
al safety instructions .................
08
T
echnical specification
....................09
It
ems delivered, part description
............09
A
ssembly ..............................
10
Indicacione
s generales de seguridad
.........13
Da
tos técnicos
..........................14
V
olumen de suministro, denominación de las piezas .
14
Monta
je ...............................
15
A
vvertenze .............................
18
Da
ti tecnici .............................
19
C
ontenuto della confezione, descrizione componenti ..
19
Montaggio
.............................20
C
onsignes générales de sécurité
............23
Car
actéristiques techniques
................24
C
ontenu de la livraison, désignation des composants ..
24
Montage
...............................
25
Algemene v
eiligheidsaanwijzingen
..........28
Technische gegevens .....................
29
Om
vang van de levering, onderdelenomschrijving ..29
Montage ...............................
30
Gener
elle sikkerhedshenvisninger
...........33
T
ekniske data ...........................
34
Delebe
tegnelse, komponentbetegnelse .......
34
Mont
ering. . . . . . . . . . . . . . . . . . . . . . . . . . . . . . 35
Γενικές υποδείξεις ασφάλειας
....................
38
Τεχνικ
ά δεδομένα ...............................
39
π
αραδοτέα ποσότητα, Χαρακτηρισμός μερών ...
39
Σ
υναρμολόγηση .................................
40
Ogólne przepisy bezpieczeństwa
................
43
Dane t
echniczne ................................
44
Z
akres dostawy, nazwa podzespołu ..............
44
M
ontaż ..........................................
45
Všeobecné bezpečnostní pokyny ................48
Technické údaje .................................49
Obsah dodávky, popis částí
......................
49
M
ontáž ..........................................
50
Sicherheitshin
weise bei Wandmontage
..............05
Inbe
triebnahme
................................06
R
einigung & Wartung ............................
07
Gar
antie ......................................
07
Safety instructions for wall installation ...............10
Putting into operation ............................
11
Cle
aning, maintenance ...........................
12
W
arranty. . . . . . . . . . . . . . . . . . . . . . . . . . . . . . . . . . . . . .12
Indicaciones de seguridad para montaje mural
.........15
Pue
sta en funcionamiento
........................16
Limpie
za, mantenimiento .........................
17
Gar
antía
......................................17
A
vvertenze di sicurezza in caso di montaggio a parete
...20
Me
ssa in funzione
..............................21
Pulizia, manut
enzione
...........................22
Gar
anzia ......................................
22
C
onsignes de sécurité pour fixation murale
...........25
Mise en servic
e
................................26
Ne
ttoyage, entretien
............................27
Gar
antie ......................................
27
Veiligheidsaanwijzingen bij de montage aan de wand
...30
Inbedrijfs
telling. . . . . . . . . . . . . . . . . . . . . . . . . . . . . . . . . 31
Reiniging, onderhoud ............................
32
W
aarborg
.....................................32
Sikkerhedshenan
visninger ved vægmontering .........
35
Ibrugtagning
...................................
36
R
engøring, vedligeholdelse
.......................37
Gar
anti .......................................
37
Υ
ποδείξεις ασφάλειας κατά τη συναρμολόγηση σε τοίχο ...
40
Θέση σε λειτουργία .......................................41
Καθαρισμός, συντήρηση ..................................42
Εγγύηση ..................................................42
P
rzepisy bezpieczeństwa w przypadku montażu na ścianie ..
45
Uruchomienie
............................................
46
Cz
yszczenie, konserwacja .................................
47
G
arantie ..................................................
47
M
ontáž tepelného zářiče na stěnu ........................
50
Uv
edení do provozu ......................................
51
Čišt
ění, údržba ............................................
52
Z
áruka ....................................................
52
Inhalts
verzeichnis
Contents
Índice
Indice
Table des matières
Inhoudsopgave
Indhold
Πίνακας περιεχομένων
Spis treści
Obsah
Page 4
- 4 -
Wir freuen uns, dass Sie sich für dieses Produkt entschieden haben und bedanken uns für Ihr Vertrauen. Damit
Sie viel Freude an Ihrem neuen Wickeltisch-Wärmestrahler haben, bitten wir Sie, die nachfolgenden Hinweise
sorgfältig zu beachten und diese Bedienungsanleitung gut aufzubewahren und an den jeweiligen Benutzer weiterzugeben.
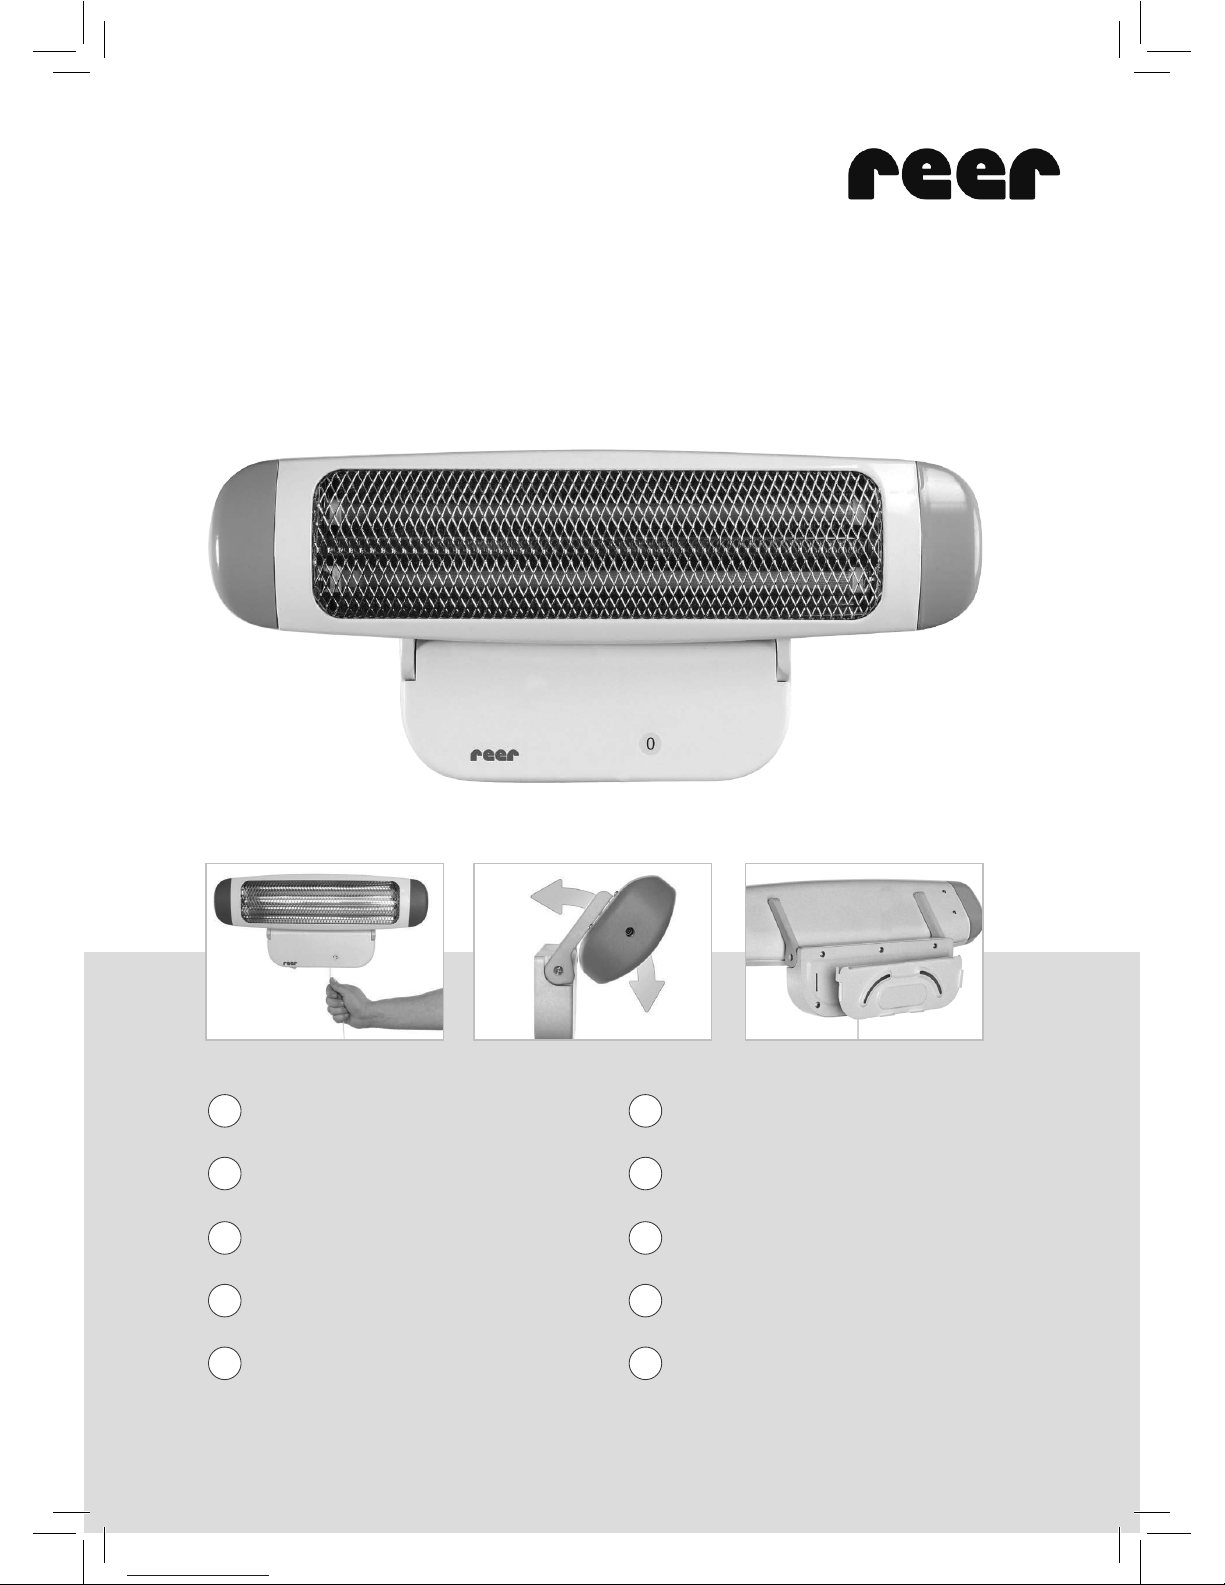
Der Wickeltisch-Wärmestrahler erzeugt behagliche Sofortwärme im Bereich von Wickeltischen. Er dient aber auch
zur schnellen Erwärmung von Badezimmern, Hobbyräumen, Dielen, geschützten Terrassen und Balkonen. Die
Strahlung sorgt dafür, dass innerhalb von wenigen Sekunden energiesparende Wärme zur Verfügung steht.
Bitte nehmen Sie sich ein paar Minuten Zeit um die Sicherheitshinweise gründlich zu lesen. Befolgen Sie die
Anweisungen der Anleitung, da anderenfalls die Gefahr besteht, dass der Wickeltisch-Wärmestrahler beschädigt
wird, im schlimmsten Fall kann Ihr Kind, Sie selbst oder andere Menschen in Gefahr gebracht oder verletzt werden.
Allgemeine Sicherheitshinweise:
! Verwenden Sie das Gerät nur für den hier beschriebenen Gebrauch, ein unsachgemäßer Gebrauch führt zum
Verlust des Garantieanspruchs.
!
Überprüf
en Sie, ob die Angaben auf dem Typenschild mit Ihrer Netzspannung übereinstimmen.
! Bei Anzeichen von Mängeln nicht verwenden.
!
Bei V
erwendung als Wickeltisch-Wärmestrahler darf das Gerät nie ohne Aufsicht benutzt werden.
!
Die ma
ximale Bestrahlungsdauer darf 15 Minuten nicht überschreiten.
! der Bestrahlungsabstand von 100 cm vom Heizstrahler zum Tisch ist unbedingt einzuhalten.
! Halten Sie die Zuleitung von allen heißen Geräteteilen fern, auch die Zuleitungen benachbarter Elektrogeräte.
!
V
ermeiden Sie zusätzliche Wärmeeinstrahlung, wie z.B. Sonnenlicht oder zusätzliche Strahlungsquellen, denn
dadurch kann die Körpertemperatur Ihres Babys ansteigen.
! Kleinkinder mit erhöhter Temperatur dürfen nicht bestrahlt werden. Es besteht die Gefahr der Körperüberhitzung.
!
Das Ger
ät bei Betrieb nicht berühren.
!
Nur direkter Anschluss an die Netzsteckdose. Schalten Sie keine Vorschaltgeräte wie z.B. Zeituhr, Funkfernschal-
ter, usw. an das Gerät an, da ein Brandrisiko besteht.
!
Das Ger
ät ist nach dem Ausschalten noch heiß. Den Wickeltisch-Wärmestrahler nicht abdecken! Es besteht
Brandgefahr.
! Beseitigen Sie vor der ersten Verwendung sämtliches Verpackungsmaterial sowie nicht verwendete Bauteile,
damit sich Ihr Kind nicht verletzen oder etwas verschlucken kann.
!
Ger
ät nicht innerhalb der Reichweite von Kindern benutzen. Netzkabel sichern und darauf achten, dass nicht
versehentlich daran gezogen wird und das Gerät dadurch zu Boden fällt.
!
P
ersonen (einschließlich Kinder), die aufgrund Ihrer physischen, sensorischen oder geistigen Fähigkeiten oder
Ihrer Unerfahrenheit oder Unkenntnis nicht in der Lage sind, das Gerät sicher zu benutzen, sollten diese Geräte
nicht ohne Aufsicht oder Anweisung durch eine verantwortliche Person benutzen.
!
Ger
ät nicht verwenden, wenn es selbst oder das Netzkabel beschädigt wurde.
! Reparaturen dürfen nur von einer qualifizierten Fachkraft durchgeführt werden. Unsachgemäße Reparaturen
können zu erheblichen Gefahren für den Benutzer führen – das gilt auch für das Auswechseln des Netzkabels.
DE
Deutsch
Page 5
- 5 -
Technische Daten
Lieferumfang
Teilebezeichnung
A B
1 Wärmestrahler mit 2 Röhren
2 Heizstufen-Anzeige
3
Schalt
er zum Ein- und Ausschalten
der automatischen Abschaltfunktion
(Timer)
4
Z
ugschnur zum Ein- und Ausschalten
des Gerätes
TIMER ON/OFF
1
3
4
2
DE
Deutsch
• Nennspannung: 230 V
• Leistung: 400 / 800 W
•
Montage
art: Netzleitung
•
Schutzklas
se: 1
•
int
egrierte Kipp-Abschalt-Funktion: Gerät schaltet beim Kippen
aut
omatisch ab (Kippwinkel von ca. 25°)
• Kabellänge: 185 cm (mit Schutzkontaktstecker)
•
W
ärmestrahlung und Temperaturverteilung nach Medizinprodukt-
s
tandards (IEC601-2-21) geprüft
Page 6
- 6 -
Montage
Sicherheitshinweise bei Wandmontage:
• Der Wickeltisch-Wärmestrahler darf nur ortsfest und waagrecht an der Wand montiert werden. Eine Deckenanbringung ist nicht zulässig!
•
Der Wickeltisch-Heizs
trahler darf nicht auf Holz, Plastik oder sonstigem brennbarem Material, oder unterhalb
von Steckdosen montiert werden.
•
WICHTIG! Minde
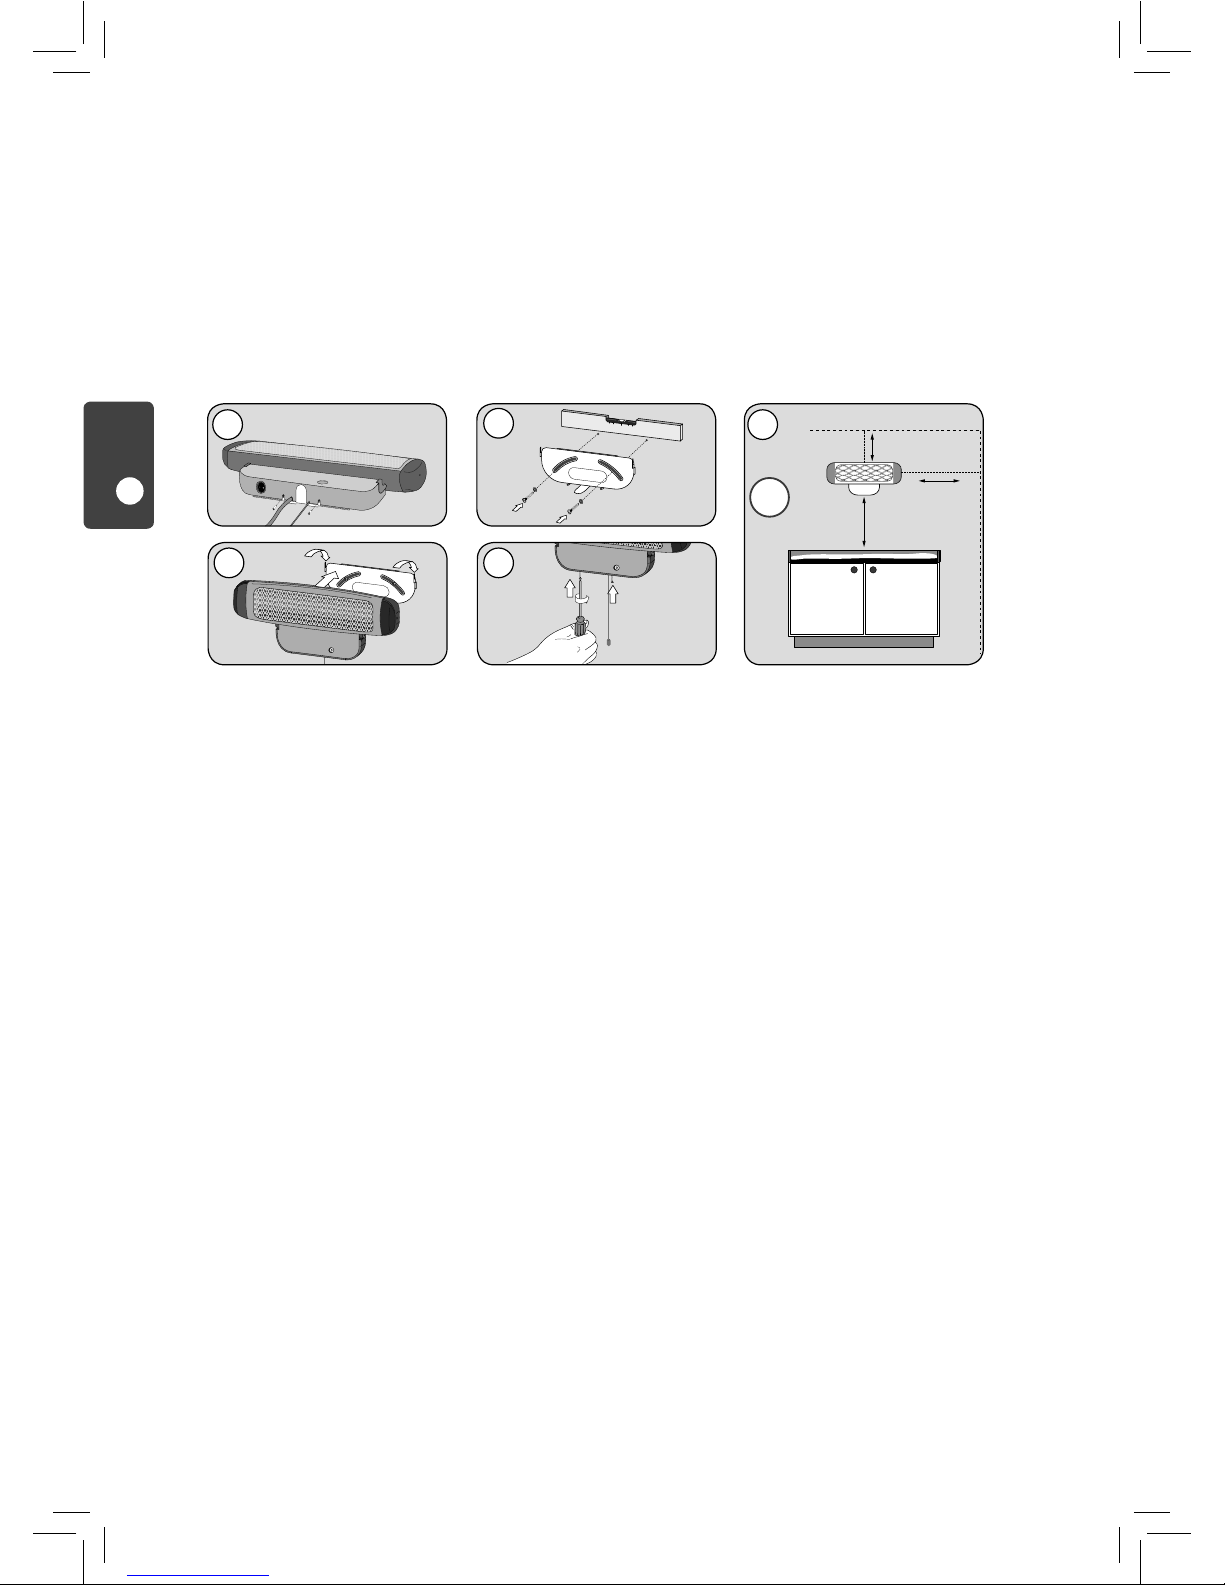
stabstände: Der Abstand vom Heizstrahler zum Wickeltisch darf 100 cm nicht unterschreiten.
Der Abs
tand vom Heizstrahler zur Decke von mind. 35 cm muss unbedingt eingehalten werden. Der Mindest-
abstand zu Möbeln und brennbaren Materialien muss 65 cm betragen. Ansonsten besteht Brandgefahr!
•
Bei Ins
tallation in Bade- oder Duschräumen sind die Vorschriften des örtlichen EVU zu beachten. Der Strahler muss so
positioniert werden, dass der Zugschalter nicht von der Badewanne oder Dusche aus betätigt werden kann.
•
Das Ger
ät darf nicht über der Badewanne montiert werden!
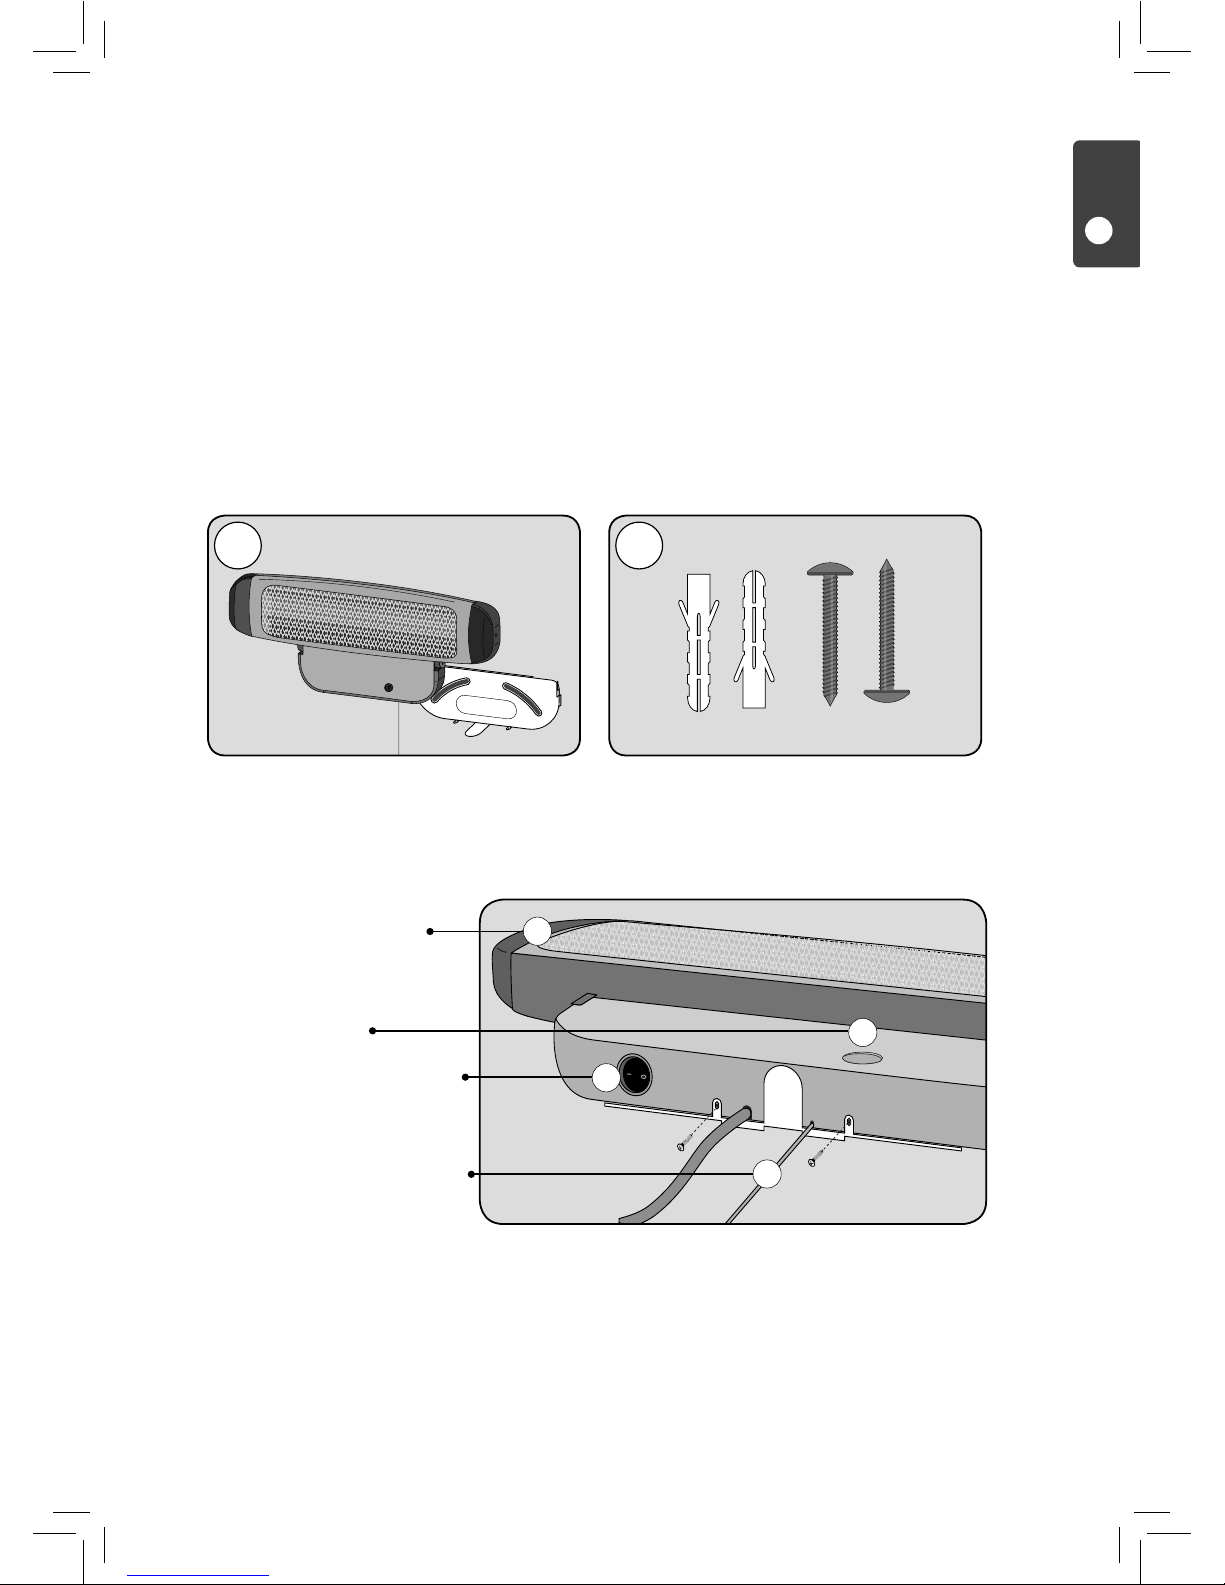
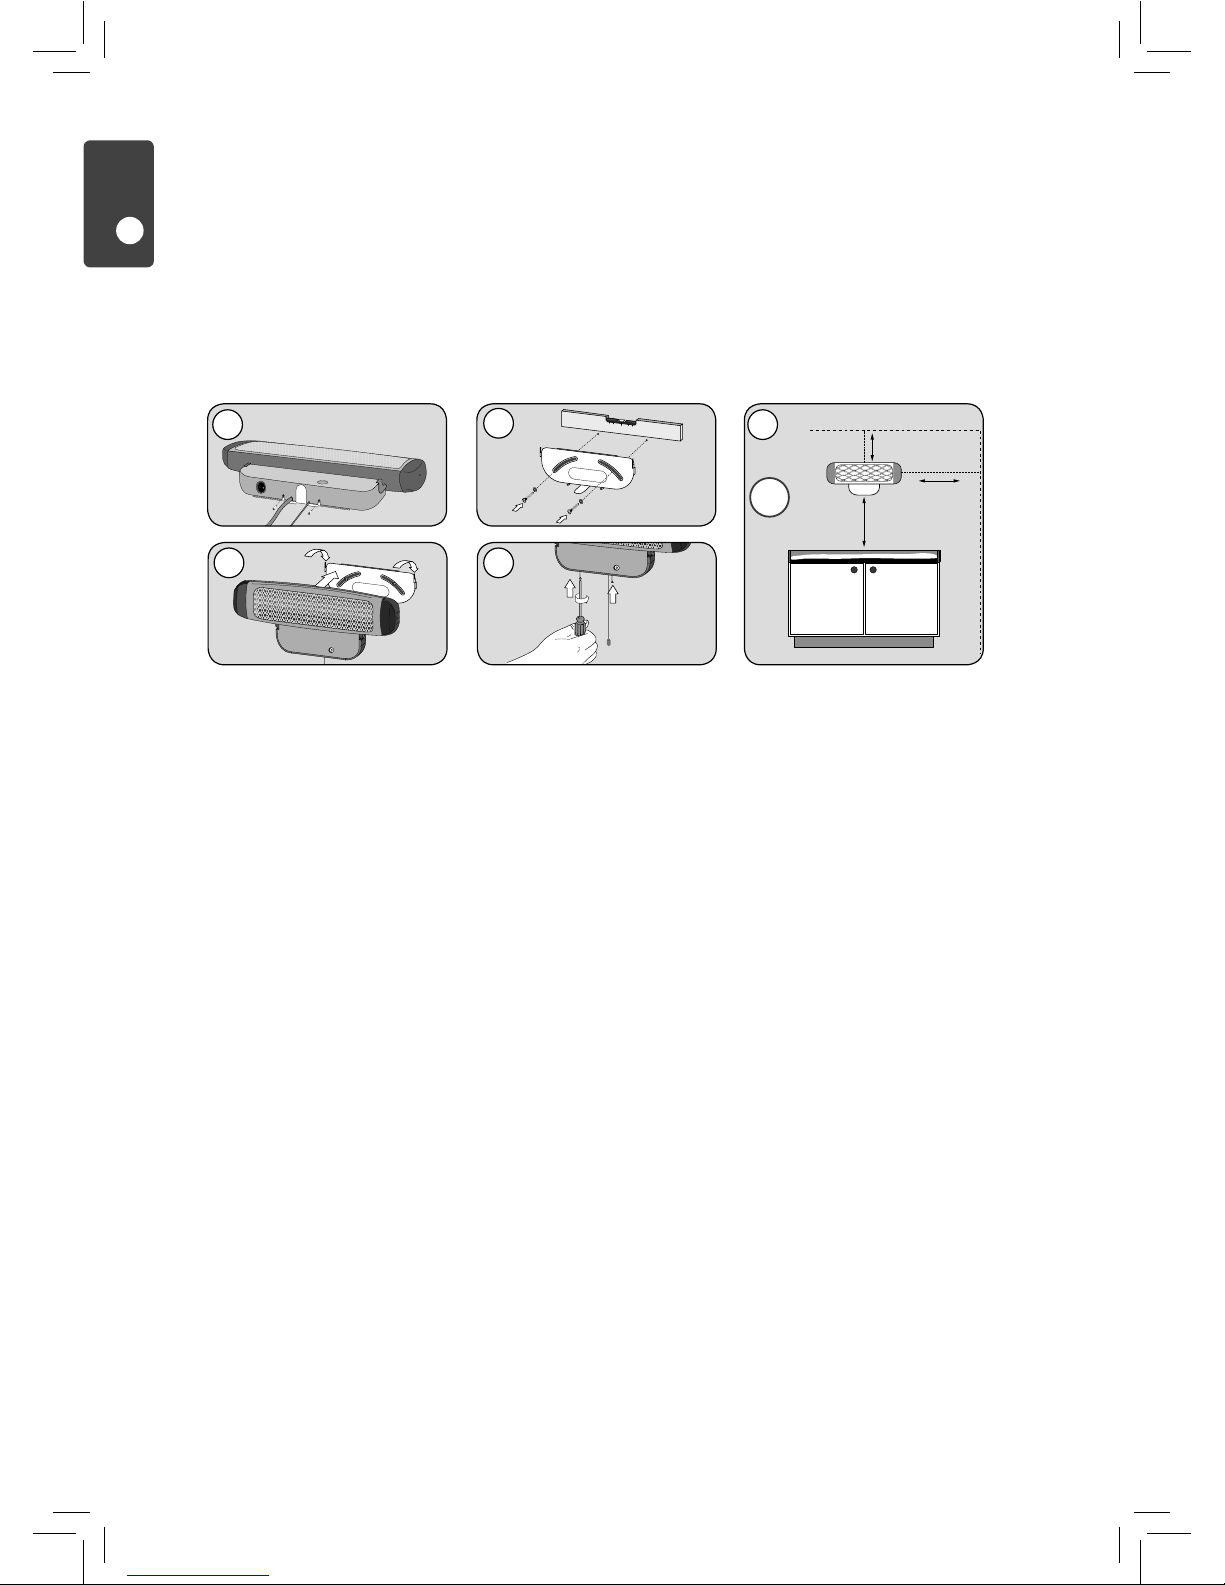
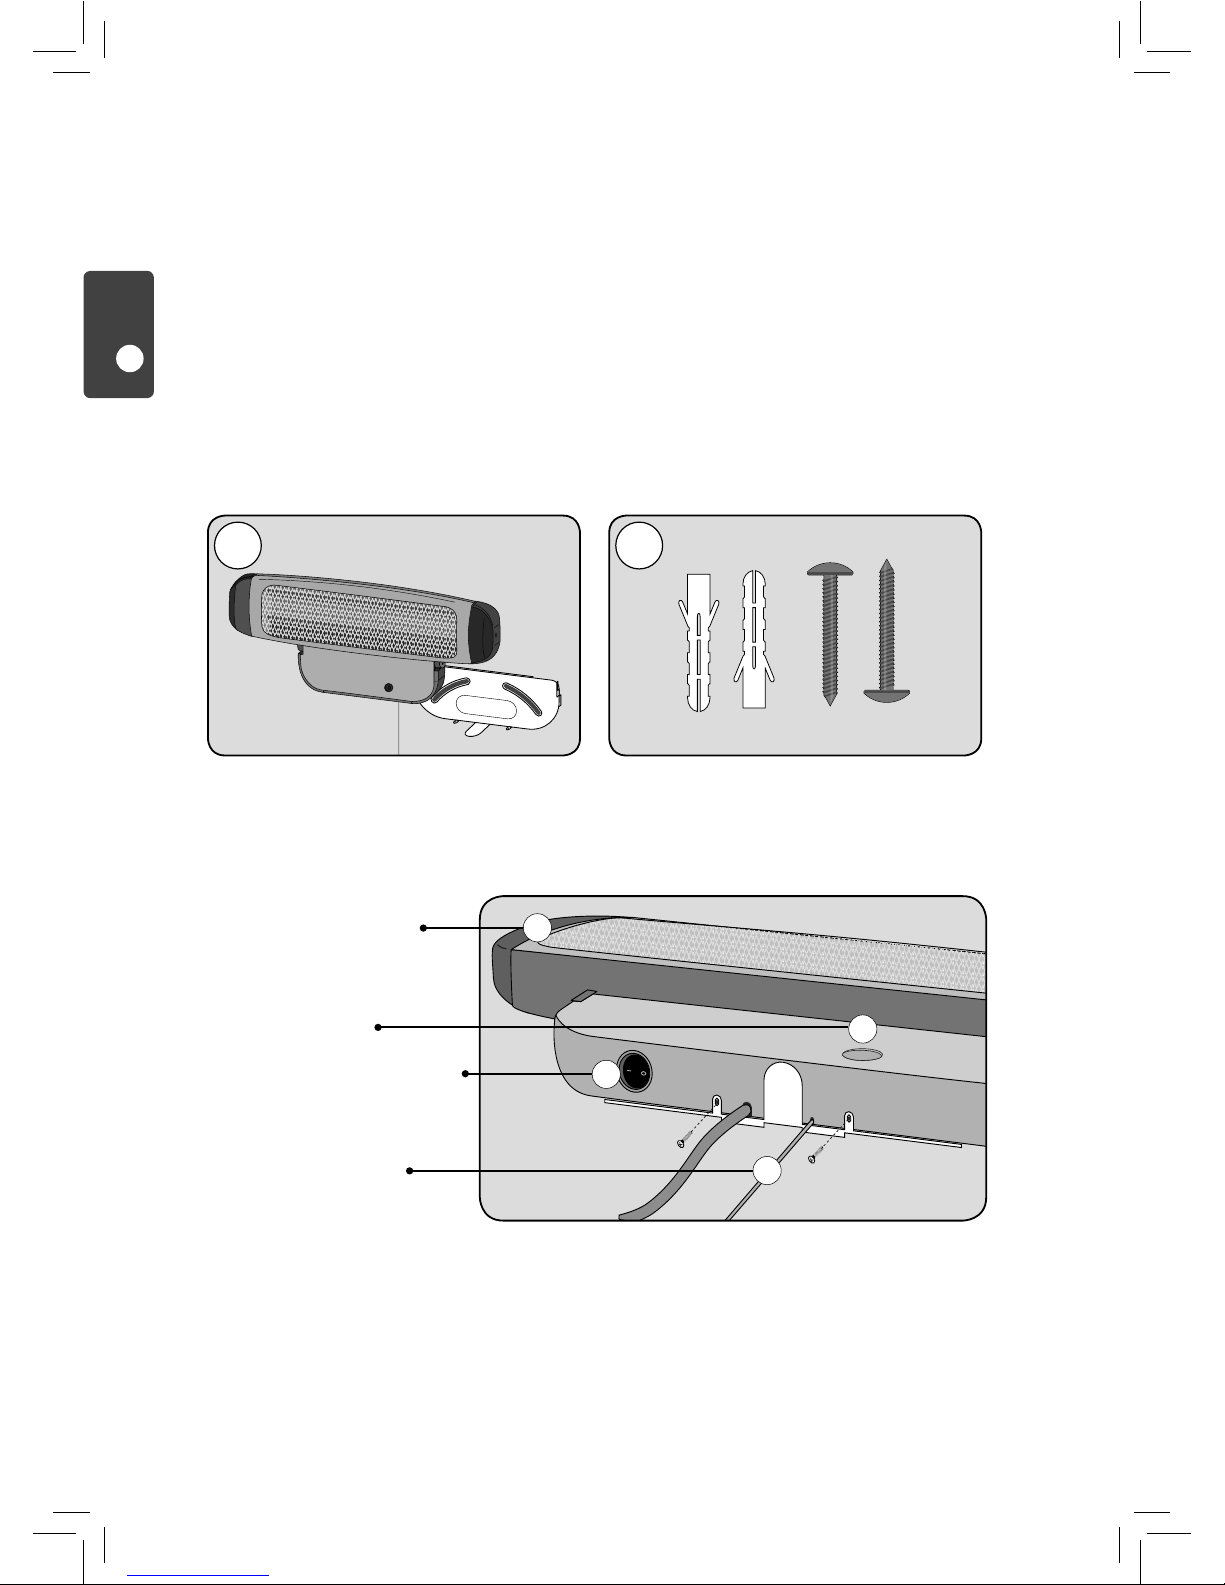
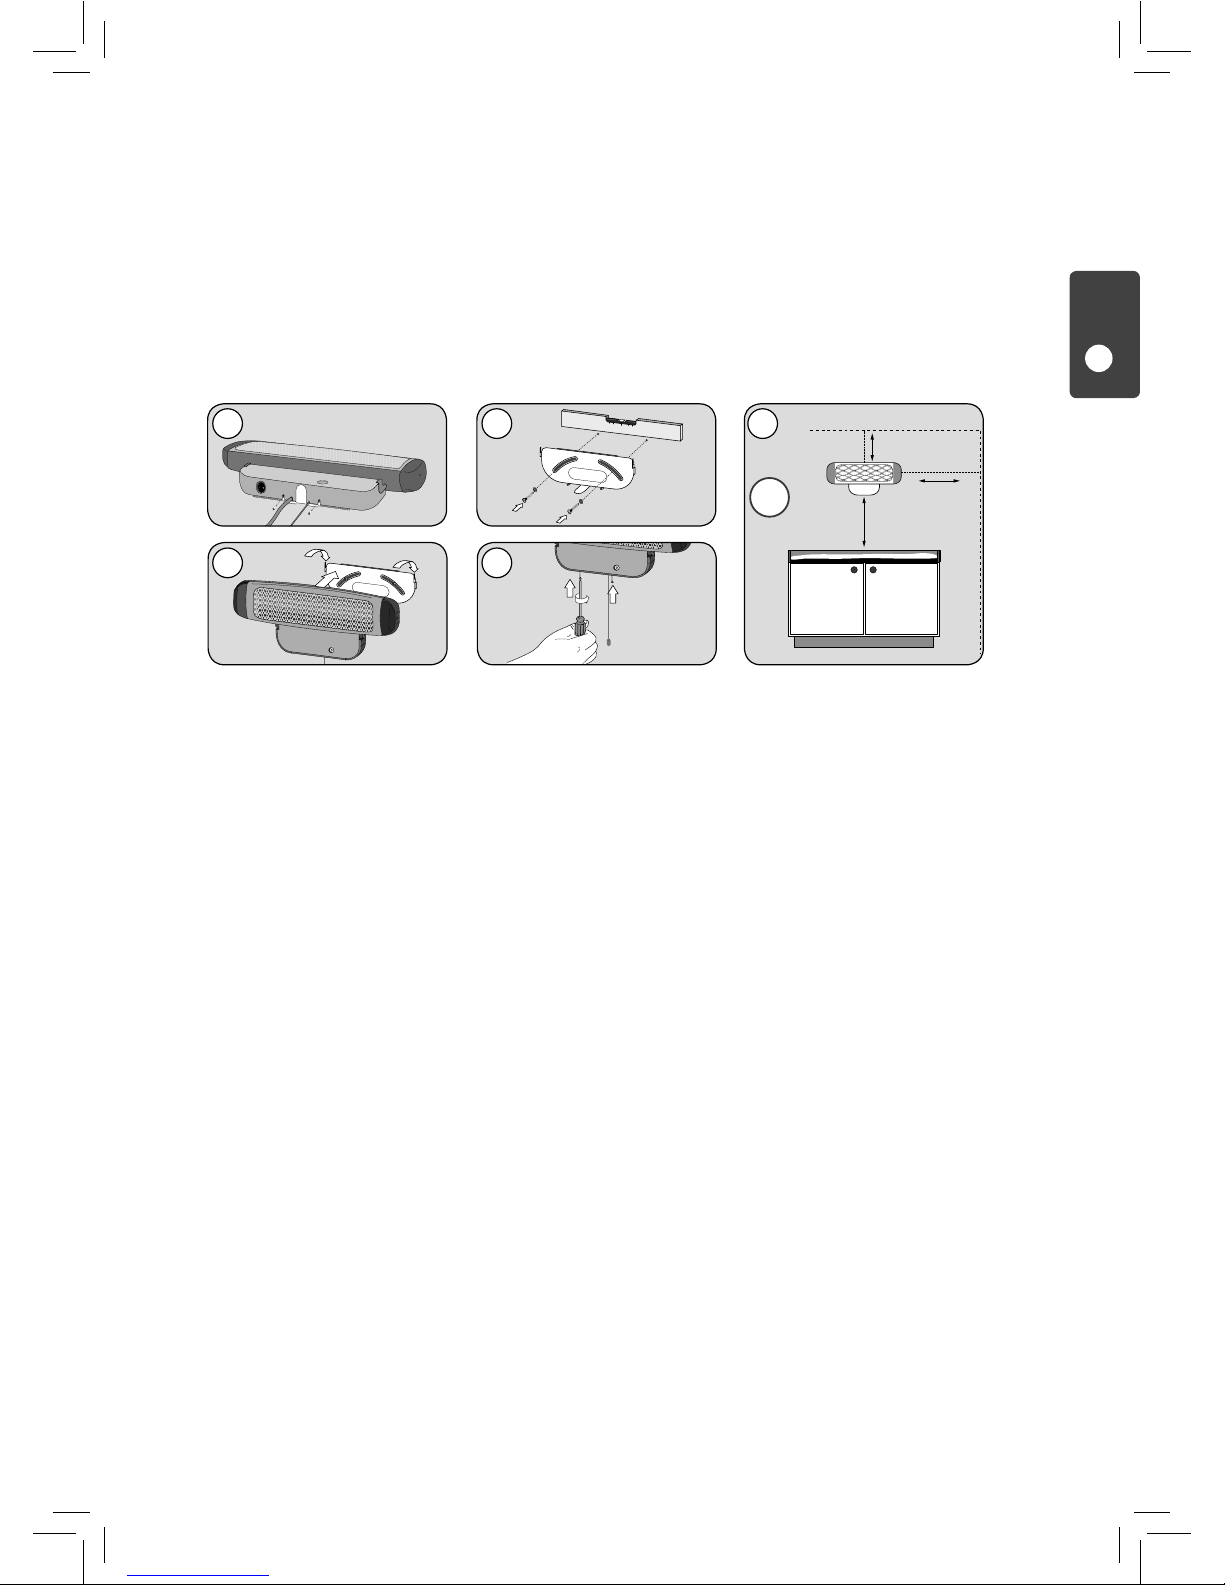
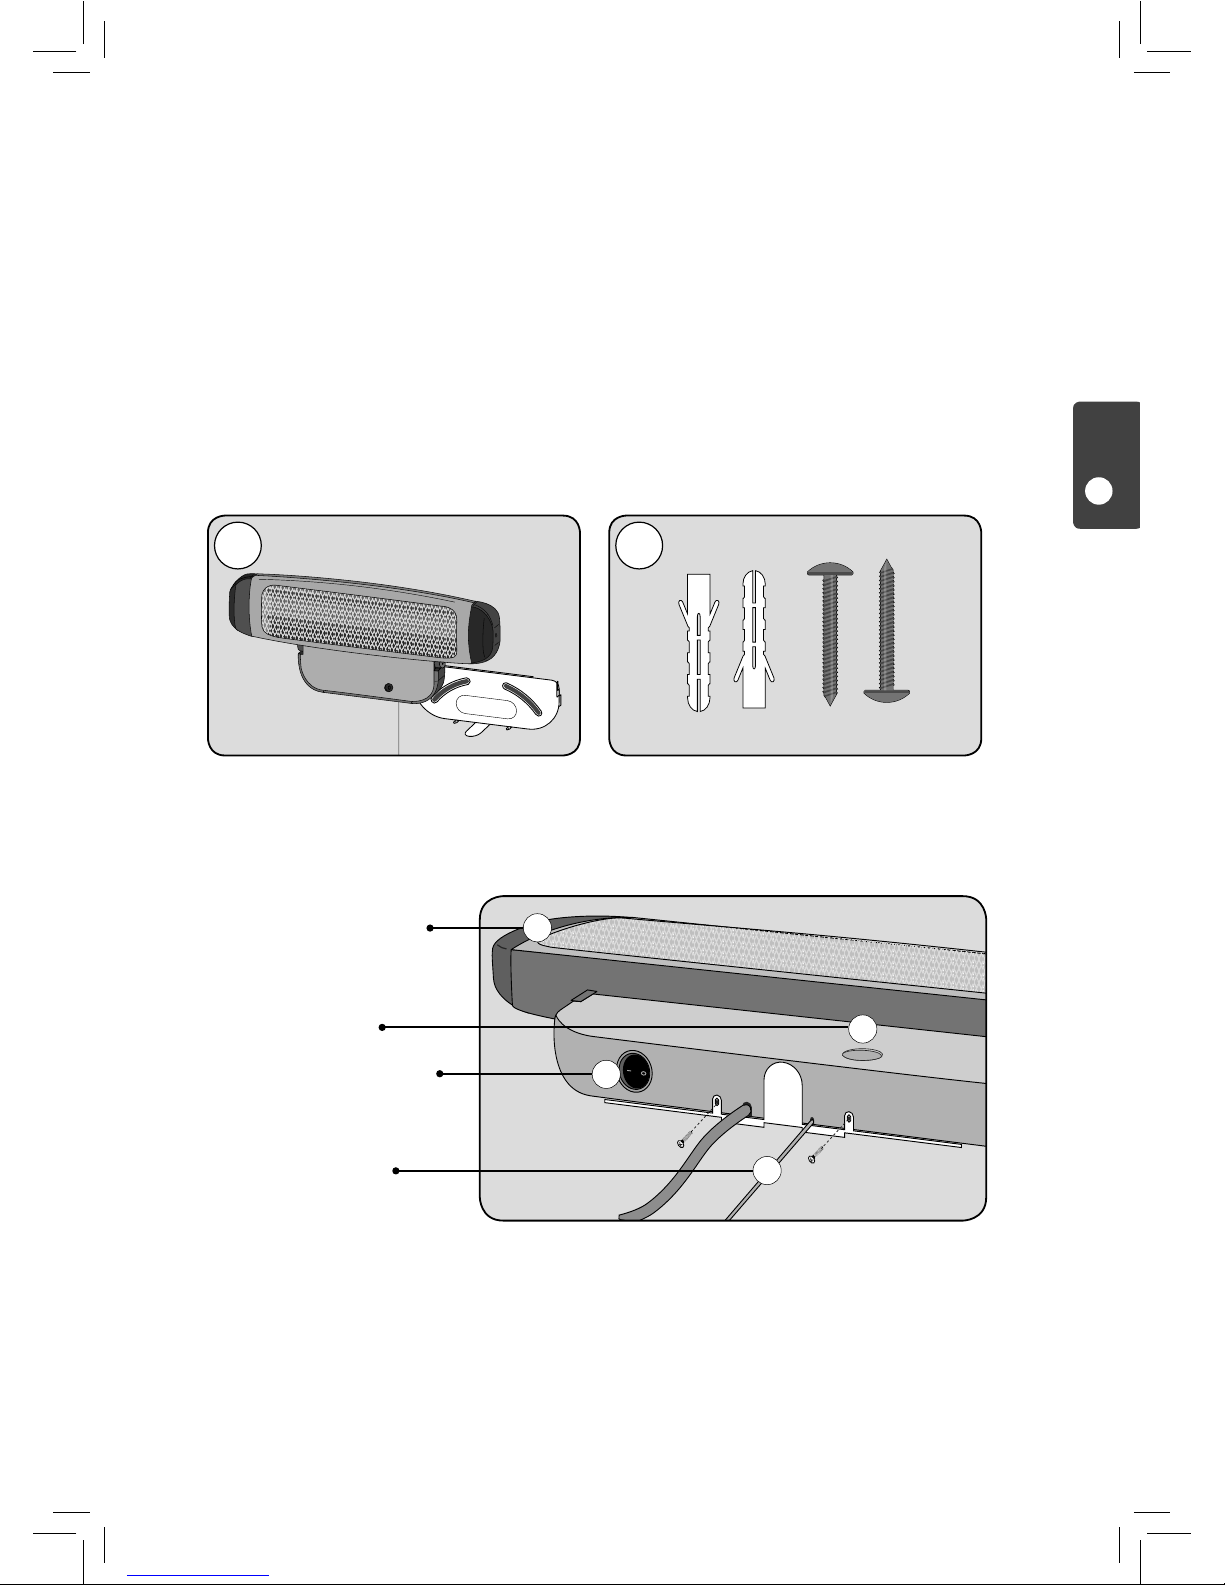
1.
Entf
ernen Sie die Montageplatte vom Gerät wie in Abb. 1 dargestellt.
2.
Halt
en Sie die Montageplatte unter Berücksichtigung der Mindestabstände (Abb. 5) an die Wand und zeichnen Sie die
Schraublöcher mit einem Bleistift an. Verwenden Sie zur waagrechten Ausrichtung eine Wasserwaage.
3.
Schr
auben Sie die Montageplatte an die Wand mit den mitgelieferten Schrauben und Dübeln.
4. Setzen Sie den Wickeltisch-Wärmestrahler in die dafür vorgesehenen Schlitze der Wandhalterung (Abb. 3).
5.
Schr
auben Sie den Wickeltisch-Wärmestrahler an die Montageplatte (Abb. 4) mit den in Abb. 1 entfernten Schrauben.
TIMER ON/OFF
35 cm
20 cm
100 cm
!
1
2
3 4
5
DE
Deutsch
Page 7
- 7 -
230 V
1 2
1
0
2
ON
400 W
ON
800 W
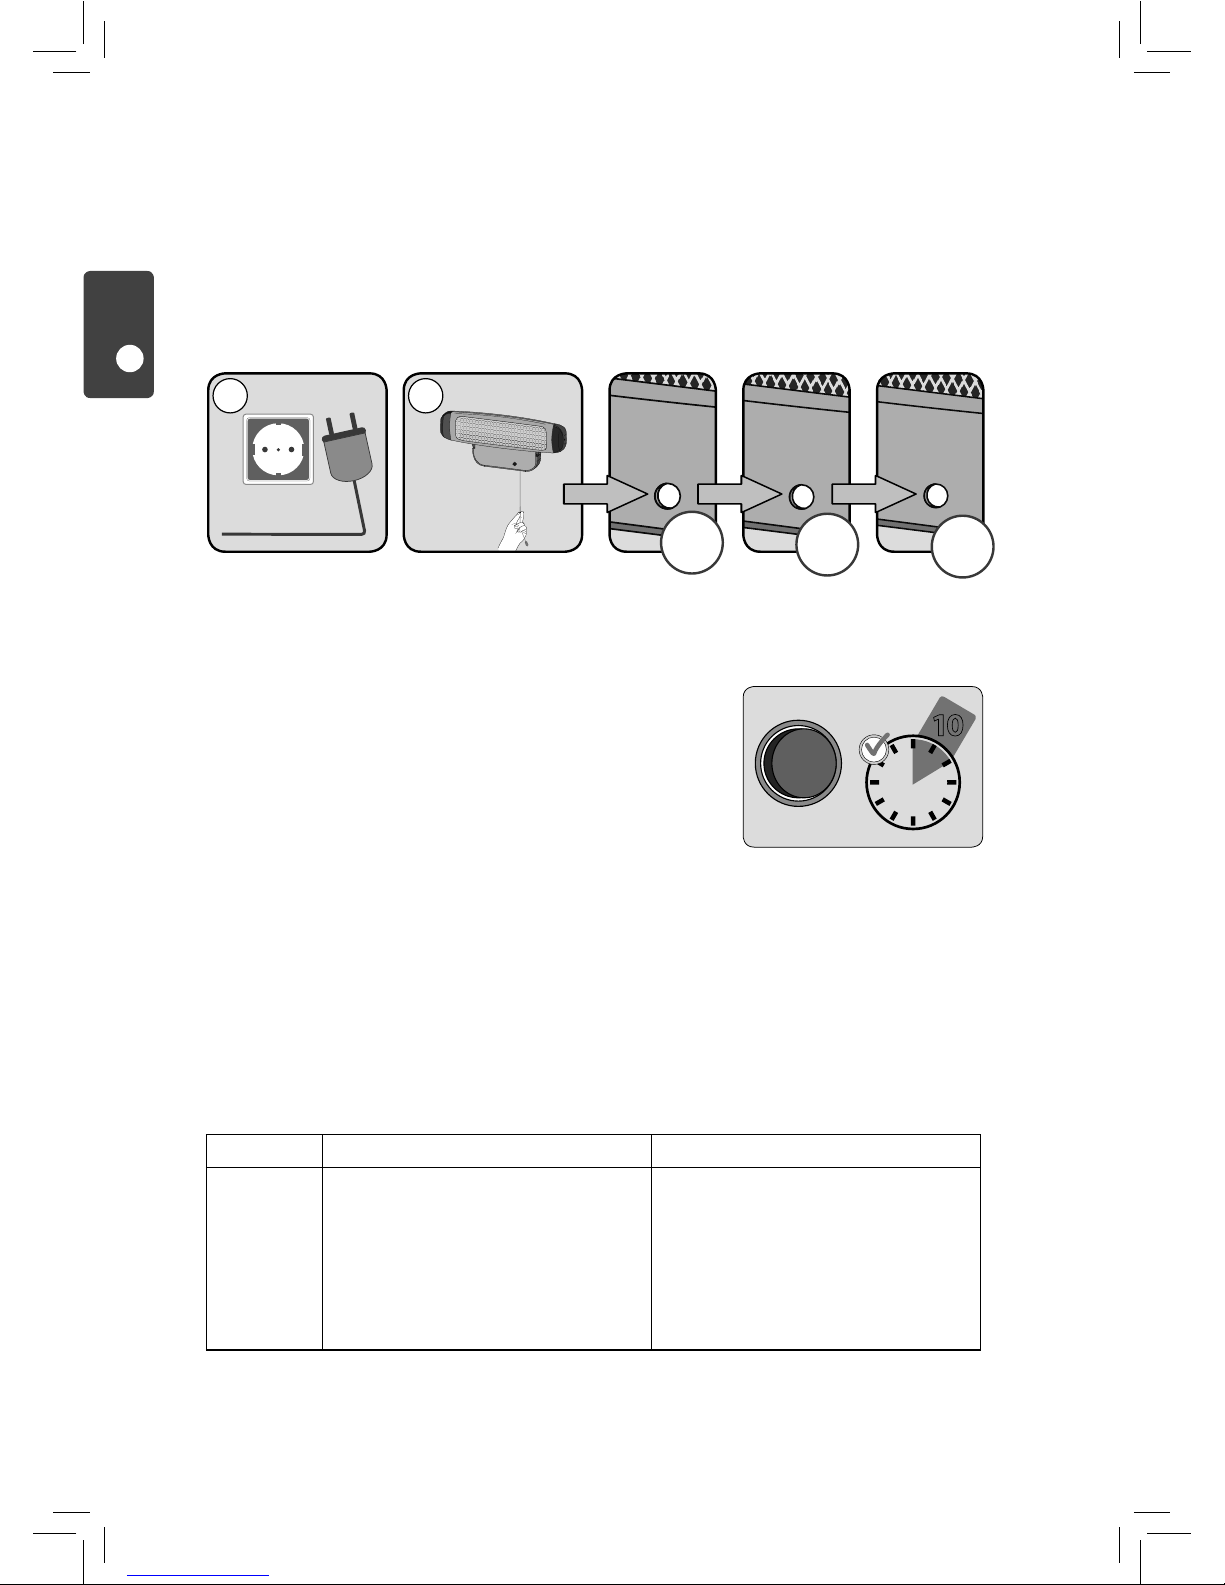
Inbetriebnahme
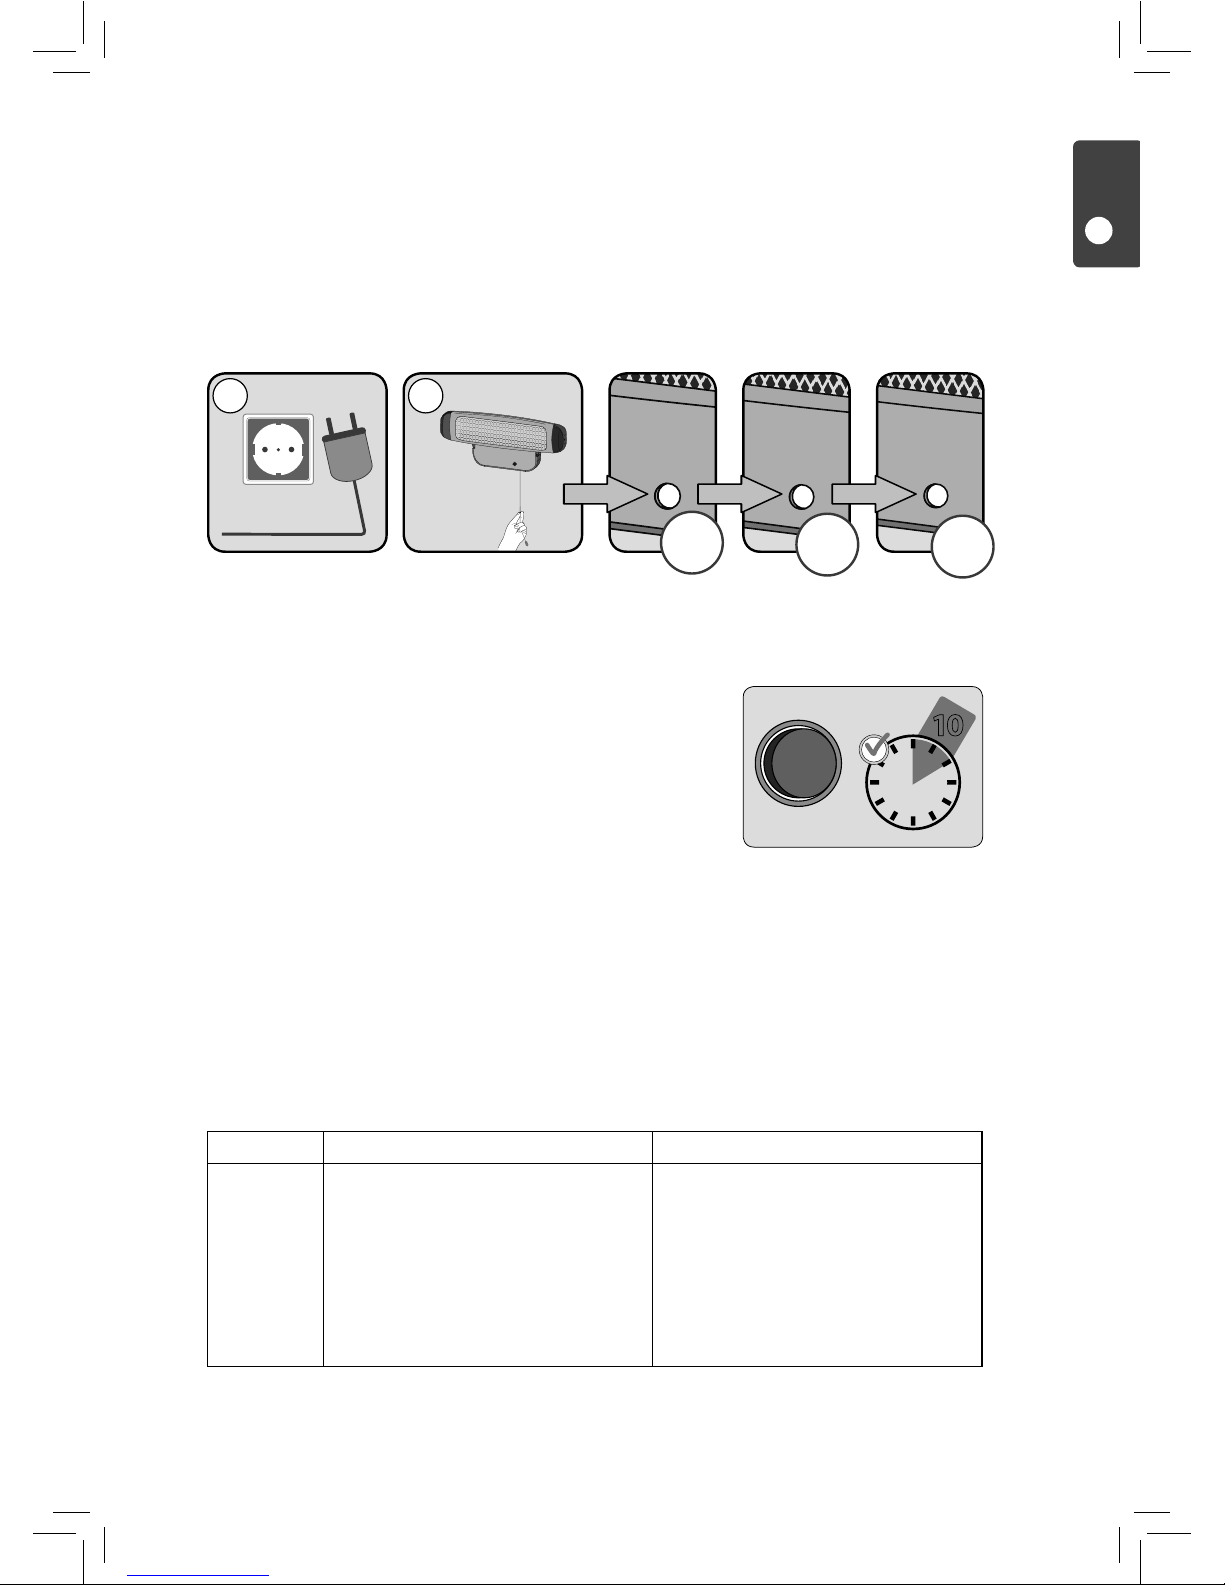
1. Stecken Sie den Netzstecker in die Steckdose (Abb. 1).
2.
Ziehen
Sie an der Zugschnur (Abb.2) um den Wärmestrahler einzuschalten. Der Wärmestrahler ist in zwei Heizstufen
einstellbar, 400 W (Stufe „1“) und 800 W (Stufe „2“).
3.
Dur
ch erneutes Ziehen an der Zugschnur kann die Heizstufe verändert werden oder das Gerät wieder ausgeschaltet
(Stufe „0“) werden.
1.
Z
ur Aktivierung der automatischen Abschaltautomatik schalten Sie den Timer-Schalter auf der Unterseite des Gerätes auf „ON“. Das Gerät schaltet
nach 10 Minuten automatisch aus.
2.
Um das Ger
ät nach der automatischen Abschaltautomatik wieder einzu-
schalten, haben Sie 2 Möglichkeiten:
• Schalt
en Sie den Schalter auf „Off“ oder
• Ziehen Sie an der Z
ugschnur bis die Heizstufen-Anzeige auf „0“ steht.
Beim erneut
en Ziehen auf Heizstufe „1“ oder „2“ wird das Gerät wieder
eingeschaltet.
Das Gerät hat eine automatische Kipp-Abschalt-Funktion. Falls der Winkel größer 25° wird (z.B. bei Deckenmontage)
schaltet das Gerät automatisch aus. Bei Aufrichten des Gerätes schaltet der Wärmestrahler automatisch wieder ein.
Automatische Abschaltautomatik
Kipp-Abschalt-Funktion
Störungsbehebung
Problem mögliche Ursachen Was ist zu tun?
Keine
Wärmestrahlung trotz
HeizstufenAnzeige„1“
oder „2“.
• Der Netzstecker ist nicht richtig eingesteckt.
• Die automatische Abschaltfunktion (Timer)
ist aktiviert.
• Die automatische Kipp-Abschalt-Funktion ist
aktiviert, da der Winkel des Wärmestrahlers
25° überschreitet.
• Überprüfen Sie den Netzstecker.
• Schalten Sie den „Timer“ auf „Off“ oder
schalten Sie das Gerät durch wiederholtes
Ziehen an der Zugschnur erst aus und dann
wieder ein.
• Stellen Sie sicher, dass der Wärmestrahler
waagrecht und ortsfest an der Wand
montiert ist.
I
O
TIMER OFF
10
I
O
TIMER OFF
I
O
10
TIMER ON/OFF
DE
Deutsch
OFF
Page 8
- 8 -
Reinigung, Wartung
Garantie
• Bevor Sie mit der Reinigung beginnen, überzeugen Sie sich davon, dass das Gerät ausgeschaltet und abgekühlt ist
(Netzstecker ziehen). Die Oberfläche mit einem trockenen oder leicht angefeuchteten Tuch reinigen. Den Reflektor und
Heizstäbe nur von einem Fachmann reinigen lassen.
• Dieses Produkt erfordert keine spezielle Wartung.
•
R
eparaturen am Gerät dürfen nur von einem Fachmann durchgeführt werden.
Bitte Kaufbeleg, Gebrauchsanleitung und Artikelnummer aufbewahren.
Gewährleistungsansprüche oder Ansprüche aus Garantieversprechen sind ausschließlich mit Händler abzuwickeln.
Alle technischen Daten, Informationen sowie Eigenschaften des in diesem Werk beschriebenen Produktes wurden nach bestem Wissen zusammengestellt und entsprechend dem Stand bei Veröffentlichung. Die von reer bereitgestellten Informationen sollten korrekt und zuverlässig sein. Die Firma reer übernimmt dennoch keinerlei Haftung für mögliche Fehler in diesem
Dokument und behält sich das Recht vor, ohne vorherige Ankündigung, Änderungen am Produktdesign beziehungsweise
an den Spezifikationen vorzunehmen. Vervielfältigung und Weitergabe von Informationen aus diesem urheberrechtlich geschützten Werk in irgendeiner Form oder auf irgendeine Weise, grafisch, elektronisch oder mechanisch, durch Fotokopieren,
Aufzeichnen auf Band oder Speichern in einem Datenabfragesystem, auch auszugsweise, bedürfen einer vorherigen schriftlichen Genehmigung der Firma reer.
Hinweise zum Umweltschutz:
Dieses Produkt darf am Ende seiner Lebensdauer nicht über den normalen Hausmüll entsorgt werden, sondern muss an einer Sammelstelle für das Recycling von elektrischen Geräten abgegeben
werden. Das Symbol auf dem Produkt, in der Gebrauchsanleitung oder auf der Verpackung weist
darauf hin. Die Werkstoffe sind gemäß Ihrer Kennzeichnung wieder verwendbar. Mit der Wiederverwendung, der stofflichen Verwertung oder anderen Formen der Verwertung von Altgeräten, leisten
Sie einen wichtigen Beitrag zum Schutze unserer Umwelt. Bitte fragen Sie bei Ihrer Gemeindeverwaltung nach der zuständigen Entsorgungsstelle.
reer GmbH
Muehlstr.41 • 71229 Leonberg • Germany
www.reer.de
DE
Deutsch
Page 9
- 9 -
We are pleased that you have chosen this product and would like to thank you the trust you are showing in us. To
enjoy the changing table heater to the full, we would ask you to read the following instructions carefully, store this
instruction manual in a safe place and pass it on to the relevant user.
The changing table heater generates comfortable instant heat in the area around changing tables. It can also be
used to warm up bathrooms, hobby rooms, entrance halls, protected patios and balconies quickly. The radiant heat
ensure that the surrounding space warms up economically within a few seconds.
Please take a few minutes to read the safety instructions carefully and in full. The instructions in the manual must
be followed to avoid damaging the changing table heater. At worst, the unit may constitute a safety or accident
hazard for your child, yourself or others.
General safety instructions:
! The unit must only be used for the purposes described herein. Improper use may result in the loss of any and all
claims under warranty.
!
Check tha
t the information on the nameplate corresponds with the mains voltage in your area.
! The unit must not be used if it shows any sign of a fault.
!
If the unit is used as a changing table he
ater, it must never be used without supervision.
!
The ma
ximum exposure time must not exceed 15 minutes.
! A minimum distance of 100 cm between the heater and the table must be observed at all times.
! Keep the supply line away from all hot equipment components, as well as other electrical appliances.
!
A
void additional heat radiation, such as sunlight or other sources of radiation, as this can cause your baby‘s body
temperature to rise.
! The heater must not be used, if a child has a temperature, as this may cause overheating.
!
Do no
t touch the unit when it is in operation.
!
The equipment must be connected directly to a power outlet. Do not connect the equipment to units such as a
timer, remote control unit etc., as this constitutes a fire hazard.
!
The unit r
emains hot even after it is switched off. Do not cover the changing table heater! Fire hazard.
!
Remove all packaging and any surplus components before first use to prevent your child being injured or choking.
! Use the unit only out of the reach of children. Secure the power lead and ensure that it cannot be accidentally
pulled out causing the unit to fall on the floor.
!
This equipment is no
t intended for use by persons (including children) with reduced physical, sensory or mental
capabilities, or lack of experience or knowledge, unless they are supervised whilst using it or have been shown
how to use it correctly by a person responsible for their safety.
! Do not use the equipment if it or its power lead is damaged.
!
Repairs must be carried out by qualified and skilled personnel only. Improper repairs may pose considerable risks
to the user – this includes changing the power lead.
GB
English
Page 10
- 10 -
GB
English
Technical specification
Items delivered
Part description
A B
TIMER ON/OFF
1
3
4
2
• rated voltage: 230 V AC
•
output
: 400 / 800 W
•
mounting s
tyle: Power lead
•
pr
otection class: 1
•
int
egrated switch-off function if tilted (tilt angle: 25°)
•
le
ad length: 185 cm (incl. safety plug)
• heat radiation and temperature distribution tested in accordance
with the medical pr
oduct standard (IEC601-2-21)
1
heater with 2 heating tubes
2
he
at setting indicator
3
switch for switching the automatic
switch off function (timer) on/off
4
pul
l cord for switching the
unit on/off
Page 11
- 11 -
Montage
Safety instructions for wall installation:
• The changing table heater must be mounted on the wall in a stationary and level position. It must not be
mounted on the ceiling!
•
The changing table he
ater must not be mounted on wood, plastic or other flammable materials or under plug
sockets.
•
IMPOR
TANT! Minimum distances: The minimum distance between the heater and the changing table is 100
cm. A minimum distance of 35 cm between the heater and the ceiling must be observed at all times. The
heater must be placed at least 65 cm away from furniture and flammable materials. Fire hazard in case of
non-compliance!
•
F
or installation in bathrooms or shower rooms, the regulations of the local utility company must be observed. The
heater must be positioned in such a manner that the pull switch cannot be reached from the bath or shower.
•
Ne
ver install the unit above a bath tub!
1.
R
emove the assembly plate from the unit as shown in fig. 1.
2.
Hold the w
all bracket on the wall taking into account the minimum distances (fig. 5) and mark the drill holes with a
pencil. Use a spirit level to ensure the bracket is level.
3.
Bolt the w
all bracket to the wall (fig. 3) using the supplied screws and wall plugs.
4.
Slide the changing table he
ater into the relevant grooves on the wall bracket (fig. 3).
5.
Screw the changing table heater to the wall bracket (fig. 4) using the screws removed in fig. 1.
TIMER ON/OFF
35 cm
20 cm
100 cm
!
1 2
3 4
5
GB
English
Page 12
- 12 -
230 V
1 2
Putting into operation
1. Insert the mains plug into the power socket (fig. 1).
2.
Pul
l the pull cord (fig. 2) to switch the heater on. The heater has two heat settings: 400 W (level „1“) and 800 W
(level „2“).
3
Pul
l the cord again to change the heat setting or switch the unit off (level „0“).
1.
To activate the automatic switch-off function, switch the timer switch on the
bottom of the unit to the „ON“ position. The unit switches off automatically
after 10 minutes.
2.
Ther
e are 2 ways of switching the unit on after automatic switch-off:
• Mo
ve the rocker switch to the „Off“ position or
• pul
l the pull cord, until the heat setting indicator shows „0“. If the pull
c
ord is pulled again on heat setting „1“ or „2“, the unit is switched on
again.
If the angle exceeds 25° (for example if the unit is mounted on the ceiling), the power supply to the unit is cut. The unit
switches back on automatically, when it is upright again.
Automatic switch-off function
Switch-off if tilted
Troubleshooting
I
O
TIMER OFF
10
I
O
TIMER OFF
I
O
10
TIMER ON/OFF
GB
English
issue possible causes remedial action
No heat radiation despite
heat setting
indicator
showing „1“
or „2“.
• The power plug is not connected properly.
• The automatic switch-off function (timer)
is activated.
• The automatic tilt switch-off function is
activated, because the angle of the heater
exceeds 25°.
• Check the power plug.
• Turn the „Timer“ to „Off“ or switch the unit
off and then on again by repeatedly pulling
the pull cord.
• Ensure that the heater is level and fixed to
the wall.
1
0
2
ON
400 W
ON
800 W
OFF
Page 13
- 13 -
reer GmbH
Muehlstr.41 • 71229 Leonberg • Germany
www.reer.de
GB
English
Cleaning, maintenance
Warranty
• Before cleaning, ensure that the unit is switched off and cooled down (pull out the power plug). Clean the surface with
a dry, slightly damp cloth. The reflector and heating tubes must be cleaned by skilled personnel only.
•
This pr
oduct does not require any special maintenance.
•
R
epairs must be carried out by skilled personnel only.
Please retain your receipt, the user manual and part number.
Claims under warranty or under warranty commitments are to be processed by the dealer alone.
The technical specification, information and characteristics of the product described herein have been compiled to the best
of our knowledge and belief and are correct at the time of printing. Any information provided by reer should be correct
and authoritative. Nevertheless, reer does not accept liability for potential errors in this document and reserves the right to
make changes to the product design and/or specifications without prior notice. Reproduction and disclosure of information
contained in this copyright-protected document, in any form or by any means - graphical, electronic or mechanical by photocopying, recording on tape or storage in a data retrieval system - even in part, require prior written consent from reer.
Environmental protection:
At the end of its life, this product must not be disposed of as normal domestic waste, but should be
recycled at a collection point for electrical appliances. Please see the relevant symbol on the product,
in the user manual and packaging. Materials can be recycled as specified. An important contribution
to the protection of the environment can be made by reusing the unit, recycling its components
or otherwise reusing old appliances. Please contact your local council to find out more about an
appropriate disposal centre.
Page 14
- 14 -
Es un placer para nosotros que haya escogido este producto y le agradecemos su confianza. Para que pueda disfrutar
por mucho tiempo de su radiador térmico para cambiador, le pedimos que lea atentamente estas instrucciones, que
guarde cuidadosamente el manual y que se lo entregue a otro posible usuario.
El radiador térmico para cambiador genera un agradable calor instantáneo en el entorno de los cambiadores de
bebés. Pero también se puede emplear para calentar baños, espacios para practicar pasatiempos, pasillos, terrazas y
balcones protegidos. La radiación garantiza que en unos segundos se disponga de un calor de bajo consumo.
Tómese un par de minutos para leer atentamente las indicaciones de seguridad. Siga las instrucciones del manual,
para evitar dañar el radiador térmico para cambiador. En el peor de los casos puede poner en peligro o lesionar al
niño, a usted mismo o a terceras personas.
Indicaciones generales de seguridad:
! Utilice el equipo solo para la finalidad aquí indicada, un uso incorrecto conlleva la pérdida de la garantía.
! Revise si los datos de la placa de características coinciden con la tensión de su red.
! Deje de usar el aparato si detecta algún defecto.
! Nunca deje sin vigilancia el radiador térmico si lo utiliza en un cambiador.
!
La dur
ación máxima de la radiación no debe superar los 15 minutos.
!
Es obliga
torio mantener la distancia mínima de 100 cm desde el radiador térmico a la mesa.
! Mantenga alejados los cables de alimentación de todas las piezas calientes del aparato, también los cables de los
equipos eléctricos adyacentes.
!
E
vite la radiación térmica adicional, tal como p.ej. la luz solar u otras fuentes de radiación, dado que ello puede
hacer que aumente la temperatura corporal de su bebé.
! Los niños pequeños con fiebre no deben ser sometidos a la radiación. Corren peligro de sobrecalentamiento cor-
poral.
! No tocar el equipo mientras está en marcha.
! Solo para conexión directa en el enchufe. No emplee ningún dispositivo preconectado tal como un temporizador,
un conmutador de control inalámbrico o similar, pues representan peligro de incendio.
!
De
spués de apagarlo el equipo todavía está caliente. No cubra el radiador térmico para cambiador! Peligro de
incendio.
!
Ant
es del primer uso retire todo el material de embalaje y los componentes que no vaya a utilizar, que el bebé
no se dañe ni pueda tragar nada.
!
No utilic
e el equipo dentro del alcance de niños. Proteja el cable y preste atención a que no se pueda tirar de él
accidentalmente, tirando el equipo al suelo.
!
Las personas (incluidos los niños) que por su capacidades físicas, sensoriales o mentales; o por falta de experiencia
o de conocimientos no sean capaces de utilizar el equipo con seguridad, no deben utilizar este producto sin la
vigilancia de una persona responsable.
! No utilizar el equipo si este o el cable están dañados.
!
Las r
eparaciones solo deben ser realizadas por un especialista cualificado. Las reparaciones incorrectas pueden ser
peligrosas para el usuario. Incluyendo también el cambio del cable de red.
ES
Español
Page 15
- 15 -
Denominación de las piezas
Volumen de suministro
Denominación de las piezas
A B
TIMER ON/OFF
1
3
4
2
ES
Español
• tensión nominal: 230 V
• potencia: 400 / 800 W
•
tipo de monta
je: Cable de red
•
clase de pr
otección: 1
•
función int
egrada de desconexión por basculación (ángulo de bascu-
lación: 25°)
•
longitud de cable: 185 cm (con clavija de puesta a tierra)
•
r
adiación térmica y distribución de la temperatura comprobadas
según el e
stándar de productos médicos (IEC601-2-21)
1
r
adiador térmico con 2 tubos
2
indicador del niv
el de
calefacción
3
int
erruptor para encender/
apagar la función automática de
desconexión (temporizador)
4 cordón para encender/
apagar el equipo
Page 16
- 16 -
Montaje
Indicaciones de seguridad para montaje mural:
• El radiador térmico de cambiador solo debe montarse en la pared de forma fija y en horizontal. ¡No se debe
cubrir!
•
El r
adiador térmico para cambiador no se debe montar sobre madera, plástico ni sobre otro material inflamable
ni debajo de cajas de enchufe.
•
¡IMPOR
TANTE! Distancias mínimas: La distancia del radiador térmico hasta la mesa del cambiador no debe
ser inferior a 100 cm. La distancia del radiador térmico hasta el techo debe ser indispensablemente de 35 cm
como mínimo. La distancia mínima hasta muebles y materiales inflamables tienen que ser de 65 cm. ¡De lo
contrario, existirá un peligro de incendio!
•
Si se ins
tala en baños o duchas deben observarse las normas de la compañía eléctrica local. El radiador debe colocarse
de tal forma que el interruptor no se pueda activar desde la bañera o desde la ducha.
•
¡El equipo no se debe montar encima de la bañer
a!
1.
E
xtraiga la placa de montaje del equipo, tal como se muestra en la fig. 1.
2.
Suje
te el soporte mural en la pared, teniendo en cuenta las distancias mínima (fig. 5) y marque los agujeros con un
lápiz. Utilice un nivel de burbuja para la alineación horizontal.
3.
Atornille el soporte a la pared (fig. 3) con los tornillos y tacos suministrados.
4.
Coloque el radiador térmico de cambiador en la ranura prevista del soporte mural (fig. 3).
5.
Atornille el radiador térmico para cambiador en el soporte mural (fig. 4) con los tornillos extraídos en la fig. 1.
TIMER ON/OFF
35 cm
20 cm
100 cm
!
1
2
3 4
5
ES
Español
Page 17

- 17 -
230 V
1 2
Puesta en funcionamiento
1. Introduzca el enchufe (fig. 1).
2.
Tir
e del cordón (fig. 2) para encender el radiador térmico. El radiador térmico dispone de dos niveles de calenta-
miento, 400 W (nivel „1“) y 800 W (nivel „2“).
3
V
olviendo a tirar del cordón se puede modificar el nivel o apagar el equipo (nivel „0“)
1.
Para activar el apagado automático ponga en „ON“ el temporizador de la
parte inferior del equipo. El equipo se apaga automáticamente tras 10 minutos.
2.
P
ara volver a encender el equipo tras un apagado automático existen 2
posibilidades:
• P
oner el conmutador en „Off“ o
• tir
ar del cordón hasta que el indicador de nivel de calentamiento esté
en „0“. Al volver a tirar le cordón en el nivel „1“ o „2“ se conecta
nue
vamente el equipo.
Si el ángulo es superior a 25° (p. ej., en caso de montaje en el techo), se interrumpe el suministro de electricidad al equipo.
Al alinear el equipo el radiador térmico se vuelve a conectar.
Apagado automático
Función automática de desconexión por basculación
Subsanación de averías
I
O
TIMER OFF
10
I
O
TIMER OFF
I
O
10
TIMER ON/OFF
ES
Español
problema causas posibles ¿Qué debo hacer?
No hay radiación térmica
pese a la
indicación de
nivel de calentamiento
„1“ o „2“.
• El equipo no está correctamente enchufado.
• La función automática de desconexión(tem
porizador) está activada.
• La función automática de desconexión por
basculación está activada, ya que el ángulo
del radiador térmico supera 25°.
• Compruebe el enchufe de red.
• Ponga el temporizador en „Off“ o desconecte y conecte de nuevo el equipo
tirando varias veces del cordón.
• Asegúrese de que el radiador térmico se
haya montado en horizontal y de forma fija
en la pared.
1
0
2
ON
400 W
ON
800 W
OFF
Page 18

- 18 -
reer GmbH
Muehlstr.41 • 71229 Leonberg • Germany
www.reer.de
ES
Español
Limpieza, mantenimiento
Garantía
• Antes de iniciar la limpieza asegúrese de que el equipo esté desconectado y frío (tirar del enchufe). Limpie la superficie
con un paño seco o ligeramente humedecido. El reflector y los calentadores solo deben ser limpiados por un especialista.
•
Es
te producto no precisa un mantenimiento especial.
•
Las r
eparaciones solo deben ser realizadas por un especialista.
Conserve el justificante de compra, el manual de instrucciones y el número de artículo. Los derechos de garantía o los derechos por compromisos de garantía deben tramitarse exclusivamente a través del distribuidor.
Todos los datos técnicos, informaciones y propiedades del producto descrito en este documento se han elaborado según
nuestro leal saber y entender y responden al nivel actual de la tecnología en el momento de su publicación. La información
proporcionada por reer debería ser correcta y fiable. La empresa reer no asume ninguna responsabilidad por posibles errores
de este documento y se reserva el derecho de realizar modificaciones de diseño o de especificaciones del producto sin previo
aviso. La reproducción y transmisión de información de esta publicación protegida por derechos de propiedad intelectual de
cualquier forma, sea de modo gráfico, electrónico o mecánico, mediante fotocopia, grabación en cinta o almacenamiento en
un sistema de consulta de datos (también a modo de extractos) exigen la previa autorización por escrito de la empresa reer.
Indicaciones de protección medioambiental:
Este producto no se debe eliminar depositar con la basura doméstica, sino que tiene que ser entregado en un punto de recogida para el reciclaje de equipos eléctricos. El símbolo en el producto,
en el manual de instrucciones o en el embalaje hacen referencia a esta disposición. Los materiales
pueden reciclarse según sus marcas de identificación. Con el reciclaje de los materiales o cualquier
otra recuperación de equipos usados usted contribuye a cuidar del medio ambiente. Consulte en su
administración local dónde está el punto de recogida competente.
Page 19

- 19 -
Siamo lieti che abbia scelto questo prodotto e la ringraziamo per la sua fiducia. Per godersi appieno il suo nuovo
radiatore scalda fasciatoio, la preghiamo di osservare scrupolosamente le seguenti avvertenze, di conservare con cura
le presenti istruzioni per l‘utilizzo.
Il radiatore produce immediatamente un piacevole calore nella zona del fasciatoio. Può essere utilizzato anche per
riscaldare bagni, locali hobby, atrii, terrazze e balconi protetti. In pochi secondi il radiatore diffonde calore consumando
poca energia.
La invitiamo a dedicare qualche minuto alla lettura delle avvertenze. Al fine di evitare di provocare danni al radiatore,
seguire scrupolosamente le istruzioni sotto riportate. In caso di errato utilizzo si possono provocare danni a persone.
Avvertenze:
! Impiegare l‘apparecchio esclusivamente per l‘uso qui descritto; un utilizzo improprio causa la perdita della garanzia.
! Verificare che i dati sulla targhetta corrispondano alla tensione di rete.
!
Non utilizzar
e il prodotto se sono stati riscontrati dei difetti.
! Se impiegato come radiatore scalda fasciatoio, l‘apparecchio deve essere utilizzato sotto stretta sorveglianza da
parte di un adulto.
!
La dur
ata massima di irradiazione non può superare i 15 minuti.
! La distanza tra il radiatore e il fasciatoio deve essere almeno di 100 cm.
! Tenere lontano il cavo di alimentazione da tutte le parti calde dell‘apparecchio.
!
E
vitare ulteriori irradiazioni di calore, come ad esempio la luce solare, che potrebbero far salire la temperatura
corporea del suo neonato.
! I bambini con febbre non devono essere esposti all‘irradiazione. Si può correre il rischio di un surriscaldamento
corporeo.
! Non toccare l‘apparecchio mentre è in funzione.
! Collegare direttamente alla presa della corrente. Non collegare all‘apparecchio alcun altro dispositivo, come ad es.
un timer etc. Pericolo di incendio.
!
Dopo lo spegniment
o, l‘apparecchio è mantiene il calore per qualche minuto. Non coprire il radiatore scalda fasci-
atoio! Pericolo di incendio.
!
Prima di pr
ocedere al primo utilizzo, rimuovere l‘intero materiale di imballaggio e i componenti non utilizzati.
!
T
enere l‘apparecchio fuori dalla portata dei bambini. Assicurare il cavo di rete e fare attenzione che lo stesso non
venga inavvertitamente tirato, provocando la caduta dell‘apparecchio.
! Le persone (bambini compresi) che per vie delle loro capacità fisiche, sensoriali o mentali, oppure della loro
inesperienza o ignoranza, non siano nelle condizioni di poter utilizzare l‘apparecchio in modo sicuro, non devono
utilizzare lo stesso senza supervisione o istruzione da parte di una persona responsabile.
!
Non utilizzar
e l‘apparecchio in presenza di danni all‘apparecchio stesso o al cavo di rete.
! Le riparazioni possono essere eseguite esclusivamente da personale qualificato. Riparazioni non appropriate pos-
sono essere causa di notevoli rischi per l‘utente; lo stesso vale per l‘eventuale sostituzione del cavo di rete.
IT
Italiano
Page 20

- 20 -
Dati tecnici
Contenuto della confezione
Descrizione componenti
A B
IT
Italiano
• tensione nominale: 230 V
• potenza: 400 / 800 W
•
ins
tallazione: Cavo di rete
•
clas
se di protezione: 1
•
funzione int
egrata di spegnimento in caso di ribaltamento
(angolo di inclinazione: 25°)
•
lunghezza cavo: 185 cm (spina con messa a terra)
•
irr
adiazione di calore e uniformità di temperatura testate secondo lo
s
tandard per i prodotti medici (IEC601-2-21)
1
Irr
adiatore di calore a 2 tubi
2
Indica
tore dei diversi
gr
adi di riscaldamento
3
Int
erruttore di attivazione/disattivazione della funzione di spegnimento
automatico (timer)
4 Cordino di accensione/
spegniment
o dell‘apparecchio
TIMER ON/OFF
1
3
4
2
Page 21

- 21 -
Montaggio
Avvertenze di sicurezza in caso di montaggio a parete:
• Il radiatore scalda fasciatoio va montato alla parete solo in posizione fissa e in orizzontale. Non è consentito il
fissaggio al soffitto! È assolutamente necessario rispettare una distanza minima di 35 cm dal radiatore al soffitto. La distanza minima da mobili e materiali infiammabili deve essere di almeno 65 cm. Pericolo di incendio!
• Il radiatore scalda fasciatoio non può essere montato su legno, plastica o altri materiali infiammabili, né al di
sotto di prese elettriche.
•
IMPOR
TANTE! Distanze minime: La distanza dal radiatore al fasciatoio non può essere inferiore a 100 cm.
• In caso di installazione in ambienti umidi quali bagno o doccia, è necessario osservare le prescrizioni delle aziende
fornitrici di energia elettrica locali. Il radiatore va posizionato in modo che l‘interruttore a strappo non possa essere
azionato dalla vasca da bagno o dalla doccia.
•
L‘appar
ecchio non può essere montato al di sopra della vasca da bagno!
1.
Rimuo
vere la piastra di montaggio dall‘apparecchio come illustrato nella Fig. 1.
2.
Sorr
eggere l‘attacco per parete contro la parete stessa, rispettando le distanze minime (Fig. 5) e segnare le posizioni
dei fori delle viti con una matita. Per l‘allineamento orizzontale, utilizzare una livella ad acqua.
3.
A
vvitare l‘attacco alla parete (Fig. 3) con le viti e i tasselli in dotazione.
4. Collocare il radiatore scalda fasciatoio nelle apposite fessure dell‘attacco per parete (Fig. 3).
5.
A
vvitare il radiatore scalda fasciatoio all‘attacco per parete (Fig. 4) con le viti Fig. 1.
TIMER ON/OFF
35 cm
20 cm
100 cm
!
1
2
3 4
5
IT
Italiano
Page 22

- 22 -
230 V
1 2
Messa in funzione
1. Inserire la spina nella presa di corrente (Fig. 1).
2.
Tir
are il cordino (Fig. 2) per accendere il radiatore. Il radiatore è regolabile su due gradi di riscaldamento, 400 W
(grado „1“) e 800 W (grado „2“).
3
Tir
ando una seconda volta il cordino si può modificare il grado di riscaldamento oppure spegnere nuovamente
l‘apparecchio (grado „0“).
1.
P
er attivare il dispositivo di spegnimento automatico, impostare l‘interruttore del timer sul retro dell‘apparecchio su „ON“. L‘apparecchio si spegnerà
automaticamente dopo 10 minuti.
2.
Per accendere nuovamente il dispositivo di spegnimento automatico, ci
sono 2 opzioni:
• impos
tare l‘interruttore di ribaltamento su „Off“, oppure
• tir
are il cordino fin quando l‘indicatore dei gradi di riscaldamento non sia
sul v
alore „0“. Tirando nuovamente il cordino sul grado di riscaldamen-
t
o „1“ o „2“, l‘apparecchio si riaccende.
L‘apparecchio si spegne automaticamente in caso di ribaltamento. Se l‘angolo è superiore a 25° (ad es. in caso di montaggio a soffitto), viene interrotta l‘alimentazione di corrente all‘apparecchio. Una volta raddrizzato l‘apparecchio, il radiatore
si riaccende automaticamente.
Dispositivo di spegnimento automatico
Spegnimento automatico in caso di ribaltamento
Risoluzione dei guasti
I
O
TIMER OFF
10
I
O
TIMER OFF
I
O
10
TIMER ON/OFF
IT
Italiano
problema possibili cause Che fare?
Nessuna
irradiazione
di calore,
nonostante
l‘apparecchio
sia sui gradi
di riscaldamento „1“
o „2“.
• La spina non è correttamente inserita.
• È attivata la funzione di spegnimento
automatico (timer).
• È attivata la funzione di spegnimento con
ribaltamento automatico, poiché l‘angolo
del radiatore è maggiore di 25°.
• Testare la spina.
• Impostare il timer su „Off“, oppure spegnere e poi riaccendere l‘apparecchio tirando
ripetutamente il cordino.
• Assicurarsi che il radiatore sia montato fisso
alla parete e in posizione orizzontale.
1
0
2
ON
400 W
ON
800 W
OFF
Page 23

- 23 -
reer GmbH
Muehlstr.41 • 71229 Leonberg • Germany
www.reer.de
IT
Italiano
Pulizia, manutenzione
Garanzia
• Prima di procedere alla pulizia, assicurarsi che l‘apparecchio sia spento e che si sia raffreddato (estrarre la spina dalla
presa di corrente). Pulire la superficie esterna con un panno asciutto o leggermente umido. Per la pulizia del riflettore e
degli elementi riscaldanti è necessario rivolgersi a un tecnico specializzato.
• Il presente prodotto non richiede una manutenzione particolare.
•
L
e riparazioni all‘apparecchio possono essere eseguite esclusivamente da un tecnico specializzato.
Conservare lo scontrino, le istruzioni per l‘uso e il codice dell‘articolo.
Eventuali richieste di garanzia dovranno essere gestite esclusivamente con il rivenditore.
Tutti i dati tecnici, le informazioni e le caratteristiche del prodotto descritto in questo testo sono stati elaborati nel miglior
modo possibile e corrispondono allo stato attuale al momento della pubblicazione. Le informazioni fornite dalla reer dovrebbero essere corrette ed affidabili. Reer non si assume comunque alcuna responsabilità per eventuali errori contenuti
in questo documento e si riserva il diritto di modificare senza preavviso il design del prodotto e le sue specifiche. Copie e
trasmissioni di informazioni contenute in questo testo, salvaguardato da diritto d‘autore, in qualsiasi forma o in qualsiasi
modalità, grafica, elettronica o meccanica, mediante fotocopie, riproduzioni audio o registrazione su un sistema di richiesta
dati – anche parziale – necessitano della preventiva autorizzazione scritta da parte della reer.
Indicazioni per tutela dell’ambiente:
Il presente prodotto, al termine della sua durata di vita, non può essere smaltito tra i rifiuti domestici
normali, ma va consegnato ad un centro di raccolta per il riciclo degli apparecchi elettrici. Il simbolo
riportato sul prodotto, sulle istruzioni per l‘uso o sull‘imballaggio ne danno indicazione. I materiali
sono riutilizzabili secondo la loro etichettatura. Con il riciclo, il recupero dei materiali o altre forme di
riutilizzo di apparecchi usati, si contribuisce in modo significativo alla tutela dell‘ambiente. Contattare
l’amministrazione comunale per conoscere il punto di smaltimento competente.
Page 24

- 24 -
Nous nous réjouissons de votre choix et vous remercions de votre confiance. Veuillez observer les informations
suivantes et conserver ce mode d‘emploi afin de pouvoir le remettre à l‘utilisateur suivant. Le radiateur thermique
plonge immédiatement toute la table à langer dans une douce chaleur très agréable. Il peut également réchauffer
rapidement les salles de bains, les ateliers de bricolage, les couloirs et les espaces abrités de terrasses et balcons. Le
rayonnement infra-rouge dispense très rapidement une chaleur économe en énergie.
Veuillez prendre le temps d’étudier attentivement les consignes de sécurité. Respectez les instructions d‘utilisation
afin de ne pas endommager le radiateur. Sinon vous risquez de vous blesser, de blesser votre enfant ou de mettre
en danger les personnes à proximité.
Consignes générales de sécurité:
! N’utilisez l‘appareil que pour l‘usage décrit; toute utilisation contraire à la destination du radiateur entraîne l‘annu-
lation de la garantie.
! Vérifiez que la tension marquée sur la plaque signalétique est bien celle de votre domicile.
! Arrêtez l‘utilisation dès que vous détectez un défaut sur l‘appareil.
!
Ne lais
sez jamais la table à langer sans surveillance si le radiateur est allumé.
!
Ne f
aites pas fonctionner ce radiateur pendant plus de 15 minutes.
! Respectez impérativement une distance minimale de 100 cm entre radiateur et table à langer.
! Éloignez le câble d‘alimentation de toute surface chaude et n‘approchez pas le câble d‘autres appareils éléctriques.
!
Évit
ez les rayonnements supplémentaires, comme les rayons directs du soleil ou d‘autres sources de rayonnement
car cela peut augmenter la température du corps de votre bébé.
! Ne pas diriger le rayonnement de ce chauffage sur les enfants en bas âge souffrant de fièvre ou d‘augmentation
de leur température. Risque de surchauffe de leurs corps.
! Ne pas entrer en contact avec l‘appareil en fonctionnement.
! Cet appareil doit toujours être branché directement sur la prise secteur. Intercaler un minuteur, une télécommande
ou tout autre appareil intermédiaire risque de provoquer un incendie.
!
Apr
ès son exctinction, l‘appareil reste encore brûlant pendant un certain temps. Ne pas couvrir le radiateur pour
table à langer! Risque d‘incendie.
!
Élimine
z les emballages et les pièces inutilisées avant la mise en route de l‘appareil. Sinon votre bébé risque d‘en
avaler ou de se blesser.
!
Éloigner l‘appar
eil de la portée d‘enfants. Sécuriser le câble d‘alimentation et éviter de tirer par inadvertance sur
celui-ci afin de ne pas faire tomber l‘appareil au sol.
!
Les personnes (y compris les enfants) dont les capacités physiques, sensorielles ou mentales ou le manque d‘ex-
périence ou de connaissances ne leur permettent pas d‘utiliser l‘appareil en toute sécurité, ne doivent utiliser ces
appareils que sous la surveillance ou qu‘avec les instructions d‘une personne responsable.
! Ne jamais utiliser l‘appareil endommagé, ni avec son câble d‘alimentation en mauvais état.
!
Les réparations doivent impérativement être confiées à un professionnel. Des réparations incorrectes peuvent
entraîner un danger considérable pour l‘utilisateur - cela s‘applique également au remplacement du cordon d‘ali-
mentation.
FR
Francais
Page 25

- 25 -
A B
FR
Francais
Contenu de la livraison
• Tension nominale: 230 V
•
Puis
sance: 400 / 800 W
• Type de montage: Câble secteur
•
Clas
se de protection: 1
•
Arr
êt automatique intégré en cas de basculement
(Angle de basc
ulement : 25°)
• Longueur du câble secteur : 185 cm
(a
vec prise de courant avec terre)
•
Ra
yonnement thermique et distribution de température
vérifiés conformément à la norme médicale IEC 601-2-21
Caractéristiques techniques
Désignation des composants
1 Radiateur thermique à
2 tubes infrarouges
2 Affichage de la
puissance de chauffe
3
Bout
on pour mise en route et arrêt
de la fonction de coupure automatique (Timer)
4 Tirette pour Marche/Arrêt
TIMER ON/OFF
1
3
4
2
Page 26

- 26 -
Montage
Consignes de sécurité pour fixation murale:
• Le radiateur fixé au mur n‘est pas orientable et doit obligatoirement être monté en position horizontale. Une
fixation au plafond est formellement interdite!
• Le radiateur ne doit pas être monté sur supports en bois, en plastique, sur matériaux inflammables ni être fixé
en dessous de prises de courant.
•
IMPOR
TANT ! Distances minimales: La distance entre le radiateur et la table à langer doit être supérieure
ou égale à 100 cm. La distance entre le radiateur et le plafond doit au minimum être de 35 cm. La distance
minimale entre les meubles et les matériaux inflammables doit être de 65 cm. Sinon risque d‘incendie!
•
Si c
e radiateur est installé dans des salles de bain ou de douche, il faut respecter les normes locales et les règlements
du fournisseur d‘électricité. L‘appareil doit être monté de sorte à ne pas pouvoir être actionné depuis la baignoire ou
la douche.
•
L
e montage au-dessus de la baignoire est interdit!
1.
Dépose
z la plaque de montage de l‘appareil comme indiqué fig. 1.
2.
En r
espectant les distances minimales indiquées dans le schéma de la notice (fig. 5), plaquez la plaque de montage
au mur et positionnez-la horizontalement (avec un niveau à bulle). Tracez la position des trous de fixation avec un
crayon.
3.
P
ercez les trous, insérez les chevilles et fixez la plaque de montage avec les vis fournies en contrôlant l‘horizontalité
(fig. 3).
4.
Glis
sez le radiateur dans les fentes prévues sur la plaque de montage (fig. 3).
TIMER ON/OFF
35 cm
20 cm
100 cm
!
1
2
3 4
5
FR
Francais
Page 27

- 27 -
230 V
1 2
1. Mettez le bouton „Timer“ en bas du radiateur sur ON pour activer la minuterie d‘arrêt automatique. L‘appareil s‘arrête automatiquement après 10
minutes de fonctionnement.
2. Pour rallumer le radiateur après un arrêt temporisé, vous disposez de 2
possibilités:
• Me
ttre l‘interrupteur à bascule „Timer“ sur OFF ou
• Tirer la tirette jusqu‘à ce que l‘affichage de la puissance de chauffe „0“
apparaisse. A la prochaine action de la tirette, l‘appareil est rallumé en
position „1“ ou „2“.
L‘appareil est équipé d‘un arrêt automatique en cas de renversement. Si l’angle était supérieur à 25° (p.ex. en cas de
montage au plafond), l’alimentation de courant est coupée. Après avoir redressé le piètement, le radiateur se remet en
route automatiquement.
Arrêt automatique réglable
Arrêt automatique en cas de renversement
I
O
TIMER OFF
10
I
O
TIMER OFF
I
O
10
TIMER ON/OFF
FR
Francais
1. Mettez la fiche dans la prise secteur (fig. 1).
2. Pour allumer le radiateur, tirez la tirette (fig.2). Le radiateur peut fonctionner à mi- puissance de 400 W (position
„1“) ou à pleine puissance de 800 W (position „2“). Le radiateur peut fonctionner à mi- puissance de 400 W (position „1“) ou à pleine puissance de 800 W (position „2“).
3
En tir
ant la tirette, la puissance varie cycliquement ou passe à l‘arrêt (position „0“).
Mise en service
Dépannage
Problème Causes possibles Que faire ?
Pas de chauffage bien que
l‘affichage de
la puissance
de chauffe est
sur position
„1“ ou „2“.
• Le câble secteur n‘est pas branché correctement.
• L‘arrêt temporisé (Timer) est activé.
• L‘arrêt automatique en cas de basculement
est activé puisque l‘angle du radiateur
dépasse les 25°.
• Vérifiez que la fiche est dans la prise de
courant et que la prise est sous tension.
• Mettez le minuteur „Timer“ sur „OFF“ ou
bien arrêtez le radiateur en tirant la tirette,
puis rallumez le.
• Vérifiez que le radiateur est monté au mur
horizontalement et de manière fixe ou que
le piètement est droit.
1
0
2
ON
400 W
ON
800 W
OFF
Page 28

- 28 -
reer GmbH
Muehlstr.41 • 71229 Leonberg • Germany
www.reer.de
FR
Francais
Nettoyage, entretien
Garantie
• Avant un nettoyage, assurez-vous que le radiateur est à l‘arrêt, qu’il est froid et débranché (retirer la fiche secteur).
Nettoyer les surfaces avec un chiffon doux et sec ou légèrement humidifié. L‘intérieur du radiateur ne doit être nettoyé
que par un professionnel.
• Ce produit ne nécessite pas d‘entretien particulier.
•
L
es réparations ne doivent être effectuées que par un professionnel.
Veuillez conserver la preuve d‘achat, le mode d‘emploi et le numéro d‘article.
Si vous pensez devoir formuler une réclamation de garantie, veuillez contacter votre revendeur.
Toutes les caractéristiques techniques, les informations et les propriétés du produit correspondent à son état à la date de la
publication de cette notice. Les informations du fabricant sont fiables et exactes. Elles sont communiquées de bonne foi. La
société ne saurait toutefois être tenue responsable d‘erreurs dans cette notice et se réserve le droit d‘apporter sans préavis
des modifications au design et à la spécification du produit. Copie et communication graphique, électronique, mécanique
ou de quelque forme que ce soit par photocopie, enregistrement sur bande ou sauvegarde dans une base de données du
contenu, même partiel, de cette notice protégée par les droits d‘auteur, n‘est permise qu‘avec l’autorisation écrite préalable
de la société REER.
Remarque concernant la protection de l‘environnement:
A la fin de sa durée de service, cet appareil ne doit pas être éliminé avec les déchets ménagers, mais
doit être confié à un point de collecte pour recyclage d‘appareils électriques. Le symbole figurant
sur le produit, dans le mode d‘emploi ou sur l‘emballage rappelle cette obligation. Les matériaux de
cet appareil portent des marquages, nécessaires au recyclage. Avec la valorisation, le recyclage ou
d‘autres méthodes de récupération des matériaux d‘appareils usagés, vous contribuez efficacement
à préservation de l‘environnement. Pour connaître l‘adresse du point de collecte le plus proche,
adressez-vous à la mairie de votre commune.
Page 29

- 29 -
Wij zijn blij dat u dit product gekozen hebt en danken u voor uw vertrouwen. Om te kunnen genieten van uw nieuwe
warmtelamp voor de luiertafel, vragen wij u om de volgende aanwijzingen zorgvuldig in acht te nemen en deze
gebruiksaanwijzing goed te bewaren en aan de respectievelijke gebruiker door te geven.
De warmtelamp voor luiertafel genereert snel een aangename warmte in het bereik van de luiertafel. Hij kan echter
ook gebruikt worden voor de snelle verwarming van badkamers, hobbykamers, gangen, overdekte terrassen en
balkons. De straling zorgt ervoor dat binnen een paar seconden een energiezuinige warmte beschikbaar is.
Neem a.u.b. een paar minuten tijd om deze veiligheidsaanwijzingen te lezen. Volg de instructies in de handleiding
om het risico op beschadiging van de warmtelamp te vermijden. In het ergste geval kan uw kind, u zelf of andere
mensen in gevaar komen of verwond worden.
Algemene veiligheidsaanwijzingen:
! Gebruik het toestel slechts voor het hier beschreven gebruiksdoel. Het ondeskundig gebruik leidt tot het vervallen
van de garantie.
! Controleer of de gegevens op het typeplaatje met uw netspanning overeenstemmen.
! Gebruik het toestel niet als het tekens van mogelijke defecten vertoont.
!
Bij he
t gebruik van de warmtelamp voor luiertafel mag het apparaat nooit zonder toezicht gebruikt worden.
!
De ma
ximale bestralingsduur mag niet boven 15 bar liggen.
! De bestralingsafstand van 100 cm van de warmtestraler tot de tafel moet nageleefd worden.
! Houd de leidingen ver van alle hete toesteldelen, ook de leidingen van elektrische toestellen in de onmiddellijke
omgeving.
!
V
ermijd elke extra warmtestraling, zoals bijv. zonlicht of bijkomende stralingsbronnen, omdat hierdoor de
lichaamstemperatuur van uw baby kan stijgen.
!
Kleine kinder
en met verhoogde lichaamstemperatuur mogen niet bestraald worden. Risico van oververhitting van
het lichaam.
! Raak het toestel niet als hij in werking is.
!
Al
leen directe aansluiting op het stopcontact. Gebruik geen op het toestel aangesloten voorschakelapparaten zoals
een timer, afstandsschakelaar enz. omdat er brandgevaar bestaat.
! Na het uitschakelen is het toestel nog heet. De warmtelamp voor luiertafel niet afdekken! Er bestaat brandgevaar.
!
Verwijder voorafgaand het eerste gebruik alle verpakkingsmaterialen en niet gebruikte onderdelen, zodat uw kind
zich niet kan verwonden of iets inslikken.
!
Gebruik he
t toestel niet binnen handbereik van kinderen. De voedingskabel beveiligen en ervoor zorgen dat er per
ongeluk niet aan getrokken kan worden zodat het toestel op de grond valt.
!
Personen (inclusief kinderen) die wegens hun lichamelijke, sensorische of geestelijke begaafdheden, hun onerva-
renheid of onwetendheid niet in staat zijn een toestel veilig te gebruiken, mogen deze toestellen niet gebruiken
zonder toezicht of instructies van een verantwoordelijk persoon.
! Gebruik het toestel niet als deze beschadigd is of als de voedingskabel beschadiging vertoont.
!
Reparaties mogen alleen door een gekwalificeerde technicus uitgevoerd worden. Onvakkundige reparaties kunnen
tot aanzienlijke gevaren voor de gebruiker leiden - dit geldt ook voor het vervangen van de voedingskabel.
NL
Nederlands
Page 30

- 30 -
A B
NL
Nederlands
Omvang van de levering
• nominale spanning: 230 V
• vermogen: 400 / 800 W
•
montage
wijze: Netkabels
•
be
schermingsklasse: 1
•
geïnt
egreerde uitschakelfunctie bij kantelen (kantelhoek: 25 °)
•
kabel
lengte: 185 cm (met randaardestekker)
• warmtestraling en temperatuurverdeling getest volgens de norm
v
oor medische elektrische toestellen (IEC601-2-21)
Technische gegevens
Onderdelenomschrijving
1 warmtelamp met 2 buizen
2 warmte-instellingen weergave
3
Schakelaar v
oor het in- / uitschakelen van de automatische uitschakelfunctie (timer)
4
tr
ekkoord voor het in- / uitschakelen
van het toestel
TIMER ON/OFF
1
3
4
2
Page 31

- 31 -
Montage
Veiligheidsaanwijzingen bij de montage aan de wand:
• De warmtelamp voor luiertafel mag slechts stationair en horizontaal aan de wand gemonteerd worden. Een
plafondmontage is niet toegestaan!
•
De w
armtelap voor luiertafel mag niet gemonteerd worden op hout, plastiek of andere brandbare materialen,
of onder stopcontacten.
•
BELANGRIJK! Minimale a
fstanden: De afstand van de warmtelamp tot de luiertafel mag niet minder zijn dan
100 cm. De afstand van 35 cm van de warmtelamp tot het plafond moet strikt nageleefd worden. De minimale
afstand tot meubels en brandbare materialen is 65 cm. Anders bestaat er brandgevaar!
•
Bij de montage in een bad- o
f doucheruimtes moeten de bepalingen van de plaatselijke elektriciteitsmaatschappijen
nageleefd worden. De warmtelamp moet zo geplaatst worden dat de trekschakelaar niet bediend kan worden vanuit
het bad of de douche.
•
He
t toestel mag niet boven het bad gemonteerd worden!
1.
V
erwijder de montageplaat uit het toestel zoals in afb. 1 wordt getoond.
2.
Houd
de wandconsole, met naleving van de minimale afstand (afb. 5), aan de wand en markeer met een potlood de
schroefgaten. Gebruik voor de horizontale uitlijning een waterpas.
3.
Schr
oef nu de wandconsole aan de wand (afb. 3) met de meegeleverde schroeven en pluggen.
4.
Plaa
ts de warmtelamp in de hiervoor voorziene sleuven op de wandconsole (afb. 3).
5.
Schroef de warmtelamp met de in de afb. B1 verwijderde schroeven op de wandconsole (afb. 4).
TIMER ON/OFF
35 cm
20 cm
100 cm
!
1
2
3 4
5
NL
Nederlands
Page 32

- 32 -
230 V
1 2
1. Om de automatische uitschakeling te activeren schakel de timerschakelaar
aan de onderzijde van het toestel naar „ON“. Het toestel schakelt zich na
10 minuten automatisch uit.
2. Om het toestel na de automatische uitschakeling opnieuw in te schakelen,
hebt u 2 mogelijkheden:
• Schakel de tuimelschakelaar naar „Off“
of
• trek aan de trekkoord tot de weergave voor warmtestand op „0“ staat.
Bij opnieuw trekken aan de trekkoord voor de warmtestand „1“ of „2“
w
ordt het toestel weer ingeschakeld.
Het toestel heeft een automatische uitschakelfunctie bij het kantelen van het toestel. Indien de hoek groter is dan 25 °
(bijv. bij plafondmontage), wordt de stroomtoevoer in het toestel onderbroken. Bij het oprichten van het toestel schakelt
de warmtelamp zich automatisch opnieuw in.
Automatische uitschakeling
Automatische uitschakelfunctie bij het kantelen van het
I
O
TIMER OFF
10
I
O
TIMER OFF
I
O
10
TIMER ON/OFF
NL
Nederlands
1. Steek de stekker in het stopcontact (afb. 1).
2. Trek aan de trekkoord (afb. 2) om de warmtelamp in te schakelen. De warmtelamp kan in twee warmteposities
ingesteld worden: 400 W (stand „1“) en 800 W (stand „2“).
3
Door opnieuw aan de tr
ekkoord te trekken kan de warmtestand gewijzigd of het toestel opnieuw uitgeschakeld
(stand „0“) worden.
Inbedrijfstelling
Probleemoplossing
probleem mogelijke oorzaken Wat te doen?
Geen
warmtestraling ondanks
warmtestand
„1“ of „2“.
• De stekker is niet goed ingestoken.
• De automatische uitschakelfunctie (timer)
wordt geactiveerd.
• De automatische uitschakelfunctie bij het
kantelen van het toestel wordt geactiveerd
omdat de hoek van de warmtelamp 25 °
werd overschreden.
• Controleer de stekker.
• Draai de „timer“ naar „Off“ of schakel het
toestel door herhaaldelijk trekken aan de
trekkoord in en dan opnieuw uit.
• VeVerzeker u ervan dat de warmtelamp
waterpas en stevig op zijn plaats aan de
wand gemonteerd is.
1
0
2
ON
400 W
ON
800 W
OFF
Page 33

- 33 -
reer GmbH
Muehlstr.41 • 71229 Leonberg • Germany
www.reer.de
NL
Nederlands
Reiniging, onderhoud
Waarborg
• Voordat u begint met de reiniging van het toestel, controleer of het toestel uitgeschakeld en afgekoeld is (stekker uitrekken). De oppervlakte met een droge of licht vochtige doek reinigen. De reflector en verwarmingselementen slechts door
een vakman laten reinigen.
• Dit product vereist geen speciaal onderhoud.
•
R
eparaties van het toestel mogen slechts door een vakman uitgevoerd worden.
Gelieve het aankoopbewijs, de gebruiksaanwijzing en het artikelnummer te bewaren.
Garantieclaims of aanspraken voortvloeiende uit garantie moeten uitsluitend met handelaars geregeld worden.
Alle technische gegevens, informatie en eigenschappen van het in dit drukwerk beschreven product worden naar ons beste
weten en overeenkomstig de stand bij publicatie opgesteld. De door reer samengestelde informatie is correct en betrouwbaar. Echter de firma reer neemt geen enkele vorm van verantwoordelijkheid voor mogelijke fouten die in dit document
staan en behoudt zich het recht om zonder voorafgaande aankondiging, wijzigingen uit te voeren aan het product, resp.
aan de specificaties van het product. Reproductie en verspreiding van informatie uit dit door auteursrechtelijk beschermd
document in welke vorm en op welke manier dan ook, grafisch, elektronisch of mechanisch, door fotokopiëren, opnemen
op band of opslaan in databank- ook gedeeltelijk - vereisen een op voorhand gegeven schriftelijk akkoord van de firma reer.
Aanwijzingen voor de milieubescherming:
Dit product mag op het einde van zijn levensduur niet met het gewone huisafval verwijderd worden,
maar moet bij een inzamelpunt voor de recyclering van elektrische toestellen ingeleverd worden.
Een symbool op het product, in de gebruiksaanwijzing of op de verpakking verwijst hiernaar. De
materialen zijn volgens hun aanduiding herbruikbaar. Met het hergebruik, de recyclering van materialen of andere vormen van hergebruik van oude toestellen levert u een belangrijke bijdrage tot
de bescherming van ons milieu. Neem a.u.b. contact met uw gemeentebestuur om de betreffende
verzamelplaats voor afval te vinden.
Page 34

- 34 -
Vi er glade for at du har valgt dette produkt og takker for din tillid. For at du får størst mulig glæde af din nye puslebord-varmestråler, beder vi dig at følge de nedenstående oplysninger omhyggeligt og opbevare denne brugsvejledning og videregive den til den pågældende bruger.
Puslebord-varmestråleren genererer hurtigt en behagelig varme i området omkring puslebordet. Den kan dog også
anvendes til hurtig opvarmning af badeværelser, hobbyrum, entreer, overdækkede terrasser og altaner. Strålingen
varmer på få sekunder de nærmeste omgivelser op.
Vigtigt, brug et øjeblik til at læsesikkerhedsvisningerne grundigt igennem. Følg henvisningerne i vejledningen, da
der ellers er fare for at puslebord-varmestråleren tager skade. I værste fald kan dit barn, du selveller andre personer
bringes i fare eller kvæstes.
Generelle sikkerhedshenvisninger:
! Produktet må kun anvendes til det her beskrevne formål, usagkyndig brug medfører at garantien bortfalder.
! Kontrollér om oplysningerne på typeskiltet stemmer overens med strømspændingen.
! Må ikke anvendes ved tegn på mangler.
! Ved brug som puslebord-varmestråler må apparatet aldrig benyttes uden opsyn.
!
Den mak
simale strålingstid må ikke overskride 15 minutter.
!
S
trålingsafstanden på 100 cm mellem varmestråler og bordet skal altid overholdes.
! Hold altid afstand mellem ledninger og alle varme dele af stråleren, også ledninger på elektriske apparater i
nærheden.
!
Undgå ek
stra varmestråling, som f. eks. sollys eller ekstra strålingskilder, fordi de kan få barnets kropstemperatur
til at stige.
! Spædbørn med forhøjet temperatur må ikke udsættes for varmestråling. Der er fare for at kropstemperaturen
stiger for meget.
! Produktet må ikke berøres under drift.
! Kun direkte tilslutning på strømstikdåsen. Må ikke tilsluttes via ekstraenheder, som f. eks. tidsur, fjernstyrede kon-
takter etc. , da dette medfører brandrisici.
!
Pr
oduktet forbliver varmt et stykke tid efter det er slukket.
Puslebord-varmestråleren må ikke overdækkes! Brandfare.
!
Inden f
ørste ibrugtagning skal alt emballagemateriale og de komponenter, der ikke bruges, fjernes, så barnet kan
ikke komme til skader eller sluge noget.
!
Pr
oduktet må ikke anvendes inden for småbørns rækkevidde. Sikr strømkablet og sørg for at der ikke trækkes i det
ved en fejltagelse og at produktet derved falder ned på gulvet.
!
Personer (inklusive børn), der pga. deres fysiske sensoriske eller mentale evner eller deres manglende erfaring
eller kundskaber ikke er i stand til at benytte produktet på en sikker måde, bør ikke bruge denne type apparater
uden opsyn og vejledning fra en ansvarlig person.
! Produktet må ikke bruges, hvis selve apparatet eller strømkablet er beskadiget.
!
Reparationer må kun udføres af en kvalificeret fagmand. Usagkyndig reparationer kan medføre alvorlige farer for
brugeren – det gælder også for udskiftning af strømkablet.
DK
Dansk
Page 35

- 35 -
Delebetegnelse
Komponentbetegnelse
A B
TIMER ON/OFF
1
3
4
2
DK
Dansk
• strømspænding: 230 V
• effekt: 400 / 800 W
•
mont
eringsmåde: strømkabel
•
Sikkerhedsklas
se: 1
•
int
egreret vippe/slukkefunktion (væltevinkel: 25°)
•
kabel
længde: 185 cm (med sikkerhedsstik)
• varmestråling og temperaturfordeling kontrolleret iht. standard for
elektr
omedicinsk udstyr (IEC601-2-21)I
Tekniske data
1 varmestråler med 2 rør
2 varmetrin-indikator
3
kontakt til a
t aktivere/deaktivere
den automatiske slukningsfunktion
(timer)
4
tr
æksnor til at tænde/slukke for
apparatet
Page 36

- 36 -
Montering
Sikkerhedsanvisninger ved vægmontering:
• Puslebord- varmestråleren må kun monteres fast og vandret i væggen. Det er ikke tilladt at montere den i
loftet!
•
Puslebor
d-varmestråleren må ikke monteres på træ, plast eller andet brændbart materiale eller neden for
stikdåser.
•
VIG
TIGT! Mindsteafstande: Afstanden mellem varmestråleren og puslebordet må ikke underskride 100 cm.
Afstanden mellem varmestråleren og loftet på mindst 35 cm skal altid overholdes. Mindsteafstanden til møbler
og brændbart materiale skal være 65 cm. Ellers opstår brandfare!
•
V
ed installation i vådrum skal forskrifterne fra det lokale elselskab overholdes. Stråleren skal positioneres således at
trækkontakten ikke kan betjens fra badekar eller bruser.
•
S
tråleren må ikke monteres over badekarret!
1.
Fjern mont
eringspladen fra produktet som vist i fig. 1.
2.
Hold
vægholderen mod væggen under hensyntagen til mindsteafstandene (billede 5) og marker skruehullerne med
en blyant. Brug et vaterpas til vandret justering.
3.
Skru v
ægholderen ind i væggen (billede 3) ved hjælp af de medfølgende skruer og dyvler.
4. Sæt puslebord-varmestråleren ind i de dertil beregnede slidser i vægholderen (billede 3).
5.
Skru puslebor
d- varmestråleren fast på vægholderen (billede 4) ved hjælp af de skruer, der er fjernet på billede B1.
TIMER ON/OFF
35 cm
20 cm
100 cm
!
1
2
3 4
5
DK
Dansk
Page 37

- 37 -
230 V
1 2
1. For at aktivere det automatiske stop indstilles timerkontakten på produktets
underside til „ON“. Produktet stopper automatisk efter 10 minutter.
2.
Der finde
s 2 muligheder for at tænde produktet igen efter automatisk stop,:
• Indstil vippekontakten til „Off“ eller
• tr
æk i træksnoren til varmetrin-indikatoren står på „0“. Når der igen
tr
ækkes til varmetrin „1“ eller „2“, tændes varmestråleren igen.
Varmestråleren har en automatisk vælte-stopfunktion. Hvis vinkelen overskrider 25° (f. eks. ved loftmontering) afbrydes
strømforsyningen til varmestråleren. Når varmestråleren rettes op, tændes den automatisk igen.
Automatisk stop
Automatisk vælte-stopfunktion
I
O
TIMER OFF
10
I
O
TIMER OFF
I
O
10
TIMER ON/OFF
DK
Dansk
1. Sæt strømstikket ind i stikdåsen (billede 1).
2. Træk i træksnoren (billede 2) for at starte varmestråleren. Varmestråleren kan indstilles på to varmetrin, 400 W (trin
„1“) og 800 W (trin „2“).
3
Når der igen tr
ækkes i træksnoren, kan varmetrinnet ændres eller varmestråleren slukkes igen (trin „0“).
Ibrugtagning
Fejlafhjælpning
problem mulige årsager Hvad kan du gøre?
Ingen
varmestråling
til trods for
varmetrin-indikator viser
„1“ eller „2“.
• Strømstikket er ikke forbundet korrekt.
• Den automatiske slukkefunktion (timer) er
aktiveret.
• Den automatiske væltestopfunktion er
aktiveret, da varmestrålerens vinkel overskrider 25°.
• Kontroller strømstikket.
• Indstil „Timer“ til „Off“ eller sluk og derefter
tænd for enheden ved gentagne gange at
trække i træksnoren.
• Sørg for at varmestråleren er monteret
vandret og fast på væggen.
1
0
2
ON
400 W
ON
800 W
OFF
Page 38

- 38 -
reer GmbH
Muehlstr.41 • 71229 Leonberg • Germany
www.reer.de
DK
Dansk
Rengøring, vedligeholdelse
Garanti
• Inden du går i gang med rengøring, skal du sikre dig at apparatet er frakoblet og afkølet (træk strømstikket). Overfladen
kan rengøres med en tør eller let fugtig klud. Reflektor og varmeelementerne må kun rengøres af en fagmand.
•
Pr
oduktet kræver ingen særlig vedligeholdelse.
•
R
eparationer på apparatet må kun udføres af en fagmand.
Opbevar købsbevis, brugsvejledning og artikelnummer.
Garantikrav eller krav fra garantitilsagn skal udelukkende gøres gældende over for forhandleren.
Alle tekniske data, oplysninger samt egenskaber af det i denne publikation beskrevne produkt er fremstillet efter bedste
viden og i henhold til vidensstanden ved udgivelsen. De af reer givne oplysninger anses for at være korrekte og pålidelige.
reer hæfter dog ikke for mulige fejl i nærværende dokument og forbeholder sig retten uden varsel at foretage ændringer
ved produktdesignet eller specifikationerne. Mangfoldiggørelse og videregivelse af oplysninger i nærværende ophavsretsligt
beskyttede publikation i enhver form og på enhver måde, det være sig grafisk, elektronisk eller mekanisk, via fotokopier,
båndoptegnelser eller lagring i et datasystem - også delvist - kræver forudgående skriftlig godkendelse fra reer.
Oplysninger vedrørende miljøbeskyttelse:
Produktet må efter endt brugstid ikke bortskaffes med dagrenovationen, men skal afleveres på en
genbrugsstation som elektrisk affald. Symbolet på produktet, i brugsvejledningen eller på emballagen gør opmærksom på dette. Materialerne kan genbruges iht. deres mærkning. Med genbrug, sortering af råstoffer eller anden genbrug af gammelt materiel yder du et vigtigt bidrag til beskyttelse
af vores miljø. Spørg hos kommunen efter den nærmeste genbrugsstation.
Page 39

- 39 -
Χαιρόμαστε που επιλέξατε αυτό το προϊόν και σας ευχαριστούμε για την εμπιστοσύνη σας. Για να έχετε τη δυνατότητα
να απολαύσετε το νέο θερμοπομπό αλλαξιέρας, σας παρακαλούμε όπως λάβετε σοβαρά υπόψη τις παρακάτω
υποδείξεις και να αποθηκεύσετε αυτές τις οδηγίες χρήσης και να τις παραδώσετε στο μελλοντικό χρήστη.
Ο θε
ρμοπομπός αλλαξιέρας παράγει άμεσα άνετη θερμότητα στο χώρο της αλλαξιέρας. Χρησιμεύει επίσης στην άμεση
θέρμανση στο μπάνιο, σε χώρους παιχνιδιών, χολ, καλυμμένες βεράντες και μπαλκόνια. Η ακτινοβολία φροντίζει ώστε
εντός λίγων δευτερολέπτων να υπάρχει διαθέσιμη θερμότητα, εξοικονομώντας παράλληλα ενέργεια.
Πα
ρακαλούμε αφιερώστε λίγα λεπτά για να διαβάσετε καλά τις υποδείξεις ασφάλειας. Ακολουθήστε τις οδηγίες, διότι
διαφορετικά υφίσταται κίνδυνος πρόκλησης βλάβης στο θερμοπομπό αλλαξιέρας. Στη χειρότερη των περιπτώσεων,
ενδέχεται να εκτεθεί σε κίνδυνο ή να τραυματιστεί το παιδί σας, εσείς οι ίδιοι ή άλλα άτομα.
Γενικές υποδείξεις ασφάλειας:
! Η συσκευή πρέπει να χρησιμοποιείται μόνο για τους σκοπούς που περιγράφονται εδώ. Η ακατάλληλη χρήση μπορεί
να οδηγήσει στην απώλεια κάθε απαίτησης από την εγγύηση.
! Ελ
έξτε αν τα στοιχεία στην πινακίδα τύπου συμφωνούν με την τάση δικτύου
.
! Σε περίπτωση ενδείξεων βλαβών, μην χρησιμοποιείτε τη συσκευή.
! Κατ
ά τη χρήση του θερμοπομπού αλλαξιέρας, πρέπει να έχετε πάντα υπό την επίβλεψή σας τη συσκευή.
! Η μέ
γιστη διάρκεια ακτινοβολίας απαγορεύεται να υπερβαίει τα 15 λεπτά.
! Πρέπει να τηρείτε πάντα σε κάθε περίπτωση μια ελάχιστη απόσταση 100 cm μεταξύ του θερμοπομπού και του
τραπεζιού.
! Κρατήσ
τε τη γραμμή τροφοδοσίας μακριά από όλα τα καυτά μέρη του εξοπλισμού, καθώς και άλλες ηλεκτρικές
συσκευές.
! Αποφύγετε την πρόσθετη ακτινοβολία θερμότητας, όπως π.χ. Το φώς του ήλιου ή τις πρόσθετες πηγές ακτινοβολίας,
καθώς αυτό μπορεί να αυξήσει τη θερμοκρασία του σώματος του μωρού σας.
! Τα μικρά παιδιά με αυξημένη θερμοκρασία απαγορεύεται να εκτίθενται σε ακτινοβολία. Υφίσταται κίνδυνος
υπερθέρμανσης του σώματος
.
! Μη
ν αγγίζετε τη συσκευή, όταν είναι σε λειτουργία.
! Πραγματ
οποιήστε μόνο άμεση σύνδεση σε ηλεκτρική πρίζα. Μην συνδέετε συσκευές, όπως π.χ. χρονόμετρα,
διακόπτες τηλεχειρισμού κ
.λπ. στη συσκευή, διότι υφίσταται κίνδυνος πυρκαγιάς.
!
Η συ
σκευή είναι είναι ακόμα ζεστή μετά την απενεργοποίηση. Μην καλύπτετε το θερμοπομπό αλλαξιέρας! Υφίσταται
κίνδυνος πυρκαγιάς.
! Πριν α
πό την πρώτη χρήση, απομακρύνετε όλα τα υλικά συσκευασίας καθώς και τα δομικά μέρη που δεν πρόκειται
να χρησιμοποιηθού, έτσι ώστε να μην αποτελούν κίνδυνο τραυματισμού ή πνιγμού για το παιδί σας.
! Μην χρησιμοποιείτε τη συσκευή κοντά σε παιδιά. Φροντίστε ώστε το καλώδιο δικτύου να μην κινδυνεύει από
αθέμιτη αποσύνδεση και συνεπαγόμενη πτώση της συσκευής στο πάτωμα
.
! Τα άτ
ομα (συμπεριλαμβανομένων των παιδιών), τα οποία λόγω των ψυχικών, αισθητικών ή πνευματικών ικανοτήτων
τους ή της απειρίας τους ή της μη επαρκούς γνώσης δεν είναι σε θέση να χειρίζονται με ασφάλεια τη συσκευή,
πρέπει να χρησιμοποιούν αυτή τη συσκευή πάντα υπό την επίβλεψη ή την καθοδήγηση υπεύθυνου ατόμου
.
! Μη
ν χρησιμοποιείτε τη συσκευή, όταν η συσκευή ή το καλώδιο δικτύου φέρουν βλάβες.
! Οι ε
πιδιορθώσεις επιτρέπεται να πραγματοποιούνται μόνο από εξουσιοδοτημένο ειδικό προσωπικό. Λανθασμένες
επισκευές μπορούν να οδηγήσουν σε σημαντικό κίνδυνο για τον χρήστη - το ίδιο ισχύει και για την αντικατάσταση
του καλωδίου τροφοδοσίας
.
GR
ελληνικός
Page 40

- 40 -
παραδοτέα ποσότητα
A B
GR
ελληνικός
• Τάση δικτύου: 230 V
• Ισχύς: 400 / 800 W
•
Είδος συνα
ρμολόγησης: Αγωγός ισχύος
•
Κλ
άση προστασίας: 1
•
Ενσωματωμέ
νη λειτουργία απενεργοποίησης ανατροπής
(Γωνία ανατ
ροπής: 25°)
• Μήκος καλωδίου: 185 cm (με το βύσμα ασφαλείας)
•
Ακτινοβ
ολία θερμότητας και διανομή θερμοκρασίας ελεγμένη
σύμφ
ωνα με πρότυπο ιατρικών προϊόντων (IEC601-2-21)
Τεχνικά δεδομένα
Χαρακτηρισμός μερών
1 Θερμοπομπός με 2 σωλήνες
2 Ένδειξη βαθμίδων θερμότητας
3
Διακ
όπτης για ενεργοποίηση/
απενεργοποίηση της αυτόματης
λειτουργίας απενεργοποίησης
(χρονόμετρο)
4 Διακόπτης σκοινί για ενεργοποίηση/
απενεργοποίηση της συσκευής
TIMER ON/OFF
1
3
4
2
Page 41

- 41 -
Συναρμολόγηση
Υποδείξεις ασφάλειας κατά τη συναρμολόγηση σε τοίχο:
• Ο θερμοπομπός αλλαξιέρας επιτρέπεται να συναρμολογείται σταθερά και σε οριζόντια θέση σε τοίχο. Η
τοποθέτηση στην οροφή δεν επιτρέπεται!
•
Ο θε
ρμοπομπός αλλαξιέρας απαγορεύεται να συναρμολογείται σε ξύλο, πλαστικό ή άλλα εύφλεκτα υλικά ή κάτω
από πρίζες.
•
ΣΗΜ
ΑΝΤΙΚΟ! Ελάχιστες αποστάσεις: Η απόσταση του θερμοπομπού από την αλλαξιέρα απαγορεύεται να
είναι μικρότερη από 100 cm. Η απόσταση του θερμοπομπού από την οροφή απαγορεύεται να είναι μικρότερη
από τουλ. 35 cm. Η ελάχιστη απόσταση από έπιπλα και εύφλεκτα υλικά πρέπει να ανέρχεται σε 65 cm. Διαφορετικά
υφίσταται κίνδυνος πυρκαγιάς!
•
Ότ
αν εγκατασταθεί στο μπάνιο ή ντους, πρέπει να τηρούνται οι διατάξεις της τοπικής επιχείρησης ηλεκτρισμού. Ο
θερμοπομπός πρέπει να τοποθετείται με τέτοιο τρόπο, έτσι ώστε ο διακόπτης να μην μπορει να ενεργοποιηθεί από τη
μπανιέρα ή τη ντουζιέρα.
• Η συσκευή απαγορεύεται να συναρμολογείται πάνω από μπανιέρα!
1
. Απομακρύνετε την πλάκα συναρμολόγησης από τη συσκευή με τον τρόπο που φαίνεται στην Εικ. 1.
2. Κρατ
άτε απόσταση από τον τοίχο λαμβάνοντας υπόψη τις ελάχιστες αποστάσεις (Εικ. 5) από τον τοίχο και σημειώστε τις
οπές διάτρησης με μολύβι. Χρησιμοποιήστε αλφάδι για οριζόντια ευθυγράμμιση.
3. Βιδ
ώστε τη συγκράτηση τοίχου στον τοίχο (Εικ. 3) με τις συνημμένες βίδες και ούπα.
4. Τοπ
οθετήστε το θερμοπομπό αλλαξιέρας μέσα στις προβλεπόμενες εγκοπές της συγκράτησης τοίχου (Εικ. 3).
5. Βιδώστε το θερμοπομπό αλλαξιέρας στη συγκράτηση τοίχου (Εικ. 4) με τις βίδες που απομακρύνθηκαν στην Εικ. 1.
TIMER ON/OFF
35 cm
20 cm
100 cm
!
1
2
3 4
5
GR
ελληνικός
Page 42

- 42 -
230 V
1 2
Η συσκευή διαθέτει αυτόματη λειτουργία απενεργοποίησης ανατροπής. Εάν η γωνία είναι μεγαλύτερη από 25° (π.χ. σε
περίπτωση συναρμολόγησης σε οροφή), διακόπτεται η ηλεκτρική τροφοδοσία της συσκευής. Κατά την ευθυγράμμιση της
συσκευής, ενεργοποιείται εκ νέου ο θερμοπομπός αλλαξιέρας.
Αυτόματη λειτουργία απενεργοποίησης ανατροπής
I
O
TIMER OFF
10
I
O
TIMER OFF
I
O
10
TIMER ON/OFF
GR
ελληνικός
1. Συνδέστε το βύσμα μέσα στην πρίζα (Εικ. 1).
2. Τραβ
ήξτε το διακόπτη σκοινί (Εικ. 2) για να ενεργοποιήσετε το θερμοπομπό. Ο θερμοπομπός μπορεί να ενεργοποιηθεί
σε δύο βαθμίδες θερμότητας, 400 W (βαθμίδα «1») και 800 W (βαθμίδα «2»).
3 Με εκ ν
έου τράβηγμα του διακόπτη σκοινιού μπορείτε να αλλάξετε τη βαθμίδα θερμότητας ή να απενεργοποιήσετε
εκ νέου τη συσκευή (βαθμίδα «0»).
Θέση σε λειτουργία
1. Για να ενεργοποιήσετε το αυτόματο κλείσιμο ενεργοποιήσετε το
χρονοδιακόπτη στο κάτω μέρος της μονάδας στη θέση „ON“. Η συσκευή
απενεργοποιείται αυτόματα μετά από10 λεπτά.
2. Για να ενεργοποιήσετε εκ νέου τη συσκευή μετά από τη λειτουργία του
αυτοματισμού αυτόματης απενεργοποίησης, έχετε 2 δυνατότητες:
• Ρυθμίσ
τε το διακόπτη σε θέση «O» ή
• τραβήξτε το διακόπτη σκοινιού έως ότου εμφανιστεί η ένδειξη βαθμίδων
θέρμανσης στη θέση «0». Κατά το εκ νέου τράβηγμα σε βαθμίδα
θέ
ρμανσης «1» ή «2» ενεργοποιείται εκ νέου η συσκευή.
Αυτοματισμός αυτόματης απενεργοποίησης
Αντιμετώπιση βλαβών
Πρόβλημα Πιθανή αιτία Τι πρέπει να γίνει;
Καμία
ακτινοβολία
θερμότητας
παρά της
ένδειξης
βαθμίδων
θερμότητας
«1» ή «2».
•
Το καλώδιο τροφοδοσίας δεν είναι
συνδεδεμένο σωστά.
• Έχ
ει ενεργοποιηθεί η αυτόματη λειτουργία
απενεργοποίησης (χρονόμετρο).
• Η αυτόματη λειτουργία απενεργοποίησης
ανατροπής έχει ενεργοποιηθεί, διότι η
γωνία του θερμοπομπού είναι μεγαλύτερη
από 25°.
• Ελ
έγξτε το καλώδιο τροφοδοσίας.
• Ρυθμίσ
τε το «Timer» σε θέση «O»
ή απενεργοποιήστε τη συσκευή με
επανειλημμένο τράβηγμα του διακόπτη
σκοινιού και ενεργοποιήστε την εκ νέου.
• Βεβαιωθείτε ότι ο θερμοπομπός έχει
συναρμολογηθεί σε οριζόντια θέση και με
σταθερότητα στον τοίχο.
1
0
2
ON
400 W
ON
800 W
OFF
Page 43

- 43 -
reer GmbH
Muehlstr.41 • 71229 Leonberg • Germany
www.reer.de
GR
ελληνικός
Καθαρισμός, συντήρηση
Εγγύηση
• Προτού ξεκινήσετε τον καθαρισμό, βεβαιωθείτε ότι η συσκευή έχει απενεργοποιηθεί και έχει κρυώσει (τράβηγμα
βύσματος). Καθαρίστε τις επιφάνειες με ένα στεγνό ή ελαφρώς υγρό πανί. Ο ανακλαστήρας και οι θερμαινόμενες ράβδοι
επιτρέπεται να καθαρίζονται μόνο από ειδικό προσωπικό.
• Αυτό το προϊόν δεν προϋποθέτει ειδική συντήρηση.
• Οι ε
πιδιορθώσεις στη συσκευή επιτρέπεται να πραγματοποιούνται μόνο από ειδικό τεχνικό.
Φυλ
άξτε την απόδειξη αγοράς, τις οδηγίες χρήσης και τον κωδικό είδους.
Γ
ια οποιαδήποτε αξίωση στο πλαίσιο της εγγύησης ή αξιώσεις υπό δεσμεύσεις εγγύησης, απευθύνεστε αποκλειστικά στον
έμπορο από τον οποίο αγοράσατε το προϊόν
.
Όλ
α τα τεχνικά δεδομένα, οι πληροφορίες και οι ιδιότητες του προϊοντος που περιγράφεται εδώ έχουν συνταχθεί με καλή
πρόθεση και σύμφωνα με τη δημοσιοποιημένη έκδοση
. Οι πληροφορίες που διαθέτει η reer πρέπει να είναι ορθές και αξιόπιστες.
Η εταιρεία reer ωστόσο δεν αναλαμβάνει καμία ευθύνη για τυχόν σφάλματα μέσα σε αυτή την τεκμηρίωση και διατηρεί το
δικαίωμα, όπως προβεί σε αλλαγές του σχεδιασμού του προϊόντος και των προδιαγραφών χωρίς προηγούμενη ειδοποίηση. Η
ανατύπωση και η διάδοση των πληροφοριών αυτού του εντύπου που προστατεύεται από την αξίωση δικαιώματος πνευματικής
ιδιοκτησίας σε οποιαδήποτε μορφή και με οποιοδήποτε τρόπο, με γραφικό τρόπο, με ηλεκτρονική ή μηχανικό, με τη βοήθεια
φωτοτυπικών μηχανημάτων, ή αποθήκευση σε σύστημα αίτησης δεδομένων - ακόμα και αποσπασματικά - προϋποθέτει την
προηγούμενη γραπτή έγκριση της εταιρείας reer
.
Υποδείξεις για την περιβαλλοντική προστασία:
Αυτό το προϊόν, κατά το τέλος της διάρκειας της ζωής του απαγορεύεται να απορρίπτεται μαζί με τα
οικιακά απορρίμματα, αλλά πρέπει να παραδοθεί σε αρμόδια υπηρεσία συλλογής για την ανακύκλωση
ηλεκτρικών συσκευών. Το σύμβολο πάνω στο προϊόν, στις οδηγίες χρήσης ή τη συσκευασία
αποτελεί σαφή υπόδειξη. Τα υλικά πρέπει να ανακυκλώνονται σύμφωνα με τη σήμανσή τους. Με
την επανεχρησιμοποίηση, την ανακύκλωση των υλικών ή άλλες μορφές επαναξιοποίησης παλιών
συσκευών, συμβάλλουμε και εμείς σημαντικά στην προστασία του περιβάλλοντός μας. Απευθυνθείτε
στην διαχείριση της κοινότητάς σας για τις αρμόδιες υπηρεσίες απόρριψης.
Page 44

- 44 -
Cieszymy się bardzo za zdecydowanie się na zakup tego produktu i dziękujemy za zaufanie. Aby byli Państwo zadowoleni z promiennika ciepła do przewijaka dla niemowląt, prosimy o staranne przeczytanie niniejszych wskazówek oraz o
staranne przechowywanie instrukcji użytkownia w celu przekazania jej kolejnemu właścicielowi.
P
romiennik ciepła do przewijaka dla niemowląt wytwarza w stree przewijaków natychmiastowo przyjemne ciepło
.
P
romiennik ten służy również do szybkiego nagrzewania łazienek, pomieszczeń do majsterkowania, przedsionków,
osłoniętych tarasów i balkonów
.
Dzięki promieniowaniu już w ciągu kilku sekund dostępne jest energooszczędne
ciepło.
P
oświęć kilka minut swego czasu w celu dokładnego zapoznania się z przepisami bezpieczeństwa. Przestrzegaj instrukcji zawartych w niniejszej instrukcji, gdyż w przeciwnym razie występuje niebezpieczeństwo uszkodzenia promiennika
ciepła do przewijaka dla niemowląt. W najgorszym przypadku Twoje dziecko, Ty lub inne osoby mogą zostać narażone
na niebezpieczeństwo lub odnieść obrażenia.
Ogólne przepisy bezpieczeństwa:
! Używaj urządzenia wyłącznie zgodnie z jego przeznaczeniem, gdyż nieprawidłowe użycie pociąga za sobą utratę
gwarancji.
! Spra
wdź, czy wszystkie dane na tabliczce znamionowej są zgodne z parametrami danego napięcia seciowego
.
! Nie używaj urządzenia w przypadku pojawienia się usterki.
! P
odczas użytkowania promiennika ciepła do przewijaka dla niemowląt nie pozostawiaj go bez nadzoru
.
! N
ie przekraczaj maksymalnego czasu napromieniowywania wynoszącego 15 minut.
! Koniecznie utrzymuj między promiennikiem a stołem odstęp wynoszący 100 cm.
! Trzymaj przewód zasilający promiennika oraz przewody zasilające sąsiadujących urządzeń elektrycznych z dala od
wszystkich gorących elementów urządzenia.
! Unik
aj dodatkowego napromieniowania jak np. światło słoneczne lub dodatkowe źródła promieniowania, gdyż
może to być przyczyną podwyższenia temperatury ciała niemowlęcia.
! Z
abronione jest napromieniowywanie małych dzieci z podwyższoną z podwyższoną temperaturą ciała. Występuje
niebezpieczeństwo przegrzania ciała.
! Nie wolno dotykaj urządzenia podczas jego pracy.
! St
osuj wyłącznie bezpośrednie podłączenie do gniazdka sieciowego. Nie podłączaj żadnych urządzeń między gni-
azdkiem i promiennikiem, na przykład zegarów sterujących, włączników zdalnych itp
.
, gdyż występuje zagrożenie
pożarowe
.
! Ur
ządzenie po wyłączeniu jest jeszcze gorące. Nie zakrywaj promiennika ciepła do przewijaka dla niemowląt! Wys-
tępuje zagrożenie pożarowe
.
! P
rzed pierwszym użyciem usuń wszelki materiał opakowania oraz niewykorzystane elementy konstrukcyjne, co po-
zwoli uniknąć zranienia się dziecka lub połknięcia przez nie części.
! Nie używaj urządzenia w zasięgu dzieci. Zabezpiecz kabel przyłączeniowy i zwróć uwagę na to, aby nie został przy-
padkowo pociągnięty, co mogłoby spowodować spadnięcie urządzenia na podłogę.
! Osob
y (również dzieci), które ze względu na swoje predyspozycje zyczne, sensoryczne lub umysłowe, albo ze względu na brak doświadczenia życiowego lub wiedzy nie są w stanie bezpiecznie użytkować urządzenia, nie powinny
tego czynić bez nadzoru albo instruktażu osoby odpowiedzialnej
.
! N
ie używaj urządzenia, jeśli ono lub jego przewód przyłączeniowy są uszkodzone
.
! Napra
wy należy zlecać wyłącznie fachowcom. Błędnie wykonane naprawy mogą prowadzić do poważnych
zagrożeń wobec użytkownika - odnosi się to również do przewodu przyłączeniowego
.
PL
Polski
Page 45

- 45 -
Zakres dostawy
A B
PL
Polski
• napięcie znamionowe: 230 V
•
moc: 400 / 800
W
• rodzaj montażu: przewód
przyłączeniowy
•
k
lasa ochrony: 1
•
zint
egrowana funkcja wyłączania po przechyleniu
(k
ąt przechylenia: 25°)
•
długość pr
zewodu: 185 cm (wtyczka ze stykiem uziemiającym)
•
pr
omieniowanie cieplne oraz rozkład temperatury sprawdzone
według standardu dla wyrobów medycznych (IEC601-2-21)
Dane techniczne
Nazwa podzespołu
1 2-lampowy promiennik ciepła
2 sygnalizacja stopnia grzania
3 Przełącznik do włączania/wyłączania
automatycznej funkcji wyłączania
(funkcja zegara sterującego)
4 sznurek do pociągania w celu włącza-
nia/wyłączania urządzenia
TIMER ON/OFF
1
3
4
2
Page 46

- 46 -
Montaż
Przepisy bezpieczeństwa w przypadku montażu na ścianie:
• Promiennik ciepła do przewijaka dla niemowląt wolno jest montować na ścianie wyłącznie poziomo i na stałe.
Montaż na sucie jest zabroniony!
• Promiennika ciepła do przewijaka dla niemowląt nie wolno montować na drewnie, plastiku ani innych materiałach palnych, a także pod gniazdkami wtykowymi.
•
W
AŻNE! Odstępy minimalne: Odstęp promiennika od przewijaka nie może być mniejszy niż 100 cm. Odstęp
promiennika od sutu musi koniecznie wynosić co najmniej 35 cm. Minimalny odstęp od mebli i materiałów
palnych musi wynosić co najmniej 65 mm. W przeciwnym razie występuje zagrożenie pożarowe!
•
W pr
zypadku instalowania w łazienkach należy przestrzegać wytycznych lokalnego zakładu energetycznego. Promiennik należy ustawić w taki sposób, aby przełącznika sznurkowego nie można było obsługiwać przebywając w wannie lub
pod prysznicem.
• Ur
ządzenia nie wolno montować nad wanną!
1.
Usuń płyt
ę montażową z urządzenia w sposób przedstawiony na rys. 1.
2. P
rzyłóż uchwyt ścienny do ściany przy uwzględnieniu odstępów minimalnych (rys. 5) i ołówkiem zaznacz otwory dla
wkrętów mocujących
. W celu wypoziomowania urządzenia należy użyć poziomnicy
.
3. P
rzykręć uchwyt ścienny do ściany (rys. 3) za pomocą znajdujących się w zestawie wkrętów mocujących i kołków rozpo-
rowych.
4. Włó
ż promiennik ciepła do przewijaka dla niemowląt w przewidziane do tego celu szczeliny uchwytu ściennego (rys. 3)
5
. Przykręć promiennik ciepła do przewijaka dla niemowląt do uchwytu ściennego (rys. 4) wykręconymi na rys. 1 wkrętami mo-
cującymi
.
TIMER ON/OFF
35 cm
20 cm
100 cm
!
1
2
3 4
5
PL
Polski
Page 47

- 47 -
230 V
1 2
1. W celu aktywowania automatycznego wyłączania ustaw znajdujący się na
spodzie urządzenia przełącznik zegara sterującego w pozycji „ON”. Urządzenie wyłącza się automatycznie po 10 minutach.
2. W celu ponownego włączenia urządzenia po automatycznym wyłączeniu,
dostępne są 2 możliwości:
• P
rosimy ustawić przełącznik dźwigniowy w pozycji „O” lub
• Pociągnij sznurek przełącznika, aż sygnalizator stopnia grzania pokaże „0”.
Po ponownym pociągnięciu i ustawieniu stopnia grzania „1” lub „2” nastę puje pono
wne włączenie urządzenia.
Ur
ządzenie wyposażone jest w automatyczną funkcję wyłączania po przechyleniu. Gdyby kąt był większy niż 25° (np. przy
montażu na sucie) następuje przerwanie dopływu prądu do urządzenia
. Po wyprostowaniu urządzenia, promiennik ciepła
włącza się ponownie w sposób automatyczny
.
Automatyczne wyłączanie
Automatyczna funkcja wyłączania po przechyleniu
Usuwanie usterek
I
O
TIMER OFF
10
I
O
TIMER OFF
I
O
10
TIMER ON/OFF
PL
Polski
1. Włóż wtyczkę sieciową do gniazdka (rys. 1).
2. P
ociągnij za sznurek (rys. 2) w celu włączenia promiennika ciepła. Promiennik ciepła można ustawić na dwa stopnie
grzania, na 400 W (stopień „1”) oraz na 800 W (stopień „2”).
3. P
onownie pociągając za sznurek przełącznika można zmieniać stopień grzania lub wyłączać urządzenie (stopień „0”).
Uruchomienie
problem możliwe przyczyny Co robić?
Brak promieniowania
cieplnego,
pomimo że
sygnalizator
stanu grzania
jest na „1” lub
na „2”.
•
Wtyczka sieciowa została nieprawidłowo
wetknięta.
• Aktywowana jest funkcja automatycznego
wyłączania (zegar sterujący).
• Funkcja automatycznego wyłączania po
przechyleniu jest aktywna, ponieważ kąt
pochylenia promiennika ciepła przekroczył
wartość 25°.
• Spra
wdź wtyczkę sieciową.
• Ustaw zegar sterujący („Timer”) w położeniu
„O” lub najpierw wyłączurządzenie
poprzez kilkakrotne pociągnięcie sznurka
przełącznika, a następnie włączy.
• Upewnij się, czy promiennik ciepła zainstalowany jest poziomo i na stałe do ściany.
1
0
2
ON
400 W
ON
800 W
OFF
Page 48

- 48 -
reer GmbH
Muehlstr.41 • 71229 Leonberg • Germany
www.reer.de
PL
Polski
Czyszczenie, konserwacja
Gwarancja
• Przed rozpoczęciem czyszczenia sprawdź, czy urządzenie zostało wyłączone i czy ostygło (wyjąć wtyczkę sieciową). Oczyść
powierzchnię suchą lub lekko zwilżoną szmatką. Zwierciadło oraz grzałki powinien oczyścić wyłącznie fachowiec
.
• W
yrób ten nie wymaga specjalnej konserwacji.
• Napra
wy urządzenia należy zlecać wyłącznie fachowcowi.
Należ
y zachować dowód zakupu, instrukcję obsługi i numer artykułu
.
R
oszczenia gwarancyjne lub roszczenia z tytułu przyrzeczenia gwarancyjnego mogą być dochodzone wyłącznie za pośred-
nictwem sprzedawcy
.
W
szelkie dane techniczne, informacje oraz właściwości produktu opisane w niniejszym opracowaniu zostały sporządzone we-
dług najlepszej wiedzy oraz według stanu na dzień publikacji. Podane informacje przez rmę reer są prawidłowe i wiarygodne
.
Firma reer nie ponosi jednak w żaden sposób odpowiedzialności za możliwe błędy występujące w tym dokumencie i zastrzega
sobie prawo, bez konieczności wcześniejszego powiadomienia, do wprowadzania zmian w konstrukcji produktu lub w jego
właściwościach
. Powielanie i przekazywanie informacji z tego prawnie chronionego opracowania autorskiego w jakiejkolwiek
formie lub w jakikolwiek inny sposób, np
.
gracznie, elektronicznie lub mechanicznie poprzez kserowanie, nagrywanie na nośniki informacji lub zapisywanie w systemie przetwarzania danych - również fragmentarycznie - wymaga uprzedniej pisemnej
zgody rmy reer
.
Wskazówki dotyczące ochrony środowiska:
Wyrób ten po zakończeniu okresu eksploatacji nie może być utylizowany wraz z normalnymi odpadami komunalnymi, lecz należy go oddać do punktu zbiórki odpowiedzialnego za recykling urządzeń
elektrycznych. Informuje o tym symbol na wyrobie, w instrukcji użytkowania lub na opakowaniu. Materiały podlegają ponownemu wykorzystaniu zgodnie z ich oznakowaniem. Poprzez udział w procesie
zagospodarowania surowców wtórnych w takiej lub innej formie oraz odstawiając zużyte urządzenia
w wyznaczone miejsce recyklingu wnosisz swój cenny wkład w ochronę środowiska. W przypadku
uzyskania informacji o miejscowych punktach utylizacji należy skontaktować z daną administracją
gminną.
Page 49

- 49 -
Těší nás, že jste se rozhodli pro tento výrobek a děkujeme vám za důvěru. Abyste se mohli ze svého nového tepelného
zářiče na přebalovací stůl dlouho těšit, prosíme vás, abyste pečlivě dodržovali následující pokyny. Tento návod kpoužití
si dobře uschovejte a předejte ho případnému dalšímu uživateli.
T
epelný zářič na přebalovací stůl v okamžiku příjemně zahřeje oblast přebalovacího stolu. Slouží ale také krychlému
vyhřívání koupelen, domácích dílen, chodeb, chráněných teras a balkonů
.
Díky tepelnému zářiči máte během několika
málo sekund kdispozici energeticky úsporné teplo
.
Udělejt
e si prosím chvilku času a pozorně si přečtěte bezpečnostní pokyny. Řiďte se pokyny uvedenými vnávodu, jinak
hrozí nebezpečí poškození tepelného zářiče na přebalovací stůl
.
Vnejhorším případě může dojít kohrožení či dokonce
zranění vašeho dítěte, vás samotných nebo jiných osob
.
Všeobecné bezpečnostní pokyny:
! Přístroj používejte pouze kúčelu popsanému vtomto návodu. Nevhodný způsob zacházení vede ke ztrátě nároku
na záruku
.
! Zk
ontrolujte, zda údaje uvedené na typovém štítku odpovídají napětí ve vaší síti.
! Projeví-li se nějaká závada, výrobek nepoužívejte.
! T
epelný zářič na přebalovací stůl nesmí být používán bez dozoru
.
! M
aximální doba zahřívání nesmí překročit 15minut.
! Při zahřívání je třeba za každých okolností dodržet minimální vzdálenost 100cm mezi tepelným zářičem a stolem.
! Přívodní kabel se nesmí dostat do kontaktu sjakýmikoliv horkými částmi přístroje ani sjinými elektrospotřebiči.
! Z
amezte působení jiných zdrojů tepelného záření, jako je např. sluneční světlo nebo další zdroje záření, protože by
mohlo dojít ke zvýšení tělesné teploty vašeho dítěte.
! Nepoužívejte zářič u dětí se zvýšenou teplotou. Hrozí nebezpečí přehřátí.
! P
řístroje se za provozu nedotýkejte
.
! Přístroj zapojte pouze přímo do síťové zásuvky. Společně spřístrojem nepoužívejte žádné předřadníky, jako jsou
spínací hodiny, bezdrátové dálkové spínače apod., hrozí nebezpečí vzniku požáru.
! P
o vypnutí je přístroj velmi horký. Tepelný zářič na přebalovací stůl nezakrývejte! Nebezpečí vzniku požáru
.
! P
řed prvním použitím odstraňte veškeré obalové materiály a nepoužívané součásti, aby se jimi vaše dítě nemohlo
poranit nebo aby je nespolklo
.
! P
řístroj používejte mimo dosah dětí. Přívodní kabel zajistěte a dbejte na to, aby za něj někdo nemohl zatahat a
strhnout tak přístroj kzemi.
! Osob
y (včetně dětí), které sohledem na své psychické, senzorické či duševní schopnosti nebo sohledem na svou
nezkušenost či neznalost nejsou schopné používat přístroj bezpečně, by takovéto přístroje neměly používat bez
dohledu nebo poučení odpovědnou osobou
.
! J
e-li přístroj nebo jeho přívodní kabel poškozený, přístroj nepoužívejte
.
! Opra
vy smějí provádět pouze kvalikovaní odborní pracovníci. Neodborně provedené opravy mohou znamenat
závažné ohrožení uživatele– to platí také pro výměnu přívodního kabelu.
CZ
Čestina
Page 50

- 50 -
Obsah dodávky
Popis částí
A B
CZ
Čestina
• síťové napětí: 230V
• příkon: 400/800W
•
způsob montáž
e: přívodní kabel
•
tř
ída ochrany: 1
•
int
egrovaná funkce vypnutí při překlopení (úhel klopení: 25°)
•
délk
a kabelu: 185cm (schráněnou vidlicí)
• vyzařování tepla a rozložení teploty bylo testováno podle standardů
platn
ých pro zdravotnické prostředky (IEC601-2-21)
Technické údaje
1 tepelný zářič se 2trubicemi
2 ukazatel stupně vytápění
3
Spínač pr
o aktivaci/deaktivaci
funkce automatického vypnutí
(časovač)
4 Šňůra pro zapnutí/vypnutí přístroje
TIMER ON/OFF
1
3
4
2
Page 51

- 51 -
Montáž
Bezpečnostní pokyny platné pro montáž na stěnu:
• Tepelný zářič na přebalovací stůl se smí montovat na stěnu pouze na pevně dané místo a ve vodorovné poloze.
Montáž na strop je nepřípustná!
• Tepelný zářič na přebalovací stůl se nesmí montovat na dřevo, plast nebo jiné hořlavé materiály ani pod síťové
zásuvky.
•
DŮLEŽITÉ! M
inimální vzdálenosti: Vzdálenost mezi tepelným zářičem a přebalovacím stolem nesmí být kratší
než 100cm. Je bezpodmínečně nutné dodržet vzdálenost 35cm mezi tepelným zářičem a stropem. Minimální
vzdálenost od nábytku a hořlavých materiálů musí činit 65cm. Jinak hrozí nebezpečí vzniku požáru!
• V případě instalace v koupelnách nebo sprchách je třeba dodržet místní platné předpisy. Tepelný zářič musí být umístěný tak, aby nebylo možné zatáhnout za šňůru zvany nebo ze sprchy.
• P
řístroj se nesmí montovat nad vanu!
1. Od přístroje oddělte montážní desku, jak je znázorněno na obr.1.
2. P
řidržte držák na stěnu u stěny, dodržte přitom minimální vzdálenosti (viz obr. 5) a tužkou na ni obkreslete otvory pro
šrouby
.
Vodorovné vyrovnání zkontrolujte za použití vodováhy
.
3. Dr
žák přišroubujte na stěnu (viz obr.3) pomocí šroubů a hmoždinek, jež jsou součástí dodávky
.
4. T
epelný zářič na přebalovací stůl nasaďte do příslušných drážek na držáku na stěnu (obr.3).
5. P
řišroubujte tepelný zářič kdržáku na stěnu (obr.4) za použití šroubů, které jste předtím odstranili (obr.1).
TIMER ON/OFF
35 cm
20 cm
100 cm
!
1
2
3 4
5
CZ
Čestina
Page 52

- 52 -
230 V
1 2
1. Chcete-li aktivovat funkci automatického vypnutí, přepněte spínač časovače
na spodní straně přístroje do polohy „ON“. Přístroj se za 10minut automaticky
vypne
.
2. Chcete-li přístroj po automatickém vypnutí znovu zapnout, máte dvě možnosti:
• P
řepněte klopný přepínač do polohy „OFF“, nebo
• opakovaně zatáhněte za šňůru, dokud se nezobrazí stupeň vytápění „0“.
Po dalším zatažení za šňůru můžete nastavit stupeň „1“ nebo „2“, a tím přístroj
znovu zapnout.
Přístroj disponuje automatickou funkcí vypnutí při překlopení. Zvětší-li se úhel na více než 25° (například vpřípadě montáže
na strop), dojde kpřerušení napájení přístroje elektřinou
.
Po vyrovnání polohy se tepelný zářič znovu automaticky zapne
.
Funkce automatického vypnutí
Automatická funkce překlopení a vypnutí
Odstraňování závad
I
O
TIMER OFF
10
I
O
TIMER OFF
I
O
10
TIMER ON/OFF
CZ
Čestina
1. Zapojte síťovou zástrčku do síťové zásuvky (obr.1).
2. Z
atáhněte za šňůru (obr.2) a tepelný zářič zapněte. Na tepelném zářiči lze nastavit dva stupně vytápění– 400W
(stupeň „1“) a 800W (stupeň „2“).
3 Opak
ovaným zatáhnutím za šňůru lze přepnout stupeň vytápění nebo přístroj vypnout (stupeň „0“).
Uvedení do provozu
problém možné příčiny Co dělat?
Tepelný zářič
nehřeje,
přestože je
zapnutý na
stupeň „1“
nebo „2“.
• Síť
ová zástrčka není správně zapojená.
• Je aktivovaná funkce automatického vypnutí
(časovač).
• Je aktivovaná automatická funkce překlopení a vypnutí, úhel tepelného zářiče
přesáhl 25°.
• Zk
ontrolujte síťovou zástrčku
.
• Přepněte časovač do polohy „OFF“ nebo
přístroj nejprve opakovaným taháním za
šňůrku vypněte a potom znovu zapněte.
• Ujistěte se, že je tepelný zářič namontovaný
na stěnu vodorovně a pevně
.
1
0
2
ON
400 W
ON
800 W
OFF
Page 53

- 53 -
reer GmbH
Muehlstr.41 • 71229 Leonberg • Germany
www.reer.de
CZ
Čestina
Čištění, údržba
Záruka
• Předtím, než začnete přístroj čistit, přesvědčte se prosím otom, že je vypnutý a vychladlý (vytáhněte zástrčku ze zásuvky).
Povrch čistěte pouze suchým nebo mírně navlhčeným hadříkem. Reektor a topné tyče smí čistit pouze odborník
.
• T
ento výrobek nevyžaduje žádnou zvláštní údržbu
.
• Opra
vy přístroje smějí provádět pouze odborní pracovníci.
Uscho
vejte, prosím, doklad okoupi, návod kpoužití a číslo výrobku
.
Z
áruční nároky nebo nároky zpříslibů garance je nutno řešit výlučně sobchodníkem.
V
šechny technické údaje, informace a vlastnosti výrobku popsaného vtomto návodu byly sestaveny v souladu s našemi ne-
jlepšími poznatky a vdobě jeho zveřejnění jsou správné
.
Informace poskytnuté rmou reer by měly být správné a spolehlivé.
Přesto rma nepřebírá odpovědnost za případné chyby vyskytující se vtomto dokumentu a vyhrazuje si právo změnit design
výrobku, resp. jeho specikace bez předchozího upozornění. Rozmnožování a šíření informací ztohoto autorským zákonem
chráněného díla jakýmkoliv způsobem a jakoukoliv cestou, gracky, elektronicky či mechanicky, pořizováním fotokopií, nahrávek nebo ukládáním do databází– a to ijen vpodobě výňatků– je podmíněno předchozím písemným souhlasem rmy reer
.
Ochrana životního prostředí:
Tento výrobek se po skončení své životnosti nesmí odkládat do běžného domovního odpadu. Uživatel
má povinnost odevzdat vysloužilý výrobek na sběrném místě určeném krecyklaci elektrospotřebičů.
Na tuto povinnost upozorňuje symbol uvedený na výrobku, vnávodu kpoužití a na obalu výrobku.
Označené materiály jsou opakovaně použitelné
.
Opakované používání použitých spotřebičů nebo
jiná forma jejich využití představuje důležitý příspěvek kochraně životního prostředí. Informace opříslušném sběrném místě vám podá vedení vaší obce.
 Loading...