

Page 1
BABYPHON
WEGA
ArtNr: 8006
Gebrauchsanleitung Babyphon “WEGA“ Wichtig! Für späteres Nachschlagen aufbewahren.
Instruction Manual Baby Monitor „WEGA“ Important! Please keep for further reference.
Mode d’emploi Babyphone „WEGA“ Important! A conserver pour une consultation ultérieure.
Istruzioni d`uso Babyphon “WEGA” Importante! Conservate questa descrizione per poter far riferimento ad essa in un second momento.
Gebruiksaanwijzing Babyfoon „WEGA“ Belangrijk! Bewaar voor latere raadpleging.
Manual del Usuario del Intercomunicador para Bebés „WEGA“ Importante! Guárdelas para poder leerlas posteriormente en caso necesario.
Page 2

Deutsch (D)
Inhaltsverzeichnis:
English (GB)
Table of contents:
Francais (F)
Sommaire :
Italiano (I)
Indice:
Nederlands (NL)
Inhoudsopgave:
Espanol (E)
Índice de contenidos:
Einleitung, Informationen und Sicherheitshinweise 2
Lieferumfang 3
Funktionsübersicht 3
Stromversorgung Baby- und Elterneinheit 4
Babyeinheit 5
Elterneinheit 6
Abgleich 8
Funktionsprüfung 9
Fehlersuche, Fehlerbehebung 9
Introduction, information and safety warnings 12
Scope of delivery 13
Functional overview 13
Power supply baby and parent unit 14
Baby unit 15
Parent unit 16
Pairing 18
Functional testing 19
Troubleshooting 19
Introduction, information et consignes de sécurité 22
Matériel livré 23
Aperçu des fonctionnalités 23
Alimentation électrique unité bébé et parentale 24
Unité bébé 25
Unité parentale 26
Configuration des appareils 28
Test de fonctionnement 29
Recherche d’erreur, remède 29
Introduzione, informazioni ed avvisi di sicurezza 32
Volume di consegna 33
Sommario funzioni 33
Approvvigionamento elettrico unità baby e genitori 34
Unità baby 35
Unità genitori 36
Sintonizzare gli apparecchi 38
Verifica funzione 39
Ricerca errori, Eliminazione errori 39
Inleiding, informatie en veiligheidsaanwijzingen 42
Leveromvang 43
Overzicht van de functies 43
Stroomverzorging van de eenheid van de ouders en van de baby 44
Eenheid van de baby 45
Eenheid van de ouders 46
Afstellen van de apparaten 48
Controle van de functies 49
Fouten zoeken, fouten opheffen 49
Introducción, información y avisos de seguridad 52
Incluido en la entrega 53
Funciones 53
Alimentación eléctrica del transmisor y el receptor 54
Transmisor 55
Receptor 56
Configuración de los aparatos 58
Prueba de funcionamiento 59
Búsqueda y eliminación de fallos 59
Seite 1
Page 3
Wichtige Informationen:
! Um einen unabsehbaren Ausfall der Geräte durch leere Batterien vorzubeugen und die
Umwelt zu schützen, empfehlen wir, sowohl die Babyeinheit, als auch die Elterneinheit mit
dem Netzteil zu betreiben. Dadurch können außerdem Übertragung und Empfang verbessert
werden.
Sicherheitshinweise:
! Platzieren Sie die Babyeinheit immer außer Reichweite des Kindes (Mindestabstand 1 Meter).
So gewährleisten Sie, dass Ihr Baby nicht mit den Knöpfen, welche für die Kontrolle des
Senders vorhanden sind, spielt.
! Legen Sie das Babyphon niemals in das Baby- oder Kinderbett bzw. in den Laufstall.
! Stellen Sie sicher, dass Baby- und Elterneinheit fehlerfrei arbeiten und sich in Funkreichweite
befinden. (siehe Abschnitt 3)
! Verwenden Sie diese Geräte NICHT mit anderen Netzteilen, nur mit den mitgelieferten.
Gehen Sie sicher, dass die Betriebsspannung der Steckdose der des Netzteils entspricht.
! Verwenden Sie die Geräte nicht in Wassernähe oder an feuchten Orten.
! Vermeiden Sie extreme Hitze und direkte Sonneneinstrahlung. Die Geräte sollten nicht auf
Oberflächen wie Sofas oder Decken gestellt werden, damit die Lüftungsschlitze nicht bedeckt
werden.
! Die Geräte und Netzteile dürfen, mit Ausnahme des Deckels am Batteriefach, nicht geöffnet
werden, da dies zu Stromschlägen führen kann. Sollte ein Gerät fehlerhaft arbeiten,
versuchen Sie bitte NICHT das Problem selbst zu beheben. In diesem Fall bitten wir Sie, sich
an Ihren Händler zu wenden.
! Prüfen Sie, insbesondere auf einer Auslandsreise, ob die lokale Netzspannung mit der
angegebenen Spannung auf den Geräten bzw. den Netzteilen übereinstimmt. Entsprechende
Angaben finden Sie auf den jeweiligen Geräten.
! Vermeiden Sie die Berührung von metallischen Gegenständen mit den Batterie- bzw.
Stromanschlusskontakten an den Geräten.
! Bei Verwendung von ungeeigneten Batterietypen besteht Explosionsgefahr.
! Gebrauchte Akkus gehören nicht in den Hausmüll und müssen ordnungsgemäß
entsorgt werden.
! Die Geräte sind nur für den Betrieb im Innenbereich geeignet.
! Werden die Geräte längere Zeit nicht benutzt, entfernen Sie bitte den Akku aus der
Elterneinheit.
! Decken Sie die Elterneinheit und die Babyeinheit niemals ab.
Herzlichen Glückwunsch zum Erwerb Ihres neuen reer Babyphons.
Wir sind sicher, Sie werden lange Zeit Freude an der Qualität unseres Produktes haben.
Bitte lesen Sie sich die folgenden Punkte sorgfältig durch und folgen Sie den Anweisungen, bevor Sie das Gerät in
Betrieb nehmen. Bewahren Sie die Bedienungsanleitung für späteres Nachschlagen sorgfältig auf. Dieses Babyphon wurde
ausschließlich als Hilfsmittel für die Beobachtung Ihres Babys entwickelt. Es sollte weder als Ersatz für die Aufsichtspflicht
der Eltern, noch als medizinisches Gerät angesehen werden.
Bitte nehmen Sie sich ein paar
Minuten Zeit um die Sicherheits-
hinweise gründlich zu lesen.
Anderenfalls besteht die Gefahr,
dass das Gerät nicht ordnungs-
gemäß funktioniert.
Dieses Gerät ist für Benutzer (ein-
schl. Kinder) mit eingeschränkten
physischen, sensorischen oder
psychischen Fähigkeiten bzw.
ohne jegliche Erfahrung oder
Vorwissen nur dann geeignet,
wenn eine angemessene Aufsicht
oder ausführliche Anleitung zur
Benutzung des Geräts durch
eine verantwortliche Person
sichergestellt ist.
Seite 2
Page 4
Deutsch (D)
- Klare Übertragung der Geräusche und des Bildes mit 2,4 GHz Frequenz
- Hochempfindliches Mikrofon garantiert klaren Ton
- Einstellbare Lautstärke und Bildschirmhelligkeit (Elterneinheit)
- Gegensprechfunktion von der Elterneinheit zur Babyeinheit
- 3 beruhigende Melodien (einzuschalten von der Elterneinheit)
- Klares Bild bei Dunkelheit dank 10 starken Infrarot LEDs
- Bewegliche Teile können nicht herausgenommen oder verschluckt werden
- Elterneinheit kann sowohl stationär als auch mobil (mit dem Akku) verwendet werden
- Akku- oder Netzbetrieb möglich (Elterneinheit)
- VOX-Funktion, automatisches Einschalten der Übertragung bei Geräuschen
- automatische Aktivierung der Infrarot-NightVision je nach Beleuchtung des Raumes
Lieferumfang:
- 1 Babyeinheit (Kamera)
- 1 Elterneinheit (Empfänger)
- 2 Netzteile
- 1 Akku (Elterneinheit)
Stromversorgung mit: Stecker Netzteil: 6 V / 800 mA max. ( im Lieferumfang enthalten)
oder Elterneinheit mit: 3,7V 1200mAh LiIon - Akku
Frequenz: 2,4GHz
Empf. Betriebstemperatur: 10-40°C
HINWEIS:
Informationen zur Auswahl und
Verwendung einer geeigneten
Stromversorgung finden
Sie auf Seite 4.
Technische Daten:
Funktionsübersicht:
Seite 3
Page 5
ACHTUNG:
Schalten Sie die Geräte aus,
bevor Sie einen Akkuwechsel
durchführen
Der Monitor benötigt einen
wiederaufladbaren Li-Ion Akku
(im Lieferumfang). Verwenden
Sie keinen anderen Akku. Falls
Sie Ersatz benötigen wenden Sie
sich an Ihren Händler.
ACHTUNG:
Vergewissern Sie sich, dass die
angegebene Spannung der
Geräte mit der lokalen
Stromversorgungsspannung
übereinstimmt.
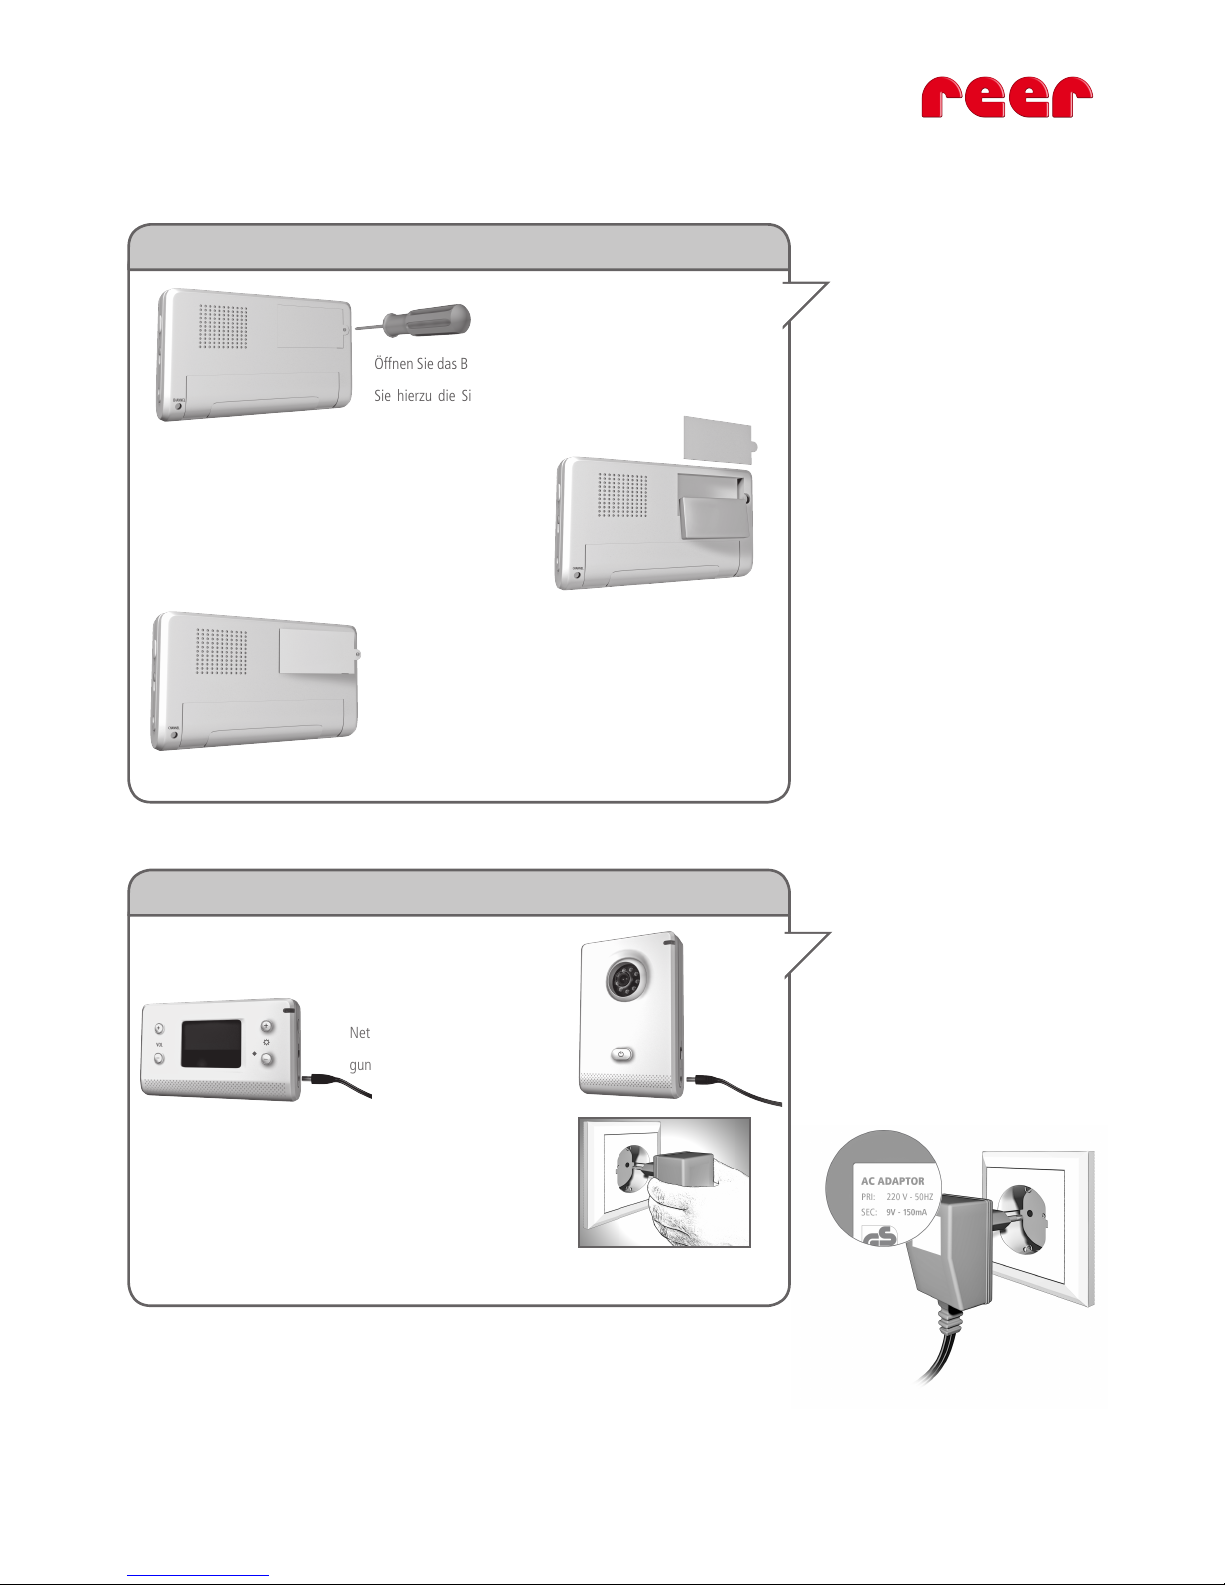
01. Batteriefachabdeckung öffnen
Öffnen Sie das Batteriefach an der Rückseite der Geräte. Drehen
Sie hierzu die Sicherungsschraube heraus und heben Sie den
Deckel nach oben ab.
02. Einsetzen des Akkus
Setzen Sie den Akku in das Batteriefach ein. Achten Sie hierbei
immer auf die richtige Polarität gemäß der Polaritätsangaben +
und - im Batteriefach.
03. Batteriefachabdeckung schließen
Legen Sie den Batteriefachdeckel nach dem Einsetzen des
Akkus wieder auf das Batteriefach und ziehen die Sicherungs-
schraube handfest an.
01. Anschließen der Netzteile:
Schließen Sie die mitgelieferten
Netzteile an die DC-Stromversor-
gungsbuchse der Geräte an.
02. Verbinden mit dem Stromnetz
Schließen Sie die Netzteile an eine Steckdose an.
(Achtung: Wählen Sie für die Babyeinheit eine geeignete Steckdo-
se, die sich möglichst weit von Ihrem Kind entfernt befindet.)
Stromversorgung der Elterneinheit und Sendeeinheit
Die Elterneinheit kann sowohl mit dem Akku betrieben, als auch an das Stromnetz angeschlossen werden.
Entscheiden Sie sich für eine geeignete Betriebsart.
Verwendung der im Lieferumfang enthaltenen Netzteile
Verwendung des Akkus
Seite 4
Page 6
Deutsch (D)
Seite 5
01. Einschalten der Babyeinheit
Um die Kamera-Einheit einzuschalten drücken Sie für ca. eine
Sekunde auf den AN/AUS-Schalter (03).
02. Vox Funktion aktivieren
VOX-Funktionsschalter (05) auf „CAMERA“: Kamera überträgt
ständig ein Bild zum Monitor
VOX-Funktionsschalter (05) auf „AUTO“: Kamera überträgt nur
ein Bild, wenn ein Geräusch im Raum wahrgenommen wird.
03. Musiklautstärke einstellen
Um die Lautstärke der wiedergegebenen Musik einzustellen
Schieben Sie den Lautstärke-Regelungsschalter (08) auf die
gewünschte Position. Sie haben die Wahl zwischen 3 verschie-
denen Lautstärken.
Abschalten: Zum Abschalten drücken Sie eine Sekunde lang den AN/AUS-Knopf (03).
1
3
9
10
7
2
8
4
5
6
HINWEIS:
Stellen Sie die Geräte immer in
aufrechter Position auf um eine
bestmögliche Übertragung zu
gewährleisten.
• Platzieren Sie die Babyeinheit immer außerhalb der Reichweite Ihres Kindes
(der Mindestabstand sollte ca. 1 Meter betragen).
• Die Babyeinheit sollte niemals in das Baby- oder Kinderbett bzw. den Laufstall gestellt werden.
• um eine bestmögliche Übertragung zu gewährleisten, stellen Sie die Geräte immer in aufrechter
Position auf
AUfSTEllUNGS-
EmpfEHlUNG:
Die Babyeinheit /
Sender
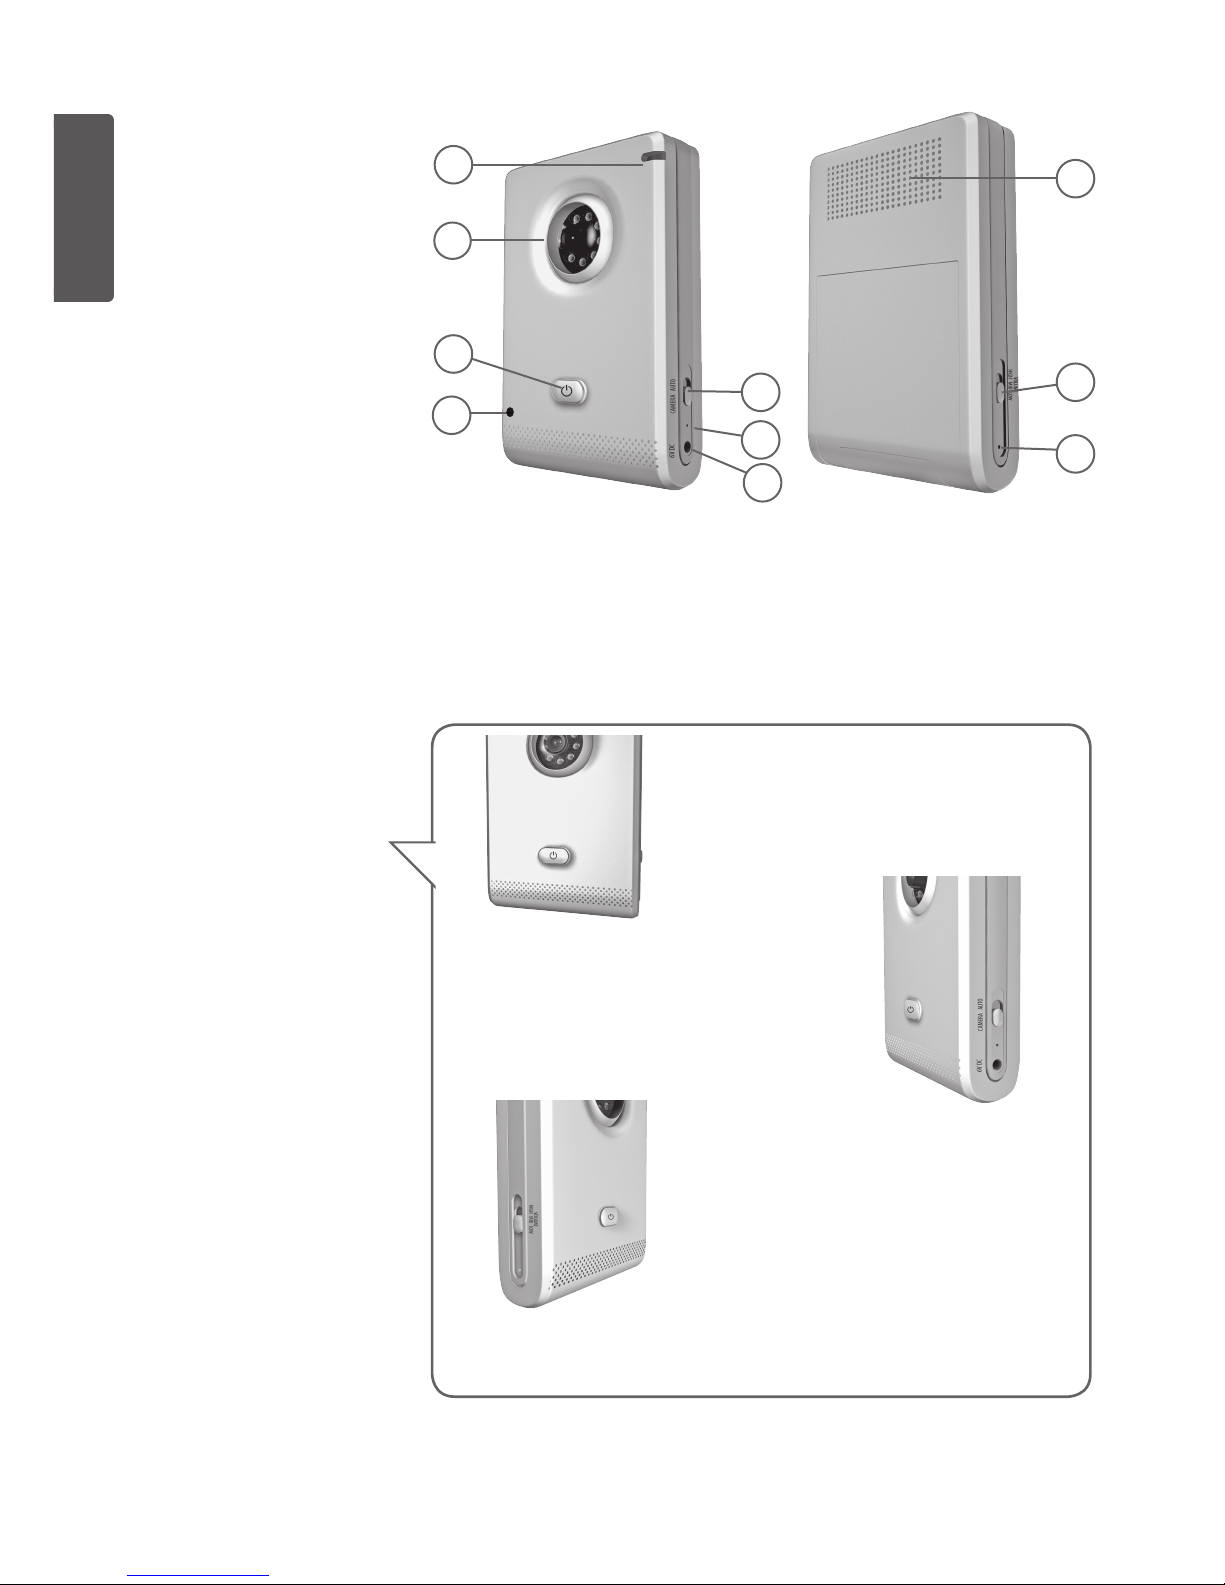
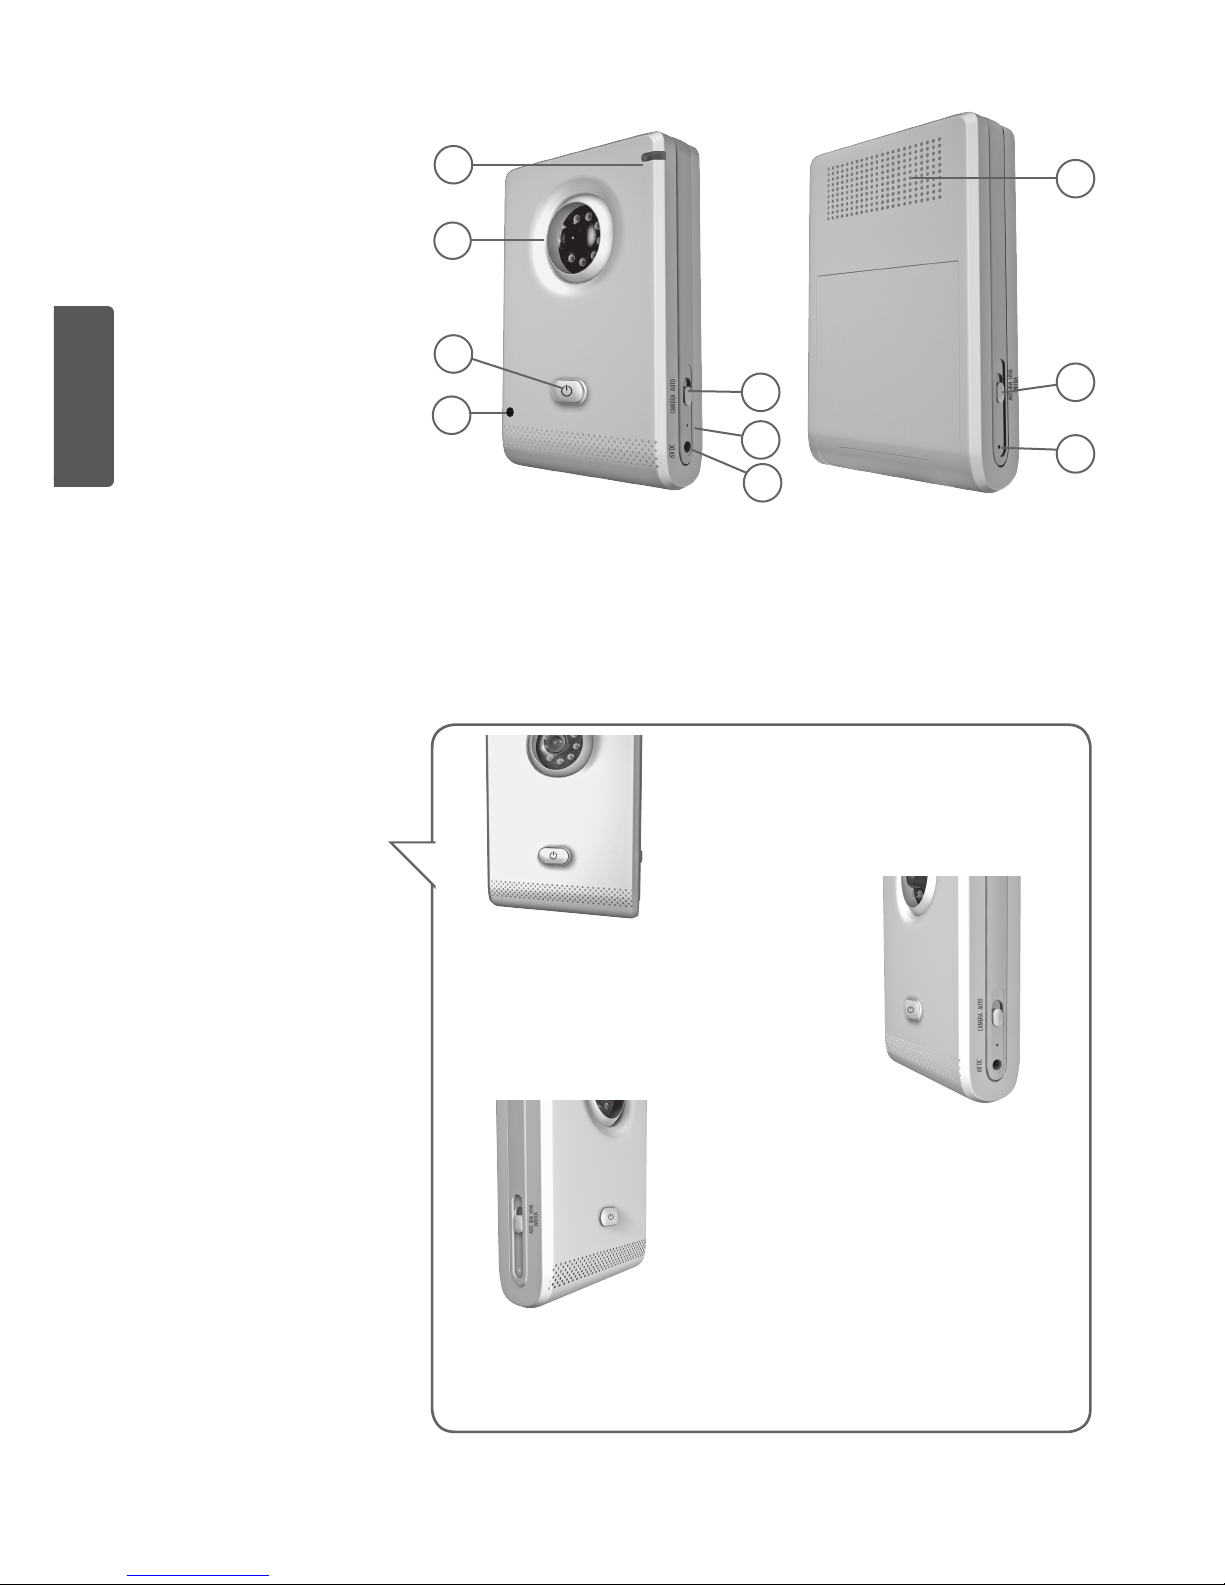
lEGENDE:
Status-LED .01
Kamera mit Infrarot LEDs .02
AN/AUS-Schalter .03
Lichtsensor .04
Vox-Funktionsschalter .05
Temperatursensor .06
Lautsprecher .07
Lautstärkeregelung .08
Abgleichsknopf .09
DC-Stromversorgungsbuschse .10
Page 7

Seite 6
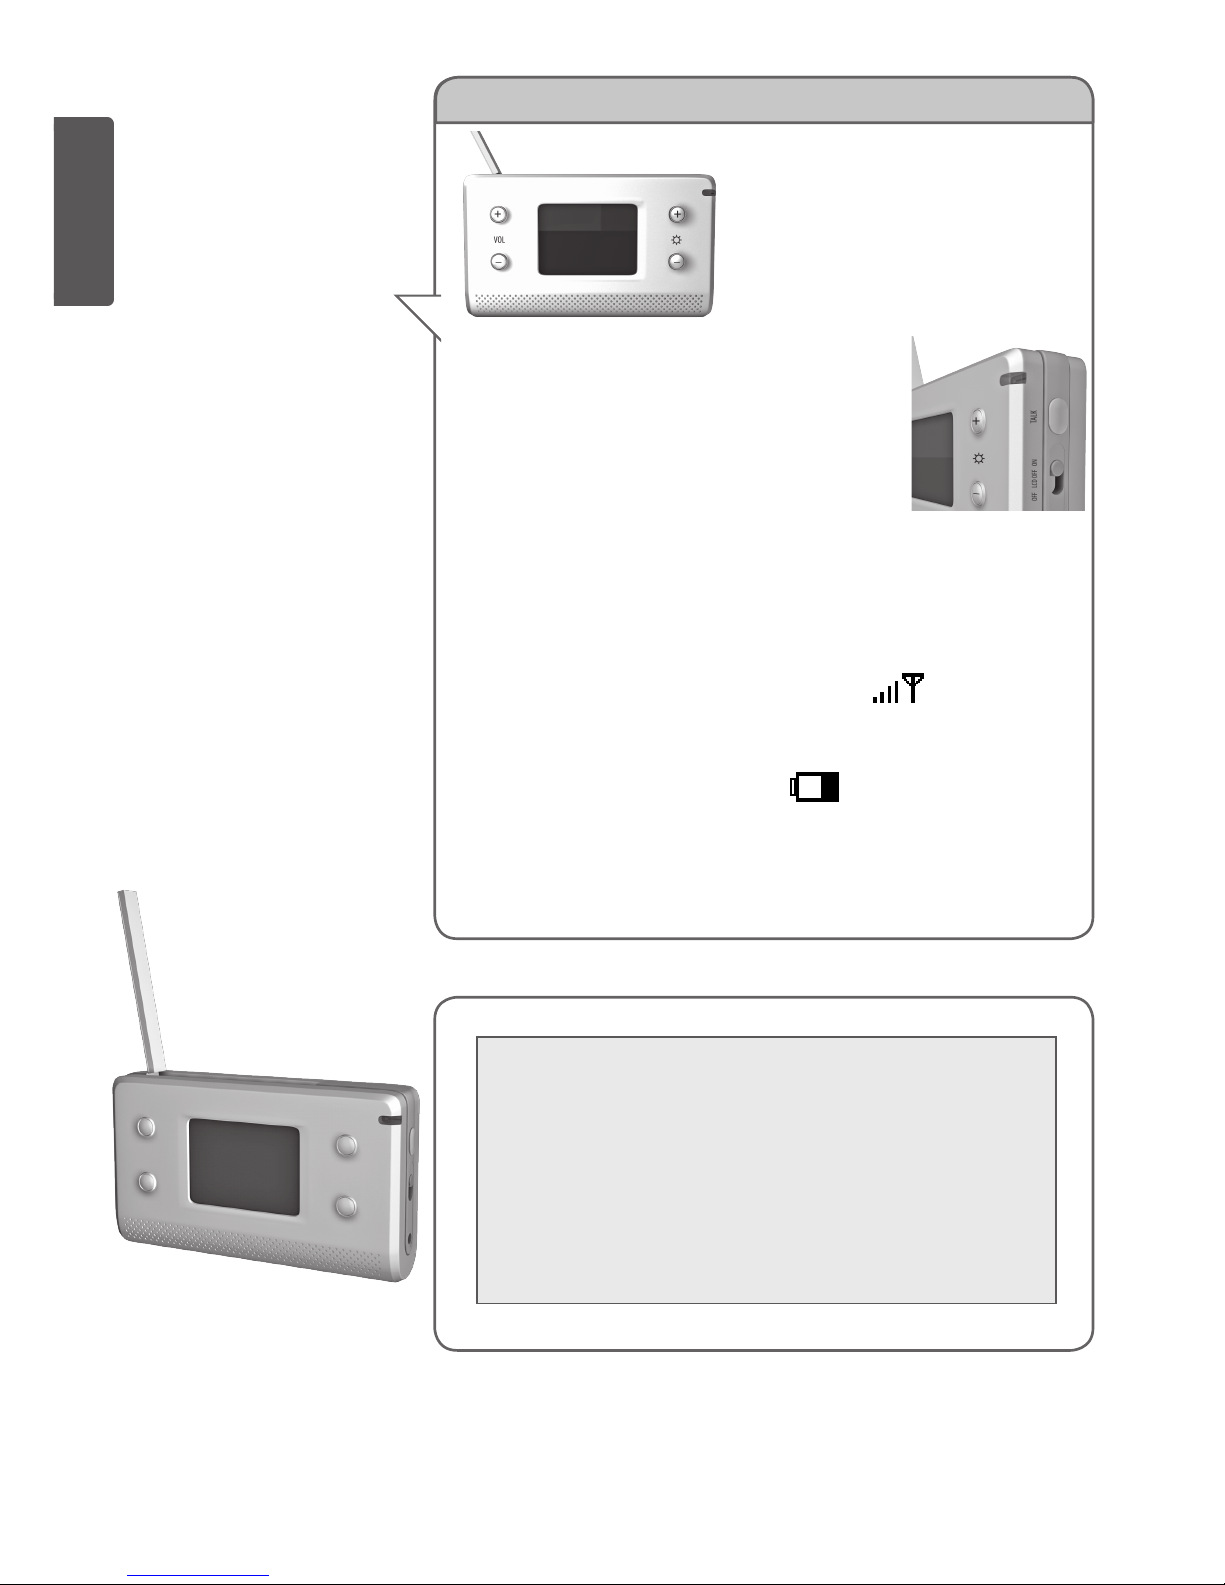
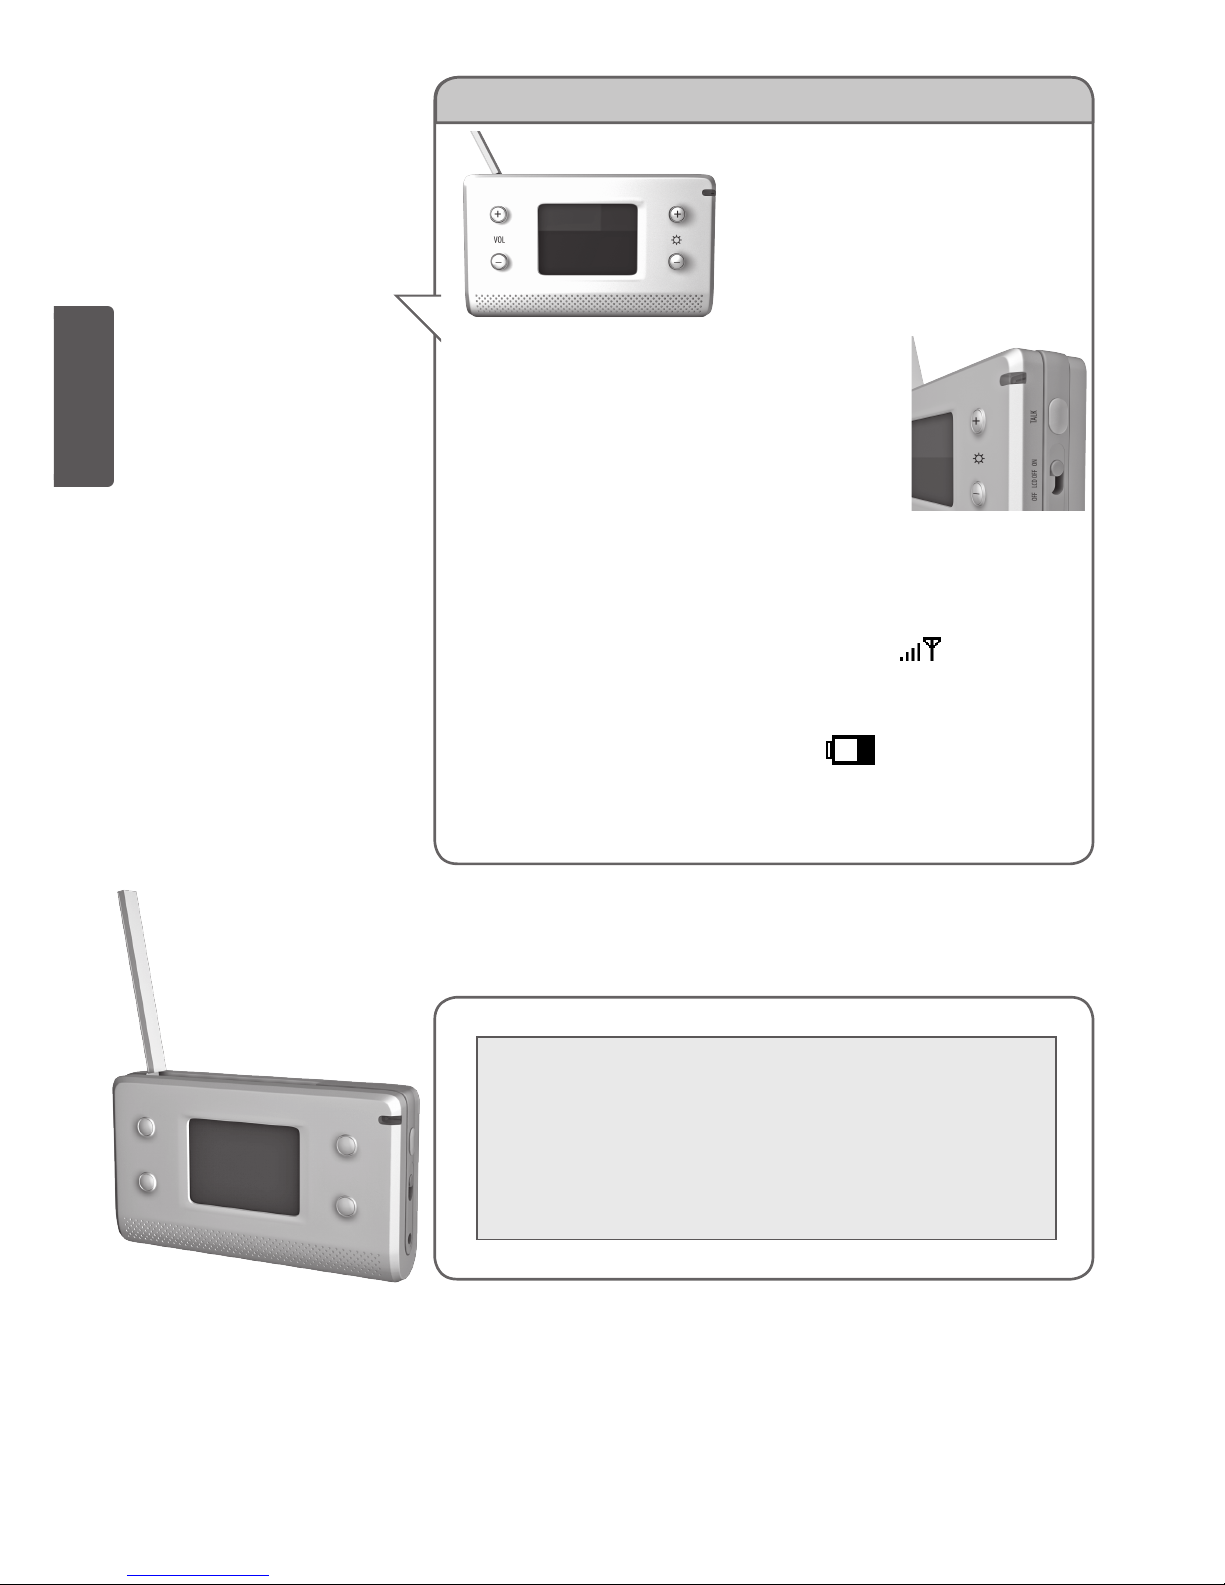
01. Einschalten der Elterneinheit
AN/AUS-Schalter (12)
Position „AN“: Gerät ist mit Videoüberwachung eingeschaltet
Position „AUS“: Gerät ist ausgeschaltet.
Position „LCD-AUS“: Gerät zeigt kein Bild an, Geräuschüber-
wachung ist aktiviert.
02. Kamera wählen
Kanalwahlschalter (02)
Drücken Sie kurz auf den Kanalwahlschalter (02) um die 4 möglichen
Kanäle durchzuschalten. Es werden nur Kanäle von verbundenen Ka-
meras angezeigt. Die mitgelieferte Kamera ist von Werk aus auf Kanal
1 eingestellt.
03. Kameras automatisch durchschalten lassen:
(Scan-Modus)
Drücken Sie den Kanalwahlschalter (02) solange kurz nacheinander bis im Display das Symbol
erscheint. Es wird nun das Bild jeder verfügbaren Kamera für 5 Sekunden angezeigt.
04. Melodie abspielen:
Um an der Babyeinheit eine Melodie abzuspielen drücken Sie den
Musik-Wiedergabeknopf (08). Durch mehrfaches Drücken können Sie
die 3 gespeicherten Melodien nacheinander durchschalten und
abspielen.
⇌
1
4
5
9
6
7
3
8
10
11
12
13
2
HINWEIS:
Sollten während der Inbetrieb-
nahme der Geräte ein hoher
Piepton auftreten, befinden sich
die beiden Geräte noch zu nah
beieinander.
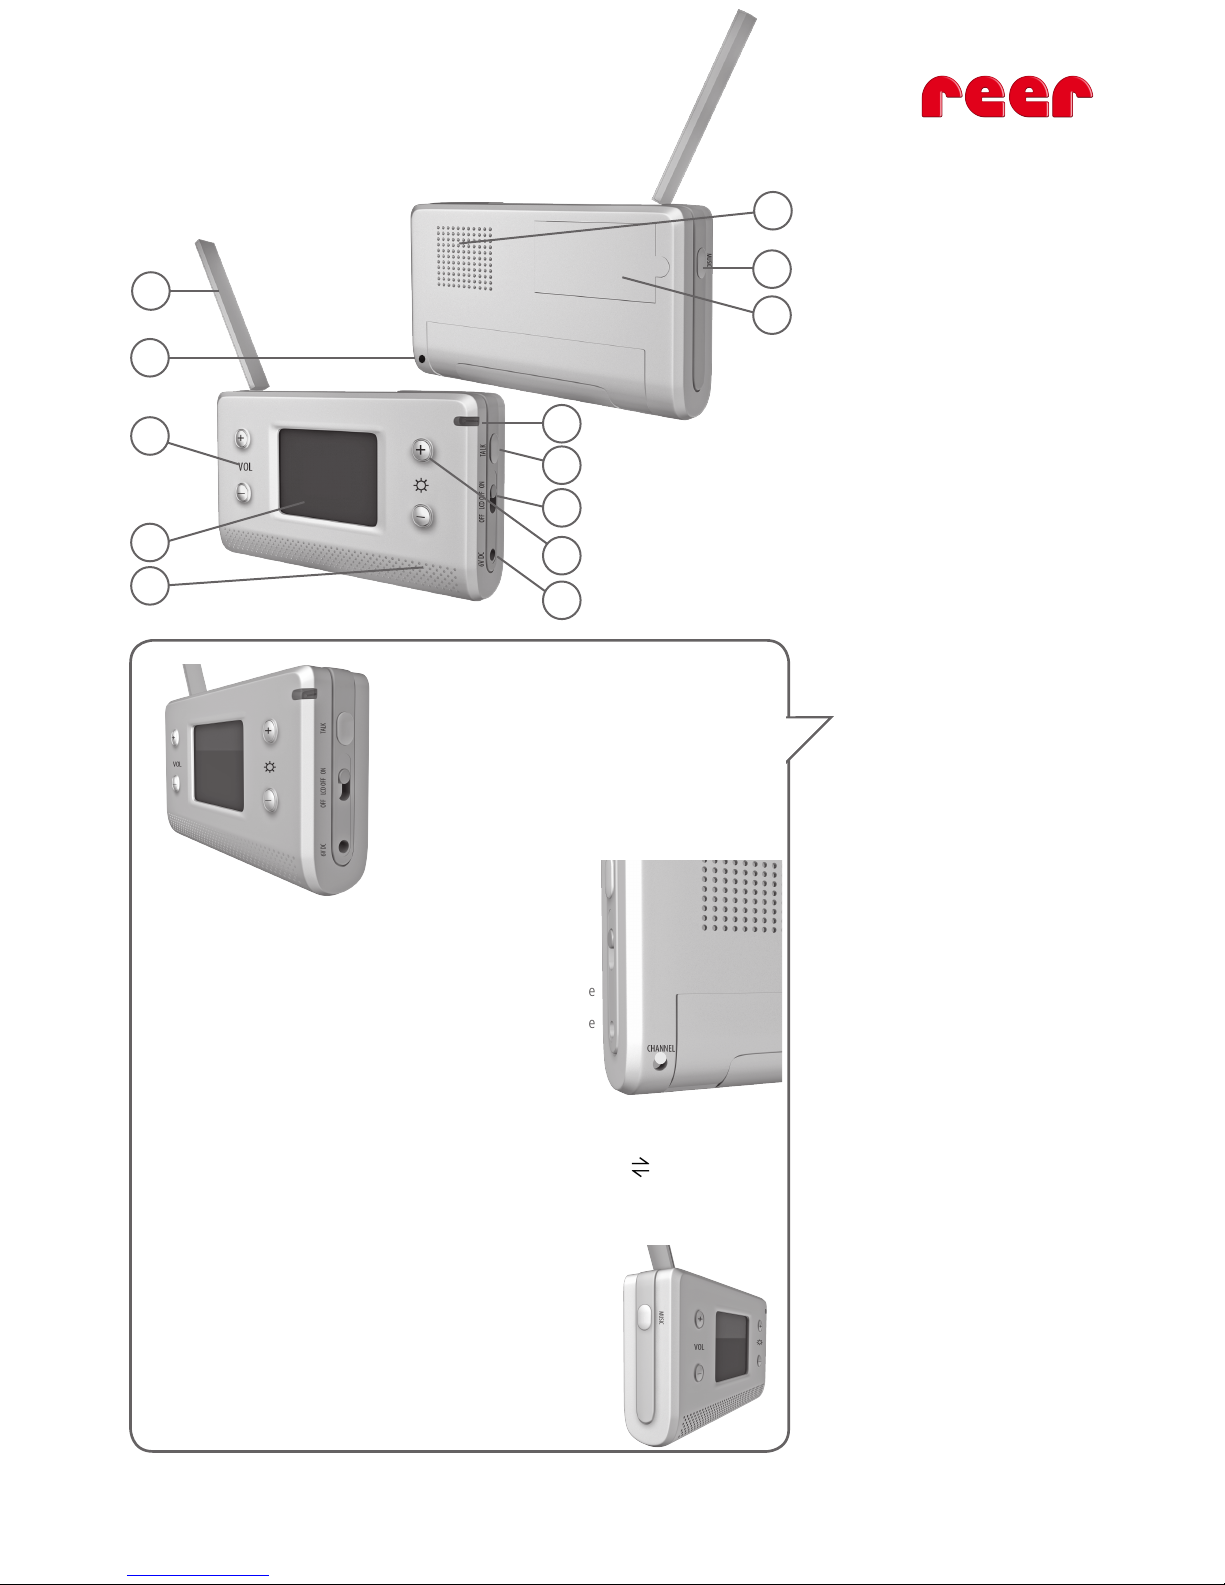
lEGENDE:
01. Antenne
02. Kanalwahlschalter
03. Lautstärkeregelung
04. Helligkeitsregelung
05. 2,4“ LCD Monitor
06. Mikrofon
07. Lautsprecher
08. Musik-Knopf
09. Batteriefachabdeckung
10. Status-LED
11. Sprechknopf
12. AN/AUS-Schalter
13. DC-Stromversorgungsbuchse
Die Elterneinheit /
Empfänger
Page 8
Deutsch (D)
05. Einstellen der Lautstärke und der Helligkeit der
Elterneinheit
Stellen Sie die gewünschte Lautstärke ein, indem Sie auf den
+ oder - Knopf (03) des Lautstärkereglers drücken. Zum
Verstellen der Helligkeit verfahren Sie genauso mit den Hel-
ligkeitsregler-Knöpfen (04).
06. Gegensprechfunktion:
Nutzen Sie die Gegensprechfunktion indem Sie den Sprechknopf (11)
drücken. Solange Sie den Knopf gedrückt halten wird Ihre Stimme zur
Babyeinheit übertragen. Lassen Sie den Sprechknopf (11) los um wiede-
rum die Geräusche Ihres Babys zu hören.
07. Raumtemperaturanzeige
Die Temperatur des Raumes in dem sich die Babyeinheit befindet wird auf dem Display der Elterneinheit
immer in Grad Celsius angezeigt.
08. Reichweitenkontrolle:
Im Display wird die momentane Empfangsstärke mit dem Symbol dargestellt. Wenn Sie sich
außer Reichweite befinden wird das Display schwarz und es erscheint „LINKING“.
09. Batteriestatusanzeige:
Im Display wird der Batteriestatus mit dem Symbol angezeigt.
Abschalten: Zum Abschalten stellen Sie den AN/AUS-Schalter (12) auf die Position „AUS“.
Seite 7
Weitere Funktionen der Elterneinheit:
Reinigung und Wartung:
Tauchen Sie die Geräte niemals in Wasser und reinigen Sie diese auch nicht unter fließendem
Wasser.
Ziehen Sie die Netzteile der Geräte aus der Steckdose, sofern diese eingesteckt sind.
Reinigen Sie die Geräte mit einem feuchten Tuch.
Prüfen Sie vor Gebrauch, daß die Geräte vollkommen trocken sind, bevor Sie sie ans Stromnetz
anschließen.
Reinigen Sie die Adapter mit einem feuchten Tuch.
HINWEIS:
Stellen Sie die Geräte immer
in aufrechter Position auf
und Klappen Sie die Antenne
des Monitors auf, um eine
bestmögliche Übertragung zu
gewährleisten.
Page 9
01. Elterneinheit abgleichen
- Schalten Sie den Monitor ein.
- Drücken Sie den Kanalwahlschalter (02) für 5 Sekunden bis das Menu am Bildschirm erscheint.
- Benutzen Sie die Lautstärke + und – Knöpfe (03) um den abzugleichenden Kanal zu wählen.
- Drücken Sie dann den Helligkeits + Knopf (04) um den Kanal zu bestätigen.
- Im Display erscheint DEL und PAIR.
- Benutzen Sie die Lautstärke + und – Knöpfe (03) um PAIR auszuwählen.
- Drücken Sie die Helligkeits + Taste (04) um zu bestätigen.
- Im Display erscheint „WAIT“.
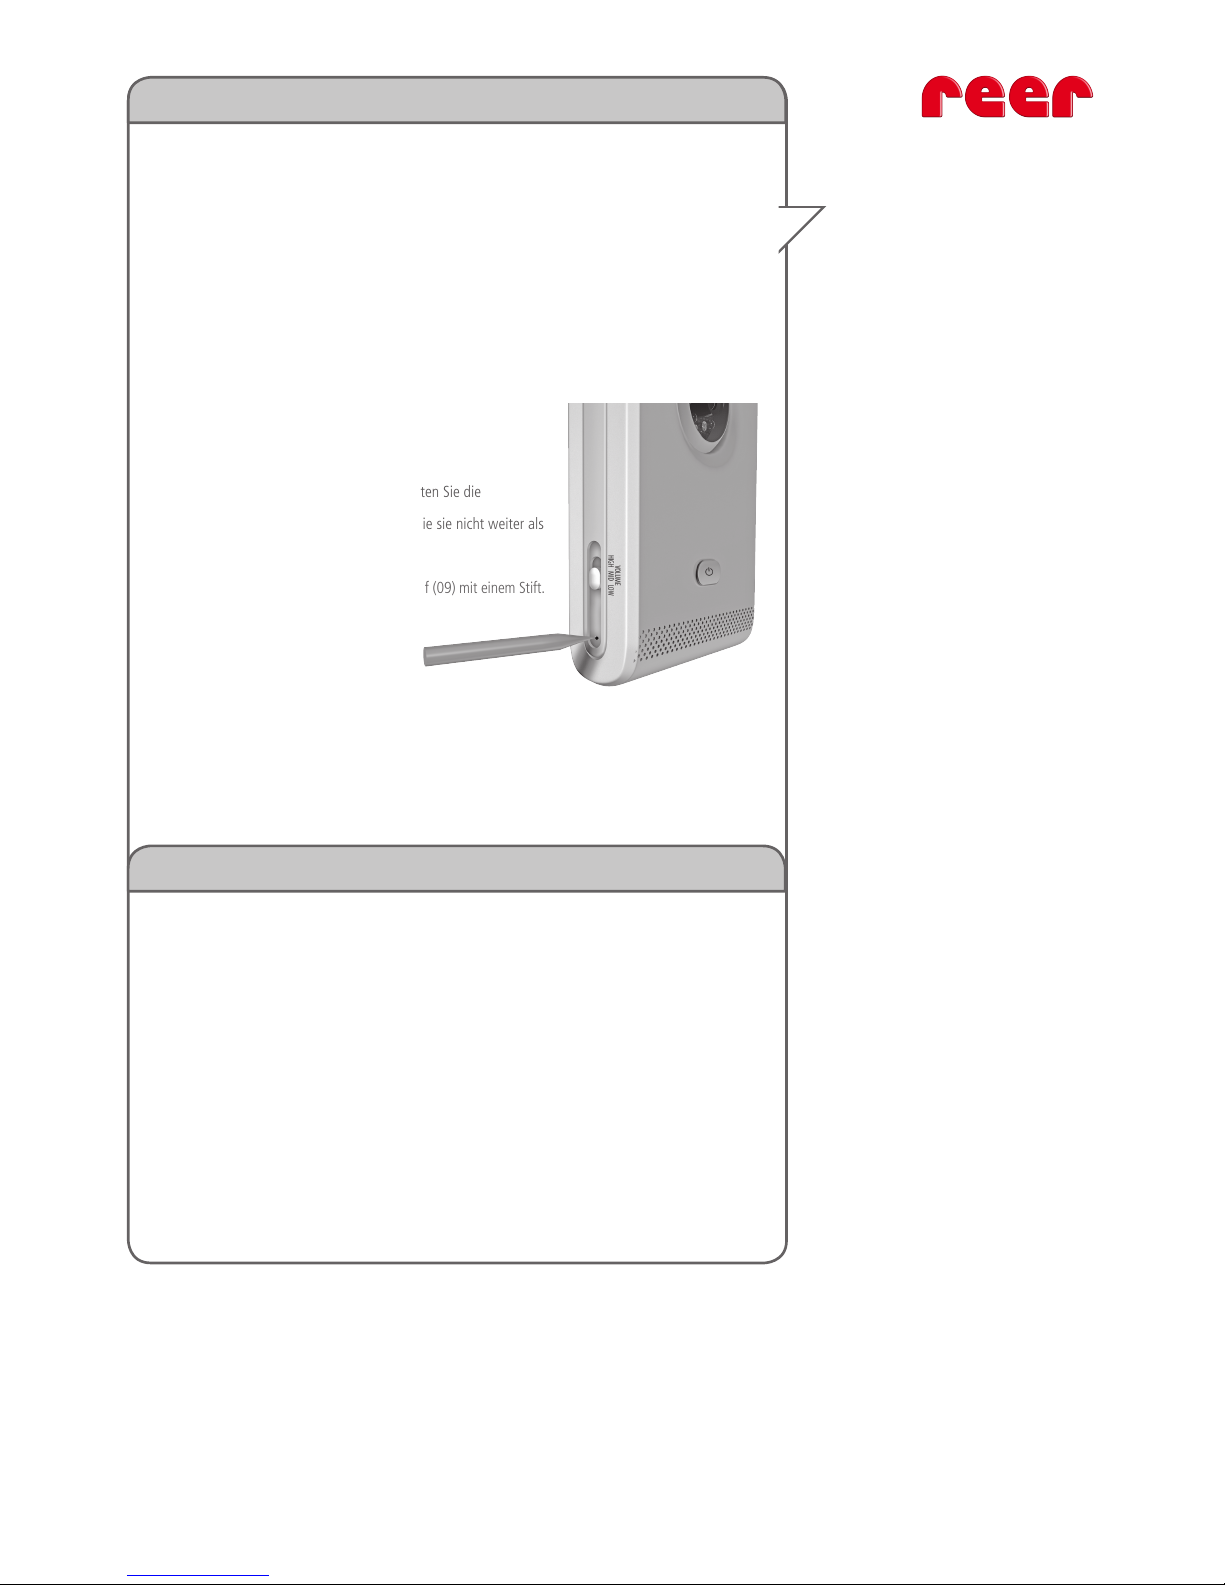
02. Kamera abgleichen
- Während im Display „WAIT“ steht schalten Sie die
abzugleichende Kamera an und stellen Sie sie nicht weiter als
einen Meter entfernt auf.
- Drücken Sie den versenkten Abgleichknopf (09) mit einem Stift.
- Die Status LED (01) beginnt zu blinken.
- Im Display erscheint „PAIRED“.
03. Abgleich beenden
Schalten Sie beide Geräte aus und wieder an. Damit ist der Abgleich beendet.
Führen Sie diese Schritte für eventuell weitere Kameras 2, 3 und 4 nacheinander aus.
- Schalten Sie den Monitor ein.
- Drücken Sie den Kanalwahlschalter (02) für 5 Sekunden bis das Menu am Bildschirm erscheint.
- Benutzen Sie die Lautstärke + und – Knöpfe (03) um den abzugleichenden Kanal zu wählen.
- Drücken Sie dann den Helligkeits + Knopf (04).
- Im Display erscheint „DEL“ und „PAIR“.
- Benutzen Sie die Lautstärke + und – Knöpfe (03) um „DEL“ auszuwählen.
- Drücken Sie die Helligkeits + Taste (04) um zu bestätigen.
- Im Display erscheint „DONE“.
Schalten Sie das Gerät aus und wieder ein um den Vorgang abzuschließen.
Abgeichen der Geräte (bei zusätzlichen Kameras oder bei Fehlern):
Löschen einer Kamera (falls nicht mehr benötigt)
HINWEIS:
Die Babyphone wurden bei der
Herstellung bereits abgeglichen.
Es besteht normalerweise kein
Bedarf, das Babyphon vor der
Benutzung nochmals
abzugleichen.
Führen Sie die Prozedur zum
Abgleich zwischen Kamera und
Monitor nur durch, wenn es
absolut notwendig ist.
ACHTUNG:
Bei Störungen durch andere
Funkgeräte liegt kein
Gerätefehler vor.
Seite 8
Page 10
Deutsch (D)
Seite 9
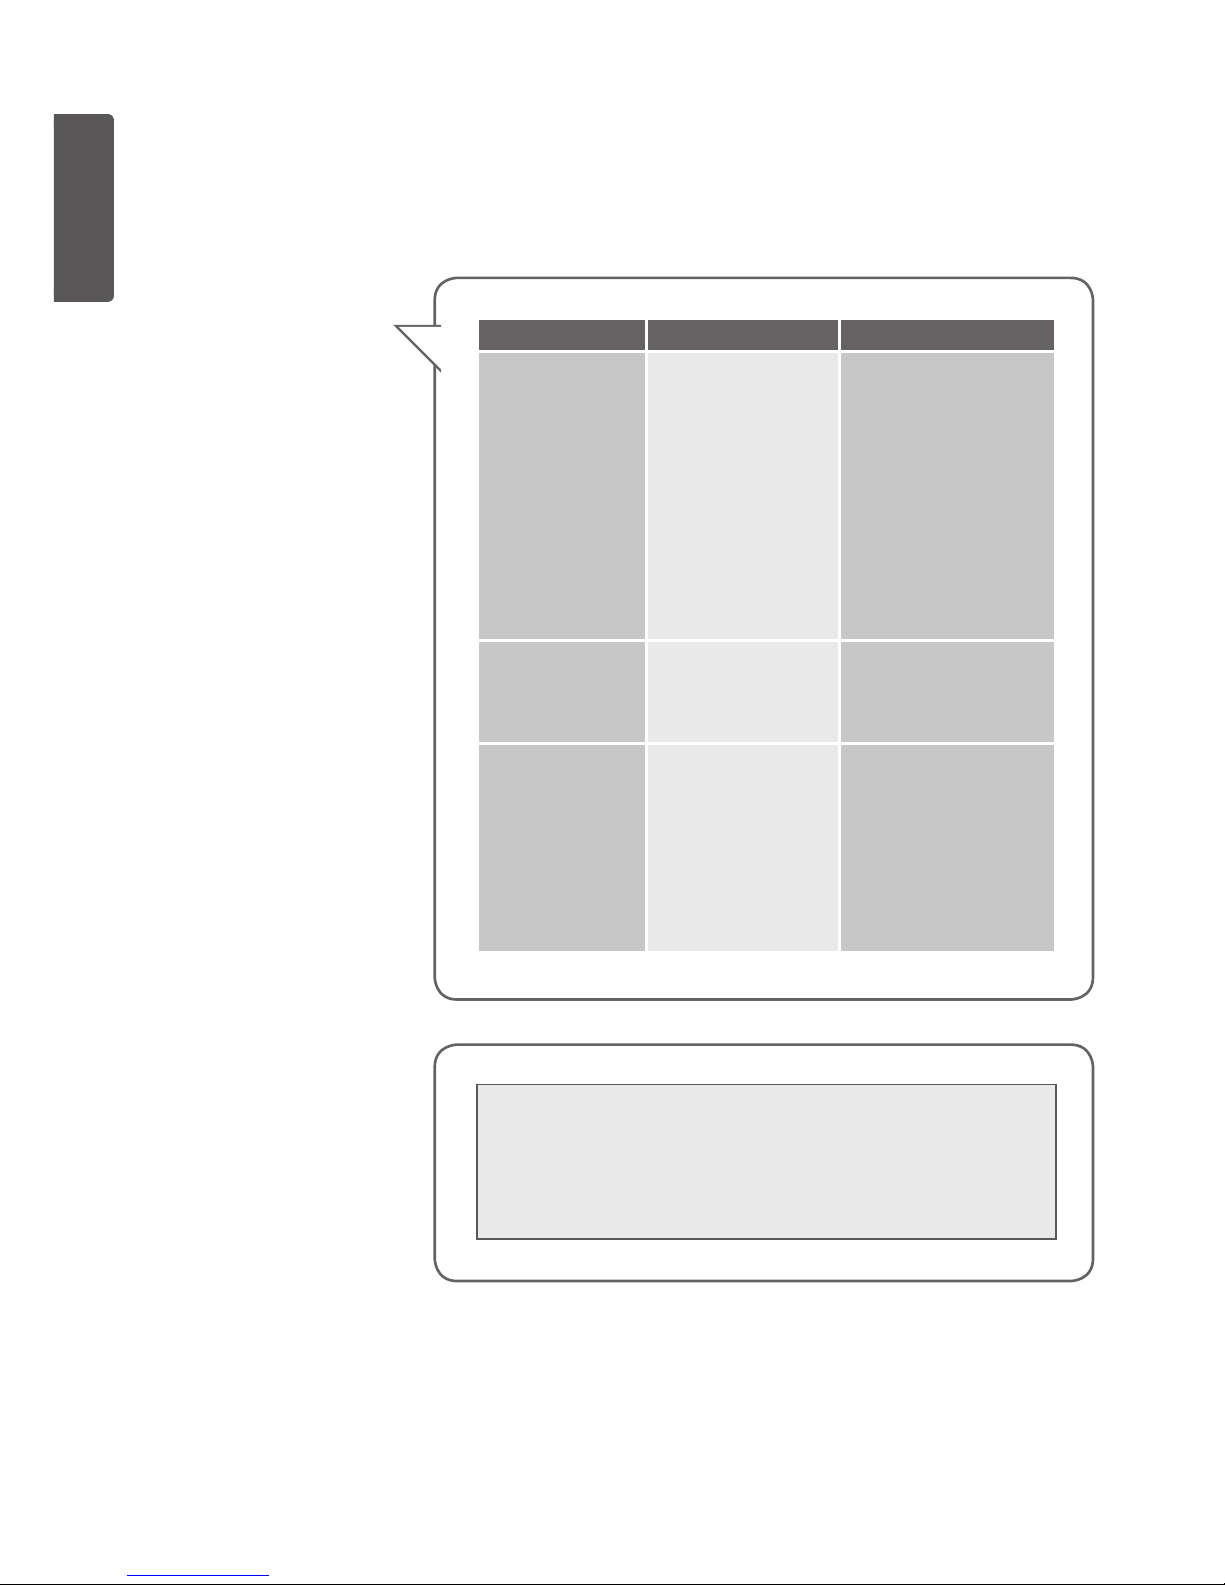
Problem / Situation mögliche Fehlerquelle Was ist zu tun?
kein Empfang an der
Elterneinheit
* Die Kamera überträgt
nicht. (Netzteil nicht
angeschlossen oder
Kamera befindet ist auf
Vox Funktion eingestellt
* Empfänger ist auf den
falschen Kanal eingestellt
* Der Sender ist
ausgeschaltet
* Netzteil an Kamera
anschließen
* Vox-Funktions-Schalter auf
CAMERA stellen
* Wählen Sie an der Elterneinheit
den richtigen Kanal aus
* Schalten Sie den Sender ein
Am Monitor ist nur
ein schwarz/weiß Bild
zu sehen
* Die Kamera ist auf Infrarot Nachtsicht gestellt
* Beleuchtung im zu überwa chenden Raum einschalten
Die Kamera Überträgt
nicht
* Kamera ist ausgeschaltet
* Netzteil nicht
angeschlossen
*Vox-Funktion eingeschaltet
(Stand-by-Modus)
* Kamera einschalten
* Netzteil anschließen
* Vox-Funktions-Schalter auf
CAMERA stellen
ACHTUNG:
Versuchen Sie auf keinen Fall die
Geräte selbst zu reparieren.
Funktionsprüfung
Testen Sie vor dem ersten Gebrauch die Funktionstüchtigkeit (z.B. mit Hilfe eines Fernsehgerätes). Neh-
men Sie nun die Feineinstellung (Lautstärke der Elterneinheit) vor und stellen Sie sicher, dass eine optimale
Übertragung gewährleistet ist. Beachten Sie hierbei, dass eine größere Entfernung und dicke Wände die
Übertragungsqualität negativ beeinflussen können.
HINWEIS:
Sollte die Baby- (Sender) oder
Elterneinheit (Empfänger) nicht
ordnungsgemäß funktionieren oder
unerwartete Fehler auftreten, bitten
wir Sie,
1.) zunächst den entsprechenden
Abschnitt der Bedienungsanleitung
erneut sorgfältig durchzulesen.
2.) Versuchen Sie bitte anschließend
den Fehler mit Hilfe der nachstehenden
Störungstabelle zu finden.
3.) Sollte sich der Fehler nicht beheben
lassen, bitten wir Sie, sich mit Ihrem
Fachhändler oder unserer Hotline unter
+49 (0)700 /73 374 624
in Verbindung zu setzen.
ACHTUNG:
Bitte Kaufbeleg und Artikelnummer aufbewahren.
Eventuelle Gewährleistungsansprüche oder Ansprüche aus Garantieversprechen sind ausschließlich mit dem Händler abzuwickeln.
Page 11

Ihre Kommentare und Meinungen sind für uns ebenfalls sehr hilfreich um unsere Produkte laufend zu
verbessern, so dass diese Ihren und den Ansprüchen Ihres Babys optimal gerecht werden.
Sie erreichen uns werktags von 08.00 bis 17.00 Uhr unter der Servicehotline:
+49 (0)700 / 733 746 24 (0,12 Euro / Min - aus dem Festnetz der Deutschen Telekom)
Sie können uns auch per E-Mail kontaktieren: service@reer.de
Alle technischen Daten, Informationen sowie Eigenschaften des in diesem Werk beschriebenen
Produktes wurden nach bestem Wissen zusammengestellt und entsprechen dem Stand bei Veröffentlichung. Die von reer bereitgestellten Informationen sollten korrekt und zuverlässig sein. Die Firma reer
übernimmt dennoch keinerlei Haftung für mögliche Fehler in diesem Dokument und behält sich das
Recht vor, ohne vorherige Ankündigung, Änderungen am Produktdesign beziehungsweise an den Spezifikationen vorzunehmen.
Vervielfältigung und Weitergabe von Informationen aus diesem urheberrechtlich geschützten Werk in
irgendeiner Form oder auf irgendeine Weise, grafisch, elektronisch oder mechanisch, durch Fotokopieren,
Aufzeichnen auf Band oder Speichern in einem Datenabfragesystem – auch auszugsweise– bedürfen
einer vorherigen schriftlichen Genehmigung der Firma reer.
Haben Sie noch Fragen oder benötigen technische Unterstützung?
Wir helfen Ihnen gerne weiter!
Kontaktinformationen:
reer GmbH, Postfach 1639, 71206 Leonberg, www.reer.de
Alle Rechte sowie Änderungen in Technik und Design vorbehalten.
1313
Seite 10
Page 12

Page 13
Important information:
! In order to prevent an incalculable breakdown of the devices due to empty batteries and to
protect the environment, we recommend you operate the baby as well as the parent unit
using the power adapters. Thus the transmission and reception can be improved.
Safety warnings:
! Always place the baby unit out of reach of the child (minimum distance 1 metre).
This ensures that your baby cannot play with the knobs which are responsible for the control
of the transmitter.
! Never place the baby monitor in the baby’s or child’s bed or rather in the playpen.
! Please make sure that the baby as well as the parent unit are functioning accurately and that
they are located within the radio range. (see section 3)
! DO NOT operate these devices with power adapters other than the ones included in delivery.
Please ensure that the operational voltage of the power outlet corresponds to the power
adapters’.
! Do not operate the devices near water or in damp places.
! Avoid extreme heat and direct sunlight.
! The devices and power adapters may not be opened, with the exception of the battery
compartment’s cover, as this can lead to an electric shock. Should one of the devices not be
functioning accurately, please DO NOT try to repair it yourself. In this case we kindly ask you
to contact your dealer.
! Please check, in particular when travelling abroad, if the local power supply voltage
corresponds to the voltage indicated on the devices or rather the power adapters. You can
find respective information on each of the devices.
! Avoid touching metal objects with the battery or rather power connection contacts on the
devices.
! There is danger of explosion if unsuitable types of batteries are used.
! Used or rather empty batteries do not belong in the household garbage and must be appro
priately disposed of.
! The devices are for indoor use only.
! Never cover up the parent unit or baby unit
Congratulations! You have purchased a new reer baby monitor.
We are confident you will enjoy the quality our product offers.
Please read the following information carefully and follow the instructions before putting the device into operation. Please
save the instruction manual for future reference. This baby monitor was developed solely for the purpose of assisting you in
monitoring your baby. It should neither be regarded as a substitute for parental supervision nor as a medical device.
Please take the time to carefully
read the safety instructions.
Failure to do so could result in
damage to the baby monitor or
injury to your child.
This appliance is suitable for users
(including children) with limited
physical, sensory and psycholo-
gical capacity, or without any ex-
perience or prior knowledge only
on condition that they are given
appropriate supervision or have
been given detailed instruction
in the use of the appliance by a
responsible person.
page 12
Page 14
English (GB)
- Clear transmission of sound and picture at 2,4 GHz frequency
- Highly sensitive microphone guarantees a clear sound
- Adjustable volume and screen brightness (parent unit)
- Intercom function between parent and baby unit
- 3 calming melodies (to be turned on from parent unit)
- Clear picture in darkness due to 9 powerful infra-red LEDs
- Moving parts cannot be removed or swallowed
- Parent unit can be stationary or portable (powered by battery)
- Battery or mains operated (parent unit)
- VOX-Function, automatic activation in response to noise
- automatic activation of infra-red NightVision depending on level of lighting in the room
Delivery contents:
- 1 Baby unit (camera)
- 1 parent unit (receiver)
- 2 mains adaptors
- 1 battery (parent unit
Power supply with: Mains adaptor: 6 V / 800 mA max. (included)
or parent unit: 3,7V 1200mAh LiIon battery
Frequency: 2,4GHz
Recommended operating
temperature: 10-40°C
NOTE:
Information about the choice and
use of suitable power supply can
be found on page 4.
Technical Data:
Overview of Functions
page 13
Page 15

ATTENTION:
Always switch off the appliance
before changing batteries.
The monitor requires a rechar-
geable Li-Ion battery (included)
to operate. Never use any other
kind of battery. If you require
replacement, please contact your
retailer.
ATTENTION:
Ensure that the voltage require-
ments of the appliance match the
local power supply voltage.
01. Open battery compartment lid
Open the battery compartment on the back of the appliance. To
do so, remove the security screw and lift the lid upwards.
02. Insert battery
Insert battery in the battery compartment. Make sure that the
battery‘s poles match the symbols + and – inside the battery
compartment.
03. Close battery compartment
After inserting the battery, replace the battery compartment lid
to cover the compartment, and tighten the safety screw hand-
tight.
01. Connecting the adapter:
Plug the included adapter into the
DC power socket on the appliance.
02. Connecting to the power supply
Connect the mains adaptor to an available mains outlet.
(Attention: Select a suitable mains socket for the baby unit, prefe-
rably far removed from your child).
Power supply for parent unit and transmitter unit
The parent unit may be operated by battery as well as connected to the mains power supply.
You decide on the appropriate operating mode.
Using the power adaptor included with the delivery
Using the battery
page 14
Page 16
page 15
English (GB)
01. Switching on the baby unit
To switch on the camera unit, press and hold for about one se-
cond the ON/OFF switch.(03)
02. Activating the Vox Function
VOX function switch (05) on “CAMERA”: camera transmits
images to the monitor constantly
VOX function switch (05) on “AUTO”: camera only transmits
when there is a noise inside the room.
03. Adjusting the volume
To adjust the volume of music playback, slide the volume con-
trol (08) slider into the desired position. You can choose bet-
ween 3 volume levels.
Switching off: To switch off unit, press and hold ON/OFF key for about one second (03).
1
3
9
10
7
2
8
4
5
6
NOTE:
Always place the appliances in
an upright position in order to
ensure the best possible signal
transmission.
• Always place the baby unit out of reach of your child (minimum distance should be about 1 metre).
• Never place the baby unit in the baby‘s or child‘s bed or play pen.
• to ensure the best possible transmission, always place the appliances in an upright position.
RECOmmENDATIONS
fOR plACEmENT:
The Baby unit /
Transmitter
lEGEND:
Status LED .01
Camera with Infra-red LEDs .02
ON/OFF switch.03
Light sensor .04
VOX function switch .05
Temperature sensor .06
Speaker .07
volume control .08
Adjustment knob .09
DC power socket .10
Page 17
page 16
01. Switching on the parent unit
ON/OFF switch (12)
Position “ON”: Appliance is on, with video function
Position “OFF”: Appliance is turned off
Position “LCD OFF”: Appliance displays no image; sound ac-
tivation is on.
02. Select camera
Channel selector switch (02)
Press briefly the channel selector switch (02) in order to step through the
four available channels. Only channels associated with a camera will be
displayed. The factory setting for the delivered camera is on channel 1.
03. Automatic camera scan:
(Scan-Mode)
Press and hold the channel selector switch (02) until the display shows the Symbol. The screen
will now display images transmitted by each camera for 5 seconds.
04. Play back melody:
In order to start music playback on the baby unit, press the music play-
back button (08). By pressing the same key repeatedly you can switch to
the next of the 3 pre-programmed melodies in sequence
⇌
1
4
5
9
6
7
3
8
10
11
12
13
2
NOTE:
A high beeping tone during ope-
ration signals that the appliances
are too close to one another.
lEGEND:
01. Antenna
02. Channel selector
03. volume control
04. brightness control
05. 2,4“ LCD Monitor
06. Microphone
07. speaker
08. Music selector
09. Battery compartment lid
10. Status-LED
11. Intercom key
12. ON/OFF switch
13. DC power socket
The parent unit /
Receiver
Page 18
English (GB)
05. Adjusting volume and brightness on parent unit
Adjust the desired volume by pressing the button + or - (03) of
the volume control. In order to adjust the brightness proceed
exactly the same way by using the brightness controls (04)
.
06. Intercom function:
Use the intercom function by pressing the talking button (11). As long as
you keep the button pressed your voice is transmitted to the baby unit.
Release the talking button in order to hear the noises of your baby.
07. Indicator of the room temperature
The room temperature of the room the baby sojourns is always indicated on the display in degree
Celsius.
08. Range control:
The display shows the actual intensity of reception through the symbol . If you are out of reach,
the display becomes black and the term “LINKING” appears.
09. Indicator of the battery status:
The display shows the battery status through the symbol
Switching off: In order to switch off the appliance press the ON/OFF switch (12) to the position “OFF”.
page 17
Further functions of the parent unit:
Cleaning and maintenance:
Never immerse the appliances into water and do not clean them under running water.
Unplug the mains adaptor as far as they are plugged in. Clean the appliances with a humid rag.
Ensure that the appliances are completely dry before plugging them in.
Clean the adapters with a humid rag
NOTE:
Always place the appliances in
an upright position and swing
out the antenna of the screen,
in order to ensure the best
possible signal transmission.
Page 19
01. Synchronizing the parent unit
- Activate the screen.
- Press the channel selector for (02) 5 seconds until the menu appears on the screen.
- Use the volume controls (03) + and – in order to choose the channel to be synchronized.
- Then press the brightness control (04) + in order to confirm the channel.
- The display shows DEL and PAIR.
- Use the volume controls (03) + and – in order to choose PAIR.
- Press the brightness control (04) + in order to confirm.
- The display shows “WAIT”.
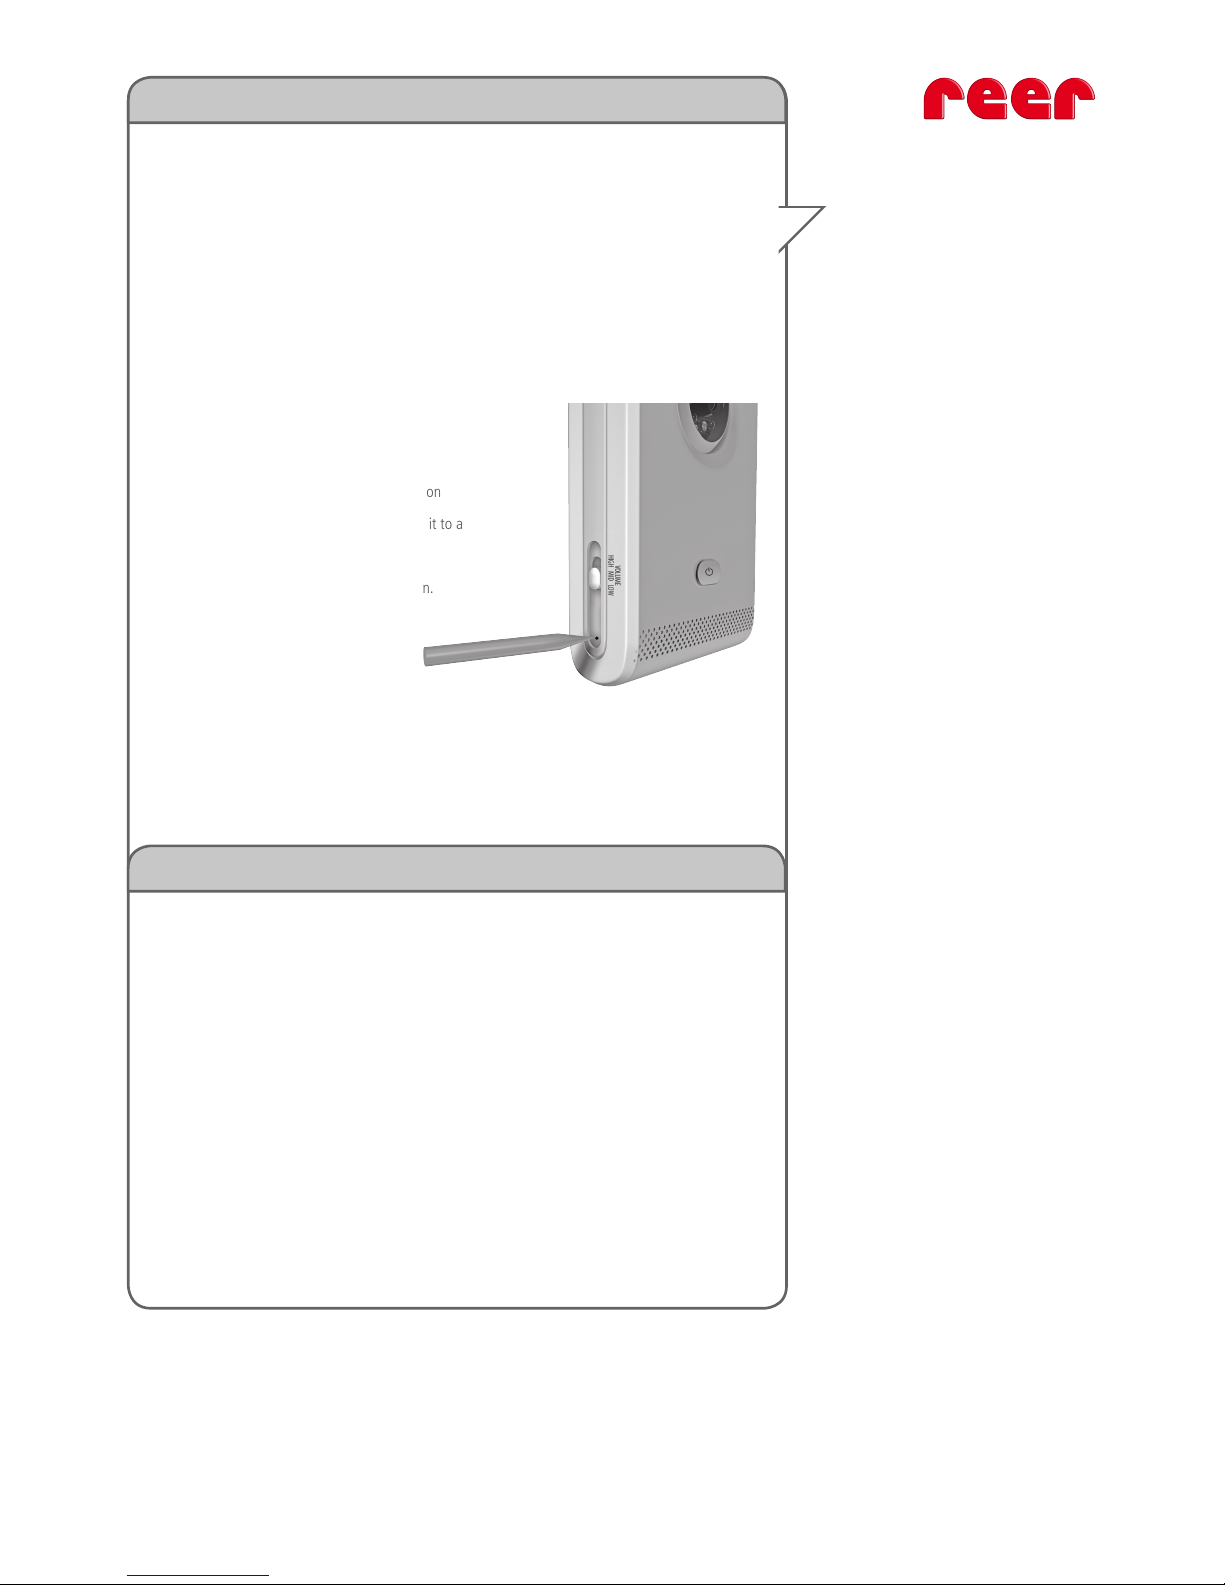
02. Synchronizing the camera
-- While the display shows “WAIT” switch on
the camera to be synchronized and place it to a
distance of not more than one meter.
- Press the recessed button (09) with a pen.
- The status LED (01) starts blinking.
- The display shows “PAIRED”.
03. Terminating the synchronization
Switch off both appliances and switch them on again. Thereby, the synchronization is terminated.
Perform these steps 2, 3 and 4 consecutively for eventual further cameras.
- Activate the screen.
- Press the channel selector for (02) 5 seconds until the menu appears on the screen.
- Use the volume controls (03) + and – in order to choose the channel to be synchronized.
- Then press the brightness control (04) +.
- The display shows “DEL” and “PAIR”.
- Use the volume controls (03) + and – in order to choose “DEL”.
- Press the brightness control (04) + in order to confirm.
- The display shows “DONE”
Switch off both appliances and switch them on again in order to terminate the
operation.
Synchronizing the appliances for using additional cameras
Deleting one camera (if not anymore in use)
NOTE:
The baby phones have been
already synchronized during the
manufacturing.
Normally, it is not necessary to
synchronize the baby phone
again before use.
Perform the operation of
synchronization between camera
and screen only if absolutely
necessary.
ATTENTION:
No defects of the appliances
are present if there are inter-
ferences due to other devices.
page 18
Page 20

page 19
English (GB)
Problem possible malfunction source What can be done?
No reception in the
parent unit
* The camera does not transmit (Power supply units
are not connected or the
camera is set to Vox
Function)
* Receiver is set to the
wrong channel
* The transmitter
is switched off
* Connect power supply unit
to the camera
* Set Vox-function-switch
to CAMERA
* Select the correct channel
on the parent unit
* Switch the transmitter on
On the monitor
only a black / white
image can be seen
* The camera is set to infrared night vision
* Switch on lighting in the room
to be monitored
The camera does not
transmit
* The camera is switched off
* Power supply unit is not
connected
*Vox-Function is switched on
(Stand-by-Mode)
* switch camera on
* Connect power supply unit
* Set Vox-Functions-Switch to
CAMERA
ATTENTION:
Never try to repair the device
yourself.
Functional Testing
Please test the function before first use (e.g. with the help of a television set). Adjust the settings (volume of
the parent unit) and make sure that the optimal transmission is taking place. Please note that distance and
thick walls can negatively influence the transmission quality.
NOTE:
If Baby- (Transmitter) or Parent Unit
(receiver) is not working properly or
if unexpected errors occur, we would
ask you:,
1.) First, to read the appropriate section
of the operating instructions again
carefully..
2.) Then please try to find the error with
the aid of the following error table.
3.) If the error cannot be remedied, we
would askyou please to contact your
retailer or to call our hotline at:
+49 (0)700 /73 374 624
.
ATTENTION:
Please keep receipt and article number.
Possible guarantee claims or claims from a guarantee agreement
must be exclusively dealt with by the retailer.
Page 21

1313
Do you have questions or need technical support?
We are here to help you!
Your comments and opinions are important for the continuous improvement of our products, making them
perfect for your needs and your baby’s.
You can reach our service hotline at +49 (0)700 / 733 746 24 weekdays between 8 a.m. and 5 p.m.
(0.12 Euro/minute from Deutsche Telekom land lines).
Or contact us by e-mail at: service@reer.de
All technical data, information, as well as features described in this documentation are compiled to the
best of our knowledge and up to date at the time of publication. The information provided by reer should
be accurate and reliable. The company reer does not assume liability for potential errors in this document
and reserves the right to make changes to the design of the product and/or specifications without prior
notification.
Duplication and circulation of information contained in this copyrighted document in any form or type of
graphic, electronic or mechanical form, such as photocopying, recording or database storage – including
excerpts – require prior written authorization by the company reer.
Manufacturer Informations:
reer GmbH, Postfach 1639, 71206 Leonberg, www.reer.de
All rights reserved, technology and design subject to change without notice.
page 20
Page 22

Page 23

Informations importantes:
! Afin d’éviter que l’appareil soit inopinément hors service pour cause de piles déchargées, et
également pour des raisons de protection de l’environnement, nous recommandons de
raccorder tant l’unité bébé que l’unité parentale au secteur. Ceci permet également
d’améliorer la qualité de transmission et de réception.
Consignes de sécurité:
! Toujours placer l’unité bébé hors de portée de l’enfant (distance minimum 1 mètre).
Ceci vous assurera que votre bébé ne pourra pas jouer avec les boutons contrôlant
l’émetteur.
! Ne jamais poser le babyphone sur le lit du bébé ou de l’enfant ou dans le parc.
! S’assurer que les unités bébé et parentale fonctionnent correctement et qu’elles se trouvent
dans la zone de portée l’une de l’autre. (voir paragraphe 3)
! NE PAS utiliser ces appareils avec d’autres blocs d’alimentation que ceux livrés avec
l’appareil. S’assurer que la tension d’alimentation au secteur corresponde à celle du bloc de
l’appareil.
! Ne pas utiliser ces appareils à proximité de l’eau ou dans des endroits humides.
! Éviter toute exposition à la chaleur extrême ou au rayonnement direct du soleil.
! Exception faite du couvercle du boîtier des piles, ne pas ouvrir les appareils et les blocs
d’alimentation sous peine de décharges électriques. . Si un appareil est défectueux, prière
de ne pas tenter de le réparer vous-même. Nous vous prions dans ces cas-là de vous adresser
à un revendeur spécialisé.
! S’assurer, en particulier lors de voyages à l’étranger, que la tension au secteur local
corresponde bien à celle indiquée sur l’appareil ou sur le bloc d’alimentation. Vous trouverez
les indications nécessaires sur l’appareil.
! Éviter tout contact entre des objets métalliques et les contacts des piles ou de l’alimentation
en courant.
! Risque d’explosion en cas d’utilisation de types de piles inadéquats.
! Ne pas jeter les piles usagées aux ordures ménagères. Celles-ci doivent être dûment
recyclées.
! Ces appareils sont conçus pou un usage en intérieur uniquement.
! Ne couvrez jamais l‘unité destinée aux parents ni celle destinée aux bébés
Félicitations pour l’achat de votre nouvelle Babyphone reer.
Nous sommes certains, que vous allez avoir un plaisir durable avec la qualité de notre produit.
Prière de lire attentivement les points suivants et de suivre les indications avant la mise en service de l’appareil. Conserver
soigneusement le mode d’emploi pour toute consultation ultérieure. Ce babyphone a été conçu uniquement comme
aide à la surveillance de votre bébe. Il ne doit pas être considéré comme un appareil médical ni suppléer au devoir de
surveillance incombant aux parents.
Veuillez accorder quelques
minutes à la lecture attentive des
conseils de sécurité. Autrement,
vous courez le risque, que votre
Babyphone sera endommagée
ou, dans le pire des cas, que
votre enfant se blessera.
Cet appareil est uniquement
adapté pour les utilisateurs (y
compris les enfants) souffrant
d‘handicaps physiques, sensoriels
ou mentaux, ou pour ceux qui
n‘ont aucune expérience ou
connaissance de base, quand
ils sont sous la surveillance
appropriée ou quand ils ont reçu
des instructions détaillées sur
l‘utilisation de l’appareil d‘une
personne responsable.
page 22
Page 24

Francais (F)
- transmission claire de l’image et du son à la fréquence de 2,4 GHz
- le microphone très sensible garantit le ton
- Haut-parleurs et luminosité de l‘écran ajustable (unité parentale)
- Fonction inversée de l’unité parentale à l’unité du bébé
- 3 meldois apaisante (activables depuis l’unité parentale)
- Image clair dans le noir grâce à 9 voyants LED infrarouges intenses.
- Les éléments mobiles ne peuvent pas se détachées ni être avalées
- L‘unité parentale peut être utilisée de manière statique ou mobile (avec des piles).
- Alimentation par piles ou sur secteur (unité parentale) possibles
- La fonction VOX, permet le démarrage automatique de la transmission dès la détection de sons
- le déclenchement automatique de la vision nocturne infrarouge, en fonction de l‘éclairage de la chambre
Contenu:
- 1 unité de bébé (Caméra)
- 1 unité parentale (récepteur)
- 2 sources d’alimentation électrique
- 1 batterie (unité parentale)
Alimentation électrique avec : adaptateur: 6 V / 800 mA max. (fourni)
ou l’unité parentale: batterie 3,7V 1200mAh Li Ion
Fréquence: 2.4GHz
Température recommandée
pendant le fonctionnement: 10-40 ° C
AVERTISSEmENT:
Ivous trouverez des informations
sur le choix et l’utilisation de
source électrique appropriée à
la page 4.
Données techniques
Vue d‘ensemble des fonctions
page 23
Page 25

ATTENTION:
Débranchez toujours l’appareil
avant de changer les piles.
Le moniteur nécessite toujours
une batterie rechargeable Li-Ion
(livrée). N’utilisez en aucun cas un
autre type de pile. Si vous avez
besoin d’en changer, adressez-
vous à votre revendeur.
ATTENTION:
Assurez-vous que
Le voltage de l’appareil
est compatible avec
le voltage local
01. L‘ouverture du couvercle du
compartiment à piles
Ouvrir le compartiment à piles à l‘arrière de l‘appareil. Pour cela
retirez la vis de sécurité et soulevez le couvercle
02. Insertion des piles
Insérez les piles dans leur emplacement. Pour ce faire assurez-
vous toujours que la polarité des piles correspond aux symboles
de polarité + et - dans le compartiment.
03. La fermeture du compartiment à piles
Après avoir placé les piles, remettez le couvercle sur les piles et
remettez bien la vis de sécurité.
01. Branchement des systèmes
d‘alimentation :
Branchez les systèmes
d’alimentation électrique fournis
aux prises de courant de l‘appareil.
02. Raccordement au réseau électrique
Branchez la prise.
(Remarque: Choisissez un endroit approprié pour brancher l‘unité
bébé, qui doit être aussi loin que possible du bébé).
Alimentation électrique de l’unité parentale et de l’unité émettrice
L‘unité parentale fonctionne aussi bien avec un e qu’avec un branchement secteur.
C’est à vous de décider, quel mode de fonctionnement vous préférez
Utilisation des boitiers d‘alimentation fournis
Utilisation des piles
page 24
Page 26

page 25
Francais (F)
01. Mise sous tension de l’unité de bébé
Pour allumer l’unité de la caméra appuyez en maintenant
l’interrupteur de mise sous tension pendant environ une seconde
(03).
02. Activation de la fonction Vox
L‘interrupteur de fonction Vox (05) sur « CAMERA »: la caméra
transmet en permanence une image à l‘écran.
Positionnez l’interrupteur pour la fonction Vox (05) sur «AUTO»:
la caméra transmet uniquement une image lorsqu’un son est
détecté dans la pièce
03. Réglage du volume de la musique
Pour régler les hautparleurs de la musique reproduite mettes le
bouton de réglage des hauts parleurs (08) sur la position dési-
rée. Vous pouvez choisir en 3 hauts parleurs différents.
Désactivation: Pour éteindre, appuyez pendant une seconde sur le bouton ON/OFF
(03).
1
3
9
10
7
2
8
4
5
6
AVERTISSEmENT:
Placez les appareils toujours en
position verticale pour obtenir
une meilleure qualité de trans-
mission.
• Mettez toujours l’unité de bébé hors de portée de votre enfant.
(La distance minimale est de 1 mètre).
• L’unité de bébé ne doit jamais être dans le berceau, le lit ou dans le parque.
• Pour garantir la meilleure qualité de transmission, placez les appareils en toujours en position
verticale.
RECOmENDACION pOUR
l’EmplACEmENT :
L’unité de bébé/Emetteur
lÉGENDE:
Voyant de contrôle-LED .01
Caméra Voyant LED infra
rouge.02
Interrupteur de mise
sous tension .03
capteur de lumière.04
Interrupteur de fonction VOX .05
Capteur de température .06
Hautparleur .07
Réglage des hauts parleurs .08
Bouton de configuration .09
Prise d’alimentation DC .10
Page 27

page 26
01. Activation de l’unité parentale
Interrupteur de mise sous tension (12)
Position « ON »: l’appareil est allumé avec surveillance vidéo.
Position « OFF »: l’appareil est éteint.
Position « LCD-OFF »: L’appareil n’affiche aucune image, la
surveillance audio est activée
02. Sélection de la caméra
Sélecteur de canaux (02)
Appuyez brièvement sur le bouton de sélection du canal (02) pour con-
necter les 4 canaux possibles. Seuls les canaux des caméras connectées
s’affichent. La caméra livrée est configurée en usine sur le canal 1
03. Permettre la connexion automatique des caméras:
(Mode-Scan)
Appuyez plusieurs fois sur le bouton de sélection (02) de canaux jusqu’à ce qu’apparaisse sur l’écran le
symbole. L’icône de chaque caméra disponible apparaitra pendant 5 secondes.
04. Production de mélodie:
Pour produire une mélodie sur l’unité de bébé appuyez sur le bouton de
production de musique (08). Si vous appuyez plusieurs fois, vous active-
rez et produirez les trois mélodies stockées progressivement.
⇌
1
4
5
9
6
7
3
8
10
11
12
13
2
AVERTISSEmENT:
Si durant la mise sous tension
vous entendez un fort sifflement
provenant de l’appareil, c’est
par ce que les appareils sont très
proches l’un de l’autre.
lEGENDE:
01. Antenne
02. Sélecteur de canal
03. Réglage des hauts parleurs
04. Contrôle de la luminosité
05. Moniteur LCD de 2,4“
06. Microphone
07. Hauts parleurs
08. Sélecteur de musiques
09. Couvercles du compartiment
des piles
10. Voyant de contrôle LED
11. Bouton de communication
12. Interrupteur mise sous
tension
13. Couvercles du compartiment
des piles
l’unité parentale /Récepteur
Page 28

Francais (F)
05. Réglage des hauts parleurs et de la luminosité
de l’unité parentale
Réglage du volume des hauts parleurs en appuyant sur le bou-
tons + ou - (03) pour la mise au point du volume. Pour régler
la luminosité, procédez de la même façon avec les boutons de
mise au point de la luminosité (04).
06. Fonction inversée:
Vous déclenchez la fonction inversé en appuyant sur le bouton (11).
Votre sera transmise à l’unité de bébé tout le temps où vous main-
tiendrez le bouton appuyé. Relâchez le bouton pour revenir en mode
écoute bébé.
07. Indicateur de température ambiante
La température ambiante de la pièce ou se trouve l’unité de bébé apparaît en degrés Celsius sur l’écran
de l’unité parentale.
08. Contrôle de la portée radio:
Sur l’écran apparaît à tout moment le niveau de réception au moyen d’un symbole. Si vous êtes
éloignée de la fréquence radio, l’écran devient noir et on peut y lire « CONNEXION ».
09. Indicateur du niveau de la batterie:
Le niveau de la bâterai apparaît sur l’écran au moyen d’un symbole
Désactivation: pour éteindre l’appareil mettez l’interrupteur de mise sous tension (12)
sur la position «OFF».
page 27
Autres fonctions d’unité parentale
Nettoyage et entretien:
Ne pas immerger l‘unité parentale ni l’unité de bébé dans l’eau et ne pas les laver pas sous
l’eau courante. N‘utilisez pas de produits de nettoyage liquides ou en aérosols.
1 Débranchez l‘adaptateur de l‘unité de bébé ou parentale, s‘il est branché.
2 Nettoyez l‘unité parentale et du bébé avec un chiffon humide.
Vérifiez que les unités sont complètement sèches avant de les rebrancher au secteur
3 Nettoyez l‘adaptateur avec un chiffon humide.
CONSEIl:
Mettez toujours les appareils
en position vertical et déployez
l’antenne du moniteur pour
obtenir la meilleure qualité de
réception
Page 29

01. Configuration de l’unité parentale
- Allumez le moniteur.
- Maintenez appuyé le sélecteur de canaux (02) durant 5 secondes jusqu‘à ce qu’apparaisse le
menu sur l’écran.
- Utilisez les boutons de volume (03) + et – pour sélectionner le canal que vous voulez configurer.
- Appuyez alors sur le bouton pour réglez la luminosité (04) + pour confirmer le canal.
- Sur l’écran apparait « DEL » et « PAIR ».
- Utilisez les boutons pour régler le volume (03)+ et – pour sélectionner PAIR.
- appuyez sur le bouton + pour régler la luminosité (04) pour
confirmer la sélection. - Sur l’écran apparaît « WAIT ».
02. Configuration de la caméra
- Pendant que sur l’écran apparait « WAIT » allumez la
caméra que vous voulez configurer et ne la placez pas à plus
d’un mètre de distance.
- Appuyez sur le bouton encastré de configuration (09) avec la
pointe d’un crayon.
- Le voyant de contrôle (01) commence à clignoter.
- Sur l’écran apparaît « PAIRED ».
03.Terminer la configuration
Eteignez les deux appareils et rallumez-les. Ainsi la configuration est terminée.
Répétez ces étapes pour configurer progressivement d’éventuelles caméras 2, 3 et 4.
- Allumez le moniteur.
- Maintenez appuyé le sélecteur de canaux (02) durant 5 secondes jusqu‘à ce qu’apparaisse le
menu sur l’écran.
- Utilisez les boutons de volume (03) + et – pour sélectionner le canal que vous voulez configurer.
- Appuyez alors sur le bouton pour réglez la luminosité (04).
- Sur l’écran apparait « DEL » et « PAIR ».
- Utilisez les boutons pour régler le volume (03) + et – pour sélectionner « DEL ».
- appuyez sur le bouton + pour régler la luminosité (04) pour confirmer la sélection.
- Sur l’écran apparaît « DONE ».
Eteignez les deux appareils et rallumez-les pour terminer l’opération.
Conguration des appareils pour l’usage de caméras supplémentaires
Supprimer une caméra (Si elle n’est nécessaire)
AVERTISSEmENT:
L’appareil de surveille de bébé est
configuré en usine.
Normalement il n’est pas néces-
saire de le reconfigurer avant de
s’en servir.
Configurer la caméra et le
moniteur uniquement si c’est
absolument nécessaire.
ATTENTION:
En cas d’interférences
Avec d’autres appareils de radio
L’appareil ne subit aucune
défaillance.
page 28
Page 30

page 29
Problèmes possibles origines de défaillances Que faire?
Mauvaise réception de
l’unité parentale
* La caméran’émet pas. (La
source d’alimentation n’est
pas branchée ou la camé et
en mode de fonction Vox.
* Canal erroné sur le
récepteur* L’émetteur
est éteint
* Connectez la source ’alimentation à la caméra
* Mettre l’interrupteur de
fonction Vox sur la position
CAMERA
* Sélectionnez sur l’unité parentalele canal approprié
* En allumant l’émetteur
On voit seulement une
image en noir et blanc
sur le moniteur
* Le mode de vision nocturne
de La caméra est activée
* allumez les lumières de la
piècepour vérifier
La Caméra n’émet pas. * La caméra est éteinte
* La source d’alimentation
n’est pasbranchée
*Fonction Vox activée
(Mode Pause)
* Allumez la caméra
* Branchez la source ’alimentation
* Mettre l’interrupteur de
fonction Vox sur la policions
CAMERA
ATENTION:
N’essayez jamais de réparer vous-
même l’appareil.
Test de Fonctionnalité
Avant la première mise en service, vérifiez le bon fonctionnement (notamment avec l‘aide
d‘une télévision). Vérifiez le réglage de précision (volume de l’unité parentale), assurez-vous que
la qualité de transmission est optimale. Notez qu’une longue distance et des murs épais peuvent
entraver la qualité de transmission.
ATTENTION:
Conservez la preuve d‘achat et le numéro de l‘article. Par une réclamation éventuelle de droit
garantie Adressez-vous à votre fournisseur
AVERTISSEmENT:
Si l‘unité bébé (émetteur) ou l‘unité
parentale (récepteur) ne fonctionnent
pas correctement ou que surgissent des
problèmes inattendus, veuillez
1.) Relire attentivement la section
correspondante dans le manuel
d’utilisation.
2.) Essayez de trouver l’origine
des pannes avec l‘aide du tableau
de détection de pannes.
3.) Si vous ne pouvez pas résoudre
le problème contactez votre revendeur
ou appelez notre hotline au numéro
+49 (0) 700 / 73 374 624.
Francais (F)
Page 31

1313
Vos commentaires et avis nous sont également d’une grande aide, afin d’améliorer en permanence nos
produits, pour qu’ils correspondent à vos attentes et aux exigences de votre bébé de manière optimale.
Vous pouvez nous joindre sous notre numéro de service: +49 (0)700 / 733 746 24 les jours ouvrables de
08.00 à 17.00 heures. (0,12 Euro / minute depuis le réseau fixe allemand de la Deutsche Telekom)
Vous pouvez également nous contacter par E-mail: service@reer.de
Toutes les données techniques, informations et caractéristiques du produit ici décrit, ont été réunies en
toute connaissance et correspondent à l’état lors de la publication. Les informations mises à disposition par
reer devraient être correctes et fiables. La société reer ne prend cependant pas de responsabilité pour des
erreurs possibles dans ce document et se réserve le droit d’entreprendre des changements de design du
produit ou des spécifications, sans annonce préalable.
Reproduction et transmission d’informations de cette oeuvre de droits protégés, sous n’importe quelle
forme et de n’importe quelle manière, graphique, électronique ou mécanique, par photocopie,
enregistrement sur bande ou enregistrement dans un système de données – aussi par extraits – sont
soumises à une autorisation écrite préalable de la société reer.
Vous avez encore des questions ou nécessitez un soutien technique?
Nous vous aidons avec plaisir!
Informations du fabricant:
reer GmbH, Postfach 1639, 71206 Leonberg, www.reer.de
Sous réserve de tous droits et de changements techniques ou de design.
page 30
Page 32

Page 33

Informazioni importanti:
! Per evitare il non funzionamento imprevedibile degli apparecchi a causa di batterie vuote e
per salvaguardare l’ambiente, raccomandiamo di mettere in funzione l’unità baby e quella
genitori mediante un componente di rete. In questo modo si possono ottimizzare trasmissio
ne e ricezione.
Avvisi di sicurezza:
! Posizioni l’unità baby sempre al di fuori della portata del bambino (distanza minima 1 metro).
! Non posizioni mai il babyfon nel lettino del baby o del bambino e neppure nella grata.
! Si assicuri che le unità baby e genitori funzionino in modo impeccabile e che si trovino
nell’ambito di portata radio. (vedi paragrafo 3).
! Non faccia uso di questo apparecchio insieme ad altri componenti di rete, eccetto in combi
nazione con quelli consegnati. Ai assicuri che la tensione di funzionamento della presa
corrisponda alla tensione del componente di rete.
! Non faccia uso degli apparecchi vicino all’acqua o in luoghi umidi.
! Eviti calore estremo e irradiazione solare.
! Gli apparecchi e i componenti di rete, ad eccezione dei coperchi dei comparti batterie, non
devono essere aperti, visto che si rischia di prendere la scossa. Nel caso in cui l’apparecchio
non dovesse funzionare in modo corretto, La preghiamo di non cercare di risolvere Lei il
problema. In questo caso La preghiamo di rivolgersi al Suo rivenditore.
! Verifichi soprattutto se si trova in viaggio all’estero, se la tensione di rete locale corrisponde
alla tensione degli apparecchi e dei componenti di rete. Le indicazioni corrispettive si trovano
sugli apparecchi in questione.
! Eviti di toccare oggetti metallici con i contatti batterie e collegamento corrente presenti sugli
apparecchi.
! In caso di impiego di tipi di batterie diversi, vi può essere il rischio di esplosione.
! Le batterie usate non vanno gettate nella spazzatura di casa, ma devono essere smaltite in
modo corretto.
! Le apparecchiature sono adatte esclusivamente per l’uso interno.
! Non copra mai l’unità genitori o l’unità baby.
Congratulazioni per aver acquistato la Sua nuova Babyfon della reer.
Siamo convinti che avra` una soddisfazione a lungo termine con la qualita` dei nostri prodotti.
La preghiamo di leggere attentamente i seguenti punti e di attenersi alle indicazioni prima di mettere in funzione
l‘apparecchio. Conservi le istruzioni per poter controllare in futuro. Questo babyfon funge unicamente da supporto per
osservare il Suo piccolo. Non funge affatto da sostituzione al dovere di sorveglianza da parte dei genitori o da apparecchiatura medica.
La preghiamo di prendersi qual-
che minuto di tempo per leggere
attentamente le indicazioni di
sicurezza. In caso contrario risulta
il pericolo che la Babyfon venga
danneggiata oppure nel caso
peggiore che venga ferito il Suo
bambino.
Quest‘apparecchio non è adatto
agli utenti (bambini inclusi) con
disturbi fisici, sensoriali o psichici.
Inoltre è soltanto adatto alle
persone inesperte e senza cono-
scenze di base, se queste sono
sorvegliate in maniera adeguata
o se una persona responsabile
può assicurare il corretto uso
dell’apparecchio.
pagina 32
Page 34

- Trasmissione chiara del suono e delle immagini attraverso una frequenza di 2,4 GHz
- Il microfono altamente sensibile garantisce un suono chiaro
- Volume e intensità luminosa dello schermo (unità genitori) regolabili
- Funzione interfono dall’unità genitori all’unità baby
- 3 melodie calmanti (inseribili dall’unità genitori)
- Immagine chiara nel buio grazie a 9 forti LED ad infrarossi
- Le parti mobili non possono essere staccate o inghiottite
- L’unità genitori può essere utilizzata sia dalla stazione sia in maniera mobile (attraverso la
batteria ricaricabile)
- L’unità genitori può essere utilizzata con la batteria ricaricabile o la presa di corrente
- Funzione VOX, inserimento automatico della trasmissione in caso di rumori
- Attivazione automatica della NightVision ad infrarossi secondo l’illuminazione della stanza
Volume di consegna:
- 1 Unità baby (videocamera)
- 1 Unità genitori (ricevitore)
- 2 Spina dell’adattatore
- 1 Batteria ricaricabile (unità genitori)
Alimentazione con: Spina dell’adattatore: 6 V / 800 mA max. (inclusa
nel volume di consegna)
O unità genitori con: 3,7V 1200 mAh batteria ricaricabile di litio
Frequenza: 2,4GHz
Temperatura di esercizio del ricevitore: 10-40°C
AVVISO:
Le informazioni per la selezione
e l’utilizzo dell’alimentazione
adatta sono riportate sulla
pagina 4.
Dati tecnici:
Riassunto delle funzioni:
Italiano (I)
pagina 33
Page 35

ATTENZIONE:
Spenga gli apparecchi prima di
eseguire il ricambio della batteria
ricaricabile.
Lo schermo richiede una batteria
ricaricabile di ioni di litio (inclusa
nel volume di consegna). Non
utilizzi una batteria ricarica-
bile diversa. La preghiamo di
rivolgersi al venditore, se diventa
necessaria la sostituzione.
ATTENZIONE:
Si assicuri che
il voltaggio degli apparecchi
indicato
corrisponda al voltaggio
dell’alimentazione locale
01. Aprire il coperchio dello scom
partimento per la batteria
Apra lo scompartimento per la batteria sul retro degli apparec-
chi. Per eseguire quest’operazione è necessario svitare la vite di
sicurezza e di alzare il coperchio verso l’alto.
02. Inserire la batteria ricaricabile
Inserisca la batteria ricaricabile nello scompartimento per la
batteria. La preghiamo di fare sempre attenzione alla giusta po-
larità secondo le istruzioni + e – indicate nello scompartimento
per la batteria.
03. Chiudere lo scompartimento per la batteria
Adagi il coperchio dello scompartimento per la batteria sullo
stesso dopo aver inserito la batteria e avviti la vite di sicurezza
in maniera abbastanza solida.
01. Collegare le prese degli
adattatori:
Colleghi gli adattatori delle
prese consegnati alla boccola
dell’alimentazione DC degli appa-
recchi.
02. Collegare con la corrente elettrica
Colleghi gli adattatori con la presa.
(Attenzione: Selezioni una presa adatta per l’unità baby. Questa si
deve trovare il più lontano possibile dal Suo bambino.)
Alimentazione dell’unità genitori e del trasmettitore
L’unità genitore può essere utilizzata sia con la batteria ricaricabile sia con la presa di corrente.
Può selezionare Lei il funzionamento adatto.
Utilizzo delle spine degli adattatori inclusi nel volume di consegna
Utilizzo della batteria ricaricabile
pagina 34
Page 36

pagina 35
Italiano (I)
01. Accendere l’unità baby
Per accendere la videocamera è necessario premere il pulsante
ADDENDERE/SPEGNERE (03) per circa un secondo .
02. Attivare la funzione Vox
Interruttore per la funzione VOX (05) su posizione “CAMERA”:
La videocamera trasmette continuamente un’immagine allo
schermo Interruttore per la funzione VOX (05) su posizione
„AUTO“: La videocamera trasmette un’immagine soltanto se
viene intercettato un rumore nella stanza.
03. Regolare il volume della musica
Spinga l’interruttore del volume verso la posizione desiderata
per regolare il volume della musica riprodotta. Può selezionare
fra 3 volumi diversi.
Spegnere: Per spegnere prema il pulsante ACCENDERE/SPEGNERE per un secondo ().
AVVISO:
Sistemi gli apparecchi sempre in
posizione verticale per garantire
una trasmissione ad un livello
qualitativo più alto possibile.
• Sistemi l’unità baby sempre fuori dalla portata del Suo bambino. (la distanza minima deve essere
di almeno 1 metro).
• L’unità baby non deve essere mai sistemata nel letto del baby / bambino o nel suo box.
• Piazzi gli apparecchi sempre in posizione verticale per garantire una trasmissione ad un livello
qualitativo più alto possibile
CONSIGlIO pER lA
SISTEmAZIONE:
1
3
9
10
7
L’unità baby /
Trasmettitore
lEGGENDA
LED dello stato .01
Videocamera con LED ad infra-
rossi .02
Interruttore ACCENDERE /
SPEGNERE .03
Sensore luminoso .04
Interruttore per la funzione VOX .05
Sensore di temperatura.06
Altoparlante .07
Volume .08
Pulsante d’aggiustamento .09
Boccola per l’alimentazioneDC
.10
2
8
4
5
6
Page 37

pagina 36
01. Accendere l’unità genitori
Interruttore ACCENDERE / SPEGNERE (12)
Posizione “ACCENDERE”: L’apparecchio è acceso con il modo
“sorveglianza video”
Posizione “SPEGNERE”: L’apparecchio è spento.
Posizione “SPEGNERE LCD”: L’apparecchio non visualizza nes-
suna immagine, è attivata la “sorveglianza rumori”.
02. Selezionare la videocamera
Interruttore per la selezione dei canali (02)
Prema brevemente l’interruttore per la selezione dei canali () per com-
mutare tra i 4 canali disponibili. Vengono indicati soltanto i canali delle
videocamere collegate. La videocamera consegnata è sintonizzata dal
produttore su canale 1.
03. Fare commutare la videocamera automaticamente fra i vari canali:
(Modo Scan)
Prema l’interruttore per i canali brevemente fino a che il simbolo appare nel display. Viene
visualizzata per 5 secondi l’immagine di ciascuna videocamera disponibile.
04. Riprodurre una melodia:
Per riprodurre una melodia dall’unità baby, è necessario premere
l’interruttore per la riproduzione della musica (). Premendo più volte
può commutare fra le 3 melodie registrate e riprodurle.
⇌
AVVISO:
Se dovesse comparire un bip
alto, i due apparecchi non hanno
una distanza sufficiente l’uno
fra l’altro.
lEGGENDA:
01. Antenna
02. Interruttore per la selezione
dei canali
03. Regolatore per il volume
04. Controllo della luminosità
05. Schermo LCD di 2,4“
06. Microfono
07. Altoparlante
08. Interruttore per la selezione
della musica
09. Batteriefachabdeckung
10. LED dello stato
11. Pulsante di comunicazione
12. Interruttore ACCENDERE /
SPEGNERE
13. Boccola per l’alimentazione
DC
Unità genitori /
Ricevitore
1
4
5
9
6
7
3
8
10
11
12
13
2
Page 38

Italiano (I)
05. Regolare il volume e l’intensità luminosa
dell’unità genitori
Sintonizzi il volume desiderato premendo uno dei due pulsanti
per il volume + o - (03). Eseguisca la stessa operazione per
sintonizzare l’intensità luminosa utilizzando i rispettivi pulsanti
(04).
06. Funzione interfono:
Utilizzi la funzione interfono premendo il pulsante di comunicazione
(11). La Sua voce viene trasmessa al baby fin quando il pulsante è cal-
cato. Per sentire i rumori del Suo baby è necessario lasciare andare il
pulsante (11).
07. Indicatore della temperatura ambiente
La temperatura della stanza in cui si trova il Suo baby è indicata in gradi Celsius sul display dell’unità
dei genitori.
08. Controllo del raggio d’azione:
L’intensità della ricezione momentanea è indicata attraverso il simbolo . Se Lei si trova fuori dal
raggio d’azione, il display diventa nero e appare “LINKING”.
09. Indicazione dello stato della batteria:
Lo stato della batteria viene indicato sul display attraverso il simbolo
Spegnere: Per spegnere l’apparecchio posizioni l‘interruttore ACCENDERE/SPEGNERE (12) su “SPEGNERE”.
pagina 37
Altre funzioni dell’unità genitori:
Pulizia a manutenzione:
Non immerga mai gli apparecchi nell’acqua e non li pulisca sotto l’acqua corrente.
Stacchi tutte le spine dalla corrente, se queste dovessero essere inserite.
Pulisca gli apparecchi con un telo umido.
La preghiamo di assicurarsi che gli apparecchi siano completamente asciutti prima di collegarli
alla corrente.
Pulisca gli adattatori con un telo umido.
AVVISO:
Sistemi gli apparecchi sempre
in posizione verticale e ribalti
l’antenna dello schermo per
garantire una trasmissione ad
un livello qualitativo più alto
possibile.
Page 39

01. Sintonizzare l’unità genitori
- Accenda lo schermo.
- Prema l’interruttore per la selezione dei canali () per 5 secondo fino a che appare il menu sullo schermo.
- Utilizzi i pulsanti per il volume + e – per selezionare il canale da sintonizzare.
- In seguito prema il pulsante per regolare l’intensità luminosa alla parte del + per confermare il canale.
- Il display indica DEL e PAIR.
- Utilizzi i pulsanti per il volume + e – per selezionare PAIR.
- Prema il tasto + per la regolazione dell’intensità luminosa per confermare la selezione.
- Nel display viene indicato “WAIT”.
02.Sintonizzare la videocamera
- Mentre il display indica “WAIT” accenda la videocamera
da sintonizzare e la sistemi a non più di un metro di
distanza.
- Prema il pulsante per la sintonizzazione con una penna ().
- La LED di stato () inizia a lampeggiare.
- Nel display appare “PAIRED”.
03. Terminare la sintonizzazione
Spenga entrambi gli apparecchi e li riaccenda. La sintonizzazione è terminata.
Eseguisca questi passaggi nello stesso ordine per sintonizzare le altre videocamere 2, 3 e 4 even-
tualmente collegate.
- Accenda lo schermo.
- Prema l’interruttore per la selezione dei canali () per 5 secondo fino a che appare il menu sullo schermo.
- Utilizzi i pulsanti per il volume + e – per selezionare il canale da sintonizzare.
- In seguito prema il pulsante per regolare l’intensità luminosa alla parte del + per confermare il canale.
- Il display indica DEL e PAIR.
- Utilizzi i pulsanti per il volume + e – per selezionare “DEL”.
- Prema il tasto + per la regolazione dell’intensità luminosa per confermare la selezione.
- Nel display viene indicato “DONE”.
Spenga entrambi gli apparecchi e li riaccenda per terminare l’operazione.
Sintonizzare gli apparecchi (quando si collegano ulteriori videocamere o in errori):
Cancellare una videocamera (se non è più necessaria)
AVVISO:
I babyfon sono stati già sintoniz-
zati durante la produzione.
Normalmente non è necessario
sintonizzare il babyfon un’altra
volta prima dell‘uso.
Eseguisca l’operazione di
sintonizzazione soltanto quando
diventa assolutamente necessaria.
ATTENZIONE:
In caso di disturbi
attraverso altri radiotrasmittenti
non sussistono difetti degli
apparecchi.
pagina 38
Page 40

Italiano (I)
pagina 39
Problem
L’unita dei genitori
non riceve
* La videocamera non
trasmette. (adattatore non
connesso oppure la video
camera non si trova sulla
funzione Vox
* La stazione di ricezione è
impostata sul canale errato
* Il trasmettitore è spento
* Collegare l’adattatore con
la videocamera
* Impostare l’interruttore della
funzione Vox su videocamera
* Selezioni il canale corretto
sull’unita dei genitori
* Accenda il trasmettitore
Sullo schermo si vede
solo un’immagine
in bianco e nero
* La videocamera è impo
stata sulla visualizzazione
notturna ad infrarosso
* Accendere l’illuminazione nella
camera da controllare
La videocamera non
trasmette
* La videocamera è spenta
* L’adattatore non è
collegato
* La funzione Vox è accesa
(modus stand-by)
* Accendere la videocamera
* Collegare l‘adattatore
* Impostare l’interruttore della
funzione Vox su CAMERA
ATTENZIONE:
Non cerchi in nessun caso
di riparare gli apparecchi di Sua
iniziativa.
Verica di funzionamento
Prima del primo uso verifichi la funzionalità (ad es. mediante un televisore). Esegua ora l’impostazione det-
tagliata (volume dell’unita dei genitori) e si assicuri che la trasmissione sia garantita. In questo contesto
faccia attenzione che una maggior distanza e pareti grossi potrebbero avere un effetto negativo sulla qualità
della trasmissione.
AVVISO:
Nel caso in cui la Sua unita per
baby- (trasmittente) o la Sua unita per
genitori (ricevitore) non dovessero fun-
zionare o se ci dovessero essere errori
imprevisti La preghiamo di procedere
come segue: 1.) Rileggere innanzitutto
con attenzione il paragrafo rispettivo
delle istruzioni d’uso.
2.) Provi in seguito a trovare l’errore
sulla base della tabella degli errori.
Nel caso in cui non sia possibile
eliminare l’errore, La preghiamo
di mettersi in contatto con il Suo
rivenditore specializzato o di
chiamare il nostro servizio clienti
allo: +49 (0)700 /73 374 624.
ATTENZIONE:
La preghiamo di conservare lo scontrino di cassa e il numero dell‘articolo Eventuali richieste di
garanzia o diritti di garanzia devono essere gestiti esclusivamente con il rivenditore.
Page 41

I Suoi commenti e le Sue opinioni sono di grande aiuto per poter migliorare i nostri prodotti, e per corrispondere dunque in ogni momento alle esigenze del Suo piccolo in modo eccellente.
Ci puo` contattare chiamando la nostra hotline di servizio clienti allo: +49 (0)700 / 733 746 24 nei
giorni feriali dalle ore 08.00 alle ore 17.00. (0,12 Euro / minuto dalla rete die telefoni fissi della Telecom
Germania) Puo` anche contattarci via email: service@reer.de
Tutti i dati tecnici, le informazioni e le caratteristiche del prodotto descritto in questa opera sono stati
elaborati nel miglior modo possibile e corrispondono allo stato di attualizzazione al momento della
pubblicazione.
Le informazioni messe a disposizione dalla ditta reer dovrebbero essere corrette ed affidabili. La ditta
reer non si assume comunque alcuna responsabilita` per eventuali errori contenuti in questo documento
e si riserva il diritto di modificare senza preavviso il design del prodotto e le sue specificazioni.
Copie e trasmissioni di informazioni di questa opera, salvaguardata da diritto d`autore, in qualsiasi forma
o in qualsiasi modalita` , grafica, elettronica o meccanica, mediante fotocopie, riproduzioni audio o
registrazione su un sistema di richiesta dati – anche parziale – necessitano della preventiva autorizzazione scritta da parte della ditta reer.
Se Lei avesse ancora delle domande o necessitasse di supporto tecnico,
La preghiamo di contattarci.
La aiutiamo molto volentieri!
informazione produttore:
reer GmbH, Postfach 1639, 71206 Leonberg, www.reer.de
Tutti i diritti e le modifiche di tecnica e design sono riservati.
1313
pagina 40
Page 42

Italiano (I)
Page 43

Belangrijke Informatie:
! Om een onbedoelde uitval van het apparaat door lege batterijen te voorkomen en het milieu
te ontzien, raden wij aan om beide eeheden op het stroomnet aan te sluiten. Daardoor kan
de overdracht en de ontvangst worden verbeterd.
Veiligheidsaanwijzingen:
! Plaats de eenheid van de baby altijd buiten bereik van het kind (minimum afstand van 1
meter) Op deze manier is zekergesteld, dat de baby niet met de knoppen die voor de contole
van dezender zijn bedoeld kan spelen.
! Leg de babyfoon nooit in de wieg of in het kinderbed of de babybox.
! Stel zeker dat de beiden eenheden foutloos werken en zich binnen zendbereik bevinden. ( zie
gedeelte 3)
! Gebruik dit apparaat NOOIT met andere adapters. Gebruik altijd de meegeleverde adapters.
Stel zeker dat de spanning van het net in overeenkomst is met de spanning van de adapter.
! Gebruik het apparaat nooit in de buurt van water of op vochtige plaatsen.
! Voorkom direct zonlicht en extreme hitte.
! De apparaten en de adapter mogen, met uitzondering van het batterijvakje, niet geopend
worden omdat dit een elektrische schok kan veroorzaken. Mocht een apparaat niet in
orde zijn, probeer dan NIET het probleem zelf op te lossen. Neem in dit geval contact op met
uw leverancier.
! Contoleer, zeker op buitenlandse reizen, of de netspanning ter plaatse overeenstemt met de
spanning van de apparaten en de adapter. De gegevens hierover staan op de apparaten
vermeld.
! Voorkom aanraking van metalen voorwerpen met de batterij- en stroomaansluiting van de
apparaten.
! Indien het verkeerde type batterijen wordt gebruikt bestaat ontploffingsgevaar.
! Gebruikte batterijen horen niet in het huisvuil. Deze batterijen moeten volgend de locale
voorschriften worden vernietigd.
! De apparaten zijn alleen geschikt voor het gebruik binnenhuis.
! Dek de oudereenheid en de baby-eenheid nooit toe.
Van harte gefeliciteerd met de aanschaf van uw nieuw reer Babyfoon!
Wij zijn er van overtuigd dat u lang kunt genieten van dit kwaliteitsproduct.
Neem de volgende punten zorgvuldig door en volg de aanwijzingen voordat het apparaat in gebruik wordt genomen.
Bewaar de gebruiksaanwijzing goed voor latere raadpleging. Deze babyfoon is bedoeld als hulpmittel om uw baby te
bewaken. Het is zeker geen vervanging voor ouderlijk toezicht. Het is niet als medisch apparaat bedoeld.
Neem aub enkele minuten de tijd
om deze veiligheidsvoorschriften
door te nemen.
Dit om de kans op ongevallen of
beschadiging aan het Babyfoon
te voorkomen.
Dit apparaat is voor gebruikers
(inclusief kinderen) met beperkte
fysieke, sensorische of psychische
vaardigheden resp. zonder enige
ervaring of voorkennis slechts
dan geschikt, wanneer voldoende
toezicht of een uitvoerige hand-
leiding voor het gebruik van dit
apparaat door een verantwoor-
delijke persoon gegarandeerd is.
pagina 42
Page 44

Nederlands (NL)
- Duidelijke transmissie van de geluiden en het beeld met 2,4 GHz frequentie
- Hooggevoelige microfoon garandeert helder geluid
- Instelbaar volume en helderheid van het beeldscherm (oudereenheid)
- Intercom spraakmogelijkheid van de oudereenheid naar de baby-eenheid
- 3 rustgevende melodieën (op de oudereenheid in te schakelen)
- Duidelijk beeld bij duisternis dankzij 9 sterke infrarode LEDs
- Beweeglijke delen kunnen niet verwijderd of ingeslikt worden
- Oudereenheid kan zowel stationair als mobiel (met de accu) worden gebruikt
- Gebruik met accu of op het stroomnet mogelijk (oudereenheid)
- VOX-functie, automatische inschakeling van de transmissie bij geluiden
- Automatische activering van de infrarood-NightVision naargelang de belichting van de ruimte
Leveromvang:
- 1 baby-eenheid (camera)
- 1 oudereenheid (ontvanger)
- 2 netvoedingen
- 1 accu (oudereenheid)
Stroomverzorging met: stekker netvoeding: 6 V / 800 mA max. (bij levering inbegrepen)
of oudereenheid met: 3,7V 1200mAh LiIon - accu
Frequentie: 2,4 GHz
Aanbevolen
bedrijfstemperatuur: 10-40°C
OpmERKING:
Informatie over de keus en
het gebruik van een geschikte
stroomverzorging vindt u op
pagina 4.
Technische gegevens:
Functieoverzicht:
pagina 43
Page 45

lET Op:
Schakel de apparaten uit alvorens
de accu te wisselen
Het beeldscherm heeft een
oplaadbare Li-Ion accu nodig (bij
de levering inbegrepen). Gebruik
geen andere accu .Mocht u een
nieuwe accu nodig hebben, dient
u met uw dealer contact op te
nemen.
lET Op:
Controleer of de aangegeven
spanning overeenkomt met de
plaatselijke spanning van de
stroomverzorging.
01. Batterijvak openen
Open het batterijvak aan de achterzijde van de apparaten.
Draai hiertoe de veiligheidsschroef eruit en til de deksel naar
boven eraf.
02. Accu inzetten
Plaats de accu in het batterijvak. Let hierbij steeds op de juiste
polariteit + en – in het batterijvak.
03. Afdekking batterijvak sluiten
Plaats de deksel van het batterijvak na het inzetten van de accu
weer op het batterijvak en draai de veiligheidsschroef stevig
aan.
01. Aansluiten van de
netvoedingen:
Sluit de meegeleverde netvoedingen
op de bus voor de stroomverzorging
van de apparaten aan.
02. Verbinden met het stroomnet
Sluit de netvoedingen op een stopcontact aan.
(Let op: kies een voor de baby-eenheid geschikt stopcontact, dat
zich zo ver mogelijk van uw kind bevindt.)
Stroomverzorging van de oudereenheid en zendeenheid
De oudereenheid kan zowel met de accu worden gebruikt als op het stroomnet worden aangesloten.
U kunt zelf beslissen, aan welke mogelijkheid u de voorkeur geeft.
Gebruik van de meegeleverde netvoedingen
Gebruik van de accu
pagina 44
Page 46

pagina 45
Nederlands (NL)
01. Baby-eenheid inschakelen
Om de camera-eenheid in te schakelen drukt u ca. 1 seconde op
de AAN/UIT-schakelaar (03).
02. Vox-functie activeren
VOX-functieschakelaar (05) op „CAMERA“: camera zendt
voortdurend een beeld naar het beeldscherm
VOX-functieschakelaar (05) op „AUTO“: camera zendt slechts
dan een beeld, wanneer er een geluid in de kamer wordt waar-
genomen
03. Muziekvolume instellen
Om het volume van de weergegeven muziek in te stellen schuift
u de volumeregelaar (08) in de gewenste stand. U hebt de keus
tussen 3 verschillende geluidssterktes.
Uitschakelen: voor het uitschakelen drukt u 1 seconde op de AAN/UIT-knop (03).
OpmERKING:
Plaats de apparaten steeds
rechtop om een optimale trans-
missie te garanderen
• Plaats de baby-eenheid steeds buiten bereik van uw kind (de minimale afstand moet ca. 1 meter
bedragen).
• De baby-eenheid mag nooit in het baby- of kinderbedje worden geplaatst.
• Om een optimale transmissie te garanderen plaatst u de apparaten steeds rechtop.
AANBEVElING VOOR HET
OpSTEllEN:
1
3
9
10
7
Eenheid van
de baby
lEGENDE:
Status-LED .01
Camera met infrarode LEDs .02
AAN/UIT-schakelaar .03
Lichtsensor .04
VOX-functieschakelaar .05
Temperatuursensor .06
Luidspreker .07
Volumeregeling .08
Afstelknop .09
DC-bus voor stroomverzorging .10
2
8
4
5
6
Page 47

pagina 46
01. Oudereenheid inschakelen
AAN/UIT-schakelaar (12)
Stand „AAN“: apparaat is met videobewaking ingeschakeld
Stand „UIT“: apparaat is uitgeschakeld.
Stand „LCD-UIT“: apparaat toont geen beeld, geluidsbewa-
king is geactiveerd.
02. Camera kiezen
Schakelaar voor kanaalkeuze (02)
Druk kort op de schakelaar voor de kanaalkeuze (02) om de 4 mogelijke
kanalen in te schakelen. Er worden uitsluitend kanalen van aangeslo-
ten camera´s getoond. De meegeleverde camera is door de fabriek op
kanaal 1 ingesteld..
03. Camera´s automatisch laten doorschakelen:
(Scan-modus)
Druk de schakelaar voor de kanaalkeuze (02) zolang kort na elkaar tot in de display het symbool
verschijnt. Nu wordt het beeld van elke beschikbare camera gedurende 5 seconden getoond.
04. Melodie afspelen::
Om op de baby-eenheid een melodie af te spelen drukt u de muzie-
kweergaveknop (03). Door herhaaldelijk drukken kunt u de 3 opgesla-
gen melodieën achter elkaar doorschakelen en afspelen.
⇌
OpmERKING:
Mocht er voor de ingebrui-
kneming een hoge pieptoon
optreden, bevinden de beide
apparaten zich te dicht bij elkaar.
lEGENDE:
01. Antenne
02. Schakelaar voor kanaalkeuze
03. Volumeregeling
04. Helderheidscontrole
05. 2,4“ LCD beeldscherm
06. Microfoon
07. Luidspreker
08. Schakelaar voor muziekkeuze
09. Afdekking batterijvak
10. Status-LED
11. Spreekknop
12. AAN/UIT-schakelaar
13. DC-bus voor stroomver-
zorging
De oudereenheid / ontvanger
1
4
5
9
6
7
3
8
10
11
12
13
2
Page 48

Nederlands (NL)
05. Instellen van het volume en de helderheid van
de oudereenheid
Stel het gewenste volume in door op de + of - knop (03)
van de volumeregelaar te drukken. Om de helderheid in te
stellen gaat u precies zo te werk met de regelaars voor de
helderheid (04).
06. Intercom spraakmogelijkheid:
Gebruik deze optie door de spreekknop (11) in te drukken. Zolang u de
knop ingedrukt houdt, wordt uw stem naar de baby-eenheid gezonden.
Laat de spreekknop los om de geluiden van uw baby weer te horen.
07. Indicatie kamertemperatuur
De temperatuur van de kamer waarin de baby-eenheid zich bevindt wordt op de display van de oude-
reenheid steeds in graden Celsius aangegeven.
08. Controle zendbereik:
In de display wordt de momentele ontvangststerkte met het symbool aangegeven. Wanneer u
zich buiten het zendbereik bevindt, wordt de display zwart en u ziet „LINKING“.
09. Indicatie batterijstatus:
In de display wordt de batterijstatus met het symbool aangegeven.
Uitschakelen: voor het uitschakelen zet u de AAN/UIT-schakelaar (12) in de stand „OFF“.
pagina 47
Overige functies van de oudereenheid:
Reiniging en onderhoud:
Dompel de oudereenheid of de baby-eenheid niet in water en reinig deze ook niet onder
stromend water. Gebruik geen reinigingsspray of vloeibare reinigingsmiddelen.
1. Trek de adapter van de baby- en oudereenheid uit het stopcontact, als deze aangesloten zijn.
2. Reinig de ouder- en de baby-eenheid met een vochtige doek. Controleer of de eenheden
volkomen droog zijn alvorens deze op het stroomnet aan te sluiten.
3. Reinig de adapters met een vochtige doek.
OpmERKING:
Plaats de apparaten steeds
rechtop en schuif de antenne
van het beeldscherm uit om
een optimale transmissie te
garanderen.
Page 49

01. Oudereenheid afstellen
- Schakel het beeldscherm in.
- Druk de schakelaar voor de kanaalkeuze (02) 5 seconden tot het menu op het beeldscherm
verschijnt.
- Gebruik de volume + en – knoppen (03)om het af te stellen kanaal te kiezen.
- Druk vervolgens de helderheids + knop (04)om het kanaal te bevestigen.
- In de display verschijnt DEL en PAIR.
- Gebruik de volume + en – knoppen (03)om PAIR te kiezen.
- Druk de helderheids + knop (04)om te bevestigen.
- In de display verschijnt „WAIT“.
02. Camera instellen
- Terwijl in de display „WAIT“ staat, schakelt u de af te stel-
len camera in en plaatst deze niet verder dan 1 meter van u
verwijderd.
- Druk op de verzonken afstelknop (09) met een pen.
- De status-LED (01) begint te knipperen.
- In de display verschijnt „PAIRED“.
03. Afstellen beëindigen
Schakel beide apparaten uit en weer in. Daarmee is het afstellen beëindigd.
Führen Sie diese Schritte für eventuell weitere Kameras 2, 3 und 4 nacheinander aus.
- Schakel het beeldscherm in.
- Druk de schakelaar voor de kanaalkeuze (02) gedurende 5 seconden tot het menu op het
beeldscherm verschijnt.
- Gebruik de volume + en – knoppen (03) om het af te stellen kanaal te kiezen.
- Druk vervolgens de helderheids + knop (04).
- In de display verschijnt „DEL“ en „PAIR“.
- Gebruik de volume + en – knoppen (03) om „DEL“ te kiezen.
- Druk de helderheids + knop (04) om te bevestigen.
- In de display verschijnt „DONE“.
Schakel beide apparaten uit en weer in om de procedure af te sluiten.
Afstellen van de apparaten (bij extra camera´s of fouten):
Camera wissen (indien niet meer nodig)
OpmERKING:
De babyphones werden bij de
productie reeds afgesteld.
Normaal gesproken is er geen
behoefte om de babyphone voor
gebruik nog eens af te stellen.
Voer de procedure voor het
afstellen tussen camera en beeld-
scherm slechts dan uit, wanneer
dit absoluut noodzakelijk is.
lET Op:
Bij storingen door andere zend-
apparatuur is er geen sprake van
een fout in het apparaat.
pagina 48
Page 50

Nederlands (NL)
pagina 49
Problem
Geen ontvangst bij de
oudereenheid
* De camera zendt niet.
(Netvoeding niet aan
gesloten of de camera is op
Vox-functie ingesteld.)
* Ontvanger is op het ver
keerde kanaal ingesteld
* De zender is uitgeschakeld
* Netvoeding aan de camera
aansluiten
* Vox-functieschakelaar op
CAMERA instellen
* Kies op de oudereenheid het
juiste kanaal
* Schakel de zender in
Op het beeldscherm is
slechts een zwart/wit
beeld te zien
* De camera is op infrarood
nachtzicht ingesteld
* Belichting in de te bewaken
ruimte inschakelen
De camera zendt niet * Camera is uitgeschakeld
* Netvoeding niet aan
gesloten
* Vox-functie ingeschakeld
(Stand-by-modus)
* Camera inschakelen
* Netvoeding aansluiten
* Vox-functieschakelaar op
CAMERA instellen
lET Op:
Probeer het apparaat in geen
geval zelf te repareren
Functietest
Controleer voor de eerste ingebruikneming het functioneren van het apparaat (bijv. met behulp van een TV-
toestel). Maak nu de fijnafstelling (volume van de oudereenheid) en controleer dat een optimale transmissie
is gegarandeerd. Let er hierbij op dat een grotere afstand en dikke muren de kwaliteit van de transmissie
ongunstig kunnen beïnvloeden.
LET OP:
Kassabon en artikelnummer s.v.p. goed bewaren.
Eventuele waarborgeisen of eisen uit beloofde garantiebepalingen dienen uitsluitend met de
dealer te worden afgewikkeld.
OpmERKING:
Mocht de baby- (zender) of oudereen-
heid (ontvanger) niet goed functioneren
of mochten er onverwachte fouten opt-
reden, verzoeken we u vriendelijk
1.) eerst de betreffende paragraaf van
de handleiding opnieuw zorgvuldig
door te lezen.
2.) Probeer vervolgens de fout met
behulp van onderstaande storingstabel
te vinden.
3.) Mocht de fout niet kunnen worden
verholpen, verzoeken we u contact op
te nemen met uw dealer of met onze
hotline op +49 (0)700 /73 374 624.
Page 51

Uw commentaar en uw mening, is zeer belangrijk voor ons om onze producten telkens opnieuw te
verbeteren, zodat deze aansluitend zowel u als uw baby optimaal kan dienen.
U kunt ons bereiken op het volgende service nummer: +49 (0) 700 / 733 / 746 24. ( 0,12 Euro/ minuut
op het vaste telefoonnet van de Deutsche n Telekom )Wij zijn iedere werkdagen van 08:00 tot 17:00
bereikbaar. U kunt ook mailen naar: service@reer.de
Alle technische gegevens, informatie zoals de eigenschappen van het in dit drukwerk beschreven product
worden met de meeste zorg samengesteld en komt overeen met de productspecificaties die voorhanden
waren ten tijden van deze druk. De door reer samengesteld informatie is correct en betrouwbaar. Echter de
firma reer neemt geen enkele vorm van verantwoordelijkheid voor de mogelijke fouten die in dit document
staan. Daarnaast behoudt reer zich het recht om zonder voorafgaande aankondiging, wijzigingen te plegen
in het product, respectievelijk aan de specificaties van het product.
Verspreiding van informatie uit deze gebruiksaanwijzing in welke vorm dan ook, elektronisch, mechanisch,
grafische, fotokopieën, opslaan op band of op een databank - dit geldt ook voor samenvattingend - ienen
op voorhand schriftelijk zijn akkoord gegeven worden door de Firma reer.
Heeft u nog vragen of technische ondersteuning nodig?
Wij helpen u graan verder!
Uitgegeven door:
reer GmbH, Postfach 1639, 71206 Leonberg, www.reer.de
Alle rechten zoals veranderingen in Techniek en design voor behouden.
1313
pagina 50
Page 52

Page 53

Por favor, tómese unos
minutos de su tiempo para leer
detenidamente las advertencias
de seguridad. En caso contrario
existe el peligro de que el aparato
no funcione debidamente.
Este aparato sólo es apropiado
para usuarios (incl. niños) con
limitaciones físicas, sensoriales o
psíquicas, o bien para aquellos
que no tengan ningún tipo de
experiencia o de conocimientos
básicos, cuando estén bajo la
supervisión pertinente o hayan
recibido instrucciones detalladas
sobre el uso del aparatode una
persona responsable.
Información importante:
! Para evitar que los aparatos dejen de funcionar de manera inesperada porque las pilas se
han gastado, y para proteger el medio ambiente, le recomendamos que conecte a la corriente
eléctrica tanto el transmisor como el receptor. De esta manera mejorará también la transmisi
ón i la recepción.
Avisos de seguridad:
! Coloque el transmisor fuera del alcance del niño (distancia mínima, 1 metro). De esta manera
se asegura de que su hijo no jugará con los botones del transmisor.
! No coloque nunca el transmisor en la cama o el parque de su hijo.
! Asegúrese de que tanto el transmisor como el receptor funcionan bien y que captan la señal.
! No use este aparato con otras fuentes de alimentación aparte de las incluidas en el paquete.
Asegúrese de que la potencia del enchufe corresponde a la de la red.
! No utilice los intercomunicadores cerca del agua o en lugares húmedos.
! Evite temperaturas extremas y los rayos del sol.
! No abra ni desmonte los aparatos ni las fuentes de alimentación –excepto la tapa del com
partimiento para las pilas–, se podría electrocutar. Si uno de los intercomunicadores no
funciona bien, NO intente resolver el problema usted solo. póngase en contacto con su
vendedor.
! Compruebe, sobretodo durante los viajes al extranjero, si la red eléctrica local es la adecuada
para el intercomunicador y sus fuentes de alimentación. En el intercomunicador encontrará la
información sobre la potencia que necesita.
! Evite tocar con objetos metálicos los contactos de las pilas y las entradas de electricidad de
los intercomunicadores.
! Si utiliza las pilas equivocadas puede ser que el intercomunicador estalle.
! Las pilas gastadas no se tiran a la basura sino que hay que desecharlas en contenedores
especiales.
! Los aparatos sólo son adecuados para el funcionamiento en el interior.
! Nunca cubra la unidad para padres ni la unidad para bebés.
Felicidades por la compra de su nueva intercomunicadores reer.
Estamos seguros que tendrá mucha satisfacción con la calidad de nuestro producto.
Por favor, lea con atención los puntos siguientes y siga las instrucciones antes de empezar a utilizar el intercomunicador.
Guarde el manual del ususario para poder consultarlo en el futuro. Este intercomunicador ha sido desarrollado exclusiva-
mente para ayudarle a vigilar a su bebé. No excluye la vigilancia de los padres y no es ningún aparato médico.
pagina 52
Page 54

Espanol (E)
- Clara transmisión de imagen y sonido con 2,4 GHz de frecuencia
- El micrófono de alta sensibilidad garantiza el tono
- Altavoces y brillo de la pantalla ajustables (unidad para padres)
- Función invertida de la unidad de padres a la unidad del bebé
- 3 melodías tranquilizadoras (activables desde la unidad de padres)
- Clara imagen en la oscuridad gracias a 9 intensos pilotos LED infrarrojos
- La unidad de padres puede usarse de forma estática o móvil (con batería)
- Batería o alimentación eléctrica posibles (unidad de padres)
- Función VOX, inicio automático de la transmisión al detectar sonidos
- Activación automática de la visión nocturna de infrarrojos, según la iluminación en la habitación
Contenido:
- 1 unidad de bebé (cámara)
- 1 unidad de padres (receptor)
- 2 fuentes de alimentación eléctrica
- 1 batería (unidad de padres)
Alimentación eléctrica con: Adaptador: 6 V / 800 mA máx. (suministrado)
o unidad de padres con: Batería 3,7V 1200mAh LiIon
Frecuencia: 2,4GHz
Temperatura recomendada
durante el funcionamiento: 10-40°C
ADVERTENCIA:
encontrará información sobre la
elección y el uso de un suministro
eléctrico apropiado en la página
4.
Datos técnicos:
Visión general de las funciones
pagina 53
Page 55

ATENCION:
Apague siempre el aparato antes
de cambiar las pilas.
El monitor requiere una batería
recargable Li-Ion (suministrada).
No use ningún otro tipo de pila.
En caso de necesitar algún repue-
sto, diríjase a su proveedor.
ATENCION:
Asegúrese de que
el voltaje del aparato
es compatible con el
voltaje local.
01. Abertura de la tapa del compar-
timento de las pilas
Abra el compartimento de las pilas en la parte trasera del apara-
to. Para ello retire el tornillo de seguridad y suba la tapa.
02. Colocación de las pilas
Coloque las pilas en el compartimento para pilas. Tenga siempre
en cuenta la correcta polaridad según los símbolos de polaridad
+ y - en el compartimento para pilas.
03. Cierre de la tapa del compartimento para pilas
Tras colocar la pilas, ponga la tapa de nuevo sobre el compar-
timento para pilas y apriete bien otra vez el tornillo de segu-
ridad.
01. Enchufe de las fuentes de
alimentación:
Enchufe las fuentes de alimentación
eléctrica suministradas a los jacks
de alimentación DC del aparato.
02. Conexión a la red eléctrica
Conecte las fuentes de alimentación al enchufe.
(Atención: Elija el lugar adecuado donde enchufar la unidad del
bebé, que debe encontrarse lo más lejos posible de su hijo).
Alimentación eléctrica de la unidad de padres y de la unidad emisora
La unidad de padres funciona tanto con una batería como enchufándola a la corriente eléctrica.
Decida usted mismo, qué modo operativo prefiere.
Uso de las fuentes de alimentación suministradas
Uso de las pilas
pagina 54
Page 56

pagina 55
Espanol (E)
01. Encendido de la unidad de bebé
Para encender la unidad de la cámara pulse y mantenga apretado
el interruptor de encendido y apagado durante aproximadamente
un segundo (03).
02. Activación de la función Vox
Interruptor de función VOX (05) en la posición de „CAMERA“:
la cámara transmite constantemente una imagen al monitor.
Situar el interruptor de función VOX (05) en la posición „AUTO“:
la cámara sólo transmite una imagen cuando se detecta un so-
nido en la habitación.
03. Ajustar el volumen de música
Para ajustar los altavoces de la música reproducida lleve la pe-
rilla de ajuste de los altavoces (08) a la posición deseada. Puede
elegir entre 3 altavoces diferentes.
Apagar: Para apagarlo pulse durante un segundo el botón OFF (03).
ADVERTENCIA:
Coloque siempre los aparatos de-
rechos para conseguir una mejor
calidad de transmisión.
• Coloque siempre la unidad del bebé fuera del alcance de su hijo.
(La distancia mínima es de 1 metro).
• La unidad del bebé nunca debe colocarse en la cuna, en la cama o en el parque.
• Para garantizar la mejor calidad de transmisión, coloque los aparatos siempre derechos.
RECOmENDACIÓN pARA
lA COlOCACIÓN:
La unidad del bebé /
Emisor
lEYENDA:
Piloto de estado-LED .01
Cámara con pilotos LED de
infrarrojos .02
Interruptor de encendido/apa-
gado (03)
Sensor de luz .04
Interruptor de función VOX .05
Sensor de temperatura .06
Altavoz .07
Ajuste de altavoces .08
Botón de configuración .09
Jacks de alimentación DC .10
1
3
9
10
7
2
8
4
5
6
Page 57

pagina 56
01. Encendido de la unidad de padres
Interruptor de encendido/apagado(12)
Posición „AN“: el aparato está encendido con vigilancia por vídeo
Posición „AUS“: el aparato está apagado.
Posición „LCD-AUS“: el aparato no muestra ninguna imagen,
está encendida la activación de vigilancia por sonido.
02. Seleccionar cámara
Seleccionador de canal (02)
Pulse brevemente el botón selector de canal (02) para conectar los 4 po-
sibles canales. Sólo se mostrarán los canales de las cámaras conectadas.
La cámara suministrada está configurada de fábrica con el canal 1.
03. Permitir la conexión automática de las cámaras:
(Modo-Scan)
Pulse varias veces brevemente el botón (02) seleccionador de canal hasta que aparezca en la pantalla
el símbolo . Aparecerá durante 5 segundos el icono de cada cámara disponible.
04. Reproducir melodía:
Para reproducir una melodía en la unidad del bebé pulse el botón para
la reproducción de música (08). Si lo pulsa varias veces, podrá activar y
reproducir las tres melodías almacenadas progresivamente.
⇌
ADVERTENCIA:
Si durante la puesta en funcio-
namiento escucha un fuerte
pitido procedente del aparato, es
porque los aparatos están muy
cerca uno de otro.
lEYENDA:
01. Antena
02. Selector de canal
03. Ajuste de altavoces
04. Control del brillo
05. Monitor LCD de 2,4“
06. Micrófono
07. Altavoces
08. Selector de música
09. Tapa del compartimento
para pilas
10. Piloto de estado LED
11. Botón de habla
12. Interruptor de encendido/
apagado
13. Jacks de alimentación DC
La unidad de padres /
Receptor
1
4
5
9
6
7
3
8
10
11
12
13
2
Page 58

Espanol (E)
05. Ajuste de los altavoces y del brillo de la unidad
de padres
Ajuste el volumen deseado, pulsando los botones reguladores
de volumen + o - (03). Para ajustar el brillo proceda de la
misma manera con los botones reguladores del brillo (04).
06. Función invertida:
Haga uso de la función invertida pulsando el botón (11). Su voz será
transmitida a la unidad del bebé durante el tiempo que mantenga
pulsado el botón. Suelte el botón para volver a escuchar los sonidos
de su bebé.
07. Indicador de la temperatura ambiente
La temperatura ambiente de la habitación donde se encuentra la unidad del bebé aparece en grados
celsius en la pantalla de la unidad de padres.
08. Control del radio de alcance:
En la pantalla aparece en todo momento el nivel de recepción mediante el símbolo . Si se
encuentra fuera del radio de alcance, la pantalla se vuelve negra y se puede leer „LINKING“.
09. Indicador del estado de la batería:
El estado de la batería aparece representado en la pantalla mediante el símbolo
Apagado: para apagar el aparato sitúe el botón de encendido/ apagado (12) en la posición „OFF“.
pagina 57
Otras funciones de la unidad de padres
Limpieza y mantenimiento:
Nunca sumerja los aparatos en agua y tampoco los limpie bajo agua corriente.
Desenchufe los aparatos, si están enchufados. Limpie los aparatos con un paño húmedo.
Antes de volver a usar los aparatos, compruebe que están completamente secos, antes de
conectarlos al suministrador de red. Limpie el adaptador con un paño húmedo.
AVISO:
Coloque los aparatos siempre
derechos y despliegue la antena
del monitor, para obtener la
mejor calidad de transmisión.
Page 59

01. Configuración de la unidad de padres
- Encienda el monitor.
- Mantenga pulsado el selector de canal (02) durante 5 segundos hasta que aparezca el menú
en pantalla.
- Use los botones de volumen (03)+ y – para seleccionar el canal que desea configurar.
- Pulse entonces el botón para regular el brillo (04) + para confirmar el canal.
- Aparece DEL y PAIR en la pantalla.
- Use los botones para regular el volumen (03) + y – para seleccionar PAIR.
- Pulse el botón + para regular el brillo (04) para confirmar la selección.
- En la pantalla aparece „WAIT“.
02. Configuración de la cámara
- Mientras aparece en la pantalla „WAIT“encienda
la cámara que desea configurar y no la coloque a más
de un metro de distancia.
- Pulse el botón hundido de configuración (09) con la punta de un lápiz.
- El piloto de estado (01) comienza a parpadear.
- En la pantalla aparece „PAIRED“.
03. Concluir la configuración
Apague ambos aparatos y vuelva a encenderlos. Con esto termina la configuración.
Siga estos pasos para configurar progresivamente una posible cámara 2, 3 y 4
-- Encienda el monitor.
- Mantenga pulsado el selector de canal (02) durante 5 segundos hasta que aparezca el menú
en pantalla.
- Use los botones de volumen (03)+ y – para seleccionar el canal que desea configurar.
- Pulse el botón + para regular el brillo (04).
- En la pantalla aparece „DEL“ y „PAIR“.
- Use los botones para regular el volumen (03) + y – para seleccionar „DEL“.
- Pulse el botón + para regular el brillo (04), para confirmar la selección.
- En la pantalla aparece „DONE“.
Apague ambos aparatos y vuelva a encenderlos para terminar el procedimiento.
Conguración de los aparatos para el uso de cámaras adicionales
Eliminar una cámara (en caso de no ser necesaria)
ADVERTENCIA:
El babyfono ya viene configurado
de fábrica.
Normalmente no es necesario
volver a configurar el babyfono
antes de usarlo.
Realice la configuración de
cámara y monitor sólo si es
absolutamente necesario.
ATENCION:
En caso de interferencias
por otros aparatos de radio
no se producen fallos en el
aparato.
pagina 58
Page 60

pagina 59
Problema / Situación posibles fuentes de fallos ¿Qué se debe hacer?
Falla la recepción
en la unidad para padres
* La cámara no está
emitiendo. (La fuente de alimentación no está conectada
o la cámara se encuentra en
función Vox.
* Canal equivocado en el
receptor
* El emisor está apagado
* Conectar la fuente de alimentacióna la cámara
* Poner el interruptor de función
Vox en la posición de CAMERA
* Seleccione en la unidad de
padres el canal adecuado
* Encienda el emisor
En el monitor sólo
se ve una imagen en
blanco y negro
* Está activada la función de
visión nocturna en la cámara
* Encender las luces en la
habitación a vigilar.
La cámara no está
emitiendo.
* La cámara está apagada
* La fuente de alimentación
no está conectada
*Función Vox encendida
(Modo Stand-by)
* Encender la cámara
* Conectar la fuente de
alimentación
* Poner el interruptor de función
Vox en la posición de CAMERA
ATENCION:
Nunca intente reparar personal-
mente el aparato.
Prueba de funcionalidad
Antes de la primera puesta en servicio, compruebe el correcto funcionamiento (p. ej. con ayuda de un aparato
de televisión). Compruebe el ajuste de precisión (volumen en la unidad de padres), asegúrese de que
la calidad de transmisión sea óptima. Tenga en cuenta que una larga distancia y paredes gruesas pueden
afectar negativamente a la calidad de la transmisión.
ATENCION:
Conserve el comprobante de compra y el número del artículo. Para una posible reclamación del
derecho a garantía diríjase a su proveedor
ADVERTENCIA:
Si la unidad del bebé (emisor) o la uni-
dad de padres
(receptor) no funciona correctamente
o surgen problemas inesperados
le rogamos que
1.) lea de nuevo detenidamente
el apartado correspondiente
en el manual de instrucciones.
2.) Intente encontrar
los fallos con la ayuda de la tabla para
la detección de fallos.
3.) Si no puede solucionar el problema
diríjase a su
proveedor o llame a nuestra línea direc-
ta en el número
+49 (0)700 /73 374 624.
Espanol (E)
Page 61

1313
¿Aún tiene preguntas o requiere soporte técnico?
¡Lo ayudaremos gustosamente!
Sus comentarios y opiniones también son de ayuda para nosotros para poder mejorar nuestros productos
constantemente, de modo que estos cumplan óptimamente con las exigencias de usted y de su bebé.
Puede contactarse con nosotros a través de la Servicehotline: +49 (0)700 / 733 746 24 días laborables
de 08.00 a 17.00 horas. (0,12 Euros /Minuto desde la red fija de la Deutsche Telekom) También puede
ponerse en contacto con nosotros vía correo electrónico: service@reer.de
Todos los datos técnicos, informaciones y características del producto descritos en esta obra fueron
reunidos según nuestro leal saber y entender y de acuerdo al estado al momento de la publicación.
Las informaciones proporcionadas por reer deben ser correctas y fiables. Pero la firma reer no asume
ninguna responsabilidad por posibles errores en este documento y se reserva el derecho, sin previo aviso,
de hacer cambios en el diseño del producto o en las especificaciones.
La reproducción o entrega de informaciones de esta obra protegida por derecho de autor de cualquier
forma, gráficamente, electrónicamente o mecánicamente, por medio de fotocopias, grabaciones en
cinta o almacenamiento en un sistema de consulta de datos – también parcialmente – requieren de la
autorización previa escrita de la firma reer.
Informaciones del fabricante:
reer GmbH, Postfach 1639, 71206 Leonberg, www.reer.de
Todos los derechos y cambios en la técnica y diseño reservados.
pagina 60
Page 62

 Loading...